VMware View45 Evaluators Guide
36
VMware View ™ 4.5 EVALUATOR’S GUIDE
-
Upload
yildizozge -
Category
Documents
-
view
244 -
download
5
Transcript of VMware View45 Evaluators Guide
VMware View™ 4.5 E va l u at o r ’ s G u i d E
VMware View 4.5
E va l u at o r ’ s G u i d E / 2
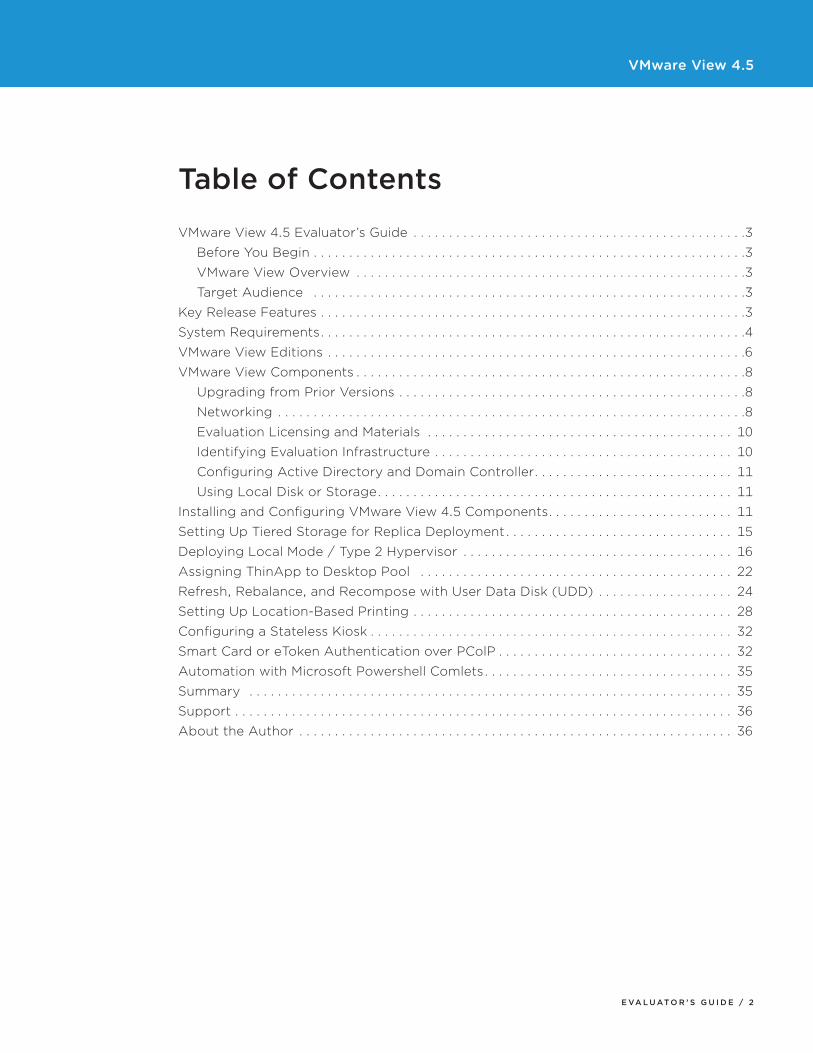
table of Contents
VMware View 4.5 Evaluator’s Guide . . . . . . . . . . . . . . . . . . . . . . . . . . . . . . . . . . . . . . . . . . . . . . . .3
. Before You Begin. . . . . . . . . . . . . . . . . . . . . . . . . . . . . . . . . . . . . . . . . . . . . . . . . . . . . . . . . . . . . .3
. VMware View Overview . . . . . . . . . . . . . . . . . . . . . . . . . . . . . . . . . . . . . . . . . . . . . . . . . . . . . . . .3
. Target Audience . . . . . . . . . . . . . . . . . . . . . . . . . . . . . . . . . . . . . . . . . . . . . . . . . . . . . . . . . . . . . .3
Key Release Features . . . . . . . . . . . . . . . . . . . . . . . . . . . . . . . . . . . . . . . . . . . . . . . . . . . . . . . . . . . . .3
System Requirements. . . . . . . . . . . . . . . . . . . . . . . . . . . . . . . . . . . . . . . . . . . . . . . . . . . . . . . . . . . . .4
VMware View Editions. . . . . . . . . . . . . . . . . . . . . . . . . . . . . . . . . . . . . . . . . . . . . . . . . . . . . . . . . . . .6.
VMware View Components. . . . . . . . . . . . . . . . . . . . . . . . . . . . . . . . . . . . . . . . . . . . . . . . . . . . . . . .8
. Upgrading from Prior Versions. . . . . . . . . . . . . . . . . . . . . . . . . . . . . . . . . . . . . . . . . . . . . . . . . .8
. Networking. . . . . . . . . . . . . . . . . . . . . . . . . . . . . . . . . . . . . . . . . . . . . . . . . . . . . . . . . . . . . . . . . . .8
. Evaluation Licensing and Materials . . . . . . . . . . . . . . . . . . . . . . . . . . . . . . . . . . . . . . . . . . . . 10
. Identifying Evaluation Infrastructure. . . . . . . . . . . . . . . . . . . . . . . . . . . . . . . . . . . . . . . . . . . 10
. Configuring Active Directory and Domain Controller. . . . . . . . . . . . . . . . . . . . . . . . . . . . . 11
. Using Local Disk or Storage. . . . . . . . . . . . . . . . . . . . . . . . . . . . . . . . . . . . . . . . . . . . . . . . . . . 11
Installing and Configuring VMware View 4.5 Components. . . . . . . . . . . . . . . . . . . . . . . . . . . 11
Setting Up Tiered Storage for Replica Deployment. . . . . . . . . . . . . . . . . . . . . . . . . . . . . . . . . 15
Deploying Local Mode / Type 2 Hypervisor . . . . . . . . . . . . . . . . . . . . . . . . . . . . . . . . . . . . . . . 16
Assigning ThinApp to Desktop Pool . . . . . . . . . . . . . . . . . . . . . . . . . . . . . . . . . . . . . . . . . . . . . 22
Refresh, Rebalance, and Recompose with User Data Disk (UDD) . . . . . . . . . . . . . . . . . . . . 24
Setting Up Location-Based Printing. . . . . . . . . . . . . . . . . . . . . . . . . . . . . . . . . . . . . . . . . . . . . . 28
Configuring a Stateless Kiosk. . . . . . . . . . . . . . . . . . . . . . . . . . . . . . . . . . . . . . . . . . . . . . . . . . . . 32
Smart Card or eToken Authentication over PColP. . . . . . . . . . . . . . . . . . . . . . . . . . . . . . . . . . 32
Automation with Microsoft Powershell Comlets. . . . . . . . . . . . . . . . . . . . . . . . . . . . . . . . . . . . 35
Summary . . . . . . . . . . . . . . . . . . . . . . . . . . . . . . . . . . . . . . . . . . . . . . . . . . . . . . . . . . . . . . . . . . . . . 35
Support . . . . . . . . . . . . . . . . . . . . . . . . . . . . . . . . . . . . . . . . . . . . . . . . . . . . . . . . . . . . . . . . . . . . . . . 36
About the Author . . . . . . . . . . . . . . . . . . . . . . . . . . . . . . . . . . . . . . . . . . . . . . . . . . . . . . . . . . . . . . 36
VMware View 4.5
E va l u at o r ’ s G u i d E / 3
VMware View 4.5 Evaluator’s Guide
Welcome to the VMware® View™ 4.5 Evaluator’s Guide. The purpose of this document is to support a self-guided, hands-on review of VMware View 4.5. The content is intended to show how easily you can get a VMware View environment up and running, and highlight both new and important capabilities. These include creating and managing virtualized desktops, and validating the documented use cases. The guide is divided into the following sections:
1. Key New Features VMware View 4.5
2. VMware View 4.5 Components Overview
3. Installation
4. Use Cases: Tiered Storage, Local Mode, ThinApp Assignment, Location-based Printing
Before You Begin
This document assumes you have basic knowledge of VMware vSphere or VMware ESX, and are comfortable configuring networking and storage in a server environment.
The objective of this document is to provide you with the information required to get a VMware View evaluation environment up and running quickly. Once the product is installed, this document can guide you through more in-depth deployment scenarios, which are covered in later sections. This guide is not intended to substitute for product documentation. For detailed information regarding installation, configuration, administration, and usage of VMware products, please refer to the online documentation. You may also consult the online Knowledge Base if you have any additional questions.
VMware View Overview
VMware View enables anywhere computing. Virtual desktops are composed on demand, based on the locations and profiles, and delivered at anytime to desktops and devices anywhere. VMware View offers the best user experience and performance over LAN or WAN. Your organization may have already adapted server virtualization with VMware server technology. By extending your existing, server-based deployments, VMware View delivers the benefits of virtualization to the desktop. VMware View offers easy-to-use management and seamless integration with the vSphere virtual infrastructure platform.
Target Audience
Before using this document, you should be familiar with desktop virtualization, including installing previous versions of VMware View.
Key Release Features
VMware View 4.5 provides a rich set of features and updates including:
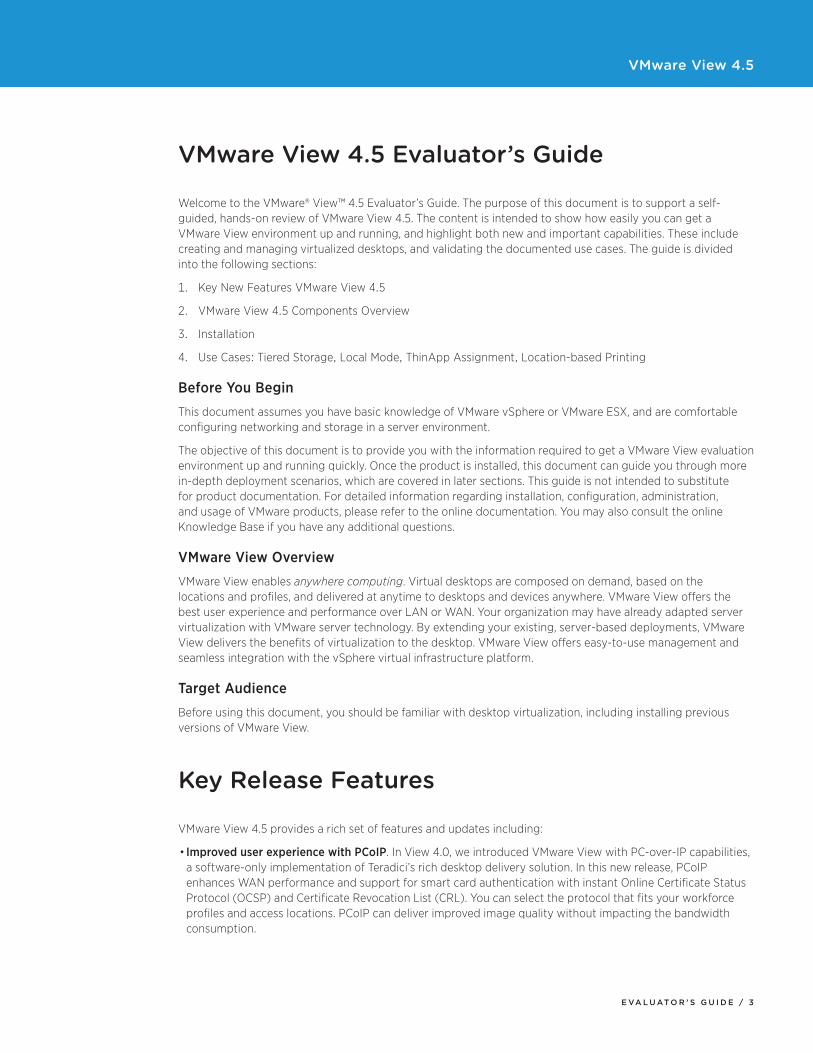
• Improved user experience with PCoIP. In View 4.0, we introduced VMware View with PC-over-IP capabilities, a software-only implementation of Teradici’s rich desktop delivery solution. In this new release, PCoIP enhances WAN performance and support for smart card authentication with instant Online Certificate Status Protocol (OCSP) and Certificate Revocation List (CRL). You can select the protocol that fits your workforce profiles and access locations. PCoIP can deliver improved image quality without impacting the bandwidth consumption.
VMware View 4.5
E va l u at o r ’ s G u i d E / 4
• Full Windows 7 support. The release is compatible with 32- and 64-bit versions of Windows 7, on both client endpoints and remote virtual desktops. VMware View 4.5 continues to deliver true multi-monitor and multimedia redirection support.
• Management scalability and efficiency. The release features a new management interface look and feel. The interactive dashboard provides an instant, integrated update of your desktop environment. The VMware View Connection Broker can manage a Pod with up to 10,000 virtual desktops.
• Refresh, recompose, and rebalance persistent and nonpersistent pools. VMware View 4.5 provides greater flexibility when using Linked Clone technology. View Composer now includes Microsoft Sysprep support in VMware vCenter, which supports applications that require a Security Identifier (SID).
For more information: http://technet.microsoft.com/en-us/library/cc961625.aspx
• Tiered storage. By placing the Replicas on a separate storage device from Linked Clones, they can be shared by all Linked Clones. You can also use high performance solid-state disks (SSDs) to improve recomposition performance.
• Better data control. This release integrates the vCenter API, which provides a lightweight approach when VMware VMFS reclaims cleared paging and temporary disk space without refreshing. Also, you can preserve a user data disk (UDD) upon the deletion of a virtual machine, then reattach or recreate a new virtual machine and reuse the same UDD.
• Local Mode or Type 2 hypervisor. Formerly known as Offline Desktop, Local Mode provides encrypted, encapsulated, and uninterrupted desktop services. IT professionals have full control on data synchronization, replication schedule, or deployment policies including Local Only smart card access, USB access, and more.
• Open platform and interface. The release introduces PowerCLI scripting using Windows PowerShell comlets, to efficiently interact with VMware vSphere virtual infrastructure and VMware View commands.
• Smart card and two-factor authentication. By adding your root certificate from a domain certificate authority, you can secure your organization’s workstations with smart cards and smart USB tokens. This enforces strong authentication for network logins and desktop access. Like the previous release, there is compliance with standards including Personal Identity Verification (PIV), Common Access Card (CAC) standard and Federal Information Processing Standards (FIPS). Smart card policy can be enabled or disabled on pool-level access, and is fully supported in Local Mode access.
• Improved log analysis. There is support for storing event data in SQL Server and Oracle databases, using Event Configuration in the VMware View Manager console. Event log information includes login, logoff activity, and a subset of the log files. Event log data can be exported to third-party log analysis tools.
There are many other updates and enhancements in this release. You can refer to VMware View Manager Administration Guide for more information.
System Requirements
In order to speed up the deployment and minimize hardware configuration and procurement issues, this evaluator’s guide is designed to use a subscription from a dedicated server package as offered by a cloud service provider. A monthly subscription provides server, storage, and networking capabilities.
Using a cloud service provider validates a WAN implementation of VMware View 4.5. You can use the SSL VPN software appliance solution of your choice. In this guide, we use a low-cost SSL VPN option from OpenVPN. Altogether, you can build and test a virtual desktop experience with RDP or PCoIP over WAN.
If you already have hardware available in your lab, you can simply install the software without an additional service subscription.
VMware View 4.5
E va l u at o r ’ s G u i d E / 5
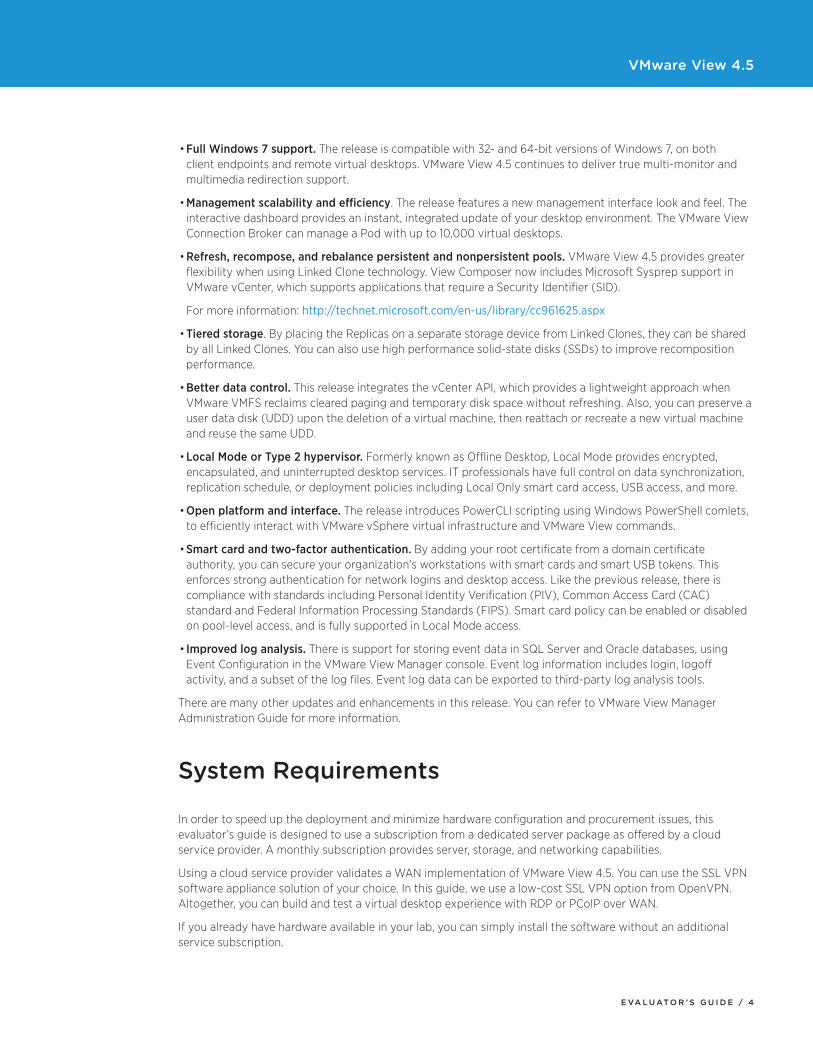
This guide is intended for IT professionals who plan to install VMware View. Figure 1 shows the basic environment we will be using throughout the evaluation. This document assumes you have a basic understanding of how to configure VMware vSphere or VMware ESX server, and the network.
Figure 1: Baseline rack configuration (graphic needs to say SSL <space> VPN)
Figure 2: Self-Contained Rack Configuration
VMware View 4.5
E va l u at o r ’ s G u i d E / 6
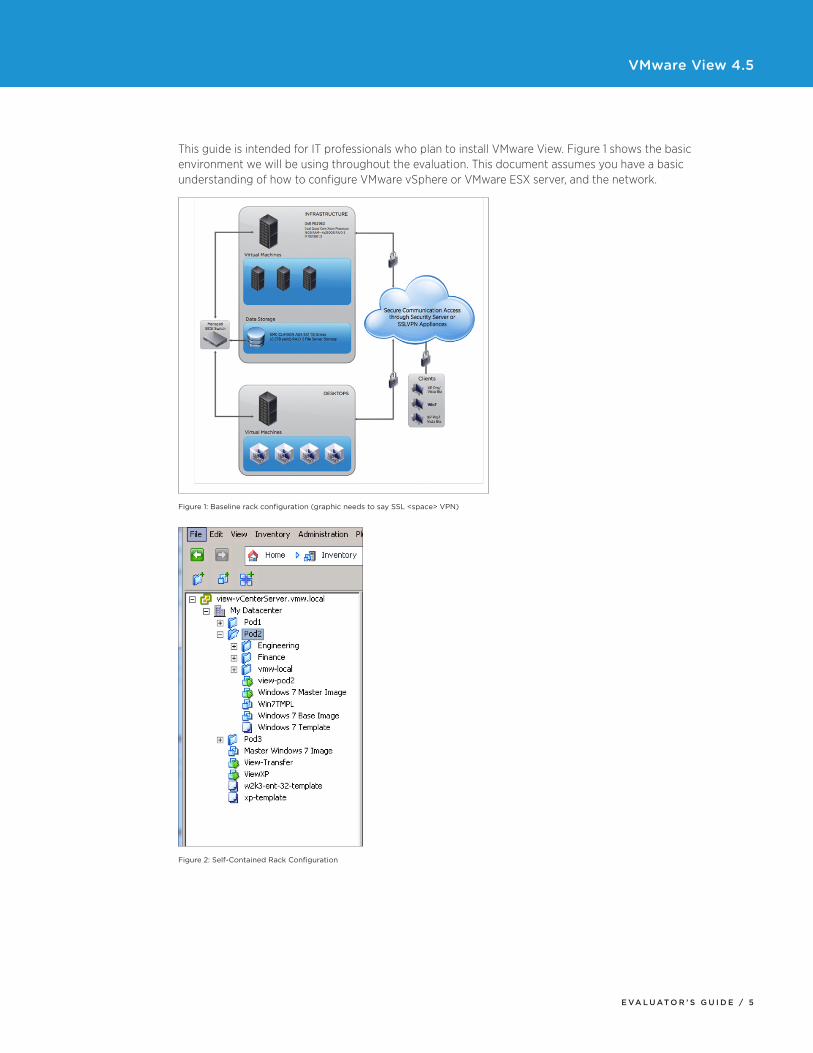
Figure 3: Configuration with SSL VPN Option
For demo purposes, you can deploy a mix of Windows Server 2003 and 2008, and prepare desktop virtual machines with Windows XP and Windows 7. See Figure 3. You can decide the OS options based on what are available to you.
VMware View Editions
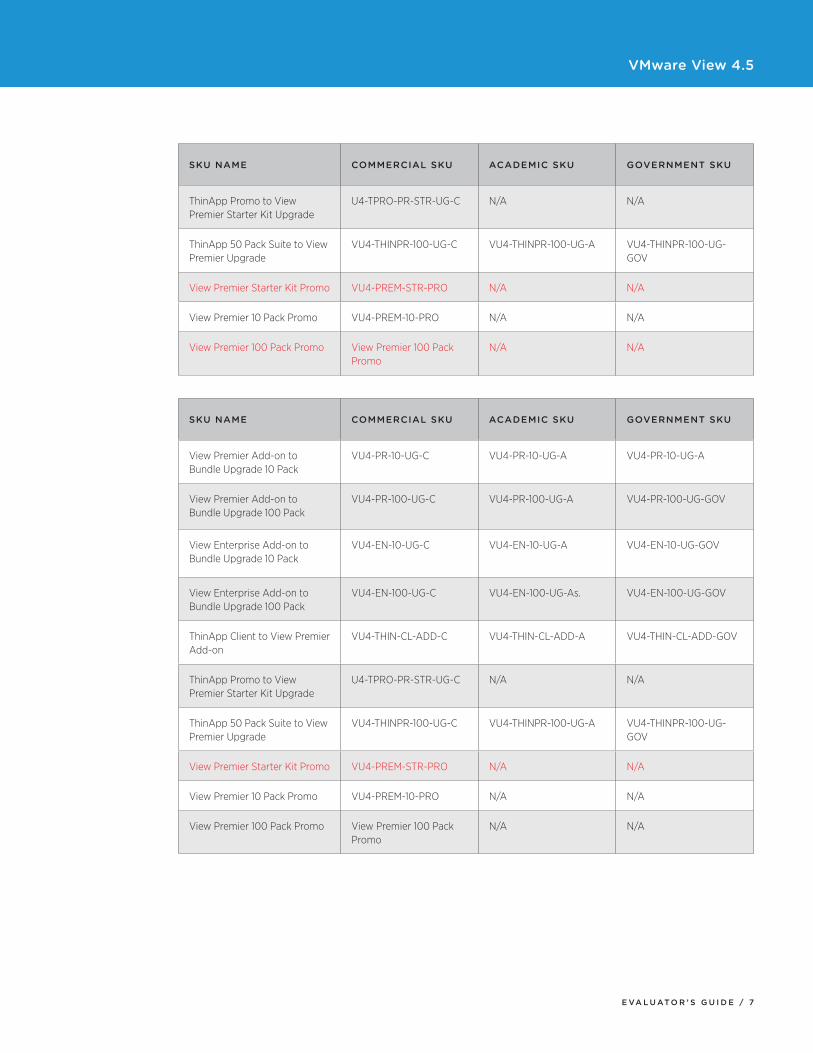
VMware View is licensed and priced by concurrent connection. For a pilot site review or other initial purchase, you will need the Starter Kit SKU, or minimum of 100 pack SKU for new deployments.
VMware View bundles (Enterprise and Premier) contain the minimum components required to run an end-to-end VMware View deployment. View bundles can be purchased in quantities of 10 or 100 users. At initial purchase, a Starter Kit or 100 pack is required before buying additional users in 10 packs, because the vCenter Server component is tied to the Starter Kit or 100 pack.
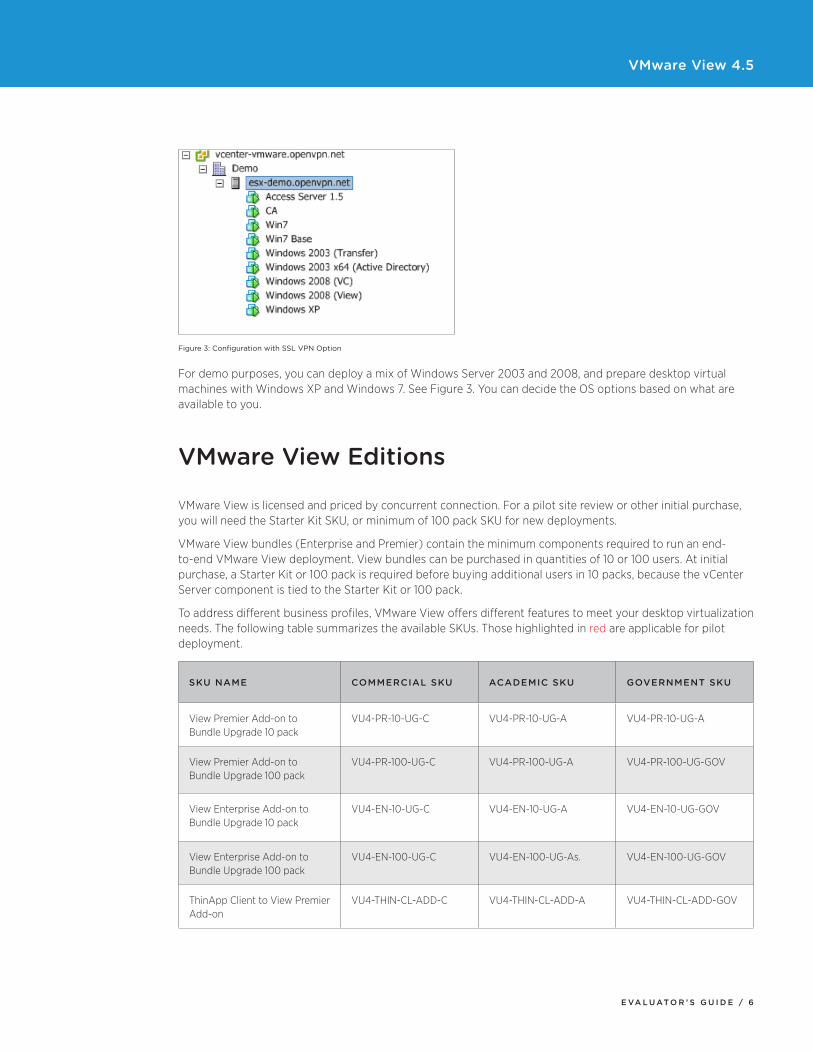
To address different business profiles, VMware View offers different features to meet your desktop virtualization needs. The following table summarizes the available SKUs. Those highlighted in red are applicable for pilot deployment.
SKU NaME CoMMERCial SKU aCadEMiC SKU GoVERNMENt SKU
View Premier Add-on to Bundle Upgrade 10 pack
VU4-PR-10-UG-C VU4-PR-10-UG-A VU4-PR-10-UG-A
View Premier Add-on to Bundle Upgrade 100 pack
VU4-PR-100-UG-C VU4-PR-100-UG-A VU4-PR-100-UG-GOV
View Enterprise Add-on to Bundle Upgrade 10 pack
VU4-EN-10-UG-C VU4-EN-10-UG-A VU4-EN-10-UG-GOV
View Enterprise Add-on to Bundle Upgrade 100 pack
VU4-EN-100-UG-C VU4-EN-100-UG-As. VU4-EN-100-UG-GOV
ThinApp Client to View Premier Add-on
VU4-THIN-CL-ADD-C VU4-THIN-CL-ADD-A VU4-THIN-CL-ADD-GOV
VMware View 4.5
E va l u at o r ’ s G u i d E / 7
SKU NaME CoMMERCial SKU aCadEMiC SKU GoVERNMENt SKU
ThinApp Promo to View Premier Starter Kit Upgrade
U4-TPRO-PR-STR-UG-C N/A N/A
ThinApp 50 Pack Suite to View Premier Upgrade
VU4-THINPR-100-UG-C VU4-THINPR-100-UG-A VU4-THINPR-100-UG-GOV
View Premier Starter Kit Promo VU4-PREM-STR-PRO N/A N/A
View Premier 10 Pack Promo VU4-PREM-10-PRO N/A N/A
View Premier 100 Pack Promo View Premier 100 Pack Promo
N/A N/A
SKU NaME CoMMERCial SKU aCadEMiC SKU GoVERNMENt SKU
View Premier Add-on to Bundle Upgrade 10 Pack
VU4-PR-10-UG-C VU4-PR-10-UG-A VU4-PR-10-UG-A
View Premier Add-on to Bundle Upgrade 100 Pack
VU4-PR-100-UG-C VU4-PR-100-UG-A VU4-PR-100-UG-GOV
View Enterprise Add-on to Bundle Upgrade 10 Pack
VU4-EN-10-UG-C VU4-EN-10-UG-A VU4-EN-10-UG-GOV
View Enterprise Add-on to Bundle Upgrade 100 Pack
VU4-EN-100-UG-C VU4-EN-100-UG-As. VU4-EN-100-UG-GOV
ThinApp Client to View Premier Add-on
VU4-THIN-CL-ADD-C VU4-THIN-CL-ADD-A VU4-THIN-CL-ADD-GOV
ThinApp Promo to View Premier Starter Kit Upgrade
U4-TPRO-PR-STR-UG-C N/A N/A
ThinApp 50 Pack Suite to View Premier Upgrade
VU4-THINPR-100-UG-C VU4-THINPR-100-UG-A VU4-THINPR-100-UG-GOV
View Premier Starter Kit Promo VU4-PREM-STR-PRO N/A N/A
View Premier 10 Pack Promo VU4-PREM-10-PRO N/A N/A
View Premier 100 Pack Promo View Premier 100 Pack Promo
N/A N/A
VMware View 4.5
E va l u at o r ’ s G u i d E / 8
VMware View Components
The following VMware View components are required for an evaluation environment:
• VMware View Connection Server
• VMware View Agent
• VMware View Client
• VMware View Composer
In VMware View, each virtual desktop or virtual machine is managed by VMware View Manager. You can team up multiple Connection Servers for high availability. During the installation of VMware View Connection Server, you will notice radio button options for View Connection Server, Transfer Server, Replica, Security Server, and so on. In this exercise, we will try a simple configuration using the Connection Server and Transfer Server. For remote extranet access, you can also use a third-party SSL VPN solution such as OpenVPN or products available from Juniper, F5, Cisco, or Nortel.
Upgrading from Prior Versions
This document is intended for new installations only, and does not provide information on upgrading an existing implementation.
Complete upgrade information is available in the VMware View Manager Administration Guide and Upgrade Guide.
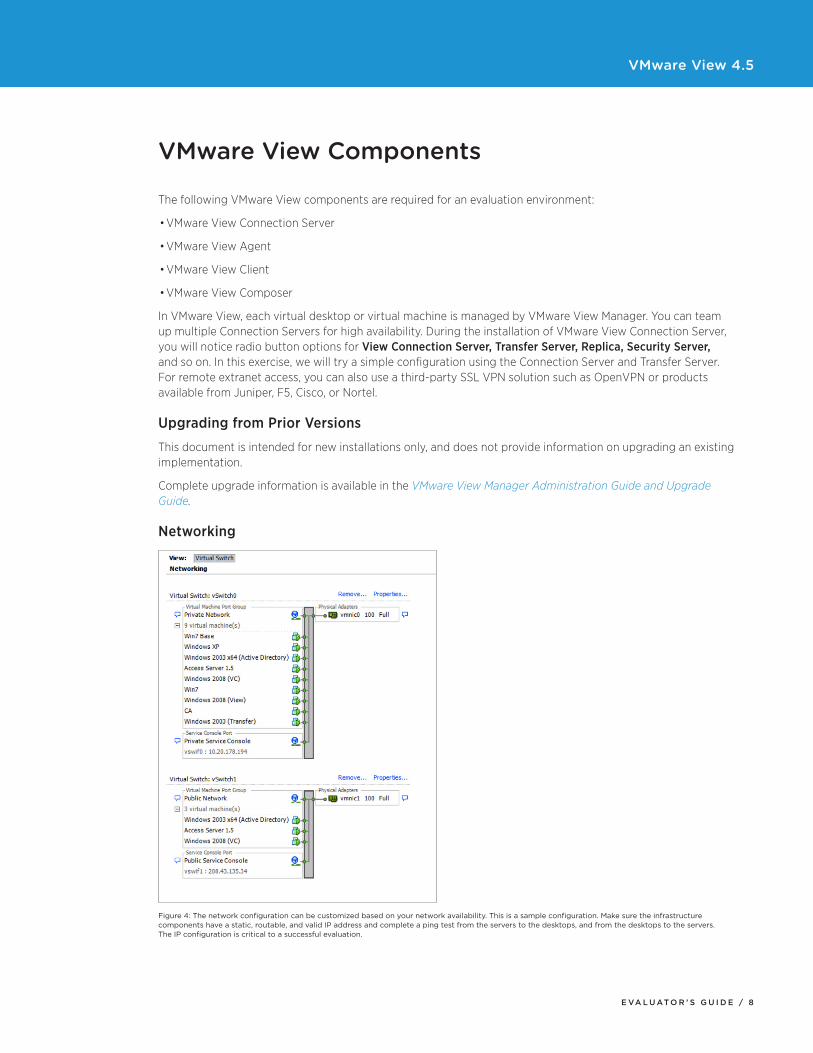
Networking
Figure 4: The network configuration can be customized based on your network availability. This is a sample configuration. Make sure the infrastructure components have a static, routable, and valid IP address and complete a ping test from the servers to the desktops, and from the desktops to the servers. The IP configuration is critical to a successful evaluation.
VMware View 4.5
E va l u at o r ’ s G u i d E / 9
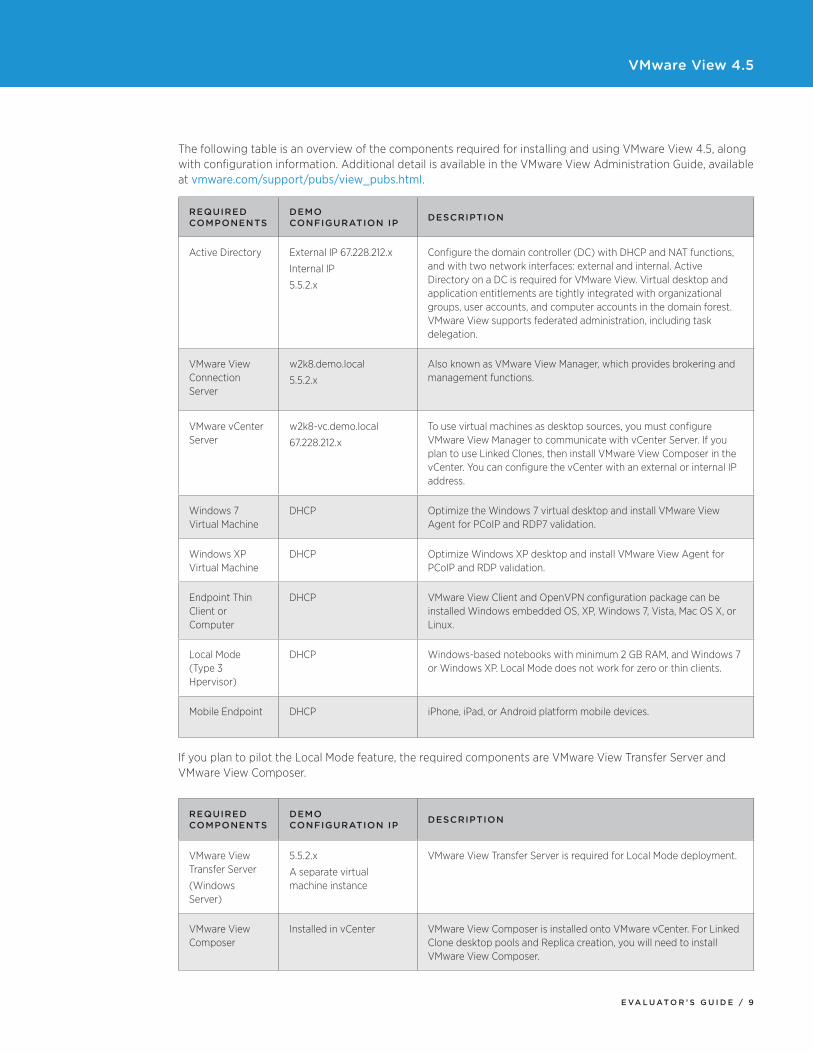
The following table is an overview of the components required for installing and using VMware View 4.5, along with configuration information. Additional detail is available in the VMware View Administration Guide, available at vmware.com/support/pubs/view_pubs.html.
REqUiREd CoMpoNENtS
dEMo CoNFiGURatioN ip dESCRiptioN
Active Directory External IP 67.228.212.x
Internal IP
5.5.2.x
Configure the domain controller (DC) with DHCP and NAT functions, and with two network interfaces: external and internal. Active Directory on a DC is required for VMware View. Virtual desktop and application entitlements are tightly integrated with organizational groups, user accounts, and computer accounts in the domain forest. VMware View supports federated administration, including task delegation.
VMware View Connection Server
w2k8.demo.local
5.5.2.x
Also known as VMware View Manager, which provides brokering and management functions.
VMware vCenter Server
w2k8-vc.demo.local
67.228.212.x
To use virtual machines as desktop sources, you must configure VMware View Manager to communicate with vCenter Server. If you plan to use Linked Clones, then install VMware View Composer in the vCenter. You can configure the vCenter with an external or internal IP address.
Windows 7 Virtual Machine
DHCP Optimize the Windows 7 virtual desktop and install VMware View Agent for PCoIP and RDP7 validation.
Windows XP Virtual Machine
DHCP Optimize Windows XP desktop and install VMware View Agent for PCoIP and RDP validation.
Endpoint Thin Client or Computer
DHCP VMware View Client and OpenVPN configuration package can be installed Windows embedded OS, XP, Windows 7, Vista, Mac OS X, or Linux.
Local Mode (Type 3 Hpervisor)
DHCP Windows-based notebooks with minimum 2 GB RAM, and Windows 7 or Windows XP. Local Mode does not work for zero or thin clients.
Mobile Endpoint DHCP iPhone, iPad, or Android platform mobile devices.
If you plan to pilot the Local Mode feature, the required components are VMware View Transfer Server and VMware View Composer.
REqUiREd CoMpoNENtS
dEMo CoNFiGURatioN ip dESCRiptioN
VMware View Transfer Server
(Windows Server)
5.5.2.x
A separate virtual machine instance
VMware View Transfer Server is required for Local Mode deployment.
VMware View Composer
Installed in vCenter VMware View Composer is installed onto VMware vCenter. For Linked Clone desktop pools and Replica creation, you will need to install VMware View Composer.
VMware View 4.5
E va l u at o r ’ s G u i d E / 1 0
When using a cloud service provider, you can configure low-cost SSL VPN appliances that are validated with PCoIP to help prevent service degradation. In this evaluator’s guide, we will use Access Server from OpenVPN. OpenVPN Access Server 1.x Virtual Machine has two Ethernet ports configured by default. Use the following steps to edit: /etc/network/interfaces and make changes to eth0 and eth1:
• Configure eth0 with the public IP address. VPN clients will connect to the Access Server on this interface.
• Configure eth1 with private network address, if applicable.
You can find the further configuration information and the OVF download at http://www.openvpn.net/.
CoMpoNENtS dEMo CoNFiGURatioN ip dESCRiptioN
OpenVPN Access Server (Debian Linux)
5.5.2.x
67.228.212.66
PCoIP is a UDP-based display protocol. Any SSL VPN solution you plan to deploy needs to tunnel UDP and perform TCP fallback without service degradation.
Evaluation Licensing and Materials
For the installation binary packages you can download a free 60-day evaluation of VMware View 4.5 at: https://www.vmware.com/tryvmware/?p=view4&lp=1.
Inside this installation package, you will find the following materials:
• OpenVPN SSL VPN Access Server 1.5 OVF Link
• Free of Distribution/Not For Commercial Use ThinApp (Paint.Net, Acrobat Reader 6)
For installation details for the View components, you can find the VMware View Installation Guide and other information at http://www.vmware.com/view.
Identifying Evaluation Infrastructure
You can configure VMware vSphere™ 4.1 as the host hypervisor for your evaluation, or link to a cloud service provider. VMware View 4.5 is fully compatible with VMware vSphere 4.1.
VMware ESX is a bare-metal hypervisor that abstracts processor, memory, storage, and networking resources to create multiple virtual machines from a single physical machine. Each virtual machine can run separate operating systems and applications. This provides companies of all sizes with a powerful foundation for building a high-performance, cost-efficient, and reliable IT infrastructure by:
• Pooling server resources
• Decreasing power, cooling, and floor space requirements
• Increasing server utilization rates
• Running multiple operating systems on a single physical server
VMware View 4.5
E va l u at o r ’ s G u i d E / 1 1
Configuring Active Directory and Domain Controller
In this evaluation, you will configure an Active Directory virtual machine and promote it as the domain controller. Consider using the following steps:
• Domain controller. In Windows Server 2003 or 2008, create an Active Directory domain named demo.local with a single domain controller.
• DNS. Configure the server to broadcast as domain name server (DNS) with forward and reverse look-up zones.
• DHCP. Configure DHCP as follows:
– DHCP scope. Set DHCP scope as View from address range of 5.5.x.x to 5.5.x.x. This enables DHCP to dynamically assign IP addresses to the new virtual desktops, while protecting the static IP addresses that you already assigned.
Using Local Disk or Storage
As part of your VMware View 4.5 evaluation, you can try the Local Mode (local storage) option. It is a quick and easy. However, you will not be able to test the vMotion and high availability (HA) functions.
installing and Configuring VMware View 4.5 Components
Please refer to the VMware View Administration Guide for VMware View 4.5 and follow the steps for installing VMware View components. The following provides an overview of the tasks needed for this evaluation.
1. Install the virtual machine infrastructure.
2. Create and prepare VMware View Agents within the virtual machines, convert to templates, and take snapshots.
3. Install and configure VMware vCenter and VMware View Composer.
• Install VMware View Composer in VMware vCenter Server
• Install SysPrep in VMware vCenter Server
4. Configure Active Directory and domain controller. VMware View Manager uses Active Directory to enable secure communication between VMware View components. You can configure Active Directory as follows.
• Create a domain
• Configure Active Directory on the domain controller
• Create an organizational unit
• Create user accounts
• Add virtual machines to the demo.local domain
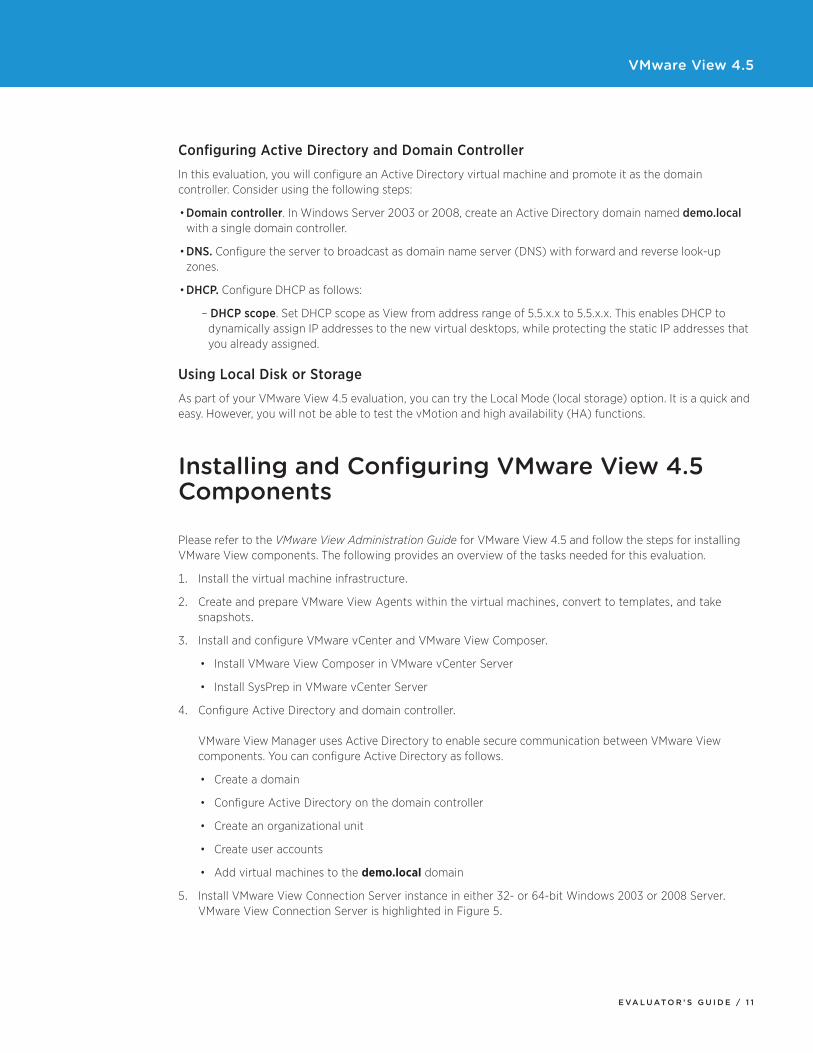
5. Install VMware View Connection Server instance in either 32- or 64-bit Windows 2003 or 2008 Server. VMware View Connection Server is highlighted in Figure 5.
VMware View 4.5
E va l u at o r ’ s G u i d E / 1 2
Figure 5: VMware View Connection Server installation binary
5a. Install VMware View Connection Server.
5b. Install SQL Server or Oracle Database Standard Edition for event database logging (optional).
5c. Install VMware View Transfer Server from the same Connection Server installer.
Note that you will access VMware View Manager administration through http://View_Connection_Server_IP/admin. This is the only management user interface for VMware View Transfer Server.
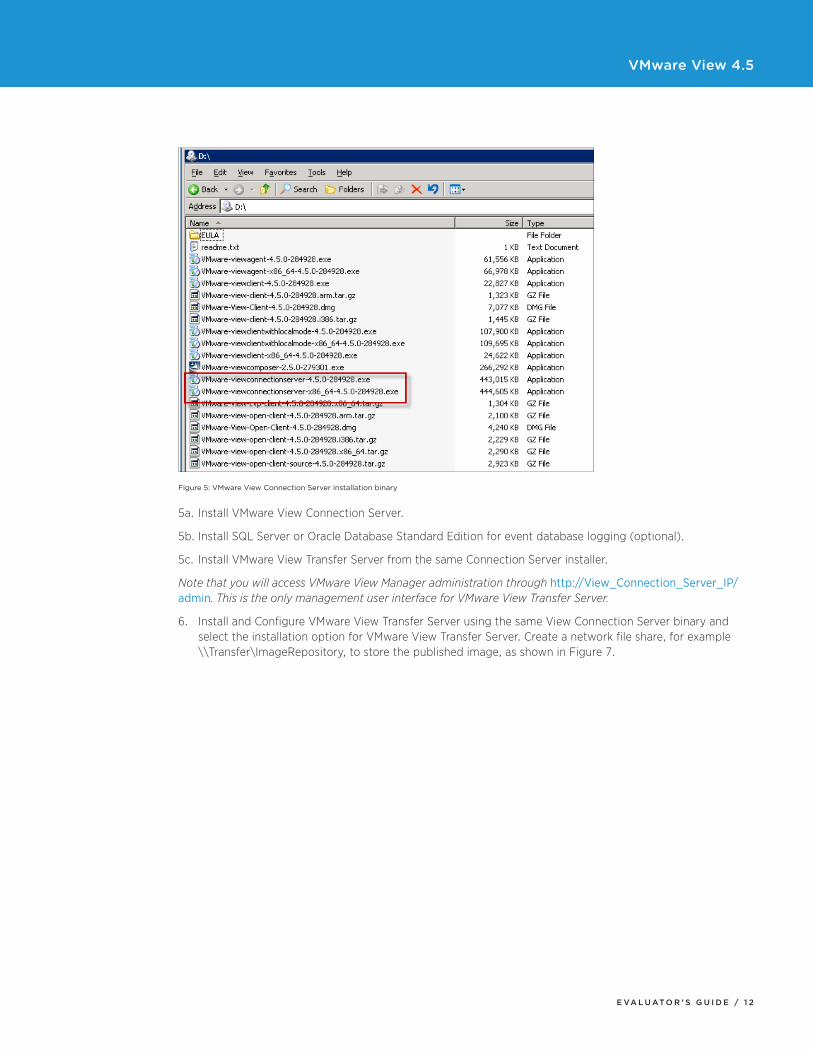
6. Install and Configure VMware View Transfer Server using the same View Connection Server binary and select the installation option for VMware View Transfer Server. Create a network file share, for example \\Transfer\ImageRepository, to store the published image, as shown in Figure 7.
VMware View 4.5
E va l u at o r ’ s G u i d E / 1 3
Figure 6: Transfer Server Repository
7. Provision virtual desktops by preparing a Windows XP or Windows 7 guest OS in a virtual machine.
8. Prepare virtual machine templates by following the instructions in the VMware View Administration Guide. Briefly, you will clone a virtual machine to the template using VMware vCenter after you install VMware View Agent and other required applications.
9. Take a snapshot of the virtual machine. In order for the virtual machine to be used by VMware View Composer, the virtual machine template also needs to have a snapshot created using VMware vCenter.
10. Provision the automated floating desktop pool with a generic Linked Clone for desktop testing. If you plan to attach, detach, or archive user data disk (UDD) or persistent disk upon virtual machine deletion, you can deploy a dedicated View Composer Linked Clone in the desktop pool, as shown in Figure 7.
Figure 7: View Composer Linked Clone in vCenter Server

VMware View 4.5
E va l u at o r ’ s G u i d E / 1 4
Figure 8
Further configuration options can be found at the Persistent Disk option under Inventory drop down.
Figure 9
VMware View 4.5
E va l u at o r ’ s G u i d E / 1 5
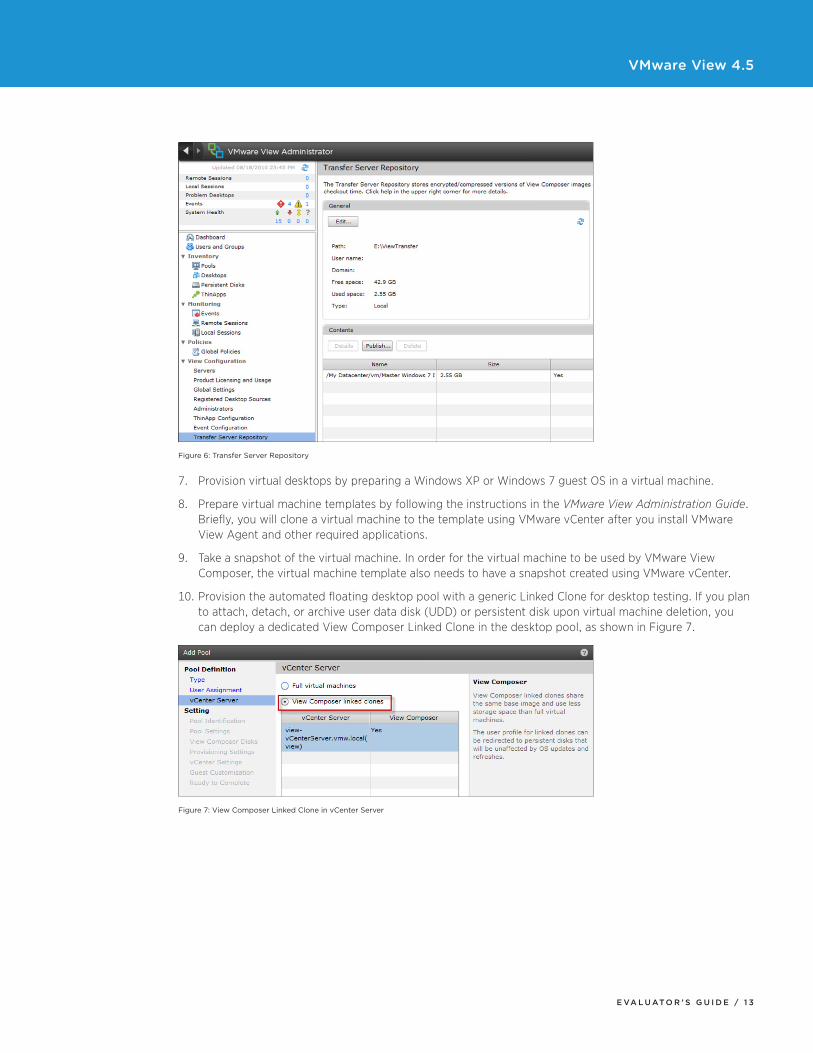
Setting Up tiered Storage for Replica deployment
VMware View 4.5 provides a comprehensive GUI for easy access to platform functionality via VMware vCenter.
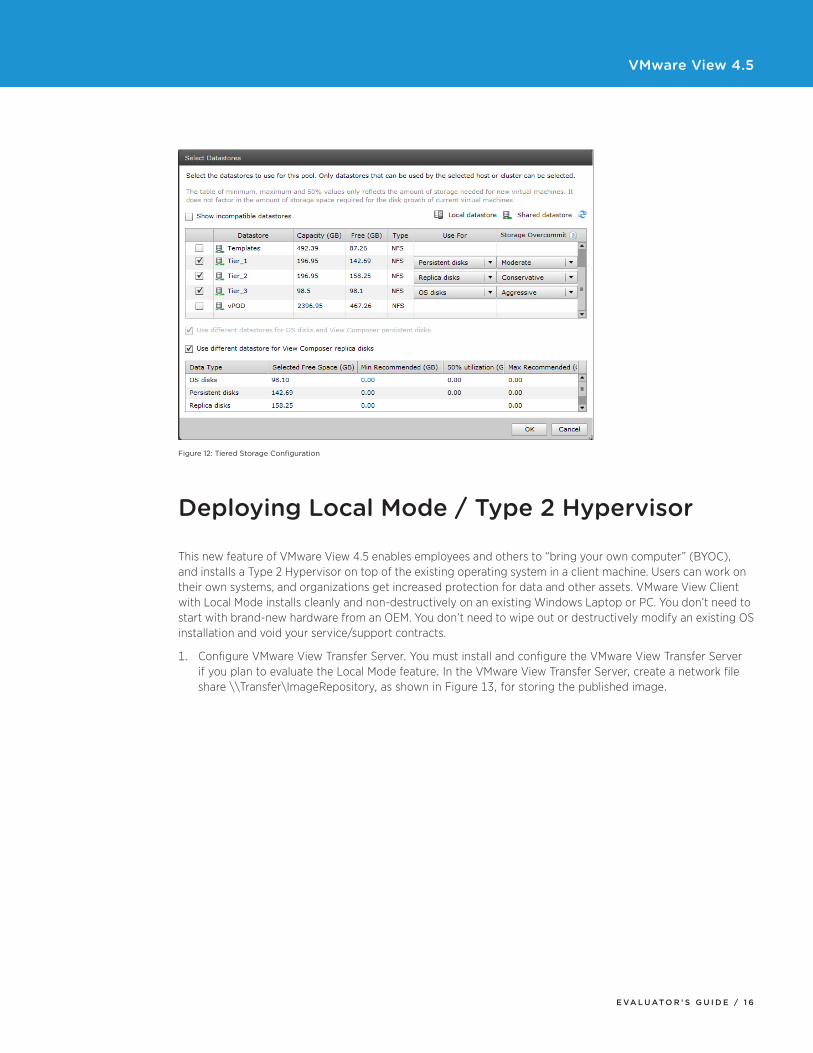
Tiered storage enables you to place Replicas on a single datastore, separate from Linked Clones. Replicas can be shared by all Linked Clones. Deploying more efficient storage optimizes Linked Clone desktop deployment.
Figure 10: Configure tiered storage for cost and efficiency when deploying Linked Clone desktops
In VMware View 4.5, you can replace or add additional datastores for the Replicas. When a new datastore is selected for the Replicas, only recomposed, rebalanced, or new virtual machines are affected. Refreshed virtual machines are not affected. Additional information on these concepts is available in the VMware View Manager Administration Guide.
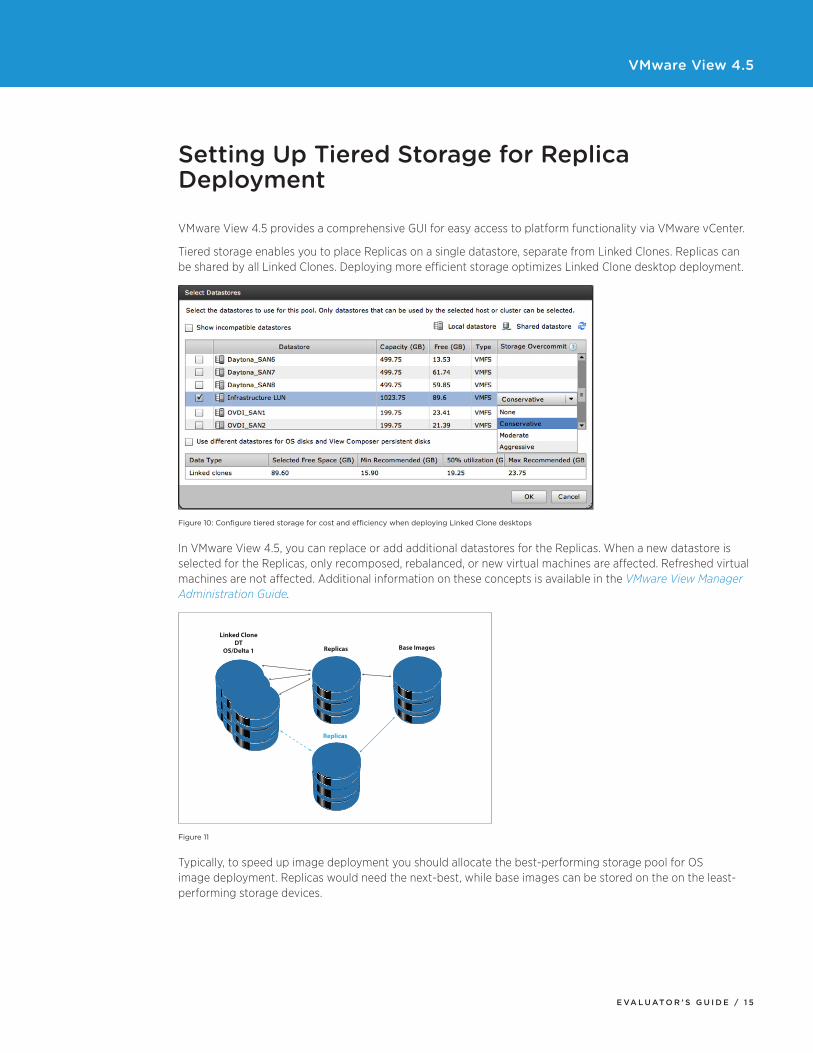
Linked CloneDT
OS/Delta 1 Replicas
Replicas
Base Images
Figure 11
Typically, to speed up image deployment you should allocate the best-performing storage pool for OS image deployment. Replicas would need the next-best, while base images can be stored on the on the least-performing storage devices.
VMware View 4.5
E va l u at o r ’ s G u i d E / 1 6
Figure 12: Tiered Storage Configuration
deploying local Mode / type 2 Hypervisor
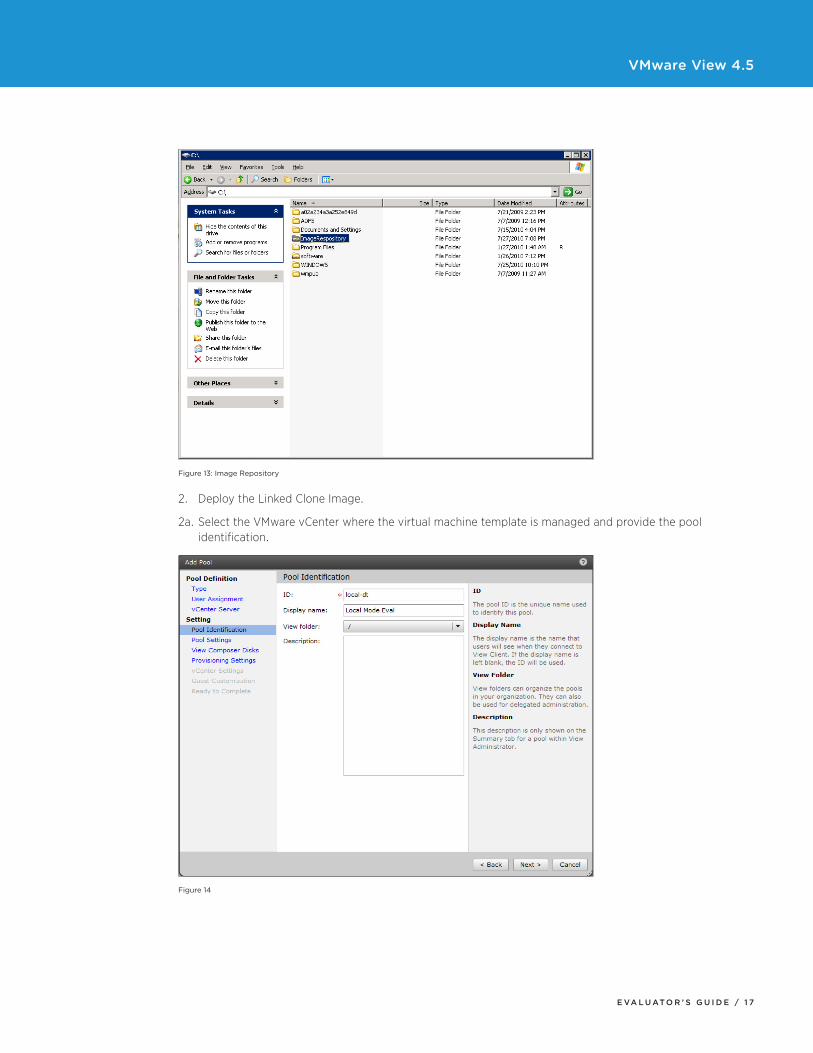
This new feature of VMware View 4.5 enables employees and others to “bring your own computer” (BYOC), and installs a Type 2 Hypervisor on top of the existing operating system in a client machine. Users can work on their own systems, and organizations get increased protection for data and other assets. VMware View Client with Local Mode installs cleanly and non-destructively on an existing Windows Laptop or PC. You don’t need to start with brand-new hardware from an OEM. You don’t need to wipe out or destructively modify an existing OS installation and void your service/support contracts.
1. Configure VMware View Transfer Server. You must install and configure the VMware View Transfer Server if you plan to evaluate the Local Mode feature. In the VMware View Transfer Server, create a network file share \\Transfer\ImageRepository, as shown in Figure 13, for storing the published image.
VMware View 4.5
E va l u at o r ’ s G u i d E / 1 7
Figure 13: Image Repository
2. Deploy the Linked Clone Image.
2a. Select the VMware vCenter where the virtual machine template is managed and provide the pool identification.
Figure 14
VMware View 4.5
E va l u at o r ’ s G u i d E / 1 8
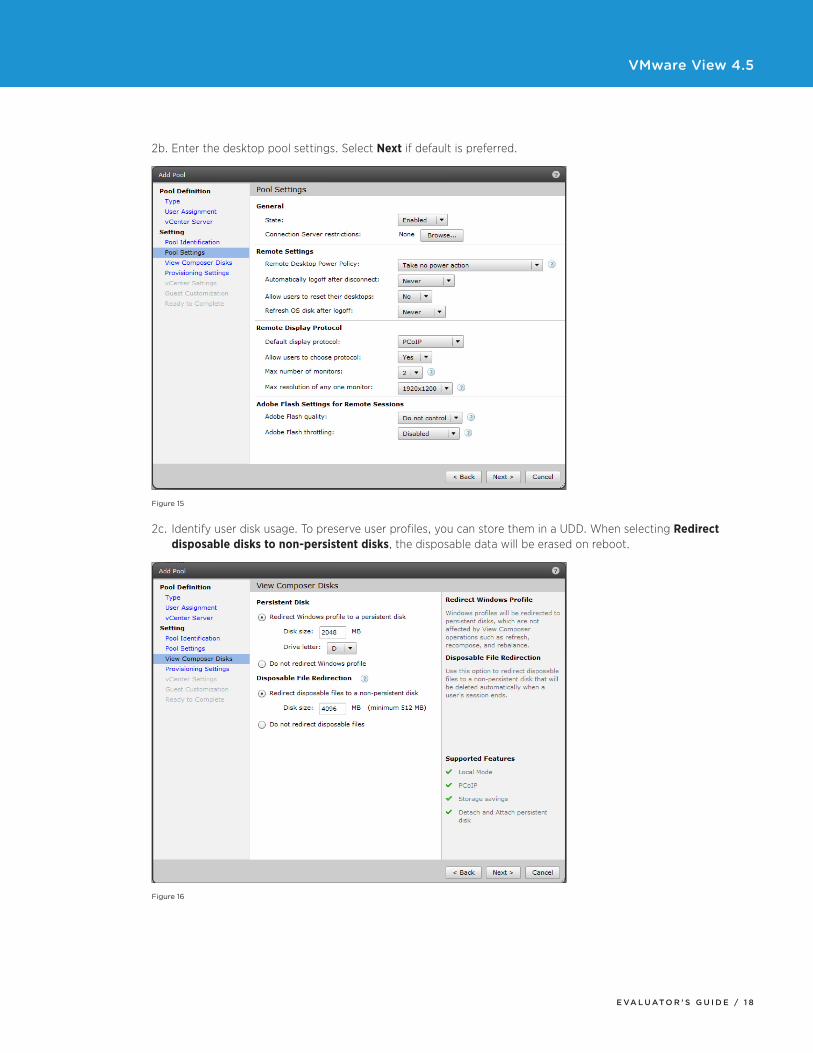
2b. Enter the desktop pool settings. Select Next if default is preferred.
Figure 15
2c. Identify user disk usage. To preserve user profiles, you can store them in a UDD. When selecting Redirect disposable disks to non-persistent disks, the disposable data will be erased on reboot.
Figure 16
VMware View 4.5
E va l u at o r ’ s G u i d E / 1 9
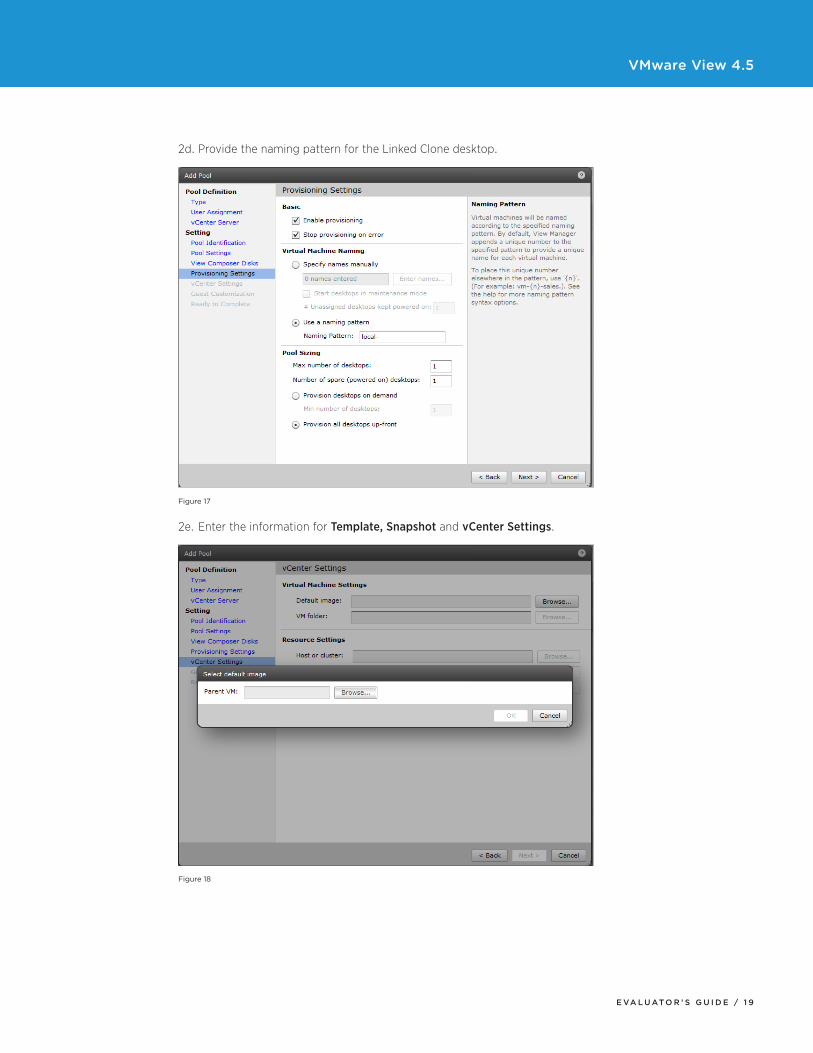
2d. Provide the naming pattern for the Linked Clone desktop.
Figure 17
2e. Enter the information for Template, Snapshot and vCenter Settings.
Figure 18
VMware View 4.5
E va l u at o r ’ s G u i d E / 2 0
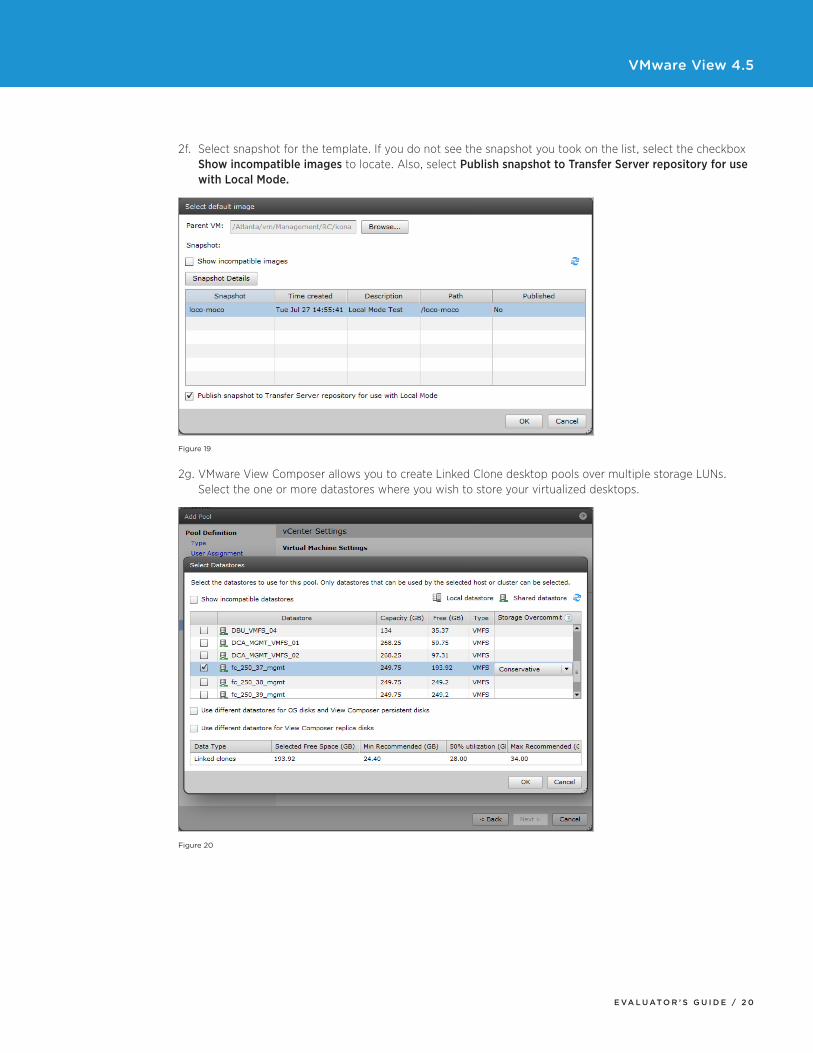
2f. Select snapshot for the template. If you do not see the snapshot you took on the list, select the checkbox Show incompatible images to locate. Also, select Publish snapshot to Transfer Server repository for use with Local Mode.
Figure 19
2g. VMware View Composer allows you to create Linked Clone desktop pools over multiple storage LUNs. Select the one or more datastores where you wish to store your virtualized desktops.
Figure 20
VMware View 4.5
E va l u at o r ’ s G u i d E / 2 1
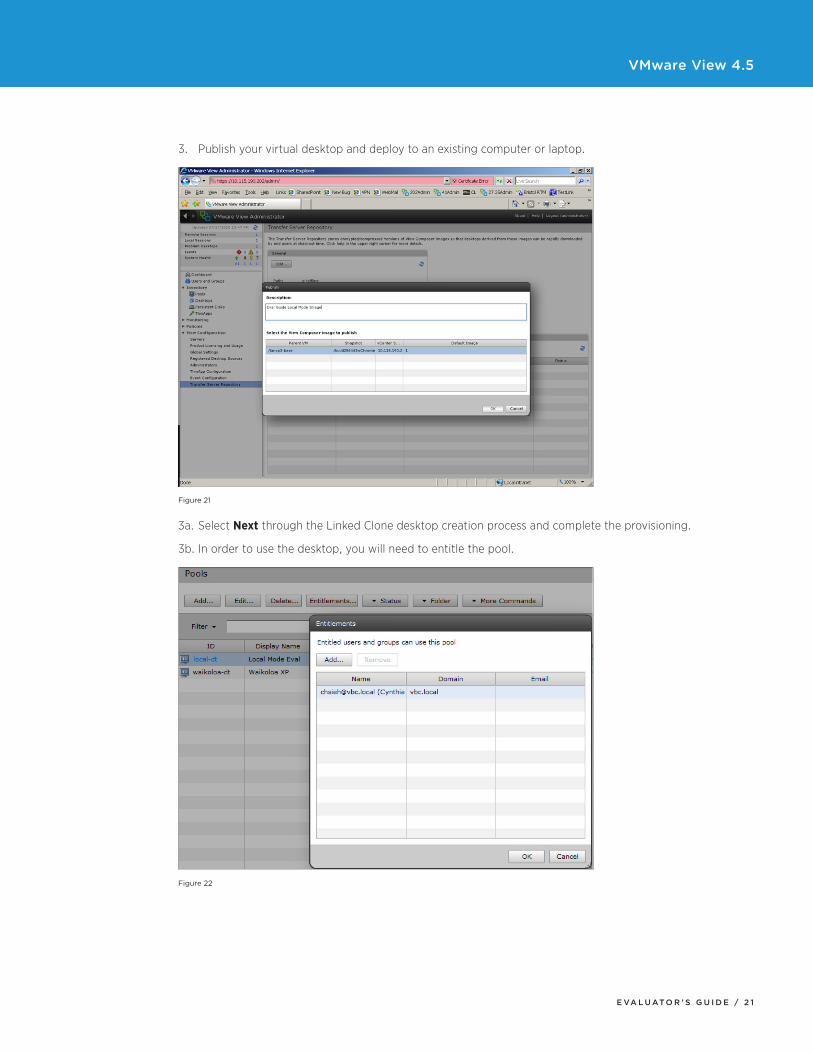
3. Publish your virtual desktop and deploy to an existing computer or laptop.
Figure 21
3a. Select Next through the Linked Clone desktop creation process and complete the provisioning.
3b. In order to use the desktop, you will need to entitle the pool.
Figure 22
VMware View 4.5
E va l u at o r ’ s G u i d E / 2 2
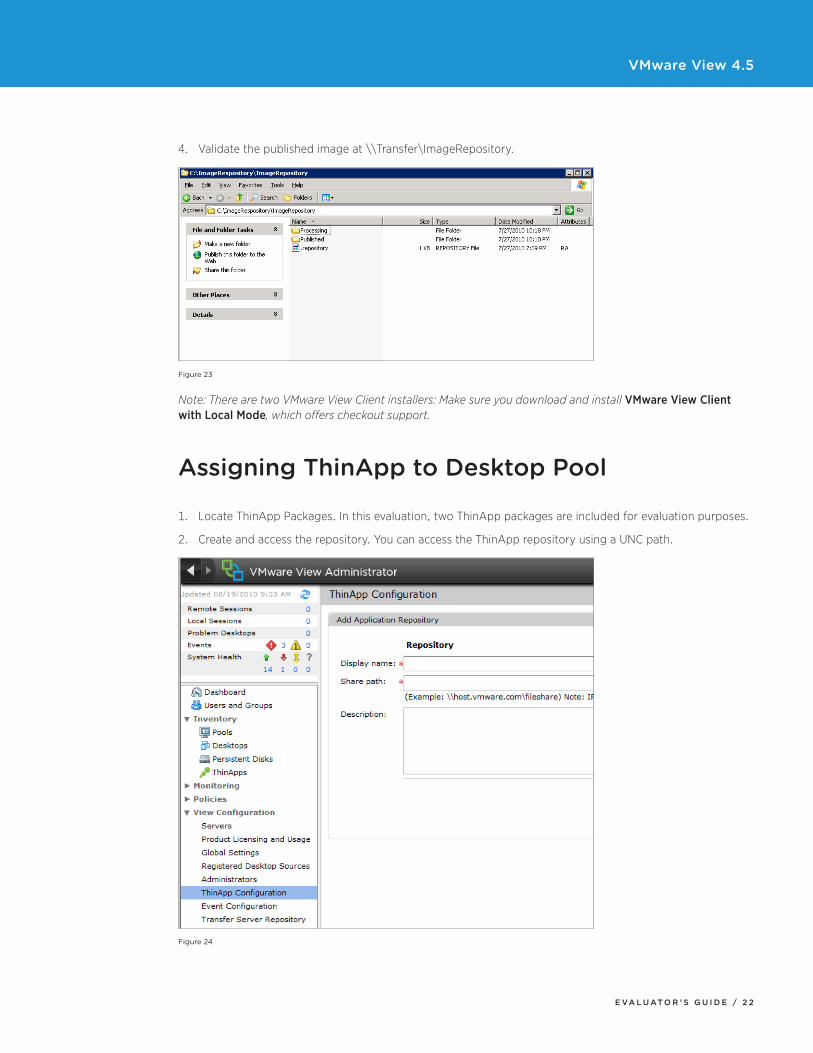
4. Validate the published image at \\Transfer\ImageRepository.
Figure 23
Note: There are two VMware View Client installers: Make sure you download and install VMware View Client with Local Mode, which offers checkout support.
assigning thinapp to desktop pool
1. Locate ThinApp Packages. In this evaluation, two ThinApp packages are included for evaluation purposes.
2. Create and access the repository. You can access the ThinApp repository using a UNC path.
Figure 24
VMware View 4.5
E va l u at o r ’ s G u i d E / 2 3
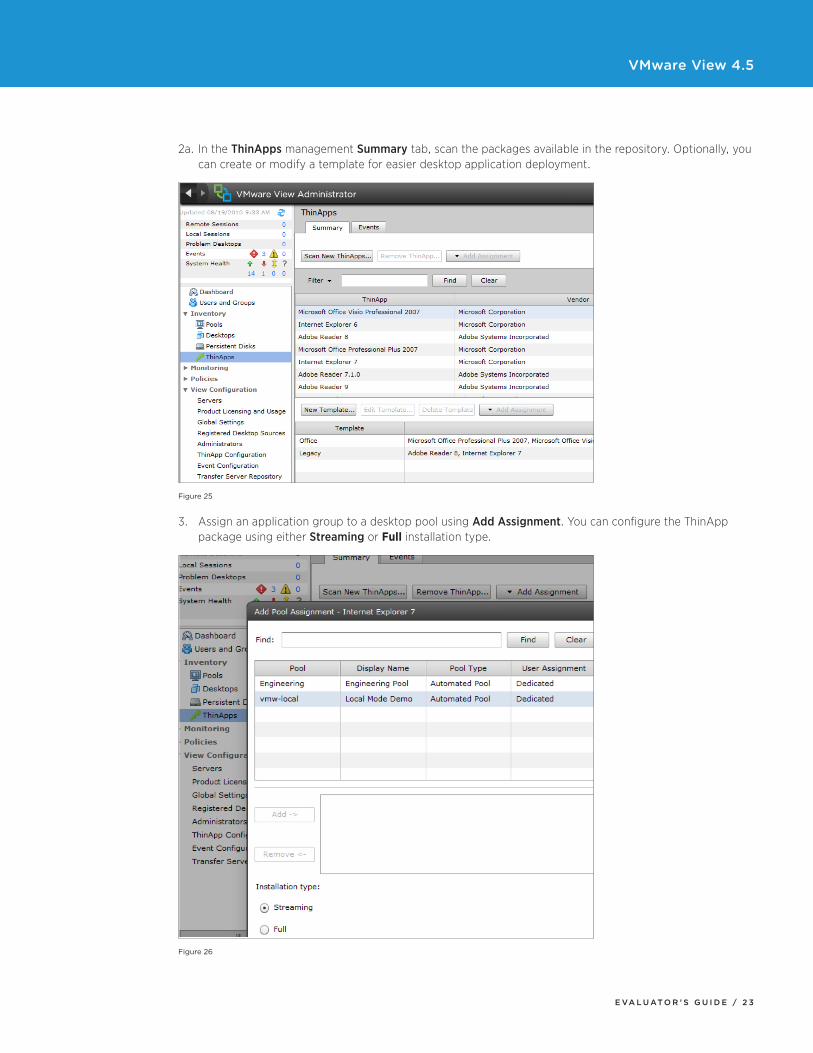
2a. In the ThinApps management Summary tab, scan the packages available in the repository. Optionally, you can create or modify a template for easier desktop application deployment.
Figure 25
3. Assign an application group to a desktop pool using Add Assignment. You can configure the ThinApp package using either Streaming or Full installation type.
Figure 26
VMware View 4.5
E va l u at o r ’ s G u i d E / 2 4
4. Verify the ThinApp assignment. Connect your VMware View Client to a virtual desktop and verify the application packages.
Refresh, Rebalance, and Recompose with User Data Disk (UDD)
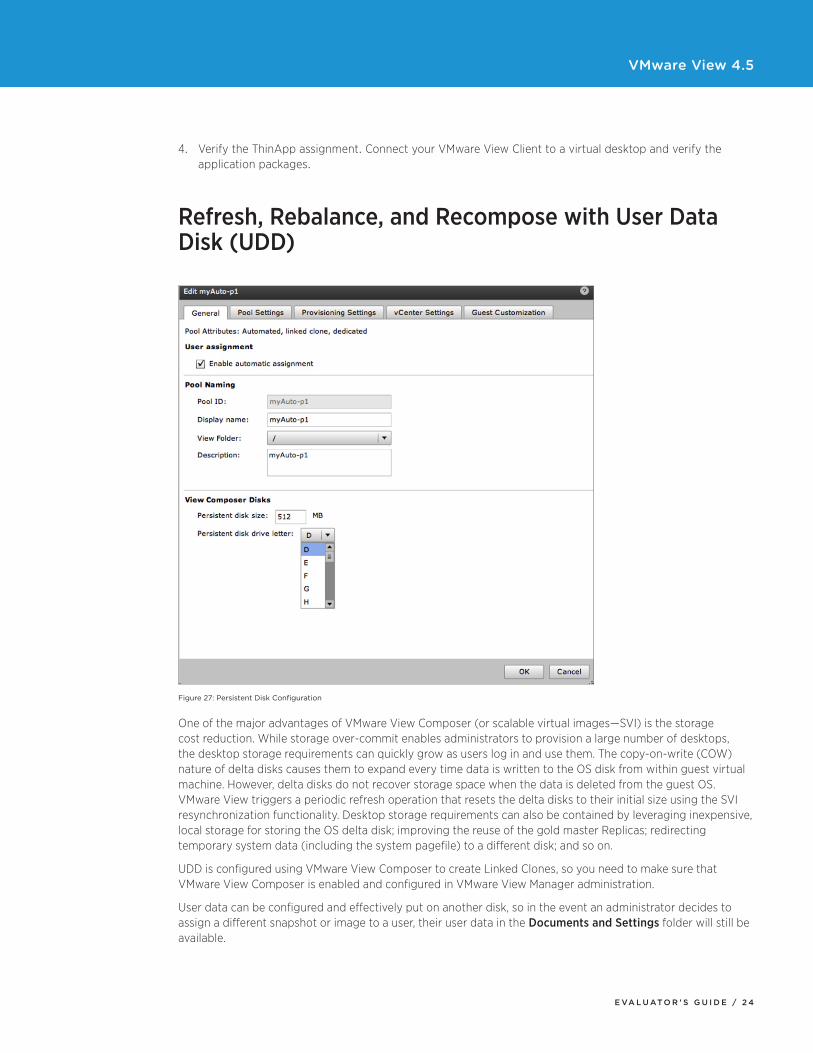
Figure 27: Persistent Disk Configuration
One of the major advantages of VMware View Composer (or scalable virtual images—SVI) is the storage cost reduction. While storage over-commit enables administrators to provision a large number of desktops, the desktop storage requirements can quickly grow as users log in and use them. The copy-on-write (COW) nature of delta disks causes them to expand every time data is written to the OS disk from within guest virtual machine. However, delta disks do not recover storage space when the data is deleted from the guest OS. VMware View triggers a periodic refresh operation that resets the delta disks to their initial size using the SVI resynchronization functionality. Desktop storage requirements can also be contained by leveraging inexpensive, local storage for storing the OS delta disk; improving the reuse of the gold master Replicas; redirecting temporary system data (including the system pagefile) to a different disk; and so on.
UDD is configured using VMware View Composer to create Linked Clones, so you need to make sure that VMware View Composer is enabled and configured in VMware View Manager administration.
User data can be configured and effectively put on another disk, so in the event an administrator decides to assign a different snapshot or image to a user, their user data in the Documents and Settings folder will still be available.

VMware View 4.5
E va l u at o r ’ s G u i d E / 2 5
Figure 28: Persistent Disk Configuration in View Manager
In VMware View 4.5, during the deletion of a virtual machine you will be prompted if you want to preserve the UDD. If yes, UDD will be archived to storage. You can either use the UDD to create a new virtual machine or select an existing virtual machine and attach the archived UDD.
The differences are:
• In a new virtual machine, the archived profile will be used as primary profile.
• In an existing virtual machine, the archived profile UDD will be used as a read-only secondary disk storage (F:\ or G:\ …).
This feature is available for dedicated desktop pool configurations, not for floating nonpersistent pools.
VMware View 4.5
E va l u at o r ’ s G u i d E / 2 6
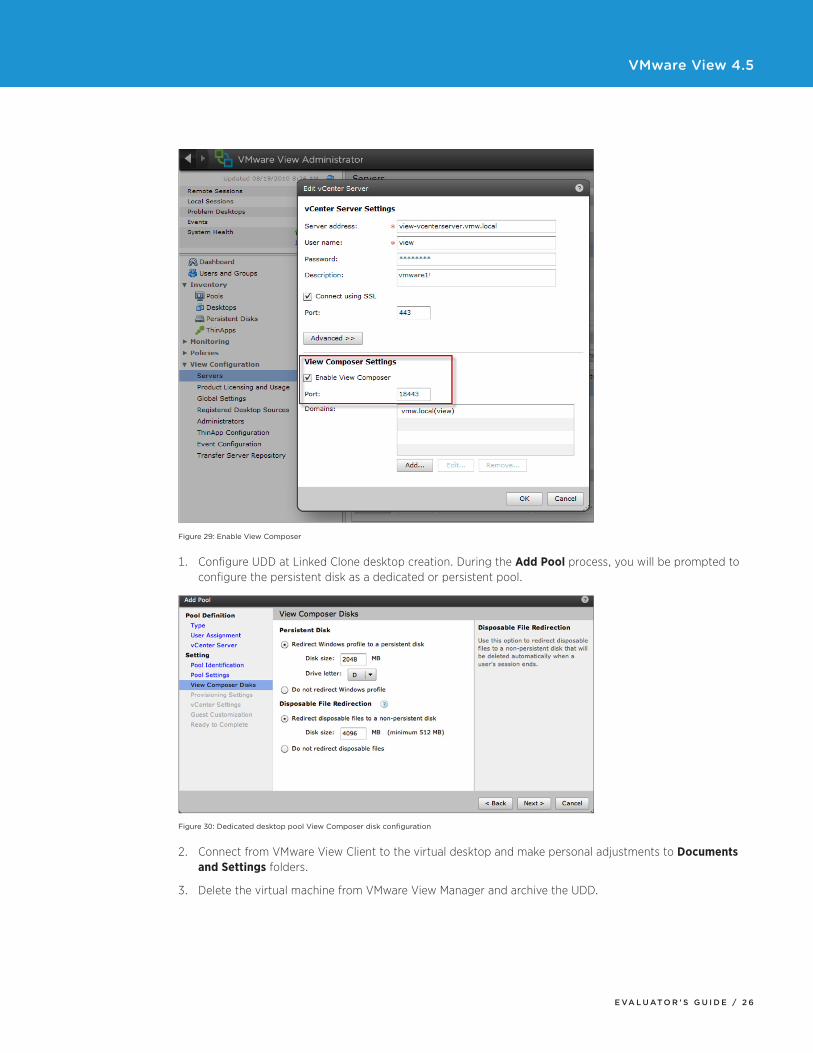
Figure 29: Enable View Composer
1. Configure UDD at Linked Clone desktop creation. During the Add Pool process, you will be prompted to configure the persistent disk as a dedicated or persistent pool.
Figure 30: Dedicated desktop pool View Composer disk configuration
2. Connect from VMware View Client to the virtual desktop and make personal adjustments to Documents and Settings folders.
3. Delete the virtual machine from VMware View Manager and archive the UDD.
VMware View 4.5
E va l u at o r ’ s G u i d E / 2 7
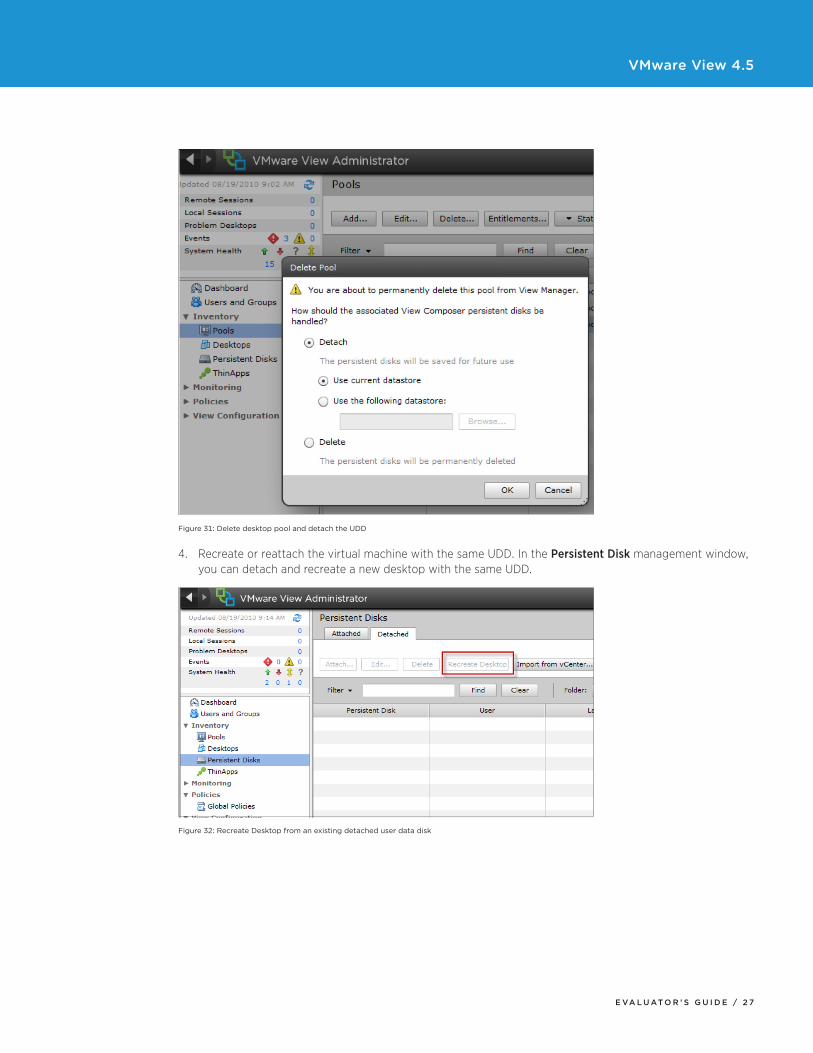
Figure 31: Delete desktop pool and detach the UDD
4. Recreate or reattach the virtual machine with the same UDD. In the Persistent Disk management window, you can detach and recreate a new desktop with the same UDD.
Figure 32: Recreate Desktop from an existing detached user data disk
VMware View 4.5
E va l u at o r ’ s G u i d E / 2 8
Setting Up location-Based printing
Printer Assumptions:
• One network printer HP LaserJet M4345 MFP PS (with IP address 10.114.24.2)
• One locally-attached printer Brother MFC 8460n (local to VMware View Client)
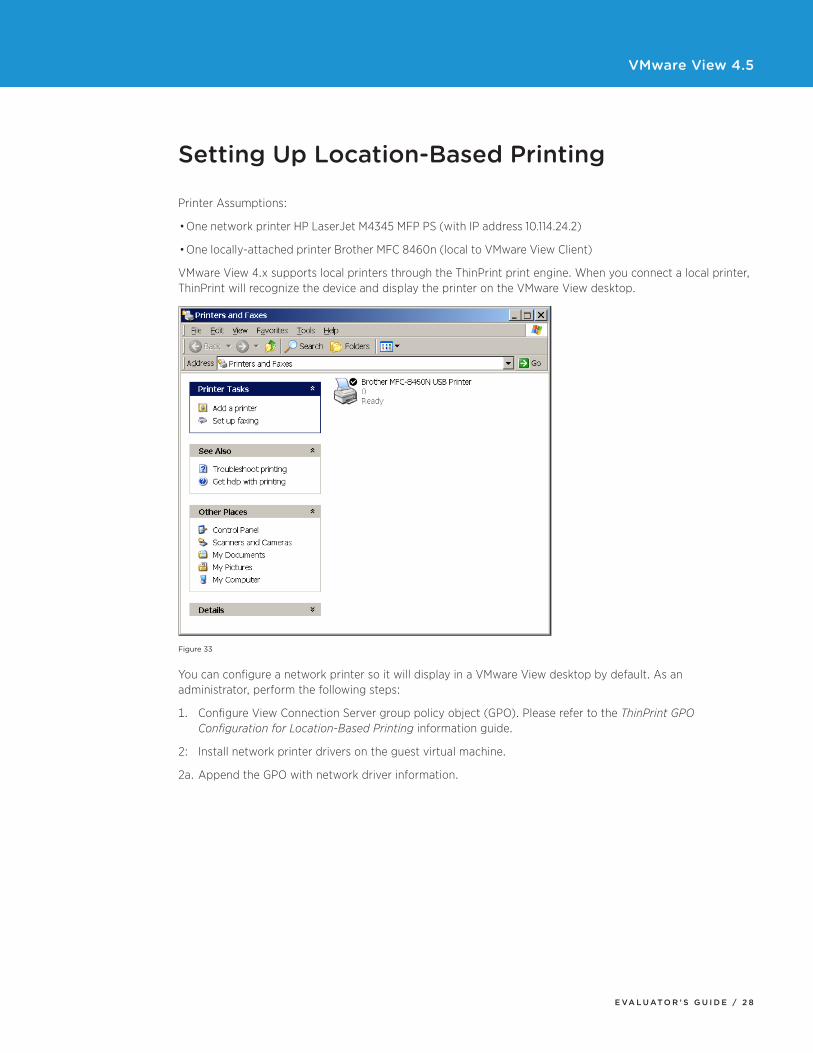
VMware View 4.x supports local printers through the ThinPrint print engine. When you connect a local printer, ThinPrint will recognize the device and display the printer on the VMware View desktop.
Figure 33
You can configure a network printer so it will display in a VMware View desktop by default. As an administrator, perform the following steps:
1. Configure View Connection Server group policy object (GPO). Please refer to the ThinPrint GPO Configuration for Location-Based Printing information guide.
2: Install network printer drivers on the guest virtual machine.
2a. Append the GPO with network driver information.
VMware View 4.5
E va l u at o r ’ s G u i d E / 2 9
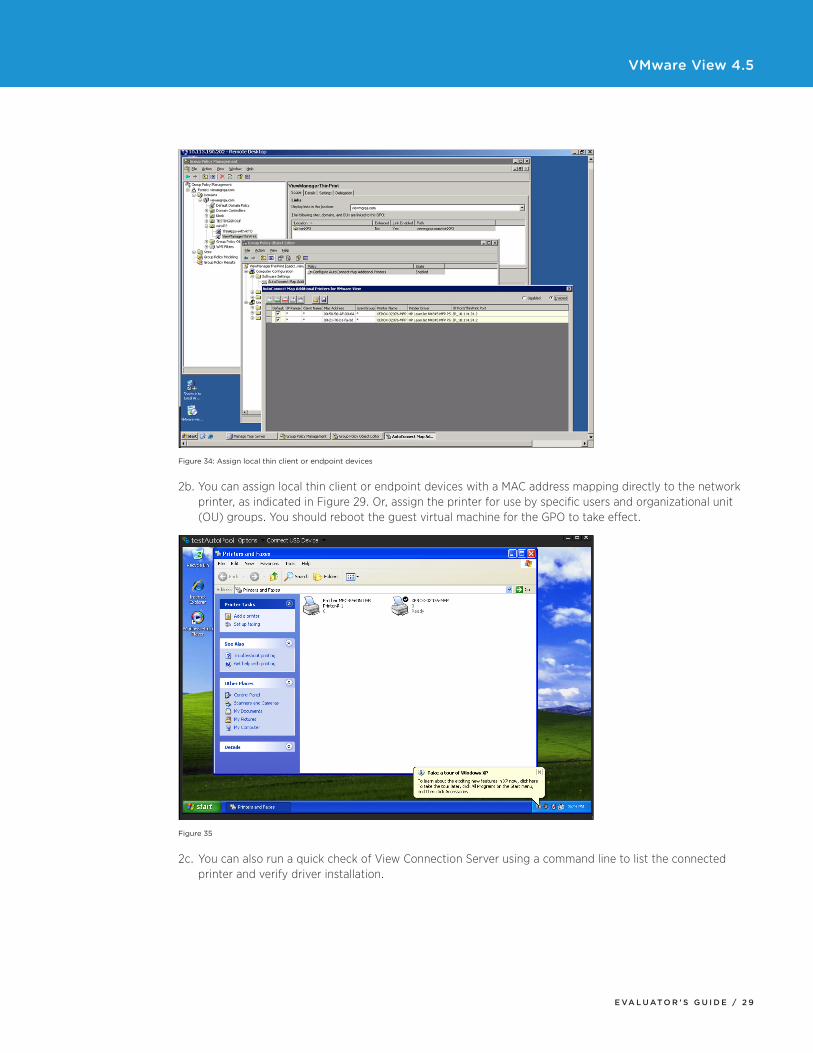
Figure 34: Assign local thin client or endpoint devices
2b. You can assign local thin client or endpoint devices with a MAC address mapping directly to the network printer, as indicated in Figure 29. Or, assign the printer for use by specific users and organizational unit (OU) groups. You should reboot the guest virtual machine for the GPO to take effect.
Figure 35
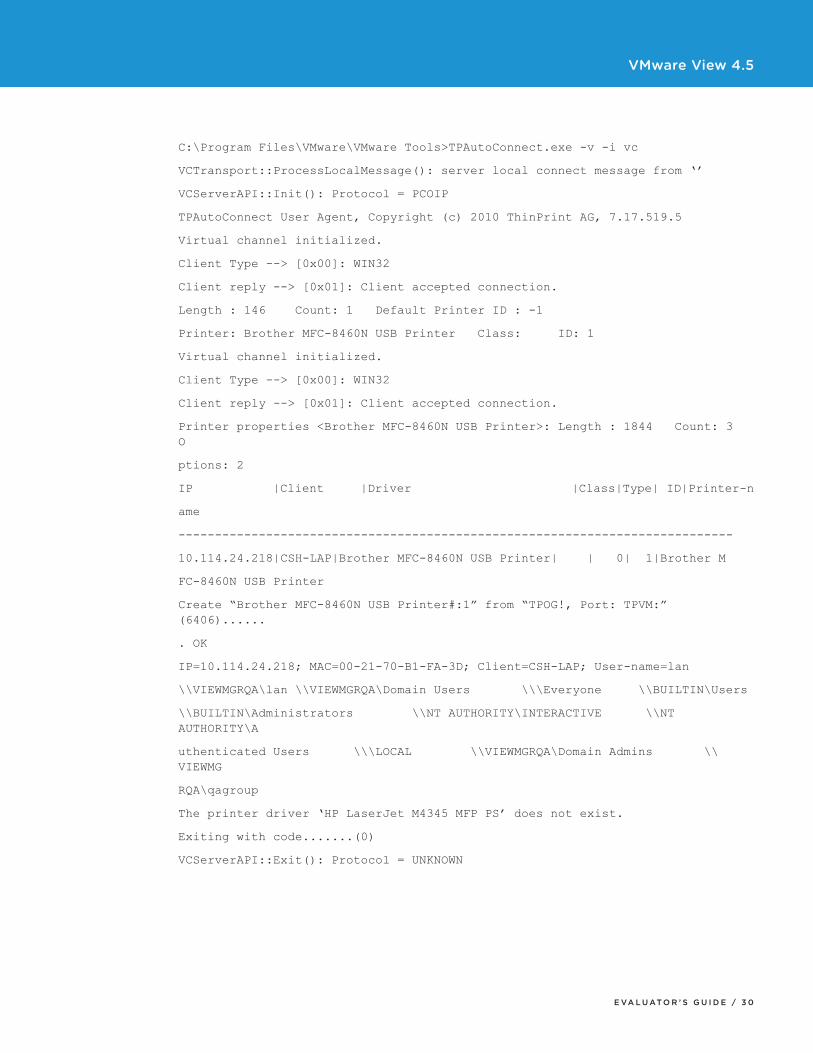
2c. You can also run a quick check of View Connection Server using a command line to list the connected printer and verify driver installation.
VMware View 4.5
E va l u at o r ’ s G u i d E / 3 0
C:\Program Files\VMware\VMware Tools>TPAutoConnect.exe -v -i vc
VCTransport::ProcessLocalMessage(): server local connect message from ‘’
VCServerAPI::Init(): Protocol = PCOIP
TPAutoConnect User Agent, Copyright (c) 2010 ThinPrint AG, 7.17.519.5
Virtual channel initialized.
Client Type --> [0x00]: WIN32
Client reply --> [0x01]: Client accepted connection.
Length : 146 Count: 1 Default Printer ID : -1
Printer: Brother MFC-8460N USB Printer Class: ID: 1
Virtual channel initialized.
Client Type --> [0x00]: WIN32
Client reply --> [0x01]: Client accepted connection.
Printer properties <Brother MFC-8460N USB Printer>: Length : 1844 Count: 3 O
ptions: 2
IP |Client |Driver |Class|Type| ID|Printer-n
ame
----------------------------------------------------------------------------
10.114.24.218|CSH-LAP|Brother MFC-8460N USB Printer| | 0| 1|Brother M
FC-8460N USB Printer
Create “Brother MFC-8460N USB Printer#:1” from “TPOG!, Port: TPVM:” (6406)......
. OK
IP=10.114.24.218; MAC=00-21-70-B1-FA-3D; Client=CSH-LAP; User-name=lan
\\VIEWMGRQA\lan \\VIEWMGRQA\Domain Users \\\Everyone \\BUILTIN\Users
\\BUILTIN\Administrators \\NT AUTHORITY\INTERACTIVE \\NT AUTHORITY\A
uthenticated Users \\\LOCAL \\VIEWMGRQA\Domain Admins \\VIEWMG
RQA\qagroup
The printer driver ‘HP LaserJet M4345 MFP PS’ does not exist.
Exiting with code.......(0)
VCServerAPI::Exit(): Protocol = UNKNOWN
VMware View 4.5
E va l u at o r ’ s G u i d E / 3 1
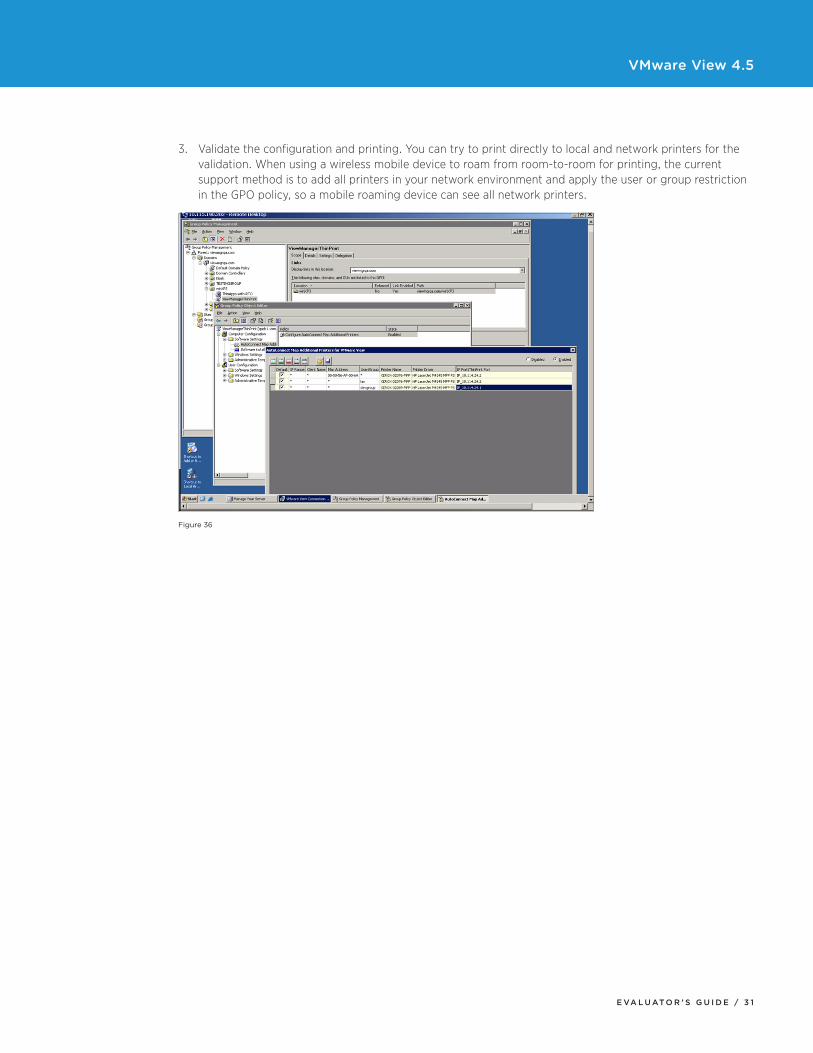
3. Validate the configuration and printing. You can try to print directly to local and network printers for the validation. When using a wireless mobile device to roam from room-to-room for printing, the current support method is to add all printers in your network environment and apply the user or group restriction in the GPO policy, so a mobile roaming device can see all network printers.
Figure 36
VMware View 4.5
E va l u at o r ’ s G u i d E / 3 2
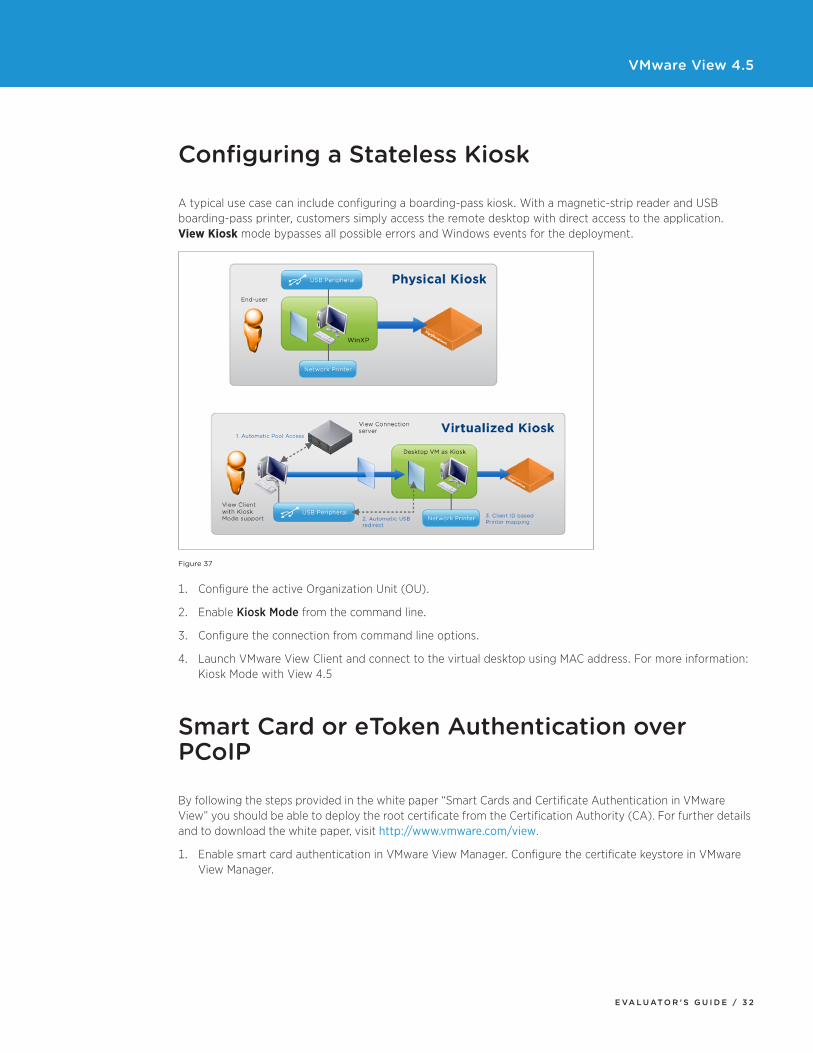
Configuring a Stateless Kiosk
A typical use case can include configuring a boarding-pass kiosk. With a magnetic-strip reader and USB boarding-pass printer, customers simply access the remote desktop with direct access to the application. View Kiosk mode bypasses all possible errors and Windows events for the deployment.
Figure 37
1. Configure the active Organization Unit (OU).
2. Enable Kiosk Mode from the command line.
3. Configure the connection from command line options.
4. Launch VMware View Client and connect to the virtual desktop using MAC address. For more information: Kiosk Mode with View 4.5
Smart Card or etoken authentication over pCoip
By following the steps provided in the white paper “Smart Cards and Certificate Authentication in VMware View” you should be able to deploy the root certificate from the Certification Authority (CA). For further details and to download the white paper, visit http://www.vmware.com/view.
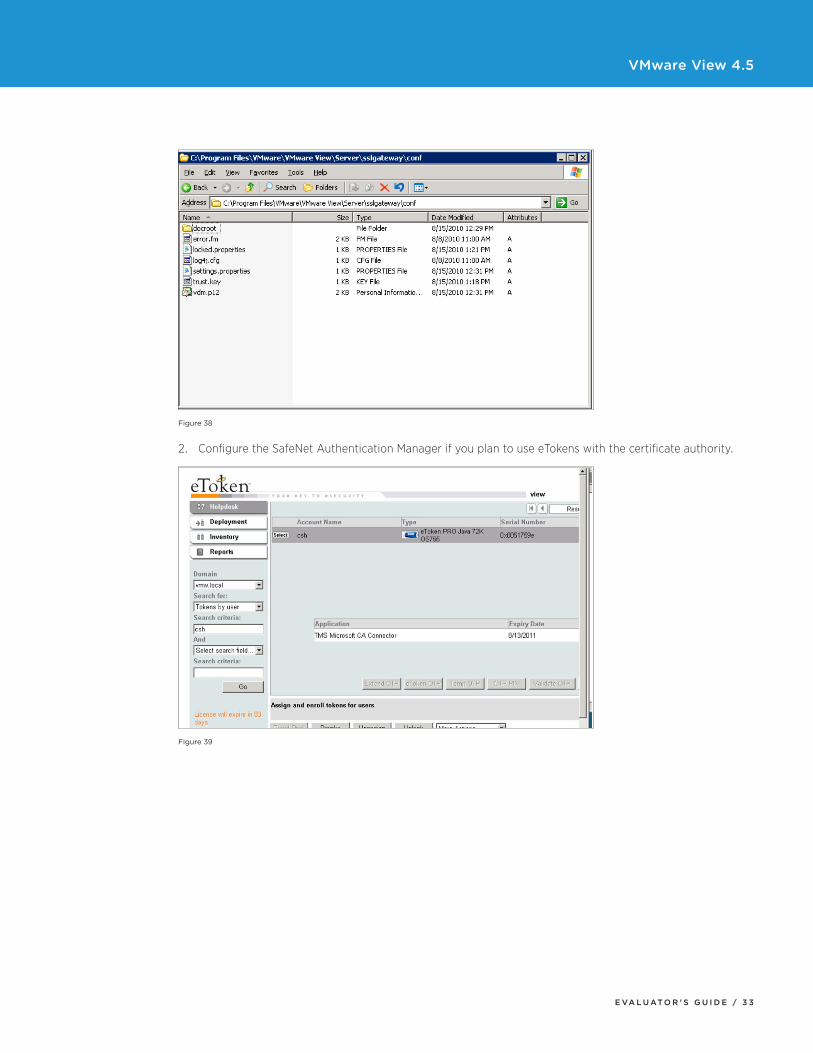
1. Enable smart card authentication in VMware View Manager. Configure the certificate keystore in VMware View Manager.
VMware View 4.5
E va l u at o r ’ s G u i d E / 3 3
Figure 38
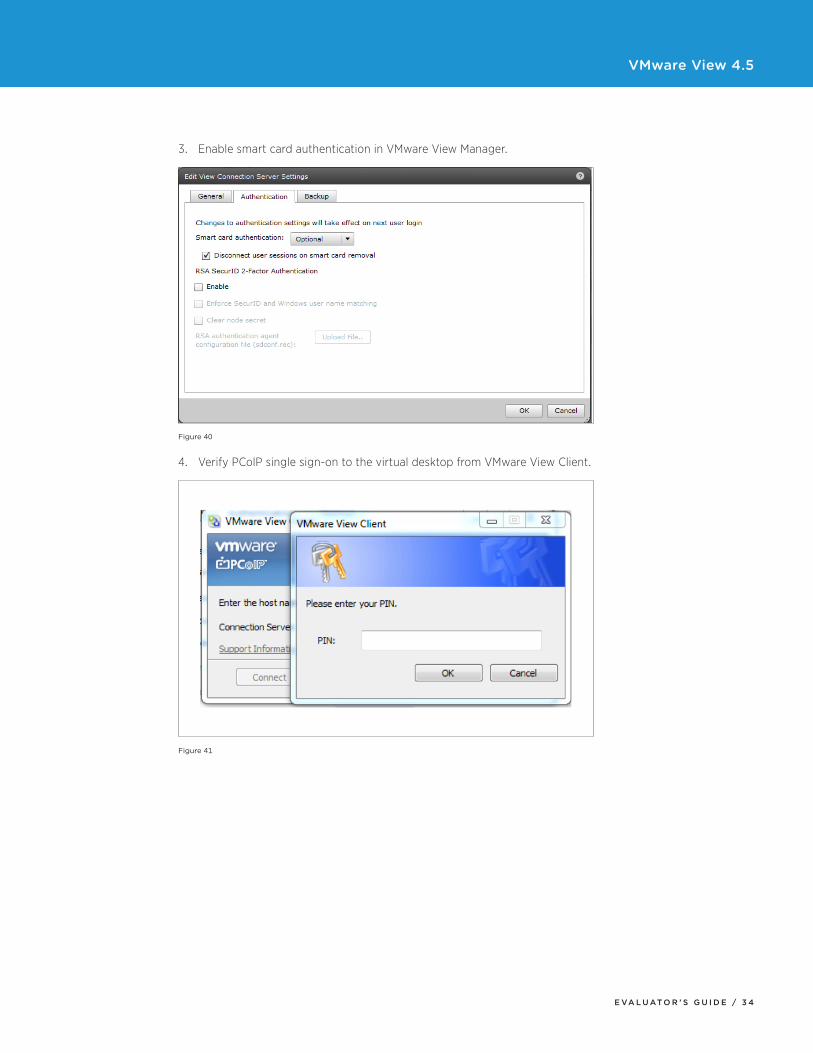
2. Configure the SafeNet Authentication Manager if you plan to use eTokens with the certificate authority.
Figure 39
VMware View 4.5
E va l u at o r ’ s G u i d E / 3 4
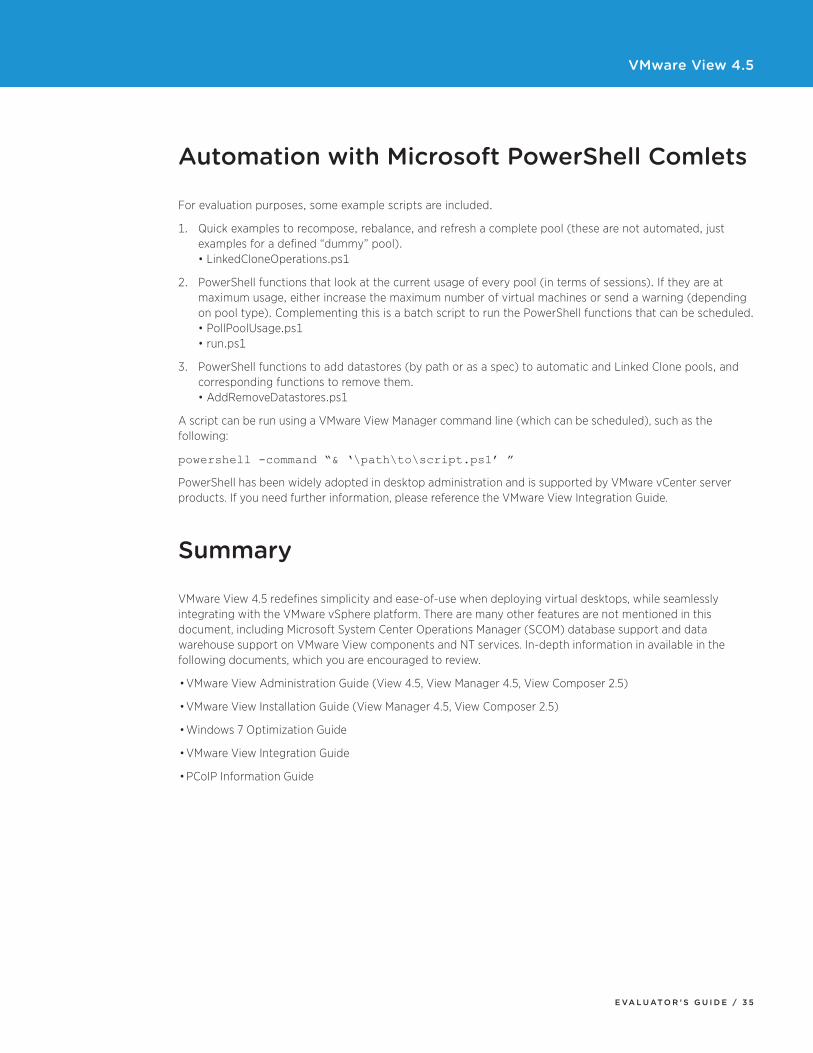
3. Enable smart card authentication in VMware View Manager.
Figure 40
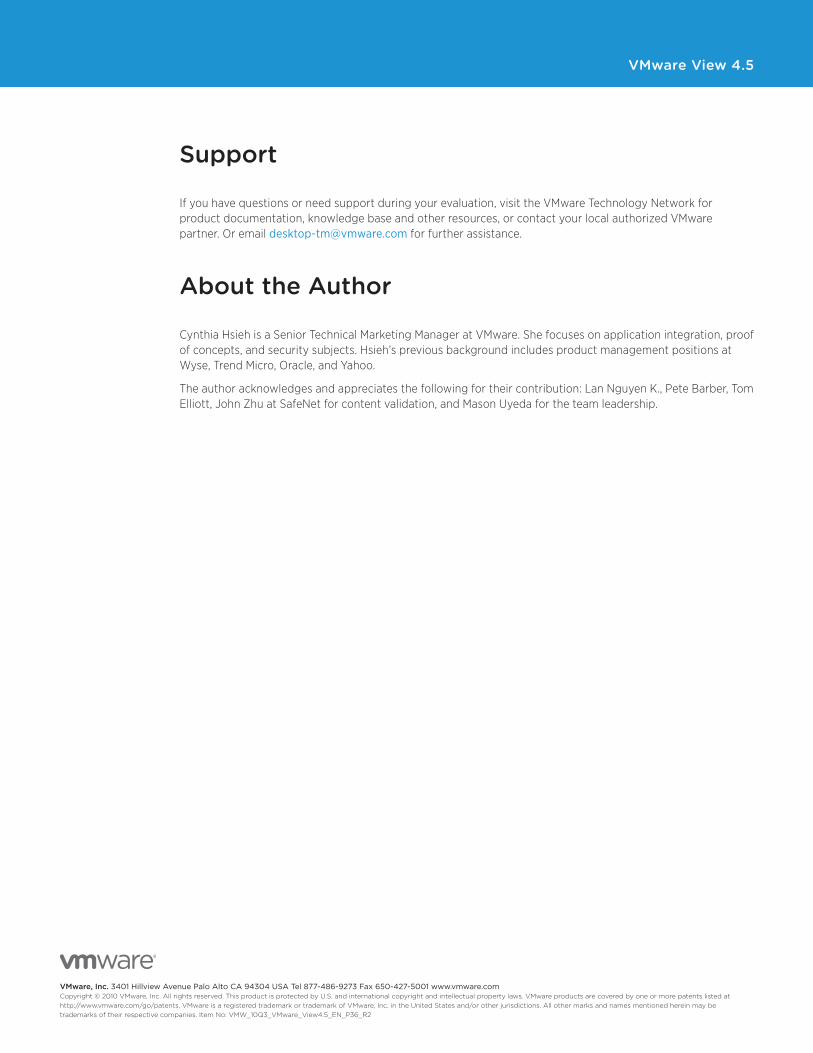
4. Verify PColP single sign-on to the virtual desktop from VMware View Client.
Figure 41
VMware View 4.5
E va l u at o r ’ s G u i d E / 3 5
automation with Microsoft powerShell Comlets
For evaluation purposes, some example scripts are included.
1. Quick examples to recompose, rebalance, and refresh a complete pool (these are not automated, just examples for a defined “dummy” pool). • LinkedCloneOperations.ps1
2. PowerShell functions that look at the current usage of every pool (in terms of sessions). If they are at maximum usage, either increase the maximum number of virtual machines or send a warning (depending on pool type). Complementing this is a batch script to run the PowerShell functions that can be scheduled. • PollPoolUsage.ps1 • run.ps1
3. PowerShell functions to add datastores (by path or as a spec) to automatic and Linked Clone pools, and corresponding functions to remove them. • AddRemoveDatastores.ps1
A script can be run using a VMware View Manager command line (which can be scheduled), such as the following:
powershell -command “& ‘\path\to\script.ps1’ ”
PowerShell has been widely adopted in desktop administration and is supported by VMware vCenter server products. If you need further information, please reference the VMware View Integration Guide.
Summary
VMware View 4.5 redefines simplicity and ease-of-use when deploying virtual desktops, while seamlessly integrating with the VMware vSphere platform. There are many other features are not mentioned in this document, including Microsoft System Center Operations Manager (SCOM) database support and data warehouse support on VMware View components and NT services. In-depth information in available in the following documents, which you are encouraged to review.
• VMware View Administration Guide (View 4.5, View Manager 4.5, View Composer 2.5)
• VMware View Installation Guide (View Manager 4.5, View Composer 2.5)
• Windows 7 Optimization Guide
• VMware View Integration Guide
• PCoIP Information Guide
VMware View 4.5
vMware, inc. 3401 Hillview Avenue Palo Alto CA 94304 USA Tel 877-486-9273 Fax 650-427-5001 www.vmware.comCopyright.©.2010.VMware,.Inc ..All.rights.reserved ..This.product.is.protected.by.U .S ..and.international.copyright.and.intellectual.property.laws ..VMware.products.are.covered.by.one.or.more.patents.listed.athttp://www .vmware .com/go/patents ..VMware.is.a.registered.trademark.or.trademark.of.VMware,.Inc ..in.the.United.States.and/or.other.jurisdictions ..All.other.marks.and.names.mentioned.herein.may.be.trademarks.of.their.respective.companies ..Item.No:.VMW_10Q3_VMware_View4 .5_EN_P36_R2
Support
If you have questions or need support during your evaluation, visit the VMware Technology Network for product documentation, knowledge base and other resources, or contact your local authorized VMware partner. Or email [email protected] for further assistance.
about the author
Cynthia Hsieh is a Senior Technical Marketing Manager at VMware. She focuses on application integration, proof of concepts, and security subjects. Hsieh’s previous background includes product management positions at Wyse, Trend Micro, Oracle, and Yahoo.
The author acknowledges and appreciates the following for their contribution: Lan Nguyen K., Pete Barber, Tom Elliott, John Zhu at SafeNet for content validation, and Mason Uyeda for the team leadership.