Installing and Configuring VMware Identity Manager - VMware ...

User Environment Manager
Administrator’s Guide
VMware® User Environment Manager
V E R S I O N 9 . 0

You can find the most up-to-date technical documentation on the VMware Web site at:
http://www.vmware.com/support/
The VMware Web site also provides the latest product updates.
Copyright © 2016 VMware, Inc. All rights reserved. Copyright and trademark information.
VMware, Inc.
3401 Hillview Ave.
Palo Alto, CA 94304
www.vmware.com

User Environment Manager
Page 3
Contents
1 Welcome ......................................................................................... 9
1.1 VMware User Environment Manager ................................................10
1.1.1 Application Configuration Management.......................................10
1.1.2 User Environment settings .......................................................10
1.1.3 Personalization .......................................................................11
1.1.4 Application Migration ...............................................................11
1.1.5 Dynamic Configuration ............................................................11
2 Planning your deployment ............................................................. 12
2.1 VMware User Environment Manager terminology ...............................12
2.2 User profile scenario considerations ................................................13
2.2.1 Mandatory profiles ..................................................................13
2.2.2 Roaming profiles ....................................................................13
2.2.3 Local profiles .........................................................................15
2.3 Infrastructure requirements ...........................................................15
2.4 System requirements ...................................................................17
2.5 User Environment Manager registry access requirements ...................17
2.6 User Environment Manager licensing requirements ............................17
2.7 Overview of User Environment Manager implementation ....................18
3 Installing and configuring User Environment Manager components 19
3.1 Manual installation .......................................................................20
3.2 Unattended installation .................................................................21
3.3 Uninstalling User Environment Manager ...........................................22
3.4 VMware User Environment Manager Group Policy configuration ...........23
3.4.1 Creating the VMware UEM Group Policy Object ............................23
3.4.2 User Environment Manager GPO Reference .................................24
3.5 FlexEngine logon / logoff script configuration ....................................31
3.5.1 FlexEngine logon script ............................................................31
3.5.2 FlexEngine logoff script ...........................................................32
3.5.3 Example GPO .........................................................................33
3.6 User Environment Manager Management Console configuration ...........34
3.6.1 Initial configuration .................................................................34
3.6.2 Further configuration ..............................................................35
3.6.3 Easy Start .............................................................................36

User Environment Manager
Page 4
4 Personalization ............................................................................. 37
4.1 Main user interface elements .........................................................37
4.1.1 Ribbon buttons ......................................................................37
4.1.2 Tree view ..............................................................................38
4.1.3 Context menu options .............................................................38
4.1.4 Importing a Flex config file.......................................................39
4.1.5 Exporting a Flex config file .......................................................40
4.1.6 Retiring vs Deleting Flex config files ..........................................40
4.1.7 Disabling Flex config files .........................................................41
4.2 Config File Creation wizard ............................................................42
4.2.1 Creating a custom config file ....................................................42
4.2.2 Using a Windows Common Setting ............................................42
4.2.3 Using an Application Template ..................................................43
4.3 Import / Export tab ......................................................................44
4.3.1 Import / Export editor fundamentals ..........................................45
4.3.2 Expanding selected Windows Common Settings and Application
Templates ........................................................................................49
4.3.3 Removing selected Windows Common Settings ...........................49
4.3.4 Changing selected Application Templates ...................................49
4.4 Profile Cleanup tab .......................................................................50
4.4.1 Profile Cleanup editor ..............................................................50
4.4.2 Converting Import / Export settings ..........................................51
4.5 Predefined Settings tab .................................................................52
4.5.1 Working with predefined settings ..............................................53
4.5.2 Specifying predefined settings ..................................................54
4.5.3 Modifying predefined settings ...................................................55
4.5.4 Multiple predefined settings .....................................................55
4.5.5 Placeholders ..........................................................................55
4.6 Backups tab ................................................................................57
4.7 DirectFlex tab ..............................................................................57
4.7.1 DirectFlex introduction ............................................................57
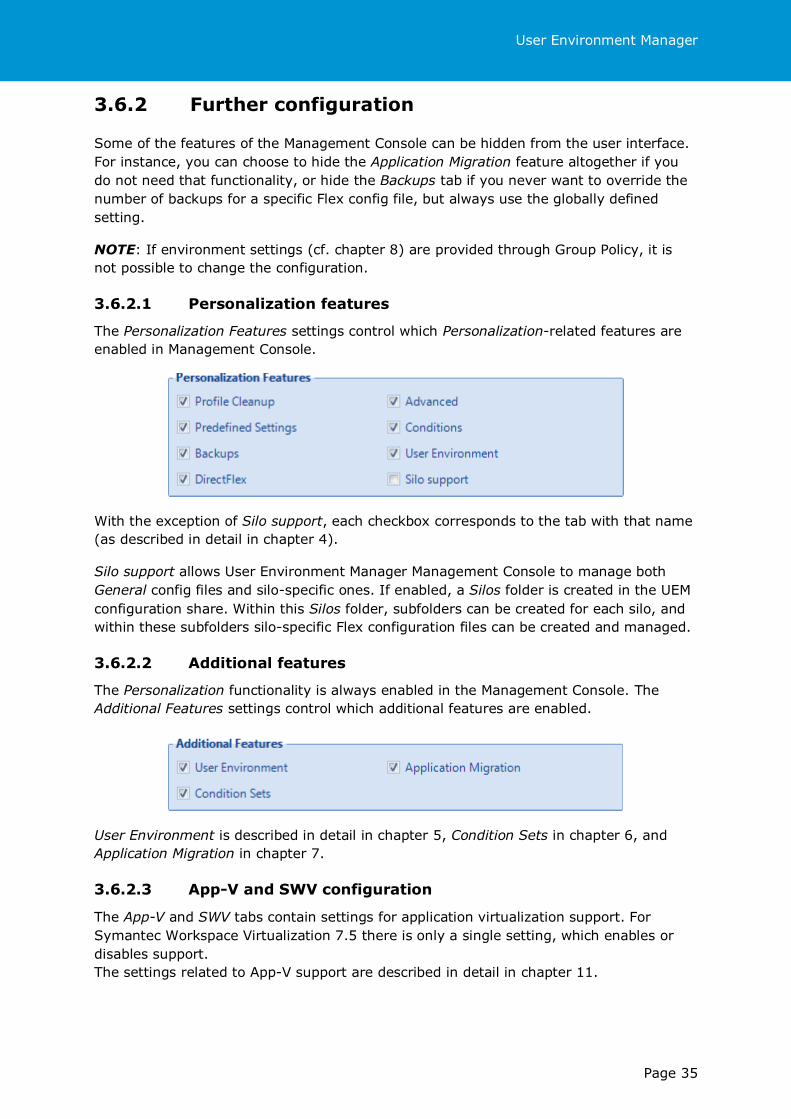
4.7.2 Configuring applications for DirectFlex .......................................58
4.7.3 DirectFlex imports and exports .................................................60
4.8 Advanced tab ..............................................................................60
4.8.1 Config File Processing..............................................................60

User Environment Manager
Page 5
4.8.2 Skip Large Files or Old Files .....................................................61
4.8.3 OS-specific Settings ................................................................61
4.9 Conditions tab .............................................................................61
4.10 User Environment tab ................................................................62
4.10.1 Conditions ..........................................................................63
4.10.2 Drive Mapping .....................................................................63
4.10.3 Files and Folders ..................................................................64
4.10.4 Printer Mapping ...................................................................64
4.10.5 Registry Settings .................................................................65
4.10.6 Import Task / Export Task .....................................................65
4.11 Information tab ........................................................................66
4.12 App-V 4.x tab ...........................................................................66
5 User Environment .......................................................................... 67
5.1 Ribbon buttons ............................................................................67
5.2 Tree view ...................................................................................68
5.3 User environment settings list ........................................................68
5.4 General configuration ...................................................................68
5.4.1 Name, label, and tag ...............................................................68
5.4.2 Use 32-bit “Program Files” on 64-bit systems ..............................69
5.4.3 Conditions .............................................................................69
5.4.4 Comments ............................................................................69
5.4.5 Editing conditions for multiple settings .......................................70
5.4.6 Importing settings ..................................................................70
5.4.7 Exporting settings ..................................................................70
5.5 ADMX-based Settings ...................................................................71
5.5.1 Managing ADMX Templates ......................................................71
5.5.2 Creating an ADMX-based Settings definition................................72
5.5.3 Applying ADMX-based Settings .................................................74
5.6 Application Blocking .....................................................................75
5.6.1 Enabling application blocking ....................................................75
5.6.2 Allowing and blocking additional paths .......................................76
5.7 Drive Mapping .............................................................................77
5.8 Environment Variables ..................................................................77
5.9 File Type Associations ...................................................................78
5.10 Files and Folders .......................................................................79

User Environment Manager
Page 6
5.11 Folder Redirection .....................................................................79
5.12 Horizon Policies.........................................................................80
5.13 Logon Tasks / Logoff Tasks .........................................................80
5.14 Printer Mappings .......................................................................81
5.15 Registry Settings.......................................................................82
5.16 Shortcuts .................................................................................82
5.17 Triggered Tasks ........................................................................84
5.18 Display Language ......................................................................85
5.19 Hide Drives ..............................................................................86
5.20 Policy Settings ..........................................................................86
6 Condition Sets ............................................................................... 87
6.1 Ribbon buttons ............................................................................87
6.1.1 Importing condition sets ..........................................................88
6.1.2 Exporting condition sets ..........................................................88
6.2 Condition set properties ................................................................88
6.3 Conditions overview .....................................................................89
6.3.1 User interface ........................................................................89
6.3.2 Combining and negating conditions ...........................................89
6.3.3 Condition groups ....................................................................90
6.3.4 Use 32-bit “Program Files” on 64-bit systems ..............................90
6.4 Conditions ..................................................................................90
6.4.1 Battery .................................................................................90
6.4.2 Endpoint IP Address ................................................................90
6.4.3 Endpoint Name ......................................................................91
6.4.4 Environment Variable ..............................................................91
6.4.5 Exit Code ..............................................................................91
6.4.6 File or Folder .........................................................................91
6.4.7 File Version ...........................................................................92
6.4.8 Group Membership .................................................................92
6.4.9 Horizon Client Property............................................................92
6.4.10 IP Address ..........................................................................93
6.4.11 Operating System Architecture ..............................................93
6.4.12 Organizational Unit ..............................................................93
6.4.13 Registry Key .......................................................................93
6.4.14 Registry Value .....................................................................93

User Environment Manager
Page 7
6.4.15 Remote Display Protocol .......................................................94
6.4.16 Windows Version .................................................................94
7 Application Migration .................................................................... 95
7.1 Ribbon buttons ............................................................................95
7.1.1 Editing conditions for multiple settings .......................................96
7.1.2 Importing settings ..................................................................96
7.1.3 Exporting settings ..................................................................96
7.2 General info ................................................................................96
7.3 Settings .....................................................................................97
7.3.1 Conditions .............................................................................98
7.4 Migration XML .............................................................................98
8 Managing Multiple Environments ................................................... 99
8.1 Configuring environments .............................................................99
8.2 Selecting an environment ............................................................ 100
8.3 Group Policy configuration ........................................................... 101
9 Locking down access to the Management Console ........................ 102
10 VMware User Environment Manager in a silo environment............ 104
11 Microsoft App-V support .............................................................. 106
11.1 App-V 4.x integration............................................................... 108
11.1.1 Configuration .................................................................... 108
11.1.2 Adding App-V 4.x integration ............................................... 110
11.1.3 Integrating multiple OSD files .............................................. 111
11.1.4 Removing App-V 4.x integration ........................................... 111
11.1.5 User Environment file type associations and shortcuts ............. 111
11.2 App-V 5.0 support ................................................................... 112
11.2.1 Configuration .................................................................... 112
11.2.2 Configuring DirectFlex for an App-V 5.0 package ..................... 112
11.2.3 Removing DirectFlex for an App-V 5.0 package ....................... 113
11.2.4 App-V 5 User Integrations ................................................... 113
11.2.5 User Environment file type associations and shortcuts ............. 113
12 Upgrading ................................................................................... 115
13 VMware User Environment Manager Self-Support ........................ 116
13.1 Using VMware User Environment Manager Self-Support ................. 116
13.1.1 Reset to defaults ............................................................... 117
13.1.2 Restore from backup .......................................................... 117

User Environment Manager
Page 8
13.2 Miscellaneous ......................................................................... 117
13.2.1 Applications not showing up for self-support .......................... 117
13.2.2 Logging ............................................................................ 118
13.2.3 Preventing access .............................................................. 118
13.2.4 Language support .............................................................. 118
13.2.5 Tray support ..................................................................... 119
13.2.6 Customizing the logo .......................................................... 119
13.2.7 VMware User Environment Manager Helpdesk Support Tool ...... 119
14 External information and downloads ............................................ 120
Appendices ....................................................................................... 121
Appendix A - FlexEngine command line arguments .................................. 122
FlexEngine operations ...................................................................... 122
FlexEngine arguments ...................................................................... 122
File-based mode versus path-based mode ........................................... 123
Overriding Group Policy settings ........................................................ 123
Applying Horizon policies in multiple sessions............................... 123
Additional FlexEngine operations........................................................ 124
Appendix B - Creating migration XML files .............................................. 125
Appendix C - COM support .................................................................. 131
Appendix D - Import status flag details .................................................. 132
Appendix E – ‘Run Once’ settings.......................................................... 133
Appendix F – Using environment variables in file and registry sections ........ 134
Appendix G – Resultant set of UEM items ............................................... 135

User Environment Manager
Page 9
1 Welcome
This administrator’s guide is provided to help you in the deployment and administration
of VMware User Environment Manager. This document has the following structure:
Planning your deployment is described in chapter 2.
Installing and configuring User Environment Manager is described in chapter 3.
Using the User Environment Manager Management Console is described in
chapters 4 (Personalization), 5 (User Environment), 6 (Condition Sets), 7
(Application Migration), and 8 (Managing Multiple Environments).
Locking down access to the Management Console is described in chapter 9.
Managing VMware User Environment Manager in a silo environment is described in
chapter 10.
Microsoft App-V support of User Environment Manager is described in chapter 11.
Upgrading to VMware User Environment Manager is described in chapter 12.
VMware User Environment Manager Self-Support is described in chapter 13.
External information and downloads are described in chapter 14.
Additional information is provided in the appendices.

User Environment Manager
Page 10
1.1 VMware User Environment Manager
VMware User Environment Manager provides end users with a personalized and dynamic
Windows desktop, adapted to their specific situation, based on aspects like role, device
and location. With User Environment Manager, VMware offers an extremely powerful
workspace virtualization solution, requiring no additional infrastructure investments.
VMware User Environment Manager offers a desktop that adjusts to the actual situation
of the end user, providing access to the IT resources that are required, based on a user’s
role, device and location. Many organizations suffer from hidden productivity loss as a
result of ad hoc activities like manually mapping network drives and printers or providing
application shortcuts to end users. This so-called distortion not only impacts IT
departments but also affects end users. The relevant user experience that User
Environment Manager offers, significantly eliminates this distortion.
User Environment Manager consists of five functional areas: Application Configuration
Management, User Environment settings, Personalization, Application Migration and
Dynamic Configuration.
1.1.1 Application Configuration Management
User Environment Manager Application Configuration Management enables you to
configure the initial settings of an application without having to rely on the defaults of the
application. Predefined Settings can be configured as one-time defaults, fully enforced
(application starts each time in desired state), or partially enforced, where the
application starts each time in a desired state but allows partial personalization by the
user.
Using VMware UEM Application Profiler, you can capture predefined settings for an
application. Simply run the application on a reference system (monitored by Application
Profiler) and configure it as desired.
User Environment Manager also provides the capability to manage certain User
Environment settings when an application is launched, like mapping drives and printers,
applying custom files, folders and registry settings, and running custom tasks.
1.1.2 User Environment settings
VMware User Environment Manager enables you to centrally manage a variety of User
Environment settings which users need to perform their daily tasks:
ADMX-based settings
Application blocking
Application shortcuts and file type associations
Display language
Drive and printer mappings
Environment variables
Files, folders, and registry settings
Folder redirection

User Environment Manager
Page 11
Hide drives
Horizon policies
Logon and logoff tasks
Triggered tasks
1.1.3 Personalization
User Environment Manager Personalization decouples and segments user-specific desktop
and application settings from the Windows operating system, making them available
across multiple devices, Windows versions and application instances. Decoupled
personalization is independent from the traditional Windows user profiles and allows for
easy introduction and management of virtualization technologies and application delivery
mechanisms. Personalization integrates seamlessly with natively installed and virtualized
applications, providing users with a consistent user experience across any Windows
platform – physical, virtual or remote. Additionally, it enables painless upgrades, like
migrating from Windows XP to Windows 7 or Windows 8, or migrating from App-V 4.x to
App-V 5.
1.1.4 Application Migration
VMware User Environment Manager can "roam" personal application settings of users
from one operating system to another (e.g. from Windows XP to Windows 7), as long as
the application is storing its configuration in the same location of the user profile (i.e.
uses the same registry and AppData locations).
In any application version upgrade, either as part of an operating system migration or as
part of the application’s lifecycle management, personalization can manage the personal
application settings. Some of these upgraded applications might however not store the
application settings in the same location as the previous version did, causing users to
lose some of their personal settings.
VMware User Environment Manager provides an XML-based settings migration
mechanism, which can migrate personal application settings between application
versions. The User Environment Manager download package contains XML migration file
samples for migrating between different versions of Microsoft Office.
1.1.5 Dynamic Configuration
User Environment Manager Condition Sets allow you to combine conditions based on
user, location and device characteristics, enabling dynamic adaptation of content and
appearance of the end-user desktop. For example, you can provide access to a network
printer based on the user’s current location or create an application shortcut on the
desktop based on the user’s identity. Conditions can be evaluated again when users
unlock their workstation or reconnect to a remote session.
Condition sets are managed centrally from the User Environment Manager Management
Console and can be applied to all configurable items within User Environment Manager.

User Environment Manager
Page 12
2 Planning your deployment
2.1 VMware User Environment Manager
terminology
When using this guide, it is useful to have a common understanding of the terminology
used in reference to the installation and configuration of VMware User Environment
Manager.
Term Description
Management Console The User Environment Manager Management Console.
UEM configuration share The UNC path to the share where the Management Console configuration and User Environment Manager configuration files will be stored.
Flex config(uration) file A configuration file containing User Environment Manager-
specific content. Flex config files are created and managed by the Management Console.
FlexEngine The User Environment Manager client component which needs to be installed on each physical or virtual Windows device where you want to use VMware User Environment Manager.
Profile archives Profile archives are ZIP files in which FlexEngine stores the personalized settings of users, based on the content of Flex configuration files. For each Flex configuration file you create, a profile archive will be created for each user.
Profile archive path The path that is used by FlexEngine to store profile archives of the individual users.
Profile archive backup path The path that is used by FlexEngine to store backups of profile archives.
General folder A folder named General, which is created by the Management Console in the UEM configuration share. This is the location where Flex configuration files will be created, managed and used from by FlexEngine.

User Environment Manager
Page 13
2.2 User profile scenario considerations
VMware User Environment Manager provides value-add to all three types of user profiles:
mandatory, roaming, and local.
2.2.1 Mandatory profiles
Mandatory profiles are most commonly used in Terminal Services environments, although
it is possible to use them on Windows desktops as well. The basic behavior of mandatory
profiles is that personalization changes are only in effect during a Windows session. As
soon as a user logs off, all changes are deleted.
There are two types of mandatory profiles you can use within Windows: a mandatory
profile based on the “Default User” profile without any customizations, or a customized
mandatory profile which already contains the application settings and Windows-specific
settings you desire for your environment. Both of these need to be created by an
administrator before they can be used by users. See chapter 14 for more information.
The advantages of using mandatory profiles are:
Short logon/logoff times.
Consistent user experience, no matter what a user changes.
Minimal troubleshooting on user profiles.
The disadvantages:
None of the personalization changes made by users are saved.
Creating a usable and customized mandatory profile requires a high skill level.
Scripting is often necessary to create shortcuts, drive mappings, etc.
When using VMware User Environment Manager in combination with mandatory profiles,
the disadvantages can be addressed as follows:
Use User Environment Manager to configure exactly which settings users are
allowed to personalize within their user environment.
Settings which you do not manage with User Environment Manager will be
discarded as soon as the user logs off.
Use the “Predefined Settings” feature to configure specific settings for applications
and / or Windows settings.
Thanks to this feature, you no longer need to customize a mandatory profile. A
mandatory profile based on the “Default User” profile is sufficient.
Use User Environment settings to easily customize the user environment (creating
shortcuts, drive mappings, et cetera).
2.2.2 Roaming profiles
Roaming profiles are most commonly used in a managed desktop environment. The basic
behavior of roaming profiles is that all personalization changes made by users during a
Windows session are stored in the central roaming profile at logoff. As soon as a user

User Environment Manager
Page 14
logs on to a Windows session, the roaming profile will be copied again from the central
location.
The advantages of using roaming profiles are:
No specific administration necessary. It just needs to be enabled.
Personalized settings roam with the user across different machines running the
same operating system.
The disadvantages:
There is very limited control over which settings users can change. Everything is
saved by default.
Potential for unnecessary growth of roaming profile, causing long logon and logoff
times.
Large roaming profiles sometimes get corrupted which leads to a total reset of the
individual roaming profile, in which case users will spend a lot of time getting all
personalized settings back to their liking.
Because all application and Windows settings are stored in a single container,
sometimes troubleshooting one application defect also results in a total reset of
the individual roaming profile.
Roaming profiles do not roam across different operating systems, which results in
multiple roaming profiles per user in a mixed environment, like desktops and
Terminal Services.
Application shortcuts and file type associations are “sticking” in roaming profiles
and often cause confusion when users roam to devices where the application(s)
might not be installed.
When using VMware User Environment Manager in combination with roaming profiles,
many disadvantages of traditional roaming profiles can be addressed:
Reduce the size of the roaming profile by using the “Profile Cleanup” feature to
clean up unimportant or obsolete parts of each user’s roaming profile at logoff,
resulting in faster logons and logoffs.
Create a mandatory set of settings for business-critical applications using the
“Predefined Settings” feature, which can also be configured to disallow
personalized settings for certain applications.
Start managing personalized application and Windows settings with the “Import /
Export” and “Profile Cleanup” mechanisms to decouple and segment these
settings from the roaming profiles and provide the following:
o Compression on all settings managed by User Environment Manager,
including files/folders, to provide shorter logon and logoff times.
o In case of a total reset of the roaming user profile, all settings managed by
User Environment Manager are still available.
o Reset certain application or Windows settings without executing a complete
reset of the roaming user profile.
o Roaming personalized application and Windows settings across different
operating systems to provide a consistent user experience.

User Environment Manager
Page 15
Start truly managing the User Environment, making sure users get a relevant user
environment by using the Conditions Sets in conjunction with the User
Environment settings within VMware User Environment Manager.
2.2.3 Local profiles
Local profiles are most commonly used in a “loosely managed” desktop environment. The
basic behavior of local profiles is that all personalization changes made by users during a
Windows session are stored on the local disk. When a user logs on again to the same
desktop, the complete user environment will be the same as before. As soon as a user
logs on to another desktop, none of the settings will be the same and a new local profile
will be created and stored locally on that desktop.
The advantages of using local profiles are:
No specific administration is necessary.
No storage is required on the network.
The disadvantages of using local profiles are the same as with a roaming profile but also:
No personalized settings will be roamed across different machines.
Each desktop a user logs on to will be polluted with a local profile for that specific
user.
If local disk failure or corruption occurs, all user settings are lost.
When using User Environment Manager in combination with local profiles, many
disadvantages can be addressed by taking the steps described in section 2.2.2, in
addition to the following:
Introduce roaming functionality for application and Windows settings that are
managed by User Environment Manager.
Create redundancy for application and Windows settings by managing these with
User Environment Manager when local disk failure or corruption occurs.
2.3 Infrastructure requirements
The implementation of VMware User Environment Manager only has a few infrastructure
requirements:
Active Directory, for Group Policy configuration of FlexEngine.
FlexEngine can be configured without using Group Policy, but then requires
command line arguments. See the section about FlexEngine arguments in
Appendix A for more information.
UEM configuration share:
o A central share on a file server. This can be a replicated share for multi-site
scenarios as long as the path to the share is the same for all client devices.
o Make sure that only User Environment Manager administrators have at
least modify permissions on the share.

User Environment Manager
Page 16
o Make sure that users for whom settings will be managed by User
Environment Manager only have read-only permissions on the share.
CAUTION: From a security point of view it is crucial that non-administrators do not have
write permissions on the UEM configuration share.
Besides these requirements it is also useful to consider where to store the users’ profile
archives and profile archive backups. It is necessary to use a location that is unique for
each user.

User Environment Manager
Page 17
2.4 System requirements
The following Windows versions and editions are supported by VMware User Environment
Manager:
Windows Vista Business, Enterprise, and Ultimate x86 and x64 SP2
Windows Server 2008 Standard and Enterprise x86 and x64 SP2
Windows 7 Professional, Enterprise, and Ultimate x86 and x64 SP1
Windows Server 2008 R2 Standard and Enterprise x64 SP1
Windows Server 2012 Standard and Datacenter x64
Windows 8.1 Professional and Enterprise x86 and x64 with Update
Windows Server 2012 R2 Standard and Datacenter x64 with Update
Windows 10 Professional and Enterprise x86 and x64
The following App-V versions are supported by VMware User Environment Manager:
App-V 4.6 Service Pack 3
App-V 5.0 Service Pack 3
App-V 5.1
No specific hardware other than the typical operating system requirements and
requirements of installed applications is required for User Environment Manager.
2.5 User Environment Manager registry access
requirements
FlexEngine uses Regedit.exe or – on Windows Vista or later, depending on User Account
Control (UAC) settings – Reg.exe to add user-specific settings to the registry. This
means that User Environment Manager may not work properly on some Windows
versions if access to Regedit.exe is disabled via Group Policy, unless the option Disable
regedit from running silently? is set to No. Unfortunately, this setting is insufficient for
Reg.exe. This means that if Regedit.exe cannot run due to UAC, this policy needs to be
not set at all.
If users are not allowed to run Regedit.exe silently, an error message may be displayed
at logon and an error message is written to the FlexEngine log file.
2.6 User Environment Manager licensing
requirements
FlexEngine requires a valid license file. To switch from an evaluation license file to a
production license file, no re-installation of any VMware User Environment Manager
component is required. You only need to replace the old license file with the new license
file, retaining both license file name and location in the file system.

User Environment Manager
Page 18
NOTE: A license file is not required on Horizon 7 for installation. A license file is required
only when you install VMware User Environment Manager as a standalone installation.
2.7 Overview of User Environment Manager
implementation
The step-by-step installation and configuration of VMware User Environment Manager is
described in detail in chapter 3. The following is a high level overview of the installation
and configuration steps that are required for a User Environment Manager
implementation.
Create UEM configuration share on file server.
Install Management Console on administrator’s machine.
Perform initial Management Console configuration.
Install FlexEngine on Windows desktops and / or Terminal Servers.
Create VMware UEM Group Policy configuration with provided Administrative
Template.
Add FlexEngine command to logoff script.
Adding FlexEngine command to a logon script is only necessary when you do not
enable the Run FlexEngine as Group Policy extension setting.
Start creating Flex config files with the Management Console, optionally assisted
by VMware UEM Application Profiler.
Start managing the user environment within the Management Console, optionally
moving away from complex scripting and dispersed Group Policy configuration.

User Environment Manager
Page 19
3 Installing and configuring User
Environment Manager components
The VMware User Environment Manager MSI consists of multiple features, which are not
necessary on each Windows machine. Use the following overview to see which feature(s)
you would like to install in which environment.
Installation feature Description
VMware UEM FlexEngine Client component, necessary on each desktop or Terminal Server on which you want to manage the user environment.
Application Migration Optional client component – can be installed on desktops or Terminal Servers if you want to migrate application settings across application versions. NOTE: This feature depends on FlexEngine – it can’t be installed by itself.
Self-Support Optional client component – can be installed on desktops or
Terminal Servers if you want users to support their application settings by themselves, without administrator intervention. NOTE: This feature depends on FlexEngine – it can’t be installed by itself.
VMware UEM Management Console
Administration console which can be installed on any desktop or Terminal Server from which you want to manage the User Environment Manager environment.
NOTE: The User Environment Manager MSI file is available in two editions – one for 32-
bit systems, and one for 64-bit. If you try to install an MSI that does not match the
architecture of your OS, an error message will be displayed:
To resolve this issue, use the MSI that matches your OS architecture.
NOTE: The MSI file has a digital signature, which the Windows Installer infrastructure
will validate when the installation is started. This includes a so-called certificate
revocation check, for which the system needs Internet access. If there is no (sufficient)
Internet connectivity, the installation will continue, but only after several timeouts – in
the meantime, the installer seems to stall without providing any feedback.

User Environment Manager
Page 20
3.1 Manual installation
Install User Environment Manager by executing VMware User Environment Manager 9.0
x86.msi (or the x64 variant for 64-bit systems). The VMware User Environment Manager
Setup Wizard guides you through the steps required to install the software on your
computer. During the installation of User Environment Manager no additional
configuration is needed.
Prerequisite: A license file is required, except when installing on Horizon 7.
The steps to install User Environment Manager are as follows:
1. Run VMware User Environment Manager 9.0 x86.msi or VMware User Environment
Manager 9.0 x64.msi after uncompressing the download package.
IMPORTANT: The MSI file must be executed under an account with
administrative privileges.
2. The VMware User Environment Manager Setup Wizard starts and the Welcome
page is displayed. Click Next.
3. The License Agreement page is displayed. Please read it carefully by scrolling
down the license text. You must accept the license agreement before you click
Next.
4. The next page lets you select the destination folder. To install into a different
folder, click the Browse button and select another folder. It is, however,
recommended to install VMware User Environment Manager into the default
folder. Click Next.
5. In the Choose Setup Type page, select the features to install.
a. Select Typical to install VMware UEM FlexEngine, Application Migration, and
Self-Support.
b. Select Custom to choose the individual components manually.

User Environment Manager
Page 21
c. Select Complete to install all the components.
6. Click Install to start the installation. The progress bar displays the status of
installation.
7. Click Finish to complete the installation.
3.2 Unattended installation
In most enterprise environments, Electronic Software Distribution systems are used to
install software in an automated fashion. The VMware User Environment Manager MSI
supports unattended installation, using the following MSI properties to select the
installation options.
Property Description
INSTALLDIR The absolute path to the installation directory. Defaults to %ProgramFiles%\Immidio\Flex Profiles.
ADDLOCAL The features to install. Defaults to FlexEngine, FlexMigrate, and FlexProfilesSelfSupport.
The following values are supported for this property:
ALL FlexEngine FlexMigrate (automatically installs FlexEngine as well) FlexProfilesSelfSupport (automatically installs FlexEngine as well) FlexManagementConsole
To install multiple features, separate the values with commas, without any spaces. For example, to select FlexMigrate and FlexProfilesSelfSupport: ADDLOCAL="FlexMigrate,FlexProfilesSelfSupport"
NOTE: These property values are case-sensitive.
LICENSEFILE The path to the location of the VMware User Environment Manager license file. The installer will copy it to the installation folder. NOTE: If LICENSEFILE only contains the file name of the license file, the
installer will look for that file in the folder where the MSI itself resides.

User Environment Manager
Page 22
An example of a custom unattended installation command is shown in the following (split
across multiple lines for readability only).
msiexec.exe /i "VMware User Environment Manager 9.0 x64.msi" /qn INSTALLDIR="D:\Apps\VMware UEM" ADDLOCAL="FlexProfilesSelfSupport" LICENSEFILE="\\filesrv1\share\VMware UEM.lic" /l* InstallUEM.log
An example of a typical unattended installation which installs FlexEngine, Application
Migration, and Self-Support in the default installation directory is shown in the following
(split across multiple lines for readability only).
msiexec.exe /i "VMware User Environment Manager 9.0 x64.msi" /qn LICENSEFILE="\\filesrv1\share\VMware UEM.lic" /l* InstallUEM.log
3.3 Uninstalling User Environment Manager
In the Control Panel, click Programs and Features.
Select VMware User Environment Manager, click Uninstall. A confirmation
message is displayed which lets you remove the software successfully.
Click Yes to uninstall VMware User Environment Manager.
When uninstalling User Environment Manager all the files are removed, except for the
license file, FlexEngine.lic. You can manually remove the license file from the VMware
User Environment Manager installation folder.

User Environment Manager
Page 23
3.4 VMware User Environment Manager Group
Policy configuration
The configuration of FlexEngine is done by creating a Group Policy Object in Active
Directory Group Policy with the VMware User Environment Manager Administrative
Template, which is provided in the download package.
One of the Group Policy settings is specifically for VMware User Environment Manager
Self-Support (see chapter 13), which also uses some of the FlexEngine Group Policy
settings. Some Management Console functionality can also be configured through Group
Policy; this is documented in chapters 8 and 9.
IMPORTANT: Many FlexEngine settings configured through a Group Policy Object can be
overridden by command line arguments. This means that FlexEngine command line
arguments have higher priority than GPO settings. See the section about FlexEngine
arguments in Appendix A for more information.
3.4.1 Creating the VMware UEM Group Policy Object
The VMware User Environment Manager administrative template only supports User
Configuration. Creating the FlexEngine GPO requires the following steps:
1. Copy the VMware UEM.admx and VMware UEM FlexEngine.admx ADMX templates
(and their corresponding ADML files) from the download package to the ADMX
location as described in the Managing Group Policy ADMX Files Step-by-Step
Guide on the Microsoft web site.
2. Open Group Policy Management Console. Create a new Group Policy Object (GPO)
or select an existing GPO that is applied to the users for which you want to
configure FlexEngine. Open the Group Policy Management Editor by a right-click
on the selected GPO and then a click on Edit…
3. The FlexEngine ADMX template is available under User Configuration\
Administrative Templates\VMware UEM\FlexEngine.
4. Configure the appropriate User Environment Manager Group Policy settings. For
details see the next section.
As a final step, FlexEngine must be called at logoff and optionally at logon,
depending on how you configure the User Environment Manager Group Policy
setting “Run FlexEngine as Group Policy Extension”. For background information
regarding logon and logoff scripts, see section 3.5.

User Environment Manager
Page 24
3.4.2 User Environment Manager GPO Reference
After adding the VMware User Environment Manager Administrative Template, use the
Group Policy Management Editor to configure the User Environment Manager settings
through the Group Policy Object in Active Directory.
All the User Environment Manager Group Policy settings are documented in detail starting
on the next page. At least the following Group Policy settings must be configured:
Flex config files
Profile archives
Run FlexEngine as Group Policy Extension – We strongly recommend
enabling this setting. If you choose not to do so, you must configure FlexEngine to
run from a logon script (see 3.5).
All other Group Policy settings are optional and enabling them is dependent on your
infrastructure and requirements.
In the following list, all the User Environment Manager settings that can be configured
through GPOs are described.

User Environment Manager
Page 25
Flex config files
Use this setting to configure the central location of the Flex config files for use by
FlexEngine. FlexEngine runs with the user's credentials and will process each Flex config
file that the user has NTFS read access to.
It is recommended to use a UNC path for this setting. Typically this would point to the
General folder created by the Management Console in the UEM configuration share:
Process folder recursively. Enable this option to also process config files found in
subfolders of the specified path.
Profile archives
Use this setting to configure the location that is used by FlexEngine to read and store
user profile archives, and some other settings related to profile archives.
It is necessary to use a location that is unique for each user, like the following example:
If you enter a subdirectory that does not exist, FlexEngine will automatically create this.
Hide profile archive folder. Enable this option to mark the specified profile archive
folder as hidden after a path-based export.
Compress profile archives. Enable this option to compress the user profile archives.
Retain file modification dates. Enable this option to restore last modified dates when
importing profile archives.

User Environment Manager
Page 26
Paths unavailable at logon
Use this setting to configure the behavior if the Flex config files path or the profile
archive path is not available at logon.
If the Flex config files path is not available, the user is immediately logged off by
default.
If the profile archive path is not available, only the user environment settings are
applied by default and no user profile archives are imported.
If Flex config files path is not available
Select one of the following options when Flex config files path is not available at logon.
Skip import. Allows the user to log on. However, the user profile archives are not
imported and the user environment settings are not applied.
Logoff. Automatically logs off the user.
If profile archive path is not available
Select one of the following options when the profile archive path is not available at logon.
Skip import. Allows the user to log on. However, the user profile archives are not
imported and the user environment settings are not applied.
Apply user environment settings. Applies the user environment settings. However,
the user profile archives are not imported.
Logoff. Automatically logs off the user.
Optional message to display. Use this setting to display a message in case the path is
missing. This setting can be configured separately for the Flex config files path (if Skip
import is selected) and for the profile archive path (if Skip import or Apply user
environment settings is selected).

User Environment Manager
Page 27
Timeout after which to dismiss message. Use this setting to configure how long the
message will be displayed. However, the user can dismiss the message manually at any
time.
Profile archive backups
Use this setting to configure the location that is used by FlexEngine to store backups of
profile archives.
It is necessary to use a location that is unique for each user, like the following example:
If you enter a subdirectory that does not exist, FlexEngine will automatically create this
at the first backup action for each user.
Hide backup folder. Enable this option to mark the specified profile archive backup
folder as hidden after a path-based export.
Number of backups per profile archive. Specify the number of backups you want to
create for each profile archive for each user.
NOTE: As described in section 4.6, this setting can be overridden in Flex config files.
Create single backup per day. Treats the number of backups as the number of days to
keep backups for.
Run FlexEngine as Group Policy Extension
Enable this setting to run FlexEngine automatically during logon by running as a Group
Policy client-side extension. When enabled, FlexEngine runs during logon. By running
FlexEngine as Group Policy Extension, settings that are managed by User Environment
Manager will be applied earlier during the logon phase than when running FlexEngine
from a logon script, extending the range of settings that can be managed by User
Environment Manager, like the Windows Multilanguage User Interface or slideshow
backgrounds.
IMPORTANT: To guarantee that the FlexEngine Group Policy client-side extension will
run during each logon, you must enable the “Always wait for the network at computer
startup and logon” Computer Group Policy setting. Be sure to apply this Group Policy to
an OU in Active Directory where all the Windows clients are located.
When a computer is offline and a user logs on with cached credentials, Group Policy
client-side extensions do not execute. To ensure that FlexEngine is still run at logon in
such a scenario, see the description of the -OfflineImport argument in the Additional
FlexEngine operations section of Appendix A.
Since the FlexEngine Group Policy client-side extension only runs during logon, make
sure that the FlexEngine logoff command is configured through a Group Policy logoff
script as described in section 3.5.2.

User Environment Manager
Page 28
FlexEngine logging
Use this setting to configure the location and filename of the FlexEngine log file, the level
of log detail and the maximum size of the log file.
It is strongly recommended to use a location that is unique for each user, like the
following example:
If you enter a subdirectory that does not exist, FlexEngine will automatically create this
as soon as logging occurs.
Log level. Use this setting to control the amount of detail that is logged. It is not
recommended to use ‘Debug’ or ‘Info’ in production environments, as the amount of
logging information can slow down the logon and logoff process.
Maximum log file size in kB. If a maximum log file size is specified, the log file will be
recreated once that size is reached.
If the size is set to 0, the log file will grow indefinitely.
Log total size of profile archive and profile archive backups folders. If this option
is enabled, FlexEngine will log the number of profile archives and profile archive backups,
and their file sizes at the end of a path-based export.
NOTE: It is not recommended to use the ‘Debug’ log level in production, but it is
extremely helpful when troubleshooting issues.
FlexEngine logging to the Windows event log
Use this setting to configure which events FlexEngine logs to the Windows event log.
When this setting is enabled, FlexEngine logs informational messages to the event log
indicating the start and finish of path-based import and export actions.
Enabling the Asynchronous UEM actions, DirectFlex refresh, and / or UEM refresh
options instructs FlexEngine to log start and finish events for those features as well.

User Environment Manager
Page 29
Warn if size of single profile archive exceeds this size in kB. If a size other than 0
is specified, FlexEngine will log an event whenever a profile archive is exported that is
larger than the specified size in kilobytes. This applies both to DirectFlex exports and
path-based exports.
Warn if size of profile archive folder exceeds this size in kB. If a size other than 0
is specified, FlexEngine will log an event whenever the total size of profile archives in the
profile archive folder is larger than the specified size in kilobytes. If Include profile
archive backup folder when determining folder size is set, the size of profile
archive backups in the backup folder is taken into account in this computation.
This size check only takes place after a path-based export.
Application blocking logging to the Windows event log
When this setting is enabled, the details on blocked application launches are logged to
the Windows event log.
DirectFlex – advanced settings
Use this setting for fine-grained control over DirectFlex export settings and visual
feedback.
Only export at logoff. By default, DirectFlex exports profile information when an
application is closed. Enabling this setting postpones the export action to the user’s
logoff.
NOTE: As described in section 4.7.3, this setting can be overridden in Flex config files.
Show DirectFlex notifications. Enable this option to display a message in the
notification area when DirectFlex is performing an import or export.
Notification delay in seconds. If the DirectFlex import or export takes less time than
the configured delay, no message is shown.
This can be used to only display messages when access to the profile archive path is
slow. If the delay is set to 0, messages are shown immediately.
Hide DirectFlex exit notification. Enable this option to only show a message when
DirectFlex is performing an import.
Silo-specific Flex config files
Use this setting to specify an additional, silo-specific path with Flex config files that
should be processed in addition to the ones configured through Flex config files. For
more information, see chapter 10.
It is recommended to use a UNC path for this setting. Typically this would point to a silo
subfolder of the Silos folder created by the Management Console in the UEM
configuration share:

User Environment Manager
Page 30
Silo-specific suffix. To distinguish profile archives corresponding to Flex config files in
the configured silo-specific folder, this suffix is used as a subfolder in the configured
profile archive and backup paths.
If no suffix is configured, the last component of the silo-specific Flex config files path is
used (“ts-1”, in the example above).
Show VMware UEM logon and logoff progress information
Enable this setting to show a splash screen with progress bar when FlexEngine runs.
Certificate support for mandatory profiles
Use this setting to enable the use of personal certificates in a mandatory profile, which is
normally not possible. In addition to enabling this setting, you also need to create a Flex
config file with the “Personal Certificates” Windows Common Setting.
NOTE: This setting does not have to be enabled when you are using roaming or local
profiles.
FlexEngine refresh settings
The configuration of this Group Policy setting is used when running FlexEngine from a
logon script and when running FlexEngine as Group Policy extension on Windows XP or
Windows Server 2003.
When running FlexEngine as Group Policy extension on more recent versions of Windows,
this setting is ignored.
Refresh Windows appearance. Enable this option to refresh Windows appearance-
related settings, like the wallpaper, at logon. In addition, you need to create a Flex config
file from the Management Console that contains the appropriate information to be
processed by FlexEngine.
Refresh mouse settings. Use this option to refresh mouse-related settings at logon. In
addition, you need to create a Flex config file that contains the “Mouse” Windows
Common Setting.
Refresh keyboard settings. Use this option to refresh keyboard-related settings at
logon. In addition, you need to create a Flex config file that contains the “Keyboard”
Windows Common Setting.
Prevent access to VMware UEM Self-Support
Use this setting to control whether users have access to VMware User Environment
Manager Self-Support (see chapter 13).

User Environment Manager
Page 31
3.5 FlexEngine logon / logoff script configuration
For VMware User Environment Manager to work correctly, FlexEngine needs to run during
the logon and logoff process. There is only one way of running FlexEngine during the
logoff process: by running the FlexEngine logoff command from a logoff script. There are
two ways of running FlexEngine during the logon process: by running the FlexEngine as
Group Policy client-side extension (as described in section 3.4.2), or by running the
FlexEngine logon command from a logon script.
3.5.1 FlexEngine logon script
IMPORTANT: If you decide to use the FlexEngine Group Policy extension by enabling
the Group Policy setting Run FlexEngine as Group Policy Extension as described in section
3.4.2, you do not need to configure FlexEngine to run from a logon script.
You can skip ahead to section 3.5.2, although be sure to pay attention to the description
of -OfflineImport in Appendix A.
If you decide not to use the FlexEngine Group Policy extension, you do need to configure
the FlexEngine logon command to run from a logon script. You can add the FlexEngine
logon command to an existing logon script or call it directly as if it were a logon script. It
is recommended to use User Configuration\Windows Settings\Scripts for this purpose.
The FlexEngine logon command that needs to run during the logon process is:
"C:\Program Files\Immidio\Flex Profiles\FlexEngine.exe" -r
NOTE: Be sure to enter the full path to FlexEngine.exe without quotes.
This command reads the settings configured through the VMware UEM Group Policy
Object and performs the path-based import accordingly.
User Environment Manager manages profile information that often must be imported
before the Windows shell is initialized. To make sure that the shell initialization waits
until the logon script has completed, enable the Run logon scripts synchronously policy
setting. This can be found under User Configuration\Policies\Administrative
Templates\System\Scripts.
NOTE: On Windows 7 and Windows Server 2008 R2, the Run logon scripts synchronously
policy setting is ignored when using mandatory profiles; when using local or roaming
profiles the policy setting is ignored the first time a user logs in. Microsoft hotfix 2550944
addresses this issue.

User Environment Manager
Page 32
If you are having trouble to get the logon script to run consistently (or at all) on Windows
2003 Terminal Services, you can try running the logon script from the AppSetup registry
value at HKLM\Software\Microsoft\Windows NT\CurrentVersion\Winlogon. For more
information, refer to the How to Set Up a Logon Script Only for Terminal Server Users
document on the Microsoft website.
3.5.2 FlexEngine logoff script
It is always necessary to configure the FlexEngine logoff command to run from a logoff
script. You can add the FlexEngine logoff command to an existing logoff script or call it
directly as if it were a logoff script. It is recommended to use User Configuration\
Windows Settings\Scripts for this purpose.
The FlexEngine logoff command that needs to run during the logoff process is:
"C:\Program Files\Immidio\Flex Profiles\FlexEngine.exe" -s
NOTE: Be sure to enter the full path to FlexEngine.exe without quotes.
This command reads the settings configured through the VMware UEM Group Policy
Object and performs the path-based export accordingly.

User Environment Manager
Page 33
3.5.3 Example GPO
An example of a Group Policy Object that contains the FlexEngine logon / logoff
commands with the “Run logon scripts synchronously” setting enabled, is shown below:

User Environment Manager
Page 34
3.6 User Environment Manager Management
Console configuration
3.6.1 Initial configuration
When you start the Management Console for the first time, it will display the settings
dialog, and prompt for the location of the UEM configuration share.
The Management Console looks for a configuration file Immidio Flex Profiles
Configuration.xml at the specified location. If it exists, this central file will be read and
used as configuration for the Management Console. Otherwise, a new configuration file,
with default values, and a General folder (as described in section 2.1) will be created.
The only setting that must be specified is the location of the UEM configuration share.
With this setting configured, you can start using the Management Console. However,
some features will only be available after further configuration.
NOTE: As the Management Console configuration is stored in the central configuration
share, any changes made to the configuration affect all Management Console installations
that are configured to use this share.
User Environment Manager
Page 35
3.6.2 Further configuration
Some of the features of the Management Console can be hidden from the user interface.
For instance, you can choose to hide the Application Migration feature altogether if you
do not need that functionality, or hide the Backups tab if you never want to override the
number of backups for a specific Flex config file, but always use the globally defined
setting.
NOTE: If environment settings (cf. chapter 8) are provided through Group Policy, it is
not possible to change the configuration.
3.6.2.1 Personalization features
The Personalization Features settings control which Personalization-related features are
enabled in Management Console.
With the exception of Silo support, each checkbox corresponds to the tab with that name
(as described in detail in chapter 4).
Silo support allows User Environment Manager Management Console to manage both
General config files and silo-specific ones. If enabled, a Silos folder is created in the UEM
configuration share. Within this Silos folder, subfolders can be created for each silo, and
within these subfolders silo-specific Flex configuration files can be created and managed.
3.6.2.2 Additional features
The Personalization functionality is always enabled in the Management Console. The
Additional Features settings control which additional features are enabled.
User Environment is described in detail in chapter 5, Condition Sets in chapter 6, and
Application Migration in chapter 7.
3.6.2.3 App-V and SWV configuration
The App-V and SWV tabs contain settings for application virtualization support. For
Symantec Workspace Virtualization 7.5 there is only a single setting, which enables or
disables support.
The settings related to App-V support are described in detail in chapter 11.

User Environment Manager
Page 36
3.6.3 Easy Start
When no User Environment Manager items have been created yet, the Easy Start
option appears in the ribbon.
Easy Start installs a default set of VMware User Environment Manager configuration
items that allow you to quickly get a feel for the Personalization, User Environment, and
Condition Sets functionality. You can use the installed items as is for an easy proof of
concept, or use them as a starting point for your own implementation.
In addition to the default items, you can choose to have Easy Start also install Flex config
files and user environment shortcuts for one or more versions of Microsoft Office.

User Environment Manager
Page 37
4 Personalization
The Personalization ribbon of the Management Console contains all functionality to
manage personalization for users.
4.1 Main user interface elements
The user interface for Personalization consists of three main areas: a ribbon, a tree view,
and a tabbed configuration/editing area.
The tabs are described in detail starting with section 4.3. The ribbon and tree view are
described in the following two subsections.
4.1.1 Ribbon buttons
Refresh Tree – Reloads the tree.
Create Config File – Starts the Config File Creation wizard (cf. 4.1.4).
Save Config File – Saves the Flex configuration file.
Section – Inserts a section header into the Import / Export or Profile Cleanup
editor (cf. 4.3 and 4.4).
Folder Token – Inserts a folder token into the Import / Export or Profile Cleanup editor (cf. 4.3 and 4.4).
Browse Local Profile – Uses the profile of the current user for browsing with AutoComplete in the Import / Export or Profile Cleanup editor (cf. 4.3 and 4.4).
Browse Other Profile – Allows the selection of another profile for browsing with AutoComplete in the Import / Export or Profile Cleanup editor (cf. 4.3 and 4.4).
Validate DirectFlex – Checks a set of Flex configuration files for duplicate references to DirectFlex executable paths (cf. 4.7.2.2). NOTE: This button is only visible if the DirectFlex tab is enabled (cf. 3.6.2.1).
Configure – Displays configuration dialog (cf. 3.6.2).
Easy Start – Launches Easy Start (cf. 3.6.3).

User Environment Manager
Page 38
4.1.2 Tree view
The tree view contains a number of items: the General node, the Silos node, silo nodes,
Flex configuration files, and folders.
The General node is the only tree item that always exists. It corresponds with the General folder in the UEM configuration share, and lists the Flex config files found in that folder (and possibly subfolders).
The Silos node corresponds with the Silos folder. This node is only displayed if Silo support has been enabled (see 3.6.2.1). The first level of subfolders of the Silos folder is displayed as silo nodes. NOTE: Flex configuration files cannot be created in the Silos node, but only in silo nodes.
Selecting a config file opens it in the configuration/editing area on the right of the tree.
If you click on the General node or on a silo node, the Management Console shows the
relevant settings for VMware UEM Group Policy configuration.
For more information about silo support, refer to chapter 10.
4.1.3 Context menu options
Right-clicking on a Flex configuration file in the tree displays a context menu:
– Exports this config file.
– Retires this config file (after confirmation).
– Deletes this config file (after confirmation).
– Disables this config file.
– Opens Windows Explorer with this config file selected.
– Opens the Windows Explorer Properties dialog for this config file.
Right-clicking on the General node, a folder node, or a silo node displays a similar menu,
affecting the folder corresponding to the selected node:
– Creates a new Flex config file in this folder.
– Creates a new folder.
– Imports a Flex config file into this folder.
– Checks the DirectFlex settings in a set of Flex config files.
– Deletes this folder (only if empty, and after confirmation).
– Opens Windows Explorer with this folder selected.
– Opens the Windows Explorer Properties dialog for this folder.

User Environment Manager
Page 39
Right-clicking on the Silos node shows a similar context menu where New Folder… is
replaced by New Silo…:
– Creates a new silo.
4.1.4 Importing a Flex config file
A Flex config file can be imported from another environment (cf. chapter 8) or – if silo
support is enabled – from another location in the current environment.
After selecting an environment to import from, a tree view with the Flex config files from
that environment is displayed:
Select a Flex config file from the tree and click the OK button to import the selected file
(and all dependent files like predefined settings and User Environment definitions for files
and folders and registry settings) into the current environment.

User Environment Manager
Page 40
4.1.5 Exporting a Flex config file
A Flex config file can be exported to another environment (cf. chapter 8), another
location in the current environment (if silo support is enabled), or to a folder of your
choice.
If you choose an environment, a tree view with the Flex config files from that
environment is displayed. If you select an environment other than the current one, the
Flex config file’s folder structure is automatically selected in the destination environment.
If that path does not exist, you have the option to create it.
Select a folder, the General node, or a silo to export the Flex config file to, and click the
OK button.
If you choose Folder on disk, a Windows folder browse dialog appears. Browse to the
folder of your choice, and click the OK button.
Note that if no environments and no silos are configured, the folder browse dialog
appears automatically.
On export, the Flex config file is copied to the specified location, together with any
dependent files like predefined settings and User Environment definitions for files and
folders and registry settings.
4.1.6 Retiring vs Deleting Flex config files
When you want to stop managing the settings for a certain application, you can either
Delete its Flex config file, or Retire it. Either choice results in VMware User Environment
Manager no longer managing the application’s settings – no profile archive will be
imported, nor will settings be exported.
The difference between retiring and deleting a Flex config file is what happens to the
profile archives and profile archive backups corresponding to that config file:
When you Delete a Flex config file, any profile archives and profile archive
backups remain as is.
When you Retire a Flex config file, however, the corresponding profile archive and
profile archive backups will be deleted when a user logs off.

User Environment Manager
Page 41
Typically, taking a Flex config file out of production is therefore a multi-step process:
First, Retire the Flex config file.
Allow a few days (depending on your scenario) for users to log on and log off,
triggering the removal of the profile archives and backups.
Finally, Delete the Flex config file.
Retired Flex config files can be identified in the tree view by their icon and the fact that
the title is greyed out: .
To undo the retire action, select the Revive menu option.
4.1.7 Disabling Flex config files
If you want to temporarily prevent FlexEngine from processing a certain Flex config file,
you can Disable it. When FlexEngine encounters a disabled config file, it logs a message
stating that the disabled file is skipped, without performing an import or export.
NOTE: Disabling a Flex config file does not affect a user’s profile archives or backups.
Disabled Flex config files can be identified in the tree view by the fact the title is greyed
out, and that the word “(DISABLED)” appears behind the title (both in the tree view and
in the right-hand pane):
To undo the disable action, select the Enable menu option.

User Environment Manager
Page 42
4.2 Config File Creation wizard
The Config File Creation wizard guides you through the creation of a new Flex config file:
4.2.1 Creating a custom config file
To save a new, empty Flex configuration file, specify a file name and click Finish. If you
don’t select a folder, the location of the currently selected tree item will be used.
Optionally you can also enter a Title and Description. These settings can also be
configured or changed later on the Information tab (see section 4.11).
4.2.2 Using a Windows Common Setting
Windows Common Settings are Flex configuration definitions for standard Windows and
Internet Explorer features. If you would like to manage user preferences for these
features with VMware User Environment Manager, you can just select one of these built-
in settings, instead of having to define the registry and/or filesystem configuration
entries yourself.
The following Windows Common Settings are provided with this release:
Active Setup
Active Setup configuration, as used by Internet Explorer for instance.
App-V 5 User Integrations
App-V 5 publishing information. See 11.2.4 for more information.
DPI settings
Text size (DPI) settings. NOTE: Only applies to Windows 7 and 8.
Internet Explorer – Personal Settings
Internet Explorer configuration items like favorites, cookies, and proxy settings.
Internet Explorer 7 - 11 – AutoComplete passwords
The AutoComplete passwords that Internet Explorer can store for logon forms.
NOTE: There are two different AutoComplete passwords settings, depending on
whether folder redirection has been configured for the Application Data folder. Make
sure to choose the setting that applies to your situation.
Keyboard
Keyboard-related settings like keyboard layout, repeat speed, and cursor blink rate.
Mouse
Mouse-related settings like pointer speed, mouse pointers, and swapping the
primary and secondary buttons.

User Environment Manager
Page 43
Multilanguage User Interface settings
The Multilanguage User Interface (MUI) language, also known as the display
language.
Personal Certificates
Certificates like the ones used to encrypt files (the Encrypt contents to secure data
checkbox in the Windows Explorer file attributes).
NOTE: There are two different Personal Certificates settings, depending on whether
folder redirection has been configured for the Application Data folder. Make sure to
choose the setting that applies to your situation.
Printers
Mapped network printers.
Regional settings
Settings like date, time, and currency formats.
Screensaver settings
Screensaver-related settings.
Taskbar settings
Settings like taskbar locking and pinning programs to the taskbar.
Typed History
History of URL’s typed in Internet Explorer, and paths typed in Windows Explorer.
Wallpaper
Wallpaper-related settings, including desktop slideshows on Windows 7.
NOTE: There are two different Wallpaper settings, depending on whether folder
redirection has been configured for the Application Data folder. Make sure to choose
the setting that applies to your situation.
Windows Explorer and view settings
Settings like Explorer layout and details pane.
After selecting a Windows Common Setting, click Next. Now you can save your new Flex
configuration file, as described in section 4.2.1.
4.2.3 Using an Application Template
Similar to Windows Common Settings, Application Templates provide built-in support to
manage settings for common applications:
Adobe Acrobat Reader
Microsoft Calculator
Microsoft Live Meeting 2007
Microsoft Live Messenger
Microsoft Notepad
Microsoft Office (versions 2003, 2007, 2010, 2013, and 2016)
Microsoft Paint
Microsoft Windows Mediaplayer
Microsoft Wordpad
WinZip

User Environment Manager
Page 44
Only a single Application Template can be selected per Flex configuration file. This does
not apply to the Microsoft Office templates, though – any number of application-specific
templates within that Office version can be selected:
After selecting an Application Template, click Next. Now you can save your new Flex
configuration file, as described in section 4.2.1.
4.3 Import / Export tab
The Import / Export tab is one of the most important parts of the Management Console:
it controls which profile information is stored at logoff (and, as a result, read back in
again at logon).
FlexEngine stores file and registry information based on Flex configuration files that
contain Windows Common Settings, Application Templates, and explicit references to
folders, files, registry keys, or registry values.
You can also use VMware UEM Application Profiler to automatically generate Flex
configuration files for applications. Application Profiler is provided as a separate MSI
installer in the VMware User Environment Manager download package, and is licensed as
part of User Environment Manager.
For example, the following configuration file manages the settings for a few popular
Microsoft Office applications using Application Templates, but in addition specifies an
additional folder and registry key to export, so the settings for a particular third-party
Office plug-in are managed as well:

User Environment Manager
Page 45
4.3.1 Import / Export editor fundamentals
The content in the Import / Export editor is divided into so-called sections. A section
starts with a section header, which defines how the lines that follow it should be
interpreted (until the next section header is encountered).
A # (hash) character at the start of a line indicates a comment – all the text that follows,
up to the end of the line, is ignored.
4.3.1.1 Section headers
Sections are either registry-related or filesystem-related, contain references to items to
include or exclude, and refer either to single items (registry values or files) or
“containers” (registry keys or folders). Registry keys and folders can be processed either
recursively or non-recursively.
Section headers can be inserted into the editor via the Section button in the ribbon. Also,
when you type a [ (open square bracket) character, a dropdown appears from which you
can select a section header.
The following section headers are defined:
Filesystem-related Import / Export section headers
[IncludeFolderTrees] Files and subfolders in the specified folder are included. Each entry refers to a folder and must start with a Folder Token (see 4.3.1.2). Wildcards are not supported.
[ExcludeFolderTrees] Same, but tree is excluded.
[IncludeIndividualFolders] Files in the specified folder are included, but subfolders are ignored. Each entry refers to a folder and must start with a Folder Token. Wildcards are not supported.
[ExcludeIndividualFolders] Same, but files from the specified folder are excluded.
NOTE: Any subfolders of the specified folder (and their files) are not excluded.
[IncludeFiles] Specified file or files (if the filename contains wildcards) are included. Each entry refers to a file and must start with a Folder Token. Wildcards are supported in the filename, but not in the path.
[IncludeFilesRecursively] Similar to [IncludeFiles], but files in
subfolders are also processed (if they match the specified filename or pattern). An entry <Desktop>\*.lnk, for example, will include all shortcut files on the desktop and in subfolders of the desktop, recursively.

User Environment Manager
Page 46
Filesystem-related Import / Export section headers
[ExcludeFiles] Specified file or files (if the filename contains wildcards) are excluded.
Each entry refers to a file, and can either be just a filename, or a full file path starting with a Folder Token. Wildcards are supported in the filename, but not in the path.
If just a filename is specified, the exclusion
will be applied to all files that are processed by one of the [Include...] sections. If a
complete path is specified, the exclusion will only be applied to files in that particular folder.
Registry-related Import / Export section headers
General remarks: All entries must start with HKCU Wildcards are not supported
[IncludeRegistryTrees] Values and subkeys of the specified key are included.
[ExcludeRegistryTrees] Same, but tree is excluded.
[IncludeIndividualRegistryKeys] Values of the specified key are included, but subkeys are ignored.
[ExcludeIndividualRegistryKeys] Same, but values of the specified key are excluded.
NOTE: Any subkeys of the specified key (and their values) are not excluded.
[IncludeIndividualRegistryValues] Specified value is included.
NOTE: Use a trailing backslash to indicate the default value.
[ExcludeIndividualRegistryValues] Same, but value is excluded.
4.3.1.2 Wildcard support in Exclude sections
Folder and registry key paths in [Exclude...] sections can contain wildcards using the
special [MATCHALL] and [MATCHONE] tokens, which correspond with the ‘*’ and ‘?’
wildcards, respectively.
NOTE: The tokens are not allowed in the file name or registry value parts of such paths.
These wildcard tokens can be used to exclude some settings for applications that use a
random name for one of their folders or registry keys.

User Environment Manager
Page 47
For example, assume that application App from vendor Vendor:
Stores its settings in the standard locations <AppData>\Vendor\App and
HKCU\Software\Vendor\App,
Supports multiple configurations by having randomly named subfolders and
subkeys at those locations, and
Maintains a large cache for each configuration as a performance optimization.
To manage App’s settings without including the caches, the following Import / Export
content could be used:
4.3.1.3 Folder Tokens
User Environment Manager uses so-called Folder Tokens to refer to well-known profile
folders:
<AppData>
<Cookies>
<Desktop>
<Favorites>
<LocalAppData>
<NetHood>
<Personal>
<PrintHood>
<ProgramsMenu>
<RecentFiles>
<SendTo>
<StartMenu>
<StartupMenu>
<UserProfile>
All entries in sections that refer to folders must start with a Folder Token. These can be
inserted into the editor via the Folder Token button in the ribbon. Also, when you type a
< (smaller than) character while in a file-related section, a dropdown appears from which
you can select a Folder Token.

User Environment Manager
Page 48
4.3.1.4 Profile browsing
Instead of having to type registry or filesystem paths in the editor, you can also use the
profile browsing feature. This allows you to browse through a profile (either your own, or
another user’s), and pick registry and filesystem information from dropdowns.
For instance, with profile browsing enabled, typing a \ (backslash) character after
<AppData> results in the following:
The dropdown lists all subfolders (since this is an [IncludeFolderTrees] section) of the
Application Data folder. You can pick a folder from the list and type another \ to display
the subfolders of that folder, browsing through an actual profile to find the right paths to
include.
The same applies to browsing for registry information. The following example, showing
an [IncludeIndividualRegistryValues] section, displays both subkeys and values:
Profile browsing is enabled via the ribbon buttons Browse Local Profile and Browse Other
Profile.
NOTE: Browse Other Profile is only available for administrators. The button is disabled
otherwise.

User Environment Manager
Page 49
4.3.1.5 Syntax highlighting
The editor uses different colors to distinguish different types of content (so-called syntax
highlighting): section headers are displayed in blue, content entries in black, comments
in green, and errors are indicated in red with a squiggly underline.
4.3.2 Expanding selected Windows Common Settings
and Application Templates
To expand a referenced Windows Common Setting or one or more Application Templates
to the underlying Import / Export definitions, select Expand from the Manage dropdown.
A confirmation message is displayed, stating that the reference to the built-in definitions
will be removed. This means that if these definitions are updated in a future version of
the Management Console, the new settings will not be reflected in this Flex config file.
4.3.3 Removing selected Windows Common Settings
When editing a Flex configuration file containing a Windows Common Setting, it is only
possible to remove the selected setting.
4.3.4 Changing selected Application Templates
4.3.4.1 Microsoft Office Application Templates
When editing a Flex configuration file containing Microsoft Office Application Templates, it
is possible to select templates of additional Office applications, or remove previously
selected ones.
4.3.4.2 Other Application Templates
When editing a Flex configuration file containing a non-Microsoft Office Application
Template, it is only possible to remove the selected template.

User Environment Manager
Page 50
4.4 Profile Cleanup tab
The Profile Cleanup feature allows you to automatically remove individual settings from
roaming or local profiles as soon as you start managing them with User Environment
Manager. Your profiles get gradually smaller while introducing VMware User Environment
Manager step by step. This leads to a smooth transition from conventional roaming
profiles to well-managed user profiles – individual applications can be migrated from
roaming profiles to VMware User Environment Manager at any time.
In addition this feature may be used to clean up profile fragments left by uninstalled
applications, which needlessly increase logon and logoff times. When using the Profile
Cleanup feature, roaming profiles are less prone to challenges created by profile growth.
On the Profile Cleanup tab you can specify which registry and filesystem information
should be deleted at logoff (or at application shutdown in the case of DirectFlex). This tab
is only visible if so configured (see 3.6.2.1).
WARNING: Profile Cleanup is a very useful feature, but make sure to very carefully test
your settings.
NOTE: Profile Cleanup is mainly useful when using roaming or local profiles.
4.4.1 Profile Cleanup editor
The Profile Cleanup editor functions similar to the one on the Import / Export tab, but
uses different section headers:
Filesystem-related Profile Cleanup section headers
[DeleteFolderTrees] Deletes files and subfolders of the specified folder. Each entry refers to a folder and must start with a Folder Token (see 4.3.1.2). Wildcards are not supported.
[DeleteFiles] Deletes file or files (if the filename contains wildcards) in the specified folder. Each entry refers to a file and must start with a Folder Token. Wildcards are supported in the filename, but not in the path.
[DeleteFilesRecursively] Same, but also deletes file(s) in subfolders of the specified folder.
Registry-related Profile Cleanup section headers
General remarks: All entries must start with HKCU
Wildcards are not supported
[DeleteRegistryTrees] Deletes values and subkeys of the specified key.
[DeleteRegistryValues] Delete specified value.
NOTE: Use a trailing backslash to indicate the default value.

User Environment Manager
Page 51
4.4.2 Converting Import / Export settings
It is possible to automatically create Profile Cleanup content based on Import / Export
settings, with the following limitations:
Application Templates can be converted, but Windows Common Settings cannot.
Only file, folder tree, registry tree and registry value include settings can be
converted (i.e. only [IncludeFiles], [IncludeFilesRecursively],
[IncludeFolderTrees], [IncludeRegistryTrees] and
[IncludeIndividualRegistryValues] content).
Other sections can’t be converted.
To convert Import / Export settings, click the button. If all settings could be
converted, the Profile Cleanup editor will contain the result. Otherwise, an error message
will be displayed:
WARNING: Profile Cleanup is a very useful feature, but make sure to very carefully test
your settings.

User Environment Manager
Page 52
4.5 Predefined Settings tab
On the Predefined Settings tab you can configure default settings, optionally with partial
or full enforcement. This tab is only visible if so configured (see 3.6.2.1).
There are four types of predefined settings:
Default Settings are only applied if no user profile archive exists.
Partially Enforced Settings are applied after the user profile archive (if any) has
been imported.
Default Settings with Partial Enforcement is a combination of the first two
types: the Default Settings are applied if no user profile archive exists, then the
user profile archive (if any) is imported, and finally the Partially Enforced
Settings are applied.
Fully Enforced Settings are applied always and no user profile archive will be
created.
NOTE: Predefined settings are very useful, but make sure to test your predefined
settings with different user accounts before deploying.

User Environment Manager
Page 53
4.5.1 Working with predefined settings
Predefined settings can be created and managed using the controls below the predefined
settings list:
The Add…, Edit…, and Duplicate… buttons display a dialog like the following:
The Name and Label fields are optional and can be used to describe the
predefined settings. This is particularly useful when defining multiple settings for a
single Flex config file (cf. 4.5.4).
The Edit…, Update…, Create…, and Install… buttons are described in sections 4.5.2
and 4.5.3.
The Remove button removes the selected predefined setting (including the corresponding
predefined settings archive(s)), and the Move Up and Move Down buttons are used to
change the order of predefined settings (cf. 4.5.4).
Right-clicking on an item in the predefined settings list displays the Enable/Disable
context menu.
A disabled predefined setting is ignored by FlexEngine.

User Environment Manager
Page 54
4.5.2 Specifying predefined settings
When you use VMware UEM Application Profiler to create a Flex config file, you have the
option to automatically create predefined settings as well, which are then used as default
settings.
Alternatively, you can install predefined settings for a Flex configuration file, either by
adding files and registry information manually, or by using an existing profile archive as
created by FlexEngine.
4.5.2.1 Creating predefined settings
To create predefined settings manually, click the Create… button. Windows Explorer will
open to a folder containing subfolders for all supported user profile subfolders:
To define the filesystem content for your predefined settings, just copy the files you want
to include into the correct locations. If file or folder names or file contents are user
dependent, you can use placeholders as described in section 4.5.5.
To define registry settings, edit the Flex Profiles.reg file in the Registry subfolder, making
sure to add your content between the “Pre” and “Post” ImportMarkers.
Click the Done button in the “Create predefined settings” popup to build a predefined
settings archive in the directory containing the Flex configuration file.
4.5.2.2 Importing predefined settings
To use an existing profile archive (created by FlexEngine) as predefined settings, click
the Install… button and browse to the profile archive.
The profile archive is copied to the directory containing the Flex configuration file.

User Environment Manager
Page 55
4.5.3 Modifying predefined settings
If you want to use different predefined settings, you can either click Edit… to modify the
predefined settings that were installed or created previously or click Update… and select
another profile archive.
In the first case, Windows Explorer will open to a folder with the expanded predefined
settings – see section 4.5.2.1 for more information. Note that only non-empty folders are
displayed. Click the button to add the other folders.
4.5.4 Multiple predefined settings
A single Flex config file can contain multiple predefined settings, to provide different
settings to different groups of users, for instance.
If you want to specify multiple predefined settings, each must have so-called conditions
defined that control whether the entry is applicable for a certain user. Conditions are
specified on the Conditions tab of the predefined settings dialog and are described in
detail in chapter 6.
FlexEngine will process the predefined settings in list order (indicated by the value in the
Order column), evaluating conditions. As described in 4.5.1, the order can be changed
using the Move Up and Move Down buttons.
If conditions match for multiple predefined settings, the last one “wins”.
4.5.5 Placeholders
Predefined settings can contain so-called placeholders that are replaced with information
from environment variables when imported. Placeholders can be used in file names and
folder names (to create user-specific names) and in the content of text files.

User Environment Manager
Page 56
4.5.5.1 Placeholder format
Placeholders have the format [Flex#%var%] where var is the name of an environment
variable. For instance, if a predefined settings archive is imported containing a file named
Desktop\[Flex#%username%].txt, this will result in a text file on the user’s desktop with
the file name being set to the user’s name (i.e. the value of the %username% variable).
NOTE: The string Flex in the placeholder must be specified exactly like that, i.e. with a
capital F. The name of the environment variable is not case-sensitive, however.
4.5.5.2 Using placeholders in text files
To have FlexEngine process placeholders within the contents of a text file (for instance
.REG files, .TXT files, or .INI files), the file’s name must contain a specific token:
[Flex#] (case sensitive). This token will be removed on import, so it does not affect the
resulting file name – it is just used to trigger placeholder replacement.
NOTE: When a predefined settings archive is built (cf. 4.5.2.1 and 4.5.3), the Flex
Profiles.reg file in the Registry subfolder and .txt, .ini, or.xml files in any of the other
folders are scanned for placeholders. If a placeholder is found, the file name is
automatically marked up with the [Flex#] token.
The placeholders in the file contents are formatted in the same way as described in the
previous section: use [Flex#%var%] where var is the name of an environment variable.
To extend the example from the previous section: by renaming the file in the predefined
profile archive to Desktop\[Flex#%username%][Flex#].txt, its contents will be
processed as well.
If that file contains the text
Hi [Flex#%username%], you are logged on to [Flex#%computername%].
and user JohnDoe logs on to computer WIN7B91, a file JohnDoe.txt will be created on
the desktop, with the following contents:
Hi JohnDoe, you are logged on to WIN7B91.
NOTES
When using placeholders in .REG files, use the alternative [Flex#%var%#reg]
format. This will escape any backslashes or double quotes in the replaced content,
in accordance with the .REG format.
For applications that refer to users via their SID you can use [Flex#%SID%]. The
special %SID% variable is replaced by the user’s SID in the well-known S-1-5-21-
format.
When processing placeholders in text files, FlexEngine tries to determine the text
encoding automatically. This auto-detect mechanism supports Unicode with a Byte
Order Mark (in the UTF-8, UTF-16 Big Endian, and UTF-16 Little Endian variants)
and the system’s default encoding.
If you need to process a file in a different encoding (or if the auto-detect fails in
your scenario), you can explicitly specify the code page by using the special token
[Flex#codepage] in the file name instead of [Flex#].
For instance, Sample[Flex#1251].txt would be interpreted as being encoded as
Windows Cyrillic (code page 1251). For a list of valid code pages, see Code Page
Identifiers on the Microsoft website.

User Environment Manager
Page 57
4.6 Backups tab
On the Backups tab you can optionally override the global backup behavior (as
configured in the VMware UEM Group Policy configuration) for this configuration file. This
tab is only visible if so configured (see 3.6.2.1).
NOTE: If you have not configured a Backup path in your Group Policy settings, no
backups will be created, regardless of the selection you make in the Management
Console.
With VMware User Environment Manager Self-Support (described in chapter 13), users
can restore settings from backups or reset them to defaults. If you want a Flex config file
to not be available for self-support, you can enable the Hide from VMware UEM Self-
Support option.
4.7 DirectFlex tab
DirectFlex makes it possible to import settings when an application is launched instead of
importing the application’s settings at logon. The DirectFlex tab is only visible if so
configured (see 3.6.2.1).
4.7.1 DirectFlex introduction
Flex configuration files that are configured for DirectFlex are no longer processed at logon
and logoff (the Process during logon and logoff option is automatically turned off when
you enable DirectFlex – see also 4.8.1). Instead, imports and exports take place when an
application starts and exits.
For each Flex configuration file that has DirectFlex enabled, one or more applications
have to be specified (see the next section for more information). FlexEngine monitors the
launch and exit for these DirectFlex applications, and performs the corresponding import
and export actions.
The exact rules regarding when (or whether) a DirectFlex import or export action takes
place are described in the DirectFlex imports and exports section.
NOTES
For DirectFlex to work, FlexEngine needs to run at logon (either as a Group Policy
extension or via a logon script) and logoff.
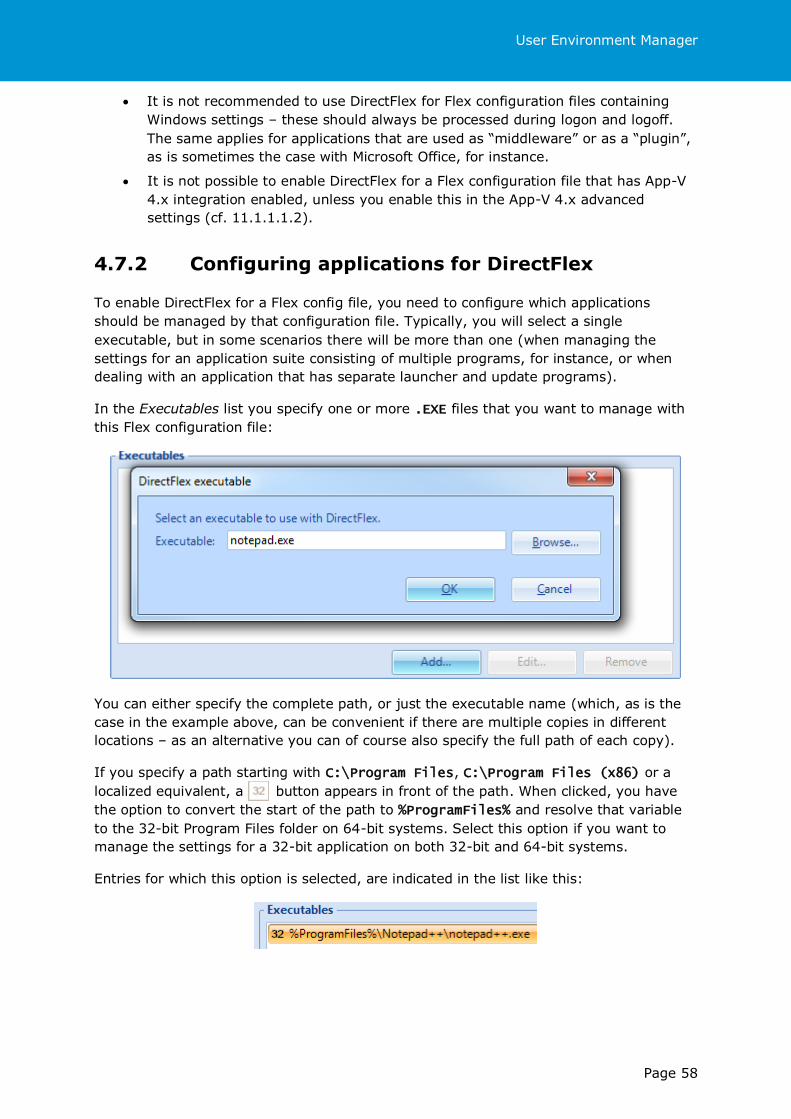
User Environment Manager
Page 58
It is not recommended to use DirectFlex for Flex configuration files containing
Windows settings – these should always be processed during logon and logoff.
The same applies for applications that are used as “middleware” or as a “plugin”,
as is sometimes the case with Microsoft Office, for instance.
It is not possible to enable DirectFlex for a Flex configuration file that has App-V
4.x integration enabled, unless you enable this in the App-V 4.x advanced
settings (cf. 11.1.1.1.2).
4.7.2 Configuring applications for DirectFlex
To enable DirectFlex for a Flex config file, you need to configure which applications
should be managed by that configuration file. Typically, you will select a single
executable, but in some scenarios there will be more than one (when managing the
settings for an application suite consisting of multiple programs, for instance, or when
dealing with an application that has separate launcher and update programs).
In the Executables list you specify one or more .EXE files that you want to manage with
this Flex configuration file:
You can either specify the complete path, or just the executable name (which, as is the
case in the example above, can be convenient if there are multiple copies in different
locations – as an alternative you can of course also specify the full path of each copy).
If you specify a path starting with C:\Program Files, C:\Program Files (x86) or a
localized equivalent, a button appears in front of the path. When clicked, you have
the option to convert the start of the path to %ProgramFiles% and resolve that variable
to the 32-bit Program Files folder on 64-bit systems. Select this option if you want to
manage the settings for a 32-bit application on both 32-bit and 64-bit systems.
Entries for which this option is selected, are indicated in the list like this:

User Environment Manager
Page 59
4.7.2.1 Application virtualization support
If App-V 5.0 support has been configured (cf. 11.2.1), you can enable DirectFlex for an
App-V 5.0 package. For more details, see 11.2.2.
If support for Symantec Workspace Virtualization has been configured (cf. 3.6.2.3), you
can enable DirectFlex for an SWV package.
You can always enable support for a VMware ThinApp 5.2 package. Only packages
created using ThinApp 5.2 can be used with DirectFlex. Additionally, the configured
DirectFlex executable path (cf. 4.7.2) must be the virtual executable, not the ThinApp
entry point.
4.7.2.2 Validating DirectFlex executable paths
Executable paths or names can’t occur more than once in Flex configuration files, as
FlexEngine uses these to determine which config file to process. To check for conflicts
(i.e. executables occurring multiple times) use the Validate DirectFlex button in the
ribbon, or the option in the tree’s context menu.
Validation is performed on all DirectFlex-enabled Flex configuration files in the specified
context. For the tree this means all configuration files below the node that was clicked;
for the ribbon, either all configuration files (if you clicked on the button itself), or the
subset selected from the dropdown:
If conflicts are found, they are displayed as follows:
Clicking on the hyperlinks in this dialog takes you to the corresponding DirectFlex
configuration files, so you can easily make modifications if needed.
NOTE: Not every “conflict” that is found like this is necessarily an actual conflict. For
instance, if the Notepad and Windows Tools configuration files are never processed by
FlexEngine at the same time, there is no conflict. Also, if you have separate sets of

User Environment Manager
Page 60
configuration files for different groups of users, for instance, configuration files in these
sets may refer to the same DirectFlex executables as long as each user will only “see” at
most one of these.
If actual conflicts occur at runtime, FlexEngine will ignore some of the references – this
will be logged in the FlexEngine log file.
4.7.3 DirectFlex imports and exports
The first time a DirectFlex application is started in a user’s session, its settings are
imported. By default, the settings are exported when the application exits, and the next
time the application is launched, the settings are imported again, etc.
If, while the application is running, it is started a second time, no second import takes
place as the settings have already been imported for the first instance. Similarly, when
one of the two running instances exits, no export takes place – the export is only
performed when the final instance exits.
All of the above also applies if multiple executables have been configured for the Flex
configuration file. The first time one of the configured executables is launched in a user’s
session, an import if performed. While that executable is running, starting any of the
other executables (or a second instance of the first one) will not trigger an additional
import. Also, no export will take place until the last instance of any of the configured
executables exits.
By default, DirectFlex will export an application’s settings when the last configured
executable exits, but it is also possible to postpone the export action till the user logs off.
The default behavior can be overridden via Group Policy (see 3.4.2), and this Group
Policy setting can again be overridden in the Flex configuration file:
NOTE: Configuring DirectFlex to export at logoff also affects imports: only the first
launch in the session will trigger an import.
4.8 Advanced tab
The Advanced tab is only visible if so configured (see 3.6.2.1).
4.8.1 Config File Processing
Commonly, FlexEngine processes at logon and logoff all configuration files in the General
folder that the user has NTFS read access to. To change this, turn off the Process during
logon and logoff option.

User Environment Manager
Page 61
You can use this option to disable processing of a Flex configuration file. The option is
also automatically turned off if you enable DirectFlex (section 4.7) or configure App-V 4.x
integration (chapter 11) for the Flex configuration file.
4.8.2 Skip Large Files or Old Files
You can optionally specify a maximum size and/or a maximum age for files that are
included in a profile archive.
If files larger than the specified size are encountered, they are skipped and the file’s
name and size are added to the log file (if logging is enabled).
Similarly, files that were last modified more than the specified number of days ago are
skipped, while logging the file names and last modification dates.
WARNING: These two Skip options can be very useful, but make sure to very carefully
test your settings to prevent crucial configuration being excluded during export.
4.8.3 OS-specific Settings
Usually, the profile archives created by VMware User Environment Manager can be used
across different Windows versions. That is, settings saved for an application on Windows
XP can generally be imported on Windows 7, for instance.
You may encounter settings that you would like to manage per OS, though. In that case,
you can set the Settings are OS-specific flag.
If this flag is set, profile archives created on a certain Windows version will only be read
back in sessions that are running on that same Windows version.
4.9 Conditions tab
Conditions make it possible to have FlexEngine only process a Flex configuration file if
certain conditions are met. By default, no conditions are applied, and the configuration
file will be processed always. The Conditions tab is only visible if so configured (see
3.6.2.1).
Conditions are evaluated during path-based import and export actions. For DirectFlex,
they are only evaluated during path-based import, and the results determine whether
DirectFlex should be enabled for that particular Flex config file – these conditions are
never evaluated when performing a DirectFlex import or export action.

User Environment Manager
Page 62
Chapter 6 describes conditions in detail. Specific to conditions in Personalization, the
following two notes apply:
Personalization conditions can reference Condition Sets (centrally defined
collections of conditions, described in detail in chapter 6).
If you specify conditions, you also need to select the actions that are to be
performed:
If DirectFlex is enabled, the options change as follows:
NOTE: Conditions are not available when App-V 4.x integration is configured.
4.10 User Environment tab
If DirectFlex is enabled or App-V 4.x integration is configured, user environment settings
can be defined on the User Environment tab. This tab is only visible if so configured (see
3.6.2.1).
The following user environment settings can be configured on Flex config files:
Drive Mapping – Create a drive mapping.
Files and Folders – Import file and folder information.
Printer Mapping – Create a printer mapping.
Registry Settings – Import registry settings.
Task – Run a command.
User environment settings can be added and edited using the buttons at the top:
The Add dropdown button is used to add user environment settings; afterwards, the
details can be modified with Edit, duplicated with Duplicate, and settings can be removed
with Remove.
Within a settings type, user environment settings are evaluated in the order in which
they are specified. Move Up and Move Down can be used to modify this order.
The same actions can be performed from the context menu, which also contains options
to Enable/Disable a user environment setting.

User Environment Manager
Page 63
User environment settings must have a name (note that this cannot be modified later)
and can optionally also have a label.
4.10.1 Conditions
User environment settings can also have conditions that have to be met for the setting to
be processed. By default, no conditions are applied, and the settings will be processed
always. Chapter 6 describes conditions in detail. One additional note applies for
conditions on user environment settings in a Flex config file: it is possible to reference
Condition Sets (centrally defined collections of conditions, also described in detail in
chapter 6).
4.10.2 Drive Mapping
Drive letter: The drive letter to assign.
Remote path: The UNC path of the share. Can contain environment variables.
Friendly name: (Optional) The description to use in Windows Explorer. Only available if
Run asynchronously is enabled.
Skip if drive letter is in use: (Optional) If enabled, the drive will not be mapped if the
specified drive letter is already mapped. If not enabled, an existing mapping will first be
removed.
Run once: (Optional) If enabled, the drive mapping will only be performed once. See
Appendix E for more information about Run once.
Undo at application exit: (Optional) If enabled, the drive will be unmapped when the
DirectFlex or App-V application exits.
Run asynchronously: (Optional) If enabled (the default and recommended value), the
drive mapping occurs in the background. If not enabled, FlexEngine waits for the drive
mapping to finish before continuing, potentially causing delays.
Combining Run once and Undo at application exit is not possible.

User Environment Manager
Page 64
4.10.3 Files and Folders
Defining Files and Folders Settings is similar to creating predefined settings (described in
4.5.2.1) with the exception that no registry settings can be defined.
Run once: (Optional) If enabled, the files and folders settings will only be imported
once. See Appendix E for more information about Run once.
4.10.4 Printer Mapping
Remote path: The UNC path of the printer. Can contain environment variables. Note
that on Windows XP and Windows Server 2003 the Browse… functionality is not available.
Default printer: (Optional) If enabled, printer will be marked as the default.
Run once: (Optional) If enabled, the printer mapping will only be performed once. See
Appendix E for more information about Run once.
Undo at application exit: (Optional) If enabled, the printer will be unmapped when the
DirectFlex or App-V application exits.
Run asynchronously: (Optional) If enabled (the default and recommended value), the
printer mapping occurs in the background. If not enabled, FlexEngine waits for the
printer mapping to finish before continuing, potentially causing delays.
Combining Run once and Undo at application exit is not possible.

User Environment Manager
Page 65
4.10.5 Registry Settings
Defining Registry Settings is similar to creating predefined settings (described in 4.5.2.1)
with the exception that only registry settings can be defined.
Run once: (Optional) If enabled, the registry settings will only be imported once. See
Appendix E for more information about Run once.
4.10.6 Import Task / Export Task
User environment Tasks can be used to run commands at four different points in time:
Before or after profile archive import (Pre-Import or Post-Import, respectively).
Before or after profile archive export (Pre-Export or Post-Export, respectively).
NOTE: Tasks run “invisible”, so they cannot be used to start applications or anything else
requiring user interaction.
Command: The command to run. Can contain environment variables. If you specify a
path starting with C:\Program Files, C:\Program Files (x86) or a localized
equivalent, a button appears in front of the path. When clicked, you have the option
to convert the start of the path to %ProgramFiles% and resolve that variable to the 32-
bit Program Files folder on 64-bit systems.
Timeout: (Optional) If configured, FlexEngine will wait at most this long for the
command to complete. If the command does not complete during this interval,
FlexEngine continues.
If not configured, FlexEngine will wait indefinitely for the command to complete.
The Timeout setting is not available if Run asynchronously is enabled.
Run once: (Optional) If enabled, the task will only be run once. See Appendix E for
more information about Run once.
Run asynchronously: (Optional) If enabled, FlexEngine runs the command in the
background, without waiting for it to complete. Not available for tasks that run before
profile archive import or export.
For export tasks, combining Run once and Run asynchronously is not possible.

User Environment Manager
Page 66
4.11 Information tab
The Information tab shows the location of the configuration file and allows specifying a
title and description.
In addition, you can enter optional comments here. This is a free-format text field that is
not processed by FlexEngine.
Finally, a summary is displayed of all relevant configuration options:
4.12 App-V 4.x tab
For a description of the App-V 4.x tab, refer to chapter 11. This tab is only visible if so
configured (see 3.6.2.3).

User Environment Manager
Page 67
5 User Environment
The User Environment ribbon of the Management Console contains all functionality for
creating and managing user environment settings. Note that these settings are applied at
logon and logoff – a subset is also available for use with DirectFlex or App-V (see section
4.10).
The User Environment ribbon is only available if so configured (see 3.6.2.2).
The user environment user interface consists of three main areas: a ribbon, a tree view
with the different types of user environment settings, and a list containing the defined
settings of the selected type.
NOTE: User environment settings are stored in the FlexRepository subfolder of the
General folder.
5.1 Ribbon buttons
Refresh List – Reloads the list of user environment settings.
Group By Tag – Toggles between displaying a Tag column and grouping the settings by tag.
Create User Environment Setting – Creates a new setting of the type that is selected in the tree.
Edit User Environment Setting – Edits the selected setting. If multiple settings are selected, only the conditions can be edited (cf. 5.4.5).
Duplicate User Environment Setting – Duplicates the selected setting.
Import User Environment Setting – Import one or more settings from another environment (cf. 5.4.6).
Export User Environment Setting – Exports the selected setting(s) (cf. 5.4.6).
Remove User Environment Setting – Removes the selected setting.
Configure – Displays configuration dialog (cf. 3.6.2).
Easy Start – Launches Easy Start (cf. 3.6.3).

User Environment Manager
Page 68
5.2 Tree view
Apply ADMX-based settings.
Manage application access.
Create a drive mapping.
Define an environment variable.
Associate a file extension with an application.
Import file and folder information.
Redirect profile folders.
Apply Horizon policies.
Run a command at logon.
Run a command at logoff.
Create a printer mapping.
Import registry settings.
Create a shortcut.
Execute a task based on a trigger.
Set the Windows display language.
Hide drives in Windows Explorer.
Configure Windows policy settings.
Right-clicking on a tree node displays a pop-up menu with the option to create a user
environment setting of the selected type.
5.3 User environment settings list
The user environment settings of the type that is selected in the tree are displayed in a
list at the right-hand side of the window.
Double-clicking an item in the list opens a dialog with the setting’s details for editing.
Right-clicking an item shows a context menu with Enable/Disable options.
5.4 General configuration
5.4.1 Name, label, and tag
User environment settings must have a name and can also have a label and/or a tag.
As the name is used for the Run once logic (as described in more detail in Appendix E),
changing the name of an existing setting may cause the setting to apply once again.
When you choose to edit the name of a user environment setting for which Run once is
enabled, you first need to confirm a warning message.
The label and tag fields can be used to describe or organize the settings (the Group By
Tag ribbon button uses this tag field for grouping the list items).

User Environment Manager
Page 69
When editing a user environment setting, the Previous and Next buttons can be used to
open the previous or next setting (based on the current sort order of the list) for editing.
5.4.2 Use 32-bit “Program Files” on 64-bit systems
Several user environment settings refer to paths in the Program Files folder. If you
specify a path starting with C:\Program Files, C:\Program Files (x86) or a localized
equivalent, a button appears in front of the path. When clicked, you have the option
to convert the start of the path to %ProgramFiles% and resolve that variable to the 32-
bit Program Files folder on 64-bit systems.
5.4.3 Conditions
By default, a user environment setting will be processed by FlexEngine at every logon (or
logoff, for logoff tasks). If you configure conditions for a user environment setting, it will
only be processed if the specified conditions are met.
Chapter 6 describes conditions in detail. One additional note applies for conditions on
user environment settings: it is possible to reference Condition Sets (centrally defined
collections of conditions, also described in detail in chapter 6).
5.4.4 Comments
The Comments tab contains a free-format text field that is not processed by FlexEngine.

User Environment Manager
Page 70
5.4.5 Editing conditions for multiple settings
Clicking the Edit button when multiple user environment settings are selected in the list
opens a dialog where the conditions can be edited for all selected settings.
NOTE: Editing conditions for multiple settings is only possible for settings that have
identical conditions (or no conditions at all).
Otherwise, an error message is displayed, indicating a pair of settings with different
conditions:
5.4.6 Importing settings
Using the Import ribbon button, you can import settings from another environment (see
chapter 8).
5.4.7 Exporting settings
The Export ribbon button creates a copy of the selected setting(s), either to another
environment (see chapter 8) or to a folder that you specify.

User Environment Manager
Page 71
5.5 ADMX-based Settings
With ADMX-based Settings, you can use standard ADMX templates to configure user
policies. The configured settings are applied by FlexEngine when the user logs on.
5.5.1 Managing ADMX Templates
Before you can create ADMX-based Settings definitions, you must import the ADMX
templates containing the policies that you want to configure. You do this in the Manage
ADMX Templates dialog, which is invoked by clicking the Manage Templates ribbon
button.
You can import all ADMX files (and the corresponding ADML files) from a folder (like
C:\Windows\PolicyDefinitions) using Add Folder…, or be more specific and use Add File…
to import templates one by one.
Instead of using the ADMX files from a Windows installation, you can also download the
full set of Administrative Templates (.admx) for Windows 8.1 and Windows Server 2012
R2 from the Microsoft web site. Similarly, you can download ADMX files for Office 2007,
Office 2010, and Office 2013.
Templates that are not used by any settings definition can be removed using Remove.
The Validate button performs a number of checks, to find ADMX templates that cannot be
used to define ADMX-based Settings. The most common validation results are listed
here:
Since VMware User Environment Manager manages the user environment,
computer policies (also known as machine policies) are not supported.
Such policies cannot be configured with ADMX-based Settings, so an ADMX
template containing only machine policies serves no purpose for User
Environment Manager.

User Environment Manager
Page 72
Policies that reference a Group Policy client-side extension are not
supported. If an ADMX template only contains such policies, it serves no
purpose for User Environment Manager.
Some ADMX templates define policies that store settings in non-policy
registry locations. Such policies cannot be configured with ADMX-based
Settings, so an ADMX template containing only non-policy locations serves
no purpose for User Environment Manager.
After you import ADMX templates, it is recommended to validate them and then remove
the templates that only contain unsupported settings or policies. Although this is by no
means necessary, it will improve the performance when managing ADMX-based Settings.
5.5.2 Creating an ADMX-based Settings definition
The way you create an ADMX-based Settings definition is very similar to using the
standard Windows Group Policy editor, but there is one major difference: instead of being
confronted with the full Administrative Templates tree, you select the categories from
which you want to configure policy settings.
To configure ADMX-based Settings:
1. Select the categories containing the policy settings you want to configure.
2. Edit policies from the selected categories.

User Environment Manager
Page 73
5.5.2.1 Selecting categories
The Select Categories dialog displays a tree with all categories, similar to the one in the
Windows Group Policy editor.
Only policies defined in the categories you select here will be available for editing, but
you can easily select additional categories later on (or deselect previously selected ones).
Using Search you can easily find the category or categories that you are looking for.
NOTE: There is no noticeable difference in performance between having a single ADMX-
based Settings definition containing many policy settings from a large set of categories
and having many individual ADMX-based Settings definitions that each only contain a
small set of related policy settings from a small number of categories.
5.5.2.2 Editing policies
Editing policies is very similar to using the Windows Group Policy editor:
The tree on the left displays the categories you selected before, and the pane on the
right shows the settings defined in a certain category.
Just like in the standard Group Policy editor, double-clicking a setting in the list brings up
the editing dialog for that setting.
The Select Categories… button displays the category selection dialog that was described
in the previous section. Here you can select additional categories or deselect previously

User Environment Manager
Page 74
selected ones. Note, however, that you cannot deselect a category containing configured
settings.
Show only Configured Settings toggles the view between displaying all settings or only
the ones that are configured.
Filtering allows you to easily find the settings or categories you’re looking for. In the
Filter dropdown you can select which aspects of the ADMX templates need to be checked
for the string you entered.
Once you’re done configuring policy settings, just close the dialog. The initial dialog now
contains a concise view of the configured settings:
5.5.3 Applying ADMX-based Settings
FlexEngine applies ADMX-based Settings during path-based import at logon. ADMX-based
Settings can also be refreshed during the session, either via a Triggered Task (cf. 5.17)
or from the command line (cf. Appendix A).
NOTE: FlexEngine will not overwrite existing information in the policy registry locations,
so if you use User Environment Manager ADMX-based Settings in combination with Active
Directory group policies and configure overlapping policy settings, Active Directory
settings will “win”.

User Environment Manager
Page 75
5.6 Application Blocking
Application blocking lets you control the folders from which applications can be started. If
a user attempts to run an application from another folder, the launch of that application
is blocked.
5.6.1 Enabling application blocking
By default, application blocking is disabled. To enable application blocking:
1. Click the Global Configuration ribbon button. The Application Blocking – Global
Configuration dialog is displayed.
2. Select the Enable Application Blocking checkbox and click OK.
You can configure conditions to control the users eligible for application blocking.
If application blocking is enabled, only executables from the Windows folder, C:\Program
Files, and C:\Program Files (x86) (on 64-bit operating systems) are allowed to run.
All other launches are blocked. See section 5.6.2 for additional configuration to allow or
block additional paths.
By default, when a user attempts to launch a blocked application, Windows Explorer
displays an error message, Your system administrator has blocked this program.

User Environment Manager
Page 76
To configure User Environment Manager to display a message of your choice, specify the
paths of the “parent” applications (typically C:\Windows\explorer.exe and
C:\Windows\System32\cmd.exe). If one of the configured parent applications attempts
to start a blocked application, the configured message is displayed instead of the default
message.
NOTE: The configurable message can only be displayed if DirectFlex is enabled for the
user’s session. Without DirectFlex, a blocked application remains blocked, and the
standard Windows error message is displayed.
5.6.2 Allowing and blocking additional paths
By default, application blocking allows executables to run only from the Windows folder,
C:\Program Files, and C:\Program Files (x86) (on 64-bit operating systems.)
Additional paths can be configured, to allow or to block applications. If a folder path is
specified, the path applies to all the files in the folder and its subfolders.
For example, the below settings block access to all executables in C:\Program
Files\Vendor\Suite and its subfolders, but grant access to a single executable in that
folder.
NOTE:
If an allowed entry and a blocked entry contain the same path, the blocked entry
will be ignored.
It is possible to allow specific files inside a blocked folder (as shown in the
example above), but it is not possible to allow subfolders of a blocked folder.
WARNING: Application blocking is a very useful feature, but make sure to very carefully
test your settings.

User Environment Manager
Page 77
5.7 Drive Mapping
Drive letter: The drive letter to assign.
Remote path: The UNC path of the share. Can contain environment variables.
Friendly name: (Optional) The description to use in Windows Explorer. Only available if
Run asynchronously is enabled.
Skip if drive letter is in use: (Optional) If enabled, the drive will not be mapped if the
specified drive letter is already mapped. If not enabled, an existing mapping will first be
removed.
Run once: (Optional) If enabled, the drive mapping will only be performed once. See
Appendix E for more information about Run once.
Undo at logoff: (Optional) If enabled, the drive will be unmapped at logoff.
Run asynchronously: (Optional) If enabled (the default and recommended value), the
drive mapping occurs in the background. If not enabled, FlexEngine waits for the drive
mapping to finish before continuing, potentially causing delays.
Combining Run once and Undo at logoff is not possible.
5.8 Environment Variables
Variable name: The name of the environment variable to set.
Value: The value that the variable will be set to. Can contain environment variables.
Run once: (Optional) If enabled, the environment variable will only be set once. See
Appendix E for more information about Run once.

User Environment Manager
Page 78
5.9 File Type Associations
Extension: The file extension that should be associated with an application.
All other settings can be read from a User Environment Manager shortcut (cf. 5.16): click
Select… and pick a shortcut from the list that is displayed. The settings for the file type
association are copied from the corresponding fields of the selected shortcut, and if
conditions are configured for the shortcut, they can optionally be copied as well.
Command: The command to start when a file with the specified extension is double-
clicked. Can contain environment variables, and supports the logic (cf. 5.4.2).
Browsing to App-V 4.x OSD files and App-V 5.0 packages is also supported (cf. 11.1.5
and 11.2.4, respectively).
Arguments: (Optional) The arguments with which the command is invoked. When a
command is selected in the browse dialog, this field is automatically set to "%1" (i.e. the
full path of the file that was double-clicked).
Icon path: (Optional) Path to a file containing the icon to use. When a command is
selected in the browse dialog, this field is automatically set to its path.
Can contain environment variables, and supports the logic (cf. 5.4.2).
Icon index: (Must be specified if icon path is configured) The index of the icon in the
configured icon path.
Description: (Optional) The description that is shown in Windows Explorer for this type.
Run once: (Optional) If enabled, the file type will only be associated once. See Appendix
E for more information about Run once.
Undo at logoff: (Optional) If enabled, the file type association will be removed at logoff.
Combining Run once and Undo at logoff is not possible.
If required, file type associations can be refreshed during a session using the UEM
Refresh feature (either via a Triggered Task (cf. 5.17) or from the command line (cf.
Appendix A)). To support refreshing a file type association, enable Undo at logoff.
NOTE: In Windows 8, file type associations set by VMware User Environment Manager
may not automatically become the default.

User Environment Manager
Page 79
5.10 Files and Folders
Defining Files and Folders Settings is similar to creating predefined settings (described in
4.5.2.1) with the exception that no registry settings can be defined.
Apply settings Before/After: Specifies whether the settings are imported before or
after profile archive import.
Run once: (Optional) If enabled, the files and folders settings will only be imported
once. See Appendix E for more information about Run once.
5.11 Folder Redirection
Remote path: The base folder to which subfolders are redirected. This path must be
user-specific, and can contain environment variables.
Folders to redirect: The profile folders that must be redirected to subfolders of the
location specified in Remote path. If Roaming Appdata is selected as a folder to redirect,
you can specify an alternative location.
NOTE: Existing folder content is not moved during redirection.
WARNING: Redirecting Desktop, Favorites, Programs Menu, or Roaming AppData might
lead to performance degradation.

User Environment Manager
Page 80
5.12 Horizon Policies
USB redirection: Determines whether USB redirection is enabled on the remote
desktop.
Printing: Determines whether virtual printing is enabled on the remote desktop.
Clipboard: Determines the direction in which clipboard redirection is allowed.
Client drive redirection: Determines whether the client drive redirection is enabled on
the remote desktop and whether shared drives and folders are writeable.
PCoIP: Configures a bandwidth profile for PCoIP sessions on the remote desktop.
NOTES:
Horizon policies are applied during logon and can be refreshed during reconnect
of a session. To reapply Horizon policies when a user reconnects to a session,
configure a Triggered Task (cf. 5.17)
When using multiple session per user, follow the steps described in the Applying
Horizon policies in multiple sessions section of Appendix A.
For more information about creating Horizon Policies, see the “Using Smart
Policies” section in Setting Up Desktop and Application Pools in the View
documentation.
5.13 Logon Tasks / Logoff Tasks
Command: The command to run. Can contain environment variables, and supports the
logic (cf. 5.4.2).
NOTE: Tasks run “invisible”, so they cannot be used to start applications or anything else
requiring user interaction.

User Environment Manager
Page 81
Timeout: (Optional) If configured, FlexEngine will wait at most this long for the
command to complete. If the command does not complete during this interval,
FlexEngine continues.
If not configured, FlexEngine will wait indefinitely for the command to complete.
The Timeout setting is not available if Run asynchronously is enabled.
Run task Before/After: Specifies whether the task is executed before or after profile
archive import (for logon tasks) or export (for logoff tasks).
Run once: (Optional) If enabled, the command will only be performed once. See
Appendix E for more information about Run once.
Run asynchronously: (Optional) If enabled, FlexEngine runs the command in the
background, without waiting for it to complete. Not available for tasks that run before
profile archive import or export.
For logoff tasks, combining Run once and Run asynchronously is not possible.
5.14 Printer Mappings
Remote path: The UNC path of the printer. Can contain environment variables. Note
that on Windows XP and Windows Server 2003 the Browse… functionality is not available.
Default printer: (Optional) If enabled, printer will be marked as the default.
Run once: (Optional) If enabled, the printer mapping will only be performed once. See
Appendix E for more information about Run once.
Undo at logoff: (Optional) If enabled, the printer will be unmapped at logoff.
Run asynchronously: (Optional) If enabled (the default and recommended value), the
printer mapping occurs in the background. If not enabled, FlexEngine waits for the
printer mapping to finish before continuing, potentially causing delays.
Combining Run once and Undo at logoff is not possible.
If required, printer mappings can be refreshed during a session using the UEM Refresh
feature (either via a Triggered Task (cf. 5.17) or from the command line (cf. Appendix
A)). To support refreshing a printer mapping, enable Undo at logoff.

User Environment Manager
Page 82
5.15 Registry Settings
Defining Registry Settings is similar to creating predefined settings (described in 4.5.2.1)
with the exception that only registry settings can be defined.
Apply settings Before/After: Specifies whether the settings are imported before or
after profile archive import.
Run once: (Optional) If enabled, the registry settings will only be imported once. See
Appendix E for more information about Run once.
5.16 Shortcuts
Shortcut name: The name of the shortcut.
Target: The item pointed to by the shortcut. Can contain environment variables, and
supports the logic (cf. 5.4.2).
If you browse to a shortcut on disk (a .LNK file), the fields are populated with the
shortcut’s properties. Browsing to App-V 4.x OSD files and App-V 5.0 packages is also
supported (cf. 11.1.5 and 11.2.4, respectively).

User Environment Manager
Page 83
Arguments: (Optional) The arguments with which the shortcut is invoked.
Start in: (Optional) The directory in which the shortcut should be started.
Run: How to display the target’s window (normal, minimized, or maximized).
Comment: (Optional) The shortcut’s tooltip text.
Icon path: (Optional) Path to a file containing the icon to use. When a target is selected
in the browse dialog, this field is automatically set to its path.
Can contain environment variables, and supports the logic (cf. 5.4.2).
Icon index: (Must be specified if icon path is configured) The index of the icon in the
configured icon path.
Destination: (At least one destination must be specified) Specifies where the shortcut(s)
must be created. If Programs folder is selected, an optional subfolder can be entered or
selected from a dropdown containing the subfolders specified in other shortcuts.
Skip if shortcut already exists: (Optional) If enabled, the shortcut will not be saved if
it already exists. If not enabled, an existing shortcut will be overwritten. Note that this
logic is applied separately for each selected destination.
Run once: (Optional) If enabled, the shortcut(s) will only be created once. See Appendix
E for more information about Run once.
Undo at logoff: (Optional) If enabled, the shortcut(s) will be removed at logoff.
Run asynchronously: (Optional) If enabled, the shortcut creation takes place in the
background. If not enabled, FlexEngine waits for the shortcut creation to finish before
continuing, potentially causing a small delay when many shortcuts are created during
logon.
Combining Run once and Undo at logoff is not possible.
If required, shortcuts can be refreshed during a session using the UEM Refresh feature
(either via a Triggered Task (cf. 5.17) or from the command line (cf. Appendix A)). To
support refreshing a shortcut, enable Undo at logoff.

User Environment Manager
Page 84
5.17 Triggered Tasks
Trigger: The event that is used to trigger this task. Choices are Lock workstation, Unlock
workstation, Disconnect session, and Reconnect session.
Only applies if (endpoint) IP has changed: (Optional) If Unlock workstation or
Reconnect session is selected, this additional setting controls whether the task should be
performed always, or only if the IP address (or, in the case of Reconnect session, the
endpoint IP address) has changed since the workstation was locked or the session was
disconnected, respectively.
This option can be used to perform tasks when the user’s network location has changed.
Action: The task to perform. Choices are:
DirectFlex refresh
DirectFlex configuration is normally only processed during logon, and any changes
made while a user is logged on will not be picked up during the session.
To re-read the DirectFlex configuration while a user is logged on, configure a
triggered task to perform a DirectFlex refresh.
User Environment refresh
Certain User Environment settings can be refreshed during the session. The
Refresh setting controls which type(s) of settings will be refreshed: ADMX-based
Settings, Application Blocking Settings, Drive Mappings, Environment Variables,
File Type Associations, Horizon Policies, Printer Mappings, and/or Shortcuts (at
least one of these must be specified).
NOTES:
Refreshing drive mappings, file type associations, printer mappings or
shortcuts is only possible for items for which Undo at logoff is enabled.

User Environment Manager
Page 85
Refreshing Horizon policies is best performed at the Reconnect session
trigger, to ensure that the Horizon remote desktop experience components
pick up the new policies.
Run custom command
Select this action to start a custom command. The Command setting can contain
environment variables, and supports the logic (cf. 5.4.2). You can specify
arguments to the command via the optional Arguments setting.
Display message
Select this action to display a message.
Show message: (Not available for Display message action) This setting controls
whether a message is displayed when the selected action is performed.
Caption: Specifies the caption of the message dialog. Can contain environment
variables.
Message: Specifies the message text. Can consist of multiple lines and can contain
environment variables.
Close automatically after … seconds: (Optional) If this setting is configured, the
message will automatically disappear after the specified number of seconds. Otherwise,
the message remains on the screen until the user dismisses it.
Also allow user to dismiss message: (Optional) If Close automatically after … seconds
is configured, this setting controls whether the user can dismiss the message before the
timeout has expired.
When running in a remote session, the following special environment variables are
available for use in custom commands or messages:
%CURRENT_CLIENTIP%
The endpoint IP address.
%PREVIOUS_CLIENTIP%
The previous endpoint IP address. This variable only exists for the Reconnect
session trigger and if the user is connecting from a different client.
%CURRENT_CLIENTNAME%
The endpoint name.
5.18 Display Language
Language: The Windows display language. Note that the selected value can only be
successfully applied if the corresponding language pack has been installed on the client.
Run once: (Optional) If enabled, the display language will only be set once. See
Appendix E for more information about Run once.

User Environment Manager
Page 86
5.19 Hide Drives
Hide drives: Select the drive letters that should be hidden in Windows Explorer.
5.20 Policy Settings
These settings correspond with the Group Policy settings available in Windows.
NOTE: Policy Settings are only available for backwards compatibility. If you want to
configure these policy settings, please use ADMX-based Settings (cf. 5.5) instead:

User Environment Manager
Page 87
6 Condition Sets
The Condition Sets ribbon of the Management Console contains all functionality for
creating and managing condition sets. Conditions are used to control whether and when
certain User Environment Manager actions are performed, and condition sets are used to
centrally group conditions that are then available for reuse.
This feature is only available if so configured (see 3.6.2.2).
Conditions and condition sets can be used in Flex config files (see section 4.9), user
environment settings (see section 5.4.3) and application migration (see section 7.3.1).
NOTE: Condition sets are stored in the FlexRepository subfolder of the General folder.
6.1 Ribbon buttons
Refresh List – Reloads the list of condition sets.
Group By Tag – Toggles between displaying a Tag column and grouping the settings by tag.
Create Condition Set – Creates a new condition set.
Edit Condition Set – Edits the condition set that is selected in the list.
Duplicate Condition Set – Duplicates the condition set that is selected in the list.
Import Condition Set – Import one or more condition sets from another environment (cf. 6.1.1).
Export Condition Set – Exports the selected condition set(s) (cf. 6.1.2).
Remove Condition Set – Removes the condition set that is selected in the list. This is only possible if no references to this condition set exist.
Find References – Shows where the condition set that is selected in the list is
used.
Configure – Displays configuration dialog (cf. 3.6.2).
Easy Start – Launches Easy Start (cf. 3.6.3).

User Environment Manager
Page 88
6.1.1 Importing condition sets
Using the Import ribbon button, you can import condition sets from another environment
(see chapter 8).
6.1.2 Exporting condition sets
The Export ribbon button creates a copy of the selected condition set(s), either to
another environment (see chapter 8) or to a folder that you specify.
6.2 Condition set properties
Condition sets must have a name and can also have a label and/or a tag.
As the name is used for referencing condition sets, it can only be modified if the condition
set is not in use. When you choose to edit the name of a condition set, the Management
Console checks whether it is in use. If so, the items that reference the condition set are
displayed, and renaming is prohibited.
The label and tag fields can be used to describe or organize the settings (the Group By
Tag ribbon button uses this tag field for grouping the list items).
When editing a condition set, the Previous and Next buttons can be used to open the
previous or next condition set (based on the current sort order of the list) for editing.

User Environment Manager
Page 89
6.3 Conditions overview
6.3.1 User interface
Conditions can be added and edited using the buttons at the top of the interface (the
condition set dialog when creating or editing a condition set, or the conditions tab when
using conditions on Flex config files or on user environment settings).
The Add dropdown button is used to add conditions, references to Condition Sets, and
condition groups (each described in more detail later in this chapter).
Edit allows modifying the condition details; with the dropdown ( ) you can specify
whether a condition should match or not, and how multiple conditions should be
combined.
Remove removes conditions, references to Condition Sets, and condition groups (note
that condition groups can only be removed if they are empty).
Conditions are evaluated in the order in which they are specified. Move Up and Move
Down can be used to modify this order (this can also be done via drag & drop).
The same actions can be performed from the context menu.
6.3.2 Combining and negating conditions
If multiple conditions are specified, they are by default “ANDed” together: the overall
result will be considered successful only if each condition is met.
Take the following example:
IF the client’s IP address is in the specified range AND the user is a member of the
specified group AND the client OS matches THEN the overall result will be successful.
Using the Edit dropdown or the context menu, conditions can be “ORed”, or negated
using “NOT”.
This now reads as follows: IF the client’s IP address is in the specified range AND
EITHER the user is NOT a member of the specified group OR the client OS matches
THEN the overall result will be successful.
NOTE: Conditions are evaluated from top to bottom, and evaluation stops as soon as the
overall result is known (so-called Boolean short-circuiting).
For instance, if two conditions are “ANDed” together and the first condition is false, the
second condition is not evaluated. Similarly, if two conditions are “ORed” together and
the first condition is true, the second is not evaluated.

User Environment Manager
Page 90
6.3.3 Condition groups
Conditions can be grouped together to build more powerful combinations. Condition
groups can be added via the Add dropdown button or the context menu.
Conditions can be added to a condition group from the context menu or by drag & drop.
An example:
This matches IF the client is running Windows XP AND Office 2003 is installed,
OR the client is running Windows Vista AND Office 2007 is installed.
6.3.4 Use 32-bit “Program Files” on 64-bit systems
Several conditions can refer to paths in the Program Files folder. If you specify a path
starting with C:\Program Files, C:\Program Files (x86) or a localized equivalent, a
button appears in front of the path. When clicked, you have the option to convert the
start of the path to %ProgramFiles% and resolve that variable to the 32-bit Program Files
folder on 64-bit systems.
6.4 Conditions
6.4.1 Battery
Checks whether the computer has a battery, or is running on battery.
6.4.2 Endpoint IP Address
Checks whether the endpoint IP address is in the specified range.
Empty octets at the start of the range are interpreted as 0, and ones at the end as 255.
The example specifies the IP range 172.17.0.0 – 172.17.255.255.

User Environment Manager
Page 91
6.4.3 Endpoint Name
Checks if the endpoint name matches the specified criterion.
6.4.4 Environment Variable
Checks whether the specified environment variable matches the specified criterion. The
comparison is case insensitive.
6.4.5 Exit Code
Runs the specified command, and compares the exit code with the specified value. The
command can contain environment variables and supports the logic (cf. 6.3.4).
NOTE: The command should not display any UI, as there is no way for the user to
interact with it.
NOTE: If no timeout is specified, FlexEngine will wait indefinitely for the command to
finish. If the command never finishes, FlexEngine hangs.
6.4.6 File or Folder
Checks if the specified file or folder exists. The specified path can be a directory or file
name, and the last component of the path can contain wildcards.
The path can contain environment variables, and supports the logic (cf. 6.3.4).
When creating a new File or Folder condition for a file type association (cf. 5.9) or
shortcut (cf. 5.16), the path will be automatically set to the corresponding field of the
user environment setting.

User Environment Manager
Page 92
6.4.7 File Version
Checks the file version or product version of the specified file. This will typically be a .EXE
file, but any file with a version resource can be used.
The file name can contain environment variables, and supports the logic (cf. 6.3.4).
When creating a new File Version condition for a file type association (cf. 5.9) or shortcut
(cf. 5.16), the file name will be automatically set to the corresponding field of the user
environment setting.
To perform an exact version comparison, specify all four components of the version
number. For a partial comparison, leave out the less significant ones – in the example
above, any 8.0.x.y version of App.exe would match.
6.4.8 Group Membership
Checks if the computer or the user is a member of the specified group. Note that the
Browse… functionality is only available on domain-joined computers.
NOTE: Using Browse… to select a group additionally stores the group’s SID in the
condition, which FlexEngine can use for certain fallback scenarios (like working offline).
6.4.9 Horizon Client Property
Checks whether the specified Horizon Client Property matches the specified criterion. The
comparison is not case sensitive.
The Property drop-down menu contains three common properties. You can also enter the
property name. The property name must be specified without the ViewClient_ prefix.
These property names correspond with the names of ViewClient_ registry settings. For
more information about registry settings, see “Using the Horizon Client Property
Condition” in Setting Up Desktop and Application Pools in the View document.
NOTE: The Horizon Client Property condition can only be used for PCoIP or VMware Blast
Extreme connections.

User Environment Manager
Page 93
6.4.10 IP Address
Checks whether one of the network adapters has an IP address in the specified range.
Empty octets at the start of the range are interpreted as 0, and ones at the end as 255.
The example specifies the IP range 172.17.0.0 – 172.17.255.255.
6.4.11 Operating System Architecture
Checks the architecture (32-bit or 64-bit) of the operating system FlexEngine is running
on.
6.4.12 Organizational Unit
Checks if the computer or user is a (direct or indirect) member of the specified
organizational unit. Note that the Browse… functionality is only available on domain-
joined computers.
The Ignore domain option can be useful in DTAP scenarios, where you create your
configuration in one domain and deploy it in another domain, while maintaining the same
OU structure.
6.4.13 Registry Key
Checks if the specified registry key exists in the selected registry hive.
6.4.14 Registry Value

User Environment Manager
Page 94
Checks if the specified registry value matches the specified criterion.
If the name (“Installed” in the example above) is empty, the (Default) value is checked.
6.4.15 Remote Display Protocol
Checks the remote display protocol for the current session.
6.4.16 Windows Version
Checks the Windows version of the system FlexEngine is running on.

User Environment Manager
Page 95
7 Application Migration
The Application Migration ribbon of the Management Console contains all functionality for
creating and managing application migration settings.
This feature is only available if so configured (see 3.6.2.2).
NOTE: Application migration settings are stored in the FlexRepository subfolder of the
General folder.
7.1 Ribbon buttons
Refresh List – Reloads the list of application migration settings.
Group By Tag – Toggles between displaying a Tag column and grouping the settings by tag.
Create Application Migration Setting – Creates a new setting.
Edit Application Migration Setting – Edits the selected setting. If multiple settings are selected, only the conditions can be edited (cf. 7.1.1).
Duplicate Application Migration Setting – Duplicates the selected setting.
Import Application Migration Setting – Import one or more settings from another environment (cf. 7.1.2).
Export Application Migration Setting – Exports the selected setting(s) (cf. 7.1.3).
Remove Application Migration Setting – Removes the setting that is selected in
the list.
Configure – Displays configuration dialog (cf. 3.6.2).
Easy Start – Launches Easy Start (cf. 3.6.3).

User Environment Manager
Page 96
7.1.1 Editing conditions for multiple settings
Clicking the Edit button when multiple application migration settings are selected in the
list opens a dialog where the conditions can be edited for all selected settings.
NOTE: Editing conditions for multiple settings is only possible for settings that have
identical conditions (or no conditions at all).
Otherwise, an error message is displayed, indicating a pair of settings with different
conditions:
7.1.2 Importing settings
Using the Import ribbon button, you can import application migration settings from
another environment (see chapter 8).
7.1.3 Exporting settings
The Export ribbon button creates a copy of the selected setting(s), either to another
environment (see chapter 8) or to a folder that you specify.
7.2 General info
Each application for which you want to migrate the users’ personal settings needs an
entry in the Application Migration ribbon of the Management Console. Here you specify
the Flex configuration files for the “old” and “new” application versions, and the migration
XML file that describes the migration steps.

User Environment Manager
Page 97
7.3 Settings
Application migration settings must have a name and can also have a label and/or a tag.
The label and tag fields can be used to describe or organize the settings (the Group By
Tag ribbon button uses this tag field to group the list items by).
When editing an application migration setting, the Previous and Next buttons can be used
to open the previous or next setting (based on the current sort order of the list) for
editing.
Source: The Flex config file corresponding with the “old” version of the application.
Target: The Flex config file corresponding with the “new” version of the application.
Overwrite target profile archive: If enabled, the migration will be performed always.
If not enabled, the migration will be skipped if the target profile archive already exists.
Migration XML: The XML configuration file that defines the migration steps. The
selected file will be copied to the application migration settings folder.
Log file: (Optional) The name of the migration log file. If a relative path is specified, it
will be resolved relative to the user’s profile archive folder.
The path can contain environment variables.
Verbose logging: (Optional) Controls the level of detail in the log file.
Run once: (Optional) If enabled, the settings will only be migrated once. See Appendix E
for more information about Run once.

User Environment Manager
Page 98
7.3.1 Conditions
By default, an application migration will be performed by FlexEngine at every logon. If
you configure conditions for an application migration, it will only be performed if the
specified conditions are met.
Chapter 6 describes conditions in detail. One additional note applies for conditions on
application migration settings: it is possible to reference Condition Sets (centrally defined
collections of conditions, also described in detail in chapter 6).
7.4 Migration XML
The VMware User Environment Manager download package contains a migration XML file
for converting settings between Office versions.
If you want to migrate settings of other applications, you can create your own migration
XML files. The structure of the migration XML format is described in Appendix B.

User Environment Manager
Page 99
8 Managing Multiple Environments
VMware User Environment Manager Management Console supports scenarios with
multiple environments, such as different customers, DTAP, or separately managed
organizational divisions, for instance.
You can use the traditional mechanisms like Active Directory Group Policies and file
services to make a design that suits your organization’s needs.
The concept is straightforward. For each “environment” you define, a UEM configuration
share needs to be created, as well as a Group Policy with the environment-specific paths
configured.
You then target the User Environment Manager Group Policies to the appropriate users
depending on to which environment they belong, for instance, based on Active Directory
Organizational Unit. You can use a single instance of the Management Console to manage
these environments as described in this section.
NOTE: When multiple environments are configured in the Management Console, it is
possible to import and export User Environment Manager configuration items between
environments.
8.1 Configuring environments
Environments can be configured through the Configure Environments menu option:

User Environment Manager
Page 100
A list of configured environments is displayed:
If no environments are configured yet, the Add environment dialog is displayed
automatically, with the current UEM configuration share filled in:
Environment names must be unique, as they are used to distinguish one environment
from the next. The location corresponds to the UEM configuration share (cf. 3.6.1) and
must be specified as a UNC path.
The environment that is currently active cannot be edited or removed. Note also that
removing an environment only removes the entry from the list; the User Environment
Manager configuration files for that environment are not affected at all.
8.2 Selecting an environment
If multiple environments are configured, the Management Console asks to select one at
startup:

User Environment Manager
Page 101
To mark an environment as the default selection, check the Use as default environment
option – the next time the Management Console starts, this environment will be selected
automatically.
The selected environment is displayed in the title bar:
Switching between environments is possible using the Switch Environment menu option.
NOTE: When only a single environment is configured, the Management Console will
automatically use that environment, and the Switch Environment menu option will be
disabled.
8.3 Group Policy configuration
If you are managing multiple VMware User Environment Manager environments with a
team of administrators, it is possible to configure these environments through Group
Policy using the VMware UEM Management Console ADMX template available in the User
Environment Manager download package.
If environments are configured via policy, the Configure Environments menu option and
the Configure button on the ribbon are not available. If only a single environment is
configured via policy, the Switch Environment menu option is not available either.

User Environment Manager
Page 102
9 Locking down access to the
Management Console
If environments are configured via policy (cf. 8.3), it is also possible to lock down access
to the Management Console.
Using the Lock down access to VMware UEM Management Console policy setting (defined
in the VMware UEM Management Console ADMX template available in the download
package) you can configure which features of the Management Console are available.
Enabling this setting completely locks down the Management Console: none of the
features are available. With the policy’s options you can then configure access to certain
features:
Personalization ribbon
User Environment ribbon – configured per user environment setting type
Condition Sets ribbon
Application Migration ribbon
Importing User Environment Manager configuration items from other
environments
Exporting User Environment Manager configuration items to other environments
or a folder on disk

User Environment Manager
Page 103
For instance, enabling the policy and only allowing access to four user environment types
and to export functionality leads to the following interface:
NOTE: If access is locked down, some features are not available or behave differently:
The Configure ribbon button is not available.
The Easy Start ribbon button is not available.
The Configure Helpdesk Support Tool menu option (cf. 13.2.7) is not available.
In ADMX-Based Settings, the Manage Templates ribbon button is not available.
In the Personalization tree view, the Explore and Properties menu items are not
available.
In various locations of Personalization, full path information about User
Environment Manager items is suppressed.
NOTE: Locking down access to the Management Console does not lock down file system
access to the UEM configuration share.

User Environment Manager
Page 104
10 VMware User Environment Manager
in a silo environment
In many environments using Terminal Servers and Citrix XenApp, applications are pooled
in application silos: separate sets of servers hosting different applications. In
environments like these, users simultaneously log on to different servers to use their
applications. When using a single roaming profile, profile corruption or loss of personal
settings is bound to happen. When a roaming profile is updated and loaded on different
servers at the same time, the risk of profile-related problems increases dramatically.
Windows 2003 and later allow a separate profile path for Terminal Servers to be
configured through Group Policy. Separate profile paths for each silo may have a big
impact on the number of profiles you will need to manage.
Through its integration into Group Policy, User Environment Manager allows separate
configuration settings for application silos. This is done by using the appropriate VMware
User Environment Manager Administrative Template settings, and combining them with
the Loopback processing of Group Policy solution, as described on the Microsoft support
website.
To have the most convenient Group Policy configuration, it is recommended to create a
separate OU in Active Directory for each silo. After enabling Silo support in the
Management Console configuration, as described in section 3.6.2.1, you can create a silo
tree similar to the OU structure for the silos.
For each silo you need to create a separate Group Policy Object containing the silo-
specific User Environment Manager configuration. Clicking on the relevant silo in the

User Environment Manager
Page 105
Management Console displays the silo-specific settings you need to configure in the
VMware UEM Group Policy Object, as shown in the screenshot above.
For each silo Group Policy Object you must configure the Silo-specific Flex config files
setting to point to the corresponding config file path. In this case Flex config files from
both the Flex config file path (typically the General folder) and the silo-specific path will
be processed. All other User Environment Manager features, like user environment
settings and condition sets will be used generally and are not silo-specific.
If you want even more separation between silos, it is advised to treat each silo as a
separate User Environment Manager environment as described in chapter 8.

User Environment Manager
Page 106
11 Microsoft App-V support
Managing the profile information for App-V-enabled applications with VMware User
Environment Manager provides the following benefits:
App-V 4.x – Decouple personal application settings from the App-V Delta files
(.PKG) proprietary format.
Using App-V 4.x, there is practically no control over what is stored into the user
delta (.PKG), which in some cases can grow extensively. With User Environment
Manager you can explicitly configure what settings need to be restored and saved
at application startup and shutdown, making you independent of the .PKG files.
App-V 5.0 – Decouple personal application settings from the App-V 5.0
“redirected” storage locations.
Using App-V 5.0, all personalization changes are stored in “redirected” locations in
the user profile. With User Environment Manager you can restore and save the
personalization at application startup and shutdown, making you independent of
the “redirected” storage locations and providing roaming capabilities without
depending on traditional roaming profiles.
Migrate user application settings from installed instance to virtual instance.
When moving from traditional installations (e.g. MSI) to App-V-enabled
(sequenced) applications, users lose their personal settings for those applications
because these settings are stored in the “real” and native location of their
Windows user profile. Using User Environment Manager in such a transition
scenario, it is possible to migrate settings you specify to the App-V-enabled
applications. This even works in a scenario where you now run Windows XP with
MSI installations and you are migrating to Windows 7 with App-V-enabled
applications.
A single, transparent way to manage all user/application settings.
This is an especially good way to manage user settings for scenarios where
different deployment solutions are being used and users work on different
Windows platforms. For example, when users are connecting to remote desktops
on TS or VDI and are also working on traditional desktops. With User Environment
Manager it is also possible to manage user settings for both virtual and installed
applications in the same way.
Migrate user application settings from App-V 4.x to App-V 5.0.
When migrating from App-V 4.x to App-V 5.0 only the application sequence is
migrated and users will lose their personal application settings. With User
Environment Manager it is very easy to migrate this personalization from App-V
4.x to App-V 5.0. It is even possible to roam personalization back-and-forth
between App-V 4.x and App-V 5.0 applications.
When managing user settings for App-V-enabled applications, it is necessary to restore
and save these settings at application startup and shutdown, because the “real” registry
and file information does not apply for the virtual environment these applications run in.

User Environment Manager
Page 107
Microsoft App-V 4.x supports running custom commands and scripts at application
startup and shutdown from the App-V 4.x application configuration file (.OSD), which
exists for each application. Using this mechanism, User Environment Manager can run
within the virtual application environment of App-V 4.x applications by launching
FlexEngine with the appropriate arguments.
NOTES:
It is not possible to enable App-V 4.x integration for a Flex configuration file that
is configured to use DirectFlex, unless you enable this in the advanced App-V
settings (cf. 11.1.1.1.2).
Due to the architectural changes in App-V 5.0, the personalization support in User
Environment Manager for App-V 5.0 is less complex, and simply capable of using
the DirectFlex feature to manage personalization for App-V 5.0 applications.

User Environment Manager
Page 108
11.1 App-V 4.x integration
11.1.1 Configuration
Before App-V 4.x integration can be enabled, some configuration settings need to be
specified:
OSD files path: The default root location for your App-V 4.x OSD files. This path is used
as the starting location when browsing for an OSD file in which you want to integrate a
Flex config file.
FlexEngine path: The location of FlexEngine.exe on the computers that will be using
the App-V applications that you have integrated with User Environment Manager. The
standard installation location is used as a default for this setting, but this might not be
applicable in your environment.
Profile archives path: The directory where the user’s profile archives will be stored and
read from.
Backup path: (Optional) The directory where backups of the user’s profile archives will
be stored.
NOTE: Make sure to configure Profile archives path and Backup path to the same
settings as used in the User Environment Manager Group Policy configuration (section
3.4.2).
If all mandatory settings are configured, App-V 4.x support can be enabled and an
additional App-V 4.x tab is displayed in the Personalization feature of the Management
Console.

User Environment Manager
Page 109
11.1.1.1 Advanced App-V 4.x settings
Typically, configuring the advanced App-V 4.x settings is not necessary. Only use these
settings if your specific scenario requires this.
11.1.1.1.1 Environment Variable Name
For the very specific scenario where the path to the UEM configuration share depends on
the user location, you can configure the App-V 4.x integration to use an environment
variable.
NOTE: You must define the configured environment variable in Windows for all users, or
the App-V 4.x application will not work.
NOTE: This advanced setting should only be used in this particular scenario.
11.1.1.1.2 Combining DirectFlex and App-V 4.x integration
By default, it is only possible to enable either DirectFlex or App-V 4.x integration for a
single Flex config file. Depending on your environment, you might want to support
combining these settings.

User Environment Manager
Page 110
11.1.2 Adding App-V 4.x integration
To manage settings for an App-V 4.x application with VMware User Environment
Manager, the application’s .OSD file (an App-V 4.x configuration file) needs to be
integrated with a Flex config file. To do so, select the Flex config file in the tree, and click
the Integrate button on the App-V 4.x tab to display the App-V 4.x Integration Wizard. In
this wizard you can select the App-V OSD file in which you want to integrate this Flex
config file.
After selecting an App-V OSD file, the wizard provides you with some information
retrieved from the OSD file. In this screen you can also specify whether you wish to
overrule the globally configured progress information, which displays a splash screen
with progress bar during application startup and shutdown.
Click Integrate to continue. Before modifying the App-V OSD file, the Management
Console will make a backup (in the folder of the OSD file).
Once the App-V 4.x integration has taken place, the following information is shown:
NOTE: The Process during logon and logoff option is automatically turned off when you
enable App-V 4.x integration – see also 4.8.1.

User Environment Manager
Page 111
11.1.3 Integrating multiple OSD files
If you want to integrate the Flex config file with additional OSD files, click Add… and
select another OSD file to integrate with. (If there is no Add… button, see the next
section).
Note that it is only possible to integrate with OSD files from the same App-V 4.x (.SFT)
package. Also, subsequent integrations reuse the Progress Display settings you selected
initially.
11.1.4 Removing App-V 4.x integration
To remove the App-V 4.x integration from an OSD file, select it in the list and click
Remove.
11.1.5 User Environment file type associations and
shortcuts
When creating user environment file type associations (cf. 5.9) or shortcuts (cf. 5.16), it
is possible to browse to an App-V 4.x OSD file.
The relevant fields of the user environment setting will then be filled in automatically,
based on the selected OSD file.

User Environment Manager
Page 112
11.2 App-V 5.0 support
11.2.1 Configuration
.APPV files path: (Optional) The default root location for your App-V 5.0 package
(.APPV) files.
If App-V 5.0 support is enabled, an additional App-V 5.0 section is displayed on the
DirectFlex tab in the Personalization feature of the Management Console.
11.2.2 Configuring DirectFlex for an App-V 5.0 package
To configure DirectFlex support for an App-V 5.0 package, select Enable App-V 5.0
support in the App-V 5.0 section on the DirectFlex tab.
After enabling App-V 5.0 support, the dialog that is used to add DirectFlex executables
also supports importing information from an App-V 5.0 package.
After clicking on Import from .APPV file… and browsing to the App-V 5.0 package (.APPV)
file, the executables found in the package are displayed.
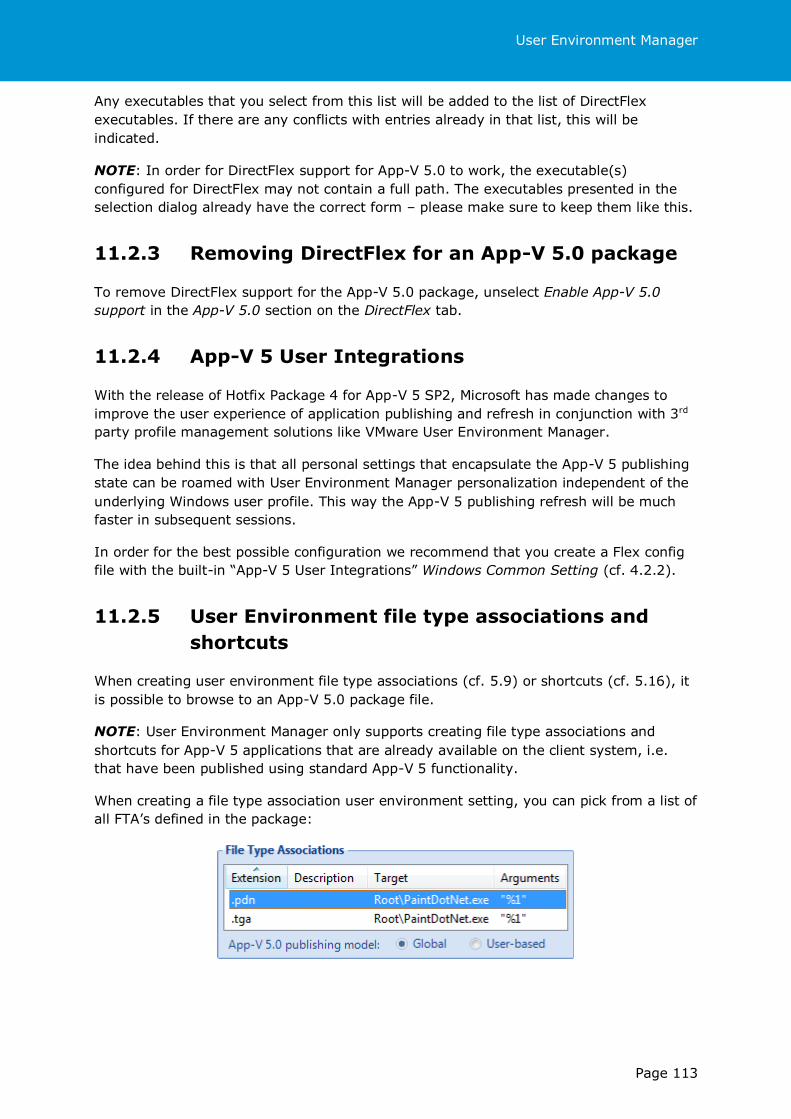
User Environment Manager
Page 113
Any executables that you select from this list will be added to the list of DirectFlex
executables. If there are any conflicts with entries already in that list, this will be
indicated.
NOTE: In order for DirectFlex support for App-V 5.0 to work, the executable(s)
configured for DirectFlex may not contain a full path. The executables presented in the
selection dialog already have the correct form – please make sure to keep them like this.
11.2.3 Removing DirectFlex for an App-V 5.0 package
To remove DirectFlex support for the App-V 5.0 package, unselect Enable App-V 5.0
support in the App-V 5.0 section on the DirectFlex tab.
11.2.4 App-V 5 User Integrations
With the release of Hotfix Package 4 for App-V 5 SP2, Microsoft has made changes to
improve the user experience of application publishing and refresh in conjunction with 3rd
party profile management solutions like VMware User Environment Manager.
The idea behind this is that all personal settings that encapsulate the App-V 5 publishing
state can be roamed with User Environment Manager personalization independent of the
underlying Windows user profile. This way the App-V 5 publishing refresh will be much
faster in subsequent sessions.
In order for the best possible configuration we recommend that you create a Flex config
file with the built-in “App-V 5 User Integrations” Windows Common Setting (cf. 4.2.2).
11.2.5 User Environment file type associations and
shortcuts
When creating user environment file type associations (cf. 5.9) or shortcuts (cf. 5.16), it
is possible to browse to an App-V 5.0 package file.
NOTE: User Environment Manager only supports creating file type associations and
shortcuts for App-V 5 applications that are already available on the client system, i.e.
that have been published using standard App-V 5 functionality.
When creating a file type association user environment setting, you can pick from a list of
all FTA’s defined in the package:

User Environment Manager
Page 114
When creating a user environment shortcut, a similar list is displayed:
In both cases, the relevant fields of the user environment setting are filled in with
information read from the App-V package.
NOTE: Be sure to set App-V 5.0 publishing model to the model that you have used when
publishing the corresponding App-V 5 package.

User Environment Manager
Page 115
12 Upgrading This chapter describes how to upgrade from a previous version of VMware User
Environment Manager, or from Immidio Flex+ 8.x.
The upgrade is very straightforward, using the following recommended steps (in order):
1. Upgrade FlexEngine on all Windows desktops and / or Terminal Servers.
2. Upgrade the Management Console.
3. Go through all Flex configuration files containing Application Templates or
Windows Common Settings, to have them automatically update to the new
definitions.
4. Install the ADMX templates from the VMware User Environment Manager
download package and remove the old Immidio Flex+ ADMX templates.

User Environment Manager
Page 116
13 VMware User Environment Manager
Self-Support
VMware User Environment Manager Self-Support is meant to run on client systems with
FlexEngine deployed and configured through Group Policy. In particular, the Group Policy
settings Flex config files and Profile archives must be configured (see section 3.4.2
for more information).
NOTE: VMware User Environment Manager Self-Support is aimed at users. For User
Environment Manager administrators or helpdesk staff, VMware provides User
Environment Manager Helpdesk Support Tool (cf. 13.2.7).
13.1 Using VMware User Environment Manager
Self-Support
When VMware User Environment Manager Self-Support is started, it displays a list of the
applications that are managed with User Environment Manager:
If the list contains many applications, Search Application can be used to filter on part of
the application’s name:

User Environment Manager
Page 117
13.1.1 Reset to defaults
Once an application is selected in the list, the Reset button becomes enabled. When
clicked, a confirmation message appears.
If the action is confirmed, the profile archive corresponding to the selected application
will be deleted. At the next logon (or, in the case of a DirectFlex or App-V application:
the next time the application is started) the application settings will be back at their
defaults, depending on the following implementation considerations.
When using a mandatory profile as a base profile, no further configuration is
required to support resetting to the default settings.
When using a local or roaming profile as a base profile, one of the following
configuration settings must be applied for each application you manage with User
Environment Manager to support resetting to the default settings:
o Use the Profile Cleanup feature (see section 4.4) to delete the application-
specific profile information at each logoff.
o Use the Predefined Settings feature (see section 4.5.2.1) to configure the
default settings.
13.1.2 Restore from backup
When an application is selected in the list for which profile archive backups exist, the
Restore button is enabled. When clicked, a list of backups appears.
When a backup is selected from the list, a confirmation message appears. If the action is
confirmed, the selected backup is restored. At the next logon (or, in the case of a
DirectFlex or App-V application: the next time the application is started) the application
settings will be back to the state they were in when the backup was created.
13.2 Miscellaneous
13.2.1 Applications not showing up for self-support
There are a number of reasons why an application may not be displayed in VMware User
Environment Manager Self-Support:
The application’s Flex config file is explicitly configured to be hidden from VMware
User Environment Manager Self-Support (cf. 4.6).
The Flex config file has been retired (cf. 4.1.6).
Neither a profile archive nor profile archive backups exist.

User Environment Manager
Page 118
13.2.2 Logging
If the FlexEngine logging Group Policy setting is configured, VMware User Environment
Manager Self-Support will log its reset and restore actions to the specified log file.
If a user resets the settings for an application, this is logged as:
Self-Support: Reset settings for '...'
If settings are restored from backup, this is logged as:
Self-Support: Restored settings for '...' to backup of date
NOTE: This message is logged at log level INFO.
13.2.3 Preventing access
Depending on your implementation scenario, you might want to prevent access to
VMware User Environment Manager Self-Support for a certain group of users.
This can be done through the Prevent access to VMware UEM Self-Support Group
Policy setting described in section 3.4.2. If this setting is enabled, the following message
is displayed when a user tries to start VMware User Environment Manager Self-Support:
13.2.4 Language support
VMware User Environment Manager Self-Support displays its user interface in English,
German or Dutch, based on the “Display Language” setting in Windows. If the configured
language is not supported, the UI defaults to English.
If you wish to override the language detection mechanism, you can do so by using the
/lang argument:
"Flex+ Self-Support.exe" /lang=de
To select English, use /lang=en; for Dutch, /lang=nl.

User Environment Manager
Page 119
13.2.5 Tray support
VMware User Environment Manager Self-Support can be configured to reside in the
taskbar notification area (also known as the “system tray” or “tray”). To do so, use the
/tray argument:
"Flex+ Self-Support.exe" /tray
NOTE: On Windows 7 or newer, the icon might be hidden. In that case, select Show
hidden icons in the notification area and change the configuration for VMware User
Environment Manager Self-Support to “Show icon and notifications”.
13.2.6 Customizing the logo
If a file Flex+ Self-Support.png is found in the VMware User Environment Manager
Self-Support installation folder, it is used instead of the VMware logo. For best results,
create a PNG file of 369 x 83 pixels.
13.2.7 VMware User Environment Manager Helpdesk
Support Tool
VMware User Environment Manager Helpdesk Support Tool is an additional and optional
component that provides support capabilities for profile archives and profile archive
backups through an intuitive graphical user interface. It can be used by User
Environment Manager administrators themselves or it can be made available to another
department that is in charge of providing support in the area of personalization.
VMware User Environment Manager Helpdesk Support Tool is described in detail in its
own Administrator’s Guide, but one aspect warrants mentioning here: the Helpdesk
Support Tool Configuration dialog that is available via the main menu.

User Environment Manager
Page 120
14 External information and downloads
VMware User Environment Manager lets you manage Windows profiles, and uses logon
and logoff scripts. It is required to get some familiarity with commonly available standard
documents and tools.
For more information, see how to create a customized mandatory profile on
Windows 7 and Windows Server 2008 R2.
If you encounter issues running logon scripts on Windows 7 and Windows Server
2008 R2 synchronously, download and install the hotfix from the Microsoft Web
Site.

User Environment Manager
Page 121
Appendices

User Environment Manager
Page 122
Appendix A - FlexEngine command line arguments
When FlexEngine starts, it first reads its Group Policy configuration (if any), and then
reads the command line arguments specified (if any).
NOTE: Command line arguments override the settings provided through Group Policy.
FlexEngine operations
FlexEngine can perform two main operations: -s stores profile information (typically used
at logoff), and -r reads profile information (typically used at logon).
FlexEngine arguments
The operations are further configured using additional arguments, some of which are
optional (●), some of which mandatory (x):
Description -s -r
-i Argument value config specifies the Flex configuration file(s) to use. x x
1
-S First argument value silo path specifies silo-specific configuration files
to use. Second argument value suffix specifies suffix to use in profile archive and backup folders – if value is an empty string, the last folder of silo path is used as suffix.
●
2 ●
2
-R Indicates that the config directory (and the silo path directory, if configured) should be processed recursively, i.e. also processes Flex configuration files in subfolders. Ignored for file-based operations.
● ●
-b Argument value backup path specifies the location for profile archive backups. If not specified, no backups are created.
●
-B Argument value backup count indicates how many backups to create. ● -Bd Indicates that a single backup should be created per day. ● -C Enables compression for profile archives. Note that FlexEngine can read
both compressed and uncompressed archives regardless of this setting – this switch only controls the creation of archives.
●
-c Enables certificate support for mandatory profiles. ●
2 ●
2 -F Indicates that export should be performed always, regardless of
whether the previous import was successful. ●
2 ●
2
-M Argument value log size specifies the maximum size of the log file in
kilobytes. If the log file is larger than that size at the start of an import or export action, the log file is cleared.
●
2 ●
2
-L Restores “last modified” dates for imported files. ● -H Marks the profile archive folder and the backup folder (if configured) as
hidden after a path-based export. ●
2
-v Verbose mode: displays a splash screen with a progress bar. ● ●
-f Argument value log file specifies the name of the log file. ● ●
-l Argument value log level specifies what information should be logged. log level can be DEBUG, INFO, WARN (the default), ERROR, or
FATAL.
● ●
-rw Refreshes Windows appearance. ●
2 -rk Refreshes keyboard settings. ●
2 -rm Refreshes mouse settings. ●
2 -ra Combination of the three options above. ●
2
1 Mandatory for path-based; not applicable for file-based. x mandatory
2 Optional for path-based; not applicable for file-based. ● optional

User Environment Manager
Page 123
File-based mode versus path-based mode
The -s and -r operations can operate on a single profile archive (file-based mode), but
they can also operate on a directory of profile archives (path-based mode). This mode is
determined from the path that is specified as the next argument (-s \\...\ie.zip vs
-s \\...\...\Archives, for instance); if no path is specified, the corresponding policy
setting is used.
Depending on this mode (file-based or path-based), some of the other arguments need
to “follow suit”: for file-based operations, the -i argument must be a Flex config file, the
-r/-s argument must be a profile archive file, and the -b argument must also be a file.
In path-based mode, the -i, -r/-s, and -b arguments must all refer to directories.
Overriding Group Policy settings
Command line arguments for FlexEngine take precedence over settings configured
through Group Policy. For instance, if you set the log level to ERROR through policy, but
specify -l DEBUG on the command line, the latter will be used.
It is also possible to reset an argument that has been configured through policy (in effect
making it “unconfigured”), by appending a - (dash) to the command line argument. For
instance, if you have configured a backup path through policy, but want to run an export
without creating backups, you can specify -b-.
The following arguments can be reset: -S, -R, -b, -B, -Bd, -C, -c, -F, -M, -L,
-H, -v, -f, -l, -rw, -rk, -rm, and -ra.
Applying Horizon policies in multiple sessions
When using a Horizon Remote Desktop in combination with Horizon Remote Applications,
the same user can have multiple sessions on the same computer. To correctly apply
Horizon policies in such a scenario, you must configure logon and logoff scripts as
described in sections 3.5.1 and 3.5.2, respectively, with an additional command line
argument.
For the logon script, specify the following arguments: -HorizonMultiSession -r.
For the logoff script, specify the following arguments: -HorizonMultiSession -s.
NOTE: -HorizonMultiSession must be the first argument.

User Environment Manager
Page 124
Additional FlexEngine operations
In addition to -r and -s, FlexEngine supports three other modes of operation.
-OfflineImport
When a computer is offline and a user logs on with cached credentials, Group Policy
client-side extensions do not execute. If FlexEngine is configured to run as a Group Policy
extension (cf. 3.4.2), this means that no import would take place in such a scenario.
As a fallback approach, just configure a logon script as described in 3.5.1 but instead of
the -r script parameter, specify -OfflineImport.
If FlexEngine is run with this argument, it checks whether an import has already taken
place. If so, it exits quietly. If not, a path-based import is performed, using the
configuration from the VMware UEM Group Policy.
-DirectFlexRefresh
DirectFlex configuration is processed during logon. If you add Flex config files with
DirectFlex enabled, or modify DirectFlex-related settings of existing files while a user is
logged on, these changes will not be automatically picked up during the session.
This is typically not an issue, but if you so require, an update can be forced by running
the following command in the user’s session:
"C:\Program Files\Immidio\Flex Profiles\FlexEngine.exe" -DirectFlexRefresh
-UemRefresh
User Environment settings are applied at logon. For certain types of settings, you can
perform a refresh while the user is logged in.
-UemRefresh performs a refresh of UEM file type associations, shortcuts, and printer
mappings. For a more granular refresh, use -UemRefreshFtas, -UemRefreshShortcuts,
-UemRefreshPrinters, -UemRefreshADMX (to refresh UEM ADMX-based settings),
-UemRefreshDrives (to refresh UEM drive mappings), -UemRefreshEnvVars (to refresh
UEM environment variables), -UemRefreshApplicationBlocking (to refresh UEM
application blocking settings), or -UemRefreshHorizonPolicy (to refresh UEM Horizon
policies).
You can combine the arguments. Also, note that -UemRefresh only refreshes UEM file
type associations, shortcuts, and printer mappings.
NOTES:
Refreshing drive mappings, file type associations, printer mappings or shortcuts is
only possible for items for which Undo at logoff is enabled.
Although Horizon policies can be refreshed at any time, whether changes actually
take effect at that time depends on the Horizon remote desktop experience
components.

User Environment Manager
Page 125
Appendix B - Creating migration XML files
The VMware User Environment Manager download package contains an XML Schema
definition (the Migrate10.xsd file in the Application Migration XML Files folder) for
the migration XML vocabulary. In some XML editors you can use this file to validate your
migration XML file or to provide context-sensitive help.
The download package also contains a sample migration XML file (Application
Migration Sample.xml) containing examples for each migration action.
B-1 General structure
The general structure of a migration XML file is as follows:
<?xml version="1.0" encoding="UTF-8"?> <migrate xmlns="http://www.immidio.com/Schemas/Flex/Migrate10/"> <registry> … registry actions … </registry> <filesystem> … file system actions … </filesystem> </migrate>
Section B-2 describes the actions that can be used within the <registry> element, and
section B-3 describes the <filesystem> actions.
Registry actions are performed first, followed by file system actions. The registry and file
system actions are performed in the order they are listed in in the XML file, which is
something to keep in mind when performing related actions.
For instance, to rename a folder and delete a file from that folder, you can either first
rename the folder and then delete the file using the new folder name, or first delete the
file using the old folder name and then rename the folder. Changing the order won’t
work, as the file will no longer exist with the old name or won’t yet exist with the new
name, respectively.
B-2 Registry actions
Registry actions can be performed on values and keys (note that most key-related
actions also affect sub keys, so in effect are applied to a registry tree).
All registry key references must start with HKEY_CURRENT_USER (or the HKCU alias) or
HKEY_LOCAL_MACHINE (or the HKLM alias), specified in all capitals.
To specify the default registry value, use the empty string (two quotes with no content in
between) as the value name.
B-2.1 Registry value actions
Registry value actions are specified as
<value action="..." key="..." source="..." ... />
child elements of the <registry> element, with the action attribute indicating the action

User Environment Manager
Page 126
to perform, and the key and source attributes specifying the registry key and value to
operate on.
Depending on the action, other attributes are needed as well, as described below.
B-2.2 Set registry value
To create or update a registry value:
<value action="set" key="HKCU\Software\VendorW" source="" type="string">Some text</value>
This sets the default registry value (as indicated by the empty source attribute) of key
HKCU\Software\VendorW to the string (as specified by the type attribute) Some text
(i.e. the content of the <value> element).
The type attribute determines the type of the registry value, and also affects the format
of the element content:
Type Description Element content example
integer A 32-bit number <value ... type="integer">42</value> string A simple string <value ... type="string">Some text</value> multi Multiple strings,
separated by
<value ... type="multi">A B</value>
expandable A string that can contain environment variables
<value ... type="expandable">%PATH%</value>
binary Base64-encoded binary data
<value ... type="binary">RmxleCs=</value>
B-2.3 Rename registry value
To rename a registry value:
<value action="rename" key="HKCU\Software\VendorX" source="oldName" destination="newName" />
This renames the oldName registry value of key HKCU\Software\VendorX to newName.
Note that this action can only rename values within the same key – to move a value to
another key, use the move_value action of the <key> element (cf. B-2.10).
B-2.4 Delete registry value
To delete a registry value:
<value action="delete" key="HKCU\Software\VendorY" source="removeMe" />
This deletes the removeMe registry value of key HKCU\Software\VendorY.

User Environment Manager
Page 127
B-2.5 Convert registry value to other type
To convert a registry value to another type:
<value action="convert" key="HKCU\Software\VendorZ" source="v" type="string" />
This changes the type of registry value v of key HKCU\Software\VendorZ to string.
Note that the original data is not converted for this; the convert action just flips the
type.
The type attribute accepts the same values as for the set action: integer, string,
multi, expandable, and binary.
NOTE: You will hardly ever need to use this action. It is mainly provided for applications
that store strings as binary data in one version and use actual strings for the next
version.
B-2.6 Registry key actions
Registry key actions are specified as
<key action="..." source="..." ... />
child elements of the <registry> element, with the action attribute indicating the action
to perform, and the source attribute specifying the registry key to operate on.
Depending on the action, other attributes are needed as well, as described below.
B-2.7 Create registry key
To create a registry key:
<key action="create" source="HKCU\Software\VendorW" /> This creates registry key HKCU\Software\VendorW.
B-2.8 Rename registry key
To rename a registry key:
<key action="rename" source="HKCU\Software\VendorX\1.0" destination="HKCU\Software\VendorX\2.0" /> This renames registry key HKCU\Software\VendorX\1.0 to HKCU\Software\VendorX\2.0.
B-2.9 Delete registry key
To delete a registry key:
<key action="delete" source="HKCU\Software\VendorY" />
This deletes registry key HKCU\Software\VendorY.

User Environment Manager
Page 128
B-2.10 Move registry value to other key
To move a registry value to another key:
<key action="move_value" source="HKCU\Software\VendorZ" destination="HKCU\Software\VendorZ\App" value="Path" />
This moves registry value Path from key HKCU\Software\VendorZ to key HKCU\Software\VendorZ\App.
B-3 File system actions
All paths for file system actions must start with one of the following folder tokens:
AppData
Cookies
Desktop
Favorites
LocalAppData
NetHood
Personal
PrintHood
ProgramsMenu
RecentFiles
SendTo
StartMenu
StartupMenu
UserProfile
These folder tokens are case-sensitive.
B-3.1 File actions
File actions are specified as
<file action="..." source="..." ... />
child elements of the <filesystem> element, with the action attribute indicating the
action to perform, and the source attribute specifying the file to operate on.
Depending on the action, the destination attribute is needed as well, as described
below.
B-3.2 Create file
To create a file:
<file action="create" source="AppData\VendorW\config.xml"></file>
This creates a config.xml file in the AppData\VendorW directory.

User Environment Manager
Page 129
To create an empty file, leave the <file> element empty. Otherwise, provide Base64-
encoded data as the element content.
B-3.3 Copy file
To copy a file:
<file action="copy" source="AppData\VendorX\App1\settings.xml" destination="AppData\VendorX\App2\settings.xml" />
This copies the settings.xml file from the AppData\VendorX\App1 directory to the AppData\VendorX\App2 directory.
Note that it is also possible to rename the file while copying it: just specify a different file name in the destination attribute.
B-3.4 Move file
To move a file:
<file action="move" source="AppData\VendorY\App1\settings.xml" destination="AppData\VendorY\App2\settings.xml" />
This moves the settings.xml file from the AppData\VendorY\App1 directory to the AppData\VendorY\App2 directory.
Note that it is also possible to rename the file while moving it: just specify a different file name in the destination attribute.
Similarly, to just rename a file (without moving it to another folder) keep the folder part of the destination attribute identical to that of the source.
B-3.5 Delete file
To delete a file:
<file action="delete" source="AppData\VendorZ\obsolete.txt" />
This deletes the obsolete.txt file from the AppData\VendorZ directory.

User Environment Manager
Page 130
B-3.6 Directory actions
Directory actions are specified as
<directory action="..." source="..." ... />
child elements of the <filesystem> element, with the action attribute indicating the
action to perform, and the source attribute specifying the directory to operate on.
Depending on the action, the destination attribute is needed as well, as described
below.
B-3.7 Create directory
To create a directory:
<directory action="create" source="AppData\VendorW\Data" /> This creates the AppData\VendorW\Data directory.
B-3.8 Copy directory
To copy a directory (with all its contents, i.e. recursively):
<directory action="copy" source="AppData\VendorX\App1\Data" destination="AppData\VendorX\App2\Data" />
This copies the AppData\VendorX\App1\Data directory to AppData\VendorX\App2\Data. All files and folders within AppData\VendorX\App1\Data will be copied.
B-3.9 Move directory
To move a directory:
<directory action="move" source="AppData\VendorY\App1\Data" destination="AppData\VendorY\App2\Data" /> This moves the AppData\VendorY\App1\Data directory to AppData\VendorY\App2\Data.
B-3.10 Delete directory
To delete a directory (with all its contents, i.e. recursively):
<directory action="delete" source="AppData\VendorZ"
This deletes the AppData\VendorZ directory, including all files and folders within.

User Environment Manager
Page 131
Appendix C - COM support
Besides running FlexEngine as an executable or a Group Policy extension, it can be used
through COM, enabling support for a broad range of scenarios.
FlexEngine is available as a COM server with ProgID ImmidioFlexProfiles.Engine,
exposing a single method: Process(). This method takes a string argument which is
interpreted in the same way as the command line to FlexEngine.exe (see Appendix A).
This COM interface can be used to call FlexEngine from custom code. For instance,
VMware ThinApp supports callback functions that are invoked when certain events occur:
Function OnFirstSandboxOwner ' Read settings Set flexEngine = CreateObject("ImmidioFlexProfiles.Engine") Call flexEngine.Process("-r H:\VMwareUEM\ThinApp\appSettings.zip") End Function Function OnLastProcessExit ' Store settings Set flexEngine = CreateObject("ImmidioFlexProfiles.Engine") Call flexEngine.Process("-i \\srv\Flex$\ThinApp\appSettings.ini " & _ "-s H:\VMwareUEM\ThinApp\appSettings.zip") End Function
User Environment Manager
Page 132
Appendix D - Import status flag details
If FlexEngine cannot access the profile archive directory at logon or is for some reason
not invoked, FlexEngine is not run at logoff, as that would overwrite the user’s
personalized settings. This behavior can be changed using the -F switch, as described in
the section about FlexEngine arguments.
If FlexEngine finds the profile archive path available at logon, a registry value
ImportStatus is set at HKCU\Software\Immidio\Flex Profiles\ImportMarkers. At
logoff, FlexEngine checks the value – if it exists, it runs normally and removes the value;
otherwise, the export is skipped, and a message is logged.
NOTE: When creating a mandatory profile, care must be taken not to accidentally
include the ImportStatus value. That would result in the value always being available,
even when FlexEngine has not run at logon, disabling this protection mechanism.

User Environment Manager
Page 133
Appendix E – ‘Run Once’ settings
As described in section 4.10 and chapters 5 and 7, user environment settings and
application migration settings can be configured to be ‘run once’. The mechanism for this
‘run once’ logic depends on flag files in a FlexRepository subfolder of the user’s profile
archive folder.
When a setting is to be processed by FlexEngine, it checks whether the corresponding
flag file already exists. If so, the action is skipped.
Otherwise, the action is performed, and – if the action was successful – the flag file is
created.
The path of the flag file depends on the following aspects:
For DirectFlex or App-V user environment settings: the path of the Flex config file
Otherwise: the setting’s type
The name of the flag file is built up from a number of components:
The setting’s name
The profile type
In the case of a local profile: the computer name
NOTE: If you are using user environment or application migration settings with ‘run
once’ enabled, it is very important that the user’s FlexRepository folder is not removed.
Otherwise, settings may be applied again.

User Environment Manager
Page 134
Appendix F – Using environment variables in file
and registry sections
VMware User Environment Manager allows using environment variables in the registry
and file system paths of Import / Export content and Profile Cleanup settings.
NOTE: Each line that needs expanding must end with \[EXPAND ENV VARS] – without
that marker, the path will be used as is, without expansion.

User Environment Manager
Page 135
Appendix G – Resultant set of UEM items
VMware User Environment Manager can optionally generate a so-called resultant set of
UEM items: an XML file that contains information about all the Flex config files and user
environment settings that have been processed.
NOTE: This is a feature that should only be enabled on a case-by-case basis and only for
individual users, to perform troubleshooting or other diagnostics.
To enable this feature, just create a folder named UEMResult in the same location as you
have configured for the FlexEngine log file:
While this UEMResult folder exists, FlexEngine will store intermediate processing results
in the user’s temp folder. When FlexEngine runs at logoff, it will use these intermediate
files to generate the resultant set of UEM items XML file in the UEMResult folder:
NOTE: FlexEngine will continue to create these files while the UEMResult folder exists, so
it is up to the administrator to periodically remove old files or to turn off the feature (by
removing the folder) after a while.
If the feature is enabled, FlexEngine will automatically process the intermediate results at
logoff. It is also possible to manually launch this action, by running the UEMResult.exe
console application which can be found in the VMware UEM installation directory.
UEMResult.exe supports the following two optional arguments:
-keep By default, the intermediate files are deleted after processing.
If -keep is specified, those files are left in place.
-quiet By default, some information is output to the console window.
If -quiet is specified, this output is suppressed.