VMware Pulse IoT Center Server Installation Guide - VMware ...€¦ · VMware Pulse Device...
65
VMware Pulse IoT Center Server Installation Guide VMware Pulse IoT Center 1.1
Transcript of VMware Pulse IoT Center Server Installation Guide - VMware ...€¦ · VMware Pulse Device...

VMware Pulse IoT CenterServer Installation GuideVMware Pulse IoT Center 1.1
VMware Pulse IoT Center Server Installation Guide
VMware, Inc. 2
You can find the most up-to-date technical documentation on the VMware website at:
https://docs.vmware.com/
If you have comments about this documentation, submit your feedback to
Copyright © 2018 VMware, Inc. All rights reserved. Copyright and trademark information.
VMware, Inc.3401 Hillview Ave.Palo Alto, CA 94304www.vmware.com
Contents
1 Introduction 5
Before You Begin 5
Prerequisites 7
Migrating from VMware Pulse IoT Center 1.0 to VMware Pulse IoT Center 1.1 8
2 VMware Pulse IoT Center Components 9
Device and Software Lifecycle Management 10
Operation Analytics Module 14
VMware Pulse IoT Center Front-End Modules 16
3 Installing VMware Pulse IoT API Server 20
Prerequisites for Configuring the Pulse IoT API Server 20
VMware Pulse IoT API Server System Services 21
OVF Properties for the VMware Pulse IoT API Server 21
VMware Pulse IoT API Ports 24
Logs and Configurations 24
Database Backup and Restore 24
Installing the VMware Pulse IoT API OVA Using vSphere Web Client UI 25
Installing the VMware Pulse IoT API OVA Using CLI 27
Post Installation Steps After Installing the VMware Pulse IoT API Server 28
4 Installing the VMware Pulse IoT Console 29
Prerequisites for Installing the VMware Pulse IoT Console 29
System Services of the VMware Pulse IoT Console 30
OVF Properties for the VMware Pulse IoT Console 30
VMware Pulse IoT Console Ports 32
Logs and Configurations for the VMware Pulse IoT Console 32
Installing the VMware Pulse IoT Console Using vSphere Web Client UI 33
Installing VMware Pulse IoT Console Using CLI 33
Post Installation Configurations for the VMware Pulse IoT Console 34
5 Installing MQTT Broker 35
Prerequisites for Installing MQTT Broker 35
MQTT System Services 36
OVF Properties for the MQTT Broker 36
Logs and Configurations for the MQTT Broker 38
Installing MQTT Broker Using the vSphere Web Client UI 38
Installing MQTT Broker Using CLI 39
VMware, Inc. 3
Configuring MQTT Broker Post Installation 40
Configuring Helix Adapter in vRealize Operations Manager 41
6 VMware Identity Manager 43
Deployment Model 44
Before You Begin Integrating VMware Identity Manager 44
VMware Pulse Device Management Suite Integration 46
Integrating VMware Pulse IoT Center with VMware Identity Manager 57
7 Upgrading from Version 1.0 61
8 Configuring the VMware Pulse IoT Components Integration 62
VMware Pulse IoT Center Server Installation Guide
VMware, Inc. 4
Introduction 1The VMware Pulse IoT Center is a suite of VMware products that provides a complete IoT solution toonboard, manage, secure, and configure the IoT Edge system and connected devices. This documentserves as a guide for a server-side installation of the VMware Pulse IoT Center.
A complete installation of the VMware Pulse IoT Center consists of the following server-side components:n VMware Pulse Device Management Suite (Back-End and Console)
n vRealize Operations Manager 6.6.1 Standard with Helix Adapter Support
n EMQTT Broker
n VMware Pulse IoT Center Console (UI)
n VMware Pulse IoT Center API Server
n VMware Identity Manager (Optional)
EMQTT broker, VMware Pulse IoT API, and the Console are distributed as separate OVAs. The OVAs arebased on Photon OS.
For installation instructions about VMware Pulse Device Management Suite and vRealize OperationsManager 6.6.1, see their respective product installation documentation. The VMware Pulse DeviceManagement Suite is essentially the VMware AirWatch mobile device management suite tuned for IoT.This version of AirWatch is limited to IoT devices alone and any other device types such as mobiledevices are not supported.
This chapter includes the following topics:
n Before You Begin
n Prerequisites
n Migrating from VMware Pulse IoT Center 1.0 to VMware Pulse IoT Center 1.1
Before You BeginThis topic provides information on how to begin an installation.
VMware, Inc. 5
The information in this document is written for experienced administrators who are familiar with thefollowing:
n The installation requires access to four public IPs, for the following:n AirWatch
n AirWatch Cloud Messaging (AWCM)
n Pulse API
n Pulse MQTT
n Windows and Linux installation and configuration: Including the expertise to configure a system'snetwork and firewall such as Network Address Translation (NAT), syslog, and port mappingconfigurations.
n Server virtualization: Primarily provided by VMWare, such as vSphere and vCenter. Even thoughthere are descriptions about deployments in VMware vCloud Director-based environments likeOneCloud and vCloud Air in this document, this release only supports deployments to VMwarevCenter-based environments.
n Installing and configuring database servers: Microsoft SQL Server on Windows and PostgreSQL onLinux.
n Microsoft Active Directory Services.
The OVAs are currently built for small and medium installations. Refer to the VMware Pulse IoT CenterSizing Guide for the number of managed objects that support small and medium installations.
To address dependencies, deploy the components in the following order :n VMware Pulse Device Management Suite (also called Device and Software Lifecycle Management).
n VMware vRealize Operations Manager with Helix Adapter Support.
n VMware Pulse IoT Center API Server.
n VMware Pulse IoT Center Console (UI)
n EMQTT Broker
Before you deploy the VMware Pulse IoT Center components, ensure that all computing and networkingresources such as VMware OneCloud or VMware vCenter are available in the deployment infrastructure.
Note The VMware Pulse IoT Center involves multiple management consoles, each with its own userdatabase. If Single Sign-On is required for each of these consoles, then the support is provided onlythrough the VMware Identity Manager (vIDM). vIDM is not distributed with VMware Pulse IoT Center andis available as a cloud offering and an on-premise solution. This product must be purchased separatelyfrom VMware. vIDM is only supported with Microsoft Active Directory Services as the source of truth foruser authentication. Ensure that you have deployed and configured vIDM before beginning with theinstallation and configuration steps listed in this guide. For information about deploying and configuringvIDM, see https://docs.vmware.com/en/VMware-Identity-Manager/index.html. The VMware Pulse IoTCenter documentation including the Install guide only provides information about the integration stepswith vIDM.
VMware Pulse IoT Center Server Installation Guide
VMware, Inc. 6
PrerequisitesThis section provides the prerequisites for Pulse Device Management Component and vRealizeOperations Manager.
Before you install and deploy, review the following prerequisites. The prerequisites apply to the PulseDevice Management component and vRealize Operations Manager:
n VMware Pulse Device Management Suite, AirWatch: Ensure that you have a license for MicrosoftWindows Server and Microsoft SQL Server. The license and the SQL Server installer are not a part ofthe VMware Pulse Software distribution. The supported SQL server versions are SQL Server 2008R2, SQL Server 2012, or SQL Server 2014 (in 2012 compatibility mode). The supported client toolsare SQL Management Studio, Reporting Services, Integration Services, SQL Server Agent, and latestservice packs. Ensure the SQL Servers are 64-bit (OS and SQL Server).
n VMWare Pulse Device Management Suite, AirWatch: Installation is supported only on a WindowsServer 2008 R2/2012 or 2012 R2 (64-bit) system with the latest service packs and updates fromMicrosoft http://www.update.microsoft.com . Windows Servers are not a part of the VMware PulseSoftware distribution. The sizing and scale determines the number of Windows Server and SQLinstances required. For more information, see the VMware Pulse IoT Sizing Guidelines document.
n Verify that there are SSL Certificates from trusted CAs or private CAs if you do not intend to use thecertificates generated by default in every OVA. The system needs the SSL certificates in the PKCS12format with the complete certificate chain in the order of intermediate to root and that follows thesigning hierarchy.
n Verify that there are valid domain names for Pulse IoT API, IoT Console Server, Pulse DeviceManagement Server, and the EMQTT Broker. The names must reflect in the common name and SANof the SSL certificate. All components except vRealize Operations require SSL certificates inPKCS12.
n Create an A Record and PTR Record for both forward and reverse resolutions in DNS using bothhostname and IP. This step is mandatory as Pulse IoT involves multiple server-side components thatare separately installed and must talk to each other with a full server certificate validation (both thehost name and CA cert).
n Enable Guest OS Customization for OneCloud or vCloud Air, on the VMs, before starting the VM.This step ensures that the VM is configured with the right hostname and network settings. ForvCenter environments, use the OVF properties to configure static IPs.
n Verify that vCenter access is set up with necessary storage. Verify that the network objects are pre-created and configured to deploy VMs that can talk to each other internally.
n Verify that you have access to a Bash shell. On Windows to get a near Bash like shell, Cygwin, orMSYS2 can be installed and used. The shell is used to Base64 encode artifacts like certificates thatmust be passed during the OVA deployment with an extra base64 encoding for line and formatpreservation. The line and format get affected when passed using OVF properties into vCenter,especially for multiline inputs like a CA certificate file.
VMware Pulse IoT Center Server Installation Guide
VMware, Inc. 7
Migrating from VMware Pulse IoT Center 1.0 to VMwarePulse IoT Center 1.1For customers already using the VMware Pulse IoT Center 1.0 GA, there is no migration path. You mustinstall the 1.1 version of the product and enroll the IoT Edge systems and connected devices into the 1.1version. Perform the migration in a phased manner.
VMware Pulse IoT version 1.1 includes the following improvements:
n The VMware Pulse IoT Center Console and the VMware Pulse IoT Center API Server services run asa projectice user, a standard Linux user with no sudo privileges. A password is not set for thisaccount. You must log in locally using sudo or su through the root user. After installation, you can login through any other user with sudo privileges created by an administrator.
n The EMQTT Broker runs as a user with the name emqtt, a standard user with no administrativeprivileges. The EMQTT Broker does not have a projectice user.
n Perform all administrative tasks by using the root user account only or by using any other user withsudo privileges created post the install by an administrator. Create an administrative user with sudoprivileges and do not use or share the root user.
n To enhance the installation experience, additional configuration options have been added throughnew OVF properties. However, you might still have to perform manual configurations.
n The IoT API, IoT Console Server, and the EMQTT Broker have a lockout period of 15 minutes forterminal access when credentials fail to authenticate. To avoid a scenario where the user gets locked,you must not share the root user credentials. Instead, create a separate user for everyone thatrequires administrative access to the terminal with sudo privileges.
n Certificate revocation is supported for any externally provided certificates. The internally generatedcertificates by the OVAs during deployment maintain a certificate revocation list.
VMware Pulse IoT Center Server Installation Guide
VMware, Inc. 8
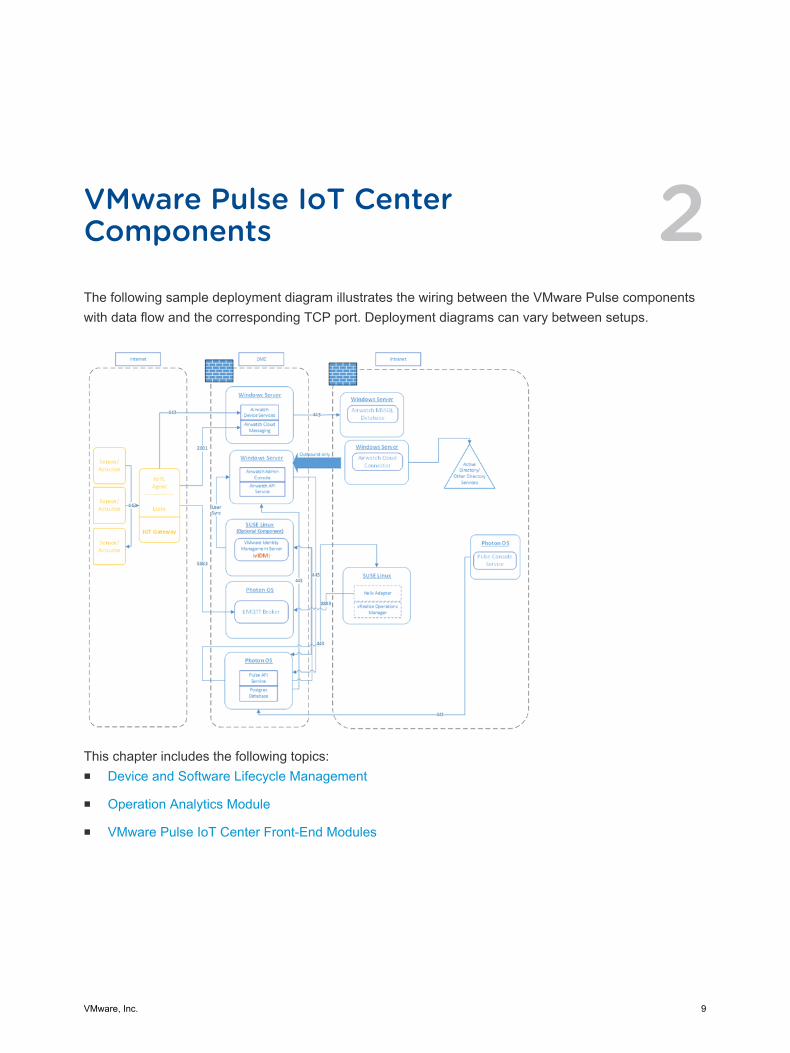
VMware Pulse IoT CenterComponents 2The following sample deployment diagram illustrates the wiring between the VMware Pulse componentswith data flow and the corresponding TCP port. Deployment diagrams can vary between setups.
This chapter includes the following topics:n Device and Software Lifecycle Management
n Operation Analytics Module
n VMware Pulse IoT Center Front-End Modules
VMware, Inc. 9

Device and Software Lifecycle ManagementYou can manage devices and the Software Lifecycle Management functionality using the VMware PulseDevice Management Suite. The VMware AirWatch Device Management is reconfigured as the VMwarePulse Device Management Suite for IoT. All other mainstream devices supported by AirWatch are notsupported in this version.
Enabling TLS 1.2This section provides the procedure to enable TLS 1.2.
Before you install the Pulse MDM services and database in one or more Windows systems, you mustharden the systems for the SSL configuration to use only TLS 1.2 for all incoming and outgoingconnections. Copy the following contents to a notepad on the target Windows machine and save the filewith a .reg extension. Right-click to merge:
Windows Registry Editor Version 5.00
[HKEY_LOCAL_MACHINE\SYSTEM\CurrentControlSet\Control\SecurityProviders\SCHANNEL\Protocols\TLS 1.2]
[HKEY_LOCAL_MACHINE\SYSTEM\CurrentControlSet\Control\SecurityProviders\SCHANNEL\Protocols\TLS
1.2\Client]
"Enabled"=dword:ffffffff
"DisabledByDefault"=dword:00000000
[HKEY_LOCAL_MACHINE\SYSTEM\CurrentControlSet\Control\SecurityProviders\SCHANNEL\Protocols\TLS
1.2\Server]
"Enabled"=dword:ffffffff
"DisabledByDefault"=dword:00000000
You can restrict support for SSL ciphers by launching the Group Policy Management Console:
Procedure
Run the Group Policy Editor in the Windows Server.
1 Navigate to Computer Configuration > Administrative Templates > Networks > SSLConfiguration .
2 Double-click the SSL Cipher Suite Order and select Enabled.
3 Double-click the box below the SSL Cipher Suites and select all and copy into a text editor such as anotepad.
4 To remove the unwanted values and copy the resulting value, edit the comma-separated values. ClickApply.
VMware Pulse IoT Center Server Installation Guide
VMware, Inc. 10
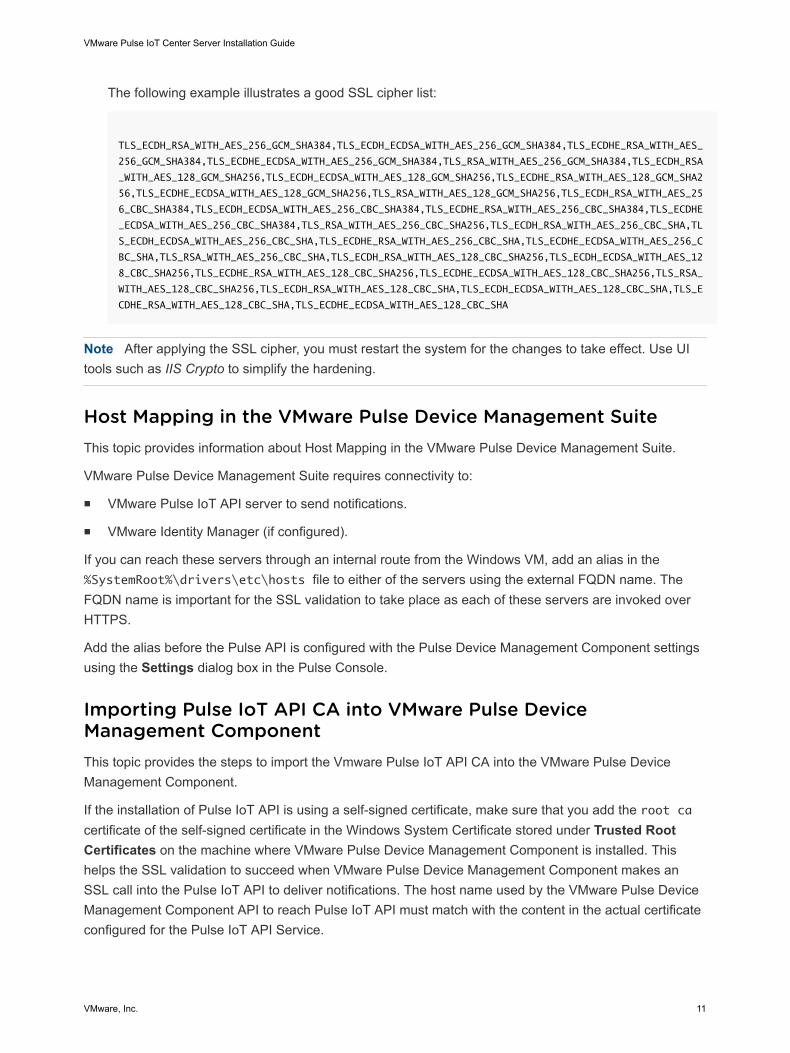
The following example illustrates a good SSL cipher list:
TLS_ECDH_RSA_WITH_AES_256_GCM_SHA384,TLS_ECDH_ECDSA_WITH_AES_256_GCM_SHA384,TLS_ECDHE_RSA_WITH_AES_
256_GCM_SHA384,TLS_ECDHE_ECDSA_WITH_AES_256_GCM_SHA384,TLS_RSA_WITH_AES_256_GCM_SHA384,TLS_ECDH_RSA
_WITH_AES_128_GCM_SHA256,TLS_ECDH_ECDSA_WITH_AES_128_GCM_SHA256,TLS_ECDHE_RSA_WITH_AES_128_GCM_SHA2
56,TLS_ECDHE_ECDSA_WITH_AES_128_GCM_SHA256,TLS_RSA_WITH_AES_128_GCM_SHA256,TLS_ECDH_RSA_WITH_AES_25
6_CBC_SHA384,TLS_ECDH_ECDSA_WITH_AES_256_CBC_SHA384,TLS_ECDHE_RSA_WITH_AES_256_CBC_SHA384,TLS_ECDHE
_ECDSA_WITH_AES_256_CBC_SHA384,TLS_RSA_WITH_AES_256_CBC_SHA256,TLS_ECDH_RSA_WITH_AES_256_CBC_SHA,TL
S_ECDH_ECDSA_WITH_AES_256_CBC_SHA,TLS_ECDHE_RSA_WITH_AES_256_CBC_SHA,TLS_ECDHE_ECDSA_WITH_AES_256_C
BC_SHA,TLS_RSA_WITH_AES_256_CBC_SHA,TLS_ECDH_RSA_WITH_AES_128_CBC_SHA256,TLS_ECDH_ECDSA_WITH_AES_12
8_CBC_SHA256,TLS_ECDHE_RSA_WITH_AES_128_CBC_SHA256,TLS_ECDHE_ECDSA_WITH_AES_128_CBC_SHA256,TLS_RSA_
WITH_AES_128_CBC_SHA256,TLS_ECDH_RSA_WITH_AES_128_CBC_SHA,TLS_ECDH_ECDSA_WITH_AES_128_CBC_SHA,TLS_E
CDHE_RSA_WITH_AES_128_CBC_SHA,TLS_ECDHE_ECDSA_WITH_AES_128_CBC_SHA
Note After applying the SSL cipher, you must restart the system for the changes to take effect. Use UItools such as IIS Crypto to simplify the hardening.
Host Mapping in the VMware Pulse Device Management SuiteThis topic provides information about Host Mapping in the VMware Pulse Device Management Suite.
VMware Pulse Device Management Suite requires connectivity to:
n VMware Pulse IoT API server to send notifications.
n VMware Identity Manager (if configured).
If you can reach these servers through an internal route from the Windows VM, add an alias in the%SystemRoot%\drivers\etc\hosts file to either of the servers using the external FQDN name. TheFQDN name is important for the SSL validation to take place as each of these servers are invoked overHTTPS.
Add the alias before the Pulse API is configured with the Pulse Device Management Component settingsusing the Settings dialog box in the Pulse Console.
Importing Pulse IoT API CA into VMware Pulse DeviceManagement ComponentThis topic provides the steps to import the Vmware Pulse IoT API CA into the VMware Pulse DeviceManagement Component.
If the installation of Pulse IoT API is using a self-signed certificate, make sure that you add the root cacertificate of the self-signed certificate in the Windows System Certificate stored under Trusted RootCertificates on the machine where VMware Pulse Device Management Component is installed. Thishelps the SSL validation to succeed when VMware Pulse Device Management Component makes anSSL call into the Pulse IoT API to deliver notifications. The host name used by the VMware Pulse DeviceManagement Component API to reach Pulse IoT API must match with the content in the actual certificateconfigured for the Pulse IoT API Service.
VMware Pulse IoT Center Server Installation Guide
VMware, Inc. 11
Perform the following steps before configuring the Pulse API with the Pulse Device ManagementComponent and vRealize Operations Manager settings using the Pulse Console.
To import the private CA into the Windows certificate store where the Pulse Device Management Suite isinstalled, perform the following steps:
Procedure
1 Copy the cacert from /opt/vmwpulse/certs/cacert.pem in the Pulse API VM to the Pulse DeviceManagement Component VM (Windows VM).
2 Launch mmc. exe in the Pulse Device Management Component VM.
3 Select File > Add/Remove Snap-in.
4 From the Available snap-ins section, select Certificates and click Add.
5 Select Computer Account and select Next.
6 From the Select Computer dialog box, select Local Computer.
7 Click Finish and then OK.
8 Right-click Certificates > All Tasks under the Third-party Trusted Root Certificates Authority toimport the certificate.
9 Follow the import wizard to save the private CA certificate that was saved from the browser.
Turning Off Automatic Certificate UpdatesIf there are private certificate authorities installed in the Trust Root Certificates in Windows Server, theWindows Root Certificate Update process cleans them on update. This cleanup removes CA certificatesof the Pulse API service if the Pulse API service is hosted using self-signed certificates or certificates withprivate CAs that get generated during the Pulse API installation.
The removal results in the Pulse Device Management Component notifications reaching the Pulse API.You can prevent this issue by disabling the Automatic Root Update Certificate process by the group policyeditor. For more information, see https://technet.microsoft.com/en-us/library/cc734054(v=ws.10).aspx.
Alternatively, if there are constraints in disabling the Automatic Certificate updates, ensure that you addthe following script to the Windows scheduler to run with admin rights. The script can be saved in a filewith a .bat extension. The argument to the script is the full file path to the CA certificate in .cer format.
echo off
title SSL Cert Check
:: See the title at the
set cert=%1
certutil -addstore "AuthRoot" %cert%
Enforcing Strong PasswordsThis topic provides the steps to enforce strong passwords.
VMware Pulse IoT Center Server Installation Guide
VMware, Inc. 12
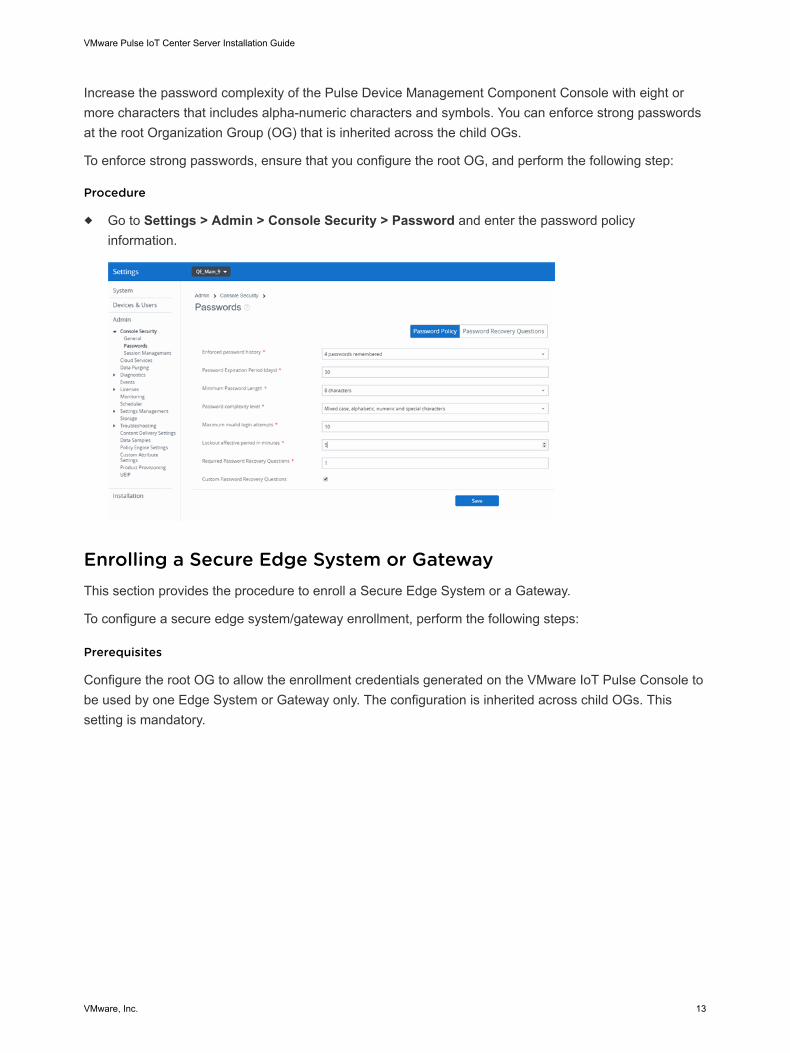
Increase the password complexity of the Pulse Device Management Component Console with eight ormore characters that includes alpha-numeric characters and symbols. You can enforce strong passwordsat the root Organization Group (OG) that is inherited across the child OGs.
To enforce strong passwords, ensure that you configure the root OG, and perform the following step:
Procedure
u Go to Settings > Admin > Console Security > Password and enter the password policyinformation.
Enrolling a Secure Edge System or GatewayThis section provides the procedure to enroll a Secure Edge System or a Gateway.
To configure a secure edge system/gateway enrollment, perform the following steps:
Prerequisites
Configure the root OG to allow the enrollment credentials generated on the VMware IoT Pulse Console tobe used by one Edge System or Gateway only. The configuration is inherited across child OGs. Thissetting is mandatory.
VMware Pulse IoT Center Server Installation Guide
VMware, Inc. 13
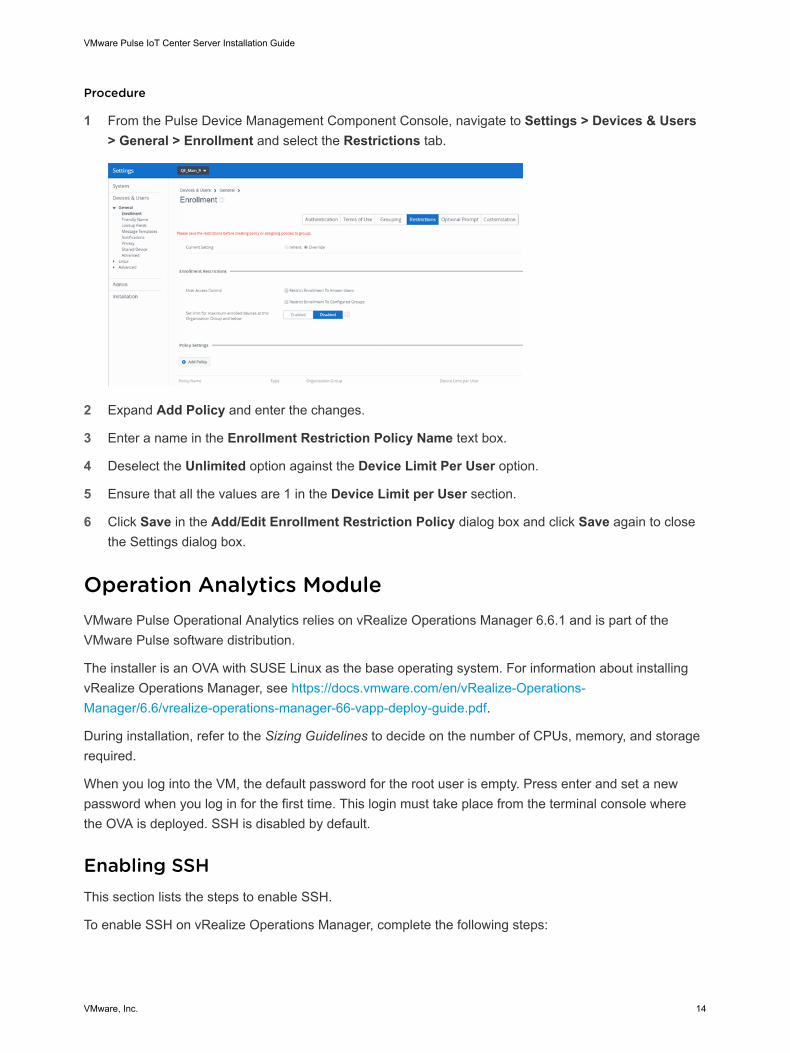
Procedure
1 From the Pulse Device Management Component Console, navigate to Settings > Devices & Users> General > Enrollment and select the Restrictions tab.
2 Expand Add Policy and enter the changes.
3 Enter a name in the Enrollment Restriction Policy Name text box.
4 Deselect the Unlimited option against the Device Limit Per User option.
5 Ensure that all the values are 1 in the Device Limit per User section.
6 Click Save in the Add/Edit Enrollment Restriction Policy dialog box and click Save again to closethe Settings dialog box.
Operation Analytics ModuleVMware Pulse Operational Analytics relies on vRealize Operations Manager 6.6.1 and is part of theVMware Pulse software distribution.
The installer is an OVA with SUSE Linux as the base operating system. For information about installingvRealize Operations Manager, see https://docs.vmware.com/en/vRealize-Operations-Manager/6.6/vrealize-operations-manager-66-vapp-deploy-guide.pdf.
During installation, refer to the Sizing Guidelines to decide on the number of CPUs, memory, and storagerequired.
When you log into the VM, the default password for the root user is empty. Press enter and set a newpassword when you log in for the first time. This login must take place from the terminal console wherethe OVA is deployed. SSH is disabled by default.
Enabling SSHThis section lists the steps to enable SSH.
To enable SSH on vRealize Operations Manager, complete the following steps:
VMware Pulse IoT Center Server Installation Guide
VMware, Inc. 14
Procedure
1 Log in to the vRealize Operations Manager virtual machine console as root using ALT-F1.
2 Start the SSH service by running the systemctl start sshd command.
3 To configure SSH to start automatically, run the chkconfig sshd on command.
4 After you have deployed and powered on vRealize Operations Manager, access vRealize OperationsManager using https://<IP-address>. You are guided through the basic installation steps of vRealizeOperations Manager. Select Express Installation and provide a password for the vRealizeOperations Manager instance.
Note Obtain a standard license key to use vRealize Operations Manager. You must also configurevRealize Operations Manager after installation.
Configuring vRealize Operations ManagerThis section provides information about configuring vRealize Operations Manager.
After you have deployed and powered on vRealize Operations Manager, access vRealize OperationsManager using https://<IP-address>. You are guided through the basic installation steps of vRealizeOperations Manager.
Note Obtain a standard license key to use vRealize Operations Manager. You must also configurevRealize Operations Manager after installation.
Procedure
1 Log in to the vRealize Operations Manager after the server starts. Select Express Installation.
2 In the Set Administrator Password step, enter a user name and password. The password and username you provide is used to log in to vRealize Operations Manager. Click Next.
3 In the Ready to Complete step, review your selections and click Finish.
4 Log in to the vRealize Operations Manager console with the administrator password that you haveset.
5 Accept the EULA and click Next.
6 Enter the product license key and validate. Click Next.
7 (Optional) Join the VMware Customer Experience Program and click Next.
8 Click Finish.
vRealize Operations Manager generates an SSL certificate with a private CA during the deployment ofthe OVA. If the SSL certificate does not have the right host name in the Common Name section, or forother troubleshooting information, see the VMware KB article 2046591athttps://kb.vmware.com/s/article/2046591.
VMware Pulse IoT Center Server Installation Guide
VMware, Inc. 15

Installing Helix AdapterThis topic provides the procedure for installing a Helix Adapter.
Prerequisites
Use Helix Adapter version 4.4.26.PAK or later. Helix Adapter is distributed separately with the OVAs. Toinstall the adapter, perform the following steps:
Procedure
1 Go to https://<vROPs-IP-address>/ui/index.action#/administration/solutions.
2 In the Select Solution step, click the + sign to add a solution.
3 Click Browse and select the PAK file you downloaded.
4 Click Upload and then click Next. Click Yes to confirm.
5 Accept the EULA and click Next.
6 After the installation runs successfully, click Finish.
7 Verify the Helix Adapter version. The adapter must be in the data receiving state.
What to do next
Configure the Helix Adapter to connect to EMQTT. For more information, see Configuring Helix Adapter invRealize Operations Manager.
VMware Pulse IoT Center Front-End ModulesThis topic includes a brief description and installation instructions for the VMware Pulse IoT Center Front-End Modules.
Front-End Installation - Pulse OVAsThis topic provides information about the front-end Installation of the Pulse OVAs.
The VMware Pulse contains three appliances based on VMware Photon OS:
n pulseapi.ova: With VMware Pulse IoT API and PostgresSQL pre-installed.
n pulseconsole.ova: With VMware Pulse IoT Console and all the dependencies.
n mqttbroker.ova: With the EMQTT broker from http://emqtt.io.
When you deploy the OVAs, you need application-specific properties for initialization. For moreinformation about these properties, see the next topic OVA Parameter Configuration.
Note Deploy the OVAs in vCenter based environments only.
VMware Pulse IoT Center Server Installation Guide
VMware, Inc. 16
Install the OVAs in the following order assuming that the Pulse Device Management Component andPulse vRealize Operations Manager are already installed.
1 Pulse IoT API
2 Pulse IoT Console
3 MQTT Broker
OVF Parameter ConfigurationThis topic provides information about configuring OVF parameters.
Deploy the OVA using vSphere and the Deploy OVF template from the vSphere UI. You can also use theOVF tool from the command line. The properties are covered in detail for each OVA.
OVF properties are used to configure the VM after it is powered on. The tools used to deploy the OVAperform minimal validation on the properties. If there are any incorrect property values, it results instarting up the system (VM), and can cause the application and system to be in an unusable state. Youmust pass the OVF properties as advised within this document. If there are any errors, delete the VM anddeploy it again with the correct property values.
Application Specific Common OVF PropertiesSome of the OVF properties are common across OVAs and are as follows. Subsequent OVA sections willdescribe the property with updates specific to that OVA.
VMware Pulse IoT Center Server Installation Guide
VMware, Inc. 17
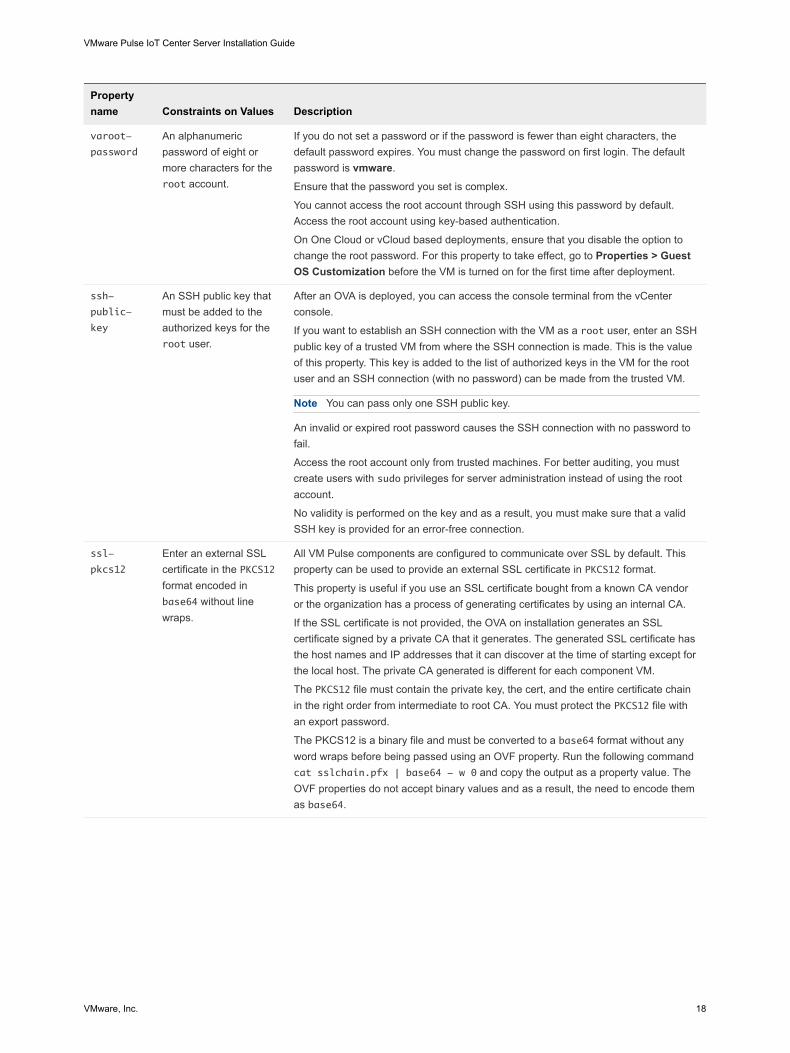
Propertyname Constraints on Values Description
varoot-
password
An alphanumericpassword of eight ormore characters for theroot account.
If you do not set a password or if the password is fewer than eight characters, thedefault password expires. You must change the password on first login. The defaultpassword is vmware.
Ensure that the password you set is complex.
You cannot access the root account through SSH using this password by default.Access the root account using key-based authentication.
On One Cloud or vCloud based deployments, ensure that you disable the option tochange the root password. For this property to take effect, go to Properties > GuestOS Customization before the VM is turned on for the first time after deployment.
ssh-
public-
key
An SSH public key thatmust be added to theauthorized keys for theroot user.
After an OVA is deployed, you can access the console terminal from the vCenterconsole.
If you want to establish an SSH connection with the VM as a root user, enter an SSHpublic key of a trusted VM from where the SSH connection is made. This is the valueof this property. This key is added to the list of authorized keys in the VM for the rootuser and an SSH connection (with no password) can be made from the trusted VM.
Note You can pass only one SSH public key.
An invalid or expired root password causes the SSH connection with no password tofail.
Access the root account only from trusted machines. For better auditing, you mustcreate users with sudo privileges for server administration instead of using the rootaccount.
No validity is performed on the key and as a result, you must make sure that a validSSH key is provided for an error-free connection.
ssl-
pkcs12
Enter an external SSLcertificate in the PKCS12format encoded inbase64 without linewraps.
All VM Pulse components are configured to communicate over SSL by default. Thisproperty can be used to provide an external SSL certificate in PKCS12 format.
This property is useful if you use an SSL certificate bought from a known CA vendoror the organization has a process of generating certificates by using an internal CA.
If the SSL certificate is not provided, the OVA on installation generates an SSLcertificate signed by a private CA that it generates. The generated SSL certificate hasthe host names and IP addresses that it can discover at the time of starting except forthe local host. The private CA generated is different for each component VM.
The PKCS12 file must contain the private key, the cert, and the entire certificate chainin the right order from intermediate to root CA. You must protect the PKCS12 file withan export password.
The PKCS12 is a binary file and must be converted to a base64 format without anyword wraps before being passed using an OVF property. Run the following commandcat sslchain.pfx | base64 - w 0 and copy the output as a property value. TheOVF properties do not accept binary values and as a result, the need to encode themas base64.
VMware Pulse IoT Center Server Installation Guide
VMware, Inc. 18
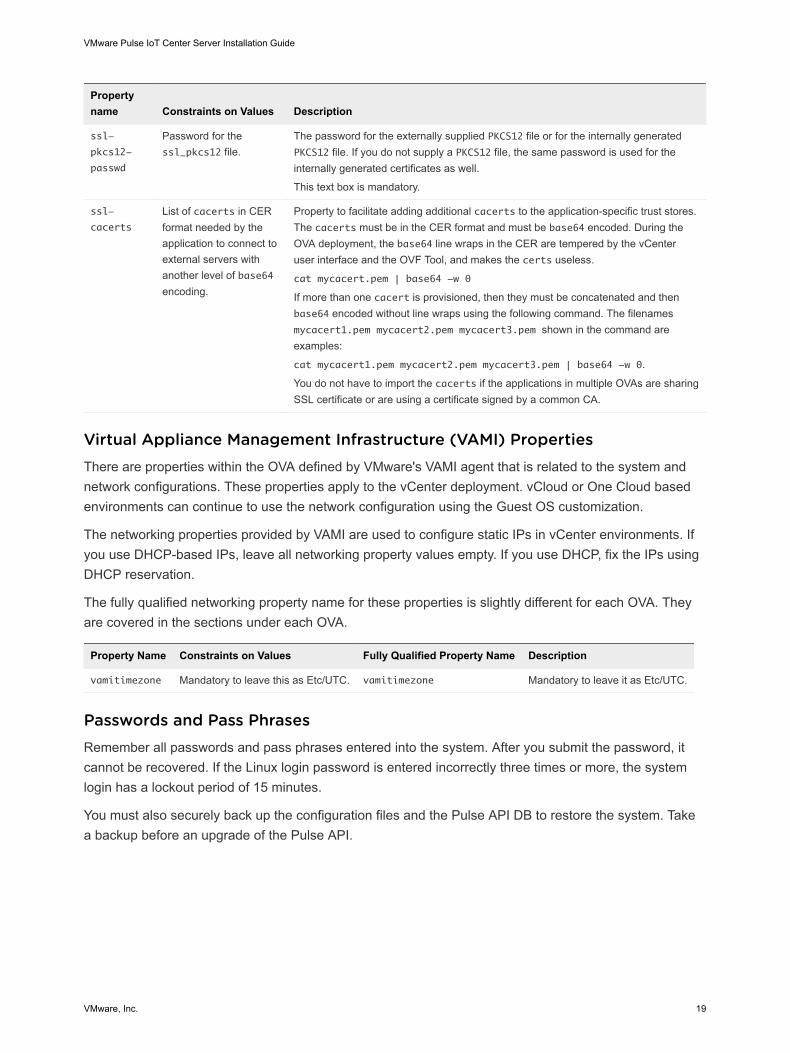
Propertyname Constraints on Values Description
ssl-
pkcs12-
passwd
Password for thessl_pkcs12 file.
The password for the externally supplied PKCS12 file or for the internally generatedPKCS12 file. If you do not supply a PKCS12 file, the same password is used for theinternally generated certificates as well.
This text box is mandatory.
ssl-
cacerts
List of cacerts in CERformat needed by theapplication to connect toexternal servers withanother level of base64encoding.
Property to facilitate adding additional cacerts to the application-specific trust stores.The cacerts must be in the CER format and must be base64 encoded. During theOVA deployment, the base64 line wraps in the CER are tempered by the vCenteruser interface and the OVF Tool, and makes the certs useless.
cat mycacert.pem | base64 -w 0
If more than one cacert is provisioned, then they must be concatenated and thenbase64 encoded without line wraps using the following command. The filenamesmycacert1.pem mycacert2.pem mycacert3.pem shown in the command areexamples:
cat mycacert1.pem mycacert2.pem mycacert3.pem | base64 -w 0.
You do not have to import the cacerts if the applications in multiple OVAs are sharingSSL certificate or are using a certificate signed by a common CA.
Virtual Appliance Management Infrastructure (VAMI) PropertiesThere are properties within the OVA defined by VMware's VAMI agent that is related to the system andnetwork configurations. These properties apply to the vCenter deployment. vCloud or One Cloud basedenvironments can continue to use the network configuration using the Guest OS customization.
The networking properties provided by VAMI are used to configure static IPs in vCenter environments. Ifyou use DHCP-based IPs, leave all networking property values empty. If you use DHCP, fix the IPs usingDHCP reservation.
The fully qualified networking property name for these properties is slightly different for each OVA. Theyare covered in the sections under each OVA.
Property Name Constraints on Values Fully Qualified Property Name Description
vamitimezone Mandatory to leave this as Etc/UTC. vamitimezone Mandatory to leave it as Etc/UTC.
Passwords and Pass PhrasesRemember all passwords and pass phrases entered into the system. After you submit the password, itcannot be recovered. If the Linux login password is entered incorrectly three times or more, the systemlogin has a lockout period of 15 minutes.
You must also securely back up the configuration files and the Pulse API DB to restore the system. Takea backup before an upgrade of the Pulse API.
VMware Pulse IoT Center Server Installation Guide
VMware, Inc. 19
Installing VMware Pulse IoT APIServer 3This topic includes information about prerequisites, system services, OVF properties, post installation,ports, logs and configurations, database backup and restore. It also includes installation steps for PulseAPI OVA using the vSphere Web Client UI and installation steps for Pulse API OVA using CLI with theOVF Tool.
The Pulse IoT API Server is distributed as a standalone OVA. You must install and wire this OVA withother Pulse components to be functional. Most of the Pulse API OVA options are configured duringinstallation using the OVF parameters. However, you can wire with Pulse Device ManagementComponent and Pulse vRealize Operations Manager using the Pulse Console after both the Pulse APIand Console are installed.
The install folder for Pulse API is at /opt/iot-api . The projectice user owns all the contentsunder /opt/iot-api and any changes to this ownership or permissions causes the Pulse API server tofail.
This chapter includes the following topics:
n Prerequisites for Configuring the Pulse IoT API Server
n VMware Pulse IoT API Server System Services
n OVF Properties for the VMware Pulse IoT API Server
n VMware Pulse IoT API Ports
n Logs and Configurations
n Database Backup and Restore
n Installing the VMware Pulse IoT API OVA Using vSphere Web Client UI
n Installing the VMware Pulse IoT API OVA Using CLI
n Post Installation Steps After Installing the VMware Pulse IoT API Server
Prerequisites for Configuring the Pulse IoT API ServerThis topic provides the prerequisites for Pulse IoT API Server.
1 Verify that there is a domain name for the Pulse API and Console. Create an A Record and a PTRRecord in the DNS server.
VMware, Inc. 20
2 Verify that the SSL certificate matches the domain name for the Pulse API. If there is no SSLcertificate, the VM created out of the OVA attempts to generate an SSL certificate using the domainname for the Pulse API.
3 Verify that there is a CA cert of the Pulse Device Management and vRealize Operations Manager toadd to the CA list in the Pulse API.
VMware Pulse IoT API Server System ServicesThis topic provides a brief on the system services of the Pulse API.
The Pulse API runs as a systemd service as iceapi and depends on the postgresql service. There areother services required for the full functionality of the VM including the VMware agents. To get a list of thedefault upstart services that have started, run the following command:
systemctl list-units --type=service --state=running
Or
systemctl list-unit-files --type=service
To get a list of all systemd services, run the following command:
ls /etc/systemd/system/*.wants
You must run both the commands as a root user.
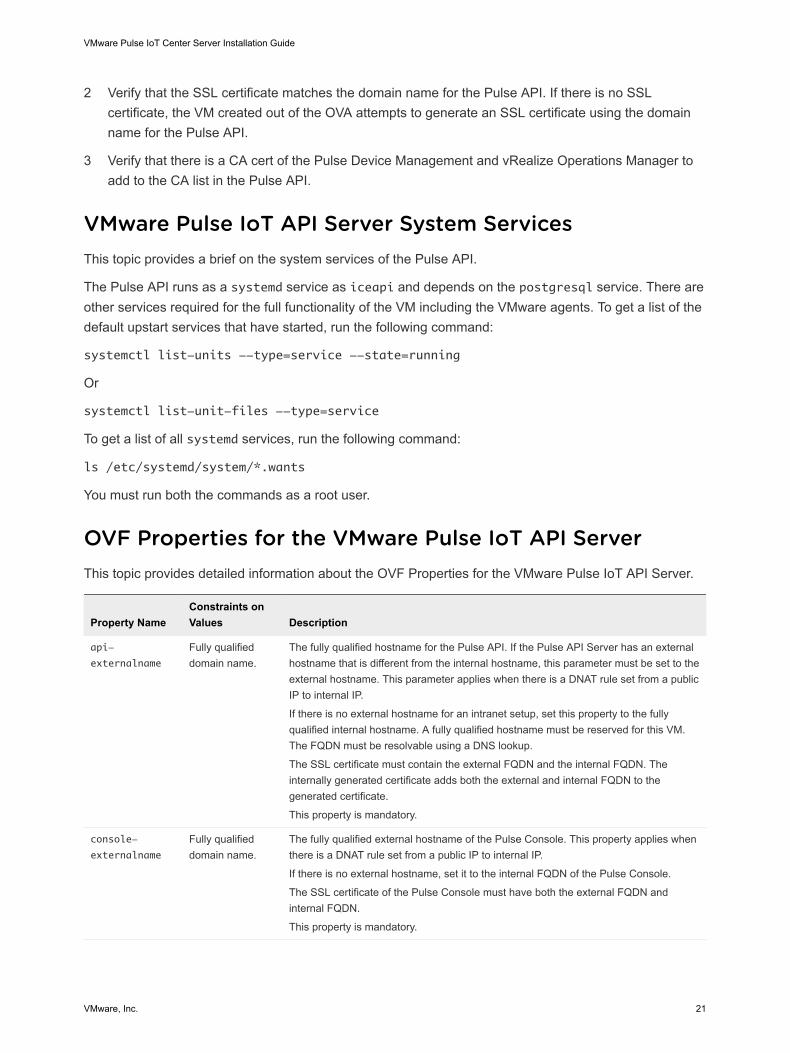
OVF Properties for the VMware Pulse IoT API ServerThis topic provides detailed information about the OVF Properties for the VMware Pulse IoT API Server.
Property NameConstraints onValues Description
api-
externalname
Fully qualifieddomain name.
The fully qualified hostname for the Pulse API. If the Pulse API Server has an externalhostname that is different from the internal hostname, this parameter must be set to theexternal hostname. This parameter applies when there is a DNAT rule set from a publicIP to internal IP.
If there is no external hostname for an intranet setup, set this property to the fullyqualified internal hostname. A fully qualified hostname must be reserved for this VM.The FQDN must be resolvable using a DNS lookup.
The SSL certificate must contain the external FQDN and the internal FQDN. Theinternally generated certificate adds both the external and internal FQDN to thegenerated certificate.
This property is mandatory.
console-
externalname
Fully qualifieddomain name.
The fully qualified external hostname of the Pulse Console. This property applies whenthere is a DNAT rule set from a public IP to internal IP.
If there is no external hostname, set it to the internal FQDN of the Pulse Console.
The SSL certificate of the Pulse Console must have both the external FQDN andinternal FQDN.
This property is mandatory.
VMware Pulse IoT Center Server Installation Guide
VMware, Inc. 21
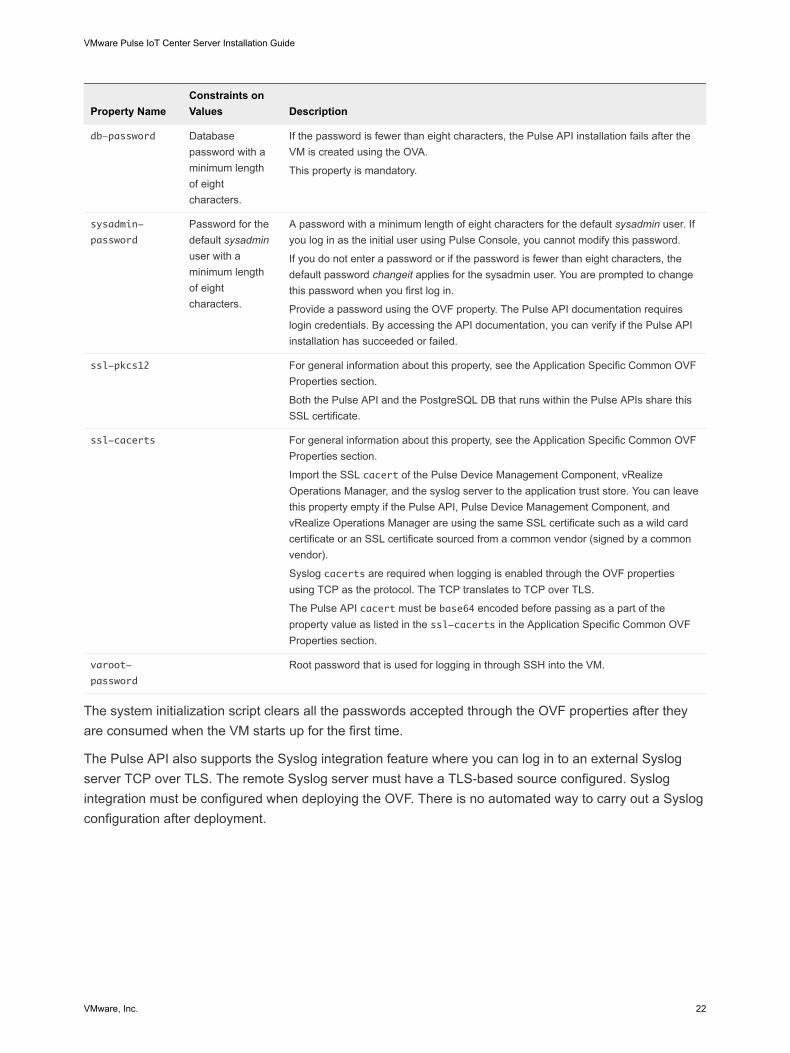
Property NameConstraints onValues Description
db-password Databasepassword with aminimum lengthof eightcharacters.
If the password is fewer than eight characters, the Pulse API installation fails after theVM is created using the OVA.
This property is mandatory.
sysadmin-
password
Password for thedefault sysadminuser with aminimum lengthof eightcharacters.
A password with a minimum length of eight characters for the default sysadmin user. Ifyou log in as the initial user using Pulse Console, you cannot modify this password.
If you do not enter a password or if the password is fewer than eight characters, thedefault password changeit applies for the sysadmin user. You are prompted to changethis password when you first log in.
Provide a password using the OVF property. The Pulse API documentation requireslogin credentials. By accessing the API documentation, you can verify if the Pulse APIinstallation has succeeded or failed.
ssl-pkcs12 For general information about this property, see the Application Specific Common OVFProperties section.
Both the Pulse API and the PostgreSQL DB that runs within the Pulse APIs share thisSSL certificate.
ssl-cacerts For general information about this property, see the Application Specific Common OVFProperties section.
Import the SSL cacert of the Pulse Device Management Component, vRealizeOperations Manager, and the syslog server to the application trust store. You can leavethis property empty if the Pulse API, Pulse Device Management Component, andvRealize Operations Manager are using the same SSL certificate such as a wild cardcertificate or an SSL certificate sourced from a common vendor (signed by a commonvendor).
Syslog cacerts are required when logging is enabled through the OVF propertiesusing TCP as the protocol. The TCP translates to TCP over TLS.
The Pulse API cacert must be base64 encoded before passing as a part of theproperty value as listed in the ssl-cacerts in the Application Specific Common OVFProperties section.
varoot-
password
Root password that is used for logging in through SSH into the VM.
The system initialization script clears all the passwords accepted through the OVF properties after theyare consumed when the VM starts up for the first time.
The Pulse API also supports the Syslog integration feature where you can log in to an external Syslogserver TCP over TLS. The remote Syslog server must have a TLS-based source configured. Syslogintegration must be configured when deploying the OVF. There is no automated way to carry out a Syslogconfiguration after deployment.
VMware Pulse IoT Center Server Installation Guide
VMware, Inc. 22
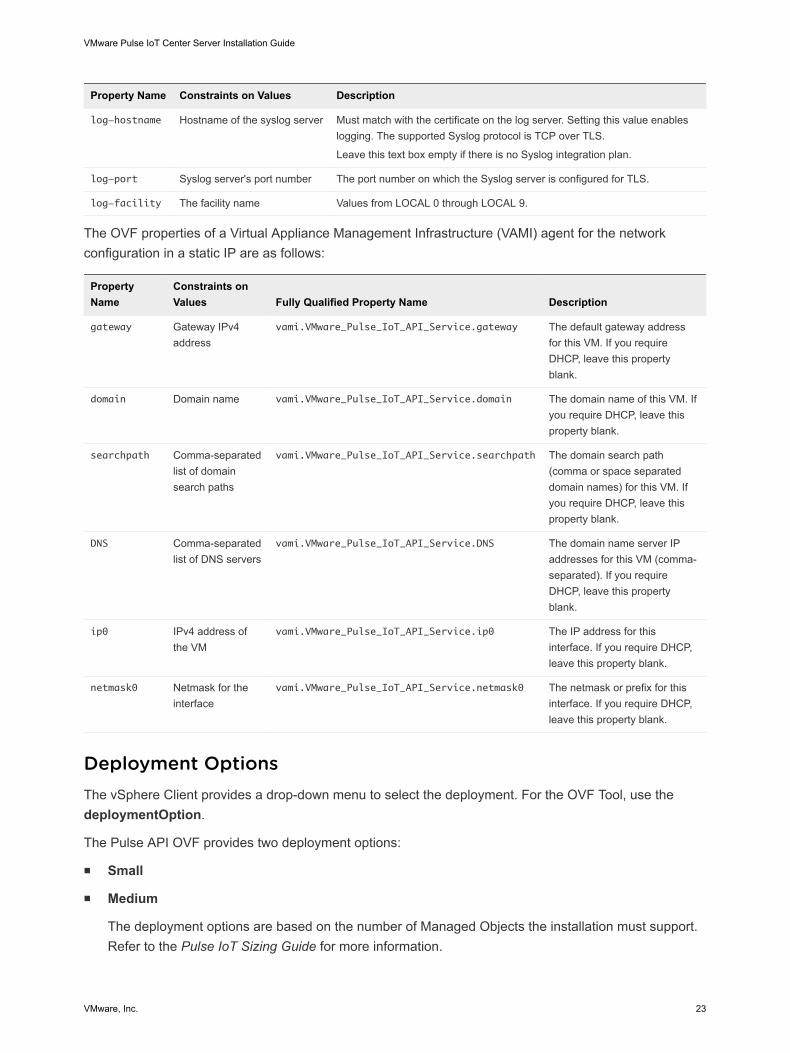
Property Name Constraints on Values Description
log-hostname Hostname of the syslog server Must match with the certificate on the log server. Setting this value enableslogging. The supported Syslog protocol is TCP over TLS.
Leave this text box empty if there is no Syslog integration plan.
log-port Syslog server's port number The port number on which the Syslog server is configured for TLS.
log-facility The facility name Values from LOCAL 0 through LOCAL 9.
The OVF properties of a Virtual Appliance Management Infrastructure (VAMI) agent for the networkconfiguration in a static IP are as follows:
PropertyName
Constraints onValues Fully Qualified Property Name Description
gateway Gateway IPv4address
vami.VMware_Pulse_IoT_API_Service.gateway The default gateway addressfor this VM. If you requireDHCP, leave this propertyblank.
domain Domain name vami.VMware_Pulse_IoT_API_Service.domain The domain name of this VM. Ifyou require DHCP, leave thisproperty blank.
searchpath Comma-separatedlist of domainsearch paths
vami.VMware_Pulse_IoT_API_Service.searchpath The domain search path(comma or space separateddomain names) for this VM. Ifyou require DHCP, leave thisproperty blank.
DNS Comma-separatedlist of DNS servers
vami.VMware_Pulse_IoT_API_Service.DNS The domain name server IPaddresses for this VM (comma-separated). If you requireDHCP, leave this propertyblank.
ip0 IPv4 address ofthe VM
vami.VMware_Pulse_IoT_API_Service.ip0 The IP address for thisinterface. If you require DHCP,leave this property blank.
netmask0 Netmask for theinterface
vami.VMware_Pulse_IoT_API_Service.netmask0 The netmask or prefix for thisinterface. If you require DHCP,leave this property blank.
Deployment OptionsThe vSphere Client provides a drop-down menu to select the deployment. For the OVF Tool, use thedeploymentOption.
The Pulse API OVF provides two deployment options:
n Small
n Medium
The deployment options are based on the number of Managed Objects the installation must support.Refer to the Pulse IoT Sizing Guide for more information.
VMware Pulse IoT Center Server Installation Guide
VMware, Inc. 23
VMware Pulse IoT API PortsThe Pulse API has the necessary firewalls to allow incoming connections to the following ports:
n 443 for the Pulse API server.
n 5432 for the PostgreSQL Database. Database access is limited to within the subnet only.
n 22 for SSH.
By default, the Pulse API listens on 8443. Port 443 is an internal IP tables redirection to 8443. Whensetting a DNAT rule from the external network to the internal network, use the port 443 externally andinternally.
Logs and ConfigurationsThis topic describes the Pulse IoT API logs and configurations at multiple file locations.
You can find the logs and configurations at multiple file locations.
File Description
/var/log/firstboot Contains a running summary when the OVA runs the first time.
/opt/iot-api/logs Contains all the Pulse API logs
/opt/iot-api/config/application.yml Contains the Pulse API application configuration in the YAML format. The YAML fileis a slightly complex format. Make modifications carefully.
/opt/iot-api/config/logback.xml Contains the logging configuration for the Pulse API.
/opt/iot-api/config/keystore.p12 Contains the SSL certificate for the Pulse API
/opt/iot-api/config/truststore.jks The trust store containing cacerts for the Pulse API and of those components thatthe Pulse API connects to.
/opt/iot-api/config/signing.pkcs12 Contains the signing keys used internally by the Pulse API.
Take a backup of the configuration folder /opt/iot-api/config. Any errors to the yaml config, xmlconfig, or certificates can cause the Pulse API service to fail at startup.
Database Backup and RestoreThis topic provides a brief information on Database Backup and Restore.
Take a backup of the Pulse API database in Postgres frequently, and run the following commands as root:
sudo -iu projectice
pg_dump -Ft -n iot projectice > /tmp/projectice.tar
logout
To restore the database, run the following command as root to stop the Pulse API:
systemctl stop iceapi
VMware Pulse IoT Center Server Installation Guide
VMware, Inc. 24
sudo -iu projectice
pg_restore --clean --if-exists -Ft -d projectice /tmp/projectice.tar
logout
sudo systemctl start iceapi
To restore the DB, you must stop the MQTT server. No metrics flow will take place during this phase
Installing the VMware Pulse IoT API OVA Using vSphereWeb Client UIThis topic provides the procedure to Install the VMware Pulse IoT API OVA using the vSphere Web ClientUI.
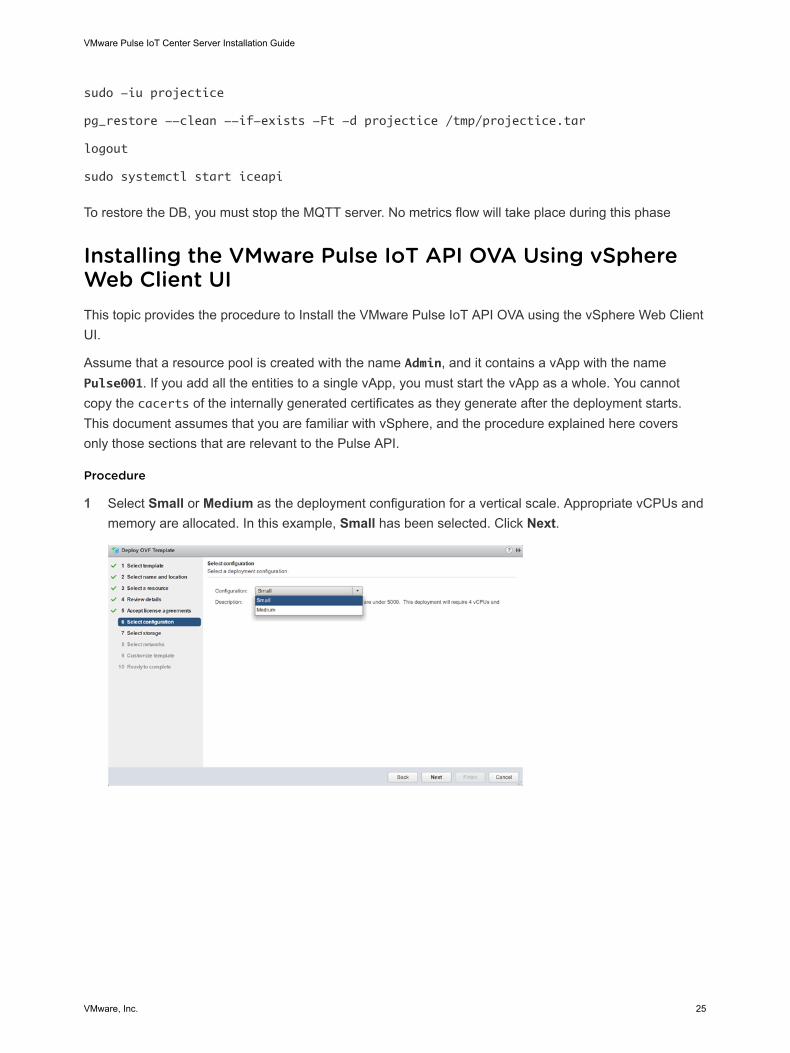
Assume that a resource pool is created with the name Admin, and it contains a vApp with the namePulse001. If you add all the entities to a single vApp, you must start the vApp as a whole. You cannotcopy the cacerts of the internally generated certificates as they generate after the deployment starts.This document assumes that you are familiar with vSphere, and the procedure explained here coversonly those sections that are relevant to the Pulse API.
Procedure
1 Select Small or Medium as the deployment configuration for a vertical scale. Appropriate vCPUs andmemory are allocated. In this example, Small has been selected. Click Next.
VMware Pulse IoT Center Server Installation Guide
VMware, Inc. 25
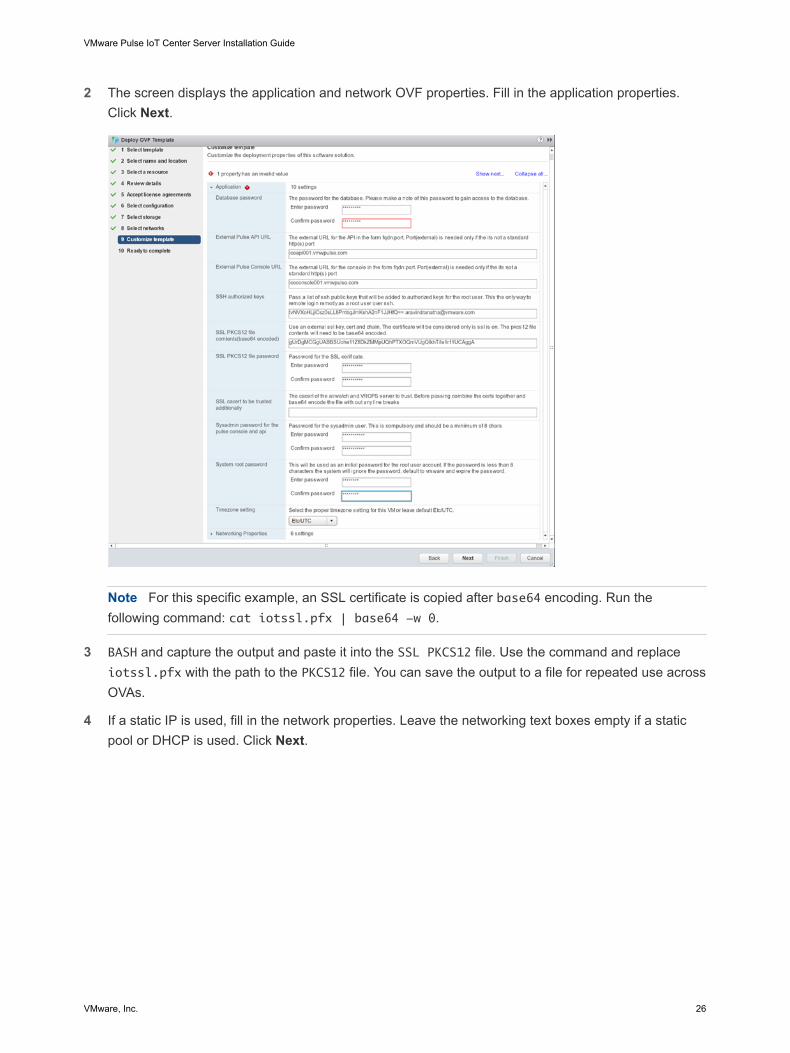
2 The screen displays the application and network OVF properties. Fill in the application properties.Click Next.
Note For this specific example, an SSL certificate is copied after base64 encoding. Run thefollowing command: cat iotssl.pfx | base64 -w 0.
3 BASH and capture the output and paste it into the SSL PKCS12 file. Use the command and replaceiotssl.pfx with the path to the PKCS12 file. You can save the output to a file for repeated use acrossOVAs.
4 If a static IP is used, fill in the network properties. Leave the networking text boxes empty if a staticpool or DHCP is used. Click Next.
VMware Pulse IoT Center Server Installation Guide
VMware, Inc. 26
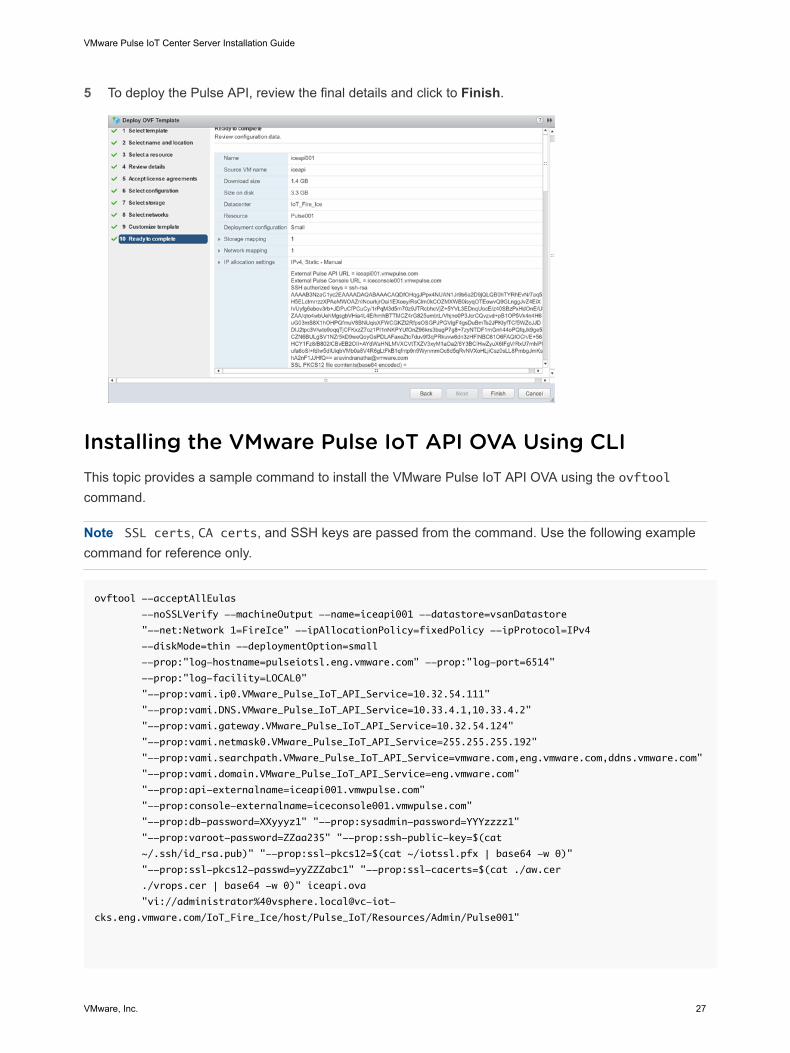
5 To deploy the Pulse API, review the final details and click to Finish.
Installing the VMware Pulse IoT API OVA Using CLIThis topic provides a sample command to install the VMware Pulse IoT API OVA using the ovftoolcommand.
Note SSL certs, CA certs, and SSH keys are passed from the command. Use the following examplecommand for reference only.
ovftool --acceptAllEulas
--noSSLVerify --machineOutput --name=iceapi001 --datastore=vsanDatastore
"--net:Network 1=FireIce" --ipAllocationPolicy=fixedPolicy --ipProtocol=IPv4
--diskMode=thin --deploymentOption=small
--prop:"log-hostname=pulseiotsl.eng.vmware.com" --prop:"log-port=6514"
--prop:"log-facility=LOCAL0"
"--prop:vami.ip0.VMware_Pulse_IoT_API_Service=10.32.54.111"
"--prop:vami.DNS.VMware_Pulse_IoT_API_Service=10.33.4.1,10.33.4.2"
"--prop:vami.gateway.VMware_Pulse_IoT_API_Service=10.32.54.124"
"--prop:vami.netmask0.VMware_Pulse_IoT_API_Service=255.255.255.192"
"--prop:vami.searchpath.VMware_Pulse_IoT_API_Service=vmware.com,eng.vmware.com,ddns.vmware.com"
"--prop:vami.domain.VMware_Pulse_IoT_API_Service=eng.vmware.com"
"--prop:api-externalname=iceapi001.vmwpulse.com"
"--prop:console-externalname=iceconsole001.vmwpulse.com"
"--prop:db-password=XXyyyz1" "--prop:sysadmin-password=YYYzzzz1"
"--prop:varoot-password=ZZaa235" "--prop:ssh-public-key=$(cat
~/.ssh/id_rsa.pub)" "--prop:ssl-pkcs12=$(cat ~/iotssl.pfx | base64 -w 0)"
"--prop:ssl-pkcs12-passwd=yyZZZabc1" "--prop:ssl-cacerts=$(cat ./aw.cer
./vrops.cer | base64 -w 0)" iceapi.ova
"vi://administrator%40vsphere.local@vc-iot-
cks.eng.vmware.com/IoT_Fire_Ice/host/Pulse_IoT/Resources/Admin/Pulse001"
VMware Pulse IoT Center Server Installation Guide
VMware, Inc. 27
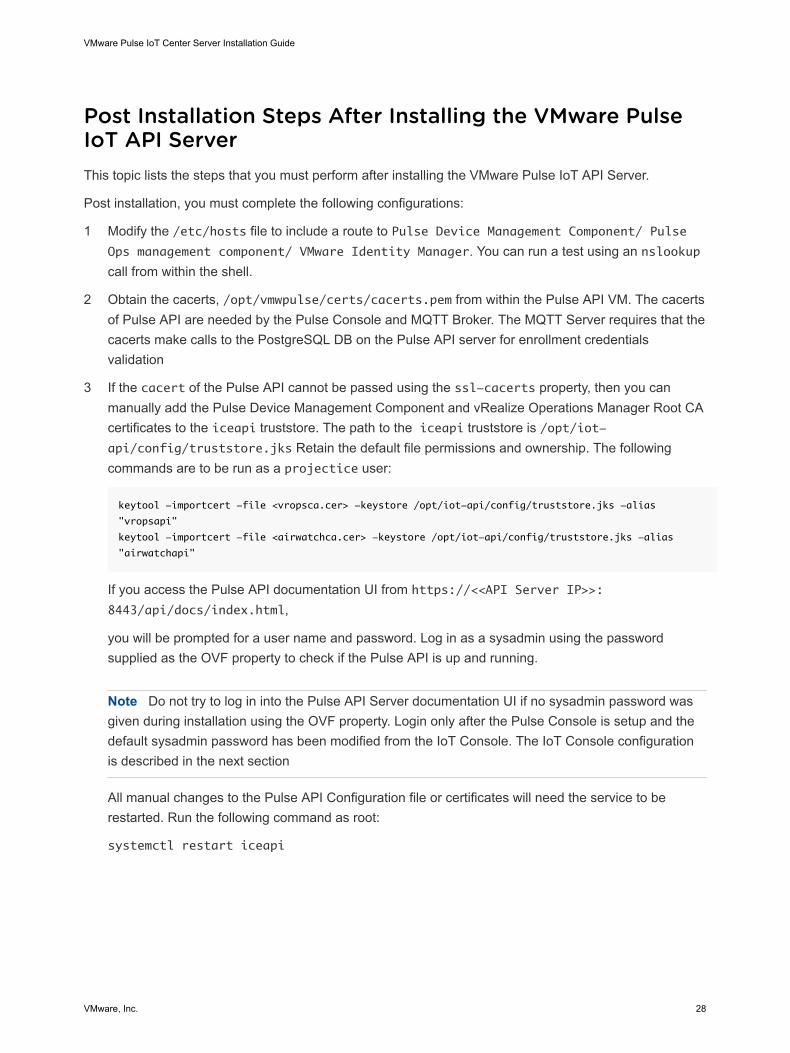
Post Installation Steps After Installing the VMware PulseIoT API ServerThis topic lists the steps that you must perform after installing the VMware Pulse IoT API Server.
Post installation, you must complete the following configurations:
1 Modify the /etc/hosts file to include a route to Pulse Device Management Component/ PulseOps management component/ VMware Identity Manager. You can run a test using an nslookupcall from within the shell.
2 Obtain the cacerts, /opt/vmwpulse/certs/cacerts.pem from within the Pulse API VM. The cacertsof Pulse API are needed by the Pulse Console and MQTT Broker. The MQTT Server requires that thecacerts make calls to the PostgreSQL DB on the Pulse API server for enrollment credentialsvalidation
3 If the cacert of the Pulse API cannot be passed using the ssl-cacerts property, then you canmanually add the Pulse Device Management Component and vRealize Operations Manager Root CAcertificates to the iceapi truststore. The path to the iceapi truststore is /opt/iot-api/config/truststore.jks Retain the default file permissions and ownership. The followingcommands are to be run as a projectice user:
keytool -importcert -file <vropsca.cer> -keystore /opt/iot-api/config/truststore.jks -alias
"vropsapi"
keytool -importcert -file <airwatchca.cer> -keystore /opt/iot-api/config/truststore.jks -alias
"airwatchapi"
If you access the Pulse API documentation UI from https://<<API Server IP>>:8443/api/docs/index.html,
you will be prompted for a user name and password. Log in as a sysadmin using the passwordsupplied as the OVF property to check if the Pulse API is up and running.
Note Do not try to log in into the Pulse API Server documentation UI if no sysadmin password wasgiven during installation using the OVF property. Login only after the Pulse Console is setup and thedefault sysadmin password has been modified from the IoT Console. The IoT Console configurationis described in the next section
All manual changes to the Pulse API Configuration file or certificates will need the service to berestarted. Run the following command as root:
systemctl restart iceapi
VMware Pulse IoT Center Server Installation Guide
VMware, Inc. 28

Installing the VMware Pulse IoTConsole 4This chapter provides information about installing the VMware Pulse IoT Console.
The VMware Pulse IoT Console is distributed as a standalone OVA. You can provide most of theconfiguration inputs to configure a running ICE console instance as OVF parameters. The VMware PulseIoT Console binary is pre-installed at /opt/iceconsole. The configuration for the VMware Pulse IoTConsole is available at /opt/iceconsole/server/config/seed-config.json.
Like the iceapi, the projectice user is the primary owner of /opt/iceconsole and all its contents.Any change to this ownership or permission causes the VMware Pulse IoT Console server to fail.
This chapter includes the following topics:
n Prerequisites for Installing the VMware Pulse IoT Console
n System Services of the VMware Pulse IoT Console
n OVF Properties for the VMware Pulse IoT Console
n VMware Pulse IoT Console Ports
n Logs and Configurations for the VMware Pulse IoT Console
n Installing the VMware Pulse IoT Console Using vSphere Web Client UI
n Installing VMware Pulse IoT Console Using CLI
n Post Installation Configurations for the VMware Pulse IoT Console
Prerequisites for Installing the VMware Pulse IoT ConsoleThis topic provides the prerequisites for installing the VMware Pulse IoT Console.
1 Create a domain name for the VMware Pulse IoT Console. You must create an A Record and aPTR Record in the DNS server for a name to IP resolution and reverse for the VMware Pulse IoTConsole.
2 Create an SSL certificate that matches the domain name for the Pulse Console. If an SSL certificateis not provided, the VM created from the OVA will attempt to generate one using the domain name forthe Pulse Console.
3 Verify the signature of the CA certs in the Pulse API. The certificates must not be signed by a CAdifferent from that of the SSL certificate imported into the Pulse Console.
VMware, Inc. 29
4 Verify that there is a CA cert of the Pulse API that needs to be added to the CA list in the PulseConsole.
System Services of the VMware Pulse IoT ConsoleThis topic provides information about the system services of the VMware Pulse IoT Console.
The Pulse Console runs a systemdservice as iceconsole and depends on thehazelcast service. Thereare other services required for the VM to run all the functions including the VMware agents. To get a list ofthe default upstart services that have started, run the following command:
systemctl list-units --type=service --state=running
Or
systemctl list-unit-files --type=service
To get a list of all systemd services, run the following command:
ls /etc/systemd/system/*.wants
You must run both the commands as a root user.
OVF Properties for the VMware Pulse IoT ConsoleThis topic provides a brief description about the OVF properties for the VMware Pulse IoT Console.
Property NameConstraints onValues Description
api-hostname Fully qualifieddomain name.
The FQDN of the API server that the Pulse Console can use to reach the Pulse API. Thehostname must be the internal hostname of the Pulse API as the Pulse Console and APIare on the same network.
The hostname must resolve to the IP of the Pulse API server within the Pulse ConsoleVM.
The hostname must match the Common Name(CN) or Subject Alternative Name (SAN)in the SSL certificate hosted by the Pulse Console. If not, the SSL hostname validationby the Pulse Console for all HTTPS requests into the Pulse API fails.
This property is mandatory.
console-
externalname
Fully qualifieddomain name.
The fully qualified hostname of the Pulse Console that the browsers use to access thePulse Console. You can add this property to the internally generated SSL certificatewhen no SSL certificate is provided through ssl-pkcs12.
This property is mandatory.
VMware Pulse IoT Center Server Installation Guide
VMware, Inc. 30
Property NameConstraints onValues Description
ssl-pkcs12 For general information about this property, see Application Specific Common OVFProperties.
Also, it is the SSL certificate for the ICE console. The common name in the certificatemust match the console-externalname.
ssl-cacerts For general information about this property, see Application Specific Common OVFProperties.
This property is the SSL cacert of the Pulse API. Leave this property empty if:n The Pulse API and Pulse Console are using the same SSL certificate such as a
wildcard certificate.n The SSL certificate is sourced from a common vendor (signed by a common
vendor).
You must base64 encode the Pulse API cacert before you pass it as a part of theproperty value.
The OVF properties of the VAMI agent for network configuration in the case of static IP are as follows:
PropertyName
Constraints onValues Fully Qualified Property Name Description
gateway Gateway IPv4address.
vami.VMware_Pulse_IoT_Console_Service.gateway The default gatewayaddress for this VM. If yourequire DHCP, leave thisproperty blank.
domain Domain name. vami.VMware_Pulse_IoT_Console_Service.domain The domain name of thisVM. If you require DHCP,leave this property blank.
searchpath Comma-separated list ofdomain searchpaths.
vami.VMware_Pulse_IoT_Console_Service.searchpath The domain search path(comma or space separateddomain names) for this VM.If you require DHCP, leavethis property blank.
DNS Comma-separated list ofDNS servers.
vami.VMware_Pulse_IoT_Console_Service.DNS The domain name server IPaddresses for this VM(comma separated). If yourequire DHCP, leave thisproperty blank.
ip0 IPv4 address ofthe VM.
vami.VMware_Pulse_IoT_Console_Service.ip0 The IP address for thisinterface. If you requireDHCP, leave this propertyblank.
netmask0 Netmask for theinterface.
vami.VMware_Pulse_IoT_Console_Service.netmask0 The netmask or prefix forthis interface. If you requireDHCP, leave this propertyblank.
VMware Pulse IoT Center Server Installation Guide
VMware, Inc. 31
Deployment OptionsThe vSphere Client provides a drop-down menu to select the type of deployment. For ovftool, use thedeploymentOption option.
The OVF provides the following deployment options:
1 Small.
2 Medium.
The deployment options are based on the number of Managed Objects the installation must support.Refer to the Pulse IoT Center Sizing Guide for more information.
VMware Pulse IoT Console PortsThis topic provides information about the ports for the VMware Pulse IoT Console.
The Pulse Console has the necessary firewalls to allow incoming connections to the following ports:
n 443 for the Pulse Console server.
n 22 for SSH.
The default Pulse Console port is 8443. Port 443 is an internal iptables redirection to 8443. Whensetting a DNAT rule from the external network to the internal network, use the port 443 externally andinternally.
Logs and Configurations for the VMware Pulse IoTConsoleThis topic provides information about the location of the logs and configuration folder for the VMwarePulse IoT Console.
You can find the logs and configurations in the following locations:
File Description
/var/log/firstboot Contains a running summary when the OVA is run thefirst time.
/opt/iceconsole/logs Contains all the Pulse Console logs.
/opt/iceconsole/server/config/seed-config.json Contains the Pulse Console application configuration inthe JSON format. The log configuration is part of theseed-config.json.
/opt/iceconsole/server/config/certificates/keystore.p12 The SSL certificate for the Pulse Console.
/opt/iceconsole/server/config/certificates/cacerts.pem The trust store that contains cacerts including that ofthe Pulse API in PEM format.
Note You must take a backup of the configuration folder /opt/iceconsole/server/config . Anyerror to the json configuration file or the certificates causes the Pulse Console startup to fail.
VMware Pulse IoT Center Server Installation Guide
VMware, Inc. 32
Installing the VMware Pulse IoT Console Using vSphereWeb Client UIThis topic provides the procedure to Install the VMware Pulse IoT Console using the vSphere Web ClientUI.
Assume that a resource pool is created with the name Admin, and it contains a vApp with the namePulse001. If you add all the entities to a single vApp, you must start the vApp as a whole. You cannotcopy the cacerts of the internally generated certificates as they generate after the deployment starts.This document assumes that you are familiar with vSphere, and the procedure explained here coversonly those sections that are relevant to the Pulse API.
Procedure
1 Select Small or Medium as the deployment configuration for a vertical scale. Appropriate vCPUs andmemory are allocated. Click Next.
2 Review the application and network OVF properties and click Next.
3 If a static IP is used, enter the network properties. Leave the networking text boxes empty if a staticpool or DHCP is used. Click Next
4 Review the details and click Finish to deploy the Pulse Console.
Installing VMware Pulse IoT Console Using CLIThis topic provides a sample command to install the VMware Pulse IoT Console using the ovftoolcommand.
Note Notice how SSL certs, CA certs, and SSH keys are passed from the command. Use thefollowing example command for reference only.
ovftool --acceptAllEulas --noSSLVerify --machineOutput --name=iceconsole001 --datastore=vsanDatastore
"--net:Network 1=FireIce" --ipAllocationPolicy=fixedPolicy --ipProtocol=IPv4 --diskMode=thin --
deploymentOption=small --prop:"vami.ip0.VMware_Pulse_IoT_Console_Service=10.32.54.112" --
prop:"vami.DNS.VMware_Pulse_IoT_Console_Service=10.33.4.1,10.33.4.2" --
prop:"vami.gateway.VMware_Pulse_IoT_Console_Service=10.32.54.124" --
prop:"vami.netmask0.VMware_Pulse_IoT_Console_Service=255.255.255.192" --
prop:"vami.searchpath.VMware_Pulse_IoT_Console_Service=vmware.com,eng.vmware.com,ddns.vmware.com" --
prop:"vami.domain.VMware_Pulse_IoT_Console_Service=eng.vmware.com" "--prop:api-
hostname=iceapi001.vmwpulse.com" "--prop:console-externalname=iceconsole001.vmwpulse.com" "--
prop:varoot-password=ZZaa235" "--prop:ssh-public-key=$(cat ~/.ssh/id_rsa.pub)" "--prop:ssl-pkcs12=$
(cat ~/iotssl.pfx | base64 -w 0)" "--prop:ssl-pkcs12-passwd=yyZZZabc1" "--prop:ssl-cacerts=$
(cat ./pulseapica.cer | base64 -w 0)" iceconsole.ova "vi://administrator%40vsphere.local@vc-iot-
cks.eng.vmware.com/IoT_Fire_Ice/host/Pulse_IoT/Resources/Admin/Pulse001"
VMware Pulse IoT Center Server Installation Guide
VMware, Inc. 33
Post Installation Configurations for the VMware Pulse IoTConsoleThis topic provides the post Installation configuration information for VMware Pulse IoT Console.
After installing the VMware Pulse IoT Console, perform the following configurations:
1 Modify the /etc/hosts file to include a route to the Pulse API hostname if it does not resolve to theinternal IP address of the Pulse API.
2 If the cacert of the Pulse API does not pass using the cacerts, you can add them manually usingthe following command as projectice:
cat pulseapicacert.pem | tee -
a /opt/iceconsole/server/config/certificates/cacerts.pem
You must restart the service for any further manual changes to the Pulse Console Configuration file,or run the following command as root:
systemctl restart iceconsole
VMware Pulse IoT Center Server Installation Guide
VMware, Inc. 34
Installing MQTT Broker 5This chapter provides information about installing the MQQT Broker.
The mqttbroker.ova installs the EMQTT broker. All install parameters required to set up the EMQTTbroker are carried out through the OVF properties. Follow the constraints described for each OVFproperty value in this section of the document. Any errors in the property can result in an unusablesystem. The only available workaround is to delete and reinstall.
The EMQTT broker, emqttd daemon, runs as an emqtt user. You must be signed in as an emqtt user toedit the emqttd configuration. The emqtt user owns all configurations used by emqtt. Any change in theownership or file permissions causes the emqttd daemon to stop running.
This chapter includes the following topics:
n Prerequisites for Installing MQTT Broker
n MQTT System Services
n OVF Properties for the MQTT Broker
n Logs and Configurations for the MQTT Broker
n Installing MQTT Broker Using the vSphere Web Client UI
n Installing MQTT Broker Using CLI
n Configuring MQTT Broker Post Installation
n Configuring Helix Adapter in vRealize Operations Manager
Prerequisites for Installing MQTT BrokerThis topic provides information about the prerequisites for installing the MQTT Broker.
n Create a domain name for the MQTT Broker. You must create an A Record and PTR in the DNSserver for a name to an IP resolution and reverse.
n Create an SSL certificate that matches the domain name for the MQTT Broker. If an SSL certificate isnot provided, the VM created from the OVA attempts to generate one using the domain name for theMQTT Broker.
n Verify that there is a CA cert of the Pulse API that is added to the CA list in MQTT broker.
VMware, Inc. 35
MQTT System ServicesThis topic provides information about the MQTT System Services.
The MQTT Broker runs as a systemd service, emqttd. There are other services required for the fullfunctionality of the VM including the VMware agents. To get a list of the default upstart services that havestarted, run the following command:
systemctl list-units --type=service --state=running
Or
systemctl list-unit-files --type=service
To get a list of all the systemd services, run the following command:
ls /etc/systemd/system/*.wants
You must run both the commands as a root user.
OVF Properties for the MQTT BrokerThis section provides information about the OVF properties for the MQTT Broker.
Property NameConstraints onValues Description
emqtt-
externalname
Fully qualifiedhostname of theMQTT Broker.
The fully qualified domain name of the MQTT Broker. This property is thehostname that the device and vRealize Operations Manager uses to connect to theMQTT Broker.
This name is used as the Common Name in the internal generated SSLcertificates.
This property is mandatory.
api-hostname Fully qualifieddomain name.
The FQDN of the API server that the MQTT server can reach to. The MQTT brokeruses the PostgreSQL DB on the Pulse API to validate credential from gateways.
The hostname must match the IP of the Pulse API server.
The hostname must match the Common Name (CN) in the SSL certificate hostedby Pulse API.
This property is mandatory.
db-password The databasepassword for thePostgreSQL DB.
The database password for the PostgreSQL DB in the Pulse API.
This property is mandatory.
emqtt-user emqtt user name. This is an access control list within the emqtt daemon and is not a Linux user. Theuser is created post deployment and is used by vRealize Operations Manager(Helix Adapter) to connect to the MQTT Broker.
This property is mandatory.
emqtt-passwd Password for theemqtt-user.
Password corresponding to the emqtt user
This property is mandatory.
VMware Pulse IoT Center Server Installation Guide
VMware, Inc. 36
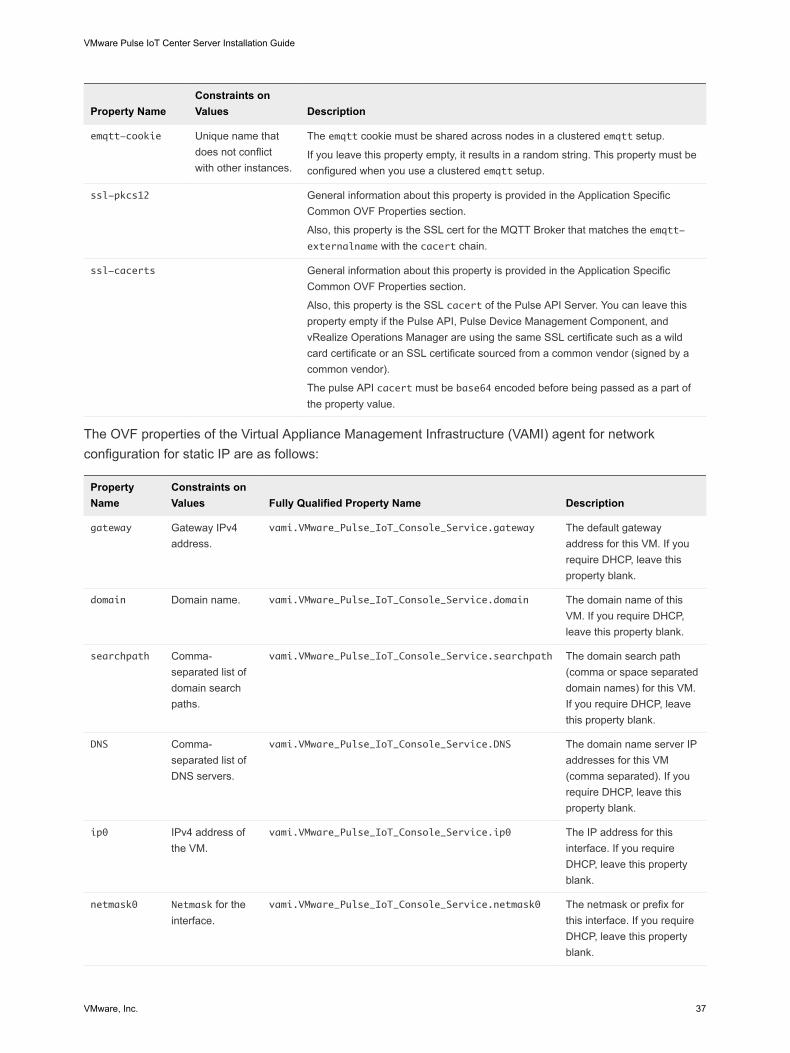
Property NameConstraints onValues Description
emqtt-cookie Unique name thatdoes not conflictwith other instances.
The emqtt cookie must be shared across nodes in a clustered emqtt setup.
If you leave this property empty, it results in a random string. This property must beconfigured when you use a clustered emqtt setup.
ssl-pkcs12 General information about this property is provided in the Application SpecificCommon OVF Properties section.
Also, this property is the SSL cert for the MQTT Broker that matches the emqtt-externalname with the cacert chain.
ssl-cacerts General information about this property is provided in the Application SpecificCommon OVF Properties section.
Also, this property is the SSL cacert of the Pulse API Server. You can leave thisproperty empty if the Pulse API, Pulse Device Management Component, andvRealize Operations Manager are using the same SSL certificate such as a wildcard certificate or an SSL certificate sourced from a common vendor (signed by acommon vendor).
The pulse API cacert must be base64 encoded before being passed as a part ofthe property value.
The OVF properties of the Virtual Appliance Management Infrastructure (VAMI) agent for networkconfiguration for static IP are as follows:
PropertyName
Constraints onValues Fully Qualified Property Name Description
gateway Gateway IPv4address.
vami.VMware_Pulse_IoT_Console_Service.gateway The default gatewayaddress for this VM. If yourequire DHCP, leave thisproperty blank.
domain Domain name. vami.VMware_Pulse_IoT_Console_Service.domain The domain name of thisVM. If you require DHCP,leave this property blank.
searchpath Comma-separated list ofdomain searchpaths.
vami.VMware_Pulse_IoT_Console_Service.searchpath The domain search path(comma or space separateddomain names) for this VM.If you require DHCP, leavethis property blank.
DNS Comma-separated list ofDNS servers.
vami.VMware_Pulse_IoT_Console_Service.DNS The domain name server IPaddresses for this VM(comma separated). If yourequire DHCP, leave thisproperty blank.
ip0 IPv4 address ofthe VM.
vami.VMware_Pulse_IoT_Console_Service.ip0 The IP address for thisinterface. If you requireDHCP, leave this propertyblank.
netmask0 Netmask for theinterface.
vami.VMware_Pulse_IoT_Console_Service.netmask0 The netmask or prefix forthis interface. If you requireDHCP, leave this propertyblank.
VMware Pulse IoT Center Server Installation Guide
VMware, Inc. 37
Deployment OptionsThe vSphere Client provides a drop-down menu to select the type of deployment. For ovftool, usedeploymentOption.
The OVF provides the following deployment options:
1 Small.
2 Medium.
The deployment options are based on the number of Managed Objects the installation must support.Refer to the Pulse IoT Center Sizing Guide for more information.
Logs and Configurations for the MQTT BrokerThis topic provides information about the location of the logs and configuration folder for the MQTTBroker.
You can view the logs and configurations at the following locations:
File Description
/var/log/firstboot Contains a running summary when the OVA runs the first time.
/var/log/emqttd Contains all the MQTT Broker and Erlang runtime logs.
/etc/emqttd/emq.conf Contains all the configurations including logging for the MQTT Broker.
Installing MQTT Broker Using the vSphere Web Client UIThis topic provides the procedure to Install MQTT Broker using the vSphere Web Client UI.
Assume that a resource pool is created with the name Admin, and it contains a vApp with the namePulse001. If you add all the entities to a single vApp, you must start the vApp as a whole. You cannotcopy the cacerts of the internally generated certificates as they generate after the deployment starts.This document assumes that you are familiar with vSphere, and the procedure explained here coversonly those sections that are relevant to the Pulse API.
Procedure
1 Select Small or Medium as the deployment configuration for a vertical scale. Appropriate vCPUs andmemory are allocated. Click Next.
2 Enter the application properties.
In this example, an SSL certificate is copied after base64 encoding. Run the following command inthe shell:
cat iotssl.pfx | base64 -w 0
VMware Pulse IoT Center Server Installation Guide
VMware, Inc. 38
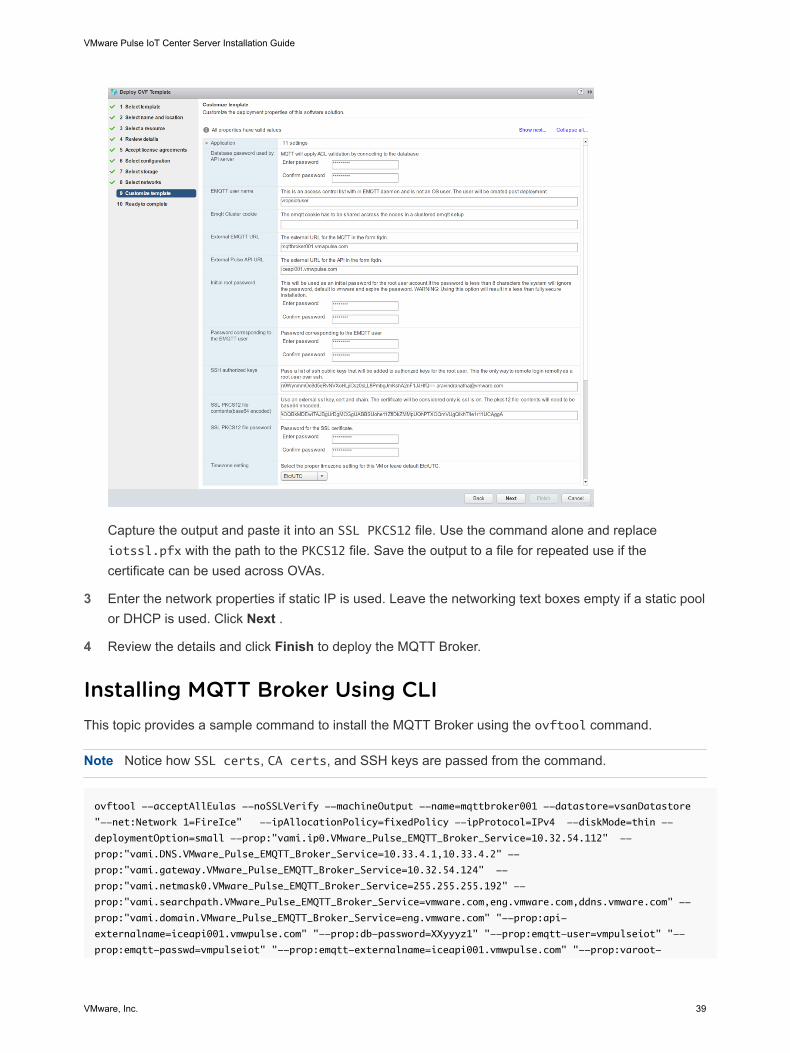
Capture the output and paste it into an SSL PKCS12 file. Use the command alone and replaceiotssl.pfx with the path to the PKCS12 file. Save the output to a file for repeated use if thecertificate can be used across OVAs.
3 Enter the network properties if static IP is used. Leave the networking text boxes empty if a static poolor DHCP is used. Click Next .
4 Review the details and click Finish to deploy the MQTT Broker.
Installing MQTT Broker Using CLIThis topic provides a sample command to install the MQTT Broker using the ovftool command.
Note Notice how SSL certs, CA certs, and SSH keys are passed from the command.
ovftool --acceptAllEulas --noSSLVerify --machineOutput --name=mqttbroker001 --datastore=vsanDatastore
"--net:Network 1=FireIce" --ipAllocationPolicy=fixedPolicy --ipProtocol=IPv4 --diskMode=thin --
deploymentOption=small --prop:"vami.ip0.VMware_Pulse_EMQTT_Broker_Service=10.32.54.112" --
prop:"vami.DNS.VMware_Pulse_EMQTT_Broker_Service=10.33.4.1,10.33.4.2" --
prop:"vami.gateway.VMware_Pulse_EMQTT_Broker_Service=10.32.54.124" --
prop:"vami.netmask0.VMware_Pulse_EMQTT_Broker_Service=255.255.255.192" --
prop:"vami.searchpath.VMware_Pulse_EMQTT_Broker_Service=vmware.com,eng.vmware.com,ddns.vmware.com" --
prop:"vami.domain.VMware_Pulse_EMQTT_Broker_Service=eng.vmware.com" "--prop:api-
externalname=iceapi001.vmwpulse.com" "--prop:db-password=XXyyyz1" "--prop:emqtt-user=vmpulseiot" "--
prop:emqtt-passwd=vmpulseiot" "--prop:emqtt-externalname=iceapi001.vmwpulse.com" "--prop:varoot-
VMware Pulse IoT Center Server Installation Guide
VMware, Inc. 39
password=ZZaa235" "--prop:ssh-public-key=$(cat ~/.ssh/id_rsa.pub)" "--prop:ssl-pkcs12=$(cat
~/iotssl.pfx | base64 -w 0)" "--prop:ssl-pkcs12-passwd=yyZZZabc1" mqttbroker.ova "vi://administrator
%[email protected]/IoT_Fire_Ice/host/Pulse_IoT/Resources/Admin/Pulse001"
Configuring MQTT Broker Post InstallationThis section lists the post installation steps for MQTT Broker.
MQTT Plug-In
The MQTT Broker configures itself if all the mandatory OVF properties are entered correctly, as listed inthe previous section. The configuration is applied when the VM runs for the first time.
n Verify the installation by running the following command:
sudo -i -u emqtt
emqttd_ctl plugins list
n The output of the preceding command must contain the following two lines:
Plugin(emq_auth_pgsql,
version=2.2, description=Authentication/ACL with PostgreSQL,
active=true)
Plugin(emq_auth_username,
version=2.2, description=Authentication with Username/Password,
active=true)
n If active = true is false in the output for emq_auth_psql, start the plug-in by running thecommand from the shell:
sudo -i -u emqtt
emqttd_ctl plugins load emq_auth_pgsql
n Verify that the output of the command states:
Plugin emq_auth_pgsql loaded successfully
n If the active = true is empty in the output for emq_auth_psql, start the plug-in by running thecommand from the shell:
sudo -i -u emqtt
emqttd_ctl plugins load emq_auth_username
n Verify that the output of the command states:
Plugin emq_auth_username loaded successfully
VMware Pulse IoT Center Server Installation Guide
VMware, Inc. 40
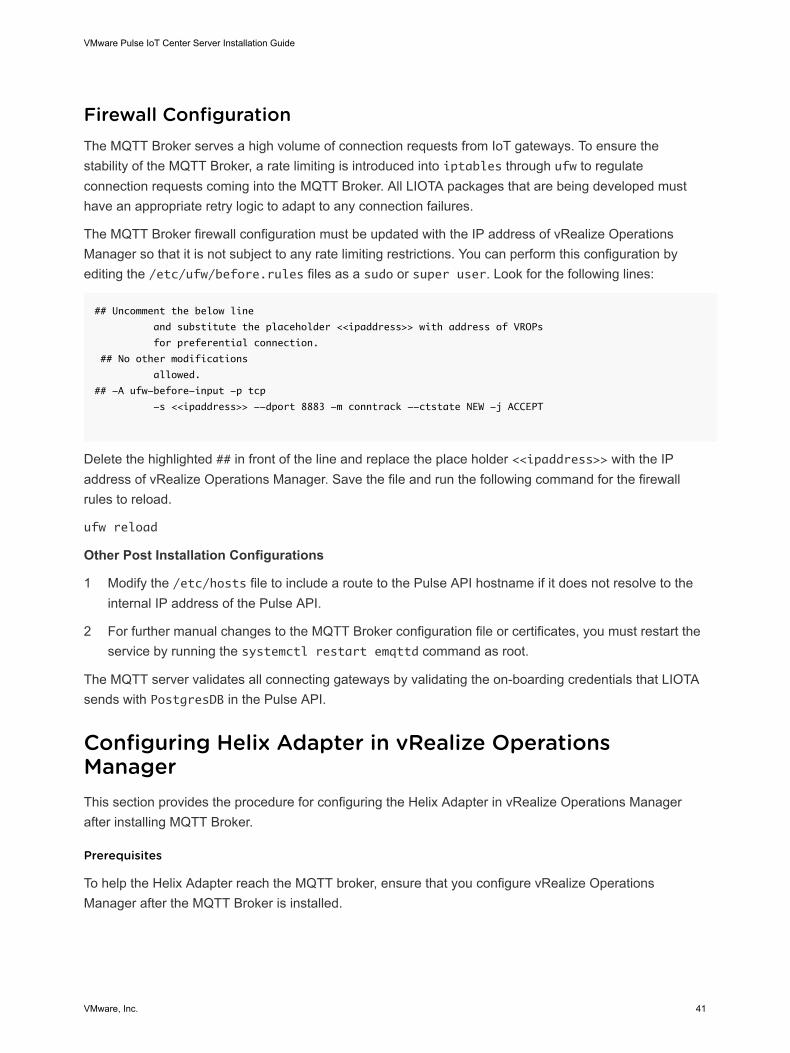
Firewall ConfigurationThe MQTT Broker serves a high volume of connection requests from IoT gateways. To ensure thestability of the MQTT Broker, a rate limiting is introduced into iptables through ufw to regulateconnection requests coming into the MQTT Broker. All LIOTA packages that are being developed musthave an appropriate retry logic to adapt to any connection failures.
The MQTT Broker firewall configuration must be updated with the IP address of vRealize OperationsManager so that it is not subject to any rate limiting restrictions. You can perform this configuration byediting the /etc/ufw/before.rules files as a sudo or super user. Look for the following lines:
## Uncomment the below line
and substitute the placeholder <<ipaddress>> with address of VROPs
for preferential connection.
## No other modifications
allowed.
## -A ufw-before-input -p tcp
-s <<ipaddress>> --dport 8883 -m conntrack --ctstate NEW -j ACCEPT
Delete the highlighted ## in front of the line and replace the place holder <<ipaddress>> with the IPaddress of vRealize Operations Manager. Save the file and run the following command for the firewallrules to reload.
ufw reload
Other Post Installation Configurations
1 Modify the /etc/hosts file to include a route to the Pulse API hostname if it does not resolve to theinternal IP address of the Pulse API.
2 For further manual changes to the MQTT Broker configuration file or certificates, you must restart theservice by running the systemctl restart emqttd command as root.
The MQTT server validates all connecting gateways by validating the on-boarding credentials that LIOTAsends with PostgresDB in the Pulse API.
Configuring Helix Adapter in vRealize OperationsManagerThis section provides the procedure for configuring the Helix Adapter in vRealize Operations Managerafter installing MQTT Broker.
Prerequisites
To help the Helix Adapter reach the MQTT broker, ensure that you configure vRealize OperationsManager after the MQTT Broker is installed.
VMware Pulse IoT Center Server Installation Guide
VMware, Inc. 41
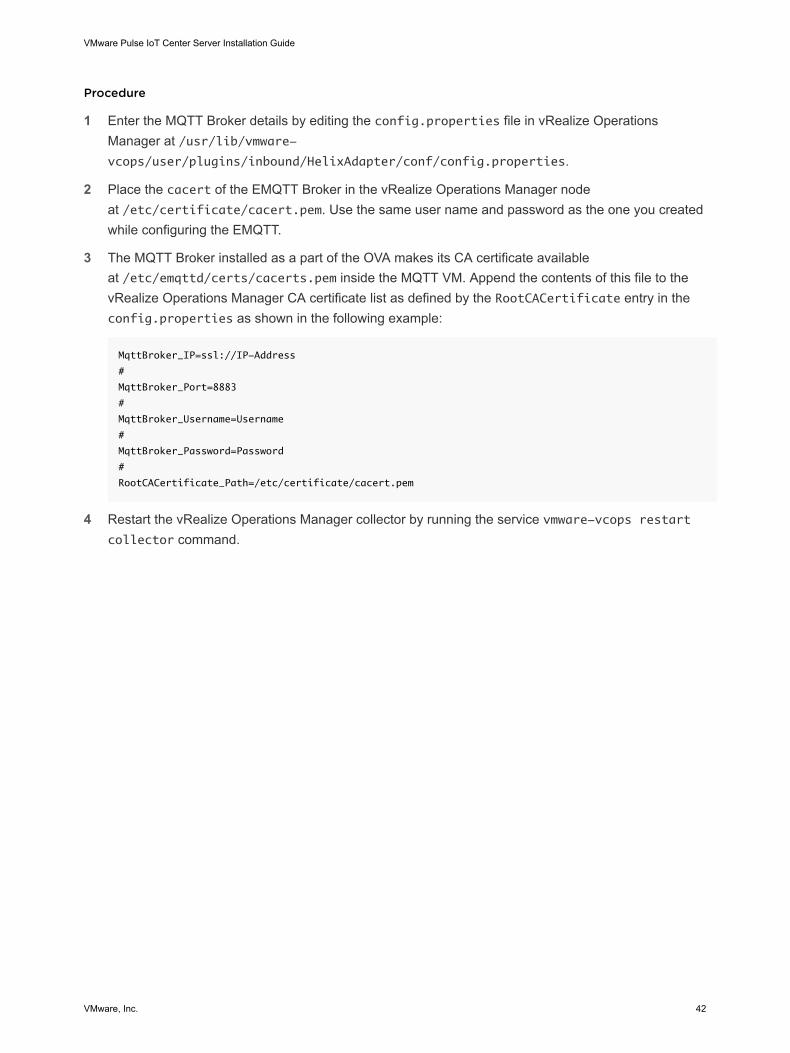
Procedure
1 Enter the MQTT Broker details by editing the config.properties file in vRealize OperationsManager at /usr/lib/vmware-vcops/user/plugins/inbound/HelixAdapter/conf/config.properties.
2 Place the cacert of the EMQTT Broker in the vRealize Operations Manager nodeat /etc/certificate/cacert.pem. Use the same user name and password as the one you createdwhile configuring the EMQTT.
3 The MQTT Broker installed as a part of the OVA makes its CA certificate availableat /etc/emqttd/certs/cacerts.pem inside the MQTT VM. Append the contents of this file to thevRealize Operations Manager CA certificate list as defined by the RootCACertificate entry in theconfig.properties as shown in the following example:
MqttBroker_IP=ssl://IP-Address
#
MqttBroker_Port=8883
#
MqttBroker_Username=Username
#
MqttBroker_Password=Password
#
RootCACertificate_Path=/etc/certificate/cacert.pem
4 Restart the vRealize Operations Manager collector by running the service vmware-vcops restartcollector command.
VMware Pulse IoT Center Server Installation Guide
VMware, Inc. 42
VMware Identity Manager 6This chapter provides information about integrating the VMware Identity Manager.
VMware Identity Manager provides identity management service, which simplifies business mobility withan included identity provider (IDP) or helps to integrate with existing on-premises identity providers toprovide seamless user experience and powerful conditional access controls to single sign on to anyapplications present in its catalogue.
VMware Identity Manager empowers employees to get productive quickly with a self-service app storewhile providing IT a central place to manage user provisioning and access policy with enterprise-classdirectory integration, identity federation, and user analytics expected from the leader of hybrid cloudinfrastructure. For more information, see the VMware Identity Manager documentation at https://docs.vmware.com/en/VMware-Identity-Manager/index.html.
This chapter includes the following topics:n Deployment Model
n Before You Begin Integrating VMware Identity Manager
n VMware Pulse Device Management Suite Integration
n Integrating VMware Pulse IoT Center with VMware Identity Manager
VMware, Inc. 43

Deployment ModelThe following diagram illustrates the VMware Identity Manager deployment model.
Before You Begin Integrating VMware Identity ManagerThis topic provides the steps to perform before you begin integrating the Pulse Device Managementcomponent with VMware Identity Manager.
Before you begin integrating the Pulse Device Management component with VMware Identity Manager,you must perform following steps:1 Set up AirWatch Cloud Connector.
2 Set up AirWatch cloud messaging through the AirWatch Admin Console.
3 Verify and update the console site URL.
4 Export the VMware Identity Manager SAML metadata.
Setting Up the AirWatch Cloud ConnectorThis topic provides the procedure to set up the AirWatch Cloud Connector.
Note Configure the AirWatch Cloud Connector by enabling it in the AirWatch admin console at a globallevel. You can read through the AirWatch Cloud Connector and AirWatch Cloud Messaging set up only ifnecessary.
Procedure
1 Log in to the Pulse Device Management console.
2 Navigate to Groups & Settings from Global OG > All Settings > System > Enterprise Integration> Cloud Connector.
VMware Pulse IoT Center Server Installation Guide
VMware, Inc. 44
3 To enable AirWatch Cloud Connector and display the General tab, select the Enable CloudConnector and Enable Auto Update check boxes , and then click Save.. Certificates are generatedfor the AC and the AirWatch server and displayed under ACC and AirWatch certificates in theAdvanced tab.
4 Select Download Cloud Connector Installer located near the bottom of screen of the General tab.
5 Enter a password for the AirWatch Cloud Connector certificate in the text boxes. The password isneeded later when you run the AirWatch Cloud Connector installer and must enter the certificatepassword. It is same as the AirWatch console password.
6 Select Download and save the Cloud Connector x.x Installer.exe.
7 Log in remotely to the AirWatch machine and copy the Cloud Connector x.x Installer.exe tothe AirWatch system.
8 Open the installer on the ACC server. When the Welcome screen appears, select Next and enter thepassword that you used to download the cloud connector.
Setting Up AirWatch Cloud Messaging through the AirWatchAdmin ConsoleThis topic provides instructions about setting up AirWatch Cloud Messaging through the AirWatch AdminConsole.
Navigate to Groups and Settings under the Global OG > All Settings > System > Advanced > SiteURL’s. Scroll down to the AirWatch Cloud Messaging section and enter the AirWatch Cloud Messagingdetails that you might have configured. If the test connection is successful, click Save.
Verifying and Updating the Console Site URLThis topic provides the procedure to verify and update the Console Site URL.
Procedure
1 From the AirWatch Admin Console, navigate to Groups & Settings > All Settings. Select Global >System > Advanced > Site URLs.
2 Click the Override button and verify if the Console URL contains the word AirWatch as a pathparameter in the console URL. For example:
https://<<Airwatch console server URL>>/AirWatch
If the console URL does not match the necessary parameters, modify the Console URL andappend /AirWatch to it.
3 Click Save.
Exporting VMware Identity Manager MetadataThis topic provides the procedure for exporting the VMware Identity Manager metadata.
VMware Pulse IoT Center Server Installation Guide
VMware, Inc. 45
Procedure
1 Log in to the administrator console of the VMware Identity Manager server and navigate to Catalog >Web Apps.
2 Click Settings.
3 Under SAML Metadata, right-click Identity Provider (IdP) metadata and save it to your local drivefor future use.
VMware Pulse Device Management Suite IntegrationThis topic provides information about integrating the VMware Pulse Device Management Suite withVMware Identity Manager.
You configure settings in the AirWatch admin console to communicate with VMware Identity Managerbefore you configure AirWatch settings in the VMware Identity Manager admin console. To integrateAirWatch and VMware Identity Manager, perform the following prerequisites:
1 Verify that the organization group in AirWatch for which VMware Identity Manager is configured is ofthe type Customer.
2 Verify that the following REST API keys are created at the same organization group where VMwareIdentity Manager is configured:
n REST API admin key for communication with the VMware Identity Manager service
n REST enrollment user API key for AirWatch Cloud Connector password authentication
3 Verify that the API admin account settings and the admin authentication certificate from AirWatch areadded to the AirWatch settings in the VMware Identity Manager admin console.
4 Verify that the Active Directory user accounts are set up at the same organization group whereVMware Identity Manager is configured.
The following configurations must be set up in the AirWatch admin console:
1 A REST admin API key for communication with the VMware Identity Manager service.
2 An API Admin account for VMware Identity Manager and the admin authorization certificate that isexported from AirWatch and added to the AirWatch settings in VMware Identity Manager.
3 A REST enrolled user API key used for the AirWatch Cloud Connector password authentication.
Creating an Organization GroupThis topic provides the procedure to create an organization group.
VMware Pulse IoT Center Server Installation Guide
VMware, Inc. 46
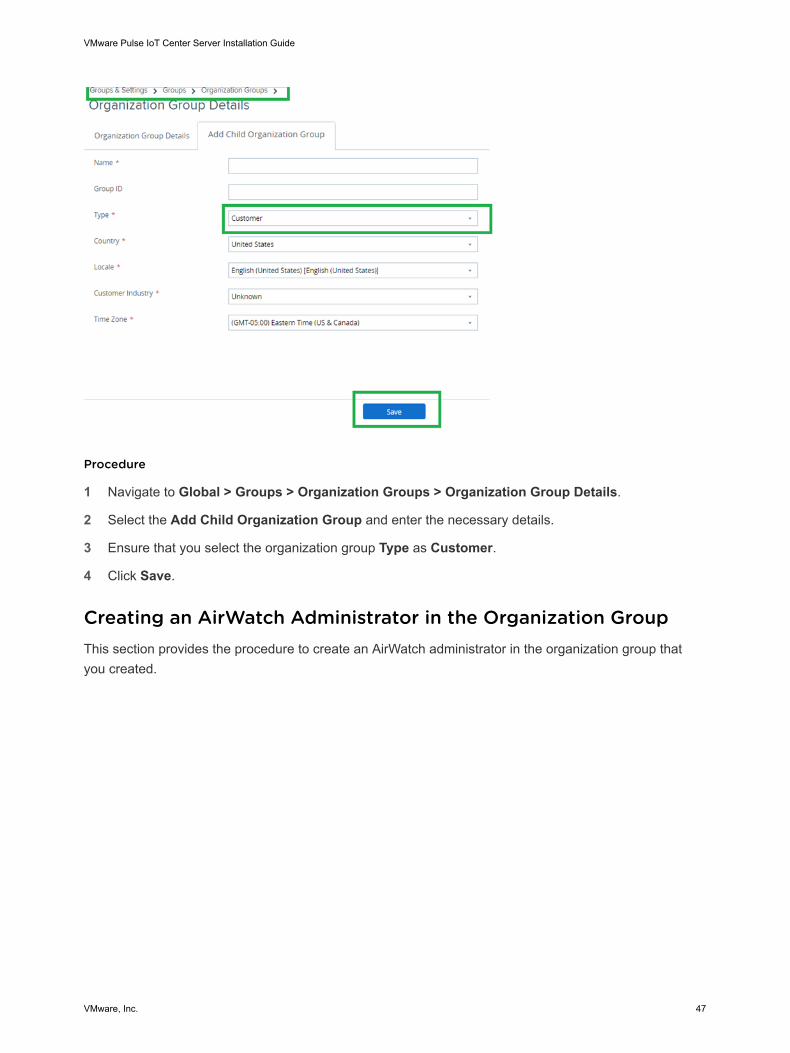
Procedure
1 Navigate to Global > Groups > Organization Groups > Organization Group Details.
2 Select the Add Child Organization Group and enter the necessary details.
3 Ensure that you select the organization group Type as Customer.
4 Click Save.
Creating an AirWatch Administrator in the Organization GroupThis section provides the procedure to create an AirWatch administrator in the organization group thatyou created.
VMware Pulse IoT Center Server Installation Guide
VMware, Inc. 47
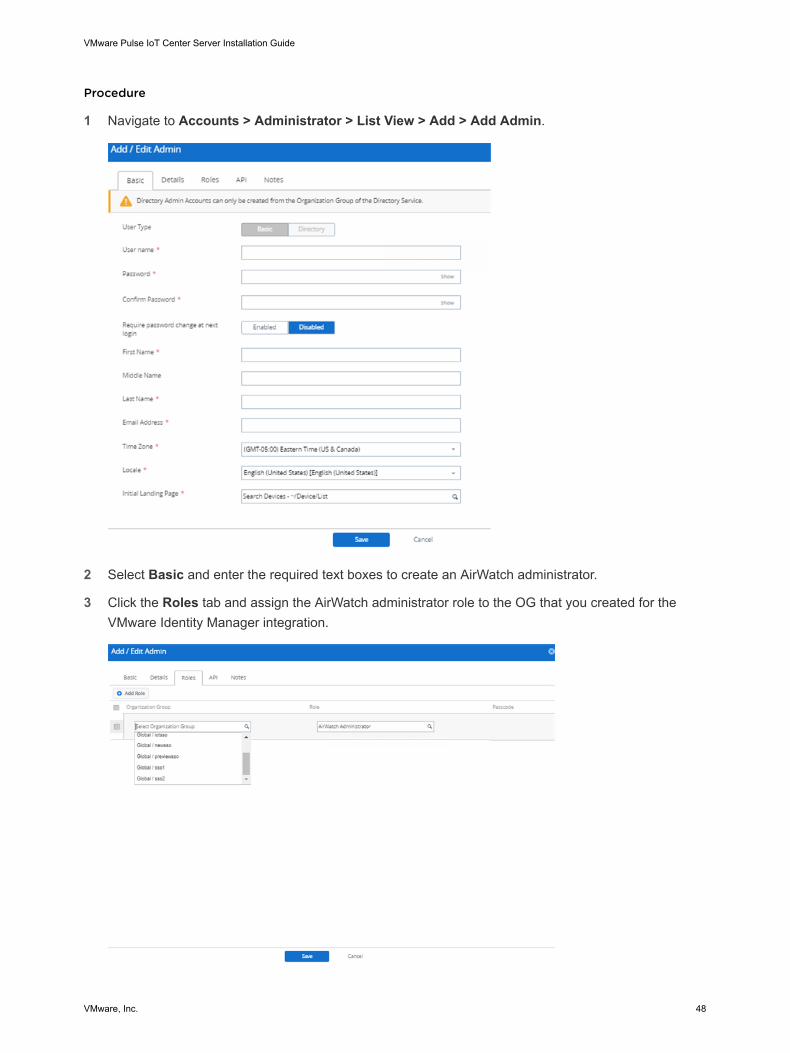
Procedure
1 Navigate to Accounts > Administrator > List View > Add > Add Admin.
2 Select Basic and enter the required text boxes to create an AirWatch administrator.
3 Click the Roles tab and assign the AirWatch administrator role to the OG that you created for theVMware Identity Manager integration.
VMware Pulse IoT Center Server Installation Guide
VMware, Inc. 48
4 Click Save.
After you create the administrator, you can view it in the list view by following the path Accounts >Administrators > List View..
Configuring the Active DirectoryThis topic provides the steps to configure the active directory in the Getting Started page.
Note If the Getting Started page is not displayed when you log in for the first time, enter the followinggetting started URL in any browser: https://<<Airwatch-api-server-domain>>/AirWatch/#/GettingStarted/GettingStarted
Procedure
1 Log in to the newly created OG with the admin user you created.
2 Accept the EULA and set the security pin and recovery answer if asked.
3 In the Getting Started page, click Start Wizard under Workspace ONE. The Workspace ONE Setuppage is displayed.
4 Click Configure against the ACC Connector/Active Directory section. The Deployment Info dialogbox is displayed.
5 Select No for the option Are you going to be using SAML for Authentication?.
6 Click Next. The Server Settings dialog box is displayed.
7 Enter your Active Directory services information.
8 Click Next. The Users & Groups Settings dialog box is displayed.
If the Active directory setup is correct, when you click Next, the auto detect in the Server Settingspage must be successful and the text boxes must be filled automatically. Auto detect is a successfulmessage with a green check mark.
9 Click Test Connection.
10 On successful test connection, click Next.
11 Select the desired option in Users & Group Settings.
12 Click Next. TheDirectory Setup Complete dialog box is displayed.
13 Click Yes or No for the option, I would like to enable Directory Services as a method ofauthentication for enrollment.
14 Click Finish.
Note After you click Finish, in the next page, you can either create the directory users and groupsas you require, or you can click Close.
Closing the window will take you the Active Directory Settings page.
VMware Pulse IoT Center Server Installation Guide
VMware, Inc. 49
15 Click Close again.
Configuring VMWare Identity Manager Settings in the GettingStarted PageThis topic provides the procedure to configure the VMWare Identity Manager settings in the GettingStarted page.
Procedure
1 1. Click Configure against VMware Identity Manager Settings.
2 Enter the VMware Identity Manager tenant URL, user name, and password.
3 Click Test Connection.
If the test connection is successful, the Continue button is enabled.
4 Click Yes for Do you want to use AirWatch to authenticate users?.
5 Click Save.
Note Steps 4 and 5 are important and essential for SSO.
6 Select VMware Identity Manager by navigating to All Settings > System > Enterprise Integration >VMware Identity Manager.
If all the VMware Identity Manager settings are successful, then you find details of the VMware IdentityManager server that you configured. A directory name against the Directory text box in the VMwareIdentity Manager settings page is also visible.
Validating the Integration of AirWatch Directories in the VMwareIdentity Manager ConsoleThis topic provides the procedure to validate the integration of AirWatch Directories in the VMwareIdentity Manager Console.
To validate if the VMware Identity Manager integration is successful, complete the following steps:
Procedure
1 Navigate to the VMware Identity Manager configuration page by following the path Groups &Settings (of the integrated Organization Group) > All settings > Enterprise Integration > VMwareIdentity Manager.
2 Under the Server subsection of VMware Identity Manager, note the name used in the text box of thedirectory.
3 Log in to VMware Identity Manager and click Directories under the Identity & AccessManagement section in the Administrative Console.
The directory name in step 2 must match the name in step 3.
VMware Pulse IoT Center Server Installation Guide
VMware, Inc. 50
Provisioning the Pulse Device Management Suite to VMwareIdentity ManagerThis topic provides the procedure to provision the Pulse Device Management Suite to VMware IdentityManager.
After you confirm that the integration of VMware Identity Manager Settings is correct, provision the PulseDevice Management Suite to the VMware Identity Manager.
Procedure
1 Navigate to the Directory services of the Customer level organization group that is integrated with theVMware Identity Manager. Go to Accounts > Administrators > Administrator Settings > DirectoryServices. Scroll down the page and click Start Setup Wizard.
2 Click Configure in the Directory Services dialog box. The Deployment Info section is displayed.
3 Click Yes, for the option Are you going to be using SAML for Authentication?.
4 Enable SAML for Both.
5 ClickYes for the option Would you like to configure your LDAP Integration?.
6 Click Next. The Server Settings section is displayed.
7 Enter the Active Directory details and click Next.
8 Click Test Connection.
9 If the test connection is successful, click Next. The Users and Group Settings section is displayed.
10 Select the desired option in the Users and Group Settings.
11 Click Next. The Directory Setup Complete section is displayed.
12 Select Yes or No for the option, I would like to enable Directory Services as a method ofauthentication for enrollment.
13 Click Next. The Select the Identity Provider section is displayed.
14 Select VMware Identity Manager and click Next. The Upload IdP file section is displayed.
15 Upload the IdP metadata XML file that you downloaded from the VMware Identity Manager and clickNext. Refer to the section Export VMware Identity Manager Metadata to export the identity providermetadata. Click Next. The Verify Settings section is displayed.
16 Verify the SAML settings and modify the Request and Response sections as required.
17 Click Next. The Finish section is displayed.
Note The request and response binding type must be POST.
18 Select both the applications and click Finish. The applications are provisioned to the instance ofVMware Identity Manager that you have configured in the preceding steps.
VMware Pulse IoT Center Server Installation Guide
VMware, Inc. 51
19 Log in to the VMware Identity Manager administrator console and click Catalog. The AirWatchapplications are displayed in the catalog.
20 Click the AirWatch Admin application and then click the Assign tab in the configuration page.
21 Search the users or groups that are entitled for this application.
22 Click Save.
Creating a REST API KeyThis topic provides the procedure to create a REST API key.
To integrate VMware Identity Manager with AirWatch, enable access to the REST Admin API and enrolledusers in the AirWatch admin console.
Procedure
1 In the AirWatch admin console, select Groups & Settings > All Settings > System > Advanced >API > Rest API.
2 In the General tab, click Add to generate the API key to be used in the VMware Identity Managerservice.
The account type is Admin with a unique service name.
3 To generate the enrollment user API key, click Add again.
4 In the Account Type drop-down menu, select Enrollment User. Provide a unique service name.
5 Copy the two API keys and save the keys to a file.
6 Click Save.
Creating a Certificate for the AirWatch AdministratorThis topic provides the procedure to create a certificate for the AirWatch administrator.
Set up certificate authentication in the AirWatch admin console. For REST API certificate-basedauthentication, a user level certificate is generated from the AirWatch admin console and the certificateused is a self-signed AirWatch certificate that is generated from the AirWatch admin root cert.
Procedure
1 From the AirWatch admin console, select the Accounts > Administrators > List View.
2 Select the pencil icon against the admin user that you had used to log in, to create the certificate.
3 Click the API tab and select Certificates against the Authentication option.
4 Enter the certificate password.
5 Click Generate Client Certificate.
6 To create the client certificate, click Save.
7 Export the AirWatch administrator Client Certificate.
VMware Pulse IoT Center Server Installation Guide
VMware, Inc. 52
8 From the AirWatch admin console, select Accounts > Administrators > List View.
9 Select the pencil icon against the admin user that you had used to log in, to export the certificate.
10 Click the API tab.
The certificates page displays information about the certificate.
11 To generate the client certificate, enter the same password you had set in the Certificate Passwordtext box.
12 Click Export Client Certificate and Save the file.
The certificate exports as a p12 file type. Save the file to your local drive.
Setting Up AirWatch in VMware Identity ManagerThis topic provides the procedure to set up AirWatch in VMware Identity Manager.
Procedure
1 From the VMware Identity Manager administrator console, navigate to Identity and AccessManagement tab > Setup > AirWatch.
2 Enter the AirWatch integration settings for the following text boxes:
Field Comments
AirWatch API URL Enter the AirWatch URL.
AirWatch API Certificate Upload the p12certificate file used to make API calls.
Certificate Password Enter the certificate password that you had used to create the admin certificate.
AirWatch Admin API Key Enter the admin API key value.
AirWatch Enrolled User API Key Enter the enrolled user API key value.
AirWatch Group ID Enter the AirWatch group ID of the organization group for which the admin API key andcertificate was generated.
VMware Pulse IoT Center Server Installation Guide
VMware, Inc. 53

3 Click Save.
4 Enable Unified Catalog to merge applications that are set up in the AirWatch catalog to the unifiedcatalog.
Even though the Enable radio button is selected, Disable and Save, and then Enable and Save.
5 Enable Compliance Check to verify that the AirWatch managed devices adhere to AirWatchcompliance policies.
Even though the Enable radio button is selected, Disable and Save, and then Enable and Save.
6 Enable User Password Authentication through AirWatch.
Even though the Enable radio button is selected, Disable and Save, and then Enable and Save.
7 Enable User External Access Token Authentication through AirWatch.
Even though the Enable radio button is selected, Disable and Save, and then Enable and Save.
Creating the Built-In Identity Provider in VMware Identity ManagerThis topic provides the procedure to create the built-in Identity Provider in VMWare Identity Manager.
Note If a built-in identity provider is already present, skip to the next section.
Procedure
1 Log in to the administrator console of the VMware Identity Manager instance.
2 Navigate to Identity and Access Management > Identity Providers > Add Identity Provider >Create Built in IDP.
3 Enter a name for the Identity Provider.
VMware Pulse IoT Center Server Installation Guide
VMware, Inc. 54
4 Select the new directory you had created in the Directory Services Configuration and validate thedirectory that you had created in the previous step.
5 Select the ALL Ranges check box for the network.
6 Select the following Authentication Methods:
n AirWatch External Access Token
n Password (AirWatch Connector)
n Device Compliance (with AirWatch)
n Password (Local Directory)
7 Click Add.
8 After you have added the new Identity Provider, validate all the required text boxes that you hadconfigured for creating the built-in IDP. Go to Identity & Access Management > Manage > IdentityProviders List view.
Editing the Built-In Identity Provider in VMware Identity ManagerThis topic provides the procedure to edit the built-in Identity Provider in VMware Identity Manager.
Procedure
1 Log in to the administrator console of the VMware Identity Manager instance.
2 Navigate to Identity and Access Management > Identity Providers and click the Built-in IDP thatis present.
3 Select the new directory that you created in the Directory Services Configuration and validate thedirectory you create in the previous step.
4 Select the ALL Ranges check box as the Network option.
5 For Authentication Methods, select and enable the following:
n AirWatch External Access Token
n Password(AirWatch Connector)
n Device Compliance (with AirWatch)
n Password (Local Directory)
6 Click Save.
Enabling Just in Time Enrollment User CreationThis topic provides the procedure to enable the Just In Time (JIT) Enrollment User Creation feature.
VMware Pulse IoT Center Server Installation Guide
VMware, Inc. 55
Procedure
1 Log in to the administrator console of VMware Identity Manager and navigate to Identity and AccessManagement and select the authentication methods.
2 Click the pencil icon against the Password (AirWatch Connector) to configure.
3 Ensure that the JIT enable option is selected and click Save.
Creating the Default Access Policy Set in VMware IdentityManagerThis topic provides the procedure to create the default access policy set in VMware Identity Manager.
If there is a default access policy rule, ensure that it has at least two policy rules where the configurationvalues are the same as the values listed in the following steps. Otherwise, you can edit and modify it asper the guidelines given in this section. If the default policy set does not exist, or if you want to create yourown access policy set, perform the following steps:
Procedure
1 Log in to the administrator console of the VMware Identity Manager instance and select Identity andAccess Management > Policies > Add Policy.
2 Enter a name for the policy.
3 Enter a description for the policy.
4 To configure the first policy, click Next .
5 Click Add Policy Rule.
6 In the Policy Rule Configuration tab, enter the following details and Save.
Configuration Values
If a User's Network Range is Select ALL RANGES.
If you are trying to access content from Select Workspace ONE App.
Then perform this action Select Authenticate using.
Then the user may authenticate using Select Password (AirWatch Connector).
If preceding Authentication Method fails or is not applicable Select Password (Local Directory).
Re-authenticate after Select 2160 hours.
7 To configure the second rule, click Add Policy Rule again.
8 In the Policy Rule Configuration tab, enter the following details:
Configuration Values
If a User's Network Range is Select ALL RANGES.
If you are trying to access content from Select Web Browser.
Then perform this action Select Authenticate using.
VMware Pulse IoT Center Server Installation Guide
VMware, Inc. 56

Configuration Values
Then the user may authenticate using Select Password (AirWatch Connector).
If preceding Authentication Method fails or is not applicable Select Password (Local Directory).
Re-authenticate after Select 8 hours.
9 Click Save.
Integrating VMware Pulse IoT Center with VMwareIdentity ManagerThis section provides information about the integrating the VMware Pulse IoT Center with VMwareIdentity Manager.
To integrate the VMware Pulse IoT Center API server with VMware Identity Manager, perform thefollowing steps:
1 Download the VMware Identity Manager metadata XML.
2 Create VMware Identity Manager OAuth API keys in the VMware Identity Manager server.
3 Configure the details in VMware Pulse IoT Center.
4 Add the VMware Pulse IoT Center API server to the VMware Identity Manager as an application.
What to do next
Download the VMware Identity Manager IDP metadata XML file. For instructions, see the ExportingVMware Identity Manager Metadata section.
Creating VMware Identity Manager OAuth Keys in VMware IdentityManagerThis topic provides the procedure to create the VMware Identity Manager OAuth Keys in VMware IdentityManager.
Procedure
1 From the VMware Identity Manager admin console, navigate to Catalog > Settings.
2 Click Create Client from the Remote App Access menu. Create a service client token.
3 Select Access Type as Service Client Token from the drop-down menu.
4 Enter the details as given in the following table:
Parameter Values
Client ID Enter any name. The name must start with a letter.
Advanced Tab Click the right arrow icon to expand the view.
Refresh Token Uncheck the option.
VMware Pulse IoT Center Server Installation Guide
VMware, Inc. 57
Parameter Values
Generate Secret key Click Generate Secret Key under the Shared Secret parameter.
Token Type Select Bearer.
Access Token TTL As per the requirement.
Refresh Token TTL As per the requirement.
Idle Time TTL As per the requirement.
5 Click Add.
Save the Generate Shared secret key and Service Client ID for future use. Next, create the useraccess token.
6 Click Create Client from the Remote App Access menu.
7 Select Access Type as the User Access Token from the drop-down menu.
8 Enter the details as given in the following table:
Parameter Values
Client ID Enter any name. The name must start with a letter.
Application Select Identity Manager.
Redirect URI Enter the following URL:
https:// <Server host>:<port>/api/saml/identity/default/validate
Scope Select Profile, User, and OpenID.
Advanced Tab Click the right arrow icon to expand the view.
Generate Secret key Click Generate Secret Key under Shared Secret parameter
Refresh Token Select this option
Token Type Select Bearer
Access Token TTL As per the requirement.
Refresh Token TTL As per the requirement.
Idle Time TTL As per the requirement.
9 Click Add.
Save the Generate Shared Secret Key and Service Client ID for future use.
What to do next
Configure the details in the VMware Pulse IoT Center. For more information about integrating VMwarePulse IoT center with VMware Identity Manager, see the Chapter 6 VMware Identity Manager section.
Adding the Pulse IoT Center API Server to VMware IdentityManagerThis topic provides the procedure to add the Pulse IoT Center API Server to VMware Identity Manager.
VMware Pulse IoT Center Server Installation Guide
VMware, Inc. 58
Procedure
1 Acquire the API access token: To access or use any API, you must acquire the API access token.Use the following API to acquire the token:
curl -X GET
--header 'Accept: application/json' --header 'Authorization: Basic xxxxxxxxxx='
'https://xx.xxx.xxx.xx:8444/api/auth/token/default/acquire'
2 Fetch the Service provider SAML metadata: You must provide the Service Provider XML to use inthe VMware Identity Manager server, to register the VMware Pulse IoT Center API server as anapplication in VMware Identity Manager. In this case, the Service Provider is the VMware Pulse IoTCenter API server. Use the following API of the VMware Pulse IoT Center to get the Service Providermetadata.
curl -X
GET --header 'Accept: text/xml' --header 'Authorization: Bearer xxxxxxxxx'
'https://xx.xxx.xxx.xx:8444/api/saml/metadata/{tenant}'
n Here, the Authorization header is Bearer xxxxxxx where xxxxxx is the token that you acquire inStep 1.
n {tenant}: Enter the tenant code without curly braces in the API.
This API provides the service provider metadata in the text/XML format as an HTTP response. Copythe XML and save it for future use.
3 Add the Pulse IoT Center as a Web application in VMware Identity Manager: Log in to theadministrator console of the VMware Identity Manager server and click Catalog > Web Apps.
4 From the Web App Catalog screen of VMware Identity Manager, click New. The Definition sectionof the New SaaS Application is displayed.
5 Enter the name of the application and click Next. The Configuration section of the New SaaSapplication is displayed.
6 From the Configuration tab, enter SAML 2.0 as the authentication type. Select URL/XML as theConfiguration.
7 Paste the metadata information that you have fetched from the service provider SAML metadata.Scroll down to the Configuration section of the New SaaS Application page.
8 Turn on Sign Response and Sign Assertion.
9 Encrypt Assertion and Include Assertion Signature options are left to the discretion of the admin.Scroll down to Custom Attribute Mapping subsection in the Configuration section of the New SaaSApplication page.
VMware Pulse IoT Center Server Installation Guide
VMware, Inc. 59

10 In the Configuration tab for Custom Attribute Mappings, add five rows and enter the followingattribute mappings and click Next. The Access Policy section of the New SaaS Application isdisplayed.
Name Format Value
UserName Basic ${user.userName}
FirstName Basic ${user.firstName}
LastName Basic ${user.lastName}
Phone Basic ${user.phone}
Email Basic ${user.email}
11 Select the access policy that you created as a new access policy in VMware Identity Manager andclick Next. The Summary tab of the New SaaS Application is displayed.
12 From the Summary tab, verify the application settings in the Summary page.
13 Click Save & Assign. The Assign page to assign entitlements for the application is displayed.
14 From the Entitlement page or Assign page, search for and add the Users/Groups to access this webapplication.
You can now access the VMware Identity Manager catalog and see the application listed in Catalog >Web Apps.
VMware Pulse IoT Center Server Installation Guide
VMware, Inc. 60
Upgrading from Version 1.0 7This section provides the procedure to upgrade from the VMware Pulse IoT Center version 1.0 to version1.1.
For existing customers, there is no upgrade path from older releases to this release because theappliance has moved from Ubuntu to VMware Photon OS. The Pulse API, Pulse Console, and PulseMQTT broker are now provided as Photon OVAs. The upgrades are provided as an ISO file (for an offlineupgrade) or as a ZIP file (for an online upgrade).
You must extract contents from the ZIP file to the update repository on the production server, and mustupdate the production server with updated repository details in the currently running appliances. You mustalso set up the HTTP production server and ensure that it is reachable from the appliances. For detailedinstructions about remote repository, see the Publishing an Update section in VMware Studio DeveloperGuide available at https://www.vmware.com/support/developer/studio/studio26/studio_developer.pdf.
For the ISO file, you must mount it in the currently running appliances and update the repository addresspath to point the CDROM path.
Open a terminal to the appliance of interest and follow these steps:
Procedure
1 Edit /opt/vmware/var/lib/vami/update/provider/provider-deploy.xml and update therepositoryAddress value by replacing the URL.
n For ZIP file extraction, point repositoryAddress to the update repository on the productionserver (http://production-server/update-repo).
n For the ISO file mount, update it to 'cdrom:/'
2 To restart the CIM broker (if the update repository details were modified in the previous step), run thefollowing command :
/etc/init.d/vami-sfcb restart
3 To check for updates, Run the following command :
/opt/vmware/bin/vamicli update --check
4 To install the update, run the following command:
/opt/vmware/bin/vamicli update --install latest
VMware, Inc. 61
Configuring the VMware PulseIoT Components Integration 8This topic provides information about configuring the VMware Pulse IoT components Integration.
After all the servers are deployed and wired together, perform the configurations on the Pulse API usingthe VMware Pulse IoT Console user interface. The configuration includes credentials that the API mustuse to synchronize with the Pulse Device Management Component and vRealize Operations Manager inthe back end. The Pulse Console does not have an account recovery option. Keep your login credentialssecurely.
Step 1: Log InLog in to the VMware Pulse IoT Console as a sysadmin user. The password for sysadmin is the onepassed as an OVF property, sysadmin-password, during installation. If the password constraints areviolated, the sysadmin-password defaults to vmware.
Step 2: Password ResetThis step is displayed if the sysadmin password constraints specified are violated. The sysadminpassword will default to vmware.
A typical password must meet the following requirements:n The password must be at least eight characters long.
n The password must have at least one uppercase letter.
n The password must have at least one special character ($#!@*&^).
n The password must have at least one number/digit (0-9).
Step 3: EULAAccept the licensing to proceed. If you do not accept the EULA, you are logged out.
VMware, Inc. 62
Step 4: System ConfigurationSet up the interaction points with the Management Console, the Operation Analytics application, VMwareIdentity Management application, SMTP server, and the Google MAPS API.
n System configuration is a multi-step process.
n The administrator must Save and Continue at each step.
n Skipping the page does not save any changes made on the screen.
As an administrator, you can save one or two configuration screens and leave the rest to come backagain and complete.
Step 4.1: Lifecycle Management ConfigurationsThe following inputs are required for the configuration of the interaction between the Pulse system andthe Management Console. It can be updated later, at any stage, as applicable. All the text boxes aremandatory.
Option Description
Console URL The public URL of the Management Console Server
API URL The public URL of the Management API Server.
Group ID The Organization Group ID in the management console. It is the highest level of Organization Group towhich the Pulse system has access to. It is also the Group ID text box in the Pulse IoT ManagementConsole.
Group Index This option is the Organization Group index that VMware Pulse Device Management Suite maintainsinternally. You can obtain the index from the URL when you open the Organization Group page.
API Key The API enablement key from the Management Console. Navigate to Groups and Settings > All Settings> Advanced > API > REST API > Enable API Access button
User + Password An admin user in the Pulse Device Management Component console who is an administrator at theOrganization Group level identified by the Group ID.
The admin user must be created at the given customer Organization Group. The user must have only onerole for the customer Organization Group (such as System Admin or Pulse Device ManagementComponent Admin).
Step 4.2: Operational Analytics ConfigurationEnter the configuration details for the interaction between the Pulse system and the Operational Analyticssystem deployment. All the text boxes are compulsory in this page.
Options Description
Suite API URL The API server URL for the Operational Analytics server.
Username + Password The basic user created on the Operational Analytics Server. This user is used for API calls and syncservices in the Pulse system.
VMware Pulse IoT Center Server Installation Guide
VMware, Inc. 63
Step 4.3: VMware Identity Manager Configurations:OptionalVMware Identity Manager (vIDM) is used to manage users and provide Single Sign-On into other systemssuch as the Management Console. Enter the following details:
Option Description
Server URL The hosting public URL of VMware Identity Manager
Service Client ID An admin account for managing the tenant. You must create a client with Service Client privileges fromthe VMware Identity Manager remote access screen. Use the service client ID that you had created. Formore information, see the Creating the VMware Identity Manager OAuth Keys in VMware IdentityManager section.
Service ClientSecret
The secret/password for the Service Account.
Use the service client token that you had created. For more information, see the Creating the VMwareIdentity Manager OAuth Keys in VMware Identity Manager section.
User Access ClientID
The Pulse API server also acts as an OAuth consumer. You must create a remote client with UserAccess Token privileges. Use the User access client ID you had created. For more information, see theCreating the VMware Identity Manager OAuth Keys in VMware Identity Manager section.
User Access ClientSecret
The user access account secret/password. Use the User access shared token you had created. Formore information, see the Creating the VMware Identity Manager OAuth Keys in VMware IdentityManager section.
SAML IDP Metadata SAML identity provider metadata that you can download from the VMware Identity Provider Console. Usethe SAML IdP metadata that you fetched. For more information, see the Creating the VMware IdentityManager OAuth Keys in VMware Identity Manager section.
SAML ServerProvider SigningCertificate
A certificate used for communication between Identity Provider ( VMware Identity Manager) and Pulse.You must generate the certificate manually and then upload it using the Upload button.
Step 4.4: SMTP Server SettingsEnter SMTP settings to receive notifications when an alert occurs on the IoT Edge System or onconnected devices. The SMTP server is used by the Pulse System to send out email notifications.
Step 4.5: Other Configurations1 Select the check box to enable Google Maps. VMware Pulse uses Google Maps to display the
location of the resources, if available.
2 Provide the API key for Google Maps to work. You can obtain the API key from the Google DeveloperConsole or from Google Enterprise Licensing. You can also obtain the API key by following the stepsat https://developers.google.com/maps/documentation/javascript/get-api-key. You must purchase thelicense key directly from Google. You must also configure the LIOTA packages appropriately toretrieve and transmit the coordinates of the IoT Edge and connected devices.
VMware Pulse IoT Center Server Installation Guide
VMware, Inc. 64

3 You must log out and log back in after you configure. The VMware Pulse IoT system reloads all theconfigurations and runs the background processes with the latest configuration. At this point, no otheruser is configured in the system. You must create some users who can log in and use the system.
VMware Pulse IoT Center Server Installation Guide
VMware, Inc. 65