VMS - Tenmast Software · you enter in VMS once each month is a snapshot of that river as of the...
41
VMS Revised: 12/29/2017 Manual What Is VMS? 2 Account Line Setup 3 VMS Type Project Mapping 5 VMS Submission Process Overview 6 Gather Processes 7 Open VMS & View Gathers 7 Gather Records 8 Delete Gathers 10 Vouchers Gathered & VMS Type 10 VMS Screen 12 Toolbar Buttons 12 Voucher UML/HAP Tab 12 Section 8 Portables Screen .................................... 13 VMS UML Details Screen ....................................... 14 VMS HAP Expense Detail Screen ........................... 14 Income/Expenses Tab 14 Disaster UML/HAP Tab 15 Reconciliation 17 Balance Sheet Items 17 Screen Tabs 19 Reports 21 VMS Data Entry Report 21 VMS Prior Month Corrections Report 22 VMS 12-Month Cumulative Report 23 Hold Code Analysis Report 24 View VMS Transactions For Individual HAP/URP 27 VMS Adjustments 30 View Current Month Payments 30 Apply Charge Adjustments 30 Apply Credit Adjustments 33 View/Edit Adjustments 36 Mark Gather As Submitted 38 VMS-To-GL Balancing Tool 39
-
Upload
truongminh -
Category
Documents
-
view
251 -
download
0
Transcript of VMS - Tenmast Software · you enter in VMS once each month is a snapshot of that river as of the...

VMS Revised: 12/29/2017 Manual
What Is VMS? 2
Account Line Setup 3
VMS Type Project Mapping 5
VMS Submission Process Overview 6
Gather Processes 7
Open VMS & View Gathers 7
Gather Records 8
Delete Gathers 10
Vouchers Gathered & VMS Type 10
VMS Screen 12
Toolbar Buttons 12
Voucher UML/HAP Tab 12
Section 8 Portables Screen .................................... 13
VMS UML Details Screen ....................................... 14
VMS HAP Expense Detail Screen ........................... 14
Income/Expenses Tab 14
Disaster UML/HAP Tab 15
Reconciliation 17
Balance Sheet Items 17
Screen Tabs 19
Reports 21
VMS Data Entry Report 21
VMS Prior Month Corrections Report 22
VMS 12-Month Cumulative Report 23
Hold Code Analysis Report 24
View VMS Transactions For Individual HAP/URP 27
VMS Adjustments 30
View Current Month Payments 30
Apply Charge Adjustments 30
Apply Credit Adjustments 33
View/Edit Adjustments 36
Mark Gather As Submitted 38
VMS-To-GL Balancing Tool 39

©2017 Tenmast Software. All rights reserved. 2 VMS Manual
What Is VMS? The Voucher Management System (VMS) is HUD’s reporting system for Housing Choice Voucher (HCV) budgets. The system is based on the HUD Form 52681-B and collects monthly data about leased vouchers in Units Month Leased (UML), the related Housing Assistance Payment (HAP), and Utility Allowance Reimbursement (UAR) expenditures categorized by voucher type. The system also collects additional fields of data for items such as vouchers issued but not leased. But the system is primarily focused on what portion of your annual HCV budget has been spent, when it was spent, and for what specific type of voucher it was spent. In May 2016, HUD updated VMS and added a number of new voucher types, mostly subsets of existing voucher types. HUD also changed the interface of the VMS reporting system. VMS requires that you report your HCV budget expenditures, in vouchers leased and dollars spent, one month behind in the month after the expenditures were made. In addition, HUD’s reporting rules for VMS state that you only report HAP/URP when the expense was paid, although the expense must be reported in VMS for the month in which the expense was incurred. For example, if you owe a landlord HAP under an existing contract but the HAP is on hold and was not paid in the month, it will not be reported in VMS until it is paid in a later month. If the HAP on hold is ultimately paid in a month later than the month incurred, the HAP will be reported in VMS for the month in which it was incurred, not for the month it was paid. For these reasons, VMS reporting is challenging to say the least. Perhaps the most challenging aspect of VMS reporting is that the HCV transaction flow is like a “river” during any given month: HAP contracts are constantly being created and terminated, liabilities are created, and payments/charge backs occur throughout the month in connection with those contracts. In some cases, transactions occur automatically, like a typical monthly HAP obligation under a contract. In other cases, transactions are manually created throughout the month in order to account for tenant actions that result in retroactive changes to the HAP calculation or termination of a contract. Notwithstanding the constant flow of HCV transactions in your system, the VMS reporting must be completed between the 4th and the 22nd day of each month. Since you are reporting for the prior month(s), you need a snapshot of what occurred in those prior months at the time you are preparing your report. In fact, under the current VMS system, you need two snapshots: one for the transactions that were incurred in the immediate past month, and one for the transactions that were incurred in the months prior to the immediate past month. The most important thing to remember when performing your VMS reporting is that the river of HCV transactions, both past and present, continues to flow through your system all day, every day. But the report you enter in VMS once each month is a snapshot of that river as of the time you enter it in the VMS report. Any transactions that are entered in your software system after you complete a monthly VMS report are available in your system and become part of your VMS report the following month. Therefore, you must look at VMS reporting completely separate from your daily work in your software system. The system is smart enough to know what transactions to add to the monthly snapshot that you enter in VMS and how to store other transactions for your next monthly report.

©2017 Tenmast Software. All rights reserved. 3 VMS Manual
Account Line Setup Before using VMS, you must map VMS line types to accounts. 1 Enter VMS in the search box on the Home screen, then select the VMS Account Line Type Setup menu.
2 The VMS Line Mapping Setup screen opens. Click the Add Line Mapping button.
3 A new row is added to the grid. Enter the following values:
• VMS Line Type – Select an option that corresponds to the VMS tool.
• GL Account – Select an account from your chart of accounts.
• Column – Select the desired option. PostedEndBal is the balance on the account at the end of the month. PostedNetChange is the net value of debits and credits posted for the month.
• Reverse Sign – Check the box if you want to change a debit to a credit or vice versa.
4 Repeat steps 2-3 to add additional lines to the grid. Multiple accounts may be added to one VMS Line
Type. The values from each account will then be included in the total income or expense line you see in the VMS tool.
5 If you add a line in error, you can remove it from the grid by clicking the small Actions button to the right of the row and selecting Delete.

©2017 Tenmast Software. All rights reserved. 4 VMS Manual
6 Click the Save button when finished.
Values will now populate the various fields in the VMS module based upon your mapping. Note that financial status fields must be manually entered. Also, net restricted assets cannot be determined since those amounts consist of account data not always accessible by Tenmast.
©2017 Tenmast Software. All rights reserved. 5 VMS Manual
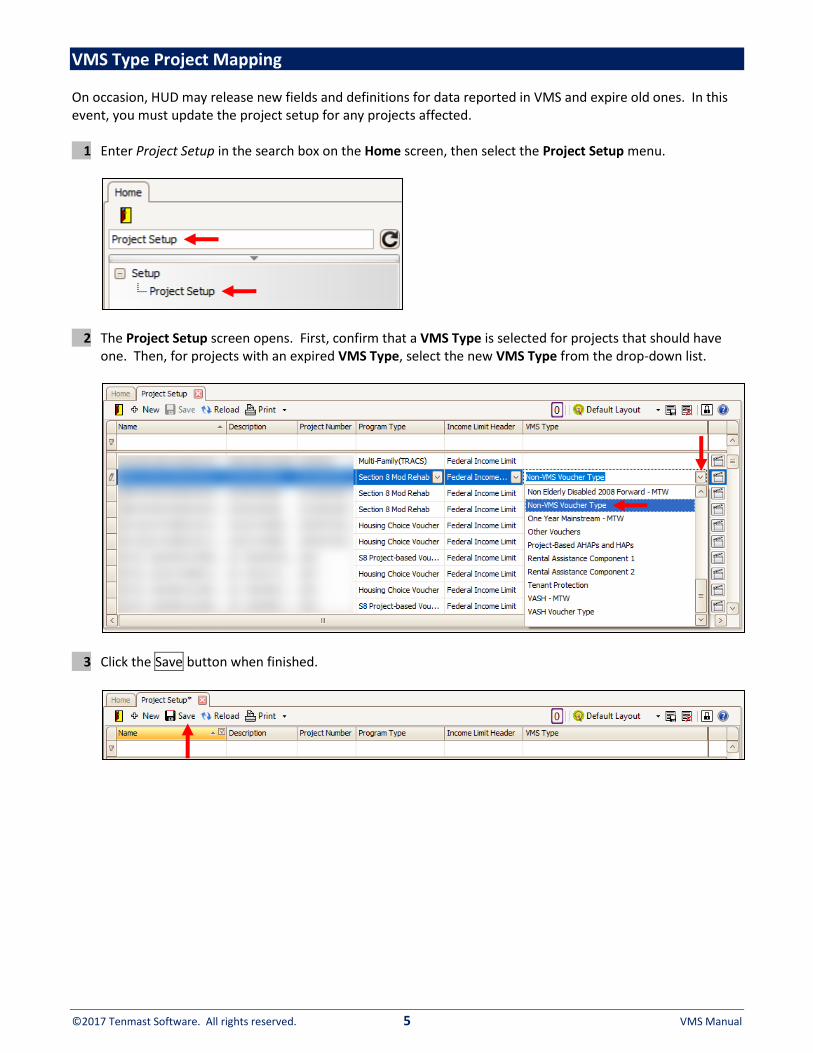
VMS Type Project Mapping On occasion, HUD may release new fields and definitions for data reported in VMS and expire old ones. In this event, you must update the project setup for any projects affected. 1 Enter Project Setup in the search box on the Home screen, then select the Project Setup menu.
2 The Project Setup screen opens. First, confirm that a VMS Type is selected for projects that should have
one. Then, for projects with an expired VMS Type, select the new VMS Type from the drop-down list.
3 Click the Save button when finished.
©2017 Tenmast Software. All rights reserved. 6 VMS Manual
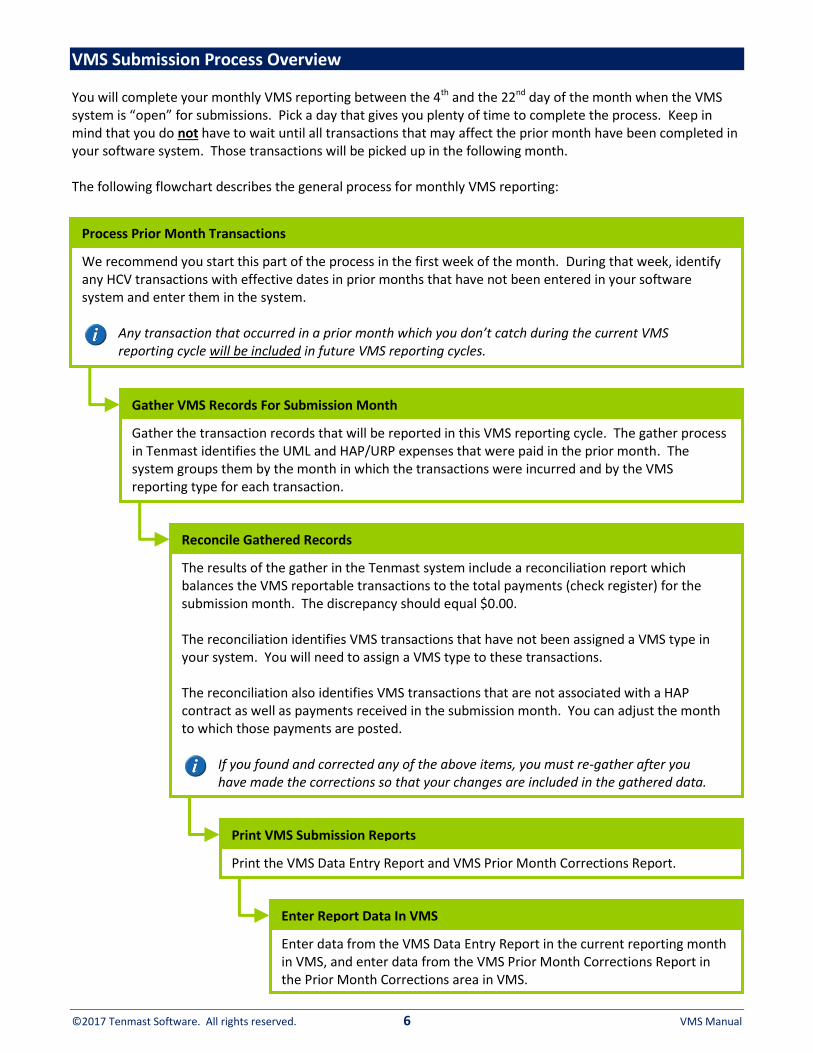
VMS Submission Process Overview You will complete your monthly VMS reporting between the 4th and the 22nd day of the month when the VMS system is “open” for submissions. Pick a day that gives you plenty of time to complete the process. Keep in mind that you do not have to wait until all transactions that may affect the prior month have been completed in your software system. Those transactions will be picked up in the following month. The following flowchart describes the general process for monthly VMS reporting:
Process Prior Month Transactions
We recommend you start this part of the process in the first week of the month. During that week, identify any HCV transactions with effective dates in prior months that have not been entered in your software system and enter them in the system.
Any transaction that occurred in a prior month which you don’t catch during the current VMS reporting cycle will be included in future VMS reporting cycles.
Gather VMS Records For Submission Month
Gather the transaction records that will be reported in this VMS reporting cycle. The gather process in Tenmast identifies the UML and HAP/URP expenses that were paid in the prior month. The system groups them by the month in which the transactions were incurred and by the VMS reporting type for each transaction.
Reconcile Gathered Records
The results of the gather in the Tenmast system include a reconciliation report which balances the VMS reportable transactions to the total payments (check register) for the submission month. The discrepancy should equal $0.00. The reconciliation identifies VMS transactions that have not been assigned a VMS type in your system. You will need to assign a VMS type to these transactions. The reconciliation also identifies VMS transactions that are not associated with a HAP contract as well as payments received in the submission month. You can adjust the month to which those payments are posted.
If you found and corrected any of the above items, you must re-gather after you have made the corrections so that your changes are included in the gathered data.
Print VMS Submission Reports
Print the VMS Data Entry Report and VMS Prior Month Corrections Report.
Enter Report Data In VMS
Enter data from the VMS Data Entry Report in the current reporting month in VMS, and enter data from the VMS Prior Month Corrections Report in the Prior Month Corrections area in VMS.

©2017 Tenmast Software. All rights reserved. 7 VMS Manual
Gather Processes
Open VMS & View Gathers Follow these instructions to open the VMS Module in Winten2+ and view gathers: 1 Enter VMS in the search box on the Home screen, then select the VMS (Voucher Management System)
menu.
2 If your agency manages VMS for multiple PHA IDs, a Select a Housing Authority screen opens. Select the
desired Housing Authority and click the OK button. If your agency only has one PHA ID, skip to step 3.
3 The VMS Records screen opens. By default, the last 3 months of gather history is displayed. To view the
last 12 months of history or all history, click the drop-down arrow in the View Gather History field and choose the desired option.
If your agency manages VMS for multiple PHA IDs, there will be a Select Housing Authority button
beside the Reload button on the toolbar. You can select a different Housing Authority by clicking
that button.
©2017 Tenmast Software. All rights reserved. 8 VMS Manual
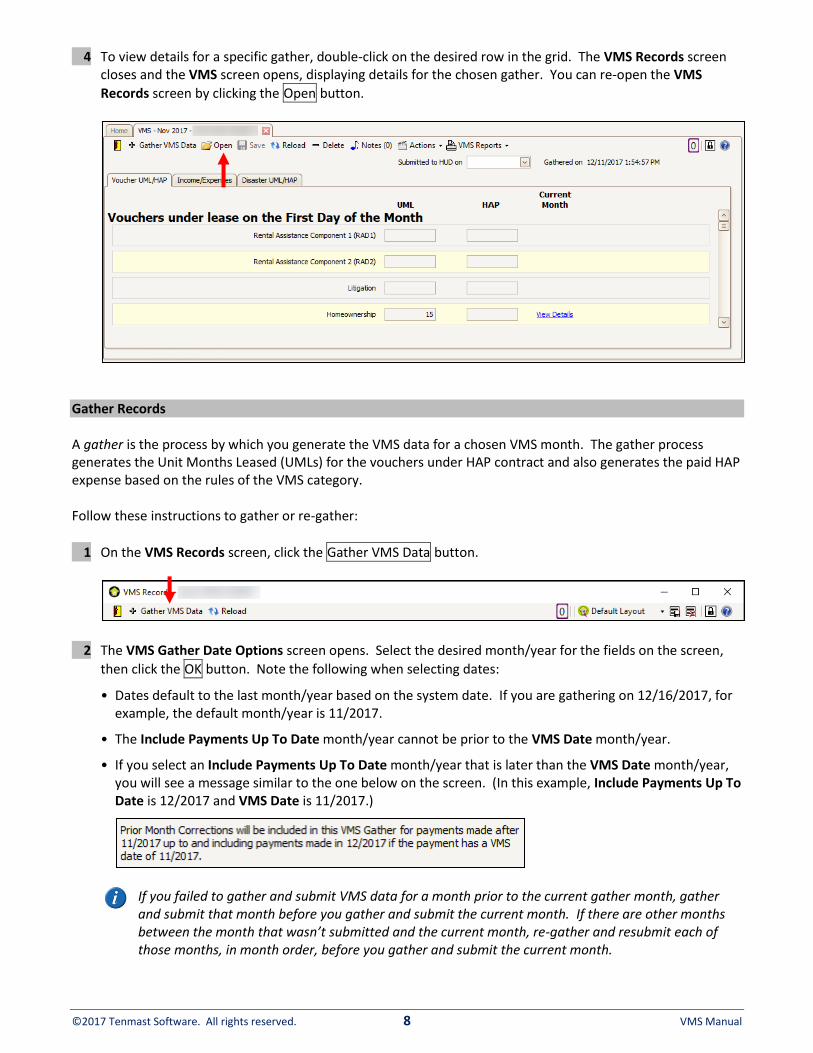
4 To view details for a specific gather, double-click on the desired row in the grid. The VMS Records screen closes and the VMS screen opens, displaying details for the chosen gather. You can re-open the VMS
Records screen by clicking the Open button.
Gather Records A gather is the process by which you generate the VMS data for a chosen VMS month. The gather process generates the Unit Months Leased (UMLs) for the vouchers under HAP contract and also generates the paid HAP expense based on the rules of the VMS category. Follow these instructions to gather or re-gather:
1 On the VMS Records screen, click the Gather VMS Data button.
2 The VMS Gather Date Options screen opens. Select the desired month/year for the fields on the screen,
then click the OK button. Note the following when selecting dates:
• Dates default to the last month/year based on the system date. If you are gathering on 12/16/2017, for example, the default month/year is 11/2017.
• The Include Payments Up To Date month/year cannot be prior to the VMS Date month/year.
• If you select an Include Payments Up To Date month/year that is later than the VMS Date month/year, you will see a message similar to the one below on the screen. (In this example, Include Payments Up To Date is 12/2017 and VMS Date is 11/2017.)
If you failed to gather and submit VMS data for a month prior to the current gather month, gather and submit that month before you gather and submit the current month. If there are other months between the month that wasn’t submitted and the current month, re-gather and resubmit each of those months, in month order, before you gather and submit the current month.

©2017 Tenmast Software. All rights reserved. 9 VMS Manual
3 The system gathers HAP/URP data from payments made in the reporting month. A progress screen is
displayed while the gather is performed. This process could take several minutes.
4 Once the gather is complete, the VMS Records screen closes and the VMS screen opens, displaying details
for the gather with the most recent VMS Date. (This may not be the gather you just performed.) You can
re-open the VMS Records screen by clicking the Open button.
5 If the system found changes to an existing gather during the gather process, it marked the previous record
as Expired and the newest record as Current. To also view expired records on the VMS Records screen, uncheck the Version box at the bottom of the screen. Check the box to show only current records.
In this example, a gather for October 2017 already existed before we performed the re-gather for that month. By unchecking the Version box, you can see both of the October gathers.
©2017 Tenmast Software. All rights reserved. 10 VMS Manual
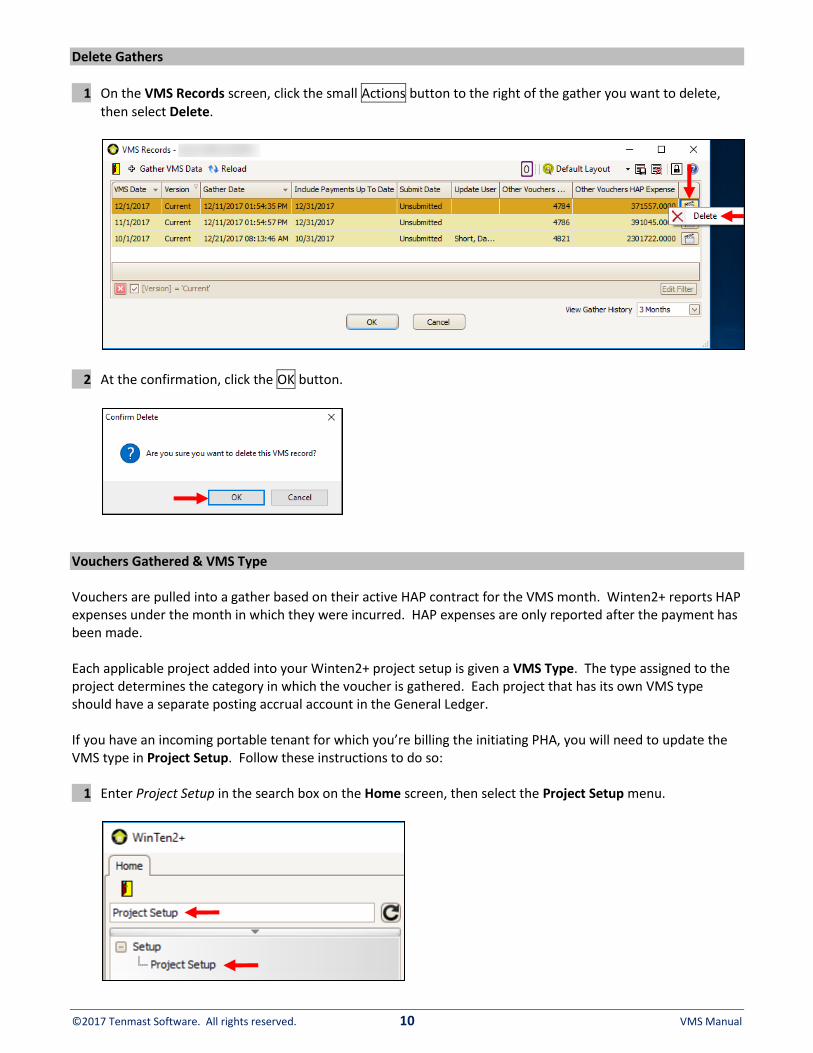
Delete Gathers
1 On the VMS Records screen, click the small Actions button to the right of the gather you want to delete,
then select Delete.
2 At the confirmation, click the OK button.
Vouchers Gathered & VMS Type Vouchers are pulled into a gather based on their active HAP contract for the VMS month. Winten2+ reports HAP expenses under the month in which they were incurred. HAP expenses are only reported after the payment has been made. Each applicable project added into your Winten2+ project setup is given a VMS Type. The type assigned to the project determines the category in which the voucher is gathered. Each project that has its own VMS type should have a separate posting accrual account in the General Ledger. If you have an incoming portable tenant for which you’re billing the initiating PHA, you will need to update the VMS type in Project Setup. Follow these instructions to do so: 1 Enter Project Setup in the search box on the Home screen, then select the Project Setup menu.

©2017 Tenmast Software. All rights reserved. 11 VMS Manual
2 Find the applicable project in the grid and set its VMS Type to Incoming Portable Billed. Then click the Save button.

©2017 Tenmast Software. All rights reserved. 12 VMS Manual
VMS Screen For ease of data entry and to improve accuracy of reported information, HUD has divided the data entry document, Form 52681-B, into tabular format. The VMS Module in Winten2+ is based on the same screens you see on the VMS portal when you enter your PHA’s information. The VMS screen consists of a toolbar of buttons at the top and 3 tabs, all of which are described in this unit of the manual.
Toolbar Buttons • Gather VMS Data – Click this button to open the VMS Records screen to view, create or delete gathers.
• Open – Click this button to open the VMS Records screen to view, create or delete gathers.
• Save – Click this button to save any changes you have made on the VMS screen.
• Reload – Click this button to refresh data on the screen to the latest saved values.
• Delete – Click this button to delete the gather currently displayed.
• Actions – Click this button to open a drop-down list of the following VMS actions that can be performed: Reconciliation – Select this option to open the VMS Reconciliation screen for the gather currently
displayed.
Missing GL Mapping – Select this option to open the Missing GL Account Mapping screen.
View Current Month Payments – Select this option to open the VMS Payments screen to view all payments received on accounts for the gather currently displayed.
VMS To GL Balancing Tool – Select this option to open the VMS To GL Balancing Tool screen.
Display All VMS Expenses – Select this option to open the VMS HAP Expense Detail screen to view all HAP expenses for the gather currently displayed.
• VMS Reports – Click this button to open a drop-down list of the following VMS reports. Then select the
desired report to generate it. Prior Month Corrections Report
VMS Data Entry Report
12-Month Cumulative Report Voucher UML/HAP Tab The Voucher UML/HAP tab displays information for vouchers leased, as defined by the category, and the associated HAP expense, which includes both HAP and URP.
For definitions of each category, refer to the Appendices in HUD’s VMS User’s Manual.

©2017 Tenmast Software. All rights reserved. 13 VMS Manual
You can manually enter data into fields highlighted in yellow. A View Details link is displayed to the right of all categories containing data. Click on a link to view the supporting data for UML and HAP expenses for the gather currently displayed.
When you click the View Details link, depending on the category, you may see a message similar to the one
below if your UML count contains both outgoing portable records and HAP contracts. Click the OK button to
continue.
Winten2+ then opens additional screens, depending on the category. Three of the most common screens are Section 8 Portables, VMS UML Details and VMS HAP Expense Detail. These screens are described in the remainder of this section. Section 8 Portables Screen The Section 8 Portables screen displays portable tenants. Select a Portability ID link to view the portable contract information for a tenant. Select a Household name link to open the Household screen for a tenant.
Click the Print button to open a preview screen where you can print, export or email the information.

©2017 Tenmast Software. All rights reserved. 14 VMS Manual
VMS UML Details Screen The VMS UML Details screen displays households with HAP, URP and HAP+URP adjustment totals. Click the
Print button to open a preview screen where you can print, export or email the information.
VMS HAP Expense Detail Screen
The VMS HAP Expense Detail screen displays HAP expenses paid for households. Click the Print button to open
a preview screen where you can print, export or email the information.
Income/Expenses Tab The Income/Expenses tab displays income and expenses grouped in sections such as Memorandum Reporting, Administrative Expenses and Financial Status.
For definitions of each category, refer to the Appendices in HUD’s VMS User’s Manual.
Many fields can be set up to pull directly from the General Ledger for the actual expenses for the VMS month, or the amounts can be entered manually by the user. Manual entry is allowed in fields highlighted in yellow. For more information on setting up VMS line account mapping, see the Account Line Setup unit in this manual. A View Details link is displayed to the right of all categories containing data. Click on a link to view the supporting data for that category for the gather currently displayed.

©2017 Tenmast Software. All rights reserved. 15 VMS Manual
Additional screens open, depending on the category. A VMS UML Details screen is shown below, displaying
households with HAP, URP and HAP+URP adjustment totals. Click the Print button to open a preview screen
where you can print, export or email the information.
Disaster UML/HAP Tab The Disaster UML/HAP tab is reserved for any special emergency voucher programs as defined by HUD.
For definitions of each category, refer to the Appendices in HUD’s VMS User’s Manual.
You can manually enter data into fields highlighted in yellow. A View Details link is displayed to the right of all categories containing data. Click on a link to view the supporting data for the gather currently displayed.

©2017 Tenmast Software. All rights reserved. 16 VMS Manual
When you click the View Details link, depending on the category, you may see a message similar to the one
below if your disaster UML count contains both outgoing portable records and HAP contracts. Click the OK button to continue.

©2017 Tenmast Software. All rights reserved. 17 VMS Manual
Reconciliation
To reconcile VMS transactions to the check register, click the Actions button on the VMS screen and select the
Reconciliation menu.
The VMS Reconciliation screen opens, displaying a reconciliation balance sheet which compares VMS reportable transactions to total payments (check register) for the submission month. The Discrepancy amount should be zero. Items displayed on the balance sheet are described in the next section.
Balance Sheet Items • Total Vouchers: Amount from the Total Vouchers HAP field on the Voucher UML/HAP tab of the VMS
screen. • FSS Escrow Deposits (-): Amount from the FSS Escrow Deposits HAP field on the Voucher UML/HAP tab of
the VMS screen. FSS deposits are actually HAP expenses that are deposited into the tenant's FSS account instead of being paid by a check to the owner. The FSS Escrow Deposits amount is included as part of the Total Vouchers amount. But in Winten2+, an FSS deposit is handled as a manual deposit instead of an actual check, so it does not show on the check register and therefore must be deducted from the Total Vouchers paid for comparison.
• Portable Units Administered (+): Amount from the Portable Vouchers Administered (Port In) HAP field on
the Voucher UML/HAP tab of the VMS screen. Port-in HAP payments are made to local landlords on behalf of the initiating housing authority. These payments show on the check register but are not considered part of
©2017 Tenmast Software. All rights reserved. 18 VMS Manual
the Total Vouchers amount on the VMS screen because the payments are reported on the other agency's VMS form.
• 5 Year Mainstream (+): Amount from the 5 Year Mainstream HAP field on the Voucher UML/HAP tab of the
VMS screen. These payments are included in the check register, but HUD does not consider them part of Total Vouchers because they use a different funding source.
• Disaster Family HAP (+): Amount from the Disaster Families Assisted (UML) HAP field on the Disaster
UML/HAP tab of the VMS screen. These payments are included in the check register, but HUD does not consider them part of Total Vouchers because they use a different funding source
• Total HAP Paid reported on VMS: The sum of all balance sheet items listed above. • Checks Paid (-): The sum of Section 8 check register checks written for the VMS reporting period, regardless
of the bank account from which they were paid. • Difference between VMS and Paid: The difference between checks paid and VMS HAP paid. This amount will
never be zero because of prior month corrections and checks written for items that do not count as HAP expenses.
• Checks for Prior VMS months (+): The sum of HAP checks written during the VMS reporting period that were
incurred in a different VMS period. These checks will be reported on other VMS reports and are considered prior month corrections to previous VMS periods.
• Admin Fees (+): Administrative fees paid for outgoing portability are not reported on VMS but will be paid in
the check register. • Non VMS Check Transactions (+): The sum of recoupment and check void transactions that are paid by
checks in the current VMS period. This can also include VMS-eligible check transactions paid by a check, but where the account balance has never returned to zero. This should not occur if the agency uses Section 8 lockout procedures.
• Non VMS Voucher Type Transactions (+): The sum of check transactions that have paid for vouchers with no
VMS designation or designated as Non-VMS Voucher Type. • Check Transactions Not Tied To HA (+): Transactions in the check register that cannot be tied to an HA in the
data. This is a problem category, and this tab should be blank all the time. • VMS HAP Paid on Checks dated after (-): The current VMS HAP expense may include payments made on
checks written outside the reporting period. These transactions are considered prior month corrections to the current VMS but are removed from the report because they do not show on the check register for the current period.
• VMS Adjustments not on a check (-): Transactions that are included in the monthly HAP expense but do not
appear on a check. The transaction date is in the current VMS month. These could be account adjustments that cause the account balance to return to a zero balance.
• VMS Future Adjustments not on a check (-): Transactions that are included in the monthly HAP expense but
do not appear on a check. The transaction date is in a future VMS month. These could be account adjustments that cause the account balance to return to a zero balance.

©2017 Tenmast Software. All rights reserved. 19 VMS Manual
Screen Tabs Up to 8 tabs may display at the bottom of the VMS Reconciliation screen. The tabs correspond to items on the right side of the balance sheet and display transactions included in the amount. Tabs will only show for items with a non-zero amount.
To view transactions on the tabs, use the drill-down boxes to the left of the lines in the grid. Each tab has a Print button you can click to open a preview screen where you can print, export or email the information.
Below are descriptions of the transactions contained on the 8 tabs that may appear on the VMS Reconciliation screen: • Checks for Prior VMS months – Checks written in the current period for a previous VMS month. These are
not included in the VMS total because they are included in a different VMS period.

©2017 Tenmast Software. All rights reserved. 20 VMS Manual
• Admin Fees – Outgoing portability administrative fees paid in the reporting period. These are not included on the VMS report because they are not considered housing assistance payments.
• Non VMS Check Transactions – Typically check recoupments and voided checks. These appear on the
reporting period for checks but do not apply the HAP expense. • Non VMS Voucher Type Transactions – Checks written in the reporting period for projects that are not
reported on the VMS report. These projects have a type of Non VMS Voucher Type. • Check Transactions Not Tied To HA – VMS transactions that cannot be linked to a specific housing authority.
This is an error condition. Please contact Tenmast Customer Support for assistance in resolving this issue. • VMS HAP Paid on Checks dated after – Transactions for the current VMS period that were paid with a future
check date. Normally, this tab does not have any transactions listed. • VMS Adjustments not on a check – Transactions appearing in the VMS HAP expense that are dated in the
current VMS period but do not appear on a check. • VMS Future Adjustments not on a check – Transactions appearing in the VMS HAP expense that are dated in
a future VMS period but do not appear on a check.

©2017 Tenmast Software. All rights reserved. 21 VMS Manual
Reports
VMS Data Entry Report The VMS Data Entry Report is for the immediate past month and displays monthly summary data that you can
report to HUD’s VMS website. To generate the report, click the VMS Reports button on the VMS screen and select the VMS Data Entry Report menu.
You are then given the option to mark the gather as Submitted. If you are just reviewing the report, click the No button. You can mark the gather as Submitted later. If you are printing the report to submit to VMS, however,
you can click the Yes button so that you do not have to mark the gather as Submitted later.
The report then opens in a preview screen where you can print, export or email the information. The report is divided into 3 sections (pages): voucher UML/HAP, income/expenses and disaster UML/HAP.

©2017 Tenmast Software. All rights reserved. 22 VMS Manual
VMS Prior Month Corrections Report Once a gather is marked as Submitted, it could still have contract changes or expenses paid or adjusted. These changes are known as Prior Month Corrections (PMCs) on the VMS website. PMCs occur as users process tenant actions that begin new contracts, terminate existing contracts, recoup from customers, pay to customers, or process interim re-examinations which change the amount of HAP expenses. The VMS Prior Month Corrections Report displays transactions which were incurred in the months prior to the
immediate past month. To generate the report, click the VMS Reports button on the VMS screen and select the Prior Month Corrections Report menu.
The report opens in a preview screen where you can print, export or email the information. For each month, the report displays an Old Value and the New Adjusted Value that needs to be entered into HUD’s VMS website as a prior month correction.

©2017 Tenmast Software. All rights reserved. 23 VMS Manual
VMS 12-Month Cumulative Report The VMS 12-Month Cumulative Report is similar to the VMS Data Collection Report that is available on the VMS Portal under the Report Selection menu. It provides a listing by month of the VMS UML and HAP expenses
for each VMS category. To generate the report, click the VMS Reports button on the VMS screen and select the 12-Month Cumulative Report menu.
When the Preview screen opens, you may need to select a Header and then click the Submit button.
The report opens in a preview screen where you can print, export or email the information. UML and HAP totals appear for each VMS category in separate columns spanning each month for the 12 months prior to the current gather month.
©2017 Tenmast Software. All rights reserved. 24 VMS Manual
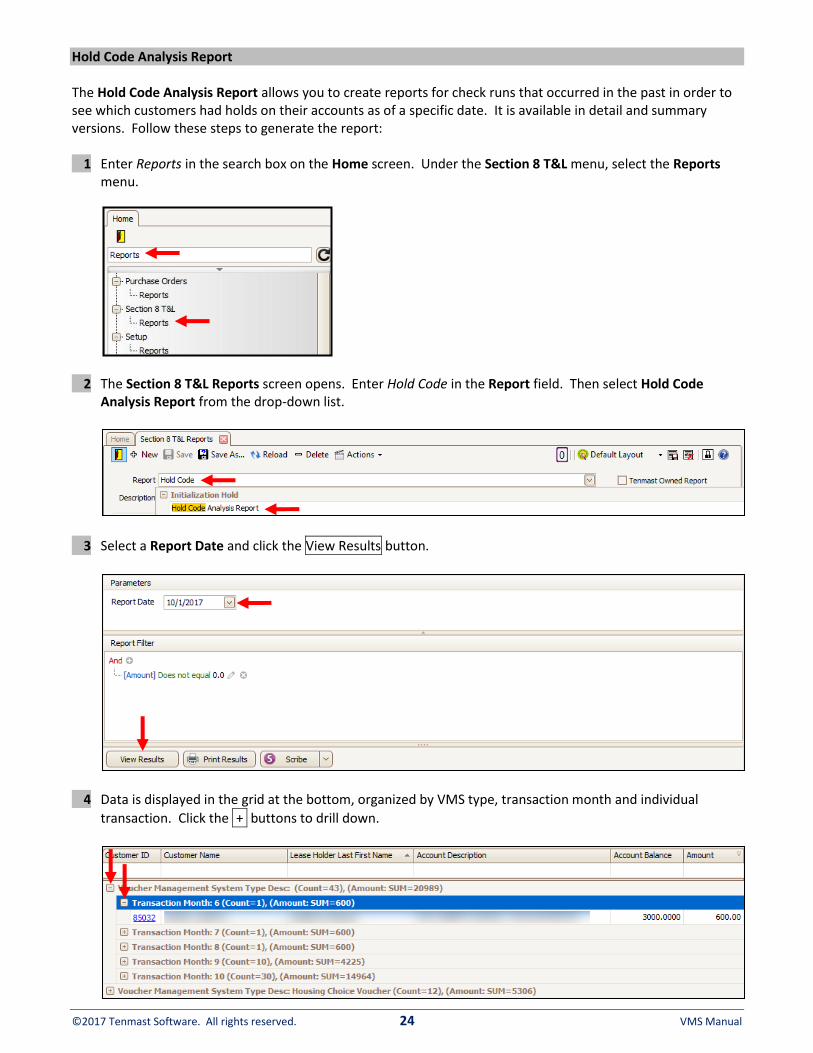
Hold Code Analysis Report The Hold Code Analysis Report allows you to create reports for check runs that occurred in the past in order to see which customers had holds on their accounts as of a specific date. It is available in detail and summary versions. Follow these steps to generate the report: 1 Enter Reports in the search box on the Home screen. Under the Section 8 T&L menu, select the Reports
menu.
2 The Section 8 T&L Reports screen opens. Enter Hold Code in the Report field. Then select Hold Code
Analysis Report from the drop-down list.
3 Select a Report Date and click the View Results button.
4 Data is displayed in the grid at the bottom, organized by VMS type, transaction month and individual
transaction. Click the + buttons to drill down.

©2017 Tenmast Software. All rights reserved. 25 VMS Manual
5 To generate a report, click the Scribe button above the grid.
6 The Open Report screen opens. Check the box for the report(s) you want to generate, then click the OK button.
7 When the Preview screen opens, you may need to select a Header and then click the Submit button.
8 The report opens in a preview screen where you can print, export or email the information. The detail
report displays transaction details grouped by month.

©2017 Tenmast Software. All rights reserved. 26 VMS Manual
The summary report displays a summary grouped by month.

©2017 Tenmast Software. All rights reserved. 27 VMS Manual
View VMS Transactions For Individual HAP/URP 1 Select the Customer Search menu on the Home screen.
2 The Customer Search screen opens. Enter the customer’s name in the search box and click the Search
button. Then select the View link to the left of the customer in the grid to open the record.
3 The Customer screen opens for the selected customer. Select the Account Summary tab, then select the
Account Number link to the left of the desired account to open its details.

©2017 Tenmast Software. All rights reserved. 28 VMS Manual
4 The Account Detail screen opens. Click the Scribe button.
5 The Open Report screen opens. Select the Report Group named S8 – Section 8 Tenants and Landlords.
Then check the box beside the report named VMS Transaction Detail – Single Account and click the OK
button.
6 When the Preview screen opens, you may need to select a Header and then click the Submit button.

©2017 Tenmast Software. All rights reserved. 29 VMS Manual
7 The report opens in a preview screen where you can print, export or email the information.
©2017 Tenmast Software. All rights reserved. 30 VMS Manual
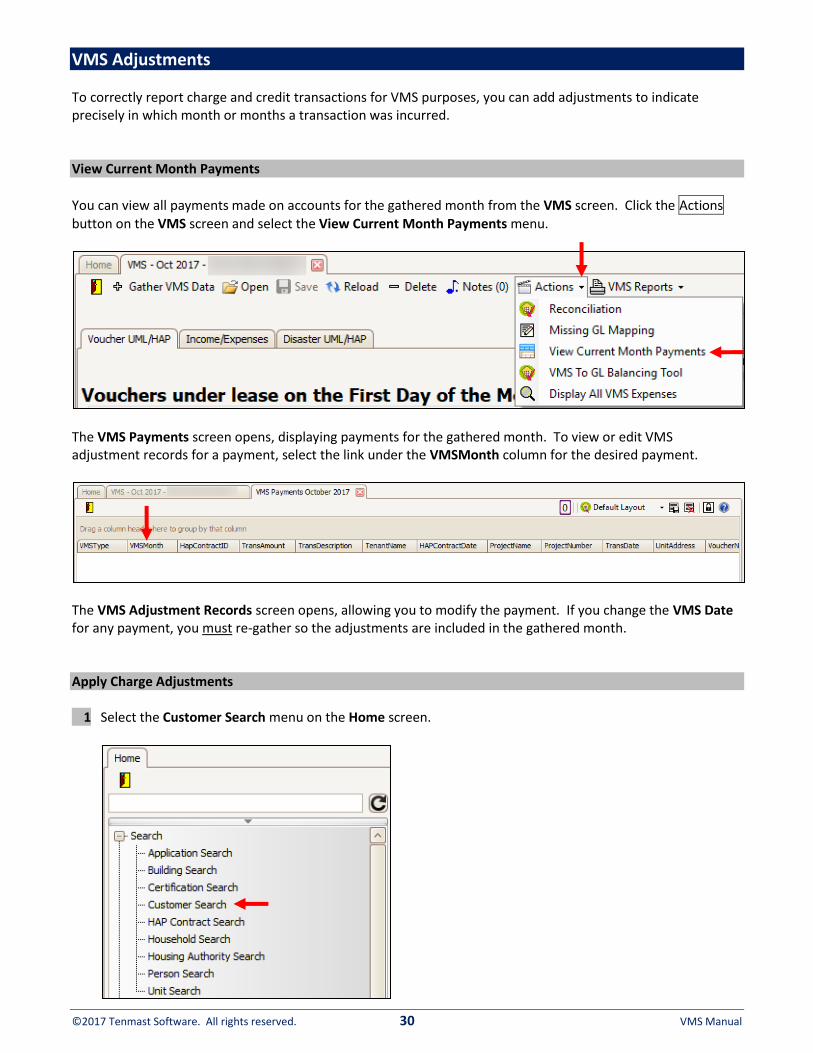
VMS Adjustments To correctly report charge and credit transactions for VMS purposes, you can add adjustments to indicate precisely in which month or months a transaction was incurred. View Current Month Payments
You can view all payments made on accounts for the gathered month from the VMS screen. Click the Actions button on the VMS screen and select the View Current Month Payments menu.
The VMS Payments screen opens, displaying payments for the gathered month. To view or edit VMS adjustment records for a payment, select the link under the VMSMonth column for the desired payment.
The VMS Adjustment Records screen opens, allowing you to modify the payment. If you change the VMS Date for any payment, you must re-gather so the adjustments are included in the gathered month. Apply Charge Adjustments 1 Select the Customer Search menu on the Home screen.
©2017 Tenmast Software. All rights reserved. 31 VMS Manual
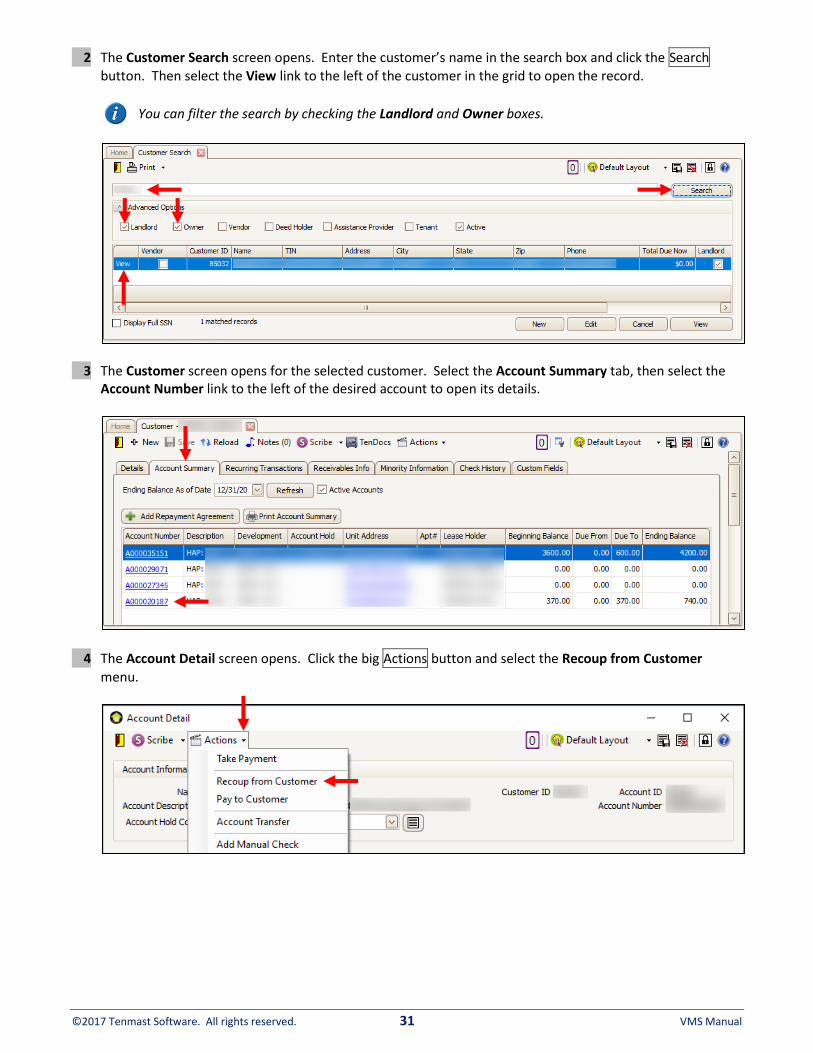
2 The Customer Search screen opens. Enter the customer’s name in the search box and click the Search button. Then select the View link to the left of the customer in the grid to open the record.
You can filter the search by checking the Landlord and Owner boxes.
3 The Customer screen opens for the selected customer. Select the Account Summary tab, then select the
Account Number link to the left of the desired account to open its details.
4 The Account Detail screen opens. Click the big Actions button and select the Recoup from Customer
menu.

©2017 Tenmast Software. All rights reserved. 32 VMS Manual
5 The Add Charge Wizard opens. Verify the Customer Name and Account, enter the other values, and click
the Next button.
The symbol indicates required fields.
6 The next screen is used to specify the month(s) in which the adjustment was incurred. If the adjustment
includes expenses that were incurred in more than one month, click the Add Adjustment button to add another row to the grid, in which you can choose a different month and re-allocate the expenses across
months. You can add as many month adjustments as needed by continuing to click the Add Adjustment
button. The total of all of the monthly adjustments added in this step should equal the Amount you
entered in step 5. If you add an adjustment in error, click the X button to the right of the row to delete it.
Click the Next button when finished.
In the example below, a $20 S8 admin fee was split between November and December.
©2017 Tenmast Software. All rights reserved. 33 VMS Manual
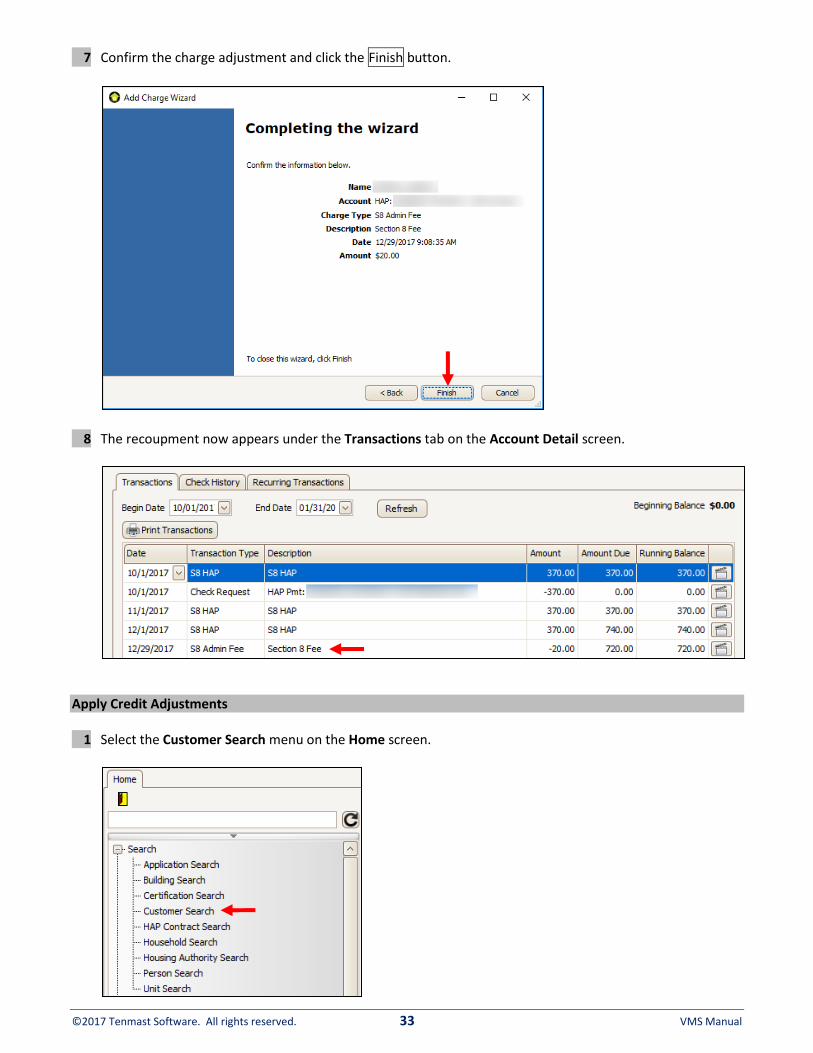
7 Confirm the charge adjustment and click the Finish button.
8 The recoupment now appears under the Transactions tab on the Account Detail screen.
Apply Credit Adjustments 1 Select the Customer Search menu on the Home screen.

©2017 Tenmast Software. All rights reserved. 34 VMS Manual
2 The Customer Search screen opens. Enter the customer’s name in the search box and click the Search button. Then select the View link to the left of the customer in the grid to open the record.
You can filter the search by checking the Landlord and Owner boxes.
3 The Customer screen opens for the selected customer. Select the Account Summary tab, then select the
Account Number link to the left of the desired account to open its details.
4 The Account Detail screen opens. Click the big Actions button and select the Pay to Customer menu.
©2017 Tenmast Software. All rights reserved. 35 VMS Manual
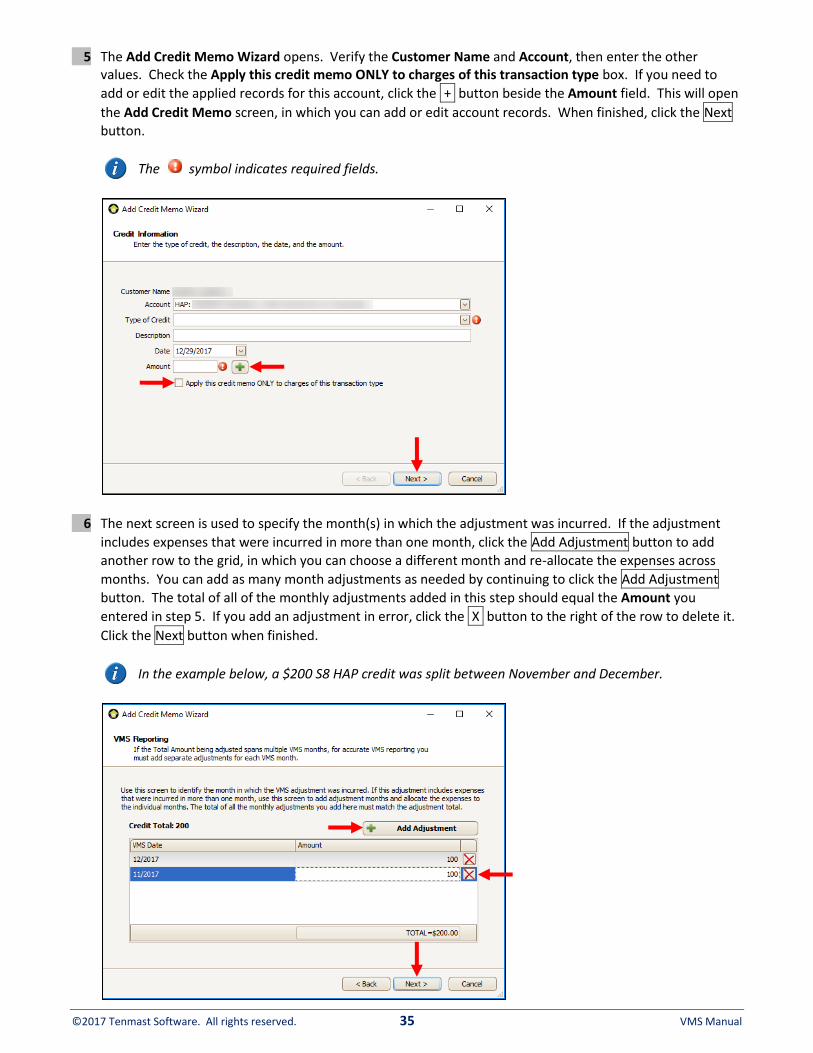
5 The Add Credit Memo Wizard opens. Verify the Customer Name and Account, then enter the other values. Check the Apply this credit memo ONLY to charges of this transaction type box. If you need to
add or edit the applied records for this account, click the + button beside the Amount field. This will open
the Add Credit Memo screen, in which you can add or edit account records. When finished, click the Next
button.
The symbol indicates required fields.
6 The next screen is used to specify the month(s) in which the adjustment was incurred. If the adjustment
includes expenses that were incurred in more than one month, click the Add Adjustment button to add another row to the grid, in which you can choose a different month and re-allocate the expenses across
months. You can add as many month adjustments as needed by continuing to click the Add Adjustment
button. The total of all of the monthly adjustments added in this step should equal the Amount you
entered in step 5. If you add an adjustment in error, click the X button to the right of the row to delete it.
Click the Next button when finished.
In the example below, a $200 S8 HAP credit was split between November and December.

©2017 Tenmast Software. All rights reserved. 36 VMS Manual
7 Confirm the credit adjustment and click the Finish button.
8 The credit now appears under the Transactions tab on the Account Detail screen.
View/Edit Adjustments From the Account Detail screen, you can review and edit how charge and credit adjustments are split across VMS reporting months. 1 Under the Transactions tab on the Account Detail screen, locate the charge or credit you want to view.
Then click the small Actions button to the right of the transaction and select the View VMS Records menu.

©2017 Tenmast Software. All rights reserved. 37 VMS Manual
2 The VMS Adjustment Records screen opens, displaying the allocation of the charge or credit. As explained
in the previous 2 sections, you can use the Add Adjustment and X buttons to change the allocation of the
transaction. Click the Save button when finished.
If you change the Amount of a credit adjustment that was previously created, be sure to use a negative sign to indicate that it is a credit.
©2017 Tenmast Software. All rights reserved. 38 VMS Manual
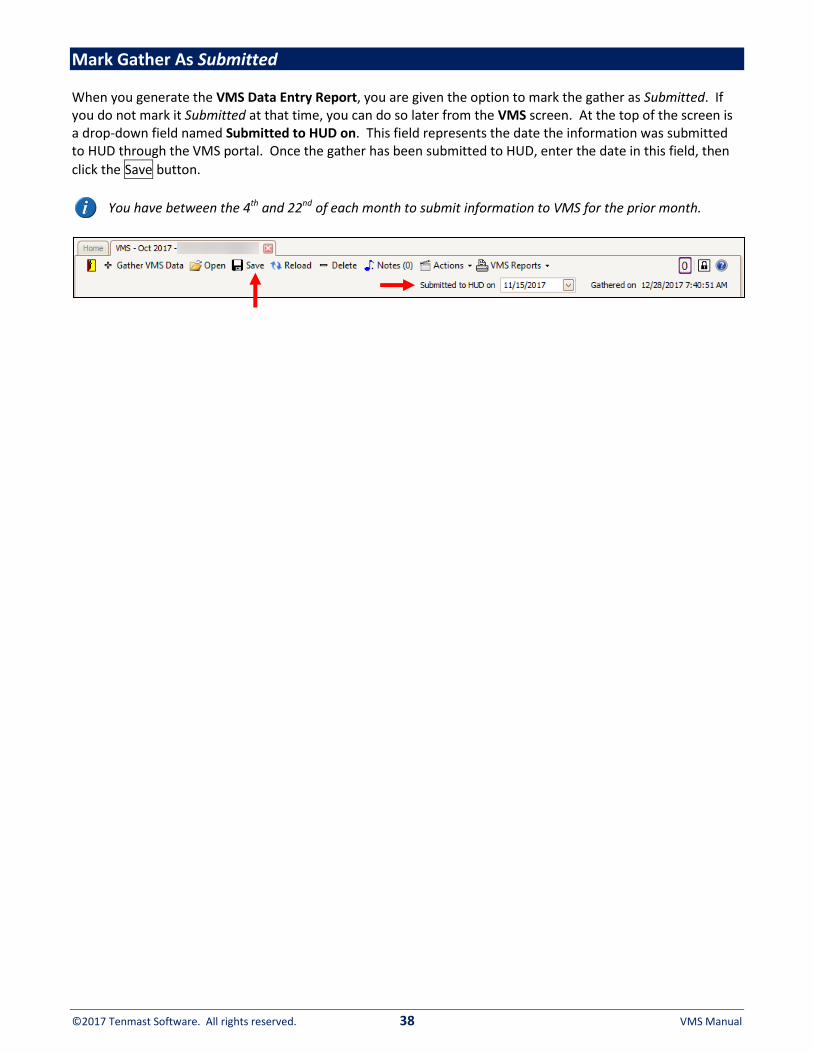
Mark Gather As Submitted When you generate the VMS Data Entry Report, you are given the option to mark the gather as Submitted. If you do not mark it Submitted at that time, you can do so later from the VMS screen. At the top of the screen is a drop-down field named Submitted to HUD on. This field represents the date the information was submitted to HUD through the VMS portal. Once the gather has been submitted to HUD, enter the date in this field, then
click the Save button.
You have between the 4th and 22nd of each month to submit information to VMS for the prior month.
©2017 Tenmast Software. All rights reserved. 39 VMS Manual
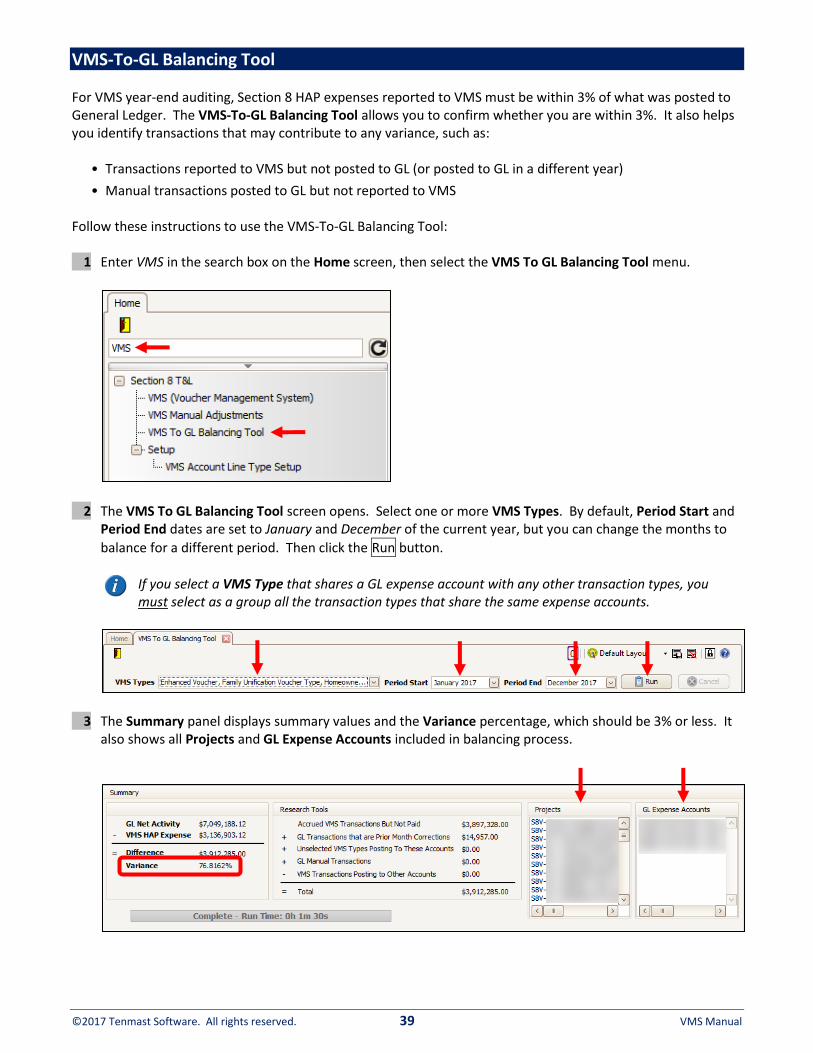
VMS-To-GL Balancing Tool For VMS year-end auditing, Section 8 HAP expenses reported to VMS must be within 3% of what was posted to General Ledger. The VMS-To-GL Balancing Tool allows you to confirm whether you are within 3%. It also helps you identify transactions that may contribute to any variance, such as:
• Transactions reported to VMS but not posted to GL (or posted to GL in a different year)
• Manual transactions posted to GL but not reported to VMS Follow these instructions to use the VMS-To-GL Balancing Tool: 1 Enter VMS in the search box on the Home screen, then select the VMS To GL Balancing Tool menu.
2 The VMS To GL Balancing Tool screen opens. Select one or more VMS Types. By default, Period Start and
Period End dates are set to January and December of the current year, but you can change the months to
balance for a different period. Then click the Run button.
If you select a VMS Type that shares a GL expense account with any other transaction types, you must select as a group all the transaction types that share the same expense accounts.
3 The Summary panel displays summary values and the Variance percentage, which should be 3% or less. It
also shows all Projects and GL Expense Accounts included in balancing process.

©2017 Tenmast Software. All rights reserved. 40 VMS Manual
4 The tabs at the bottom of the screen correspond to items in the Summary panel and display detailed transactions that may contribute to a Variance. For example, the first tab, VMS HAP Expense, corresponds
to the VMS HAP Expense line in the balancing equation. Each tab has a Print button you can click to open a
preview screen where you can print, export or email the information.
Below are descriptions of the transactions contained on the tabs that may appear on the VMS To GL Balancing Tool screen:
• VMS HAP Expense – All HAP transactions within the specified VMS Types and having a VMS Date within
the specified reporting period.
• GL Net Activity – All GL transactions associated with the GL Expense Accounts shown and for the GL fiscal periods corresponding to the specified reporting period. Includes all posted transactions without any filters.
• Accrued VMS Transactions But Not Paid – All GL transactions associated with the GL Expense Accounts
shown and for the GL fiscal periods corresponding to the specified reporting period. Includes only those GL transactions related to VMS HAP expenses that have been accrued but not yet paid.
• GL Transactions that are Prior Month Corrections – All GL transactions associated with the GL Expense
Accounts shown and for the GL fiscal periods corresponding to the specified reporting period, but with a VMS Date outside the reporting period. These GL transactions are not part of the VMS HAP Expense amount for the reporting period because they are for a different VMS reporting period. Most of these transactions should be prior month corrections posted in the account period.
• Unselected VMS Types Posting To Accounts – All GL transactions associated with the GL Expense
Accounts shown and for the GL fiscal periods corresponding to the specified reporting period, but where the VMS Type is not within one of the specified VMS Types. These GL transactions are not part of the VMS HAP Expense amount for the reporting period because they were not selected. It is recommended that you include these VMS Types in this balancing run to get an accurate account balancing report. (Note: This tab should normally be empty.)

©2017 Tenmast Software. All rights reserved. 41 VMS Manual
• GL Manual Transactions – All GL transactions associated with the GL Expense Accounts shown, and for the GL fiscal periods corresponding to the specified reporting period, that were created as manual journal entries in the GL program. These GL transactions are not part of the VMS HAP Expense amount for the reporting period because they were not posted from a HAP account in the Section 8 program.
• VMS Transactions Posting to Other Accounts – All HAP transactions within the specified VMS Types and
having a VMS Date within the specified reporting period, but where the GL accounts they posted to are not the GL accounts the project is set up to post to. This usually happens when the GL expense accounts are changed in the middle of the reporting period. The GL accounts on the tab will not show in the GL Expense Accounts box on the Summary panel. (Note: This tab should normally be empty.)
• VMS HAP Expense Compare – This tab displays 2 transaction grids. The first grid shows transactions
found on the VMS HAP Expense report that are missing from the actual data used in the balancing tool. The second grid shows transactions found in the actual data used in the balancing tool that are missing from the VMS HAP Expense report. If either grid displays transactions, please contact Tenmast Customer Support to resolve the data issues.