Virginia Department of Education 40-Hour Parent/Teen ...€¦ · This 40-hour parent/teen driving...
44
Virginia Department of Education 40-Hour Parent/Teen Driving Guide With Freedom Comes Great Responsibility Revised August 2007 Name:________________________________
Transcript of Virginia Department of Education 40-Hour Parent/Teen ...€¦ · This 40-hour parent/teen driving...

4�
Virginia Department of Education
40-Hour Parent/TeenDriving Guide
With Freedom Comes Great Responsibility
Revised August 2007
Name:________________________________

44
40-Hour Parent/Teen Driving Guide
http://www.doe.virginia.gov/VDOE/Instruction/PE/40hour.pdf
With Freedom Comes Great Responsibility
Virginia Department of Education Staff
Director of Middle and High School InstructionJames Firebaugh
Principal Specialist for Health Education, Physical Education, and Driver Education
Vanessa C. Wigand
Specialist for Driver EducationJanet Ragland
© Commonwealth of VirginiaDepartment of Education
P.O. Box ���0Richmond, Virginia ����8-���0
Revised August 2007

�
Parenting the Driving ExperienceYour child has reached an important milestone; A LEARNER’S PERMIT. It is our hope that acquiring mature driving skills and judgment will be a rewarding experience for you and your teenager. With your involvement, it can also be a safe experience. This 40-hour parent/teen driving handbook provides suggestions for in-car lessons to help you guide your child in making this step to adulthood more successful for both of you.
How do you teach a �6-year-old not to be a �6-year-old behind the wheel of an automobile? Unfortunately, there is no magic formula to prepare your teenager for the responsibilities of driving. Driver education at its best is a team effort involving schools, communities, students, and families.
Cars do not crash; people crash them. The driver, especially the young driver, continues to be a weak link in automotive safety. Motor vehicle injuries account for more years of productive life lost by students than all other causes of death. In addition, hospitalization and rehabilitation costs, lost time from school, and other costs associated with long-term injuries create substantial emotional, physical, and financial problems for students, schools, and their families.
To address the dramatic increase in traffic fatalities involving teenagers, action was taken by the Virginia General Assembly to require parents, foster parents, or guardians to certify that their children have driven motor vehicles for at least 40 hours, �0 of which must be after sunset, before they are eligible for a provisional license.
The ability to move a car skillfully is not the same thing as the ability to drive safely. Steering the vehicle is a relatively simple skill that most people can master in a short period of time. Driving is a complex psychomotor task requiring mastery of various performance skills. It requires processing and accurately evaluating risks in the driving environment, developing appropriate responses to minimize risks, and gaining experience to predict what action others may take.
This technical assistance guide provides you with a systematic approach to guide your child towards remaining collision-free in both low- and high-risk driving environments. The suggested lessons in this guide follow a sequential learning pattern that progresses from the parking lot to neighborhoods, to light traffic, to rural highways, to expressways and then to city driving. Each lesson provides you with an estimated amount of time the student will need to achieve mastery; however, because students have different abilities and learning styles you need to spend as much time as necessary to allow your child to master the skills before moving on to the next lesson. Research shows that in order to remain collision-free, parents must model safe driving behaviors and invest in meaningful guided practice over a long period of time to turn these skills into good driving habits!
If neither parent has a valid driver’s license, a friend or relative can conduct the guided practice sessions. Because parents and guardians play such a significant role in the development of safe driving habits, parents should remain involved in the learning process as observers in the car during the guided practice sessions. Knowing your child is a skilled, safety-conscious driver will give you peace of mind in years to come.
In addition to sharpening your driving skills, it is our hope the guided-practice sessions presented in this guide will provide your child with a solid foundation to develop safe, collision-free driving habits that will last a lifetime. At the end of this technical assistance guide is a 40-hour log to help you keep track of your driving time together.

�
The Juvenile Licensing Process as of July 1, 2007To reduce young driver crashes in Virginia and to save lives, the General Assembly enacted a graduated licensing process that requires new drivers to be older and to have more driving experience prior to obtaining a license.
Eligibility for a learner’s permit and provisional driver’s license
• A juvenile may apply for a learner’s permit if he or she is at least 15 years and six months of age.
• A juvenile may apply for a driver’s license when he or she becomes 16 years and three months of age.
• A juvenile must hold a learner’s permit for nine months, or until the learner’s permit holder turns �9 (whichever comes first).
• Students younger than �8 must have their parents, foster parents, or guardians certify that they have driven a motor vehicle for at least 40 hours, at least 10 of which were after sunset.
• Students younger than �9 must successfully complete a state-approved driver education program.
• The in-car teacher will administer the road test. If your child successfully passes the test, meets all the licensing requirements, and the school receives written permission from the parent to license the child, the school will issue the student a 180-day provisional license.
Learner’s permit and provisional driver’s license restrictions
• Virginia law prohibits driving with more that one non-family passenger less than 18 years old until the holder has held a provisional license for one year, and no more than three non-family passengers less than �8 years old until age �8.
• Restricts licensed drivers younger than �8 years old from operating a vehicle between midnight and 4 a.m., except when driving (i) to and from work; (ii) to and from a school-sponsored activity; (iii) when accompanied by a parent or person in loco parentis, or by a spouse who is �8 years old or older; (iv) in cases of emergency; or (v) when responding to fire or some other emergency as a volunteer firefighter or rescue worker.
• Virginia law prohibits drivers under age �8 from using cell phones or wireless communication devices while driving, regardless of hand-held or hands-free, except in a driver emergency and the vehicle is lawfully parked or stopped.
• Requires drivers younger than �0 years of age to attend a driver improvement clinic if convicted of a demerit point offense (moving violation), a seat belt or a child safety seat violation.
• Requires license renewal applicants younger than �� years of age who are convicted of one or more moving violations to retake the Department of Motor Vehicles (DMV) traffic safety knowledge test.

�
The Parents’ Role in the Juvenile Licensing ProcessThe family, not the school, is in the best position to have a sustained effect on minimizing risks faced by inexperienced drivers and encouraging responsible behavior. Parents must:
• Grant the DMV permission to issue their child a learner’s permit and a driver’s license.
• Provide their child with at least 40 hours of guided practice, �0 of which must be after sunset.
• Grant the school permission to enroll their child in the in-car phase of driver education.
• Determine when their child is ready to drive unchaperoned.
• Suspend the minor child’s driving privileges if he or she is not demonstrating responsible behavior.
• Notify their insurance agent when their child receives a �80-day temporary driver’s license.
• Continue to monitor their child’s driving after receipt of a provisional license and reinforce safety belt use, limit passengers, cell phone use and other driving distractions.
• Model safe driving behaviors.
Parenting Tips for In-Car Guided Practice SessionsParental reinforcement of basic driving skills and good decision making will lead to safe driving habits that will last a lifetime.
• Enjoy your time together. Have fun! This is a great “bonding” opportunity. Focus on the driving task and leave family issues at home.
• When you drive, set a good example to model. Always wear your safety belt. Try to correct any unsafe driving habits that you may have acquired; such as rolling through stop signs, accelerating through yellow lights, exceeding the speed limit, etc.
• If possible, initial instruction should begin in a car with automatic transmission so that your child can focus on mastering basic vehicle control maneuvers.
• Select driving environments that complement the lesson objectives and the novice driver’s ability. Start in parking lots and progress to quiet neighborhoods. Stay in a safe, low-risk driving environment as long as needed and, in the beginning, practice driving routes familiar to your child.
• Check to make sure your child has a learner’s permit, vehicle registration card, and insurance information with him or her when operating a vehicle.
• Explain the objectives of the lesson and review what was learned in the last lesson.

4
• Feedback should be precise and immediate. If a mistake is made, repeat the maneuver taking the driver step by step through the process, and then allow practice without assistance.
• Be patient, calm, and alert at all times. Make positive remarks frequently.
• Have short, well-planned practice sessions. Thirty minutes is the optimum learning period for beginning drivers. The first �0 minutes of each one-hour session should be used to introduce and practice the new skills. Assess the child’s understanding of the lesson objectives during the second half of the session. Set high standards and evaluate each driving session together.
• In a parking lot, practice steering the car with your left hand from the passenger seat.
• If you have a car with a parking brake between the seats, practice stopping the car by depressing the release button and raising the parking brake.
• To prepare yourself to regain speed control in the event your child panics and accelerates too much, practice shifting the transmission from drive to neutral from the passenger seat.
• Adjust the mirror on the passenger sun visor so you can use it as a rearview mirror. If the right outside mirror is properly adjusted to eliminate blind spot and glare, you can also use that mirror to monitor traffic to the rear from the passenger seat. (see page 7)
• Keep instructions simple and concise. First direct where to go, and then state the action to take (e.g., “At the next intersection, turn right.”)
• Check mirrors, and the space to the sides and ahead of the vehicle before giving directions.
• Emphasize driving with a large anticipation zone by looking at least �5-�0 seconds ahead. Play the “what if game”; what if a car suddenly changes lanes, stops, turns, etc.
• Encourage commentary driving! This is the most valuable tool you have for checking how your child is processing driving skills and evaluating the environment. Ask your child to “read the traffic picture aloud” describing anything that may affect your path of travel. For example, when your child changes speed, your child may say: “red light, check mirror, ease foot off accelerator and brake.” Actually, you should hear “check mirror and ease off accelerator” a lot!
• Reinforce the fact that a green light means one must scan the intersection before proceeding.
• Encourage your child not to panic when approached by an emergency vehicle and to focus on looking for a safe area to pull over.
• Discuss the rules for passing a stopped school bus with flashing lights. • Encourage new drivers to change their route to avoid making a difficult left turn.
• There is a lot to learn in each lesson, so your child may need extra time to attain adequate skill proficiency. Mastery at each level is important before moving on to the next lesson.
• If posssible, integrate night driving into each area of instruction.

5
Driving in the 21st CenturyImprovements in auto and highway design also have increased highway safety. Many new cars are equipped with safety features that dictate basic vehicle control procedures. Drivers must understand these new technologies and the need for basic vehicle maintenance.
Tires, wheels, brakes, shock absorbers, drive train, steering and suspension systems function together to provide a safe, comfortable ride and good gas mileage.
Tires Properly inflated tires are critical to vehicle control and good gas mileage. Tires should be inflated to the vehicle manufacturer’s recommended pressure printed on the vehicle’s door placard or in the owner’s manual, not the maximum limit listed on the tire sidewall. Under-inflated tires flex too much and build up heat, which can lead to blowouts or the tread separating and peeling off. The actual size of the tire patch in contact with the road is about the size of a dollar bill. These four dollar bill size patches of rubber in contact with the road surface allow the vehicle to respond to acceleration, braking, and steering. With this narrow margin of safety, it is important to check tire pressure at least once a month. Proper tire tread reduces traction loss on wet surfaces by channeling water through the tread. Tire tread depth can be measured by placing a penny in the tread, and if the tread does not reach the top of Lincoln’s head, driving in wet weather is very dangerous. Government tire ratings are listed on the side of the tire. The “AA” rating is the top traction, speed, and load rating, and “C” is the lowest tire rating.
Steering Control Due to changes in steering ratios and effort needed to turn the wheel, steering control requires a balanced hand position on the lower half of the steering wheel to avoid sudden movements.
Hand position Placing the left hand at the 8 o’clock position, and the right hand at the
4 o’clock position improves stability by lowering the body’s center of gravity, and reduces unintended and excessive steering wheel movement which is a primary cause of young driver fatalities. This more natural seating position also helps the driver to keep both hands on the wheel and reduces back pain often associated with trip driving.
Steering—Hand-to-hand/push-pull-slide steering This steering technique keeps both hands on the wheel at all times and reduces excessive steering wheel movement. In the event of a frontal crash with a vehicle equipped with an air bag, this steering method also reduces the chance of injury because the arms do not cross over the steering wheel where the air bag is housed.
To push/pull steer:
• the right hand begins at � o’clock or below;
• the left hand begins at 9 o’clock or below;

6
• the right hand moves between the 5 and � o’clock position; and
• the left hand moves between the 7 and �0 o’clock positions.
To reverse the push-pull-slide process, allow the steering wheel to slide through the hands until the vehicle’s wheels move to the straight-ahead position.
Hand-over-hand steering In modern cars, this steering technique is used only when the vehicle is moving very slowly or is stopped, and the vehicle needs to be turned in a very sharp angle. For hand-over-hand steering:
• one hand grasps the wheel and pushes the wheel up, over, and down;
• at the same time the other hand releases the wheel and passes across the forearm to grip the wheel on the far side;
• this hand then pulls the side of the wheel up, over the top, and down; and
• these movements continue as long as necessary to turn the wheel as much as needed.
Brakes Brake pads or shoes last about �0,000 miles, depending on the driving conditions.
Anti-lock Braking System (ABS) Cars with anti-lock braking systems automatically check the system when the car is started. In order to stop suddenly in an ABS equipped vehicle, one must use firm brake pressure and maintain this pressure on the brake pedal even if you feel it pulsing or hear a grinding noise. The ABS system pulses the brake �5 times a second to avoid lockup and allows your wheels to keep rolling. Rolling wheels allow you to steer—you cannot change direction if your wheels are sliding. You and your child should practice applying the hard braking mode in a vacant parking lot before having to use this crash-avoidance technology in a real emergency.
Driver and Front Passenger Air Bags are designed to inflate in a frontal impact. Drivers should sit at least �0 inches from the air bag because it inflates to six or seven inches in size at speeds up to �00 mph. Tilt the steering wheel as far down as comfortable to point at your chest, not at your face. Always wear a seat belt and secure children in the rear seat. To reduce forearm and hand injuries, hands should be placed on the lower half of the steering wheel, with knuckles on the outside and thumbs stretched along the rim of the wheel.
Side Impact Air Bags are designed to protect the torso and head in side impact collisions. Care should be taken not to sit too close to the door or to lean towards the air bag.

7
Traction Control Systems monitor any difference in rotational speed between the front and rear wheels. This differential in wheel rotation may occur on uneven or slippery surfaces. When the system is activated, an automated combination of brake and/or engine control comes into play to provide controlled acceleration and tire traction.
Contemporary mirror setting Adjust the inside mirror so that it frames the entire rear window and becomes the primary mirror for viewing what’s behind the vehicle. Adjust side mirrors to reduce the blind spot and headlight glare from the rear. Adjust the left side mirror by leaning your head towards the left side window, and set the left mirror so that the driver can barely see the side of the car. To adjust the right side mirror, lean to the right over the center console, and set the right mirror so the driver can barely see this side of the car. These adjustments provide a �5 degree viewing area to each side of the vehicle. This mirror setting reduces the overlap between the inside and sideview mirrors and allows the driver to monitor the adjacent lane. Traditional settings overlap with the rearview mirror view and should only be used if the view of the highway from the inside rearview mirror is blocked.
Tips for Driving in Adverse ConditionsDriver inattention is a primary cause of crashes. Distractions, such as interacting with passengers,
talking on the phone, or adjusting the stereo system, are especially dangerous for young drivers. Limit distractions by pulling off the road to perform activities not related to the driving task.
Fatigue severely limits your reaction time and decision-making ability, and is caused by lack of sleep, the body’s circadian rhythm, and driving for long periods of time. Circadian rhythm is the body’s natural “downtime”, which for most people is between � and 5 p.m. and around your normal bedtime. To avoid fatigue, take breaks, keep the vehicle cool, and be aware of your “downtime”.
Glare Sources of glare include headlights of oncoming or following vehicles, misaligned headlights, improperly loaded vehicles, a dirty windshield, paper on the dashboard, facing the sun at dusk or dawn, snow-covered landscapes, and traditional versus contemporary side mirror settings. To combat glare, wear sunglasses during the day only, adjust sun visor as needed, keep windows clean, reduce speed, and look to the right-hand side of the road when meeting a vehicle with high beam headlights on.
Fog During foggy conditions, reduce speed, use low beams, windshield wipers, and defroster/defogger and flashers if needed, and look for a safe area to pull off the road.

8
Heavy smoke, rain, or snow Reduce speed, turn on low-beam headlights, emergency flashers, and windshield wipers; make gentle steering, accelerating, or braking actions; be alert for stopped vehicles on the highway, and be prepared for wind gusts or strong steady crosswinds; turn on the radio to monitor weather and road conditions, and if possible, leave the highway.
Low water crossing Nearly half of all flash flood fatalities are vehicle related. In severe rainstorms watch for flooding at bridges and low areas. Driving too fast through low water will cause the vehicle to hydroplane and lose contact with the road surface.
Hot or cold temperatures place demands on tires, radiator coolant, hoses, connections, and drive belts and increase driving risks. Check these items prior to and after driving during these conditions.
Strong wind conditions create a problem called buffeting. This condition occurs on bridges, through mountain passes and ravines, and when being passed by large trucks. Reduce speed, check traffic, be prepared to steer windward, and countersteer in the direction you want the vehicle to go.
Head-on collisions The possibility of serious injury or death is great. This type of collision is more likely to occur on two-lane highways, narrow lanes or curved roads, and in construction zones.
Rear-end collisions are one of the most common types of multiple-vehicle collisions. Tailgaters are especially at risk. Adverse conditions such as dense fog or smoke, heavy rain, and snow also increase risks to motorists because some drivers stop their vehicles while still on the highway.
Side-impact collisions Most vehicles are not well-equipped to withstand a side impact. If your vehicle is in danger of being hit, your best option is to accelerate rather than apply brakes if the way ahead is clear.
Changing traction conditions Traction or adhesion is the grip the tires have on the road surface, which allows the vehicle to start, stop, and/or change directions. As speed increases, traction between the tires and the road decreases. Three kinds of traction influence motor vehicle control: static, rolling (dynamic), and sliding. Road surface conditions that decrease the level of traction are ice, snow or frost, wet surfaces or standing water, mud or wet leaves, uneven surfaces, sand, gravel, and curves. Speed should be reduced in such conditions.

9
Sessions 1 and 2: Getting Ready, Starting, Placing the Vehicle in Motion, and StoppingSessions � and � should be divided into four �0-minute periods. These sessions introduce your child to the instrument panel, vehicle controls, and mirror blind spots. Please review the vehicle owner’s manual before and during these sessions. You will need a measuring tape, cones, or plastic cups to use in these and future lessons.
Begin in a large, level parking lot free of obstacles. Use the checklist on page �� to help organize your lessons and assess learning during the second half of session �.
• Prior to entering the vehicle, the student should check for
fluid leaks, broken glass, etc.
• Check tire pressure, engine oil, radiator, and other fluid levels.
• Enter the vehicle and review interior controls; turn on the ignition switch to discuss functions of lights, gauges, and accessories. Ask your child to operate and explain all controls and to simulate monitoring the path ahead while operating the controls.
• Discuss how the proper seating position is essential for control of the vehicle. The driver should sit with his or her back firmly against the seat with at least �0 inches between the steering wheel and the driver’s chest. The air bag should point towards the driver’s chest. The top of the steering wheel should be no higher than the top of the driver’s shoulders. Adjust the seat to maintain heel contact with the floor to pivot the foot between the brake and accelerator pedals. Short drivers may need a seat cushion or pedal extenders to sit in a safe position at least �0 inches from the air bag.
• Adjust the head restraint to align with the center of the back of the driver’s head.
• Adjust the inside mirror so that it frames the entire rear window and is the primary mirror for viewing traffic behind the vehicle. Adjust side mirrors to reduce side mirror blind spot and headlight glare from the rear (see page 7).
• Practice starting the vehicle and adjusting accessories.
�0
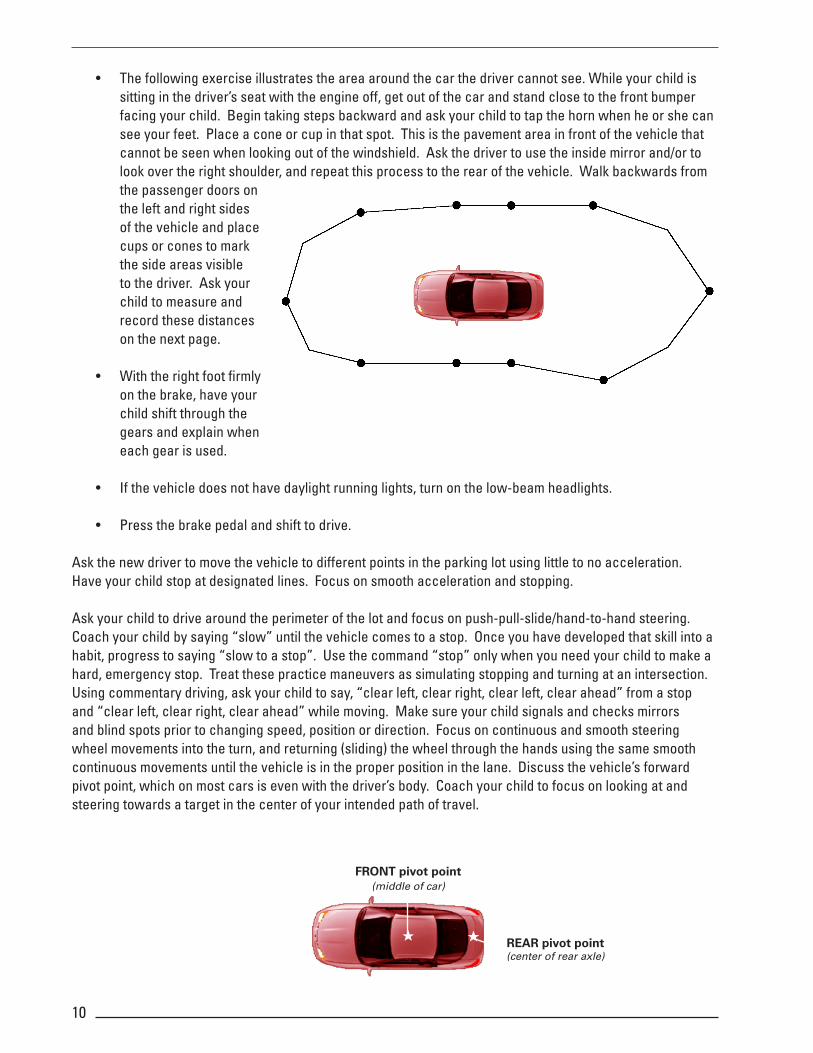
• The following exercise illustrates the area around the car the driver cannot see. While your child is sitting in the driver’s seat with the engine off, get out of the car and stand close to the front bumper facing your child. Begin taking steps backward and ask your child to tap the horn when he or she can see your feet. Place a cone or cup in that spot. This is the pavement area in front of the vehicle that cannot be seen when looking out of the windshield. Ask the driver to use the inside mirror and/or to look over the right shoulder, and repeat this process to the rear of the vehicle. Walk backwards from the passenger doors on the left and right sides of the vehicle and place cups or cones to mark the side areas visible to the driver. Ask your child to measure and record these distances on the next page.
• With the right foot firmly on the brake, have your child shift through the gears and explain when each gear is used.
• If the vehicle does not have daylight running lights, turn on the low-beam headlights.
• Press the brake pedal and shift to drive.
Ask the new driver to move the vehicle to different points in the parking lot using little to no acceleration. Have your child stop at designated lines. Focus on smooth acceleration and stopping.
Ask your child to drive around the perimeter of the lot and focus on push-pull-slide/hand-to-hand steering. Coach your child by saying “slow” until the vehicle comes to a stop. Once you have developed that skill into a habit, progress to saying “slow to a stop”. Use the command “stop” only when you need your child to make a hard, emergency stop. Treat these practice maneuvers as simulating stopping and turning at an intersection. Using commentary driving, ask your child to say, “clear left, clear right, clear left, clear ahead” from a stop and “clear left, clear right, clear ahead” while moving. Make sure your child signals and checks mirrors and blind spots prior to changing speed, position or direction. Focus on continuous and smooth steering wheel movements into the turn, and returning (sliding) the wheel through the hands using the same smooth continuous movements until the vehicle is in the proper position in the lane. Discuss the vehicle’s forward pivot point, which on most cars is even with the driver’s body. Coach your child to focus on looking at and steering towards a target in the center of your intended path of travel.
★
Front pivot point(middle of car)
rear pivot point(center of rear axle)
★

��
Checklist for Sessions 1 and 2Area around the vehicle that the driver cannot see_____ Distance in front of the vehicle that the driver cannot see_____ Distance to the rear of the vehicle that the driver cannot see_____ Distance to the left side of the vehicle that the driver cannot see_____ Distance to the right side of the vehicle that the driver cannot see
Place “S” for satisfactory or “NP” for needs practice to complete the following tasks:
Getting Ready to Drive_____ Approaches the vehicle with awareness; checks tires, fluid leaks, etc._____ Locks doors and checks all occupants for safety belt use_____ Adjusts head restraints, seat position, safety restraints, steering wheel position_____ Adjusts mirrors to reduce blind spots_____ Identifies vehicle controls (refer to owner’s manual for explanation)
Starting the Vehicle_____ Checks the parking brake _____ Selects proper starting gear_____ Pivots heel and places foot securely on brake pedal _____ Demonstrates proficient use of ignition device_____ Demonstrates ability to select and use appropriate accessories_____ Starts the vehicle and makes appropriate gear selection for movement_____ Puts headlights on day and night to increase safety
Placing Vehicle in Motion_____ Visually identifies open space and target before moving foot from brake to gas_____ Communicates with other users_____ Puts the vehicle in motion smoothly and uses commentary driving
Stopping Vehicle in Motion_____ Searches ahead of the vehicle to determine deceleration or braking needs_____ Uses controlled braking efficiently with heel of foot on floorboard_____ Checks rear zone space prior to braking_____ Applies adequate force at the beginning of the braking process_____ Brings the vehicle to a smooth stop_____ Eases off brake pressure during the last seconds of braking to reduce vehicle pitch_____ Checks the rear zone space before, during, and after braking
Steering_____ Uses a balanced 8 and 4 hand position on the steering wheel_____ Uses the hand-over-hand and hand-to-hand steering methods effectively_____ Turns head and visually checks what’s ahead prior to turning_____ Visually checks the rear/side view mirrors and mirror blind areas
Securing the Vehicle_____ Sets parking brake; shifts into appropriate gear before removing foot from brake_____ Turns off appropriate accessories prior to turning off ignition and removing key_____ Visually checks traffic flow before opening door _____ Locks doors and activates alarm system if the vehicle is equipped with this device
I certify that _______________________________________________ has spent at least two hours practicing the above tasks.
Parent/Guardian’s signature ___________________________________ Date ________________________
��
Sessions 3-5: Moving, Stopping, Steering, Knowing Where You AreSessions �-5 focus on learning the correct procedures for moving, stopping, using reference points, and steering the vehicle at different speeds. Review previous lesson objectives, and divide sessions into six �0-minute periods. If possible, drive at night during one session. Assess learning during the second half of session 5. Begin in a large, level parking lot that is free of obstacles. Place cones or other “targets” at selected locations on the lot.
The student should practice driving around the perimeter of the lot at �0 and �5 mph. Using commentary driving, have your child focus on smooth push-pull-slide/hand-to-hand steering and stops. Your child should be coached to ease off the accelerator or use the brake to reduce speed before entering a curve and to use slight acceleration to overcome inertia and pull the vehicle out of the curve. Novice drivers have a tendency to overuse the brake and under use the accelerator to control speed. Ask the student to move the vehicle to specified targets in the parking lot at �0 and �5 mph. Focus on smooth acceleration, proper speed, and smooth stops. Explain to your child that “curling” the toes back to ease pressure off the brake just before stopping results in smoother stops. Practice normal smooth stops and hard smooth stops which are done at a slightly higher speed.
Reference points: To know exactly where the vehicle is located, at speeds under �5 mph the young driver can align some part of the vehicle with the roadway. Practice establishing left, right, and front reference points �0 or �� times during each session. Exchange places with your child to demonstrate using left, right and front reference points.
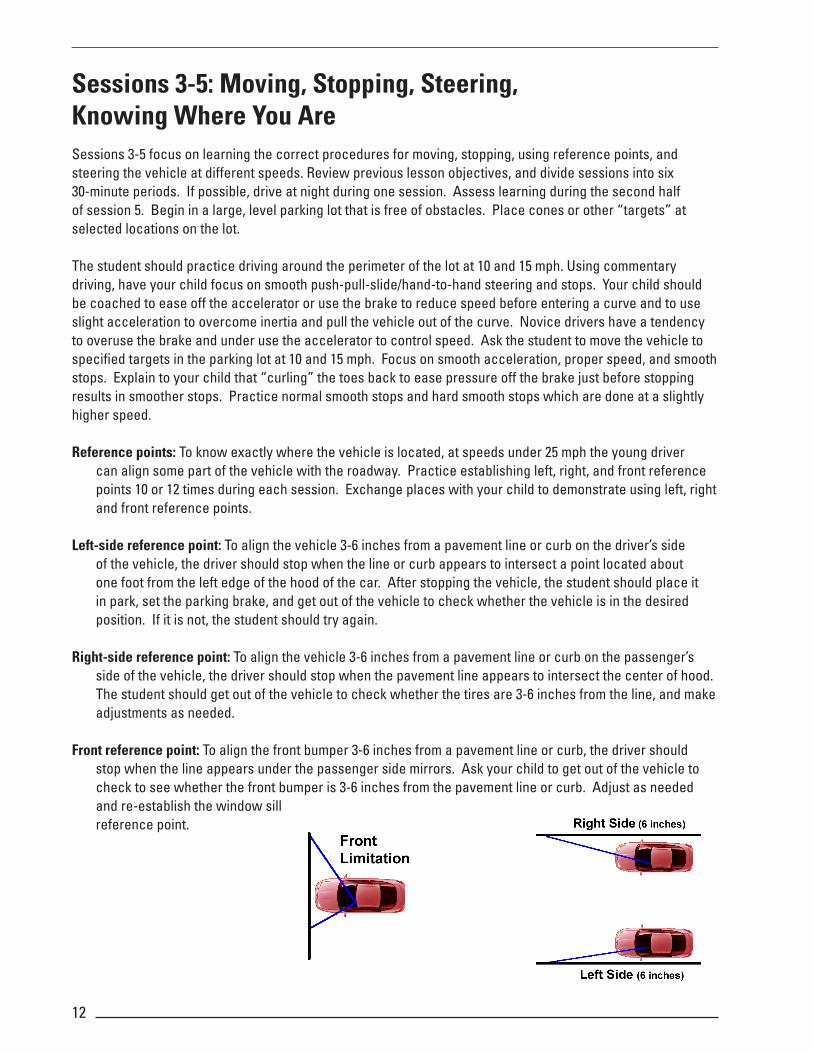
Left-side reference point: To align the vehicle �-6 inches from a pavement line or curb on the driver’s side of the vehicle, the driver should stop when the line or curb appears to intersect a point located about one foot from the left edge of the hood of the car. After stopping the vehicle, the student should place it in park, set the parking brake, and get out of the vehicle to check whether the vehicle is in the desired position. If it is not, the student should try again.
Right-side reference point: To align the vehicle �-6 inches from a pavement line or curb on the passenger’s side of the vehicle, the driver should stop when the pavement line appears to intersect the center of hood. The student should get out of the vehicle to check whether the tires are �-6 inches from the line, and make adjustments as needed.
Front reference point: To align the front bumper �-6 inches from a pavement line or curb, the driver should stop when the line appears under the passenger side mirrors. Ask your child to get out of the vehicle to check to see whether the front bumper is �-6 inches from the pavement line or curb. Adjust as needed and re-establish the window sill reference point.

��
Checklist for Sessions 3-5During session 5, parents should begin evaluating whether the driver can perform the following tasks in an efficient sequence without hesitation. Your child should also be able to explain why each step is performed.
Place “S” for satisfactory or “NP” for “Needs Practice” for the following tasks:
_____ Uses commentary driving _____ Approaches the vehicle with awareness _____ Enters the vehicle and makes appropriate checks and adjustments _____ Identifies and operates all controls (blows horn, turns wipers on and off, etc.) _____ Prepares to drive (see lessons �-�) _____ Follows steps to put vehicle in motion (see lessons �-�) _____ Places heel on floor and accelerates smoothly _____ Establishes balanced hand position on the lower half of the steering wheel _____ Looks well ahead of the vehicle to identify risks in the path of travel _____ Maintains lane position _____ Exhibits smooth push-pull-slide steering _____ Looks at target in the center of the turn _____ Maintains �0 mph speed _____ Maintains �5 mph speed _____ Checks inside mirror before braking and stops smoothly at �0 mph _____ Demonstrates smooth stop without locking wheels at �0 mph _____ Demonstrates smooth stop without locking wheels at �5 mph _____ Aligns the vehicle �-6 inches from a line or curb on driver’s side of the vehicle _____ Aligns the vehicle �-6 inches from a line or curb on passenger’s side of the vehicle _____ Aligns the front bumper �-6 inches from a pavement line or curb
_____ Properly secures the vehicle
I certify that _______________________________________________ has spent at least three hours practicing the above tasks.
Parent/Guardian’s signature ___________________________________ Date ________________________

�4
Sessions 6 and 7: BackingRepeat the tasks listed in sessions �-5 with the vehicle in reverse gear at idle or slow speeds. Backing from one target to another allows your child to practice seeing, steering, and speed control skills with the vehicle in reverse gear. Switch places with your child to demonstrate each backing task.
One-hand steering. Movement of the steering wheel with one hand is recommended only for backing maneuvers that do not require full left or right turns.
Backing and steering with one hand requires shifting one’s hips and seating position so the driver’s head can be turned to see beyond the head restraint. One loses depth perception when using the mirrors to guide the vehicle when backing it. To improve balance, the driver’s right arm can be draped over the back of the seat. The left hand grips the steering wheel near the top and turns it in the direction the driver wants the vehicle to go. Sharp turns while backing may require use of both hands. Since it is more difficult to maintain steering control and vehicle balance when the vehicle is in reverse, emphasize backing at slow speeds. Reverse is a more powerful gear than drive, so coach your child to use the accelerator pedal carefully, if at all.
To practice backing the vehicle in a straight line, have your child:
• check all areas behind the vehicle prior to and while backing;
• pivot the heel, place the right foot on the brake, and shift to reverse;
• grasp the steering wheel at �� o’clock with the left hand;
• look over right shoulder through the back window;
• use the brake and accelerator effectively for speed control; and
• make frequent quick checks to the front and stop at a designated line.
To practice backing and turning the vehicle, have your child:
• grasp the steering wheel at �� o’clock with the right hand if turning to the left, or with the left hand if turning to the right;
• look in the direction you are moving through the rear side windows;
• keep speed slow using brake and accelerator effectively for speed control; and
• make quick checks to the front and sides.
Rear bumper reference points: To align the rear bumper �-6 inches from a line or curb, the driver should stop when the line or curb appears near the middle of the rear right window when looking over the right shoulder. Have the student get out of the car to see whether the rear bumper is �-6 inches from the designated line. Adjust the vehicle’s position as needed, and reestablish the rear side window reference point from the inside of the car.
To align the rear bumper � feet from a curb when backing around a corner to the right, the driver looks over the right shoulder and should see the curb in the rear side window near the corner roof.
When backing around a corner to the left, the pivot point is the center of the rear axle between your rear tires. To establish a three-foot pivot point, the driver looks over the left shoulder and aligns the corner of the turn with the the rear left tire.

�5
Checklist for Sessions 6 and 7
Place “S” for satisfactory or “NP” for needs practice for the following tasks: _____ Approaches the vehicle with awareness _____ Enters the vehicle and makes appropriate checks and adjustments _____ Identifies controls _____ Prepares to drive _____ Follows steps to put vehicle in motion _____ Controls speed_____ Uses commentary driving
Backing straight
_____ Checks all areas around the vehicle prior to putting it in reverse and while backing _____ Pivots foot to brake pedal and shifts to reverse _____ Grasps steering wheel at �� o’clock with left hand _____ Looks through the back window and targets path of travel _____ Uses accelerator and brake effectively for speed control _____ Demonstrates effective steering technique _____ Makes frequent quick checks to the front _____ Stops with rear bumper �-6 inches from a designated line using reference points _____ Stops with rear bumper � feet from designated pavement line using reference points_____ Stops the vehicle completely before turning back around to face the front of the car
Backing and turning
_____ Searches all areas prior to putting the vehicle in reverse and while backing _____ Grasps steering wheel at �� o’clock position with the right hand for a left turn _____ Grasps steering wheel at �� o’clock position with the left hand for a right turn _____ Demonstrates effective one-hand and hand-to-hand steering techniques _____ Searches path of travel through rear side windows _____ Keeps speed slow using idle speed or slight acceleration _____ Makes frequent quick checks to the front and sides opposite the direction of the turn _____ Stops with rear bumper � feet from designated line using reference points _____ Stops at the rear tire pivot point prior to turning _____ Makes frequent quick checks to the front and sides opposite turn to determine lane position _____ Steers in the correct direction gradually and straightens the direction of the car _____ Looks to the rear and front and stops at designated line_____ Properly secures the vehicle_____ Stops the vehicle completely before turning around
I certify that _______________________________________________ has spent at least two hours practicing the above tasks.
Parent/Guardian’s signature ___________________________________ Date ________________________

�6
Sessions 8-10: Turning, Lane Position, and Visual Skills Parents and teens should review the driver’s manual. Focus on signs, signals, pavement markings, yield and speed laws. Take the online sign and knowledge tests located on the Department of Motor Vehicle’s Web site at www.dmv.state.va.us. If possible, begin integrating night driving into these sessions.
During the next three sessions practice �0-�5 right and left turns from stopped and moving positions in a parking lot. Left turns should be “squared” and right turns should be “rounded.” Emphasize proper signals, mirror checks, side-position reference points, speed and steering control, and the need to look ahead of the vehicle at a selected target in the center of the path of travel. Warn young drivers not to fixate on any one thing. Prior to progressing to driving in a quiet neighborhood, your child should be able to demonstrate the ability to move and stop the car smoothly, maintain a given speed, and steer with reasonable precision. If your child is ready, practice right and left turns in a residential area.
When turning out of a parking lot, help the new driver maintain proper lane position by asking him or her to identify a target �5 and �0 seconds ahead of the vehicle (approximately one block), and using commentary driving, explain what he or she sees and the proper reaction to it. Ask the new driver to verbalize the need to change speed or position, and to identify potential risks in the path of travel. This will enhance awareness of signs and pavement markings, and help your child develop visual scanning and risk identification skills. If the road has pavement markings, discourage the novice driver from looking at the lines to try to “center the vehicle”. Any eye motion away from the target in the center of the path of travel should be quick; delayed eye movement or looking at the pavement directly in front of the vehicle will often cause the vehicle to drift in the lane. Coach your child to scan and not focus on anything at the sides of the path of travel. Drivers have the tendency to steer in the direction they look, especially young drivers.
Using commentary driving while approaching an intersection, your child should:
• search all corners of the intersection for vehicles, pedestrians, traffic controls, etc.;
• flash brake lights, check traffic to the rear, put on turn signal 4 seconds before turning;
• at a signal-controlled intersection, identify who has the green light; and
• select the best lane and lane position and yield to pedestrians and other vehicles.
Right turns from a stop
The steps are the same whether turning onto a one-way or two-way street.
• Position the vehicle � feet from the curb (any closer the rear tire may hit curb).
• Stop with the front bumper even with the curb line, wheels angled slightly to the right.
• Yield and search intersection to the left, front, right, and back to the left.

�7
• Select a gap in traffic, avoid hesitation, and look at the target in the center of the path of travel.
• Using hand-to-hand steering, begin to turn the steering wheel when the vehicle’s right-side corner post is aligned with curb and target the center of the closest open lane.
• Allow the steering wheel to recover by letting it slide through the hands. The steering recovery point is when your wheels are straight and your vehicle is still at an angle. Be sure to say “recovery point”.
• Select a target �5-�0 seconds ahead and accelerate gradually.
NOTE: Selecting a gap in traffic is a very difficult skill for most novice drivers and requires a lot of practice!
Left turns on two-way streets from a stop
• Position the vehicle �-6 inches from the yellow line in the middle of the road.
• Stop with wheels pointed straight ahead behind the stop line, pedestrian crosswalk, or before entering an intersection.
• Search the intersection to the left, front, right, and back to the left.
• Select a gap, avoid hesitation, pull straight forward towards the middle of the intersection.
• Use the yellow line as the turning target, select gap and turn into the travel lane closest to the yellow line.
• At the steering recovery point, allow the steering wheel to slide through the hands.
• Select a new target �5-�0 seconds ahead in the center of the path of travel and accelerate gradually.
NOTE: Right of way is a gift. You do not have it unless someone gives it to you.
�8
Checklist for Sessions 8-10Place “S” for satisfactory or “NP” for needs practice for the following tasks: _____ Approaches the vehicle with awareness _____ Enters the vehicle and makes appropriate checks and adjustments _____ Identifies controls _____ Prepares to drive _____ Follows steps to put vehicle in motion_____ Checks mirrors frequently _____ Uses commentary driving
Vehicle position for right and left turns _____ Selects the best lane and lane position; understands the correct path of travel _____ Positions vehicle � feet from the curb for a right turn _____ Stops with the front bumper even with curb or behind stop line _____ Angles wheels slightly to the right when stopped for a right turn _____ Positions the vehicle �-6 inches from the center line to prepare for a left turn _____ Maintains at least a three-second space cushion at all times_____ Turns into the closest open travel lane
Visual skills _____ Looks �5-�0 seconds ahead of the vehicle _____ Looks at target in the center of the path of travel _____ Selects targets _____ Recognizes signs by their shape well in advance _____ Understands meaning of yellow and white pavement markings _____ Understands meaning of solid and broken pavement markings _____ Recognizes a green arrow, left turn only, and no left turn signs _____ Searches all areas of the intersection _____ Selects a target in the center of the travel path _____ Judges driving space in traffic; has good gap selection_____ Uses proper steering techniques _____ Yields to pedestrians and oncoming traffic _____ Uses proper signals _____ Checks mirrors before slowing or stopping _____ Avoids hesitation _____ Controls speed _____ Maintains speed_____ Properly secures vehicle_____ Score on DMV sign test _____ Score on DMV knowledge test
I certify that _______________________________________________ has spent at least three hours practicing the above tasks.
Parent/Guardian’s signature ___________________________________ Date ________________________

�9
Sessions 11-13: Searching Intended Path of TravelIn a residential area, or, if ready, on roads with light traffic, continue working on basic visual skills, negotiating curves, and right and left turns. Practice judging space in seconds, identifying a target, and searching the target area and target path. Ask your child to comment prior to changing speed or position.
Novice drivers have the tendency to monitor the road immediately in front of the vehicle. The target is a fixed object that is located ��-�0 seconds ahead of the vehicle, in the center of the path of travel, and is what the driver steers toward. It can be a car a block ahead, a traffic signal, the crest of a hill, etc. To practice this skill, use commentary driving for two to three minutes, and have your child identify targets. Having a target helps the new driver to:
• visualize the space the vehicle will be occupying;
• look far ahead of the vehicle and begin a search to identify risks;
• improve steering accuracy.
The SEEiT system: Search, Evaluate, and Execute in Time, is a simple space management system your child can use to minimize or control driving risks. When Searching the path of travel, the new driver should look for open, changing, and closed areas. Examples of a closed area would be a stop sign, stopped traffic, red light, etc. Examples of changing area would be a car pulling out of a driveway, a left-turning vehicle, a bicyclist, etc. Ask your child to use commentary driving to identify and Evaluate changing or closed space when approaching intersections, and then Execute a speed or position change in Time to reduce risk.
The need for adjustments in following time occurs when speed or road conditions change. You can steer around the risk in much less time than you can brake and stop to avoid colliding into the risk. The distance for steering is much shorter than the distance for stopping. Coach the new driver to look for open space, or an “escape route,” not at what he or she is trying to avoid. We steer in the direction we look.
A two-second interval provides the driver time to steer out of problem situations at posted speeds on a dry surface and brake out of problems at speeds under �5 mph.
A three-second interval provides the driver time to steer out of problem areas and to brake out of problems at speeds under 45 mph on a dry surface.
A four-second interval provides the driver time to steer or brake out of problems at speeds under 65 mph on a dry surface.
Judging Space in Seconds—When traveling at �5 to �0 mph, looking �� to �5 seconds ahead translates into about one city block. This is the targeting area the driver must monitor. Stopping zones are 4 to 8 seconds ahead, and following distance is � to 4 seconds. To calculate space in seconds, have the new driver select a fixed target, count one-one thousand, two-one thousand, etc. Ask your child to practice judging space in seconds at different speeds.

�0
Coaching your child to control a vehicle through a curve.
• On approach, position the vehicle in the lane to try to establish a sightline to the apex and exit of the curve, and reduce speed (observe warning sign speed which is calculated on the angle and bank of the curve).
• Reduce speed before entering the curve, and slowly lighten the pressure on the brake until reaching the apex point (where the car is closest to the inside of the curve line). At the apex or exit point, coach the new driver to apply light acceleration to pull the car out of the curve.
The vehicle’s speed and load, and the sharpness and bank of the curve affect vehicle control. Traction loss when entering a curve is often caused by excessive speed, braking, or steering. Front tire traction loss is referred to as “under-steer,” and is more likely to occur in front-wheel drive vehicles. “Over-steer” is when there is traction loss by the rear tires and occurs more often in vehicles with rear-wheel drive.
Vehicle balance refers to the distribution of the vehicle’s weight on all four tires. Ideal balance and tire patch size is only reached when the vehicle is motionless. As soon as acceleration, deceleration, cornering, or a combination of these actions occur, vehicle balance and weight on the tires change. However, if the vehicle is traveling at a constant speed, and the suspension is set on center, steering and traction control is considered to be in balance.
Changing vehicle balance from side to side (roll) Sudden steering, accelerating, braking, or road elevation can affect a vehicle’s side-to-side balance.
Changing vehicle balance from front to rear (backward pitch) When acceleration is applied, weight or center of mass is transferred toward the rear of the vehicle.
More rapid acceleration results in greater weight transfer.
Changing vehicle balance from rear to front (forward pitch) When brakes are applied, weight or center of mass is transferred toward the front of the vehicle. If
braking is hard, there is a noticeable drop of the hood and reduced rear tire traction.
Changing the vehicle’s rear load to the right or left (yaw) Sudden steering, braking, or a right or left elevation of the highway can affect rear vehicle balance
and result in the loss of tire traction. If a rear tire has less traction than the corresponding front tire, that tire will begin to slide sideways towards the front tire. This spinning action is called vehicle yaw.

��
Checklist for Sessions 11-13Evaluate the second half of session 13 by placing “S” for Satisfactory or “NP” for Needs Practice for the following tasks: _____ Approaches the vehicle with awareness _____ Enters the vehicle and makes appropriate checks and adjustments _____ Uses proper signals _____ Checks mirrors before slowing or stopping _____ Avoids hesitation _____ Maintains at least a �-4 second space cushion at all times _____ Controls speed _____ Maintains and adjusts speed to flow of traffic _____ Uses commentary driving
Searching the Intended Path of Travel
Target _____ Identifies a stationary object or area in the center of the intended path of travel
Judges Space in Seconds _____ Searches the space the vehicle will occupy at least ��-�0 seconds ahead _____ Continually evaluates the immediate 4-6 second travel path _____ Adjusts speed and/or lane position as needed when search areas cannot be maintained _____ Maintains a �-4 second following interval at all times
Identifies Open, Closed or Changing Spaces _____ Identifies the intended travel path as open, closed or changing, and adjusts speed and position as needed
Scans Intersections _____ Looks for open zones/space to the left, front, and right when approaching and entering an intersection _____ Identifies closed or changing zones/spaces and makes necessary speed and/or lane adjustments _____ Stops in proper position; stops completely; tires are motionless _____ Yields; understands right-of-way rules _____ Comments prior to changing vehicle speed or position
Curves _____ Positions the vehicle to increase line of sight_____ Slows to the speed posted on the warning sign before entering curve _____ Slowly lightens pressure on the brake until reaching the middle of the curve _____ Applies light acceleration to pull the car out of the curve _____ Properly secures vehicle
I certify that _______________________________________________ has spent at least three hours practicing the above tasks.
Parent/Guardian’s signature ___________________________________ Date ________________________

��
Sessions 14-16: ParkingSessions �4-�6 focus on learning the correct procedures for angle, perpendicular, and parallel parking using reference points and commentary driving. Review previous lesson objectives and the driver’s manual section on parking. Begin Session �4 in a large, level parking lot free of obstacles. Practice parking in the school parking lot during session �5, and spend session �6 practicing parking in a shopping mall parking lot. During each session have your child practice angle, perpendicular, and parallel parking on the right and the left �0-�� times. Coach your child to select a parking space that requires no backing.
Angle Parking Steps
• Signal intention and position the vehicle �-4 feet from the space in which the vehicle will be parked.
• Move forward until the steering wheel is aligned with the first pavement line.
• Visually locate the middle of the parking space and turn the wheel sharply at a slow controlled speed.
• Steer toward the target in the center of the space to straighten the wheels and stop when the front bumper is �-6 inches from the curb or end of the space.
• If you have a choice, parking on the left gives you more room to maneuver and a better view of traffic if you have to back out of the space.
Exiting an Angle Parking Space
• Place foot on brake, signal intention, shift to reverse, and scan path of travel.
• Back until your vehicle’s front seat is even with the bumper of the vehicle located on the turning side, and begin turning the steering wheel in the direction you want the rear to go.
• Monitor your front bumper on the opposite side of the direction you are turning.
• When your front bumper clears the back of the vehicle by several feet, stop, and shift to Drive.
Perpendicular Parking Steps (parking at a 90-degree angle)
• Signal intention and position the vehicle 5-6 feet away from the space.
• Move forward until the driver’s body is aligned with the first pavement line.
• Turn the wheel rapidly left or right controlling speed.
• Steer towards the target in center of space and straighten the wheels.
• Position the front bumper �-6 inches from the curb or end of the space.

��
Exiting a Perpendicular Space
• Place foot on brake, signal intention, shift to reverse, and look through the rear window.
• Back until your windshield is even with the bumper of the vehicle located on the turning side, and begin turning the steering wheel in the direction you want to go.
• Monitor your front bumper on the opposite side of the direction you are turning.
• When your front bumper clears the back of the vehicle by several feet, stop, and shift to Drive.
Parallel Parking Steps
• Signal stopping and turning.
• Stop �-� feet parallel to the car in front.
• Shift to Reverse. Check traffic and path of travel, and back slowly steering sharply left or right as appropriate; stop when the steering wheel is in line with the rear bumper.
• Continue backing slowly while steering rapidly in the opposite direction using quick glances to the front and the rear of the vehicle until you straighten the vehicle’s wheels.
• Center vehicle in space. Wheels should be 6-�� inches from the curb.
exiting a Parallel Parking Space
• Brake, shift to Reverse, and back as near as possible to the vehicle behind you.
• Check traffic, signal, and shift to Drive.
• Move forward slowly while steering rapidly out of the space.
• Begin straightening wheels when your vehicle’s front seat is even with the back bumper of the car in front and look at the target in the center of your path of travel.
Parking on a Hill
When parking uphill or downhill, make sure your child places the vehicle in REVERSE or FIRST gear for manual transmissions, and PARK for automatic transmissions, and that the parking brake is properly engaged. To further ensure that the vehicle does not roll into traffic, turn the front wheels:
• towards the curb when parking downhill;
• towards the curb when parking uphill without a curb; and
• away from the curb when parking uphill with a curb.

�4
Checklist for Sessions 14-16Evaluate the second half of session 16 by placing “S” for Satisfactory or “NP” for Needs Practice adjacent to the following tasks: _____ Approaches the vehicle with awareness _____ Enters the vehicle and makes appropriate checks and adjustments _____ Checks mirrors before slowing or stopping _____ Avoids hesitation_____ Uses commentary driving
Angle Parking _____ Signals intention _____ Approaches space at proper distance, and aligns the vehicle with the reference point _____ Controls speed and monitors all four corners of the vehicle _____ Centers the vehicle in the space _____ Positions the front bumper �-6 inches from the curb or end of the space
Exiting Angle Parking Space _____ Signals intention _____ Aligns the vehicle with the reference point before turning the steering wheel _____ Controls speed and monitors all four corners of the vehicle and the path of travel _____ Steers into closest lane after the front bumper clears the back of the parked vehicle
Perpendicular Parking _____ Signals intention _____ Establishes proper distance from parked vehicle and uses reference point to begin turn _____ Controls speed and steers to target in center of space _____ Centers vehicle in the space _____ Positions the front bumper �-6 inches from the curb or the end of the space
Exiting a Perpendicular Parking Space_____ Signals intention and aligns vehicle with the proper reference point_____ Controls speed and monitors all four corners of the vehicle and path of travel_____ Backs until the windshield is even with the bumper on the side which turning toward_____ Stops when the front bumper clears the back of the vehicle and shifts to Drive.
Parallel Parking _____ Signals intention and stops the vehicle �-� feet parallel to the car in front _____ Stops at reference point and steers rapidly in the opposite direction _____ Centers vehicle in parking space, 6-�� inches from the curb
Exiting Parallel Parking Space _____ Backs as near as possible to the vehicle which is parked behind the space _____ Checks traffic, signals, and shifts to Drive _____ Controls speed and steers out of the space _____ Straightens wheels gradually when front seat aligns with the back bumper of vehicle in front
I certify that _______________________________________________ has spent at least three hours practicing the above tasks.
Parent/Guardian’s signature ___________________________________ Date ________________________

�5
Sessions 17 and 18: TurnaboutsSessions �7 and �8 will focus on recognizing the different types of turnabouts and selecting the appropriate type of turnabout for a given situation. Review previous lesson objectives and the driver’s manual section on turnabouts. Begin Sessions �7 and �8 in a large, level parking lot free of obstacles. Practice �-point, �-point, and U-turns in a parking lot. Progress to a lightly traveled residential area, and practice visual search skills, turns and each turnabout at least �0 times.
The easiest and safest way to change directions is to drive around the block. The �-point turnabout to the right rear is the next best option.
Two-point turns require the driver to head into, or back into, a driveway on the same side or on the other side of the roadway to reverse direction. It is safest to execute a �-point turnabout by backing into a driveway on the same side of the street.
Three- or five-point turns are an option if no driveway is available, traffic is light, you cannot drive around the block, or the available space prevents a U-turn. To begin a
�-point turn, pull over next to the curb on the right. When safe, move while turning the wheel sharply to the left towards the opposite side of the road. Stop a foot from the curb. Shift to Reverse. Check traffic and back slowly turning the wheel to the right until your front bumper is in the center of the road. Shift to Drive and target the center of your path of travel. A 5-point turn is needed on very narrow roads.
U-turns are very dangerous. On a two-way multiple-lane highway, the driver begins the U-turn in the left lane closest to the center line or median. The driver completes the turn in the lane furthest to the right in the opposite flow of traffic and accelerates to the appropriate speed. If making the U-turn on a divided highway with a median, stay on the right side of the median.
1
3
2
4
5
13
45
2

�6
Checklist for Sessions 17-18Place “S” for Satisfactory or “NP” for Needs Practice for the following tasks: _____ Approaches the vehicle with awareness _____ Enters the vehicle and makes appropriate checks and adjustments _____ Checks mirrors before slowing or stopping _____ Avoids hesitation _____ Maintains a safe following distance at all times_____ Uses commentary driving
Precision Turns _____ Successfully executes several �-point turns _____ Successfully executes several �-point turns _____ Successfully executes a U-turn _____ Is able to select the appropriate type of turnabout for a given situation _____ Demonstrates and explains the proper side position _____ Demonstrates and explains the proper forward position _____ Searches left, front, and right of intersections to determine open spaces _____ Looks through the turn before turning the steering wheel
Approach to Intersections _____ Sees and responds to open/closed space areas _____ Checks and responds to rear space conditions _____ Establishes and maintains proper lane usage and speed control _____ Searches left, front, and right zones for line of sight or path of travel changes, and identifies open spaces before entering _____ Safely stops when necessary
Visual Skills _____ Looks well ahead of the vehicle _____ Looks into turns _____ Selects targets _____ Recognizes signs by shape and color _____ Understands meaning of pavement markings _____ Selects a target in the center of the travel path _____ Judges adequate gap in traffic prior to executing maneuver_____ Uses proper signals _____ Checks mirrors before slowing or stopping _____ Avoids hesitation _____ Controls speed _____ Secures vehicle
I certify that _______________________________________________ has spent at least two hours practicing the above tasks.
Parent/Guardian’s signature ___________________________________ Date ________________________

�7
Sessions 19-21: Multiple Lane RoadwaysSessions �9-�� focus on lane position, lane changing, following distance, and mirror blind spots. If possible, choose a time when the four-lane roadway on which you select to practice has minimal traffic, such as during early morning hours on Saturday or Sunday.
There are several lane position choices a driver can make without changing lanes. Practice driving in lane position �, � and � for several miles during each session.
Position 1: The vehicle is centered in the lane and is the lane position most often used.
Position 2: The vehicle is �-6 inches from the lane line on the driver’s side, is the lane position for a left turn, and allows for a margin of safety on the right side of the vehicle.
Position 3: The vehicle is �-6 inches from the passenger side pavement line or curb and is the best position to approach a hill or curve.
Position 4 and 5: The vehicle straddles either lane line due to an obstruction in the path of travel.
Your most important safety margin, and the one over which you have the most control, is the space in front of the vehicle. Maintaining at least a �-second space margin from the vehicle ahead provides the driver with visibility, time, and space to avoid frontal crashes, and allows the driver to steer or brake out of danger at moderate speeds. Coach your child to accelerate or decelerate as the �-second gap widens or decreases. This will also help the novice driver travel at the speed of the flow of the traffic. When stopping behind another vehicle, coach your child to stop in a position that the driver can see the back tires of the car in front for an adequate space margin.
Mirror blind spot - As a bike rider, before making a turn or changing lanes, your child was taught to check over the shoulder in the area next to and behind the bike to make sure there were no cars. As a driver, coach your child to monitor the area to the rear with the inside mirror, to the sides with the side view mirrors, and to make a blind spot check in the area slightly beyond the driver’s peripheral field of vision. Coach the driver to look out of the front side windows, not the rear side windows, when checking the mirror blind spot areas. New drivers have a tendency to move the steering wheel in the direction they move their head. Before the head check, coach your child to focus on not moving the steering wheel.

�8
Changing lanes should not be done too often or unnecessarily. Ask your child why one would need to change lanes. Answers may include: to avoid an obstacle in your lane; to make a turn; exit the road; park; or to pass another vehicle. Emphasize that passing another vehicle on a two-lane, two-way roadway with limited line of sight is extremely dangerous.
Practice changing lanes �5-�0 times during the
next three sessions. Lane change steps are:• check traffic flow to rear and sides for appropriate gap;
• signal intentions by placing gentle pressure on the turn signal lever;
• recheck traffic flow to the rear and sides;
• steady hands and make a quick glance in the mirror blind spot area;
• maintain speed or accelerate slightly before and during the lane change;
• make a gradual move into the lane (front and rear tires should glide almost simultaneously across �-5 broken pavement lines);
• regain space around the vehicle and adjust following distance as needed.
Right turns are always made from the travel lane farthest to the right to the first open lane.
Left turns can be one of the most hazardous maneuvers your child will perform. To judge which lane a vehicle is in, tell your child to look down at the vehicle’s tires in contact with the road, not at the body of the car. When making a left turn from a two-way four-lane street, begin and end the turn in the lane closest to the yellow line. The yellow line should serve as your child’s target. A protected left turn is one made from a turn lane marked with an arrow, accompanied by a traffic signal arrow. A semiprotected or unprotected left turn is made from a center or shared turn lane or from the through lane. New drivers have difficulty judging the speed and distance of multiple lanes of oncoming traffic. Practice judging oncoming vehicles’ space in seconds.
Passing and being passed - Review the legal responsibilities placed on the passing driver and the driver being passed. Using commentary driving, practice the following passing steps with your child:• position your vehicle �-� seconds behind the vehicle to be passed;
• check mirrors and oncoming traffic;
• check ahead making sure there is plenty of space before you try to pass;
• signal intentions and accelerate quickly to an appropriate speed in the passing lane;
• monitor front and rear space and check the rearview mirror for the front of the car being passed;
• signal intentions; and when you see the front of the car, change lanes, cancel signal, and maintain speed.
NOTE: If someone is trying to pass you, help him. This is not a good time to become competitive!

�9
Checklist for Sessions 19-21 Evaluate the second half of session 21 by placing “S” for Satisfactory or “NP” for Needs Practice for the following tasks: _____ Approaches the vehicle with awareness _____ Enters the vehicle and makes appropriate checks and adjustments _____ Checks mirrors before slowing or stopping _____ Avoids hesitation _____ Maintains an adequate following distance _____ Uses proper signals _____ Controls speed
Lane Change _____ Checks traffic flow _____ Signals intentions _____ Rechecks traffic flow to the rear and sides _____ Checks mirror blind spot _____ Maintains speed or accelerates slightly before and during the lane change _____ Makes a gradual move into the lane (wheels cross �-5 broken lines) _____ Adjusts following distance as needed and regains space around the vehicle
Vehicle Position _____ Selects the best lane _____ Selects the best lane position _____ Positions the vehicle three feet from the curb for a right turn _____ Stops the vehicle with the front bumper even with curb line or behind stop line _____ Angles wheels slightly to the right when stopped for a right turn _____ Positions the vehicle �-6 inches from the center of the road to prepare for a left turn _____ Maintains at least a � second space cushion at all times _____ Recognizes other vehicles’ “blind areas” _____ Recognizes and adjusts when being tailgated
Visual Skills _____ Looks well ahead of the vehicle _____ Looks into turns _____ Selects targets _____ Recognizes regulatory and warning signs by shape well in advance _____ Understands the meaning of yellow and white pavement markings _____ Understands the meaning of solid and broken pavement markings _____ Searches all corners of the intersection _____ Selects a target in the center of the path of travel _____ Judges gap in traffic
Commentary Driving _____ Can explain each position and appropriate reference points _____ Monitors other highway users _____ Properly secures vehicle
I certify that _______________________________________________ has spent at least three hours practicing the above tasks.
Parent/Guardian’s signature ___________________________________ Date ________________________

�0
Sessions 22-24: City DrivingSessions ��-�4 focus on driving on crowded urban roadways. During these three sessions have your child examine the importance of scanning ahead, lane position, covering the brake, and the hazards associated with parked cars, traffic congestion, and distractions.
Decision making is the most important skill used in driving. A driver operating in city traffic flow makes 50-60 decisions per mile. Drivers need visibility, space, time, and adequate traction to perform all maneuvers in city traffic whether crossing, turning, passing, or adjusting speed and/or position. During these sessions ask your child to focus on controlling space to the front and speed to enhance visibility, space, time, and traction.
Driving on congested roadways allows a very small margin for driver error. Effective searching skills and driver alertness are both essential. Every second counts in this driving environment.
Have your child identify city driving hazards. Examples of city driving hazards include:
• parked cars; cars entering or exiting parking places; doors opening, etc.;
• delivery trucks; drivers racing to and from the trucks, stopping suddenly, etc.;
• buses; loading and unloading passengers;
• blind alleys; cars or bicyclists darting out of alleys;
• pedestrians; moving to and from office buildings, stores, crossing streets illegally, etc.;
• limited sight distance and intersections spaced at shorter intervals;
• aggressive, impatient drivers competing for lane space or a parking place; and
• stop and go traffic flow.
When the new driver identifies a hazard, coach the driver to cover the brake to be prepared to stop or slow suddenly. Covering the brake involves taking your foot off the accelerator and holding it over the brake pedal. Remind your child not to rest the foot on the brake pedal. This is called riding the brake, and will both confuse other drivers and add unnecessary wear to the brakes.

��
Lane position - have your child position the vehicle in the lane to provide the greatest amount of space between your vehicle and a potential hazard. Ask your child to identify the least congested lane. On a three-lane roadway, the middle lane usually has the smoothest flow of traffic. Hazards in the right lane include stopped buses, parked cars, bicyclists, etc. Hazards in the left lane include vehicles waiting to make a left turn, vehicles crossing over the center line, etc.
The dangers of passing in city traffic include:
• intersections are spaced at shorter intervals;
• cars may pull into or out of parking spaces;
• traffic flow is irregular;
• oncoming drivers may drift over the center line.
Several times during each session, ask the driver to use commentary driving and identify potential risks �5 seconds ahead of the vehicle.
Distractions while driving can be deadly, especially for young drivers. Ask your child to give examples of driving distractions. Typical driving distractions include:
• changing the radio, CD, tape, dialing or talking on the phone;
• passengers or pets;
• eating, drinking, smoking or reading a road map;
• searching for an item in a purse, glove compartment, backpack, etc.;
• having books slide off the front seat or carrying other unstable items in your car;
• engaging in intense or emotional conversations;
• putting on makeup or looking at yourself in the mirror;
• driving an unfamiliar vehicle without first adjusting the mirrors and seat, selecting entertainment options, locating the lights, windshield wipers, or other vehicle controls.
In heavy traffic, coach your child to avoid distracting activities, to search the traffic scene, not fixate on any one thing, and to focus on keeping as much space as possible around the vehicle at all times.

��
Checklist for Sessions 22-24Evaluate the second half of session 24 by placing “S” for Satisfactory or “NP” for Needs Practice for the following tasks: _____ Approaches the vehicle with awareness _____ Enters the vehicle and makes appropriate checks and adjustments _____ Checks mirrors before slowing or stopping _____ Covers the brake when necessary _____ Maintains at least a �-4 second space cushion at all times
Approach to Intersections _____ Sees and responds to open/closed space areas _____ Checks and responds to tailgaters _____ Establishes and maintains proper lane usage and speed control _____ Stops safely when necessary _____ Adjusts speed to arrive in an open zone (e.g., green light)
City Driving____ Recognizes potential hazards____ Selects appropriate lane position____ Covers the brake____ Maintains a margin of safety____ Turns into the correct lane
Visual Skills _____ Looks well ahead of the vehicle _____ Looks into turns _____ Selects targets _____ Recognizes signs by shape and color _____ Understands the meaning of pavement markings _____ Selects a target in the center of the travel path _____ Judges gap in traffic _____ Uses proper signals _____ Avoids hesitation _____ Controls speed
Commentary Driving_____ Lists the potential risks the driver identified �5 seconds ahead of the vehicle
I certify that _______________________________________________ has spent at least three hours practicing the above tasks.
Parent/Guardian’s signature ___________________________________ Date ________________________

��
Sessions 25-28: ExpresswaysSessions �5-�8 focus on complex risk driving environments at speeds up to 65 mph. Traffic flow on expressways can be heavy and at times unpredictable. They are called limited access highways because there are only certain locations, called interchanges, where a driver can enter and exit the expressway. Expressways have a low frequency of collisions, but often have high injury severity rates when a collision does occur because of the higher speeds.
Review the expressway information in the DMV driver’s manual. Make sure your child understands the different kinds of expressway interchanges, expressway signs, signals, lane markings, speed limits, and the importance of maintaining a �0-�0 second visual lead.
Entering an expressway - expressway entrances include three areas: the entrance ramp, the acceleration lane, and the merge area. The entrance ramp allows the driver time to search the expressway and evaluate speed and available space before entering. Entrance ramps may be uphill, downhill, or level with the expressway. Each of these roadway conditions presents a different challenge when trying to search the traffic flow on the expressway. Using commentary driving, practice entering and exiting the expressway �0 times during each session.
Steps for entering the expressway:
• Check for ramp speed signs;
• On the entrance ramp, search for vehicles ahead and behind on the expressway using quick glances while searching for gaps or open spaces in the traffic flow;
• In the acceleration lane, use the signal to indicate your desire to enter the expressway, and adjust speed to the flow of traffic;
• From the merge lane enter the flow of traffic;
• Release lane changer device;
• Establish a new target area.
Steps for exiting the expressway:
• Identify the exit well in advance;
• Move into the lane closest to the exit;
• Check traffic to the rear; do not reduce speed on the expressway;
• Signal intentions 4-6 seconds in advance of the ramp;
• Enter the exit ramp, tap brakes and rapidly begin reducing speed;
• Continue decelerating to the posted speed before entering the curve on the ramp.

�4
Expressway driving tips
• Adjust the vehicle’s position and speed to road and weather conditions.
• Maintain a minimum 4 second following interval when merging onto the expressway, changing lanes, and exiting the expressway.
• Minimal steering inputs are needed at higher speeds to change lanes, enter, or exit the expressway; excessive steering can easily lead to a loss of control at higher speeds.
• Make room for vehicles entering the expressway from an entrance ramp by moving out of the lane next to the merging area.
• Always move over one lane at a time when moving across multiple lanes.
• Be alert for crosswinds when driving on bridges or through open mountain passes.
• When another driver tailgates, increase your 4 second following interval and, if possible, change lanes.
• When driving over a long period of time, be aware of a condition known as “highway hypnosis.” This results in driving in a dulled, drowsy, trance-like condition.
Route Numbering
Most routes are one- and two-digit numbers.
• North-south routes have odd numbers.
• East-west routes have even numbers.
• The greater the even number, the farther north the road is in the United States.
• The greater the odd number, the farther east the road is in the United States.
• Exit numbers correlate with mile marker numbers.
Alternate routes are usually three-digit numbers, with the last two numbers designating the main one- or two-digit route.
• If the first digit is even, the alternate route is a loop that goes around a city.
• If the first digit is odd, the alternate route goes into a city.
�5
Checklist for Sessions 25-28
Evaluate the second half of session 28 by placing “S” for Satisfactory or “NP” for Needs Practice for the following tasks: _____ Approaches the vehicle with awareness _____ Enters the vehicle and makes appropriate checks and adjustments _____ Checks mirrors before slowing or stopping _____ Uses commentary driving
Entering the Expressway _____ Checks for ramp speed signs _____ Maintains safe approach speed on entrance ramp to maximize search time and options _____ Evaluates gap prior to entering _____ Uses turn signal to indicate entrance to expressway in the acceleration lane _____ Reaches the speed of the expressway traffic on the acceleration lane
In the Merge Lane _____ Maintains speed/acceleration _____ Checks front, rear and left rear areas around the vehicle _____ Accepts or rejects gap/space
Entering the Flow of Traffic _____ Merges into lane position _____ Releases lane changer device _____ Establishes new target area
On the Expressway_____ Selects proper lane and lane position_____ Maintains at least a 4-second space cushion at all times_____ Searches �0-�0 seconds ahead of the vehicle_____ Adjusts speed for weather and traffic conditions
Exiting _____ Plans ahead _____ Checks following traffic and signals well in advance _____ Does not decelerate on the expressway _____ Adjusts speed on the exit ramp _____ Secures vehicle properly
I certify that _______________________________________________ has spent at least four hours practicing the above tasks.
Parent/Guardian’s signature ___________________________________ Date ________________________

�6
Sessions 29-30: Crash AvoidanceSessions �9 and �0 focus on crash avoidance skills that incorporate vision, steering, and vehicle braking techniques. Conduct the following drills in a large, level parking lot free of obstacles. Place cones or other “targets” at selected locations on the lot. The new driver will practice compensating for side to side, front to rear, and rear to front vehicle weight shifts that affect vehicle performance.
Straight-line braking drill. Once your child reaches �5-�0 mph, instruct him or her to stop in the shortest distance possible. Sudden braking causes the vehicle load to shift from the rear to the front wheels. If the brakes lock, coach your child to release just enough pressure to get the wheels rolling again. Once they are rolling again, have the novice driver reapply part of the brake pressure. If the vehicle is equipped with anti-lock brakes and goes into the hard braking mode, coach your child to maintain pressure on the brake pedal even if the pedal vibrates or makes a grinding sound. Practice this drill several times. Measure the differences in the stopping distances.
Braking in a curve. In an area free of obstacles, set up a series of cones or other markers to simulate a curve in the roadway. Ask your child to decrease the vehicle’s speed to increase control prior to entering the curve, to visually target the exit point, and to accelerate midway through the curve. Now have your child approach the curve without reducing speed, and coach the driver to try to maintain/regain vehicle balance. Do this exercise several times.
Progress to having your child approach the curve without slowing and instruct him or her to stop abruptly in the middle of the curve to simulate a blocked roadway. The weight of the vehicle will transfer to the front tire on the outside of the curve, and the front tires may slide (under-steer). If the tire begins to slide, coach your child to release a slight amount of brake pressure to regain steering control. With limited weight on the inside rear tire, this tire may also lose traction. If this occurs, ask your child to look in the direction he or she wants the vehicle to go and counter steer in that direction. This emergency braking while turning skill requires a lot of practice.
Hydroplaning happens when the tires float on top of water and can occur at slow speeds depending on tire pressure, tire tread, and water depth. Simulating hydroplaning can be done on a rainy day in a large parking lot free of obstacles. Using cones, have your child “draw” a figure eight around them at a very slow speed. Have the novice driver increase speed gradually to the point of hydroplaning. When this occurs, coach your child to reduce speed and to look and steer in the direction he or she wants the vehicle to travel.
Off-road recovery. Running off the roadway is a frequent cause of fatal crashes for novice drivers. With practice, proper offroad recovery is not a difficult skill to learn. Locate a straight section of roadway with no traffic and a gravel, dirt, or grass shoulder that is even with the road surface. Do not practice this skill on a road that drops off at the edge or has potholes or obstacles on the shoulder. The novice driver can easily lose control and can do serious damage to the tires, wheels, or underside of your
▲ ▲

�7
vehicle. Even at slow speeds, dirt or loose gravel can reduce traction causing the vehicle to slide or skid. At higher speeds, the car may also swing from side to side. At a slow speed, ask the new driver to leave the roadway, and to:
• get both wheels off the pavement and steer the vehicle parallel to the roadway;
• take foot off the accelerator pedal and DO NOT brake; and
• check traffic and ease back on the roadway at a SLOW speed.
NOTE: If you run off the road, stay off the road until you slow down and can safely get back on the paved surface.
Checklist for Sessions 29-30Evaluate the second half of session 30 by placing “S” for Satisfactory or “NP” for Needs Practice for the following tasks: _____ Approaches the vehicle with awareness _____ Enters the vehicle and makes appropriate checks and adjustments _____ Checks mirrors before slowing or stopping _____ Avoids hesitation _____ Controls speed
Straight line braking _____ Stops immediately on command _____ Adjusts brake pressure to avoid wheel lockup _____ Maintains brake pressure during ABS hard braking mode _____ Stops vehicle safely in the shortest distance possible
Braking in a curve _____ Adjusts speed prior to entering the curve _____ Regains vehicle control after entering the curve without reducing speed _____ Performs controlled stop in the middle of the curve
Hydroplaning _____ Reduces speed and steers in the proper direction
Off-road recovery _____ Controls vehicle off-road _____ Eases vehicle onto the paved surface _____ Properly secures vehicle
I certify that _______________________________________________ has spent at least two hours practicing the above tasks.
Parent/Guardian’s signature ___________________________________ Date ________________________

�8
Sessions 31-40: Driving After SunsetDriving after sunset presents a new set of challenges. The obvious challenges are glare and reduced visibility. The first routes your child drives after sunset should be on low volume roadways that the new driver has had some driving experience on during daylight. The guided practice night driving sessions should be integrated with the �0 daylight sessions.
Vision is severely limited at night. The vehicle’s narrow headlight beams limit the driver’s view of the area ahead, and the off-road area may not be visible at all. In addition, the new driver will find it difficult to determine the size, speed, color, and distance of objects. Coach your child to try to look at the outer fringes of his or her headlight beams to get the best picture of possible dangers ahead and to the sides of the vehicle. Emphasize the need to reduce speed and to increase following distance. In addition, dirt on the headlight lenses can reduce their effectiveness by as much as 75%.
Avoid using a light inside the car because this will also greatly reduce your night vision.
Overdriving your headlights occurs when the vehicle’s stopping distance is greater than the area illuminated by the headlights. To determine whether you are overdriving your headlights, have your child select an object the moment the headlights pick it up, and count off 6 seconds. If the object is still ahead of the vehicle, you are driving at a safe speed. If you have passed it, you are driving too fast. Remind your child that posted speed limits are calculated for daylight driving and are often too fast for nighttime conditions.
Blinded by the headlights of oncoming cars. Coach your child to look to the right-hand side of the lane and to make brief, frequent glances at the target ahead keeping the oncoming cars in the corner of the driver’s vision.
Glare recovery is the time it takes your eyes to adjust after being blinded by bright lights. Oncoming traffic is the primary source of glare when driving at night. Glare is also caused by the headlights of cars behind you and a dirty windshield. Adjust your rearview mirror to the “night” setting and side view mirrors to reduce glare. Dirt on glass will reflect rays of light, either from the sun or headlights, and add to glare.
Parent/teen driving agreement and 40-hour driving log We have included a parent/teen vehicle use agreement for your review and a 40-hour log at the end of
the guide to help you keep track of your 40-hours of driving time.
NOTE: Your child will receive much more traffic safety information during the classroom driver education course. Examples of information not included in this guide include the motor vehicle section of the Code, hand signals, brake failure, a blow out, skid recovery, carbon monoxide poisoning, alcohol and other drugs and driving, vehicle maintenance, pollution, buying and insuring a vehicle, and driving up or down steep hills, on bridges, through tunnels, over railroad tracks, or during the winter.

�9
Parent/Teen Driving AgreementThe intent of this agreement is to avoid any misunderstandings concerning our family driving rules. Together we will agree to vehicle use and operation rules, and the consequences for breaking any of these rules.
Financial responsibilities - determine who and what percentage each person will be responsible for: ____________ Vehicle costs ____________ Taxes and registration fees ____________ Fuel costs ____________ Monthly insurance costs ____________ Maintenance costs
Total costs: Parents/guardians: $ __________ Teen driver: $____________
Vehicle Maintenance - determine who will be responsible for the following: ____________ check fluids ____________ clean windows ____________ check tire pressure ____________ clean exterior ____________ clean interior Family safety belt agreement:
Consequences of violation:
School achievement:
Consequences of violation:
Consequences for: • moving violation or crash/property damage: • alcohol or other drug use:
• curfew violation:
• violating passenger restrictions:
• failure to provide destination or time of return:
• allowing others to drive the car:
• failure to call if you are more than �0 minutes late:
• irresponsible behavior:
This agreement may be amended at any time.
Teen Driver Date Parent/Foster Parent/Guardian Date

40
40-Hour Driving Log Session Date(s) Total Minutes Total Night Inclement Parent/Guardian or Driven Mileage Driving Weather Mentor’s Signature 1 2 3 4 5 6 7 8 9 10 11 12 13 14 15 16 17 18 19 20 21 22 23 24 25 26 27 28 29 30 31 32 33 34 35 36 37 38 39 40
I certify that has completed 40 hours of guided practice, �0 of which were after sunset.
Parent/Foster Parent/Guardian’s Signature Date

4�
© �007 Commonwealth of Virginia
The Virginia Department of Education does not unlawfully discriminate on the basis of sex, age, race, color, religion, disabilities, or national origin
in employment or in its educational programs and activities.
National Highway Traffic Safety 40� funds administered by the
Virginia Department of Motor Vehicles supported the printing of this parent guide.