science.dadeschools.netscience.dadeschools.net/middleSchool/documents/essential... · Web...
150
Miami-Dade County Public Schools Curriculum and Instruction (Science) Required ESSENTIAL Laboratory Activities For the Middle School
Transcript of science.dadeschools.netscience.dadeschools.net/middleSchool/documents/essential... · Web...

Miami-Dade County Public Schools
Curriculum and Instruction (Science)
Required ESSENTIAL
Laboratory Activities
For the Middle SchoolM/J Comprehensive Science 3
REVISED July 2012
THE SCHOOL BOARD OF MIAMI-DADE COUNTY, FLORIDA
Perla Tabares Hantman, Chair
Dr. Lawrence S. Feldman, Vice Chair
Dr. Dorothy Bendross-Mindingall
Carlos L. Curbelo
Renier Diaz de la Portilla
Dr. Wilbert “Tee” Holloway
Dr. Martin S. Karp
Dr. Marta Pérez
Raquel A. Regalado
Jude BrunoStudent Advisor
Alberto M. CarvalhoSuperintendent of Schools
Milagros R. FornellAssociate Superintendent
Curriculum and Instruction
Dr. Maria P. de ArmasAssistant Superintendent
Curriculum and Instruction, K-12 Core
Beatriz ZarraluquiAdministrative Director
Division of Mathematics, Science, and Advanced Academic Program

Table of Contents
Introduction....................................................................................................................................2
Annually Assessed Benchmarks...................................................................................................3
Materials List.................................................................................................................................5
Lab Roles........................................................................................................................................7
Safety Information and Contract.................................................................................................8
Pre-Lab Safety Worksheet and Approval Form.........................................................................9
Parts of a Lab Report..................................................................................................................10
Experimental Design Diagram....................................................................................................14
Claim Evidence Reasoning..........................................................................................................16
Engineering Design Process........................................................................................................17
Lab Activities:Density of Rocks with Differentiated Lab....................................................................................18
Density of Rocks (Revised by University of Miami Science Made Sensible Fellows)................26
Mass, Volume, Density with Differentiated Lab (Comprehensive Science 3 Advanced)...........32
Precipitating Bubbles with Differentiated Lab............................................................................38
Modeling the Greenhouse Effect with Differentiated Lab..........................................................46
Following the 4R’S: Reduce, Reuse, Recycle, Rot....................................................................51
Modeling Recycling of Matter and Energy Differentiated Lab.................................................55
Everything You Do Makes a Difference with Differentiated Lab..............................................56
The Martian Sun-Times..............................................................................................................59
Properties of Objects in the Solar System Differentiated Lab ..................................................66
Imaginary Alien Life-forms with Differentiated Lab (Adaptations and Punnett Square)..........66
Planetary Exploration and Extreme Life Forms with Differentiated Lab................................83Revised by University of Miami Science Made Sensible Fellows
Differentiated Lab Visualizing Our Solar System Scale Models.............................................89
EL8_2012 1

Introduction
The purpose of this packet is to provide the M/J Comprehensive Science 3 and Grade 8 teachers with a list of minimum basic laboratories and hands-on activities that students should experience in class. Each activity is aligned with the Next Generation Sunshine State Standards (NGSSS). Emphasis has been placed on those hands-on activities that are aligned to the Annually Assessed Benchmarks, which are assessed in the Florida Comprehensive Assessment Test 2.0 (FCAT 2.0), administered in grade eight (8).
In most cases, the activities were designed as simple as possible without the use of advanced technological equipment to make it possible for all teachers to use these activities. All activities and supplements (i.e., Parts of a Lab Report) can be modified, if necessary, to fit the needs of an individual class and/or student ability.
This document is intended to be used by science departments in M-DCPS so that all science teachers can work together, plan together, and rotate lab materials among classrooms. Through this practice, all students and teachers will have the same opportunities to participate in these experiences and promote discourse among learners which are the building blocks of authentic learning communities.
Acknowledgement:
M-DCPS Curriculum and Instruction (Science) would like to acknowledge the efforts of the teachers who worked arduously and diligently on the preparation of this document.
EL8_2012 2

Annually Assessed BenchmarksNext Generation Sunshine State Standard (NGSSS)
SC.8.N.1.1 Define a problem from the eighth grade curriculum using appropriate reference materials to support scientific understanding, plan and carry out scientific investigations of various types, such as systematic observations or experiments, identify variables, collect and organize data, interpret data in charts, tables, and graphics, analyze information, make predictions, and defend conclusions. (Also assesses SC.6.N.1.1, SC.6.N.1.3, SC.7.N.1.1, SC.7.N.1.3, SC.7.N.1.4, SC.8.N.1.3, and SC.8.N.1.4.)
SC.7.N.1.2 Differentiate replication (by others) from repetition (multiple trials). (Also assesses SC.6.N.1.2, SC.6.N.1.4, and SC.8.N.1.2.)
SC.7.N.1.5 Describe the methods used in the pursuit of a scientific explanation as seen in different fields of science such as biology, geology, and physics. (Also assesses SC.7.N.3.2, SC.8.N.1.5, and SC.8.E.5.10.)
SC.6.N.2.2 Explain that scientific knowledge is durable because it is open to change as new evidence or interpretations are encountered. (Also assesses SC.7.N.1.6, SC.7.N.1.7, SC.7.N.2.1, and SC.8.N.1.6.)
SC.7.N.3.1 Recognize and explain the difference between theories and laws and give several examples of scientific theories and the evidence that supports them. (Also assesses SC.6.N.3.1 and SC.8.N.3.2.)
SC.8.E.5.3 Distinguish the hierarchical relationships between planets and other astronomical bodies relative to solar system, galaxy, and universe, including distance, size, and composition. (Also assesses SC.8.E.5.1 and SC.8.E.5.2.)
SC.8.E.5.5 Describe and classify specific physical properties of stars: apparent magnitude (brightness), temperature (color), size, and luminosity (absolute brightness). (Also assesses SC.8.E.5.6.)
SC.8.E.5.7 Compare and contrast the properties of objects in the Solar System including the Sun, planets, and moons to those of Earth, such as gravitational force, distance from the Sun, speed, movement, temperature, and atmospheric conditions. (Also assesses SC.8.E.5.4 and SC.8.E.5.8.)
SC.8.E.5.9 Explain the impact of objects in space on each other including: 1. the Sun on the Earth including seasons and gravitational attraction 2. the Moon on the Earth, including phases, tides, and eclipses, and the relative position of each body.
SC.7.E.6.2 Identify the patterns within the rock cycle and events (plate tectonics and mountain building). (Also assesses SC.6.E.6.1, SC.6.E.6.2, and SC.7.E.6.6.) relate them to surface events (weathering and erosion) and subsurfaceevents (plate tectonics and mountain building). (Also assesses SC.6.E.6.1, SC.6.E.6.2, and SC.7.E.6.6.)
SC.7.E.6.4 Explain and give examples of how physical evidence supports scientific theories that Earth has evolved over geologic time due to natural processes. (Also assesses SC.7.E.6.3.)
SC.7.E.6.5 Explore the scientific theory of plate tectonics by describing how the movement of Earth’s crustal plates causes both slow and rapid changes in Earth’s surface, including volcanic eruptions, Earthquakes, and mountain building. (Also assesses SC.7.E.6.1 and SC.7.E.6.7.)
SC.6.E.7.4 Differentiate and show interactions among the geosphere, hydrosphere, cryosphere, atmosphere, and biosphere. (Also assesses SC.6.E.7.2, SC.6.E.7.3, SC.6.E.7.6, and SC.6.E.7.9.)
SC.6.E.7.5 Explain how energy provided by the Sun influences global patterns of atmospheric movement and the temperature differences between air, water, and land. (Also assesses SC.6.E.7.1.)
SC.8.P.8.4 Classify and compare substances on the basis of characteristic physical properties that can be demonstrated or measured; for example, density, thermal or electrical conductivity, solubility, magnetic properties, melting and boiling points, and know that these properties are independent of the amount of the sample. (Also assesses SC.8.P.8.3.)
EL8_2012 3

SC.8.P.8.5 Recognize that there are a finite number of elements and that their atoms combine in a multitude of ways to produce compounds that make up all of the living and nonliving things that we encounter. (Also assesses SC.8.P.8.1, SC.8.P.8.6, SC.8.P.8.7, SC.8.P.8.8, and SC.8.P.8.9.)
SC.8.P.9.2 Differentiate between physical changes and chemical changes. (Also assesses SC.8.P.9.1 and SC.8.P.9.3.)
SC.7.P.10.1 Illustrate that the Sun’s energy arrives as radiation with a wide range of wavelengths, including infrared, visible, and ultraviolet, and that white light is made up of a spectrum of many different colors. (Also assesses SC.8.E.5.11.)
SC.7.P.10.3 Recognize that light waves, sound waves, and other waves move at different speeds in different materials. (Also assesses SC.7.P.10.2.)
SC.7.P.11.2 Investigate and describe the transformation of energy from one form to another. (Also assesses SC.6.P.11.1 and SC.7.P.11.3.)
SC.7.P.11.4 Observe and describe that heat flows in predictable ways, moving from warmer objects to cooler ones until they reach the same temperature. (Also assesses SC.7.P.11.1.)
SC.6.P.13.1 Investigate and describe types of forces including contact forces and forces acting at a distance, such as electrical, magnetic, and gravitational. (Also assesses SC.6.P.13.2 and SC.8.P.8.2.)
SC.6.P.13.3 Investigate and describe that an unbalanced force acting on an object changes its speed, or direction of motion, or both. (Also assesses SC.6.P.12.1.)
SC.6.L.14.1 Describe and identify patterns in the hierarchical organization of organisms from atoms to molecules and cells to tissues to organs to organ systems to organisms.
SC.6.L.14.2 Investigate and explain the components of the scientific theory of cells (cell theory): all organisms are composed of cells (single-celled or multi-cellular), all cells come from preexisting cells, and cells are the basic unit of life. (Also assesses SC.6.L.14.3.)
SC.6.L.14.4 Compare and contrast the structure and function of major organelles of plant and animal cells, including cell wall, cell membrane, nucleus, cytoplasm, chloroplasts, mitochondria, and vacuoles.
SC.6.L.14.5 Identify and investigate the general functions of the major systems of the human body (digestive, respiratory, circulatory, reproductive, excretory, immune, nervous, and musculoskeletal) and describe ways these systems interact with each other to maintain homeostasis. (Also assesses SC.6.14.6.)
SC.6.L.15.1 Analyze and describe how and why organisms are classified according to shared characteristics with emphasis on the Linnaean system combined with the concept of Domains.
SC.7.L.15.2 Explore the scientific theory of evolution by recognizing and explaining ways in which genetic variation and environmental factors contribute to evolution by natural selection and diversity of organisms. (Also assesses SC.7.L.15.1 and SC.7.L.15.3.)
SC.7.L.16.1 Understand and explain that every organism requires a set of instructions that specifies its traits, that this hereditary information (DNA) contains genes located in the chromosomes of each cell, and that heredity is the passage of these instructions from one generation to another. (Also assesses SC.7.L.16.2 and SC.7.L.16.3.)
SC.7.L.17.2 Compare and contrast the relationships among organisms such as mutualism, predation, parasitism, competition, and commensalism. (Also assesses SC.7.L.17.1 and SC.7.L.17.3.)
SC.8.L.18.4 Cite evidence that living systems follow the Laws of Conservation of Mass and Energy. (Also assesses SC.8.L.18.1, SC.8.L.18.2, and SC.8.L.18.3.)
EL8_2012 4

MATERIALS LIST
Each list corresponds to the amount of materials needed per station (whether one student or a group of students uses the station). Lab Aprons and goggles should be assigned to each student on all labs requiring mixtures of chemicals.
Density of Rocks Graduated cylinder 250 mL beaker medicine dropper food coloring ( not essential but
helpful) 100 mL graduated cylinder Eye dropper
Calculator Electronic balance or triple-beam
balance 5 different type of rocks Tap water at room temperature Ruler
Density of Rocks (Revised by University of Miami Science Made Sensible Fellows) Vegetable oil Karo syrup 1 can of coke 1 can of diet coke Aquarium/container to float cokes Rocks, four types, including pumice stone Plastic baggies or other container for rocks triple beam scales 500ml graduated cylinders
Dry ice Container for dry ice demo Bubble wand and soap 1 large graduated cylinder (~1000ml) Food Coloring dye 250ml Flasks Eye droppers Paper towels
Mass, Volume, Density (Comprehensive Science 3 Advanced) Safety goggles 50 mL of isopropyl alcohol (colored red) 50 mL of water (colored blue) 50 mL of salt-water (colored green)
Graduated cylinder Eye dropper Calculator Electronic balance or triple-beam balance
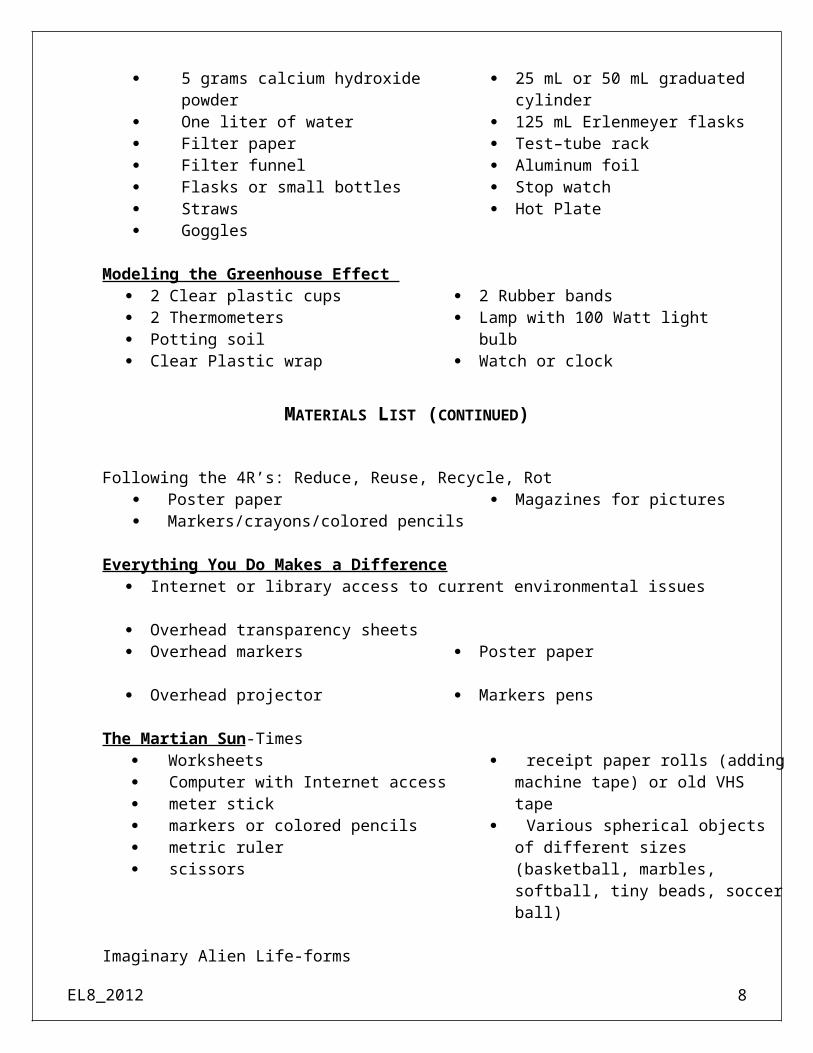
Precipitating Bubbles 5 grams calcium hydroxide powder One liter of water Filter paper Filter funnel Flasks or small bottles Straws Goggles
25 mL or 50 mL graduated cylinder 125 mL Erlenmeyer flasks Test–tube rack Aluminum foil Stop watch Hot Plate
Modeling the Greenhouse Effect 2 Clear plastic cups 2 Thermometers Potting soil Clear Plastic wrap
2 Rubber bands Lamp with 100 Watt light bulb Watch or clock
EL8_2012 5
MATERIALS LIST (CONTINUED)
Following the 4R’s: Reduce, Reuse, Recycle, Rot Poster paper Markers/crayons/colored pencils
Magazines for pictures
Everything You Do Makes a Difference Internet or library access to current environmental issues Overhead transparency sheets Overhead markers Overhead projector
Poster paper Markers pens
The Martian Sun-Times Worksheets Computer with Internet access meter stick markers or colored pencils metric ruler scissors
receipt paper rolls (adding machine tape) or old VHS tape
Various spherical objects of different sizes (basketball, marbles, softball, tiny beads, soccer ball)
Imaginary Alien Life-forms Worksheets Creature Cards
Planetary Exploration and Extreme Life Forms (Differentiated Lab) computers with internet access construction paper
books on the planets markers/crayons/colored pencils
Visualizing Our Solar System Scale Models (Differentiated Lab)For Part 1 a blueberry (Mercury) a kiwi (Venus) a peach (Earth) a grape (Mars) a melon (Jupiter) a head of lettuce (Saturn) an orange (Uranus) an apple (Neptune) two peppercorns (Pluto and Earth’s moon)
EL8_2012 6
For Part 2 meter sticks receipt paper rolls scissors markers, crayons, or colored pencils


Lab Roles and Their DescriptionsCooperative learning activities are made up of four parts: group accountability, positive interdependence, individual responsibility, and face-to-face interaction. The key to making cooperative learning activities work successfully in the classroom is to have clearly defined tasks for all members of the group. An individual science experiment can be transformed into a cooperative learning activity by using these lab roles.
Project Director (PD)The project director is responsible for the group.Roles and responsibilities:
Reads directions to the group Keeps group on task Is the only group member
allowed to talk to the teacher Shares summary of group work
and results with the class
Materials Manager (MM)The materials manager is responsible for obtaining all necessary materials and/or equipment for the lab.Roles and responsibilities:
The only person allowed to be out of his/her seat to pick up needed materials
Organizes materials and/or equipment in the work space
Facilitates the use of materials during the investigation
Assists with conducting lab procedures
Returns all materials at the end of the lab to the designated area
Technical Manager (TM)
The technical manager is in charge of recording all data.
Roles and responsibilities: Records data in tables and/or
graphs Completes conclusions and final
summaries Assists with conducting the lab
procedures Assists with the cleanup
Safety Director (SD)The safety director is responsible for enforcing all safety rules and conducting the lab.Roles and responsibilities:
Assists the PD with keeping the group on-task
Conducts lab procedures Reports any accident to the teacher Keeps track of time Assists the MM as needed.
When assigning lab groups, various factors need to be taken in consideration;Always assign the group members preferably trying to combine in each group a variety of skills. For example, you can place an “A” student with a “B”, a “C” and a “D” or an “F” student.Evaluate the groups constantly and observe if they are on task and if the members of the group support each other in a positive way. Rotation of lab groups and members throughout the year is encouraged.

Laboratory Safety
Rules:
Know the primary and secondary exit routes from the classroom.
Know the location of and how to use the safety equipment in the classroom.
Work at your assigned seat unless obtaining equipment and chemicals.
Do not handle equipment or chemicals without the teacher’s permission.
Follow laboratory procedures as explained and do not perform unauthorized experiments.
Work as quietly as possible and cooperate with your lab partner.
Wear appropriate clothing, proper footwear, and eye protection.
Report all accidents and possible hazards to the teachers.
Remove all unnecessary materials from the work area and completely clean up the work area after the experiment.
Always make safety your first consideration in the laboratory.
Safety Contract:
I will: Follow all instructions given by the teacher. Protect eyes, face and hands, and body while conducting class activities. Carry out good housekeeping practices. Know where to get help fast. Know the location of the first aid and firefighting equipment. Conduct myself in a responsible manner at all times in a laboratory situation.
I, _______________________, have read and agree to abide by the safety regulations as set forth above and also any additional printed instructions provided by the teacher. I further agree to follow all other written and verbal instructions given in class.
Signature: ____________________________ Date: ___________________
Pre-Lab Safety Worksheet and Approval Form
This form must be completed with the teacher’s collaboration before the lab.Student Researcher Name: __________________________________________Period # _____Title of Experiment: ____________________________________________________________
Place a check mark in front of each true statement below: 1. I have reviewed the safety rules and guidelines.2. This lab activity involves one or more of the following: Human subjects (Permission from participants required. Subjects must indicate willingness to participate by signing this form below.) Vertebrate Animals (requires an additional form) Potentially Hazardous Biological Agents (Microorganisms, molds, rDNA, tissues, including blood or blood products, all require an additional form.) Hazardous chemicals (such as: strong acids or bases) Hazardous devices (such as: sharp objects or electrical equipment) Potentially Hazardous Activities (such as: heating liquids or using flames)3. I understand the possible risks and ethical considerations/concerns involved in this experiment.4. I have completed an Experimental/Engineering Design Diagram.
Show that you understand the safety and ethical concerns related to this lab by responding to the questions below. Then, sign and submit this form to your teacher before you proceed with the experiment (use back of paper, if necessary).
A. Describe what you will be doing during this lab.
B. What are the safety concerns with this lab that were explained by your teacher?
How will you address them?
C. What additional safety concerns or questions do you have?
D. What ethical concerns related to this lab do you have?
How will you address them?
Student Researcher’s Signature/Date: Teacher Approval Signature:
____________________________________ ______________________________
Human Subjects’ Agreement to Participate:
_______________________________ ____________________________Printed Name/Signature/Date Printed Name/Signature/Date
_______________________________ _____________________________Printed Name/Signature/Date Printed Name/Signature/Date

Parts of a Lab ReportA Step-by-Step Checklist
A good scientist reflects on their work by writing a lab report. A lab report is a recap of what a scientist investigated. It is made up of the following parts.
Title (underlined and on the top center of the page)
Benchmarks Covered: Your teacher should provide this information for you. It is a summary of the main concepts that
you will learn about by carrying out the experiment.
Problem Statement: Identify the research question/problem and state it clearly.
Potential Hypothesis (es): State the hypothesis carefully. Do not just guess but try to arrive at the hypothesis logically and,
if appropriate, with a calculation. Write down your prediction as to how the test variable (independent variable) will affect the
outcome variable (dependent variable) using an “if” and “then” statement.o If (state the test variable) is (choose an action), then (state the outcome variable) will
(choose an action).
Materials: Record precise details of all equipment used
o For example: a balance weighing to +/- 0.001 g, a thermometer measuring from -10 to +110oC to an accuracy of +/- 0.1oC, etc.
Record precise details of any chemicals usedo For example: 5 g of copper (II) sulfate pentahydrate CuSO4
.5H2O(s).
Procedure: Do not copy the procedures from the lab manual or handout. Summarize the procedures; be sure to include critical steps. Give accurate and concise details about the apparatus and materials used.
Variables and Control Test: Identify the variables in the experiment. State those over which you have control. There are
three types of variables.1. Test Variable (Independent Variable) : (also known as the tested variable) the factor that can
be changed by the investigator (the cause).2. Outcome Variable (Dependent Variable) : (also known as the outcome variable) the
observable factor of an investigation which is the result or what happened when the independent variable was changed.
3. Controlled variables (Constants) : the other identified independent variables in the investigation that are kept constant or remain the same during the investigation.
Identify the control test. A control lest is the separate experiment that serves as the standard for comparison to identify experimental effects, changes of the dependent variable resulting from changes made to the independent variable.

Data: Ensure that all data is recorded.
o Pay particular attention to significant figures and make sure that all units are stated. Present your results clearly. Often it is better to use a table or a graph.
o If using a graph, make sure that the graph has a title, both axis are labeled clearly, and that the correct scale is chosen to utilize most of the graph space.
Record all observations. o Include color changes, solubility changes, whether heat was evolved or taken in, etc.
Results: Ensure that you have used your data correctly to produce the required result in words and provide
graphs. Include any other errors or uncertainties which may affect the validity of your result.
Conclusion and Evaluation: A conclusion statement answers the following 7 questions in at least three paragraphs.
o First Paragraph: Introduction1. What was investigated?
a. Describe the problem.2. Was the hypothesis supported by the data?
a. Compare your actual result to the expected result (either from the literature, textbook, or your hypothesis)b. Include a valid conclusion that relates to the initial problem or hypothesis.
3. What were your major findings?a. Did the findings support or not support the hypothesis as the solution to the restated problem?b. Calculate the percentage error from the expected value.
o Middle Paragraphs: These paragraphs answer question 4 and discusses the major findings of the experiment using data.4. How did your findings compare with other researchers?
a. Compare your result to other students’ results in the class. The body paragraphs support the introductory paragraph by elaborating on the different
pieces of information that were collected as data that either supported or did not support the original hypothesis.
Each finding needs its own sentence and relates back to supporting or not supporting the hypothesis.
The number of body paragraphs you have will depend on how many different types of data were collected. They will always refer back to the findings in the first paragraph.
o Last Paragraph: Conclusion5. What possible explanations can you offer for your findings?
a. Evaluate your method. b. State any assumptions that were made which may affect the result.
6. What recommendations do you have for further study and for improving the experiment?a. Comment on the limitations of the method chosen.b. Suggest how the method chosen could be improved to obtain more accurate and
reliable results.7. What are some possible applications of the experiment?

a. How can this experiment or the findings of this experiment be used in the real world for the benefit of society?
Parts of a Lab Report Reminder
Step 1: Stating the Purpose/Problem What do you want to find out? Write a statement that describes what you want to do. It
should be as specific as possible. Often, scientists read relevant information pertaining to their experiment beforehand. The purpose/problem will most likely be stated as a question such as:“What are the effects of _________ on ___________?”
Step 2: Defining Variables TEST VARIABLE (TV) (also called the independent variable) – The variable that is
changed on purpose for the experiment; you may have several levels of your test variable. OUTCOME VARIABLE (OV) (also called the dependent variable) – The variable that acts
in response to or because of the manipulation of the test variable. CONTROLLED VARIABLES (CV) – All factors in the experiment that are NOT allowed
to change throughout the entire experiment. Controlling variables is very important to assure that the results are due only to the changes in the test variable; everything (except the test variable) must be kept constant in order to provide accurate results.
Step 3: Forming a Hypothesis A hypothesis is an inferring statement that can be tested. The hypothesis describes how you think the test variable will respond to the outcome variable.
(i.e., If….., then……) It is based on research and is written prior to the experiment. Never change your hypothesis during the
experiment. For example: If the temperature increases, then the rate of the reaction will increase. Never use “I,” “we,” or “you” in your hypothesis (i.e. I believe or I think that…) It is OK if the hypothesis is not supported by the data. A possible explanation for the
unexpected results should be given in the conclusion Step 4: Designing an Experimental Procedure Select only one thing to change in each experimental group (test variable). Change a variable that will help test the hypothesis. The procedure must tell how the variable will be changed (what are you doing?). The procedure must explain how the change in the variable will be measured. The procedure should indicate how many trials would be performed (usually a minimum of 3-4
for class experiments). It must be written in a way that someone can copy your experiment, in step by step format.Step 5: Results (Data) Qualitative Data is comprised of a description of the experimental results (i.e. larger,
faster….). Quantitative Data is comprised of results in numbers (i.e. 5 cm, 10.4 grams) The results of the experiment will usually be compiled into a table/chart for easy
interpretation. A graph of the data (results) may be made to more easily observe trends.

Step 6: ConclusionThe conclusion should be written in paragraph form. It is a summary of the experiment, not a step-by-step description. Does the data support the hypothesis? If so, you state that the hypothesis is accepted. If not, you reject the hypothesis and offer an explanation for the unexpected result. You should summarize the trend in data in a concluding statement (ex: To conclude, the increase in temperature caused the rate of change to increase as shown by the above stated data.). Compare or contrast your results to those from similar experiments. You should also discuss the implications for further study. Could a variation of this experiment be used for another study? How does the experiment relate to situations outside the lab? (How could you apply it to real world situations?)

Student’s name: _____________________________________________ Date: ________________Period: _______
Experimental Design Diagram
This form should be completed before experimentation.Title:
Problem Statement:
Null Hypothesis:
Research Hypothesis:
Test Variable (Independent Variable) Number of Tests:Subdivide this box to specify each variety.Control Test:
# of Trials per Test:Outcome Variable (Dependent Variable) Controlled Variables
1.
2.
3.
4.
5.
6.

Experimental Design Diagram Hints:
Title: A clear, scientific way to communicate what you’re changing and what you’re measuring is to state your title as, "The Effect of ____________on__________." The tested variable is written on the first line above and the outcome variable is written on the second line.
Problem Statement: Use an interrogative word and end the sentence with a question mark. Begin the sentence with words such as: How many, How often, Where, Will, or What. Avoid Why.
Null Hypothesis: This begins just like the alternate hypothesis. The sentence should be in If ............, then........... form. After If, you should state the TV, and after the then, you should state that there will be no significant difference in the results of each test group.
Research Hypothesis: If ____________(state the conditions of the experiment), then ____________(state the predicted measurable results). Do not use pronouns (no I, you, or we) following If in your hypothesis.
Test Variable (TV): This is the condition the experimenter sets up, so it is known before the experiment (I know the TV before). In middle school, there is usually only one TV. It is also called the independent variable, the IV.
Number of Tests: State the number of variations of the TV and identify how they are different from one another. For example, if the TV is "Amount of Calcium Chloride" and 4 different amounts are used, there would be 4 tests. Then, specify the amount used in each test.
Control Test: This is usually the experimental set up that does not use the TV. Another type of control test is one in which the experimenter decides to use the normal or usual condition as the control test to serve as a standard to compare experimental results against. The control is not counted as one of the tests of the TV. In comparison experiments there may be no control test.
Number of Trials: This is the number of repetitions of one test. You will do the same number of repetitions of each variety of the TV and also the same number of repetitions of the control test. If you have 4 test groups and you repeat each test 30 times, you are doing 30 trials. Do not multiply 4 x 30 and state that there were 120 trials.
Outcome Variable(s): This is the result that you observe, measure and record during the experiment. It’s also known as the dependent variable, OV. (I don’t know the measurement of the OV before doing the experiment.) You may have more than one OV.
Controlled Variables or Variables Held Constant: Controlled Variables (Constants) are conditions that you keep the same way while conducting each variation (test) and the control test. All conditions must be the same in each test except for the TV in order to conclude that the TV was the cause of any differences in the results. Examples of Controlled Variables (Constants): Same experimenter, same place, time, environmental conditions, same measuring tools, and same techniques.

CONCLUSION WRITINGClaim, Evidence and Reasoning
Students should support their own written claims with appropriate justification. Science education should help prepare students for this complex inquiry practice where students seek and provide evidence and reasons for ideas or claims (Driver, Newton and Osborne, 2000). Engaging students in explanation and argumentation can result in numerous benefits for students. Research shows that when students develop and provide support for their claims they develop a better and stronger understanding of the content knowledge (Zohar and Nemet, 2002).
When students construct explanations, they actively use the scientific principles to explain different phenomena, developing a deeper understanding of the content. Constructing explanations may also help change students’ view of science (Bell and Linn, 2000). Often students view science as a static set of facts that they need to memorize. They do not understand that scientists socially construct scientific ideas and that this science knowledge can change over time. By engaging in this inquiry practice, students can also improve their ability to justify their own written claims (McNeill et al., 2006). Remember when providing evidence to support a claim, the evidence must always be: Appropriate Accurate Sufficient
The rubric below should be used when grading lab reports/conclusions to ensure that students are effectively connecting their claim to their evidence to provide logical reasons for their conclusions.
Base Explanation Rubric
Component Level0 1 2
Claim - A conclusion that answers the original question.
Does not make a claim, or makes an inaccurate claim.
Makes an accurate but incomplete claim.
Makes an accurate and complete claim.
Evidence – Scientific data that supports the claim. The data needs to be appropriate and sufficient to support the claim.
Does not provide evidence, or only provides inappropriate evidence (evidence that does not support the claim).
Provides appropriate but insufficient evidence to support claim. May include some inappropriate evidence.
Provides appropriate and sufficient evidence to support claim.
Reasoning – A justification that links the claim and evidence. It shows why the data count as evidence by using appropriate and sufficient scientific principles.
Does not provide reasoning, or only provides reasoning that does not link evidence to claim
Provides reasoning that links the claim and evidence. Repeats the evidence and/or includes some – but not sufficient – scientific principles.
Provides reasoning that links evidence to claim. Includes appropriate and sufficient scientific principles.

McNeill, K. L. & Krajcik, J. (2008). Inquiry and scientific explanations: Helping students use evidence and reasoning. In Luft, J., Bell, R. & Gess-Newsome, J. (Eds.). Science as inquiry in the secondary setting. (p. 121-134). Arlington, VA: National Science Teachers Association Press.

Engineering Design Process
1. Identify the need or problem 2. Research the need or problem
a. Examine current state of the issue and current solutions b. Explore other options via the internet, library, interviews, etc.c. Determine design criteria
3. Develop possible solution(s) a. Brainstorm possible solutions b. Draw on mathematics and science c. Articulate the possible solutions in two and three dimensions d. Refine the possible solutions
4. Select the best possible solution(s) a. Determine which solution(s) best meet(s) the original requirements
5. Construct a prototype a. Model the selected solution(s) in two and three dimensions
6. Test and evaluate the solution(s) a. Does it work? b. Does it meet the original design constraints?
7. Communicate the solution(s) a. Make an engineering presentation that includes a discussion of how the solution(s)
best meet(s) the needs of the initial problem, opportunity, or need b. Discuss societal impact and tradeoffs of the solution(s)
8. Redesign a. Overhaul the solution(s) based on information gathered during the tests and
presentation
Source(s): Massachusetts Department of Elementary and Secondary Education
Step 1Identify the
Need or Problem
Step 3Develop Possible
Solution(s)
Step 2Research the
Need or Problem
Step 6Test and Evaluate
the Solution(s)
Step 7Communicate the Solution(s)
Step 8Redesign
Step 5Construct a Prototype
Step 4Select the Best
Possible Solution(s)

DENSITY OF ROCKS Adapted from: www.sciencenet.org.uk/.../Chemistry/ StructBond/c00195b.html
Florida Next Generation Sunshine State Standards Benchmark(s): SC.8.N.1.1 Define a problem from the eighth grade curriculum using appropriate reference materials to support scientific understanding, plan and carry out scientific investigations of various types, such as systematic observations or experiments, identify variables, collect and organize data, interpret data in charts, tables, and graphics, analyze information, make predictions, and defend conclusions.SC.8.P.8.3 – Explore and describe the densities of various materials through measurement of their masses and volumes. Assessed as SC.8.P.8.4 – Classify and compare substances on the basis of characteristic physical properties that can be demonstrated or measured; for example, density, thermal or electrical conductivity, solubility, magnetic properties, melting and boiling points, and know that these properties are independent of the amount of the sample.
Background Information for the teacher:Density is a basic physical property of any sample of matter. It is much more important than other physical properties such as size or shape, in that the numerical value of density for a pure substance at a particular temperature and pressure is a constant and never changes! The density may be determined in the laboratory if the mass and volume of a sample can be determined. Density may be calculated by dividing the mass by the volume (d = m / V). It also may be thought of as the ratio of the mass to the volume. The density of water is important to know. It is 1.0 g/mL at 40C.
In this experiment, the student will measure the mass, volume, and the length of several rocks. They will then use their data to explore the relationship between the mass and volume of the rocks and calculate their density.
Materials Graduated cylinder 250 mL beaker medicine dropper food coloring ( not essential but
helpful) 100 mL Graduated cylinder Eye dropper Calculator Electronic balance or triple-beam
balance 5 different type of rocks Tap water at room temperature ruler
Teacher Pre-Lab Preparation and Presentation:1. Color the water by adding a few drops of food coloring.
Engage: (students should develop procedures similar to the ones in the Explore section)Teacher will engage students in discussion with the following questions to determine students’ pre-conceptions. Record responses on the board:
a) Observe the 5 rocks and estimate which rock could have the largest mass, volume and density?
b) Will the largest rock (largest volume) have the largest mass?c) What is density? What do you need to know to calculate density?d) Mass/Volume is a ratio which represents density.e) Predict which rock would have the greatest density and smallest density.f) Would the largest rock be the most dense and the smallest rock the least dense?g) Would all of these rocks sink in water?
Explore (students should come up these procedures and how they can be completed in the engagement)1. On the electronic or triple beam balance mass each rock in grams (g). Record your
measurement in the data table 2. Pour 50 mL of the colored water into the graduated cylinder. Use the dropper to get
the exact amount of 50 mL.3. Drop the first rock into the graduated cylinder and determine the volume of the rock
in milliliter (mL) using the water displacement method. Record your measurement in the data table.
Final volume (water with rock) – Initial volume (50 mL of water) = Volume of the rock(use cm3 since rocks are a solid and 1 mL = 1 cm3). To get a precise measurement, place the cylinder on a flat surface, bring your “eye” down to the level of the liquid, and read the bottom of the meniscus.
4. Repeat step 3 with the other 4 rocks. Record your measurement (cm3) in the data table.5. Finally calculate the density of each rock, using the following formula:
Density = Mass/VolumeUsing the unit for density (g/cm3)
6. Record your measurement in the data table.
Data Table: Density of Rocks
Rock Mass (g)Final-Initial=
Volume of rock (cm3)
Density (g/cm3)
1
2
3
4
5
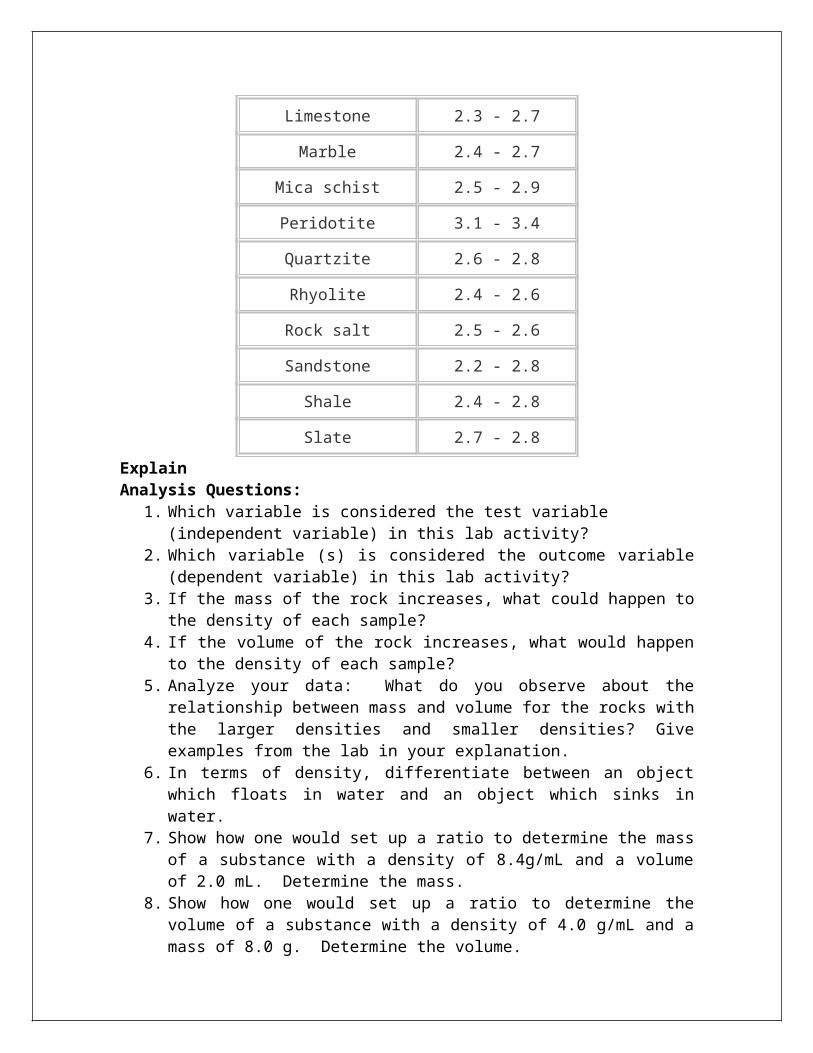
Figure 1Densities of Some Common Rocks
Rock Density
Andesite 2.5 - 2.8
Basalt 2.8 - 3.0
Coal 1.1 - 1.4
Diabase 2.6 - 3.0
Diorite 2.8 - 3.0
Dolomite 2.8 - 2.9
Gabbro 2.7 - 3.3
Gneiss 2.6 - 2.9
Granite 2.6 - 2.7
Gypsum 2.3 - 2.8
Limestone 2.3 - 2.7
Marble 2.4 - 2.7
Mica schist 2.5 - 2.9
Peridotite 3.1 - 3.4
Quartzite 2.6 - 2.8
Rhyolite 2.4 - 2.6
Rock salt 2.5 - 2.6
Sandstone 2.2 - 2.8
Shale 2.4 - 2.8
Slate 2.7 - 2.8
Explain Analysis Questions:
1. Which variable is considered the test variable (independent variable) in this lab activity?
2. Which variable (s) is considered the outcome variable (dependent variable) in this lab activity?

3. If the mass of the rock increases, what could happen to the density of each sample?
4. If the volume of the rock increases, what would happen to the density of each sample?
5. Analyze your data: What do you observe about the relationship between mass and volume for the rocks with the larger densities and smaller densities? Give examples from the lab in your explanation.
6. In terms of density, differentiate between an object which floats in water and an object which sinks in water.
7. Show how one would set up a ratio to determine the mass of a substance with a density of 8.4g/mL and a volume of 2.0 mL. Determine the mass.
8. Show how one would set up a ratio to determine the volume of a substance with a density of 4.0 g/mL and a mass of 8.0 g. Determine the volume.
9. Based on the results of this lab, explain how unknown substances can be identified or distinguished from one another by using their densities.
Bonus question:10. Density of water is 1 g/ml or 1.0 g/cm3). What is the volume of a sample of water
if the mass is 6g? Explain why this is so easy to figure out (think ratio).
Elaborate:1. Provide students with the following data derived from a set of Density Blocks
Figure 2Densities of Common Substances
Source: Teacher Developed – Classroom TestedSubstance Density (g/cm3)Acrylic 1.1 – 1.2Aluminum 2.7Brass 8.4 – 8.8Copper 8.96Oak 0.60 – 0.90 Pine 0.35 – 0.50 Polypropylene 0.91 – 0.94PVC 1.39 – 1.42 Steel 7.9Water 1.0
2. Provide students with the following information: You have been given blocks of equal volume. You may want to provide the Density Block samples or have students make cubes 2.54 cm x 2.54 cm x 2.54 cm
www.sciencenet.org.uk/.../Chemistry/ StructBond/c00195b.html

3. Based on the densities of the various substances listed in the data table above, ask students to make predictions whether the block made of the various materials would sink or float in water.
Block Prediction (sink or float) Observation (sink or float)
Acrylic
Aluminum
Brass
Copper
Oak
Pine
Polypropylene
PVC
Steel
Acrylic
EvaluateIf two blocks of pine were stacked on top of each other, would they sink or float? Explain.
Extensions:1.Students will explore the density of different liquids and/or solutions, e.g. 5%, 10%,
15% saltwater solution. Discover the relationship between density and the solute concentration.

Possible AnswersExplain Analysis Questions:
1. Which variable is considered the test variable (independent) variable in this lab activity? Type of rock
2. Which variable (s) is considered the outcome variable (dependent) variable in this lab activity? density
3. If the mass of the rock increases, what could happen to the density of each sample?
4. If the volume of the rock increases, what would happen to the density of each sample? It would stay the same because the mass would also increase
5. Analyze your data: What do you observe about the relationship between mass and volume for the rocks with the larger densities and smaller densities? Give examples from the lab in your explanation. Larger densities have larger mass compared to the object’s volume; smaller densities have larger volume compared to the mass. Examples will vary
6. In terms of density, differentiate between an object which floats in water and an object which sinks in water. An object that floats in water is less dense than the water or less than 1 g/cm3 . An object that sinks has a greater density than water.
7. Show how one would set up a ratio to determine the mass of a substance with a density of 8.4g/mL and a volume of 2.0 mL. Determine the mass. 8.4g/mL = ?g/2.0 mL mass = 16.8 g
8. Show how one would set up a ratio to determine the volume of a substance with a density of 4.0 g/mL and a mass of 8.0 g. Determine the volume. 4.0 g/mL = 8.0 g/?mL volume = 2 mL
9. Based on the results of this lab, explain how unknown substances can be identified or distinguished from one another by using their densities. All substances have a specific density. If the mass and volume can be determined, then the substance can be found by comparing with substances of known densities.
Bonus question:10. Density of water is 1 g/ml or 1.0 g/cm3). What is the volume of a sample of water
if the mass is 6g? Explain why this is so easy to figure out (think ratio). The density of water is a 1:1 ratio 6 g would mean 6 mL
EvaluateIf two blocks of pine were stacked on top of each other, would they sink or float? Explain The blocks would float. The wood is still less dense than water. For example, if the mass doubles, so does the volume, keeping the density the same.Note: Use real examples for students to measure and test.
www.sciencenet.org.uk/.../Chemistry/ StructBond/c00195b.html

Additional Background Information - Density of RocksSource: http://oceanleadership.org/files/309_Density_Oceanic_Crust.pdf
Certain properties of a substance are both distinctive and relative easy to determine. Density, the ratio between a sample’s mass and volume at specific temperature and pressure (like standard ambient temperature and pressure), is one such property. Regardless of the size of a sample, the density of a substance will always remain the same.
The density of a rock sample can, therefore, be used in the identification process.Typical densities for some types of rock are: - Basalt 3 g/cm3 (187 lbm/ft3) - Granite 2.7 g/cm3 (169 lbm/ft3) - Sandstone 2.3 g/cm3 (144 lbm/ft3)
Some rocks are heavier and others much lighter than those listed above. For example, Pumice is a rock formed from solidified foamy volcanic lava. It is full of spaces full of gas, rather like a sponge. Some examples of Pumice are half the density of water, at 0.5 g/cm3. Density varies significantly among different rock types because of differences in mineralogy and porosity. Knowledge of the distribution of underground rock densities can assist in interpreting subsurface geologic structure and rock type.
While density may vary only slightly from rock to rock, detailed sampling and correlation with other factors like depth may reveal important information about the history of a core, or may help to improve the use of seismic profiles. The average density of oceanic crust is 3.0 g/cm3 while continental crust has an average density of 2.7 g/cm3.

STUDENT HANDOUT
DIFFERENTIATED INSTRUCTION: OPEN INQUIRY
DENSITY OF MATTER
Objectives/Purpose:
Determine the physical properties of matter including the density of irregular solids.
Demonstrate that regardless of the size of a sample, the density of a substance will always remain the same.
Classify and compare substances on the basis of characteristic physical properties that can be demonstrated or measured
Demonstrate Achievement of the following Goals: Develop a problem statement based on a physical property of matter and the size
of the sample that you would like to investigate. State your hypothesis. Design an experiment to test your hypothesis. Carry out the experiment you designed. Submit a completed lab report to your teacher. Use the “Claim, Evidence & Reasoning” rubric to defend your claims when
writing your conclusion.

DENSITY OF ROCKS (Differentiated Lab)Revised by: University of Miami – Science Made Sensible Fellows
Florida Sunshine State Next Generation Standards Benchmark: SC.8.P.8.4 Classify and compare substances on the basis of characteristic physical properties that can be demonstrated or measured for example, density, thermal or electrical conductivity, solubility, magnetic properties, melting and boiling points, and know that these properties are independent of the amount of the sample. SC.8.P.8.3 Explore and describe the densities of various materials through measurement of their masses and volumes.
Background Information for the teacher:Density is a basic physical property of any sample of matter. It is much more important than other physical properties such as size or shape, in that the numerical value of density for a pure substance at a particular temperature and pressure is a constant and never changes! The density may be determined in the laboratory if the mass and volume of a sample can be determined. Density may be calculated by dividing the mass by the volume (d = m / V). It also may be thought of as the ratio of the mass to the volume. The density of water is important to know. It is 1.0 g/mL at 4oC.
In this experiment, the student will measure the mass, volume, and the length of several rocks. They will then use their data to explore the relationship between the mass and volume of the rocks and calculate the rocks’ density.
Time Frame: 1-1.5 hours
Materials:Demonstrations
Vegetable oil Karo syrup 1 can of coke 1 can of diet coke Aquarium/
container to float cokes
Dry ice Container for dry
ice demo Bubble wand and
soap 1 large graduated
cylinder (~1000ml)Lab Activity
Rocks, four types, including pumice stone
Plastic baggies or other container for rocks
triple beam scales 500ml graduated
cylinders 250ml Flasks
Eye droppers Paper towels Food Coloring dye
(for demo also)

Pre-lab preparation:1) Color the water/oil/karo syrup demo with food coloring2) Select 4 rocks with very different densities as available. One should be pumice stone. Alter
the comic strip and student worksheet (clues) so that the “evidence” rock density matches the density of one of the types of rock you have available.
3) Gather and prepare demonstration supplies as desired.
Engage:1) Engage the students by discussing the topic of density as a class, explaining how it is a
relationship between mass and volume.2) Perform one or more of the following demonstrations:
a. Water/Oil/Syrup layering: Discuss with the class what you will be doing, and have them make predictions of how the three liquids will layer in the 1000ml graduated cylinder. Start with ~250ml of colored water in the cylinder, then add vegetable oil (~100ml) and finally add Karo syrup (~100ml). Discuss why the fluids became layered.
b. Coke vs. Diet Coke: Explain what you are going to do, and have your class predict whether the sodas will sink or float. In a clear container (aquarium) filled with water, place a regular coke or comparable soda. Discuss why the soda sank. Next, add the diet coke (it will float). Discuss why a can with the exact same volume will float because it has less mass and therefore is less dense.
c. Dry ice/bubbles: In a container that is at least 12 inches deep, place the dry ice. Add some water to speed up the sublimation process and make the gas visible to the students. Then, blow bubbles gently on top of the CO2 gas. Discuss with your class why the bubbles did not sink through the CO2, and how density applies to gases also. (this is also useful at the end of the lab as they elaborate on the concept of density)
3) Engage the students further by reading the “CSI: Following the Hard Evidence” comic (source: http://www.pixton.com/SciMadeSensible).
Explore:1) Give the student all the supplies and the procedures worksheet. Discuss the concept of volume
displacement for determining the volume of non-geometric items.2) Have student complete the procedures while you assist and answer questions. You may need
to help them measure the volume of the pumice stone by pushing it completely under the surface of the water using a pencil.
Explain:1) Have students complete the analysis questions at the end of the lab.2) Discuss any questions as a class.
Elaborate/Extension:1) Students can explore the density of objects with identical masses, but different volumes.
Discover the relationship among mass, volume, and density.2) Students can explore the density of different liquids and/or solutions, e.g. 5%, 10%, 15%
saltwater solution. Discover the relationship between density and the solute concentration.3) This is a good time to do the dry ice demo in order to elaborate that the property density
applies to gases also.


C.S.I. Density of Rocks: Following the HARD EVIDENCE
Goal: Determine the densities of 4 different types of rocks in order to match the “hard evidence” found at the crime scene.
Overview: The density of each rock will be calculated by using volume displacement and measuring mass
Procedures1) Look at the rocks and make a prediction about which one you think is the most dense or the least
dense. Record your hypothesis, independent variable, and dependent variable, controlled variables and control.
2) Remove your rocks from the evidence bag.3) Measure the mass of each rock on the balance, record it on this worksheet.4) Pour 150ml of water from the 500ml beaker into the graduated cylinder. Use the dropper to
adjust it exactly to 150ml. This is the INITIAL VOLUME.5) Place one rock into the graduated cylinder, then determine the volume of water in the cylinder by
looking at the BOTTOM OF THE MENISCUS. Record this FINAL VOLUME on your worksheet.
6) Remove the rock by pouring the water back into the beaker and catching the rock with one hand so it doesn’t break the glass. Try not to spill!!
7) Refill the graduated cylinder to 150ml, add the next rock, measure the volume, and record it on your worksheet. Repeat for the third and fourth rocks, drying them with a paper towel and putting them back into their bags.
8) Calculate the volume of each rock by subtracting the initial volume of water (150ml) from the final volume of the water with the rock. Record this on your worksheet.
9) Calculate the density of each rock on the worksheet (Density= Mass/Volume).10) Answer the questions under the data table on your worksheet and write a conclusion.
CLUES:1) The detectives found a rock at the crime scene that had a density of _____ grams/cm3
2) There are three suspects, each live in an area with a different type of rock. 3) The equation for density is: density= mass/volume
Data Table
Rock Mass (g) Final Volume(water +rock)
Rock Volume (final volume- initial volume)
Density (D=m/v)
Creepy Carl
Suspicious Susan
Naughty Nathan
Police Station

Questions: 1) Which rock most closely matched the density of the evidence found at the crime scene?
2) Did all the rocks sink? If not, what can you tell about the density of that rock without doing any calculations?
3) For the rock that didn’t sink, if you put a larger sample in the water, would it sink? Why or why not?
4) If you start with 100ml of water, how many grams of Naughty Nathan’s rock would you need to add to your graduated cylinder to increase the volume by 100ml? (remember the equation for density is density=mass/volume, use the density you calculated above)
5) If the mass of the rock increases, what could happen to the volume of each sample?
6) If the volume of the rock increases, what could happen to the mass of each sample
7) Explain density in terms of a ratio. Give examples from the lab in your explanation.
8) What is the volume of a sample of water if the mass is 6.7g? Explain why this is so easy to figure out.
9) Show how one would set up a ratio to determine the mass of a substance with a density of 5.6g/mL and a volume of 3.7 mL. Then determine the mass.
10) Show how one would set up a ratio to determine the volume of a substance with a density of 2.6 g/mL and a mass of 5.5 g. Then determine the volume.
Conclusion: Write a conclusion using the “Claim, Evidence and Reasoning” format.

MASS, VOLUME, DENSITY(Comprehensive Science 3 Advanced)
Florida Next Generation Sunshine State Standards Benchmark: SC.8.N.1.1 Define a problem from the eighth grade curriculum using appropriate reference materials to support scientific understanding, plan and carry out scientific investigations of various types, such as systematic observations or experiments, identify variables, collect and organize data, interpret data in charts, tables, and graphics, analyze information, make predictions, and defend conclusions.SC.8.P.8.3 – Explore and describe the densities of various materials through measurement of their masses and volumes. Assessed as SC.8.P.8.4 – Classify and compare substances on the basis of characteristic physical properties that can be demonstrated or measured; for example, density, thermal or electrical conductivity, solubility, magnetic properties, melting and boiling points, and know that these properties are independent of the amount of the sample.
Background Information:Density is a basic physical property of any sample of matter. It is much more important than other physical properties such as size or shape, in that the numerical value of density for a pure substance at a particular temperature and pressure is a constant and never changes! The density may be determined in the laboratory if the mass and volume of a sample can be determined. Density may be calculated by dividing the mass by the volume (d = m / V). It also may be thought of as the ratio of the mass to the volume. The density of water is important to know. It is 1.0 g/mL at 4 ºC.In this experiment, the students will measure the mass and volume of several materials. They will then use their data to explore the relationship between the mass and volume of the materials and calculate their density.Literature Connection: “Archimedes and the King’s Crown”
Time Frame: 1 hour
Materials (per pair of students):Safety goggles Graduated cylinder50 mL of isopropyl alcohol (colored red) Eye dropper50 mL of water (colored blue) Calculator50 mL of salt-water (colored green) Electronic balance or triple-beam balance
ProcedurePart A: Teacher Pre-Lab Preparation and Presentation
1. Color the isopropyl alcohol red by adding a few drops of red food coloring.2. Color the water blue by adding a few drops of blue food coloring.3. Prepare a saltwater solution by mixing four parts water to one part salt by volume. Color the
solution green using a few drops of green food coloring.4. Show the students the three solutions and ask them to suggest a way to compare the masses of
the three liquids.5. Guide the discussion towards the realization that in order to compare the masses, equal
volumes would have to be massed. Ask students to predict how the masses of the different liquids would be vary if the volume of each liquid is the same. Based on their predictions, have students formulate a hypothesis.
6. The topic of density as the relationship between mass and volume can now be introduced.
Part B: Student Procedure1. On the electronic balance, mass the graduated cylinder and press "tare" to subtract the mass. If
you are using a triple beam balance, mass the graduated cylinder and record this mass to the nearest 0.01g. Record the mass of the empty cylinder in the Data Table.
2. Pour 10 mL of the red liquid into the graduated cylinder. Use an eyedropper to get the exact amount of 10.0 mL.
3. To get a precise measurement, place the cylinder on a flat surface, bring your “eye” down to the level of the liquid, and read the bottom of the meniscus.
4. Determine the mass of the 10.0 mL by reading the electronic balance directly, or if using a triple- beam balance, record the total mass (cylinder + liquid) in the Data Table. Then subtract the mass of the empty graduated cylinder from the mass of the cylinder and sample of liquid.
5. Record the mass of the sample of liquid on the Data Table in the appropriate location, e.g. Red Liquid, volume of 10.0 mL.
6. Calculate the density of the liquid by dividing the mass by the volume (10 mL).7. Record the density on the Data Table in the appropriate location, i.e. Red Liquid; volume of
10.0 mL.8. Add another 10.0 mL to the cylinder. You should now have a total of 20.0 mL (10 mL + 10
mL).9. Determine the mass of the 20.0 mL by reading the electronic balance directly, or if using a
triple- beam balance, record the total mass CL (cylinder + liquid) record in the Data Table. 10. Then subtract the mass of the empty graduated cylinder (CE) from the mass of the cylinder
and sample of liquid (CL). Record the mass of the sample of .liquid on the Data Table11. Find the density again by dividing the mass by 20.0 mL and record it on the Data Table.12. Keep adding 10.0 mL of the red liquid, recording the mass and calculating the density by
dividing the mass by the amount of liquid in the cylinder until a total of 50.0 mL of the red liquid has been used.
13. Repeat the procedure for each of the other liquids, finding mass and density.14. Graph mass (y-axis) vs. volume (x-axis) for each liquid on the graph paper provided. Use a
different color for each of the liquid solutions.15. Draw a line of “best-fit” for the points of each solution.
Data AnalysisData Table for RED LIQUID
Volume (mL)
Mass of Empty Cylinder
CE
(g)
Mass of Cylinder and Sample of
Liquid CL
(g)
Mass of Sample of
Liquid CL- CE
(g)
Density (g/mL)
10.0
20.0
30.0
40.0
50.0

Data Table for BLUE LIQUIDVolume (mL) Mass of Empty
Cylinder CE
(g)
Mass of Cylinder and Sample of
Liquid CL
(g)
Mass of Sample of
Liquid CL- CE
(g)
Density (g/mL)
10.0
20.0
30.0
40.0
50.0
DATA TABLE FOR GREEN LIQUIDVolume (mL) Mass of Empty
Cylinder CE
(g)
Mass of Cylinder and Sample of
Liquid CL
(g)
Mass of Sample of
Liquid CL- CE
(g)
Density (g/mL)
10.0
20.0
30.0
40.0
50.0
Analysis Questions:1. Which variable, mass or volume, is considered the test variable (independent variable) in this
experiment?2. Which variable, mass or volume is considered the outcome variable (dependent variable) in
this experiment?3. As the volume increases, what happens to the mass of each sample?4. Compare your density calculations for the red liquid. Should the density be the same in each
instance? Explain your answer. Will this also be true for the blue and green liquids?5. Analyze your data and determine which liquid is most dense and which one is least dense.
Focusing on the mass and volume of each liquid. Identify what the relationship is between mass and volume in terms of density.
6. Predict what would happen to the liquids, if you carefully poured each liquid into a clear container. Write an explanation which differentiates the difference between each liquid of how and why they layered that way including the relationship of density to the location of each liquid.

7. In terms of density, differentiate between an object which floats in water and an object which sinks in water
8. Density of plain water is 1g/ml. What is the volume of a sample of water if the mass is 6.7g? Explain why this is so easy to figure out.
9. Show how one would set up a ratio to determine the mass of a substance with a density of 5.6g/mL and a volume of 3.7 mL. Then determine the mass.
10. Show how one would set up a ratio to determine the volume of a substance with a density of 2.6 g/mL and a mass of 5.5 g. Then determine the volume.
11. Based on the results of this lab, design an experiment demonstrating how unknown substances can be distinguished from one another by using their densities.
Home Learning:Students will complete the Analysis Questions.
Extensions:1. Have students explore the density of objects with identical volumes, but different masses (use
density cubes). Discover the relationship among mass, volume, and density.2. Have students explore the density of different liquids and/or solutions, e.g. 5%, 10%, 15%
saltwater solution. Discover the relationship between density and the solute concentration.

Literature Connection:“Archimedes and the King’s Crown”
An ancient story tells about a Greek king, a gold crown and an amazing scientist named Archimedes. The king had ordered a solid golden crown made. When the court goldsmiths presented it to him, he asked Archimedes to test it to make sure it was pure gold. Archimedes knew that pure gold was very soft. He could bite a piece of it, and his teeth would leave a dent in it. (But he also knew that the king would be mad if he returned a dented crown. He couldn't use THAT test.) Archimedes also knew that if he took equal volumes of gold and water, the gold would weigh 23 times more than the water. He COULD use
this test. (The problem was measuring the volume of the crown, an irregular object.).
One night, while filling his tub, for a bath, Archimedes accidentally filled it to the very top. As he stepped into it, water spilled out over the top. The idea struck him, that if he collected the water, and measured it, he would know the volume of his body. HE COULD USE THIS TO MEASURE THE CROWN! In other words, the amount of displaced water in the bathtub was the same amount as the volume of his body.Archimedes was so excited that he jumped out of the tub. He ran outside and down the street yelling "Eureka! Eureka! (One of the few Greek words I know!) I found the answer!"
www.sciencenet.org.uk/.../Chemistry/ StructBond/c00195b.html
All this was fine except in his excitement, Archimedes had forgotten to put on his clothes.
He was running down the street naked! Archimedes was able to get the volume of the crown and an equal volume of pure gold obtained, no doubt, from the King’s treasury. When he placed the two items into separate pans on a two-pan balance, well, I guess you can figure out the answer if I tell you that the goldsmith was put into jail!

DIFFERENTIATED INSTRUCTION: OPEN INQUIRY
MASS, VOLUME, DENSITY
Objectives/Purpose:
Determine the physical properties of liquids. Demonstrate that regardless of the size of a sample, the density of a substance will always
remain the same. Classify and compare substances on the basis of characteristic physical properties that can be
demonstrated or measured
Demonstrate Achievement of the following Goals: Develop a problem statement based on the density of liquids that you would like to
investigate. State your hypothesis. Design an experiment to test your hypothesis. Carry out the experiment you designed. Submit a completed lab report to your teacher. Use the “Claim, Evidence & Reasoning” rubric to defend your claims when writing your
conclusion.

PRECIPITATING BUBBLESIntroduction to Scientific Method
Florida Next Generation Sunshine State Standards Benchmark(s): SC.8.N.1.1 Define a problem from the eighth grade curriculum using appropriate reference materials to support scientific understanding, plan and carry out scientific investigations of various types, such as systematic observations or experiments, identify variables, collect and organize data, interpret data in charts, tables, and graphics, analyze information, make predictions, and defend conclusions.SC.8.P.8.5 Recognize that there are a finite number of elements and that their atoms combine in a multitude of ways to produce compounds that make up all of the living and nonliving things that we encounter. (Also assesses SC.8.P.8.1, SC.8.P.8.6, SC.8.P.8.7, SC.8.P.8.8, and SC.8.P.8.9.)SC.8.P.9.2 Differentiate between physical changes and chemical changes. (Also assesses SC.8.P.9.1 and SC.8.P.9.3.)
Background Information: (Reprinted from The Brain in Space: A Teacher’s Guide With Activities for Neuroscience, NASA, URL: http://science.nasa.gov/headlines/y2002/images/playingcatch/spacebrain.pdf
Scientists aim to gain knowledge and reach an understanding of the world around them. To achieve this goal, scientists must be curious, make observations, ask questions, and try to solve problems. Early scientists tended to draw conclusions from observations that were largely speculative (e.g., that the Earth was flat or that the Sun circled the Earth). By the mid-sixteenth century, some scientists began to realize that using a systematic approach to obtaining information and solving problems could obtain far more knowledge. This resulted in a process which we call the Scientific Method.
Steps of a Scientific Method involving an experimental design Identify the problem. Collect information about the problem. Propose a hypothesis. Test the hypothesis by conducting experiments, making comparative observations, and
collecting data. Evaluate the data collected through investigation. Draw conclusions based on data and determine whether to accept or reject the hypothesis. Communicate results and ask new questions.
The problem is a statement of the question to be investigated. Observations and curiosity help to define exactly what problem should be investigated and what question(s) answered. Once a problem is defined, a scientist should collect as much information as possible about it by searching journals, books, and electronic information sources. This information will provide a basis for forming the hypothesis.
A hypothesis is often considered to be an “educated guess.” The word “guess” is inappropriate, however, because a hypothesis should be based on information gathered. A hypothesis can be defined more accurately as a “proposed” answer to the problem, based upon background information either gathered through research or through experience. The hypothesis is then tested through experimentation and observation. The results of experimentation provide evidence that may or may not support the hypothesis.

To be effective, experiments must be properly planned. The plan is called the procedure, which describes the things that actually will be done to perform the investigation. This is where decisions are made about which variables will be tested and which will be kept constant, what to use as a control, how many samples to use, how large the sample sizes should be, safety precautions needed, and how many times to run the experiment.
Many scientists investigate questions that cannot be answered directly through controlled experiments in laboratories. For example, scientists studying global warming, the AIDS epidemic, and losses of biodiversity must use comparative methods to examine differences that occur in the natural world.
When developing the procedure for an experiment, consider the following:
1. Test only one variable at a time.A scientist wanting to find out “why trees shed their leaves in the fall” would have to consider the factors that affect trees, such as the type of tree, the amount of water they receive, the temperature, the length of daylight to which they are exposed, and the type of soil in which they are growing. These are the variables which can cause changes to occur in an experiment.
To obtain reliable results, only one variable should be tested at a time. All others should be kept constant, whenever possible. If the scientist’s hypothesis states that shorter daylight hours cause trees to shed their leaves in the fall, trees of the same age should be tested. They should be placed in the same size pots with the same type of soil, given the same amount of water, and kept at the same temperature. The only thing changed should be the number of hours of light to which different groups of trees are exposed. Any variable that the experimenter chooses to change, such as the hours exposed to light, is referred to as the test variable (independent variable). The change in the experiment that happens as a result of the test variable, such as the length of time that it takes for the leaves to fall, is referred to as the outcome variable (dependent variable).
2. Use controls.The control is used for comparing the changes that occur when the variables are tested. If a number of young oak trees are placed in a greenhouse and exposed to 10 hours of light to simulate fall conditions, how will the scientist know if a loss of leaves is due to the amount of light? It could be due to the temperature that he/she chose or the amount of carbon dioxide in the air. To avoid such uncertainty, two identical experiments must be set up: one in which the trees are exposed to 10 hours of light and the other, the control, in which they are exposed to light for a longer period of time to simulate summer conditions. All factors for the control are exactly the same as for the test except for the variable being tested—the amount of light given to each tree.
3. Use several samples.Using a number of samples prevents errors due to differences among individuals being tested. Some trees are heartier than others. If only a few trees are tested, some may lose leaves for reasons that are not related to the amount of light. This will produce misleading results. Larger numbers of samples will provide more accurate results.
4. Always use appropriate safety measures.Safety measures to be followed vary according to the type of experiment being performed. For example, laboratory-based experiments frequently

require that participants wear protective clothing and safety goggles and that dangerous volatile chemicals be used only under a vented fume hood.
5. Repeat the experiment several times.To make valid conclusions, the scientist must have reproducible results. Ideally, comparable results should be obtained every time the experiment is run.
After the plan or procedure is complete, the experiment is run. It is essential that careful and accurate records be kept of all observations during an experiment. The recorded observations and the measurement comprise the data. It is always useful to present data in the form of charts, tables, or graphs, as these provide a visual way to analyze and interpret the results. When drawing graphs, the test variable (independent variable) is conventionally plotted on the horizontal axis, and the outcome variable (dependent variable) is plotted on the vertical axis. Analysis of data from the experiment allows the scientist to reach a conclusion. The scientist determines whether or not the data support the hypothesis and decides whether to accept or reject the hypothesis.
The conclusion should provide an answer to the question asked in the problem. Even if the hypothesis is rejected, much information has been gained by performing the experiment. This information can be used to help develop a new hypothesis if the results repeatedly show that the original hypothesis is inappropriate. After performing many investigations on a particular problem over a period of time, a scientist may come up with an explanation for the problem, based on all the observations and conclusions made. This is called a theory.
A Scientific Theory is an explanation, supported by data, of how or why some event took place in nature.
MAJOR CONCEPTS FOR THE TEACHER Our exhaled breath contains carbon dioxide gas. The carbon dioxide we exhale reacts with calcium hydroxide in solution to form insoluble
calcium carbonate and water.* Formation of calcium carbonate precipitate can be used as a test for the presence of carbon
dioxide. If carbon dioxide continues to be bubbled into limewater (calcium hydroxide solution) after a
period of time, the white precipitate disappears. The excess carbon dioxide forms carbonic acid in the water and the calcium carbonate reacts with the carbonic acid to form calcium ions and bicarbonate ions, which are soluble in water. **
Ca(OH)2 = calcium hydroxideCO2 = carbon dioxideCaCO3 = calcium carbonateH2O = waterH2CO3 = carbonic acid gasCa++ = calcium ionHCO3
+ = bicarbonate ion
Chemical Equations* Ca(OH)2 + CO2 CaCO3 + H2O ** CO2 + H2O + H2CO3
CaCO3 + H2CO3Ca++ 2HCO3+

This activity demonstrates the presence of carbon dioxide in exhaled air. In Activity 1, the teacher will blow through a straw into a solution of calcium hydroxide. The carbon dioxide in the exhaled air will combine with the calcium hydroxide to produce a white precipitate of calcium carbonate. In Part 2, students will attempt to reproduce the experiment. They will not be able to do so because they will only have water as their unknown liquid. They should conclude that the teacher had a liquid other than plain water, resulting in a chemical reaction that changed one or more substances in the teacher’s original solution.The second part of this activity involves designing an experiment to test the hypotheses determined in the class discussion. It may be handled in different ways depending on the age of the students.
Time Frame30 minute teacher preparation60 minutes / student activity
MATERIALS 5 grams calcium hydroxide powder One liter of water Filter paper Filter funnel Flasks or small bottles Straws 25 mL or 50 mL graduated cylinder 125 mL Erlenmeyer flasks Test–tube rack Aluminum foil Stop watch Hot Plate Goggles
Procedure:Part 1: Lab PrepThe preparation of one liter of limewater(should be prepared a day ahead of time):
1. Add 10 grams calcium hydroxide Ca(OH)2 powder to 500 mL of water.2. Cover and shake well. Calcium hydroxide is only slightly soluble in water and 5 grams will
provide more solid than will dissolve.3. Allow the suspension formed to settle for a few minutes.4. To separate the limewater from the suspension, use the filter paper and filter–funnel apparatus
to filter the suspension.5. If the limewater filtrate is still slightly cloudy, filter for a second time, using a new filter
paper.6. Keep the limewater tightly closed when not in use, as it will react with carbon dioxide from
the air and become cloudy.7. The calcium hydroxide and water suspension can be stored in a large bottle, and the limewater
filtered off when needed.8. The filtered limewater can be stored in smaller bottles or flasks, 250 mL in volume, for use in
class.

EngagePart 1:
1. Read the following background informationBACKGROUND Carbon dioxide comprises only 0.033 percent of Earth’s atmosphere, yet it is the principle inorganic source of carbon for living organisms. Carbon dioxide and water are the raw materials required by plants for the synthesis of sugars through photosynthesis. Organisms release carbon dioxide back into the atmosphere as a waste product of respiration and other cellular processes.
2. Say to students: It is important for scientists to make careful observations, and you will practice doing the same in this activity. Keep a record of all of your observations.
3. Everyone must wear safety goggles.4. Fill a 125 mL Erlenmeyer flask with 15 mL of teacher liquid (filtered limewater solution).5. Students record observations in notebook.6. Teacher will use a straw to bubble his/her breath into the liquid slowly for no more than 2
minutes. DO NOT blow vigorously as you do not want to spill the liquid! Be very careful not to allow any liquid to enter the mouth or eyes. Goggles are a must!
7. Organize students into cooperative lab groups of 3 – 4 members. Assign each member a role (see Group Roles in the front of the packet).
Data Analysis: Teacher Directed Part 11. Have group members discuss the following questions and place their answers on sticky notes. 2. Have one member of the group place their answers on the poster paper (one question/poster
paper) provided by the teacher. Have another member read the group answers when called upon.
3. Questions for groups to answer:a. What gases are present in exhaled air? Carbon dioxide gas (nitrogen, water vapor, and
small amounts of oxygen are also present.)b. What is the clear liquid? Limewater (calcium hydroxide)c. Why did a precipitate form? Why did the solution turn cloudy? There must have been a
chemical reactiond. If a chemical reaction took place, what two ingredients do you think reacted? The
limewater and the carbon dioxidee. How can we test for the presence of carbon dioxide? Bubble the gas into the clear
limewater. f. What is a positive test for carbon dioxide? Limewater is a solution of calcium hydroxide.
It chemically reacts with carbon dioxide to form solid calcium carbonate (chalk).4. The responses from all groups will be discussed in class to ensure that all students understand
the experiment.
Data Analysis: Teacher Directed Part 21. Students will repeat the procedures demonstrated by the teacher.2. Each student group is to measure 15 mL of student liquid (water) into a 125 mL Erlenmeyer
flask, and record their observations in lab notebooks.3. Using a straw, the assigned member of each group will bubble his/her breath into the liquid
slowly for no more than 2 minutes. DO NOT blow vigorously to avoid spilling the liquid!4. Observe the contents after blowing through the straws for approximately 1 – 2 minutes.

5. Record observations in lab notebook. These observations will be recorded as data.
6. When the teacher is convinced that class knows exactly what happened, he/she will say to the class, “Your teacher did the exact same experiment but got very different results!” His/her test tube has white precipitate.
7. The class now has a problem to solve: How can there be no white precipitate when the teacher performed the same experiment?
8. Groups will discuss what factors might affect the production of the precipitate (cloudy solution which will settle into a white solid and clear liquid in time).
9. Have groups propose a factor that might have affected the results.
Possible answers might be: Time—how long exhaled air was bubbled into the solution. Adults vs. teenagers Rate of bubbling Light vs. dark Temperature of the liquideither hotter or colder Different substanceThe factors identified are known as variables.
10. Each group will be assigned at least one of the variables to test.11. Use the following questions to guide the groups in the development of their group hypotheses
and experimental design:• Does the hypothesis offer an answer to the problem?
Yes, it does. The problem was, “Why was there a white precipitate when the teacher performed the experiment?” The hypothesis states that the teacher may have (choose a variable).
• Does the experiment have a control?Yes. The control is the average length of time that the students exhaled into the liquid (possibly about one minute).
• Which materials are needed? Are the materials readily available?• What conditions are being kept constant?
The conditions kept constant are the temperature of the liquid, the size of the straws, the rate of bubbling into the liquid and the amount of liquid used for each test (there may be human error here – may not blow at same rate consistently).
• What is the test variable (independent variable) being tested? This is the variable that the experimenter chooses to change.• What is the outcome variable (dependent variable) being measured? The outcome variable (dependent variable) is the presence or absence of precipitate present after exhaling into the container.• How will each group present its data? Presentation format will vary
12. Each group must submit to the teacher prior to any experimentation a proposed hypothesis; a draft procedure (which may be modified as students work
through the experiment); a draft data table
Procedure: Part 3 1. Groups will be provided with the needed materials to perform their experiments, collect data,
and draw conclusions.2. Each group must turn in a completed Laboratory Report.

3. A post-experiment class discussion may be conducted to review the conclusions made by each group.
4. Compare the experiments performed by each group of students. For each experiment designed, discuss the variable tested, the control, the factors kept constant (controlled variables), and the results obtained. Note that the amount of limewater used and the size of the straws and flasks should be the same for each experiment. A chart, such as the one below, can be developed on an overhead projector.
5. Add any other variables tested to the chart as necessary.6. From the class observations, it can be concluded that only the length of time affects the
amount of precipitate formed. However, results have also varied based upon how vigorous the blowing was, i.e. amount of carbon dioxide introduced.
7. At this point, explain that excess carbon dioxide bubbled into limewater forms carbonic acid, which dissolves the precipitate of calcium carbonate. Place balanced chemical equation on the board.
8. The use of a Scientific Method, specifically an experimental design to systematically test different hypotheses will enable the students to determine which hypothesis is correct in answering a problem.
Evaluation:1. You will be evaluated according to the amount of effort expanded, your specific job
performance, your participation within the team, and on the final product—the laboratory write-up.
2. Your group’s experiment should be evaluated based on the appropriateness of the design you initiated to test the group’s hypothesis (not whether the group actually found the “correct” solution.
3. Students will be asked to test the hypothesis that “the length of time that air was blown into the solution” caused the teacher’s results to be different. Each student in a group of four will use the same size tube and the same amount of lime water, run the experiment at the same temperature, use the same size straws, and attempt to bubble at the same rate. Students should estimate how long they exhaled into their liquid the first day. This could be the control time. One student in each group will blow into his/her tube for the control time. Each of the remaining students in the group should increase the control time by two to four minutes.
4. Explain why there was no change in the student liquid when carbon dioxide was exhaled into the liquid.
Home Learning:1. Work on designing and writing-up an experimental design for completion of Part 2.2. Work on the completion of the laboratory write-up which may include data analysis, graphing,
and drawing conclusions after completion of Part 3.3. Discussion and provide examples of chemical changes
where new substances are formed as a result of atoms combining – some students may discuss that this is a result of electron bonds forming.
Extensions:
1. Have each group perform four more different experiments, to test several variables.
2. Do not share the final chemical equation with students. Additionally, challenge them to find the correct reaction mechanism.

DIFFERENTIATED INSTRUCTION: OPEN INQUIRY
PRECIPITATING BUBBLES
Objectives/Purpose:
Demonstrate that organisms release carbon dioxide back into the atmosphere as a waste product of respiration and other cellular processes.
Design an investigation based on observations Understand that accurate record keeping, openness, and replication are essential to
maintaining an investigator's credibility with other scientists and society.
Demonstrate Achievement of the following Goals: After completing the “Precipitating Bubbles Essential Lab”, develop a problem statement
based on an unanswered question you have that you would like to investigate. State your hypothesis. Design an experiment to test your hypothesis. Carry out the experiment you designed. Submit a completed lab report to your teacher. Use the “Claim, Evidence & Reasoning” rubric to defend your claims when writing your
conclusion.

MODELING THE GREENHOUSE EFFECTNext Generation Sunshine State Standard Benchmark: SC.8.L.18.3 Construct a scientific model of the carbon cycle to show how matter and energy are continuously transferred within and between organisms and their physical environment. SC.8.L.18.4 Cite evidence that living systems follow the Laws of Conservation of Mass and Energy.
Background Information for the teacher:Greenhouse gases are carbon dioxide, methane, nitrous oxide, ozone (in the lower atmosphere), water vapor and CFCs. One greenhouse gas that has been increasing in the past 50 years is carbon dioxide. Loss of rainforests that take in carbon dioxide and the burning of fossil fuels by cars, factories and plants which releases carbon dioxide are part of the causes.A persistent question with regard to the greenhouse effect is, "Why does the light energy from the Sun pass through the greenhouse gases unhindered and the infrared energy radiated from the Earth is absorbed?"Teacher’s notes:This activity could be divided into 2 sessions. One session for the engage and explore with testing then Explain and allow students to return with more materials or work on at home then retest and evaluate.
Purpose:In this investigation students will create models of Earth with and without heat-reflecting greenhouse gases.
Materials: • 2 Clear plastic cups• 2 Thermometers• Potting soil• Clear Plastic wrap • 2 Rubber bands• Lamp with 100 Watt light bulb• Watch or clock
Engage:Read or write on the board "Why does the light energy from the Sun pass through the greenhouse gases unhindered and the infrared energy radiated from the Earth is absorbed?"
Explain how a greenhouse is able to maintain a temperature at which plants are able to grow even though the temperature outside the greenhouse sometimes will not support plant life. Relate a greenhouse to how the Earth’s atmosphere traps heat. Identify the gases in the atmosphere that “act” like the glass in a greenhouse.
Explore: Based on both, the materials given by your teacher and the main purpose of this activity you and your team will design an experiment that will measure the different amount of heat retained in a glass jar beneath a heat lamp. This activity will model how the greenhouse effect influences the temperatures in our Earth’s atmosphere. You will investigate “How does the greenhouse effect influence temperature on Earth”. Include: your problem statement for this activity. Formulate a hypothesis. Using the given materials design and complete an experiment to test your hypothesis. Explain how you tested your hypothesis. It should be as specific as possible. Often, scientists read relevant information pertaining to their experiment beforehand.

Explain and Redesigning the ExperimentStudents will share their findings from the explore activity. Summarize the results of your activity. What happened to the temperature of the jar over time? Relate how the set up of the glass jar beneath a heat lamp models the greenhouse effect on Earth. Can you identify the tested (independent), and outcome (dependent) variables in your activity? Did you only change (test) only one variable? Identify what you could do to improve this activity.
After discussion, have students complete this investigation: Have students write a problem statement and form a hypothesis before testing.Basically, during this investigation, the students should perform the following procedures:
1. Place equal volume of soil in the bottom of each plastic cup.2. Place the thermometer inside of each container at the same height relative to the soil. Record
the initial temperature in degrees Celsius(0C)3. Seal the top of one container with plastic wrap held in place with the rubber band while leaving
the second container open.4. Place the lamp with the exposed 100 watt bulb between the two containers. The light bulb
should be kept on during the whole experiment.5. Record the temperature in each container every 2 minutes for the next 20 minutes.6. Construct a multiple line graph with both sets of data on the same axes (temperature on Y, time on X)7. A possible format of data table:
Data Table 1: Changes in Temperature
Time(min)
Temperature in open container (0C)
Temperature in sealed container (0C)
0
2
4
6
8
10
12
14
16
18
20

Evaluate:1. Interpret the graph and identify a trend for the change in temperature for each container during
the experiment? Did both jars show the same change in temperature? Calculate the change in temperature for each jar.
2. Did your results support your hypothesis?3. Explain why the temperature of the covered jar showed an increase in temperature. What part of
this setup contributed to the increase in temperature?4. Explain how the covered jar setup represents an experimental model of the influences of the
greenhouse effect on the temperature of the Earth’s atmosphere. Identify what the light bulb and plastic wrap represent in this experimental model.
5. Identify the tested (independent), outcome (dependent) and controlled (constant) variables in this experiment.
6. In this experiment we only tested each setup one time (20 minute interval), explain why this will affect the validity of the data. How can we change this experiment so the data will be more valid?
7. Based on what you learned in this activity, can you connect this knowledge to the environmental issue of the dangers of the greenhouse effect? Explain
8. Think about what humans do that increases the amount of greenhouse gases released into the atmosphere and develop a list of ways that we can reduce the level of these gases.
Optional Extensions:1. Activity # 1. Students may want to continue the experiment and record the two temperatures
every day at the same time for a week. Graph the data and discuss how the temperatures fluctuate from day to day.
2. Activity # 2. Green House Gases.
There is no scientific dispute about the presence of "greenhouse gases" (including carbon dioxide--CO2) in the Earth’s atmosphere that function to trap heat from the Sun. There is also no dispute that the amount of CO2 in the atmosphere has increased 25%. Does this mean that global warming is occurring? Nobody knows for certain, but many atmospheric scientists are becoming concerned about the increasing amount of CO2 in the atmosphere.
What does this mean to you? Despite the uncertainties, if global warming does occur (or if it has already begun), it will profoundly affect human societies. Global warming may result in severe droughts, reducing crop production necessary to feed billions of people. Rising sea levels will threaten beaches, coastal cities, and people. The migration of millions of people would strain economic, health, and social services. Conflicts over remaining resources could escalate. Wildlife habitat will be destroyed, with countless species facing extinction. With the potential devastating effects of global warming, it is reasonable and prudent to examine alternatives to fossil fuels to decrease the amount of CO2 in the atmosphere. The transportation sector is one area that can, generally speaking, use alternative methods of fuel, since there are already a variety of alternate fuels available. The good news is that this transition can be done relatively easily, cheaply, and painlessly.

Activity: With parental supervision, students will visit two parking lots in different areas, and list the types of cars present to determine the amounts of CO2 these cars release.
(1) Select two areas in your town with substantial parking lots. These parking lots can be in different parts of town, surrounding different types of stores (food stores, clothing stores, discount stores), or can be of different sizes (shopping malls, "mom and pop" stores, specialty shops).(2) Walk through each parking lot, writing down the following information for 10 cars (it helps if at least one person knows about cars):
Car type (Be specific! For example: Ford F350 pickup truck) The condition of the car (new, used but excellent, badly used, etc.) The size of the car (very big, large, medium, compact, etc.) Approximately weight of the car in tons. Since CO2 emissions are tied to the weight of
the car, assume that each car emits as much CO2 per year as it weighs. Record this amount for each car.
Questions:
(1) Were there significant differences in the types and ages of the cars you saw in the different parking lots? Why or why not?
(2) Did there seem to be a correlation between the cars and the type of store?(3) Did there seem to be a correlation between the size and age of the cars?(4) Which parking lot had the cars with the most estimated CO2 emissions? Why
might this be?(5) Look up the weight information for your car. What type of CO2 emissions does it
have?(6) Would you consider emissions of air pollutants in the purchase of your next car?
Why or why not?
Sources: http://www.enviroliteracy.org/pdf/labge1.pdf http://www.myteacherpages.com/webpages/SBrenneman/files/EXPERIMENTAL%20DESIGN11.doc http://www.climatechangenorth.ca/section-lp/LP_06_I_B_greenhouse.html http://highered.mcgraw-hill.com/sites/dl/free/0072315474/26241/pollution_1.htm

STUDENT HANDOUT
DIFFERENTIATED INSTRUCTION: OPEN INQUIRY
MODELING THE GREENHOUSE EFFECT
Objectives/Purpose: In this investigation students will:
Create models of Earth to demonstrate the greenhouse effect. Relate a greenhouse to how the Earth’s atmosphere traps heat. Identify the gases in the atmosphere that “act” like the glass in a greenhouse.
Demonstrate Achievement of the following Goals: Develop a problem statement based on the concept of the “greenhouse effect” that you would
like to investigate. Create a model to demonstrate the concept of the “greenhouse effect” that you would like to
investigate. How does the model demonstrate the concept that you investigated? Remember to use the “Claim, Evidence & Reasoning” rubric to defend your claims.

FOLLOWING THE 4R’S: REDUCEREUSERECYCLEROT
Next Generation Sunshine State Standards Benchmark: SC.8.L.18.3 Construct a scientific model of the carbon cycle to show how matter and energy are continuously transferred within and between organisms and their physical environment. SC.8.N.1.5 Analyze the methods used to develop a scientific explanation as seen in different fields of science.
Background Information for the teacher: At the very heart of waste management is the waste management ladder—reduce, reuse, and recycle. Many people have added a fourth component to the hierarchy—rot—in order to further stop waste from entering the landfill. Follow the steps up the ladder as you reach for an environmentally friendly way to help protect our Earth.
The first, and most preferred, step on the ladder is to reduce what you use. Buy items with less packaging, and only buy what you need. That’s easy! When you reduce, you save landfill space, valuable agricultural land, natural resources, and money.
The second step on the ladder is to reuse an item that you no longer use or want. The saying “One person’s trash is another person’s treasure” is true! Take items that are in good shape to a secondhand store or to other reuse organizations such as Goodwill or the Veterans of Foreign Wars, for someone else to use. Many items intended for the landfill can easily be refurbished or combined with other materials to make new, functional products.
Most of us are familiar with the idea of recycling, but as the third step on the ladder, recycle is less favored than reducing and reusing. When materials are recycled, energy and resources are still spent, whereas with the first two steps, they would not be. The good news is that when manufacturers use recycled materials to make a new product, they often use fewer natural resources and less energy than if they had used new materials. Recycling materials is definitely a better choice than sending them to the landfill. To support recycling efforts, buy back the materials you recycle by purchasing recycled-content products.
Rot refers to recycling food waste and other organic materials through composting or vermicomposting. In vermicomposting, one recycles organic materials such as food waste into a nutrient-rich material that can be used—or, in this case, “reused”—as soil improvement and fertilizer. Your plants will thank you!
Materials: Poster paper Magazines for pictures Markers/crayons/colored pencils
Explore: 4-10 cm square pieces of Styrofoam/group 4-10 cm square cereal boxes/group 4-10 cm square pieces of notebook paper/group 4 plastic 1 gallon ziplock bags/group or 4 plastic containers with
dirt/group Water A warm dark place to store things for two weeks A refrigerator or cool place to store things for two weeks

Engage: Dirt for Lunch1. Have students list everything they are having or had for lunch.2. Ask students if they can name a food in their lunch that did not come from dirt? Mention that
no matter what you will eat or have eaten for lunch, ultimately they are eating dirt!3. Have students create a concept map to attempt to figure out the ingredients in different foods
and, as a group, trace each food’s origin back to the Earth.4. Use a tuna fish sandwich for an example.
The bread came from wheat grown in the dirt. Pickles are preserved cucumbers grown in the dirt. Lettuce was grown in the dirt. Mayonnaise came from eggs, which came from chickens that ate grains grown in the
dirt. Tuna living in the ocean eat smaller fish that eat zooplankton that eat phytoplankton,
which need nutrients from the decomposed bodies of dead plants and animals accumulated on the ocean floor and brought to the surface by currents.
5. Optional: As a group create a poster using an appropriate graphic organizer explaining “I Eat Dirt…Ask Me How”. Drawings, magazine cutouts, or computer graphics should be incorporated into the poster.
Explore: Fungi and BacteriaDay One
1. How do you think plants decompose and what factors effect decomposition? What conditions do they think are the best to help plants decompose?
2. You are going to test how environmental conditions effect decomposition. Your group will be given 10 plastic zip lock bags and four 10 cm square pieces of Styrofoam, four 10 cm square cereal boxes, and four 10 cm square pieces of notebook paper.
3. In two of the bags place a 10 cm square piece of Styrofoam, 10 cm square cereal boxes and 10 cm square pieces of notebook paper. Each should be wet but not soggy. Seal the bags.
4. Place one bag in a dark warm place and the other bag in the refrigerator, or a cool place.5. Repeat step 3 and 4 but do not moisten the 10 cm square stryofoam, 10 cm square cereal
boxes and 10 cm square pieces of notebook paper.6. Hypothesize what will happen to each of the items. What effect will
temperature, moisture and light have?During The Week
7. Twice during the week observe each bag and record your observations in your data journal.
After One Week or Two8. The cardboard and paper should be on their way to decomposing.

Possible ChartStudent’s Name: ________________________________________Period:___________ Data Table Fungi and Bacteria
Styrofoam (repeat for
other 2 items)Date Wet/Cool Wet/Warm Dry/Cool Dry/Warm
Explain using the diagram and student input then Evaluation by having students’ record answers: Within your group discuss and record the following questions:
1. What effect does temperature have on the decomposition?2. What effect does moisture have on the decomposition? 3. What effect does light have on the decomposition?4. Describe what you would observe if used bread slices, banana pieces, and orange slices in the
bag.5. Explain the importance of decomposition. 6. How is carbon recycled through decomposition?7. What would the Earth be like if decomposition did not take place?8. What does ‘closing the loop’ mean to you? How does decomposition close the loop?9. Describe one way you can “reduce, recycle, reuse, or rot” at home/school and the benefits.

By reducing, the number of items used you decrease waste from the start. By reusing, recycling, and allowing food waste to rot into compost, you cycle materials back for another round of use instead of sending them on a one-way road to the landfill. Your solid “waste” has remained a resource.
Source: Alameda County Home Compost Education Program, 7977 Capwell Drive,
What is the Carbon Cycle?
All living organisms are based on the carbon atom. Unique among the common elements of the Earth's surface, the carbon atom has the ability to form bonds with as many as four other atoms (including other carbon atoms) and to form double bonds to itself. Carbon compounds can be solid, liquid, or gas under conditions commonly found on the Earth's surface. Because of this, carbon can help form solid minerals (such as limestone), 'squishy' organisms (such as plants and animals), and can be dissolved in water or carried around the world through the atmosphere as carbon dioxide gas. The attributes of the remarkable carbon atom make possible the existence of all organic compounds essential to life on Earth.
Carbon atoms continually move through living organisms, the oceans, the atmosphere, and the crust of the planet. This movement is known as the carbon cycle. The paths taken by carbon atoms through this cycle are extremely complex, and may take millions of years to come full circle.
Modified with permission from Global Climates - Past, Present, and Future, S. Henderson, S. Holman, and L. Mortensen (Eds.). EPA Report No. EPA/600/R-93/126, U.S. Environmental Protection Agency, Office of Research and Development, Washington, DC. pp. 59 - 64.

STUDENT HANDOUT
DIFFERENTIATED INSTRUCTION: OPEN INQUIRY
MODELING RECYCLING OF MATTER AND ENERGY
Objectives/Purpose: In this investigation students will:
Construct a scientific model of the carbon cycle Show how matter and energy are continuously transferred within and between organisms and
their physical environment.
Demonstrate Achievement of the following Goals: Develop a problem statement based on the concept of the recycling of matter and energy that
you would like to investigate. Create a model or experiment to demonstrate the concept of the recycling of matter and
energy that you would like to investigate. How does the model/experiment demonstrate the concept that you investigated? Remember to use the “Claim, Evidence & Reasoning” rubric to defend your claims.

EVERYTHING YOU DO MAKES A DIFFERENCEhttp://www.ucar.edu/learn/1_4_2_15t.htm
Next Generation Sunshine State Standards Benchmark SC.8.N.1.6 Understand that scientific investigations involve the collection of relevant empirical evidence, the use of logical reasoning, and the application of imagination in devising hypotheses, predictions, explanations and models to make sense of the collected evidence. Background Information for the teacher:In this experience students will choose a current environmental issue and look at historical conditions as well as present conditions. Investigation teams will assess the changes in ecosystems, populations of specific species, air quality, or any other aspect of an ecosystem. The teams’ findings will be presented to the rest of the students as a project assessment. The student audience must record notes of team presentations as part of the team’s assessment.
Investigative Teams will then become “Environmental Consulting Firms” that will design a solution to the previous concerns reported by the Investigation Teams. Students will examine the results of presentations from the previous activity and design remedies as an Environmental Consulting Firm. They will present their solutions to the environmental issues to the rest of the students and those students will question them as role players particular to each solution design. Materials:
Overhead transparency sheets Overhead markersOverhead projectorMarkers pensPoster paper Internet or library access to current environmental issues
Engage: Read to students or write on the board “Choose a current environmental issue and look at historical conditions as well as present conditions. Investigation teams will assess the changes in ecosystems, populations of specific species, air quality, or any other aspect of an ecosystem.”
Explore: Describing the problem1. In a class discussion elicit prior knowledge of local, national, or global environmental
concerns, listing these topics for a choice list later.2. Investigation Teams will be formed. Each person will assume an assigned group role as
designated by the teacher (possibly secretary, reporter, lead researcher while each should be researchers.
3. Teams should choose a topic and plan an investigation that will assess the historical and contemporary status of the issue in order to compare changes.
4. Teams should design a presentation and use at least two overhead transparencies that will highlight the main points of their findings. One overhead should be a graph.
5. Your classmates will be invited to ask about your team questions about your investigations.Suggested Investigations
Kissimmee-Okeechobee-Everglades changes Black Bear population changes Florida Panther population changes Manatee population changes Occurrences of red tide Ocean turtle population changes Erosion of beaches due to creation of inlets

Salt-water intrusion of aquifer Urban development vs. loss of habitat Number of roads and highways over time
6. Students will create a report that will include the following components: title, resources, graph, and background information.
7. As a group, students will present their findings orally to the class. It must include: title, findings and graph.
8. Your presentation will have a maximum time limit of five minutes.
9. All members of the group must participate in the presentation.
Evaluate: Can You Help?1. Environmental Consulting Firms will choose a company name and design a business card.2. Environmental Consulting Firms will review the Investigative Teams research and make
notes.3. The Environmental Consulting Firm brainstorms the issue: Who is involved? Who will be
affected? Who are the stakeholders? (Don’t forget the habitat and its creatures; for example, a panther or bear may be included as a stakeholder, in those discussions and someone on the firm team can speak for the animal.) The team recorder will write all ideas on poster paper.
4. Using all available resources design a solution by investigating: local agencies. what is being done presently. how much your solution might affect human life, wildlife, the ecosystem (water,
habitat, air quality)? if your solution will have an adverse effect on the economy. if part of your solution is to impose taxes, how the community will respond.
5. Your consulting firm will create a report that will include the following components: title, who is involved, who will be affected, stakeholders, possible realistic solutions to the impending problem, and resources used to design the solutions.
6. The Environmental Consulting Firm will present its findings to a panel of experts assigned by your instructor:
Possible Types of experts Citizen: one for, one against change Business person: one for, one against change Politician: one for, one against change Species: one for, one against change
7. The presentation should include overhead graphics including those items specified in #5 above. A PowerPoint presentation is also acceptable.
8. All members of the firm must participate.9. The Environmental Consulting Firm listens and responds to stakeholders, justifying its design
to all challengers.10. Maximum time for the presentation, on and response is 15 minutes.
Create Evaluation for peers by peers:1. Use a rubric designed for oral presentation. 2. Use a rubric such as one found in the appendix to score the reports.3. Use a rubric designed for class participation to score the experts.4. For rubrics and assessment strategies please refer to:
http://www.k12science.org/training/projectmgtv2/assessment2.html http://rubistar.4teachers.org/

STUDENT HANDOUT
DIFFERENTIATED INSTRUCTION: OPEN INQUIRY
EVERYTHING YOU DO MAKES A DIFFERENCE
Objectives/Purpose: In this investigation students will:
Identify current local, national, or global environmental concerns Research historical conditions as well as present conditions. Assess the changes in ecosystems, populations of specific species, air quality, or any other
aspect of an ecosystem.
Demonstrate Achievement of the following Goals: Develop a problem statement based on the concept of “an environmental issue” that you
would like to investigate. State your hypothesis. Design an experiment to test your hypothesis. Carry out the experiment you designed. Submit a completed lab report to your teacher. Remember to use the “Claim, Evidence & Reasoning” rubric to defend your claims.

THE MARTIAN SUN-TIMES
Next Generation Sunshine State Standards Benchmark: SC.8.E.5.7 Compare and contrast the properties of objects in the Solar System including the Sun, planets, and moons to those of Earth, such as gravitational force, distance from the Sun, speed, movement, temperature, and atmospheric conditions. (Also assesses SC.8.E.5.4 and SC.8.E.5.8.).
Background Information for the teacher: Sources: NASA.gov and http://nineplanets.org/mars.html Our Solar system is a part of a spiral galaxy called the Milky Way. It is comprised of our nearest star, the Sun, and the celestial bodies that surround it. There are eight (8) planets in our solar system – Pluto was downgraded to a dwarf planet in 2006 mainly because it orbits around the Sun in “zones of similar objects that can cross its path.” Pluto has a more distinguished recognition because dwarf planets orbiting the Sun beyond Neptune are referred to as plutoids. Of the eight remaining planets, there are four (4) inner “rocky” planets and four (4) outer “gas giants.” One of particular interest, is Mars.Mars (Greek: Ares) is the god of War. The planet probably got this name due to its red color; Mars is sometimes referred to as the Red Planet. (An interesting side note: the Roman god Mars was a god of agriculture before becoming associated with the Greek Ares; those in favor of colonizing and terraforming Mars may prefer this symbolism.) The name of the month March derives from Mars. Mars has been known since prehistoric times. Of course, it has been extensively studied with ground-based observatories. But even very large telescopes find Mars a difficult target, it's just too small. It is still a favorite of science fiction writers as the most favorable place in the Solar System (other than Earth!).Early in its history, Mars was much more like Earth. As with Earth almost all of its carbon dioxide was used up to form carbonate rocks. But lacking the Earth's plate tectonics, Mars is unable to recycle any of this carbon dioxide back into its atmosphere and so cannot sustain a significant greenhouse effect. The surface of Mars is therefore much colder than the Earth would be at that distance from the Sun.
Materials: Computer with Internet access, various spherical objects of different sizes (i.e., basketball, softball, soccer ball, large marbles small marbles, beads, etc.)
ObjectivesStudents will:
Explore the solar system Gather, interpret, and compare current weather information for Mars and Earth. Interpret and make inferences from data.
Teacher note: Students are told that they are Earthling weather/news reporters for an Internet newspaper
called the Martian Sun-Times. They will write articles for the newspaper comparing weather and/or life on Mars and Earth.
It is recommended that you assign a team to each investigation. It is possible for students to collect data and answer the questions in one period if there is a computer for each group.
Another period will be necessary for them to discuss and write their article. Encourage students to use their factual information but to consider one of the following formats when writing their articles: travel brochure, human or Martian interest - story, fashion report, disaster report, weather predictions, etc.

Students will be evaluated on the basis of effort, job performance, team participation and their literary contribution.
Your role will be to answer questions for students and assist students in their interpretations. As always is the case, it's important for you to have done the investigations before teaching them. Occasionally, you may need to further explain some science concept found in the "Stats" sheets.
Part 1: Solar System Sizes
1. As a class, discuss the actual size of our solar system – the planets, moons, and the Sun. Note that all of the measurements in the table below are in thousands, and even hundreds of thousands, of kilometers.
2. Using a spreadsheet program or calculator, begin to calculate the needed data in column 3. Once done, discuss these ratios as a class.
3. To complete column 4, set Earth’s diameter to the size of a large marble and recalculate the sizes based on the ratios in column 3.
4. Try to think of objects that correspond to the calculated sizes.
Answers
Solar System BodyEquatorialDiameter
(kilometers)
DiameterCompared
withEarth's
Scaled DiametersScaled to…
Earth=Large Marble(cm)
Everyday Object Representing Solar
System Body
Mercury 4,880 Small bead
Venus 12,100 Large marble
Earth 12,756 1 2.17 Large Marble
Mars 6,787 Small marble
Jupiter 143,200 Basketball
Saturn 120,000 Soccer ball
Uranus 51,800 Softball
Neptune 49,528 Softball
Pluto (Dwarf planet) ~2,330 Tiny bead
Moon 3,476 Tiny bead
Sun 1,392,000 Epcot Ball??? (Very Large)
Source(s) www.perkins-observatory.org and www.flpromise.org

Student WorksheetPart 1: Solar System Sizes1. As a class, discuss the actual size of our solar system – the planets, moons, and the Sun. Note that
all of the measurements in the table below are in thousands, and even hundreds of thousands, of kilometers.
2. Working in groups of 3 students, use a spreadsheet program or calculator, begin to calculate the needed data in column 3. Divide each equatorial diameter by Earth’s diameter. Once done, discuss these ratios as a class.
3. To complete column 4, set Earth’s diameter to the size of a large marble and recalculate the sizes based on the ratios in column 3. (multiply Diameter compared with Earth x Earth’s Scaled Diameter)
4. Try to think of objects that correspond to the calculated sizes.5. Arrange the planets in order, be sure to identify asteroid belt, inner planets, and outer planets.6. Complete the discussion questions.
Table 1: Ratio of the diameters of the other bodies compared with Earth's diameter.
Solar System Body
EquatorialDiameter
(kilometers)
DiameterCompared
withEarth's
Scaled DiametersScaled to…
Earth=Large Marble(cm)
Everyday Object Representing Solar System
BodyMercury 4,880
Venus 12,100
Earth 12,756 1 2.17 Large Marble
Mars 6,787
Jupiter 143,200
Saturn 120,000
Uranus 51,800
Neptune 49,528Pluto (Dwarf
planet) ~2,330
Moon 3,476
Sun 1,392,000
Discussion Questions1. Identify the following:
a. Inner planetsb. Outer planetsc. Dwarf planetd. Moone. Star
2. Compare and contrast the sizes of the planets, moon, and stars

Part 2 - Solar System Distance Scale Model Objective:Students will use mathematical equations, measuring tools and skills to create an accurate scale model of the solar system.
Background Information:Distances in space can sometimes be hard to imagine because space is so vast. Think about measuring the following objects: a textbook, the classroom door, or the distance from your house to school. You would probably have to use different units of measurement. In order to measure long distances on Earth, we would use kilometers. But larger units are required for measuring distances in space. One astronomical unit equals 150 million km (1 AU = 150,000,000 km), which is the average distance from the Earth to the Sun.
Materials:- receipt paper rolls (adding machine tape) or old VHS tape - meter stick - metric ruler - markers or colored pencils - scissors
Engage:Ask students to brainstorm about all of the objects that they have seen or observed in the night sky. Then discuss with the class how far away they think these objects (stars, planets, or satellites) are. Reinforce to students that there are planets much closer to the Earth than stars other than our Sun.
Explore1. As a class, decide what scale you will use to determine your measured distance from the Earth
to the Sun. This measurement will represent one Astronomical Unit (AU); (Ex: 10 cm = 1 AU).
2. Multiply your chosen AU standard by 40 to determine the length of adding machine tape needed to complete your scale model activity. (10 cm x 40 = 400 cm of tape).
3. Place your values in Table 2.4. Cut the adding machine tape to the appropriate length.
Note: If you would like to include the Sun and Asteroid Belt, be sure to cut extra length (5 cm – 7cm should be adequate) at the start of your distance scale model. Students should also consider that the Sun’s size will not be to scale.
5. Mark one end of the tape to represent the Sun.6. Measure from the edge of your group’s drawn Sun the distances for each planet. Place a dot
where each planet should be placed. Include your scale on the model.7. Once all of the planets have mapped out, each group member should choose one or two
planets to draw and color. Use your textbook or materials provided by your teacher as a reference.

TABLE 2: Scaled Distances of Planets
PLANET
Distance from the Sun in
Astronomical Units (AU)
Standard-Scale(chosen by
class/group)AU x scale unit
Distance of Planet in the chosen
scale.(cm)
Mercury 0.4
Venus 0.7
Earth 1.0
Mars 1.5
Jupiter 5.2
Saturn 9.5
Uranus 19.5
Neptune 30.2
Pluto (Dwarf Planet) 40
Results and Conclusions:1. Why do you think scale models are important?2. Why were you instructed to multiply the distances in AU by 40 to determine how long your scale
model needed to be?3. Compare and contrast the distances of the inner and outer planets from the Sun
Extension:1) Draw the planets by scale according to size (diameter) on the distance scale model.2) Research other celestial bodies in the universe (other known stars and galaxies). Using AU and
units such as a light year, include these in you distance scale model.
Part 3 - Martian Sun Times ReportersTeacher’s Procedure: 1. Divide the class into seven different groups. Each person within the group will be assigned a
specific job, e.g. secretary, researcher(s), editor, organizer.2. Assign to each group one of the investigations to research. Use the factual information obtained
to prepare an article. This may consist of anyone of a variety of formats, e.g., a newspaper article, a travel brochure, a human –interest (or Martian interest) story, a fashion report, weather predictions.

Student Procedure:1. Your group will be assigned an investigation to research and present to class. 2. Use the factual information obtained to prepare an article. This may consist of anyone of a variety
of formats, e.g., a newspaper article, a travel brochure, a human –interest (or Martian interest) story, a fashion report, weather predictions.
3. Each person within the group will be assigned a specific job, e.g. secretary, researcher(s), editor, organizer.
Summary of Investigations:Investigation I: Weather Forecasts for Earthlings and Martians. (Comparing weather for Mars and where you live). Compare temperatures and wind speeds on Mars and on Earth where you live, as well as noting the temperature ranges across the two planets. Investigation II : A Martian Summer Day (Comparing temperatures for summer on Mars and the place you live) Research the typical high and low summer temperatures for Mars. Compare temperatures for the current date on Mars and Earth based upon 30° N latitude. Investigation III: Stormy Mars: Dust Gets In My Eyes (Finding out about dust storms on Mars). Discover the effect of Martian dust storms on temperatures. Find out what might cause the storms and infer the length of one storm. Investigation IV: Probing Earth and Mars: What Should We Pack? (Finding out temperatures at various landing sites) If MASA (Martian Aeronautics and Space Administration) sent astronauts to Earth to places that match the latitude and longitude of Viking and Pathfinder landing sites, where would they land and what weather conditions would they encounter? Investigation V: Life on Mars: Where's the Party? (Finding out about the possibility of life on Mars) Learn about the Martian meteorite that may show evidence of life there. Are any temperatures on Mars similar to Earth? Considering the environment of Mars what, would a Martian look like? Investigation VI: Getting to Mars: Are We There Yet? (Finding out about Mars' orbit and NASA Missions) Learn about planetary orbits and interplanetary travel. How long would a trip from Earth to Mars take? What are some of the next Martian missions planned? Investigation VII: Exploring Mars: Oh Water, Where Art Thou? (Finding out about water on Mars) Early observers of Mars thought they saw canals on the planet. There are no canals, but there is a lot of evidence of once– abundant water on Mars. Students will see current Mars images and compare them to water– formed features on Earth.
Extension:1. Allow students to imagine that they are living on one of the planets other than Earth. They must
assume the role of a travel agent who is trying to attract visitors to their home world. They must create an Interplanetary Travel Brochure.
Resources: http://www.ucls.uchicago.edu/MartianSunTimes/index.html) http://www.nineplanets.org/mars.html

STUDENT HANDOUT
DIFFERENTIATED INSTRUCTION: GUIDED/OPEN INQUIRY
PROPERTIES OF OBJECTS IN THE SOLAR SYSTEM
Objectives/Purpose: In this investigation students will:
Compare and contrast the properties of objects in the Solar System including the Sun, planets, and moons to those of Earth, such as gravitational force, distance from the Sun, speed, movement, temperature, and atmospheric conditions.
Construct scientific models of the solar system.
Demonstrate Achievement of the following Goals: Develop a problem statement based on the concept of comparing and contrasting properties of
objects in the Solar System that you would like to investigate. Create a model to demonstrate the concept of properties of objects in the Solar System that
you would like to investigate. How does the model demonstrate the concept that you investigated? Remember to use the “Claim, Evidence & Reasoning” rubric to defend your claims.

IMAGINARY ALIEN LIFE FORMSAdapted from Mars Critters http:// solarsystem.nasa.gov /educ/docs/ Mars _ Critters .pdf and
Solar System Activities: Search for a Habitable Planet http://solarsystem.nasa.gov/docs/modelingsolarsystem_20070112.pdf
Next Generation Sunshine State Standards Benchmark: SC.8.E.5.7 Compare and contrast the properties of objects in the Solar System including the Sun, planets, and moons to those of Earth, such as gravitational force, distance from the Sun, speed, movement, temperature, and atmospheric conditions. (Also assesses SC.8.E.5.4 and SC.8.E.5.8.); SC.7.L.15.2 Explore the scientific theory of evolution by recognizing and explaining ways in which genetic variation and environmental factors contribute to evolution by natural selection and diversity of organisms. (Also assesses SC.7.L.15.1 and SC.7.L.15.3.)SC.7.L.16.2 Determine the probabilities for genotype and phenotype combinations using Punnett Squares and pedigrees.
About This ActivityIn groups or as individuals, students will use their knowledge of Mars and living organisms to construct a model of a plant or animal that has the critical features for survival on Mars. This is a “what if” type of activity that encourages the students to apply knowledge. They will attempt to answer the question: What would an organism need to be like in order to live in the harsh Mars environment?
ObjectivesStudents will:• draw logical conclusions about conditions on Mars.• predict the type of organism that might survive on Mars.• use a Punnett Square to predict offspring genotupe and phenotype• construct a model of a possible martian life form.• write a description of the life form and its living conditions focusing on necessary structural adaptations for survival.
BackgroundTo construct a critter model, students must know about the environment of Mars. The creature must fit into the ecology of a barren dry wasteland with extremes in temperature. The atmosphere is much thinner than the Earth’s; therefore, special adaptations would be necessary to handle the constant radiation on the surface of Mars. Also the dominant gas in the Mars atmosphere is carbon dioxide with very little oxygen. The gravitational pull is just over 1/3rd (0.38) of Earth’s. In addition, Mars has very strong winds causing tremendous dust storms. Another requirement for life is food—there are no plants or animals on the surface of Mars to serve as food!
Scientists are finding organisms on Earth that live in extreme conditions previously thought not able to support life. Some of these extreme environments include: the harsh, dry, cold valleys of Antarctica, the ocean depths with high pressures and no Sunlight, and deep rock formations where organisms have no contact with organic material or Sunlight from the surface.

Vocabularyecology, adaptations, gravity, geology, atmosphere, radiation exposure, weather, environment, genotype, phenotypePart 1Materials
paper (construction, tag board, bulletin board, etc.) colored pencils glue items to decorate critter (rice, macaroni, glitter, cereal, candy, yarn, string, beads, etc.) pictures of living organisms from Earth Student Sheet, Mars Critters Student Sheet - Activity 1, If You Went to Mars Mars Fact Sheet (pg. 56)
ProcedureAdvanced Preparation
Gather materials. Set up various art supplies at each table for either individual work or small group work. This
activity may be used as a homework project. Review the “If You Went to Mars” sheet, Mars Fact Sheet, and the background provided
above along with the research conducted in the Martian Sun-Times activity or other desired research.
Classroom Procedure1. Ask students to work in groups to construct a model of an animal or plant that has features
that might allow it to live on or near the surface of Mars. 2. Have them consider all the special adaptations they see in animals and plants here on
Earth.3. They must use their knowledge of conditions on Mars, consulting the Mars Fact Sheet, If
You Went to Mars, and other resources such as web pages if necessary. Some key words for a web search might be “life in space” or “extremophile” (organisms living in extreme environments).
4. They must identify a specific set of conditions under which this organism might live. Encourage the students to use creativity and imagination in their descriptions and models.
5. If this is assigned as homework, provide each student with a set of rules and a grading sheet, or read the rules and grading criteria aloud and post a copy.
6. Review the information already learned about Mars in previous lessons.7. Remind the students that there are no wrong critters as long as the grading criteria are
followed.8. Include a scale with each living organism.9. Students select two different organisms that will mate.10. Revisit/Introduce Genetics:: Select one trait, the height of the “Mars Critter,” and
generate a Punnett Square to predict the genotype (genetic make-up) and phenotype (physical characteristics) of the offspring that the two organisms would produce, if mated. Students will learn more about this in upcoming topics. For simplicity – tell students that the height trait will have a paired allele, each parent giving one possible allele to the offspring and tall is dominant and expressed in the offspring when present. Complete a sample Punnett Square, as a reminder. Advanced students may explore incomplete dominance.
As an extension, mate offspring and/or generate Punnett Squares for other characteristics.
Genotype PhenotypeTT (dominant tall) Talltt (recessive short) ShortTt (mixed hybrid) Tall
Teacher Guide
Source: www. exploringnature.org /db/detail.php?dbID=22&detID=2290
Description and QuestionsUse another page if more space is needed.
1. The critter’s name:
2. Describe the habitat and climate in which your critter lives.
3. How does it move? Include both the form and method of locomotion. (For example: The miniature Mars Gopher leaps on powerful hind legs.)
4. What does it eat or use as nutrients? Is it herbivorous, carnivorous, omnivorous, other? What is its main food and how does it acquire this food?
5. What other creatures does it prey on, if any: How does it defend itself against predators?
6. How does your creature cope with Mars’ extreme cold, unfiltered solar radiation, and other environmental factors?
7. Suppose two Mar’s critters mated. One was Tall and the other was short. Using a Punnett Square, predict the offspring’s possible heredity of the tall gene. Each parent has two alleles for the height gene. Dad is homozygous tall (TT) and mom is short (tt). Predict the genotype (genetic make-up) and phenotype (physical characteristics) for the offspring
DadGenotype: _____% TT ____% tt ____% Tt
Phenotype: ______% Tall ______% short
Genotype PhenotypeTT (homozygous tall) Talltt (homozygous short) ShortTt (heterozygous) Tall Mom
Offspring

Student Sheet
If You Went to Mars
From: “Guide to the Solar System.”By the University of Texas, McDonald Observatory
Mars is more like Earth than any other planet in our solar system but is still very different. You would have to wear a space suit to provide air and to protect you from the Sun’s rays because the planet’s thin atmosphere does not block harmful solar radiation. Your space suit would also protect you from the bitter cold, temperatures on Mars rarely climb above freezing, and they can plummet to -129oC (200 degrees below zero Fahrenheit). You would need to bring water with you, although if you brought the proper equipment, you could probably get some Martian water from the air or the ground.
The Martian surface is dusty and red, and huge duststorms occasionally sweep over the plains, darkening the entire planet for days. Instead of a blue sky, a dusty pink sky would hang over you.
West Rim of Endeavour Crater on MarsImage Credit: NASA/JPL-Caltech/Cornell/ASU
http://www.nasa.gov/mission_pages/mer/multimedia/gallery/pia11507.html

Fourth planet from the Sun
Distance from the Sun:Minimum: 206,000,000 kilometersAverage: 228,000,000 kilometers
(1.52 times as far as Earth)Maximum: 249,000,000 kilometers
Eccentricity of Orbit: 0.093 vs. 0.017 for Earth (0.00 is a perfectly circular orbit)
Distance from Earth: Minimum: 56,000.000 kilometersMaximum: 399,000,000 kilometers
Year: 1.88 Earth years - 669.3 Mars days (sols) – 686.7 Earth days
Day: 24.6 Earth hours
Tilt of Rotation Axis: 25.2o vs. 23.5o for Earth
Size: Diameter: 6794 kilometers vs 12,76 kilometers for EarthSurface Gravity: 0.38 9 or ~ 1/3) Earth’s gravityMass: 6.4 x 1026 grams vs. 59.8 x 1026 grams for EarthDensity: 3.9 grams/cc vs. 5.5 grams/cc for Earth
Surface Temperature: ColdGlobal extremes: -125oC (-190oF) to 25oC (75oF)Average at Viking 1 site high 010oC (15oF); low -90oC (-135oF)
Atmosphere: Thin unbreathableSurface pressure: ~6 millibars, or about 1/200th of Earth’s Contains 95% carbon dioxide, 3% nitrogen, 1.5%argon, ~0.03% water (varies with season), no oxygen. (Earth has 78% nitrogen, 21% oxygen, 1% argon, 0.03% carbon dioxide.)Dusty, which makes the sky pinkish. Planet-wide dust storms black out the sky.
Surface: Color: Rust redAncient landscapes dominated by impact cratersLargest volcano in the solar system (Olympus Mons)Largest canyon in the solar system (Valles Marineris)Ancient river channelsSome rocks are basalt (dark lava rocks), most others unknownDust is reddish, rusty, like soil formed from volcanic rock
Moons Phobos (“Fear”), 21 kilometers diameterDeimos (“Panic”), 12 kilometers diameter
MARS FACT SHEET

Part 2: Search for a Habitable PlanetNext Generation
Sunshine State Standards:SC.8.E.5.3 Distinguish the hierarchical relationships between planets and other astronomical bodies relative to solar system, galaxy, and universe, including distance, size, and composition. (Also assesses SC.8.E.5.1 and SC.8.E.5.2.)SC.8.E.5.7 Compare and contrast the properties of objects in the Solar System including the Sun, planets, and moons to those of Earth, such as gravitational force, distance from the Sun, speed, movement, temperature, and atmospheric conditions. (Also assesses SC.8.E.5.4 and SC.8.E.5.8.)
Objective:This lesson focuses on characteristics of planets that make them habitable. Living creatures need food to eat, gas to breathe, and a surface that provides a comfortable temperature, gravity, and place to move around. These requirements are related to what the planet’s surface and atmosphere are made of, and how large (gravity) and close to the Sun (temperature) the planet is located. The inner planets are small (low gravity), relatively warm, and made of solid rock. Some of them have atmospheres. The outer planets are large (high gravity), cold, and made of gaseous and liquid hydrogen and helium. A creature that might be comfortable on a gas giant would not be comfortable on a small rocky planet and vise versa.
Vocabulary: habitable, life requirements, planet characteristics, surface and atmospheric composition (chemical examples) Time Required: One to two 45 minute class periods
Materials: Creature Cards Solar System Images and Script Planet Characteristics Table
Students will define the life requirements of a variety of creatures and learn that these relate to measurable characteristics of planets the creatures might inhabit. By evaluating these characteristics,

students discover that Earth is the only natural home for us in our solar system and that Mars is the next most likely home for life as we know it.

ProceduresActivity 1. Define Habitability and Design CreaturesThis lesson has students take the places of extraterrestrial creatures exploring our solar system in search of new homes. They define creature life requirements and relate them to planet characteristics in order to choose homes. Several of these creatures have life requirements quite unlike life as we know it, where water and carbon are essential, and some are downright impossible. The goals here are not to study biochemistry, but habitability of planets. Bizarre creatures had to be invented for them to find homes on some of the planets in our solar system. Another goal is to encourage creativity and teamwork in designing creatures and selecting planets. This activity is one that is outside of the box.
ENGAGE1. Set the stage by reading introduction:
We are space travelers from a distant star system. The crew of our spaceship includes six different types of creatures who live on different planets in that star system. Our star is expanding and getting very hot. Our home planets are heating up and soon we will need new places to live. It is our mission to find habitable planets for our six different types of creatures with different life requirements. In all we need to find new homes for five billion inhabitants.
First we need to know what makes a planet habitable so we can set up probes to measure the characteristics of various planets. The different requirements for life can be related to measurable planetary characteristics. What do creatures require to live?
EXPLORE2. Brainstorm on requirements and characteristics. Lead the students in producing a table similar to
the one below. Encourage free-thinking, there aren't specific right answers, but lead students to the following topics, among others.
Life requirements Planet characteristics food to eat surface & atmosphere composition gas to breathe atmosphere composition comfortable temperature temperature range ability to move surface type (solid, liquid, gas) gravity size
3. Ask students what kinds of probes might be used to measure these characteristics. Answers may range from general to specific and may be based on science fiction. Examples may include cameras, radar, thermometers, and devises to measure magnetics, altitude, and light in all wavelengths from radio waves, through infrared, ultraviolet, and X-ray to gamma-ray. [Secondary school classes might do one of the excellent activities on the electromagnetic spectrum or activities related to solar system missions.]
4. Divide students into six or more teams (more than one group can design the same creature). Explain that each team represents one of the six different types of creatures on our mission. Today we will make models of creatures having specific life requirements. Later we will collect data on a new planetary system in order to search for new homes.
5. Distribute one creature card to each team. Each card contains the information on a single line A-F below. Tell students that each team is supposed to create a creature that fits the characteristics on their creature card. Students may select art supplies (or drawing supplies) and should be able to complete their creatures in approximately 15-20 minutes. Students will name their creature ambassador and be ready to introduce it to the class. Encourage teamwork and creativity.

[Teacher, you may get questions on some of the food or gases. Handle these as they come, but do not provide this vocabulary ahead of time unless it comes up during brainstorming. Simply explain that they are various chemical elements or compounds. They are needed only for matching with planetary characteristics and should not be tested vocabulary.] 6. Ask each team to introduce their creature ambassador and to explain their creature's needs and
any specific features of the model. This will take longer than you expect because students really get involved with their creatures.
Creature Food Breathes Motion TemperatureA helium hydrogen flies coldB rock carbon dioxide flies hotC carbon oxygen walks moderateD methane hydrogen swims coldE water carbon dioxide walks moderateF carbon oxygen swims moderate
Assessment: Evaluate team presentations and collect descriptions of how their creature meets its life requirements.
EXPLAINActivity 2. Tour solar system and evaluate for habitability
1. Prepare students for solar system tour. Tell students that they will have to take notes on the planets to report back later. Students will work in the same teams as when they made creatures. The grade level/ability will determine how the teacher structures the information gathering. Each team may record the information on all planets or on just one or two planets. Young students may simply compare planet characteristics to those on their creature cards and check off boxes of matching characteristics on the planet chart.
2. Distribute copies of the blank planet characteristics chart or put it on the blackboard/overhead. Show slides/photos of the planets and read the text provided below. For elementary students, exclude the data in parentheses. For secondary students, include the data. As you tour the planets, it may be necessary to repeat each section twice for younger students to get enough information to report.
3. Compile information on overhead or blackboard planet characteristics chart as teams report data they recorded on planet (size, surface type, composition, atmosphere and temperature). Attached table gives suggested answers. Students will probably be able to name the planets, but this is not a test. Alternatively, each student could fill in a chart to allow evaluation of listening skills. Also, students could work cooperatively to complete one chart per team.
4. Have teams compare the characteristics chart on the planets with the creature requirements on their creature card. Decide which planets (if any) would be suitable homes for their creature. Report their choices orally and explain, if necessary. Tabulate on the blackboard.Creature Planet(s)A 4, 5 (Saturn and Jupiter), but also 2,3 (Neptune and Uranus)B 8 (Venus)C, F 7 (Earth)D 2,3 (Neptune and Uranus)E 6 (Mars)
No creatures can live on planets 1 or 9 (Mercury or Pluto)

5. Ask students to create a finale or read the finale below.
Now that the creatures have evaluated habitable planets we will send down spaceships to check out the surfaces in detail. Creatures A, B, D and E find uninhabited planets that are just suited to their needs. They decide to settle on their chosen planets. Creatures C and F are both interested in the same planet. Creature F finds the salt water to be a perfect home for it, while creature C finds the land to be overpopulated and polluted. They decide that there isn't room for one billion more inhabitants and decide to look for a habitable planet in another solar system.
Assessment: Collect Planet Characteristics tables and compare with the suggested answers above. Do not require a perfect match, but allow students to think critically and creatively. Allow adaptations of the environment (such as turning water into hydrogen and oxygen) and other reasonable modifications.
EVALUATEWriting assignment: Ask students to write a paragraph explaining why the planet they found will or will not be suitable for their creature. The paragraph could be in the form of a news report to be sent back to their dying solar system.

CREATURE CARDS
We are space travelers from a distant star system. The crew of our spaceship includes six different types of creatures who live on different planets in that star system. Our star is expanding and getting very hot. Our home planets are heating up and soon we will need new places to live. It is our mission to find habitable planets for our six different types of creatures with different life requirements. In all we need to find new homes for five billion inhabitants.
Your task 1) Design a creature that fits the following needs for life. 2) Give it a name. and 3) Introduce it to the class and explain how it meets its needs for life.
Creature A
Food Helium Breathes Hydrogen Motion Flies Temperature Cold
We are space travelers from a distant star system. The crew of our spaceship includes six different types of creatures who live on different planets in that star system. Our star is expanding and getting very hot. Our home planets are heating up and soon we will need new places to live. It is our mission to find habitable planets for our six different types of creatures with different life requirements. In all we need to find new homes for five billion inhabitants.
Your task 1) Design a creature that fits the following needs for life. 2) Give it a name. and 3) Introduce it to the class and explain how it meets its needs for life.
Creature B
Food RockBreathes Carbon dioxideMotion FliesTemperature Hot
We are space travelers from a distant star system. The crew of our spaceship includes six different types of creatures who live on different planets in that star system. Our star is expanding and getting very hot. Our home planets are heating up and soon we will need new places to live. It is our mission to find habitable planets for our six different types of creatures with different life requirements. In all we need to find new homes for five billion inhabitants.
Your task 1) Design a creature that fits the following needs for life. 2) Give it a name. and 3) Introduce it to the class and explain how it meets its needs for life.
Creature C
Food CarbonBreathes OxygenMotion WalksTemperature Moderate
We are space travelers from a distant star system. The crew of our spaceship includes six different types of creatures who live on different planets in that star system. Our star is expanding and getting very hot. Our home planets are heating up and soon we will need new places to live. It is our mission to find habitable planets for our six different types of creatures with different life requirements. In all we need to find new homes for five billion inhabitants.
Your task 1) Design a creature that fits the following needs for life. 2) Give it a name. and 3) Introduce it to the class and explain how it meets its needs for life.
Creature D
Food MethaneBreathes HydrogenMotion SwimsTemperature Cold

We are space travelers from a distant star system. The crew of our spaceship includes six different types of creatures who live on different planets in that star system. Our star is expanding and getting very hot. Our home planets are heating up and soon we will need new places to live. It is our mission to find habitable planets for our six different types of creatures with different life requirements. In all we need to find new homes for five billion inhabitants.
Your task 1) Design a creature that fits the following needs for life. 2) Give it a name. and 3) Introduce it to the class and explain how it meets its needs for life.
Creature E
Food WaterBreathes Carbon DioxideMotion WalksTemperature Moderate
We are space travelers from a distant star system. The crew of our spaceship includes six different types of creatures who live on different planets in that star system. Our star is expanding and getting very hot. Our home planets are heating up and soon we will need new places to live. It is our mission to find habitable planets for our six different types of creatures with different life requirements. In all we need to find new homes for five billion inhabitants.
Your task 1) Design a creature that fits the following needs for life. 2) Give it a name. and 3) Introduce it to the class and explain how it meets its needs for life.
Creature F
Food CarbonBreathes OxygenMotion SwimsTemperature Cold

Search for a Habitable PlanetSolar System Images and Script
Today we are traveling through an outer section of the Milky Way galaxy. There are many, many stars. We are approaching a medium-sized star, the type that often has habitable planets. As we draw closer we see that there are nine planets orbiting this star.
We will tour this planetary system and use our probes to measure planet characteristics in our search for a habitable planet. Record this information about your planet then when we have completed our tour we will collect all our results. We will evaluate our results to look for a new place to live.
We will now tour this new planetary system, starting from the outside and going toward the star: We are approaching the first planet.
The first “planet” is tiny (2350km). In fact, it was downgraded from a planet to a dwarf planet in 2006 mainly because it orbits around the Sun in “zones of similar objects that can cross its path.” It is made of rock and methane ice. It has almost no atmosphere (just a trace of methane) and is very cold (-230oC).
The second planet is a medium large (49,500km) and made of liquid hydrogen and helium. It has a thick atmosphere of hydrogen, helium and methane. It is very cold (-220 oC).
The third planet is very similar to the 2nd except that it has a small ring system. It is medium large (51,000 km) and made of liquid hydrogen and helium. It also has a thick atmosphere of hydrogen, helium and methane and is very cold (-210 oC).
The fourth planet is large (120,500 km) and has an extraordinary ring system. It has no solid surface, but is a giant mass of hydrogen and helium gas outside and liquid hydrogen inside. It is cold (-180 oC).

Search for a Habitable PlanetSolar System Images and Script
The fifth planet is the largest (143,000 km) in this planetary system. Like the fourth, it is a gas giant made of hydrogen and helium with no solid surface. It is also cold (-150oC) in the upper atmosphere, but increases in temperature and pressure and becomes liquid in the interior.
The sixth planet is small (6786 km) and rock. There is some water ice in polar regions and a thin atmosphere of carbon dioxide. The temperature is moderate (-23oC).
The seventh planet is medium small (12, 750 km). The surface is made of liquid water and rock with some carbon compounds. The atmosphere is mostly nitrogen and oxygen with some carbon dioxide and water vapor. The temperature is moderate (21oC).
The eighth planet is also medium small (12,100 km). The atmosphere of carbon dioxide is so thick that we can’t see the rocky surface beneath it, but need our radar probes. The temperature is very hot (480oC).
The ninth planet is tiny (4880 km) and rocky. It has almost no atmosphere (just a hint of helium). Temperatures are generally hot, but extreme variable, ranging from -180oC on the space-facing side to 400oC on the star-facing side.
We have now finished our tour and it’s time to compile all of our data. Each team will report its results and we will make a comparison chart.

PLANET CHARACTERISTICS(Teacher Key)
Size Surface Type and
Composition
Atmosphere Temperature Name
1 tiny 2350 km solid rock, methane ice
none (methane) very cold -230 C Pluto
2 medium large 49,500 km
liquid hydrogen, helium
thick hydrogen, helium, methane
very cold -220 C
Neptune
3 medium large 51,100 km
liquid hydrogen, helium
thick hydrogen, helium, methane
very cold -210 C
Uranus
4 large 120,500 km
liquid hydrogen thick hydrogen, helium
cold -180 C Saturn
5 very large 143,000 km
liquid hydrogen thick hydrogen, helium
cold -150 C Jupiter
6 small 6786 km
solid rock, water ice
thin carbon dioxide
moderate -23 C Mars
7 medium small 12,756 km
solid rock, liquid water, carbon compounds
medium nitrogen, oxygen
moderate 21 C Earth
8 medium small 12,100 km
solid rock thick carbon dioxide
very hot 480 C Venus
9 tiny 4878 km solid rock none (helium) variable range -180 to 400 C
Mercury

PLANET CHARACTERISTICSStudent Sheet
Size Surface Type and
Composition
Atmosphere Temperature Name
1
2
3
4
5
6
7
8
9
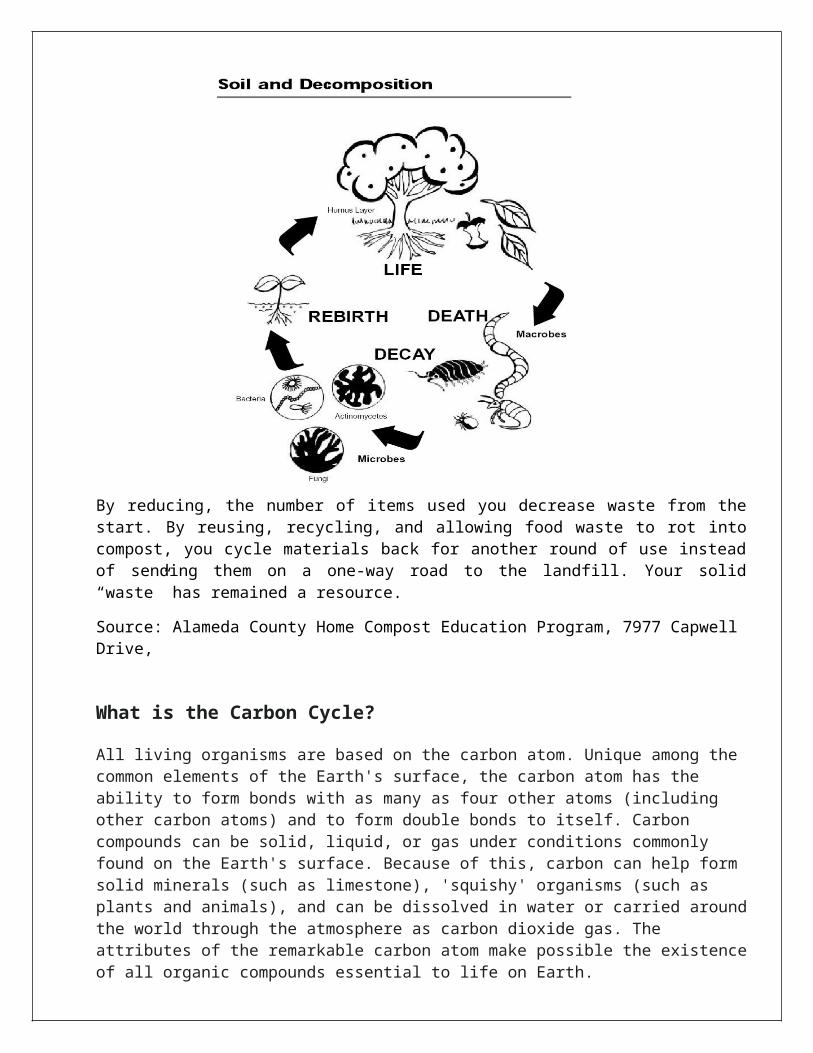
PLANETARY EXPLORATION & EXTREME LIFE FORMS (Differentiated Lab)
Revised by: University of Miami – Science Made Sensible Fellows
Next Generation Sunshine State Standards: SC.8.E.5.1 Recognize that there are enormous distances between objects in space and apply our knowledge of light and space travel to understand this distance. SC.8.E.5.3 Distinguish the hierarchical relationships between planets and other astronomical bodies relative to solar system, galaxy, and universe, including distance, size, and composition. SC.8.E.5.7 Compare and contrast the properties of objects in the solar system including the Sun, planets, and moons to those of Earth, such as gravitational force, distance from the Sun, speed, movement, temperature, and atmospheric conditions.
SC.7.L.15.3 Explore the scientific theory of evolution by relating how the inability of a species to adapt within a changing environment may contribute to the extinction of that species. SC.7.L.16.2 Determine the probabilities for genotype and phenotype combinations using Punnett Squares and pedigrees. SC.7.L.17.3 Describe and investigate various limiting factors in the local ecosystem and their impact on native populations, including food, shelter, water, space, disease, parasitism, predation, and nesting sites.
Objective: Students will research a planet in our solar system, including information about the atmosphere, surface conditions, etc. Then they will have to design an alien life form that would be adapted to live on their planet. They will present their planet research and alien life forms to the class. They will also use a Punnett Square to predict offspring genotype and phenotype.
Engage: Introduce adaption and extreme environments. Scientists are finding organisms on Earth that live in extreme conditions previously thought not able to support life. Some of these extreme environments include the harsh, dry, cold valleys of Antarctica and the bottom of the ocean under high pressure, no oxygen and no light. If life forms on other planets were to exist, what conditions would they face? How would they survive? What type of adaptations might they need? Explain that students will first research a planet, and then create a life form that had adapted to survive the conditions on their planet.
Materials: computers with internet access books on the planets construction paper markers/crayons/colored pencils
Teacher Notes: Assign one group to each planet excluding Earth. For the first part of the activity, students will research their planet, filling in a data sheet. All information can be found on the websites provided on the student handouts. Emphasize the importance of using appropriate internet sources, no Wikipedia. Once students have completed their planet worksheet, they should start on the alien life form worksheet. They will also draw their life form on construction paper. Groups will present both their planet research and their aliens including explanations of its specific adaptations that allow it to survive on their planet. Upper level students could be required to do a PowerPoint presentation.
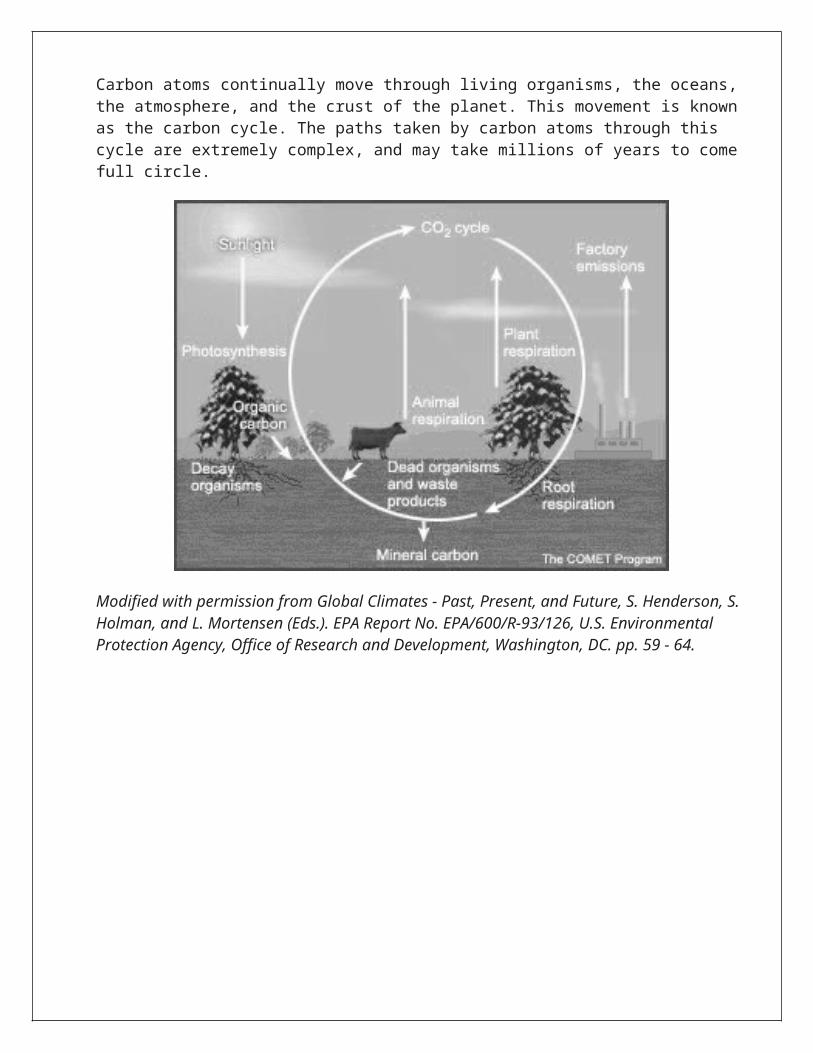
Name: ____________________________________ Date: ___________________ Pd: __________
Planet Research WorksheetFill in the worksheet below about your assigned planet; be sure to include units where necessary. Some helpful websites for your research are:
http://nineplanets.org/ http://solarsystem.nasa.gov/index.cfm www.windows2universe.org/our_solar_system/solar_system.html www.exploratorium.edu/ronh/weight/index.html
Planet: _____________________________ Planetary Symbol: ___________________________
Diameter: ___________________________ Mass: _____________________________________
Order from the Sun: ___________________ Distance from the Sun: _______________________
Gravity: ____________________________ Gravity compared to Earth: ___________________
If you weigh 100 lbs on Earth, how much would you weigh on your planet? _________________
Temperature Range: ___________________Average Temperature ________________________
Length of Day (rotation period): _________ Length of year (revolution period): ______________
Tilt of axis: __________ Eccentricity of Orbit: ________ Number of Satellites: ________
What is the atmosphere like on your planet? What gases? Poisonous? Dry? Etc
Describe the surface of your planet.

Describe what your planet looks like including any unique features such as rings.
In complete sentences, list 5 additional interesting facts about your planet that are not already discussed on this worksheet.

Name: ____________________________________ Date: ___________________ Pd: __________
Extreme Alien Life FormsYou will create an alien life form that has adaptations enabling it to survive on your assigned planet. Keep in mind the information you learned about your planet during your research. Complete the questions below, and then draw your life form on the provided construction paper. Make sure to label the aspects of your life form that let it survive on your planet. Include your life form’s name, your planet, and your name and class period on the front of your drawing. You will be presenting your drawings to the class.
Your Planet:
The name of your life form:
Describe the habitat and climate in which your life form lives:
How does it move? Include both the form and method of locomotion. (For example: The miniature Mars Gopher leaps on powerful hind legs.)
What does it eat or use as nutrients? Is it herbivorous, carnivorous, omnivorous, or other? What is its main food and how does it acquire this food?
What other creatures does it prey on, if any? How does it defend itself against predators?

Describe other adaptations your life form has developed to cope with your planet’s unique environment.
Suppose two alien creatures mated. One was tall and the other was short. Using a Punnett Square, predict the offspring’s possible heredity of the tall gene. Each parent has two alleles for the height gene. Dad is homozygous tall (TT) and mom is homozygous short (tt). Predict the genotype (genetic make-up) and phenotype (physical characteristics) for the offspring.
Dad → ______ ______
______
______
Mom ↑
The resulting offspring:
Genotype: __________% TT __________% tt __________% Tt
Phenotype: __________% tall __________% short
Genotype PhenotypeTT (homozygous tall) Talltt (homozygous short) ShortTt (heterozygous) Tall
Offspring

STUDENT HANDOUT
DIFFERENTIATED INSTRUCTION: GUIDED/OPEN INQUIRY
PLANETARY EXPLORATION ANDEXTREME ALIEN LIFE FORMS
Objectives/Purpose: In this investigation students will:
Compare and contrast the properties of objects in the solar system (gravitational force, distance from the Sun, speed, movement, temperature, and atmospheric conditions.)
Describe and investigate various limiting factors in the local ecosystem and their impact on native populations, including food, shelter, water, space for these “alien” environments
Relate how the inability of an “alien” species to adapt within a changing environment may contribute to the extinction of that species
Demonstrate Achievement of the following Goals: Develop a problem statement based on the concept of “planetary exploration and extreme
alien life forms” that you would like to investigate. Model the concept/idea that you outlined in your problem statement above. How does the model demonstrate the concept that you investigated? Remember to use the “Claim, Evidence & Reasoning” rubric to defend your claims.

STUDENT HANDOUT
DIFFERENTIATED INSTRUCTION: OPEN INQUIRY
VISUALIZING OUR SOLAR SYSTEM – SCALE MODELS
Objectives/Purpose: In this investigation students will:
Recognize that there are enormous distances between objects in space Apply our knowledge of light and space travel to understand distances in space Distinguish the hierarchical relationships between planets and other astronomical bodies
relative to solar system, galaxy, and universe, including distance, size, and composition.
Demonstrate Achievement of the following Goals: Develop a problem statement based on the concept of scale hierarchical relationships between
planets and other astronomical bodies that you would like to investigate. Model one hierarchical relationships between planets and other astronomical bodies that you
would like to investigate. How does the model demonstrate the concept that you investigated? Remember to use the “Claim, Evidence & Reasoning” rubric to defend your claims.

ANTI-DISCRIMINATION POLICYFederal and State Laws
The School Board of Miami-Dade County, Florida adheres to a policy of nondiscrimination in employment and educational programs/activities and strives affirmatively to provide equal opportunity for all as required by law:
Title VI of the Civil Rights Act of 1964 - prohibits discrimination on the basis of race, color, religion, or national origin.
Title VII of the Civil Rights Act of 1964, as amended - prohibits discrimination in employment on the basis of race, color, religion, gender, or national origin.
Title IX of the Educational Amendments of 1972 - prohibits discrimination on the basis of gender.
Age Discrimination in Employment Act of 1967 (ADEA), as amended - prohibits discrimination on the basis of age with respect to individuals who are at least 40.
The Equal Pay Act of 1963, as amended - prohibits gender discrimination in payment of wages to women and men performing substantially equal work in the same establishment.
Section 504 of the Rehabilitation Act of 1973 - prohibits discrimination against the disabled.
Americans with Disabilities Act of 1990 (ADA) - prohibits discrimination against individuals with disabilities in employment, public service, public accommodations and telecommunications.
The Family and Medical Leave Act of 1993 (FMLA) - requires covered employers to provide up to 12 weeks of unpaid, job-protected leave to “eligible” employees for certain family and medical reasons.
The Pregnancy Discrimination Act of 1978 - prohibits discrimination in employment on the basis of pregnancy, childbirth, or related medical conditions.
Florida Educational Equity Act (FEEA) - prohibits discrimination on the basis of race, gender, national origin, marital status, or handicap against a student or employee.
Florida Civil Rights Act of 1992 - secures for all individuals within the state freedom from discrimination because of race, color, religion, sex, national origin, age, handicap, or marital status.
Veterans are provided re-employment rights in accordance with P.L. 93-508 (Federal Law) and Section 295.07 (Florida Statutes), which stipulates categorical preferences for employment.
Revised 9/2008