VideoWall Construction Manual en ver1 - Panasonic … Player Digital Link Cable Third HDMI Cable In...
23
Transcript of VideoWall Construction Manual en ver1 - Panasonic … Player Digital Link Cable Third HDMI Cable In...


●Unpacking 3
●Installation
Cautions when installing or moving Wall-mounting bracket
4 6
VESA Mount 7
Cautions of Video Wall installation 8
Embedding condition 12
Connection to power source 16
Daisy Chain Connection Remote controller IR signal outreach distance
17 21
●Picture adjustment Color Calibration
22
●Maintenance
Maintenance 23
2

Remove upper carton case and front cushions
Take out accessory parts and cushions
Remove a protection bag
Joint (front and back/Each 2 points)
Front Side
Remove Joint(Total 4)
3 Unpacking
1. 2.
3.
4.
Accessory parts
Sample of 55LFV6/60

4 Cautions
・ Please do not move with the monitor as an upswing or a downswing.
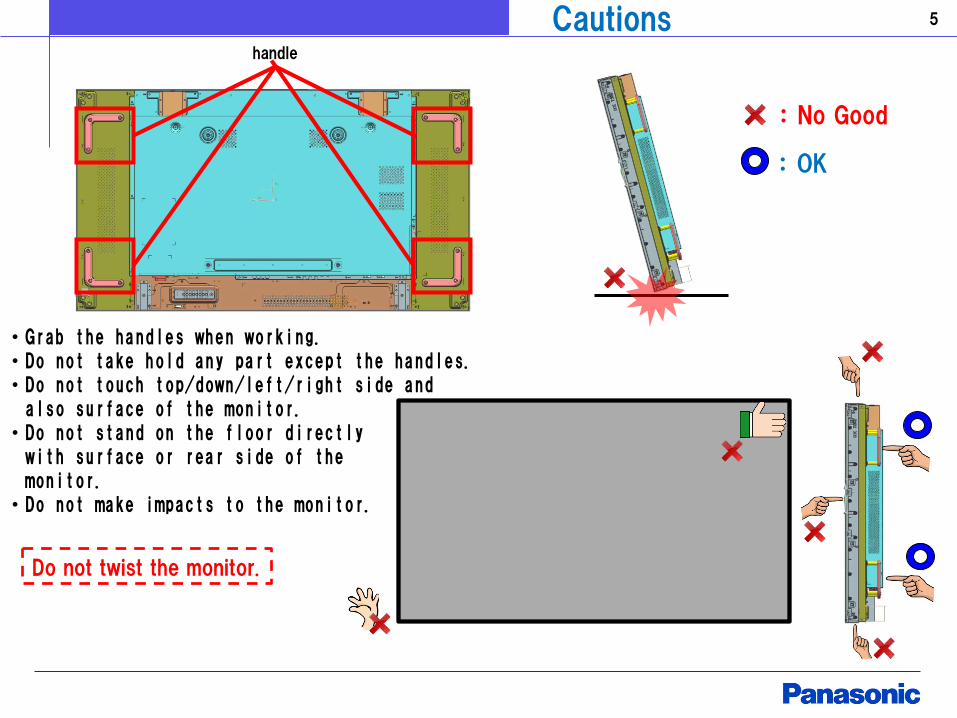
・Grab the handles when working. ・Do not take hold any part except the handles. ・Do not touch top/down/left/right side and also surface of the monitor. ・Do not stand on the floor directly with surface or rear side of the monitor. ・Do not make impacts to the monitor.
Do not twist the monitor.
handle
5 Cautions
: No Good
: OK

When preparing bracket for multiple monitors, please take the following considerations.
1) Ensure the wall on which the monitors will be installed has a smooth surface.
2) Ensure the bracket used to attach the monitors to the wall have enough load capacity to support them.
3) Ensure the bracket used can be adjusted upward, downward, to the left and right, forward and backward.
4) When installing or moving, ensure the bracket does not interfere with the back of the monitor, cable guides, and other structures.
5) Ensure the bracket is constructed so that the monitor can easily be removed.
6) Please do not distort the monitor.
Wall-mounting bracket 6

VESA MOUNT 7
There are L type protection board (downside) and protection film (monitor surface). Please remove them.
- 16mm longer than the thickness of the mounting bracket) and tighten them securely.

Please do not press panel active area and corner. Please press center edge of right and left. Please press vertically to the panel. Please increase power in right and left equality.
8 Cautions
When we press 70N power to left and Right, the wall mount will move to back ※In case of using TY-VK55LFV1
There is a possibility that if pressure is added on the bezel towards outside, the bezel will be distorted. (The bezel will be open by 20N pressure) Please add a soft pressure vertically to the panel.

9 Cautions
After turning on, the monitor slightly expands due to heat. When installing multiple monitors with fixed outer most
peripheries, space (0.5 mm) between monitors (above, below, to the left and right sides of each monitor) must be secured to account for expansion due to heat.
Space between sets (same for above, below, to the left and right directions)
Please do not distort the monitor.
0.5mm
0.5mm

10 Cautions
After hung up the monitor and adjust position、 Please do not adjust to flat each monitor surface using some material such as “PLATE”. This case, distortion is added to the monitor, and there is a possibility some picture trouble happen to the monitor.
PLATE
SIDE
BACK
SIDE FRONT

Secure air circulation to ensure the ambient condition as follows. Temperature : 0°C - 40°C Humidity : 10% - 90% (Non condensation). Note In case of LFV8 model : 20% - 80% (Non condensation) Please secure space as follows.
1) Stand-alone installation Secure 100 mm or more space above, below, to the left and right and 50 mm or more behind the monitor.
2) Multi-installation
Secure 100 mm or more space above, below, to the left and right and 150 mm or more behind the monitor.
Attention 11
A B C D E
100 100 100 100 50
Unit : mm
A
D
C
E
B
12
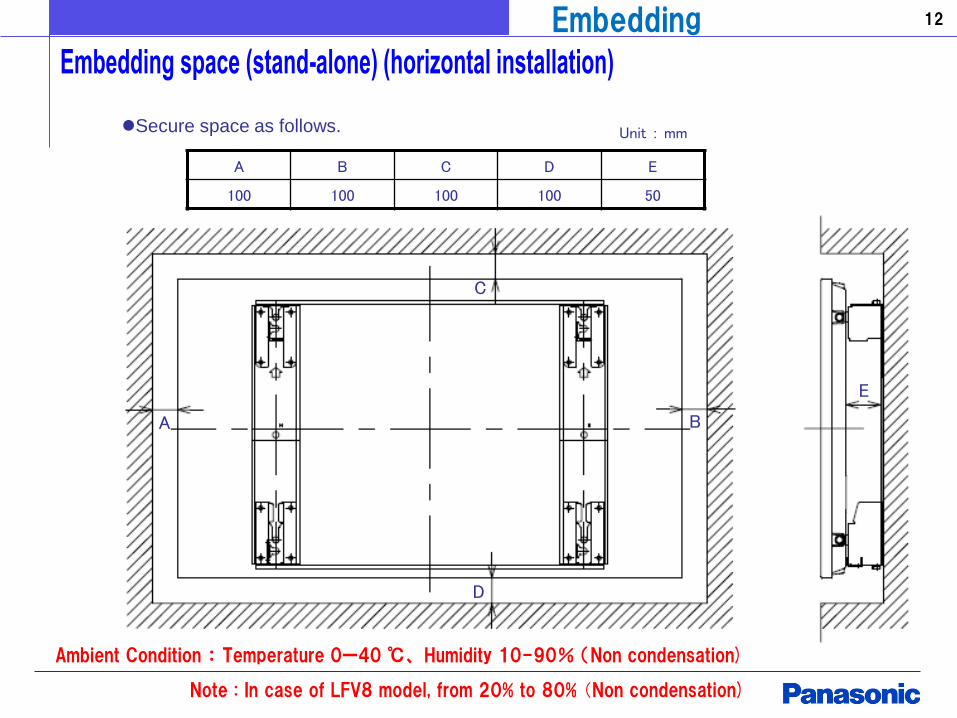
Secure space as follows.
Embedding
Ambient Condition : Temperature 0ー40 ℃、 Humidity 10-90% (Non condensation)
Note : In case of LFV8 model, from 20% to 80% (Non condensation)

A 100
B 100
C 100
D 100
E 50
Unit : mm
A B
C
D
E
13
Secure space as follows.
Embedding
Ambient Condition : Temperature 0ー40 ℃、 Humidity 10-90% (Non condensation)
Note : In case of LFV8 model, from 20% to 80% (Non condensation)
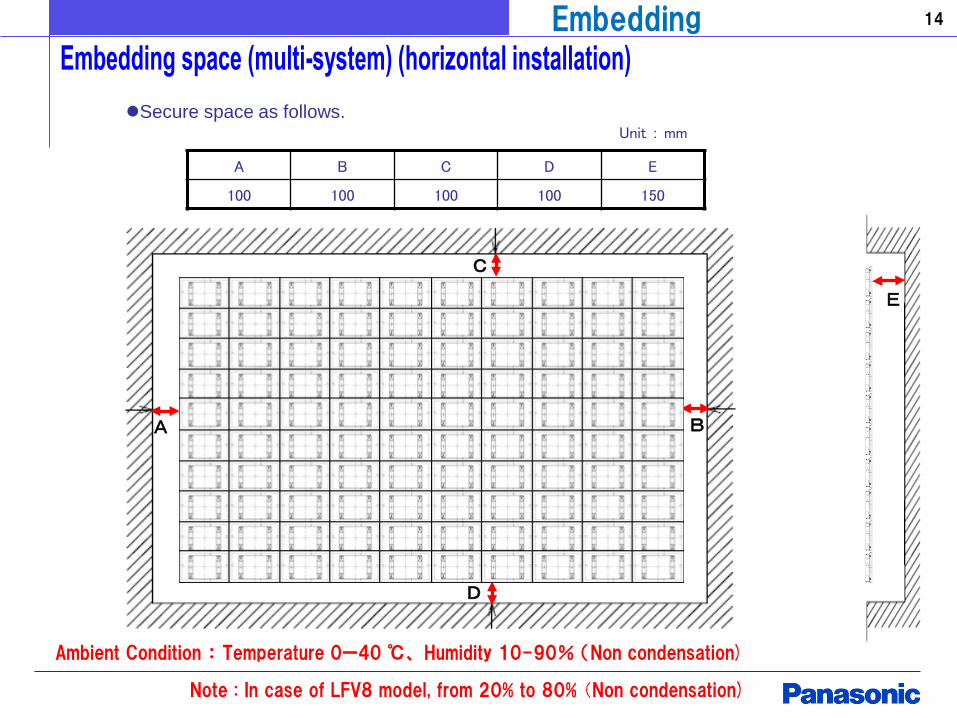
A B C D E
100 100 100 100 150
Unit : mm
A
D
C
B
A B
C
D
E
14 Embedding
Secure space as follows.
Ambient Condition : Temperature 0ー40 ℃、 Humidity 10-90% (Non condensation)
Note : In case of LFV8 model, from 20% to 80% (Non condensation)

A 100
B 100
C 100
D 100
E 150
Unit : mm A B
C
D
A B
C
D
E
15 Embedding
Secure space as follows.
Ambient Condition : Temperature 0ー40 ℃、 Humidity 10-90% (Non condensation)
Note : In case of LFV8 model, from 20% to 80% (Non condensation)

AC Power Cord
J Model
W Model
U Model
C Model
Use only the AC power cord included and connect securely. Never use a power cord other than the one included as it may lead to a smoke emission and/or fire due to insufficient contact.
Connection to power source 16
Caution
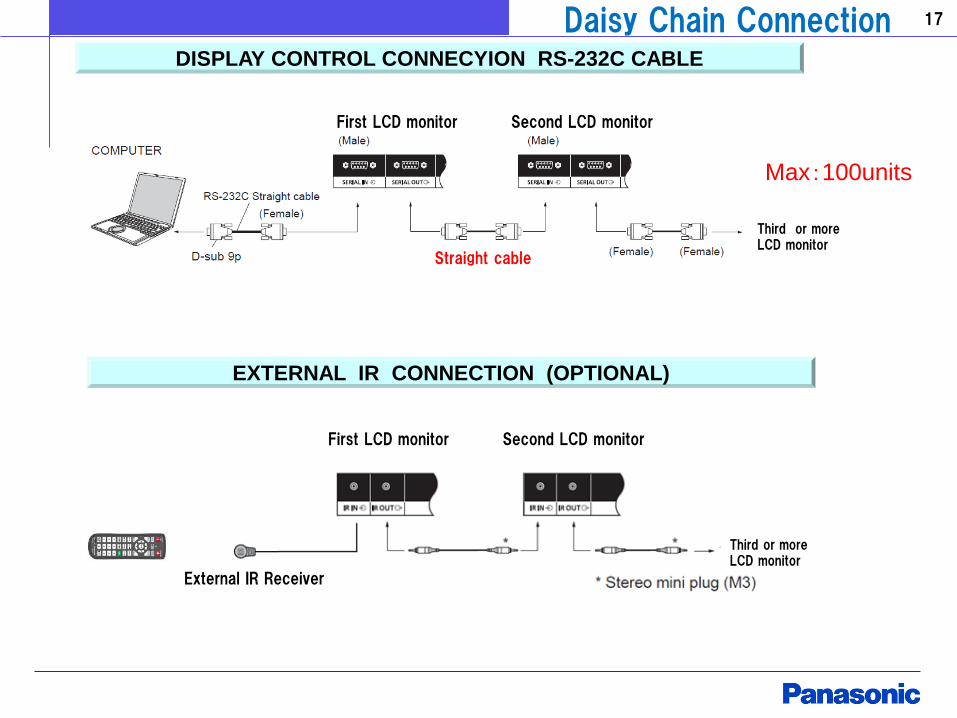
DISPLAY CONTROL CONNECYION RS-232C CABLE
EXTERNAL IR CONNECTION (OPTIONAL)
Max:100units
Straight cable
External IR Receiver
Daisy Chain Connection 17
First LCD monitor Second LCD monitor
First LCD monitor Second LCD monitor
Third or more LCD monitor
Third or more LCD monitor
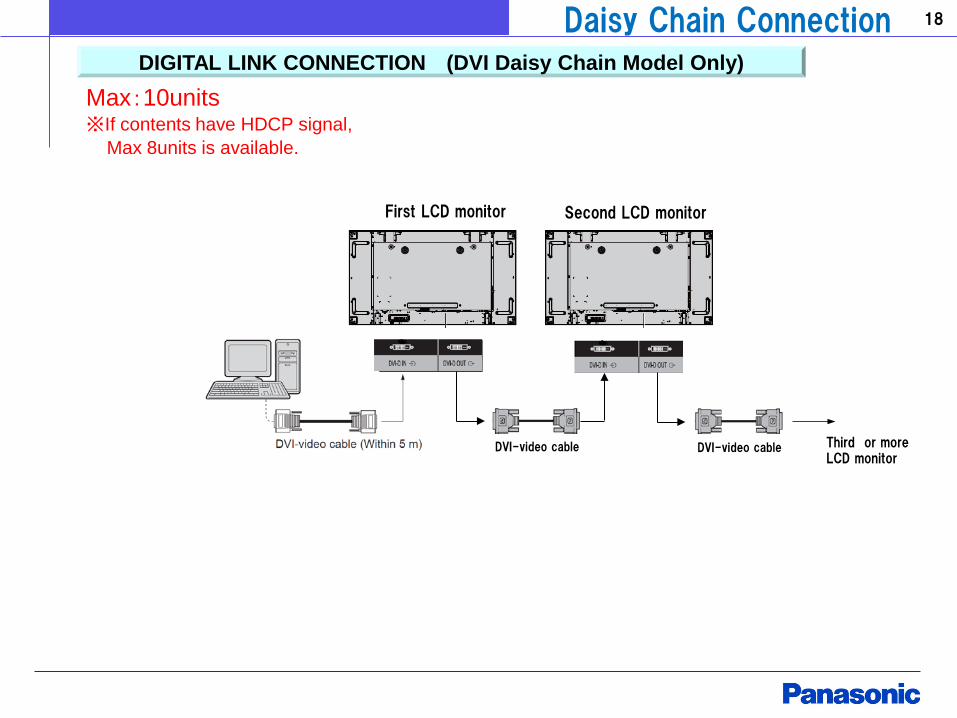
DIGITAL LINK CONNECTION (DVI Daisy Chain Model Only)
DVI-video cable
Max:10units ※If contents have HDCP signal, Max 8units is available.
Third LCD Display
Daisy Chain Connection 18
DVI-video cable Third or more LCD monitor
First LCD monitor Second LCD monitor

DIGITAL LINK CONNECTION (Digital Link Model Only)
In case of Digital Link input
In case of DVI input
Digital Link Cable Digital Link Cable
Digital Link Cable
Max:10units ※If contents have HDCP signal, Max 8units is available.
Third or more LCD monitor
Third or more LCD monitor
Daisy Chain Connection 19
First LCD monitor Second LCD monitor
First LCD monitor Second LCD monitor

DIGITAL LINK CONNECTION (Digital Link Model Only)
DVD/BD Player
Digital Link Cable
HDMI Cable
In case of HDMI input
In case of Display Port input
Digital Link Cable
Display Port Cable
Third LCD Display
Third LCD Display
Max:10units ※If contents have HDCP signal, Max 8units is available.
Daisy Chain Connection 20
First LCD monitor Second LCD monitor
First LCD monitor Second LCD monitor
Third or more LCD monitor
Third or more LCD monitor

In case of using external IR receiver, the remote controller IR signal outreach distance Is about 7m.
◆ Remote controller IR signal outreach distance
We recommend to use LAN or RS232C to control the monitor.
21 Remote controller IR signal

Please refer operation manual of Video Wall Manager Software or TY-VUK10.
◆ Support color calibration
Video Wall Manager Software TY-VUK10(Auto color adjustment Upgrade Kit)
22 Color Calibration
Camera finder PC

To maintain normal operation, check for the following regularly. Remove dust if it collects at the air vents (part indicated in pink) of the monitor. If left as is, a malfunction may occur due to temperature rise caused by
insufficient ventilation.
Maintenance 23