Version 9.4 Integration Module Guide - cisco.com€¦ · Chapter 1 Introduction ... 25 Creating an...
228
Version 9.4 Integration Module Guide v. 1.0 September 17, 2008
Transcript of Version 9.4 Integration Module Guide - cisco.com€¦ · Chapter 1 Introduction ... 25 Creating an...

Version 9.4
Integration Module Guidev. 1.0
September 17, 2008

Edition
Information in this document applies to version 9.4 of the RightFax Integration Module Guide.
Copyright Notice
©2008 All rights reserved. No part of this publication may be reproduced, transmitted, transcribed, stored in a retrieval system, or translated into any language in any form by any means without the written permission of Captaris. The following are registered trademarks and trademarks of Captaris Inc. and its subsidiaries: Captaris, the Captaris logo, Alchemy®, Captaris WorkflowTM, RightDocsTM, RightFax®, RightFlowTM and RightStarTM in the US and/or other jurisdictions. FaxPressTM is a registered trademark of Castelle. RecoStar, DOKuStar, DOKuStar Capture Suite, Single Click Entry, and Invoice CENTER are registered trademarks and trademarks of Captaris Document Technologies GmbH. All other brand names and trademarks are the property of their respective owners.
For More Information
Captaris, Inc. is a leading provider of software products that automate document-centric business processes. Captaris specializes in document capture, recognition, routing, workflow and delivery. Captaris integrated solutions provide interoperability with leading line of business applications and technology platforms. Captaris products include RightFax, Captaris Workflow, Alchemy, FaxPress, DOKuStar, RecoStar, Single Click Entry and IDStar which are distributed through a global network of leading technology partners. Captaris customers include the entire Fortune 100 and the majority of Global 2000 companies. Headquartered in Bellevue, Washington, Captaris was founded in 1982 and is publicly traded on the NASDAQ Global Market under the symbol CAPA. www.Captaris.com.
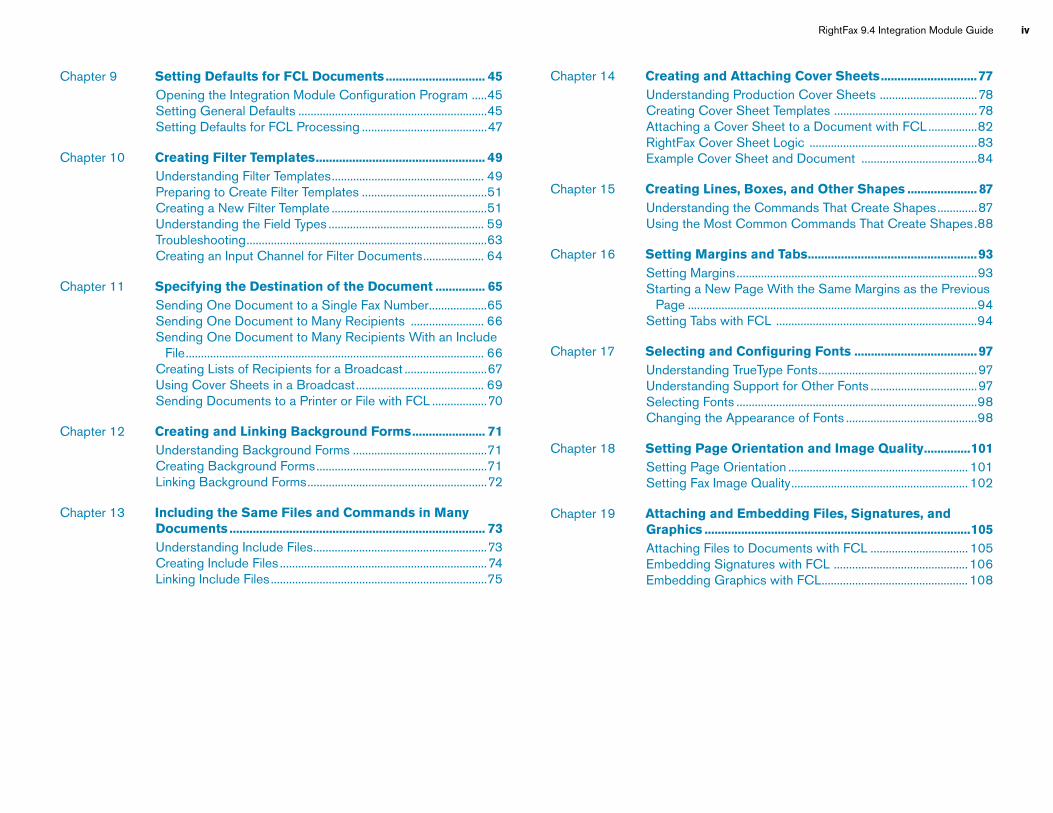
RightFax 9.4 Integration Module Guide ii

iii
Chapter 1 Introduction.................Using This Guide............Other Resources for RigGetting Help Online ......Captaris Training ServicCustomer Support .........
Chapter 2 Overview ......................Features of the IntegratiUnderstanding DocumeUnderstanding Docume
Chapter 3 Installing the RightFaInstalling the Integration and Business Integration Modules15
Chapter 4 Connecting to the RigGuidelines for Common
Integration Setup Wizard................................21
g the Integration Module Data .....................................................................25 Input Device ..............................................................25
a Named Pipe Capture.............................................27 Directory Scanning....................................................28 a Serial Capture .........................................................29 a TCP/IP Port Capture.............................................31 an IBM WebSphere MQ Connection...................32
Connection and an Input Device ....................35amed Pipe Connection .............................................35
Testing Directory Scanning ..........................................................35Testing a Serial Connection ........................................................ 36
CP/IP Port Connection ............................................ 36IBM WebSphere MQ Connection......................... 36
CL Documents....................................................39ing the Format of FCL Commands........................41L Documents .............................................................41
Contents
htFax Server ................................. 17 Connection Methods ....................... 18
Testing a TTesting an
Chapter 8 Creating FUnderstandExample FC
............................................................. 7
...................................................................7htFax Users ...........................................8...................................................................8es ..............................................................8...................................................................9
........................................................... 11on Module ............................................ 11nt Recognition .................................... 12nt Distribution...................................... 12
x Integration Module .................. 15
Chapter 5 Using the
Chapter 6 Configurinto ReceiveCreating anSetting UpSetting UpSetting UpSetting UpSetting Up
Chapter 7 Testing a Testing a N
RightFax 9.4 Integration Module Guide iv
Chapter 13 Including the Same Files and Commands in Many Documents ............................................................................. 73
nd Attaching Cover Sheets.............................77ing Production Cover Sheets ................................78
over Sheet Templates ...............................................78 Cover Sheet to a Document with FCL................82over Sheet Logic .......................................................83over Sheet and Document ......................................84
ines, Boxes, and Other Shapes ..................... 87ing the Commands That Create Shapes.............87ost Common Commands That Create Shapes.88
argins and Tabs...................................................93rgins...............................................................................93ew Page With the Same Margins as the Previous
........................................................................................94s with FCL ..................................................................94
and Configuring Fonts .....................................97ing TrueType Fonts....................................................97ing Support for Other Fonts ...................................97onts ...............................................................................98he Appearance of Fonts ...........................................98
ge Orientation and Image Quality..............101e Orientation ........................................................... 101 Image Quality.......................................................... 102
Chapter 19 Attaching and Embedding Files, Signatures, and Graphics ................................................................................105
iles to Documents with FCL ................................ 105 Signatures with FCL ............................................ 106 Graphics with FCL................................................ 108
Understanding Include Files.........................................................73Creating Include Files ....................................................................74Linking Include Files.......................................................................75
Attaching FEmbeddingEmbedding
Chapter 9 Setting Defaults for FCL Documents .............................. 45Opening the Integration Module Configuration Program .....45Setting General Defaults ..............................................................45Setting Defaults for FCL Processing .........................................47
Chapter 10 Creating Filter Templates................................................... 49Understanding Filter Templates.................................................. 49Preparing to Create Filter Templates .........................................51Creating a New Filter Template ...................................................51Understanding the Field Types ................................................... 59Troubleshooting...............................................................................63Creating an Input Channel for Filter Documents.................... 64
Chapter 11 Specifying the Destination of the Document ............... 65Sending One Document to a Single Fax Number...................65Sending One Document to Many Recipients ........................ 66Sending One Document to Many Recipients With an Include
File.................................................................................................. 66Creating Lists of Recipients for a Broadcast ...........................67Using Cover Sheets in a Broadcast.......................................... 69Sending Documents to a Printer or File with FCL ..................70
Chapter 12 Creating and Linking Background Forms...................... 71Understanding Background Forms ............................................71Creating Background Forms........................................................71Linking Background Forms...........................................................72
Chapter 14 Creating aUnderstandCreating CAttaching aRightFax CExample C
Chapter 15 Creating LUnderstandUsing the M
Chapter 16 Setting MSetting MaStarting a N
Page .......Setting Tab
Chapter 17 Selecting UnderstandUnderstandSelecting FChanging t
Chapter 18 Setting PaSetting PagSetting Fax

Contents v
Chapter
Chapter
Chapter
Chapter
Chapter
Installing the XML Interface.......................................................141XML Interface Functions ............................................................142
the RightFax API for Java................165r Java........................................................... 166 Documents .............................................. 167ts.................................................................. 170on Documents.......................................... 172......................................................................174des for XML- and Java-Based Documents
uments with InternetLink Commands
ts................................................................. 177etLink Module .......................................... 177
InternetLink FCL Commands ................ 178es to InternetLink Documents ............... 179s as E-mail if Faxes Fail........................... 181on When a Fax Fails and Is Sent as an ...................................................................... 181mands with InternetLink Options......... 181mmands .................................................... 182
le Programs187
9
Index ...................................................................................................................221
Transports......................................................................................143Understanding Body and Cover Text ...................................... 147The Schemas ................................................................................ 147Sample Documents Based on the Schemas ........................ 157
20 Scheduling Document Transmission ............................109
21 Setting Up Notification Messages of Document Transmission ....................................................................... 111Creating Notification Messages with FCL.............................111Creating Notification Templates ...............................................112Creating Notification Channels ................................................118Including the {{Notifyhost}} Command in Documents ........128
22 Testing and Troubleshooting Notification Messages......131Testing That the Host Application Is Correctly Receiving
Notifications ...............................................................................131Troubleshooting............................................................................132
23 Setting Up Actions on Document Transmission ........ 135Printing or Faxing a Copy of a Document That Was
Transmitted.................................................................................135Printing or Faxing a Document That Cannot Be Transmitted ....
137Performing Actions on Documents With Missing Data ......138
24 Programming for the RightFax XML Interface........... 141Introduction to the RightFax XML Interface...........................141
Chapter 25 Programming for Installing the API foSending OutboundQuerying DocumenPerforming Actions Using Debug ModeError and Status Co
175
Chapter 26 Creating FCL Doc177System RequiremenActivating the InternUnderstanding the Attaching Native FilSending DocumentReceiving Notificati
E-mail.....................Standard FCL ComInternetLink FCL Co
Appendix A Integration Modu
Appendix B FCL Commands18

RightFax 9.4 Integration Module Guide vi

7
Chapt
Intr
TimTat
Trppmpam
tegrate with many applications. The d in the following table, along with the here you can refer for more information.
odule Guide contains an overview for ith the RightFax Integration Module. It is strators. It is a reference guide, with
Options
Refer to these resources for information
Chapters 2-24 in this guide
RightFax Administrator’s Guide
Chapter 24, “Programming for the RightFax XML Interface” in this guide
Chapter 25, “Programming for the RightFax API for Java” in this guide
www.captaris.com/
er 1
oduction
he RightFax Integration Module enables applications for nformation exchange by integrating with applications on
ainframe, mid-range, and local area network host systems. ogether, the RightFax server and the Integration Module will send ny document created by these applications via fax, e-mail, or over he Internet.
he RightFax Integration Module automates batch-oriented, epetitive processes. It is designed to support applications that roduce output that traditionally is sent to a printer, printed on re-printed forms, folded, stuffed in envelopes, and then mailed or anually faxed. These documents can include invoices, itineraries, urchase orders, statements, order confirmations, loan pplications, bills of lading, change orders, financial reports, and aterial safety data sheets.
The RightFax system can inintegration options are listeRightFax documentation w
Using This GuideThe RightFax Integration Mconfiguring and working wwritten for RightFax admini
Table 1a RightFax Integration
Integration option
Integration Module serviceson the RightFax server withFacsimile Command Language (FCL)
RightFax XML Interface
RightFax API for Java
RightFax C, C++, and Visual Basic API

RightFax 9.4 Integration Module Guide 8
eax windows and dialog boxes include elp. Typically, this help describes each field and ox. This context-sensitive help can be launched ark icon in the title bar of a dialog box.
d then click any option on the dialog box to view
iew a definition.
ks or conceptual topics also is available. View ng the Help menu. You can browse the help for ndex to look up key words and terms.
site offers the latest product information. tation, a searchable customer support ftware downloads, and the latest product
line at www.captaris.com/.
Servicesives you the skills to optimize your RightFax rehensive technical, administrative, and user
produce full utilization and understanding of . Regular classes are held, throughout the year.
lick the uestion mark icon
Select the Help menu
introductions to and overviews of technical topics. This guide is intended to be used with the RightFax Administrator’s Guide, and it is supplemental to Captaris technical training classes.
Document conventionsNotes and warnings in this guide provide instructions for special circumstances, side effects and product interactions, and important reminders.
Notes include information that you may find useful but do not affect the integrity of your computer hardware, software, or data.Warnings always indicate that failure to proceed carefully may result in loss of data or damage to hardware or software. Always read and understand warnings before proceeding.
Because most RightFax products let you customize the install location, paths are not presented as literal paths from the root folder. Instead, the install folder you selected at the time of installation is assumed to precede folder names where applicable.
If the text in this guide contains user input (such command-line commands with switches) that should be typed exactly as shown, the user input is bold. If the user input contains variables (such as variable parameters in a command line), the variables are italicized and then described in the subsequent paragraph.
Other Resources for RightFax UsersBecause your RightFax servers may support dozens, hundreds, or even thousands of fax users, RightFax has designed its end-user documentation to be thorough, easy-to-use, and easily accessible.
In addition to the user’s guides, Quick Reference Cards cards give you quick and easy access to the most common fax management features of the FaxUtil, Microsoft Outlook, and Lotus Notes. These useful cards are compact and can be easily distributed throughout even the largest organizations.
Getting Help OnlinMost of the RightFcontext-sensitive hoption in a dialog bfrom the question m
Click this icon, anits definition.Or, press F1 to v
Online help for tasthis help by selectia topic or use the i
The Captaris WebUpdated documenknowledgebase, soofferings are all on
Captaris Training RightFax training gsolution. Our comptraining programs RightFax products
Cq

Chapter 1 Introduction 9
TaWa
CustoYttiybRcm
RightFa
Captaris155 N RTucson,
5:00 A.M
7:00 A.M
raining materials and computer-based training tools are also vailable. For more information on RightFax training, please visit our eb site at www.captaris.com/training and let us help you develop
customized training plan for your organization.
mer Supportour Customer Support Guide includes detailed information about he support options available to RightFax customers. Please fill out he RightFax Software Warranty & Registration Card and return it mmediately. If you have questions of a technical nature, contact our organization’s RightFax administrator or network administrator efore calling the RightFax customer support department. On the ightFax Web site, a database of customer support knowledge ontains a wealth of information on installing, configuring, and aintaining RightFax software.
x Customer Support:
osemont Blvd Suite 101Arizona 85711 USA
Voice: (520) 320-7070Web:www.captaris.com/support/index.htmlE-mail: [email protected]
. to 5:00 P.M. Pacific time, Monday through Friday
. to 3:00 P.M. Pacific time, Saturday

RightFax 9.4 Integration Module Guide 10

11
Chapt
Ove
TsFtrd
FeatuT
FormT
g control provided by the RightFax ule can:
cument by minutes or schedule the ment to be sent. sending.roval.hes.
d other attachmentsssed by the Integration Module,
be attached, including cover sheets. eet can be provided by FCL codes.
kup tablesed application may not include all the o send it, such as a fax number. You can e the Integration Module can “look up”
er 2
rview
his chapter provides an overview of the Integration Module ervices that can be implemented on the RightFax server with acsimile Command Language (FCL). It describes the features of he Integration Module and the workflow and programs that ecognize data, assemble the data into documents, distribute ocuments, and report the results.
res of the Integration Modulehe Integration Module provides the following features.
atting documentshe Integration Module can:
Add lines, boxes, and other shapes to a document.Set fonts, margins, and tabs.Add graphics to a document, such as a signature or a company logo.Add a background form over which the document data is placed, such as a purchase order form, bill of lading, or itinerary.
Scheduling documentsIn addition to the schedulinserver, the Integration Mod
Delay the sending of a dodate and time for a docuPrioritize a document forHold a document for appSend documents in batcBroadcast faxes.
Attaching cover sheets anWhen a document is proceadditional documents can Information for the cover sh
Including data from a looA document from a host-bainformation that is needed tcreate a table of data wherthe needed data.

RightFax 9.4 Integration Module Guide 12
nsmit a PostScript file, the host application must page with the PostScript document. This page codes in text form, which can be interpreted by dule. The Integration Module interprets the FCL, first page, formats the document, and transmits custom programming.
nsmit a PCL file, the host application must send with the PCL document. This page must contain orm, which can be interpreted by the Integration ation Module interprets the FCL, removes the mats the document, and transmits it. This may gramming.
cument Distributione shows how the Integration Module programs ecognize, and distribute data from the host ustration shows the input channels that can be ive and recognize data. Up to 70 channels can
cutable Bufdir.exe scans a folder for files sent by application. Bufdir.exe retrieves the files and em to Makedoc.exe, which begins the process rting them to documents and transmitting them. e creates a notification that is sent to an ion on the host system.
Sending notification messagesAs a document is sent via the RightFax server, notification messages can be generated and sent back to the sender of the document, to a system administrator, to a central mailbox, to a file, to a directory, or to a database on the host application. They can be e-mailed or faxed, or files can be transferred.
Notification messages can be customized to contain descriptive information about the sent document, such as:
Sender and recipient information, such as name, company name, fax number, voice number, and e-mail address.Document data such as the number of pages, transmission date and time, image quality, and the duration of the fax call.Status of the fax from the fax board.
Another form of notification is to fax or print documents that are sent or documents that encounter errors in sending.
Understanding Document RecognitionThe Integration Module can process ASCII text files, PostScript files, and print control language (PCL) files that are generated by an application.
ASCII text filesTo process text files, you must do one of the following:
Include FCL commands in the document data. This may require custom programming to add FCL to documents or to templates in the host application or to insert FCL in the data stream. This is known as native mode.Create “filter templates” that add FCL to the document data after it is sent to the Integration Module for processing. A filter template is a map of the document data that contains the FCL that is required to create and send the document. This is known as filter mode.
PostScript filesTo process and trasend a “false” first must contain FCL the Integration Moremoves the false it. This may require
PCL filesTo process and traa “false” first page FCL codes in text fModule. The Integrfalse first page, forrequire custom pro
Understanding DoThe following figurreceive, process, rapplication. This illconfigured to recebe configured.
Example The exethe hostsends thof conveNotify.exapplicat

Chapter 2 Overview 13
FA
F
dule Data Flow” shows how FCL after the Integration Module receives the plication. It explains the programs, such hown briefly in “Figure 2.1: Flow of on Module”.
e Data Flow
or a list of the programs that process and send documents, see ppendix A, “Integration Module Programs”.
igure 2.1 Flow of Documents in the Integration Module
“Figure 2.2: Integration Modocuments are processed data stream from a host apas Makedoc.exe, that are sDocuments in the Integrati
Figure 2.2 Integration Modul

RightFax 9.4 Integration Module Guide 14

15
Chapt
Inst
TimmRMIb
n and Business
odule and Business Integration Module matically during the RightFax server unctionality of these modules, they must ly enabled on the RightFax server. For adding new components to a RightFax x Installation Guide.
nterprise Integration Module
er, as described in the RightFax
server, as described in the RightFax
e service does not appear in Enterprise to create the service. To do so, open l. Double-click the RightFax Integration Module Configuration opens. Click l be created.
T
er 3
alling the RightFax Integration Module
he RightFax Integration Module enables applications for nformation exchange by integrating with applications on
ainframe, mid-range, and local area network host systems. To eet the needs of small, medium, and large enterprises, the ightFax Integration Module comes in two versions: the Integration odule which includes full functionality, and the Business
ntegration Module which includes a limited set of features for use y smaller organizations.
Installing the IntegratioIntegration Modules
The RightFax Integration Msoftware are installed autoinstallation. To enable the fbe licensed and then simpinformation on enabling or server, refer to the RightFa
To install the RightFax E
1. Install the RightFax servInstallation Guide.
2. Configure the RightFax Administrator’s Guide.
3. If the Integration ModulFax Manager, you needWindows Control Paneapplet. The IntegrationOK, and the service wil
able 3a RightFax Integration Module types
Module Features
RightFax Integration Module
70 input channels.Output methods of fax, certified email, encrypted email, or print.Up to 70 filter templates.Up to 128 notification channels.Unlimited notification messages.
RightFax Business Integration Module
Two input channels.One output method (fax or print) per input channel.Two fax channels for each fax output.One filter template per input channel.Unlimited notification messages.

RightFax 9.4 Integration Module Guide 16
4. Configure the Integration Module software, as described later in this guide.

17
Chapt
Con
Thd
Btden
Bps
Tm
er 4
necting to the RightFax Server
his chapter explains the most common methods for connecting a ost computer to the Integration Module computer for FCL-based ocuments.
ecause several methods can be used to connect a host computer o the Integration Module on the RightFax server, you must etermine the best choice for the capabilities of the host system nvironment and the distribution methods for documents and otifications about sent documents.
ecause of the wide range of host applications, environments, and otential connection scenarios, this chapter does not provide tep-by-step connection procedures.
he following figures illustrate the most common connection ethods. Some connections require third-party software that

RightFax 9.4 Integration Module Guide 18
ost Applications that Generate XML and Java Data
mon Connection Methods communication connection methods and basic escribed in the following sections:
te (LPR) connection on page 19on page 19onnection on page 19tocol (FTP) connection on page 19on page 19e MQ® client v6 for Microsoft Windows on
Captaris does not provide or support.
Figure 4.1 Connections to Applications that Generate FCL or ASCII Data
Figure 4.2 Connections to H
Guidelines for ComThe most commonrequirements are d
Line printer remo3270 emulation TCP/IP socket cFile Transfer Pro5250 emulation IBM® WebSpherpage 20

Chapter 4 Connecting to the RightFax Server 19
AcmM
ItI
LineTpDtnp
Ti
Ts
327Ymsi(b
Eccc
ns are required from different regions or ultiple sessions are supported up to the are and software. For example, a 3270 ll support five separate printer or le cluster controller.
ges back to an application on the host tion method (known as a connection
Module to receive data via this method, Pipe Capture” on page 27.
nket connection via TCP/IP to and from
h any available port. This usually requires connection software for the host system.
Module to receive data via this method, Port Capture” on page 31.
nectionodule can use FTP server services to
e host computer. The Integration Module to send notification messages back to system.
must install and configure an FTP server puter.
Module to receive data via this method, Scanning” on page 28.
he host computer to the Integration oftware is recommended. A serial l converter can be used, but it is not
fter the communication methods are established, you must onfigure the Integration Module to receive data via those ethods, as described in Chapter 6, “Configuring the Integration odule to Receive Data”.
n general, the RightFax Integration Module is a printer connected o the host computer. The host application will print to the ntegration Module.
printer remote connectiono use a line printer remote connection, set up the host system to rint to the RightFax Integration Module as a remote Berkeley Style evice (BSD) printer. In most cases, set the remote host name to
he host name of the Integration Module, and set the remote printer ame to “hostfax”. (By default, the Integration Module installs a rinter called “hostfax”. This is usually the default printer.)
he TCP/IP printing service or Print Services for Unix must be nstalled and started on the RightFax server.
o configure the Integration Module to receive data via this method, ee “Setting Up a Named Pipe Capture” on page 27.
0 emulation ou can set up a direct connection from the RightFax server to a ainframe host with 3270 emulation software. The protocol
tandard TN3270 using TCP/IP over an Ethernet network adapter s the recommended method. Systems Network Architecture SNA) can be used. Coaxial cable with a 3270 coaxial adapter can e used, but it is not recommended.
mulation software often has difficulty with a coaxial cable onnection in a Windows environment. TN3270 is often a better hoice and is easier to configure if the mainframe has a TCP/IP onnection.
In the event that connectiodifferent host computers, mlimits of the adapter hardwcoaxial adapter typically witerminal sessions to a sing
To send notification messasystem, a separate connecchannel) can be defined.
To configure the Integrationsee “Setting Up a Named
TCP/IP socket connectioYou can set up a direct socthe RightFax server througthat you acquire or create
To configure the Integrationsee “Setting Up a TCP/IP
File Transfer Protocol conThe RightFax Integration Maccept documents from thalso can use an FTP clientan FTP server on the host
For FTP connections, you on the RightFax server com
To configure the Integrationsee “Setting Up Directory
5250 emulationTo send documents from tModule, 5250 emulation sconnection with a protocorecommended.

RightFax 9.4 Integration Module Guide 20
The protocol converter sends data to the RightFax server via a serial cable connected between the converter and one of the COM ports on the RightFax server. If this method is used, the Integration Module must be configured to accept input on the serial port.
To send notification messages back to the host, SQL via ODBC is recommended. Emulation software via 32-bit high level language application programming interface (HLLAPI) or via a serial connection also can be used.
To configure the Integration Module to receive data via this method, see “Setting Up a Serial Capture” on page 29.
IBM WebSphere MQ client for WindowsThe RightFax Integration Module can communicate with an IBM WebSphere MQ 6 channel via TCP/IP. To configure the Integration Module to receive data via this method, see “Setting Up an IBM WebSphere MQ Connection” on page 32.

21
Chapt
Usin
Ttt
Tsgrb
T
1
2
t, double-click RightFax Integration n Module Configuration window
Module Configuration Window
er 5
g the Integration Setup Wizard
he RightFax Integration Module includes a wizard that helps you o create configurations for many of the connection methods. Use he wizard to:
Configure the Integration Module service and set defaults for documents that are sent from the Integration Module.Configure input channels from the host application to the Integration Module.Set notification actions and messages. You can choose to print or fax copies of documents as they are transmitted. You also can define messages with descriptive information about the documents as they are transmitted.Format documents with filter templates.
he Integration setup wizard is designed to guide you through each tep of configuring the Integration Module. Instructions in this uide supplement the instructions in the wizard. Captaris ecommends that you review the topics in this guide before you egin using the wizard.
o start the wizard
. On the Start menu, select Programs > RightFax > Enterprise Fax Manager. The Enterprise Fax Manager window opens.
. In the Fax Servers list, click the name of the server where the Integration Module is running.
3. In the Service Name lisModule. The Integratioopens.
Figure 5.1 The Integration

RightFax 9.4 Integration Module Guide 22
also described in Chapter 9, “Setting Defaults s”.
he host applicationps, you can define the settings for receiving data ons via a named pipe, directory, TCP/IP, IBM ustom input type.
cation method, you will specify the rotocol and transmission method, port, directory, r, and the configurations needed for each
.
ut type.
put.
also described in Chapter 6, “Configuring the to Receive Data”.
tions and messagesps, you can define notification actions and
can:
nts, whether successfully or not successfully internal fax number.
ments that cannot be successfully transmitted missing.
ges can:
a document was sent.trator of the status of documents.
4. Click Integration Setup Wizard. The wizard starts, and the Integration Setup Wizard window appears.
Figure 5.2 The Integration Setup Wizard
This window is the starting point for the configuration. Select from the configuration tasks, as described in the following sections.
Configure the Integration Module serviceIn this series of steps, you can define information that will appear on each fax that is sent from the Integration Module. Some of these settings can be overridden with facsimile command language (FCL) in the documents that are sent.
You can make the following default settings for documents:
Name and fax number to appear on the cover sheet.File to send as the cover sheet.The default printer for documents sent from the Integration Module.Fax image quality.Page length, page size, and reducing the image size to fit the page.
These settings arefor FCL Document
Define inputs for tIn this series of stefrom host applicatiWebSphere, or a c
For each communicommunications por queue to monitoprotocol. You will:
1. Name the input
2. Specify the inp
3. Configure the in
These settings areIntegration Module
Set notification acIn this series of stemessages.
Notification actions
Fax sent documetransmitted, to anPrint or fax docubecause data is
Notification messa
Notify users thatNotify an adminis

Chapter 5 Using the Integration Setup Wizard 23
Nwasp
T
FormIdC
otification messages can provide descriptive information, such as hether or not a document was transmitted, explanations of errors, nd transmission duration, dates, and times. These messages are ent to a host application from the Integration Module when it rocesses and sends documents.
hese settings are also described in:
Chapter 21, “Setting Up Notification Messages of Document Transmission”Chapter 23, “Setting Up Actions on Document Transmission”
at documentsn this series of steps, you can create filter templates for ocuments with MapText. These settings are also described in hapter 10, “Creating Filter Templates”.

RightFax 9.4 Integration Module Guide 24

25
Chapt
Conto R
TIft
N
Creati1
2
3
tegration Module Configuration input settings appear.
tings
er 6
figuring the Integration Module eceive Data
his chapter describes the procedures for configuring the RightFax ntegration Module to receive data. You will create an input device or receiving or retrieving data by writing a command line for each ype of input needed in the system.
ote that command lines are case-sensitive.
ng an Input Device. On the Start menu, select Programs > RightFax > Enterprise
Fax Manager. The Enterprise Fax Manager window opens.
. In the Fax Servers list, click the name of the server where the Integration Module is running.
. In the Service Name list, double-click RightFax Integration Module. The Integration Module Configuration window opens.
4. In the left pane of the Inwindow, click Inputs. The
Figure 6.1 The Inputs Set

RightFax 9.4 Integration Module Guide 26
gs for the type of data input, as described in the ns:
a Named Pipe Capture” page 27Directory Scanning” page 28a Serial Capture” page 29a TCP/IP Port Capture” page 31an IBM WebSphere MQ Connection” page 32
ttings for an input, you will type a command line s in the dialog box. When you select an option in the option appears in the command line. For you select the check box Display Verbose ears in the Complete Command Line box.
tegration Module Configuration Window
5. Right-click Inputs, and select Add Input Device from the shortcut menu. The Add Input Device dialog box appears.
Figure 6.2 The Add Input Device Dialog Box
6. In the Input Type list, select the type of data input needed for the communication method implemented for the host system. When you select an option, the available settings for the input appear in the Integration Module Configuration window.
7. Enter the settinfollowing sectio
“Setting Up “Setting Up “Setting Up “Setting Up “Setting Up
To create the seor select optionthe dialog box, example, when Output, -v app
Figure 6.3 The In
The command line appears as you make entries.

Configuring the Integration Module to Receive Data 27
SettinThcdd
T
1
2
3
the dialog box, as described in the ettings correspond to Nplisten.exe
makedoc $$” -p hplpr
e will run the command “makedoc” on d pipe. The variable $$ indicates that all Makedoc.exe. “Hplpr” is a name for an
ettings for a Named Pipe
d line Description
me The name of the named pipe that Nplisten.exe will monitor for files. You can enter any name for the pipe in one of the following formats:
pipename\\.\pipe\pipename
oc $$” The command to execute on files received via the named pipe. Makedoc.exe begins the process of converting data from the host application into a fax.
The variable $$ indicates that all files should be processed with Makedoc.exe.
Chapter 6
g Up a Named Pipe Capturehis procedure creates an input device that receives data from a ost application via a named pipe. The program Nplisten.exe reates a named pipe, scans it, and then executes a command on ata found in the pipe. Typically, this input type accommodates ata that is formatted for a line printer (LPR).
o set up a named pipe capture
. In the Input Type list, select Named Pipe (LPR). The named pipe settings appear.
Figure 6.4 Settings for a Named Pipe Input Device
. Select the check box Enable this Input device.
. In the Name box, enter a descriptive name for this input device.
4. Complete the entries infollowing table. These scommand line options.
Example nplisten.exe -c “
In this example, Nplisten.exfiles received via the namefiles will be processed withLPR printer.
Table 6a Add Input Device S
SettingCommanoption
Named Pipe to Create
-p pipena
Execute on Input (-c option)
-c “maked

RightFax 9.4 Integration Module Guide 28
ntries in the dialog box, as described in the These settings correspond to Bufdir.exe ptions.
Device Settings for Directory Scanning
ommand ine option Description
p pattern Enter the file types for which Bufdir.exe will scan, for example, *.txt. The default is *.*.
d This setting is useful when testing the connection to the host application. It determines whether or not the files in the folder are deleted after they are retrieved by Bufdir.exe.
Files are deleted by default.
r code This setting determines that files will not be deleted until the program encounters a specified exit code.
t threads Specifies the maximum number of threads of Bufdir.exe to run simultaneously. The default is 1.
o Quit after scanning the folder once.
l seconds This setting is commonly used with a shared folder on Windows.
Enter the interval in seconds that Bufdir.exe will scan for files. The default is to scan the folder when notified by Windows that a file has been placed in the folder.
Setting Up Directory ScanningThis procedure creates an input device that retrieves data by scanning a folder for files. The program Bufdir.exe retrieves the files, creates a subdirectory for each calling fax server then copies the file into the subdirectory before they are processed. Thus, preventing duplication of faxes.
To set up directory scanning
1. In the Input Type list, select Directory. The directory settings appear.
Figure 6.5 Settings for a Directory Scanning Device
2. Select the check box Enable this Input device.
3. In the Name box, enter a descriptive name for this input device.
4. Complete the efollowing table.command line o
Table 6b Add Input
SettingCl
Pattern to use for Filename Search
-
Don’t delete Input Files
-
Exit Code -
# of Threads -
Exit after one pass through Folder
-
Secs. to Loop -

Configuring the Integration Module to Receive Data 29
E
Iib
ture input device that retrieves data via a apture.exe retrieves the data.
re
elect Serial Capture. The serial capture
Serial Capture Input Device
nable this Input device.
a descriptive name for this input device.
T
Chapter 6
xample bufdir -c “makedoc $$” c:\program files\rightfax\production\inbox
n this example, Bufdir.exe will run the command “makedoc” on files n the specified directory. The variable $$ indicates that all files will e processed with Makedoc.exe.
Setting Up a Serial CapThis procedure creates anserial port. The program C
To set up a serial captu
1. In the Input Type list, ssettings appear.
Figure 6.6 Settings for a
2. Select the check box E
3. In the Name box, enter
Secs. to Age -w seconds This setting assures that the file is up to date before it is processed. If your network is slow, this setting provides time for the completed document to be delivered to the folder.
Enter the number of seconds to wait before retrieving the file.
Don’t check for file in use
-u This setting determines that Bufdir.exe will not check for files in use before retrieving them.
Folder to Monitor
Folder name and path
Enter the name of or the path to the folder to watch for documents.
Execute on Input (-c option)
-c “makedoc $$”
The command to execute on files received. Makedoc.exe begins the process of converting data from the host application into a fax.
The variable $$ indicates that all files should be processed with Makedoc.exe.
able 6b Add Input Device Settings for Directory Scanning (Continued)
SettingCommand line option Description

RightFax 9.4 Integration Module Guide 30
R character Specify one or more characters that form the right (closing) delimiter for FCL commands in documents that are received via this serial port. Usually this is a pair of right braces (}}).
E Select this check box to specify that an end-of-text character (ASCII 4 or CTRL+D) or an embedded end-of-transmission-block (ETB) character (ASCII 23 or CTRL+W) will mark the end each document that is received via this serial port.
s stopbits Specify the bit (0 or 1) that will indicate the end of each document that is received via this serial port.
e
o
Specify the parity for this serial port.
-e establishes even parity.
-o establishes odd parity.
Device Settings for a Serial Capture (Continued)
ommand ine option Description
4. Complete the entries in the dialog box, as described in the following table. These settings correspond to Capture.exe command line options.
Table 6c Add Input Device Settings for a Serial Capture
Input settingCommand line option Description
End Sequence -S sequence Specify the sequence of characters that will indicate the end of each document that is received via this serial port.
Handshaking -H
-x
Specify the handshaking method for the serial port.
H = Hardware handshaking
x = XON\XOFF (software) handshaking
Baud Rate -b baud rate The baud rate at which Capture.exe will scan the serial port.
Bits/Character -C size Specify the number of bits (7 or 8) per character.
ASCII Mode -a Select this check box to convert carriage returns in a document to carriage return-line feed pairs. In other words, <CR> (carriage return) will be converted to <CR><LF> (carriage return and line feed).
Left Brace Char -L character Specify one or more characters that form the left (opening) delimiter for FCL commands in documents that are received via this serial port. Usually this is a pair of left braces ({{).
Right Brace Char
-
Allow EOT or ETB to end input
-
Stop Bits -
Parity -
-
Table 6c Add Input
Input settingCl

Configuring the Integration Module to Receive Data 31
E
IpvM
rt Capture input device that retrieves data via a Portlstn.exe retrieves the data.
capture
elect TCP/IP Port. The TCP/IP port
TCP/IP Port Input Device
nable this Input device.
a descriptive name for this input device.
T
Chapter 6
xample capture -b 9600 -c “makedoc $$” com1
n this example, Capture.exe will read input from the COM1 serial ort and then execute the command “makedoc” on the data. The ariable $$ indicates that all files will be processed with akedoc.exe.
Setting Up a TCP/IP PoThis procedure creates anTCP/IP port. The program
To set up a TCP/IP port
1. In the Input Type list, ssettings appear.
Figure 6.7 Settings for a
2. Select the check box E
3. In the Name box, enter
COM1 or COM2
N/A Specify the COM port. The default is COM1.
Execute on Input (-c option)
-c “makedoc $$”
The command to execute on files received. Makedoc.exe begins the process of converting data from the host application into a fax.
The variable $$ indicates that all files should be processed with Makedoc.exe.
able 6c Add Input Device Settings for a Serial Capture (Continued)
Input settingCommand line option Description

RightFax 9.4 Integration Module Guide 32
nfigure the input, you specify the channel name, queue manager, and the queue to retrieve the
WebSphere MQ connection
e list, select Custom. The custom settings
gs for a Custom Input Device
k box Enable this Input device.
x, enter a descriptive name for this input device.
4. Complete the entries in the dialog box, as described in the following table. These settings correspond to Portlstn.exe command line options.
Example portlstn -c “makedoc $$” -p 6250
In this example, Portlstn.exe will read input from TCP/IP port 6250 and then execute the command “makedoc” on the data. The variable $$ indicates that all files will be processed with Makedoc.exe.
Setting Up an IBM WebSphere MQ Connection This procedure describes the configuration needed to communicate with an IBM WebSphere MQ remote queue manager to retrieve messages (outgoing documents).
The program mqget.exe utilizes the IBM WebSphere MQ client to connect to the remote queue manager and retrieve messages from the specified remote queue. The communication input device is a
TCP/IP port. To cothe host name, themessages from.
To set up an IBM
1. In the Input Typappear.
Figure 6.8 Settin
2. Select the chec
3. In the Name bo
Table 6d Add Input Device Settings for a TCP/IP Port Capture
Input settingCommand line option Description
TCP/IP Port # -p number Enter the number of the port to monitor.
Execute on Input (-c option)
-c “makedoc $$” The command to execute on files received. Makedoc.exe begins the process of converting data from the host application into a fax.
The variable $$ indicates that all files should be processed with Makedoc.exe.

Configuring the Integration Module to Receive Data 33
4
S
han -H qmmaster2 -M RightFax ”makedoc $$” -p 1414 -1
will monitor the IBM WebSphere MQ main named Qmmaster2. It will connect tFax and the queue named RF_Queue.
IP port 1414, and the command d on the data. The variable $$ indicates ed with Makedoc.exe.
ing interval
server as an administrator.
istry editor and browse to ax\Production\MQSeries.
try called imeout
e interval for scanning the queue, in
y editor
T
Chapter 6
. In the Complete Command Line box, enter a command. The Mqget.exe command line syntax and options are described in the following section.
yntax mqget -C channel -H hostname -M queuemanager -Q queue [options]
Example mqget -C RF_C-Q RF_Queue -c
In this example, Mqget.exechannel RF_Chan in the doto the queue manager Righ
Data will be read via TCP/“makedoc” will be executethat all files will be process
Setting the MQGet poll
1. Log on to the RightFax
2. Open the Windows regHKLM\Software\RightF
3. Create a new Dword enMQ_Get_ConnectionT
4. Set the data value to thseconds.
5. Close Windows registr
able 6e Mqget.exe Command Line Options
Option Description
-C channel Name to use for this connection channel.
-H hostname Fully qualified domain name of the IBM WebSphere MQ queue manager.
-M queue manager Queue manager for RightFax that is defined on the IBM WebSphere MQ server.
-Q queue Queue to retrieve messages from. The Integration Module will monitor and retrieve messages from this queue.
-c “makedoc $$” The command to execute on files received. Makedoc.exe begins the process of converting data from the host application into a fax.
The variable $$ indicates that all files should be processed with Makedoc.exe.
-d Display debugging output. This is helpful if you experience difficulty connecting to the server.
-p port TCP/IP port number to use for remote connection. The default is 1414.
-1 Selects Version 1 of the WebSphere MQ Application Programming Reference.
This option must be used because MQGet.exe is not designed to work with the WebSphere MQ API Version 2.
-tCCSID Specifies the codeset name for a language. A list of the codeset IDs (CCSIDs) supported by WebSphere MQ is available from IBM.

RightFax 9.4 Integration Module Guide 34

35
Chapt
Test
Tsc
TestinTpU
T
1
2
3
4
5
test document.
reated with filter templates (filter mode) xt.
created in native mode will be FCL nation of FCL commands and document plication.
ocuments will be in PCL or PostScript mands on the first “false” page.
back to the named pipe.
ingnnection from a host system to a folder the Bufdir.exe program, as described in ning” on page 28.
ping the Integration Module service in .
rom the host application to the folder xe command line.
r on the Integration Module to verify that received.
er 7
ing a Connection and an Input Device
his chapter describes methods for testing that the RightFax erver, Integration Module, and host application are connected and ommunicating.
g a Named Pipe Connectionhis procedure tests the connection from the host application to a rint input device on the RightFax server, as described in “Setting p a Named Pipe Capture” on page 27.
o test the connection
. Pause printing to the printer that was created for the named pipe input.
. Temporarily change the printer port to File.
. Send a test document from the host application to the printer.
. Look in the print queue to verify that the test document has been sent to print.
. Activate printing to the Integration Module printer, specifying the file name for the document.
6. Open and examine the
Documents that are cwill be plain ASCII teDocuments that are documents—a combidata from the host apPCL or PostScript dformat with FCL com
7. Change the printer port
Testing Directory ScannThis procedure tests the cothat is scanned for files by “Setting Up Directory Scan
To test the connection
1. Stop Bufdir.exe by stopEnterprise Fax Manager
2. Send a test document fspecified in the Bufdir.e
3. Look in the target foldethe test document was

RightFax 9.4 Integration Module Guide 36
ction
using one of the following methods:
the Process tab in Windows Task Manager. HFBufferStop at the command prompt.uffer.exe at the command prompt (not d).
r.exe is stopped by looking in Windows Task
ument from the host application to the TCP/IP the Portlstn.exe command line.
lorer, navigate to ction\Makedoc and verify that the test document
x Manager, start Buffer.exe by stopping and gration Module service.
ebSphere MQ Connectionts the connection from the host system to an Q queue on the RightFax server, as described
BM WebSphere MQ Connection” on page 32.
ction
nd prompt window.
d prompt, enter the command line that was the IBM WebSphere MQ input, and then press
4. Start the Integration Module service in Enterprise Fax Manager.
Testing a Serial ConnectionThis procedure tests the connection from the host system to a serial port on the RightFax server, as described in “Setting Up a Serial Capture” on page 29.
To test the connection
1. Stop Buffer.exe using one of the following methods:
Stop it from the Process tab in Windows Task Manager.Enter signal HFBufferStop at the command prompt.Enter kill /f buffer.exe at the command prompt (not recommended).
2. Verify that Buffer.exe is stopped by looking in Windows Task Manager.
3. Send a test document from the host application to the serial port specified in the Capture.exe command line.
4. In Windows Explorer, navigate to RightFax\Production\Makedoc and verify that the test document was received.
5. In Enterprise Fax Manager, start Buffer.exe by stopping and starting the Integration Module service.
Testing a TCP/IP Port ConnectionThis procedure tests the connection from the host application to a TCP/IP port on the RightFax server, as described in “Setting Up a TCP/IP Port Capture” on page 31
To test the conne
1. Stop Buffer.exe
Stop it from Enter signalEnter kill /f brecommende
2. Verify that BuffeManager.
3. Send a test docport specified in
4. In Windows ExpRightFax\Produwas received.
5. In Enterprise Fastarting the Inte
Testing an IBM WThis procedure tesIBM WebSphere Min “Setting Up an I
To test the conne
1. Open a comma
2. At the commanwritten to createENTER.

hapter 7 Testing a Connection and an Input Device 37
Its
F
C
f the connection is successful, then you should see text similar to hat shown in the following example. If the input connection is not uccessful, then you will see error messages.
igure 7.1 Successful Test of IBM WebSphere MQ Connection

RightFax 9.4 Integration Module Guide 38

39
Chapt
Crea
Titf
Beat
AA
er 8
ting FCL Documents
o create documents with FCL, you must insert FCL commands nto the data stream that comes from the host application. When he Integration Module receives this data stream, it uses the FCL to ormat and send the document.
ecause of the range of host-based applications, system nvironments, and document formats, specific instructions for ccessing and manipulating document data is beyond the scope of his guide.
bout 100 FCL commands are available. For a detailed list see ppendix B, “FCL Commands”.

RightFax 9.4 Integration Module Guide 40
Contains the fax number for the recipient and specifies that the document will be sent via fax.
If you have licensed the InternetLink Module, then you can specify an e-mail address rather than a fax number in order to e-mail documents.
Specifies that the document will be sent as a RightFax SecureDocs certified delivery e-mail message. To use this option, you must license and install the RightFax SecureDocs Module.
Specifies that the document will be sent as the body of an e-mail message. To use this option, you must license the RightFax InternetLink Module.
Specifies that the document will be transferred to a folder.
Specifies that the document will be sent as an attachment to an e-mail message. This option requires the RightFax InternetLink Module.
Specifies that the document will be sent to a printer.
eText}} }
Specifies that a message will be sent to an SMS-compatible device.
CL Commands (Continued)
Description
Each FCL document must have at least three commands: {{begin}}, {{end}}, and a command that specifies the type of transmission. An overview of these commands is provided in the following table.
Table 8a Required FCL Commands
Command Description
{{begin}} Indicates the beginning of a document.
The Integration Module will process all the data that appears between a {{begin}} and an {{end}} command as a discreet document. Data that does not appear between the {{begin}} and {{end}} commands is ignored.
This command must appear as the first command in each FCL document. This command is required in every FCL document. FCL documents may contain multiple {{begin}} and {{end}} commands, but the FCL between each set of commands will be rendered as a separate page.
{{end}} Indicates the end of a document.
The Integration Module will process all the data that appears between a {{begin}} and an {{end}} command as a discreet document. Data that does not appear between the {{begin}} and {{end}} commands is ignored.
This command must appear as the last command in each FCL document. FCL documents may contain multiple {{begin}} and {{end}} commands, but the FCL between each set of commands will be rendered as a separate page.
{{fax}}
{{type certified}}
{{type e-mail}}
{{type file}} {{file}} {{list}}
{{type mime}}
{{type print}}
{{type SMS}} {{smsmsg Messag{{sms PhoneNum}
Table 8a Required F
Command

Chapter 8 Creating FCL Documents 41
UnderTt(i
Ai
{
Ua
Ys
{
YCoC
ExamTDhaF
to the Document
January Invoices
Invoice #1: AAAAAAA
Invoice #2: BBBBBBB
Invoice #3: CCCCCCC
Invoice #4: DDDDDDD
Invoice #5: EEEEEEE
Smith Hardware Co.Purchase Order
v}}
34}}
nvoices.doc}}
yorders.inc}}
r.tif}}
y Cost294.99190.08104.32
January Invoices
Invoice #1: AAAAAAA
Invoice #2: BBBBBBB
Invoice #3: CCCCCCC
Invoice #4: DDDDDDD
Invoice #5: EEEEEEE
ardware Co.ase Order
Qty Cost1 294.9910 190.0830 104.32
1
3
5
7
standing the Format of FCL Commandshe most important requirement for forming FCL commands is that hey begin with two left braces ({{) and end with two right braces }}). Unique delimiters can be defined for serial capture input. For nstructions, see “Setting Up a Serial Capture” on page 29.
ll FCL commands have the same format, and most of them can nclude arguments and variables:
{command argument variable}}
se one or more spaces to separate commands from arguments nd variables.
ou can list several FCL commands in a sequence. Do not type paces between the commands in a line:
{begin}}{{fax 503-555-1234}}{{onsuccess fax 555-6892}}
ou can place FCL commands anywhere in a document, but aptaris recommends that you place them at the end unless therwise specified for the FCL command (see Appendix B, “FCL ommands”).
ple FCL Documentshe following figure (“Figure 8.1: Other Files Can Be Added to the ocument”) and the numbered paragraphs following it illustrate ow other documents—such as cover sheets, background forms, nd attachments—can be included in a document with the use of CL commands.
Figure 8.1 Other Files Can Be Added
{{begin}}
{{cover sales.co
{{fax 503-555-12
{{attach januaryi
{{include februar
{{form purchorde
Item SKU QtRail 16 1Clip 24 10Pin 09 30
{{end}}
{{lm 0.5}}{{moveto 0.5 1.0}}Fax Transmissionfrom SmithHardware {{end}}
{{tm 4.0}}{{lm 0.5}}{{font ariel10 10 14}}
Smith HPurch
Item SKURail 16Clip 24Pin 09
Fax Transmission fromSmith Hardware
2
4
6

RightFax 9.4 Integration Module Guide 42
e (“Figure 8.2: FCL Document for an Invoice ors to Portland Trading Co.”) illustrates the ument for an invoice. The finished document is e 8.3: Finished Invoice from NW Distributors to o.”.
r an Invoice from NW Distributors to Portland Trading
mmand specifies that the file Invoice.tif will be ackground for the fax. “Figure 8.3: Finished
Distributors to Portland Trading Co.” shows ument merged with the Invoice.tif background
ommand retrieves a file named Ptc6mos.xls. month history of items purchased by Portland ny. It is a Microsoft® Excel spreadsheet that is data from a database. The spreadsheet will be hment.
12}}
ng Co.}}
92}}otifyinv exchange}}
18277 8/8/01
Portland Trading Co. Co. 11990 S.W. Capitol Hill Roadol Hill Road Portland, OR 9703434 (503) 555-9182
13579 John Bardolph
8/7/01 2% 10 days
eef Jerky $ 8.50/lb $ 425.00
moked Salmon $ 12.00/lb $ 600.00
1,025.00 $75.00 $75.00 $1,175.00
1. The Integration Module receives the document data stream from the host. It contains the source document data and FCL commands. In the example here, the original host data is shown in bold text. It will become part of a purchase order. The FCL commands precede and follow the host data.
2. The {{cover}} command specifies that the file Sales.cov will be used as the fax cover sheet. The example cover sheet creates a 0.5-inch left margin ({{lm}}) and starts the text “Fax Transmission from Smith Hardware” at the x- and y-coordinates 0.5 and 1.0 inches from the top-left corner. The cover sheet is attached as the first page of the document.
3. The {{attach}} command specifies that the file Januaryinvoices.doc will be attached. Januaryinvoices.doc will be attached following the body of the fax.
4. The {{include}} command specifies that the file Februaryorders.inc will be referenced. The include file specifies the measurements for top and left margins ({{tm}} and {{lm}}) and the font.
5. The {{form}} command specifies that the file Purchorder.tif will be added as the background for the fax.
6. The finished fax includes the background form and the document data, as if the document has been printed on a pre-printed form.
7. The cover sheet, document, and attachment are faxed to 503-555-1234 in one transmission.
The following figurfrom NW DistributFCL-encoded docillustrated in “FigurPortland Trading C
Figure 8.2 FCL Document foCo.
1. The {{form}} coadded as the bInvoice from NWthe finished docform.
2. The {{attach}} cThis file is a six-Trading Compapopulated with sent as an attac
{{begin}}{{fax 503 555 9182}}{{form invoice.tif}}{{attach ptc6mos.xls}}{{tm 1.25}}{{lm 0.25}}{{font “times new roman”{{orient landscape}}{{company Portland Tradi{{contact Anne Paige}}{{owner John Bardolph}}{{onerror fax 503-555-45{{notifyhost notifyinv n
Anne PaigePortland Trading11990 S.W. CapitPortland, OR 970
55222
8/4/01
50 lb 13654 B
50 lb 13655 S
${{end}}
3
12
45 6

Chapter 8 Creating FCL Documents 43
3
4
5
and specifies that the sender will essage when the document is sent.
Distributors to Portland Trading Co.
ortland Trading Co.1990 S.W. Capitol Hill Roadortland, OR 97034503) 555-9182
8/8/01
$ 8.50/lb $ 425.00AmountPrice
edSales personTerms
Date
hip to
John Bardolph
2% 10 days
$75.00 $1,175.00Shipping Total
$ 12.00/lb $ 600.00
Page 1 of 4
DataData Data Data
. These four commands format the document. {{Tm}} specifies a top margin of 1.25 inches. {{Lm}} specifies a left margin of 0.25 inches. {{Font}} specifies a font of Times New Roman, 12-point. {{Orient}} specifies that the document will be in landscape orientation.
. These three commands will populate the variables in a notification message that will notify the sender when the document is sent.
. The {{onerror}} command specifies that the Integration Module take a particular action if a document fails to send properly. If an error occurs in transmission, the document will be faxed to 503-555-4592, which is a fax machine in the sender’s office.
6. The {{notifyhost}} commreceive a notification m
Figure 8.3 Finished Invoice from NW
Anne PaigePortland Trading Co.11990 S.W. Capitol Hill RoadPortland, OR 97034
P1P(
18277
50 lb 13654 Beef JerkyQty Item Description
Date orderedYour order # Our order #
Date shipp
Invoice #
SSold to
NWDistributors
135798/7/01
552228/4/01
$1,025.00 $75.00Subtotal Sales tax
50 lb 13655 Smoked Salmon
ptc6mos.xls
Data DataDataData

RightFax 9.4 Integration Module Guide 44

Chapter 9 Setting Defaults for FCL Documents 45
Chapt
Sett
TIoc
YiiF
OpeniProgr
1
2
3
tseneral. The General settings appear in
gs
er 9
ing Defaults for FCL Documents
o set most default values, you must make configurations to the ntegration Module Configuration program. In many cases, you can verride the default in specific documents by including FCL ommands in the document data from the host application.
ou can also set defaults for things like margins and fonts by nserting relevant FCL commands in a global include file. For nformation on include files, see Chapter 13, “Including the Same iles and Commands in Many Documents”.
ng the Integration Module Configuration am . On the Start menu, select Programs > RightFax > Enterprise
Fax Manager. The Enterprise Fax Manager window appears.
. In the Fax Servers list, click the name of the server on which the Integration Module is running.
. In the Service Name list, double-click RightFax Integration Module. The Integration Module Configuration window appears.
Setting General Defaul1. In the left pane, click G
the right pane.
Figure 9.1 General settin

RightFax 9.4 Integration Module Guide 46
g Level box, select the level of reporting to the t Log.
s no errorss critical errors onlyrds the most significant events only and is the g for normal userds all significant events and is the most useful nd resolving problems
value is set to verbose indefinitely, the event log can can prevent new events from being logged.
ame box, enter the name of the RightFax server.
list, select the communication protocol for the .
2. In the Company name box, enter a name to appear on the cover sheet of each sent fax. Usually this is the company name.
This setting can be overridden for a document with the {{rti}} command. For more information on this command, see Appendix B, “FCL Commands”.
3. In the CSID box, enter a voice telephone number to appear on the cover sheet of each sent fax. This is usually the telephone number for the company.
This setting can be overridden for a document with the {{csi}} command. For more information on this command, see Appendix B, “FCL Commands”.
4. In the Default cover page box, enter the file name for a cover sheet. Enter none for no cover sheet. For more information on cover sheets, see Chapter 14, “Creating and Attaching Cover Sheets”.
5. In the Default Printer box, specify the printer to use for printing documents when an error is encountered or when printing a document with the {{type print}} FCL command. Enter a printer that has been defined in Enterprise Fax Manager.
This setting can be overridden for a document with the {{printer}} command. For more information on this command, see Appendix B, “FCL Commands”.
6. Under Transmission quality, specify the image quality for faxes.
Fine is 200 x 200 dots-per-inch.Standard is 200 x 100 dots-per-inch.
This setting can be overridden for a document with the {{quality}} command. For more information on this command, see Chapter 18, “Setting Page Orientation and Image Quality”.
7. In the Event LoWindows Even
None recordTerse recordNormal recocorrect settinVerbose recofor tracking a
Caution If this become full. This
8. In the Server n
9. In the ProtocolRightFax server

Chapter 9 Setting Defaults for FCL Documents 47
Settin1
2
3
, enter the maximum page length for a tting prevents a legal-size page (11
s long) from being cut off at 11 inches. t is determined by the Units of
ed pages box, specify the maximum es for each fax. The Integration Module
pages to a fax.
o a fax that is 300 dots-per-inch will be reduce the image size and send the ect the check box Shrink 300 DPI files
ength box, specify the minimum page tting ensures that a fax with very little e that is long enough, so that it does not the recipient. The unit of measurement its of measure setting.
of a fax is sent as data to the receiving eed up the transmission of the fax if this ove this data from the fax, select the ce check box.
g Defaults for FCL Processing. In the left pane, click FCL Processes. The FCL Processor
settings appear in. the right pane.
Figure 9.2 The FCL Processor Settings
. In the Units of measure box, specify the unit of measurement that will be used for indentation, page length, and for FCL commands. With FCL commands, his setting is used to specify the x- and y-coordinates for placing data on a page. This setting can be overridden for a document with the {{units}} command. For more information on this command, see Appendix B, “FCL Commands”.
. In the Indentation box, specify the indentation of the fax image on the left side of the page. The unit of measurement is determined by the Units of measure setting.
4. In the Page length boxfax. For example, this seinches wide x 14 incheThe unit of measuremenmeasure setting.
5. In the Maximum attachnumber of attached pagcan attach up to 1024
6. A document attached tfaxed as two pages. Toimage as one page, selto fit page.
7. In the Minimum page llength for faxes. This sedata is printed on a pagget lost or discarded byis determined by the Un
8. White space at the endfax machine. You can spdata is not sent. To remTrim trailing white spa

RightFax 9.4 Integration Module Guide 48

49
Chapt
Crea
UnderThaM
Tf
following features:
ending information to the RightFax as the recipient name, fax number, and ovides information from the source er sheet.formation from the source document for ch as the sender's name and e-mail
the RightFax Integration Module, status of the sent document to the inistrator, or another recipient.rovide visual interest to the filter s of a pre-printed form such as a ery. Background forms are included by filter template.Graphics are included by linking an late. to the form so that information can be
fore it is sent. This is useful for adding the host application with the document.and facsimile command language (FCL) er template.
er 10
ting Filter Templates
standing Filter Templateshe RightFax Integration Module processes documents from the ost application by interpreting facsimile command language (FCL) nd performing functions based on the commands. The Integration odule can do this in one of two ways: native mode or filter mode.
With native mode, you include FCL commands in the document data that is sent from the host application. This may require custom programming to add FCL to documents or to templates in the host application or to insert FCL in the data stream.With filter mode, you create “filter templates” that add FCL to the document data after it is sent to the Integration Module for processing. A filter template is a map of the document data that contains the FCL that is required to create and send the document.
his chapter discusses the creation of filter templates that support ilter mode.
Filter templates provide the
Data mapping provides sIntegration Module, suche-mail address. It also prdocument for the fax covData mapping provides innotification messages, suaddress. Combined withnotifications provide the sender, to a system admBackground forms can ptemplate, with the featurepurchase order or stationlinking an image file to a Graphics can be added. image file to a filter tempData tables can be linkedadded to a document bedata that is not sent fromUser-defined data fields can further extend the filt

RightFax 9.4 Integration Module Guide 50
data now contains FCL. The {{company}} and mands are created by the mapped fields in the he document can now be processed and sent
on Module.
ment Flow
In the following example, the mapped data elements are the company name and fax number.
1. An invoice document is sent from host application that does not include FCL.
2. On the RightFax server, Filter.exe receives the document data and it retrieves a filter template. The filter template identifies data in the document that is needed for addressing and sending the document. In this filter template, the company name and fax number are mapped.
3. The filter software extracts the content of the company name and fax number fields and creates the {{company}} and {{fax}} FCL commands.
4. The document {{fax}} FCL comfilter template. Tby the Integrati
Figure 10.1 Filter Mode Docu

Chapter 10 Creating Filter Templates 51
PrepaBi
ues in the Integration Module. This is per filter.
s to documentsssigning a filter template to a document:
ach filter template. Data in the application is mapped to a field in the ies the template (see “Understanding 59).nput channels for the documents to tes. One input channel can process
template (see “Creating an Input ents” on page 64).
plateed to work with data that occurs in static data. If the document changes and a new location, then the filter template hange.
mplateam to create filter templates.
function, so that you can preview and u create it.
complete the following steps:
le data on a MapText document”
t data to MapText fields” (page 54)
gth, orientation, and background forms”
57)
ring to Create Filter Templatesefore you begin creating filter templates, prepare the following
nformation:
For each document that will be sent, obtain an ASCII text file that includes the data that will be used to the send the document, to send a notification message, or to be placed on cover sheets. This data might include the fax number, printer, voice telephone number, and the sender’s name and address. Save the text files in the folder RightFax\Production\Include.To capture a document from the host application data stream, send the document via an input channel on the Integration Module. The host data must be ASCII text with no extra characters or encoding. This may mean that a customized script must be written to prepare the data for the filter template. The file format should not be PCL, PostScript, or Portable Document Format (PDF).Identify each background form that should be included with each document. Create the forms and save them in the appropriate folder on the RightFax server, as described in Chapter 12, “Creating and Linking Background Forms”.Identify each cover sheet that should be included with each document. Create the cover sheets and save them in the appropriate folder on the RightFax server, as described in Chapter 14, “Creating and Attaching Cover Sheets”.Identify each graphic element, such as logos or signatures, to include in the filter template. Create the graphics and save them in the appropriate folder on the RightFax server, as described in Chapter 19, “Attaching and Embedding Files, Signatures, and Graphics”.Create include files, if needed. For more information, see Chapter 13, “Including the Same Files and Commands in Many Documents”.Create lookup tables, if needed. For more information, see the {{lookup}} FCL command in Appendix B, “FCL Commands”.
Create TCP/IP print quetypically one print queue
Assigning filter templateYou have two options for a
Assign a template ID to edocument from the host filter template that identifthe Field Types” on pageCreate up to 70 unique iprocess with filter templadocuments for one filter Channel for Filter Docum
Maintaining the filter temFilter templates are designlocations in the document data element is moved to amust be revised to fit the c
Creating a New Filter TeYou use the MapText progr
MapText includes a previewadjust each template as yo
To create a filter template,
“Step 1: Overlay the samp(page 52)
“Step 2: Map the documen
“Step 3: Establish page len(page 57)
“Step 4: Insert FCL” (page

RightFax 9.4 Integration Module Guide 52
sample data on a MapText documentx server in Windows Explorer, navigate to ction\Bin and run MapText.exe. The MapText with a blank document called MapText1.
MapText Window
enu, click Overlay Data File.
“Step 5: Preview the filter” (page 58)
The instructions in this chapter refer to sample files that are installed with the Integration Module. The files are described in the following table.
Step 1: Overlay the1. On the RightFa
RightFax\Produwindow opens
Figure 10.2 The
2. On the Tools m
Table 10a Sample Files Installed with Filter for Production
Sample file Location Description
SampleData.txt RightFax\Production \Include
An example of a document that a host application might create. It is formatted as a single print stream capture that contains two documents: a three-page purchase order and a one-page purchase order.
SampleForm.tif RightFax\Production \Forms
An example of a form onto which you might print a purchase order. MapText will merge SampleData.txt with SampleForm.tif to create an image of the document printed on a pre-printed form.

Chapter 10 Creating Filter Templates 53
3 Blank MapText Document
mbers at the left le file illustrate that which you create
he recipient of the purchase order. al Suppliers will bill to the first and ship to the second address.
. Select your sample document or SampleData.txt, and then click Open. The following example illustrates that SampleData.txt is placed in the blank MapText document. This image shows the data that forms Metropolitan Inc. purchase orders. In this case, the purchase order will go to Universal Suppliers.
Figure 10.3 Host Data Merged with a
The horizontal and vertical rows of nuand top borders are part of the sampSampleData.txt. They are provided toMapText filter templates are grids on fields at x- and y-coordinates.
This is tUniversaddress
This is the “ship to” address and contact information.
This is the “bill to” address and contact information.

RightFax 9.4 Integration Module Guide 54
in the document template that will contain the ipient company. Drag the mouse to select
pliers. The New Field dialog box appears.
figure, the name of the company that will receive Universal Suppliers) is selected. It will be ld. Note that the field is longer than the text it rovides space for long company names that future documents.
ning the Company Name as a Field
Step 2: Map the document data to MapText fieldsIn this step, you identify pieces of data in the document that RightFax will use to process and send the documents. You will:
Locate the data on the page (create a field for the data).Identify the type of data in the field.Map facsimile command language (FCL) to the field.
You can map host data to 25 FCL codes. The following steps map three host data elements (company name, fax number, and purchase order number) to three fields (company, fax, and comment).
For a detailed description of each type of field, see “Understanding the Field Types” on page 59.
1. Define the fieldname of the recUniversal Sup
In the followingthe document (defined as a fiecontains. This pmight appear in
Figure 10.4 Defi

Chapter 10 Creating Filter Templates 55
2
3
4
ocument template that will contain the . Drag the mouse to select the purchase Field dialog box appears.
he purchase order number (PO 13579)
Purchase Order Number as a Field
enter a description for the field, such as
Enter a desthe field yo
(13,12) deand y-coorupper-left field.
Select a fie
. In the New Field dialog box, in the Description box, enter a description for the field, such as “Company Name.”
Figure 10.5 Assigning Attributes to the Field
. In the Field Type list, click Company.
. Click OK.
5. Define the field in the dpurchase order numberorder number. The New
In the following figure, tis selected.
Figure 10.6 Defining the
6. In the Description box,“PO Number.”
criptive name for u’re creating.
scribes the x- dinates for the corner of the
ld type.

RightFax 9.4 Integration Module Guide 56
in the document template that will contain the e company that will receive this document. Drag lect the fax number. The New Field dialog box
figure, the fax number (520-555-3282) is
ning the Recipient Fax Number as a Field
d dialog box, in the Description box, enter a the field, such as “Fax Number.”
e list, click Fax.
ping the Fax Field Type
7. In the Field Type list, click Comment.
One attribute of the Comment field type is that it starts a new document when the data in the field changes. In this case, a new purchase order document will be created with each new purchase order number that is received. For detailed information on the Comment field type, see “Understanding the Field Types” on page 59.
Figure 10.7 Mapping the Purchase Order Field
8. Click OK.
9. Define the fieldfax number of ththe mouse to seappears.
In the followingselected.
Figure 10.8 Defi
10.In the New Fieldescription for
11.In the Field Typ
Figure 10.9 Map

Chapter 10 Creating Filter Templates 57
1
1
1
I
Wetp
Stebac
1
2
es) box, enter 56.
s an end-of-page symbol that indicates d page. The page breaks at whichever
r you enter in the Page Length (lines) ymbol. In SampleData.txt, the form feed symbol (^L, or ASCII-12).
t application does not include an u must specify the page length. To do e mouse at the last line on a page, and rea in the lower-right corner of the llowing figure shows that es long.
t Tray
for documents is 66 lines for portrait for landscape orientation. You can test in “Step 5: Preview the filter” on
bsence of fax number box, click 1. pears in the document from the host
n sends the specified number of copies ecified for the Integration Module.
mplate by adding FCL commands. For a mands, the proper syntax, and the s within documents, see Appendix B,
2.Click OK.
3.On the File menu, click Save.
4.Give the filter template a descriptive name. It will be saved as a MapText document (.mtd) in the RightFax\Production\Include folder.
n this example, you have:
Mapped the company name in purchase order documents to the “Company Name” field of the template. This created the FCL command {{company Universal Suppliers}} that RightFax will use to address the fax.Mapped the purchase order number in purchase order documents to the “Purchase Order” field of the template. This created the FCL command {{comment PO13579}}.Mapped the fax number in purchase order documents to the “Fax Number” field of the template. This created the FCL command {{fax 520 555 3282}} that RightFax will use to send the fax.Saved the purchase order template.
hen RightFax receives a document using this filter template, it will xtract data from the defined fields and use it to address and send he fax. It will also begin a new document each time a new urchase order number is encountered in the purchase order field.
p 3: Establish page length, orientation, and kground forms. On the File menu, click Properties, or click the Properties
button on the toolbar. The Properties dialog box appears.
. In the Form list, select SampleForm.tif, or select a background form that you have created.
3. In the Page Length (lin
SampleData.txt includethe bottom of the seconcomes first: the numbebox or an end-of-page send-of-page symbol is a
If the data from the hosend-of-page symbol, yothis in MapText, point ththen look at the status aMapText window. The foSampleData.txt is 56 lin
Figure 10.10 The MapTex
The default page lengthorientation and 33 linesthe validity of the countpage 58.
4. Select Portrait.
5. In the Print copies in aWhen no fax number apapplication, this functioto the default printer sp
Step 4: Insert FCLYou can extend the filter tedescription of the FCL complacement of the command“FCL Commands”.

RightFax 9.4 Integration Module Guide 58
nu, click Save, or click the Save icon on the owing example illustrates how FCL appears in dialog box after it is defined.
stom FCL Added to the Filter
e filterr, use the Generate Image function. Generate background form merged with the sample therefore helps you fine-tune the alignment. It
the RightFax server can receive data from the d process the data correctly with the filter.
lter
u, click Generate Image, or click the Generate n the toolbar. MapText generates the image, and age viewer opens with the finished document.
es of the finished document. If you are using a verify that it aligns with the document data.
“01” indicates that this is the first line of FCL code in this filter template, and so on.
“BE” indicates that this line of FCL will apply to the beginning of every page of the document that uses this filter template.
“BF” indicates that this line of FCL will apply to the beginning of the first page of the document that uses this filter template.
To insert FCL
1. On the File menu, click Properties, or click the Properties button on the toolbar. The Properties dialog box appears.
2. Click New. The Custom FCL dialog box appears.
Figure 10.11 The Custom FCL Dialog Box
3. Enter the FCL using the proper syntax and delimiters.
4. To specify that the commands will be inserted at the beginning of each document, select the Beginning of page check box.
5. Select one of the following options:
To specify that the FCL should apply to every page of the document, click Every page.To specify that the FCL should apply to only the first page of the document, click First page.To specify that the FCL should apply to only the first page of the document, click Last page.To specify the page number for the FCL, click Page #, and enter the page number.
6. Click OK. The MapText window appears.
7. On the File metoolbar. The follthe Properties
Figure 10.12 Cu
Step 5: Preview thTo preview the filteImage displays thedocument data anddoes not test that host application an
To preview the fi
On the Tools menImage button othe default TIFF im
Examine all the pagbackground form,

Chapter 10 Creating Filter Templates 59
Id“
F
d Types field types and their uses.
es
Map the field type to this data element
reation of a en the appears in
to the code.
This field type is commonly used for testing purposes.
Example For testing, you might create documents in a large batch that contain the word “test” in the Abort field. The documents would not be sent.
ocument is field
Map this field to data that is unique in each document.
Example The purchase order number is unique in each document. When the purchase order number changes, a new document is started.
See also the Page field type. The Page field type overrides the Comment field type.
n the following example, the form is not aligned with the document ata. For help troubleshooting filter templates, see Troubleshooting” on page 63.
igure 10.13 Your First Attempt Might Yield Alignment Errors
Understanding the FielThe following table lists the
Table 10b MapText Field Typ
Field type Description
Abort Cancels the cdocument whspecified text the field.
Corresponds {{abort}} FCL
Comment Starts a new dwhen text in thchanges.

RightFax 9.4 Integration Module Guide 60
fies the e-mail ss to send.
fications about the document to the host lication. document via e-mail g the InternetLink ule.sponds to the il}} FCL code.
ore information, see ternetLink Module .
The e-mail address of the person or company who is sending this document (used to send a notification to the e-mail address).
The e-mail address of the person or company to which you are sending this document (requires InternetLink).
fies the fax number.
sponds to the {{fax}} ode.
Map this field to the fax number where the document should be sent.
Field Types (Continued)
riptionMap the field type to this data element
Company Specifies the recipient company name.
Corresponds to the {{company}} FCL code.
Map this field to the name of the company that should receive the document.
This information may be placed on the cover sheet or in a notification message.
Contact Specifies the recipient name.
Corresponds to the {{contact}} FCL code.
Map this field to the name of the person who should receive the document.
This information may be placed on the cover sheet or in a notification message.
Cover Specifies the cover sheet.
Corresponds to the {{cover}} FCL code.
Map this field to the cover sheet file name.
The cover sheet file must be stored in the directory RightFax\Production\Covers. If the file is not found in the directory when the document is created, the default cover sheet is used.
Table 10b MapText Field Types (Continued)
Field type Description
Map the field type to this data element
Email Speciaddre
NotisentappTheusinMod
Corre{{ema
For mthe InGuide
Fax Speci
CorreFCL c
Table 10b MapText
Field type Desc

Chapter 10 Creating Filter Templates 61
T
file name of a
to the L code.
can provide at is not he document m the host ch as the
pany name r.
The text in the mapped field of the document will be compared to the first column in the specified lookup table. When a match is found, the associated data in the row will be used to send the document, included on the cover sheet, or included in a notification message.
When you create a Lookup field, you can create or edit a lookup file. To do this, click Edit lookup file.
The lookup table must be stored in the RightFax\Production\Include directory.
Example The mapped field may contain a vendor ID. In the lookup table, vendor ID data includes the company name and fax number. The company name will be printed on the cover sheet, and the fax number will be used to send the document.
es (Continued)
Map the field type to this data element
Graphic File name of a graphic. Map this field to the graphic file name. The file name must match the text in the mapped field. For example, Mark Jones' signature file must be named MarkJones.tif.
The graphic file format must be .tif. The file must be stored in the directory RightFax\Production\Forms. If the file is not found in the directory when the document is created, then the image will not appear in the document.
Example An image such as a signature or a company logo can be inserted.
Include Specifies the file name of an include file.
Corresponds to the {{include}} FCL code.
An “include” file can contain commands and data that are common to many documents.
Map this field to the include file name.
The file must be stored in the directory RightFax\Production\Include. If the file is not found in the directory when the document is created, then an error will occur and the document will not be processed.
able 10b MapText Field Types (Continued)
Field type Description
Map the field type to this data element
Lookup
Lookup2 - Lookup9
Specifies the lookup table.
Corresponds {{lookup}} FC
A lookup tableinformation thcontained in tthat is sent froapplication, surecipient comand fax numbe
Table 10b MapText Field Typ
Field type Description

RightFax 9.4 Integration Module Guide 62
fies the filter template to format the ent.
Map this field to text that describes the document or indicates the document type. For example, the words “Purchase Order” may indicate that the Purchase Order template be used to format the document.
When text in the mapped field matches the text specified, the specified template will be used to format the document.
fies user-defined ation.
sponds to the efined {{user1}}, 2}}, and {{user3}} ommands.
Map this field to text that you want to appear on the cover sheet or in a notification message.
fies the telephone er for the recipient.
Map this field to the phone number of the person who will be receiving the document.
The number can appear on the cover sheet or in notification messages.
Field Types (Continued)
riptionMap the field type to this data element
Owner Specifies the sender's name.
Corresponds to the {{owner}} FCL code.
Map this field to the sender's name.
The name can appear on the cover sheet or in notification messages.
Page Starts a new document when the number 1 appears in this field
Map this field to the page number.
See also the Comment field type. The Page field type overrides the Comment field type.
SendFax Use this field to print a document rather than fax it or send it through another method.
The document will be printed if N, a space, or null characters are found in this field.
Map this field to the fax number.
This field type is used when not all recipients have a fax number or other address for transmission. Such documents would be printed so that they could be mailed.
Table 10b MapText Field Types (Continued)
Field type Description
Map the field type to this data element
TemplateID
Specito usedocum
User1
User 2
User3
Speciinform
Correuser-d{{userFCL c
Voice Specinumb
Table 10b MapText
Field type Desc

Chapter 10 Creating Filter Templates 63
TroubTt
TheId
match the background form ocuments for a period of time, the filter s not match the document data. For rm does not line up correctly with the
tion may have changed, and the filter . For example, a carriage return or a new d.
t from the host application and the filter. en you must change the filter template to ctions, see “Step 1: Overlay the sample nt” on page 52.
dackground form, or other attached file is
for the attachment is not correct.
path to the file is correct and that the file ctory. For instructions, see “Preparing to page 51.
T
leshootinghis section provides troubleshooting tips for building filter emplates.
background form is not aligned with datan previewing a document that combines a background form with ocument data, the data does not align with the background form.
Document data does notAfter correctly formatting dtemplate unexpectedly doeexample the background fodata.
Possible cause
Data from the host applicatemplate must be updateddata element may be adde
Solution
Review the data that is senIf the data has changed, thaccommodate it. For instrudata on a MapText docume
Extra files are not includeA cover page, signature, bmissing or is incorrect.
Possible cause
The file name or path name
Solution
Verify that the file name or is stored in the correct direCreate Filter Templates” on
able 10c Background Form Does Not Align with Data
Possible cause Solution
The margins for the data are not set correctly. This causes the data to be too far from or too close to the left or top of the page.
Add or edit the FCL commands for the left and top margins. For instructions, see “Step 4: Insert FCL” on page 57.
The fonts are not set correctly. This causes the data to be aligned correctly in some places but not in others.
Add or edit the FCL commands for the font. For instructions, see “Step 4: Insert FCL” on page 57.
The number of lines on each page is not correct. This can cause the first page to align correctly, but the data on the second page is one line too low or high, the data on the third page is two lines too low or high, and so on.
Set the correct number of lines for each page of the document. For instructions, see “Step 3: Establish page length, orientation, and background forms” on page 57.
The sample data from your host application may include print control language (PCL) in the first line. If so, the data on the first page will appear one line below the top margin, and the other pages will be aligned correctly.
Remove the PCL from the data stream that is sent from the host application. For instructions, see “Preparing to Create Filter Templates” on page 51.

RightFax 9.4 Integration Module Guide 64
for the input channel must specify the filter wing table describes the command line options
.exe -c “filter -i invoice.mtd -f $$ oc” -p hplpr
listen.exe will run the “filter” command against ented by $$) received on the named pipe. Filter ands as designated by the invoice.mtd template to “makedoc” for processing.
t Device Settings for a Named Pipe
Description
The option -c specifies one or more commands to execute on files received via the channel.
Filter.exe extracts the document data using the filter template.Makedoc.exe begins the process of converting document data from the host application into a fax.
The pipe symbol (|) separates the two commands in the command line. The commands must be enclosed in quotation marks.
The option -i specifies that the specified MapText document (filename.mtd) should be included with the incoming data.
Identifies filename.mtd as a file.
Documents are not addressed or are not sent correctlyDocuments are incompletely addressed, the destination fax number is incomplete, or other information appears truncated in the document.
Possible cause
The fields for the data elements are not long enough.
Solution
Re-size the fields.
Creating an Input Channel for Filter DocumentsYou can create up to 70 unique input channels for the documents that must be processed with filter templates. One input channel can process documents for one filter template. The most common input channels are:
Named pipe capture (page 27)Directory scanning (page 28)Serial capture (page 29)TCP/IP port capture (page 31)
The command linetemplate. The folloto use.
Example nplisten| maked
In this example, Npthe data file (represwill add FCL command pipe the result
Table 10d Add Inpu
Command line option
-c “filter | makedoc”
-i filename.mtd
-f

65
Chapt
Spec
ASt
t to a Single Fax Numbera single recipient, add the {{fax}} following example shows an FCL d to 503-555-4489.
e sent.
T
Sends the documents as files to a specified folder.
Sends the document as an attachment to an e-mail message. This option requires the RightFax InternetLink Module.
Sends documents to a specified printer.
Specifies that a message will be sent to an SMS-compatible device.
ommands (Continued)
Description
er 11
ifying the Destination of the Document
document can be sent to a fax number, an e-mail address, an MS number, a printer, or a file. Use the following FCL commands
o specify the destination for documents.
Sending One DocumenTo address a document to command to the FCL. The document that is addresse
{{begin}} {{fax 503-555-4489}} Body of the document to b{{end}}
able 11a Destination FCL Commands
Code Description
{{fax}} Sends documents to a fax number.
If you have the InternetLink Module, then you can use an e-mail address with the {{fax}} command and send documents via e-mail. For more information, see the RightFax InternetLink Module Guide.
The {{altfax}} command provides an alternative fax number that is used if the number provided with the {{fax}} command fails.
{{type certified}} Sends the document as a certified e-mail message. This option requires the RightFax SecureDocs Module.
{{type email}} Sends the document as the body of an e-mail message. This option requires the RightFax InternetLink Module.
{{type file}} {{file}} {{list}}
{{type mime}}
{{type print}}
{{type SMS}} {{smsmsg MessageText}} {{sms PhoneNum}}
Table 11a Destination FCL C
Code

RightFax 9.4 Integration Module Guide 66
e Integration Module makes links between disk usage at a minimum. An {{end}} command for the final fax number.
ple shows a single-page document to be recipients.
tomer, losed on Friday, March 25 for inventory. We will sual on Monday.
ce Corporation company Salem Publishing Co.}}{{contact Juan -555-6530}}{{company Oswego abriella Navarro}} {{fax
company West Coast Shippers}}{{contact Andy
ument to Many Recipients With
rs can be associated with a document by using include file can contain a list of FCL commands ked to a document with the {{include}}
You can insert the {{altfax}} command as a backup fax number if the primary number fails:
{{begin}} {{fax 503-555-4489}} {{altfax 503-555-5240}} Body of the document to be sent. {{end}}
If you have purchased the RightFax InternetLink Module, you have more backup options. With the InternetLink Module you can specify a recipient fax number and e-mail address. If the fax number fails, the Integration Module can e-mail the document and notify you of the alternate sending method. For more information on this option and others provided by the InternetLink Module, see the RightFax InternetLink Module Guide.
For detailed information on the {{fax}} and {{altfax}} commands, including syntax and examples, see Appendix B, “FCL Commands”.
Sending One Document to Many Recipients Sending the same document to more than one recipient is called broadcasting. Broadcasting with FCL is accomplished by including additional {{fax}} commands just before the end of the FCL document. Captaris recommends that each {{fax}} command be followed by a {{company}} command for tracking purposes. Each broadcast document is issued its own document number and is treated as a separate entity for tracking and retry purposes.
Note Some restrictions exist for using cover sheets when you send documents to multiple recipients. For more information, see “Using cover sheets with broadcasts” on page 78.
When the Integration Module encounters a second fax number in a document, it determines that the document is complete, writes the current page to the disk and schedules it to be sent to the preceding fax number. This process continues for each subsequent
fax number, and thdocuments to keepcompletes the loop
The following exambroadcast to three
{{begin}} Dear cusOur office will be cbe open again as uThanks, International Finan{{fax 555-3374}}{{Garcia}} {{fax 206Boats}}{{contact G503-555-0905}}{{Wells}} {{end}}
Sending One Docan Include File
A list of fax numbean include file. An or data, and it is lincommand.

pter 11 Specifying the Destination of the Document 67
“C{a
F
Documents with an {{Include}} estCoastCustomers.inc would replace
the original data. Thus, you need to o address a document to multiple le broadcast include files stored on the
n easily broadcast a document to s you choose.
uch more than store broadcast data. For , how to create them, and where to save ing the Same Files and Commands in Many
ection deals with broadcast lists, just one
ents for a Broadcasts to create a list of recipients for a
first in each command on each line in an
829}}{{company Acura of Salem}}
a of Salem}}{{fax 503-555-3829}}
rs, such as spaces, between FCL n a line.
829}}{{company Acura of Salem}}
829}} {{company Acura of Salem}}
Cha
Figure 11.1: Broadcast Documents with an {{Include}} ommand” shows the same broadcast document with an
{include}} command that inserts multiple addresses, instead of the ddresses themselves.
igure 11.1 Broadcast Documents with an {{Include}} Command
In “Figure 11.1: BroadcastCommand”, the data from Wthe {{include}} command ininsert only one command trecipients. By having multipIntegration Module, you cawhatever group of number
Note Include files can do minformation on different usesthem, see Chapter 13, “IncludDocuments”. The following sform of include files.
Creating Lists of RecipiUse the following guidelinebroadcast transmission.
Place the {{fax}} commandFCL document.
Correct {{fax 503-555-3
Incorrect {{company Acur
Do not insert any charactecommands that are listed i
Correct {{fax 503-555-3
Incorrect {{fax 503-555-3
{{begin}}Dear customer,Our office will be closed on Friday, March 25 for inventory. We will be open again as usual on Monday.Thanks,International Finance Corporation{{include WestCoastCustomers.inc}}{{end}}
{{fax 555-3374}}{{company Salem Publishing Co.}}{{contact Juan Garcia}}{{fax 206-555-6530}}{{company Oswego Boats}}{{contact Gabriella Navarro}}{{fax 503-555-0905}}{{company West Coast Shippers}}{{contact Andy Wells}}
This is the file namedWestCoastCustomers.inc
{{begin}}Dear customer,Our office will be closed on Friday, March 25 for inventory. We will be open again as usual on Monday.Thanks,International Finance Corporation{{fax 555-3374}}{{company Salem Publishing Co.}}{{contact Juan Garcia}}{{fax 206-555-6530}}{{company Oswego Boats}}{{contact Gabriella Navarro}}{{fax 503-555-0905}}{{company West Coast Shippers}}{{contact Andy Wells}}{{end}}

RightFax 9.4 Integration Module Guide 68
dule creates a file (specified with the filename htFax\Production\Include folder. The content of between {{list filename}} and {{end}} FCL
ere to send the following document to the ion Module, it would create a file called .inc in RightFax\Production\Include.
}{{list dealers.inc}} 3-555-0912}}{{company ABSOLUTE SALE}}
3-555-7609}}{{company ACURA OF SALEM}} 5-8985}}{{company ACURA OF PORTLAND}} 1-555-8160}}{{company ACURA OF E}}
3-555-4911}}{{company HUTCHISON CO.}}
.inc would contain the following information:
3-555-0912}}{{company ABSOLUTE SALE}}
3-555-7609}}{{company ACURA OF SALEM}} 5-8985}}{{company ACURA OF PORTLAND}} 1-555-8160}}{{company ACURA OF E}}
3-555-4911}}{{company HUTCHISON CO.}}
cast lists created from a mainframe, ost
inal document, as necessary.
ent, including the {{list filename}} command, pplication to the Integration Module.
ll be over-written with the new information, the name of the specified file.
To create broadcast lists from a mainframe, server, or other host application
1. Include the {{list filename}} command in any document that contains a potential broadcast list.
For examples and usage information on this command, see Appendix B, “FCL Commands”.
Note The {{file}} command has capabilities that are similar to the {{list}} command, although {{list}} is preferable for creating broadcast lists because it removes all white space, blank lines, etc. from the input file, while {{file}} does not. To determine which command will work best for your needs, you should compare the two. See Appendix B, “FCL Commands”.
2. Send the document from the host application to the Integration Module.
The Integration Movariable) in the Rigthis file is the data codes.
Example If you wIntegratDealers
{{begin}{{fax 50WHOLE{{fax 50{{fax 55{{fax 54EUGEN{{fax 50{{end}}
Dealers
{{fax 50WHOLE{{fax 50{{fax 55{{fax 54EUGEN{{fax 50
To change broadserver, or other h
1. Change the orig
2. Send the documfrom the host a
The existing file wiunless you change

pter 11 Specifying the Destination of the Document 69
Td
1
2
UsingCcc
Ts.
Ic
red between broadcast fax numbers, so rries forward from document to or off individual cover sheets inside the over none}} command.
T
21 lines, each with each containing 69 characters maximum.
one 31 characters maximum.
m 31 characters maximum. Can contain alphabetical characters for macros.
utodeleteall Deletes successful documents.
autodelete
me 59 characters maximum.
ty Can be low (0), medium or normal (1), or high (2) priority. The default is low.
e
actnum 31 characters maximum.
d The RightFax user ID of the originator of the fax.
ord Equivalents (Continued)
doc d Notes
Cha
o creating broadcast lists from a terminal, client, or other esktop computer
. Using a text editor, word processor, spreadsheet, or database program that can produce plain text, type the required FCL commands in a text file.
. Save the file with an .inc extension to the RightFax\Production\Include folder on the Integration Module.
Warning If you do not change the extension of the file to .inc when you store it in the \Include folder, errors will occur.
Cover Sheets in a Broadcastover sheets in the Integration Module are known as “production” over sheets. They are saved as .cov files. Production cover sheets annot be used when broadcasting.
o broadcast a fax with a cover sheet, use a .pcl or .doc cover heet and keywords. For information and instructions on .pcl and doc cover sheets, see the RightFax Administrator’s Guide.
f you are an upgrade customer who is familiar only with FCL ommands, a list of equivalents is provided in the following table.
The cover sheet is not cleaone {{cover}} command cadocument. You can turn onbroadcast by using the {{c
able 11b Cover Sheet Keyword Equivalents
.cov keyword.pcl or .doc keyword Notes
billing billinfo1 15 characters maximum.
billing2 billinfo2 15 characters maximum.
comment to_citystate 59 characters maximum.
company to_company 59 characters maximum.
contact to_name 59 characters maximum.
covertext notetext
csi from_ph
fax to_faxnu
onerror delete faxflag_a
onsuccess delete
faxflag_
owner from_na
priority ucPriori
quality finemod
voice to_cont
winsecid owner_i
Table 11b Cover Sheet Keyw
.cov keyword.pcl or .keywor

RightFax 9.4 Integration Module Guide 70
ify a full path to another folder:
Files\Reports\MyDocument}} ent to be sent.
n on the {{file}} and {{list}} commands, d examples see Appendix B, “FCL Commands”.
Sending Documents to a Printer or File with FCL
Sending documents to a printer To send a document to a printer, add the {{type print}} command to the FCL. The document will print at the default printer specified in the Integration Module Configuration program. You can change the printer with the {{lp}} command. The following example shows an FCL document that will be printed.
{{begin}} {{type print}} Body of the document to be sent. {{end}}
Sending documents to a file The Integration Module can print documents to two different kinds of files: plain text (ASCII) files or .tif files. The {{type file}} command creates a .tif image of the host document and stores it in a folder that you specify. In the following example, the file MyDocument.tif would be saved in the RightFax\Production folder.
{{begin}} {{type file RightFax\Production\MyDocument}} Body of the document to be sent. {{end}}
The {{file}} and {{list}} commands creates a plain text (ASCII) file with an .inc extension in the RightFax\Production\Include folder. {{List}} strips all leading white space and blank lines, but {{file}} does not. In the following example, the file MyDocument.inc would be saved in the RightFax\Production\Include folder.
{{begin}} {{file MyDocument}} Body of the document to be sent. {{end}}
You can also spec
{{begin}} {{list c:\Marketing Body of the docum{{end}}
For more informatioincluding syntax an

71
Chapt
Crea
Tmfff
UnderTwmbd
a simple example of how the Integration om the host application with a
Background Form
orms forms by scanning an existing paper ing application to create a form.
be in class F, group 3 or 4 TIF format.
Smith Hardware Co.Purchase Order
Item SKU Qty CostRail 16 1 294.99Clip 24 10 190.08Pin 09 30 104.32
Hardware Co.hase Order
=
Host data and backgroundform merged into final
document
ground formchorder.tif)
er 12
ting and Linking Background Forms
his chapter explains background forms—the graphic files that are erged with a document from the host application to create a
inished document that looks like it was printed on a preprinted orm. Linking a background form to a host document is different rom inserting or attaching a graphic file.
standing Background Formsypically, background forms are used to replace documents that ould normally be printed on preprinted forms and then mailed or anually faxed. The Integration Module merges an electronic ackground form with the host data and then sends the finished ocument per your specifications.
The following figure showsModule merges the data frbackground form.
Figure 12.1 Host data Merged with a
Creating Background FYou can create backgroundform, or you can use a draw
All background forms must
{{begin}}{{fax 503-555-1234}}{{form purchorder.tif}}
Item SKU Qty CostRail 16 1 294.99Clip 24 10 190.08Pin 09 30 104.32
{{end}}
Smith Purc
+
Host data and FCL Back(pur

RightFax 9.4 Integration Module Guide 72
ation on the {{form}} command, including syntax Appendix B, “FCL Commands”.
Creating forms with a drawing programYou can use any application on any platform to create a background form. The file must be class F, group 3 or 4 TIF, which is the standard format for faxes.
Scanning paper formsIf you have a paper form that you want to duplicate, scan the form at 200 dpi.
Storing background formsSave background forms with any descriptive name as a class F, group 3 or 4 TIF file in the RightFax\Production\Forms folder.
Linking Background FormsUse the {{form}} FCL command to link a background form to a document.
Example
{{begin}} {{fax 503-555-9023}} {{form invoice.tif}} Host data. {{end}}
This example would merge the host data with a background form called invoice.tif, which resides in the RightFax\Production\Forms folder.
In this example, the {{form invoice.tif}} command could also be {{form invoice}} (without the .tif extension). The extension .tif is the default.
For detailed informand examples see

73
Chapt
Incl uments
Tcwfc
UnderY
E
s how a standard include file is used to nt.
n Include File
file specifies a top margin ({{tm}}), a left It also specifies that the file Logo.tif be tes.
nt of include files nds in include files to reduce the place commands in documents. You .
Dear Customer,This note is to let you know that our offices will be closed this coming Monday.Thanks,Your friends at Oswego Interiors
s New Roman” 12}}.tif 0.5 0.5}}
=
Interiors
clude file eClosed.inc)
Finished document
er 13
uding the Same Files and Commands in Many Doc
o include the same files and commands in many documents, you an create an include file. An include file contains information that ill be duplicated in multiple documents. For example, an include
ile can contain a list of fax numbers, so that the same documents an be addressed and sent to multiple recipients.
standing Include Filesou have two options for creating and using include files:
Global include files are provided in the RightFax\Production\Include folder when you install the Integration Module software. The files are empty. By default, global include files are linked to all documents but have no function unless you put information into them. Typically, global include files are used to establish default attributes for all documents.Standard include files. You can create standard include files and link them to documents with the {{include}} FCL command. Typically, standard include files are used to change an attribute in a large batch of documents, for example, to override a default attribute for a group of documents.
xample You can use a global include file to set the default font for all documents to Arial 11-point. To send a batch of documents using a different font, use a standard include file to change the font to Times 12-point.
The following example showcreate and send a docume
Figure 13.1 Host Data Merged With a
In this example, the includemargin ({{lm}}), and a font.placed at specific coordina
Understanding the conteYou can place FCL commaprogramming necessary tocan use any FCL command
{{include OfficeClosed.inc}}
Dear Customer,This note is to let you know that our offices will be closed this coming Monday.Thanks,Your friends at Oswego Interiors
{{end}}
{{font “Time{{place Logo
+
Host data and FCL In(Offic

RightFax 9.4 Integration Module Guide 74
bal.end are used for general FCL commands once per FCL document. Usually, these are FCL carried over from one document to the next , such as {{winsecid}}. {{Winsecid}} is not reset adcast documents, so placing it in Global.beg e a default, setting a RightFax mailbox to be tion documents.
bal.inc are more commonly used than obal.end.
ement in the FCL (after every fax number), overridden if there are conflicting FCL ata sent from the host.
sert {{priority low}} in Global.def, all documents ent at that priority except when a different }} command is included in the FCL coming from for that particular recipient.
ement in the FCL (before every fax number and Global.end), Global.inc overrides any conflicting
sert {{priority low}} in Global.inc, all documents that priority, ignoring any conflicting {{priority}} ds that are included in the FCL coming from the
iles
include filesord processor that will produce plain text icrosoft Notepad, to create an include file. Insert ext that you want to appear in multiple he include file with an .inc extension in the n\Include folder.
Also, you can place sentences, paragraphs, entire letters, and even multi-page documents in include files. Because include files are plain text (ASCII) documents, you must format the text with FCL commands. Any text will appear in the body of the finished document at the point where the {{include}} command or global include file appears.
Understanding the placement of global include files If the global include files contain content, the content will be inserted at default locations in all documents, as described in the following table.
The following table illustrates the default placement of information from these global include files.
Global.beg and glothat are used only commands that arewhen broadcastingautomatically in brocauses it to becomused by all produc
Global.def and GloGlobal.beg and Gl
Because of its placGlobal.def can be commands in the d
Example If you inwill be s{{prioritythe host
Because of its placat the end, before FCL.
Example If you inwill use commanhost.
Creating Include F
Creating standard You can use any w(ASCII), such as Many FCL or other tdocuments. Save tRightFax\Productio
Table 13a Placement of Data from Global Include Files
File name Default location in the FCL documents
Global.beg Beginning of document.
Global.end End of document.
Global.def Immediately after every fax number.
Global.inc Immediately before every fax number and at the end (before global.end).
Table 13b Example FCL Document with Global Include Files
FCL document Placement of data
{{BEGIN}} {{Company Test}} {{FAX 968-9601}} {{Contact Jay Doe}} {{FAX 968-9602}} {{Contact Sid Brea}} Body of the document to be sent. {{END}}
{{BEGIN}}Global.beg {{Company Test}} {{FAX 968-9601}}Global.def {{Contact Jay Doe}} Global.inc{{FAX 968-9602}}Global.def {{Contact Sid Brea}} Body of the document to be sent. Global.inc Global.end{{end}}

the Same Files and Commands in Many Documents 75
InseTRO
Id
WsiFr
Eiuiww
StoSi
Linkin
Linkcom
UhR
}}
e the {{include}} command with the fficeClosed.inc, which resides in the e folder.
include OfficeClosed.inc}} command could d}} (without the .inc extension). The .inc n include file is identified as part of an ou can insert it or omit it. Accordingly, if you include file that is not saved with an .inc cur.
the {{include}} command, including hapter 9 “Setting Defaults for FCL
es linked by default to every document that cesses. You do not need to link the ments.
s linked to all the global include files, you erting commands and other text into a incorrect FCL into a global include file ors.
Chapter 13 Including
rting content into global include fileso open any of the global include files in the ightFax\Production\Include folder, double-click the file. In the pen With dialog box, select Notepad.
nsert any FCL or other text that you want to appear in multiple ocuments.
arning Putting incorrect FCL into a global include file can cause ystem-wide errors. For example, if you put {{include file.inc}} in an nclude file called File.inc, then the file will attempt to insert itself in the CL document. The resulting infinite loop will cause RightFax to stop esponding.
very document sent through the Integration Module will use the nformation that you add to a global include file. You must nderstand the function of any FCL you insert in these files,
ncluding the different effects of a given command depending on here it appears in a document. (These effects will dictate into hich global include file you should insert certain commands.)
ring include filesave include files with any descriptive name with an .inc extension
n the RightFax\Production\Include folder.
g Include Files
ing standard include files with the {{include}} mandse the {{include}} command to link an include file (one that you ave created and saved with an .inc extension in the ightFax\Production\Include folder) with a document.
{{begin}} {{fax 503-555-9023}} {{include OfficeClosed.incHost data. {{end}}
This example would replaccontent of the file called ORightFax\Production\Includ
Note In this example, the {{also be {{include OfficeCloseextension is assumed when a{{include}} command. Thus, ycreate and attempt to link an extension, then errors will oc
For detailed information onsyntax and examples, see CDocuments”.
Linking global include filThe global include files arethe Integration Module proglobal include files to docu
Because every document imust use caution when insglobal include file. Insertingcan cause system-wide err

RightFax 9.4 Integration Module Guide 76

77
Chapt
Crea
Aiattap
AaoS
orts two kinds of cover sheets:
can contain FCL codes, text, and heets are attached to documents by mmand in the documents. The files are .cov, and they are stored in the folder ers. The Integration Module generates
an contain embedded codes, text, and heets are attached to documents by a ted or by default settings for the user or rmat can be print control language (.pcl) , and they are stored in the folder Fax server generates these cover and .doc cover sheets with FCL n .pcl and .doc cover sheets, see the Guide.
duction cover sheets.
er 14
ting and Attaching Cover Sheets
cover sheet is the first page of a faxed document. It usually ncludes information about the fax, such as the recipient’s name nd fax number, the sender’s name and telephone number, and the otal number of pages in the fax. RightFax cover sheets are emplates with placeholders for the information. The placeholders re filled with data and attached to a document when it is rocessed for faxing.
ttaching a cover sheet to a document is different from attaching nd embedding files. For more information on attaching other kinds f files, see Chapter 19, “Attaching and Embedding Files, ignatures, and Graphics”.
The RightFax system supp
Production cover sheetskeywords. These cover sinserting the {{cover}} conamed with the extensionRightFax\Production\Covthese cover sheets.Enterprise cover sheets ckeywords. These cover suser when the fax is creathe enterprise. The file foor Microsoft Word (.doc)RightFax\FCS. The Rightsheets. You can use .pcl documents. For details oRightFax Administrator’s
This chapter describes pro

RightFax 9.4 Integration Module Guide 78
eet Templates
r sheet templates dule includes a cover sheet called Auto.cov. ult cover sheet, unless you specify a different ation Module Configuration program. For blishing a default cover sheet, “Setting General 45.
generic information such as the company, number, and total pages in the fax. It is located ax\Production\Covers.
mand is included in the document data, but a is not specified, then Auto.cov will be used.
ver sheet templatet Notepad or another word processing will produce plain text.
or keywords in the template.
cks of text from the document data to the cover g blocks of text to a cover sheet from the ta” on page 79.odes, “FCL for cover sheets” on page 81.
ords, “Keywords for cover sheets”on page 79.
the last line of the cover sheet.
th the extension .cov in the folder ction\Covers.
Understanding Production Cover Sheets The following example illustrates how the Integration Module generates a simple cover sheet and then attaches it as the first page of a fax.
Figure 14.1 Sample Cover Sheet
In this example, the command {{cover GeneralUse.cov}} retrieves the template file GeneralUse.cov from the RightFax\Production\Covers folder. GeneralUse.cov contains text and keywords, which the Integration Module populates with information from the document data from the host application.
Notice that “To ^company” in GeneralUse.cov becomes “To Tigard Outfitters” in the finished cover sheet. That is because the ^company keyword maps to the content of the {{company}} FCL command.
Using cover sheets with broadcastsProduction cover sheets cannot be used when broadcasting. For more information, “Using Cover Sheets in a Broadcast” on page 69.
Creating Cover Sh
Using default coveThe Integration MoThis file is the defaone with the Integrinformation on estaDefaults” on page
Auto.cov contains contact, owner, faxin the folder RightF
If the {{cover}} comcover sheet name
Creating a basic co1. Open Microsof
application that
2. Type text, FCL,
To extract blosheet, “Addindocument daTo use FCL cTo use keyw
3. Type {{end}} in
4. Save the file wiRightFax\Produ

Chapter 14 Creating and Attaching Cover Sheets 79
Adddata
Ifwd
Udt{
N
Fig
Fc
Fc
WorBa
open the Windows registry and browse htFax\Production.
value called Max.
n a decimal number that represents the aracters per line. When finished, click
istry.
ts ywords you can use in production cover opulated with the content from the FCL the document data. In the cover sheet ust begin with the carat symbol (^).
commands, see Appendix B, “FCL
ords and FCL Equivalents
alent Notes
}}
}}
ing blocks of text to a cover sheet from the document
n addition to typing text in a cover sheet template, you can use text rom the document data to populate a cover sheet. This is useful hen a block of text on a cover sheet must be unique in each ocument.
se the {{covertext}} and {{endcovertext}} commands in the ocument data and the ^covertext keyword in the cover sheet emplate. The following figure shows the relationship between the {covertext}} command and the ^covertext keyword.
ote Coversheets provide a maximum of 75 characters, per line.
ure 14.2 How the Integration Module Uses the {{Covertext}} Command
or detailed information on the {{covertext}} and {{endcovertext}} ommands see Appendix B, “FCL Commands”.
or more information on the ^covertext keyword, “Keywords for over sheets” on page 79.
d-wrapping cover sheet note texty default, text entered in the notes field of a cover sheet will wrap t 70 characters. Use the steps below to customize this setting.
1. On the RightFax server,to HKLM\Software\Rig
2. Create a new DWORDCoverSheetWordWrap
3. Edit this value to contaimaximum number of chOK.
4. Close the Windows reg
Keywords for cover sheeThe following table lists kesheets. Each keyword is pcode that is included with template, each keyword m
For information on the FCLCommands”.
Table 14a Cover Sheet Keyw
Keyword FCL equiv
^altfax {{altfax}}
^billing
^billing2
{{billing}}
{{billing2}}
^comment {{comment
^company {{company
^contact {{contact}}

RightFax 9.4 Integration Module Guide 80
mpid}}
x}}
pe file}} The file name for {{type file}} documents.
mail}}
om}}
The {{from}} command can be used if you have licensed the InternetLink Module.
A Replaced with the local fax number set in the Integration Module Configuration program.
nerror print}} When {{onerror}} action is set to print, ^oecopies is replaced with the number of copies to be printed.
nerror}} Replaced with the {{onerror}} action specified for this document, or if none is specified, the default set in the Integration Module Configuration program.
nsuccess}} The {{onsuccess}} action specified for this document. If none is specified, the default set in the Integration Module Configuration program will be used.
wner}}
A The number of attachments in the fax.
The number of pages in an attached file are not counted.
x}}
eet Keywords and FCL Equivalents (Continued)
L equivalent Notes
^covertext n {{covertext}}
{{endcovertext}}
Text specified by the {{covertext}} and {{endcovertext}} commands in the document data.
Multiple blocks of text can be used on a single cover sheet. Specify the index number of the text block. Valid index numbers are 0-9, and the index number is not optional. If only a single text block is to be used on a cover sheet, use 0 as the index number.
^csi {{csi}} If no caller subscriber information (csi) is specified, the ^csi variable will use the default fax number set in the Integration Module Configuration program. Changes are global; you can change CSI on a per-document basis, but not on the banner line.
^date {{date}} If no {{date}} is specified, the current date will be used.
^dept {{dept}}
^docnum N/A The document number assigned by the RightFax Integration Module.
^email {{email}} This command can be used if you have licensed the InternetLink Module. The recipient’s e-mail address.
^emailcc {{email}} This command can be used if you have licensed the InternetLink Module. The e-mail address for an additional recipient.
Table 14a Cover Sheet Keywords and FCL Equivalents (Continued)
Keyword FCL equivalent Notes
^empid {{e
^fax {{fa
^file {{ty
^from {{e
{{fr
^localfax N/
^oecopies {{o
^onerror {{o
^onsuccess {{o
^owner {{o
^pages N/
^phone {{fa
Table 14a Cover Sh
Keyword FC
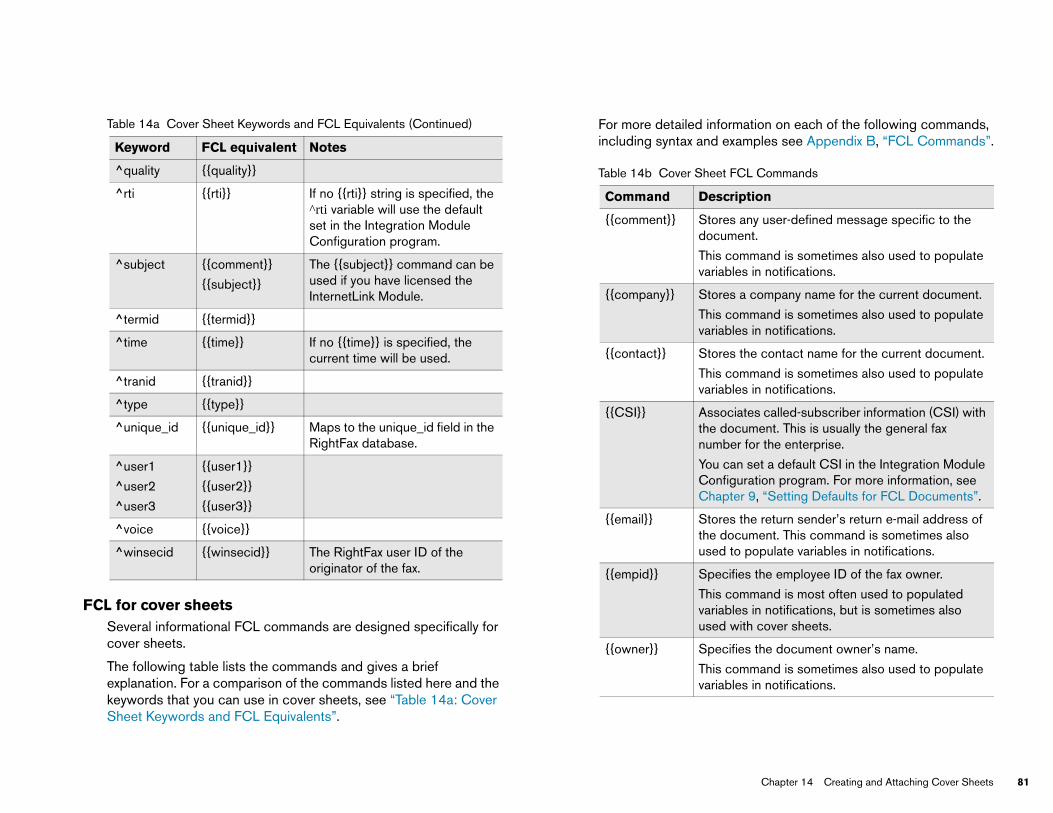
Chapter 14 Creating and Attaching Cover Sheets 81
FCLSc
TekS
ion on each of the following commands, ples see Appendix B, “FCL Commands”.
T
Commands
on
y user-defined message specific to the .
and is sometimes also used to populate n notifications.
ompany name for the current document.
and is sometimes also used to populate n notifications.
contact name for the current document.
and is sometimes also used to populate n notifications.
s called-subscriber information (CSI) with ent. This is usually the general fax r the enterprise.
et a default CSI in the Integration Module tion program. For more information, see , “Setting Defaults for FCL Documents”.
return sender’s return e-mail address of ent. This command is sometimes also pulate variables in notifications.
the employee ID of the fax owner.
and is most often used to populated n notifications, but is sometimes also cover sheets.
the document owner’s name.
and is sometimes also used to populate n notifications.
for cover sheets everal informational FCL commands are designed specifically for over sheets.
he following table lists the commands and gives a brief xplanation. For a comparison of the commands listed here and the eywords that you can use in cover sheets, see “Table 14a: Cover heet Keywords and FCL Equivalents”.
For more detailed informatincluding syntax and exam
^quality {{quality}}
^rti {{rti}} If no {{rti}} string is specified, the ^rti variable will use the default set in the Integration Module Configuration program.
^subject {{comment}}
{{subject}}
The {{subject}} command can be used if you have licensed the InternetLink Module.
^termid {{termid}}
^time {{time}} If no {{time}} is specified, the current time will be used.
^tranid {{tranid}}
^type {{type}}
^unique_id {{unique_id}} Maps to the unique_id field in the RightFax database.
^user1
^user2
^user3
{{user1}}
{{user2}}
{{user3}}
^voice {{voice}}
^winsecid {{winsecid}} The RightFax user ID of the originator of the fax.
able 14a Cover Sheet Keywords and FCL Equivalents (Continued)
Keyword FCL equivalent Notes
Table 14b Cover Sheet FCL
Command Descripti
{{comment}} Stores andocument
This commvariables i
{{company}} Stores a c
This commvariables i
{{contact}} Stores the
This commvariables i
{{CSI}} Associatethe documnumber fo
You can sConfiguraChapter 9
{{email}} Stores thethe documused to po
{{empid}} Specifies
This commvariables iused with
{{owner}} Specifies
This commvariables i

RightFax 9.4 Integration Module Guide 82
Sheet to a Document with FCLommand to attach a production cover sheet to a
3}} age.cov}}
clude one or more of these commands in the host cument so that the originator (person, group,
c.) of the document can be identified and rrectly sent the notification.
entifies the creator of this document.
is command is most often used to populated riables in notifications, but is sometimes also ed with cover sheets.
ets the voice number to be associated with the cument.
is command is most often used to populated riables in notifications, but is sometimes also ed with cover sheets.
eet FCL Commands (Continued)
escription
Attaching a CoverUse the {{cover}} cdocument.
{{begin}} {{fax 503-555-902{{cover FaxCoverPHost data. {{end}}
{{replyto}} Specifies a recipient for a notification. You can request that an HTTP post be sent back to the host as a notification when you use the RightFax XML Interface. ReplyTo is the field in the submit post that the XML Interface populates to determine where to send the notification.
{{RTI}} Specifies the remote terminal identification from which the document originated. This is typically the sending company’s name.
You can set a default name for the sending company in the Integration Module Configuration program. For more information, see Chapter 9, “Setting Defaults for FCL Documents”.
{{termID}} Specifies the terminal identification from which the document originated.
This command is most often used to populated variables in notifications, but is sometimes also used with cover sheets.
{{tranID}} Sets the identification of the transaction that produced the document.
This command is most often used to populated variables in notifications, but is sometimes also used with cover sheets.
{{uniqueID}} Sets an identification number for each destination (fax number) within the document.
This command is used most often for tracking. The Integration Module will generate a UniqueID unless you specify one in your FCL. Then, you can track the document in FaxUtil based on the UniqueID.
Secondarily, this command is sometimes used in cover sheets and with notifications.
Table 14b Cover Sheet FCL Commands (Continued)
Command Description
{{user1}}, {{user2}}, {{user3}}
Indoetco
{{userID}} Id
Thvaus
{{voice}} Sdo
Thvaus
Table 14b Cover Sh
Command D
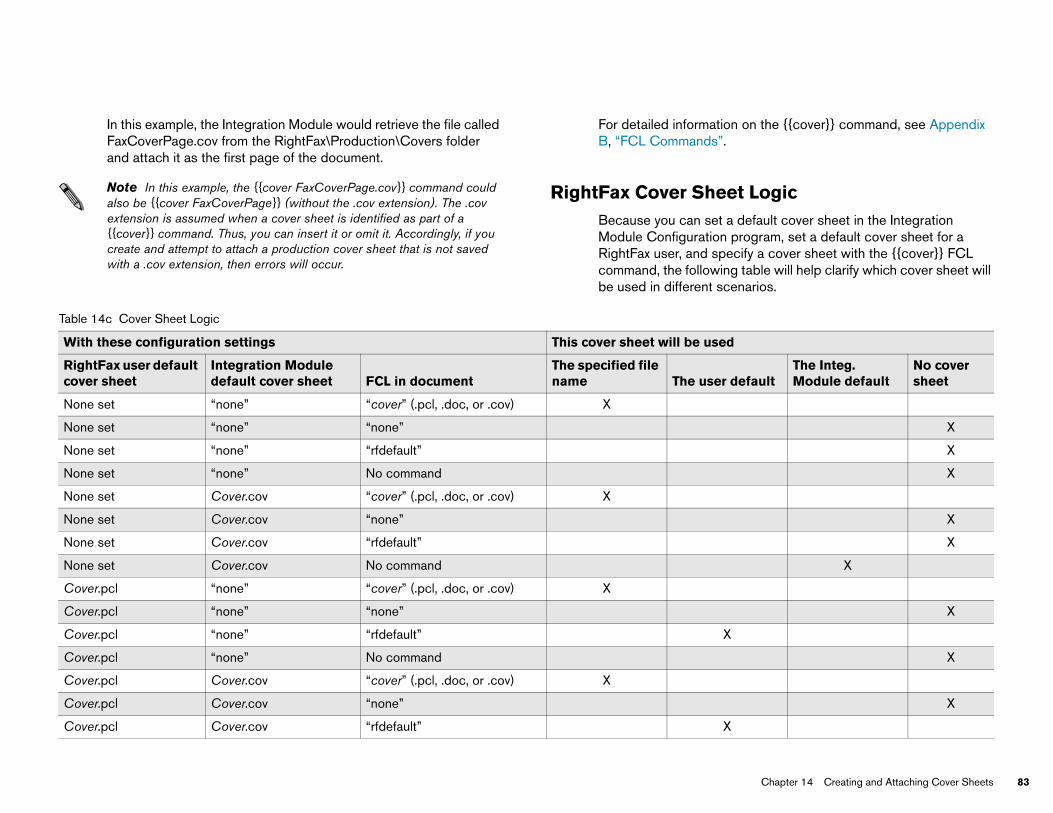
Chapter 14 Creating and Attaching Cover Sheets 83
IFa
Nae{cw
the {{cover}} command, see Appendix
ogic ault cover sheet in the Integration ram, set a default cover sheet for a
a cover sheet with the {{cover}} FCL le will help clarify which cover sheet will
ios.
Table 14c
With th
RightFacover s ult
The Integ. Module default
No cover sheet
None se
None se X
None se X
None se X
None se
None se X
None se X
None se X
Cover.p
Cover.p X
Cover.p
Cover.p X
Cover.p
Cover.p X
Cover.p
n this example, the Integration Module would retrieve the file called axCoverPage.cov from the RightFax\Production\Covers folder nd attach it as the first page of the document.
ote In this example, the {{cover FaxCoverPage.cov}} command could lso be {{cover FaxCoverPage}} (without the .cov extension). The .cov xtension is assumed when a cover sheet is identified as part of a {cover}} command. Thus, you can insert it or omit it. Accordingly, if you reate and attempt to attach a production cover sheet that is not saved ith a .cov extension, then errors will occur.
For detailed information onB, “FCL Commands”.
RightFax Cover Sheet LBecause you can set a defModule Configuration progRightFax user, and specifycommand, the following tabbe used in different scenar
Cover Sheet Logic
ese configuration settings This cover sheet will be used
x user default heet
Integration Module default cover sheet FCL in document
The specified file name The user defa
t “none” “cover” (.pcl, .doc, or .cov) X
t “none” “none”
t “none” “rfdefault”
t “none” No command
t Cover.cov “cover” (.pcl, .doc, or .cov) X
t Cover.cov “none”
t Cover.cov “rfdefault”
t Cover.cov No command
cl “none” “cover” (.pcl, .doc, or .cov) X
cl “none” “none”
cl “none” “rfdefault” X
cl “none” No command
cl Cover.cov “cover” (.pcl, .doc, or .cov) X
cl Cover.cov “none”
cl Cover.cov “rfdefault” X

RightFax 9.4 Integration Module Guide 84
ta that contains FCLxcover.cov}}{{owner Adam Guenther}} se Order}}{{covertext 0}} have questions!{{endcovertext}}
to 8.5,y}}{{lm 1.0}}
UANTITY TOTAL 2 $42.00 ====== $42.00 le Imports}}{{contact Jack Dundee}} 7}}
X
X
X
X
sed
ser defaultThe Integ. Module default
No cover sheet
Example Cover Sheet and Document
Cover sheet FCL and text{{place logo.tif 5 1}}{{lm 0.5}}{{moveto .5 1.5}}Palatine Hill Association 0615 S.W. Palatine Hill Road Portland, Oregon 97219 {{lm 1.0}}{{moveto 1 3.5}}FAX TRANSMISSION
Date: ^date Page: 1 of ^pages
To: ^contact Company: ^company Date: ^date
From: ^owner Company: Palatine Hill Association Fax: ^csi
Subject: ^comment
Notes:
^covertext 0 {{end}}
Host document da{{begin}}{{cover fa{{comment PurchaLet me know if you{{moveto 0 .5}} Purchase Order {{linewidth 4}}{{line
ITEM PRICE Q11023 $21.00 {{company Troutda{{fax 555-465-098{{end}}
Cover.pcl Cover.cov No command
Cover.pcl “rfdefault” “cover” (.pcl, .doc, or .cov) X
Cover.pcl “rfdefault” “none”
Cover.pcl “rfdefault” “rfdefault”
Cover.pcl “rfdefault” No command
Table 14c Cover Sheet Logic (Continued)
With these configuration settings This cover sheet will be u
RightFax user default cover sheet
Integration Module default cover sheet FCL in document
The specified file name The u

Chapter 14 Creating and Attaching Cover Sheets 85
Fini
Figure 14
Palati 0615 S Portla
FA Da Pa
To Co Da
Fr Co Fa
Su
No
Le
shed cover sheet and document
.3 The Cover Sheet is Attached as the First Page of the Document
Purchase Order
ITEM PRICE QUANTITY TOTAL11023 $21.00 2 $42.00
====== $42.00
ne Hill Association.W. Palatine Hill Roadnd, Oregon 97219
X TRANSMISSIONte: 08/31/01ge: 1 of 2
: Jack Dundeempany: Troutdale Importste: 08/31/01
om: Adam Guenthermpany: Palatine Hill Associationx: 503.968.9601
bject: Purchase Order
tes:
t me know if you have questions!
Palatine Hill

RightFax 9.4 Integration Module Guide 86

87
Chapt
Crea
Ass
FaCG
UnderShape
TacC
T
e {{box}} command. The box can be filled or black. This is frequently used to hide that cannot be removed easily from the coming from host application. You e text inside the box.
e whose starting and ending points are y coordinates that you supply.
e whose starting point is the current tion and whose ending point is specified tes that you supply.
ecify the width, in points, of the lines that ith other commands.
box}}, but the coordinates for size and established relative to the current cursor
contrast, the coordinates for the {{box}} re measured from the upper-left corner ment.
fillbox}}, but the coordinates for size and established relative to the current cursor
contrast, the coordinates for {{fillbox}} ed from the upper-left corner of the
hat Create Shapes (Continued)
n
er 15
ting Lines, Boxes, and Other Shapes
series of FCL commands can be used to create graphical hapes to appear in documents. Creating and configuring these hapes can supplement or replace background forms or graphics.
or information on background forms, see Chapter 12, “Creating nd Linking Background Forms”. For information on graphics, see hapter 19, “Attaching and Embedding Files, Signatures, and raphics”.
standing the Commands That Create she following table lists the FCL commands for drawing shapes nd provides a brief description. For detailed information on each ommand, including syntax and examples, see Appendix B, “FCL ommands”.
able 15a FCL Commands that Create Shapes
Command Description
{{Box}} Draws a box whose size and location at specified coordinates. You can also place text inside the box.
{{EndPoly}} Ends a polygon that is started with the {{startpoly}} command.
{{FillBox}} Same as thwith white informationdata streamcannot plac
{{Line}} Draws a linspecified b
{{LineTo}} Draws a lincursor locaby coordina
{{LineWidth}} Lets you spyou draw w
{{RBox}} Same as {{location arelocation. Incommand aof the docu
{{RFillBox}} Same as {{location arelocation. Inare measurdocument.
Table 15a FCL Commands t
Command Descriptio

RightFax 9.4 Integration Module Guide 88
creates a box at specified coordinates and u supply coordinates for the upper-left and . In the following example, (2, 2) is the upper-left corner of the box, and (4, 4) is the lower-right corner of the box.
mmand
{{begin}} {{fax 503-555-1234}} This is a test document. {{box (2, 2) (4, 4) “Example”}} {{end}}
Using the Most Common Commands That Create Shapes
This section lists the most common commands and provides examples for creating shapes, such as a line or a box, with FCL.
Example FCL code and finished documents are provided. The sample documents have horizontal and vertical numbers at the top and left margins to indicate the grid for the x- and y-coordinates for the placement of the shapes. The numbers will not appear in the finished document.
BoxThe box commandplaces text in it. Yolower-right cornerscoordinate for the coordinate for the
Figure 15.1 Box Co
{{RLine}} Same as {{line}}, but the coordinates that you supply to determine length and location are established relative to the current cursor location. In contrast, the coordinates you give with {{line}} are measured from the upper-left corner of the document.
{{RLineTo}} Same as {{lineto}}, but the coordinates that you supply to determine length and location are established relative to the current cursor location. In contrast, the coordinates you give with {{line}} are measured from the upper-left corner of the document.
{{RStartPoly}} Same as {{startpoly}}, but the coordinates that you supply to determine the starting point are established relative to the current cursor location. In contrast, the coordinates you give with {{startpoly}} are measured from the upper-left corner of the document.
{{StartPoly}} Starts a polygon at a point that you specify by supplying coordinates. The polygon is completed with a series of {{lineto}} commands and finished with the {{endpoly}} command.
Table 15a FCL Commands that Create Shapes (Continued)
Command Description

apter 15 Creating Lines, Boxes, and Other Shapes 89
FillbTio
F
line between specified coordinates. The ree {{line}} commands. In the first, (1, 1)
s for the beginning of the line, and (5, 1) end of the line.
a line between the current cursor rdinates. The current cursor location is and appears in a document but not
in this section show different options for
{{begin}} {{fax 503-555-1234}} This is a test document. {{line (1, 1) (5, 1)}} {{line (3, 1) (3, 3)}} {{line (2.5, 3) (8, 3)}} {{end}}
Ch
oxhe fillbox command is the same as {{box}}, except that you can fill
t with black or white. You might use a white-filled box to cover part f a document that should not appear in the finished document.
igure 15.2 Fillbox Command
LineThe line command draws afollowing example shows thare the x- and y-coordinateare the coordinates for the
Figure 15.3 Line Command
LinetoThe lineto command drawslocation and specified coooften where the FCL commalways. The two examples this command.
{{begin}} {{fax 503-555-1234}} This is a test document. {{fillbox (2, 2) (4, 4) black}} {{end}}

RightFax 9.4 Integration Module Guide 90
the starting point (where n is the current position does not move down). Then, the xt appears.
ommand
draws a box with a starting point that is relative or location. In contrast, the coordinates you ox}} command are measured from the upper-left ment.
location is often where the FCL command ent but not always. The two examples in this
rent options for this command.
{{begin}} {{fax 503-555-1234}} This is a {{lineto (4, n)}}test document. {{end}}
The first example begins the line at the current location when the Integration Module finds the {{lineto}} command. In this case, the location is immediately after “This is a”. The line ends at the coordinates (4, 4). Then, the remainder of the text appears.
Figure 15.4 Lineto Command
The second example starts the line at the current location when the Integration Module finds the {{lineto}} command. In this case, the location is immediately after “This is a”. The line ends at the coordinates (4, y), which is 4 units to the right of the starting point,
and n units below position; thus, the remainder of the te
Figure 15.5 Lineto C
RboxThe rbox commandto the current cursspecify with the {{bcorner of the docu
The current cursorappears in a documsection show diffe

apter 15 Creating Lines, Boxes, and Other Shapes 91
Twctr
TpdiT
F
Twcte
umbers for the (1, 8) position. The ument indicate that the box starts (2, 2) ation. These arrows would not appear in
{{begin}} {{fax 503-555-1234}} This is a test document. {{moveto (1,8)}} {{rbox (2,2) (3,3)}} {{end}}
Ch
he first example starts the box at (2, 2) from the current location hen the Integration Module finds the {{rbox}} command. In this ase, the location is immediately after “This is a”. The box ends at he coordinates (3, 3) from the current location. Then, the emainder of the text appears.
he following example does not show grid numbers, because the osition of the box is relative to a point that can move from ocument to document. The arrows in the example document
ndicate that the box starts (2, 2) from the current cursor location. hese arrows would not appear in the finished document.
igure 15.6 Rbox Command
he next example starts the box at (2, 2) from the current location hen the Integration Module finds the {{rbox}} command. In this ase, the location has been changed with the {{moveto}} command o (1, 8). Thus, the box starts (2, 2) from (1, 8), or (3, 10). The box nds at (3, 3) from (1, 8), or (4, 11).
This example shows grid narrows in the example docfrom the current cursor locthe finished document.
Figure 15.7 Rbox Command
{{begin}} {{fax 503-555-1234}} This is a {{rbox (2,2) (3,3)}}test document. {{end}}

RightFax 9.4 Integration Module Guide 92
{{begin}} {{fax 503-555-1234}} This is a {{lineto (4, 4)}}test document. {{end}}

93
Chapt
Sett
Tmdd
SettinYt
Tm
Tmi
ents”.) Any document that contains a se the defaults established in the global
l include file to establish one-inch ocuments. Later, you need to send a cuments with two-inch margins. To you include the relevant margin e FCL for those 100 documents. The are processed with two-inch margins e the default margins.
idual documents ent, insert the relevant margin cument.
ws an FCL document with left, top, and one unit.
e sent.
er 16
ing Margins and Tabs
his chapter describes the FCL commands that you can use to set argins and tabs in documents. You can set default margins for all ocuments, and then create single documents (or a group of ocuments) that override the defaults, as necessary.
g Marginsou can set margins for individual documents or default margins hat apply to all documents. Three FCL commands control margins:
{{bm}} bottom margin{{lm}} left margin{{tm}} top margin
o set margins for a single document, insert one or more of the argin commands into the FCL document.
o set default margins for all documents, insert one or more of the argin commands into a global include file. (For information on
nclude files, see Chapter 13, “Including the Same Files and
Commands in Many Docummargin command will not uinclude file.
Example You use a globamargins for all dbatch of 100 doaccomplish this,commands in th100 documentsand all others us
Setting margins for indivTo set margins for a documcommands into the FCL do
The following example shobottom margins that are all
{{begin}} {{lm 1.0}} {{tm 1.0}} {{bm 1.0}} {{fax 503-555-4489}} Body of the document to b{{end}}

RightFax 9.4 Integration Module Guide 94
ge With the Same Margins as
feed) command to begin a new page with the argins as the previous page. Use this command ents only, not in a global include file to create a
e, insert the {{ff}} command into the FCL.
wing example shows that a new page will start the words “document” and “to.” The new page
in the existing one-unit margins and not revert to ult margins.
} }} }} }}
3-555-4489}} the document {{ff}} to be sent.
FCL r individual documents or as defaults that will
nts. Three FCL commands control tabs:
oves all tab stops from a document.s a tab stop that functions globally throughout a
single tab stop; can be generic (based on a or can identify one of the tab stops created with mmand.
ngle document requires that you insert one or ab commands into the FCL.
The number you insert in the margin command reflects current units, so 1.0 could mean one inch, one centimeter, one point, or one pixel. This depends on the default units you have established.
You establish defaults, including default units, with the Integration Module Configuration program or by inserting certain FCL commands into a global include file. For more information on establishing default values, see Chapter 9, “Setting Defaults for FCL Documents”.
For detailed information on the margin commands, including syntax and examples see Appendix B, “FCL Commands”.
Setting default margins for all documents To set default margins for all documents, insert the relevant margin commands into the global include file called Global.beg.
The following example shows default margin information. By inserting these commands into the Global.beg include file, every document that the Integration Module processes will have one-inch margins.
{{lm 1.0}} {{tm 1.0}} {{bm 1.0}}
Default margins are zero until you establish a different default value.
For information on using global include files, see Chapter 13, “Including the Same Files and Commands in Many Documents”.
For detailed information on the margin commands, including syntax and examples, see Appendix B, “FCL Commands”.
Starting a New Pathe Previous Page
Use the {{ff}} (formsame left and top min individual documdefault setting.
To start a new pag
Example The follobetweenwill retathe defa
{{begin}{{lm 1.0{{tm 1.0{{bm 1.0{{fax 50Body of{{end}}
Setting Tabs with You can set tabs fogovern all docume
{{cleartabs}} rem{{settab}} createdocument.{{tab}} creates apreset tab stop) the {{settab}} co
To set tabs for a simore of the three t

Chapter 16 Setting Margins and Tabs 95
TtoCti
E
l documentst, insert the relevant commands into the
ample shows an FCL document with the and creating two different tab stops.
led 0 and sets a tab stop 1.5 units from he second is labelled 1 and sets a tab
om the left margin. The two {{tab}} tify tab stops 0 and 1, and move the cordingly.
d
to be
ment to be
document 3.
{{begin}}{{fax 503-555-4489}}{{settab 0 1.5 L}}{{settab 1 2.5 L}}Body of the document to be sent, paragraph 1.{{tab 0 Body of the document to be sent, paragraph 2.}}{{tab 1 Body of the document to be sent, paragraph 3.}}{{end}}
o set default tabs for all documents, insert one or more instance of he {{settab}} command into a global include file. (For information n include files, see Chapter 13, “Including the Same Files and ommands in Many Documents”.) Any document that contains a
ab command will not use the defaults established in the global nclude file.
xample You use a global include file to establish tab stops at one inch, two inches, and three inches for all of the documents. Later, you need to send a batch of 100 documents with a half-inch tab stop. To accomplish this, you include the relevant tab commands in the FCL for those 100 documents. The 100 documents include a half-inch tab stop, and all others revert back to the default.
Setting tabs for individuaTo set tabs for a documenFCL.
Example The following ex{{settab}} commThe first is labelthe left margin. Tstop 2.5 units frcommands idenenclosed text ac
Figure 16.1 Settab Comman
Body of the document sent, paragraph 1. Body of the docusent, paragraph 2.
Body of theto be sent, paragraph
1.5
2.5

RightFax 9.4 Integration Module Guide 96
Setting default tabs for all documents 1. Insert any {{settab}} command into the into the global include
file called Global.beg.
2. Insert corresponding {{tab}} commands into the FCL for any host document.
The host document will use the tab stops described in the corresponding {{settab}} command.
For information on using global include files, see Chapter 13, “Including the Same Files and Commands in Many Documents”.
For detailed information on the tab commands, including syntax and examples, see Appendix B, “FCL Commands”.

97
Chapt
Sele
TM
ABIf
Ffnlv
Wf
T
e Fonts use any TrueType font that is supported eType font support provides flexible, f characters. This includes:
led by the {{font}} command. For more nd, including syntax and examples, see nds”.
for Other Fontso supports any fonts that are supported
tware renders Windows fonts differently pe fonts, and the clarity of these fonts the font. Thus, Captaris recommends nts or TrueType fonts.
er 17
cting and Configuring Fonts
his chapter explains the fonts you can use with the Integration odule and explains how to manipulate fonts.
ll of the installed fonts are bitmap display format (BDF) fonts. DF fonts are not easily resized or manipulated. However, the
ntegration Module supports for vector fonts (such as TrueType onts), which can be manipulated.
onts are proportional or non-proportional. In a proportional font amily, the characters vary in width. For example, the letter I is arrower than the letter W. In a non-proportional font family, all the
etters are the same width. This is apparent when text must align in ertical columns.
hen it is necessary for letter alignment, use a non-proportional ont. The following installed fonts are non-proportional:
BlockCourierComputer Modern TeletypeLucida Typewriter
he default font is Courier bold 12-point (courb12).
Understanding TrueTypThe Integration Module canby Microsoft Windows. Trucustomized manipulation o
Font sizeLeading (vertical space)Pitch (horizontal space)WeightStrikethroughItalics
Font properties are controlinformation on this commaAppendix B, “FCL Comma
Understanding SupportThe Integration Module alsby Microsoft Windows.
The Integration Module softhan the installed or TrueTymight suffer, depending onthat you use the installed fo
RightFax 9.4 Integration Module Guide 98
t font for all documents ult font for all documents, use the {{font}} obal include file called Global.beg.
wing example shows an FCL command that will h a default font. By inserting this command into al.beg include file, every document that the
ion Module processes will use the font Times man, 12-point.
imes new roman” size=12}}
using global include files, see Chapter 13, e Files and Commands in Many Documents”.
ation on the {{font}} command, including syntax Appendix B, “FCL Commands”.
earance of Fontse appearance of fonts, such as the weight or and Windows fonts with the {{font}} command.
DF fonts, you can configure only the pitch and
any font with the {{underline}} command or draw text with the {{font}} with the strikeout option.
The Integration Module does not support double-byte fonts (such as fonts used for Chinese and Japanese).
Selecting FontsYou can establish a font for an individual document or a default font for all documents.
To set the font for a single document:
Use the {{font}} FCL command in the FCL document.Use the {{font}} command in a standard include file, as described in Chapter 13, “Including the Same Files and Commands in Many Documents”.
To change the default font for all documents, use the {{font}} command in a global include file (as described in Chapter 13, “Including the Same Files and Commands in Many Documents”.)
Documents that contains a font command will not use the defaults established in the global include file. The default font for the Integration Module is Courier bold 12-point (courb12).
Selecting fonts for individual documents To set the font for a document, use the {{font}} FCL command in the FCL document.
For detailed information on the {{font}} command, including syntax and examples, see Appendix B, “FCL Commands”.
Example The following example shows an FCL document with the font Times New Roman, 24-point, extra-bold, and italic. The {{font}} command controls all text until another {{font}} command or the end of the document.
{{begin}} {{font “times new roman” size=24 extrabold italic}} {{fax 503-555-4489}} Body of the document to be sent. {{end}}
Selecting a defaulTo change the defacommand in the gl
Example The folloestablisthe GlobIntegratNew Ro
{{font “t
For information on “Including the Sam
For detailed informand examples, see
Changing the AppYou can change thpitch for TrueType
For the installed Bleading.
You can underline a line through any

Chapter 17 Selecting and Configuring Fonts 99
FcC
E
Figure 17
Body
Body
Body
Body12-pinsta
or detailed information on the {{font}} and {{underline}} ommands, including syntax and examples, see Appendix B, “FCL ommands”.
xample The following example shows the FCL commands that would change the appearance of the same font and what the finished document would look like.
.1 Changing the Look of Fonts with FCL
text, paragraph 1.
text, paragraph 2.
text, paragraph 3.
text in Lucida Sans, oint, italic. This is an lled font.
{{begin}}{{fax 503-555-8823}}{{font “times new roman” size=12 pitch=15 extrabold italic strikeout}}Body text, paragraph 1.{{underline on}}Body text, paragraph 2.{{underline off}}{{font “times new roman” size=12 regular}}Body text, paragraph 3.{{font luis12}}Body text in Lucida Sans, 12-point, italic. This is an installed font.{{end}}

RightFax 9.4 Integration Module Guide 100

101
Chapt
Sett
TpM
SettinTd
TcS
Io
E
multiple times in a document, so that, are portrait and the even pages with a new {{orient}} command at the u can start a new page with the {{ff}} page 197).
for individual documents ument, insert either {{orient portrait}} or e FCL document.
ws an FCL document with portrait
e sent.
the {{orient}} command, including ppendix B, “FCL Commands”.
n for all documents n for all documents is portrait. To he {{orient landscape}} command into d Global.beg.
er 18
ing Page Orientation and Image Quality
his chapter explains how to set page orientation (landscape or ortrait) and image quality (standard or fine) using the Integration odule Configuration program or FCL.
g Page Orientationo determine the page orientation for individual documents or the efault for all documents, use the {{orient}} FCL command.
o set the default orientation for all documents, insert the {{orient}} ommand in a global include file (see Chapter 13, “Including the ame Files and Commands in Many Documents”).
ndividual documents that contain the {{orient}} command will verride the default in the global include file.
xample You use a global include file to establish landscape orientation for all documents (overriding the Integration Module default of portrait orientation). Later, you need to send a batch of 100 documents that must have portrait orientation. To accomplish this, you include the {{orient portrait}} command in the FCL for those 100 documents. The 100 documents are processed with portrait orientation, and all others revert back to the default.
You can change orientationfor example, the odd pageslandscape. You can do thisbeginning of each page (yocommand, as described on
Setting page orientation To set orientation for a doc{{orient landscape}} into th
The following example shoorientation.
{{begin}} {{orient portrait}} {{fax 503-555-4489}} Body of the document to b{{end}}
For detailed information onsyntax and examples, see A
Setting default orientatioThe default page orientatiochange this default, insert tthe global include file calle

RightFax 9.4 Integration Module Guide 102
e a single document in portrait orientation, you andscape default by inserting the {{orient in the FCL for the document.
g to Portrait Orientation
Qualityolution of the fax image to fine or standard.
ion is 204 x 98 dots per inch (dpi). 204 x 196 dpi.
quality for individual documents or as defaults documents.
y for a single document, insert the {{quality}} FCL document.
mage quality for all documents, see Chapter 9, or FCL Documents”.
ent to be
{{begin}}{{orient portrait}}{{fax 503-555-4489}}Body of the document to be sent{{end}}
For information on using global include files, see Chapter 13, “Including the Same Files and Commands in Many Documents”.
For detailed information on the {{orient}} command, including syntax and examples, see Appendix B, “FCL Commands”.
For more information on establishing default values, see Chapter 9, “Setting Defaults for FCL Documents”.
ExamplesThis section shows two examples of how different FCL documents yield different orientation in their finished documents.
The following example shows a single document being changed from the default of portrait orientation to landscape orientation.
Figure 18.1 Changing to Landscape Orientation
The following example assumes that you have previously changed the default orientation to landscape by inserting the {{orient landscape}} command into the Global.beg file (a global include
file). Thus, to creatmust override the lportrait}} command
Figure 18.2 Changin
Setting Fax ImageYou can set the res
Standard resolutFine resolution is
You can set imagethat will govern all
To set image qualitcommand into the
To set the default i“Setting Defaults f
Body of the document to be sent.
{{begin}}{{orient landscape}}{{fax 503-555-4489}}Body of the document to be sent.{{end}}
Body of the documsent.

pter 18 Setting Page Orientation and Image Quality 103
Atp
E
SetT{
T
{{{B{
Fe
Cha
ny document that contains the {{quality}} command will override he default established with the Integration Module Configuration rogram.
xample You use the Integration Module Configuration program to establish standard image quality for all documents. Later, you need to send a batch of 100 documents that must have fine quality. To accomplish this, you include the {{quality fine}} command in the FCL for those 100 documents. The 100 documents are processed with fine quality, and all others use the default.
ting image quality for individual documents o set image quality for a document, insert either {{quality fine}} or {quality standard}} into the FCL.
he following example shows an FCL document with fine quality.
{begin}} {quality fine}} {fax 503-555-4489}} ody of the document to be sent.
{end}}
or information on the {{quality}} command, including syntax and xamples, see Chapter 9, “Setting Defaults for FCL Documents”.

RightFax 9.4 Integration Module Guide 104

105
Chapt
Atta ics
TedC
YaPp
AttachTfaMci
Tccac
nt, use the {{libdoc}} command. nctionality as {{attach}}. For information the RightFax Administrator’s Guide.
d to fax format (.tif) in one of two ways: A) file conversions and INSO
at with SSA, the source application that st be SSA-compatible (see the RightFax list of SSA-compatible applications) must be installed on the RightFax server
d for files that cannot be converted with e attempts SSA conversions for all ent’s file type is not SSA-compatible, or application is not installed on the then an INSO conversion is used.
conversions, see the RightFax
er 19
ching and Embedding Files, Signatures, and Graph
he Integration Module provides several methods for attaching and mbedding files, signatures, and graphics. To embed text in a ocument, see Chapter 13, “Including the Same Files and ommands in Many Documents”.
ou can set defaults for how the Integration Module processes ttached graphics. See the options for Image Cropping in the FCL rocessor settings of the Integration Module Configuration rogram Chapter 9, “Setting Defaults for FCL Documents”.
ing Files to Documents with FCLhe options described here are for files that are converted to fax ormat (TIF images) before being attached and sent. If you want to ttach files in their native format, you can purchase the InternetLink odule to send documents via e-mail. For example, fax format
annot adequately represent the content of an audio file. For nstructions, see the RightFax InternetLink Module Guide.
o attach a file to a document, use the {{attach}} command. You an attach multiple documents by inserting multiple {{attach}} ommands. The {{attach}} command ends the page, so the ttachment always begins on its own page. The {{attach}} ommand cannot be used in {{type email}} documents.
To attach a library docume{{Libdoc}} has the same fuon library documents, see
Converting attached filesAttached files are converteserver-side application (SSconversions.
To convert a file to fax formcreated the attachment muAdministrator’s Guide for aand the source application computer.
INSO conversions are useSSA. The RightFax softwarattachments. If the attachmif the attachment’s source RightFax server computer,
For more information on fileAdministrator’s Guide.

RightFax 9.4 Integration Module Guide 106
e Named AugustInvoice.doc
ation on the {{attach}} command, including es, see Appendix B, “FCL Commands”.
tures with FCL
sy signature files and save them as Class F TIF
ation Module does not provide a method for , and neither Captaris Implementation Services mer Support can assist you in this process. The hod is to scan a signature. Regardless of ure must be saved as a Class F TIF file.
he main document.
NVOICESata Dataata Dataata Dataata Dataata Dataata Dataata Dataata Dataata Dataata Dataata Dataata Dataata Dataata Dataata Dataata Dataata Dataata Data
t. {{begin}}{{fax 503-555-0016}}Body of the main document{{attach AugustInvoice.doc}More of the main document{{end}}
Storing attachmentsFor every attached file, you must either provide a path to the file in the {{attach}} command, or save the file in the RightFax\Production\Forms folder. If you provide a path, it should be a full path. If you provide a path that is not a full path, then it must be relative to RightFax\Production\Forms.
Example The following example shows an FCL document that would attach a file called AugustInvoice.doc. The attachment would be converted to fax format, attached to the body of the main document at the start of a new page, and sent to (503) 555-0016.
For this example document to function properly, Microsoft Word must be installed on the RightFax server computer (to use SSA to convert AugustInvoice.doc) and AugustInvoice.doc must already be saved in the RightFax\Production\Forms folder.
Figure 19.1 Attaching the Fil
For detailed informsyntax and exampl
Embedding Signa
Creating signatureYou must create animages. The Integrcreating these filesnor Captaris Customost common metmethod, the signat
More of t
AUGUST IData Data DData Data DData Data DData Data DData Data DData Data DData Data DData Data DData Data DData Data DData Data DData Data DData Data DData Data DData Data DData Data DData Data DData Data D
Body of the main documen

hing and Embedding Files, Signatures, and Graphics 107
StoFtRbm
Emb1
2
E
les people need to send a letter to rs—each sales person must send the tomers. The {{signature}} command can es person’s signature that will appear at s or her letters.
the {{signature}}, {{sign}}, {{signed}}, or syntax and examples, see Appendix B,
ipulate the body of an FCL document, might be easier when you use one of hich requires only one FCL command ore exact placement options. For more
ng Graphics with FCL” on page 108.
Chapter 19 Attac
ring signaturesor every embedded signature file, you must either provide a path o the file in the {{signature}} command, or save the file in the ightFax\Production\Forms folder. If you provide a path, it should e a full path. If you provide a path that is not a full path, then it ust be relative to RightFax\Production\Forms.
edding a signature. Insert the {{signature}} command into the FCL to define the
signature file.
. Insert {{sign}}, {{signed}}, or {{@}} (they are identical) at the point where you want the signature to appear.
xample In the following example, the {{signature}} command establishes that DoctorRobertCribbs.tif will be the signature used in this document. The {{@}} command places this signature below the text that forms the body of the document, at the current cursor location.
For this example document to function properly, DoctorRobertCribbs.tif must already be saved as a Class F TIF in the RightFax\Production\Forms folder.
{{begin}}{{signature DoctorRobertCribbs.tif}} {{fax 503-555-0016}} Body of the document to be sent. Sincerely, {{@}} {{end}}
Because it identifies, rather than places, a signature file, the {{signature}} command is often useful in situations where you can manipulate the header of an FCL document, but not the body.
Example One-hundred sa10,000 customeletter to 100 cusidentify each salthe bottom of hi
For detailed information on{{@}} commands, including“FCL Commands”.
When you are able to manembedding a signature filethe {{place}} commands, winstead of two and offers minformation, see “Embeddi

RightFax 9.4 Integration Module Guide 108
Embedding Graphics with FCLTo embed graphics in the body of a document, use one or more of the {{place}} commands.
{{place}} positions the specified Class F TIF image. You can specify a full path to the graphic file. If you do not specify a path, then the default is RightFax\Production\Forms. The upper-left corner of the graphic is placed at the current cursor location, unless you specify x- and y-coordinates.{{placeall}} places the image on the current and all subsequent FCL pages (but not on file attachments).{{placelast}} places the image on the last page only. You can use multiple {{placelast}} commands to embed multiple images on the last page (such as multiple signatures, something you cannot do with the signature commands).{{placexy}} specifies the location on the page of the images defined in subsequent {{place}} commands. You can specify horizontal values of left, center, and right, and vertical values of top, center, and bottom. For example, {{placexy center center}} would align the horizontal and vertical centers of the image at the location specified in a subsequent {{place}} command.
Embedding a signature file (page 106) is essentially the same as embedding any other graphic. The signature commands have no functional differences from the place commands—both let you embed a graphic file in the body of a document. However, the {{place}} commands require less programming and let you locate the embedded graphic more precisely in the document.

109
Chapt
Sche
TIos
Td
Fe
T
a sending status of high, medium (or r low priority for a document. When high cuments exist, low and medium priority
ts are held so that the high priority t can be sent. The default is low priority.
ly has an effect on sending time when riables, such as document traffic or g time (for complex documents with phics, attachments, etc.), are sufficiently fficiently high” depends on multiple also, such as the number of RightFax r channels in the system.
ch}} command is a common variable that e sequence in which documents are sent, he priority that you establish for {{batch}} ts.
ple, if you batch several documents and em all high priority, they will not be sent atch is complete. In this instance, low cuments can be sent before the high tch documents are sent.
ommands (Continued)
ion
er 20
duling Document Transmission
his chapter explains the FCL commands that schedule when the ntegration Module sends documents. Unless you specify therwise with one of these commands, the Integration Module ends documents when it receives them from the host application.
he following table lists the scheduling commands and gives a brief escription.
or detailed information on these commands, including syntax and xamples, see Appendix B, “FCL Commands”.
able 20a The Scheduling Commands
Command Description
{{approval}} Holds a document in the FaxUtil mailbox until it is approved.
{{batch}} Holds a document so that it can be sent with other documents in a batch.
{{date}} Specifies a future date to send a document. Combine this command with {{time}}.
{{delay}} Delays sending by a specified number of minutes..
{{preview}} Holds the document for preview in the FaxUtil mailbox.
{{priority}} Specifiesnormal), opriority dodocumendocumen
Priority oncertain vaprocessinmany grahigh. “Suvariables servers o
The {{bataffects thas does tdocumen
For examassign thuntil the bpriority dopriority ba
Table 20a The Scheduling C
Command Descript

RightFax 9.4 Integration Module Guide 110
{{time}} Specifies a future time to send a document. Combine this command with {{date}} to send a document at a particular time on a future day.
The {{time}} command only considers the time remaining in the same day. Thus, a document is sent immediately if the time specified in the {{time}} command is in the past.
For example, if you send a document to the Integration Module at 21:00 (9:00 p.m.) and you insert the command {{time 20:45}}, the document will be sent immediately because 20:45 (8:45 p.m.) of the current day is in the past.
{{UTC}} Specifies a future date and time to send a document in universal coordinated time.
Table 20a The Scheduling Commands (Continued)
Command Description

111
Chapt
Sett ission
TsenI
NodmdmA
CreatiTma
WRpmc
not generated by the Integration Module lly, these are faxes that are missing for sending (such as the fax number). ons to set up notifications of faxes with
ger and FaxUtil to set up notifications for faxes with incomplete information x Administrator’s Guide).odule or the RightFax API to create
er to the RightFax COM Module Guide
on Process” on page 112 illustrates the sing the following notification channel
change Settings” -f $$
er 21
ing Up Notification Messages of Document Transm
his chapter explains how to configure the Integration Module to end notification messages when a document has been sent or has rrors in transmission. You have multiple options for configuring otification messages—the content they contain, how the
ntegration Module sends them, and how they are received.
otification messages are informative—they can describe whether r not a document was transmitted, any transmission errors, the ate and time of transmission, the owner of the document, and ore. Another form of notification is to print or fax a copy of the ocument to another recipient such as a system administrator. For ore information on this option, see Chapter 23, “Setting Up ctions on Document Transmission”.
ng Notification Messages with FCLo send notification messages, the FCL command {{notifyhost}} ust be included in documents sent from the host application or dded to include file that is linked to the documents.
hen a document is received, generated, and transmitted from the ightFax server, notification messages are generated by the rogram Notify.exe in the Integration Module. The notification essages are sent to the host application via “notification hannels” that you set up in the Integration Module.
Notification messages are for incomplete faxes. Usuainformation that is requiredYou have the following optiincomplete information:
Use Enterprise Fax Manaand to monitor the system(described in the RightFaUse the RightFax COM Mcustom notifications. Reffor more information.
“Figure 21.1: The NotificatiFCL notification process ucommand line:
FAX2MAPI -t $o -u “MS Ex

RightFax 9.4 Integration Module Guide 112
ns for FCL documents requires these basic
te for the notification message (described on ification templates determine the format and otification message.
ation channel (described on page 118). Use the ule Configuration program to create notification include command lines that determine how the ule will send notifications.
tifyhost}} FCL command in the document that is ost application to the Integration Module age 128). The {{notifyhost}} command specifies template for the message and the notification
ion Templatesrmat of the notification message is defined in e file that you create. The template is a collection d variables which are replaced with data about in the notification message.
ords are surrounded by carat symbols (^) and r and an optional field length. For example, the y^ would be replaced with the entire name of ich the document was sent, regardless of the
ers. The keyword ^company 12^ would be irst 12 characters only of the company name.
Figure 21.1 The Notification Process Creating notificatiosteps:
1. Create a templapage 112). Notcontent of the n
2. Create a notificIntegration Modchannels, whichIntegration Mod
3. Include the {{nosent from the h(described on pthe notification channel to use.
Creating NotificatThe content and fotext-based templatof text and keyworthe sent document
Template file keywcontain an identifiekeyword ^companthe company to whnumber of charactreplaced with the f
Fax NotificationDocument # ^docnum^sent to ^fax^.Final return code: ^retcode^.
Notification recipient
Integration Module
notify.exe
Document containing{{notifyhost exchsuccexchfail exchange}}
arrives at Integration Module
The document is transmitted successfully, so notify.exeretrieves the "success" notification template "exchsucc.inc"
Notify.exe replaces keywords in exchsucc.inc with data.
Fax NotificationDocument #8765sent to (555) 729-5403.Final return code: success.
fax2mapi -t $o -u "MS Exchange Settings" -f $$
Notify.exe retrieves the notification commandline that you created in the Integration Module Configuration program
Notify.exe replaces variables in your command line with data.
fax2mapi -t Ted Rose -u "MS Exchange Settings" -f 8765.tmp
This is "exchsucc.inc."It contains the
keywords "docnum,""fax," and "retcode."
"Exchsucc.inc"becomes "8765.tmp."The Enterprise Server
generates the finalreturn code.
The notification is delivered to the host according to the requirements in the command line.In this case, the notification is an e-mail to "Ted Rose" delivered via MAPI to an Exchange server.

Up Notification Messages of Document Transmission 113
Fpd
T
1
2
3
TemTtck
placed by the information included in the the sent document. If an FCL document 3287}}, then 503-555-3287 will appear d appears in the notification template.
FCL Equivalents
nt Description
The alternate fax number.
Billing code 1.
Billing code 2.
The {{subject}} command can be used if you have licensed the InternetLink Module. The subject appears in the subject field of the e-mail message. If no subject appears in the document, the default subject is “Success Notification” or “Error Notification.”
The destination company name.
The recipient name.
If no CSID (call subscriber ID) is specified, the default set in the RightFax Integration Module Configuration program will be used.
If no date is specified, the default is the date the fax was submitted.
The destination department number.
The document number assigned by the Integration Module.
The duration of the fax call in seconds.
Chapter 21 Setting
or an example, refer to “Figure 21.1: The Notification Process” on age 112. The template file in this example is a simple text ocument that contains three keywords:
^docnum^ is replaced with the document number assigned by the Integration Module.^fax^ is replaced by the fax number of the person or company receiving the document.^retcode^ is replaced with the text of the code returned from the fax board after transmission. This will either be the word “success” or a specific error code.
o create and save a notification template
. Open Notepad or another text editing application that will produce ASCII text files.
. Enter the text and keywords of the notification message you want to receive. For a description of all of the available keywords for notification templates, see “Template file keywords” on page 113.
. Save the file with the extension .inc in the RightFax\Production\Include folder. Make note of the file name as you will need it later when you include the {{notifyhost}} command in FCL documents from the host application.
Caution Do not save the template file with a .txt extension or any extension other than .inc. The Integration Module will only recognize files with this extension as notification templates.
plate file keywords he following table lists the keywords you can add to notification emplate files. The keywords are shown with FCL equivalents. FCL ommands in the sent document will populate the corresponding eyword in the notification message.
For example, ^altfax^ is re{{altfax}} FCL command incontains {{altfax 503-555-where the ^altfax^ keywor
Table 21a Notification Keywords and
Keyword FCL equivale
^altfax^ {{altfax}}
^billing^ {{billing}}
^billinfo2^ {{billing2}}
^comment^ {{comment}} {{subject}}
^company^ {{company}}
^contact^ {{contact}}
^csi^ {{csi}}
^date^ {{date}}
^dept^ {{dept}}
^docnum^ N/A
^duration^ N/A

RightFax 9.4 Integration Module Guide 114
The total number of fax attempts.
r}} If no {{owner}} command appears in the sent document, the default is the RightFax user name of the owner of the fax.
r}} The RightFax use ID of the owner of the fax
Total pages of the document, not including the cover sheet.
Total pages that were successfully transmitted.
The name of the currently selected printer.
ty}} The fax resolution.
to}} The reply-to name.
The text of the code returned from the fax board after transmission. Will be either “success” or a specific error message.
If no RTI string appears in the sent document, the default is the RTI set in the Integration Module Configuration program.
Fax status as listed in FaxUtil (see the RightFax Administrator’s Guide).
Numeric return code; “^Statustype^ Codes” on page 116.
id}} The termination code.
ords and FCL Equivalents (Continued)
quivalent Description
^email^ or ^emailto^
{{email}} {{to}}
These commands can be used if you have licensed the RightFax InternetLink Module. The keyword ^email^ is the recipient address. With other notifications, ^email^ is typically the e-mail address of the originator of the document.
^emailfrom^ {{from}} The e-mail address of the originator of the document. If no e-mail address appears in the document, the default is postmaster@domain. This command can be used if you have licensed the InternetLink Module.
^emailcc^ {{cc}} The e-mail address where a copy of the message should be sent. This command can be used if you have licensed the InternetLink Module.
^emailsubject^ {{subject}} The e-mail subject. This command can be used if you have licensed the InternetLink Module.
^empid^ {{empid}} The recipient employee ID.
^fax^ {{fax}} The recipient fax number. Same as ^phone^.
^phone^ {{fax}} Same as ^fax^..
^faxcard^ N/A The number of the fax board used for transmission.
^faxstatus^ N/A Numeric status code; see “The ^faxstatus^ and ^statustype^ keywords” on page 115.
^humantranstime^ N/A The date and time the fax was transmitted in human-readable format.
Table 21a Notification Keywords and FCL Equivalents (Continued)
Keyword FCL equivalent Description
^numretry^ N/A
^owner^ {{owne
^ownerid^ {{owne
^pages^ N/A
^pagessent^ N/A
^printer^ N/A
^quality^ {{quali
^replyto^ or ^reply_to^
{{reply
^retcode^ N/A
^rti^ {{rti}}
^statusstring^ N/A
^statustype^ N/A
^termid^ {{term
Table 21a Notification Keyw
Keyword FCL e

Up Notification Messages of Document Transmission 115
tustype^ keywords
ustype^ keywords describe the status e notification message. The following in the notification message.
^time^
^tranid^
^transtim
^type^
^unique
^user1^
^user2^
^user3^
^userid^
^voice^
^winsec
Table 21a
Keywor
es
ted.
heet.
ion.
ent.
n.
ent.
g or receiving.
l fax cover sheet.
o be sent.
g or receiving. Errors were encountered. .
of another fax.
. Fax will be retried.
ax needs user’s attention. Required data
ent.
view.
version.
printing.
OCR conversion.
Chapter 21 Setting
The ^faxstatus^ and ^sta
The ^faxstatus^ and ^statof the sent document in thnumeric codes will appear
{{time}} If no time is specified, the default is the time the fax was submitted.
{{tranid}} The transmission ID generated by the RightFax server.
e^ N/A The date and time that the fax was transmitted. To specify the format for the date and time, “The ^transtime^ keyword” on page 116.
{{type}} The document transmission type (fax, e-mail, certified, etc.). This keyword is the method through which you can be notified when a document that should have been sent as a fax failed and was sent as an e-mail or certified e-mail instead. These options require the InternetLink Module (for e-mail or mime documents) or the SecureDocs module (for certified e-mail documents).
_id^ {{unique_id}} The unique ID for the fax assigned by the RightFax server.
{{user1}} User-defined data code 1.
{{user2}} User-defined data code 2.
{{user3}} User-defined data code 3.
{{userid}} RightFax user ID.
{{voice}} The recipient’s phone number.
id^ {{winsecid}} The RightFax user ID of the originator of the fax.
Notification Keywords and FCL Equivalents (Continued)
d FCL equivalent Description
Table 21b ^Faxstatus^ Cod
Code Notes
0 Fax is not yet crea
1 Fax needs cover s
2 Fax needs convers
3 Fax needs to be s
4 Fax is in conversio
5 Fax needs to be s
6 Fax is done sendin
7 Fax uses a manua
8 Fax is scheduled t
9 Fax is done sendinWill not be retried
10 Fax is a duplicate
11 Error encountered
12 Sent or received fmay be missing.
13 Fax needs attachm
14 Fax is held for pre
15 Fax is in OCR con
16 Fax is printing.
17 Fax is queued for
18 Fax is queued for

RightFax 9.4 Integration Module Guide 116
lists the variables that can be used with the rd.
e^ Variables
escription
bbreviated weekday name.
ull weekday name.
bbreviated month name.
ull month name.
ate and time representation appropriate for cale.
ay of month as a digit (01-31).
our in 24-hour format (00-23).
our in 12-hour format (01-12).
ay of year as a digit (001-366).
onth as a digit (01-12).
inute as a digit (00-59)
urrent locale’s A.M./P.M. indicator for 12-hour lock.
econd as a digit (00-59).
ocal TZD.
eek of year as a digit, with Sunday as first day of eek (00-51). If ^transtime^ begins with %U, the me displayed is UTC (page 218) rather than local.
eekday as a digit (0-6; Sunday is 0).
eek of year as decimal number, with Monday as rst day of week (00-51)
ate representation for current locale
ime representation for current locale.
The ^transtime^ keyword
The ^transtime^ keyword and variables provide the date and time that the document was transmitted in the notification message.
You can specify the format of the date and time. The following table shows some possible formats for the transmit time 2:23 P.M. on November 6, 2001.
The following table^transtime^ keywo
19 Fax is being validated.
20 Fax is held for approval.
Table 21c ^Statustype^ Codes
Code Status
0 Fail
2 OK
Table 21d Example ^Transtime^ Variables with Results
Command and variable Result
^transtime %m/%d/%y^ 11/06/01
^transtime %H:%M^ 14:23
^transtime %H%M%d%Y^ 14:2311062001
^transtime %B %d, %Y^ November 6, 2001
Table 21b ^Faxstatus^ Codes
Code Notes
Table 21e ^Transtim
Variable D
%a A
%A F
%b A
%B F
%c Dlo
%d D
%H H
%I H
%j D
%m M
%M M
%p Cc
%S S
%T L
%U Wwti
%w W
%W Wfi
%x D
%X T

Up Notification Messages of Document Transmission 117
latesation Templates” shows some typical nd the resulting notification messages.
nt includes the {{notifyhost}} command:
inc notifyfail.inc 1}} mpany}}
JJS}}
e sent.
T
on Templates
rdsResulting notification message
y^
ges 02^
Duration 34
Date 05/22/2001
Comment Inv. #12345
Time 08:37
Fax 503-555-1234
Page 02/02
Return code success
Chapter 21 Setting
Sample notification temp“Table 21f: Example Notificnotification template files a
The following FCL docume
{{begin}} {{fax 503-555-1234}} {{notifyhost notifysuccess.{{company Acme Steel Co{{contact John Smith}} {{comment Inv. # 12345}}{{user1 JB1234KU-6789D{{owner William Murray}} Body of the document to b{{end}}
%y Year without century, as a digit (00-99).
%Y Year with century, as a digit.
%z Time-zone name or abbreviation; no characters if time zone is unknown.
%Z Time-zone name or abbreviation; no characters if time zone is unknown.
%% Percent.
# Prefixes formatting code to modify as follows: %#c — long date and time %#x — long date %#d, %#H, %#I, %#j, %#m, %#M, %#S, %#U, %#w, %#W, %#y, %#Y — remove any leading zeros.
able 21e ^Transtime^ Variables (Continued)
Variable Description
Table 21f Example Notificati
Template file with keywo
Duration ^duration 4^
Date ^transtime %m/%d/%
Comment ^comment 40^
Time ^transtime %H:%M^
Fax ^phone 40^
Page ^pagessent 02^/^pa
Return Code ^retcode 20^

RightFax 9.4 Integration Module Guide 118
defines how the notification will be sent. In this fax2mapi.exe will send the notification message nt e-mail box. The switches -t, -u, and -f are i.exe. Each executable has its own switches.
tification command line in the Integration ion program, you use:
e individual executable will recognize.l supply information about the sent document for essage.
notification channel
x server, select Start > Programs > RightFax > Manager.
x Manager, in the Fax Servers list, click the ver on which the Integration Module is running.
ame list, double-click RightFax Integration tegration Module Configuration window
Creating Notification ChannelsNotifications are sent to the host application via channels. The notification channel is specified in the command line that defines how the notification will be sent to the host application. The Integration Module supports 128 notification channels.
Warning Notification channel 16 is a default that the Integration Module uses when no {{notifyhost}} command is specified. Do not change the settings for channel 16.
“Figure 21.1: The Notification Process” on page 112 uses the following notification command line:
fax2mapi -t $o -u “MS Exchange Settings” -f $$
This command linecase, the programto a MAPI-compliaunique to Fax2map
To configure the noModule Configurat
Switches that thVariables that wilthe notification m
To create a new
1. On the RightFaEnterprise Fax
2. In Enterprise Faname of the ser
3. In the Service NModule. The Inappears.
Date ^transtime %B %d, %Y^
Sent to this number: ^fax 40^ at ^transtime %H:%M^
Regarding ^comment 40^
Sent to ^contact 40^
Sending confirmation: ^retcode 20^
Date May 22, 2001
Sent to this number: 503-555-1234 at 8:37
Regarding Inv. # 12345
Sent to John Smith
Sending confirmation: success
Success/error code: ^retcode^
Sent to ^contact 40^ at ^company 60 ^
Subject: ^comment 40^
Day/time: ^transtime %B %d, %Y^/^transtime %H:%M^
Success/error code: invalid phone number
Sent to John Smith at Acme Steel Company
Subject: Inv. # 12345
Day/time: May 22, 2001/8:37
Table 21f Example Notification Templates
Template file with keywordsResulting notification message

Up Notification Messages of Document Transmission 119
4
5
box, enter the case-sensitive command information on the command line to use tion, refer to the appropriate section in
s via SMTP” on page 121s to a database” on page 122s to an SMS-enabled device” on
s via 3270 emulation” on page 124s via FTP” on page 125s via IBM WebSphere MQ” on
s to Lotus Notes” on page 127s to Microsoft Exchange” on page 127
heck box if you want to save a copy of sent to the host application. in the Windows Temp folder.
w notification channel.
ation messages common methods you can use for notification messages to a device or aptaris for information on other ds.
Chapter 21 Setting
. Right-click Notification Channels, and select Add Output Device from the shortcut menu. The available settings for the notification channel appear in the Integration Module Configuration window.
Figure 21.2 The Notification Channels settings
. In the Name box, enter a descriptive name for the channel. The channel number is assigned as you add channels.
6. In the in Command lineline for the channel. Forfor each type of notificathis chapter:
“Sending notification“Sending notification“Sending notificationpage 123“Sending notification“Sending notification“Sending notificationpage 126“Sending notification“Sending notification
7. Select the Keep files ceach notification that isNotifications are saved
8. Click OK to save the ne
Methods used for notificThe following table lists theconnecting to and sendinghost application. Contact Cavailable notification metho

RightFax 9.4 Integration Module Guide 120
utable files including their command line fined in the sections that follow. For each more command line parameters support u pull information directly from the FCL in the sent.
lists the command line variables that can be ation executables. The FCL equivalents are tion that populates the corresponding variable. replaced by the information included in the mand in a sent document. So, if an FCL {{termid A3}}, then A3 will be used in the
executes.
ion Channel Variables
quivalent Notes
File name of the notification created by Notify.exe. This file contains the text of the notification to be sent and is formatted using the notification template specified with the {{notifyhost}} FCL command.
d}} The termination code of the sent fax.
}} 2}}
Billing codes 1 and 2
ent}} Comment text.
lcc}} The e-mail address where a copy of the message should be sent. This command can be used if you have licensed the InternetLink Module.
The document number assigned by the Integration Module.
} The recipient’s department.
d}} The employee ID.
Notify.exe on the RightFax Integration Module sends the notification message to the host application via the method listed in the first column using the executable listed in the second column.
Each of these execparameters are deexecutable, one orvariables that let yodocument that was
The following tableused with all notificFCL-based informaFor example, $^ is{{termid}} FCL comdocument containscommand when it
Table 21g Notification Methods and Executable Program Files
Connection method
Program that sends the notification Description
SMTP Mailsend.exe Sends messages via SMTP to an SMTP-compliant mail server.
ODBC database
Dbnotify.exe Sends notifications to an ODBC data source.
SMS Rfsms.exe Sends notifications to an SMS-enabled device via the Captaris Push-Proxy Gateway (PPG) server.
3270 emulation
Hlpisend.exe Sends notifications back through 3270; uses high-level-language application-programming interface (HLLAPI). This requires third-party 3270 emulation software.
FTP Ftpit.bat Is a Perl script used to log on to an FTP server and transfer files.
IBM WebSphere MQ
Mqput.exe Sends a message to the specified remote queue by the specified remote queue manager. This requires IBM WebSphere MQ software.
Notes Fax2note.exe Sends messages to a Lotus Notes system using Notes API.
Exchange Fax2mapi.exe Sends messages to Microsoft Exchange using MAPI. This requires a Microsoft Exchange client on the fax server.
Table 21h Notificat
Variable FCL e
$$ N/A
$^ {{termi
$B {{billing{{billing
$C {{comm
$c {{emai
$d N/A
$D {{dept}
$E {{empi

Up Notification Messages of Document Transmission 121
SMTPnnel that sends messages to an SMTP xe.
ns] input filename
T
and Line Options
ion
onnect fails.
dress where a copy of the message will he e-mail address can appear in the formats:
Apte <[email protected]>
exe will convert these formats to [email protected]>.
dress of the sender of the document.
nline help for Mailsend.exe.
ontains mail headers.
of the mail host where messages will be name must be surrounded by quotation
e recipient e-mail address from the first file, and obtain the subject of the e-mail from the second line.
f the e-mail message.
Chapter 21 Setting
Sending notifications viaTo create a notification chamail server, use Mailsend.e
Syntax mailsend [optio$f {{from}} The e-mail address of the originator
of the document. This command can be used if you have licensed the InternetLink Module.
$o {{owner}} The RightFax ID of the originator of the fax.
$p N/A The name of the currently selected printer.
$P N/A The number of pages sent, not including the cover sheet.
$r N/A The return code.
$R {{replyto}} The reply to name.
$s {{subject}} The e-mail subject. This command can be used if you have licensed the InternetLink Module.
$t {{to}} The e-mail address of the recipient of the message. This command can be used if you have licensed the InternetLink Module.
$T N/A The TIF file name of the document.
$w {{winsecid}} The RightFax user ID of the originator of the fax.
$1 {{user1}} User-defined data code 1.
$2 {{user2}} User-defined data code 2.
$3 {{user3}} User-defined data code 3.
able 21h Notification Channel Variables (Continued)
Variable FCL equivalent Notes
Table 21i Mailsend.exe Comm
Option Descript
-a Abort if c
-c address E-mail adbe sent. Tfollowing
Ashutosh
<Ashutos
Ashutosh
Mailsend.<Ashutos
-f address E-mail ad
-h Displays o
-H Input file c
-m “mailhost” The namesent. The marks.
-o Obtain thline of themessage
-s subject Subject o

RightFax 9.4 Integration Module Guide 122
ns to a databasetion channel that sends SQL messages to a ese steps:
ata Source Name (DSN) by selecting Start > trol Panel > Data Sources (ODBC). This C Data Source Administrator dialog box. Click
lete the options to create the new DSN. Make a name as you will need it later.
ion templates for both success and failure ese are text files that contain the SQL define where and how the notifications will be atabase.
nsert SampleTable(ID,Status) alues(^DocNum^, ‘^RetCode^’)
Fax” The text that will appear in the subject line of the e-mail message.
The file name of the document.
n of the Example Command Line
Description
Example mailsend -m “smtpserver.yourhost.com” -t "$o" -f [email protected] -s "Notification of Fax" $$
Sending notificatioTo create a notificadatabase, follow th
1. Set up a new DSettings > Conopens the ODBAdd and compnote of the DSN
2. Create notificatnotifications. Thcommands thatwritten to the d
Example IV
-t address The e-mail address of the recipient of the notification message. The e-mail address can appear in the following formats:
Ashutosh Apte <[email protected]>
Mailsend.exe will convert these formats to <[email protected]>.
-v Display verbose messages.
Table 21j Description of the Example Command Line
Element3 Description
mailsend The name of the executable file that will process the notification.
-m “smtpserver.yourhost.com” The name of the mail host.
-t “$o” The recipient’s name, who is also the sender of the document. The recipient will be obtained from the {{owner}} FCL command in the document received from the host application.
-f [email protected] The e-mail system’s address and the sender’s SMTP address, which is required in order to receive the notification.
Table 21i Mailsend.exe Command Line Options (Continued)
Option Description
-s “Notification of
$$
Table 21j Descriptio
Element3

Up Notification Messages of Document Transmission 123
3 an SMS-enabled device SMS-enabled device via the Captaris ) server, follow these steps:
Captaris Push-Proxy Gateway server. tion for this product for instructions.
ervice in Enterprise Fax Manager with pe. This service is required for n the RightFax server and the rver that sends the SMS messages. For
SMS/Pager services in Enterprise Fax ightFax Administrator’s Guide.
lates for both success and failure on page 112). The total length of the cluding the text substituted for keyword d 160 characters (the maximum allowed es).
ation channel (described on page 118) gram in the Command Line box.
SMSService -dSMSNumber ”MessageText”}] [-v] [-fRFServer]
] [-pPassword]
s not perform error checking on the the command line. Make sure that all are correct and that the accounts specified
T
T
and Line Options
ription
ervice ID of the SMS/Pager service you ed in Enterprise Fax Manager.
hone number of the SMS device you will ntacting.
Chapter 21 Setting
. Configure a new notification channel (described on page 118) using the Dbnotify.exe program in the Command Line box.
Syntax dbnotify {-fFileName|-sSQL} [-uUserID] [-pPassword] DSN
Example dbnotify -f$$ DSN
Sending notifications to To send notifications to anPush-Proxy Gateway (PPG
1. Install and configure theRefer to the documenta
2. Create a Pager/SMS sSMS as the Service Tycommunication betweePush-Proxy Gateway seinformation on creatingManager, refer to the R
3. Create notification tempnotifications (describednotification message, invariables may not exceelength for SMS messag
4. Configure a new notificusing the Rfsms.exe pro
Syntax rfsms -s[{-mFile|[-uUserID
Caution Rfsms.exe doeparameters you enter on command line parametersexist on the server.
able 21k Dbnotify.exe Command Line Options
Option Description
-fFileName Fully qualified file name of a file containing the SQL script for the notification. You must use -f or -s, but not both.
-sSQL SQL script to execute containing the notification script. You must use -f or -s, but not both.
-uUserID User ID. This is only required is your ODBC data source was not configured with a user name.
-pPassword Password. This is only required is your ODBC data source was not configured with a password.
DSN Data Source Name that you created in step 1.
able 21l Description of the Example Command Line Above
Element3 Description
dbnotify The name of the executable file that will process the notification.
-f $$ Tells Dbnotify to use the SQL script in the template that was specified in the {{notifyhost}} command in the data stream.
DSN This is the name of the DSN you created in step 1.
Table 21m Rfsms.exe Comm
Option Desc
-sSMSService The Screat
-dSMSNumber The pbe co

RightFax 9.4 Integration Module Guide 124
ns via 3270 emulationtion channel that sends messages via 3270 guage application programming interface
isend.exe.
d [options] filename
Maps to the {{SMS}} FCL code.
The file containing the alert text to send.
.exe Command Line Options
escription
o not clear screen before notifying.
et escape character.
o not send enter after sending file.
isplays online help for Hlpisend.exe.
LLAPI emulation package =Attachmate (default) =WRQ =Rumba =IBM Personal Com =NetSoft Elite (not supported)
teract with host (filename is a script).
pecify login script.
et host power-up delay.
SCP invalid for input.
et session number.
se file transfer.
on of the Example Command Line Above (Continued)
Description
Example rfsms -fRFServer -uAdministrator -pPassword -sRFPPG -d$1 -m$$
Sending notificatioTo create a notificausing high level lan(HLLAPI), use Hlp
Syntax hlpisen
{-mFile| ”MessageText”}
Specify a file name containing the alert text, or enter the alert text between quotes. If you specify the message text in quotes, do not use the -m switch.
-v Enables verbose event logging.
[-fRFServer] The name of the RightFax server on which the SMS service specified with the -s option resides. This is only required if the SMS service is not on the current server.
[-uUserID] The RightFax user ID required to log on to the RightFax server. This is only required if you are not using a trusted account.
[-pPassword] The password for the RightFax user ID specified with the -u option.
Table 21n Description of the Example Command Line Above
Element3 Description
rfsms The name of the executable file that will process the notification.
-fRFServer The name of the RightFax server on which the specified Pager/SMS service resides.
-uAdministrator The RightFax user ID used to log on to the server.
-pPassword The password for the specified user ID.
-sRFPPG The service ID of the Pager/SMS service in RightFax that sends SMS messages.
Table 21m Rfsms.exe Command Line Options (Continued)
Option Description
-d$1
-m$$
Table 21o Hlpisend
Option D
-c D
-e character S
-E D
-h D
-H number H12345
-i In
-l script S
-p delay S
-S S
-s number S
-t U
Table 21n Descripti
Element3

Up Notification Messages of Document Transmission 125
E
SenTF
cript used to log on to an FTP server and nd line, you must supply a host name, Ftpit.bat creates a remote file name pecify the file name in the command line.
ostname username password localfile
m franklins qwerty $$
T
T
d Line Options
ion
nline help for Ftpit.bat.
ame.
le to append to.
mmand (such as LRECL (80)).
estination directory.
Example Command Line
ription
ame of the executable file that will ess the notification.
ame of the FTP host to which the cation will be sent.
ame of the user to whom the notification e sent.
assword for the user and host.
ile name of the document.
Chapter 21 Setting
xample hlpisend -s A -H 2 -l login.inc $$
ding notifications via FTPo create a notification channel that sends messages via FTP, use tpit.bat.
This program uses a Perl stransfer files. In the commauser name, and password.called jcl###, or you can s
Syntax ftpit [options] h
Example ftpit yourhost.co
-v Display verbose messages.
-w seconds Specify wait after input.
able 21p Description of the Example Command Line
Element Description
hlpisend The name of the executable file that will process the notification.
-s A The HLLAPI shortname of the session. A is the A session. B is the B session, etc.
-H 2 The number for the HLLAPI emulation package. In this case, 2 = WRQ.
-l login.inc The file name of the login script for the session. Login.inc is created custom for every install.
$$ The file name of the document.
able 21o Hlpisend.exe Command Line Options (Continued)
Option Description
Table 21q Ftpit.bat Comman
Option Descript
-h Display o
-A account Account n
-a file name Remote fi
-c command Quote co
-r directory Remote d
Table 21r Description of the
Element Desc
ftpit The nproc
yourhost.com The nnotifi
franklins The nwill b
qwerty The p
$$ The f

RightFax 9.4 Integration Module Guide 126
C RF_Chan -H qmmaster2 -M RightFax -Q ify -i $$ -p 1414 -1
ake messages persistent. If the server is started, the IBM WebSphere MQ server will
tore messages so that they can be accessed after e server is restarted.
isplay version information.
elects Version 1 of the WebSphere MQ pplication Programming Reference.
his option must be used because MQPut.exe is ot designed to work with the WebSphere MQ API ersion 2.
pecifies the codeset name for a language. A list of e codeset IDs (CCSIDs) supported by ebSphere MQ is available from IBM.
n of the Example Command Line
Description
The name of the executable file that will process the notification.
The IBM WebSphere MQ channel name.
Indicates that the fully qualified domain name of the IBM WebSphere MQ queue manager will come next.
The IBM WebSphere MQ queue manager.
The IBM WebSphere MQ queue name.
The file name of the document.
The TCP/IP port number.
e Command Line Options (Continued)
escription
Sending notifications via IBM WebSphere MQTo create a notification channel that sends messages via IBM WebSphere MQ, use Mqput.exe.
This program submits a message to a specified remote queue. Mqput.exe receives the body of the message from standard input (STDIN) or from a file that you specify in the command line.
Syntax mqput -C channel -H hostname -M queue manager -Q queue [options]
Example mqput -RF_Not
Table 21s Mqput.exe Command Line Options
Option Description
-C channel Name of the IBM WebSphere MQ channel to use for connection.
-H hostname Fully qualified domain name of the IBM WebSphere MQ queue manager.
-M queue manager
IBM WebSphere MQ queue manager to connect to.
-Q queue IBM WebSphere MQ queue to retrieve messages from.
-d Display debugging output. This is helpful if you experience difficulty connecting to the server.
-e days Days until message expires. Default is no expiration.
-f If the message fails in delivery to the destination queue, cancel it rather than put it in the dead-letter queue. This is helpful during testing or initial setup.
-i input Source of data to send to the queue. Input can be a file or standard input (STDIN). If no file is specified, STDIN is the default.
-p port TCP/IP port number to use for remote connection. The default is 1414.
-r priority Message priority. The default is 0.
-s Mresth
-v D
-1 SA
TnV
-tCCSID SthW
Table 21t Descriptio
Element
mqput
-C RF_Chan
-H qmmaster2
-M RightFax
-Q RF_Notify
-i $$
-p 1414
Table 21s Mqput.ex
Option D

Up Notification Messages of Document Transmission 127
SenTN
S
E
Microsoft Exchangennel that sends messages to an PI, use Fax2mapi.exe.
ns]
-s “Fax Notification” -f $$ -u “MS gs”
T
T
mand Line Options
ion
specified file.
n ASCII text file to use as the message
n ASCII text file to use as the message
t mail.
ssword.
ociated with the FAX address type of This option overrides any address with -t.
ciated with the FAX address type of This option overrides any address with -t.
ne of the e-mail message.
dress for recipient(s). Multiple recipients eparated by a semicolon (;) and enclosed on marks (“). Recipients must not be s in default address book.
d -r options override the -t option.
e name.
F format) to be used as a message body.
Chapter 21 Setting
ding notifications to Lotus Noteso create a notification channel that sends messages to a Lotus otes system using the Notes API, use Fax2note.exe.
yntax fax2note [options] recipient
xample fax2note -t “$o” -s “Fax Notification” -f $$
Sending notifications to To create a notification chaExchange system using MA
Syntax fax2mapi [optio
Example fax2mapi -t “$o”Exchange Settin
able 21u Fax2note.exe Command Line Options
Option Description
-t e-mail address
Recipient(s). Multiple recipients must be separated by a semicolon (;) and enclosed in quotation marks (“). Recipients must not be ambiguous in default address book.
-s The subject line of the e-mail message.
-a Identifies a file to attach to the e-mail message.
-f Identifies an ASCII text to use as the body of the e-mail message.
-o Identifies the owner of the e-mail message.
able 21v Description of the Example Command Line
Element Description
fax2note The name of the executable file that will process the notification.
-t “$0” The recipient of the notification. The recipient will be obtained from the {{owner}} FCL command in the document received from the host application.
-s “Fax Notification”
The subject line of the notification message.
-f $$ The file to be used as the message body. The content of the notification template file will replace the $$ variable.
Table 21w Fax2mapi.exe Com
Option Descript
-a file name Attach the
-f file name Name of abody.
-i file name Name of abody.
-k Keep sen
-p password Profile pa
-q CSID CSID assrecipient.specified
-r DID DID assorecipient.specified
-s subject Subject li
-t e-mail address
E-mail admust be sin quotatiambiguou
The -q an
-u profile Mail profil
-z File (in RT

RightFax 9.4 Integration Module Guide 128
l keyword specifies the channel. The channel annel number (from 1 to 128) or name. If no
d, the default channel will be used, number 16.
ost success.inc failure.inc channel}}
ost mysucc myfail mynotify}} ost none myfail mynotify}}
hows that if the document is sent successfully, dule will create a notification based on a ysucc.” The “.inc” extension is the default, as is lude folder. If the document fails to send il” template is used.
notification is sent via the channel that is named
le sends a notification (based on the template cument fails to send. Because “none” is entered ess template name, no message will be sent if
ansmitted successfully.
ommand can be included in the document from n to the Integration Module, or you can insert it in information on include files, see Chapter 13, e Files and Commands in Many Documents”.
fyhost}} commandommand must contain:
success template, as described in ““Creating lates” on page 112.failure template, as described in ““Creating lates” on page 112.hannel number or name, as described in
cation Channels” on page 118.
ple shows an FCL document that includes a and.
Including the {{Notifyhost}} Command in Documents
The third step in creating notifications is to include the {{notifyhost}} FCL command in the document from the host application. This command specifies the notification template. It also specifies the notification channel, as created in the RightFax Integration Module Configuration program.
In the syntax shown below, the template files (Success.inc for successful documents and Failure.inc for failed documents) are specified. If the template name is not specified, then no notification
is sent. The channecan either be an chchannel is specifie
Syntax {{notifyh
Examples{{notifyh{{notifyh
The first example sthe Integration Motemplate called “mthe path to the Incproperly, the “myfa
In either case, the “mynotify.”
The second exampMyfail.inc) if the doinstead of the succthe document is tr
The {{notifyhost}} cthe host applicatioan include file. For“Including the Sam
Creating the {{NotiThe {{notifyhost}} c
The name of the Notification TempThe name of the Notification TempThe notification c““Creating Notifi
The following exam{{notifyhost}} comm
Table 21x Description of the Example Command Line
Element Description
fax2mapi The name of the executable file that will process the notification.
-t “$0” The recipient of the notification. The recipient will be obtained from the {{owner}} FCL command in the document received from the host application.
-s “Fax Notification”
The subject line of the notification message.
-f $$ The file to be used as the message body. The content of the notification template file will replace the $$ variable.
-u “MS Exchange Settings”
The mail profile name.

Up Notification Messages of Document Transmission 129
{{{{{{{{{
OthAnosd
TeconF
T
defined message specific to the t.
mand is most often used to populate in cover sheets but is sometimes used ications.
any name for the document.
mand is most often used to populate in cover sheets but is sometimes used ications.
ct name for the document.
mand is most often used to populate in cover sheets but is sometimes used ications.
. This is usually the general fax number terprise.
et a default CSID in the Integration onfiguration program. See Chapter 9, efaults for FCL Documents”.
rtment of the fax owner.
il address for the recipient of the n message.
oyee ID of the fax owner.
mand is sometimes used to populate in cover sheets.
ment owner’s name.
mand is most often used to populate in cover sheets but is sometimes used ications.
ommands (Continued)
ion
Chapter 21 Setting
{begin}} {fax 503-555-1234}} {notifyhost notifysuccess.inc notifyfail.inc 1}} {company Acme Steel Company}} {contact John Smith}} {comment Inv. # 12345}} {user1 JB1234KU-6789DJJS}} {owner William Murray}} {end}}
er FCL used in notifications number of informational FCL commands can be used for otifications. These commands store information about the sender f the document so that notification messages can be sent pecifically to that person, department, terminal, or another estination.
he following table lists these commands and gives a brief xplanation. For more detailed information on each of the ommands, see Appendix B, “FCL Commands”. For a comparison f the commands listed here and the keywords that you can use in otification templates, see “Table 21a: Notification Keywords and CL Equivalents”.
able 21y Notification FCL Commands
Command Description
{{Billing}} The billing code of the document owner.
This command is sometimes used to populate variables in cover sheets.
{{Billing2}} A secondary billing code of the document owner.
This command is sometimes used to populate variables in cover sheets.
{{Comment}} Any user-documen
This comvariables with notif
{{Company}} The comp
This comvariables with notif
{{Contact}} The conta
This comvariables with notif
{{CSI}} The CSIDfor the en
You can sModule C“Setting D
{{Dept}} The depa
{{Email}} The e-manotificatio
{{EmpID}} The empl
This comvariables
{{Owner}} The docu
This comvariables with notif
Table 21y Notification FCL C
Command Descript

RightFax 9.4 Integration Module Guide 130
he RightFax user ID of the creator of this ocument.
his command is sometimes used to populate ariables in cover sheets.
voice telephone number.
his command is sometimes used to populate ariables in cover sheets.
on FCL Commands (Continued)
escription
{{ReplyTo}} The recipient for the notification. You can request that an HTTP post be sent back to the host as a notification when you use the RightFax XML Interface. ReplyTo is the field in the submit post that the RightFax XML Interface populates to determine where to send the notification.
{{TermID}} The ID of the terminal from which the document originated.
This command is sometimes used to populate variables in cover sheets.
{{TranID}} The ID of the transaction that produced the document.
This command is sometimes used to populate variables in cover sheets.
{{UniqueID}} An identification number for each destination (fax number) within the document.
This command is used most often for tracking. The Integration Module will generate a UniqueID unless you specify one in the FCL. Then, you can track the document in FaxUtil based on the UniqueID.
Secondarily, this command is sometimes used in cover sheets and with notifications.
{{User1}} {{User2}} {{User3}}
User-defined data, such as the originator of the document (person, group, or other information).
Table 21y Notification FCL Commands (Continued)
Command Description
{{UserID}} Td
Tv
{{Voice}} A
Tv
Table 21y Notificati
Command D

131
Chapt
Test
TMu“
Tprcp
NImip
TestinRecei
Tntt“
here is not specific to the various ight have already created. Rather, this eneral terms that can be applied to any
unable to successfully troubleshoot contact Captaris Customer Support.
rom the host to the Integration Module.
} command to have the Integration ent. Besides {{fax}}, the test document egin}}, {{end}}, the correct
, and some sample text.
notification from the Integration Module specified when you created the
notification that contains the correct the same as the notification template
fication, or if the notification does not tion, then see “Troubleshooting”on
MQ connections BM WebSphere MQ connections. It from the Integration Module to the host at the host received a notification).
er 22
ing and Troubleshooting Notification Messages
his chapter describes methods for testing that the Integration odule is correctly sending notifications to the host application
sing the notification channels that are described in Chapter 23, Setting Up Actions on Document Transmission”.
he simplest way to test that notifications are being received roperly is to send a test document. If the correct notification is eceived using the correct channel, then the channel is configured orrectly. If not, then you can use this chapter to troubleshoot the roblem.
ote that notification messages are not generated by the ntegration Module for incomplete faxes. Usually, such faxes are
issing information that is required for sending. For more nformation, see “Creating Notification Messages with FCL” on age 111.
g That the Host Application Is Correctly ving Notificationshe following procedure requires that you have already created a otification channel, created a notification template, and created he {{notifyhost}} command that will identify the channel and emplate. For information on these procedures, see Chapter 21, Setting Up Notification Messages of Document Transmission”.
The information presented notification methods you mprocedure is presented in gnotification type. If you are failed notifications, you can
1. Send a test document f
You might use the {{fax}Module send the docummust at least include {{b{{notifyhost}} command
2. Verify that you receive ain the location that you notification channel.
3. Verify that you receive ainformation (it should bethat you created).
If you do not receive a noticontain the correct informapage 132.
Testing IBM WebSphere This procedure applies to Iverifies that data is flowing(as opposed to verifying th

RightFax 9.4 Integration Module Guide 132
lowchart and the corresponding numbered next page to identify the source of the error.
Notifications
otify.exe ing mode.
it appearttempting
cations?
Is the {{notifyhost}}command in yourFCL document?
Insert the {{notifyhost}} commandin your FCL and
resend the document.
Does the{{notifyhost}} command
have any errors?
Correct the errors andresend the document.
Does the commandline have any errors?
Correct the errors andresend the document.
Check your network, etc.
{{notifyhost}}o verify that youified the correctplate.
Check the template itself toverify that you have
configured it correctly.
Correct any errors and resendthe document.
No No
No
No
Yes
Yes
es
Yes
1 2
4
5 6
7
8
9
This procedure requires that you have correctly configured:
The host to receive data from the Integration ModuleThe Mqput.exe notification channel on the Integration Module (see “Sending notifications via IBM WebSphere MQ” on page 126)
To test the Integration Module-to-Host connection for IBM WebSphere MQ
1. Open a command prompt window.
2. Enter the command you entered in the Command line box in the Add Output Device dialog box when you created the notification channel.
Warning Command line options are case-sensitive. If you do not enter the command here exactly as you did in the Add Output Device dialog box, errors will occur.
3. Press ENTER.
Figure 22.1 Testing IBM WebSphere MQ Notifications
If the notification channel connection is successful, then you should see messages similar to those shown in “Figure 22.1: Testing IBM WebSphere MQ Notifications”. If the output connection is not successful, then you will see error messages.
TroubleshootingUse the following fparagraphs on the
Figure 22.2 Troubleshooting
Did your host receiveany notification?
Look in FaxUtil.Are any faxesbeing sent?
See the RightFax Administrator'sGuide.
No
Run Ndebu
Doesto be a
notifi
Check thecommand thave ident
tem
Y
3
Yes
No
Yes

Testing and Troubleshooting Notification Messages 133
1
2
3
4
5
exe would not appear to be attempting {{notifyhost}} command is absent from e error in this case is commonly that the
misspelled, is missing one or more of its ther syntax error that causes Notify.exe this is the case, Notify.exe will return a ck Notify <ID number>” with no more ge means that Notify.exe is checking its text comes after this message, then ued notifications.
be attempting a notification, examine the in the FCL document. Common
not exist (Notify.exe will return a nable to include file: <path>.inc”). does not exist (Notify.exe will return a annot find notify channel [#], defaulting Copy C:\temp\<document . In the case of the second message, the o NUL (being deleted). This happens ses the default ID (16) when no ID tion for ID 16 is to copy to NUL; thus, if anged, then files that are being copied e no ID associated with them. If you tion for ID 16 (Captaris recommends is), then nonexistent IDs will result in the ified for ID 16.
Chapter 22
. If you have created several templates with similar names, a minor typographical error can identify the wrong template, resulting in a notification that contains errors and nonpopulated keywords. If you specify a template that does not exist, then no notification can be created or sent.
. The template must contain valid (and correctly spelled) keywords. For a list of valid keywords, “Table 21a: Notification Keywords and FCL Equivalents” on page 113
. When you do not receive a notification after sending a document, the first step should be to verify that the RightFax server is sending data. Open FaxUtil and verify that faxes are being sent. If no faxes are being sent, then no notifications can be sent.
. If you verified in FaxUtil that faxes are being sent, then run Notify.exe in debug mode to proceed.
Stop Notify.exe from the Process tab in Windows Task Manager.Open a command prompt window.Type notify.exe, and then press ENTER.
The information that appears will indicate the status of Notify.exe.
. When Notify.exe is attempting to send a notification, you will see information in the command prompt window that describes the error (see the next steps for more information). If Notify.exe returns a message such as “Checking no record,” then it is not receiving a signal that a document has arrived at the Integration Module. In this case, you must check the connection (see Chapter 7, “Testing a Connection and an Input Device”).
6. One reason that Notify.notifications is that the the host data stream. Thcommand exists but is braces, or contains anoto not identify it. When message such as “Chetext after it. This messaqueues; when no moreNotify.exe found no que
7. If Notify.exe appears to {{notifyhost}} commandproblems include:
A template that doesmessage such as “UA notification ID thatmessage such as “Cto [#]” or “Executingnumber>.NT1 NUL”)file is being copied tbecause Notify.exe uexists. The default acyou leave ID 16 unchto NUL probably havhave changed the acthat you do not do thaction that you spec

RightFax 9.4 Integration Module Guide 134
8. Check the command line you created for the notification channel (see “Creating Notification Channels”on page 118). Common problems include:
A misspelled or invalid executable file, or (if you specified a path to the executable) the wrong path. (You will see a message such as “The name specified is not recognized as an internal or external command, operable program, or batch file”).Omitted or wrong variables or switches; incorrect syntax (Notify.exe will return a message specific to the executable or command that you used).In some cases, depending on the command, executable, or other command line elements, Notify.exe will not return an error message even though the command line contains an error.
9. If you have not yet found an explanation for the problem, it is likely that the Integration Module is processing and sending the notification correctly. The error is probably somewhere else, such as the network, host computer, or host application. Further evidence would be Notify.exe returning a message such as “1 file(s) copied. Function returned 0: success” (or a similar message indicating a successful action based on the executable or command you used in the command line). This means that Notify.exe has sent the notification. If you did not receive it, then the error is probably outside of the Integration Module.

135
Chapt
Sett
Tnton
TCTdet
PrintinTransm
Yd
ess” actionssfully transmitted, a copy of the nother recipient as a notification of the
n
elect Programs > RightFax > er. The Enterprise Fax Manager
lick the name of the server on which the nning.
t, double-click RightFax Integration n Module Configuration window
er 23
ing Up Actions on Document Transmission
his chapter explains how to configure the Integration Module to otify you when a document has been sent or has errors in ransmission by setting an action, such as printing or faxing a copy f the document to another recipient. This can serve as a otification that the document needs attention.
hese actions are similar to notification messages (described in hapter 21, “Setting Up Notification Messages of Document
ransmission”). Notification messages are informative—they can escribe whether or not a document was transmitted, transmission rrors, and other information such as the date and time of ransmission and the owner of the document.
g or Faxing a Copy of a Document That Was itted
ou have two options for establishing actions that occur when ocuments are transmitted successfully:
Set defaults in the Integration Module Configuration program.Use the {{onsuccess}} FCL command in a document to override the default.
Setting the default “succWhen a document is succedocument can be sent to atransmission.
To set the success actio
1. From the Start menu, sEnterprise Fax Managwindow appears.
2. In the Fax Servers list, cIntegration Module is ru
3. In the Service Name lisModule. The Integratioappears.

RightFax 9.4 Integration Module Guide 136
ptions, select the option corresponding to the fax images deleted from the server.
ess}} command to set “success” ent
ctions for a document and override the default, ss}} command to the FCL. In the following the document will be faxed to another recipient transmitted.
9}} ent to be sent.
stinations of delete, certified, fax, email, mime, {{onsuccess}} FCL command. For detailed {{onsuccess}} command, including syntax and endix B, “FCL Commands”.
Fax images will never be automatically deleted from the server.
Fax images will be automatically deleted from the server only when they have been sent successfully.
Fax images will be automatically deleted from the server on both successful and failed transmission attempts.
4. In the left pane, click General continued.
Figure 23.1 The General Continued Settings
5. Under Fax Options, select Fax on Success or Fax on Error to send the fax to a new recipient on these events. If you select either of these options, you must also enter a destination fax number in the To Number field.
Note The document also can be e-mailed or sent for certified delivery using the FCL commands {{type email}}, {{type certified}}, or {{type mime}}. For more information, refer to Chapter 11, “Specifying the Destination of the Document”.
6. Under Delete Owhen you want
7. Click OK.
Using the {{onsuccactions for a docum
To set “success” aadd the {{onsucceexample, a copy ofif it is successfully
{{begin}} {{onsuccess fax}} {{fax 503-555-448Body of the docum{{end}}
You can specify deor nothing with theinformation on the examples, see App
Never
On Success
Always

23 Setting Up Actions on Document Transmission 137
PrintinTransm
Yd
SetWtt
T
1
2
3
eneral continued.
Continued Settings
Chapter
g or Faxing a Document That Cannot Be itted
ou have two options for establishing actions that occur when ocuments are not sent:
Set defaults in the Integration Module Configuration program.Use the {{onerror}} FCL command in a document to override the default.
ting the default “error” actionhen a document cannot be successfully transmitted, a copy of
he document can be sent to another recipient as a notification of he failure.
o set the error action
. On the Start menu, select Programs > RightFax > Enterprise Fax Manager. The Enterprise Fax Manager window appears.
. In the Fax Servers list, click the name of the server on which the Integration Module is running.
. In the Service Name list, double-click RightFax Integration Module. The Integration Module Configuration window appears.
4. In the left pane, click G
Figure 23.2 The General

RightFax 9.4 Integration Module Guide 138
s on Documents With Missing
on Module processes a document, it extracts commands before it creates and sends the y you that a document is missing data that is e document, you can send the document to order to troubleshoot the error.
tions
menu, select Programs > RightFax > Manager. The Enterprise Fax Manager s.
ers list, click the name of the server on which the ule is running.
ame list, double-click RightFax Integration tegration Module Configuration window
5. Under On error, select one of the following options.
Note The document also can be e-mailed or sent for certified delivery using the FCL commands {{type email}}, {{type certified}}, or {{type mime}}. For more information, refer to Chapter 11, “Specifying the Destination of the Document”.
6. Click OK.
Using the {{onerror}} command to set “error” actions for a document
To set “error” actions for a document and override the default, add the {{onerror}} command to the FCL. In the following example, a copy of the document will be faxed to another recipient if it is not successfully transmitted.
{{begin}} {{onerror fax}} {{fax 503-555-4489}} Body of the document to be sent. {{end}}
You can specify destinations of delete, certified, fax, email, mime, or nothing with the {{onerror}} command. For detailed information on the {{onerror}} command, including syntax and examples, see Appendix B, “FCL Commands”.
Performing ActionData
When the Integratidata from the FCLdocument. To notifrequired to send thanother recipient in
To set default ac
1. From the Start Enterprise Faxwindow appear
2. In the Fax ServIntegration Mod
3. In the Service NModule. The Inappears.
Table 23a On error Options
Option Description
Nothing No action will be taken.
Delete The fax image will be deleted from the fax server.
Fax Fax the document to another recipient.
Enter a fax number in the To number: box.
Select Delete when finished to delete the fax image from the fax server.

23 Setting Up Actions on Document Transmission 139
4
5
6
using a notification channel, select e, and then enter an appropriate , refer to the instructions for writing
nes in Chapter 21, “Setting Up of Document Transmission”.
an be sent to Microsoft Exchange as an . Therefore, in the Execute command ter:
[email protected] -f $$ -u “MS gs”
nt fails because data is missing, the ule will send it to the e-mail address shs.com.
Chapter
. In the left pane, click FCL Processor.
Figure 23.3 The FCL Processor Settings
. To print the document, select Print FCL to printer, and then enter the name of the printer as defined in the Enterprise Fax Manager.
. To fax the document, select Fax FCL to number, and enter the fax number.
7. To send the document Execute command lincommand line. To do sonotification command liNotification Messages
Example The document ce-mail messageline box, you en
fax2mapi -t marcExchange Settin
When a documeIntegration Modmarco.navarro@

RightFax 9.4 Integration Module Guide 140

141
Chapt
Prog
TaF
Wtd
IntrodTaHfR
TasfRfJ
rface functions depends on the method
rface
ramming interfaces for both XML and Java. talled when you run the XML installation.
sport Methods and Functions
or S File
IBM WebSphere MQ
Yes Yes
Yes No
Yes Yes
Yes No
Yes No
Yes Yes
Yes No
er 24
ramming for the RightFax XML Interface
he RightFax XML Interface converts XML to FCL. For host pplications that produce XML and can’t be modified to produce CL, the RightFax XML Interface provides a beneficial option.
hen the Integration Module receives an XML-based document, he RightFax XML Interface converts it to an FCL-encoded ocument.
uction to the RightFax XML Interfacehe XML Interface software performs four functions (submit, query, ction, and notification) via three methods of transport (HTTP or TTPS, FTP, and IBM WebSphere MQ). XML Interface
unctionality is achieved by creating XML documents that adhere to ightFax schemas (page 147).
he RightFax API for Java is for Java programmers. It provides an lternate method of creating and sending XML to the RightFax erver. The API for Java allows access to XML Interface unctionality without requiring that a customer know XML or the ightFax XML Interface schemas. For more information on the API
or Java, see Chapter 25, “Programming for the RightFax API for ava”.
The availability of XML Inteof transport.
Installing the XML Inte
Note RightFax provides progThese interfaces are both ins
Table 24a XML Interface Tran
ActionHTTPHTTP
Action Yes
Action Reply Yes
Notification Yes
Query Yes
Query Reply Yes
Submit Yes
Submit Reply Yes

RightFax 9.4 Integration Module Guide 142
In IIS, configure the rfxml website with an IIS ightFax will use to access the IIS server. This for Java development.
velopment tools are located in the htFax\Production\XML folder.
ctions function is available for each transport method. n, see “Table 24a: XML Interface Transport tions”.
g document, use the submit function. This d by the schema XML_FAX_SUBMIT, which l and required XML tags needed to submit a nt by the RightFax server. The submit schema n such as fax number, contact name, owner, and
document, you have the option of creating a recipient or letting the RightFax server assign a For unique IDs that the software creates, the
haracters are the name of the RightFax serveraracters are a number unique to a document
your own unique ID, it must be 15 characters or less.
XML document, it must match the RightFax XML Schemas” on page 147). If the document does licable schema—out of preference, convenience, son—then you must create an XSLT to convert e RightFax schema. Or, you can create an XSLT ument directly to FCL.
Minimum System RequirementsIn addition to the minimum system requirements for the RightFax server and Integration Module, Microsoft Internet Information Server (IIS) version 6.0 or later must be installed on the RightFax server.
If you are installing the XML interface on a server running IIS version 6.0, Active Server Pages and ISAPI Extensions must be enabled. Parent Paths must also be enabled, either for the Default Web Site as a whole, or for the RFXML virtual directory which appears after the installation of the Java/XML API.
If you are installing the XML interface on a server running IIS version 7.0, you must enable CGI modules and ISAPI modules. Parent Paths must also be enabled, either for the Default Web Site as a whole, or for the RFXML virtual directory which appears after the installation of the Java/XML API.
Installing the XML InterfaceFollow the instructions for installing the RightFax server in the RightFax Installation Guide and use the following specific steps:
On the Setup Type screen, select Custom and then click Next.On the Setup Features screen, expand the RightFax Server heading in the components tree and select the Java/XML API component to install. Click Next.
After the RightFax server and Java/XML API component is installed and activated, you must configure an SMTP host and an IIS user account for the rfxml website.
SMTP Host. Open the RightFax Server Module and click the e-transport tab. Enter the name of the SMTP server on your network that will transport all SMTP alerts and notifications regarding the RightFax server. If you will not be using SMTP to deliver RightFax alerts and notifications, you can leave this option blank.
IIS User Account.user account that Raccount is required
Additional XML de\Program Files\Rig
XML Interface FunNote that not everyFor more informatioMethods and Func
SubmitTo send an outgoinfunction is governedefines the optionadocument to be seincludes informatioattachments.
When you submit aunique ID for eachunique ID for you. format is:
The first seven cThe last eight ch
Note If you create
When creating an schema (see “The not match the appor any for other reathe document to thto convert the doc

ter 24 Programming for the RightFax XML Interface 143
TXudbcnysX
QueTiTdqc
TXq
ActiTaXtdd
TXs
t a document was or was not sent tFax server, create a notification that ICATION.INC template. This function is ML_FAX_NOTIFICATION, which to create a notification. Notifications are t is, the client cannot “notify” the server. notification request when using the server sends a notification when the er sent successfully or not sent
different from the submit-reply function. submit-reply states that the server has
m the client. The message returned with server has sent (or not sent) the .
notifications, see Chapter 21, “Setting of Document Transmission”.
ethods do not support all of the ctions. For more information, see “Table ort Methods and Functions”.
and access list security using standard instead of HTTP to achieve transport r providing the RFWebCon.dll resource address, and domain restrictions.
e supports three transport methods: IBM WebSphere MQ. You can also use o create and send XML via HTTP (see for the RightFax API for Java”).
Chap
he companion to XML_FAX_SUBMIT is ML_FAX_SUBMIT_REPLY, which informs you of each recipient’s nique ID (if you did not create your own when you submitted the ocument). The reply includes a message such as “Document has een submitted for sending,” indicating that the first step has been ompleted successfully. If you configured RightFax to return a otification when the document transmission is completed, then ou will also receive an XML_FAX_NOTIFICATION report on the tatus of the transaction that is more detailed than ML_FAX_SUBMIT_REPLY.
ryo determine the status of any document in the RightFax system, ncluding those not originating from XML, use the query function. his function is governed by the schema XML_FAX_QUERY, which efines the optional and required XML tags needed to submit a uery to the RightFax server. The query schema includes search riteria such as date, time, and unique ID.
he companion to XML_FAX_QUERY is ML_FAX_QUERY_REPLY, which is a report informing you of the uery results.
ono perform an action on a sent or received document, use the ction function. This function is governed by the schema ML_FAX_ACTION, which defines the optional and required XML
ags needed to perform the action. You must specify the relevant ocument with its unique ID, and then include instructions to elete, forward, or create a library document.
he companion to XML_FAX_ACTION is ML_FAX_ACTION_REPLY, which is a report informing you of the tatus of the action you requested.
NotificationTo receive a notification thasuccessfully from the Righuses the XML_FAX_NOTIFgoverned by the schema Xdefines the XML tags useda one-way transaction. ThaRather, the user includes asubmit function, and the submitted document is eithsuccessfully.
The notification function isThe message returned withreceived the document fronotification states that the document to its destination
For information on creatingUp Notification Messages
TransportsNote that some transport mRightFax XML Interface fun24a: XML Interface Transp
You can provide transport mechanisms. Use HTTPS encryption. The Web servecan also generate user, IP
The XML Interface softwarHTTP or HTTPS, FTP, andthe RightFax API for Java tChapter 25, “Programming

RightFax 9.4 Integration Module Guide 144
ost
tslid only for the submit function.
port binary data. To be included inline with the ments must be encoded using BASE64. ts binary data using a 64-character subset of bet IA5. For information on implementation , see RFC 1421 [2].
are included inline, they significantly increase message. Some XML parser implementations
L message into memory, which causes dation when large messages are processed.
line attachments is to encapsulate the XML hment using multipart MIME. Specifically,
content type is used to separate the XML ch attachment. The first attachment with the
HTTP/S Post
Response
n.DLL
is.com
/xml
nnn
: submit
IT>... MIT>
HTTP/1.1 200 OK
Content-Type: text/xml
Content-Length: nnnn
X-Captaris-Method: submit_reply
<XML_FAX_SUBMIT_REPLY>... </XML_FAX_SUBMIT_REPLY>
HTTP or HTTPS transportThe HTTP/S transport sends XML to and from the client/server by executing a series of HTTP/S post methods (RFC 2616 [1]). You can perform three posts (submit, query, and action) and receive a success or failure notification from the RightFax server. All XML Interface functions are supported.
Each HTTP/S post is formatted with the library name of the Captaris connector (RFWebCon.dll) and the method to be executed stored in the X-Captaris-Method field. Valid methods are submit, query, and action. The format of the post line includes standard HTTP headers as well as XML data.
Figure 24.1 HTTP/HTTPS Transfer Protocol for XML Documents
Example HTTP/S P
HTTP/S AttachmenAttachments are va
Inline
XML does not supXML, binary attachBASE64 represenInternational Alphadetails of BASE64
Multipart MIME
When attachmentsthe size of the XMLload the entire XMperformance degra
An alternative to inmessage and attacmultipart or mixed document from ea
Table 24b Example
Call
POST /RFWebCoHTTP/1.1
Host: www.captar
Content-Type: text
Content-Length: n
X-Captaris-Method
<XML_FAX_SUBM</XML_FAX_SUB

ter 24 Programming for the RightFax XML Interface 145
tXMt
Rmn
HTTTlmH
FileFuwd
rinter input, do not contain a mechanism
tocol for XML Documents
le> [attachments]
oc list.pdf
ocument. Default is Submit document.ocument. Default is Submit document.ply XML to this file.
Chap
ext/XML media type listed for its content type is considered the ML_FAX_SUBMIT document. All other documents within the IME message are considered attachments to be included with
he message.
eplies (XML_FAX_REPLY) are never returned as multipart MIME essages. The data contained within a reply is minimal and does ot include binary attachments.
P or HTTPS notificationso receive notifications in this manner, you must provide an HTTP istener. The application Postfile.exe can be used to send
essages from the RightFax server, but it needs the path to the TTP listener for you to actually receive the message.
transportile transport for XML allows an XML document to be processed sing a command line executable (Parsexml.exe). When combined ith existing Captaris technology, this can be used for printer input, irectory scanning, and various other input methods.
Some methods, such as pto receive a reply.
Figure 24.2 File Transfer Pro
Command line syntax
parseXML [options] <xmlfi
Example
parseXML submit.xml po.d
Command line options
-q—XML input is Query d-a—XML input is Action d-f—<filename> Output re

RightFax 9.4 Integration Module Guide 146
Q transportQ acts as an intermediary in connecting the
the RightFax server software. It offers multiple and requires some advanced configuration. For ee the IBM’s WebSphere MQ documentation.
bSphere MQ Transfer Protocol for XML Documents
Q attachmentslid only for the submit function.
port binary data. To be included inline with the ments must be encoded using BASE64. ts binary data using a 64-character subset of bet IA5. For information on implementation , see RFC 1421 [2].
File transport attachmentsAttachments are valid only for the submit function.
Inline
XML does not support binary data. To be included inline with the XML, binary attachments must be encoded using BASE64. BASE64 represents binary data using a 64-character subset of International Alphabet IA5. For information on implementation details of BASE64, see RFC 1421 [2].
File attachments
When attachments are included inline, they significantly increase the size of the XML message. Some XML parser implementations load the entire XML message into memory, which causes performance degradation when large messages are processed. An alternative to inline attachments is to include them as separate files.
In the following example command line, po.doc and list.pdf are attached files:
parseXML submit.xml po.doc list.pdf
IBM WebSphere MIBM WebSphere Mhost application toconnection optionsmore information, s
Figure 24.3 IBM We
IBM WebSphere MAttachments are va
Inline
XML does not supXML, binary attachBASE64 represenInternational Alphadetails of BASE64

ter 24 Programming for the RightFax XML Interface 147
UnderBdtfD
UsinIs
UsinI
1
2
UsinI
1
2
3
into the XML node.
xample, the cover text is rich text format y text is in Microsoft Word (.doc) format.
a Word document, and the cover text is
type=”RTF”> pg1252\uc1 ………\par }} T> DOC” encoding=”BASE64”> .AAAAAAAAA=
section define the structure and type of erver can accept in XML documents. cument, it must match the applicable ection. If the document does not match n you must create an XSLT to convert ax schema. Or, you can create an XSLT
irectly to FCL. For sample documents, d on the Schemas” on page 157.
Chap
standing Body and Cover Textody and cover text is relevant only for the submit function. The ata for the body and cover_text nodes can be any file format. Plain ext (ASCII) allows for the simplest transition to XML, but any ormat is acceptable. Rich Text Format (.rtf) and Microsoft Word ocument (.doc) formats are examples of formatted text files.
g plain text dataf the data is in plain text (such as .txt) format, then copy the data traight into the XML nodes, with no additional attributes needed.
g formatted text dataf the data is not plain text format, then:
. Use the type attribute, setting it to the extension associated with that document type.
. Copy the data into the XML node.
g binary dataf the data is binary (.doc, .pdf, etc.), then:
. Encode the data using BASE64 encoding.
. Use the type attribute, setting it to the extension associated with that document type.
. Use the encoding attribute, setting it to the type of encoding.
4. Copy the encoded data
Example In the following e(.rtf) and the bod
… <!--The body is RTF.--> <COVER_TEXT{\rtf1\ansi\ansic</COVER_TEX<BODY type=”0M8R4KGx……</BODY>
The SchemasThe schemas listed in this content that the RightFax sWhen creating an XML doschema described in this sthe applicable schema, thethe document to the RightFto convert the document d“Sample Documents Base

RightFax 9.4 Integration Module Guide 148
urn:schemas-microsoft-com:datatypes”> e.tz”/>
> g”/>
XML_FAX_SUBMIT_schemaFor an example document based on this schema, “XML_FAX_SUBMIT” on page 157.
<?xml version=”1.0” encoding=”UTF-8”?> <!--rfxml version=”2.0” -->
<Schema name=”XML_FAX_SUBMIT” xmlns=”urn:schemas-microsoft-com:xml-data” xmlns:dt=”<ElementType name=”SEND_DATE_TIME” model=”closed” content=”textOnly” dt:type=”dateTim<ElementType name=”INCLUDE_BEG” model=”closed” content=”textOnly” dt:type=”string”/> <ElementType name=”ADD_LIBDOC” model=”closed” content=”textOnly” dt:type=”string”/> <ElementType name=”INCLUDE_END” model=”closed” content=”textOnly” dt:type=”string”/>
<!--SENDER element--> <ElementType name=”FROM_NAME” model=”closed” content=”textOnly” dt:type=”string”/> <ElementType name=”EMP_ID” model=”closed” content=”textOnly” dt:type=”string”/> <ElementType name=”FROM_COMPANY” model=”closed” content=”textOnly” dt:type=”string”/<ElementType name=”FROM_DEPARTMENT” model=”closed” content=”textOnly” dt:type=”strin<ElementType name=”FROM_PHONE” model=”closed” content=”textOnly” dt:type=”string”/> <ElementType name=”RETURN_EMAIL” model=”closed” content=”textOnly” dt:type=”string”/> <ElementType name=”BILLINFO1” model=”closed” content=”textOnly” dt:type=”string”/> <ElementType name=”BILLINFO2” model=”closed” content=”textOnly” dt:type=”string”/> <ElementType name=”REPLY_TO” model=”closed” content=”textOnly” dt:type=”uri”/> <ElementType name=”RF_USER” model=”closed” content=”textOnly” dt:type=”string”/> <ElementType name=”SENDER” model=”closed” content=”eltOnly” order=”seq”>
<element type=”FROM_NAME” minOccurs=”0” maxOccurs=”1”/> <element type=”EMP_ID” minOccurs=”0” maxOccurs=”1”/> <element type=”FROM_COMPANY” minOccurs=”0” maxOccurs=”1”/> <element type=”FROM_DEPARTMENT” minOccurs=”0” maxOccurs=”1”/> <element type=”FROM_PHONE” minOccurs=”0” maxOccurs=”1”/> <element type=”RETURN_EMAIL” minOccurs=”0” maxOccurs=”1”/> <element type=”BILLINFO1” minOccurs=”0” maxOccurs=”1”/> <element type=”BILLINFO2” minOccurs=”0” maxOccurs=”1”/> <element type=”REPLY_TO” minOccurs=”0” maxOccurs=”1”/> <element type=”RF_USER” minOccurs=”1” maxOccurs=”1”/>
</ElementType> <!--DESTINATION STUFF--> <!--Common Recipient elements and attributes-->
<AttributeType name=”unique_id” dt:type=”string”/> <ElementType name=”INCLUDE_INC” model=”closed” content=”textOnly” dt:type=”string”/>

ter 24 Programming for the RightFax XML Interface 149
<
<
Chap
<ElementType name=”TO_NAME” model=”closed” content=”textOnly” dt:type=”string”/> <ElementType name=”INCLUDE_DEF” model=”closed” content=”textOnly” dt:type=”string”/> <ElementType name=”TO_COMPANY” model=”closed” content=”textOnly” dt:type=”string”/> <ElementType name=”TO_CONTACTNUM” model=”closed” content=”textOnly” dt:type=”string”/> <ElementType name=”NOTIFY_HOST” model=”closed” content=”empty”> <AttributeType name=”SuccessTemplate” dt:type=”string” required=”yes”/> <AttributeType name=”FailureTemplate” dt:type=”string”/> <AttributeType name=”Name” dt:type=”string” required=”yes”/>
<attribute type=”SuccessTemplate”/> <attribute type=”FailureTemplate”/> <attribute type=”Name”/>
</ElementType> <ElementType name=”COVERSHEET” model=”closed” content=”textOnly” dt:type=”string”/>
!--FAX element--> <ElementType name=”ALT_FAX_NUM” model=”closed” content=”textOnly” dt:type=”string”/> <ElementType name=”TO_FAXNUM” model=”closed” content=”textOnly” dt:type=”string”/> <ElementType name=”FAX” model=”closed” content=”eltOnly” order=”seq”>
<attribute type=”unique_id”/> <element type=”TO_FAXNUM” minOccurs=”1” maxOccurs=”1”/> <element type=”INCLUDE_INC” minOccurs=”0” maxOccurs=”1”/> <element type=”TO_NAME” minOccurs=”0” maxOccurs=”1”/> <element type=”TO_COMPANY” minOccurs=”0” maxOccurs=”1”/> <element type=”ALT_FAX_NUM” minOccurs=”0” maxOccurs=”1”/> <element type=”TO_CONTACTNUM” minOccurs=”0” maxOccurs=”1”/> <element type=”NOTIFY_HOST” minOccurs=”0” maxOccurs=”1”/> <element type=”COVERSHEET” minOccurs=”0” maxOccurs=”1”/> <element type=”INCLUDE_DEF” minOccurs=”0” maxOccurs=”1”/>
</ElementType> !--EMAIL element-->
<ElementType name=”SUBJECT” model=”closed” content=”textOnly” dt:type=”string”/> <ElementType name=”CC_EMAIL” model=”closed” content=”textOnly” dt:type=”string”/> <ElementType name=”BCC_EMAIL” model=”closed” content=”textOnly” dt:type=”string”/> <ElementType name=”TO_EMAIL” model=”closed” content=”textOnly” dt:type=”string”/> <ElementType name=”EMAIL” model=”closed” content=”eltOnly” order=”seq”>
<attribute type=”unique_id”/> <element type=”TO_EMAIL” minOccurs=”1” maxOccurs=”1”/> <element type=”INCLUDE_INC” minOccurs=”0” maxOccurs=”1”/>

RightFax 9.4 Integration Module Guide 150
<element type=”TO_NAME” minOccurs=”0” maxOccurs=”1”/> <element type=”TO_COMPANY” minOccurs=”0” maxOccurs=”1”/> <element type=”TO_CONTACTNUM” minOccurs=”0” maxOccurs=”1”/> <element type=”NOTIFY_HOST” minOccurs=”0” maxOccurs=”1”/> <element type=”COVERSHEET” minOccurs=”0” maxOccurs=”1”/> <element type=”INCLUDE_DEF” minOccurs=”0” maxOccurs=”1”/> <element type=”SUBJECT” minOccurs=”0” maxOccurs=”1”/> <element type=”CC_EMAIL” minOccurs=”0” maxOccurs=”1”/> <element type=”BCC_EMAIL” minOccurs=”0” maxOccurs=”1”/>
</ElementType> <!--PRINT element-->
<ElementType name=”COPIES” model=”closed” content=”textOnly” dt:type=”i1”/> <ElementType name=”PRINTER_NAME” model=”closed” content=”textOnly” dt:type=”string”/> <ElementType name=”PRINT” model=”closed” content=”eltOnly” order=”seq”>
<attribute type=”unique_id”/> <element type=”COPIES” minOccurs=”0” maxOccurs=”1”/> <element type=”PRINTER_NAME” minOccurs=”0” maxOccurs=”1”/> <element type=”INCLUDE_INC” minOccurs=”0” maxOccurs=”1”/> <element type=”TO_NAME” minOccurs=”0” maxOccurs=”1”/> <element type=”TO_COMPANY” minOccurs=”0” maxOccurs=”1”/> <element type=”TO_CONTACTNUM” minOccurs=”0” maxOccurs=”1”/> <element type=”COVERSHEET” minOccurs=”0” maxOccurs=”1”/> <element type=”INCLUDE_DEF” minOccurs=”0” maxOccurs=”1”/>
</ElementType> <ElementType name=”DESTINATIONS” model=”closed” content=”eltOnly” order=”seq”>
<element type=”FAX” minOccurs=”0” maxOccurs=”*”/> <element type=”EMAIL” minOccurs=”0” maxOccurs=”*”/> <element type=”PRINT” minOccurs=”0” maxOccurs=”*”/>
</ElementType> <!--END DESTINATION STUFF--> <!--FORM element-->
<ElementType name=”FORM” model=”closed” content=”textOnly” dt:type=”string”> <AttributeType name=”xcoord” dt:type=”number”/> <AttributeType name=”ycoord” dt:type=”number”/>
<attribute type=”xcoord”/> <attribute type=”ycoord”/>
</ElementType>

ter 24 Programming for the RightFax XML Interface 151
<
<
LE”/> <
<
<
Chap
!--ADD_IMAGE element--> <ElementType name=”ADD_IMAGE” model=”closed” content=”textOnly” dt:type=”string”> <AttributeType name=”page” dt:type=”enumeration” dt:values=”CURRENT ALL LAST”/> <AttributeType name=”xoffset” dt:type=”i1”/><AttributeType name=”yoffset” dt:type=”i1”/>
<attribute type=”page” default=”CURRENT”/> <attribute type=”xoffset”/> <attribute type=”yoffset”/>
</ElementType> !--BODY and COVER_TEXT common attributes-->
<AttributeType name=”type” dt:type=”string”/> <AttributeType name=”encoding” dt:type=”enumeration” dt:values=”NONE BASE64 QUOTEDPRINTAB
!--COVER_TEXT element--> <ElementType name=”COVER_TEXT” model=”closed” content=”textOnly” dt:type=”string”>
<attribute type=”type” default=”TXT”/> <attribute type=”encoding”/>
</ElementType> !--BODY element-->
<ElementType name=”BODY” model=”closed” content=”mixed”> <element type=”FONT” minOccurs=”0” maxOccurs=”1”/>
<AttributeType name=”tm” dt:type=”i1”/> <AttributeType name=”lm” dt:type=”i1”/> <AttributeType name=”bm” dt:type=”i1”/> <AttributeType name=”font_name” dt:type=”string”/> <AttributeType name=”font_leading” dt:type=”i1”/> <AttributeType name=”font_pitch” dt:type=”i1”/>
<attribute type=”type” default=”TXT”/> <attribute type=”encoding”/> <attribute type=”tm”/> <attribute type=”lm”/> <attribute type=”bm”/> <attribute type=”font_name”/> <attribute type=”font_leading”/> <attribute type=”font_pitch”/>
</ElementType> !--ATTACHMENT element-->
<ElementType name=”ATTACHMENT” model=”closed” content=”eltOnly” order=”one”> <element type=”DATA”/>

RightFax 9.4 Integration Module Guide 152
<element type=”FILE”/> </ElementType> <ElementType name=”DATA” model=”closed” content=”textOnly” dt:type=”string”>
<attribute type=”type” default=”TXT”/> <attribute type=”encoding” default=”NONE”/>
</ElementType> <ElementType name=”FILE” model=”closed” content=”empty”> <AttributeType name=”path” dt:type=”string” required=”yes”/> <AttributeType name=”delete” dt:type=”string” required=”no”/>
<attribute type=”path”/> <attribute type=”delete”/>
</ElementType> <!--Root element-->
<ElementType name=”XML_FAX_SUBMIT” model=”closed” content=”eltOnly” order=”seq”> <AttributeType name=”java” dt:type=”boolean”/> <AttributeType name=”stylesheet” dt:type=”string”/>
<attribute type=”java” default=”0”/> <attribute type=”stylesheet” default=”XML_FAX_SUBMIT.XSL”/> <element type=”SEND_DATE_TIME” minOccurs=”0” maxOccurs=”1”/> <element type=”INCLUDE_BEG” minOccurs=”0” maxOccurs=”1”/> <element type=”SENDER” minOccurs=”0” maxOccurs=”1”/> <element type=”DESTINATIONS” minOccurs=”1” maxOccurs=”1”/> <element type=”FORM” minOccurs=”0” maxOccurs=”1”/> <element type=”ADD_IMAGE” minOccurs=”0” maxOccurs=”1”/> <element type=”COVER_TEXT” minOccurs=”0” maxOccurs=”1”/> <element type=”BODY” minOccurs=”0” maxOccurs=”1”/> <element type=”ATTACHMENT” minOccurs=”0” maxOccurs=”*”/> <element type=”ADD_LIBDOC” minOccurs=”0” maxOccurs=”1”/> <element type=”INCLUDE_END” minOccurs=”0” maxOccurs=”1”/>
</ElementType> </Schema>

ter 24 Programming for the RightFax XML Interface 153
XMF
<<<<<
XMF
<<
Chap
L_FAX_SUBMIT_REPLY.dtdor an example document based on this dtd, see “XML_FAX_SUBMIT_REPLY” on page 160.
!ELEMENT XML_FAX_SUBMIT_REPLY (FAX+)> !ATTLIST FAX unique_id CDATA #REQUIRED> !ELEMENT FAX (RETURN_CODE, MESSAGE)> !ELEMENT RETURN_CODE (#PCDATA)> !ELEMENT MESSAGE (#PCDATA)>
L_FAX_QUERY_schemaor an example document based on this schema, see “XML_FAX_QUERY” on page 160.
?xml version=”1.0”?> Schema xmlns=”urn:schemas-microsoft-com:xml-data” xmlns:dt=”urn:schemas-microsoft-com:datatypes”>
<ElementType name=”UNIQUE_ID” content=”textOnly”/> <AttributeType name =”start” dt:type=”datetime.tz” required=”yes”/> <AttributeType name =”end” dt:type=”datetime.tz” required=”yes”/> <ElementType name=”DATE_RANGE” content=”textOnly”>
<attribute type=”start”/> <attribute type=”end”/>
</ElementType> <AttributeType name=”faxtype” dt:type=”enumeration” dt:values=”OUTBOUND INBOUND BOTH”/> <ElementType name=”TO_FAXNUM” content=”textOnly”/> <ElementType name=”RF_USER” content=”textOnly”/> <ElementType name=”STATUS” content=”textOnly”/> <ElementType name=”QUERY” content=”eltOnly”>
<attribute type=”faxtype” default=”OUTBOUND”/> <element type=”UNIQUE_ID” minOccurs='0' maxOccurs='1'/> <element type=”DATE_RANGE” minOccurs='0' maxOccurs='1'/> <element type=”TO_FAXNUM” minOccurs='0' maxOccurs='1'/> <element type=”RF_USER” minOccurs='0' maxOccurs='1'/> <element type=”STATUS” minOccurs='0' maxOccurs='1'/>
</ElementType> <ElementType name=”QUERIES” content=”eltOnly”>
<element type=”QUERY” minOccurs='1' maxOccurs='*'/> </ElementType> <ElementType name=”XML_FAX_QUERY” content=”eltOnly”>

RightFax 9.4 Integration Module Guide 154
STAT, OWNER_ID, TO_FAXNUM, ENUM, BILLINFO1, BILLINFO2,
M1)>
<element type=”QUERIES”/> </ElementType>
</Schema>
XML_FAX_QUERY_REPLY.dtdFor an example document based on this dtd, see “XML_FAX_QUERY_REPLY” on page 161.
<!ELEMENT XML_FAX_QUERY_REPLY (MESSAGE?, FAXSTATUS*)> <!ELEMENT MESSAGE (#PCDATA)> <!ELEMENT FAXSTATUS (STATUS_CODE, STATUS_MSG, ERROR_CODE, DISPOSITION, TERM
TO_CONTACTNUM, TO_NAME, TO_COMPANY, TO_CITYSTATE, FROM_NAME, FROM_PHONCREATE_DATETIME, SENDTIME, REMOTEID, SEND_DATETIME, SEND_CHANNEL, CUSTO
<!ATTLIST FAXSTATUS unique_id CDATA #REQUIRED> <!ATTLIST FAXSTATUS query_id CDATA #IMPLIED> <!ELEMENT STATUS_CODE (#PCDATA)> <!ELEMENT STATUS_MSG (#PCDATA)> <!ELEMENT ERROR_CODE (#PCDATA)> <!ELEMENT DISPOSITION (#PCDATA)> <!ELEMENT TERMSTAT (#PCDATA)> <!ELEMENT OWNER_ID (#PCDATA)> <!ELEMENT TO_FAXNUM (#PCDATA)> <!ELEMENT TO_CONTACTNUM (#PCDATA)> <!ELEMENT TO_NAME (#PCDATA)> <!ELEMENT TO_COMPANY (#PCDATA)> <!ELEMENT TO_CITYSTATE (#PCDATA)> <!ELEMENT FROM_NAME (#PCDATA)> <!ELEMENT FROM_PHONENUM (#PCDATA)> <!ELEMENT BILLINFO1 (#PCDATA)> <!ELEMENT BILLINFO2 (#PCDATA)> <!ELEMENT CREATE_DATETIME (#PCDATA)> <!ELEMENT SENDTIME (#PCDATA)> <!ELEMENT REMOTEID (#PCDATA)> <!ELEMENT SEND_DATETIME (#PCDATA)> <!ELEMENT SEND_CHANNEL (#PCDATA)> <!ELEMENT CUSTOM1 (#PCDATA)>

ter 24 Programming for the RightFax XML Interface 155
XMF
<<
< -->
Chap
L_FAX_ACTION_schemaor an example document based on this schema, see “XML_FAX_ACTION” on page 162.
?xml version=”1.0”?> Schema xmlns=”urn:schemas-microsoft-com:xml-data” xmlns:dt=”urn:schemas-microsoft-com:datatypes”>
<ElementType name=”TO_NAME” content=”textOnly”/> <ElementType name=”TO_COMPANY” content=”textOnly”/> <ElementType name=”ALT_FAX_NUM” content=”textOnly”/> <ElementType name=”TO_CONTACTNUM” content=”textOnly”/> <ElementType name=”COVERSHEET” content=”textOnly”/> <ElementType name=”TO_FAXNUM” content=”textOnly”/> <ElementType name=”FAX_RECIPIENT” content=”eltOnly”>
<element type=”TO_NAME” minOccurs='0' maxOccurs='1'/> <element type=”TO_COMPANY” minOccurs='0' maxOccurs='1'/> <element type=”ALT_FAX_NUM” minOccurs='0' maxOccurs='1'/> <element type=”TO_CONTACTNUM” minOccurs='0' maxOccurs='1'/> <element type=”COVERSHEET” minOccurs='0' maxOccurs='1'/> <element type=”TO_FAXNUM” />
</ElementType> <ElementType name=”ID” content=”textOnly”/> <ElementType name=”DESCRIPTION” content=”textOnly”/> <ElementType name=”DELETE” content=”empty”/> <ElementType name=”FORWARD” content=”eltOnly”>
<element type=”FAX_RECIPIENT” minOccurs='1' maxOccurs='*'/> </ElementType> <ElementType name=”CREATE_LIB_DOC” content=”eltOnly”>
<element type=”ID” minOccurs='1' maxOccurs='1'/> <element type=”DESCRIPTION” minOccurs='1' maxOccurs='1'/>
</ElementType> <AttributeType name =”unique_id” dt:type=”string” required=”yes”/>
!--Had to make this ”closed” and set order to ”one” so that only one or the other of child elements can occur<ElementType name=”FAX” model=”closed” content=”eltOnly” order=”one”>
<attribute type=”unique_id”/> <element type=”DELETE”/> <element type=”FORWARD”/> <element type=”CREATE_LIB_DOC”/>
</ElementType>

RightFax 9.4 Integration Module Guide 156
M?, COVERSHEET?, TO_FAXNUM)>
STAT, OWNER_ID, TO_FAXNUM, ENUM, BILLINFO1, BILLINFO2,
M1)>
<AttributeType name =”docid” dt:type=”string”/> <ElementType name=”XML_FAX_ACTION” content=”eltOnly”>
<element type=”FAX” minOccurs='1' maxOccurs='*'/> </ElementType>
</Schema>
XML_FAX_ACTION_REPLY.dtdFor an example document based on this dtd, see “XML_FAX_ACTION_REPLY” on page 162.
<!ELEMENT XML_FAX_ACTION (FAX+)> <!ELEMENT FAX (DELETE | FORWARD)> <!ATTLIST FAX unique_id CDATA #REQUIRED> <!ELEMENT DELETE EMPTY> <!ELEMENT FORWARD FAX_RECIPIENT+> <!ELEMENT FAX_RECIPIENT (TO_NAME?, TO_COMPANY?, ALT_FAX_NUM?, TO_CONTACTNU<!ELEMENT TO_NAME (#PCDATA)> <!ELEMENT TO_COMPANY (#PCDATA)> <!ELEMENT ALT_FAX_NUM (#PCDATA)> <!ELEMENT TO_CONTACTNUM (#PCDATA)> <!ELEMENT COVERSHEET (#PCDATA)> <!ELEMENT TO_FAXNUM (#PCDATA)>
XML_FAX_NOTIFICATION.dtdFor an example document based on this dtd, see “XML_FAX_NOTIFICATION” on page 163.
<!ELEMENT XML_FAX_NOTIFICATION (FAXSTATUS*)> <!ELEMENT FAXSTATUS (STATUS_CODE, STATUS_MSG, ERROR_CODE, DISPOSITION, TERM
TO_CONTACTNUM, TO_NAME, TO_COMPANY, TO_CITYSTATE, FROM_NAME, FROM_PHONCREATE_DATETIME, SENDTIME, REMOTEID, SEND_DATETIME, SEND_CHANNEL, CUSTO
<!ATTLIST FAXSTATUS unique_id CDATA #REQUIRED> <!ELEMENT STATUS_CODE (#PCDATA)> <!ELEMENT STATUS_MSG (#PCDATA)> <!ELEMENT ERROR_CODE (#PCDATA)> <!ELEMENT DISPOSITION (#PCDATA)> <!ELEMENT TERMSTAT (#PCDATA)> <!ELEMENT OWNER_ID (#PCDATA)> <!ELEMENT TO_FAXNUM (#PCDATA)>

ter 24 Programming for the RightFax XML Interface 157
<<<<<<<<<<<<<<
SampTss
W<xcd
XM<<< ction\xml
Chap
!ELEMENT TO_CONTACTNUM (#PCDATA)> !ELEMENT TO_NAME (#PCDATA)> !ELEMENT TO_COMPANY (#PCDATA)> !ELEMENT TO_CITYSTATE (#PCDATA)> !ELEMENT FROM_NAME (#PCDATA)> !ELEMENT FROM_PHONENUM (#PCDATA)> !ELEMENT BILLINFO1 (#PCDATA)> !ELEMENT BILLINFO2 (#PCDATA)> !ELEMENT CREATE_DATETIME (#PCDATA)> !ELEMENT SENDTIME (#PCDATA)> !ELEMENT REMOTEID (#PCDATA)> !ELEMENT SEND_DATETIME (#PCDATA)> !ELEMENT SEND_CHANNEL (#PCDATA)> !ELEMENT CUSTOM1 (#PCDATA)>
le Documents Based on the Schemashis section lists sample documents based on the XML Interface chemas and corresponding DTDs. For the schemas and DTDs, ee “The Schemas” on page 147.
arning For example documents that require a name space (e.g., XML_FAX_SUBMIT stylesheet=”XML_FAX_SUBMIT.XSL” mlns=”namespace”>), the name space you write must exactly match the orresponding name space in the XSLT file. If it does not, the FCL ocuments that appear in the inbox will be empty.
L_FAX_SUBMIT?xml version=”1.0”?> !--rfxml version=”2.0” --> XML_FAX_SUBMIT stylesheet=”XML_FAX_SUBMIT.XSL” xmlns=”x-schema:c:\program files\rightfax\produ
\schemas\XML_FAX_SUBMIT_schema.xml”> <SEND_DATE_TIME>2000-01-24T15:20:00-08:00</SEND_DATE_TIME> <INCLUDE_BEG>xml.beg</INCLUDE_BEG> <SENDER>
<FROM_NAME>Bob McKenzie</FROM_NAME>

RightFax 9.4 Integration Module Guide 158
ML_FAX_NOTIFICATION.inc”
”XMLNotif”/>
<EMP_ID>555-66-7777</EMP_ID> <FROM_COMPANY>Company, ltd.</FROM_COMPANY> <FROM_DEPARTMENT>Store</FROM_DEPARTMENT> <FROM_PHONE>555-9876</FROM_PHONE> <RETURN_EMAIL>[email protected]</RETURN_EMAIL> <BILLINFO1>12345</BILLINFO1> <BILLINFO2>678dk</BILLINFO2> <REPLY_TO>http://www.company.com/faxreply</REPLY_TO> <RF_USER>bobm</RF_USER>
</SENDER> <DESTINATIONS>
<FAX unique_id=”PRODXML:0001”> <TO_FAXNUM>555-1111</TO_FAXNUM> <INCLUDE_INC>xml.inc</INCLUDE_INC> <TO_NAME>Fred Flintstone</TO_NAME> <TO_COMPANY>Acme, Inc.</TO_COMPANY> <ALT_FAX_NUM>555-1112</ALT_FAX_NUM> <TO_CONTACTNUM>555-6543</TO_CONTACTNUM> <NOTIFY_HOST SuccessTemplate=”XML_FAX_NOTIFICATION.inc” FailureTemplate=”X
Name=”XMLNotify”/> <COVERSHEET>auto.cov</COVERSHEET> <INCLUDE_DEF>xml.def</INCLUDE_DEF>
</FAX> <FAX unique_id=”PRODXML:0002”>
<TO_FAXNUM>555-1234</TO_FAXNUM> <TO_NAME>Bill Smith</TO_NAME>
</FAX> <EMAIL unique_id=”PRODXML:0003”>
<TO_EMAIL>[email protected]</TO_EMAIL> <TO_NAME>Barney Smith </TO_NAME> <NOTIFY_HOST SuccessTemplate=”exmlsuc.inc” FailureTemplate=”exmlerr.inc” Name=<SUBJECT>Here is my fax </SUBJECT> <CC_EMAIL>[email protected]</CC_EMAIL> <BCC_EMAIL>[email protected]</BCC_EMAIL>
</EMAIL> <PRINT unique_id=”PRODXML:0003”>
<COPIES>2</COPIES>

ter 24 Programming for the RightFax XML Interface 159
t_pitch=”12”>
ent.%EOF%</DATA>
<
Chap
<PRINTER_NAME>Dev1</PRINTER_NAME> <INCLUDE_INC>xml.inc</INCLUDE_INC> <TO_NAME>Bill Smith</TO_NAME> <TO_COMPANY>Acme, Inc.</TO_COMPANY> <TO_CONTACTNUM>555-6545</TO_CONTACTNUM> <COVERSHEET>auto.cov</COVERSHEET> <INCLUDE_DEF>xml.def</INCLUDE_DEF>
</PRINT> </DESTINATIONS> <FORM xcoord=”0.5” ycoord=”1.0”>form.inc</FORM> <ADD_IMAGE page=”CURRENT” xoffset=”2” yoffset=”4”>simpsons2.tif</ADD_IMAGE> <COVER_TEXT type=”TXT” encoding=”NONE”>
Put me on the cover!!!! < > Here is another line of cover text.
</COVER_TEXT> <BODY type=”TXT” encoding=”NONE” tm=”1” lm=”1” bm=”1” font_name=”Arial” font_leading=”12” fon
Yada Yada Yada < > More More More
</BODY> <ATTACHMENT>
<DATA type=”RTF” encoding=”NONE”>%RTF%/Arial%Put this text into the document at an attachm</ATTACHMENT> <ATTACHMENT>
<FILE path=”eagle.tif” delete=”yes”/> </ATTACHMENT> <ATTACHMENT>
<FILE path=”eagle2.tif”/> </ATTACHMENT> <ADD_LIBDOC>TANDC1</ADD_LIBDOC> <INCLUDE_END>xml.end</INCLUDE_END>
/XML_FAX_SUBMIT>

RightFax 9.4 Integration Module Guide 160
:00”/>
:00”/>
XML_FAX_SUBMIT_REPLY<?xml version=”1.0” ?> <XML_FAX_SUBMIT_REPLY>
<FAX unique_id=”PRODXML:2055”> <RETURN_CODE>1</RETURN_CODE> <MESSAGE>Document has been successfully submitted for sending.</MESSAGE>
</FAX> </XML_FAX_SUBMIT_REPLY>
XML_FAX_QUERY<?xml version=”1.0” ?> <XML_FAX_QUERY xmlns=”x-schema:../schemas/XML_FAX_QUERY_schema.xml”>
<QUERIES> <QUERY faxtype=”INBOUND”>
<UNIQUE_ID>PRODXML:0001</UNIQUE_ID> <DATE_RANGE start=”2000-03-08T18:39:09-08:00” end=”2000-03-10T18:39:09-08<TO_FAXNUM>555-1111</TO_FAXNUM> <RF_USER>bobm</RF_USER> <STATUS>0</STATUS>
</QUERY> <QUERY faxtype=”OUTBOUND”>
<UNIQUE_ID>PRODXML:0002</UNIQUE_ID> <DATE_RANGE start=”2000-03-08T18:39:09-08:00” end=”2000-03-10T18:39:09-08<TO_FAXNUM>555-1112</TO_FAXNUM> <RF_USER>dougm</RF_USER> <STATUS>0</STATUS>
</QUERY> <QUERY faxtype=”BOTH”> <UNIQUE_ID>PRODXML:0003</UNIQUE_ID> <DATE_RANGE start=”2000-03-08T18:39:09-08:00” end=”2000-03-10T18:39:09-08:00”/> <TO_FAXNUM>555-1113</TO_FAXNUM> <RF_USER>dougm</RF_USER> <STATUS>0</STATUS>

ter 24 Programming for the RightFax XML Interface 161
<
XM<<
<
Chap
</QUERY> </QUERIES>
/XML_FAX_QUERY>
L_FAX_QUERY_REPLY?xml version=”1.0” ?> XML_FAX_QUERY_REPLY>
<FAXSTATUS unique_id=”PRODXML:2055” query_id=”1”> <STATUS_CODE>6</STATUS_CODE> <STATUS_MSG>OK</STATUS_MSG> <ERROR_CODE>0</ERROR_CODE> <DISPOSITION>0</DISPOSITION> <TERMSTAT>32</TERMSTAT> <OWNER_ID>XMLACCOUNT</OWNER_ID> <TO_FAXNUM>5039689601</TO_FAXNUM> <TO_CONTACTNUM /> <TO_NAME>Unknown</TO_NAME> <TO_COMPANY /> <TO_CITYSTATE /> <FROM_NAME /> <FROM_PHONENUM>(999) 999-9999</FROM_PHONENUM> <BILLINFO1 /> <BILLINFO2 /> <CREATE_DATETIME>957444538</CREATE_DATETIME> <SENDTIME>30</SENDTIME> <REMOTEID>TEST computer</REMOTEID> <SEND_DATETIME>957444538</SEND_DATETIME> <SEND_CHANNEL>0</SEND_CHANNEL> <CUSTOM1>0</CUSTOM1>
</FAXSTATUS> /XML_FAX_QUERY_REPLY>

RightFax 9.4 Integration Module Guide 162
STATUS>
XML_FAX_ACTION<?xml version=”1.0” ?> <XML_FAX_ACTION xmlns=”x-schema:../schemas/XML_FAX_ACTION_schema.xml”>
<FAX unique_id=”PRODXML:0001”> <DELETE/>
</FAX> <FAX unique_id=”PRODXML:0002”>
<FORWARD> <FAX_RECIPIENT>
<TO_NAME>Fred Flintstone</TO_NAME> <TO_COMPANY>Acme, Inc.</TO_COMPANY> <ALT_FAX_NUM>555-1112</ALT_FAX_NUM> <TO_CONTACTNUM>555-6543</TO_CONTACTNUM> <COVERSHEET>auto.cov</COVERSHEET> <TO_FAXNUM>555-1111</TO_FAXNUM>
</FAX_RECIPIENT> </FORWARD>
</FAX> <FAX unique_id=”PRODXML:0003”>
<CREATE_LIB_DOC> <ID>TANDC</ID> <DESCRIPTION>This is a terms and conditions document.</DESCRIPTION> </CREATE_LIB_DOC>
</FAX> </XML_FAX_ACTION>
XML_FAX_ACTION_REPLY<?xml version=”1.0” ?> <XML_FAX_ACTION_REPLY>
<ACTION_STATUS faxid=”PRODXML:2055”> <RETURN_CODE>1</RETURN_CODE> <STATUS>Fax (PRODXML:2055) had been submitted for forwarding to: Acme Chemicals</
</ACTION_STATUS> </XML_FAX_ACTION_REPLY>

ter 24 Programming for the RightFax XML Interface 163
XM<<<
<
Chap
L_FAX_NOTIFICATION?xml version=”1.0” ?> !DOCTYPE XML_FAX_NOTIFICATION SYSTEM ”dtds/XML_FAX_NOTIFICATION.dtd”> XML_FAX_NOTIFICATION>
<FAXSTATUS unique_id=”PRODXML:0001” query_id=”1”> <STATUS_CODE>0</STATUS_CODE> <STATUS_MSG>It is fine</STATUS_MSG> <ERROR_CODE></ERROR_CODE> <DISPOSITION></DISPOSITION> <TERMSTAT></TERMSTAT> <OWNER_ID></OWNER_ID> <TO_FAXNUM></TO_FAXNUM> <TO_CONTACTNUM></TO_CONTACTNUM> <TO_NAME></TO_NAME> <TO_COMPANY></TO_COMPANY> <TO_CITYSTATE></TO_CITYSTATE> <FROM_NAME></FROM_NAME> <FROM_PHONENUM></FROM_PHONENUM> <BILLINFO1></BILLINFO1> <BILLINFO2></BILLINFO2> <CREATE_DATETIME></CREATE_DATETIME> <SENDTIME></SENDTIME> <REMOTEID></REMOTEID> <SEND_DATETIME></SEND_DATETIME> <SEND_CHANNEL></SEND_CHANNEL> <CUSTOM1></CUSTOM1>
</FAXSTATUS> /XML_FAX_NOTIFICATION>

RightFax 9.4 Integration Module Guide 164

165
Chapt
Prog
TR
TcrTf
Ttl
Tqpp
TJ
ccess to the following functions and RightFax XML Interface.
e RightFax API for Java, see the at is installed with the API. The in the folder Java\Docs.
sport Methods and Functions
P or PS File
IBM WebSphere MQ
Yes Yes
Yes No
Yes Yes
Yes No
Yes No
Yes Yes
Yes No
er 25
ramming for the RightFax API for Java
he RightFax API for Java generates XML and sends it to the ightFax server.
he RightFax API for Java converts Java to XML on the host omputer before transmitting it to the Integration Module. Once eceived, the RightFax XML Interface converts the XML to FCL. he Integration Module can then process and send the document rom the RightFax server.
his chapter is written for experienced Java developers. It requires he Sun Microsystems, Inc. Java Developer’s Kit version 1.1.8 or ater.
he RightFax API for Java can submit an outbound document, uery the RightFax server for the status of a document, and erform actions (forward, delete, or create a library document) on reviously sent documents.
he following XML Interface functions are available with the API for ava:
ActionAction ReplyNotificationQueryQuery ReplySubmitSubmit Reply
The API for Java provides amethods of transport in the
For information on using thRightFax documentation thdocumentation is installed RightFax\Production\XML\
Table 25a XML Interface Tran
FunctionHTTHTT
Action Yes
Action Reply Yes
Notification Yes
Query Yes
Query Reply Yes
Submit Yes
Submit Reply Yes

RightFax 9.4 Integration Module Guide 166
the RightFax Server Module and click the ter the name of the SMTP server on your ansport all SMTP alerts and notifications tFax server. If you will not be using SMTP to erts and notifications, you can leave this option
In IIS, configure the rfxml website with an IIS ightFax will use to access the IIS server. This for Java development.
elopment tools are located in the tFax\Production\XML\Java folder.
va development computer to use the rface from the tFax\Production\XML\Java folder on the
the development computer or the computer that Java interface. If you already have Java classes puter, Captaris recommends copying this file to
When the file has been copied, you must modify nvironment variable to include this .zip file.
JavaInt.zip file is located in the C:\Proj\Java the development computer, then set the CLASSPATH environment variable:
PATH=%CLASSPATH%;C:\Proj\Java\RFJavaI
the RightFax Java class library, you must import package by including this line in your Java code:
e Java is case-sensitive, this line must be included ing the exact capitalization in this example. Incorrect l to import the RightFax Java class library.
Installing the API for Java
Note RightFax provides programming interfaces for both Java and XML. These interfaces are both installed when you run the Java installation.
Minimum System RequirementsIn addition to the minimum system requirements for the RightFax server and Integration Module, Microsoft Internet Information Server (IIS) version 6.0 or later must be installed on the RightFax server.
If you are installing the XML interface on a server running IIS version 6.0, Active Server Pages and ISAPI Extensions must be enabled. Parent Paths must also be enabled, either for the Default Web Site as a whole, or for the RFXML virtual directory which appears after the installation of the Java/XML API.
If you are installing the XML interface on a server running IIS version 7.0, you must enable CGI modules and ISAPI modules. Parent Paths must also be enabled, either for the Default Web Site as a whole, or for the RFXML virtual directory which appears after the installation of the Java/XML API.
Installing the Java InterfaceFollow the instructions for installing the RightFax server in the RightFax Installation Guide and use the following specific steps:
On the Setup Type screen, select Custom and then click Next.On the Setup Features screen, expand the RightFax Server heading in the components tree and select the Java/XML API component to install. Click Next.
Complete the remaining instructions in the RightFax Installation Guide for installing the RightFax server. After the RightFax server and Java/XML API component are installed and activated, you must configure an SMTP host and an IIS user account.
SMTP Host. Opene-transport tab. Ennetwork that will trregarding the Righdeliver RightFax alblank.
IIS User Account.user account that Raccount is required
Additional Java devProgram Files\Righ
Configuring the JaRightFax Java inte
Copy RFJavaInt.zipProgram Files\RighRightFax server to will be running thelocated on this comthe same location. the CLASSPATH e
Example If the RFfolder onfollowing
CLASSnt.zip
Finally, when usingthe RightFax class
import RightFax.*;
Important Becausin your Java code uscapitalization will fai

apter 25 Programming for the RightFax API for Java 167
SendiTrdtf
1
2
called m_FaxDocument, in the et all the non-attachment information
t.setSenderInfo (…) to set the person sending the document. This
erloaded, with a version that takes all eters, a version that only takes the (RFUser ID), and versions that take the ation. If there is not an overloaded hat you want, use one that takes more, rs you don't want to use to empty
t.addRecipient (…) for each recipient. is, a recipient will be added to the list. n overloaded, with a version that takes ameters, a version that only takes the (Fax Number), and versions that take formation. If there is not an overloaded hat you want, use one that takes more, rs you don't want to use to empty
ghtFax 8.0, methods have been added to pients. See the JavaDocs for details.
t.setBody (…) to set the contents of the e body data is not plain text, make sure ll.t.setCoverText (…) to set the contents t text (if any). If the cover text is a data text, then use CoverTextType (…) to set the type.
ents, make a call to addAttachment (…) ch time you call this, an attachment is ethod takes a fully qualified path as its ents of the file to be attached.
Ch
ng Outbound Documents o submit an outbound document, you must set sender information, ecipient information, and add the content for the primary ocument (if any). These are encapsulated in an RFDoc object, in he RFaxSubmit object. Then you can add any attachments. The ollowing list describes the basic steps.
. Create an RFaxSubmit object.
. Set the target URL for the RightFax server, using the setTargetURL method. This takes a String, NOT a URL object (it will create the URL object).
3. Use the RFDoc object,RFaxSubmit object to sabout the document.
Call m_FaxDocumeninformation about themethod has been ovinformation as paramminimum informationmore common informversion with exactly wand set the parametestrings (””).Call m_FaxDocumenEach time you call thThis method has beeall information as parminimum informationthe more common inversion with exactly wand set the parametestrings (””).
Note New to version Riset e-mail and printer reci
Call m_FaxDocumenfax body (if any). If thto set the type as weCall m_FaxDocumenof the fax cover sheetype other than plainm_FaxDocument.set
4. If you have any attachmfor each attachment. Eaadded to the list. This mparameter, not the cont

RightFax 9.4 Integration Module Guide 168
“”, “”, “”, “”, “”, “”);
“Here is the document”, “”);
5. When all the data is set, call the method. You will get back a Vector of RFStatus objects. Each object will contain the status for one recipient, stating whether it was passed on for sending or if there was an error.
Note You can call the submitEx method in place of submit. This will return a string containing the unparsed XML returned by RightFax. The XML contains the status of each recipient in the form of the following example (page 168).
Sample code for creating an outbound documentimport RightFax.*; import java.net.MalformedURLException; import java.net.UnknownHostException; import java.io.IOException; import java.util.*;
class FaxSubmit {
//Create a outbound fax object RFaxSubmit obFS = new RFaxSubmit(); //Set the URL of the RightFax server obFS.setTargetURL (“http://www.company.com/”); //Set the information on who is sending the fax obFS.m_FaxDocument.setSenderInfo (“Bill Smith”, “”, “Acme,Co.”, “”, “”, “”, “”, “”, “”, “BillS”); //Add 2 recipients try {
obFS.m_FaxDocument.addRecipient (“PRODXML:0001”, “555-1234”, “”, “Jim Jackson”, “”, “”, } catch (RFNoFaxNumberException nfne) {
System.out.println (nfne.toString()); } catch (RFInvalidIDException iide) {
System.out.println (iide.toString()); } //Add an e-mail and a printer recipient try {
obFS.m_FaxDocument.addRecipient_email (“EMAIL:00000001”, “[email protected]”, “”, obFS.m_FaxDocument.addRecipient_printer (“PRNT:000000001”, “MyPrinter”, (short)1);
} catch (RFNoDestinationException nde) {

apter 25 Programming for the RightFax API for Java 169
}
Ch
System.out.println (nde.toString()); } catch (RFInvalidIDException iide) {
System.out.println (iide.toString()); } //Set the body text obFS.m_FaxDocument.setBody ( “Here is some body text”, “TXT”, -1, -1, -1, “Arial”, -1, -1); //Set the cover text obFS.m_FaxDocument.setCoverText (“Here is some cover text”); //Add attachments obFS.addAttachment (“c:\\documents\\mydoc.doc”); obFS.addAttachment (“c:\\documents\\license.pdf”); //Send the document, and get back the results. Vector obRetList = null; try {
obRetList = obFS.submit(); } catch (MalformedURLException mue) {
System.out.println (mue.toString()); } catch (UnknownHostException uhe) {
System.out.println (uhe.toString()); } catch (IOException ioe) {
System.out.println (ioe.toString()); } catch (RFNoDataException nde) {
System.out.println (”Error:” + nde.toString()); } //Output the results int nSize = obRetList.size(); for (int i = 0; i < nSize; i++) {
RFStatus obStat = (RFStatus)(obRetList.get(i)); System.out.println ((i+1) + ”-”); System.out.println (”\tID: ” + obStat.getID()); System.out.println (”\tStatusCode: ” + obStat.getStatusCode()); System.out.println (”\tStatusMessage: ” + obStat.getStatusMsg());
}

RightFax 9.4 Integration Module Guide 170
Querying DocumentsTo perform a query on the status of a document (or group of documents), you must set the criteria for each query. The following list describes the basic steps.
1. Create an RFaxQuery object.
2. Set the target URL for the RightFax server, using the setTargetURL method. This takes a String, not a URL object (it will create the URL object).
3. Call addQuery (…) for each query you want to add to the request. This method has been overloaded, with a version that takes all information as parameters, and versions that take the more common information. If there is not an overloaded version with exactly what you want, use one that takes more, and set the parameters you don't want to use to empty strings (””) or NULL for CALANDER objects. You must set at least one query criteria parameter.
4. When all the queries are set, call the submit method. You will get back a Vector of RFStatus objects. Each object will contain the status of one document (not one query—a query could return many fax statuses).
Sample code for querying a documentimport RightFax.*; import java.net.MalformedURLException; import java.net.UnknownHostException; import java.io.IOException; import java.util.*;
class FaxQuery {
//Create a RFaxQuery object RFaxQuery obQ = new RFaxQuery(); //Set the URL of the RightFax server obQ.setTargetURL (“http://www.company.com/”); //Criteria for one query.

apter 25 Programming for the RightFax API for Java 171
}
Ch
try { obQ.addQuery (“PRODXML:0001”, null, null, “”, “”, “”);
} catch (RFEmptyQueryException eqe) { System.out.println (eqe.toString();
} catch (RFInvalidIDException iide) { System.out.println (iide.toString());
} //Send the query, and get back the results Vector obQRetList = null; try {
obQRetList = obQ.submit(); } catch (MalformedURLException mue) {
System.out.println (mue.toString()); } catch (UnknownHostException uhe) {
System.out.println (uhe.toString()); } catch (IOException ioe) {
System.out.println (ioe.toString()); } catch (RFNoDataException nde) {
System.out.println (nde.toString()); } //Output the results int nQSize = obQRetList.size(); for (int i = 0; i < nQSize; i++) {
RFStatus obStat = (RFStatus)(obQRetList.get(i)); System.out.println ((i+1) + ”-”); System.out.println (”\tID: ” + obStat.getID()); System.out.println (”\tStatusCode: ” + obStat.getStatusCode()); System.out.println (”\tStatusMessage: ” + obStat.getStatusMsg());
}

RightFax 9.4 Integration Module Guide 172
t the software creates, the format is:
haracters are the name of the RightFax server.aracters are a number unique to a document.
Action object.
RL for the RightFax server, using setTargetURL kes a String, NOT a URL object (it will create ).
dAction (…) for each forward action you want method has been overloaded, with a version
formation as parameters and a version that only um information (ID and fax number). If there is ed version with exactly what you want, use one , and set the parameters you don’t want to use s (“”).
Action (…) for each delete action you want to parameter is required.
Action (…) for each create library document t to perform The ID, LibDocID, and tion parameters are all required.
tions are set, call the submit method. You will or of RFStatus objects. Each object will contain e action, stating whether or not the action was
Performing Actions on DocumentsTo perform an action on a document, you need the unique ID for that document. Once you have that, you can either delete the document, forward it to another recipient, or use it to create a library document. If you don’t have the unique ID, you can obtain it by doing a query on the information that you do have (see “Querying Documents” on page 170).
When you submit a document, you have the option of creating a unique ID for that document or letting the RightFax server assign a unique ID for you.
Note If you create your own unique ID, it must be 15 characters or less.
For unique IDs tha
The first seven cThe last eight ch
1. Create an RFax
2. Set the target Umethod. This tathe URL object
3. Call addForwarto perform. Thisthat takes all intakes the minimnot an overloadthat takes moreto empty string
4. Call addDeleteperform. The ID
5. Call addLibDocaction you wanLibDocDescrip
6. When all the acget back a Vectthe status of onsuccessful.

apter 25 Programming for the RightFax API for Java 173
Samiiiii
c{
Ch
ple code for performing an action on a documentmport RightFax.*; mport java.net.MalformedURLException; mport java.net.UnknownHostException; mport java.io.IOException; mport java.util.*;
lass FaxAction
//Create a RFaxAction object RFaxAction obA = new RFaxAction(); //Set the URL of the RightFax server obA.setTargetURL (“http://www.company.com/”); //Create a forward action try {
if (!obA.addForwardAction(”PRODXML:0001”, ”555-6789”, ”Mike Michell”, ””, ””, ””, ””)) { System.out.println (”Add Forward Action Failed”);
} } catch (RFNoFaxNumberException nfne) {
System.out.println (nfne.toString()); } catch (RFNoIDException nide) {
System.out.println (nide.toString()); } catch (RFInvalidOpException ioe) {
System.out.println (ioe.toString()); }
//Create a delete action try {
if (!obA.addDeleteAction(”PRODXML:0002”)) { System.out.println (”Add Delete Action Failed”);
} } catch (RFNoIDException nide) {
System.out.println (nide.toString()); } catch (RFInvalidOpException ioe) {
System.out.println (ioe.toString()); }
//Send the action requests, and get back the results Vector obARetList = null;

RightFax 9.4 Integration Module Guide 174
try { obARetList = obA.submit();
} catch (MalformedURLException mue) { System.out.println (mue.toString());
} catch (UnknownHostException uhe) { System.out.println (uhe.toString());
} catch (IOException ioe) { System.out.println (ioe.toString());
} catch (RFNoDataException nde) { System.out.println (nde.toString());
} //Output the results
int nASize = obARetList.size(); for (int i = 0; i < nASize; i++) {
RFStatus obStat = (RFStatus)(obARetList.get(i)); System.out.println ((i+1) + ”-”); System.out.println (”\tID: ” + obStat.getID()); System.out.println (”\tStatusCode: ” + obStat.getStatusCode()); System.out.println (”\tStatusMessage: ” + obStat.getStatusMsg());
} }
Using Debug ModeThe method setDebug is part of the RFax class and is therefore callable from any RFaxSubmit, RFaxAction, or RFaxQuery object.
By turning on debug mode, you can get more information sent to the standard out. This includes information such as the XML generated for sending to the RightFax server and the XML returned from the RightFax server.
To turn on debug mode, call the setDebug method, passing it true.

Chapter 25 Programming for the RightFax API for Java 175
Error Docum
Tooe
Es
Tm
Table 25b
Code
Genera
-1
-3
-5
d XSL into DOM The XSL file could not be loaded into the DOM tree. This is usually caused by the file not being found or syntax error in the XSL file.
t XSL file info. The XML file did not contain information on the XSL file to use, and the default (in the registry) could not be found.
d. Unable to perform the submit requested. The message will contain the reason.
as been y submitted for
The document has been passed on for sending. If notifications are set up, you will be informed of the success or failure of the send via that notification type.
ion found. The query returned no documents matching your criteria.
. Unable to perform the query requested. The message will contain the reason.
Error and Return Codes (Continued)
Explanation
and Status Codes for XML- and Java-Based ents
he RightFax API for Java will return status information (as a vector f RFStatus objects or as a string containing XML) for all perations, unless an error occurs in the API, in which case an xception will be thrown.
ach RFStatus object or XML node will contain a status code, tatus message, and document ID.
he following table lists all possible codes, their associated essages, and an explanation for what each indicates.
XML Interface Error and Return Codes
Message Explanation
l
Failed to load XML into DOM tree. XML file copied to err dir.
The XML file could not be loaded into the DOM tree. This is usually caused by the file not being found, a syntax error in the XML file, or the XML file not conforming to the schema.
Failed to connect to RF Server. The production software was unable to connect to the RightFax server. This is usually caused by the RFServer service not running.
Unknown XML operation type. The operation was not XML_FAX_SUBMIT, XML_FAX_QUERY, or XML_FAX_ACTION.
Submit
-2 Failed to loatree.
-4 Failed to ge
0 Submit faile
1 Document hsuccessfullsending.
Query
-99 No informat
0 Query failed
Table 25b XML Interface
Code Message

RightFax 9.4 Integration Module Guide 176
0-n N/A If you receive a message not listed in this table, it is a code universal to all RightFax software. These are listed in the RightFax Administrator’s Guide.
6 Deleted If the document had previously been sent successfully, but has since been deleted.
Action
-99 No such fax found. The document you wish to perform the action on could not be found.
0 Action failed. Unable to perform the action requested. The message will contain the reason.
1 Fax (<ID>) has been deleted. Success
1 Fax (<ID>) has been submitted for forwarding to: <recipient>.
Success
1 A Library Document has been created from fax: <ID>.
Success
Notification
0-n N/A If you receive a message that is not listed in this table, it is listed in the RightFax Administrator’s Guide.
Table 25b XML Interface Error and Return Codes (Continued)
Code Message Explanation

177
Chapt
Crea s
TEIMM
Ym
SysteT
ink ModuleternetLink Module are installed on all server installation. However, the e licensed and activated before its .
Module, you must have licensed a cludes this connector, or purchased and arately. For information on activating
ightFax server, refer to the RightFax
ocuments with the InternetLink Module, ail server.
ur e-mail server
select Start > Programs > Enterprise rprise Fax Manager window opens.
er in the list of servers in the left pane of rvices appears in the lower-right pane.
t, double-click RightFax Server nfiguration dialog box opens.
b.
er 26
ting FCL Documents with InternetLink Command
he RightFax InternetLink Module is a component of the RightFax nterprise Integration Module. The InternetLink Module enables the
ntegration Module to build documents in Multipurpose Internet ail Extensions (MIME) or text format and send them via Simple ail Transfer Protocol (SMTP) through the Internet.
ou can use the InternetLink Module to send documents in native ode or filter mode.
m Requirementshe InternetLink Module requires the following:
RightFax Enterprise Server and Integration Module already installed.Network connection to the Internet.SMTP gateway on the network.TCP/IP connection from the RightFax Integration Module to the network
Activating the InternetLThe files required by the InRightFax servers during theInternetLink Module must bfunctionality will be enabled
To activate the InternetLinkRightFax server type that inlicensed this connector sepnew components on the RInstallation Guide.
Before you begin sending dverify the name of your e-m
To verify the name of yo
1. On the RightFax server,Fax Manager. The Ente
2. Select the RightFax servthe window. A list of se
3. In the Service Name lisModule. The Server Co
4. Click the eTransport ta

RightFax 9.4 Integration Module Guide 178
U
egin}} and {{type}} can be replaced with a d, {{begin mime}} or {{begin email}}.
nt types determines the type of document that the ia e-mail. The type of document is specified with nd.
nverts the document to the editable body text of e. This is plain text; it has no formatting.
nverts the document to an un-editable, raphic attachment to an empty e-mail message.
rmatting and graphics. Sending documents in est when the document must not be editable or an exact replica of a pre-printed, hardcopy form.
pesers to the type of graphic file that is created {type mime}} command, PDF, TIF, or PCX. To pe, use the {{imagetype}} command (see page 185).
format for {{type mime}} documents is Group 4
ecipient’s e-mail address.
type email}} sends a document as the editable ody of an e-mail message.
type mime}} sends a document as an attachment an empty e-mail message.
FCL Commands (Continued)
escription
5. Verify that the fully qualified domain name of your SMTP server appears in the SMTP Hostname box. If the name of your server is not correct, enter the correct name.
To create and send documents with the InternetLink Module, use the InternetLink FCL commands.
nderstanding the InternetLink FCL CommandsDocuments sent via the InternetLink Module require six FCL commands. Without all of these commands, the document will not be sent. The required commands are listed in the following table.
The commands {{b“shortcut” comman
Choosing documeThe document typerecipient receives vthe {{type}} comma
{{type email}} coan e-mail messag{{type mime}} coMIME-encoded gThis retains all foMIME format is bwhen it must be
Choosing image tyThe image type refwhen you use the {specify an image ty“IMAGETYPE” on
The default graphicTIFF.
Table 26a Required FCL Commands
Command Description
{{begin}} Indicates the beginning of a document.
The Integration Module will process all the data that appears between a {{begin}} and {{end}} command as a discreet document. Data that does not appear between the {{begin}} and {{end}} commands is ignored.
This command must appear as the first command in each InternetLink document.
{{end}} Indicates the end of a document.
The Integration Module will process all the data that appears between a {{begin}} and {{end}} command as a discreet document. Data that does not appear between the {{begin}} and {{end}} commands is ignored.
This command must appear as the last command in each InternetLink document.
{{from}} Sender’s e-mail address.
{{subject}} Subject line of the e-mail message.
{{to}} R
{{type email}} or
{{type mime}}
{{b
{{to
Table 26a Required
Command D

reating FCL Documents with InternetLink Commands 179
UsinWcfg{
MBiit
FI
AttachWaIns
Taw
If
E
Icb
mmand without the native option, then d the host document are merged into ched to an empty e-mail message. You f this graphic file with the {{imagetype}} e types” on page 178.
{{attach}} command when the file must mat cannot adequately represent the le, fax format cannot adequately audio file.
cuments by inserting multiple {{attach}} command cannot be used with the
Link documents that have
strate FCL documents with attachments Module. In each example, the FCL (on l results (on the right).
e host data (“Here are last week’s PDF and is saved as the attachment me is generated automatically by the
the {{type mime}} and {{imagetype pdf}} ocument (Programs.xls) is also attached soft Excel file) through the use of the
he native option.
that was added to Mime.inc, “This m Oswego Corporation”. For more files with the InternetLink Module” on
Chapter 26 C
g include files with the InternetLink Module hen you activate the InternetLink Module, an empty include file
alled Mime.inc is created in the RightFax\Production\Include older. You can insert plain text (but not FCL, formatted text, or raphics) in Mime.inc, and this text will become the body of a {type mime}} document.
ime.inc is linked by default to all InternetLink documents. ecause it is empty, Mime.inc has no function unless you add
nformation to it. If you add information to Mime.inc, then that nformation will appear in the body of each {{type mime}} message hat is sent using the InternetLink Module.
or information on other types of include files, see the RightFax ntegration Module Guide.
ing Native Files to InternetLink Documentsithout the InternetLink Module, the Integration Module converts
ll attachments to fax format (a TIF image) before sending. The nternetLink Module gives you the option to attach documents in ative file format. For example, a Microsoft Word document can be ent as a Word document.
o attach a file, use the {{attach}} or {{beginnative}} commands. For description of both commands, see, “Standard FCL Commands ith InternetLink Options”.
n the following example, Program.xls will be attached in its native ormat (as a Microsoft Excel document) to the host document.
xample {{attach c:\\IST Files\Programs.xls native}}
f you create a {{type mime}} document that contains the {{attach}} ommand with the native option, then the attached document ecomes the second attachment to an empty e-mail message.
If you use the {{attach}} cothe attached document anone graphic file that is attadetermine the image type ocommand “Choosing imag
Use the native option to thebe editable or when fax forcontent of a file. For examprepresent the content of an
You can attach multiple docommands. The {{attach}} {{type email}} command.
Example FCL for Internetattachments
The following examples illucreated for the InternetLinkthe left) yields different fina
In the following example, thprograms.”) is converted tocalled 5816.pdf (the file nasystem) through the use ofcommands. The attached din its native format (a Micro{{attach}} command with t
The example includes text message comes to you froinformation, “Using includepage 179.

RightFax 9.4 Integration Module Guide 180
F mple, the host data (“Here are last week’s erted to PDF and becomes page 1 of the
5816.pdf through the use of the {{type mime}} df}} commands.
option of the {{attach}} command was not is converted to PDF and becomes page 2 of
onverted to PDF Format
.xls”}}
igure 26.1 Attaching a File in its Native Format In the following exaprograms.”) is convattachment called and {{imagetype p
Because the nativeused, Programs.xls16.pdf.
Figure 26.2 Attaching a File C
{{begin}} {{type mime}} {{imagetype pdf}} Here are last week’s programs. {{attach “c:\\IST Files\Programs.xls” native}} {{to [email protected]}} {{subject Weekly programs}} {{from [email protected]}}{{end}}
{{begin}} {{type mime}} {{imagetype pdf}} Here are last week’s programs. {{attach “c:\\IST Files\Programs{{to [email protected]}} {{subject Weekly programs}} {{from [email protected]}} {{end}}

reating FCL Documents with InternetLink Commands 181
SendiWn
Ta
{
U{dmc
Iic
{{{{B{
Worcwo
hen a Fax Fails and Is
a fax has failed and has been sent as an keyword in the notification template. For ation messages, refer to “Setting Up ocument Transmission”
ds with InternetLink
L commands have options that can be odule. The commands are described in
ration Module Guide
nds the current page (unless it is blank) files, optionally deleting them after they rrent document.
that an attached file be sent in its native xcel). Include the “native” option in the the following example.
annot be used with the {{type email}}
ng\PriceList.xls” native}}
pecifies an action for the document in smission. For example, the document alternate recipients.
Chapter 26 C
ng Documents as E-mail if Faxes Failith the InternetLink Module, you can an e-mail documents if fax
umbers fail. To do this, use the {{onerror}} command.
he {{onerror}} usage options relevant to the InternetLink Module re:
{onerror {email|mime e-mail address}}}
nlike the {{type}} command, the e-mail and mime options for the {onerror}} command do the same thing. With either option, the ocument is sent as a graphic image attached to an empty e-mail essage. With both options, you must use the {{imagetype}} ommand to specify the type of graphic image to create.
n the following example, if the document fails to send as a fax, then t will be sent as a PDF file attached to an empty e-mail message to [email protected].
{begin}} {fax 503-555-4489}} {onerror email [email protected]}} {imagetype pdf}} ody of the document to be sent.
{end}}
hen a fax fails and is sent as an e-mail, all e-mail addressing ptions (such as {{to}} and {{cc}}) in the original document are eplaced with the e-mail address specified in the {{onerror}} ommand. The content of the {{contact}} command is replaced ith “To whom it may concern.” All other fields, such as {{subject}} r {{from}}, are retained as they were in the original document.
Receiving Notification WSent as an E-mail
To create a notification thate-mail, include the ^type^ more information on notificNotification Messages of D
Standard FCL CommanOptions
The following standard FCused with the InternetLink Mdetail in the RightFax Integ
ATTACHThe {{attach}} command eand attaches one or more have been added to the cu
This command can specifyformat, such as Word or Ecommand, as illustrated in
The {{attach}} command ccommand.
Example{{attach “C:\Prici
ONERRORThe {{onerror}} command sthe event that it fails in trancan be faxed or e-mailed to

RightFax 9.4 Integration Module Guide 182
I
imilar to the {{attach}} command with the native ands let you send documents in native format.
} command also lets you specify advanced ns that {{attach}} does not support. The key {{beginnative}} and {{attach}} is that uires you to put the content of the in the FCL itself, while {{attach}} attaches a file ation.
{{beginnative}} inserts the data (which appears tive}} and {{endnative}} commands in your host e body of an e-mail message.
ggests to the recipient e-mail client that the ginnative}} and {{endnative}} commands be bedded object in the body of the e-mail ipient e-mail client cannot display the host data e data will be sent as an attachment that is icon in the body of the e-mail message. The icon h the appropriate application.
uires {{endnative}}.
ative “filename” [body] [inline] ype=type] [{base64|quotedprintable}]}}
ative “Body.txt” body mediatype=text/plain}}
s an attachment called Body.txt (whose content tween the {{beginnative}} and {{endnative}} CL document). The attachment will be displayed he body of an e-mail message.
utes of {{beginnative}}:
ibed on page 183 on page 183 on page 183ribed on page 184dprintable, described on page 184
ONSUCCESSThe {{onsuccess}} command specifies an action for the document in the event that it is successfully transmitted. For example, a copy of the document can be faxed or e-mailed to alternate recipients, such as the original sender of the document.
TYPE The {{type}} command establishes the type of document that should sent.
The {{type email}} command specifies that the document will be sent as the editable body text of an e-mail message.The {{type mime}} command specifies that the document will be sent as an un-editable, MIME-encoded graphic attachment to an empty e-mail message.
If you choose {{type mime}}, then you must also use the {{imagetype}} command to specify the type of MIME-encoded graphic attachment to create (PCX, TIF, or PDF).
If you use the {{begin mime}} or {{begin email}} commands, do not use the {{type}} command.
nternetLink FCL CommandsThe following commands are specific to the InternetLink Module.
BEGIN MIME or BEGIN EMAILSyntax {{begin {mime|email}}}
Examples{{begin email}} {{begin mime}}
The {{begin mime}} and {{begin email}} commands specify the transmission type. They can replace the {{begin}} and {{type}} commands.
BEGINNATIVE{{Beginnative}} is soption. Both commThe {{beginnative}configuration optiodifference between{{beginnative}} reqto-be-attached file from a different loc
The body option ofbetween {{beginnadata stream) into th
The inline option sudata between {{bedisplayed as an emmessage. If the recin this way, then threpresented by an can be opened wit
{{Beginnative}} req
Syntax {{beginn[mediat
Example {{beginn
The example createis the host data becommands in the Fas editable text in t
Configurable attrib
File name, descrBody, describedInline, describedMediatype, descBase64 or quote

reating FCL Documents with InternetLink Commands 183
FileTp{r
E
Itocaa
BodT{
Uys
Fti
TrfHd
ts, use multiple {{beginnative}} ption.
ent that contains both HTML and text, e following FCL:
oCleaners.com}} etroCleaners.com}} e of text and HTML in the body of the
ody.txt” body mediatype=text/plain}}
s that you asked for.
ody.htm” body mediatype=text/html}} D><TITLE></TITLE><META tml; charset=iso-8859-1” tent-Type></HEAD> <STRONG>Drew,</STRONG><BR> that you asked for.<HR> ML>
ent e-mail client that the data between ative}} commands be displayed as an dy of the e-mail message. If the recipient the host data in this way, then the data nt that is represented by an icon in the
e. The icon can be opened with the
Chapter 26 C
namehis is the suggested file name for the data. You need not supply a ath with this file name because the file data is stored between the {beginnative}} and {{endnative}} commands. This is the only equired parameter of {{beginnative}}.
xample {{beginnative “File.pdf” inline mediatype=application/pdf}} Here are the files you wanted {{endnative}}
n this example, RightFax will suggest to the recipient e-mail client hat “Here are the files you wanted” be displayed as an embedded bject in the body of the e-mail message. If the recipient e-mail lient cannot perform this task, then an icon labeled File.pdf will ppear in the e-mail message. The content of File.pdf will be “Here re the files you wanted.”
yhis sends the data that appears between the {{beginnative}} and {endnative}} commands as text in the body of the e-mail message.
sing the body option, you can specify alternative file formats when ou want to choose the format that the recipient's e-mail software hould display.
or example, you can send a text file and an HTML file. Generally, he recipient's e-mail software will display the file in the format that t supports. It will not display both files.
he sequence of the file formats determines the format that the ecipient's e-mail software will display. Generally, it will display the irst file format that it supports. For example, if you specify text and TML format, a software program that supports both formats will isplay text first.
To specify alternative formacommands with the body o
Example To send a documyou might use th
{{begin mime}} {{to drew@Metr{{from sarah@M{{subject Samplmessage}} {{beginnative “bDrew, Here are the file{{endnative}} {{beginnative “b<HTML><HEAcontent=”text/hhttp-equiv=Con<BODY><HR>Here are the file</BODY></HT{{endnative}} {{end}}
InlineThis suggests to the recipi{{beginnative}} and {{endnembedded object in the boe-mail client cannot displaywill be sent as an attachmebody of the e-mail messagappropriate application.

RightFax 9.4 Integration Module Guide 184
printable{{beginnative}} and {{endnative}} commands will the specified scheme. This does not necessarily achment be encoded using this scheme in the o the recipient. If these options are not data will not be encoded (8 bit).
ddress for a carbon copy recipient of a multiple addresses, repeat this command for
ress}}
[email protected]}} [email protected]}}
a copy of the e-mail message to both m and [email protected].
g of an attached native document that was eginnative}} command.
tive}}
tive}}
MTP address of the sender of the document.
ddress}}
[email protected] as the return e-mail address age.
MediatypeSpecifies the nature of the data between {{beginnative}} and {{endnative}} commands. The content type (which is required if you use the mediatype option) is represented by a top-level mediatype, a slash, and a subtype.
Example text/plain
The top-level media type identifies a general type of data, and the subtype identifies a specific format for that type of data. Thus, a media type of image/tif is enough to tell a recipient e-mail client that the data is an image, even if the recipient e-mail client cannot interpret the specific image format of .tif.
The default mediatype for native documents with the body option is text/plain. Without the body option, the default mediatype is application/octet-stream. Other common mediatypes are (but are not limited to):
application/ms-wordapplication/pdfaudio/midaudio/wavimage/giftext/htmltext/xmlvideo/mpeg
If you do not supply a media type, or if you supply a media type that the recipient e-mail client cannot interpret, the document most likely will not fail because most current e-mail clients can detect the media type.
Base64 or QuotedThe data between be encoded using require that the atte-mail that is sent tspecified, then the
CCStores the SMTP adocument. To storeeach recipient.
Syntax {{cc add
Example {{cc Jus{{cc Tom
The examples [email protected]
ENDNATIVEEnds the processinbegun with the {{b
Syntax {{endna
Example {{endna
FROMStores the return S
Syntax {{from a
Example {{from D
The example uses Dfor the e-mail mess

reating FCL Documents with InternetLink Commands 185
IMAS
S
E
Tm
SUBSt
S
E
Ts
TO S
S
E
TJ
Chapter 26 C
GETYPEelects the graphic format of a {{type mime}} document.
yntax {{imagetype {pdf|group3|group4|pcx}}}
xample {{imagetype pdf}}
he example identifies PDF as the graphic format for a {{type ime}} document.
JECT tores the subject of an SMTP document. The subject appears in
he subject field of the e-mail message.
yntax {{subject topic}}
xample {{subject RightFax InternetLink example.}}
he example creates an e-mail message with a subject field that ays, “RightFax InternetLink example.”
tores the SMTP address for the recipient of an SMTP document.
yntax {{to address}}
xample {{to [email protected]}}
he example sends the e-mail message to [email protected].

RightFax 9.4 Integration Module Guide 186

187
Appen
Inte
TRYst
Table A1
Program
Bufdir.ex
Capture
Dbnotify
Diagtiff.e
Encode6e
Fax2map
Lotus Notes. fax2note [options]
adecimal hd [options] input file
P/IP port. hf [options]
API. Requires that supports using a log-on 270 session
data.
hlpisend [options]
oded file to am. Buffer.exe s it for syntax, d passes the rse.exe ent to be sent.
makedoc [options] filename
-page TIFF ent consisting images.
multitif [options] documentnumber startingpage
pe and d on data ed pipe.
nplisten [options]
Integration Module (Continued)
Command line syntax
dix A
gration Module Programs
he following table lists the programs that are installed with the ightFax Integration Module in the RightFax\Production\Bin folder. ou can use them to help you configure and fax-enable your ystem. To see a list of the command line options for each program, ype -h at the command prompt to view online help.
Programs Installed With the Integration Module
DescriptionCommand line syntax
e Reads a directory and executes a command on each file that is placed in the directory.
bufdir [options] directory
.exe Reads input from a serial port at different rates and in different modes and executes a command on data that is received.
capture [options] input
.exe Updates databases from a Win32 command line.
dbnotify [options] Data Source Name
xe Diagnoses TIFF image files and provides the contents of their tags.
diagtiff [options] infile [infile ...]
4.ex Encodes files using base64 encoding.
encode64 [options] infile outfile
i.exe Sends MAPI32 messages from the Win32 command line.
fax2mapi [options]
Fax2note.exe Sends messages to
Hd.exe Displays files in hexformat.
Hf.exe Sends data to a TC
Hlpisend.exe Sends data via HLLemulation software HLLAPI. Capable ofscript to log in to a 3prior to transmitting
Makedoc.exe Submits an FCL-encthe Buffer.exe progrreads the file, parsenotes any errors, anfile to Parse.exe. Paprepares the docum
Multitif.exe Breaks one multipleimage into a documof single-page TIFF
Nplisten.exe Creates a named piexecutes a commanreceived via the nam
Table A1 Programs Installed With the
Program Description

RightFax 9.4 Integration Module Guide 188
T
Portlstn.exe Executes a command on a data stream received via a TCP/IP port.
portlstn [options] command
Pssplit.exe Splits a PostScript file to create separate pages.
pssplit [options] infile outputdirectory
Tee.exe Transcribes standard input to standard output and makes copies in the file.
tee [options] outputfile
Tiffbind.exe Combines single-page TIFF images into one multiple-page TIFF image.
tiffbind [options] outputtiff inputtiff {input tiff ...}
Tog3.exe Converts differing file formats of black and white TIFF images to Group 3, Group 4, PCX, and GIF images.
tog3 [options] infile outfile
Uuencode Encodes files using uuencode. uuencode [options] infile outfile
able A1 Programs Installed With the Integration Module (Continued)
Program DescriptionCommand line syntax

189
Appen
FCL
T(d
ABOCc
S
E
ADDIw
S
E
Tc
S
ber for document if the primary fax
leared when a document is broadcast or s used. To broadcast each document r, add an {{altfax}} command after every ommand.
ber}}
-5458}}
ate fax number for the document to
s this command, see Chapter 11, of the Document”.
proval in a FaxUtil mailbox.
s this command, see Chapter 20, nsmission”.
dix B
Commands
his appendix provides a list of the facsimile command language FCL) commands used to create FCL documents. This list provides etailed information on the command syntax and usage.
RTauses the software to ignore a document before it is faxed. You an place this command anywhere in the FCL document.
yntax {{abort}}
xample {{abort}}
COPIESncrements the number of copies to print. This affects documents ith the {{type print}} command.
yntax {{addcopies number}}
xample {{addcopies 3}}
he example increments the number of printed copies of the urrent document by three.
ee also “TYPE” on page 216
ALTFAXStores an alternate fax numnumber fails.
The {{altfax}} argument is cthe {{execute}} command iwith an alternate fax numbenew {{fax}} or {{execute}} c
Syntax {{altfax fax num
Example {{altfax 503-555
The example sets the altern(503) 555-5458.
For the procedure that use“Specifying the Destination
APPROVALHolds the document for ap
Syntax {{approval}}
Example {{approval}}
For the procedure that use“Scheduling Document Tra

RightFax 9.4 Integration Module Guide 190
d time to the next round number of minutes. This g a document to send with a batch of other batch}} command differs from {{delay}} in that it est number of minutes, rather than adding a f minutes to the scheduled time. Specify the to round to.
minutes}}
5}}
es to the next nearest five minutes. Therefore, if , the batch time would be 1:05 P.M.
on page 195 ” on page 195 on page 215
that uses this command, see Chapter 20, ment Transmission”.
ument. Any text between this command and an is rendered as a single page for faxing or
quired in every FCL document. FCL documents le {{begin}} and {{end}} commands, but the FCL of commands will be rendered as a separate
}
}
n page 196
that uses this command, see Chapter 8, uments”.
ATTACHEnds the current page (unless it is blank) and attaches one or more files, optionally deleting them after they have been added to the document.
You can specify the full path to the file with the file name. The full path must be surrounded by quotation marks. The default is RightFax\Production\Forms.
You can use a wildcard with the file name. If the file name ends in .* (such as sales.*), files matching the name and ending with any extension would be attached to the current document. This is useful for creating multiple page attachments.
If a document contains a {{quality}} command, it should be placed in the document before the {{attach}} command. The {{attach}} command cannot be used in {{type email}} documents.
The command can delete the attached file(s) after the fax is generated.
Syntax {{attach filename [delete] [native]}}
Examples{{attach PoInv.doc delete}} {{attach “C:\Program Files\RightFax\Production\MyDocs.doc” native}}
The first example converts PoInv.doc to fax format (.tif) and attaches it to the document. After the fax is generated, PoInv.doc is deleted. Because no path is specified, PoInv.doc is located in the folder RightFax\Production\Forms.
The second example can be used with the InternetLink Module to send the document via e-mail. The base document would be sent as an e-mail, and PoInv.doc would be attached to that e-mail as a native file—it would be left as a Microsoft Word (.doc) file and not converted to fax format.
For the procedure that uses this command, see Chapter 19, “Attaching and Embedding Files, Signatures, and Graphics”.
BATCHAlters the scheduleis useful for keepindocuments. The {{rounds to the nearspecified number onumber of minutes
Syntax {{batch
Example {{batch
The example batchit is now 1:02 P.M.
See also “DATE” “DELAY“TIME”
For the procedure “Scheduling Docu
BEGINStarts an FCL doc{{end}} command printing.
This command is remay contain multipbetween each set page.
Syntax {{begin}
Example {{begin}
See also “END” o
For the procedure “Creating FCL Doc

Appendix B FCL Commands 191
BEGTsat
ABw
Bei
S
E
Tda
Ts
Al
{
IPbh
S
f the fax owner.
the billing code associated with this fax
page 191
RightFax server field billinfo1. For more Sheets in a Broadcast” on page 69.
s this command, see Chapter 21, essages of Document Transmission”.
ng code of the fax owner.
}
}
the billing code associated with this fax
age 191
RightFax server field billinfo2. For more Sheets in a Broadcast” on page 69.
s this command, see Chapter 21, essages of Document Transmission”.
the current and subsequent pages. The ied in the current units from the bottom
INCVThis command embeds a document in an FCL document. The fax erver converts the document to a TIF image using server side pplication (SSA) conversion. For more information on SSA, see he RightFax Administrator’s Guide.
lternatively, you can encode the embedded document using ASE64 or QUOTEDPRINTABLE. This command must be used ith the command {{endcvt}}.
ASE64 is preferable to QUOTEDPRINTABLE unless the ncoded data must be human-readable. If no encoding sequence
s specified, the data is assumed to be 8-bit binary.
yntax {{begincvt FileName [base64|QuotedPrintable]}}
xamples{{begincvt proposal.doc}} {{begincvt proposal.doc base64}}
he first example establishes that binary data (in this case, a ocument called Proposal.doc) is included in the FCL data stream nd must be converted.
he second example does the same as the first example but pecifies to encode the data using BASE64 encoding.
long with the required {{endcvt}} command, the FCL might look ike this:
{begincvt proposal.doc base64}} nnnnnnnn {{endcvt}}
n this example, nnnnnnnn is the actual binary data—the content of roposal.doc—embedded in the FCL data stream. This data would e unreadable and undoubtedly much longer than the example ere.
ee also “ENDCVT” on page 196
BILLINGSpecifies the billing code o
Syntax {{billing code}}
Example {{billing 1234}}
The example specifies thatis 1234.
See also “BILLING2” on
{{Billing}} translates to theinformation, “Using Cover
For the procedure that use“Setting Up Notification M
BILLING2Specifies a secondary billi
Syntax {{billing2 code}
Example {{billing2 4567}
The example specifies thatis 4567.
See also “BILLING” on p
{{billing2}} translates to theinformation, “Using Cover
For the procedure that use“Setting Up Notification M
BMSets the bottom margin forsize of the margin is specifof the page.
Syntax {{bm margin}}
Example {{bm 0.5}}

RightFax 9.4 Integration Module Guide 192
le draws a 2 by 2 unit box at the coordinates rent units.
X” on page 197 IDTH” on page 201 XY” on page 208 on page 210 OX” on page 211
” on page 217
that uses this command, see Chapter 15, oxes, and Other Shapes”.
ops from the document.
bs}}
bs}}
B” on page 213 n page 214
that uses this command, see Chapter 16, nd Tabs”.
ed message specific to the document.
ent comments}}
ent Inv# 12345}}
iates the comment “Inv# 12345” with the
lates to the RightFax server field to_citystate. n, “Using Cover Sheets in a Broadcast” on
that uses this command, see Chapter 14, ching Cover Sheets”.
The example sets the bottom margin to 1/2 a unit from the bottom of the page.
See also “LM” on page 201 “TM” on page 215 “UNITS” on page 217
For the procedure that uses this command, see Chapter 16, “Setting Margins and Tabs”.
BOXDraws a box in the current line width at the specified coordinates, optionally filling it with text. The coordinates can be formatted (x,y) or (x y). The coordinates can be specified values, or you can specify a position relative to the current cursor position.
If only one coordinate pair is specified, the other coordinate pair is assumed to be the current position. Therefore, {{box (5,5)}} is equivalent to {{box (x,y) (5,5)}}.
If both coordinates are specified, you can specify a line of text to appear in the box. The text must be surrounded by quotation marks and is limited to one line. The text is placed in the box according to the current placexy settings, which default to the upper-left corner of the document.
Syntax {{box coord1 coord2 [“text”]}}
Examples{{box (0,y) (7,7) “Hi There”}} {{box 5 5 7 7}}
The first example draws a box from the left side of the page at the current line to 7 units over, and 7 units down the current page, placing the text “Hi There” within it.
The second examp(5,5) to (7,7) in cur
See also “FILLBO“LINEW“PLACE“RBOX”“RFILLB“UNITS
For the procedure “Creating Lines, B
CLEARTABSRemoves all tab st
Syntax {{clearta
Example {{clearta
See also “SETTA“TAB” o
For the procedure “Setting Margins a
COMMENTStores a user-defin
Syntax {{comm
Example {{comm
The example assocdocument.
{{Comment}} transFor more informatiopage 69.
For the procedure “Creating and Atta

Appendix B FCL Commands 193
COMS
S
E
Tw
{Fp
F“
CONS
S
E
Td
{mp
F“
COVSst
TRc
er). If the complete file name is not tion Module tries to open the file by this fails, the cover sheet is assumed to cover sheet. If no cover command is e default cover sheet defined in the le Configuration program is used.
}}
sales or Sales.cov file in rs should be used as a template for the document.
PANYtores a company name for the document.
yntax {{company name}}
xample {{company ABC Incorporated}}
he example associates the company name “ABC Incorporated” ith the document.
{Company}} translates to the RightFax server field to_company. or more information, “Using Cover Sheets in a Broadcast” on age 69.
or the procedure that uses this command, see Chapter 14, Creating and Attaching Cover Sheets”.
TACTtores the contact name for the document.
yntax {{contact name}}
xample {{contact Kim Boston}}
he example associates the contact name “Kim Boston” with the ocument.
{Contact}} translates to the RightFax server field to_name. For ore information, “Using Cover Sheets in a Broadcast” on age 69.
or the procedure that uses this command, see Chapter 14, Creating and Attaching Cover Sheets”.
ERpecifies a cover sheet template for the current document. You can pecify the file name of a cover sheet template, or you can specify hat a cover sheet should not be included.
he file name can be either a full path or a path relative to ightFax\Production\Covers (this path is for Integration Module over sheets; RightFax server cover sheets are stored in a different
folder on the RightFax servfound, the RightFax Integraadding a .cov extension. If be a RightFax .pcl or .doc specified in a document, thRightFax Integration Modu
Syntax {{cover template
Example {{cover sales}}
The example specifies the RightFax\Production\Covecover sheet of the current

RightFax 9.4 Integration Module Guide 194
dule extracts the text between {{covertext}} and mmands. If PostScript commands appear in the
e stripped out. Therefore, do not embed n {{covertext}} and {{endcovertext}}.
lates to the RightFax server field notetext. For Using Cover Sheets in a Broadcast” on
used to create a block of text within a single instance of a ^covertext keyword in the cover be replaced by the corresponding text enclosed xt}} and {{endcovertext}} commands. If no index d, the text will be linked to the ^covertext 0
covertext}} must use a different index number (0 rresponding to a numbered ^covertext field. 0 is used number.
e only option for RightFax server (.pcl or .doc) cover rmation, “Using Cover Sheets in a Broadcast” on
ext indexnumber}}
ext 0}}
that uses this command, see Chapter 14, ching Cover Sheets”.
cover sheet. This text usually is the general fax erprise. This command is valid only in cover
ing}}
3-555-5481}}
“503-555-5481” on the cover sheet.
Specific cover names
The {{cover}} command can contain the following special cover names:
None. No cover sheet is generated, even if you have defined a default cover sheet in the RightFax Integration Module Configuration program.Rfdefault. The default cover sheet action associated with the user is performed.
Examples If a cover sheet is not defined for the user sending the fax:
{{COVER NONE}} — No cover sheet is sent. {{COVER RFDEFAULT}} — No cover sheet is sent. {{COVER FCS.PCL}} — Specified RightFax server (.pcl) cover sheet is sent. {{COVER PROD.COV}} — Specified Integration Module (.cov) cover sheet is sent.
If a cover sheet is defined for the user sending the fax:
{{COVER NONE}} — No cover sheet is sent. {{COVER RFDEFAULT}} — Default cover sheet is sent. {{COVER FCS.PCL}} — Specified RightFax server (.pcl) cover sheet is sent. {{COVER PROD.COV}} — Specified Integration Module (.cov) cover sheet is sent.
For the procedure that uses this command, see Chapter 14, “Creating and Attaching Cover Sheets”.
COVERTEXTThis command creates text that should appear on the cover sheet. It stores subsequent input (until an {{endcovertext}} command (page 196)) for later inclusion as a text block in the document cover sheet.
The Integration Mo{{endcovertext}} cotext, they will not bPostScript betwee
{{Covertext}} transmore information, “page 69.
An index number iscover sheet. Each sheet template willbetween {{covertenumber is specifiekeyword.
Each instance of {{in the example), cothe most frequently
Note 0 (zero) is thsheets. For more infopage 69.
Syntax {{covert
Example {{covert
For the procedure “Creating and Atta
CSIPlaces text on the number for the entsheets.
Syntax {{csi str
Example {{csi 50
This example prints

Appendix B FCL Commands 195
{i
FC
FC
DATSce
T{dot
S
E
Tt
Tt
S
F“
DELSn
S
E
tes to the scheduled send time of the
ge 190 195 215
s this command, see Chapter 20, nsmission”.
f the fax owner.
nt}}
the department associated with this fax
s this command, see Chapter 21, essages of Document Transmission”.
address. This is usually used for routing ender that the document has been , or has failed to transmit
}}
me.com}}
ail address [email protected] for use in
s this command, see Chapter 21, essages of Document Transmission”.
{Csi}} translates to the RightFax server field from_phone. For more nformation, “Using Cover Sheets in a Broadcast” on page 69.
or the procedure on using this command with cover sheets, see hapter 14, “Creating and Attaching Cover Sheets”.
or the procedure on setting default text for the CSI field, see hapter 9, “Setting Defaults for FCL Documents”.
Eets the month, day, and optionally the year in which to send the urrent document. {{Date}} can be combined with {{time}} to stablish both a day and time to send a document.
he slashes between the month, day, and year are required. If no {date}} command is specified, the Integration Module uses the ate the FCL input file was received from the host. The year can be nly two digits, and it can include the century. If the year is less han 96, the twenty-first century is assumed.
yntax {{date month/day/year}}
xamples{{date 11/2}} {{date 11/20/2004}}
he first example specifies that the current document is to be ransmitted on November 2.
he second example specifies that the document is to be ransmitted on November 20, 2004.
ee also “TIME” on page 215
or the procedure that uses this command, see Chapter 20, Scheduling Document Transmission”.
AYchedules the document to be sent at a later time by the specified umber of minutes.
yntax {{delay minutes}}
xample {{delay 10}}
The example adds 10 minudocument.
See also “BATCH” on pa“DATE” on page“TIME” on page
For the procedure that use“Scheduling Document Tra
DEPTSpecifies the department o
Syntax {{dept departme
Example {{dept sales}}
The example specifies thatis “Sales”.
For the procedure that use“Setting Up Notification M
EMAILStores the sender’s e-maila notification back to the sprocessed, has transmitted
Syntax {{email address
Example {{email user@ac
The example stores the e-mnotifications.
For the procedure that use“Setting Up Notification M

RightFax 9.4 Integration Module Guide 196
n of an embedded foreign document that was egincvt}} command.
t}}
t}}
CVT” on page 191
olygon, drawing a line from the current position f the polygon, using the current line width. in conjunction with {{startpoly}}.
ly}}
ly}}
IDTH” on page 201 POLY” on page 214
that uses this command, see Chapter 15, oxes, and Other Shapes”.
ocument, executes the commands to this point document without clearing the previous image. tes of the original document are preserved, wing, which are cleared: {{altfax}}, {{company}}, r}}, and {{fax}}.
EMPIDSpecifies the employee ID of the fax owner.
Syntax {{empid ID}}
Example {{empid 555-111-2222}}
The example specifies that the employee ID associated with this fax is 555-111-2222.
For the procedure that uses this command, see Chapter 21, “Setting Up Notification Messages of Document Transmission”.
ENDTerminates the current document. This is a required command. This command is required in every FCL document. FCL documents may contain multiple {{begin}} and {{end}} commands, but the FCL between each set of commands will be rendered as a separate page.
Syntax {{end}}
Example {{end}}
See also “BEGIN” on page 190
For the procedure that uses this command, see Chapter 8, “Creating FCL Documents”.
ENDCOVERTEXTEnds the storing of cover sheet text and tells the RightFax Integration Module to again interpret incoming data.
Syntax {{endcovertext}}
Example {{endcovertext}}
For the procedure that uses this command, see Chapter 14, “Creating and Attaching Cover Sheets”.
ENDCVTEnds the conversiobegun with the {{b
Syntax {{endcv
Example {{endcv
See also “BEGIN
ENDPOLYEnds the current pto the first vertex o{{Endpoly}} is used
Syntax {{endpo
Example {{endpo
See also “LINEW“START
For the procedure “Creating Lines, B
EXECUTEEnds the current dand begins a new Most of the attribuexcept for the follo{{contact}}, {{cove

Appendix B FCL Commands 197
Ia{W
S
E
S
FAXAnioasdydI
S
E
Td
S
{i
F“
FCL input file. It begins a new page at rgins, just as if an ASCII form feed he host application.
s this command, see Chapter 16, ”.
t (until an {{end}} command) into the n specify the full path to the file. The tion \Include. {{File}} differs from {{list}} ing, white space, or blank lines.
sequent input until an {{end}} command ightFax\Production \Include\test.inc.
201
s this command, see Chapter 11, of the Document”.
line width at the specified coordinates, (the default is black). The coordinates y). The coordinates can be specified a position relative to the current cursor
f document processing is performed on a RightFax WorkServer, nd if the FCL document contains a print command, then the {execute}} command will force printing to occur from the
orkServer whether or not the Print service is enabled.
yntax {{execute}}
xample {{execute}}
ee also “END” on page 196 “FAX” on page 197
ssigns the fax number where the document will be sent. If this is ot the first fax number specified for this document, the document
s ended, and a new document begins with all the images of the riginal. The last page can be updated and new pages can be dded, but prior pages will remain the same as in the original. By pecifying multiple fax numbers, broadcasts to many different estinations can be made. If you have the InternetLink Module, then ou can also insert an e-mail address into the fax command and ocuments will be e-mailed. For more information, see the RightFax nternetLink Module Guide.
yntax {{fax number}} {{fax e-mail address}}
xample {{fax 555-555-5458}}
he example assigns the fax number 555- 555-5458 to the ocument.
ee also “TYPE” on page 216
{Fax}} translates to the RightFax server field to_faxnum. For more nformation, “Using Cover Sheets in a Broadcast” on page 69.
or the procedure that uses this command, see Chapter 11, Specifying the Destination of the Document”.
FFActs as a form feed in the the current left and top macharacter had come from t
Syntax {{ff}}
Example {{ff}}
For the procedure that use“Setting Margins and Tabs
FILEStores all subsequent inpuspecified file name. You cadefault is RightFax\Producin that it does not strip lead
Syntax {{file name}}
Example {{file test.inc}}
The example writes all subis encountered to the file R
See also “LIST” on page
For the procedure that use“Specifying the Destination
FILLBOXDraws a box in the currentfilling it with black or whitecan be formatted (x,y) or (xvalues, or you can specify position.

RightFax 9.4 Integration Module Guide 198
urrently in use and, optionally, the attributes of ble font attributes are described in the following
utes
escription
he name of the font. This can be one of the fonts stalled with the Integration Module, a TrueType nt, or any font supported by Microsoft Windows.
onts are installed in Rightfax\Production\Fonts. he font name is used for all subsequent text until nother {{font}} command appears in the ocument or until the end of the document.
he size of a Windows font in points. The default is 2. The size can range from 3 to 288.
his attribute is not available for the installed fonts.
he vertical spacing for the lines of text in points. his indicates the number of points to move down om the baseline of the current line to the baseline f the following line. A higher number increases the mount of vertical space used. One inch is 72 oints. Thus, a leading of 12 points is 6 lines per ch (72 divided by 12 equals 6). You can enter ading in decimals.
he horizontal spacing in characters per inch. A igher number decreases the amount of horizontal pace used. A pitch of 10 is 10 characters per orizontal inch. You can enter pitch in decimals.
he weight of a Windows font. Weights are thin, xtralight, light, regular, medium, semibold, bold, xtrabold, and heavy.
his attribute is not available for the installed fonts.
If only one coordinate pair is specified, the other coordinate pair is assumed to be the current position. Therefore, {{fillbox (5,5)}} is equivalent to {{fillbox (x,y) (5,5)}}. If both coordinate pairs are specified, you can specify a fill color. The color can be black or white.
Syntax {{fillbox coord1 coord2 color}}
Examples{{fillbox (0,y) (7,7) white}} {{fillbox 5 5 7 7)
The first example draws a box from the left side of the page at the current line to 7 units over, and 7 units down the current page, filling it in with white. This could be useful for covering up information after an {{execute}} command.
The second example draws a 2 by 2 unit filled black box at the coordinates (5,5) to (7,7) in current units.
See also “BOX” on page 192 “LINEWIDTH” on page 201 “RBOX” on page 210 “RFILLBOX” on page 211 “UNITS” on page 217
For the procedure that uses this command, see Chapter 15, “Creating Lines, Boxes, and Other Shapes”.
FONTChanges the font cthe font. The availatable.
Table B1 Font Attrib
Attribute D
Name Tinfo
FTad
Size T1
T
Leading TTfroapinle
Pitch Thsh
Weight Tee
T

Appendix B FCL Commands 199
FT
S
E
Tw
T1t
TT
F“
FORSspRuwc{
his code to specify that no form should
ord}}
0.2}}
form to
s\order
s\order.tif
n the page in current units.
ifies that there is no form to be overlaid.
e 207 e 217
s this command, see Chapter 12, kground Forms”.
n the input stream. Input from an include t came from the host application. Include me input is needed in many files. You
the file. The defaults is e. If the include file cannot be found, the ain, adding .inc to the file name.
e}}
}
t from the file e\setup. If that file does not exist, then it e file e\setup.inc.
s this command, see Chapter 13, and Commands in Many Documents”.
T
or more information on the installed fonts and support for rueType fonts, see Chapter 17, “Selecting and Configuring Fonts”.
yntax {{font name [size=##] [leading=##] [pitch=##] [weight] [italic] [strikeout]}}
xamples{{font courb12 leading=14 pitch=10}} {{font timbi10}} {{font “times new roman” size=24 extrabold italic}}
he first example sets the current font to Courier Bold 12-point, ith 14 points of leading and 10 characters per inch.
he second example sets the current font to Times Bold Italic 0-point, with default leading. Without specifying leading and pitch,
his font will be proportional and vertical columns will not line up.
he third example uses the Microsoft Windows TrueType font imes New Roman, size 24, extra bold, and italic.
or the procedure that uses this command, see Chapter 17, Selecting and Configuring Fonts”.
Mpecifies a Class F TIF file to be overlaid on the current and ubsequent pages. The specified form name can include the full ath to the file or a path that is relative to ightFax\Production\Forms. The form is normally placed with the pper-left corner at (0,0) on the page. You can specify the location ith x- and y-coordinates. Placement is relative to the upper-left orner of the current orientation, regardless of the current {placexy}} value.
Alternatively, you can use tbe overlaid.
Syntax {{form name co
Examples{{form order 0.5{{form none}}
The first example sets the
RightFax\Production\Form
or
RightFax\Production\Form
and places it at (0.5, 0.2) o
The second example spec
See also “PLACE” on pag“UNITS” on pag
For the procedure that use“Creating and Linking Bac
INCLUDEIncludes an FCL input file ifile is interpreted just as if ifiles are useful when the sacan specify the full path toRightFax\Production\IncludIntegration Module tries ag
Syntax {{include filenam
Example {{include setup}
The example includes inpuRightFax\Production\Includwould include input from thRightFax\Production\Includ
For the procedure that use“Including the Same Files
Italic Italicize a Windows font.
Strikeout Draw a horizontal line through the text.
able B1 Font Attributes (Continued)
Attribute Description

RightFax 9.4 Integration Module Guide 200
le draws a line under the current font baseline.
” on page 200 IDTH” on page 201 on page 211 O” on page 211
” on page 217
that uses this command, see Chapter 15, oxes, and Other Shapes”.
current line width on the current page from the the specified coordinates in current units. The formatted (x,y) or (x y). The coordinates can be
r you can specify a position relative to the ition.
(coord)}}
(3,5)}}
s a line from the current cursor position to (3,5)
” on page 200 IDTH” on page 201 on page 211 O” on page 211
” on page 217
that uses this command, see Chapter 15, oxes, and Other Shapes”.
LIBDOCAttaches the specified RightFax library document.
Syntax {{libdoc ID}}
Example {{libdoc InfoPack1}}
The example attaches the library document called InfoPack1 to the end of the base document.
Library documents are frequently faxed documents (such as company literature, credit applications, and employment forms) that you create with FaxUtil. RightFax stores these in the RightFax\Image folder. For more information on library documents, see the RightFax Administrator’s Guide.
For the procedure that uses this command, see Chapter 19, “Attaching and Embedding Files, Signatures, and Graphics”.
LINEDraws a line in the current line width on the current page at the specified coordinates in the current units. The coordinates can be formatted (x,y) or (x y). The coordinates can be specified values, or you can specify a position relative to the current cursor position. If both pairs of coordinates are not specified, {{line}} draws a horizontal line across the page under the baseline in the current font.
Syntax {{line [coord1] [coord2]}}
Examples{{line (2,3) (4,5)}} {{line}}
The first example draws a line from coordinates (2,3) to (4,5) in current units.
The second examp
See also “LINETO“LINEW“RLINE”“RLINET“UNITS
For the procedure “Creating Lines, B
LINETODraws a line in thecurrent position tocoordinates can bespecified values, ocurrent cursor pos
Syntax {{lineto
Example {{lineto
The example drawin current units.
See also “LINETO“LINEW“RLINE”“RLINET“UNITS
For the procedure “Creating Lines, B

Appendix B FCL Commands 201
LINSAirT
S
E
T(
S
F“
LISTWsdfsi
S
E
TR
S
F“
for rendering text, immediately ion to reflect the new value. The width of urrent units from the left edge of the
argin to 1/2 a unit from the left edge of t location.
91 15 e 217
s this command, see Chapter 16, ”.
information that is not contained in the the host application, such as the ax number, e-mail address, and contact
the specified criteria to look up ined in a lookup file and then associate
information.
table}}
}}
software to find the entry AC123 in a might look like this:
Corp}}{{contact John Doe}} Corp}}{{contact Jane Doe}} Corp}}{{contact Mary Doe}}
EWIDTHets the width to draw lines in points. A point is 1/72nd of an inch. {{linewidth}} command with zero as the number of points
ndicates that no line is to be drawn. Any other line width will be endered at least one pixel wide (approximately 1/200th of an inch). he default line width is one pixel (approximately 1/3 point).
yntax {{linewidth points}}
xample {{linewidth 1}}
he example sets the line width to 1 point, or 1/72nd of an inch about 3 pixels).
ee also “LINE” on page 200
or the procedure that uses this command, see Chapter 15, Creating Lines, Boxes, and Other Shapes”.
rites subsequent input (until an {{end}} command) to the pecified file name. You can specify the full path to the file. The efault is RightFax\Production\Include. This process will replace a
ile of the same name. {{List}} differs from {{file}} only in that it will trip any leading white space or blank lines from the input. {{List}} s useful in creating and replacing broadcast lists.
yntax {{list filename}}
xample {{list bcast.inc}}
he example writes subsequent input (until an {{end}} command) to ightFax\Production\Include\bcast.inc.
ee also “FILE” on page 197
or the procedure that uses this command, see Chapter 11, Specifying the Destination of the Document”.
LMSets the current left marginchanging the current positthe margin is specified in cpage.
Syntax {{lm margin}}
Example {{lm 0.5}}
The example sets the left mthe page, and moves to tha
See also “BM” on page 1“TM” on page 2“UNITS” on pag
For the procedure that use“Setting Margins and Tabs
LOOKUPA lookup table can providedocument that is sent fromrecipient company name, fname.
The lookup FCL code usesinformation in a table contathat information with other
Syntax {{lookup criteria
Example {{lookup AC123
The example instructs the lookup table.A lookup table
AC123{{company ACME OC456{{company OregonDefault{{company Arizona

RightFax 9.4 Integration Module Guide 202
n relative to the current x- or y-coordinate, enter and line. X is not a valid y-coordinate, and y is
inate.
ION” on page 209 ETO” on page 212 ” on page 217
that uses the {{moveto}} command, see Chapter s, Boxes, and Other Shapes”.
}} command in a Unix system {{moveto}} command in a Unix system that
cuments, you must add a value to the Windows support the command. On the RightFax server, registry. Navigate to the subkey CHINE\Software\RightFax\Parse. Add the registry value UnixSpecials. Enter the string ti-string editor.
COVERone}} (page 193). No cover sheet is generated, fined a default cover sheet in the Integration ion program.
er}}
er}}
s the document to be processed with no cover
that uses this command, see Chapter 14, ching Cover Sheets”.
If you use {{lookup AC123}}, the software would insert “ACME Corp” and “John Doe” into the document. If you made an error, such as {{lookup AC234}} (which does not exist in the lookup table), then the software would insert the default information. If you do not specify the path to the lookup table, the default is RightFax\Production\Include.
LP, LPR, or PRINTERSets the default printer for the print FCL commands such as {{type print}} and {{printnow}}.
Syntax {{lp|lpr|printer name}}
Example{{lp local}}
The example sets the printer name to local.
See also “PRINTNOW” on page 209 “TYPE” on page 216
For the procedure that uses this command, see Chapter 11, “Specifying the Destination of the Document”.
MOVETOChanges the current position to the specified coordinates in units. The coordinates can be formatted (x,y) or (x y). The coordinates can be specified values, or you can specify a position relative to the current cursor position.
Syntax {{moveto coord}}text
Examples{{moveto 3,4}}Put this here. {{moveto x,5}}Put this here.
The first example changes the position to (3,4) in current units.
The second example maintains the x position and moves vertically to 5 units down the page.
To specify a positiox or y in the commnot a valid x-coord
See also “POSIT“RMOV“UNITS
For the procedure 15, “Creating Line
Using the {{movetoIf you are using thegenerates FCL doregistry in order toedit the Windows HKEY_LOCAL_MAREG_MULTI_SIZEMoveTo in the mul
NOCOVER or NO_Same as {{cover neven if you have deModule Configurat
Syntax {{nocov
Example {{nocov
The example allowsheet.
For the procedure “Creating and Atta

Appendix B FCL Commands 203
NOTSu
S
E
Tb
NOTSosaFt
ITnnc
S
E
TRu
o
RSs
S
s this command, see Chapter 21, essages of Document Transmission”.
ax Integration Module does in the event ransmission. This command overrides in the Integration Module Configuration default “success” action” on page 135) h you use the {{onerror}} command.
Eame as {{REM}} (page 210). Inserts any information; is commonly sed for troubleshooting. It has no effect on the document.
yntax {{note text}}
xample {{note This came from the PO system}}
he example inserts “This came from the PO system” into the FCL ut not into the finished document.
IFYHOSTpecifies the templates to be used to format the success or failure f the transmission of the document. It also can specify which ID to end the notifications. The template files (in the syntax below, these re Successtemplate.inc for successful documents and ailuretemplate.inc for failed documents) describe the notification hat should be sent to the host application.
f a template name is not specified, then no notification will be sent. he channel specifies the notification channel that will send the otification message. The channel can be specified with an ID umber (from 1 to 128) or the name assigned to the channel. If no hannel is specified, the default channel will be used, number 16.
yntax {{notifyhost successtemplate failuretemplate [channel]}}
xample {{notifyhost mysucc myfail mynotify}}
he example shows that, if the document is sent successfully, the ightFax Integration Module generates a notification message sing the RightFax\Production\Include\Mysucc
r
ightFax\Production\Include\Mysucc.inc notification templates. imilarly, the Myfail template will be used if the fax is not uccessfully sent. Notifications spool to the Mynotify ID.
ee also “ONERROR” on page 203 “ONSUCCESS” on page 205
For the procedure that use“Setting Up Notification M
ONERRORDescribes what the RightFthe document fails during tthe settings you establish program (see “Setting the for each document in whic

RightFax 9.4 Integration Module Guide 204
r nothing}} r delete}} r fax number delete}} r email|mime|certified address delete}}
r fax 503-555-1234 delete}} r email [email protected]}} r certified [email protected]}}
hows that, upon failed transmission, all pages 3-555-1234 and then deleted.
le shows that, upon failed transmission, the -mailed to [email protected] via the InternetLink
shows that, upon failed transmission, the -mailed to [email protected] as a certified ecureDocs Module.
nsmission error occurs in faxing, no special action n. This overrides any defaults you set with the
ation Module Configuration program (see “Setting fault “success” action” on page 135) .
nsmission error occurs in faxing, the document int. Enter a printer ID defined in Enterprise Fax ger.
don’t enter a printer, the software uses the default r specified in the Integration Module uration program (see Chapter 9, “Setting
lts for FCL Documents”)
ptions (Continued)
ription
Options for {{onerror}} are fax, delete, email (or mime), certified, nothing, or print.
Syntax {{onerro{{onerro{{onerro{{onerro
Examples{{onerro{{onerro{{onerro
The first example swill be faxed to 50
The second exampdocument will be eModule.
The third example document will be edocument via the S
Table B2 Onerror Options
Option Description
Certified If a transmission error occurs in faxing, the document will be sent as a certified e-mail document. This option requires that you have licensed the SecureDocs Module.
To configure a notification to alert you that a document failed as a fax and was sent as a certified e-mail, see Chapter 21, “Setting Up Notification Messages of Document Transmission”.
Delete If a transmission error occurs in faxing, the fax image will be deleted. If you use {{onerror delete}}, then successful faxes also will be deleted.
Email or mime
If a transmission error occurs in faxing, the document will be sent via e-mail. This option requires that you have licensed the InternetLink Module.
To configure a notification to alert you that a document failed as a fax and was sent as an e-mail, see Chapter 21, “Setting Up Notification Messages of Document Transmission”.
Fax If a transmission error occurs in faxing, the document will be sent via fax to another fax number. Specify the fax number and whether to delete the fax image after transmission.. The fax number you enter must be contiguous (no spaces or tabs).
If you don’t enter a fax number, the software uses the default number specified in the Integration Module Configuration program (see Chapter 9, “Setting Defaults for FCL Documents”).
Nothing If a trais takeIntegrthe de
Print If a trawill prMana
If you printeConfigDefau
Table B2 Onerror O
Option Desc

Appendix B FCL Commands 205
FISG
S
{fa
F“
ONSDtspe
or more information on the InternetLink Module, see the RightFax nternetLink Module Guide. For more information on the ecureDocs Module, see the RightFax SecureDocs Module uide.
ee also “NOTIFYHOST” on page 203 “ONSUCCESS” on page 205
{Onerror delete}} translates to the RightFax server field axflag_autodeleteall. For more information, “Using Cover Sheets in Broadcast” on page 69.
or the procedure that uses this command, see Chapter 23, Setting Up Actions on Document Transmission”) .
UCCESSescribes what the RightFax Integration Module does in the event
he document transmits successfully. This command overrides the ettings you establish in the Integration Module Configuration rogram( “Setting the default “success” action” on page 135) for ach document in which you use the {{onsuccess}} command.

RightFax 9.4 Integration Module Guide 206
cess nothing}} cess delete}} cess fax number delete}} cess email|mime|certified address delete}}
cess fax 503-555-1234 delete}} cess email [email protected]}} cess certified [email protected]}}
hows that, upon successful transmission, all ment are faxed to 503-555-1234 and then
le shows that, after successful fax transmission, be e-mailed to [email protected] via the e.
hows that, after successful fax transmission, the -mailed to [email protected] as a certified ecureDocs Module.
n on the InternetLink Module, see the RightFax le Guide. For more information on the le, see the RightFax SecureDocs Module
HOST” on page 203 ROR” on page 203
a transmission succeeds in faxing, the document rint. Enter a printer ID defined in Enterprise Fax ger.
don’t enter a printer, the software uses the default r specified in the Integration Module guration program (see Chapter 9, “Setting lts for FCL Documents”)
ptions (Continued)
ription
Options for {{onsuccess}} are fax, delete, email (or mime), certified, nothing, or print.
Syntax {{onsuc{{onsuc{{onsuc{{onsuc
Examples{{onsuc{{onsuc{{onsuc
The first example spages of the docudeleted.
The second exampthe document will InternetLink Modul
The third example sdocument will be edocument via the S
For more informatioInternetLink ModuSecureDocs ModuGuide.
See also “NOTIFY“ONER
Table B3 Onerror Options
Option Description
Certified When a transmission succeeds in faxing, the document will also be sent as a certified e-mail document. This option requires that you have licensed the SecureDocs Module.
To configure a notification to alert you that a document was sent as a certified e-mail, see Chapter 21, “Setting Up Notification Messages of Document Transmission”.
Delete When a transmission succeeds in faxing, the fax image will be deleted.
Email or mime
When a transmission succeeds in faxing, the document will also be sent via e-mail. This option requires that you have licensed the InternetLink Module.
To configure a notification to alert you that a document was sent as an e-mail, see Chapter 21, “Setting Up Notification Messages of Document Transmission”.
Fax When a transmission succeeds in faxing, the document will be sent via fax to another fax number. Specify the fax number and whether to delete the fax image after transmission.. The fax number you enter must be contiguous (no spaces or tabs).
If you don’t enter a fax number, the software uses the default number specified in the Integration Module Configuration program (see Chapter 9, “Setting Defaults for FCL Documents”).
Nothing When a transmission succeeds in faxing, no special action is taken. This overrides any defaults you set with the Integration Module Configuration program (see “Setting the default “success” action” on page 135).
Print Whenwill pMana
If youprinteConfiDefau
Table B3 Onerror O
Option Desc

Appendix B FCL Commands 207
{fB
F“
ORISc{
S
E
Tt
F“
OWS
S
E
T
{mp
F“
ss F TIF image on the page. The file can path or relative to s. You can specify the placement of the inates. If no coordinates are specified,
e current cursor location.
laced in the upper-left corner. The d with the {{placexy}} command. y the current page orientation and
coord}}
e.tif 5 4}}
aphic image Yoyodyne.tif on the page at
page 208 page 207
s this command, see Chapter 19, Files, Signatures, and Graphics”.
ic image on the current and all ut not on file attachments). The file can path name or a path relative to
{Onsuccess delete}} translates to the RightFax server field axflag_autodelete. For more information, “Using Cover Sheets in a roadcast” on page 69.
or the procedure that uses this command, see Chapter 23, Setting Up Actions on Document Transmission”.
ENTets the page orientation for subsequent text and moves the urrent position to (0,0) on the page. Text specified prior to the {orient}} command will be rendered in the prior page orientation.
yntax {{orient {portrait|landscape}}}
xample {{orient portrait}}
he example sets the page orientation to portrait for subsequent ext and graphic blocks.
or the procedure that uses this command, see Chapter 18, Setting Page Orientation and Image Quality”.
NERpecifies the document owner’s name.
yntax {{owner name}}
xample {{owner Jane Doe}}
he example specifies the owner of this document as “Jane Doe”.
{Owner}} translates to the RightFax server field from_name. For ore information, “Using Cover Sheets in a Broadcast” on age 69.
or the procedure that uses this command, see Chapter 14, Creating and Attaching Cover Sheets”.
PLACEPositions the specified Clabe specified using the full RightFax\Production\Formimage using x- and y-coordthe graphic is placed at th
By default, the graphic is pplacement can be specifie{{Place}} is also affected bmeasurement units.
Syntax {{place graphic
Example {{place yoyodyn
The example places the gr(5,4) in specified units.
See also “PLACEXY” on “PLACEALL” on
For the procedure that use“Attaching and Embedding
PLACEALLPlaces the specified graphsubsequent FCL pages (bbe specified using the full

RightFax 9.4 Integration Module Guide 208
phic block is placed in the upper-left corner. The specified with the {{placexy}} command. affected by the current page orientations and .
ast graphic x y}}
st yoyodyne.tif 5 4}}
” on page 207 XY” on page 208
s the file Yoyodyne.tif in the last page at the ts, such as inches or centimeters, that you set in dule Configuration program—see Chapter 9, or FCL Documents”).
that uses this command, see Chapter 19, bedding Files, Signatures, and Graphics”.
hic images and box text should be placed on al placement can be left, center, or right. Vertical top, center, or bottom. When placing graphic } denotes the placement of the graphic relative tion of the cursor. When adding text in a box, es the location of the text in the box. If no nd is specified, left and top are used.
y horizontal vertical}}
y center center}}
cts the RightFax Integration Module to interpret sequent {{place}} commands as the horizontal of the graphic block and to horizontally and t in subsequent {{box}} or {{rbox}} commands.
” on page 207
that uses this command, see Chapter 19, bedding Files, Signatures, and Graphics”.
RightFax\Production\Forms. Optionally, x- and y-coordinates can be specified in current units. If no coordinates are specified, the graphic is placed at the current x and y location.
You can use multiple {{placeall}} commands.
By default, the graphic block is placed in the upper-left corner. The position can be specified with the {{placexy}} command. {{Placeall}} is also affected by the current page orientations and measurement units.
Syntax {{placeall graphic x y}}
Example {{placeall yoyodyne.tif 5 4}}
See also “PLACE” on page 207 “PLACEXY” on page 208
The example places the file Yoyodyne.tif in the current and all subsequent pages at the location 5 4 (in units, such as inches or centimeters, that you set in the Integration Module Configuration program—see Chapter 9, “Setting Defaults for FCL Documents”).
For the procedure that uses this command, see Chapter 19, “Attaching and Embedding Files, Signatures, and Graphics”.
PLACELASTPlaces the specified graphic image on the last page. The file can be specified using the full path name or a path relative to RightFax\Production\Forms. Optionally, x- and y-coordinates can be specified in current units. If no coordinates are specified, the graphic is placed at the current x and y location.
You can issue multiple {{placelast}} commands.
By default, the graplacement can be {{Placeall}} is also measurement units
Syntax {{placel
Example {{placela
See also “PLACE“PLACE
The example placelocation 5 4 (in unithe Integration Mo“Setting Defaults f
For the procedure “Attaching and Em
PLACEXYSpecifies how grapthe page. Horizontplacement can be images, {{placexy}to the current posi{{placexy}} describ{{placexy}} comma
Syntax {{placex
Example {{placex
The example instrucoordinates in suband vertical centervertically center tex
See also “PLACE
For the procedure “Attaching and Em

Appendix B FCL Commands 209
POSCc(
S
E
Trc
S
F“
PREH
S
E
F“
PRIS
PRIPts
S
E
rints two copies of the document.
216 INTER” on page 202
ich the document is to be processed ty documents will be processed and cuments of the same scheduled time. If specified, low priority is assumed.
presenting low, medium, or high. Normal ou do not insert a priority command, the
|medium|normal|1|high|2}}}
igh priority, because “2” is equivalent to
195 215
RightFax server field ucPriority. For ng Cover Sheets in a Broadcast” on
s this command, see Chapter 20, nsmission”.
ITIONhanges the current location on the page according to the urrently selected font. The coordinates can be formatted (x,y) or x y).
yntax {{position coord}}
xample {{position 5, 20}}
he example moves the position to the fifth column of the twentieth ow of the page (using the specified font as the guide to the haracter size).
ee also “MOVETO” on page 202 “RMOVETO” on page 212
or the procedure that uses this command, see Chapter 15, Creating Lines, Boxes, and Other Shapes”.
VIEWolds the document for preview in the FaxUtil mailbox.
yntax {{preview}}
xample {{preview}}
or the procedure that uses this command, see Chapter 20, Scheduling Document Transmission”.
NTERee “LP, LPR, or PRINTER” on page 202
NTNOWrints a copy of the current document immediately. You can specify
he number of copies to print. If the number of copies is not pecified, the default is one copy.
yntax {{printnow print copies}}
xample {{printnow print 2}}
The example immediately p
See also “TYPE” on page“LP, LPR, or PR
PRIORITYSpecifies the priority at whand scheduled. High priorisent before low priority dono {{priority}} command is
Priority can be 0, 1, or 2, reis the same as medium. If ydefault is low (0) priority.
Syntax {{priority {low|0
Example {{priority high}} {{priority 2}}
Both examples specify a h“high.”
See also “DATE” on page“TIME” on page
{{Priority}} translates to themore information, see “Usipage 69.
For the procedure that use“Scheduling Document Tra

RightFax 9.4 Integration Module Guide 210
tation marks and is limited to one line. The text is ccording to the current {{placexy}} settings, e upper-left corner.
oord1 coord2 “text”}}
,3) (2,4) “Hi There”}} -1 1 1}}
raws a box 3 units down from the current across and 4 units down, placing the text “Hi
le draws a 2-by-2-unit box one unit back and e current position, centering it on the current
n page 192
that uses this command, see Chapter 15, oxes, and Other Shapes”.
Inserts any information; is commonly used for has no effect on the document.
xt}}
is came from the PO system}}
s “This came from the PO system” into the FCL, shed document.
Y_TOnt for a notification. You can request that an back to the host as a notification when you use Interface. REPLYTO is the field in the submit Interface populates to determine where to send
QUALITYSpecifies the fax resolution at which the document will send. Standard resolution is 204 x 98 dots-per-inch (dpi). Fine resolution is 204 x 196 dpi. {{Quality}} only affects the vertical resolution. {{Quality}} should be set on the first page of a document and maintained throughout the document. Otherwise, pages will stretch or compress when sent. If no {{quality}} command is specified, the default transmission quality in Integration Module Configuration program is used.
Syntax {{quality {standard|fine}}}
Example {{quality fine}}
The example sets the fax quality for the document to fine (204 x 196 dpi).
{{Quality}} translates to the RightFax server field finemode. For more information, see “Using Cover Sheets in a Broadcast” on page 69.
For the procedure that uses this command, see Chapter 18, “Setting Page Orientation and Image Quality”.
RBOXDraws a box in the current line width at the specified coordinates, optionally filling it with the specified text. The coordinates can be formatted (x,y) or (x y). The coordinates can be specified values, or you can specify a position relative to the current cursor position. If only one coordinate pair is specified, the other coordinate pair is assumed to be the current position. Therefore, {{rbox (5,5)}} is equivalent to {{rbox (0,0) (5,5)}}. If both coordinate pairs are specified, you can embed a line of text. The text must be
surrounded by quoplaced in the box awhich default to th
Syntax {{rbox c
Examples{{rbox (0{{rbox -1
The first example dposition to 2 units There” within it.
The second exampone unit up from thposition.
See also “BOX” o
For the procedure “Creating Lines, B
REMSame as “NOTE”. troubleshooting. It
Syntax {{rem te
Example {{rem Th
The example insertbut not into the fini
REPLYTO or REPLSpecifies a recipieHTTP post be sentthe RightFax XML post that the XML the notification.

Appendix B FCL Commands 211
F2
S
E
Tw
F“
RFIDccscoTbc
S
E
Tow{
Tcu
S
s this command, see Chapter 15, d Other Shapes”.
line width on the current page at the tes in current units. The coordinates can he coordinates can be specified values, n relative to the current cursor position. ot specified, {{rline}} draws a horizontal
nder the baseline of the current font.
) (coord2)]}}
)}}
line from coordinates (2,3) to (4,5) ion in the current units.
s a line under the current font baseline.
200 e 217
s this command, see Chapter 15, d Other Shapes”.
line width on the current page from the cified relative coordinates in current be formatted (x,y) or (x y). The position is or position in the current units.
)}}
or more information on the RightFax XML Interface, see Chapter 5, “Programming for the RightFax API for Java”.
yntax {{replyto recipient}}
xample {{replyto www.captaris.com}}
he example specifies that the XML notification should return to ww.captaris.com.
or the procedure that uses this command, see Chapter 21, Setting Up Notification Messages of Document Transmission”.
LLBOXraws a box in the current line width at the specified relative oordinates, filling it black or white (black if none is specified). The oordinates can be formatted (x,y) or (x y). The coordinates can be pecified values, or you can specify a position relative to the urrent cursor position. If only one coordinate pair is specified, the ther coordinate pair is assumed to be the current position. herefore, {{rfillbox (5,5)}} is equivalent to {{rfillbox (0,0) (5,5)}}. If oth coordinate pairs are specified, you can specify a fill color. The olor can be black or white.
yntax {{rfillbox coord1 coord2 color}}
xample {{rfillbox (3,3) white}} {{rfillbox -1 -1 1 1}}
he first example draws a box from the current position to 3 units ver and 3 units down from the current position, filling it in with hite. This could be useful for covering up information after an
{execute}} command.
he second example draws a 2-by-2-unit filled black box at oordinates (-1,-1) to (1,1) relative to the current position in current nits.
ee also “BOX” on page 192 “FILLBOX” on page 197
For the procedure that use“Creating Lines, Boxes, an
RLINEDraws a line in the currentspecified relative coordinabe formatted (x,y) or (x y). Tor you can specify a positioIf either coordinate pair is nline across the page just u
Syntax {{rline [(coord1
Examples{{rline (2,3) (4,5{{rline}}
The first example draws a relative to the current posit
The second example draw
See also “LINE” on page“UNITS” on pag
For the procedure that use“Creating Lines, Boxes, an
RLINETODraws a line in the currentcurrent position to the speunits. The coordinates can relative to the current curs
Syntax {{rlineto (coord
Example {{rlineto (3,5)}}

RightFax 9.4 Integration Module Guide 212
ly}} does not create a polygon; it establishes the out the two {{lineto}} commands that create the
n (see example), {{rstartpoly}} creates nothing. the polygon by connecting the lines created by ands. If you do not specify coordinates, the e position in the document where the command
oly coord}}
oly 0,1}}{{lineto 7,y}}{{lineto 7,10}}{{endpoly}}
{{rstartpoly}} to begin a polygon at a point 0,1 current cursor location. (You establish units, entimeters, in the Integration Module ram—see Chapter 9, “Setting Defaults for FCL
LY” on page 196 ” on page 200 O” on page 211
POLY” on page 214 ” on page 217
that uses this command, see Chapter 15, oxes, and Other Shapes”.
cover sheet. This usually is the name of the This command is valid only in cover sheets.
g}}
Company}}
“ABC Company” on the cover sheet.
on using this command with cover sheets, see ting and Attaching Cover Sheets”.
on setting a default RTI, see Chapter 9, “Setting ocuments”.
The example draws a line from the current cursor position to (3,5) in current units.
See also “LINE” on page 200 “LINETO” on page 200 “LINEWIDTH” on page 201 “RLINE” on page 211 “UNITS” on page 217
For the procedure that uses this command, see Chapter 15, “Creating Lines, Boxes, and Other Shapes”.
RMOVETOChanges the current cursor position to the specified relative coordinates in the specified units. The coordinates can be formatted (x,y) or (x y).
Syntax {{rmoveto coord}}
Example {{rmoveto 3,4}}
The example changes the position to (3,4) from the current position in the specified units.
See also “MOVETO” on page 202 “POSITION” on page 209 “UNITS” on page 217
For the procedure that uses this command, see Chapter 15, “Creating Lines, Boxes, and Other Shapes”.
RSTARTPOLYMoves the current cursor position to the relative coordinate specified and starts a polygon. The coordinates can be formatted (x,y) or (x y). This command is different from {{startpoly}} on page 214. The command {{startpoly 4,5}} would begin a polygon at a point 4,5 units from the upper-left corner of the fax. The command {{rstartpoly 4,5}} would begin a polygon at a point 4,5 units from the current cursor location.
By itself, {{rstartpostarting point. Withlines of the polygo{{Endpoly}} closesthe {{lineto}} commpolygon starts at thappears.
Syntax {{rstartp
Example {{rstartp
The example uses units, relative to thesuch as inches or cConfiguration progDocuments”).
See also “ENDPO“LINETO“RLINET“START“UNITS
For the procedure “Creating Lines, B
RTIPlaces text on the sending company.
Syntax {{rti strin
Example {{rti ABC
This example prints
For the procedure Chapter 14, “Crea
For the procedure Defaults for FCL D

Appendix B FCL Commands 213
SETCi
S
E
Ti
T2
S
F“
SIGPhc
At
S
E
S
s this command, see Chapter 19, Files, Signatures, and Graphics”.
aphic file of a signature that should he signature must be created and saved
ame}}
Jones.tif}}
, or @” on page 213
s this command, see Chapter 19, Files, Signatures, and Graphics”.
er of the SMS-capable device that will the fax transmittion
}
1212}}
n page 216 and “SMSMSG” on
s this command, see Chapter 21, essages of Document Transmission”.
S notification to send
}
as sent successfully}}
n page 216 and “SMS” (SMS) on
TABreates a tab stop specified by identifiers in the command. The
dentifiers are:
Any whole number starting with zero to identify a tab group. You can specify up to 20 tabs in a document, numbered 0 through 19.Any measurement to define the size (in inches) of the tab.Alignment of the tab (C for center, L for left, R for right, D for aligning decimals in a group of numbers).
yntax {{settab tab coord {l|r|c|d}}}
xamples{{settab 0 1.5 L}} {{settab 1 2.5 C}}
he first example creates a global tab stop labeled group 0 at 1.5 nches, aligned left.
he second example creates a global tab stop labeled group 1 at .5 inches, aligned center.
ee also “CLEARTABS” on page 192 “TAB” on page 214
or the procedure that uses this command, see Chapter 16, Setting Margins and Tabs”.
N, SIGNED, or @laces the file specified by the {{signature}} command after you ave predefined a file name for {{signature}}. These three ommands insert a signature in the document.
fter you have predefined {{signature}}, you can insert one of these hree commands to insert the signature in the document.
yntax {{{sign|signed|@}}}
xample {{sign}}
ee also “SIGNATURE” on page 213
For the procedure that use“Attaching and Embedding
SIGNATURESpecifies the name of a grappear in the document. Tas a graphic file.
Syntax {{signature filen
Example {{signature Fred
See also “SIGN, SIGNED
For the procedure that use“Attaching and Embedding
SMSSpecifies the phone numbreceive notifications about
Syntax {{sms pagerID}
Example {{sms 520-555-
See also “TYPE” (SMS) opage 213
For the procedure that use“Setting Up Notification M
SMSMSGSpecifies the text of the SM
Syntax {{smsmsg text}
Example {{smsmsg Fax w
See also “TYPE” (SMS) opage 213

RightFax 9.4 Integration Module Guide 214
that uses this command, see Chapter 15, oxes, and Other Shapes”.
b stop based on the information you create with mand.
stop text|number}}
048.01}} 6.8575}} ello world}}
les are of tab stops for a tab labeled group 3 b group with the {{settab}} command). For you defined group 3 tabs as {{settab 3 4.5 D}}, 048.01 and 16.8575 would appear with their
ned vertically at 4.5 inches from the left margin.
is of a tab stop for a tab labeled group 1. If you bs as {{settab 1 1.5 L}}, then the words “Hello ar aligned left at 1.5 inches from the left margin.
TABS” on page 192 B” on page 213
that uses this command, see Chapter 16, nd Tabs”.
inal identification from which the document
ID}}
A3}}
fies that the current document came from
that uses this command, see Chapter 21, ation Messages of Document Transmission”.
For the procedure that uses this command, see Chapter 21, “Setting Up Notification Messages of Document Transmission”.
STARTPOLYMoves the current position to the coordinates specified and starts a polygon. The coordinates can be formatted (x,y) or (x y). The coordinates can be specified values, or you can specify a position relative to the current cursor position.
{{Startpoly}} is different from {{rstartpoly}} (page 212).
{{Startpoly}} starts a polygon at coordinates that are relative to the upper-left corner of the document. (You establish units, such as inches or centimeters, in the Integration Module Configuration program—see Chapter 9, “Setting Defaults for FCL Documents”). {{Rstartpoly}} starts a polygon at coordinates that are relative to the location that the command appears in the document.
By itself, {{startpoly}} does not create a polygon; it establishes the starting point. Without the two {{lineto}} commands that create the lines of the polygon (see example), {{startpoly}} creates nothing. {{Endpoly}} closes the polygon by connecting the lines created by the {{lineto}} commands. If you do not specify coordinates, the polygon starts at the position in the document where the command appears.
Subsequent calls to {{lineto}} or {{rlineto}} specify the vertices of the polygon, and {{endpoly}} is used to close the polygon. If no coordinates are specified, the current position is used for the start of the polygon.
Syntax {{startpoly coord}}
Example {{startpoly (3,4)}}{{lineto 7,y}}{{lineto 7,10}}{{endpoly}}
The example starts a polygon at (3,4) in current units.
See also “ENDPOLY” on page 196 “RSTARTPOLY” on page 212 “UNITS” on page 217
For the procedure “Creating Lines, B
TABCreates a single tathe {{settab}} com
Syntax {{tab tab
Examples{{tab 3 1{{tab 3 1{{tab 1 H
The first two examp(you defined this tathese examples, if then the numbers 1decimal points alig
The third example defined group 1 taworld” would appe
See also “CLEAR“SETTA
For the procedure “Setting Margins a
TERMIDSpecifies the termoriginated.
Syntax {{termid
Example {{termid
The example speciterminal A3.
For the procedure “Setting Up Notific

Appendix B FCL Commands 215
TIMSywc
T{r
Iit
S
E
T1
S
.“
TMSsaw
S
E
Ti
S
s this command, see Chapter 16, ”.
e transaction that produced the
}
action ID for this document to “BR549”.
s this command, see Chapter 21, essages of Document Transmission”.
Eets the time today when the document should be transmitted. If ou enter a time that is earlier than the current time, the document ill be sent immediately. You can combine the {{time}} with {{date}} ommands to schedule the document.
he colon is required if hours and minutes are specified. If no {time}} command is specified, the time at which the document was eceived by the RightFax Integration Module is used.
f you enter a time that is in the past, the document is transmitted mmediately. Documents are also transmitted immediately with the ime 0.
yntax {{time hour:minute}}
xample {{time 22:45}}
he example sets the time to transmit the current document to 0:45 P.M. today
ee also “DATE” on page 195
For the procedure that uses this command, see Chapter 20, Scheduling Document Transmission”.
ets the top margin for the current and subsequent pages in the pecified units. Text will not render above this margin on the page fter this command. By default, there is no top margin (in other ords, the top margin is zero).
yntax {{tm margin}}
xample {{tm 0.25}}
he example sets the top margin for the current document to 1/4 nch (or current unit).
ee also “BM” on page 191 “LM” on page 201
For the procedure that use“Setting Margins and Tabs
TRANIDSets the identification of thdocument.
Syntax {{tranid ID}}
Example {{tranid BR549}
The example sets the trans
For the procedure that use“Setting Up Notification M

RightFax 9.4 Integration Module Guide 216
pe copies filename}}
x}} le c:\Program htFax\Production\Forms\Example.tif}}
rint 2}}
stablishes that the document will be sent as a le or be sent to a printer. This is the Integration documents are assumed to be faxes. You would ly if you had made file or print the default, but rticular document or group of documents. For you can change the default type from fax to ee Chapter 9, “Setting Defaults for FCL
le creates a document called Example.tif in the
ments are sent as certified e-mails. To send ents certified delivery, you must license and
l the RightFax SecureDocs Module. For more ation, see the RightFax SecureDocs Module
ifies that notifications about the fax transmission e sent to an SMS-capable device. Use the syntax sms serviceID}} where serviceID is the
/Pager service ID for an SMS service defined in prise Fax Manager. For more information on ng Pager/SMS services in Enterprise Fax ger, refer to the RightFax Administrator’s Guide. ore information on sending SMS notifications, see ter 21, “Setting Up Notification Messages of ment Transmission”.
ns (Continued)
ription
TYPESpecifies the type of document. The available document types are listed here.
Syntax {{type ty
Examples{{type fa{{type fiFiles\Rig{{type p
The first example efax, rather than a fiModule default—alluse {{type fax}} onwanted to fax a painformation on howeither file or print, sDocuments”.
The second exampForms folder.
Table B4 Type Options
Option Description
Fax Documents are rendered as TIF images and transmitted via fax.
Print Documents are rendered as TIF images, scaled to full-size, and then printed. You can specify the number of copies to print. If the number of copies is not specified, one copy prints. The printed document will include production cover sheets (.cov files). Enterprise cover sheets (.pcl and .doc files) are not printed.
File Documents are rendered as TIF images and placed in the folder that you specify. This command cannot be used when submitting Embedded or False First Page (FFP) documents to the Integration Module.
Email Documents are rendered as text and included in the body of an e-mail message. To send documents as e-mail, you must license the InternetLink Module. For more information, see the RightFax InternetLink Module Guide.
Mime Documents are rendered as TIF images and included as an attachment to an e-mail message. To send documents as e-mail, you must license the RightFax InternetLink Module. For more information, see the RightFax InternetLink Module Guide.
Certified DocudocuminstalinformGuide
SMS Specwill b{{typeSMSEntercreatiManaFor mChapDocu
Table B4 Type Optio
Option Desc

Appendix B FCL Commands 217
TuCM{p
FpD
S
F“
UNDSd
S
E
T
S
F“
UNIPoiYct
ue_id}} command in cover sheet mplates. If you do not use this command ult is prod docnum, where docnum is a
}
:01ea}} :01eb}}
the RightFax server field unique_id.
s this command, see Chapter 21, essages of Document Transmission”.
ent to use for subsequent commands in s of measure can be:
) —points) —pixels
et the default unit of measurement for all essor settings in the Integration Module
e Chapter 9, “Setting Defaults for FCL command overrides this global default h the command is used.
}}
of measurement for subsequent nt to be centimeters.
s this command, see Chapter 9, “Setting ts”.
he third example prints two copies of the document. The printer sed is the default established in the Integration Module onfiguration program (it must also be defined in Enterprise Fax anager). To change the printer with FCL, you can include {{lp}},
{lpr}}, or {{printer}} (page 202). Or, you can change the default rinter in Enterprise Fax Manager.
or information on using the Integration Module Configuration rogram to establish a default printer, see Chapter 9, “Setting efaults for FCL Documents”.
ee also “PRINTNOW” on page 209 “LP, LPR, or PRINTER” on page 202
or the procedure that uses this command, see Chapter 11 Specifying the Destination of the Document”.
ERLINEets underlining on or off for subsequent text in the current ocument.
yntax {{underline {on|off}}}
xample {{underline on}}
he example turns on underlining.
ee also “FONT” on page 198
or the procedure that uses this command, see Chapter 17, Selecting and Configuring Fonts”.
QUEID or UNIQUE_IDrovides a tracking mechanism in FaxUtil by setting the ID field for ne destination (one fax number) within the document. (For
nformation on FaxUtil, see the RightFax Administrator’s Guide.) ou can use up to 15 alphanumeric characters in the {{unique_id}} ommand. If you use more than 15 characters, the command is runcated at the 15th character.
You can also use the {{uniqcreation and notification tein a document, the ID defaunique integer.
Syntax {{unique_id ID}
Examples{{unique_id test{{unique_id test
{{Unique_id}} translates to
For the procedure that use“Setting Up Notification M
UNITSSets the units of measuremthe current document. Unit
Inches — inCentimeters — cmPoints (72nds of an inchPixels (200ths of an inch
The default is inches. You sdocuments in the FCL procConfiguration program (seDocuments”). The {{units}}for each document in whic
Syntax {{units measure
Example {{units cm}}
The example sets the unitscommands in this docume
For the procedure that useDefaults for FCL Documen

RightFax 9.4 Integration Module Guide 218
fy a TZD, then Universal Coordinated Time is
YYY{-|/}MM{-|/}DD{T| }hh:mm:ss TZD}}
000-01-24T22:25:00Z}} 000-01-24T23:25Z+01:00}} 000-01-24T14:25-08:00}}
resented as two digits, with leading zeros as exception of the four-digit year and the TZD.
that uses this command, see Chapter 20, ment Transmission”.
ber to be associated with the current document. ecifying a voice number on a cover sheet or
number}}
03-555-4329}}
ns
nition Example
1970-2038
th 01-12 (January = 01)
01-31
00-23
te 00-59
nd 00-59
zone designator (Z or mm or -hh:mm)
USER1, USER2, or USER3These commands can hold user-defined information.
These commands can be used only in notifications and Integration Module (.cov) cover sheets.
Syntax {{user1 user information}} {{user2 user information}} {{user3 user information}}
Example {{user1 Some important information}}
For the procedure that uses this command, see Chapter 21, “Setting Up Notification Messages of Document Transmission”.
USERIDIdentifies the creator of this document.
Syntax {{userid ID}}
Example {{userid John Doe}}
The example sets the user ID for this document to “John Doe”.
For the procedure that uses this command, see Chapter 21, “Setting Up Notification Messages of Document Transmission”.
UTCTo avoid confusion caused by different time zones, the UTC command sets the date and time when a document should be sent in Universal Coordinated Time.
Alternatively, you can use a Time Zone Designator (TZD). A TZD of +hh:mm or -hh:mm indicates that the date/time uses a local time zone that is a particular number of hours and minutes (specified by hh and mm) ahead of or behind Universal Coordinated Time.
If you do not speciassumed.
Syntax {{UTC Y
Examples{{UTC 2{{UTC 2{{UTC 2
Times must be repnecessary, with the
For the procedure “Scheduling Docu
VOICESets the voice numThis is useful for spnotification.
Syntax {{voice
Example {{voice 5
Table B5 Time Optio
Option Defi
YYYY Year
MM Mon
DD Day
hh Hour
mm Minu
ss Seco
TZD Time+hh:

Appendix B FCL Commands 219
Tt
{mp
F“
WINSi{(
Cgcwsds
Bcta
S
E
Ft
he example sets the voice number associated with this document o (503) 555-4329.
{Voice}} translates to the RightFax server field to_contactnum. For ore information, see “Using Cover Sheets in a Broadcast” on age 69.
or the procedure that uses this command, see Chapter 21, Setting Up Notification Messages of Document Transmission”.
SECIDpecifies the RightFax user; or, if you have not created the user yet
n Enterprise Fax Manager, {{winsecid}} creates it. Because {winsecid}} can create a user, it is different from “USERID” page 218), which is informational.
aptaris recommends that you have a {{winsecid}} command in the lobal.beg file. If you do not (and you do not have a {{winsecid}} ommand in the FCL from the host), then the default user account ill be used to send documents from the Integration Module. The ettings for a default user are typically not optimized for sending ocuments from the Integration Module (notifications, cover sheet ettings, etc.).
y changing the {{winsecid}} command in the global.beg file, you an specify or change the default RightFax user account used by he Integration Module. (Open the global.beg file using Notepad or nother text editor and change the user name in {{winsecid}}.)
yntax {{winsecid user}}
xample {{winsecid John Doe}}
or more information about global.beg, see Chapter 13, “Including he Same Files and Commands in Many Documents”.

RightFax 9.4 Integration Module Guide 220

221
Symbols.mtd documents 57
Numerics3270 emulation
connection guidelines 19notification message channel 124
5250 connection guidelines 19
Aabort FCL code 189action XML Interface function 143activate InternetLink Module 177addcopies FCL code 189addressing documents 65alternative fax number 65altfax FCL code 189approval FCL code 189ASCII text files 12ATTACH command 179, 181attach FCL code 190attachments
cover sheets 82example document 106examples 179FCL codes for 105
inline via HTTP/S for XML Interface 144maximum number of pages 47multipart MIME via HTTP/S for XML
BEGIN EMAIL command 182begin FCL code 190BEGIN MIME command 182
INNATIVE command 179, 182g FCL code 191
binary data with XML Interface 147bm FCL code 191box FCL code 192
ith fill color, example in FCL cument 89example in FCL document 88, 90dcastingover sheets in 69reating a list of recipients 67xample 68ith FCL codes 66
ir.exereating a directory scan 28esting directory scanning 35esting TCP/IP port connections 36r.exe 13
ure.exereating a serial capture 29esting serial port connections 36
capturing data via a named pipe 27capturing data via a TCP/IP port for an IBM
WebSphere MQ connection 32ommand 184
Index
begincvt FCL code 191 CC c
Interface 144with IBM WebSphere MQ for the XML
Interface 146
Bbackground forms
creating 71example 71linking to a document 72overview 71
base 64 184BASE64
encoding a binary data file for the XML Interface 147
for XML attachments with IBM WebSphere MQ 146
for XML file attachments 146batch FCL code 190
box wdo
box, broa
ccew
Bufdctt
Buffe
CCapt
ct
file conversion 105in native file format 179, 181
BEGbillin

RightFax 9.4 Integration Module Guide 222
ccccc
c3270 emulation 195250 emulation 19FTP 19
ccccc
logic 83with XML Interface 147
CSID for cover sheet 46fonts 98image quality 46
XML_FAX_NOTIFICATION.dtd 156XML_FAX_QUERY_REPLY.dtd 154XML_FAX_SUBMIT_REPLY.dtd 153
Eemail FCL code 195email messages
document content for 178send notification when a fax fails 181
email server name 177email, sending with FCL code 65empid FCL code 196encoding
example using BASE64 to encode a binary data file for the XML Interface 147
for XML file attachments 146for XML file attachments with IBM
WebSphere MQ 146end FCL code 196endcovertext FCL code 196endcvt FCL code 196ENDNATIVE command 184endpoly FCL code 196Event Log 46examples
background form 71box in FCL document 88, 90box with fill color in FCL document 89broadcasting 68cover sheet with document 78, 84document with attachment 106document with signature 107faxing from Java API 168FCL documents 41
LPR 19TCP/IP 19
ontact FCL code 193ontext-sensitive help 8onvert XML to FCL 141over FCL code 193over sheets
attaching with FCL code 82broadcasting with 78creating 78default 45, 78default company name 46default CSID 46example 78example FCL document 84FCL codes for 81-82for broadcasting 69keywords 79-81
margins 94page length 57page orientation 101printer 45tabs 96units of measure for FCL 47
delay FCL code 195dept FCL code 195directory scanning 28document data flow overview 12document types, choosing 178documents
creating with FCL 40specifying destination 65
documents, FCL requirements for 178DTDs
XML_FAX_ACTION_REPLY.dtd 156
ertified email, sending with FCL code 65leartabs FCL code 192omment FCL code 192ompany name, default for cover sheet 46onnection channels
creating 25-26directory scanning 28named pipe 27serial port 29TCP/IP port 31TCP/IP port for IBM WebSphere MQ 32testing directory scanning 35testing printer 35testing serial port 36testing TCP/IP port 36
onnection guidelines
covertext FCL code 194create InternetLink documents 178csi FCL code 194CSID, default for cover sheet 46current units, setting default for FCL 47customer support 9
Ddatabase notification channel 122database notifications 122date FCL code 195dbnotify.exe 123debug mode, Java API 174default
company name for cover sheet 46cover sheet 45, 78

Index 223
fontsHTTPline inotifinotifinotifipagesettintabs XML
executabexecute F
Ffailed fax 181fax
docuexammaximmaximminimreduc
fax FCL cfax imagefax imagefax numb
alternprinti
FCL codeabortaddcaddinaddinaltfaxapproval 189attach 190attaching files with 105back
creating documents with 39creating notifications with 128creating shapes with 87-88
fonts for documents 98for cover sheets 81-82for scheduling transmission 109-110
n notification messages 129-130nclude 199ncluding external files with 75ibdoc 200ine 200ineto 200inewidth 201ist 201ist of 189m 201ookup 201p 202pr 202moveto 202no cover 202note 203otifyhost 203nerror 203-205nsuccess 205-207rient 207wner 207age orientation 101lace 207laceall 207lacelast 208lacexy 208osition 209review 209rinter 202rinting documents with 70rintnow 209riority 209uality 210box 210
rem 210replyto 210rfillbox 211line 211lineto 211
ground form for a document 72form 199form feed 94
rr
ments with FCL 65ple in Java API 168um number of pages to attach 47um page length 47um page length 47e image size 47ode 197 resolution 102, indented in document 47erative 65ng document if missing 57
189opies 189g graphics with 108g signatures with 106 189
csi 194date 195delay 195dept 195email 195empid 196end 196endcovertext 196endcvt 196endpoly 196example documents 41execute 196fax 197fax image quality 103ff 197file 197fillbox 197font 198
noooopppppppppppqr
in documents 98/S post with XML Interface 144
n FCL document 89-90cation message 128cation message process 111cation message template 117 orientation 102g margins for document 93in documents 95 Interface documents 157le files, list of 187CL code 196
batch 190begin 190begincvt 191billing 191bm 191box 192broadcasting with 66cleartabs 192comment 192contact 193converting from XML 141cover 193covertext 194
iiillllllllll

RightFax 9.4 Integration Module Guide 224
tab 214termid 214time 215
F
maintaining 51planning 51preview 58
FTP notification channel 125
GGenerate Image function 58global include files
adding data to 75linking to documents 75names 74overview 73
graphic, adding to document with FCL code 108
Hhelp, online 8host name 177HTTP XML Interface transport 143HTTP/S XML Interface transport 144
IIBM WebSphere MQ
attachments with the XML Interface 146creating an input 32notification channel 126testing notification channel 131XML Interface transport method 146
ID, unique, in Java API 172image quality, setting default 46image size, reducing 47image type 178IMAGETYPE command 178, 185include FCL code 199include files 179
adding data to global 75content of 73creating 74creating list of recipients for
broadcasting 66
tm 215tranid 215type 216underline 217uniqueid 217units 217user1 218userid 218utc 218voice 218winsecid 219
CL documentscode format 41creating 39, 40fax when recipient data is
missing 138-139print when recipient data is
missing 138-139
troubleshooting 63-64font FCL code 98, 198fonts
default 98example 98FCL code for 98overview 97strikeout 98TrueType 97underline 98Windows 97
form FCL code 199form feed FCL code 94format
for FCL codes 41FROM command 184FTP connection guidelines 19
rmoveto 212rstartpoly 212rti 212sending documents to a file with 70sending documents with 65sending one document to many recipients
with 66settab 213setting margins with 93setting tabs with 94sign 213signature 213sms 213smsmsg 213startpoly 214syntax 41
required codes 40FCL, required in InternetLink documents 178ff FCL code 197field types, MapText 59-62fields, filter template 59-62file conversion of attachments 105file FCL code 197file transport command line in XML
Interface 145file transport, with XML Interface 145fillbox FCL code 197filter mode 12filter template
creating 52-59fields 59-62input channel for documents 64

Index 225
globinclulinkinnameovervstand
indentatioinline 1inline atta
Interfacinput cha
creafor fi
installingJava API 166XML Interface 141
Integratiostarting
Integratio
JJava API
actiodebufax einstaquerysendstatu
Kkeywords
for cofor notification message
templates 113-115
LPR connection guidelines 19lpr FCL code 202LPR, connecting with a named pipe 27
Mime.inc 179Mimesend.exe 13moveto FCL code 202
ommand line syntax 33reating an IBM WebSphere MQ input 32
esting connections 36part MIME attachments 144
d pipe, creating a capture 27e files, attaching to documents 179, 181e mode 12page FCL code 94ver FCL code 202 FCL code 203
notification message channelscommand line 120creating 118
otify.exe 120verview 118esting 131-134esting IBM WebSphere MQ 131ication messages 181reating communication channels 118reating templates 112-113xample document 128xample of process flow 111xample template 117CL codes in 129-130eywords for 113-115verview 12, 111etaining copies on RightFax server 119
ication XML Interface function 143icationsax a copy of document upon
transmission 135-136fax a copy of document upon transmission
failure 137-138fax document when recipient data is
missing 138-139
Mqget.exen Module Configuration program, 45n Module setup wizard, starting 21
n on a document 172-174g mode 174xample 168lling 166ing a fax 170-171
ing documents 167s codes 175
ver sheets 79-81
MMakedoc.exe 13MapText
.mtd documents 57starting 52
MapText field types 59-62margins
example document 93FCL code 93setting default 94
maximum attached pages 47mediatype 184message body 178message body text in XML Interface 147Microsoft Exchange notification channel 127MIME attachments with XML Interface 144
Nott
notifcceeeFkor
notifnotif
f
al 73de FCL code 75g to documents 75s of global 74iew 73ard 73n (pixels) 47
83chments via HTTP/S for XML e 144nnelsting 25-26lter template documents 64
Llandscape page orientation 101libdoc FCL code 200line FCL code 200line, example in FCL document 89-90lineto FCL code 200linewidth FCL code 201list FCL code 201lm FCL code 201lookup FCL code 201lookup tables 11Lotus Notes notification channel 127lp FCL code 202
cc
tmulti
Nnamenativnativnew noconote

RightFax 9.4 Integration Module Guide 226
NnN
OONERROR command 181onerror FCL code 203-205oOoo
ooo
Pp
page orientation
print control language (PCL) files 12print copies if no fax number 57printer FCL code 202
rem FCL code 210
replyto FCL code 210requirements, system 177resolution, fax 102rfillbox FCL code 211rfsms.exe 123RFWebCon.dll library in XML Interface 144RightFax
customer support 9training 8
rline FCL code 211rlineto FCL code 211rmoveto FCL code 212rstartpoly FCL code 212rti FCL code 212
Sscheduling transmission 109schemas
XML Interface schemas 147-157XML_FAX_ACTION_REPLY.dtd 156XML_FAX_ACTION_SCHEMA 155XML_FAX_QUERY_REPLY.dtd 154XML_FAX_QUERY_SCHEMA 153XML_FAX_SUBMIT_REPLY.dtd 153XML_FAX_SUBMIT_SCHEMA 148
send documents as email if faxes fail 181sending
documents to a file with FCL 70one document to many recipients 66one document to many recipients with
include files 66settab FCL code 213shape FCL codes 87-88sign FCL code 213signature FCL code 213signature, adding to document with FCL
code 106sms FCL code 213
nline help 8NSUCCESS command 182
nsuccess FCL code 205-207pening
Integration Module Configuration program 45
Integration setup wizard 21MapText 52
rient FCL code 207verview, document data flow 12wner FCL code 207
age lengthdefault 57maximum 47minimum 47
printer, setting default 45printing with FCL 70printnow FCL code 209priority FCL code 209programs, list of 187
Qquality FCL code 210query XML Interface function 143querying a fax with Java API 170-171quotedprintable 184
Rrbox FCL code 210recipients
creating a list for broadcasting 67specifying addresses 65
print a copy of document upon transmission 135-136
print a copy of document upon transmission failure 137-138
print document when recipient data is missing 138-139
sending notifications to a database 122sending notifications via SMS 123vs. submit-reply XML Interface
function 143otify.exe 13, 120otifyhost FCL code 203plisten.exe
creating a named pipe capture 27testing printer connections 35
default 101example 102
Parse.exe 13PCL (print control language) files 12PCX image type 178PDF image type 178place FCL code 207placeall FCL code 207placelast FCL code 208placexy FCL code 208Portlstn.exe 31portrait page orientation 101position FCL code 209PostScript files 12preview a filter template 58preview FCL code 209

Index 227
SMS notSMS notsmsmsg SMTP hoSMTP nostandard
contcrealinkinoverv
startingInteg
proIntegration Module setup wizard 21MapText 52
startpoly FCL code 214status co
Java XML
SUBJECsubmit XMsupport, syntax forsystem re
Ttab FCL ctabs
examFCL settin
TCP/IP cTCP/IP ptemplates
creating cover sheet 78creating notification 112-113
termid FCL code 214
transmissionfax a copy of document upon
failure 137-138
troubleshooting
filter templates 63-64notification message channels 131-134
TrueType fonts 97TYPE command 182type FCL code 216
Uunderline FCL code 217unique ID
in Java API 172in XML Interface 142
uniqueid FCL code 217units FCL code 217units of measure for FCL 47user1 FCL code 218userid FCL code 218utc FCL code 218
Vvoice FCL code 218
WWindows Event Log 46Windows fonts 97winsecid FCL code 219
XXML
converting to FCL 141multipart MIME attachments 144
XML Interfaceattachments via HTTP/S 144attachments with IBM WebSphere
MQ 146
desAPI 175 Interface 175T command 185
L Interface function 142customer 9 FCL codes 41quirements 177
ode 214
ple 95code 94g default 96onnection guidelines 19ort capture 31
fax a copy of document upon success 135-136
fax document when recipient data is missing 138-139
print a copy of document upon failure 137-138
print a copy of document upon success 135-136
print document when recipient data is missing 138-139
scheduling 109transmission quality
setting default 46setting with FCL 103
transportsfile attachments with XML Interface 146XML Interface 141
trim trailing white space 47
ification channel 123ifications 123FCL code 213st name 177tification channel 121 include filesent of 73ting 74g to documents 75iew 73
ration Module Configuration gram 45
testingdirectory scanning connections 35, 36printer connections 35TCP/IP port connections 36
text files 12text for message body with XML
Interface 147TIF image type 178time FCL code 215tm FCL code 215TO command 185training 8tranid FCL code 215

RightFax 9.4 Integration Module Guide 228
with binary data 147XML Interface functions
action 143
X
XXXXXXXX
notification 143query 143submit 142
ML Interface transportsfile 145HTTP/S 144IBM WebSphere MQ 146
ML_FAX_ACTION_REPLY.dtd 156ML_FAX_ACTION_SCHEMA 155ML_FAX_NOTIFICATION.dtd 156ML_FAX_QUERY_REPLY.dtd 154ML_FAX_QUERY_SCHEMA 153ML_FAX_SUBMIT_REPLY.dtd 153ML_FAX_SUBMIT_SCHEMA 148SLT scripts with the XML Interface 142
example documents 157example HTTP/S post 144file transport attachments 146file transport command line 145inline attachments via HTTP/S 144installing 141multipart MIME attachments 144notification vs. submit-reply function 143RFWebCon.dll library 144schemas 147-157status codes 175text for cover sheet 147text for message body 147transport options and functions 141, 165unique ID 142using XSLT scripts 142