
Version 13 Last update: June 2016 - Craig...
46
ELECTRONIC LODGEMENT USER MANUAL Version 13 Last update: June 2016
Transcript of Version 13 Last update: June 2016 - Craig...

ELECTRONIC LODGEMENT
USER MANUAL
Version 13
Last update: June 2016

Electronic Lodgement User Manual Version 13 2
Table of Contents
1 Purpose of this Manual ------------------------------------------------------------------------------------------------- 3
2 Basic Process for Electronic Lodging --------------------------------------------------------------------------------- 4
3 Documents That Can Be Electronically Lodged ---------------------------------------------------------------------- 5
4 Recommended Methods of Support ----------------------------------------------------------------------------------- 6
4.1 Support Methods ---------------------------------------------------------------------------------------------- 6
4.2 Support Hours ------------------------------------------------------------------------------------------------- 6
5 Minimum Hardware/Software Requirements ------------------------------------------------------------------------ 7
6 Recommended Hardware/Software ---------------------------------------------------------------------------------- 7
7 Pre-Lodging ------------------------------------------------------------------------------------------------------------- 8
8 Logging On -------------------------------------------------------------------------------------------------------------- 9
9 Screen Layout ----------------------------------------------------------------------------------------------------------- 10
9.1 Menu Options -------------------------------------------------------------------------------------------------- 11
10 Home --------------------------------------------------------------------------------------------------------------------- 12
11 New Lodgement --------------------------------------------------------------------------------------------------------- 12
11.1 Adding One Document ---------------------------------------------------------------------------------------- 13
11.2 Adding Multiple Documents ---------------------------------------------------------------------------------- 14
11.3 Initial Editing ------------------------------------------------------ 14
11.4 Submitting the Lodgement for Calculation (Optical Character Recognition (OCR)) ----------------------- 15
11.5 Amending Errors ---------------------------------------------------------------------------------------------- 17
11.6 Quality Checking ---------------------------------------------------------------------------------------------- 18
11.7 Confirming the Lodgement ----------------------------------------------------------------------------------- 19
12 Requisitioned, Rejected, Rescanned & F24 Rescanned Documents ----------------------------------------------- 21
12.1 Adding Documents -------------------------------------------------------------------------------------------- 23
12.2 Initial Editing -------------------------------------------------------------------------------------------------- 23
12.3 Submitting the Lodgement ----------------------------------------------------------------------------------- 24
12.4 Amending Errors ---------------------------------------------------------------------------------------------- 26
12.5 Quality Checking ---------------------------------------------------------------------------------------------- 27
12.6 Confirming the Lodgement ----------------------------------------------------------------------------------- 28
13 Procedures for Withdrawal and Re-Entry and Full Withdrawal ---------------------------------------------------- 30
14 Reports ------------------------------------------------------------------------------------------------------------------- 31
14.1 Report Types -------------------------------------------------------------------------------------------------- 31
14.2 Viewing Reports ----------------------------------------------------------------------------------------------- 32
14.3 Downloading Reports ----------------------------------------------------------------------------------------- 33
14.4 Removing Reports -------------------------------------------------------------------------------------------- 33
14.5 Emailing Reports ---------------------------------------------------------------------------------------------- 34
14.6 Examples of Reports ------------------------------------------------------------------------------------------ 35
15 Document enquiry ------------------------------------------------------------------------------------------------------ 38
15.1 Search Type – Standard -------------------------------------------------------------------------------------- 39
15.2 Search Type – Dealing Rescans ------------------------------------------------------------------------------ 39
15.3 Search Type – Form 24 Rescans ----------------------------------------------------------------------------- 40
15.4 Search Type – Requisitions ----------------------------------------------------------------------------------- 40
15.5 Search Type – Rejected -------------------------------------------------------------------------------------- 41
16 Document Destruction-------------------------------------------------------------------------------------------------- 42
16.1 Removing Documents----------------------------------------------------------------------------------------- 42
17 Message of the Day - News -------------------------------------------------------------------------------------------- 44
18 News Archive ------------------------------------------------------------------------------------------------------------ 45
19 Account Management--------------------------------------------------------------------------------------------------- 46
19.1 Change Password --------------------------------------------------------------------------------------------- 46

Electronic Lodgement User Manual Version 13 3
1 Purpose of this Manual
The purpose of this manual is to outline and specify:
Minimum hardware and software requirements
Documents that can be electronically lodged
Appropriate support methods
Procedures for lodging
o New documents
o Requisitioned documents
o Rejected documents
o Rescanned documents
Procedures in relation to Document Enquiries/Searching
Recommended action in relation to Reports
Procedures for Document Destruction
How to change Passwords
To assist in avoiding errors, emphasis is placed on quality checking.
Although this manual is quite extensive, in practice the system is uncomplicated
in its operation.

Electronic Lodgement User Manual Version 13 4
2 Basic Process for Electronic Lodging Electronic Lodgement allows clients to lodge land title documents from their office via the
Internet. Documents are uploaded to the Department of Natural Resources and Mines (DNRM) as TIFF images of the existing forms. All notices pertaining to lodgements are
placed onto each client’s web page. The basic process for electronic lodging is:
Scan the documents to create a lodgement/batch
Log on to Electronic Lodgement
The lodgement/batch is sent to Optical Character Recognition (OCR) where the data is processed/read and the fees assessed
Submit the lodgement/batch
Amend any errors (as per error messages) and check to ensure all data is correct.
Once all checks are completed, the lodgement is ready to be confirmed
Dealings are lodged upon receipt of the success message. A Receipt and Lodgement Summary is sent and stored in Reports
All Reports should be actioned daily using the Menu options including Document Destruction
Confirm the lodgement/batch

Electronic Lodgement User Manual Version 13 5
3 Documents That Can Be Electronically Lodged
Forms may be lodged over Fee Simple, State Leasehold, Water Allocation and Interests in a dealing
where applicable.
Documents cannot be lodged through Electronic Lodgement where a paper title exists with the
exception of Caveats, Writs, Settlement Notices and some Form 14’s. However, titles can be
deposited at a DNRM lodgement centre with a Form 14 at no fee and they will be cancelled that day.
This then allows the corresponding documents to be electronically lodged.
Forms 18 and 20 will form part of a document and as such should be included as a part of that image.
The Instruments/Documents that can be lodged electronically currently include:
FORM FORM TYPE FORM DESCRIPTION
1 Transfer
Fee Simple/State Leasehold/Water Allocation
Of Dealing (e.g. Mortgage or Lease)
To Trustee
By Third Party
2 Mortgage Fee Simple/State Leasehold/Water Allocation
Of Lease
3 Release of Mortgage
4 Record Death
Fee Simple/State Leasehold/Water Allocation
Of Dealing
Of a Sole Retirement Village Lessee
Trustee or Personal Rep
5 5A
Transmission Application (NO ORIGINAL WILLS TO BE LODGED)
Fee Simple/State Leasehold/Water Allocation
Of Dealing (e.g. Mortgage or Lease)
7 Lease Sub-Lease
Lease of Freehold
Sub-Lease of Freehold
Sub-Lease of Leasehold 8 Surrender of Lease
9 Easement If new plan lodged or whole of land (Two Party)
With new plan or whole of land (Public Utility) 11 Caveat 12 Writ/Warrant of Execution
13 Amendment Of Lease
Except Leases (e.g. Mortgage)
14 General Request
NB: Fees may need to be amended
Removal of Administrative Advice (e.g. Settlement Notice)
Change of Company Name
Change of Name
Change of Company Name of Dealing
Change of Name of Dealing (e.g. Mortgage or Lease)
Correction of Company Name
Correction of Owner Details
Retirement of Trustee
Bankruptcy
Appointment of Administrator
Statutory Charge
Determination of Dealing
Disclaimer of Lease
Removal/Cancellation of Lease
Merger of Dealing (e.g. Lease)
Withdrawal
Removal of Lapsed Caveat
NOA – Caveators Notice to Registrar S126 (4)
NOT – Caveatees Notice to Caveator S126 (3)
Cancellation of Writ
Removal Charge/Writ/Caveat
Satisfaction of Writ/Caveat
Discharge of Writ
Change of Body Corporate Address
Change State Title Ownership
Trustee Permit
Vesting
Vesting of Dealing
Nature Refuge Noting

Electronic Lodgement User Manual Version 13 6
Removal Nature Refuge Notice
Heritage Register Site Notice
Environmental Offset Advice
Notice of Intention to Resume
Owner Builder Notice
Land Management Agreement
Road Dedication
Native Title Determination
Resumption
Record Revocation of Resumption
18 General Consent To be included with other Form
20 Schedule/Enlarged Panel/ Additional Page/ Declaration
To be included with other Form
23 Settlement Notice
24 Property Transfer Information Lodged with Form 1 as separate .tiff file
25 Foreign Ownership Information Lodged with Form 24 as same .tiff file
29 Profit a Prendre If new plan lodged or whole of Land 30 Mortgage Priority
31 Covenant If new plan lodged or whole of Land
4 Recommended Methods of Support
Seek assistance from your in-house Electronic Lodgement Support members.
4.1 Support Methods
The following methods of support are suggested to electronic lodgers:
● Email enquiries to DNRM’s Electronic Lodgement support team, with an explanation of
the problem at:
● Phone the Electronic Lodgement Support team on:
1300 255 616
The Electronic Lodgement Support team will endeavour to assist you in every way possible
to get a positive outcome to your enquiry.
When emailing your query, please attach a screen print of the error message if possible. To do a screen print, press the Print Screen key usually located near the top right hand corner of the keyboard, and then paste into the email message.
4.2 Support Hours
Support and lodgement (confirmation) hours are prescribed as between 8:30am and 4:30pm (Australian Eastern Standard Time) Monday to Friday excluding Queensland Public Holidays or when the Chief Executive notifies that the Titles Registry will not be open
for business.
The eLodgement system will be available for submitting for calculation and editing 24/7
excluding periods of downtime between 11:30pm and 6:00am and on Sundays when development work is required.

Electronic Lodgement User Manual Version 13 7
5 Minimum Hardware/Software Requirements
Electronic Lodgement does not require any specialised software to be loaded onto the PC or
server.
The minimum hardware and software requirements to be met are:
HARDWARE
● PC – Pentium 2, 300MHz with 64 mb RAM
● Scanner – Must be able to scan at 200dpi and produce Group 4 compressed multiple page TIFF images
● Modem – 56 kb
SOFTWARE
● Internet Connection – Internet Explorer 5 and above with 128 bit encryption pack; Firefox 3.6
● PC operating system – Windows 98, and 2000
6 Recommended Hardware/Software for Optimum
Performance
The recommended hardware and software includes:
HARDWARE
● PC – Pentium 4, 2.4GHz with 128 mb RAM
● Scanner – Must be able to scan at 200dpi and produce Group 4 compressed multiple page TIFF images
○ Document feeder
● Modem – Broadband Internet connection
SOFTWARE
● Scanning Software – barcode identification (93)
● Internet Connection – Internet Explorer 6 and above with 128 bit encryption pack; Firefox 3.6
● PC operating system – Windows XP
● WinZip – Version 8 and above
Note: These specifications are recommended for optimum performance and are not mandatory. Contact the eLodgement Support team for further information.

Electronic Lodgement User Manual Version 13 8
7 Pre-Lodging
Before scanning any documents, they must be prepared and be of imagable quality.
Each image must be scanned and saved as follows:
● Colour: Black and white
● Compression: Group 4 Compressed TIFF
● Resolution: 200 x 200 dpi
● Size: A4 (29.6cm x 21cm)
This image type is standard with most scanning software. Images can be stored anywhere,
but must be accessible for uploading to DNRM when lodging documents.
Note: All screens displayed in this manual are examples only and are current at time of publication.

Electronic Lodgement User Manual Version 13 9
8 Logging On
Save the web address as a shortcut on your desktop then using that shortcut:
Logon to the DNRM Electronic Lodgement web address
https://titles.business.qld.gov.au/el
● Enter the Username (using the SecurID card name)
● Enter the Password (four to eight digit pin), followed by the number from the SecurID card and Select Log in.
○ This action will display the Electronic Lodgement logon screen if your login attempt was successful. (Screen 2)
Screen 1
● The Electronic Lodgement logon screen will then be displayed. (Screen 2) ○ Enter your Electronic Lodgement User Name – this commences with ‘el’ or ‘ec’
○ Enter your password and select Logon to access the Electronic Lodgement Home Page (Screen 3)

Electronic Lodgement User Manual Version 13 10
Screen 2
9 Screen Layout The left section of the screen displays the Menu. This is always displayed and allows
navigation around the site. Moving the mouse pointer across Menu options highlights each link, which can then be selected.
Screen 3
Each Menu option selected displays the corresponding screen on the right processing window. Selecting Menu options while entering data will result in the screen being replaced
by the menu option selected. Screen 3 shows that Home was selected.
Electronic Lodgement User Manual Version 13 11
If a Menu option is selected -
● Prior to Submitting ○ There will be no lodgement created ○ The lodgement will need to be re-created
● While status reads Processing under Lodgements in Progress ○ Any Menu option can be selected while the batch is processing
○ This will not affect the lodgement’s status ○ Skeleton data will still be read and the fees assessed
● After the lodgement has been processed and the status reads Submitted
○ Any Menu option can be selected ○ This will not affect the status of the lodgement
○ All data up to this point has been saved
● While the lodger is attempting, but has not yet Confirmed the batch
○ The lodgement will not be Confirmed but will retain the Submitted status ○ The process to confirm the batch will need to be re-done unless the changes have
been saved (stored)
● After the lodger has Confirmed the batch ○ Any menu options can be selected following confirmation
○ This will not affect the status of the lodgement. The lodgement has completed
9.1 Menu Options
The menu options available for selection are:
● Home - Returns to the Home Page
● Submit Lodgement - Displays the relevant screens, depending on the lodgement type selected ○ New
○ Requisition ○ Rejected
○ Rescan ○ F24 Rescan
● Reports – Displays all reports available for viewing, downloading or emailing
● Document Enquiry –Search electronically lodged documents prior to registration ○ Searches are undertaken using various criteria
● Document Destruction – Displays documents to be destroyed by batch or lodgement reference
● News Archive – Displays all previous News items
○ Latest News items are displayed on the home screen when first logged on.
● Account Management – Enables change of password when required
For security purposes, the system times-out (logs off) after one hour of inactivity. The
Username and Password will then be required to be re-entered. (Screen 2)
Electronic Lodgement User Manual Version 13 12
10 Home
Home displays the number of reports (if any) available for viewing as well as the status of
any Lodgements in Progress. (Screen 3)
These include:
● Processing ○ When all details are black and the status reads Processing, Optical Character
Recognition (OCR) is reading skeleton data and assessing fees
● Submitted ○ When reference details are blue and the status reads Submitted, the lodgement has
been read, the fees assessed and the lodgement is ready to be checked and Confirmed.
Screen 4 displays submitted lodgements, ready to be checked and Confirmed.
● Details of the individual lodgements can now be viewed and edited by selecting the Lodgement Reference now displayed as a link
○ The Confirm for Lodgement screen will display (Screen 11)
11 New Lodgement
A new lodgement allows a single document or a group of documents (batch) to be lodged in the titles registry for examination and registration.
● Select New within the Submit Lodgement Menu (Screen 4) ○ Enter a Lodgement Reference
Once a Lodgement reference is used, the same combination of characters (up to fifteen) cannot be used again. This unique reference is linked to all Reports and information relating to that particular batch of documents.
○ Selecting Cancel at this stage will cancel the lodgement and take you back to the Home page, the lodgement has not been created.
Screen 4

Electronic Lodgement User Manual Version 13 13
Screen 5
11.1 Adding One Document
The documents must have been scanned before continuing. (See 7 – Pre Lodging for
required settings) ● Select Add to append documents to the lodgement (Screen 4)
○ This will display the Edit Document – Add Images screen (Screen 5)
Selecting Cancel at this stage will cancel the action and take you to the Submit for Calculation screen
● Select Browse and locate the required document/s or enter the file path (where image is stored) (Screen 5) ○ Documents can be added one at a time, or up to twenty at a time (if stored in a ZIP
file)
● Select Open – the file name will be displayed in the text box of the Edit Document – Add
Images screen ○ Select Add Image/Zip – file will be added to the lodgement and the Edit Document
screen will be displayed (Screen 6)

Electronic Lodgement User Manual Version 13 14
11.2 Adding Multiple Documents
Before commencing this process, all required files for the lodgement must be added to a Zip file. See your technical support for direction.
● On the Edit Document – Add Images screen (Screen 5), type the file name and file path (where images are stored) or select Browse and locate the required documents
using the browser dialogue box (Screen 5).
● Highlight the required file and select Open
● Select Add Image/Zip to continue to append the documents to the lodgement.
○ The file is automatically unzipped and the documents appended to the lodgement. ○ Edit Document screen is displayed. (Screen 6)
Screen 6
11.3 Initial Editing
The first document imaged/zipped in that batch is presented for editing in the Edit Document Screen (Screen 6). The Image Name and Lodgement Type are displayed. The
document image may be accessed by selecting the Image Name displayed as a link.
A Document Reference and Message (Dealing Note) may be entered. A Document reference is for your records only. Entering data into this field is not mandatory. The
message provides explanatory information to the Department’s examiners. For example, “Impressed Seal reads …” or “Family court order deposited”.
Prior to Submitting, messages can be typed in, though there is no option to use standard Messages.
After the document has been submitted for calculation, a standard Message can be selected from a pick list (refer to Screen 10).
You may add more than one standard Message by placing the cursor at the end of the previous message and selecting additional messages from the list.

Electronic Lodgement User Manual Version 13 15
It may also be necessary to edit and expand on the Message content. (Up to 1000
characters are available) It is recommended that where ever possible, standard Messages should be used.
Messages must be added where needed. Requisitions or rescans may result from
inadequate Messages.
● Once all documents have been appended to the lodgement, select Save.
○ This will display the Submit for Calculation screen (Screen 7)
11.4 Submitting the Lodgement for Calculation (Optical Character
Recognition (OCR))
The Submit for Calculation screen (Screen 7) displays:
● Office/Client – your office and client code
● Lodgement Reference – may be changed at this stage
● Email Address – Registration Confirmation Statements (RCS’s) and Requisition Notices will be sent to the email address provided in this field. If this option is used, RCS’s will
not appear on the Reports page. This email address field can default to a standard address upon application to eLodgement Support.
● All documents uploaded to be lodged
Screen 7 displays a typical example of a lodgement order:
● Form 3 – Release
● Form 1 – Transfer
● Form 24 – Property Transfer Information
● Form 2 – Mortgage
The Fee at this stage will display $0.00 and is displayed top and bottom of the screen.
To avoid errors, check all data carefully before continuing including:
● All documents required for lodgement are present ○ Select Add to append more documents (Screen 7)
● Correct documents in the lodgement ○ Select the Image Name (displayed as a link) to view each document
● Correct order of documents
● The arrows on the right side of the screen (when more than one document uploaded) enable you to change the order of the lodgement of the documents.
● Correct Lodgement Reference
○ To amend this reference, select the text box adjacent to Lodgement Reference and
insert new reference
● Correct Document Reference ○ To amend this reference; select Edit adjacent to the document you wish to amend to
display the Edit Document screen. ○ Select the text box adjacent to Document Reference and amend
● After ensuring all details are correct, select Submit
Electronic Lodgement User Manual Version 13 16
Screen 7
The Lodgement is sent to DNRM for calculation (at this stage, the documents have not been lodged, but have been submitted.)
The system checks/calculates:
● Transfer (Form 1)
○ Form type ○ Interest in item 1 ○ If a Form 24 is required (if yes, is it submitted in the correct order?)
○ Title reference ○ Fees
● Other Documents ○ Form type ○ Title reference
○ Fees
The “Lodgement was submitted successfully” message is then displayed. (Screen 8)
● Select Continue to return to a blank Submit for Calculation Screen (Screen 4) ○ Select Home from the Menu to view lodgements in progress (Screen 3)
Screen 8

Electronic Lodgement User Manual Version 13 17
Screen 10 displays lodgements that have already been processed, submitted and any
errors corrected. They are now ready to be Confirmed.
Screen 9 displays a lodgement with errors. The errors need to be corrected before
continuing (for further details see 11.5 Amending Errors)
If no errors are returned and you are confident that all details in the lodgement are correct,
the lodgement may be confirmed (for further details see 11.7 Confirming the Lodgement)
11.5 Amending Errors
Errors to the submission are shown on the Confirm for Lodgement screen. (Screen 9)
Multiple error messages may be displayed for the one error.
Screen 9
● Select Edit to the corresponding document that needs to be amended to display the Edit Document screen (Screen 10) where all necessary changes can be made.
● To add a title reference where no title reference has been read:
○ Select Add Title. An empty text box will be displayed. Enter the title reference into the text box. Continue adding until all titles have been added for that document
○ Once a title reference is added, the Remove button can be used to remove any
duplicated or incorrect title references
● The document image may be accessed by selecting Image Name.
● OCR will read the Form type and Title reference and will calculate the Fees. Any
incorrect fees should be amended by accessing the relevant Edit Document screen.
Some errors require the data to be manipulated, while other errors require the removal of
all or some documents. If all errors have not been amended, the lodgement will not confirm.
Note: the error messages may remain displayed on screen even after they have been amended. Store the lodgement to ensure all changes have been saved.

Electronic Lodgement User Manual Version 13 18
11.6 Quality Checking
The data has been briefly checked by the Electronic Lodgement System and fees calculated. Prior to confirming, it is your responsibility to ensure that all data is correct for
lodgement. Failure to accurately check fees could result in the loss of lodgement fees – use Fee Calculator link on Edit Document screen (Screen 10).
Form Id allows the user to manually change the type of form being lodged. If this is required, the Fees or Title References may need to be altered. This is not the case with Form 24’s. If a Form Id is changed to a Form 1 - Transfer, the system will revert to a
submit status. The lodgement will need to be reprocessed.
Select the correct Form Id (Screen 10) from the drop down box if required
To delete the entire lodgement
Select Remove on the Confirm for Lodgement screen (Screen 9)
To delete single documents
Select Edit on the Confirm for Lodgement screen (Screen 9) to go to the Edit Document Screen (Screen 10)
Select Delete
To add a new document to the lodgement
Select Add on the Confirm for Lodgement screen (Screen 9)
To change the order of documents lodged
Select the up/down arrows on the Confirm for Lodgement screen (Screen 9)
To view a document, select the Image Name (displayed as a link – Screens 9 and 10)
All titles on that document can be checked by selecting the drop down arrow beside the
Title Reference (Screen 9 and 11)
Screen 10

Electronic Lodgement User Manual Version 13 19
11.7 Confirming the Lodgement
At this point, the lodgement has been submitted for calculation, the errors amended and saved and the Confirm for Lodgement screen is displayed. (Screen 11)
The Confirm for Lodgement screen displays all documents in the lodgement and selected information that has been read from the forms in the initial DNRM check.
Screen 11
Screen 12

Electronic Lodgement User Manual Version 13 20
Note: Confirming is the point of lodgement. It is after confirming that the documents
appear on a title search.
Ensure that there are sufficient available funds in the nominated bank account before confirming the lodgement. The amount shown in Screen 12 must be paid.
Documents lodged in error may only be corrected by letter or documentation depending on the circumstances. Failure to accurately check lodgements may result in the loss of
lodgement fees.
Select Confirm when you are satisfied that all details (image, form, titles and fees) are correct.
○ A message will display when Confirm for Lodgement is successful (see below)
Confirming will automatically produce dealing numbers, a Lodgement Summary and Receipt. The Home screen will display the number of reports available All reports can be viewed, printed and/or downloaded from the Reports screen. (See 14 Reports)
o It is recommended that the dealing number is recorded in pencil on the reverse of the document to allow you to locate the correct document

Electronic Lodgement User Manual Version 13 21
12 Requisitioned, Rejected, Rescanned & F24
Rescanned Documents
In addition to the aforementioned New Lodgement type, there are currently four other
lodgement types specified in the Menu available to the Electronic Lodger.
Lodgement Type
Abbreviated Lodgement
Type
What does it mean?
Requisition REQ
A requisition applies to a dealing which, upon
examination, is deemed to be in non-registrable form when lodged.
A Requisition Notice is issued advising the lodger that the document requires attention.
The requisitioned document should be amended,
rescanned and re-lodged for re-examination (using the Menu option Requisition) within the specified
period, otherwise it will reject. Requisition fees apply to this lodgement type
(unless otherwise stated).
Rejected REJ
A Rejection Notice is issued to the lodger advising the document is rejected due to non-compliance
with the terms of the requisition (within the specified time period).
The rejection notice identifies the primary dealing and any associated dealings rejected.
Should these dealings be re-lodged (using the Menu option Rejected), the fees will be half of the current lodgement fee plus any outstanding
requisition and short fees.
Rescan RSC
A Rescan Notice has been issued as the image
has been identified as inadequate during the examination process, and requires individual
attention. The document to Rescan should be rescanned and
re-lodged for re-examination immediately following
the examiners instructions on the report (using the Menu option Rescan). The document must not be
altered in anyway, just scanned according to the examiners instructions.
There are no fees associated with this lodgement
type. Failure to comply with the rescan request in a
reasonable time may result in a Requisition. Fees will then apply.
F24 Rescan F24
The Form 24 image has been identified as inadequate during the data entry process and requires individual attention
The Form 24 to rescan should be amended, rescanned and re-lodged for re-evaluation
immediately (using the Menu option F24 Rescan) There are no fees associated with this lodgement
type
The screen layout and editing options that apply to these lodgement types are essentially the same. All reports are sent electronically and can be viewed, printed, downloaded and emailed.

Electronic Lodgement User Manual Version 13 22
To Return a Requisitioned Document
Select Reports under Menu
Select the required Requisition Notice
Ensure that you have the correct document and that the Requisition has been
complied with
Rescan the amended document and save the image
o Do not scan the Requisition notice or the Form 24 if the requisition refers to a Transfer
Select Requisition under Submit Lodgement on the Menu
o As with a New lodgement, this displays the Submit for Calculation screen (Screen 13)
o Note the Lodgement Type is REQ instead of NEW Enter a Lodgement Reference
Once a Lodgement Reference is used, the same combination of characters (up to fifteen) can never be used again. The original Lodgement Reference containing the requisitioned document cannot be used, as duplicate Lodgement References will not
save. o Select Add to append documents to the lodgement
Documents can be added one at a time, or up to 20 if stored in a ZIP file
o The Edit Documents – Add Image screen will be displayed
o Only the document that has been requisitioned should be returned using the dealing number drop down list box or by typing the dealing number in the adjacent
field.
To return a Rescan document or relodge a Rejected document, follow the same process above, selecting the appropriate Lodgement Type.
Note: When lodging a Rejected Form 1 - Transfer, a Form 24 is required and must follow
the Form 1.
Screen 13
Electronic Lodgement User Manual Version 13 23
12.1 Adding Documents
Alterations must be made to the original document prior to rescanning.
Providing the requisition has been complied with, a new image of the previously lodged
document must be created before continuing.
Note: When answering a requisition, the whole of the previously lodged requisitioned
document along with any extra pages that may be required must be re-lodged. Unless specifically requested in the requisition, no pages are to be removed; any unnecessary pages should be ruled through and marked ‘cancelled’.
Once rescanned, the required documents can be located using the browser window (see 11.1 Adding One Document for further details)
There can be more than one document in a Requisition lodgement (see 11.2 Adding Multiple Documents for further details)
Select Add Image/Zip when you have chosen your first image or zip file (Screen 5)
o The Edit Document screen will display (Screen 14)
12.2 Initial Editing
The first document imaged/zipped in that batch is presented for editing (Screen 14) o The document image may be accessed by selecting Image Name
o The chosen Image Name and Lodgement Type (REQ) is displayed.
The new image must be linked to the corresponding requisitioned document.
Adjacent to Dealing No is a text box and a drop down pick list containing all requisitioned elodged dealing numbers for your office
o Select the arrow to expand the drop down list. Locate and select the required dealing number from the pick list or type in the correct dealing number in the text box
Click or tab outside of this box to allow the page to refresh. (For example, click in the Document Reference or Message box to reposition the cursor.)
The first title reference that the document is lodged over will be displayed. Check the title reference against the image to confirm the correct document has been selected
A Document Reference or Message (Dealing note) may be entered to the lodgement.
o Entering data into these fields is not mandatory. o The Message provides explanatory information to the Department’s examiners.
For example, for details that cannot be read when scanned, such as ‘Impressed
Seal reads…’ Extra evidence such as trust deeds and birth/marriage certificates etc
o Select Save once all documents have been appended to the lodgement and edited as above. The Submit for Calculation screen will display (Screen 15)
At this stage, the Fees remain at $0.00
Save/Edit Next option displays if there is more than one document in the lodgement.
This function saves the data and displays the next document in the lodgement.
Save/Edit Previous option displays if there is more than one document in the lodgement. This function saves data and displays the previous document in the lodgement.

Electronic Lodgement User Manual Version 13 24
Screen 14
12.3 Submitting the Lodgement
The Submit for Calculation screen displays all documents to be lodged. (Screen 15)
To avoid errors, check all data carefully before submitting, including:
Required documents are present o Select Add to append more documents
Correct documents in the lodgement o Select the Image Name (displayed as a link) to view each document
Correct Lodgement Reference
o Place cursor in the field adjacent to Lodgement Reference and amend accordingly
Correct Document Reference
o Select Edit to display the Edit Document screen (Screen 14) Place cursor in the field adjacent to Document Reference and amend
accordingly

Electronic Lodgement User Manual Version 13 25
Screen 15
When all details are correct, select Submit.
A message “Lodgement was submitted successfully” is displayed
Select Continue o Returns Home
The Home screen will display all lodgements in progress. After the lodgement has gone
through the initial OCR process (can take up to 20 mins) the status of the lodgement will change from Processing to Submitted and the lodgement reference will be displayed as a link.
Select the lodgement reference link
o The Confirm for Lodgement screen will be displayed (Screen 16 and 18)

Electronic Lodgement User Manual Version 13 26
12.4 Amending Errors
Screen 16
Screen 16 displays a lodgement with errors – the errors need to be amended and resubmitted before continuing.
Multiple error messages may be displayed for the one error.
Select Edit to display the Edit Document screen (Screen 17) o Necessary amendments can be made from this screen.
Access the document image by the Image Name link If incorrect, the image can be removed by selecting Delete Select Add (screen 16) to upload the correct image (Screen 5)
o Amend fees if necessary Select the field adjacent to Fees and amend accordingly (Screen 17)
A message will be displayed in the form of a dealing note to the Examiner to indicate that you have amended the assessed fees.
If you wish to query the requisition fee or a short fee, you must contact Customer Services on 1300 255 750 and resolve the issue prior to returning the document.

Electronic Lodgement User Manual Version 13 27
Screen 17
Save/Edit Previous saves data and displays the previous document in the lodgement
Save/Edit Next saves data and displays the next document in the lodgement These options are only displayed when there is more than one document in the lodgement.
12.5 Quality Checking
Ensure the new image corresponds to the requisitioned document. In the field adjacent to
Dealing No is a drop down pick list containing all eLodged requisitioned dealing numbers. (Screen 17)
If incorrect, select the arrow to expand this box. o Locate and select the correct dealing number; or
o Type in the correct dealing number manually in the adjacent text box
Some errors require the data to be manipulated, while other errors require the removal of
all or some documents. If all errors have not been amended, the lodgement will not confirm. However, the error messages may remain displayed on screen even after they have been amended.
Select Store on the Confirm for Lodgement screen to save changes made to the lodgement. (Screen 16) All amended error messages will disappear. (Screen 18) Note:
error messages that refer to Form ID or Title References will remain on screen after selecting the Store button – this message is to let you know that OCR read the title
reference differently this time. These must be checked before confirming the lodgement.
To delete the entire lodgement
o Select Remove on the Confirm for Lodgement screen (Screen 18)
To delete single documents
o Select Edit on the Confirm Lodgement screen. The Edit Document screen will be displayed (Screen 17)
o Select Delete
To add a new document to the lodgement
o Select Add in the Confirm for Lodgement screen (Screen 18)
To change the order of documents lodged
o Use the up/down arrows on the Confirm for Lodgement screen (Screen 18)

Electronic Lodgement User Manual Version 13 28
12.6 Confirming the Lodgement
At this point, the lodgement has been submitted, the errors amended and the Confirm for Lodgement screen is displayed. (Screen 18)
Screen 18
When you are satisfied that all the details are correct, select Confirm.
The Confirm Payment screen will appear (Screen 19). This is the last opportunity to check that the assessed fees are correct. When you are satisfied that the fees payable
are correct, select confirm. This is the point of re-lodgement.
Screen 19

Electronic Lodgement User Manual Version 13 29
Once the lodgement is confirmed successfully, a message will appear. (See below)
o Select Continue to take you back to Home
Once the lodgement has been confirmed, a header summary and receipt is generated.
These can be viewed on the Reports screen.
To view Reports
o Select Reports from the Menu (See 14 – Reports)

Electronic Lodgement User Manual Version 13 30
13 Procedures for Withdrawal & Re-Entry and Full
Withdrawal
If you need to request a withdrawal and re-entry or a full withdrawal, the document is
likely to be under requisition. If not, contact eLodgement Support to arrange a (no fee) requisition to be issued.
Scan the original document with the letter of request as the last page of the image.
Follow instructions for returning a requisitioned dealing
Add the appropriate message by using the pick list or type your own.
o “Withdrawal and re-entry requested, letter deposited”; or o “Full withdrawal requested, letter deposited”
Appropriate fees must be paid.
If the document is not under requisition, contact eLodgement Support.
eLodgement Procedure for Letters of Full Withdrawal:
eLodgement Procedure for Letters of Withdrawal and Re-Entry:
Note: Do not scan or return the letter through eLodgement on its own. It must
be scanned as the last page of the requisitioned document.
Letter requesting Full Withdrawal prepared on
Company letterhead
Re-lodge letter behind the entire original
document (1 image)
Letter requesting
Withdrawal and Re-entry prepared on
Company letterhead
Re-lodge letter behind the
entire original document
(1 image)

Electronic Lodgement User Manual Version 13 31
14 Reports
Reports are available for viewing or downloading, printing and emailing.
It is important that all reports are processed daily. Destruction Reports, Rescan Reports, Form 24 Rescan Reports and Requisition Notices should be actioned in a timely manner.
Note: The requisition period commences when notification of the requisition is received, not when it is viewed, printed or downloaded.
Regular removal of reports will ensure the system runs efficiently.
To view a current list of all reports sent from DNRM
o Select Reports from the Menu This will open the Report Types screen (Screen 20)
Screen 20
14.1 Report Types
All Report Types are displayed with adjacent check boxes
The total number of reports available is displayed (Screen 20)
o Check the adjacent box and select Retrieve Reports screen lists all available reports
o Check individual check boxes adjacent to the required report type and select Retrieve Reports screen lists all available selected report types (Screen 21)

Electronic Lodgement User Manual Version 13 32
Report types and abbreviations are shown below:
Report Type Abbreviation
REQUISITION NOTICE – deficiencies in a document that requires attention – fees apply
REQNTCE
REGISTERED DEALINGS REPORT – identifies dealings that may have delivery instructions; i.e. original trust
deeds to be returned to the client.
REGDLGS
LODGEMENT SUMMARY – a summary of a lodgement
– provides dealing numbers. LGDSUM
DIRECT DEBIT ACCOUNT TRANSACTION LIST –
Direct Debit payment – the amount due to be taken from your specified account for the previous day’s lodgements.
Cheque payment – the amount to bring to the Titles office before 11.30am the next day after lodgement.
DDACT
WITHDRAWN AND RE-ENTERED REPORT – documents that have been withdrawn and re-entered – provides
new dealing number.
DLGWRE
REGISTRATION CONFIRMATION STATEMENT –
confirmation that documents have been registered. REGCONF
DEALING RESCAN REPORT – documents that require
rescanning due to poor image quality etc
Failure to comply with a rescan request in a timely manner may result in a requisition being issued – fees
will apply.
DLGRSCN
RECEIPT – receipt for lodgement. RECEIPT
REJECTION NOTICE – a requisitioned document has been rejected.
REJNTCE
BATCH HEADER SUMMARY – a summary of lodgements returned (i.e. requisition) with no fee.
HEDSUM
DEALINGS FOR DESTRUCTION REPORT – lists all
documents that must be destroyed. DESTRCT
FORM 24 RESCAN REPORT – Form 24’s that require
rescanning due to poor image quality or missing pages etc.
F24RSCN
14.2 Viewing Reports
Reports can be viewed individually or several at a time. (Screen 21)
Select the link under Report File for the relevant individual report o The report will display in an RTF file (Rich Text Format) in Word, WordPad or
similar. The reports can be printed, emailed and/or saved from the application; or o Check boxes adjacent to Report File and select Open to view selected reports
Reports open in one RTF file and can be printed using the File, Print options
(The way the file opens depends on your browser settings – see your IT professional for guidance)

Electronic Lodgement User Manual Version 13 33
Screen 21
14.3 Downloading Reports
Reports can be downloaded and saved. It is recommended that the reports are downloaded daily.
Check the appropriate box next to the Report File you wish to download o You may download any number of reports at a time.
Or check All Reports to download all reports
Select Download o This action zips the files
o When prompted, select the location to which the zip file is to be located and save.
14.4 Removing Reports
After the Reports have been actioned, they should be removed from the system. It is recommended that the reports are actioned and removed daily.
Using the check boxes, select the reports to be removed (any number of reports may be removed in this manner)
o Select Remove or
Use the check box adjacent to All Reports to remove all reports from the system o Select Remove
Note: Do not remove reports that have not been actioned.

Electronic Lodgement User Manual Version 13 34
14.5 Emailing Reports
Reports are sent from the DNRM and not the Lodger. Any number of reports may be emailed at one time to a recipient. (Screen 21)
Select Report/s to be emailed
Type the email address in the field provided
o Up to two email addresses can be added depending on the length of the addresses; 80 character spaces are provided. Use a comma and no spaces between each email address
i.e. [email protected],[email protected]
Add a relevant Email Subject heading
o i.e. My Office eLodgement Reports Select Email
A message displays advising the email was sent successfully (see below)
Ensure a valid email address is used as you will not receive any further notification that
the email has been received.
Reports are received as attachments in a singular email (see below for example email)

Electronic Lodgement User Manual Version 13 35
14.6 Examples of Reports
Destruction Report Rescan Report
Withdrawn & Re-Entered Report Batch Header Summary

Electronic Lodgement User Manual Version 13 36
Lodgement Summary Receipt
Registration Confirmation Statement (RCS)

Electronic Lodgement User Manual Version 13 37
Requisition Notice Direct Debit Account Statement
Registered Dealings Report

Electronic Lodgement User Manual Version 13 38
15 Document Enquiry
The Document Enquiry screen displays various ways to search for a lodgement or lodged
document/dealing processed through electronic lodgement. (Screen 22)
Screen 22
They are available to be searched from when they are first submitted through to when they are removed from the system by:
Removing a lodgement before confirming the lodgement
Removing a document before confirming the lodgement
Registration (for Standard Search type)
Document destruction
The search function allows searching by the following dealing types:
Standard (default) – (See inset diagram screen 22)
Dealing Rescans
Form 24 Rescans
Requisitions
Rejected
Electronic Lodgement User Manual Version 13 39
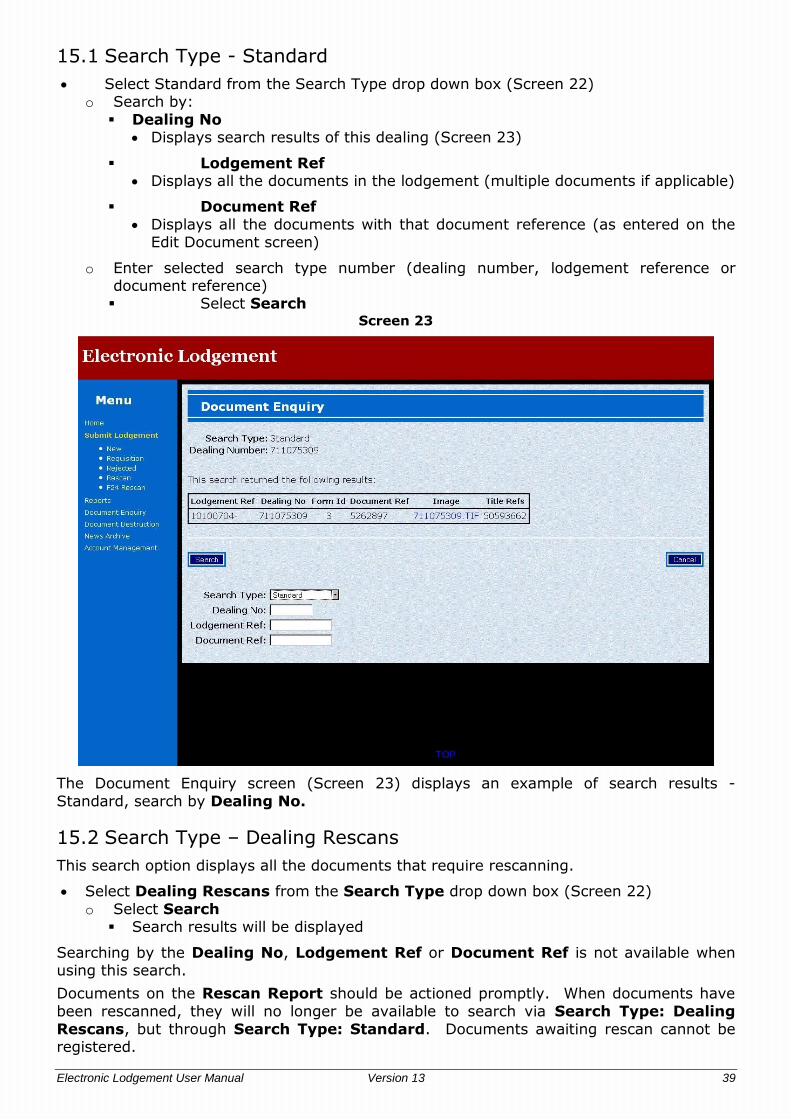
15.1 Search Type - Standard
Select Standard from the Search Type drop down box (Screen 22) o Search by:
Dealing No Displays search results of this dealing (Screen 23)
Lodgement Ref Displays all the documents in the lodgement (multiple documents if applicable)
Document Ref
Displays all the documents with that document reference (as entered on the Edit Document screen)
o Enter selected search type number (dealing number, lodgement reference or document reference) Select Search
Screen 23
The Document Enquiry screen (Screen 23) displays an example of search results -
Standard, search by Dealing No.
15.2 Search Type – Dealing Rescans
This search option displays all the documents that require rescanning.
Select Dealing Rescans from the Search Type drop down box (Screen 22)
o Select Search Search results will be displayed
Searching by the Dealing No, Lodgement Ref or Document Ref is not available when using this search.
Documents on the Rescan Report should be actioned promptly. When documents have
been rescanned, they will no longer be available to search via Search Type: Dealing
Rescans, but through Search Type: Standard. Documents awaiting rescan cannot be registered.

Electronic Lodgement User Manual Version 13 40
15.3 Search Type – Form 24 Rescans
This search displays all the Form 24’s that require rescanning.
Select Form 24 Rescans from the Search Type drop down box (Screen 22)
o Select Search Search results will be displayed
Searching by the Dealing No, Lodgement Ref or Document Ref is not available when using this search.
Documents on the Form 24 Rescan Report should be actioned promptly. When Form 24’s
have been rescanned, they will no longer be available to search via Search Type: Form 24 Rescans, but through Search Type: Standard, Lodgement Ref or Document Ref.
15.4 Search Type – Requisitions
This search displays all the documents that have been requisitioned.
Select Requisitions from the Search Type drop down box (Screen 22) o Select Search
Search results will be displayed (Screen 24) Displays all details relevant to dealings
Screen 24
Searching by the Dealing No, Lodgement Ref or Document Ref is not available when using this search.
When Requisitions have been actioned, they will no longer be available to search via Search Type: Requisition, but through Search Type: Standard.

Electronic Lodgement User Manual Version 13 41
15.5 Search Type – Rejected
This search displays all documents that have been rejected.
Select Rejected from the Search Type drop down box (Screen 22)
o Select Search Search results will be displayed (Screen 25)
Searching by the Dealing No, Lodgement Ref or Document Ref is not available when using this search.
When Rejected dealings have been re-lodged, they will no longer be available to search via
Search Type: Rejected, but through Search Type: Standard.
Screen 25

Electronic Lodgement User Manual Version 13 42
16 Document Destruction
A Dealings for Destruction Report is sent daily. You will be asked to destroy documents 28
days after the last dealing in the lodgement has been registered or completed.
Select Reports from the Menu
o The Reports screen will be displayed (Screen 20)
Destruction reports begin with DESTRCT, followed by a unique numerical identifier
Select the report reference link to view the report
Documents are grouped on this report by lodgements.
16.1 Removing Documents
Document Destruction lists all documents requiring destruction by Lodgement Reference.
Select Document Destruction from the Menu
o The Document Destruction screen is displayed (Screen 26)
Screen 26
The Electronic Lodger must collect all original lodged Documents from lodgements
mentioned in that Destruction Report and destroy them. (Shred or secure document destruction bin etc) This is in line with current DNRM processes.
To remove documents from the list:
Select the check box (tick) next to the Lodgement Reference of batch to be destroyed o Select Destroy
o Destroy (shred) document

Electronic Lodgement User Manual Version 13 43
The following method for destruction is recommended:
Print report
Retrieve original document or batch
Tick appropriate check boxes in the Electronic Lodgement screen (Screen 26)
Select Destroy
Shred documents
Note: As Form 24’s are not processed until after the Transfer has been registered, any Form 24’s associated with a transfer due for destruction should be kept for 3 months after
lodgement. This is in line with current DNRM practices.
These will be listed on the Destruction Report as the transfer dealing number followed by
an F.

Electronic Lodgement User Manual Version 13 44
17 Message of the Day – NEWS
After logging on to Electronic Lodgement (Screen 2), relevant important messages may
appear. (Screen 27) These messages must be taken note of.
Screen 27

Electronic Lodgement User Manual Version 13 45
18 News Archive
All previous News items are stored in the News Archives located on the Menu section of
the Electronic Lodgement screen.
Select News Archive
o The News Archive screen will display (Screen 28) o Select Home to return to the Home screen.
Screen 28

Electronic Lodgement User Manual Version 13 46
19 Account Management
Account Management lists options available to manage the eLodgement system. Currently
Change Password is the only option available.
Select Account Management
o The Change Password screen will be displayed. (Screen 29)
19.1 Change Password
DNRM security policy requires password changes every 90 days. If this is not complied with the account will automatically force a change of password. When the end of the 90
day period is approaching a message (asking for change of password) appears.
When DNRM set up accounts, passwords are issued. This should be changed promptly for security purposes.
Screen 29
Passwords must be at least 7 characters long with at least 1 number and cannot be the same password used in the previous 12 months. Follow the suggestions for a secure password on Screen 29.
Select Change Password o The Change Password screen will be displayed. (Screen 29)
o Enter old password o Enter new password o Re-enter new password to confirm
o Select Change
A ‘Password Successfully Changed’ message will be displayed
o Select OK to continue to Home screen o The next time you login (Screen 2) the new password will be required.
For security purposes, the system times-out (logs off) after one hour of inactivity. The username and password will then be required to be re-entered. (Screen 2)


![CH.53 – 2] SUPREME COURT - Bahamas Legislationlaws.bahamas.gov.bs/cms/images/LEGISLATION/... · Notice of intention to proceed after year’s delay. ... Service of notice of writ](https://static.fdocuments.net/doc/165x107/5ac069737f8b9aca388bdfd6/ch53-2-supreme-court-bahamas-of-intention-to-proceed-after-years-delay.jpg)


