Version 12.01 Heat press BluePRESSLine
15
Instruction Manual Version 12.01 Heat press BluePRESSLine DTG-4-S Version 12.01 1/15
Transcript of Version 12.01 Heat press BluePRESSLine

Instruction Manual
Version 12.01
Heat press
BluePRESSLine
DTG-4-S
Version 12.01 1/15

1. Introduction
1.1 Content
1. Introduction 02
1.1 Content 021.2 Heat press llustration 031.3 Technical Data 031.4 Safety arrangements of the heat press 041.5 Safety arrangements at the workspace 04
2. Initiation 05
2.1 Tips for transport 052.2 Installation of the heat press on the bench 052.3 Power supply 052.4 Initiation of the heat press 05
3. Working with the heat press 06
3.1 Programming of electronic devices 06 3.2 Bugfixing of the electronic devices 07 3.3 ECO Mode 07 3.4 Preßpressing 07
3.5 Application range and sample adjustments of the heat press 073.6 Pressure settings 083.7 Adjustment of the tensions springs 08
3.8 Adjustment of the electromagnet 08 4. Maintenance 09
4.1 Daily Maintenance 094.2 Monthly Maintenance 094.3 Replacing the main fuse 10
4.4 Replacing the fuse in the power supply 10 4.5 Replacing the electronic devices 11
4.6 Replacing the power supply 114.7 Replacing the silicon mat 124.8 Replacing the thermal fuse 124.9 Replacing the temperature sensor 124.10 Troubleshooting 13 4.11 Connection diagram 144.12 Testing Report 154.13 EC-Conformance declaration 15
Version 12.01 2/15

1.2 Heat press Illustration
1. Adjustment of the tension springs2. Base plate 3. Heating plate4. Grip 5. Contact pressure adjustment6. Electromagnet7. Closing disk of electromagnet 8. Compression lever with rubber grip
9. Electronic devices10. STOP switch11. Main fuse12. Main switch13. coiled cabel14. Connection cable15. Springs
1.3 Technical Data
Press dimension: ....................................... 41 x 85 x 97 cm Working plate: ................................................... 40 x 60 cmWeight: ....................................................................... 41 kgOperating voltage: ................................................ 230 VACPower with plate: ..................................................... 2,4 kWTemeperature range: ......................................... 0 – 220° CTime settings: ...........................................1sek – 99:59 minMax. Pressure: ................................................... ca. 500 kgMain fuse: ..................................................................... 12A
Version 12.01 3/15
1.4 Safety arrangements of the heat press
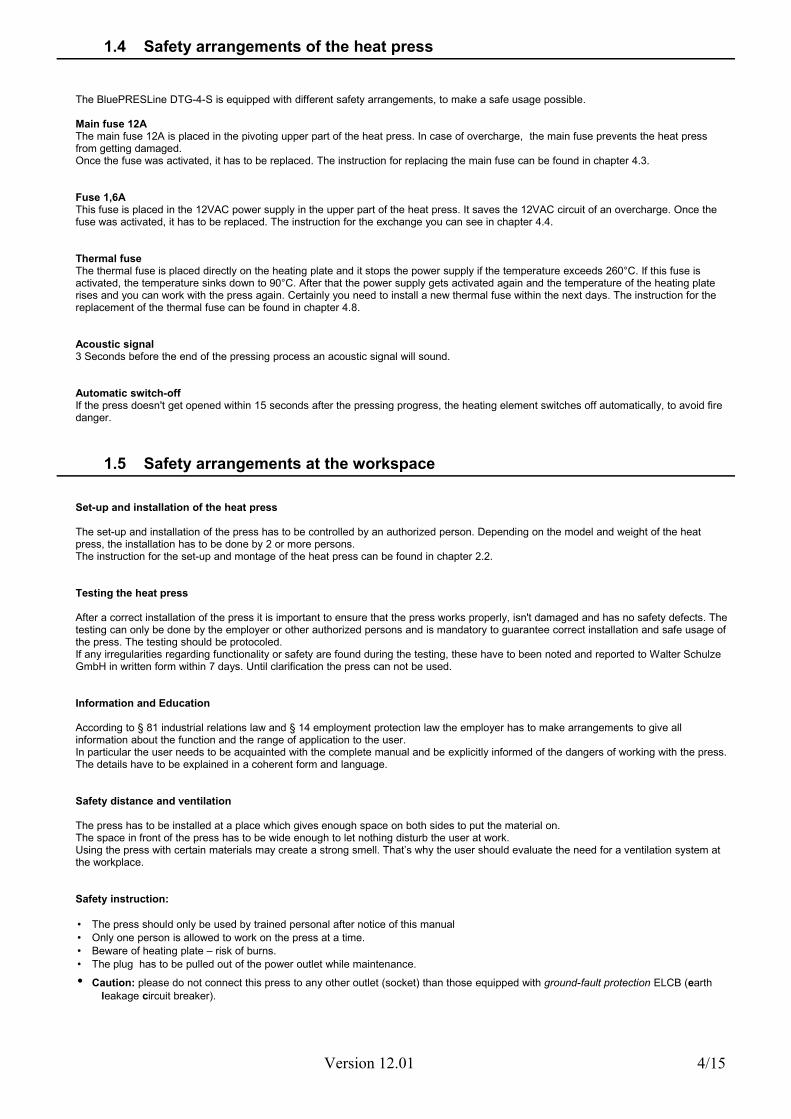
The BluePRESLine DTG-4-S is equipped with different safety arrangements, to make a safe usage possible.
Main fuse 12AThe main fuse 12A is placed in the pivoting upper part of the heat press. In case of overcharge, the main fuse prevents the heat press from getting damaged. Once the fuse was activated, it has to be replaced. The instruction for replacing the main fuse can be found in chapter 4.3.
Fuse 1,6A This fuse is placed in the 12VAC power supply in the upper part of the heat press. It saves the 12VAC circuit of an overcharge. Once the fuse was activated, it has to be replaced. The instruction for the exchange you can see in chapter 4.4.
Thermal fuseThe thermal fuse is placed directly on the heating plate and it stops the power supply if the temperature exceeds 260°C. If this fuse is activated, the temperature sinks down to 90°C. After that the power supply gets activated again and the temperature of the heating plate rises and you can work with the press again. Certainly you need to install a new thermal fuse within the next days. The instruction for the replacement of the thermal fuse can be found in chapter 4.8.
Acoustic signal3 Seconds before the end of the pressing process an acoustic signal will sound.
Automatic switch-offIf the press doesn't get opened within 15 seconds after the pressing progress, the heating element switches off automatically, to avoid fire danger.
1.5 Safety arrangements at the workspace
Set-up and installation of the heat press
The set-up and installation of the press has to be controlled by an authorized person. Depending on the model and weight of the heat press, the installation has to be done by 2 or more persons.The instruction for the set-up and montage of the heat press can be found in chapter 2.2.
Testing the heat press
After a correct installation of the press it is important to ensure that the press works properly, isn't damaged and has no safety defects. The testing can only be done by the employer or other authorized persons and is mandatory to guarantee correct installation and safe usage of the press. The testing should be protocoled. If any irregularities regarding functionality or safety are found during the testing, these have to been noted and reported to Walter Schulze GmbH in written form within 7 days. Until clarification the press can not be used.
Information and Education
According to § 81 industrial relations law and § 14 employment protection law the employer has to make arrangements to give all information about the function and the range of application to the user.In particular the user needs to be acquainted with the complete manual and be explicitly informed of the dangers of working with the press.The details have to be explained in a coherent form and language.
Safety distance and ventilation
The press has to be installed at a place which gives enough space on both sides to put the material on.The space in front of the press has to be wide enough to let nothing disturb the user at work.Using the press with certain materials may create a strong smell. That’s why the user should evaluate the need for a ventilation system at the workplace.
Safety instruction:
• The press should only be used by trained personal after notice of this manual• Only one person is allowed to work on the press at a time.• Beware of heating plate – risk of burns.• The plug has to be pulled out of the power outlet while maintenance.
• Caution: please do not connect this press to any other outlet (socket) than those equipped with ground-fault protection ELCB (earth leakage circuit breaker).
Version 12.01 4/15

2. Initiation
2.1 Tips for transport
The BluePRESSLine DTG-4-S is covered with a cardboard for transport. Right after the receiving you should check if the cardboard and the press are in good condition. Later on, if you have to send the press somewhere, we ask you to cover the press with the same cardboard and in the same way. The press has to be cold and the pressure lever has to be pulled down.
2.2 Installation of the heat press on the bench
The heat press is delivered in a cardboard. After unpacking and connecting heat press can be worked with. The BluePRESSLine Size 3-S heat press do not need any other installations.
2.3 Power supply
The BluePRESSLine DTG-4-S has to be connected to a voltage of 230VAC/ 50Hz. The press is equipped with a plug. Make sure that the power outlet is in the right condition and that the grounding is connected to the power outlet.
Caution: please do not connect this press to any other outlet (socket) than those equipped with ground-fault protection ELCB (earth leakage circuit breaker).
2.4 Initiation of the heat press
While powering up the press, the movable part has to be in the upper position, which means that the press has to be open. The press also has to be open while heating up. The press can be turned on with the green switch. If the green switch glows the press heats up to the adjusted temperature. After finishing the work with the press the switch has to be turned off and the plug has to be pulled out.
Version 12.01 5/15
3. Working with the heat press
3.1 Programming the electronic devices
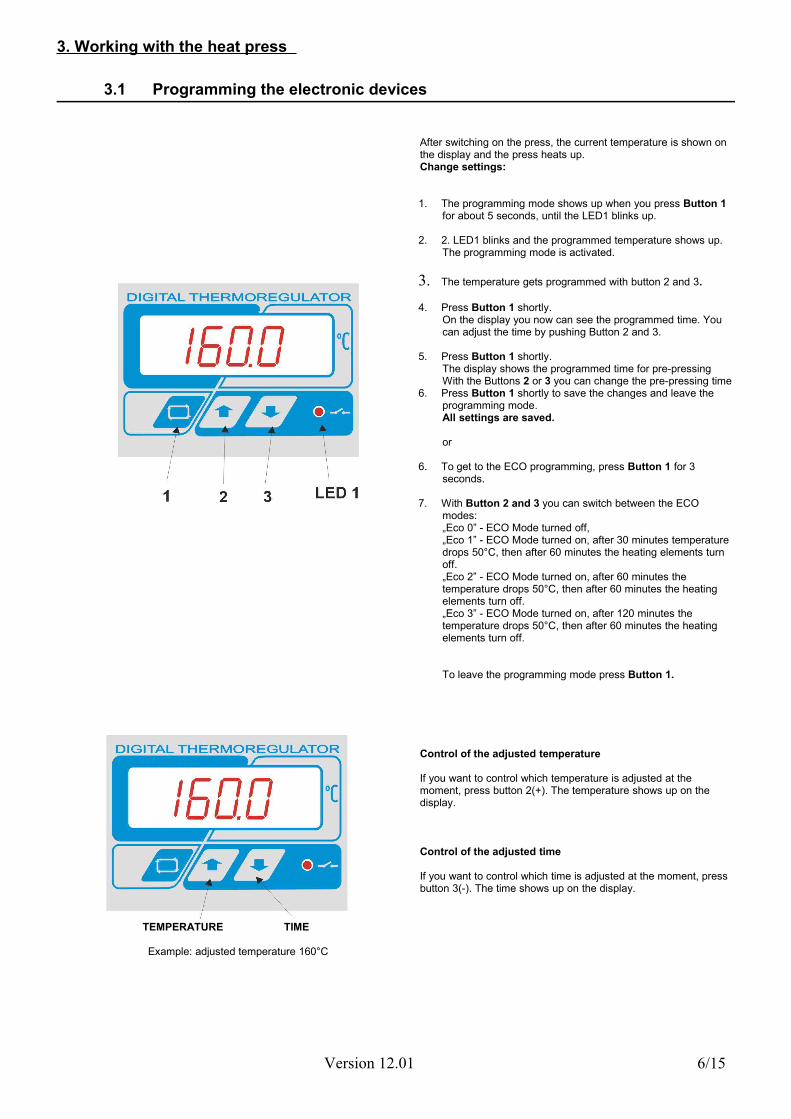
After switching on the press, the current temperature is shown on the display and the press heats up. Change settings:
1. The programming mode shows up when you press Button 1 for about 5 seconds, until the LED1 blinks up.
2. 2. LED1 blinks and the programmed temperature shows up. The programming mode is activated.
3. The temperature gets programmed with button 2 and 3.
4. Press Button 1 shortly.On the display you now can see the programmed time. You can adjust the time by pushing Button 2 and 3.
5. Press Button 1 shortly.The display shows the programmed time for pre-pressingWith the Buttons 2 or 3 you can change the pre-pressing time
6. Press Button 1 shortly to save the changes and leave the programming mode.All settings are saved.
or
6. To get to the ECO programming, press Button 1 for 3 seconds.
7. With Button 2 and 3 you can switch between the ECO modes:„Eco 0” - ECO Mode turned off, „Eco 1” - ECO Mode turned on, after 30 minutes temperature drops 50°C, then after 60 minutes the heating elements turn off. „Eco 2” - ECO Mode turned on, after 60 minutes the temperature drops 50°C, then after 60 minutes the heating elements turn off. „Eco 3” - ECO Mode turned on, after 120 minutes the temperature drops 50°C, then after 60 minutes the heating elements turn off.
To leave the programming mode press Button 1.
TEMPERATURE TIME
Example: adjusted temperature 160°C
Control of the adjusted temperature
If you want to control which temperature is adjusted at the moment, press button 2(+). The temperature shows up on the display.
Control of the adjusted time
If you want to control which time is adjusted at the moment, press button 3(-). The time shows up on the display.
Version 12.01 6/15

3.2 Bugfixing of the electronic devices
The electronic devices of the BluePRESSLine DTG-4-S heat press control the main functions of the press.
Here is a list of possible messages:
ERR.1 – No connection of the electronic devices to the temperature sensor, (Temperature sensor defect/ cable not connected)ERR.2 – Connection of electronic devices and temperature sensor bypassed , (Temperature sensor defect/)ERR.3 – Resistor of temperature sensor too low. The temperature range of the electronic devices is deceeded.ERR.4 – Resistor of temperature sensor too high. The temperature range of the electronic devices exceeded.ERR.5 – No temperature rise within 3 minutes even if heating element is switched on. (Temperature fuse is defect)ERR.6 – No reduction of the temperature within 3 minutes even if heating element is turned off. (Power relay CRYDOM is defect)ERR.7 – Temperature too high, over 230°C (Power relay CRYDOM is defect)
ERR.3 and ERR.4 can occur if the electronic devices are not programmed properly.
3.3 “ECO” Mode
The "Eco" Mode is a special economic mode, which cools down the momentarily unused press about 50°C and turns off the heating elements later. Both will be signaled acoustically.
The press gets activated again by pushing any button at the press.
3.4 Pre-pressing
The BluePRESSLine S heat press has a new function, the pre-pressing. Before closing the press, push Button 1 shortly (1 sec) to start the pre-pressing.
3.5 Application range and sample adjustments of the heat press
This press is used to put transfers and transferfilms on textiles. To get good achievements, get in contact with the producer of the textiles. Here are some settings:
Film Flex 150°C – 160°C Time 15 SecondsFilm Flex S 155°C – 160°C Time 15 SecondsFilm A-Flex 155°C – 160°C Time 15 SecondsFilm Flock 160°C – 180°C Time 15 SecondsSublimation 150°C – 160°C Time 50 Seconds
All indications without warranty, please do your own testing before producing.
Version 12.01 7/15
ECO 0 - -ECO 1 30 Minute 60 MinuteECO 2 60 Minute 60 MinuteECO 3 120Minute 60 Minute
temperature decreases The heating elementsAbout 50 degrees after turn off after

3.6 Pressure adjustments
You can adjust the pressure very precisely. Do this by following this description:1. Put a textile on the workplate.2. Close the heat press and control the pressure. Then open the heat press.o To increase the pressure- turn the knob righto To decrease the pressure- turn the knob left.
After every change of the pressure adjustment close the heat press to control the new settings. Damages caused by too high pressure adjustments does not include the guarantee.
3.7 Adjustment of the tensions springs
If you notice that the heat press does not open correctly or it opens too fast or too slow , you can change the adjustment of the tensions springs. The screw of the spring adjustment is placed on the front of the heating press. You can increase or decrease the tension with this screw. If the heat press opens to fast you have to screw the knob left. If the heat press opens to slow you have to screw the knob right. After doing this check your new adjustment.
3.8 Adjustment of the electromagnet
The electromagnet keeps the pressure lever constant and hold the heating plate down during the pressing process. When the time is over the plate will be released. This setup was adjusted in the factory.
Version 12.01 8/15
4. Maintenance
4.1 Daily Maintenance
The working surface of the heating plate and the base plate have to be clean. The heating plate can be cleaned with a clean, dry cloth. Avoid contact with the heating plate – risk of burns. The silicon gum can be cleaned with a soft cloth. You can use mild household detergent. Avoid scrub sponges, solvents or fuel.
4.2 Monthly Maintenance
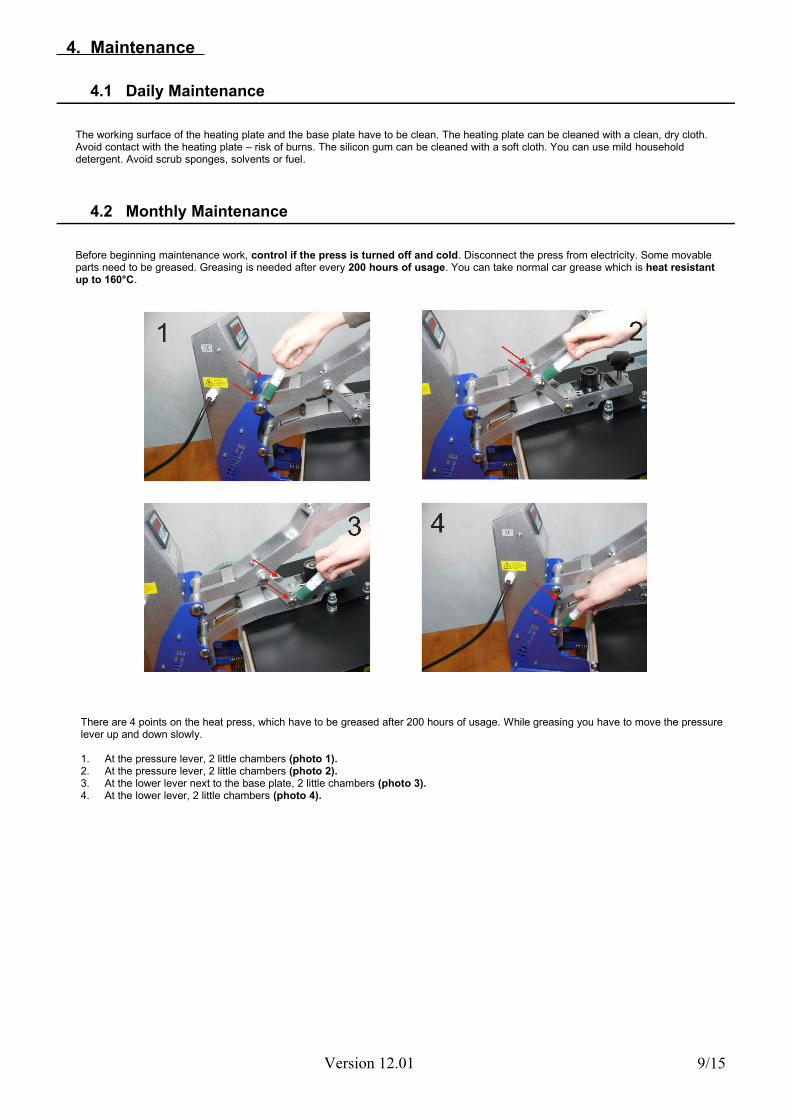
Before beginning maintenance work, control if the press is turned off and cold. Disconnect the press from electricity. Some movable parts need to be greased. Greasing is needed after every 200 hours of usage. You can take normal car grease which is heat resistant up to 160°C.
There are 4 points on the heat press, which have to be greased after 200 hours of usage. While greasing you have to move the pressure lever up and down slowly.
1. At the pressure lever, 2 little chambers (photo 1).2. At the pressure lever, 2 little chambers (photo 2).3. At the lower lever next to the base plate, 2 little chambers (photo 3).4. At the lower lever, 2 little chambers (photo 4).
Version 12.01 9/15

4.3 Replacing the main fuse
If the heat press does not work after switching on, check the main fuse of the press. The main fuse 12 A is placed at the upper part of the heat press next to the main switch (photo 1). To exchange the fuse, switch off the heat press first and pull the plug. There are additional fuses in the manual. Then remove the fuse bracket (photo 1). Pull out the main fuse (photo 2). Replace the fuse (photo 3) and tighten the fuse bracket again (photo 4).
4.4 Replacing the fuse in the power supply
To exchange the fuse, switch off the heat press first and pull the plug. Remove the back cover (photo 1). Remove the bracket of the fuse (photo 2) and pull out the fuse 1,6A (photo 3). Replace the fuse (photo 4) and tighten the fuse bracket again.
Version 12.01 10/15

4.5 Replacing the electronic devices
The electronic devices are placed inside the heat press and are regulating the time and temperature. To change the main fuse switch off the heat press and pull the plug out from the wall outlet. Unscrew the fixation screws (photo 1) and remove the back cover (photo 2). Pull out the green plug and take the electronic device out (photo 4). Put the new electronic device in the heat press. Connect the electronic device with the green plug. Screw on the back cover and screw on the fixation screws. Check the heat press.
4.6 Replacing the power supply
To change the power supply switch off the heat press and pull the plug out from the wall outlet. Unscrew the back cover. Pull out the green plug (photo 1). Take the power supply out (photo 2 ). Put the new power supply in the heat press. Connect the green plug with the power supply. Screw on the back cover of the heat press. Check the heat press.
Version 12.01 11/15
4.7 Replacing the silicon mat
To replace the silicon mat the press has to be cold and disconnected from the electricity. For the exchange you need a new silicon mat, silicon glue, acetone and a notched trowel.
1. Remove the silicon mat completely with a knife .2. Clean the plate and the new silicon mat with acetone.3. Put an equal film of silicon glue on the plate using the notched trowel.4. Put on the new silicon mat.5. Close the pressure lever gently to press the silicon mat and the plate together.6. Make sure that the plate and the mat lays exactly over each other. 7. Remove remaining glue or overlapping mat from the edges of the press.8. Let the glue dry for 24hours. Only then open the press.
4.8 Replacing the thermal fuse
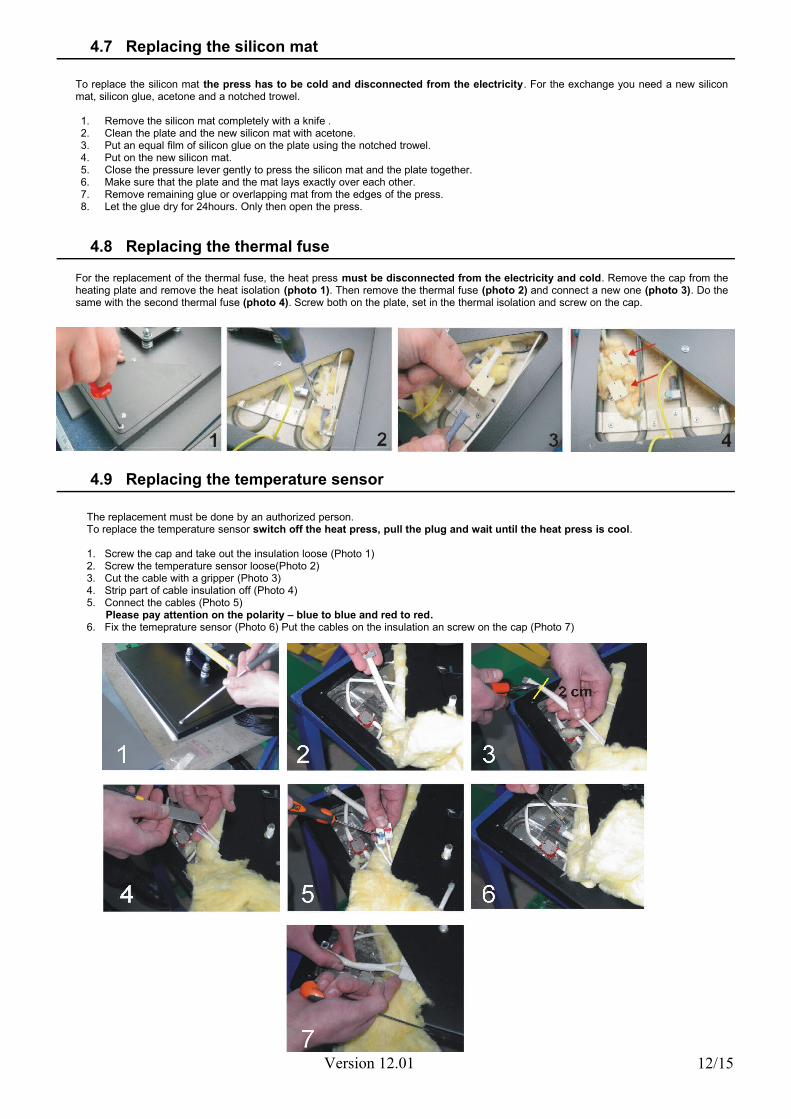
For the replacement of the thermal fuse, the heat press must be disconnected from the electricity and cold. Remove the cap from the heating plate and remove the heat isolation (photo 1). Then remove the thermal fuse (photo 2) and connect a new one (photo 3). Do the same with the second thermal fuse (photo 4). Screw both on the plate, set in the thermal isolation and screw on the cap.
4.9 Replacing the temperature sensor
The replacement must be done by an authorized person.To replace the temperature sensor switch off the heat press, pull the plug and wait until the heat press is cool.
1. Screw the cap and take out the insulation loose (Photo 1)2. Screw the temperature sensor loose(Photo 2)3. Cut the cable with a gripper (Photo 3) 4. Strip part of cable insulation off (Photo 4)5. Connect the cables (Photo 5)
Please pay attention on the polarity – blue to blue and red to red.6. Fix the temeprature sensor (Photo 6) Put the cables on the insulation an screw on the cap (Photo 7)
Version 12.01 12/15
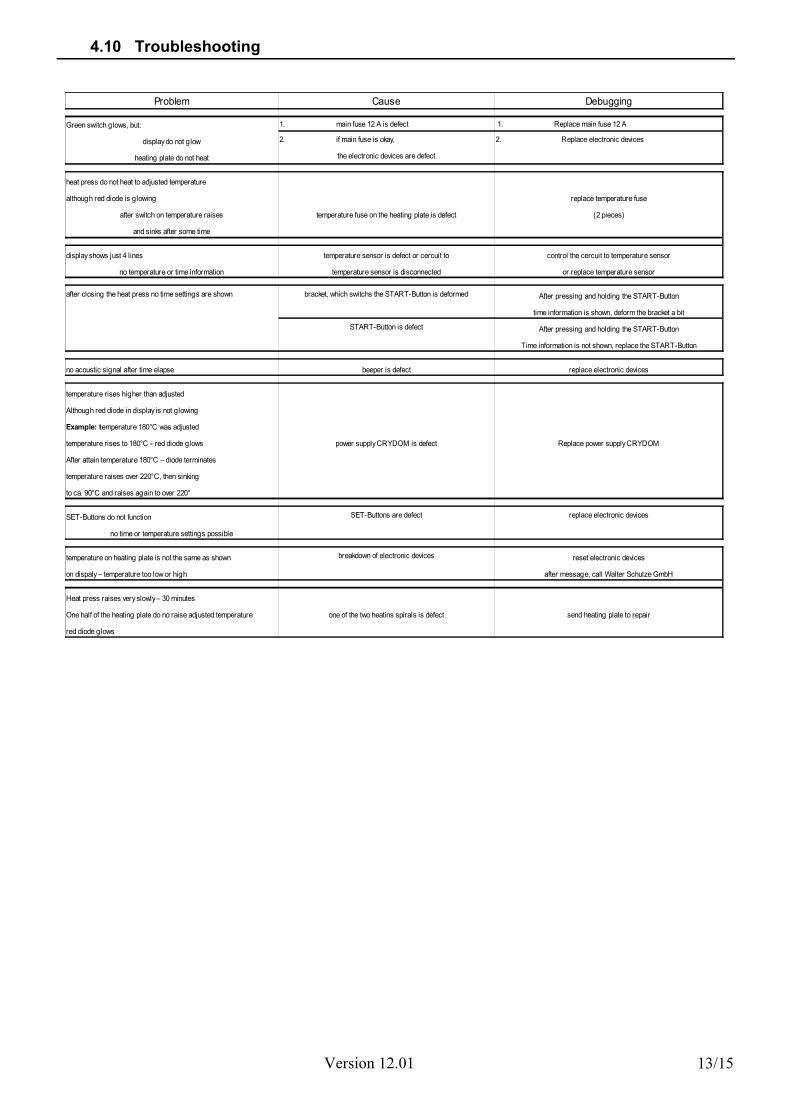
4.10 Troubleshooting
Version 12.01 13/15
Problem Cause Debugging
Green switch glows, but: 1. main fuse 12 A is defect 1. Replace main fuse 12 A
display do not glow 2. if main fuse is okay, 2. Replace electronic devices
heating plate do not heat the electronic devices are defect
heat press do not heat to adjusted temperature
although red diode is glowing replace temperature fuse
after switch on temperature raises temperature fuse on the heating plate is defect (2 pieces)
and sinks after some time
display shows just 4 lines temperature sensor is defect or cercuit to control the cercuit to temperature sensor
no temperature or time information temperature sensor is disconnected or replace temperature sensor
after closing the heat press no time settings are shown bracket, which switchs the START-Button is deformed After pressing and holding the START-Button
time information is shown, deform the bracket a bit
START-Button is defect After pressing and holding the START-Button
Time information is not shown, replace the START-Button
no acoustic signal after time elapse beeper is defect replace electronic devices
temperature rises higher than adjusted
Although red diode in display is not glowing
temperature rises to 180°C - red diode glows power supply CRYDOM is defect Replace power supply CRYDOM
After attain temperature 180°C – diode terminates
temperature raises over 220°C, then sinking
to ca. 90°C and raises again to over 220°
SET-Buttons do not function SET-Buttons are defect replace electronic devices
no time or temperature settings possible
temperature on heating plate is not the same as shown breakdown of electronic devices reset electronic devices
on dispaly – temperature too low or high after message, call Walter Schulze GmbH
Heat press raises very slowly – 30 minutes
One half of the heating plate do no raise adjusted temperature one of the two heatins spirals is defect send heating plate to repair
red diode glows
Example: temperature 180°C was adjusted
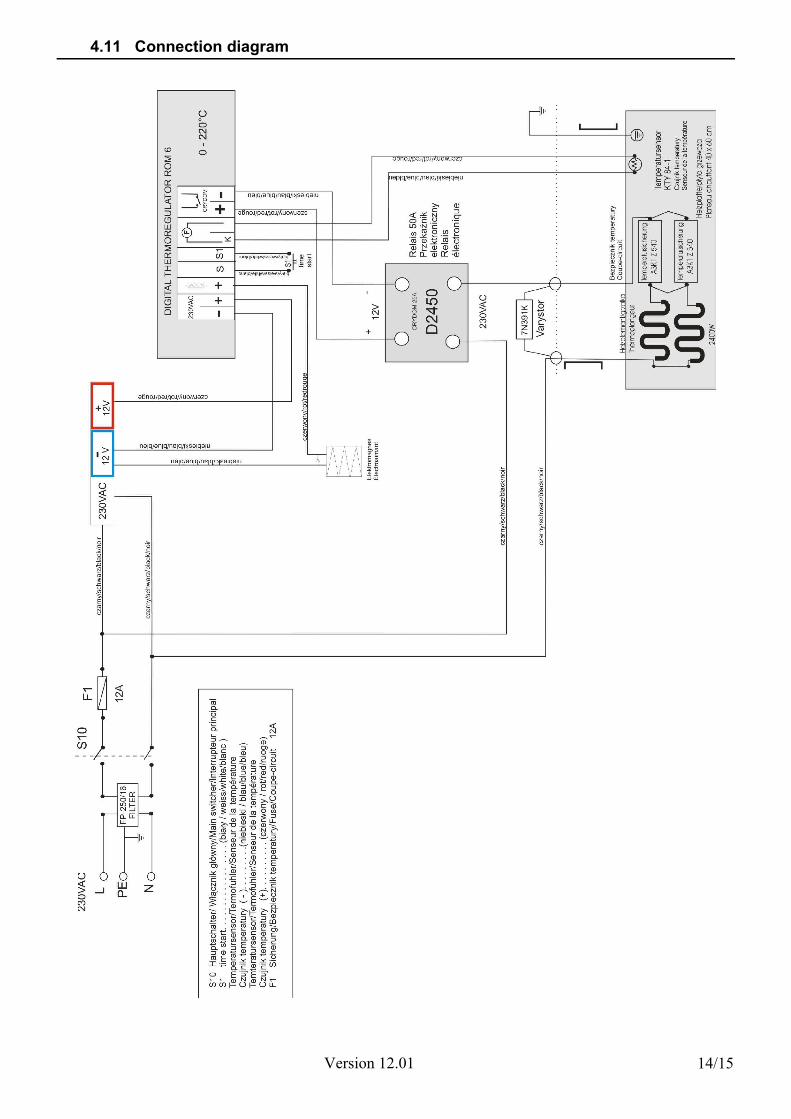
4.11 Connection diagram
Version 12.01 14/15
4.12 Testing Report
final check of the heat press:
o - base, painto - greasing of the waveso - heating plate and baseplate, silicon, teflono - electronic connection, safety wire, power cableo - electronic, max. temperature 220°C
o - check of all functions o - working time at 180°C . . . . . . . hourso - temperature tolernace at 180°C . . . . . . -/ . . . . . .+°Co - working time at 220°C . . . . . . . .hourso - test with a transfer film o - caution labels
Serial number . . . . . . . . . . . . . . . . . . Date . . . . . . . . . . . . . . . . . . . . Signature . . . . . . . . . . . . . . . . . . . . . . . . . . .
4.13 EC-Conformance-Declaration after EC- guideline for machines 2006/46 EC
The Walter Schulze GmbH Schmalenbachstraße 15 12057 Berlin as European representative of the manufacturer company ROMANIK hereby declares that the following machine:
Heat press . . . . . . . . . . . . . . . Serial number . . . . . . . . . . . .
is compliant with the specifications of the following EC directives:
Machinery ( 2006/46)Low Voltage (2006/95)EMC (2004/108)
used norms and technical specifications:
EN 292-1 EN 292-2 safety of machinesEN 60204-1 electrical equipment of machines
Berlin , . . . . . . ._____________________________Peter MeidingerPresident
All SCHULZE heat presses are exempt from the waste disposal law under reg. no. DE 231060054.
Version 12.01 15/15