version 1 - Thomann
36
USER GUIDE TRIPLEPLAY ® fishman.com
Transcript of version 1 - Thomann

1
USER GUIDETRIPLEPLAY® fishman.com
C0942ER: 192G: 148B: 46
v1.4
1.4 Software Update
version 1.4

2 3
Table of Contents
Welcome ________________________________________________________________________________System Requirements _____________________________________________________________________What is TriplePlay __________________________________________________________________________What’s Included _____________________________________________________________________________In a Hurry? Basic MIDI Controller Mode _________________________________________________________TriplePlay Package Contents ________________________________________________________________Basic Concepts ________________________________________________________________________________ A Different Kind of Pickup MIDI Guitar vs. Traditional Guitar Virtual Instruments Virtual Guitar Rigs Plug-Ins and Hosts
Typical TriplePlay Setups ___________________________________________________________________________ Installation, Setup and Final Setup Steps_____________________________________________________ Preferences ________________________________________________________________________________Calibrating TriplePlay ________________________________________________________________________Scanning for Installed Plug-Ins __________________________________________________________________Add Traditional Guitar ___________________________________________________________________________ Controlling TriplePlay Software via External MIDI Device________________________________________TriplePlay Hardware, Software, Features and Controls ____________________________________________Hardware Only Functionality, Basic Mode and Optional Controller Boot Functions ____________________ Basic Mode System Reinitialize Boot in Hardware Mode
Hardware Mode _________________________________________________________________________ Hardware Mode Patches
Load Controller: Loading Hardware Mode Patches from TriplePlay Standalone Software
TriplePlay Software ___________________________________________________________________________ The Perform Window The Patch Readout Area The Save Patch Dialogs The Sensitivity/Tuner Area
The Mixer Area __________________________________________________________________________________Plug-In Select Window ___________________________________________________________________________Plug-In Edit Window ___________________________________________________________________________The TriplePlay Parameters Panel ____________________________________________________________________ Synth View Pedal View External Synth View External Synth + Pedal View
The Fretboard/Edit Splits Area _________________________________________________________________Plug-In Version of TriplePlay ____________________________________________________________________Pull Down Menus _____________________________________________________________________________ Patches Menu Options Menu View Menu Window Menu Help Menu
Glossary ______________________________________________________________________________________
Page 3Page 3Page 3Page 3Page 3Page 4Page 5
Page 6Page 8Page 9Page 11Page 12Page 12Page 13Page 13Page 14
Page 14
Page 18
Page 20Page 21Page 21Page 22
Page 25Page 27Page 27
Page 32
3
Welcome
Thank you for making Fishman a part of your music making experience. We are proud to offer you high-quality professional-grade tools to empower you to sound your very best. We are confident that with TriplePlay, you now own a remarkable musical tool that will transform the way you play guitar.
System Requirements
Standard Broadband connection for software downloads
Computer Hardware: 4GB of RAM and 40GB of free HD space
Apple Mac: OS X Mountain Lion (10.8) or higher
Windows: Win 10 (32-bit and 64-bit)
Refer to fishman.com for detailed system requirements. System requirements for partner software packages
may change at any time. Consult those vendors for more details on their requirements.
What is TriplePlay?
TriplePlay is like a musical interpreter, translating your guitar performance into MIDI, a language understood by most music software and hardware. With TriplePlay, a guitar can sound like any instrument, real or imagined. TriplePlay doesn’t change what you love about your guitar, nor will you sacrifice any of your current sounds. In fact, you’ll probably find yourself combining traditional and synthesized sounds in exciting new ways. MIDI guitars have existed for decades, but they’ve never been this powerful, affordable, or easy to use.
What’s Included?
TriplePlay includes a pickup and controller that mount on your guitar, a small wireless USB receiver that plugs into your computer, a charging cable and power supply, hardware for multiple mounting options, and installation tools. You also get a library of software for recording, performance and notation, featuring stunning collections of sounds and virtual instruments. You need no additional music software and no music software experience to get started.
But if you are an experienced computer musician, you’ll appreciate how well TriplePlay performs with your favorite music software, including synths, samplers, drum machines, and digital DJ rigs. TriplePlay also integrates well with most popular DAW software compatible with AU or VST format plug-ins.
*Please consult the Hardware Installation Guide at www.fishman.com/tripleplay/help for more information before attempting to install any TriplePlay hardware on your instrument.
In a Hurry? Basic MIDI Controller Mode
Fishman’s TriplePlay controller and USB receiver will likely be usable as a basic MIDI controller, without any additional software, when connected to systems and applications that support MIDI input.
To determine capability, simply connect your USB receiver to your device and pair it with your controller. Your TriplePlay should appear in most software as a MIDI device with a single MIDI channel for all guitar string output. See “Boot in Hardware Mode” for details on how to use basic MIDI controller mode with six separate MIDI channels, one for each guitar string. Note that some hardware functions, such as global string sensitivity, are saved to your TriplePlay controller during use of our TriplePlay software. These settings will travel with your device even when used in Basic Mode.
A minimal installation of TriplePlay software on any compatible computer will allow you to set your string sensi-tivity and transport it with your hardware for use in Basic MIDI Controller Mode with other systems.

4 5
TriplePlay Package Contents
A. TriplePlay controller. Mounts to the top of your guitar.
B. TriplePlay pickup. Installed close to the bridge of your guitar.
C. TriplePlay receiver. This plugs into one of your computer’s USB ports.
D. Controller mounting brackets. An alternative to direct instrument controller mounting.
E. Controller mounting pad. Use this to attach your controller to your guitar or tailpiece bracket.
F. TOM pickup mounting brackets. For use with Tune-O-Matic style guitars
G. Pickup mounting pads. These can mount the pickup to your instrument or a provided bracket. H. Charge cable and AC adapter. Recharge the controller via USB or the included AC adapter.
I. Setup tools. The screwdriver and spacer tool help fine-tune your TriplePlay installation.
D E F
G H I
A B C

5
Basic Concepts
If you’re new to MIDI guitar or making music with computers, you may find it helpful to read through the following sections. If you’re an experienced computer musician, you can probably skip ahead to Typical TriplePlay Setups.
A Different Kind of Pickup.
Traditional electric guitar pickups convert string vibration into the electrical signal you send to an amplifier or recording device. The TriplePlay pickup converts that same performance into MIDI, transmitting it wirelessly to your computer.
MIDI Guitar vs. Traditional Guitar.
TriplePlay does not wirelessly transmit your traditional guitar sound. You still need to use a cable to connect your guitar to a computer, amp, or other device. The best way to do this is by plugging into the computer through a dedicated audio interface. This allows the user to combine traditional guitar and MIDI inside the TriplePlay software. While it is possible to connect directly to most computers via their audio input jacks, most users prefer the superior sound of a dedicated interface. If you only plan to use MIDI, you can do everything wirelessly without an audio interface.
Virtual Instruments.
A virtual instrument (VI) is software which mimics the sound (and often the look and feel) of a physical instrument. TriplePlay comes with VIs from the world’s most respected developers. You can conjure and combine the sounds of hundreds of standard instruments, or warp them into exciting new tones. TriplePlay can also control most commercially available virtual instruments.
Virtual Guitar Rigs.
A virtual guitar rig (VGR) is software that replicates the sound of amps, pedals, and other guitar gear. VGRs can reproduce convincing electric guitar tones, just by connecting your traditional guitar signal directly to your computer. TriplePlay comes with an industry standard virtual guitar rig that will have you believing you’re playing through your favorite analog equipment.
Plug-Ins and Hosts.
A plug-in is a computer program that runs inside another “host” program. TriplePlay works as both a plug-in and a host. When you run TriplePlay in standalone mode, it hosts all the plug-ins that come with the program and any others you’ve installed on your computer. TriplePlay can also run as a plug-in (AU or VST formats) within any compatible recording software, including the powerful program Fishman provides with TriplePlay.

6 7
Typical TriplePlay Setups
TriplePlay hardware can be used as a basic MIDI controller. Your TriplePlay hardware should appear in most software as an available MIDI device with output on a single MIDI channel. Basic MIDI Controller Mode is use-ful for quick access to MIDI functions, with little or no software installation required, and will allow access to proprietary plug-ins and instruments not usable within Fishman’s software.
The most common way to use TriplePlay is to connect to a computer using the wireless receiver for MIDI sounds and an audio interface for traditional guitar sounds. (If you’re not clear on how the two types of sounds differ, read MIDI vs. traditional guitar.) This setup requires a separately purchased computer to audio interface. *Windows installations may require a low latency audio driver - consult the Software Install Guide (Windows) at www.fishman.com/tripleplay/help for more details.
If you only want to control MIDI sounds, you can omit the audio interface and audio cables. This method requires only one USB connection.
TriplePlay wirelessly transmits MIDI data.
Audio signal sent to computer via audio interface
TriplePlay receiver
Computer runningTriplePlay software
Audio out to headphones or
speakers
TriplePlay wirelessly transmits MIDI data.
TriplePlay receiver
Computer runningTriplePlay software
Audio out to headphones or
speakers
TriplePlay wirelessly transmits MIDI data.
TriplePlay receiver
Audio out to headphones or
speakers
Computer or device running MIDI compatible
applications.

7
Typical TriplePlay Setups (cont’d)
If your computer has an internal sound card, you can also connect your guitar’s output directly to your computer’s audio input using a simple audio connector. This is an easy way to explore TriplePlay, though most users eventually opt for the improved sound and performance of a dedicated audio interface.
You can also use TriplePlay in conjunction with external synthesizers, samplers, and drum machines.
Some hardware electronic instruments (especially older ones) connect to your other gear via five-pin MIDI cables. These require a computer to MIDI interface for integration with TriplePlay.
TriplePlay receiverGuitar audio to
computer audio input via1/4” and 1/8” audio adapter
TriplePlay wirelessly transmits MIDI data.
Computer runningTriplePlay software
Audio out to headphones or
speakers
TriplePlay wirelessly transmits MIDI data.
Audio signal sent to computer via audio interface
TriplePlay receiver MIDI interface
Synth, sampler, or other MIDI sound generator
Computer runningTriplePlay software
Audio out to headphones or
speakers
TriplePlay wirelessly transmits MIDI data.
Audio signal sent to computer via audio interface
TriplePlay receiver MIDI interface
Synth, sampler, or other MIDI sound generator
Computer runningTriplePlay software
Audio out to headphones or
speakers

8 9
Installation and Setup
Installing and calibrating TriplePlay hardware requires special care. We’ll guide you through the process in easy-to-follow steps. The hardware should be installed on your instrument prior to software installation. When the installation of TriplePlay hardware is complete, you can install the software and calibrate the system to suit your style.
Download the documents below http://www.fishman.com/tripleplay/help
• Hardware Install Guide • Software Install Guide
Follow the step-by-step instructions, and then return here for a few final setup steps. It’s almost time to start making music!
Final Setup Steps
Charging the Controller TriplePlay uses no disposable batteries. Connect the controller to a com-puter USB port or the AC adapter using the provided charge cable when-ever it needs to be recharged (figure 1). A small green light illuminates while the controller is charging and goes out when charging is complete. It takes about 90 minutes to charge the controller, which will provide an estimated 20 hours of performance time.
Pairing the Controller and Receiver You must pair the controller and receiver. Complete the procedure below before opening the TriplePlay software application. Note that the controller and receiver will find the least noisy wireless channel on which to communicate during the pairing procedure. For this reason, consider re-pairing your TriplePlay whenever you move to a new location or introduce new wireless products to your environment.
1. Connect the receiver to one of your computer’s USB ports. The receiver’s LED flashes several times per second, indicating that it’s searching for a controller to link to.
2. Turn on your controller. Its LED button flashes once per second, indicating that it’s searching for a receiver.
3. The LEDs on the controller and receiver are also buttons. Press the one on your receiver and the one on your controller (figure 2). The order doesn’t matter, and you don’t need to press the two buttons simultane-ously. Note that the button on the controller does not click; the flashing of the light changes when you de-press the button to indicate it is engaged.
4. Now the receiver LED glows continuously, indicating that it’s linked to your controller. The controller LED blinks once every five seconds, indicating that it’s transmitting to your receiver.
5. To temporarily break the connection, press either of the LED buttons. Both LEDs will resume blinking at their former faster rate. Press either LED button to reconnect.
If you have started your TriplePlay software before your items are linked, the software may need to be closed and reopened after the linking process is complete.
figure 2
figure 1

9
Preferences
Audio Hardware Settings
Configure TriplePlay to work with whatever method you’re us-ing to get sound in and out of your computer. (The most common configuration options are covered in Typi-cal TriplePlay Setups.)
To reveal these settings, click Options near the upper-left corner of the main window, and then Preferences. The Pref-erences window appears (figure 3).
If you’re using a dedicated audio interface, make sure it’s connected. Its name should appear as an option in the out-put and input fields. If the device has more than two chan-nels of input and/or output, you can select which channels to use.
If you don’t intend to use traditional guitar, deselect your audio input. Many computers will default to using an inter-nal microphone for this input, which will result in squealing feedback unless the channel is set to an appropriate input.
If you aren’t using a dedicated audio device, simply choose Built-In Output (Mac) or Windows as your Audio Device output, and sound will generally be available from the headphone jack on your computer. Windows users, for best performance, should consider using an ASIO driver, such as ASIO4ALL, which is freely available on the internet. If you’ve downloaded a third party ASIO driver, you should select that as your option for audio output. If your audio interface has multiple outputs, all available options appear here (figure 4). You can leave other Audio Device Settings at their defaults for now.
Press the Test button. If your interface is properly config-ured, you should hear a test tone through your speakers or headphones. Next, try playing a few notes on your guitar (if you’re using traditional guitar in addition to MIDI). The meter beneath the Test button should illuminate as you play. (If the signal seems too weak or too loud, adjust the (figure 4) levels via the controls on your interface, and make sure your guitar’s volume controls are all the way up!)
Note that this meter only measures the signal from your traditional pickups, not the synth and sampler sounds you create within TriplePlay. (If you’re not clear on this distinction, please read MIDI vs. traditional guitar.)
Sample rate should default to the values established by your output device.
Audio buffer size affects latency and computer performance.
figure 3
figure 4

10 11
After you are performing and getting sound from your TriplePlay patches, set this value as low as you can with-out hearing unpleasant pops, clicks, distortion and other artifacts. As a rule of thumb, Windows Audio users can usually set this at 512 samples, Mac and ASIO (Windows) users may be able successfully use values of 128 or lower. The lower the buffer setting, the less latency (delay between playing a note and hearing the note) a user may experience. However, lower buffer settings are more demanding for your computer to process, and clicks, pops, dropouts and unpleasant digital distortion become more likely.
Additional Preferences
• Hardware Synth Midi Output allows a MIDI output device to be selected which can be used to connect to an external keyboard or sound module.
• Foot pedal MIDI Input allows selection of a third party MIDI foot pedal or other controller (patch changes, sustain, etc.) for use with the TriplePlay application. IMPORTANT: leave this selection set to none if you are using the Fishman FC-1 Controller (foot pedal) with your TriplePlay application. FC-1 can access your ap-plication without this setting.
• Midi Bend Range is set by default for TriplePlay at 12, and it is the correct setting for all Fishman Factory Patches and approved 3rd party libraries. Note the default setting for most virtual and hardware instru-ments is 2. If you change this setting, your TriplePlay factory patches and 3rd party libraries may not prop-erly allow string bends. It is preferable, then, to adjust instruments in new patches to use Pitch Bend Range of +- 12 when possible, to maintain uniform pitch bend range throughout all TriplePlay created patches, rather than to adjust this setting back and forth.
• Tune Base allows you to use a tuning standard with TriplePlay other than A=440. Tune Base makes adjust-ments in Cents (100th of a semitone) starting from a default (0) of A=440.
• The Guitar channel bypasses synth mix toggle at the bottom of the preferences dialog window allows the user to bypass traditional guitar channel volume control when controlling the master volume fader.
• The Final volume controlled By CC 80 toggle at the bottom of the preferences dialog window allows the user to control overall volume expression post master volume, with use of an external MIDI device.
• Mute output when tuner active will mute all audio from the TriplePlay application when the tuner is acti-vated.
• Use enhanced cache enables increased pre-memory of patches when using the Songs feature of TriplePlay. The Songs feature allows for fast changes between patches without delays. Enhanced caching requires more RAM and faster computer processors to function properly. If you are noticing sluggish performance and crashing from TriplePlay in Songs, deselect this option. For more information on this feature, see the description of Songs on p.29

11
Calibrating TriplePlay
One of TriplePlay’s coolest features is the way you can fine-tune it to suit your individual playing style. Here’s how:
1. Once you’ve linked your controller and receiver as detailed on page 8, locate the TriplePlay program on your computer and open it to begin.
2. The main TriplePlay window will appear (figure 5)
3. We’ll get to know the TriplePlay interface in-depth soon. But, for now, focus on the Sensitivity/Tuner Area, the small box in the center of the interface beneath the Fishman logo (figure 6 and 7). Here are the sensitiv-ity meters for each string, which we’ll use to fine-tune TriplePlay’s response. There’s also a battery icon that indicates your controller’s current charge level. (If you see the words Controller Not Found, double-check the instruction in Pairing your controller and receiver then close and reopen your TriplePlay application.)
4. Play a few notes. You may not hear any TriplePlay sounds yet, but you should see figure 6 the meters illuminate as you pluck each string. We suggest tuning your instrument for best results. Click the switch beneath the meters to change to the tuner view, and then click it again when you’re done to return to the sensitivity display.
5. Set the sensitivity level by plucking each string, and then clicking the up/down arrows to the right of each meter to specify more or less sensitivity. (These arrows appear when you hover your cursor to the left of the numerals (figure 6).
6. The sensitivity is best calibrated so only your very loudest playing sends the meters to the tops of their ranges (red). (Don’t be surprised if some strings require higher sensitivity settings than others.) TriplePlay remembers these global settings.
figure 5
figure 6 figure 7
12 13
Calibrating TriplePlay Cont’d
5. Set the sensitivity level by plucking each string, and then clicking the up/down arrows to the right of each meter to specify more or less sensitivity. (These arrows appear when you hover your cursor to the left of the numerals (figure 6).
6. The sensitivity is best calibrated so only your very loudest playing sends the meters to the tops of their ranges (red). (Don’t be surprised if some strings require higher sensitivity settings than others.) TriplePlay remembers these global settings.
Scanning for Installed Plug-Ins
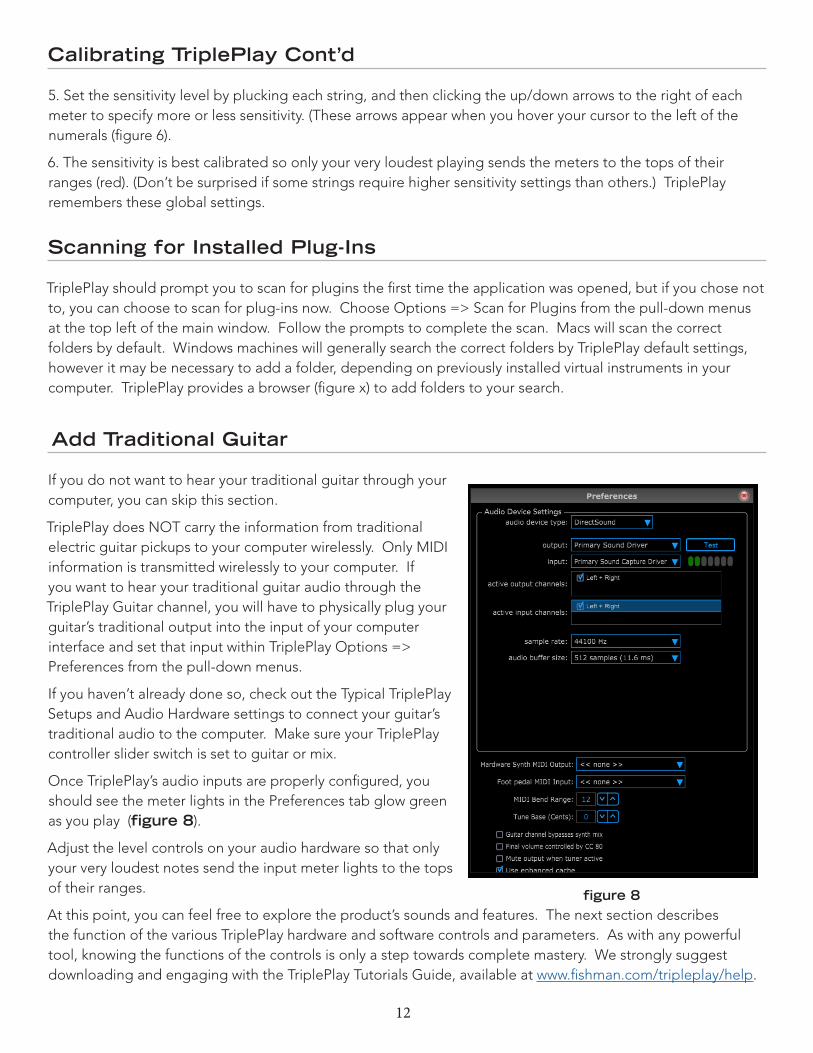
TriplePlay should prompt you to scan for plugins the first time the application was opened, but if you chose not to, you can choose to scan for plug-ins now. Choose Options => Scan for Plugins from the pull-down menus at the top left of the main window. Follow the prompts to complete the scan. Macs will scan the correct folders by default. Windows machines will generally search the correct folders by TriplePlay default settings, however it may be necessary to add a folder, depending on previously installed virtual instruments in your computer. TriplePlay provides a browser (figure x) to add folders to your search.
Add Traditional Guitar
If you do not want to hear your traditional guitar through your computer, you can skip this section.
TriplePlay does NOT carry the information from traditional electric guitar pickups to your computer wirelessly. Only MIDI information is transmitted wirelessly to your computer. If you want to hear your traditional guitar audio through the TriplePlay Guitar channel, you will have to physically plug your guitar’s traditional output into the input of your computer interface and set that input within TriplePlay Options => Preferences from the pull-down menus.
If you haven’t already done so, check out the Typical TriplePlay Setups and Audio Hardware settings to connect your guitar’s traditional audio to the computer. Make sure your TriplePlay controller slider switch is set to guitar or mix.
Once TriplePlay’s audio inputs are properly configured, you should see the meter lights in the Preferences tab glow green as you play (figure 8).
Adjust the level controls on your audio hardware so that only your very loudest notes send the input meter lights to the tops of their ranges.
At this point, you can feel free to explore the product’s sounds and features. The next section describes the function of the various TriplePlay hardware and software controls and parameters. As with any powerful tool, knowing the functions of the controls is only a step towards complete mastery. We strongly suggest downloading and engaging with the TriplePlay Tutorials Guide, available at www.fishman.com/tripleplay/help.
figure 8

13
Controlling TriplePlay Software Via External MIDI Device
Users may want to control TriplePlay functions using an external device. Once a device is connected to your computer, select its input port via the Preferences menu, under Options from the pull down menus. The Foot pedal MIDI input allows you to select your MIDI input device. Note that this DOES NOT apply to using the Fishman FC-1 foot pedal. This device is specifically designed to work with the TriplePlay application and re-quires no assignment within the TriplePlay application. However, you may choose to use a third part pedal in combination with the FC-1. In this case, plug your external MIDI controller into the input of the FC-1 and use MIDI Ch 8 for all program change messages. The TP application has five possible externally controlled func-tions. These should be sent via MIDI Ch 1:
1. Hold / Loop. Send CC 66 value 127, 0 on release, for hold/loop
2. Patch up. CC 68 value 128, 0 on release for patch up
3. Patch down. CC 67 value 127, 0 on release for patch down
4. Bank Settings. Bank and Program change messages should be sent on MIDI Ch 1. Setting the MSB and LSB for program change messages allows the user to select and increment within the following lists of patches:
User Patches: MSB 0 LSB 0: Patches 1-128 LSB 1: Patches 129-240
Factory Patches: MSB 1 LSB 0: Patches 1-128 LSB 1: Patches 129-240
Library Patches: MSB 2 LSB: LSB number selects which library Patches 0-128 only
Songs: MSB 3 LSB: LSB number selects which song Patches 0-128 only
Hardware Patches: MSB 5 LSB 0: Patches 1-128 LSB 1: Patches 129-240
5. Program Change. A MIDI program change will change to a user patch number which is one greater (de-pending on the pedal brand – some pedals will correct for this automatically, and the numbers will correspond) than the program change number. Program Change commands require a bank message (MSB LSB) to assign the patch list where the change will take effect. So, for example, if you send MSB 0 and LSB 0, with a program change 5 on midi channel 1, TriplePlay will go straight to user patch #6.
6. Volume Expression. CC 80, controlled via expression pedal. Use this command for control of TriplePlay volume post Master fader (for this to work, the final volume dialog in the Preferences menu must be toggled to on.)
TriplePlay MIDI Ports
TriplePlay information is sent on two MIDI ports. Port 1 is called Fishman TriplePlay or TP Guitar. Port 2 is called MIDIIN2 or TP Control. Note that useful information for performance is ONLY on Port 1. Many DAW will require that you ignore information on Port 2 (MIDIIN2) for TriplePlay recording to work. This port’s information is only used for communication back and forth between the TriplePlay controller and receiver and is unnecessary for recording or other MIDI performance purposes. The figure to the right shows both TriplePlay ports as they are available within Presonus StudioOne 2 for Windows. Fishman TriplePlay would be the correct port to select in all cases.

14 15
Hardware Only Functionality, Basic Mode and Optional Controller Boot Functions
Your TriplePlay controller has several optional boot modes which can be useful for certain functions of the product when operated outside of TriplePlay software or for resetting factory defaults and other diagnostics. These can be initiated by holding a D-Pad control down, while simultaneously turning on the power switch of the TriplePlay controller.
←B
Enlarged D-Pad
A B
C
D
A. Enter
B. Back
C. Up
D. Down
TriplePlay Hardware, Software, Features and Controls
Hardware The TriplePlay hardware consists of the controller, the pickup, and the receiver.
A. Volume knob. Controls the TriplePlay mixer’s Master fader, setting the overall volume for your virtual instruments and guitar sounds. B. Guitar/Synth Selector switch. In the middle Mix po-sition, you hear both the Guitar channel and any active Synths channels. With Guitar selected, all synth channels are muted, and you hear only the Guitar channel. With Synth selected, the Guitar channel is muted, and you hear only the virtual instru-ments on the synth channels. C. D-Pad control. A set of four momentary buttons for navigating TriplePlay’s Guitar Setup menu and scrolling between patches.
D. Controller LED button/status light. Both a pushbutton and an indicator light. Verifies battery power and the connection between your controller and receiver. When you power up the controller, the LED flashes once per second. Pressing both this button and the receiver’s LED button/status light links the two components, at which point the controller’s LED flashes once every five seconds. Pressing the button again temporarily breaks the link, and the LED resumes flashing at its faster rate.
E. Charge indicator LED. Glows green while the controller is being charged. The light goes out when the controller is fully charged.
F. Power switch. Turns the controller on and off.
G. USB power jack. Attach the included USB A to Micro USB B cable to charge the controller via the included adapter or most computer USB ports.
H. Receiver LED button/status light. Both a pushbutton and an indicator light. When the receiver is first connected to one of your computer’s USB ports, its LED flashes several times per second, which indicates that it’s searching for a controller. Pressing both this button and the controller’s LED button/status light links the two components, at which point the LED glows continuously. Pressing this button again temporarily breaks the link, and the LED resumes flashing at its faster rate.
←
←A
FE
G
H
D
CB
15
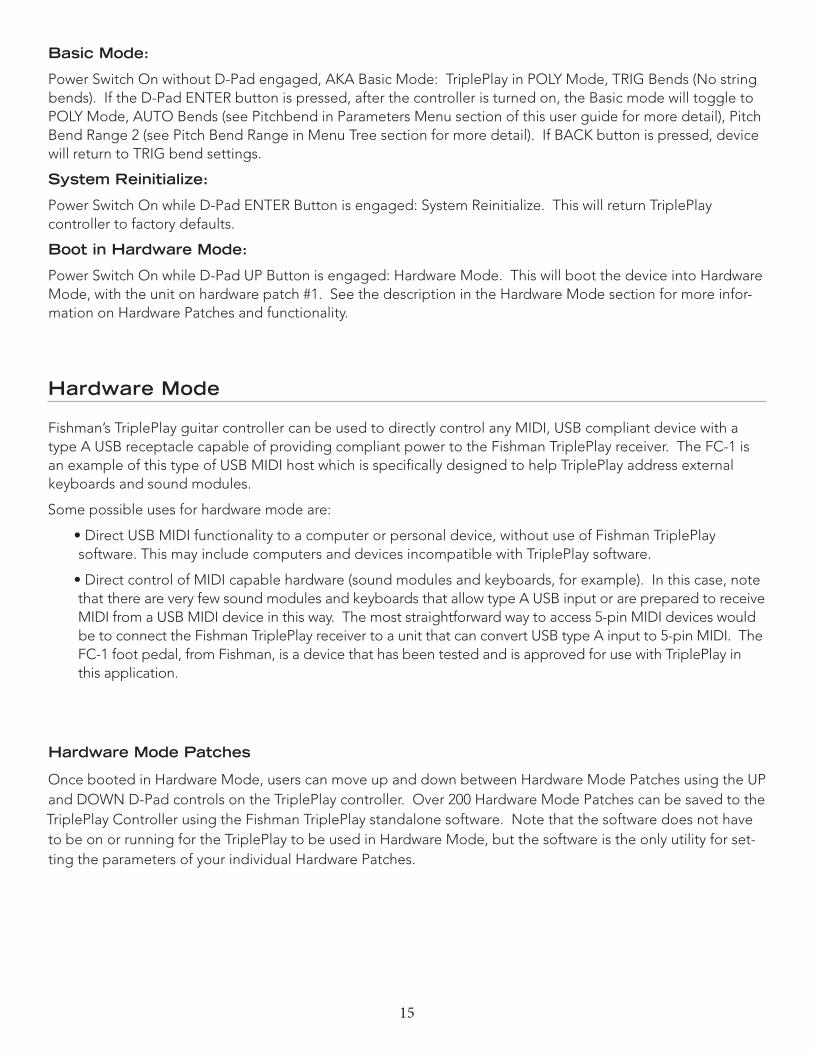
Basic Mode:
Power Switch On without D-Pad engaged, AKA Basic Mode: TriplePlay in POLY Mode, TRIG Bends (No string bends). If the D-Pad ENTER button is pressed, after the controller is turned on, the Basic mode will toggle to POLY Mode, AUTO Bends (see Pitchbend in Parameters Menu section of this user guide for more detail), Pitch Bend Range 2 (see Pitch Bend Range in Menu Tree section for more detail). If BACK button is pressed, device will return to TRIG bend settings.
System Reinitialize:
Power Switch On while D-Pad ENTER Button is engaged: System Reinitialize. This will return TriplePlay controller to factory defaults.
Boot in Hardware Mode:
Power Switch On while D-Pad UP Button is engaged: Hardware Mode. This will boot the device into Hardware Mode, with the unit on hardware patch #1. See the description in the Hardware Mode section for more infor-mation on Hardware Patches and functionality.
Hardware Mode
Fishman’s TriplePlay guitar controller can be used to directly control any MIDI, USB compliant device with a type A USB receptacle capable of providing compliant power to the Fishman TriplePlay receiver. The FC-1 is an example of this type of USB MIDI host which is specifically designed to help TriplePlay address external keyboards and sound modules.
Some possible uses for hardware mode are:
• Direct USB MIDI functionality to a computer or personal device, without use of Fishman TriplePlay software. This may include computers and devices incompatible with TriplePlay software.
• Direct control of MIDI capable hardware (sound modules and keyboards, for example). In this case, note that there are very few sound modules and keyboards that allow type A USB input or are prepared to receive MIDI from a USB MIDI device in this way. The most straightforward way to access 5-pin MIDI devices would be to connect the Fishman TriplePlay receiver to a unit that can convert USB type A input to 5-pin MIDI. The FC-1 foot pedal, from Fishman, is a device that has been tested and is approved for use with TriplePlay in this application.
Hardware Mode Patches
Once booted in Hardware Mode, users can move up and down between Hardware Mode Patches using the UP and DOWN D-Pad controls on the TriplePlay controller. Over 200 Hardware Mode Patches can be saved to the TriplePlay Controller using the Fishman TriplePlay standalone software. Note that the software does not have to be on or running for the TriplePlay to be used in Hardware Mode, but the software is the only utility for set-ting the parameters of your individual Hardware Patches.

16 17
Each Hardware Patch contains parameter information that will tell your TriplePlay how to behave when it is used in Hard-ware Mode. Splits can be created, just as with your software synth patches, and each split will be assigned the parameters detailed in its specific split channel. All of the parameters available are detailed in this in the TriplePlay Parameters sec-tion (pg.22) The Hardware Synth (figure 9) shows a hardware synth loaded into Synth 1, within TriplePlay standalone soft-ware. This indicates that any notes occupied by the region in purple, in your fingerboard splits, will have the parameter settings you save in this parameter menu, once the patch is loaded into your controller and is activated. This includes the corresponding program change and other MIDI com-mands created in the bottom of the menu. These parameter settings can be made for each region, if you wish.
Once a patch is created, save it to your Hardware Patches list.
Creating and Editing Hardware Patches from TriplePlay Standalone
The (figure 10) shows the Hardware Patches list from the Patches window (Window => Patches). When changes are made to this list they are automatically synched to the TriplePlay guitar controller. For this reason, TriplePlay must be connected to your computer when editing and saving Hardware Patches. If your device is not paired with the receiver and connected to your computer, the Hardware Patches list will appear in gray and cannot be accessed. If you want to confirm he current patch list is synched to the controller, you can do this manually as well. From the Patches window pull down menu (Window => Patches) choose Resend Hardware Patches to Controller from the Options menu.
figure 9
figure 10

17
TriplePlay Application
Please note that no one guide could be large enough to detail all the features and options in the huge variety of software that is provided with your new guitar controller system. We encourage you to read and investigate the full features of the partner software from their individual user guides and internet knowledge bases. The next section will discuss the specific features of your Fishman branded TriplePlay software.
The Perform WindowThe Perform Window is TriplePlay’s primary user interface. It’s arranged into several sections:
A. Patch Readout area. Use to audition select, load, and save your TriplePlay patches. (A “patch” is a snapshot of a TriplePlay setup, whose info includes your choice of instruments, fretboard layout, and other parameters.) More details in the Patch Readout area section of this document (pg. 17-18).
B. Sensitivity/Tuner area. This area doubles as a tuner and a calibration tool that fine-tunes TriplePlay to suit your playing style. For more info, see Sensitivity/Tuner area (pg.20).
C. Mixer area. A virtual mixing board for adjusting the levels, panning, and solo/mute status of the guitar and synth sounds that comprise each patch. Its components and functions are covered in Mixer area (pg. 20).
D. Fretboard/Edit Splits area. Displays each note you play in real time. It’s also where you create “splits” — patches that assign different sounds to different parts of the fretboard. More details in Fretboard/Edit Splits area (page 25).
E. Pull-Down Menus. Here you set your TriplePlay preferences, check for software updates, and call up various views and windows. The specific menus are detailed in the Pull-Down menus section of this document (page 27).
F. FC-1 Uitility. Click on this indicator (or choose FC-1 Configuration from the pull down menus) to activate the FC-1’s editing window. If you do not have an FC-1 foot pedal, this button will not appear. The specific function of the FC-1 utility is detailed in the FC-1 Utility section at the end of this document (page 30).
The Patch Readout AreaHere you preview, select, modify, and save your TriplePlay patches.
A. Patch name. Displays the name of the current TriplePlay patch.
B. Save button. Opens the Save Patch dialog, which lets you save your current settings as a new user patch. (If you’ve edited a patch but haven’t yet saved it, the Save icon turns red rather than blue.)
C. Browse Patches button. Opens the Patches window, from which you can load any factory or user patch.
D. Patch up/down buttons. Clicking the up and down arrows steps you through adjacent patches as arranged in the Patches window.
E. Program change number. Displays the number of each patch, as determined by its position in the Patches window lists, as well as the patch list currently active.
E
BC
D
A
←A
B CD
FE
G
HI

18 19
The Patches Window• Patches window. Appears when you click the Patch Readout area’s Browse Patches button. (figure 11). Here
you can browse third party Libraries, Factory, User and Hardware patches. Click the name of any patch to load it. You can remove or rename User and Hardware Patches by right-clicking on the patch. Once you have clicked on a patch in a given Library or list, your up/down controls in TriplePlay will increment upwards and downwards only in that list.
• Libraries. If you have installed the provided NI or IK packages prior to installing TriplePlay, you will have a library of Factory Patches in the Libraries column of the Patches window. In the Options pull-down menu from the Patches window, you can choose to install a third party library if you have purchased one and downloaded it to your computer. Any libraries you have installed will appear in this column. In the figure above you will notice an example third party library has been installed. These patches cannot be renamed or deleted and if edited must be saved as a new patch.
• User Patches. User, Library, Factory and Hardware patches can all be edited and saved to the User Patch list in TriplePlay.
• Hardware Patches. Hardware patches may only contain Hardware Synths and not VI or Guitar channel ef-fects. Only a patch meeting these criteria can be dragged or saved into the Hardware Patches list. For more details on Hardware Mode and Hardware Patches, please consult (p. 15-16) of this guide.
The Patch Readout Area cont’dF. Sound badge. Displays the names of each of TriplePlay’s sound slots: the Guitar (VGR) channel, the four Synth (VI) channels, and the Pedal channel. Double click this area to open the parameters setting for this region.
G. Sound name. Displays the name of the current sound for each active VI and VGR plug-in.
H. Audition button. Plays a factory-programmed MIDI sequence for previewing sounds. Press a second time to stop playback. Note Audition works for must but not all factory patches. It will not work with User Patches or Third Party Libraries.
I. Info text. Displays non-editable information about each factory patch. There is no info text for user patches.
figure 11

19
The Save Patch Dialogs1. Save As New Patch dialog. (figure 12) This appears when you click the Patch Readout area’s Save button while editing a factory patch.
• Options. This pull-down menu has the following patch related options:
o Resend Hardware Patches to Controller (controller must be connected). Although the TriplePlay ap-plication syncs automatically with controller, if that sync has been interrupted, or there is any confu-sion about the state of the device, this feature can be used to manually fill the controller with the full list of Hardware Patches.
o Export and Import User Patches. Saves or retrieves a copy of the user patch list to or from a location on your computer. Use this to backup, restore or share user patches with other computers. Note the other computer must have access to the same VI, VG and instruments for the import function to work properly. This does not share virtual instrument packages, only the collection of settings, such as what VI were used, and the parameters for a given patch.
o Export or Import Hardware Patches. Saves or imports a CSV (Comma Separated Value) file of the Hardware Patches list. This file can be edited through use of software such as Excel or text applica-tions, in order to make bulk changes to Hardware Patch parameters. This is useful for creating and naming dedicated Hardware Patches lists for use with a specific keyboard or sound module, allowing names to be pasted from user guides for those products, bulk editing of the program change mes-sages sent by each patch, and many other efficiencies versus editing the patches one at a time. Be cautious, though! Small errors in the file can result in extremely confusing changes to the list and dra-matic errors upon loading. So, consider editing a copy of your list and saving the original in case you need to revert.
o Install Libraries. Allows the user to install third party libraries of patches custom designed for the TriplePlay application. Note that as with saved User Patches lists, the computer must have installed the necessary plug-in packages and instruments for the new Library to work.
o Refresh Libraries. Refreshes the Library list. Zoom. Expand, shrink and reset the size of the patch names in the lists.
figure 12
20 21
A B C D
The Mixer Area
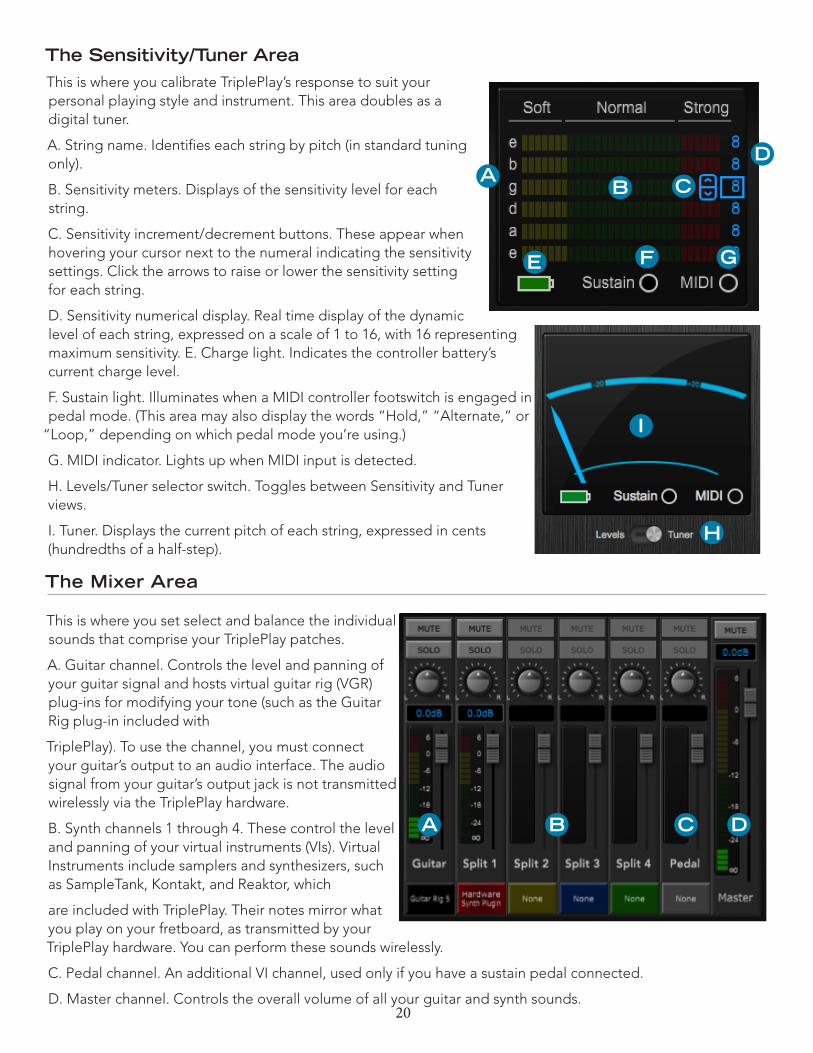
This is where you set select and balance the individual sounds that comprise your TriplePlay patches.
A. Guitar channel. Controls the level and panning of your guitar signal and hosts virtual guitar rig (VGR) plug-ins for modifying your tone (such as the Guitar Rig plug-in included with
TriplePlay). To use the channel, you must connect your guitar’s output to an audio interface. The audio signal from your guitar’s output jack is not transmitted wirelessly via the TriplePlay hardware.
B. Synth channels 1 through 4. These control the level and panning of your virtual instruments (VIs). Virtual Instruments include samplers and synthesizers, such as SampleTank, Kontakt, and Reaktor, which
are included with TriplePlay. Their notes mirror what you play on your fretboard, as transmitted by your TriplePlay hardware. You can perform these sounds wirelessly.
C. Pedal channel. An additional VI channel, used only if you have a sustain pedal connected.
D. Master channel. Controls the overall volume of all your guitar and synth sounds.
The Sensitivity/Tuner AreaThis is where you calibrate TriplePlay’s response to suit your personal playing style and instrument. This area doubles as a digital tuner.
A. String name. Identifies each string by pitch (in standard tuning only).
B. Sensitivity meters. Displays of the sensitivity level for each string.
C. Sensitivity increment/decrement buttons. These appear when hovering your cursor next to the numeral indicating the sensitivity settings. Click the arrows to raise or lower the sensitivity setting for each string.
D. Sensitivity numerical display. Real time display of the dynamic level of each string, expressed on a scale of 1 to 16, with 16 representing maximum sensitivity. E. Charge light. Indicates the controller battery’s current charge level.
F. Sustain light. Illuminates when a MIDI controller footswitch is engaged in pedal mode. (This area may also display the words “Hold,” “Alternate,” or
“Loop,” depending on which pedal mode you’re using.)
G. MIDI indicator. Lights up when MIDI input is detected.
H. Levels/Tuner selector switch. Toggles between Sensitivity and Tuner views.
I. Tuner. Displays the current pitch of each string, expressed in cents (hundredths of a half-step).
G
C
D
B
F
A
E
H
I

21
The six mixer channels share similar sets of controls.
A. Plug-In buttons. Click and hold to open the Plug-In Select window, where you can choose a VGR or VI for each channel. (The Master channel has no plug-in button.)
B. Channel names. The Guitar channel hosts audio plug-ins such as GuitarRig, for use with traditional guitar sound. The split channels host instrument plug-ins (VIs), or settings for addressing an external hardware sound module. Note each split region corresponds to a specific region of the neck. If no splits have been created, only the synth 1 channel will sound.
C. Channel faders. Virtual sliders for setting the volume of each channel.
D. Level meters. Realtime display of each channel’s volume.
E. Numerical meters. Realtime display of each channel’s volume in decibels (dB).
F. Panning controls. Positions each channel in the stereo field from left to right.
G. Solo buttons. When a Solo button is active on a channel, all other channels are temporarily muted. Multiple Solo buttons may be simultaneously active. However, the Guitar channel’s Solo status is independent from solo settings on the other mixer channels.
H. Mute buttons. Clicking a Mute button temporarily silences a channel. Multiple Mute buttons may be simultaneously active. However, the Guitar channel’s mute status is independent from mute settings on the other mixer channels.
C
H
A
D
E
F
G
B
Plug-In Select Window
Click-hold any of the mixer’s plug-in buttons to open a list of available virtual instrument plug-ins.
Select the name of any plug-in to load it. Once you do, a Plug-In Edit window opens. You can also open a plug-in edit window at any time by double-clicking on any active plug-in button.
Here you can also choose the option of controlling a MIDI-compatible hardware synth. The hardware synth control parameters appear in a specialized TriplePlay Parameters panel.
The plug-ins bundled with TriplePlay appear here automatically. So will any other compatible VST-format plugins on your system, though you must first perform a plug-in scan so TriplePlay can recognize this software. (The procedure is explained in Scanning for installed plug-ins.)
The Plug-In Edit Window
There are two parts to each Plug-In Edit window: The main area contains the plug-in’s edit screen. Attached to the left side of this field is the TriplePlay Parameters panel, where you specify how TriplePlay conveys your performance to the plug-in.
The main edit area varies from plug-in to plug-in. (figure 13) For more specifics, consult the documenta-tion that accompanies the plug-in. figure 13

22 23
The TriplePlay Parameters Panel
The TriplePlay Parameters panel is attached to the left side each plug-in interface window. It appears in several versions, depending on whether the plug-in is installed on a Synth channel or the Pedal channel, and whether it’s controlling an external hardware synth. Plug-ins loaded into the Guitar channel have no TriplePlay Parameters panel.
TriplePlay Parameters panel as it appears on the four Synth channels when controlling a software virtual instrument:
TriplePlay Parameters panel - Splits (Mixer Channels 1-4)The controls, from top to bottom:
• MIDI Mode selector. Switchable between Mono and Poly. In Poly mode, all neck and fret splits are disabled, and notes
are transmitted on MIDI Ch 1. In Mono, split regions can be used, tracking is improved, and notes are transmitted on
separate MIDI channels for each string.
• Touch Sensitivity control. Sets the dynamic response independently for each patch. The
further you move the slider toward the right, the greater the touch sensitivity.
• Pick/Fingerstyle selector. Optimizes the touch response for pick or fingerstyle playing. This
works together with Touch Sensitivity to help eliminate glitches (less sensitive) or decrease
dropped notes (more sensitive).
• Sustain Pedal. If you’ve configured a MIDI controller as a sustain pedal, checking the Block
new MIDI notes option suspends MIDI input. This would be useful if, say, you wanted to hold a
sustained organ chord while performing new notes with traditional guitar through your Guitar
channel or stage amplifier.
• Sound badge. Displays the Mixer channel to which the plug-in is assigned. Not editable.
• Dynamics Sensitivity slider. Controls how TriplePlay interprets volume variations in your
playing. MIDI instruments interpret volume on a scale of 0 to 127. With Dynamic Sensitivity on
its rightmost setting, you get maximum dynamic range — your loudest notes transmit a value
close to 127 (as loud as possible), and your softest notes are closer to 0 (silence). With the slider
at its leftmost setting, every note transmits a fixed value of 64: No matter how heavily or lightly
you play, all notes have the same level. (This is useful when mimicking instruments whose tone
doesn’t change according to how hard to you play, such as organs and harpsichords.)
• Dynamics Offset slider. Shifts the entire dynamic scale (as defined by the Dynamic Sensitivity slider) by ±64. The relative
dynamic values are unchanged — everything gets louder or softer depending on the setting. (This would be useful if, say,
you wanted a fixed-volume sound at a dynamic level other than the default setting of 64.)
• Transpose control. You can transpose each synth independently from the others. Adjustable by ±1-24, with 1 representing a half-step, and 24 representing the maximum transposition of two octaves. (You might, for example, dial in a setting of -12 for a bass patch to obtain notes below the regular range of the guitar, or a setting of +12 for a flute patch above the guitar’s range.) Clicking the up and down arrows changes the transposition in half-step increments.
• Pitchbend. Defines how TriplePlay interprets pitches that “fall between” the frets, such as bent notes and reverse bends. This will only work if you have properly matched the pitch bend range of your virtual instrument to the bend range in your TriplePlay Preferences window (pg. 27). There are four possible settings:
i. Auto. TriplePlay ignores small pitch discrepancies, but if a pitch change seems more deliberate, as in a notebend, the virtual instrument reproduces your bend.
23
TriplePlay Parameters panel -Splits (cont’d)ii. Trigger. Here TriplePlay uses no pitch bends. If, for example, you bend the note C up to D-flat, TriplePlay in-terprets this as two separate notes with two distinct attacks, producing a new note on command at the second attack. (This is often the best choice when mimicking traditional keyboard instruments such as piano and organ, which can’t produce pitch bends.)
iii. Smooth. TriplePlay interprets bent notes as pitch bends rather than newly plucked notes and does not pitch-correct them. If, for example, you bend C up to D-flat, you hear the note C slide up to D-flat without a second note attack, and the D-flat mirrors the pitch of the note you produce, even if it’s not perfectly in tune.
iv. Stepped. Here TriplePlay rounds off every note to the nearest half-step. It interprets bent notes as pitch bends rather than newly plucked notes, and rounds the bent pitch to the nearest half-step. If, for example, you bend C up to D-flat, you hear the note C slide up to D-flat without a second note attack, and the D-flat will be perfectly in tune, even if your bend is not.
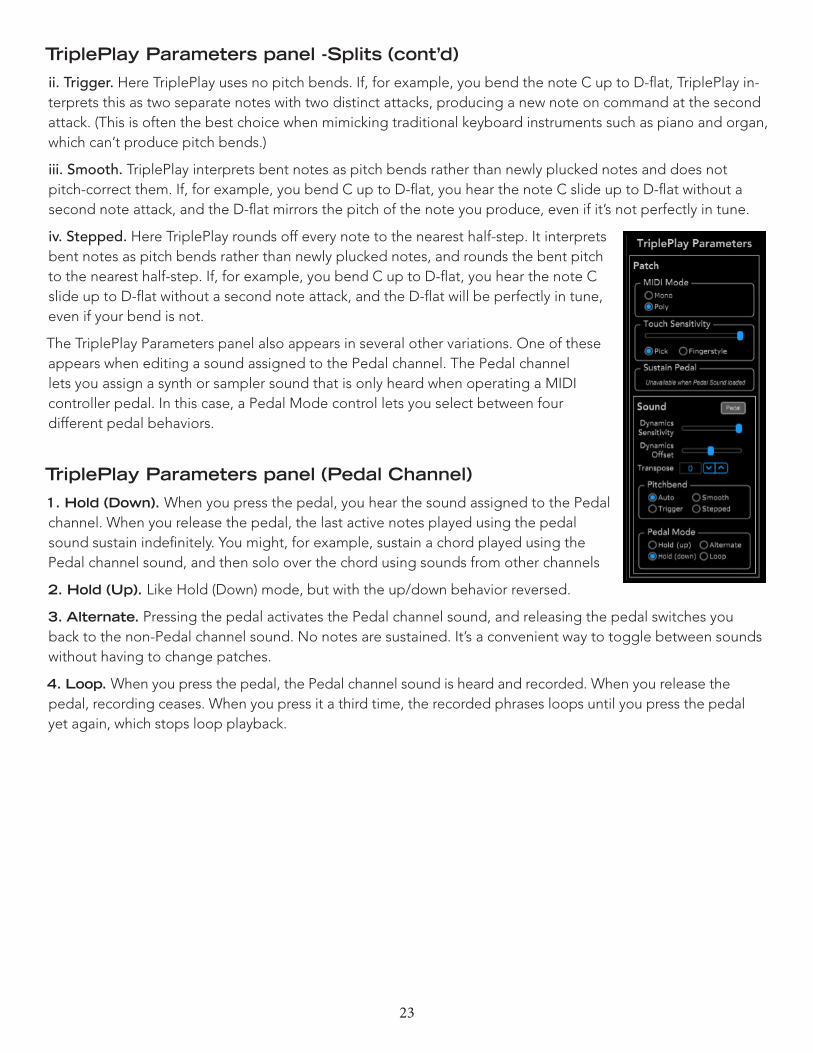
The TriplePlay Parameters panel also appears in several other variations. One of these appears when editing a sound assigned to the Pedal channel. The Pedal channel lets you assign a synth or sampler sound that is only heard when operating a MIDI controller pedal. In this case, a Pedal Mode control lets you select between four different pedal behaviors.
TriplePlay Parameters panel (Pedal Channel)1. Hold (Down). When you press the pedal, you hear the sound assigned to the Pedal channel. When you release the pedal, the last active notes played using the pedal sound sustain indefinitely. You might, for example, sustain a chord played using the Pedal channel sound, and then solo over the chord using sounds from other channels
2. Hold (Up). Like Hold (Down) mode, but with the up/down behavior reversed.
3. Alternate. Pressing the pedal activates the Pedal channel sound, and releasing the pedal switches you back to the non-Pedal channel sound. No notes are sustained. It’s a convenient way to toggle between sounds without having to change patches.
4. Loop. When you press the pedal, the Pedal channel sound is heard and recorded. When you release the pedal, recording ceases. When you press it a third time, the recorded phrases loops until you press the pedal yet again, which stops loop playback.

24 25
TriplePlay Parameters panel (Hardware Synth)
If you’ve directed a TriplePlay channel to control a external synth (in the Patch Select window), you see a spe-cialized set of Hardware parameters for controlling patch changes via program change numbers and LSB (Least Significant Byte) and MSB (Most Significant Byte) values. Different hardware instruments interpret these mes-sages differently, so consult the documentation for your particular instrument. Use the up and down arrows to scroll the values. (figure 14)
TriplePlay Parameters panel (Hardware Synth as Pedal Channel)Finally, when using the Pedal channel to control a external synth, the Parameters tab includes both the hard-ware controls and the pedal mode controls, which are detailed above. (figure 15) The main plug-in edit area simply reads “External Synth.”
figure 14
figure 15

25
The Fretboard / Edit Splits Area
The lower portion of the Perform window is a virtual fretboard that depicts each note you play in real time.
A. Virtual fretboard. The graphic is oriented with the lowest string at the bottom, as if you were peering over your guitar’s neck at the fretboard (assuming you’re right-handed). The moving dots depict each note you play on the fretboard.
B. Show Splits button. Click to open the Edit Splits view.
C. Fretboard display toggle. Clicking the pickup image toggles between three fretboard appearances: rosewood fretboard (pictured), rosewood humbucker fretboard, and maple fretboard.
When the Edit Splits View is selected, a set of adjustable “handles” appears over the fretboard graphic. Each of the color-coded zones corresponds to one of TriplePlay’s synth channels. In other words, you can assign up to four sounds to four user-definable quadrants of the fretboard, and choose which sounds are heard according to where you play on the neck. (This only applies when you’ve selected Mono mode in the TriplePlay Parameters panel. In Poly mode, the sound assigned to Synth 1 is heard across the entire fretboard, regardless of Edit Split settings.)
A. Split 1 Zone. Notes played in this zone trigger sound from the VI assigned to the Split 1 channel. If a plug-in is assigned to Split 1, its name appears here.
B. Split 2 Zone. Notes played in this zone trigger sound from the VI assigned to the Split 2 channel. If a plug-in is assigned to Split, its name appears here.
C. Split 3 Zone. Notes played in this zone trigger sound from the VI assigned to the Split 3 channel. If a plug-in is assigned to Split 3, its name appears here.
D. Split 4 Zone. Notes played in this zone trigger sound from the VI assigned to theSplit 4 channel. If a plug-in is assigned to Split 4, its name appears here.
E. Neck Split Handle. Click-drag to set the upper fret limit of the Split 1 and Split 2 split zones, or the lower fret limit of the Split 3 and Split 4 split zones. Clicking on one of these zone pairs highlights it, making its controls ac-tive. Neck split cannot be set independently for the Split 1 and Split 2 split zones, nor for the Split 3 and Split 4 split zones, but the Split 1 and 2 zones can overlap Splits 3 and 4 zones, with notes played in shared areas triggering sound from multiple channels. Note how each Split region is color coded to correspond with a specific Split chan-nel (1-4) on your mixer.
F. String Split Handle. This works like the Neck Split handle, except that it assigns synth channels to specific strings rather than to specific frets. String splits cannot be set independently for Split 1 and Split 3, or for Split 2 and Split 4. But you can specify different string splits for the Split 1/ Split 2 pair and the Split 3/ Split 4 pair.
A
B
C
A
B
C
D
EF

26 27
The Fretboard/Edit Splits area (cont’d)
figure 18 - Here the Split 1 and Split 2 zones are highlighted, making their handles active.
figure 19 - Here the Split 3 and Split 4 zones are highlighted, making their handles active
figure 20 - Here the Split 1/Split 2 and Split 3/Split 4 zones overlap. Notes played between the fifth and tenth frets trigger notes from two Split channels.
figure 21- Here the Split 1/Split 2 and Split 3/Split 4 zones overlap. There are different string splits for the two pairs of zones. Notes played between the fifth and tenth fret on the top two string trigger Split 1 and Split 3. Notes played between the fifth and tenth fret on the middle two strings play Split 1 and Split 4. And notes
played between the fifth and tenth fret on the lower two strings play Split 2 and Split 4.

27
Pull-Down MenusPatches menuUse this menu to save the active patch and to import and ex-port your patch database.
Options menu
• Preferences. Opens the Preferences window, (figure 17) which contains settings pertaining to your audio hardware.
Audio device type allows the section of the type of audio de-vice (Windows)
o The Output pull-down menu lists the outputs for any compatible and connected audio hardware, as well as your computer’s built-in output.
o The Input pull-down displays all available input devic-es. Note that this doesn’t affect the MIDI output from your TriplePlay Controller, which is transmitted via the TriplePlay Receiver (see the section on traditional guitar on p. 12 for more information.)
Plug-In Version of TriplePlayWhen you use TriplePlay as a plug-in within a DAW program, such as Presonus’s Studio One, the TriplePlay Perform window appears much like it does when using the program in standalone mode. The only difference: an upper frame, whose exact appearance varies from DAW to DAW. This area often provides access to host based functions, such loading and saving presets. (figure 16) Please refer to your DAW documentation for more details. Some menu functions may be grayed out in plug-in mode. Note that the Guitar channel does not work in plug-in mode.
figure 17
figure 16

28 29
o Output and input channels can be selected based on the options for your selected audio device. Note that your traditional guitar input is mono only, so if you select channels 1 and 2, you must plug into channel 1 of your input device. Only one output can be selected. Attempting to select multiple outputs will result in loss of sound. (figure 17)
o The Sample Rate pull-down lets you specify TriplePlay’s sample rate. By default this will generally match the settings of your connected input and output device.
o Audio buffer size allows the user to find the balance between latency (lower settings = less delay be-tween playing and hearing a note) and performance (higher settings are easier for your computer to pro-cess and result in less clicks, pops, dropped audio and other buffer related digital distortion).
o Hardware synth MIDI output lets you choose a connected MIDI interface to send TriplePlay informa-tion to an external synth or hardware sound module.
o The Foot Pedal MIDI Input pull-down lists any MIDI interfaces connected to your computer. (You need a hardware MIDI interface to use a controller pedal.) Keep this set to none if you are using the Fishman FC-1 foot controller.
o MIDI Bend Range sets the pitch bend range of the TriplePlay hardware. This MUST match the bend range of your virtual or hardware instrument in order for string bends, hammer-ons and slides to work prop-erly when a bend mode is set in your patch parameters window.
o Guitar channel bypasses synth can be checked if you want the volume knob on your guitar controller (or connected midi volume foot pedal) to only adjust the final volume of your virtual instrument channels and not your Guitar channel.
o Final volume controlled by CC 80 allows the user to connect a volume pedal to control final (post mas-ter) volume in the tripleplay application. This is not necessary when using the FC-1, only when assigning third party MIDI controllers to TriplePlay.
o Use enhanced cache permits the user to increase the number of patches pre-saved in memory, when using the Songs feature of TriplePlay. This allows faster changes between patches without delays to load instruments (Songs list only).
• Show Unsaved Patch and Plugin Warnings. When this option is checked, TriplePlay presents a warning mes-sage if you change patches or close the plugin window without saving any recent edits.
• About TriplePlay. Provides info about your TriplePlay software and hardware, including the current software version and your product serial number.
• Check for Update. If your computer is connected to a wi-fi network, clicking here searches online for Triple-Play software and firmware updates.
• Scan for Plugins. Scans for virtual instrument (such as SampleTank) and effects plugins (such as GuitarRig) on your computer and makes them available for TriplePlay to use.
View menu• Use Rosewood Fretboard, Use Rosewood Humbucker Fret, and Use Maple Fretboard. These options let you choose between three different looks for TriplePlay’s virtual fretboard.
• Show Splits and Hide Splits. Displays or hides fretboard splits on the Perform window’s virtual fretboard. (These options duplicate the functionality of the Show/Hide Splits button on the Perform Window’s Fretboard/Edit Split area.)

29
The leftmost column (User Patches) lists all your User Patches. The rightmost column (List of Songs) displays all your saved songs. The middle column (Current Song) displays all patches included in whichever song is selected in the List of Songs column (figure 18). Note only patches saved as User Patches can be loaded into a song. If you’d like to include a patch from the Factory Patches list or a third party Library, these must be first saved as a User Patch.
o To make a new song, click Create Song at the bottom of the List of Songs column.
o Erase songs by highlighting them and choosing Delete Song.
o To add patches to your song, select the song title in the List of Songs Column, and then click-drag patches from the User Patch column into the Current Song column. You can also drag a user patch directly from the leftmost column onto a song in the rightmost column, even if it’s not the currently active song.
o You can also reorder patches here via click-drag, or delete or remove patches by right-clicking.
o You can add multiple copies of the same patch to a song (which may be useful for selecting a desired sound during the course of a song performance without having to scroll through many patches).
o To display all the patches used in a song, click the plus sign next to the song name in the List of Songs column. The patch names appear in order, and the
plus sign becomes a minus sign. To hide the individual patch names, click the minus sign (figure 19).
o You can rearrange the patch order within a song here in the List of Songs window. Just select the patch you wish to move, and click/drag it to the desired location. o You can’t add a factory patch to a song list. You must first save it as a user patch.
Window menu• Patches. Opens the Patches window. (This duplicates the functionality of Browse Patches button in the Patch Read-out area. on p. 18-19)
• Songs. Opens TriplePlay’s Songs window, where you can arrange your User patches into groups. For example, you might want to use Patch #3 for a song’s intro, Patch #17 for its verses, Patch #8 for the choruses, and Patch #1 for the bridge. You could save those patches as a song, with the desired sounds saved in adjacent memory
slots so that you can step through them easily using the up and
down buttons on the TriplePlay controller’s D-Pad. You may also want to use Songs to group a short list of patches you plan to use in a single performance. Because proximal patches in a song are pre-cached (loaded into memory), changes between patches loaded into a song will happen almost immediately, with no delay to load new instru-ments. (figure 18)
figure 18
figure 19

30 31
o The User Patches column also includes Delete, Rename, and Load Controller buttons, which duplicate the functionality of these same controls in the Patches window
FC-1 ConfigurationThe foot switch layout in your FC-1 Utility corresponds with the buttons on the pedal itself. The functions and calibration of a connected expression pedal can also be adjusted. (these windows need to be numbered and numbers corresponding to the menus) Select Calibrate Pedal and follow instructions to calibrate a connected expression pedal or device. (figure 20)
FC-1 Settings1. MIDI CC (continuous controller commands): Assign the desired MIDI CC for the given FC-1 pedal button. Button will send value=127 when depressed. (figure 21)
2. Channel: Set the MIDI channel desired for the MIDI CC. Because TriplePlay may transmit note commands on many channels at once (for example on channels 1-6 on Split 1 in MONO mode), FC-1 can be adjusted to send on individual MIDI channels, groups of MIDI channels or to Internal (which sends information back to the guitar controller). Internal is the default setting for controlling the TriplePlay application.
figure 20
figure 21

31
3. Mode: Select Latching or Momentary. If set to Latching, the button will send value 127 as long as the button is held, and 0 on release. If set to Momentary, the button will send value 127 when pressed and only send value 0 when the button is released and pressed again.
4. Tripleplay Patch Select. Check this box to set FC-1 to default settings for controlling the TriplePlay application.
.
Help menu (Internet Connection Required)TriplePlay Help Takes you to the latest version of the TriplePlay user’s guide. Service and Support. Takes you to the support documentation page of the Fishman website
figure 22
figure 23

32 33
Glossary
Amp simulator (or modeler). A software or hardware device that mimics the sound of an analog guitar amplifier. Two excellent amp simulators, Native Instruments’ Guitar Rig and IK Multimedia’s AmpliTube Custom Shop, are included with TriplePlay. In TriplePlay, amp simulators can only be used on the mixer’s Guitar channel. See also: Virtual Guitar Rig (VGR).
Audio buffer. Buffering is the process of retaining a small amount of audio information in a computer’s RAM to ensure glitch-free performance. The larger the buffer setting, the less likelihood of clicks, pops, and other unwanted noises. However, larger buffer settings introduce more lag time (latency) between the instant you strike a note and the moment you hear it through your speakers or headphones. In TriplePlay, you set the buf-fer size in the Options menu. You may have to experiment with this setting to find the right balance between high performance and low latency. See also: Latency.
Audio Unit (or AU). Apple’s proprietary plug-in format. The AU version of the TriplePlay plug-in lets you run TriplePlay within such AU-based DAWs as Apple’s Logic and GarageBand. See Plug-In and Host.
Audio interface. A hardware device that converts the analog signal from your guitar into a digital signal your computer can process. Most computers have built-in audio interfaces in the form of sound cards. With the right adapter, you can probably plug your guitar’s output directly into your computer. However, most computer musicians opt for the superior sound and performance of dedicated audio interfaces, which usually connect to your computer via USB, Firewire, or Thunderbolt connectors.
Buffer. See Audio Buffer.
Controller. See MIDI Controller.
Controller pedal. A MIDI controller in the form of a foot pedal or foot switch. The Pedal channel in the TriplePlay Mixer lets you use a controller pedal (not included) to sustain notes and alternate synth sounds.
DAW. Short for “digital audio workstation.” DAWs, which can be dedicated hardware devices or software pro-grams, allow you to record, edit, mix, and perform other music-production tasks. TriplePlay is not a DAW, since it doesn’t record music. But it can run as an Audio Unit or VST plug-in inside software DAWs.
dB. Shorthand for decibel, the unit used to measure the loudness of sound. The levels of the faders and meters in TriplePlay’s Mixer section are indicated in dB units. 0dB represents absolute silence. Most human speech falls in the range of 50 to 60dB. A 747 takeoff measures about 140dB, and the loudest rock concerts on record approach similar levels.
Dynamic Sensitivity. In TriplePlay, Dynamic Sensitivity settings determine how the software interprets volume variations in your playing. There are two types of Dynamics Sensitivity settings in TriplePlay: global set-tings, which most players “set and forget.” (Here, a guitarist with a heavy touch is likely to choose lower sen-sitivity settings, while one with a lighter touch is likely to choose higher settings. You can specify independent settings for each string, which is useful because many players don’t strike every string with the same intensity.) Additionally, every TriplePlay patch has its own Dynamic Sensitivity setting. These may vary greatly from patch to patch, depending on the desired effect.
Dynamic Offset. A setting attached to each TriplePlay patch that offsets the entire dynamic sensitivity scale. Positive settings make every note louder while maintaining their relative levels. Negative ones make every note quieter while maintaining relative levels.
Controller. A device that converts data from one type to another. The TriplePlay controller in an controller that converts audio data into numerical MIDI messages.

33
Factory patch. Any of the predesigned patches included with TriplePlay. You cannot erase or overwrite the factory sounds, but you can copy them to User Memory and modify them there. See Patch and User Patch.
Fader. A control used to make fine adjustments to a sound. The sliding volume controls in TriplePlay’s Mixer section mimic the faders on hardware recording consoles.
Foot pedal. See Controller pedal.
Hexaphonic pickup. A guitar pickup with a discrete output for each of the six strings, such as the Triple-Play pickup, which can output the data sent from each string via a separate MIDI channel. That’s how TriplePlay lets you assign different sounds to different strings.
Hold mode. The settings that determine how TriplePlay interprets messages sent via a hardware sustain pedal (not included) to the mixer’s Pedal channel. TriplePlay has two hold modes, plus a related Alternate mode that allows you to toggle between two sounds within one patch via foot pedal (not included).
Host. Any software that that can run other software in the form of plug-ins. TriplePlay is a host for virtual instrument and virtual guitar rig plug-ins. Additionally, TriplePlay can run as an Audio Unit or VST plug-in within such DAW hosts as GarageBand. Logic, Live, Cubase, and Studio One. See Plug-in.
I/O. Shorthand for “in/out.” In audio applications, the term often pertains to the device that sends sound to and from your computer by translating audio data to digital data, and which reverses the process to send au-dio data to your speakers or headphones. See Audio interface.
Interface. See Audio interface.
Latency. The time lag between the instant a note is played and the moment you hear it through your speak-ers or headphones. Some latency is unavoidable, but in optimal conditions, latency is so minimal as to be imperceptible. Latency is largely dependent on computer speed and audio buffer settings. See Audio buffer.
MIDI. Acronym for “Musical Instrument Digital Interface.” Since the early 1980s, MIDI has been the standard language musical devices use to communicate with each other. TriplePlay’s controller translates your guitar performance into MIDI data, which it transmits wirelessly to the TriplePlay software on your computer.
MIDI controller. Any device or software that generates and transmits MIDI data. TriplePlay turns your guitar into a MIDI controller by converting your performances into MIDI messages that “play” your synths and samplers.
Mixer. Hardware or software that combines, balances, and modifies multiple audio signals. TriplePlay’s Mixer, modeled after an analog mixing console, performs such tasks as setting the relative levels of your virtual instru-ments and specifying their position in the stereo field. It’s also where you assign virtual instruments.
Model (or modeling). In audio, modeling usually refers to the process of using software to mimic the sound (and often the look and feel) of analog instruments or processors. For example, TriplePlay includes two virtual guitar rig programs which deliver convincing simulations of many hardware amplifiers and effects.
Mono mode. TriplePlay’s Mono mode assigns a separate MIDI channel to each string or subsection of string (see Split), as opposed to Poly mode, wherein notes played anywhere on the fretboard are transmitted via a single MIDI channel. If, for example, you want an organ sound across the entire range of the guitar, you might use Poly mode. But if you want an organ sound for the upper strings and a bass sound for the lower ones, you need Mono mode. Splits are only available in Mono Mode. See Poly mode.
Mute. Pressing the Mute button on any Mixer channel silences that channel. More than one Mute button can be active simultaneously.
Pan. Short for panorama. Refers to the position of a sound within the stereo field. Each TriplePlay mixer chan-nel lets you position sounds to the right, the left, or anywhere between. Assigning varying pan positions to multiple sounds within a patch can create a sense of drama and depth.

34 35
Patch. A “snapshot” of a set of TriplePlay settings saved in memory. Each patch represents a different sound, plus all of its attached performance parameters. TriplePlay comes with a collection of factory patches that can’t be deleted or edited, though they can be saved as user patches, which can then be altered to taste. You can group multiple patches as Songs. See Song.
Pickup. A type of transducer — that is, a device that converts one type of energy into another. Your electric guitar’s factory pickups convert the physical vibration of the strings into electrical signals that are transmitted to your amp via a cable. The TriplePlay pickup converts those same string vibrations into MIDI data, which it transmits wirelessly to the TriplePlay software.
Pitchbend. A type of MIDI message that alters the pitch of sustained notes. In TriplePlay, the Pitchbend parameter defines how TriplePlay interprets such guitar gestures as slides and bent notes.
Plug-in. A software “program within a program.” Virtual instruments and virtual guitar rigs operate as plug-ins within TriplePlay. Additionally, TriplePlay can run as a VST or Audio Units plug-in within compatible DAW hosts. In these cases, the virtual instruments become plug-ins within a plug-in. See Host.
Poly mode. In TriplePlay’s Poly Mode, notes played anywhere on any string are assigned to a single MIDI channel, as opposed to Mono mode, wherein each string is assigned its own channel. If, for example, you want an organ sound across the entire range of the guitar, you might use Poly mode. But if you want an organ sound for the upper strings and a bass sound for the lower ones, you must use Mono mode. In Poly mode splits are not available, and only sounds assigned to the mixer’s Synth 1 channel are heard.
Receiver. TriplePlay’s dongle-like component, which wirelessly receives musical information transmitted by the TriplePlay controller. It connects to any standard computer USB port.
Sample rate. Refers to the resolution of a digitally recorded sound. For CD-quality sound, the sample rate is 44.1kHz, though many musicians and engineers prefer to record music at higher sample rates such as 96kHz. You specify TriplePlay’s sampling rate in the Options menu.
Sampler. A digital musical instrument that relies on the playback of audio recordings. A sampled piano, for example, might include recordings of each individual piano key, played at varying dynamic levels. If, for exam-ple, you play middle C on your guitar, TriplePlay converts it to MIDI data, which prompts the sampler to play its recording of the piano’s middle C. If you play softly, you trigger a recording of a soft middle C, and recording of a loud one when you play louder. TriplePlay comes with powerful software samplers. See Virtual instrument.
Sensitivity. See Dynamic Sensitivity.
Sequencer. Music software or hardware that lets you record and edit music, usually in the form of MIDI data and/or audio files. TriplePlay is not a sequencer, but can run as a plug-in within all the leading DAWs, which are sequencers. See DAW and Plug-in.
Solo. Pressing the Solo button on any mixer channel silences all channels except the soloed one. More than one Solo button can be active simultaneously.
Song. In TriplePlay, a Song is a collection of patches saved as a set. It’s a convenient way to group all the patches used in a particular performance, which you can then save and recall as a single unit. See Patch.
Split. When a MIDI instrument is set up to trigger different sounds from different parts of its range, the individual zones are referred to as splits. TriplePlay’s Splits Editor can create splits according to fret position or string. For example, you might assign an organ sound to the four upper strings, and a bass sound to the two lower strings. Alternately, you might assign the organ sound to all notes played on any string at the fifth fret or higher, and a bass sound to any note played below the fifth fret.
Standalone mode. Some music programs, including TriplePlay, can run as self-standing apps, or as plug-in operating within a DAW. The former mode is called standalone. See DAW, Host and Plug-in.
Sustain pedal. A hardware foot pedal with a momentary switch often used to sustain notes. TriplePlay’s Pedal channel lets you deploy a sustain pedal in several useful ways. See Hold mode.

35
Synth. Short for synthesizer, a musical instrument that generates sound via electronic means. In TriplePlay, synthesizers run as software plug-ins that can be assigned to any mixer channel (except the Guitar channel). You can also insert sampler instruments on these Synth channels, though strictly speaking, samplers are not synthesiz-ers. TriplePlay includes several powerful synths from Native Instruments’ Reaktor. See Plug-in and Sampler.
Transducer. Any device that converts one kind of energy into another. Conventional guitar pickups are transducers, because they translate the energy of your vibrating strings into electrical signals that get sent to your amp or computer. The TriplePlay hexaphonic pickup is another type of transducer, one that converts the vibrating string energy into a MIDI signal. See hexaphonic pickup.
Transpose. To shift a piece or passage of music up or down by a specific interval. In TriplePlay, you can specify transpositions for each patch and for each sound within a patch. (You might, for example, transpose a bass sound down an octave to obtain pitches below the guitar’s standard range.)
User patch. A TriplePlay patch that you’ve saved in program memory. User patches can be edited and overwritten, unlike TriplePlay’s factory patches. However, you can save a factory patch as a user patch, and then modify it. See Factory patch and Patch.
VGR: See Virtual Guitar Rig.
VI: See Virtual Instrument.
Virtual guitar rig. An app, plug-in, or hardware device that digitally mimics the sound of analog guitar gear, including amps, stompboxes, and other elements of the guitar signal chain. You can assign virtual guitar rig (VGR) plug-ins to TriplePlay’s Guitar channel, including the powerful software provided with your product.
Virtual instrument. An app, plug-in, or hardware device that digitally mimics the sound of a physical instru-ment. These include both synthesizers and samplers. In TriplePlay, you can assign virtual instrument (VI) plug-ins to any of the mixer’s Synth tracks, as well as the Pedal track.
VST. A standard plug-in format that used by both Macs and PCs. TriplePlay can host most VST-format virtual instrument and virtual guitar rig plug-ins.

36 36
Designed and Engineered in the USA
Assembled in China
LEGAL
© 2013 FISHMAN TRANSDUCERS. All rights reserved. Printed in USA. TriplePlay® is a registered trademark of FISHMAN TRANSDUCERS. OS X, Mac and the Mac logo and AU Audio Units are registered trademarks of Apple Inc. in the US and other countries. Windows and the Windows logo are registered trademarks of Microsoft Inc. in the US and other countries. VST is a trademark of Steinberg Media Tech-nologies GmbH. ASIO is a trademark and software of Steinberg Media Technologies GmbH. Komplete Elements and Guitar Rig are registered trademarks of Native Instruments GmbH. SampleTank and AmpliTube are registered trademarks of IK Multimedia Production. Studio One is a registered trademark of PreSonus Audio Electronics, Inc. PROGRESSION is a registered trademark of Notion Music Inc.
®
FCC Notice (for U.S. Customers):
This device complies with Part 15 of the FCC Rules:
Operation is subject to the following conditions:
1. This device may not cause harmful interference, and
2. This device must accept any interference received, including interference that may cause undesired operation.
Changes and modifications not expressly approved by FISHMAN TRANSDUCERS can void your authority to operate this equipment under Federal Communications Commissions rules.
M/N: PRO-TRP-301FCC ID: RMU-PROTRP301 IC: 10812A-PROTRP301
EU Declaration of Conformity CE: Hereby, Fishman declares that this Triple Play Wireless Guitar Controller is in compliance with the essential requirements and other relevant provisions of Directive 1999/5/EC.
This device complies with Industry Canada licence-exempt RSS standard(s): Operation is subject to the following two conditions: (1) this device may not cause interference, and (2) this device must accept any interference, including interference that may cause undesired operation of the device.