Verba Recording System 7cdn.verba.com/pdf/Verba-Deployment-Guide.pdf · Verba Recording System...
235
Verba Recording System 7 For the latest online version of this documentation please visit . kb.verba.com Deployment Guide 1 Plan . . . . . . . . . . . . . . . . . . . . . . . . . . . . . . . . . . . . . . . . . . . . . . . . . . . . . . . . . . . . . . . . . . . . . . . . . . 5 1.1 Decide how to record your phone calls . . . . . . . . . . . . . . . . . . . . . . . . . . . . . . . . . . . . . . . . . . . 6 1.1.1 Passive, extension side call recording . . . . . . . . . . . . . . . . . . . . . . . . . . . . . . . . . . . . . . . . 8 1.1.2 Passive, trunk-side call recording . . . . . . . . . . . . . . . . . . . . . . . . . . . . . . . . . . . . . . . . . . . 9 1.1.3 Central call recording with RTP forking for Avaya . . . . . . . . . . . . . . . . . . . . . . . . . . . . . . . 10 1.1.4 Central call recording with RTP forking for IP Trade turrets . . . . . . . . . . . . . . . . . . . . . . . . 13 1.1.5 Call recording for Microsoft Lync . . . . . . . . . . . . . . . . . . . . . . . . . . . . . . . . . . . . . . . . . . . . 15 1.1.6 Dial-in audio and video call recorder . . . . . . . . . . . . . . . . . . . . . . . . . . . . . . . . . . . . . . . . . 16 1.1.7 Screen capturing features . . . . . . . . . . . . . . . . . . . . . . . . . . . . . . . . . . . . . . . . . . . . . . . . . 18 1.1.8 Central Cisco call recording with RTP forking . . . . . . . . . . . . . . . . . . . . . . . . . . . . . . . . . . 20 1.1.9 Central Cisco silent monitoring with RTP forking . . . . . . . . . . . . . . . . . . . . . . . . . . . . . . . . 22 1.1.10 IP telephony overview . . . . . . . . . . . . . . . . . . . . . . . . . . . . . . . . . . . . . . . . . . . . . . . . . . . 23 1.1.11 Cisco phones with central call recording support . . . . . . . . . . . . . . . . . . . . . . . . . . . . . . . 23 1.1.12 Passive call recording for Cisco UC 320 and UC 500 . . . . . . . . . . . . . . . . . . . . . . . . . . . 24 1.1.13 Supported Cisco Unified Communications Manager functions . . . . . . . . . . . . . . . . . . . . 24 1.2 Select a deployment architecture . . . . . . . . . . . . . . . . . . . . . . . . . . . . . . . . . . . . . . . . . . . . . . . 25 1.2.1 Single server architecture . . . . . . . . . . . . . . . . . . . . . . . . . . . . . . . . . . . . . . . . . . . . . . . . . 25 1.2.2 Multi site architecture . . . . . . . . . . . . . . . . . . . . . . . . . . . . . . . . . . . . . . . . . . . . . . . . . . . . . 25 1.2.3 Desktop deployment . . . . . . . . . . . . . . . . . . . . . . . . . . . . . . . . . . . . . . . . . . . . . . . . . . . . . 26 1.2.4 Redundancy options . . . . . . . . . . . . . . . . . . . . . . . . . . . . . . . . . . . . . . . . . . . . . . . . . . . . . 26 1.3 Select your server . . . . . . . . . . . . . . . . . . . . . . . . . . . . . . . . . . . . . . . . . . . . . . . . . . . . . . . . . . . 28 1.3.1 Recording Performance . . . . . . . . . . . . . . . . . . . . . . . . . . . . . . . . . . . . . . . . . . . . . . . . . . . 30 1.3.2 Calculating recording channel capacity . . . . . . . . . . . . . . . . . . . . . . . . . . . . . . . . . . . . . . . 32 1.4 Size your disks . . . . . . . . . . . . . . . . . . . . . . . . . . . . . . . . . . . . . . . . . . . . . . . . . . . . . . . . . . . . . 34
Transcript of Verba Recording System 7cdn.verba.com/pdf/Verba-Deployment-Guide.pdf · Verba Recording System...

Verba Recording System 7For the latest online version of this documentation please visit .kb.verba.com
Deployment Guide1 Plan . . . . . . . . . . . . . . . . . . . . . . . . . . . . . . . . . . . . . . . . . . . . . . . . . . . . . . . . . . . . . . . . . . . . . . . . . . 5
1.1 Decide how to record your phone calls . . . . . . . . . . . . . . . . . . . . . . . . . . . . . . . . . . . . . . . . . . . 61.1.1 Passive, extension side call recording . . . . . . . . . . . . . . . . . . . . . . . . . . . . . . . . . . . . . . . . 81.1.2 Passive, trunk-side call recording . . . . . . . . . . . . . . . . . . . . . . . . . . . . . . . . . . . . . . . . . . . 91.1.3 Central call recording with RTP forking for Avaya . . . . . . . . . . . . . . . . . . . . . . . . . . . . . . . 101.1.4 Central call recording with RTP forking for IP Trade turrets . . . . . . . . . . . . . . . . . . . . . . . . 131.1.5 Call recording for Microsoft Lync . . . . . . . . . . . . . . . . . . . . . . . . . . . . . . . . . . . . . . . . . . . . 151.1.6 Dial-in audio and video call recorder . . . . . . . . . . . . . . . . . . . . . . . . . . . . . . . . . . . . . . . . . 161.1.7 Screen capturing features . . . . . . . . . . . . . . . . . . . . . . . . . . . . . . . . . . . . . . . . . . . . . . . . . 181.1.8 Central Cisco call recording with RTP forking . . . . . . . . . . . . . . . . . . . . . . . . . . . . . . . . . . 201.1.9 Central Cisco silent monitoring with RTP forking . . . . . . . . . . . . . . . . . . . . . . . . . . . . . . . . 221.1.10 IP telephony overview . . . . . . . . . . . . . . . . . . . . . . . . . . . . . . . . . . . . . . . . . . . . . . . . . . . 231.1.11 Cisco phones with central call recording support . . . . . . . . . . . . . . . . . . . . . . . . . . . . . . . 231.1.12 Passive call recording for Cisco UC 320 and UC 500 . . . . . . . . . . . . . . . . . . . . . . . . . . . 241.1.13 Supported Cisco Unified Communications Manager functions . . . . . . . . . . . . . . . . . . . . 24
1.2 Select a deployment architecture . . . . . . . . . . . . . . . . . . . . . . . . . . . . . . . . . . . . . . . . . . . . . . . 251.2.1 Single server architecture . . . . . . . . . . . . . . . . . . . . . . . . . . . . . . . . . . . . . . . . . . . . . . . . . 251.2.2 Multi site architecture . . . . . . . . . . . . . . . . . . . . . . . . . . . . . . . . . . . . . . . . . . . . . . . . . . . . . 251.2.3 Desktop deployment . . . . . . . . . . . . . . . . . . . . . . . . . . . . . . . . . . . . . . . . . . . . . . . . . . . . . 261.2.4 Redundancy options . . . . . . . . . . . . . . . . . . . . . . . . . . . . . . . . . . . . . . . . . . . . . . . . . . . . . 26
1.3 Select your server . . . . . . . . . . . . . . . . . . . . . . . . . . . . . . . . . . . . . . . . . . . . . . . . . . . . . . . . . . . 281.3.1 Recording Performance . . . . . . . . . . . . . . . . . . . . . . . . . . . . . . . . . . . . . . . . . . . . . . . . . . . 301.3.2 Calculating recording channel capacity . . . . . . . . . . . . . . . . . . . . . . . . . . . . . . . . . . . . . . . 32
1.4 Size your disks . . . . . . . . . . . . . . . . . . . . . . . . . . . . . . . . . . . . . . . . . . . . . . . . . . . . . . . . . . . . . 34
1.4.1 Storage requirements . . . . . . . . . . . . . . . . . . . . . . . . . . . . . . . . . . . . . . . . . . . . . . . . . . . . . 341.4.2 Disk partitioning . . . . . . . . . . . . . . . . . . . . . . . . . . . . . . . . . . . . . . . . . . . . . . . . . . . . . . . . . 371.4.3 Understanding RAID . . . . . . . . . . . . . . . . . . . . . . . . . . . . . . . . . . . . . . . . . . . . . . . . . . . . . 37
1.5 Select your SQL Server Edition . . . . . . . . . . . . . . . . . . . . . . . . . . . . . . . . . . . . . . . . . . . . . . . . . 381.6 Virtualization . . . . . . . . . . . . . . . . . . . . . . . . . . . . . . . . . . . . . . . . . . . . . . . . . . . . . . . . . . . . . . . 40
1.6.1 VMware . . . . . . . . . . . . . . . . . . . . . . . . . . . . . . . . . . . . . . . . . . . . . . . . . . . . . . . . . . . . . . . 411.6.2 Microsoft Hyper-V . . . . . . . . . . . . . . . . . . . . . . . . . . . . . . . . . . . . . . . . . . . . . . . . . . . . . . . 431.6.3 Co-residency with virtualized Cisco UC applications . . . . . . . . . . . . . . . . . . . . . . . . . . . . . 43
2 Install . . . . . . . . . . . . . . . . . . . . . . . . . . . . . . . . . . . . . . . . . . . . . . . . . . . . . . . . . . . . . . . . . . . . . . . . . 442.1 Installing the Verba Desktop Agent . . . . . . . . . . . . . . . . . . . . . . . . . . . . . . . . . . . . . . . . . . . . . . 462.2 Installing Verba Unified Media Codec . . . . . . . . . . . . . . . . . . . . . . . . . . . . . . . . . . . . . . . . . . . . 492.3 Installing Lync extension for Lync 2010 . . . . . . . . . . . . . . . . . . . . . . . . . . . . . . . . . . . . . . . . . . . 512.4 Installing your Verba servers . . . . . . . . . . . . . . . . . . . . . . . . . . . . . . . . . . . . . . . . . . . . . . . . . . . 51
2.4.1 Prepare your server . . . . . . . . . . . . . . . . . . . . . . . . . . . . . . . . . . . . . . . . . . . . . . . . . . . . . . 532.4.1.1 Operating system configuration . . . . . . . . . . . . . . . . . . . . . . . . . . . . . . . . . . . . . . . . . 572.4.1.2 Firewall configuration . . . . . . . . . . . . . . . . . . . . . . . . . . . . . . . . . . . . . . . . . . . . . . . . . 602.4.1.3 Antivirus software considerations . . . . . . . . . . . . . . . . . . . . . . . . . . . . . . . . . . . . . . . . 642.4.1.4 Removing IIS Server from Windows Server 2008 . . . . . . . . . . . . . . . . . . . . . . . . . . . 652.4.1.5 Turn off User Access Control . . . . . . . . . . . . . . . . . . . . . . . . . . . . . . . . . . . . . . . . . . . 65
2.4.2 Install SQL Server . . . . . . . . . . . . . . . . . . . . . . . . . . . . . . . . . . . . . . . . . . . . . . . . . . . . . . . 652.4.2.1 Installing MS SQL Server 2008 R2 prerequisites . . . . . . . . . . . . . . . . . . . . . . . . . . . . 652.4.2.2 Installing SQL Server 2008 R2 Express Edition . . . . . . . . . . . . . . . . . . . . . . . . . . . . . 662.4.2.3 Installing SQL Server 2008 R2 Standard or Enteprise Edition . . . . . . . . . . . . . . . . . . 672.4.2.4 Installing SQL Server Management Studio Express . . . . . . . . . . . . . . . . . . . . . . . . . 702.4.2.5 Changing database path in MS SQL Server . . . . . . . . . . . . . . . . . . . . . . . . . . . . . . . 702.4.2.6 Restricting memory usage in MS SQL Server . . . . . . . . . . . . . . . . . . . . . . . . . . . . . . 732.4.2.7 Create an SQL database manually . . . . . . . . . . . . . . . . . . . . . . . . . . . . . . . . . . . . . . 74
2.4.3 Install the Verba software . . . . . . . . . . . . . . . . . . . . . . . . . . . . . . . . . . . . . . . . . . . . . . . . . . 752.4.3.1 Installing the required prerequisites . . . . . . . . . . . . . . . . . . . . . . . . . . . . . . . . . . . . . . 752.4.3.2 Installing a Verba Media Repository . . . . . . . . . . . . . . . . . . . . . . . . . . . . . . . . . . . . . . 762.4.3.3 Installing a Verba Recording Server . . . . . . . . . . . . . . . . . . . . . . . . . . . . . . . . . . . . . . 782.4.3.4 Installing a Verba Single Server solution . . . . . . . . . . . . . . . . . . . . . . . . . . . . . . . . . . 792.4.3.5 Installing the Verba Lync Filter . . . . . . . . . . . . . . . . . . . . . . . . . . . . . . . . . . . . . . . . . . 822.4.3.6 Installing the Verba Remote Capture component . . . . . . . . . . . . . . . . . . . . . . . . . . . . 862.4.3.7 Installing the combined Verba Lync Filter and Remote Capture on a Lync server . . . 87
2.5 Network and PBX configuration . . . . . . . . . . . . . . . . . . . . . . . . . . . . . . . . . . . . . . . . . . . . . . . . . 892.5.1 Overview of monitor ports for passive recording . . . . . . . . . . . . . . . . . . . . . . . . . . . . . . . . 902.5.2 Configuring monitor port for passive recording . . . . . . . . . . . . . . . . . . . . . . . . . . . . . . . . . 932.5.3 Using Cisco switches to filter SPAN traffic . . . . . . . . . . . . . . . . . . . . . . . . . . . . . . . . . . . . . 962.5.4 Configuring Cisco UCM for central recording . . . . . . . . . . . . . . . . . . . . . . . . . . . . . . . . . . . 97
2.5.4.1 Create and configure a SIP Trunk . . . . . . . . . . . . . . . . . . . . . . . . . . . . . . . . . . . . . . . 982.5.4.2 Configuring call routing in Cisco UCM for recording . . . . . . . . . . . . . . . . . . . . . . . . . . 1012.5.4.3 Creating an application user for the JTAPI connection . . . . . . . . . . . . . . . . . . . . . . . 1042.5.4.4 Adding a new extension for recording in Cisco UCM . . . . . . . . . . . . . . . . . . . . . . . . . 1042.5.4.5 Adding an extension with Extension Mobility in Cisco UCM . . . . . . . . . . . . . . . . . . . . 1062.5.4.6 Removing extensions from recording in Cisco UCM . . . . . . . . . . . . . . . . . . . . . . . . . 1082.5.4.7 Configure SIP trunk for recording encrypted calls (Optional) . . . . . . . . . . . . . . . . . . . 1092.5.4.8 Configuring recording notifications in Cisco UCM . . . . . . . . . . . . . . . . . . . . . . . . . . . 1122.5.4.9 Creating a recording profile in Cisco UCM . . . . . . . . . . . . . . . . . . . . . . . . . . . . . . . . . 1132.5.4.10 Disable the unsupported iSAC codec . . . . . . . . . . . . . . . . . . . . . . . . . . . . . . . . . . . . 1132.5.4.11 Codec guidelines for Cisco Central Recording . . . . . . . . . . . . . . . . . . . . . . . . . . . . . 1142.5.4.12 Known Cisco bugs affecting recording reliability . . . . . . . . . . . . . . . . . . . . . . . . . . . 115
2.5.5 Configuring Cisco UCM for central silent monitoring . . . . . . . . . . . . . . . . . . . . . . . . . . . . . 1172.5.6 Configuring Cisco UCM for dial-in recording . . . . . . . . . . . . . . . . . . . . . . . . . . . . . . . . . . . 1182.5.7 Configuring Cisco UC Gateway for recording . . . . . . . . . . . . . . . . . . . . . . . . . . . . . . . . . . 1192.5.8 Configuring IP Trade turrets for central recording . . . . . . . . . . . . . . . . . . . . . . . . . . . . . . . 1202.5.9 Configuring Microsoft Lync for dial-in recording . . . . . . . . . . . . . . . . . . . . . . . . . . . . . . . . . 1232.5.10 Adding the Logon As A Service Right . . . . . . . . . . . . . . . . . . . . . . . . . . . . . . . . . . . . . . . 1262.5.11 Configuring Avaya CM and AES for central recording . . . . . . . . . . . . . . . . . . . . . . . . . . . 126
2.5.11.1 Configure Avaya AES for recording . . . . . . . . . . . . . . . . . . . . . . . . . . . . . . . . . . . . . 1272.5.11.2 Configure Avaya CM for recording . . . . . . . . . . . . . . . . . . . . . . . . . . . . . . . . . . . . . . 1282.5.11.3 Verify Avaya CM and AES recording configuration . . . . . . . . . . . . . . . . . . . . . . . . . 129
2.5.12 Configuring Broadworks platform for SIPREC based call recording . . . . . . . . . . . . . . . . 1292.5.13 Configuring Polycom RMX for conference recording . . . . . . . . . . . . . . . . . . . . . . . . . . . . 131
2.6 Upgrade procedure from Carin recorders . . . . . . . . . . . . . . . . . . . . . . . . . . . . . . . . . . . . . . . . . 1332.7 Verba Remote Installation Service Description . . . . . . . . . . . . . . . . . . . . . . . . . . . . . . . . . . . . . 135

3 Configure . . . . . . . . . . . . . . . . . . . . . . . . . . . . . . . . . . . . . . . . . . . . . . . . . . . . . . . . . . . . . . . . . . . . . . 1373.1 Initial Configuration Steps . . . . . . . . . . . . . . . . . . . . . . . . . . . . . . . . . . . . . . . . . . . . . . . . . . . . . 140
3.1.1 Quick configuration of single-site servers . . . . . . . . . . . . . . . . . . . . . . . . . . . . . . . . . . . . . 1403.1.2 Quick configuration of Media Repository server . . . . . . . . . . . . . . . . . . . . . . . . . . . . . . . . 1413.1.3 Quick configuration of Recording Server component . . . . . . . . . . . . . . . . . . . . . . . . . . . . . 1413.1.4 Quick configuration of Desktop Recorder component . . . . . . . . . . . . . . . . . . . . . . . . . . . . 142
3.2 Configuration reference . . . . . . . . . . . . . . . . . . . . . . . . . . . . . . . . . . . . . . . . . . . . . . . . . . . . . . . 1433.2.1 Common settings . . . . . . . . . . . . . . . . . . . . . . . . . . . . . . . . . . . . . . . . . . . . . . . . . . . . . . . . 1433.2.2 Database connection settings . . . . . . . . . . . . . . . . . . . . . . . . . . . . . . . . . . . . . . . . . . . . . . 1443.2.3 Directory settings . . . . . . . . . . . . . . . . . . . . . . . . . . . . . . . . . . . . . . . . . . . . . . . . . . . . . . . . 1443.2.4 Passive recorder settings . . . . . . . . . . . . . . . . . . . . . . . . . . . . . . . . . . . . . . . . . . . . . . . . . . 1443.2.5 Central Cisco recorder settings . . . . . . . . . . . . . . . . . . . . . . . . . . . . . . . . . . . . . . . . . . . . . 1463.2.6 Dial-in Recorder settings . . . . . . . . . . . . . . . . . . . . . . . . . . . . . . . . . . . . . . . . . . . . . . . . . . 1473.2.7 IP Trade Recorder settings . . . . . . . . . . . . . . . . . . . . . . . . . . . . . . . . . . . . . . . . . . . . . . . . 1503.2.8 Avaya recorder settings . . . . . . . . . . . . . . . . . . . . . . . . . . . . . . . . . . . . . . . . . . . . . . . . . . . 1503.2.9 Central Cisco silent monitoring settings . . . . . . . . . . . . . . . . . . . . . . . . . . . . . . . . . . . . . . . 1523.2.10 Continuity recorder settings . . . . . . . . . . . . . . . . . . . . . . . . . . . . . . . . . . . . . . . . . . . . . . . 1523.2.11 Storage management settings . . . . . . . . . . . . . . . . . . . . . . . . . . . . . . . . . . . . . . . . . . . . . 1533.2.12 Web application settings . . . . . . . . . . . . . . . . . . . . . . . . . . . . . . . . . . . . . . . . . . . . . . . . . 1553.2.13 Monitoring settings . . . . . . . . . . . . . . . . . . . . . . . . . . . . . . . . . . . . . . . . . . . . . . . . . . . . . . 1613.2.14 Screen capturing settings . . . . . . . . . . . . . . . . . . . . . . . . . . . . . . . . . . . . . . . . . . . . . . . . . 165
3.3 Configuring the Cisco IP Phone Service . . . . . . . . . . . . . . . . . . . . . . . . . . . . . . . . . . . . . . . . . . 1673.3.1 Configure the IP Phone Service in UCM 3.x and 4.x . . . . . . . . . . . . . . . . . . . . . . . . . . . . . 1683.3.2 Configure the IP Phone Service in UCM 5.x and later . . . . . . . . . . . . . . . . . . . . . . . . . . . . 1703.3.3 Configure the IP Phone Service in UCM Express . . . . . . . . . . . . . . . . . . . . . . . . . . . . . . . 1743.3.4 Quick access buttons in UCM 3.x and 4.x . . . . . . . . . . . . . . . . . . . . . . . . . . . . . . . . . . . . . 1753.3.5 Quick access buttons in UCM 5.x and later . . . . . . . . . . . . . . . . . . . . . . . . . . . . . . . . . . . . 1753.3.6 Registering the IP Phone Service in UCM 3.x and 4.x . . . . . . . . . . . . . . . . . . . . . . . . . . . . 1763.3.7 Registering the IP Phone Service in UCM 5.x and later . . . . . . . . . . . . . . . . . . . . . . . . . . 176
3.4 Configuring Verba for Lync recording . . . . . . . . . . . . . . . . . . . . . . . . . . . . . . . . . . . . . . . . . . . . 1773.4.1 Configuring Verba Passive Recorder for Lync recording . . . . . . . . . . . . . . . . . . . . . . . . . . 1773.4.2 Configuring Verba Lync Filter service . . . . . . . . . . . . . . . . . . . . . . . . . . . . . . . . . . . . . . . . 1823.4.3 Configuring Remote Capture on Lync servers . . . . . . . . . . . . . . . . . . . . . . . . . . . . . . . . . . 1853.4.4 Configuring Verba conference recording announcement service . . . . . . . . . . . . . . . . . . . 1863.4.5 Configuring Lync 2010 for the conference recording announcement service . . . . . . . . . . 1873.4.6 Configuring Lync conference call invitation . . . . . . . . . . . . . . . . . . . . . . . . . . . . . . . . . . . . 189
3.5 Configuring Verba Proxy Recorder service . . . . . . . . . . . . . . . . . . . . . . . . . . . . . . . . . . . . . . . . 1923.6 Verba Backup Best Practices . . . . . . . . . . . . . . . . . . . . . . . . . . . . . . . . . . . . . . . . . . . . . . . . . . 1953.7 Configuring call direction detection . . . . . . . . . . . . . . . . . . . . . . . . . . . . . . . . . . . . . . . . . . . . . . 1963.8 Configuring the Verba Central Cisco Recorder . . . . . . . . . . . . . . . . . . . . . . . . . . . . . . . . . . . . . 1973.9 Configuring the Verba IP Trade Recorder Service . . . . . . . . . . . . . . . . . . . . . . . . . . . . . . . . . . 2003.10 Advanced Cisco Call Recording Rules . . . . . . . . . . . . . . . . . . . . . . . . . . . . . . . . . . . . . . . . . . 2013.11 Configuring the Verba Avaya Recorder Service . . . . . . . . . . . . . . . . . . . . . . . . . . . . . . . . . . . 2053.12 Configuring the Verba Dial-in Recorder Service . . . . . . . . . . . . . . . . . . . . . . . . . . . . . . . . . . . 2063.13 Configuring Verba for Broadsoft or other SIPREC recording . . . . . . . . . . . . . . . . . . . . . . . . . 2113.14 Configuring DTMF control and recording . . . . . . . . . . . . . . . . . . . . . . . . . . . . . . . . . . . . . . . . 2113.15 Configuring Verba for passive recording . . . . . . . . . . . . . . . . . . . . . . . . . . . . . . . . . . . . . . . . . 2123.16 Installing an SSL certificate for HTTPS access . . . . . . . . . . . . . . . . . . . . . . . . . . . . . . . . . . . . 2143.17 Configuring Verba Secure File Transfer . . . . . . . . . . . . . . . . . . . . . . . . . . . . . . . . . . . . . . . . . 2153.18 Configuring Recording into Verba Secured Format . . . . . . . . . . . . . . . . . . . . . . . . . . . . . . . . . 2163.19 Configuring Cisco MediaSense for Verba integration . . . . . . . . . . . . . . . . . . . . . . . . . . . . . . . 2173.20 Configuring the Verba Cisco MediaSense connector . . . . . . . . . . . . . . . . . . . . . . . . . . . . . . . 2183.21 VF Media File Format . . . . . . . . . . . . . . . . . . . . . . . . . . . . . . . . . . . . . . . . . . . . . . . . . . . . . . . 2203.22 Managing security keys . . . . . . . . . . . . . . . . . . . . . . . . . . . . . . . . . . . . . . . . . . . . . . . . . . . . . . 2223.23 Configuring the Verba Cisco UC Gateway Recorder . . . . . . . . . . . . . . . . . . . . . . . . . . . . . . . 2243.24 How to install your Verba license . . . . . . . . . . . . . . . . . . . . . . . . . . . . . . . . . . . . . . . . . . . . . . 2253.25 Configuring Verba for On-demand recording . . . . . . . . . . . . . . . . . . . . . . . . . . . . . . . . . . . . . 2263.26 Service Provider Edition . . . . . . . . . . . . . . . . . . . . . . . . . . . . . . . . . . . . . . . . . . . . . . . . . . . . . 227
3.26.1 Creating a new Environment . . . . . . . . . . . . . . . . . . . . . . . . . . . . . . . . . . . . . . . . . . . . . . 2283.26.2 Adding a user to an Environment . . . . . . . . . . . . . . . . . . . . . . . . . . . . . . . . . . . . . . . . . . . 2313.26.3 Adding an extension to an Environment . . . . . . . . . . . . . . . . . . . . . . . . . . . . . . . . . . . . . 2313.26.4 Environment login . . . . . . . . . . . . . . . . . . . . . . . . . . . . . . . . . . . . . . . . . . . . . . . . . . . . . . 2323.26.5 Searching calls in different Environments . . . . . . . . . . . . . . . . . . . . . . . . . . . . . . . . . . . . 2333.26.6 Managing Data Retention in Environments . . . . . . . . . . . . . . . . . . . . . . . . . . . . . . . . . . . 234

Verba Recording System Version 7
Page 4 of 235
Deployment Guide
This guide is for system and network engineers who , and Verba solutions.plan install configure
With the Verba Recording System you have selected a flexible, software-only solution that you can deployand configure in many ways to fit your requirements.
Step 1 - Planning your system
When you are planning your system you will have to make decisions about how you will deploy your system.
Decide how to record your phone callsSelect a deployment architectureSelect your serverSize your disksSelect your SQL Server EditionVirtualization
Step 2 - Installing your system
Installing the Verba Desktop AgentInstalling Verba Unified Media CodecInstalling Lync extension for Lync 2010Installing your Verba serversNetwork and PBX configurationUpgrade procedure from Carin recordersVerba Remote Installation Service Description
Step 3 - Configuring your system
The Verba Recording System needs configuration both in your network and in the system itself.
Initial Configuration StepsConfiguration referenceConfiguring the Cisco IP Phone ServiceConfiguring Verba for Lync recordingConfiguring Verba Proxy Recorder serviceVerba Backup Best PracticesConfiguring call direction detectionConfiguring the Verba Central Cisco RecorderConfiguring the Verba IP Trade Recorder ServiceAdvanced Cisco Call Recording RulesConfiguring the Verba Avaya Recorder ServiceConfiguring the Verba Dial-in Recorder ServiceConfiguring Verba for Broadsoft or other SIPREC recordingConfiguring DTMF control and recordingConfiguring Verba for passive recordingInstalling an SSL certificate for HTTPS access

Verba Recording System Version 7
Page 5 of 235
Configuring Verba Secure File TransferConfiguring Recording into Verba Secured FormatConfiguring Cisco MediaSense for Verba integrationConfiguring the Verba Cisco MediaSense connectorVF Media File FormatManaging security keysConfiguring the Verba Cisco UC Gateway RecorderHow to install your Verba licenseConfiguring Verba for On-demand recordingService Provider Edition

Verba Recording System Version 7
Page 6 of 235
PlanWhen you are planning your system you will have to make decisions about how you will deploy your system.
Decide how to record your phone calls
Passive, extension side call recordingPassive, trunk-side call recordingCentral call recording with RTP forking for AvayaCentral call recording with RTP forking for IP Trade turretsCall recording for Microsoft LyncDial-in audio and video call recorderScreen capturing featuresCentral Cisco call recording with RTP forkingCentral Cisco silent monitoring with RTP forkingIP telephony overviewCisco phones with central call recording supportPassive call recording for Cisco UC 320 and UC 500Supported Cisco Unified Communications Manager functions
Select a deployment architecture
Single server architectureMulti site architectureDesktop deploymentRedundancy options
Select your server
Recording PerformanceCalculating recording channel capacity
Size your disks
Storage requirementsDisk partitioningUnderstanding RAID
Select your SQL Server Edition
Virtualization
VMwareMicrosoft Hyper-VCo-residency with virtualized Cisco UC applications
Decide how to record your phone calls
Before you begin
Choosing the most appropriate recording mode for your phone system is important for the stability of yourrecording solution. Make sure you make an informed decision using the expertise of network engineers andsolution architects. With this topic we would like to help network engineers, IT managers and decisionmakers fully understand the pros and cons of the each recording method and clearly highlight the issuesregarding different telephony solutions.
There are two basic recording methods:
passive recording - network monitoring (e.g. SPAN port in Cisco terminology) based solution thatuses the actual network traffic to record phone calls

Verba Recording System Version 7
Page 7 of 235
central recording - sometimes called active recording uses features in the phone system to recordcalls (e.g. in an Avaya system the Media Gateway resources can send the recording streams to therecorder)
In addition, the Verba solution can provide the following additional functions:
screen recording - where the a contact center agent's desktop is recorded during phone calls into ahighly compressed video filedial-in recording - provides a recording function, where any phone can call a recording line thatstarts recording immediately (e.g. if it is part of a three party conference, this will records the call)silent monitoring - allows listening into ongoing conversations, without disturbing the phone call
Supported call recording modes in different phone systems
See the lists below to understand what functions are supported by the Verba Recording System in variousphone systems.
Cisco solutions
Page: Central Cisco call recording with RTP forking
Page: Central Cisco silent monitoring with RTP forking
Page: Dial-in audio and video call recorder
Page: Passive call recording for Cisco UC 320 and UC 500
Page: Passive, extension side call recording
Page: Passive, trunk-side call recording
Page: Screen capturing features
Avaya solutions
Page: Central call recording with RTP forking for Avaya
Page: Dial-in audio and video call recorder
Page: Passive, extension side call recording
Page: Passive, trunk-side call recording
Page: Screen capturing features
Broadsoft solutions
Page: Passive, trunk-side call recording
Page: Passive, extension side call recording
Page: Dial-in audio and video call recorder
Microsoft Lync solutions
Page: Passive, trunk-side call recording
Page: Passive, extension side call recording
Page: Call recording for Microsoft Lync
Page: Screen capturing features
IP Trade turret solution

Verba Recording System Version 7
Page 8 of 235
Page: Central call recording with RTP forking for IP Trade turrets
Standard SIP solutions
Page: Passive, trunk-side call recording
Page: Passive, extension side call recording
Page: Dial-in audio and video call recorder
Page: Screen capturing features
Passive, extension side call recording
The passive recording method is achieved by connecting the recorder server to a monitor port of a switch(SPAN/RSPAN port). The monitor port receives all of the traffic for each phones that need to be recorded.The recorder captures all the traffic, including the RTP media streams and the SCCP, SIP or H.323signaling messages.
Using Verba Recording System, multiple recording servers can be deployed in order to support multi-siteconfigurations or branch office networks and/or high volume systems with or without redundancy.
Supported platforms
The following list contains all supported platforms for passive, network monitoring based recording:
Supported Platform Supported SignalingProtocls
Supported MediaTypes
Cisco SCCP
SIP
H.323***
Voice, Video,TelePresence

Verba Recording System Version 7
Page 9 of 235
Avaya SIP Voice, Video
Microsoft* SIP Voice
BroadSoft SIP, SCCP Voice
LifeSize H.323 , SIP*** Voice, Video
Polycom** H.323 , SIP*** Voice, Video
Tandberg H.323 , SIP*** Voice, Video
Radvision H.323 , SIP*** Voice, Video
Asterisk SIP Voice, Video
Any SCCP, SIP, H.323 complient endpoint orphone
- Voice, Video
* In Microsoft OCS and Lync environments, the signaling information is received from a filter applicationinstalled on the Front End servers. Recording of encrypted calls is also supported.
** For Polycom we do not support the followings: Siren22 audio codec, Polycom telepresence endpointsand all non-standard proprietary extensions.
*** H.245 tunneling and fast start are not supported.
Advantages
Due to the nature of the passive recording method, there is no extra bandwidth or resourcerequirement from the network or call control servers.There is no connection to the call control server(s) or usage of TAPI/JTAPI. In case of call controlserver failure, the recording system is not affected, the recording can work continuously if survivabletelephony functionality is available on the site (e.g. Cisco SRST - Survivable Remote SiteTelephony). In this case, a recording server is deployed at the site.Because of the passive approach, the flow of the call is not affected at all.Can be easily deployed and maintained.Using Verba Recording System multi-site deployment architecture, the system can be adapted verywell to a wide array of use cases.If high-volume traffic is recorded, the system can be scaled easily by adding new recording servers.All types of SCCP/SIP/H.323 phones can be recorded.Monitor port technology is widely used approach.In most cases it can be easily configured and used.Silent monitoring can be supported natively by the recorder.Video and TelePresence calls can also be recorded on certain platforms.
Considerations
In complex switching infrastructure, the monitor port configuration can be a headache.In a multi-site network, branches where a few calls have to be recorded, requires dedicatedrecording server.Automatic announcement of the recording cannot be done by the recorder. An external IVR or TCLscript on the gateway should be involved.Encrypted calls cannot be recorded (except Microsoft OCS/Lync).
Passive, trunk-side call recording
The passive recording method is achieved by connecting the recorder server to a monitor port of a switch(SPAN/RSPAN port). The monitor port receives all of the traffic for each trunk that need to be recorded. Therecorder captures all the traffic, including the RTP media streams and the SIP/H.323 signaling messages.SIP/H.323 trunks usually connect the call control server with the PSTN gateways or establish a direct IPtrunk connection with the service provider.
Using Verba Recording System, multiple recording servers can be deployed in order to support multi-siteconfigurations or branch office networks and/or high volume systems with or without redundancy.

Verba Recording System Version 7
Page 10 of 235
Advantages
There is no connection to the CUCM server(s), so there is no extra capacity requirement at all.In case of CUCM failure, the recording system is not affected, the recording can work continuouslyeven in SRST (Survivable Remote Site Telephony) mode (if a local recording server is deployed atthe remote side).Because of the passive approach, the flow of the call is not affected at all.Can be easily deployed and maintained.Using Verba multi-site deployment architecture, the system can be adapted very well to fit a widearray of use cases.If high-volume traffic should be recorded, the system can be scaled easily.Monitor port technology is widely used approach. In most cases it can be easily configured andused.Silent monitoring can be supported natively by the recorder.Mobile phones can be recorded if the calls are routed through a SIP/H.323 mobile adapter (makessense for transferred or forwarded calls only).
Considerations
Encrypted calls cannot be recorded.Internal calls between IP phones cannot be recorded.Only SIP and H.323 trunks are supported by Verba. (MGCP is not supported)Automatic announcement of the recording cannot be done by the recorder itself. An external IVRshould be involved.Directory number/extension information is usually not available.
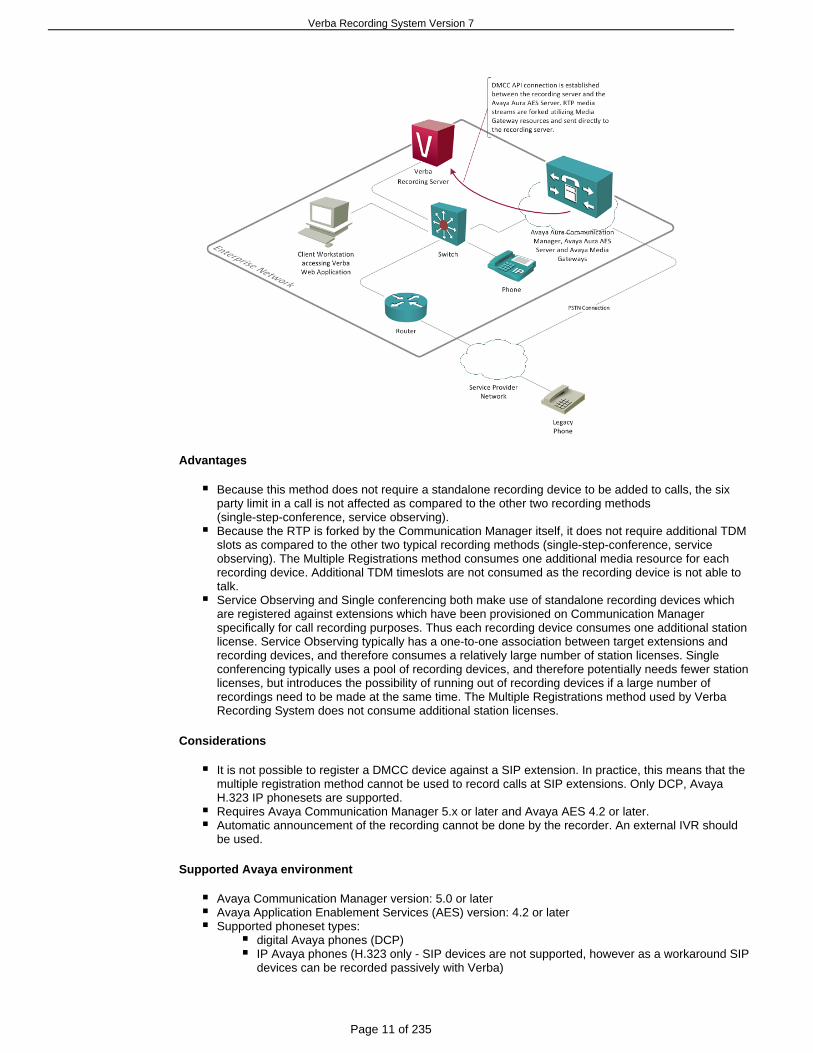
Central call recording with RTP forking for Avaya
The Verba recording solution supports RTP forking with Avaya.
Using Avaya Communication Manager release 5.0 or higher, it is possible to register up to three devicesagainst an extension; using earlier releases, only one device can be registered.
The multiple registrations call recording method, which Verba Recording System uses takes advantage ofthe multiple registrations capability to register a recording device against the actual extension from whichcalls are to be recorded. The application simply requests listening services and CM sends a duplicatedstream of all traffic from the originally provisioned extension. The forked RTP comes to the recording serverfrom the media resource (formerly MedPro) card. The duplication request takes up a media resource, butdoes not require conferencing resources or timeslots compared to other recording methods.
Verba Recording System Version 7
Page 11 of 235
Advantages
Because this method does not require a standalone recording device to be added to calls, the sixparty limit in a call is not affected as compared to the other two recording methods(single-step-conference, service observing).Because the RTP is forked by the Communication Manager itself, it does not require additional TDMslots as compared to the other two typical recording methods (single-step-conference, serviceobserving). The Multiple Registrations method consumes one additional media resource for eachrecording device. Additional TDM timeslots are not consumed as the recording device is not able totalk.Service Observing and Single conferencing both make use of standalone recording devices whichare registered against extensions which have been provisioned on Communication Managerspecifically for call recording purposes. Thus each recording device consumes one additional stationlicense. Service Observing typically has a one-to-one association between target extensions andrecording devices, and therefore consumes a relatively large number of station licenses. Singleconferencing typically uses a pool of recording devices, and therefore potentially needs fewer stationlicenses, but introduces the possibility of running out of recording devices if a large number ofrecordings need to be made at the same time. The Multiple Registrations method used by VerbaRecording System does not consume additional station licenses.
Considerations
It is not possible to register a DMCC device against a SIP extension. In practice, this means that themultiple registration method cannot be used to record calls at SIP extensions. Only DCP, AvayaH.323 IP phonesets are supported.Requires Avaya Communication Manager 5.x or later and Avaya AES 4.2 or later.Automatic announcement of the recording cannot be done by the recorder. An external IVR shouldbe used.
Supported Avaya environment
Avaya Communication Manager version: 5.0 or laterAvaya Application Enablement Services (AES) version: 4.2 or laterSupported phoneset types:
digital Avaya phones (DCP)IP Avaya phones (H.323 only - SIP devices are not supported, however as a workaround SIPdevices can be recorded passively with Verba)

Verba Recording System Version 7
Page 12 of 235
Required Avaya licenses
Computer Telephony Adjunct Links license on the Avaya Communication Manager1pc DMCC Full license for each recorded device on the AES (DMCC Basic license is enough if youalready have IP_STA license for each recorded device)1pc TSAPI Basic User license for each recorded device on the AESOptionally 1pc TSAPI Basic User license for the monitored technical hunt group (for receiving agentstatus information)Properly sized media resource card to support recording sessions (forked RTP streams)
This table summarizes common Avaya AES licensing scenarios:
Recording approaches with Avaya Communication Manager
The following table summarizes the available recording approaches in Avaya Communication Managerenvironment and the available Verba support:
Recording approach Verba support
Passive TDM trunk side recording No
Passive IP trunk side recording Yes, SIP only

Verba Recording System Version 7
Page 13 of 235
Passive IP extension side recording Yes, SIP only
AES: service observing No
AES: single-step-conference No
AES: multiple registration (RTP forking) Yes
The well known passive IP call recording is not officially accepted by Avaya, because the signaling protocolused for Avaya devices is based on a proprietary version of H.323. The new SIP based devices can bemonitored passively, but certain PBX functionality is still missing from the SIP based firmwares, so they arevery rarely used. The only officially supported recording method is CTI-based recording, which means thatthe recording solutions must work through the Avaya AES server. On the AES server, there are differentAPIs:
TSAPIJTAPIDMCC: Device, Media and Call Control API (formerly CMAPI, based on ECMA-269 Standard, usedby Verba)
There are 3 different call recording approaches using the AES:
Service Observing
This method works by operating softphones and monitoring the recorded stations and invoking serviceobserving upon recording request or automatically for each call. This way the softphones can participate inthe calls, thus receive the audio. The application uses the AE Services DMCC service to register itself as astandalone recording device. The Service Observing feature is provisioned and activated on the device sothat, when the target extension joins a call, the recording device is automatically added to the call. Theapplication receives the calls aggregated RTP media stream via the recording device and records the call.
Single-step-conference
This method works by operating softphones and monitoring the recorded stations and invokingsingle-step-conference upon recording request or automatically for each call. In this way the softphones canparticipate in the calls thus receive the audio. The application uses the AE Services DMCC service toregister a pool of standalone recording devices. The application uses the AE Services TSAPI service tomonitor the target extension for Established Call events. Whenever the extension joins a call, anEstablished Call event occurs which triggers the application to use the Single conferencing method to add arecording device to the call. The application receives the calls aggregated RTP media stream via therecording device and records the call.
Multiple registration supported by Verba Recording System
Using Communication Manager release 5.0 or higher, it is possible to register up to three devices against anextension; using earlier releases, only one device can be registered. Where multiple device registration issupported, the number of DMCC devices that can be registered against an extension is determined asfollows:
If there is no physical set and no Avaya IP softphone registered at the extension, the clientapplication can register up to three DMCC devices.If there is a physical set or Avaya IP softphone registered at an extension, the client application canregister up to two DMCC devices.If a physical set and Avaya IP softphone share control of an extension, the client application canregister only one DMCC device.
Central call recording with RTP forking for IP Trade turrets
Solution overview
The integration between the Verba and IP Trade systems is based on duplication of media stream in theturrets. For each call, the dealer board system creates a copy of the associated in-bound and out-boundRTP streams. These are sent to the voice recorder server which records and archives the live feed.
The transmission of call detail information (CDR) and the negotiation of the RTP session parameters are

Verba Recording System Version 7
Page 14 of 235
1. 2. 3. 4. 5. 6.
performed using an XML protocol co-developed by IP Trade and Verba back in 2007.
The dealer boards handle special call scenarios that require special handling on the recorder side too:
Several calls can be active simultaneously on the dealer board, these are recordedseparatelyA dealer board can register on the IP telephony infrastructure with single or multiple directorynumbers, all of these are capturedCall durations can vary from seconds up to several hours (e.g. open lines), all these arerecorded as expected, with silence suppressed in long calls
More IP Trade articles
Configuring IP Trade turrets for central recordingConfiguring the Verba IP Trade Recorder ServiceIP Trade Recorder settings
Why do you need the direct Verba - IP Trade integration?
Legacy TDM or IP call recorders using passive recording technology are not able to properly record thecomplex call scenarios in the IP Trade environment, and these systems cannot control the recordingfunctionality directly of the dealer board like Verba does. Passive IP recorders also suffer the disadvantagesof the monitor port issues:
In complex switching infrastructure, the monitor port configuration can be a headache.In a multi-site network, branches where a few calls have to be recorded, requires dedicatedrecording server.
The native integration between Verba and the IP Trade dealer boards enable sophisticated features like:
Deduplication of the media streams to lower the load on the network componentsTranscoding and selective for lower storage consumptionvoice activity detectionSimple configuration of what to record and howRecording notification on the turretReplay and advanced search functions on the turretOptionally , then sending the mixed stream to mixing multiple channels/calls into a single streamthe recorder
Supported IP Trade systems
Supported IP Trade trading turrets:
IP Trade T3203 (3 speaker channels)IP Trade T3210 (10 speaker channels)

Verba Recording System Version 7
Page 15 of 235
IP Trade T3230 (30 speaker channels)XMA modules: XMA3210 and XMA3230
Supported version:
For duplicate media stream recording: 3.3, 4.x.x and 5.x.x or later.For replay on turret: 5.2.15392 or later
Recording features available:
duplicate media stream recording (direct recording from turret)replay from turret
Channel recording modes:
recording all channels individuallyrecording with selective channel mixing
Call recording for Microsoft Lync
Overview
The Verba Recording System can record Microsoft Lync voice calls, video calls and instant messagesusing various methods.
There are of the Lync recording solution:four main components
Verba Media Repository - stores recordings, provides web access, storage management, securityand auditingVerba Recording Server - takes collected traffic and signalling and generates recorded calls withmedia and call detail recordsVerba Remote Capture Agent - sends collected traffic to recording serversVerba Lync Front End filter plugin - installed on all Lync FE servers
These four components can be used to build Lync recording systems in many variations.
The filter plugin is necessary because Lync communication is . It provides:encrypted
call detail information - rich, accurate information directly from the Lync Front Endsdecryption keys - used to decipher the media recorded from the network by the recording servers
Deployment models
Depending on recording requirements different deployment models are recommended. In the Verba solutionthese models can be mixed even within one recording system. The goal is the same in all situations:place recorders or traffic collectors to network locations / servers, where the media streams youwant to record are passing through.
The following table summarizes three different ways the Verba Recording Servers components can bedeployed.
Standalone RecordingServer
with Monitor Port
Recording Serverinstalled on
Mediation Servers
Recording Serverinstalled on
Edge Servers
No need for monitorport
Yes Yes
Call media pathuntouched
Yes Yes

Verba Recording System Version 7
Page 16 of 235
1. 2. 3.
1.
2.
Internal calls Yes 1 Yes
Inbound / Outboundcalls
Yes Yes Yes
Inbound / Outboundcallswith media bypass
Yes 2 Yes
Remote / Federatedcalls
3 Yes
Branch OfficeSurvivability
Yes Yes Yes 4
1 Requires endpoint level monitor port configuration2 Requires gateway port monitoring3 Certain calls can be recorded by monitoring the Edge Server port(s)4 Monitor port or Mediation Server based options are available for SBAs
Supported platforms
Supported Microsoft platforms:
OCS 2007 R2Microsoft Lync Server 2010Microsoft Lync Server 2013
All software and physical OCS/Lync compatible endpoints are supported.
Advantages
Does not require additional bandwidth on the network to the recording server(s).Does not change the original call in any way (except for Edge-based, that reroutes calls to LyncEdge Servers to allow centralized recording)No conference call is created, no media path is changed.Does not requires any additional resource, like conference resources (except the Edge-basedmodel, that increases Edge Server traffic)All standard Lync feature can be used without any problem. CDRs are not effected either.Call setup times are not changed.All standard recording features are available including on-demand recording, silentmonitoring, etc.
Dial-in audio and video call recorder
The Verba Dial-in Recorder is an call recording solution, where users can actively dial intoaudio and videovarious recorder lines to access the following services:
record a call or conference (both audio and video)playback recorded calls (both audio and video)listen to ongoing calls on your network (audio only)
When used for recording the dial-in recorder becomes a party of the conversation. There are two mainrecording situations:
dictation, note taking - when a caller calls the line, talks and does not connect any other party

Verba Recording System Version 7
Page 17 of 235
2. conference recording - when the caller adds the recorder to a conference call where more two ormore parties are present
All recordings are stored in a central archive and are available through our web interface.
The recording lines can be using caller number detection or even PIN authentication.secured
Consider the following example user cases to get a better understanding of the solution:
Conference call - A consultant wants to record a conference call at the customer-site where theinternal recording system is not availableTrading - A trader needs documentation of a deal, but she is currently out of office, where recordingis not availableInterviews - A journalist wants to record an interview from a mobile phone: calls the recorder andstarts a three party conference to conduct an interviewVerbal contracts and third party verification - A call center worker can connect the dial-inrecorder into a call when the a voice contract is started
Supported audio phones
The dial-in recorder solution supports:
all audio endpoints in Cisco UCM and BroadSoft BroadWorks environments are officiallysupported.most standard SIP audio endpointsall endpoints where the phone system can route calls to the recorder through a SIP trunk(this way the solution can record calls from analogue phones, digital phones, mobile phones andmore)
Experimental H.323 support is also available.
Supported video phones
The dial-in recorder solution supports .most standard SIP video endpoints
In the solution supports the following endpoints:Cisco environment
Cisco Unified Video Advantage associated with a Cisco Unified IP Phone 7911, 7940, 7941, 7942,
Verba Recording System Version 7
Page 18 of 235
7945, 7960, 7961, 7962, 7965, 7970, 7971, or 7975, or with Cisco IP Communicator, running SkinnyClient Control Protocol (SCCP)Cisco Unified IP Phones 9971 and 9951 with the optional USB camera attachmentCisco Unified IP Phones 8941 and 8945 with built-in cameraCisco IP Video Phone 7985Cisco E20 Video PhoneTandberg 2000 MXP, 1500 MXP, 1000 MXP, 770 MXP, 550 MXP, T-1000, and T-550 modelsrunning SCCPSony PCS-1, PCS-TL30, and PCS-TL50 models running SCCPCisco Unified Personal Communicator (running in softphone mode)Cisco Unified Client Services Framework (CSF) clientsCisco Unified Personal Communicator and Cisco Unified Client Services Framework (CSF) clients(running in deskphone mode) associated with a Cisco Unified IP Phone 7941, 7942, 7945, 7961,7962, 7965, 7971, or 7975 running Skinny Client Control Protocol (SCCP)
Experimental H.323 support is also available.
Advantages
Record any calls - Any phone call can be recorded; even mobile phone calls are supported.Playback on phone - Call playback on any phone device.Silent monitoring on phone - Supports silent monitoring.
Considerations
No automatic/compliance recording - the conference has to be manually set up on the phonedevice by the user
Screen capturing features
Screen capturing overview
Verba Screen Capture module is an optional building block of the Verba Performance and QualityManagement system. Contact center supervisors and managers are now able to monitor and evaluateagent performance by recording the content of the agent's computer desktop screen during the calls.
The lightweight screen capture agent module is installed on the agent computer and it automatically recordsthe screen activity during the agent's calls. The recorded screen capture video files are automaticallyuploaded to the Verba Media Repository server, where the files are merged with the audio counterparts,providing a single, synchronized media file for playback. The upload process is configurable and it supportsscheduling. As all other system components, these screen capture modules are also configured andmanaged centrally. Administrators can simply apply a common settings for all agent computers by a singlemouse click, through a configuration profile on the web based management interface.
Screen capture features
The following lists summarize the , that includes the Screen Capture module. ThisVerba Desktop Recorderrecorder is a lightweight software installed on the client PCs that need screen recording.
Recording features
Automatic recording mode - Automatically starts the screen capturing process when theassociated calls are started and automatically stop the recording process after the call ends.Invisible mode - The application can be configured to work completely invisible on the client PC.Recording of after call wrap-up - Screen recordings can continue for configured amount of timeafter the phone call is finishedAutomatic uploads - The screen capture video recordings are automatically uploaded andsynchronized with the audio counterparts on the Media Repository server, this upload can can beimmediate
Screen recording features
Lossless screen video - Lossless, optimized video recording codec technology.Low CPU utilization - when the Verba Screen Capture Codec is used, the CPU utilization is

Verba Recording System Version 7
Page 19 of 235
exceptionally low on the client PCsMultiple codecs - The recordings can be stored in: : third partyTechsmith Screen Capture Codeccodec optimized for screen recording : in-house compressionVerba Screen Recorder Codectechnology highly optimized for screen recording based on latest image processing theories,
: widely supported format from mobile devices to homeWindows Media Screen Codecentertainment, built-in support for playback on Windows
Media export features
Flexible media export - The recordings can be published/exported in the followingformats: Windows Media, MP4 (AAC audio, H.264 video)Audio-only exports - Users can switch between the original audio and screen capture video filesduring playback or file download operations.
Features important for IT
PCI DSS compliance - Pause/Resume recordings during calls manually or through HTTP APISupport ofr Desktop virtualization - Recording Windows Terminal Server and other desktopvirtualization sessions is supportedMulti-monitor support - Multi-monitor recording is supported as well, it can be configured to recordprimary screen only or all available monitorsUnattended installations - MSI based installer package with 100% unattended installation optionCentralized configuration - All desktop recorders are configured centrally from one point. The callassociation is based on the extension - user assignment in the system configuration. The login ID ofthe Windows user has to match the configured login ID in the Verba Recording System.
Storage requirements
All numbers below are given per minute, using 4 frame / second recording. These shall be used aguidelines, they can not represent exact storage requirements. Storage requirements are strongly effectedby screen capture rate (saved frames per second), screen resolution, color depth and amount of changeson the screen during recording.
Compressingalgorithm
Average businessappData entry forms(few changes onscreen)
Multiple applications (windowswitching)Application with windowscrolling (browser)(many changes on screen)
Techsmith ScreenCapture Codec
1024x768 16bitcolor
0.2-0.8 Mbyte/min 0.8-3.6 Mbyte/min
Techsmith ScreenCapture Codec
1024x768 32bitcolor
0.3-1.2 Mbyte/min 1.5-6 Mbyte/min
Techsmith ScreenCapture Codec
1280x1024 32bitcolor
0.5-2.0 Mbyte/min 2-8 Mbyte/min
Verba Screen Codec 1024x768 32bitcolor
0.1-0.3 Mbyte/min 0.5-1.5 Mbyte/min
Verba Screen Codec 1280x102432bit color
0.2-0.6 Mbyte/min 0.8-5 Mbyte/min
Windows Media ScreenCodec
Constant bitrates are selectable between 768 kbps - 2 mbps (5-15Mbyte/min)
How to minimize storage requirements
The system can record all resolutions, color depths, multiscreen setups, but the following recommendationshelp to dramatically lower disk space requirements of the recordings:
Use the minimum possible screen resolution that still fullfills the usability requirementsUse lower bit color depths

Verba Recording System Version 7
Page 20 of 235
Turn off background picture on the desktop
Central Cisco call recording with RTP forking
This recording method utilizes special features of the Cisco Unified Communication Manager introduced inversion 6.0. It integrates call recording and silent monitoring features into CUCM. If an extension isconfigured for recording (the configuration is available in the CUCM), the CUCM instructs the phone to sendthe RTP streams related to a given call, directly to the recording server utilizing the built-in bridge of thephone. The recording system is connected to the CUCM via a SIP trunk to capture the signaling messages.Additional call detail information is obtained by using a JTAPI interface.
You can also use this technology for , even without call recording, see silent monitoring Central silent.monitoring utilizing RTP forking in Cisco environment
Advantages
In a multi-site network, branches where few calls have to be recorded, the deployment of a recorderdoes not require a dedicated recording server for each remote site.Theoretically this recorder eliminates the complexity of the switching infrastructure compared to thepassive recording method, because the RTP streams are sent directly to the recording serverautomatically.Can be easily scaled by adding new recorders to the system if more capacity is required.Does not require extra DSP resources from the network compared to the active (conference based)method.Recording tone can be generated by the phone.Encrypted calls can be recorded since CUCM 8.0
Considerations
Requires additional bandwidth on the network to the recording server(s).Since the recording functionality is controlled by the CUCM, in case of a WAN link failure, therecording will not work at all in the branch offices (if the CUCM is in the central site).Cisco SRST (Survivable Remote Site Telephony) does not support native recording.Requires at least CUCM version 6.0.Does not support all phone types (check the list above)Requires extra capacity from the CUCM server(s) (for each recording session add 2 calls to BHCCin your dimensioning calculation).Only voice calls are supported.

Verba Recording System Version 7
Page 21 of 235
"Almost" all Cisco phones support central recording
The Verba passive, network spanning / traffic monitoring based recording engine technology supports all, however, the Verba central recording technology needs cooperation from software built intoCisco phones
the Cisco phones to deliver the recording function. Not all Cisco phones support this recording mode, onerequirement is the build-in-bridge technology in the phone.
Cisco maintains a detailed support matrix for RTP-forking based recording and silent monitoring:Unified CM Recording and Silent Monitoring Supported Device Matrix
Here we provide a rough summary of the above matrix, but we recommend you are look at the above link atthe Cisco site:
Supported Cisco Unified Communications Manager versions: 6.x, 7.x, 8.x, 9.x
Supported Cisco IP phones (certain phones are only supported on the latest CUCM versions):
Cisco 6911Cisco 6921Cisco 6941Cisco 6961Cisco 7906Cisco 7910Cisco 7911Cisco 7921Cisco 7925Cisco 7931Cisco 7937Cisco 7941Cisco 7941G-GECisco 7942Cisco 7945Cisco 7961Cisco 7961G-GECisco 7962Cisco 7965Cisco 7970Cisco 7971Cisco 7975Cisco 8961*Cisco 9951*Cisco 9971*Cisco IP CommunicatorCisco VGC Phone
*89xx and 99xx series support iSAC codec which isn't supported by Verba. UCM Region codec settingsshould disable this codec to record all the calls established by these models.
Cisco phones that needed for central recording: analog phones, Cisco 12 S,do not have the capabilityCisco 12 SP, Cisco 30 SP+, Cisco 3911, Cisco 6901, Cisco 7902, Cisco 7905, Cisco 7910, Cisco 7912,Cisco 7920, Cisco 7935, Cisco 7936, Cisco 7940, Cisco 7941G-GE, Cisco 7960, Cisco 7961G-GE, Cisco7970, Cisco 7971, Cisco 7985, Cisco ATA 186, Cisco ATA 187, Cisco Cius, Cisco Unified PersonalCommunicator
Find out what phones are supported on your system
To find out which phones are supported on your CUCM version, use the built-in reporting tool:
Step 1 Login to on CUCM admin screen.Cisco Unified Reporting
Step 2 From select .System Reports Unified CM Phone Feature List
Step 3 Select . This will list all phones capable to do RTP forking.Feature: Record
Encrypted call recording support matrix
Verba Recording System Version 7
Page 22 of 235
Cisco Unified Communications Manager 8.0 supports the recording of encrypted calls via the RTP forkingbased interface. The following table helps you to identify supported call scenarios regarding the encryptionfeature.
Non Secure RecordedPhone
AuthenticatedRecorded Phone
Secure RecordedPhone
Non Secure SIP trunkto the recorder
Supported Not supported Not supported
Encyrpted SIP trunkto the recorder
Supported, but theforked RTP will not beencrypted
Not supported Supported
Central Cisco silent monitoring with RTP forking
In Cisco Unified Communications Manager environments, the Verba Recording System has a special silentmonitoring module, which allows to provide silent monitoring functionality without call recording. This allowsorganizations to implement silent monitoring in a very cost effective way. This special silent monitoringservice is based on the RTP forking technology, introduced in CUCM 6.0.
The Verba Cisco Central Silent Monitoring Service is connected to the CUCM via JTAPI, and monitors allphones, which have to be silently monitored. The system automatically stores every call for the monitoredphones until the calls are not ended (calls are available in the ongoing call list). Users with full privileges canlist ongoing calls on the web interface and can start the silent monitoring. The main difference between thebuilt-in recording service based silent monitoring and this method is that this method requires a Cisco IPphone, which is used to receive the forked RTP packets from the monitored phones. When a supervisorinitiates silent monitoring for a call, the supervisor has to enter a directory number, where the system sendsthe silent monitoring session.
Supported Cisco environment
Supported Cisco Unified Communications Manager versions: 6.x, 7.x, 8.x
Supported Cisco IP phones (certain phones are only supported on the latest CUCM versions):
Cisco 6911Cisco 6921Cisco 6941Cisco 6961Cisco 7906Cisco 7910Cisco 7911Cisco 7921Cisco 7925Cisco 7931Cisco 7937Cisco 7941Cisco 7941G-GECisco 7942Cisco 7945Cisco 7961Cisco 7961G-GECisco 7962Cisco 7965Cisco 7970Cisco 7971Cisco 7975Cisco 8961Cisco 9951Cisco 9971Cisco ATA 186Cisco IP CommunicatorCisco VGC Phone
For a more detailed listing, see .Cisco phones with central call recording support

Verba Recording System Version 7
Page 23 of 235
To find out, which phones are supported on your CUCM version, use the built-in reporting tool:
Step 1 Login to on CUCM admin screen.Cisco Unified Reporting
Step 2 From select .System Reports Unified CM Phone Feature List
Step 3 Select . This will list all phones capable to do RTP forking.Feature: Record
IP telephony overview
IP telephony is voice communication transmitted over data networks. Voice calls are sent over a privatebusiness network via digitized packets using Internet Protocol (IP), like e-mail or other data transfers. Voiceover IP (VoIP) gateways convert voice from circuit switch to the packet domain.
IP telephony allows companies to merge internal voice and data traffic onto a single network, which canprovide businesses with tremendous cost savings by eliminating the need to maintain separate networks fordata and voice. In addition, IP telephony opens the door for unified messaging and other advanced featuresthat are either unavailable or much more costly through separate voice and data networks.
IP PBX solutions seamlessly integrate into the corporate data network, which eliminates the need for astand-alone PBX. They consist of computer servers running open interfaces that create inherently flexible,scalable and distributed solutions with simplified deployment and management. Unlike traditional PBXsystems, IP PBXs handle all calls over IP and make it easier to link telephones with desktop PCs.
Cisco phones with central call recording support
"Almost" all Cisco phones support central recording
The Verba passive, network spanning / traffic monitoring based recording engine technology supports all, however, the Verba central recording technology needs cooperation from software built intoCisco phones
the Cisco phones to deliver the recording function. Not all Cisco phones support this recording mode, onerequirement is the build-in-bridge technology in the phone.
Verba Recording System Version 7
Page 24 of 235
Cisco Central Recording and Silent Monitoring Support Matrix
Cisco maintains a detailed support matrix for RTP-forking based recording and silent monitoring:Unified CM Recording and Silent Monitoring Supported Device Matrix
*89xx and 99xx series support iSAC codec which isn't supported by Verba. UCM Region codec settingsshould disable this codec to record all the calls established by these models.
Find out what phones are supported on your system
To find out, which phones are supported on your CUCM version, use the buil-in reporting tool:
Step 1 Login to on CUCM admin screen.Cisco Unified Reporting
Step 2 From select .System Reports Unified CM Phone Feature List
Step 3 Select . This will list all phones capable to do RTP forking.Feature: Record
Passive call recording for Cisco UC 320 and UC 500
Passive call recording for Cisco UC 320 and UC 500 series
Verba support recording on the IPCisco Unified Communications Manager Express based (CUCME) PBX platforms, however .additional equipment is required to capture all of the voice calls
Here's why:
The CUCME platform does not allow you to use our central recording technologies, due to
the of Cisco phones, which would allowlack of support for the built-in-bridge functionyou to use the Verba central recording technologythe , which would allow the Verba system to collect information aboutlack of JTAPI supportcall details
Therefore the , which is basedonly way to record calls on CUCME devices is passive recordingon port mirroring (SPAN in Cisco terminology).
UC320/UC500 series with CUCME platforms have limited support for SPAN, it do not allow you tocreate monitor sessions that include more than one network ports at a time, which makes it hard tocapture the traffic of all your phones.
Solution
You can solve this situation, by between your phones and thedeploying an additional standard switchCUCME boxes that supports SPAN sessions for multiple (even all ports) and VLANs.
Note
An example for an entry level switch that supports SPAN port sessions with multiple ports is theCisco Catalyst 2960-24TC-S Switch - approximately 500 USD at list price at your local Ciscodistributor/integrator partner. There also smaller switches that support SPAN. Please contact yourreseller for an up-to-date recommendation.
Read more about passive recording
Page: Passive, trunk-side call recording
Page: Passive, extension side call recording
Supported Cisco Unified Communications Manager functions

Verba Recording System Version 7
Page 25 of 235
The following Unified Communications Manager functions are supported in Verba:
HoldBlind TransferScreened TransferForward (All, Busy, No Answer, etc.)ConferenceCall ParkPick UpLine ChangeIncoming and Outgoing calls through a MGCP or H.323 gatewayShared LinesExtension MobilityCalls through an Inter Cluster TrunkSRST (Survivable Remote Site Telephony)Hunt Groups
Select a deployment architecture
Verba offers the flexibility of various deployment options:
Single server architectureMulti site architectureVerba desktop application
Single server architecture
In this configuration all Verba components (Recording Server and Media Repository) are installed on thesame server.
All functionality, including recording, archiving, web-based access with security, auditing and more isdeployed on a single server.
Multi site architecture
In this configuration, the Verba components (Recording Server and Media Repository) are installed onseparated servers. Distributing the system components can increase system capacity and adds multi-site
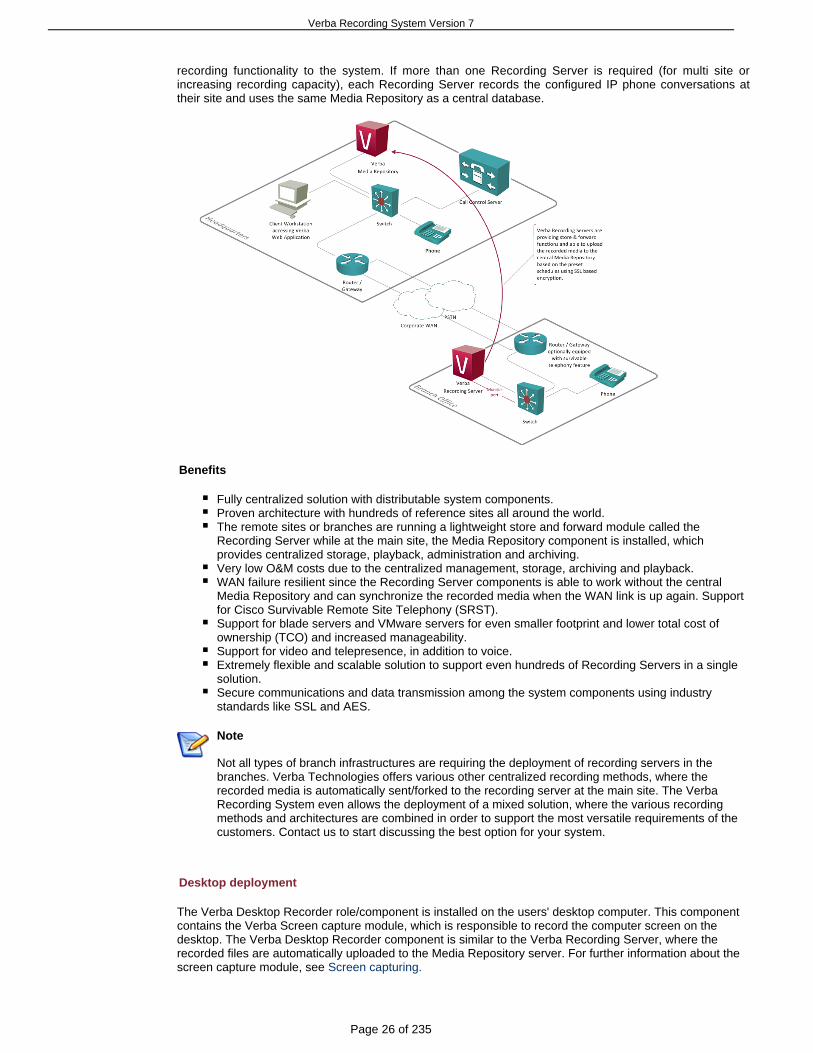
Verba Recording System Version 7
Page 26 of 235
recording functionality to the system. If more than one Recording Server is required (for multi site orincreasing recording capacity), each Recording Server records the configured IP phone conversations attheir site and uses the same Media Repository as a central database.
Benefits
Fully centralized solution with distributable system components.Proven architecture with hundreds of reference sites all around the world.The remote sites or branches are running a lightweight store and forward module called theRecording Server while at the main site, the Media Repository component is installed, whichprovides centralized storage, playback, administration and archiving.Very low O&M costs due to the centralized management, storage, archiving and playback.WAN failure resilient since the Recording Server components is able to work without the centralMedia Repository and can synchronize the recorded media when the WAN link is up again. Supportfor Cisco Survivable Remote Site Telephony (SRST).Support for blade servers and VMware servers for even smaller footprint and lower total cost ofownership (TCO) and increased manageability.Support for video and telepresence, in addition to voice.Extremely flexible and scalable solution to support even hundreds of Recording Servers in a singlesolution.Secure communications and data transmission among the system components using industrystandards like SSL and AES.
Note
Not all types of branch infrastructures are requiring the deployment of recording servers in thebranches. Verba Technologies offers various other centralized recording methods, where therecorded media is automatically sent/forked to the recording server at the main site. The VerbaRecording System even allows the deployment of a mixed solution, where the various recordingmethods and architectures are combined in order to support the most versatile requirements of thecustomers. Contact us to start discussing the best option for your system.
Desktop deployment
The Verba Desktop Recorder role/component is installed on the users' desktop computer. This componentcontains the Verba Screen capture module, which is responsible to record the computer screen on thedesktop. The Verba Desktop Recorder component is similar to the Verba Recording Server, where therecorded files are automatically uploaded to the Media Repository server. For further information about thescreen capture module, see Screen capturing.
Verba Recording System Version 7
Page 27 of 235
Redundancy options
Overview
There are two fundamental functions in the recording system that might need redundancy:
Media Repository (MR) redundancy - this can be achieved by deploying two Media Repositories inthe solutionRecording Server (RS) redundancy - this can be achieved by deploying more than one RecordingServers in the solution
It is important to decide an ambition level for redundancy your organization. For some organizationsrecording is mission critical, but downtime is acceptable on the media repository.
Redundant deployment topologies
Multiple Media Repositories and the Recording Servers can be connected to each other in the followingways:
Recording Servers feeding different Media Repositoriesthis provides both MR redundancy and RS redundancyyou essentially deploy two standalone recording systems running in parallelthe drawback: configuration, user and extension management must be done separatelythrough the two MRs
Recording Servers feeding the same Media Repositorythis provides RS redundancythis solution is managed as one system centrally from the MR servers
You need to calculate with the fact that different recording technologies provide different redundancypossibilities:
passive recordingprovides a redundancy where all recording servers that get the same traffic all can record itat the same timeif one of them fails the others will still have the complete call
central / RTP-forking basedthese solutions (e.g. Cisco, Avaya, IP Trade) can send only to one recorder at a timethey offer failover between recorders on a per call basisif one fails during a call, the last part of the call will be lost, but the next call will be recordedby another server
Note
Redundancy scenarios can become complex if the requirements are very strict. We recommendthat you contact a Verba expert to evaluate your options.
Redundant topology example
Let's look at the following example requirements and design a redundant solution based on these:
call recording is critical for the organisation, which works in finance sectorcalls must be stored for 7 years, calls might be provided to regulators within 5 workdaysCisco UCM 8.5 is deployed the customer200 Cisco desktop phones users and 25 IP Trade turrets are used by the customer
Based on these requirements we make the following assumptions:
all phones support the Cisco built-in bridge functionality (should be verified with the customer)multiple recording servers will be neededone media repository server might be enough, but long term storage is important
In this case, the following are recommended:
Verba Recording System Version 7
Page 28 of 235
use 1 Verba Media Repository servervirtualize the server with VMware, so it can be easily moved to other hardware when it fails(boot image might be in SAN to facilitate this)mount redundant SAN volumes to the virtual server
deploy 2 Verba Recording Serversboth servers can run both the Cisco and IP Trade central recording enginesthe Cisco and IP Trade solution shall be configured with both recorders in their recordingserver listboth servers will upload to the Verba Media Repository Server (will buffer locally if the MR isnot available)
Select your server
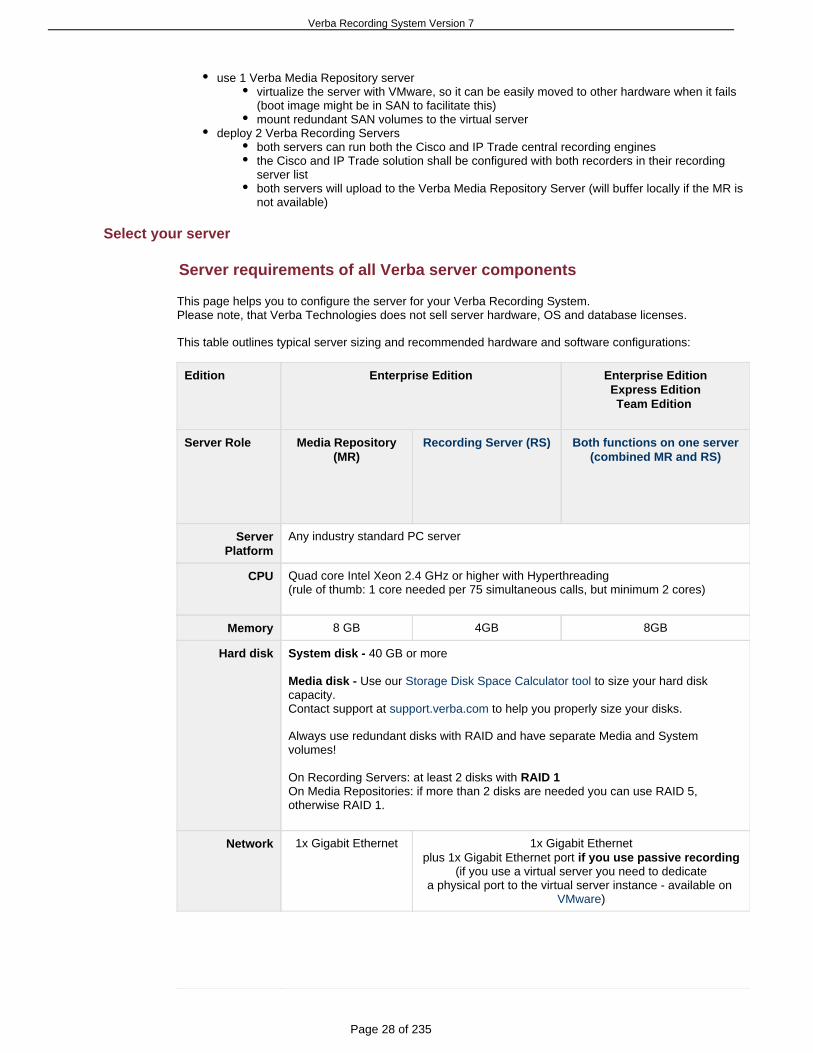
Server requirements of all Verba server components
This page helps you to configure the server for your Verba Recording System.Please note, that Verba Technologies .does not sell server hardware, OS and database licenses
This table outlines typical server sizing and recommended hardware and software configurations:
Edition Enterprise Edition Enterprise EditionExpress EditionTeam Edition
Server Role
Media Repository(MR)
Recording Server (RS) Both functions on one server(combined MR and RS)
ServerPlatform
Any industry standard PC server
CPU Quad core Intel Xeon 2.4 GHz or higher with Hyperthreading(rule of thumb: 1 core needed per 75 simultaneous calls, but minimum 2 cores)
Memory 8 GB 4GB 8GB
Hard disk System disk - 40 GB or more
Media disk - Use our to size your hard diskStorage Disk Space Calculator toolcapacity.Contact support at to help you properly size your disks.support.verba.com
Always use redundant disks with RAID and have separate Media and Systemvolumes!
On Recording Servers: at least 2 disks with RAID 1On Media Repositories: if more than 2 disks are needed you can use RAID 5,otherwise RAID 1.
Network 1x Gigabit Ethernet 1x Gigabit Ethernetplus 1x Gigabit Ethernet port if you use passive recording
(if you use a virtual server you need to dedicatea physical port to the virtual server instance - available on
)VMware

Verba Recording System Version 7
Page 29 of 235
Operatingsystem
Microsoft Windows Server 2008 R2Microsoft Windows Server 2012
Standard Edition, latest service packs installedImportant! We support the English versions of Microsoft server software!
Database Microsoft SQL Server 2008 R2Microsoft SQL Server 2012
Express, Standard or Enterprise Edition, latest service packs installed
Express Edition is bundled for free, recommended up to 1.000.000 callsSee Select your SQL Server Edition
If you have an existing SQL Server clusters, we recommend using that as Verbadatabase(in that case 4 GB RAM is enough on the MR and MR+RS servers).
Virtualization VMware recommended, see .Virtualization
IMPORTANT! Hyper-V is currently NOT supported for passive (span-port based)recorders.
Antivirus Make sure your .Antivirus software does not scan database, media and log folders
Power Redundant Power SupplyUPS recommended
Please note the following:
No other apps on the server - Verba Recording System components should be installed ondedicated servers or virtual server instances, with no other applications being co-hosted on them.You can contact Verba for server review - You can contact Verba or your system integratorrepresentative for a review before submitting orders for your server.Good backup is essential - A regular (daily) backup procedure of the Verba Recording Systemserver needs to be established to prevent data loss and allow disaster recovery.Contact Verba for video recording planning - For video, telepresence and agent computer screendeployments, pleased contact your Verba Technologies or system integrator representative.
The following documents further help you size your solution:
Recording PerformanceCalculating recording channel capacity
Desktop requirements for Verba Desktop Agent
This component is installed on the PC of the agent whose screen shall be recorded during the phone calls.
Hardware and 3rd party software requirements for Verba Desktop Agent component deployment:
CPU Intel Pentium 4 or later
Memory 1 GB
Network 10/100/100 LAN interface card
Operating system Microsoft Windows XPMicrosoft Windows VistaMicrosoft Windows 7Microsoft Windows 8

Verba Recording System Version 7
Page 30 of 235
Display The system can record all resolutions, color depths, multiscreen setups.
The following recommendations help to dramatically lower disk spacerequirements of the recordings:
Use the minimum possible screen resolution that still fulfills softwareusability requirementsUse 16 bit color depthTurn off background picture on the desktopUse a low screen recording rate: 3 frame/sec is typically enough fora proper review
Desktop requirements for standard search and replay workstations
Hardware and 3rd party software requirements for client computers accessing the web based user interface:
Computer platform Multimedia PC
CPU Intel Pentium 4 or later
Memory 1 GB
Network 10/100 LAN interface card or WiFi adapter
Operating system Microsoft Windows XPMicrosoft Windows VistaMicrosoft Windows 7Microsoft Windows 8
Browser Microsoft Internet Explorer 8.x or laterMozilla Firefox 2.x or laterGoogle Chrome 2.x or later
Media Player Windows Media Player 10.x or later
Display 1024x768 resolution or higher with 16 bit color palette
Other Sound card, speaker or headphoneMonitor, keyboard, mouse
Recording Performance
Capacity recommendations
The tables below describe recording channel capacity limitations and restrictions for the dimensioning ofhardware configurations.
Voice
Configurationdescription
RTP mediastream codec
Test HWconfiguration
Maximum number of voicerecording channels

Verba Recording System Version 7
Page 31 of 235
Co-hosted MediaRepository andRecording Serverconfiguration
G.711A-lawG.711-lawCiscoWidebandG.729G.729BiLBCG.722
x2 Quad core IntelXeon 2.4 GHz4 Gbyte RAM4 x 300 Gbyte SATAHDD15,000 RPM, RAID 0+ 1Windows Server 2008R2 (64bit)SQL Server 2008 R2(64bit)
150
StandaloneRecording Server G.711
A-lawG.711-lawCiscoWidebandG.729G.729BiLBCG.722
x2 Quad core IntelXeon 2.4 GHz4 Gbyte RAM4 x 146 Gbyte SATAHDD15,000 RPM, RAID 0+ 1Windows Server 2008R2 (64bit)
400
The capacity limitations may be different for the various recording methods supported by Verba RecordingSystem. For further information, contact Verba Technologies or your system integrator representative.
Video
Configurationdescription
RTP mediastream codec
Test HWconfiguration
Maximum number of videorecording channels
Co-hosted MediaRepository andRecording Serverconfiguration
H.261H.263H.264up to 1Mbps percall
x2 Quad core IntelXeon 2.4 GHz4 Gbyte RAM4 x 300 Gbyte SATAHDD15,000 RPM, RAID 0+ 1Windows Server 2008R2 (64bit)SQL Server 2008 R2(64bit)
15
Stand aloneRecording Server H.261
H.263H.264up to 1Mbps percall
x2 Quad core IntelXeon 2.4 GHz4 Gbyte RAM4 x 146 Gbyte SATAHDD15,000 RPM, RAID 0+ 1Windows Server 2008R2 (64bit)
30
The capacity limitations may be different for the various recording methods supported by Verba RecordingSystem. For further information, contact Verba Technologies or your system integrator representative.
Telepresence

Verba Recording System Version 7
Page 32 of 235
Configurationdescription
RTP mediastream codec
Test HWconfiguration
Maximum number of videorecording channels
Co-hosted MediaRepository andRecording Serverconfiguration
H.264 x2 Quad core IntelXeon 2.4 GHz4 Gbyte RAM4 x 300 Gbyte SATAHDD15,000 RPM, RAID 0+ 1Windows Server 2008R2 (64bit)SQL Server 2008 R2(64bit)
2 (CTP 3200/300)
6 (CTP 500/1000/1300)
StandaloneRecording Server
H.264 x2 Quad core IntelXeon 2.4 GHz4 Gbyte RAM4 x 146 Gbyte SATAHDD15,000 RPM, RAID 0+ 1Windows Server 2008R2 (64bit)
3 (CTP 3200/300)
9 (CTP 500/1000/1300)
The capacity limitations may be different for the various recording methods supported by Verba RecordingSystem. For further information, contact Verba Technologies or your system integrator representative.
Calculating recording channel capacity
Erlang B formula
An Erlang is a unit of telecommunications traffic measurement. Strictly speaking, one Erlang represents thecontinuous use of one voice path. In practice, it is used to describe the total traffic volume of one hour.
For example, if a group of users made 30 calls in one hour, and each call had an average call duration of 5minutes, then the number of Erlangs this represents is worked out as follows:
Minutes of traffic in the hour = number of calls x duration
Minutes of traffic in the hour = 30 x 5
Minutes of traffic in the hour = 150
Hours of traffic in the hour = 150 / 60
Hours of traffic in the hour = 2.5
Traffic figure = 2.5 Erlangs
Erlang traffic measurements are made in order to help telecommunications network designers understandtraffic patterns within their voice networks. Erlang traffic measurements or estimates can be used to workout how many lines are required between a telephone system and a central office (PSTN exchange lines),or between multiple network locations.
If you measure network traffic load during the busiest hour, this period represents the maximum traffic loadthat your network must support. The result gives you a traffic load measurement commonly referred to asthe Busy Hour Traffic (BHT) .
The Erlang B model is used when blocked calls are rerouted, that never come back to the original trunkgroup. This model assumes a random call arrival pattern. The caller makes only one attempt; if the call is
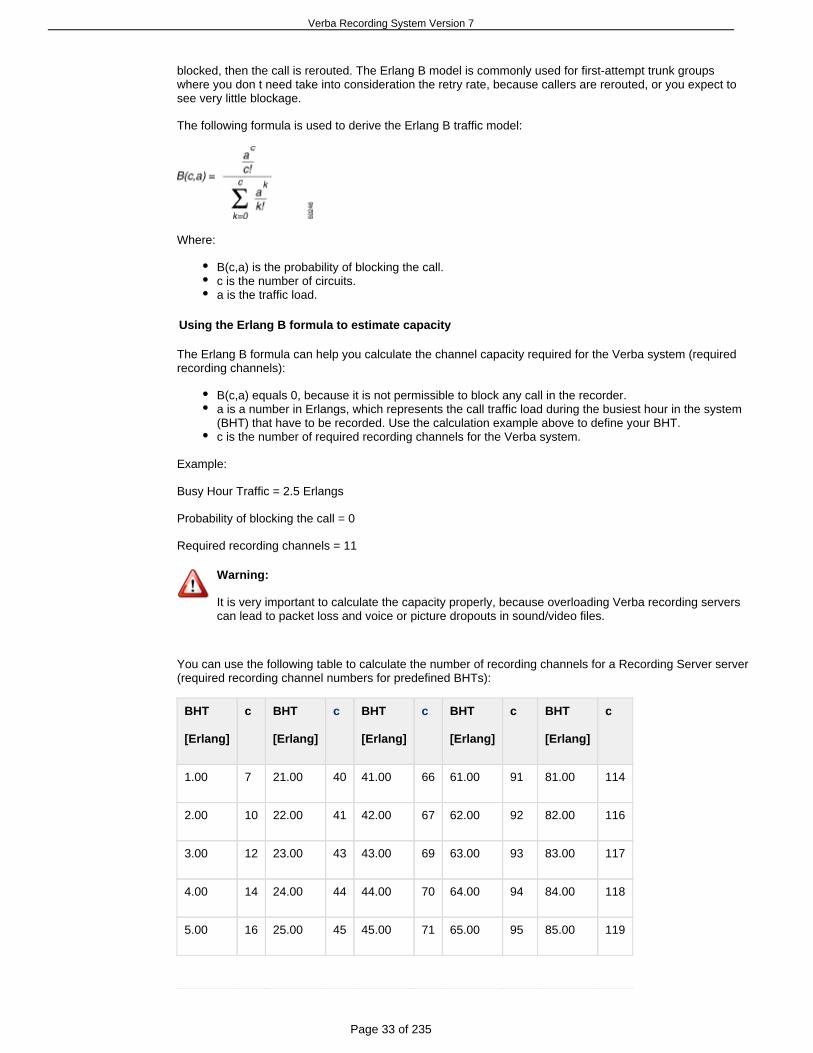
Verba Recording System Version 7
Page 33 of 235
blocked, then the call is rerouted. The Erlang B model is commonly used for first-attempt trunk groupswhere you don t need take into consideration the retry rate, because callers are rerouted, or you expect tosee very little blockage.
The following formula is used to derive the Erlang B traffic model:
Where:
B(c,a) is the probability of blocking the call.c is the number of circuits.a is the traffic load.
Using the Erlang B formula to estimate capacity
The Erlang B formula can help you calculate the channel capacity required for the Verba system (requiredrecording channels):
B(c,a) equals 0, because it is not permissible to block any call in the recorder.a is a number in Erlangs, which represents the call traffic load during the busiest hour in the system(BHT) that have to be recorded. Use the calculation example above to define your BHT.c is the number of required recording channels for the Verba system.
Example:
Busy Hour Traffic = 2.5 Erlangs
Probability of blocking the call = 0
Required recording channels = 11
Warning:
It is very important to calculate the capacity properly, because overloading Verba recording serverscan lead to packet loss and voice or picture dropouts in sound/video files.
You can use the following table to calculate the number of recording channels for a Recording Server server(required recording channel numbers for predefined BHTs):
BHT
[Erlang]
c BHT
[Erlang]
c BHT
[Erlang]
c BHT
[Erlang]
c BHT
[Erlang]
c
1.00 7 21.00 40 41.00 66 61.00 91 81.00 114
2.00 10 22.00 41 42.00 67 62.00 92 82.00 116
3.00 12 23.00 43 43.00 69 63.00 93 83.00 117
4.00 14 24.00 44 44.00 70 64.00 94 84.00 118
5.00 16 25.00 45 45.00 71 65.00 95 85.00 119

Verba Recording System Version 7
Page 34 of 235
6.00 18 26.00 47 46.00 72 66.00 97 86.00 120
7.00 19 27.00 48 47.00 74 67.00 98 87.00 121
8.00 21 28.00 49 48.00 75 68.00 99 88.00 123
9.00 23 29.00 51 49.00 76 69.00 100 89.00 124
10.00 24 30.00 52 50.00 77 70.00 101 90.00 125
11.00 26 31.00 53 51.00 78 71.00 103 91.00 126
12.00 27 32.00 55 52.00 80 72.00 104 92.00 127
13.00 29 33.00 56 53.00 81 73.00 105 93.00 128
14.00 30 34.00 57 54.00 82 74.00 106 94.00 130
15.00 32 35.00 58 55.00 83 75.00 107 95.00 131
16.00 33 36.00 60 56.00 85 76.00 108 96.00 132
17.00 34 37.00 61 57.00 86 77.00 110 97.00 133
18.00 36 38.00 62 58.00 87 78.00 111 98.00 134
19.00 37 39.00 64 59.00 88 79.00 112 99.00 135
20.00 39 40.00 65 60.00 89 80.00 113 100.00 137
There is a very useful Erlang B, Extended Erlang B and Erlang C calculator at the following URL: http://www.erlang.com/calculator/index.htm
Size your disks
Storage requirementsDisk partitioningUnderstanding RAID
Storage requirements
This article helps disk size dimensioning. Required storage size depends upon the number and length of and the .calls applied codec
Estimate your storage requirementsAudio recordingsVideo recordingsTelepresence recordingsScreen recordings
Estimate your storage requirements
You can to estimate your storage requirements for download the Excel Verba Storage Calculator sheet
Verba Recording System Version 7
Page 35 of 235
applications.voice, video, telepresence and screen recording
Warning
The calculator sheet includes , which might be disabled when you after youExcel macrosdownload this file from this site. Please and (to turn on macros)Enable Editing Enable Contentwhen Excel is asking for it, otherwise the calculator will not work.
Audio recordings
The Verba Recording System is able to store audio files in many file formats with different codecs.
Note
All our recording engines support all the formats below,except for our that currently does not support our IP Trade recorder engine proprietary vf format.
Supported formats:
Input codec Codec for storingmedia
Codecinformation
File format 1 minutefile size
1hourfilesize
8 Khz codecs:
G.711A-lawG.711 -lawG.729G.729AG.723.1iLBCGSMMicrosoftRTAudio(NarrowBand)
PCM8 8 bit, 8 Khz,Mono
wav 470 Kbyte 27.5Mbyte
8 bit, 8 Khz,Stereo
wav 936 Kbyte 54.9Mbyte
PCM16 16 bit, 8Khz, Mono
wav 936 Kbyte 54.9Mbyte
16 bit, 8Khz, Stereo
wav 1875 Kbyte 109.9Mbyte
MSADPCM 4 bit, 8 Khz,Mono
wav 233 Kbyte 13.7Mbyte
4 bit, 8 Khz,Stereo
wav 469 Kbyte 27.5Mbyte
GSM FR most used
8 Khz,Mono
wav 100 Kbyte 6Mbyte
Speex 8 Khz,Mono
ogg 45 Kbyte 2.7Mbyte
8 Khz,Stereo
ogg 58.5 Kbyte 3.51Mbyte

Verba Recording System Version 7
Page 36 of 235
Speex VAD(voice activitydetection)
8 Khz,Mono
ogg ~34 Kbyte (for speech)
~2Mbyte
8 Khz,Stereo
ogg ~44 Kbyte (speech)for
~2.6Mbyte
G.711(both A and )
8 bit, 8 Khz,Mono
wav 469 Kbyte 27.5Mbyte
8 bit, 8 Khz,Stereo
wav 936 Kbyte 54.9Mbyte
G.723.1 8 bit, 8 Khz,Mono
vf * 40 Kbyte 2.4Mbyte
8 bit, 8 Khz,Stereo
vf * 80 Kbyte 4.8Mbyte
G.723.1 VADbest compression
8 bit, 8Khz, Mono
vf * ~34 Kbyte (speech)for
~2Mbyte
8 bit, 8Khz,Stereo
vf * ~48 Kbyte (speech)for
~2.88Mbyte
16 Khz codecs:
G.722G.722.1CiscoWidebandMicrosoftRTAudio(WideBand)
PCM8 8 bit, 16Khz, Mono
wav 936 Kbyte 54.9Mbyte
8 bit, 16Khz, Stereo
wav 1875 Kbyte 109.9Mbyte
PCM16 16 bit, 16Khz, Mono
wav 1875 Kbyte 109.9Mbyte
16 bit, 16Khz, Stereo
wav 3749 Kbyte 219.7Mbyte
MSADPCM 4 bit, 16Khz, Mono
wav 469 Kbyte 27.5Mbyte
4 bit, 16Khz, Stereo
wav 936 Kbyte 54.9Mbyte
GSM FRmost used
8 Khz,Mono
wav 100 Kbyte 6Mbyte
Speex 16 Khz,Mono
ogg 90 Kbyte 5.4Mbyte
16 Khz,Stereo
ogg 117 Kbyte 7Mbyte
Speex VAD 16 Khz,Mono
ogg 68 Kbyte (forspeech)
~4Mbyte

Verba Recording System Version 7
Page 37 of 235
16 Khz,Stereo
ogg 88 Kbyte (forspeech)
~5.2Mbyte
G.711(both A and )
8 bit, 16Khz, Mono
wav 936 Kbyte 54.9Mbyte
8 bit, 16Khz, Stereo
wav 1875 Kbyte 109.9Mbyte
G.723.1 8 bit, 8 Khz,Mono
vf * 40 Kbyte 2.4Mbyte
8 bit, 8 Khz,Stereo
vf * 80 Kbyte 4.8Mbyte
G.723.1 VADbest compression
8 bit, 8Khz, Mono
vf * ~34 Kbyte(for speech)
~2Mbyte
8 bit, 8Khz,Stereo
vf * ~48 Kbyte(for speech)
~2.88Mbyte
Note
* The media file format called vf (Verba Media Format) is a flexible propriatery media format fromVerba Technology, that allows the use of high compression codecs, stereo and VAD support,efficient multi-channel audio and video multiplexing with quick navigation in the media streams.Verba provides a codec free of charge to play and bulk convert recordings in this advanced format,therefore using this format does not lock our customers into a closed and propriately technology.Using this codec our customers can benefit from very large storage capacity savings.
Video recordings
Use the to calculate video storage requirements (see the Video sheet).Verba Storage Calculator Sheet
Telepresence recordings
Use the to calculate video storage requirements (see the CiscoVerba Storage Calculator SheetTelepresence sheet).
Screen recordings
Please visit the for further information about screen video file sizes or use the Screen capturing features to calculate video storage requirements (see the Screen Capture sheet inVerba Storage Calculator Sheet
the document).
Disk partitioning
The Verba Recording System does not require special disk partitioning, but in order to achieve the bestperformance and better serviceability we have some recommendations.
System (e.g. C:\) - Operating System and application binaries: minimum 40 GbyteMedia (e.g. D:\) - Media and database files: the rest of the capacity, please use the storagecalculator tool to properly size the hard disks
Understanding RAID
Using RAID in Verba servers is a strongly recommended option. This topic provides a brief description ofeach RAID levels with comments on applying them in Verba servers. Verba Media Repository and
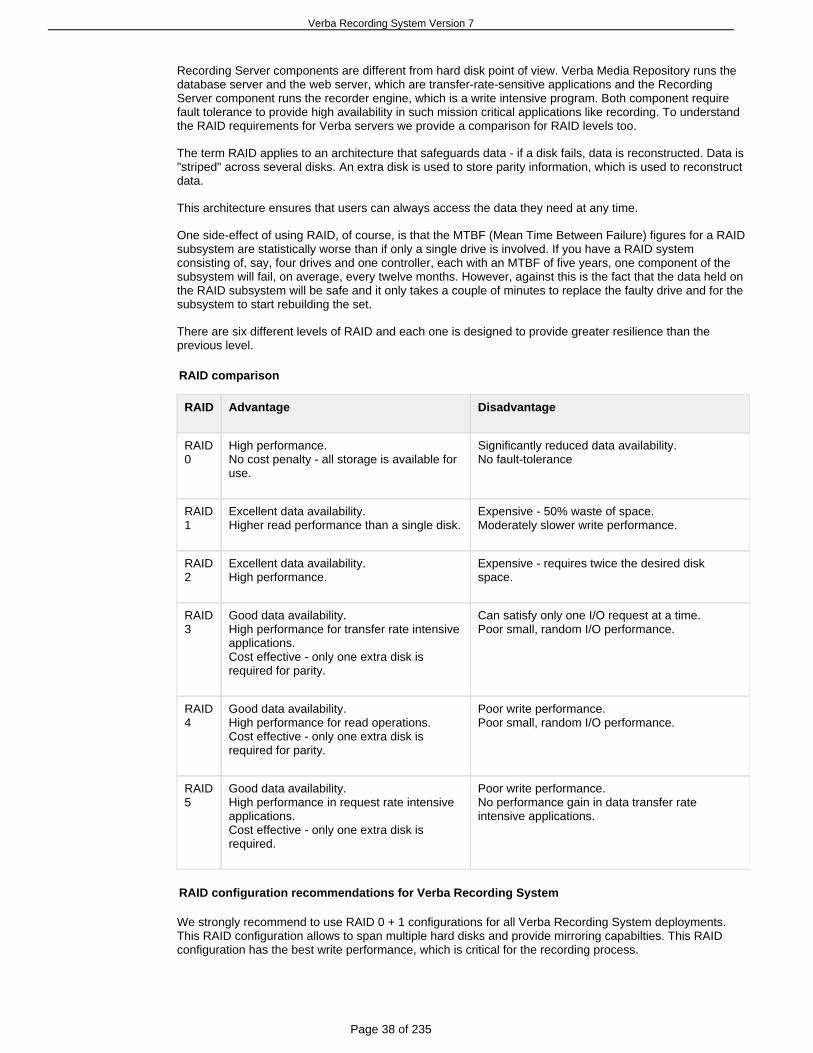
Verba Recording System Version 7
Page 38 of 235
Recording Server components are different from hard disk point of view. Verba Media Repository runs thedatabase server and the web server, which are transfer-rate-sensitive applications and the RecordingServer component runs the recorder engine, which is a write intensive program. Both component requirefault tolerance to provide high availability in such mission critical applications like recording. To understandthe RAID requirements for Verba servers we provide a comparison for RAID levels too.
The term RAID applies to an architecture that safeguards data - if a disk fails, data is reconstructed. Data is"striped" across several disks. An extra disk is used to store parity information, which is used to reconstructdata.
This architecture ensures that users can always access the data they need at any time.
One side-effect of using RAID, of course, is that the MTBF (Mean Time Between Failure) figures for a RAIDsubsystem are statistically worse than if only a single drive is involved. If you have a RAID systemconsisting of, say, four drives and one controller, each with an MTBF of five years, one component of thesubsystem will fail, on average, every twelve months. However, against this is the fact that the data held onthe RAID subsystem will be safe and it only takes a couple of minutes to replace the faulty drive and for thesubsystem to start rebuilding the set.
There are six different levels of RAID and each one is designed to provide greater resilience than theprevious level.
RAID comparison
RAID Advantage Disadvantage
RAID0
High performance.No cost penalty - all storage is available foruse.
Significantly reduced data availability.No fault-tolerance
RAID1
Excellent data availability.Higher read performance than a single disk.
Expensive - 50% waste of space.Moderately slower write performance.
RAID2
Excellent data availability.High performance.
Expensive - requires twice the desired diskspace.
RAID3
Good data availability.High performance for transfer rate intensiveapplications.Cost effective - only one extra disk isrequired for parity.
Can satisfy only one I/O request at a time.Poor small, random I/O performance.
RAID4
Good data availability.High performance for read operations.Cost effective - only one extra disk isrequired for parity.
Poor write performance.Poor small, random I/O performance.
RAID5
Good data availability.High performance in request rate intensiveapplications.Cost effective - only one extra disk isrequired.
Poor write performance.No performance gain in data transfer rateintensive applications.
RAID configuration recommendations for Verba Recording System
We strongly recommend to use RAID 0 + 1 configurations for all Verba Recording System deployments.This RAID configuration allows to span multiple hard disks and provide mirroring capabilties. This RAIDconfiguration has the best write performance, which is critical for the recording process.

Verba Recording System Version 7
Page 39 of 235
Select your SQL Server Edition
Rule of thumb
We recommend to review this topic and select your SQL Server edition based on your requirements, buthere is a rule of thumb to simplify your decision.
Phone calls stored in the system at any moment Recommended SQL Server 2008 edition
less than 500.000 calls Express Edition
between 500.000 and 10.000.000 calls Standard Edition
more than 10.000.000 calls Enterprise Edition
If you have configured in your system that automatically remove calls, you can planData retention policy listfor the maximum amount of calls that you store in the system at any moment, and not the total amount ofcalls you are record.
Please review this topic in more detail, other factors might also influence your decision (as an example: it ismore complex to configure database backup using Express Edition).
Microsoft SQL Server edition comparison
Verba uses Microsoft SQL Server 2008 R2 for storing call metadata and configuration information. Verbasupports various SQL Server 2008 R2 editions, but some limitations may apply. Verba Recording Systemofficially support the following MS SQL Server versions and editions:
SQL Server 2005 Express/Standard/EnterpriseSQL Server 2008 Express/Standard/EnterpriseSQL Server 2008 R2 Express/Standard/EnterpriseSQL Server 2012 (recommended)
The table below describes the main differences of the SQL Server 2008 R2 Server editions with respect toVerba (for information about other SQL Server versions suported by Verba Recording System, pleaseconsult Microsoft):
Features Enterprise Edition StandardEdition
Express Edition
Maximum Numbers of Processors No limit 4 1
Maximum Amount of PhysicalMemory
Operating systemmaximum
Operatingsystemmaximum
1 Gbyte
Supported Operating Systems inconjunction with Verba*
Windows Server 2003Enterprise EditionWindows Server 2003Standard EditionWindows Server 2008Enterprise EditionWindows Server 2008Standard Edition
Windows Server 2003 EnterpriseEditionWindows Server 2003 StandardEditionWindows Server 2008 EnterpriseEditionWindows Server 2008 StandardEdition (recommended)Windows XP Professional EditionWindows 7 Professional Edition
Graphical management tools** Yes Yes Yes
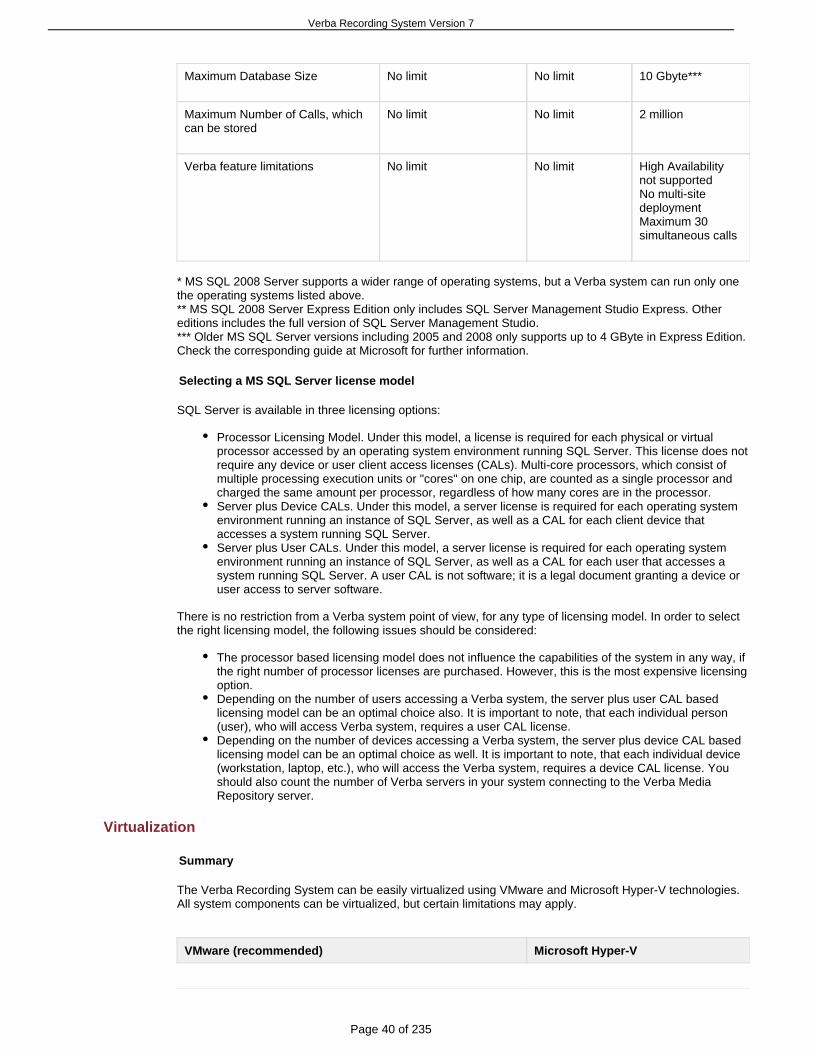
Verba Recording System Version 7
Page 40 of 235
Maximum Database Size No limit No limit 10 Gbyte***
Maximum Number of Calls, whichcan be stored
No limit No limit 2 million
Verba feature limitations No limit No limit High Availabilitynot supportedNo multi-sitedeploymentMaximum 30simultaneous calls
* MS SQL 2008 Server supports a wider range of operating systems, but a Verba system can run only onethe operating systems listed above.** MS SQL 2008 Server Express Edition only includes SQL Server Management Studio Express. Othereditions includes the full version of SQL Server Management Studio.*** Older MS SQL Server versions including 2005 and 2008 only supports up to 4 GByte in Express Edition.Check the corresponding guide at Microsoft for further information.
Selecting a MS SQL Server license model
SQL Server is available in three licensing options:
Processor Licensing Model. Under this model, a license is required for each physical or virtualprocessor accessed by an operating system environment running SQL Server. This license does notrequire any device or user client access licenses (CALs). Multi-core processors, which consist ofmultiple processing execution units or "cores" on one chip, are counted as a single processor andcharged the same amount per processor, regardless of how many cores are in the processor.Server plus Device CALs. Under this model, a server license is required for each operating systemenvironment running an instance of SQL Server, as well as a CAL for each client device thataccesses a system running SQL Server.Server plus User CALs. Under this model, a server license is required for each operating systemenvironment running an instance of SQL Server, as well as a CAL for each user that accesses asystem running SQL Server. A user CAL is not software; it is a legal document granting a device oruser access to server software.
There is no restriction from a Verba system point of view, for any type of licensing model. In order to selectthe right licensing model, the following issues should be considered:
The processor based licensing model does not influence the capabilities of the system in any way, ifthe right number of processor licenses are purchased. However, this is the most expensive licensingoption.Depending on the number of users accessing a Verba system, the server plus user CAL basedlicensing model can be an optimal choice also. It is important to note, that each individual person(user), who will access Verba system, requires a user CAL license.Depending on the number of devices accessing a Verba system, the server plus device CAL basedlicensing model can be an optimal choice as well. It is important to note, that each individual device(workstation, laptop, etc.), who will access the Verba system, requires a device CAL license. Youshould also count the number of Verba servers in your system connecting to the Verba MediaRepository server.
Virtualization
Summary
The Verba Recording System can be easily virtualized using VMware and Microsoft Hyper-V technologies.All system components can be virtualized, but certain limitations may apply.
VMware (recommended) Microsoft Hyper-V

Verba Recording System Version 7
Page 41 of 235
Supports all recording technologies and system components
The Verba solution is certified and VerbaVMware ReadyTechnologies is a VMware Technology Alliance Partner.
See VMware related information
Supports all central/active recordingsolutions
NOT suitable for passive, portmonitoring based recordingtechnologies.
See Microsoft Hyper-V relatedinformation
In a you can run the Verba Recording System Cisco environment co-residently with virtualized Cisco.Unified Communications applications
In a you can run certain Verba components .Microsoft Lync environment directly on the Lync servers
Warning
Please read the relevant articles of this guide to become familiar with the recommendations andlimitations. Note that when building high volume, high performance Recording Servers, thatvirtualization can cause up to 30% performance degradation compared to dedicated, physicalservers.
VMware
VMware Ready certification
Verba Technologies is a VMware Technology Alliance Partner, and has tested and approved all systemcomponents, including the Recording Server and the Media Repository roles, to run on VMware solutions.
The Verba Recording System is VMware Ready certified: https://solutionexchange.vmware.com/store/products/6756
VMware instance examples for Verba servers
These are very simple for the configuration of VMware instances where your Verba servers areexamplesinstalled:
Verba Media Repository(MR)
Verba Recording Server(RS)
Verba Express Server (MR+RScombo)
4 vCPU, 8 GB vRAMWindows Server 2008 R2 x64>40 GB system disk>100 GB media disk
2 vCPU, 4 GB vRAMWindows Server 2008 R2x64>40 GB system disk>40 GB media disk
4 vCPU, 8 GB vRAMWindows Server 2008 R2 x64>40 GB system disk>100 GB media disk
For more detailed requirements and dimensioning information please consult .Select your serverYou can also open a ticket at and our support team can validate your plannedhttp://support.verba.comconfiguration.

Verba Recording System Version 7
Page 42 of 235
Warning
The passive recording solutions uses a monitored network traffic to record the calls. In default, thevmware virtual interface drops the frames which are not sent to the virtual interface. To prevent this,you need to enable the promiscuous mode on virtual interface which is conneced to the VerbaRecording Server. How to configure promiscuous mode on a virtual switch or portgroup in vSphere.
Recommendations for VMware environments
When configuring the VMware platform, the following recommendations apply:
For Recording Servers using the passive recording technology, an extra dedicated physical networkinterface is required on the host machine and needs to be allocated specifically to the virtualmachine in order to capture the mirrored network traffic.For the Recording Server components, the minimum CPU and memory resources must bepermanently dedicated.The requirements regarding the hard disk performance must be carefully handled, especially for thewrite intensive Recording Server components.For the Media Repository component, the memory has to be permanently dedicated; the CPUresources can be shared with other virtual machines.It is recommended to use Intel based Nehalem processors (e.g. E5540) to enjoy the hardware assistbenefits.It is recommended to enable hyperthreading for optimum CPU performance.It is recommended to use VMware vmxnet3 paravirtualized adapter for optimum network IO.It is recommended to implement storage best practices to reduce the latency such as disk partitionalignment, proper RAID configuration, eager zeroed disk, adequate number of spindles etc.
Additional VMware guidelines and best practices
This topic provides external resources and links to additional guidelines and best practices for VMwareenvironments. Please always use the latest, updated documents from the vendor.
Name Description and Link
VMware vSphere4 Documentation
Learn about vSphere 4
http://www.vmware.com/support/pubs/vs_pubs.html
Introduction toVMware vSphere
Introduction to VMware vSphere provides information about the features andfunctionality of VMware vSphere. Introduction to VMware vSphere describes ESX,ESXi, and vCenter Server.
http://www.vmware.com/pdf/vsphere4/r41/vsp_41_intro_vs.pdf
ResourceManagementGuide
The vSphere Resource Management Guide describes resource management forVMwareESX, ESXi, andvCenter Server environments.
http://www.vmware.com/pdf/vsphere4/r41/vsp_41_resource_mgmt.pdf
Availability Guide The vSphere Availability Guide describes solutions that provide business continuity,including how to establish VMware High Availability (HA) and VMware FaultTolerance.
http://www.vmware.com/pdf/vsphere4/r41/vsp_41_availability.pdf
Verba Recording System Version 7
Page 43 of 235
Fibre ChannelSANConfigurationGuide
This manual, the Fibre Channel SAN Configuration Guide, explains how to useVMware ESX and VMwareESXi systems with a Fibre Channel storage area network(SAN).
http://www.vmware.com/pdf/vsphere4/r41/vsp_41_san_cfg.pdf
iSCSI SANConfigurationGuide
The iSCSI SAN Configuration Guide explains how to use VMware ESX and VMwareESXi systems with aniSCSI storage area network (SAN). The manual includesconceptual background information and installationrequirements for ESX, ESXi, andVMware vCenter Server.
http://www.vmware.com/pdf/vsphere4/r41/vsp_41_iscsi_san_cfg.pdf
Guest OperatingSystemInstallationGuide
The Guest Operating System Installation Guide provides users of VMware ESXServer, VMware ACE, VMware Workstation, and VMware Fusion information aboutinstalling guest operating systems in VMware virtual machines.
http://www.vmware.com/pdf/GuestOS_guide.pdf
Tips forconfiguringMicrosoft SQLServer in a virtualmachine
This article provides a quick list of points to consider when configuring MicrosoftSQL Server in a virtual machine.
Knowledge Base article
VMware VirtualNetworkingConcepts.
VMware Infrastructure provides a rich set of networking capabilities that integratewell with sophisticated enterprise networks. These networking capabilities areprovided by VMware ESX Server and managed by VMware VirtualCenter.
http://www.vmware.com/files/pdf/virtual_networking_concepts.pdf
VMware VirtualMachine FileSystem:TechnicalOverview andBest Practices
The VMware Virtual Machine File System (VMFS) is a high performance cluster filesystem that allows virtualization to scale beyond the boundaries of a single system.Designed, constructed, and optimized for the virtual server environment, VMFSincreases resource utilization by providing multiple virtual machines with sharedaccess to a consolidated pool of clustered storage. And VMFS provides thefoundation for virtualization spanning multiple servers, enabling services such asVMware Vmotion, Distributed Resource Scheduler, and VMware High Availability.
http://www.vmware.com/pdf/vmfs-best-practices-wp.pdf
Microsoft Hyper-V
The Verba Recording System can be installed on Microsoft Hyper-V platforms as well. However, one majorlimitation applies for Hyper-V based recording systems: passive / port mirroring based recording
. technologies cannot be used
The Hyper-V limitation is caused by a Hyper-V virtual networking design issue that effects all call recordingvendors. Since the mirrored network traffic required for passive recording is not targeted to the actual virtualserver IP/MAC address, the traffic does not get through the virtualized switch to the server instance.
All other recording technologies and system components can be used on Hyper-V servers.
Note
Your Microsoft Lync solution can be deployed in Hyper-V, but your recorder needs to be either inVMware or on a physical server. When your e.g. Lync Mediation Server is in a Hyper-V virtualinstance, you might need to mirror the traffic of the entire Hyper-V host to the recording server inorder to capture the Mediation Server traffic.
Verba Recording System Version 7
Page 44 of 235
Co-residency with virtualized Cisco UC applications
Cisco provides support for co-residency of UC virtual machines with Cisco non-UC virtual machines and/or3rd-party application virtual machines, including Verba Recording System, for select applications andversions. There are various limitations, which may apply, so please see official support policy at http://docwiki.cisco.com/wiki/Unified_Communications_Virtualization_Sizing_Guidelines#Application_Co-residency_Support_Policy. This page has also added diagrams and explanatory text to clarify common FAQ from partners, customersand Cisco field.
Key rules to remember:
Degree of co-residency support varies by UC app/version - check the matrices and use the mostrestrictive policy for a given app mix: http://docwiki.cisco.com/wiki/Unified_Communications_Virtualization_Sizing_Guidelines#Table_of_Co-residency_Support_Policy_by_Cisco_UC_ApplicationCo-residency rules are the same for all hardware options: UC on UCS TRC, UC on UCSSpecs-based and HP/IBM Specs-based.Verba virtual machines are not allowed on Business Edition 6000.Verba virtual machines are not allowed for use with Cisco UC Virtualization Foundation or Cisco UCVirtualization Hypervisor (e.g. R-VMW-UC-FND or VMW-VS-HYP). VMware vSphereStandard/Advanced/Enterprise/Enterprise Plus Editions are fine.For Cisco TAC to effectively provide support, customers may be asked to do tasks described in thisCisco TAC Technote. Do not deploy Verba in a co-resident way if this is an issue. http://www.cisco.com/en/US/products/ps6884/products_tech_note09186a0080bbd913.shtmlIf Verba virtual machines will be co-resident, there are new rules imposed on both the UC VMs andon the Verba VMs.

Verba Recording System Version 7
Page 45 of 235
Install
Installing your Verba Recording System
Correct installation of your Verba Recording System ensures stable operation of your system.
Installation steps:
Step 1 - Configure Your Network for RecordingStep 2 - Download your Verba Media KitStep 3 - Install your Verba Server(s)Step 4 - (Optional) Install your Verba Desktop Recorders
Step 1 - Configure Your Network for Recording
If you haven't already done that, you should start with for call recordingNetwork and PBX configuration
Step 2 - Download your Verba Media Kit
Download your from support site (requires login) and place it on your servers.Verba Media Kit
If you have no login for the Support Site register here: http://support.verba.com
Step 3 - Install your Verba Server(s)
The Verba Recording System comes in two editions:
Verba Recording System Express Edition - your Media Repository and Recording Servercomponents will be installed .on a single serverVerba Recording System Enterprise Edition - you will install a Media Repository andstandalone Recording Servers .on multiple servers
Note
If you are unsure what Verba server should be installed please review the overview this Deployment Guide. Make sure your servers fulfill the requirements of our Select your server page.The Verba Recording System supports Virtualization.
Start .Installing your Verba servers
Step 4 - (Optional) Install your Verba Desktop Recorders
The Verba Desktop Recorder component provides desktop recording services. It requires a Verba serverdeployed in your network for operation. This component is required if you plan to use desktop screen
.capturing
Start .Installing the Verba Desktop Agent
Table of contents
Installing the Verba Desktop AgentInstalling Verba Unified Media CodecInstalling Lync extension for Lync 2010Installing your Verba serversNetwork and PBX configurationUpgrade procedure from Carin recordersVerba Remote Installation Service Description
Do you need installation help?
Verba Recording System Version 7
Page 46 of 235
You can with our support team.book a remote installation session
Installing the Verba Desktop Agent
Warning
A before starting Desktop Agent installation. TheVerba Media Repository must be installed installer will ask for the Media Repository database connection parameters. The desktop agent
, it isinstaller kit checks only a limited set of hardware and 3rd party software prerequisitesvery important to fully understand the before the installation procedure.requirements
Warning
Make sure that the following on the desktops where the Verba Desktop AgentTCP ports are openis deployed: . See .10012 (TCP), 4433 (TCP) Firewall configuration
Manual installation
Installation
Please follow the steps below to install the Verba Desktop Agent:
Step 1 - Launch the installer VerbaDesktop.msi as Administrator
Step 2 The install kit starts installing Verba components. Simply press the button to start theNextinstallation.
Step 3 Read the Verba license agreement carefully before you click button.Next
Step 4 Select the destination folder for the Verba Desktop Recorder. You can change the defaultsetting by clicking on the Change button and selecting another folder. If you have finished thedestination folder configuration, press the button.Next
Step 5 The Verba installer is asking for the MS SQL Server credentials. The server name can beentered either as an IP address or an FQDN. You have to use server based authentication (mixedmode) for connecting to the SQL server (Windows authentication is not supported). Please provide asystem administrator role user account for the connection. These settings will be used for all Verbacomponents. If Verba install kit has installed MS SQL Server 2008 R2 Express Edition as aprerequisite, the password for the sa user is: Verba456+. Click ' ' and 'Test Connection Test
' to verify your input. If the tests were successful, click .Permissions Next
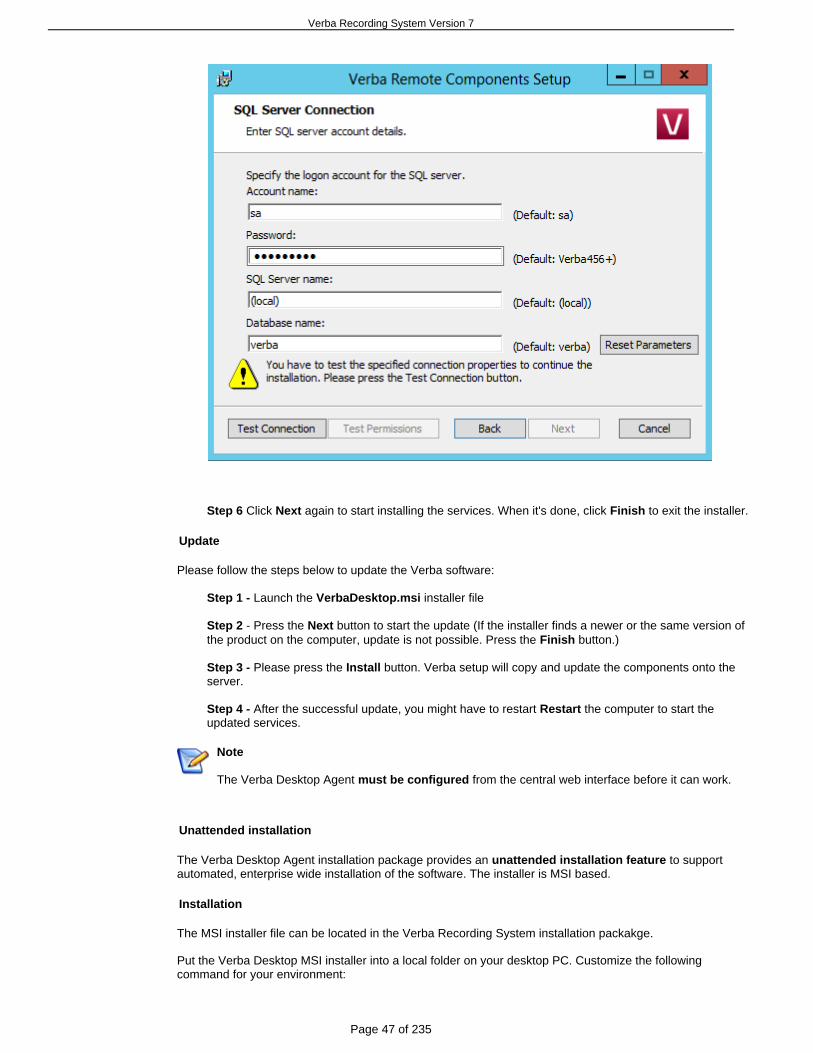
Verba Recording System Version 7
Page 47 of 235
Step 6 Click again to start installing the services. When it's done, click to exit the installer.Next Finish
Update
Please follow the steps below to update the Verba software:
Step 1 - Launch the installer fileVerbaDesktop.msi
Step 2 - Press the button to start the update (If the installer finds a newer or the same version ofNextthe product on the computer, update is not possible. Press the button.) Finish
Step 3 - Please press the button. Verba setup will copy and update the components onto theInstallserver.
Step 4 - After the successful update, you might have to restart the computer to start theRestartupdated services.
Note
The Verba Desktop Agent from the central web interface before it can work.must be configured
Unattended installation
The Verba Desktop Agent installation package provides an to supportunattended installation featureautomated, enterprise wide installation of the software. The installer is MSI based.
Installation
The MSI installer file can be located in the Verba Recording System installation packakge.
Put the Verba Desktop MSI installer into a local folder on your desktop PC. Customize the followingcommand for your environment:
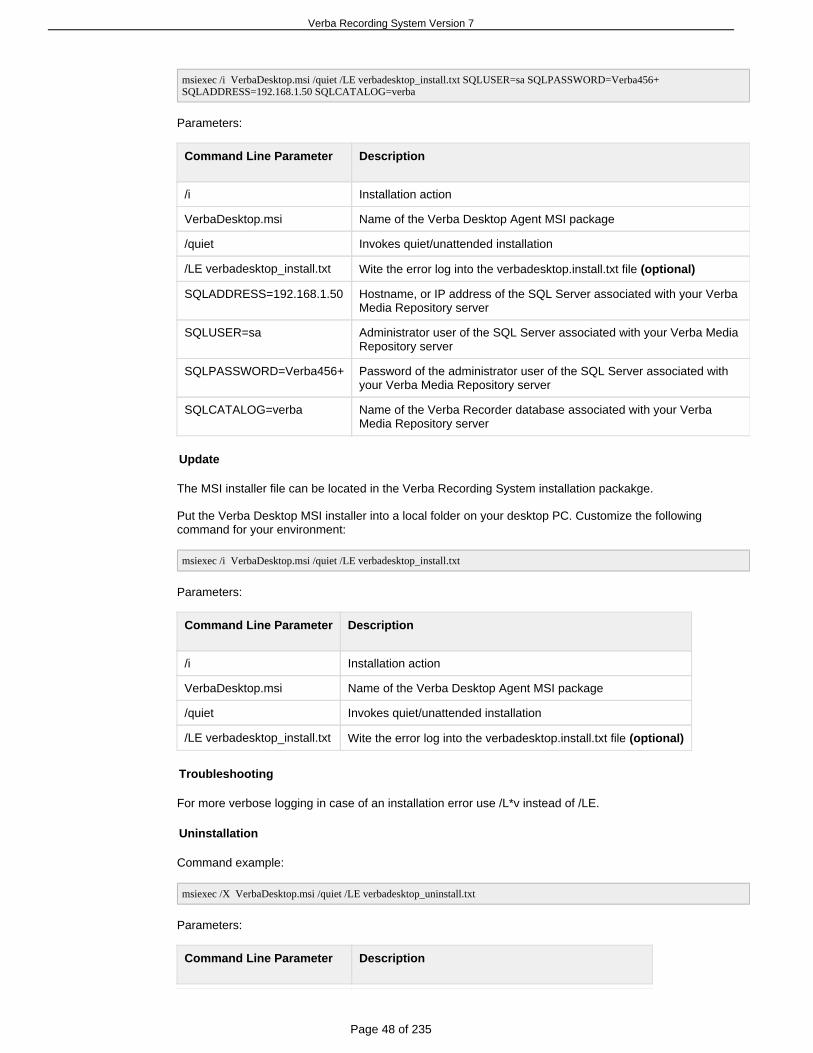
Verba Recording System Version 7
Page 48 of 235
msiexec /i VerbaDesktop.msi /quiet /LE verbadesktop_install.txt SQLUSER=sa SQLPASSWORD=Verba456+SQLADDRESS=192.168.1.50 SQLCATALOG=verba
Parameters:
Command Line Parameter Description
/i Installation action
VerbaDesktop.msi Name of the Verba Desktop Agent MSI package
/quiet Invokes quiet/unattended installation
/LE verbadesktop_install.txt Wite the error log into the verbadesktop.install.txt file (optional)
SQLADDRESS=192.168.1.50 Hostname, or IP address of the SQL Server associated with your VerbaMedia Repository server
SQLUSER=sa Administrator user of the SQL Server associated with your Verba MediaRepository server
SQLPASSWORD=Verba456+ Password of the administrator user of the SQL Server associated withyour Verba Media Repository server
SQLCATALOG=verba Name of the Verba Recorder database associated with your VerbaMedia Repository server
Update
The MSI installer file can be located in the Verba Recording System installation packakge.
Put the Verba Desktop MSI installer into a local folder on your desktop PC. Customize the followingcommand for your environment:
msiexec /i VerbaDesktop.msi /quiet /LE verbadesktop_install.txt
Parameters:
Command Line Parameter Description
/i Installation action
VerbaDesktop.msi Name of the Verba Desktop Agent MSI package
/quiet Invokes quiet/unattended installation
/LE verbadesktop_install.txt Wite the error log into the verbadesktop.install.txt file (optional)
Troubleshooting
For more verbose logging in case of an installation error use /L*v instead of /LE.
Uninstallation
Command example:
msiexec /X VerbaDesktop.msi /quiet /LE verbadesktop_uninstall.txt
Parameters:
Command Line Parameter Description
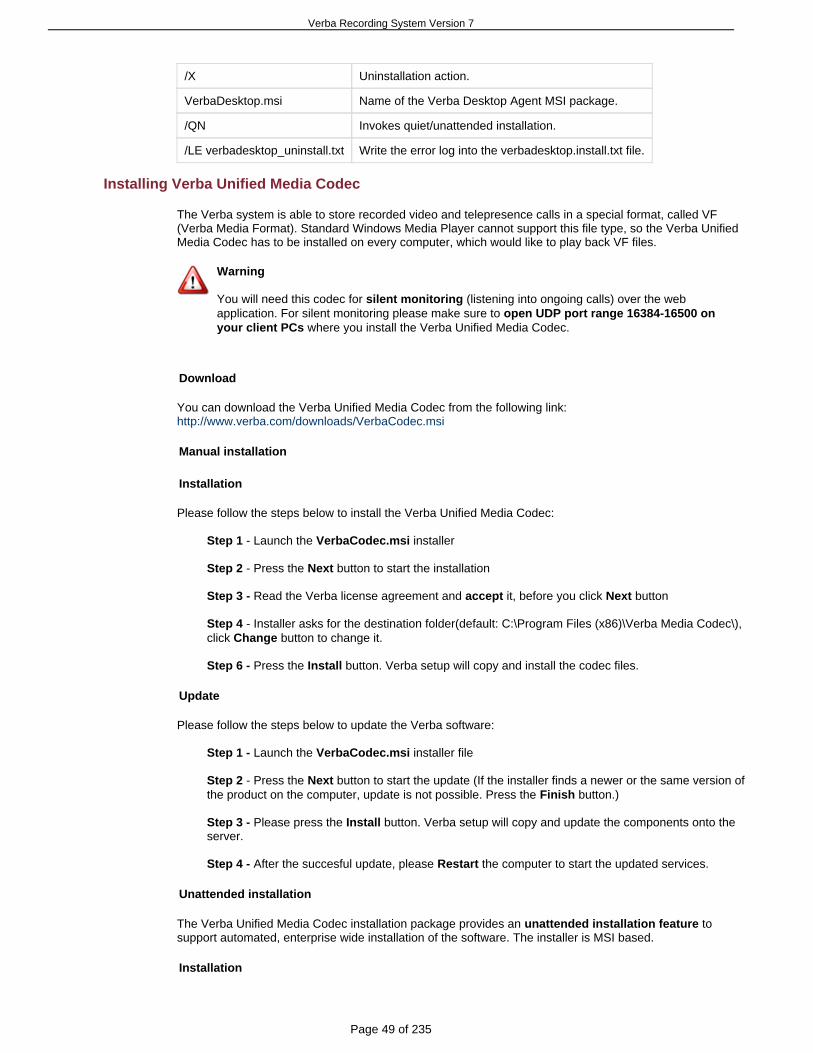
Verba Recording System Version 7
Page 49 of 235
/X Uninstallation action.
VerbaDesktop.msi Name of the Verba Desktop Agent MSI package.
/QN Invokes quiet/unattended installation.
/LE verbadesktop_uninstall.txt Write the error log into the verbadesktop.install.txt file.
Installing Verba Unified Media Codec
The Verba system is able to store recorded video and telepresence calls in a special format, called VF(Verba Media Format). Standard Windows Media Player cannot support this file type, so the Verba UnifiedMedia Codec has to be installed on every computer, which would like to play back VF files.
Warning
You will need this codec for (listening into ongoing calls) over the websilent monitoringapplication. For silent monitoring please make sure to open UDP port range 16384-16500 on
where you install the Verba Unified Media Codec.your client PCs
Download
You can download the Verba Unified Media Codec from the following link: http://www.verba.com/downloads/VerbaCodec.msi
Manual installation
Installation
Please follow the steps below to install the Verba Unified Media Codec:
Step 1 - Launch the installerVerbaCodec.msi
Step 2 - Press the button to start the installationNext
Step 3 Read the Verba license agreement and it, before you click button- accept Next
Step 4 - Installer asks for the destination folder(default: C:\Program Files (x86)\Verba Media Codec\),click button to change it.Change
Step 6 - Press the button. Verba setup will copy and install the codec files.Install
Update
Please follow the steps below to update the Verba software:
Step 1 - Launch the installer fileVerbaCodec.msi
Step 2 - Press the button to start the update (If the installer finds a newer or the same version ofNextthe product on the computer, update is not possible. Press the button.) Finish
Step 3 - Please press the button. Verba setup will copy and update the components onto theInstallserver.
Step 4 - After the succesful update, please the computer to start the updated services. Restart
Unattended installation
The Verba Unified Media Codec installation package provides an tounattended installation featuresupport automated, enterprise wide installation of the software. The installer is MSI based.
Installation
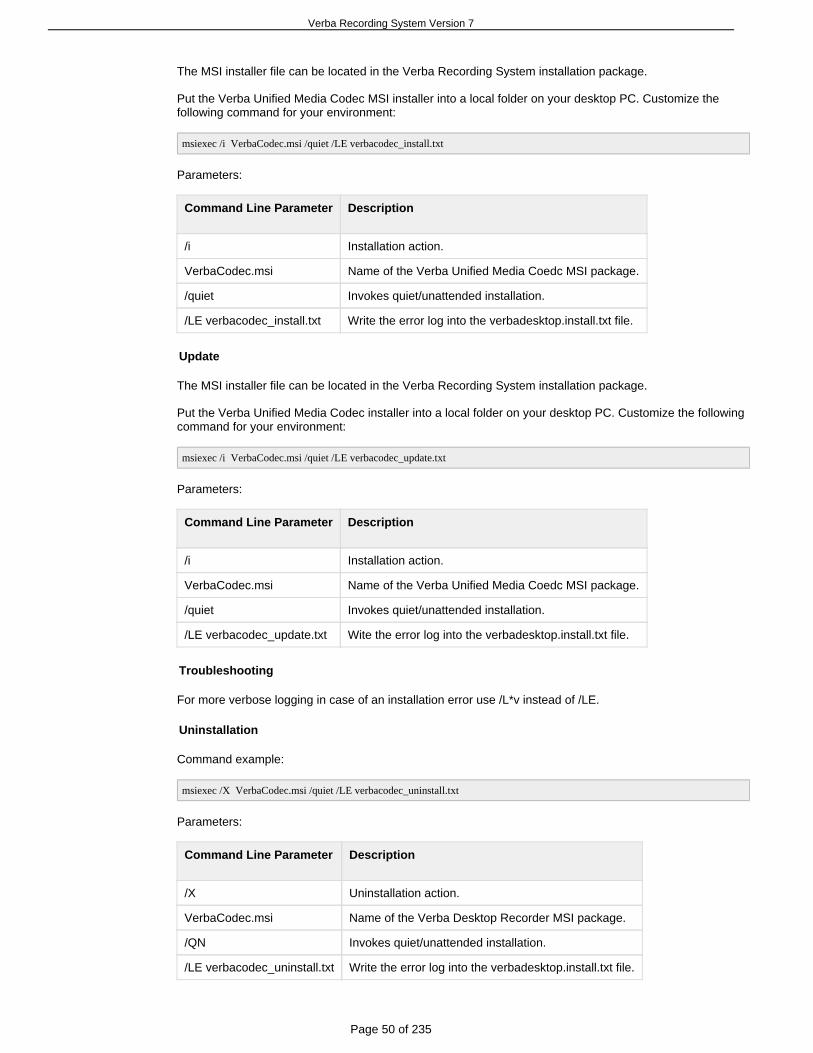
Verba Recording System Version 7
Page 50 of 235
The MSI installer file can be located in the Verba Recording System installation package.
Put the Verba Unified Media Codec MSI installer into a local folder on your desktop PC. Customize thefollowing command for your environment:
msiexec /i VerbaCodec.msi /quiet /LE verbacodec_install.txt
Parameters:
Command Line Parameter Description
/i Installation action.
VerbaCodec.msi Name of the Verba Unified Media Coedc MSI package.
/quiet Invokes quiet/unattended installation.
/LE verbacodec_install.txt Write the error log into the verbadesktop.install.txt file.
Update
The MSI installer file can be located in the Verba Recording System installation package.
Put the Verba Unified Media Codec installer into a local folder on your desktop PC. Customize the followingcommand for your environment:
msiexec /i VerbaCodec.msi /quiet /LE verbacodec_update.txt
Parameters:
Command Line Parameter Description
/i Installation action.
VerbaCodec.msi Name of the Verba Unified Media Coedc MSI package.
/quiet Invokes quiet/unattended installation.
/LE verbacodec_update.txt Wite the error log into the verbadesktop.install.txt file.
Troubleshooting
For more verbose logging in case of an installation error use /L*v instead of /LE.
Uninstallation
Command example:
msiexec /X VerbaCodec.msi /quiet /LE verbacodec_uninstall.txt
Parameters:
Command Line Parameter Description
/X Uninstallation action.
VerbaCodec.msi Name of the Verba Desktop Recorder MSI package.
/QN Invokes quiet/unattended installation.
/LE _uninstall.txtverbacodec Write the error log into the verbadesktop.install.txt file.
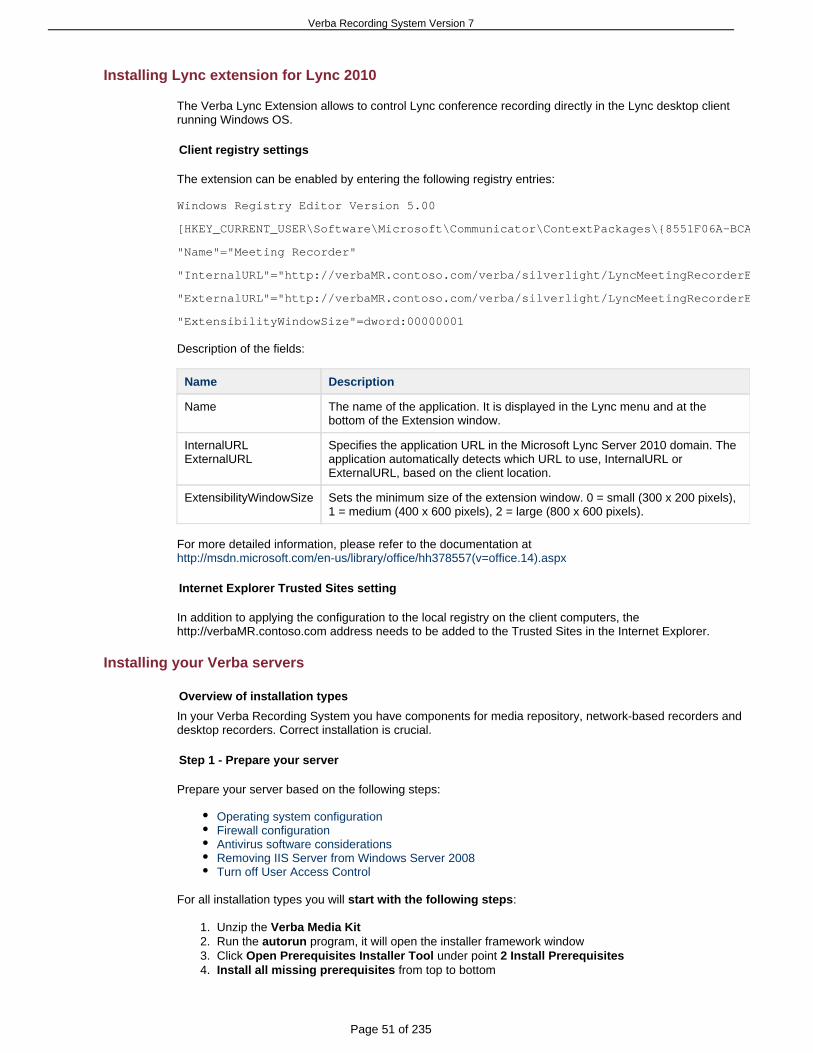
Verba Recording System Version 7
Page 51 of 235
1. 2. 3. 4.
Installing Lync extension for Lync 2010
The Verba Lync Extension allows to control Lync conference recording directly in the Lync desktop clientrunning Windows OS.
Client registry settings
The extension can be enabled by entering the following registry entries:
Windows Registry Editor Version 5.00
[HKEY_CURRENT_USER\Software\Microsoft\Communicator\ContextPackages\{8551F06A-BCA1-40ED-A57F-04EE5E8C59A3}]
"Name"="Meeting Recorder"
"InternalURL"="http://verbaMR.contoso.com/verba/silverlight/LyncMeetingRecorderExtension2010.jsp"
"ExternalURL"="http://verbaMR.contoso.com/verba/silverlight/LyncMeetingRecorderExtension2010.jsp"
"ExtensibilityWindowSize"=dword:00000001
Description of the fields:
Name Description
Name The name of the application. It is displayed in the Lync menu and at thebottom of the Extension window.
InternalURLExternalURL
Specifies the application URL in the Microsoft Lync Server 2010 domain. Theapplication automatically detects which URL to use, InternalURL orExternalURL, based on the client location.
ExtensibilityWindowSize Sets the minimum size of the extension window. 0 = small (300 x 200 pixels),1 = medium (400 x 600 pixels), 2 = large (800 x 600 pixels).
For more detailed information, please refer to the documentation at http://msdn.microsoft.com/en-us/library/office/hh378557(v=office.14).aspx
Internet Explorer Trusted Sites setting
In addition to applying the configuration to the local registry on the client computers, thehttp://verbaMR.contoso.com address needs to be added to the Trusted Sites in the Internet Explorer.
Installing your Verba servers
Overview of installation types
In your Verba Recording System you have components for media repository, network-based recorders anddesktop recorders. Correct installation is crucial.
Step 1 - Prepare your server
Prepare your server based on the following steps:
Operating system configurationFirewall configurationAntivirus software considerationsRemoving IIS Server from Windows Server 2008Turn off User Access Control
For all installation types you will :start with the following steps
Unzip the Verba Media KitRun the program, it will open the installer framework windowautorunClick under point Open Prerequisites Installer Tool 2 Install PrerequisitesInstall all missing prerequisites from top to bottom

Verba Recording System Version 7
Page 52 of 235
We recommend you turn off
Step 2 - Install SQL Server
Before this step you should .Select your SQL Server Edition
Simplified, unattended procedure
In the Verba installer we provide simple, unattended installation procedure for Microsoft SQL Server (see the Prerequisites Installer Tool).Express
Custom installation
You can also do a in the following cases (you are responsible for yourcustom SQL Server installationSQL Server installation in this case):
if you want to use SQL Server Standard or Enterprise edition on the serverif you already have an external SQL Server that you want to useif you want to install the Express edition into a non-default folder
These pages provide steps for :custom SQL Server installation
Installing MS SQL Server 2008 R2 prerequisitesInstalling SQL Server 2008 R2 Express EditionInstalling SQL Server 2008 R2 Standard or Enteprise EditionInstalling SQL Server Management Studio ExpressChanging database path in MS SQL ServerRestricting memory usage in MS SQL ServerCreate an SQL database manually
Step 3 - Install the Verba software
Your Verba Recording System can have one central component, the and multiple Media Repository.Recording Servers
The following diagram shows the major installation steps for the three major Verba installation types:
Installing the Verba Media Repository - Database and the web application without the recordingengineInstalling the required prerequisites - Recording engine without database and web applicationInstalling a single server Verba solution - When the Media Repository and Recording Server areinstalled on a single server
Server installation overview

Verba Recording System Version 7
Page 53 of 235
The following topics guide you through the installation:
Prepare your serverInstall SQL ServerInstall the Verba software
Prepare your server
Overview
The Verba Recording System has specific server requirements that must be met before the installation ofthe Verba components can be started. The includes an the Verba server installation pack Verba
tool that opens when you start your installation.Recording System Prerequisites
Note
We also provide standalone tool to evaluate if allVerba Recording System Prerequisitessoftware requirements are met by your system without download the entire installation pack. Theexact same functionality can be found in the installation pack, this is provided for installationswhere server OS and Verba installation are done by different teams.
You can download the installation files from the .support site
Verba Recording System Prerequisites tool
Note
We recommend you to install your system, it guides you through theuse our installation packrequirements below.This chapter is only for documentation purposes.
This tool asks a couple of about your installation before it creates a customized prerequisite list.questions('-' means that the question does not have any effect whether the requirement is shown or not, or it is notapplicable.)

Verba Recording System Version 7
Page 54 of 235
Question 1:Verbacomponents
Question2:SQLServer
Question 3:SQL ServerManagementStudio
Prerequisitetitle
Hint provided by the tool Mode
- - - VerifyWindowsversion
The Verba Recording Systemserver components requireone of the following operatingsystems:
WindowsServer 2008 R2(recommended)orWindows 7
Note! The Verba DesktopRecorder supports WindowsXP, Windows Vista andWindows 7.
Mandatory
- - - No existingVerbainstallation
If you are installing a newsystem, you should uninstallyour existing Verba RecordingSystem before installation.
If you are upgrading thissystem, you do not have touse this Deployment Planner,just exit and run the VerbaMSI Installer directly.
Mandatory
- - - VerifyAdministratorPrivileges
The Windows User thatinstalls the Verba RecordingSystem must haveAdministrator privileges.
Please add your user to theAdministrators group.
Mandatory
- - - No PendingWindowsRestart
There should be no Windowsrestart operation pending onyour server, since it mightinterfere with your newinstallation.
Mandatory
- - - InstallWindowsInstaller 4.5
The Verba MSI installerpackage requires WindowsInstaller 4.5.
Mandatory
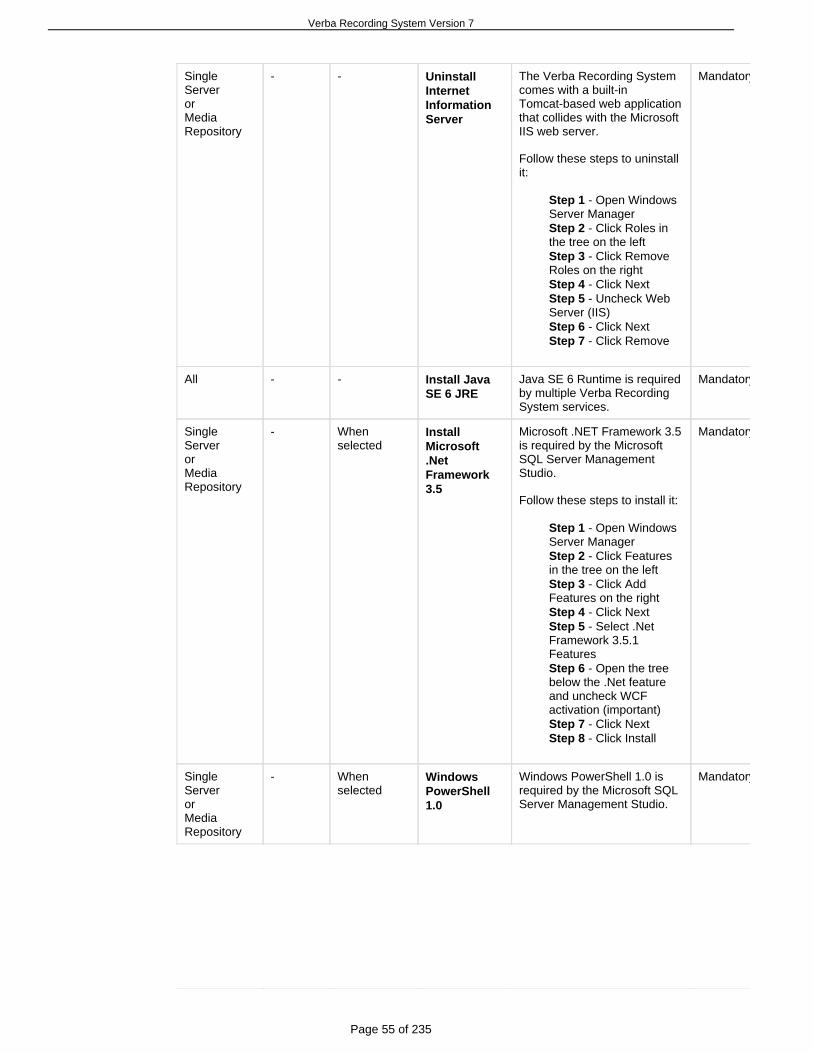
Verba Recording System Version 7
Page 55 of 235
SingleServerorMediaRepository
- - UninstallInternetInformationServer
The Verba Recording Systemcomes with a built-inTomcat-based web applicationthat collides with the MicrosoftIIS web server.
Follow these steps to uninstallit:
Step 1 - Open WindowsServer Manager
- Click Roles inStep 2the tree on the left
Click RemoveStep 3 - Roles on the right
Click NextStep 4 - Uncheck WebStep 5 -
Server (IIS) Click NextStep 6 - Click RemoveStep 7 -
Mandatory
All - - Install JavaSE 6 JRE
Java SE 6 Runtime is requiredby multiple Verba RecordingSystem services.
Mandatory
SingleServerorMediaRepository
- Whenselected
InstallMicrosoft.NetFramework3.5
Microsoft .NET Framework 3.5is required by the MicrosoftSQL Server ManagementStudio.
Follow these steps to install it:
Step 1 - Open WindowsServer Manager
Click FeaturesStep 2 - in the tree on the left
Click AddStep 3 - Features on the right
Click NextStep 4 - Select .NetStep 5 -
Framework 3.5.1Features
Open the treeStep 6 - below the .Net featureand uncheck WCFactivation (important)
Click NextStep 7 - Click InstallStep 8 -
Mandatory
SingleServerorMediaRepository
- Whenselected
WindowsPowerShell1.0
Windows PowerShell 1.0 isrequired by the Microsoft SQLServer Management Studio.
Mandatory

Verba Recording System Version 7
Page 56 of 235
SingleServerorMediaRepository
WhenSQLServerExpressisselected
- Install SQLServer 2008R2 Express
Microsoft SQL Server ExpressEdition provides free of chargeSQL database server backendfor the Verba RecordingSystem.We recommend to useStandard or Enterprise editionif you are planning to storeand search more than 500.000calls in your recording system.
Mandatory
SingleServerorMediaRepository
WhenSQLServer isselected
- Install SQLServer 2008R2 or newer
Microsoft SQL Serverprovides SQL database serverfunctionality for the VerbaRecording System
Mandatory
SingleServerorMediaRepository
- Whenselected
Install SQLServerManagementStudio
The Microsoft SQL ServerManagement Studio providesmanagement capabilities forMicrosoft SQL Server.
Mandatory
SingleServerorMediaRepository
Wheninstalledon otherserver
When notselected
Install SQLServer NativeClient x64
The Verba Recording Systemuses Microsoft SQL Server tostore data and is capable ofusing the advanced failoverfunctionality of the SQL ServerNative Client 10.0 databasedriver.
Mandatory
SingleServerorMediaRepository
Wheninstalledon otherserver
When notselected
Install SQLServer NativeClient
The Verba Recording Systemuses Microsoft SQL Server tostore data and is capable ofusing the advanced failoverfunctionality of the SQL ServerNative Client 10.0 databasedriver.
Mandatory
SingleServerorMediaRepository
- - InstallWindowsDesktopExperience
In case you plan to use PCdesktop creen and video callrecording features your VerbaMedia Repository requires theWindows Desktop Experiencefeature.
Follow these steps to install it:
Step 1 Open Windows- Server Manager
Click FeaturesStep 2 - in the tree on the left
Click AddStep 3 - Features on the right
Click NextStep 4 - Select DesktopStep 5 -
Experience Click NextStep 6 - Click InstallStep 7 - - Restart theStep 8
server (Important)
Recommended

Verba Recording System Version 7
Page 57 of 235
SingleServerorMediaRepository
- - ConfigureVirusScanning
If not configured properly, anyvirus scanner on this servercan severly impact theperformance and reliability ofyour recording system.
Please make sure you turn offbackground virus scanning ofall your Verba media and logfolders.
Recommended
SingleServerorMediaRepository
- - Verify TimeSettings
The Verba Recording Systemstores all dates in timezoneindependent UTC time andpresents correct local time toeach user.
Please verify:
Server timezone matchesyour local timezoneServer time iscorrect
Recommended
SingleServerorMediaRepository
- - Use SeparateSystem andMedia Disk
For reliabilty, performance andbackup reasons, werecommend you use separatedisk volumes for system andrecorded media.
C: (System Disk)D: (Media Disk)
Recommended
Further information
Find more information in these articles:
Operating system configurationFirewall configurationAntivirus software considerationsRemoving IIS Server from Windows Server 2008Turn off User Access Control
Operating system configuration
Please read the following topic carefully before you begin Verba installation! In order to maximize yoursatisfaction with the Verba recording system please read the following carefully and follow the guidelines ofthis topic before you begin software installation.
Warning
It is important that you follow this topic when you build your Verba servers. Failure to comply withthe guidelines in this topic may lead to degraded performance and eventual data loss in your Verbaenvironment. Verba Technologies is not responsible for the security of the HW, operating systemand database layers of the Verba recording system. The customer shall install and configure thesein accordance with industry best practices for security.
Please follow the following guidelines during the installation of your Windows operating system.

Verba Recording System Version 7
Page 58 of 235
In case you install your server from a customized Windows installer or image please try to configure theinstalled server according to the guidelines below.
Disk partitioning
Please create partitions according to the recommendations. For more information check .Disk partitioning
Regional and Language Options
Set these options to your normal local settings.
Date and Time Settings
For correct time handling please set timezone properly on all servers.
NTP-based time synchronization is strongly recommended.
It is important to note that most date/time information is stored in UTC standard time format in Verba. On theweb interface these times are converted to the actual users local time zone. The following tablessummarizes the time zones used by Verba s different system elements to present date information:
Systemelements
Time zone
User interfaces Web interfaces Time zone setting of the Verba user that logs into the webinterface.
Configuration interfaces Time zone setting of the computer that runs theconfiguration tools.
Log files Local time on the computer that does writes the log.
Internal storage SQL database (e.g. calldata)
UTC time
Configuration data UTC time
Network settings (during installation)
During installation just pick the "typical" settings or configure the network according to your policies. Networksettings shall be reconfigured for Verba after the Windows installation is complete.
Install Critical Security Updates and disable automatic updates
After installation please use Windows Update to install the latest patch level for your Windows Server. Ourteam is testing Verba on servers updated to the latest patch level. Be sure that the automatic updates aredisabled.
Update firmware and driver versions
Please consult the hardware vendor s support site and verify that the following most important items areupgraded to the latest recommended version:
chipset drivernetwork card driverthe RAID controller drivers, RAID controller firmwaredisk firmware
Verba Recording System Version 7
Page 59 of 235
Warning
Since Verba is a highly disk I/O intensive application you should be extra careful with your disk I/Osubsystems, such as RAID controllers and disks.
Configure graphics settings
Set screen saver to "(None)" under Control Panel / Display / Screen Saver.
It is recommended you enable hardware acceleration for your graphics driver under Control Panel / Display/ Settings / Advanced / Troubleshoot. Set the "Hardware acceleration" slider to "Full".
Stop unnecessary Windows services
In order to minimize the operating system overhead on your Verba servers it is recommended to and stop for certain services using tool.set the Startup Type to Manual services.msc
On systems, set the followings to manual startup type:Windows Server 2003
Application Experience Lookup ServiceDistributed Link Tracking ClientError Reporting ServiceHelp and SupportIPSEC ServicesPrint SpoolerRemote RegistryWireless ConfigurationWorld Wide Web Publishing ServiceFTP ServiceSMTP ServiceNNTP Service
On systems, set the followings to manual startup type:Windows Server 2008
Application ExperienceDiagnostic Policy ServiceIP Helper (if you are not using IPv6)Remote RegistryPrint SpoolerWindows Font Cache ServiceWindows Remote Management
Network configuration
The following configuration in this topic should only be applied to Recording Server servers or serverswhere the Media Repository and Recording Server are installed together.
Step 1 Rename network interfaces
In the Network Connections window change the name of the recording interface to , theRecording Portother interface can get the name Network access. These new interface names are not used by the Verbasystem. Verba recording ports must be configured later on. Naming the interface will however avoidconfusion in your IT team.
Step 2 Configure the "Recording" interface
If passive recording technology is used, open the properties sheet of this interface and disable Client forMicrosoft Networks and File and Printer Sharing. For other recording methods, use the deafult settings.
Click Show icon in notification area when connected to show the icon to administrators.
Disable Windows Firewall
Verba Recording System Version 7
Page 60 of 235
Disable Windows Firewall on the server in order to provide communication among the networked systemcomponents. If you company policy does not allow you to do this, carefully open all ports, which arerequired for Verba (more information: ).Firewall configuration
Warning
Make sure you are reactivating your Windows Firewall after the installation with the proper port andexecutable exception rules.
Firewall configuration
Verba system components are using several network ports for communication. It is necessary to have theseports open and ensure that these ports are not blocked with e.g. firewalls.
Ports on Verba Media RepositoryPorts on Verba Recording Server
On all serversOn servers recording Cisco phone systems with central recordingOn servers recording Lync phone systemsOther scenarios
Ports on Verba Desktop RecordersAll Ports Used by Verba Services
Ports on Verba Media Repository
Open these ports on your Media Repository :for all end-users
Verba component Port Protocol Configurable Note
Verba Web Application 80 TCP(HTTP)
Yes You can close this port, but this isnecessary if you are using Cisco phoneservices.
Verba Web Application 443 TCP(HTTPS)
Yes We recommend to use HTTPS for yourweb access.
Lync MeetingRecordingAnnouncement
6000 TCP Yes Service port. Lync Front Ends areconnecting to this.
Lync MeetingRecordingAnnouncement
12222 TCP(HTTP)
Yes Service API port
If you have remote Recording Servers open these ports from the Recording Servers towards the Media:Repository
Verba component Port Protocol Configurable Note
MS SQL Server 1433 TCP No -
Verba Secure FileTransfer Server
20111 SSL Yes, notrecommended.
Verba recorders use this port toupload media.
If your Media Repository includes Recording Server functions (Single-Server installation), pleaseopen the applicable Verba Recording Servers ports as well (see below).
Ports on Verba Recording Server

Verba Recording System Version 7
Page 61 of 235
On all servers
Open this on Verba Recording Servers (RS):all
Verba service Port Protocol Configurable Note
Verba Node Manager Agent 4433 TCP No -
On servers recording Cisco phone systems with central recording
Open these ports when you use Verba with a :Cisco phone system
Verba service Port Protocol Configurable Note
Verba Central Cisco Recorder 10003 TCP(HTTP)
Yes Service API port
Verba Central Cisco Recorder 10014 TCP Yes Recording control port
Verba Central Cisco Recorder 5060 TCP(SIP)
Yes SIP signaling communicationport
Verba Central Cisco Recorder Any UDP(RTP)
No RTP packets are coming in onthese ports
Verba Central Cisco SilentMonitoring
10013 TCP(HTTP)
Yes Service API port
In the Cisco solution RS must be able to access the Cisco UCM with JTAPI (2748, 2749, 2789 TCP) andHTTP/HTTPS (80/443).
In special cases, when the Verba Central Recorder Database Services (JTAPI) is not on an RS, TCP 11200should be opened towards the mentioned JTAPI service.
On servers recording Lync phone systems
For Lync related firewall settings please refer to the page in theInstalling the Verba Lync Filterdocumentation.
Verba service Port Protocol Configurable Note
Verba PassiveRecorder
10200 TCP Yes Listening port for SIP signaling fromVerba Lync Filter service.
Verba RecorderProxy
10201 TCP Yes Listening port for SIP signaling fromVerba Lync Filter service.
Verba RecorderProxy
11111 TCP Yes Listening port for Verba Passive Recorderconnection.
Verba RecorderProxy
11112 TCP Yes Secure listening port for Verba PassiveRecorder connection.
Verba RecorderProxy
16384 -65535
UDP(RTP)
Yes RTP packets are going through theseport.
Other scenarios
Open these ports on your Recording Server :if you have the corresponding Verba serviceactivated

Verba Recording System Version 7
Page 62 of 235
Verba service Port Protocol Configurable Note
Verba Passive Recorder 10000 TCP(HTTP)
Yes Service API port
Verba Windows Media StreamingServer
10005 TCP(HTTP)
Yes Service API port
Verba Active Recorder andStreaming Server
10004 TCP(HTTP)
Yes Service API port
Verba Active Recorder andStreaming Server
5060 TCP(SIP)
Yes SIP signalingcommunication port
Verba Dial-in Recorder 10006 TCP(HTTP)
Yes Service API port
Verba Dial-in Recorder 5060 TCP(SIP)
Yes SIP signalingcommunication port
Verba Dial-in Recorder Any UDP(RTP)
No RTP packets are coming inon these ports
Verba IP Trade Recorder 11199 TCP Yes Turret recording control port
Verba IP Trade Recorder 10010 TCP(HTTP)
Yes Service API port
Verba IP Trade Recorder Any UDP(RTP)
No RTP packets are coming inon these ports
Verba Media Receiver 10011 TCP(HTTP)
Yes Service API port
Verba Media Receiver Any UDP(RTP)
No RTP packets are coming inon these ports
Ports on Verba Desktop Recorders
Open these ports on your desktops where you use Verba Desktop Recorer:
Verba Service Port Protocol Configurable Note
Verba Screen Capturing 10012 TCP (HTTP) Yes Service API port
Verba Node Manager Agent 4433 TCP No -
All Ports Used by Verba Services
This table lists all ports used by Verba system components:
Verba component Port Protocol Configurable Note
Verba Web Application 80 TCP(HTTP)
Yes -
Verba Web Application 443 TCP(HTTPS)
Yes -
MS SQL Server 1433 TCP No -
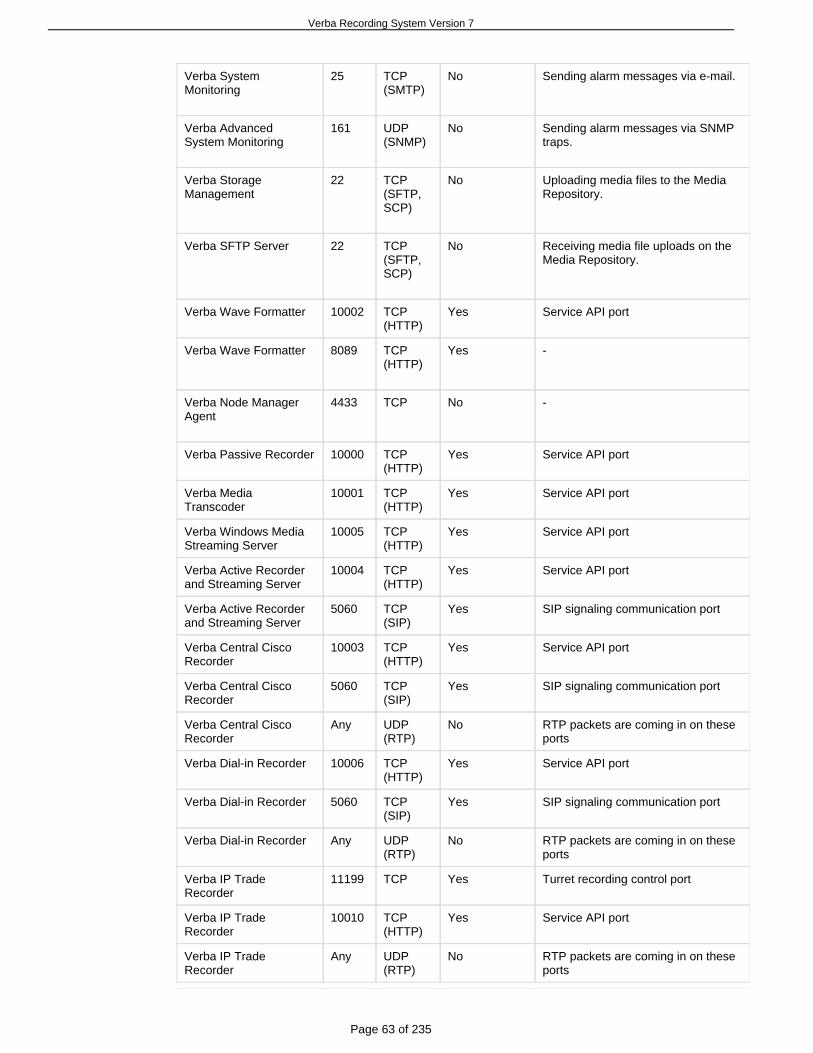
Verba Recording System Version 7
Page 63 of 235
Verba SystemMonitoring
25 TCP(SMTP)
No Sending alarm messages via e-mail.
Verba AdvancedSystem Monitoring
161 UDP(SNMP)
No Sending alarm messages via SNMPtraps.
Verba StorageManagement
22 TCP(SFTP,SCP)
No Uploading media files to the MediaRepository.
Verba SFTP Server 22 TCP(SFTP,SCP)
No Receiving media file uploads on theMedia Repository.
Verba Wave Formatter 10002 TCP(HTTP)
Yes Service API port
Verba Wave Formatter 8089 TCP(HTTP)
Yes -
Verba Node ManagerAgent
4433 TCP No -
Verba Passive Recorder 10000 TCP(HTTP)
Yes Service API port
Verba MediaTranscoder
10001 TCP(HTTP)
Yes Service API port
Verba Windows MediaStreaming Server
10005 TCP(HTTP)
Yes Service API port
Verba Active Recorderand Streaming Server
10004 TCP(HTTP)
Yes Service API port
Verba Active Recorderand Streaming Server
5060 TCP(SIP)
Yes SIP signaling communication port
Verba Central CiscoRecorder
10003 TCP(HTTP)
Yes Service API port
Verba Central CiscoRecorder
5060 TCP(SIP)
Yes SIP signaling communication port
Verba Central CiscoRecorder
Any UDP(RTP)
No RTP packets are coming in on theseports
Verba Dial-in Recorder 10006 TCP(HTTP)
Yes Service API port
Verba Dial-in Recorder 5060 TCP(SIP)
Yes SIP signaling communication port
Verba Dial-in Recorder Any UDP(RTP)
No RTP packets are coming in on theseports
Verba IP TradeRecorder
11199 TCP Yes Turret recording control port
Verba IP TradeRecorder
10010 TCP(HTTP)
Yes Service API port
Verba IP TradeRecorder
Any UDP(RTP)
No RTP packets are coming in on theseports
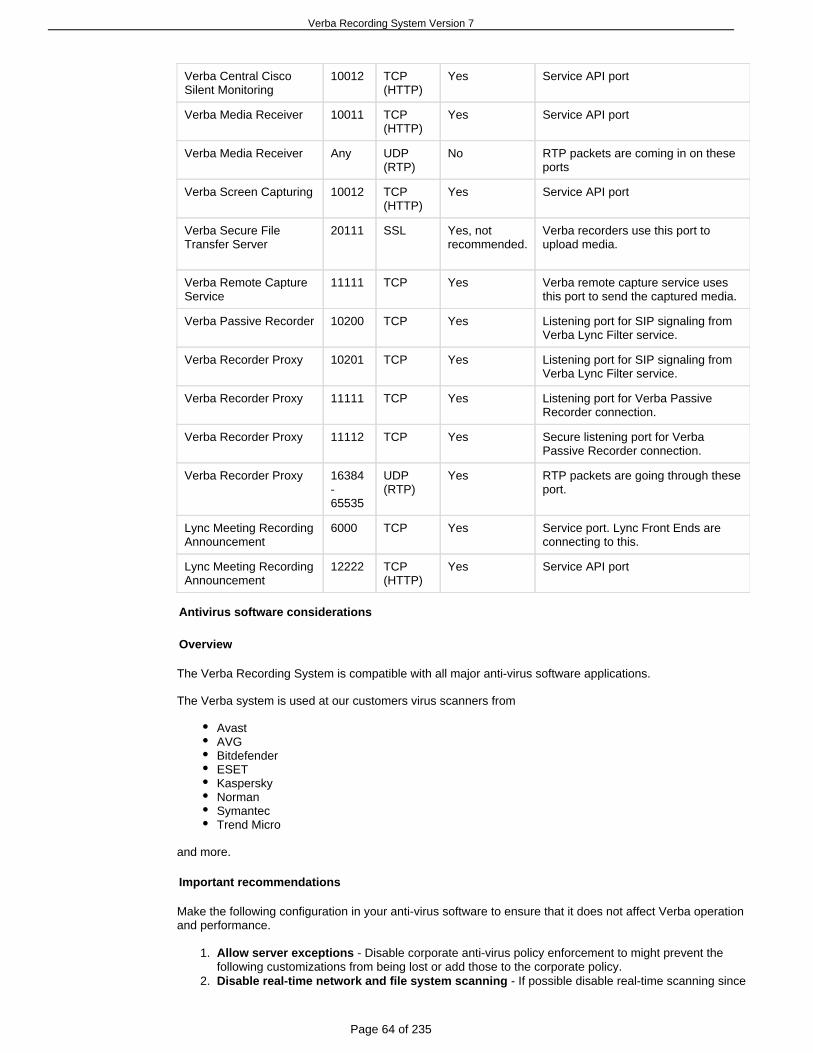
Verba Recording System Version 7
Page 64 of 235
1.
2.
Verba Central CiscoSilent Monitoring
10012 TCP(HTTP)
Yes Service API port
Verba Media Receiver 10011 TCP(HTTP)
Yes Service API port
Verba Media Receiver Any UDP(RTP)
No RTP packets are coming in on theseports
Verba Screen Capturing 10012 TCP(HTTP)
Yes Service API port
Verba Secure FileTransfer Server
20111 SSL Yes, notrecommended.
Verba recorders use this port toupload media.
Verba Remote CaptureService
11111 TCP Yes Verba remote capture service usesthis port to send the captured media.
Verba Passive Recorder 10200 TCP Yes Listening port for SIP signaling fromVerba Lync Filter service.
Verba Recorder Proxy 10201 TCP Yes Listening port for SIP signaling fromVerba Lync Filter service.
Verba Recorder Proxy 11111 TCP Yes Listening port for Verba PassiveRecorder connection.
Verba Recorder Proxy 11112 TCP Yes Secure listening port for VerbaPassive Recorder connection.
Verba Recorder Proxy 16384-65535
UDP(RTP)
Yes RTP packets are going through theseport.
Lync Meeting RecordingAnnouncement
6000 TCP Yes Service port. Lync Front Ends areconnecting to this.
Lync Meeting RecordingAnnouncement
12222 TCP(HTTP)
Yes Service API port
Antivirus software considerations
Overview
The Verba Recording System is compatible with all major anti-virus software applications.
The Verba system is used at our customers virus scanners from
AvastAVGBitdefenderESETKasperskyNormanSymantecTrend Micro
and more.
Important recommendations
Make the following configuration in your anti-virus software to ensure that it does not affect Verba operationand performance.
Allow server exceptions - Disable corporate anti-virus policy enforcement to might prevent thefollowing customizations from being lost or add those to the corporate policy.Disable real-time network and file system scanning - If possible disable real-time scanning since

Verba Recording System Version 7
Page 65 of 235
2.
3. it highly reduces system performance (which is critical in real-time media recording).Exclude folders- Exclude the following from being scanned:
The application folder (C:\Program Files (x86)\Verba\)The configured media foldersSQL Server database filesExclude the following file types from virus scanning: *.xml, *.wav, *.spx, *.tn,*.wf, *.vmf,*.vf. *.avi, *.wmv
Warning
Make sure you follow the above recommendations, otherwise your recording system might.become unstable
Removing IIS Server from Windows Server 2008
Overview
The Verba Recording System comes with a Tomcat-based web application, which collides with IIS.
Steps
Step 1 - Open Windows from the Start MenuServer Manager
Step 2 - Click in the tree on the left Roles
Step 3 - Click on the right (if Web Server (IIS) is installed)Remove Roles
Step 4 - Click Next
Step 5 - Uncheck Web Server (IIS)
Step 6 - Click Next
- Step 7 Click (restart might be requird after this)Remove
Turn off User Access Control
How to turn off User Account Control
On Windows Server 2008 and Windows 7 UAC might cause problems during your Verba installation.
Step 1 - Open Windows User Accounts
Step 2 - Click on Change User Account Control settings
Step 3 - Set it to Never notify
Step 4 - Click Ok
Step 5 - Restart the server
Install SQL Server
Installing MS SQL Server 2008 R2 prerequisitesInstalling SQL Server 2008 R2 Express EditionInstalling SQL Server 2008 R2 Standard or Enteprise EditionInstalling SQL Server Management Studio ExpressChanging database path in MS SQL ServerRestricting memory usage in MS SQL ServerCreate an SQL database manually

Verba Recording System Version 7
Page 66 of 235
Installing MS SQL Server 2008 R2 prerequisites
Installing Microsoft .NET Framework 3.5
Microsoft .NET Framework3.5 SP1 is required by Microsoft SQL 2008 R2 Server.
MS .NET Framework 3.5 SP1 installer is included in the Verba install media.
If the MS .NET Framework 3.5 SP1 is already installed, skip the installation.
Please, follow the steps below to install MS .NET Framework 3.5 SP1:
Step 1 Put the Verba install media into the appropriate drive.
Step 2 Wait for the automatic splash screen or locate the file manually and execute it.autorun.exe
Step 3 In the installer splash screen select the .Open Prerequisites Installer Tool
Step 4 On the new page click on . Install Microsoft .NET Framework 3.5 SP1
Step 5 Follow the instructions of the installer.
Installing Windows PowerShell 1.0
Microsoft Windows PowerShell 1.0 is required by Microsoft SQL 2008 R2 Server.
Microsoft Windows PowerShell 1.0 installer is included in the Verba install media.
If the Microsoft Windows PowerShell 1.0 is already installed, skip the installation.
Please, follow the steps below to install Microsoft Windows PowerShell 1.0:
Step 1 Put the Verba install media into the appropriate drive.
Step 2 Wait for the automatic splash screen or locate the file manually and execute it.autorun.exe
Step 3 In the installer splash screen select the .Open Prerequisites Installer Tool
Step 4 On the new page click on for the appropiate operatingInstall Windows PowerShell 1.0system.
Step 5 Follow the instructions of the installer.
Installing Windows Installer 4.5
Microsoft Windows Installer 4.5 is required by Microsoft SQL 2008 R2 Server.
Microsoft Windows Installer 4.5 installer is included in the Verba install media.
If the Microsoft Windows Installer 4.5 is already installed, skip the installation.
Please, follow the steps below to install Microsoft Windows Installer 4.5:
Step 1 Put the Verba install media into the appropriate drive.
Step 2 Wait for the automatic splash screen or locate the file manually and execute it.autorun.exe
Step 3 In the installer splash screen select the Open Prerequisites Installer Tool
Step 4 On the new page click on for the appropiate operating system.Install Windows Installer 4.5
Step 5 Follow the instructions of the installer.
Step 6 You may have to restart the server in order to continue the installation of the system.

Verba Recording System Version 7
Page 67 of 235
Installing SQL Server 2008 R2 Express Edition
Overview
Before installing SQL Server Express, please read .Select your SQL Server Edition
These installations steps are valid on .Microsoft Windows Server 2008 R2
Prerequisites
Installing .Net Framework 3.5
Step 1 - Open Server Manager
Step 2 - Click in the tree on the left Features
Step 3 - Click on the rightAdd Features
Step 4 - Check .Net Framework 3.5.1 Features
Step 5 - Make sure you open the feature and unclick (Important, otherwise IIS isWCF Activation required.)
Step 6 - Click Install
Installation - SQL Server Express
Microsoft SQL Server 2008 R2 Express Edition is a required application for Verba Express Editiondeployments. If you are deploying Verba Enterprise Edition, you have to install Microsoft SQL Server 2008R2 Standard or Enterprise Edition (not included in Verba install media, and has to be purchasedseparately). You can also install Microsoft SQL Server 2008 R2 Standard or Enterprise Editions for VerbaExpress Edition.
MS SQL Server Express Edition unattended installer is included in the Verba install media.
Verba only supports Microsoft SQL Server 2008 R2 and it is recommended as the standard Verba databaseenvironment.
If MS SQL Server 2008 R2 (any edition) is already installed, skip the installation.
Please, follow the steps below to install MS SQL Server 2008 R2 Express Edition:
Step 1 Put the Verba install media into the appropriate drive.
Step 2 Wait for the automatic splash screen or locate the file manually and execute it.autorun.exe
Step 3 In the installer splash screen select the Open Prerequisites Installer Tool.
Step 4 On the new page click on . Install Microsoft SQL Server 2008 R2 Express Edition
Step 5 The unattended installation starts automatically.
This unattended installer sets the password to . The Verba installer will need this information.sa Verba456+
Installing SQL Server 2008 R2 Standard or Enteprise Edition
Verba only supports Microsoft SQL Server 2008 R2 and Verba Technologies recommends it as thestandard Verba database environment.
Verba Enterprise Edition requires MS SQL Server 2008 R2 Standard or Enterprise Editions. These MS SQLServer 2008 R2 editions are not included in the Verba install media, they have to be purchased andinstalled separately.
For more information please refer to .Selecting MS SQL Server

Verba Recording System Version 7
Page 68 of 235
Please follow the guidelines below during the installation of your Microsoft SQL Server 2008 R2.
Detailed installation instructions can be found at: http://msdn.microsoft.com/hu-hu/library/bb500395(en-us).aspx
Feature selection
Select the following MS SQL Server 2008 R2 components:
Database Engine ServicesSQL Server Replication if High Availability option will be usedClient Tools ConnectivityIntegration ServicesClient Tools Backward CompatibilityManagement Tools - Complete
Instance configuration
It is recommended to install the Verba database as Default instance, however the system support namedinstances too.

Verba Recording System Version 7
Page 69 of 235
Service accounts
Please select Use the built-in System account and set it to Network service and check the SQL ServerAgent to start at the end of the setup.

Verba Recording System Version 7
Page 70 of 235
Note
Safer, but more complex security policies are also supported by Verba, please contact VerbaTechnologies Support to evaluate your environment. After installation you can change the user ofVerba services and also the user of other related services according to another security policy.
Account provisioning
Verba services require . Please set a safe sa password, and Mixed Mode authentication make a note of. The Verba installer will need this information.the password
Installing SQL Server Management Studio Express
Microsoft SQL Server Management Studio Express is needed for managing and operating MS SQL Server2008 R2 Express Edition. For Microsoft SQL Server 2008 R2 Standard or Enterprise Edition use the normalMS SQL Server Management Studio included in the original setup kit.
The MS SQL Server Management Studio Express installer is included in the Verba install media.
If the MS SQL Server Management Studio Express is already installed, skip the installation.
Please, follow the steps below to install MS SQL Server 2008 R2 Express Edition:
Step 1 Put the Verba install media into the appropriate drive.
Step 2 Wait for the automatic splash screen or locate the autorun.exe file manually and execute it.
Step 3 In the installer splash screen select the Open Prerequisites Installer Tool.
Step 4 On the new page click on .Install SQL Server 2008 R2 Management Studio Express
Step 5 The unattended installation starts automatically.
Changing database path in MS SQL Server
Verba Recording System Version 7
Page 71 of 235
Overview
This topic describes a procedure to move your database from one location to an other.
It is not recommended to have your Verba database and index on your system disk.
How to move the database
During MS SQL Server installation, the database data files are generated automatically in the default MSSQL Server data directory (e.g. C:\Program Files\Microsoft SQLServer\MSSQL10_50.MSSQLSERVER\MSSQL\DATA). You can change this setting in order to placedatabase data files to another location (e.g. to another partition). This step is highly recommended for highvolume recording systems. Follow the described steps below:
Step 1 Stop all Verba related services.
Step 2 Determine the current location of the Verba database files by starting the SQL ServerManagement Studio or SQL Server Management Studio Express.
Step 3 On the left pane connect to the database server.
Step 4 Expand .Databases
Step 5 Select and open the database properties window by right clicking on andverba verbaselecting .Properties
Step 6 In the window select on the left pane.Database Properties Files
Step 7 On the right pane the properties of the database files are displayed. Check the fields andPathtake note of them.
Step 8 Right click on database and select and verba Tasks Detach
Step 9 In the pop up window check in option than click .Drop Connections OK
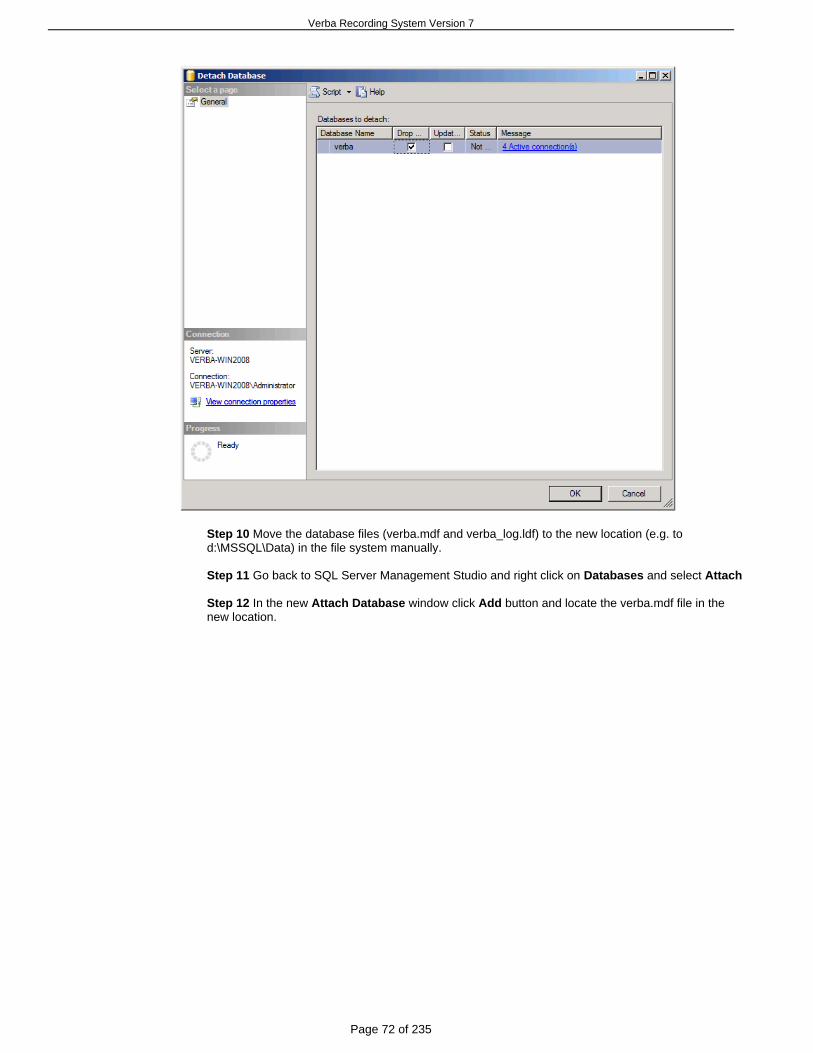
Verba Recording System Version 7
Page 72 of 235
Step 10 Move the database files (verba.mdf and verba_log.ldf) to the new location (e.g. tod:\MSSQL\Data) in the file system manually.
Step 11 Go back to SQL Server Management Studio and right click on and select Databases Attach
Step 12 In the new window click button and locate the verba.mdf file in theAttach Database Add new location.

Verba Recording System Version 7
Page 73 of 235
Step 13 Click .OK
Step 14 Restart all, previously stopped Verba services.
Restricting memory usage in MS SQL Server
If you are planning to install the Recording Server and Media Repository components on the same server, itis recommended that you restrict the amount of system resources that the Microsoft SQL Server will beallowed to use. This is accomplished in the following way:
Step 1 Start SQL Server Management Studio or SQL Server Management Studio Express andconnect to the Verba database server.
Step 2 Open the database server properties window by right clicking on the server and selecting .Properties
Step 3 On the left pane select the page.Memory
Step 4 Set the field to the desired value.Maximum server memory (in MB)
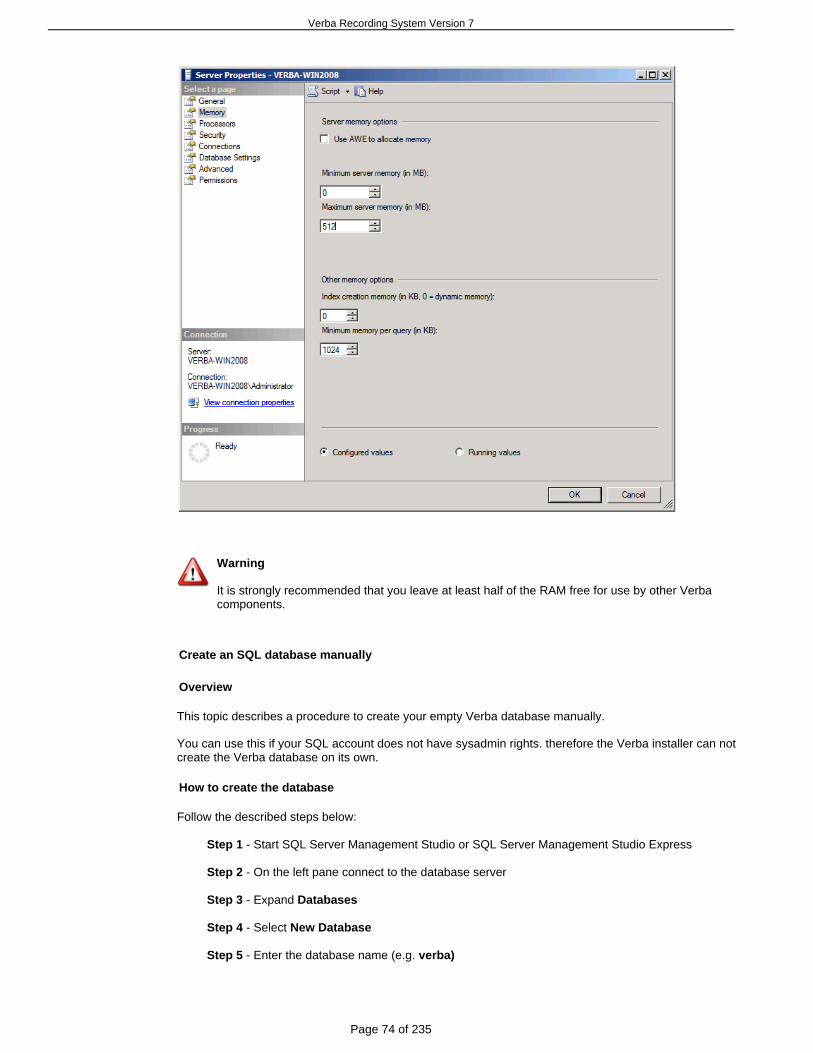
Verba Recording System Version 7
Page 74 of 235
Warning
It is strongly recommended that you leave at least half of the RAM free for use by other Verbacomponents.
Create an SQL database manually
Overview
This topic describes a procedure to create your empty Verba database manually.
You can use this if your SQL account does not have sysadmin rights. therefore the Verba installer can notcreate the Verba database on its own.
How to create the database
Follow the described steps below:
Step 1 - Start SQL Server Management Studio or SQL Server Management Studio Express
Step 2 - On the left pane connect to the database server
Step 3 - Expand Databases
Step 4 - Select New Database
Step 5 - Enter the database name (e.g. verba)

Verba Recording System Version 7
Page 75 of 235
Step 6 - Click OK
If you want you can from e.g. C: drive to D:.change the path of the database files
Install the Verba software
Installing the required prerequisitesInstalling a Verba Media RepositoryInstalling a Verba Recording ServerInstalling a Verba Single Server solutionInstalling the Verba Lync FilterInstalling the Verba Remote Capture componentInstalling the combined Verba Lync Filter and Remote Capture on a Lync server
Installing the required prerequisites
The Verba installer kit contains a prerequisite checking tool. You can use it to install all the thirdparty software prerequisites before starting the Verba installer.
Please follow the steps below to install the prerequisites for your Verba Recording System
Step 1 Unzip the Verba Install Kit to a local drive of the server.
Step 2 Launch the prerequisite tool by starting setup.exe in the VerbaInstallKit folder. The followingimage illustrates this step.
Step 3 Select the Verba server role to be installed in the top right corner. Depending on your choice,the list of prerequisites on the right will dynamically change to show only the required software for thatVerba component.
Step 4 Select the SQL server you want to use. The Verba installation package contains the freeMicrosoft SQL Server 2008 Express edition. It's recommended that you install it if you don't have aseparate SQL database server in your system.
Step 5 Decide if you want to install SQL Server Management studio on this server for easier databasemanagement (recommended).

Verba Recording System Version 7
Page 76 of 235
Step 6 Use the list on the right to check, install and verify the required third party software. They areincluded in the Verba installation package, so you can install them by selecting them from the list thenclicking on the install button located at the bottom of the list.
Step 7 After a prerequisite is installed, click the 'Done, please verify' button, to verify it.
Step 8 Repeat steps 6 and 7 until all the prerequisites are installed.
Step 9 Click 'Start the Verba Installer' to start installing the Verba Recording System.
After this point please refer to the corresponding article depending on the server role you chose toinstall.
Media Repository: http://kb.verba.com/display/docs/Installing+a+Verba+Media+RepositoryRecording Server: http://kb.verba.com/display/docs/Installing+a+Verba+Recording+ServerSingle Server: http://kb.verba.com/display/docs/Installing+a+Verba+Single+Server+solution
Installing a Verba Media Repository
Note
If you haven't already done so, please make sure all the prerequisites are installed foryour Media Repository. Refer to http://kb.verba.com/display/docs/Installing+the+required+prerequisites
The Verba Media Repository is the central controlling component of the Recording System. It contains themanagement web application and various other services necessary for the system to function. Thiscomponent should always be installed first when deploying a new system. If you don't have a separate SQLserver to install the database on, this server will run the Verba database services as well.
Please follow the steps below to install a Verba Media Repository:
Step 1 The install kit starts installing Verba components. Simply press the button to start theNextinstallation.
Step 2 Read the Verba license agreement carefully before you click button.Next
Step 3 Select the Media Repository role from the list. Click Next.
Step 4 Select the destination folder for Verba system and the desired location of the media files. Youcan change the default setting by clicking on the Change button and selecting another folder. If youhave finished the destination folder configuration, press the button.Next
Step 5 The Verba installer is asking for the MS SQL Server credentials. The server name can beentered either as an IP address or an FQDN. You have to use server based authentication (mixedmode) for connecting to the SQL server (Windows authentication is not supported). Please provide asystem administrator role user account for the connection. These settings will be used for all Verbacomponents. If Verba install kit has installed MS SQL Server 2008 R2 Express Edition as aprerequisite, the password for the sa user is: Verba456+. Click ' ' and 'Test Connection Test
' to verify your input. If the tests were successful, click .Permissions Next
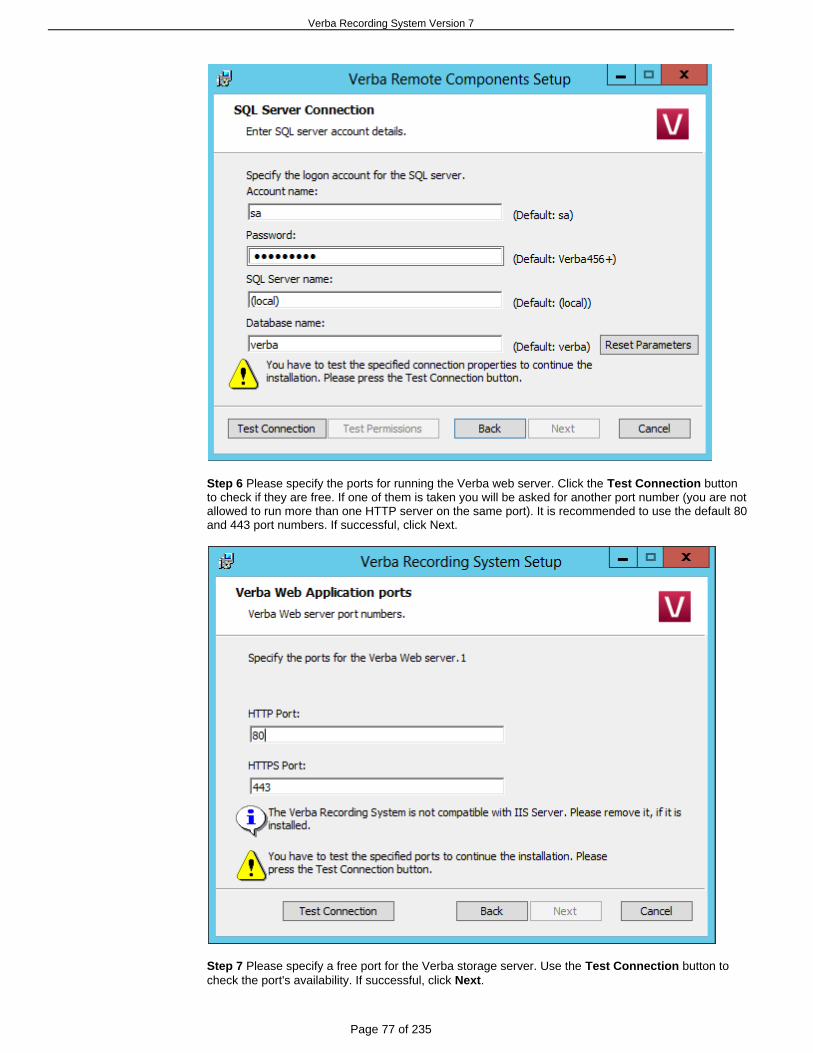
Verba Recording System Version 7
Page 77 of 235
Step 6 Please specify the ports for running the Verba web server. Click the buttonTest Connectionto check if they are free. If one of them is taken you will be asked for another port number (you are notallowed to run more than one HTTP server on the same port). It is recommended to use the default 80and 443 port numbers. If successful, click Next.
Step 7 Please specify a free port for the Verba storage server. Use the button toTest Connectioncheck the port's availability. If successful, click .Next
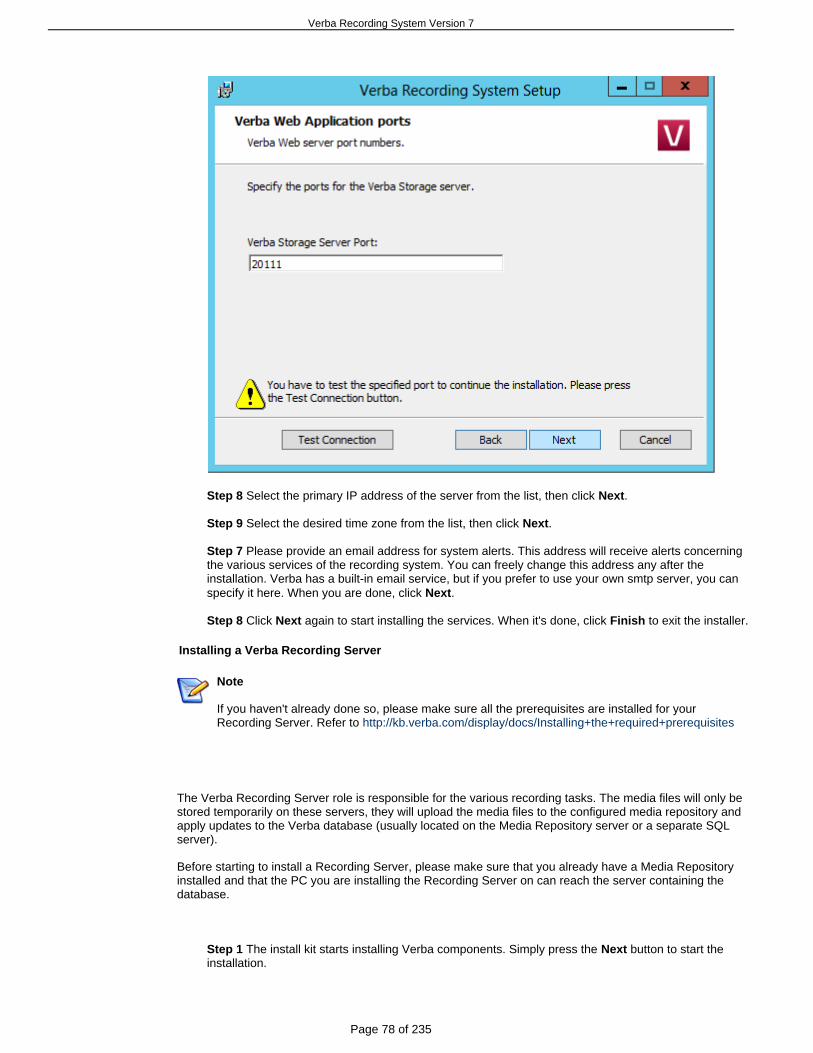
Verba Recording System Version 7
Page 78 of 235
Step 8 Select the primary IP address of the server from the list, then click .Next
Step 9 Select the desired time zone from the list, then click .Next
Step 7 Please provide an email address for system alerts. This address will receive alerts concerningthe various services of the recording system. You can freely change this address any after theinstallation. Verba has a built-in email service, but if you prefer to use your own smtp server, you canspecify it here. When you are done, click .Next
Step 8 Click again to start installing the services. When it's done, click to exit the installer.Next Finish
Installing a Verba Recording Server
Note
If you haven't already done so, please make sure all the prerequisites are installed for yourRecording Server. Refer to http://kb.verba.com/display/docs/Installing+the+required+prerequisites
The Verba Recording Server role is responsible for the various recording tasks. The media files will only bestored temporarily on these servers, they will upload the media files to the configured media repository andapply updates to the Verba database (usually located on the Media Repository server or a separate SQLserver).
Before starting to install a Recording Server, please make sure that you already have a Media Repositoryinstalled and that the PC you are installing the Recording Server on can reach the server containing thedatabase.
Step 1 The install kit starts installing Verba components. Simply press the button to start theNextinstallation.
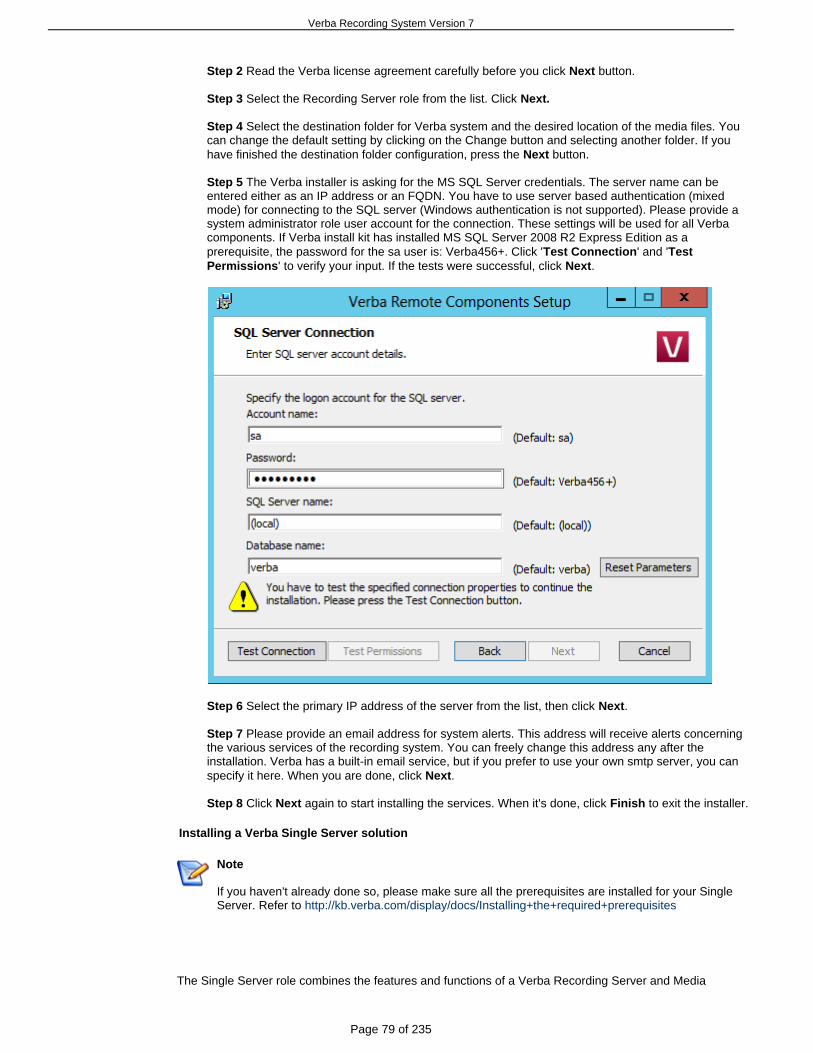
Verba Recording System Version 7
Page 79 of 235
Step 2 Read the Verba license agreement carefully before you click button.Next
Step 3 Select the Recording Server role from the list. Click Next.
Step 4 Select the destination folder for Verba system and the desired location of the media files. Youcan change the default setting by clicking on the Change button and selecting another folder. If youhave finished the destination folder configuration, press the button.Next
Step 5 The Verba installer is asking for the MS SQL Server credentials. The server name can beentered either as an IP address or an FQDN. You have to use server based authentication (mixedmode) for connecting to the SQL server (Windows authentication is not supported). Please provide asystem administrator role user account for the connection. These settings will be used for all Verbacomponents. If Verba install kit has installed MS SQL Server 2008 R2 Express Edition as aprerequisite, the password for the sa user is: Verba456+. Click ' ' and 'Test Connection Test
' to verify your input. If the tests were successful, click .Permissions Next
Step 6 Select the primary IP address of the server from the list, then click .Next
Step 7 Please provide an email address for system alerts. This address will receive alerts concerningthe various services of the recording system. You can freely change this address any after theinstallation. Verba has a built-in email service, but if you prefer to use your own smtp server, you canspecify it here. When you are done, click .Next
Step 8 Click again to start installing the services. When it's done, click to exit the installer.Next Finish
Installing a Verba Single Server solution
Note
If you haven't already done so, please make sure all the prerequisites are installed for your SingleServer. Refer to http://kb.verba.com/display/docs/Installing+the+required+prerequisites
The Single Server role combines the features and functions of a Verba Recording Server and Media
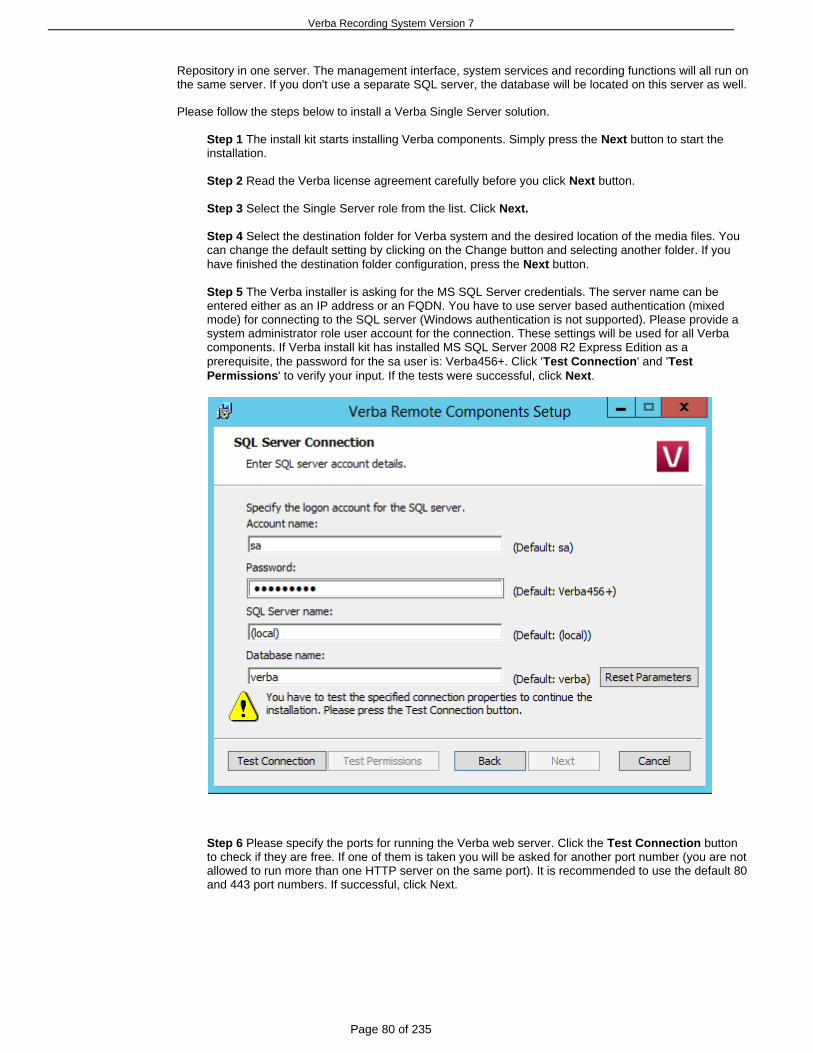
Verba Recording System Version 7
Page 80 of 235
Repository in one server. The management interface, system services and recording functions will all run onthe same server. If you don't use a separate SQL server, the database will be located on this server as well.
Please follow the steps below to install a Verba Single Server solution.
Step 1 The install kit starts installing Verba components. Simply press the button to start theNextinstallation.
Step 2 Read the Verba license agreement carefully before you click button.Next
Step 3 Select the Single Server role from the list. Click Next.
Step 4 Select the destination folder for Verba system and the desired location of the media files. Youcan change the default setting by clicking on the Change button and selecting another folder. If youhave finished the destination folder configuration, press the button.Next
Step 5 The Verba installer is asking for the MS SQL Server credentials. The server name can beentered either as an IP address or an FQDN. You have to use server based authentication (mixedmode) for connecting to the SQL server (Windows authentication is not supported). Please provide asystem administrator role user account for the connection. These settings will be used for all Verbacomponents. If Verba install kit has installed MS SQL Server 2008 R2 Express Edition as aprerequisite, the password for the sa user is: Verba456+. Click ' ' and 'Test Connection Test
' to verify your input. If the tests were successful, click .Permissions Next
Step 6 Please specify the ports for running the Verba web server. Click the buttonTest Connectionto check if they are free. If one of them is taken you will be asked for another port number (you are notallowed to run more than one HTTP server on the same port). It is recommended to use the default 80and 443 port numbers. If successful, click Next.

Verba Recording System Version 7
Page 81 of 235
Step 7 Please specify a free port for the Verba storage server. Use the button toTest Connectioncheck the port's availability. If successful, click .Next

Verba Recording System Version 7
Page 82 of 235
Step 8 Select the primary IP address of the server from the list, then click .Next
Step 9 Select the desired time zone from the list, then click .Next
Step 10 Please provide an email address for system alerts. This address will receive alerts concerningthe various services of the recording system. You can freely change this address any after theinstallation. Verba has a built-in email service, but if you prefer to use your own smtp server, you canspecify it here. When you are done, click .Next
Step 11 Click again to start installing the services. When it's done, click to exit theNext Finishinstaller.
Installing the Verba Lync Filter
Overview
The Verba Recording System requires a filter software installed on all Microsoft Lync Front End servers.(including SBAs)
Since the Microsoft Lync environment is encrypted, this extra filter component is needed to collect call metadata including cryptographic keys. Based on this the Lync enabled Verba passive recorder engine willproperly process media streams captured through the monitor port(s).
These are the general installation steps:
1 - Preparations2 - Filter installation and registration3 - Configure the Verba Lync filters
Note
This filter interfere with your Lync call control. It only receives call control messages fromdoes notthe Lync Front End and immediately sends them to the Verba Recording Server(s) without anychange. This approach ensures that the call recording service cannot cause service deterioration inyour Lync environment in any situation.
1 - Preparations
Step 1 - to the Windows user account used during installation to the followingAdd the following groups groups:
CSAdministratorDomain AdminsRTCUniversalServerAdminsRTCUniversalGlobalReadOnlyGroup
Step 2 - for the Verba Lync Filter service (e.g. svcverbalync) and addCreate a new domain user accountit to the following groups on :all Front End server(s) and SBAs
(the server groups on all Lync FEs and SBAs)Administrators localRTC Server Applications (the server groups on all Lync FEs and SBAs)local
This account will be used to run the Verba Lync Filter service, so Add the Logon As A Service.Right
Warning
You must configure in a way, that they above users and group memberships do not violate your. If any of these are removed or modified during regular Group Policy processingGroup Policies
the recording system will .stop recording calls
Step 3 - on the Front End Servers if it is not installed already. YouInstall Microsoft .NET Framework 4.0

Verba Recording System Version 7
Page 83 of 235
1.
2.
3.
can find the .Net installer here:
http://www.microsoft.com/download/en/details.aspx?id=17851 (Web Installer) orhttp://www.microsoft.com/en-us/download/details.aspx?id=24872 (Standalone Installer)
Step 4 - (note: your Verba Recording Server and your Media Repository might beConfigure your firewallson the same server in a singe server configuration):
allow incoming connections to the Lync Front End Server(s) from the Verba MediaRepository server(s) on port TCP 4433allow incoming connections to the Verba Media Repository server(s) from the Lync Front EndServer(s) on port TCP 1433allow incoming connections to the Verba Recording Server(s) from the Lync Front Endserver(s) on port TCP 10200
2 - Filter installation and registration
Warning
Make sure you are installing this filter you have installed your main Verba server (MediaafterRepository or Express Edition). Make sure you are running the MSI package as administrator.(Execute the MSI from command line with administrator rights).
Install the Verba Lync Filter using the provided MSI installation package
Step 1 The install kit starts installing Verba components. Simply press the button to start theNextinstallation.
Step 2 Read the Verba license agreement carefully before you click button.Next
Step 3 Select the Lync Filter role from the list. Click Next.
Step 4 Select the destination folder for Verba Lync Filter. You can change the default setting byclicking on the Change button and selecting another folder. If you have finished the destination folderconfiguration, press the button.Next
Step 5 Please provide the IP address of the Recording server the filter should connect to. Unless youchanged the port number in the web interface, leave it on default. Click .Next
Step 6 The Verba installer is asking for the MS SQL Server credentials. The server name can beentered either as an IP address or an FQDN. You have to use server based authentication (mixedmode) for connecting to the SQL server (Windows authentication is not supported). Please provide asystem administrator role user account for the connection. These settings will be used for all Verbacomponents. If Verba install kit has installed MS SQL Server 2008 R2 Express Edition as aprerequisite, the password for the sa user is: Verba456+. Click ' ' and 'Test Connection Test
' to verify your input. If the tests were successful, click .Permissions Next
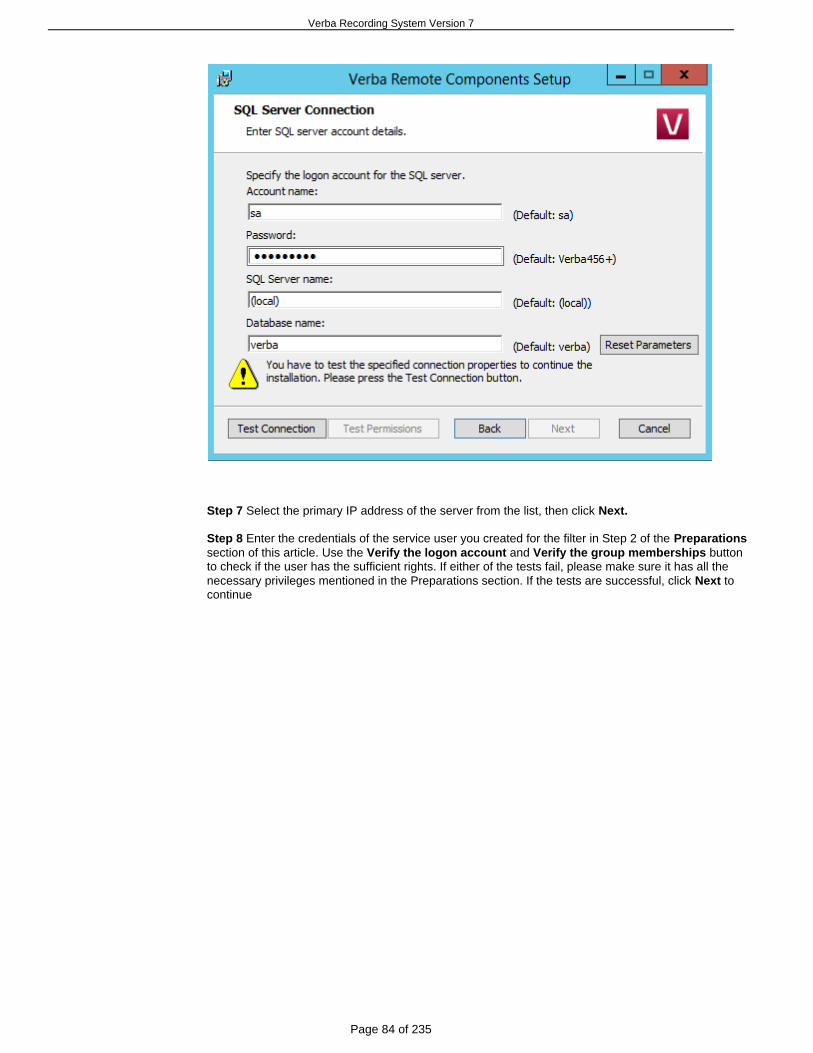
Verba Recording System Version 7
Page 84 of 235
Step 7 Select the primary IP address of the server from the list, then click .Next
Step 8 Enter the credentials of the service user you created for the filter in Step 2 of the Preparationssection of this article. Use the and buttonVerify the logon account Verify the group membershipsto check if the user has the sufficient rights. If either of the tests fail, please make sure it has all thenecessary privileges mentioned in the Preparations section. If the tests are successful, click toNextcontinue

Verba Recording System Version 7
Page 85 of 235
Step 9 Please provide an email address for system alerts. This address will receive alerts concerningthe various services of the recording system. You can freely change this address any after theinstallation. Verba has a built-in email service, but if you prefer to use your own smtp server, you canspecify it here. When you are done, click .Next
Step 10 Click again to start installing the services. When it's done, click to exit theNext Finishinstaller.
Register the Verba Lync Filter into your Lync environment
Add the filter application as a new server application to the Lync system. Open the Lync Server from the Start Menu and enter the following command to create a new ServerManagement Shell
Application on the Lync Front End Server for the Verba Lync Filter Service:
New-CsServerApplication -Identity "Service:Registrar:lync-server-address.yourdomain.com/VerbaLyncFilter" -Uri -Enabled $True -Critical $False -ScriptName "C:\Program Fileshttp://www.verba.com/LyncFilter
(x86)\Verba\VerbaLyncFilter.am"
Warning
If you have multiple front-end , you will need to register this filter on pools one of the Front-ends.in each pool
Parameters are the following:
Name Value
Verba Recording System Version 7
Page 86 of 235
Identity Service:Registrar: lync-server-address.yourdomain.com/VerbaLyncFilter
where lync-server-address.yourdomain.com is the of your Lync Front End ServerFQDN
Uri http://www.verba.com/LyncFilter
Enabled True
Critical False
ScriptName C:\Program Files (x86)\Verba Lync Filter\VerbaLyncFilter.am (assuming default installationpath)
You can verify the list of the registered server applications using this command from the Lync Server:Management Shell
get-CsServerApplication
You can always remove these filters if you make a configuration mistake:
Remove-CsServerApplication -Identity " lync-server-address.acme.com/VerbaLyncFilter"Service:Registrar:
3 - Configure the Verba Lync filters
When the above steps are completed the Verba Lync Filter Service(s) can be configured as any otherserver components in the system using the web based administration. The filters will appear as otherVerba servers with Lync Filter role.
Installing the Verba Remote Capture component
The Verba Remote capture component is responsible for capturing the call media on the node it's installedon and forwarding it to the recording server. In a Lync environment it's typically installed on the Edgeserver(s) or the Mediation server depending on your recording needs.
Please follow the steps below to install the Verba Remote capture component.
Step 1 The install kit starts installing Verba components. Simply press the button to start theNextinstallation.
Step 2 Read the Verba license agreement carefully before you click button.Next
Step 3 Select the Remote Capture role from the list. Click Next.
Step 4 Select the destination folder for the Verba Remote Capture component. You can change thedefault setting by clicking on the Change button and selecting another folder. If you have finished thedestination folder configuration, press the button.Next
Step 5 The Verba installer is asking for the MS SQL Server credentials. The server name can beentered either as an IP address or an FQDN. You have to use server based authentication (mixedmode) for connecting to the SQL server (Windows authentication is not supported). Please provide asystem administrator role user account for the connection. These settings will be used for all Verbacomponents. If Verba install kit has installed MS SQL Server 2008 R2 Express Edition as aprerequisite, the password for the sa user is: Verba456+. Click ' ' and 'Test Connection Test
' to verify your input. If the tests were successful, click .Permissions Next
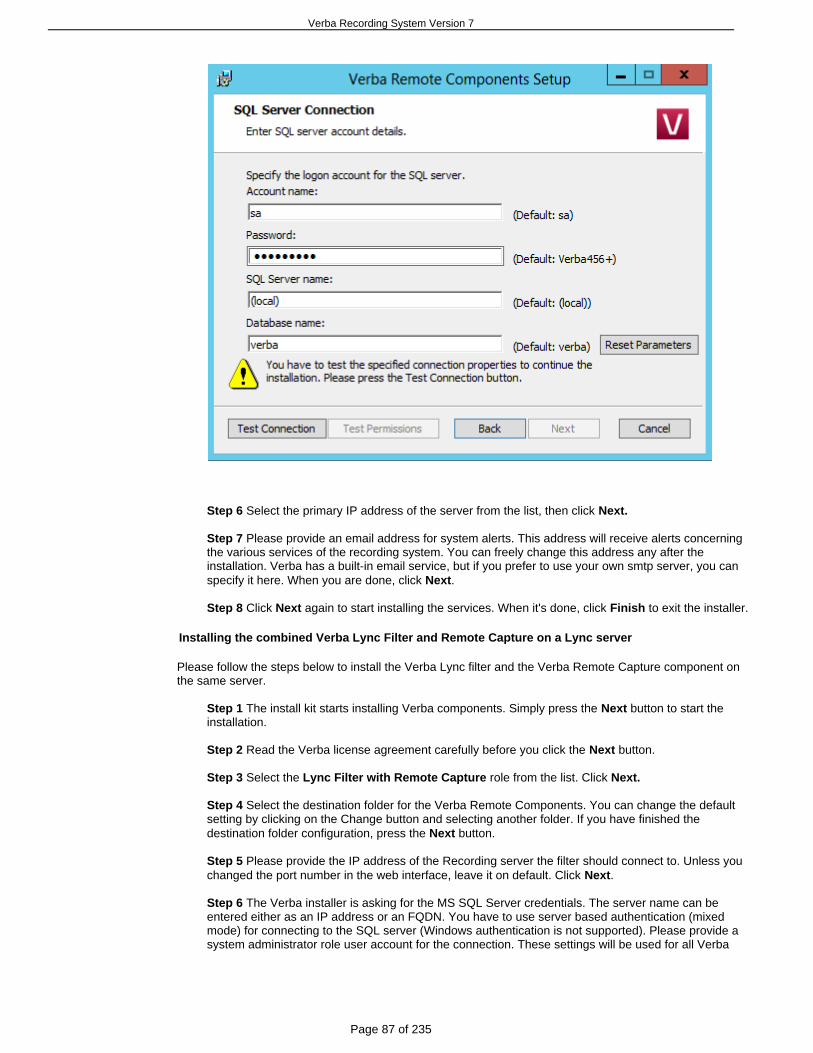
Verba Recording System Version 7
Page 87 of 235
Step 6 Select the primary IP address of the server from the list, then click .Next
Step 7 Please provide an email address for system alerts. This address will receive alerts concerningthe various services of the recording system. You can freely change this address any after theinstallation. Verba has a built-in email service, but if you prefer to use your own smtp server, you canspecify it here. When you are done, click .Next
Step 8 Click again to start installing the services. When it's done, click to exit the installer.Next Finish
Installing the combined Verba Lync Filter and Remote Capture on a Lync server
Please follow the steps below to install the Verba Lync filter and the Verba Remote Capture component onthe same server.
Step 1 The install kit starts installing Verba components. Simply press the button to start theNextinstallation.
Step 2 Read the Verba license agreement carefully before you click the button.Next
Step 3 Select the role from the list. Click Lync Filter with Remote Capture Next.
Step 4 Select the destination folder for the Verba Remote Components. You can change the defaultsetting by clicking on the Change button and selecting another folder. If you have finished thedestination folder configuration, press the button.Next
Step 5 Please provide the IP address of the Recording server the filter should connect to. Unless youchanged the port number in the web interface, leave it on default. Click .Next
Step 6 The Verba installer is asking for the MS SQL Server credentials. The server name can beentered either as an IP address or an FQDN. You have to use server based authentication (mixedmode) for connecting to the SQL server (Windows authentication is not supported). Please provide asystem administrator role user account for the connection. These settings will be used for all Verba
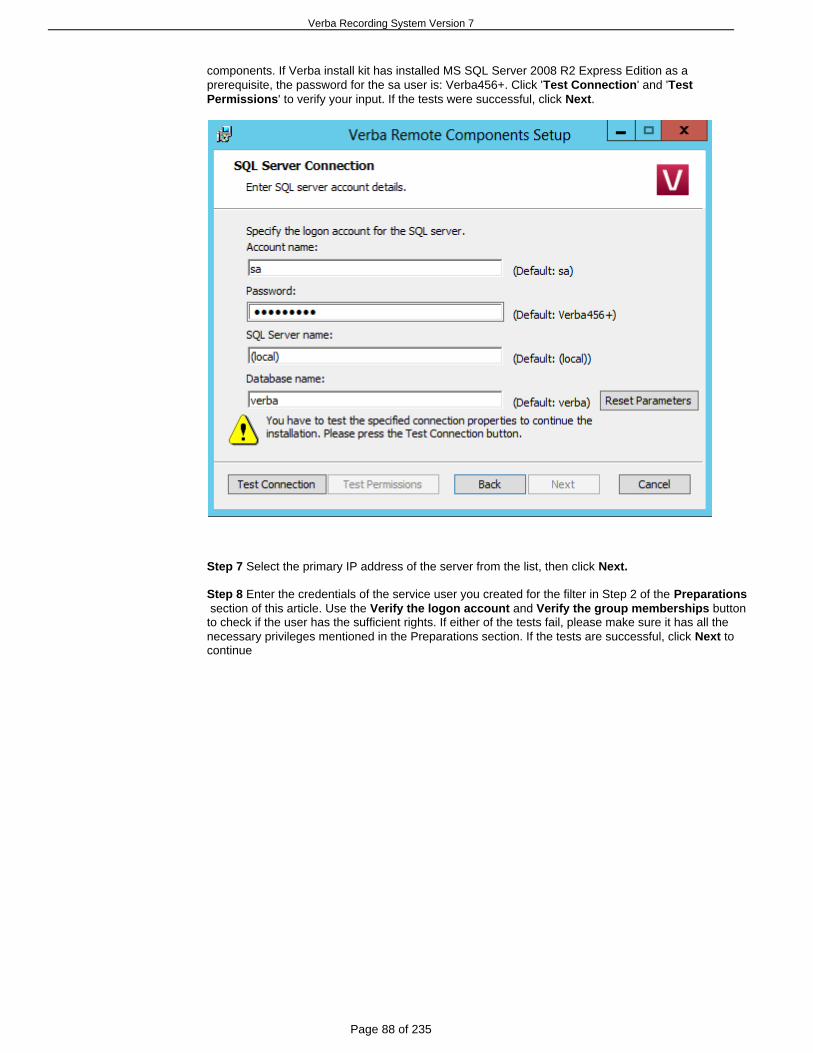
Verba Recording System Version 7
Page 88 of 235
components. If Verba install kit has installed MS SQL Server 2008 R2 Express Edition as aprerequisite, the password for the sa user is: Verba456+. Click ' ' and 'Test Connection Test
' to verify your input. If the tests were successful, click .Permissions Next
Step 7 Select the primary IP address of the server from the list, then click .Next
Step 8 Enter the credentials of the service user you created for the filter in Step 2 of the Preparations section of this article. Use the and buttonVerify the logon account Verify the group membershipsto check if the user has the sufficient rights. If either of the tests fail, please make sure it has all thenecessary privileges mentioned in the Preparations section. If the tests are successful, click toNextcontinue

Verba Recording System Version 7
Page 89 of 235
Step 9 Please provide an email address for system alerts. This address will receive alerts concerningthe various services of the recording system. You can freely change this address any after theinstallation. Verba has a built-in email service, but if you prefer to use your own smtp server, you canspecify it here. When you are done, click .Next
Step 10 Click again to start installing the services. When it's done, click to exit theNext Finishinstaller.
Network and PBX configuration
Configuration on different PBX platforms
Find the configuration documents for the platform and recording method you are planning to use:
Cisco central and dial-in recording
Page: Configuring Cisco UCM for central recording
Page: Configuring Cisco UCM for central silent monitoring
Page: Configuring Cisco UCM for dial-in recording
Cisco passive recording
Page: Configuring monitor port for passive recording
Page: Overview of monitor ports for passive recording
Avaya central recording
Page: Configuring Avaya CM and AES for central recording

Verba Recording System Version 7
Page 90 of 235
Microsoft Lync passive and dial-in recording
Page: Configuring Microsoft Lync for dial-in recording
Page: Configuring monitor port for passive recording
Page: Overview of monitor ports for passive recording
Page: Using Cisco switches to filter SPAN traffic
Page: Installing the Verba Lync Filter
IP Trade turret recording
Page: Configuring IP Trade turrets for central recording
Standard SIP passive recording
Page: Configuring monitor port for passive recording
Page: Overview of monitor ports for passive recording
Page: Using Cisco switches to filter SPAN traffic
BroadSoft SIPRec-based recording
Page: Configuring Broadworks platform for SIPREC based call recording
Overview of monitor ports for passive recording
This topic describes the recommendations for configuring monitor ports.
Warning:
The most important issue that system engineers have to keep in mind when planning Verba systemis the following (regarding to monitor ports):One of the and one of the of a call must to besignaling endpoints RTP media stream endpointsmonitored on the same Recording Server in order to record a conversation.
Internal calls - Verba can a record a call between two IP phones if signaling messages are monitored for atleast one of the stations and the RTP media streams are monitored at least for at least one endpoint.
Incoming and outgoing calls - Verba can record an incoming or outgoing call if signaling messages for anIP phone are monitored and the RTP media streams are monitored for at least one endpoint. Verba is alsorecord the IP trunk traffic directly, if the signaling is set to SIP.
Conference calls - Verba can record a conference call if all signaling messages for the participants aremonitored and the RTP media streams are monitored for every endpoint, that participates in the conference.
The following scenarios are supported in the Verba system:
Internal call between monitored phonesIncoming and outgoing call between a monitored phone and a gatewayInternal call between a monitored and a not monitored phoneIncoming and outgoing call between a monitored gateway and a not monitored phone
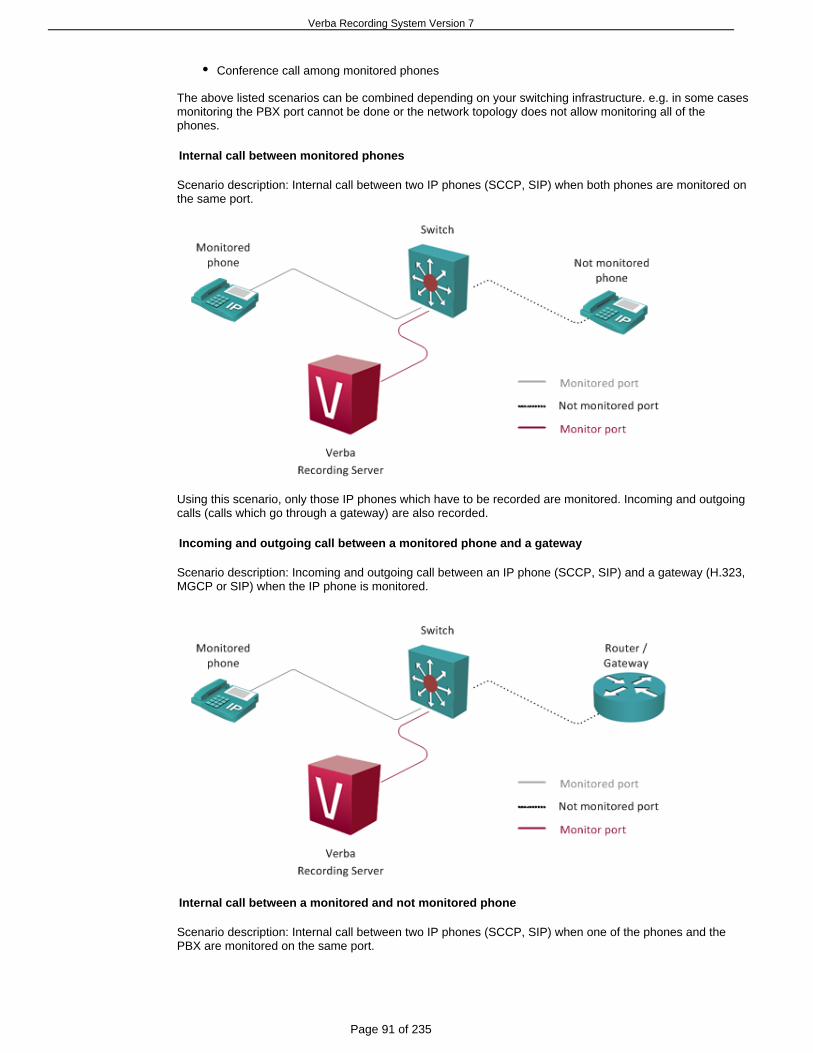
Verba Recording System Version 7
Page 91 of 235
Conference call among monitored phones
The above listed scenarios can be combined depending on your switching infrastructure. e.g. in some casesmonitoring the PBX port cannot be done or the network topology does not allow monitoring all of thephones.
Internal call between monitored phones
Scenario description: Internal call between two IP phones (SCCP, SIP) when both phones are monitored onthe same port.
Using this scenario, only those IP phones which have to be recorded are monitored. Incoming and outgoingcalls (calls which go through a gateway) are also recorded.
Incoming and outgoing call between a monitored phone and a gateway
Scenario description: Incoming and outgoing call between an IP phone (SCCP, SIP) and a gateway (H.323,MGCP or SIP) when the IP phone is monitored.
Internal call between a monitored and not monitored phone
Scenario description: Internal call between two IP phones (SCCP, SIP) when one of the phones and thePBX are monitored on the same port.

Verba Recording System Version 7
Page 92 of 235
With this scenario, you can record calls between a monitored and a not monitored IP phone, becausemonitoring one of the call endpoints will provide RTP media streams, and monitoring one of the IP phoneswill provide signaling messages for both endpoints.
Incoming and outgoing calls between a monitored IP phone and a not monitored gateway are also recorded.
Incoming and outgoing call between a monitored gateway and a not monitored phone
Scenario description: Incoming and outgoing call between an IP phone (SCCP, SIP) and a gateway (H.323,MGCP or SIP) when the gateway and the PBX are monitored on the same port.
With this scenario, you can record calls between a not monitored IP phone and monitored gateway,because monitoring one of the call endpoints will provide RTP media streams, and monitoring the PBX willprovide signaling messages for the IP phone.
Internal calls between not monitored IP phones are not recorded.
Conference call among monitored phones
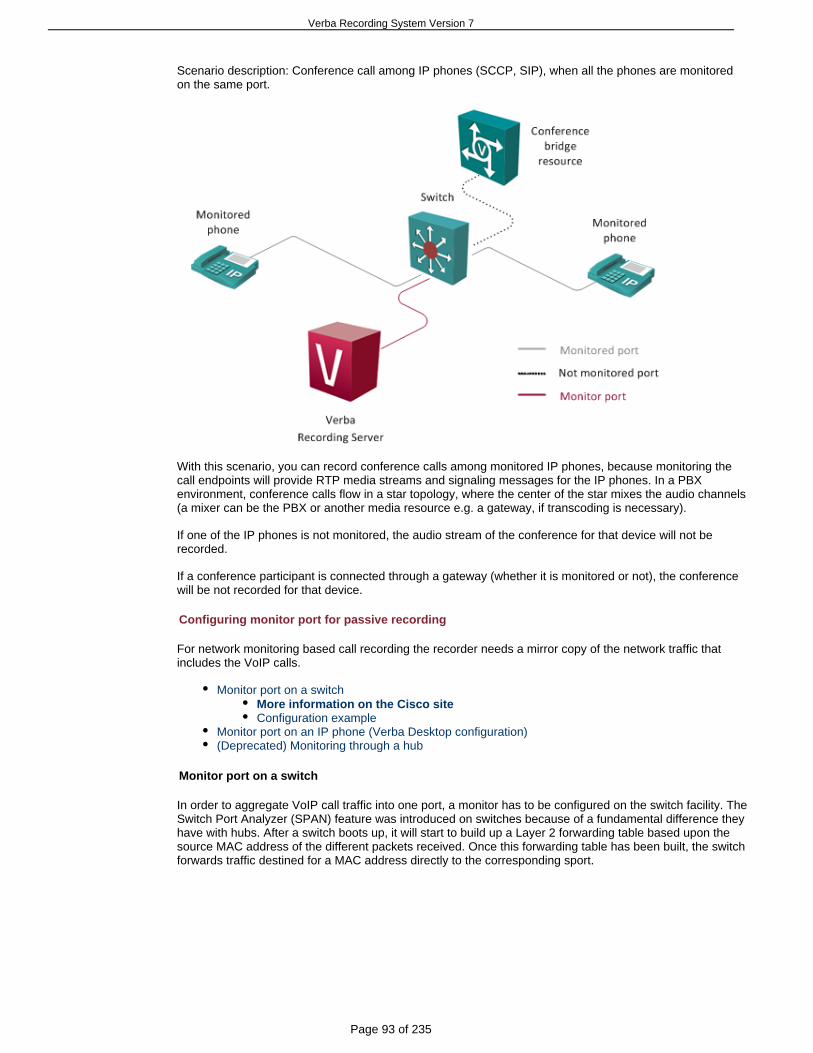
Verba Recording System Version 7
Page 93 of 235
Scenario description: Conference call among IP phones (SCCP, SIP), when all the phones are monitoredon the same port.
With this scenario, you can record conference calls among monitored IP phones, because monitoring thecall endpoints will provide RTP media streams and signaling messages for the IP phones. In a PBXenvironment, conference calls flow in a star topology, where the center of the star mixes the audio channels(a mixer can be the PBX or another media resource e.g. a gateway, if transcoding is necessary).
If one of the IP phones is not monitored, the audio stream of the conference for that device will not berecorded.
If a conference participant is connected through a gateway (whether it is monitored or not), the conferencewill be not recorded for that device.
Configuring monitor port for passive recording
For network monitoring based call recording the recorder needs a mirror copy of the network traffic thatincludes the VoIP calls.
Monitor port on a switchMore information on the Cisco siteConfiguration example
Monitor port on an IP phone (Verba Desktop configuration)(Deprecated) Monitoring through a hub
Monitor port on a switch
In order to aggregate VoIP call traffic into one port, a monitor has to be configured on the switch facility. TheSwitch Port Analyzer (SPAN) feature was introduced on switches because of a fundamental difference theyhave with hubs. After a switch boots up, it will start to build up a Layer 2 forwarding table based upon thesource MAC address of the different packets received. Once this forwarding table has been built, the switchforwards traffic destined for a MAC address directly to the corresponding sport.

Verba Recording System Version 7
Page 94 of 235
In this above diagram, Verba is attached to a port that is configured to receive a copy of every single packetthat is sent by host A. This port is called a SPAN port.
More information on the Cisco site
You can find more information about configuring and using monitor ports in Cisco switching environment,please read the following documentation's:
Port Monitoring
http://www.cisco.com/en/US/tech/tk389/tk816/tsd_technology_support_protocol_home.html
Configuring SPAN on Catalyst 5000
http://www.cisco.com/en/US/docs/switches/lan/catalyst5000/catos/5.x/configuration/guide/span.html
Configuring SPAN and RSPAN on Catalyst 4000 Running Hybrid Mode
http://www.cisco.com/en/US/docs/switches/lan/catalyst4500/12.2/18ew/configuration/guide/span.html
Configuring SPAN and RSPAN on Catalyst 3550
http://www.cisco.com/en/US/docs/switches/lan/catalyst3550/software/release/12.1_19_ea1/configuration/guide/swspan.html
Configuring SPAN and RSPAN on Catalyst 2950
http://www.cisco.com/en/US/docs/switches/lan/catalyst2950/software/release/12.1_22ea/SCG/swspan.html
Configuring SPAN on Catalyst 2900XL/3500XL
http://www.cisco.com/en/US/products/hw/switches/ps708/products_tech_note09186a008015c612.shtml#topic1
Configuration example
In the following example we provide a short description about setting up a monitor port on a Cisco Catalyst3524-XL-PWR switch.
You can use SPAN to monitor traffic on a given port by forwarding incoming and outgoing traffic on the portto another port in the same VLAN. A SPAN port cannot monitor ports in a different VLAN, and a SPAN portmust be a static-access port. You can define any number of ports as SPAN ports, and any combination ofports can be monitored:
Step 1 - Connect your computer to the switch (through the LAN or the console port).
Step 2 - configure terminal
Enter global configuration mode.
Step 3 - interface FastEthernet 0/24
Enter interface configuration mode, and enter the port that acts as the monitor port.
Step 4 - port monitor FastEthernet 0/1
Verba Recording System Version 7
Page 95 of 235
Enable port monitoring on the desired port.
Step 5 - Repeat Step 4. until you configured all VoIP ports.
Step 6 - end
Return to privileged EXEC mode.
Step 7 - show running-config
Verify your entries.
Step 8 - copy running-config startup-config
Copy running configuration to startup configuration.
For more information, please ask your switch manufacturer or your system integrator/distributor.
Monitor port on an IP phone (Verba Desktop configuration)
In order to aggregate VoIP call traffic into one port in a Verba Desktop environment, we can configure thePC to monitor voice traffic through the 10/100 Ethernet port of the IP phone which is connected to thedesktop computer.
In the above diagram, Verba is attached to the 10/100 Ethernet port of the IP phone. All voice traffic ismonitored directly on the IP phone PC port.
Below Unified Communications Manager 3.3(3) versions, voice traffic is automatically forwarded to the PCport. From 3.3(3) version onward you can forbid voice traffic monitoring on the PC port. You are able toconfigure this option for every phone through the Unified Communications Manager administration interface:
PC Voice VLAN Access,
Which indicates whether the phone will allow a device attached to the PC port to access the Voice VLAN.Disabling Voice VLAN Access will prevent the attached PC from sending and receiving data on the VoiceVLAN. It will also prevent the PC from receiving data sent and received by the phone. You Must set thissetting to be able to use Verba Desktop Edition for call recording.
(Deprecated) Monitoring through a hub
Warning
This option is It is documenteddeprecated and not recommended in production environments. here to just cover all available technologies.
When IP phones connected through a hub, there is no special configuration task in order to aggregate calltraffic, because when a hub receives a packet on one port, it will send out a copy of that packet on all portsexcept on the one where it was received. So you can simply connect Verba server to a hub port, and allVoIP traffic will appear on Verba recording interface.

Verba Recording System Version 7
Page 96 of 235
For example, if you want to capture Ethernet traffic sent by host A to host B and both are connected to ahub, just attach Verba to this hub as all other ports see the traffic between host A and B.
Using Cisco switches to filter SPAN traffic
Overview
Using passive recording scenarios (when traffic is delivered to the Verba recording servers throughmonitoring or SPAN ports) large amounts of traffic could overload the recording servers. In a typical IPtelephony environment, this problem can be handled easily by monitoring only the voice VLANs, whichshould only contain voice traffic.
This technique, however, can not be used in all situations. If a dedicated voice VLAN is not available in thenetwork architecture, or if the voice and video traffic is mixed with other kinds of traffic (e.g. when using
), the best solution is to filter the SPAN traffic. SPAN traffic filteringsoftphones installed on desktop PCsis available only on selected Cisco switches.
Cisco's Flow-based SPAN allows filtering
Here is the Cisco definition of the feature that allows SPAN traffic filtering:
Flow-Based Switch Port Analyzer (FSPAN) - SPAN provides a mechanism to capture data appearing onspecified ports or VLANs, mirroring it on destination ports. It is very useful for security monitoring and trafficmanagement. However, sometimes the amount of traffic captured with SPAN can be too large and difficult
Flow based SPAN provides a mechanism to capture only required (interesting) data betweento analyze.endhosts, by using specified filters. The filters are defined in terms of access-lists that limit IPv4, IPv6 orIPv4 + IPv6, or non IP traffic (MAC) between specified source and destination addresses.
You can use the to find which products support it (e.g. type "Flow-based" to findCisco Feature Navigatorit).
http://tools.cisco.com/ITDIT/CFN/jsp/by-feature.jsp
E.g. the Series switches all support FSPAN.Cisco 3560-X and Cisco 3750-X
Sample configuration for Cisco or SIP passive recording
If your RTP port range is 16384-32767 (standard on Cisco gateways) you could use the followings to filterout the majority of none-voice traffic.
extended IP access list verbafilter10 permit udp any any range 16384 3276720 permit udp any range 16384 32767 any30 permit ip any <ip-pbx>
40 permit ip <ip-pbx> any
Where the <ip-pbx> part shall be replaced with the IP address of your IP PBX, e.g. Cisco UCM. In yourSPAN traffic you should mostly see SIP, Cisco SCCP and RTP packets.
Sample configuration for Microsoft Lync passive recording
In , signalling is coming to the recorders directly from the Lync Front EndMicrosorft Lync passive recording

Verba Recording System Version 7
Page 97 of 235
servers, therefore you will only need to allow RTP traffic in your filter. You can configure Lync to use anarrow UDP range for RTP traffic, e.g. 18000-18040. This will effectively filter-out most non-RTP traffic fromthe monitor port.
extended IP access list verbafilter10 permit udp any any range 18000 1804020 permit udp any range 18000 18040 any
After this, you should mostly see UDP packets (which are encrypted RTP packets) in your SPAN traffic.
Configuring Cisco UCM for central recording
In order to take advantage of the RTP forking method and use the Verba Recording System's Central CiscoRecording method, configuration of the Cisco Unified Communication Manager and the recorded devices isrequired.
Warning
The recording system's reliablity depends on both Cisco and Verba software components. Wehighly recommend to , and installhave a look at these known recording affecting Cisco bugsnecessary updates.
Tip
We recommend that you while you are configuring Cisco UCM and openkeep this page openeach step in a new window.
Initial configuration
The initial Cisco UCM configuration for central recording includes the following steps:
Step 1 - Create and configure the SIP trunk pointing to the recorder(s) (steps to record encrypted)Cisco calls
Step 2 - used by the recorded lines / extensionsCreate a recording profile
Step 3 - that let the Cisco UCM to direct calls to the recorder (includesConfigure call routingconfigurations for multiple recorders)
Step 4 - that provides recording control andCreate an application user for the JTAPI connectiondetailed CDR information
Step 5 - if you use devices supporting iSAC (89xx, 99xx family) (Disable the unsupported iSAC codec applicable above CUCM 8.5(1)SU1)only
Step 6 - (recommended)Consider need of and configure transcoder resources
Step 7 - (optional)Configure a recording notification tone
After these steps you can start adding extensions.
Note
The codec configuration in UCM is important for recording, since Cisco phones do not supportcodec changes of the secondary recording call. You might have to deploy transcoding resources tohandle all scenarios, for more information read .Codec guidelines for Cisco Central Recording
Adding and removing extensions
Follow the steps below to add and remove extensions to/from central recording in Cisco UCM:

Verba Recording System Version 7
Page 98 of 235
Add new extensions to central recording (follow these steps to add extensions with Extension)Mobility
Remove extensions from central recording
Warning
When you use RTP-forking based Cisco central recording, the system can record only thoseextensions that are properly configured in the Cisco UCM. It is not enough to add extensions in theVerba Recording System.
Create and configure a SIP Trunk
Configure a SIP trunk security profile
Step 1 Select menu item.System / Security Profile / SIP Trunk Security Profile
Step 2 Modify the default or create new profile for the new recorder trunk by clicking on the Add Newbutton.
Step 3 Set to Incoming Transport Type TCP+UDP.
Step 4 Set to (this setting has to match the configuration in the VerbaOutgoing Transport Type TCPRecording Server). TCP is recommended.
Step 5 when you create the SIP Trunk Security Profile, the Disable digest authentication - Enable option might be checked. Make sure to disable it in the profile you plan to useDigest Authentication
with Verba.
Step 6 Set to port (this setting has to match the configuration in the VerbaIncoming Port 5060Recording Server).IMPORTANT! For the Verba Dial-in Recorder Service please use 5065, use 5060 only for centralrecording.
Step 7 Let other parameters default to setting at the parameter.Non Secure Device Security Mode
Step 8 Click on the button.Save
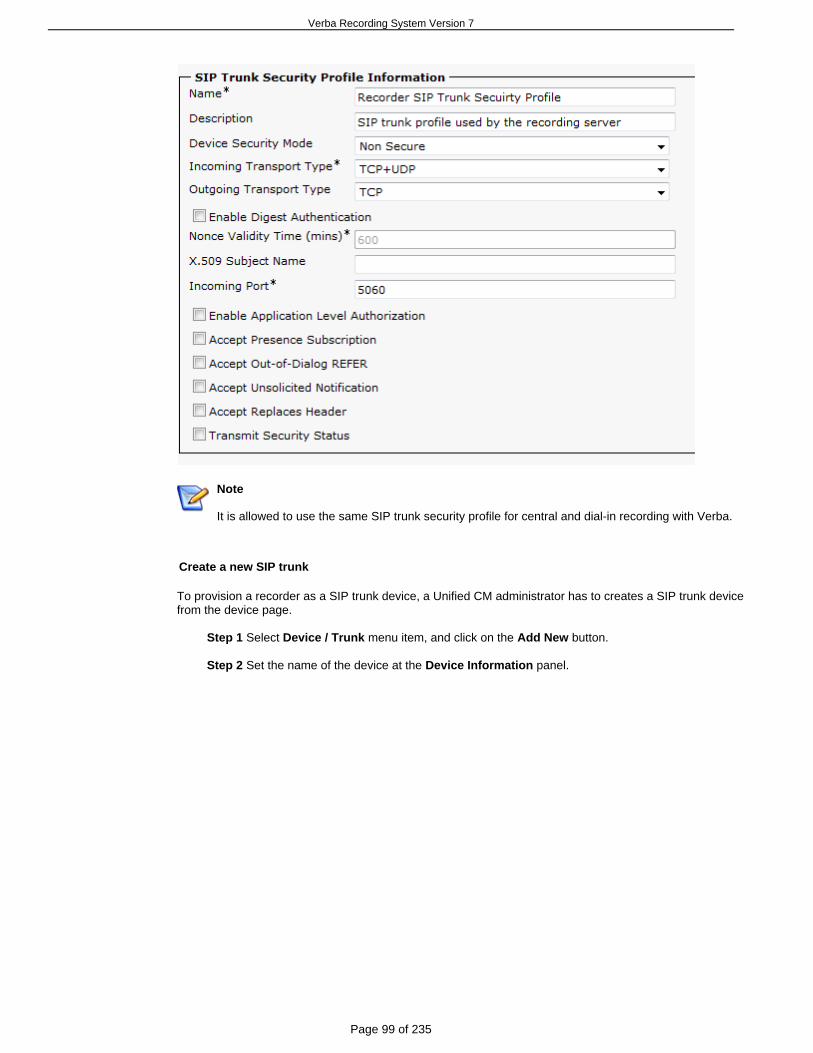
Verba Recording System Version 7
Page 99 of 235
Note
It is allowed to use the same SIP trunk security profile for central and dial-in recording with Verba.
Create a new SIP trunk
To provision a recorder as a SIP trunk device, a Unified CM administrator has to creates a SIP trunk devicefrom the device page.
Step 1 Select menu item, and click on the button.Device / Trunk Add New
Step 2 Set the name of the device at the panel.Device Information

Verba Recording System Version 7
Page 100 of 235
Step 3 Set value to match the recorder local address.Destination Address
Step 4 Set to (this value has to match the Verba Recording ServerDestination Port 5060configuration).
Step 5 Set to the one modified/created in the previous part.SIP Trunk Security Profile
Step 6 Leave other parameters as default.
Step 7 Click on the button.Save
On newer UCM systems destination is configured slightly differently:

Verba Recording System Version 7
Page 101 of 235
(Optional) Configuring Cisco UCM for multiple recording servers
Verba recorders can be deployed in redundant fashion in order to increase the availability of the recordingservice. In this mode, each recorded call will be directed to the first available recorder trunk in theconfigured route group.
The configuration of the Cisco UCM for use with multiple recorders is similar to the steps above with thefollowing differences:
Step 1 Set TCP as transport type in the SIP trunk security profile.
Step 2 Add the new necessary SIP trunks for each recording server.
Step 3 Add all SIP trunks to the configured route group and set the distribution algorithm to Top Down.
Note
Since version 8.5, is available in Cisco UCM, to check the availability of theSIP OPTIONS Pingrecording servers. Verba Recording System supports this funtion, which provides switchingfasterbetween the recording servers in case of fault or unavailability. In order to configure SIP OPTIONS
, the following additional steps are to be completed in Cisco UCM.Ping
Step 4 Create a new by copying the Standard SIP Profile, and setting SIP Profile SIP OPTIONS Pingto under .Enabled Device / Device Settings / SIP Profile
Step 5 Configure 's settings according to the following:SIP OPTIONS Ping
Step 6 Select the newly created profile as for every SIP trunk that is used for recordingSIP Profileunder .Device / Trunk
Configuring call routing in Cisco UCM for recording
Note
Ensure that the recorded devices and recorder trunk(s) are able to call the Calling Search Spacethat is selected at in the Recorder Profile To avoid call accessRecording Calling Search Space . issues it is highly recommended to do not put the route pattern into any partition, in thiscase Calling Search Space configuration is not necessary.
Create a new route group
Step 1 Select menu item and click on the Call Routing / Route/Hunt / Route Group Add New
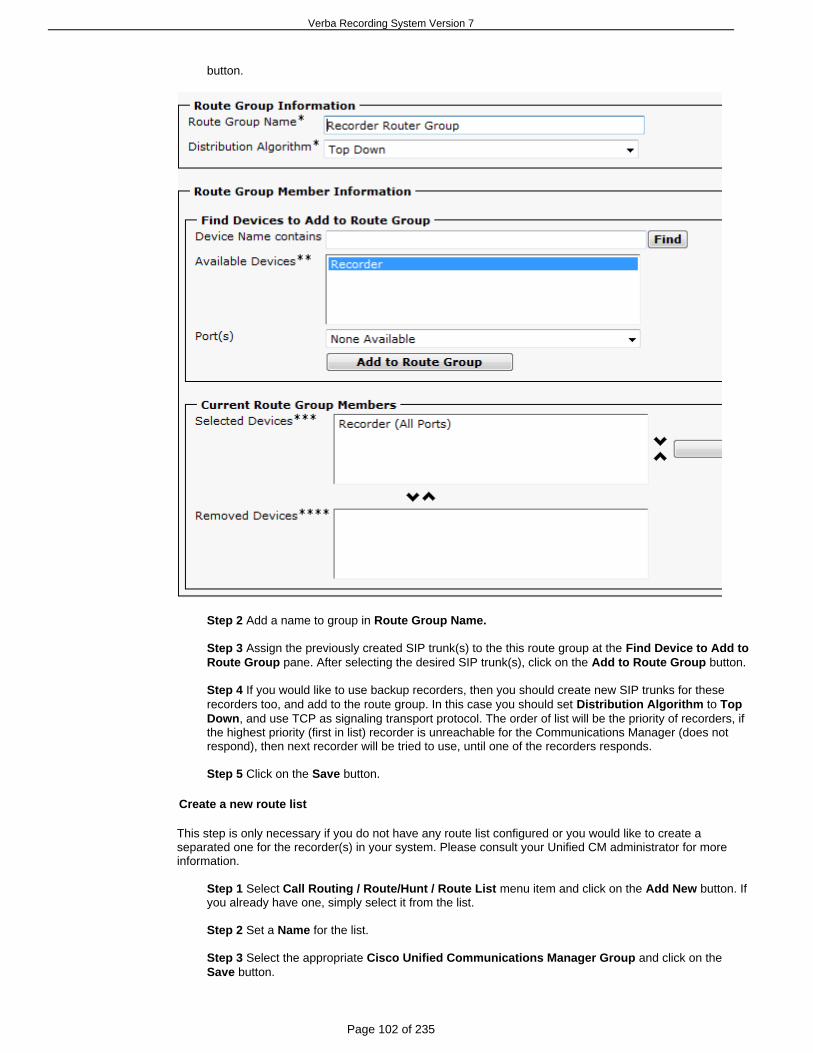
Verba Recording System Version 7
Page 102 of 235
button.
Step 2 Add a name to group in Route Group Name.
Step 3 Assign the previously created SIP trunk(s) to the this route group at the Find Device to Add to pane. After selecting the desired SIP trunk(s), click on the button.Route Group Add to Route Group
Step 4 If you would like to use backup recorders, then you should create new SIP trunks for theserecorders too, and add to the route group. In this case you should set to Distribution Algorithm Top
, and use TCP as signaling transport protocol. The order of list will be the priority of recorders, ifDownthe highest priority (first in list) recorder is unreachable for the Communications Manager (does notrespond), then next recorder will be tried to use, until one of the recorders responds.
Step 5 Click on the button.Save
Create a new route list
This step is only necessary if you do not have any route list configured or you would like to create aseparated one for the recorder(s) in your system. Please consult your Unified CM administrator for moreinformation.
Step 1 Select menu item and click on the button. IfCall Routing / Route/Hunt / Route List Add Newyou already have one, simply select it from the list.
Step 2 Set a for the list.Name
Step 3 Select the appropriate and click on the Cisco Unified Communications Manager Group button.Save

Verba Recording System Version 7
Page 103 of 235
Step 4 Add the previously created route group to this route list at the Route List Member Informationpane. Click on the button and select the desired route group.Add Route Group
Step 5 Click on the button.Save
Create a new route pattern
To provision the route pattern for the recorder, the administrator has to open the route pattern configurationpage, and enters a route pattern based on the recorder DN. The administrator selects the SIP trunk devicefor the recorder, and then saves the route pattern. If the recorder address is given as a SIP URL and theRHS of the URL does not belong to Unified CM cluster, a SIP route pattern should be configured. Thepattern field should be the domain or ip address of the recorder (the RHS part of the recorder URL) and theSIP trunk field should be the SIP trunk for the recorder.
Step 1 Select menu item and click on the Call Routing / Route/Hunt / Route Pattern Add Newbutton.
Step 2 Set the to the value configured in the recorder profile previously.Route Pattern
Step 3 Set the to the one created/modified in the previous step.Gateway/Route List
Step 4 Click on the button.Save

Verba Recording System Version 7
Page 104 of 235
1. 2. 3.
Creating an application user for the JTAPI connection
Create an application user for the JTAPI application
Execute the following steps in your Cisco UCM web administration interface:
Step 1 - Navigate to menu item.User Management / Application User / Add New
Step 2 - Fill out all necessary fields and make a note of the and fields, becauseUser ID Passwordyou will have to set them in the Verba Recording System. E.g. you can call it .VerbaJTAPI
Step 3 - Navigate to menu item.User Management / User Group
Step 4 - Put the user to the following groups by selecting this group form the list, than click Addand select the previously created user:Application Users to Group
Standard CTI EnabledStandard CTI Allow Control of Phones supporting Connected Xfer and conf(necessary for Cisco 89xx or 99x SIP phones)
Adding a new extension for recording in Cisco UCM
Overview
There are three major steps you do when you are adding a new extension:
Enable built-in-bridgeConfigure recording on the lineAdd the phone device to the JTAPI user
You can see the detailed steps below.
Configure phones for recording
Step 1 - Select menu item and select the desired phone.Device / Phone
Step 2 - On the configuration page enable the Built In Bridge.
Step 3 - Select the you would like to enable recording on.line

Verba Recording System Version 7
Page 105 of 235
Step 4 - Set to Recording Option Automatic Call Recording Enabled. Note! You should use mode instead if you want to use Application Invoked Advanced
.Cisco Call Recording Rules
Step 5 - Set to the previously created profile.Recording Profile
Step 6 - Click on the button.Save
Note
You need to for recording.reset every phone you configure
Step 7 - Assign the device to the JTAPI application user. Go to User Management / Application, select the Verba JTAPI user and add the device to the list.User Controlled Devices
Step 8 - Click on the button Save .

Verba Recording System Version 7
Page 106 of 235
Adding an extension with Extension Mobility in Cisco UCM
Configure phones for recording
Step 1 - Select menu item and select the phone where the user will log in with Device / Phone.Extension Mobility
Step 2 - On the configuration page enable the Built In Bridge.
Step 3 - Go to and select the profile that is configured toDevice / Device Settings / Device Profileuse with Extension Mobility.
Step 4 - Select the line you would like to enable recording on.
Step 5 - Set to Recording Option Automatic Call Recording Enabled.
Step 6 - Set to the previously created profile.Recording Profile
Step 7 - Click on the button.Save
Step 8 - Assign the device to the JTAPI application user. Go to User Management / Application, select the Verba JTAPI user and add the device to the list.User Controlled Devices
Step 9 - Click on the button Save .

Verba Recording System Version 7
Page 107 of 235
Step 9 - Go to and select the user that is using the User Management / End User Extension feature with the extension.Mobility
Step 10 - Tick and click .Allow Control of Device from CTI Save

Verba Recording System Version 7
Page 108 of 235
Removing extensions from recording in Cisco UCM
Remove extensions from recordings
Step 1 - Select menu item and select the desired phone.Device / Phone
Step 2 - Optionally disable the If you are using features like barge-in, which requireBuilt In Bridge. the built-in-bridge, do not disable it.
Step 3 - Select the line you would like to disable recording on.
Step 4 - Set to Recording Option Call Recording disabled.
Step 5 - Set to .Recording Profile None
Step 6 - Click on the button.Save
Note
You need to for recording.reset every phone you configure
Step 7 - Remove the device from the JTAPI application user.Go to User Management / Application and remove the device from the list.User Controlled Devices
Step 8 - Click on the button Save .

Verba Recording System Version 7
Page 109 of 235
Configure SIP trunk for recording encrypted calls (Optional)
Configure SIP trunk for recording encrypted calls
From Cisco Unified Communications Manager 8.0 the RTP forking based recording interface enables therecording of encrypted calls. In order to enable this option various configuration tasks have to beaccomplished. Please follow the instructions below to properly configure the Cisco Unified CommunicationsManager and the Verba Recording System. This topic only reflects the difference between creating a secureand a non-secure SIP trunk for recording. For the complete configuration, please follow the instructions ofthe main article.
Upload the certificate to the CUCM
Step 1 Login to the Cisco Unified OS Administration interface.
Step 2 Select menu.Security / Certificate Management
Step 3 Click on the button.Upload Certificate
Step 4 Select the certificate.CallManager-trust
Step 5 Enter an optional description.
Step 6 Locate the certificate file located on the Verba Recording System Media RepositoryVerba.crtserver under C:\. This certificate file is automatically created during the installation process and usedfor the HTTPS configuration of the Web Application server.
Step 7 Click button.Upload File
Step 8 After successful upload the new certificate should appear on the list and it has a namecontaining the host name of the Media Repository server.
Warning
If you have multiple nodes (publisher+subscribers) in your cluster you must install the recorder'scertificate on each node.

Verba Recording System Version 7
Page 110 of 235
Create a secure SIP trunk security profile
Step 1 Follow the instructions of the Configure a SIP trunk security profile topic above and make thefollowing changes inthe process.
Step 2 Set the to .Device Security Mode Encrypted
Step 3 Set the to Incoming Transport Type TLS.
Step 4 Set the to Outgoing Transport Type TLS.
Step 5 Set the to recorders certificates subjects CN name, which is the hostX.509 Subject Namename of the Media Repository server. You can check this attribute by opening the certificate file inWindows.
Step 6 Enable .Transmit Security Status

Verba Recording System Version 7
Page 111 of 235
Create a secure SIP trunk
Step 1 Follow the instructions of the Create a new SIP trunk topic above and make the followingchanges in the process.
Step 2 Enable .SRTP Allowed
Step 3 Set the to the previuosly created secure profile.SIP Trunk Security Profile
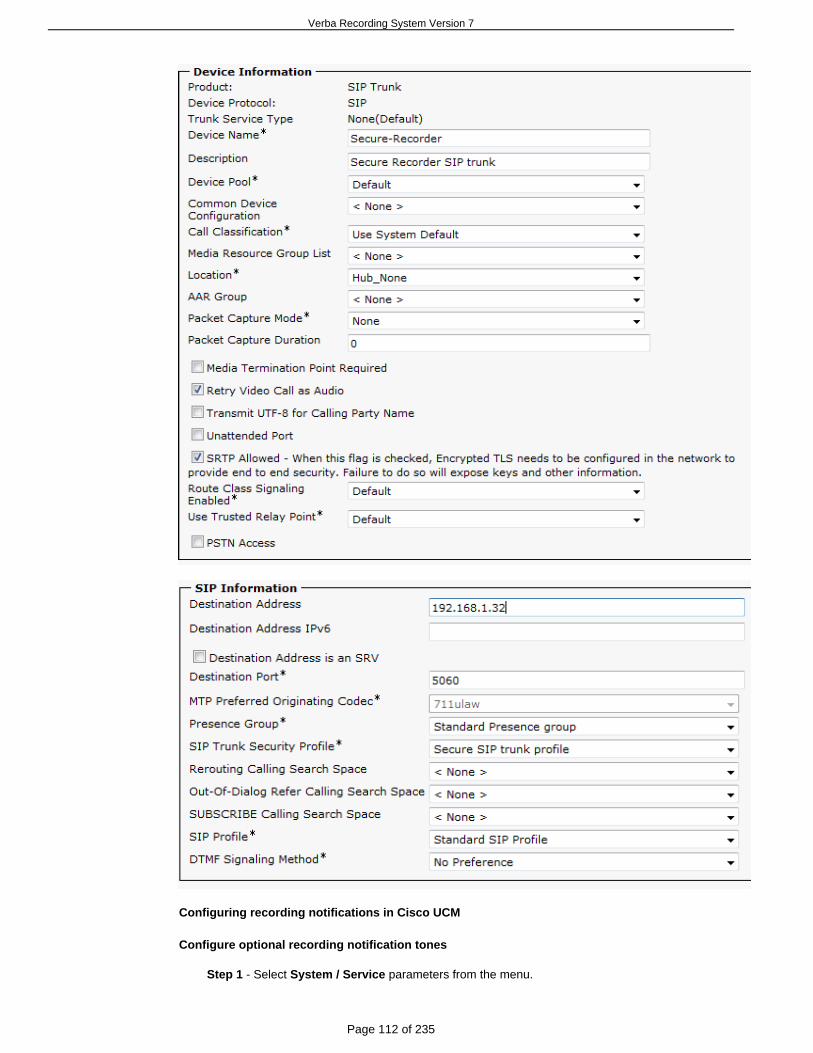
Verba Recording System Version 7
Page 112 of 235
Configuring recording notifications in Cisco UCM
Configure optional recording notification tones
Step 1 - Select parameters from the menu.System / Service

Verba Recording System Version 7
Page 113 of 235
Step 2 - Select the current Cisco UCM server.
Step 3 - Then select the service.Cisco CallManager
Step 4 - Enable or disable recording notification tone parameters in Clusterwide Parameters group.(Feature - Call Recoding)
Step 5 - Click on the button.Save
Creating a recording profile in Cisco UCM
Create a new recording profile
To provision line appearances of users for call recording, one or more call recording profiles should becreated. A recording profile can then be selected for a line appearance. To create a recording profile, aUnified CM administrator has to open Device Setting page and select Recording Profile.
Step 1 - Select , and click on the button.Device / Device Settings / Recording Profile Add New
Step 2 - Set a for the profile.Name
Step 3 - Set to the directory number or the URL of the recorder thatRecording Destination Address associates with this recording profile.The only guideline for this number: it should be possible for UCMto route it to the . No user is going to directly call this number,SIP trunk where the recorder is definedthis is internal to the system. Make sure it does not collide with your numbering plan. This is why theexample shows '9999'.
Step 4 - Click on the button.Save
Note
Ensure that the recorded devices are able to call the Calling Search Space that is selected at Recording Calling Search Space.
Disable the unsupported iSAC codec
Because the codecs for recording calls match the codecs for agent-customer calls, you may need to inserttranscoders if the recorder does not support the matching codecs or you configured the network regions insuch ways, that transcoders are inserted. Cisco IP phones can use codecs that transcoders do not support,so it is recommended to disable codecs, which are not supported by the Verba Recording System and/oryou do no have transcoder support. Verba Recording System supports G.711, G.729, G.722 and iLBC, but
.does not support iSAC
This feature was introduced in CUCM 8.5(1)SU1.
Use the following service parameters to enable or disable usage of the G722, iLBC, and iSAC codecs:
G722 Codec Enabled for All DevicesiLBC Codec Enabled for All DevicesiSAC Codec Enabled for All Devices Except Recording-Enabled Devices
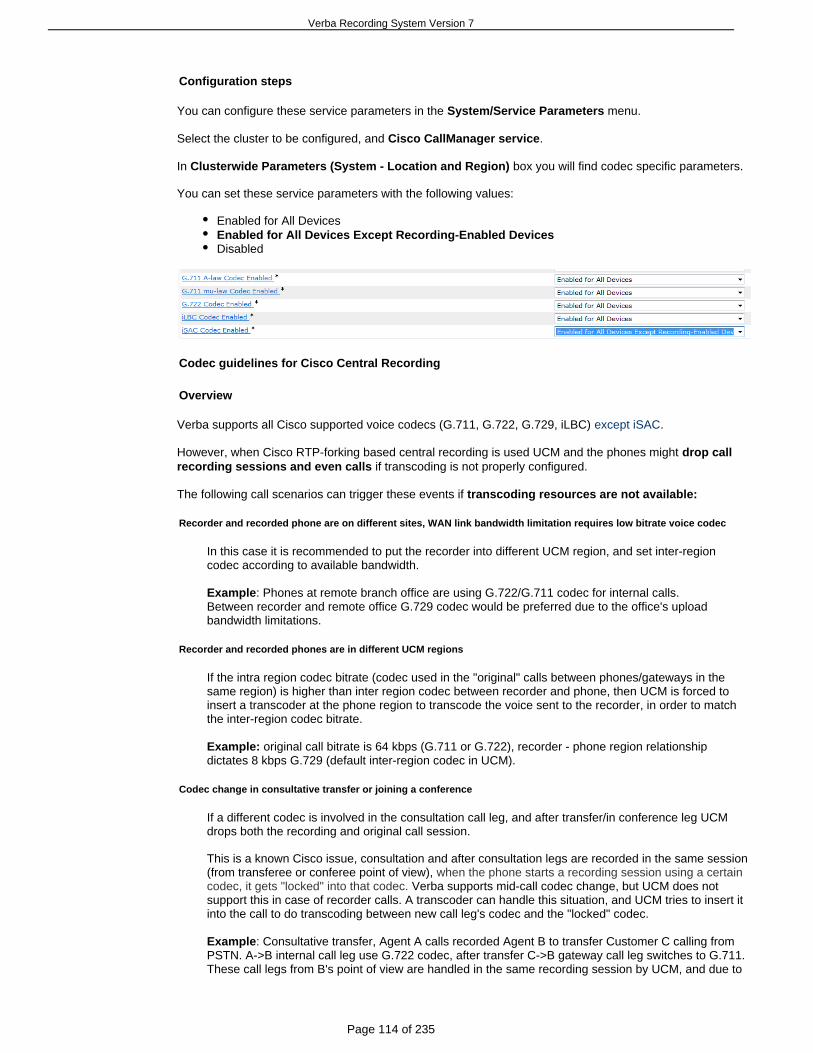
Verba Recording System Version 7
Page 114 of 235
Configuration steps
You can configure these service parameters in the menu.System/Service Parameters
Select the cluster to be configured, and .Cisco CallManager service
In box you will find codec specific parameters.Clusterwide Parameters (System - Location and Region)
You can set these service parameters with the following values:
Enabled for All DevicesEnabled for All Devices Except Recording-Enabled DevicesDisabled
Codec guidelines for Cisco Central Recording
Overview
Verba supports all Cisco supported voice codecs (G.711, G.722, G.729, iLBC) .except iSAC
However, when Cisco RTP-forking based central recording is used UCM and the phones might drop call if transcoding is not properly configured.recording sessions and even calls
The following call scenarios can trigger these events if transcoding resources are not available:
Recorder and recorded phone are on different sites, WAN link bandwidth limitation requires low bitrate voice codec
In this case it is recommended to put the recorder into different UCM region, and set inter-regioncodec according to available bandwidth.
Example: Phones at remote branch office are using G.722/G.711 codec for internal calls.Between recorder and remote office G.729 codec would be preferred due to the office's uploadbandwidth limitations.
Recorder and recorded phones are in different UCM regions
If the intra region codec bitrate (codec used in the "original" calls between phones/gateways in thesame region) is higher than inter region codec between recorder and phone, then UCM is forced toinsert a transcoder at the phone region to transcode the voice sent to the recorder, in order to matchthe inter-region codec bitrate.
Example: original call bitrate is 64 kbps (G.711 or G.722), recorder - phone region relationshipdictates 8 kbps G.729 (default inter-region codec in UCM).
Codec change in consultative transfer or joining a conference
If a different codec is involved in the consultation call leg, and after transfer/in conference leg UCMdrops both the recording and original call session.
This is a known Cisco issue, consultation and after consultation legs are recorded in the same session(from transferee or conferee point of view), when the phone starts a recording session using a certain
Verba supports mid-call codec change, but UCM does notcodec, it gets "locked" into that codec.support this in case of recorder calls. A transcoder can handle this situation, and UCM tries to insert itinto the call to do transcoding between new call leg's codec and the "locked" codec.
Example: Consultative transfer, Agent A calls recorded Agent B to transfer Customer C calling fromPSTN. A->B internal call leg use G.722 codec, after transfer C->B gateway call leg switches to G.711.These call legs from B's point of view are handled in the same recording session by UCM, and due to

Verba Recording System Version 7
Page 115 of 235
locking the Built-in Bridge to G.722 causes to drop the second call leg.
Verify your configuration
1. Check/configure region relationships
- Open Cisco Unified CM Step 1 administration
- Select Step 2 System / Region menu item
- Select the Verba recorder's regionStep 3
Step 4 - Check whether region relationship and inter-region codecs are configured according toyour needs as described above
2. Check/assign media resource to recorded phone's device pool
Step 1 - Select System / Device pool menu item
- Select the recorded phones' pool(s)Step 2
- Check whether valid transcoding resource is available in the Media Resource Group listStep 3if according to region relationships and other needs it might be required
Warning
Errors in above codec and transcoding configurations can lead to loss of recordings or dropped.calls
Known Cisco bugs affecting recording reliability
Cisco CallManagerIntermittent secure recording

Verba Recording System Version 7
Page 116 of 235
Recording Tone options on phone page for 69x1 phones do not workCall Redirect can fail when Call Recording Profile is enabledUnable to record voice for SIP calls
Cisco phone firmwares (firmware versions!)Intermittent recording (69xx/79xx)6921 sends one RTP stream to recorder, when sRTP is expectedCaller gets one-way audio after hold/resume when conf with recordingRecording Tone options on phone page for 69x1 phones do not work6921 SCCP/SIP - Cannot turn off Recording Tone notification
Cisco CallManager
Intermittent secure recording
http://tools.cisco.com/Support/BugToolKit/search/getBugDetails.do?method=fetchBugDetails&bugId=CSCtu06601&from=summary
: Secure recording failing intermittent with cause 57 403 forbidden Symptom Put the agent phones on the same node as the sip trunk Work around:
8.5(1) (we experienced the same issue with 8.0 branch, upgrade to 9.0.1 solved it at customer)First found:
8.6(2.98000.116), 8.6(2.98000.46), 9.0(1.10000.15), 9.0(1.10000.37)Fixed:
Recording Tone options on phone page for 69x1 phones do not work
http://tools.cisco.com/Support/BugToolKit/search/getBugDetails.do?method=fetchBugDetails&bugId=CSCtz31279&from=summary
: Recording Tone parameters missing on phone page for 7911. Symptom n/a Work around:
9.1(1) First found: 9.0(0.98000.41), 9.0(0.98000.158), 8.6(3.98000.199), 8.6(4.10000.15), 9.0(1.10000.15),Fixed:
9.0(1.10000.37)
Call Redirect can fail when Call Recording Profile is enabled
http://tools.cisco.com/Support/BugToolKit/search/getBugDetails.do?method=fetchBugDetails&bugId=CSCtq87736&from=summary
When incoming call to UCCX being queue as all agents are busy, UCCX will record a call backSymptom:number. If at a later time, an agent becomes available, UCCX will then call that agent, when agent answerthe call, he will hear a menu prompt to press 1 to call the call back number, after that the UCCX will then callthe call back number, currently after the agent press 1, the call get disconnected and it seems to mostlyaffect agent using extension mobility. Work around: Remove Call Recording Profile.
7.1(2.31900.1), 8.5(1.11001.35) First found: 8.6(1.98000.37), 8.6(1.98000.82), 8.5(1.12025.1), 8.0(3.23034.1), 8.6(1.21002.1), 8.6(2.10000.30),Fixed:
7.1(5.34070.2)
Unable to record voice for SIP calls
http://tools.cisco.com/Support/BugToolKit/search/getBugDetails.do?method=fetchBugDetails&bugId=CSCty15458&from=summary
Unable to record voice for some SIP calls. The issue will be encountered only during redirectsSymptom:over a SIPTrunk which looks at SIP URL in the Invite when the name/number got modified from the DAresponse after redirect request.
n/a Work around: 8.6(2) First found:
9.0(0.98000.16), 9.0(0.99999.2242), 9.0(0.98000.55), 7.1(5.34091.1), 8.5(1.14060.1),Fixed:8.6(2.21900.5), 8.6(2.21021.1), 7.1(5.34900.7), 8.0(3.24047.1), 9.0(1.10000.15), 8.6(4.98000.10),9.0(1.10000.37)
Cisco phone firmwares (firmware versions!)

Verba Recording System Version 7
Page 117 of 235
Intermittent recording (69xx/79xx)
http://tools.cisco.com/Support/BugToolKit/search/getBugDetails.do?method=fetchBugDetails&bugId=CSCtx84429&from=summary
Calls to 3rd party Recording Server via BIB are failing intermittently. CCM SDI Traces will showSymptom:CUCM sending a BYE to the Recording Server with cause=47.
: n/a Work around 9.2.1 and higher First found:
9.2(3)ES3, 9.2(3)MN1.16, 9.3(1)CT1.50 (we have experience with 9.3.1SR1, and can confirm it isFixed:fixed)
6921 sends one RTP stream to recorder, when sRTP is expected
http://tools.cisco.com/Support/BugToolKit/search/getBugDetails.do?method=fetchBugDetails&bugId=CSCtq54881&from=summary
6921 sends one RTP stream to recorder, when sRTP is expected. 9.2.1 firmware fixes theSymptom:CSCtj38017 - SSRC field in RTP Stream Packet is always zero. However, the secure recording streamfunctionality is broken in 9.2.1 firmware. Downgrading to lower firmware version (9.1.1) would help in notrunning into the secure recording stream issue. However, the 6921 phone will be susceptible toCSCtj38017.
n/a Work around: 9.2(1) First found:
9.2(1)SR1Fixed:
Caller gets one-way audio after hold/resume when conf with recording
http://tools.cisco.com/Support/BugToolKit/search/getBugDetails.do?method=fetchBugDetails&bugId=CSCtq76447&from=summary
Agents will get a one way audio after resume calls on hold/transfer This defect happen whenSymptom:RTL is act as call recoding agent and playing MMOH using multicast address. When customer resume thiscall. CUCM send skinny message StationStopMulticastMediaReceptionMessage to close MMOH mediachannel. But RTL call control do not clear multicast address properly. When CUCM trigger RTL to openRX/TX unicast media channel with customer. Call control open RX channel using the previous multicastaddress. Therefore, RTL cannot receive RX packets properly and play it out.
n/a Work around: 9.1(1.100) First found:
9.2(2), 9.2(1)SR1Fixed:
Recording Tone options on phone page for 69x1 phones do not work
http://tools.cisco.com/Support/BugToolKit/search/getBugDetails.do?method=fetchBugDetails&bugId=CSCtq54881&from=summary
On the device phone page, enabling Recording Tone should play a tone for every callSymptom:regardless of whether it is recorded or not. This does not play. Enabling the Recording Tone via ServiceParameters does work for recorded calls, but the Recording Tone Volume options on the phone config pagedo not apply successfully.
n/a Work around: 9.1(1) First found:
9.2(1)Fixed:
6921 SCCP/SIP - Cannot turn off Recording Tone notification
http://tools.cisco.com/Support/BugToolKit/search/getBugDetails.do?method=fetchBugDetails&bugId=CSCua57846&from=summary
Cannot disable the Recording Tone notification: Symptom: n/a Work around:
9.3(2) First found: 9.3(1)ES1, 9.3(1)ES4Fixed:
Configuring Cisco UCM for central silent monitoring
This procedure consists of multiple steps:
Configure phones for silent monitoring

Verba Recording System Version 7
Page 118 of 235
For each phone, which you would like to silently monitor, you have to enable the built-in-bridge in the deviceconfiguration. This will allow to utilize the RTP forking feature of the device. For supported phone models,see .Supported Cisco environment
Step 1 Select menu item and select the desired phone.Device / Phone
Step 2 On the configuration page enable the Built In Bridge.
Step 3 Click on the button.Save
Note
You need to for silent monitoring.reset every phone you configure
Configure supervisor line/directory number
The central - RTP forking based - silent monitoring feature requires the phone of the supervisor. When asilent monitoring session is initiated, a new call is made to the supervisor's line, which must include themonitored agent or device partition to allow monitoring the agent.
Step 1 Select menu item and select the desired supervisor phone.Device / Phone
Step 2 Select the line you would like to use for silent monitoring.
Step 3 On the directory number configuration page set the proper Monitoring Calling Search Space.
Step 4 Click on the button.Save
Create an application user for the JTAPI application
Step 1 Navigate to menu item.User Management / Application User / Add New
Step 2 Fill out all necessary fields and make a note of the and fields, because youUser ID Passwordwill have to set them in the Verba Recording System.
Step 3 Add the devices, you would like to silently monitor, to the user by selecting them from theupper pane at the panel and move them to the list.Device Information Controlled Devices
Step 4 Add the devices, you would like to use for silent monitoring (phones, which will be used toreceive the silent monitoring session, in a contact center environment, these phones are usually usedby the supervisors) to the user by selecting them from the upper pane at the Device Informationpanel and move them to the list.Controlled Devices
Step 5 Navigate to menu item.User Management / User Group
Step 6 Put the user to group by selecting this group form the list, than click Standard CTI Enabledand select the previously created user.Add Application Users to Group
Step 7 Put the user to group by selecting this group form theStandard CTI Allow Call Monitoringlist, than click and select the previously created user.Add Application Users to Group
Step 8 If you are planning to use Cisco 89xx or 99x SIP phones, you have to also put the user to group by selectingStandard CTI Allow Control of Phones supporting Connected Xfer and conf
this group form the list, than click and select the previously createdAdd Application Users to Group user.
Configuring Cisco UCM for dial-in recording
In order to use the Dial-In capabilities of the Verba Recording System configuration of the Cisco UnifiedCommunication Manager is required.
Initial configuration
Verba Recording System Version 7
Page 119 of 235
1. 2.
1. 2.
3.
4. 5.
1.
2.
3.
The initial Cisco UCM configuration for dial-in recording includes the following steps:
Step 1 - Create and configure the SIP trunk that points to the recorder(s). Note! Use 5065 as SIP port with this recorder service instead of 5060.
Step 2 - that let's Cisco UCM to direct calls to the recorder (includes configurationsConfigure routingfor multiple recorders).
After these steps you can start enabling dial-in recording on your Verba extensions.
Warning
If you are using both central and dial-in recording with Cisco UCM, make sure that you use to two in your route patterns.different extensions
Adding and removing extensions
Extensions can be added to the recording system by enabling Dial-In recording in the Verba extension.management
Configuring Cisco UC Gateway for recording
In order to take advantage of the Cisco UC gateway RTP forking method and use the Verba RecordingSystem's Cisco UC Gateway Recording method, configuration of the voice gateway(s) are required. Thistechnology e.g. allows you to recording Jabber mobile calls, even if they do not enter your network.
Warning
This recording method requires withCisco UC ISR G2 routers Cisco IOS Release 15.2(2)T orThe WSAPI makes possible recording calls where at least one leg is SIP or TDM.newer.
Configuration steps in gateway's IOS
Step 1 - Enter terminal configuration mode
enableconfigure terminal
Step 2 - Enable HTTP server module
ip http server: enter HTTP configuration modeip http max-connection value (optional): Sets the maximum number of concurrent connectionsto the HTTP sever that will be allowed. The default value is 5.ip http timeout-policy idle seconds life seconds requests value (optional): Sets thecharacteristics that determine how long a connection to the HTTP server should remain open.The default values are: idle 600 life 86400 requests 86400.http client persistent ( ): Enables HTTP persistent connections.requiredhttp client connection idle timeout seconds (optional): Sets the number of seconds that theclient waits in the idle state until it closes the connection. The default value is 600.
Step 3 - Enable gateway API
uc wsapi: enter GW API configuration mode message-exchange max-failures number (optional): Configures the maximumnumber of failed message exchanges between the application and the providerbefore the provider stops sending messages to the application. Range is 1 to 3.Default is 1. probing max-failures number (optional): Configures the maximum number of failedprobing messages before the router unregisters the application. Range is 1 to 5.

Verba Recording System Version 7
Page 120 of 235
3.
4.
5.
6.
1. 2. 3.
4. 5. 6.
Default is 3. probing interval keepalive seconds (optional): Configures the interval betweenprobing messages, in seconds. Default is 120 seconds. probing interval negative seconds (optional): Configures the interval betweennegative probing messages, in seconds. source-address ip-address ( ): Configures the IP address (hostname) as therequiredsource IP address for the UC IOS service.
Step 4 - Enable XCC API service
uc wsapi: enter GW API configuration modeprovider xcc: enter Call Control API configuration moderemote-url url: specifies recorder server's URL. It is used to contact the recorder and IP : Portpart authenticates Register requests from recorder. Please note that resource part must becisco_xcc, for example: http://192.168.1.150:8090/cisco_xccno shutdown: enabled APIexitend
Configuration example
....ip http serverhttp client persistent....uc wsapisource-address router_ipprovider xcc
cisco_xccremote-url http://verba_rec:8090/no shutdown
Warning
If you are using IP access list, you should allow HTTP connection from/to the recorder on thedefined port, and allow RTP flow from GW to the recorder in the given UDP port range. The WSAPImodule listens on TCP 8090 for HTTP api requests.
Configuring IP Trade turrets for central recording
This section provides information on configuring the IP Trade trading solution for recording. For the latestconfiguration guides and options, please contact IP Trade directly.
For the supported turrets and versions, see Central call recording with RTP forking for IP Trade turrets
For the detailed information regarding the configuration of the Verba IP Trade Recorder service, see IP.Trade Recorder settings
Note
The Verba Recording System todoes not require a separate IP Trade ReplayBox componentprovide playback-on-turret functionality. This makes call playbacks much faster. Your ReplayBoxparameter can point to the Verba Media Repository.
Turret configuration
This topic describes the recording related configuration keys in the turret configuration.
Step 1 Login to the web based TSS administration interface.

Verba Recording System Version 7
Page 121 of 235
Step 2 Navigate to .TSS / System / Settings / FTP/TFTP Settings
Step 3 Go to and check to .Recorder Recorder compatibility iptrade
Step 4 Enable on all recorded turrets.Keep Alive
Step 5 Make a shared profile which will be attached to all of the recorded turrets (if there is an existingshared profile it can be used for this settings but make sure it is attached to all of the recorded turrets).
Step 6 In the shared profile settings do the following steps:
Step 1 At tab go to and set the Recording server address.Basic Mode Recorder (vrc://192.168.1.40:11999)
Step 2 Set Recording Mixing mode to separated.
Step 3 Set Authorize Replay to true.
Step 4 Set the ReplayBox URL. (http://192.168.1.40:11999)
Step 5 At tab add the following 2 keys: Advanced Mode
application.global.replay.mode = TCPprofile.setting.disablerecorder = false
Step 6 To see the Replay panel on the turrets go to the shared profile's tab and Turret Layoutthere go to the and add the button to the menu. Access Button Configuration Recorder
Step 7 Configure the profile settings according to your needs. See the table below for availableconfiguration options.
Step 8 Make sure to reboot all recorded turrets after the configuration changes.
Recorder configuration
Keep alive configuration

Verba Recording System Version 7
Page 122 of 235
Parameter reference
Configuration Name and Key Location Value Description
Recorder compatibility
application.recorder.compatibility
FTP iptrade Defines which type of recorder is in use.
For Verba Recording System it has to be thedefault value: iptrade.
Recorder server
profile.setting.activerecording
SharedProfile
vrc://192.168.2.1:11999 Recorder Server URI for active recording.
Format: vrc://recorder_address:port
For redundancy, add the second recorder after";" Example:vrc://192.168.2.1:11999;vrc://192.168.2.2:11999
The port number is configured in the VerbaRecording System, see IP Trade Recorder
.settings
Recording mixing mode
profile.setting.recording.mixingmode
SharedProfile
separated Indicates the mixing mode:
separated: each call is recordedseparatly by recorder channel at thesame time.We use one recorderchannel by call.mixed: calls can be recorded on a samerecorder channel at the same time.Onerecorder channel can be used forseveral calls at the same time.
Default recording channel
profile.setting.recording.default.channel
SharedProfile
0 All devices which are not configured to berecorded on a particular channel arerecordedon the default channel set using this keyNoeffect if mixing mode is not "mixed".
Recording channel 0..9 devices
profile.setting.recording.channel.0..9.devices
SharedProfile
Devices recorded on channel 0 (mixing modeonly).Multiple devices may be listed separatedby ';' character.For advanced GUI editionsapplet may be referenced in this key.

Verba Recording System Version 7
Page 123 of 235
Authorize replay
profile.setting.authorizereplay
SharedProfile
true Defines if recorder replay is authorized on theturret.
ReplayBox URL
profile.setting.replaybox.url
SharedProfile
http://192.168.2.1:11999 Defines the URL path to the ReplayBox modulefor recording replay features.
Format: http://recorder_address:port
The port number is configured in the VerbaRecording System, see IP Trade Recorder
.settings
If you have multi site deployment, where youhave a separated Media Repository, you haveto point the replay URL to this server and not tothe recorder.
Replay mode
application.global.replay.mode
FTP TCP Defines the replay mode.
Disable recorder
profile.setting.disablerecorder
SharedProfile
false Specifies if recorder button is disabled on thescreen. If true, the user is not able toaccess therecorder panel.
Recorder icon blink count
profile.setting.recorderblinkingcount
SharedProfile
10 Defines the number of times the recorder iconhas to blink (red) when the recorderconnectionfails.
Configuring Microsoft Lync for dial-in recording
In order to use the Dial-In capabilities of the Verba Recording System configuration of the Micorosoft Lyncpool is required. The recorder is connected to Lync through mediation server as a SIP gateway.
Basic configuration
The basic Lync configuration for dial-in recording includes the following steps:
Step 1 - Create a PSTN gateway trunk in Lync Topology Builder. It's destination address must matchthe SIP listening address of Dial-in Recorder. Assign it to the mediation pool. Publish the newtopology. Note! Use 5065 as SIP port with this recorder service instead of 5060. TLS is currentlynot supported, TCP is the prefered transport.
Step 2 - Enter Lync Configuration Center
Step 3 - in Global dial plan under Voice Routing/Dial Plan page. This exampleCreate new dial plancreates pattern for 8000-8009 range, with internal numbers attribute..
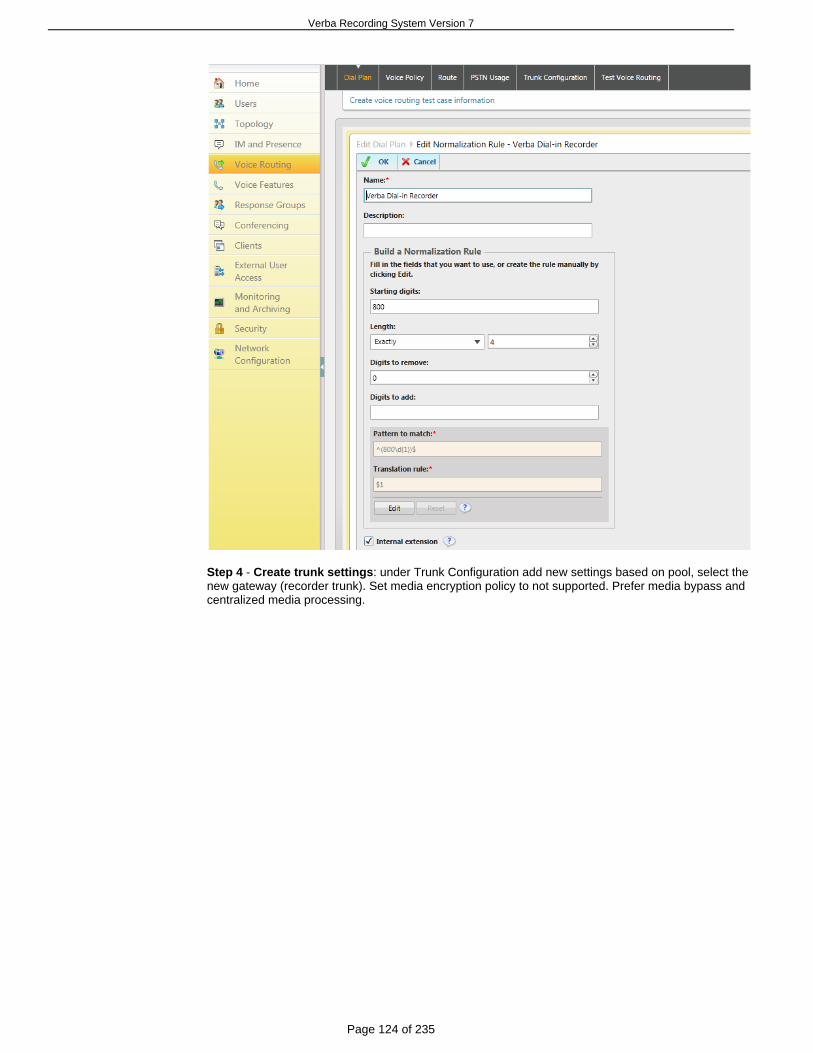
Verba Recording System Version 7
Page 124 of 235
Step 4 - : under Trunk Configuration add new settings based on pool, select theCreate trunk settingsnew gateway (recorder trunk). Set media encryption policy to not supported. Prefer media bypass andcentralized media processing.
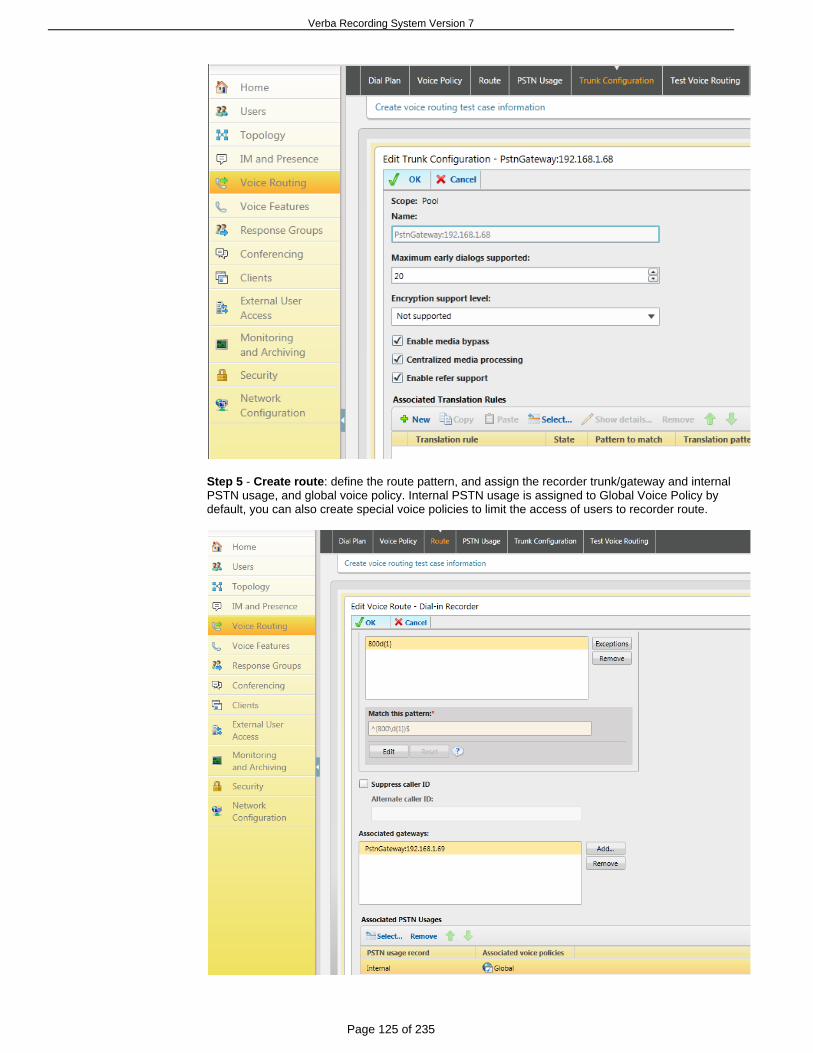
Verba Recording System Version 7
Page 125 of 235
Step 5 - : define the route pattern, and assign the recorder trunk/gateway and internalCreate routePSTN usage, and global voice policy. Internal PSTN usage is assigned to Global Voice Policy bydefault, you can also create special voice policies to limit the access of users to recorder route.
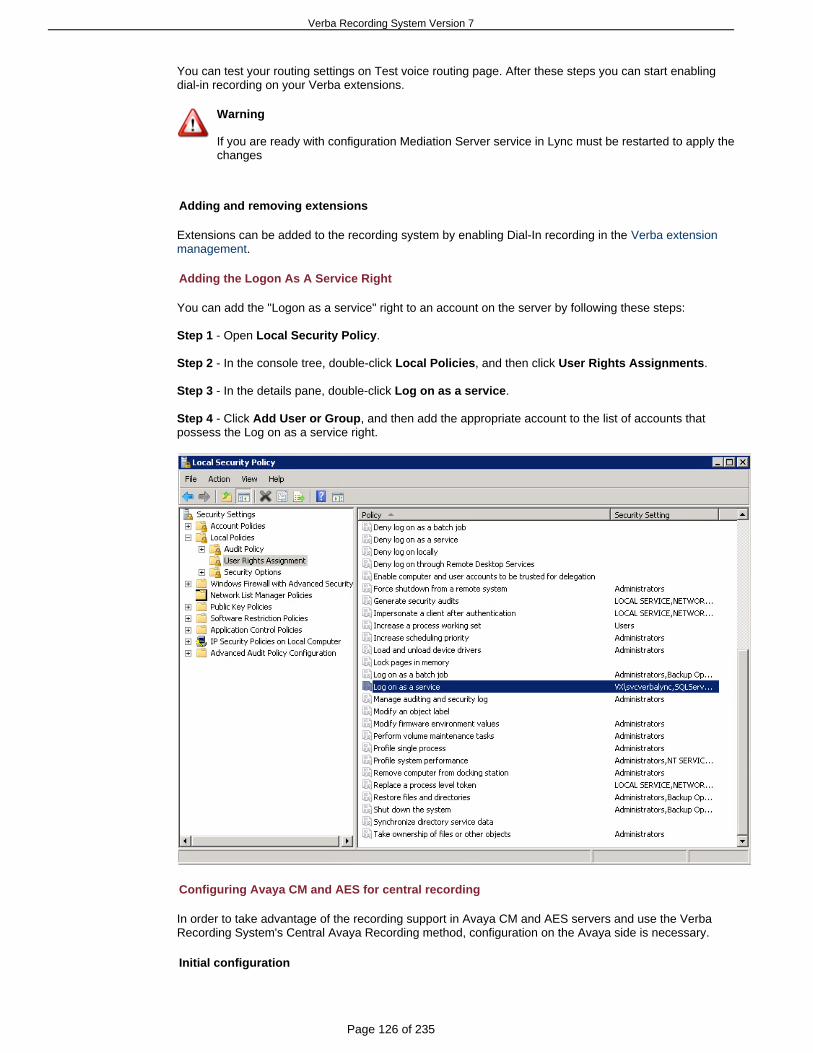
Verba Recording System Version 7
Page 126 of 235
You can test your routing settings on Test voice routing page. After these steps you can start enablingdial-in recording on your Verba extensions.
Warning
If you are ready with configuration Mediation Server service in Lync must be restarted to apply thechanges
Adding and removing extensions
Extensions can be added to the recording system by enabling Dial-In recording in the Verba extension.management
Adding the Logon As A Service Right
You can add the "Logon as a service" right to an account on the server by following these steps:
Step 1 - Open .Local Security Policy
Step 2 - In the console tree, double-click , and then click .Local Policies User Rights Assignments
Step 3 - In the details pane, double-click .Log on as a service
Step 4 - Click , and then add the appropriate account to the list of accounts thatAdd User or Grouppossess the Log on as a service right.
Configuring Avaya CM and AES for central recording
In order to take advantage of the recording support in Avaya CM and AES servers and use the VerbaRecording System's Central Avaya Recording method, configuration on the Avaya side is necessary.
Initial configuration

Verba Recording System Version 7
Page 127 of 235
The inital Avaya configuration for central recording includes the following steps:
Step 1 - Configure Avaya CM for recording
Step 2 - Configure Avaya AES for recording
Step 3 - Verify Avaya CM and AES recording configuration
After these steps you can start adding extensions.
Warning
When you use Avaya-based central recording, the Verba system can record only those extensionsthat are properly configured on the Avaya side. It is not enough to add extensions in the VerbaRecording System.
Configure Avaya AES for recording
The Avaya Application Enablement Services (AES) server enables Computer Telephony Interface (CTI)applications to control and monitor telephony resources on Avaya Communication Manager. The AvayaApplication Enablement Services (AES) server receives requests from CTI applications, and forwards themto Avaya Communication Manager. Conversely, the Avaya Application Enablement Services (AES) serverreceives responses and events from Avaya Communication Manager and forwards them to the appropriateCTI applications.
This section assumes that installation and basic administration of the Avaya Application EnablementServices server has been performed. The steps in this section describe the configuration of a SwitchConnection, a CTI user, a CMAPI port, and creating a CTI link for TSAPI.
Configuring switch connection
Follow the steps below to configure Avaya CM and AES connection.
Step 1 Launch a web browser, enter https://IP_address_of_AES_server:8443/MVAP in the addressfield, and log in with the appropriate credentials for accessing the AES CTI OAM pages.
Step 2 Select the link from the left pane of the screen.CTI OAM Administration
Step 3 Click on in the left pane to invoke the Administration / Switch Connections Switch page. A Switch Connection defines a connection between the Avaya AES and AvayaConnections
Communication Manager. Enter a descriptive name for the switch connection and click on Add.Connection
Step 4 The next window that appears prompts for the Switch Connection password. Enter the samepassword that was administered in Avaya Communication Manager. Default values may be used inthe remaining fields. Click on .Apply
Step 5 After returning to the Switch Connections page, select the radio button corresponding to theswitch connection added previously, and click on .Edit CLAN IPs
Step 6 Enter the CLAN-AES IP address which was configured for AES connectivity and click on Add. Repeat this step as necessary to add other C-LAN boards enabled with ApplicationName or IP
Enablement Services.
Configuring the CTI user
The steps in this section describe the configuration of a CTI user.
Step 1 Launch a web browser, enter https://IP_address_of_AES_server:8443/MVAP in the URL, andlog in with the appropriate credentials to access the relevant administration pages.
Verba Recording System Version 7
Page 128 of 235
Step 2 The Welcome to OAM page is displayed next. Select from the left pane.User Management
Step 3 From the Welcome to User Management page, navigate to the User Management / Add Userpage to add a CTI user.
Step 4 On the Add User page, provide the following information: User Id, Common Name, Surname,User Password, Confirm Password. The above information (User ID and User Password) must matchwith the information configured in Verba. Select using the drop down menu on the CT User field.YesThis enables the user as a CTI user. Click the button at the bottom of the screen to complete Applythe process. Default values may be used in the remaining fields.
Step 5 Once the user is created, select in upper right and navigate to the OAM Home CTI OAM page. Select the User ID createdAdministration / Security Database / CTI Users / List All Users
previously, and click the button to set the permission of the user.Edit
Step 6 Provide the user with unrestricted access privileges by clicking the button on theEnable Unrestricted Access field. Click the button.Apply Changes
Step 7 Navigate to the page to set the DMCC server CTI OAM Home -> Administration -> Portsport. The following screen displays the default port values. Set the Unencrypted Port field to .EnabledClick the button at the bottom of the screen to complete the process. Default values Apply Changesmay be used in the remaining fields.
Configuring the TSAPI CTI link
Step 1 Navigate to the OAM Home -> CTI OAM Admin / Administration / CTI Link Admin / TSAPI page to set the . Click on .Links TSAPI CTI Link Add Link
Step 2 Select a Switch Connection using the drop down menu configured in Avaya CommunicationManager. Select the using the drop down menu. Switch CTI Link Number Switch CTI Link Number should match with the number configured in the cti-link form in Avaya Communication Manager. Clickthe button. Default values may be used in the remaining fields. Apply Changes
Configure Avaya CM for recording
This section provides the procedures for configuring an ip-codec-set and ip-network region, a switchconnection and Computer Telephony Integration (CTI) links, recorded/monitored stations on AvayaCommunication Manager. All the configuration changes in Avaya Communication Manager are performedthrough the System Access Terminal (SAT) interface.
Codec configuration
Enter the command, where is a number between 1 and 7, inclusive. Select t as thechange ip-codec-set t tappropriate codec set for the ip-network-region used by the recorded stations.
Configuring IP network regions
In most cases a C-LAN board dedicated for H.323 endpoint registration is assigned to IP network region 1.One consequence of assigning the aforementioned IP telephones, IP Softphones, and MedPro boards to acommon IP network region is that the RTP traffic between them is governed by the same codec set. Thesecond C-LAN board (CLAN-AES), which is dedicated for the AES server is assigned to network region 2.
Configuring switch connection and CTI links between Avaya CM and Avaya AES
The Avaya AES server forwards CTI requests, responses, and events between Verba and AvayaCommunication Manager. The AES server communicates with Avaya Communication Manager over aswitch connection link. Within the switch connection link, CTI links may be configured to provide CTIservices to CTI applications such as Verba. The following steps demonstrate the configuration of the AvayaCommunication Manager side of the switch connection and CTI links. See the topics below for the details ofconfiguring the AES side of the switch connection and CTI links.
Step 1 Enter the add command, where is a number between 1 and 64, inclusive. Enter acti-link m mvalid extension under the provisioned dial plan in Avaya Communication Manager, set the fieldTypeto , and assign a descriptive to the CTI link. ADJ-IP Name
Verba Recording System Version 7
Page 129 of 235
Step 2 Enter the command. In most cases the CLAN IP address is utilizedchange node-names ipfor registering H.323 endpoint (Avaya IP Telephones and IP Softphones, and AES Device, Media andCall Control API stations) and the CLAN-AES IP address is used for connectivity to Avaya AES.
Step 3 Enter the command. On , configure the Service Type field to change ip-services Page 1 and the Enabled field to . The Local Node field should be pointed to the boardAESVCS y CLAN-AES
that was configured previously in the IP NODE NAMES form in this section.
Step 4 On , enter the hostname of the AES server for the AE Services Server field. The serverPage 4name may be obtained by logging in to the AES server using ssh, and running the command uname a. Enter an alphanumeric password for the field. Set the field to . The samePassword Enabled ypassword will be configured on the AES server.
Configuring recorded (monitored) stations
Step 1 Enter the command, where is an extension valid in the provisioned dial plan.add station s s
Step 2 On of the STATION form, set the field to an IP telephone set type, enter aPage 1 Typedescriptive , specify the (this code will be configured in the Verba RecordingName Security CodeSystem as well for each recorded station), and make sure that the field is set to .IP Softphone y
Allowing H.323 endpoints for IP Interfaces
Step 1 Enter the command and set to for the CLANchange ip-interface Allow H.323 Enpoints? ythat is set up in the in the Verba Recording System configurationAvaya Connection Settingsoptions.
Verify Avaya CM and AES recording configuration
This section provides the tests that can be performed to verify proper configuration of AvayaCommunication Manager and Avaya AES.
Verify Avaya Communication Manager
Step 1 Verify the status of the administered AES link by using the command.status aesvcs link
Step 2 Verify the Service State field of the administered TSAPI CTI link is in established state, byusing the command.status aesvcs cti-link
Verify Avaya Application Enablement Services
Step 1 From the CTI OAM Admin web pages, verify the status of the TSAPI and DMCC Services areONLINE, by selecting from the left pane. Status and Control / Services Summary
Configuring Broadworks platform for SIPREC based call recording
In order to use the Broadsoft SIPREC interface configuration of PBX is required.
Application Server Provisioning Steps
Step 1 - Activate the service feature as follows:
AS_CLI/System/ActivatableFeature> activate 46941
Feature details:
Activatable Feature ID: 46941.
Activatable Feature Name: Call Recording.
Dependencies: FR 140637 “Enable CDR schema version R17 SP4 for Activatable Features”.
Step 2 - Add call recording platform:
Verba Recording System Version 7
Page 130 of 235
AS_CLI/Service/CallRecording/add [name] [netAddress] [port] [transportType] [mediaStream]description [description label]
name The name of the recording platform. ( 1-80 characters)
netAddress This is the FQDN, host, or IP address of the recording platform.
port This is the address port of the recording platform. ( Integer 1 to 65535 ).
transportType This is the SIP interface type (“UDP”, “TCP”, “Unspecified”).
mediaStream This is the type of media stream defined either as “dual” or “single” stream.
description value This is the description of this recording platform.
Example:
AS_CLI/Service/CallRecording> add platformA RD_FQDN 5065 TCP dual descriptionRecordingDeviceFQDN
...Done
Step 3 - Set the Default Call Recording Platform
AS_CLI/Service/CallRecording/set [name] systemDefault true
Warning
Check firewall rules and allow connection between recorders and Broadsoft platform.You can check/control SIP and RTP listening address range in recorder configurationEnsure Verba Dial-in Recorder server is listening on the provisioned address. Werecommend using static IP and referencing the recorder by IP instead of NETBIOS/DNSname
BroadWorks Call Recording Service Administration Configuration
The following menus have been modified to add links to the new BroadWorks Recording Services page:
ServiceProvider/Enterprise Resources Services
Group Resources Services
User Call Control
The following pages have been added to support the new BroadWorks Call Recording service:
Service Provider/Enterprise Utilities Feature Access Codes
Group Utilities Feature Access Codes
User Call Control BroadWorks Call Recording (administrator view)
User Call Control BroadWorks Call Recording (user view)
Step 1 - Under enable Call Recording and setService Provider/EnterPrise/Resources/Servicesappropriate limitation. This will authorize call recording service for provider/enterprise
Verba Recording System Version 7
Page 131 of 235
1. 2.
3.
Step 2 - Under set appropriate FACService Provider/EnterPrise/Utilities/Feature Access Codesfor on demand call keep/record command
Step 3 - Under enable Call Recording and set appropriate limitation forGroup/Resources/Servicesthe intended group. This will authorize call recording service at group level if service is authorized forthe provider/enterprise to which it belongs
Step 4 - Under set appropriate FAC for on demand callGroup/Utilities/Feature Access Codeskeep/record command. You can configure this at group level as well.
Step 5 - Under select the previously provisioned callGroup/Resources/Call Recording Platformrecording platform
Step 6 - Under add Call Recording service to the userUser/Profile/Assign Services
Step 7 - Under select the desired call recording modeUser/Call Control/Call Recording
Configuring Polycom RMX for conference recording
Overview
Verba Dial-in Recorder service is able to record video conference calls automatically via recorder linkinterface. For this to work, the Verba recorder must be provisioned via RMX configuration.
OverviewSupported call scenariosVerba configuration stepsConfiguration stepsRecording link encryption
Supported call scenarios
This solution supports the following scenarios:
all Polycom "conference room" calls on RMX bridgethe recorded "conferences rooms" can be joined with H.323 and SIP both unencrypted andencrypted modespeer-to-peer calls are not forced to go through the RMX bridge, therefore peer-to-peer calls are not
in this scenariorecorded
Verba configuration steps
Please follow the configuration steps in .Configuring the Verba Dial-in Recorder Service
Warning
Additionally to the steps in the above configuration guide, also enable and"Open recording lines"set the parameter to in the Verba Dial-in"Recorder emulation mode" Basic Video EndpointRecorder Configuration.
Configuration steps
Step 1 - Create Recorder link
To define a Recording Link: in the RMX Management pane, click Recording Links,in the Recording Links list, click the New Recording Link button.
Select SIP as controling protocolEnter the IP address of the recorder
Enter a SIP uri pointing to the recorder
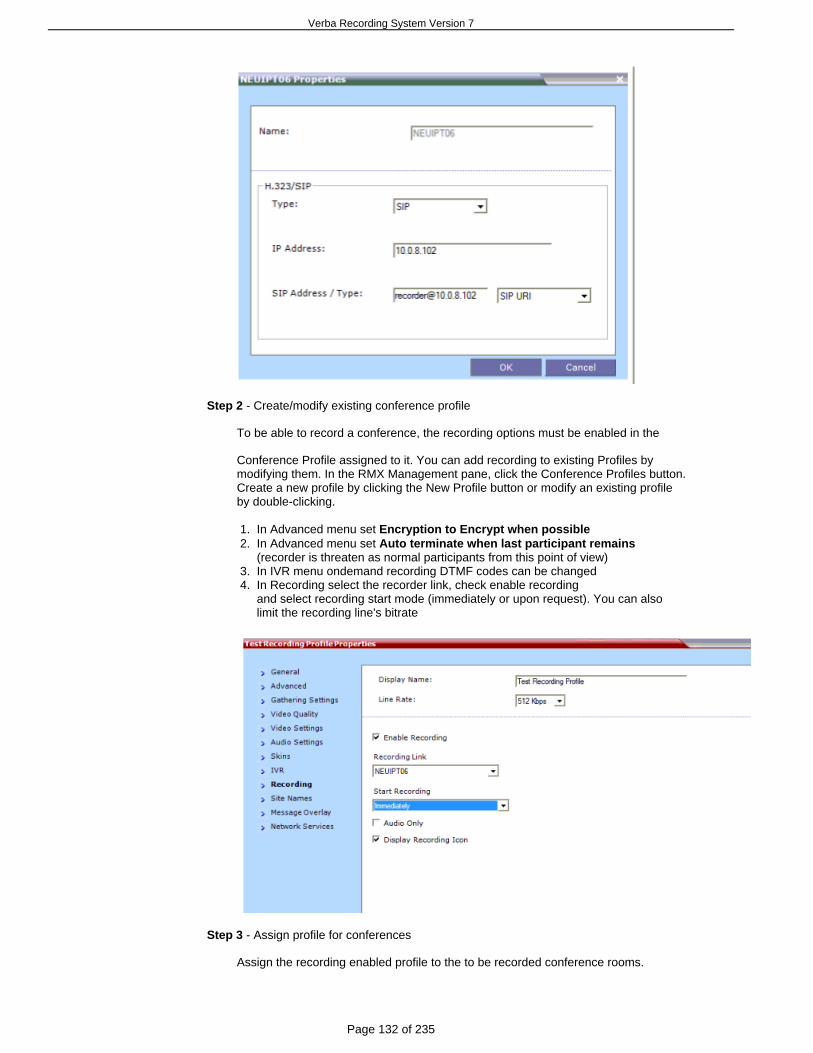
Verba Recording System Version 7
Page 132 of 235
1. 2.
3. 4.
Step 2 - Create/modify existing conference profile
To be able to record a conference, the recording options must be enabled in the
Conference Profile assigned to it. You can add recording to existing Profiles by modifying them. In the RMX Management pane, click the Conference Profiles button.Create a new profile by clicking the New Profile button or modify an existing profileby double-clicking.
In Advanced menu set Encryption to Encrypt when possibleIn Advanced menu set Auto terminate when last participant remains(recorder is threaten as normal participants from this point of view)In IVR menu ondemand recording DTMF codes can be changedIn Recording select the recorder link, check enable recordingand select recording start mode (immediately or upon request). You can alsolimit the recording line's bitrate
Step 3 - Assign profile for conferences
Assign the recording enabled profile to the to be recorded conference rooms.

Verba Recording System Version 7
Page 133 of 235
Recording link encryption
According to Polycom documentation the recording link can be encrypted when recording an encryptedconference, this requires H.323 recorder signaling. Since Verba supports only SIP, the recording link cannotbe encrypted, but still it is possible to record an encrypted conference. To achieve this system flag
must be set to . Recording LinkALLOW_NON_ENCRYPT_RECORDING_LINK_IN_ENCRYPT_CONF YESEncryption Flag Setting Recording Links are treated as regular participants, however if theALLOW_NON_ENCRYPT_RECORDING_LINK_IN_ENCRYPT_CONF System Flag is set to YES anon-encrypted Recording Link is to be allowed to connect to an encrypted conference.
For more information you can read the Polycom® RealPresence® Collaboration Server (RMX)1500/2000/4000 Administrator’s Guide: Recording Conferences chapter.
Upgrade procedure from Carin recorders
The Carin - Verba upgrade procedure consists of three essential steps.
Making a backup of the existing Carin installationRemoving the existing Carin installationInstalling and configuring Verba Recording System and restoring from backup
Making a backup of the existing Carin installation
Step 1 - Launch from Start - Run..., Navigate to Registry backup regedit, right click on and choose ExportHKEY_LOCAL_MACHINE/SOFTWARE Carin
Step 2 - After the registry backup is done, close regedit, open a file manager, navigateMedia backupto the Carin media folder (by default it is ) and backup all files andC:\Program Files\Carin\mediadirectories
Verba Recording System Version 7
Page 134 of 235
Step 3 - After the media file copying procedure is finished, open Database backup Microsoft SQL, connect to the database engine, right click on the database named ,Management Studio carin
select and choose .Tasks Detach...Navigate the file manager to the Microsoft SQL Server Data directory (default: C:\Program
) and backup the database file.Files\Microsoft SQL Server\MSSQL.1\MSSQL\Data carin.mdf
Removing the existing Carin installation
Before starting the uninstallation procedure, please make sure that you have completed the steps in theprevious part, and you have a valid backup of the registry values, the media files and the database.
Step 1 Launch from , select and choose Add or Remove Programs Control Panel Carin Uninstall
Step 2 Make sure you backed up the media files from this directory before! Start a file manager,navigate to (assuming default installation path) and delete the directory.C:\Program Files Carin
Warning
Make sure you have read and done everyting in the part,Making backups of existing installationand also have valid backups of , and .registry data database media files
Verba Technologies take responsibility for any data loss occuring during self-madedoes notupgrade.
Installing and configuring Verba Recording System and restoring from backup
In order to install the new Verba Recording System, please see . Installation OverviewAfter the regular installation procedure is finished, please follow these steps to restore the backups. TheSQL script files mentioned in this topic can be located and downloaded from the Verba TechnologiesPortal's Support site
Step 1 Open and launch Control Panel, Administrative Tools Services
Step 2 Select all running services and stop them one by oneVerba
Step 3 Start and connect to the database serverMicrosoft SQL Management Studio
Step 4 Right click on the database named , select and choose verba Tasks Detach...
Step 5 Attach the database from the backup, by right clicking on , and selecting carin DatabasesAttach...
Step 6 After the attachment is finished, rename the database to , or run carin verbarename-database.sql
Step 7 Execute the SQL script .update-from-carin.sql
Note
This procedure can take several hours, depending on the database size and record count.
Step 8 Execute update.sql
Step 9 After the update script has stopped, start the previously stopped Verba services in Services
Step 10 Configure the Verba Recording System and the Verba services via the .Web Interface
Step 11 Copy the media files from the backup to (assuming defaultC:\Program Files\Verba\mediainstallation path)

Verba Recording System Version 7
Page 135 of 235
Warning
After these steps are completed, password stored in the system, including the databaseeveryconnection's password has to be re-entered, and saved!
Verba Remote Installation Service Description
This document describes how Verba Technologies will help you with your software installations when youare ordering installation services.
The purpose of this document is to outline the information needed and tasks to be completed during theInstallation services for the Verba Recording System product line. Since this installation will be conductedby Verba Technologies personnel from an off-site location (in order to reduce installation fees andexpenses) Remote Desktop software will be utilized to complete these tasks. Verba Technologies uses theservices of LogMeIn, a web based remote desktop support service. Verba Technologies can supportadditional forms of remote desktop or temporary VPN access at the client’s request.
Verba Technologies respects your confidentiality and acknowledges the trust bestowed when 3rd partyvendors access your network, and will only use this connection to fulfill the installation requirements of theClient. For further information on Verba Technologies’ remote support services please see: http://www.verba.com/group/support/service-description
About the information below:
Information to be collected before installationClient’s Responsibilities
Pre-installation tasksInstallation TasksPost Installation Tasks
Verba Technologies’ ResponsibilitiesPre-InstallationInstallation TasksPost Installation Tasks
Information to be collected before installation
To complete the installation the Verba Technologies support engineer will need the following informationfrom the client, prior to scheduling the installation.
Verba Server Hardware/Software information
CPU type:RAM size:HDD size/drives:Operating System:IP Address:Hostname:
Cisco UCM Admin information:
Version:IP/Hostname:Administrator user:Administrator password: (can be kept confidential and entered by Client)
Gateway information:
Gateway Model(s):IP address(es):Cisco Switch Model(s):Cisco IP Phone Models:

Verba Recording System Version 7
Page 136 of 235
Verba Installation/Configuration settings
Log File location:Database File location:Media File location:Outgoing SMTP Server:Email account for system alerts:SNMP server:Type of Recording Method: (Passive or Central)
Client’s Responsibilities
Pre-installation tasks
Verba Server is ready (hardware is configured and Operating System installed) and can beaccessed via the internet or via a remote desktop from a computer with internet accessProvide installation information to Verba (see above)Configure Monitor Session/SPAN port to capture traffic from the applicable VLAN/switchesProvide list of users and extensions/directory numbers Provide User/Group mapping and which users are Group Supervisors and/or Group Administrators(All users are members of the default group when created)Download the installation files and put them onto the server computer (provide location informationto Verba if different from C:\Downloads\)
Installation Tasks
Have a knowledgeable IT person responsible for this implementation who is available during theagreed upon days/timesAccess the Verba Support website to initiate a Remote Desktop Session ( -http://support.verba.comlogin required)The computer to be controlled needs to have access to: (Verba server or Desktop)
Remotely control the serverThe internetThe Cisco UCM Administration webpage
Post Installation Tasks
Complete and sign user acceptance testing script from a PC (other than the Verba Server) andreturn to VerbaConfigure Additional Users, Groups, Extensions as neededConfigure Additional IP Phones for XML Service access as neededConfigure SQL Server and Media file backup schedule and archiving schedule as desired
Verba Technologies’ Responsibilities
Pre-Installation
Set time/date for Remote Desktop Support SessionSend client server requirement information and other information neededMake installation files available to client (secured web access) to download
Installation Tasks
Install Prerequisite items: Java, .NET etc.Install and configure SQL Server databaseInstall and configure Verba Server ComponentsInstall and configure the Verba Node ManagerValidate initial settings and database connectivityValidate SPAN port data captureConfigure Users and user privilegesConfigure User to Extension mapping with recording modeConfigure User to Group mapping with privileges
Post Installation Tasks

Verba Recording System Version 7
Page 137 of 235
Configure Cisco UCM phone service for Verba phone service users (Optional)Configure Email/SNMP Alerts for basic system monitoringKnowledge transfer: Walk through basic user navigationKnowledge transfer: Walk through basic system administration and node managerProvide Client with Product Support Online access account information
Verba Recording System Version 7
Page 138 of 235
Configure
Configuring your Verba Recording System
The Verba Recording System needs configuration both in your network and in the system itself.
Your Verba Recording System comes with an advanced web-based solution that letsCentral Configurationyou:
configure all your server and desktop recorders from a single web interfaceautomatically push configuration to all local and remote componentskeep track all configuration changes for auditing purposes
You can access the Central configuration solution with your administrator account under Administration /.Verba Servers
Configuration steps:
Step 1 - Configure Your Network for RecordingStep 2 - Configure basic Verba settingsStep 3 - Configure phone system specific Verba settingsStep 4 - Configure backupStep 5 - Configure other advanced featuresStep 6 - Configure access control
Step 1 - Configure Your Network for Recording
If you haven't already done that, configure your network and your phone system for recording.
You will find the guides for various phone systems in the topic.Network and PBX configuration
Step 2 - Configure basic Verba settings
After installation there are a couple of configuration steps to take, before your system becomes operational.
Here are quick configuration steps for different server roles you have selected during installation:
Page: Quick configuration of Media Repository server
Page: Quick configuration of single-site servers
Page: Quick configuration of Desktop Recorder component
Page: Quick configuration of Recording Server component
Step 3 - Configure phone system specific Verba settings
Different phone system and recording modes have require different settings in the Verba Recording System.You will find the corresponding parameters in the configuration tree of the Change Configuration settings tab of only if you have activated the corresponding services on the Administration / Verba Servers Service
.Activation tab
See detailed steps (available for select systems):
Page: Configuring Recording into Verba Secured Format
Page: Configuring the Verba Avaya Recorder Service
Page: Configuring the Verba Central Cisco Recorder
Page: Configuring the Verba IP Trade Recorder Service
Page: Configuring Verba for Lync Recording - OLD
Page: Configuring Verba for passive recording
Verba Recording System Version 7
Page 139 of 235
Here are the descriptions of the phone system specific parameters:
Page: Avaya recorder settings
Page: Central Cisco recorder settings
Page: Central Cisco silent monitoring settings
Page: Dial-in Recorder settings
Page: IP Trade Recorder settings
Page: Passive recorder settings
Step 4 - Configure backup
Warning
It is highly important that you . All otherproperly configure Backup of your Media Repositorycomponents can be reinstalled and reconfigured if your Media Repository is restored.
Step 5 - Configure other advanced features
Page: Configuring call direction detection
Page: Configuring the Cisco IP Phone Service
Page: SSO with Active Directory — The web application can authenticate users using Microsoft Windows domain authentication information.
Step 6 - Configure access control
In order to provide access control to the recordings, you have to setup phone numbers/extensions, usersand groups.
Page: Group List — Groups are essentially lists of Users. You can define Group supervisors who can see calls of Group members.
Page: User rights — Each user can have different rights in the system, that define what actions are available for the user.
Page: Extension details
Page: Privilege levels — Access control is defined through user privilege levels and detailed user rights.
Page: User List — Users represent people who can log in to the recording system. Users can belong to Groups and have associated Extensions.
Page: User Details
Page: Group Details — Groups are essentially lists of Users. You can define Group supervisors who can see calls of Group members.
Page: Extension list — Extensions are phone numbers configured with recording modes and user association (the basis of access control).
Settings Reference
Common settingsDatabase connection settingsDirectory settingsPassive recorder settingsCentral Cisco recorder settingsDial-in Recorder settings

Verba Recording System Version 7
Page 140 of 235
IP Trade Recorder settingsAvaya recorder settingsCentral Cisco silent monitoring settingsContinuity recorder settingsStorage management settingsWeb application settingsMonitoring settingsScreen capturing settings
Do you need installation help?
If you need any help with troubleshooting or configuration you can schedule a support session online bysubmitting a request at .http://support.verba.com
Scheduled installation and configuration support are available on between:weekdays
US EST: 8 AM - 2 PMUS PST: 8 AM - 12 PMEU CET: 9 AM - 3 PMME AST: 10 AM - 3 PMAsia HKT: 2 PM - 7 PM
Please provide us when you request a session.two 1-2 hour long possible time slots
Our team uses for remote sessions, but we can also use your solution if necessary.LogMeIn
Initial Configuration Steps
Quick configuration of single-site serversQuick configuration of Media Repository serverQuick configuration of Recording Server componentQuick configuration of Desktop Recorder component
Quick configuration of single-site servers
Please follow the guidelines below to quickly configure your Verba Recording System.
Step 1 After finishing the installation start Verba Web Application by pointing your browser tohttp://server_ip_address_or_hostname and login to the system by the administrator / Verba456+account. Do not forget to change this password after the first login.
Step 2 Navigate to the menu item and select the corresponding itemAdministration / Verba Serversfrom the list.
Step 3 On the tab activate the desired recording service(s).Service Control and Activation
Step 4 On the tab select the parameters and configureChange Configuration Settings Commonthem accordingly. For more information see .Common configuration
Step 5 On the tab select the parametersChange Configuration Settings Directory Configurationand configure them accordingly. For more information see .Directory configuration
Step 6 On the tab select the previously enabled recording serviceChange Configuration Settingsparameters and configure them accordingly.
Step 7 Save the configuration by clicking on the button.Save
Step 8 Follow the instruction of the web interface to apply all changes to the server and restart thecorresponding services.
Following the steps above, you will have a functioning Verba Recording System server with basicconfiguration, but in order to provide reliability for long-term usage you have to configure and consider thefollowings also:
Make sure that all kind of recommended tasks are executed for configuring the Windows operatingsystem (disable unnecessary services, set up time synchronization, disable Windows firewall and
Verba Recording System Version 7
Page 141 of 235
automatic updates, etc.). For further information see .Operating system configurationConfigure recurring database backup. For further information see Verba Operation and Maintenance
.GuideConfigure system monitoring parameters in order to provide self-correction capabilities and alertmessage sending features. For further information see .Monitoring configurationConfigure your recording system parameters through the Verba Web Application (Verba servers,recorded extensions, groups, users, etc.). For further information see .Verba Administration Guide
Quick configuration of Media Repository server
Please follow the guidelines below to quickly configure your Verba Recording System.
Step 1 After finishing the installation start Verba Web Application by pointing your browser tohttp://server_ip_address_or_hostname and login to the system by the administrator / Verba456+account. Do not forget to change this password after the first login.
Step 2 Navigate to the menu item and select the corresponding itemAdministration / Verba Serversfrom the list.
Step 3 On the tab activate the desired recording service(s).Service Control and Activation
Step 4 On the tab select the parameters and configureChange Configuration Settings Commonthem accordingly. For more information see .Common configuration
Step 5 On the tab select the parametersChange Configuration Settings Directory Configurationand configure them accordingly. For more information see .Directory configuration
Step 6 Save the configuration by clicking on the button.Save
Step 7 Follow the instruction of the web interface to apply all changes to the server and restart thecorresponding services.
Step 8 Install and configure Verba SFTP Server. For more information see Installing Verba SFTP.Server component
Following the steps above, you will have a functioning Verba Media Repository server with basicconfiguration, but in order to provide reliability for long-term usage you have to configure and consider thefollowings also:
Make sure that all kind of recommended tasks are executed for configuring the Windows operatingsystem (disable unnecessary services, set up time synchronization, disable Windows firewall andautomatic updates, etc.). For more information see .Operating system configurationConfigure recurring database backup. For more information see Verba Operation and Maintenance
.GuideConfigure system monitoring parameters in order to provide self-correction capabilities and alertmessage sending features. For more information see .Monitoring configurationConfigure your recording system parameters through the Verba Web Application (Verba servers,recorded extensions, groups, users, etc.). For more information see .Verba Administration Guide
Quick configuration of Recording Server component
Please follow the guidelines below to quickly configure your Verba Recording System.
Step 1 After finishing the installation start Verba Web Application by pointing your browser tohttp://server_ip_address_or_hostname and login to the system by the administrator / Verba456+account. Do not forget to change this password after the first login.
Step 2 Navigate to the menu item and select the corresponding itemAdministration / Verba Serversfrom the list. If you are planning to deploy more than one server with the same configuration, youmight want to consider using configuration templates. In that way, you do not have to configure eachcomputer separately.
Step 3 On the tab activate the desired recording service(s).Service Control and Activation
Step 4 On the tab select the parameters and configureChange Configuration Settings Commonthem accordingly. For more information see .Common configuration

Verba Recording System Version 7
Page 142 of 235
Step 5 On the tab select the parametersChange Configuration Settings Directory Configurationand configure them accordingly. For more information see .Directory configuration
Step 6 On the tab select the previously enabled recording serviceChange Configuration Settingsparameters and configure them accordingly.
Step 7 On the tab select Change Configuration Settings Storage Management Configuration / parameters and configure them accordingly. For more information see Upload settings Storage
.management configuration
Step 8 Save the configuration by clicking on the button.Save
Step 9 Follow the instruction of the web interface to apply all changes to the server and restart thecorresponding services.
Following the steps above, you will have a functioning Verba Recording Server with basic configuration, butin order to provide reliability for long-term usage you have to configure and consider the followings also:
Make sure that all kind of recommended tasks are executed for configuring the Windows operatingsystem (disable unnecessary services, set up time synchronization, disable Windows firewall andautomatic updates, etc.). For further information see .Operating system configurationConfigure system monitoring parameters in order to provide self-correction capabilities and alertmessage sending features. For further information see .Monitoring configurationMake sure that the Verba SFTP Server is installed and configured on the Media Repository server,so the recordings can be uploaded. For further information, see Installing Verba SFTP Server
.component
Quick configuration of Desktop Recorder component
Please follow the guidelines below to quickly configure your Verba Desktop Recorder component installedon the users' desktop computer.
Step 1 After finishing the installation start Verba Web Application by pointing your browser tohttp://server_ip_address_or_hostname and login to the system by the administrator / Verba456+account. Do not forget to change this password after the first login.
Step 2 Navigate to the menu item and select the corresponding itemAdministration / Verba Serversfrom the list. If you are planning to deploy more than one computer with the same configuration, youmight want to consider using configuration templates. In that way, you do not have to configure eachcomputer separately.
Step 3 On the tab select the parametersChange Configuration Settings Directory Configurationand configure them accordingly. For further information see .Directory configuration
Step 4 On the tab select the Change Configuration Settings Screen Capturing Configurationparameters and configure them accordingly. For further information see Screen capturing
. Recorder engine's API address(es) must be set properly, the capture agent subscribesconfigurationfor call events on these addresses, call events triggers the screen capturing.
Step 5 On the tab select Change Configuration Settings Storage Management Configuration / parameters and configure them accordingly. For more information see Upload settings Storage
.management configuration
Step 6 Save the configuration by clicking on the button.Save
Step 7 Follow the instruction of the web interface to apply all changes to the computer and restart thecorresponding services.
Step 8 The screen capturing service requires the configuration of the recorded extension andassociation of that extension to a Verba user account. The Verba user ID has to match the login ID ofthe Windows user. For more information, see .Extension administration
Following the steps above, you will have a functioning Verba Desktop Recorder computer with basicconfiguration, but in order to provide reliability for long-term usage you have to configure and consider thefollowings also:

Verba Recording System Version 7
Page 143 of 235
Make sure that Windows Firewall is configured properly. For further information about the portnumber used by the system, see .Firewall configuration, port usageMake sure that anti virus applications are configured properly. For further information, see Anti-Virus
.software settingsMake sure that the Verba Screen Capture Multiplexer service, which merges the screen capturevideo files with their audio counterparts is enabled and configured properly on the Media Repositoryserver. For further information, see .Screen capturing configuration
Configuration reference
Accessing the configuration settings
Please follow the guidelines below to quickly configure your Verba Recording System.
Step 1 - Pointing your browser to and login to the system byhttp://server_ip_address_or_hostnamean account with user right.System administrator
Step 2 - Navigate to the menu item and select the correspondingAdministration / Verba Serversitem from the list.
Step 3 - Click on the tab.Change Configuration Settings
Step 4 - After making your changes clicking on the button.Save
Step 5 - Follow the instruction of the web interface to apply all changes to the server and restart thecorresponding services.
Note
Settings of a feature are shown on the Change Configuration Setting tab when only if the on the tab.corresponding service is activated Service Control and Activation
Configuration settings
Common settingsDatabase connection settingsDirectory settingsPassive recorder settingsCentral Cisco recorder settingsDial-in Recorder settingsIP Trade Recorder settingsAvaya recorder settingsCentral Cisco silent monitoring settingsContinuity recorder settingsStorage management settingsWeb application settingsMonitoring settingsScreen capturing settings
Common settings
System Settings
The following table provides detailed instructions on each configuration setting:
ConfigurationParameterName
Description

Verba Recording System Version 7
Page 144 of 235
Server IPAddress
IP address of the server. This setting is used to define the proper network interface touse by various Verba Recording System components on the network. This IP addressshould be accessible by other components of the system in the network. If this settingis not configured, certain services may not start at all.
Recording settings
The following table provides detailed instructions on each configuration setting:
ConfigurationParameterName
Description
Gateway IPAddresses
IP addresses of telephony gateways. If no gateways are defined the system will recordcalls, but can not determine if the call is in- or outbound. This setting also affects theconfiguration of recording only selected call directions. By default all calls are markedas internal calls.
Database connection settings
The following table provides detailed instructions on each configuration setting:
ConfigurationParameter Name
Description
Database Hostname Hostname or IP address of the SQL Server used by various VerbaRecording System components.
Database Login SQL Server user name for database login. This login must have full accessto the SQL Server.
Database Password SQL Server database user password for database login.
Directory settings
The following table provides detailed instructions on each configuration setting:
ConfigurationParameterName
Description
Media Folder Folder where media files of recorded calls will be saved. Network drives are notsupported, because of reliability and performance issues, so please do not use mappednetwork drives or UNC network drives, use only local folders. Use the browse button toselect the proper folder.
Log Folder The log folder for Verba Recording System applications. Network drives are notsupported, because of reliability and performance issues, so please do not use mappednetwork drives or UNC network drives, use only local folders. Use the browse button toselect the proper folder.
ApplicationFolder
The home folder for Verba Recording System applications. DO NOT CHANGE it,unless you explicitly told to do so. Use the browse button to select the proper folder.
TemporaryFolder
The temporary folder for Verba Recording System applications. Network drives are notsupported, because of reliability and performance issues, so please do not use mappednetwork drives or UNC network drives, use only local folders. Use the browse button toselect the proper folder.
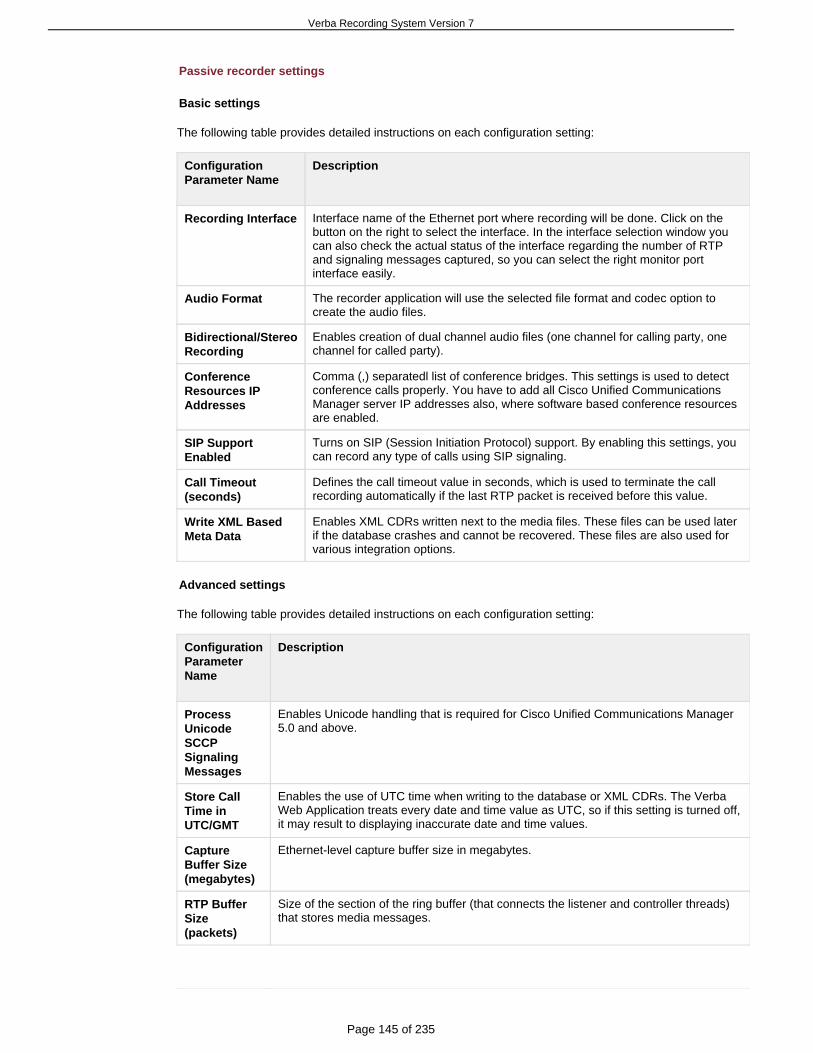
Verba Recording System Version 7
Page 145 of 235
Passive recorder settings
Basic settings
The following table provides detailed instructions on each configuration setting:
ConfigurationParameter Name
Description
Recording Interface Interface name of the Ethernet port where recording will be done. Click on thebutton on the right to select the interface. In the interface selection window youcan also check the actual status of the interface regarding the number of RTPand signaling messages captured, so you can select the right monitor portinterface easily.
Audio Format The recorder application will use the selected file format and codec option tocreate the audio files.
Bidirectional/StereoRecording
Enables creation of dual channel audio files (one channel for calling party, onechannel for called party).
ConferenceResources IPAddresses
Comma (,) separatedl list of conference bridges. This settings is used to detectconference calls properly. You have to add all Cisco Unified CommunicationsManager server IP addresses also, where software based conference resourcesare enabled.
SIP SupportEnabled
Turns on SIP (Session Initiation Protocol) support. By enabling this settings, youcan record any type of calls using SIP signaling.
Call Timeout(seconds)
Defines the call timeout value in seconds, which is used to terminate the callrecording automatically if the last RTP packet is received before this value.
Write XML BasedMeta Data
Enables XML CDRs written next to the media files. These files can be used laterif the database crashes and cannot be recovered. These files are also used forvarious integration options.
Advanced settings
The following table provides detailed instructions on each configuration setting:
ConfigurationParameterName
Description
ProcessUnicodeSCCPSignalingMessages
Enables Unicode handling that is required for Cisco Unified Communications Manager5.0 and above.
Store CallTime inUTC/GMT
Enables the use of UTC time when writing to the database or XML CDRs. The VerbaWeb Application treats every date and time value as UTC, so if this setting is turned off,it may result to displaying inaccurate date and time values.
CaptureBuffer Size(megabytes)
Ethernet-level capture buffer size in megabytes.
RTP BufferSize(packets)
Size of the section of the ring buffer (that connects the listener and controller threads)that stores media messages.
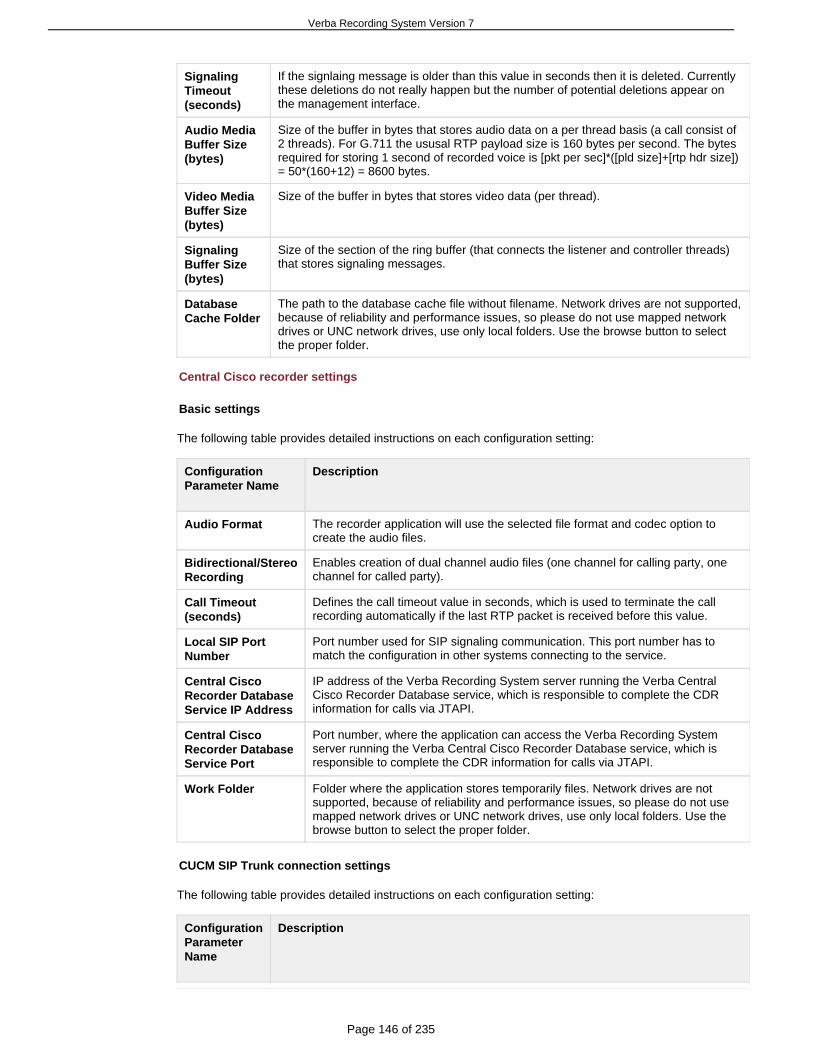
Verba Recording System Version 7
Page 146 of 235
SignalingTimeout(seconds)
If the signlaing message is older than this value in seconds then it is deleted. Currentlythese deletions do not really happen but the number of potential deletions appear onthe management interface.
Audio MediaBuffer Size(bytes)
Size of the buffer in bytes that stores audio data on a per thread basis (a call consist of2 threads). For G.711 the ususal RTP payload size is 160 bytes per second. The bytesrequired for storing 1 second of recorded voice is [pkt per sec]*([pld size]+[rtp hdr size])= 50*(160+12) = 8600 bytes.
Video MediaBuffer Size(bytes)
Size of the buffer in bytes that stores video data (per thread).
SignalingBuffer Size(bytes)
Size of the section of the ring buffer (that connects the listener and controller threads)that stores signaling messages.
DatabaseCache Folder
The path to the database cache file without filename. Network drives are not supported,because of reliability and performance issues, so please do not use mapped networkdrives or UNC network drives, use only local folders. Use the browse button to selectthe proper folder.
Central Cisco recorder settings
Basic settings
The following table provides detailed instructions on each configuration setting:
ConfigurationParameter Name
Description
Audio Format The recorder application will use the selected file format and codec option tocreate the audio files.
Bidirectional/StereoRecording
Enables creation of dual channel audio files (one channel for calling party, onechannel for called party).
Call Timeout(seconds)
Defines the call timeout value in seconds, which is used to terminate the callrecording automatically if the last RTP packet is received before this value.
Local SIP PortNumber
Port number used for SIP signaling communication. This port number has tomatch the configuration in other systems connecting to the service.
Central CiscoRecorder DatabaseService IP Address
IP address of the Verba Recording System server running the Verba CentralCisco Recorder Database service, which is responsible to complete the CDRinformation for calls via JTAPI.
Central CiscoRecorder DatabaseService Port
Port number, where the application can access the Verba Recording Systemserver running the Verba Central Cisco Recorder Database service, which isresponsible to complete the CDR information for calls via JTAPI.
Work Folder Folder where the application stores temporarily files. Network drives are notsupported, because of reliability and performance issues, so please do not usemapped network drives or UNC network drives, use only local folders. Use thebrowse button to select the proper folder.
CUCM SIP Trunk connection settings
The following table provides detailed instructions on each configuration setting:
ConfigurationParameterName
Description

Verba Recording System Version 7
Page 147 of 235
SIP TransportProtocol
SIP signaling transport protocol configured in Cisco Unified Communications Manager.Values can be TCP, UDP or TLS. TCP is recommended. Use TLS if encrypted callshave to be recorded.
CertificateAuthorityCertificateFile Path
Path to the Certificate Authority (CA) certificate file. Supported file format: X.509. If youdo not have this type of CA certificate, you can use your own, self-signed certificate; inthis case leave this setting empty. This certifiate file has to be uploaded to the CiscoUnified Communications Manager also.
RecorderCertificateFile Path
Path to the certificate file used by the recorder service to establish the SIP TLSconnection with the Cisco Unified Communications Manager. Supported file format:X.509. You can use your own, self-signed certificate. This certificate file has to beuploaded to the Cisco Unified Communications Manager also.
RecorderPrivate KeyFile Path
Path to the private key file used by the recorder service to establish the SIP TLSconnection with the Cisco Unified Communications Manager. Supported file format:X.509.
RecorderPrivate KeyFilePassword
Password for the private key file used by the recorder service to establish the SIP TLSconnection with the Cisco Unified Communications Manager.
Cisco UCM JTAPI connection settings
The following table provides detailed instructions on each configuration setting:
ConfigurationParameterName
Description
Cisco UCM IPAddresse(s)
Comma(,) separated list of Cisco Unified Communications Manager servers IPaddresses. The application will connect to these servers' JTAPI service provider toestablish the CTI connection.
JTAPI UserName
Login name of the user configured in Cisco Unified Communications Manager, whichallows to monitor the recorded phones via JTAPI.
JTAPI UserPassword
Password of the user configured in Cisco Unified Communications Manager, whichallows to monitor the recorded phones via JTAPI.
Advanced settings
The following table provides detailed instructions on each configuration setting:
ConfigurationParameter Name
Description
Automatic GainControl Enabled
If this setting is enabled, the application automatically controls the gain in theaudio file to provide more convenient user experiance while listening backrecordings.
Strip Domain fromSIP PhoneNumbers
If enabled, the system automatically strips the domain information from the SIPaddresses and leaves the phone number information only.
Dial-in Recorder settings
Basic settings
The following table provides detailed instructions on each configuration setting:
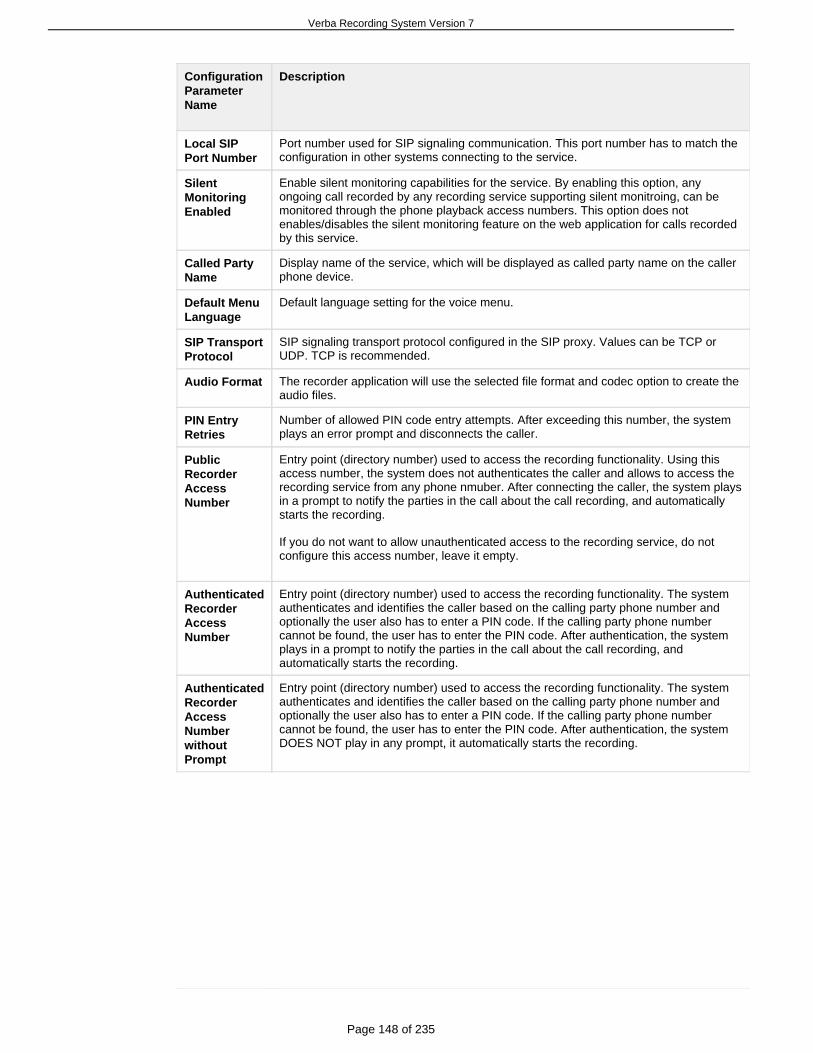
Verba Recording System Version 7
Page 148 of 235
ConfigurationParameterName
Description
Local SIPPort Number
Port number used for SIP signaling communication. This port number has to match theconfiguration in other systems connecting to the service.
SilentMonitoringEnabled
Enable silent monitoring capabilities for the service. By enabling this option, anyongoing call recorded by any recording service supporting silent monitroing, can bemonitored through the phone playback access numbers. This option does notenables/disables the silent monitoring feature on the web application for calls recordedby this service.
Called PartyName
Display name of the service, which will be displayed as called party name on the callerphone device.
Default MenuLanguage
Default language setting for the voice menu.
SIP TransportProtocol
SIP signaling transport protocol configured in the SIP proxy. Values can be TCP orUDP. TCP is recommended.
Audio Format The recorder application will use the selected file format and codec option to create theaudio files.
PIN EntryRetries
Number of allowed PIN code entry attempts. After exceeding this number, the systemplays an error prompt and disconnects the caller.
PublicRecorderAccessNumber
Entry point (directory number) used to access the recording functionality. Using thisaccess number, the system does not authenticates the caller and allows to access therecording service from any phone nmuber. After connecting the caller, the system playsin a prompt to notify the parties in the call about the call recording, and automaticallystarts the recording.
If you do not want to allow unauthenticated access to the recording service, do notconfigure this access number, leave it empty.
AuthenticatedRecorderAccessNumber
Entry point (directory number) used to access the recording functionality. The systemauthenticates and identifies the caller based on the calling party phone number andoptionally the user also has to enter a PIN code. If the calling party phone numbercannot be found, the user has to enter the PIN code. After authentication, the systemplays in a prompt to notify the parties in the call about the call recording, andautomatically starts the recording.
AuthenticatedRecorderAccessNumberwithoutPrompt
Entry point (directory number) used to access the recording functionality. The systemauthenticates and identifies the caller based on the calling party phone number andoptionally the user also has to enter a PIN code. If the calling party phone numbercannot be found, the user has to enter the PIN code. After authentication, the systemDOES NOT play in any prompt, it automatically starts the recording.

Verba Recording System Version 7
Page 149 of 235
AuthenticatedandUnauthorizedPlaybackAccessNumber
Entry point (directory number) used to access the playback functionality. The systemauthenticates and identifies the caller based on the calling party phone number andoptionally the user also has to enter a PIN code. If the calling party phone numbercannot be found, the user has to enter the PIN code. After authentication, the systemasks for a phone number, which is used to query the database and offer calls forplayback or silent monitoring. Silent monitoring is only available for the ongoing calls.
It is important to understand, that using this access number, the system does not checkany authorization to access certain calls or group membership right or information whileoffering calls for playback or silent monitoring. The system simple offers all calls. If youdo not want to offer unauthorized access to the calls, do not configure this accessnumber, leave it empty.
The playback functionality is available for all voice calls recorded by any recordinhservice. It is not limited to the calls recorded by the Dial-in recording service.
AuthenticatedandAuthorizedPlaybackAccessNumber
Entry point (directory number) used to access the playback functionality. The systemauthenticates and identifies the caller based on the calling party phone number andoptionally the user also has to enter a PIN code. If the calling party phone numbercannot be found, the user has to enter the PIN code. After authentication, the systemasks for a phone number, which is used to query the database and offer calls forplayback or silent monitoring. Silent monitoring is only available for the ongoing calls.
The system automatically checks the user authorization to access the calls and onlyoffers those calls for playback or silent monitoring, which are available for the userbased on her/his settings.
The playback functionality is available for all voice calls recorded by any recordingservice. It is not limited to the calls recorded by the Dial-in recording service.
Advanced settings
The following table provides detailed instructions on each configuration setting:
ConfigurationParameterName
Description
ProcessUnicodeNames
If enabled, the system treats the calling party names as unicode characters.
Store CallTime inUTC/GMT
Enables the use of UTC time when writing to the database or XML CDRs. The VerbaWeb Application treats every date and time value as UTC, so if this setting is turned off,it may result to displaying inaccurate date and time values.
Strip Domainfrom SIPPhoneNumbers
If enabled, the system automatically strips the domain information from the SIPaddresses and leaves the phone number information only.
Menu Timeout(seconds)
The system wait that long in seconds for a DTMF input from the user. If the timeoutexpires and the user did not enter any code, the system automatically disconnects thecall after a warning prompt.
Call Timeout(seconds)
Defines the call timeout value in seconds, which is used to terminate the call if thereinvite was not successful.
DatabaseCache Folder
The path to the database cache file without filename. Network drives are not supported,because of reliability and performance issues, so please do not use mapped networkdrives or UNC network drives, use only local folders. Use the browse button to selectthe proper folder.
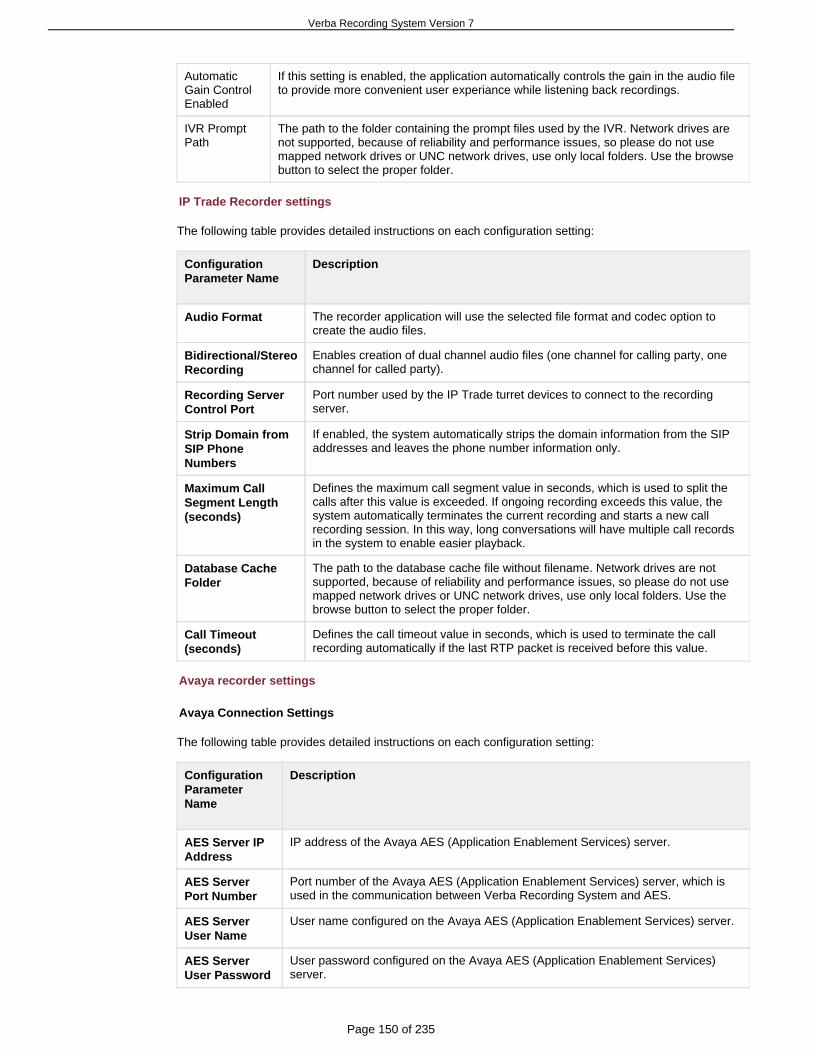
Verba Recording System Version 7
Page 150 of 235
AutomaticGain ControlEnabled
If this setting is enabled, the application automatically controls the gain in the audio fileto provide more convenient user experiance while listening back recordings.
IVR PromptPath
The path to the folder containing the prompt files used by the IVR. Network drives arenot supported, because of reliability and performance issues, so please do not usemapped network drives or UNC network drives, use only local folders. Use the browsebutton to select the proper folder.
IP Trade Recorder settings
The following table provides detailed instructions on each configuration setting:
ConfigurationParameter Name
Description
Audio Format The recorder application will use the selected file format and codec option tocreate the audio files.
Bidirectional/StereoRecording
Enables creation of dual channel audio files (one channel for calling party, onechannel for called party).
Recording ServerControl Port
Port number used by the IP Trade turret devices to connect to the recordingserver.
Strip Domain fromSIP PhoneNumbers
If enabled, the system automatically strips the domain information from the SIPaddresses and leaves the phone number information only.
Maximum CallSegment Length(seconds)
Defines the maximum call segment value in seconds, which is used to split thecalls after this value is exceeded. If ongoing recording exceeds this value, thesystem automatically terminates the current recording and starts a new callrecording session. In this way, long conversations will have multiple call recordsin the system to enable easier playback.
Database CacheFolder
The path to the database cache file without filename. Network drives are notsupported, because of reliability and performance issues, so please do not usemapped network drives or UNC network drives, use only local folders. Use thebrowse button to select the proper folder.
Call Timeout(seconds)
Defines the call timeout value in seconds, which is used to terminate the callrecording automatically if the last RTP packet is received before this value.
Avaya recorder settings
Avaya Connection Settings
The following table provides detailed instructions on each configuration setting:
ConfigurationParameterName
Description
AES Server IPAddress
IP address of the Avaya AES (Application Enablement Services) server.
AES ServerPort Number
Port number of the Avaya AES (Application Enablement Services) server, which isused in the communication between Verba Recording System and AES.
AES ServerUser Name
User name configured on the Avaya AES (Application Enablement Services) server.
AES ServerUser Password
User password configured on the Avaya AES (Application Enablement Services)server.
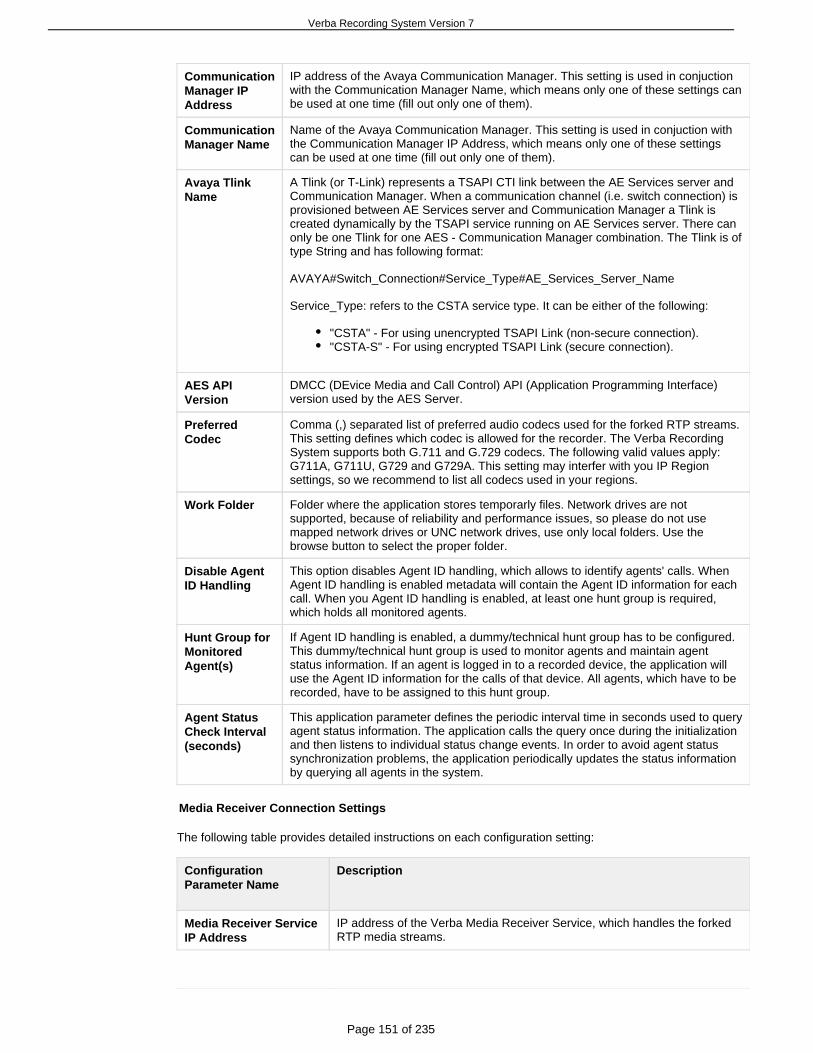
Verba Recording System Version 7
Page 151 of 235
CommunicationManager IPAddress
IP address of the Avaya Communication Manager. This setting is used in conjuctionwith the Communication Manager Name, which means only one of these settings canbe used at one time (fill out only one of them).
CommunicationManager Name
Name of the Avaya Communication Manager. This setting is used in conjuction withthe Communication Manager IP Address, which means only one of these settingscan be used at one time (fill out only one of them).
Avaya TlinkName
A Tlink (or T-Link) represents a TSAPI CTI link between the AE Services server andCommunication Manager. When a communication channel (i.e. switch connection) isprovisioned between AE Services server and Communication Manager a Tlink iscreated dynamically by the TSAPI service running on AE Services server. There canonly be one Tlink for one AES - Communication Manager combination. The Tlink is oftype String and has following format:
AVAYA#Switch_Connection#Service_Type#AE_Services_Server_Name
Service_Type: refers to the CSTA service type. It can be either of the following:
"CSTA" - For using unencrypted TSAPI Link (non-secure connection)."CSTA-S" - For using encrypted TSAPI Link (secure connection).
AES APIVersion
DMCC (DEvice Media and Call Control) API (Application Programming Interface)version used by the AES Server.
PreferredCodec
Comma (,) separated list of preferred audio codecs used for the forked RTP streams.This setting defines which codec is allowed for the recorder. The Verba RecordingSystem supports both G.711 and G.729 codecs. The following valid values apply:G711A, G711U, G729 and G729A. This setting may interfer with you IP Regionsettings, so we recommend to list all codecs used in your regions.
Work Folder Folder where the application stores temporarly files. Network drives are notsupported, because of reliability and performance issues, so please do not usemapped network drives or UNC network drives, use only local folders. Use thebrowse button to select the proper folder.
Disable AgentID Handling
This option disables Agent ID handling, which allows to identify agents' calls. WhenAgent ID handling is enabled metadata will contain the Agent ID information for eachcall. When you Agent ID handling is enabled, at least one hunt group is required,which holds all monitored agents.
Hunt Group forMonitoredAgent(s)
If Agent ID handling is enabled, a dummy/technical hunt group has to be configured.This dummy/technical hunt group is used to monitor agents and maintain agentstatus information. If an agent is logged in to a recorded device, the application willuse the Agent ID information for the calls of that device. All agents, which have to berecorded, have to be assigned to this hunt group.
Agent StatusCheck Interval(seconds)
This application parameter defines the periodic interval time in seconds used to queryagent status information. The application calls the query once during the initializationand then listens to individual status change events. In order to avoid agent statussynchronization problems, the application periodically updates the status informationby querying all agents in the system.
Media Receiver Connection Settings
The following table provides detailed instructions on each configuration setting:
ConfigurationParameter Name
Description
Media Receiver ServiceIP Address
IP address of the Verba Media Receiver Service, which handles the forkedRTP media streams.

Verba Recording System Version 7
Page 152 of 235
Media Receiver ServicePort Number
Port number used ot connect to the Verba Media Receiver Service, whichhandles the forked RTP media streams.
Media Receiver Settings
The following table provides detailed instructions on each configuration setting:
ConfigurationParameterName
Description
Audio Format The recorder application will use the selected file format and codec option to createthe audio files.
Call Timeout(seconds)
Defines the call timeout value in seconds, which is used to terminate the callrecording automatically if the last RTP packet is received before this value.
Automatic GainControlEnabled
If this setting is enabled, the application automatically controls the gain in the audiofile to provide more convenient user experience while listening back recordings.
Central Cisco silent monitoring settings
The following table provides detailed instructions on each configuration setting:
ConfigurationParameterName
Description
Cisco UCM IPAddresse(s)
Comma(,) separated list of Cisco Unified Communications Manager servers IPaddresses. The application will connect to these servers' JTAPI service provider toestablish the CTI connection.
JTAPI UserName
Login name of the user configured in Cisco Unified Communications Manager, whichallows to monitor the recorded phones via JTAPI.
JTAPI UserPassword
Password of the user configured in Cisco Unified Communications Manager, whichallows to monitor the recorded phones via JTAPI.
Play ToneSetting
Indicates whether the tone needs to be played to the target, to the caller, or both duringthe silent monitoring session.
Work Folder Folder where the application stores temporary files. Network drives are not supported,because of reliability and performance issues, so please do not use mapped networkdrives or UNC network drives, use only local folders. Use the browse button to selectthe correct folder.
Continuity recorder settings
The following table provides detailed instructions on each configuration setting:
ConfigurationParameterName
Description
CaptureFolder forRaw Traffic
The path to the folder used to store the capture files. Network drives are not supported,because of reliability and performance issues, so please do not use mapped networkdrives or UNC network drives, use only local folders. Use the browse button to selectthe proper folder.
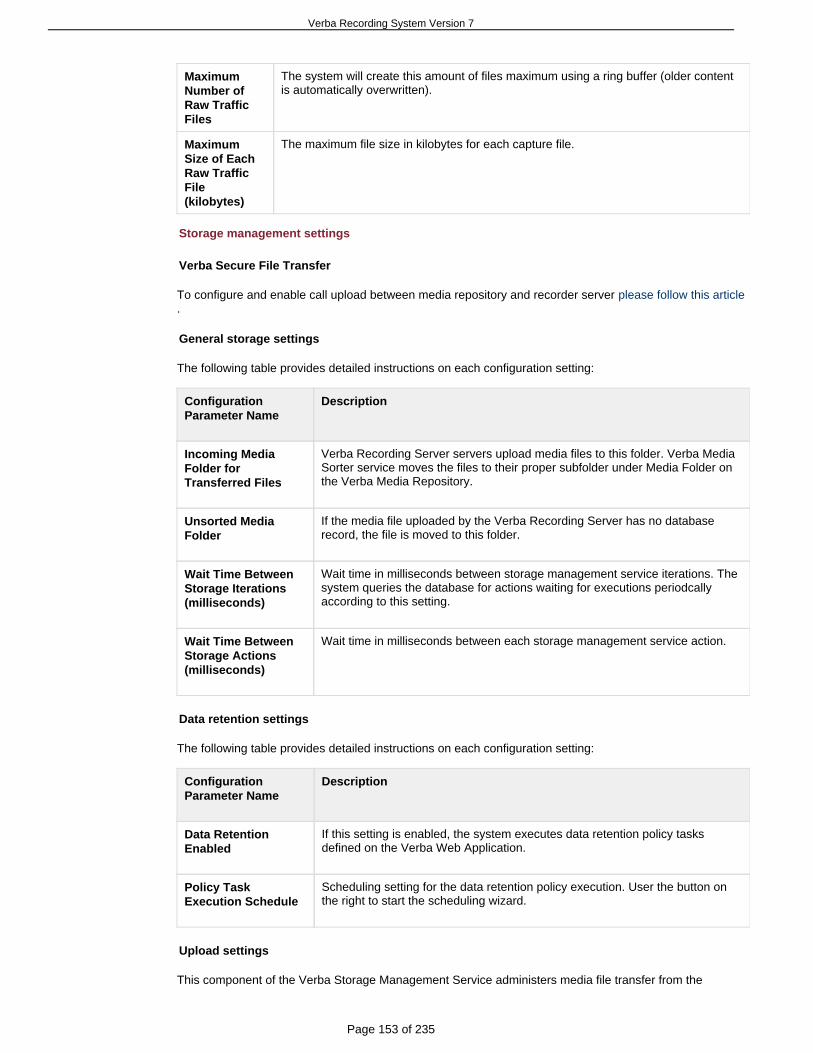
Verba Recording System Version 7
Page 153 of 235
MaximumNumber ofRaw TrafficFiles
The system will create this amount of files maximum using a ring buffer (older contentis automatically overwritten).
MaximumSize of EachRaw TrafficFile(kilobytes)
The maximum file size in kilobytes for each capture file.
Storage management settings
Verba Secure File Transfer
To configure and enable call upload between media repository and recorder server please follow this article.
General storage settings
The following table provides detailed instructions on each configuration setting:
ConfigurationParameter Name
Description
Incoming MediaFolder forTransferred Files
Verba Recording Server servers upload media files to this folder. Verba MediaSorter service moves the files to their proper subfolder under Media Folder onthe Verba Media Repository.
Unsorted MediaFolder
If the media file uploaded by the Verba Recording Server has no databaserecord, the file is moved to this folder.
Wait Time BetweenStorage Iterations(milliseconds)
Wait time in milliseconds between storage management service iterations. Thesystem queries the database for actions waiting for executions periodcallyaccording to this setting.
Wait Time BetweenStorage Actions(milliseconds)
Wait time in milliseconds between each storage management service action.
Data retention settings
The following table provides detailed instructions on each configuration setting:
ConfigurationParameter Name
Description
Data RetentionEnabled
If this setting is enabled, the system executes data retention policy tasksdefined on the Verba Web Application.
Policy TaskExecution Schedule
Scheduling setting for the data retention policy execution. User the button onthe right to start the scheduling wizard.
Upload settings
This component of the Verba Storage Management Service administers media file transfer from the

Verba Recording System Version 7
Page 154 of 235
Recording Server to the Media Repository. The transfer can utilize Verba Secure File Transfer protocol(new) or SSH based File Transfer Protocol (SCP) (legacy). This feature is only available on RecordingServers.
In order to use legacy SSH based File Transfer Protocol (SCP) the Verba SFTP Server has to be installedon a Verba Media Repository server. For further information on installing this component, see Installing the
. In Verba 6.0 this is obsolated and built-in Verba Secure File Transfer protocol isVerba SFTP Serverrecommended, see Configuring Verba Secure File Transfer
The following table provides detailed instructions on each configuration setting:
ConfigurationParameterName
Description
UploadingEnabled
Enable or disable uploading function.
SchedulingMode
Scheduling mode defines the execution time of each upload action. If 'Upload oncompletion' option is selected, all media files will be uploaded right after finishing therecording (actually in the next storage cycle). If 'Upload according to schedule' option isselected, the uploading will occur according to the scheduling settings.
UploadSchedule
Scheduling settings for uploading function. This option only applies if the SchedulingMode is set to 'Upload according to schedule'. Click on the right button to open thescheduling wizard.
UploadProtocol
The file transfer protocol used for media file uploading.
UploadServer Port
Port number of the application accepting file uploads on the Verba Media Repositoryserver.
UploadServer IPAddress orHostname
IP address and hostname of the Verba Media Repository server.
Upload Path The incoming media folder path configured on the Verba Media Repository server.
UploadServer User
Username of account used for file uploading.
UploadServerPassword
Password of the user account used for file uploading.
On-demand recording settings
This component of the Verba Storage Management Service administers on-demand call recording. Userswith extensions where on-demand recording mode is set can decide, which call has to be recorded. If a callis not marked for recording, the system will delete the call record in the database and the media file too.
In multi-site deployments, the on-demand calls are not uploaded to the Media Repository server until theused marks them for keeping.
The deletion mechanism will only delete calls older then the defined length of the on-demand call buffer.
The following table provides detailed instructions on each configuration setting:
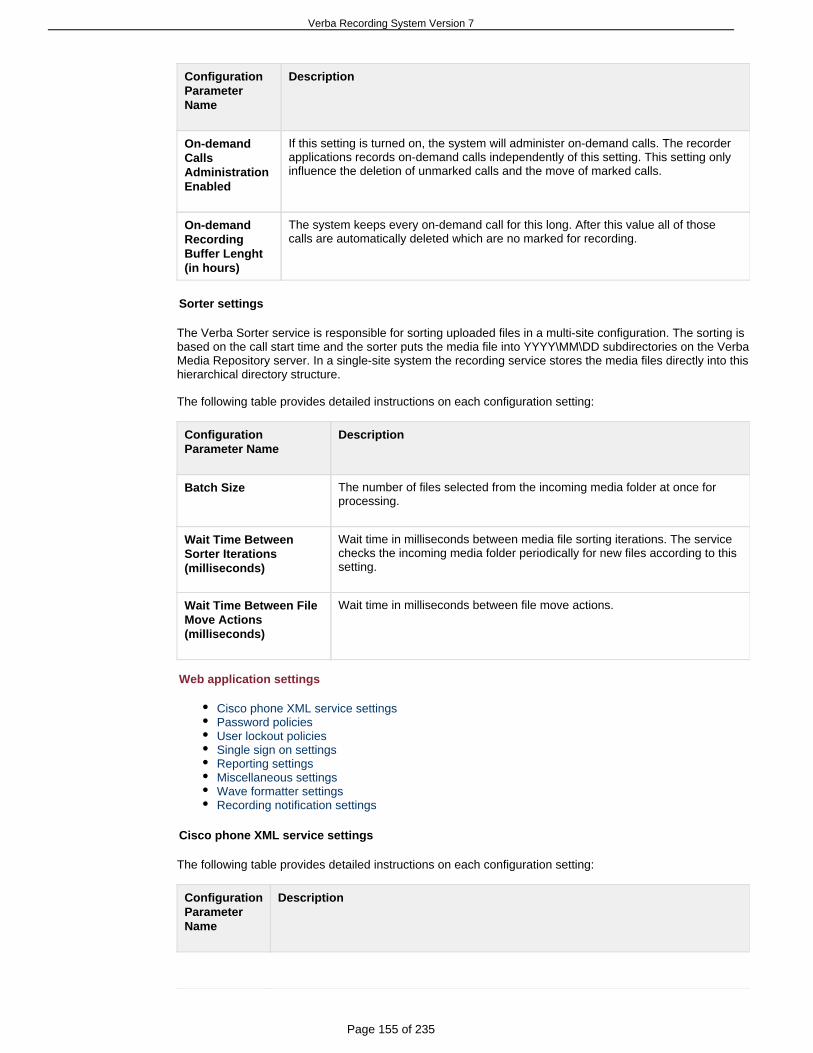
Verba Recording System Version 7
Page 155 of 235
ConfigurationParameterName
Description
On-demandCallsAdministrationEnabled
If this setting is turned on, the system will administer on-demand calls. The recorderapplications records on-demand calls independently of this setting. This setting onlyinfluence the deletion of unmarked calls and the move of marked calls.
On-demandRecordingBuffer Lenght(in hours)
The system keeps every on-demand call for this long. After this value all of thosecalls are automatically deleted which are no marked for recording.
Sorter settings
The Verba Sorter service is responsible for sorting uploaded files in a multi-site configuration. The sorting isbased on the call start time and the sorter puts the media file into YYYY\MM\DD subdirectories on the VerbaMedia Repository server. In a single-site system the recording service stores the media files directly into thishierarchical directory structure.
The following table provides detailed instructions on each configuration setting:
ConfigurationParameter Name
Description
Batch Size The number of files selected from the incoming media folder at once forprocessing.
Wait Time BetweenSorter Iterations(milliseconds)
Wait time in milliseconds between media file sorting iterations. The servicechecks the incoming media folder periodically for new files according to thissetting.
Wait Time Between FileMove Actions(milliseconds)
Wait time in milliseconds between file move actions.
Web application settings
Cisco phone XML service settingsPassword policiesUser lockout policiesSingle sign on settingsReporting settingsMiscellaneous settingsWave formatter settingsRecording notification settings
Cisco phone XML service settings
The following table provides detailed instructions on each configuration setting:
ConfigurationParameterName
Description
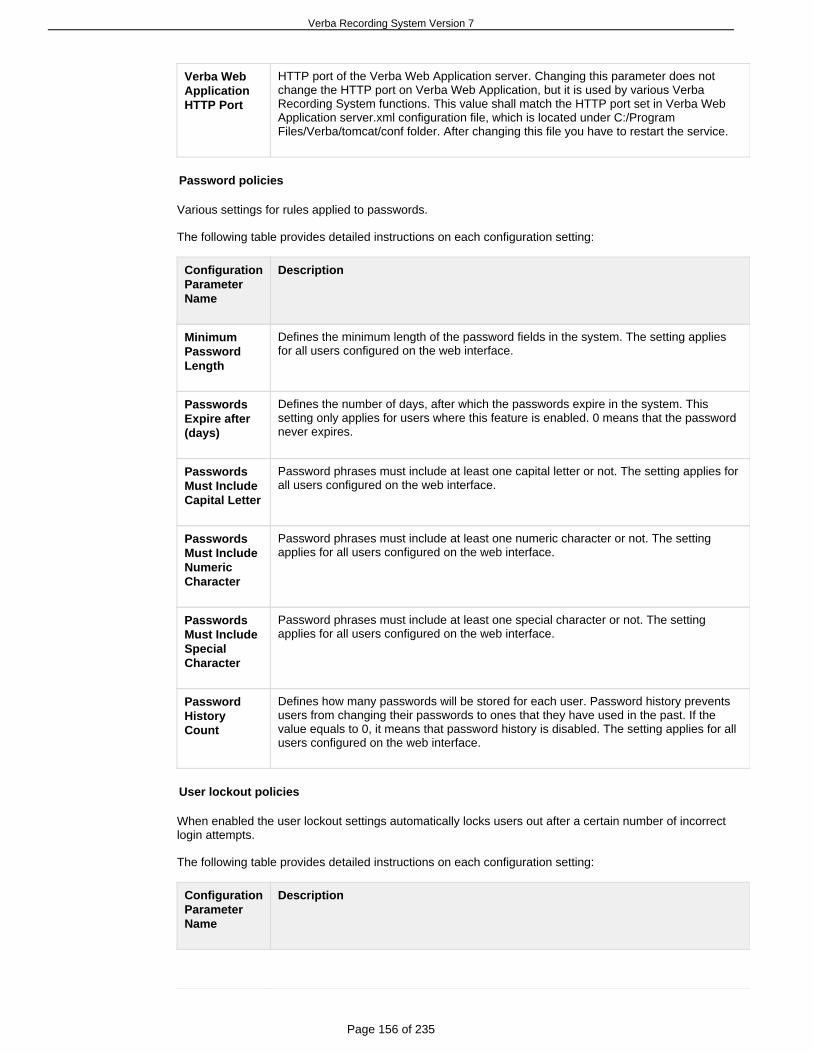
Verba Recording System Version 7
Page 156 of 235
Verba WebApplicationHTTP Port
HTTP port of the Verba Web Application server. Changing this parameter does notchange the HTTP port on Verba Web Application, but it is used by various VerbaRecording System functions. This value shall match the HTTP port set in Verba WebApplication server.xml configuration file, which is located under C:/ProgramFiles/Verba/tomcat/conf folder. After changing this file you have to restart the service.
Password policies
Various settings for rules applied to passwords.
The following table provides detailed instructions on each configuration setting:
ConfigurationParameterName
Description
MinimumPasswordLength
Defines the minimum length of the password fields in the system. The setting appliesfor all users configured on the web interface.
PasswordsExpire after(days)
Defines the number of days, after which the passwords expire in the system. Thissetting only applies for users where this feature is enabled. 0 means that the passwordnever expires.
PasswordsMust IncludeCapital Letter
Password phrases must include at least one capital letter or not. The setting applies forall users configured on the web interface.
PasswordsMust IncludeNumericCharacter
Password phrases must include at least one numeric character or not. The settingapplies for all users configured on the web interface.
PasswordsMust IncludeSpecialCharacter
Password phrases must include at least one special character or not. The settingapplies for all users configured on the web interface.
PasswordHistoryCount
Defines how many passwords will be stored for each user. Password history preventsusers from changing their passwords to ones that they have used in the past. If thevalue equals to 0, it means that password history is disabled. The setting applies for allusers configured on the web interface.
User lockout policies
When enabled the user lockout settings automatically locks users out after a certain number of incorrectlogin attempts.
The following table provides detailed instructions on each configuration setting:
ConfigurationParameterName
Description

Verba Recording System Version 7
Page 157 of 235
User LockoutAttemptsThreshold
The lockout threshold can be set to any value from 0 to 999 (attempts). If the lockoutthreshold is set to zero, users will not be locked out due to invalid logon attempts. Anyother value sets a specific lockout threshold. The setting applies for all users configuredon the web interface.
User LockoutThresholdReset After(minutes)
This value represents how long a user will be locked out after unsuccessfully logginginto the system. By default, the lockout threshold is maintained for 30 minutes, but anyvalue can be set from 1 to 99,999 minutes. The setting applies for all users configuredon the web interface.
Single sign on settings
The Verba Recording System supports Windows Domain authentication and provides single sign on (SSO)authentication for the web application.
The system also supports custom SSO authentication with 3rd party solutions. For more information, see .Single Sign-On overview
The following table provides detailed instructions on each configuration setting:
ConfigurationParameterName
Description
Single SignOn Enabled
Enables or disables the usage of single sign on feature on the web interface. TheWindows domain users can access the web interface without additionalauthentication. The system matches the domain user ID with the Verba login ID. TheVerba Media Repository server has to be part of the domain.
Strip DomainInformationfrom Login ID
If enabled, the system will not use the Windows domain information during the singlesign on process. Practically it means, that the users - configured in the Verba system -do not contain the domain information in the login ID.
Domain UserAccountFormat
If the Windows domain information is used during the single sign on process (the Strip setting is disabled), then the users - configuredDomain Information from Login ID
in the Verba system - have to contain the domain information. This setting allowsusers to select the way the domain information is stored in the login ID in the Verbasystem.
Allow SingleSign On forSystemAdministrators
Enables or disables the single sign on feature for system administrators. If disabled,the users with system administrator privileges are not allowed to authenticate usingthe single sign on functionality.
Reporting settings
Configuration settings for the Verba Reporting module.
The following table provides detailed instructions on each configuration setting:
ConfigurationParameter Name
Description
AllowedReportingInterval StartTime
Start time value for allowed reporting time period in hour: minute format.
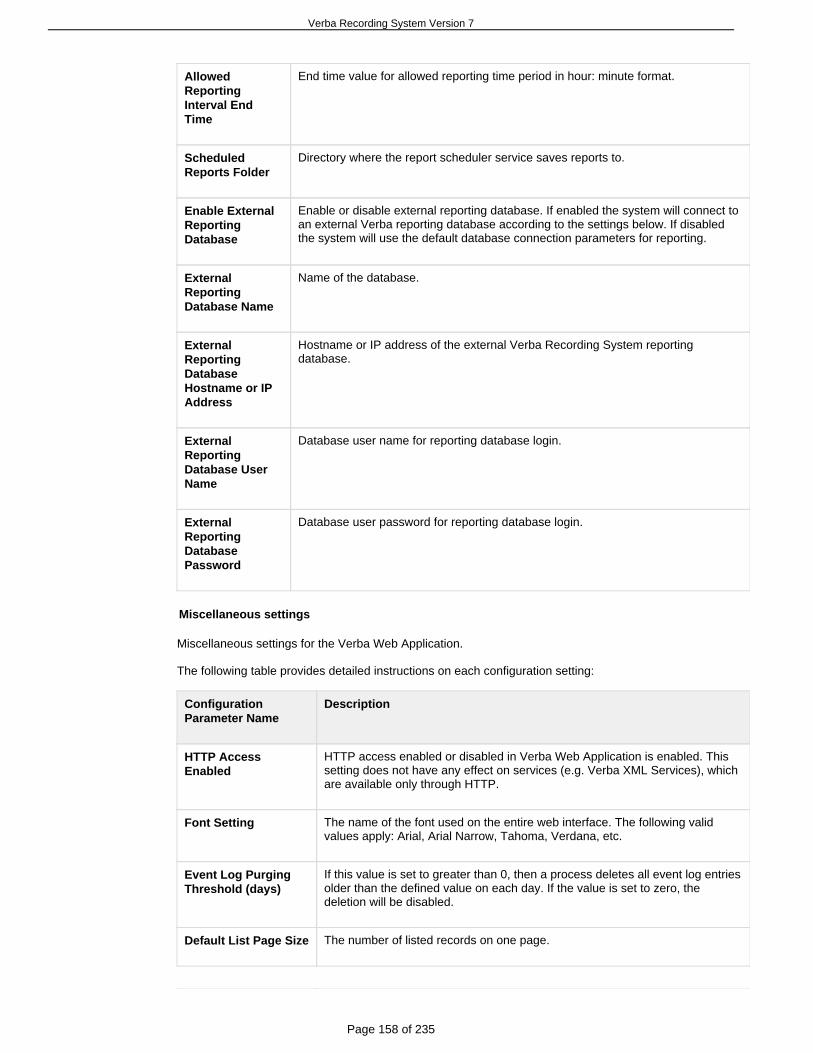
Verba Recording System Version 7
Page 158 of 235
AllowedReportingInterval EndTime
End time value for allowed reporting time period in hour: minute format.
ScheduledReports Folder
Directory where the report scheduler service saves reports to.
Enable ExternalReportingDatabase
Enable or disable external reporting database. If enabled the system will connect toan external Verba reporting database according to the settings below. If disabledthe system will use the default database connection parameters for reporting.
ExternalReportingDatabase Name
Name of the database.
ExternalReportingDatabaseHostname or IPAddress
Hostname or IP address of the external Verba Recording System reportingdatabase.
ExternalReportingDatabase UserName
Database user name for reporting database login.
ExternalReportingDatabasePassword
Database user password for reporting database login.
Miscellaneous settings
Miscellaneous settings for the Verba Web Application.
The following table provides detailed instructions on each configuration setting:
ConfigurationParameter Name
Description
HTTP AccessEnabled
HTTP access enabled or disabled in Verba Web Application is enabled. Thissetting does not have any effect on services (e.g. Verba XML Services), whichare available only through HTTP.
Font Setting The name of the font used on the entire web interface. The following validvalues apply: Arial, Arial Narrow, Tahoma, Verdana, etc.
Event Log PurgingThreshold (days)
If this value is set to greater than 0, then a process deletes all event log entriesolder than the defined value on each day. If the value is set to zero, thedeletion will be disabled.
Default List Page Size The number of listed records on one page.

Verba Recording System Version 7
Page 159 of 235
Maximum ActiveSessions
Defines the maximum number of simultaneous user sessions for the VerbaWeb Application. If a new user tries to log in after the value is reached, theuser will be rejected. Verba XML service sessions are not counted.
Maximum QueryRows
Sets the maximum number of rows to retrieve in the result set of the call lists(results of the search screen).
Support Site URL URL of the support site, which is available as a link in the menu of the webinterface.
Click2Dial Enabled Enable or disable Click2Dial feature.
Cisco UnifiedCommunicationsManager IP Addressor Hostname
IP address or Hostname of the Cisco Unified Communications Manager. Thisparameter is used in the Click2dial feature.
Video TranscodingEnabled
If this setting is turned on, users are able to initiate video transcoding jobs inthe Verba Player. This video transcoding function enables to convert VF(Verba Media Format) files to standard Windows Media Video (WMV) files.
Hide Menu Item(s) Comma(,) separated list of menu items, which has to be disabled on the webinterface.
Record URLClipboard Copy inSearch List Enabled
If this setting is turned on, call lists will include an icon, which allows to copythe URL pointing to the given call to the client computer's clipboard.
Display Alert afterClipboard CopyDisabled
If this setting is turned on, the system will NOT display an alert message if anUTL pointing to a call is copied to the client computer's clipboard.
Timeline Enabled If this setting is turned on, the users are able to display calls in a uniquetimeline viewer.
Publishing Enabled If this setting is enabled, the users are able to publish and share recordingsand other users can access these records through the Verba PublishingServer. The default URL of this server: http://x.x.x.x/verba/pub
Exported Call FileName Format
Defines the file name convention used when the user downloads multiple callsfrom the user interface. The following variable fields are available:
[year][month][day][hour][minute][second][caller][called]
You can also define meta data fields to be added to the file name: [meta_field]where the 'field' part should be the Field Identifier variable configured as aMetadata Template Field.
You can use any type of other characters to separate the fields. If thisparameter is empty, the default setting is applied:[caller]--[called]_[year]-[month]-[day]_[hour]_[minute]
Wave formatter settings

Verba Recording System Version 7
Page 160 of 235
Configuration settings for the Verba Wave Formatter service.
The following table provides detailed instructions on each configuration setting:
ConfigurationParameter Name
Description
Hostname or IPAddress of WaveformService
Hostname or IP address of the Wave Formatter service. It is installed on theVerba Media Repository server by default.
HTTP Port HTTP port number for accessing the Wave Formatter service.
Sampling Rate Defines the number of samples used to draw the amplitude of the audiosignal. The value is multiplied by the total number of samples in the audiofiles.
Call Segment ExportCodec
Call segments exported are saved using the configured codec.
Recording notification settings
If this feature is enabled than Verba Web Application Server pushes an XML message to the given Ciscophone right after the recording has been started. If the Verba Recording Server cannot reach the VerbaMedia Repository than this service is not available. All of those IP phones, which receive recordingnotification messages, must be associated with a Cisco Unified Communications Manager user.
The following table provides detailed instructions on each configuration setting:
ConfigurationParameter Name
Description
RecordingNotificationDisplay Enabled
Enables or disables the sending of recording notification messages to XML capableIP phones. If this setting is enabled than Verba Web Application Server pushes anXML message to the given phone right after the recording has been started. If theVerba Recording Server cannot reach the Verba Media Repository than this serviceis not available.
Cisco UnifiedCommunicationsManager PushXML User ID
The login name of that Cisco Unified Communications Manager user, which is usedto send recording notification messages to XML capable IP phones. All of those IPphones, which will receive these notification messages have to be associated withthis user. Alternatively you can enable the Enable CTI Super Provider option for thisuser (if this option is enabled you do not have to associate the phones to this user).
Cisco UnifiedCommunicationsManager PushXML UserPassword
The password of that Cisco Unified Communications Manager user, which is usedto send recording notification messages to XML capable IP phones.
RecordingNotificationLanguage
This parameter defines the language used for the recording notification messages.This setting is a global value, the language setting of a given user, does not effectthis parameter. Select the desired language from the drop-down list.
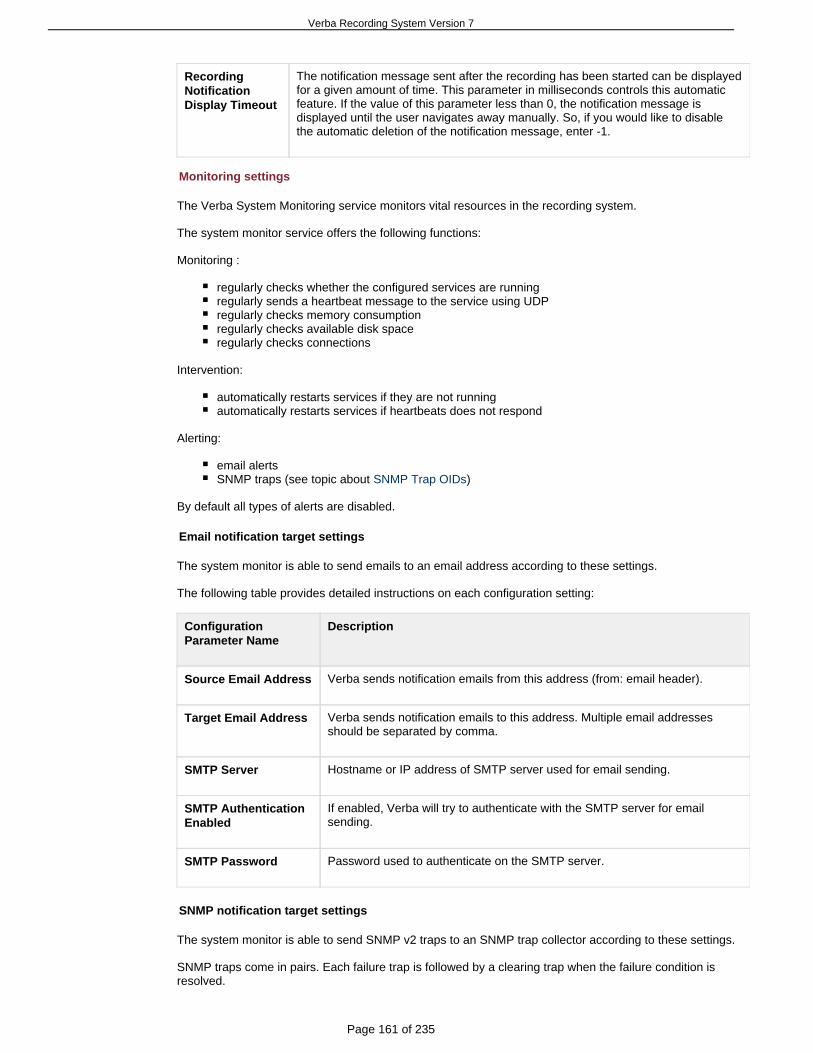
Verba Recording System Version 7
Page 161 of 235
RecordingNotificationDisplay Timeout
The notification message sent after the recording has been started can be displayedfor a given amount of time. This parameter in milliseconds controls this automaticfeature. If the value of this parameter less than 0, the notification message isdisplayed until the user navigates away manually. So, if you would like to disablethe automatic deletion of the notification message, enter -1.
Monitoring settings
The Verba System Monitoring service monitors vital resources in the recording system.
The system monitor service offers the following functions:
Monitoring :
regularly checks whether the configured services are runningregularly sends a heartbeat message to the service using UDPregularly checks memory consumptionregularly checks available disk spaceregularly checks connections
Intervention:
automatically restarts services if they are not runningautomatically restarts services if heartbeats does not respond
Alerting:
email alertsSNMP traps (see topic about )SNMP Trap OIDs
By default all types of alerts are disabled.
Email notification target settings
The system monitor is able to send emails to an email address according to these settings.
The following table provides detailed instructions on each configuration setting:
ConfigurationParameter Name
Description
Source Email Address Verba sends notification emails from this address (from: email header).
Target Email Address Verba sends notification emails to this address. Multiple email addressesshould be separated by comma.
SMTP Server Hostname or IP address of SMTP server used for email sending.
SMTP AuthenticationEnabled
If enabled, Verba will try to authenticate with the SMTP server for emailsending.
SMTP Password Password used to authenticate on the SMTP server.
SNMP notification target settings
The system monitor is able to send SNMP v2 traps to an SNMP trap collector according to these settings.
SNMP traps come in pairs. Each failure trap is followed by a clearing trap when the failure condition isresolved.

Verba Recording System Version 7
Page 162 of 235
E.g. in case a service does not respond, a "service is down" trap is sent. When the service is properlyrestarted (either manually or automatically) a "service is up" trap is sent, which allows your managementsystem to automatically close any open trouble tickets created by the first error condition.
The following table provides detailed instructions on each configuration setting:
Configuration ParameterName
Description
SNMP Trap target The monitoring service will send SNMP v2 traps to this hostname or IPaddress.
SNMP Trap community The monitoring service will send SNMP v2 traps to this community.
Monitoring settings for low memory alerts
Configuration settings for low memory alerts.
The following table provides detailed instructions on each configuration setting:
ConfigurationParameter Name
Description
Email NotificationEnabled
Enable or disable email notification sending. Email notification is sent ifavailable memory goes below Minimum Physical Memory Threshold.
SNMP Trap Enabled Enable or disable SNMP trap sending. SNMP trap is sent if available memorygoes below Minimum Physical Memory Threshold.
Minimum PhysicalMemory Threshold
Minimum required physical memory in megabytes. Alert is sent when availablefree memory goes below this level.
Monitoring settings for recording inactivity
Configuration settings for recording inactivity alerts. This feature is only available for the Passive RecordingService.
The following table provides detailed instructions on each configuration setting:
ConfigurationParameter Name
Description
Email NotificationEnabled
Enable or disable email notification sending. Email notification is sent if no call isrecorded within Maximum Idle Period.
SNMP Trap Enabled Enable or disable SNMP trap sending. SNMP trap is sent if no call is recordedwithin Maximum Idle Period.
Maximum IdlePeriod
Maximum allowed idle period in minutes while no call is recorded. Alert is sentwhen no call is recorded within this period.
Monitoring settings for low disk space alerts

Verba Recording System Version 7
Page 163 of 235
Configuration settings for low disk space alerts. The system monitoring service is able to monitor free diskspace and send notifications/alerts. Here you can enable or disable the different notification methods. Eachdisk volume in your Verba system can has its own monitoring configuration folder in the Windows registryunder HKEY_LOCAL_MACHINE\SOFTWARE\Verba\System Monitor\Volumes. These configuration foldershave their own arbitrary index key, this index can be chosen freely, it is not used in the monitoring algorithm(we recommend numbers as 1, 2, 3, etc.). The configuration values in these volume configuration foldersdefine how the Verba System Monitor will monitor available disk space of a volume.
The following table provides detailed instructions on each configuration setting:
ConfigurationParameterName
Description
EmailNotificationEnabled
Enable or disable email notification sending. Email notification is sent if the freespace on the given disk volume drops below Alert Threshold in megabytes.
SNMP TrapEnabled
Enable or disable SNMP trap sending. SNMP trap is sent if the free space on thegiven disk volume drops below Alert Threshold in megabytes.
As mentioned, every disk volume has its own settings for low disk space alerts (by default only 2 volumesare defined). The following table provides detailed instructions on each configuration setting:
ConfigurationParameter Name
Description
Volume Path Mount point of the disk volume (e.g. C:\)
Alert Threshold Minimum required disk space in megabytes. Alert is sent when available diskspace goes below this level.
Monitoring settings for connection checks
Monitoring settings for connection checks. I enables to monitor TCP connectivity to a list of serversconfigured in registry. Here you can enable or disable the different notification methods.
The following table provides detailed instructions on each configuration setting:
ConfigurationParameter Name
Description
EmailNotificationEnabled
Enable or disable email notification sending. Email notification is sent according tothe various settings for the configured connection.
SNMP TrapEnabled
Enable or disable SNMP trap sending. SNMP trap is sent according to the varioussettings for the configured connection.
Connection TestTimeout (msec)
The connection test waits this value in milliseconds. The value could be higher forlarger networks. This timeout suspends all other tests, so it is recommended toconfigure it as small as possible.

Verba Recording System Version 7
Page 164 of 235
Connection TestTCP Port
Defines the TCP port number, to where the service tries to connect on TCP level,and closes immediately if succeeds.
Health HistoryWindow Size
Size of the sliding health history window. Valid values can be from 0 (dead) to 100(healthy).
InterventionPercentage inHealth History
If the number of healthy values in the health history window go below this percentthe service intervenes.
The connections to be monitored are stored as registry subkeys under 'Verba\System Monitor\Connections'.The keys should be the hostnames or IP addresses. Invalid hostnames or IP addresses are automaticallyignored.
Monitoring settings for service health checks
Monitoring settings for service health checks. The system monitoring service is able to monitor configuredservices and intervene in problematic situations. Here you can enable or disable the different notificationmethods.
The following table provides detailed instructions on each configuration setting:
ConfigurationParameter Name
Description
Email NotificationEnabled
Enable or disable email notification sending. Email notification is sent accordingto the various settings for the given service.
SNMP TrapEnabled
Enable or disable SNMP trap sending. SNMP trap is sent according to thevarious settings for the given service.
Every Verba service has its own service health check setting. By default all Verba services can beconfigured individually, but none of the alerts are enabled. The following table provides detailed instructionson each configuration setting:
ConfigurationParameter Name
Description
MonitoringEnabled
Enable or disable monitoring. If enabled the monitoring service will monitor thisservice and intervene according to the settings.
RestartNotificationEnabled
Enable or disable restart notification sending. If enabled the monitoring service willsend notifications after service restarts.
Number ofRestart Attempts
Number of maximum consecutive service retries of restarts.
Health HistoryWindow Size
Size of the sliding health history window. Valid values can be from 0 (dead) to 100(healthy).

Verba Recording System Version 7
Page 165 of 235
InterventionPercentage inHealth History
If the number of healthy values in the health history window go below this percentthe service intervenes.
HeartbeatEnabled
Enable or disable heartbeat. Heartbeats are sent periodically to the systemmonitoring service. If heartbeats do not arrive in the configured manner, thesystem monitoring service will intervene.
HeartbeatResponseTimeout
Maximum time in milliseconds the system monitor waits for heartbeat after sendingthe request.
License to Kill This might allow the monitoring service to kill a service as a last resort.
Maximum Timefor ServiceRestart
This much time in milliseconds is allowed during service restart.
Wait Time AfterService RestartFailure
The service waits this much time in milliseconds after a failure, before tries torestart the service again.
Wait TimeBetween ServiceRestart Attempts
The service waits this much time in milliseconds between two service restarts.
Screen capturing settings
Screen capturing settings
The following table provides detailed instructions on each configuration setting:
ConfigurationParameterName
Description
CapturedScreenFrames perSecond
Determines how many screens should be captured within a single second. Highervalues results better quality videos, but it also increases the file size. If there is a lot ofmovement in the video, and therefore delta compression is minimal, decreasing theframe rate can drastically decrease file size. If there is little movement in the video andthe majority of delta frames contain little or no data, slower frame rates will not have asmuch effect on file size. If there is no movement in the video at all, basically a staticimage, lowering frame rates will decrease file size insomuch as there will be fewer keyframes.
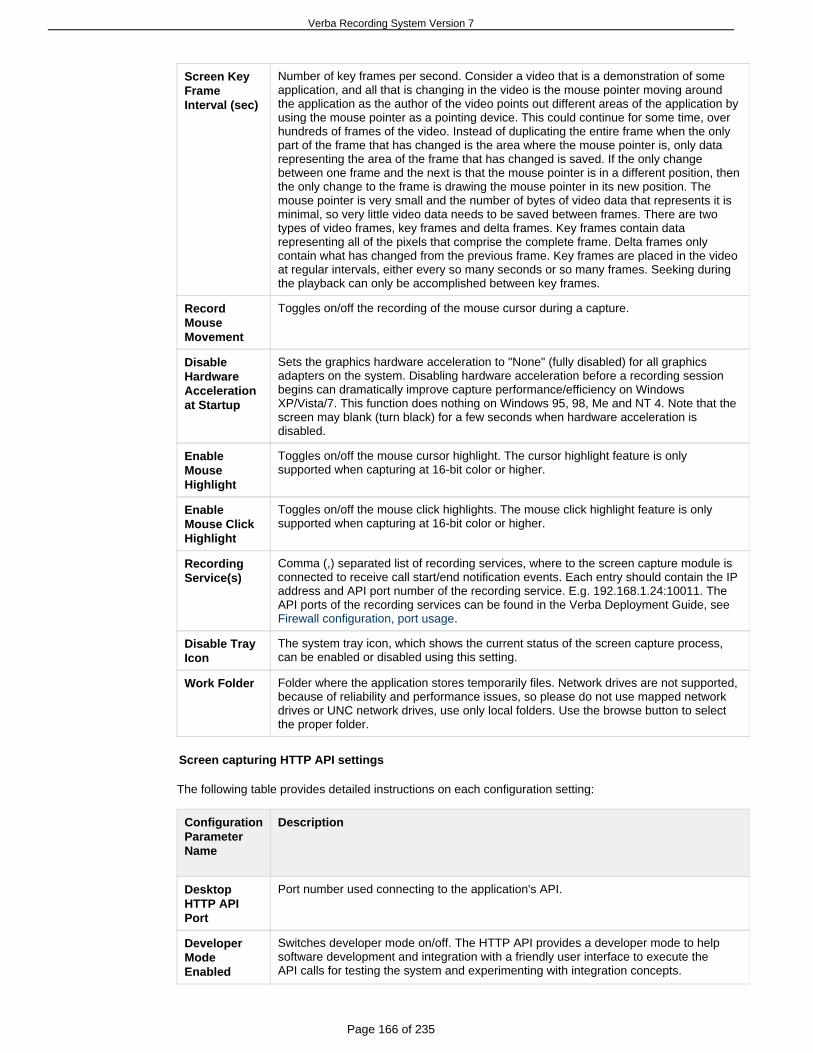
Verba Recording System Version 7
Page 166 of 235
Screen KeyFrameInterval (sec)
Number of key frames per second. Consider a video that is a demonstration of someapplication, and all that is changing in the video is the mouse pointer moving aroundthe application as the author of the video points out different areas of the application byusing the mouse pointer as a pointing device. This could continue for some time, overhundreds of frames of the video. Instead of duplicating the entire frame when the onlypart of the frame that has changed is the area where the mouse pointer is, only datarepresenting the area of the frame that has changed is saved. If the only changebetween one frame and the next is that the mouse pointer is in a different position, thenthe only change to the frame is drawing the mouse pointer in its new position. Themouse pointer is very small and the number of bytes of video data that represents it isminimal, so very little video data needs to be saved between frames. There are twotypes of video frames, key frames and delta frames. Key frames contain datarepresenting all of the pixels that comprise the complete frame. Delta frames onlycontain what has changed from the previous frame. Key frames are placed in the videoat regular intervals, either every so many seconds or so many frames. Seeking duringthe playback can only be accomplished between key frames.
RecordMouseMovement
Toggles on/off the recording of the mouse cursor during a capture.
DisableHardwareAccelerationat Startup
Sets the graphics hardware acceleration to "None" (fully disabled) for all graphicsadapters on the system. Disabling hardware acceleration before a recording sessionbegins can dramatically improve capture performance/efficiency on WindowsXP/Vista/7. This function does nothing on Windows 95, 98, Me and NT 4. Note that thescreen may blank (turn black) for a few seconds when hardware acceleration isdisabled.
EnableMouseHighlight
Toggles on/off the mouse cursor highlight. The cursor highlight feature is onlysupported when capturing at 16-bit color or higher.
EnableMouse ClickHighlight
Toggles on/off the mouse click highlights. The mouse click highlight feature is onlysupported when capturing at 16-bit color or higher.
RecordingService(s)
Comma (,) separated list of recording services, where to the screen capture module isconnected to receive call start/end notification events. Each entry should contain the IPaddress and API port number of the recording service. E.g. 192.168.1.24:10011. TheAPI ports of the recording services can be found in the Verba Deployment Guide, see
.Firewall configuration, port usage
Disable TrayIcon
The system tray icon, which shows the current status of the screen capture process,can be enabled or disabled using this setting.
Work Folder Folder where the application stores temporarily files. Network drives are not supported,because of reliability and performance issues, so please do not use mapped networkdrives or UNC network drives, use only local folders. Use the browse button to selectthe proper folder.
Screen capturing HTTP API settings
The following table provides detailed instructions on each configuration setting:
ConfigurationParameterName
Description
DesktopHTTP APIPort
Port number used connecting to the application's API.
DeveloperModeEnabled
Switches developer mode on/off. The HTTP API provides a developer mode to helpsoftware development and integration with a friendly user interface to execute theAPI calls for testing the system and experimenting with integration concepts.
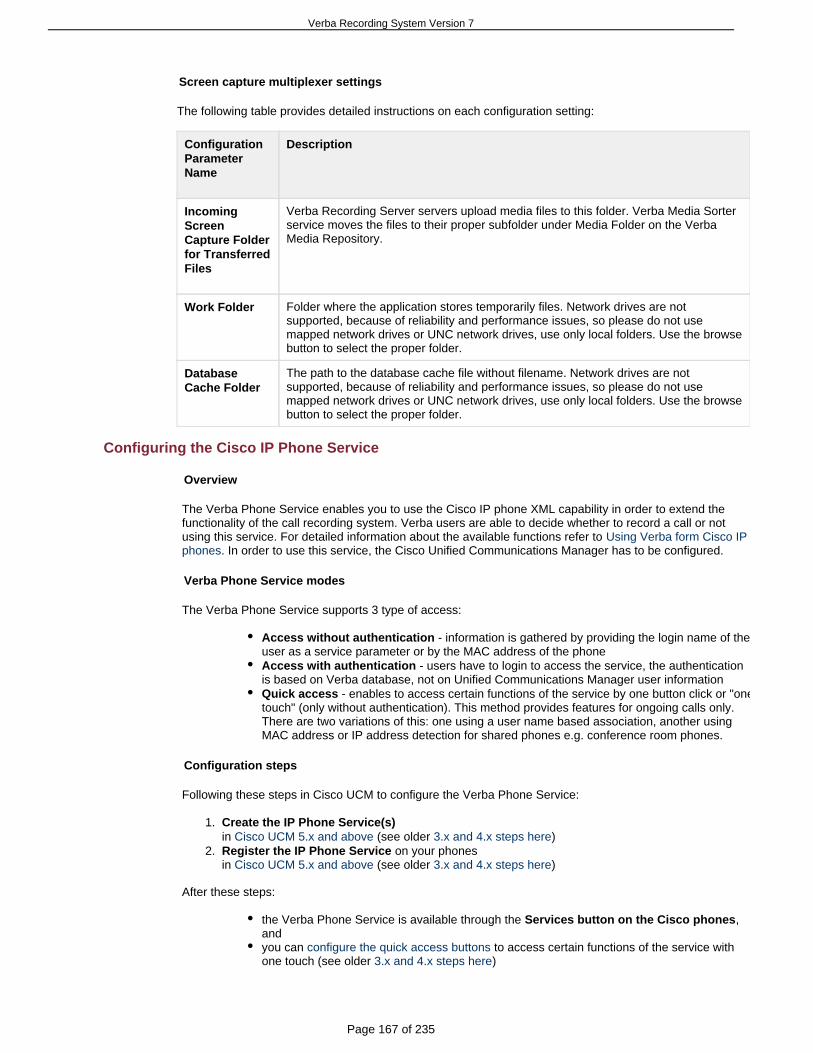
Verba Recording System Version 7
Page 167 of 235
1.
2.
Screen capture multiplexer settings
The following table provides detailed instructions on each configuration setting:
ConfigurationParameterName
Description
IncomingScreenCapture Folderfor TransferredFiles
Verba Recording Server servers upload media files to this folder. Verba Media Sorterservice moves the files to their proper subfolder under Media Folder on the VerbaMedia Repository.
Work Folder Folder where the application stores temporarily files. Network drives are notsupported, because of reliability and performance issues, so please do not usemapped network drives or UNC network drives, use only local folders. Use the browsebutton to select the proper folder.
DatabaseCache Folder
The path to the database cache file without filename. Network drives are notsupported, because of reliability and performance issues, so please do not usemapped network drives or UNC network drives, use only local folders. Use the browsebutton to select the proper folder.
Configuring the Cisco IP Phone Service
Overview
The Verba Phone Service enables you to use the Cisco IP phone XML capability in order to extend thefunctionality of the call recording system. Verba users are able to decide whether to record a call or notusing this service. For detailed information about the available functions refer to Using Verba form Cisco IP
. In order to use this service, the Cisco Unified Communications Manager has to be configured.phones
Verba Phone Service modes
The Verba Phone Service supports 3 type of access:
Access without authentication - information is gathered by providing the login name of theuser as a service parameter or by the MAC address of the phoneAccess with authentication - users have to login to access the service, the authenticationis based on Verba database, not on Unified Communications Manager user informationQuick access - enables to access certain functions of the service by one button click or "onetouch" (only without authentication). This method provides features for ongoing calls only.There are two variations of this: one using a user name based association, another usingMAC address or IP address detection for shared phones e.g. conference room phones.
Configuration steps
Following these steps in Cisco UCM to configure the Verba Phone Service:
Create the IP Phone Service(s)in (see older )Cisco UCM 5.x and above 3.x and 4.x steps hereRegister the IP Phone Service on your phonesin (see older )Cisco UCM 5.x and above 3.x and 4.x steps here
After these steps:
the Verba Phone Service is available through the ,Services button on the Cisco phonesandyou can to access certain functions of the service withconfigure the quick access buttonsone touch (see older )3.x and 4.x steps here

Verba Recording System Version 7
Page 168 of 235
Warning
Due to functional based products, the Verba Phone Servicelimitations in Cisco UCM Expresshas a simpler feature set. The and the quick access mode can notconfiguration steps are differentbe used.
Phone Service App
The app is accessed through the on the phone. Softkeys of the app are presented belowServices buttonthe phone screen.
Quick Access Buttons
Individual features of the app can be added to on the right side of the phone for quick access.line buttonsE.g. a call can be marked important with a single press of a button.
Configure the IP Phone Service in UCM 3.x and 4.x
You can access the Cisco Unified Communications Manager administration interface through a webbrowser (if you have problem accessing the interface, ask your Unified Communications Manager systemadministrator).

Verba Recording System Version 7
Page 169 of 235
Configuring the Verba Phone Service without authentication
Step 1 After authentication select the menu item.Feature / IP Phone Services
Step 2 Click on .Add a New IP Phone Service
Step 3 Type in the : Verba (or what you would like to display)Service Name
Step 4 Type in the : Verba Phone Service (or what you would like to display)Service Description
Step 5 Type in the :Service URL
http://verba_media_repository_IP_address_or_hostname/verba/phoneservice.do
Step 6 Press the button.Insert
Step 7 Add a new parameter by clicking on the button (the parameter is only required when theNewservice is used without authentication).
Step 8 Type : unameParameter Name
We are going to add a user name parameter to the service. This user name equals the login name of theVerba user, defined in the web application. The service uses this parameter to identify the user, which callsthe service from an IP phone (when the service is only available with authentication the user name isobtained through the login process).
Step 9 Type : Login name of the userParameter Display Name
Step 10 Type : This parameter is equal to Verba user login name. ThisParameter Descriptionparameter enables to service to identify the user, which is called the service from the IP phone.
Step 11 Check the optionParameter is Required
Step 12 Press the Insert and button.Close
Step 13 Press .Update Subscriptions
Configuring the Verba Phone Service with authentication
Step 1 After authentication select the menu item.Feature / IP Phone Services
Step 2 Click on Add a New IP Phone Service.
Step 3 Type in the : Verba (or what you would like to display)Service Name
Step 4 Type in the : Verba Phone Service (or what you would like to display)Service Description
Step 5 Type in the :Service URL
http://verba_media_repository_IP_address_or_hostname/verba/phoneserviceauth.do
Step 6 Press the button.Insert
Step 7 Press .Update Subscriptions
Configuring the Verba Phone Service quick access
Step 1 After authentication select menu item.Feature / IP Phone Services
Step 2 Click on .Add a New IP Phone Service
Step 3 Type in the : Verba Quick Access (or what you would like to display)Service Name
Step 4 Type in the : Verba Phone Service (or what you would like to display)Service Description
Step 5 Type in the :Service URL
Verba Recording System Version 7
Page 170 of 235
http://verba_media_repository_IP_address_or_hostname/verba/phoneservice.do
Step 6 Press the button.Insert
Step 7 Add a new parameter by clicking on the button.New
Step 8 Type : unameParameter Name
We are going to add a user name parameter to the service. This user name is the login name of the Verbauser, defined in the web application. The service uses this parameter to identify the user, which calls theservice from an IP phone (when the service is only available with authentication, the user name is obtainedthrough the login process).
Step 9 Type in the : Login name of the userParameter Display Name
Step 10 Type in the : This parameter is equal to the Verba user login name.Parameter DescriptionThis parameter enables the service to identify the user that called the service from an IP phone.
Step 11 Check the optionParameter is Required
Step 12 Add another new parameter by clicking on the button.New
Step 13 Type in the : onLoginParameter Name
This 2 parameter will define a Verba Phone Service action, which will be executed after calling thend
service. The following valid values apply for ongoing calls:
Record marks the ongoing call for recording flags the ongoing call as privatePrivate
flags the ongoing call as importantImportant adds a comment to the ongoing callAddTag
stores a marker for the ongoing callMarker sends a URL pointing to the ongoing call in an email to the userEmailMe
sends a URL pointing to the ongoing call in an email to the user s group supervisorEmailBoss
Detailed information about each function is available in Using Verba Phone Service.
Step 14 Type in the : Quick Access ActionParameter Display Name
Step 15 Type in the : This parameter defines the name of the action, which isParameter Descriptionexecuted on the ongoing call.
Step 16 Check the optionParameter is Required
Step 17 Press the button.Insert and Close
Step 18 Press .Update Subscriptions
Configure the IP Phone Service in UCM 5.x and later
Overview
You can access the Cisco UCM administration interface through a web browser (if you have problemaccessing the interface, ask your UCM system administrator):

Verba Recording System Version 7
Page 171 of 235
The following variations of the phone service are available:
Configuring the Verba Phone Service without authenticationConfiguring the Verba Phone Service with authenticationConfiguring the Verba Phone Service quick accessConfiguring the Verba Phone Service quick access without providing a username (easiest toconfigure)Configuring the Verba Silent Monitoring Phone Service without authenticationConfiguring the Verba Silent Moniotring Phone Service with authentication
Configuring the Verba Phone Service without authentication
Step 1 After authentication select the menu item.Device / Device Settings / Phone Services
Step 2 Click on .Add New
Step 3 Type in the : Verba (or what you would like to display)Service Name
Step 4 Type in the : Verba Phone Service (or what you would like to display)Service Description
Step 5 Type in the :Service URL
http://verba_media_repository_IP_address_or_hostname/verba/phoneservice.do
Step 6 Press the button.Save
Step 7 Add a new parameter by clicking on the button (the parameter is only requiredNew Parameterwhen the service is used without authentication). A new window opens.
Step 8 Type : unameParameter Name
Step 9 We are going to add a user name parameter to the service. This user name equals the loginname of the Verba user, defined in the web application. The service uses this parameter to identify theuser, which calls the service from an IP phone (when the service is only available with authenticationthe user name is obtained through the login process).
Step 10 Type : A short display name (for example "Login name of the user")Parameter Display Name
Step 11 Type : Describe the service in a few words here (e.g.: This parameterParameter Descriptionis equal to Verba user login name. This parameter enables the service to identify the user, which iscalled the service from the IP phone.)
Step 12 Check the optionParameter is Required

Verba Recording System Version 7
Page 172 of 235
Step 13 Press the button.Save And Close
Step 14 Press button in the original window.Update Subscriptions
Configuring the Verba Phone Service with authentication
Step 1 After authentication select the menu item.Device / Device Settings / Phone Services
Step 2 Click on w.Add Ne
Step 3 Type in the : Verba (or what you would like to display)Service Name
Step 4 Type in the : Verba Phone Service (or what you would like to display)Service Description
Step 5 Type in the :Service URL
http://verba_media_repository_IP_address_or_hostname/verba/phoneserviceauth.do
Step 6 Press the button.Save
Step 7 Press button.Update Subscriptions
Configuring the Verba Phone Service quick access
Step 1 After authentication select the menu item.Device / Device Settings / Phone Services
Step 2 Click on .Add New
Step 3 Type in the : Verba Quick Access (or what you would like to display)Service Name
Step 4 Type in the : Verba Phone Service (or what you would like to display)Service Description
Step 5 Type in the :Service URL
http://verba_media_repository_IP_address_or_hostname/verba/phoneservice.do
Step 6 Press the button.Save
Step 7 Add a new parameter by clicking on the button. A new window opens.New Parameter
Step 8 Type : unameParameter Name
We are going to add a user name parameter to the service. This user name is the login name of the Verbauser, defined in the web application. The service uses this parameter to identify the user, which calls theservice from an IP phone (when the service is only available with authentication, the user name is obtainedthrough the login process).
Step 9 Type in the : Login name of the userParameter Display Name
Step 10 Type in the : This parameter is equal to the Verba user login name.Parameter DescriptionThis parameter enables the service to identify the user that called the service from an IP phone.
Step 11 Check the option.Parameter is Required
Step 12 Press button.Save And Close
Step 13 Add another new parameter by clicking on the button.New Parameter
Step 14 Type in the : onLoginParameter Name
This 2 parameter will define a Verba Phone Service action, which will be executed after calling thend
service. The following valid values apply for ongoing calls:
Record marks the ongoing call for recording flags the ongoing call as privatePrivate

Verba Recording System Version 7
Page 173 of 235
flags the ongoing call as importantImportant adds a comment to the ongoing callAddTag
stores a marker for the ongoing callMarker sends a URL pointing to the ongoing call in an email to the userEmailMe
sends a URL pointing to the ongoing call in an email to the user s group supervisorEmailBossmarks the ongoing call as protectedProtect
stops recording and deletes the recorded file (if your system allows)Delete
Detailed information about each function is available in .Using Verba Phone Service
Step 15 Type in the : Quick Access ActionParameter Display Name
Step 16 Type in the : This parameter defines the name of the action, which isParameter Descriptionexecuted on the ongoing call.
Step 17 Check the optionParameter is Required
Step 18 Press the button.Save And Close
Step 19 Press button on the original window.Update Subscriptions
Configuring the Verba Phone Service quick access without providing a username (easiest toconfigure)
This mode is useful in systems without users or when you have shared phones e.g. conference roomphones.
Step 1 - After authentication select the menu item.Device / Device Settings / Phone Services
Step 2 - Click on .Add New
Step 3 - Type in the : e.g. Verba Quick Access Record (or what you would like toService Namedisplay)
Step 4 - Type in the : e.g. Verba Phone Service (or what you would like toService Descriptiondisplay)
Step 5 - Type in the :Service URL
Device MAC based (recommended)To mark the ongoing call for :recordinghttp://verba_media_repository_IP_address_or_hostname/verba/ps_RecordByDeviceId.do
(note: case sensitive)?name=#DEVICENAME#To mark the ongoing call as :protectedhttp://verba_media_repository_IP_address_or_hostname/verba/ps_ProtectBy .doDeviceId
(note: case sensitive)?name=#DEVICENAME#To stop recording and the recorded file:deletehttp://verba_media_repository_IP_address_or_hostname/verba/ps_DeleteByDeviceId
(note: case sensitive).do?name=#DEVICENAME#
IP Address based (only for passive recording)To mark the ongoing call for :recording
(note: case sensitive)http://verba_media_repository_IP_address_or_hostname/verba/ps_RecordByIp.doTo mark the ongoing call as :protected
(note: case sensitive)http://verba_media_repository_IP_address_or_hostname/verba/ps_ProtectByIp.doTo and delete the recorded file:stop recording
(note: case sensitive)http://verba_media_repository_IP_address_or_hostname/verba/ps_DeleteByIp.do
Step 6 - Press the button.Save
Step 7 - Press button on the original window.Update Subscriptions
Configuring the Verba Silent Monitoring Phone Service without authentication
Step 1 After authentication select the menu item.Device / Device Settings / Phone Services

Verba Recording System Version 7
Page 174 of 235
Step 2 Click on .Add New
Step 3 Type in the : Silent Monitoring (or what you would like to display)Service Name
Step 4 Type in the : Verba Silent Monitoring Phone Service (or what you wouldService Descriptionlike to display)
Step 5 Type in the :Service URL
http://verba_media_repository_IP_address_or_hostname/verba/phoneservicesm.do
Step 6 Press the button.Save
Step 7 Add a new parameter by clicking on the button (the parameter is only requiredNew Parameterwhen the service is used without authentication). A new window opens.
Step 8 Type : unameParameter Name
Step 9 We are going to add a user name parameter to the service. This user name equals the loginname of the Verba user, defined in the web application. The service uses this parameter to identify theuser, which calls the service from an IP phone (when the service is only available with authenticationthe user name is obtained through the login process).
Step 10 Type : A short display name (for example "Login name of the user")Parameter Display Name
Step 11 Type : Describe the service in a few words here (e.g.: This parameterParameter Descriptionis equal to Verba user login name. This parameter enables the service to identify the user, which iscalled the service from the IP phone.)
Step 12 Check the optionParameter is Required
Step 13 Press the button.Save And Close
Step 14 Press button in the original window.Update Subscriptions
Configuring the Verba Silent Moniotring Phone Service with authentication
Step 1 After authentication select the menu item.Device / Device Settings / Phone Services
Step 2 Click on w.Add Ne
Step 3 Type in the : Silent Monitoring (or what you would like to display)Service Name
Step 4 Type in the : Verba Silent Monnitoring Phone Service (or what you wouldService Descriptionlike to display)
Step 5 Type in the :Service URL
http://verba_media_repository_IP_address_or_hostname/verba/phoneservicsmeauth.do
Step 6 Press the button.Save
Step 7 Press button.Update Subscriptions
Configure the IP Phone Service in UCM Express
Cisco Unified Communications Manager Express supports XML services but with limited functionality (e.g.phone level service parameters cannot be defined). Because of such kind of limitations, Verba PhoneService differs in some way from the original functionalities:
Access without authentication - this mode originally requires a parameter provided by each phonein order to identify the given user. Since Unified Communications Manager Express does not supportservice parameters, the automatically provided device name (MAC address) is used to identify theusers. The Verba Phone Service automatically recognizes the device name parameter and tries tofind a matching extension record, which has a valid used mapping.Access with authentication - no difference from other Unified Communications Manager versions
Verba Recording System Version 7
Page 175 of 235
Quick access - cannot be used.
Configuring the Verba Phone Service without authentication
Step 1 - After authentication select t select the menu item.Configure / IP Phone URLs
Step 2 - Type in the :Service URL
http://verba_media_repository_IP_address_or_hostname/verba/phoneservice.do
Step 3 - Press the button.Set
Configuring the Verba Phone Service with authentication
Step 1 - After authentication select t select the menu item.Configure / IP Phone URLs
Step 2 - Type in the :Service URL
http://verba_media_repository_IP_address_or_hostname/verba/phoneserviceauth.do
Step 3 - Press the button.Set
Quick access buttons in UCM 3.x and 4.x
In order to utilize the quick access functions in the most efficient way, you can configure line buttons for it oncertain IP phones. In this way a single button click on the phone can activate the given function. Follow thesteps below to configure quick access functions on line buttons:
Step 1 Make sure that you subscribed to the desired quick access services.
Step 2 As a first step you have to enable a service URL button on the given phone type. If you alreadyhave a phone button template configured, jump to .Step 7
Step 3 Select the menu item.Device / Device Setting / Phone Button Template
Step 4 Select the desired phone/device type and press the button.Copy
Step 5 Add a new name for the template and select for the desired button.Service URL
Step 6 Press .Insert
Step 7 Navigate to page and select the desired phone.Device / Phone
Step 8 Change the to the previously created one and press the Phone Button Template Updatebutton.
Step 9 Now click on the new link on the top left corner.Add/Update Service URL Buttons
Step 10 In the new window select the quick access service.
Step 11 Press .Update and Close
Step 12 In the window press the button.Phone Configuration Update
Quick access buttons in UCM 5.x and later
In order to utilize the quick access functions in the most efficient way, you can configure line buttons for it oncertain IP phones. In this way a single button click on the phone can activate the given function. Follow thesteps below to configure quick access functions on line buttons:
Step 1 Make sure that you subscribed to the desired quick access services.
Step 2 Select the menu item.Device / Phone
Step 3 Select the desired phone/device.
Verba Recording System Version 7
Page 176 of 235
Step 4 Press the button on the left side. A new window opens.Modify Button Items
Step 5 In the window select item in theReorder Phone Button Configuration Add a new SURLright list (Unassigned Associated Items) and move it to the left list (Associated Items). Make sure thatthe new SURL item will be visible on the given phone type considering the number of available items(line buttons).
Step 6 Press than .Save Close
Step 7 In the window now click on the link on the left pane.Phone Configuration Add a new SURL
Step 8 In the new pop up window select Verba from the list box.
Step 9 Press the than .Save Close
Step 10 Press the button in the window.Save Phone Configuration
Registering the IP Phone Service in UCM 3.x and 4.x
After you have successfully configured the Verba Phone Service, you have to register the service for eachIP phone device that needs access to the service.
Step 1 Select the menu item.Device / Phone
Step 2 Select the desired phone/device.
Step 3 Click .Subscribe/Unsubscribe Services
Step 4 In the new pop up window select Verba from the list box.
Step 5 Press the button.Continue
Step 6 Provide the necessary parameters if required:
Login name service access without authenticationLogin name, Quick access action name quick service access withoutauthenticationNone service access with authentication
Step 7 Press the button.Subscribe
Step 8 Continue the above steps for each IP phone.
If you have more then one line on a device and all of them are recorded, you do not have to configuredifferent Verba Phone Services for them, because the service uses the user name for identifying callsrelated to a user, not extension numbers. If the user is properly configured in the Verba database, all callsare visible from the service, which are linked to the given user (calls are linked to a user through the stationmapping).
Registering the IP Phone Service in UCM 5.x and later

Verba Recording System Version 7
Page 177 of 235
After you have successfully configured the Verba Phone Service, you have to register the service for eachIP phone device that needs access to the service.
Step 1 Select the menu item.Device / Phone
Step 2 Select the desired phone/device.
Step 3 Select link from the "Related links" dropdown list.Subscribe/Unsubscribe Services
Step 4 In the new pop up window select Verba from the list box.
Step 5 Press the button.Next
Step 6 Provide the necessary parameters if required:
Login name service access without authenticationLogin name, Quick access action name quick service access withoutauthenticationNone service access with authentication
Step 7 Press the button.Subscribe
Step 8 Continue the above steps for each IP phone.
If you have more then one line on a device and all of them are recorded, you do not have to configuredifferent Verba Phone Services for them, because the service uses the user name for identifying callsrelated to a user, not extension numbers. If the user is properly configured in the Verba database, all callsare visible from the service, which are linked to the given user (calls are linked to a user through the stationmapping).
Configuring Verba for Lync recording
Configuring Verba Passive Recorder for Lync recording
To navigate to the passive recorder configuration follow the next steps:
Step 1 Navigate to 'Administration/Verba Servers' menu
Step 2 Select the server where the Verba Recording Server was deployed to

Verba Recording System Version 7
Page 178 of 235
Step 3 Select the 'Service Activation' tab and activate the ' with theVerba Passive Recorder Service' gear icon at the end of the row
Step 4 Go to 'Change Configuration Settings' tab and navigate to ' ' node ofPassive Recorderconfiguration tree (Figure below)
Configuring Passive recorder service for SPAN (monitor) port based call recording
The basic passive recording solution requires a properly After monitor portconfigured SPAN (monitor) port.configuration follow the instructions below:
Step 1 Click on the ' ' icon in the row.+ 'Recording Interfaces'
Step 2 Select the configured monitor port on the localhost server from the interfaces' list and hit 'Save'button

Verba Recording System Version 7
Page 179 of 235
Step 3 Save the modified configuration if the changes looks like in the picture below
The Lync Filter side configuration for collecting the required signaling can be found in the following article Configuring Verba Lync Filter service
Configuring Passive recorder service for Lync Edge Server based relay call recording
The Lync Edge Server based call recording collects the media streams on the Lync Edge server'sinterfaces. The Verba Proxy server's Remote capture module collects the data for the recording, for properconfiguration follow this ' ' article's steps.Configuring Remote Capture on Lync servers
If the Remote capture service is properly configured follow the instructions bellow:
Step 1 Click on the '+' icon in the 'Recorder Proxy' row.
Step 2 Select the Lync Edge Server's host name from the drop down menu at ' row the port'sHost'default value is 11112, this can be modified on Remote Capture side.
Step 3 Fill the ' ' and ' ' fields with the following values (these are default values): User Password
User: verba
Password: Verba456+
Step 4 Save the interface
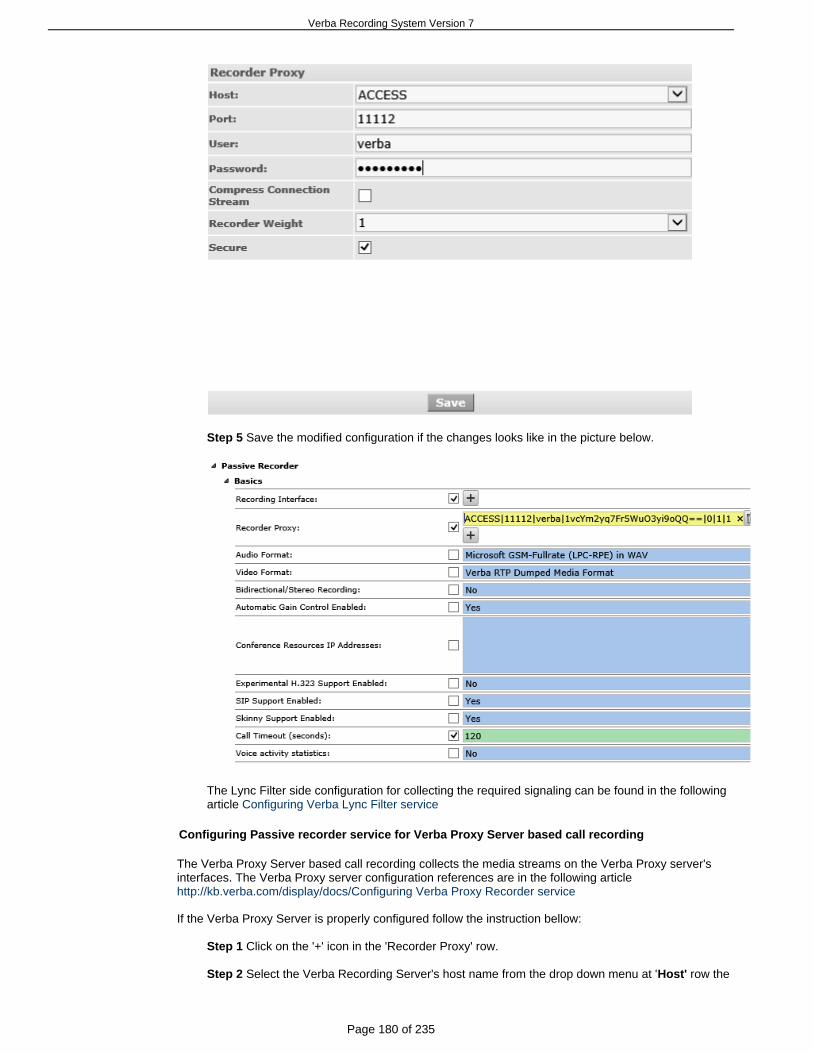
Verba Recording System Version 7
Page 180 of 235
Step 5 Save the modified configuration if the changes looks like in the picture below.
The Lync Filter side configuration for collecting the required signaling can be found in the followingarticle Configuring Verba Lync Filter service
Configuring Passive recorder service for Verba Proxy Server based call recording
The Verba Proxy Server based call recording collects the media streams on the Verba Proxy server'sinterfaces. The Verba Proxy server configuration references are in the following article http://kb.verba.com/display/docs/Configuring Verba Proxy Recorder service
If the Verba Proxy Server is properly configured follow the instruction bellow:
Step 1 Click on the '+' icon in the 'Recorder Proxy' row.
Step 2 Select the Verba Recording Server's host name from the drop down menu at ' row theHost'

Verba Recording System Version 7
Page 181 of 235
port's default value is 11112, this can be modified on Verba Proxy Server side.
Step 3 Fill the ' ' and ' ' fields with the following values (these are default values): User Password
User: verba
Password: Verba456+
Step 4 Save the interface
Step 5 Save the modified configuration if the changes looks like in the picture below.
The Lync Filter side configuration for collecting the required signaling can be found in the followingarticle Configuring Verba Lync Filter service

Verba Recording System Version 7
Page 182 of 235
Warning
Please note that all configuration changes need restarting of the services or just a reread ofconfiguration by the running service. The Verba Web Application puts notification on the top of theconfiguration form about the required tasks.
Configuring Verba Lync Filter service
The Verba Lync Filter service is responsible to gather signaling information regarding recordedinteractions. The service is deployed on Lync Front End servers, SBAs and SBSs. The filterservice connects to multiple components of the recording system, depending on the deployedsolution.
Once you deploy the Lync Filter role on a Lync server, the service is automatically enabled. For moreinformation on Lync Filter installation, see and Installing Verba Lync Filter role Installing Verba Lync Filter
.and Remote Components roles on a single server
Quick configuration guides
Basic Passive Recording with SPAN (monitor) port:
Server Mode: Set to the proper Lync environment version
Relaying Mode: Normal
Recording Server(s): Put the Verba Recording servers' addresses with the defined port number(e.g. 192.168.1.200:10200)
Lync Edge Server Based Recording:
Server Mode: Set to the proper Lync environment version
Relaying Mode: Edge Relay
Recording Server(s): Put the Verba Recording servers' addresses with the defined port number(e.g. 192.168.1.200:10200)
Edge Proxy Type: Set to desired type of call recording (Audio, Video or both)
Verba RTP Proxy Based Recording:
Server Mode: Set to the proper Lync environment version
Relaying Mode: ProxyProxy address: Put the Verba RTP Proxy server's address with the defined port number (e.g.192.168.1.206:10201)
Configuration reference
Lync Filter Configuration - Basic properties:
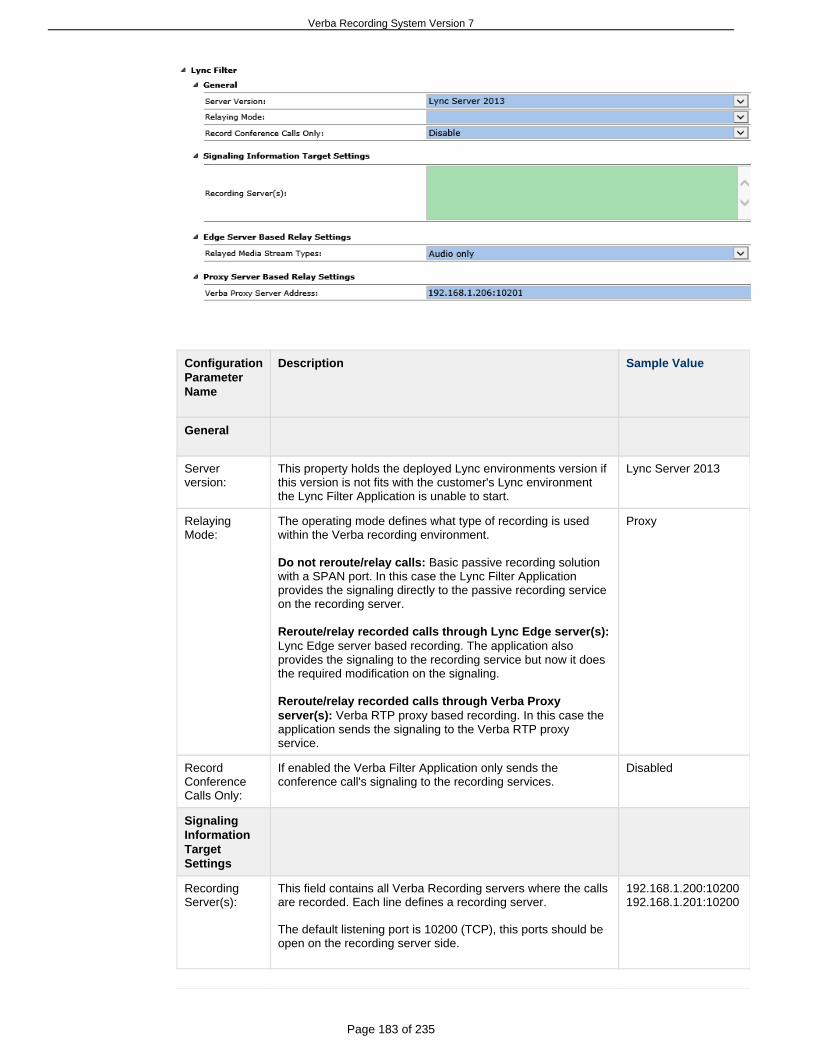
Verba Recording System Version 7
Page 183 of 235
ConfigurationParameterName
Description Sample Value
General
Serverversion:
This property holds the deployed Lync environments version ifthis version is not fits with the customer's Lync environmentthe Lync Filter Application is unable to start.
Lync Server 2013
RelayingMode:
The operating mode defines what type of recording is usedwithin the Verba recording environment.
Do not reroute/relay calls: Basic passive recording solutionwith a SPAN port. In this case the Lync Filter Applicationprovides the signaling directly to the passive recording serviceon the recording server.
Reroute/relay recorded calls through Lync Edge server(s):Lync Edge server based recording. The application alsoprovides the signaling to the recording service but now it doesthe required modification on the signaling.
Reroute/relay recorded calls through Verba Proxyserver(s): Verba RTP proxy based recording. In this case theapplication sends the signaling to the Verba RTP proxyservice.
Proxy
RecordConferenceCalls Only:
If enabled the Verba Filter Application only sends theconference call's signaling to the recording services.
Disabled
SignalingInformationTargetSettings
RecordingServer(s):
This field contains all Verba Recording servers where the callsare recorded. Each line defines a recording server.
The default listening port is 10200 (TCP), this ports should beopen on the recording server side.
192.168.1.200:10200192.168.1.201:10200
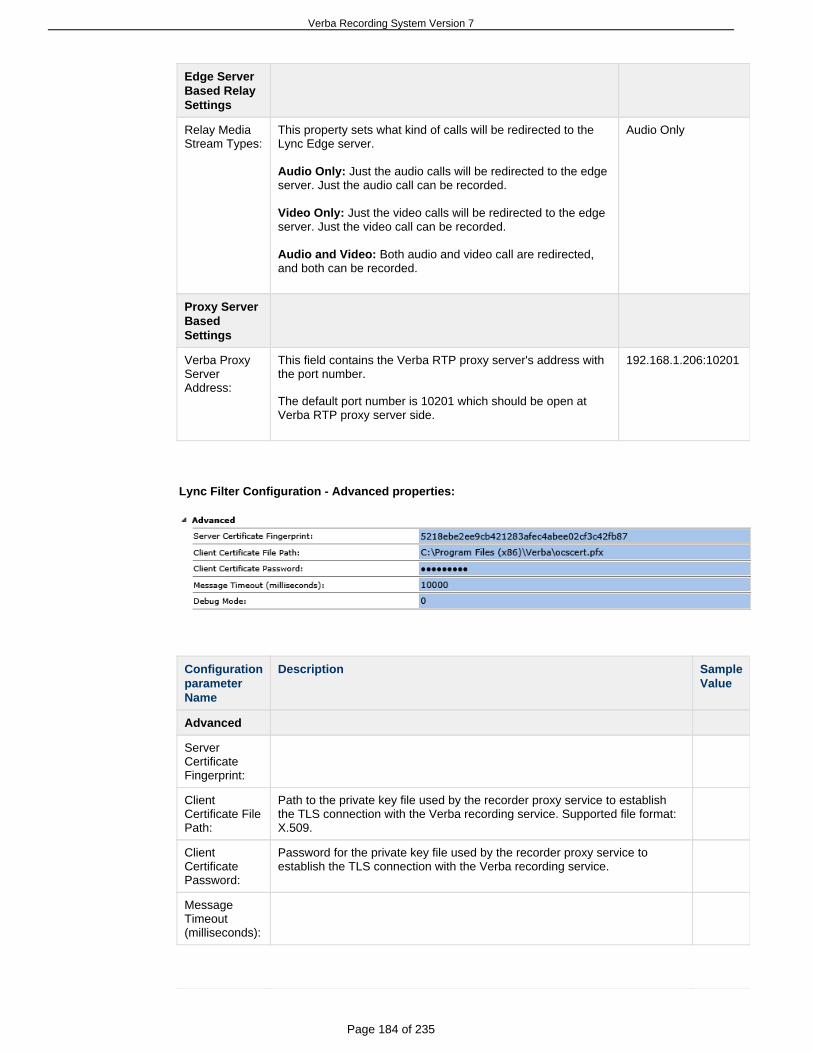
Verba Recording System Version 7
Page 184 of 235
Edge ServerBased RelaySettings
Relay MediaStream Types:
This property sets what kind of calls will be redirected to theLync Edge server.
Audio Only: Just the audio calls will be redirected to the edgeserver. Just the audio call can be recorded.
Video Only: Just the video calls will be redirected to the edgeserver. Just the video call can be recorded.
Audio and Video: Both audio and video call are redirected,and both can be recorded.
Audio Only
Proxy ServerBasedSettings
Verba ProxyServerAddress:
This field contains the Verba RTP proxy server's address withthe port number.
The default port number is 10201 which should be open atVerba RTP proxy server side.
192.168.1.206:10201
Lync Filter Configuration - Advanced properties:
ConfigurationparameterName
Description SampleValue
Advanced
ServerCertificateFingerprint:
ClientCertificate FilePath:
Path to the private key file used by the recorder proxy service to establishthe TLS connection with the Verba recording service. Supported file format:X.509.
ClientCertificatePassword:
Password for the private key file used by the recorder proxy service toestablish the TLS connection with the Verba recording service.
MessageTimeout(milliseconds):
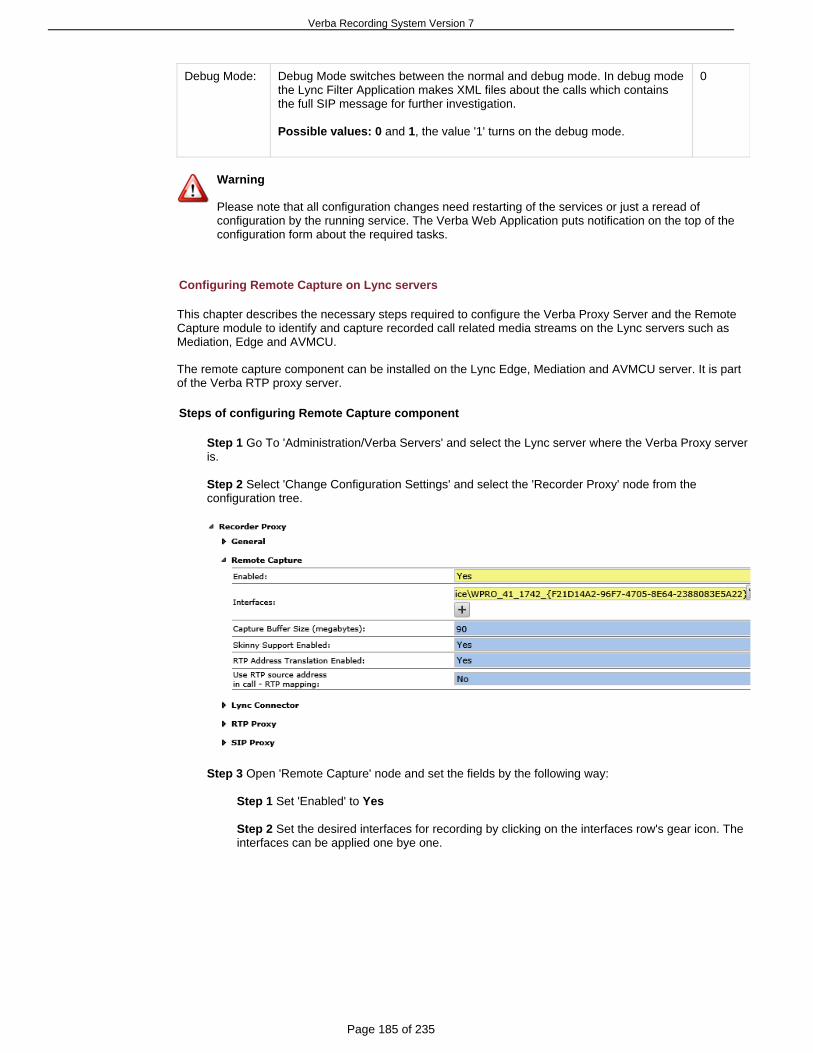
Verba Recording System Version 7
Page 185 of 235
Debug Mode: Debug Mode switches between the normal and debug mode. In debug modethe Lync Filter Application makes XML files about the calls which containsthe full SIP message for further investigation.
Possible values: and , the value '1' turns on the debug mode.0 1
0
Warning
Please note that all configuration changes need restarting of the services or just a reread ofconfiguration by the running service. The Verba Web Application puts notification on the top of theconfiguration form about the required tasks.
Configuring Remote Capture on Lync servers
This chapter describes the necessary steps required to configure the Verba Proxy Server and the RemoteCapture module to identify and capture recorded call related media streams on the Lync servers such asMediation, Edge and AVMCU.
The remote capture component can be installed on the Lync Edge, Mediation and AVMCU server. It is partof the Verba RTP proxy server.
Steps of configuring Remote Capture component
Step 1 Go To 'Administration/Verba Servers' and select the Lync server where the Verba Proxy serveris.
Step 2 Select 'Change Configuration Settings' and select the 'Recorder Proxy' node from theconfiguration tree.
Step 3 Open 'Remote Capture' node and set the fields by the following way:
Step 1 Set 'Enabled' to Yes
Step 2 Set the desired interfaces for recording by clicking on the interfaces row's gear icon. Theinterfaces can be applied one bye one.
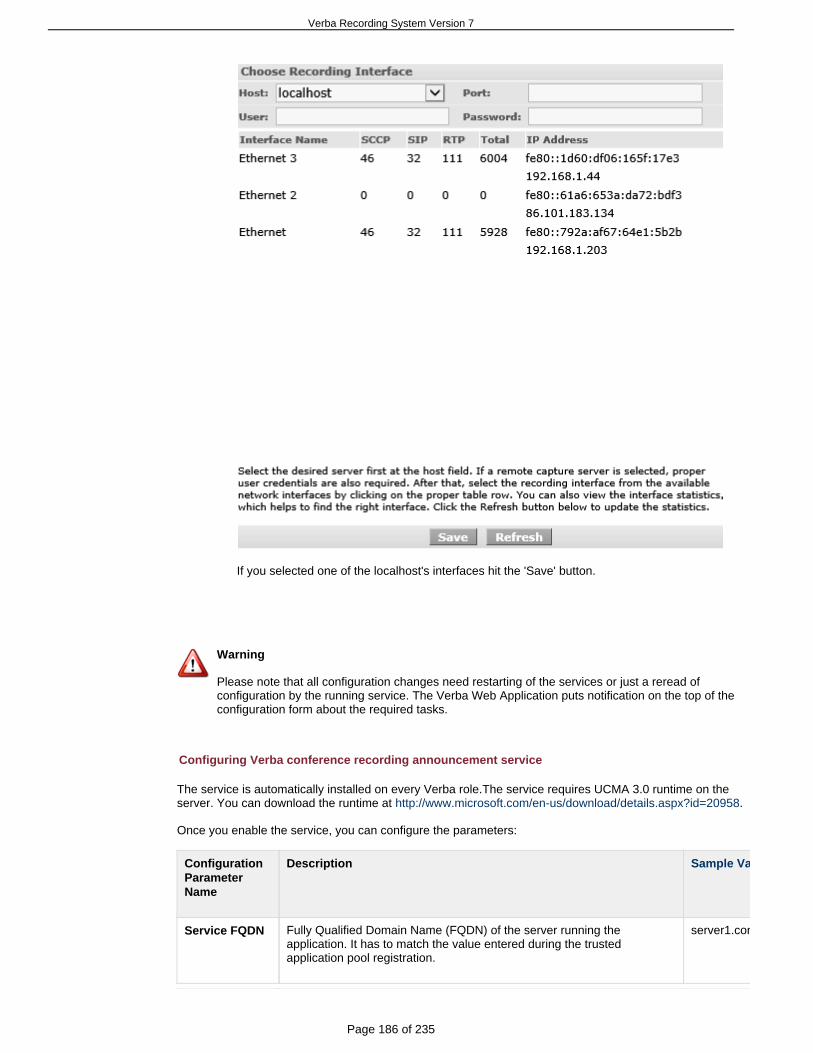
Verba Recording System Version 7
Page 186 of 235
If you selected one of the localhost's interfaces hit the 'Save' button.
Warning
Please note that all configuration changes need restarting of the services or just a reread ofconfiguration by the running service. The Verba Web Application puts notification on the top of theconfiguration form about the required tasks.
Configuring Verba conference recording announcement service
The service is automatically installed on every Verba role.The service requires UCMA 3.0 runtime on theserver. You can download the runtime at .http://www.microsoft.com/en-us/download/details.aspx?id=20958
Once you enable the service, you can configure the parameters:
ConfigurationParameterName
Description Sample Value
Service FQDN Fully Qualified Domain Name (FQDN) of the server running theapplication. It has to match the value entered during the trustedapplication pool registration.
server1.contoso.com

Verba Recording System Version 7
Page 187 of 235
Service Port Service port number used by the UCMA library to communicate with theFront End servers. It has to match the value entered during the trustedapplication pool registration.
6000
Lync PoolFQDN
Fully Qualified Domain Name (FQDN) of the Front End pool where theapplication is registered to.
fepool.contoso.com
Lync Port SIP port on the Front End pool. 5061
Servicecertificate
Friendly name of the certificate used to establish trusted connectionbetween the UCMA application and the Front End pool. You can obtainthe name by locating the installed certificate under application hostcomputer's Console Root\Certificates (LocalComputer)\Personal\Certificates folder, and checking the certificatedetails.
verbaapps.contoso.com Pool
ApplicationURI
SIP address of the announcement service endpoint created by theNew-CsTrustedApplicationEndpoint command. To check the address runthe Get-CsTrustedApplicationEndpoint command and look for theSipAddress parameter.
ApplicationGRUU
Computer Routable User Agent URI (GRUU) of the announcementapplication. Run the following command in a Lync Management Shell,where the the FQDN of the trusted application pool isverbaapps.contoso.com and the application ID is verbaAppID. You cancheck these parameters by simply running the Get-CsTrustedApplicationcommand:
$a = Get-CsTrustedApplication -identity"verbaapps.contoso.com/urn:application:verbaAppID"
$a.ComputerGruus
More information: http://msdn.microsoft.com/en-us/library/office/hh347323(v=office.14).aspx
sip:[email protected];gruu;opaque=srvr:verbaAppID:tBiusNAOGF-VCccpM-LG-gAA
API URL Recorder API address and port number. Use * to enable the API on alllocal network interfaces. The service uses this API to communicate withthe recorder service(s) to obtain such events as call recordingstarted/stopped.
http://*:12222/
IMAnnouncement
The instant messaging text displayed when recording is started by one ofthe participants in the conference. The message is only displayed in thegroup chat when recording is started. If new participant joins theconference, the message is not displayed again.
This meeting is being recorded
VoiceAnnouncement
The audio prompt played in when recording is started by one of theparticipants in the conference. If new participant joins the conference, theservice automatically plays the announcement directly to the newparticipant. Existing participants will not hear the prompt again.
c:\Program Files (x86)\Verba\resources\announcement\recording.wma
Configuring Lync 2010 for the conference recording announcement service
Create a Pool of Trusted Application Servers Using PowerShell Cmdlets
All computers on which the application is to run must be added to the Lync Server 2010 topology document.It is recommended that you create a separate computer pool for a trusted application instead of running theapplication in the same pool where other Lync Server 2010 services are running. This step involves creatinga new pool and adding application servers to it.
Step 1. Running in the Lync Server 2010 Administrator role on the computer on which Lync ServerManagement Shell is installed, launch Lync Server Management Shell.
On the menu, select . On the right-click menu, select , andStart All Programs Microsoft Lync Server 2010then select .Lync Server Management Shell
Verba Recording System Version 7
Page 188 of 235
Step 2. Create the application pool by running the cmdlet. In theNew-CsTrustedApplicationPoolfollowing example, the FQDN of the pool of trusted application computers isverbaapps.contoso.com, the Registrar pool FQDN is atl-mcs-001.contoso.com, CentralManagement Store replication is set to false, and the site ID is Contoso. The ComputerFqdn parameter specifies the FQDN of the first server in the trusted application pool. FQDN of thisserver is server1.contoso.com.
New-CsTrustedApplicationPool -Identity verbaapps.contoso.com -Registraratl-mcs-001.contoso.com –RequiresReplication $false -Site co1 –ComputerFqdnserver1.contoso.com
The FQDN of the application server should appear in the list of replicas.
Step 3. (Optional) If you want to deploy the recording announcement application on multiple servers,additional servers have to be added to the trusted application pool. Run the
cmdlet. In the following example, a new server with an FQDN ofNew-CsTrustedApplicationComputerserver2.contoso.com is added to the trusted application pool whose FQDN is verbaapps.contoso.com.
New-CsTrustedApplicationComputer -Identity server2.contoso.com -Poolverbaapps.contoso.com
Step 4. Run the cmdlet to create the appropriate trusted service entries in ActiveEnable-CsTopologyDirectory for interoperability with Microsoft Office Communications Server 2007 R2.
Enable-CsTopology
Create a Certificate for the Servers in a Trusted Application Pool
MTLS requires a certificate to establish a mutual trust relationship. For servers in a trustedapplication pool, the certificate should meet the following criteria:
Certificates should be stored in the application host computers' (the servers where the application isbeing deployed) Console Root\Certificates (Local Computer)\Personal\Certificates folder.The Subject Name (SN) of the certificate should be set to the trusted application pool FQDN.The Subject Alternative Name (SAN) of the certificate should list the trusted application pool FQDNand all of the trusted application server FQDNs.The certificate must be trusted by a root certificate in the host computer’s Console Root\Certificates(Local Computer)\Trusted Root Certification Authorities\Certificates folder.The account used to run the application must have read access to the certificate store and theprivate key.
The steps that follow list different ways of requesting a certificate that matches the given criteria. Certificatesmeeting all of the preceding requirements for multiple computers in a pool can be exported to othercomputers’ local certificate stores and used for trusted applications. However, users in the TrustedApplication Service Account role must be given access to the certificates on all machines.
For more information on creating certificate requests, please refer to the following documentation: http://msdn.microsoft.com/en-us/library/office/hh347354(v=office.14).aspx
Add a Trusted Service Port for the Application
To perform the steps of the following procedure, you must be in the Lync Server 2010 Administrator role onthe computer where Lync Server Management Shell is installed. To add a trusted service port for theapplication:
Step 1. On the menu, select , select , and then select Start All Programs Microsoft Lync Server 2010.Lync Server Management Shell
Step 2. Add your application to the application pool.
The following PowerShell cmdlet adds an application to the verbaapps.contoso.com application pool, usingport 6000, with application ID verbaAppID.
Verba Recording System Version 7
Page 189 of 235
New-CsTrustedApplication -ApplicationId verbaAppID -TrustedApplicationPoolFqdnverbaapps.contoso.com -Port 6000
Step 3. Run the cmdlet to create the appropriate trusted service entries in Active Enable-CsTopologyDirectory for interoperability with Microsoft Office Communications Server 2007 R2.
Enable-CsTopology
Using Microsoft Lync Server 2010 Control Panel you can view the application name, trusted application poolFQDN, and application port.
Create Active Directory Contact Object
The Active Directory contact object is similar to an Active Directory user object. This contact object gives theapplication a virtual identity in the form of a SIP URI or phone number. To create an Active Directory contactobject, carry out the following steps. To perform the steps of the following procedure, you must be in theLync Server Administrator role or Trusted Application Operator role, on a computer on which Lync ServerManagement Shell is installed. To create Active Directory contact objects:
Step 1. On the computer where Lync Server Management Shell is installed, launch Lync ServerManagement Shell.
On the menu, select , select , and then click Start All Programs Microsoft Lync Server 2010 Lync Server.Management Shell
Step 2. Add an endpoint for the trusted application. In the following example, a new trusted applicationendpoint is added to the trusted application with an ID of applicationID, running on the trusted applicationpool whose FQDM is trustedapps.contoso.com. The endpoint is assigned a SIP URI ofsip:[email protected] and a display name of Meeting Recorder.
New-CsTrustedApplicationEndpoint -SipAddress sip:[email protected] "Meeting Recorder" -TrustedApplicationPoolFqdnverbaapps.contoso.com -ApplicationId applicationID
Step 3. You can optionally change some of the values of the contact object by running the cmdlet. The following example changes the display name of theSet-CsTrustedApplicationEndpoint
trusted application endpoint with a SIP URI of sip:Meeting [email protected] to Recorder.
Set-CsTrustedApplicationEndpoint -Identity sip:[email protected] "Recorder"
Configuring Lync conference call invitation
This feature in the Verba Web Application allows to receive Lync conference call invites and parse theavailable metadata in the invitation and store the information in the database along with the conference callrecordings. The application is able to detect the subject of the conference call, the meeting ID, and theparticipants are also stored in the Verba system. If a call recording is started with a meeting ID which waspreviously received in an invitation, the system automatically attach the mentioned metadata to the call. Thesystem uses a built-in custom metadata template to store the information.
The related configuration options are accessible on the web interface: open the Media Repository server'sconfiguration and open Web Application / Conference Share Invitation item in the tree.
Meeting processing currently is a custom feature in Verba. In order to match the recordings with theinvitations, the following SQL script has to be executed in the database: invitation-create-share-trigger.sql
ConfigurationParameterName
Description Sample Value
Verba Recording System Version 7
Page 190 of 235
EmailProtocol
POP3 or IMAP POP3
Email Server Host name or IP address of the POP3 or IMAPserver.
pop.mailserver.com
Email ServerFolder forInvites
Logical name of the Inbox folder.Usually it should be set to INBOX.
INBOX
Email AccountUser Name
User name of the email server account. verba_account
Email AccountPassword
Password for the email server account. secret_pwd
AuthenticationRequiredfor EmailAccount
If the email server requires authentication, thisshould be set to Yes.
Yes
Email ServerPort Number
Default ports:
POP3: 110POP3+SSL: 995IMAP: 143IMAP+SSL: 993
110
SSL Requiredfor EmailServer
If the email server requires the use of SSL, thisshould be set to Yes.
No
ArchiveInvites inFolder
Verba puts a flag on each processed emailmessage. If processed messages should be movedto a specific folder (because there are too many),here you can set the target folder name.
PROCESSED
Delete InvitesAfter (days)
Invitation emails can be left on the email server fordebugging purposes. Emails will be deleted after theconfigured value in days. If emails should bedeleted immediately after processing, this should beset to 0.
0
Meeting URLsin Invites
Verba parses the invitation email and tries to find aMeeting ID in the body of the email. This setting letsthe system know where to look for the Meeting ID.For example, if the meeting URL looks like"https://meet.mycompany.com/myuser/QOP2XV3S",then set this setting to "meet.mycompany.com".Multiple values separated by new lines areaccepted.
meet.mycompany.com
Store InviteMessageBodies
For debugging purposes the invitation messagebody can be stored in the database. Requires morestorage but can be handy if anything went wrong.
No
Check for NewInvites Period(sec)
Frequency of email server polling. 15
SendNotificationEmails
If it is set to "Yes", Verba will send an email aftereach recording to the meeting organizer andparticipants.
Yes

Verba Recording System Version 7
Page 191 of 235
Email Subject The subject of the notification email sent by Verba.Available reference strings:
Reference Description
${MEETING_ID} Meeting ID parsedfrom the meetingURL.
${CONFERENCE_ID} Conference ID foundin the meeting emailafter "Conference ID:"
${MEETING_SUBJECT} Subject of theinvitation email.
${USER_NAME} Name of the user theemail will be sent to.
${ORGANIZER_NAME} Name of the meetingorganizer.
${ORGANIZER_EMAIL} Email address of themeeting organizer.
${LINK} Direct access link tothe recording(pointing to Verbaweb application)
Meeting (${MEETING_SUBJECT} -${CONFERENCE_ID} -${MEETING_ID}) recording available
Email Bodyfor Attendees
The body of the notification email sent by Verba toall of the participants except the one who recordedthe call. Available reference strings are the same asfor the Email Subject setting. Verba sends the emailin HTML format so it has to be valid HTML.
Dear ${USER_NAME},<br/><br/>The recorded media of your LyncMeeting(${MEETING_SUBJECT} -${CONFERENCE_ID} -${MEETING_ID}),organized by ${ORGANIZER_NAME}(${ORGANIZER_EMAIL})is now shared with you on thefollowing link: <ahref='${LINK}'>${LINK}</a><br/><br/>You can also access it by looking forit under the Sharing / View SharedItems menu.<br/><br/>Sincerely,<br/>Verba Recording System
Email Bodyfor Organizer
The body of the notification email sent by Verba tothe user who recorded the call. Available referencestrings are the same as for the Email Subjectsetting. Verba sends the email in HTML format so ithas to be valid HTML.
Dear ${USER_NAME},<br/><br/>The recorded media of your LyncMeeting(${MEETING_SUBJECT} -${CONFERENCE_ID} -${MEETING_ID})is now available on the following link:<a href='${LINK}'>${LINK}</a><br/>You can also access it by looking forit under the Search menu.<br/><br/>Sincerely,<br/>Verba Recording System

Verba Recording System Version 7
Page 192 of 235
ShareRecordings toParticipants
If it is "Yes", Verba will automatically create a socalled Shared Item and adds the participants to it sothey will have access to the recording. Note that therecording is owned by the user who started therecording and normally only the owner has accessto a recording.
Configuring Verba Proxy Recorder service
Verba Proxy Recorder service consists of the following modules:
Remote Capture - This module allows to remotely capture network traffic. When the service isenabled on a server, Verba Recording Servers - deployed on other servers - can get access to thenetwork traffic of the local network interfaces on the server. The application is primarily used inMicrosoft Lync recording, where the remote capture service is able to identify the recorded callrelated streams and send them to the Recording Server for processing. The remote capture servicereceives signaling information for the Lync Filter applications, installed on Front End servers andSBAs and SBS. Signaling information is used to identify the relevant streams and only fork streamsrelated to recorded interactions.RTP Proxy - This module acts as a standard RTP proxy, allowing to reroute any RTP streamthrough the application and provide access to media streams for recording. You can use the RTPproxy in any standard SIP environment together with SIP Proxy module, and in Lync environmenttogether with Lync Filter applications installed on frontends, SBA and SBSs.SIP Proxy - It is a standard bypass SIP proxy server implementation. You can reroute SIP callsthrough the proxy server in order to get access to media streams for recording, and insert into thecalls the RTP proxy module. The proxy server can act as SIP outbound proxy and as SIP router, inthis case calls based on called pattern are rerouted to intended next hop in the route. The proxysupports TLS so secure SIP and SRTP in the RTP proxy is supported as well.
You can use any of these modules in the service, you can also combine them on a single server.
General settings
ConfigurationParameterName
Description SampleValue
Listening Port API port used with the Verba passive recording service. 11111
SecureListening Port
API port over TLS used with the Verba passive recording service. 11112
Certificate FilePath
Path to the certificate file used by the recorder proxy service toestablish the TLS connection with the passive recorder service.Supported file format: X.509. You can use your own, self-signedcertificate.
c:\verba.crt
CertificateAuthorityCertificate FilePath
Path to the Certificate Authority (CA) certificate file. Supported fileformat: X.509. If you do not have this type of CA certificate, you canuse your own, self-signed certificate; in this case leave this settingempty.
Private KeyFile Path
Path to the private key file used by the recorder proxy service toestablish the TLS connection with the passive recorder service.Supported file format: X.509.
c:\verba.key
Private KeyFile Password
Password for the private key file used by the recorder proxy service toestablish the TLS connection with the passive recorder service.
AuthenticationUser
User account name to authenticate the passive recorder serviceaccessing the proxy service.
verba
AuthenticationPassword
Password for the user account.

Verba Recording System Version 7
Page 193 of 235
Assign Call ToRecorder onlyon First RTP
If enabled, calls will only be forked to the recording service when theproxy service receives the first RTP packet. If set to No and there is noRTP for the recorded call, the call will not be recorded at all.
No
Call Timeout(sec)
Defines the call timeout value in seconds, which is used to terminatethe call recording automatically if the last RTP packet is received beforethis value.
60
SIP UriModification
Allows to define SIP address manipulation before applying therecording rules. The following valid values apply:
Do not modify SIP addresses - this option does notupdate/manipulate the addresses at allRemove domain part - removes the domain part fromaddressesRemove domain part for numbers only - removes the domainfrom addresses only for addresses containing numbers
Removedomain partfor numbersonly
SIP SupportEnabled forRecording
Enable or disable SIP signaling support for the service. Yes
Remote Capture settings
ConfigurationParameterName
Description SampleValue
Enabled Enable or disable the remote capture module in the service. Yes
Interfaces Interface name of the Ethernet port where recording will be done. Click onthe button on the right to select the interface. In the interface selectionwindow you can also check the actual status of the interface regarding thenumber of RTP and signaling messages captured, so you can select theright interface easily.
CaptureBuffer Size(megabytes)
Ethernet-level capture buffer size in megabytes. 90
SkinnySupportEnabled
Turns on SCCP/Skinny support. By enabling this settings, you can recordany type of calls using SCCP signaling.
Yes
RTP AddressTranslationEnabled
Enable or disable RTP address translation hint to detect the address oftranslated RTP streams.
Yes
Use RTPsourceaddress incall - RTPmapping
Allows to use RTP source address in internal stream map tables. No
Lync Connector settings
ConfigurationParameterName
Description Sample Value

Verba Recording System Version 7
Page 194 of 235
Enabled Enable or disable the Lync Filter connection. Thissetting needs to enabled when Lync recording isused.
Yes
Act as RTPProxy
If enabled, call setup messages - sent by the LyncFilter services - are updated to include the proxyserver as the only available media route optionbetween the participants.
Yes
ListeningPort
API port number used by the Lync Filter services. 10201
CertificateFile Path
Path to the certificate file used by the recorder proxyservice to establish the TLS connection with theLync filter service. Supported file format: X.509. Youcan use your own, self-signed certificate.
C:\Program Files(x86)\Verba\bin\recordercert.crt
CertificateAuthorityCertificateFile Path
Path to the Certificate Authority (CA) certificate file.Supported file format: X.509. If you do not have thistype of CA certificate, you can use your own,self-signed certificate; in this case leave this settingempty.
Private KeyFile Path
Path to the private key file used by the recorderproxy service to establish the TLS connection withthe Lync filter service. Supported file format: X.509.
C:\Program Files(x86)\Verba\bin\recorderkey.key
Private KeyFilePassword
Password for the private key file used by therecorder proxy service to establish the TLSconnection with the Lync filter service.
RTP Proxy settings
ConfigurationParameterName
Description Sample Value
Enabled Enable or disable the RTP proxy module in the service. Yes
Port RangeBegin
RTP port range starting number to receive media streams. 16384
Port RangeEnd
RTP port range ending number to receive media streams. 65535
RerouteTURN/relaystreams
If the original call setup message includes TURN/relay servercandidates, the proxy server can remove those entries to ensure thatthe media will be relayed through this proxy server and notelsewhere.
Yes
EndpointLocal IPSubnets
Calls originated form the listed subnets will be relayed only. If you donot want to filter subnets, leave it empty.
192.168.1.0/24
SIP Proxy settings
ConfigurationParameterName
Description SampleValue
Enabled Enable or disable SIP Proxy module in the service. Yes
Verba Recording System Version 7
Page 195 of 235
Operationmode
The following valid values apply:
Outbound Proxy - the SIP proxy server acts as a standardoutbound proxy.SIP Router - the SIP proxy server uses its own routing rules toroute calls.
OutboundProxy
ListeningPort
SIP listening port. 5060
CertificateFile Path
Path to the certificate file used by the recorder proxy service to establishthe SIP TLS connection with the communication server (e.g. CiscoUCM). Supported file format: X.509. You can use your own, self-signedcertificate.
c:\verba.crt
CertificateAuthorityCertificateFile Path
Path to the certificate file used by the recorder service to establish theSIP TLS connection with the communication server (e.g. Cisco UCM).Supported file format: X.509. You can use your own, self-signedcertificate.
Private KeyFile Path
Path to the private key file used by the recorder service to establish theSIP TLS connection with the communication server (e.g. Cisco UCM).Supported file format: X.509.
c:\verba.key
Private KeyFilePassword
Password for the private key file used by the recorder service toestablish the SIP TLS connection with the communication server (e.g.Cisco UCM).
Verba Backup Best Practices
Having an extensive backup procedure in place for your call recording solution is very important. In case ofa hardware failure or other serious disruptive events, this will let you recover all your recorded calls andconfigurations into a newly reinstalled Verba Recording System.
Warning
Without extensive backup configuration your recordings are at risk. It is the user's responsibilityto have proper backup tools and procedures.
What should I backup for a proper restore?
Your backup is complete and a new Verba Recording System could be from itcompletely restored(including all recordings and configurations), if it consist of the following two components:both
the media files - media path, archiving path, storage targets, all disk folders where you are storingrecorded call media)the SQL database backup file - an SQL database backup file created by the SQL server during abackup job
You need of the followings for a complete restore:no backup
registry - all configurations are included in the database Verba executable files - those are installed after re-installation
When should I backup?
Depending on your business requirements you can do daily, weekly or other regular backups. Most userschose daily backups.
We recommend you are running your file backup:
during the lowest traffic period of your operation (in most cases between 1:00-3:00 AM during thenight)

Verba Recording System Version 7
Page 196 of 235
after your SQL database backup have finished (so your .bak file is available for file backup)
Tip
If your recording system is recording during your backup, make sure you are executing backup in atime period, where recorded traffic is lower and when other servers are not using the backupsystem and backup time will be as short as possible.
How do I find the media files?
You will find all your media files in the following places:
Media Folder - if you have Administrator rights find these under Administration menu / VerbaServers / (select your server) / Change Configuration Settings / Directory Configuration /Media FolderStorage Target Folders - if you have Administrator rights find these under Administration / StorageTarget Folders
Include all these folders in your file backup for complete coverage of all your recordings.
How to do an SQL backup?
Your goal with the SQL backup is to create a .bak backup file that your can handle using your standard filebackup methods.
Please refer to these topics:
Creating a one-off full database backupScheduling backup and maintenance for SQL Server Express (without build-in backup policies)Scheduling backup and maintenance for SQL Server Std and Ent (not available on Express Edition)
Warning
, since those are notDo not do a file backup of the SQL Server database and index filessuitable for restore operations. Run a backup in SQL Server to create a .bak file and include thatfile in your backup.
How to do a restore?
You can completely restore your Verba Recording System if you have a and anbackup for the media files. No other information is necessary.SQL database backup
Steps to restore a Verba Media Repository
Step 1 - Restore your database into a Microsoft SQL Server
Step 2 - Copy the media files to a folder on your planned
Step 3 - Install the Verba Media Repository (during installation point to the restored SQL Server andthe restored Media folder)
Steps to restore a Verba Recording Server
Step 1 - Install the recording server
Step 2 - Go to the web interface and click on the newly installed recording server in Administration /Verba Servers menu item
Step 3 - Follow the instructions
Configuring call direction detection

Verba Recording System Version 7
Page 197 of 235
1.
2.
3. 4. 5. 6.
Definition of call direction
The Verba Recording System detects the direction of each phone call and stores this information in the calldetail record.
Call direction can be one of the followings:
Internal - calls between two phones inside the organizationIncoming - calls initiated outside and coming into the organizationOutgoing - calls initiated inside and going out from the organization
The call direction is detected based on a that you have configured in thelist of gateway IP addressessolution, based on the the following rules:
All calls where the media is coming from an IP address included in your gateway list is an incomingcallAll calls where the media is going to an IP address included in your gateway list is an outgoing callAll other calls are .internal calls
Configuring gateway IP addresses
Login to the Verba Web Application with (e.g. using the default adminSystem Administrator rightsuser called 'Administrator').Find the parameters under Recording Settings Administration menu / Verba Servers / (select
.your server) / Change Configuration Settings / Common ConfigurationSet (IP address entries separated with line breaks).Gateway IP AddressesPress the icon in the top right corner of the configuration tree.SaveA warning appears: " There are tasks to be executed...", click on the link.click hereInspect the list of tasks that wait for execution and click .Execute Selected Tasks
The new settings have effect on , since the call direction decision is made during thenew calls onlyrecording of the call.
Warning
Make sure you list all your gateways (even gateways at your SIP trunk providers if necessary) inorder to allow proper call direction detection.
Configuring the Verba Central Cisco Recorder
Prerequisities - PBX side configuration
First you should to enable central recording API with the dedicated Verba server(s).configure Cisco UCM
Step 1 - Activate the Central Cisco Recorder Services
Step 1 - Login to the web interface with rights.System administrator
Step 2 - Navigate to the menu item and select the correspondingAdministration / Verba Serversserver from the list.
Step 3 - Click on the tab.Service Activation
Step 4 - the following services using the 'Activate this service' button:Activate
Verba Central Cisco Recorder Database ServiceVerba Central Cisco Recorder Service
(Activate this service)
Step 2 - Configure the Central Cisco Recorder Database Service

Verba Recording System Version 7
Page 198 of 235
Go to the tab in the Verba Server management screen (see in stepsChange Configuration Settingsabove) and open the subtree.Central Cisco Recorder Configuration
Step 1 - Set , it is a list of comma separated addressesCisco UCM IP Addresse(s)
Step 2 - Set configured previouslyJTAPI User name
Step 3 - Set configured previouslyJTAPI User Password
Step 4 - After making your changes clicking on the button in top right corner of the configurationSavetree
Step 5 - Follow the instruction in the yellow stripe above the configuration tree to toapply changesVerba services.
Step 6 - Start the in the Service Control tabVerba Central Cisco Recorder Database Service
Step 3 - Configure the Central Cisco Recorder Service
For non-encrypted Cisco phone systems
Step 1 - Make sure that matches the destination address of the trunk device set inServer IP AddressCisco UCM
Step 2 - Make sure that is TCP and UDPSIP Transport Protocol
Step 3 - Make sure that matches the destination port of the trunk device setLocal SIP Port Numberin Cisco UCM

Verba Recording System Version 7
Page 199 of 235
Step 4 - After making your changes clicking on the button in top right corner of the configurationSavetree
Step 5 - Follow the instruction in the yellow stripe above the configuration tree to toapply changesVerba services.
Step 6 - Start the in the Service Control tabVerba Central Cisco Recorder Service
For encrypted Cisco phone systems
Step 1 - Make sure that matches the destination address of the trunk device set inServer IP Address Callmanager
Step 2 - Make sure that is TLSSIP Transport Protocol
Step 3 - Make sure that matches the destination port of the trunk device setLocal SIP Port Numberin Callmanager
Step 4 - Set the (by default you can use c:\verba.crt, this must be theRecorder Certificate File Pathsame as uploaded to Callmanager-trusted cert group)
Step 5 - Set the (by default you can use c:\verba.key)Recorder Private Key File Path
Step 6 - Set the (for verba.key it is Verba456+)Recorder Private Key File Password

Verba Recording System Version 7
Page 200 of 235
Step 7 - After making your changes clicking on the button in top right corner of the configurationSavetree
Step 8 - Follow the instruction in the yellow stripe above the configuration tree to toapply changesVerba services.
Step 9 - Start the in the Service Control tabVerba Central Cisco Recorder Service
If the services start properly, you can start making from your configured endpoints and verify themtest callsby .searching for phone calls
Configuring the Verba IP Trade Recorder Service
Step 1 - Activate the IP Trade Recorder Service
Step 1 - Login to the web interface with rights.System administrator
Step 2 - Navigate to the menu item and select the correspondingAdministration / Verba Serversserver from the list.
Step 3 - Click on the tab.Service Activation
Step 4 - Activate the using the 'Activate this service' button Verba IP Trade Recorder Service
(Activate this service)
Step 2 - Configure the IP Trade Recorder Service
After you have finished you must the Verba IPConfiguring IP Trade turrets for central recording configure

Verba Recording System Version 7
Page 201 of 235
Trade Recorder service.
Go to the tab in the Verba Server management screen (see in stepsChange Configuration Settingsabove).
Step 1 - Make sure that matches the destination address set in the IP TradeServer IP Addresssystem
Step 2 - You can leave the rest of the parameters as default (see for moreIP Trade Recorder settingsdetails)
Step 3 - After making your changes clicking on the button in top right corner of the configurationSavetree
Step 4 - Follow the instruction in the yellow stripe above the configuration tree to toapply changesVerba services.
Step 5 - Start the in the Service Control tabVerba IP Trade Recorder Service
If the services start properly, you can start making from your configured endpoints and verify themtest callsby .searching for phone calls
Advanced Cisco Call Recording Rules
Overview
In certain situations selective recording rules defined through the Verba web interface might not be powerfulenough to define the filter rules you are planning to implement. For these cases you can use an alternative
.method, that provides more powerful recording conditions
The solution is based on an XML file that defines these advanced recording rules:
<VERBA_APP_PATH>\settings\rules.xml
The rules.xml file contains an , where each rule has:ordered list of rules
conditions - a list of conditions, where all should succeed for the rule to matchaction - an action that should be taken when a rule matches
See the rules.xml example below for syntax and usage details.
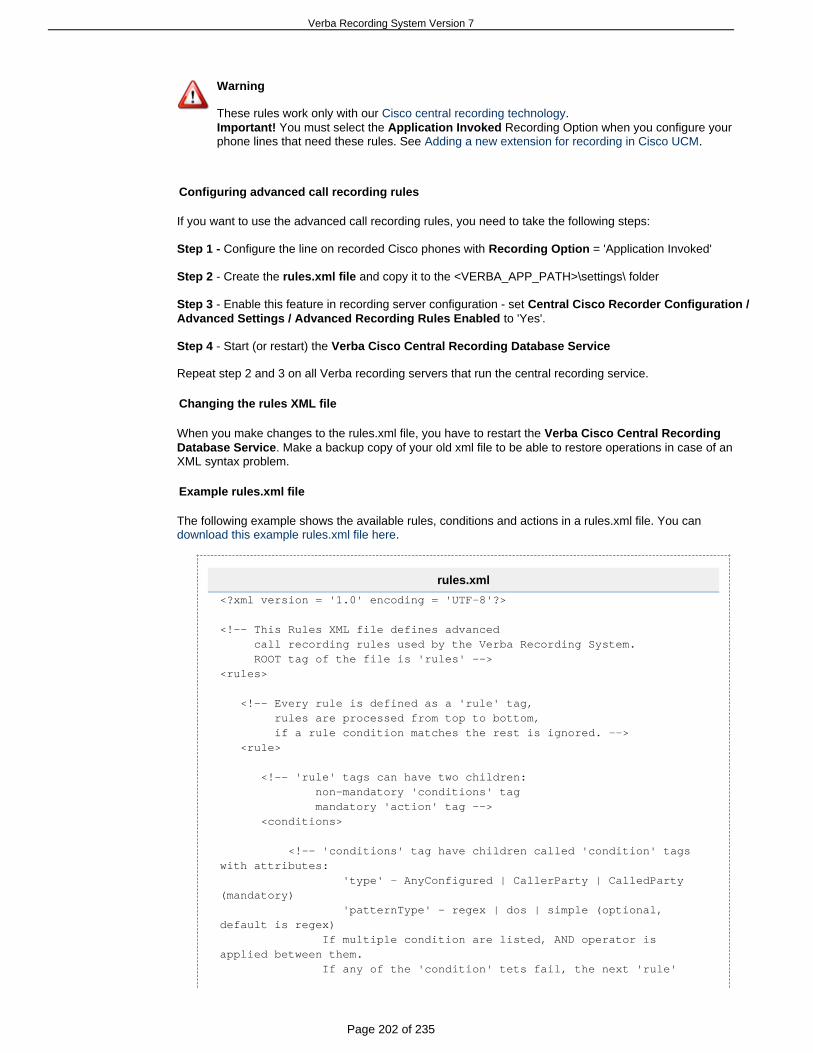
Verba Recording System Version 7
Page 202 of 235
Warning
These rules work only with our .Cisco central recording technology You must select the Recording Option when you configure yourImportant! Application Invoked
phone lines that need these rules. See .Adding a new extension for recording in Cisco UCM
Configuring advanced call recording rules
If you want to use the advanced call recording rules, you need to take the following steps:
- Step 1 Configure the line on recorded Cisco phones with = 'Application Invoked'Recording Option
Step 2 - Create the and copy it to the rules.xml file <VERBA_APP_PATH>\settings\ folder
- Enable this feature in recording server configuration - set Step 3 Central Cisco Recorder Configuration / to 'Yes'.Advanced Settings / Advanced Recording Rules Enabled
Step 4 - Start (or restart) the Verba Cisco Central Recording Database Service
Repeat step 2 and 3 on all Verba recording servers that run the central recording service.
Changing the rules XML file
When you make changes to the rules.xml file, you have to restart the Verba Cisco Central RecordingDatabase Service. Make a backup copy of your old xml file to be able to restore operations in case of anXML syntax problem.
Example rules.xml file
The following example shows the available rules, conditions and actions in a rules.xml file. You can .download this example rules.xml file here
rules.xml
<?xml version = '1.0' encoding = 'UTF-8'?>
<!-- This Rules XML file defines advanced call recording rules used by the Verba Recording System. ROOT tag of the file is 'rules' --><rules> <!-- Every rule is defined as a 'rule' tag, rules are processed from top to bottom, if a rule condition matches the rest is ignored. --> <rule> <!-- 'rule' tags can have two children: non-mandatory 'conditions' tag mandatory 'action' tag --> <conditions>
<!-- 'conditions' tag have children called 'condition' tagswith attributes: 'type' - AnyConfigured | CallerParty | CalledParty(mandatory) 'patternType' - regex | dos | simple (optional,default is regex) If multiple condition are listed, AND operator isapplied between them. If any of the 'condition' tets fail, the next 'rule'

Verba Recording System Version 7
Page 203 of 235
will be evaluated, without processing the 'action'.
See 'condition' examples below: -->
<condition type="CallerParty"patternType="regex">^\d{4}$</condition> <!-- caller party is 4 characters long, contains numbers only-->
<condition type="CalledParty"patternType="regex">^\d{5}$</condition> <!-- called party is 5 characters long, contains numbers only-->
<condition type="CallerParty"patternType="dos">????</condition> <!-- caller party is 4 characters long DOS style -->
<condition type="CalledParty"patternType="dos">?????</condition> <!-- called party is 5 characters long DOS style -->
<condition type="CallerParty"patternType="simple">1234</condition> <!-- caller party is 1234 -->
<condition type="CalledParty"patternType="simple">12345</condition> <!-- called party is 12345 -->
<condition type="CallerParty"patternType="dos">123?</condition> <!-- caller party is 4 characters long and starts with 123-->
<condition type="CalledParty"patternType="dos">123?5</condition> <!-- called party is 12345 -->
</conditions>
<!-- The 'action' tags specifies the action to be taken when all'condition' tags match. Action values can be: record | dont_record --> <action>record</action>
</rule> <!-- The following rule matches for all calls where at least one of the parties are configured for recording in the extension listof the system. --> <rule> <conditions> <condition type="AnyConfigured" /> </conditions> <action>record</action> </rule>
<!-- The following 'rule' tag shows that the 'conditions' tag is notmandatory. This will match every call which did not match any of the above

Verba Recording System Version 7
Page 204 of 235
'rule'. --> <rule> <action>dont_record</action>
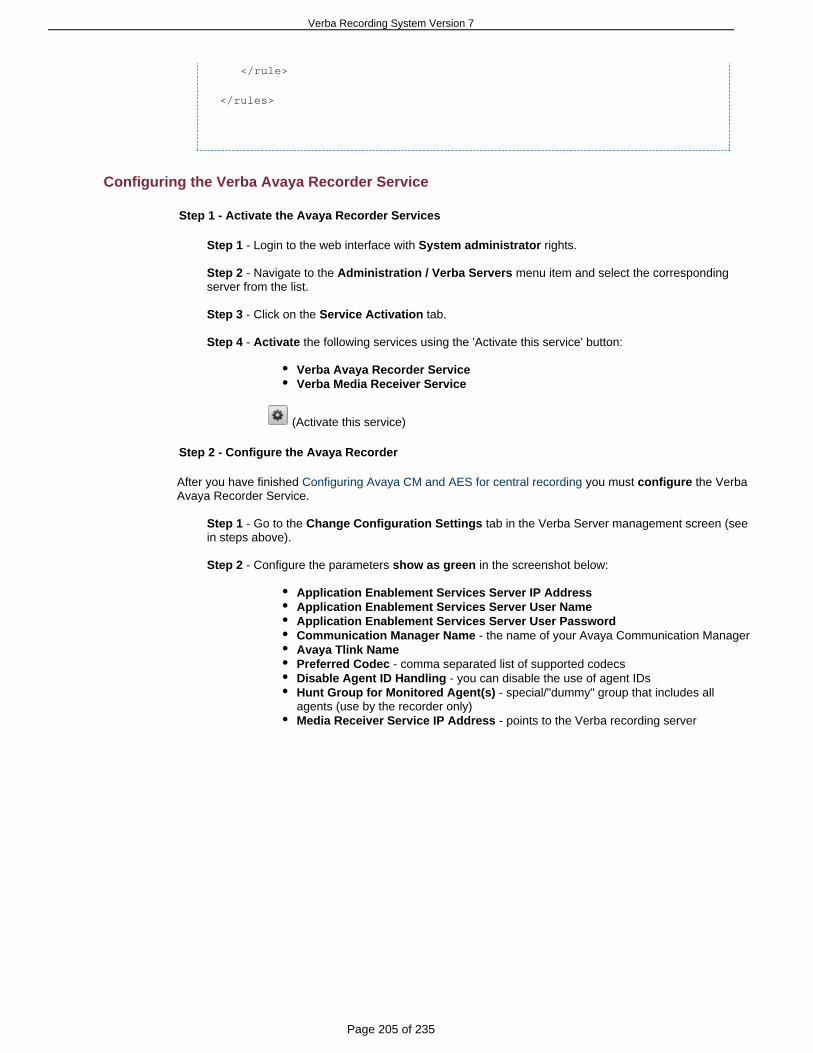
Verba Recording System Version 7
Page 205 of 235
</rule> </rules>
Configuring the Verba Avaya Recorder Service
Step 1 - Activate the Avaya Recorder Services
Step 1 - Login to the web interface with rights.System administrator
Step 2 - Navigate to the menu item and select the correspondingAdministration / Verba Serversserver from the list.
Step 3 - Click on the tab.Service Activation
Step 4 - the following services using the 'Activate this service' button:Activate
Verba Avaya Recorder ServiceVerba Media Receiver Service
(Activate this service)
Step 2 - Configure the Avaya Recorder
After you have finished you must the VerbaConfiguring Avaya CM and AES for central recording configureAvaya Recorder Service.
Step 1 - Go to the tab in the Verba Server management screen (seeChange Configuration Settingsin steps above).
Step 2 - Configure the parameters in the screenshot below:show as green
Application Enablement Services Server IP AddressApplication Enablement Services Server User NameApplication Enablement Services Server User PasswordCommunication Manager Name - the name of your Avaya Communication ManagerAvaya Tlink NamePreferred Codec - comma separated list of supported codecsDisable Agent ID Handling - you can disable the use of agent IDsHunt Group for Monitored Agent(s) - special/"dummy" group that includes allagents (use by the recorder only)Media Receiver Service IP Address - points to the Verba recording server

Verba Recording System Version 7
Page 206 of 235
Step 3 - After making your changes clicking on the button in top right corner of the configurationSavetree
Step 4 - Follow the instruction in the yellow stripe above the configuration tree to toapply changesVerba services.
Step 5 - Start the Verba Avaya Recorder Service and the Verba Media Receiver Service
If the services start properly, you can start making from your configured endpoints and verify themtest callsby .searching for phone calls
Configuring the Verba Dial-in Recorder Service
Prerequisities - PBX side configuration
Step 1 - Plan directory numbers used for different available features
Unattended recorder line: after directory number based authentication call is recordedsilently, without any notificationVoice recorder line: after directory number or PIN code based authentication via voiceprompts call is recorded with beep notification Voice player line: after directory number or PIN code based authentication user canplayback his/her callsVoice portal line: after directory number or PIN code based authentication user can recordcurrent call or playback his/her calls, or playback calls by directory number if access isgranted Controling is done via DTMF - instant voice response.Video portal line: after directory number or PIN code based authentication user can recordcurrent video call or playback his/her calls (audio, video), or playback calls (audio, video) bydirectory number if access is granted. Controling is done via DTMF - instant video response.Open recording lines enabled: incoming calls to other non-specified directory numbers willbe recorded without any authentication process
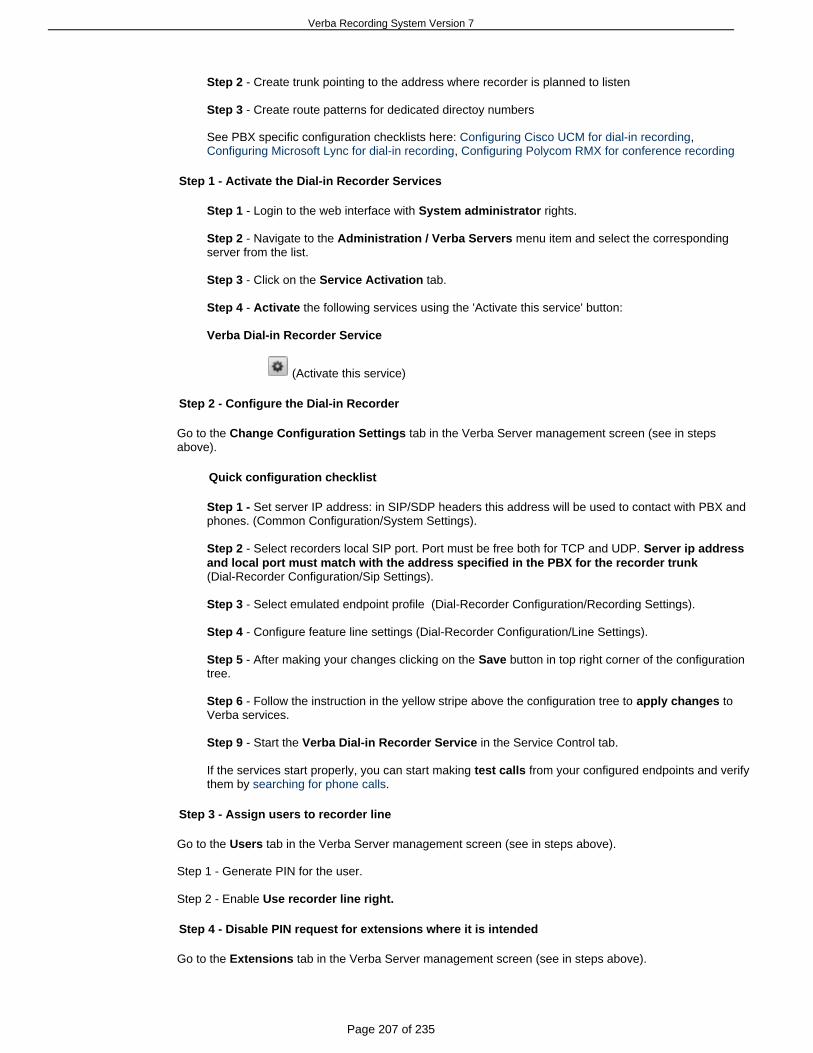
Verba Recording System Version 7
Page 207 of 235
Step 2 - Create trunk pointing to the address where recorder is planned to listen
Step 3 - Create route patterns for dedicated directoy numbers
See PBX specific configuration checklists here: , Configuring Cisco UCM for dial-in recording, Configuring Microsoft Lync for dial-in recording Configuring Polycom RMX for conference recording
Step 1 - Activate the Dial-in Recorder Services
Step 1 - Login to the web interface with rights.System administrator
Step 2 - Navigate to the menu item and select the correspondingAdministration / Verba Serversserver from the list.
Step 3 - Click on the tab.Service Activation
Step 4 - the following services using the 'Activate this service' button:Activate
Verba Dial-in Recorder Service
(Activate this service)
Step 2 - Configure the Dial-in Recorder
Go to the tab in the Verba Server management screen (see in stepsChange Configuration Settingsabove).
Quick configuration checklist
Step 1 - Set server IP address: in SIP/SDP headers this address will be used to contact with PBX andphones. (Common Configuration/System Settings).
Step 2 - Select recorders local SIP port. Port must be free both for TCP and UDP. Server ip addressand local port must match with the address specified in the PBX for the recorder trunk(Dial-Recorder Configuration/Sip Settings).
Step 3 - Select emulated endpoint profile (Dial-Recorder Configuration/Recording Settings).
Step 4 - Configure feature line settings (Dial-Recorder Configuration/Line Settings).
Step 5 - After making your changes clicking on the button in top right corner of the configurationSavetree.
Step 6 - Follow the instruction in the yellow stripe above the configuration tree to toapply changesVerba services.
Step 9 - Start the in the Service Control tab.Verba Dial-in Recorder Service
If the services start properly, you can start making from your configured endpoints and verifytest callsthem by .searching for phone calls
Step 3 - Assign users to recorder line
Go to the tab in the Verba Server management screen (see in steps above).Users
Step 1 - Generate PIN for the user.
Step 2 - Enable Use recorder line right.
Step 4 - Disable PIN request for extensions where it is intended
Go to the tab in the Verba Server management screen (see in steps above).Extensions

Verba Recording System Version 7
Page 208 of 235
Step 1 - Check Do not request PIN for recorder line.
Configuration reference
System settings
Make sure that matches the destination address of the trunk device set in the PBXServer IP Address
Recording line settings
Default voice prompt language: voice prompt language for unauthenticated or users wherelanguage is not specifiedEnable open recording lines: if enabled all calls going to unspecified directory number will berecorded without any authenticationVoice and video prompt's directory: directory for IVR prompts. For customization see xxxxxxUser response timeout: call will be timed out and terminated if there is no user response forrequested action until this timeDifferent feature lines: one or multiply numbers where given feature will invoked.
SIP settings

Verba Recording System Version 7
Page 209 of 235
Call timeout in sec: SIP session timer, if call keepalive fails call is terminated and considered timedoutRTCP support: support for Real-Time Control Protocol, based on this network/bandwidth adaptationfor encoders/decoders is possibleSIP r-port: support for SIP symmetric response routing (RFC 3581)Force duplex streams: the recorder can act as receive only endpoint according to SIP/SDPnegotiation, however some devices do not honor this, and terminates the call because of mediatimeout. If duplex media is forced recorder acts as send-receive endpoint, and generates media. If itis not forced most of the MCUs hide the recorder in the conference, so from video conferencerecording point of view we would recommend disable it.SIP user, password, uri for registration, register as client: if trunk based integration with PBX isnot prefered, the recorder can register as user agent, however in this case it can serve only onedirectory number. SIP address is registration uri config, user name is the user used for digestauthenticationRecorder display name: SIP display name of the recorderRTP port range begin - end: RTP port range used by the recorderSIP signaling transport: prefered transport for recorder initiated SIP sessionsLocal SIP port: SIP port on which the recorder is listening. Be sure that configured IP address andlocal SIP port match the trunk destination address in the PBX
Recording settings
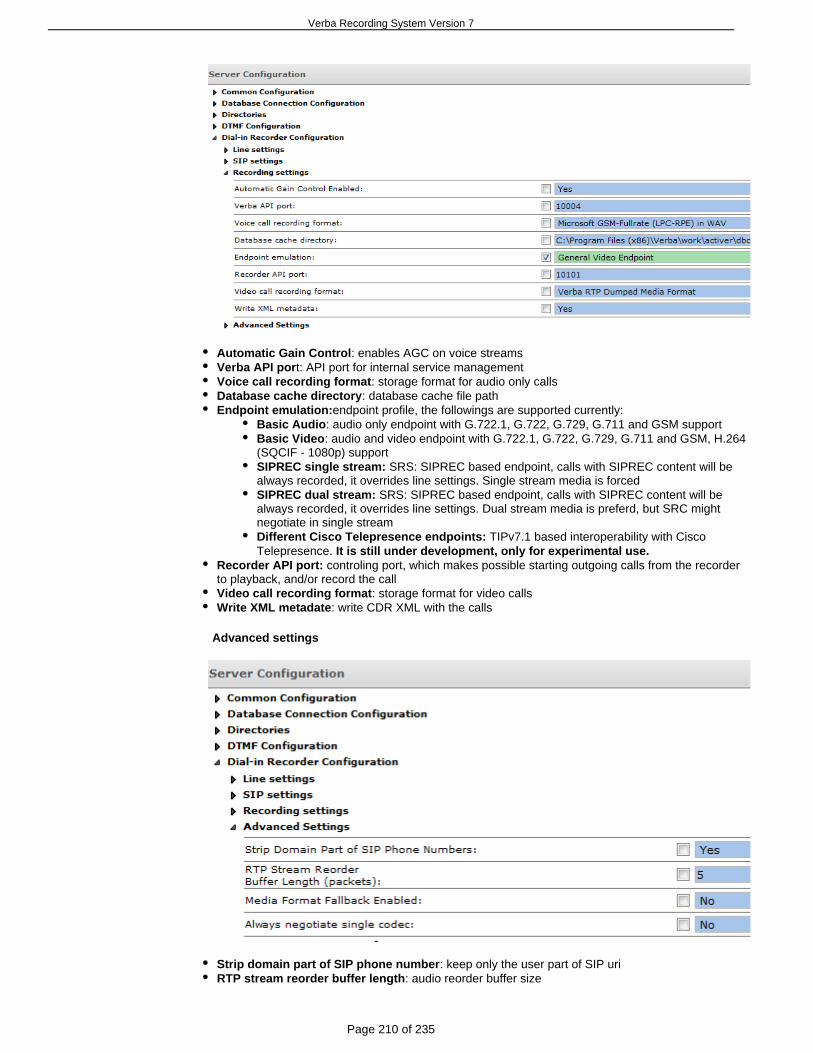
Verba Recording System Version 7
Page 210 of 235
Automatic Gain Control: enables AGC on voice streamsVerba API port: API port for internal service managementVoice call recording format: storage format for audio only callsDatabase cache directory: database cache file pathEndpoint emulation:endpoint profile, the followings are supported currently:
Basic Audio: audio only endpoint with G.722.1, G.722, G.729, G.711 and GSM supportBasic Video: audio and video endpoint with G.722.1, G.722, G.729, G.711 and GSM, H.264(SQCIF - 1080p) supportSIPREC single stream: SRS: SIPREC based endpoint, calls with SIPREC content will bealways recorded, it overrides line settings. Single stream media is forcedSIPREC dual stream: SRS: SIPREC based endpoint, calls with SIPREC content will bealways recorded, it overrides line settings. Dual stream media is preferd, but SRC mightnegotiate in single streamDifferent Cisco Telepresence endpoints: TIPv7.1 based interoperability with CiscoTelepresence. It is still under development, only for experimental use.
Recorder API port: controling port, which makes possible starting outgoing calls from the recorderto playback, and/or record the callVideo call recording format: storage format for video callsWrite XML metadate: write CDR XML with the calls
Advanced settings
Strip domain part of SIP phone number: keep only the user part of SIP uriRTP stream reorder buffer length: audio reorder buffer size

Verba Recording System Version 7
Page 211 of 235
Media format fallback enabled: in case of not supported codecs, too many streams, not supportedstreams, transcoding quality issue, the recorder can inteligently change storage format to differentkind of codecs which might preserve the recording in more optimal quality.Always negotiate single codec: in case of SDP offer the recorder will select one codec in eachmedia stream's codec list in the answer. We support handling of list of codecs, and dynamic codecchanges, so only in case of interoperability issue should this be enabled.
Configuring Verba for Broadsoft or other SIPREC recording
Verba Dial-in Recorder has SIPREC implementation and is responsible to record calls via this newinterface/standard. It detects proprietary vendor specific extensions in the SIPREC CDR xmls automatically,no vendor specific configuration is needed at Verba side.
Activate recording
Step 1 - Provision recoding in PBX. Read more: Configuring Broadworks platform for SIPREC basedcall recording
Step 2 - Configure Verba Dial-in Recording
Step 3 - Select emulation profile for the recorder. If you are not interestedSIPREC dual stream SRSin other services offered by the recorder do not configure any feature line.
Step 4 - If you are interested in DTMF control and recording . configure it
Configuring DTMF control and recording
Passive and SIPREC based recording services support the following DTMF specific features for RFC2833 DTMF:
On demand call keeping by feature access codeMarker addition by feature access codeRecording of DTMF sequences as Verba call markers
Active feature and specify FACs
Step 1 - Navigate to the menu item and select the correspondingAdministration / Verba Serversserver from the list.
Step 2 - Go to the tab in the Verba Server management screen.Change Configuration Settings
Step 3 - Enable feature, and set feature access codes:
Add marker point: adds a zero length marker
Verba Recording System Version 7
Page 212 of 235
Begin a marker: starts a new marker, implicitly closes previous open.End a marker: ends an open marker, so call segments can be markedKeep ondemand call: records on demand callDTMF grouping timeout: timeout till recorder is looking for DTMF chars to put in the samemarker
Configuring Verba for passive recording
Step 1 - Prerequisities
Step 1 - Configure your network mirror ports
Plan where you want to tap your network. For a good recording both signaling and RTP trafficrelated to the to be recorded phones/trunks must be seen on the monitoring port.You can read more about this here:
Overview of monitor ports for passive recordingConfiguring monitor port for passive recordingUsing Cisco switches to filter SPAN traffic
Step 2 - Active the Passive Recorder Service
Step 1 - Login to the web interface with System administrator rights.
Step 2 - Navigate to the menu item and select the correspondingAdministration / Verba Serversserver from the list.
Step 3 - Click on the tab.Service Activation
Step 4 - the following services using the 'Activate this service' button:Activate
Verba Passive Recorder Service
(Activate this service)
Step 3 - Configure the Passive Recorder
Go to the tab in the Verba Server management screen (see in stepsChange Configuration Settingsabove).
Step 1 – Set to determine call direction info (outgoing/incoming/internal)gateway addresses(Common Configuration/Recording Settings)
Step 2 - Select connected to monitoring port (Passive Recorder Configuration/BasicinterfaceSettings/Recording interface)
Step 3 - Select (Passive Recorder Configuration/Advancedvideo call recording modeSettings/Record video call as audio)
Step 4 - If you are interested in (calls canceled, called busy…), enable logging ofincomplete callsthem (Passive Recorder Configuration/Advanced Settings/Record incomplete calls)
Step 5 - If you are interested in DTMF recording configure it
Step 6 - After making your changes clicking on the button in top right corner of the configurationSavetree
Step 7 - Follow the instruction in the yellow stripe above the configuration tree to toapply changesVerba services.
Step 8 - Start the in the Service Control tabVerba Passive Recorder Service
If the services start properly, you can start making from your configured endpoints and verifytest callsthem by .searching for phone calls
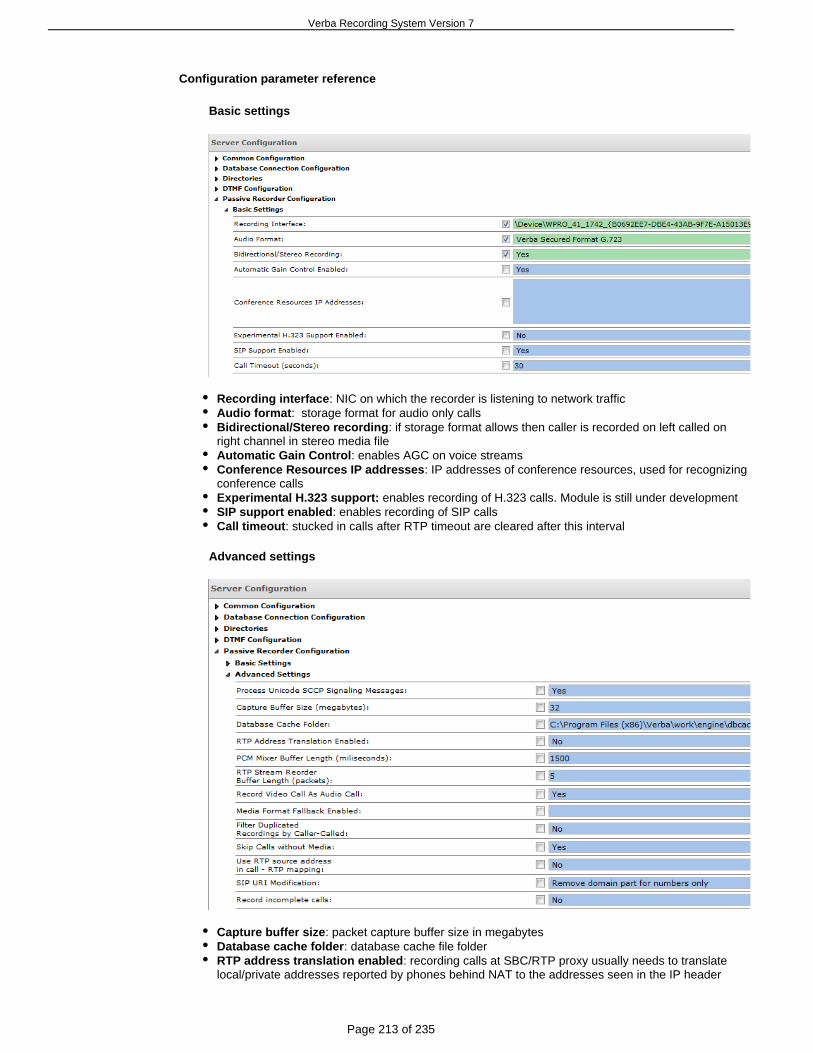
Verba Recording System Version 7
Page 213 of 235
Configuration parameter reference
Basic settings
Recording interface: NIC on which the recorder is listening to network trafficAudio format: storage format for audio only callsBidirectional/Stereo recording: if storage format allows then caller is recorded on left called onright channel in stereo media fileAutomatic Gain Control: enables AGC on voice streamsConference Resources IP addresses: IP addresses of conference resources, used for recognizingconference callsExperimental H.323 support: enables recording of H.323 calls. Module is still under developmentSIP support enabled: enables recording of SIP callsCall timeout: stucked in calls after RTP timeout are cleared after this interval
Advanced settings
Capture buffer size: packet capture buffer size in megabytesDatabase cache folder: database cache file folderRTP address translation enabled: recording calls at SBC/RTP proxy usually needs to translatelocal/private addresses reported by phones behind NAT to the addresses seen in the IP header

Verba Recording System Version 7
Page 214 of 235
rewritten by NAT (public address). You can enable a special mechanism that tries to fix RTPaddress issues here.PCM mixer buffer length: length of mixing buffer in miliseconds. Greater value provides betterquality but higher memory load and bursty CPU usage.RTP stream reorder buffer length: length of RTP reorder buffer can be controled here. Greatervalue provides better reordering but increases memory usageRecord video call as audio call: if enabled only audio part of video calls are recorded, else videocalls are recorded in Verba Media FormatMedia format fallback: in case of not supported codecs, too many streams, not supported streams,transcoding quality issue, the recorder can intelligently change storage format to different kind ofcodecs which might preserve the recording in more optimal quality.Filter duplicated recordings by caller-called: only one call with the same participants will berecorded. This can avoid call duplication in case of SBC/RTP proxy recording related to inbound andoutbound legs.Skip calls without media: Do not insert CDR at calls where no RTP has been received/processedSIP URI modification: control how to transform SIP uriRecord incomplete calls: if enabled CDR related to not established calls due to call cancellation,busy/not available response will be recorded with appropriate end cause info
Installing an SSL certificate for HTTPS access
Overview
The Verba Recording System comes with a for web access and preconfigured HTTPS port HTTP access.can be turned off
In order to avoid HTTPS related security warnings when your end-users access the Verba web applicationyou need to .install an SSL certificate
Note
Generating or purchasing the SSL certificate for your solution is a customer responsilibity. Verbacan only assist with installation of the certificate.
Steps
Here are the steps to import your SSL certificate (the steps below assume that you have installed theproduct in the default folder):
Step 1 - Create a backup of C:\Verba.crt and C:\Verba.key
Step 2 - Create a backup of C:\Program Files\Verba\tomcat\conf\server.xml (on 64 bit systems it isC:\Program Files (x86)\Verba\tomcat\conf\server.xml)
Step 3 - Overwrite C:\Verba.crt with your public key
Step 4 - Overwrite C:\Verba.key with your private key
Step 5 - Open C:\Program Files\Verba\tomcat\conf\server.xml with a file editor
The SSL configuration is around the 100th line and looks something like this:
<Connector port="443" maxHttpHeaderSize="8192" maxThreads="150" minSpareThreads="25" maxSpareThreads="75" enableLookups="false" disableUploadTimeout="true" acceptCount="100" scheme="https" secure="true" clientAuth="false" URIEncoding="UTF-8" protocol="org.apache.coyote.http11.Http11AprProtocol" SSLEnabled="true" sslProtocol="TLS" SSLPassword="Verba456+" SSLCertificateFile="c:\Verba.crt" SSLCertificateKeyFile="c:\Verba.key" compression="on" compressionMinSize="2048" noCompressionUserAgents="gozilla, traviata" compressableMimeType="text/html,text/xml"/>

Verba Recording System Version 7
Page 215 of 235
Change SSLPassword="Verba456+" to the private key's password.
Obviously, you can put the key files to somewhere else and change the SSLCertificateFileand SSLCertificateKeyFile attributes.
Step 6 - Restart Verba Web Application Service
Configuring Verba Secure File Transfer
Overview
Verba Secure File Transfer (VSFT) must be configured on your Verba servers in order to upload files from:
Verba Recording Servers (RS) to (MR)Verba Media RepositoryVerba Desktop Recorders (DR) to (MR) Verba Media Repository
Step 1 - Activate the Verba Storage Management Service
The Verba Secure File Transfer (VSFT) solution is part of the . InVerba Storage Management Serviceorder to configure and use it you will have to activate the service.
Step 1 - Login to the web interface with rights.System administrator
Step 2 - Navigate to the menu item and select the correspondingAdministration / Verba Serversserver or desktop recorder from the list.
Step 3 - Click on the tab.Service Activation
Step 4 - the following serviceActivate Verba Storage Management Service
using the 'Activate this service' button .
Step 2 - Configure VSFT on Verba Media Repository
-Step 1 Go to the tab of the server you want to configureChange Configuration Settings
- Step 2 Open the Storage Management Configuration / Verba Secure File Transfer Server category in the tree
Step 3 - Set status to Enabled Yes
Step 4 - After making your changes clicking on the button in top right corner of the configurationSavetree
Step 5 - Follow the instruction in the yellow stripe above the configuration tree to toapply changesVerba services.
Step 3 - Configure VSFT on Verba Recording Server or Desktop Recorder
-Step 1 Go to the tab of the server/desktop you want to configureChange Configuration Settings
- Step 2 Open the category in the tree Storage Management Configuration / Upload Settings

Verba Recording System Version 7
Page 216 of 235
Step 3 - Set status to Enabled Yes
- Step 4 Make sure that is Upload Protocol Verba Secure File Transfer
- Step 5 Set to the IP address of your Media RepositoryUpload Server IP address or Hostname
Step 6 - After making your changes clicking on the button in top right corner of the configurationSavetree
Step 7 - Follow the instruction in the yellow stripe above the configuration tree to toapply changesVerba services.
Configuring Recording into Verba Secured Format
Overview
The consists of an encrypted media file with an andVerba Secured Format AES 256 RSA encrypted keya . This provides both encryption and tamper proofing.digital signature
Step 1 - Prerequisities
Before you start configuring Configure your solution for call recording without encryption.
Step 2 - Active the Media Streamer Service
Step 1 - Login to the web interface with System administrator rights.
Step 2 - Navigate to the menu item and select the correspondingAdministration / Verba Serversserver from the list.
Step 3 - Click on the tab.Service Activation
Step 4 - the following services using the 'Activate this service' button:Activate
Verba Media Streamer and Content Server Service
(Activate this service)
Step 3 - Generate keys for your recording servers
Each recording server in your Verba solution needs a dedicated encryption key, this key can be generatedfrom the Verba administration interface.
Step 1 – Go to and click System / Encryption Keys Add new Encryption Key
Step 2 – Select the recording server where the key should be deployed ( )Owner Server
Step 3 Click and wait until the keys are (this might take up to 30 seconds)– Save generated
Step 4 - Navigate to the menu item and select the above recordingAdministration / Verba Serversserver from the list
Verba Recording System Version 7
Page 217 of 235
Step 5 - Click on the tab and the recording service that you activated on thatService Control restartserver
Step 4 - Activate Verba Secured Format
Go to the tab in the Verba Server management screen (see the stepsChange Configuration Settingsabove).
Step 1 – Set the Audio Format to under the settings of the recordingVerba Secured Format G.723technology you are using (e.g. Central Cisco Recording Configuration / Basic Settings)
Step 2 – Set the to 'Yes' under Web Application Configuration /Content Server EnabledMiscellaneous Settings
Step 3 After making your changes clicking on the button in top right corner of the configuration– Savetree
Step 4 – Follow the instruction in the yellow stripe above the configuration tree to toapply changesVerba services
Step 5 - Direct playback of encrypted calls using the Verba web player
Note
After the above configurations are done, you usingwill be able to download and play recordingsthe download icon in the call list.However it using the . In order to use thewill no longer allow playback Web-based media playerweb-based player you will have to follow the step below.
For security reasons you have to on your Verba MediaInstall an for HTTPS accessSSL certificateRepository server. You are responsible for generating the SSL certificate for your local hostname of theVerba server.
Configuring Cisco MediaSense for Verba integration
In order to take advantage of Cisco MediaSense and Verba integration, configuration of the Cisco UnifiedCommunication Manager and the recorded devices is required
Tip
We recommend that you while you are configuring Cisco UCM and openkeep this page openeach step in a new window.
Cisco UCM configuration
The inital Cisco UCM configuration includes the following steps:
Step 1 - Activate and start Cisco AXL web service. MediaSense uses AXL for administration andconfiguration tasks
Step 2 - Create or modify an application super user to grant AXL access permission. Application usershould have Standard CCM Super Users group rights
Step 3 - Create Media Sense API user (standard End user, no special rights required), Verba is goingto use the user to connect MediaSense
Step 1 - pointing to the MediaSense server(s). Default listeningCreate and configure the SIP trunkport is 5060, SIP over TLS, and encrypted call recording is not supported currently by Media Sense.
Step 2 - used by the recorded lines / extensionsCreate a recording profile

Verba Recording System Version 7
Page 218 of 235
Step 3 - that let the Cisco UCM to direct calls to the MediaSense clusterConfigure call routing
Step 4 - that provides recording control andCreate an application user for the JTAPI connectiondetailed CDR information. Verba is extending available CDR information for real-time calls via JTAPI
Step 5 - if you use devices supporting iSAC (89xx,Disable the unsupported iSAC and G.722 codec99xx family) or G.722 ( applicable above CUCM 8.5(1)SU1)only
Step 6 - (recommended)Consider need of and configure transcoder resources
Step 7 - (optional) Configure a recording notification tone
Cisco MediaSense configuration
The inital Cisco MediaSense configuration includes the following steps:
Step 1 - In the configuration wizard or Administration/ pUnified CM configuration menu rovide the AXLservice provider. It should be the primary node in your CUCM cluster, and user should be anapplication super user having AXL API access role
In the configuration wizard or Administration/ Step 2 - MediaSense API user configuration menu addthe end user to be used for API access
In the configuration wizard or Step 3 - Administration/Prune policy menu configure the desired datapruning policy
After these steps you can start adding extensions.
Note
The codec configuration in UCM is important for recording, since Cisco phones do not supportcodec changes of the secondary recording call. You might have to deploy transcoding resources tohandle all scenarios, for more information read .Codec guidelines for Cisco Central Recording
Adding and removing extensions
Follow the steps below to add and remove extensions to/from central recording in Cisco UCM:
Add new extensions to central recording (follow these steps to add extensions with Extension)Mobility
Remove extensions from central recording
Warning
When you use RTP-forking based Cisco central recording, the system can record only thoseextensions that are properly configured in the Cisco UCM. It is not enough to add extensions in theVerba Recording System.
Configuring the Verba Cisco MediaSense connector
Skip to end of metadata
Page restrictions applyAttachments:4 Added by , last edited by on Sep 24,Verba Support Verba Support2012 ( )view change
Go to start of metadata
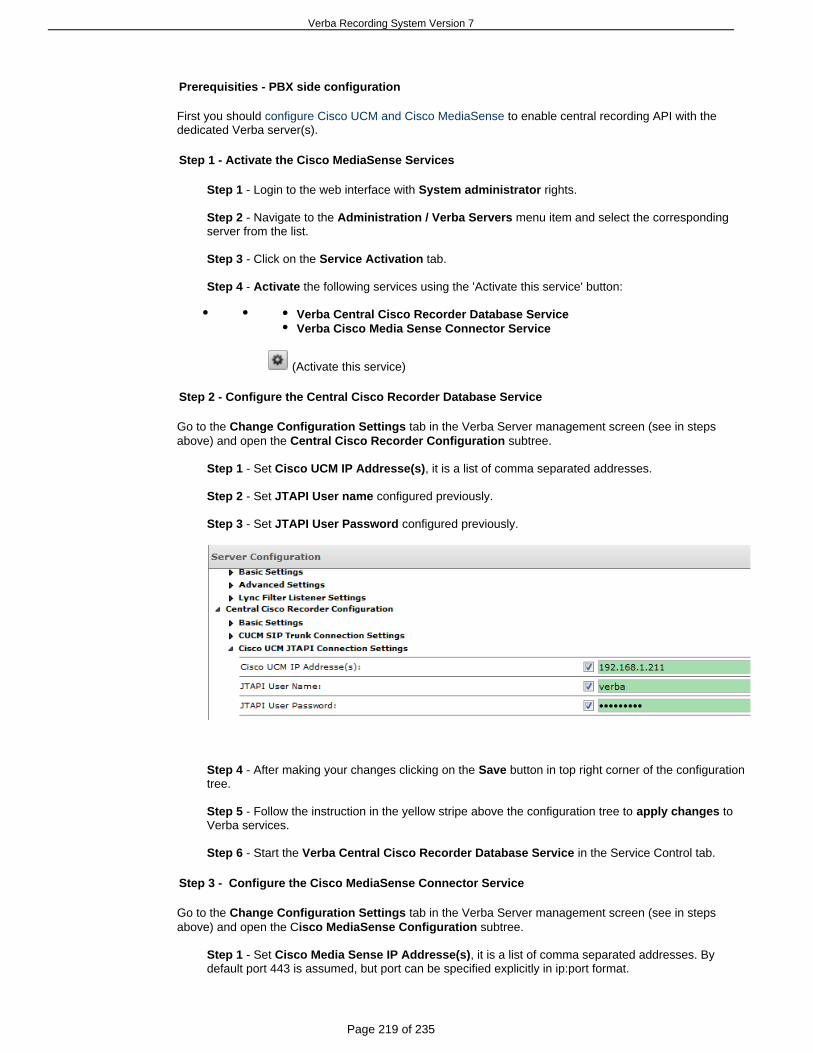
Verba Recording System Version 7
Page 219 of 235
Prerequisities - PBX side configuration
First you should to enable central recording API with theconfigure Cisco UCM and Cisco MediaSensededicated Verba server(s).
Step 1 - Activate the Cisco MediaSense Services
Step 1 - Login to the web interface with rights.System administrator
Step 2 - Navigate to the menu item and select the correspondingAdministration / Verba Serversserver from the list.
Step 3 - Click on the tab.Service Activation
Step 4 - the following services using the 'Activate this service' button:Activate
Verba Central Cisco Recorder Database ServiceVerba Cisco Media Sense Connector Service
(Activate this service)
Step 2 - Configure the Central Cisco Recorder Database Service
Go to the tab in the Verba Server management screen (see in stepsChange Configuration Settingsabove) and open the subtree.Central Cisco Recorder Configuration
Step 1 - Set , it is a list of comma separated addresses.Cisco UCM IP Addresse(s)
Step 2 - Set configured previously.JTAPI User name
Step 3 - Set configured previously.JTAPI User Password
Step 4 - After making your changes clicking on the button in top right corner of the configurationSavetree.
Step 5 - Follow the instruction in the yellow stripe above the configuration tree to toapply changesVerba services.
Step 6 - Start the in the Service Control tab.Verba Central Cisco Recorder Database Service
Step 3 - Configure the Cisco MediaSense Connector Service
Go to the tab in the Verba Server management screen (see in stepsChange Configuration Settingsabove) and open the C subtree.isco MediaSense Configuration
Step 1 - Set , it is a list of comma separated addresses. ByCisco Media Sense IP Addresse(s)default port 443 is assumed, but port can be specified explicitly in ip:port format.

Verba Recording System Version 7
Page 220 of 235
Step 2 - Set configured previously.API User name
Step 3 - Set configured previously.API User Password
Step 4 - Set Central Recorder Database Service address.
Step 5 - Set interval If start and end time is equal, import is donescheduled offline call import . continously. MediaSense is polled every for available callsAdvanced/ interval MediaSense Polling . This import feature affects calls recorded during connector is down.
Step 6 - Modify if necessary (the HTTPS port on which MediaSensecall event listening port connects to send call event notifications after connector successfully subscribed on events). Firewallmust allow connection to this port.
Step 7 - After making your changes clicking on the button in top right corner of the configurationSavetree
Step 8 - Follow the instruction in the yellow stripe above the configuration tree to toapply changesVerba services.
Step 9 - Start the in the Service Control tabVerba Cisco MediaSense Connector Service
If the services start properly, you can start making from your configured endpoints and verify themtest callsby .searching for phone calls
VF Media File Format
Overview
The is a proprietary Verba developed low overhead container format to multiplexVF Media File Formatmultiple recorded voice/video and screen capture channels that supports optional encryptedAES 256media with an and a . This provides both encryption and tamperRSA encrypted keys digital signatureproofing.
The format provides
Supports multiplexing up to 256 channelsFast random access in the media streamsCDR information stored in the media headerDigitally signed header and media contentEncrypted header and media content
Verba Recording System Version 7
Page 221 of 235
Note
The VF Media File Format is in the Verba Recordingjust one of the media storage optionsSystem. It is always used, however when encryption or digital signatures are enabled.
Security features
Best practice industry standard cryptography methods are used. The optional digital signature functionprovides media integrity and authentication verification. When the encryption function is usedplayback is only possible using encryption keys.
Both encryption and digital signatures use public key cryptography:
RSA-2048 public key cryptography protects the media stream cipher's key and signs SHA-1 digestof media content and header valuesAES-256 counter mode block cipher encrypts media streamsAES key is generated from 4096 bit random number with SHA-256 hashing, and protected with RSAencoding in the headerMultiple RSA key pairs might be used for encryption, so each media file can have a master key, andcan be played back by master key owners even if other keys are lost
Playback infrastructure
Playback is done via a media streaming service, which decrypts the media on the server, transcodes it toMP3, and streams it to the web-based media player of the system over HTTPS. All media requests areauthenticated by tokens, requests with valid tokens are served: Tokens are generated in Verba WebApplication authenticated user sessions for each playback requests.
Offline VF Media File Format tool
For offline media handling there is a Windows-based tool with the following features:
Checks digital signature (requires public key)Shows CDR information (requires private key for encrypted content)Shows media information (requires private key for encrypted content)
Note
This tool is not required when users access the media repository directly through their secureVerba web access.
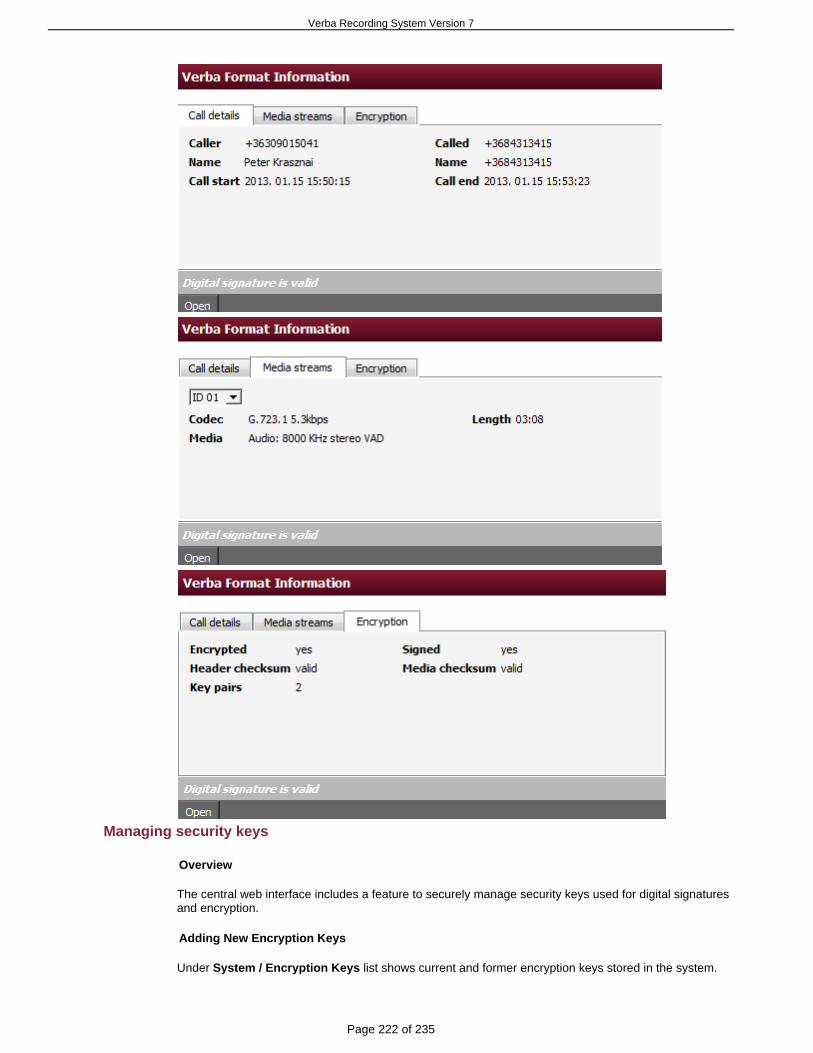
Verba Recording System Version 7
Page 222 of 235
Managing security keys
Overview
The central web interface includes a feature to securely manage security keys used for digital signaturesand encryption.
Adding New Encryption Keys
Under list shows current and former encryption keys stored in the system.System / Encryption Keys

Verba Recording System Version 7
Page 223 of 235
Former keys have to be deactivated, before a new can be can be generated. The former keys are stored inthe system for decryption of calls recording during the time when the key was active.
The simplest way to add new keys to the system is using the function.Add New Encryption Key
Warning
Generating the new keys might take more than a minute. Please after you click Save.be patient
Changed encryption key configuration must be "pushed" to the recording servers by following thesteps shown in the above the list.yellow stripe
Changing existing key parameters
On the Encryption Key Configuration page you can do the following actions:
Change Validity Interval - This shows and controls the time period when the keys are used fordigital signature and encryptionReport Compromised - If you suspect that a certain key have left the system in any way,you can mark it as Compromised. The system will alert you of this fact whenever you tryto verify the digital signature of a call
- Before you add a new key to the system, you must Deactivate the formerDeactivatekey, deactivation sets the field of the key to the current date and timeValid to
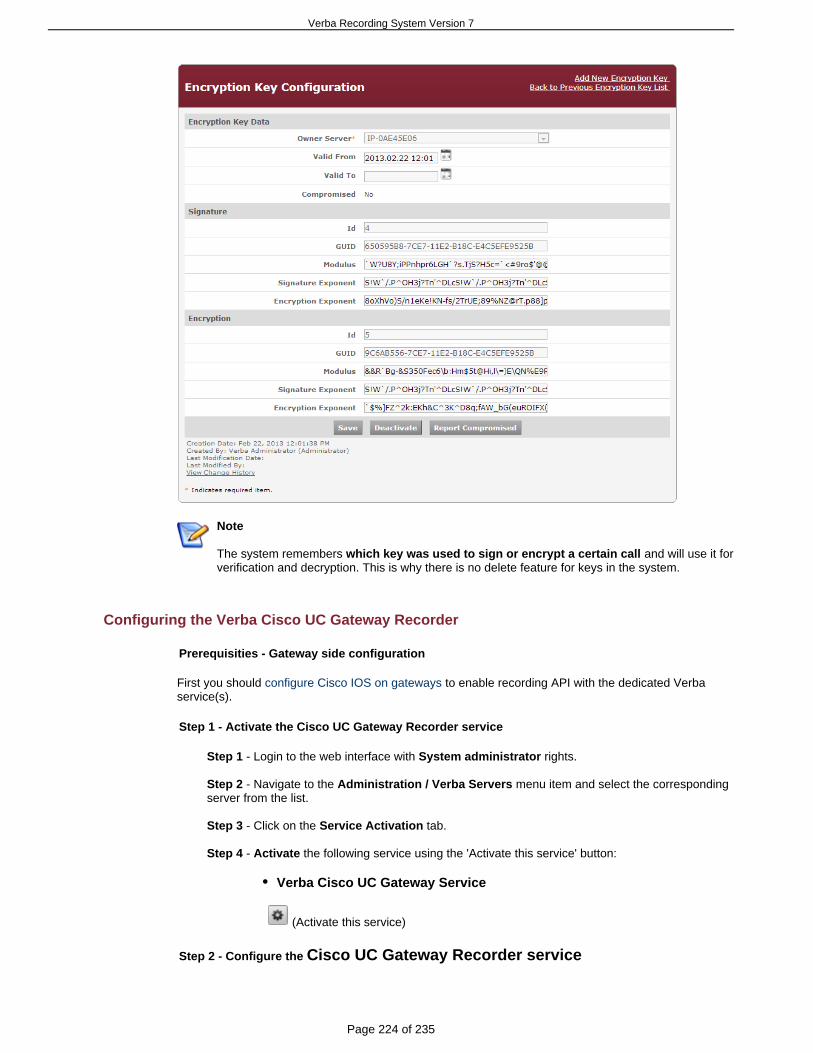
Verba Recording System Version 7
Page 224 of 235
Note
The system remembers and will use it forwhich key was used to sign or encrypt a certain callverification and decryption. This is why there is no delete feature for keys in the system.
Configuring the Verba Cisco UC Gateway Recorder
Prerequisities - Gateway side configuration
First you should to enable recording API with the dedicated Verbaconfigure Cisco IOS on gatewaysservice(s).
Step 1 - Activate the Cisco UC Gateway Recorder service
Step 1 - Login to the web interface with rights.System administrator
Step 2 - Navigate to the menu item and select the correspondingAdministration / Verba Serversserver from the list.
Step 3 - Click on the tab.Service Activation
Step 4 - the following service using the 'Activate this service' button:Activate
Verba Cisco UC Gateway Service
(Activate this service)
Step 2 - Configure the Cisco UC Gateway Recorder service

Verba Recording System Version 7
Page 225 of 235
Go to the tab in the Verba Server management screen (see in stepsChange Configuration Settingsabove) and open the subtree.Cisco UC Gateway Recorder Configuration
Step 1 - Set , it is a list of gateway urls. One recorder is able to record manyXCC service url(s)gateways.
One entry specifies the XCC provider url (gateway's url) and recorder's local port number where itshould listen and connect to specified gateway separated by ';'.
Warning
Please note that:1. Gateway authenticates the recorder's HTTP requests by wsapi/xcc/remote-url setting(ip and port part), it must match the recorders's ip and local port specified here2. Gateway sends HTTP requests to the recorder to address specified inwsapi/xcc/remote-url setting (ip and port part), it must match the recorders's ip and localport specified here3. The local port must be a free and unique TCP port for each gateway connection fromrange 1-65535
Step 2 - After making your changes clicking on the button in top right corner of the configurationSavetree
Step 3 - Follow the instruction in the yellow stripe above the configuration tree to toapply changesVerba services.
Step 4 - Start the in the Service Control tabVerba Cisco UC Gateway Recorder
How to install your Verba license
Please follow the guidelines below to quickly install your Verba license:
Step 1 - Navigate to the itemSystem/License
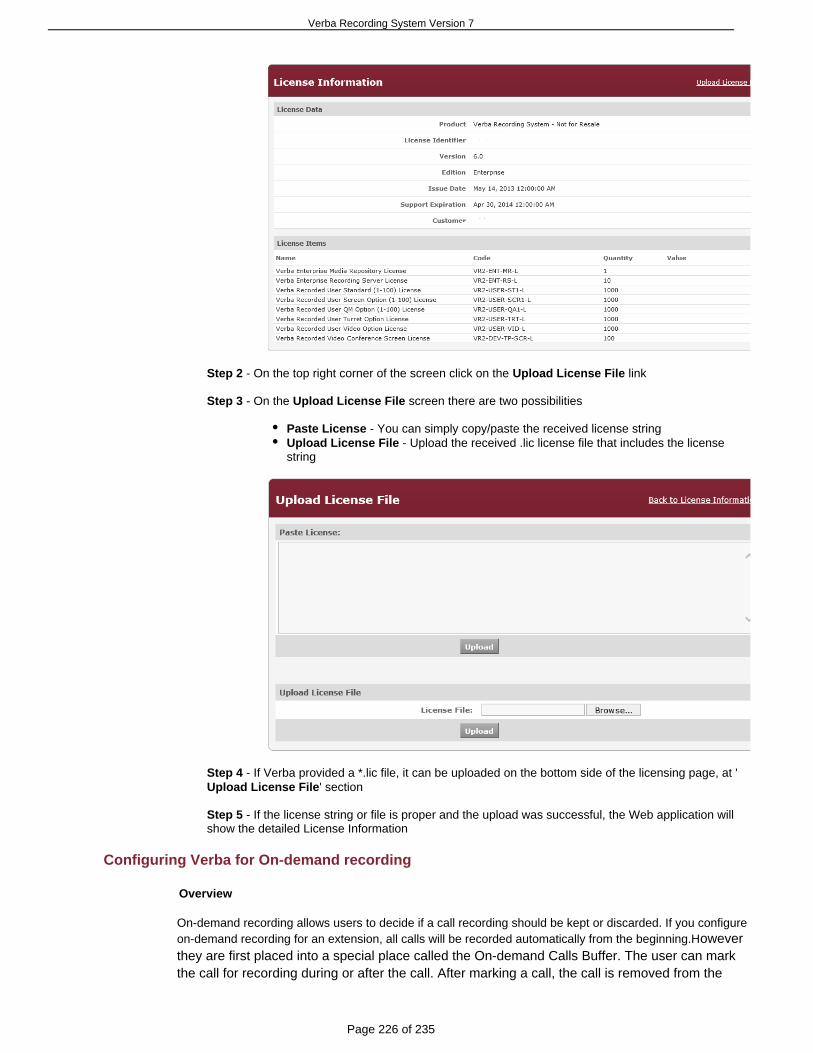
Verba Recording System Version 7
Page 226 of 235
Step 2 - On the top right corner of the screen click on the linkUpload License File
Step 3 - On the screen there are two possibilitiesUpload License File
Paste License - You can simply copy/paste the received license stringUpload License File - Upload the received .lic license file that includes the licensestring
Step 4 - If Verba provided a *.lic file, it can be uploaded on the bottom side of the licensing page, at '' sectionUpload License File
Step 5 - If the license string or file is proper and the upload was successful, the Web application willshow the detailed License Information
Configuring Verba for On-demand recording
Overview
On-demand recording allows users to decide if a call recording should be kept or discarded. If you configureon-demand recording for an extension, all calls will be recorded automatically from the beginning.Howeverthey are first placed into a special place called the On-demand Calls Buffer. The user can markthe call for recording during or after the call. After marking a call, the call is removed from the

Verba Recording System Version 7
Page 227 of 235
buffer and can be found among the other normally recorded calls. Calls that are not marked forrecording will be deleted after a configurable amount of time. Since this feature is based ondatabase and file transactions, it's entirely platform independent and therefore works with anyphone system and call recording technology.
Enabling On-demand recording for extensions
You can configure Verba for on-demand call recording by following the steps below:
Step 1: Configure the required extensions in your phone system and Verba for automatic always-onrecording. ( ).Configure Recording
Step 2: In the Verba web application go to Administration > Extensions.
Step 3: Choose an extension for which you want to enable on-demand recording or if you haven'tadded it to Verba yet, add it by clicking 'Add New Extension'.
Step 4: On the extension configuration page, set 'Recording Mode' to 'On-demand', then click Save.
Step 5: Apply the changes to extension configuration across all Verba servers
Working with on-demand recording
User assigned to an on-demand extension can keep calls using the following options:
Verba web interface: select Calls > On-demand calls buffer and click on the Record icon to mark thedesired call for recording.
Cisco Phone Service: users with Cisco phones can mark a call for recording through the Verbaphone service using the Record soft key. To configure the Cisco phone service, please refer to thecorresponding article: .Configuring the Cisco Phone serviceDTMF control from the phone. To configure DTM control, please refer to the following article:
.Configuring DTMF Control
Changing the on-demand buffer size
Unmarked calls will be deleted by the storage system after a set amount of time. To configure this timewindow, follow the steps below.
Step 1: In the Verba web application go to Administration > Verba Servers and select your MediaRepository.
Step 2: Select the 'Change configuration settings' tab, then click Storage Management > On-demandRecording.
Set the ' Step 3: On-demand Recording Buffer Length (hours)' property to the desired value.
Save your settings.Step 4:
Service Provider Edition
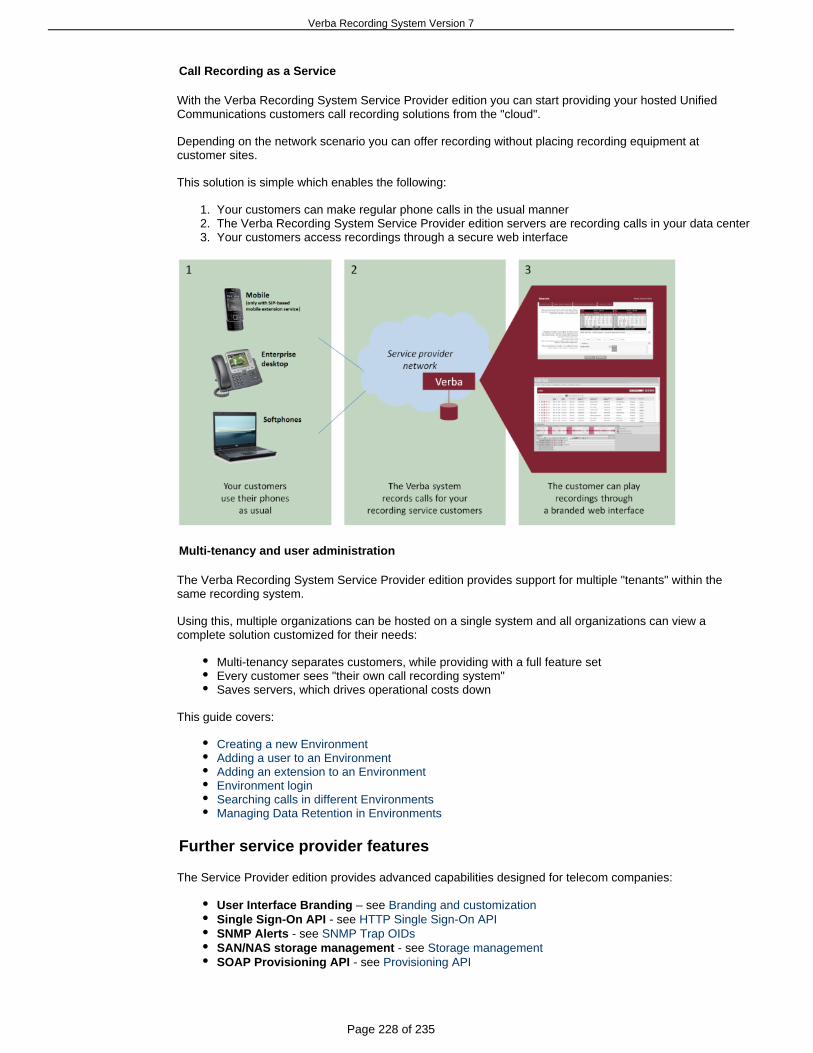
Verba Recording System Version 7
Page 228 of 235
1. 2. 3.
Call Recording as a Service
With the Verba Recording System Service Provider edition you can start providing your hosted UnifiedCommunications customers call recording solutions from the "cloud".
Depending on the network scenario you can offer recording without placing recording equipment atcustomer sites.
This solution is simple which enables the following:
Your customers can make regular phone calls in the usual mannerThe Verba Recording System Service Provider edition servers are recording calls in your data centerYour customers access recordings through a secure web interface
Multi-tenancy and user administration
The Verba Recording System Service Provider edition provides support for multiple "tenants" within thesame recording system.
Using this, multiple organizations can be hosted on a single system and all organizations can view acomplete solution customized for their needs:
Multi-tenancy separates customers, while providing with a full feature setEvery customer sees "their own call recording system"Saves servers, which drives operational costs down
This guide covers:
Creating a new EnvironmentAdding a user to an EnvironmentAdding an extension to an EnvironmentEnvironment loginSearching calls in different EnvironmentsManaging Data Retention in Environments
Further service provider features
The Service Provider edition provides advanced capabilities designed for telecom companies:
User Interface Branding – see Branding and customizationSingle Sign-On API - see HTTP Single Sign-On APISNMP Alerts - see SNMP Trap OIDs
- see SAN/NAS storage management Storage managementSOAP Provisioning API - see Provisioning API

Verba Recording System Version 7
Page 229 of 235
Creating a new Environment
To create a new environment in your Verba multi-tenant system, you have to login the '0000' defaultenvironment. This tenant is the main configuration part of a multi-tenant system.
The environment management page is under the ' ', here you can create andAdministration\Environmentsmanage the environments.
On the top right corner of this page you will find the ' ' link. Click on this and you willAdd new environmentsee the following form, where you can compile a new environment:
The following table describes the available fields:

Verba Recording System Version 7
Page 230 of 235
Field Name Description Requirements
EnvironmentID (EID)
This ID represents the environment in Verba.
This is a unique ID which required at administration.
Required field
Unique 4 digitalphanumericalstring
Max length: 4characters
EnvironmentName
Full name of the environment Required field
EnvironmentName(short)
Short name of the environment Required field
Logo todisplay
Optional logo image can be attached to an environment. The logoimage will be displayed in the header of Verba Web Application forevery user in the environment. The logo will be also displayed in reportheaders generated by environment members.
In order to select a logo image, press the button. In theChoose Logoopen window, you can see the uploaded logo images. Simply click onthe name of the file in the first column to select an image.
-
Valid From Start date of the validation for the environment. It can be configured forlater or previous dates. This field is checked when a call record isinserted and the system tries to associate the call to an environment. Ifa call with a phone number, which is mapped to an environment isrecorded, but the Valid From date is later than the start date of the call,the call will not be associated to the environment.
Required field
Valid Until End date of the validation for the environment. It can be configured forlater or previous dates. This field is checked when a call record isinserted and the system tries to associate the call to an environment. Ifa call with a phone number, which is mapped to an environment isrecorded, but the Valid Until date is earlier than the start date of thecall, the call will not be associated to the environment.
If the field is blank the environment will not expire.
Required field
User CountLimit
The number of maximum users of the environment. -
Group CountLimit
The number of maximum groups of the environment. -
ExtensionCount Limit
The number of maximum extensions of the environment. -
Always onRecordingMode Limit
The number of maximum Always on Recording Mode users of theenvironment.
-
On DemandRecordingMode limit
The number of maximum On Demand Recording Mode users of theenvironment.
-

Verba Recording System Version 7
Page 231 of 235
ControlledRecordingMode Limit
The number of maximum Controlled Recording Mode users of theenvironment.
-
WebSessionCount Limit
The number of simultaneous connections to the web interface. -
SMTPoptions
You can add your own SMTP service to send system alert, report to theenvironment users. (Verba has a default built-in SMTP service)
-
Adding a user to an Environment
Creating a new user account in Verba multi-tenant environment has two possibilities:
Create a user in the default environment to the relevant environmentLogin to the desired extension with a user with full user rights and create the user account 'inside'the environment
The first option is a global solution of adding users to Verba multi-tenant system.
To create the user in default environment, login the default, '0000', environment with the administrator user.
Under ' ' you can find on the top right corner a drop down menu, the 'Administration/Users Current' menu. Here you can select the relevant environment and click the ' ' linkEnvironment Add New User
above.
The user form is the same as the standard Verba system's user form.
Here you can find out details regarding the form: User Details
The is that you can create the user in the environment's administration page.second option
Login to the relevant environment with a user account and follow the instructions set out in the User Detailsarticle.

Verba Recording System Version 7
Page 232 of 235
Adding an extension to an Environment
Adding a new extension in Verba multi-tenant environment has two possibilities:
Add an extension in the default environment to the relevant environmentLogin to the desired extension with a user with full user rights and add the extension 'inside' theenvironment
The first option is a global solution of adding users to Verba multi-tenant system.
To create the user in the default environment, log in to the default, '0000', environment with theadministrator user.
Under ' ' you can locate on the top right corner, a drop down menu, the 'Administration/Extensions Current' menu. Here you can select the desired environment and click the ' ' linkEnvironment Add New Extension
above.
The extension form is the same as the standard Verba system's extension form.
You can find out details about the form and how to add an extension: Extension Details
The is that you can add the extension in the desired environment's administration page.second option
Login to the relevant environment with a user account from that account and follow the instructions set outin the article.Extension Details
Environment login
If the multi-tenant feature is enabled, the Verba login screen contains a new field, theenvironment ID.

Verba Recording System Version 7
Page 233 of 235
Verba represents the environments with a 4 digit number/character ID, during the environment creation youcan assign this specified ID to the new environment. The default (reference environment) is the '0000'. From this default environment you are able to manage theother environments directly ( , , and dataadd environment add users to environments add extensionsretention targets).
In the Environment ID field type the relevant environment's EID.
In a selected environment you are able to login just with an environment user. A newly created environmentdoesn't contain any user by default, it is important to create at least one user to able to login to theenvironment.
The login screen remembers the previous choice of environment. If you want to change the EID, you haveto click on the 'change' check box.
Searching calls in different Environments
In a multi-tenant system, you are able to apply search filters from the default tenant to other tenants or youcan log in the relevant environment and apply filter only on the logged in tenant.
Search from the default environment
If you are logged in to the '0000' default environment you will find an additional field under the Searchpage's Advanced Search Option segment of Criteria panel, this is the ' ' drop down field.Environment
Here you can select the environment you would like to apply your search filter to.
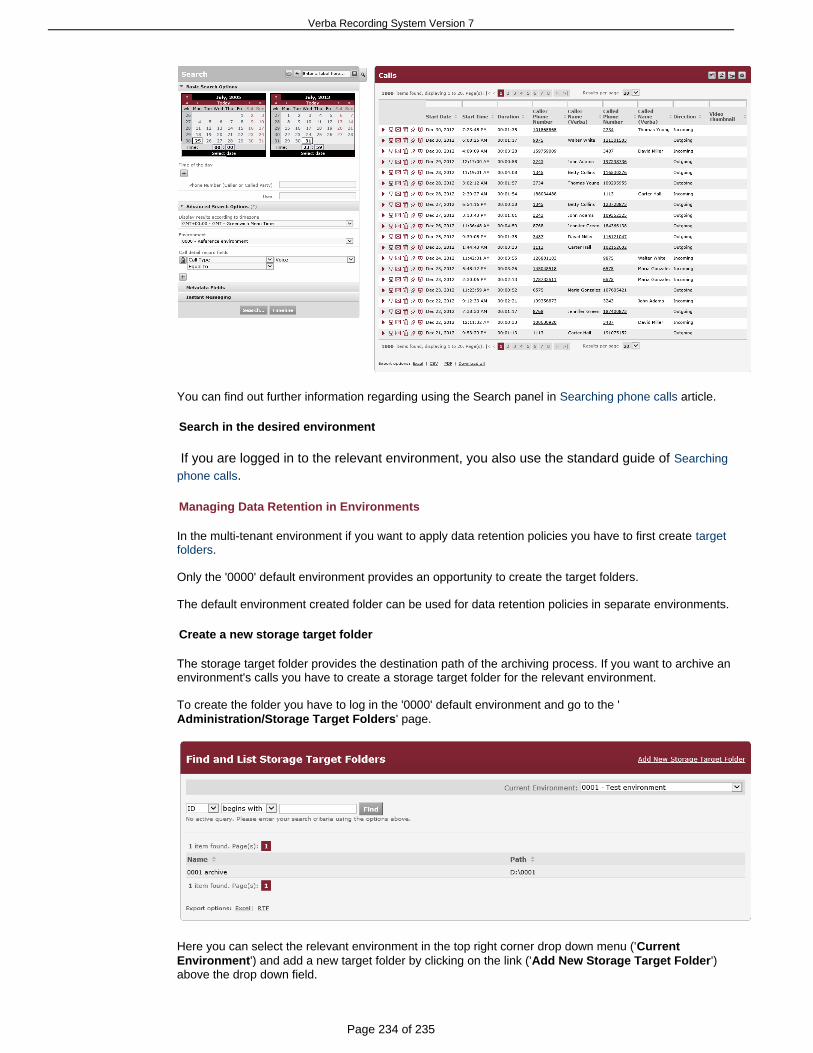
Verba Recording System Version 7
Page 234 of 235
You can find out further information regarding using the Search panel in article.Searching phone calls
Search in the desired environment
If you are logged in to the relevant environment, you also use the standard guide of Searching
phone calls.
Managing Data Retention in Environments
In the multi-tenant environment if you want to apply data retention policies you have to first create target.folders
Only the '0000' default environment provides an opportunity to create the target folders.
The default environment created folder can be used for data retention policies in separate environments.
Create a new storage target folder
The storage target folder provides the destination path of the archiving process. If you want to archive anenvironment's calls you have to create a storage target folder for the relevant environment.
To create the folder you have to log in the '0000' default environment and go to the '' page.Administration/Storage Target Folders
Here you can select the relevant environment in the top right corner drop down menu ('Current') and add a new target folder by clicking on the link (' ')Environment Add New Storage Target Folder
above the drop down field.
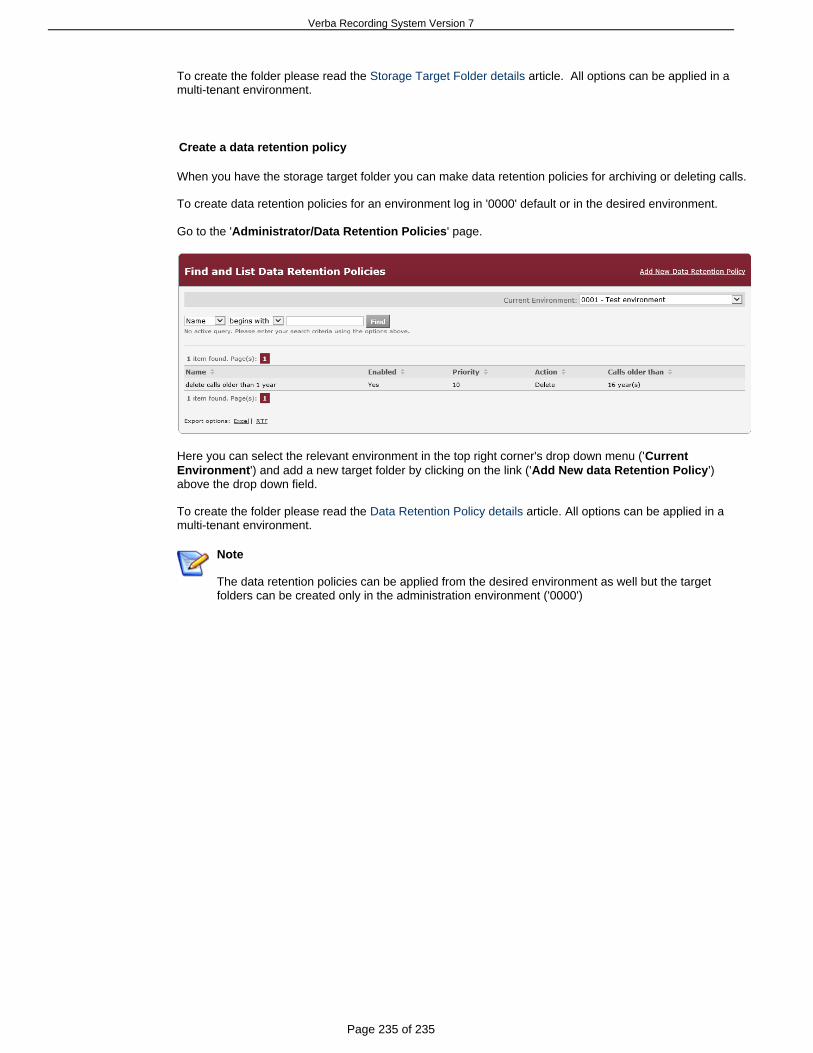
Verba Recording System Version 7
Page 235 of 235
To create the folder please read the article. All options can be applied in aStorage Target Folder detailsmulti-tenant environment.
Create a data retention policy
When you have the storage target folder you can make data retention policies for archiving or deleting calls.
To create data retention policies for an environment log in '0000' default or in the desired environment.
Go to the ' ' page.Administrator/Data Retention Policies
Here you can select the relevant environment in the top right corner's drop down menu ('Current') and add a new target folder by clicking on the link (' ')Environment Add New data Retention Policy
above the drop down field.
To create the folder please read the article. All options can be applied in aData Retention Policy detailsmulti-tenant environment.
Note
The data retention policies can be applied from the desired environment as well but the targetfolders can be created only in the administration environment ('0000')