Venny Travel Adjust - X Fusion Shox · Microsoft Word - Venny Travel Adjust Author: Mike Created...
26
Tools Needed: Bike stand Oil Bucket Lint free shop Towels 13mm Deep Socket (6 point) 1.5mm Allen Key Soft Blow Hammer Pick Set Flat Blade Screwdriver Grease (We recommend Slick Honey) Fork Oil 40cc (We recommend Torco RSF Medium) Oil Measuring Cup (with cc Scale) Isopropyl Alcohol Small Metal Drift 6mm (or similar sized socket) Shop Vise Good Tunes! Tip: Before you start servicing the fork. Note the riders’ settings of the fork adjustments: Air Pressure: __________ Rebound Clicks (from closed): __________ High Speed Clicks (from closed): __________ Low Speed Clicks (from closed): __________ Rev 1.0
Transcript of Venny Travel Adjust - X Fusion Shox · Microsoft Word - Venny Travel Adjust Author: Mike Created...
Tools Needed: Bike stand Oil Bucket Lint free shop Towels 13mm Deep Socket (6 point) 1.5mm Allen Key Soft Blow Hammer Pick Set Flat Blade Screwdriver Grease (We recommend Slick Honey) Fork Oil 40cc (We recommend Torco RSF Medium) Oil Measuring Cup (with cc Scale) Isopropyl Alcohol Small Metal Drift 6mm (or similar sized socket) Shop Vise Good Tunes! Tip: Before you start servicing the fork. Note the riders’ settings of the fork adjustments: Air Pressure: __________ Rebound Clicks (from closed): __________ High Speed Clicks (from closed): __________ Low Speed Clicks (from closed): __________
Rev 1.0

1. Get fork mounted in stand. You can leave it in the bike, but you must remove the wheel and front brake.
2. Release the pressure from the main air chamber

3. Remove Compression Adjuster Cap
4. Remove Low Speed Compression Adjuster (Take care not to use a ball end allen key)

5. Remove High Speed Compression Adjuster (Take care not to use a ball end allen key)
6. Loosen and Remove Damper Foot Nut (If the plastic crush washer stays on the Damper, Carefully Remove with a Pick)

7. Loosen and Remove Air Rod Foot Nut (If the plastic crush washer stays on the Air Rod, Carefully Remove with a Pick)
8. Place oil bucket under fork. Use a hammer and socket to unseat air rod from lowers. Then use the nut from the air rod on damper to unseat that from the lowers. Allow oil to drain into bucket.

9. Remove Lowers from upper assembly and place aside on towel to drain remaining fluid.
10. Using a lint free towel, wipe clean both the air rod and the damper.

11. Using a pick. Locate the notch in the spiral clip and gently pry out of groove.
12. Firmly grasp air rod and pull. Use a pointed object to hold open the air valve; this will ease removal of the air rod. Clean the air rod with isopropyl alcohol and a lint free cloth.

13. Using a small dowel, place air rod on vise, so that the roll pin can be pushed through a little
bit.
14. Use a 6mm socket as a receptacle for the roll pin.

15. Place in vise. Take care not to push roll pin completely through the travel stop. Assembly will be much more difficult if roll pin is removed completely.
16. Select which travel you would like set your Vengeance to. This procedure will be for the 100mm, but it is the same for all three.

17. Once you have decided what travel you are setting to. Line up roll pin and carefully place in vise and gently begin to press roll pin through travel stop and air rod. A slight rotation back and forth while pressing the roll pin will help it engage the air rod and reduce risk of damaging air rod.
18. Press roll pin in until vise bottoms on travel stop. Do not pinch or tighten vise down on
travel stop.
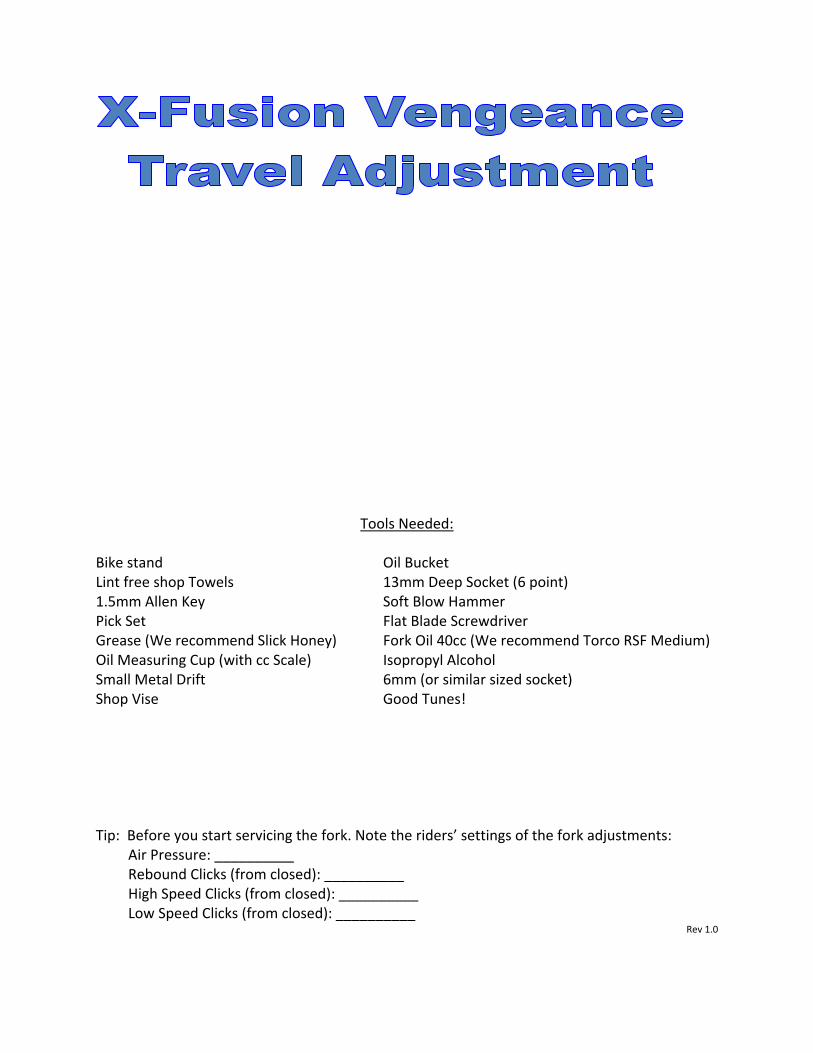
19. Notice that the roll pin is not centered within the travel stop.
20. Use a small dowel pin to gently center roll pin in the travel stop.

21. Check to ensure the roll pin has been pressed into a centered position within the travel stop.
22. This is the completed 100mm air rod.

23. Before you re‐install the air rod into the stanchion tube. Check a few things, your air rod should look just like this one.
1. Check that the bumper pad, make sure it is seated within the base plate. 2. Check for very firm 90 durometer o‐ring 3. Make sure there is no heat shrink around bottom of negative spring 4. Check heat shrink for tension. If loose or worn replace.
*‐ If any of these items are incorrect or damaged check with your local service center for the needed parts.
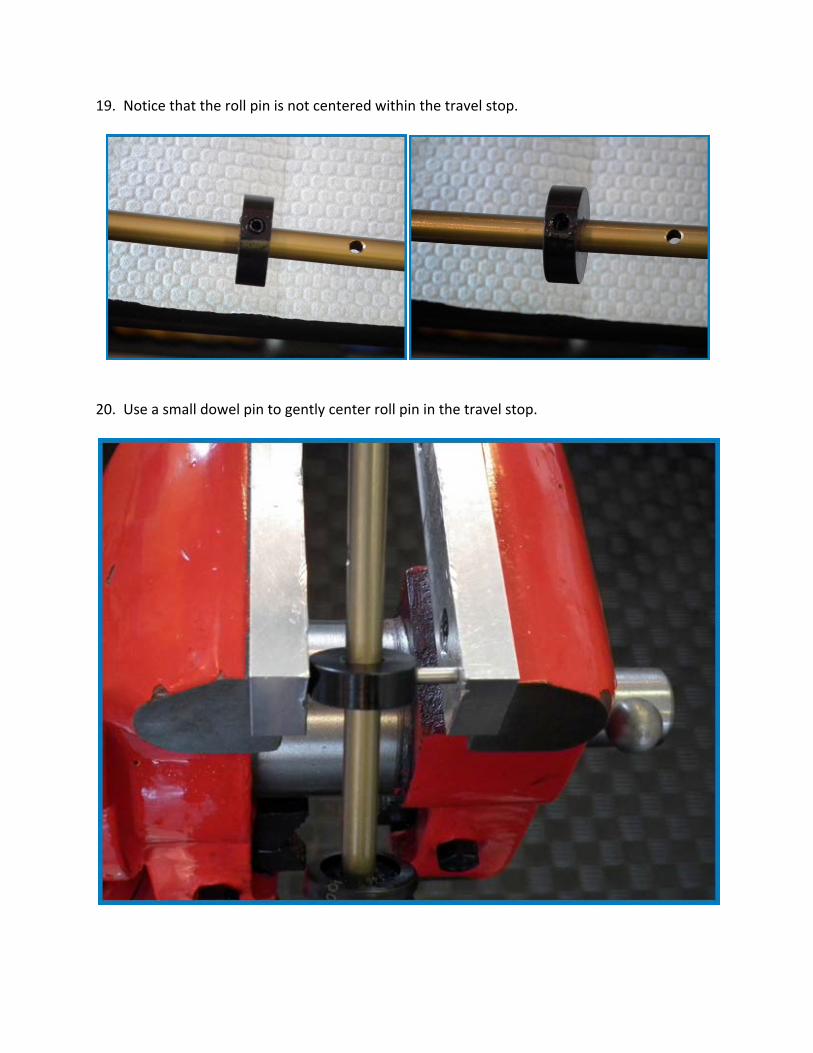
24. Liberally apply grease to the air piston head.
25. Apply about 5cc of grease to negative spring assembly.

26. Carefully install Air Rod into stanchion. Take time and care not to damage the X‐ring seal when installing. Before installing, carefully add 3‐5cc of suspension fluid to air chamber.
27. Use a finger or pointed item to depress air valve. This will make installing the air rod much easier.

28. Firmly seat base plate into stanchion tube. Make sure it is seated all the way in. If the base plate is cocked sideways the spiral clip will not seat correctly.
29. Gently start spiral clip by inserting one side into the slot in stanchion and continuing all the way around.
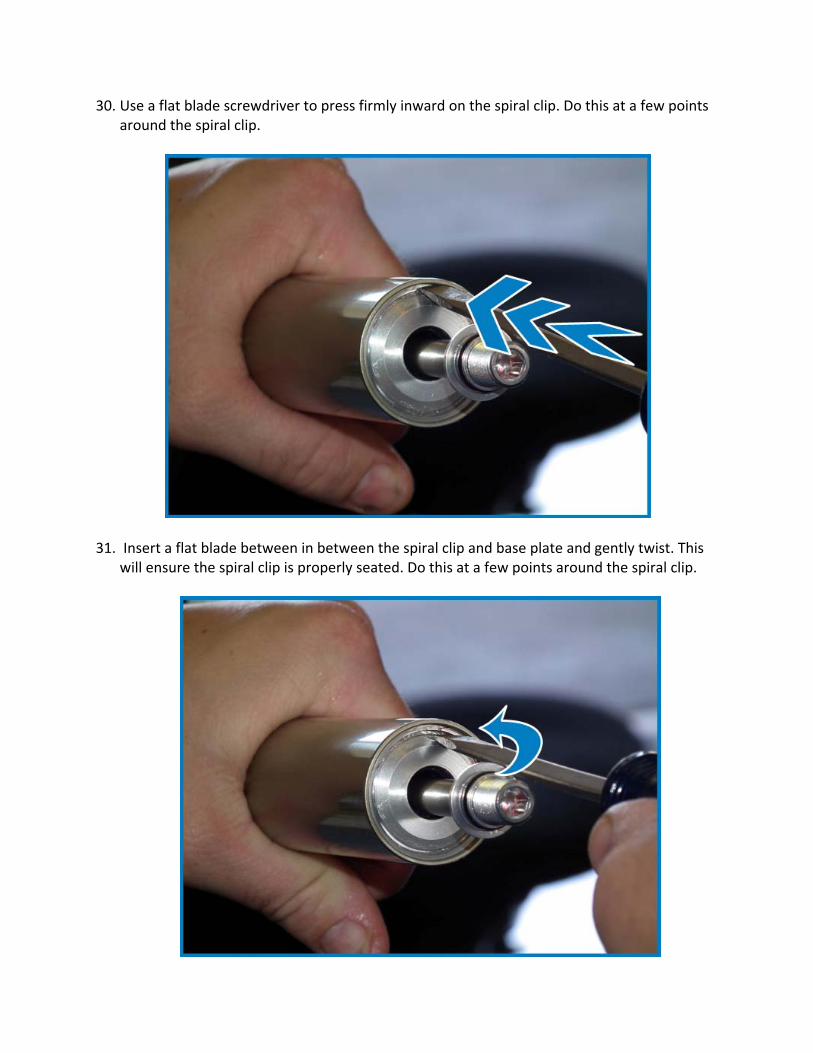
30. Use a flat blade screwdriver to press firmly inward on the spiral clip. Do this at a few points around the spiral clip.
31. Insert a flat blade between in between the spiral clip and base plate and gently twist. This will ensure the spiral clip is properly seated. Do this at a few points around the spiral clip.

32. Inflate air chamber to 80 psi.
33. Measure the bottom of the air rod from inside the foot nut to bottom of stanchion.

34. Before assembling the lowers, wipe them clean with a lint free cloth. If needed clean them out with isopropyl alcohol. Then apply a liberal amount of grease to seals and foam rings.
35. Gently give the damper a tug to extend it to full travel and slide lowers onto stanchions taking care not to roll a seal under one of them.

36. Turn fork upside down and add 20cc of suspension oil into each side of the lowers.
37. Guide lowers on until the damper starts to come through.

38. Use a pair of pliers to hold the high speed adjuster and gently pull to seat the damper in the lowers.
39. When the air rod comes though, hold the stanchion and give the lowers a firm push to seat the air rod foot nut.

40. Install the plastic crush washer and foot nut on the damper.
41. Install the plastic crush washer and foot nut on the air rod.

42. Torque air rod foot nut to 50 in/lb.
43. If air rod just spins while applying torque, you can use a 6mm allen key and a 13mm wrench to tighten the foot nut.

44. Install High speed adjuster knob. Make sure you locate the set screw hole on the adjuster shaft.
45. Take care not to use a ball end allen key, and tighten the adjuster knob.

46. Install the Low speed adjuster knob taking care to locate the seat for the set screw.
47. Tighten Set screw. Do not use a ball end allen key.

48. Replace the adjuster knob cap.
49. Check it… you now have a 100mm Vengeance. Go ahead and reset the adjustments to the users preference based on what you recorded before you started.