VB 2010 in 24 Hours Notes - hguywilliams.nethguywilliams.net/images/documents/Notes/VB/VB...
85
VB 2010 in 24 Hours Notes Object Browser © 2011, H Guy Williams 1
Transcript of VB 2010 in 24 Hours Notes - hguywilliams.nethguywilliams.net/images/documents/Notes/VB/VB...

VB 2010 in 24 Hours Notes
Object Browser
© 2011, H Guy Williams 1

Me.Close() closes a form and releases the resources it consumes.The Close() method tells Visual Basic not to simply hide the form but to destroy it completely.
Using Snap LinesA relatively new and useful feature is the Snap to Lines layout feature. Tell VisualBasic 2010 to use Snap to Lines now by following these steps:1. Choose Tools, Options to display the Options dialog box.2. Click Windows Forms Designer to display the layout settings.3. Change the LayoutMode property to SnapLines.4. Turn off the grid by setting the ShowGrid property to False.5. Click OK to save your settings.
Making Controls the Same SizeIn addition to aligning controls, you can make all selected controls the same size—height, width, or both. To do this, use the Make Same Size button on the toolbar.
© 2011, H Guy Williams 2

© 2011, H Guy Williams 3

In Visual Basic, True is stored internally as –1 (negative 1), whereas False is stored as 0. Actually,any nonzero number can represent True, but Visual Basic always treats True internally as –1
Constant definitions have the following syntax:Const name As datatype = valueConst c_pi As Single = 3.14159265358979
Debug.WriteLine(c_pi * 2)
Strict typing is the process by which Visual Basic enforces data typing; you can put avalue in a variable only if the value is of the correct data type. If you want to cast avalue of one type into a variable of another type that holds a smaller number or hasless precision, you must use a type-conversion function.To turn on Option Strict follow these steps:
© 2011, H Guy Williams 4

1. Right-click the project name in the Solution Explorer and choose Properties from the context menu.2. On the Project Properties page, click the Compile tab on the left.3. Open the Option strict drop-down list and choose On, as shown in Figure 11.2.4. While on the options page, change Option infer to Off.
ScopeWhen you declare a constant or variable within a procedure, that constant or variablehas procedure-level or local scope.
Module-Level ScopeWhen a constant or variable has module-level scope, it can be viewed by all procedureswithin the module containing the declaration. To procedures in all other modules,however, the constant or variable doesn’t exist. To create a constant or variablewith module-level scope, you must place the declaration within a module but not within a procedure.
Global (Namespace) ScopeA constant or variable is said to have global scope (or namespace scope) when it can beseen and referenced from any procedure, regardless of the module in which the procedureexists. One common use of a global variable is storing a reference to a databaseconnection so that all code that needs access to the database can do so via the variable.
Creating global constants and variables is similar to declaring module-levelconstants and variables. Global constants and variables must be declared in a module’sDeclarations section, just like module-level constants and variables. The differencebetween a module-level declaration and a global-level declaration is the use ofthe keyword Public.
Public Const MyConstant As Integer = 1
Public strMyVariable as String
Static ScopeYou can create variables that persist between procedure calls by using the keywordStatic. To create a static variable, use the keyword Static in place of the keywordDim. The following code is similar to the last example, except that the variable createdhere is a static variable; it stays in existence and retains its value between callsto the procedure in which it resides:
Public Sub MyProcedure()Static intMyInteger As IntegerintMyInteger = intMyInteger + 10End Sub
© 2011, H Guy Williams 5

Naming Conventions
Using Prefixes to Denote Data Type
Denoting Scope Using Variable Prefixes
© 2011, H Guy Williams 6

DateAdd(interval, number, date) As Date
Visual Basic never advances more calendar months than specified when adding months. For example, DateAdd(“m”, 1, #1/31/2010#) produces the date2/28/2010. Because February doesn’t have 31 days, Visual Basic uses the lastday of the month.
Dim dteToday As Date = DateTime.TodayDim dteToday As Date = DateTime.Now
DateDiff(interval, Date1, Date2) As Long
DatePart(interval, date) As Integer
DatePart(DateInterval.Month, #7/22/2010#) ‘ Returns 7DatePart(DateInterval.Hour, #3:00:00 PM#) ‘ Returns 15 (military format)DatePart(DateInterval.Quarter, #6/9/2010#) ‘ Returns 2
© 2011, H Guy Williams 7

Dealing with an ExceptionCatching exceptions so that they don’t crash your application is a noble thing to do,but it’s only part of the error-handling process. You’ll usually want to tell the user (ina friendly way) that an exception has occurred. You’ll probably also want to tell theuser what type of exception occurred. To do this, you must have a way of knowingwhat exception was thrown. This is also important if you intend to write code to dealwith specific exceptions. The Catch statement enables you to specify a variable tohold a reference to an Exception object. Using an Exception object, you can getinformation about the exception. The following is the syntax used to place the exceptionin an Exception object:
Catch variablename As Exception
Modify your Catch section to match the following:
Catch ex As ExceptionDebug.WriteLine(“Catch”)MessageBox.Show(“An error has occurred: “ & ex.Message)
The Message property of the Exception object contains the text that describes thespecific exception that occurred. Run the project and click the button. Visual Basicdisplays your custom error message.
Handling an Anticipated ExceptionAt times, you’ll anticipate a specific exception being thrown. For example, you mightwrite code that attempts to open a file when the file does not exist. In such aninstance, you’ll probably want the program to perform certain actions when thisexception is thrown. When you anticipate a specific exception, you can create aCatch section designed specifically to deal with that one exception.Recall from the previous section that you can retrieve information about the currentexception by using a Catch statement, such as
Catch objException As Exception
By creating a generic Exception variable, this Catch statement catchesany and all exceptions thrown by statements within the Try section.
To catch a specific exception, change the data type of the exception variable to a specific exception type.
Dim lngAnswer As Long
© 2011, H Guy Williams 8

TrylngAnswer = 100 / CLng(txtInput.Text)MessageBox.Show(“100/” & txtInput.Text & “ is “ & lngAnswer)
Catch objException As System.InvalidCastExceptionMessageBox.Show(“You must enter something in the text box.”)
Catch objException As ExceptionMessageBox.Show(“Caught an exception that wasn’t an invalid cast.”)
End Try
The first Catch statement is designed to catch only an overflow exception; it doesn’t catch exceptions of any other type.
The second Catch statement doesn’t care what type of exception is thrown; it catches all of them. The second Catch statement acts as a catchall for any exceptions that aren’t overflow exceptions because Catch sections are evaluated from top to bottom.
Designing Objects Using Classeso Encapsulating data and code using classeso Comparing classes to standard moduleso Creating an object interfaceo Exposing object attributes as propertieso Exposing functions as methodso Instantiating objects from classeso Binding an object reference to a variableo Releasing object referenceso Understanding object lifetimes
The real power of leveraging objects, however, comesfrom being able to design and implement custom objects of your own.
In this hour, you’ll learn how to create your own objects by using classes (in contrast to using standard modules).
You’ll learn how to o define the template for an object and o how to create your own custom properties and methods.
© 2011, H Guy Williams 9

ClassesClasses enable you to develop applications using object-oriented programming(OOP) techniques. Classes are templates that define objects.
When you create a new form in a Visual Basic project, you’re actually creating a class that defines a form; forms instantiated at runtime are derived from the class.
To truly realize the benefits of OOP, you must create your own classes.
The philosophy of programming with classes is considerably different from that oftraditional programming. Proper class-programming techniques can make yourprograms better, in both structure and in reliability.
Class programming forces you to consider the logistics of your code and data more thoroughly, causing you to create more reusable and extendable object-based code.
EncapsulatingAn object derived from a class is an encapsulation of data and code.The object comprises its (the class's) code and all the data it uses.
Suppose that you need to keep track of employees in an organization, for example, and that you must store many pieces of information for each employee, such as name, date hired, and title. In addition, suppose that you need methods for adding and removing employees, and that you want all this information and functionality available to many functions within your application.
You could use standard modules to manipulate the data, but doing so would most likely require many variable arrays as well as code to manage those arrays.
A better approach is to encapsulate all the employee data and functionality(adding and deleting routines and so forth) into a single, reusable object.
Encapsulation is the process of integrating data and code into one entity: an object.
© 2011, H Guy Williams 10

Your application, as well as external applications, could then work with the employee data through a consistent interface — the Employee object’s interface.
(An interface is a set of exposed functionality—essentially, code routines that define methods, properties, and events.)
The encapsulation of data and code is the key idea of classes.
By encapsulating the data and the routines to manipulate the data into a single object by way of aclass, you free application code that needs to manipulate the data from the intricaciesof data maintenance.
As long as you don’t modify the object’s interface (as discussed shortly), all the routines that usethe object to create a new employee will instantly have the policy change in effect.
Comparing Classes with Standard ModulesClasses are similar to standard modules in how they appear in the Visual Studiodesign environment and in how you write code within them. However, the behaviorof classes at runtime differs greatly from that of standard modules.
With a standard module, all module-level data (static and module-level variables) isshared by all procedures within the module. In addition, there are never multipleinstances of the module data. With classes, objects are instantiated from a class,and each object receives its own set of module data.
Module-level variables in a standard module exist for the lifetime of the application.However, module variables for a class exist only for the duration of anobject’s lifetime. Objects can be created and destroyed as needed, and when anobject is destroyed, all its data is destroyed as well.
Classes differ from standard modules in more ways than just how their data
© 2011, H Guy Williams 11
behaves. When you define a standard module, its public functions and proceduresare instantly available to other modules within your application. However, publicfunctions and procedures of classes aren’t immediately available to your program.
Classes are templates for objects. At runtime, your code doesn’t interact with thecode in the class module per se, but it instantiates objects derived from the class.
Each object acts as its own class “module” and thus has its own set of moduledata.
When classes are exposed externally to other applications, the applicationcontaining the class’s code is called the server. An application that creates and usesinstances of an object is called a client. When you use instances of classes in theapplication that contains those classes, the application itself acts as both a clientand a server.
Object InterfaceFor an object to be created from a class, the class must expose an interface. An interface is a set of exposed functionality (properties, methods, and events). An interface is the means by which client code communicates with the object derived from the class.
A class interface consists of one or more of the following members:o Propertieso Methodso Events
You must first decide how you want client code to interactwith your object. You’ll want to consider both the data contained within the objectand the functions that the object can perform. You might want client code to be ableto retrieve the name of an employee and other information such as sex, age, and the
© 2011, H Guy Williams 12

date of hire. For client code to get these values from the object, the object mustexpose an interface member for each of these items. Values exposed by an object are called properties.
In addition to properties, you can expose functions, such as Delete or AddNew. Publicly exposed functions of an object are called methods.
For even more interaction between the client and the object, you can expose customevents. With custom events, you have complete control over the following:
o The name of the evento The parameters passed to the evento When the event occurs
Properties, methods, and events together make up an object’s interface. This interfaceacts as a contract between the client application and the object. Any and all communicationbetween the client and the object must transpire through this interface. Your responsibility is to define an object’s properties, methods, and events so that its interface is logical and consistent and exposes all the functionality a client must have available to use the object productively.
Exposing Object Attributes as PropertiesProperties are the attributes of objects. Properties can be read-only, or they can allowboth reading and writing of their values.
You can add properties to a class in two ways.
© 2011, H Guy Williams 13
1) Declare public variables. Any variable declared as public instantly becomes a property of the class
(actually, it is a field). Example, suppose that you have the following statement in the
Declarations section of a class:Public Quantity as IntegerClients could read from and write to the field, using code like the
following:objMyObject.Quantity = 420
Limitations:o You can’t execute code when a field (“property”) value changes
(refering to a change event).o You can’t prevent client code from changing a field because the
client code accesses the variable directly.o Perhaps the biggest problem is how do you control data validation?
Instead of exposing public variables, you should ...
2) Use property procedures to create class properties.Property procedures enable you to:
§ execute code when a property is changed, § validate property values,§ dictate whether a property is read-only, write-only, or both
readable and writable.
Declaring a property procedure is similar to declaring a standard Function or Sub procedure, but with some important differences. The basic structure of a property procedure looks like this:
Public Property propertyname() As datatypeGet
‘ Code to return the property’s value goes here.End Get
Set (ByVal Value As datatype)‘ Code that accepts a new value goes here.
End SetEnd Property
The first word in the property declaration designates the scope of the property (Public, Private, Friend).
© 2011, H Guy Williams 14

Properties declared with Public are available to code outside the class. If the application exposes its objects to other applications, Public procedures are visible outside the application. Procedures declared as Friend, behave like Public procedures, excep that they are not available outside the application.Properties declared as Private are available only to code within the class.
Immediately following the scope identifier is the word Property. This word tells Visual Basic that you’re creating a property procedure rather than a Sub or Function procedure.Next come the property name and data type.
A property has to get its value from somewhere, and a module-level variable is usually the best place to store it. The property procedure acts as a wrapper for this variable. Notice that the variable is declared as Private rather than Public. This means that no code outside the class can view or modify the contents of this variable.
Get ConstructThe Get construct is used to place code that returns a value for the property when read by a client.
Set ConstructThe Set construct is where you place code that accepts a new property value from client code.Value contains the value being passed to the property by the client code.
The property procedure is a wrapper around the module-level variable.When the client code sets the property, the Set construct stores the new value in the variable. When the client retrieves the value of the property, the Get construct returns the value in the module-level variable.
Read-Only or Write-Only PropertiesTo create a read-only property, you would use the ReadOnly keyword to declare the property procedure and then remove the Set...End Set section.
Example:
© 2011, H Guy Williams 15

Public ReadOnly Property Height() As IntegerGet
Return m_intHeightEnd Get
End Property
Although far more rare, it is possible to create a write-only property, in which theproperty can be set but not read. To do so, you would use the keyword WriteOnlyin place of ReadOnly and remove the Get...End Get section instead of theSet...End Set section.
Functions as MethodsA method is a function exposed by an object. Methods are nothing more than exposed code routines. A method can return a value, but it doesn’t have to.
To create a method within a class, create a public Sub or Function procedure.
Methods defined with Function return valuesTo make a procedure private to the class and therefore invisible to client code, declare the procedure as Private rather than Public.
Instantiating Objects from ClassesAfter you obtain a reference to an object and assign it to a variable, you can manipulate the object by using an object variable.
Binding an Object Reference to a VariableAn object can contain any number of properties, methods, and events.The interface members (the object’s properties, methods, and events) are resolved when an object variable is bound to an object. The two forms of binding are early binding, which occurs at compile time, and late binding, which occurs at runtime.
What you need to know to perform each type of binding:
© 2011, H Guy Williams 16

Both types of binding have advantages, but early binding generally is superior to late binding. Code that uses late-bound objects requires more work by Visual Basic than code that uses early-bound objects.You cannot use late binding in a project with Option Strict turned on.
When you dimension a variable as data type Object, as shown in the following code sample, you’re late-binding to the object:
Dim objMyObject As ObjectobjMyObject = New clsMyClass()MessageBox.Show(objMyObject.AddTwoNumbers(1, 2))
When you late-bind an object, the binding occurs at runtime when the variable is setto reference an object. For a member of the object to be referenced, Visual Basic mustdetermine and use an internal ID of the specified member. When you late-bind an object variable (dimension the variable As Object), the following occurs behind the scenes:
1. Visual Basic obtains a special ID (the Dispatch ID) of the property, method, or event that you want to call. This takes time and resources.2. An internal array containing the parameters of the member, if any, is created.3. The member is invoked, using the ID obtained in step 1.
The preceding steps require a great deal of overhead and adversely affect an application’s performance. Therefore, late binding isn’t the preferred method of binding. One of the main drawbacks of late binding is the compiler’s inability to check thesyntax of the code manipulating an object. Because a member’s ID and the parameters it uses aren’t determined until runtime, the compiler has no way of knowing whether you’re using a member correctly—or even if the member you’re referencing exists.
Early-Binding an Object VariableIf Visual Basic can determine a Dispatch ID for a member at compile time, there’s noneed to look up the ID when the member is referenced at runtime. This results in
© 2011, H Guy Williams 17

considerably faster calls to object members. Not only that, but Visual Basic can alsovalidate the member call at compile time, reducing the chance of errors in your code.
Early binding occurs when you dimension a variable as a specific type of object,rather than just As Object. When a variable is early-bound, Visual Basic looks upthe Dispatch IDs of the object’s members at compile time, rather than at runtime.
The following are important reasons to use early binding:
o Speedo Objects, their properties, and their methods appear in IntelliSense
drop-down lists.o The compiler can check for syntax and reference errors in your code
so thatmany problems are found at compile time, rather than at runtime.
For early binding to take place, an object variable must be declared as a specificobject type (that is, not As Object). Change the Dim statement in the code you’veentered to read as follows:
Dim objMyObject As clsMyClass
As soon as you commit this statement, Visual Basic displays a wavy blue line underthe bad method call, as shown in Figure 16.6. This occurs because Visual Basic nowknows the exact type of object the variable will contain; therefore, it can and doesperform syntax checking on all member references. Because it can’t find a memberwith the name AddtoNumbers, it flags this as a build error. Try running the project bypressing F5, and you’ll see that Visual Basic does indeed recognize this as a buildproblem.
Place the cursor at the period between the words objMyObject and AddtoNumbers.
© 2011, H Guy Williams 18

Delete the period and then type a period once more. This time, Visual Basic displaysan IntelliSense drop-down list with all the members of the class.
Creating a New Object When Dimensioning a VariableYou can instantiate a new object on the declaration statement by including the keywordNew, like this:
Dim objMyObject As New clsMyClass()
This approach alleviates the need for a second statement to create a new instance of the object. If you do this the variable will always contain a reference to an object.
If there’s a chance that you might not need the object, you should probably avoid using the New keyword on the Dim statement.
Consider the following:
Dim objMyObject As clsMyClass
If condition ThenobjMyObject = New clsMyObject‘ Code to use the custom object would go here.
End If
Remember that instantiating an object takes resources. In this code, no object is created when condition is False.
If you were to place the word New on the Dim statement, a new object would be instantiated whenever this code was executed, regardless of the value of condition.
Releasing Object ReferencesWhen an object is no longer needed, it should be destroyed so that all the resourcesused by the object can be reclaimed.
© 2011, H Guy Williams 19
Objects are destroyed automatically when the last reference to the object is released.
There are two primary ways to release an object reference, one is better than the other.
One way to release a reference to an object is simply to let the object variable holdingthe reference go out of scope, variables are destroyed when they go out of scope.
You can’t necessarily be assured that an object is fully released and that all thememory being used by the object is freed by letting the object’s variable go out ofscope. Therefore, relying on scope to release objects isn’t a good idea.
To explicitly release an object, set the object variable equal to Nothing, like this:
objMyObject = Nothing
When you set an object variable equal to Nothing, you’re assured that the object reference is fully released. The object won’t be destroyed, however, if other variables are referencing it. After the last reference is released, the garbage collector eventually destroys the object.
If you don’t correctly release object references, your application might experience resource leaks.
Understanding the Lifetime of an ObjectAn object created from a class exists as long as a variable holds a reference to it.
The .NET Framework handles the details of keeping track of the references to a given object.
When all the references to an object are released, the object is flagged and eventually destroyed by thegarbage collector.
© 2011, H Guy Williams 20

The following are key points to remember about an object’s lifetime and what they mean to your application:
· An object is created (and hence referenced) when an object variable is declared by the keyword New. For example:
Dim objMyObject = New clsMyClass()
· An object is created (and hence referenced) when an object variable is assigned an object by the keyword New. For example:
objMyObject = New clsMyClass()
· An object is referenced when an object variable is assigned an existing object.For example:
objThisObject = objThatObject
· An object reference is released when an object variable is set to Nothing, as discussed in the preceding section.
· An object is destroyed sometime after the last reference to it is released.
Only when all references to an object are released is the object flagged for destruction and the resources it uses are reclaimed.
Interacting with UsersMessageBox.Show(MessageText,Caption, MessageBoxButtons.OKCancel,MessageBoxIcon.Information)
© 2011, H Guy Williams 21

Determining Which Button Is Clicked
Enumerators for DialogResult
© 2011, H Guy Williams 22

Note the phrase “Usually sent from” in the descriptions of the DialogResult values.When you create custom dialog boxes (as shown later in this hour), you canassign a DialogResult to any button of your choosing.
If (MessageBox.Show(“Would you like to do X?”,”MessageBox sample”, MessageBoxButtons.YesNo,MessageBoxIcon.Question) = Windows.Forms.DialogResult.Yes) Then
‘ Code to do X would go here.
End If
Creating Custom Dialog Boxes
If CustomDialogBoxForm.ShowDialog() = Windows.Forms.DialogResult.OK Then
MessageBox.Show(“You clicked OK.”)Else
MessageBox.Show(“You clicked Cancel.”)End If
© 2011, H Guy Williams 23

If you click the Close (X) button in the upper-right corner of the form, the form isclosed, and the code behaves as if you’ve clicked Cancel because the Else codeoccurs.
InputBox()InputBox(prompt, [title], [defaultresponse])
strResult = InputBox(“What is your favorite color?”, “Enter Color”)
strResult = InputBox(“How many eggs do you want to order?”, “Order Eggs”, “12”)
© 2011, H Guy Williams 24
Using the Common Mouse Events
© 2011, H Guy Williams 25

Dim rectEllipse As RectangleIf e.Button <> Windows.Forms.MouseButtons.Left Then Exit Sub
With rectEllipse.X = e.X - 1.Y = e.Y - 1.Width = 2.Height = 2
End Withm_objGraphics.DrawEllipse(System.Drawing.Pens.Blue, rectEllipse)
Working with GraphicsGraphics ObjectAs your applications increase in size and complexity, you’ll find moreand more occasions to draw your own interfaces directly to the screen.The basics of drawing and printing to the screen.
The code within the Windows operating system that handles drawing everything tothe screen, including text, lines, and shapes, is called the Graphical Device Interface (GDI).
Creating a Graphics Object for a Form or ControlIf you want to draw directly to a form or control, you can easily get a reference to thedrawing surface by calling the CreateGraphics() method of the object in question.
Dim objGraphics As Graphics = TextBox1.CreateGraphics
When you call CreateGraphics(), you’re setting the object variable to hold a referenceto the Graphics object of the form or control’s client area. The client area of aform is the gray area within the form’s borders and title bar, whereas the client areaof a control is usually the entire control. All drawing and printing done using the
© 2011, H Guy Williams 26

Graphics object are sent to the client area.
When you draw directly to a form or control, the object in question doesn’t persistwhat’s drawn on it. If the form is obscured in any way, such as by a window coveringit or the form’s being minimized, the next time the form is painted, it won’tcontain anything that was drawn on it.
Creating a Graphics Object for a New BitmapYou don’t have to set a Graphics object to the client area of a form or control; youcan also set a Graphics object to a bitmap that exists only in memory. For performancereasons, you might want to use a memory bitmap to store temporary images oras a place to build complex graphics before sending them to a visible element (suchas a form or control). To do this, you first have to create a new bitmap.To create a new bitmap, you dimension a variable to hold a reference to the newbitmap, using the following syntax:
variable = New Bitmap(width, height, pixelformat)
The width and height arguments are exactly what they appear to be: the width andheight of the new bitmap.
The pixelformat argument determines the bitmap’s color depth and might also specify whether the bitmap has an alpha layer (used for transparent portions of bitmaps).
Table below lists a few of the common values for pixelformat. (See Visual Basic’s online Help for the complete list of values and their meanings.)
To create a new bitmap that’s 640 pixels wide by 480 pixels tall and that has a pixeldepth of 24 bits, for example, you could use this statement:
objMyBitMap = New Bitmap(640, 480, Drawing.Imaging.PixelFormat.Format24bppRgb)
© 2011, H Guy Williams 27

Common Values for pixelformat
After the bitmap is created, you can create a Graphics object that references thebitmap by using the FromImage() method, like this:
objGraphics = Graphics.FromImage(objMyBitMap)
Now any drawing or printing done using objGraphics would be performed on the memory bitmap.
For the user to see the bitmap, you’d have to send the bitmap to a form or control.
When you’re finished with a Graphics object, call its Dispose() method to ensure that all resources used by the Graphics object are freed.
Working with PensA pen is an object that defines characteristics of a line. Pens are used to define color,line width, and line style (solid, dashed, and so on).
Visual Basic supplies a number of predefined pens, and you can also create your own.To create your own pen, use the following syntax:
© 2011, H Guy Williams 28

penVariable = New Pen(color, width)
After a pen is created, you can set its properties to adjust its appearance. For example, all Pen objects have a DashStyle property that determines the appearance oflines drawn with the pen.
Possible Values for DashStyle
The enumeration for DashStyle is part of the Drawing.Drawing2D namespace.To create a new, dark blue pen that draws a dotted line, you would use code like the following:
Dim objMyPen As PenobjMyPen = New Pen(Drawing.Color.DarkBlue, 3)objMyPen.DashStyle = Drawing.Drawing2D.DashStyle.Dot
The 3 passed as the second argument to create the new pen defines the pen’s width in pixels.
Visual Basic includes many standard pens, which are available via the System.Drawing.Pens class, as in
objPen = System.Drawing.Pens.DarkBlue
Using System Colors
© 2011, H Guy Williams 29

The colors that Windows allows you to change are called system colors.
To designate that an interface color should stay in sync with a user’s system colors,you assign a system color to a color property of the item in question.
If you wanted to ensure that the color of a button matches the user’s systemcolor, for example, you would assign the system color Control to the BackColorproperty of the Button control.
System Colors
© 2011, H Guy Williams 30

RectanglesA rectangle is a structure used to hold bounding coordinates used to draw a shape. A rectangle isn’t necessarily used to draw a rectangle (although it can be).
To draw most shapes, you must have a rectangle. The rectangle you pass to a drawing method is used as a bounding rectangle. The proper shape (circle, ellipse, and so on) is always drawn within the confines of the bounding rectangle.Creating a rectangle: first you dimension a variable as Rectangle, and then you set the X,Y, Width, and Height properties of the object variable. The X, Y value is the coordinate of the upper-left corner of the rectangle.
© 2011, H Guy Williams 31

The following code creates a rectangle that has its upper-left corner at coordinate 0,0,has a width of 100, and height of 50. Note that this code simply defines a rectangle incode; it doesn’t draw a rectangle to the screen:
Dim rectBounding As New Rectangle()rectBounding.X = 0rectBounding.Y = 0rectBounding.Width = 100rectBounding.Height = 50
The Rectangle object enables you to send the X, Y, Height, and Width values as partof its initialize construct. Using this technique, you could create the same rectanglewith only a single line of code:
Dim rectBounding as New Rectangle(0,0,100,50)
You can do a number of things with a rectangle after it’s defined. Perhaps the mostuseful is the capability to enlarge or shrink the rectangle with a single statement.
You enlarge or shrink a rectangle using the Inflate() method. Here’s the most common syntax of Inflate():
object.Inflate(changeinwidth, changeinheight)
© 2011, H Guy Williams 32

When called this way, the rectangle width is enlarged (the left side of the rectangleremains in place), and the height is enlarged (the top of the rectangle stays in place).
To leave the height or width unchanged, pass 0 as the appropriate argument. To shrink a side, specify a negative number.
Drawing ShapesI’ve chosen to discuss only the most commonly drawn shapes. The Graphicsobject contains many methods for drawing additional shapes.
DrawLine() is one of the few drawing methods that doesn’t require a rectangle. Syntax:
object.DrawLine(pen, x1, y1, x2, y2)
Object refers to a Graphics object\Pen refers to a Pen object. x1, y1 is the coordinate of the line’s starting pointx2, y2 is the coordinate of the ending point
Drawing RectanglesTo draw rectangles and squares use the DrawRectangle() method. DrawRectangle() accepts a pen and a rectangle. Syntax:
object.DrawRectangle(pen, rectangle)
If you don’t have a Rectangle object you can call DrawRectangle() by using the following format:
object.DrawRectangle(pen, X, Y, width, height)
Drawing Circles and EllipsesDraw circles and ellipses by calling the DrawEllipse() method. DrawEllipse() accepts a pen and a rectangle. The rectangle is used as a bounding rectangle. The width of the rectangle is the width of the ellipse.The height of the rectangle is the height of the ellipse. Syntax:
© 2011, H Guy Williams 33

object.DrawEllipse(pen, rectangle) or object.DrawEllipse(pen, X, Y, Width, Height)
Clearing a Drawing SurfaceTo clear the surface of a Graphics object, call the Clear()method, passing it the color to paint the surface:
objGraphics.Clear(Drawing.SystemColors.Control)
Drawing TextDrawing text on a Graphics object is similar to drawing a shape, the method nameeven contains the word Draw. To draw text on a Graphics object, call the DrawString() method. The basic format for DrawString() looks like this:
object.DrawString(stringoftext, font, brush, topX, leftY)
The topX and leftY arguments represent the coordinate at which drawing will take place; they represent the upper-left corner of the string.
The arguments brush and font accept objects. Where a pen describes the characteristics of a line, a brush describes the characteristics of a fill. Brush has an attribute for a fill pattern such as solid, hatched, weave, or trellis.When you draw text, a solid brush is usually sufficient. You can create brushes in much the same way as you create pens, or you can use one of the standard brushesavailable from the System.Drawing.Brushes class.
A Font object defines characteristics used to format text;Character set (font), size (point size), and style (bold, italic, normal, underlined, ...)
To create a new Font object:
© 2011, H Guy Williams 34

Dim objFont As FontobjFont = New System.Drawing.Font(“Arial”, 30)
The text Arial in this code is the name of a font installed on my computer.Arial is one of the few fonts installed on all Windows computers. If you supply the name of a font that doesn’t exist on the machine at runtime, Visual Basic uses adefault font that it thinks is the closest match to the font you specified.
The second parameter is the point size of the text. If you want to use a style other than normal, you can provide a style value as a third parameter:
objFont = New System.Drawing.Font(“Arial Black”, 30, FontStyle.Bold or FontStyle.Italic)
In addition to creating a Font object, you can use the font of an existing object, such as a form. Example: the following statement prints text to a Graphics object using the font of the current form:
objGraphics.DrawString(“This is the text that prints!”, Me.Font, System.Drawing.Brushes.Azure, 0, 0)
Persisting GraphicsRecall that when you draw to a form (actually, you draw to a Graphics object that references a form), the things you draw aren’t persisted. The next time the form paints itself, the drawn elementsdisappear. You can use a couple of approaches to deal with this behavior:
o Place all code that draws to the form in the form’s Paint event.o Draw to a memory bitmap, and copy the contents of the memory
bitmap to the form in the form’s Paint event.
If you’re drawing only a few items, placing the drawing code in the Paint event might be a good approach.In a situation where you have a lot of drawing code, such as the graphics are drawn in response to user input, you can’t re-create them all at once. In these situations, the second approach is clearly better.
© 2011, H Guy Williams 35

File OperationsOpenFileDialog ControlThe OpenFileDialog control is used to display a dialog box that enables the user tobrowse and select a file. The OpenFileDialog doesn’t have an interfaceper se, for the user to browse for files, you have to manipulate the OpenFileDialog,using its properties and methods.
OpenFileDialog1.InitialDirectory = “C:\”OpenFileDialog1.Title = “Select a File”OpenFileDialog1.FileName = ““
Creating File FiltersThe Filter property determines what types of files appear in the Open File dialog box. A filter is specified in the following format:
Description|*.extension
The text that appears before the pipe symbol (|) describes the file type on which to filter.The text after the pipe symbol is the pattern used to filter files. Example: to display only Windows bitmap files:
control.Filter = “Windows Bitmaps|*.bmp”
You can specify more than one filter type by adding a pipe symbol between the filters:
control.Filter = “Windows Bitmaps|*.bmp|JPEG Files|*.jpg”
FilterIndex property specify which filter appears selected:
OpenFileDialog1.FilterIndex = 1
Unlike most other collections, the FilterIndex property is 1-based, not 0-based, so 1 is the first filter listed.
© 2011, H Guy Williams 36

Open File Dialog BoxThe ShowDialog() method of the OpenFileDialog control actsmuch like the method of forms by the same name, returning a result that indicatesthe user’s selection in the dialog box.
By default, the OpenFileDialog doesn’t let the user enter a filename that doesn’texist. You can override this behavior by setting the CheckFileExists propertyof the OpenFileDialog to False.
The OpenFileDialog control can allow the user to select multiple files. If you’re interested, take a look atthe Multiselect property of the OpenFileDialog in the Help text.
The OpenFileDialog control makes allowing a user to browse and select a file almost trivial.
SaveFileDialog ControlThe SaveFileDialog control is similar to the OpenFileDialog control, but it’s used toallow a user to browse directories and specify a file to save, rather than open. It’s important to note that the SaveFileDialog control doesn’t actually save a file.
SaveFileDialog1.Title = “Specify Destination Filename”SaveFileDialog1.Filter = “Text Files (*.txt)|*.txt”SaveFileDialog1.FilterIndex = 1SaveFileDialog1.OverwritePrompt = True
The first three statements set properties identical to those of theOpenFileDialog. The OverwritePrompt property, however, is unique to theSaveFileDialog. When this property is set to True, Visual Basic asks users toconfirm their selections when they choose a file that already exists. Prompt the user about replacing files by ensuring that the OverwritePrompt property is set to True.
If you want the Save File dialog box to prompt users when the file they specifydoesn’t exist , set the CreatePrompt property of the SaveFileDialog control toTrue.
© 2011, H Guy Williams 37

The OpenFileDialog and SaveFileDialog controls are similar in design andappearance, but each serves a specific purpose.
Manipulating Files with the File ObjectVisual Basic includes a powerful namespace called System.IO (the IO object acts likean object property of the System namespace). The System.IO.File and System.IO.Directory objects provide you with extensive file and directory (folder) manipulation capabilities.
Determining Whether a File Exists
Before attempting any operation on a file, such as copying or deleting it, it’s a goodidea to make certain the file exists.
For example, if the user doesn’t click the Source button to select a file but instead types the name and path of a file into the text box, the user could type an invalid or nonexistent filename. Attempting to manipulate a nonexistent file could result in an exception—which you don’t want to happen.
Because you’ll work with the source file selected by the user in many routines, youneed to create a central function that can be called to determine whether the sourcefile exists. The function uses the Exists() method of the System.IO.File object todetermine whether the file exists. Add the following function to your form class:
Private Function SourceFileExists() As BooleanIf Not (System.IO.File.Exists(txtSource.Text)) Then
MessageBox.Show(“The source file does not exist!”)Return False
ElseReturn True
End IfEnd Function
© 2011, H Guy Williams 38

The SourceFileExists() method looks at the filename specified in the text box. Ifthe file exists, SourceFileExists() returns True; otherwise, it returns False.
Copying a File
Copying files is a common task. For example, you might want to create an applicationthat backs up important data files by copying them to another location. Copying is pretty safe—as long as you use a destination filename that doesn’t already exist.
To copy files you use the Copy() method of the System.IO.File class.
The Copy() method has two arguments. 1. The first is the file that you want to copy,2. The second is the name and path of the new copy of the file.
Moving a File
You can specify a new name for the file or use its original name. You use the Move() method of the System.IO.File object to move a file.
Renaming a File
To rename a file, use the Move() method of System.IO.File, specifying a new filename but keeping the same path.Deleting a File
The Delete() method of System.IO.File deletes a file permanently —it does not send the file to the Recycle Bin.
Instead of permanently deleting a file, you can send it to the Recycle Bin by usingthe My object like this:
My.Computer.FileSystem.DeleteFile(“C:\test.txt”, FileIO.UIOption.AllDialogs, FileIO.RecycleOption.SendToRecycleBin)
Retrieving a File’s Properties
© 2011, H Guy Williams 39
Files have a number of properties, such as the date the file was last modified.
The System.IO.File object provides ways to get at most of the data displayed on theGeneral tab of the File Properties dialog box. Some of this data is available directly from the File object, while the FileAttributes object is used to access other data.
Getting Date and Time Information About a FileGetCreationTime Returns the date and time the file was created.GetLastAccessTime Returns the date and time the file was last accessed.GetLastWriteTime Returns the date and time the file was last modified.
Getting a File’s AttributesA file’s attributes aren’t available as properties of the System.IO.File object. How you determine an attribute is complicated. The GetAttributes() method of System.IO.File returns a Long. This Long, in turn, acts as a set of flags for the various attributes. The method used to store these values is called bit packing.
Bit packing is pretty complicated and has to do with the binary method in which values are stored in memory and on disk.
Teaching bit packing is beyond the scope of this book. What I want to show you is how to determine whether a certain flag is set in a value that is bit-packed.
The first step in determining the attributes is to get the Long containing the flags forthe file attributes. To do this, you would create a Long variable and callGetAttributes(), like this:
Dim lngAttributes As LonglngAttributes = System.IO.File.GetAttributes(“c:\test.txt”)
or use the short form, like this:
© 2011, H Guy Williams 40

Dim lngAttributes As Long = System.IO.File.GetAttributes(“c:\test.txt”)
After you retrieve the file attributes flag into the variable lngAttributes, perform alogical And on lngAttributes with one of the flags shown in Table 19.2 to determinewhether a particular attribute is set. Example, to determine whether a file’s ReadOnly flag is set:
lngAttributes And IO.FileAttributes.ReadOnly
A quick way to determine a file’s size is to use the built-in Visual Basic function FileLen(), as in lngFileSize = FileLen(“c:\temp\test.txt”).
GetCreateTime()GetLastAccessTime()GetLastWriteTime()
© 2011, H Guy Williams 41

Directory ObjectManipulating directories (folders) is similar to manipulating files: use System.IO.Directory. The following are the method calls:
· To create a directory, call the CreateDirectory() method of
System.IO.Directory, and pass the name of the new folder, like this:System.IO.Directory.CreateDirectory(“c:\my new directory”)
· To determine whether a directory exists, call the Exists() method of System.IO.Directory and pass it the directory name in question, like this:
MsgBox(System.IO.Directory.Exists(“c:\temp”))
· To move a directory, call the Move() method of System.IO.Directory. The Move() method takes two arguments. The first is the current name of the directory, and the second is the new name and path of the directory. When you move a directory, its contents are moved as well. The following illustrates a call to Move():
System.IO.Directory.Move(“c:\current directory name”, “c:\new directory name”)
· Deleting directories is even more perilous than deleting files because when you delete a directory, you also delete all files and subdirectories within the directory. To delete a directory, call the Delete() method of System.IO.Directory, and pass it the directory to delete:
System.IO.Directory.Delete(“c:\temp”)
To send a directory to the Recycle Bin, rather than permanently delete it, use the "My" object like this:
My.Computer.FileSystem.DeleteDirectory(“D:\OldDir”, FileIO.UIOption.AllDialogs, FileIO.RecycleOption.
SendToRecycleBin, FileIO.UICancelOption.ThrowException)
Registry and Text Files
© 2011, H Guy Williams 42

Working with the RegistryThe Windows Registry is a repository used to store application, user, and machine specific information. It’s the perfect place to store configuration data such as user preferences, database connection strings, file locations, and more.
Don’t pollute the Registry! I’m constantly amazed by the amount of junk that a program will store in the Registry. Keep in mind that the Registry is not your personal database. In fact, if your application uses a database, it’s often a better idea to store information in the database.
The Registry is organized in a hierarchical structure—like a tree. The top nodes in the tree (called hives) are predefined—you can’t add to, modify, or delete them. Table 20.1 lists the hives (top levels) of the Registry.
Under each hive listed in Table 20.1 are a number of keys. Figure 20.1 shows what theRegistry looks like on my computer. Notice how 10.0 is a subkey that belongs to theVBExpress key, which is a subkey that belongs to the Microsoft key, which in turn isa subkey of the Software key, which belongs to the HKEY_CURRENT_USER hive. Note
© 2011, H Guy Williams 43

that while you can’t see the higher levels in the tree, you can see the entire path inthe status bar.Keys can contain one or more values. In Figure 20.1, notice that the 10.0 key hasmany values (they appear in the list view on the right). Keys are used to provide aframework for storing data; values actually hold the data in question. Value itemshave specific data types, although they are different from the data types in VisualBasic. Table 20.2 lists the possible data types for Registry values.
By far, the most commonly used data type is the REG_SZ string data type. You can store all sorts of things in a REG_SZ value, such as text (obviously), True, False, 0, 1, and more.
Accessing the Registry with My.Computer.RegistryYou can access the Windows Registry in two ways. The first (and easiest) is to use the built-in Visual Basic functions GetSetting() and SaveSetting().
These functions have serious limitations, however, including letting you manipulate keys and values only in specific Visual Basic keys within the Registry. No self-respecting commercial application would do this, and neither should your applications. I won’t teach you these two functions.
Instead, you’ll learn how to use the Registry object to manipulate the Windows Registry like a pro.
The Registry object is an object property of My.Computer.
© 2011, H Guy Williams 44

The My object is basically a shortcut to other useful objects that aren’t so easy to get to on their own. The My object makes it easy to retrieve information about your running application and the user’s computer. One of the object properties available to the My object is the Computer object, which is used to access objects that let you work with the user’s computer. The Computer object has an object property called Registry, which gives you direct access to the Windows Registry. You will use My.Computer.Registry to performall your Registry tasks.
Creating Registry KeysThe My.Computer.Registry object has a number of properties. Among these are object properties that relate to the hives of the Registry.
Creating Registry keys using My.Computer.Registry is a snap. First, you have toidentify the hive under which you want to create the key. When you know the hive,you just call the CreateSubKey() method of the corresponding hive object property,passing it the name of the key to create. For example, consider this statement:
My.Computer.Registry.CurrentUser.CreateSubKey(“UserSettings”)
This statement would create the key UserSettings under HKEY_CURRENT_USER. Realizethat an application rarely creates a key directly under a hive. You can use manysubkeys for each hive, but perhaps the most common is the \Software key. Mostapplications create a corporate-named key under \Software and then create productkeys below the corporate subkey. For example, suppose that your company name isCleverSoftware, you’re planning to ship the Picture Viewer program, and you want tostore some application settings in the Registry. (In fact, you will modify your Picture
© 2011, H Guy Williams 45

Viewer to do this later in this hour.) You want to end up with a key structure thatlooks like this:
HKEY_CURRENT_USER\Software\CleverSoftware\PictureViewer
Fortunately, the CreateSubKey() method enables you to specify multiple levels of keysin one method call. To create this structure, you would use the following statement:
My.Computer.Registry.CurrentUser.CreateSubKey (“Software\CleverSoftware\PictureViewer”)
Visual Basic would parse this statement by first locating the hive HKEY_CURRENT_USERand then looking for a \Software key. It would find one, because all Windowsmachines have this key, but it would not overwrite this key. It would then look forCleverSoftware. Assuming that it does not find this key, it would create it and the subkeythat you specified. Note that if Visual Basic finds an existing subkey that youdefined in your statement (all subkeys are separated by a backslash [\]), it does notoverwrite it.
Why HKEY_CURRENT_USER instead of HKEY_LOCAL_MACHINE? In general, it’s best to save application settings in HKEY_CURRENT_USER so that each user who uses your application can have his or her own settings. If you store your settings in HKEY_LOCAL_MACHINE, the settings will be global to all users who run the application from the computer in question. Also, some administrators restrict access to HKEY_LOCAL_MACHINE, and your application will fail if it attempts to access restricted keys.
Deleting Registry KeysYou can use two methods to delete a Registry key: 1. DeleteSubKey(): deletes a key and all its values as long as the key
contains no subkeys.2. DeleteSubKeyTree(): deletes a key, its values, and all subkeys and
values found below it.
Here’s a statement that could be used to delete the key created with the previous sample code:
© 2011, H Guy Williams 46

My.Computer.Registry.CurrentUser.DeleteSubKey (“Software\CleverSoftware\PictureViewer”)
DeleteSubKey throws an exception if the key you specify does not exist. Whenever you write code to work with the Registry, try to account for the unexpected.
Getting and Setting Key ValuesCreating and deleting keys is useful, keys provide the structure for the important data: the value items. Keys can have one or more value items.Value items are defined as a specific data type.
All that’s left is to learn the code used to manipulate Registry values.
Getting and setting key values isn’t as easy as defining keys. When you define keys, the My.Computer.Registry object makes it easy to work with hivesby giving you an object property for each hive.
There are properties for getting and setting values for each of these hive properties, but they don’t work as expected.
To create a new value item, or to set the value of an existing value item, use
My.Computer.Registry.SetValue()
The SetValue()method has the following syntax:SetValue(keypath, itemname, value)
Unfortunately, you have to specify the hive name in keypath. You do not specify the data type; Visual Basic sets the data type according to the value that is passed to the method. Example, to create a RegistrationName value item for the Registry key discussed in the preceding section, you would use a statement like this:
My.Computer.Registry.SetValue (“HKEY_CURRENT_USER\Software\CleverSoftware\PictureViewer\”, “RegistrationName”, “James Foxall”)
This statement would produce a value item, as shown below.
© 2011, H Guy Williams 47

To change the value, you would call SetValue again, passing it the same key and item name, different value.
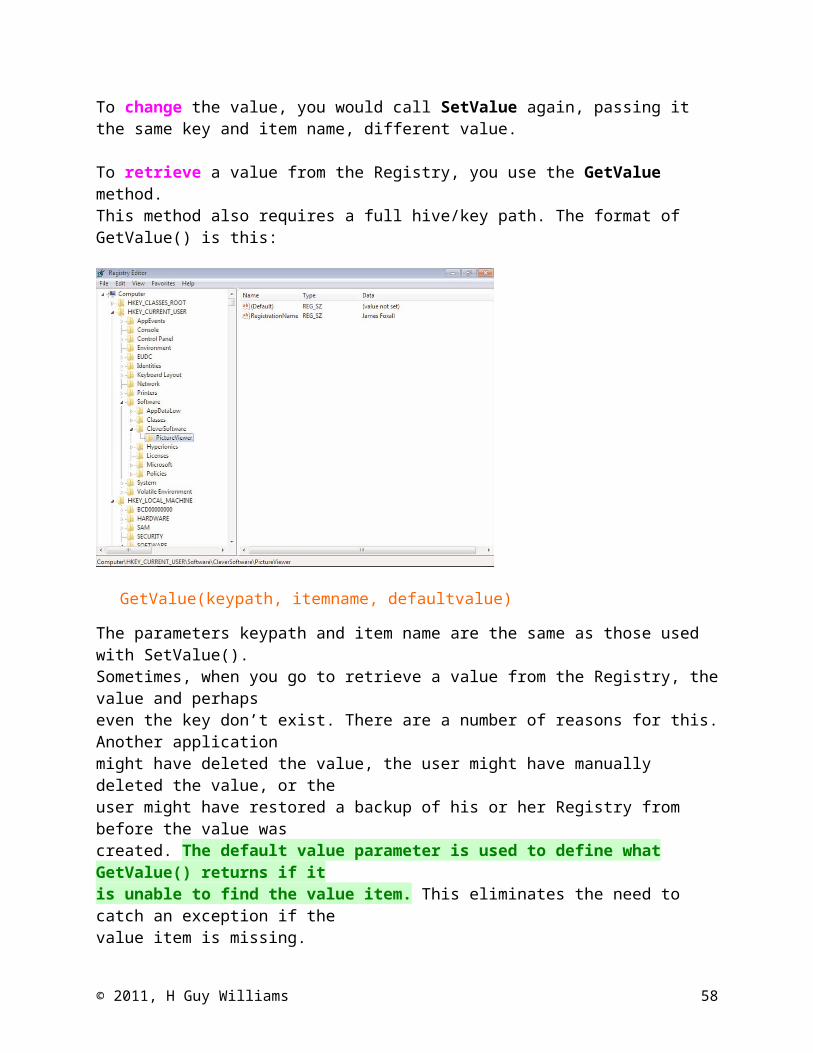
To retrieve a value from the Registry, you use the GetValue method. This method also requires a full hive/key path. The format of GetValue() is this:
GetValue(keypath, itemname, defaultvalue)The parameters keypath and item name are the same as those used with SetValue().Sometimes, when you go to retrieve a value from the Registry, the value and perhapseven the key don’t exist. There are a number of reasons for this. Another applicationmight have deleted the value, the user might have manually deleted the value, or theuser might have restored a backup of his or her Registry from before the value wascreated. The default value parameter is used to define what GetValue() returns if itis unable to find the value item. This eliminates the need to catch an exception if thevalue item is missing. The following statement displays the value in the RegistrationName as created in the previous example:
© 2011, H Guy Williams 48

MessageBox.Show(My.Computer.Registry.GetValue (“HKEY_CURRENT_USER\Software\CleverSoftware\PictureViewer\”, “RegistrationName”, ““))
Reading and Writing Text FilesIf you have a lot of text data to store and retrieve, a good old-fashioned text file is probablythe best place to put it. Visual Basic includes classes that make it relatively easy to manipulatetext files: StreamWriter and StreamReader.
Notice that reading and writing text files are performed by two different objects, only one of which can access a file at any given time. If you want to simultaneously read and write to a single file, you’re probably better off using a real database.
Writing to a Text FileYou write to text files by using the StreamWriter class. The first step of using thisclass is to declare an object of type StreamWriter, like this:
Dim objFile As New System.IO.StreamWriter(“c:\test.txt”)
or like this:
Dim objFile As New System.IO.StreamWriter(“c:\test.txt”, True)
There are actually at least seven different forms of StreamWriter usage. If you plan to do serious work with text files, you should read the Microsoft Developer Network (MSDN) document on the StreamWriter class.
As you can see, the second parameter is optional (it is omitted in the first example), and it determines whether you want to append to the text file if it already exists. If you omit this second parameter or supply False as its value, a new text file is created. If the text file already exists, it gets replaced with a new file of the same name. If you pass True, as in the second example, the file is opened, and any write operations are tacked on to the end of the file.If you pass a file path/filename that doesn’t exist, Visual Basic creates a new text file for you when you write data to the StreamWriter object.
© 2011, H Guy Williams 49

After you have an object that points to a StreamWriter object, you can store data inthe text file, using one of the following two methods:
o WriteLine() sends a single line of text to the file and automatically appends a carriage return to the end of the line. Each call to WriteLine() creates a new line.
o Write() sends data to the file but does not automatically append a carriage return to create a new line.
These two methods are best understood by example. Consider the following code snippet:
Dim objFile As New System.IO.StreamWriter(“c:\test.txt”)objFile.WriteLine(“text1”)objFile.WriteLine(“text2”)objFile.WriteLine(“text3”)objFile.Close()
This snippet would produce the following data in the text file:text1text2text3
Notice the last statement, objFile.Close(). It’s vital that you close a text file when you’re finished with it. You should also call objFile.Dispose() to make sure that the file is fully released.
Now, consider the same code snippet that uses Write() instead of WriteLine():
Dim objFile As New System.IO.StreamWriter(“c:\test.txt”)objFile.Write(“text1”)objFile.Write(“text2”)objFile.Write(“text3”)objFile.Close()
This snippet produces a text file that contains the following:text1text2text3
The following code illustrates how you could use WriteLine() tostore a list of albums (assuming that you have the list in a list box titled lstAlbums):
© 2011, H Guy Williams 50

Dim objFile As New System.IO.StreamWriter(“c:\albums.txt”)Dim intCounter As Long = lstAlbums.Items.Count
For intCounter = 0 To lstAlbums.Items.Count - 1objFile.WriteLine(lstAlbums.Items(intCounter).ToString)
Next intCounterobjFile.Close()
Reading a Text FileReading a text file is handled by the StreamReader class, which behaves similarly to theStreamWriter class. First, you need to define an object of type StreamReader, like this:
Dim objFile As New System.IO.StreamReader(“c:\test.txt”)
A key difference in declaring a StreamReader object versus a StreamWriter object ishow the code behaves if the file is not found. The StreamWriter object is happy to create a new text file for you if the specified file isn’t found. If StreamReader can’t find the specified file, it throws an exception—something you need to account for in your code.
StreamReader has multiple ways to read the data. The first of the two most common ways is to use the ReadToEnd() method, which reads the entire file and is used to place the contents of the file into a variable. Example ReadToEnd() use:
Dim objFile As New System.IO.StreamReader(“c:\test5.txt”)Dim strContents As StringstrContents = objFile.ReadToEnd()objFile.Close()objFile.Dispose()MessageBox.Show(strContents)
Sometimes you just want to get a single line of text at a time. The following code shows how you could load the Albums.txt text file, one line at a time, and place each album name in a list box:
Dim objFile As New System.IO.StreamReader(“c:\albums.txt”)Dim strAlbumName As StringstrAlbumName = objFile.ReadLine()Do Until strAlbumName Is Nothing
lstAlbums.Items.Add(strAlbumName)
© 2011, H Guy Williams 51

strAlbumName = objFile.ReadLine()LoopobjFile.Close()objFile.Dispose()
A couple of important concepts in this example need discussing. The first is how you know when you’ve reached the end of a text file. The answer is that the return result will be Nothing. So, the first thing this code does is get the first line from the text file. It’s possible that the text file could be empty, so the Do loop tests for this. If the string is Nothing, the file is empty, so the loop doesn’t execute. If the string is not Nothing, the loop begins. The first statement in the loop adds the string to the list box. The next statement gets the next line from the file. One thing this code doesn’t test for is a zero-length string (””). If the text file has a blank line, the string variable holds a zero-length string. You might want to test for a situation like this when working with text files in your code.
DatabaseIntroducing ADO.NETADO.NET is the .NET platform’s database technology, and it builds on the older ADO(Active Data Objects) technology. ADO.NET provides DataSet and DataTable objectsthat are optimized for moving disconnected sets of data across the Internet andintranets, including through firewalls. At the same time, ADO.NET includes the traditionalconnection and command objects, as well as an object called a DataReader(which resembles a forward-only, read-only ADO RecordSet, in case you’re familiarwith ADO). Together, these objects provide the best performance and throughput forretrieving data from a database.
· SqlConnection is used to establish a connection to a SQL Server data source.
· DataSet is a memory-resident representation of data. There are many ways of working with a DataSet, such as through DataTables.
© 2011, H Guy Williams 52

· DataTable holds a result set of data for manipulation and navigation.· DataAdapter is used to populate a DataReader.
All the ADO.NET objects, except the DataTable, are part of the System.Data namespace.The DataTable is part of System.Xml.
Connecting to a Database
To access data in a database, you must first establish a connection, using anADO.NET connection object. Multiple connection objects are included in the .NETFramework, such as the OleDbConnection object (for working with the same OLE DBdata providers you would access through traditional ADO) and the SqlConnectionobject (for optimized access to Microsoft SQL Server). Because these examples connectto a Microsoft SQL Database, you’ll be using the SqlConnection object. To create anobject variable of type SqlConnection and initialize the variable to a new connection,you could use a statement like this:
Dim cnADONetConnection As New SQLConnection()
You’ll create a module-level variable to hold the connection. Double-click the formnow to access its events, and place the cursor below the class definition statement atthe top of the module. Enter the following statement:
Private m_cn As New SQLConnection()
Before using this connection, you must specify the data source to which you want toconnect. This is done through the ConnectionString property of the ADO.NET connectionobject. The ConnectionString contains connection information such as thename of the provider, username, and password. The ConnectionString might containmany connection parameters; the set of parameters available varies, depending
© 2011, H Guy Williams 53

on the source of data to which you’re connecting. Table 21.1 lists some of the parametersused in the SQL ConnectionString. If you specify multiple parameters, separatethem with a semicolon.
The Provider= parameter is one of the most important at this point; it is governed bythe type of database you’re accessing. For example, when accessing a SQL Serverdatabase, you specify the provider information for SQL Server, and when accessing aJet database, you specify the provider for Jet. In this example, you access a MicrosoftSQL database, so you use the provider information for Microsoft SQL.
In addition to specifying the provider, you also need to specify the database.
When you attach to an unsecured Microsoft SQL Server database, it isn’t necessary toprovide a username and password. When attaching to a secured database, however,
© 2011, H Guy Williams 54

you must provide a username and a password. You do so by passing the usernameand password as parameters in the ConnectionString property.
Closing a Connection to a Data SourceYou close a connection to a data source. That means you shouldn’t rely on a variablegoing out of scope to close a connection. Instead, you should force an explicit disconnectvia code. You do so by calling the Close() method of the connection object.Now you’ll write code to explicitly close the connection when the form is closed.Start by opening the object drop-down list in the code window and selecting Main-Form Events if it isn’t already selected. Next, choose FormClosed from the event dropdownlist to create an event handler for the FormClosed event. Enter the followingstatements in the FormClosed event:
m_cn.Close()m_cn.Dispose()
Manipulating DataThe easiest way to manipulate data when using ADO.NET is to create a DataTableobject containing the result set of a table, query, or stored procedure. Using aDataTable object, you can add, edit, delete, find, and navigate records. The followingsections explain how to use DataTables.Understanding DataTables
DataTables contain a snapshot of data in the data source.
You generally start by filling a DataTable, manipulating its results, and finally sending the changes back to the data source.
You populate the DataTable by using the Fill() method of a DataAdapter object, and changes are sent back to the database through use of the Update() method of a SqlDataAdapter.
© 2011, H Guy Williams 55

Any changes made to the DataTable appear only in the local copy of the data until you call the Update method. Having a local copy of the data reduces contention by preventing users from blocking othersfrom reading the data while it’s being viewed. If you’re familiar with ADO, you’llnote that this is similar to the Optimistic Batch Client Cursor in ADO.Creating a DataAdapter
To populate a DataTable, you must create a SqlDataAdapter. The DataAdapteryou’ll create uses the connection you’ve already defined to connect to the data sourceand then executes a query you provide. The results of that query are pushed into aDataTable.
As mentioned earlier, the .NET Framework has multiple connection objects. It hasmultiple ADO.NET DataAdapter objects as well. You’ll use the SqlDataAdapterbecause you will be connecting to Microsoft SQL Server.
The constructor for an SqlDataAdapter optionally takes the command to executewhen filling a DataTable or DataSet, as well as a connection specifying the datasource (you could have multiple connections open in a single project). This constructorhas the following syntax:
Dim daSqlDataAdapter As New SqlDataAdapter([CommandText],[Connection])
Creating and Populating DataTables
You need to create a module-level DataTable in your project. Follow these steps:
1. Create the DataTable variable by adding the following statement on the classheader to create another module-level variable:
Private m_DataTable As New DataTable
© 2011, H Guy Williams 56

2. You use an integer variable to keep track of the user’s current position (row)within the DataTable. To do this, add the following statement immediatelybelow the statement you just entered to declare the new DataTable object:
Private m_rowPosition As Integer = 0
3. You now have a SqlDataAdapter that allows access to a data source via theconnection. You’ve declared a DataTable that will hold a reference to data.Next, add the following statement to the form’s Load event, after the existingcode, to fill the DataTable with data:
m_DA.Fill(m_DataTable)
Because the DataTable doesn’t hold a connection to the data source, you don’t needto close it when you’re finished.
Referencing Fields in a DataRow
DataTables contain a collection of DataRows. To access a row within the DataTable,you specify the ordinal (index) of that DataRow. For example, you could access thefirst row of your DataTable like this:
Dim m_DataRow As DataRow = m_DataTable.Rows(0)
Data elements in a DataRow are called columns. For example, the Contacts table I’vecreated has two columns: ContactName and State. To reference the value of a column,you can pass the column name to the DataRow like this:
’ Change the value of the column.m_DataRow(“ContactName”) = “Bob Brown”or’ Get the value of the column.strContactName = m_DataRow (“ContactName”)
If you misspell a column name, an exception occurs when the statement executesat runtime; no errors are raised at compile time.
© 2011, H Guy Williams 57
Navigating RecordsThe ADO.NET DataTable object supports a number of methods that can be used toaccess its DataRows. The simplest of these is the ordinal accessor that you used inyour ShowCurrentRecord() method. Because the DataTable has no dependency onthe source of the data, this same functionality is available regardless of where thedata comes from.
Editing RecordsTo edit records in a DataTable, you change the value of a particular column in thedesired DataRow. Remember, though, that changes aren’t made to the original datasource until you call Update() on the SqlDataAdapter, passing in the DataTablecontaining the changes.
Creating New RecordsYou add records to a DataTable much as you edit records. However, to create a newrow in the DataTable, you must first call the NewRow() method. After creating thenew row, you can set its column values. The row isn’t actually added to theDataTable, however, until you call the Add() method on the DataTable’sRowCollection.
Now you need to modify your interface so that the user can add new records. Onetext box is used for the contact name and a second text box for the state. When theuser clicks the button you provide, the values in these text boxes are written to theContacts table as a new record.
Notice that after the new record is added, the position is set to the last row, and the
© 2011, H Guy Williams 58

ShowCurrentRecord() procedure is called. This causes the new record to appear inthe display text boxes you created earlier.
Deleting Records
To delete a record from a DataTable, you call the Delete() method on the DataRow to be deleted.
Controlling Other Applications Using AutomationCreating an Instance of an Automation ServerReferencing a type library enables Visual Basic to integrate the available objects ofthe type library with its own internal objects. After this is done, you can create objectvariables based on object types found in the type library. Excel has an object calledApplication, which acts as the primary object in the Excel object model. In fact,most Office programs have an Application object. How do you know what objectsan automation server supports? The only sure way is to consult the documentation ofthe program in question or use the Object Browser, as discussed in Hour 3, “UnderstandingObjects and Collections.”
Deploying ApplicationsUnderstanding ClickOnce TechnologyClickOnce technology has its drawbacks, mostly in its lack of flexibility, but it does have some significant improvements over earlier technologies, and Microsoft has continued to improve it.
The following points are highlights of the new ClickOnce technology:
© 2011, H Guy Williams 59

· ClickOnce is designed to bring the ease of deploying a web application to the
deployment of desktop applications. Traditionally, to distribute a desktopapplication you had to touch every client computer, running the setup programand installing the appropriate files. Web applications, on the otherhand, need to be updated in only one place: on the web server. ClickOnce providesdesktop applications with update functionality similar to that of webapplications.
· Applications deployed with ClickOnce can update themselves. They can check
the Web for a newer version and install the newer version automatically.
· ClickOnce programs update only necessary files. With previous installation
technologies, entire applications had to be reinstalled to be updated.
· ClickOnce allows applications to install their components in such a way that
they don’t interfere with other installed applications. In other words, they areself-contained applications. With Windows Installer deployments (that is, the“old way”), applications shared components such as custom controls. If oneapplication mistakenly installed an older version of a component, deleted acomponent, or installed an incompatible version of a component, it wouldbreak other installed applications that used the shared component.
· ClickOnce programs do not require the user to have administrative permissions.
With Windows Installer deployments, users needed administrative permissionsto install an application. Trust me—this is a serious issue, and I’mglad to see ClickOnce address it.
· A ClickOnce application can be installed in one of three ways: from a webpage, from a network file share, or from media such as a CD-ROM.
· A ClickOnce application can be installed on a user’s computer, so it can be run
when the user is offline. Or it can be run in an online-only mode, where itdoesn’t permanently install anything on the user’s computer.
Using the Publish Wizard to Create a ClickOnce Application
© 2011, H Guy Williams 60

see book pg 483
Uninstalling an Application You’ve DistributedAll Windows applications should provide a facility to easily be removed from theuser’s computer. Most applications provide this functionality in the Add/Remove Programsdialog box, and yours is no exception. In fact, all ClickOnce programs automaticallycreate an entry in the Uninstall or Change a Program dialog box. Followthese steps to uninstall the Picture Viewer program:
Setting Advanced Options for Creating ClickOnce ProgramsThe Publish Wizard is the easiest way to create a ClickOnce program, but it doesn’tgive you access to all the features of ClickOnce. To view all the available settings,right-click the project name in the Solution Explorer and choose Properties. Next,click the Publish tab, and you see a page of publishing options, as shown in Figure23.10. Using this page, you can specify prerequisites, such as whether to install the.NET Framework, which is required to run any .NET application. (By default, the PublishWizard creates your ClickOnce application such that it installs the .NET Frameworkfrom the Web if the user performing the install doesn’t have the Frameworkinstalled.) The Publish Wizard walks you through many of these options, but yougain the most control by setting your options here and clicking the Publish Now button,which appears at the bottom right of the Publish page.
© 2011, H Guy Williams 61

The 10,000-Foot ViewThe .NET FrameworkThe components and technology that make up Microsoft .NET are collectively calledthe .NET Framework. The .NET Framework is composed of numerous classes andincludes components such as the Common Language Runtime, Microsoft Intermedi-ate Language, and ADO.NET. The following sections explain the various pieces thatmake up the .NET Framework.
Common Language Runtime
© 2011, H Guy Williams 62

A language runtime allows an application to run on a target computer; it consists ofcode that’s shared among all applications developed using a supported language. Aruntime contains the “guts” of language code, such as code that draws forms to thescreen, handles user input, and manages data. The runtime of .NET is called thecommon language runtime.
Unlike runtimes for other languages, the common language runtime is designed as amultilanguage runtime. For example, both C# and Visual Basic use the commonlanguage runtime. In fact, currently more than 15 language compilers are beingdeveloped to use the common language runtime.
Because all .NET languages share the common language runtime, they also sharethe same IDE, forms engine, exception-handling mechanism, garbage collector (discussedshortly), and much more. One benefit of the multilanguage capability of thecommon language runtime is that programmers can leverage their knowledge of agiven .NET language.
For example, some developers on a team might be comfortable with Visual Basic,whereas others are more comfortable with C#. Because both languages share thesame runtime, both can be integrated to deliver a single solution. In addition, a commonexception-handling mechanism is built into the common language runtime sothat exceptions can be thrown from code written in one .NET language and caughtin code written in another.
Code that runs within the common language runtime is called managed codebecause the code and resources that it uses (variables, objects, and so on) are fullymanaged by the common language runtime. Visual Basic is restricted to workingonly in managed code, but some languages (such as C++) can drop to unmanaged
© 2011, H Guy Williams 63

code—code that isn’t managed by the common language runtime.
Another advantage of the common language runtime is that all .NET tools share thesame debugging and code-profiling tools. In the past, Visual Basic was limited in itsdebugging tools, whereas applications such as C++ had many third-party debuggingtools available. All languages now share the same tools. This means that asadvancements are made to the debugging tools of one product, they’re made to toolsof all products because the tools are shared. This goes beyond debugging tools. Addins to the IDE such as code managers, for example, are just as readily available to Visual Basic as they are to C#—or any other .NET language, for that matter.
Although Microsoft hasn’t announced any official plans to do so, it’s possible that it could produce a version of the common language runtime that runs on other operating systems, such as Macintosh OS or Linux. If this occurs, the applications that you’ve written for Windows should run on a newly supported operating system with little or no modification.
Microsoft Intermediate LanguageAs you can see in Figure 24.1, all .NET code, regardless of the language syntax used,compiles to Intermediate Language (IL) code. IL code is the only code that the commonlanguage runtime understands; it doesn’t understand C#, Visual Basic, or anyother developer syntax. IL gives .NET its multilanguage capabilities; as long as anoriginal source language can be compiled to IL, it can become a .NET program. Forexample, people have developed a .NET compiler for COBOL—a mainframe languagewith a long history. This compiler takes existing COBOL code and compiles itto IL so that it will run within the .NET Framework, using the common language runtime.COBOL itself isn’t a Windows language and doesn’t support many of the featuresfound in a true Windows language (such as a Windows Forms engine), so you
© 2011, H Guy Williams 64

can imagine the excitement of COBOL programmers when they first learned of beingable to leverage their existing code and programming skills to create powerful Windowsapplications.
A potential drawback of IL is that it can be susceptible to reverse compilation. This has many people questioning the security of .NET code and the security of the .NET Framework in general. If code security is a serious concern for you, I encourage you to research this matter on your own.
Generating IL code isn’t the final step in the process of compiling and running anapplication. For a processor (CPU) to execute programmed instructions, those instructionsmust be in machine language format. When you run a .NET application, a justin-time compiler (called a JITter) compiles the IL to machine-language instructions
© 2011, H Guy Williams 65

that the processor can understand. IL code is processor independent, which againbrings up the possibility that JITters could be built to create machine code for computersthat are using something other than Intel-compatible processors. If Microsoft wereto offer a common language runtime for operating systems other than Windows,many of the differences would lie in how the JITter would compile IL.
As .NET evolves, changes made to the common language runtime will benefit all.NET applications. For example, if Microsoft finds a way to further increase the speedat which forms are drawn to the screen by making improvements to the commonlanguage runtime, all .NET applications will immediately benefit from the improvement.However, optimizations made to a specific syntax compiler, such as the onethat compiles Visual Basic code to IL, are language specific. This means that eventhough all .NET languages compile to IL code and use the common language runtime,it’s possible for one language to have small advantages over another because ofhow the language’s code is compiled to IL.
NamespacesAs mentioned earlier in this book, the .NET Framework is composed of classes—many classes. Namespaces are the way .Net creates a hierarchical structure of all theseclasses, and they help prevent naming collisions. A naming collision occurs when twoclasses have the same name. Because namespaces provide a hierarchy, it’s possible tohave two classes with the same name, as long as they exist in different namespaces.Namespaces, in effect, create scope for classes.
The base namespace in the .NET Framework is the System namespace. The Systemnamespace contains classes for garbage collection (discussed shortly), exception handling,
© 2011, H Guy Williams 66

data typing, and much more. The System namespace is just the tip of the iceberg.There are literally dozens of namespaces. Table 24.1 lists some of the morecommon namespaces, many of which you’ve used in this book. All the controlsyou’ve placed on forms and even the forms themselves belong to theSystem.Windows.Forms namespace. Use Table 24.1 as a guide; if a certain namespaceinterests you, I suggest that you research it further in the Visual Studio .NETonline help.
All Microsoft-provided namespaces begin with either System or Microsoft.
© 2011, H Guy Williams 67

Common Type System
© 2011, H Guy Williams 68

The common type system in the common language runtime is the component thatdefines how data types are declared and used. The common language runtime’scapability to support cross-language integration to the level it does is largely due tothe common type system. In the past, each language used its own data types andmanaged data in its own way. This made it difficult for applications developed in differentlanguages to communicate because no standard way existed for passing databetween them.
The common type system ensures that all .NET applications use the same data types.It also provides for self-describing type information (called metadata) and controls allthe data manipulation mechanisms so that data is handled (stored and processed) inthe same way among all .NET applications. This allows data (including objects) to betreated the same way in all .NET languages.
Garbage CollectionAlthough I’ve talked a lot about objects (you can’t talk about anything .NET-relatedwithout talking about objects), I’ve avoided discussing the underlying technicaldetails of how .NET creates, manages, and destroys objects. Although you don’t needto know the complex minutiae of how .NET works with objects, you do need tounderstand a few details of how objects are destroyed.
As discussed in previous hours, setting an object variable to Nothing or letting it goout of scope destroys the object. However, as mentioned in Hour 16, “DesigningObjects Using Classes,” this isn’t the whole story. The .NET platform uses a garbagecollector to destroy objects. The specific type of garbage collection that .NET implementsis called reference-tracing garbage collection. Essentially, the garbage collector
© 2011, H Guy Williams 69

monitors the resources a program uses. When consumed resources reach a definedthreshold, the garbage collector looks for unused objects. When the garbage collectorfinds an unused object, it destroys it, freeing all the memory and resources the objectwas using.
An important thing to remember about garbage collection is that releasing an object by setting it to Nothing or letting an object variable go out of scope doesn’t mean that the object is destroyed immediately.
The object isn’t destroyed until the garbage collector is triggered to go looking for unused objects.
© 2011, H Guy Williams 70