Variax Workbench HD Revision B - Line 6...DADGAD Save Manage Tuning Parallel Pitch Body R-Billy...
17
VARIAX WORKBENCH HD Rev B ©2014 Line 6, Inc. PILOT’S GUIDE MANUEL DE PILOTAGE PILOTENHANDBUCH PILOTENHANDBOEK MANUAL DEL PILOTO 取扱説明書
Transcript of Variax Workbench HD Revision B - Line 6...DADGAD Save Manage Tuning Parallel Pitch Body R-Billy...

VARIAX WORKBENCH HD
Rev B ©2014 Line 6, Inc.
PILOT’S GUIDE
MANUEL DE PILOTAGEPILOTENHANDBUCHPILOTENHANDBOEK
MANUAL DEL PILOTO取扱説明書
VARIAX WORKBENCH HD Pilot’s Guide
1
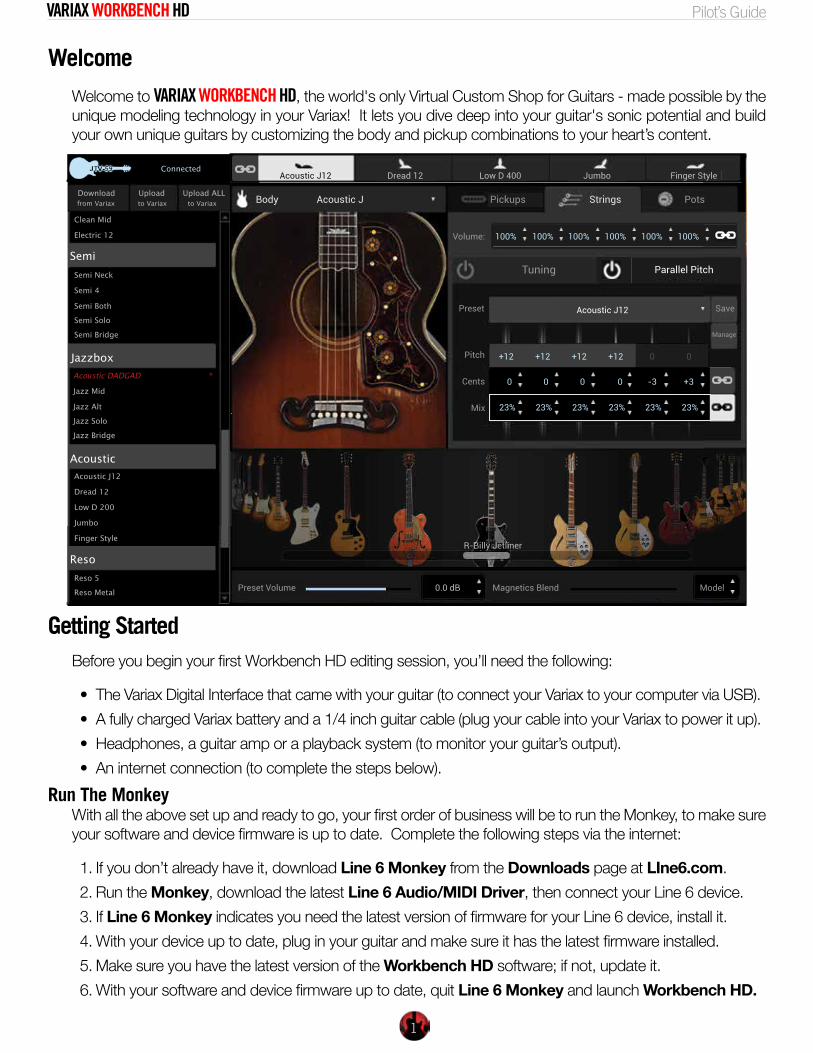
WelcomeWelcome to VARIAX WORKBENCH HD, the world's only Virtual Custom Shop for Guitars - made possible by the unique modeling technology in your Variax! It lets you dive deep into your guitar's sonic potential and build your own unique guitars by customizing the body and pickup combinations to your heart’s content.
Preset
Pitch
Acoustic J12 Save
Manage
Parallel Pitch
StringsPickups PotsBody Acoustic J
100% 100% 100% 100% 100% 100%
R-Billy Jetliner
Magnetics Blend ModelPreset Volume 0.0 dB
Volume:
0 0 0 +3
0
0
+12
-3
0
Cents
Mix
+12+12+12
Semi
Jazzbox
Acoustic
Reso
Download Upload Upload ALLto Variaxto Variaxfrom Variax
Clean Mid
Electric 12
Semi Neck
Semi 4
Semi Both
Semi Solo
Semi Bridge
Acoustic DADGAD *
Jazz Mid
Jazz Alt
Jazz Solo
Jazz Bridge
Acoustic J12
Dread 12
Low D 200
Jumbo
Finger Style
Reso 5
Reso Metal
Tuning
Acoustic J12 Dread 12 Low D 400 Finger StyleJumboConnected
23%23%23%23% 23%23%
Getting StartedBefore you begin your first Workbench HD editing session, you’ll need the following:
• The Variax Digital Interface that came with your guitar (to connect your Variax to your computer via USB).• A fully charged Variax battery and a 1/4 inch guitar cable (plug your cable into your Variax to power it up).• Headphones, a guitar amp or a playback system (to monitor your guitar’s output).• An internet connection (to complete the steps below).
Run The MonkeyWith all the above set up and ready to go, your first order of business will be to run the Monkey, to make sure your software and device firmware is up to date. Complete the following steps via the internet:
1. If you don’t already have it, download Line 6 Monkey from the Downloads page at LIne6.com.2. Run the Monkey, download the latest Line 6 Audio/MIDI Driver, then connect your Line 6 device.3. If Line 6 Monkey indicates you need the latest version of firmware for your Line 6 device, install it.4. With your device up to date, plug in your guitar and make sure it has the latest firmware installed.5. Make sure you have the latest version of the Workbench HD software; if not, update it.6. With your software and device firmware up to date, quit Line 6 Monkey and launch Workbench HD.
VARIAX WORKBENCH HD Pilot’s Guide
2
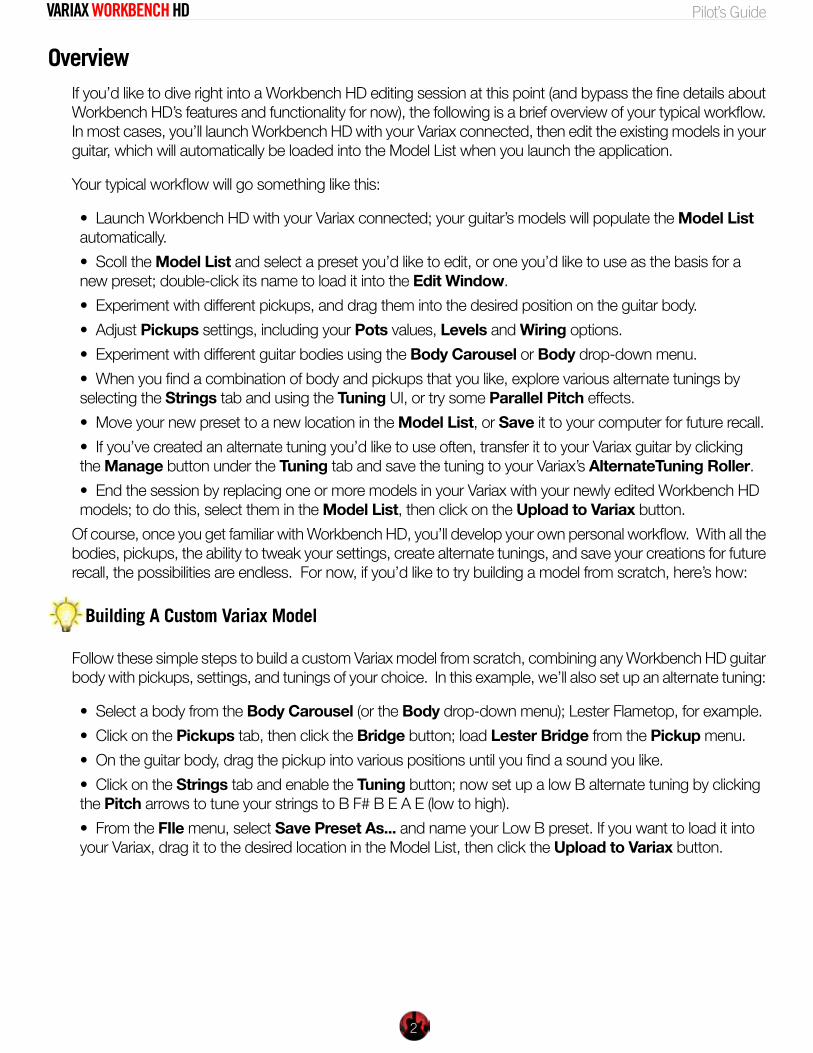
Overview If you’d like to dive right into a Workbench HD editing session at this point (and bypass the fine details about Workbench HD’s features and functionality for now), the following is a brief overview of your typical workflow. In most cases, you’ll launch Workbench HD with your Variax connected, then edit the existing models in your guitar, which will automatically be loaded into the Model List when you launch the application.
Your typical workflow will go something like this:
• Launch Workbench HD with your Variax connected; your guitar’s models will populate the Model List automatically.• Scoll the Model List and select a preset you’d like to edit, or one you’d like to use as the basis for a new preset; double-click its name to load it into the Edit Window.• Experiment with different pickups, and drag them into the desired position on the guitar body.• Adjust Pickups settings, including your Pots values, Levels and Wiring options.• Experiment with different guitar bodies using the Body Carousel or Body drop-down menu.• When you find a combination of body and pickups that you like, explore various alternate tunings by selecting the Strings tab and using the Tuning UI, or try some Parallel Pitch effects.• Move your new preset to a new location in the Model List, or Save it to your computer for future recall.• If you’ve created an alternate tuning you’d like to use often, transfer it to your Variax guitar by clicking the Manage button under the Tuning tab and save the tuning to your Variax’s AlternateTuning Roller.• End the session by replacing one or more models in your Variax with your newly edited Workbench HD models; to do this, select them in the Model List, then click on the Upload to Variax button.
Of course, once you get familiar with Workbench HD, you’ll develop your own personal workflow. With all the bodies, pickups, the ability to tweak your settings, create alternate tunings, and save your creations for future recall, the possibilities are endless. For now, if you’d like to try building a model from scratch, here’s how:
Building A Custom Variax Model
Follow these simple steps to build a custom Variax model from scratch, combining any Workbench HD guitar body with pickups, settings, and tunings of your choice. In this example, we’ll also set up an alternate tuning:
• Select a body from the Body Carousel (or the Body drop-down menu); Lester Flametop, for example.• Click on the Pickups tab, then click the Bridge button; load Lester Bridge from the Pickup menu.• On the guitar body, drag the pickup into various positions until you find a sound you like.• Click on the Strings tab and enable the Tuning button; now set up a low B alternate tuning by clicking the Pitch arrows to tune your strings to B F# B E A E (low to high).• From the FIle menu, select Save Preset As... and name your Low B preset. If you want to load it into your Variax, drag it to the desired location in the Model List, then click the Upload to Variax button.

VARIAX WORKBENCH HD Pilot’s Guide
3
Offline ModeWhen your Variax isn’t connected to your computer, you can still use Workbench HD in Offline Mode. All the information in this Pilot’s Guide applies to Offline Mode, except for saving and loading to and from your Variax.
Simply launch the Workbench HD application, use the File menu to open a single Preset, a Bank of Presets, or a full Bundle, then edit your Variax presets as usual. Of course you won’t hear them without your Variax.
Offline mode can be useful, however, for organizing your presets or setting up tunings for various models. When you’re finished with your session, simply save the results to your computer for future recall.
Local TonesWhen Workbench HD launches, it will pull a copy of the complete set of models from your Variax and show them in a Model List on the left side of the app window. This list is essentially a "scratch pad" that tracks any changes you make to the models or their order without altering the tones saved in your Variax.
A B C
D
E
F
Semi
Jazzbox
Acoustic
Reso
Clean Mid
Electric 12 *
Semi Neck
Semi 4
Semi Both
Semi Solo
Semi Bridge
Acoustic DADGAD *
Jazz Mid
Jazz Alt
Jazz Solo
Jazz Bridge
Dread
Dread 12
Low D 200 *
Jumbo
Finger Style
Reso 5
Reso Metal *
Download Upload Upload ALLto Variaxto Variaxfrom Variax
Automatic Backups
When you first launch Workbench HD, it creates an automatic Variax Backup bundle of your Variax model set and stores it on your computer in the Line 6/Tones/Workbench HD directory. That way, you’ll have a copy of your pre-edited Variax model set in case you want to revisit one or more models in their pre-edited state.
Similarly, every time you press the Upload ALL to Variax button to upload the Workbench HD Model List into your Variax, Workbench HD creates an automatic User Backup bundle of the Model List, which includes all the edits you’ve made during your current edit session, and stores it in the same Workbench HD directory.
B The Upload to Variax button updates the memory in the Variax for only the models that are selected in the Model List.
D When a model has been edited in some way, its name is displayed in red text with an asterisk.
A When you click the Download from Variax button, all models that are selected in the Model List are downloaded from the Variax.
E The Model List consists of 12 banks, matching the Variax Model Selector knob, with 5 models listed per bank.
C The Upload ALL to Variax button updates the memory in the Variax to match the Workbench HD scratch pad.
F Use the scroll bar to view all the models in the Model List.
VARIAX WORKBENCH HD Pilot’s Guide
4
Organizing Your Model ListIn the Model List you can copy and paste or drag and drop any model (or models) into any position in the list. Here’s an overview of drag and drop how-tos when working with your presets in the Model List:
Single Preset:• Reorder (within bank): drag source to target (highlight is automatically displayed between presets); other presets reorder accordingly.• Replace (within bank): Ctrl + drag source to target (Windows); Option + drag source to target (OS X); target is replaced, source patch remains unchanged.• Replace (in another bank): drag source to target; target is replaced, source patch remains unchanged.• Transpose: Shift + drag source to target; target and source patches switch places.
Bank Of 5 Presets:• Replace: drag source bank header to target bank header; replaces all patches in target bank with source bank patches.• Transpose: Shift + drag source bank to target bank; all patches within each bank switch places.
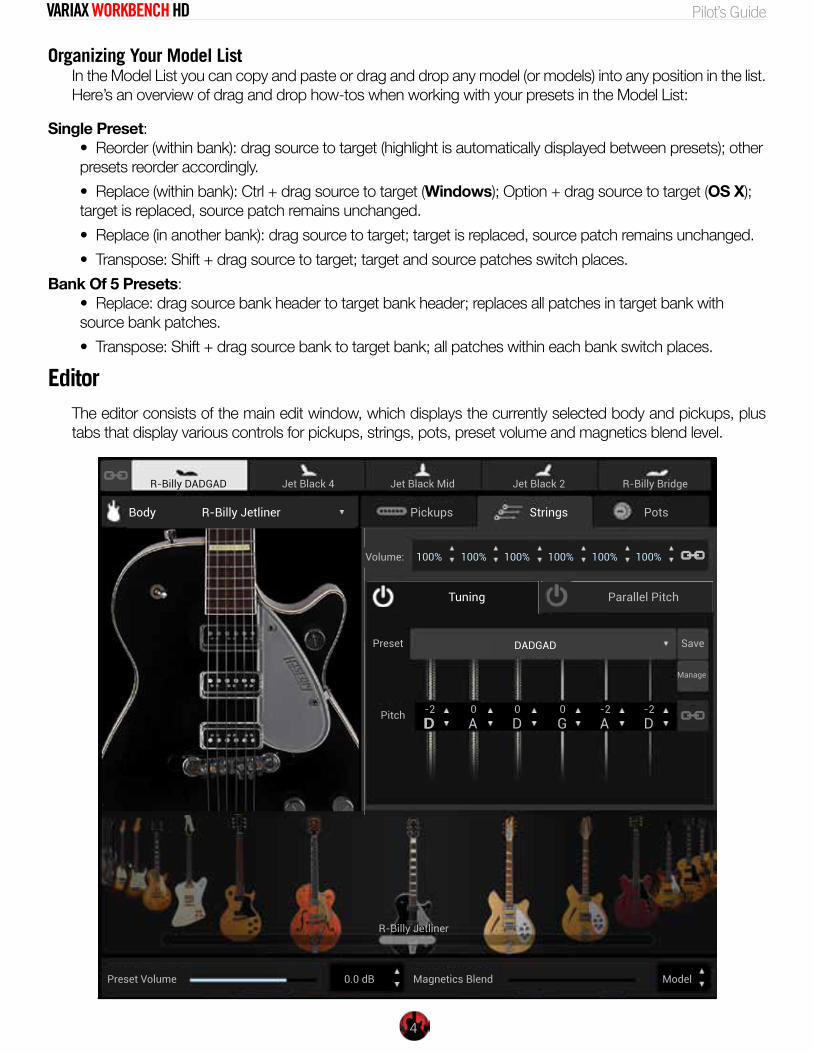
EditorThe editor consists of the main edit window, which displays the currently selected body and pickups, plus tabs that display various controls for pickups, strings, pots, preset volume and magnetics blend level.
Preset
Pitch
DADGAD Save
Manage
Tuning Parallel Pitch
StringsPickups PotsBody R-Billy Jetliner
R-Billy DADGAD Jet Black 4 Jet Black Mid Jet Black 2 R-Billy Bridge
R-Billy Jetliner
Magnetics Blend ModelPreset Volume 0.0 dB
Volume:
DD-2
A0
D0
D-2
G0
A-2
100% 100% 100% 100% 100% 100%
VARIAX WORKBENCH HD Pilot’s Guide
5
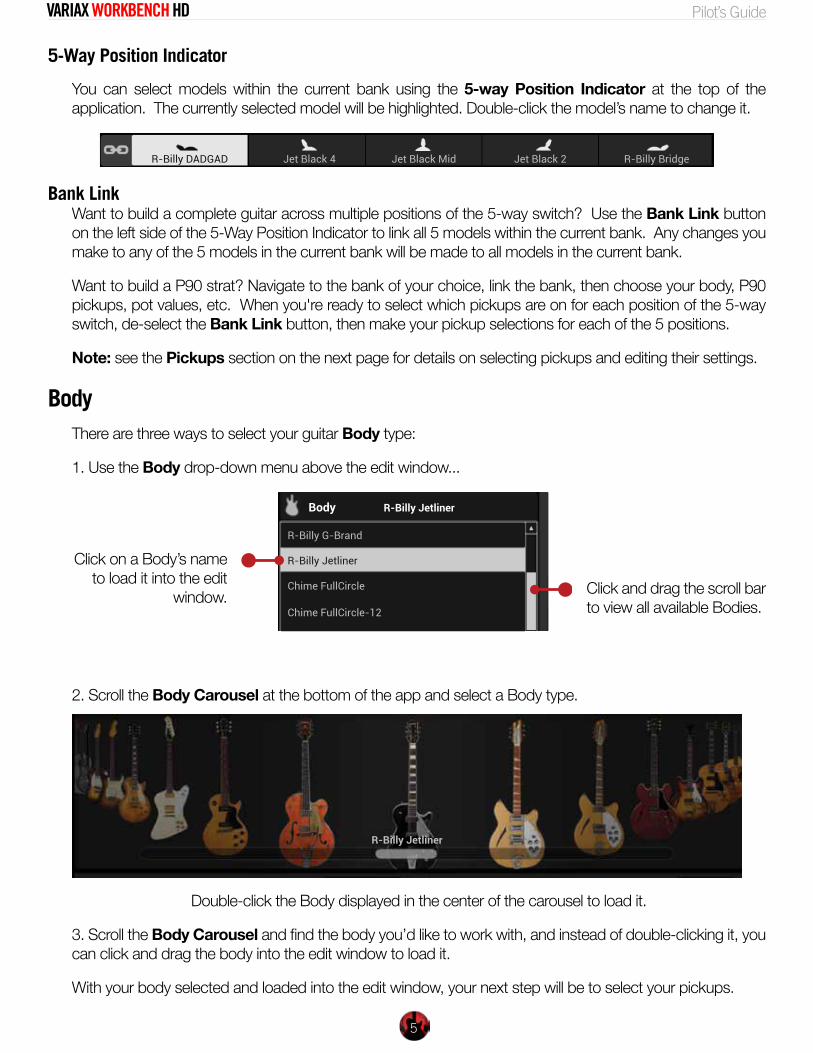
5-Way Position Indicator
You can select models within the current bank using the 5-way Position Indicator at the top of the application. The currently selected model will be highlighted. Double-click the model’s name to change it.
R-Billy DADGAD Jet Black 4 Jet Black Mid R-Billy BridgeJet Black 2
Bank Link Want to build a complete guitar across multiple positions of the 5-way switch? Use the Bank Link button on the left side of the 5-Way Position Indicator to link all 5 models within the current bank. Any changes you make to any of the 5 models in the current bank will be made to all models in the current bank.
Want to build a P90 strat? Navigate to the bank of your choice, link the bank, then choose your body, P90 pickups, pot values, etc. When you're ready to select which pickups are on for each position of the 5-way switch, de-select the Bank Link button, then make your pickup selections for each of the 5 positions.
Note: see the Pickups section on the next page for details on selecting pickups and editing their settings.
Body There are three ways to select your guitar Body type:
1. Use the Body drop-down menu above the edit window...
R-Billy G-Brand
R-Billy Jetliner
Chime FullCircle
Chime FullCircle-12
R-Billy JetlinerBody
2. Scroll the Body Carousel at the bottom of the app and select a Body type.
R-Billy Jetliner
Double-click the Body displayed in the center of the carousel to load it.
3. Scroll the Body Carousel and find the body you’d like to work with, and instead of double-clicking it, you can click and drag the body into the edit window to load it.
With your body selected and loaded into the edit window, your next step will be to select your pickups.
Click and drag the scroll bar to view all available Bodies.
Click on a Body’s name to load it into the edit
window.
VARIAX WORKBENCH HD Pilot’s Guide
6
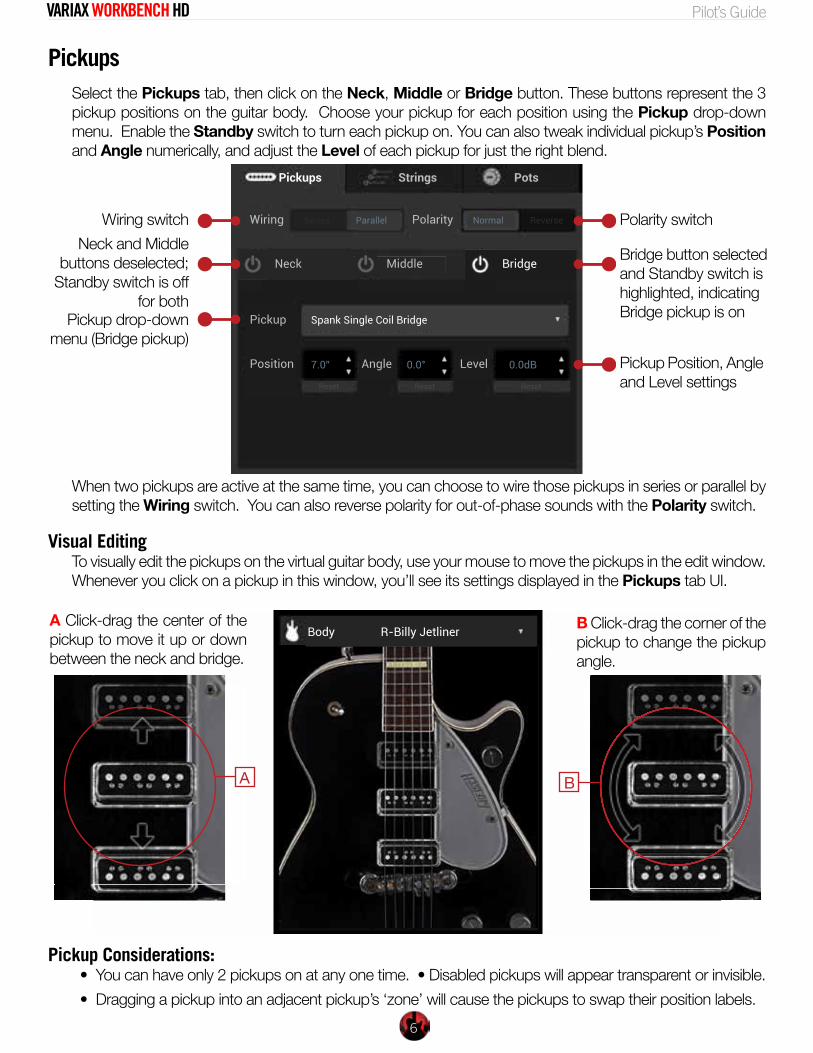
PickupsSelect the Pickups tab, then click on the Neck, Middle or Bridge button. These buttons represent the 3 pickup positions on the guitar body. Choose your pickup for each position using the Pickup drop-down menu. Enable the Standby switch to turn each pickup on. You can also tweak individual pickup’s Position and Angle numerically, and adjust the Level of each pickup for just the right blend.
MiddleNeck Bridge
PolarityWiring
Pickup
Position
Spank Single Coil Bridge
Angle Level
Reset
7.0” 0.0° 0.0dB
Parallel Normal ReverseSeries
Pickups Strings Pots
Reset Reset
When two pickups are active at the same time, you can choose to wire those pickups in series or parallel by setting the Wiring switch. You can also reverse polarity for out-of-phase sounds with the Polarity switch.
Visual EditingTo visually edit the pickups on the virtual guitar body, use your mouse to move the pickups in the edit window. Whenever you click on a pickup in this window, you’ll see its settings displayed in the Pickups tab UI.
A B
Body R-Billy Jetliner
Pickup Considerations:• You can have only 2 pickups on at any one time. • Disabled pickups will appear transparent or invisible.• Dragging a pickup into an adjacent pickup’s ‘zone’ will cause the pickups to swap their position labels.
Wiring switchNeck and Middle
buttons deselected; Standby switch is off
for bothPickup drop-down
menu (Bridge pickup)
Polarity switch
Pickup Position, Angle and Level settings
Bridge button selected and Standby switch is highlighted, indicating Bridge pickup is on
A Click-drag the center of the pickup to move it up or down between the neck and bridge.
B Click-drag the corner of the pickup to change the pickup angle.
VARIAX WORKBENCH HD Pilot’s Guide
7
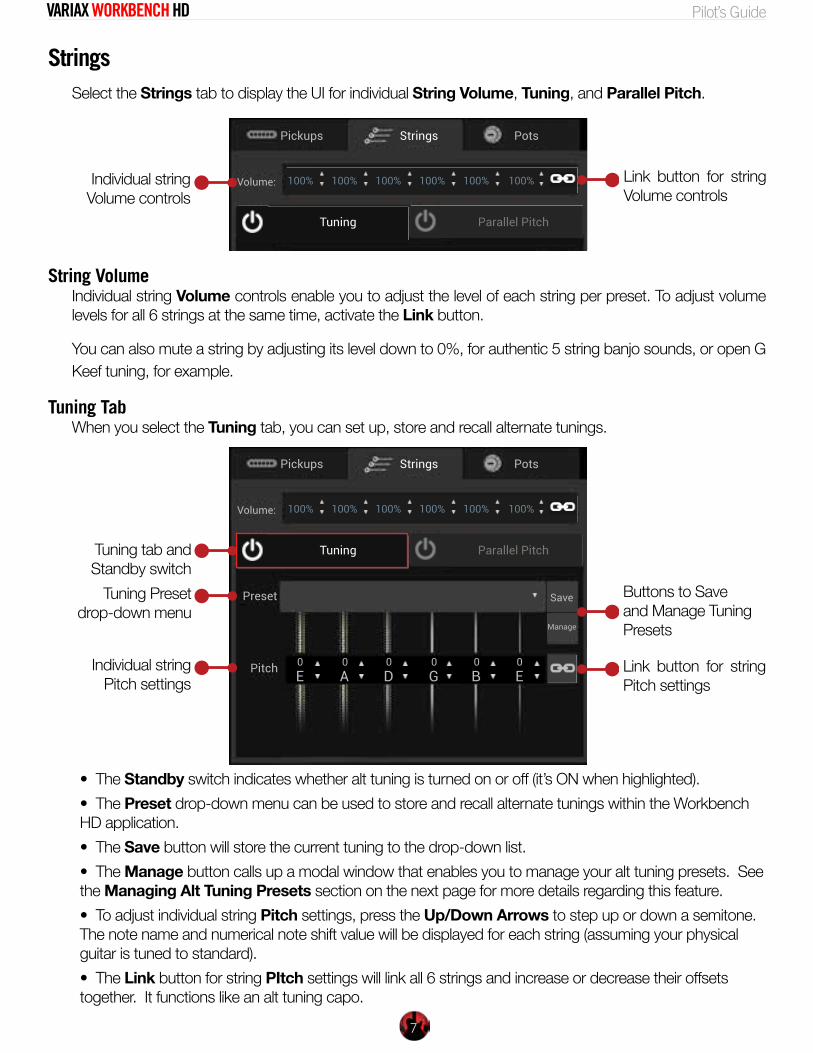
StringsSelect the Strings tab to display the UI for individual String Volume, Tuning, and Parallel Pitch.
Tuning Parallel Pitch
Save
Manage
Preset
Pitch
100% 100% 100% 100% 100% 100%Volume:
E0
A0
D0
E0
G0
B0
StringsPickups Pots
String Volume Individual string Volume controls enable you to adjust the level of each string per preset. To adjust volume levels for all 6 strings at the same time, activate the Link button.
You can also mute a string by adjusting its level down to 0%, for authentic 5 string banjo sounds, or open G Keef tuning, for example.
Tuning TabWhen you select the Tuning tab, you can set up, store and recall alternate tunings.
•
Tuning Parallel Pitch
Save
Manage
Preset
Pitch
100% 100% 100% 100% 100% 100%Volume:
E0
A0
D0
E0
G0
B0
StringsPickups Pots
The Standby switch indicates whether alt tuning is turned on or off (it’s ON when highlighted).• The Preset drop-down menu can be used to store and recall alternate tunings within the Workbench HD application. • The Save button will store the current tuning to the drop-down list.• The Manage button calls up a modal window that enables you to manage your alt tuning presets. See the Managing Alt Tuning Presets section on the next page for more details regarding this feature.• To adjust individual string Pitch settings, press the Up/Down Arrows to step up or down a semitone. The note name and numerical note shift value will be displayed for each string (assuming your physical guitar is tuned to standard).• The Link button for string PItch settings will link all 6 strings and increase or decrease their offsets together. It functions like an alt tuning capo.
Individual string Volume controls
Link button for string Volume controls
Buttons to Save and Manage Tuning Presets
Link button for string Pitch settings
Tuning tab and Standby switch
Tuning Preset drop-down menu
Individual string Pitch settings
VARIAX WORKBENCH HD Pilot’s Guide
8
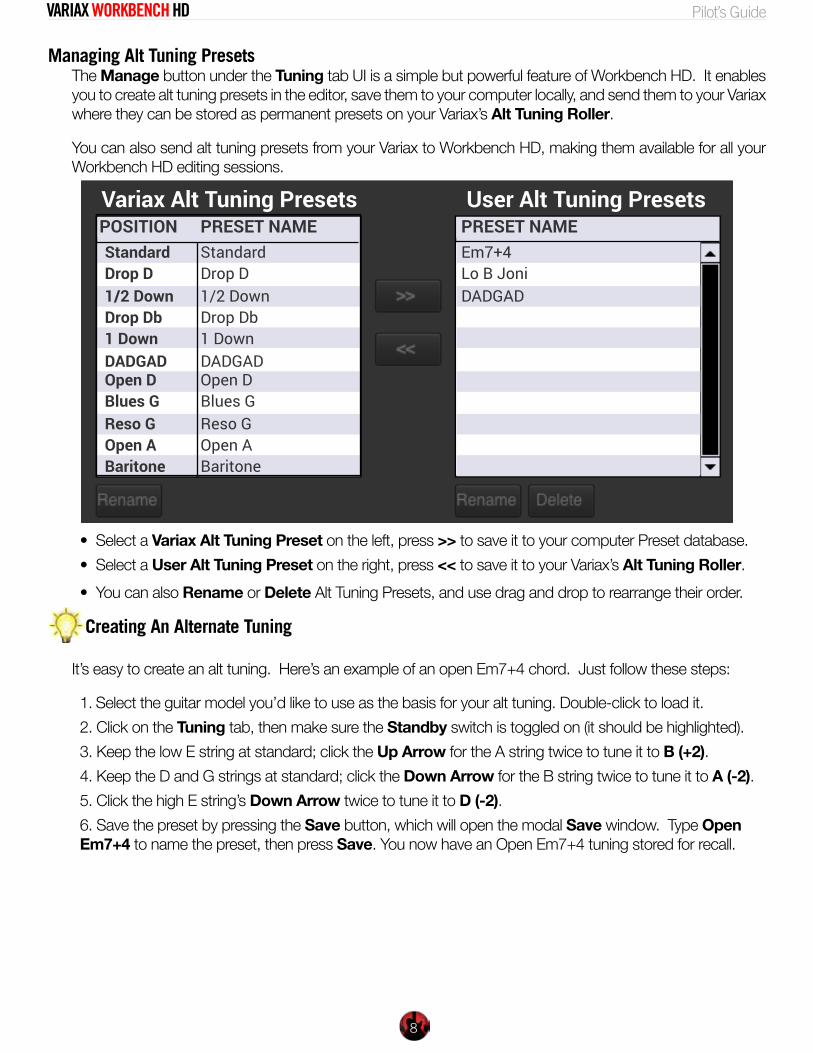
Managing Alt Tuning PresetsThe Manage button under the Tuning tab UI is a simple but powerful feature of Workbench HD. It enables you to create alt tuning presets in the editor, save them to your computer locally, and send them to your Variax where they can be stored as permanent presets on your Variax’s Alt Tuning Roller.
You can also send alt tuning presets from your Variax to Workbench HD, making them available for all your Workbench HD editing sessions.
DADGADLo B JoniEm7+4
1/2 DownDrop DStandard
DADGAD1 DownDrop Db
Reso GBlues GOpen D
BaritoneOpen A
1/2 DownDrop DStandard
DADGAD1 DownDrop Db
Reso GBlues GOpen D
BaritoneOpen A
Variax Alt Tuning Presets User Alt Tuning PresetsPRESET NAMEPRESET NAMEPOSITION
• Select a Variax Alt Tuning Preset on the left, press >> to save it to your computer Preset database.• Select a User Alt Tuning Preset on the right, press << to save it to your Variax’s Alt Tuning Roller.• You can also Rename or Delete Alt Tuning Presets, and use drag and drop to rearrange their order.
Creating An Alternate Tuning
It’s easy to create an alt tuning. Here’s an example of an open Em7+4 chord. Just follow these steps:
1. Select the guitar model you’d like to use as the basis for your alt tuning. Double-click to load it.2. Click on the Tuning tab, then make sure the Standby switch is toggled on (it should be highlighted).3. Keep the low E string at standard; click the Up Arrow for the A string twice to tune it to B (+2).4. Keep the D and G strings at standard; click the Down Arrow for the B string twice to tune it to A (-2).5. Click the high E string’s Down Arrow twice to tune it to D (-2).6. Save the preset by pressing the Save button, which will open the modal Save window. Type Open Em7+4 to name the preset, then press Save. You now have an Open Em7+4 tuning stored for recall.
VARIAX WORKBENCH HD Pilot’s Guide
9
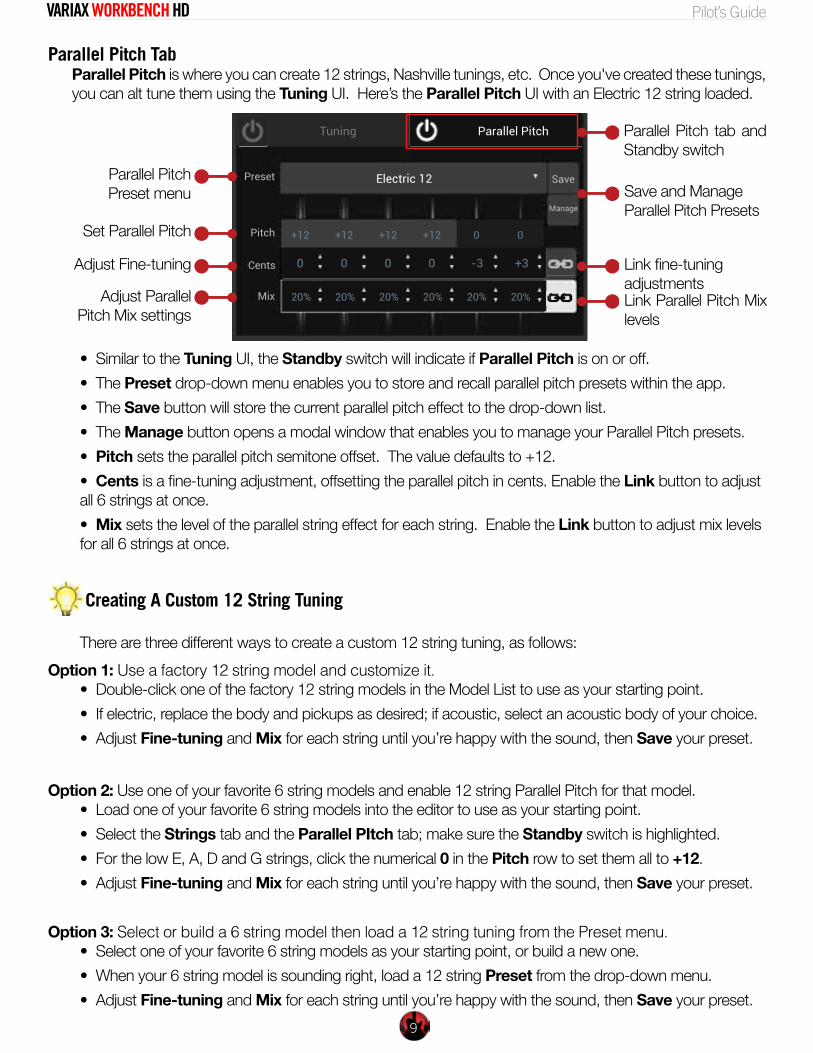
Parallel Pitch TabParallel Pitch is where you can create 12 strings, Nashville tunings, etc. Once you've created these tunings, you can alt tune them using the Tuning UI. Here’s the Parallel Pitch UI with an Electric 12 string loaded.
20% 20% 20% 20% 20% 20%
Electric 12
Tuning Parallel Pitch
Preset
Pitch
Cents
Mix
Save
Manage
0 0 0 0 -3 +3
+12 +12 +12 +12 0 0
• Similar to the Tuning UI, the Standby switch will indicate if Parallel Pitch is on or off.• The Preset drop-down menu enables you to store and recall parallel pitch presets within the app. • The Save button will store the current parallel pitch effect to the drop-down list.• The Manage button opens a modal window that enables you to manage your Parallel Pitch presets.• Pitch sets the parallel pitch semitone offset. The value defaults to +12.• Cents is a fine-tuning adjustment, offsetting the parallel pitch in cents. Enable the Link button to adjust all 6 strings at once.• Mix sets the level of the parallel string effect for each string. Enable the Link button to adjust mix levels for all 6 strings at once.
Creating A Custom 12 String Tuning
There are three different ways to create a custom 12 string tuning, as follows:Option 1: Use a factory 12 string model and customize it.
• Double-click one of the factory 12 string models in the Model List to use as your starting point.• If electric, replace the body and pickups as desired; if acoustic, select an acoustic body of your choice.• Adjust Fine-tuning and Mix for each string until you’re happy with the sound, then Save your preset.
Option 2: Use one of your favorite 6 string models and enable 12 string Parallel Pitch for that model.• Load one of your favorite 6 string models into the editor to use as your starting point.• Select the Strings tab and the Parallel PItch tab; make sure the Standby switch is highlighted.• For the low E, A, D and G strings, click the numerical 0 in the Pitch row to set them all to +12.• Adjust Fine-tuning and Mix for each string until you’re happy with the sound, then Save your preset.
Option 3: Select or build a 6 string model then load a 12 string tuning from the Preset menu.• Select one of your favorite 6 string models as your starting point, or build a new one.• When your 6 string model is sounding right, load a 12 string Preset from the drop-down menu.• Adjust Fine-tuning and Mix for each string until you’re happy with the sound, then Save your preset.
Link fine-tuning adjustmentsLink Parallel Pitch Mix levels
Parallel Pitch Preset menu
Adjust Parallel Pitch Mix settings
Save and Manage Parallel Pitch Presets
Set Parallel Pitch
Adjust Fine-tuning
Parallel Pitch tab and Standby switch
VARIAX WORKBENCH HD Pilot’s Guide
10
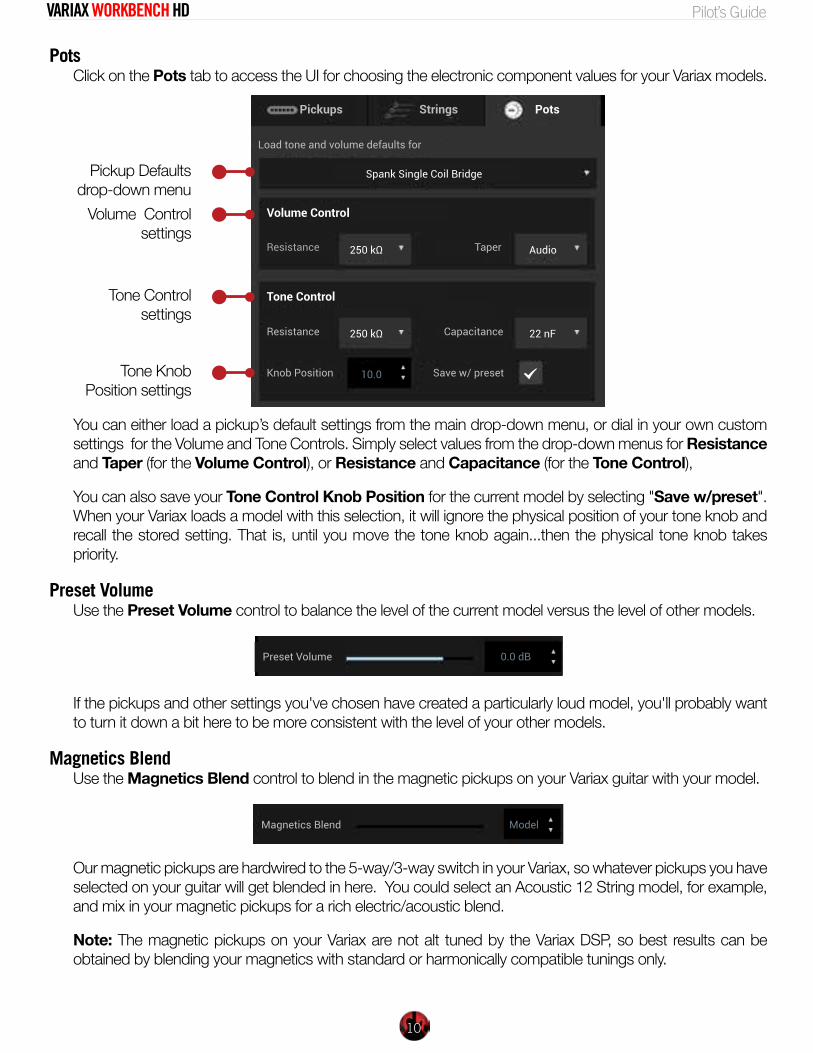
PotsClick on the Pots tab to access the UI for choosing the electronic component values for your Variax models.
Pickups Strings Pots
Load tone and volume defaults for
Spank Single Coil Bridge
Volume Control
Tone Control
Resistance
Resistance Capacitance
Knob Position Save w/ preset
250 kΩ
250 kΩ Taper Audio
22 nF
10.0
You can either load a pickup’s default settings from the main drop-down menu, or dial in your own custom settings for the Volume and Tone Controls. Simply select values from the drop-down menus for Resistance and Taper (for the Volume Control), or Resistance and Capacitance (for the Tone Control),
You can also save your Tone Control Knob Position for the current model by selecting "Save w/preset". When your Variax loads a model with this selection, it will ignore the physical position of your tone knob and recall the stored setting. That is, until you move the tone knob again...then the physical tone knob takes priority.
Preset VolumeUse the Preset Volume control to balance the level of the current model versus the level of other models.
Magnetics BlendPreset Volume 0.0 dB Model
If the pickups and other settings you've chosen have created a particularly loud model, you'll probably want to turn it down a bit here to be more consistent with the level of your other models.
Magnetics BlendUse the Magnetics Blend control to blend in the magnetic pickups on your Variax guitar with your model.
Magnetics BlendPreset Volume 0.0 dB Model
Our magnetic pickups are hardwired to the 5-way/3-way switch in your Variax, so whatever pickups you have selected on your guitar will get blended in here. You could select an Acoustic 12 String model, for example, and mix in your magnetic pickups for a rich electric/acoustic blend.
Note: The magnetic pickups on your Variax are not alt tuned by the Variax DSP, so best results can be obtained by blending your magnetics with standard or harmonically compatible tunings only.
Pickup Defaults drop-down menu
Tone Knob Position settings
Volume Control settings
Tone Control settings

VARIAX WORKBENCH HD Pilot’s Guide
11
Application Menu CommandsApplication Menu Commands are available in the top menu bar of the Workbench HD application. On the far left is the Variax Workbench HD menu, which features standard operating system menu commands that include About, Services (Mac OS), Show, Hide and Quit. To the right are the menus for File, Edit, Transfer and Help. The Mac OS X version is illustrated below. Windows is different in appearance only.
File Edit HelpOpen Preset...Save Preset As...
Open Preset Folder
⇧⌘O
⌘O
▶
Transfer
⌘S
⌃O⌃S
Open Recent
⇧⌘S
Open Bank...Save Bank As...
Open Bundle...Save Bundle As...
Edit Transfer HelpGlobal String Levels...
Revert to Original
Undo Redo
Copy PresetPaste Preset
Select All
Special Characters...
⇧⌘Z⌘Z
⌘C⌘V
⌘A
⌥⌘T
HelpDownload From VariaxUpload To Variax
Download All From VariaxUpload All To Variax
Transfer
Help
Online HelpWorkbench HD Help
Search
Download all Presets from the Variax to the editorUpload all Presets from the editor to the Variax
Download selected Presets from the Variax to the editorUpload selected Presets from the editor to the Variax
Open the Workbench HD Pilot’s Guide PDFGo to the Online Help at Line6.com
Type in a key word to search
Open a Workbench HD PresetSave and name a Workbench HD Preset
Open a Workbench HD BankSave and name a Workbench HD Bank
Open a Workbench HD BundleSave and name a Workbench HD Bundle
Open the most recent Workbench HD Preset
Open the Workbench HD Preset Folder
Copy selected Preset to clipboardPaste copied Preset to selected location
Undo last actionRedo last action
Revert Preset to original state
Opens a modal window that enables you to adjust the level of each string on your Variax; the resulting levels are saved globally
Select all Presets in the Model List
Open the O.S. special characters window (Mac OS X only)
VARIAX WORKBENCH HD Pilot’s Guide
12
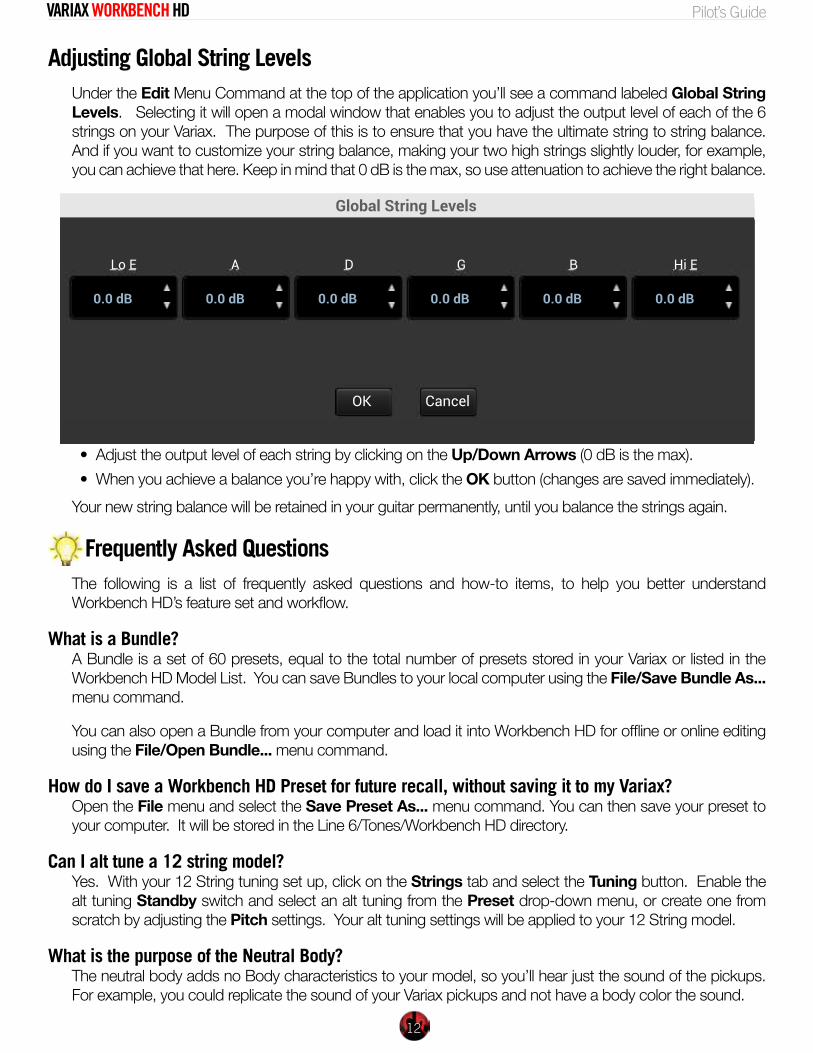
Adjusting Global String LevelsUnder the Edit Menu Command at the top of the application you’ll see a command labeled Global String Levels. Selecting it will open a modal window that enables you to adjust the output level of each of the 6 strings on your Variax. The purpose of this is to ensure that you have the ultimate string to string balance. And if you want to customize your string balance, making your two high strings slightly louder, for example, you can achieve that here. Keep in mind that 0 dB is the max, so use attenuation to achieve the right balance.
0.0 dB 0.0 dB 0.0 dB 0.0 dB 0.0 dB 0.0 dB
Lo E A D G B Hi E
Global String Levels
OK Cancel
• Adjust the output level of each string by clicking on the Up/Down Arrows (0 dB is the max).• When you achieve a balance you’re happy with, click the OK button (changes are saved immediately).
Your new string balance will be retained in your guitar permanently, until you balance the strings again.
Frequently Asked QuestionsThe following is a list of frequently asked questions and how-to items, to help you better understand Workbench HD’s feature set and workflow.
What is a Bundle?A Bundle is a set of 60 presets, equal to the total number of presets stored in your Variax or listed in the Workbench HD Model List. You can save Bundles to your local computer using the File/Save Bundle As... menu command.
You can also open a Bundle from your computer and load it into Workbench HD for offline or online editing using the File/Open Bundle... menu command.
How do I save a Workbench HD Preset for future recall, without saving it to my Variax?Open the File menu and select the Save Preset As... menu command. You can then save your preset to your computer. It will be stored in the Line 6/Tones/Workbench HD directory.
Can I alt tune a 12 string model?Yes. With your 12 String tuning set up, click on the Strings tab and select the Tuning button. Enable the alt tuning Standby switch and select an alt tuning from the Preset drop-down menu, or create one from scratch by adjusting the Pitch settings. Your alt tuning settings will be applied to your 12 String model.
What is the purpose of the Neutral Body?The neutral body adds no Body characteristics to your model, so you’ll hear just the sound of the pickups. For example, you could replicate the sound of your Variax pickups and not have a body color the sound.
VARIAX WORKBENCH HD Pilot’s Guide
13
Why won’t my computer see my Line 6 device? I’m plugged into my computer.You probably don’t have the latest Line 6 Audio/MIDI Driver installed on your computer. Run the Line 6 Monkey and install the latest Line 6 Audio/MIDI Driver, then your device should appear as expected.
Why can’t I adjust my 12 string fine-tuning to a postive value?The upward limit of pitch shift for Workbench HD is +12. So if parallel pitch for a given string is already set to +12, you can only use negative values to fine-tune that string, since the parallel pitch setting is already at the upward limit.
Why do I see only 2 pickups on some bodies, and 3 pickups on others (with 1 being transparent)?True to the original guitars we modeled, the number of pickups you see will be appropriate to the source guitar. In other words, on a 2 pickup guitar, when a Workbench HD middle pickup is de-activated, it will become invisible, but on a 3 pickup guitar, a de-activated middle pickup will be translucent.
For all electric bodies, however, you can toggle any 1 of the 3 available pickups ON in the Pickups tab, and you’ll see the respective Neck, Middle or Bridge pickup appear on the body.
Why do the Neck and Middle pickups change labels while I’m dragging them on the body?The Neck, Middle and Bridge position labels are based on their positional relationship on the guitar body. So all 3 pickups are subject to this rule, including the Bridge pickup.
For example, if you drag the bridge pickup further toward the neck than the neck pickup, the bridge pickup will be labeled neck (since it’s closest to the neck). The former neck pickup will then become the middle pickup, since it would be in the middle position, and the former middle pickup, which would end up closest to the bridge, will be labeled bridge.
What do the Wiring and Polarity switches do?These switches behave the same as they would on a physical guitar. When two Workbench HD pickups are turned on and the WIring switch is set to Series, the output of the second pickup is summed with the output of the first, which results in a louder, fatter tone. When set to Parallel, the pickups are blended together in parallel, resulting in a cleaner sound, at a volume similar to having only one of the pickups on.
Regarding the Polarity switch, when it’s set to Reverse, the second pickup’s waveform sonically cancels out the waveform of the first pickup to a degree, resulting in a hollow, comb filtered out-of-phase sound.
Which Line 6 devices will work as a computer interface with my Variax and Workbench HD?The Variax Digital Interface that came with your Variax is the best interface to use with Workbench HD. You’ll need a fully charged battery and a 1/4 inch guitar cable plugged in to power up your Variax.
Any other Line 6 device with a VDI input will also work. This includes the POD HD Pro, POD HD 500, POD X3 Live, POD X3 Pro and Vetta II. Those devices, when connected to your Variax with a Line 6 VDI cable, will also provide power to your Variax.
Why doesn’t the alt-tuning sound right when I blend in my magnetics with a Workbench HD model?The magnetic pickups on your physical guitar are not alt tuned by the DSP. So when you turn up the Magnetics Blend level on an alt tuned model, you may hear dissonance. You can blend in the magnetics with 12 string models, however, which will be harmonically compatible.
You might want to experiment with other harmonically related tunings as well. For example, try alt tuning a model to +5 for all 6 strings and set the Magnetics Blend value to 100%. You’ll hear a harmonic blend of your magnetics and 5ths that sounds really fat and musical.
VARIAX WORKBENCH HD Pilot’s Guide
14
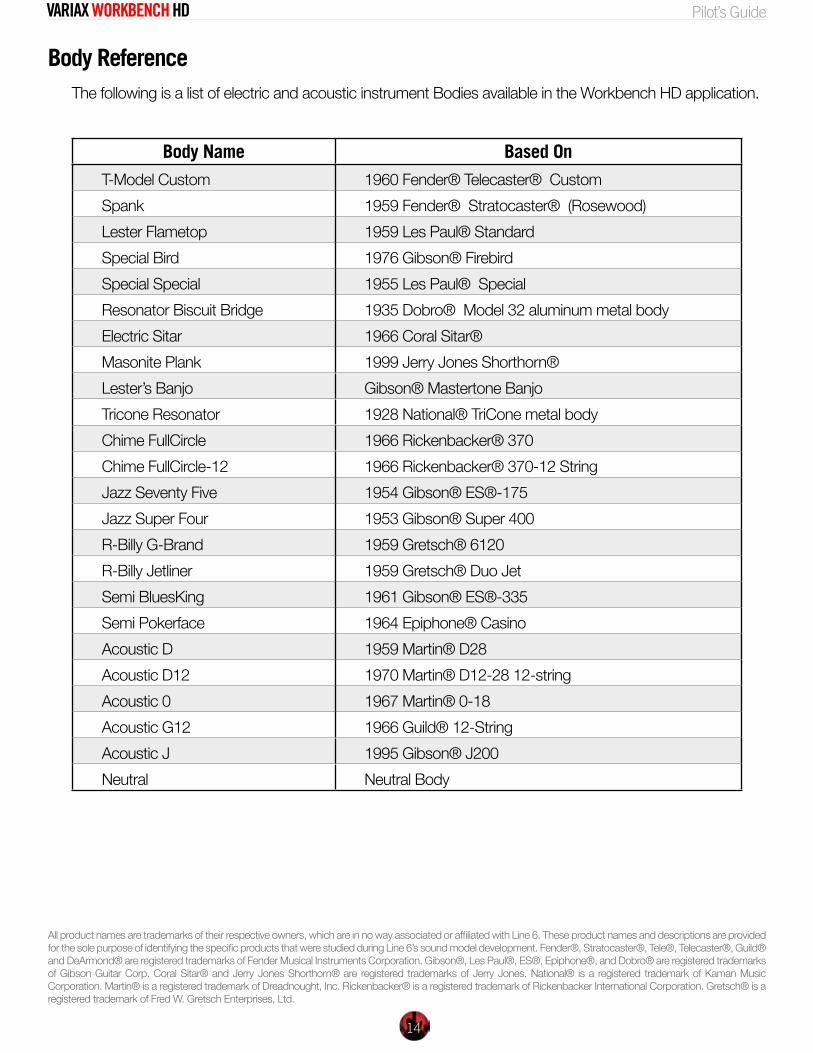
Body ReferenceThe following is a list of electric and acoustic instrument Bodies available in the Workbench HD application.
Body Name Based On
T-Model Custom 1960 Fender® Telecaster® CustomSpank 1959 Fender® Stratocaster® (Rosewood)Lester Flametop 1959 Les Paul® StandardSpecial Bird 1976 Gibson® FirebirdSpecial Special 1955 Les Paul® SpecialResonator Biscuit Bridge 1935 Dobro® Model 32 aluminum metal bodyElectric Sitar 1966 Coral Sitar® Masonite Plank 1999 Jerry Jones Shorthorn® Lester’s Banjo Gibson® Mastertone BanjoTricone Resonator 1928 National® TriCone metal bodyChime FullCircle 1966 Rickenbacker® 370Chime FullCircle-12 1966 Rickenbacker® 370-12 StringJazz Seventy Five 1954 Gibson® ES®-175Jazz Super Four 1953 Gibson® Super 400R-Billy G-Brand 1959 Gretsch® 6120R-Billy Jetliner 1959 Gretsch® Duo JetSemi BluesKing 1961 Gibson® ES®-335Semi Pokerface 1964 Epiphone® CasinoAcoustic D 1959 Martin® D28Acoustic D12 1970 Martin® D12-28 12-stringAcoustic 0 1967 Martin® 0-18Acoustic G12 1966 Guild® 12-StringAcoustic J 1995 Gibson® J200Neutral Neutral Body
All product names are trademarks of their respective owners, which are in no way associated or affiliated with Line 6. These product names and descriptions are provided for the sole purpose of identifying the specific products that were studied during Line 6’s sound model development. Fender®, Stratocaster®, Tele®, Telecaster®, Guild® and DeArmond® are registered trademarks of Fender Musical Instruments Corporation. Gibson®, Les Paul®, ES®, Epiphone®, and Dobro® are registered trademarks of Gibson Guitar Corp. Coral Sitar® and Jerry Jones Shorthorn® are registered trademarks of Jerry Jones. National® is a registered trademark of Kaman Music Corporation. Martin® is a registered trademark of Dreadnought, Inc. Rickenbacker® is a registered trademark of Rickenbacker International Corporation. Gretsch® is a registered trademark of Fred W. Gretsch Enterprises, Ltd.
VARIAX WORKBENCH HD Pilot’s Guide
15
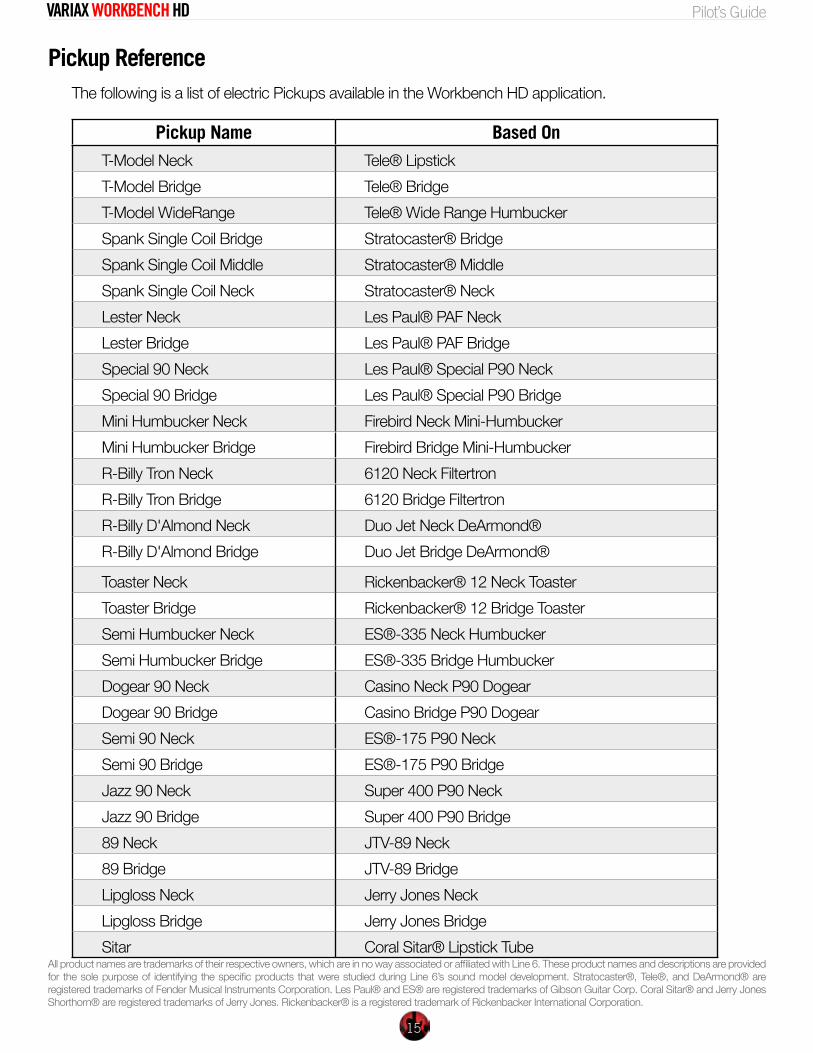
Pickup ReferenceThe following is a list of electric Pickups available in the Workbench HD application.
Pickup Name Based OnT-Model Neck Tele® LipstickT-Model Bridge Tele® BridgeT-Model WideRange Tele® Wide Range HumbuckerSpank Single Coil Bridge Stratocaster® BridgeSpank Single Coil Middle Stratocaster® MiddleSpank Single Coil Neck Stratocaster® NeckLester Neck Les Paul® PAF NeckLester Bridge Les Paul® PAF BridgeSpecial 90 Neck Les Paul® Special P90 NeckSpecial 90 Bridge Les Paul® Special P90 BridgeMini Humbucker Neck Firebird Neck Mini-HumbuckerMini Humbucker Bridge Firebird Bridge Mini-HumbuckerR-Billy Tron Neck 6120 Neck FiltertronR-Billy Tron Bridge 6120 Bridge FiltertronR-Billy D'Almond Neck Duo Jet Neck DeArmond®R-Billy D'Almond Bridge Duo Jet Bridge DeArmond®
Toaster Neck Rickenbacker® 12 Neck ToasterToaster Bridge Rickenbacker® 12 Bridge ToasterSemi Humbucker Neck ES®-335 Neck HumbuckerSemi Humbucker Bridge ES®-335 Bridge HumbuckerDogear 90 Neck Casino Neck P90 DogearDogear 90 Bridge Casino Bridge P90 DogearSemi 90 Neck ES®-175 P90 NeckSemi 90 Bridge ES®-175 P90 BridgeJazz 90 Neck Super 400 P90 NeckJazz 90 Bridge Super 400 P90 Bridge89 Neck JTV-89 Neck89 Bridge JTV-89 BridgeLipgloss Neck Jerry Jones NeckLipgloss Bridge Jerry Jones BridgeSitar Coral Sitar® Lipstick Tube
All product names are trademarks of their respective owners, which are in no way associated or affiliated with Line 6. These product names and descriptions are provided for the sole purpose of identifying the specific products that were studied during Line 6’s sound model development. Stratocaster®, Tele®, and DeArmond® are registered trademarks of Fender Musical Instruments Corporation. Les Paul® and ES® are registered trademarks of Gibson Guitar Corp. Coral Sitar® and Jerry Jones Shorthorn® are registered trademarks of Jerry Jones. Rickenbacker® is a registered trademark of Rickenbacker International Corporation.
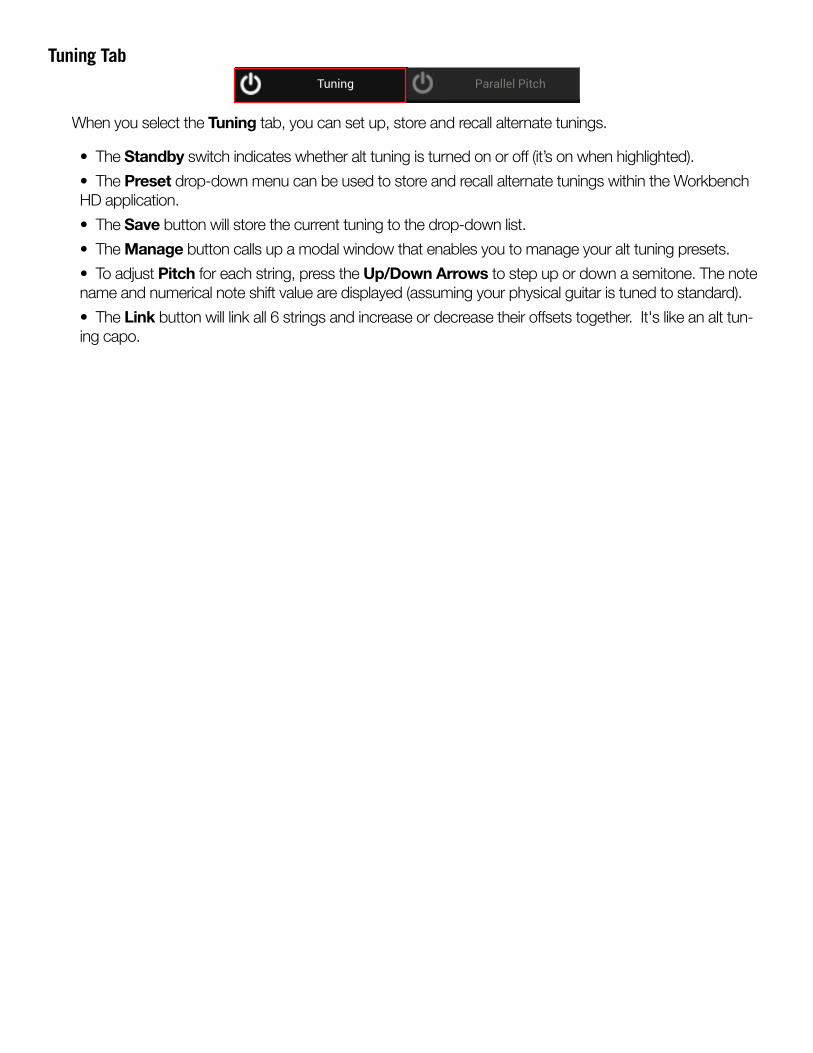
Tuning TabTuning Parallel Pitch
When you select the Tuning tab, you can set up, store and recall alternate tunings.
• The Standby switch indicates whether alt tuning is turned on or off (it’s on when highlighted).• The Preset drop-down menu can be used to store and recall alternate tunings within the Workbench HD application. • The Save button will store the current tuning to the drop-down list.• The Manage button calls up a modal window that enables you to manage your alt tuning presets.• To adjust Pitch for each string, press the Up/Down Arrows to step up or down a semitone. The note name and numerical note shift value are displayed (assuming your physical guitar is tuned to standard).• The Link button will link all 6 strings and increase or decrease their offsets together. It's like an alt tun-ing capo.