Variable Frequency Drive (VFD) Factory---Installed · PDF fileVariable Frequency Drive (VFD)...
32
Variable Frequency Drive (VFD) Factory---Installed Option 2---Speed Motor Control for 2---Stage Cooling Rooftop Units Installation, Setup & Troubleshooting Supplement This document provides supplemental installation, setup and troubleshooting information for the Variable Frequency Drive (VFD) factory-installed option. It is to be used with the base unit Installation Instructions for 48/50TC, 50TCQ, 48/50HC, 50HCQ, and 40RU 2-Stage cooling units, sizes 07 – 30. Units equipped with the VFD are identified by an indicator in the unit's model number (see the unit's nameplate). Use Table 1 to identify whether or not a given unit is equipped with the factory-installed VFD option. NOTE: Read the entire instruction manual before starting the installation. C11526 Fig. 1 - Variable Frequency Drive (VFD) TABLE OF CONTENTS SAFETY CONSIDERATIONS 1 .................... GENERAL 2 .................................... Staged Air Volume (SAV) Indoor Fan Speed System 2 . Identifying Factory Option 2 ...................... Unit Installation with SAV Option 2 ................ Pre-Start Check, SAV Option 9 .................... START-UP, SAV Option 9 ....................... Cooling with SAV 9 ............................. Operating Sequences, SAV Option 9 ................ Ventilation (Fan Only) 9 ........................ Cooling (FAN switch in AUTO) 9 ................ Heating 10 .................................... Operating Fan for Test & Balance 11 ............... Unit without Accessory Keypad 11 ............... Unit with Accessory VFD Keypad 11 ............. Service 12 ..................................... Central Terminal Board Jumpers (48/50-Series Only) 14 . VFD ALARMS AND FAULTS TROUBLESHOOTING 14 .. VFD Maintenance 18 ............................ APPENDIX - REMOTE VFD KEYPAD REFERENCE 19 .. SAFETY CONSIDERATIONS CONFIGURATION OVERRIDE HAZARD DO NOT USE ABB OR CARRIER START-UP ASSISTANT ON THIS VFD APPLICAITON! Use of start-up assistant will override the factory VFD configurations! CAUTION !
Transcript of Variable Frequency Drive (VFD) Factory---Installed · PDF fileVariable Frequency Drive (VFD)...

Variable Frequency Drive (VFD)Factory---Installed Option2---Speed Motor Controlfor 2---Stage Cooling Rooftop Units
Installation, Setup & Troubleshooting Supplement
This document provides supplemental installation, setup and troubleshooting informationfor the Variable Frequency Drive (VFD) factory-installed option. It is to be used with the baseunit Installation Instructions for 48/50TC, 50TCQ, 48/50HC, 50HCQ, and 40RU 2-Stage coolingunits, sizes 07 – 30. Units equipped with the VFD are identified by an indicator in the unit'smodel number (see the unit's nameplate). Use Table 1 to identify whether or not a given unitis equipped with the factory-installed VFD option.
NOTE: Read the entire instruction manual before startingthe installation.
C11526
Fig. 1 -- Variable Frequency Drive (VFD)
TABLE OF CONTENTS
SAFETY CONSIDERATIONS 1. . . . . . . . . . . . . . . . . . . .
GENERAL 2. . . . . . . . . . . . . . . . . . . . . . . . . . . . . . . . . . . .
Staged Air Volume (SAV) Indoor Fan Speed System 2.
Identifying Factory Option 2. . . . . . . . . . . . . . . . . . . . . .
Unit Installation with SAV Option 2. . . . . . . . . . . . . . . .
Pre--Start Check, SAV Option 9. . . . . . . . . . . . . . . . . . . .
START--UP, SAV Option 9. . . . . . . . . . . . . . . . . . . . . . .
Cooling with SAV 9. . . . . . . . . . . . . . . . . . . . . . . . . . . . .
Operating Sequences, SAV Option 9. . . . . . . . . . . . . . . .
Ventilation (Fan Only) 9. . . . . . . . . . . . . . . . . . . . . . . .
Cooling (FAN switch in AUTO) 9. . . . . . . . . . . . . . . .
Heating 10. . . . . . . . . . . . . . . . . . . . . . . . . . . . . . . . . . . .
Operating Fan for Test & Balance 11. . . . . . . . . . . . . . .
Unit without Accessory Keypad 11. . . . . . . . . . . . . . .
Unit with Accessory VFD Keypad 11. . . . . . . . . . . . .
Service 12. . . . . . . . . . . . . . . . . . . . . . . . . . . . . . . . . . . . .
Central Terminal Board Jumpers (48/50--Series Only) 14.
VFD ALARMS AND FAULTS TROUBLESHOOTING 14. .
VFD Maintenance 18. . . . . . . . . . . . . . . . . . . . . . . . . . . .
APPENDIX -- REMOTE VFD KEYPAD REFERENCE 19. .
SAFETY CONSIDERATIONS
CONFIGURATION OVERRIDE HAZARD
DO NOT USE ABB OR CARRIER START--UPASSISTANT ON THIS VFD APPLICAITON! Useof start--up assistant will override the factory VFDconfigurations!
CAUTION!
2
Improper installation, adjustment, alteration, service,maintenance, or use can cause explosion, fire, electricalshock or other conditions which may cause personalinjury or property damage. Consult a qualified installer,service agency, or your distributor or branch forinformation or assistance. The qualified installer oragency must use factory--authorized kits or accessorieswhen modifying this product. Refer to the individualinstructions packaged with the kits or accessories wheninstalling.
Follow all safety codes. Wear safety glasses and workgloves. Use quenching cloths for brazing operations andhave a fire extinguisher available. Read these instructionsthoroughly and follow all warnings or cautions attached tothe unit. Consult local building codes and appropriatenational electrical codes (in USA, ANSI/NFPA70,National Electrical Code (NEC); in Canada, CSA C22.1)for special requirements.
It is important to recognize safety information. This is thesafety--alert symbol . When you see this symbol on theunit and in instructions or manuals, be alert to thepotential for personal injury.
Understand the signal words DANGER, WARNING,CAUTION, and NOTE. These words are used with thesafety--alert symbol.
DANGER identifies the most serious hazards which willresult in severe personal injury or death. WARNINGsignifies hazards which could result in personal injury ordeath.
CAUTION is used to identify unsafe practices, whichmay result in minor personal injury or product andproperty damage.
NOTE is used to highlight suggestions which will result inenhanced installation, reliability, or operation.
ELECTRICAL SHOCK HAZARD
Failure to follow this warning could cause personalinjury or death.
Before performing service or maintenance operationson unit, always turn off main power switch to unit andinstall lock(s) and lockout tag(s). Unit may have morethan one power switch. Ensure electrical service torooftop unit agrees with voltage an amperage listed onthe unit rating plate.
! WARNING
CUT HAZARD
Failure to follow this caution may result in personal injury.
Sheet metal parts may have sharp edges or burrs. Usecare and wear appropriate protective clothing, safetyglasses and gloves when handling parts and servicingair conditioning equipment.
CAUTION!
GENERAL
Staged Air Volume (SAV) Indoor Fan SpeedSystem
The Staged Air Volume (SAV) system utilizes a Fan Speedcontrol board and Variable Frequency Drive (VFD) toautomatically adjust the indoor fan motor speed in sequencewith the unit’s ventilation, cooling and heating operation. PerASHRAE 90.1 2010standard section 6.4.3.10.b, during thefirst stage of cooling operation the SAV system will adjustthe fan motor to provide two--thirds (2/3) of the designairflow rate for the unit. When the call for the second stageof cooling is required, the SAV system will allow the designairflow rate for the unit established (100%). During theheating mode, the SAV system will allow total designairflow rate (100%) operation. During ventilation mode, theSAV system will operate the fan motor at 2/3 speed.
Identifying Factory Option
This supplement only applies to units that meet thecriteria detailed in Table 1. If the unit does not meet thatcriteria, discard this document.
Table 1 – Model--Size / VFD Option Indicator
Model / Sizes Position inModel Number
VFD FIOPIndicator
48/50TC / 08---30 17 G, J
50TCQ / 08---24 17 G, J
48/50HC / 08---28 17 G, J
50HCQ / 08---12 17 G, J
40RUA / 07---30 9 T
40RUS / 08---30 9 T
40RUQ / 07---25 9 T
NOTE: See Figs. 2 and 3 (on page 3) for examples oftypical Model Number Nomenclature.
NOTE: 07 size scheduled for late 2015 production.
NOTE: 48/50LC units are not covered in this document;VFDs are standard equipment on belt drive LC units. VFDinstructions for the 48/50LC series are found in theInstallation Instructions for the LC base units.
Unit Installation with SAV Option
48/50HC, TC Rooftop — Refer to the base unitinstallation instructions for standard required operatingand service clearances.
40RU without Remote VFD Keypad — Additional serviceclearance is required on the rear for 40RU fan coil unitequipped with the SAV option. Increase the recommendedrear panel clearance to 30 inches.
40RU with Remote VFD Keypad — Refer to the base unitinstallation instructions for standard required operatingand service clearances. Install the accessory Remote VFDKeypad before positioning the 40RU unit in its finaloperating location.
NOTE: The Remote VFD Keypad is a field--installedoption. It is not included as part of the Factory installedVFD option.

3
4 8 H C D D 2 4 A 2 A 6 - 0 A 0 G 0
Product Type
Product Series
Cooling Tons
1Example:Position: 2 3 4 5 6 7 8 9 10 11 12 13 14 15 16 17 18
Refrig. Systems Options
Heat Options
Sensor Options
Indoor Fan Options
Coil Options (RTPF) (Outdoor - Indoor - Hail Guard)
Voltage Design Revision
Base Unit Controls
Intake / Exhaust Options
Service Options
Factory Assigned
Electrical Options A = NoneC = Non-Fused DisconnectD = Thru-The-Base ConnectionsF = Non-Fused Disconnect and Thru-The-Base ConnectionsG = Two-Speed BlowerJ = Non-Fused Disconnect and Two-Speed Blower
C11527
Fig. 2 -- Model Number Nomenclature Example, 48/50–Series
4 0 R U A A 1 2 T 1 A 6 - 0 A 0 A 0
Nominal Tonnage
1Example:Position: 2 3 4 5 6 7 8 9 10 11 12 13 14 15 16 17 18
Refrigeration Options
Type of Coil
Indoor Fan Options - Belt Drive
Coil Options
Voltage
Revision Number
Future Use
Future Use
Cabinet Paint
Packaging
Future Use
Model Type Packaged Air-Handling Unit Puron
Staged Air Volume T = SAV/VFD
C12003
Fig. 3 -- Model Number Nomenclature Example, 40RU–Series
IMPORTANT: Do NOT change units equipped withthe VFD option to operate at less than the pre--settwo--thirds minimum Hz setting (40 Hz). For exampledo not change a unit equipped with a standard staticmotor to operate at less than 40Hz (which is two--thirdsof its 60Hz rating).
Tables 2 through 10 list the minimum recommendedCFM per fan motor type (Single Speed or 2--Speed) forthe units covered in this document.
Table 2 – 48TC Min CFM Per Fan Motor Type
Model --- Size Single SpeedFan Motor
2---Speed FanMotor (at highspeed)
2---Speed FanMotor (at lowspeed)
48TC 08 2250 2250 1485
48TC 09 2550 2873 1896
48TC 12 3000 3380 2231
48TC 14 3600 4225 2789
48TC 16 4500 5625 3713
48TC 17 4500 4500 2970
48TC 20 5250 5250 3465
48TC 24 6000 6000 3960
48TC 28 7500 8450 5577
48TC 30 8250 8250 5445

4
Table 3 – 50TC Min CFM Per Fan Motor Type
Model --- Size Single SpeedFan Motor
2---Speed FanMotor (at highspeed)
2---Speed FanMotor (at lowspeed)
50TC 08 2250 2250 1485
50TC 09 2550 2873 1896
50TC 12 3000 3380 2231
50TC 14 3600 4225 2789
50TC 16 4500 5625 3713
50TC 17 4500 4500 2970
50TC 20 5250 5250 3465
50TC 24 6000 6000 3960
50TC 28 7500 8450 5577
50TC 30 8250 8250 5445
Table 4 – 50TCQ Min CFM Per Fan Motor Type
Model --- Size Single SpeedFan Motor
2---Speed FanMotor (at highspeed)
2---Speed FanMotor (at lowspeed)
50TCQ 08 2250 2535 1673
50TCQ 09 2550 2873 1896
50TCQ 12 3000 3000 1980
50TCQ 14 3750 4225 2789
50TCQ 17 4500 5070 3346
50TCQ 24 6000 6760 4462
Table 5 – 48HC Min CFM Per Fan Motor Type
Model --- Size Single SpeedFan Motor
2---Speed FanMotor (at highspeed)
2---Speed FanMotor (at lowspeed)
48HC 08 2250 2535 1673
48HC 09 2550 2550 1683
48HC 11 3000 3380 2231
48HC 12 3000 3380 2231
48HC 14 3750 4225 2789
48HC 17 4500 5070 3346
48HC 20 5250 5915 3904
48HC 24 6000 7500 4950
48HC 28 7500 8450 5577
Table 6 – 50HC Min CFM Per Fan Motor Type
Model --- Size Single SpeedFan Motor
2---Speed FanMotor (at highspeed)
2---Speed FanMotor (at lowspeed)
50HC 08 2250 2535 1673
50HC 09 2550 2550 1683
50HC 11 3000 3380 2231
50HC 12 3000 3380 2231
50HC 14 3750 4225 2789
50HC 17 4500 5070 3346
50HC 20 5250 5915 3904
50HC 24 6000 7500 4950
50HC 28 7500 8450 5577
Table 7 – 50HCQ Min CFM Per Fan Motor Type
Model --- Size Single SpeedFan Motor
2---Speed FanMotor (at highspeed)
2---Speed FanMotor (at lowspeed)
50HCQ 08 2250 2250 1485
50HCQ 09 2550 2873 1896
50HCQ 12 3000 3380 2231
Table 8 – 40RUA Min CFM Per Fan Motor Type
Model --- Size Single SpeedFan Motor
2---Speed FanMotor (at highspeed)
2---Speed FanMotor (at lowspeed)
40RUA 07 1800 2030 1338
40RUA 08 2250 2535 1673
40RUA 12 3000 3380 2231
40RUA 14 3750 4225 2789
40RUA 16 4500 4500 2970
40RUA 25 6000 6000 3960
40RUA 28 7500 8450 5577
40RUA 30 9000 9295 6135
Table 9 – 40RUS Min CFM Per Fan Motor Type
Model --- Size Single SpeedFan Motor
2---Speed FanMotor (at highspeed)
2---Speed FanMotor (at lowspeed)
40RUS 08 2250 2535 1673
40RUS 10 2550 2873 1896
40RUS 12 3000 3380 2231
40RUS 14 3750 4225 2789
40RUS 16 4500 4500 2970
40RUS 25 6000 6000 3960
40RUS 28 7500 8450 5577
40RUS 30 9000 9295 6135
Table 10 – 40RUQ Min CFM Per Fan Motor Type
Model --- Size Single SpeedFan Motor
2---Speed FanMotor (at highspeed)
2---Speed FanMotor (at lowspeed)
40RUQ 07 1800 2030 1338
40RUQ 08 2250 2535 1673
40RUQ 12 3000 3380 2231
40RUQ 16 4500 4500 2970
40RUQ 25 6000 6000 3960
5
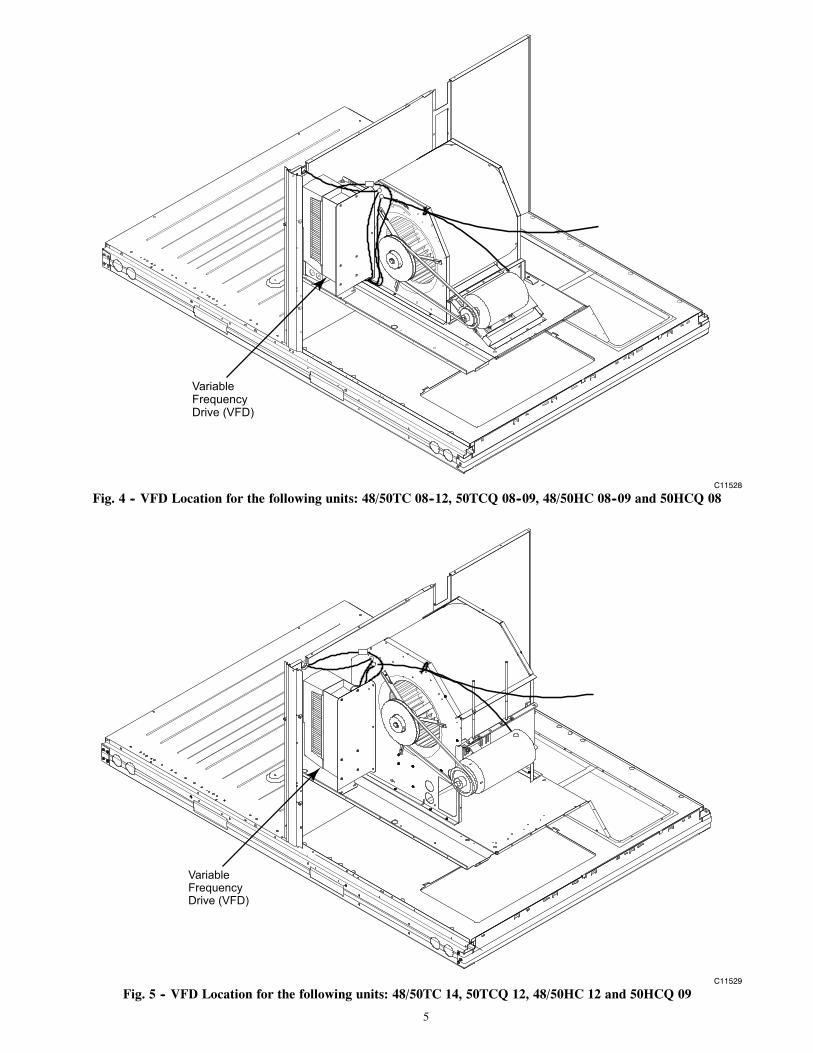
VariableFrequency Drive (VFD)
C11528
Fig. 4 -- VFD Location for the following units: 48/50TC 08--12, 50TCQ 08--09, 48/50HC 08--09 and 50HCQ 08
VariableFrequency Drive (VFD)
C11529
Fig. 5 -- VFD Location for the following units: 48/50TC 14, 50TCQ 12, 48/50HC 12 and 50HCQ 09
6
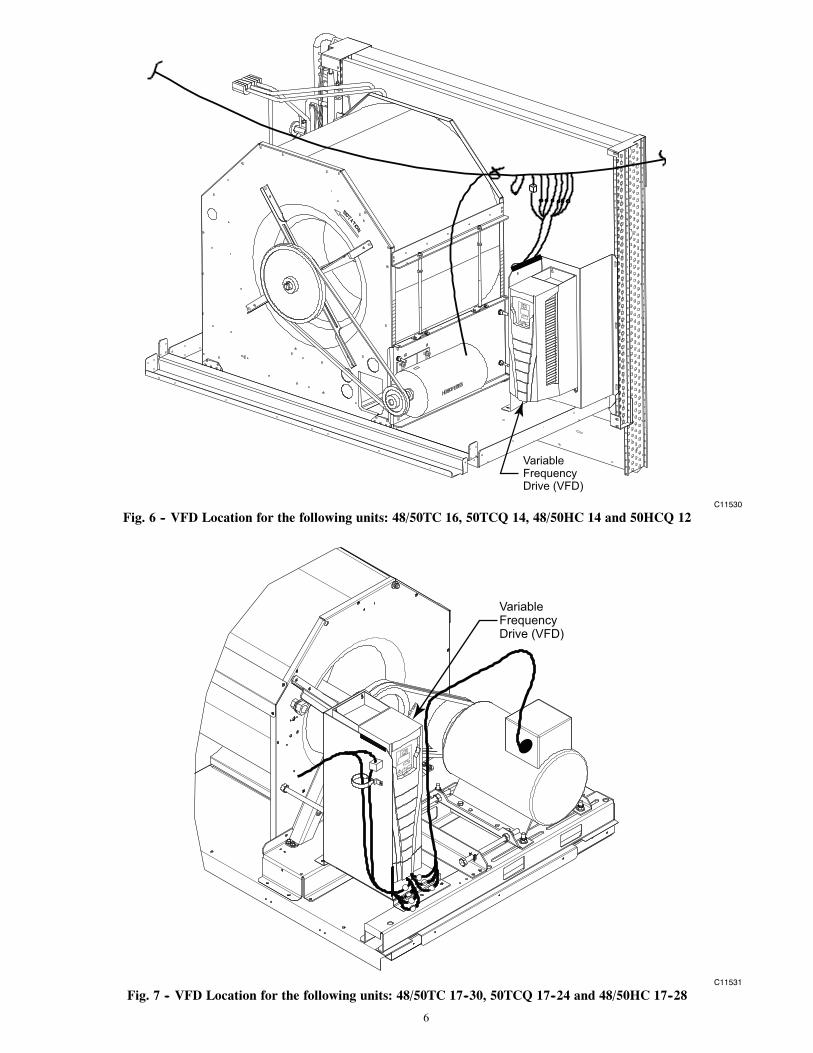
VariableFrequency Drive (VFD)
C11530
Fig. 6 -- VFD Location for the following units: 48/50TC 16, 50TCQ 14, 48/50HC 14 and 50HCQ 12
VariableFrequency Drive (VFD)
C11531
Fig. 7 -- VFD Location for the following units: 48/50TC 17--30, 50TCQ 17--24 and 48/50HC 17--28

7
VariableFrequency Drive (VFD)
C11532
Fig. 8 -- VFD Location for the following units: 40RUA/RUQ 07--12 and 40RUS 08--12

8
VariableFrequency Drive (VFD)
C11533Fig. 9 -- VFD Location for the following units: 40RUA/RUS 14--25, 40RUQ 16--25
VariableFrequency Drive (VFD)
C11534Fig. 10 -- VFD Location for the following units: 40RUA/RUS 28--30

9
Pre--Start Check, SAV Option1. Remove the access panel to reach the VFD.S 48/50 Series: Blower compartment panelS 40RU: Rear access panel
NOTE: See Figs. 4 through 10 for VFD location in theunits covered by this document.
2. Read all safety, caution and warning labels.3. Inspect wiring at the VFD for loose or disconnected
wires at the terminal strip and for wires in contactwith sharp edges and moving parts (pulley, belt,).
START--UP, SAV OptionCompressor Rotation:
Units equipped with a VFD on the indoor fan motorcannot use rotation direction of the indoor fan motor andfan to visually confirm a correct phase connection to theunit and compressors. Pressure gages MUST BE USEDduring cooling system start--up to confirm correctcompressor rotation and operation.
Indoor Fan Motor:
Raise the cooling set point at the space thermostat tohigher than space temperature. Switch the thermostat’sFAN switch to CONT (Continuous) position. Fan motorwill start, run at reduced speed.
Check for fan rotation direction. To reverse the fanrotation, disconnect all power to unit and then switch twomotor power leads between the VFD and the motor.Restore unit power and recheck fan rotation direction.
Check fan motor speed. Motor shaft should be rotating at1150--1180 RPM (19.2--19.7 r/s).
Switch the thermostat’s FAN switch to AUTO position.Fan motor will stop.
Cooling with SAV:
1st Stage (Y1): Set the thermostat FAN switch to AUTOand the SYSTEM switch to COOL. Slowly lower thecooling setpoint until first stage compressor starts. Indoorfan motor also starts, runs at reduced speed.
2nd Stage (Y2): Lower the cooling setpoint until second stagecompressor starts. Indoor fan motor will switch to high speed.
Check fan motor speed. Motor shaft should be rotating at1725--1760 RPM (28.8--29.3 r/s).
Confirm compressors are running at correct rotation bychecking suction and discharge pressures. To reverse thecompressor rotation, disconnect unit power and switchtwo of the unit’s main power leads. Restore unit powerand recheck compressor operation.
Reset thermostat cooling setpoint to a position abovespace temperature. Both compressors will shut off. Indoorfan motor will stop immediately.
40RU, 50--Series units: Indoor fan motor will stopimmediately.
48--Series units: Indoor fan operation will continue for45--seconds, then stop.
Operating Sequences, SAV Option
Ventilation (Fan only)
Ventilation mode occurs when the indoor fan runs withoutaccompanying cooling or heating system operation. Thethermostat’s FAN selection switch will be in CONT(Continuous) position; no demand for cooling or heatingwill be present.
48--Series units: The thermostat’s G terminal is energizedwith 24--v. This signal is conveyed to the 48--Series unit’sCentral Terminal Board (CTB) at the field connectionTSTAT terminal strip at terminal G. The 24--v signalfollows an internal trace path through jumper JMP6 toconnector CONTL BOARD pin 1. A harness wireconnects pin 1 to IGC board terminal G. The IGCenergizes its fan relay, energizing IGC terminal IFO. This24--v signal follows a harness conductor back to theCTB’s CONTL BOARD connector at pin 6 and pin 7. Pin7 is connected to the Fan Speed Board at connector J1 pin4. Relay K3 is energized. A 24--VDC signal is passed tothe VFD terminal 14. The VFD starts the indoor fan motorand runs it at 40HZ for reduced/low speed operation.
50HC, TC--Series units: The thermostat’s G terminal isenergized with 24--v. This signal is conveyed to the50HC,TC--Series unit’s Control Terminal Board (CTB) atthe field connection TSTAT terminal strip at terminal G.The 24--v signal follows an internal trace path throughjumper JMP6 to connector CONTL BOARD pin 1. Aharness wire connects pin 1 to the Fan Speed Board atconnector J1 pin 4. Relay K3 is energized. A 24--VDCsignal is passed to the VFD terminal 14. The VFD startsthe indoor fan motor and runs it at 40HZ for reduced/lowspeed operation.
50TCQ, HCQ--Series: The thermostat’s G terminal isenergized with 24--v. This signal is conveyed to the50HCQ,TCQ--Series unit’s Control Terminal Board (CTB)at the field connection TSTAT terminal strip at terminalG. The 24--v signal follows an internal trace path toconnector REHEAT/DEFROST pin 1. A harness wireconnects pin 1 to DFB board terminal P2--3. The DFBenergizes its fan relay, energizing DFB terminal P3--8.This 24--v signal follows a harness conductor back to theCTB’s REHEAT/DEFROST pin 2. An internal trace pathconnects pin 2 to CONTL BOARD connector at pin 1. Pin1 is connected to the Fan Speed Board at connector J1 pin4. Relay K3 is energized. A 24--VDC signal is passed tothe VFD terminal 14. The VFD starts the indoor fan motorand runs it at 40HZ for reduced/low speed operation.
Cooling (FAN switch in AUTO)
1st Stage (Y1): When the thermostat initiates a call for 1stStage Cooling by closing its Y1 contacts, the thermostat alsoenergizes its G terminal. Follow the sequence underVentilation above. Fan Speed Relay board relay K3 isenergized, causing the VFD to start the indoor fan motor andrun at 40HZ for reduced fan speed operation.
When space temperature drops to satisfy the thermostat Y1demand, contact Y1 opens de--energizing terminal G. RelayK3 is de--energized. The relay board output at J2--2 to theVFD is removed and indoor fan motor ramps down to stop.

10
2nd Stage (Y2): If space temperature continues to rise,thermostat Y2 demand will be initiated. Contact Y2 willclose, sending a 24--v signal to CTB’s TSTAT terminalstrip at Y2. An internal path passes this signal toconnector DDC/TSTAT pin 6. A harness wire carries thissignal to Fan Speed Relay board pin J1--3. Relay K2 isenergized. The relay board’s output to VFD at pin J2--2 isde--energized and the output at J2--3 is energized, causingthe VFD to shift its output to the indoor fan motor to60HZ. The indoor fan motor ramps up to full/high speedoperation.
When the space temperature drops to satisfy thermostatY2 demand, contact Y2 opens de--energizing terminal Y2.Relay K2 is de--energized, removing the VFD input atterminal 15. Fan Speed Board output at pin J2--2 isrestored to the VFD at terminal 14; VFD shifts back to40HZ output to the indoor fan motor and motor shiftsback to reduced speed operation.
Heating
When the thermostat initiates a call for 1st Stage Heatingby closing its W1 contacts, a 24--v signal is conveyed tothe CTB’s TSTAT terminal strip at W1. An internal pathpasses this signal to connector DDC/TSTAT pin 5. Aharness wire carries this signal to Fan Speed Relay boardpin J1--2. Relay K1 is energized. The relay board’s outputto VFD at pin J2--3 is energized, providing a 24--VDCsignal to VFD terminal 15. The VFD starts the indoor fanmotor, runs at 60HZ for full/high speed operation.
When space temperature rises to satisfy the thermostatW1 demand, contact W1 opens de--energizing terminalW1. Relay K1 is de--energized. The relay board output atJ2--3 to the VFD is removed.
40RU, 50--Series: Indoor fan motor ramps down to stop.
48--Series: The IGC’s fan--off delay sequence will energizerelay K3 for 45--seconds, causing the VFD to operate theindoor fan motor at 40HZ (low speed) for 45--seconds, thenindoor fan motor will ramp down to stop.
N/A 1J2
24vdc6J2
2
3
Lo Spd
Hi Spd
K1 K2
K2
K3 K4 JMP2
K3
K1
K1
K2
K3
K4
W1
C
Y2
HUMID
G
2
1J1
3
4
5
4 & 5
JMP1
COM
VFD TERMINAL
YEL
WHT
1110 12 13 14 15 16
C13807Fig. 11 -- Connection Schematic – Fan Speed Relay Board and VFD.
11
Operating Fan for Test & Balance
During the Test and Balance procedure, it is necessary tooperate the supply fan in High Speed without concurrentoperation of the Cooling or Heating systems. Use thefollowing procedure to force the fan speed to High.
CAUTION — MOVING PARTS
Unit without Accessory Keypad:
1. Set the space thermostat to SYSTEM OFF and FANin AUTO.
2. Disconnect unit power. Lock--out/tag out.3. Open the fan access panel and locate the VFD (see
Figs. 4 through 10 for your specific unit).4. Locate and connect the WHT and YEL wires
extending from the VFD. The two wires are bundledtogether using the label shown in Fig. 12.
***IMPORTANT***CONNECT WHITE & YELLOW WIRESFOR HIGH SPEED BLOWER TEST
DISCONNECT FOR NORMAL OPERATION48TM504557
C150116
Fig. 12 -- High Speed Test Label
5. Locate pressure ports or pitot tubes in the return ductand supply duct to measure external static pressure.See Fig. 13 for typical locations.
6. Restore unit power.7. Set the space thermostat to FAN CONT.8. Check the motor speed with stroboscope or similar
tool. Motor shaft speed must be in 1725--1760 RPM(28.8--29.3 r/s) range for High Speed.
9. Replace the fan access panel.10. Perform Test & Balance procedure.11. Adjust the supply fan speed according to base unit in-
structions to deliver the project selection CFM value.Ensure the selection CFM value is not lower that the“Min CFM Per Fan Motor Type” for this unit--size asfound in Tables 2 through 10 on page 3.
To restore the unit to ready--to--start condition, disconnectthe unit power and lock--out/tag--out, set the spacethermostat to FAN AUTO, remove the test pressure portsfrom the external duct locations, and disconnect the WHTand YEL wires. Replace the supply fan access panel.Restore unit power.
Unit with Accessory VFD Keypad:
1. Set the space thermostat to SYSTEM OFF and FANin AUTO.
2. Disconnect unit power. Lock--out/tag out.3. Open the fan access panel (see Figs. 4 through 10 for
your specific unit).4. Locate pressure ports or pitot tubes in the return duct
and supply duct to measure external static pressure.See Fig. 13 for typical locations.
5. Restore unit power.6. Set the space thermostat to FAN CONT.
7. At the VFD keypad, tap the HAND key and then tapthe UP arrow button to increase the motor speed until60.0 is displayed on the display screen.
8. Check the motor speed with stroboscope or similartool. Motor shaft speed must be in 1725--1760 RPM(28.8--29.3 r/s) range for High Speed.
9. Replace the fan access panel.10. Perform Test & Balance procedure.11. Adjust the supply fan speed according to base unit in-
structions to deliver the project selection CFM value.Ensure the selection CFM value is not lower that the“Min CFM Per Fan Motor Type” for this unit--size asfound in Tables 2 through 10 on page 3.
To restore the unit to ready--to--start condition, tap theDOWN arrow button to reduce motor speed until the 40.0 isdisplayed on the display screen and then tap the AUTO key.Disconnect the unit power and lock--out/tag--out, set thespace thermostat to FAN AUTO. Remove the test pressureports from the external duct locations. Restore unit power.
SUPPLYAIR
RETURNAIR
A
B
C12013
ARI PRESSURE LOCATIONS
MODEL SIZES
IN IN MM MM
SupplyAir
ReturnAir
SupplyAir
ReturnAi
[A] [B] [A] [B]
48/50HC
04---06 32 10 830 260
07---12 43.5 12 1100 310
14 64.5 14 1640 350
17---28 83 19 2110 490
48/50TC
04---07 32 10 830 260
08---14 43.5 12 1100 310
16 64.5 14 1640 350
17---30 83 19 2110 490
50HCQ
04---06 32 10 1100 310
07---09 43.5 12 1100 310
12 44.5 13 1130 330
50TCQ
04---07 32 10 830 260
08---12 43.5 12 1100 310
14 44.5 14 1130 350
17---24 83 19 2110 490
Fig. 13 -- Measuring External Static Pressure —Distance Below Unit Base

12
Service
EQUIPMENT DAMAGE HAZARD
Failure to follow this caution will result in equipmentdamage.
Do NOT exceed the recommended minimum Hz orCFM settings. Operating these units at a Hz settingbelow 40 Hz or at a CFM below the minimums listedin Tables 2 through 10 (see page 3) will result indamage to the unit.
CAUTION!
Figs. 4 through 10 show the location of the VDF option inthe various units covered by this document.
Staged Air Volume (SAV) Option Components – The SAVfactory option is comprised of three major components andrelated connecting harnesses:
1. Fan Speed Relay Board2. Variable Frequency Drive3. Indoor Fan Motor, designed for use with VFD
Fan Speed Relay Board – This board (PNOHK50ZA002) is designated as the VFD Fan Board on theunit wiring diagram labels. It is a small (3.0 x 3.12 in, 76x 79 mm) printed circuit board with four SPDT controlrelays. See Fig. 14. There is no software on this board.The relay board is located in the unit’s main control box;refer to unit label diagram for Component Location view.
C150081Fig. 14 -- VFD Fan Board
The board is arranged in two separate circuits with individualpin connectors. Connector J1 is connected to the 24--vac inputsignal circuit with the four relay coils. Connector J2 isconnected to the 24--VDC output circuit that connects to theVFD’s terminal strip. See Fig. 11 for a simplified connectionschematic for Fan Speed Relay board and the VFD.
In this SAV application, there are three inputs to the relayboard, originating from the space thermostat’s G, Y2 andW1 terminals. An input from terminal G (for continuousfan operation for ventilation or from a Y1 call) will resultin the VFD starting the indoor fan motor and running themotor at LOW speed. An input from either Y2 or W1 willresult in the VFD running the indoor fan motor at HIGHspeed. See Table 11 for relay operation for each unitmode. Relay K4 is not used in this 2--speed application.
Table 11 – Two--Speed Configuration Logic(Thermostat Control)
INPUT Relay CoilStatus Controlling
OutputFan MotorSpeed
K1 K2 K3
G Off Off On K3 Low (40 Hz)
Y1 Off Off On K3 Low (40 Hz)
Y2 Off On On K2 High (60 Hz)
W1 On On On K1 High (60 Hz)
Configuration Jumpers – The relay board has twoconfiguration jumpers, marked JW1 and JW2. For this2--speed motor application, both jumpers must be cut andopen (see Fig. 15). Factory--installed boards will havethese jumpers cut. Service replacement boards have thesejumpers intact; servicer must cut both jumpers wheninstalling a new service board. Failure to cut thesejumpers will cause continuous fan motor operation.
Cut Jumper JW2- as shown
Cut Jumper JW1- as shown
C150082
Fig. 15 -- Jumpers JW1 & JW2 Cut for Two--SpeedFan Board Configuration
Variable Frequency Drive – The VFD is used to switchthe indoor fan motor speed between full/high speed (60HZmotor operation) and reduced/low speed (40HZ motoroperation) as required by ASHRAE 90.1 requirements fortwo--stage HVAC units. The VFD is factory--configured tomatch the current and power requirements for each motorselection and all wiring connections are completed by thefactory; no field adjustments or connections are necessary.
While the basic VFD retains all of its standardcapabilities, the SAV 2--speed application uses only alimited portion of these features to provide two discreteoutput speeds to the motor. Consequently the VFD is notequipped with a keypad. A keypad is available as anaccessory (PNO CRDISKIT001A00) for field--installation

13
or expanded service access to VFD parameter andtroubleshooting tables. Refer to Appendix for expandeddiscussion on VFD parameters and factory settings.
CONFIGURATION OVERRIDE HAZARD
DO NOT USE ABB OR CARRIER START--UPASSISTANT ON THIS VFD APPLICAITON! Useof start--up assistant will override the factory VFDconfigurations!
CAUTION!
The SAV control circuit inputs to the VFD are 24--VDCsignals. This voltage is sourced from the VFD at itsterminal 10 (+24 V). SAV speed inputs are received atterminals 14 (DI--2) for low speed (40HZ) motor operation
and 15 (DI--3) for high speed (60HZ) motor operation.When neither input is present, the VFD will shut the fanmotor off. There is no separate indoor fan contactorrequired in this application.
The VFD used in the SAV system has soft startcapabilities to slowly ramp up the speeds, eliminating anyhigh inrush of air volume during speed changes. It alsohas internal over current protection for the fan motor.
Indoor Fan Motor – The indoor fan motors used with theVFD are specially manufactured for use with VFD powercircuits. The motor winding insulation is speciallyformulated to resist breakdown due to voltage stressissues. The motor shaft includes grounding rings toprevent damage to bearings caused by grounding currents.Replace these motors with Factory Authorized Partsavailable from Replacement Components Division (RCD).
Table 12 – VFD Terminal Designations
TERMINAL FUNCTIONU1
Three---Phase main circuit input power supplyV1W1U2
Three---Phase AC output to motor, 0V to maximum input
voltage levelV2W211 (GND)
Factory---supplied jumper12 (COMMON)10 (24VDC)
Run (factory---supplied jumper)13 (DI---1)
10 (24VDC) Start Enable 1 (factory---supplied jumper). When opened,
the drive goes to emergency stop16 (DI---4)
14 (DI---2)Factory wired for 24Vdc input from Fan Speed Board
15 (D1---3)
VFD TERMINAL STRIP
SC
R
AI-1
AG
ND
GN
D
DC
OM
1
+24
V
DI-1
DI-2
DI-3
DI-4
1 2 3 10 11 12 13 14 15 16
PNK YEL WHT
C13808
Fig. 16 -- VFD Wiring

14
Central Terminal Board Jumpers —48/50--Series only
The Central Terminal Board (CTB) is a large printedcircuit board that is located in the unit control box. Thisprinted circuit board contains multiple termination stripsand connectors to simplify factory control box wiring andfield control connections. Terminals are clearly marked onthe board surface. See Fig 17 for Part NumberHK50AA051.
The CTB contains no software and no logic. But it doesinclude seven configuration jumpers that are cut toconfigure the board to read external optional andaccessory controls, including that the unit is a heat pump.
Table 13 – CTB Jumpers
Jumper Control Function Note
JMP1 Phase Monitor
JMP2 Occupancy Control
JMP3 Smoke Detector Shutdown
JMP4 Remote Shutdown
JMP5 Heat Pump / Reheat 50HCQ, TCQ default: Cut
JMP6 Heat Pump / Reheat 50HCQ, TCQ default: Cut
JMP7 Heat Pump / Reheat 50HCQ, TCQ default: Cut
Jumpers JMP5, JMP6 and JMP7 are located in notchesacross the top of the CTB (see Fig. 17 ). These jumpersare intact on units with gas heat or electric heat. Thesejumpers are factory cut on all heat pump units and onunits with Humidi--MiZer (reheat) option.
Table 14 – Jumper Configuration
Unit Type / Model
ConfigurationJumper
Gas Heat48HC, TC*
Electric Heat50 HC, TC*
Heat Pump50HCQ, TCQ
JMP5 Intact Intact Cut
JMP6 Intact Intact Cut
JMP7 Intact Intact Cut
*Unit without Humidi---MiZer (Reheat)
Factory--installed boards will have these jumpersfactory--cut where required. Service replacement boardshave these jumpers intact; servicer must cut these jumpersas indicated in Table 14 when installing a replacementboard.
VFD ALARMS AND FAULTSTROUBLESHOOTING –
The VFD has two LEDs on its front panel that indicateVFD operating status. These LEDs are GREEN and RED.
S GREEN LED ON STEADY: Power ON to VFD
S GREEN LED FLASHING: Alarm condition detected
S RED LED ON (Steady or Flashing): Fault conditiondetected
C11509
Fig. 17 -- Central Terminal Board (CTB)
Alarms – Alarms are advisory in nature. These indicate aproblem has been detected by the VFD’s diagnostics butthis problem will not require that the VFD and its motorbe shut down. Typical fault condition on the SAVapplication might be loose connections at the VFDterminal board or damaged conductors between the FanSpeed Board connector J2 and the VFD terminal strip. SeeTable 21 in the Appendix section for a full list.
Clear the Alarm LED: Shut off power to the VFD forfive minutes. Restore power and recheck the GREENLED. If this LED is still flashing, connect the accessoryremote display--keypad kit and follow the troubleshootinginstructions in the Appendix, page 26.
Faults – A fault is a significant internal situation for theVFD or its motor. If the motor was running when the faultwas detected, it was shutdown. See Table 20 in theAppendix section for a full list of Faults, display codesand troubleshooting guides. Connect the accessory remotedisplay--keypad kit and follow the troubleshootinginstructions in the Appendix.
Clear the Fault LED: Shut off power to the VFD for fiveminutes. Restore power and recheck the RED LED.

15
C14348Fig. 18 -- Typical Wiring Diagram -- Single Package Rooftop Unit (48HC*14 with VFD shown)

16
C14349Fig. 19 -- Typical Wiring Diagram -- Single Package Rooftop Unit (50HC*14 with VFD shown)

17
C13812Fig. 20 -- Typical Wiring Diagram -- Split System Air--Handling Unit (40RU with VFD shown)

18
VFD Maintenance
If installed in an appropriate environment, the VFDrequires very little maintenance.
Table 15 lists the routine maintenance intervalsrecommended by Carrier.
Table 15 – MAINTENANCE INTERVALS
MAINTENANCE INTERVAL
Heat sink temperature checkand cleaning
Every 6 to 12 months(depending on the dustiness ofthe environment)
Main cooling fan replacement Every five years
HVAC Control panel batterychange
Every ten years
VFD Module Fan Replacement
The main cooling fan of the VFD has a life span of abut60,000 operating hours at maximum rated operatingtemperature and drive load. The expected life spandoubles for each 18_F drop in the fan temperature (fantemperature is a function of ambient temperatures anddrive loads).
The VFD module fan cools the heat sink. Fan failure canbe predicted by the increasing noise from fan bearings andthe gradual rise in the heat sink temperature in spite ofheat sink cleaning. If the drive is operated in a critical partof a process, fan replacement is recommended once thesesymptoms start appearing. Replacement fans are availablefrom Carrier.
Use the following procedure to replace the VFD modulecooling fan:
1. Turn off and lock out unit power.2. Remove drive cover (see Fig. 24).3. Press together the retaining clips on the fan cover and
lift.4. Disconnect the fan cable.5. Install the new fan be reversing Steps 2 to 4.6. Restore power.
3
34
2
C08681
Fig. 21 -- VFD Module Fan Replacement
Heat Sink Cleaning
The heat sink fins accumulate dust from the cooling air. Ina normal environment check the heat sink annually, in adusty environment check more often.
Use the following procedure to clean the heat sink:
1. Turn off and lock out unit power.2. Remove the drive cover.3. Press together the retaining clips on the fan cover and
lift.4. Blow clean compressed air (not humid) from bottom
to top while simultaneously using a vacuum cleanerat the air outlet to trap the dust.
5. Replace the cooling fan.6. Replace the drive cover7. Restore power.
19
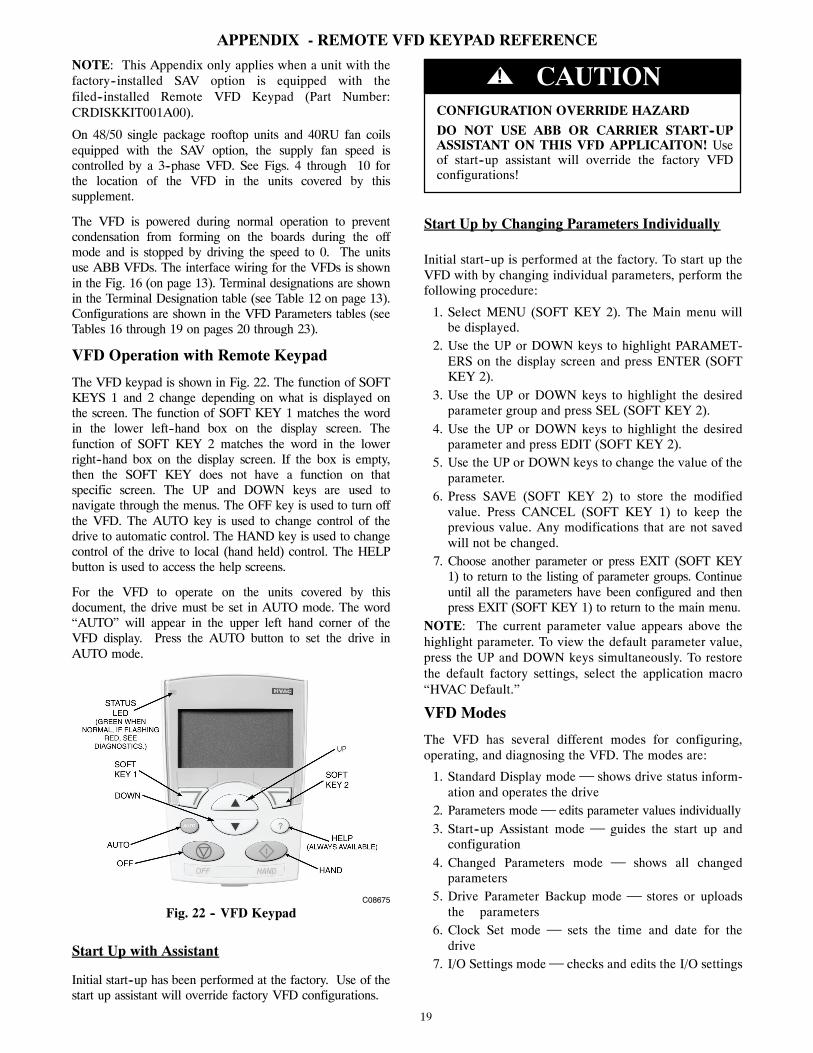
APPENDIX - REMOTE VFD KEYPAD REFERENCE
NOTE: This Appendix only applies when a unit with thefactory--installed SAV option is equipped with thefiled--installed Remote VFD Keypad (Part Number:CRDISKKIT001A00).
On 48/50 single package rooftop units and 40RU fan coilsequipped with the SAV option, the supply fan speed iscontrolled by a 3--phase VFD. See Figs. 4 through 10 forthe location of the VFD in the units covered by thissupplement.
The VFD is powered during normal operation to preventcondensation from forming on the boards during the offmode and is stopped by driving the speed to 0. The unitsuse ABB VFDs. The interface wiring for the VFDs is shownin the Fig. 16 (on page 13). Terminal designations are shownin the Terminal Designation table (see Table 12 on page 13).Configurations are shown in the VFD Parameters tables (seeTables 16 through 19 on pages 20 through 23).
VFD Operation with Remote Keypad
The VFD keypad is shown in Fig. 22. The function of SOFTKEYS 1 and 2 change depending on what is displayed onthe screen. The function of SOFT KEY 1 matches the wordin the lower left--hand box on the display screen. Thefunction of SOFT KEY 2 matches the word in the lowerright--hand box on the display screen. If the box is empty,then the SOFT KEY does not have a function on thatspecific screen. The UP and DOWN keys are used tonavigate through the menus. The OFF key is used to turn offthe VFD. The AUTO key is used to change control of thedrive to automatic control. The HAND key is used to changecontrol of the drive to local (hand held) control. The HELPbutton is used to access the help screens.
For the VFD to operate on the units covered by thisdocument, the drive must be set in AUTO mode. The word“AUTO” will appear in the upper left hand corner of theVFD display. Press the AUTO button to set the drive inAUTO mode.
C08675
Fig. 22 -- VFD Keypad
Start Up with Assistant
Initial start--up has been performed at the factory. Use of thestart up assistant will override factory VFD configurations.
CONFIGURATION OVERRIDE HAZARD
DO NOT USE ABB OR CARRIER START--UPASSISTANT ON THIS VFD APPLICAITON! Useof start--up assistant will override the factory VFDconfigurations!
CAUTION!
Start Up by Changing Parameters Individually
Initial start--up is performed at the factory. To start up theVFD with by changing individual parameters, perform thefollowing procedure:
1. Select MENU (SOFT KEY 2). The Main menu willbe displayed.
2. Use the UP or DOWN keys to highlight PARAMET-ERS on the display screen and press ENTER (SOFTKEY 2).
3. Use the UP or DOWN keys to highlight the desiredparameter group and press SEL (SOFT KEY 2).
4. Use the UP or DOWN keys to highlight the desiredparameter and press EDIT (SOFT KEY 2).
5. Use the UP or DOWN keys to change the value of theparameter.
6. Press SAVE (SOFT KEY 2) to store the modifiedvalue. Press CANCEL (SOFT KEY 1) to keep theprevious value. Any modifications that are not savedwill not be changed.
7. Choose another parameter or press EXIT (SOFT KEY1) to return to the listing of parameter groups. Continueuntil all the parameters have been configured and thenpress EXIT (SOFT KEY 1) to return to the main menu.
NOTE: The current parameter value appears above thehighlight parameter. To view the default parameter value,press the UP and DOWN keys simultaneously. To restorethe default factory settings, select the application macro“HVAC Default.”
VFD Modes
The VFD has several different modes for configuring,operating, and diagnosing the VFD. The modes are:
1. Standard Display mode shows drive status inform-ation and operates the drive
2. Parameters mode edits parameter values individually3. Start--up Assistant mode guides the start up and
configuration4. Changed Parameters mode shows all changed
parameters5. Drive Parameter Backup mode stores or uploads
the parameters6. Clock Set mode sets the time and date for the
drive7. I/O Settings mode checks and edits the I/O settings

20
AP
PE
ND
IX-
RE
MO
TE
VF
DK
EY
PAD
RE
FE
RE
NC
E(C
ON
T)
Tab
le16
–V
FD
Par
amet
ers
—48
/50T
C08
--14,
50T
CQ
08--1
2,48
/50H
C08
--12
and
50H
CQ
08--0
9
VFD
Part
Number
ABBPartNumber
Description
Motor
Part
Number
Voltage
(9905)
NomAmps
(9906)
Motor
NomFreq
(9907)
NomRPM
(9908)
Nom HP
(9909)
Const
SpeedSel
(1201)
Const
Speed1
(1202)
Const
Speed2
(1203)
Const
Speed3
(1204)
Relay
Out3
(1403)
Max
Amps
(2003)
Min
Freq
(2007)
MaxFreq
(2008)
Switch
Freq
(2606)
Start
Fcn
(2101)
Stop
Fcn
(2102)
Accel/
Decel
(2201)
Accel
(2202)
Decel
(2203)
HK30WA364
ACH550---U0---012A---2
1.7HP230V
HD56FR233
230
5.8
60Hz
1725
1.7
DI2,3
40Hz
60Hz
60Hz
16FLT/
Alarm
6.7
0Hz
60Hz
4kHz
Auto
Ramp
NotSel30sec30sec
HK30WA356
ACH550---U0---012A---2
1.7HP460V
HD56FR463
460
2.9
60Hz
1725
1.7
DI2,3
40Hz
60Hz
60Hz
16FLT/
Alarm
3.3
0Hz
60Hz
4kHz
Auto
Ramp
NotSel30sec30sec
HK30WA366
ACH550---U0---017A---2
1.7HP575V
HD56FR579
575
3.1
60Hz
1725
1.7
DI2,3
40Hz
60Hz
60Hz
16FLT/
Alarm
3.6
0Hz
60Hz
4kHz
Auto
Ramp
NotSel30sec30sec
HK30WA352
ACH550---U0---024A---2
2.4HP230V
HD56FE653
230
7.9
60Hz
1725
2.4
DI2,3
40Hz
60Hz
60Hz
16FLT/
Alarm
9.1
0Hz
60Hz
4kHz
Auto
Ramp
NotSel30sec30sec
HK30WA356
ACH550---U0---06A9---4
2.4HP460V
HD56FE653
460
460Hz
1725
2.4
DI2,3
40Hz
60Hz
60Hz
16FLT/
Alarm
4.6
0Hz
60Hz
4kHz
Auto
Ramp
NotSel30sec30sec
HK30WA360
ACH550---U0---06A9---4
2.4HP575V
HD56FE577
575
3.4
60Hz
1725
2.4
DI2,3
40Hz
60Hz
60Hz
16FLT/
Alarm
3.9
0Hz
60Hz
4kHz
Auto
Ramp
NotSel30sec30sec
HK30WA352
ACH550---U0---06A9---4
2.9HP230V
HD58FE654
230
9.2
60Hz
1725
2.9
DI2,3
40Hz
60Hz
60Hz
16FLT/
Alarm
10.6
0Hz
60Hz
4kHz
Auto
Ramp
NotSel30sec30sec
HK30WA356
ACH550---U0---08A8---4
2.9HP460V
HD58FE654
460
4.6
60Hz
1725
2.9
DI2,3
40Hz
60Hz
60Hz
16FLT/
Alarm
5.3
0Hz
60Hz
4kHz
Auto
Ramp
NotSel30sec30sec
HK30WA353
ACH550---U0---012A---4
3.7HP230V
HD60FE656
230
11.2
60Hz
1725
3.7
DI2,3
40Hz
60Hz
60Hz
16FLT/
Alarm
12.9
0Hz
60Hz
4kHz
Auto
Ramp
NotSel30sec30sec
HK30WA357
ACH550---U0---03A9---6
3.7HP460V
HD60FE656
460
5.6
60Hz
1725
3.7
DI2,3
40Hz
60Hz
60Hz
16FLT/
Alarm
6.4
0Hz
60Hz
4kHz
Auto
Ramp
NotSel30sec30sec
HK30WA361
ACH550---U0---06A1---6
3.7HP575V
HD58FE577
575
4.2
60Hz
1725
3.7
DI2,3
40Hz
60Hz
60Hz
16FLT/
Alarm
4.8
0Hz
60Hz
4kHz
Auto
Ramp
NotSel30sec30sec
HK30WA354
ACH550---U0---09A0---6
5.3HP230V
HD60FK658
230
1360Hz
1740
5.3
DI2,3
40Hz
60Hz
60Hz
16FLT/
Alarm
150
0Hz
60Hz
4kHz
Auto
Ramp
NotSel30sec30sec
HK30WA358
ACH550---U0---07A5---2
5.3HP460V
HD60FK658
460
6.4
60Hz
1740
5.3
DI2,3
40Hz
60Hz
60Hz
16FLT/
Alarm
7.4
0Hz
60Hz
4kHz
Auto
Ramp
NotSel30sec30sec
HK30WA362
ACH550---U0---02A7---6
5.3HP575V
HD60FE576
575
5.4
60Hz
1725
5.3
DI2,3
40Hz
60Hz
60Hz
16FLT/
Alarm
6.2
0Hz
60Hz
4kHz
Auto
Ramp
NotSel30sec30sec

21
AP
PE
ND
IX-
RE
MO
TE
VF
DK
EY
PAD
RE
FE
RE
NC
E(C
ON
T)
Tab
le17
–V
FD
Par
amet
ers
—48
/50T
C16
,50T
CQ
14,4
8/50
HC
14an
d50
HC
Q12
VFD
Part
Number
ABBPartNumber
Description
Motor
Part
Number
Voltage
(9905)
NomAmps
(9906)
Motor
NomFreq
(9907)
NomRPM
(9908)
Nom HP
(9909)
Const
SpeedSel
(1201)
Const
Speed1
(1202)
Const
Speed2
(1203)
Const
Speed3
(1204)
Relay
Out3
(1403)
Max
Amps
(2003)
Min
Freq
(2007)
MaxFreq
(2008)
Switch
Freq
(2606)
Start
Fcn
(2101)
Stop
Fcn
(2102)
Accel/
Decel
(2201)
Accel
(2202)
Decel
(2203)
HK30WA352
ACH550---U0---012A---2
2.4HP230V
HD56FE653
230
7.9
60Hz
1725
2.4
DI2,3
40Hz
60Hz
60Hz
16FLT/
Alarm
9.1
0Hz
60Hz
4kHz
Auto
Ramp
NotSel30sec30sec
HK30WA356
ACH550---U0---012A---2
2.4HP460V
HD56FE653
460
460Hz
1725
2.4
DI2,3
40Hz
60Hz
60Hz
16FLT/
Alarm
4.6
0Hz
60Hz
4kHz
Auto
Ramp
NotSel30sec30sec
HK30WA360
ACH550---U0---017A---2
2.4HP575V
HD56FE577
575
3.4
60Hz
1725
2.4
DI2,3
40Hz
60Hz
60Hz
16FLT/
Alarm
3.9
0Hz
60Hz
4kHz
Auto
Ramp
NotSel30sec30sec
HK30WA352
ACH550---U0---024A---2
2.9HP230V
HD58FE654
230
9.2
60Hz
1725
2.9
DI2,3
40Hz
60Hz
60Hz
16FLT/
Alarm
10.6
0Hz
60Hz
4kHz
Auto
Ramp
NotSel30sec30sec
HK30WA356
ACH550---U0---024A---2
2.9HP460V
HD58FE654
460
4.6
60Hz
1725
2.9
DI2,3
40Hz
60Hz
60Hz
16FLT/
Alarm
5.3
0Hz
60Hz
4kHz
Auto
Ramp
NotSel30sec30sec
HK30WA353
ACH550---U0---06A9---4
3.7HP230V
HD60FE656
230
11.2
60Hz
1725
3.7
DI2,3
40Hz
60Hz
60Hz
16FLT/
Alarm
12.9
0Hz
60Hz
4kHz
Auto
Ramp
NotSel30sec30sec
HK30WA357
ACH550---U0---06A9---4
3.7HP460V
HD60FE656
460
5.6
60Hz
1725
3.7
DI2,3
40Hz
60Hz
60Hz
16FLT/
Alarm
6.4
0Hz
60Hz
4kHz
Auto
Ramp
NotSel30sec30sec
HK30WA361
ACH550---U0---08A8---4
3.7HP575V
HD58FE577
575
4.2
60Hz
1725
3.7
DI2,3
40Hz
60Hz
60Hz
16FLT/
Alarm
4.8
0Hz
60Hz
4kHz
Auto
Ramp
NotSel30sec30sec
HK30WA354
ACH550---U0---012A---4
5.0HP230V
HD60FL657
230
16.7
60Hz
1745
5DI2,3
40Hz
60Hz
60Hz
16FLT/
Alarm
19.2
0Hz
60Hz
4kHz
Auto
Ramp
NotSel30sec30sec
HK30WA358
ACH550---U0---012A---4
5.0HP460V
HD60FL657
460
8.4
60Hz
1745
5DI2,3
40Hz
60Hz
60Hz
16FLT/
Alarm
9.7
0Hz
60Hz
4kHz
Auto
Ramp
NotSel30sec30sec
HK30WA362
ACH550---U0---03A9---6
5.0HP575V
HD60FL575
575
5.1
60Hz
1725
5DI2,3
40Hz
60Hz
60Hz
16FLT/
Alarm
5.9
0Hz
60Hz
4kHz
Auto
Ramp
NotSel30sec30sec
HK30WA354
ACH550---U0---06A1---6
5.0HP230V
HD60FK657
230
14.7
60Hz
1760
5DI2,3
40Hz
60Hz
60Hz
16FLT/
Alarm
16.9
0Hz
60Hz
4kHz
Auto
Ramp
NotSel30sec30sec
HK30WA358
ACH550---U0---09A0---6
5.0HP460V
HD60FK657
460
6.8
60Hz
1760
5DI2,3
40Hz
60Hz
60Hz
16FLT/
Alarm
7.8
0Hz
60Hz
4kHz
Auto
Ramp
NotSel30sec30sec
HK30WA362
ACH550---U0---09A0---6
5.0HP575V
HD60FL576
575
5.4
60Hz
1745
5DI2,3
40Hz
60Hz
60Hz
16FLT/
Alarm
6.2
0Hz
60Hz
4kHz
Auto
Ramp
NotSel30sec30sec

22
AP
PE
ND
IX-
RE
MO
TE
VF
DK
EY
PAD
RE
FE
RE
NC
E(C
ON
T)
Tab
le18
–V
FD
Par
amet
ers
—48
/50T
C17
--30,
50T
CQ
17--2
4an
d48
/50H
C17
--28
VFD
Part
Number
ABBPartNumber
Description
Motor
Part
Number
Voltage
(9905)
NomAmps
(9906)
Motor
NomFreq
(9907)
NomRPM
(9908)
Nom HP
(9909)
Const
SpeedSel
(1201)
Const
Speed1
(1202)
Const
Speed2
(1203)
Const
Speed3
(1204)
Relay
Out3
(1403)
Max
Amps
(2003)
Min
Freq
(2007)
MaxFreq
(2008)
Switch
Freq
(2606)
Start
Fcn
(2101)
Stop
Fcn
(2102)
Accel/
Decel
(2201)
Accel
(2202)
Decel
(2203)
HK30WA352
ACH550---U0---012A---2
2.9HP230V
HD58FE654
230
9.2
60Hz
1725
2.9
DI2,3
40Hz
60Hz
60Hz
16FLT/
Alarm
10.6
0Hz
60Hz
4kHz
Auto
Ramp
NotSel30sec30sec
HK30WA356
ACH550---U0---017A---2
2.9HP460V
HD58FE654
460
4.6
60Hz
1725
2.9
DI2,3
40Hz
60Hz
60Hz
16FLT/
Alarm
5.3
0Hz
60Hz
4kHz
Auto
Ramp
NotSel30sec30sec
HK30WA353
ACH550---U0---024A---2
3.7HP230V
HD60FE656
230
11.2
60Hz
1725
3.7
DI2,3
40Hz
60Hz
60Hz
16FLT/
Alarm
12.9
0Hz
60Hz
4kHz
Auto
Ramp
NotSel30sec30sec
HK30WA357
ACH550---U0---024A---2
3.7HP460V
HD60FE656
460
5.6
60Hz
1725
3.7
DI2,3
40Hz
60Hz
60Hz
16FLT/
Alarm
6.4
0Hz
60Hz
4kHz
Auto
Ramp
NotSel30sec30sec
HK30WA361
ACH550---U0---024A---2
3.7HP575V
HD58FE577
575
4.2
60Hz
1725
3.7
DI2,3
40Hz
60Hz
60Hz
16FLT/
Alarm
4.8
0Hz
60Hz
4kHz
Auto
Ramp
NotSel30sec30sec
HK30WA354
ACH550---U0---024A---2
5.0HP230V
HD60FK657
230
14.7
60Hz
1760
5DI2,3
40Hz
60Hz
60Hz
16FLT/
Alarm
16.9
0Hz
60Hz
4kHz
Auto
Ramp
NotSel30sec30sec
HK30WA358
ACH550---U0---024A---2
5.0HP460V
HD60FK657
460
6.8
60Hz
1760
5DI2,3
40Hz
60Hz
60Hz
16FLT/
Alarm
7.8
0Hz
60Hz
4kHz
Auto
Ramp
NotSel30sec30sec
HK30WA362
ACH550---U0---031A---2
5.0HP575V
HD60FL576
575
5.4
60Hz
1745
5DI2,3
40Hz
60Hz
60Hz
16FLT/
Alarm
6.2
0Hz
60Hz
4kHz
Auto
Ramp
NotSel30sec30sec
HK30WA354
ACH550---U0---031A---2
7.5HP230V
HD62FK654
230
23.5
60Hz
1760
7.5
DI2,3
40Hz
60Hz
60Hz
16FLT/
Alarm
27.0
0Hz
60Hz
4kHz
Auto
Ramp
NotSel30sec30sec
HK30WA358
ACH550---U0---06A9---4
7.5HP460V
HD62FK654
460
11.9
60Hz
1760
7.5
DI2,3
40Hz
60Hz
60Hz
16FLT/
Alarm
13.7
0Hz
60Hz
4kHz
Auto
Ramp
NotSel30sec30sec
HK30WA362
ACH550---U0---08A8---4
7.5HP575V
HD62FL576
575
9.0
60Hz
1750
7.5
DI2,3
40Hz
60Hz
60Hz
16FLT/
Alarm
10.4
0Hz
60Hz
4kHz
Auto
Ramp
NotSel30sec30sec
HK30WA354
ACH550---U0---012A---4
5.0HP230V
HD60FL650
230
16.7
60Hz
1740
5DI2,3
40Hz
60Hz
60Hz
16FLT/
Alarm
19.2
0Hz
60Hz
4kHz
Auto
Ramp
NotSel30sec30sec
HK30WA358
ACH550---U0---012A---4
5.0HP460V
HD60FL650
460
8.4
60Hz
1740
5DI2,3
40Hz
60Hz
60Hz
16FLT/
Alarm
9.7
0Hz
60Hz
4kHz
Auto
Ramp
NotSel30sec30sec
HK30WA362
ACH550---U0---012A---4
5.0HP575V
HD60FL575
575
5.1
60Hz
1725
5DI2,3
40Hz
60Hz
60Hz
16FLT/
Alarm
5.9
0Hz
60Hz
4kHz
Auto
Ramp
NotSel30sec30sec
HK30WA354
ACH550---U0---012A---4
5.3HP230V
HD60FK658
230
1360Hz
1740
5.3
DI2,3
40Hz
60Hz
60Hz
16FLT/
Alarm
150
0Hz
60Hz
4kHz
Auto
Ramp
NotSel30sec30sec
HK30WA358
ACH550---U0---012A---4
5.3HP460V
HD60FK658
460
6.4
60Hz
1740
5.3
DI2,3
40Hz
60Hz
60Hz
16FLT/
Alarm
7.4
0Hz
60Hz
4kHz
Auto
Ramp
NotSel30sec30sec
HK30WA362
ACH550---U0---015A---4
5.3HP575V
HD60FE576
575
5.4
60Hz
1725
5.3
DI2,3
40Hz
60Hz
60Hz
16FLT/
Alarm
6.2
0Hz
60Hz
4kHz
Auto
Ramp
NotSel30sec30sec
HK30WA354
ACH550---U0---015A---4
7.5HP230V
HD62FL650
230
22.9
60Hz
1745
7.5
DI2,3
40Hz
60Hz
60Hz
16FLT/
Alarm
26.3
0Hz
60Hz
4kHz
Auto
Ramp
NotSel30sec30sec
HK30WA358
ACH550---U0---06A1---6
7.5HP460V
HD62FL650
460
11.5
60Hz
1745
7.5
DI2,3
40Hz
60Hz
60Hz
16FLT/
Alarm
13.2
0Hz
60Hz
4kHz
Auto
Ramp
NotSel30sec30sec
HK30WA362
ACH550---U0---09A0---6
7.5HP575V
HD62FL575
575
8.1
60Hz
1745
7.5
DI2,3
40Hz
60Hz
60Hz
16FLT/
Alarm
9.3
0Hz
60Hz
4kHz
Auto
Ramp
NotSel30sec30sec
HK30WA355
ACH550---U0---09A0---6
10.0HP230V
HD64FK654
230
2860Hz
1755
10DI2,3
40Hz
60Hz
60Hz
16FLT/
Alarm
32.2
0Hz
60Hz
4kHz
Auto
Ramp
NotSel30sec30sec
HK30WA359
ACH550---U0---09A0---6
10.0HP460V
HD64FK654
460
12.6
60Hz
1755
10DI2,3
40Hz
60Hz
60Hz
16FLT/
Alarm
14.5
0Hz
60Hz
4kHz
Auto
Ramp
NotSel30sec30sec
HK30WA363
ACH550---U0---09A0---6
10.0HP575V
HD64FL576
575
11.0
60Hz
1755
10DI2,3
40Hz
60Hz
60Hz
16FLT/
Alarm
12.7
0Hz
60Hz
4kHz
Auto
Ramp
NotSel30sec30sec
HK30WA355
ACH550---U0---09A0---6
10.0HP230V
HD64FL650
230
30.8
60Hz
1745
10DI2,3
40Hz
60Hz
60Hz
16FLT/
Alarm
35.4
0Hz
60Hz
4kHz
Auto
Ramp
NotSel30sec30sec
HK30WA359
ACH550---U0---011A---6
10.0HP460V
HD64FL650
460
15.4
60Hz
1745
10DI2,3
40Hz
60Hz
60Hz
16FLT/
Alarm
17.7
0Hz
60Hz
4kHz
Auto
Ramp
NotSel30sec30sec
HK30WA363
ACH550---U0---011A---6
10.0HP575V
HD64FL575
575
1160Hz
1740
10DI2,3
40Hz
60Hz
60Hz
16FLT/
Alarm
12.7
0Hz
60Hz
4kHz
Auto
Ramp
NotSel30sec30sec

23
AP
PE
ND
IX-
RE
MO
TE
VF
DK
EY
PAD
RE
FE
RE
NC
E(C
ON
T)
Tabl
e19
–40
RU
/40R
UQ
Uni
tV
FD
Par
amet
ers
—40
RU
A07
--30,
40R
US
08--3
0an
d40
RU
Q07
--25
VFD
Part
Number
ABBPartNumber
Description
Motor
Part
Number
Voltage
(9905)
NomAmps
(9906)
Motor
NomFreq
(9907)
NomRPM
(9908)
Nom HP
(9909)
Const
SpeedSel
(1201)
Const
Speed1
(1202)
Const
Speed2
(1203)
Const
Speed3
(1204)
Relay
Out3
(1403)
Max
Amps
(2003)
Min
Freq
(2007)
MaxFreq
(2008)
Switch
Freq
(2606)
Start
Fcn
(2101)
Stop
Fcn
(2102)
Accel/
Decel
(2201)
Accel
(2202)
Decel
(2203)
HK30WA353
ACH550---U0---017A---2
2.4HP230V
HD56FE653
230
7.9
60Hz
1725
2.4
DI2,3
40Hz
60Hz
60Hz
16FLT/
Alarm
9.1
0Hz
60Hz
4kHz
Auto
Ramp
NotSel30sec30sec
HK30WA357
ACH550---U0---08A8---4
2.4HP460V
HD56FE653
460
460Hz
1725
2.4
DI2,3
40Hz
60Hz
60Hz
16FLT/
Alarm
4.6
0Hz
60Hz
4kHz
Auto
Ramp
NotSel30sec30sec
HK30WA361
ACH550---U0---06A1---6
2.4HP575V
HD56FE577
575
3.4
60Hz
1725
2.4
DI2,3
40Hz
60Hz
60Hz
16FLT/
Alarm
3.9
0Hz
60Hz
4kHz
Auto
Ramp
NotSel30sec30sec
HK30WA353
ACH550---U0---017A---2
2.9HP230V
HD58FE654
230
9.2
60Hz
1725
2.9
DI2,3
40Hz
60Hz
60Hz
16FLT/
Alarm
10.6
0Hz
60Hz
4kHz
Auto
Ramp
NotSel30sec30sec
HK30WA357
ACH550---U0---08A8---4
2.9HP460V
HD58FE654
460
4.6
60Hz
1725
2.9
DI2,3
40Hz
60Hz
60Hz
16FLT/
Alarm
5.3
0Hz
60Hz
4kHz
Auto
Ramp
NotSel30sec30sec
HK30WA353
ACH550---U0---017A---2
3.7HP230V
HD60FE656
230
11.2
60Hz
1725
3.7
DI2,3
40Hz
60Hz
60Hz
16FLT/
Alarm
12.9
0Hz
60Hz
4kHz
Auto
Ramp
NotSel30sec30sec
HK30WA357
ACH550---U0---08A8---4
3.7HP460V
HD60FE656
460
5.6
60Hz
1725
3.7
DI2,3
40Hz
60Hz
60Hz
16FLT/
Alarm
6.4
0Hz
60Hz
4kHz
Auto
Ramp
NotSel30sec30sec
HK30WA361
ACH550---U0---06A1---6
3.7HP575V
HD58FE577
575
4.2
60Hz
1725
3.7
DI2,3
40Hz
60Hz
60Hz
16FLT/
Alarm
4.8
0Hz
60Hz
4kHz
Auto
Ramp
NotSel30sec30sec
HK30WA354
ACH550---U0---024A---2
5.0HP230V
HD60FK653
230
15.3
60Hz
1745
5DI2,3
40Hz
60Hz
60Hz
16FLT/
Alarm
17.6
0Hz
60Hz
4kHz
Auto
Ramp
NotSel30sec30sec
HK30WA358
ACH550---U0---012A---4
5.0HP460V
HD60FK653
460
6.4
60Hz
1745
5DI2,3
40Hz
60Hz
60Hz
16FLT/
Alarm
7.4
0Hz
60Hz
4kHz
Auto
Ramp
NotSel30sec30sec
HK30WA362
ACH550---U0---09A0---6
5.0HP575V
HD60FK575
575
5.4
60Hz
1760
5DI2,3
40Hz
60Hz
60Hz
16FLT/
Alarm
6.2
0Hz
60Hz
4kHz
Auto
Ramp
NotSel30sec30sec
HK30WA354
ACH550---U0---024A---2
7.5HP230V
HD62FK652
230
22.4
60Hz
1760
7.5
DI2,3
40Hz
60Hz
60Hz
16FLT/
Alarm
25.8
0Hz
60Hz
4kHz
Auto
Ramp
NotSel30sec30sec
HK30WA358
ACH550---U0---012A---4
7.5HP460V
HD62FK652
460
9.7
60Hz
1760
7.5
DI2,3
40Hz
60Hz
60Hz
16FLT/
Alarm
11.2
0Hz
60Hz
4kHz
Auto
Ramp
NotSel30sec30sec
HK30WA362
ACH550---U0---09A0---6
7.5HP575V
HD62FK576
575
9.0
60Hz
1750
7.5
DI2,3
40Hz
60Hz
60Hz
16FLT/
Alarm
10.4
0Hz
60Hz
4kHz
Auto
Ramp
NotSel30sec30sec
HK30WA355
ACH550---U0---031A---2
10.0HP230V
HD64FK654
230
30.8
60Hz
1760
10DI2,3
40Hz
60Hz
60Hz
16FLT/
Alarm
35.4
0Hz
60Hz
4kHz
Auto
Ramp
NotSel30sec30sec
HK30WA359
ACH550---U0---015A---4
10.0HP460V
HD64FK654
460
15.4
60Hz
1760
10DI2,3
40Hz
60Hz
60Hz
16FLT/
Alarm
17.7
0Hz
60Hz
4kHz
Auto
Ramp
NotSel30sec30sec
HK30WA363
ACH550---U0---011A---6
10.0HP575V
HD64FK575
575
11.0
60Hz
1755
10DI2,3
40Hz
60Hz
60Hz
16FLT/
Alarm
12.7
0Hz
60Hz
4kHz
Auto
Ramp
NotSel30sec30sec

24
APPENDIX - REMOTE VFD KEYPAD REFERENCE (CONT)
Standard Display Mode
Use the standard display mode to read information on thedrive status and operate the drive. To reach the standarddisplay mode, press EXIT until the LCD display showsstatus information as described below. (See Fig. 23.)
60.0Hz100.0 %SP
1.9 A10.0 Vdc
C09249
Fig. 23 -- Standard Display Example
The top line of the LCD display shows the basic statusinformation of the drive. The HAND icon indicates thatthe drive control is local from the control panel. TheAUTO icon indicates that the drive is in remote controlmode, such as the basic I/O or field bus.
The arrow icon indicates the drive and motor rotationstatus. A rotating arrow (clockwise or counterclockwise)indicates that the drive is running and at set point and theshaft direction is forward or reverse. A rotating blinkingarrow indicates that the drive is running but not at setpoint. A stationary arrow indicates that the drive isstopped. For the units covered in this manual, the correctdisplay rotation is clockwise.
The upper right corner shows the frequency set point thatthe drive will maintain.
Using parameter group 34, the middle of the LCD displaycan be configured to display 3 parameter values. Thedefault display shows parameters 0103 (OUTPUT FREQ)in percent speed, 0104 (CURRENT) in amperes, and 0120(Al1) in voltage DC.
The bottom corners of the LCD display show thefunctions currently assigned to the two soft keys. Thelower middle displays the current time (if configured toshow the time).
The first time the drive is powered up, it is in the OFFmode. To switch to local hand--held control and controlthe drive using the control panel, press and hold theHAND button. Pressing the HAND button switches thedrive to hand control while keeping the drive running.Press the AUTO button to switch to remote input control.To start the drive press the HAND or AUTO buttons, tostop the drive press the OFF button.
To adjust the speed in HAND mode, press the UP orDOWN buttons (the reference changes immediately). Thereference can be modified in the local control (HAND)mode, and can be parameterized (using Group 11reference select) to also allow modification in the remotecontrol mode.
Parameters Mode
The Parameters mode is used to change the parameters onthe drive. To change parameters, perform the followingprocedure:
1. Select MENU (SOFT KEY 2). The Main menu willbe displayed.
2. Use the UP or DOWN keys to highlight PARAMET-ERS on the display screen and press ENTER (SOFTKEY 2).
3. Use the UP or DOWN keys to highlight the desiredparameter group and press SEL (SOFT KEY 2).
4. Use the UP or DOWN keys to highlight the desiredparameter and press EDIT (SOFT KEY 2).
5. Use the UP or DOWN keys to change the value of theparameter.
6. Press SAVE (SOFT KEY 2) to store the modifiedvalue. Press CANCEL (SOFT KEY 1) to keep theprevious value. Any modifications that are not savedwill not be changed.
7. Choose another parameter or press EXIT (SOFT KEY1) to return to the listing of parameter groups. Contin-ue until all the parameters have been configured andthen press EXIT (SOFT KEY 1) to return to the mainmenu.
NOTE: The current parameter value appears above thehighlight parameter. To view the default parameter value,press the UP and DOWN keys simultaneously. To restore thedefault factory settings, select the Carrier application macro.

25
APPENDIX - REMOTE VFD KEYPAD REFERENCE (CONT)
Changed Parameters Mode
The Changed Parameters mode is used to view and editrecently changed parameters on the drive. To view thechanged parameters, perform the following procedure:
1. Select MENU (SOFT KEY 2). The Main menu willbe displayed.
2. Use the UP or DOWN keys to highlight CHANGEDPAR on the display screen and press ENTER (SOFTKEY 2). A list of the recently changed parameterswill be displayed.
3. Use the UP or DOWN keys to highlight the desiredparameter group and press EDIT (SOFT KEY 2) tochange the parameter if desired.
4. Press EXIT (SOFT KEY 1) to exit the Changed Para-meters mode.
Drive Parameter Backup Mode
The drive parameter back up mode is used to export theparameters from one drive to another. The parameters canbe uploaded from a VFD to the removable control panel.The control panel can then be transferred to another driveand the parameters downloaded into memory.
Depending on the motor and application, there are twooptions available. The first option is to download allparameters. This copies both application and motorparameters to the drive from the control panel. This isrecommended when using the same application for drivesof the same size. This can also be used to create a backupof the parameters group for the drive.
The second option downloads only the applicationparameters to the drive. This is recommended when usingthe same application for drives of different sizes. Parameters9905, 9906, 9907, 9908, 9909, 1605, 1607, 5201, and group51 parameters and internal motor parameters are not copied.
Upload All Parameters
To upload and store parameters in the control panel fromthe VFD, perform the following procedure:
1. Select MENU (SOFT KEY 2). The Main menu willbe displayed.
2. Use the UP or DOWN keys to highlight PARBACKUP on the display screen and press ENTER(SOFT KEY 2).
3. Use the UP or DOWN keys to highlight UPLOAD TOPANEL and press SEL (SOFT KEY 2).
4. The text “Copying Parameters” will be displayed witha progress indicator. To stop the process, selectABORT (SOFT KEY 1).
5. When the upload is complete, the text “Parameter up-load successful” will be displayed.
6. The display will then return to the PAR BACKUPmenu. Select EXIT (SOFT KEY 1) to return to themain menu.
7. The control panel can now be disconnected from thedrive.
Download All Parameters
To download all parameters from the control panel to theVFD, perform the following procedure:
1. Install the control panel with the correct parametersonto the VFD.
2. Select MENU (SOFT KEY 2). The Main menu willbe displayed.
3. Use the UP or DOWN keys to highlight PARBACKUP on the display screen and press ENTER(SOFT KEY 2).
4. Use the UP or DOWN keys to highlight DOWNLOADTO DRIVE ALL and press SEL (SOFT KEY 2).
5. The text “Restoring Parameters” will be displayedwith a progress indicator. To stop the process, selectABORT (SOFT KEY 1).
6. When the download is complete, the text “Parameterdownload successful” will be displayed.
7. The display will then return to the PAR BACKUPmenu. Select EXIT (SOFT KEY 1) to return to themain menu.
8. The control panel can now be disconnected from thedrive.
Download Application Parameters
To download application parameters only to the controlpanel from the VFD, perform the following procedure:
1. Install the control panel with the correct parametersonto the VFD.
2. Select MENU (SOFT KEY 2). The Main menu willbe displayed.
3. Use the UP or DOWN keys to highlight PARBACKUP on the display screen and press ENTER(SOFT KEY 2).
4. Use the UP or DOWN keys to highlight DOWNLOADAPPLICATION and press SEL (SOFT KEY 2).
5. The text “Downloading Parameters (partial)” will bedisplayed with a progress indicator. To stop the pro-cess, select ABORT (SOFT KEY 1).
6. When the download is complete, the text “Parameterdownload successful” will be displayed.
7. The display will then return to the PAR BACKUPmenu. Select EXIT (SOFT KEY 1) to return to themain menu.
8. The control panel can now be disconnected from thedrive.
Clock Set Mode
The clock set mode is used for setting the date and timefor the internal clock of the VFD. In order to use the timerfunctions of the VFD control, the internal clock must beset. The date is used to determine weekdays and is visiblein the fault logs.

26
APPENDIX - REMOTE VFD KEYPAD REFERENCE (CONT)
To set the clock, perform the following procedure:
1. Select MENU (SOFT KEY 2). The Main menu willbe displayed.
2. Use the UP or DOWN keys to highlight CLOCK SETon the display screen and press ENTER (SOFT KEY2). The clock set parameter list will be displayed.
3. Use the UP or DOWN keys to highlight CLOCK VIS-IBILITY and press SEL (SOFT KEY 2). This para-meter is used to display or hide the clock on thescreen. Use the UP or DOWN keys to change theparameter setting. Press OK (SOFT KEY 2) to savethe configuration and return to the Clock Set menu.
4. Use the UP or DOWN keys to highlight SET TIMEand press SEL (SOFT KEY 2). Use the UP or DOWNkeys to change the hours and minutes. Press OK(SOFT KEY 2) to save the configuration and return tothe Clock Set menu.
5. Use the UP or DOWN keys to highlight TIMEFORMAT and press SEL (SOFT KEY 2). Use the UPor DOWN keys to change the parameter setting. PressOK (SOFT KEY 2) to save the configuration and re-turn to the Clock Set menu.
6. Use the UP or DOWN keys to highlight SET DATEand press SEL (SOFT KEY 2). Use the UP or DOWNkeys to change the day, month, and year. Press OK(SOFT KEY 2) to save the configuration and return tothe Clock Set menu.
7. Use the UP or DOWN keys to highlight DATEFORMAT and press SEL (SOFT KEY 2). Use the UPor DOWN keys to change the parameter setting. PressOK (SOFT KEY 2) to save the configuration and re-turn to the Clock Set menu.
8. Press EXIT (SOFT KEY 1) twice to return to themain menu.
I/O Settings Mode
The I/O Settings mode is used for viewing and editing theI/O settings.
To configure the I/O settings, perform the followingprocedure:
1. Select MENU (SOFT KEY 2). The Main menu willbe displayed.
2. Use the UP or DOWN keys to highlight I/O SETTINGSon the display screen and press ENTER (SOFT KEY 2).The I/O Settings parameter list will be displayed.
3. Use the UP or DOWN keys to highlight the desiredI/O setting and press SEL (SOFT KEY 2).
4. Use the UP or DOWN keys to select the parameter toview. Press OK (SOFT KEY 2).
5. Use the UP or DOWN keys to change the parametersetting. Press SAVE (SOFT KEY 2) to save the con-figuration. Press CANCEL (SOFT KEY 1) to keepthe previous value. Any modifications that are notsaved will not be changed.
6. Press EXIT (SOFT KEY 1) twice to return to themain menu.
VFD Diagnostics
The drive detects error situations and reports them using:
1. Green and red LEDs on the body of the drive (locatedunder the keypad)
2. Status LED on the control panel3. Control panel display4. The Fault Word and Alarm Word parameter bits
(parameters 0305 to 0309)
The form of the display depends on the severity of theerror. The user can specify the severity for many errors bydirecting the drive to ignore the error situation, report thesituation as an alarm, or report the situation as a fault.
Faults (Red LED Lit)
The VFD signals that it has detected a severe error, orfault, by:
1. Enabling the red LED on the drive (LED is eithersteady or flashing)
2. Setting an appropriate bit in a Fault Word parameter(0305 to 0307)
3. Overriding the control panel display with the displayof a fault code
4. Stopping the motor (if it was on)5. Sets an appropriate bit in Fault Word parameter
0305-- 0307.
The fault code on the control panel display is temporary.Pressing the MENU, ENTER, UP button or DOWNbuttons removes the fault message. The messagereappears after a few seconds if the control panel is nottouched and the fault is still active.
Alarms (Green LED Flashing)
For less severe errors, called alarms, the diagnosticdisplay is advisory. For these situations, the drive issimply reporting that it had detected something unusual.In these situations, the drive:
1. Flashes the green LED on the drive (does not apply toalarms that arise from control panel operation errors)
2. Sets an appropriate bit in an Alarm Word parameter(0308 or 0309)
3. Overrides the control panel display with the displayof an alarm code and/or name
Alarm messages disappear from the control panel displayafter a few seconds. The message returns periodically aslong as the alarm condition exists.

27
APPENDIX - REMOTE VFD KEYPAD REFERENCE (CONT)
Correcting Faults
The recommended corrective action for faults is shown inthe Fault Listing Table 20. The VFD can also be reset toremove the fault. If an external source for a startcommand is selected and is active, the VFD may startimmediately after fault reset.
To reset a fault indicated by a flashing red LED, turn offthe power for 5 minutes. To reset a fault indicated by a redLED (not flashing), press RESET from the control panelor turn off the power for 5 minutes. Depending on thevalue of parameter 1604 (FAULT RESET SELECT),digital input or serial communication could also be usedto reset the drive. When the fault has been corrected, themotor can be started.
History
For reference, the last three fault codes are stored intoparameters 0401, 0412, 0413. For the most recent fault(identified by parameter 0401), the drive stores additionaldata (in parameters 0402 through 0411) to aid introubleshooting a problem. For example, a parameter0404 stores the motor speed at the time of the fault. Toclear the fault history (all of Group 04, Fault Historyparameters), follow these steps:
1. In the control panel, Parameters mode, selectparameter 0401.
2. Press EDIT.3. Press the UP and DOWN buttons simultaneously.4. Press SAVE.
Correcting Alarms
To correct alarms, first determine if the Alarm requiresany corrective action (action is not always required). UseTable 21 to find and address the root cause of theproblem.
If diagnostics troubleshooting has determined that thedrive is defective during the warranty period, contactABB Automation Inc., at 1--800--435--7365, option 4,option 3. A qualified technician will review the problemwith the caller and make a determination regarding how toproceed. This may involve dispatching a designatedservice station (DSS) representative from an authorizedstation, dispatching a replacement unit, or advising returnfor repair.
Control Panel Cleaning
Use a soft damp cloth to clean the control panel. Avoidharsh cleaners which could scratch the display window.
Battery Replacement
A battery is only used in assistant control panels that havethe clock function available and enabled. The batterykeeps the clock operating in memory during powerinterruptions. The expected life for the battery is greaterthan ten years. To remove the battery, use a coin to rotatethe battery holder on the back of the control panel.Replace the battery with type CR2032.
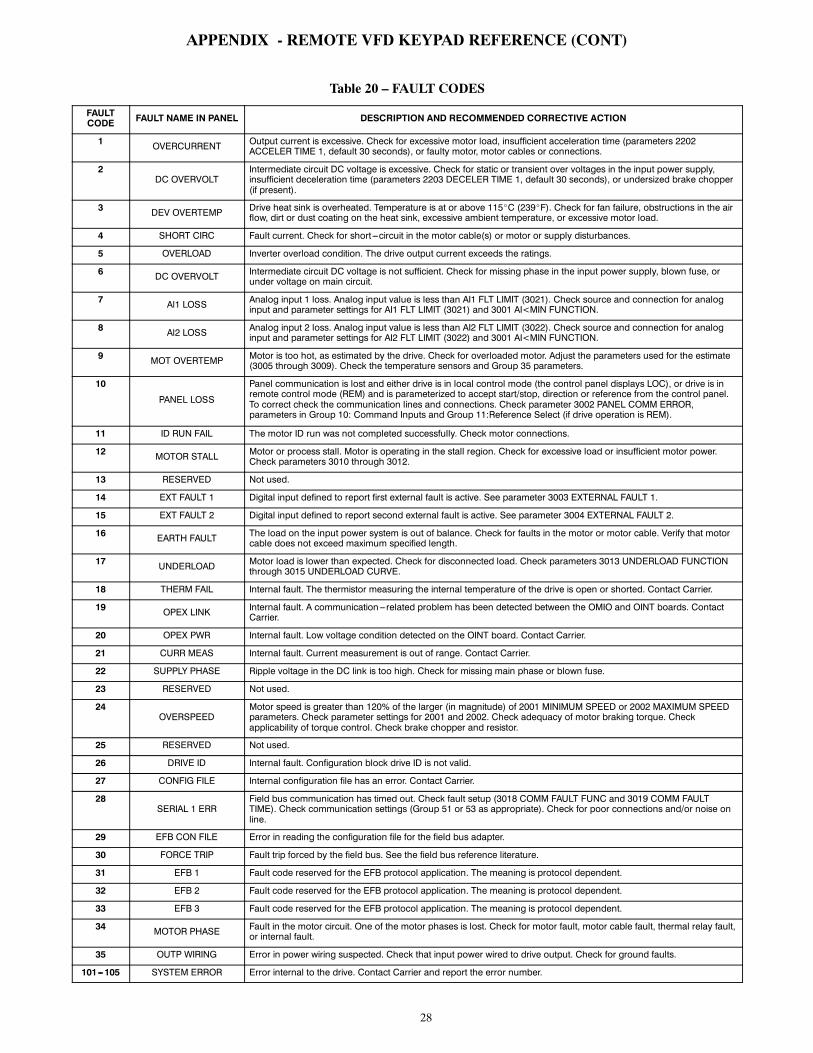
28
APPENDIX - REMOTE VFD KEYPAD REFERENCE (CONT)
Table 20 – FAULT CODES
FAULTCODE FAULT NAME IN PANEL DESCRIPTION AND RECOMMENDED CORRECTIVE ACTION
1 OVERCURRENT Output current is excessive. Check for excessive motor load, insufficient acceleration time (parameters 2202ACCELER TIME 1, default 30 seconds), or faulty motor, motor cables or connections.
2DC OVERVOLT
Intermediate circuit DC voltage is excessive. Check for static or transient over voltages in the input power supply,insufficient deceleration time (parameters 2203 DECELER TIME 1, default 30 seconds), or undersized brake chopper(if present).
3 DEV OVERTEMP Drive heat sink is overheated. Temperature is at or above 115_C (239_F). Check for fan failure, obstructions in the airflow, dirt or dust coating on the heat sink, excessive ambient temperature, or excessive motor load.
4 SHORT CIRC Fault current. Check for short---circuit in the motor cable(s) or motor or supply disturbances.
5 OVERLOAD Inverter overload condition. The drive output current exceeds the ratings.
6 DC OVERVOLT Intermediate circuit DC voltage is not sufficient. Check for missing phase in the input power supply, blown fuse, orunder voltage on main circuit.
7 Al1 LOSS Analog input 1 loss. Analog input value is less than AI1 FLT LIMIT (3021). Check source and connection for analoginput and parameter settings for AI1 FLT LIMIT (3021) and 3001 AI<MIN FUNCTION.
8 Al2 LOSS Analog input 2 loss. Analog input value is less than AI2 FLT LIMIT (3022). Check source and connection for analoginput and parameter settings for AI2 FLT LIMIT (3022) and 3001 AI<MIN FUNCTION.
9 MOT OVERTEMP Motor is too hot, as estimated by the drive. Check for overloaded motor. Adjust the parameters used for the estimate(3005 through 3009). Check the temperature sensors and Group 35 parameters.
10
PANEL LOSS
Panel communication is lost and either drive is in local control mode (the control panel displays LOC), or drive is inremote control mode (REM) and is parameterized to accept start/stop, direction or reference from the control panel.To correct check the communication lines and connections. Check parameter 3002 PANEL COMM ERROR,parameters in Group 10: Command Inputs and Group 11:Reference Select (if drive operation is REM).
11 ID RUN FAIL The motor ID run was not completed successfully. Check motor connections.
12 MOTOR STALL Motor or process stall. Motor is operating in the stall region. Check for excessive load or insufficient motor power.Check parameters 3010 through 3012.
13 RESERVED Not used.
14 EXT FAULT 1 Digital input defined to report first external fault is active. See parameter 3003 EXTERNAL FAULT 1.
15 EXT FAULT 2 Digital input defined to report second external fault is active. See parameter 3004 EXTERNAL FAULT 2.
16 EARTH FAULT The load on the input power system is out of balance. Check for faults in the motor or motor cable. Verify that motorcable does not exceed maximum specified length.
17 UNDERLOAD Motor load is lower than expected. Check for disconnected load. Check parameters 3013 UNDERLOAD FUNCTIONthrough 3015 UNDERLOAD CURVE.
18 THERM FAIL Internal fault. The thermistor measuring the internal temperature of the drive is open or shorted. Contact Carrier.
19 OPEX LINK Internal fault. A communication---related problem has been detected between the OMIO and OINT boards. ContactCarrier.
20 OPEX PWR Internal fault. Low voltage condition detected on the OINT board. Contact Carrier.
21 CURR MEAS Internal fault. Current measurement is out of range. Contact Carrier.
22 SUPPLY PHASE Ripple voltage in the DC link is too high. Check for missing main phase or blown fuse.
23 RESERVED Not used.
24OVERSPEED
Motor speed is greater than 120% of the larger (in magnitude) of 2001 MINIMUM SPEED or 2002 MAXIMUM SPEEDparameters. Check parameter settings for 2001 and 2002. Check adequacy of motor braking torque. Checkapplicability of torque control. Check brake chopper and resistor.
25 RESERVED Not used.
26 DRIVE ID Internal fault. Configuration block drive ID is not valid.
27 CONFIG FILE Internal configuration file has an error. Contact Carrier.
28SERIAL 1 ERR
Field bus communication has timed out. Check fault setup (3018 COMM FAULT FUNC and 3019 COMM FAULTTIME). Check communication settings (Group 51 or 53 as appropriate). Check for poor connections and/or noise online.
29 EFB CON FILE Error in reading the configuration file for the field bus adapter.
30 FORCE TRIP Fault trip forced by the field bus. See the field bus reference literature.
31 EFB 1 Fault code reserved for the EFB protocol application. The meaning is protocol dependent.
32 EFB 2 Fault code reserved for the EFB protocol application. The meaning is protocol dependent.
33 EFB 3 Fault code reserved for the EFB protocol application. The meaning is protocol dependent.
34 MOTOR PHASE Fault in the motor circuit. One of the motor phases is lost. Check for motor fault, motor cable fault, thermal relay fault,or internal fault.
35 OUTP WIRING Error in power wiring suspected. Check that input power wired to drive output. Check for ground faults.
101---105 SYSTEM ERROR Error internal to the drive. Contact Carrier and report the error number.

29
PPENDIX - REMOTE VFD KEYPAD REFERENCE (CONT)
Table 20 — FAULT CODES (cont)
FAULTCODE FAULT NAME IN PANEL DESCRIPTION AND RECOMMENDED CORRECTIVE ACTION
201---206 SYSTEM ERROR Error internal to the drive. Contact Carrier and report the error number.
1000
PAR HZRPM
Parameter values are inconsistent. Check for any of the following:2001 MINIMUM SPEED > 2002 MAXIMUM SPEED2007 MINIMUM FREQ > 2008 MAXIMUM FREQ2001 MINIMUM SPEED / 9908 MOTOR NOM SPEED is outside of the range: ---128/+1282002 MAXIMUM SPEED / 9908 MOTOR NOM SPEED is outside of the range: ---128/+1282007 MINIMUM FREQ / 9907 MOTOR NOM FREQ is outside of the range: --- 128/+1282008 MAXIMUM FREQ / 9907 MOTOR NOM FREQ is outside of the range: --- 128/+128
1001 PAR PFA REFNG Parameter values are inconsistent. Check that 2007 MINIMUM FREQ is negative, when 8123 PFA ENABLE is active.
1002
PAR PFA IOCNF
Parameter values are inconsistent. The number of programmed PFA relays does not match with Interlockconfiguration, when 8123 PFA ENABLE is active. Check consistency of RELAY OUTPUT parameters 1401 through1403, and 1410 through 1412. Check 8117 NR OF AUX MOTORS, 8118 AUTOCHANGE INTERV, and 8120INTERLOCKS.
1003 PAR AI SCALE Parameter values are inconsistent. Check that parameter 1301 AI 1 MIN > 1302 AI 1 MAX and that parameter 1304 AI2 MIN > 1305 AI 2 MAX.
1004 PAR AO SCALE Parameter values are inconsistent. Check that parameter 1504 AO 1 MIN > 1505 AO 1 MAX and that parameter 1510AO 2 MIN > 1511 AO 2 MAX.
1005
PAR PCU 2
Parameter values for power control are inconsistent: Improper motor nominal kVA or motor nominal power. Checkthe following parameters:1.1 < (9906 MOTOR NOM CURR * 9905 MOTOR NOM VOLT * 1.73 / PN) < 2.6Where: PN = 1000 * 9909 MOTOR NOM POWER (if units are kW) or PN = 746* 9909 MOTOR NOM POWER (if units are HP, e.g., in US)
1006 PAR EXT RO Parameter values are inconsistent. Check the extension relay module for connection and 1410 through 1412 RELAYOUTPUTS 4 through 6 have non---zero values.
1007 PAR FBUS Parameter values are inconsistent. Check that a parameter is set for field bus control (e.g., 1001 EXT1 COMMANDS= 10 (COMM)), but 9802 COMM PROT SEL = 0.
1008 PAR PFA MODE Parameter values are inconsistent. The 9904 MOTOR CTRL MODE must = 3 (SCALAR SPEED) when 8123 PFAENABLE activated.
1009
PAR PCU 1
Parameter values for power control are inconsistent or improper motor nominal frequency or speed. Check for bothof the following:1 < (60 * 9907 MOTOR NOM FREQ / 9908 MOTOR NOM SPEED < 160.8 < 9908 MOTOR NOM SPEED / (120 * 9907 MOTOR NOM FREQ / Motor poles) < 0.992
1010 OVERRIDE/PFACONFLICT
Override mode is enabled and PFA is activated at the same time. This cannot be done because PFA interlocks cannotbe observed in the override mode.

30
APPENDIX - REMOTE VFD KEYPAD REFERENCE (CONT)
Table 21 – ALARM CODES
ALARMCODE
ALARM NAMEIN PANEL DESCRIPTION AND RECOMMENDED CORRECTIVE ACTION
2001 --- Reserved
2002 --- Reserved
2003 --- Reserved
2004 DIR LOCK The change in direction being attempted is not allowed. Do not attempt to change the direction of motor rotation, orChange parameter 1003 DIRECTION to allow direction change (if reverse operation is safe).
2005 I/O COMMField bus communication has timed out. Check fault setup (3018 COMM FAULT FUNC and 3019 COMM FAULTTIME). Check communication settings (Group 51 or 53 as appropriate). Check for poor connections and/or noise online.
2006 Al1 LOSS Analog input 1 is lost, or value is less than the minimum setting. Check input source and connections. Check theparameter that sets the minimum (3021) and the parameter that sets the Alarm/Fault operation (3001).
2007 Al2 LOSS Analog input 2 is lost, or value is less than the minimum setting. Check input source and connections. Checkparameter that sets the minimum (3022) and the parameter that sets the Alarm/Fault operation (3001).
2008 PANEL LOSS
Panel communication is lost and either the VFD is in local control mode (the control panel displays HAND), or theVFD is in remote control mode (AUTO) and is parameterized to accept start/stop, direction or reference from thecontrol panel. To correct, check the communication lines and connections, Parameter 3002 PANEL LOSS, andparameters in groups 10 COMMAND INPUTS and 11 REFERENCE SELECT (if drive operation is REM).
2009 --- Reserved
2010 MOT OVERTEMPMotor is hot, based on either the VFD estimate or on temperature feedback. This alarm warns that a Motor Overloadfault trip may be near. Check for overloaded motor. Adjust the parameters used for the estimate (3005 through 3009).Check the temperature sensors and Group 35 parameters.
2011 UNDERLOADMotor load is lower than expected. This alarm warns that a Motor Underload fault trip may be near. Check that themotor and drive ratings match (motor is NOT undersized for the drive). Check the settings on parameters 3013 to3015.
2012 MOTOR STALL Motor is operating in the stall region. This alarm warns that a Motor Stall fault trip may be near.
2013* AUTORESET This alarm warns that the drive is about to perform an automatic fault reset, which may start the motor. Tocontrol automatic reset, use parameter group 31 (AUTOMATIC RESET).
2014 AUTOCHANGE This alarm warns that the PFA autochange function is active. To control PFA, use parameter group 81 (PFA) and thePump Alternation macro.
2015 PFA INTERLOCK This alarm warns that the PFA interlocks are active, which means that the drive cannot start any motor (whenAutochange is used), or a speed regulated motor (when Autochange is not used).
2016 --- Reserved
2017* OFF BUTTON This alarm indicates that the OFF button has been pressed.
2018 PID SLEEP This alarm warns that the PID sleep function is active, which means that the motor could accelerate when the PIDsleep function ends. To control PID sleep, use parameters 4022 through 4026 or 4122 through 4126.
2019 ID RUN The VFD is performing an ID run.
2020 OVERRIDE Override mode is activated.
2021 START ENABLE 1MISSING
This alarm warns that the Start Enable 1 signal is missing. To control Start Enable 1 function, use parameter 1608. Tocorrect, check the digital input configuration and the communication settings.
2022 START ENABLE 2MISSING
This alarm warns that the Start Enable 2 signal is missing. To control Start Enable 2 function, use parameter1609. Tocorrect, check the digital input configuration and the communication settings.
2023 EMERGENCY STOP Emergency stop is activated.
* This alarm is not indicated by a relay output, even when the relay output is configured to indicate alarm conditions, parameter 1401 RELAY OUTPUT = 5(ALARM) or 16 (FLT/ALARM).
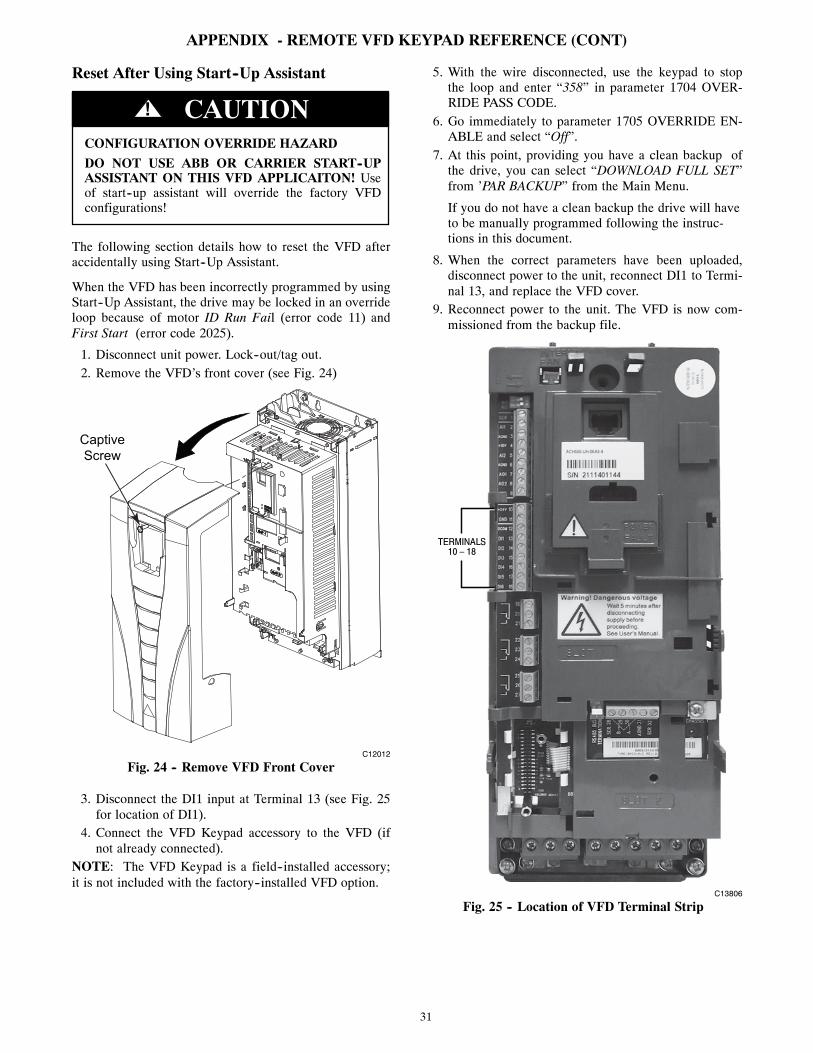
31
APPENDIX - REMOTE VFD KEYPAD REFERENCE (CONT)
Reset After Using Start--Up Assistant
CONFIGURATION OVERRIDE HAZARD
DO NOT USE ABB OR CARRIER START--UPASSISTANT ON THIS VFD APPLICAITON! Useof start--up assistant will override the factory VFDconfigurations!
CAUTION!
The following section details how to reset the VFD afteraccidentally using Start--Up Assistant.
When the VFD has been incorrectly programmed by usingStart--Up Assistant, the drive may be locked in an overrideloop because of motor ID Run Fail (error code 11) andFirst Start (error code 2025).
1. Disconnect unit power. Lock--out/tag out.2. Remove the VFD’s front cover (see Fig. 24)
CaptiveScrew
C12012
Fig. 24 -- Remove VFD Front Cover
3. Disconnect the DI1 input at Terminal 13 (see Fig. 25for location of DI1).
4. Connect the VFD Keypad accessory to the VFD (ifnot already connected).
NOTE: The VFD Keypad is a field--installed accessory;it is not included with the factory--installed VFD option.
5. With the wire disconnected, use the keypad to stopthe loop and enter “358” in parameter 1704 OVER-RIDE PASS CODE.
6. Go immediately to parameter 1705 OVERRIDE EN-ABLE and select “Off”.
7. At this point, providing you have a clean backup ofthe drive, you can select “DOWNLOAD FULL SET”from ’PAR BACKUP” from the Main Menu.
If you do not have a clean backup the drive will haveto be manually programmed following the instruc-tions in this document.
8. When the correct parameters have been uploaded,disconnect power to the unit, reconnect DI1 to Termi-nal 13, and replace the VFD cover.
9. Reconnect power to the unit. The VFD is now com-missioned from the backup file.
TERMINALS10 – 18
C13806
Fig. 25 -- Location of VFD Terminal Strip

32
Copyright 2015 Carrier Corp. D 7310 W. Morris St. D Indianapolis, IN 46231 Edition Date: 03/15
Manufacturer reserves the right to change, at any time, specifications and designs without notice and without obligations.
Catalog No: VFD---04SI
Replaces: VFD---03SI