V-Series Panels Operational training. V-SERIES PANEL OPERATION – BASIC The V-series panels are...
35
V-Series Panels Operational training
-
Upload
sylvia-dixon -
Category
Documents
-
view
228 -
download
0
Transcript of V-Series Panels Operational training. V-SERIES PANEL OPERATION – BASIC The V-series panels are...

V-Series PanelsOperational training

V-SERIES PANEL OPERATION – BASIC
The V-series panels are available either as Lever key, Push button or Rotary panels
The panels come in ► 2U -24 key panel► 1U -12 key panel ► Desktop -12 key panel► 1U -12 key extension panel
Push button key panelLever key panel
All panels can have fitted as an optional extra ► A AES-3 daughter card to allow Coax or “CAT5-digital” connection to the matrix via the AES-6
card
Rotary button key panel

Mic and headset connectionsWith auto-detection circuitry
Mic On/Off, MenuShift, Headset select,
Loudspeaker Main intercom and Aux Level controls
Numeric keypad forTelephone dialingand for menu functionality
Label key,-10 characters - Can be talk, listen or a combination of talk and listen.- Shows icon indications for function
Crosspoint level control per key with audio bar graph
V-SERIES PANEL OPERATION – BASIC

Reply/Answer back
Push button
Lever key
V-SERIES PANEL OPERATION – BASIC

Reply/Answer back
Rotary key
V-SERIES PANEL OPERATION – BASIC

► Lever Key operation
►Push button Key operation
► Rotary Key operation
Level control
Talk / listen key selector
Key status LED
Talk key selector
Listen key selector & Level control
Level control
Talk / listen key selector
► All displays have an Audio bar graph indicating crosspoint level
V-SERIES PANEL OPERATION – BASIC

On lever keys
- Push the lever key up to LATCH the LISTEN path
- Push the lever key down to TALK to the destination
LEVER KEY OPERATIONThe lever keys operate as both talk and listen selectors► Pressing a lever key down accesses a talk label► Pushing it up accesses a listen label► Use the level up/down buttons to adjust the crosspoint level
Pressing the lever key down and quickly releasing it (less than 200 ms) will “latch” the key and the talk path will stay active until it is pressed again. Pressing and holding a lever key down causes the talk path to stay active only for as long as it is held down.
To prevent the lever key on the panel from latching in the talk position, use EHX to set local or global latch disable for the destination port.
When a talk path is active, the talk LED lights bright RED continuously. When a listen path is active, the listen LED lights bright GREEN continuouslyHaving both talk and listen paths active will produce an AMBER led status
V-SERIES PANEL OPERATION – BASIC

PUSHBUTTON OPERATIONThe pushbuttons operate as talk or listen selectors depending on the key configuration. Possible key configurations are:-
► Talk only► Listen only ► Talk and listen ► Talk and Forced listen ► Dual talk and listen
► Use the level up/down buttons to adjust the crosspoint level
Pressing the button and quickly releasing it (less than 200 ms) will “latch” the button and the talk or listen path will stay active until it is pressed again. Pressing and holding a pushbutton down causes the talk / listen path to stay active only for as long as it is held down
To prevent the key on the panel from latching in the talk position, use EHX to set local or global latch disable for the destination port.
When a talk path is active, the talk LED lights bright RED continuously. When a listen path is active, the listen LED lights bright GREEN continuouslyHaving both talk and listen paths active will produce an AMBER led status
Red - TalkGreen - ListenAmber - Talk and Listen
V-SERIES PANEL OPERATION – BASIC

ROTARY BUTTON OPERATION► The pushbutton operates as a talk key selector► Push rotary encoder to operate as a listen button ► Adjust the rotary encoder to adjust the crosspoint level
Possible key configurations are:- ► Talk only (talk key selector)► Listen only (rotary button)► Forced listen (rotary button)
Pressing the talk button and quickly releasing it (less than 200 ms) will “latch” the button and the talk path will stay active until it is pressed again. Pressing and holding the talk button down causes the talk path to stay active only for as long as it is held down
To prevent the key on the panel from latching in the talk position, use EHX to set local / global latch disable for the destination port.
Red – Talk (button)Green – Listen (rotary)
Listen button & Level control
Talk key selector
V-SERIES PANEL OPERATION – BASIC

Audio routes / paths
► Listen key: When you press or latch an assigned listen key, the key lights up bright green while you listen to the incoming (source) audio.
► Talk: When you press or latch an assigned talk key, the key lights up bright red while you talk to the destination port.
► Talk & Listen: When you press or latch a talk & listen key you will be able to talk & listen simultaneously to the destination port
► Usually only programmed for 4wires and interfaces. Be careful with audio levels to avoid howl-round.
► Generally its best to avoid programming talk/listen keys between two panels as this can lead to howl-round (audio-feedback)
V-SERIES PANEL OPERATION – BASIC

Audio paths / routes
► Talk & Forced Listen: The panel operator will permanently hear the incoming audio. Pressing the talk key will make a talk route to the port
► Forced Listen: The panel operator will permanently hear the incoming audio.► On V-Rotary panels if the rotary encoder is programmed as a F/Listen key then pushing
the encoder will turn OFF the forced listen route
► Dual Talk and Listen : Pushbutton panels only. A quick tap of the key <200ms will latch the listen route on. A press and hold of the key will make a non-latching talk route to the destination. When the talk key is released, the listen route is still latched on
V-SERIES PANEL OPERATION – BASIC

► Answer-Back (Reply key) and Clear: Allows you to reply to incoming any calls from a non programmed caller and also from a programmed one.
► The answer-back key is the leftmost lower key on the intercom panel.
► When replying to an incoming call from a Fixed Group or IFB the caller port is displayed rather than the Fixed Group or IFB and the reply key only connects to the caller.
► Use the scroll up/down buttons to display other callers in the reply key stack
► The display associated with the reply key provides the following additional information► Shift page: shows only the number of the active shift page the active shift page► Panel Monitoring - displays an ear icon if your panel is being monitored by another panel, this
is, if panel A has pressed a LISTEN key to your panel, then your panel’s reply key will show the ear icon to indicate that another panel has pressed a LISTEN key.
Reply Key Display
V-SERIES PANEL OPERATION – BASIC

► The display associated with each key provides the following information
► 10 characters per key ► 5 chars if port label is set into “split mode” ► Supports Cyrillic, Hiragana, Full & Half-width Katakana, Kanji, Hangul and Arabic
characters ► Audio bar graph indicating crosspoint level► Latch indicator, to show if the key LEVER key is pressed up or down► Icon indications for Key Type ( PL , IFB , Group)► Icon indications for Key Status (Incoming vox, Telephone, Speed dial, Control relay)
Key Display
V-SERIES PANEL OPERATION – BASIC
GN MIC (gooseneck microphone on/off )Turns the gooseneck mic on and off.
SHIFT (to access 8 shift pages)
HS MIC (headset microphone on/off )Turns your panel’s headset microphone on and off. When a headset is plugged into the panel, the headset microphone automatically becomes active and both gooseneck microphone & panel LS are switched off.
MENU (to access menu options)Access a set of local panel menu options
GN mic, HS mic, Shift and Menu buttons
V-SERIES PANEL OPERATION – BASIC

► All V-series panels have 8 shift pages which can have customised names for individual shift pages.
► Press the shift button for less than 500ms to access the “selected” shift page.► Press it again to go back to the main page.
► Press and hold the ‘SHIFT’ button for more than 500ms. ► The full shift menu is displayed. ► The user can then select one of the eight available shift pages.
► The shift page led will flash if there is an unanswered call on any shift page
► Shift pages are only available on main panels and not on expansion panels
Shift 08
Shift 07
Shift 06Shift 04Shift 02
Shift 01 Shift 03 Shift 05Main
SHIFT
Shift button
V-SERIES PANEL OPERATION – BASIC

LS CUT It mutes the audio from the loudspeaker.To cut the audio press the MAIN VOL pot. The led will show solid red when the LS is muted.
Main Volume ControlControls the incoming audio from the matrix.The LED volume indications are:Red - high volumeAmber - intermediate volumeGreen - low volume
AUX Volume controlSets the volume on the optional external loudspeaker that can be connected to the auxiliary audio port on the rear of the panel.
► Press and hold the aux pot to show listen labels on Lever key and Rotary panels
Listen Again featurePressing and releasing the auxiliary volume control will play back messages stored on the “Listen Again” system.
Main and AUX volume pot canbe set to have minimum OFF levels in EHX
The Main and AUX volume controls
V-SERIES PANEL OPERATION – BASIC

AUX control - Listen again function
► This feature allows the panel operator to listen to the last seconds of audio heard on the speaker.
1. Press the auxiliary volume control switch momentarily. This activates the ‘Listen Again’ feature and the panel will replay
the last seconds of stored audio - From 5-15 seconds can be stored.- This feature is configured in EHX under Panel Options. - A value of 0 will disable this option.
2. The number of presses determines the total number of messages to be replayed
1 press -- 2 presses --- 3 pressesLast message 2nd message 3rd message
Messages played in this order
V-SERIES PANEL OPERATION – BASIC

Using EHX configuration software
► Call signal / Change on error tones – ► Call signal – allows your panel to beep whenever it receives a call signal from another
panel or interface like a CCI-22
► For Lever key and Push button panels: Press and hold both up/down buttons to send call signal to the destination label
► For Rotary panel: Press and hold the rotary encoder to send call signal to the destination label
ADDITIONAL PANEL FEATURES
CALL SIGNALING:A call signal is an electronic signal (TALLY) that is sent from one panel or interface to another to get a panel operator’s attention. It can be used for a variety of technical purposes as well, such as Que light, to activate a relay to open a door, set off an alarm, or activate a public address (PA) system.
V-SERIES PANEL OPERATION – BASIC

Using EHX configuration software
► Display brightness, screen saver time
► Gooseneck and Headset microphone type (dynamic or electrect)
► Speaker Dim level
► Internal Audio DSP mixer
► Fast Assignment mode
► Supervisor function
► Change on error tones allows your panel to beep whenever there is a map download
► V-Rotary panels allow you to over write the Reply key – therefore providing a full 12 or 24 intercom keys. This is useful for producers / directors who often do not need a reply key
ADDITIONAL PANEL FEATURES
V-SERIES PANEL OPERATION – BASIC

Panel Start-Up Sequence:
► On boot up the 4 function Leds (mic on, shift, menu, H/S) will flash in rotation as the panel boots up
► When a panel is connected to power, but not connected to the matrix. The panel offline message is
► This also shows the panels firmware A xxxx ► If there is no communication to the matrix, the display will show the message: “Waiting for
Eclipse EHX.”► Press the local menu button to enter the IP panel setup or to display more panel diagnostic
info
Local menu
V-SERIES PANEL OPERATION – BASIC
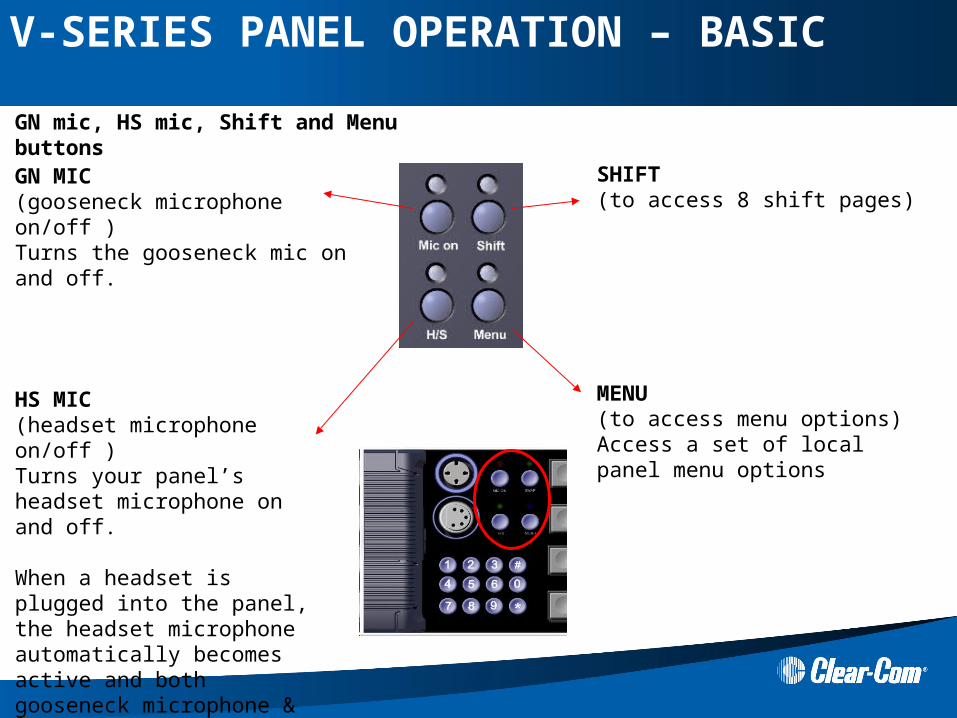
Vseries hands on Practise
► Practice – BASIC talk and listen keys operation
► Practice – Shift page operation
► Practice – Call signalling operation
► Practise – Panel start up screen
V-SERIES PANEL OPERATION – BASIC

V-SERIES PANEL OPERATION – ADVANCED
Vseries Panels Advanced menus

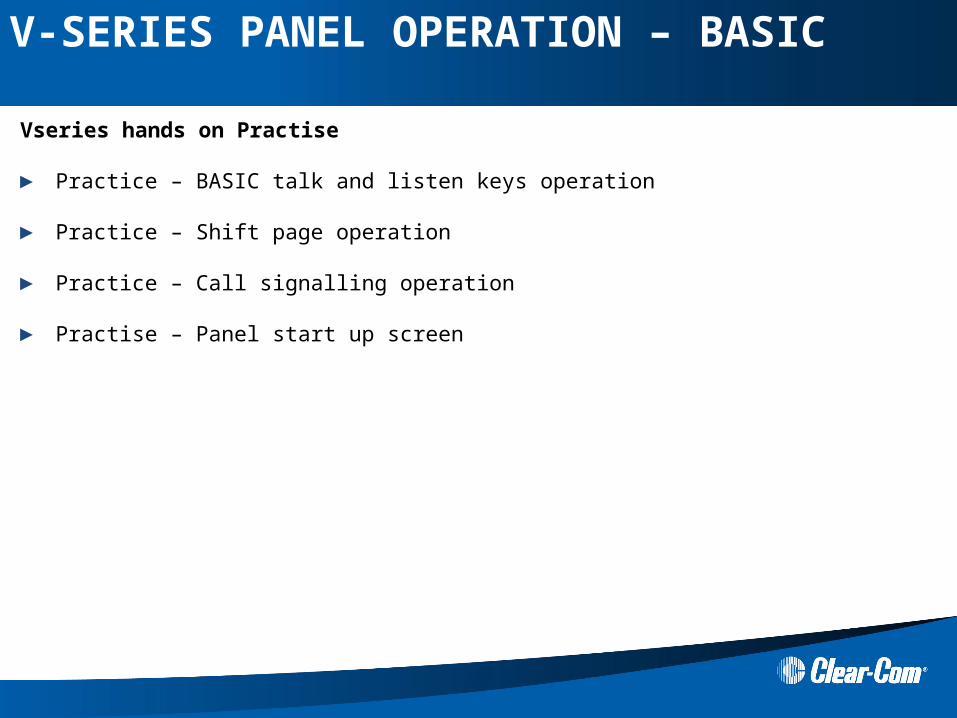
V-Series panels have a number of options accessed via a menu system.
► To enter menu mode press the menu button on the front panel to display the top level menu. ► The menu indicator LED will light BLUE and various menu options will be displayed on the key
displays.
Note: Access to menu mode is controlled by the configuration program (EHX)
► To navigate the menu levels use the lever key or push button corresponding to the display showing the required menu item to select the option required.
► To return to the previous menu use the ‘REPLY’ key which will display the name of the current menu in inverse video.
Vseries local Menu
V-SERIES PANEL OPERATION – ADVANCED

MEN
U
Sys
Info
Loca
l Pre
f
Sys
Con
fig
Dia
gnos
tics
Dia
l
Loca
l Exc
l
Assn
mt P
nl
Mes
sage
Cal
l
Loca
l Pag
e
Supe
rvis
e
View
key
s
PL Tem
pora
ry p
rivat
e ca
ll w
hile
dis
ablin
g ot
her t
alk
keys
IFB
Play
, Rev
iew
, Pla
y, E
rase
Puts
pan
el in
sup
ervi
sor m
ode.
Nee
ds p
assc
ode
from
CC
.
Syst
em d
ata
PL FG Nea
r pan
els
Mon
itors
FL s
ourc
e an
d de
stin
atio
n
Tim
eout
sLe
vel a
djus
tBr
ight
ness
Res
et x
poin
ts
FG Loca
l pan
elR
emot
e pa
nel
Forc
e lis
ten
Inpu
t & O
utpu
t lev
el
PL FGNum
eric
key
pad
Red
ial a
nd R
elea
se
Allo
ws
tem
pora
ry c
all t
o a
port
with
the
repl
y ke
y. N
eeds
SG
Test
tone
Res
et p
anel
Tel r
elea
se
Wor
ks w
ith p
age
over
ride
set i
n EC
S
Panel menu structure
V-SERIES PANEL OPERATION – ADVANCED

Keypad (2RU / Desktop panels only)The keypad on 2RU panels/ Desktops may be used to access certain menu pages directly (as a shortcut) and to enter telephone numbers to dial out via a telephone interface such as a TEL-14 interface unit.
The menu shortcuts available from the keypad are:1 - Dial Menu2 - Local Exclusive3 - Local page override4 - Assignment Panel menu5 - Local Key Assign menu7 - Local Preferences menu9 - Diagnostic menu# - Fast Assignment mode
V-SERIES PANEL OPERATION – ADVANCED

MENU
System Info
View keys: View panel key setup, map name.
FG: View available Fixed Groups and members
Near Pnls: View panels set as nearby panels in Local Advanced in HX
Monitors: Shows panels that are monitoring this panel
FL Source: View of Forced Listen sources to this panel
PL: View available Party Lines and members
FL Destination: View of Forced Listen destination from this panel
Local Preferences
Timeouts: Adjust time for Answerback and Listen again
Brightness: Adjust display brightness
Reset Xpts: Resets crosspoint levels to default
Level Adjust: Adjust levels for GN mic, HS mic, HS2 mic, LS Dim, L & R Sidetone, L2 & R2 Sidetone.
ENTER PIN(configured in HX)
Panel menu structure
V-SERIES PANEL OPERATION – ADVANCED
MENU
FG: Assign/remove members in FG.
Local panel: Add/remove keys in the panel. Modify the attributes of the keys.
Remote panel: Add/remove keys in other panels of the system. Modify the attributes of the keys.
Force Listen: Create a force listen with 2 ports in the system.
PL: Assign/remove members in PLs.
IN and OUT level: Adjust of Input and Output level of ports in the system. Requires Sort Groups.
Dial
Shows numeric keypad to be used in 1RU panels.
Release: Releases the telephone line.
Redial: Allows to redial last number.
ENTER PIN(configured in HX)
Local Exclusive
Establishes a temporary talk path while disabling other Talk keys engaged . Also accessed with No.2 in keypad.
System Config
Panel menu structure
V-SERIES PANEL OPERATION – ADVANCED

MENU
FG: Add/remove members in Fixed Groups.
PL: Add/remove members in Party Lines
IFB: Assign/remove sources to destinations.
Enabled in HXAssignment panel
IFB
PL
FG
IFBs: Destinations will flash in red, select one. Then select the source from the flashing green labels. The destination labels need global IFB enabled in EHX.
PL: The available party lines will flash in red, select one. Then add or remove members from the flashing green labels.
FG: The available fixed groups will flash in red, select one. Then add or remove members from the flashing green labels.
Panel menu structure
V-SERIES PANEL OPERATION – ADVANCED

MENU
Review: Allows reviewing the recorded audio message.
Play: Plays the recorded message which can be heard by a panel monitoring this panel.
Erase: Erases the recorded message.
Record: Records 10 seconds of audio
Call
Allows a temporary talk path to a selected port with the use of the reply key. Needs Sort Groups.
Diagnostic
Allows a page to a panel when its volume is completely off. Requires page override enabled in HX.
Message
Test tone: Sends tone to matrix and back for testing purposes.
Reset panel: Resets panel to factory defaults. It will also delete all locally assigned keys.
Tel Release: Releases the telephone line when “Remote line release” is enabled in HX.
System data: Displays date, time of last download, map name, port number and label.
Local page
ENTER PIN(configured in HX)
Panel menu structure
V-SERIES PANEL OPERATION – ADVANCED

Fast Assignment Mode
The fast key assign mode on 2RU / Desktop panel allows users to quickly create and delete local key assignments, quickly without the need to enter the normal local key assignment menu
Fast Assignment mode must be enabled for the panel in EHX using the “Advanced Settings”
► To assign label to a key ► Enter fast key assign mode by pressing the ‘ # ’ key on the keypad. ► The reply key will then display ‘FAST ASSN’ in inverted text.► Enter the destination panel port number as a string of 3 digits
► The destination port numbers start at 01 01 001 = MVX port 1► Press the ‘ * ’ key to accept the entry ► Select any flashing key to assign the label to the key
►Code:01=(System No:1) / 01=(MVX) / 001=MVX port 1►Code:01=(System No:1) / 02=(PL) / 001=PL 1►Code:01=(System No:1) / 03=(FG) / 001=FG1►Code:01=(System No:1) / 06=(BP’s) / 00=BP1► To delete a label from a key
► Enter fast key assign mode by pressing the ‘ # ’ key on the keypad► Press the ‘ * ’ key on the keypad► Select any flashing key to delete the label from the key
V-SERIES PANEL OPERATION – ADVANCED

Rotary encoder actions
The rotary encoder on the V-rotary panel has a number of different functions
► Adjusting rotary encoder will adjust the incoming audio level of talk label
Normal mode
► Press and hold the Aux pot ► Adjusting rotary encoder will adjust the incoming audio level of listen label
+
V-SERIES PANEL OPERATION – ADVANCED

Rotary encoder actions
► Press and hold rotary encoder to send call signal to the label► If the port is a TEL-14 then a “Tel-Release” signal is sent
Normal mode
► Press and hold rotary encoder AND twist to adjust your send level to the label
CCI-22 RS-601 Matrix
Sending a call signal will cause the call light on the RS-601 to flash
Matrix 4wire-1
Adjusting your send level will adjust the crosspoint level between you and 4wire-1, therefore 4wire-1 will hear you louder than other panels
V-SERIES PANEL OPERATION – ADVANCED

Rotary encoder actionsAP (assignment) mode - IFBWhen using the V-Rotary panel in IFB - AP mode. The rotary encoders have additional functions
IFB assignment mode: ► IFB Destinations will flash in red, select one. The destination labels need global IFB enabled in
EHX.► Adjusting rotary encoder will adjust the matrix output level of the selected IFB destination
port
► Then select the Program source from the flashing green labels.► Adjusting rotary encoder will adjust the matrix input level of the selected Program source
port
MENU
FG: Add/remove members in Fixed Groups.
PL: Add/remove members in Party Lines
IFB: Assign/remove sources to destinations.
Enabled in ECSAssignment panel
V-SERIES PANEL OPERATION – ADVANCED

Vseries hands on Practise
► Practise – Fast Assignment ► Practise – Local Preferences► Practise – Local Key assign► Practise – Using the advance menu functions
V-SERIES PANEL OPERATION – ADVANCED

Thank you!