UTV ENclOSUrE FoR KAWAsAKI - CARiD.com This Enclosure will NOT protect against noise, engine...
12
WARNING This Enclosure will NOT protect against noise, engine exhaust, chemicals, collision, roll-over or other accidents. WARNING When your UTV is at idle with your Enclosure installed, make sure to open a side door to ensure proper ventilation against carbon monoxide. WARNING Operating a UTV with this Enclosure will restrict your field of vision. WARNING Usage of this Enclosure DOES NOT negate the necessity of wearing a helmet. INSTALLATION Apply the adhesive-backed Rip-and-Grip strips to front, outside of the front roll bars, 5 per side, spaced evenly (Fig. 01). Press firmly and allow 24 hours for adhesive strips to cure. Unzip the doors and remove from the enclosure. Loosely drape the enclosure over UTV with the Front label facing toward the front of the UTV. Be careful the metal clips do not strike the UTV. Pull enclosure toward the front to provide enough slack to attach the front corner attachment clips. Attach the clips (A) at both front corners by hooking the short arm on the back of the front roll cage bar terminal, and holding firmly, rotate the clip toward the front. Apply light pressure and click into place. Starting at the clips, pull cover up and attach to Rip-and-Grip strips on front roll cage. Make sure cover is centered on the roll cage. Continue pulling the enclosure over the top and down the back of your UTV. Connect the back Vertical straps and Horizontal straps (B). Inside the roof, attach the inside tension straps by wrapping the straps around the roll cage bars from front to back. Pull tight. Pull down at the bottom of the doors and fenders to determine where the doors and fender adhesive Rip-and-Grip will go. It is not necessary to use all the Rip-and-Grip strips. You may want to use just 6” approx. at the bottom of the front fenders (C). Re-attach doors. When Rolling doors up: Loop lower door wrap around seat arm, which will pull the rolled up door out of the way of the dump mechanism. USAGE The doors of your Enclosure can be rolled sideways out of the way and secured with the attached Rip-and-Grip straps (D). The doors also can be unzipped and removed completely. CLEANING Clean your Enclosure with a soft brush and warm water. DO NOT USE SOAP as it can damage the protective coatings on the fabric. Air dry. STORAGE To avoid mildew be sure that your Enclosure is completely dry before you store it for an extended period in an enclosed area. UTV ENCLOSURE FOR KAWASAKI ® 610 UTVS Fig. 01 C A Unzip and remove doors for installation B C C C (Optional) (Optional) D D
Transcript of UTV ENclOSUrE FoR KAWAsAKI - CARiD.com This Enclosure will NOT protect against noise, engine...

WARNING This Enclosure will NOT protect against noise, engine exhaust, chemicals, collision, roll-over or other accidents.
WARNINGWhen your UTV is at idle with your Enclosure installed, make sure to open a side door to ensure proper ventilation against carbon monoxide.
WARNING Operating a UTV with this Enclosure will restrict your field of vision.
WARNING Usage of this Enclosure DOES NOT negate the necessity of wearing a helmet.
INstAllAtIoN
Apply the adhesive-backed Rip-and-Grip strips to front, outside of the front roll bars, 5 per side, spaced evenly (Fig. 01). Press firmly and allow 24 hours for adhesive strips to cure.
Unzip the doors and remove from the enclosure.
Loosely drape the enclosure over UTV with the Front label facing toward the front of the UTV. Be careful the metal clips do not strike the UTV. Pull enclosure toward the front to provide enough slack to attach the front corner attachment clips. Attach the clips (A) at both front corners by hooking the short arm on the back of the front roll cage bar terminal, and holding firmly, rotate the clip toward the front. Apply light pressure and click into place.
Starting at the clips, pull cover up and attach to Rip-and-Grip strips on front roll cage. Make sure cover is centered on the roll cage.
Continue pulling the enclosure over the top and down the back of your UTV.
Connect the back Vertical straps and Horizontal straps (B). Inside the roof, attach the inside tension straps by wrapping the straps around the roll cage bars from front to back. Pull tight.
Pull down at the bottom of the doors and fenders to determine where the doors and fender adhesive Rip-and-Grip will go. It is not necessary to use all the Rip-and-Grip strips. You may want to use just 6” approx. at the bottom of the front fenders (C).
Re-attach doors.
When Rolling doors up: Loop lower door wrap around seat arm, which will pull the rolled up door out of the way of the dump mechanism.
UsAGeThe doors of your Enclosure can be rolled sideways out of the way and secured with the attached Rip-and-Grip straps (D). The doors also can be unzipped and removed completely.
CleANINGClean your Enclosure with a soft brush and warm water.
DO NOT USE SOAP as it can damage the protective coatings on the fabric. Air dry.
stoRAGe To avoid mildew be sure that your Enclosure is completely dry before you store it for an extended period in an enclosed area.
UTV ENclOSUrE FoR KAWAsAKI® 610 UtVs
Fig. 01 C A
Unzip and remove doors for installation
B
C
CC (Optional)
(Optional)
DD

InstallatIon1. Loosely drape your Enclosure shell over your UTV with the “BACK” label facing toward the back of your UTV.
2. Starting at the front, loosely attach the front rubberized rip-and-grip straps [A] to the frame of the roll cage bar as shown (Fig 1). Then attach the rear vertical straps [B] to the rear horizontal supports of the roll cage. Make sure the cover is centered, side to side, on the roll cage (Fig 2).
Adjust your Enclosure from front to back or side to side as needed for proper fit.
3. Locate tension panel [C] on the inside of the front windshield and wrap it around the roll cage bars. Clip the opposing ends of strap [C] together loosely.
4. Locate the two sets of straps [D] on the roof inside of your Enclosure and wrap them around the roll cage bars. Clip the opposing ends of the two straps [D] together.
5. Tighten your Enclosures front rubberized straps [A] to the lower roll cage frame. Matching the front windshield edge to the UTV front cowling.
6. Pull down on the back of your Enclosure to fit it onto the upper part of the roll cage; the curves of the roll cage should nest into the curved shape of the Enclosure top.Tension tight the two straps [B].
7. Tighten the rear straps [E] to your roll cage.
8. Check alignment and fit of the Enclosure —all curves should match and align with the shape of the roll cage. Secure and tighten all straps [A, B, C, D and E] again to assure a proper fit.
CaUtIonDAMAGE TO ZIPPERS AND ENCLOSURE MAY BE CAUSED WITH EXCESSIVE FORCE. IF YOUR DOOR DOES NOT ZIP TO THE ENCLOSURE SIDE WALLS CHECK AND ADJUST YOUR ENCLOSURE FOR PROPER ALIGNMENT TO THE ROLL CAGE.
9. Locate the driver side door [F] and zip onto the Enclosure.
Repeat with the passenger door [G].
10. Pull down at the bottom of the doors and fenders to verify that the door and fenders align with the frame of your UTV. Adjust your Enclosure as necessary for proper fit.
11. Locate the extra adhesive-backed rip-and-grip strips inside your Enclosure box. Apply the adhesive-backed rip-and-grip strips to your UTV roll cage as it corresponds with the rip-and-grip strips sewn on the Enclosure. It is not necessary to use all the rip-and-grip strips provided. Press firmly and allow 24 hours for the adhesive strips to cure.
WaRnInG This Enclosure will NOT protect against noise, engine exhaust, chemicals, collision, roll-over or other accidents.
WaRnInGWhen your UTV is at idle with your Enclosure installed, make sure to open a side door to ensure proper ventilation against carbon monoxide.
WaRnInG Operating a UTV with this Enclosure will restrict your field of vision.
WaRnInG Usage of this Enclosure DOES NOT negate the necessity of wearing a helmet.
UTV ENCLOSURE FoR KaWasaKI® teRyx™ UtVs
Fig. 1
Fig. 2
A
E E
A
C
B
D
F G
HH
Front Windshield
Side Door
Side Door
Back Windshield
VIEW FROM INSIDE OF ENCLOSURE
D
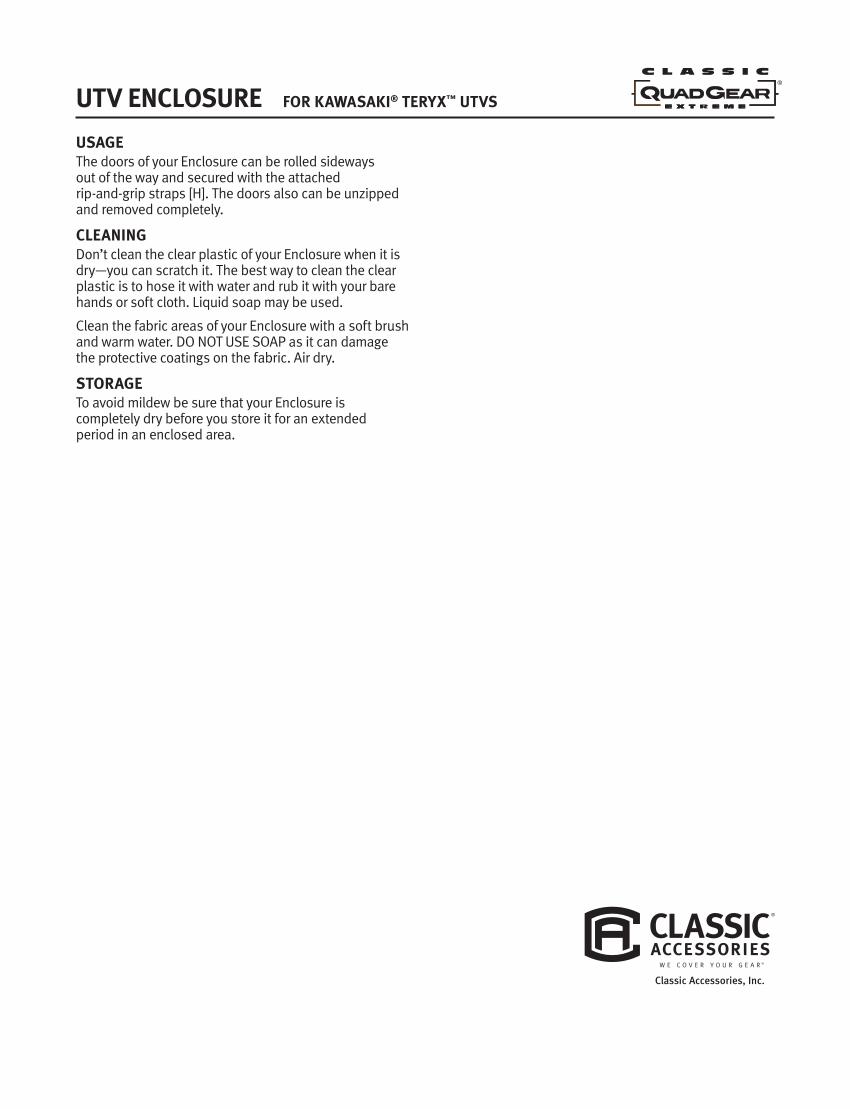
UsaGeThe doors of your Enclosure can be rolled sideways out of the way and secured with the attached rip-and-grip straps [H]. The doors also can be unzipped and removed completely.
CleanInG Don’t clean the clear plastic of your Enclosure when it is dry—you can scratch it. The best way to clean the clear plastic is to hose it with water and rub it with your bare hands or soft cloth. Liquid soap may be used.
Clean the fabric areas of your Enclosure with a soft brush and warm water. DO NOT USE SOAP as it can damage the protective coatings on the fabric. Air dry.
stoRaGe To avoid mildew be sure that your Enclosure is completely dry before you store it for an extended period in an enclosed area.
UTV ENCLOSURE FoR KaWasaKI® teRyx™ UtVs
Classic Accessories, Inc.

WARNING This Enclosure will NOT protect against noise, engine exhaust, chemicals, collision, roll-over or other accidents.
WARNINGWhen your UTV is at idle with your Enclosure installed, make sure to open a side door to ensure proper ventilation against carbon monoxide.
WARNING Operating a UTV with this Enclosure will restrict your field of vision.
WARNING Usage of this Enclosure DOES NOT negate the necessity of wearing a helmet.
CAUTION Improper alignment of the rear mesh panel [G] may impair the performance of your UTV engine.
INsTAllATION1. Loosely drape your Enclosure shell over your UTV with the “BACK” label facing toward the back of your UTV.
2. Starting at the front, loosely attach the front rubberized rip-and-grip straps [A] to the frame of the roll cage bar as shown (Fig 1). Then attach the rear vertical straps [B] to the rear horizontal supports of the roll cage. Make sure the cover is centered side to side on the roll cage (Fig 2).
Adjust your Enclosure from front to back or side to side as needed for proper fit.
3. Locate the two sets of straps [C] on the roof inside of your Enclosure and wrap them around the roll cage bars. Clip the opposing ends of the two straps [C] together.
4. Tighten your Enclosures front rubberized straps [A] to the lower roll cage frame. Matching the front windshield edge to the UTV front cowling.
5. Pull down on the back of your Enclosure to fit it onto the upper part of the roll cage; the curves of the roll cage should nest into the curved shape of the Enclosure top.Tension tight the two straps [B].
6. Check alignment and fit of the Enclosure —all curves should match and align with the shape of the roll cage. Check that the rear mesh panel [G] is aligned over your UTV air intake. Secure and tighten all straps [A, B, and C] again to assure a proper fit.
CAUTIONDAMAGE TO ZIPPERS AND ENCLOSURE MAY BE CAUSED WITH EXCESSIVE FORCE. IF YOUR DOOR DOES NOT ZIP TO THE ENCLOSURE SIDE WALLS CHECK AND ADJUST YOUR ENCLOSURE FOR PROPER ALIGNMENT TO THE ROLL CAGE.
7. Locate the driver side door [D] and zip onto the Enclosure.
Repeat with the passenger door [E].
8. Pull down at the bottom of the doors and fenders to verify that the door and fenders align with the frame of your UTV. Adjust your Enclosure as necessary for proper fit.
9. Locate the extra adhesive-backed rip-and-grip strips inside your Enclosure box. Apply the adhesive-backed rip-and-grip strips to your UTV roll cage as it corresponds with the rip-and-grip strips sewn on the Enclosure. It is not necessary to use all the rip-and-grip strips provided. Press firmly and allow 24 hours for the adhesive strips to cure.
UTV ENCLOSURE FOR kAWAsAkI® 4000 & 4010 UTV
Fig. 1
Fig. 2
D E
Front Windshield
Side Door
Side Door
Back Windshield
VIEW FROM INSIDE OF
ENCLOSURE
A
C
H
I
G
B
F F

UsAGeThe doors of your Enclosure can be rolled sideways out of the way and secured with the attached rip-and-grip straps [F]. The doors also can be unzipped and removed completely.
The front windshield of your Enclosure can be zipped open to access the front cargo hold. Locate the zipper [H] on the driver side windshield and roll the windshield out of the way to access the cargo hold. Locate webbing loop [I] to tension windshield and relieve stress while zipping closed.
CAUTIONDAMAGE TO ZIPPERS AND ENCLOSURE MAY BE CAUSED WITH EXCESSIVE FORCE.
CleANING Don’t clean the clear plastic of your Enclosure when it is dry—you can scratch it. The best way to clean the clear plastic is to hose it with water and rub it with your bare hands or soft cloth. Liquid soap may be used.
Clean the fabric areas of your Enclosure with a soft brush and warm water. DO NOT USE SOAP as it can damage the protective coatings on the fabric. Air dry.
sTORAGe To avoid mildew be sure that your Enclosure is completely dry before you store it for an extended period in an enclosed area.
UTV ENCLOSURE FOR kAWAsAkI® 4000 & 4010 UTV

WARNINGThis Enclosure will NOT protect against noise, engine exhaust, chemicals, collision, roll-over or other accidents.
WARNINGWhen your UTV is at idle with your Enclosure installed, make sure to open a side door to ensure proper ventilation against carbon monoxide.
WARNINGOperating a UTV with this Enclosure will restrict your field of vision.
WARNINGUsage of this Enclosure DOES NOT negate the necessity of wearing a helmet.
INstAllAtIoN1. Unfold your Enclosure and lay it on the ground with the outside of the roof facing up. Take care not to scratch the windows.
2. Unzip the doors and remove from the Enclosure. This will greatly aid the fitting of the Enclosure.
3. Pull your Enclosure over the roll cage/frame. Center the front and back sections so that they are level with the roll cage frames.
4. Raise the cowl cover and attach the elasticized clips [A] to the corresponding points in the cowl area. Pull your Enclosure tight against the cowl and close the cowl cover.
5. Secure all interior buckles [B] to the roll cage.
6. Reattach the doors to the Enclosure.
7. Find the rip-and-grip attachment points [C] on your Enclosure. Clean the corresponding areas on your UTV with alcohol or other non-abrasive cleaner.
8. Install the enclosed adhesive-backed rip-and-grip strips on to your UTV so that they line up with the rip-and-grip panels on your Enclosure. For best results and to help the adhesive cure, do this in a warm environment, like a heated garage.
9. Attach your Enclosure to the rip-and-grip strips. If possible, don’t pull your Enclosure off the strips too soon. It’s best to let the adhesive on the back of the rip-and-grip strips cure for 24 hours before your first use.
UsAGeThe doors of your Enclosure can be rolled sideways out of the way and secured with the attached rip-and-grip straps [D]. The doors also can be unzipped and removed completely.
CleANINGClean your Enclosure with a soft brush and warm water. DO NOT USE SOAP as it can damage the protective coatings on the fabric. Air dry.
stoRAGeTo avoid mildew be sure that your Enclosure is completely dry before you store it for an extended period in an enclosed area.
C
C CA
B
D
B Unzip and remove doors for installation
C
D
C
BB
UTV ENclOSUrE FoRPolARIs®RANGeRUtVs
Classic Accessories, Inc.
InstallatIon1. Loosely drape your Enclosure shell over your UTV with the “BACK” label facing toward the back of your UTV.
2. Starting at the front, loosely attach the front rubberized rip-and-grip straps [A] to the frame of the roll cage bar as shown (Fig 1). Then attach the rear vertical straps [B] to the rear horizontal supports of the roll cage. Make sure the cover is centered side to side on the roll cage (Fig 2).
Adjust your Enclosure from front to back or side to side as needed for proper fit.
3. Locate tension panels [C] on the inside of the front windshield and wrap them around the roll cage bars. Clip the opposing ends of the straps [C] together loosely.
4. Locate the two sets of straps [D] on the roof inside of your Enclosure and wrap them around the roll cage bars. Clip the opposing ends of the two straps [D] together.
5. Tighten your Enclosures front rubberized straps [A] to the lower roll cage frame. Matching the front windshield edge to the UTV front cowling.
6. Pull down on the back of your Enclosure to fit it onto the upper part of the roll cage; the curves of the roll cage should nest into the curved shape of the Enclosure top.Tension tight the two straps [B].
7. Tighten the rear straps [E] to your roll cage.
8. Check alignment and fit of the Enclosure —all curves should match and align with the shape of the roll cage. Secure and tighten all straps [A, B, C, D and E] again to assure a proper fit.
CaUtIonDAMAGE TO ZIPPERS AND ENCLOSURE MAY BE CAUSED WITH EXCESSIVE FORCE. IF YOUR DOOR DOES NOT ZIP TO THE ENCLOSURE SIDE WALLS CHECK AND ADJUST YOUR ENCLOSURE FOR PROPER ALIGNMENT TO THE ROLL CAGE.
9. Locate the driver side door [F] and zip onto the Enclosure.
Repeat with the passenger door [G].
10. Pull down at the bottom of the doors and fenders to verify that the door and fenders align with the frame of your UTV. Adjust your Enclosure as necessary for proper fit.
11. Locate the extra adhesive-backed rip-and-grip strips inside your Enclosure box. Apply the adhesive-backed rip-and-grip strips to your UTV roll cage as it corresponds with the rip-and-grip strips sewn on the Enclosure. It is not necessary to use all the rip-and-grip strips provided. Press firmly and allow 24 hours for the adhesive strips to cure.
WaRnInG This Enclosure will NOT protect against noise, engine exhaust, chemicals, collision, roll-over or other accidents.
WaRnInGWhen your UTV is at idle with your Enclosure installed, make sure to open a side door to ensure proper ventilation against carbon monoxide.
WaRnInG Operating a UTV with this Enclosure will restrict your field of vision.
WaRnInG Usage of this Enclosure DOES NOT negate the necessity of wearing a helmet.
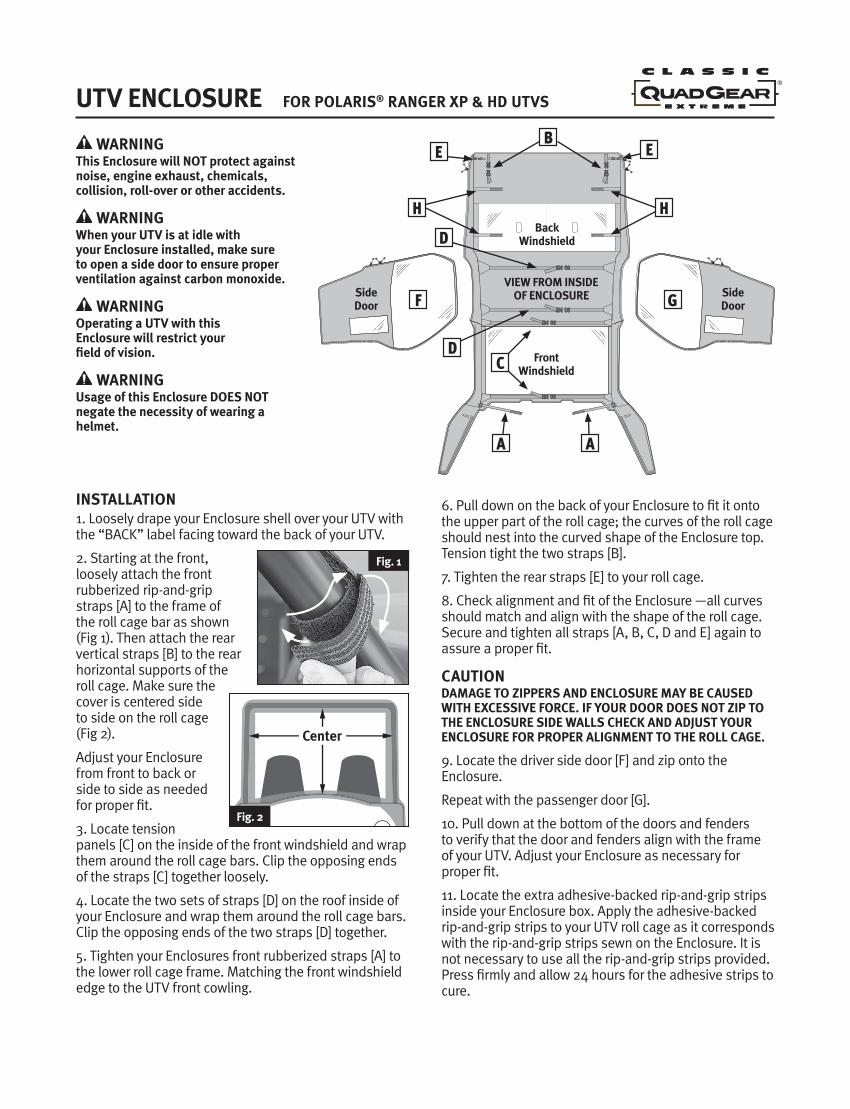
UTV ENCLOSURE FoR PolaRIs® RanGER XP & HD UtVs
Fig. 1
Fig. 2
A
E E
A
C
B
D
F G
D
HH
Front Windshield
Side Door
Side Door
Back Windshield
VIEW FROM INSIDE OF ENCLOSURE

UsaGEThe doors of your Enclosure can be rolled sideways out of the way and secured with the attached rip-and-grip straps [H]. The doors also can be unzipped and removed completely.
ClEanInG Don’t clean the clear plastic of your Enclosure when it is dry—you can scratch it. The best way to clean the clear plastic is to hose it with water and rub it with your bare hands or soft cloth. Liquid soap may be used.
Clean the fabric areas of your Enclosure with a soft brush and warm water. DO NOT USE SOAP as it can damage the protective coatings on the fabric. Air dry.
stoRaGE To avoid mildew be sure that your Enclosure is completely dry before you store it for an extended period in an enclosed area.
UTV ENCLOSURE FoR PolaRIs® RanGER XP & HD UtVs
Classic Accessories, Inc.

InstallatIon1. Loosely drape your Enclosure shell over your UTV with the “BACK” label facing toward the back of your UTV.
2. Starting at the front, loosely attach the front rubberized rip-and-grip straps [A] to the frame of the roll cage bar as shown (Fig 1). Then attach the rear vertical straps [B] to the rear horizontal supports of the roll cage. Make sure the cover is centered side to side on the roll cage (Fig 2).
Adjust your Enclosure from front to back or side to side as needed for proper fit.
3. Locate tension panels [C] on the inside of the front windshield and wrap them around the roll cage bars. Clip the opposing ends of the straps [C] together loosely.
4. Locate the two sets of straps [D] on the roof inside of your Enclosure and wrap them around the roll cage bars. Clip the opposing ends of the two straps [D] together.
5. Tighten your Enclosures front rubberized straps [A] to the lower roll cage frame. Matching the front windshield edge to the UTV front cowling.
6. Pull down on the back of your Enclosure to fit it onto the upper part of the roll cage; the curves of the roll cage should nest into the curved shape of the Enclosure top.Tension tight the two straps [B].
7. Tighten the rear straps [E] to your roll cage.
8. Check alignment and fit of the Enclosure —all curves should match and align with the shape of the roll cage. Secure and tighten all straps [A, B, C, D and E] again to assure a proper fit.
CaUtIonDAMAGE TO ZIPPERS AND ENCLOSURE MAY BE CAUSED WITH EXCESSIVE FORCE. IF YOUR DOOR DOES NOT ZIP TO THE ENCLOSURE SIDE WALLS CHECK AND ADJUST YOUR ENCLOSURE FOR PROPER ALIGNMENT TO THE ROLL CAGE.
9. Locate the driver side door [F] and zip onto the Enclosure.
Repeat with the passenger door [G].
10. Pull down at the bottom of the doors and fenders to verify that the door and fenders align with the frame of your UTV. Adjust your Enclosure as necessary for proper fit.
11. Locate the extra adhesive-backed rip-and-grip strips inside your Enclosure box. Apply the adhesive-backed rip-and-grip strips to your UTV roll cage as it corresponds with the rip-and-grip strips sewn on the Enclosure. It is not necessary to use all the rip-and-grip strips provided. Press firmly and allow 24 hours for the adhesive strips to cure.
WaRnInG This Enclosure will NOT protect against noise, engine exhaust, chemicals, collision, roll-over or other accidents.
WaRnInGWhen your UTV is at idle with your Enclosure installed, make sure to open a side door to ensure proper ventilation against carbon monoxide.
WaRnInG Operating a UTV with this Enclosure will restrict your field of vision.
WaRnInG Usage of this Enclosure DOES NOT negate the necessity of wearing a helmet.
UTV ENCLOSURE FoR PolaRIs® RanGER XP & HD UtVs
Fig. 1
Fig. 2
A
E E
A
C
B
D
F G
D
HH
Front Windshield
Side Door
Side Door
Back Windshield
VIEW FROM INSIDE OF ENCLOSURE

UsaGEThe doors of your Enclosure can be rolled sideways out of the way and secured with the attached rip-and-grip straps [H]. The doors also can be unzipped and removed completely.
ClEanInG Don’t clean the clear plastic of your Enclosure when it is dry—you can scratch it. The best way to clean the clear plastic is to hose it with water and rub it with your bare hands or soft cloth. Liquid soap may be used.
Clean the fabric areas of your Enclosure with a soft brush and warm water. DO NOT USE SOAP as it can damage the protective coatings on the fabric. Air dry.
stoRaGE To avoid mildew be sure that your Enclosure is completely dry before you store it for an extended period in an enclosed area.
UTV ENCLOSURE FoR PolaRIs® RanGER XP & HD UtVs
Classic Accessories, Inc.
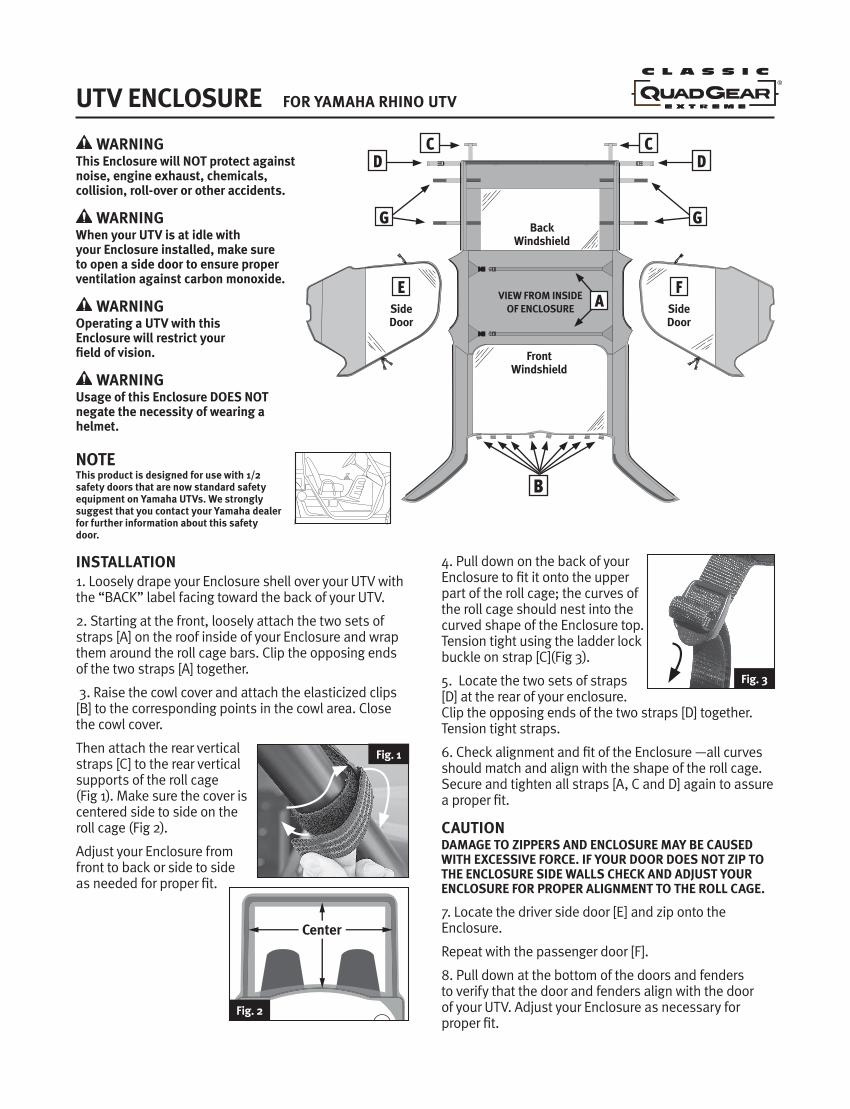
InstallatIon1. Loosely drape your Enclosure shell over your UTV with the “BACK” label facing toward the back of your UTV.
2. Starting at the front, loosely attach the two sets of straps [A] on the roof inside of your Enclosure and wrap them around the roll cage bars. Clip the opposing ends of the two straps [A] together.
3. Raise the cowl cover and attach the elasticized clips [B] to the corresponding points in the cowl area. Close the cowl cover.
Then attach the rear vertical straps [C] to the rear vertical supports of the roll cage (Fig 1). Make sure the cover is centered side to side on the roll cage (Fig 2).
Adjust your Enclosure from front to back or side to side as needed for proper fit.
4. Pull down on the back of your Enclosure to fit it onto the upper part of the roll cage; the curves of the roll cage should nest into the curved shape of the Enclosure top. Tension tight using the ladder lock buckle on strap [C](Fig 3).
5. Locate the two sets of straps [D] at the rear of your enclosure. Clip the opposing ends of the two straps [D] together. Tension tight straps.
6. Check alignment and fit of the Enclosure —all curves should match and align with the shape of the roll cage. Secure and tighten all straps [A, C and D] again to assure a proper fit.
CaUtIonDAMAGE TO ZIPPERS AND ENCLOSURE MAY BE CAUSED WITH EXCESSIVE FORCE. IF YOUR DOOR DOES NOT ZIP TO THE ENCLOSURE SIDE WALLS CHECK AND ADJUST YOUR ENCLOSURE FOR PROPER ALIGNMENT TO THE ROLL CAGE.
7. Locate the driver side door [E] and zip onto the Enclosure.
Repeat with the passenger door [F].
8. Pull down at the bottom of the doors and fenders to verify that the door and fenders align with the door of your UTV. Adjust your Enclosure as necessary for proper fit.
WaRnInG This Enclosure will NOT protect against noise, engine exhaust, chemicals, collision, roll-over or other accidents.
WaRnInGWhen your UTV is at idle with your Enclosure installed, make sure to open a side door to ensure proper ventilation against carbon monoxide.
WaRnInG Operating a UTV with this Enclosure will restrict your field of vision.
WaRnInG Usage of this Enclosure DOES NOT negate the necessity of wearing a helmet.
NOTEThis product is designed for use with 1/2 safety doors that are now standard safety equipment on Yamaha UTVs. We strongly suggest that you contact your Yamaha dealer for further information about this safety door.
UTV ENCLOSURE FoR yamaha RhIno UtV
Fig. 1
Fig. 2
Front Windshield
ESide Door
FSide Door
Back Windshield
VIEW FROM INSIDE OF ENCLOSURE
GG
A
C CD D
B
Fig. 3

9. Locate the extra adhesive-backed rip-and-grip strips inside your Enclosure box. Apply the adhesive-backed rip-and-grip strips to your UTV door as it corresponds with the rip-and-grip strips sewn on the Enclosure. It is not necessary to use all the rip-and-grip strips provided. Press firmly and allow 24 hours for the adhesive strips to cure.
UsaGeThe doors of your Enclosure can be rolled sideways out of the way and secured with the attached rip-and-grip straps [G]. The doors also can be unzipped and removed completely.
CleanInG Don’t clean the clear plastic of your Enclosure when it is dry—you can scratch it. The best way to clean the clear plastic is to hose it with water and rub it with your bare hands or soft cloth. Liquid soap may be used.
Clean the fabric areas of your Enclosure with a soft brush and warm water. DO NOT USE SOAP as it can damage the protective coatings on the fabric. Air dry.
stoRaGe To avoid mildew be sure that your Enclosure is completely dry before you store it for an extended period in an enclosed area.
UTV ENCLOSURE FoR yamaha RhIno UtV