
Usu del a Gu G - Cell Phones - Smartphones: Cell Phone Service
264
TELÉFONO V CAST USER GUIDE Guía del Usuario User Guide V CAST PHONE VX8360 VX8360 VX8360 MMBB0299901(1.1) G
Transcript of Usu del a Gu G - Cell Phones - Smartphones: Cell Phone Service

TELÉFONO VCAST
US
ER
GU
IDE
Guíadel Usuario User Guide
V CAST PHONE
VX8360VX8360
VX
8360M
MBB0299901(1.1)G

Copyright©2008 LG Electronics, Inc. All rights reserved.LG and the LG logo are registered trademarks of LG Groupand its related entities. All other trademarks are the propertyof their respective owners.

Read these simple guidelines. Breaking the rules may be dangerousor illegal. Further detailed information is given in this user guide.
Violation of the instructions may cause serious injury or death.
l Never use an unapproved battery since this coulddamage the phone and/or battery and could causethe battery to explode.
l Never place your phone in a microwave oven as it willcause the battery to explode.
l Never store your phone in temperatures less than -4°F or greater than 122°F.
l Do not dispose of your battery near fire or withhazardous or flammable materials.
l When riding in a car, do not leave your phone or setup the hands-free kit near the air bag. If wirelessequipment is improperly installed and the air bag isdeployed, you may be seriously injured.
l Do not use a hand-held phone while driving.
l Do not use the phone in areas where its use isprohibited. (For example: aircraft)
Important Safety Precautions
VX8360 1

Important Safety Precautions l Do not expose the battery charger or adapter to direct
sunlight or use it in places with high humidity, such asa bathroom.
l Do not use harsh chemicals (such as alcohol,benzene, thinners, etc.) or detergents to clean yourphone. This could cause a fire.
l Do not drop, strike, or shake your phone severely. Itmay harm the internal circuit boards of the phone.
l Do not use your phone in high explosive areas as thephone may generate sparks.
l Do not damage the power cord by bending, twisting,pulling, or heating. Do not use the plug if it is loose asit may cause electric shock or fire.
l Do not place any heavy items on the power cord. Donot allow the power cord to be crimped as it maycause electric shock or fire.
l Do not handle the phone with wet hands while it isbeing charged. It may cause an electric shock orseriously damage your phone.
l Do not disassemble the phone.
2 VX8360

l Do not place or answer calls while charging thephone as it may short-circuit the phone and/or causeelectric shock or fire.
l Do not hold or let the antenna come in contact withyour body during a call.
l Make sure that no sharp-edged items, such asanimal’s teeth or nails, come into contact with thebattery. This could cause a fire.
l Store the battery out of reach of children.
l Be careful that children do not swallow any parts(such as earphone, connection parts of the phone,etc.) This could cause asphyxiation or suffocationresulting in serious injury or death.
l Unplug the power cord and charger during lightningstorms to avoid electric shock or fire.
l Only use the batteries and chargers provided by LG.The warranty will not be applied to products providedby other suppliers.
l Only authorized personnel should service the phoneand its accessories. Faulty installation or service mayresult in accidents and consequently invalidate thewarranty.
l An emergency call can be made only within a servicearea. For an emergency call, make sure that you arewithin a service area and that the phone is turned on.
VX8360 3

Table of Contents
Important Safety Precautions .1Welcome . . . . . . . . . . . . . . . . . . . .8Technical Details . . . . . . . . . . . . .9
Important Information . . . . . . . . . . . .9
Phone Overview . . . . . . . . . . . .12Installing the Battery . . . . . . . . . . . . .14
Removing the Battery . . . . . . . . . . .14
Menus Overview . . . . . . . . . . . .15Getting Started with Your Phone . . . . . . . . . . . . . . . . . . . . . .18
Charging the Battery . . . . . . . . . . . .18
Charging with USB . . . . . . . . . . . . . .18
Battery Temperature Protection . . .18
How to Install Your microSDTM
Card . . . . . . . . . . . . . . . . . . . . . . . . . .19
How to Remove Your microSDTM
Card . . . . . . . . . . . . . . . . . . . . . . . . . .19
Battery Charge Level . . . . . . . . . . . .19
Signal Strength . . . . . . . . . . . . . . . . .19
Turning the Phone On and Off . . . .20
Turning the Phone On . . . . . . . . . .20
Turning the Phone Off . . . . . . . . . .20
Making Calls . . . . . . . . . . . . . . . . . . .20
Correcting Dialing Mistakes . . . . . .20
Redialing Calls . . . . . . . . . . . . . . . . . .20Receiving Calls . . . . . . . . . . . . . . . . . .20Screen Icons . . . . . . . . . . . . . . . . . . . .20
Quick Access to ConvenientFeatures . . . . . . . . . . . . . . . . . . . .21
Vibrate Mode . . . . . . . . . . . . . . . . . . .21Sounds Off . . . . . . . . . . . . . . . . . . . . . .21
Mute Function . . . . . . . . . . . . . . . . . . .21Volume Quick Adjustment . . . . . . . .21Call Waiting . . . . . . . . . . . . . . . . . . . . .21Caller ID . . . . . . . . . . . . . . . . . . . . . . . .21Voice Commands . . . . . . . . . . . . . . . .21
Entering and Editing Information . . . . . . . . . . . . . . . . .22
Text Input . . . . . . . . . . . . . . . . . . . . . . .22
Contacts in Your Phone’sMemory . . . . . . . . . . . . . . . . . . . .23
Storing Basics . . . . . . . . . . . . . . . . . .23Customizing Individual Entries . . . .23Speed Dial . . . . . . . . . . . . . . . . . . . . . .23Storing a Number with Pauses . . .24Adding Another Phone Number . .24Changing the Default Number . . . .25Deleting . . . . . . . . . . . . . . . . . . . . . . . .25Speed Dialing . . . . . . . . . . . . . . . . . . .26
MEDIA CENTER . . . . . . . . . . . . . . . .271. Music & Tones . . . . . . . . . . . . . . . .271.1 V CAST Music l Rhapsody . . . . .27
1.2 Get New Ringtones . . . . . . . . . .28
1.3 My Ringtones . . . . . . . . . . . . . . .28
1.4 My Music . . . . . . . . . . . . . . . . . .28
Playing Your Music . . . . . . . . . . . . . .29
Controlling the Music Player . . . . .29
Front Music Controls . . . . . . . . . . .29
1.5 My Sounds . . . . . . . . . . . . . . . . .30
1.6 Sync Music . . . . . . . . . . . . . . . . .30
2. Picture & Video . . . . . . . . . . . . . . .322.1 V CAST Videos . . . . . . . . . . . . . .32
4 VX8360
2.2 Get New Pictures . . . . . . . . . . . .34
2.3 My Pictures . . . . . . . . . . . . . . . .34
2.4 My Videos . . . . . . . . . . . . . . . . . .35
2.5 Take Picture . . . . . . . . . . . . . . . .36
2.6 Record Video . . . . . . . . . . . . . .37
2.7 Online Album . . . . . . . . . . . . . . .37
3. Games . . . . . . . . . . . . . . . . . . . . . . . .384. Mobile Web . . . . . . . . . . . . . . . . . .385. Browse & Download . . . . . . . . . .406. Extras . . . . . . . . . . . . . . . . . . . . . . . .40
MESSAGING . . . . . . . . . . . . . . . . . .411. New Message . . . . . . . . . . . . . . . .411.1 TXT Message . . . . . . . . . . . . . . .41
1.2 Picture Message . . . . . . . . . . . .43
1.3 Video Message . . . . . . . . . . . . .45
1.4 Voice Message . . . . . . . . . . . . . .46
2. Inbox . . . . . . . . . . . . . . . . . . . . . . . .473. Sent . . . . . . . . . . . . . . . . . . . . . . . . .484. Drafts . . . . . . . . . . . . . . . . . . . . . . . .495. Voicemail . . . . . . . . . . . . . . . . . . . .506. Mobile IM . . . . . . . . . . . . . . . . . . . .507. Email . . . . . . . . . . . . . . . . . . . . . . . . .518. Chat . . . . . . . . . . . . . . . . . . . . . . . . .51Messaging Settings . . . . . . . . . . . . .51
1. Entry Mode (T9 Word/ Abc/ ABC/123) . . . . . . . . . . . . . . . . . . . . . . . . .51
2. Auto Save Sent (On/ Off/ Prompt) . . . . . . . . . . . . . . . . . . . . . .51
3. Auto Erase Inbox (On/ Off) . . . .51
4. Messaging Font Size . . . . . . . . .52
5. TXT Auto View (On/Off) . . . . . . .52
6. TXT Auto Scroll (On/Off) . . . . . .52
7. Multimedia Auto Receive(On/Off) . . . . . . . . . . . . . . . . . . . . . .52
8. Quick Text . . . . . . . . . . . . . . . . .52
9. Voicemail # . . . . . . . . . . . . . . . . .52
0. Callback # . . . . . . . . . . . . . . . . . .52
*. Signature (None/ Custom) . . . . .52
Erasing Messages . . . . . . . . . . . . . . .52CONTACTS . . . . . . . . . . . . . . . . . . . .531. New Contact . . . . . . . . . . . . . . . . . .532. Contact List . . . . . . . . . . . . . . . . . . .533. Groups . . . . . . . . . . . . . . . . . . . . . . .544. Speed Dials . . . . . . . . . . . . . . . . . . .545. In Case of Emergency (ICE) . . . .556. My Name Card . . . . . . . . . . . . . . . .56
RECENT CALLS . . . . . . . . . . . . . . . .571. Missed . . . . . . . . . . . . . . . . . . . . . . .572. Received . . . . . . . . . . . . . . . . . . . . .573. Dialed . . . . . . . . . . . . . . . . . . . . . . . .584. All . . . . . . . . . . . . . . . . . . . . . . . . . . . .585. View Timers . . . . . . . . . . . . . . . . . . .59
SETTINGS & TOOLS . . . . . . . . . . . .601. My Verizon . . . . . . . . . . . . . . . . . . . .602. Tools . . . . . . . . . . . . . . . . . . . . . . . . .602.1 Voice Commands . . . . . . . . . . . .60
2.1.1 Call <Name or Number> . . .61
2.1.2 Send Msg to <Name orNumber> . . . . . . . . . . . . . . . . . . . . .61
2.1.3 Go to <Menu> . . . . . . . . . . .61
2.1.4 Check <Item> . . . . . . . . . . . .61
2.1.5 Contacts <Name> . . . . . . . .61
VX8360 5

Table of Contents
2.1.6 My Verizon . . . . . . . . . . . . . . .62
2.1.7 Help . . . . . . . . . . . . . . . . . . . .62
2.2 Calculator . . . . . . . . . . . . . . . . . .62
2.3 Ez Tip Calculator . . . . . . . . . . . . .62
2.4 Calendar . . . . . . . . . . . . . . . . . . .63
2.5 Alarm Clock . . . . . . . . . . . . . . . .63
2.6 Stopwatch . . . . . . . . . . . . . . . . . .64
2.7 World Clock . . . . . . . . . . . . . . . .64
2.8 Notepad . . . . . . . . . . . . . . . . . . .65
2.9 USB Mass Storage . . . . . . . . . .65
3. Bluetooth® Menu . . . . . . . . . . . .653.1 Add New Device . . . . . . . . . . . .67
Turn On . . . . . . . . . . . . . . . . . . . . . . .68
My Device Info . . . . . . . . . . . . . . . . .68
Discovery Mode . . . . . . . . . . . . . . . .69
Supported Profiles . . . . . . . . . . . . . .69
Auto Pair Handsfree . . . . . . . . . . . . .70
4. Sounds Settings . . . . . . . . . . . . . . .714.1 Master Volume . . . . . . . . . . . . .71
4.2 Call Sounds . . . . . . . . . . . . . . . .71
4.2.1 Call Ringtone . . . . . . . . . . .71
4.2.2 Call Vibrate . . . . . . . . . . . . .72
4.3 Alert Sounds . . . . . . . . . . . . . . . .72
4.4 Keypad Volume . . . . . . . . . . . . .72
4.5 Service Alerts . . . . . . . . . . . . . .73
4.6 Power On/Off . . . . . . . . . . . . . .73
4.7 Voice Clarity . . . . . . . . . . . . . . . .73
5. Display Settings . . . . . . . . . . . . . . .745.1 Banner . . . . . . . . . . . . . . . . . . .74
5.1.1 Personal Banner . . . . . . . . .74
5.1.2 ERI Banner . . . . . . . . . . . . .74
5.2 Backlight . . . . . . . . . . . . . . . . . .75
5.3 Wallpaper . . . . . . . . . . . . . . . . . .75
5.4 Display Themes . . . . . . . . . . . . .75
5.5 Main Menu Settings . . . . . . . . .76
5.6 Font Type . . . . . . . . . . . . . . . . . .76
5.7 Font Size . . . . . . . . . . . . . . . . . . .76
5.8 Clock Format . . . . . . . . . . . . . . .77
6. Phone Settings . . . . . . . . . . . . . . .776.1 Airplane Mode . . . . . . . . . . . . . .77
6.2 Set Shortcuts . . . . . . . . . . . . . . .77
6.2.1 Set My Shortcuts . . . . . . . . .78
6.2.2 Set Directional Keys . . . . . . .78
6.3 Voice Commands . . . . . . . . . . . .78
6.4 Language . . . . . . . . . . . . . . . . . .79
6.5 Location . . . . . . . . . . . . . . . . . . .79
6.6 Security . . . . . . . . . . . . . . . . . . .80
6.6.1 Edit Codes . . . . . . . . . . . . .80
6.6.2 Restrictions . . . . . . . . . . . .80
6.6.3 Phone Lock . . . . . . . . . . . .81
6.6.4 Lock Phone Now . . . . . . . .81
6.6.5 Reset Default . . . . . . . . . .81
6.6.6 Restore Phone . . . . . . . . . .82
6.7 System Select . . . . . . . . . . . . . .82
6.8 NAM Select . . . . . . . . . . . . . . . .83
7. Call Settings . . . . . . . . . . . . . . . . . .837.1 Answer Options . . . . . . . . . . . . .83
7.2 Auto Retry . . . . . . . . . . . . . . . . . .83
7.3 TTY Mode . . . . . . . . . . . . . . . . .84
7.4 One Touch Dial . . . . . . . . . . . . .85
7.5 Voice Privacy . . . . . . . . . . . . . . . .85
7.6 DTMF Tones . . . . . . . . . . . . . . . .86
6 VX8360

8. USB Auto Sync . . . . . . . . . . . . . . . .869. Memory . . . . . . . . . . . . . . . . . . . . . .869.1 Save Options . . . . . . . . . . . . . . .87
9.2 Phone Memory . . . . . . . . . . . . .87
9.3 Card Memory . . . . . . . . . . . . . .88
0. Phone Info . . . . . . . . . . . . . . . . . . . .880.1 My Number . . . . . . . . . . . . . . . .88
0.2 SW/HW Version . . . . . . . . . . . . .88
0.3 Icon Glossary . . . . . . . . . . . . . . .88
0.4 Software Update . . . . . . . . . . . .89
Safety . . . . . . . . . . . . . . . . . . . . . .90TIA Safety Information . . . . . . . . . .90
Exposure to Radio Frequency Signal . . . . . . . . . . . . . . . . . . . . . . . .90
Antenna Care . . . . . . . . . . . . . . . . .90
Phone Operation . . . . . . . . . . . . . . .90
Tips on Efficient Operation . . . . . . .91
Driving . . . . . . . . . . . . . . . . . . . . . . .91
Electronic Devices . . . . . . . . . . . . .91
Pacemakers . . . . . . . . . . . . . . . . . .91
Hearing Aids . . . . . . . . . . . . . . . . . .92
Other Medical Devices . . . . . . . . . .92
Health Care Facilities . . . . . . . . . . .92
Vehicles . . . . . . . . . . . . . . . . . . . . . .92
Posted Facilities . . . . . . . . . . . . . . .92
Aircraft . . . . . . . . . . . . . . . . . . . . . . .92
Blasting Areas . . . . . . . . . . . . . . . . .92
Potentially Explosive Atmosphere .92
For Vehicles Equipped with an Air Bag . . . . . . . . . . . . . . . . . . . . . . . . . .93
Safety Information . . . . . . . . . . . . .93Charger and Adapter Safety . . . . . .94
Battery Information and Care . . . . .94
Explosion, Shock, and Fire Hazards95
General Notice . . . . . . . . . . . . . . . .95
Caution: Avoid potential hearingloss. . . . . . . . . . . . . . . . . . . . . . . . . . . .97FDA Consumer Update . . . . . . . . .9910 Driver Safety Tips . . . . . . . . . . .106Consumer Information on SAR .109FCC Hearing-Aid Compatibility(HAC) Regulations for WirelessDevices . . . . . . . . . . . . . . . . . . . . . .110
Accessories . . . . . . . . . . . . . . .113LIMITED WARRANTYSTATEMENT . . . . . . . . . . . . . .114Glossary . . . . . . . . . . . . . . . . . . .117Terminology . . . . . . . . . . . . . . . . . .117Acronyms and Abbreviations . .117
Index . . . . . . . . . . . . . . . . . . . . . .119
VX8360 7
Welcome
Thank you for choosing the VX8360cellular phone designed to operatewith the latest digital mobilecommunication technology, CodeDivision Multiple Access (CDMA).Along with the many advancedfeatures of the CDMA system, suchas greatly enhanced voice clarity,this compact phone offers:l V CAST Music with Rhapsodyl V CAST Videosl microSD™ expansion slotl Built-in 1.3 Megapixel digital
cameral Mobile Web 2.0l Sleek and Compact Design l Large, easy-to-read, 8-line
backlit LCD with status iconsl Media Center capable for game,
wallpaper and ringtonedownloads
l 24-key keypad and DirectionalKey
l Front LCD and Play Key withoutopening the flip
l Long battery standby and talktime
l Easy operation using menu-driven interface with prompts
l Paging, messaging, Voicemail,caller ID, IM and chat
l Advanced Voice Recognitionl Quick calling functions including,
auto answer, auto retry, 999speed dials, and voicecommands
l Flash Wallpaper with funanimations
l Bilingual (English and Spanish)Capability
l Bluetooth® wireless technology(for certain profiles)
NOTE The Bluetooth® word mark and logosare owned by the Bluetooth SIG, Inc.and any use of such marks by LGElectronics is under license. Othertrademarks and trade names arethose of their respective owners.
NOTE Find the interactive user guide on theweb for your convenience where youcan freely surf and interactively learnhow to use your phone step-by-step.Go to http://www.verizonwireless.com -> Support -> Phones & Devices ->then choose your phone model ->then select Equipment Guide.
8 VX8360

Important InformationThis user’s guide provides importantinformation on the use andoperation of your phone. Pleaseread this guide carefully prior tousing the phone to be able to useyour phone to its greatestadvantage and to prevent anyaccidental damage or misuse. Anyunapproved changes ormodifications will void yourwarranty.
FCC Part 15 Class B Compliance This device and its accessoriescomply with part 15 of FCC rules.Operation is subject to the followingtwo conditions: (1) This device andits accessories may not causeharmful interference, and (2) thisdevice and its accessories mustaccept any interference received,including interference that causesundesired operation.
Information to User This equipment has been testedand found to comply with the limitsfor a Class B digital device,pursuant to part 15 of the FCCRules. These limits are designed toprovide reasonable protectionagainst harmful interference in aresidential installation. This equipment generates, usesand can radiate radio frequencyenergy and, if not installed andused in accordance with theinstructions, may cause harmfulinterference to radio
communications. However, there is no guarantee thatinterference will not occur in aparticular installation. If thisequipment does cause harmfulinterference to radio or televisionreception, which can bedetermined by turning theequipment off and on, the user isencouraged to try to correct theinterference by one or more of thefollowing measures: - Reorient or relocate the receiving
antenna - Increase the separation between
the equipment and receiver - Connect the equipment into an
outlet on a circuit different fromthat which the receiver isconnected.
- Consult the dealer or anexperienced radio/TV technicianfor help.
Modifications not expresslyapproved by the manufacturercould void the user’s authority tooperated the equipment under FCCrules.
Technical DetailsThe VX8360 is an all digital phonethat operates on both Code DivisionMultiple Access (CDMA)frequencies: Cellular services at 800MHz and Personal CommunicationServices (PCS) at 1.9 GHz.CDMA technology uses a featurecalled DSSS (Direct SequenceSpread Spectrum) that enables thephone to keep communication from
Technical Details
VX8360 9

Technical Details
being crossed and to use onefrequency channel by multipleusers in the same specific area.This results in a 10-fold capacityincrease when compared withanalog mode. In addition, featuressuch as soft / softer handoff, hardhandoff, and dynamic RF powercontrol technologies combine toreduce call interruptions.The Cellular and PCS CDMAnetworks consist of MSO (MobileSwitching Office), BSC (BaseStation Controller), BTS (BaseStation Transmission System), and
MS (Mobile Station). * TSB -74: Protocol between an IS-
95A system and ANSI J-STD-0081xRTT system receives twice asmany subscribers in the wirelesssection as IS-95. Its battery life istwice as long as IS-95. High-speeddata transmission is also possible.EV-DO system is optimized for dataservice and is much faster than1xRTT system in applicable area. The following table lists some majorCDMA standards.
10 VX836010
CDMA Standard Designator Description
Basic AirInterface
TIA/EIA-95ATSB-74ANSI J-STD-008TIA/EIA-IS2000
CDMA Dual-Mode Air Interface14.4kbps radio link protocol and inter-band operationsIS-95 adapted for PCS frequency band CDMA20001xRTT Air Interface
Network
TIA/EIA/IS-634TIA/EIA/IS/651TIA/EIA/IS-41-CTIA/EIA/IS-124
MAS-BSPCSC-RSIntersystem operationsNon-signaling data comm.
Service
TIA/EIA/IS-96-BTIA/EIA/IS-637TIA/EIA/IS-657IS-801TIA/EIA/IS-707-A
Speech CODECShort Message ServicePacket DataPosition Determination Service (gpsOne)High Speed Packet Data
1x EV-DO
Related interface
TIA/EIA/IS-856
TIA/EIA/IS-878
TIA/EIA/IS-866
TIA/EIA/IS-890
CDMA2000 High Rate Packet Data Air Interface1xEV-DO Inter-Operability Specification forCDMA2000 Access Network InterfacesRecommended Minimum Performance Standards forCDMA2000 High Rate Packet Data Access TerminalTest Application Specification (TAS) for High RatePacket Data Air Interface

VX8360 11
FCC RF Exposure Information
WARNING! Read this informationbefore operating the phone.In August 1996, the FederalCommunications Commission (FCC)of the United States, with its actionin Report and Order FCC 96-326,adopted an updated safety standardfor human exposure to RadioFrequency (RF) electromagneticenergy emitted by FCC regulatedtransmitters. Those guidelines areconsistent with the safety standardpreviously set by both U.S. andinternational standards bodies. Thedesign of this phone complies withthe FCC guidelines and theseinternational standards.
Bodily Contact During OperationThis device was tested for typicaluse with the back of the phone kept0.78 inches (2 cm) from the body. Tocomply with FCC RF exposurerequirements, a minimumseparation distance of 0.78 inches(2 cm) must be maintained betweenthe user’s body and the back of thephone, including the antenna,whether extended or retracted.Third-party belt-clips, holsters, andsimilar accessories containingmetallic components should not beused. Avoid the use of accessoriesthat cannot maintain 0.78 inches (2cm) distance between the user’sbody and the back of the phone and
have not been tested forcompliance with FCC RF exposurelimits.
Vehicle-Mounted External Antenna (Optional, if available.)To satisfy FCC RF exposurerequirements, keep 8 inches (20 cm)between the user / bystander andvehicle-mounted external antenna.For more information about RFexposure, visit the FCC website atwww.fcc.gov.
CautionUse only the supplied antenna. Useof unauthorized antennas (ormodifications to the antenna) couldimpair call quality, damage thephone, void your warranty and/orviolate FCC regulations.Don't use the phone with adamaged antenna. A damagedantenna could cause a minor skinburn. Contact your local dealer for areplacement antenna.

Phone Overview
1. Earpiece Lets you hear the caller andautomated prompts.
2. Flip Use to make or answer calls. Flip open toreveal the keypad to dial a number or answeran incoming call. Close the flip to end the call.
3. Main LCD Screen Displays messages andindicator icons.
4. OK Key / Directional Key Use the OK Key to select the function displayed at the bottomof the LCD between the Left and Right Soft Keyfunctions. Use the Directional Key toscroll through the menu items and highlight aspecific field or object by moving up, down, leftor right.
5. Left Soft Key Use to access Messaging menu.6. Speakerphone Key Use to change to
speakerphone mode. 7. 2.5 mm Headset Jack Allows you to plug in an
optional headset for convenient, hands-free
conversations.8. SEND Key Use to make and answer calls.9. Side Keys / Volume Keys Up/Down Use to
adjust the Master Volume in standby mode* andthe Earpiece Volume during a call.
10. Voice Commands Key Use for quick access toVoice Commands.
11. International Call Prefix Key To make aninternational call, press and hold for 2 or 3 seconds. + is the international callingcode.
12. Accessory Charger Port Connects the phoneto the battery charger, or other compatibleaccessory.
12 VX8360
2. Flip
9. Side Keys /Volume Keys Up/Down
16. Right Soft Key
3. Main LCD Screen
4. OK Key /Directional Key
6. Speakerphone Key5. Left Soft Key
12. AccessoryCharger Port
1. Earpiece
8. SEND Key
22. microSD™ Slot
23. Vibrate Mode Key
20. CLR Key
19. PWR/END Key
21. Alphanumeric Keypad
18. Camera Key
7. 2.5 mm Headset Jack
* Standby mode is when the phone is waiting for input from you.No menu is displayed and the phone isn’t performing anyaction. It’s the starting point for all of the instruction steps.
This User Manual gives navigation instructions according to thedefault "Tab" Main Menu Layout in the Display Settings menu. If other themes or menus are set, navigating the phone's menusmay be different.
11. International Call Prefix Key
24. Microphone
13. Camera Lens
10. Voice Commands Key
15. Front MusicControl keys
14. Front LCDScreen
17. Send Message Key

VX8360 13
TIP If you hold the phoneenclosing the upper edge, youmay interfere with the antenna'sability to receive a clear signalwhich affects call quality for voiceor data transfer.
NOTE
Antenna equipped insideyour phone.
Battery
Battery Cover
NOTES• It’s important to fully chargethe battery before using thephone for the first time.
• Battery life and signal strengthare significant factors (amongothers) that affect your phone’sability to send/receive calls.
Rear view
13. Camera Lens Used to take a photo or video.Keep it clean for optimal photo/ video quality.
14. Front LCD Screen Display digital clock andphone status. If play key is pressed for 2 or 3seconds, it will display V CAST | Rhapsodymusic controls.
15. Front Music Control Keys Use for quickaccess to your music player to listen to yourmusic.
16. Right Soft Key Use to access Contact List.17. Send Message Key Use to access SEND
MESSAGE menu.
TIPl Send a Text Message
1. Press message .2. Select Enter Name/Number or From
Contact List to select a Contact, enter aphone number or email address and press
.3. Use your keypad to enter a message or
press Left Soft Key abc to choosefrom quick text or symbols.
4. Press SEND.
l How to set Favorites1. To set up your Favorites, choose up to 5
contacts that you frequently message.Select to continue.
2. Add from Contacts by pressing MARKand press Left Soft Key Done.
18. Camera Key Use for quick access to Camerafunction. Press and hold the camera key torecord Video.
19. PWR / END Key Use to turn the power on/offand to end a call. Also returns to standbymode.
20. CLR Key Deletes single spaces or characterswith a quick press, but press and hold todelete entire words. Also backs out of menus,one level at a time.
21. Alphanumeric Keypad Use to enter numbersand characters and select menu items.
22. microSD™ Slot Accommodates optionalmicroSD cards up to 8GB.
23. Vibrate Mode Key Use to set Vibrate mode(from standby mode press and hold for about3 seconds).
24. Microphone Allows other callers to hear youclearly when you are speaking to them.

Phone Overview
Installing the Battery
1. Insert the bottom of the battery into theopening on the back of the phone.
2. Push the battery down until it clicksinto place.
3. Place the battery cover over theopening on the back of the phone,then slide it upward until it clicksinto place.
Removing the Battery
1. Turn the phone off, then slide thebattery cover downward to removeit.
2. Remove the battery from the batterycompartment by lifting the top of thebattery.
14 VX8360

MMEDIAEDIA CCENTERENTER
1. Music & Tones1. V CAST Music |
Rhapsody2. Get New Ringtones3. My Ringtones4. My Music5. My Sounds6. Sync Music
2. Picture & Video1. V CAST Videos2. Get New Pictures3. My Pictures4. My Videos5. Take Picture6. Record Video 7. Online Album
3. Games4. Mobile Web5. Browse & Download6. Extras
MMESSAGINGESSAGING
1. New Message2. Inbox3. Sent4. Drafts5. Voicemail6. Mobile IM7. Email8. Chat
CCONTONTACTSACTS
1. New Contact2. Contact List3. Groups4. Speed Dials5. In Case of Emergency6. My Name Card
RRECENTECENT CCALLSALLS
1. Missed2. Received3. Dialed4. All5. View Timers
Menus Overview
VX8360 15

Menus Overview
SSETTINGSETTINGS & T& TOOLSOOLS
1. My Verizon2. Tools
1. Voice Commands2. Calculator3. Ez Tip Calculator4. Calendar5. Alarm Clock
1. Alarm 12. Alarm 23. Alarm 3
6. Stopwatch7. World Clock8. Notepad9. USB Mass Storage
3. Bluetooth Menu1. Add New Device
4. Sounds Settings1. Master Volume2. Call Sounds
1. Call Ringtone2. Call Vibrate
3. Alert Sounds1. TXT Message2. Multimedia Message3. Voicemail4. Emergency Tone
4. Keypad Volume5. Service Alerts
1. ERI2. Minute Beep3. Call Connect4. Charge Complete
6. Power On/Off
1. Power On2. Power Off
7. Voice Clarity5. Display Settings
1. Banner1. Personal Banner2. ERI Banner
2. Backlight1. Display2. Keypad
3. Wallpaper1. Main Wallpaper
1. My Pictures2. My Videos3. Fun Animations
2. Front Wallpaper1. My Pictures2. My Videos
4. Display Themes5. Main Menu Settings6. Font Type7. Font Size8. Clock Format
6. Phone Settings1. Airplane Mode2. Set Shortcuts3. Voice Commands4. Language5. Location6. Security
1. Edit Codes2. Restrictions3. Phone Lock4. Lock Phone Now5. Reset Default6. Restore Phone
7. System Select
16 VX8360

8. NAM Select7. Call Settings
1. Answer Options2. Auto Retry3. TTY Mode4. One Touch Dial5. Voice Privacy6. DTMF Tones
8. USB Auto SyncSync MusicSync DataAsk On Plug
9. Memory1. Save Options2. Phone Memory3. Card Memory
0. Phone Info1. My Number2. SW/HW Version3. Icon Glossary 4. Software Update
VX8360 17
Some content in this user guidemay differ from your phonedepending on the phonesoftware. Features andspecifications are subject tochange without prior notice.
Charging the Battery
To use the charger provided with yourphone:
NOTICE Please use only an approvedcharging accessory to charge yourLG phone. Improper handling of thecharging port, as well as the use ofan incompatible charger, may causedamage to your phone and void thewarranty.
1. Plug the end of the AC adapterinto the phone’s charger port andthe other end into an electricaloutlet.
2. The charge time varies dependingupon the battery level.
Charging with USBYou can use your computer tocharge your phone. Connect oneend of the USB cable to thecharging accessory port on yourphone and the other end to ahighpower USB port on your PC.But prior to do these steps, youneed to have proper USB drivers.LG USB Driver is downloadablebelow site;http://us.lge.com > Click SUPPORT> Click DOWNLOAD and search forLG USB Driver.
NOTE Low power USB port is not supported,such as the USB port on yourkeyboard or bus-powered USB hub.
Battery Temperature ProtectionIf the battery gets overheated, thephone will automatically turn off.When you turn the phone back on,a message pops up alerting youthat the phone was powered off foryour safety.
Getting Started with Your Phone
18 VX8360
NOTICE
Please make sure that the LGlogo faces down beforeinserting a charger or datacable into the charger port ofyour phone.
How to Install Your microSDTM
Card
1. Locate the microSDTM slot on theright side of the phone and gentlyuncover the slot opening.(microSD™ slot cover staysattached to the phone so you don'tlose it).
2. Insert the microSDTM card in thecorrect direction until it clicks intothe slot. If you insert the card inthe wrong direction, it maydamage your phone or your card.
How to Remove YourmicroSDTM CardGently press and release the exposededge of the microSDTM card, thenremove it from the slot and replacethe cover.
NOTESl Do not attempt to remove the microSDTM
card while reading or writing to the card.l Users wishing to transfer or download music
onto a MicroSD™ card inserted into thisphone (through either MTP Sync or Over theAir) should format the MicroSD™ card onthis handset before using it through(Menu ->
Settings & Tools -> Memory -> CardMemory -> Options -> Format). Warning:Formatting the MicroSD™ card will erase allcontents on the card. In the event theMicroSD™ card is used on this phonewithout first formatting it,the phone willdisplay a “License acquisition failed” duringOTA downloading or MTP Sync. Song filesdownloaded or otherwise purchased fromthird party providers and stored on aMicroSD™ card inserted into this devicemay be protected or encrypted by suchprovider and cannot be played on thisdevice.
Battery Charge LevelYou can find the battery chargelevel at the top right of theLCD screen. When the charge levelbecomes low, the battery sensorsounds a warning tone, blinks thebattery icon, and displays awarning message. As the chargelevel approaches empty, the phoneautomatically switches off withoutsaving.
Signal StrengthCall quality depends on the signalstrength in your area. You can tellhow much signal strength you haveby the number of bars next to thesignal strength icon: themore bars, the stronger the signal.If you’re having problems withsignal quality, move to an open areaor, when inside a building, trymoving near a window.
VX8360 19
NOTEMemory card is soldseparately.

Getting Started with Your Phone
Turning the Phone On and Off
Turning the Phone On
1. Install a charged battery orconnect the phone to an externalpower source.
2. With the flip open, press (located above the key onthe keypad) until the LCD screenlights up.
Turning the Phone Off
With the flip open, press and holduntil the display turns off.
Making Calls
1. Make sure the phone is turnedon. If not, open the flip and press
for about three seconds. If necessary, enter the lock code.
2. Enter the phone number.
3. Press .
4. Press to end the call.
NOTE Your phone has a Voice Commandsfeature that also lets you make callsby saying a phone number, name, orlocation.
Correcting Dialing Mistakes
With the flip open, press once
to erase the last digit entered, orhold it down for at least twoseconds to delete all the digits.
Redialing Calls
With the flip open, press twiceto redial the last number dialed.
Receiving Calls
1. When the phone rings orvibrates, you can answer the callby simply opening the flip.
NOTE If the Answer Options setting is set toAny Key, you can:l Open the flip and press the Left Soft
Key [Quiet] to mute theringing or vibration for that call.
l Open the flip and press the RightSoft Key [Ignore] to end thecall or send it directly to Voicemail.
2. Press to end the call, orsimply close the flip.
Screen IconsWhen the phone is on, the top lineof the LCD screen displays phonestatus icons. To see the icon glossary, with theflip open, go to MENU -> Settings &Tools -> Phone Info -> IconGlossary on your phone.
20 VX8360
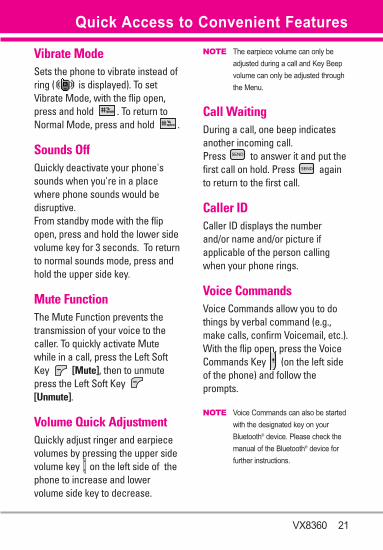
Vibrate ModeSets the phone to vibrate instead ofring ( is displayed). To setVibrate Mode, with the flip open,press and hold . To return toNormal Mode, press and hold .
Sounds OffQuickly deactivate your phone'ssounds when you're in a placewhere phone sounds would bedisruptive.From standby mode with the flipopen, press and hold the lower sidevolume key for 3 seconds. To returnto normal sounds mode, press andhold the upper side key.
Mute FunctionThe Mute Function prevents thetransmission of your voice to thecaller. To quickly activate Mutewhile in a call, press the Left SoftKey [Mute], then to unmutepress the Left Soft Key [Unmute].
Volume Quick AdjustmentQuickly adjust ringer and earpiecevolumes by pressing the upper sidevolume key on the left side of thephone to increase and lowervolume side key to decrease.
NOTE The earpiece volume can only beadjusted during a call and Key Beepvolume can only be adjusted throughthe Menu.
Call WaitingDuring a call, one beep indicatesanother incoming call. Press to answer it and put thefirst call on hold. Press againto return to the first call.
Caller IDCaller ID displays the numberand/or name and/or picture ifapplicable of the person callingwhen your phone rings.
Voice CommandsVoice Commands allow you to dothings by verbal command (e.g.,make calls, confirm Voicemail, etc.).With the flip open, press the VoiceCommands Key (on the left sideof the phone) and follow theprompts.
NOTE Voice Commands can also be startedwith the designated key on yourBluetooth® device. Please check themanual of the Bluetooth® device forfurther instructions.
Quick Access to Convenient Features
VX8360 21

Entering and Editing Information
Text InputThe following key functions areavailable to help with text entry:
Left Soft Key: Press tochange text input mode.
Shift: Press to changecapitalization (initial cap,caps lock, lowercase).
Next: Press to display othermatching words in thedatabase in word mode.
Space: Press to complete aword and insert a space.
Clear: Press to delete asingle space or character.Hold to delete words.
Punctuation: Press toinsert punctuation.
Text Input ModesIn a text field, press the Left SoftKey to display text modes.T9 Word/ Abc/ ABC/ 123/ Symbols/Quick Text
22 VX8360

Storing Basics1. With the flip open, enter a
number (max. 48 digits), thenpress the Left Soft Key [Save].
2. Use the Directional Key tohighlight Add New Contact/Update Existing, then press .
3. Use the Directional Key tohighlight Mobile 1/ Home/ Work/Mobile 2/ Fax, then press .
4. Enter a name (max. 32characters), then press .
5. Press to exit, to call, orthe Right Soft Key [Options].
Customizing IndividualEntries1. With the flip open, press the
Right Soft Key [Contacts],then use the Directional Key
to highlight an entry.2. Press the Left Soft Key [Edit].3. Use the Directional Key to
highlight the information tocustomize.
4. Change the entry as you want,then press to save yourchanges.
Speed DialAllows you to set up your SpeedDials.
1. With the flip open, press theRight Soft Key [Contacts],then use the Directional Key
to highlight an entry.
2. Press the Left Soft Key [Edit].
3. Use the Directional Key tohighlight a phone number, thenpress the Right Soft Key [Options].
4. Use the Directional Key tohighlight Set Speed Dial, thenpress .
5. Enter a Speed Dial digit.
l Use the keypad, then press.
l Use the Directional Key tohighlight the Speed Dial digit,then press .
6. Press Yes to confirm, thenpress to save.
Contacts in Your Phone’s Memory
VX8360 23

Contacts in Your Phone’s Memory
Storing a Number withPausesPauses allow you to enteradditional series of numbers toaccess automated systems such asVoicemail or credit billing numbers.Pause types are: Wait (W) Thephone stops dialing until you pressthe Left Soft Key [Release] toadvance to the next number. 2-SecPause (P) The phone waits twoseconds before sending the nextstring of digits.1. With the flip open, enter the
number, then press the Right SoftKey [Options].
2. Use the Directional Key tohighlight 2-Sec Pause or Wait,then press .
3. Enter additional number(s) (e.g., pinnumber,credit card number,etc.).
4. Press the Left Soft Key [Save].
5. Choose Add NewContact/Update Existing.
6. Choose Mobile1/Home/Work/Mobile 2/Fax.
7. Continue entering information forthe Contact entry as necessary.
Adding Another PhoneNumber
From standby mode
1. With the flip open, enter a phonenumber, then press the Left SoftKey [Save].
2. Use the Directional Key tohighlight Update Existing, thenpress .
3. Use the Directional Key tohighlight an existing entry, thenpress .
4. Use the Directional Key tohighlight Mobile 1/ Home/ Work/Mobile 2/ Fax, then press tosave.
From the Contact List Screen
1. With the flip open, press theRight Soft Key [Contacts].
2. Use the Directional Key tohighlight an entry, then press theLeft Soft Key [Edit].
3. Use the Directional Key tohighlight the phone number fieldto add, then enter the numberand press to save.
24 VX8360

Changing Saved Information
To edit any information you stored,access the Edit Contacts screen:
1. With the flip open, press theRight Soft Key [Contacts].
2. Use the Directional Key tohighlight a Contact entry, thenpress the Left Soft Key [Edit].
3. Use the Directional Key tohighlight the field you want tochange.
4. Make the changes, then press.
Adding a Pause to a Contact Entry
1. With the flip open, press theRight Soft Key [Contacts].
2. Use the Directional Key tohighlight a Contact entry, thenpress the Left Soft Key [Edit].
3. Use the Directional Key tohighlight the number, then pressthe Right Soft Key [Options].
4. Press Wait or 2-SecPause.
5. Enter additional number(s), thenpress .
Changing the DefaultNumberThe Default Number is the phonenumber you entered when youcreated the Contact. Anothernumber can be saved as theDefault Number.1. With the flip open, press the
Right Soft Key [Contacts].
2. Use the Directional Key tohighlight an entry.
3. Press the Left Soft Key [Edit].
4. Use the Directional Key tohighlight a phone number, thenpress the Right Soft Key [Options].
5. Use the Directional Key tohighlight Set As Default, thenpress .
6. Press Yes to set the newnumber as the default.A confirmation message isdisplayed.
7. Press again to save.
Deleting
Deleting a Contact Entry
1. With the flip open, press theRight Soft Key [Contacts].
2. Use the Directional Key tohighlight an entry.
VX8360 25

Contacts in Your Phone’s Memory
3. Press the Right Soft Key [Options].
4. Press Erase.
5. Press Yes to confirm.
Deleting a Speed Dial
1. With the flip open, press theRight Soft Key [Contacts].
2. Use the Directional Key tohighlight a Contact entry to editand press [VIEW].
3. Select the phone number withthe Speed Dial, then press [EDIT].
4. Press the Right Soft Key [Options].
5. Press Remove Speed Dial.
6. Press Yes to confirm.
7. Press again to save.
Speed DialingAllows you to make phone callsquickly and easily to numbersstored in Contacts.
NOTE Speed Dial 1 is for Voicemail.Speed Dial 411 is for DirectoryAssistance.
Single Digit Speed Dials
Press and hold the Speed Dial digit.Your phone recalls the phonenumber from your Contacts,displays it, and dials it for you.
Multiple Digit Speed Dials
When you press and hold a numberkey, it signals the phone to attempta Speed Dial transmission. To dialSpeed Dials with multiple digits,press the first digit(s) as necessary,then press and hold the last digit.For example, to Speed Dial 25,press , then press and hold
.
NOTE You can also enter the Speed Dialdigit(s), then press .
Speed Dials 95, 97, 98, and 99
Speed Dials 95, 97, 98, and 99 arepreset to access certain phoneaccount information: 95 (#WarrantyCenter), 97 (#BAL), 98 (#MIN), and99 (#PMT). Unlike Speed Dial 1,these can be changed if you want.
NOTE 411 is not available for Set or Remove.
26 VX8360

MMEEDDIIAA CCEENNTTEERRMEDIA CENTER allows you to domore than just talk on your phone.MEDIA CENTER is a technologyand service that allows you todownload and use applications onyour phone. With MEDIA CENTER,it’s quick and easy to personalizeyour phone to your lifestyle andtastes. Just download theapplications that appeal to you.With a wide range of softwareavailable, you can be assured thatyou can find something useful,practical, or entertaining.
Anything Unclear?From the MEDIA CENTER menu,press the Right Soft Key [Info]to see your memory status, activitylog, help text, and MEDIA CENTERstatus. Use the Help option to viewinformation from buying newapplications to expired applications.
1. Music & TonesPersonalize your phone withringtones. A wide variety ofchoices are available, such ascurrent hits, pop, hip-hop, andmore.
Access and Options
1. With the flip open, press [MENU].
2. Use the Directional Key toscroll to MEDIA CENTER.
3. Press Music & Tones.
4. Select a submenu by pressingthe number that correspondswith the submenu.
1.1 V CAST Music l RhapsodyAllows you to download a variety ofmusic via V CAST whenever andwherever you are.
1. With the flip open, press [MENU].
2. Use the Directional Key toscroll to MEDIA CENTER.
3. Press Music & Tones.
4. Press V CAST Music lRhapsody.
NOTE Additional charges for music mayapply. V CAST Music service is notavailable in all areas. Checkwww.verizonwireless.com/musicwebsite for details.
MEDIA CENTER
VX8360 27

MEDIA CENTER1.2 Get New RingtonesAllows you to connect to MEDIACENTER and download variousringtones.
1. With the flip open, press [MENU].
2. Use the Directional Key toscroll to MEDIA CENTER.
3. Press Music & Tones.
4. Press Get New Ringtones.
1.3 My RingtonesAllows you to select a desiredringtone, or download a newringtone.
1. With the flip open, press [MENU].
2. Use the Directional Key toscroll to MEDIA CENTER.
3. Press Music & Tones.
4. Press My Ringtones.
5. Use the Directional Key tohighlight a ringtone and pressthe Left Soft Key [Set As].You can press [PLAY] topreview the ringtone.
l Ringtone
l Contact ID: Highlight andselect the Contact to beidentified by the ringtone youselected.
l Alert Sounds: Press thecorresponding number key to setthe ringtone for one of thefollowing:All Messages/ TXT Message/Multimedia Message/ Voicemail
1.4 My MusicAllows you to store and to listen tomusic right from your phone.Connect to V CAST to download avariety of music, transfer musicbetween your phone and your PC,manage and organize your musicfiles, and more.
NOTE File storage varies according to thesize of each file as well as memoryallocation of other applications.
1. With the flip open, press [MENU].
2. Use the Directional Key toscroll to MEDIA CENTER.
3. Press Music & Tones.
4. Press My Music.
28 VX8360

5. Use the Directional Key toscroll to a category, then press
.
Playing Your MusicIt's easy to find and play the musicyou've stored in your phone.
Access My Music
1. With the flip open, press [MENU].
2. Use the Directional Key toscroll to MEDIA CENTER.
3. Press Music & Tones.
4. Press My Music.
5. Use the Directional Key toscroll through the songs andpress to play a song.
Controlling the Music Player
If you keep the flip open whilelistening to your music, use thefollowing to control the MusicPlayer:
l Left Soft Key [Repeat]Repeats the current playlist.
l Right Soft Key [Options]Allows you to choose:Play All / Shuffle / My Music /Shop / Listeners also liked /Help
l : Adjust the volume.
l / Scroll through thesong list.
l Play / Pause the currentsong.
l Rewinds the song. Twoclicks of the left soft key playsthe previous song.
l Play the next song.
Front Music Controls
: Play a song or pause thesong.
: Go back to previous songs orpress and hold to rewind.
: Skip to the next song orpress and hold to fastforward.
VX8360 29

MEDIA CENTER1.5 My SoundsAllows you to record a new soundor select a desired sound.
How to record a new sound
1. With the flip open, press [MENU].
2. Use the Directional Key toscroll to MEDIA CENTER.
3. Press Music & Tones.
4. Press My Sounds.
5. Press Record New andpress to start recording,then press again to stop.
How to select a sound
1. With the flip open, press [MENU].
2. Use the Directional Key toscroll to MEDIA CENTER.
3. Press Music & Tones.
4. Press My Sounds.
5. Use the Directional Key toscroll and highlight a preloadedsound.
Options with a sound filehighlighted:
l Press the Left Soft Key [Erase].
l Press [PLAY].
l Press the Right Soft Key [Options] to select:
Send/ To Online Album/Rename/ Move/ Lock(Unlock)/Erase All/ File Info
1.6 Sync MusicV CAST Music with Rhapsody is adigital music service that lets youlisten to millions of songs fromthousands of artists. Discover newand old favorites in an extensivemusic catalog. Sync unlimitedmusic* from the PC, to any V CASTMusic with Rhapsody capabledevice, at no additional per trackcost. For a flat monthly subscriptionfee, subscribers can sync theirmusic on up to 3 compatible VerizonWireless handsets, or Rhapsodycompatible portable players.Download V CAST Music withRhapsody software to sync tracks,albums, and playlists to your new
30 VX8360

compatible phone, while managingyour existing PC music library all inone place. NOTE Subscribers may listen to song tracks
as long as the subscription ismaintained. The handset must besynced at least monthly, to renew thelicenses of subscription music.Requires 1-time software download toWindows VistaTM or XP PCs only;software available atVerizonWireless.com/music* Subject to device/memory card
storage capacity.
Download music to your PC
1. Open V CAST Music withRhapsody. Don’t have V CASTMusic with Rhapsody? Downloadit for free atwww.verizonwireless.com/music.
2. Log in.
3. For each V CAST Music trackyou’ve downloaded to your phone,you can download a copy to yourcomputer at no additional charge.Song tracks available fordownload will pop-up upon log incompletion.
4. Check the boxes of songs youwish to download.
5. Select “Download Tracks.”
6. To play the song, you can find it byselecting the My Library tab.
NOTE V CAST Music with Rhapsody willwork with Windows VistaTM, or XP.Not available for Mac or Linux.
Sync your music from your PC toyour V CAST Music wirelessdevice This option allows you to transfermusic files from your PC. In order touse this option, you must install VCAST Music with Rhapsody on yourPC.
1. Open V CAST Music withRhapsody. Don’t have V CASTMUSIC with Rhapsody? Downloadit for free atwww.verizonwireless.com/music.
2. Plug in the USB cable to yourphone and connect it to a USBport on your PC.
3. From the main screen on yourphone, the SYNC MUSIC V CASTMOBILE PHONE display appears.Your phone should display themessage: Connected.
4. Drag and drop the song(s) youwant to sync from My Library, toyour V CAST mobile phone, listedunder the Sources tab.
VX8360 31

MEDIA CENTEROnce synchronization is complete,press the END/Power key anddisconnect the USB cable.
NOTE A compatible USB cable (soldseparately) is required for syncing.
2. Picture & Video View, take, and trade digitalpictures and videos right from yourwireless phone.
Access and Options
1. With the flip open, press [MENU].
2. Use the Directional Key toscroll to MEDIA CENTER.
3. Press Picture & Video.
4. Select a submenu.
2.1 V CAST VideosV CAST brings the world to yourmobile phone with full-motion videoand sound. Catch up with what’shappening with video clips fromnews, sports, entertainment, orweather (must be in V CASTcoverage area. Additional fees mayapply).
1. With the flip open, press [MENU].
2. Use the Directional Key toscroll to MEDIA CENTER.
3. Press Picture & Video.
4. Press V CAST Videos.
Browsing, Selecting, and PlayingVideo Clips
1. With the flip open, press [MENU].
2. Use the Directional Key toscroll to MEDIA CENTER.
3. Press Picture & Video.
4. Press V CAST Videos toopen Video Clips Catalog.
5. Use the Directional Key tohighlight Video Clip categoriesincluding News, Music, Sports,and other entertainmentcontents then press toselect.
6. Highlight content provider, thenpress .
7. If applicable, highlight a sub-category, then press .
8. Highlight the video clip you wantto view, then press .
32 VX8360

To view a Streaming Video
1. With the flip open, press [MENU].
2. Use the Directional Key toscroll to MEDIA CENTER.
3. Press Picture & Video.
4. Press V CAST Videos.
5. Select a Video Clip Category anda Video Clip, and press .
6. Read the description of the videoclip, and press to view.
7. Select Yes to accept charges,press and the Video Clip willinitiate transfer.
8. The video clip will beginplayback shortly after beingselected.
To download a Video Clip
1. With the flip open, press [MENU].
2. Use the Directional Key toscroll to MEDIA CENTER.
3. Press Picture & Video.
4. Press V CAST Videos.
5. Highlight a video clip, then press.
6. Read the description of the videoclip and press the Right Soft Key
[Options].
7. Press Save Video.
8. Select Yes to accept charges,press and the video clip willbegin downloading.
9. Once video is downloaded amessage will appear on yourphone.
10. Select Yes (if applicable) andpress to view video.
11. The video clip will beautomatically saved in MyVideos.
NOTE Not all videos are downloadable.Only videos that have the option tosave can be downloaded. Additionalcharges for each video clip viewedmay apply. Video Clips service is notavailable in all areas. Checkwww.verizonwireless.com/getitnowwebsite for details..
Deleting Video Clips
1. With the flip open, press [MENU].
2. Use the Directional Key toscroll to MEDIA CENTER.
3. Press Picture & Video.
4. Press V CAST Videos.
VX8360 33
MEDIA CENTER
5. Press the Left Soft Key [MyVideos].
6. Highlight the Video to deleteusing the Directional Key .
7. Press the Right Soft Key [Options] and press Erase.
8. Press [Yes] to erase Video.
Configure Alerts for New VideoClips
1. With the flip open, press [MENU].
2. Use the Directional Key toscroll to MEDIA CENTER.
3. Press Picture & Video.
4. Press V CAST Videos.
5. From Video Clips Catalog, selecta category.
6. Select Content Provider.
7. Press the Right Soft Key [Options].
8. Select Alerts.
9. Select Configure Alerts.
10. Select content for alerts desiredand press to save.
2.2 Get New PicturesAllows you to connect to MEDIACENTER and download a variety ofimages for My Pictures.1. With the flip open, press
[MENU].
2. Use the Directional Key toscroll to MEDIA CENTER.
3. Press Picture & Video.
4. Press Get New Pictures.
5. Press .
2.3 My PicturesAllows you to view and managephotos stored in the phone.1. With the flip open, press
[MENU].
2. Use the Directional Key toscroll to MEDIA CENTER.
3. Press Picture & Video.
4. Press My Pictures.5. Highlight a picture with the
Directional Key and pressthe Right Soft Key [Options]for options.
6. Select one of the followingoptions:
Send Picture Message/ ToOnline Album/ Via Bluetooth
34 VX8360

Set As Main Wallpaper/ FrontWallpaper/ Picture ID
Take Picture Turns on thecamera function.
Get New Pictures Downloadvarious pictures.Manage My Pics Allows you tomark multiple pictures to beerased, moved or locked/unlocked.Rename Allows you to changethe file name.*Lock (Unlock) Allows you tolock or unlock. Locked files can'tbe erased accidentally.Print Print via Bluetooth/ PrintPreferencesFile Info Name/ Date/ Time/Resolution/ Size
NOTE The option 'Send via Bluetooth' is notdisplayed when you select picturesprotected by DRM (Digital RightsManagement).
* Only appears when the picture isstored on the phone.
Editing a PictureAccess My Pictures, then use theDirectional Key to highlight apicture. Press [VIEW] thenpress the Right Soft Key [Options] to access additional Editoptions like:
Edit and Zoom Allows you to zoom,rotate and crop the photo.
2.4 My VideosAllows you to view videos stored inthe phone.1. With the flip open, press
[MENU].
2. Use the Directional Key toscroll to MEDIA CENTER.
3. Press Picture & Video.
4. Press My Videos.5. Highlight a video with the
Directional Key and pressthe Right Soft Key [Options]for options. *Send Sends a video message.Record Video Turns on the videocamera function.To Online Album Accesses theOnline Album.V CAST Videos Accesses V CAST Videos feature.Manage My Videos Allows youto mark multiple videos to beerased, moved or locked/unlocked.Set As Wallpaper Displays theselected video file as thebackground for your phone.Rename Renames the selectedvideo.
VX8360 35

MEDIA CENTERFile Info Name/ Date/ Time/Duration/ Size
* This will not appear for protectedcontent.
6. Press to play.
NOTE File storage varies according to thesize of each file as well as memoryallocation of other applications.
l : Adjust the volume.
l Left Soft Key : Mute/ Unmutel : Pause/ Playl Up Directional Key : Shows
the widescreen.l Down Directional Key : Stopl Right Directional Key : FFl Left Directional Key :
Rewind
7. Press the Right Soft Key [Options] to select one of thefollowing options:Set As Wallpaper/ File Info
2.5 Take PictureLets you to takedigital pictures.
1. With the flipopen, press [MENU].
2. Use the Directional Key toscroll to MEDIA CENTER.
3. Press Picture & Video.
4. Press Take Picture.
5. Set the brightness by pressingthe Directional Key up and down
, zoom by pressing theDirectional Key left and right ,and press the Right Soft Key [Options] to change othersettings.
NOTE Zoom is not available if the Resolutionis set to 1280x960.
l Select the option(s) to customize.RESOLUTION 1280x960 / 640x480/ 320x240 SELF TIMER Off/ 3 Seconds/ 5 Seconds/ 10 SecondsWHITE BALANCE Auto/ Sunny/Cloudy/ Fluorescent/ Glow
SHUTTER SOUND Shutter/ NoSound /Say “Cheese”/ Ready! 1 2 3
COLOR EFFECTS Normal/Negative/ Aqua/ Sepia/Black&White
NIGHT MODE On/ Off
SAVE OPTION Internal/ External
PHOTOMETRY Average/ Spot/Spot Multiple
PREVIEW Actual view/ Fullscreen
36 VX8360

CAPTURE Camera/ Video
6. Take a picture by pressing [TAKE].
7. Press the Left Soft Key [Save]. The picture is stored inMy Pictures.
TIP Taking pictures with the flip closed.
l Press and hold the side camerakey on the right side of thephone.
l Press the side camera key totake a picture. Or press toexit.
2.6 Record VideoLets you record avideo with sound.
1. With the flipopen, press [MENU].
2. Use the Directional Key toscroll to MEDIA CENTER.
3. Press Picture & Video.
4. Press Record Video.
5. Set the brightness by pressingthe Directional Key up and down
, zoom by pressing theDirectional Key left and right ,and press the Right Soft Key [Options] to change othersettings.
RECORDING TIME For Send/ ForSave
SAVE OPTION Internal/ External
COLOR EFFECTS Normal/Negative/ Aqua/ Sepia/Black&White
WHITE BALANCE Auto/ Sunny/Cloudy/ Fluorescent/ Glow
CAPTURE Camera/ Video
6. Press [REC] to beginrecording, and again to stop.
7. Press the Left Soft Key [Save]. The recorded video isstored in My Videos.
TIP Taking videos with the flip closed.
l Press and hold the side camerakey on camera mode.
l Press the side camera key totake a video.
After taking video, press the sidecamera key again to stop. Orpress to exit.
2.7 Online AlbumUse to access the Online Album(PIX Place).
1. With the flip open, press [MENU].
2. Use the Directional Key toscroll to MEDIA CENTER.
VX8360 37

MEDIA CENTER3. Press Picture & Video.
4. Press Online Album.
5. Login your mobile number andpassword, as applicable.
3. GamesAllows you to download games andapplications from the MEDIACENTER server. Choose thesoftware you want from the listdisplayed on the screen.1. With the flip open, press
[MENU].
2. Use the Directional Key toscroll to MEDIA CENTER.
3. Press Games.
4. Press Get NewApplications.
4. Mobile WebDashboard is an easy to useapplication, which acts as theprimary platform for discovering,buying, & personalizing multimediacontent and services on yourdevice. It provides access topersonalized channels like VCASTMusic & Video, Mobile Web 2.0,ring tones, games and more!1. With the flip open, press
[MENU].
2. Use the Directional Key toscroll to MEDIA CENTER.
3. Press Mobile Web.
4. Select the type of news andinformation you want to view.
Ending a Browser SessionEnd a Browser session by pressing
.
Navigating Through the BrowserOn-screen items appear in one ofthe following ways: l Numbered options
You can use your numeric keypador you can select the items bymoving the cursor and pressingthe appropriate Soft Keys.
l Links embedded in content
You can act on the options or thelinks using the Soft Keys justbelow the display screen.
l Text or numbers
You can select the items by
38 VX8360

moving the cursor and pressingthe appropriate Soft Keys.
Scrolling
Use the Directional Key . A cursor lets you know which itemis currently selected.
Fast Scrolling
Press and hold the Directional Keyto quickly move the cursor up
and down on the current screen.
Scrolling by Page
Press the Side Keys to move up anddown a page at a time.
Home Page
Press Right Soft Key [Menu]and select 1. VZW Home to go tothe Home Page.NOTE To go to the Home Page from Online
Album, Email, Chat, or My Verizon,press and hold or .
View Browser Menu
Press Voice Commands key todisplay the Browser menu.
Soft Keys
To navigate to different screens orselect special functions, use the
Soft Keys. The function associatedwith the Soft Keys can change foreach page and depends on eachhighlighted item.
Left Soft Key
Left Soft Key is used primarilyfor options or selecting an item butits function may change, dependingon the content displayed.
Right Soft Key
Right Soft Key is used primarilyfor secondary options or a menu ofsecondary options.
Entering Text, Numbers, or Symbols
When prompted to enter text, thecurrent text entry method appearsabove the Right Soft Key as Word, Abc, ABC, 123 or Symbols. To change the input mode, pressthe Right Soft Key . To create anupper case character, press .
Deleting Text/Number Entered
When entering text or numbers,press to clear the lastnumber, letter, or symbol. Press andhold to clear the input fieldcompletely.
VX8360 39

MEDIA CENTERInitiating a Phone Call From theBrowser
You can make a phone call from theBrowser if the site you are usingsupports the feature (the phonenumber may be highlighted and theLeft Soft Key appears as Call).The browser connection isterminated when you initiate thecall. After you end the call, yourphone returns to the screen fromwhich you initiated the call.
5. Browse & DownloadEverything you need to know whileyou’re on the go.
1. With the flip open, press [MENU].
2. Use the Directional Key toscroll to MEDIA CENTER.
3. Press Browse &Download.
4. Press Get New Applicationsor select VZ Navigator using theDirectional Key then press .
VZ NavigatorSM
Now you can find the address of agreat restaurant or the nearestATM. Check movie times. Discoverthe latest hot spots. And knowexactly how to get where you’regoing. VZ Navigator puts all theadvanced features of the latest GPSdevices and systems on yourwireless device — at a fraction ofthe price.
NOTES l To use VZ Navigator, you mustturn location on. (See page 79)
l Download, subscription andairtime required for use; only inNational Enhanced ServiceCoverage Area: accuracy andcompleteness of information isnot guaranteed; informationabout location of device will beused to deliver service.
6. Extras
1. With the flip open, press [MENU].
2. Use the Directional Key toscroll to MEDIA CENTER.
3. Press Extras.
4. Press Get NewApplications.
40 VX8360

MMEESSSSAAGGIINNGG SHORTCUTFrom standby mode, pressing the Left Soft Key
is a hot key to your MESSAGING.
Text messages, Picture messages,and the Voicemail box becomeavailable as soon as the phone ispowered on. l Check types of messages by
pressing the Left Soft Key [Message].
l Make a call to the callbacknumber (in Inbox) by pressing
during a message check.Depending on the content and sizeof your messages, the phone canstore well over 540 messages. Theinformation stored in the messageis determined by phone model andservice capability. Other limits toavailable characters per messagemay exist. Please check with yourservice provider for system featuresand capabilities.
New Message AlertYour phone will alert you when youhave new messages.
1. The phone displays a messageon the screen.
2. The message icon ( ) isdisplayed on the display screen.In the case of a high prioritymessage, the icon will flash.
1. New MessageAllows you to send messages (Text,Picture, Video, and Voice). Eachmessage has a destination(Address) and information(Message). These are dependentupon the type of message you wantto send. You can also attach files toyour messages including pictures,videos, sounds, and name cards.
1.1 TXT Message
The Basics of Sending a TextMessage
1. With the flip open, press the LeftSoft Key [Message].
2. Press New Message.
3. Press TXT Message.
4. Enter the phone number of therecipient or the email address foran email message. You can enterup to 10 addresses for a singlemessage.
MESSAGING
VX8360 41
MESSAGING
5. Press the Directional Key downward.
6. Type your message in the textfield.
7. Press [SEND].
Customizing the Message UsingOptions
l Editing the To: field
1. With the To field highlighted,press the Right Soft Key [Add].
2. Select the option(s) to customize.From Contacts/ Recent Calls/Groups/ To Contacts
l Editing Text
1. With the Text field highlighted,press the Right Soft Key [Options].
2. Select the option(s) to customize.
Insert Quick Text Allows you toadd Quick Text.
Insert Picture Allows you to addpicture.
Insert Video Allows you to addvideo.
Insert Voice Allows you to addvoice.
Save As Draft Saves the
message into the Drafts folder.
Add Allows you to add Graphic,Animation, Sound, Signature,Name Card, or Address FromContacts .
Copy Text Allows you to copytext.
Paste Allows you to paste thetext you last copied into a textfield.
Format Text Allows you tochange the look of the text.
Alignment/ Font Size/ Font Style/Text Color/ Background
Priority Level Gives priority tothe message. High/ Normal
Callback # Inserts a pre-programmed callback numberwith your message.On/ Off/ Edit
Save Quick Text Allows you tosave the message as a QuickText.
Cancel Message Cancelsmessage editing and goes to theprevious menu.
3. Complete and then send or savethe message.
42 VX8360

Using Contacts to Send a Message
You can designate an entry savedin your Contacts as the addressinstead of manually entering thedestination.
1. With the flip open, press the LeftSoft Key [Message].
2. Press New Message.
3. Press TXT Message.
4. Press the Right Soft Key [Add].
5. Use the Directional Key tohighlight From Contacts andpress .
6. Use the Directional Key tohighlight the Contact entrycontaining the destination andpress to mark the contact.
7. Press the Left Soft Key [Done].
NOTE The Address feature allows multi-sending of up to 10 total addresses.
8. Complete the message asnecessary.
1.2 Picture Message
The Basics of Sending a PictureMessage
1. With the flip open, press the LeftSoft Key [Message].
2. Press New Message.
3. Press Picture Message.
4. Enter the cellular phone numberor email address of the recipient.
5. Press the Directional Key downward.
6. Type your message in the textfield.
7. Use the Directional Key tohighlight Picture and press theLeft Soft Key [My Pics]. Usethe Directional Key toselect the image you want tosend, then press .
8. Use the Directional Key tohighlight Sound, then press theLeft Soft Key [Sounds]. Usethe Directional Key tohighlight the audio file you wantto send then press .
9. Use the Directional Key tohighlight Name Card, then pressthe Left Soft Key [Contacts]. Use the Directional
VX8360 43

MESSAGINGKey to choose My NameCard/ From Contacts.
10. Use the Directional Key tohighlight Subject and enter thesubject.
11. Press [SEND]. A confirmation message isdisplayed.
l Editing the To: field
1. With the To field highlighted,press the Right Soft Key [Add].
2. Select the option(s) to customize.
From Contacts/ From RecentCalls/ Groups/ To Online Album/To Contacts
l Editing Text
1. With the Text field highlighted,press the Right Soft Key [Options].
2. Select the option(s) to customize.
Preview Displays the Picturemessage as it would be seen bythe recipient.
Save As Draft Saves themessage into the Drafts folder.
Insert Quick Text Allows you toadd Quick Text.
Copy Text Allows you to copytext.
Paste Allows you to paste thetext you last copied into a textfield.
Add Slide Insert multiplepictures into a picture message.
Priority Level Gives priority tothe message. High/ Normal
Cancel Message Cancelsmessage editing and goes toMessaging menu.
l Editing Picture
1. With the Picture field highlighted,press the Right Soft Key [Options].
2. Select the option(s) to customize.Preview/ Save As Draft/ AddSlide/ Priority Level/ RemovePicture/ Cancel Message
l Editing Sound
1. With the Sound field highlighted,press the Right Soft Key [Options].
2. Select the option(s) to customize.Preview/ Save As Draft/ AddSlide/ Priority Level/ RemoveSound/ Cancel Message
44 VX8360

l Editing Name Card
1. With the Name Card fieldhighlighted, press the Right SoftKey [Options].
2. Select the option(s) to customize.Preview/ Save As Draft/ AddSlide/ Priority Level/ RemoveName Card/ Cancel Message
l Editing a Subject
1. With the Subject fieldhighlighted, press the Right SoftKey [Options].
2. Select the option(s) to customize.Preview/ Save As Draft/ InsertQuick Text/ Copy Text/ Paste/Add Slide/ Priority Level/ CancelMessage
1.3 Video Message
The Basics of Sending a VideoMessage
1. With the flip open, press the LeftSoft Key [Message].
2. Press New Message.
3. Press Video Message.
4. Enter the cellular phone numberor email address of the recipient.
5. Press the Directional Key downward.
6. Type your message in the textfield.
7. Use the Directional Key tohighlight Video and press theLeft Soft Key [Videos].
Use the Directional Key tohighlight the video file you wantto send, then press .
8. Use the Directional Key tohighlight Name Card, then pressthe Left Soft Key [Contacts]. Use the DirectionalKey to choose My NameCard/ From Contacts.
9. Use the Directional Key tohighlight Subject and enter thesubject.
10. Press [SEND]. A confirmation message isdisplayed.
Customizing the Message UsingOptionsl Editing the To: field
1. With the To field highlighted,press the Right Soft Key [Add].
2. Select the option(s) to customize.From Contacts/ From RecentCalls/ Groups/ To Online Album/To Contacts
VX8360 45

MESSAGINGl Editing Text
1. With the Text field highlighted,press the Right Soft Key [Options].
2. Select the option(s) to customize.
Preview Displays the Videomessage as it would be seen bythe recipient.
Save As Draft Saves themessage into the Drafts folder.
Insert Quick Text Allows you toadd Quick Text.
Copy Text Allows you to copytext.
Paste Allows you to paste thetext you last copied into a textfield.
Priority Level Gives priority tothe message. High/ Normal
Cancel Message Cancelsmessage editing and goes toMessaging menu.
l Editing Video
1. With the Video field highlighted,press the Right Soft Key [Options].
2. Select the option(s) to customize.
Preview/ Save As Draft/ PriorityLevel/ Remove Video/ CancelMessage
l Editing Name Card
1. With the Name Card fieldhighlighted, press the Right SoftKey [Options].
2. Select the option(s) to customize.Preview/ Save As Draft/ PriorityLevel/ Remove Name Card/Cancel Message
l Editing the Subject
1. With the Subject fieldhighlighted, press the Right SoftKey [Options].
2. Select the option(s) to customize.
Preview/ Save As Draft/ InsertQuick Text/ Copy Text/ Paste/Priority Level/ Cancel Message
3. Complete and then send or savethe message.
1.4 Voice Message
The Basics of Sending a VoiceMessage
1. With the flip open, press the LeftSoft Key [Message].
2. Press New Message.
46 VX8360

3. Press Voice Message.
4. Press to start recording.
5. Record your voice message.
6. Press to end recording.
7. Enter the cellular phone numberor email address of the recipient.
8. Press the Directional Key downward.
9. Type your message.
10. Use the Directional Key tohighlight Name Card, then pressthe Left Soft Key [Contacts]. Use the DirectionalKey to choose My NameCard/ From Contacts.
11. Use the Directional Key tohighlight Subject and enter thesubject.
12. Press [SEND].
After a connecting display,message is transmitted.
2. InboxThe phone alerts you in 3 wayswhen you receive a new message:l By displaying a notification
message on the screen.l By sounding a sound or
vibration, if set.l By displaying . (The icon will
blink when you get a high prioritymessage.)
Viewing Your Inbox
1. With the flip open, press the LeftSoft Key [Message].
2. Press Inbox.
3. Options from here with amessage highlighted:
l Press [OPEN] to view themessage.
l Press the Left Soft Key [Erase] to erase thehighlighted message.
l Press the Right Soft Key [Options] to access theoptions.
Reply Replies to the originationaddress of the received message.Reply With Copy Replies to theorigination address with a copy ofthe original message attached.
VX8360 47

MESSAGINGForward Forwards a receivedmessage to other destinationaddress(es).
Add To Contacts Stores thecallback number, email address,and numbers from the address ofthe received message into yourContacts.
Extract Addresses Allows you toextract addresses.
Sort By Sender/Time Allows youto sort messages alphabeticallyby sender's name or by timereceived.
Manage Inbox Allows you tomanage (lock or erase) messagelist.
Message Info Allows you tocheck the received messageinformation.
Message Icon Reference
New/ Unread TXTMessages
Opened/ Read TXTMessages
Priority High
Locked
New/ Unread MultimediaMessage
Open/ Read MultimediaMessage
New/Unread BrowserMessages
Opened/Read BrowserMessages
New/Unread NotificationMessages
Open/Read NotificationMessages
* Multimedia Message indicates Picture/ Video/Voice Message.
3. SentDepending on the content and sizeof your messages, you can save upto 100 Sent messages. This menulists your Sent messages. Use it toverify whether the transmissionwas successful or not and viewmessage contents.
1. With the flip open, press the LeftSoft Key [Message].
2. Press Sent.
3. Options from here with amessage highlighted:
l Press [OPEN] to view themessage.
48 VX8360

l Press the Left Soft Key [Erase] to erase highlightedmessage.
l Press the Right Soft Key [Options].
Forward Forwards a sentmessage to other destinationaddress(es).
Send/Resend Allows you toretransmit the selectedmessage.
Add To Contacts Stores thecallback number, email address,and numbers from the address ofthe message into your Contacts.
Sort By Recipient/Time Allowsyou to sort alphabetically byrecipient's name or by time sent.
Manage Sent Allows you tomanage (erase or lock) messagelist.
Message Info Allows you tocheck the sent messageinformation.
Message Icon Reference
Text/Picture/Video/VoiceMessages sent
Message delivered
Text/Picture/Video/VoiceMessages failed
Multiple Messages sent
Multiple Messagesdelivered
Multiple Messages failed
Multiple Messagesincomplete
Priority High
Locked
4. DraftsDisplays draft messages.1. With the flip open, press the Left
Soft Key [Message].
2. Press Drafts.
3. Options from here with amessage highlighted:
l Press [EDIT] to continueediting the message.
l Press the Left Soft Key [Erase].
l Press the Right Soft Key [Options].
Send Sends the selectedmessage.
VX8360 49

MESSAGINGAdd To Contacts Stores thecallback number, email address,and numbers from the addressincluded in the message intoyour Contacts.
Manage Drafts Allows you tomanage (erase or lock)messages.
Message Icon Reference
Draft TXT
Draft Multimedia Message
5. VoicemailAllows you to view the number ofnew voice messages recorded inthe Voicemail box. Once youexceed the storage limit, oldmessages are overwritten. Whenyou have a new voice message,your phone will alert you.
Checking Your Voicemail Box
1. With the flip open, press the LeftSoft Key [Message].
2. Press Voicemail.
3. Options from here :
l Press the Left Soft Key [Clear] to delete information, andthen press [Yes].
l Press or [CALL] tolisten to the message(s).
OR
1. Dial *86 (*VM) from yourphone or dial your wirelessphone number from any touch-tone phone.
2. When the recordedannouncement begins, press
to interrupt (if applicable).
3. When prompted, enter yourpassword, then .
6. Mobile IMAllows you to send and receive anInstant Message at any time.
1. With the flip open, press the LeftSoft Key [Message].
2. Press Mobile IM.
50 VX8360

7. EmailAllows you to send an email viaMobile Web.
1. With the flip open, press the LeftSoft Key [Message].
2. Press Email.
3. A Mobile Web Browser sessionstarts.
4. Highlight an email provider andpress .
5. Login or enter your emailaddress and password.
8. ChatAllows you to chat with InternetMessenger users.
1. With the flip open, press the LeftSoft Key [Message].
2. Press Chat.
3. A Mobile Web Browser sessionstarts.
4. Highlight a Chat provider andpress .
NOTE This feature may require asubscription to a Chat serviceprovider.
Messaging SettingsAllows you to configure settings foryour messages.
1. With the flip open, press the LeftSoft Key [Message].
2. Press the Left Soft Key [Settings].
3. Use the Directional Key tohighlight one of the settings andpress to select it.
Message Settings Sub-MenuDescriptions
1. Entry Mode (T9 Word/ Abc/ ABC/123)
Allows you to select the defaultinput mode including Word, Abc,ABC, 123.
2. Auto Save Sent (On/ Off/ Prompt)
With this feature on, messages areautomatically saved in the Sentfolder when transmitted.
3. Auto Erase Inbox (On/ Off)
With this feature on, readmessages are automaticallydeleted when you exceed thestorage limit.
VX8360 51

MESSAGING4. Messaging Font Size
Allows you to set the message fontsize. Choose Normal or Large.
5. TXT Auto View (On/Off)
Allows the phone to directly displaythe content when receiving amessage.
6. TXT Auto Scroll (On/Off)
Allows the display to automaticallyscroll while viewing messages.
7. Multimedia Auto Receive(On/Off)
Allows you to directly download thecontent when receiving a Picture,Video, or Voice message.
8. Quick Text
Allows you to display, edit, and addtext phrases. These text stringsallow you to reduce manual textinput into messages.
9. Voicemail #
Allows you to manually enter theaccess number for VoicemailService. This feature should be onlyused when a VMS (VoicemailService) access number is notprovided from the network.
0. Callback #
Allows you to automatically send adesignated callback number whenyou send a message.
*. Signature (None/ Custom)
Allows you make/edit a signature toautomatically send with yourmessages.
Erasing MessagesAllows you to erase messagesstored in your Inbox, Sent, or Draftsfolders. You can also erase allmessages at the same time.
1. With the flip open, press the LeftSoft Key [Message].
2. Press the Right Soft Key [Options] then select one of thefollowing:
Erase Inbox/ Erase Sent/ EraseDrafts/ Erase All
3. Press to erase themessages selected.
4. Press to confirm thedeletion.
A confirmation message isdisplayed.
52 VX8360
CONTACTS
CCOONNTTAACCTTSSThe Contacts Menu allows you tostore names, phone numbers andother information in your phone’smemory. SHORTCUT Pressing the Right Soft Key
is a hot key to Contact List.
1. New ContactAllows you to add a new number toyour Contact List.
NOTE Using this submenu, the number issaved as a new Contact, not into anexisting Contact.
1. With the flip open, press [MENU].
2. Use the Directional Key toscroll to CONTACTS.
3. Press New Contact.
4. Enter the name and press theDirectional Key downward.
5. Use the Directional Key tohighlight the phone number type.
6. Enter the number and press .
NOTE For more detailed information, seepage 23.
2. Contact ListAllows you to view your ContactList.
1. With the flip open, press [MENU].
2. Use the Directional Key toscroll to CONTACTS.
3. Press Contact List.
4. Use the Directional Key toscroll through your Contactsalphabetically.
l Press the Right Soft Key [Options] to select one of thefollowing:New Contact/ Erase/ NewTXT Message/ New PictureMessage/ New VideoMessage/ New VoiceMessage/ Set As ICE Contact/Call/ Erase All/ Send NameCard
l Press the Left Soft Key [Edit] to edit.
l Press to view the entrydetails.
TIP Use the Go To field, for quick accessto an entry without scrolling. Forexample, to go to "Vet", enter theletter V.
VX8360 53

CONTACTS3. GroupsAllows you to view your groupedContacts, add a new group, changethe name of a group, delete agroup, or send a message toeveryone in the selected group.
1. With the flip open, press [MENU].
2. Use the Directional Key toscroll to CONTACTS.
3. Press Groups.
4. View a Group
Use the Directional Key tohighlight a group, then press .
Add a New Group
Press the Left Soft Key [New] to add a new group to thelist.
Options Using a Group
Press the Right Soft Key [Options] to select one of thefollowing:
New TXT Message/ NewPicture Message/ New VideoMessage/ New Voice Message/Rename/ Erase/ Add/ SendName Card
4. Speed DialsAllows you to view your list ofSpeed Dials or designate SpeedDials for numbers entered in yourContacts.
1. With the flip open, press [MENU].
2. Use the Directional Key toscroll to CONTACTS.
3. Press Speed Dials.
4. Use the Directional Key tohighlight the Speed Dial position,or enter the Speed Dial digit andpress [SET].
5. Use the Directional Key tohighlight the Contact then press
. (For Contacts with multiplenumbers, highlight the numberfor the Speed Dial, then press
.)
6. Press Yes to confirm.A confirmation message isdisplayed.
54 VX8360

5. In Case of Emergency(ICE)
This menu allows you to storenames, phone numbers and otherinformation, which will be veryhelpful in case of emergency. Also,it allows you to add, read, edit, orerase the notes about yourself asnecessary in case an emergencytakes place.
1. With the flip open, press [MENU].
2. Use the Directional Key toscroll to CONTACTS.
3. Press In Case ofEmergency.
4. Use the Directional Key tohighlight Contact 1, 2, or 3, thenpress [ADD].
5. Press to add Contact fromyour Contact List.
Highlight the Contact, then press.
ICE CONTACT ASSIGNED isdisplayed.
OR
Press to enter informationnot stored in your Contact List.
6. The generic Contact labelchanges to the specified name.
Entering Your ICE Personal Info
1. With the flip open, press [MENU].
2. Use the Directional Key toscroll to CONTACTS.
3. Press In Case ofEmergency.
4. Use the Directional Key tohighlight Personal Info, thenpress .
5. Use the Directional Key tohighlight one of the Note entries,then press .
6. Enter information that would behelpful in an emergency (e.g.,your medical record number),then press .
TIP When you've assigned ICE Contactsand your phone is locked, the LeftSoft Key appears as [ICE]allowing the emergency information tobe viewed without unlocking thephone.
VX8360 55

CONTACTS6. My Name CardAllows you to view all of yourpersonal Contact informationincluding name, phone numbers,and email address in one entry.
1. With the flip open, press [MENU].
2. Use the Directional Key toscroll to CONTACTS.
3. Press My Name Card.
4. Press [EDIT] to enter yourpersonal Contact information.
5. Use the Directional Key toscroll to the information youwant to enter.
6. Enter your information asnecessary, then press .
NOTE Press the Right Soft Key [Options] to send your name card.
56 VX8360
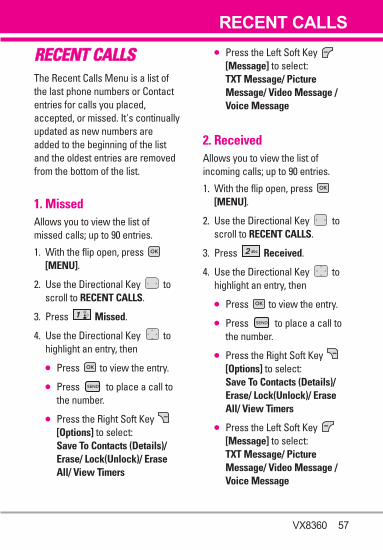
RREECCEENNTT CCAALLLLSSThe Recent Calls Menu is a list ofthe last phone numbers or Contactentries for calls you placed,accepted, or missed. It's continuallyupdated as new numbers areadded to the beginning of the listand the oldest entries are removedfrom the bottom of the list.
1. MissedAllows you to view the list ofmissed calls; up to 90 entries.
1. With the flip open, press [MENU].
2. Use the Directional Key toscroll to RECENT CALLS.
3. Press Missed.
4. Use the Directional Key tohighlight an entry, then
l Press to view the entry.
l Press to place a call tothe number.
l Press the Right Soft Key [Options] to select:Save To Contacts (Details)/Erase/ Lock(Unlock)/ EraseAll/ View Timers
l Press the Left Soft Key [Message] to select:TXT Message/ PictureMessage/ Video Message /Voice Message
2. ReceivedAllows you to view the list ofincoming calls; up to 90 entries.
1. With the flip open, press [MENU].
2. Use the Directional Key toscroll to RECENT CALLS.
3. Press Received.
4. Use the Directional Key tohighlight an entry, then
l Press to view the entry.
l Press to place a call tothe number.
l Press the Right Soft Key [Options] to select:Save To Contacts (Details)/Erase/ Lock(Unlock)/ EraseAll/ View Timers
l Press the Left Soft Key [Message] to select:TXT Message/ PictureMessage/ Video Message /Voice Message
RECENT CALLS
VX8360 57

RECENT CALLS3. DialedAllows you to view the list ofoutgoing calls; up to 90 entries.
1. With the flip open, press [MENU].
2. Use the Directional Key toscroll to RECENT CALLS.
3. Press Dialed.
4. Use the Directional Key tohighlight an entry, then
l Press to view the entry.
l Press to place a call tothe number.
l Press the Right Soft Key [Options] to select:Save to Contacts(Details)/Erase/ Lock(Unlock)/ EraseAll/ View Timers
l Press the Left Soft Key [Message] to select:TXT Message/ PictureMessage/ Video Message /Voice Message
4. AllAllows you to view the list of allcalls; up to 270 entries.
1. With the flip open, press [MENU].
2. Use the Directional Key toscroll to RECENT CALLS.
3. Press All.
4. Use the Directional Key tohighlight an entry, then
l Press to view the entry.
l Press to place a call tothe number.
l Press the Right Soft Key [Options] to select:Save to Contacts(Details)/Erase/ Lock(Unlock)/ EraseAll/ View Timers
l Press the Left Soft Key [Message] to select:TXT Message/ PictureMessage/ Video Message /Voice Message
SHORTCUT To view a quick list of all yourrecent calls, press from standby mode.
58 VX8360

5. View TimersAllows you to view the duration ofselected calls.
1. With the flip open, press [MENU].
2. Use the Directional Key toscroll to RECENT CALLS.
3. Press View Timers.
4. Use the Directional Key tohighlight a call list.
Last Call/ All Calls/ ReceivedCalls/ Dialed Calls/ RoamingCalls/ Transmit Data/ ReceivedData/ Total Data/ Last Reset/Lifetime Calls/ Lifetime Data
5. Press the Left Soft Key [Reset] to reset the highlightedtimer.
6. Reset all the recorded timers bypressing the Right Soft Key [Reset All].
NOTE Lifetime Calls and Lifetime DataCounter cannot be reset.
VX8360 59

SETTINGS & TOOLS
60 VX8360
SSEETTTTIINNGGSS && TTOOOOLLSS
1. My VerizonCheck your subscriptioninformation ranging from yourpayment plan to your softwareupgrade or other available service.
1. With the flip open, press [MENU].
2. Use the Directional Key toscroll to SETTINGS & TOOLS.
3. Press My Verizon.
2. ToolsYour phone tools include VoiceCommands, Calculator, Ez TipCalculator, Calendar, Alarm Clock,Stopwatch, World Clock, Notepad,and USB Mass Storage.
1. With the flip open, press [MENU].
2. Use the Directional Key toscroll to SETTINGS & TOOLS.
3. Press Tools.
2.1 Voice CommandsThis feature provides you with thefollowing options equipped withAVR (Advanced Voice Recognition)
technology. Each option has itsdetailed information on the phoneand you can check it out bypressing the Left Soft Key [Info].
1. With the flip open, press [MENU].
2. Use the Directional Key toscroll to SETTINGS & TOOLS.
3. Press Tools.
4. Press Voice Commands.
Access and Options
1. With the flip open, press theVoice Command Key (on theleft side of the phone).
The Voice Commands feature hasseveral settings which allow you tocustomize how you want to use it.Access Voice Commands, thenpress the Right Soft Key [Settings].
Digit Dial Readout On/ Off
Choice List Automatic/ Always Off
Sensitivity Control the sensitivity asReject More/ Automatic/ RejectLess.
Train Voice If the phone often asksyou to repeat voice command, trainthe phone to recognize your voice

VX8360 61
patterns. Train Words/ Train Digits
Prompts Mode/ Audio Playback/TimeoutFor Mode, set Prompts/ Readout +Alerts/ Readout/ Tones Only. ForAudio Playback, set Speakerphoneor Earpiece. For Timeout, set 5 seconds or 10 seconds.
Call Alert Ring Only/ Caller ID +Ring/ Name Repeat
2.1.1 Call <Name or Number>
Say "Call" and then call someonesimply by saying the name or phonenumber. Please speak clearly andsay the name or number exactly asit is entered in your Contact List.When you have more than onecontact number, you can state thename and number type of thecontact (for example, 'Call JohnWork').
2.1.2 Send Msg to <Name orNumber>
Say "Send Message" and thecommand will prompt you for thetype of message. After choosing themessage type, you will be promptedfor the contact name, number orgroup. It will automatically start a
message. If you say a full-sentencecommand, such as 'Send Messageto Bob', it will automatically start atext message without asking for themessage type. When using 'SendMessage' command, speak clearlyand say the name, number or groupexactly as it is entered in yourContact List.
2.1.3 Go to <Menu>
The 'Go to' command allows you toaccess a menu within the phone(for example, 'Go to Calendar'). If no menu option is stated, a list ofoptions will be provided.
2.1.4 Check <Item>
The ‘Check’ command allows you tocheck out a wide range of itemssuch as Phone Status, Voicemail,Messages, Missed Calls, Time,Signal Strength, Battery andVolume.
2.1.5 Contacts <Name>
You can look up names in yourContacts (for example, 'ContactsJohn') as well as manage yourContact List including creating,erasing or modifying.Read out/ Create New/ Erase/Modify

SETTINGS & TOOLS
62 VX8360
2.1.6 My Verizon
The 'My Verizon' commandprovides you with direct access toyour Verizon Wireless accountinformation.
2.1.7 Help
Provides a general guideline tousing Voice Commands.
2.2 CalculatorAllows you to perform simplemathematical calculations. You canenter numbers up to eight digits andthe sixth decimal place.Calculations can be made with upto 4 lines at one time.
1. With the flip open, press [MENU].
2. Use the Directional Key toscroll to SETTINGS & TOOLS.
3. Press Tools.
4. Press Calculator.
5. Enter the numbers to get thevalue you want. To cancel anumber, press the Left Soft Key
[Clear].
6. Use the Right Soft Key [Operators] to add parenthesis orpower among numbers forcalculation.
7. Use the Directional Key toenter operation betweennumbers and press [ = ] forthe result.
NOTE To insert a decimal, press . Toinsert ±, press .
2.3 Ez Tip CalculatorAllows you to quickly and easilycalculate bill amounts using the billtotal, tip % and number of people asvariables.1. With the flip open, press
[MENU].
2. Use the Directional Key toscroll to SETTINGS & TOOLS.
3. Press Tools.
4. Press Ez Tip Calculator.
5. Enter the variable fields (Totalbill, Tip (%), Split) and thecorresponding calculation fields(tip and total for each person)appear automatically.
6. Press the Left Soft Key [Reset] for another calculation.

VX8360 63
2.4 CalendarAllows you to keep your agendaconvenient and easy to access.Simply store your appointments andyour phone will alert you with areminder you set.
SHORTCUT Pressing the Directional Keydownward from standby
mode is a hot key to Calendarby default.
1. With the flip open, press [MENU].
2. Use the Directional Key toscroll to SETTINGS & TOOLS.
3. Press Tools.
4. Press Calendar.
5. Use the Directional Key tohighlight the scheduled day.
Left : Previous Day
Right : Next Day
Up : Previous Week
Down : Next Week
6. Press the Left Soft Key [Add].
7. Enter Subject, then scroll downto set remaining settings.
8. Highlight a Calendar setting field,then press the Left Soft Key [Set]. For each Calendar eventyou can set:
l Start Date & Timel End Date & Timel Repeat l Untill Alerts l Tonesl Vibrate
9. Use the Directional Key tohighlight the setting you want,then press .
10. Press [SAVE] whenCalendar information iscomplete.
2.5 Alarm ClockAllows you to set up to threealarms. At the alarm time, Alarm 1(or 2 or 3) will be displayed on theLCD screen and the alarm willsound.
1. With the flip open, press [MENU].
2. Use the Directional Key toscroll to SETTINGS & TOOLS.
3. Press Tools.
4. Press Alarm Clock.
5. Use the Directional Key tohighlight an Alarm (1, 2, or 3),

SETTINGS & TOOLS
64 VX8360
then press .
6. Enter the alarm informationincluding:
l Turn On/Off l Set Time
l Repeat l Ringtone
7. Use the Directional Key tohighlight the information youwant to set, then press the LeftSoft Key [Set] to view yoursetting choices.
8. Press [SAVE] after setting allof the Alarm fields as necessary.
NOTE You can also open the flip and chooseSnooze or Dismiss.
2.6 StopwatchAllows you to use your phone as atypical stopwatch. Pressing willstart and stop Stopwatch time.While measuring time, press theLeft Soft Key to lap. After timehas stopped, press the Right SoftKey [Reset].
1. With the flip open, press [MENU].
2. Use the Directional Key toscroll to SETTINGS & TOOLS.
3. Press Tools.
4. Press Stopwatch.
2.7 World ClockAllows you to determine the currenttime in another time zone or countryby navigating with the DirectionalKey to the right or left.
1. With the flip open, press [MENU].
2. Use the Directional Key toscroll to SETTINGS & TOOLS.
3. Press Tools.
4. Press World Clock.
5. Press the Right Soft Key [Cities] for a list of availablecities.
6. Select a city from the list, thenpress . The display shows the position ofthe city on a global map.
7. Press again to zoom in onthe city and view its date andtime infomation.
NOTE With the Left Soft Key [Set DST],set to daylight saving time.

VX8360 65
2.8 NotepadAllows you to add, read, edit, anderase notes to yourself.
1. With the flip open, press [MENU].
2. Use the Directional Key toscroll to SETTINGS & TOOLS.
3. Press Tools.
4. Press Notepad.
5. Press the Left Soft Key [Add] to write a new note.
6. Press the Left Soft Key tochange the entry mode.
7. After filling in the note, press to save it.
2.9 USB Mass StorageThis menu allows you to transfercontent from your phone to yourWindows® XP or Windows Vista™PC (or vice versa) when your phoneis connected to your Windows® XPor Windows Vista™ PC with acompatible USB cable. Mac OSTM orLinux OS operating system is notsupported. You can only accessthis menu when a microSD™ cardis inserted in your phone. (seepage 19 to insert it).
1. With the flip open, press [MENU].
2. Use the Directional Key toscroll to SETTINGS & TOOLS.
3. Press Tools.
4. Press USB Mass Storage.
3. Bluetooth® MenuThe VX8360 is compatible withdevices that support the Bluetooth®
Headset, Handsfree, Dial UpNetworking , Object Push forContacts including name cards andCalendar events, Advanced AudioDistribution (Stereo), File TransferProfile(s), PhoneBook AccessProfile, Basic Printing Profile andBasic Imaging Profile.

SETTINGS & TOOLS
66 VX8360
You may create and store 20pairings within the VX8360 andconnect to one device. The approximate communicationrange for Bluetooth® wirelesstechnology is up to 30 feet (10meters).Bluetooth® QD ID B014194
NOTE Read the user guide of eachBluetooth® accessory that you aretrying to pair with your phone becausethe instructions may be different.
NOTE Your phone is based on the Bluetooth®
specification, but it is not guaranteedto work with all devices enabled withBluetooth® wireless technology.Phone does not support ALLBluetooth® OBEX Profiles.* For vehicle/accessory compatibility go towww.verizonwireless.com/bluetoothchart.
TIPS l HEADSET: Supports use of acompatible bluetooth® headset formono voice.
l HANDSFREE: Supports Bluetooth®
headsets, and may also support otherinstalled compatible Bluetooth®
devices with speakerphonecapabilities, such as car kits or aconference room device. ForHandsfree Car Kit Compatibility, refertowww.verizonwireless.com/bluetoothcharton the Verizon Wireless website.
l DIAL UP NETWORKING: Allows thephone to be used as a data modemwith a compatible Bluetooth® device,such as a laptop or PDA, over theVZW NationalAccess and / or VZW
BroadbandAccess systems.l STEREO: Supports delivery of stereo
audio to a compatible Bluetooth®
device.l PHONEBOOK ACCESS: Allows
sharing of your name card,phonebook entries, and call historywith a compatible Bluetooth® device.
l BASIC PRINTING: Allows printing ofJPEG files to a Bluetooth® enabledprinter.
l OBJECT PUSH: Allows sending andreceiving of contact name cards,calendar events, and JPEG picturesbetween devices.
l FILE TRANSFER: Allows acompatible Bluetooth® device to viewa list of files and transfer non-protected files in either direction.
l BASIC IMAGING: Allows sending andreceiving of non-protected images forstoring and printing.

VX8360 67
3.1 Add New DevicePairing is the process that allowsthe handset to locate, establish,and register 1-to-1 connection withthe target device.
3.1.1 For pairing with a newBluetooth® device
1. Follow the Bluetooth® accessoryinstructions to set the device topairing mode.
2. With the flip open, press [MENU].
3. Use the Directional Key toscroll to SETTINGS & TOOLS.
4. Press Bluetooth Menu.
5. Press Add New Device.
Set the desired device to pairing.
6. If Bluetooth® power is set to off,you will be prompted to turnpower on. Highlight Yes andpress .
7. The device will appear in AddNew Device menu once it hasbeen located. Highlight thedevice and press .
8. The handset will prompt you forthe passcode. Consult theBluetooth® accessoryinstructions for the appropriatepasscode (typically “0000” - 4zeroes). Enter the passcode andpress . When Auto PairHandsfree is set to On, thedevice will try to autopair forheadset.
9. When pairing with the Computer,PC or PDA is successful,highlight either Always Ask orAlways Connect and press to connect with the device.
10. Once connected, you will seethe device listed in theBluetooth® Menu andBluetooth® indicator will changeto the will show up on yourscreen when connected to theBluetooth® device. You can alsocheck out the connection with ablue icon on the list.
3.1.2 Icon Reference in AddingNew Device
When the Bluetooth® wirelessconnection is built and paireddevices are found, the followingicons are displayed.

SETTINGS & TOOLS
68 VX8360
l Icon References When aBluetooth® Wireless Connectionis Searched (neither connectednor paired).
l Icon References WhenSuccessfully Connected
Turn OnAllows you to set the phone'sBluetooth® power On/Off.
1. With the flip open, press [MENU].
2. Use the Directional Key toscroll to SETTINGS & TOOLS.
3. Press Bluetooth Menu.
4. Press the Left Soft Key [Turn On].
NOTE By default, your device’s Bluetooth®
functionality is turned off.
My Device InfoAllows you to edit the name of theBluetooth® device when Add NewDevice menu is highlighted.
When an only mono headsetis connected with yourVX8360 device
When an only stereo headsetis connected with yourVX8360 device
When stereo headsets andmono headsets are allconnected with your VX8360device
When an audio device isfound by your VX8360 device
When a PC is found by yourVX8360 device
When a PDA is found by yourVX8360 device
When another phone deviceis found by your VX8360device
When a printer is found byyour VX8360 device
When other undefineddevices are found by yourVX8360 device
When a carkit device is foundby your VX8360 device

VX8360 69
1. With the flip open, press [MENU].
2. Use the Directional Key toscroll to SETTINGS & TOOLS.
3. Press Bluetooth Menu.
4. Press the Right Soft Key [Options].
5. Press My Device Info.
6. Press to clear the existingname.
7. Use the Alphanumeric Keypad toenter a new custom name.
8. Press to save and exit.
TIP Bluetooth® wireless connection isdependent on your Bluetooth® stereodevice. Even though you want toconnect with a headset that supportsboth stereo and handsfree profiles,you may only be able to connect withone.
Discovery ModeAllows you to set whether yourdevice is able to be searched byother Bluetooth devices in the area.
1. With the flip open, press [MENU].
2. Use the Directional Key toscroll to SETTINGS & TOOLS.
3. Press Bluetooth Menu.
4. Press the Right Soft Key [Options].
5. Press Discovery Mode.
6. Use the Directional Key tohighlight a setting, then press .
On / Off
NOTE If you choose On for Discovery Mode,your device is able to be searched byother in-range Bluetooth® devices.
Supported ProfilesAllows you to see profiles that yourVX8360 phone can support.
1. With the flip open, press [MENU].
2. Use the Directional Key toscroll to SETTINGS & TOOLS.
3. Press Bluetooth Menu.
4. Press the Right Soft Key [Options].
5. Press Supported Profiles.
Dial-up Networking
In order to start a dial-upnetworking session:
1. Start the Bluetooth® serviceapplication or program present

SETTINGS & TOOLS
70 VX8360
on the Client device.
2. Find your phone’s name from thelist of available devices.
3. From the list of available servicesor menu, select dial-upnetworking.
4. Enter required information suchas ID, password and phonenumber in the "Connect To"dialog box.
5. Press the "Dial" button to initiatethe call. Once the connection isestablished, you can start usingthe Internet.
File Transfer
In order to start a file transfersession:
1. Start the Bluetooth® serviceapplication or program presenton the Client device.
2. Set the discovery mode On.
3. Find your phone’s name from thelist of available devices.
4. From the list of available servicesor menu, select file-transferservice.
5. A separate window appears withthe directory structure of your
phone. You are now able totransfer files to and from theClient device.
Phonebook Access
Please refer to your handsfreedevice or car audio system manualfor further instructions.
Auto Pair HandsfreeAllows Bluetooth pairing with anaudio device to be triedautomatically with a default PINcode- 0000.
1. With the flip open, press [MENU].
2. Use the Directional Key toscroll to SETTINGS & TOOLS.
3. Press Bluetooth Menu.
4. Press the Right Soft Key [Options].
5. Press Auto Pair Handsfree.
The following options are availablein the paired device.For headset devices:
1. Remove Device: You can removethe device from the pairing list.
2. Incoming Security: Allows you toset permission beforeconnecting an incoming device.

VX8360 71
3. Rename Device: You can renamethe paired device.
4. Service Discovery: Allows you tosearch for the services that theselected device supports.
5. Device Info: Shows the deviceinformation.
NOTES
In the pairing list, you can disconnect theconnected device with the blue arrow signalby pressing or by pressing the Left SoftKey [Turn Off]. Reversely, you can turnit on by pressing the Left Soft Key [Turn On] again.When an audio device is connected, thenyou select another device and press ,both devices are connected.In case your search fails to find any pairingdevice, select found device instead.Print Picture allows you to print to devicesthat support BPP profiles:l When connected with Phone or PC
supporting OPP, the following menus arepossible: Send name card: Allows mycontact data to send other device up to1000 Contacts.
l Get name card: Allows you to pull namecard of other device. Exchange namecard: Allows you to exchange my namecard with other device. Send CalendarEvent: Allows you to send up to 300Calendar events to other device.
l Send Picture: Allows you to send myphone image to other device.
l Browse/Get file: Allows you to get files ofother device.(Only when other device cansupport FTP.)
4. Sounds SettingsProvides options to customize thephone’s sounds.
4.1 Master Volume Allows you to set volume settings.1. With the flip open, press
[MENU].
2. Use the Directional Key toscroll to SETTINGS & TOOLS.
3. Press Sounds Settings.
4. Press Master Volume.
5. Adjust the volume with theDirectional Key then press
to save the setting.
4.2 Call SoundsAllows you to set how the phonealerts you for types of incomingcalls.
1. With the flip open, press [MENU].
2. Use the Directional Key toscroll to SETTINGS & TOOLS.
3. Press Sounds Settings.
4. Press Call Sounds.
4.2.1 Call Ringtone
1. With the flip open, press[MENU].

SETTINGS & TOOLS
72 VX8360
2. Use the Directional Key to scroll to SETTINGS &TOOLS.
3. Press Sounds Settings.
4. Press Call Sounds.
5. Press Call Ringtone.
6. Use the Directional Key to highlight a ringtone thenpress to save the sound.
TIP To hear a ringtone before you set it,
press the Left Soft Key [[PPllaayy]].
4.2.2 Call Vibrate
1. With the flip open, press[MENU].
2. Use the Directional Key to scroll to SETTINGS &TOOLS.
3. Press Sounds Settings.
4. Press Call Sounds.
5. Press Call Vibrate.
6. Use the Directional Key to highlight a setting, thenpress .
On/ Off
4.3 Alert SoundsAllows you to select the alert typefor a new message.
1. With the flip open, press [MENU].
2. Use the Directional Key toscroll to SETTINGS & TOOLS.
3. Press Sounds Settings.
4. Press Alert Sounds.5. Select TXT Message/
Multimedia Message/Voicemail/Emergency Tone
6. The Alert Sounds menu hasthese options:Tone/ Vibrate/ ReminderThe exception for this is theEmergency Tone menu. Thismenu has these options:Alert/ Vibrate/ Off
4.4 Keypad Volume Allows you to set the keypadvolume.
1. With the flip open, press [MENU].
2. Use the Directional Key toscroll to SETTINGS & TOOLS.
3. Press Sounds Settings.
4. Press Keypad Volume.

5. Adjust the volume with theDirectional Key then press
to save the setting.
4.5 Service Alerts Allows you to set any of the fourAlert options to either On or Off.
1. With the flip open, press [MENU].
2. Use the Directional Key toscroll to SETTINGS & TOOLS.
3. Press Sounds Settings.
4. Press Service Alerts.
5. Select an alert option.ERI Alerts you to the status ofcellular service. ERI: Enhanced RoamingIndicatorMinute Beep Alerts you 10seconds before the end of everyminute during a call.Call Connect Alerts you whenthe call is connected.Charge Complete Alerts youwhen the battery is completelycharged.
6. Use the Directional Key tohighlight a setting, then press .On/ Off
4.6 Power On/Off Allows you to set the phone tosound a tone when the phone ispowered on/off.
1. With the flip open, press [MENU].
2. Use the Directional Key toscroll to SETTINGS & TOOLS.
3. Press Sounds Settings.
4. Press Power On/Off.
5. Select Power On/ Power Off.
6. Use the Directional Key tohighlight a setting, then press.
On/ Off
4.7 Voice ClarityAllows you to set the phone toautomatically adapt to noisyenvironments by adjusting thelistening level and improvingspeech intelligibility.
NOTE The Voice Clarity feature isautomatically disabled when you usethe speakerphone or the hands-freedevices.
1. With the flip open, press [MENU].
2. Use the Directional Key toscroll to SETTINGS & TOOLS.
VX8360 73

SETTINGS & TOOLS
3. Press Sounds Settings.
4. Press Voice Clarity.
5. Select Power On/ Power Off.
6. Use the Directional Key toscroll to a setting, then press .
On/ Off
5. Display SettingsProvides options to customize thephone’s display screen.
1. With the flip open, press [MENU].
2. Use the Directional Key toscroll to SETTINGS & TOOLS.
3. Press Display Settings.
5.1 BannerAllows you to enter a string of up to23 characters which displays on theLCD screen.
1. With the flip open, press [MENU].
2. Use the Directional Key toscroll to SETTINGS & TOOLS.
3. Press Display Settings.
4. Press Banner.
5.1.1 Personal Banner
1. With the flip open, press[MENU].
2. Use the Directional Key to scroll to SETTINGS &TOOLS.
3. Press Display Settings.
4. Press Banner.
5. Press Personal Banner.
6. Enter your own banner text.
NOTE Press the Directional Key tochange the color of the text. Use the
to select the color you want.Black/ White/ Yellow/ Orange/ Red/Brown/ Blue/ Green/ Light Blue
7. Press .
5.1.2 ERI Banner
If you use ERI Service, ERI Text isshown on the sub banner.
1. With the flip open, press [MENU].
2. Use the Directional Key to scroll to SETTINGS &TOOLS.
3. Press Display Settings.
4. Press Banner.
5. Press ERI Banner.
74 VX8360

6. Use the Directional Key to highlight a setting, thenpress .
On/ Off
5.2 BacklightAllows you to set the duration forilluminating the backlight. Displayand Keypad are set separately.
1. With the flip open, press [MENU].
2. Use the Directional Key toscroll to SETTINGS & TOOLS.
3. Press Display Settings.
4. Press Backlight.
5. Highlight a Backlight submenuand press .
Display/ Keypad
1. Display
Main Backlight: 7 Seconds/15 Seconds/ 30 Seconds/ Always On/ Always Off
Front Backlight: 7 Seconds/15 Seconds/ 30 Seconds
2. Keypad: 7 Seconds/ 15Seconds/ 30 Seconds/ Always On/ Always Off
5.3 WallpaperAllows you to choose the kind ofbackground to be displayed on thephone's LCD in standby mode.1. With the flip open, press
[MENU].
2. Use the Directional Key toscroll to SETTINGS & TOOLS.
3. Press Display Settings.
4. Press Wallpaper.
5. Highlight a Wallpaper submenuand press .
Main Wallpaper/ FrontWallpaper
1. Main WallpaperMy Pictures/ My Videos/ FunAnimations
2. Front WallpaperMy Pictures/ My Videos
6. Select from available screensthen press .
5.4 Display ThemesAllows you to choose the color ofthe background screen.
1. With the flip open, press [MENU].
2. Use the Directional Key toscroll to SETTINGS & TOOLS.
3. Press Display Settings.
VX8360 75

SETTINGS & TOOLS
4. Press Display Themes.
5. Use the Directional Key tohighlight a setting, then press .
Classic/Water/Black
NOTE Press the Left Soft Key [Preview] to preview the selecteddisplay theme.
5.5 Main Menu SettingsAllows you to choose how the MainMenu displays for menu selection.
1. With the flip open, press [MENU].
2. Use the Directional Key toscroll to SETTINGS & TOOLS.
3. Press Display Settings.
4. Press Main MenuSettings.
5. Use the Directional Key tohighlight a setting, then press .
Tab/ List/ Grid
NOTE This User Guide gives navigationinstructions according to the default"Tab" Main Menu Layout in theDisplay Settings menu. If other menusare set, navigating the phone's menusmay be different.
NOTE Press the Left Soft Key [Preview] to preview the selectedmenu setting.
5.6 Font TypeAllows you to set the font type.
1. With the flip open, press [MENU].
2. Use the Directional Key toscroll to SETTINGS & TOOLS.
3. Press Display Settings.
4. Press Font Type.
5. Use the Directional Key toscroll to a setting, then press .VZW Font/ LG Edge/ LG Script
NOTE Press the Left Soft Key
[Preview] to preview the selected
font.
5.7 Font SizeAllows you to set the Dial Digits fontsize, Menu & Lists font size, andMessage font size. This setting ishelpful for those who need the textto display a little bit larger.
1. With the flip open, press [MENU].
2. Use the Directional Key toscroll to SETTINGS & TOOLS.
3. Press Display Settings.
4. Press Font Size.
5. Use the Directional Key toselect Dial Digits/ Menu & Lists/Message.
76 VX8360

6. Press the Left Soft Key [Set].
7. Use the Directional Key tohighlight a setting, then press
.
Dial Digits: Normal/LargeMenu & Lists: Normal/ LargeMessage: Normal/ Large
5.8 Clock Format Allows you to choose the kind ofclock to be displayed on the frontand main LCD screens.
1. With the flip open, press [MENU].
2. Use the Directional Key toscroll to SETTINGS & TOOLS.
3. Press Display Settings.
4. Press Clock Format.
5. Highlight a Clock Formatsubmenu and press .
Main Clock/ Front Clock1. Main Clock
Small Digital 12/ Small Analog/Large Analog/ Large Digital 12/Large Digital 24/ Dual City/ Off
2. Front ClockDigital 12/ Large Digital 12/Analog/ Small Digital 12/ Off
6. Use the Directional Key tohighlight a setting, then press .
NOTE Press the Left Soft Key
[Preview] to preview the selected clock
format.
6. Phone SettingsThe Phone Settings Menu allowsyou to designate specific settings tocustomize how you use your phone.
6.1 Airplane ModeTurning on Airplane Mode willdisable all wirelesscommunications.
1. With the flip open, press [MENU].
2. Use the Directional Key toscroll to SETTINGS & TOOLS.
3. Press Phone Settings.
4. Press Airplane Mode.
5. Use the Directional Key tohighlight a setting, then press .
On/ Off
6.2 Set ShortcutsAllows you to set shortcuts tophone menus using the down, up,left and right Directional Key.
VX8360 77

SETTINGS & TOOLS6.2.1 Set My Shortcuts
To access these shortcuts open theflip, then press the Directional Keyto the right from standby mode (bydefault) to display your fourshortcuts.
1. With the flip open, press [MENU].
2. Use the Directional Key toscroll to SETTINGS & TOOLS.
3. Press Phone Settings.
4. Press Set Shortcuts.
5. Press Set My Shortcuts.
6. Use the Directional Key tohighlight a shortcut key you wantto set. Shortcut 1/ Shortcut 2/ Shortcut3/ Shortcut 4
7. Press to display theavailable shortcuts. Use theDirectional Key to selectone, then press .
6.2.2 Set Directional Keys
To access these shortcuts open theflip, then press the Directional Keyto access the option that youconfigured for that specificdirectional key.
1. With the flip open, press [MENU].
2. Use the Directional Key toscroll to SETTINGS & TOOLS.
3. Press Phone Settings.
4. Press Set Shortcuts.
5. Press Set Directional Keys.
6. Use the Directional Key tohighlight a shortcut key you wantto set. Up Directional Key/ LeftDirectional Key/ DownDirectional Key
7. Press to display theavailable shortcuts. Use theDirectional Key to selectone, then press .
6.3 Voice Commands
Using the Internal Keypad
1. With the flip open, press [MENU].
2. Use the Directional Key toscroll to SETTINGS & TOOLS.
3. Press Phone Settings.
4. Press Voice Commands.
Prompts Mode/ AudioPlayback/ TimeoutFor Mode, set Prompts/ Readout+ Alerts/ Readout/ Tones Only.For Audio Playback, set
78 VX8360

Speakerphone/ Earpiece. ForTimeout, set 5 seconds or 10seconds.
Call Alert Ring Only/ Caller ID +Ring/ Name Repeat
6.4 LanguageAllows you to set the bilingual(English or Spanish) featureaccording to your preference. 1. With the flip open, press
[MENU].
2. Use the Directional Key toscroll to SETTINGS & TOOLS.
3. Press Phone Settings.
4. Press Language.
5. Use the Directional Key tohighlight a setting, then press .
English/ Español
6.5 LocationAllows you to set GPS (GlobalPositioning System: Satelliteassisted location informationsystem) mode.1. With the flip open, press
[MENU].
2. Use the Directional Key toscroll to SETTINGS & TOOLS.
3. Press Phone Settings.
4. Press Location.
5. Use the Directional Key tohighlight a setting, then press .
Location On/ E911 OnlyNOTES l GPS satellite signals are not
always received by the phone,especially under bad atmosphericand environmental conditions,indoors, etc.
l When a Location SettingRestriction is activated in theSecurity Menu, the lock code isrequired when you enter locationmenu. The lock code is the same 4digits you use as your device lockcode; initially the last 4 digits ofyour phone number.
l When in Airplane Mode, servicessupporting Location Onfunctionality (such as Chaperone)will be suspended.
VX8360 79
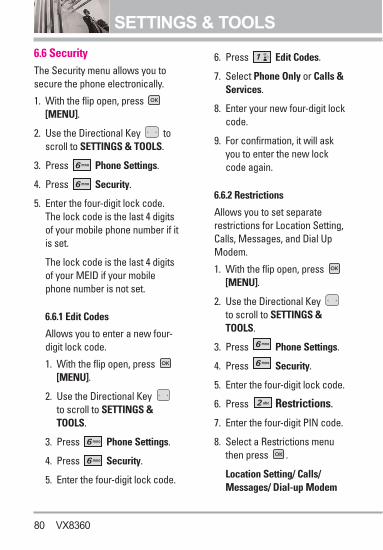
SETTINGS & TOOLS6.6 SecurityThe Security menu allows you tosecure the phone electronically.
1. With the flip open, press [MENU].
2. Use the Directional Key toscroll to SETTINGS & TOOLS.
3. Press Phone Settings.
4. Press Security.
5. Enter the four-digit lock code.The lock code is the last 4 digitsof your mobile phone number if itis set.
The lock code is the last 4 digitsof your MEID if your mobilephone number is not set.
6.6.1 Edit Codes
Allows you to enter a new four-digit lock code.
1. With the flip open, press[MENU].
2. Use the Directional Key to scroll to SETTINGS &TOOLS.
3. Press Phone Settings.
4. Press Security.
5. Enter the four-digit lock code.
6. Press Edit Codes.
7. Select Phone Only or Calls &Services.
8. Enter your new four-digit lockcode.
9. For confirmation, it will askyou to enter the new lockcode again.
6.6.2 Restrictions
Allows you to set separaterestrictions for Location Setting,Calls, Messages, and Dial UpModem.
1. With the flip open, press[MENU].
2. Use the Directional Key to scroll to SETTINGS &TOOLS.
3. Press Phone Settings.
4. Press Security.
5. Enter the four-digit lock code.
6. Press Restrictions.
7. Enter the four-digit PIN code.
8. Select a Restrictions menuthen press .
Location Setting/ Calls/Messages/ Dial-up Modem
80 VX8360

9. Use the Directional Key to highlight the restrictionthen press .
Location Setting Lock Setting/Unlock Setting
Calls: Incoming Calls AllowAll / Contacts Only / Block All
Calls: Outgoing Calls Allow All/ Contacts Only / Block All
Messages: IncomingMessages Allow All / BlockAll
Messages: OutgoingMessages Allow All / BlockAll
Dial-up Modem Allow All/Block All
6.6.3 Phone Lock
Keeps your phone fromunauthorized use. Once thephone is locked, it's in restrictedmode until the lock code isentered. You can still receivephone calls and makeemergency calls. You can modifythe lock code using Edit Codessubmenu within the Securitymenu.
1. With the flip open, press[MENU].
2. Use the Directional Key to scroll to SETTINGS &TOOLS.
3. Press Phone Settings.
4. Press Security.
5. Enter the four-digit lock code.
6. Press Phone Lock.
7. Highlight an option then press.
Unlocked The phone is neverlocked (Lock mode can stillbe used).
On Power Up The phone islocked when it is turned on.
6.6.4 Lock Phone Now
1. With the flip open, press[MENU].
2. Use the Directional Key to scroll to SETTINGS &TOOLS.
3. Press Phone Settings.
4. Press Security.
5. Enter the four-digit lock code.
6. Press Lock Phone Now.
6.6.5 Reset Default
Allows you to reset your phone
VX8360 81

SETTINGS & TOOLSto the factory default settings.
1. With the flip open, press[MENU].
2. Use the Directional Key to scroll to SETTINGS &TOOLS.
3. Press Phone Settings.
4. Press Security.
5. Enter the four-digit lock code.
6. Press Reset Default.
7. Press after reading thewarning message.
8. Select Revert by pressing .
A confirmation message isdisplayed briefly before thephone resets itself.
6.6.6 Restore Phone
Allows you to erase all user dataand Contact information you'veentered in the phone's memoryso it's as if it just left the factory.
1. With the flip open, press [MENU].
2. Use the Directional Key to scroll to SETTINGS &TOOLS.
3. Press Phone Settings.
4. Press Security.
5. Enter the four-digit lock code.
6. Press Restore Phone.
7. Press after reading thewarning message.
8. Enter the four-digit lock code.
6.7 System SelectAllows you to set up the phonemanagement environment. Leavethis setting as the default unlessyou want to alter system selectionas instructed by your serviceprovider.
1. With the flip open, press [MENU].
2. Use the Directional Key toscroll to SETTINGS & TOOLS.
3. Press Phone Settings.
4. Press System Select.
5. Use the Directional Key tohighlight a setting, then press .
Home Only/ Automatic
82 VX8360

6.8 NAM SelectAllows you to select the phone’sNAM (Number AssignmentModule) if the phone is registeredwith multiple service providers.
1. With the flip open, press [MENU].
2. Use the Directional Key toscroll to SETTINGS & TOOLS.
3. Press Phone Settings.
4. Press NAM Select.
5. Use the Directional Key tohighlight a setting, then press .
NAM1/ NAM2
7. Call SettingsThe Call Settings Menu allows youto designate how the phonehandles both incoming andoutgoing calls.
7.1 Answer OptionsAllows you to determine how thephone will answer an incoming call.
1. With the flip open, press [MENU].
2. Use the Directional Key toscroll to SETTINGS & TOOLS.
3. Press Call Settings.
4. Press Answer Options.
5. Use the Directional Key toto mark the setting(s) you want touse, then press .
Flip Open/ Any Key/ Auto withHandsfree
6. Press the Left Soft Key [Done]when you have marked thesetting(s) you want.
NOTE Auto with Handsfree is availableonly when any external device isconnected to your phone.
When the following settings are set,Ringer is not activated.l When Sounds Off / Alarm Only is
set or individual Contact RingerID is set to No Ring/ Silence.
l When Ringer is set to Sounds Offwith side key or "Quiet".
7.2 Auto RetryAllows you to set the length of timethe phone waits beforeautomatically redialing a numberwhen the attempted call fails.
1. With the flip open, press [MENU].
2. Use the Directional Key toscroll to SETTINGS & TOOLS.
3. Press Call Settings.
VX8360 83

SETTINGS & TOOLS
4. Press Auto Retry.
5. Use the Directional Key tohighlight a setting, then press .
Off/ Every 10 Seconds/ Every 30Seconds/ Every 60 Seconds
7.3 TTY ModeAllows you to attach a TTY deviceenabling you to communicate withparties also using a TTY device. Aphone with TTY support is able totranslate typed characters to voice.Voice can also be translated intocharacters and then displayed onthe TTY.
1. With the flip open, press [MENU].
2. Use the Directional Key to
scroll to SETTINGS & TOOLS.
3. Press Call Settings.
4. Press TTY Mode.
An explanation message isdisplayed.
5. Press to continue.
6. Use the Directional Key tohighlight a setting, then press .TTY Full/ TTY + Talk/ TTY + Hear/TTY Off
TTY Full: Users who cannot talk orhear send and receive a textmessage through TTY equipment.
TTY + Talk: Users who can talk butcannot hear receive a text messageand send voice through TTYequipment.
84 VX8360
Menu User FeatureTransmission/
Receiving Mode
When makingcommunications with a
normal terminal
TTY FullFor hearing-/
verbally-impaired
text message transmission,text message receiving
Operator required
TTY +Talk
For hearing-impaired able to talk voice transmission, text
message receivingOperator required
TTY +Hear
For verbally-impaired
audible text message transmission,
voice receiving Operator required
TTY Off voice transmission, voicereceiving
TTY Mode (Tele Type writer)

TTY + Hear: Users who can hearbut cannot talk send a textmessage and receive voice throughTTY equipment.
TTY Off: Users send and receivewithout TTY equipment.
Connecting TTY Equipment and aTerminal
1. Connect a TTY cable to TTYconnection on the terminal (TTYconnection location is the sameas a headset jack).
2. Enter the phone menu and setthe desired TTY mode.
3. After setting a TTY mode, checkthe LCD screen of the phone forthe TTY icon.
4. Connect the TTY equipment tothe power source and turn it on.
5. Make a phone connection to thedesired number.
6. When connection is made, usethe TTY equipment to type in andsend a text message or sendvoice.
7. The voice or text message fromthe receiver end displays on theTTY equipment display.
7.4 One Touch Dial Allows you to initiate a speed dialcall by pressing and holding thespeed dial digit. If set to Off, SpeedDial numbers designated in yourContacts will not function.
1. With the flip open, press [MENU].
2. Use the Directional Key toscroll to SETTINGS & TOOLS.
3. Press Call Settings.
4. Press One Touch Dial.
5. Use the Directional Key tohighlight a setting, then press .
On/ Off
7.5 Voice PrivacyAllows you to set the voice privacyfeature for CDMA calls. CDMAoffers inherent voice privacy. Checkwith your service provider foravailability.
1. With the flip open, press [MENU].
2. Use the Directional Key toscroll to SETTINGS & TOOLS.
3. Press Call Settings.
4. Press Voice Privacy.
VX8360 85

SETTINGS & TOOLS5. Use the Directional Key to
highlight a setting, then press .
On/ Off
7.6 DTMF TonesAllows you to set the DTMF tonelength.
1. With the flip open, press [MENU].
2. Use the Directional Key toscroll to SETTINGS & TOOLS.
3. Press Call Settings.
4. Press DTMF Tones.
5. Use the Directional Key tohighlight a setting, then press .
Normal/ Long
8. USB Auto SyncYour phone automatically detects aUSB device when it is connected toyour phone for Sync Music or SyncData operation. If the option is setto Ask On Plug, you are asked toconfirm whenever the connection ismade.
1. With the flip open, press [MENU].
2. Use the Directional Key toscroll to SETTINGS & TOOLS.
3. Press USB Auto Sync.
4. Use the Directional Key tohighlight a setting, then press .
Sync Music/ Sync Data/ Ask OnPlug
9. MemoryAllows you to check your VX8360internal phone memory as well asthe microSD external memory. The VX8360 can access thefollowing file types stored on theremovable microSD card.My Pictures: png, jpg, bmp, gifMy Sounds: mid, qcp (used forMMS, cannot be set as ringtones)My Videos: 3gp, 3g2My Music: wma, mp3, unprotectedaac & aac+
86 VX8360

9.1 Save Options Allows you to select which memory(phone or memory card) to use tosave your files.
1. With the flip open, press [MENU].
2. Use the Directional Key toscroll to SETTINGS & TOOLS.
3. Press Memory.
4. Press Save Options.
5. Use the Directional Key toselect file type, then press .Pictures / Videos / Sounds
6. Use the Directional Key toselect place to save, then press
.Phone Memory / Card Memory
9.2 Phone Memory
Shows the memory informationsaved in your phone.1. With the flip open, press
[MENU].
2. Use the Directional Key toscroll to SETTINGS & TOOLS.
3. Press Memory.
4. Press Phone Memory.
5. Use the Directional Key toselect file storage type in theVX8360, then press to viewthe memory used.Memory Usage / My Pictures /My Videos / My Music / MySounds
NOTE You can reset my music for MyMusic option. This removes all songsand playlists purchased orsubscribed by V CAST Music withRhapsody. Playlists created on thephone will not be affected.
Store onVX8360
Store onmicroSDCard
TransferPhone toPC viaCard
TransferPC toPhonevia Card
V CASTMusic/WMASongs
W W W W
Ringtones W
Sound W W W W
V CASTVideo Clips W
DownloadedPicture/Video
W
Picture/Video (user-generatedor receivedvia MMS)
W W W W
VX8360 87

SETTINGS & TOOLS9.3 Card Memory Shows the memory informationsaved in the card.
1. With the flip open, press [MENU].
2. Use the Directional Key toscroll to SETTINGS & TOOLS.
3. Press Memory.
4. Press Card Memory.
5. Use the Directional Key toselect file storage type on thememory card, then press .Memory Usage / My Pictures /My Videos / My Music / MySounds
NOTE The option Card Memory Usageshows the total used memory andmemory space remaining.
NOTE Do not insert or remove the microSDTM
while playing, deleting or downloadingPictures/Videos/ Music/Sounds.
0. Phone InfoAllows you to view the informationspecific to your phone and software.
1. With the flip open, press [MENU].
2. Use the Directional Key toscroll to SETTINGS & TOOLS.
3. Press Phone Info.
0.1 My NumberAllows you to view your phonenumber.
1. With the flip open, press [MENU].
2. Use the Directional Key toscroll to SETTINGS & TOOLS.
3. Press Phone Info.
4. Press My Number.
0.2 SW/HW VersionAllows you to view the versions ofvarious applications such as SW,PRL, ERI, Browser, Media Center,AVR, MMS, Bluetooth®, MSUI, HW,MEID Version, and Warranty DateCode.
1. With the flip open, press [MENU].
2. Use the Directional Key toscroll to SETTINGS & TOOLS.
3. Press Phone Info.
4. Press SW/HW Version.
0.3 Icon GlossaryAllows you to view all the icons andtheir meanings.
88 VX8360

1. With the flip open, press [MENU].
2. Use the Directional Key toscroll to SETTINGS & TOOLS.
3. Press Phone Info.
4. Press Icon Glossary.
0.4 Software UpdateThis feature gives your phone theability to upgrade to the latestsoftware and keeps your phoneoperating with the latest featureswithout visiting a Verizon WirelessCommunications Store for theupgrade. You can either be notifiedautomatically that there is anupdated version of softwareavailable for your phone, or you canmanually check to see if there areany updates available for you todownload.
Automatic Update
Your phone will receive anotification that there is an updatedversion of software available to bedownloaded. You can press when notified that a download isavailable or it can happenautomatically. Once the downloadis complete you may, depending onthe nature of the update, have threeoptions available: Accept theupdate, Defer the update, or Reject
the update.
NOTE During the update you cannot makeor receive phone calls, including 911calls, or text messages.
Manual Update
1. With the flip open, press [MENU].
2. Use the Directional Key toscroll to SETTINGS & TOOLS.
3. Press Phone Info.
4. Press Software Update.
The two options shown will beStatus and Check New.
Press Status to see thestatus of a download or updateand see information on the lastsuccessful update. If updates havenot yet been performed, statusinformation will be unavailable.
Press Check New to checkif any new software updates areavailable to download. If a newersoftware version is available, it willautomatically begin downloadingafter 30 seconds or you can beginthe download immediately bypressing . To stop the softwaredownload press the Right Soft Key
[Quit].
VX8360 89

Safety
TTIIAA SSaaffeettyyIInnffoorrmmaattiioonnThe following is the complete TIASafety Information for wirelesshandheld phones.
Exposure to Radio FrequencySignal
Your wireless handheld portablephone is a low power radiotransmitter and receiver. When ON,it receives and sends out RadioFrequency (RF) signals.In August, 1996, the FederalCommunications Commissions(FCC) adopted RF exposureguidelines with safety levels forhandheld wireless phones. Thoseguidelines are consistent with thesafety standards previously set byboth U.S. and internationalstandards bodies:
ANSI C95.1 (1992) *
NCRP Report 86 (1986)
ICNIRP (1996)* American National StandardsInstitute; National Council onRadiation Protection andMeasurements; InternationalCommission on Non-IonizingRadiation Protection
Those standards were based oncomprehensive and periodicevaluations of the relevantscientific literature. For example,over 120 scientists, engineers, andphysicians from universities,government health agencies, andindustry reviewed the availablebody of research to develop theANSI Standard (C95.1).The design of your phonecomplies with the FCCguidelines (and thosestandards).
Antenna Care
Use only the supplied or anapproved replacement antenna.Unauthorized antennas,modifications, or attachments coulddamage the phone and may violateFCC regulations.
Phone Operation
NORMAL POSITION: Hold thephone as you would any othertelephone with the antenna pointedup and over your shoulder.
90 VX8360

Tips on Efficient Operation
For your phone to operate mostefficiently:Don’t touch the antennaunnecessarily when the phone is inuse. Contact with the antennaaffects call quality and may causethe phone to operate at a higherpower level than otherwise needed.
Driving
Check the laws and regulations onthe use of wireless phones in theareas where you drive and alwaysobey them. Also, if using yourphone while driving, please observethe following:l Give full attention to driving --
driving safely is your firstresponsibility;
l Use hands-free operation, ifavailable;
l Pull off the road and park beforemaking or answering a call ifdriving conditions or the lawrequire it.
Electronic Devices
Most modern electronic equipmentis shielded from RF signals.However, certain electronicequipment may not be shielded
against the RF signals from yourwireless phone.
Pacemakers
The Health Industry ManufacturersAssociation recommends that aminimum separation of six (6)inches be maintained between ahandheld wireless phone and apacemaker to avoid potentialinterference with the pacemaker.These recommendations areconsistent with the independentresearch by and recommendationsof Wireless Technology Research.Persons with pacemakers:l Should ALWAYS keep the phone
more than six (6) inches fromtheir pacemaker when the phoneis turned ON;
l Should not carry the phone in abreast pocket;
l Should use the ear opposite thepacemaker to minimize thepotential for interference;
l Should turn the phone OFFimmediately if there is anyreason to suspect thatinterference is taking place.
VX8360 91

Safety
Hearing Aids
Some digital wireless phones mayinterfere with some hearing aids. Inthe event of such interference, youmay want to consult your serviceprovider (or call the customerservice line to discuss alternatives).
Other Medical Devices
If you use any other personalmedical device, consult themanufacturer of your device todetermine if it is adequatelyshielded from external RF energy.Your physician may be able toassist you in obtaining thisinformation.
Health Care Facilities
Turn your phone OFF in health carefacilities when any regulationsposted in these areas instruct youto do so. Hospitals or health carefacilities may use equipment thatcould be sensitive to external RFenergy.
Vehicles
RF signals may affect improperlyinstalled or inadequately shieldedelectronic systems in motorvehicles. Check with themanufacturer or its representative
regarding your vehicle. You shouldalso consult the manufacturer ofany equipment that has been addedto your vehicle.
Posted Facilities
Turn your phone OFF in any facilitywhere posted notices so require.
Aircraft
FCC regulations prohibit using yourphone while in the air. Switch OFFyour phone before boarding anaircraft.
Blasting Areas
To avoid interfering with blastingoperations, turn your phone OFFwhen in a “blasting area” or inareas posted: “Turn off two-wayradio”. Obey all signs andinstructions.
Potentially Explosive Atmosphere
Turn your phone OFF when in anyarea with a potentially explosiveatmosphere and obey all signs andinstructions. Sparks in such areascould cause an explosion or fireresulting in bodily injury or evendeath.Areas with a potentially explosiveatmosphere are often, but not
92 VX8360

always marked clearly. Potentialareas may include: fueling areas(such as gasoline stations); belowdeck on boats; fuel or chemicaltransfer or storage facilities;vehicles using liquefied petroleumgas (such as propane or butane);areas where the air containschemicals or particles (such asgrain, dust, or metal powders); andany other area where you wouldnormally be advised to turn off yourvehicle engine.
For Vehicles Equipped with an AirBag
An air bag inflates with great force.DO NOT place objects, includingeither installed or portable wirelessequipment, in the area over the airbag or in the air bag deploymentarea. If in-vehicle wirelessequipment is improperly installedand the air bag inflates, seriousinjury could result.
SSaaffeettyy IInnffoorrmmaattiioonnPlease read and observe thefollowing information for safe andproper use of your phone and toprevent damage. Also, keep theuser guide in an accessible place atall times after reading it.
Violation of theinstructions may
cause minor or serious damage tothe product.l Do not disassemble or open
crush, bend or deform, punctureor shred.
l Do not modify or remanufacture,attempt to insert foreign objectsinto the battery, immerse orexpose to water or other liquids,expose to fire, explosion or otherhazard.
l Only use the battery for thesystem for which it is specified.
l Only use the battery with acharging system that has beenqualified with the system perIEEE-Std-1725-2006. Use of anunqualified battery or chargermay present a risk of fire,explosion, leakage, or otherhazard.
VX8360 93

Safetyl Do not short circuit a battery or
allow metallic conductiveobjects to contact batteryterminals.
l Replace the battery only withanother battery that has beenqualified with the system per thisstandard, IEEE-Std-1725-2006.Use of an unqualified batterymay present a risk of fire,explosion, leakage or otherhazard.
l Promptly dispose of usedbatteries in accordance withlocal regulations.
l Battery usage by children shouldbe supervised.
l Avoid dropping the phone orbattery. If the phone or battery isdropped, especially on a hardsurface, and the user suspectsdamage, take it to a servicecenter for inspection.
l At least, one of theAuthentication methods may beimplemented. (e.g. H/W, S/W,Mechanical, Hologram, etc.)
l Improper battery use may resultin a fire, explosion or otherhazard.
Charger and Adapter Safety
l The charger and adapter areintended for indoor use only.
l Insert the battery pack chargervertically into the wall powersocket.
l Only use the approved batterycharger. Otherwise, you maycause serious damage to yourphone.
l Use the correct adapter for yourphone when using the batterypack charger abroad.
Battery Information and Care
l Please dispose of your batteryproperly or take it to your localwireless carrier for recycling.
l The battery doesn’t need to beempty before recharging.
l Use only LG-approved chargersspecific to your phone modelsince they are designed tomaximize battery life.
l Do not disassemble or short-circuit the battery.
l Keep the battery’s metalcontacts clean.
l Replace the battery when it nolonger provides acceptable
94 VX8360

performance. The battery can berecharged several hundred timesbefore replacement.
l Recharge the battery after longperiods of non-use to maximizebattery life.
l Battery life will vary due tousage patterns andenvironmental conditions.
l Use of extended backlighting,Browser, and data connectivitykits affect battery life and talk/standby times.
l The self-protection function ofthe battery cuts the power of thephone when its operation is in anabnormal state. In this case,remove the battery from thephone, reinstall it, and turn thephone on.
Explosion, Shock, and Fire Hazards
l Do not put your phone in a placesubject to excessive dust andkeep the minimum requireddistance between the powercord and heat sources.
l Unplug the power cord prior tocleaning your phone, and cleanthe power plug pin when it’sdirty.
l When using the power plug,ensure that it’s firmly connected.If not, it may cause excessiveheat or fire.
l If you put your phone in a pocketor bag without covering thereceptacle of the phone (powerplug pin), metallic articles (suchas a coin, paperclip or pen) mayshort-circuit the phone. Alwayscover the receptacle when not inuse.
l Don’t short-circuit the battery.Metallic articles such as a coin,paperclip or pen in your pocketor bag may short-circuit the +and – terminals of the battery(metal strips on the battery) uponmoving. Short-circuit of theterminal may damage the batteryand cause an explosion.
General Notice
l Using a damaged battery orplacing a battery in your mouthmay cause serious injury.
l Do not place items containingmagnetic components such as acredit card, phone card, bankbook, or subway ticket near yourphone. The magnetism of thephone may damage the datastored in the magnetic strip.
VX8360 95

Safetyl Talking on your phone for a long
period of time may reduce callquality due to heat generatedduring use.
l When the phone is not used fora long period time, store it in asafe place with the power cordunplugged.
l Using the phone in proximity toreceiving equipment (i.e., TV orradio) may cause interference tothe phone.
l Do not use the phone if theantenna is damaged. If adamaged antenna contacts skin,it may cause a slight burn.Please contact an LG AuthorizedService Center to replace thedamaged antenna.
l Do not immerse your phone inwater. If this happens, turn it offimmediately and remove thebattery. If the phone does notwork, take it to an LG AuthorizedService Center.
l Do not paint your phone.l The data saved in your phone
might be deleted due to carelessuse, repair of the phone, orupgrade of the software. Pleasebackup your important phonenumbers. (Ringtones, text
messages, voice messages,pictures, and videos could alsobe deleted.) The manufacturer isnot liable for damage due to theloss of data.
l When you use the phone inpublic places, set the ringtone tovibration so you don't disturbothers.
l Do not turn your phone on or offwhen putting it to your ear.
l Use accessories, such asearphones and headsets, withcaution. Ensure that cables aretucked away safely and do nottouch the antenna unnecessarily.
96 VX8360

CCaauuttiioonn:: AAvvooiidd ppootteennttiiaallhheeaarriinngg lloossss..Prolonged exposure to loud sounds(including music) is the mostcommon cause of preventablehearing loss. Some scientificresearch suggests that usingportable audio devices, such asportable music players and cellulartelephones, at high volume settingsfor long durations may lead topermanent noise induced hearingloss. This includes the use ofheadphones (including headsets,earbuds and Bluetooth® or otherwireless devices). Exposure to veryloud sound has also beenassociated in some studies withtinnitus (a ringing in the ear),hypersensitivity to sound anddistorted hearing. Individualsusceptibility to noise-inducedhearing loss and other potentialhearing problems varies.The amount of sound produced bya portable audio device variesdepending on the nature of thesound, the device, the devicesettings and the headphones. Youshould follow some commonsenserecommendations when using anyportable audio device:
l Set the volume in a quietenvironment and select thelowest volume at which you canhear adequately.
l When using headphones, turnthe volume down if you cannothear the people speaking nearyou or if the person sitting nextto you can hear what you arelistening to.
l Do not turn the volume up toblock out noisy surroundings. Ifyou choose to listen to yourportable device in a noisyenvironment, use noise-cancelling headphones to blockout background environmentalnoise.
l Limit the amount of time youlisten. As the volume increases,less time is required before yourhearing could be affected.
l Avoid using headphones afterexposure to extremely loudnoises, such as rock concerts,that might cause temporaryhearing loss. Temporary hearingloss might cause unsafe volumesto sound normal.
l Do not listen at any volume thatcauses you discomfort. If youexperience ringing in your ears,
VX8360 97

Safety
hear muffled speech orexperience any temporaryhearing difficulty after listeningto your portable audio device,discontinue use and consult yourdoctor.
You can obtain additionalinformation on this subject from thefollowing sources:
American Academy of Audiology11730 Plaza American Drive, Suite300Reston, VA 20190Voice: (800) 222-2336Email: [email protected]: www.audiology.org
National Institute on Deafness andOther Communication DisordersNational Institutes of Health31 Center Drive, MSC 2320Bethesda, MD USA 20892-2320Voice: (301) 496-7243Email: [email protected]:http://www.nidcd.nih.gov/health/hearing
National Institute for OccupationalSafety and HealthHubert H. Humphrey Bldg.200 Independence Ave., SWWashington, DC 20201Voice: 1-800-35-NIOSH (1-800-356-4674)Internet:http://www.cdc.gov/niosh/topics/noise/default.html
98 VX8360

FFDDAA CCoonnssuummeerrUUppddaattee
The U.S. Food and DrugAdministration’s Centerfor Devices and
Radiological Health ConsumerUpdate on Mobile Phones:
1. Do wireless phones pose ahealth hazard?
The available scientific evidencedoes not show that any healthproblems are associated with usingwireless phones. There is no proof,however, that wireless phones areabsolutely safe. Wireless phonesemit low levels of Radio Frequency(RF) energy in the microwave rangewhile being used. They also emitvery low levels of RF when instandby mode. Whereas high levelsof RF can produce health effects(by heating tissue), exposure to lowlevel RF that does not produceheating effects causes no knownadverse health effects. Manystudies of low level RF exposureshave not found any biologicaleffects. Some studies havesuggested that some biologicaleffects may occur, but suchfindings have not been confirmedby additional research. In some
cases, other researchers have haddifficulty in reproducing thosestudies, or in determining thereasons for inconsistent results.
2. What is the FDA's roleconcerning the safety of wirelessphones?
Under the law, the FDA does notreview the safety of radiation-emitting consumer products suchas wireless phones before they canbe sold, as it does with new drugsor medical devices. However, theagency has authority to take actionif wireless phones are shown toemit Radio Frequency (RF) energyat a level that is hazardous to theuser. In such a case, the FDA couldrequire the manufacturers ofwireless phones to notify users ofthe health hazard and to repair,replace, or recall the phones sothat the hazard no longer exists.Although the existing scientific datadoes not justify FDA regulatoryactions, the FDA has urged thewireless phone industry to take anumber of steps, including thefollowing:l Support needed research into
possible biological effects of RFof the type emitted by wirelessphones;
VX8360 99

Safetyl Design wireless phones in a way
that minimizes any RF exposureto the user that is not necessaryfor device function; and
l Cooperate in providing users ofwireless phones with the bestpossible information on possibleeffects of wireless phone use onhuman health.
The FDA belongs to an interagencyworking group of the federalagencies that have responsibilityfor different aspects of RF safety toensure coordinated efforts at thefederal level. The followingagencies belong to this workinggroup:l National Institute for
Occupational Safety and Health
l Environmental ProtectionAgency
l Occupational Safety and HealthAdministration
l National Telecommunicationsand Information Administration
The National Institutes of Healthparticipates in some interagencyworking group activities, as well.The FDA shares regulatoryresponsibilities for wireless phoneswith the Federal CommunicationsCommission (FCC). All phones that
are sold in the United States mustcomply with FCC safety guidelinesthat limit RF exposure. The FCCrelies on the FDA and other healthagencies for safety questions aboutwireless phones.The FCC also regulates the basestations that the wireless phonenetworks rely upon. While thesebase stations operate at higherpower than do the wireless phonesthemselves, the RF exposures thatpeople get from these base stationsare typically thousands of timeslower than those they can get fromwireless phones. Base stations arethus not the subject of the safetyquestions discussed in thisdocument.
3. What kinds of phones are thesubject of this update?
The term “wireless phone” refershere to handheld wireless phoneswith built-in antennas, often called“cell”, “mobile”, or “PCS” phones.These types of wireless phones canexpose the user to measurableRadio Frequency (RF) energybecause of the short distancebetween the phone and the user’shead. These RF exposures are limited byFCC safety guidelines that were
100 VX8360

developed with the advice of theFDA and other federal health andsafety agencies. When the phone islocated at greater distances fromthe user, the exposure to RF isdrastically lower because aperson's RF exposure decreasesrapidly with increasing distancefrom the source. The so-called“cordless phones,” which have abase unit connected to thetelephone wiring in a house,typically operate at far lower powerlevels, and thus produce RFexposures far below the FCC safetylimits.
4. What are the results of theresearch done already?
The research done thus far hasproduced conflicting results, andmany studies have suffered fromflaws in their research methods.Animal experiments investigatingthe effects of Radio Frequency (RF)energy exposures characteristic ofwireless phones have yieldedconflicting results that often cannotbe repeated in other laboratories. Afew animal studies, however, havesuggested that low levels of RFcould accelerate the developmentof cancer in laboratory animals.However, many of the studies that
showed increased tumordevelopment used animals that hadbeen genetically engineered ortreated with cancer-causingchemicals so as to be pre-disposedto develop cancer in the absence ofRF exposure. Other studies exposedthe animals to RF for up to 22 hoursper day. These conditions are notsimilar to the conditions underwhich people use wireless phones,so we do not know with certaintywhat the results of such studiesmean for human health. Three largeepidemiology studies have beenpublished since December 2000.Between them, the studiesinvestigated any possibleassociation between the use ofwireless phones and primary braincancer, glioma, meningioma, oracoustic neuroma, tumors of thebrain or salivary gland, leukemia, orother cancers. None of the studiesdemonstrated the existence of anyharmful health effects fromwireless phone RF exposures.However, none of the studies cananswer questions about long-termexposures, since the averageperiod of phone use in thesestudies was around three years.
VX8360 101

Safety
5. What research is needed todecide whether RF exposure fromwireless phones poses a healthrisk?
A combination of laboratory studiesand epidemiological studies ofpeople actually using wirelessphones would provide some of thedata that are needed. Lifetimeanimal exposure studies could becompleted in a few years. However,very large numbers of animalswould be needed to provide reliableproof of a cancer promoting effect,if one exists. Epidemiologicalstudies can provide data that isdirectly applicable to humanpopulations, but ten or more yearsfollow-up may be needed to provideanswers about some health effects,such as cancer. This is because theinterval between the time ofexposure to a cancer-causingagent and the time tumors develop— if they do — may be many, manyyears. The interpretation ofepidemiological studies ishampered by difficulties inmeasuring actual RF exposureduring day-to-day use of wirelessphones. Many factors affect thismeasurement, such as the angle atwhich the phone is held, or whichmodel of phone is used.
6. What is the FDA doing to find outmore about the possible healtheffects of wireless phone RF?
The FDA is working with the U.S.National Toxicology Program andwith groups of investigators aroundthe world to ensure that highpriority animal studies areconducted to address importantquestions about the effects ofexposure to Radio Frequency (RF)energy. The FDA has been a leadingparticipant in the World HealthOrganization International ElectroMagnetic Fields (EMF) Projectsince its inception in 1996. Aninfluential result of this work hasbeen the development of a detailedagenda of research needs that hasdriven the establishment of newresearch programs around theworld. The project has also helpeddevelop a series of publicinformation documents on EMFissues. The FDA and the CellularTelecommunications & InternetAssociation (CTIA) have a formalCooperative Research AndDevelopment Agreement (CRADA)to do research on wireless phonesafety. The FDA provides thescientific oversight, obtaining input
102 VX8360

from experts in government,industry, and academicorganizations. CTIA-fundedresearch is conducted throughcontracts with independentinvestigators. The initial researchwill include both laboratory studiesand studies of wireless phoneusers. The CRADA will also includea broad assessment of additionalresearch needs in the context ofthe latest research developmentsaround the world.
7. How can I find out how muchRadio Frequency energy exposure Ican get by using my wirelessphone?
All phones sold in the United Statesmust comply with FederalCommunications Commission (FCC)guidelines that limit RadioFrequency (RF) energy exposures.The FCC established theseguidelines in consultation with theFDA and the other federal healthand safety agencies. The FCC limitfor RF exposure from wirelessphones is set at a SpecificAbsorption Rate (SAR) of 1.6 wattsper kilogram (1.6 W/kg). The FCClimit is consistent with the safetystandards developed by theInstitute of Electrical and Electronic
Engineering (IEEE) and the NationalCouncil on Radiation Protection andMeasurement. The exposure limittakes into consideration the body’sability to remove heat from thetissues that absorb energy from thewireless phone and is set wellbelow levels known to have effects.Manufacturers of wireless phonesmust report the RF exposure levelfor each model of phone to the FCC.The FCC website(http://www.fcc.gov/oet/rfsafety)gives directions for locating the FCCidentification number on yourphone so you can find your phone’sRF exposure level in the onlinelisting.
8. What has the FDA done tomeasure the Radio Frequencyenergy coming from wirelessphones?
The Institute of Electrical andElectronic Engineers (IEEE) isdeveloping a technical standard formeasuring the Radio Frequency(RF) energy exposure from wirelessphones and other wirelesshandsets with the participation andleadership of FDA scientists andengineers. The standard,“Recommended Practice forDetermining the Spatial-Peak
VX8360 103

Safety
Specific Absorption Rate (SAR) inthe Human Body Due to WirelessCommunications Devices:Experimental Techniques”, setsforth the first consistent testmethodology for measuring the rateat which RF is deposited in theheads of wireless phone users. Thetest method uses a tissue-simulating model of the humanhead. Standardized SAR testmethodology is expected to greatlyimprove the consistency ofmeasurements made at differentlaboratories on the same phone.SAR is the measurement of theamount of energy absorbed intissue, either by the whole body ora small part of the body. It ismeasured in watts/kg (ormilliwatts/g) of matter. Thismeasurement is used to determinewhether a wireless phone complieswith safety guidelines.
9. What steps can I take to reducemy exposure to Radio Frequencyenergy from my wireless phone?
If there is a risk from theseproducts — and at this point we donot know that there is — it isprobably very small. But if you areconcerned about avoiding evenpotential risks, you can take a few
simple steps to minimize yourexposure to Radio Frequency (RF)energy. Since time is a key factor inhow much exposure a personreceives, reducing the amount oftime spent using a wireless phonewill reduce RF exposure. If youmust conduct extendedconversations by wireless phoneevery day, you could place moredistance between your body andthe source of the RF, since theexposure level drops offdramatically with distance. Forexample, you could use a headsetand carry the wireless phone awayfrom your body or use a wirelessphone connected to a remoteantenna. Again, the scientific datadoes not demonstrate that wirelessphones are harmful. But if you areconcerned about the RF exposurefrom these products, you can usemeasures like those describedabove to reduce your RF exposurefrom wireless phone use.
10. What about children usingwireless phones?
The scientific evidence does notshow a danger to users of wirelessphones, including children andteenagers. If you want to take stepsto lower exposure to Radio
104 VX8360

Frequency (RF) energy, themeasures described above wouldapply to children and teenagersusing wireless phones. Reducingthe time of wireless phone use andincreasing the distance betweenthe user and the RF source willreduce RF exposure. Some groups sponsored by othernational governments have advisedthat children be discouraged fromusing wireless phones at all. Forexample, the government in theUnited Kingdom distributed leafletscontaining such a recommendationin December 2000. They noted thatno evidence exists that using awireless phone causes braintumors or other ill effects. Theirrecommendation to limit wirelessphone use by children was strictlyprecautionary; it was not based onscientific evidence that any healthhazard exists.
11. What about wireless phoneinterference with medicalequipment?
Radio Frequency (RF) energy fromwireless phones can interact withsome electronic devices. For thisreason, the FDA helped develop adetailed test method to measureElectro Magnetic Interference
(EMI) of implanted cardiacpacemakers and defibrillators fromwireless telephones. This testmethod is now part of a standardsponsored by the Association forthe Advancement of MedicalInstrumentation (AAMI). The finaldraft, a joint effort by the FDA,medical device manufacturers, andmany other groups, was completedin late 2000. This standard will allowmanufacturers to ensure thatcardiac pacemakers anddefibrillators are safe from wirelessphone EMI.The FDA has tested hearing aids forinterference from handheldwireless phones and helpeddevelop a voluntary standardsponsored by the Institute ofElectrical and Electronic Engineers(IEEE). This standard specifies testmethods and performancerequirements for hearing aids andwireless phones so that nointerference occurs when a personuses a “compatible” phone and a“compatible” hearing aid at thesame time. This standard wasapproved by the IEEE in 2000. The FDA continues to monitor theuse of wireless phones for possibleinteractions with other medicaldevices. Should harmful
VX8360 105

Safety
interference be found to occur, theFDA will conduct testing to assessthe interference and work toresolve the problem.
12. Where can I find additionalinformation?
For additional information, pleaserefer to the following resources:
FDA web page on wireless phones(http://www.fda.gov/cellphones/)
Federal CommunicationsCommission (FCC) RF SafetyProgram(http://www.fcc.gov/oet/rfsafety)
International Commission on Non-lonizing Radiation Protection(http://www.icnirp.de)
World Health Organization (WHO)International EMF Project(http://www.who.int/emf)
National Radiological ProtectionBoard (UK)(http://www.nrpb.org.uk/)
1100 DDrriivveerr SSaaffeettyy TTiippssYour wireless phone gives you thepowerful ability to communicate byvoice almost anywhere, anytime.An important responsibilityaccompanies the benefits ofwireless phones, one that everyuser must uphold.When operating a car, driving isyour first responsibility. When usingyour wireless phone behind thewheel of a car, practice goodcommon sense and remember thefollowing tips:
1. Get to know your wireless phoneand its features such as speeddial and redial. Carefully readyour instruction manual andlearn to take advantage ofvaluable features most phonesoffer, including automatic redialand memory. Also, work tomemorize the phone keypad soyou can use the speed dialfunction without taking yourattention off the road.
2. When available, use a hands-free device. A number of hands-free wireless phone accessoriesare readily available today.Whether you choose an installedmounted device for your
106 VX8360

wireless phone or a speakerphone accessory, takeadvantage of these devices ifavailable to you.
3. Make sure you place yourwireless phone within easyreach and where you can reachit without removing your eyesfrom the road. If you get anincoming call at an inconvenienttime, if possible, let yourvoicemail answer it for you.
4. Suspend conversations duringhazardous driving conditions orsituations. Let the person you arespeaking with know you aredriving; if necessary, suspendthe call in heavy traffic orhazardous weather conditions.Rain, sleet, snow, and ice can behazardous, but so is heavytraffic. As a driver, your firstresponsibility is to pay attentionto the road.
5. Don’t take notes or look upphone numbers while driving. Ifyou are reading an address bookor business card, or writing a“to-do” list while driving a car,you are not watching where youare going. It is common sense.Do not get caught in adangerous situation because you
are reading or writing and notpaying attention to the road ornearby vehicles.
6. Dial sensibly and assess thetraffic; if possible, place callswhen you are not moving orbefore pulling into traffic. Try toplan your calls before you beginyour trip or attempt to coincideyour calls with times you may bestopped at a stop sign, red light,or otherwise stationary. But ifyou need to dial while driving,follow this simple tip -- dial only afew numbers, check the roadand your mirrors, then continue.
7. Do not engage in stressful oremotional conversations thatmay be distracting. Stressful oremotional conversations anddriving do not mix; they aredistracting and even dangerouswhen you are behind the wheelof a car. Make people you aretalking with aware you aredriving and if necessary,suspend conversations whichhave the potential to divert yourattention from the road.
8. Use your wireless phone to callfor help. Your wireless phone isone of the greatest tools you canown to protect yourself and your
VX8360 107

Safety
family in dangerous situations --with your phone at your side,help is only three numbers away.Dial 911 or other localemergency number in the caseof fire, traffic accident, roadhazard, or medical emergency.Remember, it’s a free call on yourwireless phone!
9. Use your wireless phone to helpothers in emergencies. Yourwireless phone provides you aperfect opportunity to be a“Good Samaritan” in yourcommunity. If you see an autoaccident, crime in progress orother serious emergency wherelives are in danger, call 911 orother local emergency number,as you would want others to dofor you.
10. Call roadside assistance or aspecial wireless non-emergencyassistance number whennecessary. Certain situations youencounter while driving mayrequire attention, but are noturgent enough to merit a call foremergency services. But youcan still use your wirelessphone to lend a hand. If you seea broken-down vehicle posingno serious hazard, a broken
traffic signal, a minor trafficaccident where no one appearsinjured or a vehicle you know tobe stolen, call roadsideassistance or other special non-emergency wireless number.
The above tips are meant asgeneral guidelines. Before decidingto use your mobile device whileoperating a vehicle, it isrecommended that you consultyour applicable jurisdiction’s locallaws or other regulations regardingsuch use. Such laws or otherregulations may prohibit orotherwise restrict the manner inwhich a driver may use his or herphone while operating a vehicle.
108 VX8360

CCoonnssuummeerrIInnffoorrmmaattiioonn oonn SSAARR(Specific Absorption Rate)
This model phone meets thegovernment's requirements forexposure to radio waves. Yourwireless phone is a radiotransmitter and receiver. It isdesigned and manufactured not toexceed the emission limits forexposure to Radio Frequency (RF)energy set by the FederalCommunications Commission of theU.S. Government. These limits arepart of comprehensive guidelinesand establish permitted levels of RFenergy for the general population.The guidelines are based onstandards that were developed byindependent scientificorganizations through periodic andthorough evaluation of scientificstudies. The standards include asubstantial safety margin designedto assure the safety of all persons,regardless of age and health.The exposure standard for wirelessmobile phones employs a unit ofmeasurement known as theSpecific Absorption Rate, or SAR.The SAR limit set by the FCC is 1.6W/kg. Tests for SAR are conducted
using standard operating positionsspecified by the FCC with the phonetransmitting at its highest certifiedpower level in all tested frequencybands. Although SAR is determinedat the highest certified power level,the actual SAR level of the phonewhile operating can be well belowthe maximum value. Because thephone is designed to operate atmultiple power levels to use onlythe power required to reach thenetwork, in general, the closer youare to a wireless base stationantenna, the lower the poweroutput.Before a phone model is availablefor sale to the public, it must betested and certified to the FCC thatit does not exceed the limitestablished by the government-adopted requirement for safeexposure. The tests are performedin positions and locations (e.g., atthe ear and worn on the body) asrequired by the FCC for each model. The highest SAR value for thismodel phone when tested for use atthe ear is 1.14 W/kg and when wornon the body, as described in thisuser guide, is 0.418 W/kg (body-worn measurements differ amongphone models, depending uponavailable accessories and FCC
VX8360 109

Safety
requirements). While there may bedifferences between SAR levels ofvarious phones and at variouspositions, they all meet thegovernment requirement for safeexposure.The FCC has granted an EquipmentAuthorization for this model phonewith all reported SAR levelsevaluated as in compliance with theFCC RF emission guidelines. SARinformation on this model phone ison file with the FCC and can befound under the Display Grantsection ofhttp://www.fcc.gov/oet/fccid aftersearching on FCC ID BEJVX8360.Additional information on SpecificAbsorption Rates (SAR) can befound on the CellularTelecommunications IndustryAssociation (CTIA) website athttp://www.ctia.org.* In the United States and Canada,the SAR limit for mobile phonesused by the public is 1.6 watts/kg(W/kg) averaged over one gram oftissue. The standard incorporates asubstantial margin of safety to giveadditional protection for the publicand to account for any variations inmeasurements.
FFCCCC HHeeaarriinngg--AAiiddCCoommppaattiibbiilliittyy ((HHAACC))RReegguullaattiioonnss ffoorrWWiirreelleessss DDeevviicceessOn July 10, 2003, the U.S. FederalCommunications Commission (FCC)Report and Order in WT Docket 01-309 modified the exception ofwireless phones under the HearingAid Compatibility Act of 1988 (HACAct) to require digital wirelessphones be compatible with hearing-aids. The intent of the HAC Act is toensure reasonable access totelecommunications services forpersons with hearing disabilities.While some wireless phones areused near some hearing devices(hearing aids and cochlearimplants), users may detect abuzzing, humming, or whining noise.Some hearing devices are moreimmune than others to thisinterference noise, and phones alsovary in the amount of interferencethey generate.The wireless telephone industryhas developed a rating system forwireless phones, to assist hearingdevice users to find phones thatmay be compatible with theirhearing devices. Not all phones
110 VX8360

have been rated. Phones that arerated have the rating on their box ora label located on the box.The ratings are not guarantees.Results will vary depending on theuser's hearing device and hearingloss. If your hearing devicehappens to be vulnerable tointerference, you may not be able touse a rated phone successfully.Trying out the phone with yourhearing device is the best way toevaluate it for your personal needs.M-Ratings: Phones rated M3 or M4meet FCC requirements and arelikely to generate less interferenceto hearing devices than phones thatare not labeled. M4 is thebetter/higher of the two ratings.T-Ratings: Phones rated T3 or T4meet FCC requirements and arelikely to generate less interferenceto hearing devices than phones thatare not labeled. T4 is the better/higher of the two ratings.Hearing devices may also be rated.Your hearing device manufactureror hearing health professional mayhelp you find this rating. Higherratings mean that the hearingdevice is relatively immune tointerference noise. The hearing aidand wireless phone rating valuesare then added together. A sum of 5
is considered acceptable fornormal use. A sum of 6 isconsidered for best use.In the above example, if a hearingaid meets the M2 level rating andthe wireless phone meets the M3level rating, the sum of the twovalues equal M5. This shouldprovide the hearing aid user with“normal usage” while using theirhearing aid with the particularwireless phone. “Normal usage” inthis context is defined as a signalquality that’s acceptable for normaloperation.The M mark is intended to besynonymous with the U mark. The Tmark is intended to be synonymouswith the UT mark. The M and Tmarks are recommended by theAlliance for TelecommunicationsIndustries Solutions (ATIS). The Uand UT marks are referenced inSection 20.19 of the FCC Rules. TheHAC rating and measurementprocedure are described in the
VX8360 111

Safety
American National StandardsInstitute (ANSI) C63.19 standard.When you're talking over the cellphone, it's recommended you'd turnthe BT (Bluetooth) mode off forHAC.
112 VX8360
For information about hearing aidsand digital wireless phones
FCC Hearing Aid Compatibility andVolume Controlhttp://www.fcc.gov/cgb/dro/hearing.html
Gallaudet University, RERChttp://tap.gallaudet.edu/DigWireless.KS/DigWireless.htm
HLAA (Hearing Loss Association ofAmerica)http://www.hearingloss.org/learn/cellphonetech.asp
The Hearing Aid Compatibility FCCOrderhttp://hraunfoss.fcc.gov/edocs_public/attachmatch/FCC-03-168A1.pdf

Accessories
VX8360 113
There are a variety of accessories available for your phone and three easyways to purchase them: shop online anytime at www.verizonwireless.com,call us at 1866 VZ GOT IT (894 6848) or visit one of our Verizon WirelessCommunication Stores.
Chargers
Car Charger
Batteries
Portable StereoSpeakers
USB Cable
BluetoothStereo Headset
smileks
타원

LIMITED WARRANTY STATEMENT
1. WHAT THIS WARRANTYCOVERS:
LG offers you a limited warrantythat the enclosed subscriber unitand its enclosed accessories willbe free from defects in material andworkmanship, according to thefollowing terms and conditions:
(1)The limited warranty for theproduct extends for TWELVE (12)MONTHS beginning on the dateof purchase of the product withvalid proof of purchase, orabsent valid proof of purchase,FIFTEEN (15) MONTHS from dateof manufacture as determined bythe unit's manufacture datecode.
(2)The limited warranty extendsonly to the original purchaser ofthe product and is not assignableor transferable to anysubsequent purchaser/end user.
(3)This warranty is good only to theoriginal purchaser of the productduring the warranty period aslong as it is in the U.S., includingAlaska, Hawaii, U.S. Territoriesand Canada.
(4)The external housing andcosmetic parts shall be free ofdefects at the time of shipment
and, therefore, shall not becovered under these limitedwarranty terms.
(5)Upon request from LG, theconsumer must provideinformation to reasonably provethe date of purchase.
(6)The customer shall bear the costof shipping the product to theCustomer Service Department ofLG. LG shall bear the cost ofshipping the product back to theconsumer after the completion ofservice under this limitedwarranty.
2. WHAT THIS WARRANTY DOESNOT COVER:
(1)Defects or damages resultingfrom use of the product in otherthan its normal and customarymanner.
(2)Defects or damages fromabnormal use, abnormalconditions, improper storage,exposure to moisture ordampness, unauthorizedmodifications, unauthorizedconnections, unauthorizedrepair, misuse, neglect, abuse,accident, alteration, improperinstallation, or other acts which
114 VX8360

are not the fault of LG, includingdamage caused by shipping,blown fuses, spills of food orliquid.
(3)Breakage or damage toantennas unless caused directlyby defects in material orworkmanship.
(4)That the Customer ServiceDepartment at LG was notnotified by consumer of thealleged defect or malfunction ofthe product during the applicablelimited warranty period.
(5)Products which have had theserial number removed or madeillegible.
(6)This limited warranty is in lieu ofall other warranties, express orimplied either in fact or byoperations of law, statutory orotherwise, including, but notlimited to any implied warranty ofmarketability or fitness for aparticular use.
(7)Damage resulting from use ofnon LG approved accessories.
(8)All plastic surfaces and all otherexternally exposed parts that arescratched or damaged due tonormal customer use.
(9) Products operated outsidepublished maximum ratings.
(10) Products used or obtained in arental program.
(11) Consumables (such as fuses).
3. WHAT LG WILL DO:
LG will, at its sole option, eitherrepair, replace or refund thepurchase price of any unit that doesnot conform to this limited warranty.LG may choose at its option to usefunctionally equivalent re-conditioned, refurbished or newunits or parts or any units. Inaddition, LG will not re-install orback-up any data, applications orsoftware that you have added toyour phone. It is thereforerecommended that you back-upany such data or information priorto sending the unit to LG to avoidthe permanent loss of suchinformation.
4. STATE LAW RIGHTS:
No other express warranty isapplicable to this product. THEDURATION OF ANY IMPLIEDWARRANTIES, INCLUDING THEIMPLIED WARRANTY OFMARKETABILITY, IS LIMITED TO
VX8360 115

LIMITED WARRANTY STATEMENT
THE DURATION OF THE EXPRESSWARRANTY HEREIN. LG SHALLNOT BE LIABLE FOR THE LOSS OFTHE USE OF THE PRODUCT,INCONVENIENCE, LOSS OR ANYOTHER DAMAGES, DIRECT ORCONSEQUENTIAL, ARISING OUTOF THE USE OF, OR INABILITY TOUSE, THIS PRODUCT OR FOR ANYBREACH OF ANY EXPRESS ORIMPLIED WARRANTY, INCLUDINGTHE IMPLIED WARRANTY OFMARKETABILITY APPLICABLE TOTHIS PRODUCT.Some states do not allow theexclusive limitation of incidental orconsequential damages orlimitations on how long an impliedwarranty lasts; so these limitationsor exclusions may not apply to you.This warranty gives you specificlegal rights and you may also haveother rights which vary from stateto state.
5. HOW TO GET WARRANTYSERVICE:
If you experience any problemswith either the Bluetooth headset orthe mobile handset, in each case asmay be covered by this limitedwarranty, you need only return theaffected device. For example, if a
problem exists with the Bluetoothheadset, please DO NOT returnyour mobile handset with theheadset. Likewise, if a problemexists with the mobile handset,please DO NOT return theBluetooth Headset with thehandset.To obtain warranty service, pleasecall or fax to the followingtelephone numbers from anywherein the continental United States: Tel. 1-800-793-8896 or Fax. 1-800-448-4026Or visit http://us.lgservice.com.Correspondence may also bemailed to:LG Electronics Service- MobileHandsets, P.O. Box 240007,Huntsville, AL 35824
DO NOT RETURN YOUR PRODUCTTO THE ABOVE ADDRESS. Pleasecall or write for the location of theLG authorized service centernearest you and for the proceduresfor obtaining warranty claims.
116 VX8360

TTeerrmmiinnoollooggyy
EZ Tip CalculatorFeature for easy bill calculation using thetotal cost, tip, and number of people asvariables.
Advanced Voice Recognition
Feature that allows you to perform awide range of verbal commands bytraining the phone to recognize yourindividual speech patterns.
Bluetooth® wireless technology
Technology used to allow mobile phones,computers, and other personal devicesto be easily coordinated andinterconnected using a short-rangewireless connection.
MEDIA CENTER
Feature that accesses the Internet toprovide the ability to access and evendownload a wide variety of software,information, music, video, and more righton your LG Verizon wireless phone.
microSDTM
Additional external memory for yourmobile phone.
V CASTSM
Feature that is the next generation inwireless technology which transformsyour wireless phone into a portablemusic player and delivers an amazingstreaming mobile video experience. V CAST uses technology thatsignificantly increases downloadcapabilities to deliver better graphics,sound and depth and uses the power ofbroadband so that you can download thehottest entertainment, sports highlights,news and breaking weather to yourVerizon Wireless V CAST phone. Thenew V CAST phones provide betterimaging capabilities, mega pixelcameras and video cameras, improvedaudio and expandable memory storage.
AAccrroonnyymmss aannddAAbbbbrreevviiaattiioonnss
DTMF
Dual-Tone Multi Frequency (or “touch-tone”) is a method used to communicatekeys pressed on the phone. Pressing akey generates two simultaneous tones,one for the row and one for the columnto determine which key was pressed.
Glossary
VX8360 117

Glossary
ERI
Enhanced Roaming Indicator is afeature to indicate whether a mobilephone is on its home system, a partnernetwork, or a roaming network. Manyphones indicate home vs. roaming as anicon, but ERI capable phones can clearlyindicate third “partner network” status.
EVDO
Evolution Data Only or Evolution DataOptimized (abbreviated as EVDO, EV-DO,EvDO, 1xEV-DO or 1xEvDO) provides fastwireless broadband access (3G)anywhere, without needing a WiFihotspot.
GPS
Global Positioning System is a system ofsatellites, computers, and receivers ableto determine the latitude and longitude ofa specific receiver on Earth. Position iscalculated using time and distance.
IS 2000
Type of digital signaling. It's the secondgeneration of CDMA digital cellular, anextension of IS-95. Differences betweensignaling types have to do with pilotsignal and links to provide more trafficchannels, and control protocols.
NAM
Number Assignment Module is how thephone stores the phone number and itselectronic serial number.
SSL
Secure Sockets Layer Protocol used toencrypt data sent over the air.
TTY
Teletypewriter. An electromechanicaltypewriter that either transmits orreceives messages coded in electricalsignals. A phone with TTY support is ableto translate typed characters to voice ortranslate voice into characters to displayon the TTY.
118 VX8360

10 Driver Safety Tips 106
A
Accessories 113Add New Device 67Airplane Mode 77Alarm Clock 63Alert 72Answer Options 83Auto Pair Handsfree 70Auto Retry 83
B
Backlight 75Banner 74Battery Charge Level 19Battery Temperature
Protection 18Bluetooth® Menu 65
C
Calculator 62Calendar 63Call Settings 83Call Sounds 71Call Waiting 21Caller ID 21Card Memory 88Charging the Battery 18Charging with USB 18Chat 51Clock Format 77Consumer Information on
SAR 109Contact List 53CONTACTS 53
D
Dialed 58Display Settings 74Display Themes 75Drafts 49DTMF Tones 86
E
Email 51Erasing Messages 52Ez Tip Calculator 62
F
FCC Hearing-AidCompatibility (HAC)Regulations for WirelessDevices 110
FDA Consumer Update 99Font Size 76
G
Games 38Get New Ringtones 28Glossary 117Groups 54
H
How to Install YourmicroSDTM Card 19
I
Icon Glossary 88Important Safety
Precautions 1In Case of Emergency (ICE)
55Inbox 47Installing the Battery 14
L
Language 79LIMITED WARRANTY
STATEMENT 114Location 79
M
Main Menu Settings 76Making Calls 20Master Volume 71Memory 86Menus Overview 15Messaging Settings 51Missed 57Mobile Web 38Music & Tones 27Mute Function 21My Device Info 68My Music 28My Name Card 56My Number 88My Videos 35
N
NAM Select 83New Contact 53New Message 41Notepad 65
O
One Touch Dial 85Online Album 37
Index
VX8360 119

P
Phone Info 88Phone Memory 87Phone Overview 12Phone Settings 77Picture 32Picture Message 43Playing Your Music 29Power On/Off 73
R
Received 57Receiving Calls 20Record Video 37Removing the Battery 14
S
Safety Information 93Save Options 87Screen Icons 20Security 80Sent 48Service Alerts 73Set Shortcuts 77Signal Strength 19Software Update 89Sounds Settings 71Speed Dials 54Stopwatch 64Supported Profiles 69SW/HW Version 88Sync Music 30
T
Take Picture 36Technical Details 9Text Input 22TIA Safety Information 90Tools 60TTY Mode 84
U
USB Auto Sync 86USB Mass Storage 65
V
Vibrate Mode 21Video Message 45View Timers 59Voice Commands 21, 60Voice Message 46Voicemail 50Volume Quick Adjustment
21
W
Wallpaper 75World Clock 64
Index
120 VX8360

MEMO

MEMO

MEMO

Lea estas sencillas instrucciones. Romper las reglas puede serpeligroso o ilegal. Se ofrece más información detallada en esta guíadel usuario.
No seguir las instrucciones puede ocasionar lesiones graveso la muerte.
l No use nunca una batería no aprobada, ya que estopodría dañar el teléfono o la batería, y podríaocasionar que estalle la batería.
l Nunca coloque el teléfono en un horno demicroondas ya que esto haría que estallara la batería.
l Nunca almacene el teléfono a temperaturas menoresde -4°F ni mayores de 122°F.
l No se deshaga de la batería mediante el fuego o conmateriales peligrosos o inflamables.
l Al ir en automóvil, no deje el teléfono ni instale el kitde manos libres cerca de la bolsa de aire. Si el equipoinalámbrico está instalado incorrectamente y seactiva la bolsa de aire, usted puede resultargravemente lesionado.
l No use un teléfono de mano cuando estéconduciendo.
l No use el teléfono en zonas donde esté prohibidohacerlo. (Por ejemplo: en los aviones)
Precaución de Seguridad Importante
VX8360 1

Precaución de Seguridad Importante l No exponga cargador de baterías o el adaptador a la
luz directa del sol, ni lo utilice en sitios con elevadahumedad, como por ejemplo el baño.
l No use sustancias químicas corrosivas (como alcohol,bencina, solventes, etc.) ni detergentes para limpiar elteléfono. Existe riesgo de causar un incendio.
l No deje caer el teléfono, ni lo golpee o agitefuertemente. Tales acciones pueden dañar las tarjetasde circuitos internas del teléfono.
l No use el teléfono en áreas altamente explosivas, yaque puede generar chispas.
l No dañe el cable de corriente doblándolo,retorciéndolo, tirando de él o calentándolo. No use la clavija si está suelta, ya que esto puedeocasionar incendios o descargas eléctricas.
l No coloque objetos pesados sobre el cable decorriente. No permita que el cable de corriente sedoble, ya que esto puede ocasionar incendios odescargas eléctricas.
l No manipule el teléfono con las manos húmedascuando se esté cargando. Puede causar un choqueeléctrico o dañar gravemente el teléfono.
l No desarme el teléfono.
2 VX8360

l No haga ni conteste llamadas mientras esté cargandoel teléfono, ya que puede causar un corto circuito enéste o provocar descargas eléctricas o incendios.
l No sostenga la antena ni permita que entre en contactocon su cuerpo durante las llamadas.
l Asegúrese de que no entren en contacto con la bateríaobjetos con bordes cortante, como dientes deanimales o uñas. Hay riesgo de causar un incendio.
l Almacene la batería en un sitio alejado del alcance delos niños.
l Cuide que los niños no se traguen partes del teléfono(como los tapones de hule, del auricular, partesconectoras del teléfono, etc.) Esto podría causarasfixia o sofocación, dando como resultado lesionesgraves o la muerte.
l Desconecte el enchufe de la toma de corriente y elcargador cuando se ilumina porque puede provocarunchoque electrico o peligro de incendio.
l Sólo use baterías y cargadores proporcionados por LG.La garantía no se aplicará a productos proporcionadospor otros proveedores.
l Sólo personal autorizado debe darle servicio alteléfono y a sus accesorios. La instalación o servicioincorrectos pueden dar como resultado accidentes ypor tanto invalidar la garantía.
l Las llamadas de emergencia sólo pueden hacersedentro de un área de servicio. Para hacer una llamadade emergencia, asegúrese de estar dentro de un áreade servicio y que el teléfono esté encendido.
VX8360 3

Contenido
Precaución de SeguridadImportante . . . . . . . . . . . . . . . . . .1
Bienvenidos . . . . . . . . . . . . . . . . .8
Detalles Técnicos . . . . . . . . . . . .9Información Importante . . . . . . . . . . .9Información para el usuario . . . . . . .9
Descripción general delTeléfono . . . . . . . . . . . . . . . . . . . .13
Instalación de la batería . . . . . . . . . .15Extracción de la batería . . . . . . . . . .15
Descripción general de losmenús . . . . . . . . . . . . . . . . . . . . . .16
Para hacer funcionar suteléfono por primera vez . . . . .19
Carga de la batería . . . . . . . . . . . . . .19Carga con USB . . . . . . . . . . . . . . . . .19Protección de la temperatura de labatería . . . . . . . . . . . . . . . . . . . . . . . .19Instalación de la tarjeta microSDTM .20Desinstalación de la tarjetamicroSDTM . . . . . . . . . . . . . . . . . . . .20Nivel de carga de la batería . . . . . . .20Potencia de la señal . . . . . . . . . . . . .21Apagar y Encender el teléfono . . . .21Encender el teléfono . . . . . . . . . . .21Apagar el teléfono . . . . . . . . . . . . .21
Para hacer llamadas . . . . . . . . . . . . .21Corrección de errores en la marcación . . . . . . . . . . . . . . . . . . . .21
Remarcado de llamadas . . . . . . . . . .21Para recibir llamadas . . . . . . . . . . . . .22Iconos de pantalla . . . . . . . . . . . . . . .22
Modo de vibración . . . . . . . . . . . . . .23
Sonidos desactivados . . . . . . . . . . .23Función de silencio . . . . . . . . . . . . . .23Ajuste rápido del volumen . . . . . . . .23Llamada en espera . . . . . . . . . . . . . .23Id. de quien llama . . . . . . . . . . . . . . . .23Comandos de Voz . . . . . . . . . . . . . . .23
Introducir y editar información24Entrada de texto . . . . . . . . . . . . . . . . .24
Modos de entrada de texto . . . . . .24
Contactos en la memoria de suteléfono . . . . . . . . . . . . . . . . . . . .25
Aspectos Básicos . . . . . . . . . . . . . . .25Personalización de entradasindividuales . . . . . . . . . . . . . . . . . . . . .25Marcación Rápida . . . . . . . . . . . . . . .25Almacenar un número con unapausa . . . . . . . . . . . . . . . . . . . . . . . . . .26Agregar otro número de teléfono .26Cambiar el Número Predeterminado . . . . . . . . . . . . . . . . .28Borrar . . . . . . . . . . . . . . . . . . . . . . . . . .28Marcado Rápido . . . . . . . . . . . . . . . .29
CENTRO de MEDIOS . . . . . . . . . . .301. Música y Tonos . . . . . . . . . . . . . . .301.1 Música de V CAST l Rhapsody 311.2 Obtén Nuevos Timbres . . . . . . .311.3 Mis Timbres . . . . . . . . . . . . . . . .311.4 Mi Música . . . . . . . . . . . . . . . . . .32Reproducción de Mi música . . . . . .32Control del reproductor de música 32Teclas Frontales de Control de Música . . . . . . . . . . . . . . . . . . . . . . .33
1.5 Mis Sonidos . . . . . . . . . . . . . . . .33
4 VX8360

1.6 Sincronizar Música . . . . . . . . . . .342. Foto y Video . . . . . . . . . . . . . . . . .352.1 Videos de V CAST . . . . . . . . . . .352.2 Obtén Nuevas Fotos . . . . . . . . .382.3 Mis Fotos . . . . . . . . . . . . . . . . . .382.4 Mis Videos . . . . . . . . . . . . . . . . .392.5 Tomar Foto . . . . . . . . . . . . . . . . .402.6 Grabar Video . . . . . . . . . . . . . . . .412.7 Álbum En Línea . . . . . . . . . . . . .42
3. Juegos . . . . . . . . . . . . . . . . . . . . . . .424. Internet Móvil . . . . . . . . . . . . . . . .425. Browse & Download . . . . . . . . . .456. Extra . . . . . . . . . . . . . . . . . . . . . . . . .45
MENSAJERÍA . . . . . . . . . . . . . . . . .461. Nuevo Mensaje . . . . . . . . . . . . . . .461.1 Mensaje de TXT . . . . . . . . . . . . .461.2 Mensaje de Foto . . . . . . . . . . . .481.3 Mensaje de Video . . . . . . . . . . .501.4 Mensaje de Voz . . . . . . . . . . . . .52
2. Entrada . . . . . . . . . . . . . . . . . . . . . .533. Enviado . . . . . . . . . . . . . . . . . . . . . .544. Borradores . . . . . . . . . . . . . . . . . . .555. Mensajes de Voz . . . . . . . . . . . . . .566. IMMóvil . . . . . . . . . . . . . . . . . . . . . .567. Correo Elect . . . . . . . . . . . . . . . . . .568. Chatear . . . . . . . . . . . . . . . . . . . . . .57Programación de MENSAJES . . . .57
1. Modo de Ingreso (T9 Palabra/ Abc/ABC/ 123) . . . . . . . . . . . . . . . . . . . .572. Grdr Autmtc Envdo (Encendido/Apagado/ Preguntar) . . . . . . . . . . . .573. Bor Autmtc Entrada (Encendido/Apagado) . . . . . . . . . . . . . . . . . . . . .57
4. Tamaño de Fuente de Mensajeria . . . . . . . . . . . . . . . . . . . .575. Ver TXT Autmtc (Encendido/Apagado) . . . . . . . . . . . . . . . . . . . . .576. Auto-dsplz TXT (Encendido/Apagado) . . . . . . . . . . . . . . . . . . . . .587. Rec Aut Multimedias (Encendido/Apagado) . . . . . . . . . . . . . . . . . . . .588. Text Rápido . . . . . . . . . . . . . . . . .589. Mensajes de Voz # . . . . . . . . . . .580. Dev Llmda # . . . . . . . . . . . . . . . .58*. Firma (Ninguno/ Costumbre) . . .58
MSJ Borrar . . . . . . . . . . . . . . . . . . . . .58CONTACTOS . . . . . . . . . . . . . . . . . . .591. Nuevo Contacto . . . . . . . . . . . . . . .592. Lista de Contacto . . . . . . . . . . . . . .593. Grupos . . . . . . . . . . . . . . . . . . . . . . .604. Marcado Rápido . . . . . . . . . . . . . .615. In Case of Emergency (ICE) . . . .616. Mi Tarjeta de Nombre . . . . . . . . .62
Llamas. Recntes . . . . . . . . . . . . . . .631. Perdidas . . . . . . . . . . . . . . . . . . . . .632. Recibidas . . . . . . . . . . . . . . . . . . . . .633. Marcadas . . . . . . . . . . . . . . . . . . . .644. Todas . . . . . . . . . . . . . . . . . . . . . . . . .645. Ver Cronómetro . . . . . . . . . . . . . . .65
PROG/HERR . . . . . . . . . . . . . . . . . . .661. Mi Verizon . . . . . . . . . . . . . . . . . . . .662. Herramientas . . . . . . . . . . . . . . . . .662.1 Comandos de Voz . . . . . . . . . . .662.1.1 Llamar <Nombre o Número>672.1.2 Enviar Msj a <Nombre oNúmero> . . . . . . . . . . . . . . . . . . . . .672.1.3 Ir a <Menú> . . . . . . . . . . . . .67
VX8360 5

Contenido
2.1.4 Verificar <Elemento> . . . . . .672.1.5 Contactos <Nombre> . . . . . .682.1.6 Mi Verizon . . . . . . . . . . . . . . .682.1.7 Ayuda . . . . . . . . . . . . . . . . . . .68
2.2 Calculadora . . . . . . . . . . . . . . . .682.3 Ez Sugerencia . . . . . . . . . . . . . . .682.4 Calendario . . . . . . . . . . . . . . . . . .692.5 Reloj Despertador . . . . . . . . . . .702.6 Cronómetro . . . . . . . . . . . . . . . .702.7 Reloj Mundial . . . . . . . . . . . . . . .702.8 Cuaderno de Notas . . . . . . . . . .712.9 Almacen masivo USB . . . . . . . .71
3. Menú de Bluetooth® . . . . . . . . . .723.1 Anadir Nuevo Aparato . . . . . . . .73Encendido . . . . . . . . . . . . . . . . . . . . .75Mi Nombre de Teléfono . . . . . . . . . .75Modo de Descubrimiento . . . . . . . .76Perfiles Soportados . . . . . . . . . . . . .76Auto-Emparejamiento Manos Libres77
4. Programación de Sonidos . . . . . .784.1 Volumen Maestro . . . . . . . . . . . .784.2 Sonidos de Llamada . . . . . . . . . .79
4.2.1 Timbre de Llamada . . . . . .794.2.2 Vibrador de Llamada . . . . .79
4.3 Sonidos de Alerta . . . . . . . . . . . .794.4 Volumen de Teclado . . . . . . . . . .804.5 Alertas de Servicio . . . . . . . . . . .804.6 Apagado/Encendido . . . . . . . . . .814.7 Claridad de Voz . . . . . . . . . . . . . .81
5. Programación de Pantalla . . . . .815.1 Aviso . . . . . . . . . . . . . . . . . . . . . .81
5.1.1 Personal Aviso . . . . . . . . . .825.1.2 Aviso IRO . . . . . . . . . . . . . .82
5.2 Luz de Pantalla . . . . . . . . . . . . .825.3 Fondo de Pantalla . . . . . . . . . . . .83
5.4 Mostrar Temas . . . . . . . . . . . . . .835.5 Menú Principal Fijado . . . . . . . .845.6 Tipo de Fuente . . . . . . . . . . . . . .845.7 Tamaño de Fuente . . . . . . . . . . .845.8 Formato de Reloj . . . . . . . . . . . .85
6. Programación de Teléfono . . . . .856.1 Modo de avión . . . . . . . . . . . . . .856.2 Establecer Atajos . . . . . . . . . . . .866.2.1 Establecer mis Atajos . . . . . .866.2.2 Establecer Teclas Direccionales . . . . . . . . . . . . . . . . . .86
6.3 Comandos de Voz . . . . . . . . . . .876.4 Idioma . . . . . . . . . . . . . . . . . . . . .876.5 Ubicación . . . . . . . . . . . . . . . . . .876.6 Seguridad . . . . . . . . . . . . . . . . . .88
6.6.1 Editar Códigos . . . . . . . . . .886.6.2 Restricciones . . . . . . . . . .896.6.3 Bloqueo de teléfono . . . . .896.6.4 Bloquear teléfono ahora . .906.6.5 Restablecer Implícito . . . . .906.6.6 Restaurar teléfono . . . . . . .91
6.7 Selección de Sistema . . . . . . . .916.8 Seleccionar NAM . . . . . . . . . . . .92
7. Programación de Llamada . . . . .927.1 Opciones de Respuesta . . . . . .927.2 Reintentar Automáticamente . .937.3 Modo TTY . . . . . . . . . . . . . . . . . .937.4 Marcado oprimiendo un botón .957.5 Privacidad de Voz . . . . . . . . . . . .957.6 Tonos DTMF . . . . . . . . . . . . . . . .96
8. Sinc automática de USB . . . . . .969. Memoria . . . . . . . . . . . . . . . . . . . . . .979.1 Opciones de Memoria . . . . . . . .979.2 Memoria de Teléfono . . . . . . . . .989.3 Memoria de Tarjeta . . . . . . . . . .98
6 VX8360

0. Información de Teléfono . . . . . . .990.1 Mi Número . . . . . . . . . . . . . . . . .990.2 Versión SW/HW . . . . . . . . . . . . .990.3 Glosario de Iconos . . . . . . . . . . .990.4 Actualización de Software . . . .100
Seguridad . . . . . . . . . . . . . . . . .101Información de seguridad de la TIA . . . . . . . . . . . . . . . . . . . . . . . . . . .101
Exposición a las señales deradiofrecuencia . . . . . . . . . . . . . . .101Cuidado de la antena . . . . . . . . . .101Funcionamiento del teléfono . . . .101Sugerencias para un funcionamientomás eficiente . . . . . . . . . . . . . . . .102Manejo . . . . . . . . . . . . . . . . . . . . .102Dispositivos Electrónicos . . . . . . .102Marcapasos . . . . . . . . . . . . . . . . . .102Aparatos para la sordera . . . . . . .103Otros Dispositivos Médicos . . . . .103Centros de atención médica . . . .103Vehículos . . . . . . . . . . . . . . . . . . . .103Instalaciones con letreros . . . . . .103Aeronaves . . . . . . . . . . . . . . . . . . .103Áreas de explosivos . . . . . . . . . . .103Atmósfera potencialmente explosiva . . . . . . . . . . . . . . . . . . . .104Para vehículos equipados con bolsasde aire . . . . . . . . . . . . . . . . . . . . . .104
Información de seguridad . . . . .105Seguridad del cargador y deladaptador . . . . . . . . . . . . . . . . . . .106Información y cuidado de la batería . . . . . . . . . . . . . . . . . . . . . .106Peligros de explosión, descargaseléctricas e incendio . . . . . . . . . . .107Aviso General . . . . . . . . . . . . . . . .107
Cuidado: Evite una ProbablePérdida del Oído. . . . . . . . . . . . . . .109Actualización de la FDA para losconsumidores . . . . . . . . . . . . . . . .11110 Consejos de Seguridad paraConductores . . . . . . . . . . . . . . . . . .120Información al consumidor sobre laSAR . . . . . . . . . . . . . . . . . . . . . . . . .123Reglas para la compatibilidad conaparatos para la sordera (HAC) dela FCC para los dispositivosinalámbricos . . . . . . . . . . . . . . . . . .125
Accesorios . . . . . . . . . . . . . . . .128
DECLARACIÓN DE GARANTÍALIMITADA . . . . . . . . . . . . . . . . .129
Glosario . . . . . . . . . . . . . . . . . . .132Terminología . . . . . . . . . . . . . . . . .132Siglas y abreviaturas . . . . . . . . .133
Índice . . . . . . . . . . . . . . . . . . . . .135
VX8360 7

Bienvenidos
Felicidades por elegir el avanzado ycompacto teléfono celular VX8360,diseñado para funcionar con la másreciente tecnología decomunicaciones móviles digitales:Acceso múltiple de división decódigo (Code Division MultipleAccess, CDMA). Junto con lasmuchas funciones avanzadas delsistema CDMA, como una claridadde voz altamente mejorada, esteteléfono ofrece:l Música V CAST con Rhapsodyl Videos V CASTl Ranura de extensión para la
tarjeta de microSD™l Cámara digital 1.3 Megapíxeles
interconstruidal Mobile Web 2.0l Diseño delgado y elegante l LCD de 8 líneas, grande, de fácil
lectura, con luz de fondo eiconos de estado
l Capaz de usar CENTRO deMEDIOS® para descargas dejuegos, tapices de fondo y tonosde timbre
l Teclado de 24 teclas y círculo denavegación
l Pantalla LCD Frontal y tecla Playsin tener que abrir la tapa
l Tiempo prolongado de batería en
espera y en conversaciónl Interfaz accionada por menús,
con indicaciones para una fáciloperación
l Localizador, mensajería, correode voz e identificador dellamada, IM y chat
l Reconocimiento de vozavanzado
l Protección de teclasl Respuesta con cualquier tecla,
reintento automático, marcadode una tecla y marcado rápidocon 999 ubicaciones de memoria
l Tapiz de fondo Flash condivertidas animaciones
l Capacidades bilingües (Inglés yEspañol)
l La tecnología inalámbricaBluetooth® (cualquier perfil)
NOTA Las palabras de la marca y loslogotipos de Bluetooth® son propiedadde la Bluetooth SIG, Inc. y cualquieruso de tales marcas por parte de LGElectronics se hace bajo licencia.Otras marcas y nombres comercialesson los de sus respectivospropietarios.
NOTA Para su comodidad, encontrará laguía del usuario interactiva enInternet, que podrá recorrerlibremente y así aprender de manerainteractiva cómo usar el teléfono pasoa paso. Diríjase ahttp://www.verizonwireless.com ->Support -> Phones & Devices ->seleccione el modelo de su teléfono
8 VX8360

-> luego seleccione Equipment Guide.
Información ImportanteEsta guía del usuario ofreceinformación importante sobre el usoy funcionamiento de su teléfono. Leatoda la información cuidadosamenteantes de usar el teléfono, para tenerel mejor desempeño y para evitarcualquier daño al teléfono o su usoincorrecto. Cualquier cambio omodificación no aprobados anularála garantía.
Cumplimiento de Clase B con elartículo 15 de la FCC Este dispositivo y sus accesorioscumplen con el artículo 15 de lasreglas de la FCC. El funcionamientoestá sujeto a las dos siguientescondiciones: (1) Este dispositivo ysus accesorios no pueden causarinterferencia dañina y (2) estedispositivo y sus accesorios debenaceptar cualquier interferencia quereciban, incluida la interferenciaque cause un funcionamiento nodeseado.
Información para el usuario Este equipo ha sido probado y seha hallado que cumple con loslímites para un dispositivo digitalClase B, conforme al artículo 15 delas reglas de la FCC. Estos límiteshan sido diseñados para brindaruna protección razonable contra
interferencia dañina en unainstalación residencial. Este equipo genera, utiliza y puedeirradiar energía de radiofrecuenciay, si no se instala y utiliza deacuerdo con las instrucciones,podría causar interferencia dañinapara las comunicaciones radiales.Sin embargo, no existe garantía deque la interferencia no se produciráen una instalación en particular. Sieste equipo ocasiona interferenciadañina en la recepción de radio otelevisión (lo cual puededeterminarse encendiendo yapagando el equipo), serecomienda al usuario que intentecorregir la interferencia tomandouna o más de las siguientesmedidas: - Reorientar o reubicar la antena
receptora - Aumentar la separación entre el
equipo y el receptor - Conectar el equipo en un toma de
un circuito diferente de aquél alque está conectado el receptor.
- Consultar con el distribuidor o untécnico de radio/TVexperimentado para obtenerayuda.
Las modificaciones no aprobadasexpresamente por el fabricantepodrían invalidar la autoridad delusuario para operar el equiposegún las reglas de la FCC.
Detalles Técnicos
VX8360 9

Detalles Técnicos
10 VX8360
Estándar CDMA Designador CDMA Designador Descripción
Interfaz aéreabásica
TIA/EIA-95ATSB-74ANSI J-STD-008TIA/EIA-IS2000
Interfaz aérea CDMA de modo dobleProtocolo de enlace de radio a 14.4kbps yoperaciones interbandaInterfaz aérea 1xRTT CDMA2000 IS-95 adaptadapara la banda de frecuencia PCS
Red
TIA/EIA/IS-634TIA/EIA/IS/651TIA/EIA/IS-41-CTIA/EIA/IS-124
MAS-BSPCSC-RSOperaciones intersistemaComunic. de datos con señales nom
Servicio
TIA/EIA/IS-96-BTIA/EIA/IS-637TIA/EIA/IS-657IS-801TIA/EIA/IS-707-A
CODEC de vozServicio de mensajes cortosDatos de paqueteServicio de determinación de posición (gpsOne)Datos de paquete de alta velocidad
Interfaz
relacionada
1x EV-DO
TIA/EIA/IS-856
TIA/EIA/IS-878
TIA/EIA/IS-866
TIA/EIA/IS-890
Interfaz aérea de datos en paquete de alta velocidadCDMA2000Especificación de interoperabilidad 1xEV-DO paraInterfaces de red de acceso CDMA2000Estándares de desempeño mínimo recomendadopara Terminal de acceso de datos en paquetes dealta velocidad CDMA2000Especificación de aplicaciones de prueba (TAS) paraInterfaz aérea de datos en paquetes de altavelocidad
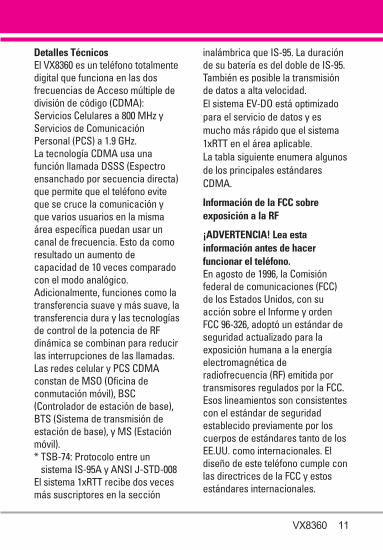
VX8360 11
Detalles TécnicosEl VX8360 es un teléfono totalmentedigital que funciona en las dosfrecuencias de Acceso múltiple dedivisión de código (CDMA):Servicios Celulares a 800 MHz yServicios de ComunicaciónPersonal (PCS) a 1.9 GHz.La tecnología CDMA usa unafunción llamada DSSS (Espectroensanchado por secuencia directa)que permite que el teléfono eviteque se cruce la comunicación yque varios usuarios en la mismaárea específica puedan usar uncanal de frecuencia. Esto da comoresultado un aumento decapacidad de 10 veces comparadocon el modo analógico.Adicionalmente, funciones como latransferencia suave y más suave, latransferencia dura y las tecnologíasde control de la potencia de RFdinámica se combinan para reducirlas interrupciones de las llamadas.Las redes celular y PCS CDMAconstan de MSO (Oficina deconmutación móvil), BSC(Controlador de estación de base),BTS (Sistema de transmisión deestación de base), y MS (Estaciónmóvil).* TSB-74: Protocolo entre un
sistema IS-95A y ANSI J-STD-008 El sistema 1xRTT recibe dos vecesmás suscriptores en la sección
inalámbrica que IS-95. La duraciónde su batería es del doble de IS-95.También es posible la transmisiónde datos a alta velocidad. El sistema EV-DO está optimizadopara el servicio de datos y esmucho más rápido que el sistema1xRTT en el área aplicable.La tabla siguiente enumera algunosde los principales estándaresCDMA.
Información de la FCC sobreexposición a la RF
¡ADVERTENCIA! Lea estainformación antes de hacerfuncionar el teléfono.En agosto de 1996, la Comisiónfederal de comunicaciones (FCC)de los Estados Unidos, con suacción sobre el Informe y ordenFCC 96-326, adoptó un estándar deseguridad actualizado para laexposición humana a la energíaelectromagnética deradiofrecuencia (RF) emitida portransmisores regulados por la FCC.Esos lineamientos son consistentescon el estándar de seguridadestablecido previamente por loscuerpos de estándares tanto de losEE.UU. como internacionales. Eldiseño de este teléfono cumple conlas directrices de la FCC y estosestándares internacionales.

Detalles Técnicos
12 VX8360
Contacto corporal durante elfuncionamientoEste dispositivo se probó para unuso ordinario con la parte posteriordel teléfono a una distancia de 2 cm(0.78 pulgadas) del cuerpo. Paracumplir con los requisitos deexposición a RF de la FCC, debemantenerse una distancia deseparación mínima de 2 cm (0.78pulgadas) entre el cuerpo delusuario y la parte posterior delteléfono, incluida la antena, ya seaextendida o retraída. No debenusarse sujetadores de cinturón,fundas y otros accesorios deterceros que contengancomponentes metálicos. Evite el usode accesorios que no puedanmantener una distancia de 2 cm(0.78 pulgadas) entre el cuerpo delusuario y la parte posterior delteléfono y que no se hayan probadopara determinar que cumplen loslímites de exposición a RF de la FCC.
Antena externa instalada en unvehículo(Opcional, en caso de estardisponible.)Debe mantenerse una distanciamínima de separación de 20 cm (8pulgadas) entre el usuario o quienesté cerca y la antena externainstalada en un vehículo parasatisfacer los requisitos deexposición a RF de la FCC. ParaObtener más información sobre laexposición a la RF, visite el sitioWeb de la FCC en www.fcc.gov.
PrecauciónUse sólo la antena incluida yaprobada. El uso de antenas noautorizadas o modificaciones noautorizadas pueden afectar lacalidad de la llamada telefónica,dañar al teléfono, anular sugarantía o dar como resultado unaviolación de las reglas de la FCC. No use el teléfono si la antena estádañada. Si una antena dañadaentra en contacto con la piel, puedeproducirse una ligera quemadura.Comuníquese con su distribuidorlocal para obtener una antena dereemplazo.* Antena interna (a lo largo de estaguía del usuario, el término "antena"se referirá a la antena interna).

Descripción general del Teléfono
VX8360 13
1. Audífono Le permite escuchar la persona al otro ladode la línea.
2. Tapa Abra el teléfono para responder a una llamadaentrante y cierrelo para terminar la llamada.
3. Pantalla LCD principal Muestra los mensajes eiconos indicadores.
4. Tecla OK/direccional Use para seleccionardistintas opciones en los menús del teléfono. Se usapara desplazarse por los menús principales de lapantalla de menú principal. Use el direccionales Tecla
para desplazarse por el menú y poner de relieveun campo específico o un objeto en movimiento porarriba, abajo, izquierda o derecha.
5. Tecla suave Izquierda Úselo para acceder al menú deMensaje.
6. Tecla de Altavoz Se usa para cambiar al modo deAltavoz.
7. 2.5 mm Enchufe de audífonos Le permite conectarunos audífonos opcionales para tener conversacionescómodas de manos libres.
8. Tecla SEND Úsela para hacer llamadas.
9. Teclas Laterales / Subir/Bajar Volúmen Úselas paraajustar el Volumen maestro en estado de espera* y elVolumen del Audífono durante una llamada.
10. Tecla de Comandos de Voz Úsela para accederrápidamente al Comandos de Voz.
11. Tecla de prefijo de llamada internacionalPara hacer una llamada internacional,mantenga oprimida la tecla durante 2 ó3 segundos. + es el códigode llamada internacional.
12. Puerto para cargador y accesorios Conecta elteléfono al cargador de baterías u otros accesorioscompatibles.
13. Lente de la Cámara Se usa para tomar fotos yvideos. Consérvela limpia para obtener unacalidad óptima de las fotografías/ videos.
* Modo de espera es cuando el teléfono aguarda una entrada delusuario. No se muestra ningún menú, y el teléfono no está realizandoninguna acción. Es el punto de partida para cualquier instrucción.
El esquema del menú del manual del usuario está basado en el estilopredeterminado "Cuadrícula".
2. Tapa
9. Teclas Laterales /Subir/Bajar Volúmen
16. Tecla suave Derecha
3. Pantalla LCD principal
4. Tecla OK /Navegación
6. Tecla de Altavoz5. Tecla suave Izquierda
12. Puerto paracargador yaccesorios
1. Audífono
8. Tecla SEND
22. Ranura de microSD™
23. Tecla de modo Vibrar
20. Tecla CLR (Borrar)
19. Tecla END/PWR
21. Teclado Alfanumérico
18. Tecla Cámara
7. 2.5 mm Enchufe de audífonos
11. Tecla de prefijo de llamadainternacional
24. Micrófono
13. Lente de laCámara
10. Tecla de Comandos de Voz
17. Tecla de Enviar Mensaje
15. Teclas de Controlde Música
14. Pantalla LCDfrontal

14. Pantalla LCD frontal Muestra el reloj digital yel estatus del teléfono. Si oprime la tecla Playpor 2 o 3 segundos mostrará los controles deV CAST | Rhapsody.
15. Música teclas de control Úsela para unacceso rápido a su reproductor de músicapara escuchar música.
16. Tecla suave Derecha Úselas para acceder al menúContactos.
17. Tecla de Enviar Mensaje Úsela para accederrapidamente al menú de Mensajería.
SUGERENCIAl Enviar un mensaje de texto
1. Oprima message .2. Seleccione Introducir Nom/Num o De list
de Contactos, introduzca un número deteléfono o dirección de correo electrónico yoprima .
3. Utiliza tu teclado para introducir un mensajeo oprima tecla suave izquierda Abc aelegir rápido de texto o símbolos.
4. Oprima ENV.l Cómo establecer favoritos
1. Para configurar los favoritos, seleccionehasta 5 contactos que utiliza frecuentemente
para mensajes. Seleccione paracontinuar.
2. Añadir de Contactos oprima SUBRY yoprima tecla suave izquierda Hecho.
18. Tecla Cámara Úsela para acceder rápidamente a lafunción de Cámara. Mantenga oprimida la teclacámara para grabar video.
19. Tecla END/PWR Úsela para apagar o encender elteléfono y para terminar una llamada. Úsela tambiénpara volver a la pantalla del menú principal.
20. Tecla CLR (Borrar) Borra espacios sencillos ocaracteres oprimiéndola rápidamente, peromanténgala oprimida para borrar uno palabra.También le permitirá retroceder en los menús, unnivel a la vez.
21. Teclado Alfanumérico Úselo para introducir númerosy caracteres y seleccionar elementos de menú.
22. Ranura de microSD™ Acepta tarjetas microSD™opcionales hasta 8GB.
23. Tecla de modo Vibrar Úsela para configurar el modode vibración (desde el modo en espera, manténgalaoprimida durante unos 3 segundos).
24. Micrófono Permite a las personas que lehablan escucharlo claramente cuando ustedestá hablando con ellos.
Descripción general del Teléfono
14 VX8360
Vista posterior
SUGERENCIA Si sostiene elteléfono cubriendo el bordesuperior, podría dificultar que laantena reciba una señal clara, locual afectará la calidad de lallamada de voz.
NOTALa antena se ofrecedentro del teléfono.
Batería
Cubierta de la batería
NOTASl Es importante cargarcompletamente la batería antes deusar el teléfono por primera vez.
l La vida de la batería y la potenciade la señal son factoressignificativos (entre otros) queafectan la capacidad de suteléfono de hacer o recibirllamadas.

Instalación de la batería
1. Introduzca la parte inferior de labatería en la abertura de la parteposterior del teléfono.
2. Oprima la batería hacia abajohasta que quede ajustada en susitio.
3. Coloque la tapa de la batería sobrela abertura de la parte posterior delteléfono y deslícela hacia arribahasta que quede ajustada en susitio.
Extracción de la batería
1. Deslice la tapa de la batería haciaabajo para quitarla.
2. Levante la parte superior de labatería para extraerla de sucompartimiento.
VX8360 15

CENTRO CENTRO DEDE MEDIOSMEDIOS
1. Música y Tonos1. Música de V CAST l
Rhapsody2. Obtén Nuevos Timbres3. Mis Timbres4. Mi Música5. Mis Sonidos6. Sincronizar Música
2. Foto y Video1. Videos de V CAST2. Obtén Nuevas Fotos3. Mis Fotos4. Mis Videos5. Tomar Foto6. Grabar Video7. Álbum En Línea
3. Juegos4. Internet Móvil5. Navegar y Descargar6. Extra
MENSAJERÍA MENSAJERÍA
1. Nuevo Mensaje2. Entrada3. Enviado4. Borradores5. Mensajes de Voz6. IMMóvil7. Correo Elect8. Chatear
CONTCONTACTOSACTOS
1. Nuevo Contacto2. Lista de Contactos3. Grupos4. Marcado Rápido5. In Case of Emergency6. Mi Tarjeta de Nombre
LLAMAS.RECNTESLLAMAS.RECNTES1. Perdidas2. Recibidas3. Marcadas4. Todas5. Ver Cronómetro
Descripción general de los menús
16 VX8360

VX8360 17
PROG/HERRPROG/HERR
1. Mi Verizon2. Herramientas
1. Comandos de Voz2. Calculadora3. Ez Sugerencia4. Calendario5. Reloj Despertador
1. Alarma 12. Alarma 23. Alarma 3
6. Cronómetro7. Reloj Mundial8. Cuaderno de Notas9. Almacen masivo USB
3. Menú de Bluetooth 1. Anadir Nuevo Aparato
4. Programación de Sonidos1. Volumen Maestro2. Sonidos de Llamada
1. Timbre de Llamada2. Vibrador de Llamada
3. Sonidos de Alerta1. Mensaje de TXT2. Mensaje de Multimedias3. Mensajes de Voz4. Tiimbre de Emergencia
4. Volumen de Teclado5. Alertas de Servicio
1. IRO2. Sonido de Minutos3. Conexión de Llamada4. Cargar Completado
6. Apagado/Encendido1. Apagado
2. Encendido7. Claridad de Voz
5. Programación de Pantalla1. Aviso
1. Personal Aviso 2. Aviso IRO
2. Luz de Pantalla1. Pantalla2. Teclado
3. Fondo de Pantalla1. Fondo de Pantalla
Principal1. Mis Fotos2. Mis Vídeos3. Animaciones
Divertidas2. Fondo de Pantalla Frontal
1. Mis Fotos2. My Videos
4. Mostrar Temas5. Menú Principal Fijado6. Tipo de Fuente7. Tamaño de fuente8. Formato Reloj
6. Programación de Teléfono1. Modo de Avión2. Establecer atajos3. Comandos de Voz4. Idioma5. Ubicación6. Seguridad
1. Editar Códigos2. Restricciones3. Bloqueo de teléfono4. Bloquear teléfono ahora5. Restablecer Implícito6. Restaurar teléfono

7. Selección de Sistema8. Seleccionar NAM
7. Programación de Llamada1. Opciones de Respuesta2. Reintentar Automáticamente3. Modo TTY4. Marcado oprimiendo un
botón5. Privacidad de Voz6. Tonos DTMF
8. Sinc automática de USBSyncro-MúsicaSyncro datosPreguntar al conectar
9. Memoria1. Opciones de Memoria 2. Memoria de Teléfono3. Memoria de la Tarjeta
0. Información de Teléfono1. Mi Número2. Versión SW/HW3. Glosario de Iconos4. Actualización de Software
Descripción general de los menús
18 VX8360
Algunos contenidos de estaguía del usuario pueden serdistintos de su teléfono enfunción del software delteléfono. Las funciones yespecificaciones están sujetasa cambios sin previo aviso.

Para hacer funcionar su teléfono por primera vez
VX8360 19
Carga de la batería
Para utilizar el cargador suministradocon su teléfono:
AVISO Use únicamente un accesorio decarga aprobado para cargar suteléfono LG. La manipulación inadecuada delpuerto de carga, así como el uso deun cargador no compatible puedenocasionarle daños a su teléfono yanular la garantía.
1. Enchufe el extremo del adaptadorde CA en el conector del cargadordel teléfono y el otro extremo enuna toma de corriente.
2. El tiempo de carga varía según elnivel de la batería.
Carga con USBPuede utilizar su ordenador paracargar tu teléfono. Conecte unextremo del cable USB al puerto decarga accesorio en su teléfono y elotro extremo a un highpowerpuerto USB de su PC. Pero antes de hacer estos pasos,es necesario que usted tenga buencontroladores USB. LG USB Driveres descargable por debajo de sitio; http://us.lge.com > Click SUPPORT> Click DOWNLOAD y búsqueda deLG USB Driver.
NOTA No son compatibles los puertos USBde baja energía, como el que seencuentra en el teclado o en elconcentrador USB con alimentaciónpor bus.
Protección de la temperaturade la bateríaSi la batería se sobrecalienta, elteléfono se apagaráautomáticamente. Al volver aencender el teléfono, un mensajeemerge avisándole que el teléfonose apagó por su seguridad.
AVISOPor favor asegurese de que el logo de LGeste mirando hacia abajo antes de insertarel cargador o cable USB en el puerto paracargador de su teléfono.

Instalación de la tarjetamicroSDTM
1. Localice la ranura microSDTM en ellateral derecho del teléfono ydestápela suavemente.
2. Inserte la tarjeta microSDTM en ladirección correcta hasta que hagaclic en la ranura. Si inserta latarjeta en la dirección equivocada,podría dañarse el teléfono o latarjeta.
Desinstalación de la tarjetamicroSDTM
Oprima suavemente y libere el bordeexpuesto de la tarjeta microSDTM paraexpulsarla, retírela de la ranura yvuelva a colocar la cubierta.
NOTASl No intente retirar la tarjeta microSDTM
mientras se está leyendo o escribiendo en latarjeta.
l Los usuarios que deseen transferir música ala tarjeta microSDTM insertada en el teléfono(sea mediante sincronización MTP o poraire) primero deben formatear la tarjetamicroSDTM en esta terminal (Menú--> Prog/
Herr--> Memoria--> Memoria de la Tarjeta --> Opciones--> Format). Advertencia: Alformatear la tarjeta microSDTM se borrarátodo el contenido de la misma. En caso deque la tarjeta microSDTM se utilice en esteteléfono sin haberla formateado antes, elteléfono mostrará un error de adquisición delicencias MOD. Los archivos de músicadescargados o adquiridos de otrosproveedores y almacenados en una tarjetamicroSDTM insertada en este dispositivopueden estar protegidos o cifrados por elproveedor en cuestión y quizás no puedanreproducirse en este dispositivo.
Nivel de carga de la bateríaEl nivel de carga de la bateríase muestra en la parte superiorderecha de la pantalla de LCD.Cuando disminuya el nivel de cargade la batería, el sensor de bateríabaja le alerta haciendo sonar untono audible, haciendo destellar elicono de batería y mostrando unamensaje de alertas. Si el nivel decarga de la batería se hacedemasiado bajo, el teléfono seapaga automáticamente y no seguarda ninguna función que estéen curso.
Para hacer funcionar su teléfono por primera vez
20 VX8360
NOTALa tarjeta de memoriase vende por separado.

VX8360 21
Potencia de la señalLa calidad de las llamadas dependede la potencia de la señal en lazona donde se encuentra. Lapotencia de la señal se indica en lapantalla como el número de barrasjunto al icono de potenciade la señal. A más barras, mejor lapotencia de la señal. Si la calidadde la señal es defectuosa,trasládese a una zona abierta. Siestá en un edificio, la recepciónpuede ser mejor cerca de unaventana.
Apagar y Encender el teléfono
Encender el teléfono
1. Instale una batería cargada oconecte el teléfono a una fuentede electricidad externa.
2. Oprima (ubicada arriba deel número en el teclado)hasta que la pantalla LCD seencienda.
Apagar el teléfono
1. Mantenga oprimida hastaque se apague la pantalla.
Para hacer llamadas
1. Asegúrese de que el teléfonoesté encendido. Si no lo está,oprima durante unos 3segundos incluya el código debloqueo si fuera necesario.
2. Introduzca el número deteléfono.
3. Oprima .
4. Oprima para terminar lallamada.
NOTA Su teléfono tiene una función deComandos De Voz que también lepermite hacer llamadas diciendo elnúmero de teléfono, nombre oubicación.
Corrección de errores en lamarcación
Oprima una vez para borrar laúltima cifra introducida, omantenga oprimida durante almenos 2 segundos para borrartodas las cifras.
Remarcado de llamadas
Oprima dos veces para volvera marcar la última llamada.

Para hacer funcionar su teléfono por primera vez
Para recibir llamadas
1. Cuando el teléfono suena ovibra, puede contestar lallamada simplemente abriendo latapa.
NOTA Si el parámetro Opciones derespuesta está establecido enCualquier Tecla, usted puede:l Abrir la tapa y presionar la tecla de
función izquierda [Silenc.]para silenciar el timbre o lavibración de esa llamada.
l Abrir la tapa y presionar la tecla defunción derecha [Ignorar]para finalizar la llamada o derivarladirectamente al correo de voz.
2. Oprima para finalizar lallamada.
Iconos de pantallaCuando el teléfono está encendido,la línea superior de la pantalla LCDmuestra iconos que indican elestado del teléfono. Para ver elglosario de iconos, vaya a MENÚ ->PROG/HERR -> Información deTeléfono -> Glosario de Iconos.
22 VX8360

Modo de vibraciónAjusta el teléfono para vibrar enlugar de sonar (se muestra ).Para ajustar el Modo de vibración,mantenga oprimida . Paravolver al Modalidad Normal,mantenga oprimida .
Sonidos desactivadosDesactive rápidamente los sonidosdel teléfono cuando usted seencuentre en un lugar en el que lossonidos perturbarían el ambiente.En el modo de espera y con la tapaabierta, mantenga presionada latecla lateral inferior durante 3segundos. Para volver al modonormal de sonidos, mantengapresionada la tecla lateral superior.
Función de silencioLa Función de Silencio no transmitesu voz a la persona que llama. Paraactivar Silencio rápidamentedurante una llamada, toque la Teclasuave Izquierda [Mudo], ypara cancelarlo toque la Teclasuave Izquierda [No Mudo].
Ajuste rápido del volumenAjuste rápidamente los volúmenesdel timbre y del audífonooprimiendo la tecla lateral de arribapara aumentarlo o la tecla lateralde abajo para disminuirlo.
NOTA El volumen del audífono puedeajustarse durante una llamada y elvolumen de teclas sólo puedenajustarse mediante el Menú.
Llamada en esperaOprima una llamada, un pitidoindica otra llamada entrante.
Oprima para responder yponer la primera llamada enespera. Oprima de nuevo paravolver a la primera llamada.
Id. de quien llamaId. de quien llama muestra elnúmero o (foto ID si fuéconfigurada) de la persona quellama cuando suena su teléfono.
Comandos de VozComandos de Voz le permite hacercosas mediante órdenes verbales(por ej., hacer llamadas, confirmarVoicemail, etc.). Oprima la tecla deComandos de Voz y siga lasindicaciones.
NOTA También se pueden iniciar losComandos de Voz con la tecladesignado de su dispositivoBluetooth®. Compruebe el manual deldispositivo Bluetooth® para obtenermás instrucciones.
Acceso rápido a funciones de conveniencia
VX8360 23

Entrada de textoLas siguientes funciones de teclaestán disponibles para ayudar a laintroducción de texto:
Tecla suave Izquierda:Toque para desplazarse yacceder a diferentesmodos de introducción detexto.
Bloq Mayús: Oprima paracambiar de mayúscula/minúscula (mayúsculainicial, todas mayúsculaso minúsculas).
Siguiente: En el modo dePalabra, oprima paramostrar otras palabrascoincidentes.
Espacio: Oprímalo paraaceptar una palabra eintroducir un espacio.
Borrar: Toque para borrarun solo espacio ocarácter. Manténgalaoprimida para borrarpalabras.
Puntuación: Oprima paraintroducir puntuación.
Modos de entrada de texto
En un campo de texto, toque laTecla suave Izquierda paramostrar los modos de texto.T9 Palabra/ Abc/ ABC/ 123/Símbolos/ Texto Rápido
Introducir y editar información
24 VX8360

Contactos en la memoria de su teléfono
VX8360 25
Aspectos Básicos
1. Introduzca el número de teléfono(de hasta 48 dígitos) y toque laTecla suave Izquierda [Grdr].
2. Use la tecla direccional para desplazarse hasta NuevoContacto/ Actualizar Existente.
3. Use la tecla direccional para desplazarse hasta Móvil 1/Casa/ Trabajo/ Móvil 2/ Fax.
4. Introduzca el nombre (hasta 32caracteres) del númerotelefónico y oprima .
5. Oprima para salir, para llamar, o la Tecla suaveDerecha [Opciones].
Personalización deentradas individuales
1. Toque la Tecla suave Derecha[Contactos], y Use la tecla
direccional paradesplazarse hasta una entrada.
2. Toque la Tecla suave Izquierda[Corregir].
3. Use la tecla direccional para desplazarse hasta lainformación que deseapersonalizar.
4. Cambie la entrada como desee yoprima para guardar loscambios.
Marcación RápidaLe permite configurar susMarcación Rápida.1. Toque la Tecla suave Derecha
[Contactos], y Use la tecladireccional paradesplazarse hasta una entrada.
2. Toque la Tecla suave Izquierda[Corregir].
3. Use la tecla direccional para desplazarse hasta unnúmero de teléfono, y toque laTecla suave Derecha [Opciones].
4. Use la tecla direccional para desplazarse hasta FijarMarcado Rápido.
5. Introduzca una cifra de MarcadoRápido.
l Use el teclado y oprima .
l Use la tecla direccional para desplazarse hasta eldígito de Marcado Rápido yoprima .
6. Oprima Sí, y oprima para guardar. Oprima paraguardar el contacto editado.

Contactos en la memoria de su teléfono
26 VX8360
Almacenar un número conuna pausaLas pausas le permiten introducirseries de números adicionales paraacceder a sistemas automatizados,como el Correo de voz o losnúmeros de facturación de tarjetade crédito. Los tipos de pausa son:Espera (W) El teléfono deja demarcar hasta que usted toque laTecla suave Izquierda [Release] para avanzar al siguientenúmero. 2-Seg Pausa (P) El teléfonoespera 2 segundos antes de enviarla siguiente cadena de cifras.
1. Desde la pantalla principal,introduzca el número y toque laTecla suave Derecha [Opciones].
2. Use la tecla direccional para desplazarse hasta Pausade 2-Seg Pausa/ Espera.
3. Introduzca números adicionales(por ejemplo, el nip o el númerode la tarjeta de crédito, etc.).
4. Toque la Tecla suave Izquierda[Grdr].
5. Elija Nuevo Contacto/ ActualizarExistente.
6. Elija un tipo de número teléfonicoMóvil 1/ Casa/ Trabajo/ Móvil 2/Fax.
7. Continúe introduciendo elnúmero como una entrada decontacto según sea necesario.
Agregar otro número deteléfono
En el modo de espera
1. Introduzca un número deteléfono y toque la Tecla suaveIzquierda [Grdr].
2. Use la tecla direccional para desplazarse hasta unaActualizar Existente.
3. Use la tecla direccional para desplazarse hasta a unaentrada existente y oprima .
4. Use la tecla direccional para desplazarse hasta Móvil 1/Casa/ Trabajo/ Móvil 2 / Fax, yoprima para guardar.
En la pantalla de Lista de contactos
1. Oprima la tecla suave derecha[Contactos].
2. Use la tecla de dirección para resaltar una entrada, luegooprima la tecla suave derecha
[Corregir].

3. Use la tecla de dirección para resaltar el campo delnúmero de teléfono a agregar,luego introduzca el número yoprima la tecla de dirección a guardar
Desde la pantalla Lista decontactos
1. Toque la Tecla suave Derecha[Contactos].
2. Use la tecla direccional para desplazarse hasta unaentrada y toque la Tecla suaveIzquierda [Corregir].
3. Use la tecla direccional para desplazarse hasta el campodel número de teléfono quedesea agregar, introduzca elnúmero y oprima paraguardar.
Cambiar Información Guardada
Para editar cualquier informaciónque haya guardado, acceda a lapantalla Editar contactos:
1. Toque la Tecla suave Derecha[Contactos].
2. Use la tecla direccional para desplazarse hasta unaentrada y toque la Tecla suaveIzquierda [Corregir].
3. Use la tecla direccional para desplazarse hasta el campoque desea cambiar.
4. Haga los cambios y oprima .
Agregar una pausa a una entradade contacto
1. Toque la Tecla suave Derecha[Contactos].
2. Use la tecla direccional para desplazarse hasta unaentrada de Contactos y toque laTecla suave Izquierda [Corregir].
3. Use la tecla direccional para desplazarse hasta elnúmero y toque la Tecla suaveDerecha [Opciones].
4. Oprima Espera o2-Seg Pausa.
5. Introduzca los número(s)adicionales y oprima .
VX8360 27

Contactos en la memoria de su teléfono
Cambiar el NúmeroPredeterminadoEl Número predeterminado es elnúmero de teléfono que introdujo alcrear el contacto. Se puedeguardar otro número como NúmeroPredeterminado.
1. Toque la Tecla suave Derecha[Contactos].
2. Use la tecla direccional para desplazarse hasta unaentrada.
3. Toque la Tecla suave Izquierda[Corregir].
4. Use la tecla direccional para desplazarse hasta elnúmero de teléfono y toque laTecla suave Derecha [Opciones].
5. Use la tecla direccional para desplazarse hasta Fijarcomo Predet.
6. Oprima Sí para configurar elnuevo número comopredeterminado. Aparece un mensaje deconfirmación.
7. Oprima de nuevo paraactualizar el contacto.
Borrar
Borrar una entrada de contacto
1. Toque la Tecla suave Derecha[Contactos].
2. Use la tecla direccional para desplazarse hasta unaentrada.
3. Toque la Tecla suave Derecha[Opciones].
4. Oprima Borrar.
5. Oprima Sí.
Borrar un Marcado Rápido
1. Toque la Tecla suave Derecha[Contactos].
2. Use la tecla direccional para desplazarse hasta laentrada de Contacto para editary oprima [VER].
3. Seleccione el número con elMarcado rápido, y oprima [CRRGR].
4. Toque la Tecla suave Derecha[Opciones].
5. Oprima Borrar MarcadoRápido.
6. Oprima Sí.
7. Oprima para actualizar elcontacto.
28 VX8360

Marcado RápidoLe permite hacer llamadas deteléfono en sus contactos rápida yfácilmente.
NOTA El número 1 de Marcado Rápido espara Mensajes de Voz.El número 411 de Marcado Rápido espara Asistencia de Directorio.
Marcado rápido de una cifra
Oprima y mantenga presionado eldígito de marcado rápido. Elteléfono recuerda el númerotelefónico de sus Contactos, lomuestra y lo marca.
Marcado rápido de más de unacifra
Al mantener presionada una teclanumérica, se le indica al teléfonoque intente un marcado rápido.Para realizar un marcado rápido demás de una cifra, oprima el o losprimeros dígitos, según seanecesario, y luego mantengapresionado el último dígito. Porejemplo, para utilizar el marcadorápido 25, presione y luegomantenga oprimida la tecla .
NOTA También puede introducir las cifras deMarcado Rápido y oprimir .
Para los Marcados Rápidos de 95,97, 98 y 99
Marcación rápida 95, 97, 98, y 99están preprogramadas paraacceder a determinadas teléfonoinformación de la cuenta: 95 (#Warranty Center), 97 (# BAL), 98 (#MIN), y 99 (# PMT). A diferencia demarcación rápida 1, éstas sepueden cambiar si así lo desea.
NOTA 411 no está disponible para ajustar oquitar.
VX8360 29

CENTRO de MEDIOS
CCEENNTTRROO ddee MMEEDDIIOOSSCENTRO de MEDIOS® le permitehacer en su teléfono más que sólohablar. CENTRO de MEDIOS es unatecnología y un servicio que lepermite descargar y usaraplicaciones en su teléfono. ConCENTRO de MEDIOS, es rápido yfácil adaptar su teléfono a su estilode vida y sus gustos. Simplementedescargue las aplicaciones que leatraigan. Con una amplia gama desoftware disponible, puede estarseguro de que encontrará algo útil,práctico o entretenido.
¿Hay algo que no sea claro?Del menú CENTRO de MEDIOS,toque la Tecla suave Derecha [Info] para ver el estado de sumemoria, registro de actividades,texto de ayuda y estado deCENTRO de MEDIOS. Utilice laopción de la Ayuda para vista lainformación de comprar nuevosusos a los usos expirados.
1. Música y TonosPersonalice su teléfono con tonosde timbre. Hay una gran variedadde opciones disponibles para elegirde éxitos actuales, pop, hiphop ymucho más.
Acceso y Opciones
1. Oprima [MENÚ].
2. Oprima la Tecla Direccional Para obtener acceso al menúCENTRO de MEDIOS.
3. Oprima Música y Tonos.
4. Seleccione un submenúoprimiendo el número quecorresponda al submenú.
30 VX8360

1.1 Música de V CAST lRhapsody
Permite que usted descargue unavariedad de música vía V CASTsiempre y dondequiera que esté.
1. Oprima [MENÚ].
2. Oprima la Tecla Direccional Para obtener acceso al menúCENTRO de MEDIOS.
3. Oprima Música y Tonos.
4. Oprima Música de V CASTl Rhapsody.
NOTA Cargos adicionales para la música sepueden aplicar. V CAST Musicservicio no está disponible en todoslos ámbitos. Compruebewww.verizonwiress.com/music sitioweb para obtener más detalles.
1.2 Obtén Nuevos TimbresLe permite conectarse a CENTROde MEDIOS y descargar diversostonos de timbre.
1. Oprima [MENÚ].
2. Oprima la Tecla Direccional Para obtener acceso al menúCENTRO de MEDIOS.
3. Oprima Música y Tonos.
4. Oprima Obtén NuevosTimbres.
1.3 Mis TimbresLe permite seleccionar el tono detimbre que desee, descargar unonuevo.
1. Oprima [MENÚ].
2. Oprima la Tecla Direccional Para obtener acceso al menúCENTRO de MEDIOS.
3. Oprima Música y Tonos.
4. Oprima Mis Timbres.
5. Use la tecla direccional para resaltar el tono de timbre ytoque la Tecla suave Izquierda
[Fij como].
l Timbre
l Contacto ID: Desplácese yseleccione el contacto que seidentificará con el tono de timbreque seleccionó.
l Sonidos de Alerta: Oprimala tecla del númerocorrespondiente para uno de lossiguientes:
Todo Mensaje/ Mensaje de TXT/Mensaje de Multimedias/Mensajes de Voz
VX8360 31

32 VX8360
CENTRO de MEDIOS
1.4 Mi MúsicaLe permite almacenar música yescucharla directamente desde suteléfono. Conéctese a V CAST paradescargar una variedad de música,transferir música entre su teléfonoy su PC, administrar y organizar susarchivos de música y mucho más.NOTA El almacenamiento de archivos varía
según el tamaño de cada archivo así
como la asignación de memoria de
otras aplicaciones.
1. Oprima [MENÚ].
2. Oprima la Tecla Direccional Para obtener acceso al menúCENTRO de MEDIOS.
3. Oprima Música y Tonos.
4. Oprima Mi Música.
5. Use la tecla Navegación paradesplazarse hasta un submenú ypresione .
Reproducción de Mi músicaEs fácil de encontrar y escuchar lamúsica que has guardado en tuteléfono.
Acceso a Mi música
1. Oprima [MENÚ].
2. Oprima la Tecla Direccional Para obtener acceso al menúCENTRO de MEDIOS.
3. Oprima Música y Tonos.
4. Oprima Mi Música.
5. Use la tecla direccional paradesplazarse hasta un submenú,a continuación, oprima .
Control del reproductor de músicaSi mantiene la tapa abierta mientrasescucha música, use lo siguientepara controlar el Music Player:
l Tecla suave Izquierda [Repeat] Repite la lista decanciones.
l Tecla suave Derecha [Options]Le permite elegir:Play All / Shuffle / My Music /Shop / Listeners also liked /Help

VX8360 33
l : Ajustar el volumen.
l / Muestra la lista detemas para elegir otra canción.
l Reproduce o pausa el temaactual.
l Rebobina la canción. Dosclics va a la canción anterior.
l Salta y reproduce el temasiguiente.
Teclas Frontales de Control deMúsica
: Reproducir una canción opausa la canción.
: Volver a canciones anterioreso mantenga oprimida la teclapara rebobinar.
: Pasar a la siguiente cancióno mantenga oprimida la teclapara adelantar.
1.5 Mis SonidosLe permite seleccionar ó grabar unsonido que desee.
Cómo grabar un nuevo sonido
1. Oprima [MENÚ].
2. Oprima la Tecla Direccional Para obtener acceso al menúCENTRO de MEDIOS.
3. Oprima Música y Tonos.
4. Oprima Mis Sonidos.
5. Oprima Grabar Nuevo yoprima para empezar agrabar, y oprimalo de nuevo paraterminar de grabar .
Cómo seleccionar el sonido
1. Oprima [MENÚ].
2. Oprima la Tecla Direccional Para obtener acceso al menúCENTRO de MEDIOS.
3. Oprima Música y Tonos.
4. Oprima Mis Sonidos.
5. Use la tecla Navegaciónpara desplazarse y resaltar unsonido.Opciones desde aquí:
l Toque la Tecla suaveIzquierda [Borrar].
l Oprima [ESCU].
l Toque la Tecla suave Derecha[Opciones] :
Enviar/ Álbum En Línea/Renombrar/ Bloq/ BorrarToda/ Prueba Info

34 VX8360
CENTRO de MEDIOS
1.6 Sincronizar MúsicaMúsica V CAST con Rhapsody esun servicio de música digital que lepermite escuchar millones decanciones de miles de artistas.Descubra favoritos nuevos yantiguos en un catálogo de músicaextensivo.Sincronice música sinlímites* desde la PC, a cualquierdispositivo activado para Música VCAST con Rhapsody®, sin pagarningún costo adicional por pista.Descargue el software de Música VCAST con Rhapsody parasincronizar pistas, álbumes, y listasde reproducción con su nuevoteléfono compatible, mientrasadministra la biblioteca de músicade su PC, todo en un lugar.* Sujetoa la capacidad de almacenamientode la tarjeta dememoria/dispositivo.NOTA Los subscriptores pueden escuchar
pistas de canciones siempre y cuandola subscripción este vigente. Elteléfono debe ser syncronizado por lomenos una vez al mes, para renovarla licencia de subscripción. Requerirácargar el software 1-vez y solo paraWindows Vista™ ó XP PCs. Estesoftware está disponible enVerizonWireless.com/music* Sujeto a la capacidad dealmacenamieto del teléfono/ tarjeta dememoria.
Descargar música a una PC
1. Abra Música V CAST conRhapsody. ¿No tiene Música VCAST con Rhapsody? Descárguelogratuitamente enwww.verizonwireless.com/music.
2. Inicie sesión.
3. Para cada pista de Música VCAST que haya descargado en suteléfono, podrá descargar unacopia en su computadora sincosto adicional. Las pistas decanciones disponibles paradescargar aparecerán una vezcompletado el inicio de sesión.
4. Seleccione las casillas de lascanciones que desee descargar.
5. Seleccione "Descargar pistas".
6. Para reproducir la canción, puedebuscarla seleccionando la fichaMi biblioteca.
NOTA Música V CAST con Rhapsodyfuncionará con Windows VistaTM, o XP.No disponible para Mac o Linux.
Sincronice su música desde su PCa su dispositivo inalámbrico deMúsica V CAST.Esta opción le permite transferirarchivos de música desde su PC.Para poder user esta opción, usteddebe instalar primero V CAST Music

VX8360 35
con Rhapsody en su PC.
1. Abra V CAST Music conRhapsody. ¿No tiene Música VCAST con Rhapsody®
Descárguelo gratuitamente enwww.verizonwireless. com/music
2. Conecte el cable USB a suteléfono, y conectelo a un puertode USB de su PC.
3. Desde la pantalla principal de suteléfono, el mensaje de SYNCMUSIC V CAST MOBILE PHONEaparecerá. Su teléfono deberá demostrar el mensaje de: Connected.
4. Arrastre todas las canciones queusted quiera sincronizar de MyLibrary al V CAST de su teléfono,listadas en la lengüeta de Sources.
Una vez que la sincronización estecompleta, oprima la teclaEND/PWR y desconecte el cableUSB.
NOTA Un cable USB compatible (se vendepor separado) se requiere para lasincronización.
2. Foto y Video Vea, tome, e intercambie susimágenes y videos digital desde suteléfono inalámbrico.
Acceso y Opciones
1. Oprima [MENÚ].
2. Oprima la Tecla Direccional Para obtener acceso al menúCENTRO de MEDIOS.
3. Oprima Foto y Video .
4. Seleccione un submenú.
2.1 Videos de V CASTV CAST lleva el mundo a suteléfono celular con video demovimiento total y sonido. Póngaseal día de lo que está ocurriendo conVideo Clips de noticias,entretenimiento, deportes o clima(debe estar en un área decobertura de V CAST. Puedenaplicarse cargos adicionales)
1. Oprima [MENÚ].
2. Oprima CENTRO deMEDIOS.
3. Oprima Foto y Video.
4. Oprima Videos de V CAST.

36 VX8360
CENTRO de MEDIOS
Navegación, Selección y Video V CAST
1. Oprima [MENÚ].
2. Oprima la Tecla Direccional Para obtener acceso al menúCENTRO de MEDIOS.
3. Oprima Foto y Video.
4. Oprima Videos de V CAST.
5. Oprima la círculo de direccionalpara visión las categorías
video del clip incluyendoNoticias, Entretenimiento,Deportes, y Tiempo y oprima para seleccione.
6. Seleccione el proveedor decontenidos y oprima .
7. De ser aplicable, seleccione lasubcategoría y oprima .
8. Desplácese hasta el video clipque desea ver y oprima .
Para ver un video
1. Oprima [MENÚ].
2. Oprima la Tecla Direccional Para obtener acceso al menúCENTRO de MEDIOS.
3. Oprima Foto y Video.
4. Oprima Videos de V CAST.
5. Seleccione una categoría devideo clip y un video clip y oprima
.
6. Lea la descripción del video clipy oprima para verlo.
7. Seleccione Sí (si es aplicable)para aceptar los cargos, oprima
y se iniciará la transferenciadel videoclip.
8. El video clip comenzará atransferirse y se reproducirápoco después de haber sidoseleccionado.
Para descargar un Video Clip
1. Oprima [MENÚ].
2. Oprima la Tecla Direccional Para obtener acceso al menúCENTRO de MEDIOS.
3. Oprima Foto y Video.
4. Oprima [Videos de V CAST].
5. Desplácese hasta un video clip yoprima .
6. Lea la descripción del video clipy toque la Tecla suave Derecha
[Options].
7. Oprima Save Video.
8. Seleccione Yes para aceptar loscargos, oprima y Video Clipiniciará la descarga del video.

VX8360 37
9. Una vez que se hayadescargado el video, apareceráun mensaje en su teléfono.
10. Seleccione Yes y oprima para ver el video.
11. El Video clip se guardaráautomáticamente en Mis Clips yen Mis Videos.
NOTA No todos los videos son descargables.Sólo pueden descargarse los videosque tienen la opción de guardarse.Pueden aplicarse cargos adicionalespor cada video clip que vea. Elservicio de Video Clips no estádisponible en todas las áreas.Compruebe el sitio Webwww.verizonwireless.com/getitnowpara obtener detalles.
Borrar Video Clips
1. Oprima [MENÚ].
2. Oprima la Tecla Direccional Para obtener acceso al menúCENTRO de MEDIOS.
3. Oprima Foto y Video.
4. Oprima Videos de V CAST.
5. Toque la Tecla suave Izquierda[Mis Videos].
6. Desplácese hasta el Video quedesea borrar con la círculo deNavegación .
7. Toque la Tecla suave Izquierda[Options] y oprima
[Erase].
8. Oprima [Yes] para borrar elVideo .

38 VX8360
CENTRO de MEDIOS
Configurar alertas para nuevosVideo Clips
1. Oprima [MENÚ].
2. Oprima la Tecla Direccional Para obtener acceso al menúCENTRO de MEDIOS.
3. Oprima Foto y Video.
4. Oprima Videos de V CAST.
5. En el catálogo de Video Clips,seleccione una categoría.
6. Seleccione al Proveedor decontenido.
7. Toque la Tecla suave Derecha[Options].
8. Seleccione Alerts.
9. Seleccione Configure Alerts.
10. Seleccione el contenido de lasalertas que desea y oprima para guardar.
2.2 Obtén Nuevas FotosLe permite conectarse a CENTROde MEDIOS y descargar diversosFOTO (imágenes) para Mis Fotos.
1. Oprima [MENÚ].
2. Oprima la Tecla Direccional Para obtener acceso al menúCENTRO de MEDIOS.
3. Oprima Foto y Video.
4. Oprima Obtén NuevasFotos.
5. Oprima .
2.3 Mis FotosLe permite ver fotografíasalmacenadas en el teléfono.
1. Oprima [MENÚ].
2. Oprima la Tecla Direccional Para obtener acceso al menúCENTRO de MEDIOS.
3. Oprima Foto y Video.
4. Oprima Mis Fotos.
5. Seleccione la imagen que deseacon la círculo de direccional
y toque la Tecla suaveDerecha [Opciones].

6. Seleccione una de las opcionessiguientes:
Enviar Envía el foto mensaje.
Fijar Como Papel TapizPrincipal/ Papel TapizDelantero/ Foto ID
Tomar Foto Activa la función decámara.
Obtener Nuevo Fotos Descargavarios fotos.
Administrar Mis Fotos Lepermite marcar la imagenseleccionada y aplicar lasopciones.
Renombrar Cambie el nombrede las FOTOs seleccionadas.
*Bloq (Desbloq) Le permitebloquear o desbloquear. Losarchivos bloqueados no sepueden borrar accidentalmente.
Imprimir Imprimir via Bluetooth/Preferencias de impresión
Prueba Info Nombre/ Fecha/Hora/ Resolución/ Tamaño
NOTA La opción 'Enviar medianteBluetooth' no se muestra cuando seseleccionan imágenes protegidas por DRM(Administración digital de derechos).
* Sólo aparece cuando la imagense guarda en el teléfono.
Edición de una FotoUse la tecla de dirección pararesaltar una imagen, luego oprima
[VER] luego oprima la teclasuave derecha [Opciones] paraacceder a opciones extras deedición como:
Editar & Zoom le permite realizarzoom, girar y recortar la fotografía.
2.4 Mis VideosLe permite ver videos almacenadosen el teléfono.
1. Oprima [MENÚ].
2. Oprima la Tecla Direccional Para obtener acceso al menúCENTRO de MEDIOS.
3. Oprima Foto y Video.
4. Oprima Mis Videos.
5. Seleccione el video que deseacon la círculo de direccional
y toque la Tecla suaveDerecha [Opciones].
*Enviar Envía un mensaje devídeo.
Grabar Video Activa la funciónde cámara de video.
Álbum En Línea Accede alálbum en línea (PIX Place).
VX8360 39

CENTRO de MEDIOS
Videos de V CAST Obtieneacceso a la función Videos de VCAST.Administrar Mis Videos Lepermite marcar videos paraborrarlos, bloquearlos odesbloquearlos.Tapiz Fijar Como Muestra elarchivo de video seleccionadocomo pantalla de fondo delteléfono.Renombrar Cambia el nombre alvídeo seleccionado.Prueba Info Nombre/ Fecha/Hora/ Duración/ Tamaño
* Esto no aparecerá para contenidoprotegido.
6. Oprima parareproducirlo.
NOTA El almacenaje de archivo varía según
el tamaño de cada archivo así como la
asignación de memoria de otros usos.
l : Ajustar el volumen.
l Tecla suave Izquierda :Mudo/ No Mudo
l : Pausa/ Reproducción
l Arriba tecla direccional :Muestra la pantalla completa.
l Abajo tecla direccional :Parar
l Derecha tecla direccional :Avance rápido
l Izquierda tecla direccional :Rebobinar
7. Toque la Tecla suave Derecha[Opciones] para seleccione
una de las opciones siguientes:Tapiz Fijar Como/ Info de Arch
2.5 Tomar FotoLe permite tomarfotografíasdigitales.
1. Oprima[MENÚ].
2. Oprima laTeclaDireccional Para obteneracceso al menú CENTRO deMEDIOS.
3. Oprima Foto y Video.
4. Oprima Tomar Foto.
5. Configure el brillo con el círculode direccional
, y el Zoom con el círculo dedireccional , y toque la Teclasuave Derecha [Opciones]para cambiar otros valores.
NOTA Zoom no está disponible si la
resolución se fija a 1280x960.
40 VX8360

l Seleccione las opcione(s) quedesea personalizar.
RESOLUCIÓN 1280x960 / 640x480/ 320x240
DISPARO AUTO Apagado/ 3Segundos/ 5 Segundos/ 10Segundos
EQUIL BLANCO Automático/Soleado/ Nublado/ Fluorescente/Brillo
SONIDO DISPA Obturador/ SinSonido/ Say "Cheese"/ Ready! 1 2 3
EFECTOS COLOR Normal/Negativo/ Aqua/ Sepia/ Blanco yNegro
MODO NOCHE Encendido/Apagado
EXCEPTO OPCIÓN Interna/Externa
FOTOMETRÍAPromedio/Mancha/ ManchaMúltiple
AVANCE Vista real/ Pantallallena
CAPTURA Cámara/ Video
6. Tome la foto tocando [FOTO].
7. Toque la Tecla suave Izquierda[Guar]. La imagen se
almacena en Mis Fotos.
2.6 Grabar VideoLe permite grabarun mensaje devideo con sonido.
1. Oprima[MENÚ].
2. Oprima la Tecla Direccional Para obtener acceso al menúCENTRO de MEDIOS.
3. Oprima Foto y Video.
4. Oprima Grabar Video.
5. Configure el brillo con el círculode direccional , y el Zoomcon el círculo de direccional ,y toque la Tecla suave Derecha
[Opciones] para cambiarotros valores.
GRABACIÓN HORA Para Enviar/Para GuardarEXCEPTO OPCIÓN Interna/ExternaEFECTOS COLOR Normal/Negativo/ Aqua/ Sepia/ Blanco yNegroEQUIL BLANCO Automático/Soleado/ Nublado/ Fluorescente/BrilloCAPTURA Cámara/ Video
VX8360 41

CENTRO de MEDIOS
6. Oprima [REC] para empezara grabar y otra vez para parar.
7. Toque la Tecla suave Izquierda[Guar]. El video grabado se
almacena en Mis Videos.
SUGERENCIA
Teniendo vídeos con la tapa cerrada.
l Oprima y mantenga la tecla de cámara lateral
en modo de cámara.
l Oprima la tecla de cámara lado para tomar
un video.
Después de tomar vídeo, pulse la tecla decámara lateral de nuevo para detener. O oprima
para salir.
2.7 Álbum En LíneaAccede al albúm en línea (Lugar deFotos).
1. Oprima [MENÚ].
2. Oprima la Tecla Direccional Para obtener acceso al menúCENTRO de MEDIOS.
3. Oprima Foto y Video.
4. Oprima Álbum En Línea.
5. Introduzca su número deteléfono y contraseña, según seael caso.
3. JuegosLe permite descargar juegos yaplicaciones del servidor CENTROde MEDIOS. Elija el software quedesea en la lista que se presentaen pantalla.
1. Oprima [MENÚ].
2. Oprima la Tecla Direccional Para obtener acceso al menúCENTRO de MEDIOS.
3. Oprima Juegos.
4. Oprima [Obtén NuevasAplicaciones].
4. Internet Móvil Dashboard es una aplicación muysencilla de usar, que actúa comoplataforma principal parabúsqueda, compra ypersonalización de servicios ycontenido multimedia en sudispositivo. Brinda acceso acanales personalizados, como losde Música o Video V CAST, MobileWeb 2.0, tonos, juegos y muchomás.
1. Oprima [MENÚ].
2. Oprima CENTRO deMEDIOS.
3. Oprima Internet Móvil.
42 VX8360

VX8360 43
4. Seleccione el tipo de noticias einformación que desea ver.
Terminar una sesión de NavegadorTermine la sesión de Navegadoroprimiendo .
Uso del navegadorLos elementos en pantalla puedenpresentarse de una de lassiguientes formas:
l Opciones numeradas
Puede usar su teclado numéricoo puede seleccionar loselementos moviendo el cursor yoprimiendo las teclas suavescorrespondientes.
l Enlaces incrustados en elcontenido
Puede actuar sobre las opcioneso sobre los enlaces con lasteclas suaves que están justodebajo de la pantalla.
l Texto o números
Puede seleccionar los elementosmoviendo el cursor y oprimiendolas teclas suavescorrespondientes.
Desplazamiento Use la tecla direccional paradesplazarse por el contenido si lapágina actual no cabe en lapantalla. Un cursos en la pantallaindica el elemento seleccionado.
Desplazamiento rápidoOprima y mantenga oprimida lacírculo de direccional paramover rápidamente el cursor haciaarriba y hacia abajo en la pantallaactual.
Desplazamiento por página
Oprima las teclas laterales paramoverse una página hacia adelanteo hacia atrás.
Página de inicio
Presione la tecla de funciónderecha [Menú] y seleccione1. VZW Inicio para ir a la página deinicio.NOTA Para ir a la página de inicio desde el
álbum en línea, el correo electrónico,el chat o Mi Verizon, mantengapresionada la tecla o .

44 VX8360
CENTRO de MEDIOS
Abrir el menú del navegadorOprima la tecla de Comandos deVoz para usar el menú delnavegador.
Teclas suavesPara navegar a distintas pantallas oseleccionar funciones especiales,use las teclas suaves. La funciónasociada con las teclas suavespuede cambiar en cada página ydepende de cada elementoresaltado.
Tecla suave Izquierda La Tecla suave Izquierda seusa principalmente para lasopciones o para seleccionar unelemento, pero su función puedecambiar según el contenido que semuestre.
Tecla suave Derecha La Tecla suave Derecha se usaprincipalmente para las opcionessecundarias o para un menú deopciones secundarias.
Introducción de Texto, Números oSímbolosCuando se le pida que introduzcatexto, el método actual de entradade texto aparece sobre la Teclasuave Derecha como ABC,Sim, 123, Emoticons ó WORD.Para cambiar el modo de
introducción, toque la Tecla suaveDerecha . Para crear uncarácter en mayúsculas, oprima
.
Borrado del Texto/NúmeroIntroducidoAl introducir texto o números,oprima para borrar el últimonúmero, letra o símbolo. Oprima ymantenga oprimida paraborrar completamente el campo deentrada.
Iniciar una llamada de teléfonodesde el NavegadorPuede hacer una llamada deteléfono desde el Navegador si elsitio que está usando admite lafunción (el número de teléfonopuede resaltarse y la Tecla suaveIzquierda aparece comoSelección). La conexión con elnavegador se da por terminadacuando inicia la llamada. Despuésde terminar la llamada, su teléfonovuelve a la pantalla desde la cualinició dicha llamada.

VX8360 45
5. Browse & DownloadTodo lo que necesita sabermientras está en movimiento.
1. Oprima [MENÚ].
2. Oprima la Tecla Direccional Para obtener acceso al menúCENTRO de MEDIOS.
3. Oprima Navegar yDescargar.
4. Oprima Obtén Nuevas oseleccione VZ Navigator con latecla direccional y oprima .
Sistema de direccional VZNavigatorSM
Ahora puedes encontrar ladirección de un gran restaurante oel cajero automático más cercano.Ve los horarios de películas.Descubre los sitios más populares.Y conoce exactamente cómo llegara donde vas. El Sistema dedireccional VZ Navigator te ofrecetodas las funciones avanzadas delos últimos aparatos y sistemas deposicionamiento global (GPS), auna fracción del precio de otrosaparatos y sistemas GPS.
NOTAS l Para utilizar el navegador VZ,debe activar la ubicación.(Consulte la página 87)
l Para utilizarlo se requieredescarga, suscripción y tiempode uso; sólo dentro de una Áreanacional de tarifa de serviciosoptimizados; no se garantiza quela información sea exacta nicompleta; para la prestación delservicio, se utilizará lainformación acerca de laubicación del dispositivo.
6. Extra
1. Oprima [MENÚ].
2. Oprima la Tecla Direccional Para obtener acceso al menúCENTRO de MEDIOS.
3. Oprima Extra.
4. Oprima Obtén NuevasAplicaciones.

MENSAJERÍA
MMEENNSSAAJJEERRÍÍAA
Desde el modo de espera, aloprimir la Tecla suave Izquierda
es una tecla directa a laMENSAJERÍA.
Los mensajes de texto, los deimagen y el buzón de correo de vozquedan disponibles en cuanto seenciende el teléfono.l Compruebe los tipos de
mensajes tocando la Tecla suaveIzquierda [Mensaje].
l Hacer una llamada al número dedevolución de llamada tocando
durante unacomprobación de mensajes.
Según el contenido y el tamaño delos mensajes, el teléfono puedealmacenar más de 540 mensajes.La información almacenada en elmensaje está determinada por elmodo del teléfono y la capacidaddel servicio. Puede haber otroslímites a los caracteres disponiblespor mensaje. Compruebe con suproveedor de servicio las funcionesy capacidades del sistema.
Alerta de nuevo mensaje
Hay maneras su teléfono le avisade nuevos mensajes.
1. El teléfono muestra un mensajeen la pantalla.
2. Aparece el icono de mensaje( ) en la pantalla. En el casode un mensaje urgente, el iconoparpadeará.
1. Nuevo MensajeLe permite enviar mensajes (TXT,Foto, Video). Cada mensaje tiene undestino (Dirección) e información(Mensaje). Éstos dependen del tipode mensaje que desea enviar.También puede adjuntar archivos alos mensajes, entre otros,imágenes, videos, sonidos ytarjetas de nombre.
1.1 Mensaje de TXT
Aspectos básicos de los mensajesde texto
1. Toque la Tecla suave Izquierda[Mensaje].
2. Oprima Nuevo Mensaje.
3. Oprima Mensaje de TXT.
ACCESODIRECTO
46 VX8360

VX8360 47
4. Introduzca el número de teléfonodel destinatario o la dirección decorreo electrónico para unmensaje de correo electrónico.Usted puede incorporar hasta 10direcciones para un solomensaje.
5. Oprima la círculo de direccionalabajo.
6. Escriba su mensaje (Texto ocorreo elect.).
7. Oprima [ENV].
Personalización del mensaje conOpcionesl Edición del campo Para:
1. Con el campo Para resaltado,toque la Tecla suave Derecha
[Añadir].
2. Seleccione las opciones quedesea personalizar.De Contactos/ Llmdas Recntes/Grupos/ A Contactos
l Editar Texto
1. Con el campo Para resaltado,toque la Tecla suave Derecha
[Opciones].
2. Seleccione las opciones quedesea personalizar.
Insertar Texto Rápido Le permiteagregar texto rápidamente.
Insertar Foto Le permite añadir laimagen.
Insertar Video Le permite añadirvídeo.
Insertar Voz Le permite añadir lavoz.
Guardar Como Borrador Guardael mensaje en la carpetaBorradores.
Añadir Le permite agregar unGráfico, Animación, Sonido,Firma, Tarjeta de Nombre oDirección de Contactos.
Copiar Text Le permite copiartexto.
Pegar Le permite pegar el textoque copió por última vez en otrocampo.
Formato al Text Le permitecambiar el aspecto del texto. Alineación/ Tamaño del Fuente/Estilo de Fuente/ Color de Text/Fondo
Prioridad Da prioridad almensaje. Alto/ Normal

MENSAJERÍA
Dev Llmda # Introduce unnúmero preprogramado dedevolución de llamada con sumensaje.Encendido/ Apagado/ Editar
Guardar Text Rápido Le permitedefinir frases para Insertar textorápido.
Cancelar Mensaje Cancela laedición del mensajes y va almenú mensajes.
3. Finalizar y enviar o guardar elmensaje.
Uso de contactos para enviar unmensajePuede designar una entradaguardada en sus Contactos comodirección en lugar de introducirmanualmente el destino.
1. Con el campo Para resaltado,toque la Tecla suave Izquierda
[Mensaje].
2. Oprima Nuevo Mensaje.
3. Oprima Mensaje de TXT.
4. Toque la Tecla suave Derecha[Añadir].
5. Use la tecla direccional para desplazarse hasta DeContactos y oprima .
6. Use la tecla direccional para resaltar la entrada decontacto que contiene el destinoy oprima .
7. Toque la Tecla suave Izquierda[Hecho].
NOTA La función de Dirección permite el
envío múltiple de hasta 10 direcciones
en total.
8. Finalice el mensaje según seanecesario.
1.2 Mensaje de Foto
Aspectos básicos del envío de unmensaje
1. Toque la Tecla suave Izquierda[Mensaje].
2. Oprima Nuevo Mensaje.
3. Oprima Mensaje de Foto.
4. Introduzca el número de teléfonocelular o la dirección de correoelectrónico del destinatario.
5. Oprima la círculo de direccionalabajo.
6. Escriba su mensaje (texto correoelect.).
48 VX8360

VX8360 49
7. Use la tecla direccional para resaltar Foto y toque laTecla suave Izquierda [MisFotos]. Use la tecla direccional
para desplazarse hasta laimagen que desea enviar yoprima .
8. Use la tecla direccional para desplazarse hasta Sonido, ytoque la Tecla suave Izquierda
[Sonidos]. Use la tecladireccional paradesplazarse hasta el archivo quedesea enviar y oprima .
9. Use la Tecla de direccional para resaltar Nom Tarj y la Teclasuave Izquierda [Contactos].Use para seleccionar MiTarjeta de Nombre/ DeContactos.
10. Use la tecla direccional para desplazarse hasta Asunto yenter the subject.
11. Oprima [ENV]. Aparece un mensaje deconfirmación.
l Edición del campo A (Destino):
1. Con el campo Para resaltado,toque la Tecla suave Derecha
[Añadir].
2. Seleccione las opciones quedesea personalizar.
De Contacto/ De Llamas.Recntes/ Grupos/ Álbum EnLínea/ A Contactos
l Editar Texto
1. Con el campo Texto resaltado,toque la Tecla suave Derecha
[Opciones].
2. Seleccione las opciones quedesea personalizar.
Avance Muestra el mensajeFoto como lo verá el destinatario.
Guardar Como Borrador Guardael mensaje en la carpetaBorradores.
Insertar Text Rápido Insertafrases predefinidas.
Copiar Texto Le permite copiartexto.
Pegar Le permite pegar el textoque copió por última vez en otrocampo.

MENSAJERÍA
Añadir Diapositiva Inserte variasimágenes en un mensaje deimagen.
Prioridad Da prioridad almensaje. Alto/ Normal
Cancelar Mensaje Cancela laedición del mensaje y va al menúanterior.
l Editar Foto
1. Con el campo Foto resaltado,toque la Tecla suave Derecha
[Opciones].
2. Seleccione las opciones quedesea personalizar.Avance/ Guardar ComoBorrador/ Añadir Diapositiva/Prioridad/ Eliminar Foto/Cancelar Mensaje
l Editar Sonido
1. Con el campo Sonido resaltado,toque la Tecla suave Derecha
[Opciones].
2. Seleccione las opciones quedesea personalizar.Avance/ Guardar ComoBorrador/ Añadir Diapositiva/Prioridad/ Elimin Sonido/Cancelar Mensaje
l Editar Nom Tarj
1. Con el campo Nom Tarjresaltado, toque la Tecla suaveDerecha [Opciones].
2. Seleccione las opciones quedesea personalizar.Avance/ Guardar ComoBorrador/ Añadir Diapositiva/Prioridad/ Elimin Tarjeta deNombre/ Cancelar Mensaje
l Editar Asunto
1. Con el campo Asunto resaltado,toque la Tecla suave Derecha
[Opciones].
2. Seleccione las opciones quedesea personalizar.Avance/ Guardar ComoBorrador/ Insertar Texto Rápido/Copiar Texto/ Pegar/ AñadirDiapositiva/ Prioridad/ CancelarMensaje
1.3 Mensaje de Video
Aspectos básicos del envío de unmensaje
1. Toque la Tecla suave Izquierda[Mensaje].
2. Oprima Nuevo Mensaje.
3. Oprima Mensaje de Video.
50 VX8360

VX8360 51
4. Introduzca el número delteléfono celular o la dirección decorreo electrónico deldestinatario.
5. Oprima la círculo de direccionalabajo.
6. Escriba su mensaje.
7. Use la tecla direccional para desplazarse hasta Video ytoque la Tecla suave Izquierda
[Videos].Use la tecladireccional paradesplazarse hasta la video quedesea enviar, y oprima .
8. Use la Tecla de direccional para resaltar Nom Tarj y la Teclasuave Izquierda [Contactos].Use para seleccionar MiTarjeta de Nombre/ DeContactos.
9. Use la tecla direccional para desplazarse hasta Asunto eintroduzca el asunto.
10. Oprima [ENV]. Aparece un mensaje deconfirmación.
Personalización del mensaje conOpcionesl Edición del campo A (Destino):
1. Con el campo Para resaltado,toque la Tecla suave Derecha
[Añadir].
2. Seleccione las opciones quedesea personalizar.De Contactos/ De Llamas.Recntes/ Grupos/ Álbum EnLínea/ A Contactos
l Editar Texto
1. Con el campo Para resaltado,toque la Tecla suave Derecha
[Opciones].
2. Seleccione las opciones quedesea personalizar.
Avance Muestra el mensajeVideo como lo verá eldestinatario.
Guardar Como Borrador Guardael mensaje en la carpetaBorradores.
Insertar Text Rápido Insertafrases predefinidas.
Copiar Texto Le permite copiartexto que resalte para pegarlo enotro mensaje.

MENSAJERÍA
Pegar Le permite pegar el textoque copió por última vez en otrocampo.
Prioridad Da prioridad almensaje. Alto/ Normal
Cancelar Mensaje Cancela laedición del mensaje y va al menúanterior.
l Editar Video
1. Con el campo Video resaltado,toque la Tecla suave Derecha
[Opciones].
2. Seleccione las opciones quedesea personalizar.Avance/ Guardar ComoBorrador/ Prioridad/ EliminarVideo/ Cancelar Mensaje
l Editar Nom Tarj
1. Con el campo Para resaltado,toque la Tecla suave Derecha
[Opciones].
2. Seleccione las opciones quedesea personalizar.Avance/ Guardar ComoBorrador/ Prioridad/ EliminTarjeta de Nombre/ CancelarMensaje
l Editar Asunto
1. Con el campo Para resaltado,toque la Tecla suave Derecha
[Opciones].
2. Seleccione las opciones quedesea personalizar.Avance/ Guardar ComoBorrador/ Insertar Texto Rápido/Copiar Texto/ Pegar/ Prioridad/Cancelar Mensaje/ CancelarMensaje
3. Finalizar y enviar o guardar elmensaje.
1.4 Mensaje de Voz
Aspectos básicos del envío de unmensaje
1. Toque la Tecla suave Izquierda[Mensaje].
2. Oprima Nuevo Mensaje.
3. Oprima Mensaje de Voz.
4. Oprima para iniciargrabacion.
5. Grabe el mensaje de voz.
6. Oprima para fin grabacion.
7. Introduzca el número delteléfono celular o la dirección decorreo electrónico deldestinatario y oprima .
52 VX8360

VX8360 53
8. Oprima la Tecla de direccional.
9. Escriba su mensaje (texto ocorreo elect).
10. Use la Tecla de direccional para resaltar Nom Tarj y la Teclasuave Izquierda [Contactos].Use para seleccionar MiTarjeta de Nombre/ DeContactos.
11. Use la Tecla de direccional para resaltar Asunto y escribarel asunto.
12. Oprima [ENV].
Aparece un mensaje deconfirmación.
2. EntradaEl teléfono le alerta en 3 formascuando recibe un nuevo mensaje:l Mostrando una notificación de
mensaje en la pantalla.
l Haciendo sonar una sonido ovibrando, si está configurado así.
l Haciendo destellar (sólocuando recibe un mensaje deprioridad Alta).
Ver su bandeja de entrada
1. Toque la Tecla suave Izquierda[Mensaje].
2. Oprima Entrada.
4. Opciones desde aquí:
l Oprima [ABRIR] para abrirel mensaje.
l Toque la Tecla suaveIzquierda [Borrar].
l Toque la Tecla suave Derecha[Opciones].
Contestar Responde a ladirección del remitente delmensaje recibido.
Responder con copia Respondea la dirección de origenincluyendo el mensaje originalcon su respuesta.
Adelantar Reenvía un mensajerecibido a otras direcciones dedestino.
Añdr A Contactos Guarda ensus contactos el número dedevolución de llamada, ladirección de correo electrónicoy los números de la dirección delmensaje recibido.
Extraer direcciones Le permiteextraer direcciones.

MENSAJERÍA
Odernar por remitente/Ordenadopor Tiempo Le permite ordenarlos mensajes recibidosalfabéticamente o por fecha.
Administrar Entrada Le permiteadministrar sus mensajes.
Info. Mensaje Le permitecomprobar la información de losmensajes recibidos.
Referencia de iconos de mensaje
Mensajes de TXTnuevos/no leídos
Mensajes de TXTabiertos/leídos
Prioridad
Bloqueado
Mensajes de Foto/Video noleídos y descargados
Notificaciones de Foto/Video nuevos/no leídos
Mensajes Del BrowserNuevos/No leídos
Mensajes Del BrowserAbiertas/ Leídos
Mensajes de notificaciónnuevos o no leídos
Mensajes de notificaciónabiertos o leídos
* Mensaje Multimedia indica Foto / Vídeo / Vozmensaje.
3. EnviadoSegún el contenido y el tamaño delos mensajes, el teléfono puedeguardar hasta 100 mensajes.Confirme la transmisión correcta,vea el contenido, administre la listay más.
1. Toque la Tecla suave Izquierda[Mensaje].
2. Oprima Enviado.
3. Opciones desde aquí:
l Oprima [ABRIR] para abrirel mensaje.
l Toque la Tecla suaveIzquierda [Borrar].
l Toque la Tecla suave Derecha[Opciones].
Adelantar Reenvía un mensajeenviado a otras direcciones dedestino.
Enviar/ Reenviar Le permiteretransmitir el mensajeseleccionado.
Añadir A Contactos Guarda ensus contactos el número dedevolución de llamada, ladirección de correo electrónicoy los números de la dirección delmensaje.
54 VX8360

VX8360 55
Ordenado por Destinatario/Ordenado por Tiempo Lepermite gestionar (borrar obloquear) la lista de mensajes.
Administrar Enviado Le permitegestionar (borrar o bloquear) lalista de mensajes.
Info. Mensaje Le permitecomprobar la información demensajes enviados.
Referencia de iconos de mensaje
Mensajes TXT/Foto/Videoenviados
Mensaje entregados
Enviar mensajes TXT/Foto/Video fallidos
Mensajes múltiplesenviados
Mensajes múltiplesentregados
Mensajes múltiples conerror
Entrega incompleta/Pendiente
Prioridad
Bloqueado
4. BorradoresMuestra los borradores demensaje.
1. Toque la Tecla suave Izquierda[Mensaje].
2. Oprima Borradores.
3. Opciones desde aquí:
l Oprima [CRRGR].
l Toque la Tecla suaveIzquierda [Borrar].
l Toque la Tecla suave Derecha[Opciones].
Enviar Le permite enviar elmensaje seleccionado.
Añadir A Contactos Almacenaen sus contactos el número dedevolución de llamada, ladirección de correo electrónicoy los números de la dirección delmensaje.
Administrar Borradores Borratodos los mensajesalmacenados en Borradores.
Referencia de iconos de mensaje
TXT de borrador
Preparar Foto/Video

MENSAJERÍA
5. Mensajes de VozLe permite ver el número delnuevos mensajes de voz grabadosen la bandeja de entrada de correode voz. Una vez que supere el límitede almacenamiento, sesobrescriben los mensajesantiguos. Cuando tenga un nuevomensaje de voz, el teléfono loalertará.
Revisión de su Buzón de Correo deVoz
1. Toque la Tecla suave Izquierda[Mensaje].
2. Oprima Bzn Msjs Voz.
3. Opciones desde aquí:
l Toque la Tecla suave Izquierda[Anular] para borrar
información, y oprima [Sí].
l Oprima o [LLMD] paraescuchar los mensajes.
O
1. Marque *86 (*VM) desdesu teléfono o marque su númerode teléfono inalábrico desdecualquier teléfono de tonos.
2. Cuando comience el anunciograbado, oprima parainterrumpirlo (de ser aplicable).
3. Comenzará un tutorial deconfiguración fácil de seguir.Siga las indicaciones paraconfigurar su nueva contraseñay grabar un saludo.
6. IMMóvilLe permite enviar y recibir unMensaje instantáneoen cualquier momento.
1. Toque la Tecla suave Izquierda[Mensaje].
2. Oprima IMMóvil.
7. Correo ElectLe permite enviar correoelectrónico.
1. Toque la Tecla suave Izquierda[Mensaje].
2. Oprima Correo Elect.
3. Se iniciará una sesión delnavegador Web móvil.
4. Desplácese hasta un proveedorde correo electrónico y oprima
.
5. Inicie sesión o ingrese sudirección de correo electrónicoy contraseña.
56 VX8360

VX8360 57
8. ChatearLe permite chatear con usuarios deInternet Messenger.
1. Toque la Tecla suave Izquierda[Mensaje].
2. Oprima Chatear.
3. Se iniciará una sesión delnavegador Web móvil.
4. Desplácese hasta un proveedorde chat y oprima .
NOTA Esta función puede requerir unasuscripción a un proveedor deservicios de chat.
Programación deMENSAJESLe permite configurarconfiguracións para sus mensajes.
1. Toque la Tecla suave Izquierda[Mensaje].
2. Toque la Tecla suave Izquierda[Prog].
3. Use la tecla direccional para desplazarse hasta uno delos ajustes y oprima .
Descripciones del submenú deconfiguración de mensajes
1. Modo de Ingreso (T9 Palabra/Abc/ ABC/ 123)
Le permite seleccionar el métodode introducción predeterminado, yasea T9 Palabra, Abc, ABC, 123.
2. Grdr Autmtc Envdo (Encendido/Apagado/ Preguntar)
Con esta función activada, losmensajes se guardanautomáticamente en Enviadoscuando se transmiten.
3. Bor Autmtc Entrada (Encendido/Apagado)
Con esta función activada, losmensajes leídos se borranautomáticamente al superarse ellímite de almacenamiento.
4. Tamaño de Fuente de Mensajeria
Permite configurar el mensaje eltamaño de la letra. Elija Normal oGrande.
5. Ver TXT Autmtc (Encendido/Apagado)
Le permite mostrar directamente elcontenido al recibir un mensaje.

MENSAJERÍA
6. Auto-dsplz TXT (Encendido/Apagado)
Le permite a la pantalla desplazarseautomáticamente hacia abajo al vermensajes.
7. Rec Aut Multimedias(Encendido/ Apagado)
Le permite mostrar directamente elcontenido al recibir un mensajeFoto, de video o de voz.
8. Text Rápido
Le permite mostrar, editar y agregarfrases de texto. Estas frases cortas leayudan a disminuir la entrada detexto manual en los mensajes.
9. Mensajes de Voz #
Le permite introducir manualmenteel número de acceso del serviciode correo de voz. Este número sólodebería usarse cuando por la redno se proporciona un número deacceso de servicio de correo devoz (Servicio de Correo Voz).
0. Dev Llmda #
Con esta función activada, puedeintroducir el número de devoluciónde llamada que se incluiráautomáticamente cuando envíe unmensaje.
*. Firma (Ninguno/ Costumbre)
Le permite hacer o editar una firmapara enviarla automáticamente consus mensajes.
MSJ BorrarLe permite borrar todos losmensajes de texto almacenados ensu bandeja de entrada, o en lascarpetas Enviados y Borradores.También puede borrar todos losmensajes de una vez.
1. Toque la Tecla suave Izquierda[Mensaje].
2. Toque la Tecla suave Derecha[Opciones].
Borrar Entrada/ Borrar Enviado/Borrar Borradores/ Borrar Todo
3. Oprima para borrar losmensajes seleccionados.
4. Oprima para confirmar laoperación de borrado.
Aparece un mensaje deconfirmación.
58 VX8360

CONTACTOS
VX8360 59
CCOONNTTAACCTTOOSSEl menú Contactos le permitealmacenar nombres, números deteléfono y otros tipos deinformación en la memoria de suteléfono.
La Tecla suave Derecha esuna tecla directa a la Lista decontactos.
1. Nuevo ContactoLe permite agregar un nuevoentrada a su Lista de contactos.
NOTA Este submenú crea una entrada decontacto, si desea agregar un númeroa un Contacto existente, en vez deello edite la entrada del Contacto.
1. Oprima [MENÚ].
2. Oprima la Tecla Direccional Para obtener acceso al menúCONTACTOS.
3. Oprima Nuevo Contacto.
4. Introduzca el nombre y oprima lacírculo de direccional abajo.
5. Use la tecla direccional para desplazarse hasta el tipo denúmero de teléfono.
6. Introduzca el número y oprima.
NOTA Para obtener información másdetallada, vea la página 25.
2. Lista de ContactoLe permite ver su lista deContactos.
1. Oprima [MENÚ].
2. Oprima la Tecla Direccional Para obtener acceso al menúCONTACTOS.
3. Oprima Lista de Contacto.
4. Use la tecla direccional para desplazarsealfabéticamente por suscontactos.
l Toque la Tecla suave Derecha[Opciones] para
seleccionar uno de lossiguientes:Nuevo Contacto/ Borrar/Nuevo Mensaje de TXT/Nuevo Mensaje de Foto/Nuevo Mensaje de Video/Nuevo Mensaje de Voz/ Fijarcomo Contacto ICE/ Llamada/Borrar Todo/ Enviar Tarjeta deNombre
ACCESODIRECTO

CONTACTOS
60 VX8360
l Toque la Tecla suaveIzquierda [Corregir] paraeditar.
l Oprima para ver losdetalles de la entrada.
SUGERENCIA Use el campo Ir A paraacceder rápidamente a unaentrada sin necesidad dedesplazarse. Por ejemplo, parair a la entrada "Veterinario",ingrese la letra V y presione
.
3. GruposLe permite ver sus contactosagrupados, agregar un gruponuevo, cambiar el nombre de ungrupo, borrar un grupo o enviar unmensaje a todas las personas queestán dentro del gruposeleccionado.
1. Oprima [MENÚ].
2. Oprima la Tecla Direccional Para obtener acceso al menúCONTACTOS.
3. Oprima Grupos.
4. Ver un grupo
Use la tecla direccional para resaltar un grupo y luegooprima .
Agregar un nuevo grupo
Presione la tecla de funciónizquierda [Nuevo] paraagregar un nuevo grupo a lalista.
Opciones cuando se usa ungrupo
Oprima la tecla de funciónderecha [Opciones] paraseleccionar uno de lossiguientes:
Nuevo Mensaje de TXT / Nuevomensaje de Foto / Nuevomensaje de Vídeo / Nuevomensaje de Voz / Renombrar /Borrar / Añadir / Enviar tarjetade Nombre

VX8360 61
4. Marcado RápidoLe permite ver su lista de MarcadosVeloz o designar Marcados Velozpara números introducidos en suscontactos.
1. Oprima [MENÚ].
2. Oprima la Tecla Direccional Para obtener acceso al menúCONTACTOS.
3. Oprima Marcado Rápido.
4. Use la tecla direccional para resaltar la posición deMarcado Rápido o introduzca lacifra de Marcado Rápido yoprima [AJUST].
5. Use la tecla direccional para resaltar el Contacto yoprima .
6. Oprima [Sí].Aparece un mensaje deconfirmación.
5. In Case of Emergency(ICE)
Le permite que usted almacene elnombre, los números de teléfono yla otra información, que serán muyprovechosos en cualquier caso dela emergencia. También le permiteleer, añadir, editar o borrar lasnotas usted mismo según lonecesite, en caso de que ocurrauna emergencia.
1. Oprima [MENÚ].
2. Oprima la Tecla Direccional Para obtener acceso al menúCONTACTOS.
3. Oprima In Case ofEmergency.
4. Use la tecla direccional para resaltar Contacto 1, 2, o 3, yoprima [AÑADIR].
5. Oprima para agregarcontacto en la lista de contactos.
Resaltar el Contacto, y oprima.
Aparecerá el mensajeCONTACTO de ICE ASIGNADOS.
O
Oprima para ingresar lainformación que no estéguardada en la lista decontactos.
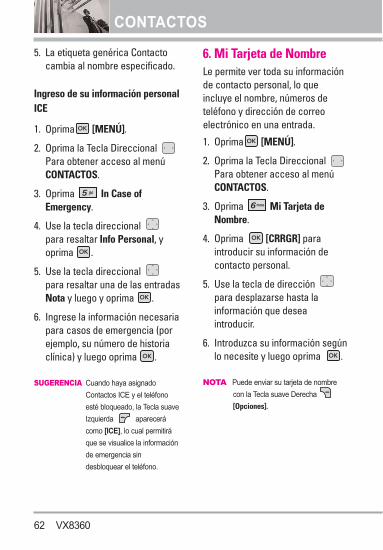
CONTACTOS
62 VX8360
5. La etiqueta genérica Contactocambia al nombre especificado.
Ingreso de su información personalICE
1. Oprima [MENÚ].
2. Oprima la Tecla Direccional Para obtener acceso al menúCONTACTOS.
3. Oprima In Case ofEmergency.
4. Use la tecla direccional para resaltar Info Personal, yoprima .
5. Use la tecla direccional para resaltar una de las entradasNota y luego y oprima .
6. Ingrese la información necesariapara casos de emergencia (porejemplo, su número de historiaclínica) y luego oprima .
SUGERENCIA Cuando haya asignadoContactos ICE y el teléfonoesté bloqueado, la Tecla suaveIzquierda aparecerácomo [ICE], lo cual permitiráque se visualice la informaciónde emergencia sindesbloquear el teléfono.
6. Mi Tarjeta de NombreLe permite ver toda su informaciónde contacto personal, lo queincluye el nombre, números deteléfono y dirección de correoelectrónico en una entrada.
1. Oprima [MENÚ].
2. Oprima la Tecla Direccional Para obtener acceso al menúCONTACTOS.
3. Oprima Mi Tarjeta deNombre.
4. Oprima [CRRGR] paraintroducir su información decontacto personal.
5. Use la tecla de dirección para desplazarse hasta lainformación que deseaintroducir.
6. Introduzca su información segúnlo necesite y luego oprima .
NOTA Puede enviar su tarjeta de nombrecon la Tecla suave Derecha [Opciones].

VX8360 63
LLllaammaass.. RReeccnntteessEl menú Llamas.Recntes es unalista de los últimos números deteléfono o entradas de contacto delas llamadas que hizo, contestadaso perdió. Se actualizacontinuamente conforme seagregan nuevos números alprincipio de la lista y las entradasmás antiguas se eliminan de laparte inferior de la lista.
1. PerdidasLe permite ver la lista de llamadasausente; hasta 90 entradas.
1. Oprima [MENÚ].
2. Oprima la Tecla Direccional Para obtener acceso al menúLLAMAS. RECNTES.
3. Oprima Perdidas.
4. Use la tecla direccional para resaltar una entrada, y
l Oprima para ver laentrada.
l Oprima para llamar alnúmero.
l Toque la Tecla suave Derecha[Opciones] para
seleccionar:Guardar en contactos(Detalles)/ Borrar/Asegurar(Abrir)/ Borrar Todo/Ver Cronómetro
l Toque la Tecla suaveIzquierda [Mensaje] paraseleccionar:Mensaje de TXT/ Mensaje deFoto/ Mensaje de Video/Mensaje de Voz
2. RecibidasLe permite ver la lista de llamadasentrantes; hasta 90 entradas.
1. Oprima [MENÚ].
2. Oprima la Tecla Direccional Para obtener acceso al menúLLAMAS. RECNTES.
3. Oprima Recibidas.
4. Use la tecla direccional para resaltar una entrada, y
l Oprima para ver laentrada.
l Oprima para llamar alnúmero.
LLAMAS. RECNTES

LLAMAS. RECNTESl Toque la Tecla suave Derecha
[Opciones] paraseleccionar:Guardar Contactos (Detalles)/Borrar/ Asegurar(Abrir)/Borrar Todo/ Ver Cronómetro
l Toque la Tecla suaveIzquierda [Mensaje] paraseleccionar:Mensaje de TXT/ Mensaje deFoto/ Mensaje de Video/Mensaje de Voz
3. MarcadasLe permite ver la lista de llamadasque ha hecho puede tener; hasta 90entradas.
1. Oprima [MENÚ].
2. Oprima la Tecla Direccional Para obtener acceso al menúLLAMAS. RECNTES.
3. Oprima Marcadas.
4. Use la tecla direccional para resaltar una entrada, y
l Oprima para ver laentrada.
l Oprima para llamar alnúmero.
l Toque la Tecla suave Derecha[Opciones] para
seleccionar:Guardar en contactos(Detalles)/ Borrar/Asegurar(Abrir)/ Borrar Todo/Ver Cronómetro
l Toque la Tecla suaveIzquierda [Mensaje] paraseleccionar:Mensaje de TXT/ Mensaje deFoto/ Mensaje de Video/Mensaje de Voz
4. TodasLe permite ver la lista de todas lasllamadas; hasta 270 entradas.
1. Oprima [MENÚ].
2. Oprima la Tecla Direccional Para obtener acceso al menúLLAMAS. RECNTES.
3. Oprima Todas.
4. Use la tecla direccional para resaltar una entrada, y
l Oprima para ver laentrada.
l Oprima para llamar alnúmero.
64 VX8360

VX8360 65
l Toque la Tecla suave Derecha[Opciones] para
seleccionar:Guardar en contactos(Detalles)/ Borrar/Asegurar(Abrir)/ Borrar Todo/Ver Cronómetro
l Toque la Tecla suaveIzquierda [Mensaje] paraseleccionar:Mensaje de TXT/ Mensaje deFoto/ Mensaje de Video/Mensaje de Voz
Para ver una lista rápida de todassus llamadas recientes, oprima
desde el modo de espera.
5. Ver CronómetroLe permite ver la duración de lasllamadas seleccionadas.
1. Oprima [MENÚ].
2. Oprima la Tecla Direccional Para obtener acceso al menúLLAMAS. RECNTES.
3. Oprima Ver Cronómetro.
4. Use la tecla direccional para resaltar una lista dellamadas.
Última Llamada/ Todas lasLlamadas/ Llamadas Recibidas/Llamadas Marcadas/ LlamadasRoaming/ Datos Transmitido/Datos Recibidas/ Datos Total/Último Reajuste/ Ttal de Llmdas/Contr Dtos Vda
5. Oprima le tecla suave izquierda[Reaj] para reajustar el reloj
escogido.
6. Restaure todos los relojesregistrados tocando la Teclasuave Derecha [Rest Tod] sídesea restaurarlos.
NOTA Ttal de Llmdas, y Contr Dtos Vda nopueden ser reajustados.
ACCESODIRECTO

66 VX8360
PROG/HERR
PPRROOGG//HHEERRRR1. Mi VerizonCompruebe su información delsubscripción que se extiende de suplan del pago a la su mejora deldispositivo o al otro serviciodisponible.
1. Oprima [MENÚ].
2. Oprima la Tecla Direccional Para obtener acceso al menúPROG/HERR.
3. Oprima Mi Verizon.
2. HerramientasLas herramientas de su teléfonoincluyen un Comandos de Voz,Calculadora, Calendario, RelojDespertador, Cronómetro, RelojMundial, Cuaderno de Notas, EzSugerencia, Almacen masivo USB.
1. Oprima [MENÚ].
2. Oprima la Tecla Direccional Para obtener acceso al menúPROG/HERR.
3. Oprima Herramientas.
2.1 Comandos de VozEsta función le proporcionaopciones equipada con tecnología
AVR (Reconocimiento de vozavanzado). Cada opción tiene suinformación detallada en el teléfonoy puede revisarla tocando la Teclasuave Izquierda [Info].
1. Oprima [MENÚ].
2. Oprima la Tecla Direccional Para obtener acceso al menúPROG/HERR.
3. Oprima Herramientas.
4. Oprima Comandos de Voz.
Acceso y Opciones
1. Oprima la tecla de comandos devoz ubicada en el ladoizquierdo del teléfono.
Ajustes para optimizar la funciónComandos De Voz tocando la Teclasuave Derecha [Prog].
Lectura de Llamar NúmeroEncendido/ Apagado
Lista de SeleccionesAutomático/ Siempre Apagado
Sensibilidad Controle lasensibilidad como RechazarMás/ Automático/ RechazarMenos.
Entrenar Voz Si el teléfono pidea menudo que usted repita elcomando de voz, entrene alteléfono para reconocer sus

VX8360 67
PROG/HERR
patrones de la voz. Entrenar palabras/EntrenarDígitos
Avisos Modo/ Reproducción deAudio/ Tiempo AgotadoPara Modo, elija Avisos/ Lectura+ Alertas/ Lectura/ Sólo Tonos.Para Reproducción de Audio,elija Altavoz o Auricular. Para Tiempo Agotado, elija5 segundos o 10 segundos.
Alerta de Llamada Sólo Timbre/ID de llamador + Timbre/ RepetirNombre
2.1.1 Llamar <Nombre o Número>
Diga "Llamar" y luego llame aalguien simplemente diciendo elnúmero de teléfono y el nombre.Hable claramente y exactamentecomo están en su lista deContactos. Cuando la entrada deContacto tiene varios números,puede establecer el tipo de nombrey número (por ejemplo, 'LlamarJuan Trabajo').
2.1.2 Enviar Msj a <Nombre oNúmero>
Diga 'Enviar Mensaje' y el comandole incitará para el tipo de mensaje.Después de elegir el tipo demensaje, se le solicitará el nombre
del contacto, el número o el grupodel contacto. Comenzaráautomáticamente un mensaje. Siusted dice un comando completo,por ejemplo 'Envíe el Mensaje aBob', él comenzaríaautomáticamente un mensaje deltexto sin pedir el tipo de mensaje.Cuando use el comando de EnviarMsj a, hable claramente y diga elnúmero, el nombre de grupo, o elnombre exactamente como seincorpora en su lista del Contacto.
2.1.3 Ir a <Menú>
El comando "Ir a" accederápidamente a cualquiera de losmenús del teléfono directamente(por ejemplo, ‘Ir a Calendario’) yofrece indicaciones u opcionesadicionales.
2.1.4 Verificar <Elemento>
El comando de Verficar permite queusted compruebe una gran gamade artículos que van desde el nivelde la batería, modo del servicio,fuerza de la señal, volumen, númerode llamadas perdidas, Buzón deVoz, mensajes, a la hora y a lafecha.

68 VX8360
PROG/HERR
2.1.5 Contactos <Nombre>
Puede buscar nombres entre suscontactos con opciones como (porejemplo, 'Contactos Juan'): Lectura/ Crear Nuevo/ Borrar/Modificar
2.1.6 Mi Verizon
El comando "Mi Verizon" leproporciona acceso directo a lainformación de su cuenta VerizonWireless.
2.1.7 Ayuda
Proporciona lineamientosgenerales para el uso de losComandos de Voz.
2.2 CalculadoraLe permite realizar cálculosmatemáticos simples. Puedeintroducir números hasta ochodígitos. Se pueden hacer cálculoscon hasta 4 líneas a la vez.
1. Oprima [MENÚ].
2. Oprima la Tecla Direccional Para obtener acceso al menúPROG/HERR.
3. Oprima Herramientas.
4. Oprima Calculadora.
5. Introduzca los números paraobtener el valor que desea. Paracancelar cualquier número,toque la Tecla suave Izquierda
[Despejar].
6. Use la Tecla suave Derecha[Operadores] para agregar unparéntesis o potencia entre losnúmeros para su cálculo.
7. Use la tecla de dirección para introducir una operaciónmatemática básica y oprima [ = ] para el resultado.
NOTA Para insertar un decimal, oprima. Para insertar ±, oprima .
2.3 Ez SugerenciaLe permite calcular rápida yfácilmente las cantidades de laspropinas usando como variables eltotal de la factura, la propina % y elnúmero de personas.
1. Oprima [MENÚ].
2. Oprima la Tecla Direccional Para obtener acceso al menúPROG/HERR.
3. Oprima Herramientas.
4. Oprima Ez Sugerencia.
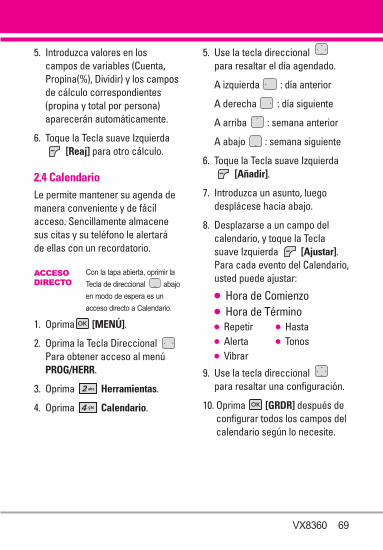
VX8360 69
5. Introduzca valores en loscampos de variables (Cuenta,Propina(%), Dividir) y los camposde cálculo correspondientes(propina y total por persona)aparecerán automáticamente.
6. Toque la Tecla suave Izquierda[Reaj] para otro cálculo.
2.4 CalendarioLe permite mantener su agenda demanera conveniente y de fácilacceso. Sencillamente almacenesus citas y su teléfono le alertaráde ellas con un recordatorio.
Con la tapa abierta, oprimir laTecla de direccional abajoen modo de espera es unacceso directo a Calendario.
1. Oprima [MENÚ].
2. Oprima la Tecla Direccional Para obtener acceso al menúPROG/HERR.
3. Oprima Herramientas.
4. Oprima Calendario.
5. Use la tecla direccional para resaltar el día agendado.
A izquierda : día anterior
A derecha : día siguiente
A arriba : semana anterior
A abajo : semana siguiente
6. Toque la Tecla suave Izquierda[Añadir].
7. Introduzca un asunto, luegodesplácese hacia abajo.
8. Desplazarse a un campo delcalendario, y toque la Teclasuave Izquierda [Ajustar].Para cada evento del Calendario,usted puede ajustar:
l Hora de Comienzol Hora de Término l Repetir l Hastal Alerta l Tonosl Vibrar
9. Use la tecla direccional para resaltar una configuración.
10. Oprima [GRDR] después deconfigurar todos los campos delcalendario según lo necesite.
ACCESODIRECTO

70 VX8360
PROG/HERR
2.5 Reloj DespertadorLe permite configurar tres alarmas.A la hora de la alarma, Alarma 1 (o2 o 3) se mostrará en la pantallaLCD y sonará la alarma.
1. Oprima [MENÚ].
2. Oprima la Tecla Direccional Para obtener acceso al menúPROG/HERR.
3. Oprima Herramientas.
4. Oprima Reloj Despertador.
5. Use la tecla direccional para resaltar una Alarma (1, 2, o3), y oprima .
6. Introduzca la información de sucompromiso, con:
l Encender/ Apagarl Fijar Tiempl Periodicidad l Timbre
7. Use la tecla direccional para resaltar la información quedesea configurar y toque laTecla suave Izquierda [Ajustar] para ver sus opciones.
8. Oprima [GRDR] después deconfigurar todos los campos deAlarma según lo necesite.
NOTA También puede abrir la tapa yseleccionar Posponer o Descartar.
2.6 CronómetroLe permite utilizar el teléfono comoun típico cronómetro en la vidacotidiana. Si oprime , seiniciará o detendrá el cronómetro.Durante la medición del tiempo,presione la tecla de funciónizquierda para las vueltas. Unavez detenida la medición, oprima latecla de función derecha [Reaj].
1. Oprima [MENÚ].
2. Oprima la Tecla Direccional Para obtener acceso al menúPROG/HERR.
3. Oprima Herramientas.
4. Oprima Cronómetro.
2.7 Reloj MundialLe permite determinar la horaactual en otra zona horaria o paísnavegando con las teclas dedireccional izquierda o derecha.
1. Oprima [MENÚ].
2. Oprima la Tecla Direccional Para obtener acceso al menúPROG/HERR.
3. Oprima Herramientas.
4. Oprima Reloj Mundial.

VX8360 71
5. Toque la Tecla suave Derecha[Ciudads] y le permite fijar la
lista de ciudades.
6. Seleccione una ciudad de la listay luego oprima . En la pantalla se verá laubicación de la ciudad en unmapamundi.
7. Oprima otra vez paraampliar la ciudad y ver los datosde fecha y hora.
NOTA Con la Tecla suave Izquierda [Fije DST], establezca el horario deverano.
2.8 Cuaderno de NotasLe permite leer, agregar, editar yborrar notas para usted mismo.
1. Oprima [MENÚ].
2. Oprima la Tecla Direccional Para obtener acceso al menúPROG/HERR.
3. Oprima Herramientas.
4. Oprima Cuaderno deNotas.
5. Toque la Tecla suave Izquierda[Añadir] para escribir una
nueva nota.
6. Toque la Tecla suave Izquierdapara cambiar el modo de
introducción de texto.
7. Después de escribir la nota,oprima para guardarla.
2.9 Almacen masivo USBEste menú le permite transferircontenido del teléfono a una PCcon sistema operativo Windows®
XP o Windows Vista™ PC (oviceversa) cuando el teléfono seconecte a la PC con Windows® XPo Windows Vista™ mediante uncable USB compatible. No escompatible con el sistemaoperativo Mac OS o Linux OS.Podrá acceder a este menú sólocuando haya una tarjeta microSD™insertada en el teléfono (consulte lapágina 20 para aprender ainsertarla).
1. Oprima [MENÚ].
2. Oprima la Tecla Direccional Para obtener acceso al menúPROG/HERR.
3. Oprima Herramientas
4. Oprima Almacen masivoUSB.

72 VX8360
PROG/HERR
3. Menú de Bluetooth®
El VX8360 es compatible condispositivos que admiten losperfiles de audifonos, manos libres,redes de marcado telefónico yperfiles de objeto push paraContactos, incluidos eventos decalendarios y tarjetas de nombre,Distribución audio avanzada(Estéreo), Transferencia dearchivos de Bluetooth®, Perfil DelAcceso Del Libro De Teléfono, PerfilBásico De La Impresión y PerfilBásico De Imágenes.* Puede creary almacenar 20 emparejamientosdentro del VX8360 y conectarse aun dispositivo a la vez. El alcancede comunicación aproximado parala tecnología inalámbricaBluetooth® es de hasta 10 metros(30 pies). Bluetooth® QD ID B014194
NOTA Lea la guía del usuario de cadaaccesorio del Bluetooth® que ustedestá intentando aparear con suteléfono porque las instruccionespueden ser diferentes.
NOTA Su teléfono está basado en laespecificación Bluetooth®, pero no segarantiza que funcione con todos losdispositivos habilitados con latecnología inalámbrica Bluetooth®.El teléfono no admite TODOS OBEXde Bluetooth®.* Para ver la compatibilidad de
vehículos y accesorios, vaya awww.verizonwireless.com/bluetoothchart.
SUGERENCIAS
l AURICULAR: Soporta la utilizaciónde un auricular bluetooth®
compatible para monovoz.
l MANOS LIBRES: Soportaauriculares Bluetooth®, y puede quetambién soporte otros dispositivosBluetooth® compatibles instaladoscon capacidades de teléfono dealtavoz, tales como kits de coche oun dispositivo de sala deconferencias. Para la compatibilidadde kit de coche manos libres,consulte www.verizonwireless.com/bluetoothchart en el sitio Webinalámbrico Verizon.
l ACCESO TELEFÓNICO a REDES:Permite que el teléfono se utilicecomo módem de datos con undispositivo compatible Bluetooth®,tales como computadoras portátileso PDA, por medio de los sistemasVZW NationalAccessy/ o VZWBroadbandAccess.
l ESTÉREO: Soporta la entrega deaudio estéreo a un dispositivocompatible Bluetooth®.
l ACCESSO A AGENDATELEFÓN...: Permite lacompartición de su tarjeta denombre, entradas de agendatelefónica, y archivos de calendariocon un dispositivo compatible deBluetooth®.

VX8360 73
l IMPRESIÓN BÁSICA: Permite laimpresión de archivos JPEG en unaimpresora activada por Bluetooth®.
l PUSH de OBJECTO: Permite elenvío y la recepción de tarjetas denombre de contacto, eventos decalendario y foto de JPEG entredispositivos.
l TRANSFERENCIA de ARCHIVOS:Permite la capacidad de enviar yrecibir archivos de datos noprotegidos a un dispositivocompatible Bluetooth®.
l BÁSICO IMAGEN: Le permiteenviar imágenes no protegidas paraalmacenamiento y impresión.
3.1 Anadir Nuevo AparatoEl emparejamiento es el procesoque permite que el terminal ubique,establezca y registre una conexión1-a-1 con el dispositivo objetivo.
Para emparejar con un nuevodispositivo Bluetooth®
1. Siga las instrucciones delaccesorio de Bluetooth® paraajustar el dispositivo en modo deemparejamiento.
2. Oprima [MENÚ].
3. Oprima la Tecla Direccional Para obtener acceso al menúPROG/HERR.
4. Oprima Menú deBluetooth.
5. Oprima Anadir NuevoAparato.
Configure el dispositivo deseadopara el emparejamiento.
6. Si Bluetooth® está desactivado, sele pedirá que lo encienda. ResalteSí y oprima .

74 VX8360
PROG/HERR
7. El dispositivo aparecerá en elmenú Anadir Nuevo Aparatoque haya sido localizado.Resalte el dispositivo y oprima
.
8. El terminal le pedirá la clave depaso. Consulte las instruccionesdel accesorio Bluetooth® paraver la clave de paso adecuada(habitualmente “0000”- 4 ceros).Introduzca la clave de paso yoprima . Cuando Auto ManosPair está Activada, el dispositivointentará autopair paraauriculares.
9. Una vez que el emparejamientose haya realizado, resalteSiempre Preguntar o SiempreConectar y oprima paraconectarse con el dispositivo.
10. Una vez conectado, verá eldispositivo en el menúBluetooth® y aparecerá ensu enunciador cuando estéconectado con el dispositivoBluetooth®. También puedecomprobar la conexión quetiene un icono azul en lalista.
Referencia de iconos para agregarnuevo dispositivoCuando se crea la conexióninalámbrica Bluetooth® y seencuentran dispositivosemparejados, se muestran losiconos siguientes. l Referencias de iconos cuando
se encuentra una conexióninalámbrica Bluetooth® (niconectado ni emparejado).
Cuando su dispositivo VX8360busca un dispositivo de audio
Cuando su dispositivoVX8360 busca una PC
Cuando su dispositivoVX8360 busca un PDA
Cuando su dispositivoVX8360 busca otrodispositivo de teléfonoCuando su dispositivoVX8360 encuentra unaimpresoraCuando su dispositivoVX8360 encuentra otrosdispositivos no definidosCuando el teléfono VX8360está buscando un dispositivode manos libres o un kit paraautomóvil

VX8360 75
l Referencias de iconos al estarconectado correctamente
EncendidoLe permite activar o desactivar laalimentación de Bluetooth®.
1. Oprima [MENÚ].
2. Oprima la Tecla Direccional Para obtener acceso al menúPROG/HERR.
3. Oprima Menú deBluetooth.
4. Toque la Tecla suave Izquierda[Encender].
NOTA De manera predeterminado, lafuncionalidad del Bluetooth® de sudispositivo está desactivada.
Mi Nombre de TeléfonoLe permite editar el nombre deBluetooth® de su teléfono cuandose resalta el menú Agregar nuevodispositivo.
1. Oprima [MENÚ].
2. Oprima la Tecla Direccional Para obtener acceso al menúPROG/HERR.
3. Oprima Menú deBluetooth.
4. Toque la Tecla suave Derecha[Opciones].
5. Oprima Mi Info deDispositivo.
6. Toque para borrar elnombre existente.
7. Use el teclado numérico paraintroducir un nuevo nombrepersonalizado.
8. Oprima para guardar y salir.
SUGERENCIA La conexión inalámbricaBluetooth® depende de sudispositivo estéreo Bluetooth®.Incluso si desea conectarsecon unos audífonos queadmitan tanto perfiles estéreoy de manos libres, sólo puedeconectarse con uno.
Cuando unos audífonos sólo monoaurales estánconectados con sudispositivo VX8360 Cuando unos audífonos sólo estereofónicos estánconectados con sudispositivo VX8360Cuando hay audífonosestéreo y monoauralesconectados con sudispositivo VX8360

76 VX8360
PROG/HERR
Modo de DescubrimientoLe permite configurar si sudispositivo puede ser buscado porotros dispositivos Bluetooth® en lazona.
1. Oprima [MENÚ].
2. Oprima la Tecla Direccional Para obtener acceso al menúPROG/HERR.
3. Oprima Menú deBluetooth.
4. Toque la Tecla suave Derecha[Opciones].
5. Oprima Modo deDescubrimiento.
6. Use la tecla direccional para desplazarse hasta un valor,y oprima .Encendida/ Apagado
NOTA Si el modo de descubrimiento está enEncendida, otros dispositivosBluetooth® en el rango de alcancepueden buscar su dispositivo.
Perfiles SoportadosLe permite ver perfiles que suteléfono VX8360 puede admitir.
1. Oprima [MENÚ].
2. Oprima la Tecla Direccional Para obtener acceso al menú
PROG/HERR.
3. Oprima Menú deBluetooth.
4. Toque la Tecla suave Derecha[Opciones].
5. Oprima PerfilesSoportados.
Redes de marcado telefónico
Para iniciar una sesión de red demarcado telefónico:1. Inicie la aplicación de servicio
Bluetooth® o programa presenteen el dispositivo cliente.
2. Busque el nombre de su teléfonoen la lista de dispositivosdisponibles.
3. En el menú o la lista de serviciosdisponibles, seleccione redes demarcado telefónico.
4. Se abrirá el cuadro de diálogo"Conectar a" con cuadros dediálogos para completar datos,como identificador, contraseña ynúmero telefónico.
5. Presione el botón "Marcar" parainiciar la llamada.Una vez establecida la conexión,pueden comenzar a usarInternet.

VX8360 77
Transferencia de archivos
Para iniciar una sesión detransferencia de archivos:
1. Inicie la aplicación de servicioBluetooth® o programa presenteen el dispositivo cliente.
2. Establezca el modo dedescubrimiento.(
3. Busque el nombre de su teléfonoen la lista de dispositivosdisponibles.
4. En el menú o la lista de serviciosdisponibles, seleccione elservicio de transferencia dearchivos.
5. Aparecerá una ventanaseparada con la estructura dedirectorios del teléfono.Ahora podrá transferir archivoshacia y desde el dispositivocliente.
Acceso a libreta de teléfonos
Para obtener más instrucciones,consulte el manual del dispositivode manos libres o del sistema deaudio de su auto.
Auto-Emparejamiento ManosLibresPermite que el emparejamiento deBluetooth® con un dispositivo deaudio se intente automáticamentecon un código 0000.
1. Oprima [MENÚ].
2. Oprima la Tecla Direccional Para obtener acceso al menúPROG/HERR.
3. Oprima Menú deBluetooth.
4. Toque la Tecla suave Derecha[Opciones].
5. Oprima Auto-Emparejamiento Manos Libres.
l En el dispositivo emparejado,estarán disponibles lassiguientes opciones.Para dispositivos de audífonos:
1. Quitar Dispositivo: Puedeeliminar el dispositivo de la listade emparejamiento.
2. Seguridad Entrante: Permite queusted fije el permiso antes deconectar un dispositivo entrante.
3. Cambiar Nombre de Dispositivo:Puede cambiar el nombre deldispositivo emparejado.

78 VX8360
PROG/HERR
4. Descubrimiento de Servicio: Lepermite buscar los servicios queadmite el dispositivoseleccionado.
5. Info de Dispositivo: Muestra lainformación del dispositivo.
NOTAS En la lista de emparejamiento,puede desconectar el dispositivoconectado con la señal de flechaazul tocando o pulsando latecla suave izquierda [Encendido]. El contrario, puedeencenderlo presionando la teclasuave izquierda [Apagado]de nuevo.Una vez que el dispositivo de audioesté conectado, la conexión setransfiere al otro dispositivo cuandolo selecciona y oprima la teclaselección .En caso de que falle con algúndispositivo, seleccione en su lugarel dispositivo encontrado. ImprimirFoto permite imprimir endispositivos que admitan perfilesBPP. Cuando está conectado conel teléfono o PC de apoyo OPP, lossiguientes menús son posibles:l Enviar Tarjeta de Nombre:
Permite que mis datos decontacto para enviar cualquierotro dispositivo hasta 1000contactos.
l Obtener tarjeta de nombre:Puede obtener información de latarjeta Mi nombre del teléfono
emparejado.l Intercambiar tarjeta de nombre:
Puede intercambiar informaciónde la tarjeta Mi nombre delteléfono emparejado.
l Enviar mi calendario: Le permiteenviar hasta 300 eventos decalendario a otro dispositivo.
l Enviar Foto: Puede transferirimágenes a un dispositivo. *Examinar/Obtener archivo: seusa para obtener archivos deotro dispositivo (sólo cuando elotro dispositivo admita elprotocolo FTP).
4. Programación de SonidosOfrece opciones para personalizarlos sonidos del teléfono.
4.1 Volumen MaestroLe permite configurar los valores devolumen.
1. Oprima [MENÚ].
2. Oprima la Tecla Direccional Para obtener acceso al menúPROG/HERR.
3. Oprima Programación deSonidos.
4. Oprima Volumen Maestro.
5. Ajuste el volumen con la tecladireccional y oprima para guardar la configuración.

VX8360 79
4.2 Sonidos de LlamadaLe permite configurar cómo elteléfono lo alertará según los tiposde llamadas entrantes.
1. Oprima [MENÚ].
2. Oprima la Tecla Direccional Para obtener acceso al menúPROG/HERR.
3. Oprima Programación deSonidos.
4. Oprima Sonidos deLlamada.
4.2.1 Timbre de Llamada
1. Oprima [MENÚ].
2. Oprima la Tecla DireccionalPara obtener acceso al
menú PROG/HERR.
3. Oprima Programaciónde Sonidos.
4. Oprima Sonidos deLlamada.
5. Oprima Timbre deLlamada.
6. Use la tecla direccional para desplazarse hasta untono de timbre y oprima para guardar el cambio.
SUGERENCIA
Para oír un tono de timbre antes de
establecerlo, oprima la tecla de función
izquierda [[EEssccuu]].
4.2.2 Vibrador de Llamada
1. Oprima [MENÚ].
2. Oprima la Tecla DireccionalPara obtener acceso al
menú PROG/HERR.
3. Oprima Programaciónde Sonidos.
4. Oprima Sonidos deLlamada.
5. Oprima Vibrador deLlamada.
6. Use la tecla direccional para desplazarse hasta unvalor y oprima .
Encendido/ Apagado
4.3 Sonidos de AlertaLe permite seleccionar el tipo dealerta de un nuevo mensaje.
1. Oprima [MENÚ].
2. Oprima la Tecla Direccional Para obtener acceso al menúPROG/HERR.
3. Oprima Programación deSonidos.

80 VX8360
PROG/HERR
4. Oprima Sonidos de Alerta.
5. Seleccione Mensaje de TXT/Mensaje de Multimedias/Mensages de Voz/ Timbre deEmergencia.
6. Cada menú del sonido de laalarma tiene las opcionessiguientes.
Tono/ Vibrar/ Recordatorio
Para Timbre de Emergencia lasopciones son: Alertas/ Vibrar/Desactivado
4.4 Volumen de TecladoLe permite configurar el volumendel teclado.
1. Oprima [MENÚ].
2. Oprima la Tecla Direccional Para obtener acceso al menúPROG/HERR.
3. Oprima Programación deSonidos.
4. Oprima Volumen deTeclado.
5. Ajuste el volumen con la círculode direccional y oprima para guardar la configuración.
4.5 Alertas de ServicioLe permite configurar comoEncendido o Apagado cualquierade las cuatro opciones de Aviso.
1. Oprima [MENÚ].
2. Oprima la Tecla Direccional Para obtener acceso al menúPROG/HERR.
3. Oprima Programación deSonidos.
4. Oprima Alertas deServicio.
5. Seleccione una opción de alerta.
IRO Le avisa de las condicionesdel servicio celular.IRO: Indicador de RoamingMejorado
Sonido de Minutos Le avisa 10segundos antes del final de cadaminuto durante una llamada.
Conexión de Llamada Le avisacuando la llamada se haconectado.
Cargar Completado Lo alertacuando la batería estácompletamente cargada.
6. Use la tecla direccional para desplazarse hasta un valor,y oprima .

VX8360 81
4.6 Apagado/EncendidoLe permite configurar el teléfonopara que haga sonar un tonocuando el teléfono se enciende yapaga.
1. Oprima [MENÚ].
2. Oprima la Tecla Direccional Para obtener acceso al menúPROG/HERR.
3. Oprima Programación deSonidos.
4. Oprima Apagado/Encendido.
5. Seleccione Apagado/Encendido.
6. Use la tecla direccional para desplazarse hasta un valor,y oprima .
Apagado/ Encendido
4.7 Claridad de VozLe permite configurar la función declaridad de voz.
NOTA La característica de Claridad de Vozes desactivada automáticamentecuando se utiliza el altavoz o eldispositivo de manos libres.
1. Oprima [MENÚ].
2. Oprima la Tecla Direccional
Para obtener acceso al menúPROG/HERR.
3. Oprima Programación deSonidos.
4. Oprima Claridad de Voz.
5. Seleccione Encendido/Apagado.
6. Use la tecla direccional para desplazarse hasta un valor,y oprima .
Apagado/ Encendido
5. Programación de PantallaOfrece opciones para personalizarla pantalla del teléfono.
1. Oprima [MENÚ].
2. Oprima la Tecla Direccional Para obtener acceso al menúPROG/HERR.
3. Oprima Programación dePantalla.
5.1 AvisoLe permite introducir una frase dehasta 23 caracteres que se muestraen la pantalla LCD.
1. Oprima [MENÚ].

82 VX8360
PROG/HERR
2. Oprima la Tecla Direccional Para obtener acceso al menúPROG/HERR.
3. Oprima Programación dePantalla.
4. Oprima Aviso.
5.1.1 Personal Aviso
1. Oprima [MENÚ].
2. Oprima la Tecla DireccionalPara obtener acceso al
menú PROG/HERR.
3. Oprima Programaciónde Pantalla.
4. Oprima Aviso.
5. Oprima Personal Aviso.
6. Ingrese el texto que deseepara el titular.
NOTA Presione la tecla direccional para cambiar el color del texto. Use latecla para seleccionar el colorque desee.Negro/Blanco/Amarillo/Naranja/Rojo/Marrón/Azul/Verde/Celeste
7. Oprima .
5.1.2 Aviso IRO
Si usa el Servicio IRO, el textoIRO se muestra en el banderín.
1. Oprima [MENÚ].
2. Oprima la Tecla DireccionalPara obtener acceso al
menú PROG/HERR.
3. Oprima Programaciónde Pantalla.
4. Oprima Aviso.
5. Oprima Aviso IRO.
6. Use la tecla direccional para desplazarse hastaun valor, y oprima .Encendido/ Apagado
5.2 Luz de PantallaLe permite establecer la duraciónde la iluminación de la luz de fondo.Pantalla y Teclado se configuranindependientemente.
1. Oprima [MENÚ].
2. Oprima la Tecla Direccional Para obtener acceso al menúPROG/HERR.
3. Oprima Programación dePantalla.
4. Oprima Luz de Pantalla.
5. Elija un submenú de Luz traseray oprima .Pantalla/ Teclado

VX8360 83
1. Pantalla
l Luz de Pantalla Principal: 7Segundos/ 15 Segundos/ 30Segundos/ SiempreEncendido/ SiempreApagado
l Luz de Pantalla Frontal: 7Segundos/ 15 Segundos/ 30Segundos
2. Teclado: 7 Segundos/ 15Segundos/ 30 Segundos/Siempre Encendido/ SiempreApagado
5.3 Fondo de PantallaPermite que usted elija la clase defondo que se exhibirá en elteléfono.
1. Oprima [MENÚ].
2. Oprima la Tecla Direccional Para obtener acceso al menúPROG/HERR.
3. Oprima Programación dePantalla.
4. Oprima Fondo de Pantalla.
5. Elija un submenú y oprima .
Fondo de Pantalla Principal/Fondo de Pantalla Frontal
1. Fondo de Pantalla PrincipalMis Fotos/ Mis Videos/Animaciones Divertidas
2. Fondo de Pantalla FrontalMis Fotos/ Mis Videos
6. Seleccione entre las pantallasdisponibles y oprima .
5.4 Mostrar TemasLe permite elegir el color de lapantalla de fondo y cómo semuestra el software.
1. Oprima [MENÚ].
2. Oprima la Tecla Direccional Para obtener acceso al menúPROG/HERR.
3. Oprima Programación dePantalla.
4. Oprima Mostrar Temas.
5. Use la tecla direccional para desplazarse hasta un valor,y oprima .Clásica/ Agua/ Negro
NOTA Oprima la tecla izquierda [Avance] para una vista previa deltema seleccionado de pantalla.

84 VX8360
PROG/HERR
5.5 Menú Principal FijadoLe permite establecer que semuestre el portapapeles en el modode espera.
1. Oprima [MENÚ].
2. Oprima la Tecla Direccional Para obtener acceso al menúPROG/HERR.
3. Oprima Programación dePantalla.
4. Oprima Menú PrincipalFijado.
5. Use la tecla direccional para desplazarse hasta unaopción, y oprima .
Tab/ Lista/ Cuadrícula
NOTA Esta Guía del usuario da
instrucciones de navegación de
acuerdo con el valor por defecto
"Tab" del menú principal de diseño
en la configuración de la pantalla
de menú. Si otros menús se
establecen, navegando por los
menús del teléfono pueden ser
diferentes.
NOTA para obtener una vista previa de la
fuente seleccionada.
[Avance] para obtener una vista
previa de la escenario
seleccionada.
5.6 Tipo de FuentePermite configurar el tipo de fuente.
1. Oprima [MENÚ].
2. Oprima la Tecla Direccional Para obtener acceso al menúPROG/HERR.
3. Oprima Programación dePantalla.
4. Oprima Tipo de Fuente.
5. Use la tecla direccional para desplazarse hasta unaopción, y oprima .VZW Font/ LG Edge/ LG Script
NOTA para obtener una vista previa de la
fuente seleccionada.
[Avance] para obtener una vista
previa de la fuente seleccionada.
5.7 Tamaño de FuenteLe permite ajustar el tamaño de lafuente. Esta configuración es útilpara quienes necesitan que el textose muestre un poco más grande.
1. Oprima [MENÚ].
2. Oprima la Tecla Direccional Para obtener acceso al menúPROG/HERR.
3. Oprima Programación dePantalla.

VX8360 85
4. Oprima Tamaño de fuente.
5. Use la tecla direccional para seleccionar Llamar anúmeros/ Menú & Listas/Mensaje
6. Toque la Tecla suave Izquierda[Ajustar].
7. Use la tecla de dirección para resaltar una configuración,y luego oprima .
Llamar números: Normal/GrandeMenú & Listas: Normal/ GrandeMensaje: Normal/ Grande
5.8 Formato de RelojLe permite elegir el tipo de reloj quese mostrará en la pantalla LCD.
1. Oprima [MENÚ].
2. Oprima la Tecla Direccional Para obtener acceso al menúPROG/HERR.
3. Oprima Programación dePantalla.
4. Oprima Formato de Reloj.
5. Resalte un formato de reloj yoprima .
Reloj principal/Reloj Delantero1. Reloj principal
Digital 12 Pequeña/ AnálogoPequeña/ Análogo Grande/Digital 12 Grande/ Digital 24Grande/Doble ciudad/Apagado
2. Reloj Delantero/Digital 12/ Digital 12 Grande/Analógico/ Digital 12 Pequeña/Apagado
5. Use la tecla direccional pararesaltar una opción y luegooprima .
NOTA Presione la tecla de función
izquierda [Avance] para tener
una vista previa del formato de reloj
seleccionado.
6. Programación deTeléfono
El menú Programación de Teléfonole permite designar ajustesespecíficos de la configuración dered.
6.1 Modo de aviónSi activa el modo de avión, sedesactivaran todas lascomunicaciones inalambricas.
1. Oprima [MENÚ].
2. Oprima la Tecla Direccional Para obtener acceso al menúPROG/HERR.

86 VX8360
PROG/HERR
3. Oprima Programación deTeléfono.
4. Oprima Modo Avión.
5. Use la tecla direccional para desplazarse hasta un valor,y oprima .
Encendido/ Apagado
6.2 Establecer AtajosLe permite establecer un accesodirecto a los menús del teléfonocon las teclas de direccional arriba,abajo, izquierda y derecha.
6.2.1 Establecer mis Atajos
Acceda a estos métodosabreviados oprimiendo la tecladireccional derecha en el modo deespera (predet.) para mostrar suscuatro métodos abreviados.
1. Oprima [MENÚ].
2. Oprima la Tecla Direccional Para obtener acceso al menúPROG/HERR.
3. Oprima Programación deTeléfono.
4. Oprima Establecer atajos.
5. Oprima Establecer misatajos.
6. Use la Tecla de direccional para desplazarse a la tecla deacceso directo que deseaconfigurar.Atajo 1/ Atajo 2/ Atajo 3/ Atajo 4
7. Oprima para mostrar losaccesos directos existentes. Usela tecla direccional paraseleccionar uno y luego presione
.
6.2.2 Establecer TeclasDireccionales
Para acceder a estos atajos, abrala tapa, y después oprima la tecladireccional para acceder a laopción que usted configuró paraesa especifica tecla direccional.
1. Oprima [MENÚ].
2. Oprima la Tecla Direccional Para obtener acceso al menúPROG/HERR.
3. Oprima Programación deTeléfono.
4. Oprima Establecer Atajos.
5. Oprima Establecer TeclasDireccionales
6. Use la Tecla de direccional para desplazarse a la tecla deacceso directo que deseaconfigurar.

VX8360 87
tecla direccional Arr/ tecladireccional Izq/ tecladireccional Abj
7. Oprima para mostrar losaccesos directos existentes. Usela tecla direccional paraseleccionar uno y luego presione
.
6.3 Comandos de Voz
Uso del teclado interno
1. Oprima [MENÚ].
2. Oprima la Tecla Direccional Para obtener acceso al menúPROG/HERR.
3. Oprima Programación deTeléfono.
4. Oprima Comandos de Voz.
Avisos Modo/ Reproducción deAudio/ Tiempo AgotadoPara Modo, elija Avisos/ Lectura+ Alertas/ Lectura/ Sólo Tonos.Para Reproducción de Audio,elija Altavoz/ Auricular. ParaTiempo Agotado, elija 5 segundos/ 10 segundos.
Alerta de Llamada Sólo Timbre/ID de llamador + Timbre/ RepetirNombre
6.4 IdiomaLe permite configurar la funciónbilingüe según su preferencia. Elijaentre English y Español.
1. Oprima [MENÚ].
2. Oprima la Tecla Direccional Para obtener acceso al menúPROG/HERR.
3. Oprima Programación deTeléfono.
4. Oprima Idioma.
5. Use la tecla direccional para desplazarse hasta un valor,y oprima .English/ Español
6.5 UbicaciónLe permite configurar el modo GPS(Sistema de posicionamientoglobal: sistema de información de laubicación asistido por satélite).
1. Oprima [MENÚ].
2. Oprima la Tecla Direccional Para obtener acceso al menúPROG/HERR.
3. Oprima Programación deTeléfono.
4. Oprima Ubicación.

88 VX8360
PROG/HERR
5. Use la tecla direccional para desplazarse hasta un valor,y oprima .
Ubicación Encendido/ Sólo E911
NOTAS l Las señales de satélite GPS nosiempre se reciben a través delteléfono, especialmente bajocondiciones atmosféricas omedioambientales adversas, enrecintos cerrados, etc.
l Cuando la opción deProgramación de Ubicación quese encuentra en el menú deSeguridad está activada, serequiere el código debloqueo/desbloqueo para queusted abra el menú de laubicación. El código de lacerradura es también los 4dígitos de código de su númerode teléfono, el mismo que ustedutiliza como su código debloqueo del dispositivo.
l Cuando está en Modo de avión,se suspenderán los servicios queadmiten la función Ubicaciónactivada (como Chaperone).
6.6 SeguridadEl menú Seguridad le permiteasegurar el teléfonoelectrónicamente.
1. Oprima [MENÚ].
2. Oprima la Tecla Direccional Para obtener acceso al menúPROG/HERR.
3. Oprima Programación deTeléfono.
4. Oprima Seguridad.
5. Introduzca el código debloqueo de cuatro cifras.El código de bloqueo es: lasúltimas 4 cifras de su númerode teléfono.
Las últimas 4 cifras de su MEIDsi su número de teléfono móvilno está configurado.
6.6.1 Editar Códigos
Le permite introducir un nuevocódigo de bloqueo de cuatrocifras.
1. Oprima [MENÚ].
2. Oprima la Tecla DireccionalPara obtener acceso al
menú PROG/HERR.
3. Oprima Programaciónde Teléfono.
4. Oprima Seguridad.
5. Introduzca el código debloqueo de cuatro cifras.
6. Oprima Editar Códigos.
7. Seleccione Sólo teléfono oLlamadas & Servicios.

VX8360 89
8. Introduzca el código debloqueo de cuatro cifras.
9 Para confirmar, se le pediráque introduzca otra vez elnuevo código de bloqueo.
6.6.2 Restricciones
Le permite restringir laConfiguración de ubicación,Llamadas, Mensajes, ó modemde conexión telefónica.
1. Oprima [MENÚ].
2. Oprima la Tecla DireccionalPara obtener acceso al
menú PROG/HERR.
3. Oprima Programaciónde Teléfono.
4. Oprima Seguridad.
5. Introduzca el código debloqueo de cuatro cifras.
6. Oprima Restricciones.
7. Introduzca el código NIP decuatro cifras.
8. Seleccione un menú derestricciones y oprima .
Configuración de ubicación/Llamadas/ Mensajes/ Módemtelefónico
9. Use la tecla direccional para ajustar un nivel derestricciones y oprima .
Programación de ubicaciónProg de Bloq./ Prog de Abrir
Llamadas
Llamadas Entrante Permitirtodo / Sólo contactos /Bloquear todo
Llamadas Saliente Permitirtodo / Sólo contactos /Bloquear todo
Mensajes
Mensajes Entrante Permitirtodo / Bloquear todo
Mensajes Saliente Permitirtodo / Bloquear todo
Módem de conexióntelefónica Permitir todo/Bloquear todo
6.6.3 Bloqueo de teléfono
Evita el uso no autorizado de suteléfono. Una vez que el teléfonoestá bloqueado, estará en modorestringido hasta que seintroduzca el código de bloqueo.Puede recibir llamadas deteléfono y seguir haciendollamadas de emergencia. Puedemodificar el código de bloqueo

90 VX8360
PROG/HERR
con Submenú editar código en elmenú Seguridad.
1. Oprima [MENÚ].
2. Oprima la Tecla DireccionalPara obtener acceso al
menú PROG/HERR.
3. Oprima Programaciónde Teléfono.
4. Oprima Seguridad.
5. Introduzca el código debloqueo de cuatro cifras.
6. Oprima Bloqueo deteléfono.
7. Seleccione una opción yoprima .
Desbloqueado El teléfononunca está bloqueado (sepuede usar el modo deBloqueo).
Al Encender El Teléfono El teléfono está bloqueado cuando se enciende.
6.6.4 Bloquear teléfono ahora
1. Oprima [MENÚ].
2. Oprima la Tecla DireccionalPara obtener acceso al
menú PROG/HERR.
3. Oprima Programaciónde Teléfono.
4. Oprima Seguridad.
5. Introduzca el código debloqueo de cuatro cifras.
6. Oprima Bloquearteléfono ahora.
6.6.5 Restablecer Implícito
Le permite restaurar su teléfonoa la configuraciónpredeterminada de fábrica.
1. Oprima [MENÚ].
2. Oprima la Tecla DireccionalPara obtener acceso al
menú PROG/HERR.
3. Oprima Programaciónde Teléfono.
4. Oprima Seguridad.
5. Introduzca el código debloqueo de cuatro cifras.
6. Oprima RestablecerImplícito.
7. Oprima después de leerel mensaje de advertencia.

VX8360 91
8. Seleccione Revertirpresionando .
Aparece brevemente unmensaje de confirmaciónantes de que el teléfono serestaure.
6.6.6 Restaurar teléfono
Le permite eliminar todos losdatos de usuario e informaciónde contactos que hayaingresado en la memoria delteléfono, de modo que quedecomo recién salido de fábrica.
1. Oprima [MENÚ].
2. Oprima la Tecla DireccionalPara obtener acceso al
menú PROG/HERR.
3. Oprima Programaciónde Teléfono.
4. Oprima Seguridad.
5. Introduzca el código debloqueo de cuatro cifras.
6. Oprima Restaurarteléfono.
7. Oprima después de leerel mensaje de advertencia
8. Introduzca el código debloqueo de cuatro cifras.
6.7 Selección de SistemaLe permite configurar el entorno deadministración teléfono. Deje estaconfiguración como lapredeterminada a menos quedesee alterar la selección delsistema por instrucciones de suproveedor de servicio.
1. Oprima [MENÚ].
2. Oprima la Tecla Direccional Para obtener acceso al menúPROG/HERR.
3. Oprima Programación deTeléfono.
4. Oprima Selección deSistema.
5. Use la tecla direccional para desplazarse hasta un valor,y oprima .
Sólo Base/ Automático

92 VX8360
PROG/HERR
6.8 Seleccionar NAMLe permite seleccionar el NAM(módulo de asignación de número)del teléfono si éste está registradocon varios proveedores de servicio.
1. Oprima [MENÚ].
2. Oprima la Tecla Direccional Para obtener acceso al menúPROG/HERR.
3. Oprima Programación deTeléfono.
4. Oprima Seleccionar NAM.
5. Use la tecla direccional para desplazarse hasta un valor,y oprima .
NAM1/ NAM2
7. Programación deLlamada
El menú Programación de Llamadale permite designar cómo manejaráel teléfono las llamadas entrantes ysalientes.
7.1 Opciones de RespuestaLe permite determinar cómomanejar una llamada contestada.
1. Oprima [MENÚ].
2. Oprima la Tecla Direccional
Para obtener acceso al menúPROG/HERR.
3. Oprima Programación deLlamada.
4. Oprima Opciones deRespuesta.
5. Use la tecla direccional para desplazarse hasta un valor,y oprima .Al Abrirlo/ Cualquier Tecla/ Autocon Manos libres
6. Oprima la tecla de funciónizquierda [Hecho] cuandohaya marcado los parámetrosdeseados.
NOTA La Auto con Manos libres estádisponible sólamente cuandocualquier dispositivo externo estáconectado con su teléfono.
Cuando el timbre está silenciado,como en los ajustes que aparecena continuación, no se activa eltimbre.l Cuando se configura Todo
Apagado/ Sólo Alarma para laalarma o el timbre de ID deContacto está configurado comoSin Timbre/ Silencio.
l Cuando el timbre se asilenciacon la tecla lateral "Silenc.".

VX8360 93
7.2 Reintentar AutomáticamenteLe permite fijar cuánto tiempoespera el teléfono antes deremarcar automáticamente unnúmero cuando no se consigue unallamada.
1. Oprima [MENÚ].
2. Oprima la Tecla Direccional Para obtener acceso al menúPROG/HERR.
3. Oprima Programación deLlamada.
4. Oprima ReintentarAutomáticamente.
5. Use la tecla direccional para desplazarse hasta un valor,y oprima .
Desactivado/ Cada 10 Segundos/Cada 30 Segundos/ Cada 60Segundos
7.3 Modo TTYLe permite conectar un dispositivoTTY (teclado para personas conproblemas de audición) paracomunicarse con personas quetambién lo usen. Un teléfono concompatibilidad TTY puede traducircaracteres escritos a voz. La voztambién puede traducirse encaracteres y mostrarse en el TTY.
1. Oprima [MENÚ].
2. Oprima la Tecla Direccional Para obtener acceso al menúPROG/HERR.
Modo TTY (máquina de escribir a distancia)
Menú Usuario Función Modo de Transmisión y recepción
Al establecer comunicación con un terminal normal
TTYLlena
Para la transmisión apersonas con problemas
de audición o habla
transmisión de mensajesde texto, recepción de
mensajes de textoSe requiere de un operador
TTY+Charla
Para las personas conproblemas de audición con voz
transmisión de voz,recepción de mensajes de
textoSe requiere de un operador
TTY+Oír Para las personas conproblemas del habla. audible transmisión de mensajes
de texto, recepción de voz Se requiere de un operador
TTYApagada
transmisión de voz,recepción de voz

94 VX8360
PROG/HERR
3. Oprima Programación deLlamada.
4. Oprima [Modo TTY].
Aparece un mensaje deexplicación.
5. Oprima para continuar.
6. Use la tecla direccional para desplazarse hasta un valor,y oprima .TTY Llena/ TTY + Charla/ TTY +Oír/ TTY Apagada
TTY Llena: Los usuarios que nopueden hablar ni oír envían yreciben mensajes de texto pormedio de un equipo de TTY.
TTY + Charla: Los usuarios quepueden hablar pero no oír recibenun mensaje de texto y envían vozpor medio de un equipo de TTY.
TTY + Oír: Los usuarios que puedenoír pero no hablar envían unmensaje de texto y reciben voz pormedio de un equipo de TTY.
TTY Apagada: Los usuarios envíany reciben sin tener equipo TTY.
Conexión de un equipo TTY y unterminal
1. Conecte un cable de TTY a laconexión TTY del terminal(Conexión TTY situada en elmismo sito que el conector paraaudífonos de manos libres).
2. Entre al menú del teléfono yajuste el modo de TTY deseado.
3. Después de establecer un modode TTY, compruebe la pantalla deLCD del teléfono para confirmarque esté presente el icono deTTY.
4. Conecte el equipo de TTY a lafuente de alimentación yenciéndalo.
5. Haga una conexión de teléfonoal número deseado.
6. Al establecerse la conexión, useel equipo TTY para escribir yenviar un mensaje de texto oenviar voz.
7. El mensaje de voz o de texto dellado del destinatario se muestraen la pantalla del equipo TTY.

VX8360 95
7.4 Marcado oprimiendo unbotón
Le permite iniciar una llamada demarcado rápido manteniendooprimida la cifra de marcadorápido. Si se configura comoApagado, los números de MarcadoRápido designados en susContactos no funcionarán.
1. Oprima [MENÚ].
2. Oprima la Tecla Direccional Para obtener acceso al menúPROG/HERR.
3. Oprima Programación deLlamada.
4. Oprima Marcadooprimiendo un botón.
5. Use la tecla direccional para desplazarse hasta un valor,y oprima .
Encendido/ Apagado
7.5 Privacidad de VozLe permite configurar la función deprivacidad de voz en Mejorada oEstándar para las llamadas CDMA.CDMA ofrece privacidad de vozinherente. Compruebe ladisponibilidad con su proveedor deservicio.
1. Oprima [MENÚ].
2. Oprima la Tecla Direccional Para obtener acceso al menúPROG/HERR.
3. Oprima Programación deLlamada.
4. Oprima Privacidad de Voz.
5. Use la tecla direccional para desplazarse hasta un valor,y oprima .
Encendido/ Apagado

96 VX8360
PROG/HERR
7.6 Tonos DTMFLe permite configurar los tonosDTMF.
1. Oprima [MENÚ].
2. Oprima la Tecla Direccional Para obtener acceso al menúPROG/HERR.
3. Oprima Programación deLlamada.
4. Oprima Tonos DTMF.
5. Use la Tecla de direccional para desplazarse hasta un valory oprima .
Normal/ Largo
8. Sinc automática de USBEl teléfono detectaautomáticamente los dispositivosUSB cuando se conectan alteléfono para actividades desincronización de música o dedatos. Si la opción está establecidaen Preguntar al conectar, se lepedirá que establezca cada vez quese realice la conexión.
1. Oprima [MENÚ].
2. Oprima la Tecla Direccional Para obtener acceso al menúPROG/HERR.
3. Oprima Detecciónautomática de USB.
4. Use la tecla direccional para desplazarse hasta un valor,y oprima .
Syncro-Música/ Syncro datos /Preguntar al conectar

VX8360 97
9. MemoriaLe permite revisar la memoriainterna de su teléfono VX8360 asícomo la memoria externa de lamicroSD™. El puede tener accesoa los tipos siguientes del archivoalmacenados en la tarjetadesprendible del microSD™.Mis Fotos: png, jpg, bmp, gifMis Sonidos: mid, qcp (utilizadopara MMS, no puede ser fijadocomo tonos de timbres)Mis Videos: 3gp, 3g2Mi Música: wma, mp3, unprotectedaac & aac+
9.1 Opciones de MemoriaLe permite designar si desea usarla memoria de su teléfono o unamemoria externa (tarjeta dememoria) para guardar imágenes,videos y archivos de sonido.
1. Oprima [MENÚ].
2. Oprima la Tecla Direccional Para obtener acceso al menúPROG/HERR.
3. Oprima Memoria.
4. Oprima Opciones deMemoria.
5. Desplazarse hasta Fotos/Videos/ Sonidos un valor yoprima .
6. Use la tecla direccional para seleccionar una ubicaciónde almacenamiento y luegopresione .Memoria del teléfono/Memoriade la tarjeta
AlmacenarenVX8360
Almacenaren tarjetamicroSDTM
Transferenciade PC ateléfono através detarjeta
Transferenciade tarjeta ateléfono através de PC
V CASTMusic/ WMAcanciones
W W W W
Tonos detimbres W
Sonido W W W W
V CASTVideo del clip W
Descargue elImagen/Video
W
Imagen/ Video(generado por el usuarioo recibidos através deMMS)
W W W W

98 VX8360
PROG/HERR
9.2 Memoria de Teléfono
Muestra la información dememoria almacenada en suteléfono.1. Oprima [MENÚ].
2. Oprima la Tecla Direccional Para obtener acceso al menúPROG/HERR.
3. Oprima Memoria.
4. Oprima Memoria deTeléfono.
5. Use la tecla direccional para seleccionar el tipo dealmacenamiento de archivos enel teléfono VX8360 y luegopresione para ver lamemoria utilizada.Uso de la memoria/ Mis Fotos/Mis videos/ Mi música/ Missonidos
NOTA Es posible reajustar su música con
la opción Mi música. De esta
manera, se quitarán todos los temas
y listas de reproducción adquiridos o
suscritos mediante Música V CAST |
Rhapsody. Las listas creadas en el
teléfono no se verán afectadas.
9.3 Memoria de TarjetaMuestra la información de memoriaalmacenada en la tarjeta.
1. Oprima [MENÚ].
2. Oprima la Tecla Direccional Para obtener acceso al menúPROG/HERR.
3. Oprima Memoria.
4. Oprima Memoria deTarjeta.
5. Use la tecla direccional para seleccionar el tipo dealmacenamiento de archivos enla tarjeta de memoria y luegopresione .Uso de la memoria/ Mis Fotos/Mis videos/ Mi música/ Missonidos
NOTA La opción Uso de la Memoria muestrala memoria total usada y la memoriaadicional disponible para guardar.
NOTA No instale ni quite la microSDTM
cuando esté reproduciendo, borrandoo descargando Fotos/Videos/Música/Sonidos.

VX8360 99
0. Información de TeléfonoLe da información concretarespecto al modelo del teléfono.
1. Oprima [MENÚ].
2. Oprima la Tecla Direccional Para obtener acceso al menúPROG/HERR.
3. Oprima Información deTeléfono.
0.1 Mi NúmeroLe permite ver su número deteléfono.
1. Oprima [MENÚ].
2. Oprima la Tecla Direccional Para obtener acceso al menúPROG/HERR.
3. Oprima Información deTeléfono.
4. Oprima Mi Número.
0.2 Versión SW/HWLe permite ver las Versións deappliciónes divertidas cómo SW,PRL, IRO, Browser, CENTRO deMEDIOS, AVR, MMS, Bluetooth®,MSUI, HW, MEID, y fecha garantía.
1. Oprima [MENÚ].
2. Oprima la Tecla Direccional Para obtener acceso al menúPROG/HERR.
3. Oprima Información deTeléfono.
4. Oprima Versión SW/HW.
0.3 Glosario de IconosLe permite ver todos los iconos ysus significados.
1. Oprima [MENÚ].
2. Oprima la Tecla Direccional Para obtener acceso al menúPROG/HERR.
3. Oprima Información deTeléfono.
4. Oprima Glosario deIconos.

PROG/HERR
0.4 Actualización de SoftwareEsta función le permite que elteléfono tenga siempre la últimaversión de software y las funcionesmás actualizadas, sin necesidad dedirigirse una tienda decomunicaciones Verizon Wirelesspara hacer las actualizaciones.Usted puede recibirautomáticamente una notificaciónde que hay una versión de softwareactualizada a su disposición otambién constatar manualmente siexiste alguna actualización paradescargar.
Actualización automática
El teléfono recibirá una notificaciónde que tiene su disposición unaversión de software actualizadapara descargar. Cuando recibe lanotificación, puede presionar obien la descarga puede serautomática. Una vez finalizada ladescarga, según el tipo deactualización, podrá tener tresopciones: aceptar, posponer orechazar la actualización.
NOTA Durante el proceso de actualización,no podrá hacer ni recibir llamadas, nisiquiera al número de emergencia, nimensajes de texto.
Actualización manual
1. Oprima [MENÚ].
2. Oprima la Tecla Direccional Para obtener acceso al menúPROG/HERR.
3. Oprima Información deTeléfono.
4. Oprima Actualización deSoftware.
Las dos opciones que verá enpantalla serán: Estado y VVeerriiffiiccaarrnuevo.
Presione para ver el Estadode una descarga o unaactualización y obtenerinformación sobre la últimaactualización satisfactoria.
Por otra parte, puede presionarVerificar nuevo para
averiguar si hay alguna nuevaactualización de software paradescargar. Si hay una versión desoftware más reciente, comenzaráa descargarse automáticamentetras 30 segundos o usted puedeindicar que la descarga comiencede inmediato presionando .Para detener la descarga desoftware, presione la tecla defunción derecha Quit.
100 VX8360

Seguridad
VX8360 101
IInnffoorrmmaacciióónn ddeesseegguurriiddaadd ddee llaa TTIIAALo que sigue es la Informacióncompleta de seguridad de la TIA(Asociación de la industria de lastelecomunicaciones) sobreteléfonos inalámbricos de mano.
Exposición a las señales deradiofrecuencia
Su teléfono celular de manoinalámbrico es un transmisor yreceptor de radio de baja potencia.Cuando está encendido, recibe ytambién envía señales deradiofrecuencia (RF).En agosto de 1996, la ComisiónFederal de Comunicaciones (FCC)de EE.UU. adoptó lineamientos deexposición a RF con niveles deseguridad para teléfonosinalámbricos de mano. Esoslineamientos corresponden a lanorma de seguridad establecidapreviamente por organismos deestándares tanto de EE.UU. comointernacionales:
ANSI C95.1 (1992) *NCRP Report 86 (1986)ICNIRP (1996)
* Instituto de estándares nacionalestadounidense; Consejo nacional
de protección contra la radiación ymediciones, Comisión internacionalde protección de radiación noionizante. Estos estándares se basaron enevaluaciones amplias y periódicasde la literatura científica relevante.Por ejemplo, más de 120 científicos,ingenieros y médicos deuniversidades, dependenciasgubernamentales de salud y de laindustria revisaron lasinvestigaciones realizadas paradesarrollar el estándar ANSI(C95.1).El diseño de su teléfono cumple loslineamientos de la FCC (y esasnormas internacionales).
Cuidado de la antena
Utilice solamente la antena incluidao una antena de reemplazoaprobada. Las antenas,modificaciones o accesorios noautorizados pueden dañar elteléfono y violar los reglamentos dela FCC.
Funcionamiento del teléfono
POSICIÓN NORMAL: Sostenga elteléfono como cualquier otroteléfono con la antena apuntandohacia arriba por sobre su hombro.

Seguridad
102 VX8360
Sugerencias para unfuncionamiento más eficiente
Para que su teléfono funcione conla máxima eficiencia:No toque la antenainnecesariamente cuando estéusando el teléfono. El contacto conla antena afecta la calidad de lallamada y puede ocasionar que elteléfono funcione a un nivel depotencia mayor que el quenecesitaría de otro modo.
Manejo
Compruebe las leyes y reglamentosreferidos al uso de teléfonosinalámbricos en las áreas dondeusted maneja y cúmplalas siempre.Igualmente, si va a usar el teléfonomientras maneja, por favor tengapresente lo siguiente:l Preste toda su atención a
conducir -- manejar conseguridad es su primeraresponsabilidad;
l Use la operación a manos libres,si la tiene;
l Salga del camino y estacióneseantes de hacer o recibir unallamada si las condiciones demanejo o la ley así lo demandan.
Dispositivos Electrónicos
La mayoría del equipo electrónicomoderno está blindado contra lasseñales de RF. Sin embargo,algunos equipos electrónicospueden no estar blindados contralas señales de RF de su teléfonoinalámbrico.
Marcapasos
La Asociación de fabricantes de laindustria médica recomienda unaseparación mínima de quince (15)centímetros o seis (6) pulgadasentre el teléfono inalámbrico demano y un marcapasos para evitarla posible interferencia con éste.Estas recomendaciones soncoherentes con las investigacionesindependientes y lasrecomendaciones de Investigaciónen tecnología inalámbrica.Las personas con marcapasos:l Deben SIEMPRE mantener el
teléfono a más de quincecentímetros (seis pulgadas) delmarcapasos cuando el teléfonoesté encendido;
l No deben llevar el teléfono en unbolsillo del pecho.
l Deben usar la oreja opuesta almarcapasos para reducir al

VX8360 103
mínimo la posibilidad deinterferencia.
l Deben apagar el teléfono deinmediato si tienen motivo parasospechar que está ocurriendouna interferencia.
Aparatos para la sordera
Algunos teléfonos inalámbricosdigitales pueden interferir conalgunos aparatos para la sordera.En caso de presentarse talinterferencia, es recomendable queconsulte con su proveedor deservicio (o llame a la línea deservicio al cliente para comentarlas opciones a su alcance).Opcional para cada fabricante deteléfonos.
Otros Dispositivos Médicos
Si usa cualquier otro dispositivomédico personal, consulte alfabricante de dicho dispositivo parasaber si está adecuadamenteblindado contra la energía de RFexterna. Su médico puede ayudarlea obtener esta información.
Centros de atención médica
Apague el teléfono cuando esté eninstalaciones de atención médicaen las que haya letreros que así lo
indiquen. Los hospitales o lasinstalaciones de atención médicapueden emplear equipos quepodrían ser sensible a la energía deRF externa.
Vehículos
Las señales de RF pueden afectar alos sistemas electrónicos malinstalados o blindados de manerainadecuada en los vehículosautomotores. Pregunte alfabricante o a su representanterespecto de su vehículo. Tambiéndebe consultar al fabricante decualquier equipo que haya añadidoa su vehículo.
Instalaciones con letreros
Apague el teléfono en cualquierinstalación donde así lo exijan losletreros de aviso.
Aeronaves
Los reglamentos de la FCC prohíbenel uso del teléfono en el aire.Apague el teléfono antes deabordar una aeronave.
Áreas de explosivos
Para evitar la interferencia enzonas donde se realicenexplosiones, apague el teléfono

Seguridad
104 VX8360
cuando esté en estos sitios o enáreas con letreros que indiquen:“Apague los radios de dos vías”.Obedezca todos los letreros einstrucciones.
Atmósfera potencialmenteexplosiva
Apague el teléfono cuando esté enun área con una atmósferapotencialmente explosiva yobedezca todos los letreros einstrucciones. Las chispas endichas áreas pueden causar unaexplosión o un incendio que dencomo resultado lesionespersonales o incluso la muerte. Las áreas con una atmósferapotencialmente explosiva estánclaramente marcadas confrecuencia, pero no siempre. Entrelas áreas potenciales tenemos: lasáreas de abastecimiento decombustible (como las gasolineras),bajo cubierta en barcos,instalaciones de almacenamiento otransferencia de combustible osustancias químicas, vehículos queusen gas de petróleo licuado (comopropano o butano), áreas en lasque el aire contenga sustanciasquímicas o partículas (comogranos, polvo o polvo metálico) y
cualquier otra área en la quenormalmente sería recomendableque apagara el motor de suvehículo.
Para vehículos equipados conbolsas de aire
Una bolsa de aire se infla con granfuerza. NO coloque objetos,incluido el equipo inalámbrico, yasea instalado o portátil, en el áreaque está sobre la bolsa de aire o enel área donde se despliega. Si elequipo inalámbrico del interior delvehículo está mal instalado y seinfla la bolsa de aire, puedenproducirse graves lesiones.

VX8360 105
IInnffoorrmmaacciióónn ddeesseegguurriiddaaddLea y atienda la informaciónsiguiente para el uso seguro yadecuado de su teléfono y paraevitar cualquier daño. Igualmente,mantenga la guía del usuario en unsitio accesible en todo momentodespués de leerla.
No seguir lasinstrucciones
puede ocasionar daños leves ograves al producto.
l No desarme ni abra, aplaste,doble, deforme, perfore ni hagatiras.
l No modifique ni remanufacture,ni intente introducir objetosextraños en el interior de labatería, ni la sumerja ni expongaa agua u otros líquidos, ni laexponga al fuego, explosiones uotros riesgos.
l Sólo use la batería para elsistema para el cual estáindicada.
l Sólo use la batería con unsistema de carga que haya sidocertificado con IEEE-Std-1725-2006 según este estándar. El usode una batería o cargador no
certificados puede presentarriesgo de incendo, explosión,derrames o de otro tipo.
l No cortocircuite las baterías nipermita que objetos conductorsemetálicos toquen los terminalesde las baterías.
l Sólo reemplace la batería conotra que haya sido certificadacon el sistema según esteestándar, IEEE-Std-1725-2006. El uso deuna batería no certificada puedepresentar riesgo de incendo,explosión, derrames o de otrotipo.
l Deshágase rápidamente de lasbaterías usadas de acuerdo conlas regulaciones locales.
l El uso de las baterías por partede niños debe hacerse bajosupervisión.
l Evite dejar caer el teléfono o labatería. Ei el teléfono o la bateríacaen, especialmente en unasuperficie dura, y el usuariosospecha que hay daños, llévelaa un centro de servicio para quela inspeccionen.
l Debe implementarse, al meno,uno de los métodos de

Seguridad
106 VX8360
autenticación. (por ej. H/W, S/W,Mecánico, Holograma, etc.)
l El uso incorrecto de las bateríaspuede dar como resultado unincendio, explosión u otrosriesgos.
Seguridad del cargador y deladaptador
l El cargador y el adaptador stándiseñados sólo para ser usadosbajo techo.
l Intro duzca el cargador debaterías verticalmente en elenchufe eléctrico de pared.
l Únicamente use el cargador debaterías aprobado. En casocontrario, esto podría dar comoresultado graves daños alteléfono.
l Use el adaptador correcto parasu teléfono al usar el cargadorde baterías en el extranjero.
Información y cuidado de la batería
l Deshágase de la bateríacorrectamente o llévela con suproveedor de serviciosinalábricos para que seareciclada.
l La batería no necesita estartotalmente descargada paracargarse.
l Use únicamente cargadoresaprobados por LG que seanespecíficamente para el modelode su teléfono, ya que estándiseñados para maximizar la vidaútil de la batería.
l No desarme la batería ni leprovoque un corto circuito.
l Mantenga limpios los contactosde metal de la batería.
l Reemplace la batería cuando yano tenga un desempeñoaceptable. La batería puederecargarse varios cientos deveces antes de necesitar serreemplazada.
l Cargue la batería después deperíodos prolongados sin usar elteléfono para maximizar la vidaútil de la misma.
l La vida útil de la batería serádistinta en función de lospatrones de uso y lascondiciones medioambientales.
l El uso extendido de la luz defondo, del mininavegador y delos kits de conectividad de datosafectan la vida útil de la batería y

VX8360 107
los tiempos de conversación yespera.
l La función de autoprotección dela interrumpe la alimentación delteléfono cuando su operaciónesté en un estado anormal. Eneste caso, extraiga la batería delteléfono, vuelva a instalarla yencienda el teléfono.
Peligros de explosión, descargaseléctricas e incendio
l No coloque el teléfono en sitiosespuestos a exceso de polvo ymantenga la distancia mínimarequerida entre el cable dealimentación y las fuentes decalor.
l Desconecte el cable dealimentación antes de limpiar elteléfono, y limpie la clavija dealimentación cuando esté sucia.
l Al usar la clavija dealimentación, asegúrese de queesté conectada firmemente. Encaso contrario, puede provocarcalor excesivo o incendio.
l Si coloca el teléfono en unbolsillo o bolso sin cubrir elreceptáculo (clavija dealimentación), los artículos
metálicos (tales como unamoneda, clip o pluma) puedenprovocarle un corto circuito alteléfono. Siembre cubra elreceptáculo cuando no se estéusando.
l No le provoque un corto circuitoa la batería. Los artículosmetálicos como monedas, clipso plumas en el bolsillo o bolsopueden provocar al moverse uncortocircuito en los terminales +y – de la batería (las tiras demetal de la batería). Elcortocircuito de los terminalespuede dañar la batería yocasionar una explosión.
Aviso General
l El uso de una batería dañada oel introducir la batería en la bocapueden causar gravs lesiones.
l No coloque cerca del teléfonoartículos que contengancomponentes magnéticos comoserían tarjetas de crédito,tarjetas telefónicas, libretas debanco o boletos del metro. Elmagnetismo del teléfono puededañar los datos almacenados enla tira magnética.

Seguridad
108 VX8360
l Hablar por el teléfono durante unperíodo de tiempo prolongadopuede reducir la calidad de lallamada debido al calorgenerado durante la utilización.
l Cuando el teléfono no se usedurante mucho tiempo,almacénelo en un lugar segurocon el cable de alimentacióndesconectado.
l El uso del teléfono cerca deequipo receptor (como untelevisor o radio) puede causarinterferencia el teléfono.
l No use el teléfono si la antenaestá dañada. Si una antenadañada toca la piel, puedecausar una ligera quemadura.Comuníquese con un Centro deservicio autorizado LG para quereemplacen la antena dañada.
l No sumerja el teléfono en agua.Si esto ocurre, apáguelo deinmediato y extraiga la batería. Siel teléfono no funciona, llévelo aun Centro de servicio autorizadoLG.
l No pinte el teléfono.
l Los datos guardados en elteléfono se pueden borrardebido a un uso descuidado,
reparación del teléfono oactualización del software. Porfavor respalde sus números deteléfono importantes. (Tambiénpodrían borrarse los tonos detimbre, mensajes de texto,mensajes de voz, imágenes yvideos.) El fabricante no esresponsable de daños debidos ala pérdida de datos.
l Al usar el teléfono en lugarespúblicos, fije el tono de timbre envibración para no molestar aotras personas.
l No apague o encienda elteléfono cuando se lo ponga aloído.
l Use los accesorios(especialmente los micrófonos)con cuidado y asegúrese de quelos cables están protegidos y noestán en contacto con la antenainnecesariamente.
VX8360 109
CCuuiiddaaddoo:: EEvviittee uunnaa PPrroobbaabblleePPéérrddiiddaa ddeell OOííddoo..La exposición prologada a sonidosaltos (incluida la música) es lacausa más común de la pérdida deloído que puede prevenirse. Ciertosestudios científicos sugieren que eluso a alto volumen de aparatosportátiles de audio, como son losreproductores portátiles de músicay teléfonos celulares durantemucho tiempo puede conllevar lapérdida permanente del oído. Estoincluye el uso de audífonos (incluyetodo tipo de audífonos y Bluetooth®
u otros aparatos móviles). Enalgunos estudios, la exposición asonidos muy altos también ha sidorelacionada con tinitus (un zumbidoen el oído), hipersensibilidad alsonido y un oído distorsionado.Varían la susceptibilidad individuala la pérdida del oído inducida porruido y otros problemas potencialesdel oído.
La cantidad de sonido producidapor un aparato portátil de audiovaría dependiendo de la naturalezadel sonido, del aparato, de laprogramación del aparato y losaudífonos. Deberá seguir algunasrecomendaciones de sentidocomún cuando use cualquieraparato portátil de audio:
• Fije el volumen en un entornosilencioso y seleccione elvolumen más bajo al cual puedaescuchar adecuadamente.
• Cuando use audífonos, baje elvolumen si no puede escuchar alas personas hablar cerca deusted o si la persona sentadajunto a usted puede oír lo queestá escuchando.
• No suba el volumen parabloquear los alrededoresruidosos. Si usted elige escucharsu aparato portátil en un entornoruidoso, use audífonosatenuantes de ruidos externospara bloquear el ruido ambiental.
• Limite la cantidad de tiempo queescucha.Mientras el volumen aumenta,se requiere menos tiempo paraque su oído pueda ser afectado.

Seguridad
110 VX8360
• Evite el uso de audífonosdespués de la exposición aruidos extremadamente altos,como conciertos de rock, quepuedan causar pérdida temporaldel oído. La pérdida temporal deloído puede causar que losvolúmenes peligrosos suenennormales.
• No escuche a un volumen que lecause molestias. Si experimentaun zumbido en sus oídos,escucha las voces apagadas oexperimenta cualquier dificultadtemporal del oído después deescuchar su aparato portátil deaudio, deje de usarlo y consultecon su médico.
Puede obtener informaciónadicional sobre este tema delas siguientes fuentes:
Academia Americana deAudiología
11730 Plaza American Drive, Suite300Reston, VA 20190Voz: (800) 222-2336*Correo electrónico:[email protected]: www.audiology.org*
Instituto Nacional de la Sordera yOtros Trastornos de Comunicación
National Institutes of Health31 Center Drive, MSC 2320Bethesda, MD USA 20892-2320Voz: (301) 496-7243*Correo electrónico:[email protected]:http://www.nidcd.nih.gov/health/hearing*
Instituto Nacional para laSeguridad y Salud Ocupacional
Hubert H. Humphrey Bldg.200 Independence Ave., SW Washington, DC 20201Voz: 1-800-35-NIOSH (1-800-356-4674)*Internet:http://www.cdc.gov/niosh/topics/noise/default.html*
*Sólo disponible en inglés.

VX8360 111
AAccttuuaalliizzaacciióónn ddee llaaFFDDAA ppaarraa lloossccoonnssuummiiddoorreess
Actualización paraconsumidores sobreteléfonos móviles del
Centro de dispositivos y saludradiológica de la Administración dealimentos y medicamentos deEE.UU.:
1. ¿Representan un riesgo para lasalud los teléfonos inalámbricos?
La evidencia científica disponibleno muestra que haya ningúnproblema de salud asociado con eluso de teléfonos inalámbricos. Sinembargo, no hay pruebas de quelos teléfonos inalámbricos seantotalmente seguros. Los teléfonosinalámbricos emiten bajos nivelesde energía de radiofrecuencia (RF)en el rango de microondas cuandose usan. También emiten muy bajosniveles de RF cuando están enmodo de espera. Mientras quealtos niveles de RF pueden producirefectos en la salud (calentando lostejidos), la exposición a RF de bajonivel no produce efectos decalentamiento y no causa efectosconocidos adversos para la salud.
Muchos estudios sobre laexposición a RF de bajo nivel nohan encontrado ningún efectobiológico. Algunos estudios hansugerido que puede haber algunosefectos biológicos, pero talesconclusiones no se han vistoconfirmadas por investigacionesadicionales. En algunos casos, losinvestigadores han tenidodificultades en reproducir talesestudios o en determinar el motivode las inconsistencias en losresultados.
2. ¿Cuál es el papel de la FDA encuanto a que los teléfonosinalámbricos sean seguros?
Según las leyes, la FDA nocomprueba la seguridad de losproductos para el consumidor queemitan radiación antes de quepuedan venderse, como sí lo hacecon los nuevos medicamentos odispositivos médicos. No obstante,la agencia tiene autoridad paraemprender acciones si sedemuestra que los teléfonosinalámbricos emiten energía deradiofrecuencia (RF) a un nivel quesea peligroso para el usuario. En talcaso, la FDA podría exigir a losfabricantes de teléfonos

Seguridad
112 VX8360
inalámbricos que informaran a losusuarios del riesgo para la salud yreparar, reemplazar o sacar delmercado los teléfonos de modo quedeje de existir el riesgo.Aunque los datos científicosexistentes no justifican que la FDAemprenda accionesreglamentarias, la agencia hainstado a la industria de losteléfonos inalámbricos para que dédeterminados pasos, entre ellos lossiguientes:l Apoyar la investigación
necesaria sobre los posiblesefectos biológicos de lasradiofrecuencias del tipo queemiten los teléfonosinalámbricos,
l Diseñar teléfonos inalámbricosde tal modo que se minimice laexposición del usuario a RF queno sea necesaria para la funcióndel dispositivo y
l Cooperar para dar a los usuariosde teléfonos inalámbricos lamejor información sobre losposibles efectos del uso de losteléfonos inalámbricos sobre lasalud humana.
La FDA pertenece a un grupo detrabajo interinstitucional dedependencias federales que tienen
responsabilidad en distintosaspectos de la seguridad de la RFpara garantizar la coordinación deesfuerzos a nivel federal. Lassiguientes instituciones pertenecena este grupo de trabajo:l National Institute for
Occupational Safety and Health(Instituto nacional para laseguridad y salud laborales)
l Environmental ProtectionAgency (Agencia de protecciónmedioambiental)
l Occupational Safety and HealthAdministration (Administraciónde la seguridad y saludlaborales)
l National Telecommunicationsand Information Administration(Administración nacional detelecomunicaciones einformación)
El National Institutes of Healthtambién participa en algunasactividades del grupo de trabajointerinstitucional.La FDA comparte lasresponsabilidades reglamentariassobre los teléfonos inalámbricoscon la Comisión federal decomunicaciones (FCC). Todos losteléfonos que se venden en EE.UU.

VX8360 113
deben cumplir con los lineamientosde seguridad de la FCC que limitanla exposición a radiofrecuencias.La FCC depende de la FDA y deotras instituciones de salud paralas cuestiones de seguridad de losteléfonos inalámbricos. La FCC también regula lasestaciones de base de las cualesdependen los teléfonosinalámbricos. Mientras que estasestaciones de base funcionan auna potencia mayor que losteléfonos inalámbricos mismos, laexposición a RF que recibe la gentede estas estaciones de base eshabitualmente miles de vecesmenor de la que pueden tenerprocedente de los teléfonosinalámbricos. Las estaciones debase, por tanto no están sujetas alas cuestiones de seguridad que seanalizan en este documento.
3. ¿Qué tipos de teléfonos son eltema de esta actualización?
El término “teléfonos inalámbricos”se refiere a los teléfonosinalámbricos de mano con antenasinterconstruidas, con frecuenciallamados teléfonos “celulares”,“móviles” o “PCS”. Estos tipos deteléfonos inalámbricos pueden
exponer al usuario a una energíade radiofrecuencia (RF) mensurabledebido a la corta distancia entre elteléfono y la cabeza del usuario.Estas exposiciones a RF estánlimitadas por los lineamientos deseguridad de la FCC que sedesarrollaron con indicaciones dela FDA y otras dependenciasfederales de salud y seguridad.Cuando el teléfono se encuentra adistancias mayores del usuario, laexposición a RF es drásticamentemenor, porque la exposición a RFde una persona disminuyerápidamente al incrementarse ladistancia de la fuente. Los asíllamados "teléfonos inalámbricos"que tienen una unidad de baseconectada al cableado telefónicode una casa habitualmentefuncionan a niveles de potenciamucho menores y por tantoproducen exposiciones a RF queestán muy por debajo de los límitesde seguridad de la FCC.
4. ¿Cuáles son los resultados de lainvestigación que ya se harealizado?
La investigación realizada hasta lafecha ha producido resultadoscontradictorios y muchos estudios

Seguridad
114 VX8360
han sufrido de fallas en susmétodos de investigación. Losexperimentos con animales queinvestigan los efectos de laexposición a las energías deradiofrecuencia (RF) característicasde los teléfonos inalámbricos hanproducido resultadoscontradictorios que con frecuenciano pueden repetirse en otroslaboratorios. Algunos estudios conanimales, sin embargo, sugierenque bajos niveles de RF podríanacelerar el desarrollo del cáncer enanimales de laboratorio. Sinembargo, muchos de los estudiosque mostraron un desarrollo detumores aumentado usaronanimales que habían sido alteradosgenéticamente o tratados consustancias químicas causantes decáncer de modo que estuvieranpredispuestos a desarrollar cánceraún sin la presencia de unaexposición a RF. Otros estudiosexpusieron a los animales a RFdurante períodos de hasta 22 horasal día. Estas condiciones no seasemejan a las condiciones bajolas cuales la gente usa losteléfonos inalámbricos, de modoque no sabemos con certeza quésignifican los resultados de dichosestudios para la salud humana. Tres
grandes estudios epidemiológicosse han publicado desde diciembrede 2000. Entre ellos, los estudiosinvestigaron cualquier posibleasociación entre el uso deteléfonos inalámbricos y el cáncerprimario del cerebro, glioma,meningioma, o neuroma acústico,tumores del cerebro o de laglándula salival, leucemia u otrostipos de cáncer. Ninguno de losestudios demostró la existencia deningún efecto dañino para la saludoriginado en la exposición a RF delos teléfonos inalámbricos. Noobstante, ninguno de los estudiospuede responder a preguntas sobrela exposición a largo plazo, ya queel período promedio de uso delteléfono en estos estudios fue dealrededor de tres años.
5. ¿Qué investigaciones senecesitan para decidir si laexposición a RF de los teléfonosinalámbricos representa un riesgopara la salud?
Una combinación de estudios delaboratorio y estudiosepidemiológicos de gente queutiliza teléfonos inalámbricosefectivamente proporcionaríaalgunos de los datos necesarios.

VX8360 115
Dentro de algunos años se podránrealizar estudios de exposiciónanimal durante toda la vida. Sinembargo, se necesitarían grandescantidades de animales paraproporcionar pruebas confiables deun efecto promotor del cáncer, siexistiera. Los estudiosepidemiológicos puedenproporcionar datos directamenteaplicables a poblaciones humanas,pero puede ser necesario unseguimiento de 10 años o más paraproporcionar respuestas acerca dealgunos efectos sobre la salud,como lo sería el cáncer. Esto sedebe a que al intervalo entre elmomento de la exposición a unagente cancerígeno y el momentoen que se desarrollan los tumores,en caso de hacerlo, puede ser demuchos, muchos años. Lainterpretación de los estudiosepidemiológicos se ve entorpecidapor la dificultad de medir laexposición real a RF durante el usocotidiano de los teléfonosinalámbricos. Muchos factoresafectan esta medición, como elángulo al que se sostiene elteléfono, o el modelo de teléfonoque se usa.
6. ¿Qué está haciendo la FDA paraaveriguar más acerca de losposibles efectos en la salud de laRF de los teléfonos inalámbricos?
La FDA está trabajando con el U.S.National Toxicology Program(Programa nacional de toxicologíade EE.UU.) y con grupos deinvestigadores en todo el mundopara asegurarse de que se lleven acabo estudios de alta prioridad conanimales para ocuparse deimportantes preguntas referentes alos efectos de la exposición a laenergía de radiofrecuencia (RF).
La FDA ha sido un participante líderen el Proyecto de camposelectromagnéticos (EMF)internacional de la OrganizaciónMundial de la Salud desde suorigen en 1996. Un importanteresultado de este trabajo ha sido eldesarrollo de una agenda detalladade necesidades de investigaciónque ha impulsado elestablecimiento de nuevosprogramas de investigación portodo el mundo. El proyecto tambiénha ayudado a desarrollar una seriede documentos de informaciónpública sobre temas de EMF. LaFDA y la Asociación de

Seguridad
116 VX8360
Telecomunicaciones e InternetCelular (CTIA) tienen un Acuerdo deinvestigación y desarrollo encolaboración (CRADA) formal pararealizar investigaciones sobre laseguridad de los teléfonosinalámbricos. La FDA proporcionala supervisión científica, recibiendoinformes de expertos deorganizaciones gubernamentales,de la industria y académicas. Lainvestigación patrocinada por laCTIA se realiza por medio decontratos con investigadoresindependientes. La investigacióninicial incluirá tanto estudios delaboratorio como estudios de losusuarios de teléfonos inalámbricos.El CRADA también incluirá unaamplia evaluación de lasnecesidades de investigaciónadicionales en el contexto de losmás recientes desarrollos deinvestigación del mundo.
7. ¿Cómo puedo averiguar cuántaexposición a energía deradiofrecuencia puedo recibir alusar mi teléfono inalámbrico?
Todos los teléfonos que se vendenen Estados Unidos deben cumplircon los lineamientos de la ComisiónFederal de Comunicaciones (FCC)
que limitan las exposiciones a laenergía de radiofrecuencia (RF). LaFCC estableció esos lineamientosasesorada por la FDA y otrasdependencias federales de salud yseguridad. El límite de la FCC paraexposición a RF de teléfonosinalámbricos se ha fijado a unaTasa de absorción específica(Specific Absorption Rate, SAR) de1.6 watts por kilogramo (1.6 W/kg).El límite de la FCC es consistentecon los estándares de seguridaddesarrollados por el Instituto deingeniería eléctrica y electrónica(Institute of Electrical andElectronic Engineering, IEEE) y elConsejo nacional para laprotección y medición de laradiación (National Council onRadiation Protection andMeasurement). El límite deexposición toma en consideraciónla capacidad del cuerpo de eliminarel calor de los tejidos que absorbenenergía de los teléfonosinalámbricos y se ha fijado muy pordebajo de los niveles que se sabeque tienen algún efecto. Losfabricantes de teléfonosinalámbricos deben informar a laFCC del nivel de exposición a RF decada modelo de teléfono. El sitioWeb de la FCC (http://www.

VX8360 117
fcc.gov/oet/rfsafety) ofrecedirecciones para ubicar el númerode certificación de la FCC en suteléfono de modo que puedeencontrar el nivel de exposición deRF de su teléfono en la lista queaparece en línea.
8. ¿Qué ha hecho la FDA paramedir la energía deradiofrecuencia que proviene delos teléfonos inalámbricos?
El Instituto de Ingenieros enElectrónica y Electricidad (IEEE)está desarrollando un estándartécnico para la medición de laexposición a energía deradiofrecuencia (RF) proveniente delos teléfonos inalámbricos y otrosdispositivos inalámbricos con laparticipación y el liderazgo decientíficos e ingenieros de la FDA.El estándar denominado “Prácticarecomendada para determinar laTasa de absorción específica (SAR)pico espacial en el cuerpo humanodebida a los dispositivos decomunicación inalámbrica:técnicas experimentales”establece la primera metodologíaconsistente de pruebas para medirla tasa a la cual se deposita la RFen la cabeza de los usuarios de
teléfonos inalámbricos. El métodode prueba utiliza un modelo de lacabeza humana que simula sustejidos. Se espera que lametodología de pruebas de SARestandarizada mejore notablementela consistencia de las medicionesrealizadas en distintos laboratorioscon el mismo teléfono. La SAR es lamedición de la cantidad de energíaque absorben los tejidos, ya sea detodo el cuerpo o de una pequeñaparte de él. Se mide en watts/kg (omiliwatts/g) de materia. Estamedición se emplea paradeterminar si un teléfonoinalámbrico cumple con loslineamientos de seguridad.
9. ¿Qué pasos puedo dar parareducir mi exposición a la energíade radiofrecuencia de mi teléfonoinalámbrico?
Si estos productos presentan unriesgo, cosa que en este momentono sabemos que ocurra, esprobablemente muy pequeño. Perosi le preocupa evitar incluso losriesgos potenciales, puede tomaren cuenta estos consejos sencillospara reducir al mínimo suexposición a la energía deradiofrecuencia (RF). Dado que el

Seguridad
118 VX8360
tiempo es un factor clave en lacantidad de exposición que unapersona puede recibir, la reduccióndel tiempo dedicado al uso deteléfonos inalámbricos reducirá laexposición a RF. Si debe mantenerconversaciones prolongadas conteléfonos inalámbricos todos losdías, puede aumentar la distanciaentre su cuerpo y la fuente de la RF,dado que el nivel de exposición caedrásticamente con la distancia. Porejemplo, podría usar un auricular yllevar el teléfono inalámbrico lejosdel cuerpo o usar teléfonosinalámbricos conectados a unaantena remota. Reiteramos que losdatos científicos no demuestranque los teléfonos inalámbricos seandañinos. Pero si le preocupa laexposición a RF de estos productos,puede usar medidas como lasdescritas arriba para reducir suexposición a RF producto del usode teléfonos inalámbricos.
10. ¿Qué hay del uso de teléfonosinalámbricos por parte de losniños?
La evidencia científica no muestraningún peligro para los usuarios deteléfonos inalámbricos, incluidoslos niños y adolescentes. Si desea
reducir la exposición a la energíade radiofrecuencia (RF), lasmedidas arriba indicadas seaplicarían a niños y adolescentesque usen teléfonos inalámbricos. Lareducción del tiempo de uso deteléfonos inalámbricos y aumentarla distancia entre el usuario y lafuente de RF disminuirá laexposición a RF. Algunos grupos patrocinados porotros gobiernos han aconsejadoque se desaliente el uso deteléfonos inalámbricos del todopara los niños. Por ejemplo, elgobierno del Reino Unido distribuyóvolantes con una recomendaciónsimilar en diciembre de 2000.Señalaron que no hay pruebas deque el uso de teléfonosinalámbricos cause tumorescerebrales u otros efectos dañinos.Su recomendación para que selimitara el uso de teléfonosinalámbricos por parte de los niñosera estrictamente precautoria, noestaba basada en ningunaevidencia científica de que existaningún riesgo para la salud.

VX8360 119
11. ¿Qué hay de la interferencia delos teléfonos inalámbricos con elequipo médico?
La energía de radiofrecuencia (RF)de los teléfonos inalámbricospuede interactuar con algunosdispositivos electrónicos. Por estemotivo, la FDA ayudó al desarrollode un método de prueba detalladopara medir la interferenciaelectromagnética (EMI) de losteléfonos inalámbricos en losmarcapasos implantados y losdesfibriladores. El método deprueba ahora es parte de unestándar patrocinado por laAsociación para el avance de lainstrumentación médica(Association for the Advancementof Medical Instrumentation, AAMI).El borrador final, un esfuerzoconjunto de la FDA, los fabricantesde dispositivos médicos y otrosgrupos, se concluyó a fines de 2000.Este estándar permitirá a losfabricantes asegurarse de que losmarcapasos cardiacos y losdesfibriladores estén a salvo deEMI de teléfonos inalámbricos.La FDA ha probado aparatos parala sordera para determinar sireciben interferencia de losteléfonos inalámbricos de mano y
ayudó a desarrollar un estándarvoluntario patrocinado por elInstituto de Ingenieros enElectrónica y Electricidad (IEEE).Este estándar especifica losmétodos de prueba y los requisitosde desempeño de los aparatos parala sordera y los teléfonosinalámbricos de modo que noocurra ninguna interferenciacuando una persona use al mismotiempo un teléfono y un aparatopara la sordera que sean“compatibles”. Este estándar fueaprobado por la IEEE en 2000.La FDA sigue supervisando el usode los teléfonos inalámbricos paradetectar posibles interacciones conotros dispositivos médicos. Si sedeterminara que se presenta unainterferencia dañina, la FDArealizará las pruebas necesariaspara evaluar la interferencia ytrabajará para resolver el problema.
12. ¿Dónde puedo hallarinformación adicional?
Para obtener información adicional,por favor consulte los recursossiguientes:
Página Web de la FDA sobreteléfonos inalámbricos(http://www.fda.gov/cellphones/)

Seguridad
120 VX8360
Programa de seguridad de RF de laComisión Federal deComunicaciones (FCC)(http://www.fcc.gov/oet/rfsafety)
Comisión Internacional para laProtección contra Radiación noIonizante(http://www.icnirp.de)
Proyecto de EMF internacional dela Organización Mundial de la Salud(OMS)(http://www.who.int/emf)
Junta Nacional de ProtecciónRadiológica (R.U.)(http://www.nrpb.org.uk/)
1100 CCoonnsseejjooss ddeeSSeegguurriiddaadd ppaarraaCCoonndduuccttoorreessUn teléfono inalámbrico le ofrece laextraordinaria capacidad decomunicarse por voz prácticamenteen cualquier lugar y a cualquierhora. Las ventajas de los teléfonosinalámbricos van acompañadas deuna gran responsabilidad por partede los conductores.Cuando conduzca un coche, laconducción es su primeraresponsabilidad. Cuando utilice unteléfono inalámbrico y esté alvolante, sea sensato y tengapresente los siguientes consejos:
1. Conozca su teléfono inalámbricoy sus funciones, como lamarcación rápida y la rellamada.Lea el manual de instruccionescon atención y aprenda a sacarpartido de las valiosas funcionesque ofrecen la mayoría deteléfonos, entre las que seincluyen la rellamada automáticay la memoria. Asimismo,memorice el teclado del teléfonopara que pueda utilizar lafunción de marcación rápida sindejar de prestar atención a lacarretera.
VX8360 121
2. Cuando esté disponible, utiliceun dispositivo de manos libres.Varios accesorios para teléfonosinalámbricos con manos libresestán a su disposiciónactualmente. Tanto si elige undispositivo montado e instaladopara su teléfono inalámbricocomo si utiliza un accesorio parateléfono con altavoz, saquepartido de estos dispositivos siestán a su disposición.
3. Coloque el teléfono inalámbricoen un lugar donde puedaalcanzarlo fácilmente.Asegúrese de que coloca elteléfono inalámbrico en un lugarde fácil alcance y donde puedautilizarlo sin perder de vista lacarretera. Si recibe una llamadaen un momento inoportuno, si esposible, dejeque el buzón de vozconteste en su lugar.
4. Termine las conversaciones quese produzcan en condiciones osituaciones de conducciónpeligrosa. Comunique a lapersona con la que estáhablando que está conduciendo;si fuera necesario, termine lallamada en situaciones de tráficodenso o en las que lascondiciones climatológicas
comporten un peligro para laconducción. La lluvia, elaguanieve, la nieve y el hielopueden ser peligrosos, así comoun tráfico denso. Comoconductor, su principalresponsabilidad es prestaratención a la carretera.
5. No tome notas ni busquenúmeros de teléfono mientrasconduce. Si está leyendo unaagenda o una tarjeta de visita,así como si está escribiendo unalista de “tareas por hacer”mientras conduce, no estáviendo lo que está haciendo. Esde sentido común:no se pongaen una situación peligrosaporque esté leyendo oescribiendo y no esté prestandoatención a la carretera o a losvehículos cercanos.
6. Marque con cuidado y observeel tráfico; si es posible, realicelas llamadas cuando no estécirculando o antes de ponerseen circulación. Intente planificarsus llamadas antes de iniciar elviaje o intente que éstascoincidan con los momentos enlos que esté parado en una señalde Stop, en un semáforo en rojoo en cualquier otra situación en

Seguridad
122 VX8360
la que deba detenerse. Sinecesita marcar mientrasconduce, siga este sencilloconsejo: marque unos cuantosnúmeros, compruebe lacarretera y los espejos y, acontinuación, siga marcando.
7. No mantenga conversacionesconflictivas o de gran cargaemocional que puedandistraerle. Este tipo deconversaciones debe evitarse atoda costa, ya que le distraen eincluso le pueden poner enpeligro cuando está al volante.Asegúrese de que la gente conla que está hablando sabe queestá conduciendo y, si fueranecesario, termine aquellasconversaciones que puedandistraer su atención de lacarretera.
8. Utilice el teléfono inalámbricopara pedir ayuda. Un teléfonoinalámbrico es una de lasmejores herramientas que poseepara protegerse a usted yproteger a su familia ensituaciones peligrosas; con elteléfono a su lado, sólo tresnúmeros le separarán de laayuda necesaria. Marque el 911u otro número de emergencia
local en caso de incendio,accidente de tráfico, peligro enla carretera o emergenciamédica. ¡Recuerde que es unallamada gratuita para su teléfonoinalámbrico!.
9. Utilice el teléfono inalámbricopara ayudar a otras personas ensituaciones de emergencia. Unteléfono inalámbrico le ofrece laoportunidad perfecta para ser un“buen samaritano” en sucomunidad. Si presencia unaccidente de circulación, undelito o cualquier otraemergencia grave en la quehaya vidas en peligro, llame al911 o a otro número deemergencia local, ya quetambién le gustaría que otros lohicieran por usted.
10. Llame al servicio de asistenciaen carretera o a un número deasistencia especial parasituaciones que no sean deemergencia si fuera necesario.Durante la conducciónencontrará situaciones queprecisen de atención, pero noserán lo bastante urgentescomo para llamar a los serviciosde emergencia. Sin embargo,puede utilizar el teléfono

VX8360 123
inalámbrico para echar unamano. Si ve un vehículo averiado queno supone un peligro, una señalde tráfico rota, un accidente detráfico de poca importancia enla que no parece haber heridoso un vehículo robado, llame alservicio de asistencia encarretera o a otro número deasistencia especial parasituaciones que no sean deemergencia.
Las sugerencias que aparecenarriba se ofrecen comolineamientos generales. Antes dedecidir si usar su dispositivo móvilmientras opera un vehículo, serecomienda que consulte con lasleyes locales aplicables de sujurisdicción u otras normativasrespecto de dicho uso. Tales leyesu otras normativas pueden prohibiro restringir de otra forma la maneraen la cual un conductor pued eusarsu teléfono al estar operando unvehículo.
IInnffoorrmmaacciióónn aallccoonnssuummiiddoorr ssoobbrree llaaSSAARR (Tasa de absorción específica,Specific Absorption Rate)
Este modelo de teléfono cumplecon los requisitos gubernamentalesde exposición a las ondas de radio.Su teléfono inalámbrico es untransmisor y receptor de radio. Estádiseñado y fabricado para que nosupere los límites de emisión parala exposición a energía deradiofrecuencia (RF) establecidospor la Comisión Federal deComunicaciones del gobierno deEE.UU. Estos límites son parte deunos lineamientos generales yestablecen los niveles permitidosde energía de radiofrecuencia parala población en general. Estoslineamientos están basados enestándares que desarrollaronorganizaciones científicasindependientes por medio de unaevaluación periódica y exhaustivade los estudios científicos. Losestándares incluyen un notablemargen de seguridad diseñadopara garantizar la salud de todaslas personas sin importar su edad ocondición física.

Seguridad
124 VX8360
El estándar de exposición para losteléfonos celulares inalámbricosemplea una unidad de medidallamada Tasa de absorciónespecífica o SAR. El límite de SARestablecido por la FCC es de 1.6W/kg. Las pruebas de SAR serealizan usando posiciones defuncionamiento estándarespecificadas por la FCC con elteléfono transmitiendo a su nivel deenergía certificado más alto entodas las bandas de frecuenciaprobadas. Aunque la SAR sedetermina al nivel de potencia másalto certificado, el nivel de SAR realdel teléfono en funcionamientopuede estar muy por debajo delvalor máximo. Dado que el teléfonoestá diseñado para funcionar avarios niveles de potencia parausar sólo la necesaria para llegar ala red, en general, mientras máscerca esté de una antena deestación de base inalámbrica,menor será la emisión de potencia.Antes de que un modelo deteléfono esté disponible para suventa al público, debe probarse ycertificarse ante la FCC quedemostrar que no supera el límiteestablecido por el gobierno para laexposición segura. Las pruebas serealizan en posiciones y
ubicaciones (por ejemplo, en laoreja y llevándolo en el cuerpo)según lo demanda la FCC paracada modelo. El valor SAR más alto de estemodelo de teléfono cuando seprobó usándolo cerca del oído esde 1.14 W/kg y al usarlo en elcuerpo, como se describe en estaguía del usuario es de 0.418 W/kg(las mediciones de uso en elcuerpo difieren según los modelosde teléfono en función de losaccesorios disponibles y losrequisitos de la FCC). Aun cuandopuede haber diferencias entre losniveles de SAR de varios teléfonosy en varias posiciones, todos elloscumplen el requisito gubernamentalpara una exposición segura.La FCC ha otorgado unaAutorización de equipo para estemodelo de teléfono con todos losniveles de SAR reportados yevaluados en cumplimiento de loslineamientos de emisión deradiofrecuencias de la FCC. Lainformación sobre SAR de estemodelo de teléfono está archivadacon la FCC y puede encontrarse enla sección Display Grant (Mostrarsubvención) dehttp://www.fcc.gov/oet/fcciddespués de buscar la ID

VX8360 125
BEJVX8360 de la FCC.Se puede encontrar informaciónadicional sobre Tasas de absorciónespecífica (SAR) en el sitio Web dela Asociación de la Industria de lasTelecomunicaciones Celulares(Cellular TelecommunicationsIndustry Association, CTIA) enhttp://www.ctia.org.* En Estados Unidos y Canadá, ellímite de SAR de los teléfonoscelulares usados por el público esde 1.6 watts/kg (W/kg) promediadossobre un gramo de tejido. Elestándar incluye un margensustancial de seguridad para daruna protección adicional al públicoy para tomar en cuenta cualquiervariación en las mediciones.
RReeggllaass ppaarraa llaaccoommppaattiibbiilliiddaadd ccoonnaappaarraattooss ppaarraa llaassoorrddeerraa ((HHAACC)) ddee llaaFFCCCC ppaarraa lloossddiissppoossiittiivvoossiinnaalláámmbbrriiccoossEl 10 de julio de 2003, el Informe yorden de la minuta WT 01-309 de laComisión federal decomunicaciones (FCC) de losEE.UU. modificó la excepción a losteléfonos inalámbricos en lostérminos de la Ley decompatibilidad con aparatos para lasordera de 1988 (Ley HAC) paraexigir que los teléfonosinalámbricos digitales seancompatibles con los aparatos parala sordera. El objetivo de la LeyHAC es asegurar un accesorazonable a los servicios detelecomunicaciones por parte delas personas con discapacidadesauditivas. Aunque algunos teléfonosinalámbricos se usan cerca dealgunos dispositivos para laaudición (aparatos para la sorderae implantes cocleares), los usuarios

Seguridad
126 VX8360
pueden detectar un ruido dezumbido, murmullo o chirrido.Algunos dispositivos auditivos sonmás inmunes a este ruido deinterferencia que otros, y losteléfonos también varían en lacantidad de interferencia quegeneran.La industria de los teléfonosinalámbricos ha desarrollado unsistema de clasificación para losteléfonos inalámbricos, para ayudara los usuarios de dispositivosauditivos a encontrar teléfonos quepuedan ser compatibles con susdispositivos. No se han clasificadotodos los teléfonos. Los teléfonosclasificados tienen la clasificaciónen su caja o llevan una etiquetasituada en la caja. Las clasificaciones no songarantías. Los resultados variaránen función del dispositivo auditivodel usuario y su pérdida deaudición. Si su dispositivo auditivoresultara ser vulnerable a lainterferencia, es posible que nopueda usar satisfactoriamente unteléfono clasificado. Probar elteléfono con su dispositivo auditivoes la mejor forma de evaluarlo parasus necesidades personales.Clasificaciones M: Los teléfonoscon clasificación M3 o M4 cumplen
los requisitos de la FCC yprobablemente generen menosinterferencia para los dispositivosauditivos que los teléfonos noetiquetados. M4 es la mejor o másalta de las dos clasificaciones.Clasificaciones T: Los teléfonosclasificados como T3 o T4 cumplencon los requisitos de la FCC y esprobable que generen menosinterferencia a los dispositivos parala audición que los teléfonos que noestán etiquetados. T4 la mejor omás alta de las dos clasificaciones.Los dispositivos auditivos tambiénpueden estar clasificados. Elfabricante de su dispositivo auditivoo su profesional de la salud auditivapuede ayudarle a encontrar estaclasificación. Las clasificacionesmás altas indican que el dispositivoauditivo es relativamente inmune alruido de interferencia. Los valoresde la clasificación del aparato parasordera y el teléfono inalámbrico sesuman. Una suma de 5 seconsidera aceptable para el usonormal. Una suma de 6 seconsidera como la de mejor uso.

VX8360 127
En el ejemplo antes señalado, si unaparato para sordera cumple con laclasificación de nivel M2 y elteléfono inalámbrico cumple laclasificación de nivel M3, la sumade los dos valores es igual a M5.Esto debería proporcionar alusuario del aparato para sordera un“uno normal” al usar su dispositivoauditivo con ese teléfonoinalámbrico en particular. “Usonormal” en este contexto se definecomo una calidad de señal que esaceptable para el funcionamientonormal. La marca M tiene tiene por objetoser sinónimo de la marca U. Lamarca T tiene tiene por objeto sersinónimo de la marca UT. Lasmarcas M y T son recomendadaspor la Alianza para las solucionesde las industrias detelecomunicaciones (ATIS). Lasmarcas U y UT se referencian en laSección 20.19 de las reglas de laFCC. El procedimiento declasificación y medición HAC sedescribe en el estándar C63.19 del
Instituto de estándares nacionalestadounidense (ANSI).Al estar hablando por el telefonocelular, se recomienda quedesactive el modo BT (Bluetooth)para HAC.
Para obtener información sobre losaparatos para la audición y losteléfonos digitales inalámbricos
Compatibilidad y control devolumen según la FCChttp://www.fcc.gov/cgb/dro/hearing.html
Universidad de Gallaudet, RERChttp://tap.gallaudet.edu/DigWireless.KS/DigWireless.htm
HLAA (Hearing Loss Association ofAmerica)http://www.hearingloss.org/learn/cellphonetech.asp
Orden de compatibilidad conaparatos para la audición de la FCChttp://hraunfoss.fcc.gov/edocs_public/attachmatch/FCC-03-168A1.pdf

128 VX8360
Accesorios
Hay una variedad de accesorios disponibles para su teléfono y tres sencillasformas de adquirirlos: comprar en línea en cualquier momento enwww.verizonwireless.com, llamarnos al 1866 VZ GOT IT (894 6848) o visitaruna de nuestras Tiendas Verizon Wireless Communication.
Cargadors
Cargador de coche
Baterías
Altavoz EstéreoPortátil
Cable del USB
AudífonosEstereofónicosBluetooth
smileks
타원

VX8360 129
DECLARACIÓN DE GARANTÍA LIMITADA
1. LO QUE CUBRE ESTA GARANTIA:
LG le ofrece una garantia limitadade que la unidad de suscriptoradjunta y sus accesorios incluidosestaran libres de defectos demateriales y mano de obra segunlos terminos y condicionessiguientes: (1)La garantia limitada del producto
se prolonga durante DOCE (12)MESES contado a partir de lafecha de adquisicion delproducto. El periodo de garantiarestante QUINCE (15) MESES dela unidad que se esta reparandoo sustituyendo se determinaramediante la presentacion delrecibo de ventas original por lacompra de la unidad.
(2)La garantia limitada se extiendesolo al comprador original delproducto y no es asignable nitransferible a ningun otrocomprador o usuario finalsubsecuentes.
(3)Esta garantia solo es buena parael comprador original delproducto durante el periodo degarantia siempre que sea en losEE.UU., incluidos Alaska, Hawaii,los territorios de los EE.UU. ytodas las provinciascanadienses.
(4)La carcasa externa y las partescosmeticas estaran libres dedefectos al momento de ladistribucion, y por tanto noestaran cubiertas por losterminos de esta garantialimitada.
(5)A solicitud de LG, el consumidordebera aportar informacionaceptable para probar la fechade compra.
(6)El cliente se hara cargo delcosto de envio del producto alDepartamento de servicio alcliente de LG. LG se hara cargodel costo de envio del productode vuelta al consumidor despuesde realizar el servicio segun estagarantia limitada.
2. LO QUE NO CUBRE ESTAGARANTIA:
(1)Defectos o danos producto deluso del producto de una formadistinta de la normal yacostumbrada.
(2)Defectos o danos producto deun uso anormal, condicionesanormales, almacenamientoinadecuado, exposicion ahumedad o agua, modificacionesno autorizadas, conexiones noautorizadas, reparacion noautorizada, mal uso, negligencia,

130 VX8360
abuso, accidentes, alteraciones,instalacion incorrecta ocualquier otro acto que no searesponsabilidad de LG, incluidoel dano causado por latransportacion, fusibles fundidosy derrames de alimentos oliquidos.
(3)Rotura o danos a las antenas amenos que hayan sidoocasionadas directamente pordefectos en los materiales omano de obra.
(4)El consumidor debe notificar alDepartamento de servicio alcliente de LG el supuestodefecto o desperfecto delproducto durante el periodo degarantia limitada aplicable parahacer efectiva la garantia.
(5)Productos a los que se hayaeliminado el numero de serie, oen los que este sea ilegible.
(6)Esta garantia limitada se otorgaen lugar de cualquier otragarantia, explicita o implicita, dehecho o por lo dispuesto en lasleyes, establecido por ellas oimplicado, incluso, aunque demanera enunciativa y nolimitativa, cualquier garantiaimplicita de comerciabilidad oadecuacion para un uso enparticular.
(7)Danos resultantes del uso deaccesorios no aprobados por LG.
(8) Todas las superficies de plasticoy todas las demas piezasexternas expuestas que serayen o danen debido al usonormal por parte del cliente.
(9)Productos que hayan sidopuestos en funcionamiento porencima de las limitacionesmaximas indicadas.
(10) Productos utilizados uobtenidos en un programa dearrendamiento.
(11) Consumibles (como seria elcaso de los fusibles).
3. LO QUE HARÁ LG:
LG, a su exclusivo criterio, reparará,reemplazará o rembolsará el preciode compra de cualquier unidad queno cumpla con la presente garantíalimitada. LG puede, a su elección,optar por usar partes o unidadesnuevas, restauradas oreacondicionadas equivalentes encuanto a funcionalidad. Además, LGno reinstalará o realizará copias deseguridad de ningún dato,aplicación o software que elusuario haya agregado al teléfono.Por lo tanto, se recomienda queusted realice una copia deseguridad de todo dato o
DECLARACIÓN DE GARANTÍA LIMITADA

VX8360 131
información de ese tipo antes deenviar la unidad a LG, de modo deevitar una pérdida permanente deesa información.
4. DERECHOS DE LA LEY ESTATAL:
No se aplica a este productoninguna otra garantia explicita. LADURACION DE CUALQUIERGARANTIA IMPLICITA, INCLUIDALA GARANTIA IMPLICITA DECOMERCIABILIDAD, SE LIMITA ALA DURACION DE LA GARANTIAEXPLICITA AQUI INDICADA. LG NOTENDRA RESPONSABILIDADLEGAL POR LA PERDIDA DEL USODE ESTE PRODUCTO, LASINCOMODIDADES, PERDIDAS OCUALQUIER OTRO DANO, DIRECTOO CONSECUENCIAL, QUE SEPRODUZCA POR EL USO O LAINCAPACIDAD DE USAR ESTEPRODUCTO, NO POR LAVIOLACION DE CUALQUIERGARANTIA EXPLICITA OIMPLICITA, INCLUIDA LAGARANTIA IMPLICITA DECOMERCIABILIDAD APLICABLE AESTE PRODUCTO. Algunos paises no permiten laexcluyente de limitacion de danosincidentales o consecuenciales, olas limitaciones sobre la duracionde la garantia implicita, de modoque es posible que estas
limitaciones o exclusiones no se leapliquen a usted. Esta garantia leconcede derechos legalesconcretos y es posible que tambientenga otros derechos, que variande estado a estado.
5. CÓMO OBTENER SERVICIO PORLA GARANTÍA:
Para obtener servicio de estagarantia llame al siguiente telefonodesde cualquier ubicacioncontinental de los Estados Unidos:
Tel. 1-800-793-8896 o Fax. 1-800-448-4026
O visite http://us.lgservice.com.También puede enviarcorrespondencia a:
LG Electronics Service- MobileHandsets, P.O. Box 240007,Huntsville, AL 35824
NO DEVUELVA SU PRODUCTO A LADIRECCIÓN ARRIBA INDICADA.Llame o escriba para conocer laubicación del centro de servicioautorizado LG más cercano a ustedy los procedimientos necesariospara presentar una reclamaciónpor garantía.

132 VX8360
TTeerrmmiinnoollooggííaa
Calculadora EZ Tip
Función para un fácil cálculo de lascuentas de restaurante usandocomo variables el costo total, lapropina y el número de personas.
Reconocimiento de VozAvanzado
Función que le permite efectuaruna amplia variedad de comandosverbales entrenando al teléfonopara que reconozca sus patronesde habla individuales.
La tecnología inalámbricaBluetooth®
Tecnología empleada para permitirque los teléfonos celulares,computadoras y otros dispositivospersonales se coordinen einterconecten fácilmente por mediode una conexión inalámbrica decorto alcance.
CENTRO de MEDIOS®
Función que accede a Internet paradar la posibilidad de acceder a unagran variedad de software,información, música, vídeos y más,e incluso descargarlos, en supropio teléfono inalámbrico LGVerizon.
microSDTM
Memoria externa adicional para suteléfono celular.
V CASTSM
Función que es la siguientegeneración en tecnologíainalámbrica y que transforma suteléfono inalámbrico en unreproductor portátil de música yofrece una asombrosa experienciade vídeo móvil en flujo continuo. VCAST emplea tecnología queaumenta de modo significativo lascapacidades de descarga paraofrecer mejores gráficos, sonido yprofundidad, y usa la potencia de labanda ancha de modo que puedadescargar el entretenimiento más
Glosario

VX8360 133
actual, momentos destacados delos deportes, noticias yactualizaciones sobre el tiempo ensu teléfono Verizon Wireless. Los nuevos teléfonos V CASTofrecen mejores capacidades degeneración de imágenes, cámarasde más de 1 megapixel y cámarasde vídeo, audio mejorado yalmacenamiento de memoriaexpandible.
SSiiggllaass yy aabbrreevviiaattuurraass
DTMF Dual-Tone MultiFrequency(multifrecuencia detono doble o “tono detecla”) es un métodousado para comunicarlas teclas que seoprimen en el teléfono.Al oprimir una tecla segeneran dos tonossimultáneos, uno parala fila y otro para lacolumna, paradeterminar qué tecla seoprimió.
ERI Enhanced RoamingIndicator (indicador deroaming optimizado) esuna característica paraindicar si un teléfonocelular está en susistema de origen, unared asociada o una redde roaming. Muchosteléfonos indican origeno roaming como unicono, pero losteléfonos con ERIpueden indicar elestado de "redasociada" de otroproveedor.
EVDO Evolution Data Only(sólo datos deevolución) o EvolutionData Optimized(optimizado para datosde evolución)(abreviado como EVDO,EV-DO, EvDO, 1xEV-DOo 1xEvDO) ofreceracceso inalmábricorápido de banda ancha(3G) en cualquier lugar,sin necesidad de tener

134 VX8360
Glosario
un punto de acceso deWiFi.
GPS Global PositioningSystem (sistema deposicionamientoglobao) es un sistemade satélites,computadoras yreceptores capaces dedeterminar la latitud ylongitud de un receptordeterminado en laTierra. La posición secalcula usando eltiempo y la distancia.
IS 2000 Tipo de señal digital. Esla segunda generaciónde celular digitalCDMA, una extensióndel IS-95. Lasdiferencias entre lostipos de señal serefieren a las señalespiloto y a los enlacespara porporcionar máscanales de tráfico yprotocolos de control.
NAM Number AssignmentModule (módulo deasignación de número)
es la forma en que elteléfono almacena elnúmero de teléfono y sunúmero de serieelectrónico.
SSL Secure Sockets LayerProtocol (Protocolo decapas de socketsseguros) empleadapara cifrar datos que seenvían por el aire.
TTY Teletypewriter(máquina de escribir adistancia). Una máquinade escribirelectromecánica quetransmite o recibemensajes codificadosen las señaleseléctricas. Un teléfonocon compatibilidad TTYpuede traducircaracteres escritoscomo voz o traducir lavoz en caracteres ymostrarlos en la TTY.

10 Consejos deSeguridad paraConductores 120
A
Accesorios 128Actualización de la FDA
para losconsumidores 111
Actualización deSoftware 100
Ajuste rápido delvolumen 23
Alertas de Servicio 80Almacen masivo USB
71Anadir Nuevo Aparato
73Apagado/Encendido 81Auto-Emparejamiento
Manos Libres 77Aviso 81
B
Borradores 55
C
Calculadora 68Calendario 69Carga con USB 19Carga de la batería 19Chatear 57Comandos de Voz 23,
66, 87CONTACTOS 59Correo Elect 56Cronómetro 70Cuaderno de Notas 71
D
DECLARACIÓN DEGARANTÍALIMITADA 129
Descripción general delTeléfono 14
E
Entrada 53Entrada de texto 24Enviado 54Establecer Atajos 86Ez Sugerencia 68
F
Fondo de Pantalla 83Formato de Reloj 85Función de silencio 23
G
Glosario de Iconos 99Grupos 60
H
Herramientas 66
I
Iconos de pantalla 22Id. de quien llama 23Idioma 87IMMóvil 56In Case of Emergency
(ICE) 61Información al
consumidor sobre laSAR 123
Información deseguridad 105
Información deseguridad de la TIA101
Información de Teléfono99
L
Lista de Contacto 59Llamada en espera 23Llamas. Recntes 63Luz de Pantalla 82
M
Marcadas 64Marcado oprimiendo un
botón 95Marcado Rápido 61Memoria 97Memoria de Tarjeta 98Memoria de Teléfono
98Mensaje de Foto 48Mensaje de Video 50Mensaje de Voz 52MENSAJERÍA 46Menú de Bluetooth®
72Menú Principal Fijado
84Mi Nombre de Teléfono
75Mi Número 99Mi Tarjeta de Nombre
62Modo de avión 85Modo de
Descubrimiento 76Modo de vibración 23
Índice
VX8360 135

Modo TTY 93Mostrar Temas 83MSJ Borrar 58
N
Nivel de carga de labatería 20
Nuevo Contacto 59Nuevo Mensaje 46
O
Opciones de Memoria97
Opciones de Respuesta92
P
Para hacer llamadas 21Para recibir llamadas 22Perdidas 63Potencia de la señal 21Precaución de
SeguridadImportante 1
Privacidad de Voz 95PROG/HERR 66Programación de
Llamada 92Programación de
MENSAJES 57Programación de
Pantalla 81Programación de
Sonidos 78Programación de
Teléfono 85Protección de la
temperatura de la
batería 19
R
Recibidas 63Reglas para la
compatibilidad conaparatos para lasordera (HAC) de laFCC para losdispositivosinalámbricos 125
ReintentarAutomáticamente 93
Reloj Despertador 70Reloj Mundial 70Remarcado de llamadas
21
S
Seguridad 88Seleccionar NAM 92Sinc automática de
USB 96Sonidos de Alerta 79Sonidos de Llamada 79
T
Tamaño de Fuente 84Todas 64Tonos DTMF 96
U
Ubicación 87
V
Ver Cronómetro 65Versión SW/HW 99Volumen Maestro 78
Índice
136 VX8360

MEMO

MEMO

MEMO


![K - 19 Basic Principle of Pharmacokinetic.ppt [Read-Only]ocw.usu.ac.id/course/download/1110000102-basic-biology-of-cell-3/... · Terapeutik, Fakultas Kedokteran, USU, Medan ... USU,](https://static.fdocuments.net/doc/165x107/5c9130ad09d3f258468b705e/k-19-basic-principle-of-read-onlyocwusuacidcoursedownload1110000102-basic-biology-of-cell-3.jpg)


