Using Whidbey Layout Building a non-resizable dialog.
31
Using Whidbey Layout Using Whidbey Layout Building a non-resizable dialog Building a non-resizable dialog
-
Upload
gertrude-bradley -
Category
Documents
-
view
228 -
download
1
Transcript of Using Whidbey Layout Building a non-resizable dialog.

Using Whidbey LayoutUsing Whidbey LayoutBuilding a non-resizable dialogBuilding a non-resizable dialog

Building a login dialogBuilding a login dialogPart 1Part 1

Sizing RequirementsSizing Requirements
Grow and shrink Grow and shrink depending on depending on text/fonttext/font
{

Sizing RequirementsSizing Requirements
Grow and shrink Grow and shrink depending on depending on text/fonttext/font
{Fill up the remaining spaceFill up the remaining space

Sizing RequirementsSizing Requirements
Grow and shrink Grow and shrink depending on depending on text/fonttext/font
{Fill up the remaining spaceFill up the remaining space
{Label Label vertically vertically centered centered relative relative to their to their matching matching TextBoxTextBox

Sizing RequirementsSizing Requirements
Grow and shrink Grow and shrink depending on depending on text/fonttext/font
{Fill up the remaining spaceFill up the remaining space
{Label Label vertically vertically centered centered relative relative to their to their matching matching TextBoxTextBox
} Dialog Dialog should should size to fit size to fit contentscontents

Start off with a blank form.Start off with a blank form.

Drag and Drop a new TableLayoutPanel onto the form.Drag and Drop a new TableLayoutPanel onto the form.

Add two labels and two text boxes from the toolbox to the Add two labels and two text boxes from the toolbox to the newly added TableLayoutPanel.newly added TableLayoutPanel.

Are we there yet?Are we there yet?
Nope! We have the controls, but no Nope! We have the controls, but no sizing behavior yet. sizing behavior yet.
Lets start out by fixing up the Lets start out by fixing up the columns, then we’ll address the columns, then we’ll address the rows.rows.

Choose Edit Rows and Columns off the context menu.Choose Edit Rows and Columns off the context menu.

By editing the rows and columns we can control the By editing the rows and columns we can control the sizing behavior of our table.sizing behavior of our table.

In this case, we want the first column to be autosized, and the second In this case, we want the first column to be autosized, and the second column to fill up the remaining space in the table.column to fill up the remaining space in the table.

Set the Label Set the Label column to be column to be AutoSize so that AutoSize so that the width of the the width of the column is the size column is the size of the largest of the largest label.label.
Set the TextBox Set the TextBox column to be column to be 100% so as to fill 100% so as to fill up the remaining up the remaining space in the table space in the table with TextBoxes.with TextBoxes.
In this case, we want the first column to be autosized, and the second In this case, we want the first column to be autosized, and the second column to fill up the remaining space in the table.column to fill up the remaining space in the table.

Back on the form, we see the results of our edits. Now that we’ve fixed up Back on the form, we see the results of our edits. Now that we’ve fixed up the columns, lets address the rows.the columns, lets address the rows.

Going back into the same editor, we can access the RowStyles by Going back into the same editor, we can access the RowStyles by
switching the ComboBox to Rows.switching the ComboBox to Rows.

Since we want both rows to be as tall as the largest control (most likely Since we want both rows to be as tall as the largest control (most likely
the height of the text box) – use AutoSize for both rows.the height of the text box) – use AutoSize for both rows.
Set both rows to Set both rows to be AutoSize so be AutoSize so that they are as that they are as large as the large as the largest control in largest control in the rowthe row

The results of the changes to RowStyles.The results of the changes to RowStyles.
We’re closer, but the last row is way too big!We’re closer, but the last row is way too big!

We need to shrink up the table itself in order to collapse the last row. We need to shrink up the table itself in order to collapse the last row.
Set AutoSize = true Set AutoSize = true and AutoSizeMode and AutoSizeMode to GrowAndShrinkto GrowAndShrink

Rows are fixed.Rows are fixed. …but the table isn’t stretching the width of the dialog. …but the table isn’t stretching the width of the dialog.
There are several ways to fix this, we’ll use the Dock property.There are several ways to fix this, we’ll use the Dock property.
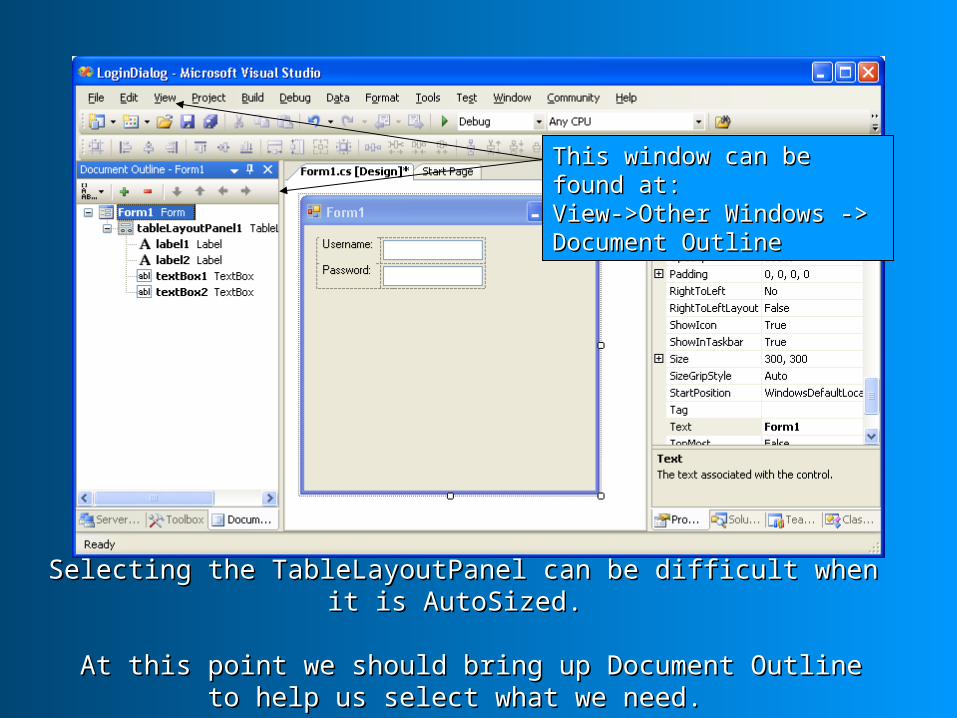
Selecting the TableLayoutPanel can be difficult when it is AutoSized. Selecting the TableLayoutPanel can be difficult when it is AutoSized.
At this point we should bring up Document Outline to help us select At this point we should bring up Document Outline to help us select what we need. what we need.
This window can be found at:This window can be found at:View->Other Windows -> View->Other Windows -> Document OutlineDocument Outline

Select the table and Dock fill it. Select the table and Dock fill it.
It may look like we’re back to square one, but stay with it….It may look like we’re back to square one, but stay with it….

Set AutoSize on the Form and AutoSizeMode to GrowAndShrink. Set AutoSize on the Form and AutoSizeMode to GrowAndShrink.
(When you run the application, the form will shrink down, you can also (When you run the application, the form will shrink down, you can also manually shrink it in the designer).manually shrink it in the designer).

At this point, you can add space from the edge of the form by adjusting At this point, you can add space from the edge of the form by adjusting the Form’s Padding property.the Form’s Padding property.
RightLeft
Top
Bottom
Control the spacing Control the spacing from the frame of the from the frame of the form by changing form by changing Form.PaddingForm.Padding

We want the Labels to be glued to the left edge, but vertically centered We want the Labels to be glued to the left edge, but vertically centered within their cells. In order to do this, we can set the anchor to be Left.within their cells. In order to do this, we can set the anchor to be Left.

We can stretch the textboxes by setting their Anchors to Right | Left.We can stretch the textboxes by setting their Anchors to Right | Left.
Set UseSystemPasswordChar=true on the password text box.Set UseSystemPasswordChar=true on the password text box.

Testing automatic resize behaviorTesting automatic resize behavior
We can change the label’s text to “Network Password:” and watch the We can change the label’s text to “Network Password:” and watch the first column grow and second column shrink.first column grow and second column shrink.
Notice how the first Notice how the first column grew?column grew?
Previous column width
Previous column width

Resetting the text to “Password:” shrinks back up the first column.Resetting the text to “Password:” shrinks back up the first column.
Notice how the first Notice how the first column shrinks back column shrinks back when the original text when the original text is restored.is restored.

Set the Form’s title to Login by changing the Text property and….Set the Form’s title to Login by changing the Text property and….

We’re done!We’re done!….ish. Now its time add an OK and Cancel button…….ish. Now its time add an OK and Cancel button…