
using The Templates - For Word 2007 - Manitoba · using the templates – for word 2007 . 1...
27
USING THE TEMPLATES – FOR WORD 2007 1 INTRODUCTION TO THE MUNICIPAL EMERGENCY PLAN TEMPLATE ..... 2 2 WHEN YOU FIRST OPEN THE DOCUMENT ....................................................... 3 2.1 DOCUMENT PROTECTION AND NAVIGATING THE DOCUMENT 3 2.2 FORM FIELD SHADING .......................................................................... 3 2.2.1 Turning Form Field Shading On or Off ...................................................... 4 2.3 TEXT PROMPTS ....................................................................................... 6 2.4 TABLE EXAMPLES.................................................................................. 6 3 COMPLETING THE TEMPLATE ............................................................................ 7 3.1 ENTERING INFORMATION IN TEXT FIELDS WITH BRACKETS AROUND NORMAL TEXT ...................................................................... 7 3.2 ENTERING INFORMATION IN TABLES .............................................. 7 3.3 ENTERING TEXT AND IMAGES IN FREE EDITING SECTIONS ...... 8 3.4 DELETING PROMPTS AND TABLE EXAMPLES ................................ 9 3.5 UPDATING THE TABLE OF CONTENTS ........................................... 10 3.6 UPDATING THE YEAR IN THE FOOTER ........................................... 11 3.7 CHECKLIST FOR ANNUAL UPDATES ............................................... 15 4 PROTECTING YOUR DOCUMENT FOR DISTRIBUTION ................................ 16 5 INSTRUCTIONS FOR SPECIFIC DOCUMENTS ................................................. 21 5.1 USING FORMS DOCUMENTS .............................................................. 21 5.2 PART 3 – RESOURCES AND CAPABILITIES..................................... 21 5.2.1 Organizing the Tables ............................................................................... 21 5.2.2 Required Information ................................................................................ 21 5.2.3 Formatting New Tables............................................................................. 22 6 TABLE OF EDITING OPTIONS ............................................................................ 25
Transcript of using The Templates - For Word 2007 - Manitoba · using the templates – for word 2007 . 1...

USING THE TEMPLATES – FOR WORD 2007 1 INTRODUCTION TO THE MUNICIPAL EMERGENCY PLAN TEMPLATE..... 2
2 WHEN YOU FIRST OPEN THE DOCUMENT ....................................................... 3
2.1 DOCUMENT PROTECTION AND NAVIGATING THE DOCUMENT 3
2.2 FORM FIELD SHADING.......................................................................... 3
2.2.1 Turning Form Field Shading On or Off...................................................... 4
2.3 TEXT PROMPTS ....................................................................................... 6
2.4 TABLE EXAMPLES.................................................................................. 6
3 COMPLETING THE TEMPLATE ............................................................................ 7
3.1 ENTERING INFORMATION IN TEXT FIELDS WITH BRACKETS
AROUND NORMAL TEXT...................................................................... 7
3.2 ENTERING INFORMATION IN TABLES .............................................. 7
3.3 ENTERING TEXT AND IMAGES IN FREE EDITING SECTIONS...... 8
3.4 DELETING PROMPTS AND TABLE EXAMPLES................................ 9
3.5 UPDATING THE TABLE OF CONTENTS ........................................... 10
3.6 UPDATING THE YEAR IN THE FOOTER........................................... 11
3.7 CHECKLIST FOR ANNUAL UPDATES............................................... 15
4 PROTECTING YOUR DOCUMENT FOR DISTRIBUTION................................ 16
5 INSTRUCTIONS FOR SPECIFIC DOCUMENTS................................................. 21
5.1 USING FORMS DOCUMENTS.............................................................. 21
5.2 PART 3 – RESOURCES AND CAPABILITIES..................................... 21
5.2.1 Organizing the Tables ............................................................................... 21
5.2.2 Required Information................................................................................ 21
5.2.3 Formatting New Tables............................................................................. 22
6 TABLE OF EDITING OPTIONS ............................................................................ 25

1 INTRODUCTION TO THE MUNICIPAL EMERGENCY PLAN TEMPLATE
The Municipal Emergency Plan Template contains three main documents, several appendices, and numerous forms.
These documents have been set up as templates which contain
standardized emergency management information and directions for Manitoba municipalities, and
“fill-in-the-blank” textboxes, tables, or free editing spaces that allow you to customize the documents to fit your municipal situation.
This fill-in-the-blanks format will
ensure that documents are consistent within your region, allowing for ease of use by exchange coordinators,
protect you from accidentally deleting formatting, and
increase the speed and ease at which you can complete the written component of your emergency plan.
To assist you in completing or updating your documents, a table is included at the end of this document that lists all the areas where you can add information that is specific to your municipality.
Municipal Emergency Plan – Using the Templates – For Word 2007 2

2 WHEN YOU FIRST OPEN THE DOCUMENT
2.1 DOCUMENT PROTECTION AND NAVIGATING THE DOCUMENT All of the documents in the template have been protected so that only certain sections can be edited. Because of this protection, you will not be able to click on anything but the areas that are set up for editing; however, you can still scroll through the document using your scroll bars or mouse scroll wheel. Once you complete a document, you will need to unprotect the document and then re-protect it as read only. This setting allows you to click anywhere in the document, but prevents you from changing the document’s contents. Instructions on how to do this are provided in 4 –Protecting Your Document For Distribution. You can also move forward through the text field portions of the documents by hitting the Tab, → (forward arrow), or ↑ (up arrow) keys and move backward through the text fields by hitting the Shift+Tab, ← (backward arrow), or ↓ (down arrow) keys.
2.2 FORM FIELD SHADING
When you open the document you will see grey boxes in some of the places where your specific municipal information can be entered.
This grey colouring, called Form Field Shading,
highlights the locations where you can enter information in text boxes,
will not appear when you print, and
can be turned off using the Legacy Tools on the Developer tab.
Municipal Emergency Plan – Using the Templates – For Word 2007 3
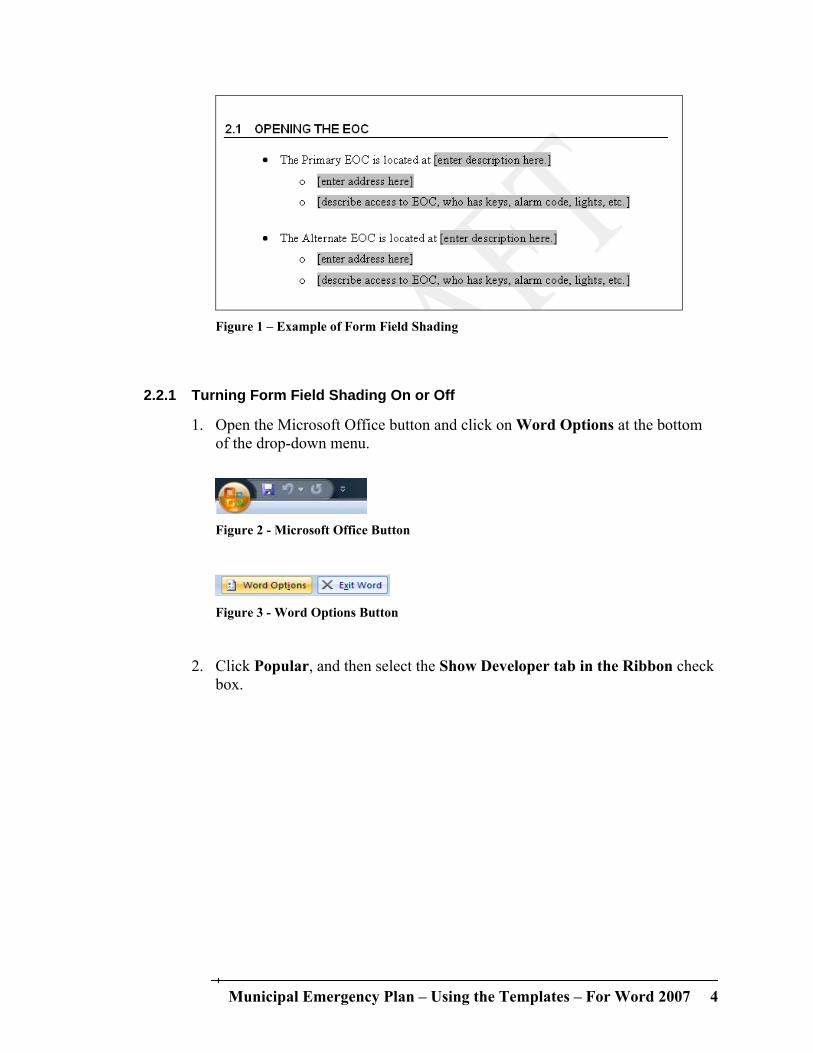
Figure 1 – Example of Form Field Shading
2.2.1 Turning Form Field Shading On or Off
1. Open the Microsoft Office button and click on Word Options at the bottom of the drop-down menu.
Figure 2 - Microsoft Office Button
Figure 3 - Word Options Button
2. Click Popular, and then select the Show Developer tab in the Ribbon check
box.
Municipal Emergency Plan – Using the Templates – For Word 2007 4

Figure 4 - Showing the Developer Tab in the Ribbon
3. Click OK.
4. Click on the Developer tab → Legacy Tools.
Figure 5 - Accessing the Form Field Shading Button
5. The Legacy Forms and ActiveX Controls drop-down menu will appear.
6. Click on the Form Fielding Shading button to turn shading on or off.
Municipal Emergency Plan – Using the Templates – For Word 2007 5

2.3 TEXT PROMPTS
The template contains prompts that tell you what kind of information should be put in different sections of the documents. There are three kinds of prompts: 1. Text fields with brackets [ ] around italicized text
These fields contain information only and do not require you to enter any text. They typically precede a table and explain how to fill out the table.
2. Text fields with brackets [ ] around normal text
These fields require you to enter text. The text in the brackets will direct you as to the information that should be entered in the text field.
3. Normal text with brackets [ ] (no shading)
These prompts require you to enter information, but do not limit you to just text. The prompts are located in areas with free editing (areas that allow you to do any normal Word function) and look like text fields, but do not have any Form Field Shading as they are not actually text fields.
2.4 TABLE EXAMPLES
Part 2 – Operational Emergency Plan includes table examples. These examples are marked in red and contain example information to help you understand how to complete the table.
Municipal Emergency Plan – Using the Templates – For Word 2007 6
3 COMPLETING THE TEMPLATE 3.1 ENTERING INFORMATION IN TEXT FIELDS WITH BRACKETS
AROUND NORMAL TEXT
1. Click on or key to the text field where you want to enter information.
2. Highlight the text that you want to erase. If you keyed to the field, all of the text will automatically be highlighted.
3. Start typing. Any highlighted text will be replaced by your new text.
4. If there is a bullet point symbol ( -, , etc.) before the text field and you want to have additional bulleted lines, hit Enter at the end of your line and a new bulleted line will appear.
Note: You cannot put a space in between the bulleted lines (and maintain the automatic bullet formatting). Just hit Enter once and begin typing.
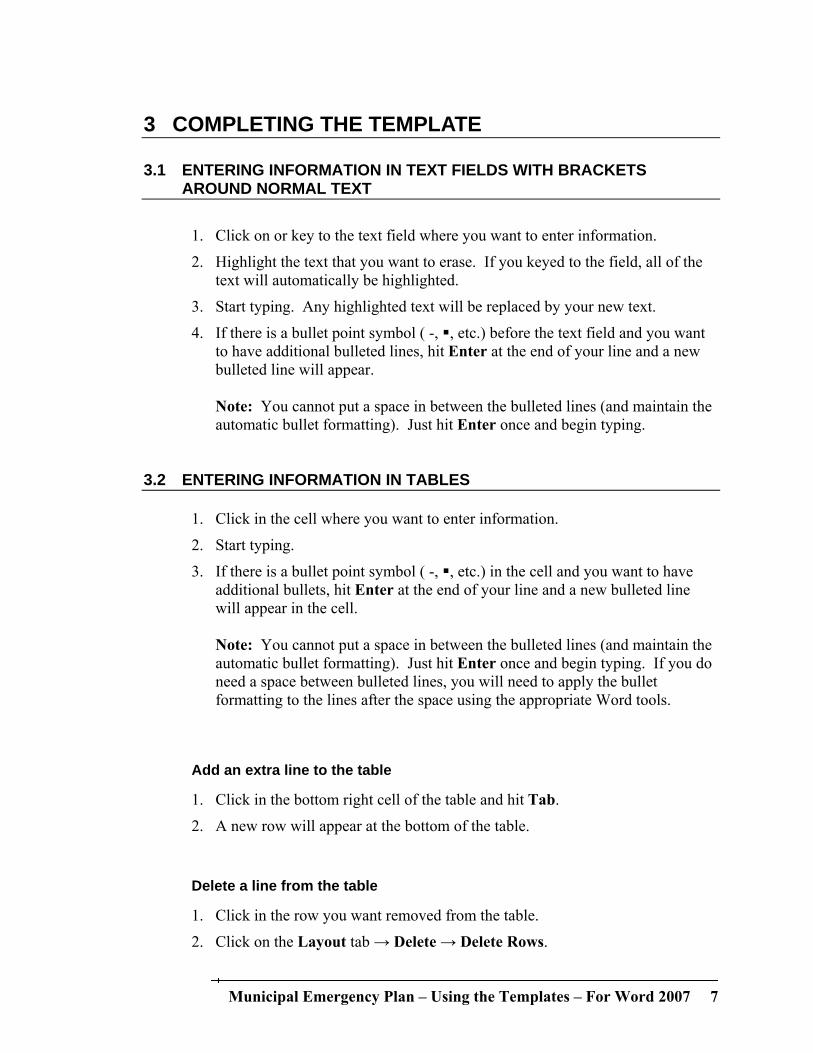
3.2 ENTERING INFORMATION IN TABLES 1. Click in the cell where you want to enter information.
2. Start typing.
3. If there is a bullet point symbol ( -, , etc.) in the cell and you want to have additional bullets, hit Enter at the end of your line and a new bulleted line will appear in the cell.
Note: You cannot put a space in between the bulleted lines (and maintain the automatic bullet formatting). Just hit Enter once and begin typing. If you do need a space between bulleted lines, you will need to apply the bullet formatting to the lines after the space using the appropriate Word tools.
Add an extra line to the table
1. Click in the bottom right cell of the table and hit Tab.
2. A new row will appear at the bottom of the table.
Delete a line from the table
1. Click in the row you want removed from the table.
2. Click on the Layout tab → Delete → Delete Rows.
Municipal Emergency Plan – Using the Templates – For Word 2007 7

Figure 6 - Deleting a Row 3. The row will be deleted.
3.3 ENTERING TEXT AND IMAGES IN FREE EDITING SECTIONS These sections are open for you to add any text/images/diagrams/flowcharts/etc. that will help you complete the information requirements of the section.
For consistency, free editing sections where you are supposed to enter information are marked by brackets; however, you cannot tab from text field to text field, as in the other sections of the templates.
Entering text
1. Highlight the text that you want to erase or click or key to the place where you would like to insert new text.
2. Start typing. Any highlighted text will be replaced by your new text.
Entering pictures/diagrams/images
1. Highlight the text that you want to erase.
2. Click on Insert → Picture, if the image is saved as a file on your computer.
Figure 7 - Adding a Picture from File
Municipal Emergency Plan – Using the Templates – For Word 2007 8

3. Find the correct file in your directories.
4. Click on the file.
5. Click Insert.
OR
5. Copy the image and paste it into the document using the paste button, hitting Ctrl+V, or right-clicking and choosing Paste.
Figure 8 - Paste Button
6. Your picture will be inserted or pasted into the document.
3.4 DELETING PROMPTS AND TABLE EXAMPLES Once you no longer need the instructions in the text fields with brackets around italicized text, delete the text in the field. Remember, you can always go back to the original document you received to review the instructions.
Once you no longer need the table examples (marked in red), delete the tables:
1. Click on the table.
2. Click on the Layout tab → Delete → Delete Table.
Municipal Emergency Plan – Using the Templates – For Word 2007 9

Figure 9 - Deleting a Table
3. The table will be deleted.
3.5 UPDATING THE TABLE OF CONTENTS
You will need to update the Table of Contents once you have completed the template:
1. Right-click anywhere in the Table of Contents.
2. Click on Update Field.
Figure 10 - Update Field
3. Click Update entire table.
Municipal Emergency Plan – Using the Templates – For Word 2007 10

Figure 11 - Update Entire Table
4. Click OK.
5. The table of contents will adjust any headings or page numbers that have changed since the last update to the table of contents.
Note: If you have manually adjusted the table of contents and you wish to keep your formatting, choose Update page numbers only. Ensure that your headings are correct before you choose this option, as the headings will not be updated.
3.6 UPDATING THE YEAR IN THE FOOTER
You will need to update the year in the footer after you have made your annual updates. However, before you can make changes to the footer, you will need to unprotect the document: 1. Click on the Developer tab → Protect Document → Restrict Formatting
and Editing.
Figure 12 - Opening Restrict Formatting and Editing Panel
Municipal Emergency Plan – Using the Templates – For Word 2007 11

2. The Restrict Formatting and Editing panel will appear at the right side of the screen.
3. Click on the Stop Protection button at the bottom of the panel.
Figure 13 – Stop Protection in Restrict Formatting and Editing Panel
Figure 14 - Stop Protection Button
4. An Unprotect Document box will pop up and prompt you to enter a password.
Figure 15 - Unprotecting Document with Password
5. Enter the default password: MEC
6. Click OK.
7. Your document is now unprotected.
Municipal Emergency Plan – Using the Templates – For Word 2007 12

Now that you have unprotected the document, you can edit the footer:
1. Click on the Insert tab → Footer.
Figure 16 - Opening Footer
2. Click on Edit Footer at the bottom of the drop-down footer menu.
Figure 17 - Selecting Edit Footer Option
3. Scroll to the footer at the bottom of any page.
4. Highlight the year (or the [insert year] text the first time).
5. Type in the correct year.
6. Double-click anywhere outside of the footer OR click Close Header and Footer on the Design tab.
Figure 18 – Close Header and Footer Button
Finally, you’ll have to re-protect the document:
1. Click on Yes, Start Enforcing Protection in the Restrict Formatting and
Editing panel at the right side of your screen.
Municipal Emergency Plan – Using the Templates – For Word 2007 13

Figure 19 - Start Enforcement in Restrict Formatting and Editing Panel
Figure 20 - Enforcing Document Protection
2. Enter and reenter a password for the document.
Note: Password is case-sensitive.
Figure 21 - Entering Document Protection Password
Municipal Emergency Plan – Using the Templates – For Word 2007 14

3. Click OK.
4. Your document is now protected.
3.7 CHECKLIST FOR ANNUAL UPDATES
Content Updated Table of Contents Updated Footers Updated
Municipal Emergency Plan – Using the Templates – For Word 2007 15

4 PROTECTING YOUR DOCUMENT FOR DISTRIBUTION
When you have completed your document, you may decide that you would like to prevent anyone from modifying your completed emergency plan.
Before you can set the document as read only (document can not be edited), you will need to unprotect the document: 1. Click on the Developer tab → Protect Document → Restrict Formatting
and Editing.
Figure 22 - Opening Restrict Formatting and Editing Panel
2. The Restrict Formatting and Editing panel will appear at the right side of the screen.
3. Click on the Stop Protection button at the bottom of the panel.
Municipal Emergency Plan – Using the Templates – For Word 2007 16

Figure 23 – Stop Protection in Restrict Formatting and Editing Panel
Figure 24 - Stop Protection Button
4. An Unprotect Document box will pop up and prompt you to enter a password.
Figure 25 - Unprotecting Document with Password
5. Enter the default password: MEC
6. Click OK.
7. Your document is now unprotected.
Now that you have unprotected the document, you can re-protect your document as read only:
Municipal Emergency Plan – Using the Templates – For Word 2007 17

1. Click on the down arrow beside the box that says Filling in Forms under 2. Editing restrictions in the Restrict Formatting and Editing panel at the right side of your screen.
Figure 26 - Editing Restrictions in Restrict Formatting and Editing Panel
Municipal Emergency Plan – Using the Templates – For Word 2007 18

2. Change the selected option to No changes (Read only).
Figure 27 - Changing Protection to Read Only
3. Click on Yes, Start Enforcing Protection.
Figure 28 - Enforcing Document Protection
Municipal Emergency Plan – Using the Templates – For Word 2007 19
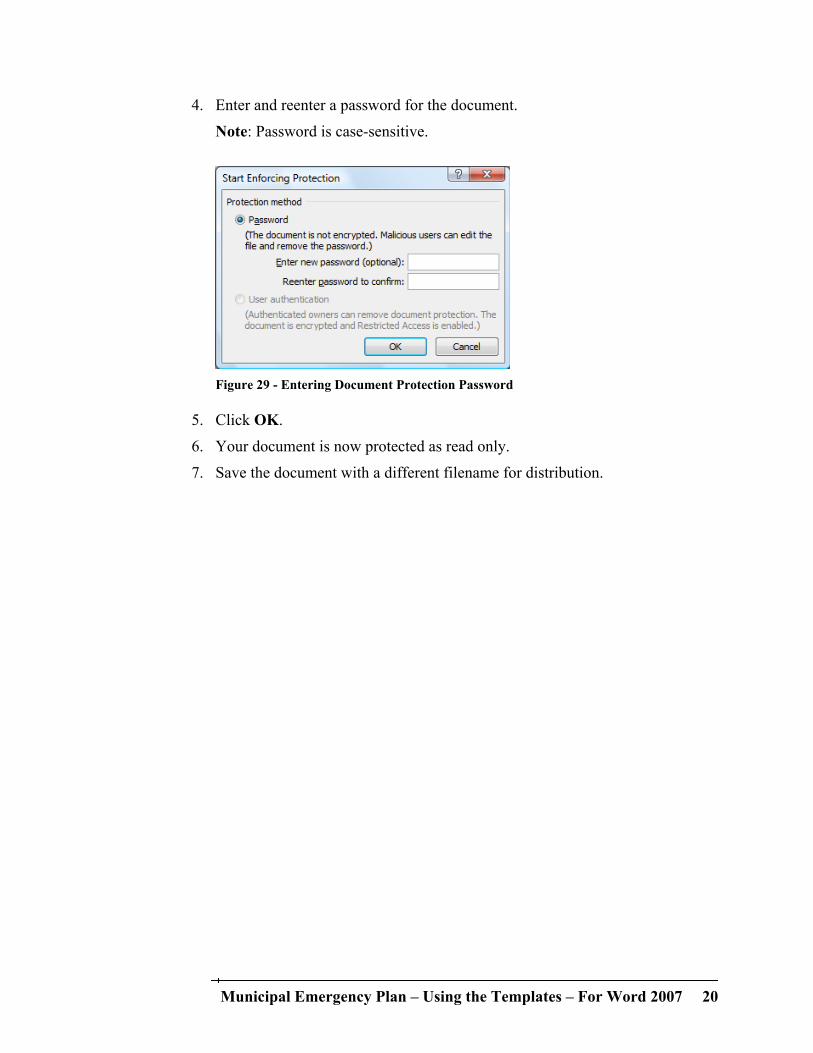
4. Enter and reenter a password for the document.
Note: Password is case-sensitive.
Figure 29 - Entering Document Protection Password
5. Click OK.
6. Your document is now protected as read only.
7. Save the document with a different filename for distribution.
Municipal Emergency Plan – Using the Templates – For Word 2007 20

5 INSTRUCTIONS FOR SPECIFIC DOCUMENTS 5.1 USING FORMS DOCUMENTS
Your template package includes a variety of forms that you can simply fill in and print. These forms will be among the documents labeled FORM – [name of form]. Note: Not all documents with this type of name are fill-in-the-blank forms. Some are forms that are meant to be printed and completed on paper.
To ensure the instructions text is available in the forms every time you open a form document, use one of the following options:
1. Do not save the document – just complete the form, print it, and close the document
OR
2. Complete the form and save the document under a different file name so your
original remains unchanged.
5.2 PART 3 – RESOURCES AND CAPABILITIES
5.2.1 Organizing the Tables
Part 3 – Resources and Capabilities contains a number of tables to assist you in completing your contact lists. The order of these tables, as you received them, is a suggestion for organizing your information. You may re-order them as you need to.
5.2.2 Required Information
You may delete the tables in Part 3 – Resources and Capabilities and substitute your own contact lists if you would prefer. However, certain information must be included somewhere in Part 3, as it is referenced in Part 2 – Operational Emergency Plan. Refer to the following table for a list of all references to Part 3:
Municipal Emergency Plan – Using the Templates – For Word 2007 21

Document Section Reference Statement Part 2 – Operational Emergency Plan
2.2.1 – Internal Communication
See Part 3 – Resources and Capabilities for specific numbers and available communication resources.
2.2.2 – Public Communication
See Part 3 – Resources and Capabilities for specific numbers, email addresses, and procedures to update web pages.
2.3.2 – Using Emergency Power (Back-Up)
See Part 3 – Resources and Capabilities for the contact information of individuals trained to use generators.
2.4 – Staffing the EOC
See Part 3 – Resources and Capabilities for names and phone numbers of EOC staff.
5.2.3 Formatting New Tables
If you wish to format new tables with the same formatting as the tables included in the template, you will need to change the heading border of the table using one of the following options: 1. Click on the table and then the Design tab.
2. Highlight (select) the first row of the table.
3. Click on the down arrow beside the border width drop-down menu.
4. Select 1 ½ pt.
Figure 30 – Selecting 1 ½ pt Border Width
5. Click on the down arrow beside the Borders drop-down menu.
6. Select Bottom Border.
Municipal Emergency Plan – Using the Templates – For Word 2007 22

Figure 31 - Applying Line Width Format to Bottom Border of Cell
7. You will now have a wider heading border that matches the other tables in the document.
OR
1. Click anywhere in the table
2. Click on the down arrow beside the border width drop-down menu.
3. Select 1 ½ pt.
Figure 32 – Selecting 1 ½ pt Border Width
4. Your mouse arrow will turn into a pen drawing tool.
5. Trace along the border in the table where you want the wider line (the bottom of the first row in the table).
Figure 33 - Applying Line Width Format to Table with Pen Tool
Municipal Emergency Plan – Using the Templates – For Word 2007 23
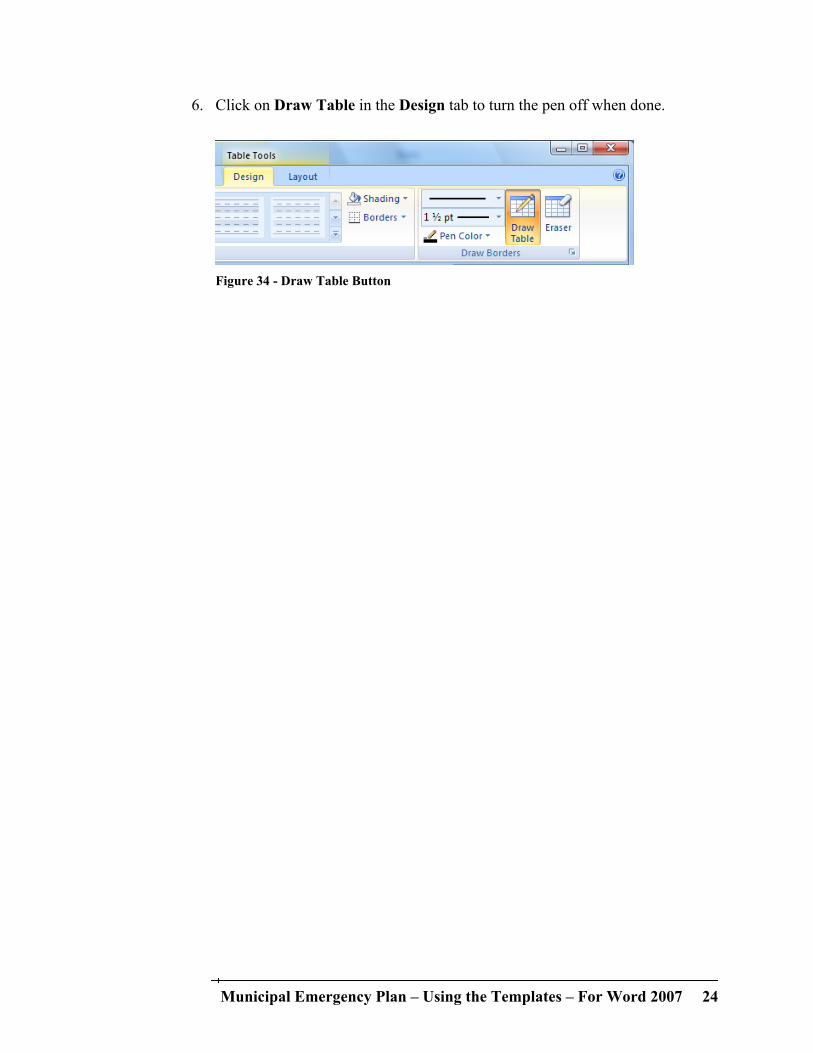
6. Click on Draw Table in the Design tab to turn the pen off when done.
Figure 34 - Draw Table Button
Municipal Emergency Plan – Using the Templates – For Word 2007 24

6 TABLE OF EDITING OPTIONS
Editing Option Document Section Text Box Table Free Editing Part 1 – Organization and Management
Title Page Table of Contents By-Law 2.5 – Duties and
Responsibilities (Job Descriptions)
Part 2 – Operational Emergency Plan
Title Page
Table of Contents 1.3 – Notifying the
MEC and CAO of an Emergency
1.4 – Decision to Activate the EOC / Emergency Plan
1.6 – Public Alerting 2.1 – Opening the
EOC
2.2.1 – Internal Communication
2.2.2 – Public Communication
2.3.1 – Assembling Equipment, Supplies, and Materials
2.3.2 – Using Emergency Power (Back-up)
2.3.3 – Securing the EOC
2.4 – Staffing the EOC
3.1 – Daily Schedule
Municipal Emergency Plan – Using the Templates – For Word 2007 25

Municipal Emergency Plan – Using the Templates – For Word 2007 26
Editing Option Document Section Text Box Table Free Editing 3.2 –
Communicating with the Site
3.3 – Attending the Site
3.5.1 – Statistics 3.5.2 – Record
Keeping Procedures
3.5.3 – Disaster Financial Assistance
4.1 – Identifying Media Relations Positions at Site and EOC
4.4 – Media Release Schedule
Part 3 – Resources and Capabilities
Table of Contents
1.1 – Emergency Fan-Out
1.12.1 – Changing Web Page Content
2.5 – Radio Frequencies / Talk Groups
2.6 – Other Communications Systems
7 - General All other sections,
other than 1.3.1 – Manitoba Emergency Measures Organization (EMO)
Appendix A – Hazard Analysis
All, except title line

Municipal Emergency Plan – Using the Templates – For Word 2007 27
Editing Option Document Section Text Box Table Free Editing Appendix B – Memorandums of Understanding
All, except title line
Appendix C – Evacuation, Reception, and Re-Entry
Table of Contents
1.1 – Authority to Order Evacuation
1.4 – Evacuation Routes and Transportation
1.5.1 – Mode of Transportation
1.5.2 – Assembly Areas
1.6 – Special Provisions
1.7.1 – Pets 2.1 – Potential
Reception Centre Locations
2.4 – Accommodations
2.5 – Food and Social Services
2.6 – Special Needs 2.7 – Traffic Control
and Direction
3.6 – Re-Entry Checklist
Appendix D – Public Information Messages
All, except title line


![[Ms Word] Ebook Templates - AGP Vol.2](https://static.fdocuments.net/doc/165x107/55cf9472550346f57ba21589/ms-word-ebook-templates-agp-vol2.jpg)