
Using Symantec Packager to Build Custom PcA Install With Sp2 and Sp3 Included
33
1 Symantec Packager. Symantec Packager is a tool to use in conjunction with pcAnywhere to build a custom install that includes all settings and customizations so that you can deploy to an end user with no user intervention if you choose. Symantec Packager Installation. 1. Symantec Packager is no longer included on the pcAnywhere install CD. To download the packager files run the setup.exe located on the root of the pcAnywhere installation CD. 2. Click View Other Installation Options. 3. Click Download Symantec Packager.
Transcript of Using Symantec Packager to Build Custom PcA Install With Sp2 and Sp3 Included

1
Symantec Packager.
Symantec Packager is a tool to use in conjunction with pcAnywhere to build a custom install that
includes all settings and customizations so that you can deploy to an end user with no user intervention
if you choose.
Symantec Packager Installation.
1. Symantec Packager is no longer included on the pcAnywhere install CD. To download the
packager files run the setup.exe located on the root of the pcAnywhere installation CD.
2. Click View Other Installation Options.
3. Click Download Symantec Packager.

2
4. A prompt to run or save the file will appear select Save
5. A prompt to pick a location will open select your desktop and click Save.

3
6. Once the packager is downloaded go to your desktop and double click the Packager_ENG.exe
icon.
7. Click Run if a Security Warning comes up.
8. A prompt You are about to install Symantec packager, Do you want to Continue? Select Yes.
9. The Symantec pcAnywhere – InstallShield Wizard will open and select Next >

4
10. After the packager extracts itself a Symantec Packager 1.4 – InstallSheild Wizard screen will come
up click Next >
11. Enter User Name: and Organization: appropriately.

5
12. Select the I agree radio button and click Next.
13. Select the destination default is fine click Next >

6
14. Click Install
15. Live update will run. Because there are no updates for packager click Cancel

7
16. Click Finish
17. The latest build of pcAnywhere will then be imported into Symantec Packager.

8
18. Once the import is finished the wizard will close.
Gathering Packager files.
Packager can be used to build any combination of customized installations. For this How To we will be
building a host only installation that will include pcAnywhere sp2 and sp3 on a windows XP system.
Please modify the location to reflect the name and location of the files in your environment.
Packager can include preconfigured Host, Remote, Caller, Option sets, Security Identifiers and Command
Queues, these files can be harvested from following folders of a machine that has pcAnywhere installed
and configured the way you want it to be.
For this How To we are interested in the host files (.bhf) and caller files (.cif). For full control of every
aspect of a pcAnywhere install be familiar with the remote files (.chf), option sets (.opt) , security
Identifiers (.sid) and Command Queues (.cqf) configuration files that can be used for other
customizations.
The location of these files varies by operating system:
- Windows 2000:
C:\Documents and Settings\All Users.WINNT\Application Data\Symantec\pcAnywhere
- Windows XP and 2003
C:\Documents and Settings\All Users\Application Data\Symantec\pcAnywhere
- Windows Vista, 7 and 2008

9
C:\ProgramData\Symantec\pcAnywhere
1. For this How To you will need to have a Host and Caller configured. If you are new to
pcAnywhere you can refer to the How to install and configure a host How To document.
2. Open Windows Explorer and locate the Hosts folder in the appropriate location based on your
OS. If you are working with a default install on windows XP the path will be the following.
C:\Documents and Settings\All Users\Application Data\Symantec\pcAnywhere\Hosts
Note: If you are not able to locate the Application data folder the machine may be configured to not
show hidden files and folders.
3. To configure windows to show hidden files and folders from within the Windows Explorer select
Tools > Folder Options
4. From the Folder Options menu select the View tab and then select the radio button for Show
hidden files and folders.

10
5. Click OK.
6. now you should be able to see the hidden Application Data folder
7. Navigate to the C:\Documents and Settings\All Users\Application
Data\Symantec\pcAnywhere\Hosts

11
Note: the following Host on MachineOne .BHF and PCA.pca.CIF were built in the “How to install and
configure a host” How To document. Your Host and caller files may have different names.
The host files are where the preconfigured preferences and security settings are stored and make this
install and all future deployments behave in a specific way. Similarly the callers files reflect the settings
and level of access for the user or group that have been configured to be used by this installation. Note
that if your packager program is installed on the same machine as your host you don’t need to do
anything with these files. If your host is configured on a different machine you will need to copy the
BHF and CHF files to the machine that has packager installed.
Downloading SP2 and SP3 for pcAnywhere 12.5 to be included in the install.
Symantec pcAnywhere 12.5 has 2 patches sp2 (build 463) and sp3 (build 486) that can be included with
the install package.
Please download the 12.5 sp2 and sp3 from the following Knowledge base documents and save them to
the following location
C:\Documents and Settings\All Users\Application Data\Symantec\pcAnywhere\
These files will be referred to again under the “Building a Custom Command” section of this document.
Title: Symantec pcAnywhere 12.5 SP2 (Build 463): Release Notes
Document ID: TECH132060
> Web URL: http://Symantec.com/docs/TECH132060

12
Title: Symantec pcAnywhere 12.5 build 486 SP3 standalone installer
Document ID: TECH167734
> Web URL: http://Symantec.com/docs/TECH167734
Creating a batch file that will run the sp2 and sp3 files.
Symantec Packager can include a custom command that will launch one command after the install of
pcAnywhere is completed. Because we need to run both the sp2 and sp3 installers we will need to
create a batch file that can be launched to then run multiple commands.
The following is the contents of a batch file that will
A. Remove the Symantec pcAnywhere icon form the desktop
B. Install sp2 silently
C. Install sp3 silently
D. Remove the sp2 and sp3 install files.
Rem ---- This line removes the desktop short cut on Windows xp systems ----
del "C:\Documents and Settings\All Users\Desktop\symantec pcanywhere.lnk"
Rem ---- This line removes the desktop short cut on Windows 7 systems ----
del “C:\Users\Public\Desktop\symantec pcanywhere.lnk"
Rem ---- This line installs sp2 silently ----
c:\windows\temp\pcAnywhere_12.5_SP2.exe /qn
Rem ---- This line installs sp3 silently ----
c:\windows\temp\pcAnywhere_12.5_SP3.exe /qn
Rem ---- These lines clean up the sp2 and sp3 files after the install ----
del c:\windows\temp\pcAnywhere_12.5_SP2.exe
del c:\windows\temp\pcAnywhere_12.5_SP3.exe
To create the batch file perform the following steps.
1. Open Notepad and paste the above bold lines into the new document

13
2. Select File and then Save as
a. In the Save as window browse to the following location
C:\Documents and Settings\All Users\Application Data\Symantec\pcAnywhere\
b. Name the file shortcutremoval.bat
c. Change the Save as type to All Files
d. Click Save

14
Creating a custom product
Packager has 4 phases to be able to build a custom install. The first is automatically taken care of when
you install it. That is the importing of the product files (.pmi). The second is to customize a product.
1. From your desk top double click the Symantec Packager icon.
2. Select the Configure Products tab
3. Select File > New Product Configuration
4. Select the version of the product that you will be configuring and click OK (by default you will
only have one choice but if you imported multiple versions of pcAnywhere packager files then
you may have more than one version to choose from.)

15
5. The product editor page opens.
6. Uncheck the Remote option as we will be making a host only package.

16
7. Select the Configuration Files tab
8. Highlight and remove all of the files that were default in this product. See screen shot to follow.

17
9. Highlight the Host Files (*.BHF) line and click Add
10. Brows to the folder noted in Gathering Packager Files section C:\Documents and Settings\All
Users\Application Data\Symantec\pcAnywhere\Hosts and select the appropriate .BHF file
and click Open

18
11. Highlight the Caller Files (*.CIF) line and click Add
12. Brows to the folder noted in Gathering Packager Files section and select the appropriate .CIF file
and click Open.

19
13. Click the Installation Options tab.
14. Select the Host object to start with Windows click Modify
15. From the Value drop down menu select your host .BHF click OK.

20
16. Click OK again
17. At the Save As dialog name this file My_Host_Only_Product.pcg and select Save.
Note: The default location for packager files is C:\Documents and Settings\%user profile%\My
Documents\Packager
Building a Custom Command
A custom command is simply a configuration that includes commands that could be ran in a batch file or
from a command prompt. One additional option is the ability to include custom files for distribution.
For this custom command we will be adding the pcAnywhere_12.5_SP2.exe, pcAnywhere_12.5_SP3.exe
and the removeshortcut.bat file that we created earlier.
1. From your desktop double click the Symantec Packager icon.

21
2. Select the Configure Products tab
3. Select File > New Custom Command
4. The Command Editor opens. Highlight the Description line and click Modify

22
5. Enter a clear description of what this custom command is used for and click OK
6. In the Additional files section click the Add button

23
7. Navigate to the C:\Documents and Settings\All Users\Application
Data\Symantec\pcAnywhere\ folder and highlight the pcAnywhere_12.5_SP2.exe file that
was downloaded earlier, click Open
8. In the Additional files section click the Add button again and navigate to the C:\Documents and
Settings\All Users\Application Data\Symantec\pcAnywhere\ folder and highlight the
pcAnywhere_12.5_SP3.exe file that was downloaded earlier, click Open
9. In the Additional files section click the Add button again and navigate to the C:\Documents and
Settings\All Users\Application Data\Symantec\pcAnywhere\ folder and highlight the
shortcutremoval.bat file that was created earlier, click Open
10. Highlight the Target location for additional files and click Modify

24
11. Select the Custom path radio button and under the Folder specification: enter
c:\Windows\temp and click OK
12. Highlight the Command line and select Modify

25
13. In the Command line Specification screen type the following information.
a. In the Command line and switches line type c:\Windows\temp\shortcutremoval.bat
b. Select the 3 boxes at the bottom under the Run options
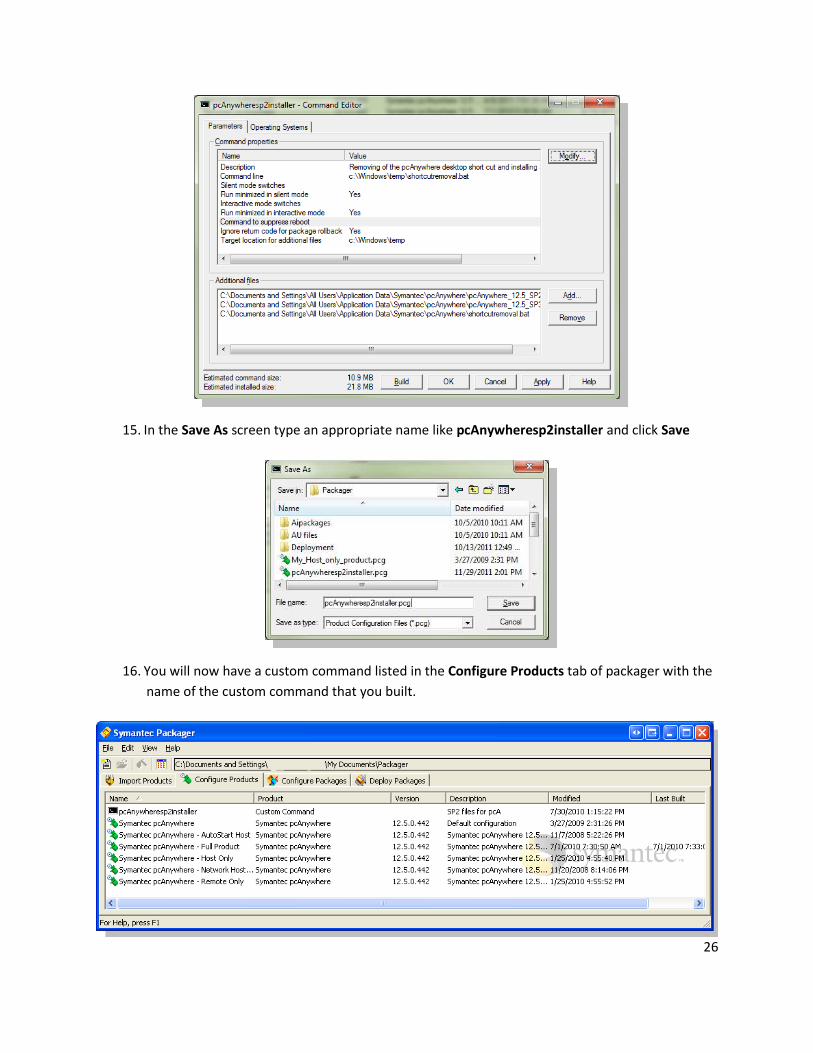
14. Your Command Editor screen should look like the following, click OK and
26
15. In the Save As screen type an appropriate name like pcAnywheresp2installer and click Save
16. You will now have a custom command listed in the Configure Products tab of packager with the
name of the custom command that you built.

27
Creating a Custom Package
The third step to building a custom install is to configure a package that includes your custom product
and the custom command that has been built. Once the package is created it can be selected and built
into a deployable installation file. In this example we will make the package installer passive meaning
that we can see the status but can’t make any selections. Silent and interactive installs are an option
also but may have problems if an existing installation of pcAnywhere is on the machine that we are
deploying to.
1. Select the Configure Packages tab
2. Select File > New Package Definition
3. Click Add

28
4. Locate C:\Documents and Settings\%user profile%\My Documents\Packager and select the
My_Host_Only_Product.pcg and click OK.
5. Select the Installation Options tab

29
6. Select the Default installation mode and click Modify
7. Select the Passive radio button and click OK
Note: Passive and Silent mode installations may yield installation issues during upgrade installs. It is
recommended at this time to use interactive mode for upgrades or uninstall the prior version prior to
installing the new pcAnywhere 12.5 with sp2 and sp3.

30
8. Select the Product Selection Tab and click Add
9. Locate C:\Documents and Settings\%user profile%\My Documents\Packager and select the
custom command file that was created earlier pcAnywheresp2installer.pcg Click Open
10. On the Package Editor screen select OK
a. Note: Make sure that the Host product is in the list above the custom command. The
files will be installed from top to bottom so it is important that the custom command

31
with the updates is last in the list. You can highlight any of the items on the left hand
screen and then select the Move Up or Move Down buttons to rearrange the order.
11. In the Save as dialog name this file My_Host_Only_Package.pkg and select Save.
12. Right click the My_Host_Only_Package and select Build.

32
13. Once the package is done building and the Close button is available click Close
Note There is a know defect with Packager when a package is built. The windows what shows the
status does not have enough a large enough buffer to hold all of the lines of information that
pcAnywhere 12.5 has. You won't fully know if the package was a success or a failure until it is deployed.
In all of my testing the packages that I have built that had failures failed soon enough that the failure
was displayed in the status window. Additionally you can only determine that the package is done
being built by when the cancel button changes to a close button.
For more information see TECH110406
http://symantec.com/docs/TECH110406

33
Package Deployment
Symantec Packager will build several files located in the following locations depending on the OS that is
being used.
Windows xp
C:\Documents and Settings\%user profile%\My Documents\Packager \Deployment
Windows Vista and 7
C:\Users\%user profile%\My Documents\Packager \Deployment
My_Host_Only_Package.exe
This file will be larger than the other two files that are created and is the combination of the
core pcAnywhere program files and the custom command wrapped together in a single installer.
This is the file that must be deployed if only one file is to be deployed. See below for more
information about the .msi and smaller .exe files.
My_Host_Only_Product.msi
This file is not as large as the .exe file and contains only the core pcAnywhere install; it does
not include the custom command or the sp2 and sp3 files that were added to the custom
package. When using the MSI to deploy pcAnywhere then the smallest.exe must be
deployed also (see next item)
pcAnywheresp2installer.exe
This file is the smallest and contains only the custom command and the sp2 and sp3 files. As
mentioned above, if the MSI file is installed directly, then it will be necessary to run this file
in order to apply the sp2 and sp3 updates.


