USING AUDIO AND VIDEO FOR EDUCATIONAL PURPOSES - … · Using audio and video for educational...
45
Using audio and video for educational purposes: Modules 1-4 Last updated 28 February 2014 Using audio and video for educational purposes Prepared by the Deakin Learning Futures Teaching Development Team deakin.edu.au/learning-futures [email protected] CRICOS Provider Code 00113B Contents MODULE OVERVIEW 2 MODULE 1: USING AUDIO AND VIDEO IN TEACHING 3 Using audio and video in teaching 3 Audio and video copyright overview ...................... 3 Benefits of using audio and video in teaching ........ 3 Audio as a learning tool .......................................... 4 Video as a learning tool .......................................... 4 Audio and video resources to support learning 5 CloudDeakin ............................................................ 5 Echosystem ............................................................. 6 DeakinAir................................................................. 6 Camtasia ................................................................. 6 Deakin Library ......................................................... 7 The internet ............................................................ 7 Equipment............................................................... 7 Using audio and video for cloud concepts 8 References: Module 1 8 Endnotes: Module 1 9 MODULE 2: PRODUCING AUDIO AND VIDEO 10 Three steps in producing audio and video: Planning, production and publishing 10 Producing audio and video: Planning ................... 10 Producing audio and video: Production................ 11 Producing audio and video: Publishing ................. 12 Creating a welcome message or weekly updates 14 Option 1: Recording audio .................................... 14 Option 2: Recording video with a webcam ........... 17 Option 3: Recording with a video camera............. 18 Option 4: Recording a screen capture with audio and video ................................................... 21 References: Module 2 22 Endnotes: Module 2 23 MODULE 3: CLOUD CONCEPTS 26 What is a cloud concept? 26 Identifying when to use cloud concepts ............... 26 Using audio and video everyday 27 Video recording locations..................................... 27 Cloud concept techniques 27 Talking head ......................................................... 29 Cut-away............................................................... 29 Screen capture/Annotation .................................. 29 Interviews ............................................................. 31 Demonstration ..................................................... 32 Voiceover.............................................................. 32 Images .................................................................. 33 Transcript.............................................................. 33 Planning and producing a cloud concept 35 ConceptPlans ........................................................ 35 Cloud concepts framework .................................. 35 Publishing your cloud concept ............................. 38 Want to find out more? ........................................ 39 References: Module 3 39 Endnotes: Module 3 40 MODULE 4: AUDIO AND VIDEO IN ASSESSMENT 42 Audio and video in assessment 42 Using video for formative assessment information ......................................................... 42 Using audio and video for assignment feedback.. 43 Practice and implement 45 Endnotes: Module 4 45
Transcript of USING AUDIO AND VIDEO FOR EDUCATIONAL PURPOSES - … · Using audio and video for educational...

Using audio and video for educational purposes: Modules 1-4 Last updated 28 February 2014
Using audio and video for educational purposes
Prepared by the Deakin Learning Futures Teaching Development Team deakin.edu.au/learning-futures [email protected]
CRICOS Provider Code 00113B
ContentsMODULE OVERVIEW 2
MODULE 1: USING AUDIO AND VIDEO IN TEACHING 3
Using audio and video in teaching 3 Audio and video copyright overview ...................... 3 Benefits of using audio and video in teaching ........ 3 Audio as a learning tool .......................................... 4 Video as a learning tool .......................................... 4
Audio and video resources to support learning 5 CloudDeakin ............................................................ 5 Echosystem ............................................................. 6 DeakinAir ................................................................. 6 Camtasia ................................................................. 6 Deakin Library ......................................................... 7 The internet ............................................................ 7 Equipment ............................................................... 7
Using audio and video for cloud concepts 8
References: Module 1 8
Endnotes: Module 1 9
MODULE 2: PRODUCING AUDIO AND VIDEO 10
Three steps in producing audio and video: Planning, production and publishing 10
Producing audio and video: Planning ................... 10 Producing audio and video: Production ................ 11 Producing audio and video: Publishing ................. 12
Creating a welcome message or weekly updates 14
Option 1: Recording audio .................................... 14 Option 2: Recording video with a webcam ........... 17 Option 3: Recording with a video camera............. 18 Option 4: Recording a screen capture with audio and video ................................................... 21
References: Module 2 22
Endnotes: Module 2 23
MODULE 3: CLOUD CONCEPTS 26
What is a cloud concept? 26 Identifying when to use cloud concepts ............... 26
Using audio and video everyday 27 Video recording locations ..................................... 27
Cloud concept techniques 27 Talking head ......................................................... 29 Cut-away ............................................................... 29 Screen capture/Annotation .................................. 29 Interviews ............................................................. 31 Demonstration ..................................................... 32 Voiceover .............................................................. 32 Images .................................................................. 33 Transcript .............................................................. 33
Planning and producing a cloud concept 35 ConceptPlans ........................................................ 35 Cloud concepts framework .................................. 35 Publishing your cloud concept ............................. 38 Want to find out more? ........................................ 39
References: Module 3 39
Endnotes: Module 3 40
MODULE 4: AUDIO AND VIDEO IN ASSESSMENT 42
Audio and video in assessment 42 Using video for formative assessment information ......................................................... 42
Using audio and video for assignment feedback .. 43
Practice and implement 45
Endnotes: Module 4 45

Using audio and video for educational purposes: Modules 1-4 Last updated 28 February 2014
Module overview
The course Using audio and video for educational purposes includes the following modules:
Module 1: Using audio and video in teaching An overview of using audio and video in teaching and the resources available at Deakin to support its use.
Module 2: Producing audio and video This module explores the production process for audio and video and provides tips on how to effectively plan, produce and publish your projects. Practice these skills by using audio and video to create welcome messages for students.
Module 3: Cloud concepts This module looks at the elements used in cloud concepts and provides a look at how to identify and use a concept in your teaching.
Module 4: Audio and video in assessment this module explores using audio and video as a means of providing formative assessment information and feedback to students about their assessments.
In the course you will find guides for creating and publishing media, as well as links to examples of how to use audio and video in different ways. At the end of each module, we suggest you practice creating audio and video using the methods described.

Module 1: Using audio and video in teaching Using audio and video for educational purposes: Modules 1-4 Last updated 28 February 2014
Module 1: Using audio and video in teaching
In this module you will be provided with an overview of using audio and video in teaching and the resources available at Deakin to support its use.
Using audio and video in teaching Providing rich interactive multimedia is a key feature of cloud learning at Deakin. It enables students to access resources that support learning wherever they are; without the need to attend a specific location at a defined time. The use of audio and video also makes it possible to present knowledge in different ways and enables different forms of interaction with learners. Utilising audio and video to support learning is now more accessible than ever, especially for learners’ off-campus, with 9 out of 10 staff and students at Deakin saying they have high-speed and reliable Internet access at home (Oliver et al. 2012).
Audio and video materials can be used to enhance learning resources by showing real life scenarios, explaining concepts, observing social groups, and acting as triggers for discussion. They are also able to bring experts and viewpoints to the student learning experience and are excellent at bringing subjects ‘to life’ to engage discussion and inspire learning.
As Deakin moves into the cloud, you are encouraged to learn more about creating your own audio and video resources to ensure you have the skills to deliver rich, engaging content. Both audio and video have been used to support learning for some time, but as new technologies have become available and the cost of making media resources has dropped, it is now possible for individual educators to capture their own audio and video using every day, accessible technology.
Audio and video copyright overview When using audio and video for educational purposes it’s crucial to be aware of the various copyright guidelines and requirements used by the university. The guidelines provide general information about copyright and outline the responsibilities of staff to ensure compliance with the law. These guidelines are particularly important when using someone else’s audio and video materials in your teaching, or when creating your own resources that feature colleagues or students. Visit the Deakin Copyright1 information page for more information (Deakin login required).
Benefits of using audio and video in teaching Having audio and video available to your students can support their learning in the following ways. It:
• provides diverse teaching techniques for learning
• gives the teacher a voice – this can reduce the feeling of isolation for cloud based students, but also helps located students feel connected
• can be used to simplify and explain complex problems
• can allow students to access the learning materials as often as required
• allows students to learn at their own pace, with instant playback, rewind and pause
• reduces frequently asked questions from students
• can be re-used.

Module 1: Using audio and video in teaching Using audio and video for educational purposes: Modules 1-4 Last updated 28 February 2014
Audio as a learning tool From the audiocassettes of the 1970s to digitally recorded music on an invisible Cloud, audio has come a long way as a teaching and learning aid and is an extremely valuable method for capturing and presenting information. Audio provides a quick, cost-effective alternative to text for connecting with your students and providing up-to-date content, interviews, discussions or lecture materials. Middleton (2013) highlights that audio has a demonstrated capacity to facilitate authentic engagement, allowing students to connect in various ways to the outside world as both listeners and publishers. Audio can easily be created with many desktop tools and small digital recording devices such as smartphones. Table 1 shows some ways in which you can use audio to support learning.
Module 1, Table 1: Some of the many ways audio can be used to support learning
Type of audio Examples
Unit podcasts weekly updates relating to teaching events, key dates, current issues
Interviews with subject matter experts can be listened to and used as primary sources of information or smaller and incidental uses
Recording feedback for students either to supplement written feedback or as a replacement
Student generated recordings used as part of a learner activity or to record evidence
Recordings of public lectures can be repurposed and used for different contexts and subjects
Live online discussions between two or more people
(Source: adapted from JISC Digital Media 2012.)
By using audio materials in your courses, you are able to make your content more accessible to a wider range of students, be creative with your assessment tasks and address graduate learning outcome requirements.
Video as a learning tool Video is also a popular tool used to engage learners and enhance a learning experience. Anyone with a digital camera, webcam, tablet or smartphone can now create and edit a movie. YouTube statistics highlight the widespread use of video online, with more than 4 billion hours of video watched each month and 72 hours of video being uploaded every minute (YouTube 2013, statistics). Videos are an excellent way to present and elaborate concepts, demonstrate a procedure or gain an understanding of learning in action.
There are many ways to exploit video in order to create motivating, memorable and inclusive learning experiences. Table 2 shows a list of different ways videos can be used to support learning.

Module 1: Using audio and video in teaching Using audio and video for educational purposes: Modules 1-4 Last updated 28 February 2014
Module 1, Table 2: Some of the ways video can be used to support learning
Educational purpose Examples
To demonstrate experiments or experimental situations Sodium (version 1) - Periodic Table of Videos2
To illustrate abstract principles through the use of specially constructed physical models What’s In a Candle Flame?3
To illustrate principles involving three-dimensional space Interactive, rotatable model of tetragonal perovskite structure4
To use animated, slow-motion, or speeded-up video to demonstrate changes over time Awesome HD Slinky Slow-Mo5
To demonstrate decision-making processes Conflicts in the Workplace: Sources & Solutions6
To change student attitudes by presenting material from a different perspective
Tough Guise: Violence, Media and the Crisis in Masculinity7
To demonstrate methods or techniques of performance Physics of a golf swing8
To interpret artistic performance Leroy Curwood & Zoe Marsh Choreography – ‘Brother’ Matt Corby9
To demonstrate practical activities A notched-bar impact test of aluminium, carried out at room temperature10
To synthesise, summarise or condense contextually and media rich information relevant to the course. Ottawa Charter11
(Source: adapted from Bates 2013.)
Audio and video resources to support learning Deakin University offers a range of different tools and platforms available to support the use of audio and video in learning. While the course enhancement process will help identify where these resources might be better utilised, effectively using audio and video comes from trialling new approaches and evaluating their effectiveness. Knowing about the tools on offer at Deakin and attending the relevant capacity building workshops will help you start to pull together ideas for how you can use audio and video to support learning.
CloudDeakin CloudDeakin is the central platform for utilising audio and video to support learning, as it is the place where students engage with their course units and content. Audio and video can be used in CloudDeakin in many ways to encourage participation and present information. You might use audio and video in CloudDeakin to:
• set a homework task around a piece of media embedded from YouTube or DeakinAir and ask students to answer quiz questions
• give your students updates and deliver messages, using the news section of your units pages
• ask students to submit an audio or video recording to the Assessment area of CloudDeakin in response to a question or other pieces of stimulus.
• replay a lecture or interview
• deliver a cloud concept or demonstration.

Module 1: Using audio and video in teaching Using audio and video for educational purposes: Modules 1-4 Last updated 28 February 2014
Using audio and video in CloudDeakin is simple; inbuilt tools allow you to embed many types of media or record directly to the platform. CloudDeakin should be used as a central point for embedding audio and video for educational purposes.
For more information on how to use CloudDeakin, visit the CloudDeakin guides12.
Echosystem Echosystem is a presentation, capture and playback service that incorporates both visual and audio content of lectures and presentations. This system allows you to capture and record presentations in an Echo-recording venue. It allows students to playback and download audio and video of recorded lectures and web recordings through CloudDeakin. Echo recordings ensure that students can playback media in various formats, making them accessible in many different environments. For more information on how to use EchoSystem, including booking venues, managing media and linking your recording, visit Deakin’s Echo Recordings guide13.
DeakinAir DeakinAir is an online streaming video platform that allows you to browse and upload videos. DeakinAir is used to host your audio and video for embedding into your CloudDeakin site. Content contributed to DeakinAir is automatically stored as a private resource, and by default is not searchable/discoverable to the public or the wider university community. You must provide a direct link to viewers if you want them to view your resource. Requests can be made for videos to be made public if that suits your teaching requirements.
You can utilise DeakinAir to support teaching in the following ways:
• upload and host cloud concepts
• record direct messages utilising your computer’s webcam
• organise your video resource collections into unit playlists
• link to resources from CloudDeakin.
For more information on how to use DeakinAir including browsing content, adding content, sharing content and creating a playlist, visit the DeakinAir guide14.
Camtasia Camtasia is a screen-capture tool available to Deakin staff for both Mac and PC. It is particularly useful for capturing activity on a computer screen. Using Camtasia can also give you useful video elements that can be used in a cloud concept. You can utilise Camtasia to support your teaching in the following ways:
• record instructions
• demonstrate a procedure or use of software
• narrate and record a PowerPoint or Prezi presentation
• edit together audio and video.
It’s important to note that Deakin licenses for Camtasia are currently limited and you may need to arrange for your own license with your faculty if required. For more information on how to use Camtasia including preparing, recording, editing and exporting your videos, visit the Camtasia guide15.

Module 1: Using audio and video in teaching Using audio and video for educational purposes: Modules 1-4 Last updated 28 February 2014
Deakin Library The Deakin University Library has a range of audio and video resources that can be used for educational purposes. In supporting the move to cloud learning, the library provides access to streaming video through a range of databases. Deakin staff and students currently have access to over 17 000 DVDs and over 33 000 streamed videos. Below is a list of some of the databases you might use to support the use of audio and video in your teaching. Many of these databases allow you to directly embed video content into your CloudDeakin site and many come complete with accompanying transcripts to support accessibility.
• Kanopy streaming website16 – Provides access to some of the world’s most creative filmmakers and respected distributors, offering diverse content in areas such as architecture, teacher education, health and safety, culture and politics in media, and health studies.
• Informit TV News17 – TVNews is a database that lets you search and retrieve news stories and current affairs programs broadcast on free-to-air networks.
• Informit Edu TV18 – An online streaming service for Australian tertiary institutions showcasing documentaries, drama, and series shown on TV. Some videos are offered with comprehensive study guides. Most programs are made available within a week of broadcast.
• Alexander Street Press19 – A streaming video service with nearly 17 000 videos covering disciplines of art and architecture, business, counselling and therapy, dance opera, theatre, music, anthropology, health, rehabilitation and more. You can embed videos from this collection in your CloudDeakin site.
• Enhance TV20 – Enhance TV offers a great range of TV and film content for purchase. You can find out about upcoming educational programs and search for broadcasts.
Deakin Library provides you with access to important information on how to find streaming video services relevant to your subject area. For more information, visit the Streaming Video21 support page.
The internet While Deakin has a wealth of resources to support the use of audio and video in education, you might find other resources available on the web suitable to your needs. These might include:
• Creative Commons22 licenced audio and video for repurposing
• online streaming media for embedding in CloudDeakin
• open source editing tools for audio and video
• audio and video publishing platforms.
Equipment There are a number of places to get equipment suitable for capturing audio and video for teaching and learning.
• Personal equipment – Smartphones, tablets, iPod’s and other small recording devices are cheap and in abundance.
• University issued PC or Mac – These computers come with inbuilt microphones and cameras and can easily support applications from the self-service centre.
• Library – the Library has a range of devices available for loan. Visit the Borrow from our libraries23 page for more information.

Module 1: Using audio and video in teaching Using audio and video for educational purposes: Modules 1-4 Last updated 28 February 2014
Using audio and video for cloud concepts Cloud concepts can transform old and tired lectures and presentations into dynamic new learning resources. Using audio and video is vital to the creation of cloud concepts and knowing how to use audio and video tools will greatly improve your ability to create cloud concepts.
Cloud concepts are:
• stand-alone videos (from 5–10 minutes long)
• available in the cloud, usually within CloudDeakin
• focussed on one or two key concepts
• include a variety of material: face-to-camera, images, graphics and other sources
• a technique to encourage learning.
While using audio and video recordings of lectures allows students to replay them at their convenience, cloud concepts are designed to transform the information into accessible and visually engaging core concepts for students. Cloud concepts are central to teaching and learning within CloudDeakin.
For an introduction to cloud concepts visit the From lectures to cloud concepts24 page. On this page you will find examples of cloud concepts and links to resources to help support their development. As you progress through the course, refer back to these examples for inspiration and ideas on how to create your own. Module 3 in this series will take a closer look at the practical skills to create cloud concepts.
References: Module 1 Bates, T 2012, ‘Pedagogical roles for video in online learning’, retrieved 29 April, 2013,
<www.tonybates.ca/2012/03/10/pedagogicalx-roles-for-video-in-online-learning/>.
JISC Digital Media 2012, ‘Using audio in teaching and learning’, retrieved 29 April 2013, <www.jiscdigitalmedia.ac.uk/guide/using-audio-in-teaching-and-learning>.
Middleton, A 2009, ‘Beyond podcasting: creative approaches to designing education audio’, Alt-J, Research in Learning Technology, vol. 17, no. 2, retrieved from <www.researchinlearningtechnology.net/index.php/rlt/article/download/10871/12544>.
Pettigrew, J, Oliver, B, Fluker, G, Dracup, M, Brighton, T, Atkinson, K 2012, ‘Student and staff digital access 2012: internet, mobile devices and social software’, Deakin Learning Futures, Melbourne.

Module 1: Using audio and video in teaching Using audio and video for educational purposes: Modules 1-4 Last updated 28 February 2014
Endnotes: Module 1 All hyperlinks below were checked and found to be active on 28 February 2014.
1 Deakin Library copyright information page (Deakin login required), https://staff.deakin.edu.au/services/copyright/index.php
2 Sodium (version 1) - Periodic Table of Videos 2008, YouTube, periodic videos, 5 July, retrieved 28 February 2014, http://youtu.be/YvSkXd_VVYk.
3 What’s in a Candle Flame? 2012, YouTube, 1veritasium, 11 September, retrieved 28 February 2014, http://youtu.be/a7_8Gc_Llr8.
4 Interactive model of tetragonal perovskite structure 2009, YouTube, core materials, 22 December, retrieved 28 February 2014, http://youtu.be/0-P4jS63Dh0.
5 Awesome HD Slinky Slow-Mo 2012, YouTube, 1veritasium, 13 June, retrieved 28 February 2014, http://youtu.be/uiyMuHuCFo4.
6 Kantola Productions 2009, Conflicts in the workplace: Sources & solutions, retrieved 28 February 2014, http://deakin.kanopystreaming.com/video/conflicts-workplace-sources-solutions.
7 Media Education Foundation Tough Guise: Violence, Media and the Crisis in Masculinity 1999, retrieved 28 February 2014, http://deakin.kanopystreaming.com/node/41587.
8 Bass, C, 2013. SEM327: Dynamics of machines – Physics of a golf swing, March 19, 2013, retrieved 28 February 2014, http://air.deakin.edu.au/public/media/entry_id/0_97e6ds8o.
9 Leroy Curwood & Zoe Marsh Choreography - ‘Brother’ Matt Corby 2012, YouTube, Leroy Curwood, 18 February, retrieved 28 February 2014, http://youtu.be/-OUOFa3g8yM.
10 A notched-bar impact test of aluminium 2009, YouTube, core materials, 22 Dec, retrieved 28 February 2014, http://youtu.be/KArao4qzu5Q. (Originally from University of Cambridge, www.doitpoms.ac.uk/vidlib/full_record.php?id=24.
11 Newnham, S 2002, Ottawa Charter, Deakin University, 3 December 2012, retrieved 28 February 2014, http://air.deakin.edu.au/public/media/Ottawa+Charter/0_xem4q35h.
12 Cloud Deakin guides, www.deakin.edu.au/learning/clouddeakin/clouddeakin-guides.
13 Echo Recordings guide on the Deakin Learning Futures website, www.deakin.edu.au/learning/clouddeakin/clouddeakin-guides/video-and-audio/echo.
14 DeakinAir guide, deakin.edu.au/learning/clouddeakin/clouddeakin-guides/video-and-audio/deakinair.
15 Camtasia guide, deakin.edu.au/learning/clouddeakin/clouddeakin-guides/video-and-audio/camtasia.
16 Kanopy streaming website, deakin.kanopystreaming.com/s-homepage.
17 Informit TV News, http://search.informit.com.au/titles;res=TVNEWS.
18 Informit Edu TV, http://edutv.informit.com.au/home.php.
19 Alexander Street Press, http://vasc.alexanderstreet.com/.
20 Enhance TV, www.enhancetv.com.au/.
21 Deakin Library streaming video support page, deakin.edu.au/library/teach/streaming-video-support.php.
22 Creative Commons www.creativecommons.org.au/about.
23 Deakin University borrow from our libraries, deakin.edu.au/library/access-borrow/from-our-libraries.php#equipment.
24 From lectures to cloud concepts page, deakin.edu.au/learning/course-enhancements-sandpits/from-lectures-to-cloud-concepts.

Module 2: Producing audio and video Using audio and video for educational purposes: Modules 1-4 Last updated 28 February 2014
Module 2: Producing audio and video
In module 2, you will be introduced to the steps of planning and producing audio and video for educational resources and shown practical examples of how to use freely available tools to create your content.
Three steps in producing audio and video: Planning, production and publishing With any audio or video project it is important to follow the three steps of production to ensure that you have a well planned and executed project. Make sure you allow time for each step to ensure that you end up with the best possible final product.
Producing audio and video: Planning ‘Before you hit record, planning is everything’
Effective planning is the most critical part in the production of educational media. Most people skip right to the shooting step before doing any planning. To get a good quality recording, you’ll need to carefully plan your finished product and the steps towards producing it.
Make sure you consider the following:
1. Understand the purpose
If you’ve chosen to record audio or video, first decide why you’re doing it.
• Before anything else, figure out why you need it. Think in terms of the ‘final outcome’. What is its educational purpose? To explain a complex concept? To welcome students to your unit? Hear from a guest speaker? What do you want your students to know or do after watching or listening to it?
2. Brainstorm
What am I going to produce to say what I want to say?
• What is it that you want to produce? Look at similar resources to gain ideas and inspiration. You might want to use the examples from Module 1: Using audio and video in teaching. Decide what you like and dislike. Why? How could you improve on them for your purpose? Make a note of your decisions.
3. Prepare
Everything you need to do before the cameras start rolling
• Figure out the logistics now so you don’t have to fix problems later. This step will save you a lot of time.
• Where will you record? Have you got a suitable location? What equipment do you need? Who or what is being recorded? What are they going to say or do? What shots, audio or other media will I need? Have I checked if I need any material approved by the copyright team?
• In this step it is a good idea to create a ConceptPlan (storyboard) of your project. Refer to the ConceptPlans25 page for more information and instructions.
Planning Production Publishing

Module 2: Producing audio and video Using audio and video for educational purposes: Modules 1-4 Last updated 28 February 2014
Module 2, Table 1 Four important considerations when planning audio and video
(Source: Deakin University, 2013)
Table 1 (above) provides four important considerations you should use in your planning stage, before you start recording your audio or video. By ensuring that you have addressed each of these elements you will significantly save time and streamline your production process. This will also make it easier if you’re working with other people, as the project will be properly mapped out and easy to follow. Once you have addressed each of these elements you will be ready for the production of your materials.
Producing audio and video: Production ‘Lights, camera, action’
The shooting or recording stage is what most people consider the production phase of an audio or video project. It is the stage where you execute the elements you have planned for, and will run more smoothly if you have done this thoroughly.
To begin production, refer to your ConceptPlan (storyboard) or planning notes and decide which parts you are going to do first. The order in which you do these may depend on many factors including weather, availability of talent, or equipment loans. Remember, if you are unable to complete one recording on your ConceptPlan you might be able to do another first. Again, proper planning can reduce these unexpected situations.
The production phase can involve several takes of a recording until you get the right outcome. Figure 1 shows some production tips that can help you reduce time with your recordings.
Module 2, Figure 1 Production tips
(Source: Deakin University, 2013)
•Will audio/ video work?
•What style of video?•How does it fit with
other teaching components?
Purpose
•Prepare a structure•Write a script•Outline screen shots• Is it a suitable length
(10–15 mins)?
ConceptPlan(Storyboard)
•Check your camera, tripod, lights,
•Do you need a microphone?
•Software?•Props?
Equipment
•Where? Background noise?
•Ambient light?•Who is going to be
recorded?•When?
Location
Practice with your camera or device
until you can operate it smoothly
Minimise noise, pans, tilts and
zooms
Check sound and lighting

Module 2: Producing audio and video Using audio and video for educational purposes: Modules 1-4 Last updated 28 February 2014
Practice your scripts, piece-to-cameras and cut-away shots before you start recording. Minimise unnecessary camera movements and make sure your shot is set up properly before you roll cameras. During the process don’t be put off if you make a mistake; you can always do another take. Work through your ConceptPlan until you have completed all the required recordings. Once you have wrapped up your recordings, it’s time for editing and publishing your work.
Producing audio and video: Publishing The publishing phase is the final part of producing audio or video for educational purposes and is often referred to as post-production. It is generally made up of two elements: editing and distribution. There are many different methods and tools used during post-production, and this section will give you an overview of some simple ways to finalise your project.
Editing
Post-production begins when the camera stops rolling and you begin editing your work. It is a creative process where all the various parts of your production come together into one clear, concise product. This phase is time consuming, as you need to go through all your material and identify which is best for the finished product. During this process you will need to cut out the parts you don’t want, and decide the best way to put the remaining material together. Use your ConceptPlan to guide your editing process. There are many free consumer products available to help you edit your final product. Table 2 gives you a look at some commonly used audio and video editing applications freely available to Deakin staff. Click on the icons to be taken to the software pages.
Module 2, Table 2 Commonly used audio and video editing applications
Software icon Editing software Good for Availability
Audacity26 Recording and editing
audio Free, available for PCs and Macs
iMovie27 Video editing software Available for Macs
(including iPad and iPhone)
GarageBand28 Recording and editing
sounds Available for Macs (including iPad and iPhone)
Windows Live Movie Maker29 Video editing software Free, available for PCs
QuickTime Pro30 Video editing software Available for PCs and Macs
(Source: Deakin University, 2014)
These programs are only a small selection of the products available for editing audio and video. You may already have a product you prefer or might want to look for something more suitable to your needs. To find out more about the products above, refer to each application’s support pages for tutorials and instructions. It’s also a good idea to search YouTube to see if you can find video tutorials to help you get started or for a demonstration of a particular feature.
Once you have finished editing your product, it’s time to publish your work and distribute it to your students or audience.

Module 2: Producing audio and video Using audio and video for educational purposes: Modules 1-4 Last updated 28 February 2014
Publishing and distribution
Once editing of your audio or video is complete, you have a number of options for making it available to your students. They include: publishing your audio and video online and providing a link; or embedding the media in your CloudDeakin site. The latter is going to be your preferred distribution option, especially when you create media to support your teaching. However, in order to embed media in CloudDeakin you will need to publish it to a video or audio hosting service. Table 3 (below) shows the services you will most likely use to host your finished media.
Module 2, Table 3 Publishing and sharing platforms
Software icon Publishing platform Description
DeakinAir31 A purpose built online video hosting service for Deakin
University.
YouTube32 The world’s biggest online repository of videos.
Lots of instructional videos. Part of Google account.
Vimeo33 Online video sharing service. Has a large creative
community. Used as alternative to YouTube.
SoundCloud34 Online audio sharing community and publishing platform.
(Source: Deakin University, 2013)
All of the platforms in the table above are freely available to Deakin Staff. Once you have uploaded your audio or video, you can then share it through your CloudDeakin site by embedding the media within your course pages. You can also use the same embedding process to share your video on any blog or website that supports embed codes. For information on how to embed media into CloudDeakin refer to the DeakinAir resource page35.
After your audio or video project is completed you may wish to share it with your colleagues or students. Often media files can be too large to share via email so you will need to share your resource using another method. Table 4 shows common file-sharing resources available to Deakin staff.
Module 2, Table 4 File-sharing services
Software icon File-sharing service Description
Portfolio (D2L)36 A D2L tool for staff and students to store documents and
share with peers (part of CloudDeakin37)
OneDrive for Business38
Store and synchronise files which are then accessible from any computer, tablet or mobile device. NB: OneDrive for Business was known as SkyDrive Pro prior to February 2014.
GoogleDrive39 Create, edit and store online documents
Cloudstor40 Transfer large files between both internal and external
educational users
(Source: Deakin University, 2014)
By following the three steps of production (planning, production and publishing), you will ensure your projects have been properly planned, produced and published. In the next section you will learn how to record audio and video for use as welcome messages or video updates for your students.

Module 2: Producing audio and video Using audio and video for educational purposes: Modules 1-4 Last updated 28 February 2014
Creating a welcome message or weekly updates Keeping in touch with your students is an important factor in student motivation. Both audio and video, in the form of regular ‘podcasts’ or ‘vodcasts’ can be used to promote student–teacher interaction. They can be used to: introduce new topics; link to relevant news items; provide information about assessments and information about progress within the unit. Start by recording a ‘Welcome’ message, introducing yourself; welcoming students to the course; providing tips for getting started; and informing students how to access resources. Adding a weekly update keeps the conversation going.
Regular audio or video messages for students can be made in a number of ways. In this module, we make some recommendations for methods that are commonly used. We have tried to identify the simplest options that exist. As technology is changing all the time, you may prefer to use another method however the basic principles of getting good quality recordings are still the same.
On the following pages, we describe four options for creating your welcome message/weekly update using audio and video.
• Option 1: Recording audio
• Option 2: Recording video with a webcam
• Option 3: Recording with a video camera
• Option 4: Recording a screen capture with audio and video.
Option 1: Recording audio Recording an audio message is a quick and effective way to keep in touch with your students, and is an important element in creating a cloud concept, especially when using voiceovers. There are a number of ways to record an audio message using the tools available at Deakin:
• Create a news item directly in CloudDeakin, and add audio to it. This is the simplest way of using audio to communicate with your students because the audio is automatically uploaded using the News tool. However, you can only make a short recording (1 min) and your ability to edit is limited. Refer to the News tool guide41, for more information.
• Use your smartphone or tablet to record a message. When used correctly, the microphones on mobile technologies can handle fairly high-tech audio applications. There are a variety of apps available for recording audio – use whichever suits you best. Once you have recorded your message, you can download it and add it to a CloudDeakin News item or a Content page.
• Use sound recording software (Audacity on a PC, or GarageBand on a Mac) to make an audio recording using your computer. To improve audio quality, you should use a good microphone connected to your computer. This option allows you to edit your recording.
Planning
Make sure you are clear about the purpose of your recording. How does the content support the unit’s stated learning outcomes? Keep it short, interesting and to the point. Five to ten minutes maximum is the most effective. If your recording has multiple purposes, consider making separate recordings for each.
Write some notes outlining what you want to say and run through them, speaking aloud to get a feel for the ‘script’ and an idea of its length. If you are recording audio for the purposes of a voiceover narration, you should work your script out on the basis of a three words per minute reading speed. This will help give you an indication of how long the recording will run for.

Module 2: Producing audio and video Using audio and video for educational purposes: Modules 1-4 Last updated 28 February 2014
Record Once you’ve worked out what you want to say, find a suitable location for the recording. Ensure that there is no background noise and that you won’t be interrupted. Set up your recording equipment, and then practice recording your voice to ensure it is clear and the message comes across concisely. Speak in your normal voice, and try neither to rush nor to speak too slowly – just act naturally!
Listen to your recording to make sure you’re happy with the quality. Once you are satisfied with the quality of your practice recordings, press record, leave a few seconds ‘lead-in’, then begin speaking. It can help, in the absence of an audience, to imagine yourself explaining your material to an attentive listener. When you have finished, leave a few seconds of silence, then press stop. If you are unhappy with your first take, you can always do another (JISC Digital Media, 2013a).
Tips for recording quality audio using a mobile device
Find a suitable app: The inbuilt voice-recorder app included with your mobile device might be useful for simple applications, but there may be a limit on the size of files that you can send to your email, and there may not be any extra features included to help you record better audio. You might want to check out audio recording apps available through your app store. Be sure to read a few reviews and check the features of each app to make sure they suit your purpose, before selecting and purchasing one. Table 5 (below) lists some apps that might be useful when recording audio on a smartphone.
Module 2, Table 5 Voice recording apps for iOS and Android
Software icon App Platform Features
Voice Pro42 ($14.59) Android
• Create and edit audio in more than 100 formats • Tag and highlight sections of audio • Edit using noise and background cancelling effects • Cloud integration • Language conversion
Voice Recorder Pro43 ($3.00) Android
• Record in .wav • Timetag sections of audio • MP3 conversion • Multi-level recording quality • Integration with Gmail
Recordium44 ($5.49) iOS
• Create and edit audio • Tag and highlight sections • Adjustable sampling rates and recording formats • Cloud integration
Voice Recorder HD45 ($1.99) iOS
• Unlimited recording time • Adjustable quality control • Audio trimming • Supports external microphone • Cloud integration
(Source: Deakin University, 2013)
Using the inbuilt microphone: Check the microphone position. Microphone positions vary depending on your smartphone so it’s best to locate your mic and point the phone horizontally at the sound source (optimally about 15–30 cm away). Smartphone microphones are quite sensitive and will pick up nearly all sound in the room, so be prepared to deal with room noise if you haven’t selected a quiet location.

Module 2: Producing audio and video Using audio and video for educational purposes: Modules 1-4 Last updated 28 February 2014
Limitations: Unplug the headphones from the headphone jack on your device. If the headphones are plugged in while recording, you may get diminished audio quality. Also, remember that people are less likely to accept poor audio in the same way as they would accept low resolution video. If your recording is not clear, you might need to consider doing it again on another device. Make sure that you are easily able to get your audio file from your smartphone onto the computer and operating system you require.
Recording audio in a news item on CloudDeakin
It’s simple to add an audio message to a News item in CloudDeakin. Select the link to add a New News Item, add a Headline and insert any text in the Content field. Then scroll down the page and click the Record Audio icon. You may be prompted to allow Adobe Flash Player to access your system microphone. Accept this request if you are prompted.
Module 2, Figure 2 Image of record and playback icons in CloudDeakin
(Source: Deakin University, 2013)
To begin recording, click the record button (red circle); click it again to pause.
Use the green play icon (triangle pointing to the right) to playback your recording. If you click record after pausing the playback, you can re-record over existing audio. Once you are happy with your recording, click Add to attach the audio to your news item.
Edit
If you need to edit audio on your computer, you will need to get hold of an audio editing application such as Audacity. If you are using a Mac computer, you can use GarageBand to record and edit your audio. The CloudDeakin built in recording function is not able to edit audio files.
You’ll find useful information about how to use Audacity and GarageBand on the Teaching with Technology website46.
Uploading to CloudDeakin
If you didn’t record directly into CloudDeakin you will have to attach your audio file to a News item or a Content page in CloudDeakin. For more information on how to do this visit the CloudDeakin Guides47 page.
Want to find out more? • Creating an audio podcast48, JISC Digital Media, 2013. JISC Digital Media Guides
• Increasing student engagement using podcasts49, Case study COFA online, 2011
• Pedagogical roles for audio in online learning50, Bates, T 2012, Online learning and distance education resources blog
• Podcasting workshop: an introduction to audio podcasting51, Atomic Learning 2013
• Recording audio in Audacity52, COFA online, 2011, Learning to teach online
• The art of writing great voice over scripts53, The eLearning coach blog
• Using audio in teaching and learning54, JISC Digital Media Guides
• Using ‘News’ CloudDeakin guide55.

Module 2: Producing audio and video Using audio and video for educational purposes: Modules 1-4 Last updated 28 February 2014
Option 2: Recording video with a webcam Recording a quick video message is another easy way to keep in touch with students, and provides a great way to introduce subjects and send direct messages. One of the easiest ways to record a video message is with a webcam using the inbuilt feature in CloudDeakin or DeakinAir.
If you have a webcam available on your computer or laptop, you can quickly produce a short video of yourself talking to your students. This can be used to present content such as welcome messages, to introduce topics, provide overviews and address frequently asked questions.
Planning
When planning to record video there are several other considerations you will need to make unlike with audio. The following steps will help you properly plan your video recording.
What are you going to say? Before embarking on your webcam recording, consider what the purpose of the video is. What do you want to tell your students? Work out what you want to say and prepare any visuals you want to use (photographs, graphs, etc.). ‘Talking head’ recordings need to be short and to the point (1–3 mins max) or you’ll find your students won’t bother to watch the whole recording.
Location: You’ll need to put some thought into the location of the webcam recording. Have a look around you for the best location. If you are planning to make the recording at your desk, check what your viewer will be looking at. Make sure there is nothing distracting in the background and that the lighting is ok; your face shouldn’t be too dark or too bright. Play around with turning lights on/off to get the best picture. Experiment with your sitting position. Don’t be afraid to sit close so viewers can see your face clearly.
Sound: Be aware of the background sounds in the room. Things that you take for granted can become irritating or render other things inaudible in a recording. Are there any fans switched on? Printers? People talking in the corridor outside your room? Remember to turn off your mobile phone and any other potential distractions. Check the audio recording quality of your computer’s internal microphone. Consider using an external microphone that is compatible with your computer to improve the audio quality.
Record
Log into the DeakinAir site56, then use the Add New > Webcam Recording link to record. Once you’ve finished your recording, you’ll be able to go to the webcam video you’ve just created and get either the URL or the embed code for the video. You can then embed the video you have just recorded directly into your CloudDeakin site. For more information visit the Using DeakinAir57 CloudDeakin guide.
Alternatively, you can record a brief video within a CloudDeakin News item. Select the link to add a New News Item, add a Headline and insert any text in the Content field. Then scroll down the page and click the Record Video icon. You may be prompted to allow Adobe Flash Player to access your system microphone. Accept this request if you are prompted.
Edit
To edit a webcam recording on your computer you are going to need video editing software such as iMovie or Windows Movie Maker. For more information on how to use these editing programs, visit the Atomic Learning58 website for tutorials. Unfortunately, if you record your welcome message directly in to DeakinAir or CloudDeakin you will be unable to edit your clip. You will however be able to re-record your message until you are happy with the outcome.

Module 2: Producing audio and video Using audio and video for educational purposes: Modules 1-4 Last updated 28 February 2014
Uploading to CloudDeakin
Go to your CloudDeakin59 site. Embed the code into a News item or on a Content page. You can find further information in the Using DeakinAir60 CloudDeakin guide.
For an example of how to use webcam videos to engage with students, take a look at Dr Jaclyn Broadbent’s (School of Psychology) use of video in her large mixed-mode unit: example of good practice in online communication61.
Want to find out more?
• Using DeakinAir62, CloudDeakin guide for DeakinAir. Includes: browsing, contributing, adding or sharing content.
• Examples of good practice in online communication63, Deakin University
• Getting started with creating your own video64, JISC Digital Media Guides
• So you want to make a video65, Hints, tips and advice to help you produce high quality footage including location scouting, sound recording, presentation techniques, camera handling and framing (Deakin login required).
Option 3: Recording with a video camera Creating a welcome video with a small video camera or using the inbuilt camera on a mobile device is quite easy, and allows you to undertake simple editing to shape your message. You can then upload the video to DeakinAir and embed it in your CloudDeakin site (or record directly into a News item on CloudDeakin).
However, videos shot in this manner can look amateurish. This is because there are certain things, which while always of some importance on any camera, become absolutely vital when using a small camera. With a little bit of knowledge and effort, the quality of these videos can be improved significantly.
Choosing a video camera
First of all, decide which camera you want to use. This will depend primarily on what you have available. You can use a small video camera (a camcorder) which has been designed specifically for making video; a digital still camera set to video mode; or you can use your mobile device with in-built camera. The quality of the output will vary, but there are plenty of cameras available which are suitable. If you’re unsure, do some quick testing to judge for yourself if the quality is good enough.
If you don’t have a camera immediately to hand, you can use one of the Zoom recorders66 that are available from the Deakin library. You might instead want to book the use of Deakin’s video recording locations67 to use more professional equipment.
Planning
First of all, make sure you’re clear about the purpose of your video and how it will be used to support your teaching. If you’ve decided to use a video camera, decide who will feature in the video, who will do the filming and what other visuals you want to use.
Work out a basic structure for the video and plan what you are going to say. Prepare a script or bullet points that you can refer to or even read while on camera. If you’re planning to shoot in more than one location, make sure you have a plan for each location.
Check you’ve got all the equipment you need for the shoot, including tripod, batteries and lights. It’s important to ensure that the battery in your camera is fully charged and that your camera has enough record time.

Module 2: Producing audio and video Using audio and video for educational purposes: Modules 1-4 Last updated 28 February 2014
Record
Once you’ve set up your equipment and got your talent in place, set the camera to record. Let the camera run for 5 or 10 seconds before indicating to the person on camera that they can begin to speak and leave the camera running for at least 5 to 10 seconds after they have finished. You can always cut out unwanted footage.
If you have supporting materials (e.g. photographs, images, webpages), record them separately so you can cut them into the finished video.
Once you’ve finished your recording, download your files to your computer (and back them up) as soon as possible.
Tips to improve the quality of your recording
Hold the camera steady
If possible, use a tripod. Failing that, place the camera on a flat, stable surface such as a table, the top of a chair, or a wall (for static shots); or find a way to brace yourself and use both hands to hold the camera steady. If you are using a tablet computer for recording, it’s a good idea to use a smart cover to steady your device.
Hold the camera or phone close to your body rather than too far out in front. Not only will you hold the camera more steadily, but you will restrict your ability to unconsciously add camera movement and your arms won’t get tired as quickly.
Check your sound
The optimum camera position for a good image (far enough back to see everything) is not the optimum position for good sound (very close up).
There are a few things you can do to improve the sound:
• use an external microphone if possible
• try to shoot closer to the subject
• use a quiet room where there is no noise leaking in from outside, and which doesn’t have a lot of echo
• switch off any mobile phones
• make sure that the only person talking during the recording is the person you want to hear
• use the audio level monitor built into your video recording app if you have one. The audio level monitor should not go into the red zone (upper levels).
Check the lighting
If possible, give your subject more light than there is in the background. A subject appearing in shot with a much brighter object such as a bright window or a projected image on a screen will appear as a silhouette. A subject lit much the same as the background will not stand out.
Experiment with the lighting before you shoot. Try turning off lights or closing blinds and curtains to improve the image quality.
Check your shot
Many small video cameras like the Zoom recorders don’t have the ability to focus. This means that everything in shot will be noticed. Be careful to ensure that the image you capture is free of distracting, inappropriate or confusing elements.
Try to keep the objects in the frame large. If possible, try to shoot closer rather than further from objects. Keep your camera upright and steady. Rotated images will generally look at best confusing, and at worst clumsy.

Module 2: Producing audio and video Using audio and video for educational purposes: Modules 1-4 Last updated 28 February 2014
Recording display on monitors or computer screens
Shoot any TV or computer images from an LCD or plasma screen (not a CRT screen). If this isn’t possible, shoot a projected image on a wall screen.
To see how these considerations can greatly improve your video watch the JISC Digital Media video68 illustrating the steps as outlined above.
Tips for recording video with a mobile device
Inbuilt video recording apps on a mobile device may only have limited functionality to help you record your video. It’s important to remember that the camera quality of each device is different and you may not get the video output that you wanted. You may also find that you want to edit out sections of your video, but your inbuilt app doesn’t have the capacity to do so. It’s important when recording video on a mobile device that you are aware of your camera quality and the most suitable app to achieve your goals. Table 6 (below) shows a list of video recording apps for iOS and Android devices that you may want to use.
Module 2, Table 6 Video recording and editing apps for mobile devices
Icon App Platform Features
iMovie69 ($5.49, or free if you purchased your iPad after 1 Sept. 2013)
iOS (iPod, iPhone, iPad)
• Multi-touch gestures for drag and drop video editing • HD movie rendering • Timeline editor • Inbuilt voiceover and video capture • Special effects
Pinnacle Studio70 ($13.99)
iOS (iPad)
• Multi-touch gestures for drag and drop video editing • Access media internally and capture within app • Special effects • Timeline editor
Magisto71 (Free) Android
• Add Instagram photos • Access movies from your device • Automatic video stabilisation, effects, filters • Export to popular cloud services
Vid Trim Pro72 ($4.47) Android
• Record and trim video • Special effects • Multiple transcoding conversion • Frame grabber • Share with social media
(Source: Deakin University, 2013)
Edit
If you need to edit your video on a computer you will need to use video editing software like Windows Movie Maker for PC or iMovie for Mac. You may have recorded your video on a tablet device and have a separate app, like the ones listed above, where you can edit your clips.
Want to find out more? • Basic guide to the Flip73, JISC Digital Media Guides
• Basic guide to videoing interviews74, JISC Digital Media Guides
• Basic guide to shooting video75, JISC Digital Media Guides
• Digital equipment for loan76, Deakin University Library
Module 2: Producing audio and video Using audio and video for educational purposes: Modules 1-4 Last updated 28 February 2014
• Recording and editing vodcasts on a smart phone (iPhone)77, Enhancing use of tools in the cloud (scroll down the page to see video)
• Recording video with a smartphone78, ABC Open ‘Tip sheet’ (PDF)
• Using DeakinAir79, CloudDeakin guide.
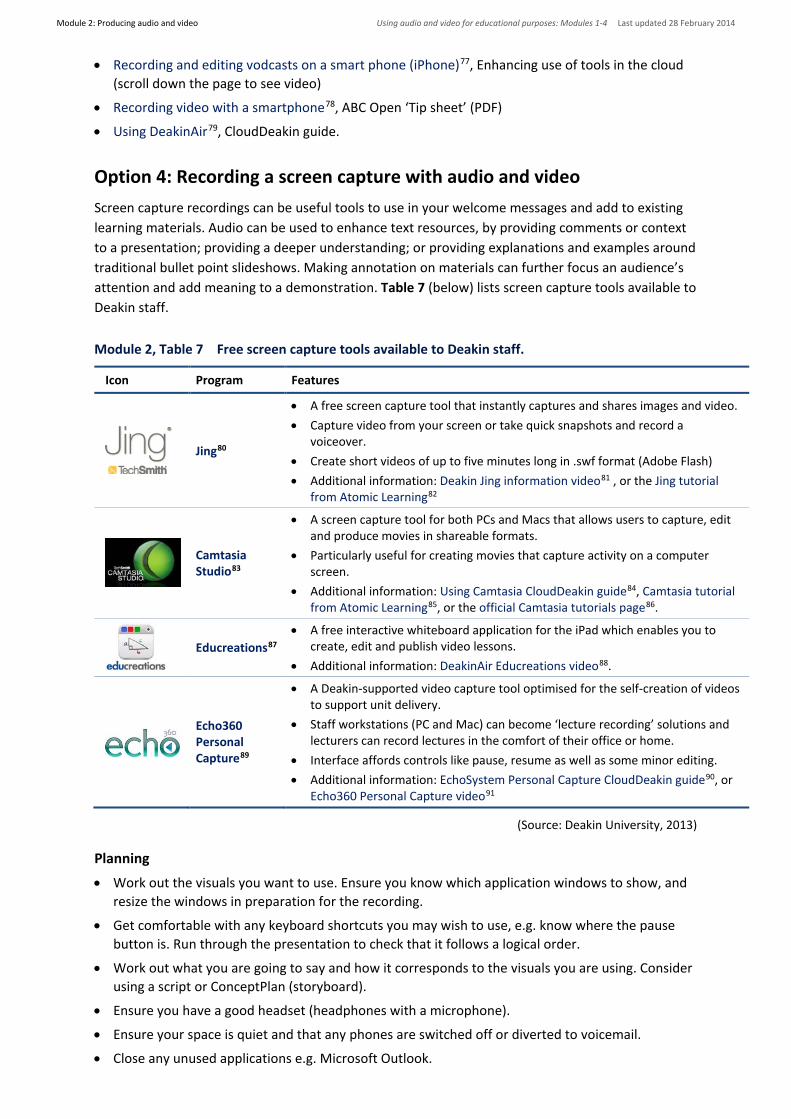
Option 4: Recording a screen capture with audio and video Screen capture recordings can be useful tools to use in your welcome messages and add to existing learning materials. Audio can be used to enhance text resources, by providing comments or context to a presentation; providing a deeper understanding; or providing explanations and examples around traditional bullet point slideshows. Making annotation on materials can further focus an audience’s attention and add meaning to a demonstration. Table 7 (below) lists screen capture tools available to Deakin staff.
Module 2, Table 7 Free screen capture tools available to Deakin staff.
Icon Program Features
Jing80
• A free screen capture tool that instantly captures and shares images and video. • Capture video from your screen or take quick snapshots and record a
voiceover. • Create short videos of up to five minutes long in .swf format (Adobe Flash) • Additional information: Deakin Jing information video81 , or the Jing tutorial
from Atomic Learning82
Camtasia Studio83
• A screen capture tool for both PCs and Macs that allows users to capture, edit and produce movies in shareable formats.
• Particularly useful for creating movies that capture activity on a computer screen.
• Additional information: Using Camtasia CloudDeakin guide84, Camtasia tutorial from Atomic Learning85, or the official Camtasia tutorials page86.
Educreations87
• A free interactive whiteboard application for the iPad which enables you to create, edit and publish video lessons.
• Additional information: DeakinAir Educreations video88.
Echo360 Personal Capture89
• A Deakin-supported video capture tool optimised for the self-creation of videos to support unit delivery.
• Staff workstations (PC and Mac) can become ‘lecture recording’ solutions and lecturers can record lectures in the comfort of their office or home.
• Interface affords controls like pause, resume as well as some minor editing. • Additional information: EchoSystem Personal Capture CloudDeakin guide90, or
Echo360 Personal Capture video91
(Source: Deakin University, 2013)
Planning • Work out the visuals you want to use. Ensure you know which application windows to show, and
resize the windows in preparation for the recording.
• Get comfortable with any keyboard shortcuts you may wish to use, e.g. know where the pause button is. Run through the presentation to check that it follows a logical order.
• Work out what you are going to say and how it corresponds to the visuals you are using. Consider using a script or ConceptPlan (storyboard).
• Ensure you have a good headset (headphones with a microphone).
• Ensure your space is quiet and that any phones are switched off or diverted to voicemail.
• Close any unused applications e.g. Microsoft Outlook.

Module 2: Producing audio and video Using audio and video for educational purposes: Modules 1-4 Last updated 28 February 2014
Record
• Configure settings for recording: frame rate, video display dimensions, effects etc. Refer to the guide relating to the application you are using for advice about what settings to choose.
• Plan for editing in post-recording, e.g. allow for introduction time or an audible gap between topics.
• Try to keep your recordings a short as possible.
Edit
Once you have made your recording, you will need to edit it to make it ready for publication. If you are using Echo360 Personal Capture or Camtasia, you will be able to make minor edits to your video from within the applications. If you are going to combine your screen capture video with other media, you will need to create your video using video editing software as mentioned in Option 3: Recording with a video camera above.
Uploading to CloudDeakin
Once you have finished recording your video, make it available to your students by uploading it to DeakinAir. You will then be able to copy the embed code and add it to your CloudDeakin site.
Refer to the Using DeakinAir92 CloudDeakin guide for instructions on how to upload videos and add them to your CloudDeakin site.
Want to find out more?
• Recording audio voiceovers for teaching and learning materials93, JISC Digital Media Guides
• Screencasting: broadcasting on-screen activity94, JISC Digital Media Guides
• The art of writing great voice over scripts95, The eLearning Coach blog
• Using EchoSystem Personal Capture96, CloudDeakin guide
• Using DeakinAir97, CloudDeakin guide.
References: Module 2 JISC Digital Media 2012, ‘Using audio in teaching and learning’, retrieved 29 April 2013,
<www.jiscdigitalmedia.ac.uk/guide/using-audio-in-teaching-and-learning>.

Module 2: Producing audio and video Using audio and video for educational purposes: Modules 1-4 Last updated 28 February 2014
Endnotes: Module 2 All hyperlinks below were checked and found to be active on 28 February 2014.
25 ConceptPlan page on Deakin Learning Futures website, http://www.deakin.edu.au/learning/course-enhancements/from-lectures-to-cloud-concepts/concept-plans
26 Audio and video editing applications: Audacity, www.deakin.edu.au/software/media.php?anchor=audacity
27 Audio and video editing applications: iMovie, www.apple.com/au/support/imovie/
28 Audio and video editing applications: GarageBand, www.apple.com/support/garageband/
29 Audio and video editing applications: Windows Live Movie Maker, http://windows.microsoft.com/en-AU/windows-live/movie-maker-get-started
30 Audio and video editing applications: QuickTime Pro, www.apple.com/au/quicktime/extending/
31 Publishing and sharing platforms: Deakin Air, http://air.deakin.edu.au/
32 Publishing and sharing platforms: YouTube, www.youtube.com/
33 Publishing and sharing platforms: Vimeo, www.vimeo.com/
34 Publishing and sharing platforms: SoundCloud, www.soundcloud.com/
35 Resource page with information on how to embed media into CloudDeakin (‘sharing content’ area tab), http://www.deakin.edu.au/learning/clouddeakin/clouddeakin-guides/video-and-audio/deakinair
36 File-sharing services: Portfolio (D2L), http://www.deakin.edu.au/students/clouddeakin/help-guides/eportfolio/ eportfolio-overview
37 CloudDeakin, www.deakin.edu.au/clouddeakin
38 File-sharing services: OneDrive for Business (previously known as SkyDrive Pro) http://www.deakin.edu.au/about-deakin/administrative-divisions/esolutions/it-help/digital-file-storageDropbox
39 File-sharing services: GoogleDrive, https://support.google.com/drive/?hl=en
40 File-sharing services: CloudStor, www.aarnet.edu.au/services/cloud-services/cloudstor
41 CloudDeakin News tool guide,www.deakin.edu.au/learning/clouddeakin/clouddeakin-guides/communication/news-tool
42 Voice recording apps (Android): VoicePro, https://play.google.com/store/apps/details?id=com.voicepro&hl=en
43 Voice recording apps (Android): Voice Recorder Pro, https://play.google.com/store/apps/details?id=com.tokasiki. android.voicerecorderpro&hl=en
44 Voice recording apps (iOS): Recordium, https://itunes.apple.com/au/app/id637494062?mt=8
45 Voice recording apps (iOS): Voice Recorder HD, https://itunes.apple.com/us/app/voice-recorder-hd-for-audio/id373045717?mt=8
46 Teaching with technology (info on Audacity and GarageBand), https://sites.google.com/site/mmlteachingwithtechnology/
47 CloudDeakin guides page (uploading to CloudDeakin), www.deakin.edu.au/learning/clouddeakin/clouddeakin-guides/communication/news-tool
48 Creating an audio podcast, www.jiscdigitalmedia.ac.uk/audio/advice/creating-an-audio-podcast
49 Increasing student engagement using podcasts, http://online.cofa.unsw.edu.au/learning-to-teach-online/ltto-episodes?view=video&video=233
50 Pedagogical roles for audio in online learning, www.tonybates.ca/2012/03/18/pedagogical-roles-for-audio-in-online-learning/
51 Podcasting workshop: an introduction to audio podcasting, www.atomiclearning.com/au/podcasting
52 Recording audio in Audacity, http://online.cofa.unsw.edu.au/learning-to-teach-online/ltto-episodes?view=video &video=249
53 The art of writing great voice over scripts, http://theelearningcoach.com/elearning_design/the-art-of-writing-great-voice-over-scripts/
54 Using audio in teaching and learning, www.jiscdigitalmedia.ac.uk/guide/using-audio-in-teaching-and-learning
55 Using ‘News’ CloudDeakin guide, www.deakin.edu.au/learning/clouddeakin/clouddeakin-guides/communication/ news-tool
56 DeakinAir site, http://air.deakin.edu.au/

Module 2: Producing audio and video Using audio and video for educational purposes: Modules 1-4 Last updated 28 February 2014
57 Using Deakin Air, www.deakin.edu.au/students/clouddeakin/help-guides/video-and-audio/deakinair
58 Atomic Learning, http://www.atomiclearning.com/au/home
59 CloudDeakin, www.deakin.edu.au/clouddeakin
60 Using Deakin Air (webcam), www.deakin.edu.au/learning/clouddeakin/clouddeakin-guides/video-and-audio/deakinair
61 Example of good practice in online communication, http://www.deakin.edu.au/learning/leadership-in-cloud-and-located-learning2/leadership-in-cloud-and-located-learning/examples-of-premium-cloud-and-located-learning
62 Using DeakinAir (CloudDeakin guide), www.deakin.edu.au/students/clouddeakin/help-guides/video-and-audio/deakinair
63 Example of good practice in online communication, http://www.deakin.edu.au/learning/leadership-in-cloud-and-located-learning2/leadership-in-cloud-and-located-learning/examples-of-premium-cloud-and-located-learning
64 Getting started with creating your own video, www.jiscdigitalmedia.ac.uk/guide/getting-started-with-creating-your-own-video
65 So you want to shoot a video (Please note, Deakin staff log in is required to access this site), https://staff.deakin.edu.au/services/content-media/sound-vision.php
66 Zoom recorders in Deakin Library, www.deakin.edu.au/library/campus-libraries/equipment.php#equipment
67 Deakin video recording locations, www.deakin.edu.au/learning/course-enhancements-sandpits/from-lectures-to-cloud-concepts
68 JISC Digital Media video on recording monitors, www.jiscdigitalmedia.ac.uk/videos/flip.mp4
69 Video recording and editing apps for mobile devices (iOS): iMovie, https://itunes.apple.com/au/app/imovie/ id377298193?mt=8
70 Video recording and editing apps for mobile devices (iOS): Pinnacle Studio, https://itunes.apple.com/au/app/pinnacle-studio/id552100086?mt=8
71 Video recording and editing apps for mobile devices Android: Magisto, https://play.google.com/store/apps/ details?id=com.magisto
72 Video recording and editing apps for mobile devices Android: Vid Trim Pro, https://play.google.com/store/apps/ details?id=com.goseet.VidTrimPro&feature=more_from_developer#?t=W251bGwsMSwxLDEwMiwiY29tLmdvc2VldC5WaWRUcmltUHJvIl0.
73 Basic guide to the Flip, www.jiscdigitalmedia.ac.uk/movingimages/advice/basic-guide-to-the-flip
74 Basic guide to videoing interviews, www.jiscdigitalmedia.ac.uk/movingimages/advice/basic-guide-to-videoing-interviews
75 Basic guide to shooting video, www.jiscdigitalmedia.ac.uk/movingimages/advice/basic-guide-to-shooting-video/
76 Digital equipment for loan, Deakin University Library, www.deakin.edu.au/library/campus-libraries/equipment. php#equipment
77 Recording and editing vodcasts on a smart phone (iPhone), http://www.deakin.edu.au/learning/capacity-building/ learning-2013-resources/speed-dating-in-the-cloud
78 Recording video with a smartphone, https://open.abc.net.au/assets/pdf/abc_open_tip_sheet_smartphone_video.pdf
79 Using DeakinAir, www.deakin.edu.au/learning/clouddeakin/clouddeakin-guides/video-and-audio/deakinair
80 Jing video capture site, www.techsmith.com/jing.html
81 Deakin Jing information video, http://air.deakin.edu.au/public/media/debra-petty/0_wmodbpal
82 Jing tutorial from Atomic Learning, www.atomiclearning.com/au/movie/90477/play_window?sid=2506
83 Camtasia studio site, www.techsmith.com/camtasia.html
84 Using Camtasia CloudDeakin guide, www.deakin.edu.au/learning/clouddeakin/clouddeakin-guides/video-and-audio/camtasia
85 Camtasia tutorial from Atomic Learning, www.atomiclearning.com/au/?q=camtasia&selected_topics=All+topics&selected_categories=
86 Official Camtasia tutorials page, www.techsmith.com/tutorial.html
87 Educreations site, www.educreations.com/
88 DeakinAir Educreations video, http://air.deakin.edu.au/public/media/susie-mafarlane/0_5src7x03
89 EchoSystem Personal Capture CloudDeakin guide, www.deakin.edu.au/learning/clouddeakin/clouddeakin-guides/ video-and-audio/echo

Module 2: Producing audio and video Using audio and video for educational purposes: Modules 1-4 Last updated 28 February 2014
90 EchoSystem Personal Capture CloudDeakin guide, www.deakin.edu.au/learning/clouddeakin/clouddeakin-guides/video-and-audio/echo
91 Echo360 Personal Capture video, http://air.deakin.edu.au/public/media/sid-manay-echo/0_s00qwqli
92 Using DeakinAir, www.deakin.edu.au/students/clouddeakin/help-guides/video-and-audio/deakinair
93 Recording audio voiceovers for teaching and learning materials, www.jiscdigitalmedia.ac.uk/guide/recording-audio-voiceovers-for-teaching-and-learning
94 Screencasting— broadcasting on-screen activity, www.jiscdigitalmedia.ac.uk/movingimages/advice/screencasting/
95 The art of writing great voice over scripts, http://theelearningcoach.com/elearning_design/the-art-of-writing-great-voice-over-scripts/
96 Using EchoSystem Personal Capture, CloudDeakin guide, www.deakin.edu.au/learning/clouddeakin/clouddeakin-guides/video-and-audio/echo
97 Using DeakinAir, CloudDeakin guide, www.deakin.edu.au/students/clouddeakin/help-guides/video-and-audio/deakinair

Module 3: Cloud Concepts Using audio and video for educational purposes: Modules 1-4 Last updated 28 February 2014
Module 3: Cloud concepts
In this module you will you will learn about the different audio and video elements that can be used for educational resources and shown practical examples of how to use freely available tools to create your content.
What is a cloud concept? Cloud concepts utilise audio and video to present information in the cloud, to engage and support students with key information. They are a key feature of the third stage of the course enhancement process known as resourcing98. Cloud concepts may be used to add ‘life’ to a key concept, help explain a complex idea, or enhance student engagement. Using cloud concepts is particularly useful if you deploy a flipped classroom approach to teaching and you need to provide your students with audio/visual materials.
Cloud concepts can transform parts of lectures and presentations into learning resources that can be watched repeatedly, on-demand by the learner. They are usually 5 to 10 minutes in length, focus on 1 or 2 concepts and include a variety of techniques to encourage learning. In essence, cloud concepts are designed to transform information into accessible and engaging pieces of media to support teaching.
Module 3, Figure 1 What makes a cloud concept?
(Source: Deakin University, 2013)
Throughout the previous modules we looked at the systems and platforms in place to support audio and video use at Deakin and how to properly plan and produce materials. In this module we will be looking at the different audio and video elements that can be used to make up a cloud concept, how to piece together a concept, and ways to identify the areas of your teaching where cloud concepts could be utilised.
For examples of cloud concepts, look at the From lectures to cloud concepts99 page.
Identifying when to use cloud concepts Identifying when to use a cloud concept can be confusing. It requires you to think about the delivery of your unit and the areas where you can best utilise audio and video. Creating a cloud concept is not done simply for aesthetic reasons, you should instead think about why the concept is needed, and what components of your materials will benefit from transformation. Consider the following basic learning design guidelines when creating any learning materials:
What area in my content is this activity addressing?
Has this concept proven problematic for students in the past?
Who will be using the resource?
Ideas/ concept
Media and
Internet
Cloud Concept
Prepared by the DLF Teaching Development Team www.deakin.edu.au/learning-futures © Deakin University 2014 Page 26 of 45

Module 3: Cloud Concepts Using audio and video for educational purposes: Modules 1-4 Last updated 28 February 2014
What is the purpose of adding audio and video?
How long will the cloud concept have to be to address the desired content?
Will a cloud concept better motivate students to learn the content?
What resources will I require to do the activity?
Will the concept be linked to an assessment task?
Addressing some of these questions will help you better decide where your content could benefit from a cloud concept. This will also help you in the planning process of creating your materials.
Using audio and video everyday As we continue to increase our use of audio and video in teaching online, it is good to have some ways to reduce the time demands of creating content. A list of suggestions for supporting the creation of audio and video is below:
• Start using technology in teaching every day. It will become second nature.
• Continually experiment with new apps and devices.
• Capture as much content as you can. Record lectures, guest speakers, tutorials. Get students to record their classwork and document assignment tasks. Pre-arrange events and guests for each trimester.
• Encourage your colleagues to attend Teaching Development professional development sessions regularly (to see a list of PD sessions, please view the Event Registration System100).
• Use the resources available at Deakin to support audio and video production.
Video recording locations Deakin Learning Futures with assistance from DeakinPrime, have established facilities at Melbourne Burwood campus, Geelong Waterfront campus, and Melbourne City Centre to allow you to book a date and time for recording with a camera. At these locations you will be able to record parts of your cloud concepts with professional equipment and use green screen technology for interviews or your talking head. Using your ConceptPlan and cloud concept planning, these recordings can be transformed with graphics, text and other media to create cloud concepts. For instructions on how to book, view the ‘Cloud concept (video) recording locations’ area on the From lectures to cloud concepts information101 page.
Cloud concept techniques There are many audio and video techniques that can be deployed to deliver a cloud concept. You might use a screen capture to demonstrate a process; a video recording to present an interview or direct a message; or use a series of still images with a narration to present information. Whichever technique you choose, you will be using technology to present your idea or concept to students. These techniques can be used in conjunction with each other, or as stand-alone artefacts to support your teaching. Because information is the most important part of a cloud concept, make sure you choose the right techniques to get your message across.
Table 1 shows a list of common techniques used to support teaching and learning through cloud concepts. The following section will provide additional information about these techniques and take a look at how each one can be used to create cloud concepts.
Prepared by the DLF Teaching Development Team www.deakin.edu.au/learning-futures © Deakin University 2014 Page 27 of 45

Module 3: Cloud Concepts Using audio and video for educational purposes: Modules 1-4 Last updated 28 February 2014
Module 3, Table 1 Common audio and video techniques used in cloud concepts
Technique What is it? When should I use it? Requirements
Talking head (link to area in this document)
Directly talking to the camera. Often called a piece-to-camera
Introducing a theme or linking parts
Summarising information Directing a learner to complete a task
Camera Smartphone/tablet Script Suitable location Camera stand or camera person
Screen capture/ Annotation (link to area in this document)
Recording the screen of your computer or device using software
To demonstrate a procedure Record information from within an application
Create instructions
Screen capture software Microphone/headset Computer Script
Interviews (link to area in this document)
Recording a person answering questions
Add expert knowledge to a presentation
Gain insight into opinions Discuss a topic Clarify understanding
Location Camera/smartphone/tablet Microphone Interviewee List of questions
Demonstration (link to area in this document)
Recording a task that can be repeated
Document a clearly defined task/operation
Support written instructions
Task specific equipment Camera/s and stand Instructions/script
Voice over (link to area in this document)
Recording voice over the top of imagery or sounds
Give context to imagery/sounds Tell a story Explain a visual concept/demonstration
Suitable location Smartphone/tablet with voice apps
Good quality microphone Script
Images (link to area in this document)
Original, copyright approved or licensed still images
Used to show location, person, thing
In-place of video Comparison of historical images Document an event
Camera/smartphone/tablet Internet Wikimedia Photoshop/Gimp
Cutaway (link to area in this document)
Using images or video to cut away from a main video element
Used to establish location Present supporting images or video
Make an interview or talking head more engaging
Camera/smartphone/tablet Editing software
Transcript (link to area in this document)
Providing written transcript of cloud concept for accessibility
Support accessibility Word processor
(Source: Deakin University 2013)
Prepared by the DLF Teaching Development Team www.deakin.edu.au/learning-futures © Deakin University 2014 Page 28 of 45

Module 3: Cloud Concepts Using audio and video for educational purposes: Modules 1-4 Last updated 28 February 2014
Talking head A talking head or piece-to-camera (PTC) is a commonly used video technique for presenting information. They feature prominently on the television news and throughout many programs where there is a presenter or host. A talking head is a medium or close-up video recording of a person talking directly to the camera. These are usually very short summaries of information or used to introduce or link a section of a program. Sometimes they are used in educational videos to direct an action for a learner to complete.
Module 3, Figure 2 Commonly used shot sizes for talking head
(Source: Deakin University, 2013)
Figure 2 (above) shows the commonly used shot sizes when filming a talking head. It is important that the shot is relatively close to the person speaking to help show their facial expressions and better connect the audience with the presenter. When recording a talking head, make sure you follow the steps of producing audio and video from Module 2. For more information on presenting to camera, watch the presenting to camera102 video on the Deakin sound and vision support page.
Cut-away Cut-away shots are used to overlay images or video over the top of another piece of media. As the term suggests, a cut away is when a camera cuts away from the main piece of action. They are often used over the top of a talking head to highlight main points with other visual elements. Cut-away shots are also used to give audiences a sense of location and to add imagery to a clip. When you use a cut-away shot you should retain the audio from your main clip. Return frequently to your main clip to re-establish your shot. Cut-away shots should be interspersed with your interview or talking head, and should retain relevance to the subject matter of your main clip. A good example of using the cut-away technique is the presentation and graphics video103. For more information about cut-away techniques visit the cutaway technique104 video on the Videomaker website.
Screen capture/Annotation Screen capture is the process of using software to record action on a computer or mobile device. This technique is most commonly used to demonstrate a procedure or give tutorial instructions from within a computer application. There is a range of software that can help you to capture your computer screen or mobile device, including online and downloadable applications. Many of these applications allow you to annotate your screen and edit using different effects. Deakin staff have access to Camtasia105 and Jing106 software for use on their computers, and there are many apps available for iPad in the iOS App Store. Table 2 shows some useful screen capture and annotation apps for iPad.
Prepared by the DLF Teaching Development Team www.deakin.edu.au/learning-futures © Deakin University 2014 Page 29 of 45

Module 3: Cloud Concepts Using audio and video for educational purposes: Modules 1-4 Last updated 28 February 2014
Module 3, Table 2 Screen capture apps for iPad
Icon Name Features
Educreations Interactive Whiteboard107 (Free)
• Record and replay voice, voice, handwriting and drawings • Add photos from camera roll • Animate images • Share lessons via social media • Embed lessons in blog wiki.
Explain Everything for iPad108 ($2.99)
• Record and edit voice, handwriting, drawing and animations • Create slides, draw in any colour, add shapes, text, use laser pointer • Rotate, move, scale, copy/paste, clone and object • Add new or existing photos and video. • Import PDF, PPT, DOC, XLS • Cloud integration – Dropbox, Evernote, Google Drive, WebDAV • Multiplatform export and computer application
ShowMe Interactive Whiteboard109 (Free)
• Instant recording • Easy switching between drawing and erasing • No recording limit • Voice record • Import images from multiple locations • Easy embedding and sharing
ScreenChomp110 (Free)
• Record audio, handwriting, drawing and annotation • Import images from camera roll • Share using www.screenchomp.com
Doodle Buddy for iPad – Paint, Draw, Scribble, Sketch111 (Free)
• Doodle and stamp • Import photos • Share doodle with users on same Wi-Fi • Export via email
(Source: Deakin University, 2013)
It is always best practice to prepare a script before recording a screen capture. If you are recording instructions, go through the procedure before you start recording and think of the most logical method for completing your task. Make notes of your procedure as this will help you write your voiceover. They key to making a good quality screen-capture is to practice with your software. Below are some tips to help you improve your screen capturing technique:
• clean up your desktop and close unnecessary applications before you record
• do a practice run-through and write your script as you go, using concise words
• don’t talk with the mouse i.e. avoid frantic mouse movements around the screen
• practice using a microphone.
If you are using Camtasia, make sure you visit the Camtasia tutorials page112 for video guides and tips on using the product.
Prepared by the DLF Teaching Development Team www.deakin.edu.au/learning-futures © Deakin University 2014 Page 30 of 45

Module 3: Cloud Concepts Using audio and video for educational purposes: Modules 1-4 Last updated 28 February 2014
Interviews Interviews are a great way to present information as a dialogue between two or more people. Interviews can be used to add expert knowledge on a subject, gauge public opinion and clarify information. There are different types of interviewing styles that you might want to record for your teaching and learning practice. You might want to be present in the video as the interviewer or you might want to be hidden behind the camera. You might want to use a ‘vox pop’ or, there may even be times when you decide to record a panel interview at a live event. Depending on the interview style you choose, you will need to set up your shot accordingly. It is important when you are recording an interview that you obey the 180-degrees rule.
Figure 3 shows a diagram of the 180-degree rule113 in action. It is important that the camera never crosses the 180-degree axis, as this will confuse the spatial relationship between the two people in the interview. By keeping the camera to one side of the axis, you will ensure that there is no accidental flip in position between interviewer and the interviewee. This is especially important if you are using two cameras on different angles during your interview. By using this technique, you enable viewers to visually connect with their subjects and get a professional look and feel when you edit the clips together. Watch the 180 degree rule114 video for a more detailed explanation. This video is also a good example of a cloud concept.
Module 3, Figure 3 180 degree rule
This schematic shows the axis between two characters and the 180° arc on which cameras may be positioned (green). When cutting from the green arc to the red arc, the characters switch places on the screen.
(Source: Wikipedia, 2013)
Interviews are a great resource for making cloud concepts as you have the choice of cutting your clips to just show the parts you want, or providing the whole video as a resource to your students. Interviews are often used in conjunction with cut-away shots to add extra imagery and supporting visuals. When preparing for an interview, it is suggested you have some pre-prepared questions to help guide the session. By having these prepared you will ensure that you ask all the questions you need answered.
Vox pop
Vox pop is an interviewing technique that allows you to quickly record a range of opinions. The term ‘vox pop’ comes from the Latin expression, vox populi meaning ‘voice of the people’. You see this technique often used in news items and reporting from on-location events. It is a great device to use in cloud concepts, especially if you are trying to debunk a myth. Simply ask a range of people the same question and record their varied answers. When editing the responses you create the opportunity to clarify the answer to your question. When recording a vox pop it is a good idea to remain out of the camera shot. Watch the What is a browser?115 video for an example of a vox pop in action.
Prepared by the DLF Teaching Development Team www.deakin.edu.au/learning-futures © Deakin University 2014 Page 31 of 45

Module 3: Cloud Concepts Using audio and video for educational purposes: Modules 1-4 Last updated 28 February 2014
Panel interview
A panel interview is the recording of a group of people in conversation about a particular topic. This style of interview is useful when recording live events and can be used effectively in cloud concepts. Depending on your level of production, you might have several camera angles recording the panel discussion, or you might simply record a front-on angle of the panel. If possible, this style of interview should be supported with a good quality audio setup to ensure all panel members are clear and audible.
Two-person interview
A regular interview is easy to set up and is the most common type you will use in your cloud concept. You can easily setup an interview in your office, library or outdoor location and record it with your personal or loaned equipment. Sometimes interviews can be set up in a room with a single shot focussing only on the subject. Once the interview has been conducted and the subject has left the room, the interviewer will then set up the camera, obeying the 180-degree rule (as described earlier), and record their cut-away questions (i.e. asking your questions to the new camera angle). These cut-away questions can then be edited into the interview as required. For more information on setting up an interview, visit the interviewing page116 on the Atomic Learning site.
Demonstration Demonstrations should be used in your cloud concepts to document and show a clearly defined task that can be repeated. You might include a demonstration on how to correctly perform a physical task, undertake a science experiment, or to show the mechanics of an operation. The tasks that you choose to demonstrate should be selected based on their importance and relevance to a unit. To set up a demonstration you will need to make sure you have properly planned your procedure and carefully chosen the environment in which you will conduct it. Use the information in Module 2: Producing audio and video to help you plan your recording. You might require assistance with camera work or participants for your demonstration, to save time, practice your demonstration before you hit record. Consider the following before recording a demonstration:
• What is the best angle for filming?
• Will the demonstration be a single shot or multiple parts edited together?
• Do I require assistance?
• Will the audience be able to repeat my demonstration without confusion?
A demonstration can effectively be used as a stand-alone piece of media to support teaching, or as an element in a cloud concept. Use demonstrations when you have identified an area your students struggle with or need to be able to perform with a higher degree of accuracy. By recording a demonstration, students have the ability to repeatedly watch and learn your procedure or task.
Voiceover Writing a good voiceover is a crucial part in effectively using audio and video in education. Voiceovers should be concise, well-articulated audio devices that are used to emphasise and present the key information of your cloud concept. Places where you would use a voiceover include:
• narrating a PowerPoint or Prezi presentation
• during video or image overlay
• explaining an annotation or diagrammatic element.
Prepared by the DLF Teaching Development Team www.deakin.edu.au/learning-futures © Deakin University 2014 Page 32 of 45

Module 3: Cloud Concepts Using audio and video for educational purposes: Modules 1-4 Last updated 28 February 2014
The key to creating a good voiceover is to make sure that you write to your visual elements. Here are some tips to help you write and record a good quality voiceover:
• Don’t introduce ideas, themes or explain something without having the visual elements to support you.
• Always write to your visuals.
• Practice your instructions to make sure they are accurate.
• Use a read speed of 3 words-per-second to determine the required length of your visual elements. This is the average reading speed for broadcast. (Edge Studio, 2013) If you try to speed up your reading, your voiceover will sound rushed and unnatural.
• Practice until you are comfortable with your script.
• If you stumble over a sentence when recording: pause, and then read the sentence again. You can edit out your mistakes later.
• Use a good quality recording device or app and a quiet location.
By following these basic rules, you should be able to write and record a good quality voiceover. Remember, people won’t accept poor quality audio the same way they accept lesser quality video or images. Watch the YouTube clip How to record voiceovers117 for useful tips in this area.
Images Images are an important part of creating audio and video concepts for education. They provide visual elements to identify processes, themes and ideas, and are used to tell stories and present information. They are especially important where suitable video is not available. There are several ways to use images to support cloud concepts:
• narrated slideshow of images
• using visual effects such as Ken Burns (or Hitchcock) style zooming and cropping118 to create movement
• to show historical images.
Unless you have taken the images yourself, you must be acutely aware of copyright infringement laws and the license agreements of the images you have sourced. As a general rule, you must NOT use images that you find on the web, unless you have permission and the appropriate rights to use the image. The safest way to use images from the web is to purchase them from reputable microstock providers. Table 3 shows a list of reputable microstock providers, where you can safely purchase licenses to use images, audio and video. Please refer to the Copyright guidelines and requirements119 page for more information on licensing and legal obligations at Deakin.
Please see Table 3 on the following page for examples of reputable microstock providers.
Transcript When you produce a cloud concept you should accompany it with a written transcript to support accessibility. This will ensure that students with disabilities have the same access to the materials as other students. While DeakinAir has inbuilt subtitle technology, it is quite difficult to arrange to have your cloud concepts supported in this manner. The easiest way to provide a transcript is to create an accessible PDF or Word document to support your media.
Prepared by the DLF Teaching Development Team www.deakin.edu.au/learning-futures © Deakin University 2014 Page 33 of 45

Module 3: Cloud Concepts Using audio and video for educational purposes: Modules 1-4 Last updated 28 February 2014
Module 3, Table 3 Reputable microstock providers
Resource Description Features
istockphoto120 Originally a photo repository, iStockphoto now includes illustrations, video and music. Licenses for materials are exchanged with credits that are purchase by the user.
• Over 10 million files • 115,000+ contributors • 7 million members • 45,000 files added weekly • Standard and extended licenses • Royalty-free materials with legal guarantee • Feature-rich search functionality
ShutterStock121 Shutterstock is a subscription based stock repository of photos, illustrations, vectors and videos.
• Over 25 million stock photos • 10,000 images added daily • Subscription and on-demand pricing plans • Spectrum colour search feature • Free weekly photo
Fotolia 122 Fotolia is a crowd-sourced library of royalty-free images, vectors, illustrations and video footage clips. Media can be purchased with credits or by subscription.
• Over 23 million files • Standard and extended licenses available • Feature-rich search functionality
Pond5123 Pond5 is an online marketplace for media makers. It includes the world’s largest collection of royalty-free video as well as music, sound effects and after-effects projects. Items are sold individually.
• 1.7 million video clips • 8 million photos • Low prices • Full resolution preview
Revostock124 Revostock is the first microstock website to offer stock video and audio in one location. Revostock items are purchased using a credit system.
• Over 472 000 videos • 4 700 video templates for Adobe After
Effects and Apple Motion software • 94 000 music and sound effects
Getty Images125 Getty Images is a worldwide leading provider of royalty-free and rights managed stock images, editorial images, footage, music and multimedia. Rights to media are individually purchased.
• 24 million images • Royalty-free, rights managed, editorial and
music licenses available • Search guides and tips • Up-to-the-minute news footage • Rights and clearance service
Stocksy126 Stocksy has been created to provide a cooperative ownership platform for contributing artists. It is an artist focussed image library curated by its developers, with a range of licenses available.
• Thousands of exclusive images • Royalty-free and extended licenses for
commercial use • Photography focussed
Canstockphoto127 Canstockphoto is a royalty-free stock photography service with different methods for purchasing and downloading images including using credits, paying cash and subscriptions.
• 21 000 contributors • 140 000 members • 10 000 files added per day • Multiple licensing options available
including standard and commercial
(Source: Deakin University 2014)
Prepared by the DLF Teaching Development Team www.deakin.edu.au/learning-futures © Deakin University 2014 Page 34 of 45

Module 3: Cloud Concepts Using audio and video for educational purposes: Modules 1-4 Last updated 28 February 2014
Planning and producing a cloud concept Using the basic elements above, you can create a range of different cloud concepts. The following section provides two basic methods for planning and producing a cloud concept. Make your cloud concepts as simple or as complex as your creativity and technical ability allow and always utilise a method that works best for you.
ConceptPlans In the process of planning your cloud concept you might want to create a ConceptPlan (storyboard) to help visualise your project. Deakin provides access to several options for creating your ConceptPlan:
• Deakin ConceptPlan template:128 Offers a ConceptPlan template as well as video instructions on how to build your ConceptPlan.
• Atomic Learning:129 Deakin staff are members of Atomic Learning, which has a range of materials to support teaching. Download Storyboard Pro for help with your ConceptPlan and watch the supporting videos to teach yourself how to use the software.
A ConceptPlan (storyboard) will help you greatly as you attempt to piece together your cloud concept. When building your ConceptPlan, make sure you do the following:
• have a draft script prepared
• have a list of your audio and video components and where you have sourced them from
• include all timing and instructions on effects, transitions, titles
• have clear audio instructions.
For more information on planning your story read the story planning130 page on the Atomic Learning website. By using a ConceptPlan and following the suggested methods below, you should be able to create an easy to follow concept that is engaging for your students.
Cloud concepts framework It is a good idea to follow a basic framework to ensure consistency with the look and feel of your cloud concepts. You should build this into your original ConceptPlan. This will help your products look professional and your students to become familiar with their structure. Figure 4 (below) shows an example of a basic framework for piecing together a cloud concept.
Module 3, Figure 4 Basic framework for a cloud concept
(Source: Deakin University, 2013)
For a copy of the official Deakin video bumper, speak to your faculty pod. (A ‘bumper’ is a short recording used to show ‘ownership’ or branding at the start of a video.) Ensure that you are familiar with the Deakin visual identity guide131 for all text and logo use in your cloud concept, and that you properly reference your materials in the tail (credits) of your concept.
Below are two suggested methods for putting together the content section of your cloud concept. It is important to note that these methods are only to be used as a guide. There might be specific technical elements to your selected hardware and software that cannot be covered in this document. Make sure that you are familiar with your equipment and have utilised the internet for application and hardware support.
Bumper (Branding) Title Slide Content Tail
(Credits)
Prepared by the DLF Teaching Development Team www.deakin.edu.au/learning-futures © Deakin University 2014 Page 35 of 45

Module 3: Cloud Concepts Using audio and video for educational purposes: Modules 1-4 Last updated 28 February 2014
Method 1: Image overlay
Overlay is a simple method for presenting audio and video information to your students. If you have never made a cloud concept before, it is a good place to start and practice your skills. This method utilises three basic elements and can be pieced together relatively easily. A good example of this style of cloud concept is the Resourcing the new history curriculum using ICT132 video.
Figure 5 (below) shows the required elements and structure of an image overlay cloud concept. The video begins with a talking head introduction to humanise the learning experience. This helps students connect with the person teaching or presenting the information. The introduction is followed by the main content section, which is a combination of still images and a voiceover. To finish the cloud concept, the video uses another talking head to summarise the content and give any further instructions.
Module 3, Figure 5 Requirements of an image overlay cloud concept
Elements used Talking head, voiceover, images
Equipment/Software Video camera or smartphone, zoom recorder or headset microphone, images, iMovie or Windows Media Maker
Structure
(Source: Deakin University, 2013)
Method:
Step 1: Decide on the topic and learning objectives of the cloud concept.
Step 2: Write a draft script for your introduction, voiceover and summary, covering all your information.
Step 3: Identify your visual requirements and the length of your voiceover, using the 3 words-per-second rule133 and assess how many distinct talking points you have.
Step 4: Source relevant images, including screenshots, licensed images or original images; and create a ConceptPlan (storyboard) with your script. Assign images to the relevant places in your script making sure the textual content relates to the images. Make a note on your ConceptPlan of how long each image will stay onscreen, what effects will be used and if you require any special transitions. Ensure you keep a record of the source and copyright status of all images.
Step 5: Make final edits to your script and adjustments to your ConceptPlan.
Step 6: Record your voiceover. Remember, if you make mistakes: pause, then redo the section with the error and continue on with your voiceover. You can edit out errors later.
Step 7: Record your talking head (piece-to-camera) introduction and summary with your chosen device. This may require several takes until you are happy with the shot.
Step 8: Import all your media into iMovie. Use the iMovie Help Centre within the application for video tutorials and instructions on how to use the software.
Step 9: Add your media to the timeline. First, add your introduction talking head, then, your voiceover audio and then your summary talking-head. Make sure to cut out and add only the sections of video that you require. Your timeline should now resemble Figure 5, giving you a basic skeleton for your cloud concept.
Prepared by the DLF Teaching Development Team www.deakin.edu.au/learning-futures © Deakin University 2014 Page 36 of 45

Module 3: Cloud Concepts Using audio and video for educational purposes: Modules 1-4 Last updated 28 February 2014
Step 10: Scan through your voiceover track and delete the sections where you made mistakes. Begin to drag and drop your images over the top of your voiceover, adjusting the timing of your images to match the ConceptPlan. Add transitions where necessary.
Step 11: Review your cloud concept and make adjustments where necessary.
Step 12: Add bumper, title and tail slides and other audio or music. Review and publish.
The image overlay method demonstrates how to use a talking head to introduce and summarise your cloud concept, and how to use a voiceover with image overlay to present information. The next method will look at how to utilise annotation and screen capture to add extra elements to your cloud concept.
Method 2: Annotation/Screen capture
Using annotation is another useful method for presenting information in a cloud concept. It follows the same methodology as the image overlay technique described above, but instead uses video screen capture instead of still images. Watch the Lift134 example to see how annotation and screen capture can effectively be used in a cloud concept.
Module 3, Figure 6 Requirements for a screen capture cloud concept
Elements used Talking head, voiceover, images, screen capture
Equipment/Software Video camera or smartphone, zoom recorder or headset microphone, images, Explain Everything or other annotation app, iPad and iMovie or Windows Media Maker
Structure
(Source: Deakin University, 2013)
To add a screen capture to your cloud concept, follow the same method as the image overlay, and add a new video element instead of more still images. This cloud concept again begins with a talking head introduction and finishes with a summary talking head at the end of the concept. In the middle is the image overlay and screen capture elements with the voiceover section now extended to cover the additional elements.
Method:
Step 1: Decide on the topic and learning objectives of the cloud concept.
Step 2: Write a draft script for your introduction, voiceover and summary, covering all your information. This time you will need to write copy specifically addressing the screen recording or annotation you intend to use. Practice your screen capture and make notes to use for your script. If your planning has been successful, your draft script should match the screen capture.
Step 3: Identify your visual requirements, using the three words-per-second rule and assess how many distinct talking points you have.
Step 4: Source relevant images, including screenshots, licensed or original images, and create a ConceptPlan with your script. Assign the elements to the relevant places in your script making sure the textual content relates to the visual content. Make a note on your ConceptPlan of how long each element needs to stay on screen, what effects will be used, and if you require any special transitions.
Step 5: Make final edits to your script and adjustments to your ConceptPlan.
Prepared by the DLF Teaching Development Team www.deakin.edu.au/learning-futures © Deakin University 2014 Page 37 of 45

Module 3: Cloud Concepts Using audio and video for educational purposes: Modules 1-4 Last updated 28 February 2014
Step 6: Record your screen capture using screen capture software, following the process from your practice-run and script.
Step 7: Record your voiceover. Remember, if you make mistakes: pause, then redo the section with the error and continue on with your voiceover. You can edit errors out later.
Step 8: Record your talking head (piece to camera) introduction and summary. This may require several takes until you are happy with the shot.
Step 9: Import all your media into iMovie. Use the iMovie Help Centre within the application for video tutorials and instructions on how to use the software.
Step 10: Add your media to the timeline. First, add your introduction talking head, then your voiceover audio, and then your summary talking head. Make sure to add only the sections of video that you require. Your timeline should now resemble Figure 6, without the image overlay and screen capture elements.
Step 11: Scan through your voiceover track and delete the sections where you made mistakes. Begin to drag and drop your elements over the top of your voiceover, adjusting the timing of your images to match the ConceptPlan. Use the same process to add your screen capture, ensuring it lines up with the relevant part of your voiceover. Add transitions where necessary.
Step 12: Review your cloud concept and make adjustments where necessary. You may need to further trim your screen capture video to fit with your voiceover track.
Step 13: Add bumper, title and tail slides and other audio or music. Review and publish.
There is no limit to the amount of elements you can add in the content section of your cloud concept. By following the above two methods you can see how to quickly and easily add extra elements to your content. Use this as a guide for experimenting with your own cloud concept structures and develop a cloud concept method that will work for your needs.
Publishing your cloud concept Once you have finished planning and producing your cloud concept you will be required to export the resource from your editing software into a supported file type for publishing. Depending on your editing software, you will have a range of different compression and rendering formats available for both audio and video. These will vary slightly depending on the software you are using. Before you export your cloud concept you should consider the following:
• What formats does my publishing platform support?
• How accessible will the media be to my audience?
• On which devices will my cloud concept be viewed?
By making these considerations you will ensure that you export your media in the most suitable format for your platform and audience.
DeakinAir recommends that videos should be prepared in 1280x720p and using the H.264 video codec at about 4000kb/s. As a general rule, this compression rate will be suitable for video to be displayed on most smartphones, tablets and computers. DeakinAir provides staff with a secure streaming server for their cloud concepts. Once videos are uploaded to DeakinAir, they can then be embedded in your CloudDeakin site to support your teaching. For information on how to upload content to DeakinAir, visit the DeakinAir guide135.
Prepared by the DLF Teaching Development Team www.deakin.edu.au/learning-futures © Deakin University 2014 Page 38 of 45

Module 3: Cloud Concepts Using audio and video for educational purposes: Modules 1-4 Last updated 28 February 2014
Want to find out more? Below is a list of some useful resources that can assist you in making your cloud concepts:
• Atomic Learning: iMovie Training136: a range of video tutorials for iMovie 11 (on Mac).
• Atomic Learning: Microsoft Movie Maker 2 Training137: a range of video resources to help you use Movie Maker (on PC) to create your videos.
• Video Maker YouTube Channel138: a range of tutorial videos on audio and video production.
• JISC Digital Media: Top tips for video editing139 : short guide with key advice on editing audio and digital video.
• Vimeo Video Compression Guidelines140: information on compression guidelines and tutorials for uploading to Vimeo.
References: Module 3 Edge Studio. (2013). Words to time calculator. Retrieved July 5, 2013 from
http://www.edgestudio.com/production/words-to-time-calculator
Wikipedia. (2013). 180 Degree Rule. Retrieved July 7, 2013 from http://en.wikipedia.org/wiki/180-degree_rule
Prepared by the DLF Teaching Development Team www.deakin.edu.au/learning-futures © Deakin University 2014 Page 39 of 45

Module 3: Cloud Concepts Using audio and video for educational purposes: Modules 1-4 Last updated 28 February 2014
Endnotes: Module 3 All hyperlinks below were checked and found to be active on 28 February 2014.
98 Third stage of course enhancements: resourcing, www.deakin.edu.au/learning/course-enhancements/course-enhancements-stage-3
99 From lectures to cloud concepts, www.deakin.edu.au/learning/course-enhancements-sandpits/from-lectures-to-cloud-concepts
100 Event Registration System (requires Deakin log in), https://www.deakin.edu.au/learning-futures/ers/index.php
101 From lectures to cloud concepts, www.deakin.edu.au/learning/course-enhancements-sandpits/from-lectures-to-cloud-concepts
102 Presenting to Camera – video on the Sound and Vision support page (requires Deakin log in), https://staff.deakin.edu.au/services/content-media/sound-vision-training.php?video=2&autostart=1
103 Presentation plus graphics, http://air.deakin.edu.au/public/media/Clip2_Pres%2BGraphics.m4v/0_7dfqjsbj
104 Cutaway Technique – video on the video maker website, www.videomaker.com/video/watch-external/236
105 Camtasia, www.deakin.edu.au/learning/clouddeakin/clouddeakin-guides/video-and-audio/camtasia
106 Jing, www.techsmith.com/jing.html
107 Educreations (iPad app), https://itunes.apple.com/us/app/id478617061?mt=8
108 Explain Everything (iPad app), https://itunes.apple.com/au/app/explain-everything/id431493086?mt=8
109 ShowMe Interactive Whiteboard (iPad app), https://itunes.apple.com/us/app/id445066279?mt=8
110 ScreenChomp (iPad app), https://itunes.apple.com/us/app/id442415881?mt=8
111 Doodle Buddy (iPad app), Sketch, https://itunes.apple.com/us/app/id364201083?mt=8
112 Camtasia tutorials, www.techsmith.com/tutorial.html
113 180 degree rule, http://en.wikipedia.org/wiki/File:180_degree_rule.svg
114 180 degree rule video, http://air.deakin.edu.au/public/media/180+degree+rule-edit/0_n91e1x5ee
115 What is a browser video, www.youtube.com/watch?v=o4MwTvtyrUQ
116 Interviewing page on Atomic Learning, www.atomiclearning.com/au/editinterviews.shtml
117 How to Record Voiceovers (video on YouTube), http://www.youtube.com/watch?v=zosxH76_5Fc
118 Ken Burns-style zooming and cropping, https://en.wikipedia.org/wiki/Ken_Burns_effect
119 Copyright guidelines and requirements, https://staff.deakin.edu.au/services/copyright/index.php
120 iStockphoto (microstock provider), www.istockphoto.com
121 Shutterstock (microstock provider), www.shutterstock.com
122 Fotolia (microstock provider), www.fotolia.com
123 Pond5 (microstock provider), www.pond5.com
124 Revostock (microstock provider), www.revostock.com
125 Getty Images (microstock provider), www.gettyimages.com
126 Stocksy (microstock provider), www.stocksy.com
127 Canstockphoto (microstock provider), www.canstockphoto.com
128 Deakin ConceptPlan Template, www.deakin.edu.au/learning/course-enhancements/from-lectures-to-cloud-concepts/concept-plans
129 Atomic Learning, http://www.atomiclearning.com/au/storyboardpro
130 Story Planning page on the Atomic Learning website, www.atomiclearning.com/au/storyplanning.shtml
131 Deakin visual identity guide, http://www.deakin.edu.au/marketing/national-recruitment/comms-branding/visual-identity.php
132 Resourcing the new history curriculum using ICT video, http://air.deakin.edu.au/public/media/entry_id/0_0jriz0lx
133 Edge Studio: Words to time calculator, www.edgestudio.com/production/words-to-time-calculator
134 Lift example for a look at how to use annotation and screen capture in-place of still images, http://air.deakin.edu.au/public/media/Lift/0_jbahilqd
Prepared by the DLF Teaching Development Team www.deakin.edu.au/learning-futures © Deakin University 2014 Page 40 of 45

Module 3: Cloud Concepts Using audio and video for educational purposes: Modules 1-4 Last updated 28 February 2014
135 Deakin Air guide, www.deakin.edu.au/learning/clouddeakin/clouddeakin-guides/video-and-audio/deakinair
136 Atomic Learning: iMovie Training, www.atomiclearning.com/au/imovie11
137 Atomic Learning: Microsoft Movie Maker 2 Training, www.atomiclearning.com/au/moviemaker2
138 Video Maker YouTube channel, www.youtube.com/user/videomaker/videos?tag_id=&shelf_index=0&sort=dd&view=0
139 JISC Digital Media: Top tips for video editing, www.jiscdigitalmedia.ac.uk/guide/top-tips-video-editing/
140 Vimeo video compression guide, http://vimeo.com/help/compression
Prepared by the DLF Teaching Development Team www.deakin.edu.au/learning-futures © Deakin University 2014 Page 41 of 45

Module 4: Audio and video in assessment Using audio and video for educational purposes: Modules 1-4 Last updated 28 February 2014
Module 4: Audio and video in assessment
In this module you will learn about how audio and video can be used to support assessment tasks and provide assessment feedback.
Audio and video in assessment Beyond using audio and video to support unit content, it can be used as a valuable tool in assessments. Audio and video can be used to support assessments by: providing clear and concise instructions on an assessment task; outlining expectations and marking guidelines; help to address common mistakes; and provide valuable feedback on completion of a task. Using audio and video in this manner can help personalise an assignment task and engage learners, and once you have the hang of the technology can even be quicker than providing traditional written feedback. Creating audio and video to support assessment utilises similar skills and techniques as creating cloud concepts including planning, producing and publishing. This module will look at ways audio and video can support assessments including formative assessment resources and post-assessment feedback. To recap on cloud concept techniques that can be used in assessment resources go to Module 3 in this course: Module 3: Cloud Concepts.
Using video for formative assessment information Using audio and video as a formative assessment tool is a great way to engage and direct students with their assessment tasks. By addressing the key requirements of an assessment task through audio and video, you can reinforce the objectives and processes required for students to successfully complete their assignment. This type of resource also enables you to clearly outline the marking requirements for your students and can assist unit staff across campuses form consensus on marking standards.
Your formative assessment video might address the following, using a range of different cloud concept video techniques:
assignment outline, due date and weighting
detailed information about the task
important tips
feedback and advice from previous iterations of the assessment
demonstration on where to find information
clearly outlined marking criteria
information on where to get help.
When creating a formative assessment resource for CloudDeakin it is important that there is consultation between the staff who create the resource and other teaching staff – this is to ensure all necessary items are addressed by the video. It may be the case that students on different campuses have different issues and you need to consider how this could be addressed using a single video resource or whether multiple resources are required.
Prepared by the DLF Teaching Development Team www.deakin.edu.au/learning-futures © Deakin University 2014 Page 42 of 45

Module 4: Audio and video in assessment Using audio and video for educational purposes: Modules 1-4 Last updated 28 February 2014
To create a formative assessment video resource that effectively supports your assessment task, it must do more than just replicate the written assessment outline. Using cloud concept techniques, you should provide students with a visual guide to help them understand the requirements of the assignment. Some of the visual elements you might include in a formative assessment video include:
• screen captures of how to find unit resources in CloudDeakin
• examples of well-answered and less well-answered assignments
• annotations of past assignments
• talking heads giving overviews and addressing assignment requirements
• recorded slides to list important points
• title screens to help scaffold formative assessment video into sections.
One way to produce a formative assessment video is to record a talking head and use the cut-away method to show your supporting visuals. Figure 1 shows a basic cut-away method for creating a formative assessment video. A good example of using a talking head with cut-away footage is the video Using CloudDeakin to provide students with course work when they can’t get to class141 by Dr Sophie Goldingay
Module 4, Figure 1 Using the cut-away method to create a formative assessment video
(Source: Deakin University 2013)
By using the cut-away method, you reduce the amount of time required to create your video. To create a formative assessment video using this method, all you have to do is write a script based on your assessment task, then source or create supporting visuals to use as cut-away material. By recording a single talking head, you ensure that the audio in your video is consistent and you reduce the time needed to create the resource. The easiest way to record your talking head is by using personal equipment or by making a booking to use professional equipment at Deakin video recording locations142 (scroll down the page for locations).
Using audio and video for assignment feedback Audio and video can also be used to give valuable feedback on the completion of a task. Built into CloudDeakin is the ability to give audio or video feedback on assignments submitted using the Assessment area. These recordings need to be brief (around 1 minute) and will require an inbuilt or external microphone. You can also attach files to assignment feedback submitted in Assessment area if you require audio or video feedback that is longer than 1 minute. Use the Assignments tool guide (Leave feedback and grading submissions)143 for additional information on how to add audio and video feedback to assignments submitted using the Assessment area of CloudDeakin.
Prepared by the DLF Teaching Development Team www.deakin.edu.au/learning-futures © Deakin University 2014 Page 43 of 45

Module 4: Audio and video in assessment Using audio and video for educational purposes: Modules 1-4 Last updated 28 February 2014
Module 4, Figure 2 Assignment feedback in CloudDeakin (add text, a file, audio or video)
(Source: Deakin University, 2014)
Deciding on what to include in your assignment feedback will vary depending on the unit and the relevant marking rubrics. It is up to the marker to decide what information is best presented using audio or video. A good way to structure your audio or video feedback is to address the marking rubric that is associated with the unit. Below is an example script of how you might offer audio feedback on a piece of student assessment such as an essay by using a holistic rubric.
Example script: Sarah Student
Unit XYZ
Name of essay topic
Sarah you have satisfied the following criteria in completing the essay assignment:
• You have communicated and responded to topic in an articulate and coherent manner.
• Highly developed critical thinking skills are displayed in the essay with demonstrated analysis and synthesis of written concepts.
• Your sentence construction, grammar and written expression are coherent. You have frequently used appropriate and discipline specific language to demonstrate understanding to your audience.
• Your argument is structured clearly and essay displays coherent internal logic.
• Correct referencing practices are observed in following the required reference styles and incorporated into essay structure and your bibliography is comprehensive.
I therefore awarded you the mark of Distinction (D) for the essay. Please refer to the marking rubric in the Assignments area of CloudDeakin.
Well done Sarah! (personalised sign-off)
Matthew Marker.
135 words = 45 seconds of audio feedback
Prepared by the DLF Teaching Development Team www.deakin.edu.au/learning-futures © Deakin University 2014 Page 44 of 45

Module 4: Audio and video in assessment Using audio and video for educational purposes: Modules 1-4 Last updated 28 February 2014
Using this approach is helpful for giving individual feedback and addresses the marking rubric and grading systems in place for the task. It can also help save time and some learners may actually respond better to audio then traditional written feedback. After addressing the rubric, use the sign-off to add your personalised message to the feedback. This is where you have the opportunity to create a more unique and engaging experience for individual students. Experiment with using audio feedback in CloudDeakin and decide where it could best be used for your units. Another way to give assessment feedback is to address the entire unit cohort with a more generalised assessment feedback video. Again, this process will make use of cloud concept techniques and require proper planning.
Practice and implement You have now finished Module 4 of the Using audio and video for educational purposes series. Refer to these modules anytime you need support in using audio and video in your teaching and learning. Practice the skills and methods suggested and extend your learning by following the links and resources provided. Remember, these modules are to be used as a guide and you may have your own preferred methods and skills to help you implement audio and video into your teaching and learning. Deakin Learning Futures always welcomes feedback and encourages the open sharing of useful resources related to teaching and learning. Please feel free to share this resource with your colleagues and don’t forget additional resources can be found on the Deakin Learning Futures144 site.
Endnotes: Module 4 All hyperlinks below were checked and found to be active on 28 February 2014.
141 Using CloudDeakin to provide students with course work when they can’t get to class (video), http://air.deakin.edu.au/public/media/entry_id/0_3ol3em3w
142 From lectures to cloud concepts –video recording locations, www.deakin.edu.au/learning/course-enhancements-sandpits/from-lectures-to-cloud-concepts
143 Assignments tool guide (Leave feedback and grading submissions), www.deakin.edu.au/learning/clouddeakin/clouddeakin-guides/assessment/dropbox
144 Deakin Learning Futures, www.deakin.edu.au/learning-futures
Prepared by the DLF Teaching Development Team www.deakin.edu.au/learning-futures © Deakin University 2014 Page 45 of 45