
Using Apply Image in Photoshop to compare differences in ...digitaldog.net/files/Apply_Image.pdf ·...
3
1 Using Apply Image in Photoshop to compare differences in two documents. You want to see if two similar but perhaps subtle processes make a visual differences. Use the Apply Image command! 1. Just take a document and duplicate it in Photoshop so you have two that are identical (Image> Duplicate). 2. Use Convert to Profile and select a different color space for the 2nd image (convert from ColorMatch RGB to sRGB). Or Convert to Profile on one doc, use Apple CMM, on the other, ACE as an example. You just need two identical images that have differing processing you want to compare and examine visually. When doing color space conversions, turn Dither OFF (it adds random noise making this analysis flawed). The original image is on the left, in ColorMatch RGB. After duplicating the image, Convert to Profile is used to convert the data into sRGB. Now we can see visually what the differences are between the two documents.
Transcript of Using Apply Image in Photoshop to compare differences in ...digitaldog.net/files/Apply_Image.pdf ·...

1
Using Apply Image in Photoshop to compare differences in two documents.
You want to see if two similar but perhaps subtle processes make a visual differences. Use the Apply Image command!
1. Just take a document and duplicate it in Photoshop so you have two that are identical (Image> Duplicate).
2. Use Convert to Profile and select a different color space for the 2nd image (convert from ColorMatch RGB to sRGB). Or Convert to Profile on one doc, use Apple CMM, on the other, ACE as an example. You just need two identical images that have differing processing you want to compare and examine visually. When doing color space conversions, turn Dither OFF (it adds random noise making this analysis flawed).
The original image is on the left, in ColorMatch RGB. After duplicating the image, Convert to Profile is used to convert the data into sRGB. Now we can see visually what the differences are between the two documents.
2
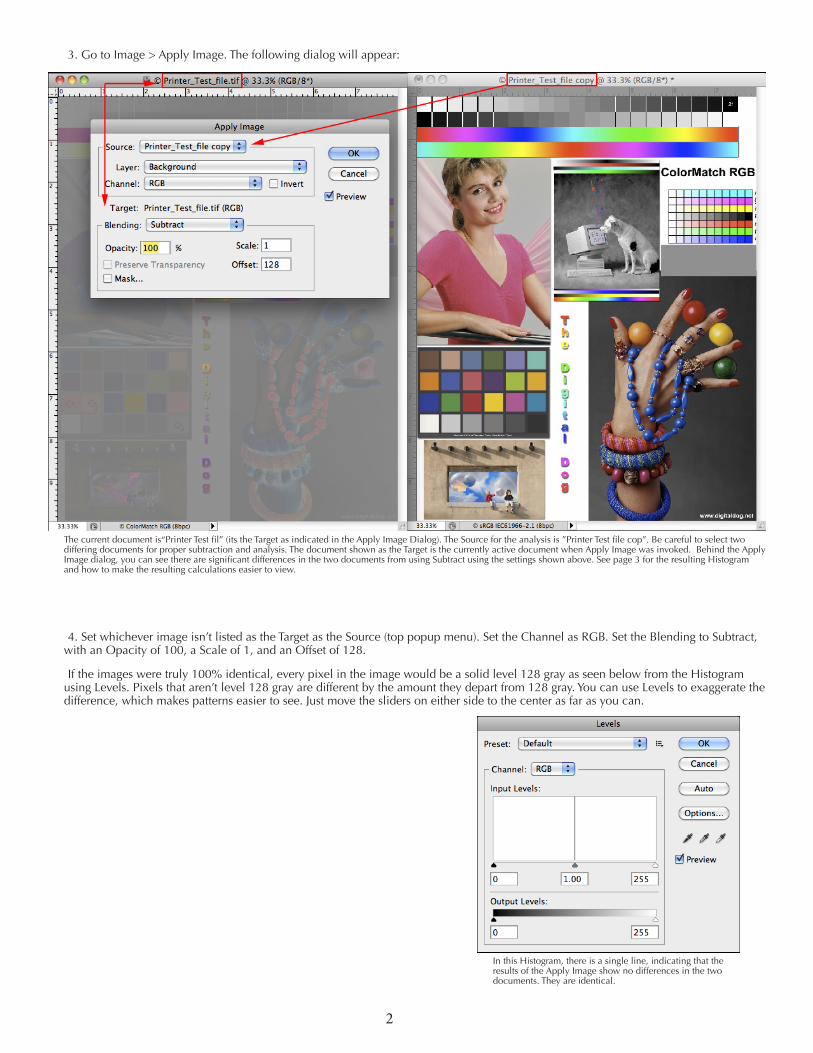
3. Go to Image > Apply Image. The following dialog will appear:
4. Set whichever image isn’t listed as the Target as the Source (top popup menu). Set the Channel as RGB. Set the Blending to Subtract, with an Opacity of 100, a Scale of 1, and an Offset of 128.
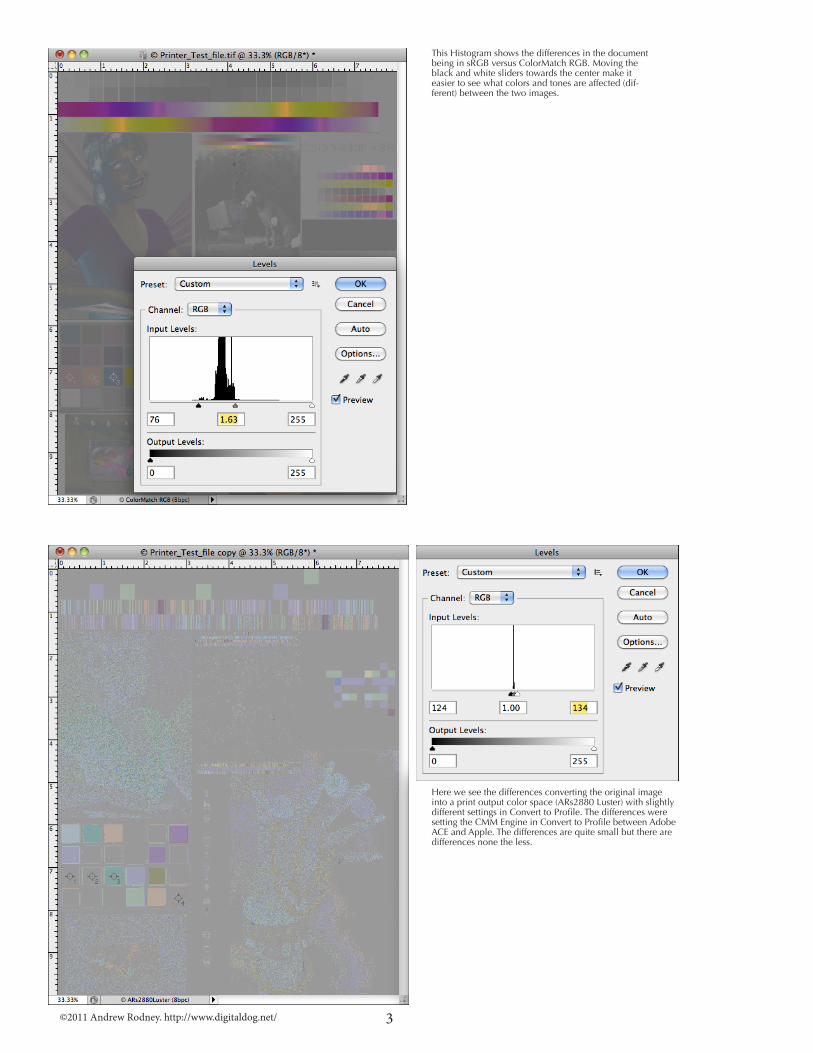
If the images were truly 100% identical, every pixel in the image would be a solid level 128 gray as seen below from the Histogram using Levels. Pixels that aren’t level 128 gray are different by the amount they depart from 128 gray. You can use Levels to exaggerate the difference, which makes patterns easier to see. Just move the sliders on either side to the center as far as you can.
In this Histogram, there is a single line, indicating that the results of the Apply Image show no differences in the two documents. They are identical.
The current document is“Printer Test fil” (its the Target as indicated in the Apply Image Dialog). The Source for the analysis is ”Printer Test file cop”. Be careful to select two differing documents for proper subtraction and analysis. The document shown as the Target is the currently active document when Apply Image was invoked. Behind the Apply Image dialog, you can see there are significant differences in the two documents from using Subtract using the settings shown above. See page 3 for the resulting Histogram and how to make the resulting calculations easier to view.
3
This Histogram shows the differences in the document being in sRGB versus ColorMatch RGB. Moving the black and white sliders towards the center make it easier to see what colors and tones are affected (dif-ferent) between the two images.
Here we see the differences converting the original image into a print output color space (ARs2880 Luster) with slightly different settings in Convert to Profile. The differences were setting the CMM Engine in Convert to Profile between Adobe ACE and Apple. The differences are quite small but there are differences none the less.
©2011 Andrew Rodney. http://www.digitaldog.net/


![[ 4.2 ] Drafting a Constitution. Learning Objectives Identify the leaders of the Constitutional Convention. Compare the main differences between the two.](https://static.fdocuments.net/doc/165x107/5a4d1b8b7f8b9ab0599bee47/-42-drafting-a-constitution-learning-objectives-identify-the-leaders-of-the.jpg)

