User’s Manual ‘Avenger’ Model H500 Series · Mobility Scooter User’s Manual ‘Avenger’...
13
Mobility Scooter User’s Manual ‘Avenger’ Model H500 Series Freedom Mobility International Pty Ltd 18 / 200 Canterbury Road, Bayswater, Vic, 3153 Phone: 03 909 584 34 Fax: 03 867 733 22 Email: [email protected] Web: www.freedommobility.com.au ABN: 60 201 676 998 ACN: 113 488 458
Transcript of User’s Manual ‘Avenger’ Model H500 Series · Mobility Scooter User’s Manual ‘Avenger’...

Mobility Scooter User’s Manual
‘Avenger’ Model H500 Series
Freedom Mobility International Pty Ltd
18 / 200 Canterbury Road, Bayswater, Vic, 3153Phone: 03 909 584 34 Fax: 03 867 733 22Email: [email protected]: www.freedommobility.com.auABN: 60 201 676 998 ACN: 113 488 458

TABLE OF CONTENTS I. Introduction 1 II. Specifications 2 III. Features 3 IV. Assembly & Disassembly 4 V. Operating your scooter 5 VI. Safety Instructions 7 VII. Battery Charging 8 VIII. Maintenance Schedule 9 IX. WARRANTY 10

1
I. INTRODUCTION Congratulations on the purchase of the Freedom Avenger scooter Model H500. This medium-size mobility scooter is designed for people who want an easy yet active life. It’s specifically for the use of senior citizens and disabled people. We have designed this scooter to restore the dignity, equality and personal freedom, and to provide convenience and comfort to you. This manual contains important information concerning the safe operation and proper maintenance of your scooter. Please read this manual thoroughly and carefully to become familiar with all instructions prior to operating your scooter. Should you have any questions concerning the scooter operation or maintenance, please contact your local dealer. Your scooter has many unique features not found on other comparable scooters. With proper care and maintenance, you should enjoy many years of reliable and dependable service from your unit. Your scooter should receive regular maintenance according to the schedule outlined in this manual, and the recommendation from the authorised dealer. By following the maintenance instructions, you will be able to take care of most of your unit’s needs. Should you be unable to correct a fault in your scooter, contact your scooter dealer as soon as possible. Above all, follow all service recommendation outlined in this manual to achieve trouble free, safe and enjoyable operation of your scooter. ABOUT THE MANUAL The manufacturer reserves the rights of final interpretation on the manual. For any printing mistakes or new improvements, the manufacturer will update in the new editions.
2
II. SPECIFICATIONS Avenger, Model H500-1 (4-Wheel) PERFORMANCE DATA Maximum forward speed 8.0 km/h Maximum backward speed 4.8 km/h Maximum Climbing Grade 12 degrees or 20% grade Load Capacity 120kg Ground Clearance 60 mm Range with Full Charge 40km Turning Radius 1.2m
DIMENSIONAL DATA Overall Dimensions 1250×640×1170mm WEIGHT Net weight with 2 batteries 87 kg
BATTERY SPECIFICATIONS 12V/40 Ah Lead-acid battery Weight 14kg/ each BATTERY CHARGER Input AC /110V/240V 50~60Hz Output DC24V/ 4amp MOTOR POWER (rated) 400w

3
III. FEATURES
Adjustable seat height
Swing away armrests
360 degrees swivel seat
Adjustable Forward/Reverse Seat
Adjustable tiller
Dynamic regenerative brake
Rear wheel direct drive with differential
Fully solid state controller
External Battery Charger
24-volt permanent magnet heavy duty DC motor
ON/OFF switch lock
Horn
Head light
Turning Indicator lights
Rear lights
Battery-charging indicator
Anti-tip-off wheels
Front and rear bumpers
Accessories adapter
Electronic High/Low speed switch

4
IV. ASSEMBLY AND DISASSEMBLY The Avenger, model H500, has been designed to be assembled and disassembled quickly and easily without the need for specialized tools. Should you need excessive force when you assemble or disassemble your unit, you are probably doing something wrong. Stop immediately! Think for a moment and refer to the user’s manual, then try again. 1. HOW TO ASSEMBLE
a) Adjust the tiller angle by loosening and re-tightening the round knob at the lower part of the tiller.
b) Place batteries onto the floor pan and secure them.
c) Attach each battery lead to the corresponding battery terminal.
d) There is a single white coloured plug which connects all power to the rear lights on
the rear fairing.
e) Loosely sit the rear fairing over the back wheels to easily allow the joining of the connector.
f) Place the rear fairing over the seat pole and press down to secure on the Velcro both
top and sides of the scooter frame.
g) Set the seat on the seat post and lock the seat in position by tightening the knob.
h) Adjust the height of the seat by bolt on the seat post under the seat.
Battery Connections Wiring for rear fairing lights

5
2. HOW TO DISASSEMBLE To disassemble just reverse the process of the assembly. You must turn off power before starting to dismantle the scooter.
a) Turn off the power and take out the power key from switch lock.
b) Loosen and Remove the seat from the seat post.
c) Carefully remove the rear fairing to allow for access to the rear fairing lights connector.
d) Disconnect the rear fairing lights and completely remove the rear fairing.
e) Undo all battery terminal connections.
f) Remove the batteries from the floor pan.
g) Fold down the tiller to horizontal.
V. OPERATING YOUR SCOOTER
a) BEFORE OPERATION
a. Insert the power key into the switch lock and turn clockwise to the ON position.
b. Check the battery charge indicator to make sure the batteries are fully
charged.
c. Make sure that neutral clutch lever is not engaged at the closed position.
b) TURN POWER ON
a. Insert the key into the key switch on the upper tiller and rotate clockwise to the “ON” position.
c) FORWARD MOTION
a. To move forward, pull the right thumb lever under the control console
towards you.
b. The further you pull, the faster the scooter will go. The maximum speed may be selected by the speed selection dial located in the middle of the control console.

6
d) REVERSE MOTION
a. To drive in reverse, pull the left side of the thumb lever under the control console towards you. NOTE: Reverse speed is limited to 4.8 km/h.
e) STOPPING THE SCOOTER
a. To stop the scooter, just release the thumb lever. The scooter will quietly
come to a smooth stop and the electro-mechanical brake will automatically engage to hold the scooter in position on horizontal surface, or an incline of up to 12 degrees, with a load of no more than 120 kg.
b. Quick smooth stops are made possible by the dynamic braking feature built in the controller.
Warning: The brake may not be effective when engaged on inclines greater than 12 degrees or if 20% of the occupant’s weight exceeds 110 kg’s. In the event the brake fails to engage, the scooter may roll slowly on a decline.
Turning off the key switch cuts of the power to the brake and engages the brake. 5. MOVING THE SCOOTER MANUALLY To move the scooter manually, release the clutch lever mounted on the gearbox at the rear underside of the scooter. When in operation, the clutch release lever should be in its engaged position (forward). Should you wish to freewheel, pull the lever to the release position.
Clutch Release for the scooter

7
VI. SAFETY INSTRUCTIONS Your scooter can move on grass, gravel, dirt, and sand surfaces, as well as hard paved or carpeted surfaces. However, extra caution should be taken when operating your scooter on uneven surfaces. In summary,
- DO NOT try to climb sharp curbs.
- DO NOT drive off or over obstacles exceeding 5 cm in height.
- DO NOT make abrupt changes in direction at high speed - DO NOT climb inclines greater than 12 degrees or a rise of 2 metres in 10.
- DO NOT move backward on uneven surfaces or inclines.
- DO NOT travel on highways and freeways; ALWAYS stay in bike lanes or sidewalks.
- DO NOT carry passengers. - DO NOT operate your scooter when the red battery indicator light is flashing. - DO NOT operate your scooter with the clutch lever in the disengaged position.
-DO NOT mount or dismount your unit with power switch in the “ON” position. -DO NOT turn ON the power while charging your battery. - ALWAYS make sure that the chassis lock pins are in position.
- ALWAYS make sure that the steering tiller adjustment knobs are tight. - ALWAYS make sure that the seat is locked so that it will not swing during operation.
-BE AWARE that modifications or disregard for advised operating procedures will make the operation of the scooter unsafe and violate the Warranty.
8
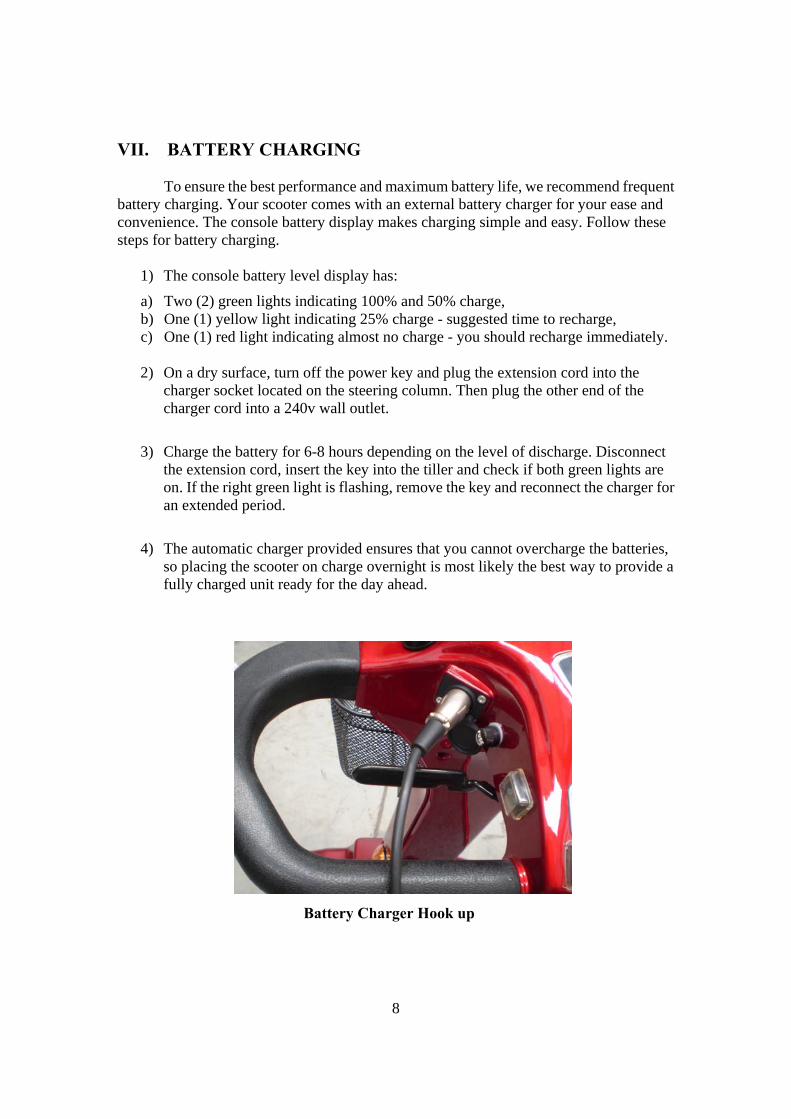
VII. BATTERY CHARGING To ensure the best performance and maximum battery life, we recommend frequent battery charging. Your scooter comes with an external battery charger for your ease and convenience. The console battery display makes charging simple and easy. Follow these steps for battery charging.
1) The console battery level display has:
a) Two (2) green lights indicating 100% and 50% charge, b) One (1) yellow light indicating 25% charge - suggested time to recharge, c) One (1) red light indicating almost no charge - you should recharge immediately.
2) On a dry surface, turn off the power key and plug the extension cord into the
charger socket located on the steering column. Then plug the other end of the charger cord into a 240v wall outlet.
3) Charge the battery for 6-8 hours depending on the level of discharge. Disconnect
the extension cord, insert the key into the tiller and check if both green lights are on. If the right green light is flashing, remove the key and reconnect the charger for an extended period.
4) The automatic charger provided ensures that you cannot overcharge the batteries,
so placing the scooter on charge overnight is most likely the best way to provide a fully charged unit ready for the day ahead.
Battery Charger Hook up

9
VIII. MAINTENENCE SCHEDULE
In order to obtain the best performance and lasting service life, please maintain your scooter according to the following schedule and instructions:
DAILY
a. Test brake effectiveness before you drive. b. Recharge battery fully every night.
WEEKLY
a. Check tire pressures to suit preferred ride. Usually should be 35-40 psi. b. Clean seat upholstery, plastic body and covers. c. To avoid the electrical failure, do not spray water directly inside your unit.
Use a damp clean rag to clean all parts. d. Check and tighten the throttle screw.
MONTHLY
a. Check battery condition and clean terminals if necessary. b. Check all electrical connectors to eliminate any loose connections. c. Tighten all exposed nuts and bolts. d. Check wheel bearings by spinning tires and checking for free rotation.
YEARLY Arrange annual service with your dealer or local technician.

10
IX. WARRANTY I) GUARANTEE CONDITIONS:
Purchase the unit from the manufacturer or authorized dealer. Operate according to the instructions set in this manual. The manufacturing guarantee then relates to any quality problems concerning its manufacturing or materials within the guarantee period. TWO-YEAR LIMITED WARRANTY For two years from the date of purchase, the manufacturer will repair or replace at their option to the original purchaser, free of charge, any part or electronic component found upon examination by an authorized dealer to be defective in material and/or workmanship. The warranty will also cover all the structural frame components, including fork, platform and frame. Warranty service can be performed by the manufacturer or its authorized dealer. Do not return faulty parts to manufacturer without prior consent. All transportation costs and shipping damage that incurred for repair or replacement of the faulty parts are the responsibility of the original purchaser. WARRANTY EXCLUSIONS
ABS plastic shrouds and footrest covers ( wear and tear items are not warranted) Batteries (the battery manufacturer provides a six-month limited warranty). Tires and tire tubes (wear and tear items are not warranted). In the event of an increase in the operational noise level, the warranty does not apply
as this is usually occurs as a result abusive and excessive strain on the scooter. Brake pads/Brake wear are a fair wear and tear item and not warranted. Repairs and/or modifications made to any part of the scooter without prior consent
from the manufacturer. Circumstances beyond the control of the manufacturer. Damaged caused by: battery fluid spillage, abuse, misuse, accident, or negligence,
improper operation, maintenance, or storage, commercial use or other than normal. Labour, service calls, shipping, and other charges incurred for repair of the products.
II) GUARANTEE IS NOT ENSURED WITH THE PROBLEMS CAUSED BY
THE FOLLOWING:
(1) Do not operate according to the manual. (2) Do not get maintenance from the specified dealers. (3) Do not use the components or parts made by our corporation. (4) Modify the unit or its part without authorization. (5) The warranty has expired. (6) Incidents caused by uncontrollable factors such as typhoon, floods, fire,
earthquake or war.

Self-Help Guide S-Drive controller for mobility scooter H500 series
On the battery charge indicator screen there are a number of light bars. In the event of an issue, you can establish the source of most problems by counting the number of bars that are flashing.
1 bar—The battery needs charging or there’s a bad connection to the battery. Check all connections between the controller and the battery. If the connections are good, try charging the battery.
2 bar—There is a bad connection to the motor. Check the motor, connections and leads. Check the free wheel mode if applicable.
3 bar—The motor has a short circuit to a battery connection.
4 bar—Not used.
5 bar—Not used
6 bar—Check the function of the charger or external device. Check the connections and switches according to the Scooter Manual.
7 bar—A throttle fault is indicated. Check the throttle is in the rest (centre) position. Check the function of the throttle potentiometer.
8 bar—A controller fault is indicated. Contact the manufacturer.(provider)
9 bar—Check the brake. Check the connections and leads.
10 bar—High battery voltage. Check the battery charger connections and leads. Check battery voltage, replace the battery if necessary.
11 bar—The controller has entered Sleep Mode. Switch scooter off and on again. If not able to reset return the controller to the manufacturer.