
USERS INSTRUCTION USERSINSTRUCTION MANUAL · FR510DX2/ FR510DXs2 USERS INSTRUCTION MANUAL...
44
FR510DX2/ FR510DXs2 USERS INSTRUCTION MANUAL USERS INSTRUCTION MANUAL USERS INSTRUCTION MANUAL USERS INSTRUCTION MANUAL ATTENTION Read all parts in this manual before operating your scooter ATTENTION Read all parts in this manual before operating your scooter ATTENTION Read all parts in this manual before operating your scooter ATTENTION Read all parts in this manual before operating your scooter FR168-3/ FR-168-3S FR168-4/ FR168-4S/FR168-4S2b
Transcript of USERS INSTRUCTION USERSINSTRUCTION MANUAL · FR510DX2/ FR510DXs2 USERS INSTRUCTION MANUAL...
FR510DX2/ FR510DXs2
USERS INSTRUCTIONMANUAL
USERS INSTRUCTIONMANUAL
USERS INSTRUCTIONMANUAL
USERS INSTRUCTIONMANUAL
ATTENTION
Read all parts in this
manual before operating
your scooter
ATTENTION
Read all parts in this
manual before operating
your scooter
ATTENTION
Read all parts in this
manual before operating
your scooter
ATTENTION
Read all parts in this
manual before operating
your scooter
FR168-3/ FR-168-3S FR168-4/ FR168-4S/FR168-4S2b

Using your product safely depends upon your
diligence in following the warnings, cautions and instructions
in this manual. Using your Scooter safely also
depends upon your good judgment and / or common sense,
as well as that of your Provider, Carer or Health Professional.
Freerider
Freerider
Always think safety!
Freerider
Freerider
FOREWORD
Battery and battery charging . . . . . . . . . . . . . . . . . . . . 23
Care and maintenance. . . . . . . . . . . . . . . . . . . . . . . . . 26
Basic fault finding . . . . . . . . . . . . . . . . . . . . . . . . . . . . 30
Technical specification. . . . . . . . . . . . . . . . . . . . . . . . . 33
Circuit diagrams. . . . . . . . . . . . . . . . . . . . . . . . . . . . . 38
Advisory safety notice . . . . . . . . . . . . . . . . . . . . . . . . . 39
spare parts . . . . . . . . . . . . . . . . . . . . 39
Optional accessories . . . . . . . . . . . . . . . . . . . . . . . . . . 40
Guarantee terms . . . . . . . . . . . . . . . . . . . . . . . . . . . . 41
Service history . . . . . . . . . . . . . . . . . . . . . . . . . . . . . . 42
Freerider ScooterFreerider
Please keep in mind that the operator of the Scooter isresponsible for hazards occurring to other people ortheir property.
Congratulations on purchase of your Scooter.
Please read this User Instruction Manual carefullybefore your attempt to operate Scooter. YourUser Instruction Manual will assist you to get the mostfrom your machine.
This manual contains important information regardingthe safe operation and maintenance of yourScooter. Before beginning to use your Scooter, makesure you completely read and understand allinstructions thoroughly. Please observe the "Rules forsafe use"and the Safety Instructions outlined onpage of this manual. If you have any queriesconcerning operation or maintenance, consult yourauthorized dealer.
Freerider
Freerider
Freerider
Freerider
5,12
Freerider
Freerider
Freerider
Freerider
Please read and follow all instructions in this UsersInstruction Manual before attempting to operate your
Scooter for the first time. If there is anythingin this manual that you do not understand, or if yourequire additional assistance for setting it up , contactyour Authorized Agent.
Freerider
Freerider
Freerider
Freerider
CONTENTS
Introduction . . . . . . . . . . . . . . . . . . . . . . . . . . . . . . . . . 2
Product description. . . . . . . . . . . . . . . . . . . . . . . . . . . . 3
Purpose of your Scooter . . . . . . . . . . . . . . . . . . 5
Rules for safe use. . . . . . . . . . . . . . . . . . . . . . . . . . . . . . 5
Getting to know your Scooter. . . . . . . . . . . . . . . 7
Operating your Scooter. . . . . . . . . . . . . . . . . . . 8
Freewheeling your Scooter . . . . . . . . . . . . . . . 12
Safety instructions and warnings . . . . . . . . . . . . . . . . . . 12
Safety instruction labels . . . . . . . . . . . . . . . . . . . . . . . . 16
Learning to get about . . . . . . . . . . . . . . . . . . . . . . . . . 16
Transporting your Scooter . . . . . . . . . . . . . . . . . . . . . 19
Freerider
Freerider
Freerider
Freerider
Freerider
Freerider
Freerider
Freerider
INTRODUCTION
Your Scooter has numberous features notfound on other power Scooters. With proper care andmaintenance, you will enjoy many years of dependableservice.
Your Scooter needs to receive maintenance atregular intervals and should be inspected frequentlyfor proper mechanical operation. Troubles shootingGuidelines, methods of detecting improper operationand making minor adjustments are included in manual.
Follow all recommendations to obtain trouble free, safeand enjoyable operation of your Scooter.
Please remember that when it comes to service andrepairs, your authorized dealer knows your
Scooter best.
Freerider
Freerider
Freerider
FreeriderFreerider
Freerider
Freerider
Freerider
FreeriderFreerider
2
Rear-wheel drive via sealed drive axle
36 A/H sealed non-maintenance lead-acid batteries.
Automatic charging system.
Off-board charging facility.
Seat with folding backrest, height adjustment and
adjustable width arm-rests.
Seat rotates and is fully adjustable forwards and backwards
and for height.
Multi-positional handle bars for greater comfort, driving
mirror, front basket for storing personal items.
A simple 'wig-wag' tyre control lever situated on the
handlebar, controls speed, braking and direction.
Steering is controlled by handlebar attached to a linkage
system containing front wheels for FR168-4/FR168-4S/
FR510DX2/FR510DXs2.
1
2
3
4
5
6
7
8
9
10
11
12
13
Steering handlebars
Drive mirror
Console
Charging socket
Basket
Front light
Direction indicator lights
Front and rear bumper
Amber side reflectors
Floor mat
Pneumatic wheels with grey tyres
Rear lights and indicators
Adjustable angle seat with backrest
1
2
3
4
5
6
7
8
9
10
11
12
13
3
PRODUCT DESCRIPTION
a fork system
containing the single front wheel for .
'System-of-the-art' micro-controller electronics ensure a
smooth, comfortable and safe drive on all surfaces and
gradients.
Two piece steel chassis for ease of transporting.
Your scooter can be dismantled into separate components
without the use of tools for ease of transporting. However,
your scooter is not designed to transport the user in a
moving vehicle; for advice on transporting consult your
selling agent.
Your Scooter should be serviced as
recommended by an approved distributor in
order to ensure safe, reliable operation. For details and
list of options available for user, refer to accessories
section of this manual.
Steering is controlled by handlebar attached to
FR168-3/FR168-3S
Freerider
Freerider
FR168-3/FR168-3S
Freerider
Freerider
FR510DX2/FR510DXs2 FEATURE GUIDE
12
2
4
10
8
11
7
1
3
6
9
5
13
1
2
3
4
5
7
8
9
10
11
12
13
Adjustable steering handlebars
Driving mirror
Console
Charging socket
Basket
Front light
Direction indicator lights
Front and rear bumper
Amber side reflectors
Floor mat
Pneumatic wheels with grey tyres
Rear lights and indicators
Adjustable angle seat with backres
6
1
2
3
4
5
6
7
8
9
10
11
12
13
FR168-4/FR168-4S/FR168-4S2b FEATURE GUIDE
4
FR168-3/FR168-3S FEATURE GUIDE
1
2
3
4
5
7
8
9
10
11
12
13
Adjustable steering handlebars
Driving mirror
Console
Charging socket
Basket
Front light
Direction indicator lights
Front and rear bumper
Amber side reflectors
Floor mat
Pneumatic wheels with grey tyres
Rear lights and indicators
Adjustable angle seat with backres
6
1
2
3
4
5
6
7
8
9
10
11
12
13
12
2
4
10
8
11
1
3
6
9
5
13
7
12
2
4
10
8
11
1
3
6
9
5
13
7
Your Scooter is suitable forpersons who require independent mobilitycombined with comfort, maneuverability,reliability and a product that needs aminimal amount of maintenance.
The intended user should possess some degree of ability withthe use of both arms and hands, reasonable balance andeyesight, and a degree of spatial awareness. The user shouldhave received training in the use of the product, preferably intheir normal environment. The maximum user weight for yourScooter can be found in the rear of this manual,under'Technical Specification'(see page 33,34).
Your Scooter is suitable for use indoors in shopping malls orprecincts for example, or outdoors on dry, smooth levelsurfaces. It climbs slopes safely up to 8 rain or snow, onloose slippery surfaces and slopes or on wet grass etc.,which could become a danger to the rider. Passengers mustnot be carried. Excess baggage outside of the seating areacan affect stability.
Freerider
Your Scooter is a 'Class 2' (B) * vehicle and designed forpavement use only. The Scooter must only be used on theroad with caution if a pavement is not available. It is designedfor a single occupant who experiences difficulty or discomfortwhen walking for prolonged periods, but has the use of bothlegs and the physical, visual and cognitive ability to operatethe Scooter safely.
Do not drive your Scooter if you are under the influence ofalcohol, drugs or medication that may affect your ability. If indoubt consult your doctor. As a pavement user you should
Freerider
PURPOSE OF YOUR FREERIDER SCOOTER
Warning:
Cautions:
These symbols below are used in this owner manual toidentify and warnings and cautions. It is very important foryou to read and understand them.
Failure to note the warnings in this usersmanual may result in personal injury.
Failure to observe the cautions in thisusers manual in damage to your scooter.
Your scooter is a powerful machine, for your safetyand the safety of bystanders, please read all of theinstruction in this manual before operating your scooter, theyhave been prepared from years of experience with this tyre ofequipment.Follow notes carefully to ensure safety at all times.Always make certain your machine is in full working orderbefore starting your journey.
Warning:
Cautions:
familiarize yourself with the current editions of the HighwayCode.
Electrically powered scooter are classified in the followingcategories :Class 2 as defined in "The use of invalid carriages on theHighways Regulations 1988"A scooter tyre invalid carriage designed for the use on thefootway, with maximum speed up to 4 M.P.H.Class 'B', as defined in The European Standard EN12184:1999. A scooter sufficiently compact and maneuverable forsome indoor environments and capable of traveling overlonger distances and negotiating outdoor obstacles.
* DEFINITION* DEFINITION
RULES FOR SAFE USE
1. Do not ride your scooter without reading this instructionmanual. Also read all of safety instructions and warningsstarting on page12 of this manual.
2. Only drive your scooter if your health condition will allowyou to be safe.
3. Do not exceed the maximum safe gradient outlined foryour vehicle (see Technical Specification, page 33).
Always have the anti-tipping wheels fittedwhen outdoors or on rams indoors (see Fig18 page19).
4. Do not carry passengers or exceed the maximum carryingweight.
5. Do not mount or dismount your scooter unless it isswitched off with the freewheel device fully engaged.
Warning:
5
6. Do not switch your scooter 'on' with the forward/reverselever depressed. Do not hang bags etc overyour steering handlebars, always use the front basket.Failure to observe this warning may interfere with yourcontrols and put you and other at risk.
7. Do not mount or dismount your scooter unless thespeed adjustment dial is set to minimum.
8. Do not reverse your scooter onto uneven inclines orsurfaces. Be cautions when traversing slopes.
9. Do not drive your in a confined space unless thespeed adjustment dial is set low.
10. Do not turn suddenly at full speed, especially on unevenor sloping ground.
11. Do not drive your where you cannot safely orlegally walk. Obey the Highway Code.
12. Do not drive your unless the seat is locked intothe driving position.
13. Do not drive your scooter with the handlebar adjustmentlock, in the unlocked position.
14. Do not drive your scooter over deep, soft terrain(eg. soft earth, deep grass, snow).
15. Do not drive when under the influence of alcohol or certaindrugs which may impair your safety.
16. Avoid climbing or descending kerbs, you may ground yourchassis and fall over.
17. Always approach small obstacles "straight on" and at slowspeed. Do not attempt to climb or descend kerbs. This maydamage your
18. Always stop fully before changing dissection(forward or reverse).
19. Always keep your feet on the vehicle when driving.
20. Always proceed carefully while riding, especially as youapproach the downgrade of a ramp.
21. Always avoid uneven surfaces.
22. Always consult your physician or a therapist if in doubtabout your ability to operate a .
24. The batteries fitted to your scooter are Mai
the top of the battery. Failure to observe
Scooter
Scooter
Scooter
Scooter
Scooter
23. Transport- Do not sit on your scooter while it is in amoving vehicle. Always strap down your scooter thentransfer to the vehicle seat.
ntenancefree and do not require topping up with distilled water.Do not attempt to remove the safety values situated in
this warning
Warning:will invalidate your battery guarantee.
25. Do not drive your Scooter through deep water or cleanwith a high pressure hose.
26. Do not drive your Scooter through sea sand or sea water,this is very corrosive. Always wash salt splashing from themetal parts of your scooter with hot soapy water as soonas possible. This is also important during the wintermouths when roads and pavements have been treated withsal1t to prevent icing.
Please remember you are a motorized pedestrian and mustobserve all rules and regulations of other pedestrianswherever possible. Your scooter has not been designed foruse on normal roads, except for crossing between pavementsand where a pavement is not available.
Please have a safe journeyPlease have a safe journey
6

COMFORT-
VERSATILITY-
SERVICE-
Your scooter is delivered in a strong tri-wall carton.When unpacking the carton, first remove all of the sharpmetal staples which are located in the top. Carefully disposeof the staples to avoid injury. Remove all packing materials,avoid using sharp instruments as this may damage thescooter. Carefully remove the scooter from the carton; tominimize damage to the scooter and the operator, twopeople should be used for this operation.
Safely dispose of all packaging materials, your local wastedisposal authority can advise you on this procedure.
Your Scooter is delivered fully assembled, fitting thetwo batteries and the seat assembly together with someminor adjustments are detailed on the following pages, under'Operating your Scooter'. A full technicalspecification for your Scooter can be found at therear of this manual.
A great deal of thought and consultation has gone into thedesign of your state-of-the-art, life-changing scooter. Your
Scooter will help to increase your mobility andtherefore give you more time and energy to enjoy life.
Six models of Scooter are described in this manual.models have same control functions but vary in
wheel sizes, battery location and seats. Please refer to yourappropriate model when reading the manual. A full technicalspecification for each model can be found at the rear of thismanual. A great deal of thought has gone into the design ofyour Three wheeled vehicle which will allow you tonegotiate obstacles found in confined shopping areas, fourwheels will give you added stability on uneven surfaces. Thisis just one of the features you will find on yourScooter.
Others are:
The contoured seat helps cushion you from thevibrations of a journey, giving you maximum comfort. A fullyproportional speed-controller with a speed restriction facilityallows you a smooth jerk-free ride. Automatic braking givesyou that added peace of mind.
The removable fold down seat, together witha facility to fully lower the steering handlebar,
Freerider
Freerider
FreeriderFreerider
Freerider
FreeriderFreerider
Freerider
Freerider
Freerider
allows your. to be easily transported in an average saloon orhatchback car for those days when you travel further afield.
Your scooter has been designed to beservice friendly. Sealed batteries which are virtuallymaintenance-free will give your the power itrequires. Should you need to take you batteries on an aircraft,then you can peace of mind because the batteries are totally
Freerider
Freerider
Freerider
FreeriderFreerider
Freerider
FreeriderFreerider
Freerider
Freerider
Freerider
COMFORT-
VERSATILITY-
SERVICE- Freerider
Spill-free. (Please consult your carrier for details).
The advanced speed controller has been designedwith extensive self-checking circuits to give you the maximum'state-of-the-art' safety technology. Fully automatic brakinggive the driver confidence in any environment. The on/off keybe removed for added security and safety, this disables theelectronic drive circuitry, and your scooter cannottherefore be easily driven away by any other person.
Do not switch 'off' the on/off power key whenyou are moving; this will automatically apply the motorparking brake suddenly and could place you in a dangeroussituation. Your scooter is fitted with anti-tipping wheels.
, they are an importantpart of the scooter design provided specifically for your safety.They help protect against backwards tipping on excessivelysharp inclines.
Your scooter is fitted with a battery levelindicator. Charging is straight forward. Your charge is fullyautomatic and will reduce to a top-up charge mode when there-charge cycle is complete. (See Batteries and BatteryCharging section of this manual).
Freerider
SAFETY-
CAUTION-
Donot remove these anti-tipping wheels
CHARGING-
SAFETY-
CAUTION-
CHARGING-
Freerider
GETTING YOU KNOW YOUR SCOOTER
7
Warning:
Caution:
Warning:
Caution:
Warning:
Warning:
Before setting out on your scooter you need to make surethat your seat is in the correct driving position. Your
distributor will set the seat to the correct height foryour individual needs (note: see warnings on page 9). Theseat has four basic adjustments to assist your comfort.
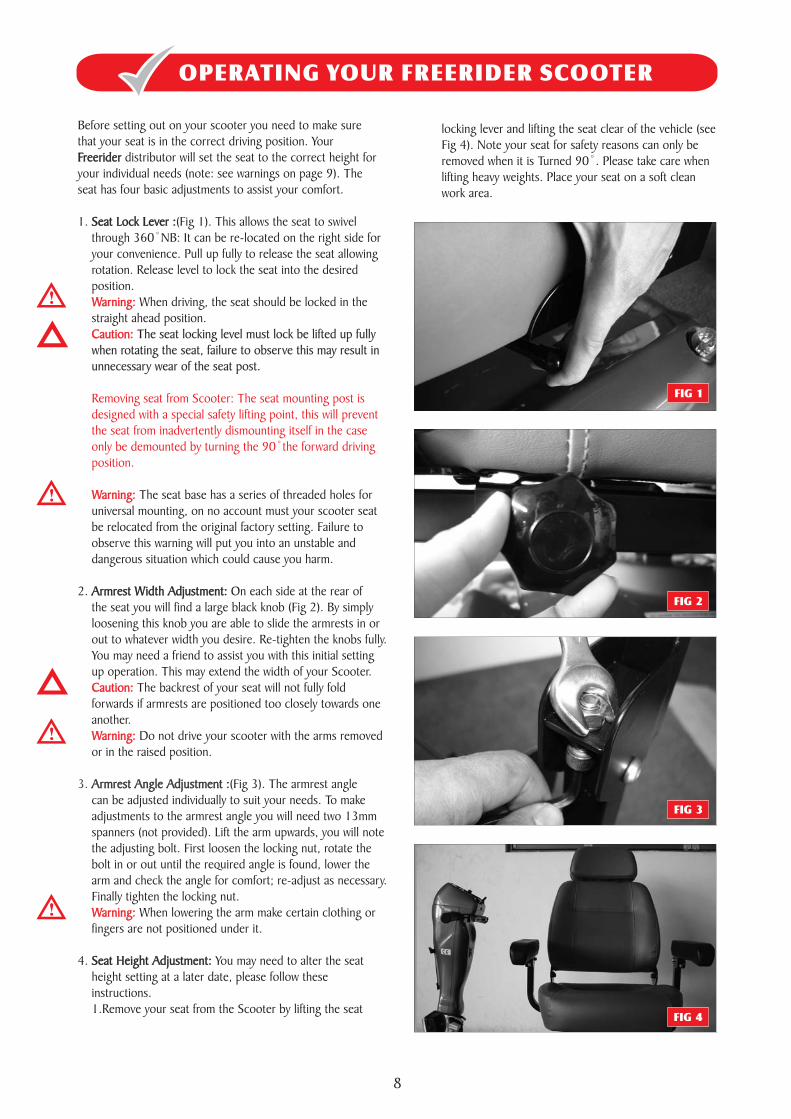
(Fig 1). This allows the seat to swivelthrough 360 NB: It can be re-located on the right side foryour convenience. Pull up fully to release the seat allowingrotation. Release level to lock the seat into the desiredposition.
When driving, the seat should be locked in thestraight ahead position.
The seat base has a series of threaded holes foruniversal mounting, on no account must your scooter seatbe relocated from the original factory setting. Failure toobserve this warning will put you into an unstable anddangerous situation which could cause you harm.
On each side at the rear ofthe seat you will find a large black knob (Fig 2). By simplyloosening this knob you are able to slide the armrests in orout to whatever width you desire. Re-tighten the knobs fully.You may need a friend to assist you with this initial settingup operation. This may extend the width of your Scooter.
The backrest of your seat will not fully foldforwards if armrests are positioned too closely towards oneanother.
Do not drive your scooter with the arms removedor in the raised position.
(Fig 3). The armrest anglecan be adjusted individually to suit your needs. To makeadjustments to the armrest angle you will need two 13mmspanners (not provided). Lift the arm upwards, you will notethe adjusting bolt. First loosen the locking nut, rotate thebolt in or out until the required angle is found, lower thearm and check the angle for comfort; re-adjust as necessary.Finally tighten the locking nut.
When lowering the arm make certain clothing orfingers are not positioned under it.
You may need to alter the seatheight setting at a later date, please follow theseinstructions.1.Remove your seat from the Scooter by lifting the seat
Freerider
Seat Lock Lever :
Armrest Width Adjustment:
Seat Height Adjustment:
1.
2.
4.
The seat locking level must lock be lifted up fullywhen rotating the seat, failure to observe this may result inunnecessary wear of the seat post.
3. Armrest Angle Adjustment :
Removing seat from Scooter: The seat mounting post isdesigned with a special safety lifting point, this will preventthe seat from inadvertently dismounting itself in the caseonly be demounted by turning the 90 the forward drivingposition.
Freerider
Seat Lock Lever :
Armrest Width Adjustment:
Armrest Angle Adjustment :
Seat Height Adjustment:
Warning:
Caution:
Warning:
Caution:
Warning:
Warning:
The seat locking level must lock be lifted up fullywhen rotating the seat, failure to observe this may result inunnecessary wear of the seat post.
OPERATING YOUR FREERIDER SCOOTER
locking lever and lifting the seat clear of the vehicle (seeFig 4). Note your seat for safety reasons can only beremoved when it is Turned 90 . Please take care whenlifting heavy weights. Place your seat on a soft cleanwork area.
FIG 1
FIG 2
FIG 3
FIG 4
8
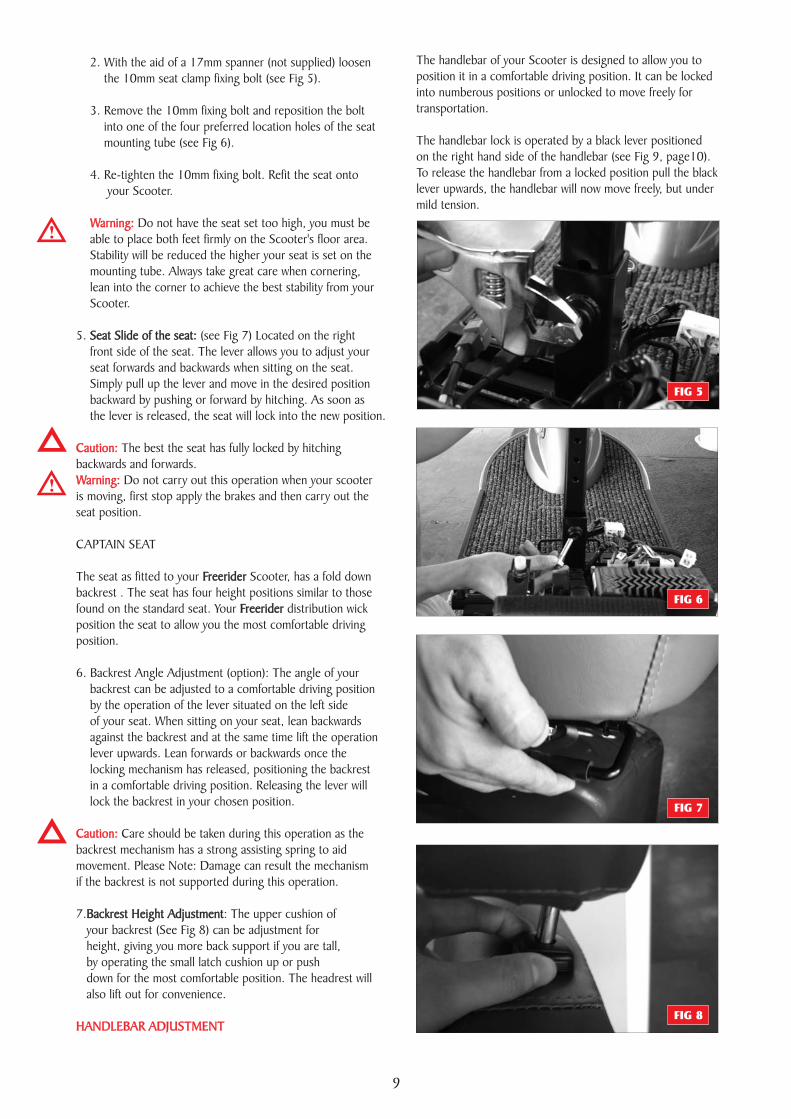
2. With the aid of a 17mm spanner (not supplied) loosenthe 10mm seat clamp fixing bolt (see Fig 5).
3. Remove the 10mm fixing bolt and reposition the boltinto one of the four preferred location holes of the seatmounting tube (see Fig 6).
4. Re-tighten the 10mm fixing bolt. Refit the seat ontoyour Scooter.
Do not have the seat set too high, you must beable to place both feet firmly on the Scooter's floor area.Stability will be reduced the higher your seat is set on themounting tube. Always take great care when cornering,lean into the corner to achieve the best stability from yourScooter.
(see Fig 7) Located on the rightfront side of the seat. The lever allows you to adjust yourseat forwards and backwards when sitting on the seat.Simply pull up the lever and move in the desired positionbackward by pushing or forward by hitching. As soon asthe lever is released, the seat will lock into the new position.
The best the seat has fully locked by hitchingbackwards and forwards.
Do not carry out this operation when your scooteris moving, first stop apply the brakes and then carry out theseat position.
CAPTAIN SEAT
The seat as fitted to your Scooter, has a fold downbackrest . The seat has four height positions similar to thosefound on the standard seat. Your distribution wickposition the seat to allow you the most comfortable drivingposition.
6. Backrest Angle Adjustment (option): The angle of yourbackrest can be adjusted to a comfortable driving positionby the operation of the lever situated on the left sideof your seat. When sitting on your seat, lean backwardsagainst the backrest and at the same time lift the operationlever upwards. Lean forwards or backwards once thelocking mechanism has released, positioning the backrestin a comfortable driving position. Releasing the lever willlock the backrest in your chosen position.
Care should be taken during this operation as thebackrest mechanism has a strong assisting spring to aidmovement. Please Note: Damage can result the mechanismif the backrest is not supported during this operation.
: The upper cushion ofyour backrest (See Fig 8) can be adjustment forheight, giving you more back support if you are tall,by operating the small latch cushion up or pushdown for the most comfortable position. The headrest willalso lift out for convenience.
5.
7.
Seat Slide of the seat:
Freerider
Freerider
Backrest Height Adjustment
Warning:
Caution:
Warning:
Caution:
HANDLEBAR ADJUSTMENT
Warning:
Caution:
Warning:
Caution:
HANDLEBAR ADJUSTMENT
Seat Slide of the seat:
Freerider
Freerider
Backrest Height Adjustment
FIG 5
FIG 6
FIG 7
FIG 8
The handlebar of your Scooter is designed to allow you toposition it in a comfortable driving position. It can be lockedinto numberous positions or unlocked to move freely fortransportation.
The handlebar lock is operated by a black lever positionedon the right hand side of the handlebar (see Fig 9, page10).To release the handlebar from a locked position pull the blacklever upwards, the handlebar will now move freely, but undermild tension.
9
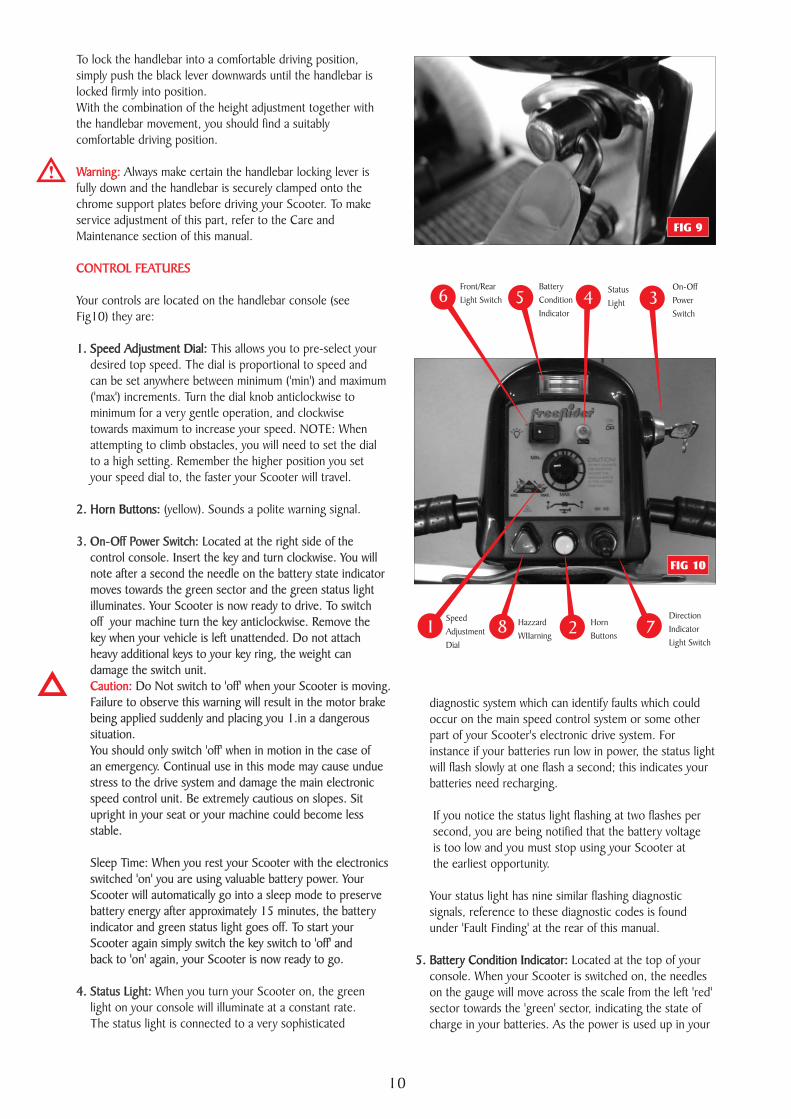
To lock the handlebar into a comfortable driving position,simply push the black lever downwards until the handlebar islocked firmly into position.With the combination of the height adjustment together withthe handlebar movement, you should find a suitablycomfortable driving position.
Always make certain the handlebar locking lever isfully down and the handlebar is securely clamped onto thechrome support plates before driving your Scooter. To makeservice adjustment of this part, refer to the Care andMaintenance section of this manual.
Your controls are located on the handlebar console (seeFig10) they are:
This allows you to pre-select yourdesired top speed. The dial is proportional to speed andcan be set anywhere between minimum ('min') and maximum('max') increments. Turn the dial knob anticlockwise tominimum for a very gentle operation, and clockwisetowards maximum to increase your speed. NOTE: Whenattempting to climb obstacles, you will need to set the dialto a high setting. Remember the higher position you setyour speed dial to, the faster your Scooter will travel.
(yellow). Sounds a polite warning signal.
1. Speed Adjustment Dial:
2. Horn Buttons:
3. On-Off Power Switch:
Status Light:
Located at the right side of thecontrol console. Insert the key and turn clockwise. You willnote after a second the needle on the battery state indicatormoves towards the green sector and the green status lightilluminates. Your Scooter is now ready to drive. To switchoff your machine turn the key anticlockwise. Remove thekey when your vehicle is left unattended. Do not attachheavy additional keys to your key ring, the weight candamage the switch unit.
Do Not switch to 'off' when your Scooter is moving.Failure to observe this warning will result in the motor brakebeing applied suddenly and placing you 1.in a dangeroussituation.You should only switch 'off' when in motion in the case ofan emergency. Continual use in this mode may cause unduestress to the drive system and damage the main electronicspeed control unit. Be extremely cautious on slopes. Situpright in your seat or your machine could become lessstable.
Sleep Time: When you rest your Scooter with the electronicsswitched 'on' you are using valuable battery power. YourScooter will automatically go into a sleep mode to preservebattery energy after approximately 15 minutes, the batteryindicator and green status light goes off. To start yourScooter again simply switch the key switch to 'off' andback to 'on' again, your Scooter is now ready to go.
When you turn your Scooter on, the greenlight on your console will illuminate at a constant rate.The status light is connected to a very sophisticated
4.
Warning:
CONTROL FEATURES
Caution:
Warning:
CONTROL FEATURES
Caution:
1. Speed Adjustment Dial:
2. Horn Buttons:
3. On-Off Power Switch:
Status Light:
Located at the right side of thecontrol console. Insert the key and turn clockwise. You willnote after a second the needle on the battery state indicatormoves towards the green sector and the green status lightilluminates. Your Scooter is now ready to drive. To switchoff your machine turn the key anticlockwise. Remove thekey when your vehicle is left unattended. Do not attachheavy additional keys to your key ring, the weight candamage the switch unit.
Do Not switch to 'off' when your Scooter is moving.Failure to observe this warning will result in the motor brakebeing applied suddenly and placing you 1.in a dangeroussituation.You should only switch 'off' when in motion in the case ofan emergency. Continual use in this mode may cause unduestress to the drive system and damage the main electronicspeed control unit. Be extremely cautious on slopes. Situpright in your seat or your machine could become lessstable.
Sleep Time: When you rest your Scooter with the electronicsswitched 'on' you are using valuable battery power. YourScooter will automatically go into a sleep mode to preservebattery energy after approximately 15 minutes, the batteryindicator and green status light goes off. To start yourScooter again simply switch the key switch to 'off' andback to 'on' again, your Scooter is now ready to go.
4.
FIG 9
FIG 10
diagnostic system which can identify faults which couldoccur on the main speed control system or some otherpart of your Scooter's electronic drive system. Forinstance if your batteries run low in power, the status lightwill flash slowly at one flash a second; this indicates yourbatteries need recharging.
If you notice the status light flashing at two flashes persecond, you are being notified that the battery voltageis too low and you must stop using your Scooter atthe earliest opportunity.
Your status light has nine similar flashing diagnosticsignals, reference to these diagnostic codes is foundunder 'Fault Finding' at the rear of this manual.
5. Battery Condition Indicator: Located at the top of yourconsole. When your Scooter is switched on, the needleson the gauge will move across the scale from the left 'red'sector towards the 'green' sector, indicating the state ofcharge in your batteries. As the power is used up in your
5. Battery Condition Indicator:
3On-Off
Power
Switch
5Battery
Condition
Indicator
Hazzard
WIIarning
Speed
Adjustment
Dial77
4Status
Light6
Horn
Buttons
Direction
Indicator
Light Switch
281
Front/Rear
Light Switch
10
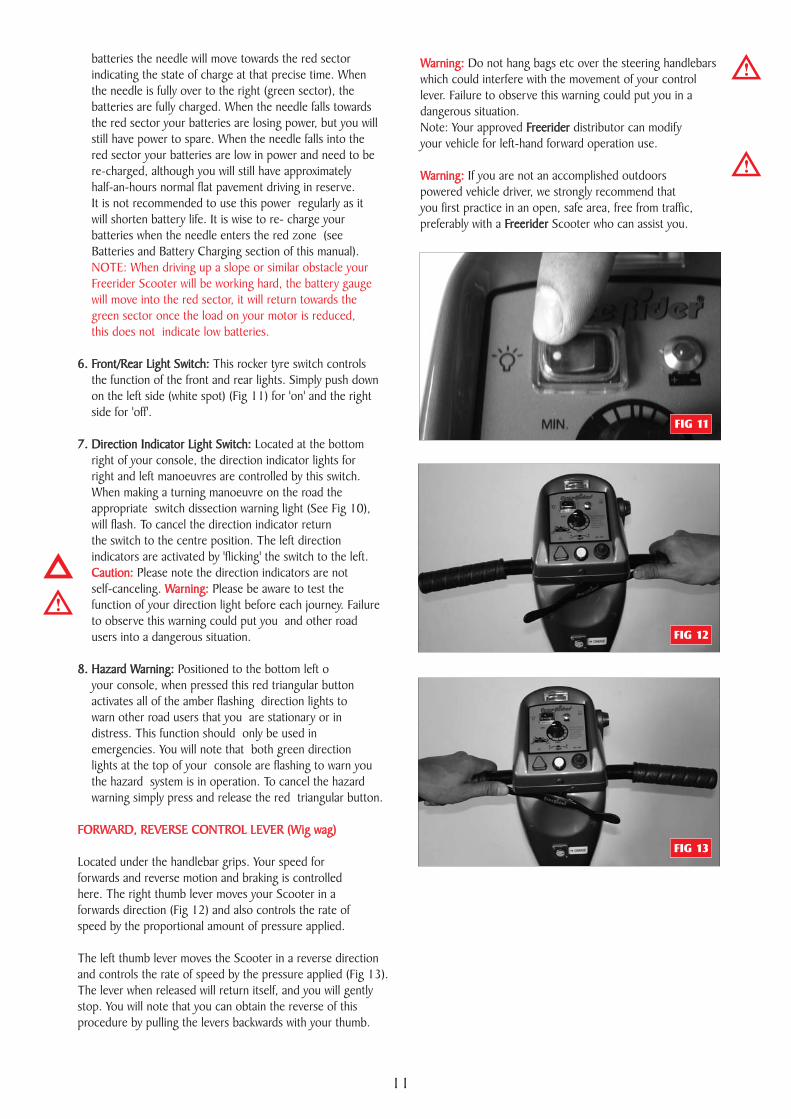
batteries the needle will move towards the red sectorindicating the state of charge at that precise time. Whenthe needle is fully over to the right (green sector), thebatteries are fully charged. When the needle falls towardsthe red sector your batteries are losing power, but you willstill have power to spare. When the needle falls into thered sector your batteries are low in power and need to bere-charged, although you will still have approximatelyhalf-an-hours normal flat pavement driving in reserve.It is not recommended to use this power regularly as itwill shorten battery life. It is wise to re- charge yourbatteries when the needle enters the red zone (seeBatteries and Battery Charging section of this manual).
This rocker tyre switch controlsthe function of the front and rear lights. Simply push downon the left side (white spot) (Fig 11) for 'on' and the rightside for 'off'.
Located at the bottomright of your console, the direction indicator lights forright and left manoeuvres are controlled by this switch.When making a turning manoeuvre on the road theappropriate switch dissection warning light (See Fig 10),will flash. To cancel the direction indicator returnthe switch to the centre position. The left directionindicators are activated by 'flicking' the switch to the left.
Please note the direction indicators are notself-canceling. Please be aware to test thefunction of your direction light before each journey. Failureto observe this warning could put you and other roadusers into a dangerous situation.
Positioned to the bottom left oyour console, when pressed this red triangular buttonactivates all of the amber flashing direction lights towarn other road users that you are stationary or indistress. This function should only be used inemergencies. You will note that both green directionlights at the top of your console are flashing to warn youthe hazard system is in operation. To cancel the hazardwarning simply press and release the red triangular button.
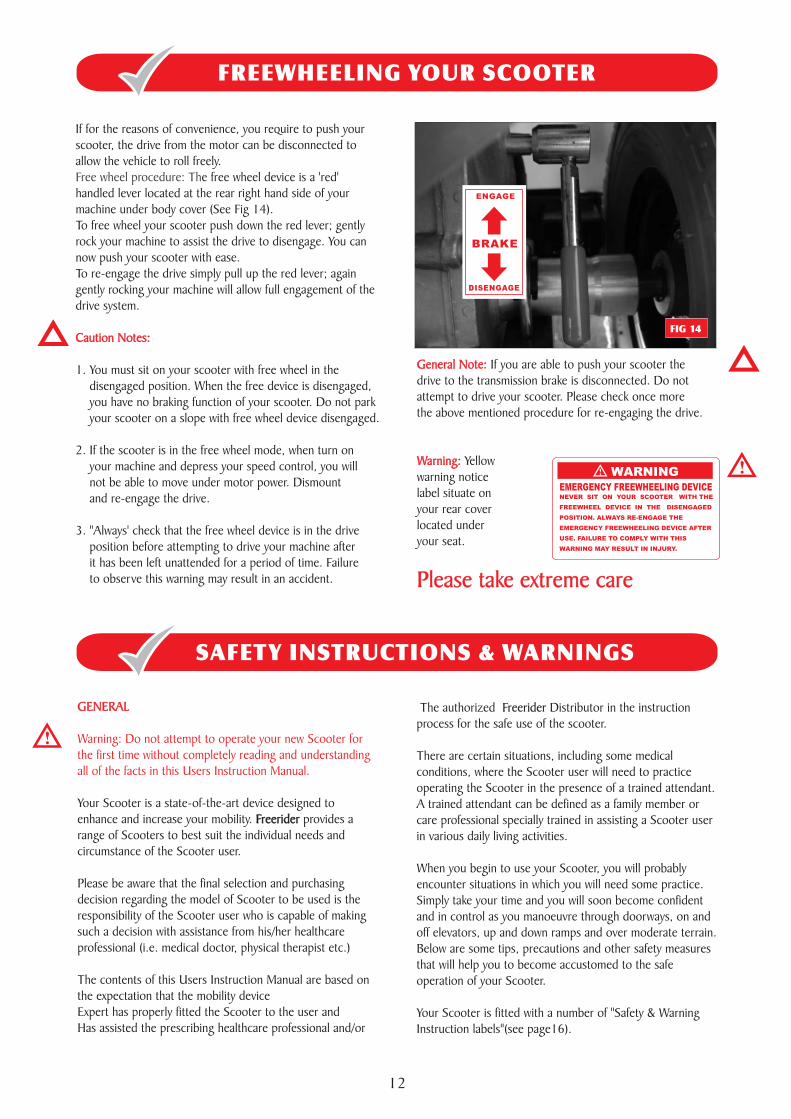
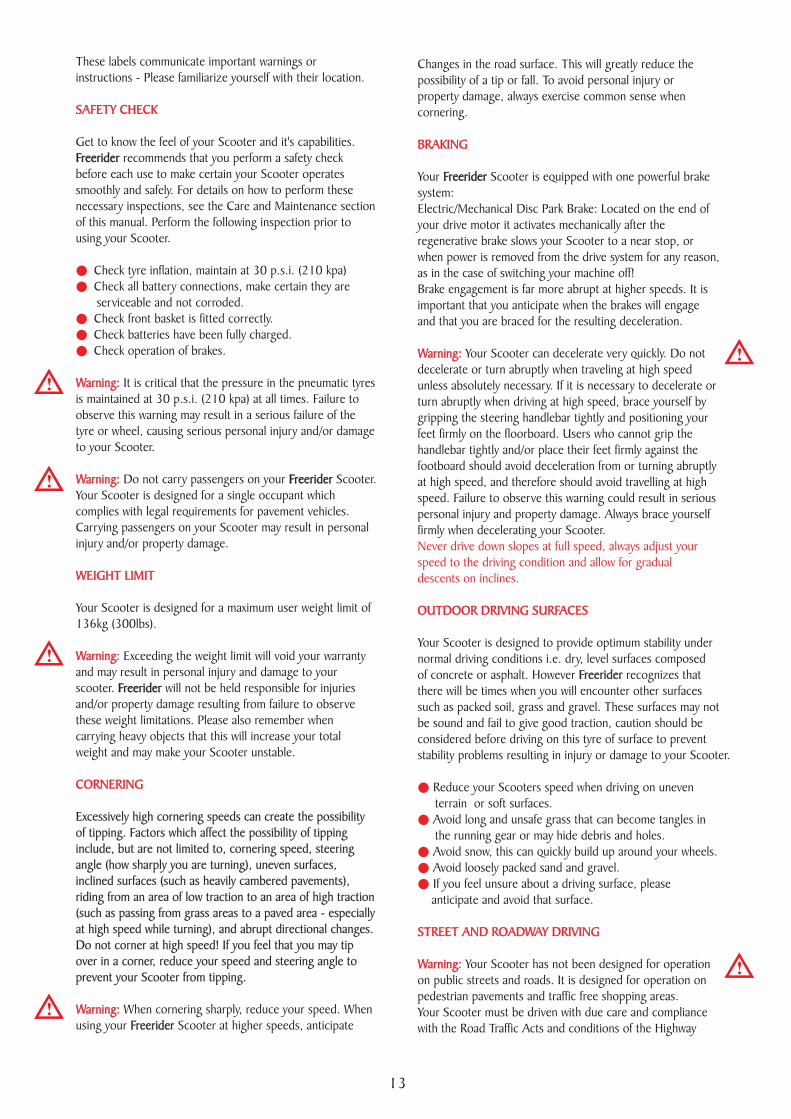
Located under the handlebar grips. Your speed forforwards and reverse motion and braking is controlledhere. The right thumb lever moves your Scooter in aforwards direction (Fig 12) and also controls the rate ofspeed by the proportional amount of pressure applied.
The left thumb lever moves the Scooter in a reverse directionand controls the rate of speed by the pressure applied (Fig 13).The lever when released will return itself, and you will gentlystop. You will note that you can obtain the reverse of thisprocedure by pulling the levers backwards with your thumb.
6. Front/Rear Light Switch:
7. Direction Indicator Light Switch:
8. Hazard Warning:
NOTE: When driving up a slope or similar obstacle yourFreerider Scooter will be working hard, the battery gaugewill move into the red sector, it will return towards thegreen sector once the load on your motor is reduced,this does not indicate low batteries.
Caution:Warning:
FORWARD, REVERSE CONTROL LEVER (Wig wag)
Caution:Warning:
FORWARD, REVERSE CONTROL LEVER (Wig wag)
6. Front/Rear Light Switch:
7. Direction Indicator Light Switch:
8. Hazard Warning:
Do not hang bags etc over the steering handlebarswhich could interfere with the movement of your controllever. Failure to observe this warning could put you in adangerous situation.Note: Your approved distributor can modifyyour vehicle for left-hand forward operation use.
If you are not an accomplished outdoorspowered vehicle driver, we strongly recommend thatyou first practice in an open, safe area, free from traffic,preferably with a Scooter who can assist you.
Freerider
Freerider
Warning:
Warning:
Warning:
Warning:
Freerider
Freerider
FIG 11
FIG 12
FIG 13
11
Caution Notes:
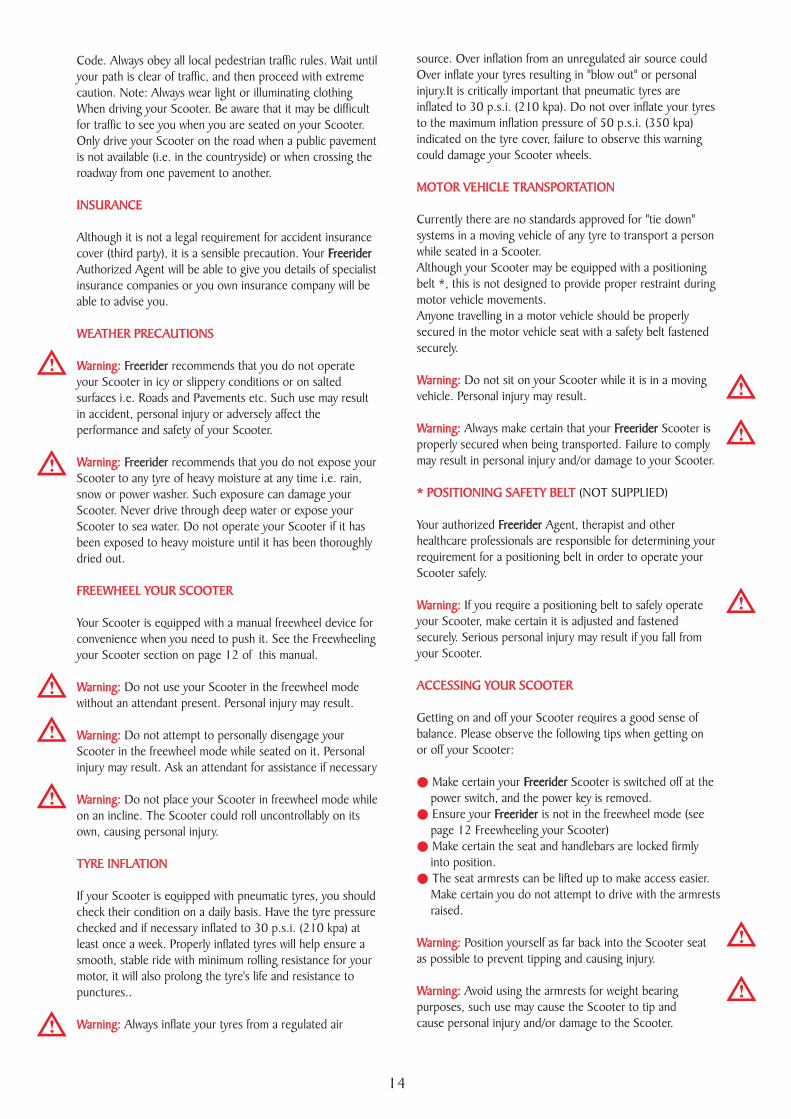
If for the reasons of convenience, you require to push yourscooter, the drive from the motor can be disconnected toallow the vehicle to roll freely.
To free wheel your scooter push down the red lever; gentlyrock your machine to assist the drive to disengage. You cannow push your scooter with ease.To re-engage the drive simply pull up the red lever; againgently rocking your machine will allow full engagement of thedrive system.
1. You must sit on your scooter with free wheel in thedisengaged position. When the free device is disengaged,you have no braking function of your scooter. Do not parkyour scooter on a slope with free wheel device disengaged.
2. If the scooter is in the free wheel mode, when turn onyour machine and depress your speed control, you willnot be able to move under motor power. Dismountand re-engage the drive.
3. "Always' check that the free wheel device is in the driveposition before attempting to drive your machine afterit has been left unattended for a period of time. Failureto observe this warning may result in an accident.
e free wheel device is a 'red'handled lever located at the rear right hand side of yourmachine under body cover (See Fig 14).
Free wheel procedure: Th
Caution Notes:
FREEWHEELING YOUR SCOOTER
FIG 14
General Note:
Warning:
Please take extreme care
If you are able to push your scooter thedrive to the transmission brake is disconnected. Do notattempt to drive your scooter. Please check once morethe above mentioned procedure for re-engaging the drive.
Yellowwarning noticelabel situate onyour rear coverlocated underyour seat.
General Note:
Warning:
Please take extreme care
SAFETY INSTRUCTIONS & WARNINGS
GENERAL
Warning: Do not attempt to operate your new Scooter forthe first time without completely reading and understandingall of the facts in this Users Instruction Manual.
Your Scooter is a state-of-the-art device designed toenhance and increase your mobility. provides arange of Scooters to best suit the individual needs andcircumstance of the Scooter user.
Please be aware that the final selection and purchasingdecision regarding the model of Scooter to be used is theresponsibility of the Scooter user who is capable of makingsuch a decision with assistance from his/her healthcareprofessional (i.e. medical doctor, physical therapist etc.)
The contents of this Users Instruction Manual are based onthe expectation that the mobility deviceExpert has properly fitted the Scooter to the user andHas assisted the prescribing healthcare professional and/or
Freerider
GENERAL
Freerider
The authorized
measuresthat will help you to become accustomed to the safeoperation of your Scooter.
Your Scooter is fitted with a number of "Safety & WarningInstruction labels"(see page16).
Distributor in the instructionprocess for the safe use of the scooter.
There are certain situations, including some medicalconditions, where the Scooter user will need to practiceoperating the Scooter in the presence of a trained attendant.A trained attendant can be defined as a family member orcare professional specially trained in assisting a Scooter userin various daily living activities.
When you begin to use your Scooter, you will probablyencounter situations in which you will need some practice.Simply take your time and you will soon become confidentand in control as you manoeuvre through doorways, on andoff elevators, up and down ramps and over moderate terrain.Below are some tips, precautions and other safety
Freerider
DISENGAGE
BRAKE
ENGAGE
WARNING
EMERGENCY FREEWHEELING DEVICENEVER SIT ON YOUR SCOOTER WITH THE
FREEWHEEL DEVICE IN THE DISENGAGED
POSITION. ALWAYS RE-ENGAGE THE
EMERGENCY FREEWHEELING DEVICE AFTER
USE. FAILURE TO COMPLY WITH THIS
WARNING MAY RESULT IN INJURY.
12
Get to know the feel of your Scooter and it's capabilities.recommends that you perform a safety check
before each use to make certain your Scooter operatessmoothly and safely. For details on how to perform thesenecessary inspections, see the Care and Maintenance sectionof this manual. Perform the following inspection prior tousing your Scooter.
Check all battery connections, make certain they areserviceable and not corroded.Check front basket is fitted correctly.Check batteries have been fully charged.Check operation of brakes.
It is critical that the pressure in the pneumatic tyresis maintained at 30 p.s.i. (210 kpa) at all times. Failure toobserve this warning may result in a serious failure of thetyre or wheel, causing serious personal injury and/or damageto your Scooter.
Do not carry passengers on your Scooter.Your Scooter is designed for a single occupant whichcomplies with legal requirements for pavement vehicles.Carrying passengers on your Scooter may result in personalinjury and/or property damage.
Your Scooter is designed for a maximum user weight limit of136kg (300lbs).
Exceeding the weight limit will void your warrantyand may result in personal injury and damage to yourscooter. will not be held responsible for injuriesand/or property damage resulting from failure to observethese weight limitations. Please also remember whencarrying heavy objects that this will increase your totalweight and may make your Scooter unstable.
These labels communicate important warnings orinstructions - Please familiarize yourself with their location.
Check tyre inflation, maintain at 30 p.s.i. (210 kpa)
Freerider
Freerider
Freerider
Excessively high cornering speeds can create the possibilityof tipping. Factors which affect the possibility of tippinginclude, but are not limited to, cornering speed, steeringangle (how sharply you are turning), uneven surfaces,inclined surfaces (such as heavily cambered pavements),riding from an area of low traction to an area of high traction(such as passing from grass areas to a paved area - especiallyat high speed while turning), and abrupt directional changes.Do not corner at high speed! If you feel that you may tipover in a corner, reduce your speed and steering angle toprevent your Scooter from tipping.
When cornering sharply, reduce your speed. Whenusing your Scooter at higher speeds, anticipateFreerider
SAFETY CHECK
Warning:
Warning:
WEIGHT LIMIT
Warning
CORNERING
:
Warning:
SAFETY CHECK
Warning:
Warning:
WEIGHT LIMIT
Warning
CORNERING
Freerider
Freerider
Freerider
:
Excessively high cornering speeds can create the possibilityof tipping. Factors which affect the possibility of tippinginclude, but are not limited to, cornering speed, steeringangle (how sharply you are turning), uneven surfaces,inclined surfaces (such as heavily cambered pavements),riding from an area of low traction to an area of high traction(such as passing from grass areas to a paved area - especiallyat high speed while turning), and abrupt directional changes.Do not corner at high speed! If you feel that you may tipover in a corner, reduce your speed and steering angle toprevent your Scooter from tipping.
Warning:Freerider
Changes in the road surface. This will greatly reduce thepossibility of a tip or fall. To avoid personal injury orproperty damage, always exercise common sense whencornering.
Your Scooter is equipped with one powerful brakesystem:Electric/Mechanical Disc Park Brake: Located on the end ofyour drive motor it activates mechanically after theregenerative brake slows your Scooter to a near stop, orwhen power is removed from the drive system for any reason,as in the case of switching your machine off!Brake engagement is far more abrupt at higher speeds. It isimportant that you anticipate when the brakes will engageand that you are braced for the resulting deceleration.
Your Scooter can decelerate very quickly. Do notdecelerate or turn abruptly when traveling at high speedunless absolutely necessary. If it is necessary to decelerate orturn abruptly when driving at high speed, brace yourself bygripping the steering handlebar tightly and positioning yourfeet firmly on the floorboard. Users who cannot grip thehandlebar tightly and/or place their feet firmly against thefootboard should avoid deceleration from or turning abruptlyat high speed, and therefore should avoid travelling at highspeed. Failure to observe this warning could result in seriouspersonal injury and property damage. Always brace yourselffirmly when decelerating your Scooter.
Your Scooter is designed to provide optimum stability undernormal driving conditions i.e. dry, level surfaces composedof concrete or asphalt. However recognizes thatthere
Freerider
Freeriderwill be times when you will encounter other surfaces
such as packed soil, grass and gravel. These surfaces may notbe sound and fail to give good traction, caution should beconsidered before driving on this tyre of surface to preventstability problems resulting in injury or damage to your Scooter.
Reduce your Scooters speed when driving on uneventerrain or soft surfaces.Avoid long and unsafe grass that can become tangles inthe running gear or may hide debris and holes.Avoid snow, this can quickly build up around your wheels.Avoid loosely packed sand and gravel.If you feel unsure about a driving surface, pleaseanticipate and avoid that surface.
Your Scooter has not been designed for operationon public streets and roads. It is designed for operation onpedestrian pavements and traffic free shopping areas.Your Scooter must be driven with due care and compliancewith the Road Traffic Acts and conditions of the Highway
BRAKING
Warning:
OUTDOOR DRIVING SURFACES
STREET AND ROADWAY DRIVING
Warning:
Never drive down slopes at full speed, always adjust yourspeed to the driving condition and allow for gradualdescents on inclines.
BRAKING
Warning:
OUTDOOR DRIVING SURFACES
STREET AND ROADWAY DRIVING
Warning:
Freerider
Freerider
13
source. Over inflation from an unregulated air source couldOver inflate your tyres resulting in "blow out" or personalinjury.It is critically important that pneumatic tyres areinflated to 30 p.s.i. (210 kpa). Do not over inflate your tyresto the maximum inflation pressure of 50 p.s.i. (350 kpa)indicated on the tyre cover, failure to observe this warningcould damage your Scooter wheels.
Currently there are no standards approved for "tie down"systems in a moving vehicle of any tyre to transport a personwhile seated in a Scooter.Although your Scooter may be equipped with a positioningbelt *, this is not designed to provide proper restraint duringmotor vehicle movements.Anyone travelling in a motor vehicle should be properlysecured in the motor vehicle seat with a safety belt fastenedsecurely.
Do not sit on your Scooter while it is in a movingvehicle. Personal injury may result.
Always make certain that your Scooter isproperly secured when being transported. Failure to complymay result in personal injury and/or damage to your Scooter.
(NOT SUPPLIED)
Your authorized Agent, therapist and otherhealthcare professionals are responsible for determining yourrequirement for a positioning belt in order to operate yourScooter safely.
If you require a positioning belt to safely operateyour Scooter, make certain it is adjusted and fastenedsecurely. Serious personal injury may result if you fall fromyour Scooter.
Getting on and off your Scooter requires a good sense ofbalance. Please observe the following tips when getting onor off your Scooter:
Make certain your Scooter is switched off at thepower switch, and the power key is removed.Ensure your is not in the freewheel mode (seepage 12 Freewheeling your Scooter)Make certain the seat and handlebars are locked firmlyinto position.The seat armrests can be lifted up to make access easier.Make certain you do not attempt to drive with the armrestsraised.
Position yourself as far back into the Scooter seatas possible to prevent tipping and causing injury.
Avoid using the armrests for weight bearingpurposes, such use may cause the Scooter to tip andcause personal injury and/or damage to the Scooter.
Freerider
Freerider
Freerider
Freerider
MOTOR VEHICLE TRANSPORTATION
Warning:
Warning:
* POSITIONING SAFETY BELT
Warning:
ACCESSING YOUR SCOOTER
Warning:
Warning:
MOTOR VEHICLE TRANSPORTATION
Warning:
Warning:
* POSITIONING SAFETY BELT
Warning:
ACCESSING YOUR SCOOTER
Warning:
Warning:
Freerider
Freerider
Freerider
Freerider
Code. Always obey all local pedestrian traffic rules. Wait untilyour path is clear of traffic, and then proceed with extremecaution. Note: Always wear light or illuminating clothingWhen driving your Scooter. Be aware that it may be difficultfor traffic to see you when you are seated on your Scooter.Only drive your Scooter on the road when a public pavementis not available (i.e. in the countryside) or when crossing theroadway from one pavement to another.
Although it is not a legal requirement for accident insurancecover (third party), it is a sensible precaution. YourAuthorized Agent will be able to give you details of specialistinsurance companies or you own insurance company will beable to advise you.
hat you do not operateyour Scooter in icy or slippery conditions or on saltedsurfaces i.e. Roads and Pavements etc. Such use may resultin accident, personal injury or adversely affect theperformance and safety of your Scooter.
recommends that you do not expose yourScooter to any tyre of heavy moisture at any time i.e. rain,snow or power washer. Such exposure can damage yourScooter. Never drive through deep water or expose yourScooter to sea water. Do not operate your Scooter if it hasbeen exposed to heavy moisture until it has been thoroughlydried out.
Your Scooter is equipped with a manual freewheel device forconvenience when you need to push it. See the Freewheelingyour Scooter section on page 12 of this manual.
Do not use your Scooter in the freewheel modewithout an attendant present. Personal injury may result.
Do not attempt to personally disengage yourScooter in the freewheel mode while seated on it. Personalinjury may result. Ask an attendant for assistance if necessary
If your Scooter is equipped with pneumatic tyres, you shouldcheck their condition on a daily basis. Have the tyre pressurechecked and if necessary inflated to 30 p.s.i. (210 kpa) atleast once a week. Properly inflated tyres will help ensure asmooth, stable ride with minimum rolling resistance for yourmotor, it will also prolong the tyre's life and resistance topunctures..
Freerider
Freerider
Freerider
recommends t
place your Scooter in freewheel mode whileon an incline. The Scooter could roll uncontrollably on itsown, causing personal injury.
Always inflate your tyres from a regulated air
Do not
INSURANCE
WEATHER PRECAUTIONS
Warning:
Warning:
FREEWHEEL YOUR SCOOTER
Warning:
Warning:
Warning:
TYRE INFLATION
Warning:
INSURANCE
WEATHER PRECAUTIONS
Warning:
Warning:
FREEWHEEL YOUR SCOOTER
Freerider
Freerider
Freerider
t
Warning:
Warning:
Warning:
TYRE INFLATION
Warning:
14
Avoid putting weight onto the steeringhandlebars, such use may cause the Scooter to tip andcause personal injury and/or damage to the Scooter.
Avoid putting all of your weight onto thefootboard, such use may cause the Scooter to tip andcause personal injury.
access in mind. Ramps have specified percentage ofinclination, designed for easy and safe access. Someramps may have turning switchbacks (180 degree turns)that require you to have good cornering skills on yourScooter.
Proceed with extreme caution as you approach thedowngrade of a ramp or other incline, sit right back inyour seat, brace your arms on the handlebars and yourfeet on the floorboardTake a wide arc with your front wheelaround tight corners, your rear wheels will followpreventing you from cutting the corner short andbumping or getting hung up on raised kerbs.When descending an incline keep your speedadjustment set to the slowest speed setting to ensure asafely controlled descent and driving in a forwarddirection only. If your Scooter descent is quicker than youanticipated allow the Scooter to completely stop, thenprogress at a slower speed setting.
Never drive down an incline at full speed.
When climbing an incline, try to keep your Scootermoving, if you must stop, start up again slowly and thenaccelerate smoothly with caution. Avoid sudden stopstarts, lean forward towards your handlebars to increasestability and prevent rearward tipping.
When climbing an incline, do not zig-zagor drive at an angle up the face of the incline. Driveyour Scooter smoothly up the incline withoutstopping, this greatly reduces the possibility of a tipor fall.
You should not travel over a potentiallyhazardous incline i.e. areas covered with ice or snow,cut grass or wet leaves or any unstable surface.
Freerider's
Warning:
Warning:
MODIFICATIONS
Warning:
INCLINES
Warning:
Warning:
Warning:
Failure to observe this warning may result in personalinjury and/or damage to your Scooter.
More and more modern buildings are designed withdisability
Freerider has designed your Scooter to provide maximummobility. A range of accessories are available fromAuthorised Agents, to further customise yourScooter needs. However, under no circumstances shouldyou modify, add, remove or disable any feature, part orfunction of your machine.
Freerider
Warning:
Warning:
MODIFICATIONS
Warning:
INCLINES
Warning:
Warning:
Warning:
Freerider
Freerider's
Warning:
Warning:
STAIRS AND ESCALATORS
Warning:
Warning:
DISPOSAL OF ELECTRO-MOBILE SCOOTER
ALWAYS TAKE CARE AND BE SAFE
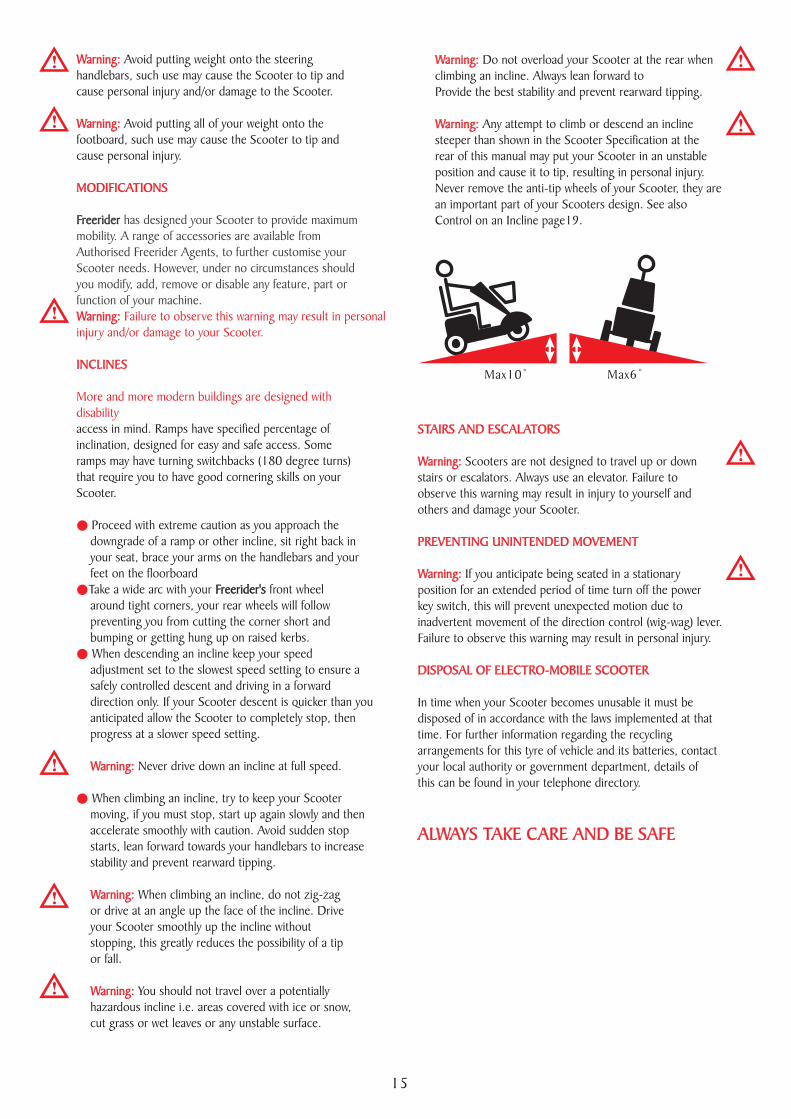
Do not overload your Scooter at the rear whenclimbing an incline. Always lean forward toProvide the best stability and prevent rearward tipping.
Any attempt to climb or descend an inclinesteeper than shown in the Scooter Specification at therear of this manual may put your Scooter in an unstableposition and cause it to tip, resulting in personal injury.Never remove the anti-tip wheels of your Scooter, they arean important part of your Scooters design. See alsoControl on an Incline page19.
Scooters are not designed to travel up or downstairs or escalators. Always use an elevator. Failure toobserve this warning may result in injury to yourself andothers and damage your Scooter.
If you anticipate being seated in a stationaryposition for an extended period of time turn off the powerkey switch, this will prevent unexpected motion due toinadvertent movement of the direction control (wig-wag) lever.Failure to observe this warning may result in personal injury.
In time when your Scooter becomes unusable it must bedisposed of in accordance with the laws implemented at thattime. For further information regarding the recyclingarrangements for this tyre of vehicle and its batteries, contactyour local authority or government department, details ofthis can be found in your telephone directory.
PREVENTING UNINTENDED MOVEMENT
Warning:
Warning:
STAIRS AND ESCALATORS
Warning:
PREVENTING UNINTENDED MOVEMENT
Warning:
DISPOSAL OF ELECTRO-MOBILE SCOOTER
ALWAYS TAKE CARE AND BE SAFE
Max10 Max6
15
Warning:
Warning:
Warning:
stop simply release the lever, the brakes will be automaticallyapplied.firmly in position. Next, turn the 'Speed AdjustmentDial' to minimum (min), and turn the 'on/off' key to 'on' (Fig10, page10). (The battery state indicator will move and thegreen status light will illuminate). Gently press the rightthumb control lever (Fig 12, page 11) to start you in a forwarddirection. To stop simply relese the lever, the brakes will beautomatically applied.
Please take care not to have your thumb on theforward/reverse control lever when you switch 'on' yourScooter; this will result in your machine going into a faultmode. Switch 'off' then 'on' again to clear the fault.
If your Scooter has been adapted for left hand,forward operation then this procedure will be reversed: i.e.pressing with the left thumb for forward direction and theright thumb for reverse direction.
If your Scooter has been converted with a "Delta" tyre control system,please refer to the separate
Warning:
Warning:
Warning:
SAFETY WARNING & INSTRUCTION LABELS
MAIN CIRCUIT BREAKER
PRESS TO RESET
Control console label
Located on the top of the Scooter's rear cover
(under seat)
Data serial plate located on front wheel
cross member
Located on right of handlebar cover
Located on front wheel cross member
Wiring diagram for batteries located under
rear cover
Located at the left or right
hand rear cover of
Scooter
Located at right rear
of handlebars near
charging socket
Located on the top leftside of the rear cover
(under seat).
Yellow label located on the top of the rear cover
LEARNING TO GET ABOUT
Warning:
MOUNTING
If you are not an accomplished outdoors mobilityproduct driver, we strongly recommend that you first practicein an open area, free from traffic and preferably with anattendant who can assist you.
For your first drive make certain that you and your newScooter are on a level surface. Put the power on/off key intoits slot, but leave it turned off. Stand behind the Scooter'sseat, and reach down to the 'Seat Lock Lever'. It will be onthe left side directly under the armrest.
Grasp the 'black' knob on the lever and pull up, releasing theSeat (Fig 15). It will now turn easily to meet you. If need be,you can lock the seat into position to make it steady beforeyou sit down. You can also lift up the armrest to assist thisprocedure. Seat yourself and swing the seat to face thehandlebars. Make sure you are straight, then release thespring assisted lever, making certain that it locks your seat
Warning:
MOUNTING
The following labels are positioned on your Freerider, theycommunicate important warnings or instructions regarding the
safe operation of your scooter. Please familiarize yourselfwith their location.
16

FIG 15
instructions provided with this accessory (see also page 40 ofthis manual)
If you prefer you can swing the armrests back to allow you topivot on your seat and then ease yourself onto your feet.
Do not use the handlebars as a crutch to leveryourself out of your seat. Failure to observe this warning maydamage the handlebar mechanism and make the Scooterunstable.
If you need to park and leave your Scooter, simplyremove your key. This will keep the brake on and make yourScooter more difficult to move. It is best to leave it in sightof someone like a store assistant etc. who can watch it foryou. Another precaution is to you're your serial number andthe date of purchase.
Your serial number can be found on a plate attached to thefront cross member located under the body cover.
Make certain you are comfortably seated on yourand both armrests are down. Ensure that the 'SpeedAdjustment Dial' (Fig 10, page 10) is turned to minimum foryour first drive. When you have become more confident youcan increase the setting to a higher speed. Push the right'Thumb Lever Control' (Fig 12, page 11), as described earlier.You will very gently move forwards. Release the lever, andyou will gently stop. Practice these two basic functions untilyou get used to them.
Steering the Scooter is easy and logical by turning thehandle bars in the direction you wish to manoeuvre. Be sureto remember to give a wide clearance when turning so thatthe rear wheels follow the path of the front one, instead ofcutting short.
Cutting short on pavement corners or 'cut outs' can mean
Freerider
Scooter
DISMOUNTING
Caution:
PARKING IN PUBLIC
Always switch off your Scooter before dismounting. Locatethe seat lever and pull up (Fig 15). Now you can swing theseat away, lock it, and ease yourself onto your feet.
BASIC DRIVING
DISMOUNTING
Caution:
PARKING IN PUBLIC
BASIC DRIVING
Freerider
that a back wheel will go off the pavement, causing a stabilityproblem. Avoid this at all times by steering an exaggeratedwide arc around the obstacle.
If you must steer in a tight spot, such as entering a doorwayor when turning around, stop, turn the handlebars to whereyou want to go, then apply the power gently. This will makethe turn sharply. It will still go gently, and withcomplete stability. Practice in an open area, until you areproficient.
Reversing requires attention. Be sure your 'Speed AdjustmentDial' is turned to minimum before you reverse (Fig 10, page 10).Push the left thumb reverse control lever (Fig 13, page 11).Remember, when you reverse you have to steer in the oppositedirection to the way you want to go. Practice is required here,again use that open space. Please note as a safety requirementreverse speed is half of forward speed.
Note: If your Scooter is set up for left forward driving theafore mentioned description is reversed.
If it is a tight turn, turn your steering columnbefore applying power. Steer wide of all corners andobstacles, please move slowly and with care.
When you start using your Scooter you will meet someobstacles that will require some practice to drive throughsmoothly.
Here are some common problems, with tips that will helpyou master them quickly. You will soon be in control throughdoors and up and down ramps with surprising ease byfollowing these tips.
Approach an unfamiliar door slowly, sizing it up. Does ithave a knob or push bar? Does it open toward you or away?Think in terms of using the power of the Scooter to do thework for you! You need not strain.
Hold the doorknob or bar in one hand and apply power withthe other hand. (Remember that you can drive forwards byusing your left thumb to move the wig-wag lever towardsyou.) If the door is self closing, you can go through, allowingthe door to close behind you, if you go quickly enough. Ifnot, just stop when you're clear of the door and push itclosed.
If the door opens toward you, hold the knob or bar with onehand and gently let the reverse power do the work. When
Scooter
REMEMBER:
Do not turn your 'on-off' power key switch to the'off' position when your Scooter is in motion, failure toobserve this warning may irreparably damage the mainelectronic speed control unit or drive transmission. Alwaysfirst slow your Scooter down to a stationery position beforeyou switch your Scooter off.
Warning:
CONTROL THROUGH TIGHT SPOTS
CONTROL THROUGH DOORS
Warning:
CONTROL THROUGH TIGHT SPOTS
CONTROL THROUGH DOORS
17
where you are not certain of the terrain. Always anticipateand think safety.
Because of the power of your Scooter, youwill be able to climb inclines. But
FreeriderThe maximum safe gradient
limit is 10 degrees. The reason for this is to ensure goodstability. Always have the anti-tipping wheels fitted to yourmachine (Fig 18) when climbing angles or obstacles.Always avoid turning on slopes or climbing kerbs.
Always make certain that your Scooter is in full working orderbefore attempting to drive. Never attempt to drive beyondthe design capability of your Scooter. Observeweather conditions. Tyres can slip on wet or icy surfaces.
i.e. During or after a thunderstorm.
Do not attempt to turn when negotiating an incline, only turnwhen all wheels are fully on or off the incline; failure toobserve this warning could result in the machine becomingunstable and toppling over.
Always lean forward when ascending an incline andbackwards when descending an incline. This will enable youto maintain good stability and will eliminate any chance of anupset.
Freerider
DO NOT DRIVE THROUGH DEEP WATER OR LEAVEYOUR FREERIDER EXPOSED TO HEAVY RAIN.
Caution: Freerider
Freerider
DO NOT DRIVE THROUGH DEEP WATER OR LEAVEYOUR FREERIDER EXPOSED TO HEAVY RAIN.
the door is open wide enough, go ahead quickly, leaving thehand on the door to keep it free of the Scooter and letting goas you pass the doorjamb. It is an easy technique. Practicemakes perfect. Remember - your Scooter can do the workwithout wearing you out!
If you're notmoving, your rear wheel is probably caught. Reverse and tryagain. Take your time - relax - enjoy yourself.
More and more buildings have ramps for wheelchair access.Some have a change of direction in the middle, and goodcornering is required.
Make a wide manoeuvre with your front wheel around tightcorners.so that your back wheels follow a wide arc to stayclear of the corner.
If you stop while facing uphill, the automatic parking brakewill hold you safe. To start again, slowly push the forwarddirection lever, the parking brake will release and you willstart to move.
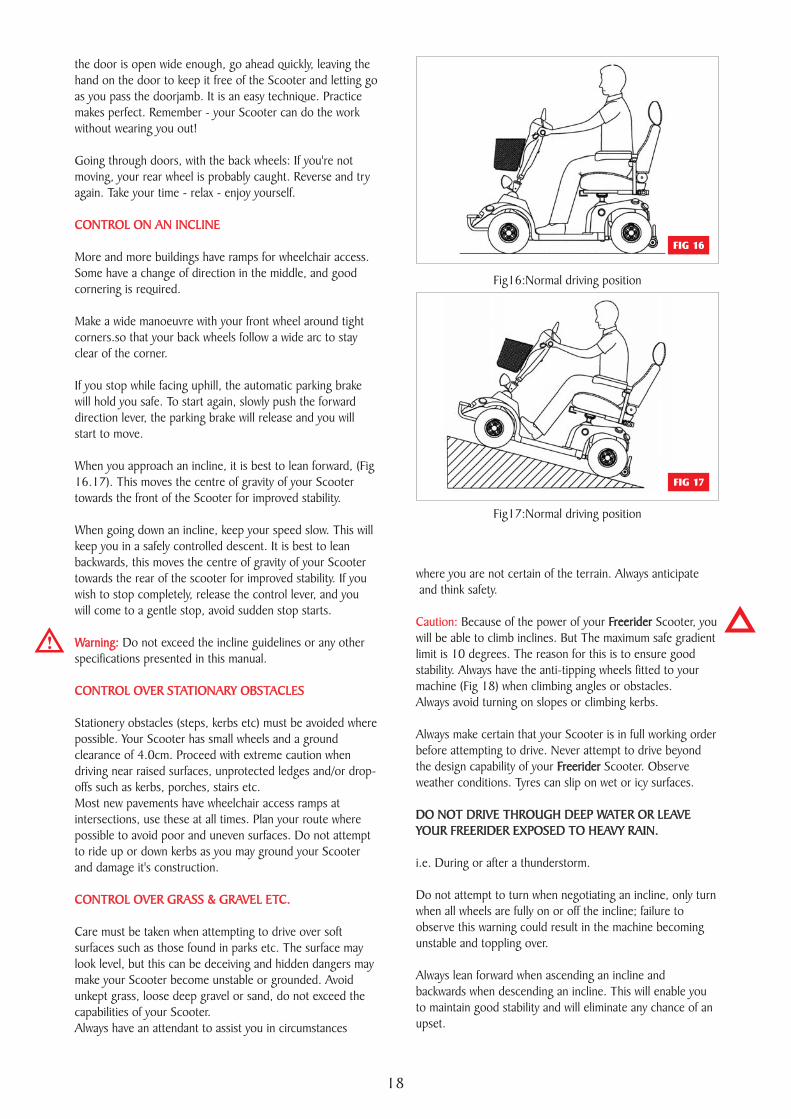
When you approach an incline, it is best to lean forward, (Fig16.17). This moves the centre of gravity of your Scootertowards the front of the Scooter for improved stability.
When going down an incline, keep your speed slow. This willkeep you in a safely controlled descent. It is best to leanbackwards, this moves the centre of gravity of your Scootertowards the rear of the scooter for improved stability. If youwish to stop completely, release the control lever, and youwill come to a gentle stop, avoid sudden stop starts.
Do not exceed the incline guidelines or any otherspecifications presented in this manual.
Stationery obstacles (steps, kerbs etc) must be avoided wherepossible. Your Scooter has small wheels and a groundclearance of 4.0cm. Proceed with extreme caution whendriving near raised surfaces, unprotected ledges and/or drop-offs such as kerbs, porches, stairs etc.Most new pavements have wheelchair access ramps atintersections, use these at all times. Plan your route wherepossible to avoid poor and uneven surfaces. Do not attemptto ride up or down kerbs as you may ground your Scooterand damage it's construction.
Care must be taken when attempting to drive over softsurfaces such as those found in parks etc. The surface maylook level, but this can be deceiving and hidden dangers maymake your Scooter become unstable or grounded. Avoidunkept grass, loose deep gravel or sand, do not exceed thecapabilities of your Scooter.Always have an attendant to assist you in circumstances
Going through doors, with the back wheels:
CONTROL ON AN INCLINE
Warning:
CONTROL OVER STATIONARY OBSTACLES
CONTROL OVER GRASS & GRAVEL ETC.
CONTROL ON AN INCLINE
Warning:
CONTROL OVER STATIONARY OBSTACLES
CONTROL OVER GRASS & GRAVEL ETC.
FIG 16
FIG 17
Fig16:Normal driving position
Fig17:Normal driving position
18
PLEASE NOTE:
Freerider
The rear stability of your Scooter isdependent on a number of factors which you should considerbefore attempting to climb an incline or other obstacle: (a)your height; (b) the height of your seat; (c) your weight and(d) the angle of the incline you are attempting to climb. All ofthese factors can affect the rear stability of yourScooter. If you are unsure of your capability to climb anobstacle, then try another route - always think 'safety first'.
Please take care and be safe
PLEASE NOTE:
Freerider
Please take care and be safe
LOADING YOUR SCOOTER
Warning:
Whether it is for a holiday, a day out to visit family or friends,or a trip to the shop, your scooter can be taken along too.
Depending on the size or model of your car you will be ableto load your scooter in one of the following methods.
1. With the aid of a car hoist. Your fealer will be able toadvise on suitable equipment.
2. With the aid of ramps. Ramps will aid you to drive yourscooter straight into a people carrier or estate car, if therear opening is low you may have to remove yourscooter seat and lower handlebars. You will also requirea suitable folding ramp to lift your scooter into your car.Your r Distributor will be able advise you ofsuitable for this purpose (See Fig 19).
3. Small hatchback or estate or estate car (See Fig 20.21).4. If your car is small or has a conventional boot, your
scooter can be dismantled into six basic parts (See Fig 29).
1. Remove your seat or fold down the backrest as necessary(Fig 22).
2. Lower the steering handlebars sufficiently to allow thehandlebars clearance under the top of your tail gateentry, lock handlebars into position with black locking lever(See Fig 9 page 10 ).
3. Set your speed 'min-max' adjustment dial (See Fig 10page10 ).
4. Switch Scooter 'on' and gently operate the speed controllever, to make a slow and controlled accent of ramp.
5. When you have safety loaded your scooter into yourvehicle switch off the power switch. Load ramp into vehicle.
To unload your scooter from your car follow points to 5in reverse order.
Freeride
Always make certain that you are on level ground whenloading and unloading your scooter from your carrying
Freeride
LOADING YOUR SCOOTER
Warning:
FIG 18Anti-tipping wheels
TRANSPORTING YOUR SCOOTER
FIG 19
FIG 21
FIG 20
19
vehicle. Always keep your body clear of your scooter toprevent entrapment.Always make certain your scooter tyres and your rampsurface is dry, failure of observe this warning could makeyour scooter unstable and put you in a dangerous situation.Always make certain your ramps are at a sufficientlylow angle to maintain good stability and climbingadhesion. Failure to observe this warning could put youin a dangerous situation.Never ride on your scooter when loading it into avehicle, warning could put you in dangerous situation.Always make certain that your scooter and any ancillaryart is correctly strapped into your carrying vehicle toprevent forward or reward movement during normaldriving or in the case of severe braking. Most of modernvehicles have 'loading eyes' situation in the carryingvehicles floor, use these with suitable straps to preventyour scooter moving.
Always make certain your scooter drive systemis in the engaged position.
For convenience, you may want to dismantle your scooter toallow it to be transported in a smaller space. Your scootercan be dismantled into six individual parts (See Fig 29, Page21). To enable scooter to be dismantled and transportedfollow these simple instructions. This procedure can becarried out without tools.
1. Drive your scooter close to the vehicle into whichyou are about to load it. You may need some assistanceto life the components once your machine is dismantled.
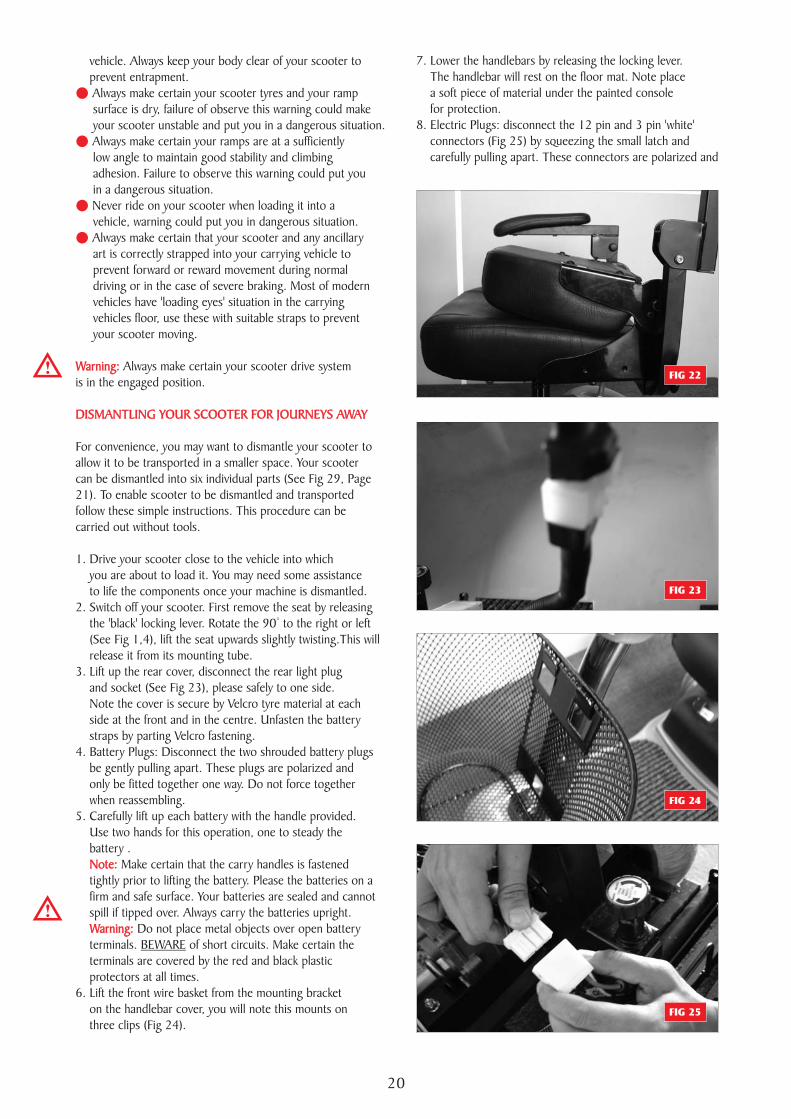
2. Switch off your scooter. First remove the seat by releasingthe 'black' locking lever. Rotate the 90 to the right or left(See Fig 1,4), lift the seat upwards slightly twisting.This willrelease it from its mounting tube.
3. Lift up the rear cover, disconnect the rear light plugand socket (See Fig 23), please safely to one side.Note the cover is secure by Velcro tyre material at eachside at the front and in the centre. Unfasten the batterystraps by parting Velcro fastening.
4. Disconnect the two shrouded battery plugsbe gently pulling apart. These plugs are polarized andonly be fitted together one way. Do not force togetherwhen reassembling.
5. Carefully lift up each battery with the handle provided.Use two hands for this operation, one to steady thebattery .
Make certain that the carry handles is fastenedtightly prior to lifting the battery. Please the batteries on afirm and safe surface. Your batteries are sealed and cannotspill if tipped over. Always carry the batteries upright.
Do not place metal objects over open batteryterminals. of short circuits. Make certain theterminals are covered by the red and black plasticprotectors at all times.
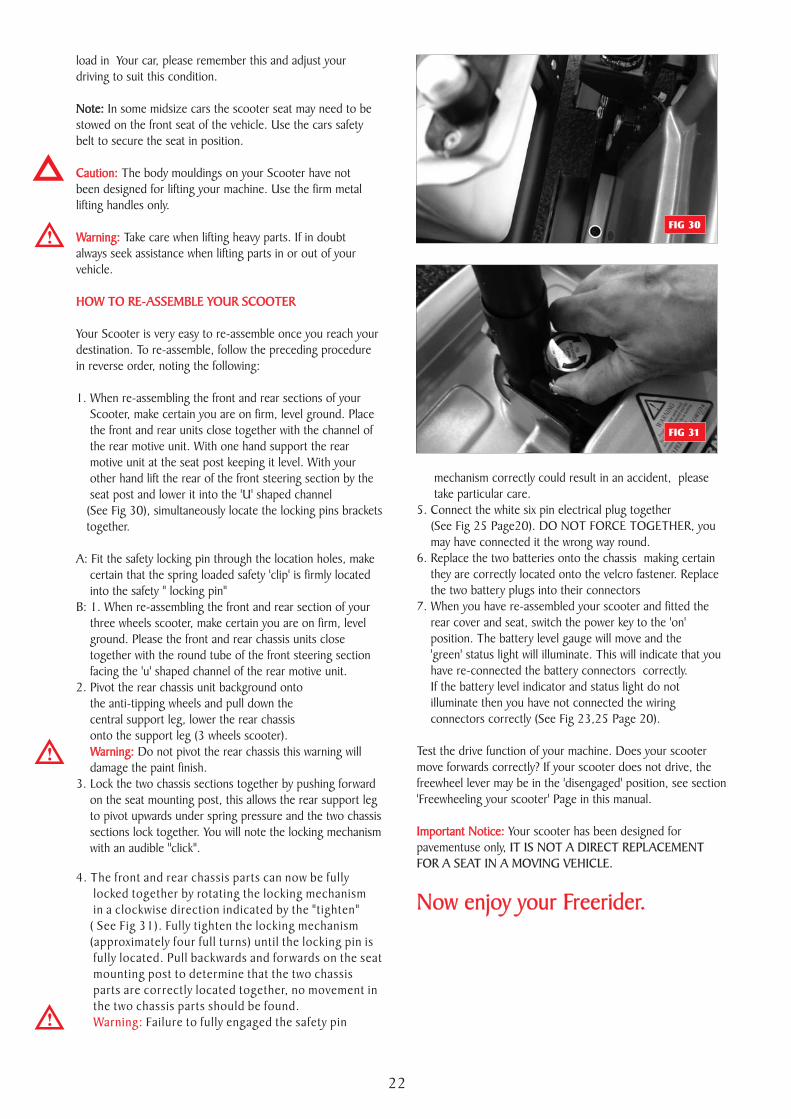
6. Lift the front wire basket from the mounting bracketon the handlebar cover, you will note this mounts onthree clips (Fig 24).
Battery Plugs:
BEWARE
Warning:
DISMANTLING YOUR SCOOTER FOR JOURNEYS AWAY
Note:
Warning:
Warning:
DISMANTLING YOUR SCOOTER FOR JOURNEYS AWAY
Note:
Warning:
FIG 22
FIG 25
FIG 23
7. Lower the handlebars by releasing the locking lever.The handlebar will rest on the floor mat. Note placea soft piece of material under the painted consolefor protection.
8. Electric Plugs: disconnect the 12 pin and 3 pin 'white'connectors (Fig 25) by squeezing the small latch andcarefully pulling apart. These connectors are polarized and
FIG 24
20
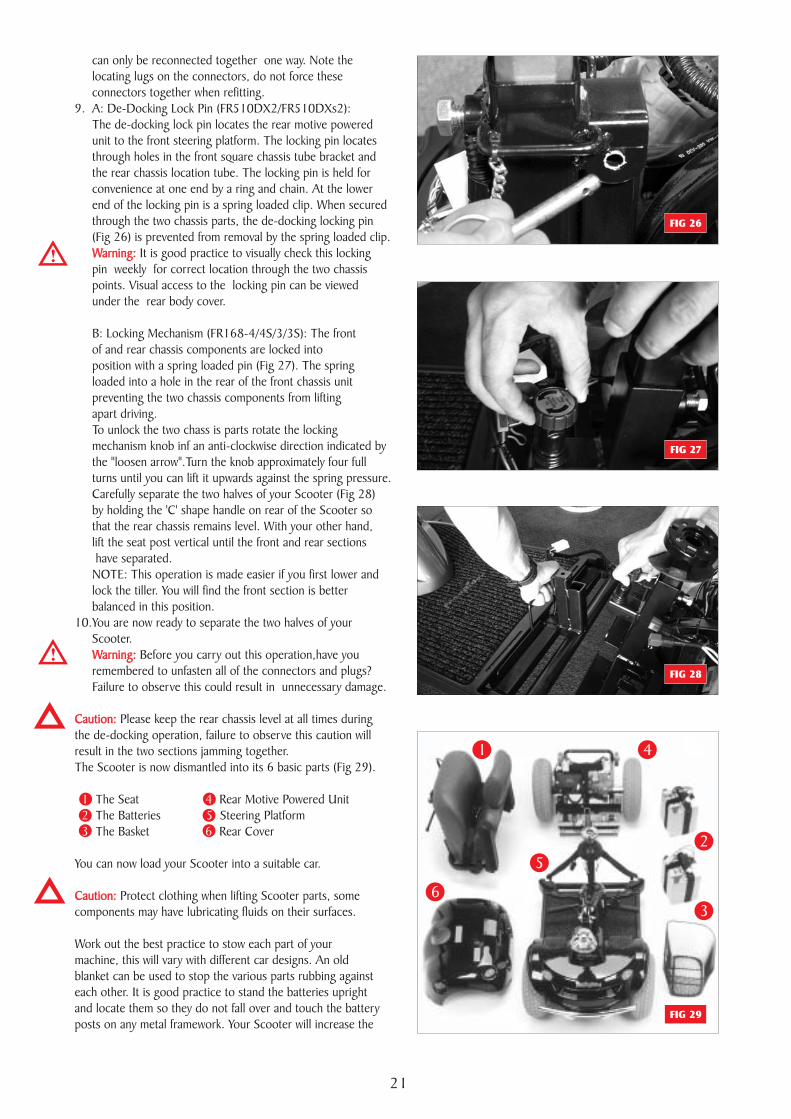
FIG 26
FIG 29
FIG 28
FIG 27
can only be reconnected together one way. Note thelocating lugs on the connectors, do not force theseconnectors together when refitting.
9.The de-docking lock pin locates the rear motive poweredunit to the front steering platform. The locking pin locatesthrough holes in the front square chassis tube bracket andthe rear chassis location tube. The locking pin is held forconvenience at one end by a ring and chain. At the lowerend of the locking pin is a spring loaded clip. When securedthrough the two chassis parts, the de-docking locking pin(Fig 26) is prevented from removal by the spring loaded clip.
It is good practice to visually check this lockingpin for correct location through the two chassispoints. Visual access to the locking pin can be viewedunder the rear body cover.
The frontof and rear chassis components are locked intoposition with a spring loaded pin (Fig 27). The springloaded into a hole in the rear of the front chassis unitpreventing the two chassis components from liftingapart driving.To unlock the two chass is parts rotate the lockingmechanism knob inf an anti-clockwise direction indicated bythe "loosen arrow".Turn the knob approximately four fullturns until you can lift it upwards against the spring pressure.Carefully separate the two halves of your Scooter (Fig 28)by holding the 'C' shape handle on rear of the Scooter sothat the rear chassis remains level. With your other hand,lift the seat post vertical until the front and rear sectionshave separated.
This operation is made easier if you first lower andlock the tiller. You will find the front section is betterbalanced in this position.
10.You are now ready to separate the two halves of yourScooter.
Before you carry out this operation,have youremembered to unfasten all of the connectors and plugs?Failure to observe this could result in unnecessary damage.
Please keep the rear chassis level at all times duringthe de-docking operation, failure to observe this caution willresult in the two sections jamming together.The Scooter is now dismantled into its 6 basic parts (Fig 29).
The Seat Rear Motive Powered UnitThe Batteries Steering PlatformThe Basket Rear Cover
You can now load your Scooter into a suitable car.
Protect clothing when lifting Scooter parts, somecomponents may have lubricating fluids on their surfaces.
Work out the best practice to stow each part of yourmachine, this will vary with different car designs. An oldblanket can be used to stop the various parts rubbing againsteach other.
A: De-Docking Lock Pin (FR510DX2/FR510DXs2):
weekly
B: Locking Mechanism (FR168-4/4S/3/3S):
NOTE:
It is good practice to stand the batteries uprightand locate them so they do not fall over and touch the batteryposts on any metal framework. Your Scooter will increase the
Warning:
Warning:
Caution:
Caution:
1 42 53 6
Warning:
Warning:
Caution:
Caution:
1 4
2
3
5
6
21
load in
Your Scooter is very easy to re-assemble once you reach yourdestination. To re-assemble, follow the preceding procedurein reverse order, noting the following:
1. When re-assembling the front and rear sections of yourScooter, make certain you are on firm, level ground. Placethe front and rear units close together with the channel ofthe rear motive unit. With one hand support the rearmotive unit at the seat post keeping it level. With yourother hand lift the rear of the front steering section by theseat post and lower it into the 'U' shaped channel
(See Fig 30), simultaneously locate the locking pins bracketstogether.
A: Fit the safety locking pin through the location holes, makecertain that the spring loaded safety 'clip' is firmly locatedinto the safety " locking pin"
B: 1. When re-assembling the front and rear section of yourthree wheels scooter, make certain you are on firm, levelground. Please the front and rear chassis units closetogether with the round tube of the front steering sectionfacing the 'u' shaped channel of the rear motive unit.
2. Pivot the rear chassis unit background ontothe anti-tipping wheels and pull down thecentral support leg, lower the rear chassisonto the support leg (3 wheels scooter).
Do not pivot the rear chassis this warning willdamage the paint finish.
3. Lock the two chassis sections together by pushing forwardon the seat mounting post, this allows the rear support legto pivot upwards under spring pressure and the two chassissections lock together. You will note the locking mechanismwith an audible "click".
Your car, please remember this and adjust yourdriving to suit this condition.
In some midsize cars the scooter seat may need to bestowed on the front seat of the vehicle. Use the cars safetybelt to secure the seat in position.
The body mouldings on your Scooter have notbeen designed for lifting your machine. Use the firm metallifting handles only.
Take care when lifting heavy parts. If in doubtalways seek assistance when lifting parts in or out of yourvehicle.
Note:
Caution:
Warning:
HOW TO RE-ASSEMBLE YOUR SCOOTER
Warning:
Note:
Caution:
Warning:
HOW TO RE-ASSEMBLE YOUR SCOOTER
Warning:
FIG 30
4. The front and rear chassis parts can now be fullylocked together by rotating the locking mechanismin a clockwise direction indicated by the "tighten"
( See Fig 31). Fully tighten the locking mechanism(approximately four full turns) until the locking pin isfully located. Pull backwards and forwards on the seatmounting post to determine that the two chassisparts are correctly located together, no movement inthe two chassis parts should be found.
Failure to fully engaged the safety pinWarning:
mechanism correctly could result in an accident, pleasetake particular care.
5. Connect the white six pin electrical plug together(See Fig 25 Page20). DO NOT FORCE TOGETHER, youmay have connected it the wrong way round.
6. Replace the two batteries onto the chassis making certainthey are correctly located onto the velcro fastener. Replacethe two battery plugs into their connectors
7. When you have re-assembled your scooter and fitted therear cover and seat, switch the power key to the 'on'position. The battery level gauge will move and the'green' status light will illuminate. This will indicate that youhave re-connected the battery connectors correctly.If the battery level indicator and status light do notilluminate then you have not connected the wiringconnectors correctly (See Fig 23,25 Page 20).
Test the drive function of your machine. Does your scootermove forwards correctly? If your scooter does not drive, thefreewheel lever may be in the 'disengaged' position, see section'Freewheeling your scooter' Page in this manual.
Your scooter has been designed forpavementuse only, IT IS NOT A DIRECT REPLACEMENTFOR A SEAT IN A MOVING VEHICLE.
Important Notice:
Now enjoy your Freerider.
Important Notice:IT IS NOT A DIRECT REPLACEMENT
FOR A SEAT IN A MOVING VEHICLE.
Now enjoy your Freerider.
FIG 31
22
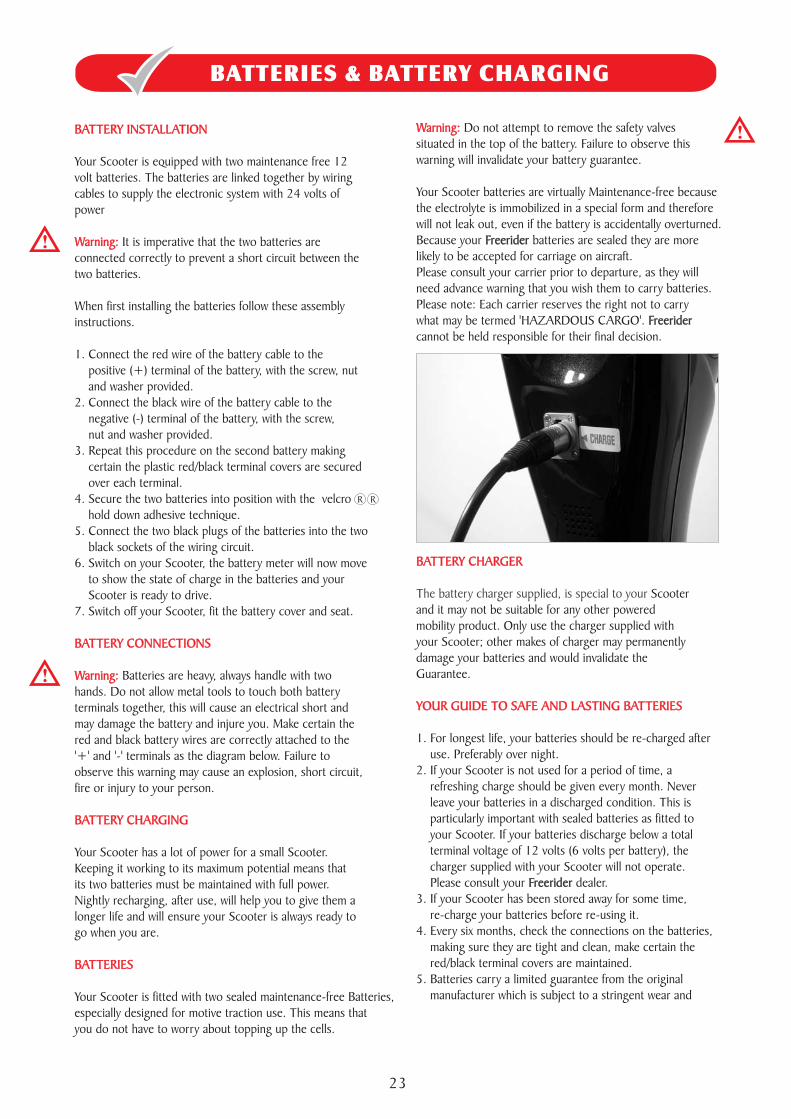
Warning:
BATTERY CONNECTIONS
Warning:
BATTERY CHARGING
BATTERIES
BATTERY INSTALLATION
Scooter
Your Scooter is equipped with two maintenance free 12volt batteries. The batteries are linked together by wiringcables to supply the electronic system with 24 volts ofpower
It is imperative that the two batteries areconnected correctly to prevent a short circuit between thetwo batteries.
When first installing the batteries follow these assemblyinstructions.
1. Connect the red wire of the battery cable to thepositive (+) terminal of the battery, with the screw, nutand washer provided.
2. Connect the black wire of the battery cable to thenegative (-) terminal of the battery, with the screw,nut and washer provided.
3. Repeat this procedure on the second battery makingcertain the plastic red/black terminal covers are securedover each terminal.
4. Secure the two batteries into position with the velcrohold down adhesive technique.
5. Connect the two black plugs of the batteries into the twoblack sockets of the wiring circuit.
6. Switch on your Scooter, the battery meter will now moveto show the state of charge in the batteries and yourScooter is ready to drive.
7. Switch off your Scooter, fit the battery cover and seat.
Batteries are heavy, always handle with twohands. Do not allow metal tools to touch both batteryterminals together, this will cause an electrical short andmay damage the battery and injure you. Make certain thered and black battery wires are correctly attached to the'+' and '-' terminals as the diagram below. Failure toobserve this warning may cause an explosion, short circuit,fire or injury to your person.
Your Scooter has a lot of power for a small Scooter.Keeping it working to its maximum potential means thatits two batteries must be maintained with full power.Nightly recharging, after use, will help you to give them alonger life and will ensure your is always ready togo when you are.
Your Scooter is fitted with two sealed maintenance-free Batteries,especially designed for motive traction use. This means thatyou do not have to worry about topping up the cells.
BATTERY INSTALLATION
Warning:
BATTERY CONNECTIONS
Warning:
BATTERY CHARGING
BATTERIES
BATTERIES & BATTERY CHARGING
Do not attempt to remove the safety valvessituated in the top of the battery. Failure to observe thiswarning will invalidate your battery guarantee.
Your batteries are virtually Maintenance-free becausethe electrolyte is immobilized in a special form and thereforewill not leak out, even if the battery is accidentally overturned.Because your batteries are sealed they are morelikely to be accepted for carriage on aircraft.Please consult your carrier prior to departure, as they willneed advance warning that you wish them to carry batteries.
Each carrier reserves the right not to carrywhat may be termed 'HAZARDOUS CARGO'.cannot be held responsible for their final decision.
and it may not be suitable for any other poweredmobility product. Only use the charger supplied withyour Scooter; other makes of charger may permanentlydamage your batteries and would invalidate theGuarantee.
1. For longest life, your batteries should be re-charged afteruse. Preferably over night.
2. If your Scooter is not used for a period of time, arefreshing charge should be given every month. Neverleave your batteries in a discharged condition. This isparticularly important with sealed batteries as fitted toyour Scooter. If your batteries discharge below a totalterminal voltage of 12 volts (6 volts per battery), thecharger supplied with your Scooter will not operate.Please consult your dealer.
3. If your Scooter has been stored away for some time,re-charge your batteries before re-using it.
4. Every six months, check the connections on the batteries,making sure they are tight and clean, make certain thered/black terminal covers are maintained.
Scooter
Please note:
Scooter
5. Batteries carry a limited guarantee from the originalmanufacturer which is subject to a stringent wear and
Freerider
Freerider
Freerider
Warning:
YOUR GUIDE TO SAFE AND LASTING BATTERIES
BATTERY CHARGER
The battery charger supplied, is special to your
Warning:
YOUR GUIDE TO SAFE AND LASTING BATTERIES
Freerider
Freerider
Freerider
BATTERY CHARGER
R R
23
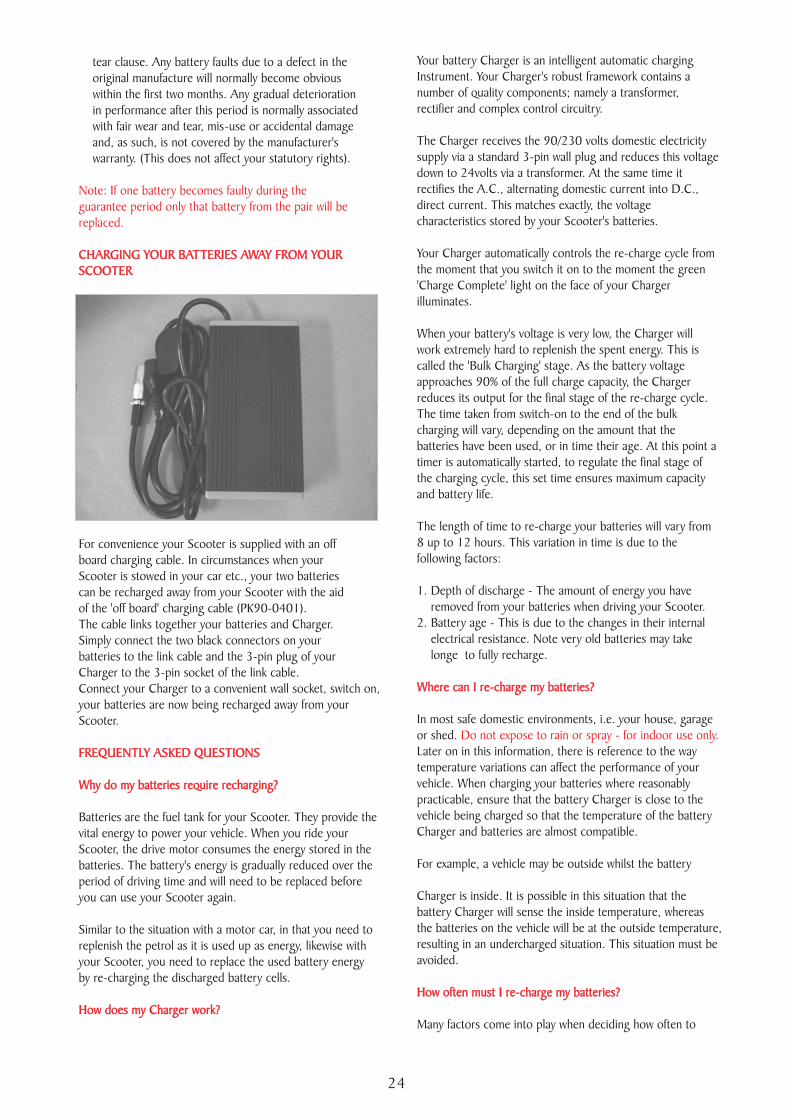
For convenience your Scooter is supplied with an offboard charging cable. In circumstances when yourScooter is stowed in your car etc., your two batteriescan be recharged away from your Scooter with the aidof the 'off board' charging cable (PK90-0401).The cable links together your batteries and Charger.Simply connect the two black connectors on yourbatteries to the link cable and the 3-pin plug of yourCharger to the 3-pin socket of the link cable.Connect your Charger to a convenient wall socket, switch on,your batteries are now being recharged away from yourScooter.
Batteries are the fuel tank for your Scooter. They provide thevital energy to power your vehicle. When you ride yourScooter, the drive motor consumes the energy stored in thebatteries. The battery's energy is gradually reduced over theperiod of driving time and will need to be replaced beforeyou can use your Scooter again.
Similar to the situation with a motor car, in that you need toreplenish the petrol as it is used up as energy, likewise withyour Scooter, you need to replace the used battery energyby re-charging the discharged battery cells.
tear clause. Any battery faults due to a defect in theoriginal manufacture will normally become obviouswithin the first two months. Any gradual deteriorationin performance after this period is normally associatedwith fair wear and tear, mis-use or accidental damageand, as such, is not covered by the manufacturer'swarranty. (This does not affect your statutory rights).
Note: If one battery becomes faulty during theguarantee period only that battery from the pair will bereplaced.
CHARGING YOUR BATTERIES AWAY FROM YOURSCOOTER
FREQUENTLY ASKED QUESTIONS
Why do my batteries require recharging?
How does my Charger work?
CHARGING YOUR BATTERIES AWAY FROM YOURSCOOTER
FREQUENTLY ASKED QUESTIONS
Why do my batteries require recharging?
How does my Charger work?
Your battery Charger is an intelligent automatic chargingInstrument. Your Charger's robust framework contains anumber of quality components; namely a transformer,rectifier and complex control circuitry.
The Charger receives the 90/230 volts domestic electricitysupply via a standard 3-pin wall plug and reduces this voltagedown to 24volts via a transformer. At the same time itrectifies the A.C., alternating domestic current into D.C.,direct current. This matches exactly, the voltagecharacteristics stored by your Scooter's batteries.
Your Charger automatically controls the re-charge cycle fromthe moment that you switch it on to the moment the green'Charge Complete' light on the face of your Chargerilluminates.
When your battery's voltage is very low, the Charger willwork extremely hard to replenish the spent energy. This iscalled the 'Bulk Charging' stage. As the battery voltageapproaches 90% of the full charge capacity, the Chargerreduces its output for the final stage of the re-charge cycle.The time taken from switch-on to the end of the bulkcharging will vary, depending on the amount that thebatteries have been used, or in time their age. At this point atimer is automatically started, to regulate the final stage ofthe charging cycle, this set time ensures maximum capacityand battery life.
The length of time to re-charge your batteries will vary from8 up to 12 hours. This variation in time is due to thefollowing factors:
1. The amount of energy you haveremoved from your batteries when driving your Scooter.
2. This is due to the changes in their internalelectrical resistance. Note very old batteries may takelonge to fully recharge.
In most safe domestic environments, i.e. your house, garageor shed.Later on in this information, there is reference to the waytemperature variations can affect the performance of yourvehicle. When charging your batteriespracticable, ensure that the battery Charger is close to thevehicle being charged so that the temperature of the batteryCharger and batteries are almost compatible.
For example, a vehicle may be outside whilst the battery
Charger is inside. It is possible in this situation that thebattery Charger will sense the inside temperature, whereasthe batteries on the vehicle will be at the outside temperature,resulting in an undercharged situation.
Many factors come into play when deciding how often to
Depth of discharge -
Battery age -
where reasonably
This situation must beavoided.
Do not expose to rain or spray - for indoor use only.
Where can I re-charge my batteries?
How often must I re-charge my batteries?
Where can I re-charge my batteries?
How often must I re-charge my batteries?
24

charge your batteries. You may use your vehicle all day on aDaily basis or you may not use it for weeks at a time. Otherfactors such as driver and baggage weight, smooth or roughterrain, flat areas or inclines and speed must all beconsidered.
With these variables you should concern yourself with twoquestions: HOW OFTEN should I charge and for HOWLONG? The Charger is designed so that it is impossible toovercharge your batteries. If you follow the guidelines below,your batteries will provide safe and reliable operation.
1. Put it on chargeas soon as you have finished using it. The Charger is fullyautomatic so it will not overcharge your batteries. Yourvehicle will be ready each morning to give you several hoursuse. It is recommended that you charge your batteries afterdaily use until the green 'Charge Complete' light illuminates.
2. (once a week or less)you should charge it at least once per week until the green
' Charge Complete' light illuminates. Remember: Keep yourbatteries fully charged and avoid deeply discharging them.
3. Batteries should always be stored fullycharged. Check once a month and recharge fully ifneeded. Sealed batteries can hold their charge for approx. 6months. If they are left connected on the Scooter, rememberkey switches, meters and electronic circuits can drain thebatteries rapidly. It is advisable to disconnect the batteries forprolonged storage. Store in a warm, dry room.
Simply put, a fully charged battery is a happy battery! Afully charged battery will provide reliable performanceand extended battery life, so keep your batteries fullycharged whenever possible.
Extra care must be taken when handling batteries, if youdecide to dismantle your vehicle for transportation etc.Dropped batteries, even from a very small height, canlead to damage of the internal components, causingpremature cell failure. Your batteries are sealed and donot require maintenance. Do not force open the valvesin the battery top.
The batteries fitted to your vehicle are guaranteedagainst a manufacturing or material defect for 6months. Any battery faults due to a defect inmanufacture or materials will be obvious within a fewweeks of use. Your batteries are not guaranteed to
If you use your vehicle during the day.
If you use your vehicle infrequently
Storing batteries:
Used batteries must not be disposed of bymeans of a domestic refuse disposal unit (dustbin) etc.Please contact your Dealer to dispose of used batteries.Please note, he may charge for this service.
How can I ensure maximum battery life?
Handling your batteries
Disposal
Caution:
BATTERY WARRANTIES
How can I ensure maximum battery life?
Handling your batteries
Disposal
Caution:
BATTERY WARRANTIES
perform to full capacity for 12 months. This will, of coursebe dependent on the actual use of the vehicle and how often the batteries are cycled i.e. discharged and charged.
Gradual deterioration in performance and reduction inrange is normal and associated with fair wear-and-tear,misuse or accidental damage. Under thesecircumstances, the warranty will not apply.
This istermed 'Cycle Life'. Batteries have a defined number ofdischarge cycles they can make i.e. the more times you useyour Scooter the more cycles your battery will make - theshorter their life span.
If you take time to run-in your batteries properly, it will beworth it. Remember: how long your batteries will provideservice is quite often a reflection of the care they receive.This is how to run-in your new batteries:
1. Fully recharge any new batteries prior to your initial use.This will bring your battery up to about 88% performance.
2. Ride your vehicle around the house or garden. Do notventure too far away until you become accustomed tothe controls and feel of the vehicle. This will gently run-in your batteries.
3. Give your batteries another full charge and run thevehicle again. The batteries will now perform to over 90%of their full potential.
4. After ten to fifteen charging cycles, the batteries will topoff at 100% charge and last for an extended period dueto your patience and care in the first few days of operation.
Rarely do we have an ideal driving situation such as a smooth,flat, hard terrain with no wind or curves and warmtemperatures. More often, we are presented with hills,uneven and loosely packed surfaces, curves, wind, cold andheavy loads. All of these factors will affect the distance orrunning time per battery charge.
1. Always charge your batteries fully prior to your trip. Itis a good idea to keep your Charger connected when the'Charge Complete' (green) light is illuminated in the 'Top-Up'maintains mode.
2. Maintain relevant tyre-pressures as stated in the TechnicalSpecifications of this Users Instruction Manual.
3. Plan your trip in advance to avoid inclines, kerbs andsoft surfaces.
4. Limit your baggage weight to essential items.5. Try to maintain an even speed to avoid stop and start
driving.6. Ensure recommended routine servicing of the vehicle's
components, i.e. motors, brakes, electrical connectionsetc., is carried out as instructed in this Users InstructionManual.
Here are a few suggestions for obtaining the maximum rangeper charge:
It is a factthat some users due to their hectic lifestyle, weight oroperating conditions, may wear their batteries outduring the original battery manufacturer's guaranteeperiod due to extensive use of their Scooter.
How can I get the maximum operating time per charge?How can I get the maximum operating time per charge?
25
Warning: When working or disposing of your batteries
1. Always make certain the terminals of your batteries arecovered with the red/black terminal protectors. Do notallow metal objects to short out the terminals, yourbattery could explode causing you injury.
2. Do not allow your batteries to freeze. If frozen allowthem to naturally thaw out before charging, failure toobserve this warning may damage the batteries.
3. If you need to replace your batteries, contact your
Warning:
Remove salt contact as this is verycorrosive to bright metal parts.
SEAT UPHOLSTERY
BODYWORK
Caution:
Your Scooter like any other electro-mechanical machine willbenefit from regular servicing by your dealer.
You too, can help keep your in tip-top condition byfollowing a simple guide to home maintenance.
Note: Only competent people should carry out service work.
A damp cloth and a little soapy water will keep your seat,backrest and arms looking smart. Do not use abrasivecleaners as this will damage the coating. Upholstery can bedamaged by chemical cleaners. The coating material can alsodegrade over a period of time due to contamination bynatural oils in the hair and skin.Ultra-violet light can also reduce the life of the upholsterycoating material. This is a normal ageing process and cannotbe guaranteed (see exclusions in the Guarantee Terms).
The painted bodywork on your Scooter can be lightlywashed with clean soapy water. Do not use abrasive cleanersor strong detergents. This could fade the colour, an auto tyreshampoo works well.
Freerider
Freerider
Do not hose down your with a powerfulScootercs and cause
permanent damage.
On the painted finish, be cautious not to wash with a dirtycloth as this could scratch the paint finish. Auto polish canbe used to keep the paintwork and bright chrome parts inpristine condition.
The metal framework of your Scooter should be cleanedonce a year and any paintwork damaged should be treated toprevent further attack from the elements.
Do not store your Scooter in damp conditions. This mayaffect the electronics if left for very long periods of time.Moisture, if left unattended can cause deterioration on metal
cleaner. Water could be forced into the electroni
SEAT UPHOLSTERY
BODYWORK
Caution:
CARE & MAINTENANCE
26
Agent. Only batteries supplied as originalequipment on your machine will give you the bestperformance. When charging batteries make certain thepositive and negative terminals are correctly assembled.Failure to observe this warning may cause an explosion,short circuit or fire.
4. Always handle batteries carefully, they are heavy. Wearprotective gloves and glasses when handling.5.Dispose of worn out batteries carefully, contact yourlocal waste disposal authority for advise.
Freerider
work, protect with proprietary cleaners.
Servicing of the drive electronics and charger should only becarried out by your local Freerider service dealer. These unitsare sealed and should not be opened. BROKEN SEALS WILLINVALIDATE YOUR GUARANTEE.
The motor on your Freerider Scooter is fitted with long-lifebrushes. The brushes should be inspected for wear every 12months or more frequently if you use you Scooter daily forlong periods. The brushes should be changed when they haveworn down to approximately 8mm in length. Access to thesebrushes can only be made by dismantling the motor body.
Only competent people should service the motor'scomponents.
This unit is factory filled and will not normally need additionallubrication.
Note: Your Scooter transmission is filled with aspecial lubricant. Do not attempt to force grease into thetransmission as this will contaminate the original lubricationand will invalidate your guarantee.
Take care when lifting the transmission, keep wellaway from clothing. It is normal to find a light film oflubrication around this part.
Freerider
ELECTRONICS
Do not operate your Freerider Scooter in exceptional weatherconditions i.e. very heavy rain. Cover your machine up, if it isto be left unattended and outside for a long period of time.Do not drive through deep water with your Scooter. Thiscould damage the electronic speed controller. Sea and roadsalts are very corrosive and should be neutralized quickly.
MOTOR
Caution:
DRIVE TRANSMISSION LUBRICATION
Caution:
MOTOR BRAKES
ELECTRONICS
MOTOR
Caution:
DRIVE TRANSMISSION LUBRICATION
Caution:
MOTOR BRAKES
Freerider

service of a tyre or tube carry out the following instructions(only competent people should carry out this procedure).
1. Switch off your Scooter and remove the key.2. Using a suitable body stand, lift the side of the vehicle you
wish to service off the ground. Place the stand underthe metal chassis. Care must be taken when lifting heavyloads, you may need a friend to help you. Care shouldalso be taken when working on a stand.Please be safe. Do not lift by the plastic bodywork.
3. With the aid of a 19mm spanner (not supplied) removethe centre hub nut and washer (see fig 33).Slide the wheel from the mounting axle. Rear wheels arefitted to the drive axle via a hub which locates onto a key.
4. These wheels fit tight onto the axle and may need somepressure from a bearing puller onto the wheel hub torelease them from the axles. Look for spacing washers andtake care not to mislay the drive key which fits between thewheel hub and the axle shaft.
5. First deflate the air from the wheel assembly by removingthe valve core from the valve with a suitable valve key
FIG 32
27
Safety Note: For your own safety, we recommend that youcheck the function of your Scooter brakes prior to a journey.
If the motor brake is functioning correctly andthe drive is engaged you will not be able to push yourmachine when it is switched off. Or switched on with thespeed control lever in the 'zero speed', central position.
If your machine can be pushed as described above, the motorbrake could be faulty, or the freewheel system hasbeen disengaged. Please do not use, contact your local
distributor.
Note: Check the Freewheeling Instructions on page 12 of thismanual.
When you drive yourScooter and you let go of the speed control lever yourScooter should reduce speed
Freerider
Freerider
very quickly. If you notice achange in the normal slowing/braking condition, and yourScooter does not slow down quickly, please do not use yourmachine, contact your distributor.
The bearings which control the movement of the steeringhandle bar may need to be adjusted if up and down
movement is noticed in your steering handle bars, and thoseare accessed at the base of your handle bars.
The bearings are adjusted by first releasing the locking nutanti-clockwise one full turn with a suitable spanner (Fig35).
Turn the upper bearing adjustment nut clockwise, one flat ata time until all of the up and down movement in the handlebars is removed. Retighten the lock nut clockwise intoposition with a second spanner. Do not over tighten thebearing adjustment nut, as this will damage the bearing tracks.
The handle bar bearings are NOT 'Sealed for life' and mayrequire lubrication with a general purpose bearing grease onan annual basis.
Check the condition of your tyres regularly. Look for signs ofwear, cuts and foreign objects lodged in the tread. Also,maintain the tyre pressures at all times; failure to comply withthis can lead to poor performance of your machine and couldmake your machine unsafe and/or unstable.
Your is designed with 'split' wheel rims.Do not remove wheel bolts with the wheel inflated. Maintainpneumatic tyres at 30 p.s.i. (210 kpa). Failure to observethis warning may result in personal injury. Note low orunequal tyre pressures can make your Scooter becomeunstable and reduce battery / motor performance.
To remove a rear wheel from your Scooter for the
Freerider
TYRES
Freerider
Freerider
Motor Brake:
Driving Brake: Warning:
HANDLE BAR BEARINGS
Warning:
TYRE SERVICING REAR WHEEL
Motor Brake:
Driving Brake: Warning:
Freerider
Freerider
Freerider
HANDLE BAR BEARINGS
Warning:
TYRE SERVICING REAR WHEEL
TYRES
Freerider
Freerider
(purchased from auto shops).
With the aid of 13mm spanners (not supplied) removethe four nuts and washers from the rear of the wheel hub.
6. Remove the four wheel bolts and part the hub from thewheel rims. Part the inner and outer wheel rim from theside wall of the tyre.
To re-assemble the wheel and hub simply follow the aboveprocedure in reverse order noting the following points:
1. Make certain you have tightened the two wheel rims tothe centre hub.
2. Make certain your tyre is re-inflated to the recommendedpressure 30 p.s.i. (210 kpa)
3. Make certain that you replace any spacing washers andkeys in the order that they wereremoved.
4. Locking Nut: The special nylon 'locking' centre hub nutmay lose its effectiveness when it has been removedover a number of times. If the plastic locking ring at theend of the nut becomes worn or damaged, then the nutshould be replaced with a new part obtained you is your
Agent.Freerider
Warning: Please note the rims of your wheel are a splitrim system, do not dismantle the wheel from the hubwithout first letting air out of the tyre.
Freerider
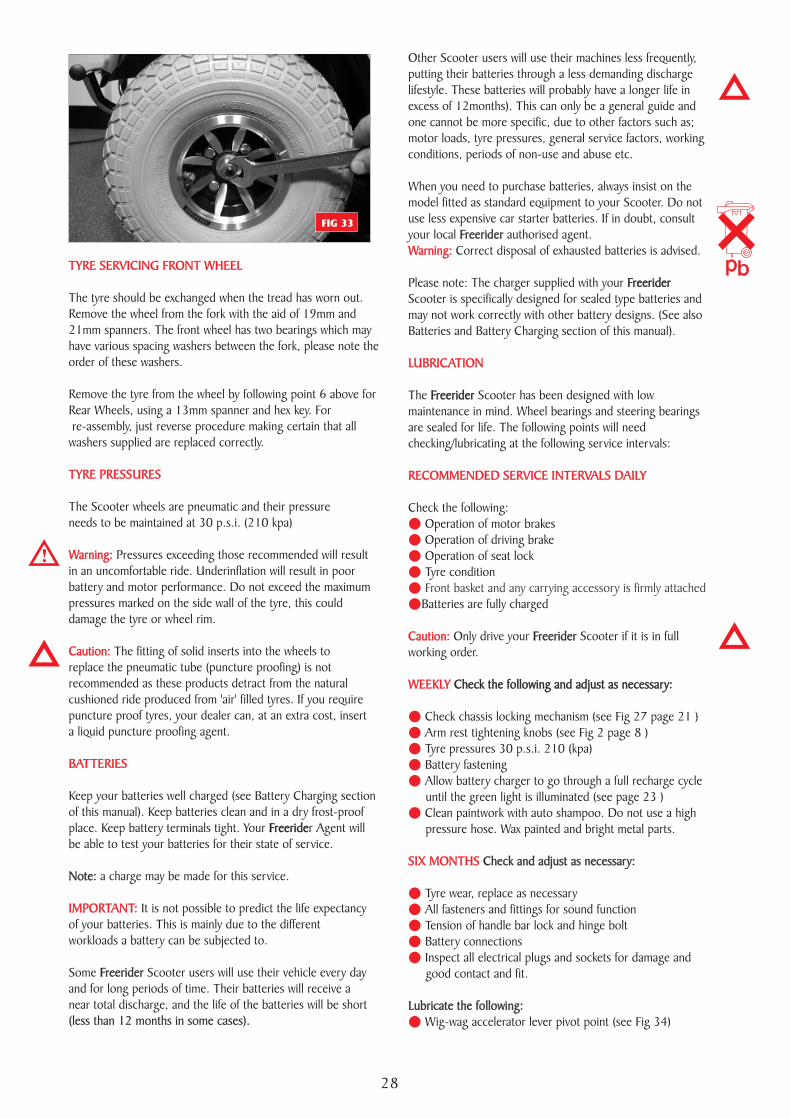
The tyre should be exchanged when the tread has worn out.Remove the wheel from the fork with the aid of 19mm and21mm spanners. The front wheel has two bearings which mayhave various spacing washers between the fork, please note theorder of these washers.
Remove the tyre from the wheel by following point 6 above forRear Wheels, using a 13mm spanner and hex key. Forre-assembly, just reverse procedure making certain that all
washers supplied are replaced correctly.
The Scooter wheels are pneumatic and their pressureneeds to be maintained at 30 p.s.i. (210 kpa)
Pressures exceeding those recommended will resultin an uncomfortable ride. Underinflation will result in poorbattery and motor performance. Do not exceed the maximumpressures marked on the side wall of the tyre, this coulddamage the tyre or wheel rim.
The fitting of solid inserts into the wheels toreplace the pneumatic tube (puncture proofing) is notrecommended as these products detract from the naturalcushioned ride produced from 'air' filled tyres. If you requirepuncture proof tyres, your dealer can, at an extra cost, inserta liquid puncture proofing agent.
Keep your batteries well charged (see Battery Charging sectionof this manual). Keep batteries clean and in a dry frost-proofplace. Keep battery terminals tight. Your r Agent willbe able to test your batteries for their state of service.
a charge may be made for this service.
It is not possible to predict the life expectancyof your batteries. This is mainly due to the differentworkloads a battery can be subjected to.
Some Scooter users will use their vehicle every dayand for long periods of time. Their batteries will receive anear total discharge, and the life of the batteries will be short
Freeride
Note:
Freerider
(less than 12 months in some cases).
TYRE SERVICING FRONT WHEEL
TYRE PRESSURES
Warning:
Caution:
BATTERIES
IMPORTANT:
TYRE SERVICING FRONT WHEEL
TYRE PRESSURES
Warning:
Caution:
BATTERIES
IMPORTANT:
Freeride
Note:
Freerider
(less than 12 months in some cases).
FIG 33
Other Scooter users will use their machines less frequently,putting their batteries through a less demanding dischargelifestyle. These batteries will probably have a longer life inexcess of 12months). This can only be a general guide andone cannot be more specific, due to other factors such as;motor loads, tyre pressures, general service factors, workingconditions, periods of non-use and abuse etc.
When you need to purchase batteries, always insist on themodel fitted as standard equipment to your Scooter. Do notuse less expensive car starter batteries. If in doubt, consultyour local authorised agent.
Correct disposal of exhausted batteries is advised.
Please note: The charger supplied with yourScooter is specifically designed for sealed type batteries andmay not work correctly with other battery designs. (See alsoBatteries and Battery Charging section of this manual).
The Scooter has been designed with lowmaintenance in mind. Wheel bearings and steering bearingsare sealed for life. The following points will needchecking/lubricating at the following service intervals:
Freerider
Freerider
Freerider
Check the following:Operation of motor brakesOperation of driving brakeOperation of seat lockTyre condition
Batteries are fully charged
Check chassis locking mechanism (see Fig 27 page 21 )Arm rest tightening knobs (see Fig 2 page 8 )Tyre pressures 30 p.s.i. 210 (kpa)Battery fasteningAllow battery charger to go through a full recharge cycleuntil the green light is illuminated (see page 23 )Clean paintwork with auto shampoo. Do not use a highpressure hose. Wax painted and bright metal parts.
Tyre wear, replace as necessaryAll fasteners and fittings for sound functionTension of handle bar lock and hinge boltBattery connectionsInspect all electrical plugs and sockets for damage andgood contact and fit.
Wig-wag accelerator lever pivot point (see Fig 34)
Only drive your Scooter if it is in fullworking order.
Freerider
Check and adjust as necessary:
Lubricate the following:
Check the following and adjust as necessary:
Warning:
LUBRICATION
RECOMMENDED SERVICE INTERVALS DAILY
Caution:
WEEKLY
SIX MONTHS
Front basket and any carrying accessory is firmly attached
FreeriderWarning:
LUBRICATION
RECOMMENDED SERVICE INTERVALS DAILY
Freerider
Freerider
Caution:
WEEKLY
SIX MONTHS
Freerider
Check and adjust as necessary:
Lubricate the following:
Check the following and adjust as necessary:
28
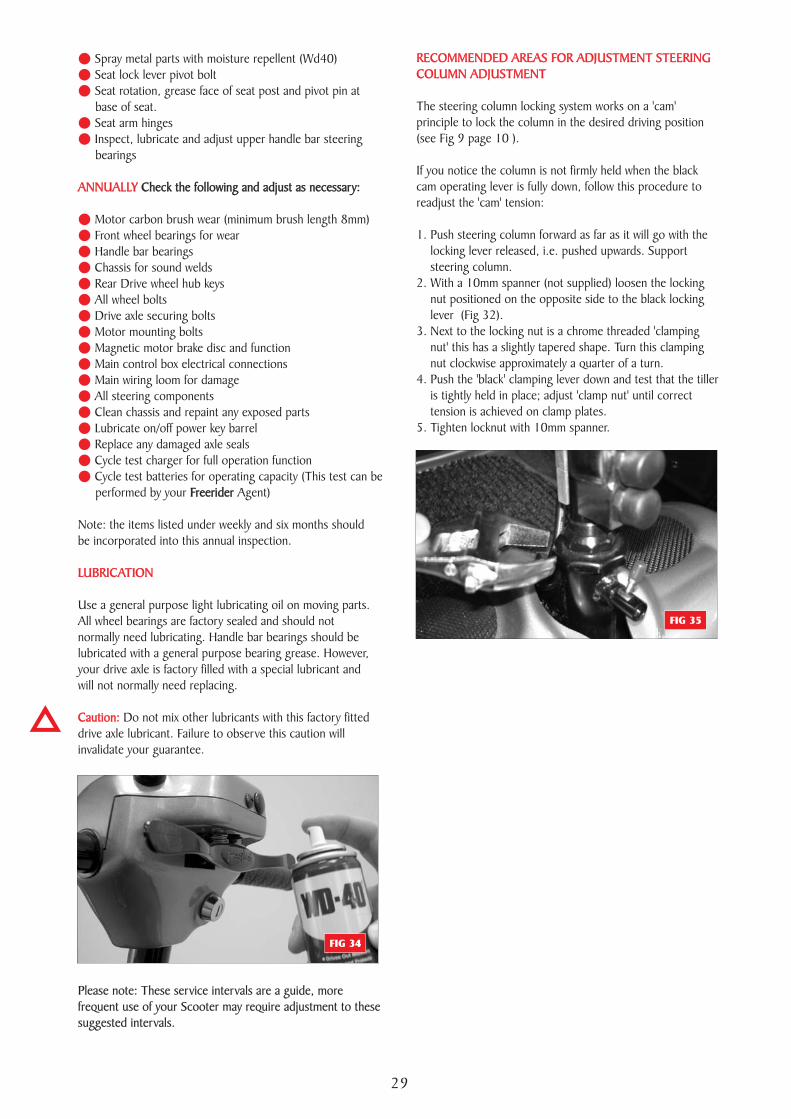
Spray metal parts with moisture repellent (Wd40)Seat lock lever pivot boltSeat rotation, grease face of seat post and pivot pin atbase of seat.Seat arm hingesInspect, lubricate and adjust upper handle bar steeringbearings
Motor carbon brush wear (minimum brush length 8mm)Front wheel bearings for wearHandle bar bearingsChassis for sound weldsRear Drive wheel hub keysAll wheel boltsDrive axle securing boltsMotor mounting boltsMagnetic motor brake disc and functionMain control box electrical connectionsMain wiring loom for damageAll steering componentsClean chassis and repaint any exposed partsLubricate on/off power key barrelReplace any damaged axle sealsCycle test charger for full operation functionCycle test batteries for operating capacity (This test can beperformed by your Agent)
Note: the items listed under weekly and six months shouldbe incorporated into this annual inspection.
Use a general purpose light lubricating oil on moving parts.All wheel bearings are factory sealed and should notnormally need lubricating. Handle bar bearings should belubricated with a general purpose bearing grease. However,your drive axle is factory filled with a special lubricant andwill not normally need replacing.
Do not mix other lubricants with this factory fitteddrive axle lubricant. Failure to observe this caution willinvalidate your guarantee.
Check the following and adjust as necessary:
Freerider
Please note: These service intervals are a guide, morefrequent use of your Scooter may require adjustment to thesesuggested intervals.
ANNUALLY
LUBRICATION
Caution:
ANNUALLY
LUBRICATION
Caution:
Check the following and adjust as necessary:
Freerider
Please note: These service intervals are a guide, morefrequent use of your Scooter may require adjustment to thesesuggested intervals.
The steering column locking system works on a 'cam'principle to lock the column in the desired driving position(see Fig 9 page 10 ).
If you notice the column is not firmly held when the blackcam operating lever is fully down, follow this procedure toreadjust the 'cam' tension:
1. Push steering column forward as far as it will go with thelocking lever released, i.e. pushed upwards. Supportsteering column.
2. With a 10mm spanner (not supplied) loosen the lockingnut positioned on the opposite side to the black lockinglever (Fig 32).
3. Next to the locking nut is a chrome threaded 'clampingnut' this has a slightly tapered shape. Turn this clampingnut clockwise approximately a quarter of a turn.
4. Push the 'black' clamping lever down and test that the tilleris tightly held in place; adjust 'clamp nut' until correcttension is achieved on clamp plates.
5. Tighten locknut with 10mm spanner.
RECOMMENDED AREAS FOR ADJUSTMENT STEERINGCOLUMN ADJUSTMENTRECOMMENDED AREAS FOR ADJUSTMENT STEERINGCOLUMN ADJUSTMENT
FIG 34
FIG 35
29
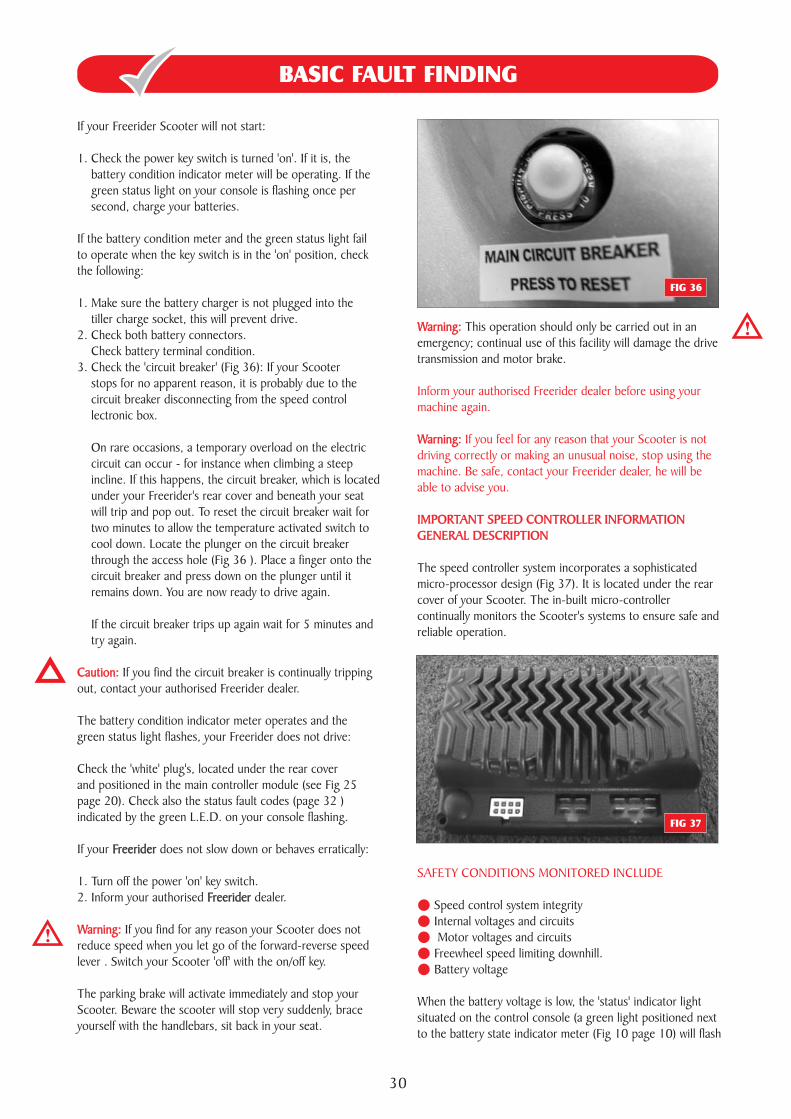
BASIC FAULT FINDING
If your Freerider Scooter will not start:
1. Check the power key switch is turned 'on'. If it is, thebattery condition indicator meter will be operating. If thegreen status light on your console is flashing once persecond, charge your batteries.
If the battery condition meter and the green status light failto operate when the key switch is in the 'on' position, checkthe following:
1. Make sure the battery charger is not plugged into thetiller charge socket, this will prevent drive.
2. Check both battery connectors.Check battery terminal condition.
3. Check the 'circuit breaker' (Fig 36): If your Scooterstops for no apparent reason, it is probably due to thecircuit breaker disconnecting from the speed controllectronic box.
On rare occasions, a temporary overload on the electriccircuit can occur - for instance when climbing a steepincline. If this happens, the circuit breaker, which is locatedunder your Freerider's rear cover and beneath your seatwill trip and pop out. To reset the circuit breaker wait fortwo minutes to allow the temperature activated switch tocool down. Locate the plunger on the circuit breakerthrough the access hole (Fig 36 ). Place a finger onto thecircuit breaker and press down on the plunger until itremains down. You are now ready to drive again.
If the circuit breaker trips up again wait for 5 minutes andtry again.
If you find the circuit breaker is continually trippingout, contact your authorised dealer.
The battery condition indicator meter operates and thegreen status light flashes, your Freerider does not drive:
Check the 'white' plug's, located under the rear coverand positioned in the main controller module (see Fig 25page 20). Check also the status fault codes (page 32 )indicated by the green L.E.D. on your console flashing.
If your does not slow down or behaves erratically:
1. Turn off the power 'on' key switch.2. Inform your authorised dealer.
Freerider
Freerider
Freerider
If you find for any reason your Scooter does notreduce speed when you let go of the forward-reverse speedlever . Switch your Scooter 'off' with the on/off key.
The parking brake will activate immediately and stop yourScooter. Beware the scooter will stop very suddenly, braceyourself with the handlebars, sit back in your seat.
Caution:
Warning:
Caution:
Freerider
Freerider
Warning:
FIG 36
This operation should only be carried out in anemergency; continual use of this facility will damage the drivetransmission and motor brake.
The speed controller system incorporates a sophisticatedmicro-processor design (Fig 37). It is located under the rearcover of your Scooter. The in-built micro-controllercontinually monitors the Scooter's systems to ensure safe andreliable operation.
Speed control system integrityInternal voltages and circuitsMotor voltages and circuits
Freewheel speed limiting downhill.Battery voltage
When the battery voltage is low, the 'status' indicator lightsituated on the control console (a green light positioned nextto the battery state indicator meter (Fig 10 page 10) will flash
Warning:
Warning:
IMPORTANT SPEED CONTROLLER INFORMATIONGENERAL DESCRIPTION
Inform your authorised Freerider dealer before using yourmachine again.
If you feel for any reason that your Scooter is notdriving correctly or making an unusual noise, stop using themachine. Be safe, contact your Freerider dealer, he will beable to advise you.
SAFETY CONDITIONS MONITORED INCLUDE
Warning:
Warning:
IMPORTANT SPEED CONTROLLER INFORMATIONGENERAL DESCRIPTION
FIG 37
30
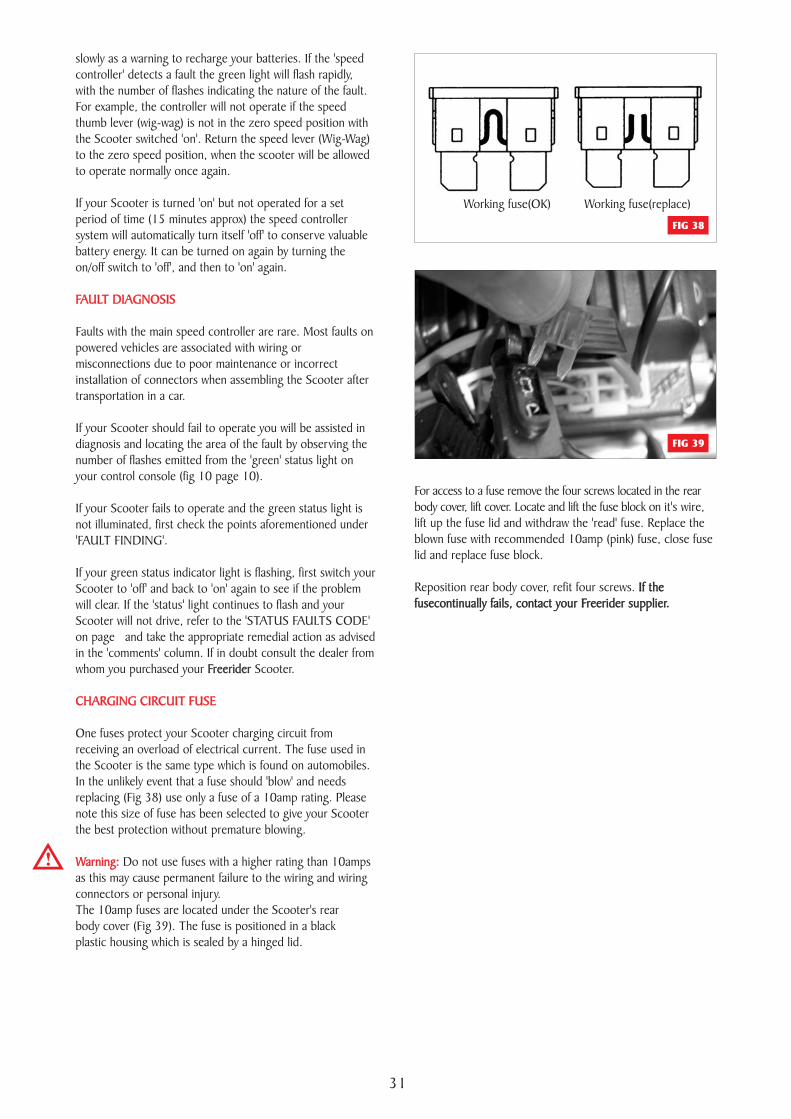
FIG 38
FIG 39
Working fuse(OK) Working fuse(replace)
slowly as a warning to recharge your batteries. If the 'speedcontroller' detects a fault the green light will flash rapidly,with the number of flashes indicating the nature of the fault.For example, the controller will not operate if the speedthumb lever (wig-wag) is not in the zero speed position withthe Scooter switched 'on'. Return the speed lever (Wig-Wag)to the zero speed position, when the scooter will be allowedto operate normally once again.
If your Scooter is turned 'on' but not operated for a setperiod of time (15 minutes approx) the speed controllersystem will automatically turn itself 'off' to conserve valuablebattery energy. It can be turned on again by turning theon/off switch to 'off', and then to 'on' again.
Faults with the main speed controller are rare. Most faults onpowered vehicles are associated with wiring ormisconnections due to poor maintenance or incorrectinstallation of connectors when assembling the Scooter aftertransportation in a car.
If your Scooter should fail to operate you will be assisted indiagnosis and locating the area of the fault by observing thenumber of flashes emitted from the 'green' status light onyour control console (fig 10 page 10).
If your Scooter fails to operate and the green status light isnot illuminated, first check the points aforementioned under'FAULT FINDING'.
If your green status indicator light is flashing, first switch yourScooter to 'off' and back to 'on' again to see if the problemwill clear. If the 'status' light continues to flash and yourScooter will not drive, refer to the 'STATUS FAULTS CODE'on page and take the appropriate remedial action as advisedin the 'comments' column. If in doubt consult the dealer fromwhom you purchased your Scooter.
One fuses protect your Scooter charging circuit fromreceiving an overload of electrical current. The fuse used inthe Scooter is the same type which is found on automobiles.In the unlikely event that a fuse should 'blow' and needsreplacing (Fig 38) use only a fuse of a 10amp rating. Pleasenote this size of fuse has been selected to give your Scooterthe best protection without premature blowing.
Do not use fuses with a higher rating than 10ampsas this may cause permanent failure to the wiring and wiringconnectors or personal injury.The 10amp fuses are located under the Scooter's rearbody cover (Fig 39). The fuse is positioned in a blackplastic housing which is sealed by a hinged lid.
Freerider
FAULT DIAGNOSIS
CHARGING CIRCUIT FUSE
Warning:
FAULT DIAGNOSIS
CHARGING CIRCUIT FUSE
Warning:
Freerider
For access to a fuse remove the four screws located in the rearbody cover, lift cover. Locate and lift the fuse block on it's wire,lift up the fuse lid and withdraw the 'read' fuse. Replace theblown fuse with recommended 10amp (pink) fuse, close fuselid and replace fuse block.
Reposition rear body cover, refit four screws. If thefusecontinually fails, contact your Freerider supplier.
If thefusecontinually fails, contact your Freerider supplier.
31
FLASH CODE(No.of flashes)
Battery needs recharging
Battery voltage too low
Battery voltage too high
Current limit time out
Brake fault
Out of neutral when power
switched on at key switch
Speed pot error
(wig wag)
Motor volts error
Other internal error
STATUS FAULT CODES
The original manufacturer's settings for this Scooter are:SPEED CONTROLLER SETTINGS
Warning: Performance adjustments should not be
made which could put the operator in a serious
situation of control or braking. Performance
adjustments should only be made by a person
fully trained and conversant with the
programming process and it's capabilities.
Warning: Incorrect settings could cause injury to
the Scooter operator and/or to bystanders, or
damage to the vehicle and/or surrounding
property.
The forward-reverse speed Controller (Fig 37
page 30) is a state-of-the-art microprocessor
designed to give smooth and safe operation. For
maximum performance, protection and
convenience the Controller is housed in a solid
die cast aluminium case situated under the rear
body cover.
The speed Controller, 'Dynamic' model
DS72KO1(Rhino 70amp) is programmed by
to obtain the maximum performance
and safety for your Scooter.
If in doubt consult your
Manufacture
Freerider
Freerider
SPEED CONTROLLER SETTINGS
Warning:
Freerider
Freerider
1 Flash
2 Flashes
3 Flashes
4 Flashes
5 Flashes
6 Flashes
7 Flashes
8 Flashes
9 Flashes
The battery voltage has dropped below 23.3 volts in neutral.
Recharge the batteries soon.
The battery voltage at Controller has dropped to 16.5 volts.
Check the battery condition and the connections.
The battery voltage at the controller is greater the 32 volts.
Check the battery condition and the connections.
Suspect a charger malfunction.
The Controller has detected a shorted or overworked motor.
Check the loom for shorts or check out the motor.
Contact your Service Agent.
Check the Freewheel Lever is fully engaged. Check the Park
Brake and wiring for open or short circuits. Contact your
Service Agent.
Return the speed lever to neutral. Re-adjust the speed lever
neutral if necessary. Consult your Service Agent.
Check speed pot wiring for open or short circuits. Speed pot
may not be correctly set up. Contact your Service Agent.
Motor or wiring is faulty. Contact your Service Agent.
Contact your Service Agent.
Driving still possible
Drive inhibited
Drive inhibited
Drive inhibited
Drive inhibited
Drive inhibited. Drive possible if
neutral selected within 10 secs.
Drive inhibited
Drive inhibited
Drive inhibited
FAULT DISPLAYEDBY PROGRAMMER
FREERIDER SCOOTERCONDITION
COMMENT
168-3 168-3S 168-4 168-4S 510DX2 510DXs2
1
6
10
4
4
10
60
15
70
6
1
6
10
4
4
10
60
15
70
6
1
6
10
5
4
10
60
15
70
6
1
6
10
4
4
10
60
15
70
6
1
8
8
4
4
10
60
15
70
6
1
8
10
5
4
10
60
15
70
6
OFF
OFF
OFF
OFF
ON
ON
ON
OFF
ON
OFF
OFF
OFF
OFF
ON
ON
ON
OFF
ON
OFF
OFF
OFF
OFF
ON
ON
ON
OFF
ON
OFF
OFF
OFF
OFF
ON
ON
ON
OFF
ON
OFF
OFF
OFF
OFF
ON
ON
ON
OFF
ON
OFF
OFF
OFF
OFF
ON
ON
ON
OFF
ON
SET-UP MENU DESCRIPTIONSETTINGS
OPTION MENU DESCRIPTIONSETTINGS
Acceleration
Deceleration
Forward Speed
Reverse Speed
Reduce Speed
Buzzer Volume
Motor Resistance
Sleep Time
Maximum Current
Park Brake Delay
Single-Ended Pot
Standard Speed Pot
Motor Reverse
Pot Reverse
Brake Checking
Load Compensation
Enable Sleep
Check for Slope
Current Limit Tim
168-4S2b
1
6
10
4
4
10
60
15
110
6
OFF
OFF
OFF
OFF
ON
ON
ON
OFF
ON
32
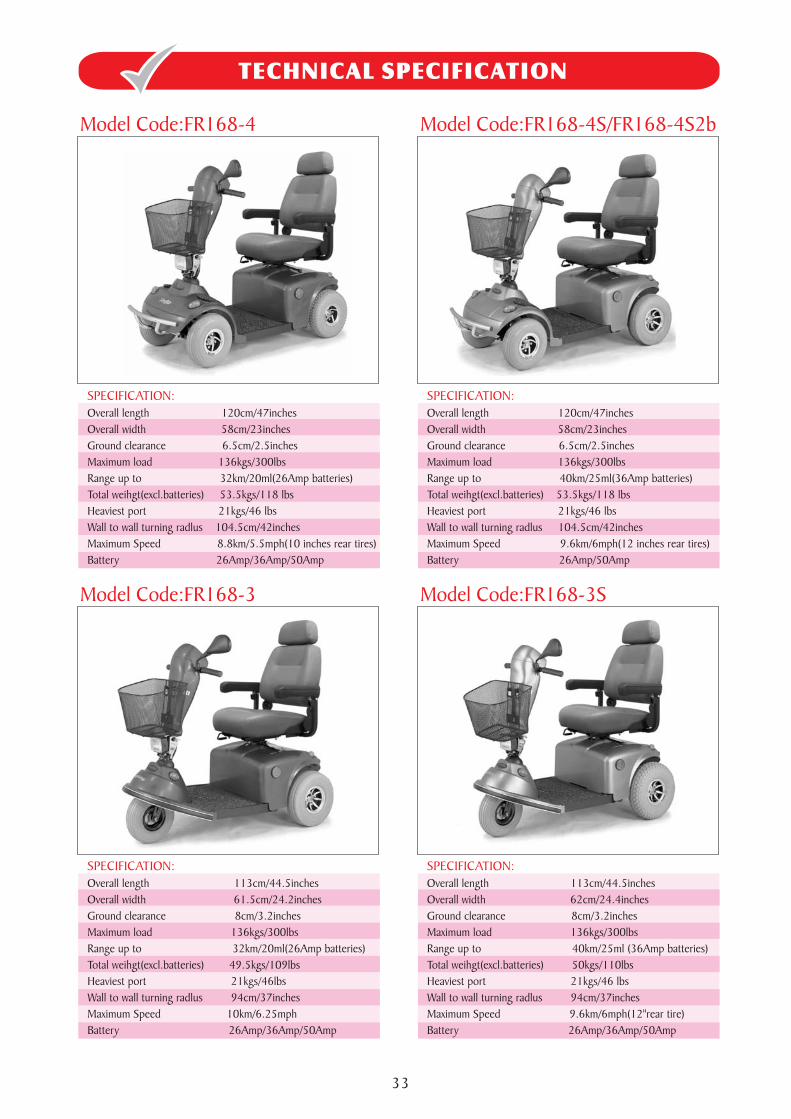
TECHNICAL SPECIFICATION
Model Code:FR168-4 Model Code:FR168-4S/FR168-4S2b
SPECIFICATION:
Overall length 120cm/47inches
Overall width 58cm/23inches
Ground clearance 6.5cm/2.5inches
Maximum load 136kgs/300lbs
Range up to 32km/20ml(26Amp batteries)
Total weihgt(excl.batteries) 53.5kgs/118 lbs
Heaviest port 21kgs/46 lbs
Wall to wall turning radlus 104.5cm/42inches
Maximum Speed 8.8km/5.5mph(10 inches rear tires)
Battery 26Amp/36Amp/50Amp
SPECIFICATION:
Overall length 120cm/47inches
Overall width 58cm/23inches
Ground clearance 6.5cm/2.5inches
Maximum load 136kgs/300lbs
Range up to 40km/25ml(36Amp batteries)
Total weihgt(excl.batteries) 53.5kgs/118 lbs
Heaviest port 21kgs/46 lbs
Wall to wall turning radlus 104.5cm/42inches
Maximum Speed 9.6km/6mph(12 inches rear tires)
Battery 26Amp/50Amp
Model Code:FR168-3 Model Code:FR168-3S
SPECIFICATION:
Overall length 113cm/44.5inches
Overall width 61.5cm/24.2inches
Ground clearance 8cm/3.2inches
Maximum load 136kgs/300lbs
Range up to 32km/20ml(26Amp batteries)
Total weihgt(excl.batteries) 49.5kgs/109lbs
Heaviest port 21kgs/46lbs
Wall to wall turning radlus 94cm/37inches
Maximum Speed 10km/6.25mph
Battery 26Amp/36Amp/50Amp
SPECIFICATION:
Overall length 113cm/44.5inches
Overall width 62cm/24.4inches
Ground clearance 8cm/3.2inches
Maximum load 136kgs/300lbs
Range up to 40km/25ml (36Amp batteries)
Total weihgt(excl.batteries) 50kgs/110lbs
Heaviest port 21kgs/46 lbs
Wall to wall turning radlus 94cm/37inches
Maximum Speed 9.6km/6mph(12"rear tire)
Battery 26Amp/36Amp/50Amp
33
CLASSIFICATION
Maximum safe climbing angle:
Warning:
Maximum speed:
Range:
Recommended Tyre Pressure:
Batteries:
Exceeding the safe climbing angle may put you at risk ofinjury. On no account must you attempt to climb an inclineof more than
Charger:
Type 'B' indoor/with some outdoorcapability (EN12184 : 1999) Class 2 (The use of invalidcarriages on the highway regulations 1988)
8 (136kg) rider
The safe climbing angle is measured with the seatin the highest position, and a rider weight of 300lbs (136kg).The motor on your scooter is powerful and may be able toclimb a steeper incline than the maximum safe climbingangle.
up to 4mph (6km/h) [+/- 10%] dependenton weight and manufacturing tolerances.
Up to 10 miles (16km) between charges under idealconditions. Note: Range varies with weight, terrain,temperature, battery condition etc. and is subject tomanufacturing tolerances.
Front solid, Rear 30psi(210 kpa). Do not exceed maximum inflation figureindicated on tyre wall.
2 x 12 volt. Maintenance free. 26AH sealed leadacid.
AC input. 230 volt. 50 Hz. 71w. 0.57A UK Plug 5 Amp f
8
CLASSIFICATION
Maximum safe climbing angle:
Warning:
Maximum speed:
Range:
Recommended Tyre Pressure:
Batteries:
Charger:
Model Code:FR510DX2/510DXs2
SPECIFICATION:
Overall length 138cm/54.7inches
Overall width 63cm/24.5inches
Ground clearance 8.5cm/3.4inches
Maximum load 136kgs/300lbs
Range up to 40km/25ml(36Amp batteries)
Total weihgt(excl.batteries) 68kgs/150 lbs
Heaviest port 23.5kgs/52 lbs
Wall to wall turning radlus 116cm/45.5inches
Maximum Speed 10km/6.25mph
Battery 36Amp/50Amp
use internal TIA. DC output 24 Volt. 2 Amp.Conforms to: EN60335-2-29 and En12184.
24 volt DC.
Rear wheel, direct drive via sealed drive axle.
24 volt DC. Permanent magnet, totally enclosed foroutdoor use. Internal brushes. 3.0 Amp. (no load)350W. 5100R.P.M.
Automatic dynamic regenerating braking system withspring activated magnetic solenoid parking brake. Free wheelfacility.
Easily dismantled into six basic pieces forconvenient transporting.
for driving comfort.
State of the art design for safetyand smooth operation; incorporating 'Fault' diagnosis.
Adjustable for height, arm width and armrestangle. Swivels for easy access.
Charging point is on the rear cover.
complies with E.M.C. Directive 89/336/EECcomplies with Medical Devices Directives 93/42/EEC
Electrical System:
ADDITIONAL FEATURES
Drive system:
Motor:
Brake:
Modular Design:
Adjustable Locking Tiller:
Proportional Speed Control:
Contoured Seat:
Automatic Charger:
Electrical System:
ADDITIONAL FEATURES
Drive system:
Motor:
Brake:
Modular Design:
Adjustable Locking Tiller:
Proportional Speed Control:
Contoured Seat:
Automatic Charger:
34
SIZE SPECIFICATION-FR168-3/FR168-3S
35
SIZE SPECIFICATION-FR168-4/FR168-4S
36
SIZE SPECIFICATION-FR510DX2/FR510DXs2
37
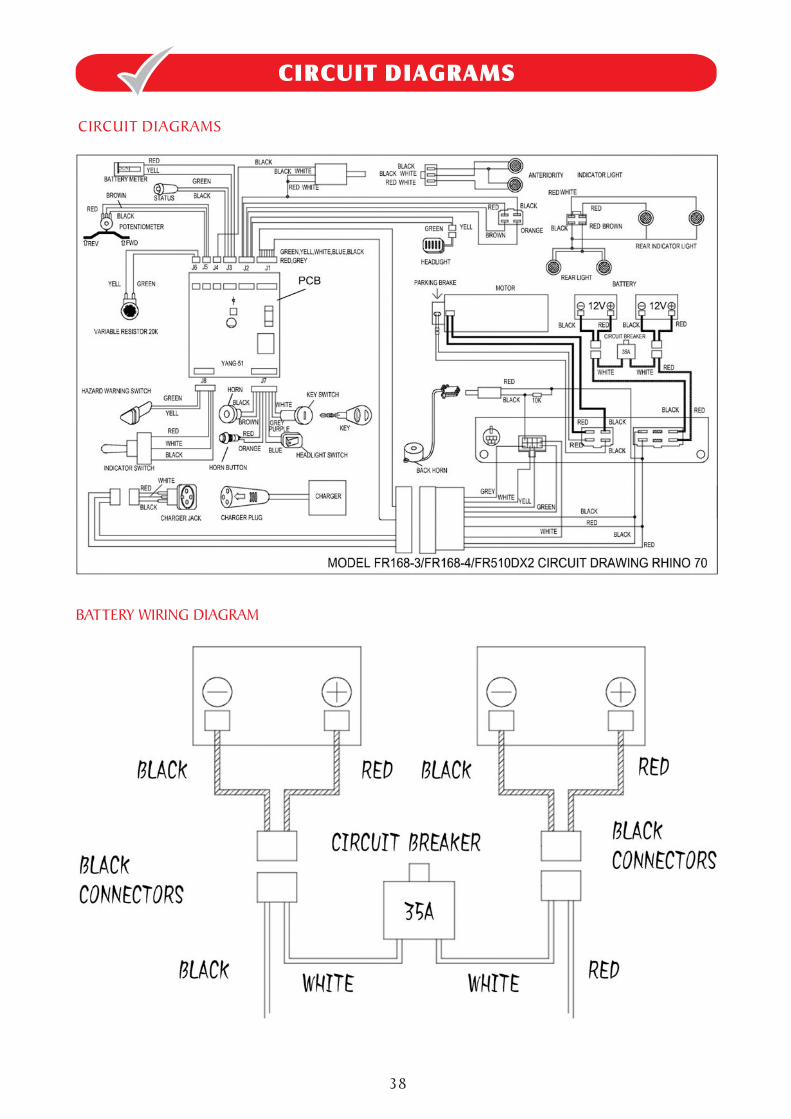
CIRCUIT DIAGRAMSCIRCUIT DIAGRAMS
BATTERY WIRING DIAGRAM
CIRCUIT DIAGRAMS
38
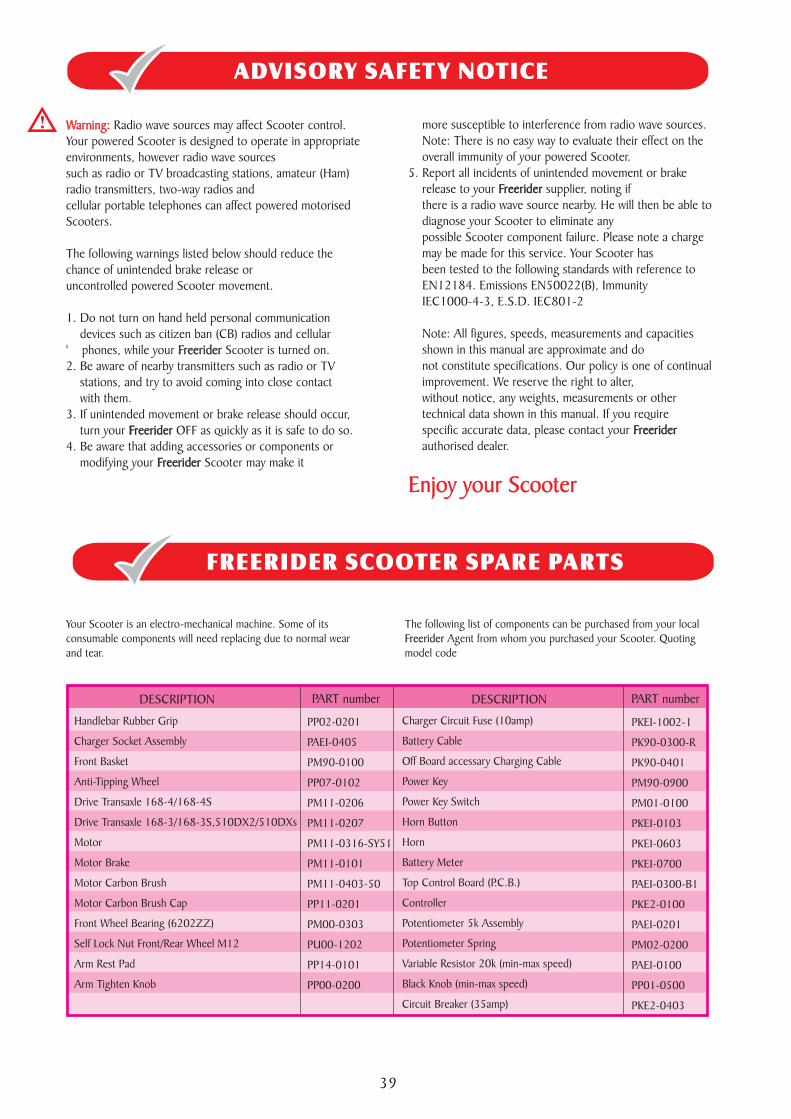
more susceptible to interference from radio wave sources.Note: There is no easy way to evaluate their effect on theoverall immunity of your powered Scooter.
5. Report all incidents of unintended movement or brakerelease to your supplier, noting ifthere is a radio wave source nearby. He will then be able todiagnose your Scooter to eliminate anypossible Scooter component failure. Please note a chargemay be made for this service. Your Scooter hasbeen tested to the following standards with reference toEN12184. Emissions EN50022(B), ImmunityIEC1000-4-3, E.S.D. IEC801-2
Note: All figures, speeds, measurements and capacitiesshown in this manual are approximate and donot constitute specifications. Our policy is one of continualimprovement. We reserve the right to alter,without notice, any weights, measurements or othertechnical data shown in this manual. If you requirespecific accurate data, please contact yourauthorised dealer.
Freerider
Freerider
Enjoy your Scooter
Freerider
Freerider
Enjoy your Scooter
ADVISORY SAFETY NOTICE
Warning: Radio wave sources may affect Scooter control.Your powered Scooter is designed to operate in appropriateenvironments, however radio wave sourcessuch as radio or TV broadcasting stations, amateur (Ham)radio transmitters, two-way radios andcellular portable telephones can affect powered motorisedScooters.
The following warnings listed below should reduce thechance of unintended brake release oruncontrolled powered Scooter movement.
1. Do not turn on hand held personal communicationdevices such as citizen ban (CB) radios and cellular
' phones, while your Scooter is turned on.2. Be aware of nearby transmitters such as radio or TV
stations, and try to avoid coming into close contactwith them.
3. If unintended movement or brake release should occur,turn your OFF as quickly as it is safe to do so.
4. Be aware that adding accessories or components ormodifying your Scooter may make it
Freerider
Freerider
Freerider
Warning:
Freerider
Freerider
Freerider
FREERIDER SCOOTER SPARE PARTS
Charger Circuit Fuse (10amp)
Battery Cable
Off Board accessary Charging Cable
Power Key
Power Key Switch
Horn Button
Horn
Battery Meter
Top Control Board (P.C.B.)
Controller
Potentiometer 5k Assembly
Potentiometer Spring
Variable Resistor 20k (min-max speed)
Black Knob (min-max speed)
Circuit Breaker (35amp)
Handlebar Rubber Grip
Charger Socket Assembly
Front Basket
Anti-Tipping Wheel
Drive Transaxle 168-4/168-4S
Drive Transaxle 168-3/168-3S,510DX2/510DXs
Motor
Motor Brake
Motor Carbon Brush
Motor Carbon Brush Cap
Front Wheel Bearing (6202ZZ)
Self Lock Nut Front/Rear Wheel M12
Arm Rest Pad
Arm Tighten Knob
The following list of components can be purchased from your localAgent from whom you purchased your Scooter. Quoting
model codeFreerider
Your Scooter is an electro-mechanical machine. Some of itsconsumable components will need replacing due to normal wearand tear.
PP14-0101
PP00-0200
PP02-0201
PAEI-0405
PM90-0100
PP07-0102
PM11-0206
PM11-0207
PM11-0316-SY51
PM11-0101
PM11-0403-50
PP11-0201
PM00-0303
PU00-1202
PKEI-1002-1
PK90-0300-R
PK90-0401
PM90-0900
PM01-0100
PKEI-0103
PKEI-0603
PKEI-0700
PAEI-0300-B1
PKE2-0100
PAEI-0201
PM02-0200
PAEI-0100
PP01-0500
PKE2-0403
39
DESCRIPTION PART number DESCRIPTION PART number
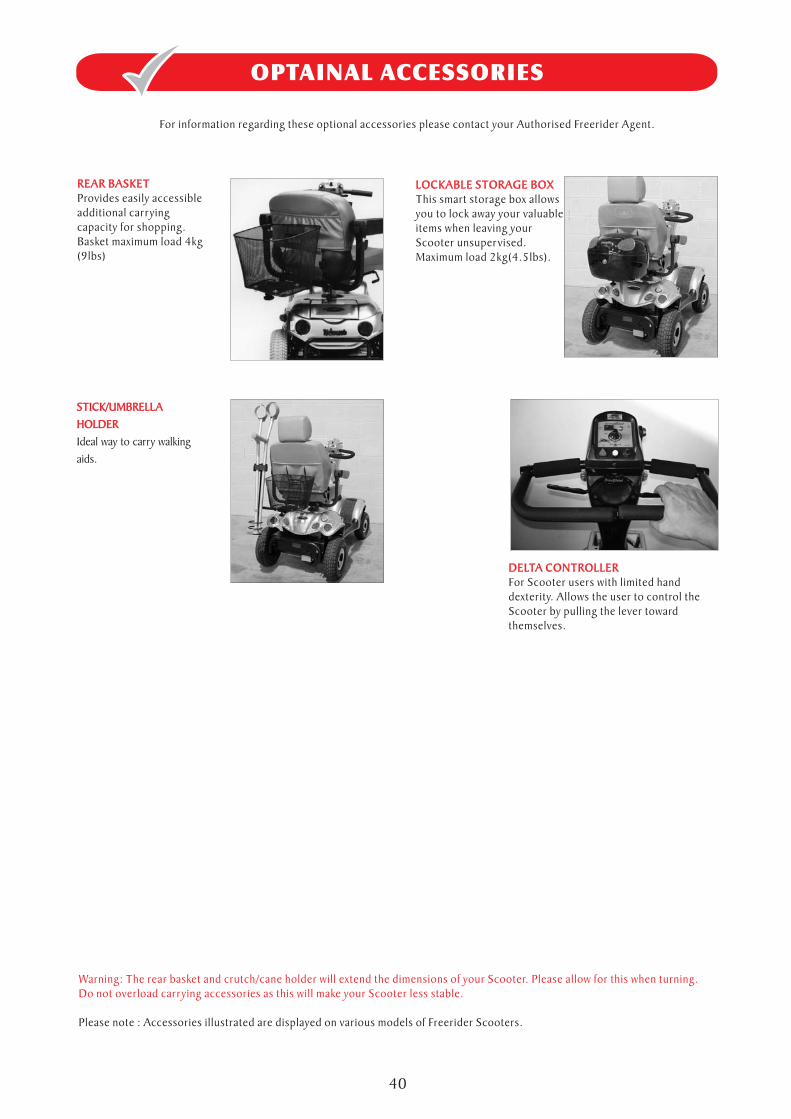
Warning: The rear basket and crutch/cane holder will extend the dimensions of your Scooter. Please allow for this when turning.Do not overload carrying accessories as this will make your Scooter less stable.
Please note : Accessories illustrated are displayed on various models of Freerider Scooters.
OPTAINAL ACCESSORIES
For information regarding these optional accessories please contact your Authorised Freerider Agent.
REAR BASKETProvides easily accessibleadditional carryingcapacity for shopping.Basket maximum load 4kg(9lbs)
REAR BASKET LOCKABLE STORAGE BOXThis smart storage box allowsyou to lock away your valuableitems when leaving yourScooter unsupervised.Maximum load 2kg(4.5lbs).
LOCKABLE STORAGE BOX
DELTA CONTROLLERFor Scooter users with limited handdexterity. Allows the user to control theScooter by pulling the lever towardthemselves.
DELTA CONTROLLER
STICK/UMBRELLA
HOLDER
Ideal way to carry walking
aids.
STICK/UMBRELLA
HOLDER
40
GUARANTEE TERMS
GUARANTEE TERMS
Freerider
WARRANTY REGISTRATION
Exclusions:
Freerider
METAL WORK:
Please keep a note of your serial No.
Due to the individual prescription nature of this product. Thisguarantee is not transferable.
Note: Extended guarantee insurance can be arranged by yourDistributor, he will be able to advise the extra cost of this cover.
This guarantee does not apply if your Freerider shows signs ofexcessive wear and abuse, or has been modified without theauthority of .
www.freerider.com.tw
...............................(This is located on a plate on the front frame tube, under the frontbody cover).
Your Scooter is guaranteed for 12 months from the date ofpurchase against faults arising due to defects in manufacture ormaterials. This guarantee does not detract from, but is in additionto your legal rights. Parts replaced or repaired under the terms ofthis guarantee will be covered for the balance of the 12 months period.This guarantee applies only to parts supplied or approved by
To enable to handle any enquiries regarding theguarantee of your Scooter; please complete and return the pre-paid warranty registration card supplied with your Scooter at yourearliest convenience. If you prefer use our website at
This guarantee does not extend to consumable itemswhich may need replacing due to normal wear and tear, namelytyres, tubes, punctures, lubrication, carpets, oil seals, gaskets,screws, brake shoes, mirrors, bulbs, upholstery, motor brushes,fuses, batteries, handgrips etc. or to damage to the product causedby mis-use, neglect or accident for which or its agentcannot be held responsible.
This guarantee does not cover the following items:1. Any noise or vibration, which does not effect the quality and
function of the machine.2. Damage due to lack of maintenance or improper use or
operation or storage.3. Fees for the regular service inspection and maintenance.4. Any fees incurred as a result of warranty repair, losses or
compensation because of the inability to use the Scooter(telephone use, shipping, car rental, travel fees etc.)
Metal components, such as the framework andbright metal parts require special attention and may deteriorate incertain conditions. Moisture and salt may corrode parts leftunattended, proprietary auto cleaner polishes should be used toPrevent long term damage. Failure to clean and protect thesecomponents may void your warranty.
Freerider
Freerider
Freerider
GUARANTEE TERMS
Freerider
WARRANTY REGISTRATION
Exclusions:
Freerider
METAL WORK:
Freerider
Freerider
Freerider
This guarantee does not cover deterioration ofpaintwork resulting from the lapse of time i.e. natural fading. It isthe users responsibility to clean and protect the painted surfaces.
Servicing of the speed controller orbattery charger must only be carried out by your local authorisedFreerider distributor. Any attempt to open or dismantle these itemsrender the guarantee void on that item.
Batteries carry a limited 12 month guarantee from theoriginal manufacturer which is subject to a stringent wear and tearclause. Any battery faults due to a defect in the original manufacture willnormally become obvious within the first two months of use.(Seebatteries and battery charging section of this manual). Any gradualdeterioration in the performance after this period is normal andassociated with fair wear and tear, mis-use or accidental damage and assuch is not covered by the manufacturers warranty.
Do not attempt to open the battery vent plugs.
In line with all mobility vehicles, your will benefit fromregular service inspections to keep it in pristine condition. Thefrequency of these service inspections will depend on the amount ofuse your vehicle is put to. We strongly recommend you contact yourlocal distributor to arrange for a service visit. (See Care &Maintenance Section of this manual).
Your product must be fully serviced at least every 12months or more frequently if conditions and use require it.
Please contact your authorised distributor who will be ableto advise you of his current costs affecting service visits. Please note:Non-warranty service costs are chargeable.
The warranty on your may not apply if routine maintenance isnot carried out as defined in the 'Care and Maintenance' section in thismanual.
WARRANTY SERVICE VISIT: If your Scooter should needattention due to failure as defined under the guarantee terms, pleasecontact the distributor from whom you purchased your machine.The Scooter shown and described in this manual may not be exactlyidentical in every detail as your own . However, all instructionsare still entirely relevant, irrespective of detail differences. If you are notsure of any details, please consult your Authorised Distributorbefore driving your Scooter.
disclaims all responsibility for any personal injury orproperty damage which may occur as a result of improper orunsafe use of its products. Mechanical or electrical defects will bedealt with on a contingency liability basis. The part or parts will bereplaced or repaired but no responsibility for damage or injury canbe implied to .
Guidelines in this manual are intended to assist you in the safeoperation of your powered Scooter. If you should haveany questions about the correct operation of your Scooter, pleasecontact your authorised dealer. Consult your doctor andtherapist if you are in doubt about your ability to operate your
Scooter.
It is the responsibility of the user to carry out daily inspectionsand regularly maintain and keep records of inspection andmaintenance covered in this manual. The user is also responsiblefor the proper use of the Scooter as detailed in this manual.
Freerider
Freerider
Freerider
Freerider
Freerider
Freerider
Freerider
Freerider
Freerider
Freerider
Freerider
Freerider
PAINT WORK:
SPEED CONTROLLER:
BATTERIES:
Warning:
SERVICE CHECKS
DISCLAIMER
(Batteries areguaranteed as single parts, only the failed part is replaceable).
PAINT WORK:
SPEED CONTROLLER:
BATTERIES:
Warning:
SERVICE CHECKS
DISCLAIMER
Freerider
Freerider
Freerider
Freerider
Freerider
Freerider
Freerider
Freerider
Freerider
Freerider
Freerider
Freerider
41
SERVICE HISTORY
DETAILS OF WORK CARRIED OUT DEALER STAMP
DATE INITIALS
DETAILS OF WORK CARRIED OUT DEALER STAMP
DATE INITIALS
DETAILS OF WORK CARRIED OUT DEALER STAMP
DATE INITIALS
DETAILS OF WORK CARRIED OUT DEALER STAMP
DATE INITIALS
42
This section is designed to assist you in keeping a record ofany service and repairs to your Scooter.
Should you decide to seel or exchange your Scooterin the future this will prove most helpful to you.Your
FreeriderService agent will also benefit from a documented record andthis book should accompany the Scooter when service orrepair work is carried out. The service agent will completethis section and return the book to you.
43
SERVICE HISTORY
DETAILS OF WORK CARRIED OUT DEALER STAMP
DATE INITIALS
DETAILS OF WORK CARRIED OUT DEALER STAMP
DATE INITIALS
DETAILS OF WORK CARRIED OUT DEALER STAMP
DATE INITIALS
DETAILS OF WORK CARRIED OUT DEALER STAMP
DATE INITIALS
This section is designed to assist you in keeping a record ofany service and repairs to your Scooter.
Should you decide to seel or exchange your Scooterin the future this will prove most helpful to you.Your
FreeriderService agent will also benefit from a documented record andthis book should accompany the Scooter when service orrepair work is carried out. The service agent will completethis section and return the book to you.
C
YOUR LOCAL DEALER
Freerider has a policy of continual improvement. We reserve the right to change specification without prior notice.All contents of this manual Freerider 2005No reproduction in any from of this manual in whole or in part (except for brief quotations in critical articles or reviews),may be made without the written
authorisation from Freerider.
No. 22, Bengong 5th Road, Gangshan Dist., Kaohsiung City, 820, Taiwan(R.O.C.)Call us +886-7-6223093 Fax: +886-7-6230373
Email: [email protected]://www.freerider.com.tw
http://www.luggiescooter.com
FREERIDER CORPORTION
Jan.2011.1000NO.PL90-0200