User’s Guide - Oklahoma Department of Transportation€¦ · User’s Guide Title Block ... Title...
63
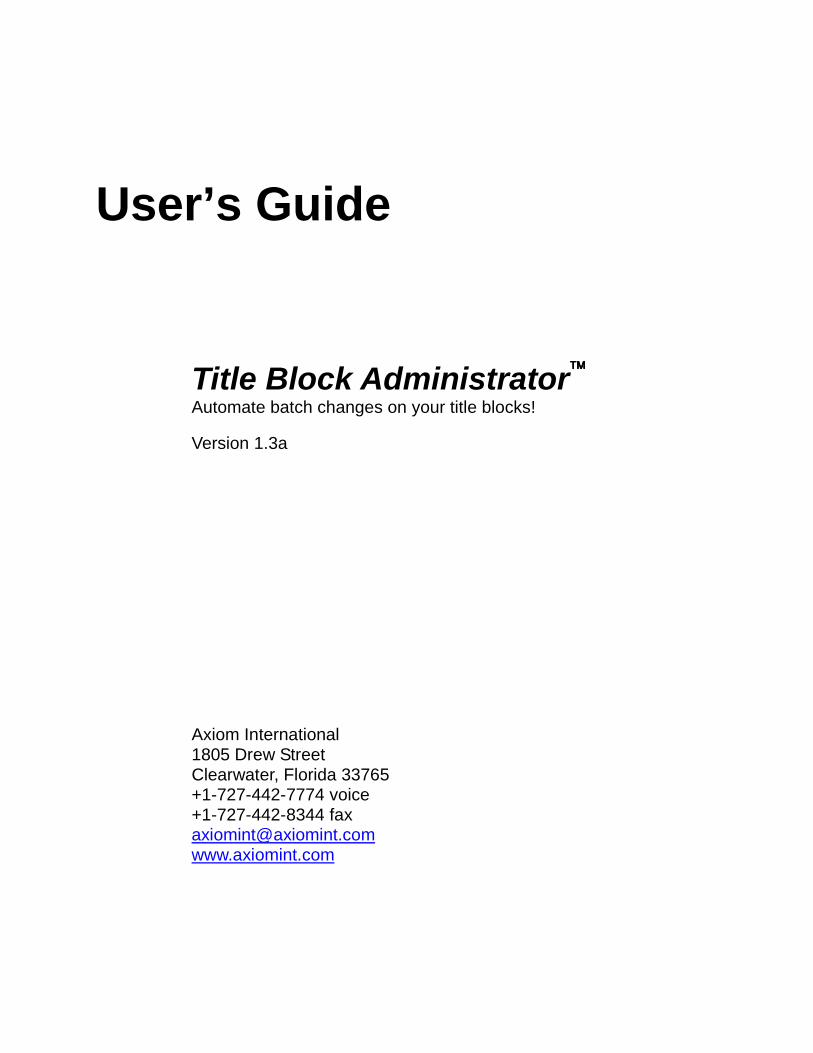
User’s Guide Title Block Administrator Automate batch changes on your title blocks! Version 1.3a Axiom International 1805 Drew Street Clearwater, Florida 33765 +1-727-442-7774 voice +1-727-442-8344 fax [email protected] www.axiomint.com
Transcript of User’s Guide - Oklahoma Department of Transportation€¦ · User’s Guide Title Block ... Title...
User’s Guide
Title Block AdministratorAutomate batch changes on your title blocks!
Version 1.3a
Axiom International1805 Drew StreetClearwater, Florida 33765+1-727-442-7774 voice+1-727-442-8344 [email protected]

Page 2 Title Block Manager
Copyright © 2003-2004 Axiom International.All rights reserved.
This document was last modified on 13 July 2004 4:53 PM.
This software and manual are provided “as is” without warranty of any kind, eitherexpressed or implied, including, but not limited to the implied warranties of
merchantability and fitness for a particular purpose. The entire risk as to the quality andperformance of this program is with you. You are advised to test the program thoroughly
before you rely on it. Should the program prove defective, you (and not the seller normanufacturer) assume the entire cost of all necessary servicing, repair or correction. Anyliability of seller or manufacturer of this software will be limited exclusively to product
replacement or refund of the purchase price. Venue for the resolution of any disputerelated to this license or the use of this product shall be Pinellas County, Florida.
MicroStation is a registered trademark of Bentley Systems, Incorporated.Title Block Administrator, Title Block Client and Title Block Manager are trademarks of
Axiom International.

Table of Contents Page 3
Table of Contents
Chapter 1 — Introduction ----------------------------------------------------------------------7Title Blocks ----------------------------------------------------------------------------------------------- 7Title Block Administrator------------------------------------------------------------------------------- 7Features ---------------------------------------------------------------------------------------------------- 8
Chapter 2 — Installation ------------------------------------------------------------------------9Preparing for installation ------------------------------------------------------------------------------- 9Installation from CD --------------------------------------------- Error! Bookmark not defined.Network installation from the server-------------------------- Error! Bookmark not defined.Environment variable -------------------------------------------- Error! Bookmark not defined.
Chapter 3 — Uninstalling--------------------------------------------------------------------- 11Why you might uninstall an Axiom product----------------- Error! Bookmark not defined.How to do it -------------------------------------------------------- Error! Bookmark not defined.Stop MicroStation from running an Axiom product ------- Error! Bookmark not defined.Identifying your Axiom Base Directory---------------------- Error! Bookmark not defined.Removing products from the Axiom menu ------------------ Error! Bookmark not defined.Removing the Axiom menu------------------------------------- Error! Bookmark not defined.Removing files from your hard-disk -------------------------- Error! Bookmark not defined.Axiom.cfg file and axiom_user.ucf file----------------------- Error! Bookmark not defined.
Chapter 4 — Quick Start---------------------------------------------------------------------- 15When should I use Title Block Administrator?-------------- Error! Bookmark not defined.Quick Start Objectives ------------------------------------------- Error! Bookmark not defined.Prerequisites ------------------------------------------------------- Error! Bookmark not defined.Demonstration Version------------------------------------------- Error! Bookmark not defined.Tutorial #1 – Update a database from selected design filesError! Bookmark not defined.Tutorial #2 – Update selected design files from a database.Error! Bookmark not defined.Tutorial #3 – Create a title block template from an existing title block.Error! Bookmark notdefined.Tutorial #4 – Add the title block template to a cell library.Error! Bookmark not defined.Tutorial #5 – Working with tags ------------------------------- Error! Bookmark not defined.How to begin with your own files ----------------------------- Error! Bookmark not defined.
Chapter 5 — Using Title Block Administrator----------------------------------------- 26The Title Block Administrator main dialog box---------------------------------------------------26Three primary functions of Title Block Administrator-------------------------------------------26
Update database from selected design files.-------------------------------------------------27Update selected design files from database.-------------------------------------------------27Create a new title block cell. -------------------------------------------------------------------27
Other menus and buttons on the main dialog box ------------------------------------------------27The File menu -------------------------------------------------------------------------------------27The Settings menu--------------------------------------------------------------------------------28

Page 4 Title Block Manager
The Help menu------------------------------------------------------------------------------------29Design Files----------------------------------------------------------------------------------------------29Database --------------------------------------------------------------------------------------------------30Cell Library ----------------------------------------------------------------------------------------------30Report File -----------------------------------------------------------------------------------------------31<Start> ----------------------------------------------------------------------------------------------------31<Display Report...>-------------------------------------------------------------------------------------31<Edit Database>-----------------------------------------------------------------------------------------31<Close> ---------------------------------------------------------------------------------------------------31Focus Item Description --------------------------------------------------------------------------------32
Chapter 6 — The Title Block Cell Library----------------------------------------------- 33Title Block Cells ----------------------------------------------------------------------------------------33
Chapter 7 — Create title block cells. ----------------------------------------------------- 34Getting started from an existing system ------------------------------------------------------------34Step 1: Set up a template for the cell. ---------------------------------------------------------------34
Step 2: Create a new title block cell.----------------------------------------------------------37Automatic field updates -------------------------------------------------------------------------------38
File related variables -----------------------------------------------------------------------------38MicroStation configuration variables ---------------------------------------------------------39
Settings----------------------------------------------------------------------------------------------------40General----------------------------------------------------------------------------------------------40
Chapter 8 — Update database from selected design files. ----------------------- 41Database updates----------------------------------------------------------------------------------------41Procedure -------------------------------------------------------------------------------------------------42
Chapter 9 — Update selected design files from database. ----------------------- 44Updating design files from the database.-----------------------------------------------------------44Procedure -------------------------------------------------------------------------------------------------44
Chapter 10 — Tag management ----------------------------------------------------------- 46Tag basics-------------------------------------------------------------------------------------------------46Reporting tag data in the database-------------------------------------------------------------------47
Process Tags ---------------------------------------------------------------------------------------47Select tag sets to process ------------------------------------------------------------------------------48
Chapter 11 — Reports ------------------------------------------------------------------------- 49Sample Report – “Update database from selected design files” -------------------------------49Sample Report – “Update selected design files from database” -------------------------------50
Chapter 12 — The File List Editor --------------------------------------------------------- 51The File List Editor Dialog Box ------------------------------- Error! Bookmark not defined.The List menu ----------------------------------------------------- Error! Bookmark not defined.
File list only (text) ------------------------------------------ Error! Bookmark not defined.All data (binary) -------------------------------------------- Error! Bookmark not defined.List | Import -------------------------------------------------- Error! Bookmark not defined.
Table of Contents Page 5
List | Export-------------------------------------------------- Error! Bookmark not defined.Navigation Section ----------------------------------------------- Error! Bookmark not defined.File List Editing Section----------------------------------------- Error! Bookmark not defined.
The “Selected Files” list----------------------------------- Error! Bookmark not defined.Extended File List Specifications ----------------------- Error! Bookmark not defined.
<OK>---------------------------------------------------------------- Error! Bookmark not defined.<Cancel> ----------------------------------------------------------- Error! Bookmark not defined.Select files by date range ---------------------------------------- Error! Bookmark not defined.
Earliest date-------------------------------------------------- Error! Bookmark not defined.Latest date---------------------------------------------------- Error! Bookmark not defined.
Messages ----------------------------------------------------------- Error! Bookmark not defined.“xxx” is not currently accessible.------------------------ Error! Bookmark not defined.
Chapter 13 — Frequently asked questions -------------------------------------------- 59Can I convert my existing title blocks in design files to Title Block Manager title blocks?59Can I modify cell contents without using Title Block Client?----------------------------------59Can I have more than one title block in a design file?-------------------------------------------59Do Title Block Manager title blocks have to be cells?-------------------------------------------60Can I create variable fields that do not display? --------------------------------------------------60
Chapter 14 — We’ll Make (Almost) Any Enhancements You Want ------------ 61We welcome your suggestions -----------------------------------------------------------------------61
Chapter 15 — New Features and Fixes-------------------------------------------------- 62Version 1.3a – 13 July 2004 --------------------------------------------------------------------------62Version 1.2a — 28 May 2004 ------------------------------------------------------------------------62Version 1.1b — 9 April 2004 -------------------------------------------------------------------------62Version 1.1a — 20 February 2004-------------------------------------------------------------------62Version 1.0b — 5 December 2003-------------------------------------------------------------------63Version 1.0a — 19 November 2003-----------------------------------------------------------------63

Chapter 1 — Introduction Page 7
Chapter 1 — Introduct ion
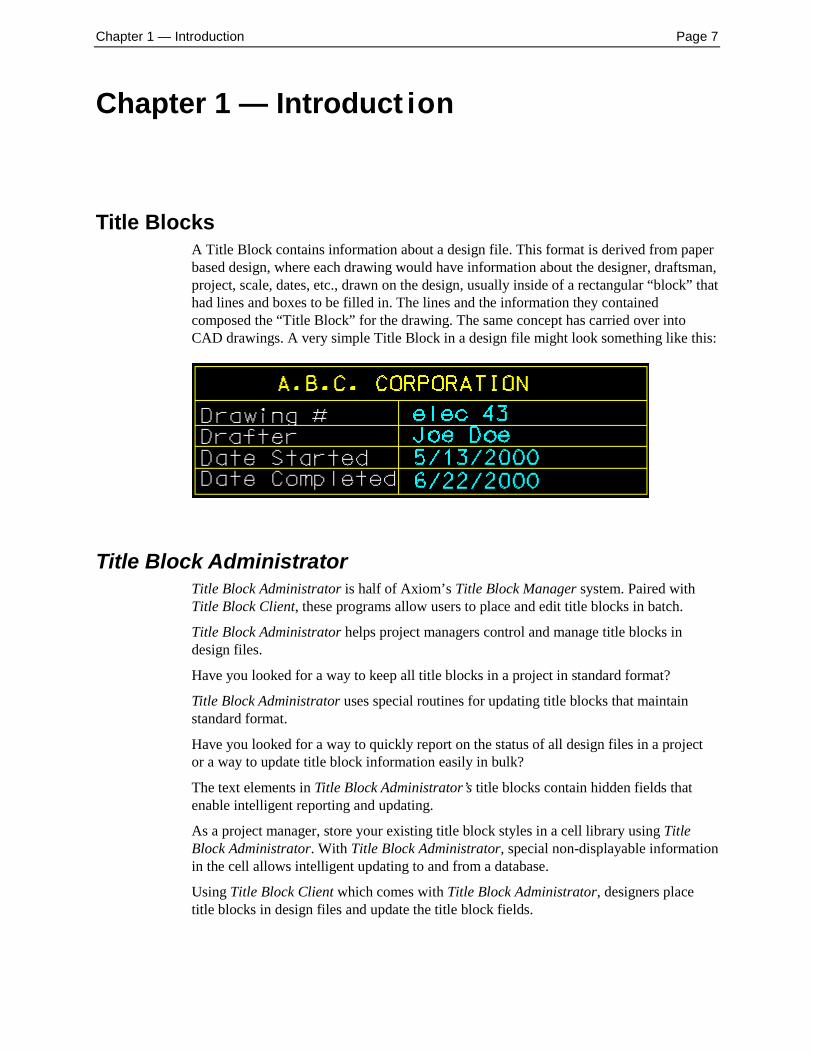
Title BlocksA Title Block contains information about a design file. This format is derived from paperbased design, where each drawing would have information about the designer, draftsman,project, scale, dates, etc., drawn on the design, usually inside of a rectangular “block” thathad lines and boxes to be filled in. The lines and the information they containedcomposed the “Title Block” for the drawing. The same concept has carried over intoCAD drawings. A very simple Title Block in a design file might look something like this:
Title Block AdministratorTitle Block Administrator is half of Axiom’s Title Block Manager system. Paired withTitle Block Client, these programs allow users to place and edit title blocks in batch.
Title Block Administrator helps project managers control and manage title blocks indesign files.
Have you looked for a way to keep all title blocks in a project in standard format?
Title Block Administrator uses special routines for updating title blocks that maintainstandard format.
Have you looked for a way to quickly report on the status of all design files in a projector a way to update title block information easily in bulk?
The text elements in Title Block Administrator’s title blocks contain hidden fields thatenable intelligent reporting and updating.
As a project manager, store your existing title block styles in a cell library using TitleBlock Administrator. With Title Block Administrator, special non-displayable informationin the cell allows intelligent updating to and from a database.
Using Title Block Client which comes with Title Block Administrator, designers placetitle blocks in design files and update the title block fields.

Page 8 Title Block Manager
As project manager, you use Title Block Administrator to create and update Exceldatabase files from design files. You can use the database to create reports on the statusof your files.
You can also update design file title block information in a single design file or in bulkfrom changes you make to the database.
The project manager has exclusive control of the options that define the database andcontrol the title block cells. The manager can make bulk changes to title blockinformation in design files and produce comprehensive reports.
Create your title blocks with EDF’s and they can be exported and updated remotely, andwill retain all database functions when returned to you. You need no special instructionsfor developers.
Features1. Standardize title block formats by storing them in a cell library.
2. Place title blocks as shared cells, regular cells or individual elements in thedesign file.
3. Easy to use cell placement and modify functions hold entries to the correctformat and symbology.
4. Full file path and/or filename can be pre-defined to update automatically.
5. Insert data automatically from your own configuration variables.
6. Create and/or update Excel databases from selected design files or from theactive file only.
7. Report on the current status of design files.
8. Combine data from several projects in a single database while retaining theability to update separate databases or temporary databases for selected files.
9. Update design files in bulk from changes made in Excel.
10. Extract and modify tagged information in batch.
Chapter 2 — Installation Page 9
Chapter 2 — Installation
Preparing for installationInstallation of Axiom products is quick and easy.
Your computer must have MicroStation up and running. Be sure that the MicroStationversion that you are using is the only MicroStation that is running.
You should have received a license file for the product(s) you are about to install andknow the location of that file. Usually this will be on a floppy disk or a file that youreceived by email and saved to a temporary location on your drive.
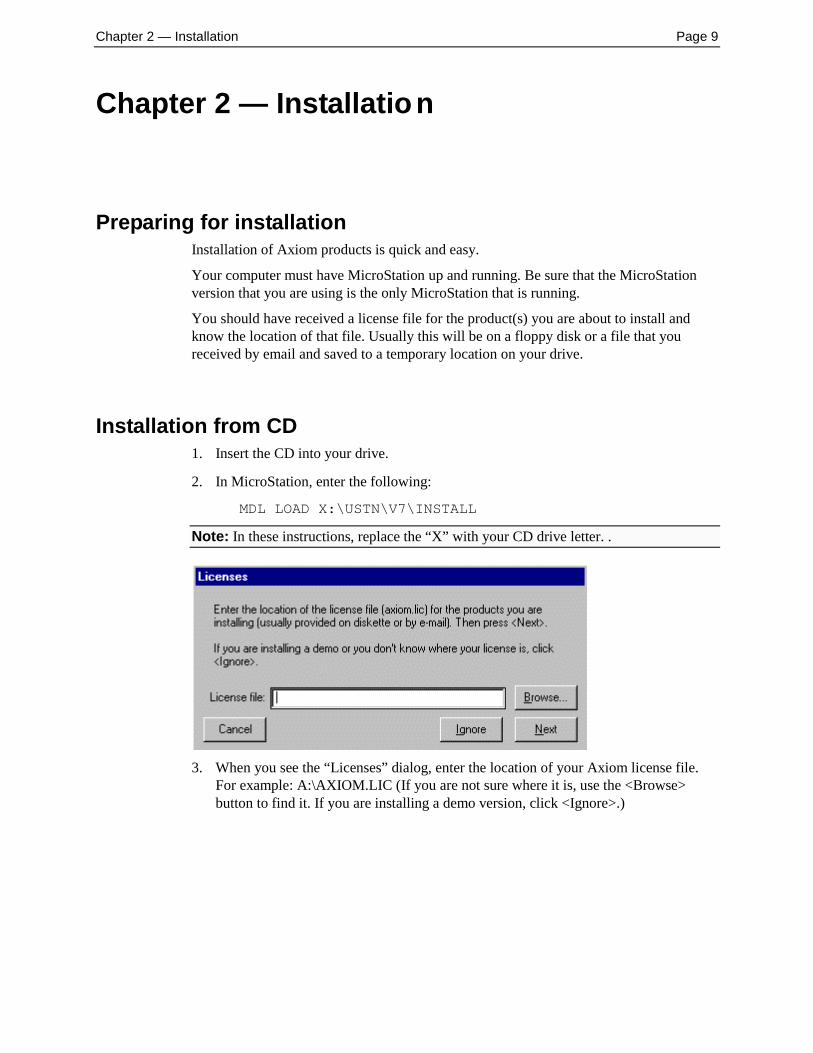
Installation from CD1. Insert the CD into your drive.
2. In MicroStation, enter the following:
MDL LOAD X:\USTN\V7\INSTALL
Note: In these instructions, replace the “X” with your CD drive letter. .
3. When you see the “Licenses” dialog, enter the location of your Axiom license file.For example: A:\AXIOM.LIC (If you are not sure where it is, use the <Browse>button to find it. If you are installing a demo version, click <Ignore>.)

Page 10 Title Block Manager
4. You will see a dialog box containing the available products to install. The productsthat match your license file will already be highlighted. You can install all of these byclicking the <OK> button, or you can make some other selection with Ctrl + click.
Note: You can install all of the products listed. For the ones not licensed, you can obtaina demonstration license from your Axiom MicroStation Consultant.
Tip: A readme.txt file on the CD contains the answers to frequently asked questionsabout installation.
Network installation from the serverIf you want to install Axiom products on a network, you can copy the CD onto a serverdrive and let each user install from the server. Use the instructions for installing from CD,but use the path to the directory on the server rather than your CD drive.
Environment variableA MicroStation environment variable, MS_NOEOF_MSGFILE will be installedautomatically. When MicroStation encounters a corrupt design file a message will bedisplayed:
MicroStation cannot open this damaged file. The file must be repaired with FileFixer.Open a healthy file, then repair the damaged file with FileFixer.
Chapter 3 — Uninstalling Page 11
Chapter 3 — Uninstalli ng
Why you might uninstall an Axiom productThere are a few reasons you may want to uninstall an Axiom product:
1. You have run a demo and want to remove it from your computer.
2. You have moved the product to another computer and need to remove the productfrom the original computer.
3. You have a site or corporate license and want your users to have access to only someof the many Axiom products that you have already installed on their computers.
There may be other reasons.
How to do itThere are three basic stages to uninstalling an Axiom product:
1. Stopping MicroStation from trying to automatically run the Axiom product.
2. Removing the Axiom product from MicroStation’s Axiom menu or entirelyremoving the Axiom menu from MicroStation’s menu bar.
3. Removing the Axiom files from your hard disk.
Stop MicroStation from running an Axiom productSome Axiom products such as Version Manager and Microsoft Office Importer may beset up to run automatically whenever MicroStation is started.
You can stop this from happening by going into MicroStation | Workspace |Configuration and looking for the variable MS_DGNAPPS. Edit the value of thisvariable and remove any references to the Axiom product that you no longer want to runautomatically, when running MicroStation. Exit MicroStation and re-start, then checkthat the MS_DGNAPPS variable is clear of the Axiom product you no longer want tostart when MicroStation is started.
Page 12 Title Block Manager
Identifying your Axiom Base DirectoryYou will need to locate your Axiom Base Directory.
Open the MicroStation | Workspace | Configuration dialog box and look for the “AXI”configuration variable. The Expansion field of the AXI variable points to your AxiomBase Directory. It is usually something like “c:\program files\axiom\V7\axiom\” or“c:\program files\axiom\V8\axiom\”.
Removing products from the Axiom menuThis is an optional step. If you want to skip this step, go on to the “Removing the Axiommenu” section.
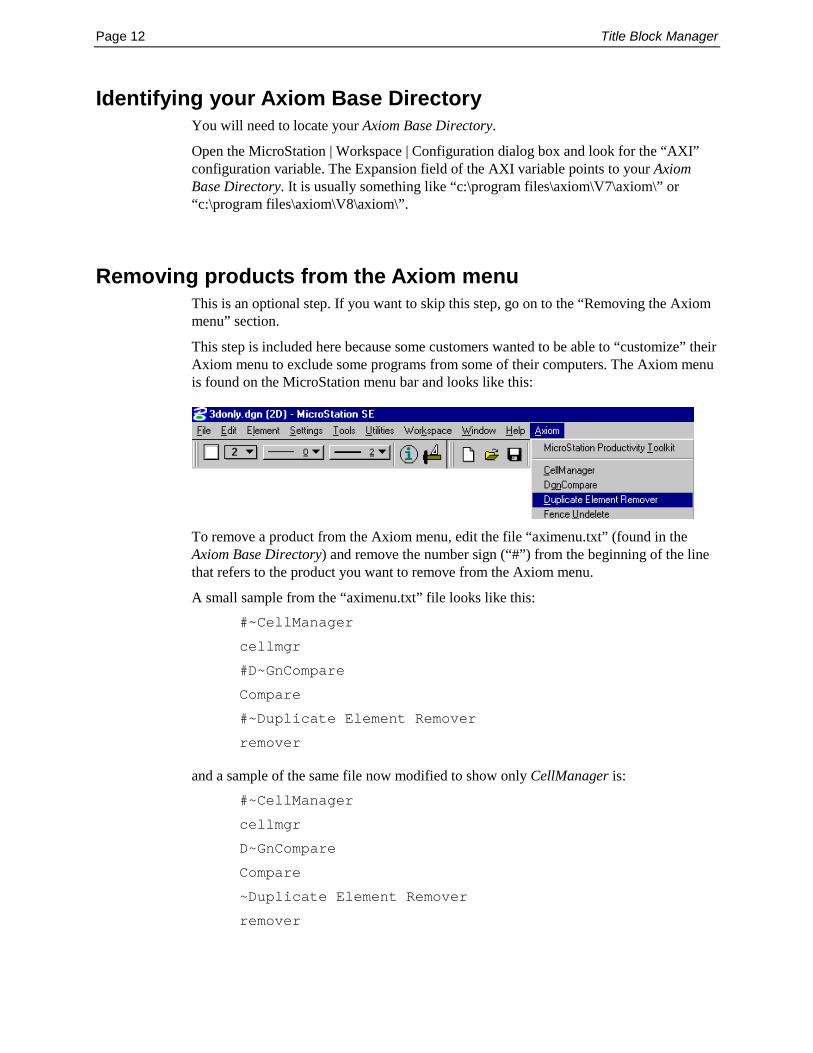
This step is included here because some customers wanted to be able to “customize” theirAxiom menu to exclude some programs from some of their computers. The Axiom menuis found on the MicroStation menu bar and looks like this:
To remove a product from the Axiom menu, edit the file “aximenu.txt” (found in theAxiom Base Directory) and remove the number sign (“#”) from the beginning of the linethat refers to the product you want to remove from the Axiom menu.
A small sample from the “aximenu.txt” file looks like this:#~CellManager
cellmgr
#D~GnCompare
Compare
#~Duplicate Element Remover
remover
and a sample of the same file now modified to show only CellManager is:#~CellManager
cellmgr
D~GnCompare
Compare
~Duplicate Element Remover
remover

Chapter 3 — Uninstalling Page 13
If you have multiple Axiom products and you only want one product to be removed, youdon’t have to remove this product’s name from the Axiom menu. Just remove theprogram’s files from your disk (see section titled “Removing files from your hard-disk”)leaving the entry on the Axiom menu. When you select the program from the Axiommenu, you will get a text-style dialog box, which will describe the product. You will notget any errors or failures.
Removing the Axiom menuIf you intend to remove all Axiom products from your computer, you would want to dothis step.
The “Axiom menu” is actually a program that is run whenever MicroStation is started up.You can stop this menu from appearing in MicroStation by going into MicroStation |Workspace | Configuration and looking for the variable MS_DGNAPPS. Edit the valueof this variable and remove the entry “aximenu.ma”. When you have done this, next timeyou start MicroStation the menu bar will look like this:
Notice that the word “Axiom” no longer appears to the right of “Help”.
Page 14 Title Block Manager
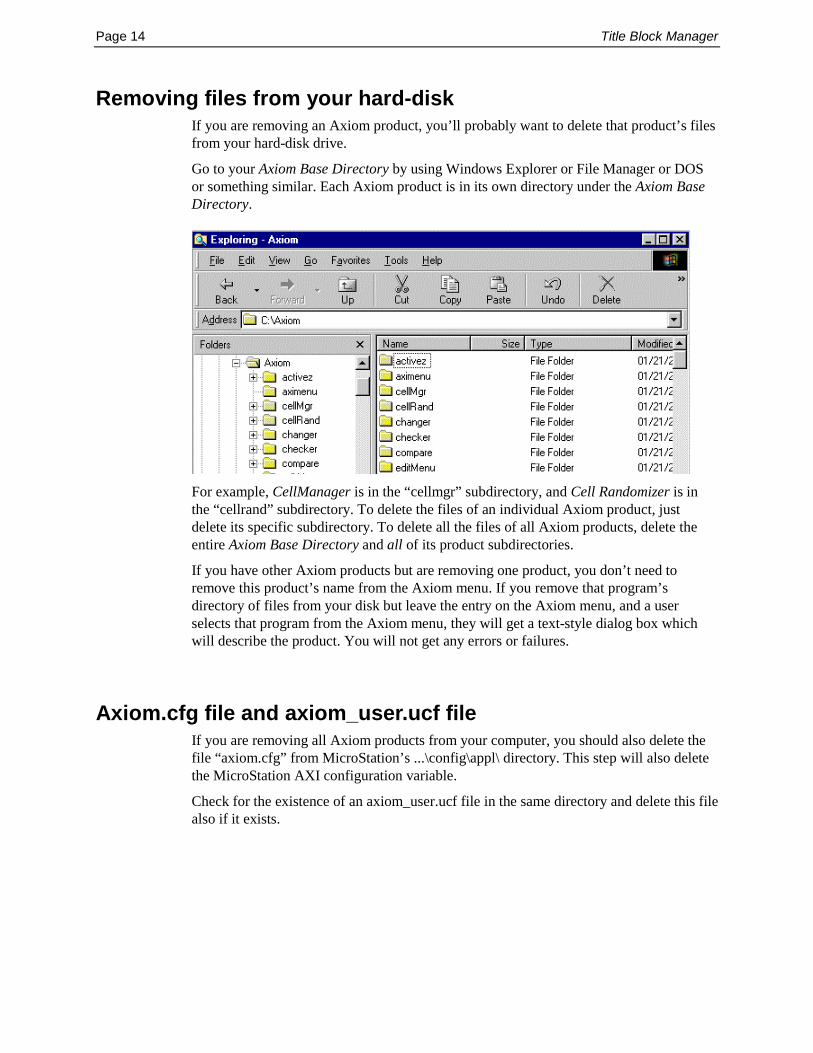
Removing files from your hard-diskIf you are removing an Axiom product, you’ll probably want to delete that product’s filesfrom your hard-disk drive.
Go to your Axiom Base Directory by using Windows Explorer or File Manager or DOSor something similar. Each Axiom product is in its own directory under the Axiom BaseDirectory.
For example, CellManager is in the “cellmgr” subdirectory, and Cell Randomizer is inthe “cellrand” subdirectory. To delete the files of an individual Axiom product, justdelete its specific subdirectory. To delete all the files of all Axiom products, delete theentire Axiom Base Directory and all of its product subdirectories.
If you have other Axiom products but are removing one product, you don’t need toremove this product’s name from the Axiom menu. If you remove that program’sdirectory of files from your disk but leave the entry on the Axiom menu, and a userselects that program from the Axiom menu, they will get a text-style dialog box whichwill describe the product. You will not get any errors or failures.
Axiom.cfg file and axiom_user.ucf fileIf you are removing all Axiom products from your computer, you should also delete thefile “axiom.cfg” from MicroStation’s ...\config\appl\ directory. This step will also deletethe MicroStation AXI configuration variable.
Check for the existence of an axiom_user.ucf file in the same directory and delete this filealso if it exists.
Chapter 4 — Quick Start Page 15
Chapter 4 — Quick Sta rt
When should I use Title Block Administrator?Use Title Block Administrator to create standardized title block cells which can then beupdated in bulk.
Use Title Block Administrator to create and update a database with design file names andtitle block information.
Use Title Block Administrator to update title block information in design files fromchanges you make to the database.
Quick Start ObjectivesThe purpose of this Quick Start is to introduce you to the basic functions of Title BlockAdministrator so that you can immediately use the program.
This Quick Start should take less than an hour.
Prerequisites1. MicroStation SE or J.
2. Microsoft Excel 97, 2000, or XP
3. Title Block Administrator must be installed on your computer. You can verify this byselecting the Axiom menu from MicroStation’s main menu bar, then select TitleBlock Administrator. If Title Block Administrator does not appear in the Axiommenu, follow the instructions in the Installation chapter of your User Guide.
4. Sample files that are delivered with Title Block Administrator and Title Block Client.
...TBMgr\ — contains cell libraries containing sample title blocks.
...TBAdmin\sample — contains sample files containing title block cells.
...TBAdmin\templates — contains sample title blocks for creating new cells.

Page 16 Title Block Manager
Demonstration VersionThe demonstration version of Title Block Administrator is limited to processing only thefirst ten records in the database.
In this quick start, we use simple title block cells for demonstration only. In a productionenvironment, you create your own title block cells from existing title blocks in yoursystem. Tutorials #3 and #4 show how easy this is to do.
Tutorial #1 – Update a database from selected design files
You can use Title Block Administrator to create a database containing information in titleblocks in a set of design files.
1. Open sample design file …axiom\V7\tbadmin\sample\regular_cell.dgn. This filecontains a sample title block.
2. The border, including title block information, is a single cell. Take a look at thevarious title block fields.
3. In Title Block Administrator’s main dialog box, click the <Select…> button to theright of the “Design Files:” field. The dialog that opens allows you to select a batchof files for processing. We will select the five files in the sample directory.
4. On the bottom left side of the dialog box, you will see a field called “Extended FileSpecification” This field will take a wildcard expression. Notice that it currentlycontains the filespec of your active file.

Chapter 4 — Quick Start Page 17
On the right side of the dialog, notice that your active file is the only file in the selectedfile list. We will select the four additional files that are in the sample directory.
5. Notice that the “Extended File Specification” field contains the name of your activefile. This field will take a wildcard.
6. In the “Extended File Specification” field, change the filename regular_cell.dgn to*.dgn, and click the <Add> button underneath the field. All dgn files in the sampledirectory will be selected.
7. Click <OK> to return to the Title Block Administrator main dialog.
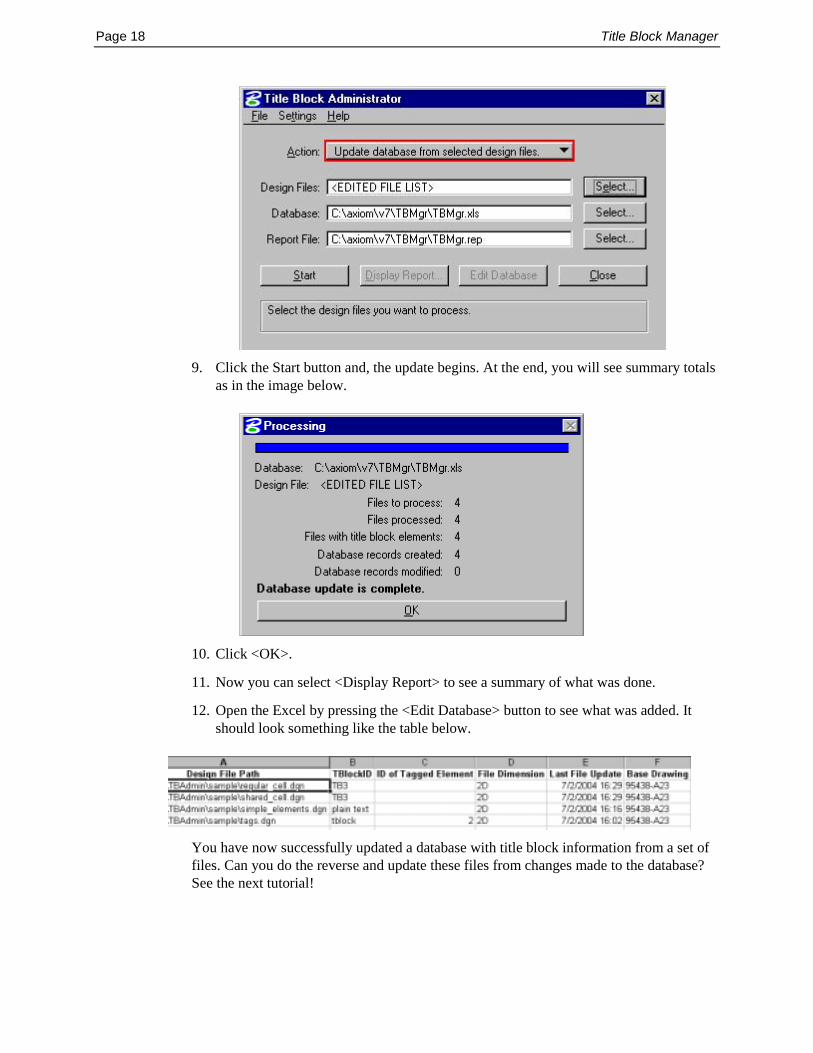
8. Select Action : “Update database from selected design files.”
Page 18 Title Block Manager
9. Click the Start button and, the update begins. At the end, you will see summary totalsas in the image below.
10. Click <OK>.
11. Now you can select <Display Report> to see a summary of what was done.
12. Open the Excel by pressing the <Edit Database> button to see what was added. Itshould look something like the table below.
You have now successfully updated a database with title block information from a set offiles. Can you do the reverse and update these files from changes made to the database?See the next tutorial!
Chapter 4 — Quick Start Page 19
Tutorial #2 – Update selected design files from a database.Changing some data in a title block in a single file is not difficult, but what happens whenyou want to make a global change to a large group of design files? You can use TitleBlock Administrator to make such changes.
Note: If you skipped tutorial # 1, you should go back and do it now. tutorial # 1 createsthe title block database.
1. If you just completed Tutorial #1, your file list is still there as <Edited File List>. Ifnot, use the <Edit List...> dialog to select all files in the tbadmin\sample directory.
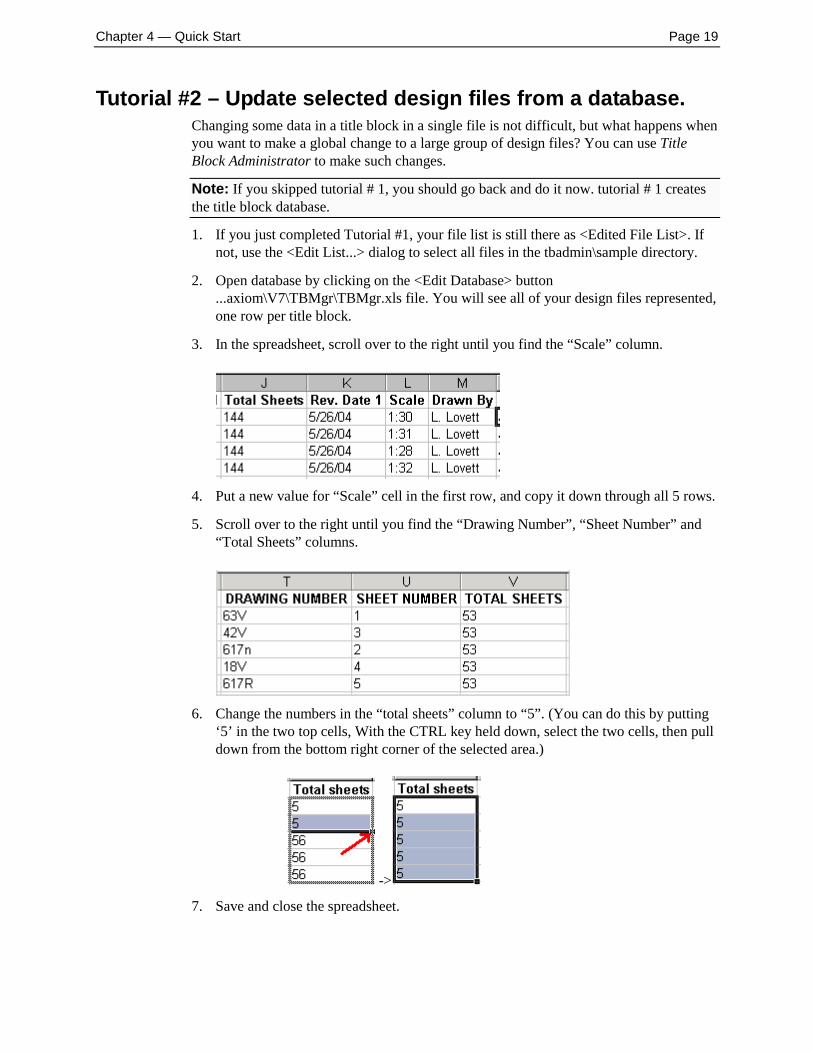
2. Open database by clicking on the <Edit Database> button...axiom\V7\TBMgr\TBMgr.xls file. You will see all of your design files represented,one row per title block.
3. In the spreadsheet, scroll over to the right until you find the “Scale” column.
4. Put a new value for “Scale” cell in the first row, and copy it down through all 5 rows.
5. Scroll over to the right until you find the “Drawing Number”, “Sheet Number” and“Total Sheets” columns.
6. Change the numbers in the “total sheets” column to “5”. (You can do this by putting‘5’ in the two top cells, With the CTRL key held down, select the two cells, then pulldown from the bottom right corner of the selected area.)
->
7. Save and close the spreadsheet.

Page 20 Title Block Manager
8. In MicroStation, change the “Action:” to <Update selected design files fromdatabase. The main dialog box should look like the image below with <Edited FileList> in the “Design Files:” field.
9. Now click <Start>, and the update begins. At the end, you will see summary totals.
10. Click <OK> to those totals.
11. Open the various sample design files to see your changes.
Tutorial #3 – Create a title block template from an existingtitle block.
Putting your title blocks into a cell library is the setup step needed before using the TitleBlock Manager system on your design files.
You must tell Title Block Administrator the names of the fields in your title block. It isnot difficult to do. We’ll practice with a sample title block that is delivered with TitleBlock Administrator.

Chapter 4 — Quick Start Page 21
In the ...TBAdmin\templates\ directory you will find a number of design files containingsimple title blocks. Open “Practice.dgn”.
Practice.dgn contains a sample title block. You can see that some fields in the title blockcontain text elements that are field names surrounded by double dollar signs. These textelements will not appear in the cell when it is placed.
The field names that are between the double dollar signs will match the column headersin your database.
For practice, you can type field names into the remaining three blank fields. Be sure touse the double dollar signs before and after the field names. You can use any names thatyou want.
For example:
These ‘$$’ text elements will not be visible after the cell is created. It does not matter ifthey overlap or overflow boundaries.
Also, if the text is left adjusted, as it is in these three fields, user data will be left adjustedto the first position of the text that you placed.
Notice the $${FILENAME /P}$$ in the last field at the bottom. The variable$${FILENAME /P}$$ will cause the full file path to appear automatically in the cellwhen it is placed.
Page 22 Title Block Manager
Note: EDFs are supported in these fields. For more specifics on using EDFs see thesection on “Tips for including EDFs” later in this guide.
Now you have a title block that can be made into a title block cell. That is all there is toit. The next step shows how to create the new cell.
Tutorial #4 – Add the title block template to a cell library.Now let’s add the title block template in Practice.dgn to a cell library.
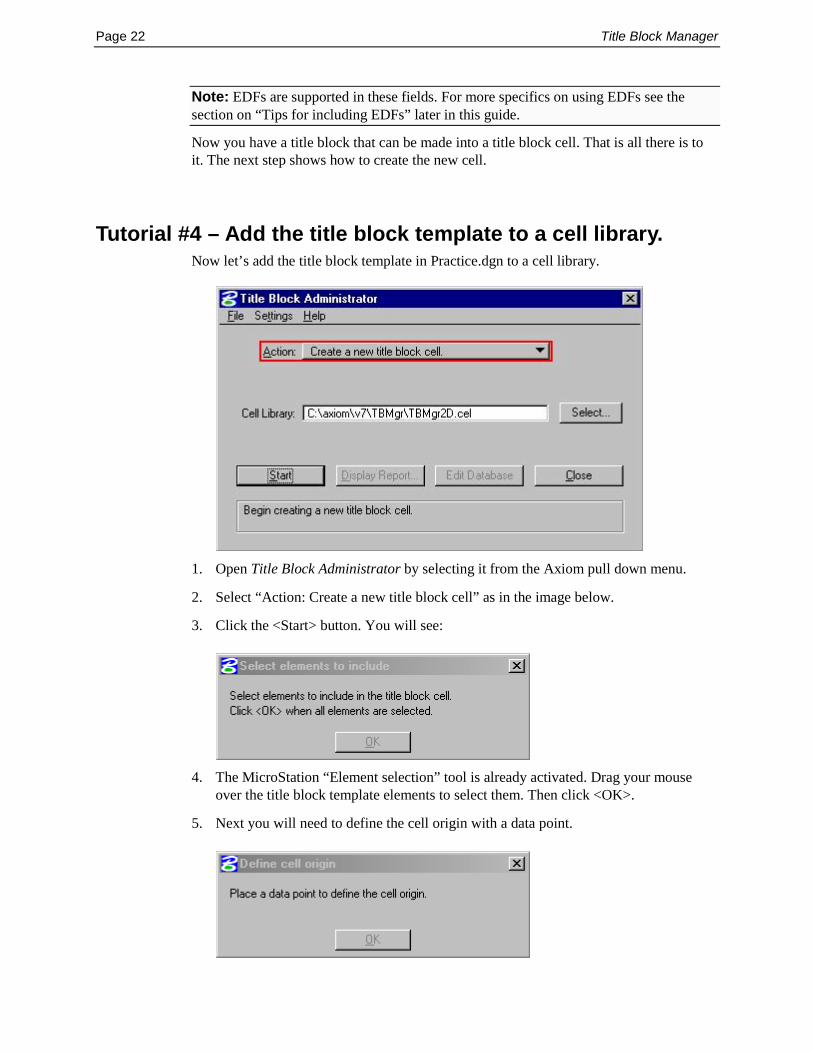
1. Open Title Block Administrator by selecting it from the Axiom pull down menu.
2. Select “Action: Create a new title block cell” as in the image below.
3. Click the <Start> button. You will see:
4. The MicroStation “Element selection” tool is already activated. Drag your mouseover the title block template elements to select them. Then click <OK>.
5. Next you will need to define the cell origin with a data point.
Chapter 4 — Quick Start Page 23
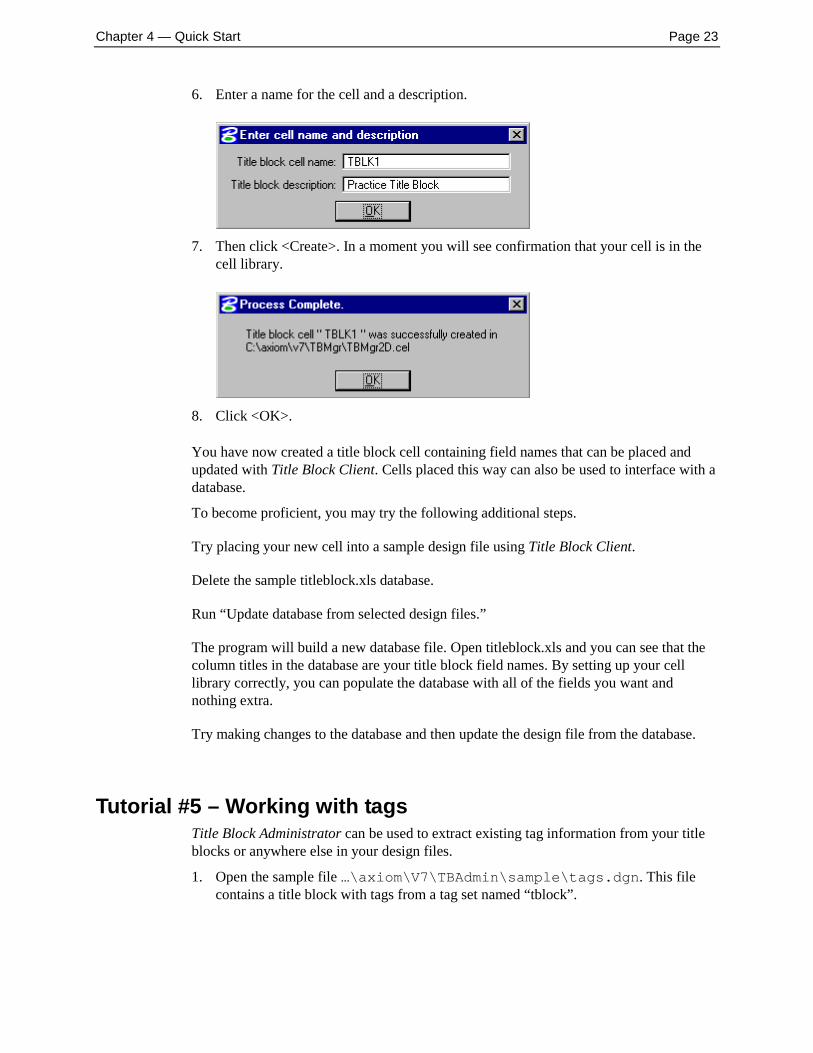
6. Enter a name for the cell and a description.
7. Then click <Create>. In a moment you will see confirmation that your cell is in thecell library.
8. Click <OK>.
You have now created a title block cell containing field names that can be placed andupdated with Title Block Client. Cells placed this way can also be used to interface with adatabase.
To become proficient, you may try the following additional steps.
Try placing your new cell into a sample design file using Title Block Client.
Delete the sample titleblock.xls database.
Run “Update database from selected design files.”
The program will build a new database file. Open titleblock.xls and you can see that thecolumn titles in the database are your title block field names. By setting up your celllibrary correctly, you can populate the database with all of the fields you want andnothing extra.
Try making changes to the database and then update the design file from the database.
Tutorial #5 – Working with tagsTitle Block Administrator can be used to extract existing tag information from your titleblocks or anywhere else in your design files.
1. Open the sample file …\axiom\V7\TBAdmin\sample\tags.dgn. This filecontains a title block with tags from a tag set named “tblock”.

Page 24 Title Block Manager
2. In order to enable Title Block Administrator’s tag processing capability, click on the“Settings” menu.
3. Select the “Change Settings…” option.
4. Under the “General” settings category turn on the “Process Tags” checkbox.
Chapter 4 — Quick Start Page 25
5. By default, the “Tag sets to process:” field is set to “*”. This allows for processing ofthe existing “tblock” tag set. Specific tag set names may be entered into this field torestrict the tag sets that Title Block Administrator will read. This is useful if you alsouse tags outside your title blocks and do not wish to process them.
6. Click <OK> button.
7. Now Title Block Administrator will detect all tags associated with the tag set ‘tblock.’
8. With this option enabled you will be able to create a database using taggedinformation rather than using Title Block Manager specific elements, as you learnedto do in the earlier Quick Start sections.
How to begin with your own filesCongratulations! You have completed the Quick Start for Title Block Administrator. Youcan use it immediately to put your project files into a database.
Then begin creating title block cells from your existing title blocks. Once these are in use,all title block information will be in your control.
If you have any questions, please contact [email protected].
Page 26 Title Block Manager
Chapter 5 — Using Titl e BlockAdministrator
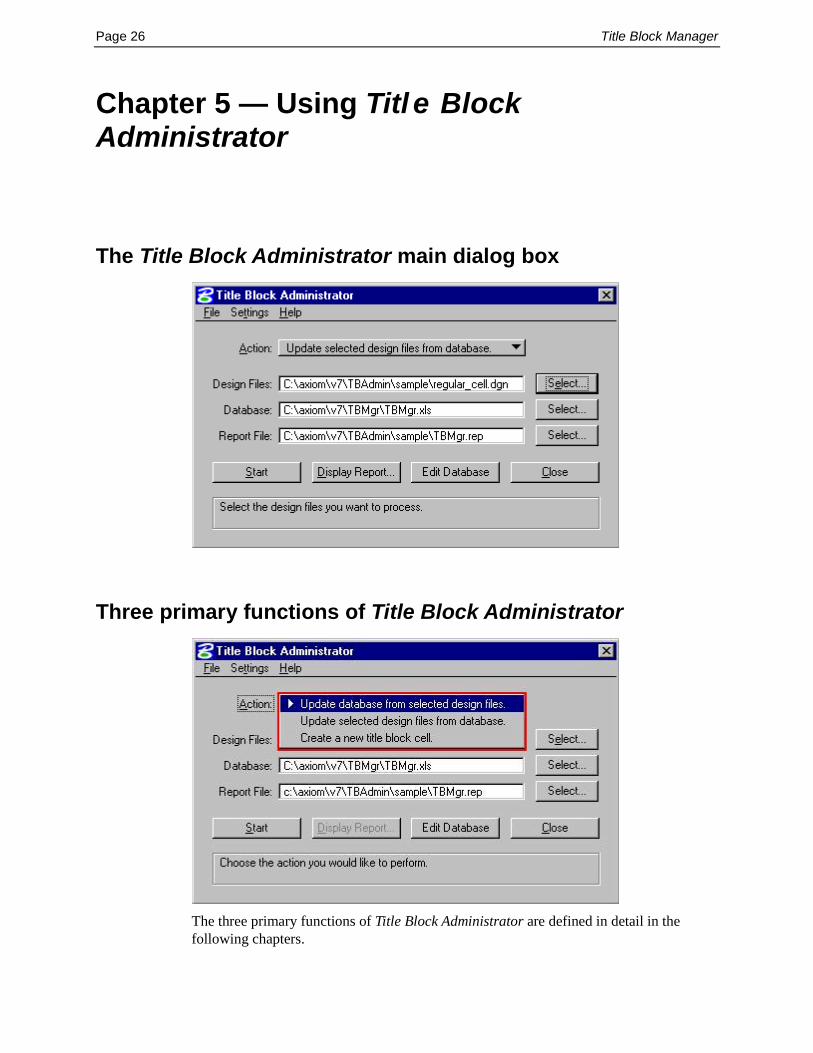
The Title Block Administrator main dialog box
Three primary functions of Title Block Administrator
The three primary functions of Title Block Administrator are defined in detail in thefollowing chapters.

Chapter 5 — Using Title Block Administrator Page 27
Update database from selected design files.Use this function to put title block information into a database. If you have one title blockper design file, the program will create one record per design file. Otherwise, it willcreate one database record for each title block.
Update the database from a single file or from a group of files.
Update an existing database or create a new one if the specified database file does notexist.
Update selected design files from database.You can make global changes to title block information in design files using the “Updateselected design files from database.” function. Make changes to title block informationfor one or more design files in a database. Then run this function to put your data into thedesign files.
Create a new title block cell.Select “Create a new title block cell.” to create a title block template cell from aformatted title block in a design file. Use this function to put all of your title blocks into acell library.
Note: Cells created by this function contain non-displaying field names for updating adatabase.
Designers will use Title Block Client, a small companion program that simplifiesselecting and placing these cells into design files. Title Block Client also allowsmodifying fields easily while maintaining position and symbology of variable fields.
Other menus and buttons on the main dialog box
The File menu
The File menu contains only “Exit”. “Exit” unloads the application.
Page 28 Title Block Manager
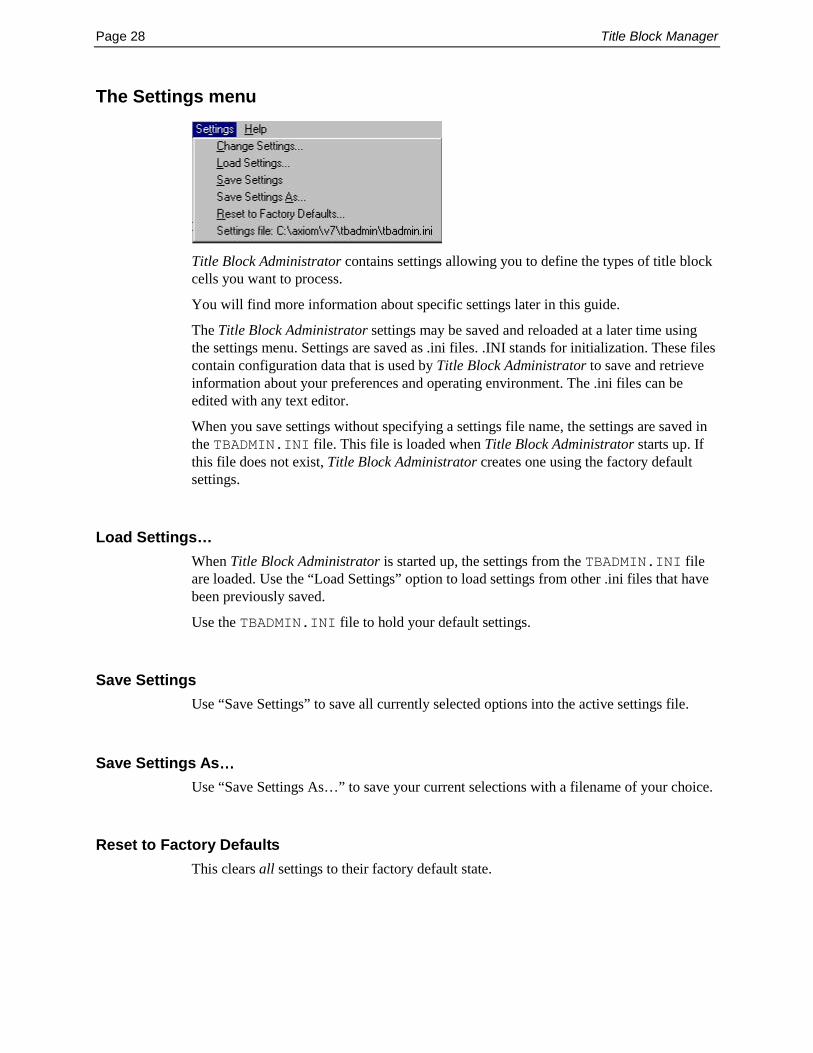
The Settings menu
Title Block Administrator contains settings allowing you to define the types of title blockcells you want to process.
You will find more information about specific settings later in this guide.
The Title Block Administrator settings may be saved and reloaded at a later time usingthe settings menu. Settings are saved as .ini files. .INI stands for initialization. These filescontain configuration data that is used by Title Block Administrator to save and retrieveinformation about your preferences and operating environment. The .ini files can beedited with any text editor.
When you save settings without specifying a settings file name, the settings are saved inthe TBADMIN.INI file. This file is loaded when Title Block Administrator starts up. Ifthis file does not exist, Title Block Administrator creates one using the factory defaultsettings.
Load Settings…When Title Block Administrator is started up, the settings from the TBADMIN.INI fileare loaded. Use the “Load Settings” option to load settings from other .ini files that havebeen previously saved.
Use the TBADMIN.INI file to hold your default settings.
Save SettingsUse “Save Settings” to save all currently selected options into the active settings file.
Save Settings As…………Use “Save Settings As…” to save your current selections with a filename of your choice.
Reset to Factory DefaultsThis clears all settings to their factory default state.

Chapter 5 — Using Title Block Administrator Page 29
Settings file:The “Settings file:” line displays the name of the currently loaded .ini file. If you select“Save Settings”, your current settings will be saved to this filename.
Change SettingsTitle Block Administrator contains settings allowing you to define the types of title blockcells you want to process.
The Help menu
Help | Contents…The “Contents” option of the Help menu opens the online Users’ Guide.
Help | About…The Help | About function displays an informational box which shows the currentversion, the license type, and copyright information for Title Block Administrator.
Design Files
Tell Title Block Administrator which design files you want to process here.
Tabbing out of this field while it is blank will cause it to default to the active design filename.
You can use the <Select…> button to select an individual file or a list of files to beprocessed. For detailed information on the File List Editor dialog box that will appear,see “The File List Editor” section of this guide.
When you create a list of files to process, the Design Files field will display <EDITEDFILE LIST>.

Page 30 Title Block Manager
Database
When you open Title Block Administrator, the file name in this field is the database pathand name defined as the default database.
You can modify that selection here on the main dialog box.
You can type in another name or browse to find another database. If the database doesnot exist, but the path is good, then the database will be created.
The relevant database sheet name is always “Title Blocks”. If the database exists butcontains no sheet named “Title Blocks”, the sheet will be created.
Otherwise, the program will update the existing “Title Blocks” sheet.
To change the default database name, modify the name of the spreadsheet contained inthis field.
Note: Database selection is available for the two actions that use database linkage. Whenyou select the action to “Create a new title block cell.”, this field changes to ‘Celllibrary’. See below.
Cell Library
You will only see “Cell Library:” selection when you have selected “Action:”-> “Createa new title block cell.”
The ‘Cell Library:’ field contains the name of the active cell library taken from theappropriate configuration variable.
The configuration variable TBMGR_CELL_LIB2D may be set in order to specify the fullpath of the cell library containing title block cells to be used when the active file is a 2Dfile.
Chapter 5 — Using Title Block Administrator Page 31
TBMGR_CELL_LIB3D may be set in order to specify the full path of the cell librarycontaining title block cells to be used when the active file is a 3D file.
You can type in the name of a different cell library or use the <Select…> button tobrowse for one.
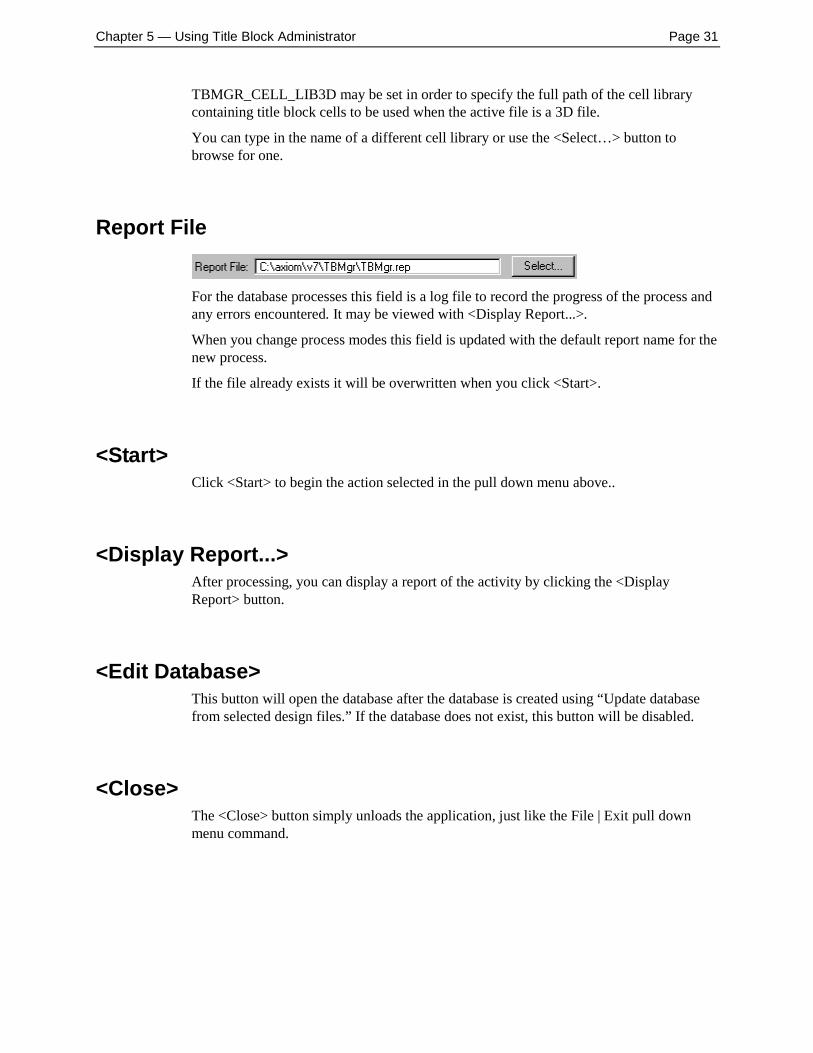
Report File
For the database processes this field is a log file to record the progress of the process andany errors encountered. It may be viewed with <Display Report...>.
When you change process modes this field is updated with the default report name for thenew process.
If the file already exists it will be overwritten when you click <Start>.
<Start>Click <Start> to begin the action selected in the pull down menu above..
<Display Report...>After processing, you can display a report of the activity by clicking the <DisplayReport> button.
<Edit Database>This button will open the database after the database is created using “Update databasefrom selected design files.” If the database does not exist, this button will be disabled.
<Close>The <Close> button simply unloads the application, just like the File | Exit pull downmenu command.
Page 32 Title Block Manager
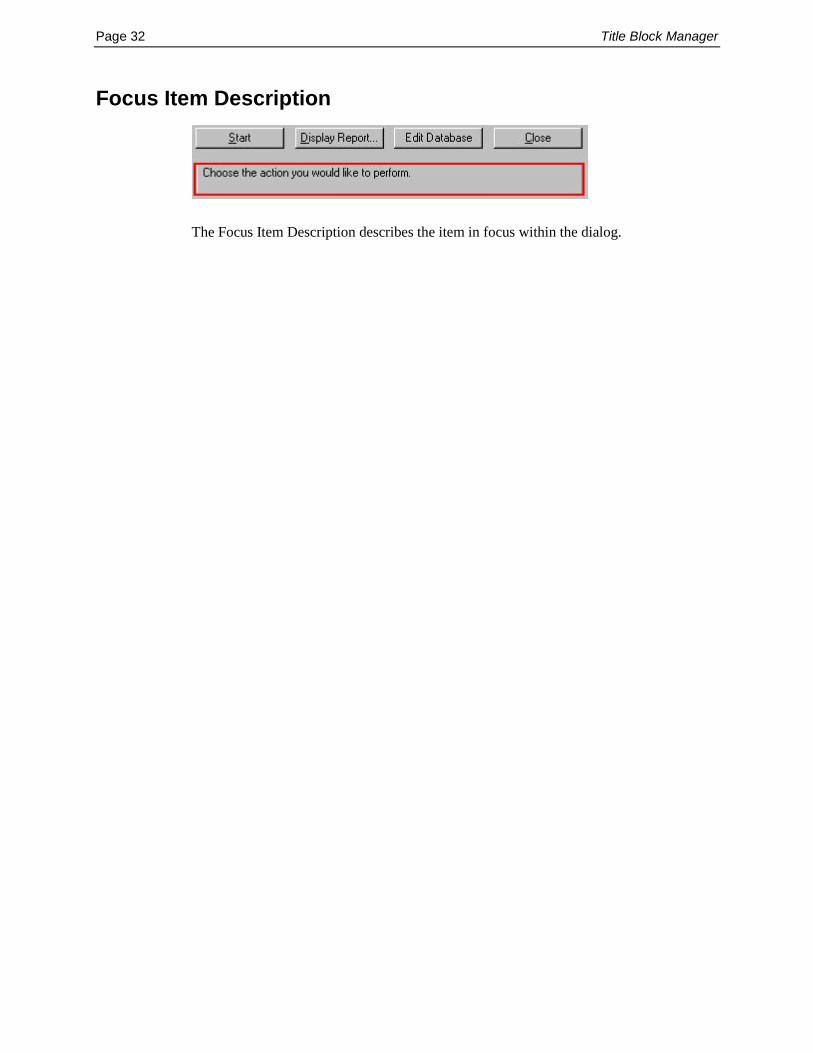
Focus Item Description
The Focus Item Description describes the item in focus within the dialog.
Chapter 6 — The Title Block Cell Library Page 33
Chapter 6 — The Title Block Cell Library
Title Block CellsYou convert your own title block format to title block cells using the <Create a new titleblock cell.> function of Title Block Administrator. The cells that you create with thisfunction contain some non-displaying information including field names for matching todatabase columns.
Select an existing cell library in which to place your title block template cells.
Note: You can use any cell library. Title Block Administrator and Title Block Client willrecognize their own cells and not confuse them with other cells.
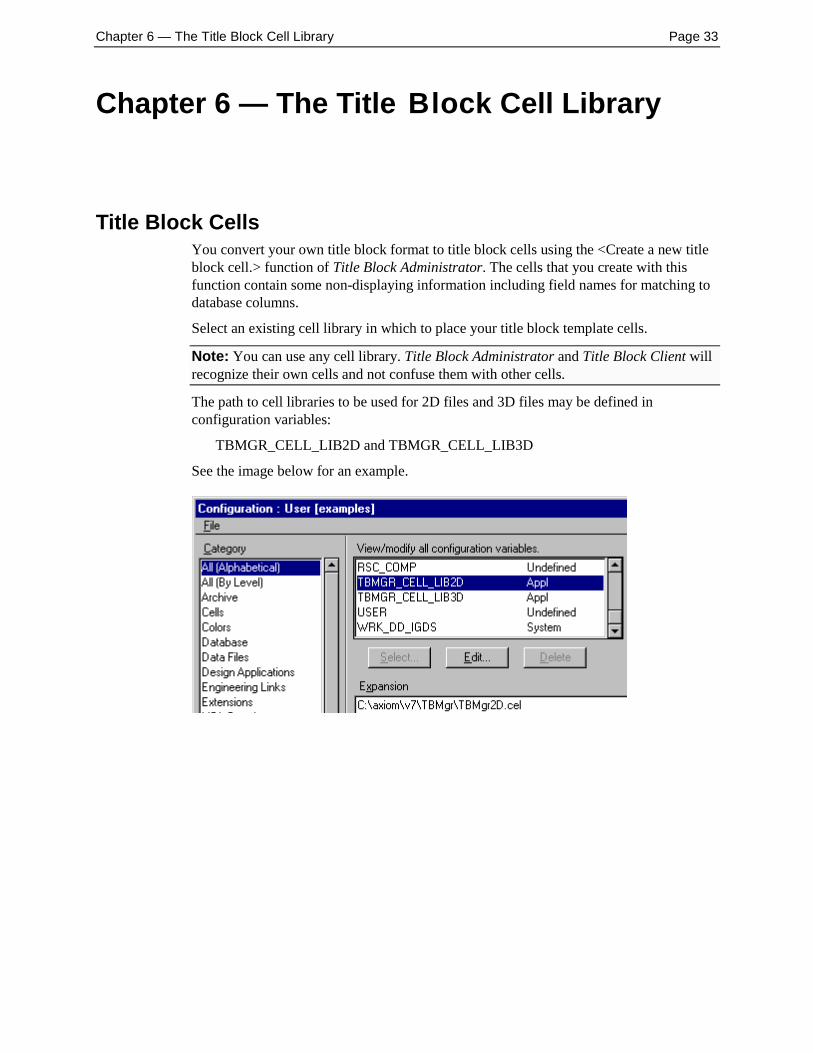
The path to cell libraries to be used for 2D files and 3D files may be defined inconfiguration variables:
TBMGR_CELL_LIB2D and TBMGR_CELL_LIB3D
See the image below for an example.
Page 34 Title Block Manager
Chapter 7 — Create tit le block cells.
Getting started from an existing systemThe title blocks that you use with Title Block Administrator are your own design.
Probably you already have title blocks either in a cell library or in seed files or referencefiles. You can use them to create title block cells in three steps.
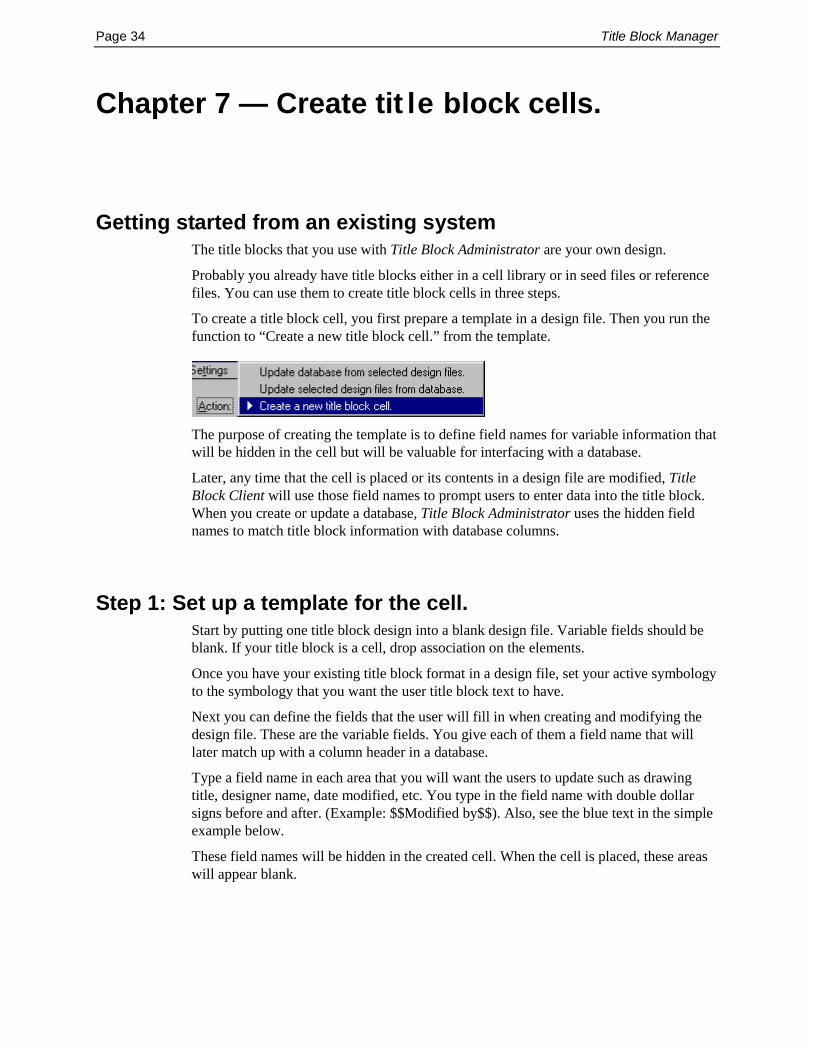
To create a title block cell, you first prepare a template in a design file. Then you run thefunction to “Create a new title block cell.” from the template.
The purpose of creating the template is to define field names for variable information thatwill be hidden in the cell but will be valuable for interfacing with a database.
Later, any time that the cell is placed or its contents in a design file are modified, TitleBlock Client will use those field names to prompt users to enter data into the title block.When you create or update a database, Title Block Administrator uses the hidden fieldnames to match title block information with database columns.
Step 1: Set up a template for the cell.Start by putting one title block design into a blank design file. Variable fields should beblank. If your title block is a cell, drop association on the elements.
Once you have your existing title block format in a design file, set your active symbologyto the symbology that you want the user title block text to have.
Next you can define the fields that the user will fill in when creating and modifying thedesign file. These are the variable fields. You give each of them a field name that willlater match up with a column header in a database.
Type a field name in each area that you will want the users to update such as drawingtitle, designer name, date modified, etc. You type in the field name with double dollarsigns before and after. (Example: $$Modified by$$). Also, see the blue text in the simpleexample below.
These field names will be hidden in the created cell. When the cell is placed, these areaswill appear blank.

Chapter 7 — Create title block cells. Page 35
Tips for placing field names:1. Use the symbology that you want the cell to display in these areas when the user
modifies it.
2. If using left justification, place the text to the left. If using center, place it in thecenter of the available area.
3. Do not use text nodes. Define each line separately.
4. Do not use the same field name more than once in a single title block.
5. Since the field name is non displayable, you can make it as long as you want andoverlap borders and other elements without problem.
6. See the section on automatic field updates below to set up fields that updateautomatically with file name, file path or configuration variable contents.
7. After setting up the file, you can highlight the validly coded variable fields toverify your setup. See the “Settings” section below for instruction on doing this.
Tip: Different title block cells can use the same field name for similar fields. Forexample, the field for the designer name can be called “Designer”. When users fill inthese fields, even though they use different title block cells, the data will appear in thesame database column. That means that you will have a single database column fordesigner regardless of which title block cell is in the design file.
Tips for including EDF’s
Title block cells will support EDF’s. See the example below.
Tip: You can also look at the sample template CellEDF.dgn that was used to create thesample title block cell that contains EDFs.
1. Create the title block with blank EDF’s of the correct size.

Page 36 Title Block Manager
2. Modify the EDF’s by placing field names within double dollar signs on theEDF’s. For example:
3. When field name is longer than the EDF, fill in as many positions as areavailable.
4. Then use the MicroStation “Analyze Element” tool to view the element.
5. Notice that EDF’s are indicated by “<<” and “>>”. You can type in the rest of thefield name outside the “>>” as in the example below.
6. If you have a single element that contains blanks between EDFs, it could beentered as in the example below.
Chapter 7 — Create title block cells. Page 37
7. After typing in the full field name, click <Apply>. This sets up your full titleblock element with EDF shorter than the field name.
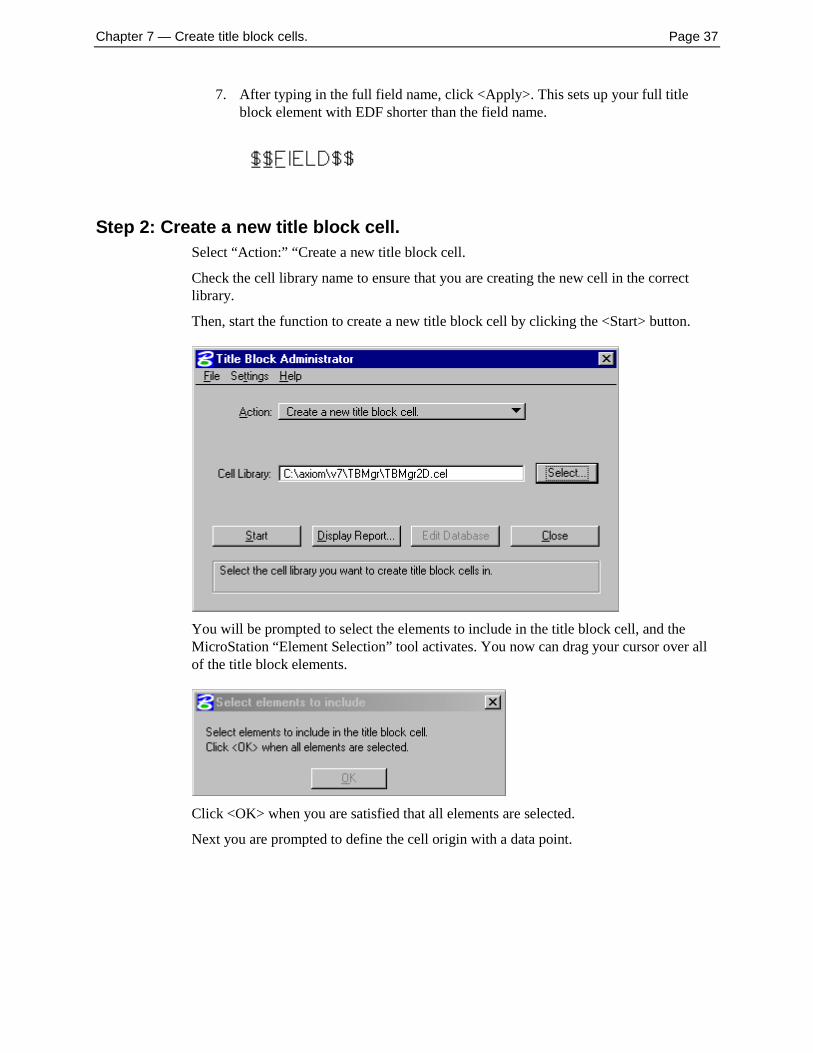
Step 2: Create a new title block cell.Select “Action:” “Create a new title block cell.
Check the cell library name to ensure that you are creating the new cell in the correctlibrary.
Then, start the function to create a new title block cell by clicking the <Start> button.
You will be prompted to select the elements to include in the title block cell, and theMicroStation “Element Selection” tool activates. You now can drag your cursor over allof the title block elements.
Click <OK> when you are satisfied that all elements are selected.
Next you are prompted to define the cell origin with a data point.

Page 38 Title Block Manager
Tip: If you plan to eventually replace existing cells with your new cells, you will want togive the new title block cells the same origin as the existing ones.
After defining the cell origin, click <OK>.
Now you simply have to give the cell a name and description.
When you click the <Create> button, you accomplish the final step of cell creation. Youwill see the following dialog box.
Automatic field updates
File related variablesFile related variables in title blocks relate to the design file and cannot be modified by theuser. These variable fields also contain axiom signature and field name. File name andfull filespec are file related variables.
To automatically insert the name of the design file into the title block, use the format
$${FILENAME}$$
To automatically insert the full file path into the title block, use the format
$${FILENAME /p}$$
Note, that curly braces are used, not left and right parenthesis.
File related variables are updated automatically when any user modifies title blockinformation. For example, you save fileA.dgn as fileB.dgn. When you use Title Block

Chapter 7 — Create title block cells. Page 39
Client to modify title block information in FileB.dgn such as to enter a designer name ordata, the file name field updates automatically.
The field also updates automatically when you add the title block information to thedatabase via the “Update database from selected design files” function.
Tip: After creating new files from a seed file containing the title block cell, select all ofthe new files in the “Design Files:” field and perform the function, “Update databasefrom selected design files.” All file related variables will update to correct values.
MicroStation configuration variablesDo you have fixed data that you want to put in the title block when it is first placed? Youcan put this data into a title block from any configuration variable. These text elementsalso contain axiom signature and field name.
To send data to a title block from a configuration variable, you can code thatconfiguration variable name in the field using parenthesis in the following format:
$$(MY_VARIABLE)$$
These variables differ from the file related variables in that they will not be updatedautomatically after they are placed, however the contents of these fields can be modifiedusing Title Block Client or Title Block Administrator.
Variables for use with Title Block Client.Three optional variables can be used by Title Block Client for help with placing andmodifying the title block.
TBLOCK_TYPE allows fixing the type of title block placement. Valid values are:
shared cellregular cellsimple elements
When this variable is not defined, the program offers all three options at the time the cellis placed.
TBLOCK_LOCKED allows you to place locked title block elements. When a title blockis placed “locked” it can only be updated via the Title Block Manager system. Validvalues are “1” or “yes” both of which activate locking.
When your title block cell contains enter data fields (EDFs), longer text will normally betruncated to the position of the last EDF. To allow placing any length of text regardless ofEDF length, create the variable, TBLOCK_EDF_ALLOW_EXTENDED_TEXT, andgive it a value of “1” or “yes”.

Page 40 Title Block Manager
Settings
GeneralThis category allows you to control the element types processed with Title BlockAdministrator. By default, all items are checked except “Process Tags”.
Process Title Block Manager shared cells.Enabling this option will allow Title Block Administrator to process title blocks placed asshared cells.
Process Title Block Manager regular cells.Enabling this option will allow Title Block Administrator to process title blocks placed asregular cells.
Process Title Block Manager simple elements.Enabling this option will allow Title Block Administrator to process title blocks placed assimple elements.
Process tags.For more information on tag processing see the Chapter 10 “Tag Management”.
TIP: At least one of the above check boxes must be enabled in order to run Title BlockAdministrator.
Chapter 8 — Update database from selected design files. Page 41
Chapter 8 — Update da tabase from selecteddesign files.
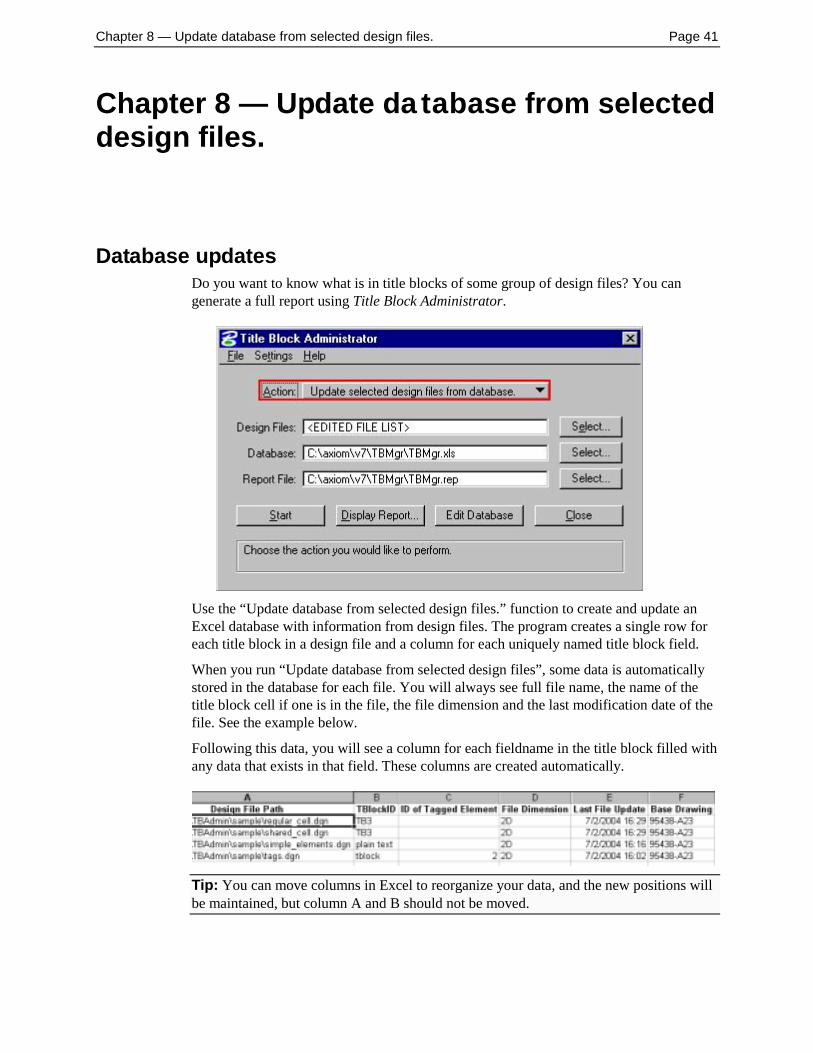
Database updatesDo you want to know what is in title blocks of some group of design files? You cangenerate a full report using Title Block Administrator.
Use the “Update database from selected design files.” function to create and update anExcel database with information from design files. The program creates a single row foreach title block in a design file and a column for each uniquely named title block field.
When you run “Update database from selected design files”, some data is automaticallystored in the database for each file. You will always see full file name, the name of thetitle block cell if one is in the file, the file dimension and the last modification date of thefile. See the example below.
Following this data, you will see a column for each fieldname in the title block filled withany data that exists in that field. These columns are created automatically.
Tip: You can move columns in Excel to reorganize your data, and the new positions willbe maintained, but column A and B should not be moved.
Page 42 Title Block Manager
Procedure
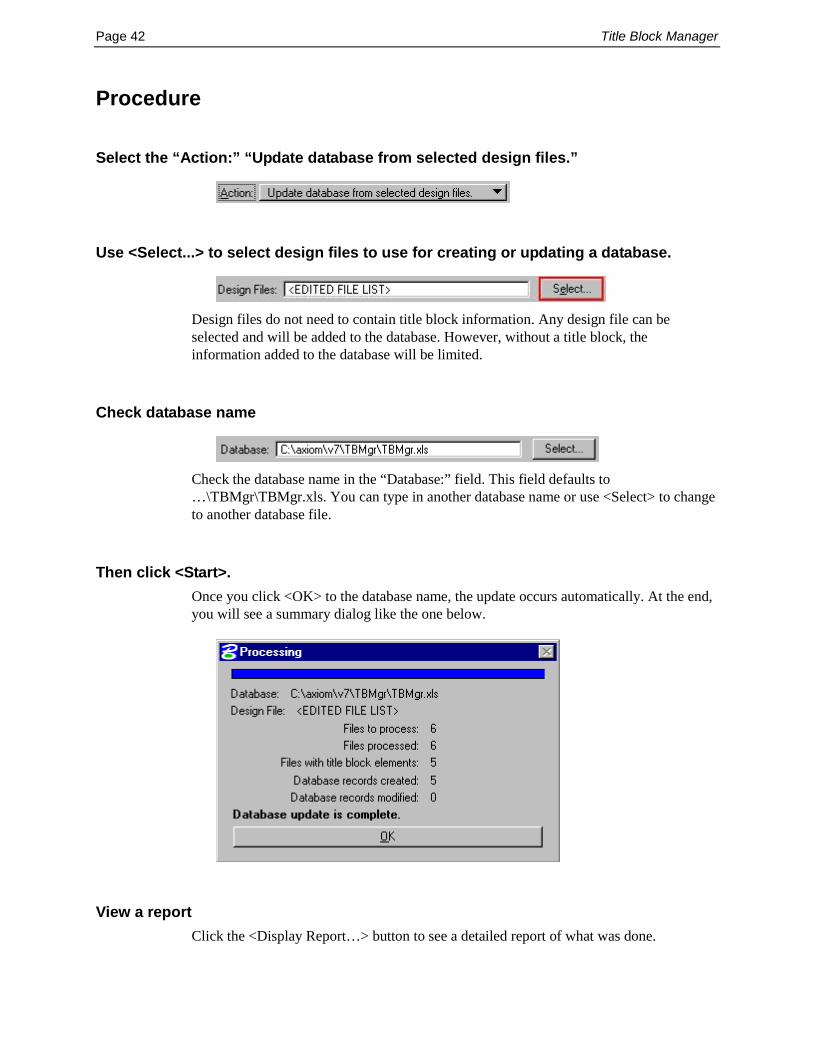
Select the “Action:” “Update database from selected design files.”
Use <Select...> to select design files to use for creating or updating a database.
Design files do not need to contain title block information. Any design file can beselected and will be added to the database. However, without a title block, theinformation added to the database will be limited.
Check database name
Check the database name in the “Database:” field. This field defaults to…\TBMgr\TBMgr.xls. You can type in another database name or use <Select> to changeto another database file.
Then click <Start>.Once you click <OK> to the database name, the update occurs automatically. At the end,you will see a summary dialog like the one below.
View a reportClick the <Display Report…> button to see a detailed report of what was done.

Chapter 8 — Update database from selected design files. Page 43

Page 44 Title Block Manager
Chapter 9 — Update se lected design filesfrom database.
Updating design files from the database.
Perhaps you want to make a change to title block information in many design files. Youcan do this easily with Title Block Administrator.
Tip: You may want to update the database from design files before making changes tothe database. That way, you can see the current data and will know whether you want tooverwrite it.
When you run “Update selected design files from database”, any changes that you maketo the title block fields in the database will be made to the design files with oneexception:
• File related variables cannot be changed. Filename and file path fields that weredefined as $${filename}$$ and $${filename /p}$$ can not be changed with thisfunction.
Procedure
Select the Action “Update selected design files from database.”

Chapter 9 — Update selected design files from database. Page 45
Select design files to updateUse <Select...> to select the design files that you want to update from the database.
Check database nameCheck the database name in the “Database:” field. This field defaults to…\TBMgr\TBMgr.xls. You can type in another database name or use <Select> to changeto another database file.
Then click <Start>.The function will pass all of the selected design files and update their title blockinformation. At the end, you will see a summary dialog like the one below.
View a reportClick the <Display Report…> button to see a detailed report of what was done.
Page 46 Title Block Manager
Chapter 10 — Tag mana gement
Tag basicsThe tag management functionality of Title Block Administrator will process any titleblock elements containing tags which use displayed tag values as field names.
A simple example:
Tag set named “TITLE” contains 3 tags.
Tag name is “Drawing number”
Tag name is “Designer”
Tag name is “Date checked”
This tag set can be placed multiple times within a design file. Each placement is uniquedue to the element which the tag set is attached.
The tag set “TITLE” is attached to a line element in the design file.
The tag values for each tag are as follows:
“Drawing number” = 43
“Designer” = T. Jones
“Date checked” = April 2, 2004
The tag set “TITLE” tag is placed on a different element within the same design file
The values in these tags are:
“Drawing number” = 43
“Designer” = B. Smith
“Date checked” = February 4, 2004
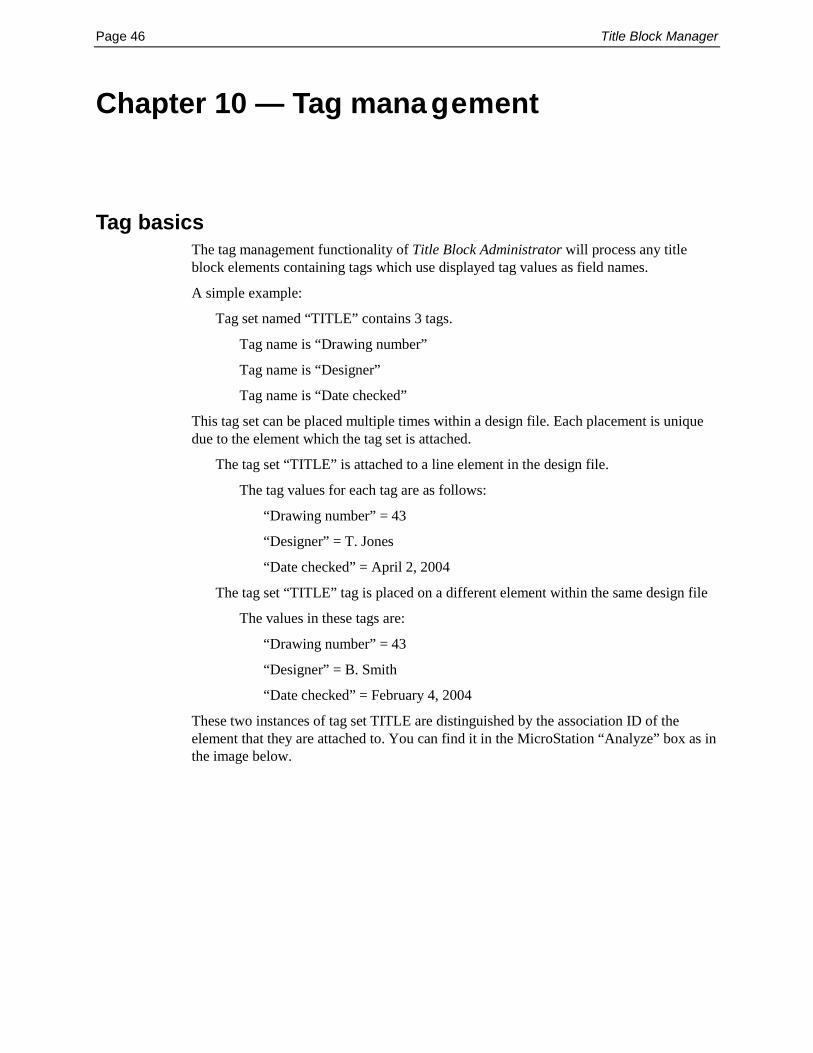
These two instances of tag set TITLE are distinguished by the association ID of theelement that they are attached to. You can find it in the MicroStation “Analyze” box as inthe image below.
Chapter 10 — Tag management Page 47
Title Block Administrator defines this field within the database as, “ID of TaggedElement”. It appears as a column within the spreadsheet that differentiates one instance ofthis tag set from another.
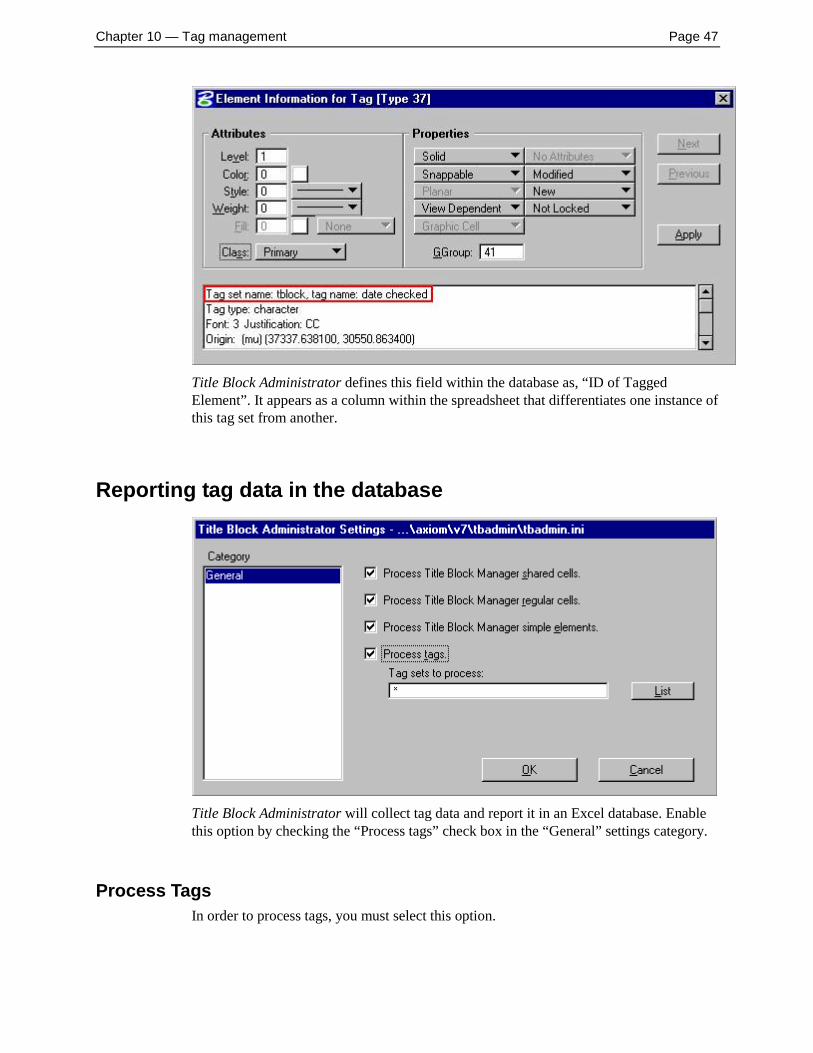
Reporting tag data in the database
Title Block Administrator will collect tag data and report it in an Excel database. Enablethis option by checking the “Process tags” check box in the “General” settings category.
Process TagsIn order to process tags, you must select this option.

Page 48 Title Block Manager
Select tag sets to processThis field allows you to select the names of the tag sets that you want to process. Specifictag sets can be typed within the field and separated by a comma or via the ”Enter tag setnames” dialog box that opens by clicking on the <List…> button.
WildcardsYou can use wildcards in the list of tag set names. By default an asterisk (*) is placed inthe “Select tag sets to process” field, in order to process all tag sets present in the designfiles that you wish to process.

Chapter 11 — Reports Page 49
Chapter 11 — Reports
Title Block Administrator creates two reports. One report is created after performing an“Update database from selected design files”. The other is created after performing an“Update selected design files from database”.
Sample Report – “Update database from selected designfiles”
Title Block Administrator 1.3aCopyright (c) 2003-2004 Axiom InternationalSite license – AxiomSunday, 11 July 2004 at 3:40 pm
Action: Update database from selected design files.Database: C:\axiom\v7\TBMgr\TBMgr.xls
GENERAL SETTINGS:[x] Process Title Block Manager shared cells.[x] Process Title Block Manager regular cells.[x] Process Title Block Manager simple elements.[x] Process tags: *
REPORT DETAILS:2D Design File: c:\axiom\v7\TBAdmin\sample\regular_cell.dgn
Title Block ID: "TB3"Type: Regular CellDatabase record has been created.
Finished on Sunday, 11 July 2004 at 3:40 pm==============================================================================2D Design File: c:\axiom\v7\TBAdmin\sample\shared_cell.dgn
Title Block ID: "TB3"Type: Shared CellDatabase record has been created.
Finished on Sunday, 11 July 2004 at 3:40 pm==============================================================================2D Design File: c:\axiom\v7\TBAdmin\sample\simple_elements.dgn
Title Block ID: N/AType: Simple ElementsDatabase record has been created.
Finished on Sunday, 11 July 2004 at 3:40 pm==============================================================================2D Design File: c:\axiom\v7\TBAdmin\sample\tags.dgn
Title Block ID: "tblock"Type: TagID of Tagged Element: 2
Finished on Sunday, 11 July 2004 at 3:40 pm==============================================================================REPORT SUMMARY:4 design files were processed.4 files contained title blocks.4 database records were created.0 database records were modified.
This report will document all title block manager cells and tags found within the designfiles processed.
Page 50 Title Block Manager
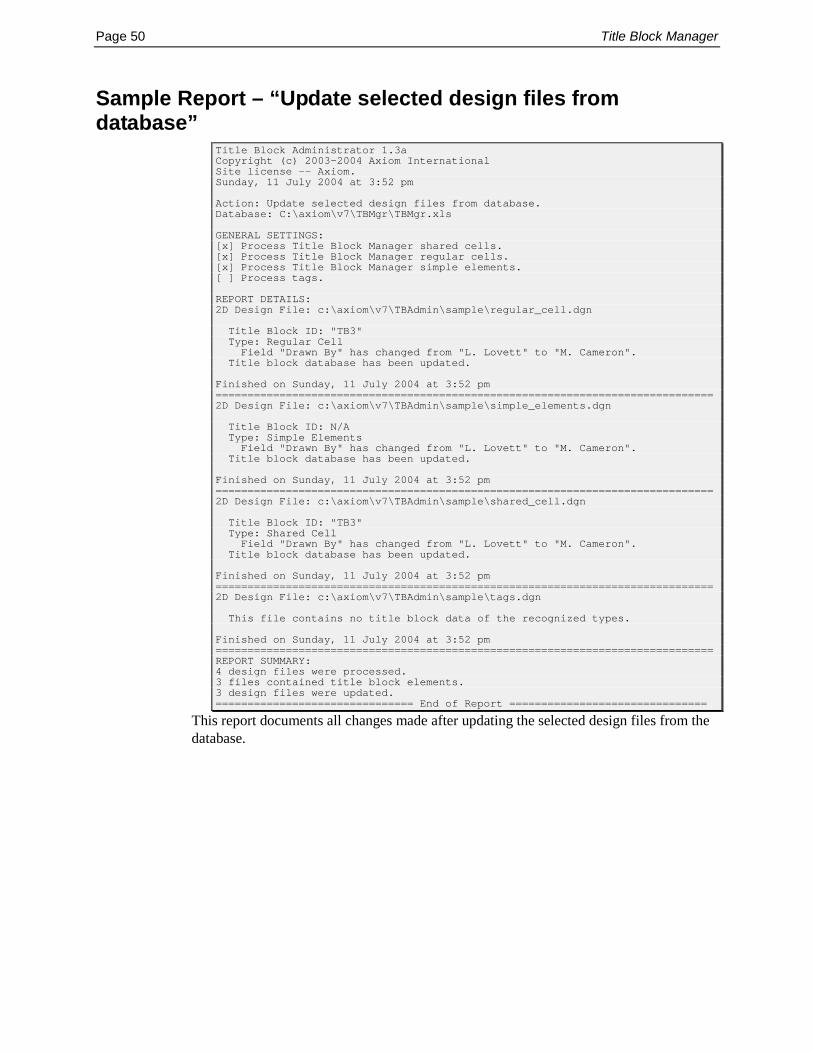
Sample Report – “Update selected design files fromdatabase”
Title Block Administrator 1.3aCopyright (c) 2003-2004 Axiom InternationalSite license -- Axiom.Sunday, 11 July 2004 at 3:52 pm
Action: Update selected design files from database.Database: C:\axiom\v7\TBMgr\TBMgr.xls
GENERAL SETTINGS:[x] Process Title Block Manager shared cells.[x] Process Title Block Manager regular cells.[x] Process Title Block Manager simple elements.[ ] Process tags.
REPORT DETAILS:2D Design File: c:\axiom\v7\TBAdmin\sample\regular_cell.dgn
Title Block ID: "TB3"Type: Regular CellField "Drawn By" has changed from "L. Lovett" to "M. Cameron".
Title block database has been updated.
Finished on Sunday, 11 July 2004 at 3:52 pm==============================================================================2D Design File: c:\axiom\v7\TBAdmin\sample\simple_elements.dgn
Title Block ID: N/AType: Simple ElementsField "Drawn By" has changed from "L. Lovett" to "M. Cameron".
Title block database has been updated.
Finished on Sunday, 11 July 2004 at 3:52 pm==============================================================================2D Design File: c:\axiom\v7\TBAdmin\sample\shared_cell.dgn
Title Block ID: "TB3"Type: Shared CellField "Drawn By" has changed from "L. Lovett" to "M. Cameron".
Title block database has been updated.
Finished on Sunday, 11 July 2004 at 3:52 pm==============================================================================2D Design File: c:\axiom\v7\TBAdmin\sample\tags.dgn
This file contains no title block data of the recognized types.
Finished on Sunday, 11 July 2004 at 3:52 pm==============================================================================REPORT SUMMARY:4 design files were processed.3 files contained title block elements.3 design files were updated.=============================== End of Report ===============================
This report documents all changes made after updating the selected design files from thedatabase.

Chapter 12 — The File List Editor Page 51
Chapter 12 — The File L ist Editor
The File List Editor Dialog BoxUse the File List Editor dialog box to create a list of files to be processed.
The List menu
The List menu lets you create, save, and re-use different lists of files. There are severalapplications that can make use of these lists of files. So lists can be imported andexported between applications.
Tip: Although there are some similarities between this menu and a standard “File” menu,the differences are significant. When you Import or Export from this menu, the files donot remain “open”, you are not “editing a file”, and no files are “updated”. Effectively,these are “one shot copy” operations where an entire set of data is copied from the dialogbox to a file, or from a file to the dialog box.
There are two possible file formats, each having different advantages and disadvantages.
Page 52 Title Block Manager
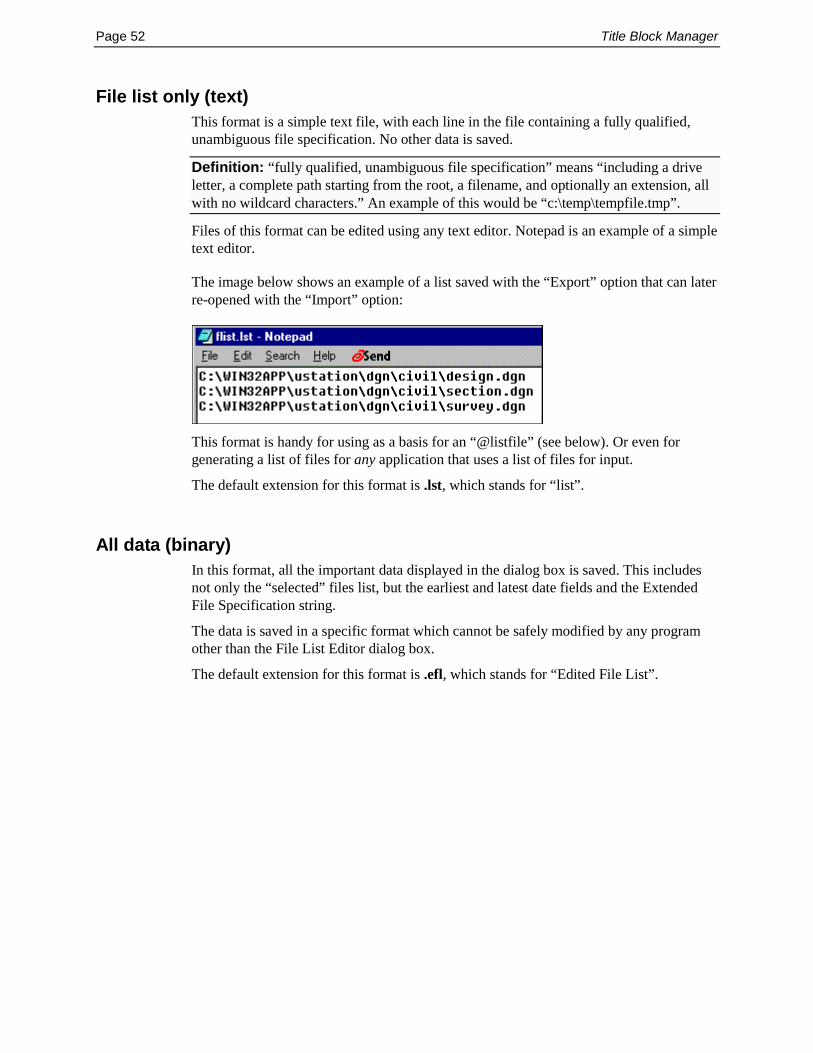
File list only (text)This format is a simple text file, with each line in the file containing a fully qualified,unambiguous file specification. No other data is saved.
Definition: “fully qualified, unambiguous file specification” means “including a driveletter, a complete path starting from the root, a filename, and optionally an extension, allwith no wildcard characters.” An example of this would be “c:\temp\tempfile.tmp”.
Files of this format can be edited using any text editor. Notepad is an example of a simpletext editor.
The image below shows an example of a list saved with the “Export” option that can laterre-opened with the “Import” option:
This format is handy for using as a basis for an “@listfile” (see below). Or even forgenerating a list of files for any application that uses a list of files for input.
The default extension for this format is .lst, which stands for “list”.
All data (binary)In this format, all the important data displayed in the dialog box is saved. This includesnot only the “selected” files list, but the earliest and latest date fields and the ExtendedFile Specification string.
The data is saved in a specific format which cannot be safely modified by any programother than the File List Editor dialog box.
The default extension for this format is .efl, which stands for “Edited File List”.
Chapter 12 — The File List Editor Page 53
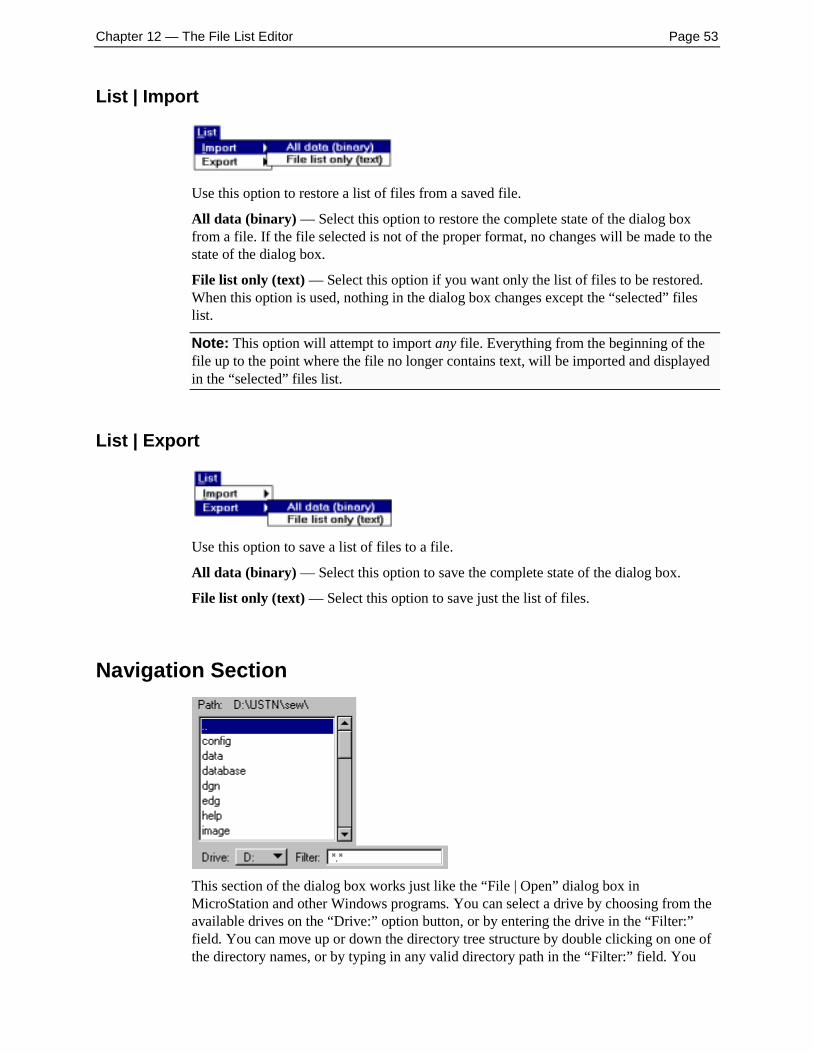
List | Import
Use this option to restore a list of files from a saved file.
All data (binary) — Select this option to restore the complete state of the dialog boxfrom a file. If the file selected is not of the proper format, no changes will be made to thestate of the dialog box.
File list only (text) — Select this option if you want only the list of files to be restored.When this option is used, nothing in the dialog box changes except the “selected” fileslist.
Note: This option will attempt to import any file. Everything from the beginning of thefile up to the point where the file no longer contains text, will be imported and displayedin the “selected” files list.
List | Export
Use this option to save a list of files to a file.
All data (binary) — Select this option to save the complete state of the dialog box.
File list only (text) — Select this option to save just the list of files.
Navigation Section
This section of the dialog box works just like the “File | Open” dialog box inMicroStation and other Windows programs. You can select a drive by choosing from theavailable drives on the “Drive:” option button, or by entering the drive in the “Filter:”field. You can move up or down the directory tree structure by double clicking on one ofthe directory names, or by typing in any valid directory path in the “Filter:” field. You

Page 54 Title Block Manager
can display specific file types in the “Files:” list by specifying wildcards in the “Filter:”field. The “Filter:” field will recognize any valid combination of device, directory and/orfilename, including UNC specifiers.
As you make changes to any of these fields, the other fields and lists will beautomatically updated.
File List Editing Section
This section of the dialog box is used to add and remove individual filenames from thelist of selected files.
The “Selected Files” listThis displays the files that have been selected for processing, and the files in the currentdirectory. To remove a file from the list, simply double-click on it, or highlight it andpress the <Del> key, or highlight it and click the “Remove” button or press <Alt-R> onthe keyboard. To remove multiple files from the list at once, select all the desired files,and click the “Remove” button or press <Alt-R> or <Del> on the keyboard. To clear theentire list, click the “Clear” button. To add a file to the list, double click the filename inthe “Files:” list. To add multiple files to the list, selected all the desired files from the“Files:” list and click the “Add” button.
As you add and remove files from the “selected” list, the “Number of Files Selected:”field will keep track of the total number of tiles in the list.
Files in the “selected” list which are also in the “available” list, will be displayed in grayin the “available” list. Since these files are already in the “selected” list, they cannot beadded again.

Chapter 12 — The File List Editor Page 55
Extended File List Specifications
An extended file specification is based on a simple wildcard, such as“C:\DESIGNS\*.DGN, with added options and parameters that are defined below.
To add the specified files to the “Selected Files:” list, click the “Add” button, or press<Alt-d> on the keyboard. To remove all files fitting the extended specification from the“Selected Files:” list, click the “Remove” button, or press <Alt-m> on the keyboard.
/s – include sub directories“/s” includes all matching files in all subdirectories of the one specified in the precedingfile specification.
c:\dgnfiles\*.dgn /s
/fedate – earliest date“/fe1-1-1992” includes files with dates that fall in a range beginning on January 1, 1992
/fldate – latest date“/fl12-31-2002” includes files with dates that fall in a range ending on December 31,2002
/fodate – on date“/fo1-1-2002” includes only files modified on January 1st, 2002.
/ft – today“/ft” includes only files with dates matching the current system date.
Note: Since the forward slash is used to indicate an option, and the backward slash isused to separate directory names, neither can be used for separating month, day and yearin dates. Use either periods (12.31.92) or dashes (12-31-92) instead of slashes.
Tip: “/fldate” and “/fedate” may be combined to restrict file dates to a specific range, asin “c:\dgnfiles\*.dgn /fe7-1-1997 /fl8-1-2002 /s”

Page 56 Title Block Manager
semicolonMultiple extended file specifications may be strung together by separating them withsemicolons “ ; ”. For example:
c:\dgnfiles\*.dgn /s; d:\dgnfiles\*.dgn /s
@“@” prefixed to a file specification indicates a list file. A “list file” is a flat text filecontaining lines composed of file specifications as defined above. That is, each line canbe a simple file specification, a wildcard file specification, a list file specification, asingle extended file specification, or multiple file specifications of any of theses types,separated by semicolons. The contents of a list file might look something like this:
e:\reffiles\border.dgne:\reffiles\ref1.dgne:\reffiles\ref2.dgne:\reffiles\ref3.dgne:\reffiles\ref4.dgne:\reffiles\ref5.dgnc:\dgnfiles\*.dgn /s /ftd:\dgnfiles\*.cel /s /ft@c:\filelists\project1.lst@c:\filelists\project2.lst
<OK>
Use this pushbutton to save the list in the “selected” files listbox and exit the dialog box.
<Cancel>
Use this pushbutton to cancel any changes made to the list in the “selected” files listboxand exit the dialog box.

Chapter 12 — The File List Editor Page 57
Select files by date range
To add the files which fall within the date range specified from the “Files:” list to the“Selected Files:” list, click the “Add” button. To delete the files in the “Selected Files:”list which fall within the date range specified , click the “Remove” button.
Earliest date
Use this field to enter a beginning “cutoff” date for a range of files to be added to the“selected” files listbox. Files whose last modification date is before this date will not beadded to the “selected” files listbox when the <Add by dates> pushbutton is clicked orremoved from the “selected” files listbox when the <Remove by dates> pushbutton isclicked.
Latest date
Use this field to enter an ending “cutoff” date for a range of files to be added to the“selected” files listbox. Files whose last modification date is after this date will not beadded to the “selected” files listbox when the <Add by dates> pushbutton is clicked orremoved from the “selected” files listbox when the <Remove by dates> pushbutton isclicked.
Note: The “Filter:” is combined with the dates when adding files to the “selected” fileslist. In other words, only those files which fall within the specified date range, and whichare displayed in the “available” files list, are added to the “selected” files list when the“Add” button is clicked.

Page 58 Title Block Manager
Messages
“xxx” is not currently accessible.This message indicates one of two things:
1. A file specification was entered into the “Files:” field, but it does not correspond toany resource accessible to the system. This usually just ends up being a mis-typed ormis-remembered directory name or UNC path.
2. A resource is truly not accessible to your system. Some likely reasons for this are: a)you do not have, or no longer have, access permissions for the resource, b) theresource’s name has changed, c) a resource is down, offline, or inaccessible for someother “mechanical” reason, d) drive letter mappings have been changed on yourcomputer, e) a directory has been deleted or moved.
If you get this message and have checked your entry, contact your systems administratorto determine why the resource is not accessible.
Note: The term “resource” is borrowed from the UNC definition "\\<server-name>\<resource-name>\". In our context we mean “a specified device/directorycombination in either DOS or UNC format”. This specifically excludes the filename andextension. Examples of this might be “c:\dgn_files\” and “\\server\drive_c\dgn_files\”.
Chapter 13 — Frequently asked questions Page 59
Chapter 13 — Frequentl y asked questions
Can I convert my existing title blocks in design files to TitleBlock Manager title blocks?
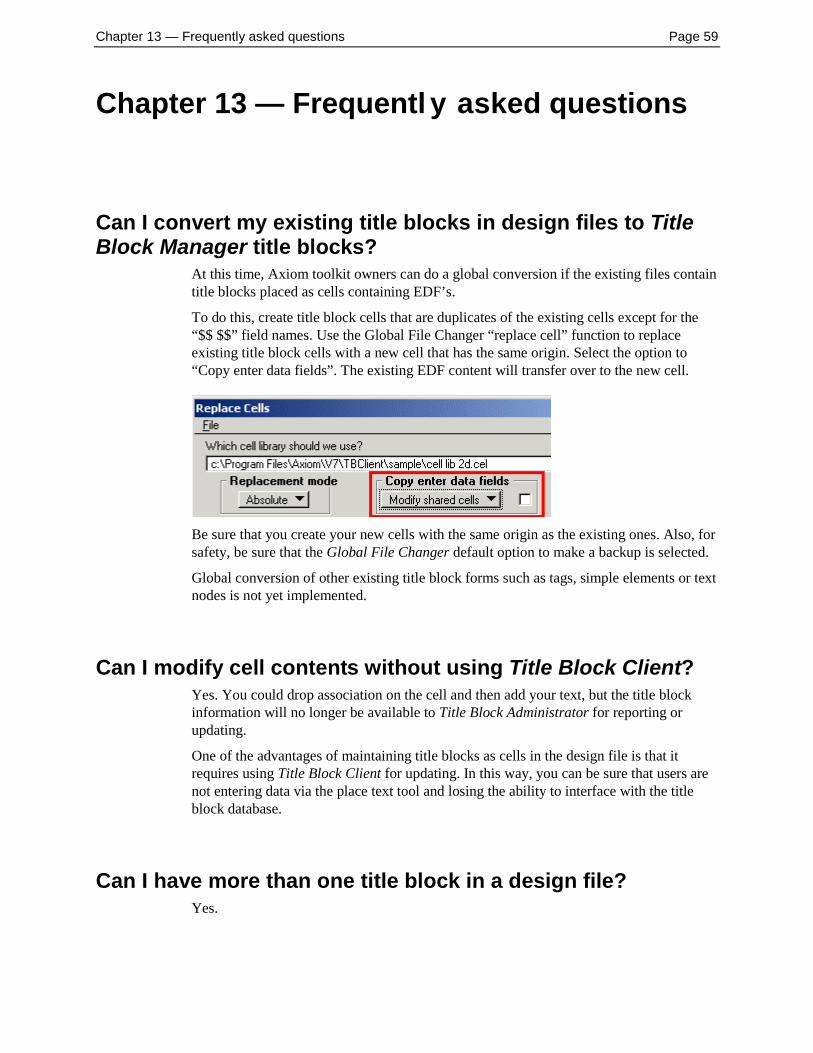
At this time, Axiom toolkit owners can do a global conversion if the existing files containtitle blocks placed as cells containing EDF’s.
To do this, create title block cells that are duplicates of the existing cells except for the“$$ $$” field names. Use the Global File Changer “replace cell” function to replaceexisting title block cells with a new cell that has the same origin. Select the option to“Copy enter data fields”. The existing EDF content will transfer over to the new cell.
Be sure that you create your new cells with the same origin as the existing ones. Also, forsafety, be sure that the Global File Changer default option to make a backup is selected.
Global conversion of other existing title block forms such as tags, simple elements or textnodes is not yet implemented.
Can I modify cell contents without using Title Block Client?Yes. You could drop association on the cell and then add your text, but the title blockinformation will no longer be available to Title Block Administrator for reporting orupdating.
One of the advantages of maintaining title blocks as cells in the design file is that itrequires using Title Block Client for updating. In this way, you can be sure that users arenot entering data via the place text tool and losing the ability to interface with the titleblock database.
Can I have more than one title block in a design file?Yes.
Page 60 Title Block Manager
Do Title Block Manager title blocks have to be cells?No. When you place a title block cell using Title Block Client, you have the option toplace the title block as a shared cell, a regular cell or as simple elements in the design file.
Note: If you place title blocks as simple text elements, users can easily replace themusing the MicroStation “Place Text” tool. In this case, database connectivity will be lost.
Can I create variable fields that do not display?Yes. At the time you create the title block cell, if you define the field name as aconstruction element, it will display only when “View Attributes” option for constructionelements is selected.
Can I have the same title block field display in morethan one place?Yes. Create fields with duplicate field names. You will get a warning when you create thecell, and an option to cancel or continue. You should continue and create the cell. TitleBlock Administrator will create only one database column for fields of the same name.When you update the design file from the database, the same information goes into allduplicate fields.

Chapter 14 — We’ll Make (Almost) Any Enhancements You Want Page 61
Chapter 14 — We’ll Make (Almost) AnyEnhancements You Want
We welcome your suggestionsTitle Block Administrator is a very powerful program. Nonetheless, we realize that you, askilled and creative MicroStation user, will think of ways in which it can be improved.We invite you to tell us your ideas.
For ten years we’ve listened to you, the skilled MicroStation professional, and haveimplemented the features you’ve requested. Every widely acclaimed product we’ve everdeveloped, including FileFixer, evolved in this manner.
We’d like to make Title Block Administrator perform every function you could everimagine such a product being able to do. We intend to make you such a satisfied TitleBlock Administrator customer that you can’t wait for the next user group meeting so youcan tell your friends and associates how much you like Title Block Administrator andhow strongly you recommend it.
Your suggestions on how to improve Title Block Administrator are most welcome. Youmay email your suggestions to [email protected], or call us.

Page 62 Title Block Manager
Chapter 15 — New Features and Fixes
Version 1.3a – 13 July 2004Added <Edit Database> button. This allows users to quickly open databases created byTitle Block Manager.
Added Focus Item Description. This describes all items within the main dialog whenfocus is changed.
Report file redesign.
Various user interface improvements.
Version 1.2a — 28 May 2004Added tag support. This will allow users who use tagged information within title blocksto extract this information from their design files.
Title Block Manager’s name has been changed to Title Block Administrator. Hereafter,Title Block Manager refers to Axiom’s title block management system which consists oftwo programs: Title Block Administrator and Title Block Client.
Made various report file refinements.
Version 1.1b — 9 April 2004To speed up processing, Title Block Manager will not update the display of each designfile it processes.
Added a progress bar.
Support for Enter Data Fields (EDFs) in title blocks.
Version 1.1a — 20 February 2004Title blocks can now be placed as shared cells, regular cells or simple elements. Previousversions only supported title blocks as shared cells.
Added support for more than one title block per design file.
Various user interface improvements.
Chapter 15 — New Features and Fixes Page 63
Version 1.0b — 5 December 2003We added some limitations to the demonstration version.
We added support for Windows 98.
Version 1.0a — 19 November 2003First release of Title Block Manager