
Users' Guide, LabSoft - Local and Network Installation · Users' Guide, LabSoft - Local and Network...
32
Users' Guide, LabSoft - Local and Network Installation
-
Upload
truongngoc -
Category
Documents
-
view
250 -
download
0
Transcript of Users' Guide, LabSoft - Local and Network Installation · Users' Guide, LabSoft - Local and Network...
Users' Guide, LabSoft - Local and Network Installation
Users' Guide, LabSoft - Local and Network Installation
Contents
Preface ...................................................................................................................................... 3 Name and address of manufacturer .......................................................................................... 3 1 Legal information .................................................................................................................... 4 1.1 Liability limitations ............................................................................................................... 4 1.2 Copyright/authorisation ....................................................................................................... 4 2 Local installation ..................................................................................................................... 5 2.1 System requirements .......................................................................................................... 5 2.2 Before starting ..................................................................................................................... 5 2.3 Installing the software .......................................................................................................... 5 2.4 Running LabSoft ................................................................................................................ 11 3 Network installation .............................................................................................................. 14 3.1 System requirements ........................................................................................................ 14 3.2 Before starting ................................................................................................................... 14 3.3 Installing the server ........................................................................................................... 15 3.4 Installing a client ................................................................................................................ 22 3.5 Testing the network installation ......................................................................................... 26 3.6 LabSoft Manager ............................................................................................................... 28 4. Error Messages and Faults ................................................................................................. 29

Users' Guide, LabSoft - Local and Network Installation
3
P r e f a c e
These software installation instructions are written to be read, understood and complied with in every respect by persons intending to use the training system. These software installation instructions describe the installation of LabSoft at a single workplace computer (local installation) or in a local computer network (LAN). An existing LAN is assumed and its construction is not dealt with here. A local network can be set up as a peer-to-peer configuration (e.g. classroom network with teacher and students' PC workplaces) as well as in a client-server architecture (central server and network connections in the classrooms). The training courses are each installed on a central server (PC). The results achieved by the users can also be saved in the central server. This provides a central administration of the courses and the user on a single computer. Access to the courses and the administration can be made from any computer (clients) in the network.
For that reason, these software installation instructions must be read through carefully. Only the information in these software installation instructions can prevent errors and ensure faultless operation.
N a m e a n d a d d r e s s o f m a n u f a c t u r e r
Manufacturer and servicing address
LUCAS-NÜLLE GmbH Siemensstr. 2 D-50170 Kerpen
Tel.: +49 (0) 22 73 5 67-0 Fax: +49 (0) 22 73 5 67-30
www.lucas-nuelle.com www.unitrain-i.com
Users' Guide, LabSoft - Local and Network Installation
4
1 L e g a l i n f o r m a t i o n
1.1 Liability limitations
LUCAS-NÜLLE GmbH accepts no liability for any damage occurring due to the following:
Inappropriate or incompetent use Irresponsible or incorrect assembly and/or commissioning by operators or third parties Subsequent modifications by operators or third parties Natural wear and tear Negligent or incorrect handling, servicing or maintenance Actions not in keeping with the instruction manual Use of inappropriate materials
1.2 Copyright/authorisation
The making of copies, including extracts, is expressly permitted to users of the training system, but only for internal use in connection with the operation of the equipment.
Users' Guide, LabSoft - Local and Network Installation
5
2 L o c a l i n s t a l l a t i o n
2.1 System requirements
PC:
Operating system: Microsoft Windows® 7, 8, 8.1 or 10
Hardware: As recommended in the Microsoft specification for the relevant operating system plus:
• CD- or CD / DVD drive for the installation
• 1 free USB connection for the LN training system
• At least 500 MB free hard disc space, 1 GB is recommended for the installation of LabSoft and the courses
• Internet Explorer 9 or higher (IE 11 recommended)
• Adobe Flash player (latest version) (www.adobe.com)
• Adobe Acrobat reader 10 or higher (www.adobe.com)
2.2 Before starting
Ensure that you have the necessary access rights to the computer for the installation. Administrator rights are required for the installation. Consult your system administrator to obtain the rights necessary.
2.3 Installing the software The CDs for all courses that are to be installed are required. The course CDs can be used in any order – the sequence is not important. 1. Insert a course CD in the CD-ROM or CD/DVD drive of the computer. If automatic start-
up (autorun) is active, the installation wizard is displayed. If the wizard window is not displayed automatically, switch to "My Computer" or "Windows Explorer" and select the CD-ROM or CD/DVD drive. Start the installation routine by double clicking the file "setup.exe“ in the main directory of the CD
Users' Guide, LabSoft - Local and Network Installation
6
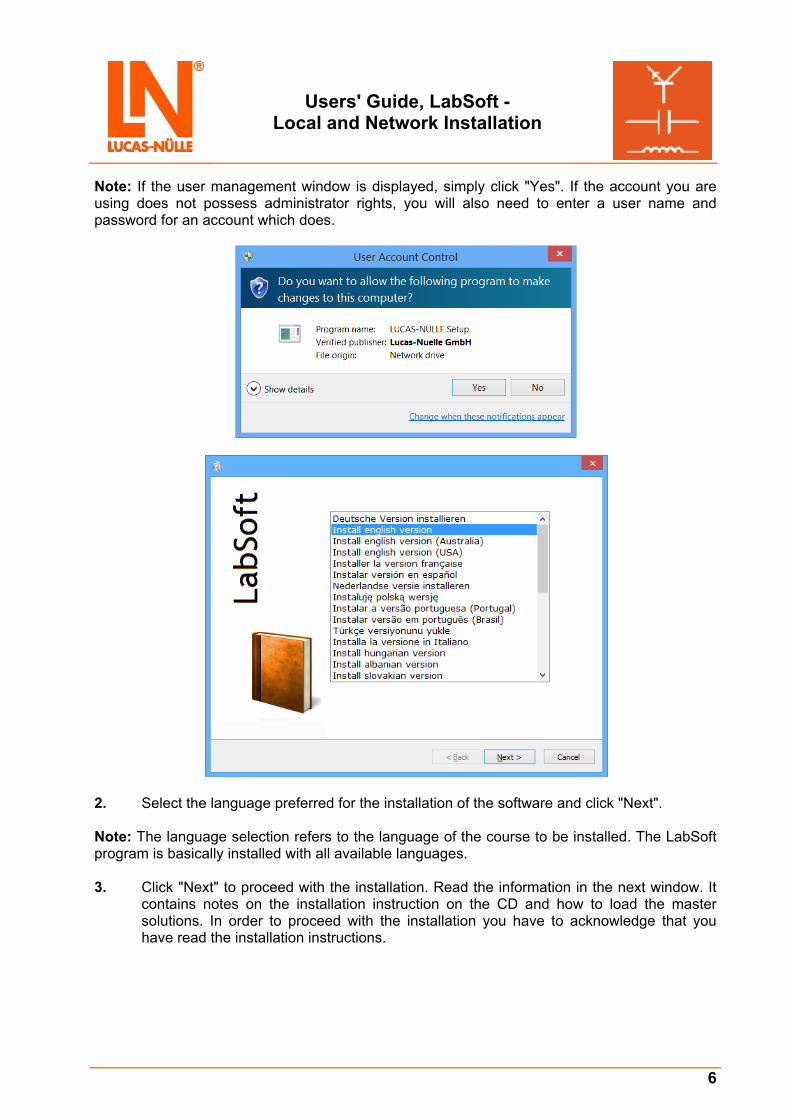
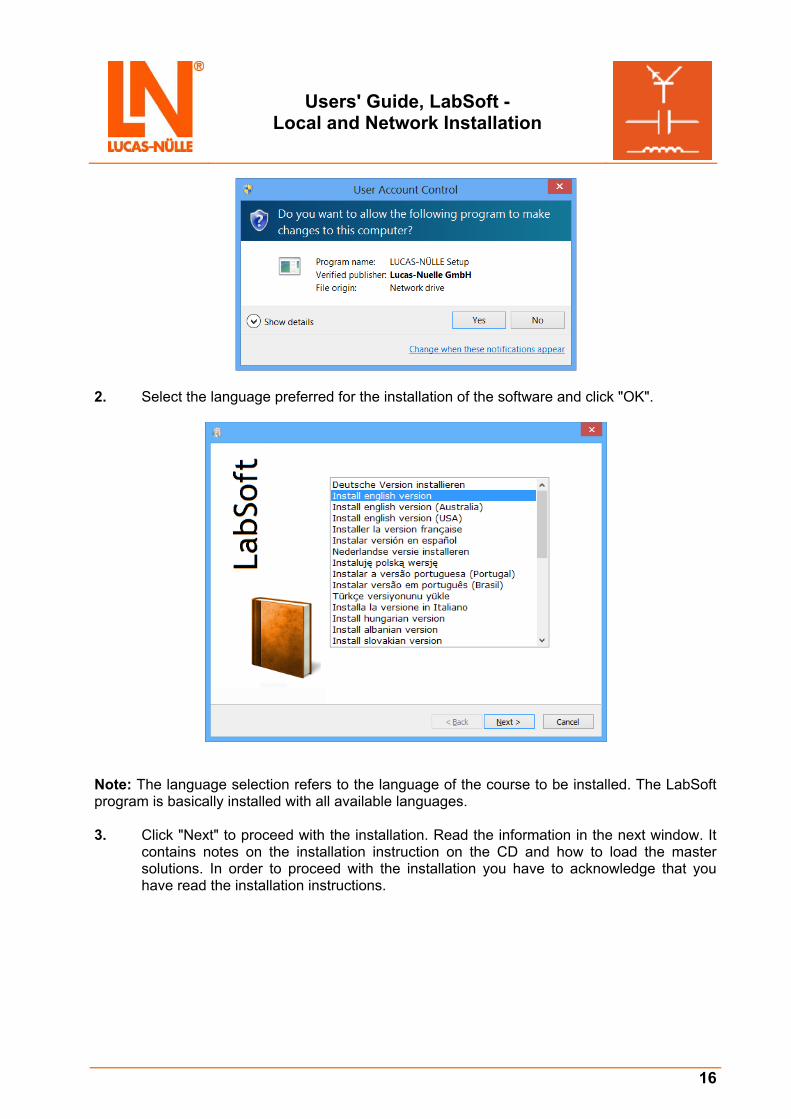
Note: If the user management window is displayed, simply click "Yes". If the account you are using does not possess administrator rights, you will also need to enter a user name and password for an account which does.
2. Select the language preferred for the installation of the software and click "Next". Note: The language selection refers to the language of the course to be installed. The LabSoft program is basically installed with all available languages. 3. Click "Next" to proceed with the installation. Read the information in the next window. It
contains notes on the installation instruction on the CD and how to load the master solutions. In order to proceed with the installation you have to acknowledge that you have read the installation instructions.
Users' Guide, LabSoft - Local and Network Installation
7
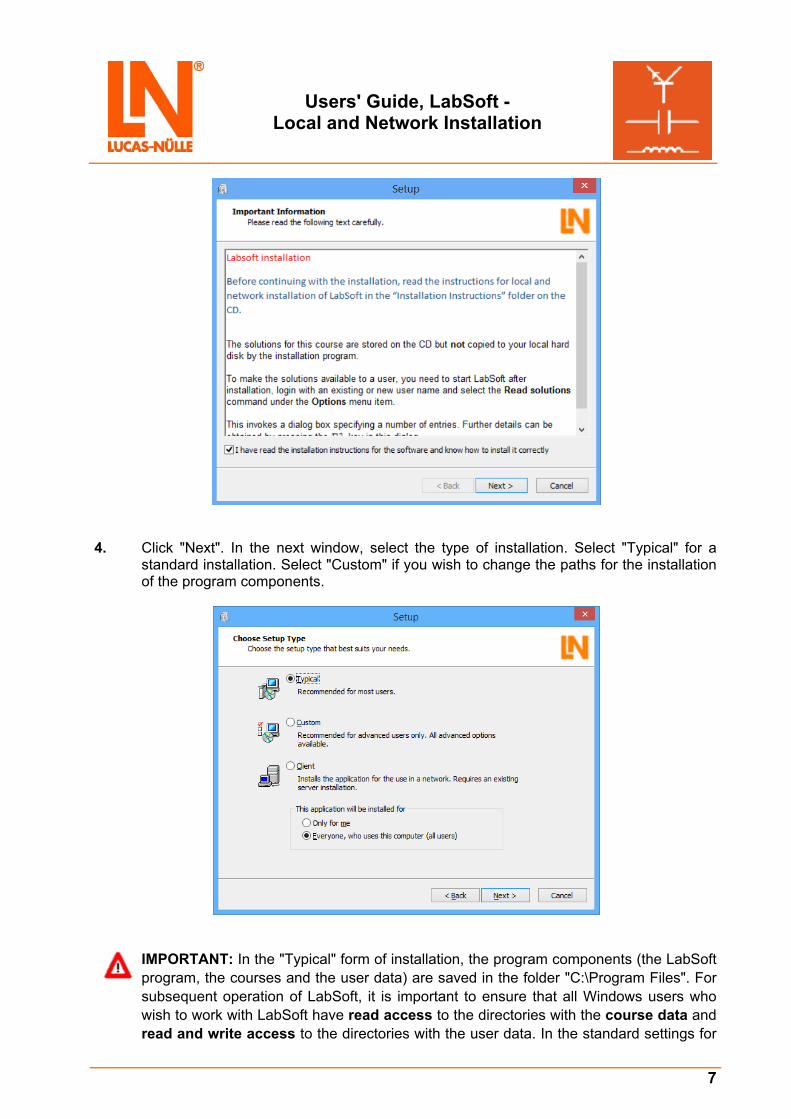
4. Click "Next". In the next window, select the type of installation. Select "Typical" for a
standard installation. Select "Custom" if you wish to change the paths for the installation of the program components.
IMPORTANT: In the "Typical" form of installation, the program components (the LabSoft program, the courses and the user data) are saved in the folder "C:\Program Files". For subsequent operation of LabSoft, it is important to ensure that all Windows users who wish to work with LabSoft have read access to the directories with the course data and read and write access to the directories with the user data. In the standard settings for

Users' Guide, LabSoft - Local and Network Installation
8
Windows, administrator rights are required for write access to data in "C:\Program Files". Therefore, these rights need to be set for the user by the system administrator. Alternatively, using a custom installation, the course and user data can be installed to a different directory (recommended).
Important note: In the lower selection box, you can specify Windows users who may access the LabSoft installation. Select "Everyone who uses this computer (all users)" to enable all users who work on this computer under Windows to use the program.
Note: The selection window for the type of installation is displayed only upon initial installation of LabSoft on a PC. If LabSoft is already installed and it is only additional courses which need to be installed, the setup wizard detects the existing installation and installs the components using the same type specified with the first installation of LabSoft. 5. Click "Next". The next window starts the installation. Click "Back" if settings previously
made are to be changed. Click "Next" again to start the installation. The installation process may take a few minutes.
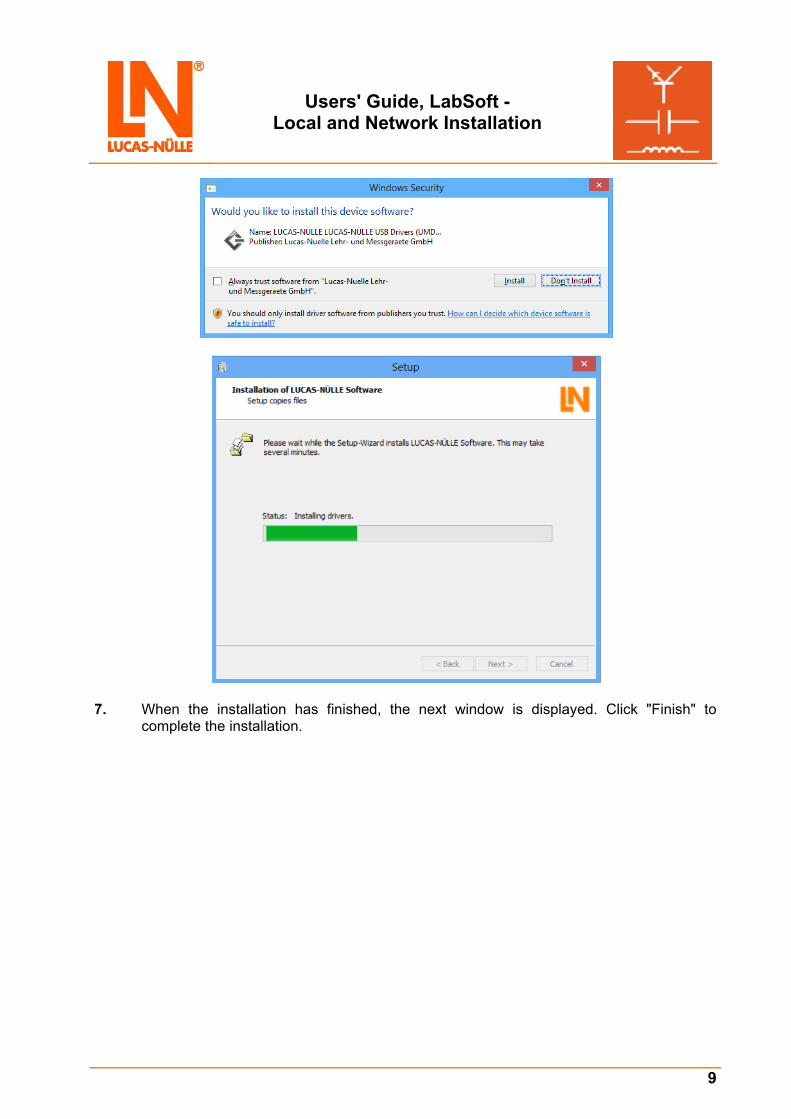
6. After this, the drivers for the LN training systems will be installed. During installation, a
windows security prompt may be displayed. Click "Install" to install the software for the equipment and continue the installation.
Users' Guide, LabSoft - Local and Network Installation
9
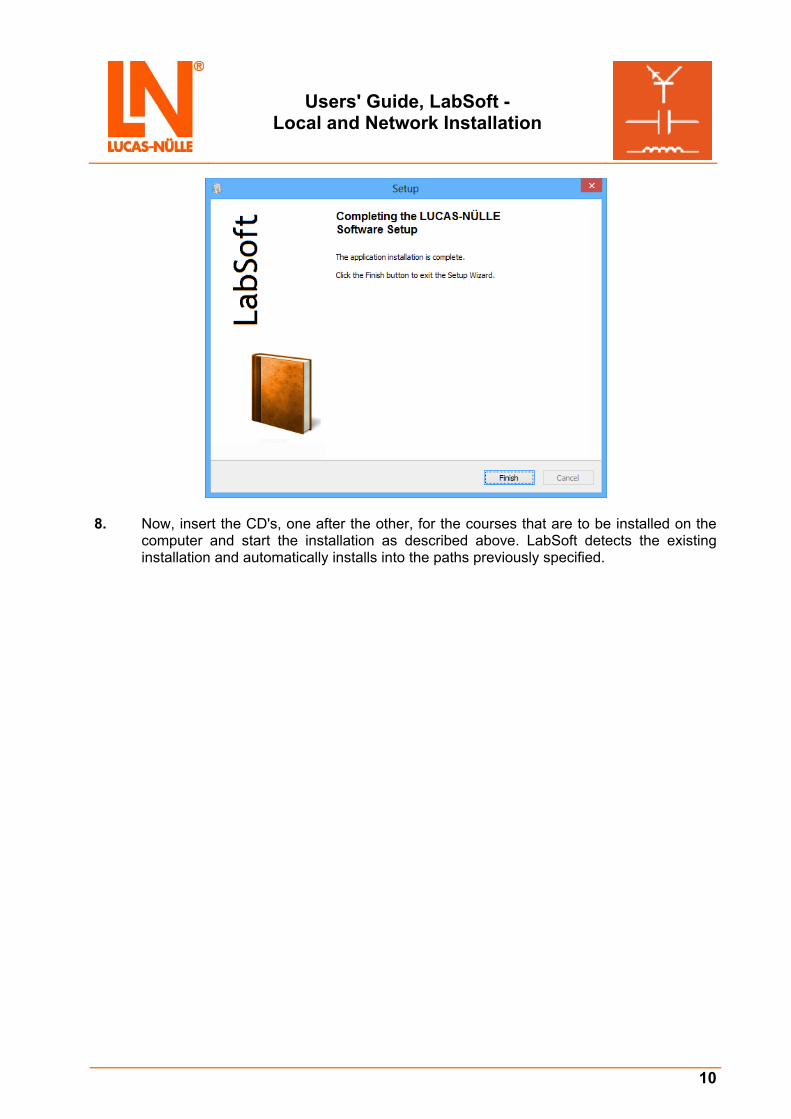
7. When the installation has finished, the next window is displayed. Click "Finish" to
complete the installation.
Users' Guide, LabSoft - Local and Network Installation
10
8. Now, insert the CD's, one after the other, for the courses that are to be installed on the
computer and start the installation as described above. LabSoft detects the existing installation and automatically installs into the paths previously specified.
Users' Guide, LabSoft - Local and Network Installation
11
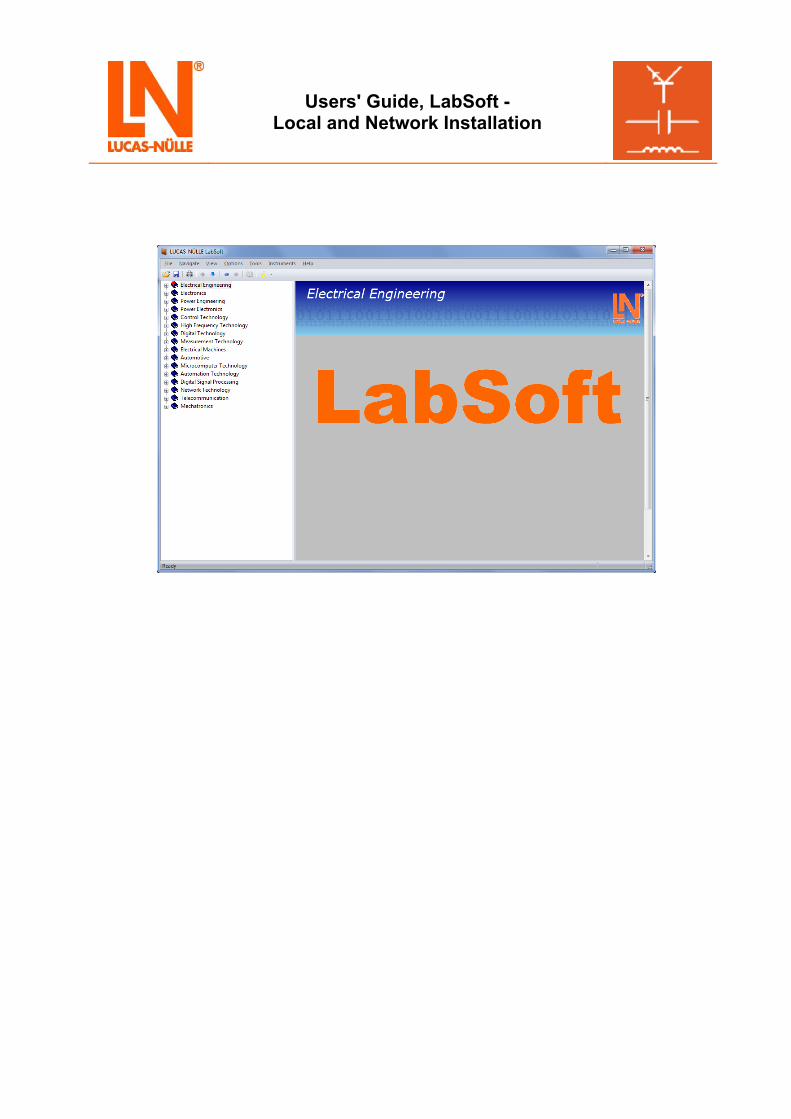
2.4 Running LabSoft Start LabSoft by way of the "Start“ button in your Windows task bar. Providing that you have not changed the settings for the program symbol during the installation, the Start symbol will be found under: Start Programmes LabSoft LabSoft
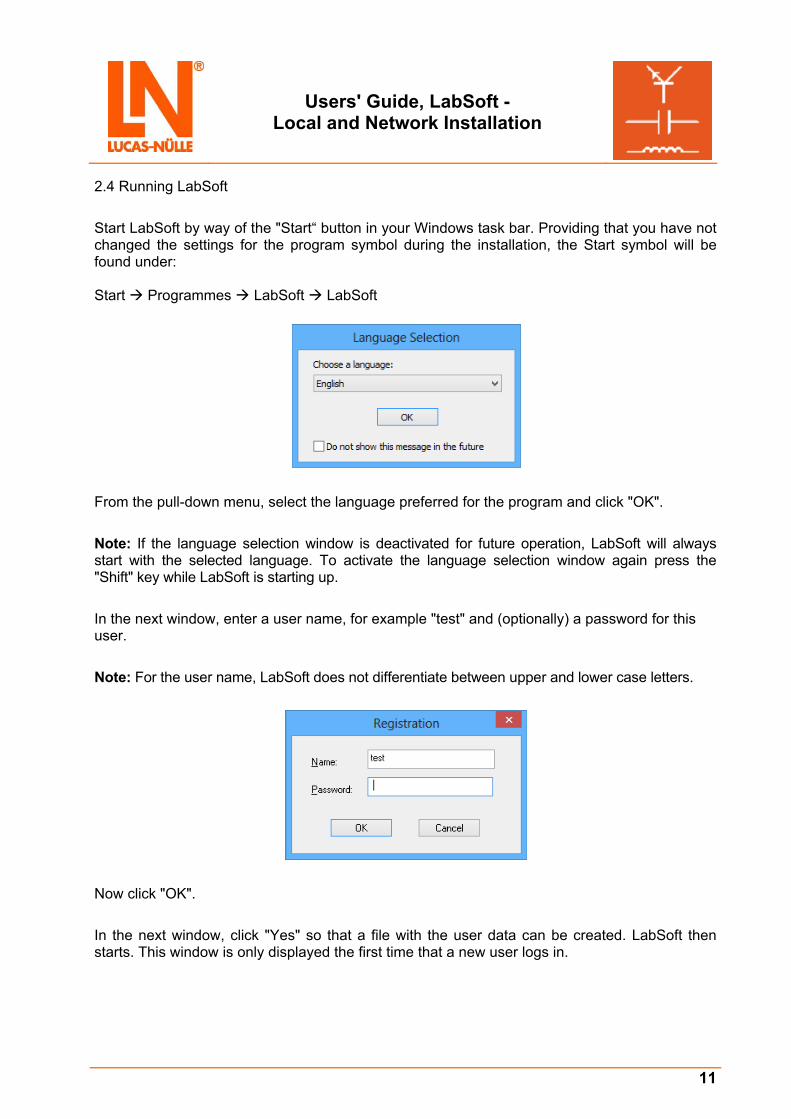
From the pull-down menu, select the language preferred for the program and click "OK". Note: If the language selection window is deactivated for future operation, LabSoft will always start with the selected language. To activate the language selection window again press the "Shift" key while LabSoft is starting up. In the next window, enter a user name, for example "test" and (optionally) a password for this user. Note: For the user name, LabSoft does not differentiate between upper and lower case letters.
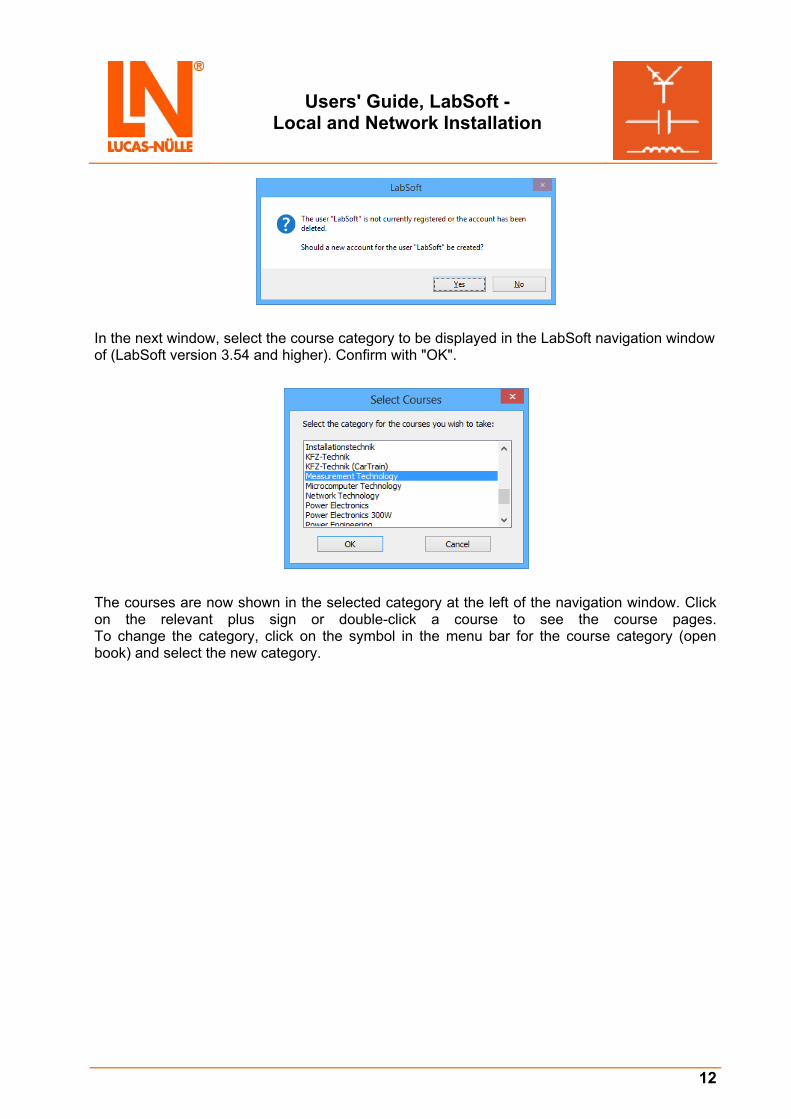
Now click "OK". In the next window, click "Yes" so that a file with the user data can be created. LabSoft then starts. This window is only displayed the first time that a new user logs in.
Users' Guide, LabSoft - Local and Network Installation
12
In the next window, select the course category to be displayed in the LabSoft navigation window of (LabSoft version 3.54 and higher). Confirm with "OK".
The courses are now shown in the selected category at the left of the navigation window. Click on the relevant plus sign or double-click a course to see the course pages. To change the category, click on the symbol in the menu bar for the course category (open book) and select the new category.

Users' Guide, LabSoft - Local and Network Installation
13
The following window is displayed when no LN training system is connected to the computer.
Click "Run program in simulation mode". LabSoft then starts without any support for a training system. Measurements using the virtual instruments are then not possible.
Note: The window is also displayed if the driver for the connected training system has not been installed.
Note: Information for operating LabSoft will be found in the online help (menu option Help).
Users' Guide, LabSoft - Local and Network Installation
14
3 N e t w o r k i n s t a l l a t i o n
3.1 System requirements
Server:
Operating system: Microsoft Windows® 7, 8, 8.1, 10, Server 2008, 2012
Hardware: As recommended in the Microsoft specification for the relevant operating system plus
• Suitable network adapter for the LAN connection
• CD or CD/DVD drive for the installation (optional)
• At least 500 MB of free hard disc space, 1 GB is recommended for the installation of LabSoft and the courses
Note: A computer with a Linux operating system can also be used as a server. Notes for the installation in a network with a Linux-based server will be found in the section, "3.3 Server installation"
Client:
Operating system: Microsoft Windows® 7, 8, 8.1 or 10
Hardware: As recommended in the Microsoft specification for the relevant operating system plus:
• Suitable network adapter for the LAN connection
• CD or CD/DVD drive for the installation
• 1 free USB port for the training system
• At least 500 MB of free hard disc space (1 GB recommended) for the installation of LabSoft
• Internet Explorer 9 or higher (IE 11 recommended)
• Adobe Flash player (latest version) (www.adobe.com)
• Adobe Acrobat reader 10 or higher (www.adobe.com)
3.2 Before starting
Ensure that you have the necessary access rights to the computers in your network for the installation (server and clients). Administrator rights are required for the installation. Consult your system administrator to obtain the rights necessary.
Users' Guide, LabSoft - Local and Network Installation
15
Before the installation, consider where (in which directories on the server) the course and student data are to be saved.
Important note: For later operation of LabSoft, it must be ensured that the clients (student PCs) have permanent read access to the directories with the course data, as well as read and write access to the directories with the user data. If necessary, these rights must be enabled by the network administrator.
Access rights to server
Course data User data Configuration file Client (teacher) Read and write Read and write Read and write
Client (student) Read Read and write Read
The following sections "Installation of the server" and "Installation of clients", assume that the server is present and available in a LAN as a network drive, with drive letters or a server name ("UNC names" - Unified Naming Convention).
3.3 Installing the server Start the network installation by installing the server. For this, you require the CDs for all the courses that are to be installed on the server. You may start with any course CD.
Important note: If possible, use a client PC for installing the data on the server. In this way, you can ensure that with the installation, the correct paths (drive letters) are saved in the LabSoft configuration file. Also, at the same time, you can install the LabSoft program on the client PC you are using.
Note: You must start installing the software on the server because for installation on the clients, the configuration file for LabSoft needs to be present on the server already.
1. Insert a course CD in the CD-ROM or CD/DVD drive of the computer from which you
wish to carry out the installation of the server. This can be any computer (client) within the network. If automatic start-up (autorun) is active, the installation wizard is displayed. If the wizard window is not displayed automatically, switch to "My Computer" or "Windows Explorer" and select the CD-ROM or CD/DVD drive. Start the installation routine by double-clicking the file "setup.exe" in the main directory of the CD.
Note: If the user management window is displayed, simply click "Yes". If the account you are using does not possess administrator rights, you will also need to enter a user name and password for an account which does.
Users' Guide, LabSoft - Local and Network Installation
16
2. Select the language preferred for the installation of the software and click "OK".
Note: The language selection refers to the language of the course to be installed. The LabSoft program is basically installed with all available languages. 3. Click "Next" to proceed with the installation. Read the information in the next window. It
contains notes on the installation instruction on the CD and how to load the master solutions. In order to proceed with the installation you have to acknowledge that you have read the installation instructions.
Users' Guide, LabSoft - Local and Network Installation
17
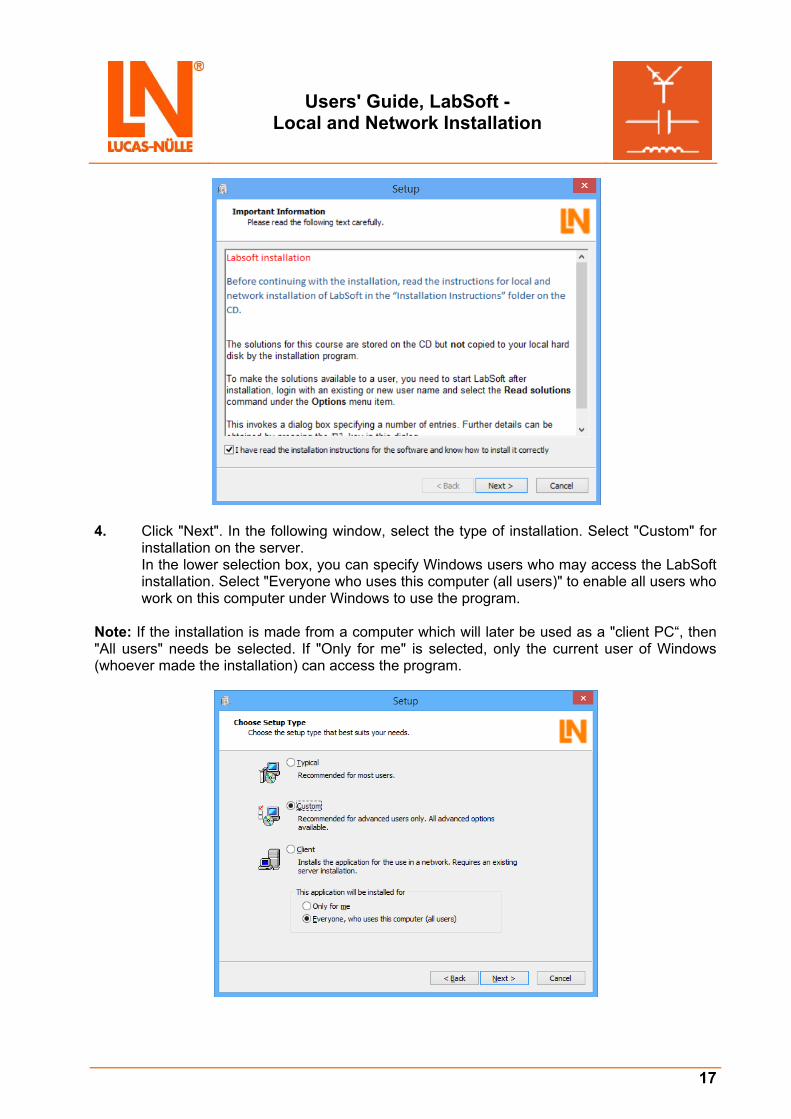
4. Click "Next". In the following window, select the type of installation. Select "Custom" for
installation on the server. In the lower selection box, you can specify Windows users who may access the LabSoft installation. Select "Everyone who uses this computer (all users)" to enable all users who work on this computer under Windows to use the program.
Note: If the installation is made from a computer which will later be used as a "client PC“, then "All users" needs be selected. If "Only for me" is selected, only the current user of Windows (whoever made the installation) can access the program.

Users' Guide, LabSoft - Local and Network Installation
18
Important Note: The selection window for the type of installation is displayed only upon initial installation of LabSoft on a PC. If LabSoft is already installed on this computer, the setup wizard detects the existing installation and installs the components in accordance with the type specified upon initial installation of LabSoft. The following pane is also skipped. In order to reinstall fully, the old version of LabSoft and all courses need to be deinstalled using the Windows control panel (Add/Remove Software) before a new installation can be started.
5. Click "Next". In the next window, you can now specify the path for the program
components to be installed. Important note: The paths to the directories on the server can be specified in various
ways, by stating a drive letter or via so-called "UNC paths" If the path on the server was assigned using a drive letter, then click on the field after the path to select the drive required and the directory in the network. If the path on the server was specified using a "UNC path" (recommended), then the path must be directly entered in the window.
Example of "UNC-path": \\server name\directory name\course directory
Both forms of path specification are allowed, the advantage of the "UNC" method being that the server on a local network has the same name for all clients. If the path specification is given with a drive letter, the letter for the server may be different on another client. This can lead to errors in network operation of LabSoft. If drive letters are used in the path specifications, it must be ensured that all clients use the same drive letter for the server and therefore the same path for the program components.
Users' Guide, LabSoft - Local and Network Installation
19
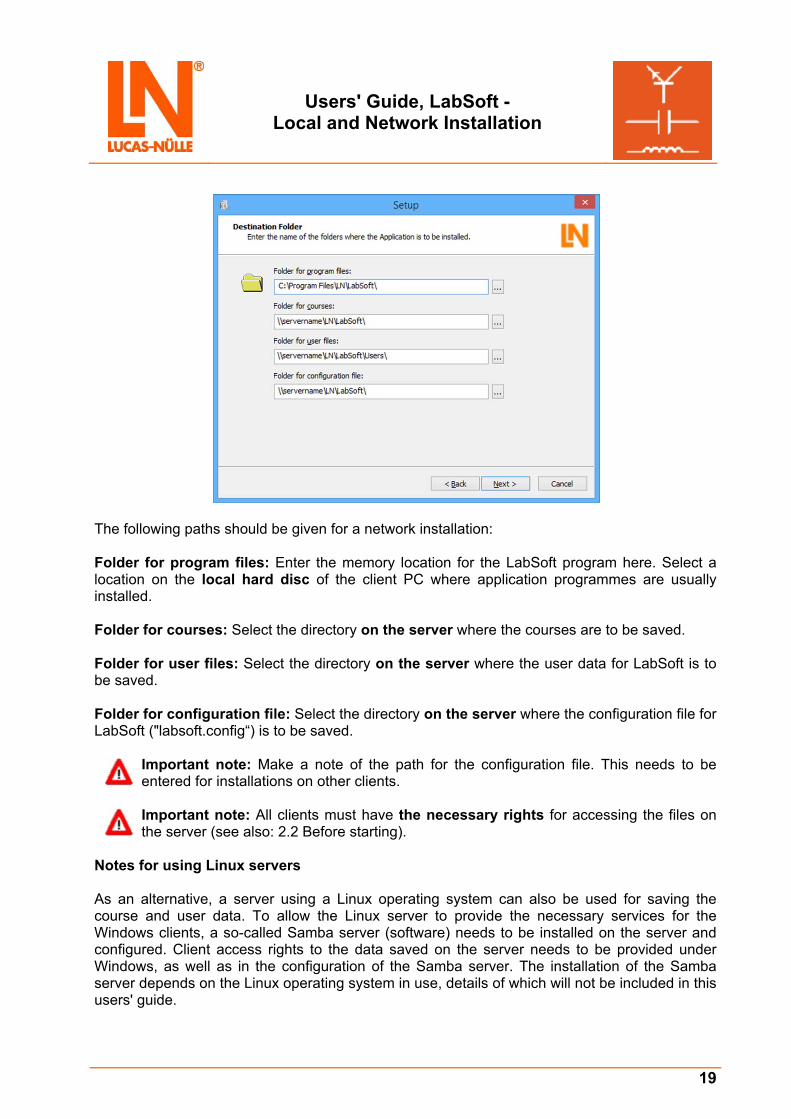
The following paths should be given for a network installation: Folder for program files: Enter the memory location for the LabSoft program here. Select a location on the local hard disc of the client PC where application programmes are usually installed. Folder for courses: Select the directory on the server where the courses are to be saved. Folder for user files: Select the directory on the server where the user data for LabSoft is to be saved. Folder for configuration file: Select the directory on the server where the configuration file for LabSoft ("labsoft.config“) is to be saved.
Important note: Make a note of the path for the configuration file. This needs to be entered for installations on other clients.
Important note: All clients must have the necessary rights for accessing the files on the server (see also: 2.2 Before starting).
Notes for using Linux servers As an alternative, a server using a Linux operating system can also be used for saving the course and user data. To allow the Linux server to provide the necessary services for the Windows clients, a so-called Samba server (software) needs to be installed on the server and configured. Client access rights to the data saved on the server needs to be provided under Windows, as well as in the configuration of the Samba server. The installation of the Samba server depends on the Linux operating system in use, details of which will not be included in this users' guide.
Users' Guide, LabSoft - Local and Network Installation
20
Important note: Installation of the server from a Windows client is mandatory, since the installation wizard (Windows) will not start on a Linux system.
Important note: When using a Linux server, the paths must be entered in the form of UNC specifications. Also it is necessary to add a "file" entry before the path for the course directory. If paths cannot be specified this way during installation, the entry can be made afterwards with the aid of the LabSoft Manager (see section 2.6).
Example for UNC-path and Linux Server:
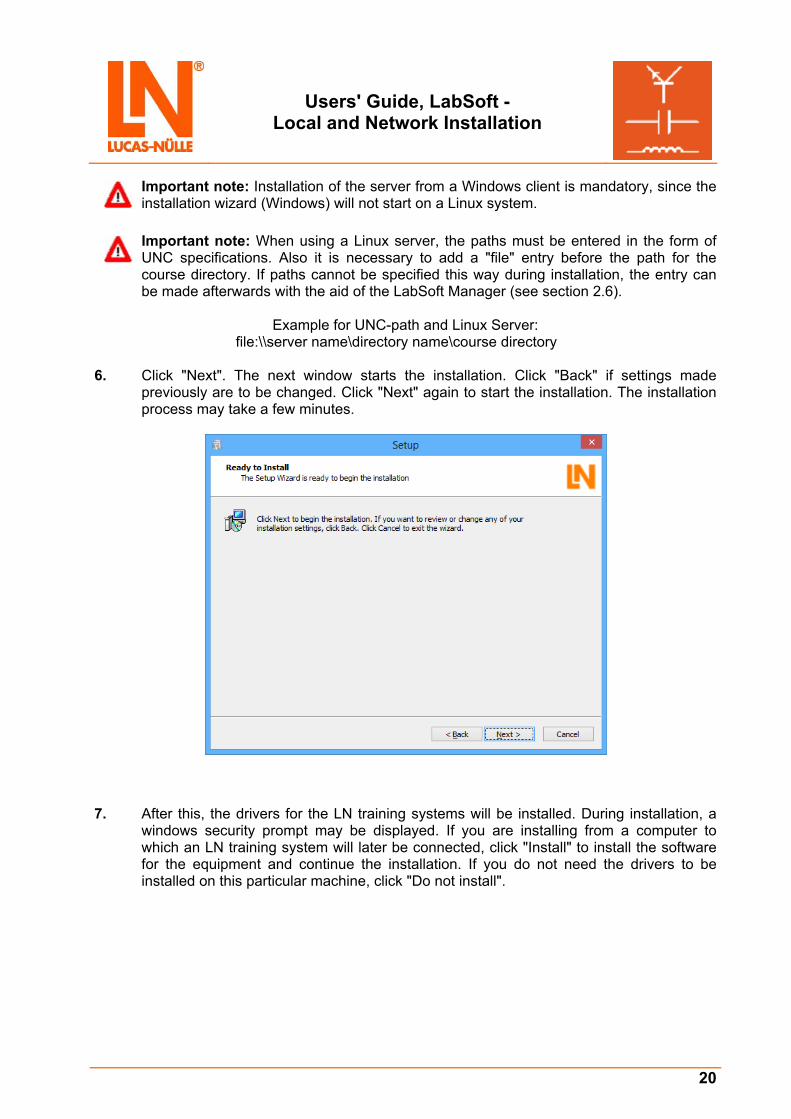
file:\\server name\directory name\course directory 6. Click "Next". The next window starts the installation. Click "Back" if settings made
previously are to be changed. Click "Next" again to start the installation. The installation process may take a few minutes.
7. After this, the drivers for the LN training systems will be installed. During installation, a
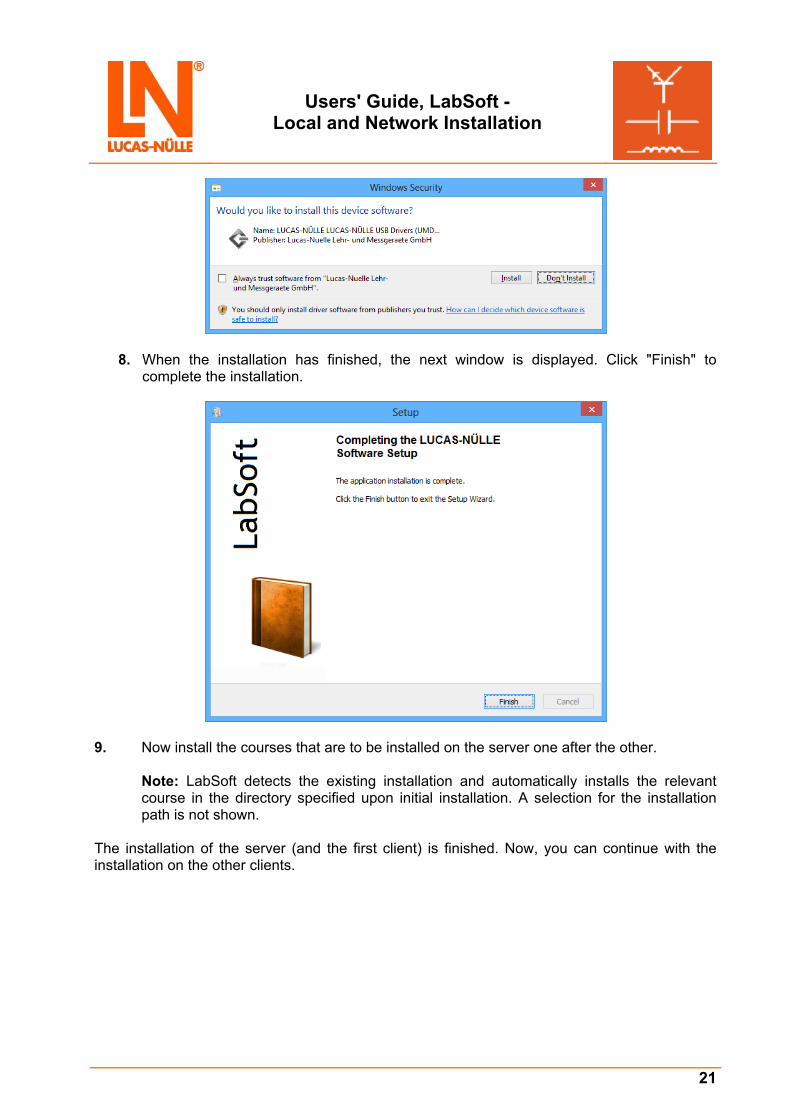
windows security prompt may be displayed. If you are installing from a computer to which an LN training system will later be connected, click "Install" to install the software for the equipment and continue the installation. If you do not need the drivers to be installed on this particular machine, click "Do not install".
Users' Guide, LabSoft - Local and Network Installation
21
8. When the installation has finished, the next window is displayed. Click "Finish" to complete the installation.
9. Now install the courses that are to be installed on the server one after the other.
Note: LabSoft detects the existing installation and automatically installs the relevant course in the directory specified upon initial installation. A selection for the installation path is not shown.
The installation of the server (and the first client) is finished. Now, you can continue with the installation on the other clients.
Users' Guide, LabSoft - Local and Network Installation
22
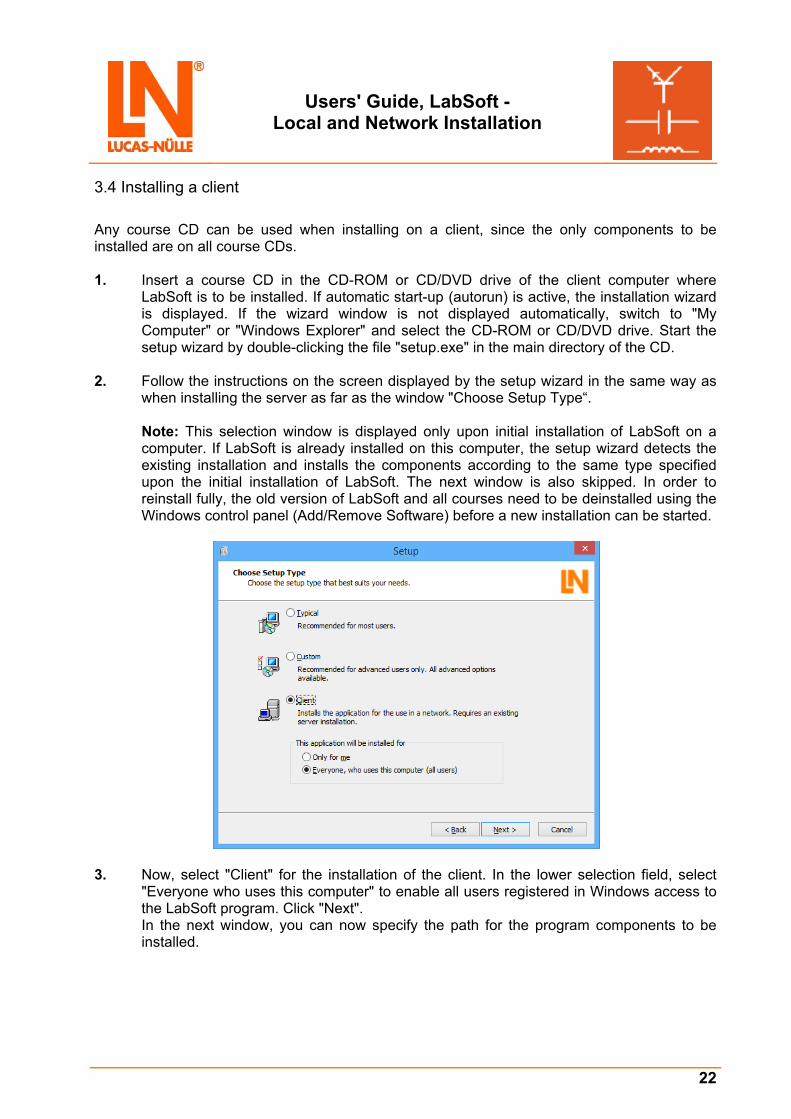
3.4 Installing a client Any course CD can be used when installing on a client, since the only components to be installed are on all course CDs. 1. Insert a course CD in the CD-ROM or CD/DVD drive of the client computer where
LabSoft is to be installed. If automatic start-up (autorun) is active, the installation wizard is displayed. If the wizard window is not displayed automatically, switch to "My Computer" or "Windows Explorer" and select the CD-ROM or CD/DVD drive. Start the setup wizard by double-clicking the file "setup.exe" in the main directory of the CD.
2. Follow the instructions on the screen displayed by the setup wizard in the same way as
when installing the server as far as the window "Choose Setup Type“.
Note: This selection window is displayed only upon initial installation of LabSoft on a computer. If LabSoft is already installed on this computer, the setup wizard detects the existing installation and installs the components according to the same type specified upon the initial installation of LabSoft. The next window is also skipped. In order to reinstall fully, the old version of LabSoft and all courses need to be deinstalled using the Windows control panel (Add/Remove Software) before a new installation can be started.
3. Now, select "Client" for the installation of the client. In the lower selection field, select
"Everyone who uses this computer" to enable all users registered in Windows access to the LabSoft program. Click "Next". In the next window, you can now specify the path for the program components to be installed.

Users' Guide, LabSoft - Local and Network Installation
23
4. Click on the box after the path details to open the directory required or enter a "UNC
path" directly. Folder for program files: Enter the memory location for the LabSoft program here. Select a location on the local hard disc of the client PC where application programmes are usually installed. Configuration file: Enter the configuration file on the server ("labsoft.config“) with path details exactly the same as that used during the installation of the server.
Important note: The clients must have read access to this file. 5. Click "Next". The next window starts the installation. Click "Back" if settings made
previously are to be changed. Click "Next" again to start the installation. The installation process may take a few minutes.
Users' Guide, LabSoft - Local and Network Installation
24
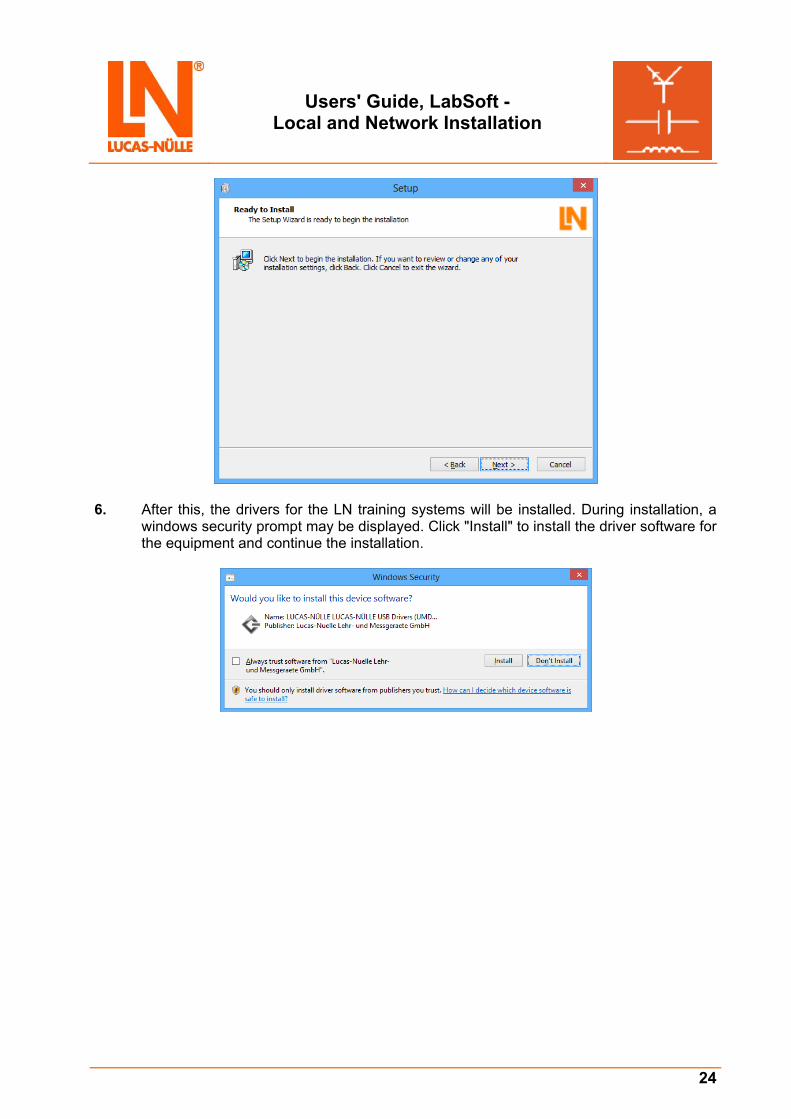
6. After this, the drivers for the LN training systems will be installed. During installation, a
windows security prompt may be displayed. Click "Install" to install the driver software for the equipment and continue the installation.
Users' Guide, LabSoft - Local and Network Installation
25
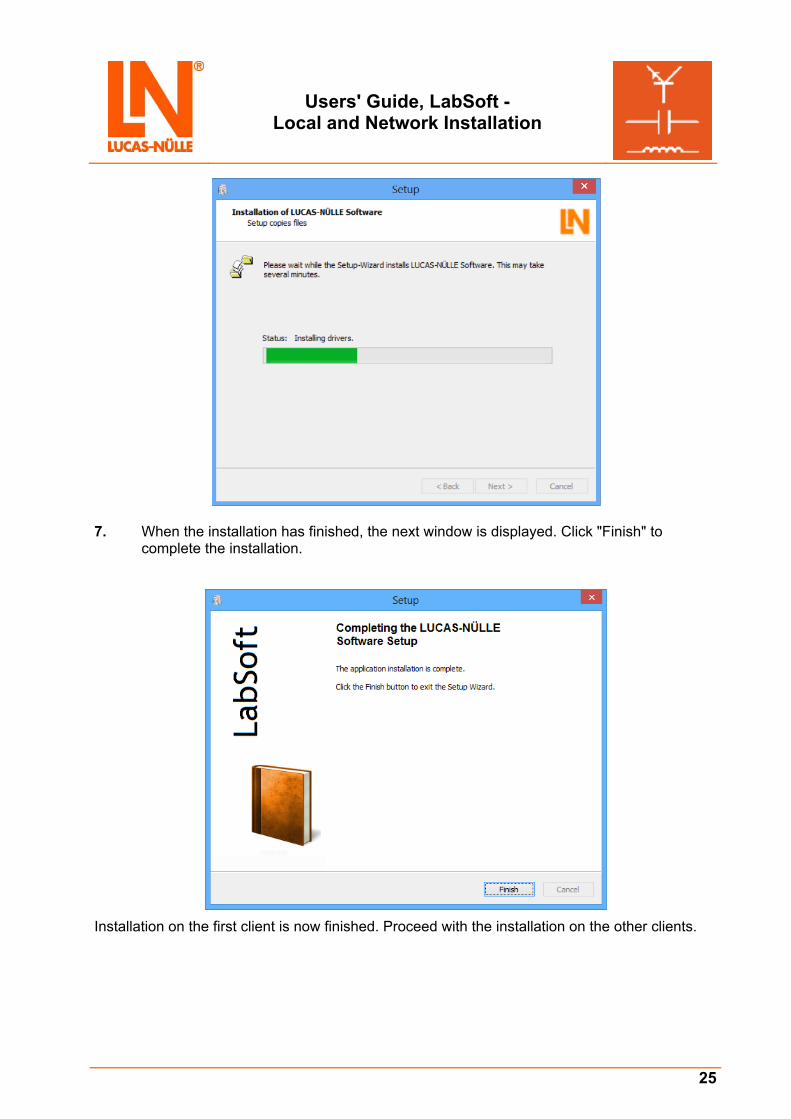
7. When the installation has finished, the next window is displayed. Click "Finish" to
complete the installation.
Installation on the first client is now finished. Proceed with the installation on the other clients.
Users' Guide, LabSoft - Local and Network Installation
26
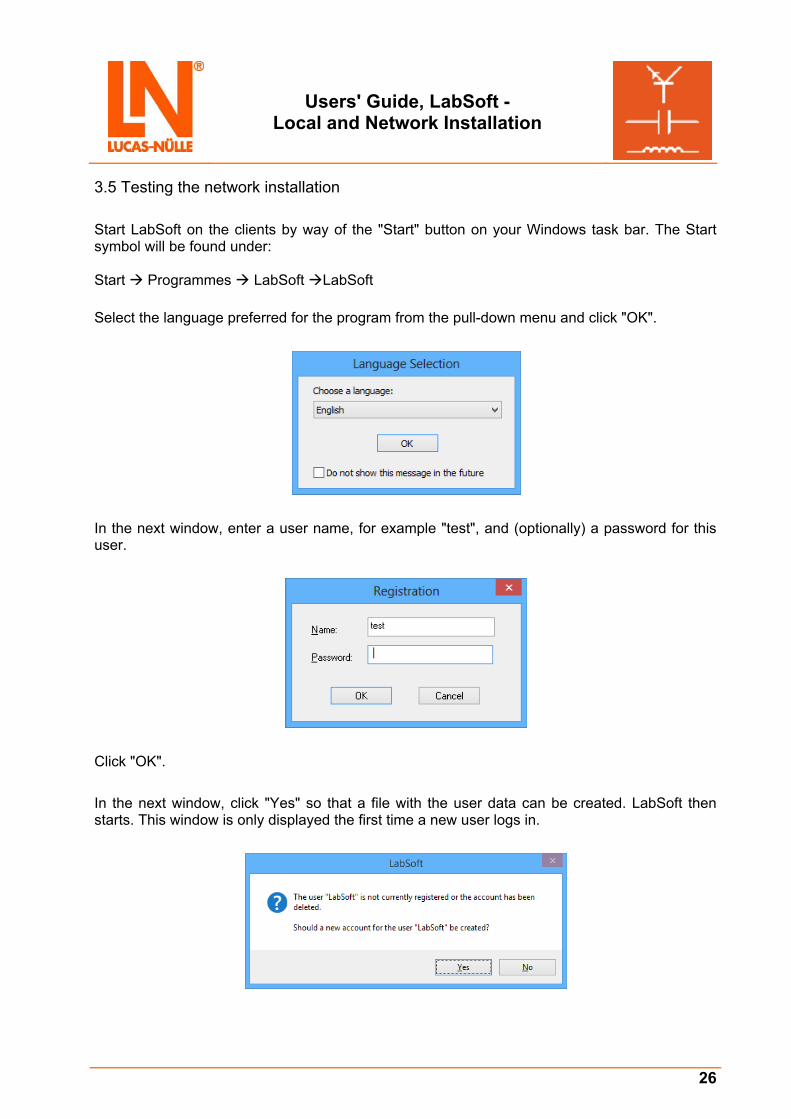
3.5 Testing the network installation Start LabSoft on the clients by way of the "Start" button on your Windows task bar. The Start symbol will be found under: Start Programmes LabSoft LabSoft Select the language preferred for the program from the pull-down menu and click "OK".
In the next window, enter a user name, for example "test", and (optionally) a password for this user.
Click "OK". In the next window, click "Yes" so that a file with the user data can be created. LabSoft then starts. This window is only displayed the first time a new user logs in.
Users' Guide, LabSoft - Local and Network Installation
27
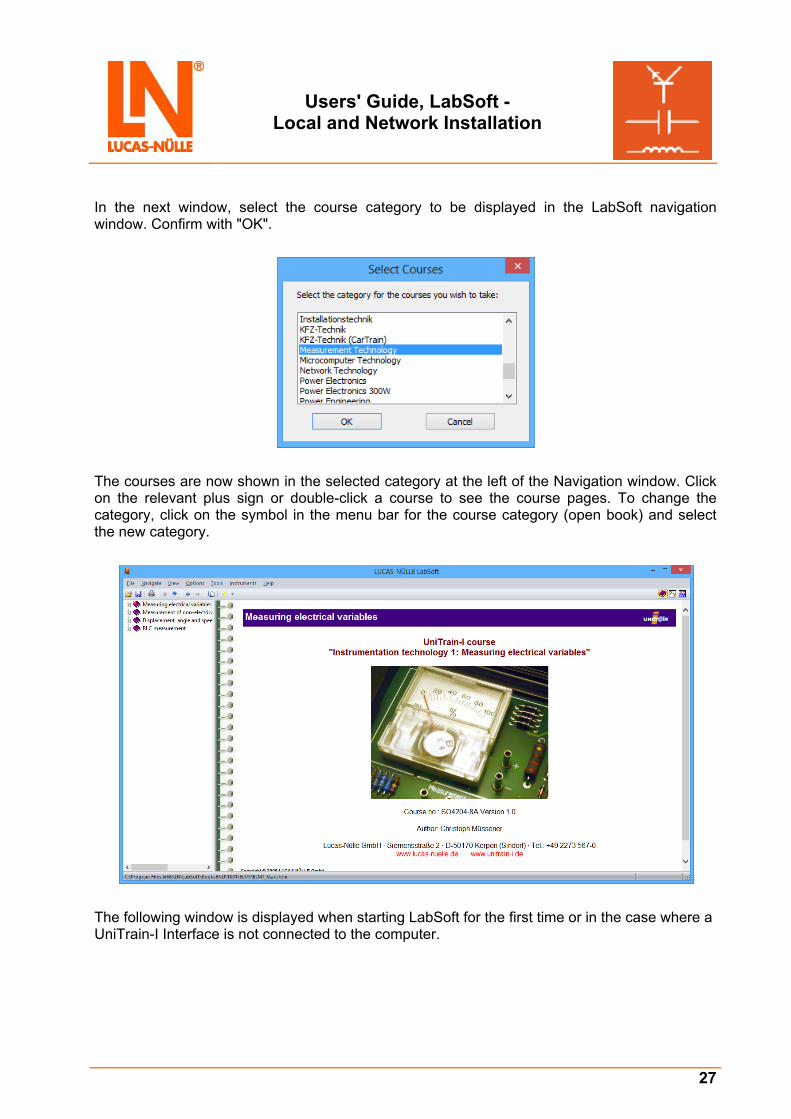
In the next window, select the course category to be displayed in the LabSoft navigation window. Confirm with "OK".
The courses are now shown in the selected category at the left of the Navigation window. Click on the relevant plus sign or double-click a course to see the course pages. To change the category, click on the symbol in the menu bar for the course category (open book) and select the new category.
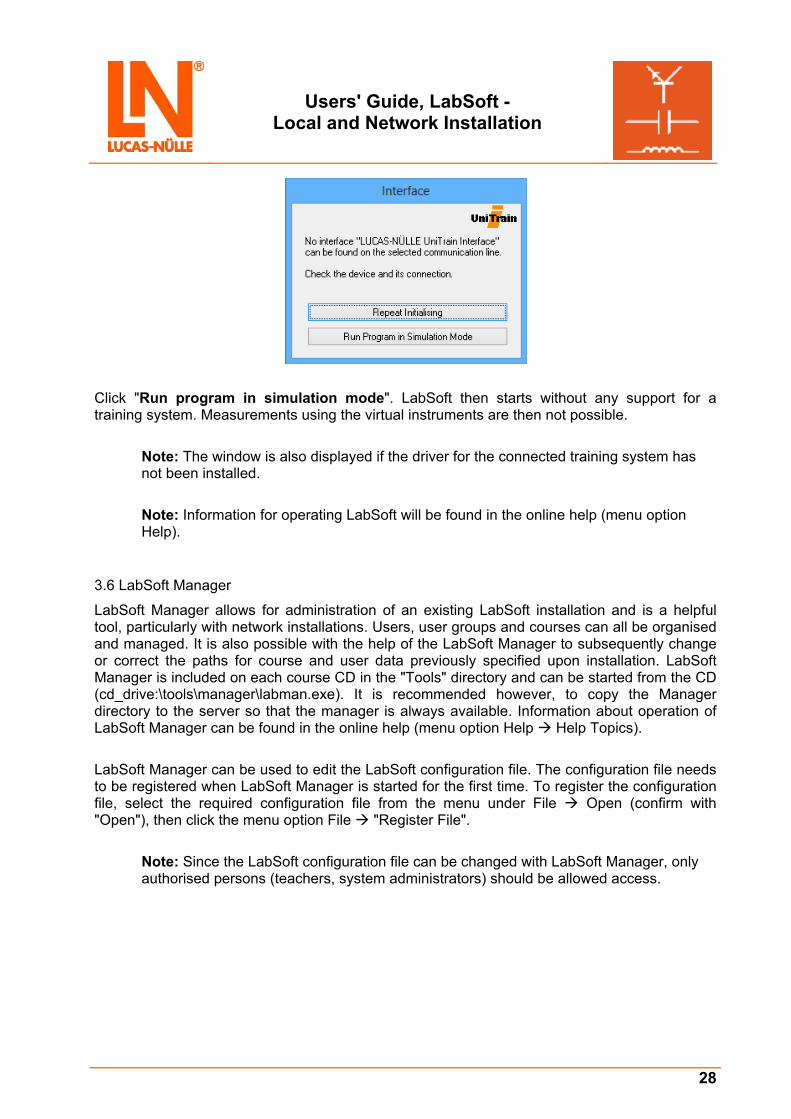
The following window is displayed when starting LabSoft for the first time or in the case where a UniTrain-I Interface is not connected to the computer.
Users' Guide, LabSoft - Local and Network Installation
28
Click "Run program in simulation mode". LabSoft then starts without any support for a training system. Measurements using the virtual instruments are then not possible.
Note: The window is also displayed if the driver for the connected training system has not been installed.
Note: Information for operating LabSoft will be found in the online help (menu option Help).
3.6 LabSoft Manager LabSoft Manager allows for administration of an existing LabSoft installation and is a helpful tool, particularly with network installations. Users, user groups and courses can all be organised and managed. It is also possible with the help of the LabSoft Manager to subsequently change or correct the paths for course and user data previously specified upon installation. LabSoft Manager is included on each course CD in the "Tools" directory and can be started from the CD (cd_drive:\tools\manager\labman.exe). It is recommended however, to copy the Manager directory to the server so that the manager is always available. Information about operation of LabSoft Manager can be found in the online help (menu option Help Help Topics). LabSoft Manager can be used to edit the LabSoft configuration file. The configuration file needs to be registered when LabSoft Manager is started for the first time. To register the configuration file, select the required configuration file from the menu under File Open (confirm with "Open"), then click the menu option File "Register File".
Note: Since the LabSoft configuration file can be changed with LabSoft Manager, only authorised persons (teachers, system administrators) should be allowed access.
Users' Guide, LabSoft - Local and Network Installation
29
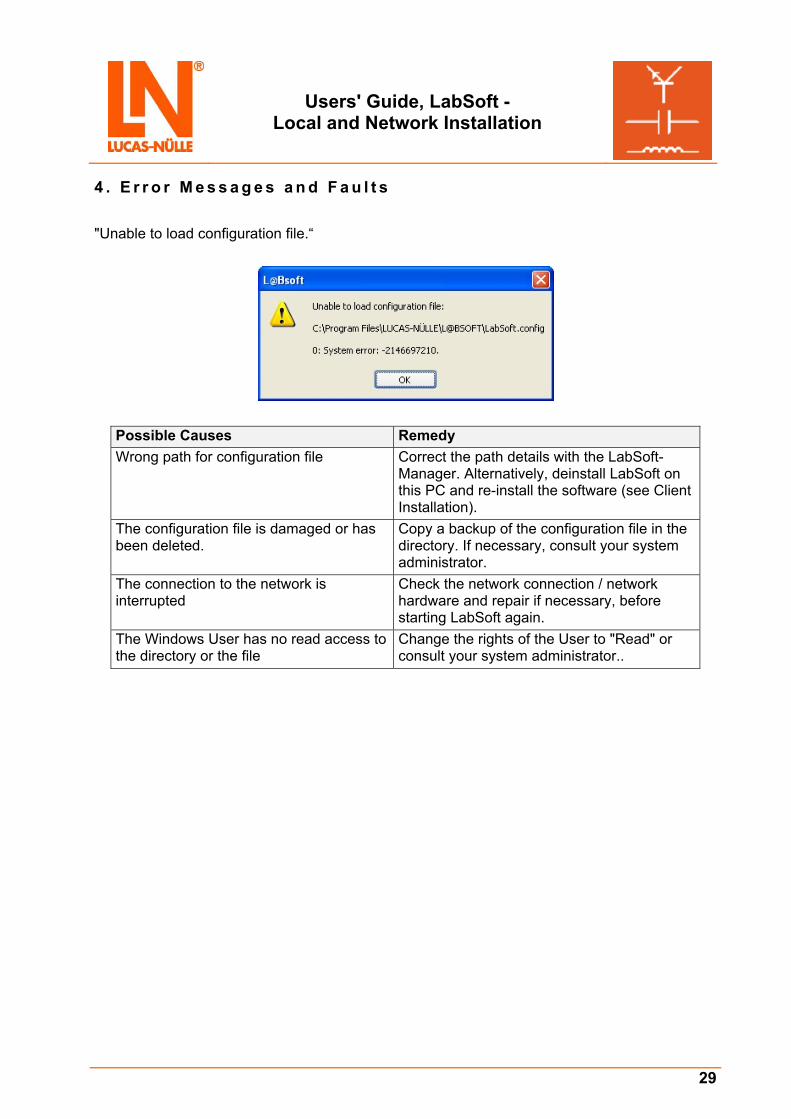
4 . E r r o r M e s s a g e s a n d F a u l t s "Unable to load configuration file.“
Possible Causes Remedy Wrong path for configuration file Correct the path details with the LabSoft-
Manager. Alternatively, deinstall LabSoft on this PC and re-install the software (see Client Installation).
The configuration file is damaged or has been deleted.
Copy a backup of the configuration file in the directory. If necessary, consult your system administrator.
The connection to the network is interrupted
Check the network connection / network hardware and repair if necessary, before starting LabSoft again.
The Windows User has no read access to the directory or the file
Change the rights of the User to "Read" or consult your system administrator..

Users' Guide, LabSoft - Local and Network Installation
30
"The folder 'User name' cannot be created. Cannot access the network".
Possible Causes Remedy The connection to the network is interrupted
Check the network connection / network hardware and repair if necessary, before starting LabSoft again.
"Unable to create the folder 'User name'. Access is denied".
Possible Causes Remedy The Windows User has no write access to the directory or the file
Change the rights of the User to "Read and Write" or consult your system administrator.
Users' Guide, LabSoft - Local and Network Installation
31
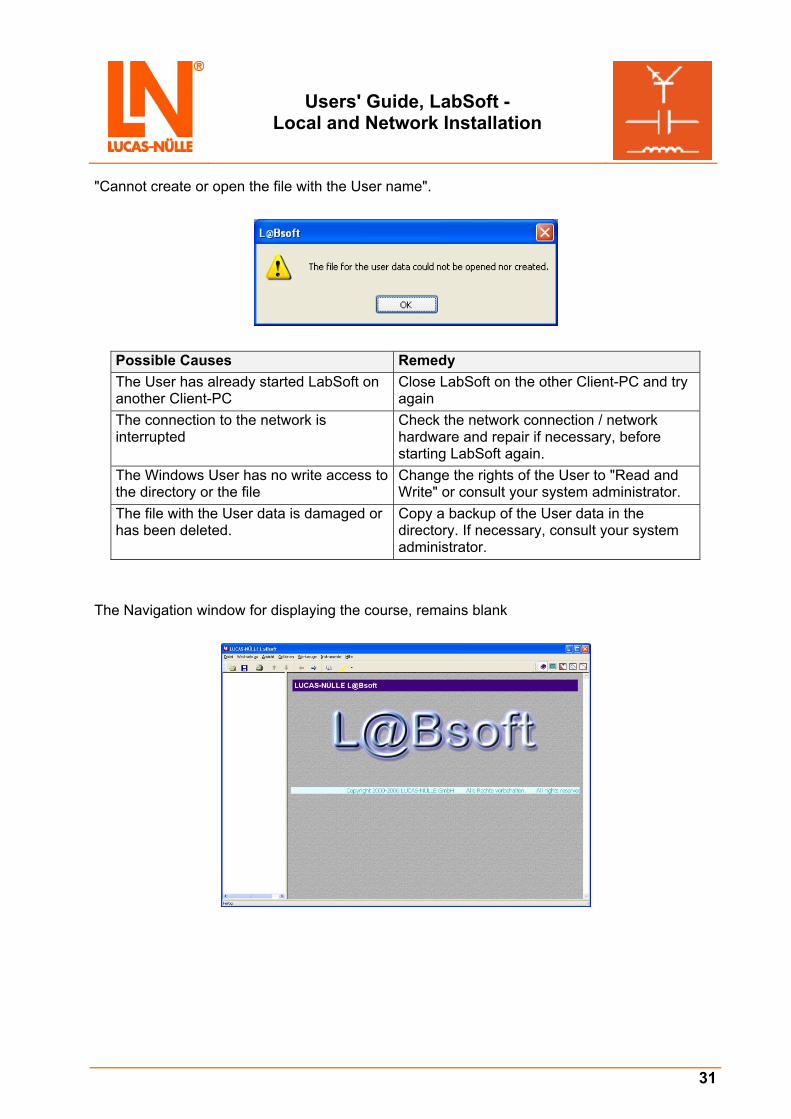
"Cannot create or open the file with the User name".
Possible Causes Remedy The User has already started LabSoft on another Client-PC
Close LabSoft on the other Client-PC and try again
The connection to the network is interrupted
Check the network connection / network hardware and repair if necessary, before starting LabSoft again.
The Windows User has no write access to the directory or the file
Change the rights of the User to "Read and Write" or consult your system administrator.
The file with the User data is damaged or has been deleted.
Copy a backup of the User data in the directory. If necessary, consult your system administrator.
The Navigation window for displaying the course, remains blank
Users' Guide, LabSoft - Local and Network Installation
32
Possible Causes Remedy The Windows User has no read access to the course directory or files
Change the rights of the User to "Read" or consult your system administrator.
The connection to the network drive with the course data, is interrupted
Check the network connection / network hardware and repair if necessary, before starting LabSoft again.
The path detail for the courses in the configuration file is incorrect
Correct the course path details in the configuration file with the LabSoft Manager.
In the Navigation window for displaying the courses, no course is shown even though they have been installed.
Possible Causes Remedy The file imsmanifest.xml for the course is not in the course directory or it is damaged
Re-install the missing course
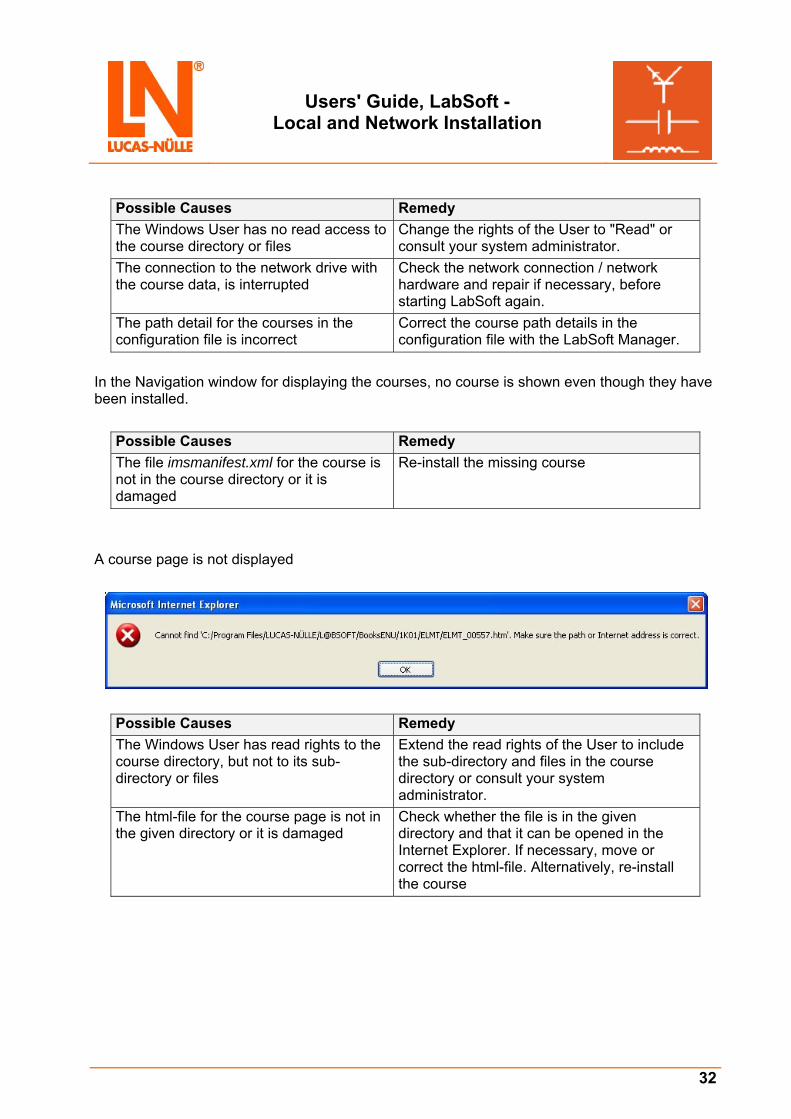
A course page is not displayed
Possible Causes Remedy The Windows User has read rights to the course directory, but not to its sub-directory or files
Extend the read rights of the User to include the sub-directory and files in the course directory or consult your system administrator.
The html-file for the course page is not in the given directory or it is damaged
Check whether the file is in the given directory and that it can be opened in the Internet Explorer. If necessary, move or correct the html-file. Alternatively, re-install the course