
USER REFERENCE MANUAL RoboSep™-S: The Fully Automated …
48
USER REFERENCE MANUAL RoboSep™-S: The Fully Automated Cell Separator
Transcript of USER REFERENCE MANUAL RoboSep™-S: The Fully Automated …
USER REFERENCE MANUAL
RoboSep™-S: The Fully Automated Cell Separator


STEMCELL TECHNOLOGIES INC.’S QUALITY MANAGEMENT SYSTEM IS CERTIFIED TO ISO 13485 MEDICAL DEVICE STANDARDS. FOR RESEARCH USE ONLY. NOT INTENDED FOR HUMAN OR ANIMAL DIAGNOSTIC OR THERAPEUTIC USES.
TOLL-FREE PHONE 1 800 667 0322 PHONE +1 604 877 0713 VERSION 02
[email protected] [email protected] FOR GLOBAL CONTACT DETAILS VISIT WWW.STEMCELL.COM DOCUMENT #10000005578
i
Table of Contents
Safety Information and Warnings ............................................................................................................ iii
RoboSep™-S Software .............................................................................................................................. iii
1.0 Introduction .................................................................................................................................... 1
1.1 EasySep™ Magnetic Cell Separation Technology .......................................................................... 1
2.0 RoboSep™-S System .................................................................................................................... 2
2.1 Instrument Overview ........................................................................................................................ 2
2.1.1 Robotic Arm and Carousel ....................................................................................................... 4
2.1.2 Tip Stripping Arm ...................................................................................................................... 6
2.1.3 Hydraulic System ..................................................................................................................... 7
2.2 User Interface Overview ................................................................................................................... 8
2.2.1 Screens .................................................................................................................................... 8
2.2.2 Icons ......................................................................................................................................... 9
3.0 RoboSep™-S Installation ............................................................................................................ 10
3.1 Placement of the Instrument .......................................................................................................... 10
3.2 Power and Network Connections ................................................................................................... 11
3.2.1 Connecting to a Network ........................................................................................................ 11
3.3 Startup ............................................................................................................................................ 12
3.4 Shutdown ....................................................................................................................................... 12
3.5 Priming the Hydraulic System ........................................................................................................ 13
4.0 Running RoboSep™-S ................................................................................................................ 14
4.1 User Profiles ................................................................................................................................... 14
4.1.1 Adding a User Profile ............................................................................................................. 14
4.1.2 Deleting a User Profile ........................................................................................................... 15
4.1.3 Editing User Profile Preferences ............................................................................................ 15
4.1.4 Privacy Settings ...................................................................................................................... 17
4.2 RoboSep™ Protocols ..................................................................................................................... 17
4.2.1 Adding Protocols to a User Profile ......................................................................................... 18
4.2.2 Removing Protocols from a User Profile ................................................................................ 19
4.2.3 Adding New Protocols to RoboSep™-S ................................................................................ 19
4.3 Setting Up a Run ............................................................................................................................ 20
4.3.1 Selecting a Cell Separation Protocol...................................................................................... 20
STEMCELL TECHNOLOGIES INC.’S QUALITY MANAGEMENT SYSTEM IS CERTIFIED TO ISO 13485 MEDICAL DEVICE STANDARDS. FOR RESEARCH USE ONLY. NOT INTENDED FOR HUMAN OR ANIMAL DIAGNOSTIC OR THERAPEUTIC USES.
TOLL-FREE PHONE 1 800 667 0322 PHONE +1 604 877 0713 VERSION 02
[email protected] [email protected] FOR GLOBAL CONTACT DETAILS VISIT WWW.STEMCELL.COM DOCUMENT #10000005578
ii
4.3.2 Preparing the Cells ................................................................................................................. 21
4.3.3 Loading the Carousel and Starting a Run .............................................................................. 21
4.3.4 Scanning Barcodes ................................................................................................................. 24
4.3.5 Collecting Isolated Cells ......................................................................................................... 25
5.0 Report Files ................................................................................................................................... 26
5.1 RoboSep™-S End-of-Run Report Files .......................................................................................... 26
6.0 Care and Maintenance ................................................................................................................. 27
6.1 Cleaning the Tip Head .................................................................................................................... 27
6.2 Cleaning RoboSep™-S .................................................................................................................. 27
6.2.1 External Surface ..................................................................................................................... 27
6.2.2 Internal Surface ...................................................................................................................... 28
6.3 Replacing the Fuses ....................................................................................................................... 28
6.4 Help Videos .................................................................................................................................... 29
7.0 Specifications ............................................................................................................................... 30
8.0 Troubleshooting ........................................................................................................................... 31
8.1 Log Files ......................................................................................................................................... 31
8.2 Power Issues .................................................................................................................................. 31
8.3 Software/Hardware Issues .............................................................................................................. 32
8.4 Mechanical Performance Issues .................................................................................................... 33
8.5 Liquid Handling Performance Issues .............................................................................................. 34
8.6 Barcode Scanning Issues ............................................................................................................... 35
9.0 Software and Hardware Updates ................................................................................................ 36
9.1 Software Updates ........................................................................................................................... 36
9.2 Hardware Updates .......................................................................................................................... 36
10.0 Related Products .......................................................................................................................... 37
11.0 Appendix A: Running RoboSep™-S: Quick Start Instructions ............................................... 37

STEMCELL TECHNOLOGIES INC.’S QUALITY MANAGEMENT SYSTEM IS CERTIFIED TO ISO 13485 MEDICAL DEVICE STANDARDS. FOR RESEARCH USE ONLY. NOT INTENDED FOR HUMAN OR ANIMAL DIAGNOSTIC OR THERAPEUTIC USES.
TOLL-FREE PHONE 1 800 667 0322 PHONE +1 604 877 0713 VERSION 02
[email protected] [email protected] FOR GLOBAL CONTACT DETAILS VISIT WWW.STEMCELL.COM DOCUMENT #10000005578
iii
Safety Information and Warnings RoboSep™-S (Catalog #21000) must be operated by trained professionals and is intended for research use only. Not intended for human or animal diagnostic or therapeutic uses.
RoboSep™-S should be placed on a clean, flat surface free of any foreign objects or debris and insulated from excessive vibration. There should be at least 13 mm of clearance on each side of the instrument to ensure adequate cooling.
Always connect the power supply to a 3-prong, grounded AC outlet rated 2A 100 - 240 V using the AC power cord provided with RoboSep™-S. Do not use an adapter to a two-terminal outlet. Before plugging the instrument in, be sure that two FB 4 A 250 V~ fuses are installed.
All electrical devices pose a risk of electric shock. To reduce this risk, do not open any covers that are fastened with screws. While RoboSep™-S is designed to withstand spills, do not allow fluids to enter the interior of the instrument. In the event of such a spill, switch off RoboSep™-S and disconnect the power cable before cleaning (section 6.2).
Operate RoboSep™-S at 15 - 30°C, in an environment with a relative humidity of 20 - 85%. RoboSep™-S should be used indoors only. RoboSep™-S does not require placement in a biohazard safety cabinet and is not specified for use inside an incubator or cold room. Protect the instrument against dust and moisture. Do not exert excess pressure or use sharp objects on the touchscreen. It is not recommended to use UV light lamps for prolonged periods of time, as exposure to UV light will result in discoloring of external RoboSep™-S components over time.
EasySep™ magnets on the RoboSep™-S carousel generate strong magnetic fields. Keep away from pacemakers, watches, or other objects that respond to magnetic fields.
RoboSep™-S weighs 22 kg (48.5 lb). Exercise caution when moving RoboSep™-S. It is recommended that two people are present to lift or move the instrument safely.
This device complies with Part 15 of the FCC Rules. Operation is subject to the following two conditions: (1) this device may not cause harmful interference, and (2) this device must accept any interference received, including interference that may cause undesired operation.
In case of malfunction, call STEMCELL Technologies Inc. for service. Servicing performed by anyone other than an authorized STEMCELL Technologies representative will void the warranty associated with RoboSep™-S. There are no user-serviceable parts inside the instrument and the outer casing should never be removed.
RoboSep™-S is manufactured and distributed by STEMCELL Technologies Inc., 1618 Station Street, Vancouver BC, Canada V6A 1B6. Call 1-604-877-0713 or toll-free 1-800-667-0322 within North America.
STEMCELL Technologies is not responsible for any injury or damage caused by the use of this instrument for purposes other than those for which it is intended, or by modifications of the instrument or software not performed by an authorized STEMCELL Technologies representative.
RoboSep™-S Software This manual is applicable to RoboSep™-S software version 1.3.0.0. For older software versions, contact us at [email protected] for the applicable manual.


STEMCELL TECHNOLOGIES INC.’S QUALITY MANAGEMENT SYSTEM IS CERTIFIED TO ISO 13485 MEDICAL DEVICE STANDARDS.
FOR RESEARCH USE ONLY. NOT INTENDED FOR HUMAN OR ANIMAL DIAGNOSTIC OR THERAPEUTIC USES.
TOLL-FREE PHONE 1 800 667 0322 PHONE +1 604 877 0713 VERSION 02
[email protected] [email protected] FOR GLOBAL CONTACT DETAILS VISIT WWW.STEMCELL.COM DOCUMENT #10000005578
1
1.0 Introduction RoboSep™-S is the second generation of RoboSep™, a fully automated cell separator based on column-free EasySep™ technology. EasySep™ is an immunomagnetic cell separation technology that enables both positive and negative selection of desired cells from virtually any species, sample source, or size. Using an integrated color touchscreen, RoboSep™-S can be programmed to separate cells from up to four samples simultaneously and can also sequentially isolate different cell types from the same sample. The user simply loads the cell sample and reagents into the carousel and starts the experiment. RoboSep™-S automatically executes the EasySep™ immunomagnetic labeling and magnetic separation steps using disposable pipette tips, eliminating cross-contamination. After completion of the cell separation cycle, the cells of interest are immediately available for any application.
1.1 EasySep™ Magnetic Cell Separation Technology EasySep™ is a powerful immunomagnetic cell separation procedure that combines the specificity of monoclonal antibodies with the simplicity of a column-free magnetic system. EasySep™ can be used as either a negative or a positive selection approach to purify your cells of interest.
For EasySep™ negative selection applications, unwanted cells are targeted for depletion using a cocktail of monoclonal antibodies directed against specific cell surface antigens. The labeled unwanted cells are then cross-linked to EasySep™ magnetic particles. The sample tube containing the cells is placed in a specially designed EasySep™ magnet. The desired (unlabeled) cells are removed either by inversion of the magnet (manual EasySep™) or by pipetting off the supernatant (RoboSep™-S).
With EasySep™ positive selection, highly purified cells are obtained by targeting the cells of interest with monoclonal antibodies directed against one or more specific cell surface antigens. These targeted cells are cross-linked to EasySep™ magnetic particles. The sample tube containing the cells is then placed directly in a specially designed EasySep™ magnet. The cells that are not bound to the magnetic particles are removed either by inversion of the magnet (manual EasySep™) or by pipetting off the supernatant (RoboSep™-S). Unlike larger particles used with other cell separation systems, the EasySep™ magnetic particles used in positive selection procedures do not interfere with subsequent flow cytometry and do not need to be removed.

STEMCELL TECHNOLOGIES INC.’S QUALITY MANAGEMENT SYSTEM IS CERTIFIED TO ISO 13485 MEDICAL DEVICE STANDARDS. FOR RESEARCH USE ONLY. NOT INTENDED FOR HUMAN OR ANIMAL DIAGNOSTIC OR THERAPEUTIC USES.
TOLL-FREE PHONE 1 800 667 0322 PHONE +1 604 877 0713 VERSION 02
[email protected] [email protected] FOR GLOBAL CONTACT DETAILS VISIT WWW.STEMCELL.COM DOCUMENT #10000005578
2
2.0 RoboSep™-S System
2.1 Instrument Overview
Figure 1. Front View of RoboSep™-S with the Lid Open
STEMCELL TECHNOLOGIES INC.’S QUALITY MANAGEMENT SYSTEM IS CERTIFIED TO ISO 13485 MEDICAL DEVICE STANDARDS.
FOR RESEARCH USE ONLY. NOT INTENDED FOR HUMAN OR ANIMAL DIAGNOSTIC OR THERAPEUTIC USES.
TOLL-FREE PHONE 1 800 667 0322 PHONE +1 604 877 0713 VERSION 02
[email protected] [email protected] FOR GLOBAL CONTACT DETAILS VISIT WWW.STEMCELL.COM DOCUMENT #10000005578
3
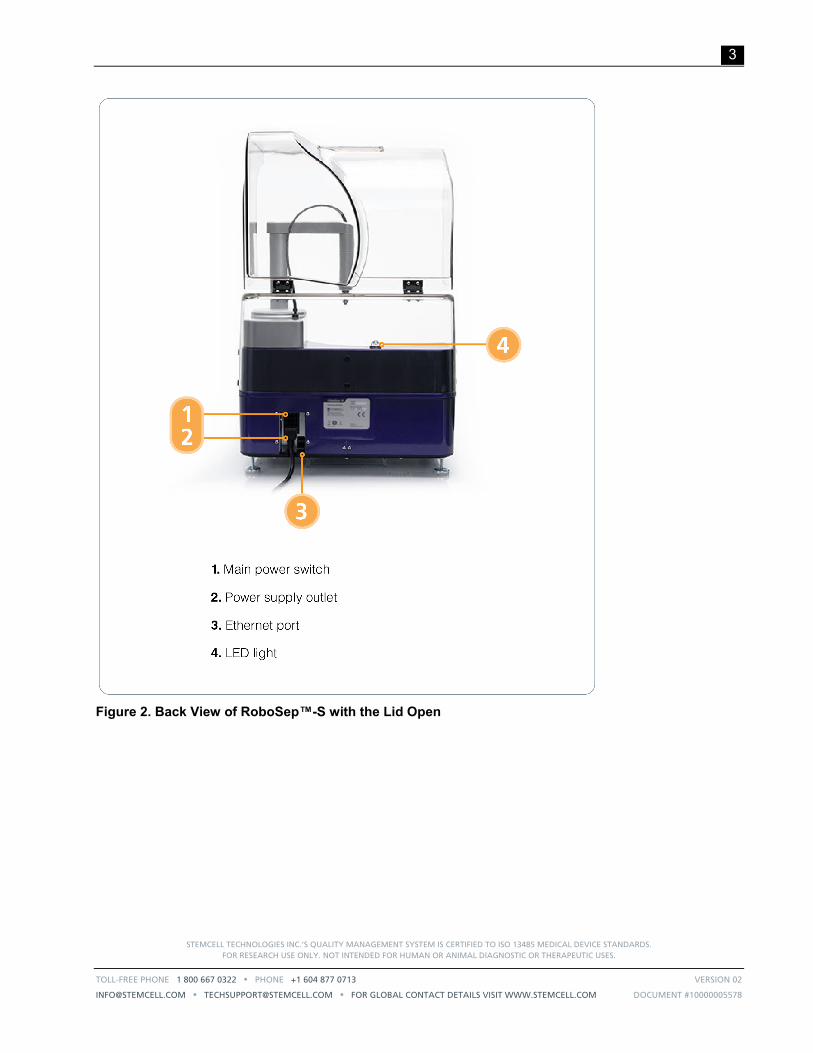
Figure 2. Back View of RoboSep™-S with the Lid Open

STEMCELL TECHNOLOGIES INC.’S QUALITY MANAGEMENT SYSTEM IS CERTIFIED TO ISO 13485 MEDICAL DEVICE STANDARDS. FOR RESEARCH USE ONLY. NOT INTENDED FOR HUMAN OR ANIMAL DIAGNOSTIC OR THERAPEUTIC USES.
TOLL-FREE PHONE 1 800 667 0322 PHONE +1 604 877 0713 VERSION 02
[email protected] [email protected] FOR GLOBAL CONTACT DETAILS VISIT WWW.STEMCELL.COM DOCUMENT #10000005578
4
RoboSep™-S is an instrument that comprises four main mechanical components operated under computer control (Figure 1):
Robotic Arm
Carousel
Tip Stripping Arm (not shown)
Hydraulic System (behind access panel)
With these systems acting in concert, RoboSep™-S performs the following actions to automate EasySep™
cell separation protocols:
Accurate dispensing of magnetic labeling reagents into cell samples using disposable 1 mL tips
Mixing and transfer of the sample between tubes using disposable 5 mL tips
Transfer of buffer solution from the buffer bottle to tubes on the carousel using disposable 5 mL tips
Simultaneous tracking of incubation times for all separation protocols
RoboSep™-S automatically executes all actions required to process up to four samples, with the flexibility to simultaneously perform different types of separations.
2.1.1 Robotic Arm and Carousel Robotic Arm
The robotic arm (Figure 3A) moves both vertically and rotationally. The stainless steel tip head at the end of the arm is used to pick up pipette tips from the RoboSep™ Filter Tip Rack (Figure 3B). A custom, single-use RoboSep™ Filter Tip Rack contains all the disposable pipette tips necessary to process a single sample.
Figure 3. (A) Robotic Arm and (B) RoboSep™ Filter Tip Rack. Note that the lid of the RoboSep™ Filter Tip Rack needs to be removed prior to use.
STEMCELL TECHNOLOGIES INC.’S QUALITY MANAGEMENT SYSTEM IS CERTIFIED TO ISO 13485 MEDICAL DEVICE STANDARDS.
FOR RESEARCH USE ONLY. NOT INTENDED FOR HUMAN OR ANIMAL DIAGNOSTIC OR THERAPEUTIC USES.
TOLL-FREE PHONE 1 800 667 0322 PHONE +1 604 877 0713 VERSION 02
[email protected] [email protected] FOR GLOBAL CONTACT DETAILS VISIT WWW.STEMCELL.COM DOCUMENT #10000005578
5
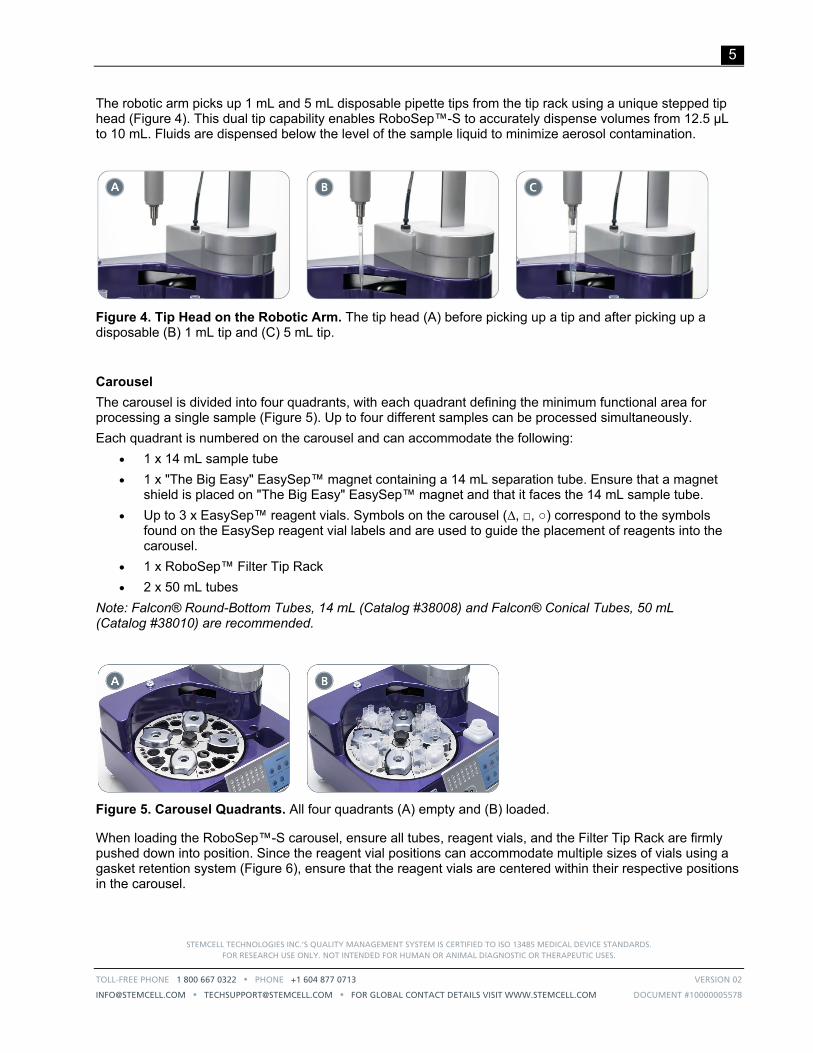
The robotic arm picks up 1 mL and 5 mL disposable pipette tips from the tip rack using a unique stepped tip head (Figure 4). This dual tip capability enables RoboSep™-S to accurately dispense volumes from 12.5 µL to 10 mL. Fluids are dispensed below the level of the sample liquid to minimize aerosol contamination.
Figure 4. Tip Head on the Robotic Arm. The tip head (A) before picking up a tip and after picking up a disposable (B) 1 mL tip and (C) 5 mL tip.
Carousel
The carousel is divided into four quadrants, with each quadrant defining the minimum functional area for processing a single sample (Figure 5). Up to four different samples can be processed simultaneously.
Each quadrant is numbered on the carousel and can accommodate the following:
1 x 14 mL sample tube
1 x "The Big Easy" EasySep™ magnet containing a 14 mL separation tube. Ensure that a magnet shield is placed on "The Big Easy" EasySep™ magnet and that it faces the 14 mL sample tube.
Up to 3 x EasySep™ reagent vials. Symbols on the carousel (∆, □, ○) correspond to the symbols found on the EasySep reagent vial labels and are used to guide the placement of reagents into the carousel.
1 x RoboSep™ Filter Tip Rack
2 x 50 mL tubes
Note: Falcon® Round-Bottom Tubes, 14 mL (Catalog #38008) and Falcon® Conical Tubes, 50 mL (Catalog #38010) are recommended.
Figure 5. Carousel Quadrants. All four quadrants (A) empty and (B) loaded.
When loading the RoboSep™-S carousel, ensure all tubes, reagent vials, and the Filter Tip Rack are firmly pushed down into position. Since the reagent vial positions can accommodate multiple sizes of vials using a gasket retention system (Figure 6), ensure that the reagent vials are centered within their respective positions in the carousel.
STEMCELL TECHNOLOGIES INC.’S QUALITY MANAGEMENT SYSTEM IS CERTIFIED TO ISO 13485 MEDICAL DEVICE STANDARDS. FOR RESEARCH USE ONLY. NOT INTENDED FOR HUMAN OR ANIMAL DIAGNOSTIC OR THERAPEUTIC USES.
TOLL-FREE PHONE 1 800 667 0322 PHONE +1 604 877 0713 VERSION 02
[email protected] [email protected] FOR GLOBAL CONTACT DETAILS VISIT WWW.STEMCELL.COM DOCUMENT #10000005578
6
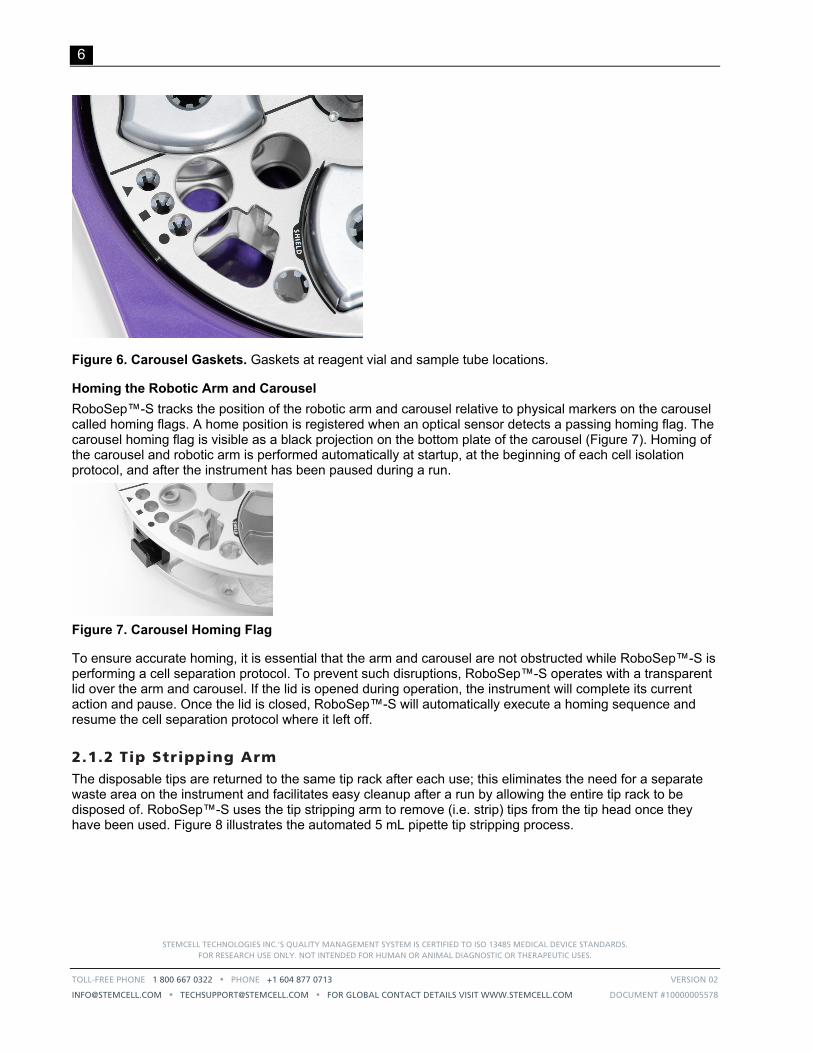
Figure 6. Carousel Gaskets. Gaskets at reagent vial and sample tube locations.
Homing the Robotic Arm and Carousel
RoboSep™-S tracks the position of the robotic arm and carousel relative to physical markers on the carousel called homing flags. A home position is registered when an optical sensor detects a passing homing flag. The carousel homing flag is visible as a black projection on the bottom plate of the carousel (Figure 7). Homing of the carousel and robotic arm is performed automatically at startup, at the beginning of each cell isolation protocol, and after the instrument has been paused during a run.
Figure 7. Carousel Homing Flag
To ensure accurate homing, it is essential that the arm and carousel are not obstructed while RoboSep™-S is performing a cell separation protocol. To prevent such disruptions, RoboSep™-S operates with a transparent lid over the arm and carousel. If the lid is opened during operation, the instrument will complete its current action and pause. Once the lid is closed, RoboSep™-S will automatically execute a homing sequence and resume the cell separation protocol where it left off.
2.1.2 Tip Stripping Arm The disposable tips are returned to the same tip rack after each use; this eliminates the need for a separate waste area on the instrument and facilitates easy cleanup after a run by allowing the entire tip rack to be disposed of. RoboSep™-S uses the tip stripping arm to remove (i.e. strip) tips from the tip head once they have been used. Figure 8 illustrates the automated 5 mL pipette tip stripping process.

STEMCELL TECHNOLOGIES INC.’S QUALITY MANAGEMENT SYSTEM IS CERTIFIED TO ISO 13485 MEDICAL DEVICE STANDARDS.
FOR RESEARCH USE ONLY. NOT INTENDED FOR HUMAN OR ANIMAL DIAGNOSTIC OR THERAPEUTIC USES.
TOLL-FREE PHONE 1 800 667 0322 PHONE +1 604 877 0713 VERSION 02
[email protected] [email protected] FOR GLOBAL CONTACT DETAILS VISIT WWW.STEMCELL.COM DOCUMENT #10000005578
7
Figure 8. Tip Strip Process. (A) The robotic arm places the used 5 mL tip partly back into the tip rack. (B) The tip stripping arm swings out to engage the tip head just above the 5 mL tip. (C) The robotic arm moves up and the tip fully falls into the tip rack.
Tip Strip Failures
In some cases RoboSep™-S may be unable to strip a pipette tip from the tip head. If RoboSep™-S detects a tip strip failure, a dialog box will appear and the instrument will beep and the LED light (Figure 2) will flash. Selecting the Resume button will prompt RoboSep™-S to try stripping the tip again. If RoboSep™-S cannot successfully strip the tip, this step should be done manually.
Note: If a tip strip failure occurs, the tip head may need to be cleaned as described in section 6.1.
2.1.3 Hydraulic System The hydraulic system uses sterile deionized water driven by a positive displacement piston pump. The pipette handling tip head is connected to a hydraulic fluid bottle containing sterile deionized water located behind the front access panel of RoboSep™-S (Figure 1). The only visible part of this system is the tubing running from the console to the robotic arm.
The hydraulic fluid does not make contact with samples or reagents, and because it is deionized water, it is less damaging to the piston seal than salt solutions or buffers. Therefore the RoboSep™-S pump has a substantially longer operating life than the seals on syringe pumps used in other instruments and does not require any user maintenance. The use of water as a hydraulic fluid instead of air allows for accurate high-speed dispensing: the water effectively acts as an incompressible extension of the pump piston, allowing the system to operate with a dead air volume similar to that of a manual pipette.
The hydraulic fluid bottle should be refilled periodically (section 3.5). To reduce the chance of the hydraulic tubing becoming clogged with microbial growth, sterile deionized water should be used.
Note: RoboSep™-S will automatically monitor the volume of deionized water in the hydraulic fluid bottle and a dialog box will notify you if priming is required (section 3.5).
STEMCELL TECHNOLOGIES INC.’S QUALITY MANAGEMENT SYSTEM IS CERTIFIED TO ISO 13485 MEDICAL DEVICE STANDARDS. FOR RESEARCH USE ONLY. NOT INTENDED FOR HUMAN OR ANIMAL DIAGNOSTIC OR THERAPEUTIC USES.
TOLL-FREE PHONE 1 800 667 0322 PHONE +1 604 877 0713 VERSION 02
[email protected] [email protected] FOR GLOBAL CONTACT DETAILS VISIT WWW.STEMCELL.COM DOCUMENT #10000005578
8
2.2 User Interface Overview
2.2.1 Screens
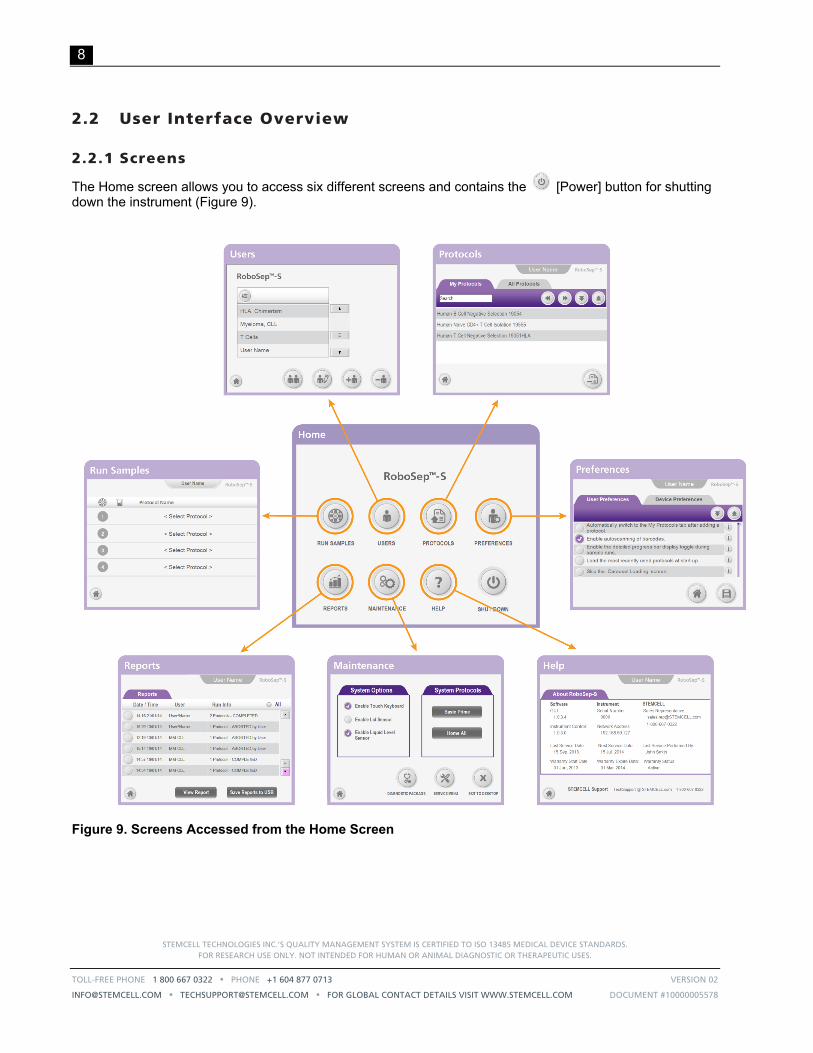
The Home screen allows you to access six different screens and contains the [Power] button for shutting down the instrument (Figure 9).
Figure 9. Screens Accessed from the Home Screen
STEMCELL TECHNOLOGIES INC.’S QUALITY MANAGEMENT SYSTEM IS CERTIFIED TO ISO 13485 MEDICAL DEVICE STANDARDS.
FOR RESEARCH USE ONLY. NOT INTENDED FOR HUMAN OR ANIMAL DIAGNOSTIC OR THERAPEUTIC USES.
TOLL-FREE PHONE 1 800 667 0322 PHONE +1 604 877 0713 VERSION 02
[email protected] [email protected] FOR GLOBAL CONTACT DETAILS VISIT WWW.STEMCELL.COM DOCUMENT #10000005578
9
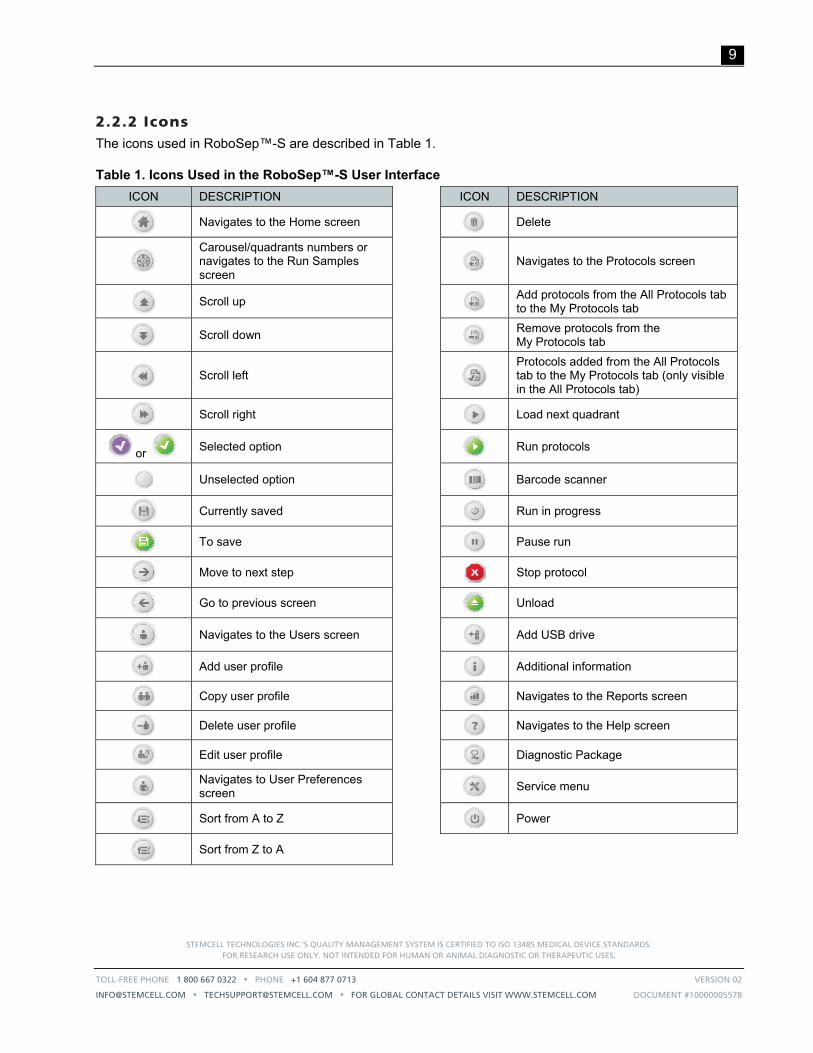
2.2.2 Icons The icons used in RoboSep™-S are described in Table 1.
Table 1. Icons Used in the RoboSep™-S User Interface
ICON DESCRIPTION ICON DESCRIPTION
Navigates to the Home screen
Delete
Carousel/quadrants numbers or navigates to the Run Samples screen
Navigates to the Protocols screen
Scroll up
Add protocols from the All Protocols tab to the My Protocols tab
Scroll down
Remove protocols from the My Protocols tab
Scroll left
Protocols added from the All Protocols tab to the My Protocols tab (only visible in the All Protocols tab)
Scroll right
Load next quadrant
or Selected option
Run protocols
Unselected option
Barcode scanner
Currently saved
Run in progress
To save
Pause run
Move to next step
Stop protocol
Go to previous screen
Unload
Navigates to the Users screen
Add USB drive
Add user profile
Additional information
Copy user profile
Navigates to the Reports screen
Delete user profile
Navigates to the Help screen
Edit user profile
Diagnostic Package
Navigates to User Preferences screen
Service menu
Sort from A to Z
Power
Sort from Z to A

STEMCELL TECHNOLOGIES INC.’S QUALITY MANAGEMENT SYSTEM IS CERTIFIED TO ISO 13485 MEDICAL DEVICE STANDARDS. FOR RESEARCH USE ONLY. NOT INTENDED FOR HUMAN OR ANIMAL DIAGNOSTIC OR THERAPEUTIC USES.
TOLL-FREE PHONE 1 800 667 0322 PHONE +1 604 877 0713 VERSION 02
[email protected] [email protected] FOR GLOBAL CONTACT DETAILS VISIT WWW.STEMCELL.COM DOCUMENT #10000005578
10
3.0 RoboSep™-S Installation Successful operation of RoboSep™-S requires correct installation. An authorized STEMCELL Technologies representative will be present to help you unpack, connect, and install the instrument. They will also provide your laboratory’s staff with training on the proper operation of RoboSep™-S.
3.1 Placement of the Instrument RoboSep™-S should be placed on a clean, flat surface free of any foreign objects or debris and insulated from excessive vibration. There should be at least 13 mm of clearance on each side of the instrument to ensure adequate cooling. RoboSep™-S is not specified for use inside an incubator or cold room. See section 7.0 for detailed RoboSep™-S specifications.
It is recommended to operate RoboSep™-S with the lid in place to prevent accidental interference with the operation of the robotic arm.
RoboSep™-S is designed to fit in chemical hoods and biohazard safety cabinets. To make operation within such environments easier, the lid can be removed from RoboSep™-S using the following instructions:
1. Place RoboSep™-S so that you are facing the side of the instrument (Figure 10A).
2. Ensure the lid is closed.
3. Remove the six thumb screws holding the lid in place (two on the back and two on each side of the instrument).
4. Slowly remove the lid by lifting it.
5. Replace the thumb screws in their original position (Figure 10B) and store the lid.
6. Select [Maintenance] on the Home screen and deselect Enable Lid Sensor under the System Options tab.
Figure 10. Removing the Lid. The lid (A) in place and (B) removed. Note that only four thumb screws are shown in this diagram.

STEMCELL TECHNOLOGIES INC.’S QUALITY MANAGEMENT SYSTEM IS CERTIFIED TO ISO 13485 MEDICAL DEVICE STANDARDS.
FOR RESEARCH USE ONLY. NOT INTENDED FOR HUMAN OR ANIMAL DIAGNOSTIC OR THERAPEUTIC USES.
TOLL-FREE PHONE 1 800 667 0322 PHONE +1 604 877 0713 VERSION 02
[email protected] [email protected] FOR GLOBAL CONTACT DETAILS VISIT WWW.STEMCELL.COM DOCUMENT #10000005578
11
3.2 Power and Network Connections Plug in the power cord provided with RoboSep™-S to the power supply outlet located on the back of the instrument (Figure 11), and connect it into a 3-prong, grounded AC outlet rated 2A 100 - 240 V. Do not use an adapter to a two-terminal outlet.
Figure 11. Power and Network Connections
Data connections to RoboSep™-S are through:
An Ethernet port located on the back of the instrument (Figure 11)
3 x USB ports located on the front of the instrument (Figure 1)
3.2.1 Connecting to a Network RoboSep™-S can be connected to networks via the Ethernet port. The instrument will automatically assign itself an IP address when connected to a Local Area Network (LAN). Shared documents can then be accessed by all other computers also connected to the LAN.
To access RoboSep™-S shared documents from a separate networked computer:
1. Connect one end of a CAT-5 Ethernet cable (not provided) to the Ethernet port located on the back of RoboSep™-S (Figure 11) and the other end to a networked router. This will connect RoboSep™-S to your LAN.
2. Start up RoboSep™-S (section 3.3) and select [Help] from the Home screen.
3. Note the Network address (IP address) that appears on the Help screen (Figure 12).
4. On the separate networked computer, go to Start > Run and then enter two backslashes followed by the Network address (e.g. //192.168.59.127).
Figure 12. Help Screen
STEMCELL TECHNOLOGIES INC.’S QUALITY MANAGEMENT SYSTEM IS CERTIFIED TO ISO 13485 MEDICAL DEVICE STANDARDS. FOR RESEARCH USE ONLY. NOT INTENDED FOR HUMAN OR ANIMAL DIAGNOSTIC OR THERAPEUTIC USES.
TOLL-FREE PHONE 1 800 667 0322 PHONE +1 604 877 0713 VERSION 02
[email protected] [email protected] FOR GLOBAL CONTACT DETAILS VISIT WWW.STEMCELL.COM DOCUMENT #10000005578
12
Once connected, the following folders can be accessed:
Logs - Contains the log files (section 8.1)
Reports - Contains the RoboSep™-S End-of-Run report files (section 5.1)
Protocols - Contains the RoboSep™ protocol files
Data - Allows transfer of files from the instrument to the connected computer
3.3 Startup Note: The first time RoboSep™-S is used following installation, the STEMCELL Technologies representative will turn on the main power switch located on the back of the instrument (Figure 2) and will also prime the hydraulic system. It is recommended not to attach any USB drives to the instrument at the time of startup.
1. Turn ON the power switch located on the front of the instrument (Figure 1).
Note: A green indicator light on the front of the instrument will light up, indicating that the instrument is turned on.
2. Wait for RoboSep™-S homing to occur.
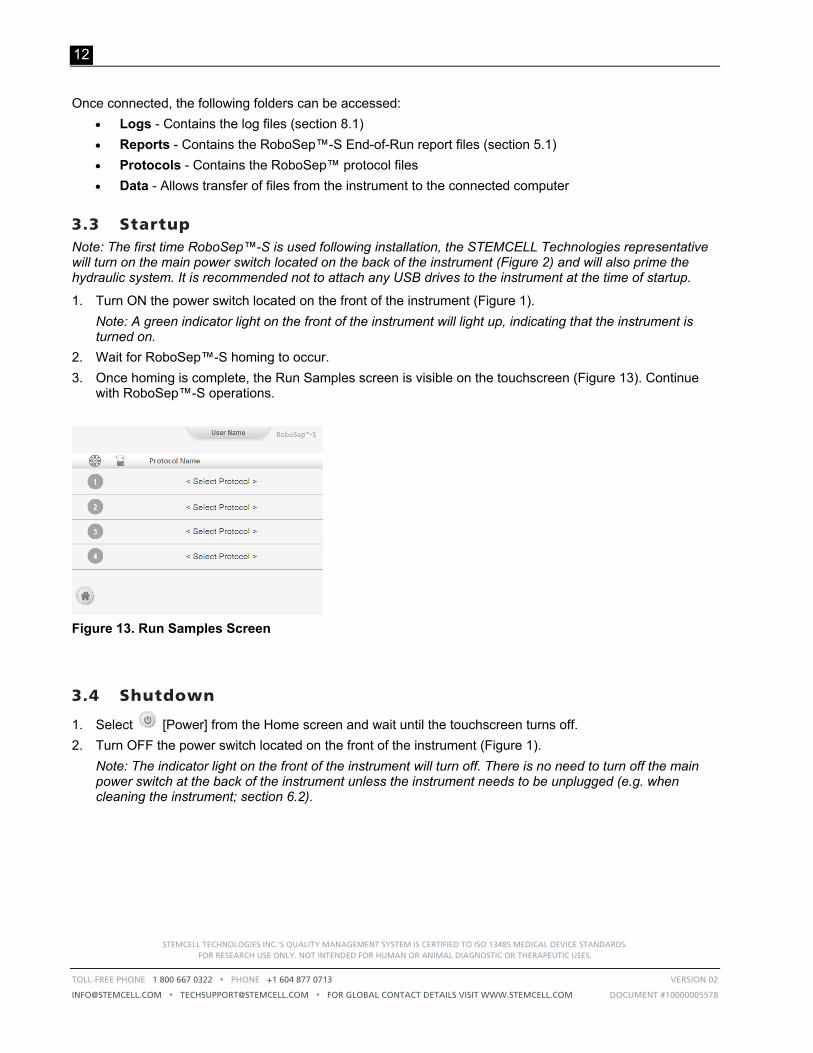
3. Once homing is complete, the Run Samples screen is visible on the touchscreen (Figure 13). Continue with RoboSep™-S operations.
Figure 13. Run Samples Screen
3.4 Shutdown
1. Select [Power] from the Home screen and wait until the touchscreen turns off.
2. Turn OFF the power switch located on the front of the instrument (Figure 1).
Note: The indicator light on the front of the instrument will turn off. There is no need to turn off the main power switch at the back of the instrument unless the instrument needs to be unplugged (e.g. when cleaning the instrument; section 6.2).
STEMCELL TECHNOLOGIES INC.’S QUALITY MANAGEMENT SYSTEM IS CERTIFIED TO ISO 13485 MEDICAL DEVICE STANDARDS.
FOR RESEARCH USE ONLY. NOT INTENDED FOR HUMAN OR ANIMAL DIAGNOSTIC OR THERAPEUTIC USES.
TOLL-FREE PHONE 1 800 667 0322 PHONE +1 604 877 0713 VERSION 02
[email protected] [email protected] FOR GLOBAL CONTACT DETAILS VISIT WWW.STEMCELL.COM DOCUMENT #10000005578
13
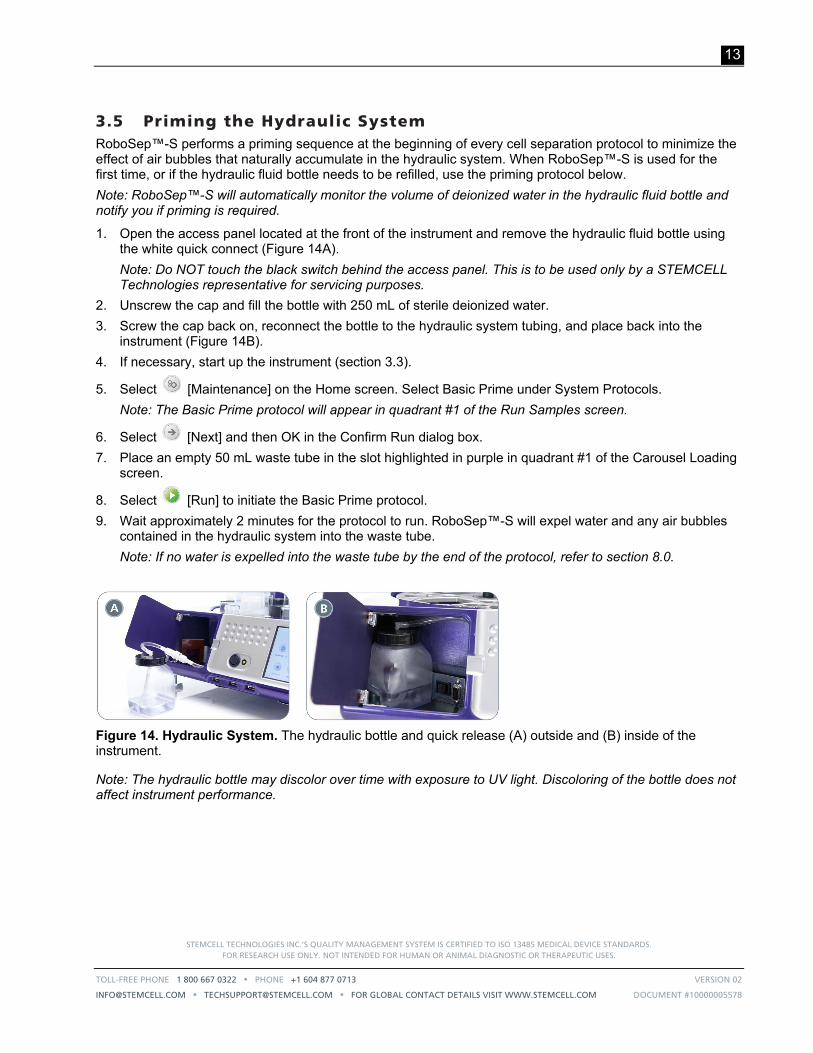
3.5 Priming the Hydraulic System RoboSep™-S performs a priming sequence at the beginning of every cell separation protocol to minimize the effect of air bubbles that naturally accumulate in the hydraulic system. When RoboSep™-S is used for the first time, or if the hydraulic fluid bottle needs to be refilled, use the priming protocol below.
Note: RoboSep™-S will automatically monitor the volume of deionized water in the hydraulic fluid bottle and notify you if priming is required.
1. Open the access panel located at the front of the instrument and remove the hydraulic fluid bottle using the white quick connect (Figure 14A).
Note: Do NOT touch the black switch behind the access panel. This is to be used only by a STEMCELL Technologies representative for servicing purposes.
2. Unscrew the cap and fill the bottle with 250 mL of sterile deionized water.
3. Screw the cap back on, reconnect the bottle to the hydraulic system tubing, and place back into the instrument (Figure 14B).
4. If necessary, start up the instrument (section 3.3).
5. Select [Maintenance] on the Home screen. Select Basic Prime under System Protocols.
Note: The Basic Prime protocol will appear in quadrant #1 of the Run Samples screen.
6. Select [Next] and then OK in the Confirm Run dialog box.
7. Place an empty 50 mL waste tube in the slot highlighted in purple in quadrant #1 of the Carousel Loading screen.
8. Select [Run] to initiate the Basic Prime protocol.
9. Wait approximately 2 minutes for the protocol to run. RoboSep™-S will expel water and any air bubbles contained in the hydraulic system into the waste tube.
Note: If no water is expelled into the waste tube by the end of the protocol, refer to section 8.0.
Figure 14. Hydraulic System. The hydraulic bottle and quick release (A) outside and (B) inside of the instrument.
Note: The hydraulic bottle may discolor over time with exposure to UV light. Discoloring of the bottle does not affect instrument performance.
STEMCELL TECHNOLOGIES INC.’S QUALITY MANAGEMENT SYSTEM IS CERTIFIED TO ISO 13485 MEDICAL DEVICE STANDARDS. FOR RESEARCH USE ONLY. NOT INTENDED FOR HUMAN OR ANIMAL DIAGNOSTIC OR THERAPEUTIC USES.
TOLL-FREE PHONE 1 800 667 0322 PHONE +1 604 877 0713 VERSION 02
[email protected] [email protected] FOR GLOBAL CONTACT DETAILS VISIT WWW.STEMCELL.COM DOCUMENT #10000005578
14
4.0 Running RoboSep™-S Detailed operating instructions are described in this section. For a set of quick start instructions for running RoboSep™-S, refer to section 11.0.
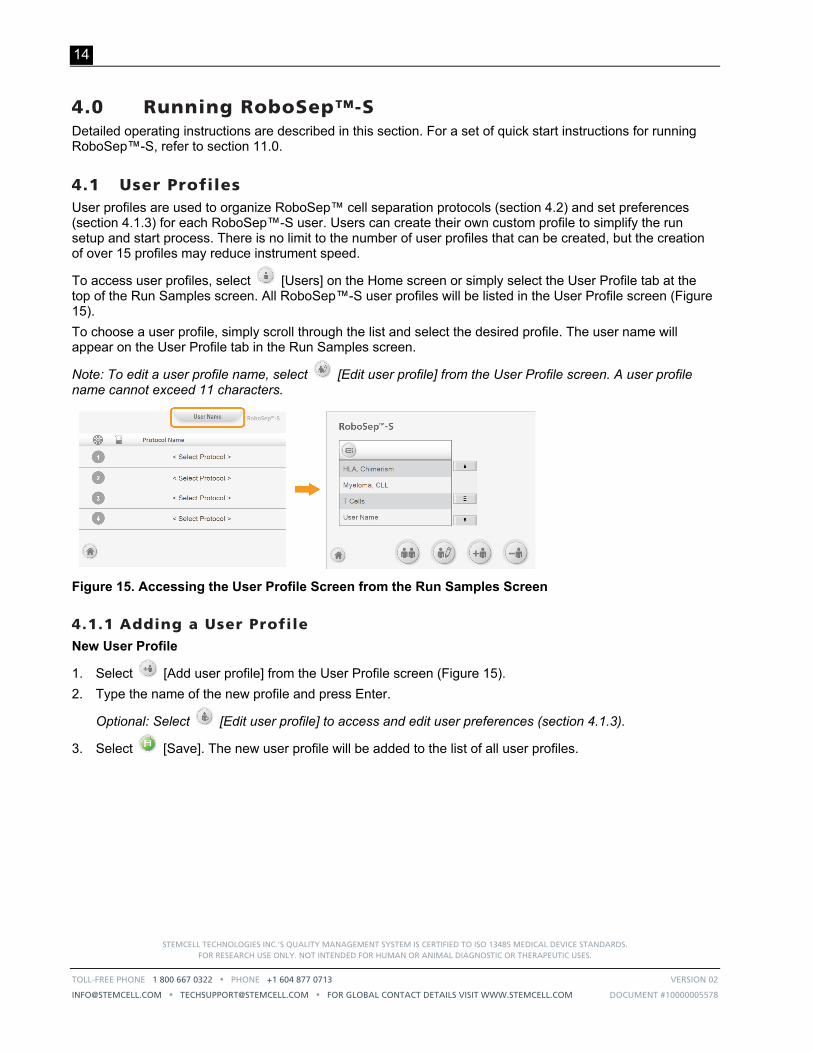
4.1 User Profiles User profiles are used to organize RoboSep™ cell separation protocols (section 4.2) and set preferences (section 4.1.3) for each RoboSep™-S user. Users can create their own custom profile to simplify the run setup and start process. There is no limit to the number of user profiles that can be created, but the creation of over 15 profiles may reduce instrument speed.
To access user profiles, select [Users] on the Home screen or simply select the User Profile tab at the top of the Run Samples screen. All RoboSep™-S user profiles will be listed in the User Profile screen (Figure 15).
To choose a user profile, simply scroll through the list and select the desired profile. The user name will appear on the User Profile tab in the Run Samples screen.
Note: To edit a user profile name, select [Edit user profile] from the User Profile screen. A user profile name cannot exceed 11 characters.
Figure 15. Accessing the User Profile Screen from the Run Samples Screen
4.1.1 Adding a User Profile New User Profile
1. Select [Add user profile] from the User Profile screen (Figure 15).
2. Type the name of the new profile and press Enter.
Optional: Select [Edit user profile] to access and edit user preferences (section 4.1.3).
3. Select [Save]. The new user profile will be added to the list of all user profiles.
STEMCELL TECHNOLOGIES INC.’S QUALITY MANAGEMENT SYSTEM IS CERTIFIED TO ISO 13485 MEDICAL DEVICE STANDARDS.
FOR RESEARCH USE ONLY. NOT INTENDED FOR HUMAN OR ANIMAL DIAGNOSTIC OR THERAPEUTIC USES.
TOLL-FREE PHONE 1 800 667 0322 PHONE +1 604 877 0713 VERSION 02
[email protected] [email protected] FOR GLOBAL CONTACT DETAILS VISIT WWW.STEMCELL.COM DOCUMENT #10000005578
15
Copying a User Profile
This allows one user profile to be copied under a new user name.
1. Select [Copy user profile] from the User Profile screen (Figure 15).
2. Select the user profile you want to copy and then select [Select].
3. Type the new name for the copied user profile and press Enter.
Optional: Select [Edit user profile] to access and edit user preferences (section 4.1.3).
4. Select [Save]. The new copied user profile will be added to the list of all user profiles.
4.1.2 Deleting a User Profile Note: A user profile cannot be deleted if that user is currently logged into RoboSep™-S (i.e. if the user name is present in the User Profile tab). The user must first select another user profile and then delete the unwanted user profile.
1. Select [Delete user profile] from the User Profile screen (Figure 15).
2. Select the user profile to be deleted.
3. Select [Select]. The selected user profile will be deleted from the list of all user profiles.
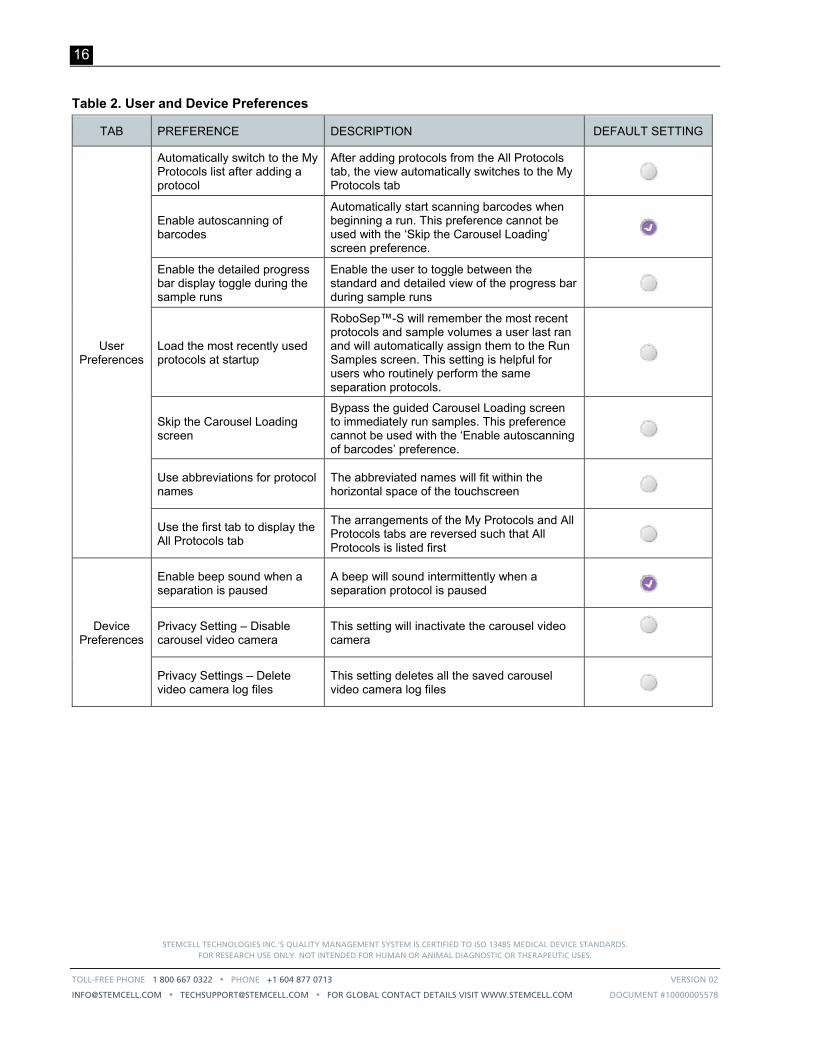
4.1.3 Editing User Profile Preferences For each user profile, a number of user and device preferences (Table 2) can be changed from the User
Preferences screen. Once done editing, select [Save] to save the edits made.
Note: The User Preferences screen can be accessed directly from the Home screen by simply selecting
[Edit user profile] once the desired user profile has been selected.
STEMCELL TECHNOLOGIES INC.’S QUALITY MANAGEMENT SYSTEM IS CERTIFIED TO ISO 13485 MEDICAL DEVICE STANDARDS. FOR RESEARCH USE ONLY. NOT INTENDED FOR HUMAN OR ANIMAL DIAGNOSTIC OR THERAPEUTIC USES.
TOLL-FREE PHONE 1 800 667 0322 PHONE +1 604 877 0713 VERSION 02
[email protected] [email protected] FOR GLOBAL CONTACT DETAILS VISIT WWW.STEMCELL.COM DOCUMENT #10000005578
16
Table 2. User and Device Preferences
TAB PREFERENCE DESCRIPTION DEFAULT SETTING
User Preferences
Automatically switch to the My Protocols list after adding a protocol
After adding protocols from the All Protocols tab, the view automatically switches to the My Protocols tab
Enable autoscanning of barcodes
Automatically start scanning barcodes when beginning a run. This preference cannot be used with the ‘Skip the Carousel Loading’ screen preference.
Enable the detailed progress bar display toggle during the sample runs
Enable the user to toggle between the standard and detailed view of the progress bar during sample runs
Load the most recently used protocols at startup
RoboSep™-S will remember the most recent protocols and sample volumes a user last ran and will automatically assign them to the Run Samples screen. This setting is helpful for users who routinely perform the same separation protocols.
Skip the Carousel Loading screen
Bypass the guided Carousel Loading screen to immediately run samples. This preference cannot be used with the ‘Enable autoscanning of barcodes’ preference.
Use abbreviations for protocol names
The abbreviated names will fit within the horizontal space of the touchscreen
Use the first tab to display the All Protocols tab
The arrangements of the My Protocols and All Protocols tabs are reversed such that All Protocols is listed first
Device Preferences
Enable beep sound when a separation is paused
A beep will sound intermittently when a separation protocol is paused
Privacy Setting – Disable carousel video camera
This setting will inactivate the carousel video camera
Privacy Settings – Delete video camera log files
This setting deletes all the saved carousel video camera log files
STEMCELL TECHNOLOGIES INC.’S QUALITY MANAGEMENT SYSTEM IS CERTIFIED TO ISO 13485 MEDICAL DEVICE STANDARDS.
FOR RESEARCH USE ONLY. NOT INTENDED FOR HUMAN OR ANIMAL DIAGNOSTIC OR THERAPEUTIC USES.
TOLL-FREE PHONE 1 800 667 0322 PHONE +1 604 877 0713 VERSION 02
[email protected] [email protected] FOR GLOBAL CONTACT DETAILS VISIT WWW.STEMCELL.COM DOCUMENT #10000005578
17
4.1.4 Privacy Settings RoboSep™-S has an internal video camera (including microphone) that can record sample handling. These monitoring devices can be made active throughout protocol runs and the recorded data is stored in the instrument’s internal hard drive. In the event your instrument malfunctions, this data can be retrieved and analyzed by STEMCELL Technologies Technical Support team to help get your RoboSep™-S up and running again as quickly as possible.
By default, RoboSep™-S records both video and sound of the carousel workspace including a limited field of vision in front of the instrument. These features can be configured during installation or modified at any time by the customer. To disable, edit the following two Privacy Setting preferences under the User Profile Preferences (section 4.1.3):
Privacy Setting – Disable carousel video camera
Privacy Settings – Delete video camera log files
Note: Video camera log files can be deleted at any time.
Users are expected to follow region- and institution-specific privacy policies. It is the user’s responsibility to protect sensitive information and to NOT make such information accessible to STEMCELL Technologies. Sensitive information includes any information concerning personal/material circumstances of an identified individual.
Users shall not hold STEMCELL Technologies liable for any data or sensitive information that is disclosed.
To comply with your region and institution’s privacy policies, update these settings as needed.
4.2 RoboSep™ Protocols RoboSep™ cell separation protocols involve a series of software commands and scheduling instructions designed to optimize the automation of EasySep™ cell separation kits. Each RoboSep™ protocol has been optimized for an automated system and may differ from manual EasySep™ separation protocols. Refer to the Product Information Sheet (PIS) of the EasySep™ kit for protocol names to be used. Unless otherwise noted, all protocols have been optimized for use at room temperature (15 - 25°C).
RoboSep™-S will contain all cell separation protocols available at the time of purchase. The instrument may need to be updated with new protocols as new EasySep™ cell separation kits become available or as existing protocols are improved. Contact STEMCELL Technologies at [email protected] for more information on how to update RoboSep™ protocols or refer to section 4.2.3.
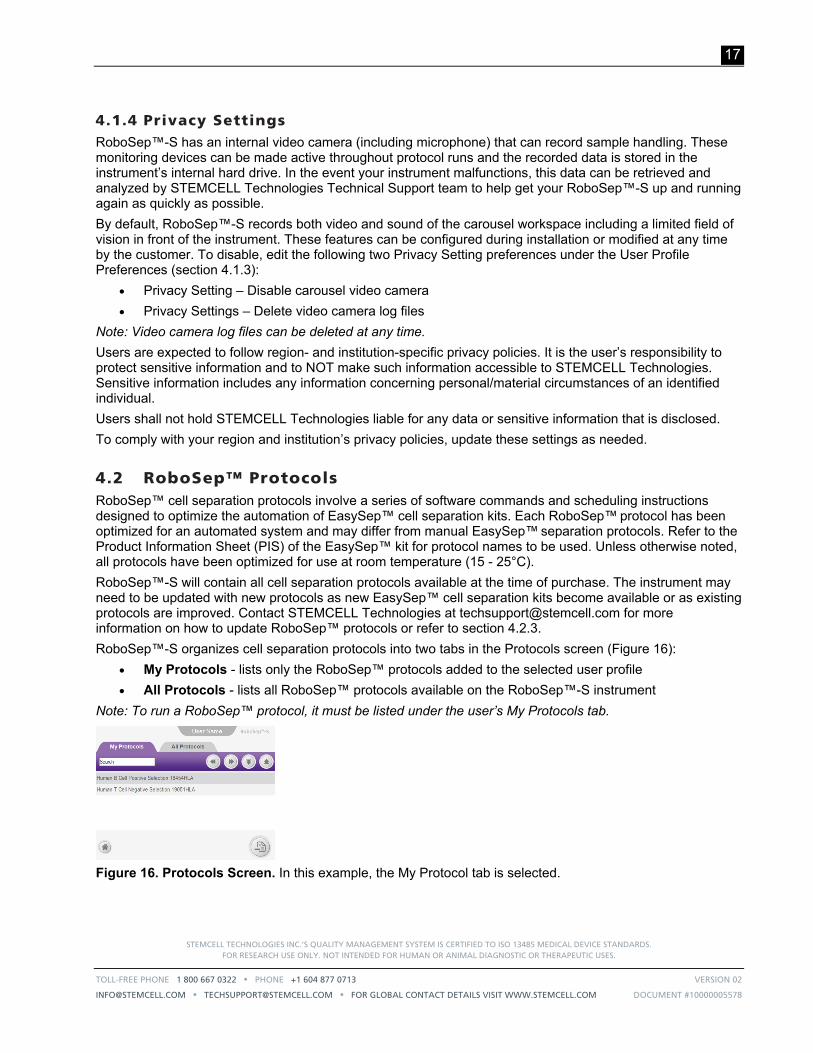
RoboSep™-S organizes cell separation protocols into two tabs in the Protocols screen (Figure 16):
My Protocols - lists only the RoboSep™ protocols added to the selected user profile
All Protocols - lists all RoboSep™ protocols available on the RoboSep™-S instrument
Note: To run a RoboSep™ protocol, it must be listed under the user’s My Protocols tab.
Figure 16. Protocols Screen. In this example, the My Protocol tab is selected.

STEMCELL TECHNOLOGIES INC.’S QUALITY MANAGEMENT SYSTEM IS CERTIFIED TO ISO 13485 MEDICAL DEVICE STANDARDS. FOR RESEARCH USE ONLY. NOT INTENDED FOR HUMAN OR ANIMAL DIAGNOSTIC OR THERAPEUTIC USES.
TOLL-FREE PHONE 1 800 667 0322 PHONE +1 604 877 0713 VERSION 02
[email protected] [email protected] FOR GLOBAL CONTACT DETAILS VISIT WWW.STEMCELL.COM DOCUMENT #10000005578
18
4.2.1 Adding Protocols to a User Profile Note: Figure 17 represents an overall schematic of the detailed instructions described below.
1. Select a user profile (section 4.1) and ensure that no protocols have been assigned to a quadrant in the Run Sample screen (i.e. all quadrants have <Select Protocol> listed under Protocol Name).
2. Select [Protocols] on the Home Screen. The Protocols screen will appear (Figure 16).
3. Select the All Protocols tab and search for the desired protocol using at least one of the following options:
o Use the Search box to type in key words related to a protocol name. For example, enter the EasySep™ kit catalog number.
o Scroll up and down the All Protocols list as needed using the [Scroll up] and [Scroll down], respectively.
4. Select all desired protocols to be added to the My Protocol tab. A [Select] will appear to the left of the selected protocol names.
5. Select [Add protocol]. The protocols will be added to the My Protocols tab.
Note: Once a protocol has been added on the My Protocols tab, the icon will appear to the left of the protocol name in the All Protocols tab.
Figure 17. Adding a Protocol to a User Profile

STEMCELL TECHNOLOGIES INC.’S QUALITY MANAGEMENT SYSTEM IS CERTIFIED TO ISO 13485 MEDICAL DEVICE STANDARDS.
FOR RESEARCH USE ONLY. NOT INTENDED FOR HUMAN OR ANIMAL DIAGNOSTIC OR THERAPEUTIC USES.
TOLL-FREE PHONE 1 800 667 0322 PHONE +1 604 877 0713 VERSION 02
[email protected] [email protected] FOR GLOBAL CONTACT DETAILS VISIT WWW.STEMCELL.COM DOCUMENT #10000005578
19
4.2.2 Removing Protocols from a User Profile Note: Figure 18 represents an overall schematic of the detailed instructions described below.
1. Select a user profile (section 4.1).
2. Select [Protocols] on the Home Screen. The Protocols screen will appear (Figure 16).
3. Select the desired protocols to be removed under the My Protocols tab. A [Select] will appear to the left of the selected protocol names.
4. Select [Remove protocol]. The selected protocols will be removed from the My Protocols tab.
Figure 18. Removing a Protocol from a User Profile
4.2.3 Adding New Protocols to RoboSep™-S New RoboSep™ protocols can be added to RoboSep™-S simply by using a USB drive. Contact STEMCELL Technologies at [email protected] for more information on how to customize existing protocols or add new protocols to RoboSep™-S.
Once you have a new RoboSep™ protocol, transfer it onto a USB drive and use the following set of instructions to add it onto RoboSep™-S:
1. Select [Protocols] on the Home screen. Ensure the All Protocols tab is selected.
2. Insert a USB drive into one of the USB ports of RoboSep™-S (Figure 1).
3. Select [Add USB] and navigate to the location of the new protocol on the USB drive.
4. Select the new RoboSep™ protocol and then select [Save].
5. Confirm that the new separation protocol is listed under the All Protocols tab has the icon next to it and then remove the USB drive.
Note: Refer to section 4.2.1 for instructions on how to add protocols to the My Protocols tab.
Note: Only handle (e.g. open, download, or forward) RoboSep™ protocols using a Windows device. If protocols are handled on Apple devices (e.g. Macbook, iPhone, etc.), the Apple software may alter the protocols, rendering them unreadable by the RoboSep™-S software.
STEMCELL TECHNOLOGIES INC.’S QUALITY MANAGEMENT SYSTEM IS CERTIFIED TO ISO 13485 MEDICAL DEVICE STANDARDS. FOR RESEARCH USE ONLY. NOT INTENDED FOR HUMAN OR ANIMAL DIAGNOSTIC OR THERAPEUTIC USES.
TOLL-FREE PHONE 1 800 667 0322 PHONE +1 604 877 0713 VERSION 02
[email protected] [email protected] FOR GLOBAL CONTACT DETAILS VISIT WWW.STEMCELL.COM DOCUMENT #10000005578
20
4.3 Setting Up a Run RoboSep™-S is designed to avoid any cross-contamination of the samples and reagents manipulated during experiments. RoboSep™-S can be operated within a biohazard safety cabinet to maintain sample and reagent sterility. When using RoboSep™-S, it is essential to observe good laboratory practices as described by your institution.
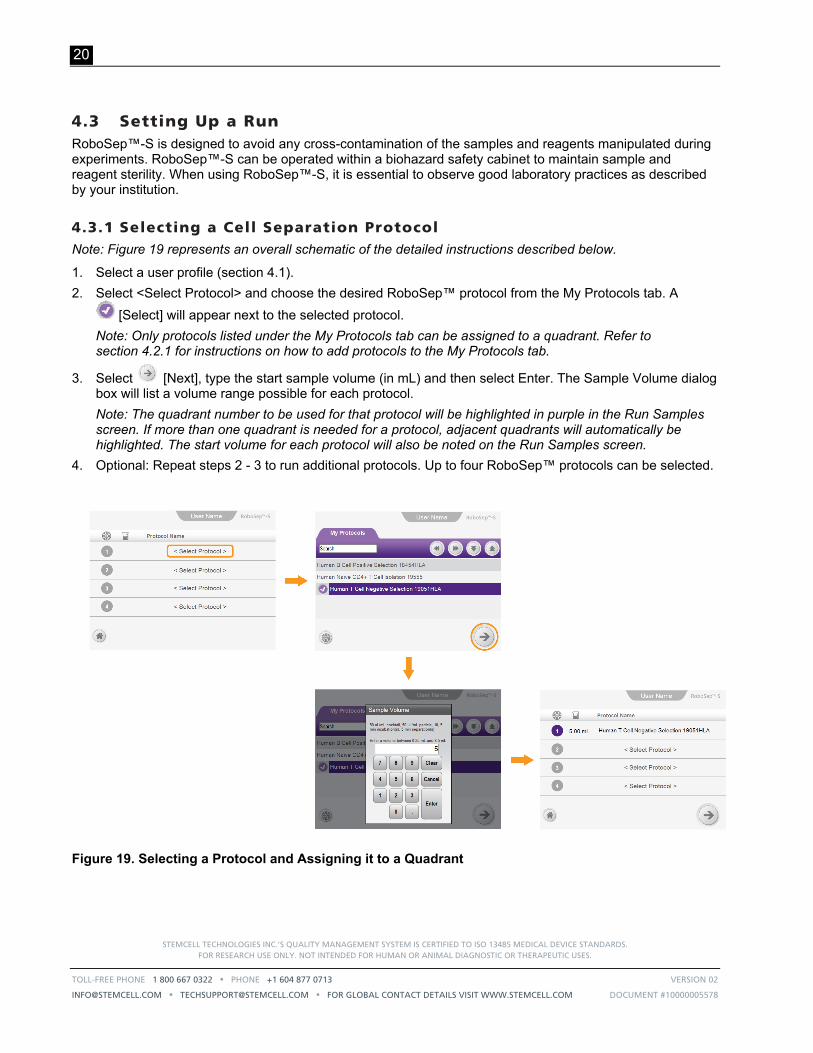
4.3.1 Selecting a Cell Separation Protocol Note: Figure 19 represents an overall schematic of the detailed instructions described below.
1. Select a user profile (section 4.1).
2. Select <Select Protocol> and choose the desired RoboSep™ protocol from the My Protocols tab. A
[Select] will appear next to the selected protocol.
Note: Only protocols listed under the My Protocols tab can be assigned to a quadrant. Refer to section 4.2.1 for instructions on how to add protocols to the My Protocols tab.
3. Select [Next], type the start sample volume (in mL) and then select Enter. The Sample Volume dialog box will list a volume range possible for each protocol.
Note: The quadrant number to be used for that protocol will be highlighted in purple in the Run Samples screen. If more than one quadrant is needed for a protocol, adjacent quadrants will automatically be highlighted. The start volume for each protocol will also be noted on the Run Samples screen.
4. Optional: Repeat steps 2 - 3 to run additional protocols. Up to four RoboSep™ protocols can be selected.
Figure 19. Selecting a Protocol and Assigning it to a Quadrant

STEMCELL TECHNOLOGIES INC.’S QUALITY MANAGEMENT SYSTEM IS CERTIFIED TO ISO 13485 MEDICAL DEVICE STANDARDS.
FOR RESEARCH USE ONLY. NOT INTENDED FOR HUMAN OR ANIMAL DIAGNOSTIC OR THERAPEUTIC USES.
TOLL-FREE PHONE 1 800 667 0322 PHONE +1 604 877 0713 VERSION 02
[email protected] [email protected] FOR GLOBAL CONTACT DETAILS VISIT WWW.STEMCELL.COM DOCUMENT #10000005578
21
Note: If the same protocol has been selected in more than one quadrant, RoboSep™-S will automatically provide the option of sharing reagents across multiple quadrants. The quadrants that will utilize a single set of reagents can be selected in the Resource Sharing screen. RoboSep™-S will indicate if a single reagent set has insufficient volume to accommodate all of the specified quadrants.
Note: To remove a protocol from an assigned quadrant, select the quadrant number icon on the Run Samples
screen. An X will appear on the quadrant number icon (Figure 20). Select [Delete] to remove the selected protocol from the assigned quadrant. Any combination of quadrants can be selected in this manner.
Figure 20. Removing a Protocol from an Assigned Quadrant
4.3.2 Preparing the Cells Refer to the Product Information Sheet (PIS) that came with your cell separation kit for instructions on how to prepare cells for separation.
4.3.3 Loading the Carousel and Starting a Run RoboSep™-S comes with a RoboSep™ Service Rack to hold and organize reagents and sample tubes prior to loading them onto the carousel (Figure 21). The rack can also be used to hold the tube caps during the separation protocol. Place the caps upside down in the rack’s designated spots.
Figure 21. RoboSep™ Service Rack. Tubes and vials placed in the rack before loading the carousel. Quadrant numbers are noted on the side of the rack.

STEMCELL TECHNOLOGIES INC.’S QUALITY MANAGEMENT SYSTEM IS CERTIFIED TO ISO 13485 MEDICAL DEVICE STANDARDS. FOR RESEARCH USE ONLY. NOT INTENDED FOR HUMAN OR ANIMAL DIAGNOSTIC OR THERAPEUTIC USES.
TOLL-FREE PHONE 1 800 667 0322 PHONE +1 604 877 0713 VERSION 02
[email protected] [email protected] FOR GLOBAL CONTACT DETAILS VISIT WWW.STEMCELL.COM DOCUMENT #10000005578
22
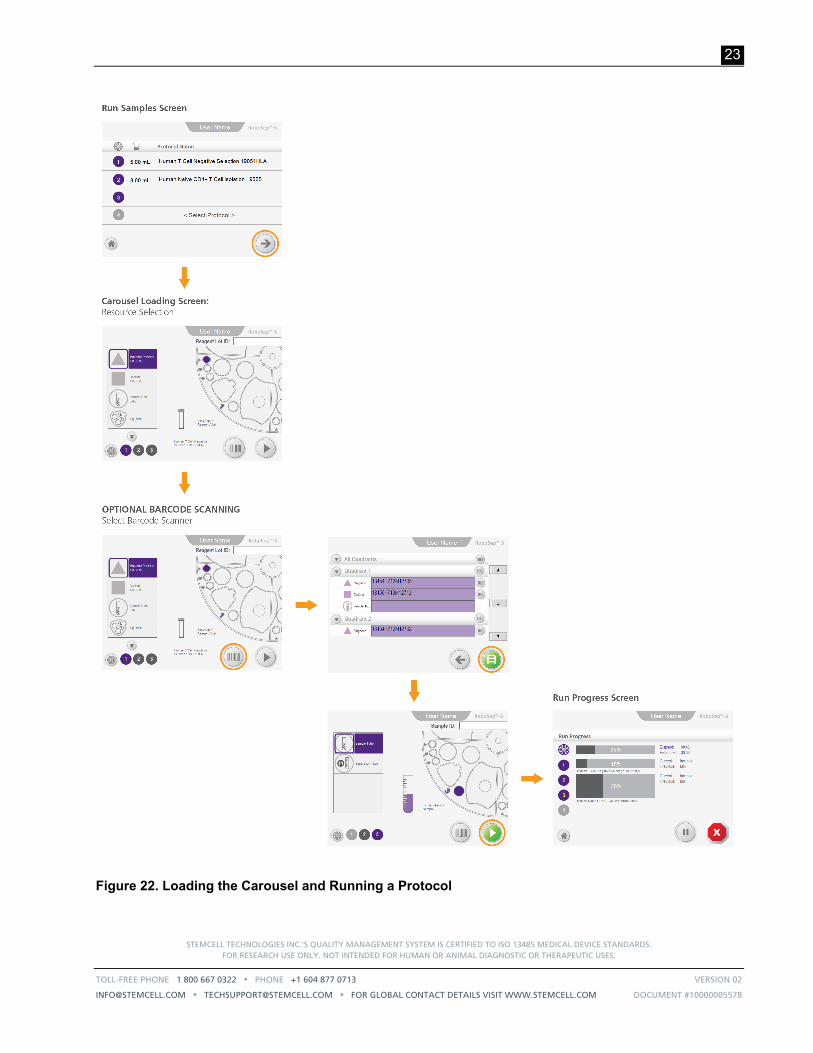
Use the following instructions to load resources (i.e. reagents, samples, tubes and tip racks) onto the carousel:
1. Select [Next] on the Run Samples screen after selecting the desired protocols.
2. Verify that you have sufficient volume of reagents before loading them into the carousel. Ensure that all lids/caps are removed from each resource before loading onto the carousel.
Note: The Carousel Loading screen will indicate the reagent volumes required for the separation based on the sample volume assigned (Figure 22).
3. Select a resource (e.g. Magnetic Particles) from the resource list on the Carousel Loading screen and place the resource in the corresponding position (highlighted in dark purple) of the carousel without the cap on.
Note: Ensure the resource is loaded in the correct quadrant. The quadrant number is displayed both on the bottom left corner (highlighted in dark purple) and on the carousel schematic on the Carousel Loading screen.
4. Scroll down the resource list until all resources have been placed in the carousel.
Note: The position for the RoboSep™ Buffer Bottle will not appear on the carousel schematic on the Carousel Loading screen. The buffer bottle should be loaded in its compartment (Figure 1).
5. Optional: Scan barcodes to record reagent-specific information such as catalog and lot numbers
(section 4.3.4). Select [Barcode scanner] on the Carousel Loading screen (Figure 22) to scan
desired barcodes for resources loaded in each quadrant. Once all scanning is finished, select [Save] to save the information. Resource-specific information will be recorded in the end-of run reports for each protocol (section 5.1).
Note: Sample ID and Reagent Lot IDs can also be manually entered.
6. Select [Run] on the Carousel Loading screen to start the protocol. A Run Progress screen will appear after approximately one minute (Figure 22).
Note: If more than one quadrant is used during the run, you will be asked to load the remaining quadrants as needed until all resources have been placed into the carousel. If a hydraulic fluid warning dialog box appears, refill the hydraulic bottle with sterile deionized water and prime the hydraulic system as described in section 3.5 before continuing.
Note: Users can pause a separation by selecting [Pause] or stop a run altogether by selecting
[Stop]. In both cases RoboSep™-S will complete the current action before stopping. To resume a run after pausing, select Resume. RoboSep™-S will home the carousel and resume the separation. If the run is stopped, the run cannot be restarted from where it was stopped and will need to be set up again from the start.
STEMCELL TECHNOLOGIES INC.’S QUALITY MANAGEMENT SYSTEM IS CERTIFIED TO ISO 13485 MEDICAL DEVICE STANDARDS.
FOR RESEARCH USE ONLY. NOT INTENDED FOR HUMAN OR ANIMAL DIAGNOSTIC OR THERAPEUTIC USES.
TOLL-FREE PHONE 1 800 667 0322 PHONE +1 604 877 0713 VERSION 02
[email protected] [email protected] FOR GLOBAL CONTACT DETAILS VISIT WWW.STEMCELL.COM DOCUMENT #10000005578
23
Figure 22. Loading the Carousel and Running a Protocol

STEMCELL TECHNOLOGIES INC.’S QUALITY MANAGEMENT SYSTEM IS CERTIFIED TO ISO 13485 MEDICAL DEVICE STANDARDS. FOR RESEARCH USE ONLY. NOT INTENDED FOR HUMAN OR ANIMAL DIAGNOSTIC OR THERAPEUTIC USES.
TOLL-FREE PHONE 1 800 667 0322 PHONE +1 604 877 0713 VERSION 02
[email protected] [email protected] FOR GLOBAL CONTACT DETAILS VISIT WWW.STEMCELL.COM DOCUMENT #10000005578
24
4.3.4 Scanning Barcodes It is optional to scan the EasySep™ vial barcodes to record reagent-specific information such as catalog and lot numbers. This can be done using the RoboSep™-S built-in scanner or using a handheld barcode scanner (optional). For standard EasySep™ kits (i.e. non-custom), RoboSep™-S will also detect if the correct barcoded EasySep™ vial has been loaded in the appropriate position in the carousel. Vial catalog IDs will be shown in the Resources screen and this information is recorded in the End-of-Run reports for each protocol that is run (section 5.1).
Note: If the user labels sample tubes with barcodes, these can be scanned by the user with a manual barcode scanner.
By default, all barcodes will be scanned. If you do not want to scan all barcodes at once during each run, edit the user profile preferences and deselect the “Enable autoscanning of barcodes” option (section 4.1.3). Then
select [Barcode scanner] on the Carousel Loading screen (Figure 22) to scan desired barcodes for
resources loaded in each quadrant. Once all scanning is finished, select [Save] to save the information.
Refer to Table 3 for the various messages that may appear on the screen after barcode scanning.
Table 3. On-Screen Messages After Barcode Scanning
ON-SCREEN MESSAGE EXPLANATION
Scanned Catalog # shown in resource screen Scanned Catalog # matches the expected Catalog # based on chosen protocol
Yellow flashing warning message: “NO BARCODE SHOULD BE READ”
Scanned Catalog # was not expected due to use of custom protocol, etc.
Red flashing error message: “INCORRECT BARCODE”
Scanned Catalog # does not match the expected Catalog # based on chosen protocol
Yellow flashing message: “CUSTOM”
No barcode detected; Catalog # not applicable due to use of custom protocol, etc.
Red flashing error message: “NONE_DETECTED”
No barcode detected; Catalog # was expected based on chosen protocol
STEMCELL TECHNOLOGIES INC.’S QUALITY MANAGEMENT SYSTEM IS CERTIFIED TO ISO 13485 MEDICAL DEVICE STANDARDS.
FOR RESEARCH USE ONLY. NOT INTENDED FOR HUMAN OR ANIMAL DIAGNOSTIC OR THERAPEUTIC USES.
TOLL-FREE PHONE 1 800 667 0322 PHONE +1 604 877 0713 VERSION 02
[email protected] [email protected] FOR GLOBAL CONTACT DETAILS VISIT WWW.STEMCELL.COM DOCUMENT #10000005578
25
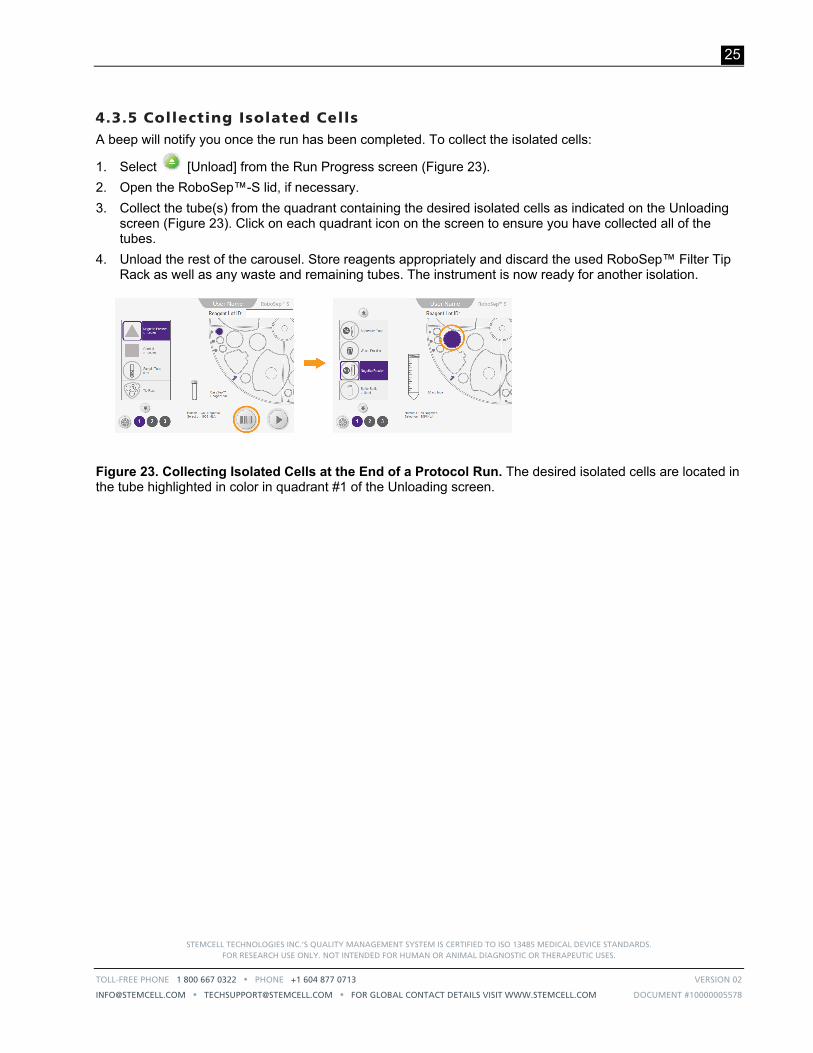
4.3.5 Collecting Isolated Cells A beep will notify you once the run has been completed. To collect the isolated cells:
1. Select [Unload] from the Run Progress screen (Figure 23).
2. Open the RoboSep™-S lid, if necessary.
3. Collect the tube(s) from the quadrant containing the desired isolated cells as indicated on the Unloading screen (Figure 23). Click on each quadrant icon on the screen to ensure you have collected all of the tubes.
4. Unload the rest of the carousel. Store reagents appropriately and discard the used RoboSep™ Filter Tip Rack as well as any waste and remaining tubes. The instrument is now ready for another isolation.
Figure 23. Collecting Isolated Cells at the End of a Protocol Run. The desired isolated cells are located in the tube highlighted in color in quadrant #1 of the Unloading screen.
STEMCELL TECHNOLOGIES INC.’S QUALITY MANAGEMENT SYSTEM IS CERTIFIED TO ISO 13485 MEDICAL DEVICE STANDARDS. FOR RESEARCH USE ONLY. NOT INTENDED FOR HUMAN OR ANIMAL DIAGNOSTIC OR THERAPEUTIC USES.
TOLL-FREE PHONE 1 800 667 0322 PHONE +1 604 877 0713 VERSION 02
[email protected] [email protected] FOR GLOBAL CONTACT DETAILS VISIT WWW.STEMCELL.COM DOCUMENT #10000005578
26
5.0 Report Files Two types of report files are automatically saved during RoboSep™-S operation: RoboSep™-S End-of-Run Reports (section 5.1) and log files (section 8.1). RoboSep™-S End-of-Run Reports contain details of each run as entered by the operator, while log files contain more detailed information about instrument operation.
5.1 RoboSep™-S End-of-Run Report Files RoboSep™-S End-of-Run Reports contain information such as the operator ID (User Profile), protocol name, run time, reagent information, sample ID, and volumes used.
EasySep™ reagent lot numbers as well as sample ID information can be entered before each run at the time of loading the carousel (section 4.3.3).
To access RoboSep™-S End-of-Run Reports:
1. Select [Reports] from the Home screen.
2. Select the desired report you want to view. A [Select] will appear to the left of the selected report.
3. Select View Report to view a PDF version of the report.
Note: Multiple reports can be selected and saved onto a USB drive by simply selecting “Save Reports to USB”.
STEMCELL TECHNOLOGIES INC.’S QUALITY MANAGEMENT SYSTEM IS CERTIFIED TO ISO 13485 MEDICAL DEVICE STANDARDS.
FOR RESEARCH USE ONLY. NOT INTENDED FOR HUMAN OR ANIMAL DIAGNOSTIC OR THERAPEUTIC USES.
TOLL-FREE PHONE 1 800 667 0322 PHONE +1 604 877 0713 VERSION 02
[email protected] [email protected] FOR GLOBAL CONTACT DETAILS VISIT WWW.STEMCELL.COM DOCUMENT #10000005578
27
6.0 Care and Maintenance As RoboSep™-S uses disposable pipette tips in a column-free system, no daily maintenance is required. However, the following routine maintenance and cleaning steps are recommended to ensure optimal performance, reliability, and longevity of your instrument:
Lightly spray the instrument’s external surfaces with 70% ethanol or 70% isopropanol and wipe clean with a soft, clean towel (section 6.2.1).
Verify that the hydraulic fluid bottle is full of sterile deionized water (section 3.5).
Clean the tip head (section 6.1).
6.1 Cleaning the Tip Head Use the RoboSep™ Tip Head Polishing Compound (Catalog #20119) provided with the instrument to clean the tip head. Do not apply other cleaning agents to the tip head.
Note: The RoboSep™ Tip Head Polishing Compound can be conveniently stored in its designated compartment in the instrument (Figure 1).
Over time, the tip head can accumulate a thin film of plastic from repeated loading and unloading of pipette tips. This accumulation can prevent RoboSep™-S from stripping the disposable pipette tips from the tip head. RoboSep™ Tip Head Polishing Compound is specially formulated to help remove this build up and disinfect the tip head when used as described below:
1. Apply 1 - 2 drops of RoboSep™ Tip Head Polishing Compound to a clean paper towel or other non-abrasive laboratory wipe.
2. Wipe the RoboSep™-S tip head.
3. Use a clean paper towel or other non-abrasive laboratory wipe to polish the tip head. Ensure that all traces of the cleaner are removed.
6.2 Cleaning RoboSep™-S
6.2.1 External Surface It is recommended to clean RoboSep™-S by lightly spraying the instrument’s external surfaces with 70% ethanol or 70% isopropanol and wiping clean with a soft, clean towel. RoboSep™-S can also be wiped down with a dilute bleach solution (e.g. 1 in 10 dilution of 5% sodium hypochlorite solution), but should then be wiped clean with water afterwards.
To avoid fluid seeping behind the touchscreen’s external surface it is recommended that the 70% isopropanol or 70% ethanol be sprayed on a soft, clean towel prior to wiping down the touchscreen. Do not allow excess fluid to pool at the margins of the touchscreen.

STEMCELL TECHNOLOGIES INC.’S QUALITY MANAGEMENT SYSTEM IS CERTIFIED TO ISO 13485 MEDICAL DEVICE STANDARDS. FOR RESEARCH USE ONLY. NOT INTENDED FOR HUMAN OR ANIMAL DIAGNOSTIC OR THERAPEUTIC USES.
TOLL-FREE PHONE 1 800 667 0322 PHONE +1 604 877 0713 VERSION 02
[email protected] [email protected] FOR GLOBAL CONTACT DETAILS VISIT WWW.STEMCELL.COM DOCUMENT #10000005578
28
6.2.2 Internal Surface If accidental spilling of biological material occurs in the carousel area of the instrument or if more thorough cleaning is needed:
1. Remove all reagents and materials (including magnets) from the carousel.
2. Rotate the carousel so that quadrant #1 faces the front side of the instrument.
3. Unscrew the black central knob (Figure 24) counterclockwise until the threads have disengaged.
4. Lift out the carousel.
5. Clean any spilled biological material according to the good laboratory practices described by your institution. Clean the carousel and magnets by lightly spraying with 70% ethanol or 70% isopropanol and wiping clean with a soft, clean towel. Exercise caution when cleaning the gaskets located within the reagent vial and 14 mL sample tube locations. Ensure you do not overly bend or permanently crease the plastic fingers of the gaskets during the cleaning process.
6. Place the carousel back into the instrument so that quadrant #1 faces the front side of the instrument, and screw the central knob clockwise until locked back into place.
Figure 24. Black Central Knob Used to Remove the Carousel
6.3 Replacing the Fuses If RoboSep™-S does not turn on after plugging it in and following the startup procedure (section 3.3), the fuses may need to be replaced.
Two fuses are located on the back of the instrument next to the power supply outlet and the main power switch (Figure 11). To replace the fuses:
1. Ensure that RoboSep™-S is shut down (section 3.4) and that the main power switch located on the back of the instrument (Figure 11) is turned OFF.
2. Unplug the instrument and open the fuse box.
3. Examine the fuses and replace any faulty fuse with a FB 4 A 250 V~.
4. Reinsert the fuse box containing the new fuse(s) in its slot. Press gently until it snaps back into place.
5. Plug in the instrument and start up RoboSep™-S (section 3.3) to check if it turns back on.
STEMCELL TECHNOLOGIES INC.’S QUALITY MANAGEMENT SYSTEM IS CERTIFIED TO ISO 13485 MEDICAL DEVICE STANDARDS.
FOR RESEARCH USE ONLY. NOT INTENDED FOR HUMAN OR ANIMAL DIAGNOSTIC OR THERAPEUTIC USES.
TOLL-FREE PHONE 1 800 667 0322 PHONE +1 604 877 0713 VERSION 02
[email protected] [email protected] FOR GLOBAL CONTACT DETAILS VISIT WWW.STEMCELL.COM DOCUMENT #10000005578
29
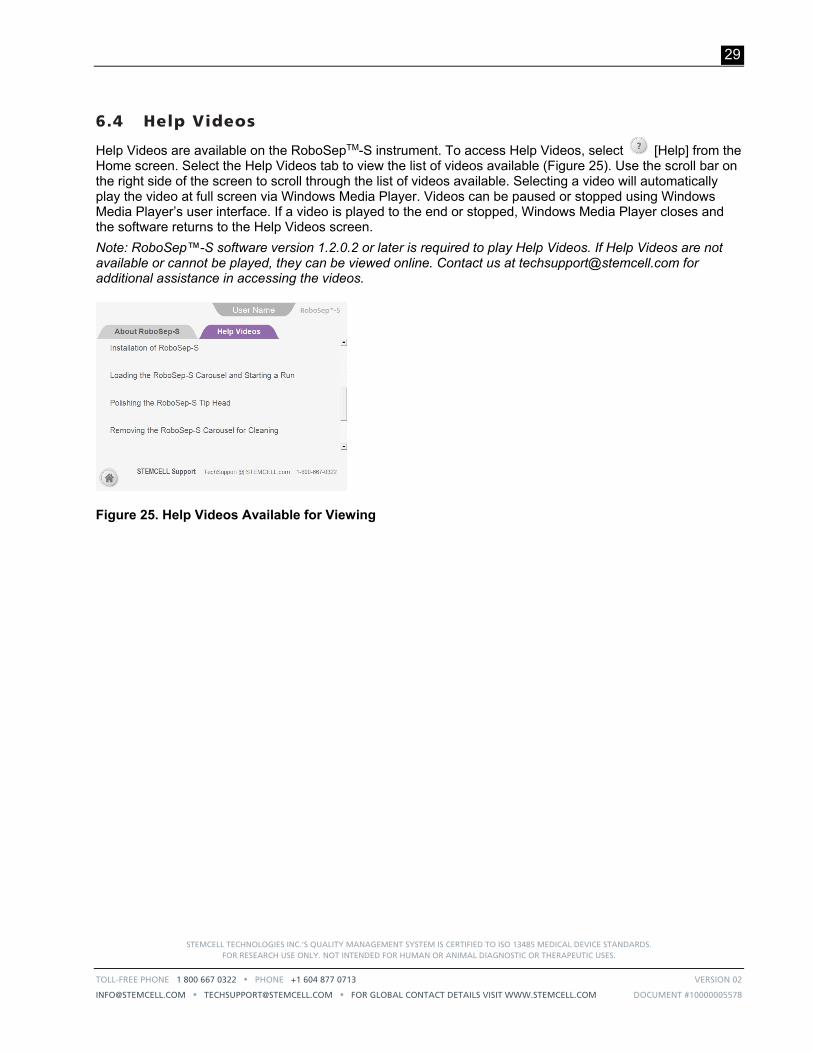
6.4 Help Videos
Help Videos are available on the RoboSepTM-S instrument. To access Help Videos, select [Help] from the Home screen. Select the Help Videos tab to view the list of videos available (Figure 25). Use the scroll bar on the right side of the screen to scroll through the list of videos available. Selecting a video will automatically play the video at full screen via Windows Media Player. Videos can be paused or stopped using Windows Media Player’s user interface. If a video is played to the end or stopped, Windows Media Player closes and the software returns to the Help Videos screen.
Note: RoboSep™-S software version 1.2.0.2 or later is required to play Help Videos. If Help Videos are not available or cannot be played, they can be viewed online. Contact us at [email protected] for additional assistance in accessing the videos.
Figure 25. Help Videos Available for Viewing
STEMCELL TECHNOLOGIES INC.’S QUALITY MANAGEMENT SYSTEM IS CERTIFIED TO ISO 13485 MEDICAL DEVICE STANDARDS. FOR RESEARCH USE ONLY. NOT INTENDED FOR HUMAN OR ANIMAL DIAGNOSTIC OR THERAPEUTIC USES.
TOLL-FREE PHONE 1 800 667 0322 PHONE +1 604 877 0713 VERSION 02
[email protected] [email protected] FOR GLOBAL CONTACT DETAILS VISIT WWW.STEMCELL.COM DOCUMENT #10000005578
30
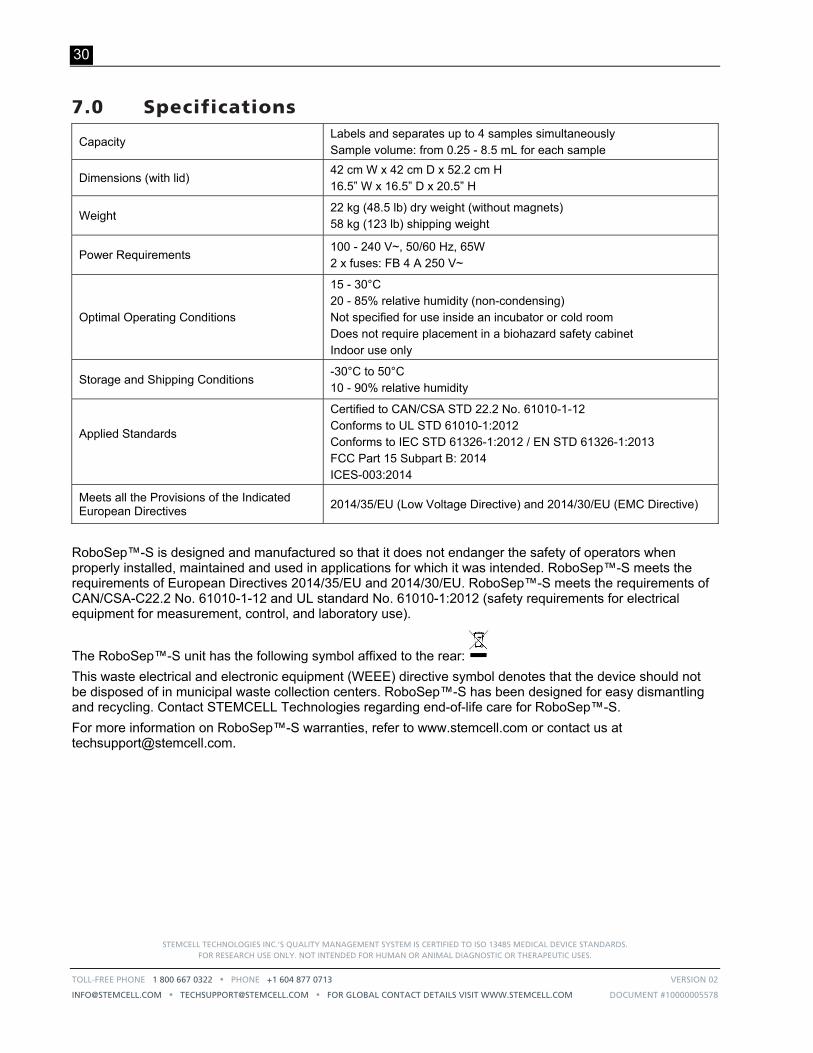
7.0 Specifications
Capacity Labels and separates up to 4 samples simultaneously Sample volume: from 0.25 - 8.5 mL for each sample
Dimensions (with lid) 42 cm W x 42 cm D x 52.2 cm H 16.5” W x 16.5” D x 20.5” H
Weight 22 kg (48.5 lb) dry weight (without magnets) 58 kg (123 lb) shipping weight
Power Requirements 100 - 240 V~, 50/60 Hz, 65W 2 x fuses: FB 4 A 250 V~
Optimal Operating Conditions
15 - 30°C 20 - 85% relative humidity (non-condensing) Not specified for use inside an incubator or cold room Does not require placement in a biohazard safety cabinet Indoor use only
Storage and Shipping Conditions -30°C to 50°C 10 - 90% relative humidity
Applied Standards
Certified to CAN/CSA STD 22.2 No. 61010-1-12 Conforms to UL STD 61010-1:2012 Conforms to IEC STD 61326-1:2012 / EN STD 61326-1:2013 FCC Part 15 Subpart B: 2014 ICES-003:2014
Meets all the Provisions of the Indicated European Directives
2014/35/EU (Low Voltage Directive) and 2014/30/EU (EMC Directive)
RoboSep™-S is designed and manufactured so that it does not endanger the safety of operators when properly installed, maintained and used in applications for which it was intended. RoboSep™-S meets the requirements of European Directives 2014/35/EU and 2014/30/EU. RoboSep™-S meets the requirements of CAN/CSA-C22.2 No. 61010-1-12 and UL standard No. 61010-1:2012 (safety requirements for electrical equipment for measurement, control, and laboratory use).
The RoboSep™-S unit has the following symbol affixed to the rear:
This waste electrical and electronic equipment (WEEE) directive symbol denotes that the device should not be disposed of in municipal waste collection centers. RoboSep™-S has been designed for easy dismantling and recycling. Contact STEMCELL Technologies regarding end-of-life care for RoboSep™-S.
For more information on RoboSep™-S warranties, refer to www.stemcell.com or contact us at [email protected].

STEMCELL TECHNOLOGIES INC.’S QUALITY MANAGEMENT SYSTEM IS CERTIFIED TO ISO 13485 MEDICAL DEVICE STANDARDS.
FOR RESEARCH USE ONLY. NOT INTENDED FOR HUMAN OR ANIMAL DIAGNOSTIC OR THERAPEUTIC USES.
TOLL-FREE PHONE 1 800 667 0322 PHONE +1 604 877 0713 VERSION 02
[email protected] [email protected] FOR GLOBAL CONTACT DETAILS VISIT WWW.STEMCELL.COM DOCUMENT #10000005578
31
8.0 Troubleshooting
8.1 Log Files To assist with troubleshooting and diagnostics, a STEMCELL Technologies representative may ask to receive the log files.
To access RoboSep™-S log files:
1. Select [Maintenance] from the Home screen.
2. Select [Diagnostic Package].
3. Insert a USB drive into one of the USB ports of the RoboSep™-S (Figure 1).
4. Select USB as a destination and navigate to the USB drive folder where you want to save the log files. The files will automatically be transferred onto the USB drive.
5. Remove the USB drive.
8.2 Power Issues PROBLEM POTENTIAL CAUSE SOLUTION
RoboSep™-S will not start up
No power in outlet Plug into an outlet that is known to be live
Faulty fuse Replace fuse (section 6.3)
Faulty cable Test by temporarily attaching PC computer tower cable in place of usual cable
Faulty power supply Contact Technical Support
STEMCELL TECHNOLOGIES INC.’S QUALITY MANAGEMENT SYSTEM IS CERTIFIED TO ISO 13485 MEDICAL DEVICE STANDARDS. FOR RESEARCH USE ONLY. NOT INTENDED FOR HUMAN OR ANIMAL DIAGNOSTIC OR THERAPEUTIC USES.
TOLL-FREE PHONE 1 800 667 0322 PHONE +1 604 877 0713 VERSION 02
[email protected] [email protected] FOR GLOBAL CONTACT DETAILS VISIT WWW.STEMCELL.COM DOCUMENT #10000005578
32
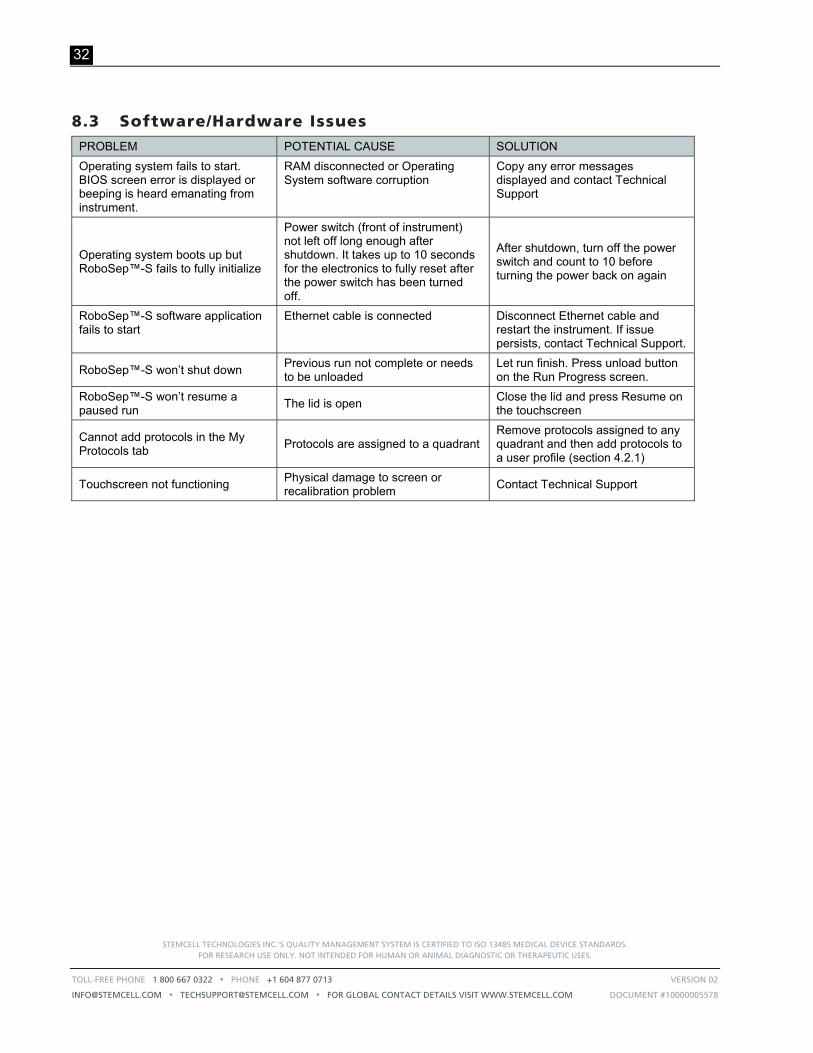
8.3 Software/Hardware Issues PROBLEM POTENTIAL CAUSE SOLUTION
Operating system fails to start. BIOS screen error is displayed or beeping is heard emanating from instrument.
RAM disconnected or Operating System software corruption
Copy any error messages displayed and contact Technical Support
Operating system boots up but RoboSep™-S fails to fully initialize
Power switch (front of instrument) not left off long enough after shutdown. It takes up to 10 seconds for the electronics to fully reset after the power switch has been turned off.
After shutdown, turn off the power switch and count to 10 before turning the power back on again
RoboSep™-S software application fails to start
Ethernet cable is connected Disconnect Ethernet cable and restart the instrument. If issue persists, contact Technical Support.
RoboSep™-S won’t shut down Previous run not complete or needs to be unloaded
Let run finish. Press unload button on the Run Progress screen.
RoboSep™-S won’t resume a paused run
The lid is open Close the lid and press Resume on the touchscreen
Cannot add protocols in the My Protocols tab
Protocols are assigned to a quadrant Remove protocols assigned to any quadrant and then add protocols to a user profile (section 4.2.1)
Touchscreen not functioning Physical damage to screen or recalibration problem
Contact Technical Support

STEMCELL TECHNOLOGIES INC.’S QUALITY MANAGEMENT SYSTEM IS CERTIFIED TO ISO 13485 MEDICAL DEVICE STANDARDS.
FOR RESEARCH USE ONLY. NOT INTENDED FOR HUMAN OR ANIMAL DIAGNOSTIC OR THERAPEUTIC USES.
TOLL-FREE PHONE 1 800 667 0322 PHONE +1 604 877 0713 VERSION 02
[email protected] [email protected] FOR GLOBAL CONTACT DETAILS VISIT WWW.STEMCELL.COM DOCUMENT #10000005578
33
8.4 Mechanical Performance Issues PROBLEM POTENTIAL CAUSE SOLUTION
Barcode scanning fails Barcode scanner cannot read barcode label on vial.
Check the barcode label is not damaged. Twist the vial and scan the barcode again.
Unsuccessful tip pickup Tip rack not secure or seated properly in the carousel.
Ensure tip rack is properly inserted and flush against the carousel.
RoboSep™-S arm disturbed during a protocol run.
Take note of the step that run(s) is at. Abort current run. If appropriate, finish separation manually, otherwise prepare new sample and restart the protocol from the beginning. If issue persists, contact Technical Support.
Tips not well aligned with tubes Tip rack not secure or seated properly in the carousel.
Ensure tip rack is properly inserted and flush against the carousel.
RoboSep™-S arm disturbed during a protocol run.
Take note of the step that run(s) is at. Abort current run. If appropriate, finish separation manually, otherwise prepare new sample and restart the protocol from the beginning. If issue persists, contact Technical Support.
Tip stripping failure Plastic buildup on tip head. Clean tip head using RoboSep™ Tip Head Polishing Compound (section 6.1). Do not use ethanol.
Robotic arm stuck and bouncing up and down in fully extended position
Homing flag on carousel is misaligned.
Power off the instrument and physically move the arm all the way down. Start instrument again. If issue persists, contact Technical Support.
Tip rack separates when removing the lid to open it
Excess force applied when removing the tip rack lid.
Ensure only the top lid is removed.
Instrument waits for approximately one minute with tip attached
This is a normal operation to optimize the overall run time of the instrument.
Contact STEMCELL Technical Support to change the default threshold time.

STEMCELL TECHNOLOGIES INC.’S QUALITY MANAGEMENT SYSTEM IS CERTIFIED TO ISO 13485 MEDICAL DEVICE STANDARDS. FOR RESEARCH USE ONLY. NOT INTENDED FOR HUMAN OR ANIMAL DIAGNOSTIC OR THERAPEUTIC USES.
TOLL-FREE PHONE 1 800 667 0322 PHONE +1 604 877 0713 VERSION 02
[email protected] [email protected] FOR GLOBAL CONTACT DETAILS VISIT WWW.STEMCELL.COM DOCUMENT #10000005578
34
8.5 Liquid Handling Performance Issues PROBLEM POTENTIAL CAUSE SOLUTION
No water ejected from the tip head prior to run
Priming step missed or incomplete
Refill the hydraulic fluid bottle and make sure the connection between the bottle and tubing is secure by disconnecting and reconnecting the quick connect firmly
Leaking water from tip head onto the tips' filter inserts
Compromised Teflon tube or leak in the hydraulic system
Take a photo of the end of the tip head and contact Technical Support
Dripping of sample from pipette tips onto carousel
Bad seal between the tip head and disposable tip
Clean tip head and replace the tip rack (use new tips)
A leak in the hydraulic system Clean tip head and replace the tip rack (use new tips). If issue persists, contact Technical Support.
Liquid transfer not taking place or not accurate during a protocol run
Hydraulic fluid bottle has run out of water
Refill hydraulic fluid bottle and run Prime protocol (section 3.5) 3 - 5 times
Compromised Teflon tube or leak in the hydraulic system
Take photo of the end of the tip head and Contact Technical Support
Hydraulic fluid sputtering out of tip head/particulate matter present in hydraulic fluid lines
Hydraulic fluid line contamination
Replace contents of hydraulic fluid bottle with 70% isopropanol or ethanol and prime > 4 times. Leave alcohol in line for 1 hour. Replace contents of hydraulic fluid bottle with sterile deionized water and prime > 5 times. If problem persists, take a photo of the end of the tip head and contact Technical Support.
Backflow of sample/blood into hydraulic fluid bottle
Faulty valves within pump Take photo of hydraulic fluid bottle and contact Technical Support
Reagents left in tips
This is a normal operation and is required to meet the accuracy requirements for low volume reagent addition. The residual volume should be 20 µL.
If the residual volume in the tips is > 20 µL, take a photo of the tips in question and contact Technical Support
Residual diluted sample volume left in tubes
Under most normal conditions, RoboSep™-S leaves a residual volume of 250 µL in tubes
If the volume of the diluted sample is 250 µL, measured with a micropipette, take a photo of the tube in question and contact Technical Support
STEMCELL TECHNOLOGIES INC.’S QUALITY MANAGEMENT SYSTEM IS CERTIFIED TO ISO 13485 MEDICAL DEVICE STANDARDS.
FOR RESEARCH USE ONLY. NOT INTENDED FOR HUMAN OR ANIMAL DIAGNOSTIC OR THERAPEUTIC USES.
TOLL-FREE PHONE 1 800 667 0322 PHONE +1 604 877 0713 VERSION 02
[email protected] [email protected] FOR GLOBAL CONTACT DETAILS VISIT WWW.STEMCELL.COM DOCUMENT #10000005578
35
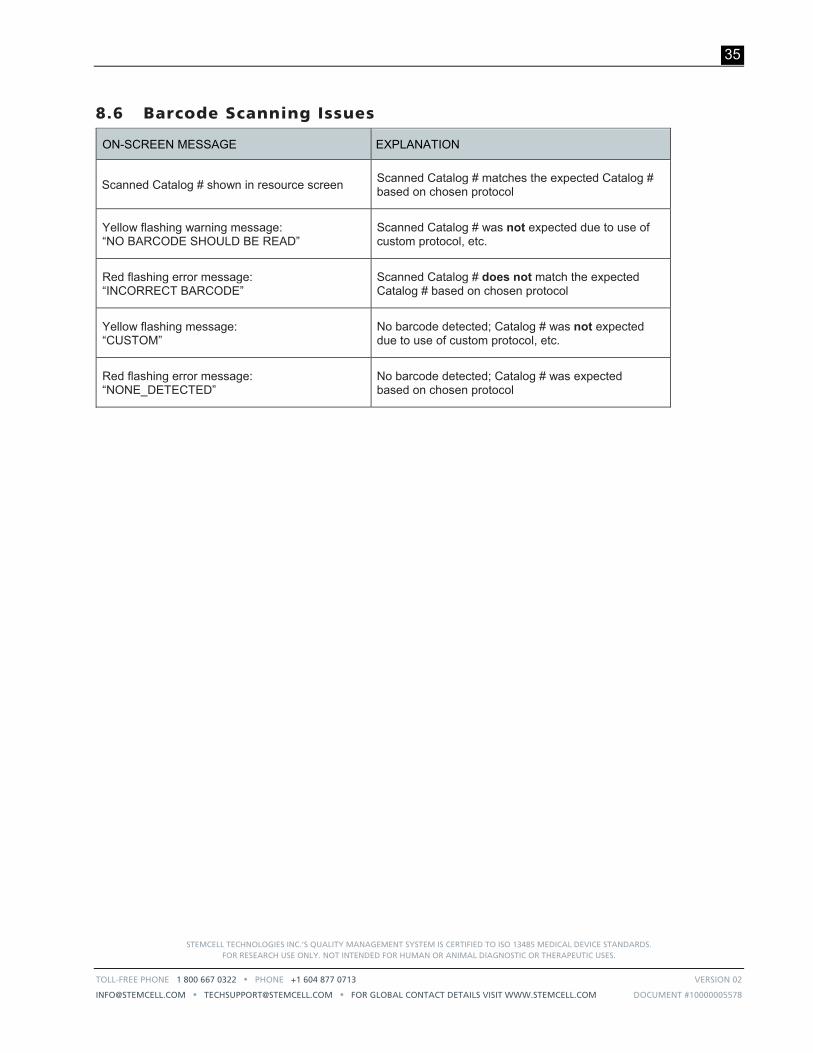
8.6 Barcode Scanning Issues
ON-SCREEN MESSAGE EXPLANATION
Scanned Catalog # shown in resource screen Scanned Catalog # matches the expected Catalog # based on chosen protocol
Yellow flashing warning message: “NO BARCODE SHOULD BE READ”
Scanned Catalog # was not expected due to use of custom protocol, etc.
Red flashing error message: “INCORRECT BARCODE”
Scanned Catalog # does not match the expected Catalog # based on chosen protocol
Yellow flashing message: “CUSTOM”
No barcode detected; Catalog # was not expected due to use of custom protocol, etc.
Red flashing error message: “NONE_DETECTED”
No barcode detected; Catalog # was expected based on chosen protocol

STEMCELL TECHNOLOGIES INC.’S QUALITY MANAGEMENT SYSTEM IS CERTIFIED TO ISO 13485 MEDICAL DEVICE STANDARDS. FOR RESEARCH USE ONLY. NOT INTENDED FOR HUMAN OR ANIMAL DIAGNOSTIC OR THERAPEUTIC USES.
TOLL-FREE PHONE 1 800 667 0322 PHONE +1 604 877 0713 VERSION 02
[email protected] [email protected] FOR GLOBAL CONTACT DETAILS VISIT WWW.STEMCELL.COM DOCUMENT #10000005578
36
9.0 Software and Hardware Updates
9.1 Software Updates The following table outlines the new functionality and/or fixes to RoboSep™-S software versions.
ROBOSEP™-S SOFTWARE VERSION
NEW FUNCTIONALITY/FIX
1.2.1.1
Pre-set user profiles removed
Updated branding
Barcode scanning updated to include reagent lot number
Bug fixes
1.3.0.0
Customization of reagent names displayed on graphical user interface (GUI): Reagent names can now be customized via the Protocol Editor.
Update to barcode scanning logic, as required for new format of catalog numbers
Update to End of Run report template
Bug fixes
9.2 Hardware Updates In 2018, the RoboSep™-S carousel was updated to accommodate multiple reagent vial sizes, including reagents found in the EasySep™ RBC Depletion Kit (Catalog #18170) and various EasySep™ Direct Human Cell Isolation Kits. This carousel requires software version 1.2.0.2 or later. Contact us at [email protected] for more information.

STEMCELL TECHNOLOGIES INC.’S QUALITY MANAGEMENT SYSTEM IS CERTIFIED TO ISO 13485 MEDICAL DEVICE STANDARDS.
FOR RESEARCH USE ONLY. NOT INTENDED FOR HUMAN OR ANIMAL DIAGNOSTIC OR THERAPEUTIC USES.
TOLL-FREE PHONE 1 800 667 0322 PHONE +1 604 877 0713 VERSION 02
[email protected] [email protected] FOR GLOBAL CONTACT DETAILS VISIT WWW.STEMCELL.COM DOCUMENT #10000005578
37
10.0 Related Products
PRODUCT SIZE CATALOG #
RoboSep™ Service Rack 1 Rack 20101
RoboSep™ Buffer 250 mL 20104
RoboSep™ Buffer (5X Concentrate) 250 mL 20124
RoboSep™ Filter Tips 8 Racks 20125
RoboSep™ Tip Head Polishing Compound 7 mL 20119
11.0 Appendix A: Running RoboSep™-S: Quick Start Instructions
The following is a brief guide to using the RoboSep™-S. Detailed instructions on running RoboSep™-S are provided in section 4.0. Alternatively, a Quick Start Guide (Document #28943) is included with RoboSep™-S. For easy access, the Quick Start Guide can be stored in the document tray located underneath RoboSep™-S.

STEMCELL TECHNOLOGIES INC.’S QUALITY MANAGEMENT SYSTEM IS CERTIFIED TO ISO 13485 MEDICAL DEVICE STANDARDS. FOR RESEARCH USE ONLY. NOT INTENDED FOR HUMAN OR ANIMAL DIAGNOSTIC OR THERAPEUTIC USES.
TOLL-FREE PHONE 1 800 667 0322 PHONE +1 604 877 0713 VERSION 02
[email protected] [email protected] FOR GLOBAL CONTACT DETAILS VISIT WWW.STEMCELL.COM DOCUMENT #10000005578
38
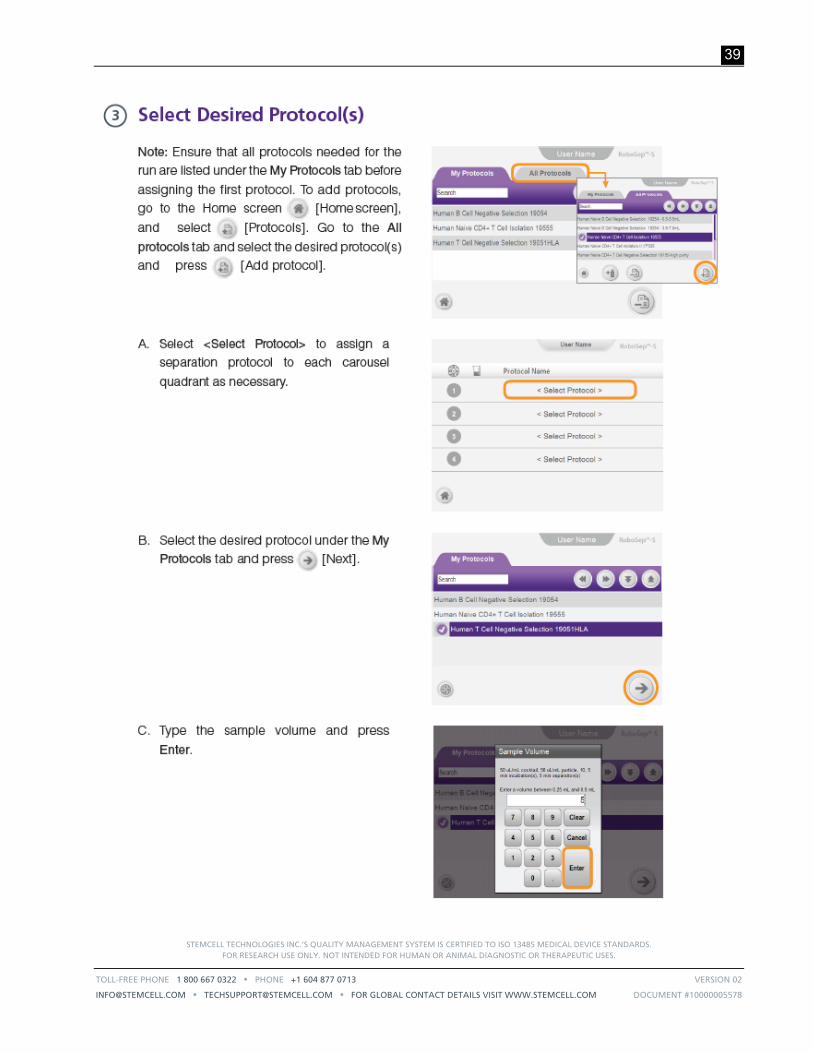
STEMCELL TECHNOLOGIES INC.’S QUALITY MANAGEMENT SYSTEM IS CERTIFIED TO ISO 13485 MEDICAL DEVICE STANDARDS.
FOR RESEARCH USE ONLY. NOT INTENDED FOR HUMAN OR ANIMAL DIAGNOSTIC OR THERAPEUTIC USES.
TOLL-FREE PHONE 1 800 667 0322 PHONE +1 604 877 0713 VERSION 02
[email protected] [email protected] FOR GLOBAL CONTACT DETAILS VISIT WWW.STEMCELL.COM DOCUMENT #10000005578
39

STEMCELL TECHNOLOGIES INC.’S QUALITY MANAGEMENT SYSTEM IS CERTIFIED TO ISO 13485 MEDICAL DEVICE STANDARDS. FOR RESEARCH USE ONLY. NOT INTENDED FOR HUMAN OR ANIMAL DIAGNOSTIC OR THERAPEUTIC USES.
TOLL-FREE PHONE 1 800 667 0322 PHONE +1 604 877 0713 VERSION 02
[email protected] [email protected] FOR GLOBAL CONTACT DETAILS VISIT WWW.STEMCELL.COM DOCUMENT #10000005578
40
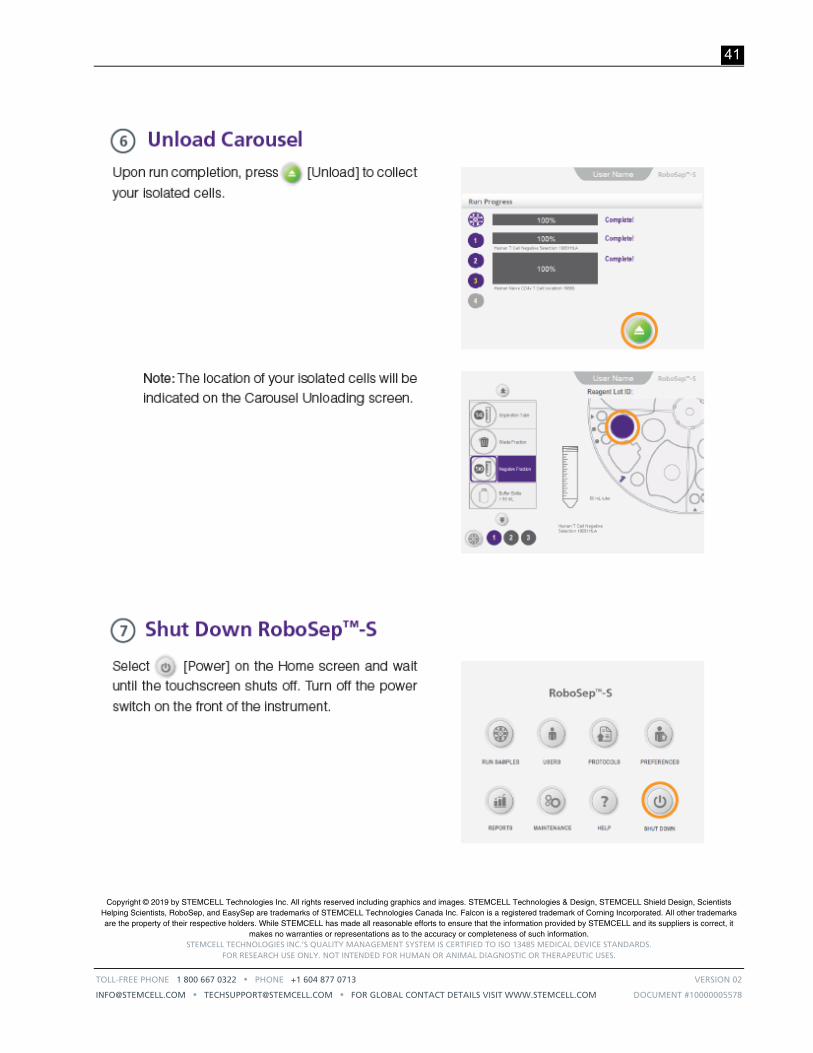
Copyright © 2019 by STEMCELL Technologies Inc. All rights reserved including graphics and images. STEMCELL Technologies & Design, STEMCELL Shield Design, Scientists Helping Scientists, RoboSep, and EasySep are trademarks of STEMCELL Technologies Canada Inc. Falcon is a registered trademark of Corning Incorporated. All other trademarks are the property of their respective holders. While STEMCELL has made all reasonable efforts to ensure that the information provided by STEMCELL and its suppliers is correct, it
makes no warranties or representations as to the accuracy or completeness of such information. STEMCELL TECHNOLOGIES INC.’S QUALITY MANAGEMENT SYSTEM IS CERTIFIED TO ISO 13485 MEDICAL DEVICE STANDARDS.
FOR RESEARCH USE ONLY. NOT INTENDED FOR HUMAN OR ANIMAL DIAGNOSTIC OR THERAPEUTIC USES.
TOLL-FREE PHONE 1 800 667 0322 PHONE +1 604 877 0713 VERSION 02
[email protected] [email protected] FOR GLOBAL CONTACT DETAILS VISIT WWW.STEMCELL.COM DOCUMENT #10000005578
41
TECHNICAL MANUAL
RoboSep™-S: The Fully Automated Cell Separator
TOLL-FREE PHONE 1 800 667 0322
PHONE +1 604 877 0713
FOR GLOBAL CONTACT DETAILS VISIT WWW.STEMCELL.COM
DOCUMENT #10000005578 VERSION 02 OCT 2019 | FOR INTERNAL USE: MATERIAL #29792


![Fully Automated Soccer Trainer [FAST]](https://static.fdocuments.net/doc/165x107/58a8fa671a28ab837c8b5b75/fully-automated-soccer-trainer-fast.jpg)


