User Manual V1 - images-na.ssl-images-amazon.com · User Manual V1.4 2016.8 . ZEROTECH (Beijing)...
43
User Manual V1.4 2016.8
Transcript of User Manual V1 - images-na.ssl-images-amazon.com · User Manual V1.4 2016.8 . ZEROTECH (Beijing)...

User Manual V1.4
2016.8

ZEROTECH (Beijing) Intelligence Technology Co., Ltd.
I
Contents
Legend ......................................................................................................................................................... 1
Symbols ................................................................................................................................................ 1
Reading Suggestions ............................................................................................................................ 1
Downloading the App ............................................................................................................................ 1
Product Profile ............................................................................................................................................ 2
Introduction ........................................................................................................................................... 2
Features Highlights ............................................................................................................................... 2
Aircraft Diagram .................................................................................................................................... 3
Aircraft ......................................................................................................................................................... 5
Aircraft Profile ........................................................................................................................................ 5
On/Off Switch and Power Indicator ....................................................................................................... 5
Aircraft Status Indicator ......................................................................................................................... 5
GPS Positioning .................................................................................................................................... 6
Optic Flow and Ultrasonic Positioning .................................................................................................. 6
Flight Data ............................................................................................................................................. 7
Propeller ................................................................................................................................................ 7
Battery ................................................................................................................................................... 9
Using the Battery ........................................................................................................................... 9
Checking the Battery Level .......................................................................................................... 10
Charging the Battery .................................................................................................................... 10
Camera................................................................................................................................................ 12
Micro-USB Port ................................................................................................................................... 12
Reset Button ....................................................................................................................................... 12
App ............................................................................................................................................................. 14
App Profile ........................................................................................................................................... 14
App Main Interface .............................................................................................................................. 14
App Settings ........................................................................................................................................ 18
Media Library ...................................................................................................................................... 20
Photos .......................................................................................................................................... 20
Video ............................................................................................................................................ 22
Flying/Shooting ........................................................................................................................................ 23
Flight Environment Requirements ...................................................................................................... 23

ZEROTECH (Beijing) Intelligence Technology Co., Ltd.
II
Flight Restrictions................................................................................................................................ 24
Preflight Checklist ............................................................................................................................... 24
Calibrating the Compass ..................................................................................................................... 24
Flight Protection .................................................................................................................................. 25
Connecting the Aircraft to Do.Fun ....................................................................................................... 26
Takeoff/Landing ................................................................................................................................... 27
Flight Control ....................................................................................................................................... 27
Motion Sensing Method ............................................................................................................... 27
Swipe Screen Method.................................................................................................................. 29
Free Sticks Method ...................................................................................................................... 30
Safe Sticks Method ...................................................................................................................... 32
Taking Photos/Video Recording .......................................................................................................... 32
Taking Photos .............................................................................................................................. 32
EIS ............................................................................................................................................... 33
Conventional Video Recording .................................................................................................... 33
“More Features” .................................................................................................................................. 34
Short Video (Only under Outdoor GPS Positioning) ................................................................... 34
Target Tracking (Only under Outdoor GPS Positioning) ............................................................. 35
Return to Home (Only under Outdoor GPS Positioning) ............................................................ 36
Somersault ................................................................................................................................... 37
Orbit ............................................................................................................................................. 37
Face Tracking .............................................................................................................................. 37
Voice Control ....................................................................................................................................... 37
Appendix Specifications ......................................................................................................................... 39
ZEROTECH (Beijing) Intelligence Technology Co., Ltd. 1
Legend
Symbols
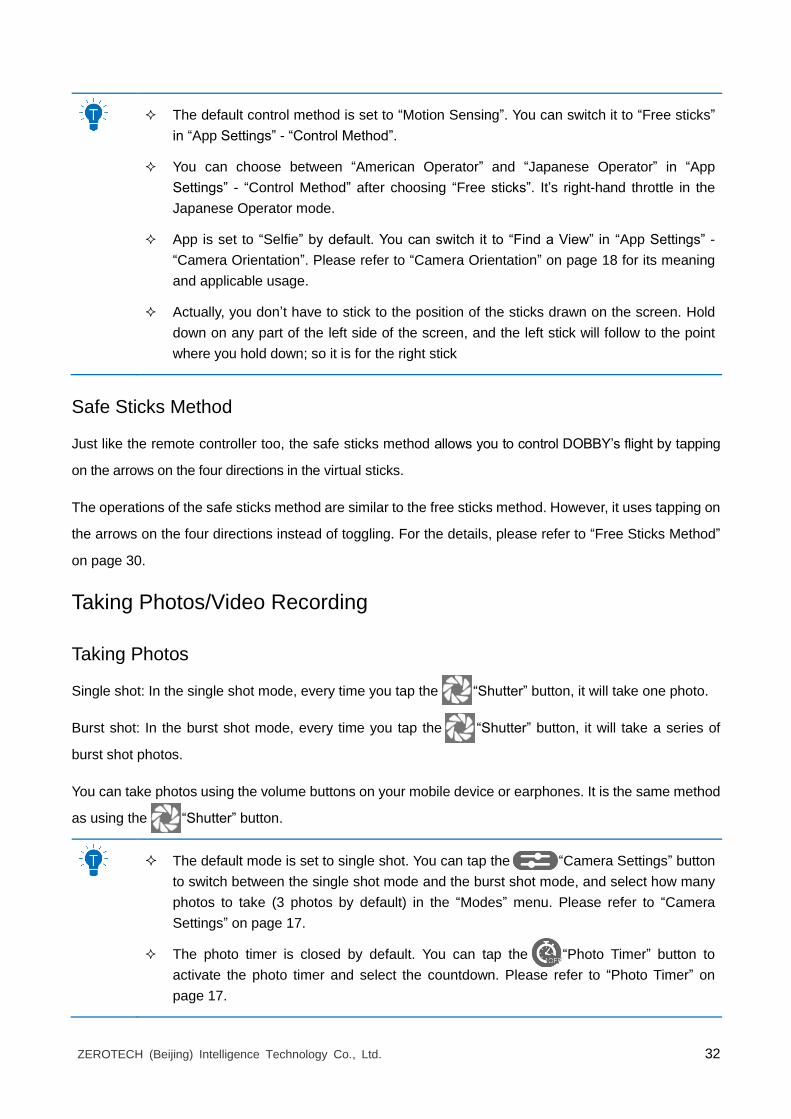
Warning Tips
Reading Suggestions
ZEROTECH has provided the following manuals for DOBBY users:
In the Box
Battery Safety Instructions
Disclaimer
DOBBY Quick Start Guide
DOBBY User Manual
To learn how to use DOBBY, we suggest you read the provided manuals in this order: In the Box, Battery
Safety Instructions, Disclaimer and then DOBBY Quick Start Guide. If you want to learn more, please
read DOBBY User Manual.
Downloading the App
Before using this product, you need to download and install the Do.Fun app. You can scan the following
QR codes, or search for Do.Fun in App Store or Google Play.
Do.Fun supports Android 4.3 and higher versions, iOS 8.0 and higher versions.
iOS Android

ZEROTECH (Beijing) Intelligence Technology Co., Ltd. 2
Product Profile
This section will cover DOBBY’s functional characteristics and the names of DOBBY’s structural
components.
Introduction
DOBBY is a portable and easy-to-use drone for selfie. It consists of the aircraft itself and an
accompanying app.
Through using the app, you can control DOBBY’s flight, take photos and record videos. The app also
allows you to control DOBBY by voice commands, earphones and other methods simply and easily.
Features Highlights
In order to give you a quick and safe selfie experience, DOBBY is equipped with a variety of great
features:
Accompanying App
The app is specifically developed for DOBBY and is really simple to use. It can be used as a remote
controller for flight control and photo & video shooting.
Indoor Flight
DOBBY uses the optic flow and ultrasonic positioning system to support indoor flight. You can also enjoy it
indoor, free of the no-fly zone restrictions
High Definition Photo & Video Shooting
DOBBY is equipped with a professional high definition camera that supports 4208×3120 photo shooting
and 1920×1080 video shooting.
10s Auto-Track Short Video Shooting (“Short Video” for short)
Allowing you to zoom in and out just like in films, the 10s auto-track video shooting turns you into a
director for 10 seconds.
Target Tracking
DOBBY can automatically follow and record video on the target you’ve chosen.
EIS (Electronic Image Stabilisation)

ZEROTECH (Beijing) Intelligence Technology Co., Ltd. 3
After EIS, your 4K video footages become 1080p high definition videos. The videos won’t be blurry even if
you’re flying during recording.
Palm Takeoff, Palm Landing
DOBBY can take off from and land safely in the palm of your hand.
Voice Control
You can give voice commands through the app to control DOBBY’s flight and photo & video shooting.
One-Key Sharing
Share your photos & Videos directly with your friends on WeChat, Weibo, Facebook and other social
media websites.
Aircraft Diagram
1. Camera 2. Propeller 3. Arm 4. On/Off Switch, Power Indicator

ZEROTECH (Beijing) Intelligence Technology Co., Ltd. 4
5. Reset Key 6. Micro-USB Port 7. Battery 8. Battery Level Switch
9. Battery Level Indicators 10. Optic Flow and Ultrasonic Positioning Module
11. Aircraft Status Indicator

ZEROTECH (Beijing) Intelligence Technology Co., Ltd. 5
Aircraft
Aircraft Profile
DOBBY mainly consists of the flight system, the positioning system, the communication system, the
power supply system and the camera system.
This section will explain the functions of each of the parts.
On/Off Switch and Power Indicator
The On/Off Switch has an inbuilt Power Indicator.
Hold the On/Off Switch for 3 seconds. Wait until the Power Indicator starts flashing blue, then remove
your finger and DOBBY will switch on. After a few seconds, DOBBY will make a noise alerting you that the
ESC has turned on.
After connecting to the app, the Power Indicator will turn solid blue.
Hold the On/Off Switch for 3 seconds. Wait until the blue light of the Power Indicator goes out, then
remove your finger and DOBBY will switch off.
Aircraft Status Indicator
On the tail of the aircraft, there’s an RGB indicator that shows the status of DOBBY. The Aircraft Status
Indicator’s status and the corresponding meanings are as follows:
Indicator Colour Meaning
Normal Status
Solid Blue GPS Positioning
Slow Blue Flashing Optic Flow and Ultrasonic Positioning
Warning and Abnormal Status
Fast Green Flashing GPS Failure
Fast Yellow and Green Flashing Ultrasonic Failure
Fast Yellow and Red Flashing Optic Flow Failure
Slow Yellow Flashing No-Fly Zone Warning
Fast Red Flashing Low Battery Warning

ZEROTECH (Beijing) Intelligence Technology Co., Ltd. 6
Solid Red Critical Battery Warning
Fast Purple Flashing Compass Failure
Assistant Prompts
Solid Green Horizontal Compass Calibration
Solid White Vertical Compass Calibration
GPS Positioning
DOBBY uses a GPS&GLONASS dual-mode satellite positioning system. The satellite positioning system is
GPS based, with GLONASS acting as a supplementary system.
During outdoor flight, DOBBY uses GPS positioning when the number of searched-out GPS satellites≥8.
Optic Flow and Ultrasonic Positioning
DOBBY will use the optic flow and ultrasonic positioning during indoor flight. If the GPS signal is weak (the
number of searched-out GPS satellites<8) during outdoor flight, the aircraft will automatically use optic
flow and ultrasonic positioning for supplement.
The optic flow and ultrasonic positioning system combines dynamic image analysis to horizontally
position the aircraft during flight and ultrasonic distance measurement to determine the distance from the
ground. It positions the aircraft during indoor flight and assists the GPS positioning system during outdoor
flight.
The optic flow and ultrasonic positioning module is located on the base of the aircraft. It consists of an
optic flow camera and an ultrasonic sensor.
Usage Conditions and Restrictions
The optic flow and ultrasonic positioning system is used for indoor flight. It is also used for outdoor flight if
the GPS signal is weak. The operating height range for this positioning system is 0.5-3m.
When using this positioning system, after the aircraft has taken off and ascended to 0.5m, it will determine
if the requirements for using this system have been met. If they have not, it will initiate landing. If the
requirements are not met for this system during flight, the aircraft will also initiate landing.
Requirements for the optic flow and ultrasonic positioning system: When using this system, the area
underneath the aircraft needs to have a clear textured surface that is not too sparse or too dense. Users
can put a textured carpet or cloth on the ground, table or any large, horizontal surface to provide the
required textured surface.

ZEROTECH (Beijing) Intelligence Technology Co., Ltd. 7
The optic flow and ultrasonic positioning system may not work under these circumstances,
please use with caution:
Above highly reflective surfaces;
Above water or transparent objects;
Above people or moving objects;
In areas with rapidly changing/flashing lights;
Above very bright or very dark surfaces;
Above objects that easily absorb ultrasonic waves;
Above surfaces without clear textures or with too sparse or too dense textures;
During fast flight at low levels (0.5m or less), the optic flow and ultrasonic positioning
system may not work.
Ensure that the lens of the optic flow camera is clear.
Because the ultrasonic positioning system may be disturbed by ultrasonic waves
emitted by other ultrasonic equipment, please do not use DOBBY near other ultrasonic
equipment, including other drones.
The Ultrasonic Sensor will emit ultrasonic waves that are inaudible to humans but may
make some animals nervous. Please do not use DOBBY close to animals.
Flight Data
DOBBY will begin to record flight data from the moment you turn it on. It will stop recording the data once
the power source is turned off. The name of the file will be the time when the data was recorded.
When you use the fault report function in the app, flight data will be automatically uploaded to the server,
so as to help with fault diagnosis.
Propeller
DOBBY has 4 sets of 3-inch foldable Propellers. The propeller blades are already mounted; users only
need to expand the Arms before flight. When you’re done flying, fold the Arms and the blades into the
base of the aircraft to prevent damaging them.
The blades have either “A” or “B” on the top to indicate in which direction they spin, as shown in the
following figure:

ZEROTECH (Beijing) Intelligence Technology Co., Ltd. 8
Replacing the Propeller Blades
Blades must be replaced with ones that spin in the same direction. Blades with an “A” on top must be
replaced with ones that also have an “A”; Blades with a “B” on top must be replaced with ones that also
have a “B”, as in the above figure.
How to replace the propeller blades:
Use a wrench or a screwdriver to loosen the screws, remove the old ones and mount the new ones onto
the base, as shown in the following figure:
Please ensure that the propeller is tightly screwed in, to prevent against the screws coming
loose and the propellers blades coming off during flight. It will need to be retightened after
every 10 hours of flight.

ZEROTECH (Beijing) Intelligence Technology Co., Ltd. 9
Battery
The battery is designed specifically for use with DOBBY. It has a rated capacity of 970mAh and a nominal
voltage of 7.6V.
The battery’s major characteristics are as follows:
Battery level display: The battery comes with a Battery Level Indicator, which shows the current
battery level;
Balance Charging Protection: automatic balance of the battery’s internal cell voltage to preserve the
battery;
Overcharge Protection: Overcharging can seriously damage the battery. The battery will stop
charging once it’s charged to 8.7V;
Over-discharge Protection: Over-discharging can seriously damage the battery. The battery will cease
output once it’s discharged to 4.6V;
Short-circuit Protection: The battery will cease output to protect itself once short circuit occurs.
Before using DOBBY, ensure that the battery is fully charged. For more details about charging the battery,
please refer to “Charging the Battery” on page 10.
Using the Battery
Please plug the battery into the battery compartment before using DOBBY.
Please don’t remove the batteries while the aircraft is turned on.
Battery overheating may affect the performance of DOBBY. Do not use it in hot
environments (over 45°C). If the app notifies you of battery overheating, please
immediately initiate landing, and suspend use before it’s fully cooled down.
The battery may be very hot after use. Please do not touch it with bare hands
immediately after use, for fear of burns.
If the battery leaks, emits an odor, generates heat by itself, changes shape (swells, etc.),
changes color or shows any other abnormalities during use, charging or storage, please
remove the battery immediately and cease use.
Do not use the battery in cold environments (under 5°C), or it may cause irreversible
damage to it. When the temperature is low, the battery’s usage time may drop. Please
warm it up to 5°C or higher before plugging it into the aircraft, 20°C or higher is better.

ZEROTECH (Beijing) Intelligence Technology Co., Ltd. 10
Checking the Battery Level
The battery has a Battery Level Indicator and a Battery Level Button, set up as in the following figure:
Press the Battery Level Button, and the Battery Level Indicator will show the current battery level. The
indicator will go out automatically after 5 seconds. The indicator’s status and the corresponding battery
level in percentage are as follows:
0~25%
25%~50%
50%~75%
75%~100%
Charging the Battery
The battery comes with a charger, an adapter, and a USB cable.
Plug the battery down into the charger. Use the USB cable to connect the charger to the adapter. Plug the
adapter into a power socket to begin charging.
LED 4
LED 3
LED 2
LED 1
Battery Level Button
Battery Level Indicator
Charging Status Indicator
Type-C Port
Charger
USB Port
Adapter

ZEROTECH (Beijing) Intelligence Technology Co., Ltd. 11
The charger uses quick charge technology. Using it together with the accompanying adapter allows for
quick charge. The Charging Status Indicator will be solid orange during quick charge. If you don’t use the
provided adapter, it may only achieve slow charge instead of quick charge. The Charging Status Indicator
will be solid red during slow charge.
If the Charging Status Indicator turns solid green, this means the battery is fully charged. Please turn off
the power source and remove the battery from the charger.
The Charging Status Indicator’s status and the corresponding meanings are as follows:
Indicator Color Meaning
Solid Orange Fast Charging
Solid Red Slow Charging
Solid Green Charging Completed
Green Flashing Not Charging
Red Flashing Failure
We suggest you use the provided ZEROTECH’s DOBBY battery charging devices to
charge the battery. Any issues that occur due to use of other charging equipment shall
be the responsibility of the user.
Do not connect power sources or power banks to the Micro-USB port on the base of the
aircraft. This may not only be unable to charge the battery effectively, but also damage
the aircraft.
Users can use a power bank to charge the battery. Plug the battery down into the
charger, and use the USB cable to connect the charger to the power bank to begin
charging.
The adapter can only be used below 2000m above sea level.
ZEROTECH (Beijing) Intelligence Technology Co., Ltd. 12
Camera
DOBBY is equipped with a high definition camera that can take 4208×3120 photos and shoot 1920×1080
videos.
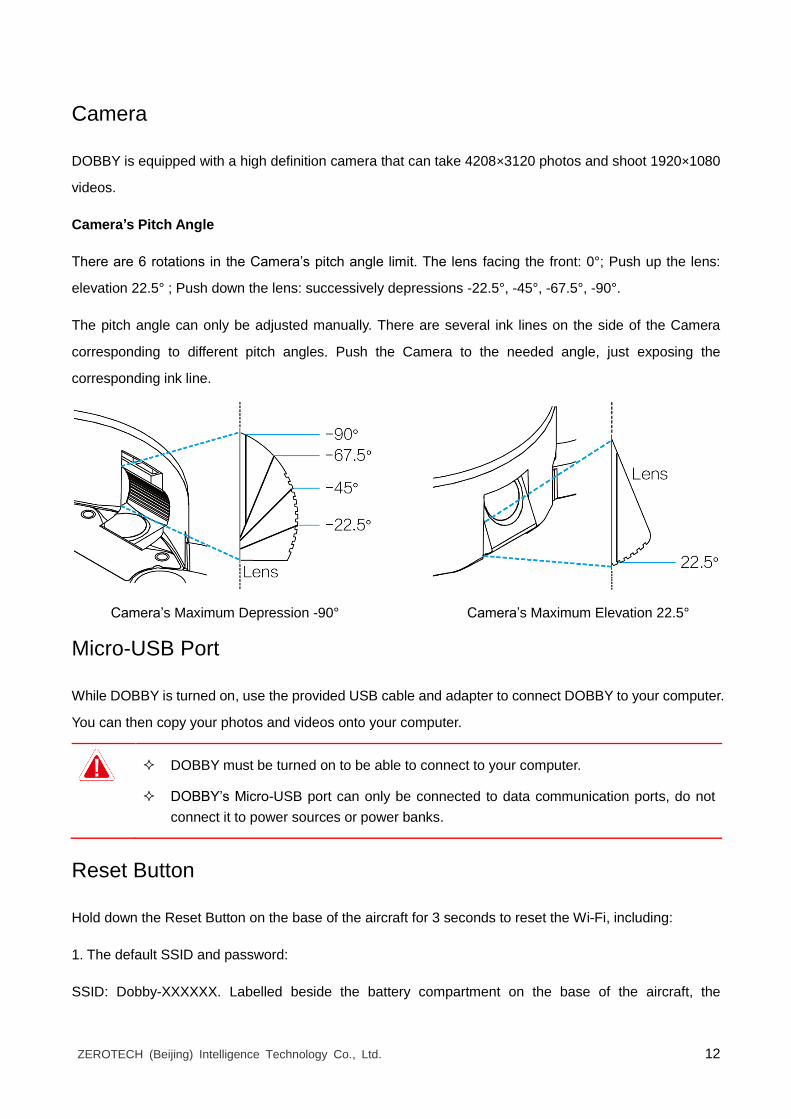
Camera’s Pitch Angle
There are 6 rotations in the Camera’s pitch angle limit. The lens facing the front: 0°; Push up the lens:
elevation 22.5° ; Push down the lens: successively depressions -22.5°, -45°, -67.5°, -90°.
The pitch angle can only be adjusted manually. There are several ink lines on the side of the Camera
corresponding to different pitch angles. Push the Camera to the needed angle, just exposing the
corresponding ink line.
Micro-USB Port
While DOBBY is turned on, use the provided USB cable and adapter to connect DOBBY to your computer.
You can then copy your photos and videos onto your computer.
DOBBY must be turned on to be able to connect to your computer.
DOBBY’s Micro-USB port can only be connected to data communication ports, do not
connect it to power sources or power banks.
Reset Button
Hold down the Reset Button on the base of the aircraft for 3 seconds to reset the Wi-Fi, including:
1. The default SSID and password:
SSID: Dobby-XXXXXX. Labelled beside the battery compartment on the base of the aircraft, the
Camera’s Maximum Depression -90° Camera’s Maximum Elevation 22.5°

ZEROTECH (Beijing) Intelligence Technology Co., Ltd. 13
“XXXXXX” are the last 6 alphanumeric digits of the Wi-Fi’s MAC address.
Password: zerotech.
2. The Wi-Fi frequency, which will reset to 2.4GHz.

ZEROTECH (Beijing) Intelligence Technology Co., Ltd. 14
App
This section will cover the main parts of the Do.Fun app and the settings.
App Profile
The Do.Fun app is specifically developed to be used with DOBBY. Users can use Do.Fun as a remote
controller for flight control and photo & video shooting. You can also directly share your photos and videos
to social networks.
App Main Interface
All the necessary status indicators and main function buttons are on the main interface. The layout is as
follows:
1. Login/Register 2. Wi-Fi Connection Status 3. Current Flight Distance
4. Current Flight Height 5. Aircraft Battery 6. Positioning Status
7. Status Bar 8. App Settings 9. Indoor/Outdoor Switch
10. Takeoff/Landing/Stop 11. Voice control 12. More Features
13. Photo Timer 14. Camera Settings 15. Shutter

ZEROTECH (Beijing) Intelligence Technology Co., Ltd. 15
16. Photo/Video Switch 17. Media library 18. A-GPS (Assisted GPS)
Here’s a brief description of these status indicators and function buttons. For more details on flight control
and camera operation, please refer to “Flight/Shooting” on page 23.
1. Login/Register
Tap to login or register your ZEROTECH account.
Login/register will need to access the Internet by using mobile data or switching to router Wi-Fi.
2. Wi-Fi Connection Status
Wi-Fi connected
Wi-Fi disconnected
If the Wi-Fi connection is lost during flight,DOBBY will return and land if the GPS positioning
is being used, or initiate landing if the optic flow and ultrasonic positioning is being used.
3. Current Flight Distance
The current flight distance will be displayed after the icon.
4. Current Flight Height
The current flight height will be displayed after the icon.
5. Aircraft Battery
Full battery (The battery level will be displayed in percentage after the icon)
Low battery (The battery level will be displayed in percentage after the icon)
Once the battery level gets too low during flight, DOBBY will initiate landing.
A fully charged battery will allow for approximately 9 minutes of flight time.
Please schedule your shooting progress according to the current battery level, and
charge the battery timely.

ZEROTECH (Beijing) Intelligence Technology Co., Ltd. 16
6. Positioning Status
GPS positioning status normal (The number of searched-out satellites will be displayed after the
icon. The number≥8 means normal)
GPS positioning status normal (The number of searched-out satellites will be displayed after the
icon. The number<8 means abnormal)
Optic flow and ultrasonic positioning status normal
Optic flow and ultrasonic positioning status abnormal
If the positioning status gets abnormal during flight, DOBBY will start to hover until the
positioning status returns to normal or user lands it.
7. Status Bar
The status bar will display the current status information. Different levels of status will be displayed in
different colors: red - abnormal status, yellow - status warning, blue - normal status. Abnormal status will
be displayed by priority if there’re several pieces of status information. Tap to see all the status
information.
8. App Settings
Tap to enter the app settings and see ‘About’.
Some of the settings will need to access the Internet by using mobile data or switching to router Wi-Fi.
9. Indoor/Outdoor Switch
Before takeoff, toggle to choose the current environment to be indoor or outdoor.
10. Takeoff/Landing/Stop
Tap to initiate takeoff, or activate palm takeoff.
Tap to initiate landing, or enable palm landing.
Tap to stop during takeoff/landing.
11. Voice control

ZEROTECH (Beijing) Intelligence Technology Co., Ltd. 17
Hold to enable voice control.
12. More Features
Tap to pop up more features:
Short Video: DOBBY will automatically fly in the direction of the set lens angle, and record video.
Orbit: DOBBY will automatically fly around the chosen target, and record video.
Target Tracking: DOBBY will automatically follow the chosen target, and record video.
Face Tracking: DOBBY will automatically follow the chosen face t, and record video.
Return to Home: DOBBY will automatically return to the takeoff point and land.
Somersault: DOBBY will do a somersault.
13. Photo Timer
Tap to set whether to enable the photo timer or not and select the countdown.
14. Camera Settings
Tap to enter the camera settings:
Modes
Single shot: Tap to enter the single shot mode.
Burst shot: Tap to enter the burst shot mode and select how many photos to take.
Parameters White Balance: Tap to set the white balance.
EV: Tap to select the EV value.
Preview Resolution: Tap to select the real-time preview resolution of the viewfinder frame.
Settings EIS: Tap to select the lens angle in the short video shooting and activate the EIS function.
15. Shutter
Tap to take photo(s).
16. Photo/Video Switch
Toggle to go to the conventional video recording interface, and the icon changes to .
Toggle once again to return to the main interface.

ZEROTECH (Beijing) Intelligence Technology Co., Ltd. 18
17. Media library
Tap to enter your media library.
18. A-GPS (Assisted GPS)
Tap to use A-GPS to help with quick positioning before outdoor flight (mobile data may be used).
indicates the A-GPS positioning failed. However, it doesn’t affect the GPS positioning.
App Settings
The options in the app settings include: Photograph Vibration, App Mute, Camera Orientation, Control
Method, Change Wi-Fi Information, Frequency Switch, Compass Calibration, Aircraft System Upgrade,
App Upgrade, Available Storage, etc.
Photograph Vibration
It’s turned off by default.
When it is activated, your mobile device will vibrate after taking photos.
App Mute
It’s turned off by default.
When it is activated, your mobile device will be mute when the app is used.
Camera Orientation
It’s set to “Selfie” by default.
We suggest you set it to “Selfie” when taking selfies. The Camera’s perspective is opposite to the user’s
perspective. DOBBY’s flight direction will follow the user’s perspective. The flight direction will be the
same as the operating direction for the user. Please refer to “Motion Sensing Method” on page 27, “Free
Sticks Method” on page 30, “Safe Sticks Method” on page 32.
When you are not taking selfies, we suggest you set it to “Find a View” to switch back to the Camera’s
perspective for easier operation.
This option only works with the motion sensing method and the two sticks methods, not with the swipe
screen method. The swipe screen method always follows the camera’s perspective.
Control Method

ZEROTECH (Beijing) Intelligence Technology Co., Ltd. 19
It’s set to “Motion Sensing” by default.
Do.Fun comes with 4 control methods that users can choose between: “Motion Sensing”, “Swipe Screen”,
“Free Sticks” and “Safe Sticks”.
The motion sensing method uses your mobile device’s gravity sensor. It allows you to control DOBBY’s
flight by tilting your mobile device. For specifics on operation, please refer to “Motion Sensing Method” on
page 27.
Looking through the camera’s perspective, the swipe screen method allows you to control DOBBY’s flight
by swiping the screen in the viewfinder frame. For specifics on operation, please refer to “Swipe Screen
Method” on page 29.
Just like the remote controller, the free sticks method allows you to control DOBBY’s flight by holding the
virtual sticks and toggling up/down/left/right. For specifics on operation, please refer to “Free Sticks
Method” on page 30. You can choose between “American Operator” (left-hand throttle) and “Japanese
Operator” (right-hand throttle).
Just like the remote controller too, the safe sticks method allows you to control DOBBY’s flight by tapping
on the arrows on the four directions in the virtual sticks. For specifics on operation, please refer to “Safe
Sticks Method” on page 32. Also, you can choose between “American Operator” (left-hand throttle) and
“Japanese Operator” (right-hand throttle).
Change Wi-Fi Information
You can change the Wi-Fi’s SSID and password. The SSID can be up to 16 characters long. It can be
made up of Chinese, English, numbers and/or special characters. The password has to be between 8-20
characters long and can be made up of numbers, letters and/or special characters.
Frequency Switch
The default frequency is set to 2.4GHz.
DOBBY supports both a 2.4GHz and 5GHz frequency. You can switch between them on this page.
Compass Calibration
Do.Fun can assist with compass calibration. Please refer to “Calibrating the Compass” on page 24.
Aircraft Upgrade
Upgrade the aircraft firmware.
Aircraft System Upgrade

ZEROTECH (Beijing) Intelligence Technology Co., Ltd. 20
Upgrade the aircraft system.
Quick Guide
Download DOBBY Quick Start Guide, which may help you to learn to use.
Reset Novice Guide
Once again display the novice guide on the interfaces.
Available Storage
Check the available storage space on DOBBY. Please schedule your shooting progress according to the
available storage space and timely clear DOBBY’s memory.
About
App Upgrade, Fault Report, Feedback, etc.
Media Library
When opening the media library, it will go to the photo gallery by default. Tap the “Video” button at the
top of the screen to switch to the video gallery.
Photos
When you are connected to DOBBY’s Wi-Fi, after you take photos the thumbnails will automatically be
sent to your mobile device. The photo gallery displays thumbnails in date order. Swipe up to load more
thumbnails and swipe down to load new thumbnails.
If a photo is already downloaded to your mobile device, a mobile phone icon will be added to the top
right hand corner of the thumbnail.

ZEROTECH (Beijing) Intelligence Technology Co., Ltd. 21
Selecting Photos
To select a photo, tap the tick in the bottom right hand corner of the photo. To select all the photos taken in
a day, tap the “Select All” next to the date.
Deleting Photos
After selecting photos, tap the “Delete” button in the upper right hand corner of the screen to remove them
from your media library. When you are connected to DOBBY’s Wi-Fi, it will delete the files from both
DOBBY and your mobile device. When the Wi-Fi is not connected, it will not delete the files from DOBBY.
The browsing page also has a “Delete” button, so you can delete photos directly.
When an Android device is connected to DOBBY’s Wi-Fi, it will ask you to choose to delete
from the mobile device or from DOBBY.
Downloading & Browsing
After selecting photos, tap the “Download” button in the upper right hand corner of the screen to download
them to your mobile device. You can also download and browse a photo by tapping on the thumbnail. You
can directly download and browse the previous/next photo by swiping left/right on the photo browsing
page. Tapping on a photo will make it full screen.

ZEROTECH (Beijing) Intelligence Technology Co., Ltd. 22
If you have an iOS device, allow access to your gallery in system settings, otherwise you will
only be able to tap the “Download” button in the top right hand corner to download photos to
your gallery. Other downloading methods will download photos into a new folder and won’t
be able to download photos into your gallery.
Photo Sharing
There is a “Share” button on the browsing page, tapping it will directly share your photos to your
Facebook, WeChat and Weibo.
Sharing your photos will need to access the Internet by using mobile data or switching to
router Wi-Fi.
Video
Browsing through videos is basically the same as browsing through photos, but to download videos to your
mobile device you need to tap the “Download” button on the top right hand corner after selecting them.
There will be a progress bar during the download. You can download multiple videos at the same time.
You can also background download.
You can share your videos directly with your friends on WeChat, Weibo and Facebook.
iOS mobile device users, please allow access to tour gallery in system settings, otherwise
you will only be able to download videos into a new folder and not into your gallery.

ZEROTECH (Beijing) Intelligence Technology Co., Ltd. 23
Flying/Shooting
Before flying please read Disclaimer and Battery Safety Instructions to understand the safety precautions.
This section will cover what you need to know and how you need to prepare before flying DOBBY, as well
as details on flight and photo & video shooting operations.
Flight Environment Requirements
We suggest you conduct the first flight in an open outdoor area, and you can turn off the
novice mode to conduct indoor flight after getting familiar with the flight control.
Outdoors
1. Don’t fly DOBBY in bad weather conditions, such as in high wind, rain, snow.
2. When flying, always keep DOBBY in your line of sight. Ensure that you avoid obstacles, high voltage
wires, trees and shrubbery, groups of people, bodies of water.
3. Please fly in open area, do not fly near buildings and keep a good distance from tall buildings, for fear
that the GPS signal would be blocked.
4. Do not fly near complex electromagnetic environments, such as near signal tower, base station, for
fear that the Wi-Fi signal would be interfered.
5. Do not fly near areas with abnormal magnetic fields, for fear that the compass would be interfered.
DOBBY cannot fly in the north and south poles.
6. In areas 3000m or higher above sea level, the flight performance may be affected due to
environmental conditions. Please use with caution.
If the GPS signal is weak, DOBBY will use the optic flow and ultrasonic positioning. Please fulfil the
requirements for the optic flow and ultrasonic positioning, see “Indoors”.
Indoors
1. During indoor flight, DOBBY uses the optic flow and ultrasonic positioning. The flight area needs to
be above a clear textured surface that is not too sparse or too dense. If you can’t find an appropriate
textured surface, you can put a textured carpet or cloth on the ground, table or any large, horizontal
surface to provide the required texture.
2. Indoor flight needs to be conducted in a well-lit area (luminosity > 15lux) such as an area illuminated

ZEROTECH (Beijing) Intelligence Technology Co., Ltd. 24
by an ordinary fluorescent lamp.
3. During fast flight at low levels (0.5m or less), the optic flow and ultrasonic positioning system may not
work.
For more requirements for indoor flight, please refer to “Optic Flow and Ultrasonic Positioning” on page 6.
Flight Restrictions
Maximum ascent height under the GPS positioning: 50m.
Maximum ascent height under the optic flow and ultrasonic positioning: 3m.
Maximum control distance: 100m (in open air free of interference).
No-Fly Zone
Please do not fly in areas where flying is illegal or restricted.
According to regulations, the surrounding areas of airports are strictly no fly zones.
In no-fly zones, DOBBY will not be able to fly while using the GPS positioning. The Aircraft Status
Indicator will be slow yellow flashing. The app will prompt the no-fly zone warning
Preflight Checklist
Please check the following items before flying. You can take off only if all of the items are OK:
1. Check that DOBBY and your mobile device have enough power;
2. Check that the Arms are fully expanded;
3. Check that the propeller blades and other parts of the aircraft aren’t loose or damaged;
4. Check that the lenses on the optic flow camera and the front facing camera are clean.
Calibrating the Compass
You’re required to calibrate your compass before the first flight, or the system may work
abnormally which leads to unsafe flight.
The compass is easily interfered by other electronic devices. This can lead to data
abnormalities even unsafe flight. Regular calibrations ensure that the compass is
working at its best.

ZEROTECH (Beijing) Intelligence Technology Co., Ltd. 25
Please calibrate your compass in the following cases:
Before the first flight and the first outdoor flight;
The location you are flying is quite far from the last location you flew;
The Aircraft Status Indicator is fast purple flashing, indicating compass failure;
The Aircraft drifts severely, for example: cannot fly straight.
Do not calibrate your compass near large metal objects or in places with strong
magnetic field interferences.
The process of compass calibration is as follows:
1. Expand the Arms. Turn on the aircraft. Connect to the aircraft’s Wi-Fi. Enter Do.Fun’s “Settings” -
“Compass Calibration”, and tap on “Start”.
2. Keep the aircraft horizontal (the Aircraft Status Indicator will turn solid green if
it’s set to the required angle). Slowly rotate it 2-3 times. During this rotation,
make sure the indicator stays solid green, or you will need to adjust the
aircraft’s angle once again. The app will automatically jump to the next step
once it’s done.
3. Keep the aircraft head vertical downwards (the Aircraft Status Indicator will
turn solid white if it’s set to the required angle). Slowly rotate it 2-3 times.
During this rotation, make sure the indicator stays solid white, or you will
need to adjust the aircraft’s angle once again.
4. The app will notify you once calibration is completed. At this point the Aircraft Status Indicator will show
the aircraft’s actual status.
After the horizontal calibration, immediately begin the vertical calibration, don’t stop
midway.
Will take effective immediately (no need to restart the aircraft).
Flight Protection
In order to ensure safe use and to avoid damage, ZEROTECH has fitted DOBBY with multiple flight
protection measures:

ZEROTECH (Beijing) Intelligence Technology Co., Ltd. 26
If the battery level gets too low or a major failure occurs, DOBBY will immediately initiate
landing.
If both the GPS and the optic flow and ultrasonic positioning systems are not working,
DOBBY will start to hover until the positioning status returns to normal or user lands it.
But if the battery level gets too low while hovering, DOBBY will initiate landing.
If the Wi-Fi connection is lost or the app drops out, DOBBY will return and land if the
GPS positioning is being used, or initiate landing if the optic flow and ultrasonic
positioning is being used.
When the app is minimized or you get a phone call, DOBBY will start to hover until you
are back to the app. But if the battery level gets too low while hovering, DOBBY will
initiate landing.
When DOBBY tilts beyond 45°, it will automatically stop the motor as a safety precaution
(excluding during somersault).
Connecting the Aircraft to Do.Fun
Connect your mobile device to the aircraft’s Wi-Fi. The default SSID is Dobby-XXXXXX. Please check the
label beside the battery compartment on the base of the aircraft to acquire the SSID. The default
password is zerotech. And you can change them in “App Settings”.
Open the main interface of Do.Fun. First, toggle the “Indoor/Outdoor Switch” to choose your current
environment:
indicates indoor, it will use optic flow positioning.
indicates outdoor, it will use GPS positioning.
At last, check if it shows that it’s connected to the Wi-Fi , that the aircraft’s battery level is high ,
and that the optic flow positioning status is normal or the GPS positioning status is normal . If so,
it’s ready to fly, and you can take off.
Please manually adjust the Camera’s pitch angle depending on your need before flight. Refer
to “Camera” on page 12.
When flying, keep DOBBY in your line of sight. Please ensure you keep DOBBY a good
distance away from people.

ZEROTECH (Beijing) Intelligence Technology Co., Ltd. 27
When you touch DOBBY with your hand or other objects, like when using the palm
takeoff/landing function, take care not to touch the propeller.
Take extra care not to run into people or objects during indoor flight.
Takeoff/Landing
Takeoff
Tap it, the app will pop up the “Ground Takeoff” and “Palm Takeoff” options.
If you choose “Ground Takeoff”, DOBBY will directly take off.
If you want to try palm takeoff, please first place DOBBY on your palm/tray, and then choose “Palm
Takeoff”. The propellers will start to rotate. Wait until they fully rotate, remove your palm/tray or slightly toss
it.
After takeoff, the button will switch to “Landing”.
Landing
Tap it, the app will pop up the “Ground Landing” and “Palm Landing” options.
If you choose “Ground Landing”, it will directly start to descend.
If you choose “Palm Landing”, it will start to descend slowly. Place your palm/tray right under it. It will land
onto your palm/tray. Or it will close palm landing and restore to ground landing in 10 seconds.
After landing, the button will switch to “Takeoff”.
Flight Control
During your first flight, please begin with operating on a small scale. Pay attention to the
flight direction and adjust the flight speed, slowly working towards moderate-scale
operation.
Please don’t operate on too large scale, so as to avoid accidental collision.
Motion Sensing Method
Using your mobile device’s gravity sensor system, you can control flight by tilting your mobile device.
The left side of the screen is the swipe zone which controls ascent/descent and direction; the right side is
the motion zone which controls flying forward/backward/left/right, as in the picture below:

ZEROTECH (Beijing) Intelligence Technology Co., Ltd. 28
Fly forward/backward/left/right:
Your mobile device tilted within 45° from horizontal, hold down on any part of the right hand half (motion
zone) of your screen, and tilt your mobile device forward/backward/left/right. For fear of misoperation, the
motion sensing can be activated by holding down on the screen only when the mobile device’s angle from
horizontal is within 45°.
Ascent/descent:
Swipe the left hand half (swipe zone) of your screen up/down. Swipe and hold to continue the movement.
Turn left/right:
Swipe the left hand half (swipe zone) of your screen left/right. Swipe and hold to continue the movement.
App is set to “Selfie” by default. You can switch it to “Find a View” in “App Settings” -

ZEROTECH (Beijing) Intelligence Technology Co., Ltd. 29
“Camera Orientation”. Please refer to “Camera Orientation” on page 18 for its meaning
and applicable usage.
The default control method is set to “Motion Sensing”. If it’s already switched to other
methods, you can switch it back to “Motion Sensing in “App Settings” - “Control Method”.
Swipe Screen Method
Looking through the Camera’s perspective, you can control DOBBY’s flight by swiping the screen in the
viewfinder frame.
Ascent/descent, fly left/right:
Swipe the screen up/down, left/right. Swipe and hold to continue the movement.
Fly backward:
Two fingers swipe the screen and get close to each other. Swipe and hold to continue the movement.
Fly forward:
Two fingers swipe the screen and get away from each other. Swipe and hold to continue the movement.
Turn left/right:
Tap the direction icon in the top right hand corner, it changes into . And then swipe the screen
left/right. Swipe and hold to continue the movement. Tapping again will exit direction control.

ZEROTECH (Beijing) Intelligence Technology Co., Ltd. 30
The default control method is set to “Motion Sensing”. You can switch it to “Swipe
Screen” in “App Settings” - “Control Method”.
All the directions means the own directions of the aircraft.
Free Sticks Method
Just like the remote controller, the free sticks method allows you to control DOBBY’s flight by holding the
virtual sticks and toggling up/down/left/right.
Take the American Operator mode as an example: it’s left-hand throttle and the left stick controls
ascent/descent and direction; the right stick controls flying forward/backward/left/right, as in the picture
below:

ZEROTECH (Beijing) Intelligence Technology Co., Ltd. 31
Ascent/descent:
Hold down on the left stick (the dot at the center of the left circle) and toggle up and down. Toggle and hold
to continue the movement.
Turn left/right:
Hold down on the left stick (the dot at the center of the left circle) and toggle left and right. Toggle and hold
to continue the movement.
Fly forward/backward/left/right:
Hold down on the right stick (the dot at the center of the right circle) and toggle up/down/left/right. Toggle
and hold to continue the movement.
ZEROTECH (Beijing) Intelligence Technology Co., Ltd. 32
The default control method is set to “Motion Sensing”. You can switch it to “Free sticks”
in “App Settings” - “Control Method”.
You can choose between “American Operator” and “Japanese Operator” in “App
Settings” - “Control Method” after choosing “Free sticks”. It’s right-hand throttle in the
Japanese Operator mode.
App is set to “Selfie” by default. You can switch it to “Find a View” in “App Settings” -
“Camera Orientation”. Please refer to “Camera Orientation” on page 18 for its meaning
and applicable usage.
Actually, you don’t have to stick to the position of the sticks drawn on the screen. Hold
down on any part of the left side of the screen, and the left stick will follow to the point
where you hold down; so it is for the right stick
Safe Sticks Method
Just like the remote controller too, the safe sticks method allows you to control DOBBY’s flight by tapping
on the arrows on the four directions in the virtual sticks.
The operations of the safe sticks method are similar to the free sticks method. However, it uses tapping on
the arrows on the four directions instead of toggling. For the details, please refer to “Free Sticks Method”
on page 30.
Taking Photos/Video Recording
Taking Photos
Single shot: In the single shot mode, every time you tap the “Shutter” button, it will take one photo.
Burst shot: In the burst shot mode, every time you tap the “Shutter” button, it will take a series of
burst shot photos.
You can take photos using the volume buttons on your mobile device or earphones. It is the same method
as using the “Shutter” button.
The default mode is set to single shot. You can tap the “Camera Settings” button
to switch between the single shot mode and the burst shot mode, and select how many
photos to take (3 photos by default) in the “Modes” menu. Please refer to “Camera
Settings” on page 17.
The photo timer is closed by default. You can tap the “Photo Timer” button to
activate the photo timer and select the countdown. Please refer to “Photo Timer” on
page 17.

ZEROTECH (Beijing) Intelligence Technology Co., Ltd. 33
EIS
EIS (Electronic Image Stabilization) can deblur the images of a video, eliminating jitter, jelly, etc. It applies
to both the conventional video recording and the 10s auto-track short video recording. We suggest you
enable it.
How to enable EIS: Tap the “Camera Settings” button, select any of the lens angles in “Settings” -
“EIS”. Please refer to “Camera Settings” on page 17. EIS needs to be enabled once again each time you
open the app.
How to disable EIS: When the temperature of the aircraft reaches 70°C or you quit the app, EIS will
automatically be disabled.
Conventional Video Recording
Tap the “Photo/Video Switch” to go to the conventional video recording interface.
Tap the “Record” button to start recording. Tap the “Stop Recording” button on the right hand
side of the interface to end your recording.
Conventional video recording can last as long as you want. The duraton will be displayed at the bottom of
the interface.
The conventional video recording interface is as follows:
During the conventional video recording, you can use the motion sensing method, the swipe
screen method, the free sticks method or the safe sticks method to control the flight.

ZEROTECH (Beijing) Intelligence Technology Co., Ltd. 34
“More Features”
This section will introduce how to use “Short Video”, “Target Tracking”, “Somersault” and other features in
“More Features” .
Short Video (Only under Outdoor GPS Positioning)
Tap the “Camera Settings” button, select the needed lens angle (also enable EIS) in “Settings” -
“EIS”. Then tap the “More Features” button on the bottom left hand corner of the main interface, and
select
“Short Video” in the popup features list to go to the short video recording interface.
Then hold the “Record” button on the right hand side of the interface to record a video. Meanwhile,
DOBBY will fly in the direction of the selected lens angle. Releasing your finger off the button (or the
duration reaching 10 seconds) will stop recording, and DOBBY will automatically return. You can also
record short videos by holding during DOBBY’s return flight.
Short video recording can last 10 seconds. The duration will be displayed at the bottom of the interface.
The short video recording interface is as follows:
Here we respectively take the selected lens angles 22.5°, 0°, -45° and -90° for example to illustrate the
relationship between the flight path in the short video recording and the lens angle:

ZEROTECH (Beijing) Intelligence Technology Co., Ltd. 35
The short video feature can be used only under outdoor GPS positioning.
The lens angle can be selected in “Settings” - “EIS” after you tap the “Camera
Settings” button. Please refer to “Camera Settings” on page 17.
We suggest you adjust the Camera’s pitch angle to be the same as the selected lens
angle. It can be manually adjusted, refer to “Camera” on page 12.
Target Tracking (Only under Outdoor GPS Positioning)
To use the target tracking feature, you need to adjust the Camera’s pitch angle to - 45°prior to the flight.
How to use it:
1. Fly DOBBY to over 5 meters above the ground. Then tap the “More Features” button on the
bottom left hand corner of the main interface, and select
“Target Tracking” in the popup features
list.
2. Draw a frame on the screen to select the target to follow. A red frame will show up. Cover the target
with the red frame.
ZEROTECH (Beijing) Intelligence Technology Co., Ltd. 36
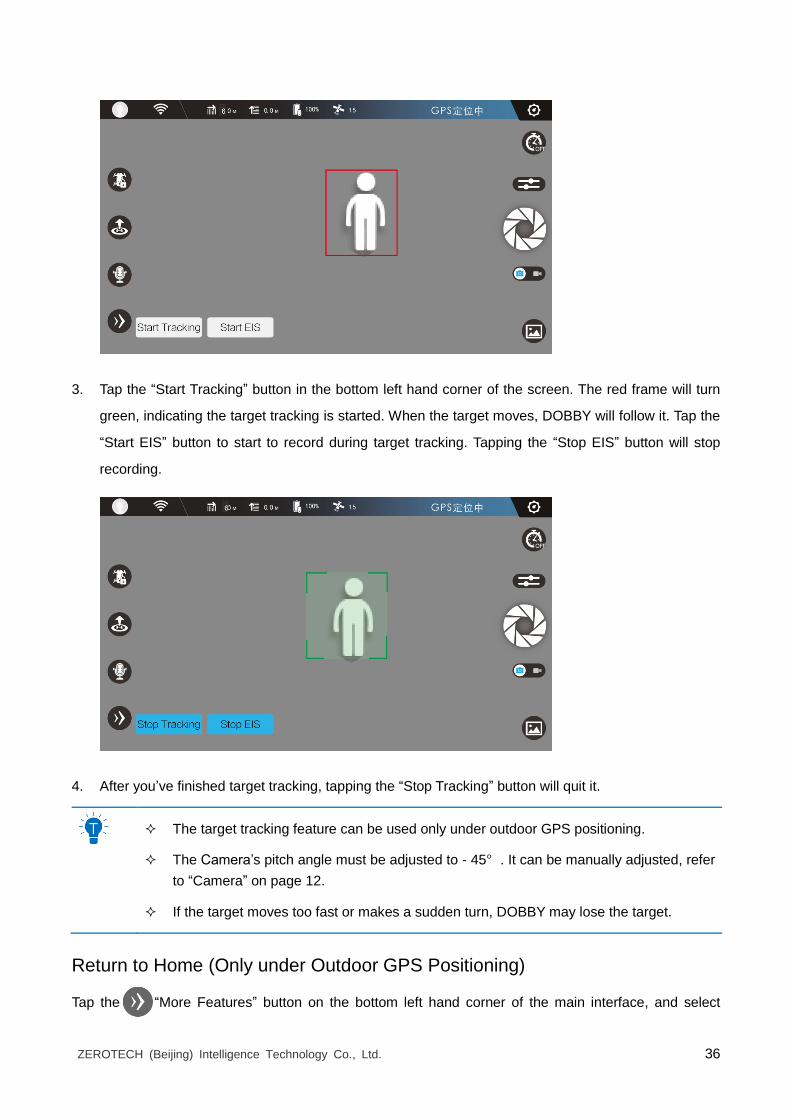
3. Tap the “Start Tracking” button in the bottom left hand corner of the screen. The red frame will turn
green, indicating the target tracking is started. When the target moves, DOBBY will follow it. Tap the
“Start EIS” button to start to record during target tracking. Tapping the “Stop EIS” button will stop
recording.
4. After you’ve finished target tracking, tapping the “Stop Tracking” button will quit it.
The target tracking feature can be used only under outdoor GPS positioning.
The Camera’s pitch angle must be adjusted to - 45°. It can be manually adjusted, refer
to “Camera” on page 12.
If the target moves too fast or makes a sudden turn, DOBBY may lose the target.
Return to Home (Only under Outdoor GPS Positioning)
Tap the “More Features” button on the bottom left hand corner of the main interface, and select

ZEROTECH (Beijing) Intelligence Technology Co., Ltd. 37
“Return to Home” in the popup features list. DOBBY will automatically return from the current
position to the takeoff point and land.
If there’re trees, utility poles, highline or other obstacles on the way of the return,
DOBBY may collide with it. Please confirm that there’re no obstacles between the
current position of DOBBY and the takeoff point.
If it is about to collide, please immediately control it to avoid the obstacle manually, or
tap the “Stop” button.
The return to home feature can be used only under outdoor GPS positioning.
You can tap the “Stop” button to stop for other operations on the way of the return.
Somersault
First, fly DOBBY to 2 meters (1.5 meters for indoors) above the ground. Then tap the “More
Features” button on the bottom left hand corner of the main interface, and select
“Somersault” in the
popup features list.
Every time you tap , DOBBY will do a somersault. The shortest interval between taps is 1 second.
Orbit
Coming soon.
Face Tracking
Coming soon.
Voice Control
Hold the “Voice Control” button on the left hand side of the main interface. A microphone icon will
pop up in the middle of your screen. You can control DOBBY’s actions by speaking corresponding
commands to your mobile device.
Command DOBBY’s action
Fly Up Initiating Ground Takeoff
Get Down Initiating Ground Landing
Cheers Taking Photo(s)
DOBBY Go Activating Palm Takeoff

ZEROTECH (Beijing) Intelligence Technology Co., Ltd. 38
DOBBY Back Enabling Palm Landing

ZEROTECH (Beijing) Intelligence Technology Co., Ltd. 39
Appendix Specifications
Aircraft
Weight (including battery) 199g
Size (excluding propellers) Expanded: 135mm×145mm×36.8mm
Folded up: 135mm×67mm×36.8mm
Max. operating altitude 3000m
Flight duration 9 minutes (at sea level)
Operating temperature 0~40°C
Highest wind resistance 28km/h
Positioning system Outdoor: GPS&GLONASS dual-mode satellite positioning
Indoor: optic flow (luminosity>15lux) + ultrasonic wave
Max. ascent height GPS positioning: 50m (may be adjusted by local regulations)
Optic flow and ultrasonic positioning: 3m
Max. control distance 100m (in open air free of interference)
Hovering accuracy Vertical: ±0.1m (ultrasonic positioning active); ±0.5m (outdoor)
Vertical: ±0.3m (optic flow positioning active); ±1.0m (outdoor)
Wi-Fi
Wi-Fi frequency 2.4GHz band; 5GHz band
Transmitting power (EIRP) 2.4GHz: 19dBm
5GHz: 25dBm
Camera
Sensor 1/3.06” CMOS; Effective pixels: 13M
Lens FOV 75°; 28mm (35mm format equivalent); f/2.2; Focus at ∞
Pitch range -90°~22.5°
Photo size 4208×3120
Photo shooting modes Single shot; Burst shot (2-15 photos)
Timed shot
White balance Auto; Incandescent; Fluorescent; Daylight; Cloudy;
EV range -12; -8; -4; 0; 4; 8; 12

ZEROTECH (Beijing) Intelligence Technology Co., Ltd. 40
Timed shot countdown Off; 3s; 5s; 10s; 20s
Video recording 1080p@30fps after EIS on 4k@30fps
Video shooting modes HD video shooting
10s Auto-track short video shooting
Storage format Photo: JPG
Video: MP4 (MPEG-4 AVC/H.264)
Storage capacity 16GB
Data port type Micro-USB port
Battery
Rated capacity 970mAh
Rated energy 7.37Wh
Nominal voltage 7.6V
Battery type LiPo 2S
Operating temperature (charge) 5~45°C
Operating temperature (discharge) 5~45°C
Max. charge voltage 8.7V
Charger
Charging port type Type-C
Input 9V --- 2A
Output 8.7V --- 1.5A
App
App name Do.Fun
Real-time image transmission 1280×720@30fps; 640×480@30fps; 320×240@30fps
Delay 160ms (depending on actual environment and mobile device)
Supported mobile device OS Android 4.3 and higher versions
iOS 8.0 and higher versions


![User Guide...User. {{]}]} {}]}](https://static.fdocuments.net/doc/165x107/60918ca14327954d24291644/-user-guide-user-.jpg)