User Manual MIT-W101 - Advantechadvdownload.advantech.com/.../MIT-W101_User_Manual... · User...
52
User Manual MIT-W101 Rugged Mobile Computer Use In Hazardous Locations
Transcript of User Manual MIT-W101 - Advantechadvdownload.advantech.com/.../MIT-W101_User_Manual... · User...
User Manual
MIT-W101
Rugged Mobile Computer Use In Hazardous Locations

CopyrightThe documentation and the software included with this product are copyrighted 2016by Advantech Co., Ltd. All rights are reserved. Advantech Co., Ltd. reserves the rightto make improvements in the products described in this manual at any time withoutnotice. No part of this manual may be reproduced, copied, translated or transmittedin any form or by any means without the prior written permission of Advantech Co.,Ltd. Information provided in this manual is intended to be accurate and reliable. How-ever, Advantech Co., Ltd. assumes no responsibility for its use, nor for any infringe-ments of the rights of third parties, which may result from its use.
AcknowledgementsAll other product names or trademarks are properties of their respective owners.
Part No. 2005W10100 Edition 1
Printed in Taiwan April 2016
MIT-W101 User Manual ii

Declaration of Conformity
CE Conformity Statement
Radio products with the CE alert marking comply with the R&TTE Directive (1999/5/EC) issued by the Commission of the European Community. Compliance with thisdirective implies conformity to the following European Norms (in brackets are theequivalent international standards).
EN 60950-1 (IEC60950-1) - Product Safety EN 300 328 Technical requirement for radio equipment ET S301 489 General EMC requirements for radio equipmentProducts that contain the radio transmitter are labeled with CE alert marking and mayalso carry the CE logo.
MIT-W101 User Manual
FCC Compliance Statement
This device complies with part 15 of the FCC Rules. Operation is subject to the fol-lowing two conditions:
1. This device may not cause harmful interference;2. This device must accept any interference received, including interference that
may cause undesired operation.
This equipment has been tested and found to comply with the limits for a Class B dig-ital device, pursuant to part 15 of the FCC Rules. These limits are designed to pro-vide reasonable protection against harmful interference in a residential installation.This equipment generates uses and can radiate radio frequency energy. If this equip-ment does cause harmful interference to radio or television reception, which can bedetermined by turning the equipment off and on, the user is encouraged to try andcorrect the interference by one or more of the following measures:
However, there is no guarantee that interference will not occur in a particular installa-tion. If this equipment does cause harmful interference to radio or television recep-tion, which can be determined by turning the equipment off and on, the user isencouraged to try to correct the interference by one or more of the following mea-sures:
Reorient or relocate the receiving antenna Increase the separation between the equipment and receiver Connect the equipment into an outlet on a circuit different from that to which the
receiver is connected Consult the dealer or an experienced computer technician for help
Caution! Exposure to Radio Frequency Radiation.
The radiated output of this device is far below the FCC radio frequency exposure limits. Nevertheless, the device shall be used in such a man-ner that the potential for human contact during normal operation is mini-mized. When connecting an external antenna to the device, the antenna shall be placed in such a manner to minimize the potential for human contact during normal operation. In order to avoid the possibility of exceeding the FCC radio frequency exposure limits, human proximity to the antenna shall not be less than 20cm (8inches) during normal opera-tion.
iii MIT-W101 User Manual

Technical Support and Assistance1. Visit the Advantech website at http://support.advantech.com where you can find
the latest information about the product.
2. Contact your distributor, sales representative, or Advantech's customer service center for technical support if you need additional assistance. Please have the following information ready before you call:– Product name and serial number– Description of your peripheral attachments– Description of your software (operating system, version, application software,
etc.)– A complete description of the problem– The exact wording of any error messages
Caution! Exposure to Radio Frequency Radiation.
The radiated output of this device is far below the FCC radio frequency exposure limits. Nevertheless, the device shall be used in such a man-ner that the potential for human contact during normal operation is mini-mized.
When connecting an external antenna to the device, the antenna shall be placed in such a manner to minimize the potential for human contact during normal operation. In order to avoid the possibility of exceeding the FCC radio frequency exposure limits, human proximity to the antenna shall not be less than 20cm (8inches) during normal operation.
MIT-W101 User Manual I the latest information about the product.
MIT-W101 User Manual iv

Safety Instructions1. Read these safety instructions carefully.2. Keep this User Manual for later reference.3. Disconnect this equipment from any AC outlet before cleaning. Use a damp
cloth. Do not use liquid or spray detergents for cleaning.4. Keep this equipment away from humidity.5. Put this equipment on a reliable surface during installation. Dropping it or letting
it fall may cause damage.6. Do not leave this equipment in an environment unconditioned where the storage
temperature under -20° C or above 60° C, it may damage the equipment.7. Make sure the voltage of the power source is correct before connecting the
equipment to the power outlet.8. 8.Place the power cord such a way that people cannot step on it. Do not place
anything over the power cord. The voltage and current rating of the cord should be greater than the voltage and current rating marked on the product.
9. All cautions and warnings on the equipment should be noted.10. If the equipment is not used for a long time, disconnect it from the power source
to avoid damage by transient overvoltage.11. Never pour any liquid into an opening. This may cause fire or electrical shock.12. Never open the equipment. For safety reasons, the equipment should be
opened only by qualified service personnel.13. If one of the following situations arises, get the equipment checked by service
personnel:The power cord or plug is damaged.Liquid has penetrated into the equipment.The equipment has been exposed to moisture.The equipment does not work well, or you cannot get it to work according to
the user's manual.The equipment has been dropped and damaged.The equipment has obvious signs of breakage.
14. CAUTION: The computer is provided with a battery-powered real-time clock cir-cuit. There is a danger of explosion if battery is incorrectly replaced. Replace only with same or equivalent type recommended by the manufacture. Discard used batteries according to the manufacturer's instructions.
15. CAUTION: For Use in Hazardous LocationsENGLISH: a.This Equipment is Suitable for Use in Class I, Division 2. Groups A, B, C, D OR non-hazardous locations Only.b.Temperature Code (T-Code) of T5.FRENCH :
a.Cet équipement est adapté à une utilisation en Classe I, Division 2. Groupes
A, B, C, D ou environnements non dangereux.
b. Code de température (T-Code) de T5..
v MIT-W101 User Manual
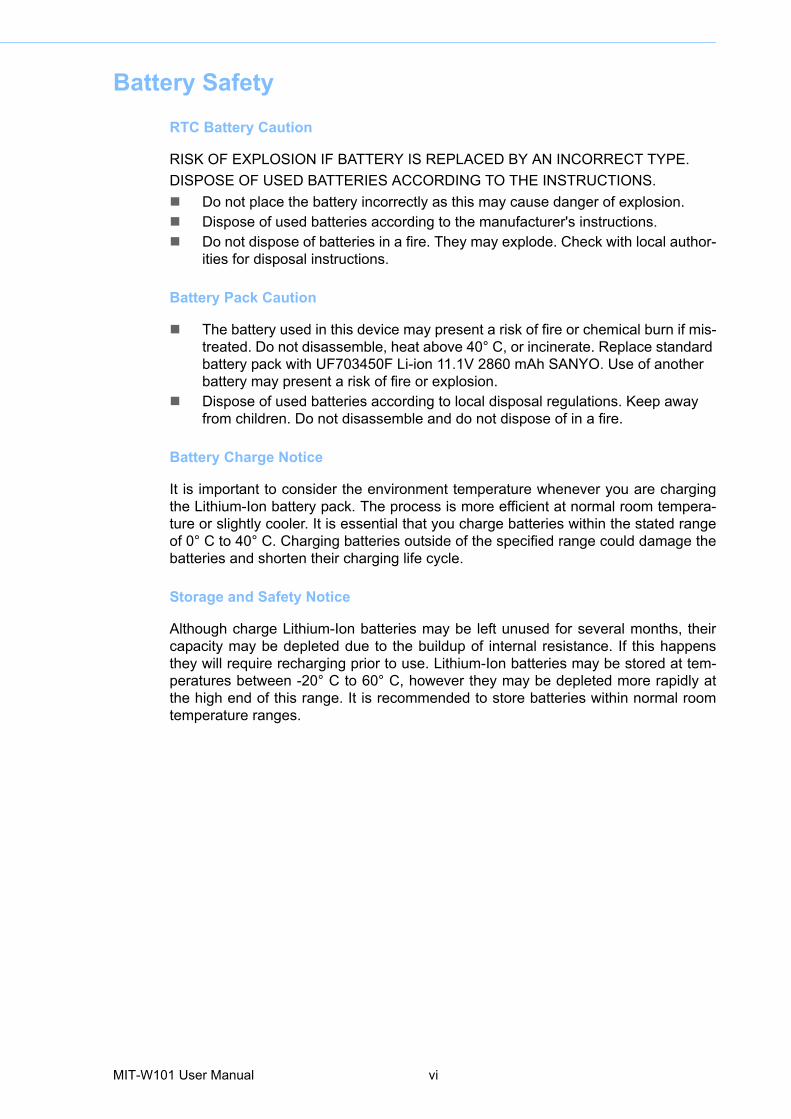
Battery Safety
RTC Battery Caution
RISK OF EXPLOSION IF BATTERY IS REPLACED BY AN INCORRECT TYPE.
DISPOSE OF USED BATTERIES ACCORDING TO THE INSTRUCTIONS.
Do not place the battery incorrectly as this may cause danger of explosion. Dispose of used batteries according to the manufacturer's instructions. Do not dispose of batteries in a fire. They may explode. Check with local author-
ities for disposal instructions.
Battery Pack Caution
The battery used in this device may present a risk of fire or chemical burn if mis-treated. Do not disassemble, heat above 40° C, or incinerate. Replace standard battery pack with UF703450F Li-ion 11.1V 2860 mAh SANYO. Use of another battery may present a risk of fire or explosion.
Dispose of used batteries according to local disposal regulations. Keep away from children. Do not disassemble and do not dispose of in a fire.
Battery Charge Notice
It is important to consider the environment temperature whenever you are chargingthe Lithium-Ion battery pack. The process is more efficient at normal room tempera-ture or slightly cooler. It is essential that you charge batteries within the stated rangeof 0° C to 40° C. Charging batteries outside of the specified range could damage thebatteries and shorten their charging life cycle.
Storage and Safety Notice
Although charge Lithium-Ion batteries may be left unused for several months, theircapacity may be depleted due to the buildup of internal resistance. If this happensthey will require recharging prior to use. Lithium-Ion batteries may be stored at tem-peratures between -20° C to 60° C, however they may be depleted more rapidly atthe high end of this range. It is recommended to store batteries within normal roomtemperature ranges.
MIT-W101 User Manual vi

Contents
Chapter 1 Ready to Go .........................................11.1 Symbols Used in this Manual.................................................................... 21.2 Product Features....................................................................................... 21.3 Package Contents..................................................................................... 21.4 Optional Accessories ................................................................................ 31.5 Optional Modules ...................................................................................... 31.6 Exploring the MIT-W101 ........................................................................... 3
1.6.1 Front View..................................................................................... 31.6.2 Right View..................................................................................... 41.6.3 Right View..................................................................................... 51.6.4 Left View ....................................................................................... 51.6.5 Top View....................................................................................... 61.6.6 Bottom View.................................................................................. 6
Chapter 2 Getting Started.....................................72.1 Installing the Rubber Bumpers (Optional) ................................................. 82.2 Removing the Rubber Bumpers (Optional) ............................................... 9
Chapter 3 Making Connections .........................113.1 Connecting the Power............................................................................. 123.2 Connecting to a Monitor .......................................................................... 123.3 Connecting USB Devices........................................................................ 133.4 Connecting Headphones......................................................................... 133.5 Connecting a Microphone ....................................................................... 13
Chapter 4 Turning On .........................................154.1 Controlling the MIT-W101 ....................................................................... 16
4.1.1 Using the Touch Screen ............................................................. 164.1.2 Using the Tap Function............................................................... 164.1.3 Using the Control Panel Buttons................................................. 164.1.4 Using the On-Screen Keyboard .................................................. 174.1.5 Adjusting Screen Brightness....................................................... 194.1.6 Adjusting the Volume.................................................................. 20
Chapter 5 Wireless Connections .......................235.1 Wi-Fi Connection..................................................................................... 245.2 Bluetooth Connections ............................................................................ 27
5.2.1 Setting Up Bluetooth ................................................................... 27
Chapter 6 Advanced Setting ..............................296.1 Checking Battery Status.......................................................................... 306.2 Maintenance............................................................................................ 30
6.2.1 Maintaining the Battery ............................................................... 306.2.2 Maintaining the LCD Display....................................................... 306.2.3 Cleaning the MIT-W101 .............................................................. 31
vii MIT-W101 User Manual
6.2.4 Trouble Shooting ........................................................................ 31
Appendix A Specifications.................................... 33A.1 Specifications.......................................................................................... 34A.2 Optional Accessories .............................................................................. 35
A.2.1 External Battery .......................................................................... 35A.2.2 Installing the External Battery ..................................................... 36
A.3 Installing an SSD .................................................................................... 37A.3.1 Inserting an SSD......................................................................... 37A.3.2 Removing an SSD ...................................................................... 39
A.4 Pogo Cover Bracket installtion Instructions For Hazardous Locations .. 40A.4.1 Installing the Bracket (Must) ....................................................... 40A.4.2 Removing the Bracket (Optional)................................................ 42
A.5 WARNING - EXPLOSION HAZARD....................................................... 42
MIT-W101 User Manual viii

Chapter 1
1 Ready to Go
Congratulations on your purchase of the MIT-W101 Rugged Tablet PC. This productcombines rugged design with reliable performance and powerful functionality to bestsuit all your needs, in a wide range of working conditions. This user manual outlinesall you need to know to set up and use your MIT-W101. If you have any further ques-tions or queries, contact our technical support team via our website:
http://www.advantech.com.tw/
1.1 Symbols Used in this Manual
1.2 Product Features Rugged design. Intel® Celeron™ processor for intelligent system. Built-in WLAN/Bluetooth/NFC. Durable, shock-resistant magnesium alloy housing. Complies with IP65 sealing & built to withstand a 4 ft drop and only 20 mm in
thickness. 10.1” WXGA TFT LCD Integrated Barcode, NFC and expansion module option of MSR and smart card
reader. Optional accessories to meet 6ft drop and a variety of user scenarios.
1.3 Package ContentsEnsure all the following items are present when you receive your MIT-W101. If any ofthese items are missing, contact your vendor immediately.
MIT-W101 Tablet PC AC power adaptor Battery Pack
Warning! Denotes information that must be observed.
Failure to do so may result in personal harm or damage to the product.
Note! Screens used in this manual are for illustrative purposes only. Actual screens may vary depending on your product version.
MIT-W101 User Manual 2

Chapter 1
Ready
toG
o
1.4 Optional Accessories Rubber bumpers
1.5 Optional Modules Barcode Scanner
1.6 Exploring the MIT-W101
1.6.1 Front View
No. Component
1 P1 - Programmable Button
2 P2 - Programmable Button
3 Front Camera
4 Power button
5 Connected to expansion module
6 DC-in jack
7 Docking connector
8 Projective capacitive multiple touch screen
9
I/O ports USB 3.0 x 1 USB 2.0 x 1 Micro HDMI x 1 Audio x 1
10Connectivity LED indicator Blue: when Wi-Fi / BT module is on
3 MIT-W101 User Manual

1.6.2 Right View
11HDD LED indicator Blinking green: when hard disk drive is working
12
Power / Battery LED indicator Green: Battery is fully charged (>95%) Amber: Battery is charging Amber: Battery life is lower than 10%
No. Component
1 Back camera
2 Barcode scanner
3 SSD cover
4 Speaker
5 Docking Cover Bracket
6 NFC
MIT-W101 User Manual 4
Chapter 1
Ready
toG
o
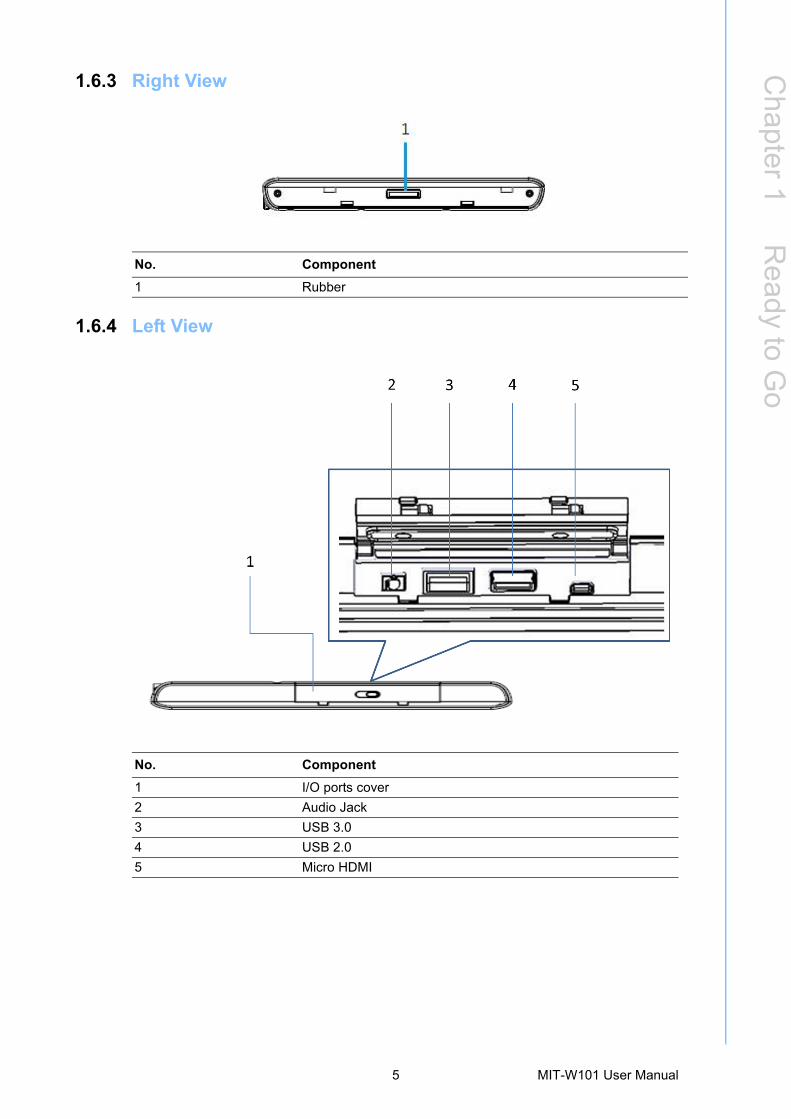
1.6.3 Right View
1.6.4 Left View
No. Component
1 Rubber
No. Component
1 I/O ports cover
2 Audio Jack
3 USB 3.0
4 USB 2.0
5 Micro HDMI
5 MIT-W101 User Manual

1.6.5 Top View
1.6.6 Bottom View
No. Component
1 Function buttons
2 Built-in MIC
3 Power button
No. Component
1 Docking Cover
2 DC-in jack
MIT-W101 User Manual 6

Chapter 2
2 Getting Started
2.1 Installing the Rubber Bumpers (Optional)To protect the housing case of MIT-W101, install the rubber bumpers.
1. Install the rubber bumpers on the left and right side of the MIT-W101.2. Make sure the rubber bumpers are aligned and locked on the indents.
3. Attach the rubber bumpers on left and right of MIT-W101.
Note! The rubber bumpers provide drop protection. Please ensure the rubber bumpers are in the correct position and the screws fastened firmly.
MIT-W101 User Manual 8
Chapter 2
Getting
Started
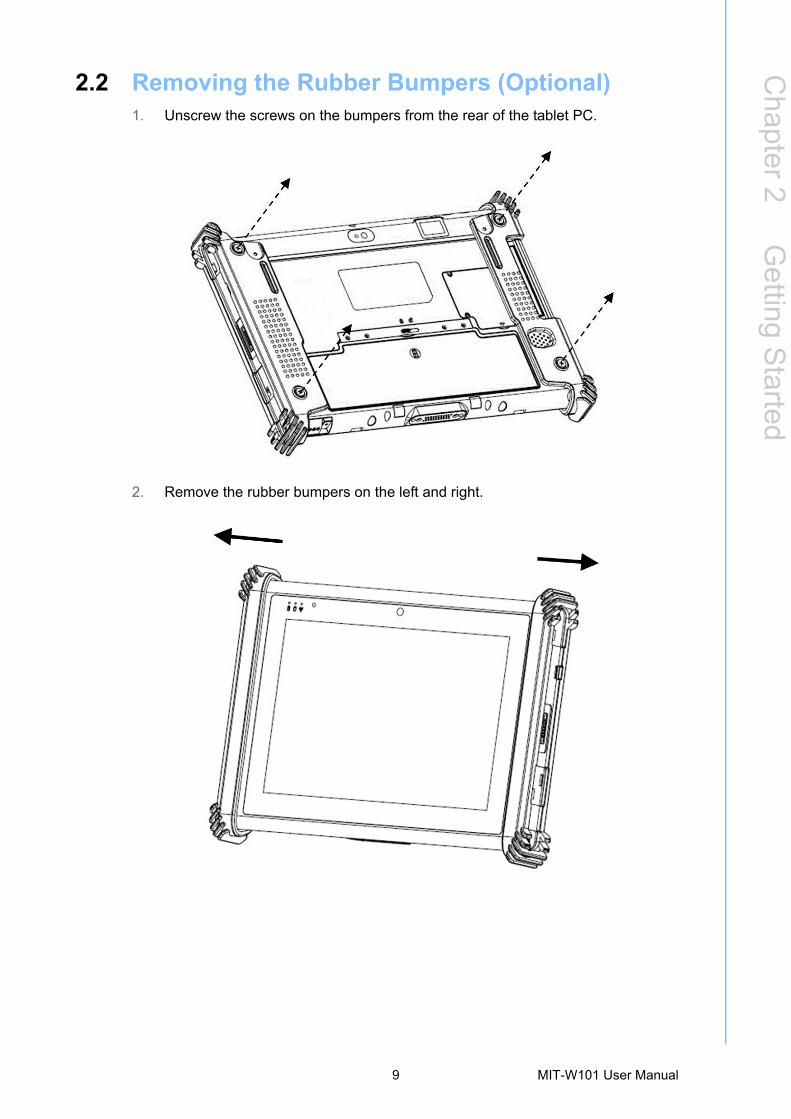
2.2 Removing the Rubber Bumpers (Optional)1. Unscrew the screws on the bumpers from the rear of the tablet PC.
2. Remove the rubber bumpers on the left and right.
9 MIT-W101 User Manual

MIT-W101 User Manual 10

Chapter 3
3 Making Connections
3.1 Connecting the PowerBefore you can use your MIT-W101, you must fully charge the battery. Connect thepower adapter as shown and leave it to charge for:
A minimum of 2 hours when using the internal battery A minimum of 4 hours when a second battery is installedConditions: operating time is based on the LCD backlight at 50% and the average uti-lization of the system under 10%.
Installation Procedures:
1. Connect the female end of the power adapter to the DC-in of MIT-W101-A.2. Connect the female end of the power cord to the DC power adapter.3. Connect the 3-pin male plug of the power cord to an electrical outlet.
3.2 Connecting to a MonitorYou can connect the MIT-W101 to an external monitor for enhanced viewing.
Connect one end of a HDMI to VGA cable to the Micro HDMI port on the left side ofthe MIT-W101.Connect the other end to the VGA cable and connect to the monitor.
Note! Be sure always handle the power cords by holding the plug ends only.
MIT-W101 User Manual 12
Chapter 3
Making
Connections
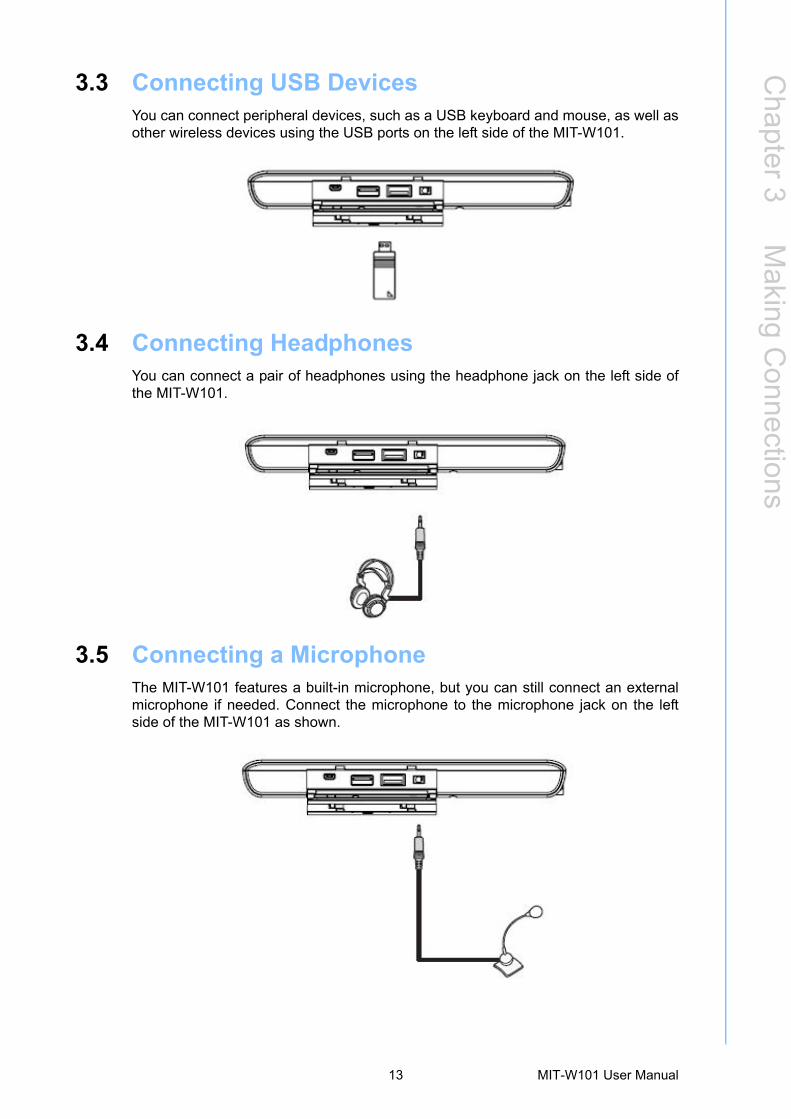
3.3 Connecting USB DevicesYou can connect peripheral devices, such as a USB keyboard and mouse, as well asother wireless devices using the USB ports on the left side of the MIT-W101.
3.4 Connecting HeadphonesYou can connect a pair of headphones using the headphone jack on the left side ofthe MIT-W101.
3.5 Connecting a MicrophoneThe MIT-W101 features a built-in microphone, but you can still connect an externalmicrophone if needed. Connect the microphone to the microphone jack on the leftside of the MIT-W101 as shown.
13 MIT-W101 User Manual

MIT-W101 User Manual 14

Chapter 4
4 Turning On
Press and hold the power button to turn on the MIT-W101.
4.1 Controlling the MIT-W101
4.1.1 Using the Touch ScreenThe MIT-W101 is equipped with touch screen technology, for ease of use when youare on the go. Simply tap the screen with your finger to select icons and run applica-tions.
4.1.2 Using the Tap FunctionWhen you tap on the screen with a pen or stylus, it emulates click functions of a reg-ular mouse.
To emulate a left click single tap the screen once. To emulate a right click tap and hold the screen. To emulate a double click, tap the screen twice.
4.1.3 Using the Control Panel ButtonsThe control panel buttons are located on the top side of MIT-W101.
See below for a description of the two buttons and its function.
Button Name Function
Function Press to access your favorite programs
Power Press to power on/off
MIT-W101 User Manual 16
Chapter 4
Turning
On
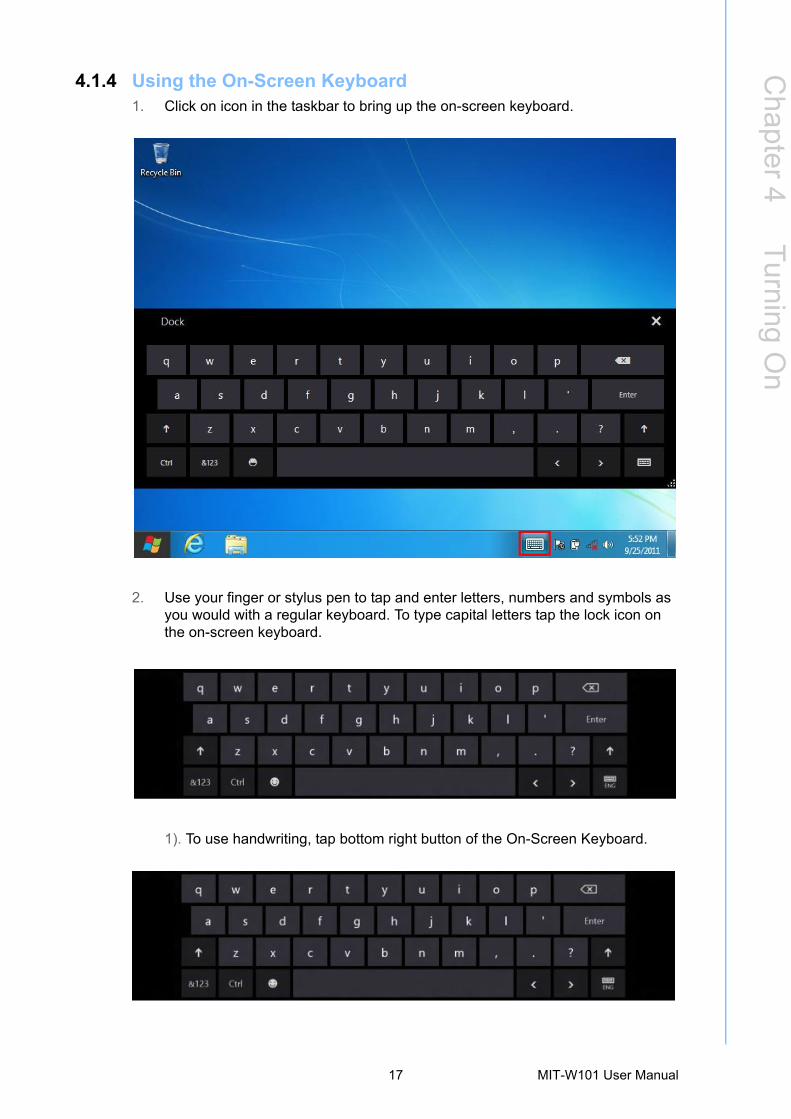
4.1.4 Using the On-Screen Keyboard1. Click on icon in the taskbar to bring up the on-screen keyboard.
2. Use your finger or stylus pen to tap and enter letters, numbers and symbols as you would with a regular keyboard. To type capital letters tap the lock icon on the on-screen keyboard.
1). To use handwriting, tap bottom right button of the On-Screen Keyboard.
17 MIT-W101 User Manual
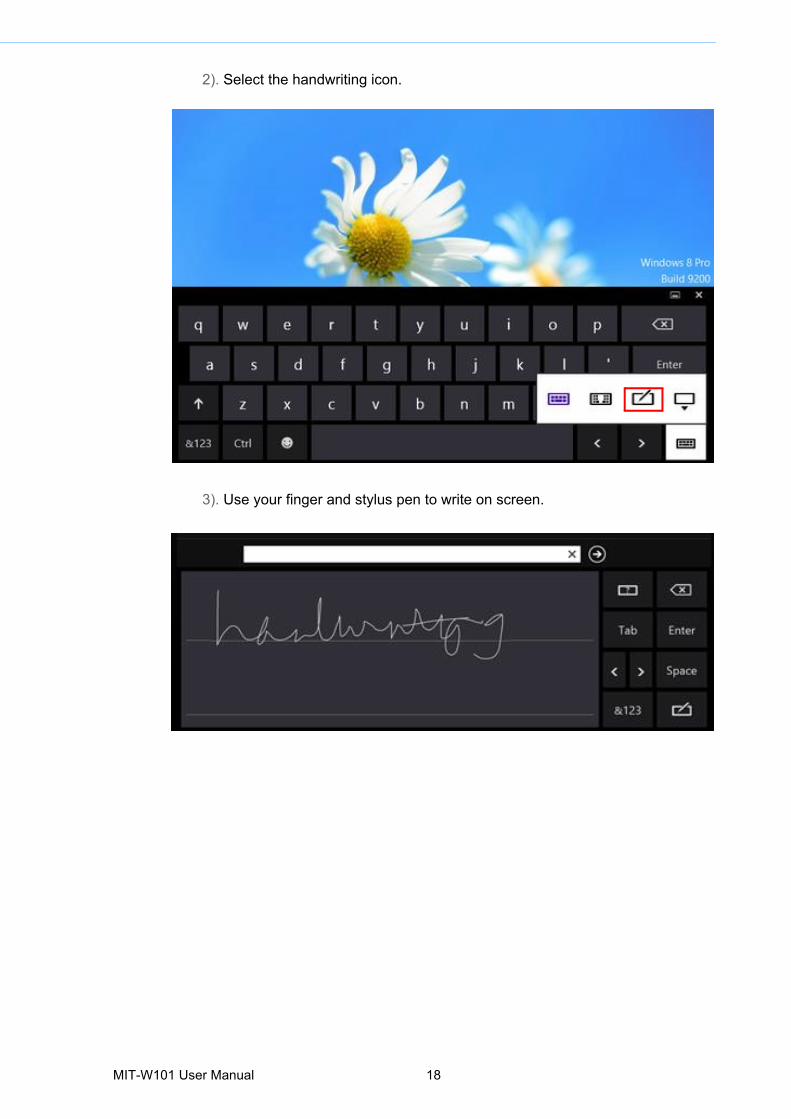
2). Select the handwriting icon.
3). Use your finger and stylus pen to write on screen.
MIT-W101 User Manual 18

Chapter 4
Turning
On
4.1.5 Adjusting Screen Brightness1. Tap the Settings icon on the right.
2. Tap Screen icon to access the brightness control.
19 MIT-W101 User Manual

3. To move the brightness control bar up / down to increase / decrease brightness.
4.1.6 Adjusting the Volume1. Tap the Settings icon on the right.
MIT-W101 User Manual 20

Chapter 4
Turning
On
2. Tap the Volume icon on the system tray.
1). Move the slide to adjust volume.
21 MIT-W101 User Manual

2). Tap the icon to mute.
MIT-W101 User Manual 22

Chapter 5
5 Wireless Connections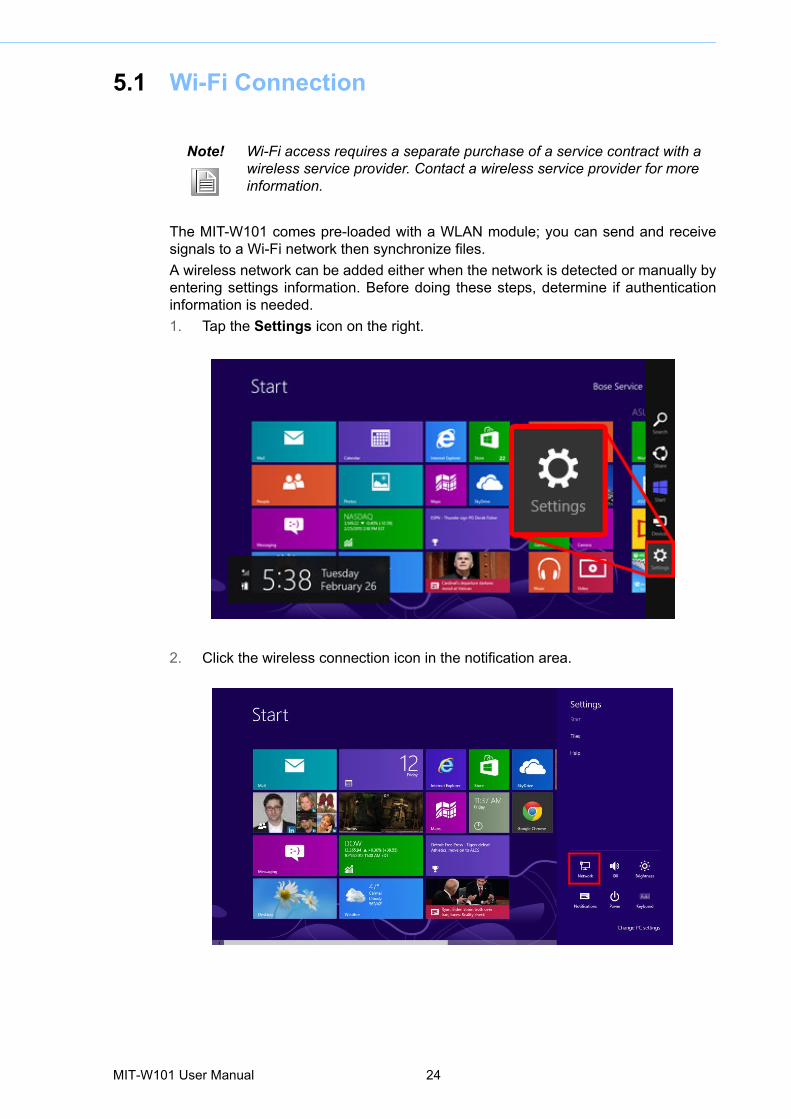
5.1 Wi-Fi Connection
The MIT-W101 comes pre-loaded with a WLAN module; you can send and receivesignals to a Wi-Fi network then synchronize files.
A wireless network can be added either when the network is detected or manually byentering settings information. Before doing these steps, determine if authenticationinformation is needed.
1. Tap the Settings icon on the right.
2. Click the wireless connection icon in the notification area.
Note! Wi-Fi access requires a separate purchase of a service contract with a wireless service provider. Contact a wireless service provider for more information.
MIT-W101 User Manual 24
Chapter 5
Wireless
Connections
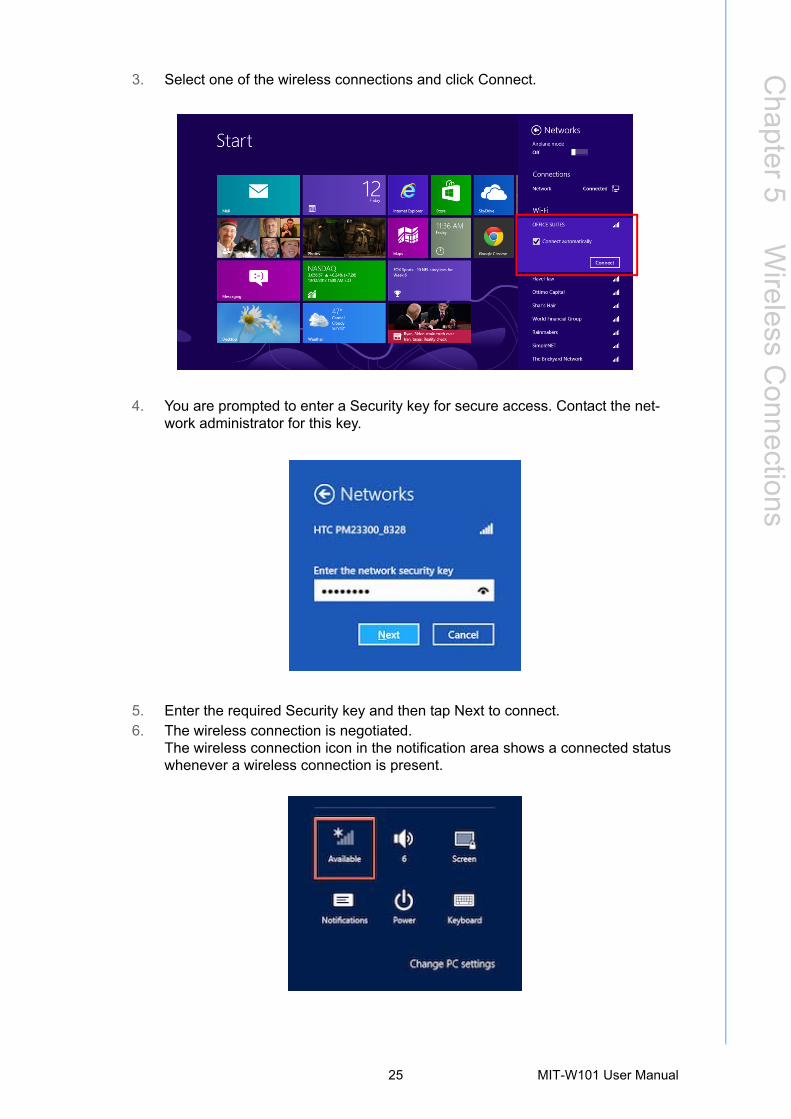
3. Select one of the wireless connections and click Connect.
4. You are prompted to enter a Security key for secure access. Contact the net-work administrator for this key.
5. Enter the required Security key and then tap Next to connect.6. The wireless connection is negotiated.
The wireless connection icon in the notification area shows a connected status whenever a wireless connection is present.
25 MIT-W101 User Manual

Set airplane mode or turn off wireless devices
MIT-W101 User Manual 26

Chapter 5
Wireless
Connections
5.2 Bluetooth ConnectionsThe MIT-W101 comes with built-in Bluetooth functionality that allows you to connectand communicate with other Bluetooth-enabled devices.
5.2.1 Setting Up BluetoothFollow these instructions to set up a Bluetooth connection.
1. Type Bluetooth in Search
2. In notification area, tap Add Bluetooth device.
27 MIT-W101 User Manual

3. Add more Bluetooth devices by clicking on Add a device.
4. Select Yes for comparing both MIT-W101 and the Bluetooth device after pass-key is confirmed.
5. The Bluetooth device is successfully added into MIT-W101 when the process is complete.
Note! It is recommended that you use a passkey to prevent unauthorized access to your MIT-W101.
MIT-W101 User Manual 28
Chapter 6
6 Advanced Setting
6.1 Checking Battery StatusAs it is likely you will be using your MIT-W101 when out and about, it is important thatyou monitor the battery status regularly, to ensure you do not run out of power at acritical moment.
1. Tap on the Power icon on the system tray to view detailed information and the battery screen appears.
Balanced – Automatically balanced performance with energy consumption.
Power saver – Saves energy by reducing MIT-W101’s performance.
6.2 Maintenance
6.2.1 Maintaining the Battery Do not expose heat or attempt to disassemble the battery, and do not place the
battery in water or in a fire. Do not subject the battery to strong impact, such as a blow from a hammer, or
stepping on or dropping it. Do not puncture or disassemble the battery. Do not attempt to open or service the battery. Replace only with batteries designed specifically for this product. Keep the battery out of reach of children. Dispose of used batteries according to local regulations.
6.2.2 Maintaining the LCD Display Do not scratch the surface of the screen with any hard objects. Do not spray liquid directly on the screen or allow excess liquid to drip down
inside the device. Do not place anything, such as food and drink, on the screen at any time to pre-
vent damage to the screen. Clean the LCD display only with a soft cloth dampened with denatured alcohol
or a proprietary LCD screen cleaner.
MIT-W101 User Manual 30
Chapter 6
Advanced
Setting
6.2.3 Cleaning the MIT-W1011. Turn off the MIT-W101 and unplug the power cord.2. Wipe the screen and exterior with a soft, damp cloth moistened only with water.
Do not use liquid or aerosol cleaners on the screen, as these will discolor the finish and damage the screen.
6.2.4 Trouble ShootingWhen System behaves abnormally, such as
1. Failure to power on.2. Failure to power off.3. Power on LED off but DC power plug in.4. Any other LEDs ON but system cannot work.
Contact your distributer, sales representative, or Advantech’s customer service cen-ter for technical support if you need additional assistance. Please have the followinginformation ready before you call:
Product name and serial number. Descriptions of your peripheral attachments. Descriptions of your software (OS, version, application software, etc.) A complete description of the problem. The exact wording of any error messages. Symptoms, photo or video if available.
31 MIT-W101 User Manual

MIT-W101 User Manual 32

Appendix A
A Specifications
A.1 Specifications
Feature Description
Operating SystemMicrosoft Windows Embedded 8 Standard Microsoft Windows 7 Professional for Embedded System (Optional)
Processor Intel® Celeron® Processor N2930
Max. speed Quad Core 1.83GHz
Chipset Intel® Bay Trail-M SoC
Memory One DDR3L 1333MHz SO-DIMM, up to 8GB
Storage One mSATA SSD, up to 128GB
Display 10.1” WXGA TFT LCD
Touch Panel P-CAP Multiple Touch
Application ButtonOne Power buttonTwo Function programmable buttons for quickselection of applications
Communication802.11a/b/g/n WLAN built-in with integrated antenna Bluetooth class 2, 4.0 + EDR built-in with integrated antenna
Camera2.0M Fixed Focus Camera at front5.0M Auto Focus Camera with Flash LED at rear
Main BatteryRechargeable Li-ion battery,Standard battery, 11.1V, 2860 mAh, 3S2P
ITE Power AdapterAC Adapter: AC 100V-240V 50/60Hz,1.5A Output : 19Vdc/3.42~4.2A/65W, Auto Sensing/Switching worldwide power supply
Feature Description
Security 1. Password security
I/O Ports
One USB 3.0/ 2.0One USB 2.0One HP/MIC combined jackOne Micro HDMI type DOne DC-in jackOne Expansion port 8-pinOne Docking port 32-pin
Audio Output One 1 watt speaker
Physical295 x 196 x 20mmApprox. 1.1Kg (base configuration); approx. 2.43lbs
Environment
Operational altitude: 3000 meters (700-1060hPa)Storage/Transportation altitude: 5000 meters (500-1060hPa)Operating Temperature:0ºC to 35ºCStorage/Transportation Temperature -20ºC to 60ºCOperating Humidity 10% ~ 90% @40C non-condensingStorage and Transportation Humidity 10%~90% @60C non-con-densing4ft drop onto concrete
MIT-W101 User Manual 34

Appendix A
Specifications
LED Status
A.2 Optional Accessories
A.2.1 External BatteryYou can use an external battery to extend the power of your MIT-W101.
Battery specification: 2860 mAh, 11.1V
Feature Description
CertificationFCC Class B, CE, CB, UL , ANSI / ISA 2.12.01-2013– Optional Class I division 2, groups ABCD certified model
Optional Device /Accessories
Rubber Bumper (Optional)
DUT on/off
AC adapter in
Internal Battery
Green LED
Amber LED
Remark
Off X X Off Off System Off
Off V V Off On Battery is charging
Off V V On OffBattery is fully charged(100%)
On V V Off On Battery is charging
On V V On Off Battery is fully charged (100%)
On V V Off OnBattery Low (< 10 %)
35 MIT-W101 User Manual

A.2.2 Installing the External Battery1. Align and insert the battery on the MIT-W101.
2. Lock to secure the battery once it is properly to be inserted.
MIT-W101 User Manual 36

Appendix A
Specifications
A.3 Installing an SSD
A.3.1 Inserting an SSD You can insert an SDD to store data, which needs to be later transferred to anothermachine, or to simply expand the storage capacity of the MIT-W101-A.
1. Open the SSD card compartment cover.
2. Insert the SDD, facing upwards, until it clicks into place.
37 MIT-W101 User Manual

3. Screw and fix the SSD.
4. Close the SDD compartment cover.
MIT-W101 User Manual 38
Appendix A
Specifications
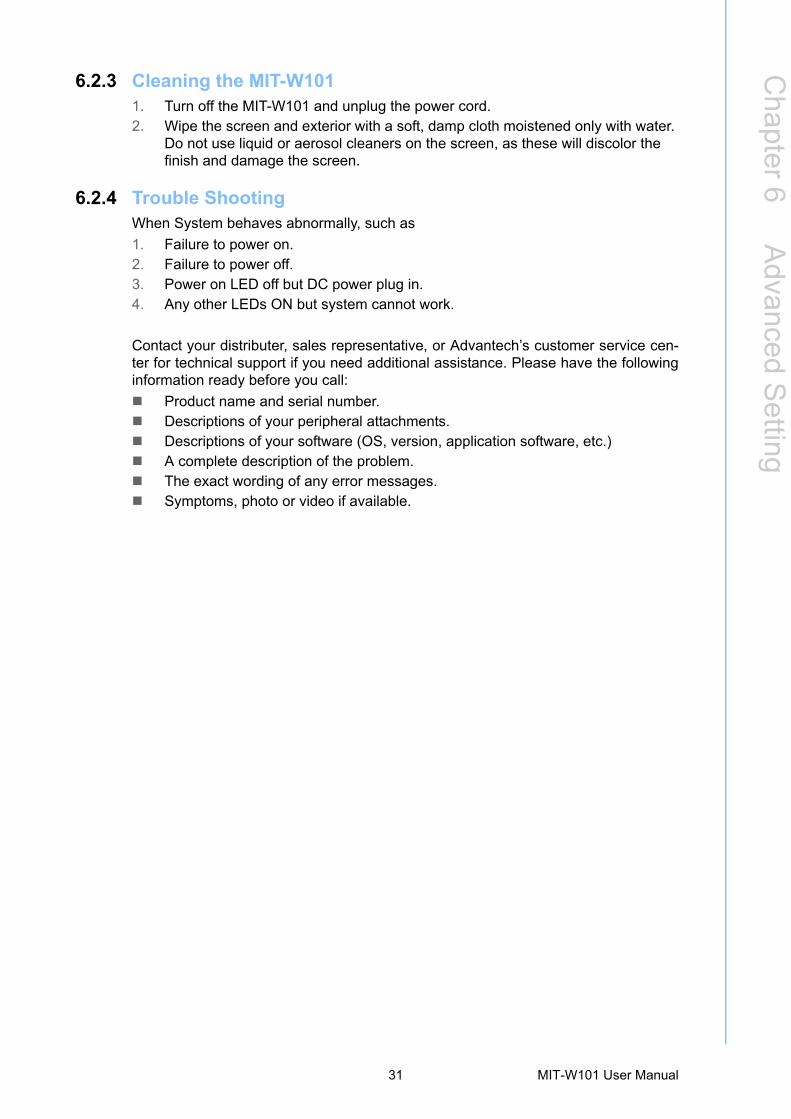
A.3.2 Removing an SSD1. Open the SSD compartment cover.
2. Unscrew and remove SSD from the slot.
39 MIT-W101 User Manual

3. Close and screw the SSD card compartment cover.
A.4 Pogo Cover Bracket Installation Instructions For Hazardous Locations
A.4.1 Installing the Bracket (Must) Must Installing the Pogo cover bracket
Operator must install the bracket to compliant with the CID2 regulation.
Without this bracket, MIT-W101 tablet is forbidden used in CID2 environment.
1. Unscrew the Battery latch from the rear of the tablet PC.
MIT-W101 User Manual 40
Appendix A
Specifications
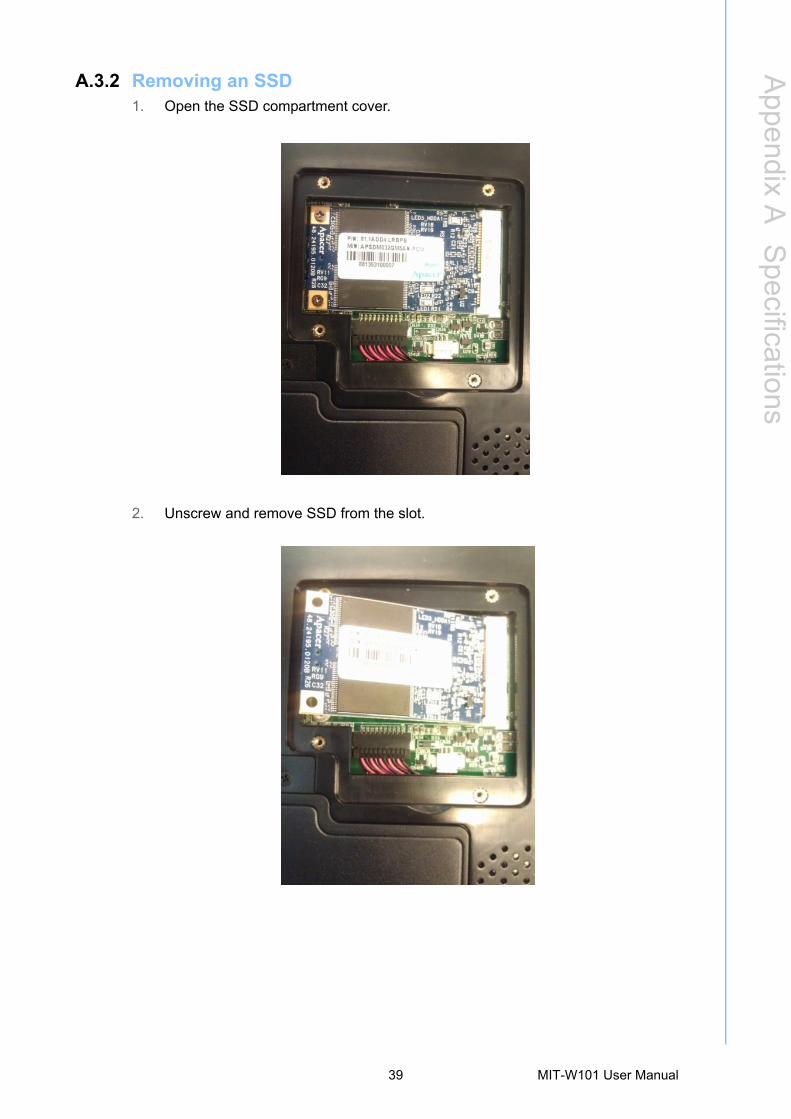
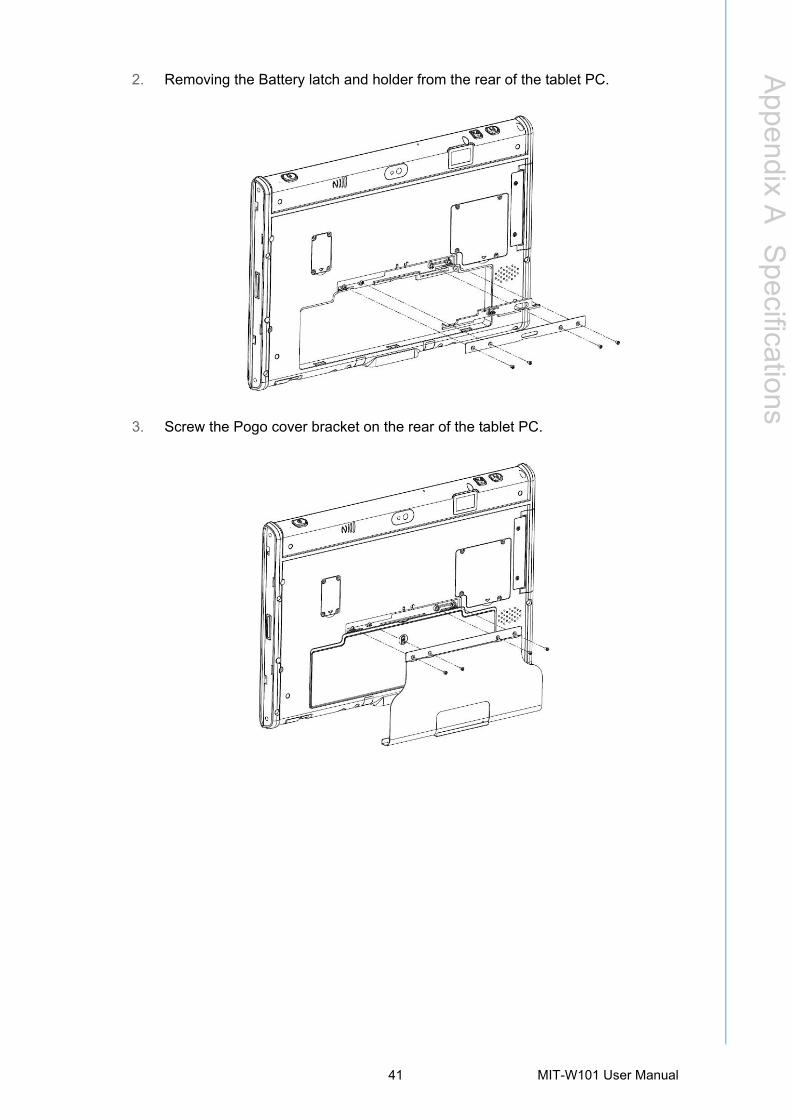
2. Removing the Battery latch and holder from the rear of the tablet PC.
3. Screw the Pogo cover bracket on the rear of the tablet PC.
41 MIT-W101 User Manual
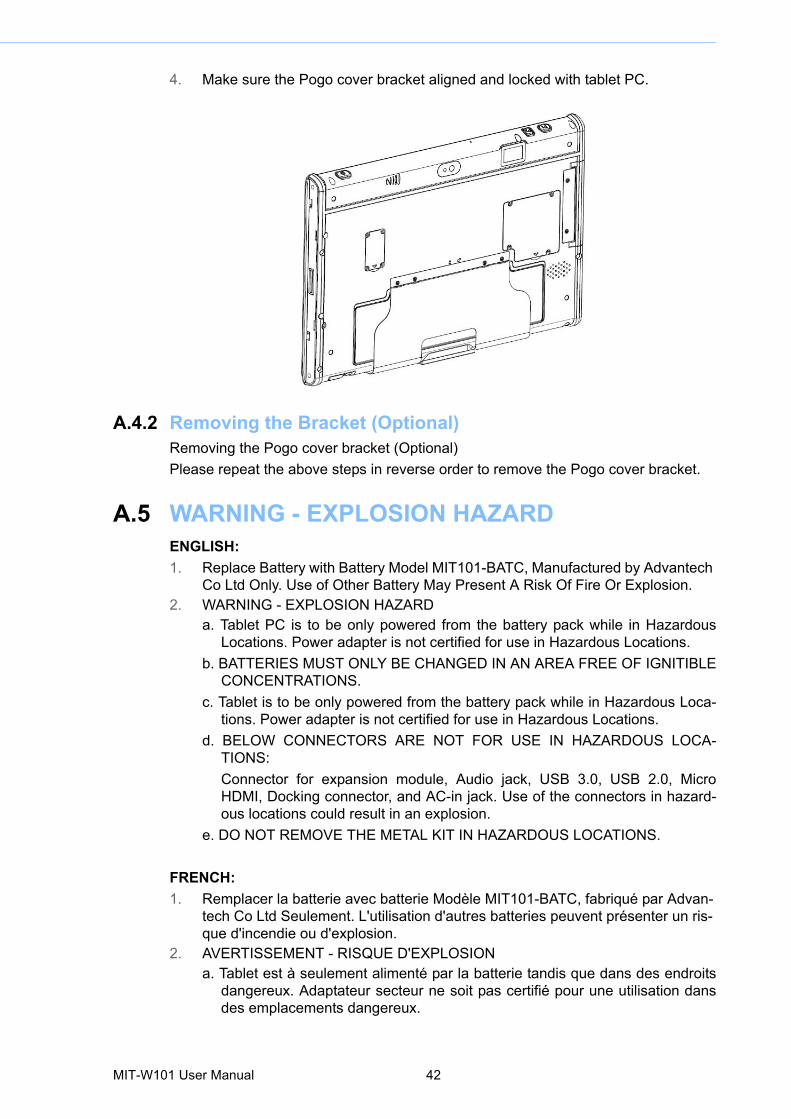
4. Make sure the Pogo cover bracket aligned and locked with tablet PC.
A.4.2 Removing the Bracket (Optional) Removing the Pogo cover bracket (Optional)
Please repeat the above steps in reverse order to remove the Pogo cover bracket.
A.5 WARNING - EXPLOSION HAZARDENGLISH:
1. Replace Battery with Battery Model MIT101-BATC, Manufactured by Advantech Co Ltd Only. Use of Other Battery May Present A Risk Of Fire Or Explosion.
2. WARNING - EXPLOSION HAZARDa. Tablet PC is to be only powered from the battery pack while in Hazardous
Locations. Power adapter is not certified for use in Hazardous Locations.
b. BATTERIES MUST ONLY BE CHANGED IN AN AREA FREE OF IGNITIBLECONCENTRATIONS.
c. Tablet is to be only powered from the battery pack while in Hazardous Loca-tions. Power adapter is not certified for use in Hazardous Locations.
d. BELOW CONNECTORS ARE NOT FOR USE IN HAZARDOUS LOCA-TIONS:
Connector for expansion module, Audio jack, USB 3.0, USB 2.0, MicroHDMI, Docking connector, and AC-in jack. Use of the connectors in hazard-ous locations could result in an explosion.
e. DO NOT REMOVE THE METAL KIT IN HAZARDOUS LOCATIONS.
FRENCH:
1. Remplacer la batterie avec batterie Modèle MIT101-BATC, fabriqué par Advan-tech Co Ltd Seulement. L'utilisation d'autres batteries peuvent présenter un ris-que d'incendie ou d'explosion.
2. AVERTISSEMENT - RISQUE D'EXPLOSIONa. Tablet est à seulement alimenté par la batterie tandis que dans des endroits
dangereux. Adaptateur secteur ne soit pas certifié pour une utilisation dansdes emplacements dangereux.
MIT-W101 User Manual 42
Appendix A
Specifications
b. Les batteries doivent être modifiés que dans une zone exempte de concen-trations inflammables.
c. Tablet est à seulement alimenté par la batterie tandis que dans des endroitsdangereux. Adaptateur secteur ne soit pas certifié pour une utilisation dansdes emplacements dangereux.
d. CONNECTEURS POUR dessous ne sont pas les emplacements dangereux:
Connecteur pour module d'extension, prise audio, USB 3.0, USB 2.0, MicroHDMI, connecteur d'accueil, et AC-jack.Utilisation des connecteurs dans desendroits dangereux pourrait provoquer une explosion.
e. NE PAS RETIRER LE KIT DE METAL DANS DES ENDROITS DAN-GEREUX.
43 MIT-W101 User Manual
www.advantech.comPlease verify specifications before quoting. This guide is intended for referencepurposes only.All product specifications are subject to change without notice.No part of this publication may be reproduced in any form or by any means,electronic, photocopying, recording or otherwise, without prior written permis-sion of the publisher.All brand and product names are trademarks or registered trademarks of theirrespective companies.© Advantech Co., Ltd. 2016