User Manual LabMaster/Partner water activity … system for measuring water activity. You have opted...
48
Operating Instructions aw-Messgerät / aw measuring instrument / Appareil de mesure aw 2518902 200040.355.04 & LabPartner-aw World leading thanks INNOVATION solution and sensor technology www.novasina.ch E
Transcript of User Manual LabMaster/Partner water activity … system for measuring water activity. You have opted...

Operating Instructions
aw-Messgerät / aw measuring instrument / Appareil de mesure aw
2518
902
20
0040
.355
.04
& LabPartner-aw
World leading thanks INNOVATION solution and sensor technology
www.novasina.ch
E

www.novasina.ch
© Novasina AG, Printed at 2007 in SwitzerlandTechnische Änderungen vorbehaltenTechnical data subject to modificationSous réserve de modifications techniques

1. Introduction ....................................................................................................................... 41.1. Starting Out .............................................................................................................................. 41.2. Important Notes ....................................................................................................................... 4
2. General Product Description .......................................................................................... 52.1. System Overview ..................................................................................................................... 52.2. System Architecture ................................................................................................................. 62.3. Instrument Overview ................................................................................................................ 72.4. Standard Delivery .................................................................................................................... 82.5. Optional Accessories .............................................................................................................. 9
3. Putting Into Operation...................................................................................................... 103.1. Packaging / Installation ............................................................................................................ 103.2. Putting Into Operation .............................................................................................................. 103.3. Adding An Additional Channel (LabPARTNER-aw) ............................................................................113.4. Quick Start ............................................................................................................................... 12
3.4.1. System Start ..................................................................................................................................123.4.2. Quick Measurement Start ..............................................................................................................123.4.3. Changing the Reading Display .......................................................................................................123.4.4. Change Selected "Chamber Temperature" ...................................................................................133.4.5. Stability Parameter Setting for Analysis ..........................................................................................13
4. Description, Instrument Functions ................................................................................. 144.1. General Description of the System User Elements ................................................................. 144.2. Operating the Measuring Instrument ....................................................................................... 15
4.2.1. System Startup ................................................................................................................................154.2.2. The standard „Operation Mode" ......................................................................................................15
4.3. Setting the Instrument .............................................................................................................. 164.3.1. Chamber Settings ............................................................................................................................164.3.2. Samples Database (max.10) ......................................................................................................... 184.3.3. Printout function for external printer ..............................................................................................194.3.4. General system Settings ............................................................................................................... 22
5. Water Activity Measurements..............................................................................255.1. Carrying Out aw-Measurements ................................................................................. 255.2. Important Notes About The Sensor ......................................................................................... 275.3. Function Principle of Stability Observation .............................................................................. 285.4. Setting Stability Observation Time Factors ............................................................................. 295.5. Recording Desorption and Adsorption Curves ........................................................................ 30
6. Calibration ......................................................................................................................... 346.1. Factory Calibration, Delivery Status ........................................................................................ 346.2. Set A Sensor Password? ........................................................................................................ 346.3. Display Sensor Calibration Points .......................................................................................... 356.4. Calibration Procedure .............................................................................................................. 356.5. Clear Sensor Calibration Points .............................................................................................. 376.6. Interfaces RS-232 and USB ................................................................................................... 37
7. Maintenance ...................................................................................................................... 387.1. Cleaning ................................................................................................................................... 387.2. Sensor Recalibration with Humidity Standards ....................................................................... 397.3. Replacing Protective Filters ..................................................................................................... 397.4. Replacing a CM-2 Sensor Unit ................................................................................................ 417.5. Replacing an Instrument Fuse ................................................................................................. 42
8. Technical specifications ................................................................................................. 438.1. Equilibrium humidity values of the SAL-T humidity source ..................................................... 44
9. Troubleshooting ............................................................................................................... 449.1. What is wrong, when....? ......................................................................................................... 449.2. Error message screens............................................................................................................ 45
10. Short Menu overview ....................................................................................................... 46
Engl
ish
INDEX
www.novasina.ch

4
Engl
ish
www.novasina.ch
1. Introduction1.1. Starting Out
Thank you for having purchased an instrument of the NovasinaLabMASTER-aw system for measuring water activity. You have opted fora highly accurate and reliable instrument representing the latest state of theart in electronics and software design when it comes to highest precisionin aw (water activity) measuring.
To get the most out of all the possibilities of your Novasina LabMASTER-aw or LabPARTNER-aw, and to guarantee safe, reliable operation, pleaseread these operating instructions before setting the unit into operationcarefully.
Please keep this manual in a safe place where it will be at hand wheneveryou need it. If you lose the manual, please contact your Novasinarepresentative for immediate replacement.
1.2. Important NotesIntended use
The Novasina LabMASTER-aw or LabPARTNER-aw is exclusivelyintended for measuring WATER ACTIVITY under strict adherence to theinformation and notes given in this manual. Any use beyond this scope isconsidered to be a violation of the intended purpose and may endangeryour safety or could result in the product being damaged. Any use of thisNovasina instrument other than as intended is at the customer’s own riskand by no means will the manufacturer or supplier be liable for any resultingdamage.
Safety instructions
• The Novasina LabMASTER-aw system should be serviced, maintainedand repaired only by qualified people who are familiar with the equipment.
• The LabMASTER-aw system must not be used in hazardous zones orsimilar areas. The design was made only for the laboratory field.
• No explosive materials and no highly inflammable substances may bemeasured in the measurement chamber system.
• Before connecting the unit to the mains, ensure that:
• the mains voltage is within 90...260V, at 50 or 60Hz. Please checkthe name plate of the system!
• the power cable between the mains and the instrument is notdamaged.
• The Novasina LabMASTER-aw system may be used only under thespecified operating conditions (see chapter „Specifications“).
• Observe and strictly adhere to the local regulations regarding thehandling of mains- powered devices.
• Use only genuine accessories and spare parts available from yourNovasina supplier or look in the internet under www.novasina.com.
• This instrument must not be modified in any way without the writtenconsent of Novasina, a division of Axair Ltd.
• Never open the instrument without removing the mains power cable firstto avoid any risk of dangerous currents.

5
Engl
ish
www.novasina.ch
2. General Product Description2.1. System Overview
The LabMASTER-aw system has been specially developed fordetermining the fraction of free water in a test sample like food,cosmetics or pharmaceutical probes. This fraction is also known as"water activity" in the foodstuffs industry. Unfortunately, these daysmany people still confuse water activity with the water content of asample. Measuring the water content of a specimen, however, ismeasuring the combined fraction of both bound and free water. Thewater content can be determined indirectly, yet non - destructively, usingLabMASTER-aw (see SI Sorption Isotherm)
The fundamental requisite for determining water activity quickly and withextreme precision is an excellent moisture sensor that reaches an exact,reproducible measurement over a very wide range (moisture from0....100% rF). Novasina has been developing special electrolytic moisturesensors that stand out for such unique properties for more than 40 years.The intelligent,resistive, electrolytic sensor integrated into theLabMASTER or PARTNER-aw is based on the latest Novasina „NovalyteTechnology“, with which one can guarantee such precision andreproducibility. Thanks this technology an aw-meter as has never beenattained before.
The complete LabMASTER-aw system comprises various modularcomponents. The system can thus be optimally adapted to the customerand his requirements.
The components of such a system are essentially as follows:
LabMaster-aw LabPartner-aw 1 ... 9
PC- analysis software for LabMaster/Partner-aw

6
Engl
ish
www.novasina.ch
2.2. System Architecture
A LabMASTER-aw can be operated either alone or as controlling unit ina network. The connection between this main unit and up to nineLabPARTNER-aw network components is established over a specialcommunication circuit. The LabMASTER-aw is normally powered from amains socket. To avoid high inrush currents, the connected LabPARTNER-aw units are fed power directly from the LabMASTER-aw.
The LabMASTER-aw can communicate with other computer systems,such as a (Windows) PC or laptop, over a USB or RS-232 interface. Theappropriate software for analysis and data recording comes included withthe „STANDARD“ and „ADVANCED“ models.
A LabMASTER-aw can monitor and control up to nine additionalLabPARTNER-aw units. All settings to the LabPARTNER-aw are madefrom the LabMASTER-aw, the controlling unit. A LabPARTNER-aw cannot be operated alone (without LabMaster-aw)!
Every LabPARTNER-aw has its own independent, temperature - stabilisedmeasuring chamber, a chamber for preconditioning, an LCD panel and twobuttons (for start / stop and internal settings options). A device number canbe allocated using the software setup to uniquely identify the unit. Attention!No two units may be allocated the same number in a network!!
Please check that on a system of LabMASTER / PARTNER-aw it has tobe only one LabMASTER as a chief manager. It is forbidden to connect twoLabMASTER-aw via the bus line together.
For further information, please read the operating instructions for theLabPARTNER-aw.
A LabMaster-aw system with 3 Partner and a laptop

7
Engl
ish
www.novasina.ch
! Detailed LabPartner-aw description see operation manual !
2.3. Instrument Overview
Cover with sensor unit
Probe measurement andpre-conditioning chamber
LED light "Analyse"LED light "Stable"
Fix-Functions keyboardStandard keyboardFunctions buttons
LCD screen
Main switch
Mains outlet to the next-LabPARTNER-aw
System bus linet to the nextLabPARTNER-aw
USB output to a PC
RS-232 output to a PC or external printer
Mains power for anyLabMASTER/PARTNER-aw(Fuse over the plug!)

8
Engl
ish
www.novasina.ch
2.4. Standard DeliveryNovasina LabMASTER-aw „BASIC“:
AW measuring instrument with precise, temperature - stabilised samplechamber and additional preconditioning chamber, basis software withoutuser administration/management and without samples database system.
This instrument can only be operated as a stand-alone system. No analysisprograms for PC (Novalog MC) and no cable are included. An connectionto an external RS-232 printer is possible. It is as well possible to expand theinstrument to a higher software level with additional functions at any timeby a version code.
Standard accessories:
• Set with 5 humidity standards: SAL-T 11, 33, 75, 90, 97%
• 50 sample cups
• Operating instructions
Novasina LabMASTER-aw „STANDARD“: (single-channel control)
AW measuring instrument with precise, temperature-stabilised samplechamber and additional preconditioning chamber, standard software withuser administration/management and samples database functions.
This instrument can only be operated as a stand-alone system. It cancommunicate with a PC-based computer system (required PC-basedsoftware included) over a USB/RS232 interface. An connection to anexternal RS-232 printer is possible. It is as well possible to expand theinstrument to a higher software level with additional functions at any time.
Standard accessories:
• Set with 5 humidity standards: SAL-T 11, 33, 75, 90, 97%
• 50 sample cups
• Operating instructions
• Interface RS232 - PC cable 1.8m/D-Sub 9M/9F and USB cable
• PC software „NOVALOG MC“ for Win9X/2000/NT/XP
Novasina LabMASTER-aw „ADVANCED“ (multi-channel control)
AW measuring instrument with precise, temperature-stabilised samplechamber and additional preconditioning chamber, standard software withmulti-user administration/management and samples database system.System extension via bus line to a LabPARTNER-aw possible.
The software for this instrument allows a multi-unit measurement systemwith up to 9 LabPARTNER units. But can also be operated as a stand-alone unit. The instrument communicates with a PC-based computersystem over a USB / RS232 interface and with the LabPARTNER units witha Field Bus system (required software is included).An connection to anexternal RS-232 printer is possible.
Standard accessories:
• Set with 5 humidity standards: SAL-T 11, 33, 75, 90, 97%
• 50 sample cups
• Operating instructions
• Interface RS232 - PC cable 1.8m/D-Sub 9M/9F and USB cable
• PC software „NovaLog MC“ for Win9X/2000/NT/XP

9
Engl
ish
www.novasina.ch
Novasina LabPartner-aw (max. 1....9 units on a network):
Modular expansion of the measuring station by one or more measuringand preconditioning chambers can be achieved over an internal networkusing LabPARTNER-aw units.
Standard accessories:
• 50 sample cups
• Power and communication cables, both 1.8m, from MASTER toPARTNER unit.
Please read the LabPARTNER-aw operating instructions for furtherdetails!
2.5. Optional Accessories
For certain use of the equipment, the precision measuring cell of theLabMASTER/PARTNER-aw must be protected against aggressivevapours. Novasina offers various protective filter systems for thispurpose. Please consult the corresponding datasheets for Novasinaprotective filter systems or contact your Novasina sales partner. Usingfilter systems can prolong the service life of the measuring cellconsiderably. Should you implement such filter systems, please see toit that they are tested and changed at regular intervals. Chemical filters,in particular, tend to become saturated and thus ineffective after theyhave been in use for a certain time.
• Cell protection filters against aggressive vapours:
• Please consult the filter specification sheet
Novasina offers a special accessory for determining the sorption iso-therm of a sample medium. In conjunction with the SAL-T humiditystandards, a suitable curve can thus be adopted with the greatest ofease. As such, the LabMASTER/PARTNER-aw can also be used forfast, precise and non-destructive water content measurement.
Operation manualfor sorpiton-Isotherm
Plastic casewith soft padding
Special pincers
Special measurementbody for the chamber
Weighing glass with cover
Stainless steelsubstance basket
10
Engl
ish
www.novasina.ch
3. Putting Into Operation3.1. Packaging / Installation
Novasina precision measuring instruments are supplied in sturdy, speciallylined cardboard packaging with all necessary accessories. Upon receipt,please check first to make sure everything is present, and immediately notifyyour Novasina sales partner if anything is missing or broken. Do not putdamaged or incomplete measuring instruments into operation.
The equipment must be installed in a laboratory on an even surface, avoidingvibrations, strong heat radiation, air flow and dust.
There must be a perimeter of at least 30 cm of free space around the entiremeasuring instrument, since it can momentarily give off great heat.
The temperature controller may generate excess waste heat, depending onsettings, which is dissipated through the vent holes in the housing and by thebuilt-in fan. The fan is thermostatically regulated. There must be unobstructedair circulation around and especially at the back of the instrument.
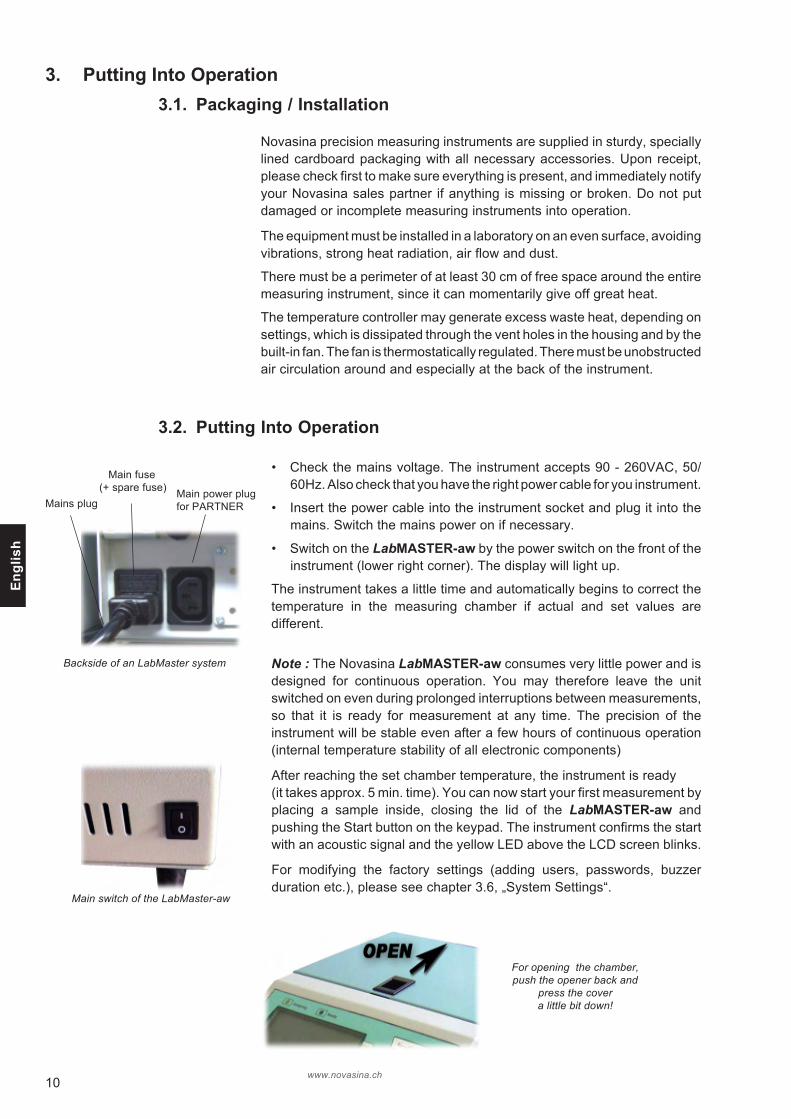
3.2. Putting Into Operation
• Check the mains voltage. The instrument accepts 90 - 260VAC, 50/60Hz. Also check that you have the right power cable for you instrument.
• Insert the power cable into the instrument socket and plug it into themains. Switch the mains power on if necessary.
• Switch on the LabMASTER-aw by the power switch on the front of theinstrument (lower right corner). The display will light up.
The instrument takes a little time and automatically begins to correct thetemperature in the measuring chamber if actual and set values aredifferent.
Note : The Novasina LabMASTER-aw consumes very little power and isdesigned for continuous operation. You may therefore leave the unitswitched on even during prolonged interruptions between measurements,so that it is ready for measurement at any time. The precision of theinstrument will be stable even after a few hours of continuous operation(internal temperature stability of all electronic components)
After reaching the set chamber temperature, the instrument is ready(it takes approx. 5 min. time). You can now start your first measurement byplacing a sample inside, closing the lid of the LabMASTER-aw andpushing the Start button on the keypad. The instrument confirms the startwith an acoustic signal and the yellow LED above the LCD screen blinks.
For modifying the factory settings (adding users, passwords, buzzerduration etc.), please see chapter 3.6, „System Settings“.
Main switch of the LabMaster-aw
For opening the chamber,push the opener back and
press the covera little bit down!
Backside of an LabMaster system
Main power plugfor PARTNERMains plug
Main fuse(+ spare fuse)
11
Engl
ish
www.novasina.ch
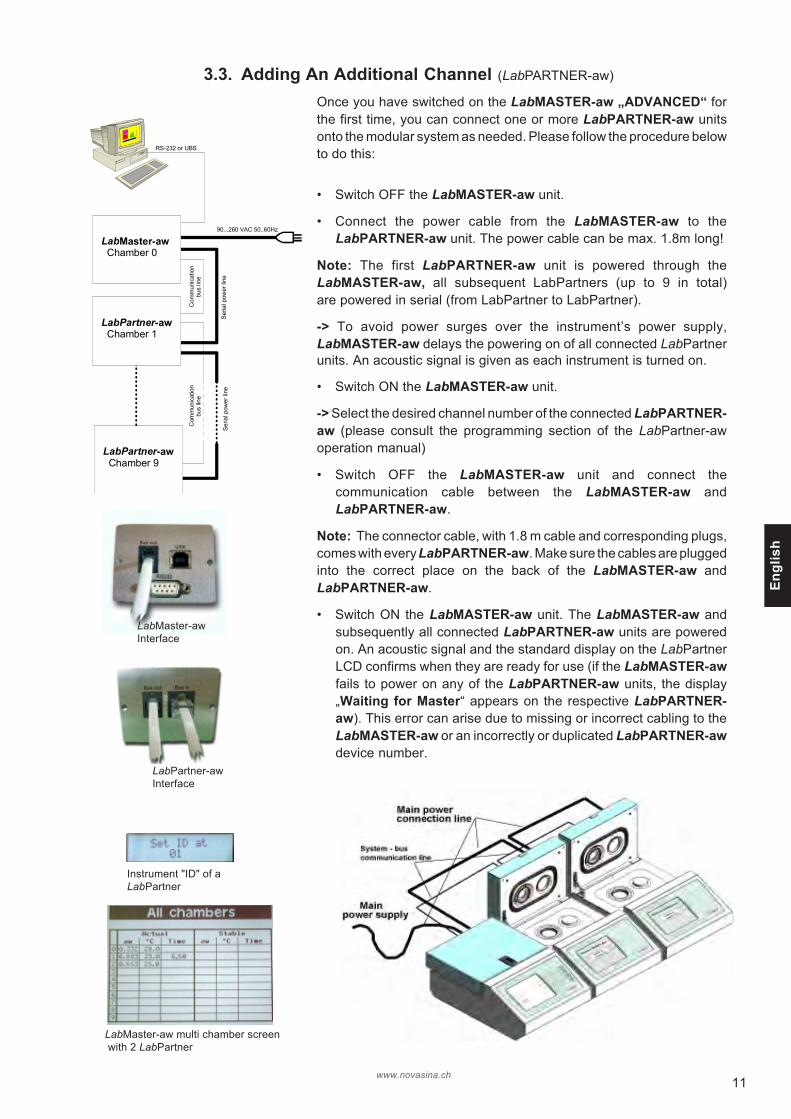
3.3. Adding An Additional Channel (LabPARTNER-aw)
Once you have switched on the LabMASTER-aw „ADVANCED“ forthe first time, you can connect one or more LabPARTNER-aw unitsonto the modular system as needed. Please follow the procedure belowto do this:
• Switch OFF the LabMASTER-aw unit.
• Connect the power cable from the LabMASTER-aw to theLabPARTNER-aw unit. The power cable can be max. 1.8m long!
Note: The first LabPARTNER-aw unit is powered through theLabMASTER-aw, all subsequent LabPartners (up to 9 in total)are powered in serial (from LabPartner to LabPartner).
-> To avoid power surges over the instrument’s power supply,LabMASTER-aw delays the powering on of all connected LabPartnerunits. An acoustic signal is given as each instrument is turned on.
• Switch ON the LabMASTER-aw unit.
-> Select the desired channel number of the connected LabPARTNER-aw (please consult the programming section of the LabPartner-awoperation manual)
• Switch OFF the LabMASTER-aw unit and connect thecommunication cable between the LabMASTER-aw andLabPARTNER-aw.
Note: The connector cable, with 1.8 m cable and corresponding plugs,comes with every LabPARTNER-aw. Make sure the cables are pluggedinto the correct place on the back of the LabMASTER-aw andLabPARTNER-aw.
• Switch ON the LabMASTER-aw unit. The LabMASTER-aw andsubsequently all connected LabPARTNER-aw units are poweredon. An acoustic signal and the standard display on the LabPartnerLCD confirms when they are ready for use (if the LabMASTER-awfails to power on any of the LabPARTNER-aw units, the display„Waiting for Master“ appears on the respective LabPARTNER-aw). This error can arise due to missing or incorrect cabling to theLabMASTER-aw or an incorrectly or duplicated LabPARTNER-awdevice number.
LabMaster-aw multi chamber screen with 2 LabPartner
Instrument "ID" of aLabPartner
LabMaster-awInterface
LabPartner-awInterface
RS-232 or UBS
LabMaster-aw Chamber 0
90...260 VAC 50..60Hz
LabPartner-aw Chamber 1
LabPartner-aw Chamber 9
Ser
ial p
ower
line
Ser
ial p
ower
line
Com
mun
icat
ion
bus
line
Com
mun
icat
ion
bus
line

12
Engl
ish
www.novasina.ch
ATTENTION : A LabPARTNER-aw can only be operated with oneconnection to a LabMASTER-aw. All settings to the measuring chamberetc. can only be made from the LabMASTER-aw.
An additional LabPARTNER-aw instrument may be placed directly besidethe LabMASTER-aw unit or up to the distance of the cables (1.8m) aroundit, wherever there is space available. Special systems with up to 9additional channels may be distributed over different rack levels.
3.4. Quick Start3.4.1. System Start
While the LabMASTER-aw System is starting, a greeting text appears onthe display. After about 3 seconds, the display automatically switches tosingle-chamber measuring mode. Depending on the LabMASTER-awversion, „BASIC“, „STANDARD“ or „ADVANCED“, the user may need toidentify himself (password) or may be able to commence the measurementsimmediately.
3.4.2. Quick Measurement Start
Please fill a suitable test sample into a sample cup. Make sure the samplecup is well filled, but not over the lip. Do not compact the sample mediumunder any circumstances. The greater the overall surface of the sample is,the quicker and more precise the aw measurement will be. Next, place aproduct sample in the left chamber (the measurement chamber). Place asecond sample into the pre-conditioning chamber on the right side. Closethe cover and the equilibrium begins to develop. Momentary values of „aw“and „°C“ are shown on the display.Samples at very different temperatures from the chamber : to save time, itis recommended to place the next sample to be measured in the pre-conditioning chamber in order to minimise the temperature difference.
The „stable“- and analyse function may be started with the „Start/Stop“button. The yellow LED „ANALYSING“ flashes. When the value becomes„stable“, the green LED lights up. The system send you as well an acusticsignal, if it will be finished by a "peep". If the cover is opened or was notproperly closed, the „STABLE“ function is interrupted and the analysingfunction cannot be started!
3.4.3. Changing the Reading Display
Every LabMASTER-aw has two different display modes for the currentreading. These will be referred to below as „single-chamber display mode“and „summary chamber mode“. Single-chamber mode only shows thecurrent reading from the selected chamber number. This can be changedwith the software button „Select chamber“. In summary chamber display,the current readings of the entire system are shown. At the same time, itcan be checked in this display mode which LabPARTNER-aw (device No.)a LabMASTER-aw is communicating with.
Note : When the instrument is switched on, the last set chamber No. andthe actual aw and temperature values are displayed. You can as well checkthe communication status of all other LabPARTNER-aw on the systemwith the "summary chamber mode"
OK Fault
Start / Stop
Analyzing / Stable LED
View single
"Singlechambermode"
View All
"Multi / summarychamber mode"
Pre-conditioning chamber
Measurement chamber

13
Engl
ish
www.novasina.ch
3.4.4. Change Selected "Chamber Temperature"
Push the function key "Settings" to switch into the system menu. Thereyou can adjust any chamber-, samle- and systems parameters.
Select the point "0 : Chamber settings..." on the screen and press"ENTER". The selection can be in two way. Either by pressing „0“ on thekeyboard, or moving the highlight up or down using the „ “ or „ “ softkeys and then press „ENTER“.
Select on the same way the menu point : „2 : Temperature" by pressing„2“ or moving the highlight up or down using the „ “ or „ “ soft keys andthen press „ENTER“.
Set the new required chamber temperature (by keyboard) and finishyour settings by pressing the „OK“ soft key. Return to single chambermode by pressing „ESC“ or many time the function key "Previousscreen".
The internal controller system will change now the new chambertemperature.Maybe the rotation speed of the internal fan will be changed part timeand you can hear it a little bit. On the screen you can see, that thetemperature of the actual value will move the direction to the new settemperature. This takes a little while. During this time, the chambersystem must be closed! A sample or a SAL-T can be inside but thespeed of changing will be slower. Please wait during the temperaturestabilisation process.
Note : If you are using a multi-channel system (LabMASTER-aw andat least one LabPARTNER-aw), select the chamber number beforechanging the settings !
3.4.5. Stability Parameter Setting for Analysis
To optimise the measuring speed of the instrument, it is possible tooptimise the stability criteria of the measurement for each sample. Twostability parameters can be set : One for the aw value and one for thetemperature in °C. The range of the stabilty parameter will be from 1up to 30 min. To keep within these parameters, the change in measu-rement reading may not be greater than 0.001 aw or 0.1°C during theset time. If both criteria are fullfiled over the observation time themeasurement will be finished and you see the result on the lower partof the screen. Please refer to chapter 5.4 of these operating instructionsfor further information.
Stab. observation time aw range: 1....30 min(stable if the aw value deviation isless than +/- 0.001 aw during this time)
Stab. observation time °C range: 1....30 min(stable if the chamber temperaturevalue deviation is less than +/- 0.1 °C during this time)

14
Engl
ish
www.novasina.ch
4. Description, Instrument FunctionsThe modular LabMASTER-aw system has a great variety of functions,depending on software version and expansion status. These shall bedescribed in detail below. The table below shows which functions areactivated in which expansion status. It will be possible to update an"BASIC" or "STANDARD" to the next possible version or directly to a"ADVANCED" version of a LabMASTER-aw. The way is very simple andcode driven. A new code can be ordered through your local Novasinarepresentative.
4.1. General Description of the System User ElementsA LabMASTER-aw system is used primarily for precise measurement ofthe water activity of a test sample at an exactly reproducible temperature.It stands out for the following special properties:
• High-precision, temperature-stabilised, active measuring chamber.
• Second pre-conditioning chamber for the following sample.
• Precise, especially developed humidity measuring cells that can beadjusted to the proven Novasina humidity standards at any time.
• High-precision, adjustable stability display.
• Multi-user management system with dynamic administration.
• Multi-chamber management system with dynamic administration.
• Samples database system for efficient lab work.Main operating elements of the LabMASTER-aw:
Functions "BASIC" "STANDARD" "ADVANCED"
Date and time Measurement analysing Probe data base Single-user Login / Logout Multi-User User management system Password protection RS-232 / USB communication External printer RS-232 PC software NovaLog32 LabPartner bus line Power ON / OFF (LabPartner) Measurement chamber selection Intelligent sensor, password Calibration at 8 points Unit changing aw/% RH, °C/°F, date Optioncode alignment

15
Engl
ish
www.novasina.ch
4.2. Operating the Measuring Instrument
4.2.1. System Startup
The system runs a comprehensive function control of all internalmodules and important software components when starting up. Afterthis, the LabMASTER-aw tries to establish a connection to anyconnected LabPARTNER-aw units. Any errors in the LabMASTER/PARTNER-aw hardware or software are then shown in an informationwindow on the LabMASTER-aw.
After some seconds, the system is ready to conduct measurements.The screen automatically switches to OPERATION MODE. Pleasenote that the system should already be in operation for several hoursfor exact and reproducible measurements. Only this way can allelectronic components have stabilised to the optimum temperaturelevel and be working at highest precision.
4.2.2. The standard „Operation Mode"
Measurements and analyses can be made in this mode. The displaycan be switched from single-chamber display (chambers selectable byID) to summary table display. This is very easily done by pressing thesoft key „VIEW“ (single / all). When in single-chamber display, thecurrent chamber number can be set and displayed with the „SelectChamber“ soft key. The LabMASTER-aw chamber itself is alwaysallocated number „0“.
The chamber numbers of connected LabPARTNER-aw unitscorrespond to the set ID numbers of the respective units. It is possibleto connect up to nine LabPARTNER-aw units with ID No. 1...9 to aLabMASTER-aw. The summary display table is created dynamically.Successful communication with the LabPARTNER-aw is thus alsodisplayed.
Keypad unitfor data input
LCD multi-function display
Function keys
Fix functionskeys
status line, time, dateand actual logged USER
Status ofanalising
Multifuncion LCDscreen with backlight
Functions keyand information
Statusline : Date, time and logged user
SelectedchamberNumber
Actualvalue
Stablevalue

16
Engl
ish
www.novasina.ch
Elements of the configuration menu:
You open the main menu by pushing the „Settings“ soft key.
Selecting a further menu point (e.g. „3“) and then pressing the„ENTER“ (5) soft key brings you to the submenu and the correspondingdisplay window. Pressing the „Previous screen“ soft key (6) bringsyou back one menu level.
.. These soft keys let you move the menu selection up or down withinthe current window.
The selection in this case must be confirmed with the „ENTER“ (5)soft key.
Instead of making a selection with the soft keys, it is also possible to usethe keypad for navigating through the various submenus. Each menu pointis pre-allocated a number.
In the example given on the left, the „Units…“ function has temporarilybeen allocated to button 2 on the keypad. If this button „2“ is pressed, thefunction is the same as selecting the row „Units…“ with the soft keys (3 +4) and then pressing the „ENTER“ soft key (5).
The following device settings are possible for each LabMASTER/PARTNER-aw:
• Chamber settings Menu point (0)
• Sample settings Menu point (1)
• System settings Menu point (2)
4.3. Setting the Instrument4.3.1. Chamber Settings
(can be set separately for each measuring chamber 0....9, if necessary)
All settings are only ever related to the currently selected measuringchamber with the corresponding number, which is shown at the top right ofthe screen within the „Select chamber“ soft key.
0: Power (power ON / OFF for a selected chamber, only LabPartners 1....9)
0 = OFF for one selected LabPARTNER-aw or 1 = ON default setting when a system is configured.
This allows to switch ON or OFF the power of the temperature control of anLabPARTNER-aw. Please switch OFF the power on a LabPARTNER onlyif you dont need this during a longer period of days or weeks. Otherwice thechamber takes a very long time (over hours) to become stable before youcan measure very precise.
Numeric or alpha-numeric keypad Logout
Delete the lastcharacterDelete the full line
Escape
change the function of thekey AA, aa, 123 (p, q ,r ,s ,7)

17
Engl
ish
www.novasina.ch
1: Load from database... (load one sample parameter set )
So that not all settings need be changed individually for each testsample, all necessary parameters set for a test sample can be savedunder a name in a database and allocated to a measuring chamber atany time. A database with up to 10 possible test sample data is availablefor this purpose. (See chapter 4.3. probe data base). As soon as aparameter is subsequently changed, the link to the samples databaseis unmade and the display shows „OFF“ to confirm this. If a parameterneeds to be changed generally for a sample, this should be done in thesamples database (see chapter 4.3.1.).
2: Temperature (temperature setpoint of selected chamber)
A new nominal temperature value for the selected measuring chambercan be entered with this. Select the menu "Settings -> Chambersettings -> Temperature". The internal temperature regulator processesnominal temperatures in the range of 0.0....50.0°C (32.0-122.0°F).Thus, the measuring chamber can be operated at up to 25°C above orbelow the normal environment temperature (as a rule 25°C).
After changing the measuring chamber nominal temperature, theLabMASTER/PARTNER-aw requires some time to settle down to thenew chamber temperature. During this time, no exact aw measurementis possible! Every completed input must be confirmed with the „OK“ softkey.
3: Stab. observation time aw (stability condition of aw value)
After commencing measurement, the analysis phase of the aw-valuesample measuring is activated. The observation time over which thechange in aw value must be less than 0.001 aw can be optimised foreach sample. Together with „Stab. observation time °C“, this is themost important criteria that must be met for an exact and reliable stablevalue display.
The time range of the „Stab. observation time aw“ is 1.0....30.0 min.Only whole number values are accepted.
4: Stab. observation time °C (stability cond. of probe temperature)
After commencing measurement, the analysis phase of the temperaturestability of the sample measuring is activated. The observation timeover which the change in aw value must be less than 0.1°C can beoptimised for each sample. Together with „Stab. observation timeaw“, this is the most important criteria that must be met for an exact andreliable stable value display.The time range of the „Stab. observation time °C“ is 1.0....30.0 min. Onlywhole number values are accepted.
5: Calibration... (recalibration with SAL-T standards)
With this function, every LabMASTER/PARTNER-aw can be periodicallychecked and, if necessary, recalibrated using the Novasina humiditystandard, SAL-T, at various measuring points. For this purpose, aspecial box set with 6 SAL-T humidity standards is included with everyLabMaster. In this box are reusable salt tablets in the form of a samplecup that generate the following humidities: 0.113 aw, 0.328 aw, 0.529 aw,0.753 aw, 0.901 aw and 0.970 aw.

18
Engl
ish
www.novasina.ch
Display all actual calibration points: Reference and „status of cal.“
Clear one or all calibration points if necessary.
Calibrate one point (see chapter 6.4.)
Protect the calibration with a „sensor password“
Please refer to chapter 6.2. for further Information.
6 : Info (System- and chamber information)Under this menu point, system information on the LabMASTER/PARTNER-aw (depending on selected chamber), and sensor information can becalled up. Changes cannot be made.
Instrument type and serial No. of the instrument
Hardware revision level: (important for service)
Firmware / software version: (important for service)
Currently installed sensor type: (important for replacement)
Serial number of the sensor: (important for service and warranty)
Firmware / software version: (important for service)
Last calibration date/time: (important for maintenance)
4.3.2. Samples Database (Database of max.10 sample parameter definitions)
The „Samples database“ is a powerful tool for quickly and correctly settingall necessary parameters of a measurement relating to a type of sample.Up to 10 different samples can be defined. The name of the samplesdatabase can be chosen freely. A „Default sample“ was already createdby default. This can be written over, added to or deleted as required.
To create further sample data in the database, please select a free tablespace by pressing the soft key „0-9“ or the corresponding number on thekeypad. After this, the system prompts you to enter a suitable name(confirm with „ENTER“). Now, the appropriate parameters for the samplecan be entered and finalised by pressing the „ENTER“ key.
Sample data is modified in the same way as it is created.
The following parameters must be entered as sample data:
Obvious name of the sample: (max. 21 characters)
Set chamber temperature for this sample: 0....50°C
Stab. observation time aw for this sample: 1....30 min.
Stab. observation time °C for this sample: 1....30 min.
If sample data is no longer needed, it can be deleted. Select thecorresponding row in the samples database table (->ENTER) and thendelete the corresponding name by pressing "Clr" key. This frees up thetable space for new sample data.

19
Engl
ish
www.novasina.ch
The sample data are allocated to a measuring chamber in the menu„Chamber settings“ under point „1 : Load from database“. There, thedesired sample data can be allocated the respective measuring station.The deallocation is done under the same menu.
The link to the sample data is also automatically unmade as soon as aparameter is subsequently changed in the „Chamber settings“ menu.(see status from „Load from database“)
Status: OFF (means no link to the sample data exists)Status: 0...9 (a link to the sample data exists)
4.3.3. Printer functions for external printer
From the software version V.1.05 C003 all LabMaster-aw systemhave the ability to print out information about measurements andcalibration on a printer. The software supports the protocol standardESC/P. Novasina recommends following printer models:
Seiko DPU 411 and 414 thermo paper printer(only by RS-232 interface)
Protocol printoutIf you have connected by a RS-232 interface a printer to the LabMaster-aw system and you have configured the device following chapter„printer settings“ the system prints out the results automatically assoon as a stable value is reached. Actual measuring values of allconnected measuring chambers are printed by pushing the button 0....9on the LabMaster-aw during the standard operation mode.
• In the „Stable protocol“ values are printed out that were valid at thetime of stability. Attention: on the protocol the user name who ismomentary logged in will be printed out as well.
• In the „Actual protocol“ values are printed out that were valid at thestart of the printing process.
General system settings (function extensions)After the connection of the main supply and printer cable (RS-232, partno. 111 7473), all printing functions have to be activated by theLabMaster-aw software. This shall be done as following:
Communication:„Settings“ –›„System settings“ –› „Communication“, activation byselecting the menu point „Printer“. For de-activation please select themenu point „PC“ (selection for a connection with the NovaLog MCsoftware).
Printer communication:„Settings“ –› „System Settings“ –› „Communication“–› „Printer-configuration“. This menu point is only visible, if the „Device“ is set on „Printer“.
The following parameters can be selected:
• „Laboratory“:Laboratory or company name, which should be printed on theprotocol.

20
Engl
ish
www.novasina.ch
• „Auto stable printout“ :If setting is „On“ the measured values are printed out automatically afterreaching the stability (as soon as the green LED is flashing).
• „Line feed, form feed“:Selection of the number of empty lines after the protocol. With thatfunction you can define the right position of the paper tear off line. Ifthere is no number input (delete „0“ –› „FF“), a one page feed will beperformed.
Back to operating mode :If you want to quit the menu after selecting „Printer“ under menu „Device“ thereis a information window confirming that actual printouts can be started byselecting a button (0...9). This shall be confirmed by pressing the functionbutton „OK“.
Printing of calibration dataPrerequisite : Activation of the printer function in the „System settings“
If the LabMaster-aw is configured on a printer, single or all calibration pointscan be printed out by selecting the printer function button under the menupoint „Display cal. points“.
Settings on the measurement chamber„Settings“ –› „Chamber Settings“ –› „Calibration“–› „Displ. cal. points“ or–› „Displ. single cal. points“
If you press the printer function button in the general view, all calibrationpoints will be printed out (adjusted and not adjusted points) and informationabout date, time, instrument and user of each single point will be also printed.If you select the printer function button in the single view, only selectedcalibration points will be printed.
Printouts on Seiko Printer
"Stable" Protokoll "Actual" Protokoll "Single cal.point" Protokoll chamber 9
***************************************** N O V A S I N A ** Water activity meter *****************************************
LabMaster-aw: SW version 1.04 User account: Default user
Chamber 9: SW version 1.05 Serial number: 0504004
Sensor Type: CM-2.06 Serial number: 0504004 last modif: 10.06.2005 11:21:00
Laboratory: Schnyders Labor
Product: .............................
Batch no.: .............................
Sample file: Fleischwaren
Date, time: 14.06.2005 13:00:00Time: 00:00:05Temperature: 25.0°CActual: aw 0.388
***************************************** N O V A S I N A ** Water activity meter *****************************************
LabMaster-aw: SW version 1.06 C003 User account: Default user
Chamber 9: SW version 1.06 C003 Serial number: LABMAST 0409011
Sensor Type: CM-2.07 Serial number: 0504004 last modif: 10.06.2005 11:21:00
Laboratory: Schnyders Labor
Cal.point: 0.064aw (Calibrated)User account: Default userLast modif: 22.06.2005 06:09:00Instrument: LabMast 0409011Ref-Value: 0.064awInput Value: 0.066awTemperature: 25.0°C
***************************************** N O V A S I N A ** Water activity meter *****************************************
LabMaster-aw: SW version 1.04 User account: Default user
Chamber 9: SW version 1.05 Serial number: 0504004
Sensor Type: CM-2.06 Serial number: 0504004 last modif: 10.06.2005 11:21:00
Laboratory: Schnyders Labor
Product: .............................
Batch no.: .............................
Sample file: FleischwarenStab. obs. time: aw: 5min °C: 1min
Date, time: 14.06.2005 13:00:00Duration: 00:00:05Temperature: 25.0°CStable: aw 0.388

21
Engl
ish
www.novasina.ch
Accessories for printer - LabMaster-aw
Printer cableNovasina offers a cable set for Seiko printers, which enables to connect aLabMaster-aw to a Seiko DPU-411 or DPU-414 printer. The cable lengthis 1.5m.
Novasina part no. : 111 7473This cable is not included to the LabMaster-aw!
The printer functions can be used on all versions „BASIC“, „STANDARD“ and „ADVANCED“.
Printer settings
IS ONLY VALID FOR A thermo paper printer !!
- SEIKO DPU-411 or- DPU–414
A ESC/P compatible printer shall be connected to the RS-232 interface ofthe LabMaster-aw. Novasina recommends the Seiko DPU-414 printerwith following settings:
Dip SW-1/1 (OFF) Input = SerialDip SW-1/2 (ON) Printing Speed = HighDip SW 1/3 (ON) Auto Loading = ONDip SW-1/4 (OFF) Auto LF = OFFDip SW-1/5 (ON) Setting Command = EnableDip SW-1/6 (OFF) PrintingDip SW-1/7 (ON) DensityDip SW-1/8 (ON) = 100%Dip SW-2/1 (ON) Printing Colums = 40Dip SW-2/2 (ON) User Font Back-up = ONDip SW-2/3 (ON) Character Select = NormalDip SW-2/4 (ON) Zero = NormalDip SW-2/5 (ON) InternationalDip SW-2/6 (ON) CharacterDip SW-2/7 (ON) SetDip SW-2/8 (OFF) U.S.A.Dip SW-3/1 (ON) Data Length = 8 bitsDip SW-3/2 (ON) Parity Setting = NoDip SW-3/3 (ON) Parity Condition = OddDip SW-3/4 (OFF) Busy Control = XON/XOFFDip SW-3/5 (OFF) BaudDip SW-3/6 (ON) RateDip SW-3/7 (ON) SelectDip SW-3/8 (ON) = 9600 bps
Dip SW-3/1 through Dip SW3/8 of the Seiko DPU-414 printer have to be setfollowing the table above. The settings of all other switches are just arecommendation.

22
Engl
ish
www.novasina.ch
4.3.4. General system SettingsVarious generally valid parameters that cannot be allocated to a measuringchamber are managed in this module. The multi-user administration, passwordallocation and access protection can be defined here. All of these settingsdepend on the LabMASTER-aw version, „BASIC“, „STANDARD“ or„ADVANCED“. Such parameters may be able to be entered only partially or notat all, depending on the model.(see list on page 14, chapter 4)
0 : Set data, time... (System settings only for LabMASTER-aw)
Each LabMASTER-aw has an internal clock and calendar function thatcontinues to run even while the unit is switched OFF. By default, the system isset to GMT (Greenwich Meridian Time). This parameter should be set to localtime and current date after first starting up the system. The easiest way to dothis is with the keypad beside the display. Please separate day, month and yearor hours, minutes and seconds with a dot [.] and conclude the input with „YES“.
The displayed date is in the European format with the pattern: DD.MM.YYYY (e.g. 17 April 2005 = 17.04.2005)
The displayed time is in 24h format with the pattern: hh.mm.ss(e.g. 16:45:50 = 04h PM, 45min, 50sec.)
1 : Users... (only for LabMASTER-aw „STANDARD“ and „ADVANCED“)
Every LabMASTER-aw „STANDARD“ and „ADVANCED“ gives the option ofa Multi-User Management system. If a USER wants to measure an aw-Valueon the system unit, he must first log in with User ID and a password. As soonas all measurements are finished, he must log OFF of the system again bypressing the "Logout-key".
Up to 10 users can be defined with name and unique password and their rightsmanaged.
By default, a „Sys Admin“ is set without password protection. These rights arerequired for the administration. One person must be responsible for managingthe system as administrator. This person should immediately write over(rename) „Sys Admin“ with his name and protect his administrator rights witha password. The „Username“ and the password can be entered using thekeypad.
Swapping from numeric keys to upper or lower case letters is done with thefunction button at the top right.
Please keep your password in a safe place. A forgotten administrator passwordcan only be deactivated in the Novasina factory or at an authorised Novasinaservice centre. If this is so, then all saved parameters and data will also beirretrievably lost. The instrument will then be put back to its original factorydefault condition.
Please be careful with UPPER and LOWER cases and NUMERICAL inputwhen entering a password.
Note: Use only numerical characters for the password. This simplifies inputand is less likely to be forgotten!

23
Engl
ish
www.novasina.ch
Defining a userTo define a new user in the system, select a free space in the table (e.g.No. 3) using the soft keys or the keypad.Then, you can enter the new user name and finalise it with „ENTER“.Next, you will have the option of allocating different rights (see „UserRights“ below) for the respective user. The status (active = YES ;inactive = NO) is shown. This action is terminated with the key„Previous screen“.
User RightsThe user management system gives the administrator the option toallocate each entered user different rights. The table below gives anoverview of the rights currently possible. These can be extended infuture. Please consult the current user management system whileallocating rights.
Deleting a UserA user can be deleted from the administration by deleting the username. There must be at least one „Administrator User“ defined at anytime, however, otherwise the system will be locked completely. Onlyadministrator rights allow the deletion of users or passwords.
User PasswordWhen first entering a new user, the password must be entered twicetime (to confirm). This helps make sure the password is enteredcorrectly.
The administrator can see a forgotten user password in the Managementsystem. (see „User“ -> „1: Password“)
2 : Units... (for all LabMASTER-aw versions)
A LabMASTER-aw can display the measured values in various differentunits. The values are as follows:Humidity : aw-value or relativ humidity % RHTemperature : °C or °FDate format : DD.MM.YYYY, MM.DD.YYYY
or YYYY.MM.DDThere are three different date displays to select from.
Examples : DD.MM.YYYY = 03.05.2005 (3 May 2005)MM.DD.YYYY = 05.15.2005 (15 May 2005)YYYY.MM.DD = 2005.05.27 (27 May 2005)
Mea
sure
men
t
Cha
mbe
rO
N /
OFF
Cha
mbe
r ppa
ram
eter
Cha
mbe
rC
alib
ratio
n
SET
Sens
orpa
ssw
ord
Use
r man
age-
men
t sys
tem
Prob
e-da
ta b
ase
Gen
eral
sy
stem
fact
ory
rese
t
Administrator Yes Yes Yes Yes Yes Yes Yes Yes
PERMITCalibration
PERMITSample data base
PERMITChamber setting
User level system
Yes Yes No Yes No No No No
Yes Yes No No No No Yes No
Yes Yes Yes No No No No No
General permition Yes Yes No No No No No No

24
Engl
ish
www.novasina.ch
3 : Buzzer... (for all LabMASTER-aw versions)
The volume and duration of the acoustic signal upon attained stability can beset with this.
Volume : noise 0....9 : 0=low 9= highStable buzz duration : 0...120 sec. : 0 = OFF
4 : LCD Settings... (for all LabMASTER-aw versions)
The contrast and backlighting can be individually adjusted for optimum screenreadability.
Contrast : 0....9Backlight : 0....9 : 0 = OFF
Since the backlighting is LED lighting, it is always switched on. This does notaffect the service life of the instrument.
5 : Communication.. (abilities of LabMaster-aw versions page 14)
It is possible to select various special output devices depending on whichfirmware version is being used. Currently the PC and Printer devices aredefined. With the PC device, LabPartner units (1....9) can be connectedparallel over the LabMASTER-aw, the main unit, to a PC that is running the"NovaLog MC" analysis software and thus data transmitted online.If you set the Printer device and a printer is connected and configured with aLabMaster-aw over the RS-232 interface, a protocol can be printed out. It ispossible to print out the "stable" or "actual" protocol. Further settings for theprinter or the protocol can be made under "printer configuration".If the Printer device is set, there is the possibility to print out a single or severalcalibration points by pressing the printer function button under "Display cal.points".
Should, for example, the measurement data from the LabPARTNER-aw withmeasuring chamber No. 3 be printed out over NovaLog MC or the Printer, itcan be activated using key "3" (or selection by arrow keys).
Under menu point Data format you can either select a single channel overNovalog32 (Chamber x) or you can select the NovaxCom format for the newsoftware NovaLog MC.
6 : Reset to factory settings (for all LabMASTER-aw versions)
This function resets the entire system (LabMASTER-aw and, where applicable,also LabPARTNER-aw) to the original status upon delivery. This function canonly be called up by the user with administrator rights. All settings of the usermanagement system will be irretrievably lost. Only the serial and softwarelicence numbers („BASIC“, „STANDARD“ or „ADVANCED“), and the databased on the sensor, such as adjustments, will be retained.To preventunintentional deletion, it must be confirmed twice whether all settings shallreally be reset to default settings or not. The first prompt must be answered with„Yes“ and the second with „NO“ for this reset function executed.

25
Engl
ish
www.novasina.ch
7 : Info (for all LabMASTER-aw versions)
This menu point contains general information on the hardware and softwareof the LabMASTER/PARTNER-aw.
Instrument ID : LabMaster-awHardware : L001Firmware : V.01.07. C003 (date : 08/05)
This information is very important for the service centre to be able find errorsand functions. It also allows any system updates to be retraced. Pleasekeep this information at hand whenever contacting your service centre.
8 : Set options code (for all LabMASTER-aw versions)
System expansion : „BASIC“ -> „STANDARD“ -> „ADVANCED“
This function allows you to equip a LabMASTER-aw with extended functions(see "4. Function description"). Doing so requires the currently set andreadable CODE to be provided to a Novasina representative. Therepresentative will then unlock the corresponiding software functions with anew CODE. The new CODE is a product from the old CODE and the newfunction you need. Please send your actual CODE of the system togetherwith an order to your local Novasina representative. This software extensioncomes at an extra charge.
Keep the current code in a safe place. This code only ever relates to onespecific LabMASTER-aw unit. The CODE will be as well on the softwarecertification paper. Please add the new CODE as well to this paper. Thecode must always be presented for any repairs. Only so you can be certainthat the same functions will be available after repair.
A label on the LabMASTER-aw gives information on the system code of thedelivered unit. Please complete this if needed.
5. Water Activity Measurements5.1. Carrying Out "aw"-Measurements
• Switch on the LabMASTER-aw as described in chapter 3.2. Afterreaching the chamber temperature, the instrument is ready for measuringthe sample. For a high precision measurement, the system must run hoursbefore you can start the measurement. The temperature of the completesystem must be stabilised first.
• Fill the sample cup with the material to be measured. The sample cupmust be completely clean and dry (rub dry with tissue paper if necessary)!Ideally, always use a fresh cup and dispose of it after use.
Important ! Fill the sample cup to approximately 2/3 with the product to bemeasured. Do not overfill the sample cups ! Bulkier material must besuitably crushed or manually cut into small pieces. Products consisting ofseveral layers, or an outer coating, must also be crushed (e.g. confectioneryproducts). Prolonged hand contact with the product must be avoided(falsification of measured value!). A grinder, if used, must not warm up theproduct.
26
Engl
ish
www.novasina.ch
• Open the instrument cover and check the chamber inside. This must beclean an absolute dry.
• Make sure an appropriate cell protection filter is installed in front of themeasuring cell unit, should the product sample require such protectionmeasures. For details, please consult the filter specification sheet.
• Insert the open sample cup containing the sample into the measuringchamber (left) and close the cover again. Press the cover completely down,otherwise the anlaysing function does not start.
Note : To gain time for measuring the next sample while measuring the currentsample, place the next sample cup (with its plastic cover closed!) into thepreconditioning chamber (right) to reach thermal equilibrium, before closing theinstrument cover.
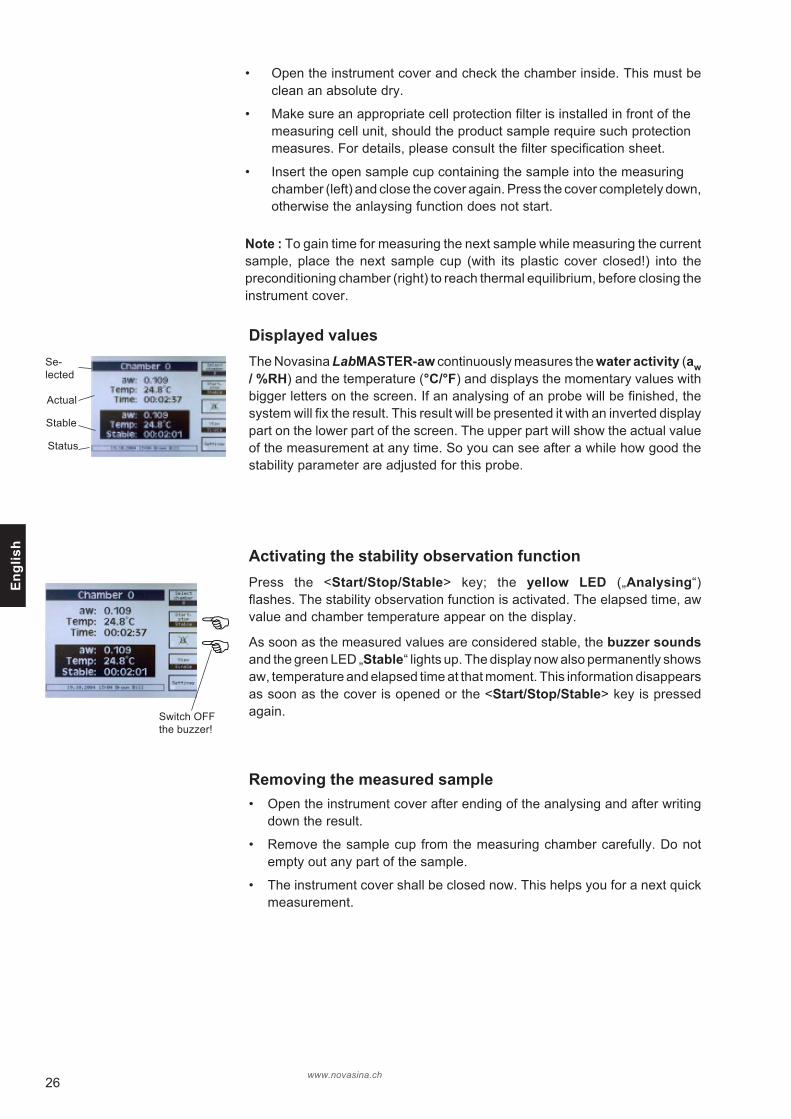
Displayed valuesThe Novasina LabMASTER-aw continuously measures the water activity (aw/ %RH) and the temperature (°C/°F) and displays the momentary values withbigger letters on the screen. If an analysing of an probe will be finished, thesystem will fix the result. This result will be presented it with an inverted displaypart on the lower part of the screen. The upper part will show the actual valueof the measurement at any time. So you can see after a while how good thestability parameter are adjusted for this probe.
Activating the stability observation functionPress the <Start/Stop/Stable> key; the yellow LED („Analysing“)flashes. The stability observation function is activated. The elapsed time, awvalue and chamber temperature appear on the display.
As soon as the measured values are considered stable, the buzzer soundsand the green LED „Stable“ lights up. The display now also permanently showsaw, temperature and elapsed time at that moment. This information disappearsas soon as the cover is opened or the <Start/Stop/Stable> key is pressedagain.
Removing the measured sample• Open the instrument cover after ending of the analysing and after writing
down the result.
• Remove the sample cup from the measuring chamber carefully. Do notempty out any part of the sample.
• The instrument cover shall be closed now. This helps you for a next quickmeasurement.
Se-lected
Actual
Stable
Status
Switch OFFthe buzzer!

27
Engl
ish
www.novasina.ch
Note : If heavy concentrations of glycol, glycerine, acetic acid etc. werepresent in the sample, leave the cover open to let the cell and its protectionfilter recover in the air.
• If you want to measure the next sample, take it from the pre-conditioningchamber, open the cup (remove its cover) and place it in the measuringchamber. The following sample may be put into the pre-conditioningspace before closing the instrument cover.
Note : Leave the instrument switched on so that it is ready to measure atany time. The power consumption is very low.
If a product sample has a greatly different temperature from that of thechamber, a temperature gradient inside the chamber may retard thetemperature equilibrium, thus also the aw value. The instrument measuresthe different temperatures inside the chamber very accurately and candetect a large gradient of temperature. It may then display the following text:"reaching stability is retarded due to too great a temperature differenceinside the measuring chamber". Then you need to wait till the temperatureof the sample will be the same like the chamber temperature. After that startthe analysing again.
5.2. Important Notes About The SensorGeneralThe sensor supplied with the Novasina LabMASTER-aw was factorytested and then calibrated at the following seven aw-value reference points: 0.064 aw, 0.11aw, 0.33aw, 0.53aw, 0.75aw, 0.90aw and 0.97aw.
Humidity sensors are subject to certain ageing phenomena, which manifestthemselves in deviations from the original value. For the most part, thesedeviations can be compensated for by recalibration. We thereforerecommend you to periodically check the accuracy at the humidity referencepoints and to recalibrate the instrument if required.
Correct handling of the sensorNote : Before starting the measurement. The Novasina sensor is a highlysensitive precision device. Please observe the following rules in order toavoid measuring errors or even destruction of the sensor :
• Do not physically shock or dip sensors into liquids. If the CM-2 sensoris dropped down, it will be damaged or this result can be wrong!
• If substances with aggressive acidic vapours are present, the sensorsmust be protected with a chemical pre-filter system. Contact you localNovasina dealer for the suitable filter protection. Otherwise the systemmight drift away permanently.
• Condensation (saturation humidity 100 %rH), which can be caused bysudden temperature changes, should be avoided.
• Sensors that are not in use should be stored in a dust free, neutralatmosphere at room temperature and ambient humidity (both chambersin the instrument must be empty before switching OFF the power of aLab-MASTER/PARTNER-aw).

28
Engl
ish
www.novasina.ch
• Never open or take the measuring cell apart or clean the sensor with anychemical or mechanical parts! The sensor itself is not cleanable. All attemptwill expire the warranty.
• Under no circumstances connect the sensor to an Ohmmeter or such like.This may damage the sensor and will expire the warranty of the sensor!
Any warranty will expire if one ormore of these points counteracts !!
Measurements up to +/- 1.000 awThe sensor is capable of measurements up to 1.00 aw (100%RH). A built-inheating system protects the measuring cell from saturation and thereforeagainst destruction.
The following points must be borne in mind :
• The instrument must be switched on before a product sample is placed intothe measuring chamber. Please wait until the instrument has reached thechosen chamber temperature.
• At the same time, the next sample can be placed in the pre-conditioningchamber to reach the same temperature before it is measured.
• Always first remove the sample from the measuring chamber before aninstrument is switched OFF.
Note : If possible, always leave the instrument switched ON. The integratedheating system protects the sensor from saturation and the instrument isalways ready for the next measurement. At the same time, the next sample canbe preconditioned to the correct temperature. The power consumption isextremely low.
5.3. Function Principle of Stability ObservationThe stability observation function, if activated, observes the changes in aw andtemperature value. Stability will be shown when the change within a selectedtime frame is less than the accuracy of the instrument, which is 0.001aw and0.1°C.The shortest time window is 1 minute (stability time factor 1), the longestwindow is 30 minutes (factor 30). At factor 1, stability will be reached thefastest, but the aw value may be too far off the requested accuracy of the finalstable aw value. At factor 30, the highest accuracy is attained.
aw-V
alue
/ te
mpe
ratu
re
M e a s u re m e n t in te r v a l l
E x a m p le :C h a n g in g o f th e a w -v a lu e o r th e p r o b e te m p e r a tu re m u s t b e s t a b le a n d m u s t b e s m a le r th e n < 0 .0 0 1 a w a n d < 0 .1 ° C
S ta b . o b s e rv a t io n t im e a w o r ° C 1 . . . . 3 0 M in
" A n a ly z in g " " s t a b le "

29
Engl
ish
www.novasina.ch
5.4. Setting Stability Observation Time Factors• Go to the menu "Settings" -> "Chamber Settings" if two or more channels
are used -> "Select chamber" number first. Select (3) for the "stabilityobservation time factor" for aw, or select (4) for the temperatureobservation time factor.
• You will see some values from experience in the table below. Afterseveral tries, you can select the best time factors for your samples,possibly also using the NovaLog MC analysis program.
• The "aw stability observation time" is the interval of time in which themeasured value may still vary by a minimum value, though less than0.001aw resp. 0.1°C, such that the instrument assesses it as „stable“.
Factory setting for „aw“ : 1 (= 1 minute, shortest time interval)
Factory setting temperature : 5 (= 5 minutes)
Factor setting range : 1 minute....30 minutes
Recommended stability time factor (minutes)Examples of products aw temperature
Fruit jams, tomato sauces 1 2Chocolate, salmon, pharmaceuticals 2 3Dried meat, pastry products 3 4Clear soups/stock concentrate 4 4Cheese 5 5Butter 7 8Sunflower oil 30 10
Recommendation : There are two ways to found the optimum of thestability factor. The optimum means, a good balance of the measurementbetween speed and accuracy. Either you can analyse the curve of theNovaLog MC for this probe or you can look it on the screen of theLabMASTER-aw or analyse the difference between the actual value andthe stable value. For quickly attaining a „stable“ value, we recommendselecting the aw stability factor „1“, but then continuing to measure andobserve a change in the aw value after the „stable“ value has beendisplayed. Many food products need a certain period of time to free thewater molecules and reach equilibrium. If you decide that the „stable“ valuedeviates too much from the final value, then the stability factor may beincreased.Please check as well the temperature. This must be absolute stable and onthe same level than the temperature of the chamber. Otherwise anyadjusting of these parameter will be wrong.
The temperature stability observation time may also be changed from thefactor „5“ set by Novasina to a higher factor for products with a temperaturegreatly different from that of the chamber (e.g. chilled samples).

30
Engl
ish
www.novasina.ch
5.5. Recording Desorption and Adsorption CurvesMost materials and all food products contain water. There are two different kindof water in a probe. A part of bounded water and free water. A LabMASTER/PARTNER-aw measure only the part of free water into a probe. But there is acompounding between the part of free water and bounding water of a probe.The "Sorptions isotherm" chart gives the depending of both factors. Suchchart are valid and unique only for one type of probe. Novasina has created aspecial "SI" set. For such purposes using this set in combination with aLabMASTER / PARTNER-aw, you can record such "Sorpitons isotherm" fora product.
Definitions :
The WATER or MOISTURE CONTENT is the weight in % of the total water ina product. Test methods are e.g. Karl Fischer Titration, or drying balances.
The WATER ACTIVITY, aw, is the free water – the only value that givesinformation on the micro-biological safety of a product and especiallyimportant for foodstuffs.
In materials, it is called the RELATIVE EQUILIBRIUM HUMIDITY (% rh). Therange of 0.00....1.00 aw corresponds to 0....100% rh.
The relationship between moisture content and water activity is the SI, SorptionIsotherm curve, which is product and temperature specific. An absolutelyconstant temperature during all measurements is therefore very important!
Examples of SI-curves:

31
Engl
ish
www.novasina.ch
Recording a Sorption Isotherm curve
Setup the LabMASTER/PARTNER-aw
The lower part of the probe chamber of a LabMASTER/PARTNER-awmust be prepared first. Change the standard steerage to the specialsteerage for SI set. Take a screwdriver No. 2 and replace the steerage (seepictures below). Be careful regarding a deformation of the steerage thatmight affect a correct measurement.
Measure the precise weight of the special probe cap including thetransprotation glass container. This is important for the net weight definitionafter changing the weight following the humidification of the probe.
Preparing a probe : Fill the special metallic sample cup to 2/3 with thecrushed probe (in order to get the maximum possible surface). Keep yourprobe always inside the glass container when you are not using it formeasurments inside the chamber.
Adsorption curveIn order to start, the substance must be dry, so it must first be totallydesiccated in an oven (e.g. 2 hours at 102°C, depending on the material).
1. Close the glas container immediately after taking it out from the dryingoven and for transportation.
2. Weigh the probe afterwards with the closed weighing glass on a precisionbalance and define the net weight of the probe.
3. Put first the SAL-T 6 in the deeper measurement chamber andafterwards the probe inside the stainless steel basket over it and close thechamber.
4. After about one hour or more, write the aw value. If you wait longer, theaw value as well as the weight become higher, moving along the SI-curve.Therefore the „equilibration time“ is not critical.
5. Weigh the probe again and write the net weight in a table and calculatethe difference between the weights before and after humidification.
6. Put the next SAL-T into the measurement chamber and perform thesame operation at point 2, 3 etc. up to the SAL-T 97 humidity standard.
Based on the acquired data you can define and print the "Adsorptioncurve" for a specific product on a paper !

32
Engl
ish
www.novasina.ch
Desorption curve
This is in princple the inverse part of an adsorption curve. The substance mustbe more humid when starting to weigh (to be safely on the desorption curve toavoid SI-hysteresis mistakes), so the first salt to use is SAL-T97. Uponreaching a value well above 0.9, SAL-T90 can be placed in. After about onehour or more, note the aw value and weigh the substance. Upon waiting longer,the aw value as well as the weight are lower, moving along the SI-curve, so thewaiting time is not critical.After that, place in SAL-T75, down to SAL-T6. Then, after totally drying thesubstance in the oven, the net (dry) weight is known and all points can beplotted.
How to proceed :
1. Weigh the tare (empty substance basket and weighing glass)
2. Lift up the cup with a screwdriver; push the deeper cup into place
3. Place in the first SAL-T standard
4. Place basket with substance on top
5. Now close the cover and select the desired chamber temperature
6. Wait until the chamber temperature is reached, then wait for equilibrium(stability observation time factor set as desired).
Weigh the net tara of the empty unit

33
Engl
ish
www.novasina.ch
Put the SAL-T standard into the Place the probe inside the basket overmeasurement chamber the SAL-T into the measurement chamber
Example
of doing a Sorption Isotherm curve (adsorption) with a biscuit:
• Selected temperature of Novasina instrument: 25.0°C.
• The totally desiccated sample has a net weight of 0.485g.
• SAL-T 11% was placed together with the sample in thechamber. After about one hour, the aw value was 0.087.Weighing the sample showed 0.519g, which is a 6.94%increase in weight; this is the moisturecontent at this point!
• Next salt: SAL-T 33%. Displayed values: 0.290aw, 0.530g(+ 9.1%).
• Next salt: SAL-T 53%. Displayed values: 0.523aw, 0.553g(+13.84%).
• Next salt: SAL-T 75%. Displayed values: 0.749aw, 0.605g(+24.55%).
Greater humidity was not of interest in this „dry biscuit“ case. Withthese 5 points, a rough SI curve can be drawn.

34
Engl
ish
www.novasina.ch
6. Calibration6.1. Factory Calibration, Delivery Status
Every new instrument, as well as every new replacement sensor unit, calledCM-2 cell, is delivered already factory calibrated at 7 points : 0.06, 0.11, 0.33,0.53, 0.75, 0.90 and 0.97aw and a factory certificate. The user therefore onlyhas to check accuracy and recalibrate, if required, after some time. Werecommend checking the points that cover the products’ aw range, in thebeginning after 2 weeks, then 4 weeks, then 3 months, as long as the valuesare within the tolerances specified by the user’s QC manual, or fix shorterrecalibration periods according to personal standards.An other good way is, to test one point with a Novasina SAL-T standard that fitnear to the last measurement point of the last few probes at the end of a day.Leave the SAL-T minimum 30 min into the chamber before you write the valuein a table. If you have a bigger drift of the actual measurement accuracy is overa longer periode, calibrate the system new. You dont need to calibrate anypoint of the chamber at once if you measure always in a high aw-value everytime. Then it will be enough, when you check and calibrate only the 0.75, 0.90and 0,97 aw point.
A sensor unit carries all calibration information. Up to 15 points can be stored.Please check the sensor calibration data. Most likely a 4% point and allNovasina standard salts 0.34, 0.63, 0.11, 0.33, 0.53, 0.75, 0.90, 0.97, and 0.98aw are stored in the memory for automatic recalibration within 15°C and 30°C.
Note : Define a standard quality process for your work and define an standardtest procedure for your LabMASTER/PARTNER-aw system.
6.2. Set Sensor PasswordEvery sensor unit can be used in any of the LabMASTER/PARTNER-awinstruments and carries all calibration data with it. We call it „intelligentsensor“ unit. Nevertheless, for highest accuracy, Novasina recommendschecking/recalibrating an instrument once it is finally installed and has beenswitched on for several hours. A very good and easy check on some humiditypoints is possible using the Novasina SAL-T checks, which are included.
This sensor unit can now be password-protected so that only an administratorwho knows the password has access to the first recalibration of the sensor. Thepassword protects only the sensor and is stored on the sensor itself. This is setafter the first full calibration in the facory (factory setting of the sensor passwordis "8808"). Please change it as a system administrator immediately whenstarting operating the device.
After that, recalibration is freely accessible (exception: after a reset to factorysettings).
Attention : Store the password together with your system administratorpassword on a secure place. An forgotten password means to send the sensorback to Novasina. There is no way to reset the sensor!
Set a sensor password:Go to menu "Settings" -> "Chamber settings" -> "Select chamber" number(only if you have 2 or more chambers activated), then press (5) "Calibration"->n (3): now type a "password".
35
Engl
ish
www.novasina.ch
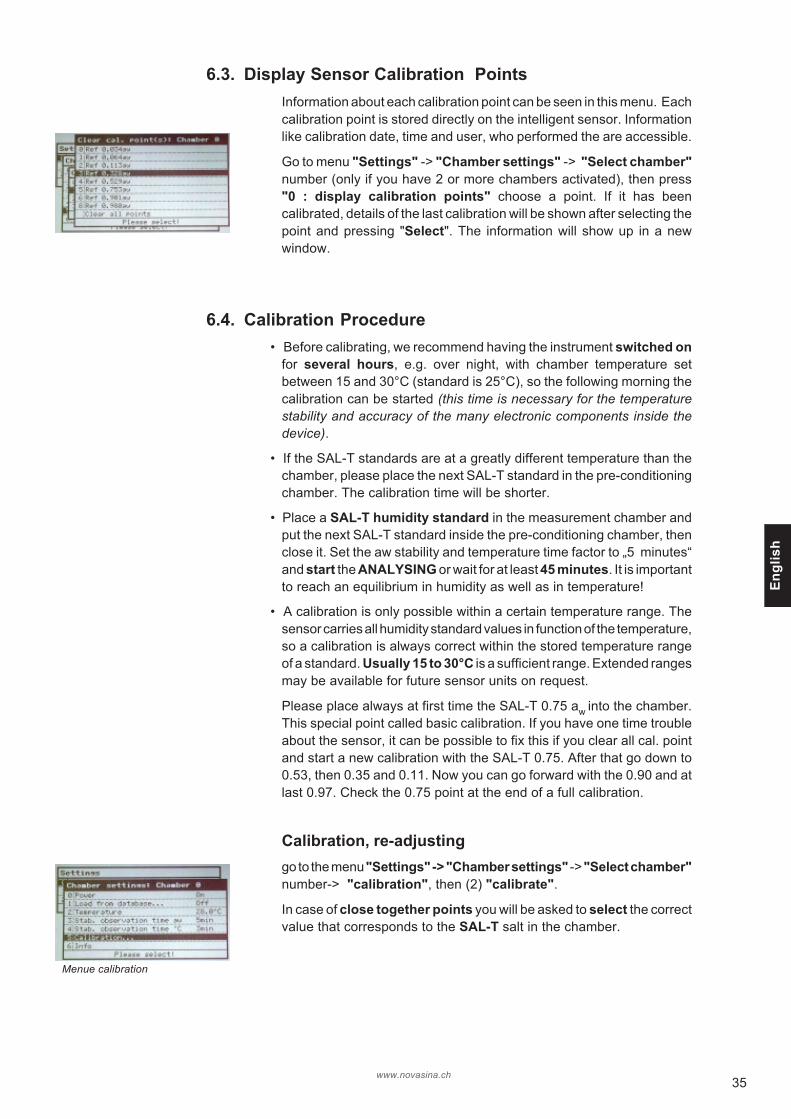
6.3. Display Sensor Calibration PointsInformation about each calibration point can be seen in this menu. Eachcalibration point is stored directly on the intelligent sensor. Informationlike calibration date, time and user, who performed the are accessible.
Go to menu "Settings" -> "Chamber settings" -> "Select chamber"number (only if you have 2 or more chambers activated), then press"0 : display calibration points" choose a point. If it has beencalibrated, details of the last calibration will be shown after selecting thepoint and pressing "Select". The information will show up in a newwindow.
6.4. Calibration Procedure• Before calibrating, we recommend having the instrument switched on
for several hours, e.g. over night, with chamber temperature setbetween 15 and 30°C (standard is 25°C), so the following morning thecalibration can be started (this time is necessary for the temperaturestability and accuracy of the many electronic components inside thedevice).
• If the SAL-T standards are at a greatly different temperature than thechamber, please place the next SAL-T standard in the pre-conditioningchamber. The calibration time will be shorter.
• Place a SAL-T humidity standard in the measurement chamber andput the next SAL-T standard inside the pre-conditioning chamber, thenclose it. Set the aw stability and temperature time factor to „5 minutes“and start the ANALYSING or wait for at least 45 minutes. It is importantto reach an equilibrium in humidity as well as in temperature!
• A calibration is only possible within a certain temperature range. Thesensor carries all humidity standard values in function of the temperature,so a calibration is always correct within the stored temperature rangeof a standard. Usually 15 to 30°C is a sufficient range. Extended rangesmay be available for future sensor units on request.
Please place always at first time the SAL-T 0.75 aw into the chamber.This special point called basic calibration. If you have one time troubleabout the sensor, it can be possible to fix this if you clear all cal. pointand start a new calibration with the SAL-T 0.75. After that go down to0.53, then 0.35 and 0.11. Now you can go forward with the 0.90 and atlast 0.97. Check the 0.75 point at the end of a full calibration.
Calibration, re-adjustinggo to the menu "Settings" -> "Chamber settings" -> "Select chamber"number-> "calibration", then (2) "calibrate".
In case of close together points you will be asked to select the correctvalue that corresponds to the SAL-T salt in the chamber.
Menue calibration

36
Engl
ish
www.novasina.ch
If the actual value is outside of the acceptable tolerance of the sensor,a warning text appears. Most likely that CM-2 sensor must be replaced.
Calibration is possible: you may be asked (only once for a new sensor) toenter the sensor password.
The calibration itself is then done immediately and confirmed by „Calibrationwas successful“.
SAL-T 97% rh and the older SALT-T 98%rh: never try to calibrate both!They are too close together and would disturb the measurement.
Attention : If all calibration points have been cleared, you should start anew calibration with the base calibration using the SAL-T 75% standardfirst. After calibrating this first point, all other desired points can becalibrated in any order.
Select table for
Menu calibration
Type of Novasina EU Toxic Color Chem. % relative humidity in relation LiteratureHum.check type classe of salt symbols of temperature (x / 100 in aw) Reference
15°C 20°C 25°C 30°C
SAL-T / 4 SC-4 T white CsF (>25%) 4.3 3.8 3.4 3.0 A
SAL-T / 6 SC-6 Xn white LiBr 6.9 6.6 6.4 6.2 A
SAL-T / 11 SC-11 Xn white LiCl 11.3 11.3 11.3 11.3 A
SAL-T / 33 SC-33 -- blue MgCl2-6H2O 33.3 33.1 32.8 32.4 A
SAL-T / 53 SC-53 O green Mg(NO3)2-6H2O 55.9 54.4 52.9 51.4 A
SAL-T / 75 SC-75 -- purple NaCl 75.6 75.5 75.3 75.1 A/B
SAL-T / 90 SC-90 T white Ba(Cl)2-2H2O 90.9 90.5 90.1 89.9 C
SAL-T / 97 SC-97 -- yellow K2SO4 (>20%) 97.9 97.6 97.3 97.0 A
SAL-T / 98 SC-98 T+/N orange K2Cr2O7 98.5 98.2 98.0 98.0 A
Lit : A : Greenspan, Humidity Fixed points of Binary Saturated Aequeous Solutions Journal of Research of the National Bureau of Standards Vol. 81A, No1 01/02 1977B : Robinson R.A. and Stokes R.H. Electrolyte Solutions, Butterworths London 1959C : Wexler, Humidity and Moisture Vol.3, Fundamentals and Standards, Robert E.Krieger, Publishing Company Huntingon, New York
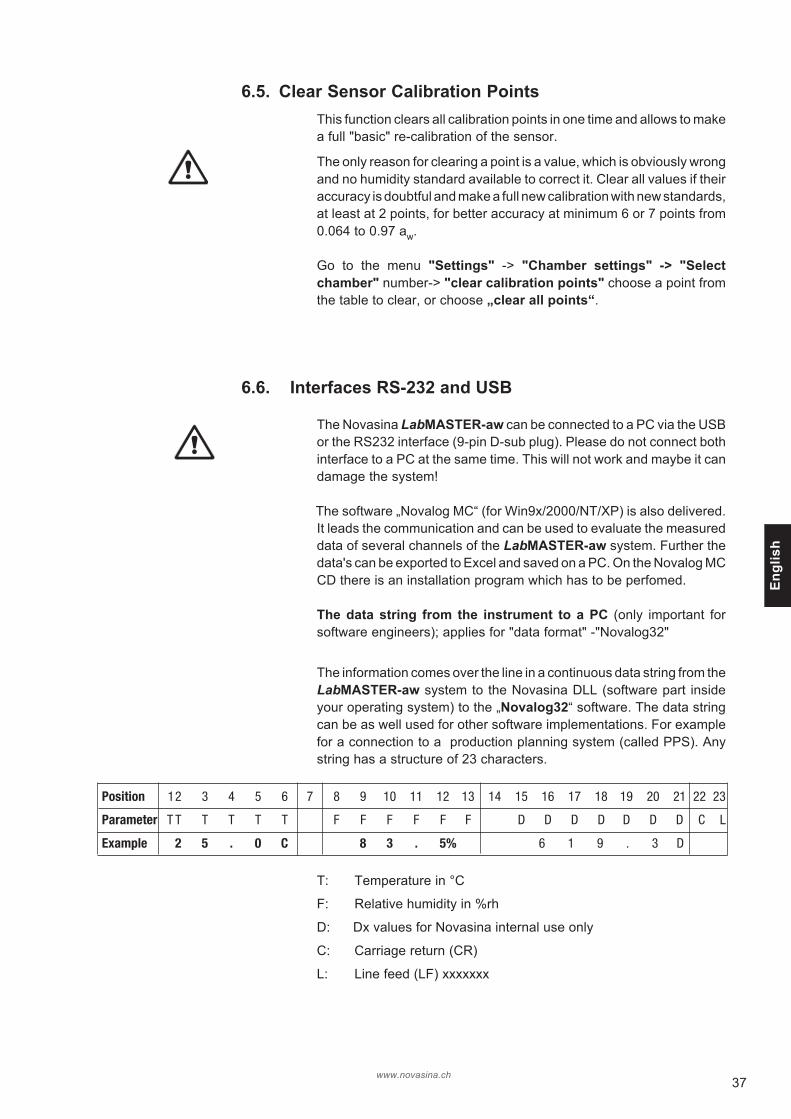
37
Engl
ish
www.novasina.ch
6.5. Clear Sensor Calibration PointsThis function clears all calibration points in one time and allows to makea full "basic" re-calibration of the sensor.
The only reason for clearing a point is a value, which is obviously wrongand no humidity standard available to correct it. Clear all values if theiraccuracy is doubtful and make a full new calibration with new standards,at least at 2 points, for better accuracy at minimum 6 or 7 points from0.064 to 0.97 aw.
Go to the menu "Settings" -> "Chamber settings" -> "Selectchamber" number-> "clear calibration points" choose a point fromthe table to clear, or choose „clear all points“.
6.6. Interfaces RS-232 and USB
The Novasina LabMASTER-aw can be connected to a PC via the USBor the RS232 interface (9-pin D-sub plug). Please do not connect bothinterface to a PC at the same time. This will not work and maybe it candamage the system!
The software „Novalog MC“ (for Win9x/2000/NT/XP) is also delivered.It leads the communication and can be used to evaluate the measureddata of several channels of the LabMASTER-aw system. Further thedata's can be exported to Excel and saved on a PC. On the Novalog MCCD there is an installation program which has to be perfomed.
The data string from the instrument to a PC (only important forsoftware engineers); applies for "data format" -"Novalog32"
The information comes over the line in a continuous data string from theLabMASTER-aw system to the Novasina DLL (software part insideyour operating system) to the „Novalog32“ software. The data stringcan be as well used for other software implementations. For examplefor a connection to a production planning system (called PPS). Anystring has a structure of 23 characters.
Position 12 3 4 5 6 7 8 9 10 11 12 13 14 15 16 17 18 19 20 21 22 23
Parameter T T T T T T F F F F F F D D D D D D D C L
Example 2 5 . 0 C 8 3 . 5% 6 1 9 . 3 D
T: Temperature in °C
F: Relative humidity in %rh
D: Dx values for Novasina internal use only
C: Carriage return (CR)
L: Line feed (LF) xxxxxxx

38
Engl
ish
www.novasina.ch
Instead of communication over a RS-232 interface, it can be made over theUSB interface integrated in the LabMASTER-aw. A suitable USB plug isintegrated on the back of the unit.
Please use ordinary USB cables that are available in computer stores. TheUSB interface uses the USB 1.1 standard.
As soon as you connect a LabMASTER-aw with a USB cable to a WindowsPC, Windows will ask you to install two new drivers for the USB as well fora virtual RS-232 interface to the "NovaLog MC" software. You will find thedrivers on the Novasina „NovaLog MC“ CD under directory "USB-Driver".After successful installation, the NovaLog MC program can be connectedon a virtual USB COM port and then receive data from the USB interface.Please check, which virtual COM port no. is used in your Windows systemafter the driver installation. This is an important information for the NovaLogMC software and essential for a working data transmission.
It is not possible to operate both USB and RS-232 at the same time. USBalways takes priority over the RS-232 interface.
7. Maintenance7.1. Cleaning
Caution ! Before cleaning switch OFF the Novasina LabMASTER-awand dis-connect it from the mains.
Use a damp cloth to clean the housing of the Novasina LabMASTER-awor a LabPARTNER-aw. Use a commercially available mild cleaning agent,as required. Make sure no water is entering the housing or the connectors.
Caution! Do not use aggressive cleaning agents.
Caution ! Please do NEVER clean the sensor CM-2 itself. It is notpossible to do that! The sensor is an very sensitive element with achemical filter protecion on the top. If you blow or touch the filter witha mechanical part or if you try to clean it with any liquid cleaningproducts, the sensor might be damaged!
USB interface
RS-232 interface
LabPartner

39
Engl
ish
www.novasina.ch
7.2. Sensor Recalibration with Humidity StandardsLike all precision measuring instruments, the Novasina humidity sensormust be checked periodically. After initial commissioning of theinstrument, we recommend carrying out a calibration
• every couple of months,
• always before measuring critical products, at minimum those pointscovering the product’s aw range
• when the instrument was not used over a period of time.
Novasina developed a simple method for checking the sensors withhumidity standards. The humidity standards are saturated aqueous saltsolutions consisting of pure chemical salts and distilled water. If thehumidity standard is in thermal and humidity equilibrium with thesensor, it can be seen, if the displayed value is within the user’stolerance band or outside. If the deviation is greater than desired, arecalibration is recommended.
The humidity standards should be saturated so that they form a slushyslurry. Before use we recommend to shake the humiditystandard vigorously.
Note: Under normal storage and maintenance conditions the humiditystandards will last for several years.
7.3. Replacing Protective FiltersThe use of special pre-filters (available as accessories) is recommendedas protection against faster sensor aging due to chemical aggression.
A destructive effect on a sensor may have e.g. alcohols, aromas,amines, acids (lactic, formic, sulphuric), hydrocarbons, halogens etc.Please consult the protection filter specifications.
General rule
Chemical pre-filters are to be used if the admissible workplaceconcentrations (MAK-values) are exceeded.
Some examples :sulphur dioxide -> 2 ppmformaldehyde -> 2 ppmhydrogen sulfide -> 3 ppmethanol -> 300 ppm

40
Engl
ish
www.novasina.ch
Novasina offers the following protecion filters for the LabMASTER/PARTNER-aw.
• Redox filterChemical filter:protects against all kinds of alcohols, aromas, fragrances.
• eVC-21 chemical filterChemical filter:protects against hydrogen peroxide, acid gases, dilutedacetic and formic acid, sulfur dioxide, chlorine.
• eVC-26 universal filterChemical filter:protects against a multitude of aggressive substances, e.g.nitrogen oxides, amines, aldehyde solvents, aromatic hydro-carbons, oil vapours, fine dust particles.
• eVALC-1 alcohol filterMechanical filter:protects against alcohols.
Note: Certain aggressive vapours may also influence the measured result.Exactly for that reason, the use of an appropriate protection filter is highlyrecommended. A combination of 2 filters may also be used for overallprotection (e.g. eVC-21 and eVALC-1).
Filter replacement
Chemical filters must be periodically replaced. Saturated filters falsify themeasuring results and the protective effect of chemical filters alsodeteriorates.
No generally valid guidelines can be given concerning the filter service lifeas this mainly depends on the concentration of harmful substances andthe operating temperature.
Attention! A damaged filter must be replaced immediately. Please replaceas well any chemical filter periodically and calibrate the system WITH thefilter on board. Do not handling at any time into the chamber without anyglove!
All filter are fixed into the head of the measurement chamber with a snapring. It will be possible to put maximum 2 filters in serial line direct behindthe sensor and in front of the measurement chamber. Every filter protectionhelps to extend the lifetime of the sensor itself, but extends as well themeasurement time.

41
Engl
ish
www.novasina.ch
7.4. Replacing a CM-2 Sensor Unit• Switch off the instrument and disconnect the mains from the system.
• Remove the 3 screws (tool is inside the SAL-T set), carefully pull out the• measuring block (NEVER let drop this unit on the instrument table).
• Remove the two sensor unit screws on the backside of the measuringblock.
• Pull out the CM-2 unit.
• Push the new CM-unit in its position and assemble in the opposite manner.
• Set the measuring block back into the instrument cover in the right place(there is only one position possible to click in).
• Screw in the last 3 screws of the measuring block (don't fix the screws tootight).
Warning! Never press with a finger on the top of measuring cells, this mightdamage the cell protection filter!

42
Engl
ish
www.novasina.ch
7.5. Replacing an Instrument Fuse
The LabMASTER-aw can be connected directly to your local power lineof 90...260V AC. A main fuse protects the power supply against overload.The fuse is integrated directly inside the mains connector. Please follow theinstructions to replace it with a same type of fuse (1 spare fuse included indrawer above mains connector).
• Switch off the LabMASTER/PARTNER-aw.
• Pull out the mains cable to have access to the fuse drawer.
• Replace a defective fuse by one of the same type (1 spare fuseincluded)!
fuse holder20 x 5mm230V / 6.3 Aincl. 1 pc spare fuse
main cable115/ 230 V AC
FUSE 20x5mm 1 x 6.3 AT

43
Engl
ish
www.novasina.ch
8. Technical specifications
GeneralMains supply : 90…260V, 50/60HzLabMASTER-aw : Fuse: 6.3 A FST (slow blow), 1 spare fuseLabPARTNER-aw : Fuse: 6.3 A FST (slow blow), 1 spare fusePower consumption : max. 65 W per instrument
(after temperature equilibrium 15 W)
Permissible ambientTemperature range : 5…45°CHumidity range : 5...95%rH not saturated !Surface area (W x D) : 26 x 44 cm (LabMASTER and PARTNER-aw)
Weight : 10 kg (depends on the additional accessories)
Protection class : IP 21
Temperature controllerTemperature setting range : 0…50 °CAccuracy of control : > +/- 0.1°CMax. cooling in respect ofambient temperature : 25 °C down to the ambient temperature!Max. deviation : ±0.2 °C
Measuring system with measuring converter and sensorMeasuring range aw-value sensor : 0.03…1.00awOperating range aw-value sensor : 0°C...50°CAccuracy when fully calibrated : ±0.003 aw (at 25°C and 7 point calibration)
( range 0.04...0.97aw) or +/- 0.010aw
Resolution : 0.001 awRepeatability : ±0.002 awTemperature sensor accuracy : ±0.3 °CTemperature sensor resolution : 0.1 °C
InterfaceUSB / RS-232 : USB 1.1
RS232, Baud rate 9600, 19’200 ASCII signsLCD illuminated display : 115mm x 86mm, 320 x 240 dot matrix LCDLabMASTER-aw with LED backlightLCD illuminated display : 60mm x 17mm, 2 x 30 character orientated LCDLabPARNER-aw with LED backlight
Level of soundNoice level is lower then : < 68 dBA
More technical information and data see as welloperation manual of the LabPartner-aw

44
Engl
ish
www.novasina.ch
8.1. Equilibrium humidity valuesof the SAL-T humidity source
9. Troubleshooting
9.1. What is wrong, when....?
A connected LabPARTNER-aw is not 1. Your LabMaster has not the "ADVANCED" functions activated.found by a LabMASTER ? 2. The bus cable or the mains power is not connected correctly.
3. Another LabPARTNER in the system has the same chamber No.
No recalibration of the aw-value 1. The user managment system does not allow the calibrationis possible? function.
2. The sensor is protected with an additional password.3. Your sensor is damaged or badly contaminated. Change the sensor immediately.
You have a drift of the aw-value after 1. The stability observation factor for aw or °C is to short in time.completing the analising process? 2. The temperature of the probe is not in equilibrium (Chamber).
3. The probe has an second sorption step.( A fat barrieres or something else)
Cooling power of the instrument 1. The abient environment temperature around the instrument isis at the limit and the temperature of too high.the chamber is not stable? 2. The probe produces a chemical heating (Process)
3. The internal cooling control does not work properly.
Reading of the LCD screen 1. The contrast of the screen is very low (contrast = 0).is very bad? 2. The backlight is turned off or the background light is low.
3. The ambient light is bad. Please change the place of the instrument
You as a user, you have forgotten your 1. Contact your system administrator, he can change your oldpassword? password to a new one.
2. If you are a system administrator, you have to reset the system to the factory status or send the instrument to the next Novasina service station.3. Reload the software via RS-232 or USB on the LabMASTER -> You loose all personal settings of the system!
Type of Novasina EU Toxic Color Chem. % relative humidity in relation LiteratureHum.check type classe of salt symbols of temperature (x / 100 in aw) Reference
15°C 20°C 25°C 30°C
SAL-T / 4 SC-4 T white CsF (>25%) 4.3 3.8 3.4 3.0 A
SAL-T / 6 SC-6 Xn white LiBr 6.9 6.6 6.4 6.2 A
SAL-T / 11 SC-11 Xn white LiCl 11.3 11.3 11.3 11.3 A
SAL-T / 33 SC-33 -- blue MgCl2-6H2O 33.3 33.1 32.8 32.4 A
SAL-T / 53 SC-53 O green Mg(NO3)2-6H2O 55.9 54.4 52.9 51.4 A
SAL-T / 75 SC-75 -- purple NaCl 75.6 75.5 75.3 75.1 A/B
SAL-T / 90 SC-90 T white Ba(Cl)2-2H2O 90.9 90.5 90.1 89.9 C
SAL-T / 97 SC-97 -- yellow K2SO4 (>20%) 97.9 97.6 97.3 97.0 A
SAL-T / 98 SC-98 T+/N orange K2Cr2O7 98.5 98.2 98.0 98.0 A
Lit : A : Greenspan, Humidity Fixed points of Binary Saturated Aequeous Solutions Journal of Research of the National Bureau of Standards Vol. 81A, No1 01/02 1977B : Robinson R.A. and Stokes R.H. Electrolyte Solutions, Butterworths London 1959C : Wexler, Humidity and Moisture Vol.3, Fundamentals and Standards, Robert E.Krieger,

45
Engl
ish
www.novasina.ch
error report
"PELTIER Driver!"
"Fan!"
"Temp control (tempgauge)!"
"Temp gauge head!
"No humidity sensor!"
"Humidity sensorfile system!"
"Humidity Sensorcapability!"
"Capability Firmware!"
"CRC F-Settings!"
"CRC U-Settings!"
"Humidity Gauge(analog)!"
"Humidity system!"
"BUS!"
"File format notsupported!""Sensor not supported or defective!"
"The battery of the datamemory must be re-placed!"
If any error message appears on the LabMaster-aw screen, please proceed as follows:* Please write down the error message carefully. Switch the instrument off and restart. If the error message recur, please follow the instructions on the table and/or contact your Novasina representative (www.novasina.com)
Hardware-Errors
needed action
*, return the instrument for repair
*, return the instrument for repair
*, return the instrument for repair
*, return the instrument for repair
*, replace humidity sensor, returnthe instrument for repair
*, replace humidity sensor, sendthe instrument for repair
use a humidity measrement cellwith the latest technology
Update the firmware
*
*
*, use a new humidity measrementcell
*
*, Check the cabling of theLabPartner-aw
*, Update the latest software, usea suitable humidity sensor
*, use a suitable humditiy sensor
Please contact your Novasina rep-resentative
error description
cooling unit or electronics defective !
ventilator, cabling or fan-electronicsdefective !
Table-temperature-sensor, cabling or con-trol-electronics defective !
Table-temperature-sensor, cabling or con-trol-electronics defective !
Humidity measurement system not recog-nized. Sensor, cabling or -electronicsdefective !
Data system of humidity measurementsystem defective. Sensor, cabling or elec-tronics defective !
capability of humidity measurement sys-tem is wrong. (Sensor is incompatible tothe instrument) !
capability of measuring chamber (electro-nics) wrong !
EEPROM - content factory settings de-stroyed !
EEPROM - content user settingsdestroyed !
Humidity measurement system, cablingor electronics defective !
humidity measurement faulty !
BUS error ! Communication betweenLabMASTER and PARTNER faulty !
Sensor incompatible (data - format) !
Sensor incompatible (test circuit) !
Battery empty, defective or no batteryin the instrument !
9.2. Error message screens

46
Engl
ish
www.novasina.ch
Several errors
error report
"The SRAM was re-initiali-zed! All data were reset todefault conditions, exceptfor the calibration values!"
error description
The "battery" - packed RAM -con-tent is destroyed and was new ini-tialised. All settings have beencancelled except the saved calib-ration values !
needed action
1) press "OK"2) enter the licence-code under"System settings" ...->"Set opti-ons code". The code is stated onthe licence-certificate or on thesticker on the bottom of the in-strument.This point does not apply for theLabMaster-aw "BASIC"-version.3) set all settings new (date, ti-met, "user" account, ...)
Fatal Error
error report
"Fatal Error"
error description
fatal hardware- or (mainly) softwa-re-error
needed action
Please note the error messagecarefully, switch the instrumentoff and restart. If the error mes-sage recur, please contact yourNovasina representative(www.novasina.com)

47
Engl
ish
www.novasina.ch
10. Short Menu overviewLa
bMas
ter-
aw m
enu
setti
ngs
0 C
ham
ber s
ettin
gs2
Syst
em s
ettin
gs
0 Po
wer
0 Se
t dat
e, ti
me
0 of
f
0
Dat
e1
on
1
Tim
e
1 Lo
ad fr
om d
atab
ase
1 U
sers
0 to
9 u
ser a
ccou
nts
1
Sam
ple
data
base
0 N
ame
0 to
9 d
ata
base
1 P
assw
ord
_ D
on’t
load
from
file
(off)
0
to 9
Sam
ple
Dat
abas
e2
Adm
inis
trato
r
0 ...
.(e.g
. Bre
ad w
hite
)3
Per
mit
Cal
ibra
tion
2 Te
mpe
ratu
re4
Per
mit
edit
sam
ple
data
base
(0 to
50°
C) /
(32
to 1
32°F
)0
Nam
e5
Per
mit
cham
ber s
ettin
gs3
Stab
ility
par
amet
er a
w1
Tim
e2
Uni
ts(1
to 3
0 m
in)
2 S
tab.
Obs
erva
tion
time
aw0
Hum
idity
(aw
/%R
H)
4 St
abili
ty p
aram
eter
tem
p3
Sta
b. O
bser
vatio
n tim
e °C
1 Te
mpe
ratu
re (°
C/°
F)(1
to 3
0 m
in)
2 D
ata
form
at (D
/M/Y
; Y/M
/D; M
/D/Y
)5
Cal
ibra
tion
3 B
uzze
r0
Dis
play
cal
ibra
tion
poin
ts0
to 8
cal
ibra
tion
poin
ts0
Vol
ume
(0 to
9)
1 C
lear
cal
ibra
tion
poin
ts1
Sta
ble
buzz
dur
atio
n (0
to 1
20 s
econ
ds)
2 C
alib
rate
3 S
et s
enso
r pas
swor
d4
LCD
set
tings
6 Sy
stem
info
0 C
ontra
st(0
to 9
)1
Bac
klig
ht (0
to 9
)0
Sys
tem
info
cha
mbe
r1
Sys
tem
info
sen
sor
5 C
omm
unic
atio
nP
C1
Dat
a fo
rmat
(PC
) ...
NLO
G x
0 D
evic
e0
to 9
Nov
alog
32
(Cha
mbe
r x)
Prin
ter
1 P
rinte
r con
figur
atio
n ...
0 La
bora
tory
(nam
e) 1
Aut
o st
able
prin
tout
(on/
off)
2 L
ine
feed
, for
m fe
ed (0
to 9
9)6
Res
et to
fact
ory
setti
ngs
7 In
fo8_
Set o
ptio
n co
de

48
Consulting, Sales and Service:
Novasina AG, Neuheimstrasse 12, 8853 Lachen, SwitzerlandTelephone +41-55-642 67 67, Fax +41-55-642 67 70, e-mail: [email protected], www.novasina.com
The Novasina team would like to thank you for your confidence and hope you will enjoy andobtain successful measurements with the world leader instrument LabMaster-aw for highperformance quality measurement of water activity and its manifold options. You have now thepowerfullest water activity meter with outstanding options, simple handling and bestreproducability for your special application in quality measurements.
In case of any further questions, Novasina and its agencies will be happy to advise you at anytime.
Your Novasina