User Manual for Dendroscope V2.7 -...
24
User Manual for Dendroscope V2.7.4 Daniel H. Huson, Daniel C. Richter, Christian Rausch and Regula Rupp June 23, 2010 Contents Contents 1 1 Introduction 3 2 Program Overview 3 3 Obtaining and Installing the Program 3 4 Getting Started 4 5 Main Window 4 5.1 File Menu .......................................... 5 5.2 Edit Menu .......................................... 5 5.3 Select Menu ......................................... 6 5.4 Options Menu ........................................ 7 5.5 Tree Menu .......................................... 8 5.6 View Menu ......................................... 9 1
Transcript of User Manual for Dendroscope V2.7 -...

User Manual for Dendroscope V2.7.4
Daniel H. Huson, Daniel C. Richter, Christian Rausch and Regula Rupp
June 23, 2010
Contents
Contents 1
1 Introduction 3
2 Program Overview 3
3 Obtaining and Installing the Program 3
4 Getting Started 4
5 Main Window 4
5.1 File Menu . . . . . . . . . . . . . . . . . . . . . . . . . . . . . . . . . . . . . . . . . . 5
5.2 Edit Menu . . . . . . . . . . . . . . . . . . . . . . . . . . . . . . . . . . . . . . . . . . 5
5.3 Select Menu . . . . . . . . . . . . . . . . . . . . . . . . . . . . . . . . . . . . . . . . . 6
5.4 Options Menu . . . . . . . . . . . . . . . . . . . . . . . . . . . . . . . . . . . . . . . . 7
5.5 Tree Menu . . . . . . . . . . . . . . . . . . . . . . . . . . . . . . . . . . . . . . . . . . 8
5.6 View Menu . . . . . . . . . . . . . . . . . . . . . . . . . . . . . . . . . . . . . . . . . 9
1

5.7 Window Menu . . . . . . . . . . . . . . . . . . . . . . . . . . . . . . . . . . . . . . . 9
5.8 Toolbar . . . . . . . . . . . . . . . . . . . . . . . . . . . . . . . . . . . . . . . . . . . 10
5.9 Context Menus . . . . . . . . . . . . . . . . . . . . . . . . . . . . . . . . . . . . . . . 11
5.10 Side Bar . . . . . . . . . . . . . . . . . . . . . . . . . . . . . . . . . . . . . . . . . . . 11
5.11 Consensus Bar . . . . . . . . . . . . . . . . . . . . . . . . . . . . . . . . . . . . . . . 11
5.12 Status Line . . . . . . . . . . . . . . . . . . . . . . . . . . . . . . . . . . . . . . . . . 11
6 Additional Windows 12
6.1 Format Panel . . . . . . . . . . . . . . . . . . . . . . . . . . . . . . . . . . . . . . . . 12
6.2 Find Window . . . . . . . . . . . . . . . . . . . . . . . . . . . . . . . . . . . . . . . . 12
6.3 Message Window . . . . . . . . . . . . . . . . . . . . . . . . . . . . . . . . . . . . . . 13
6.4 Export Image Dialog . . . . . . . . . . . . . . . . . . . . . . . . . . . . . . . . . . . . 13
6.5 About Window . . . . . . . . . . . . . . . . . . . . . . . . . . . . . . . . . . . . . . . 13
7 Additional Features 14
7.1 Using the Mouse to Select . . . . . . . . . . . . . . . . . . . . . . . . . . . . . . . . . 14
7.2 Magnifier Functionality . . . . . . . . . . . . . . . . . . . . . . . . . . . . . . . . . . 14
7.3 Navigating trees with keys and mouse wheel . . . . . . . . . . . . . . . . . . . . . . . 14
8 File Formats 14
8.1 Dendroscope Files . . . . . . . . . . . . . . . . . . . . . . . . . . . . . . . . . . . . . 15
8.2 Nexus files . . . . . . . . . . . . . . . . . . . . . . . . . . . . . . . . . . . . . . . . . . 15
8.3 Newick files . . . . . . . . . . . . . . . . . . . . . . . . . . . . . . . . . . . . . . . . . 15
8.4 Extended Newick format and rooted phylogenetic networks . . . . . . . . . . . . . . 15
8.5 Graphics Formats . . . . . . . . . . . . . . . . . . . . . . . . . . . . . . . . . . . . . . 15
9 Commands 16
10 Examples 18
11 Acknowledgements 18
References 19
2

1 Introduction
Disclaimer: This software is provided ”AS IS” without warranty of any kind. This is develop-mental code, and we make no pretension as to it being bug-free and totally reliable. Use at yourown risk. We will accept no liability for any damages incurred through the use of this software.Use of the Dendroscope is free, however the program is not open source.
Type-setting conventions: In this manual we use e.g. Edit→Find to indicate the Find menuitem in the Edit menu.
How to cite: If you publish results obtained in part by using Dendroscope , then we require thatyou acknowledge this by citing the program as follows:
• Daniel H Huson, Daniel C Richter, Christian Rausch, Tobias Dezulian, Markus Franz andRegula Rupp. Dendroscope: An interactive viewer for large phylogenetic trees . BMC Bioin-formatics 8:460, 2007, software freely available from www.dendroscope.org [4].
2 Program Overview
Dendroscope is a platform-independent software written in Java that enables conveniently to browsephylogenetic trees and networks with up to hundreds of thousands of taxa. Here is an overview ofits features:
• There are 8 different tree views available, e.g. phylogram, cladogram or radial views.
• Its novel navigational features facilitate the analysis of large trees.
• It provides several tree manipulating functions like rerooting, subtree rotating, tree flippingand formating features like renaming, coloring or resizing edges, nodes and labels.
• A comprehensive set of export formats for the generation of images is available.
• User formated trees can be saved as a Dendroscope project file or as .nexus, or Newick treefiles.
• Tree structures (single or multiple) can be loaded from .tre (Newick format) or .nexus filesor entered manually.
• Rooted phylogenetic networks can be entered and visualized using the Extended Newickformat [1].
• The program facilitates the computation of consensus trees and networks from a set of inputtrees.
3 Obtaining and Installing the Program
Dendroscope is written in Java and requires a Java runtime environment version 1.5 or later, freelyavailable from www.java.org.
3

Dendroscope is installed using an installer program that is freely available fromwww.dendroscope.org. There are three different installers, targeting different operating systems:
• Dendroscope windows 2.7.4.exe provides an installer for Windows.
• Dendroscope macos 2.7.4.dmg provides an installer for MacOS.
• Dendroscope unix 2.7.4.sh provides a shell installer for Linux and Unix.
Alternatively Dendroscope will be available as Java Webstart application fromwww-ab2.informatik.uni-tuebingen.de/webstart/dendroscope. If you need information concerningJava Webstart, go to http://java.sun.com/products/javawebstart/.
4 Getting Started
This section describes how to get started and to do the first steps of analyses using Dendroscope .
First, download an installer for the program fromwww.dendroscope.org, see Section 3 for details.
Start the program and load any .tre, .nexus or .dendro project file via File→Open . Alternatively,if the file was recently opened by the program, then it may be contained in the File→Recent
Files submenu.At startup, the tree will be scaled to fit to the window size.
Draw the tree differently by choosing one of the 8 provided views e.g. Tree→Draw Rectangular
Phylogram , Tree→Draw Rectangular Cladogram , Tree→Draw Slanted Cladogram ,Tree→Draw Circular Phylogram , Tree→Draw Circular Cladogram , Tree→Draw Internal
Circular Cladogram , Tree→Draw Radial Phylogram , Tree→Draw Radial Cladogram . Tryout the magnifier functions by clicking on View→Use Magnifier . Change any label font, size,color or edge/node size/width by opening the Format Panel via Edit→Format .
If you want to print the current image choose File→Print . In case you need a quality image ofthe tree, simply export it to several file formats via File→Export Image .
Finally, if you want to save the tree(s) and the formatting click File→Save As generating a.dendro project file. You can alos export the tree(s) by clicking File→Export . Choose one of theexport formats (newick, nexus, dendro).
Note that only by saving a formatted tree as a .dendro project file you can save the formattingwith the tree.
5 Main Window
The Main window is used to display the taxonomy and to control the program via the mainmenus.
We now discuss all menus of the Main window.
4

5.1 File Menu
The File menu contains the following file-related items:
• The File→New item opens an empty Dendroscope document.
• The File→Open item provides an Open File dialog to open one or more Dendroscopefiles (see Section 8) or .tre or .nexus files containing input data.
• The File→Recent Files item can be used to re-open a recently opened file.
• The File→Save item can be used to save the current tree and layout as Dendroscopeproject file.
• The File→Save As item can be used to save the current tree(s) as Dendroscope projectfile (.dendro) with the topology and layout.
• The File→Export item can be used to export the current tree(s) to Newick or Nexus fileformat. Note that only the topology but not the layout will be saved.
• The File→Duplicate item opens an additional window of Dendroscope containing thecurrent tree.
• The File→Export Image item opens the Export Image dialog which is used to save thecurrent tree in a number of different graphics formats, see Section 8.5.
• The File→Print item is used to print the current tree.
• The File→Close item closes the current window. In case only one window is opened,the application exits.
• The File→Quit item quits the program. Under MacOS , this item is contained in theDendroscope menu.
5.2 Edit Menu
The Edit menu contains the usual edit-related items:
• The Edit→Copy item is used to copy the current tree or all selected trees.
• The Edit→Paste item is used to paste the copied trees to a new tab.
• The Edit→Find/Replace item opens the Find window which can be used to search fortaxa and labels.
• The Edit→Find Again item finds the next occurrence of a search string.
• The Edit→Reroot item reroots the tree at the specified node or edge. If more thannode is selected, all selected taxon labels are intepreted as outgroup taxa and the programdetermines the “tightest” rooting so that the outgroup appear together below the root.
5

• The Edit→Swap Subtrees item swaps the subtree (or subtrees) at the specified node (ornodes), see also Section 7.3
• The Edit→Rotate Subtrees item rotates the subtree(s) at the specified node(s).
• The Edit→Reorder Subtrees item opens a dialog that allows one to specific any typeof reordering of the children of a node using “drag and drop”.
• The Edit→Delete Taxa item removes the selected subtree form the current tree.
• The Edit→Unlock Edge Lengths item is used to “unlock edge lengths” so that the useris allowed to move individual nodes and internal edge points.
• The Edit→Format item opens a Format Panel which provides several possibilities tochange color, fonts, node and edge shapes and the positioning of the labels of the tree.
5.3 Select Menu
The Select menu contains items for selecting different sets of substructures of the tree.
• The Select→Select All item is used to select all nodes, edges and labels.
• The Select→Select Nodes item is used to select all nodes.
• The Select→Select Edges item is used to select all edges.
• The Select→From Previous Window item is used to apply the selection of the previouswindow to the active window.
• The Select→Deselect All item is used to deselect all nodes, edges and labels that arecurrently selected.
• The Select→Deselect Nodes item is used to deselect all nodes that are currentlyselected.
• The Select→Deselect Edges item is used to deselect all edges that are currently selected.
• The Select→Select Labeled Nodes item is used to select all labeled nodes.
• The Select→Select Leaves item is used to select all leaves.
• The Select→Select Subtree item is used to select the subtree below a selected innernode.
• The Select→Select Induced Tree item is used to select a subtree induced by the setof currently selected nodes.
• The Select→Select Spanned Edges item is used to select all edges spanned by the setof currently selected nodes.
• The Select→Select Root item is used to select the root node of the tree.
6
• The Select→Select Non-Terminal item is used to select all non-terminal nodes andedges.
• The Select→Select Special item is used to select all edges leading to reticulationnodes in networks.
• The Select→Invert Selection item is used to invert the current selection.
• The Select→Scroll to Selection item is used to scroll to the current selection.
• The Select→List Selected Taxa item is used to list all selected taxa.
5.4 Options Menu
The Options menu contains items for collapsing nodes and extracting subtrees.
• The Options→Collapse item enables to collapse a subtree at a selected specified node.The former subtree is replaced by a new ”edge” with label [...].
• The Options→Uncollapse item is used to uncollapse (expand) a selected, collapsedsubtree.
• The Options→Uncollapse Subtree item is used to uncollapse (expand) all collapsedsubtrees of a selected node.
• The Options→Collapse Complement item is used to collapse all subtrees except thecurrently selected part of the tree.
• The Options→Collapse at Level item is used to collapse all subtrees at the specifiedlevel from the root.
• The Options→Extract Subtree item is used to extract a selected subtree to a new file.
• The Options→Load Taxon Images item is used to specify a directory containing imagefiles. Dendroscope tries to match taxon names to the names of images files and for each matchfound, Dendroscope shows the image near the node representing the given taxon.
• The Options→Image Size item is used to set the size of the image for the currentlyselected nodes.
• The Options→Image Position submenu is used to determine the relative positions ofimages in relative to the corresponding nodes (North, South, East, West, Radial).
• The Options→Strict Consensus item is used to compute the strict consensus of aset of trees.
• The Options→Loose Consensus item is used to compute the loose consensus of a setof trees.
• The Options→Majority Consensus item is used to compute the majority consensusof a set of trees.
7

• The Options→LSA Consensus item is used to compute the LSA consensus of a set oftrees.
• The Options→Network Consensus item is used to compute a rooted network consensusof a set of trees. If the input set contains more than two trees, then the user can set athreshold that determines the percentage of input trees that a cluster must be contained into make it into the output rooted network. The user can also decide whether the programshould come a cluster network [6] that shows the clusters in a hardwired representation, a galled network [5] that represents the clusters in a topologically restricted softwiredrepresentation , or a minimum network that attemps to represent the clusters in a networkof minimum level , as described in Van Iersel et al, submitted, 2009.
• The Options→Network for Multi-Labeled Tree menu item is used to compute a rootedphylogenetic network for a multi-labeled tree such that the network contains each label (ortaxon) exactly once. There are three methods available here: the Cluster method extractsall the clusters in the tree and constructs a cluster network. The exact method computesthe nested label for the root node of the tree and then constructs the corresponding networkfor that label, see Huber, Oxelman, Lott and Moulton (2006). The LevelK method extractsall clusters and then seeks to compute a level-k network of minimum level k for the clusters.
Note that Dendroscope does not require that the trees all contain exactly the same set of taxa tobe able to compute a consensus (unlike most other programs).
5.5 Tree Menu
The Tree menu contains items for different tree and network views [3].
• The Tree→Draw Rectangular Phylogram item is used to draw the tree as rectangularphylogram.
• The Tree→Draw Rectangular Cladogram item is used to draw the tree as rectangularcladogram.
• The Tree→Draw Slanted Cladogram item is used to draw the tree as slanted cladogram.
• The Tree→Draw Circular Phylogram item is used to draw the tree as circular phylogram.
• The Tree→Draw Circular Cladogram item is used to draw the tree as circular cladogram.
• The Tree→Draw Internal Circular Cladogram item is used to draw the tree as circularcladogram with leaves on the inside.
• The Tree→Draw Radial Phylogram item is used to draw the tree as radial phylogram.
• The Tree→Draw Radial Cladogram item is used to draw the tree as radial cladogram.
• The Tree→Previous Tree item is used to switch to the last opened tree.
• The Tree→Next Tree item is used to switch to the next opened tree.
8

• The Tree→Ladderize Left item is used to order the tree so that the largest cladesappear leftmost (uppermost in the view).
• The Tree→Ladderize Right item is used to order the tree so that the largest cladesappear rightmost (lowermost in the view).
• The Tree→Ladderize Random item is used to order the clades randomly.
5.6 View Menu
The Views menu contains items for scaling the tree, using the magnifier and showing/hidinglabels.
• The View→Zoom to Fit item is used to scale the tree to fit the window.
• The View→Fully Contract item is used to contract the tree.
• The View→Fully Expand item is used to expand the whole tree.
• The View→Use Magnifier item is used to turn the magnifier functionality on and off.
• The View→Magnify All Mode item modifiers the magnification process so that the wholetree gets mapped into the magnifier.
• The View→Show Node Labels item is used to make all node labels visible.
• The View→Hide Node Labels item is used to hide all node labels.
• The View→Show Edge Weights item is used to make edge weights visible.
• The View→Show Edge Labels item is used to make edge labels visible.
• The View→Hide Edge Labels item is used to hide edge labels.
• The View→Sparse Labels item instructs the program to show only a subset of the taxonlabels, thus avoiding overlapping labels.
• The View→Radial Labels item instructs the program to rotate leaf labels to match theorientation of the edges that lead to them.
• The View→Reposition Labels item sets all the labels to their original position.
5.7 Window Menu
The Window menu contains a number of window-related commands as well as a list of all currentlyopen windows.
• The Window→About item opens a splash screen showing the program version. In MacOS,this can be found under Dendroscope→About .
9

• The Window→How to Cite item shows the citation info for this software which is:Daniel H Huson, Daniel C Richter, Christian Rausch, Tobias Dezulian, Markus Franz andRegula Rupp. Dendroscope: An interactive viewer for large phylogenetic trees . BMC Bioin-formatics 8:460, 2007.
• The Window→Set Window Size item is used to set the size of the Main window.
• The Window→Command-line Syntax item lists all commands supported by the program.
• The Window→Execute Command item opens a window that can be used to enter a command(see command).
• The Window→Add Tree or Network item opens a window to enter tree or networkmanually in Newick Format.
• The Window→Message Window item is used to open the Message window.
• If several program windows are openend, they are listed at the end of the window menu.
5.8 Toolbar
For easier access of frequently used functions, a Toolbar is provided with the following functions:
• File→Open , File→Save As , File→Print , File→Export Image , Edit→Format
• The Expand view vertically button expands the tree vertically.
• The Contract view vertically button shrinks the tree vertically.
• The Expand view horizontally button expands the tree horizontally.
• The Contract view horizontally button shrinks the tree horizontally.
• The Rotate Left button rotates the whole tree to the left.
• The Rotate Right button rotates the whole tree to the right.
• View→Zoom to Fit , View→Fully Contract , View→Fully Expand , View→Use
Magnifier , Tree→Draw Rectangular Phylogram , Tree→Draw Rectangular Cladogram
, Tree→Draw Slanted Cladogram , Tree→Draw Circular Phylogram , Tree→Draw
Circular Cladogram , Tree→Draw Internal Circular Cladogram , Tree→Draw Radial
Phylogram , Tree→Draw Radial Cladogram , Edit→Find , Tree→Ladderize Left
, Tree→Ladderize Right , Tree→Ladderize Random Tree→Ladderize Random
Edit→Reroot Edit→Swap Subtree
10

5.9 Context Menus
A right mouse click on a node opens a context menu which allows to edit the node label, open theFormat Panel, show or hide node labels, copy the node label, select the subtree starting from thisnode, and swap the subtree starting from this node.
A right mouse click on an edge opens a context menu which allows to edit the edge label, open theFormat Panel, show or hide edge labels, and copy the edge label.
A right mouse click beside the tree opens a context menu which allows to select or deselect alledges, nodes, and labels.
5.10 Side Bar
The Side Bar on the left contains a list of all trees in the current file. The arrows on top can beused to browse the list. Additionally, one can change the order of the list by dragging and droppingsingle trees to a new position in the list. The sidebar can be made (in)visible when clicking thesmall (left) right arrow located on the sidebar itself.
Right-clicking on one of the trees listed in the sidebar opens a popup menu with the following items:
• The Copy item can be used to copy a tree.
• The Remove item can be used to remove a tree for the list of trees.
• The Rename item can be used to rename a tree.
• The Duplicate item can be used to duplicate a tree.
• The Clear Formatting item can be used to clear all formating of a tree (such as choiceof colors and fonts, etc.).
5.11 Consensus Bar
The Consensus Bar allows direct access to the following menu items:
• The Options→Strict Consensus item.
• The Options→Loose Consensus item.
• The Options→Majority Consensus item.
• The Options→LSA Consensus item.
• The Options→Network Consensus item.
5.12 Status Line
The Status Line at the bottom of the program window shows the index of the current tree,the total number of trees, the number of nodes and edges and the available space of the reservedmemory.
11

6 Additional Windows
6.1 Format Panel
The Format Panel can be opened via Edit→Format or by a right mouse click after selectingelements of the tree like edges, nodes or labels. You can format them as follows:
• Edges can have their edge width and edge width set.
• Edges can be assigned three types of shapes: straight edges, curved edges and angular edges,the effect of which depends on the current view.
• Nodes can be assigned certain shapes: square nodes, circle nodes or none. Square and circlenode shapes. They can have their node size and node color set.
• If a selected node or edge has a label, then you can choose its font family, font style or fontsize.
• Labels can be switched on and off, and can be rotated to the left or right. .
Configuration changes are applied immediately. The Options→Save Font As Default menuitem can be used to set the default font, style and size used by the program. .
6.2 Find Window
The Find window can be opened using the Edit→Find/Replace item. Its purpose is to findand also to replace taxa labels in the tree. Enter a query specifying the name of a taxon in the toptext region. Use the following check boxes to configure the search:
• If the Match Whole item is selected, then only taxa or labels matching the complete querystring will be returned.
• If the Respect Case item is selected, then the case of letters is distinguished in comparisons.
• If the Regular Expression item is selected, the query is interpreted as a Java regularexpression (see example further down).
If a searched label is ”hidden” inside a bounding box (black opaque area of tree) or in a collapsedbranch, it will be highlighted.
Press the Close, Find First, Find Next or Find All buttons to close the dialog, or find the first,or next occurrence of the query, respectively.
Alternatively, use the From File button to find all nodes that match any line of a given inputfile. The Match Whole, Respect Case and Regular Expression buttons apply to this type ofsearch, too.
Regular Expressions are powerful and flexible text-processing tools. They allow to specifycomplex patterns of text that can be discovered in an input string.
12

Example 1:
Each of the following represent valid regular expressions, and all will successfully match the char-acter sequence ”Escherichia”:
• Escherichia
• E.*
• [eE]scherichia
• [eE]sch[aeiou][a-z]ichi.*
Example 2:
To select the five taxa simutaneously, e.g. Human, Mouse, Dog, Cat and Rat, use the followingexpression: Human|Mouse|Dog|cat|Rat and then press Find All .
For an extensive list of metacharacters and futher explanations go tohttp://java.sun.com/j2se/1.5.0/docs/api/java/util/regex/Pattern.html
6.3 Message Window
The Message window is opened using the Window→Message Window item. The program writesall internal messages to this window. The window contains the usual File and Edit menu items.
6.4 Export Image Dialog
The Export Image dialog is opened using the File→Export Image item. This dialog is usedto save an image of the current tree in a number of different formats, see Section 8.5.
The format is chosen from a menu. There are two radio buttons Save whole image to save thewhole image, and Save visible region to save only the part of the image that is currentlyvisible in the main viewer. If the chosen format is EPS , then selecting the Convert text to
graphics check box will request the program to render all text as graphics, rather than fonts.
Pressing the apply button will open a standard file save dialog to determine where to save thegraphics file.
6.5 About Window
The About Window is opened using the Window→About submenu ( Dendroscope→About inMacOS). It reports the version of the program and its authors.
13

7 Additional Features
7.1 Using the Mouse to Select
Nodes, edges and labels can also be selected by clicking on them , shift-clicking to extend a selectionor by (shift-) dragging the mouse to perform rubber-band selection in which all objects containedwithin a dragged rectangle are selected.
7.2 Magnifier Functionality
Dendroscope provides the user with a magnifier functionality that can be used to magnifyportions of the tree.
Selecting the View→Use Magnifier item adds a magnifier layer to the view.
• Magnifier band: For all rooted views (rectangular and slanted view) a magnifier band islaid over the tree.
• Magnifier disk: For all unrooted views (radial and circular tree view) a circular magnifieris laid over the tree.
The magnifier can be pulled to a desired position by grabbing its frame with the mouse. Theradius/width of the magnifier can be changed by dragging the rhomb at the magnifier’s border line.The zoom factor of the magnifier can be changed via the [+,-] button.Two magnifier modes are available depending on the current tree view:
7.3 Navigating trees with keys and mouse wheel
Dendroscope allows one to browse and analyze trees. Navigating trees is facilitated by somekey bindings :
• Scrolling: Hold down the Shift button and use the mouse wheel to scroll top-down.Hold down the Alt and Shift buttons and use the mouse wheel to scroll right-left.
• Zooming: Use the mouse wheel to zoom the tree. Zooming is centered on the current mouseposition. Alternatively, use the arrow keys to scroll the tree, or additionally press the shiftkey to zoom the graph in horizontal or vertical direction. Use the alt and control keys foracceleration.
• Rotating: For circular and radial drawings, use the shift-key and left and right arrow keys torotate the tree.
8 File Formats
Dendroscope uses its own file format to store the data of the modified and/or formatted tree. Byconvention, we use the suffix .dendro for Dendroscope files.
14

8.1 Dendroscope Files
Dendroscope saves trees in a simple text-based format with the file extension .dendro. It containsthe tree in Newick notation and additional (machine-readable) information on the view, selections,coloring etc. of the saved trees.
Trees can also be saved in Nexus and Newick format. However, when these formats are used, allinformation on the layout of the trees, fonts, colors, linewidths etc are lost.
8.2 Nexus files
Dendroscope can read a Nexus file that contains a Nexus trees block and can export trees in thisformat.
8.3 Newick files
Dendroscope can read Newick files and can export trees in this format.
8.4 Extended Newick format and rooted phylogenetic networks
The Extended Newick format was designed as an extension of the Newick format to be able todescribe rooted phylogenetic networks in bracket notation. Unfortunately, there is not just one suchformat, but a number of different ones. Dendroscope implements a version of the Extended-Newickformat that arose out of discussions that took place during the Phylogenetics Programme at theIsaac Newton Institute in 2007.
In Dendroscope, a rooted phylogenetic network is described as a single line of extended-Newickformat using brackets, as in the description of a rooted phylogenetic tree in the standard Newickformat, with additional labels placed at the end of node labels. These special labels are of the form’#H1’, ’#H2’, etc. When parsing an extended-Newick string, all nodes whose labels end on ’#H1’are identified with each other, all nodes that end on ’#H2’ are identified, etc.
For example, to describe a rooted phylogenetic network with three leaves labeled ’a’, ’b’ and ’c’, inwhich ’b’ is to have a “reticulate” parent node that connects both above ’a’ and above ’c’, use thefollowing extended-Newick string:
((a,(b)#H1),(c,#H1));
Copy and paste this string into a Dendroscope window to see the corresponding network.
In Dendroscope, anything that can be done with a rooted tree can also be done with a rootedphylogenetic network!
8.5 Graphics Formats
The following graphics formats are supported (how to open the Export Image dialog see 6.4):
15

• JPEG, “Joint Photographic Experts Group”.
• GIF, “Graphics Interchange Format”.
• EPS, “Encapsulated PostScript”.
• SVG, “Scalable Vector Graphics”.
• PNG, “Portable Network Graphics”.
• BMP, “Bitmap”.
• PDF, “Portable Document Format”.
9 Commands
The program provides a command-intepreter to access all its functionalities. a command can beentered either using the Window→Enter Command item or by starting the program in command-linemode and typing (or piping) commands to the program via the console.
The Command window has a field for entering commands, a cancel button and two two differentapply buttons. The Apply button applies the entered command to the current tree, whereas theApply to All button applies the entered command to all trees in the current file.
Here is a summary of all available commands:
Opening and saving files:
open file=name [init=command] - Open the named file in the current window, if empty, otherwise in a new window,
and then optionally perform specified initial commands in new window
launch file=name - Open the named file in the current window
save [format=value] file=name - Save data to file in the specified format (possible formats: nexus newick dendro)
exportgraphics [format={EPS|PNG|GIF|JPG|SVG|PDF}] [replace=bool] [textasshapes=bool] [title=title] file=filename -
Export a picture of the current tree
source file=name - Read commands from the named file
Choosing tree and visualization:
set which=value - Sets the current tree (possible values: number-of-tree first last previous next)
set drawer=drawer-name - Set the drawer used to draw the tree
(Possible values: RectangularPhylogram RectangularCladogram SlantedCladogram
RadialPhylogram RadialCladogram CircularPhylogram CircularCladogram InnerCircularCladogram)
set auxilaryparameter=number - Set the auxilary parameter used by some of the drawers
Customizing the layout of a tree:
reroot - Reroot current tree using currently selected set of nodes (outgroups), node or edge
ladderize=value - Ladderize each displayed tree (possible values: left right random none)
rotatesubtree - Rotate all children of all selected nodes
swapsubtree - Swap subtree below selected node(s)
reset labelpositions - Reset all node label positions
center - Center the tree
rotate angle=number - Rotate the whole tree by the given angle (in radian)
set hflip=bool - Flip the tree horizontally?
rotatelabels - Rotate the labels of selected nodes
Adding, creating and modifying trees:
add tree=newick-tree - Add the specified tree to the list of trees
duplicate - Duplicate the current window
extractsubtree - Extract the subtree induced by the currently selected nodes
extractlsatree - Extract the LSA-tree from a rooted network
remove taxa={selected| names} - Remove all selected taxa, if taxa=selected, otherwise, remove named taxa
compute consensus=value Compute a consensus tree or network of a set of trees
(possible values: Strict Majority Loose Network LSA)
remove innerlabels - Remove all labels of inner nodes
apply command - Applies the given command to all trees in the file
Selection and Deselection:
select all - Select all nodes and edges
select nodes - Select all nodes
16

select edges - Select all edges
select previous - Select all labeled nodes as in previous window
select labelednodes - Select all labeled nodes
select leaves - Select all leaves
select subtree - Select all nodes in subtrees below selected
select subpart - Select part of subtree
select nonterminal - Select all non-terminal nodes
select intermediate - Select all intermediate nodes
select root - Select root
select special - Select all ’special’ edges
select invert - Invert the current selection
deselect all - Deselect all nodes and edges
deselect nodes - Deselect all nodes
deselect edges - Deselect all edges
list taxa=selected - List all currently selected taxa
Searching:
find searchtext=text target={Nodes|Edges} [all=bool] [regex=bool] [wholeword=bool] [respectcase=bool] -
Find and select the next label matching the given search text
replace searchtext=text replacetext=text [target={Nodes|Edges}] [all=bool]
[regex=bool] [wholeword=bool] [respectcase=bool] - Find and select the next label matching the given search text
Collapsing and uncollapsing nodes:
collapse all - Collapse all nodes
collapse selection - Collapse all selected nodes
collapse complement - Collapse the complement of all selected nodes
collapse level=number - Collapse all nodes at the given level (distance from root)
uncollapse all - Uncollapse all nodes
uncollapse selection - Uncollapse all selected nodes
uncollapse subtree - Uncollapse whole subtree for selected nodes
Visualization:
set window [width=num] [height=num] [x=num] [y=num]-
Set size and location of main window
set font=name Set font by name
set autolayoutlabels=bool - Set auto-layout of labels
set margin [left=num] [right=num] [top=num] [bottom=num] -
Set the margin around the tree
show approxthreshold=int - Set minimum threshold for representing subtrees by approximate shapes
show edgelabels=bool - Show or hide edge lbels
show edgeweights=bool - Show or hide edge weights
show nodelabels=bool - Show or hide node labels
show intermediatenodelabels=bool -
Show or hide labels of intermediate nodes
set maintainedgelengths=bool - When set, edge lengths cannot be changed, when not set, edges can be stretched
set eshape=value - Set the shape of selected edges (possible values: polygon quadratic cubic)
set nshape=value - Set the shape of selected nodes (possible values: rect oval)
set radiallabels=bool - Set radial layout of node labels
set sparselabels=bool - Set sparse layout of node labels (in which labels that would overlap others are not shown)
set color=color - Set the color of all selected nodes and edges
set bgcolor=color - Set the background color of all selected nodes
set labelcolor=color - Set the label color of all selected nodes and edges
set edgewidth=number - Set the line width of all selected edges
set nodesize=number - Set the size of all selected edges
Scaling:
contract direction=horizontal - Contract tree horizontally
contract direction=vertical - Contract tree vertically
expand direction=horizontal - Expand tree horizontally
expand direction=vertical - Expand tree vertically
zoom selection - Zoom to current selection of nodes
zoom fit - Zoom to fit whole tree in window
reset view - Reset the scaling of the tree
Controlling the magnifier:
set magnifier=bool - Turn magnifier on or off
set magradius=number - Set magnifier radius
set magdisplacement=number - Set magnifier displacement (power)
set magnifyallmode=bool Set the magnifier all mode
Adding images to nodes:
load imagedir=directory-name -Load image files from named directory. Images are placed next to taxa of same name
set imageheight=num - Set the height of the images associated with all selected nodes
set imagelayout=value - Set the layout used for images (possible values: north south east west radial)
Special purpose:
update - Update the computation
metasim - Run metasim commands
set dirty=bool - Set the dirty status of a document
set vint=bool - Set show version-in-window-title mode
set scalebar=bool - Set show scalebar mode
setprop name=boolean - Set the boolean value of a named property
Other:
version - List version info
help - List this help
about - List information about Dendroscope
quit -
17
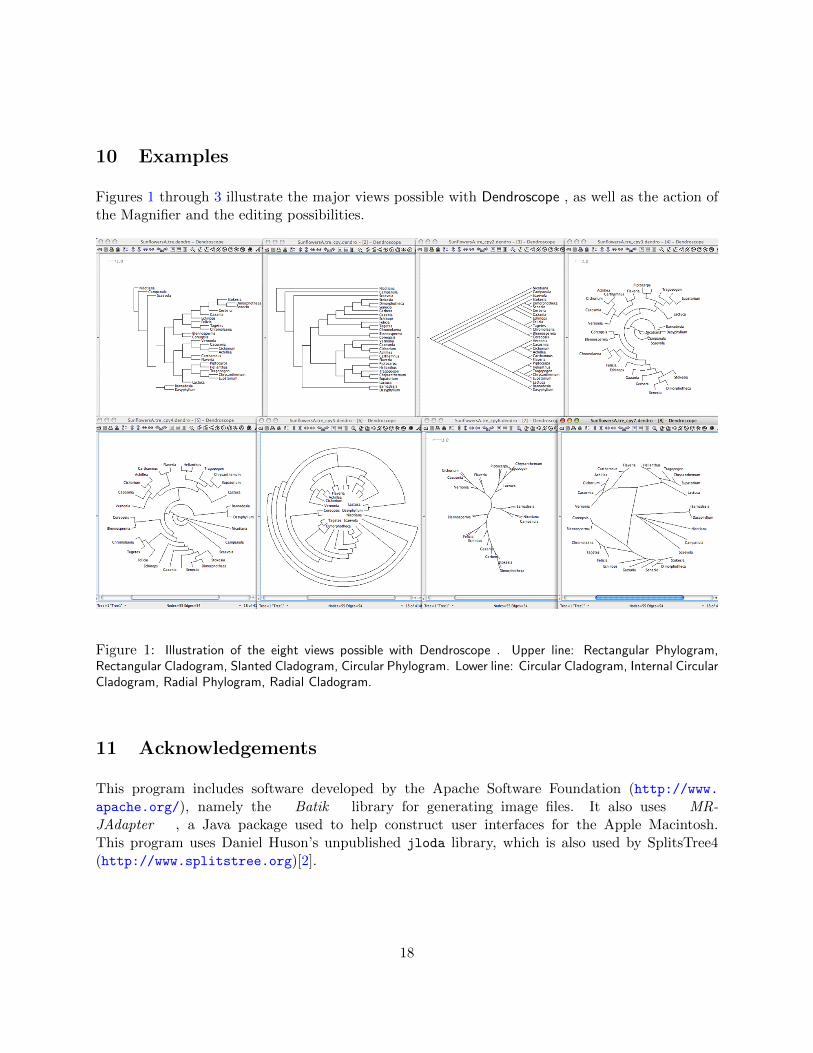
10 Examples
Figures 1 through 3 illustrate the major views possible with Dendroscope , as well as the action ofthe Magnifier and the editing possibilities.
Figure 1: Illustration of the eight views possible with Dendroscope . Upper line: Rectangular Phylogram,Rectangular Cladogram, Slanted Cladogram, Circular Phylogram. Lower line: Circular Cladogram, Internal CircularCladogram, Radial Phylogram, Radial Cladogram.
11 Acknowledgements
This program includes software developed by the Apache Software Foundation (http://www.apache.org/), namely the Batik library for generating image files. It also uses MR-JAdapter , a Java package used to help construct user interfaces for the Apple Macintosh.This program uses Daniel Huson’s unpublished jloda library, which is also used by SplitsTree4(http://www.splitstree.org)[2].
18

Figure 2: Part of the NCBI taxonomy showing Homo sapiens and his relatives without and with the magnifierturned on.
References
[1] Gabriel Cardona, Francesc Rossell, and Gabriel Valiente. Extended newick: It is time for a stan-dard representation, 2008. Submitted to BMCB, http://bioinfo.uib.es/media/uploaded/bmc-2008-enewick-sub.pdf.
[2] Daniel H. Huson. Splitstree: analyzing and visualizing evolutionary data. BIO, 14(1):68–73,1998. http://bioweb.pasteur.fr/docs/doc-gensoft/splitstree/splitstree.ps.
[3] Daniel H. Huson. Drawing rooted phylogenetic networks. TCBB, 2008. To appear.
[4] Daniel H. Huson, Tobias Dezulian, Markus Franz, Christian Rausch, Daniel C. Richter,and Regula Rupp. Dendroscope - an interactive tree drawer. BMCB, 8:460,2007. http://dx.doi.org/10.1186/1471-2105-8-460, software freely available from http://www-ab.informatik.uni-tuebingen.de/software/dendroscope/.
19

Figure 3: All labels and tree substructures can be easily edited.
[5] Daniel H. Huson, Regula Rupp, Vincent Berry, Gambette Philippe, and Christophe Paul. Toappear in: RECOMB, 2009.
[6] Regula Rupp and Daniel H. Huson. Summarizing multiple gene trees using cluster networks.In WABI08, 2008.
20

Index
About, 9, 13Add Tree or Network, 10angular edges, 12apply a command, 16apply to all trees, 16
Batik, 18BMP, 16
circle nodes, 12circular, 14citing the program, 3Clear Formatting, 11click selection, 14Close, 5, 12Cluster method, 8cluster network, 8Collapse, 7Collapse at Level, 7Collapse Complement, 7Command, 16command, 16Command-line Syntax, 10Consensus Bar, 11Contract view horizontally, 10Contract view vertically, 10Convert text to graphics, 13Copy, 5, 11curved edges, 12
default font, setting, 12Delete Taxa, 6Dendroscope→About, 9, 13Dendroscope macos 2.7.4.dmg, 4Dendroscope unix 2.7.4.sh, 4Dendroscope windows 2.7.4.exe, 4Deselect All, 6Deselect Edges, 6Deselect Nodes, 6Disclaimer, 3Draw Circular Cladogram, 4, 8, 10Draw Circular Phylogram, 4, 8, 10Draw Internal Circular Cladogram, 4, 8, 10Draw Radial Cladogram, 4, 8, 10Draw Radial Phylogram, 4, 8, 10
Draw Rectangular Cladogram, 4, 8, 10Draw Rectangular Phylogram, 4, 8, 10Draw Slanted Cladogram, 4, 8, 10Duplicate, 5, 11
edge labels, 9edge weights, 9edge width, 12Edit, 5Edit→Copy, 5Edit→Delete Taxa, 6Edit→Find, 10Edit→Find Again, 5Edit→Find/Replace, 5, 12Edit→Format, 4, 6, 10, 12Edit→Paste, 5Edit→Reorder Subtrees, 6Edit→Reroot, 5, 10Edit→Rotate Subtrees, 6Edit→Swap Subtree, 10Edit→Swap Subtrees, 6Edit→Unlock Edge Lengths, 6Enter Command, 16EPS, 13, 16exact method, 8Execute Command, 10Expand view horizontally, 10Expand view vertically, 10Export, 4, 5Export Image, 4, 5, 10, 13Extended Newick, 15Extract Subtree, 7
File, 5File→Close, 5File→Duplicate, 5File→Export, 4, 5File→Export Image, 4, 5, 10, 13File→New, 5File→Open, 4, 5, 10File→Print, 4, 5, 10File→Quit, 5File→Recent Files, 4, 5File→Save, 5File→Save As, 4, 5, 10
21

Find, 10, 12Find Again, 5Find All, 12, 13Find First, 12Find Next, 12Find/Replace, 5, 12finding taxa from a file, 12font family, 12font size, 12font style, 12Format, 4, 6, 10, 12Format Panel, 12From File, 12From Previous Window, 6Fully Contract, 9, 10Fully Expand, 9, 10
galled network, 8GIF, 16graphics formats, 15
hardwired representation, 8Hide Edge Labels, 9Hide Node Labels, 9How to Cite, 10How to cite, 3
Image Position, 7Image Size, 7Invert Selection, 7
JPEG, 16
key bindings, 14
Ladderize Left, 9, 10Ladderize Random, 9, 10Ladderize Right, 9, 10level, 8LevelK, 8Linux, 4List Selected Taxa, 7Load Taxon Images, 7Loose Consensus, 7, 11loose consensus, 7LSA Consensus, 8, 11LSA consensus, 8
MacOS, 4, 5magnifier band, 14magnifier functionality, 14Magnify All Mode, 9Main, 4Majority Consensus, 7, 11majority consensus, 7Match Whole, 12Message, 13Message Window, 10, 13minimum network, 8MRJAdapter, 18
Navigating trees, 14Network Consensus, 8, 11Network for Multi-Labeled Tree, 8New, 5Next Tree, 8Nexus trees block, 15node color, 12node shapes, 12node size, 12
Open, 4, 5, 10Open File, 5Options, 7Options→Collapse, 7Options→Collapse at Level, 7Options→Collapse Complement, 7Options→Extract Subtree, 7Options→Image Position, 7Options→Image Size, 7Options→Load Taxon Images, 7Options→Loose Consensus, 7, 11Options→LSA Consensus, 8, 11Options→Majority Consensus, 7, 11Options→Network Consensus, 8, 11Options→Network for Multi-Labeled Tree, 8Options→Save Font As Default, 12Options→Strict Consensus, 7, 11Options→Uncollapse, 7Options→Uncollapse Subtree, 7outgroup, 5
Paste, 5PDF, 16
22

PNG, 16Previous Tree, 8Print, 4, 5, 10
Quit, 5
Radial Labels, 9Recent Files, 4, 5Regular Expression, 12Remove, 11Rename, 11Reorder Subtrees, 6Reposition Labels, 9Reroot, 5, 10Respect Case, 12rooted network consensus, 8rotate labels, 12Rotate Left, 10Rotate Right, 10Rotate Subtrees, 6rubber-band selection, 14
Save, 5Save As, 4, 5, 10Save Font As Default, 12Save visible region, 13Save whole image, 13Scroll to Selection, 7Select, 6Select All, 6Select Edges, 6Select Induced Tree, 6Select Labeled Nodes, 6Select Leaves, 6Select Nodes, 6Select Non-Terminal, 7Select Root, 6Select Spanned Edges, 6Select Special, 7Select Subtree, 6Select→Deselect All, 6Select→Deselect Edges, 6Select→Deselect Nodes, 6Select→From Previous Window, 6Select→Invert Selection, 7Select→List Selected Taxa, 7
Select→Scroll to Selection, 7Select→Select All, 6Select→Select Edges, 6Select→Select Induced Tree, 6Select→Select Labeled Nodes, 6Select→Select Leaves, 6Select→Select Nodes, 6Select→Select Non-Terminal, 7Select→Select Root, 6Select→Select Spanned Edges, 6Select→Select Special, 7Select→Select Subtree, 6selection, 14Set Window Size, 10shift-click selection, 14Show Edge Labels, 9Show Edge Weights, 9Show Node Labels, 9show/hide labels, 12Side Bar, 11Sidebar→Clear Formatting, 11Sidebar→Copy, 11Sidebar→Duplicate, 11Sidebar→Remove, 11Sidebar→Rename, 11softwired representation, 8Sparse Labels, 9square nodes, 12Status Line, 11straight edges, 12Strict Consensus, 7, 11strict consensus, 7SVG, 16Swap Subtree, 10Swap Subtrees, 6
Toolbar, 10Tree, 8Tree→Draw Circular Cladogram, 4, 8, 10Tree→Draw Circular Phylogram, 4, 8, 10Tree→Draw Internal Circular Cladogram, 4, 8,
10Tree→Draw Radial Cladogram, 4, 8, 10Tree→Draw Radial Phylogram, 4, 8, 10Tree→Draw Rectangular Cladogram, 4, 8, 10Tree→Draw Rectangular Phylogram, 4, 8, 10
23

Tree→Draw Slanted Cladogram, 4, 8, 10Tree→Ladderize Left, 9, 10Tree→Ladderize Random, 9, 10Tree→Ladderize Right, 9, 10Tree→Next Tree, 8Tree→Previous Tree, 8Type-setting conventions, 3
Uncollapse, 7Uncollapse Subtree, 7Unix, 4Unlock Edge Lengths, 6Use Magnifier, 4, 9, 10, 14
View→Fully Contract, 9, 10View→Fully Expand, 9, 10View→Hide Edge Labels, 9View→Hide Node Labels, 9View→Magnify All Mode, 9View→Radial Labels, 9View→Reposition Labels, 9View→Show Edge Labels, 9View→Show Edge Weights, 9View→Show Node Labels, 9View→Sparse Labels, 9View→Use Magnifier, 4, 9, 10, 14View→Zoom to Fit, 9, 10Views, 9
Webstart application, 4Window, 9Window→About, 9, 13Window→Add Tree or Network, 10Window→Command-line Syntax, 10Window→Enter Command, 16Window→Execute Command, 10Window→How to Cite, 10Window→Message Window, 10, 13Window→Set Window Size, 10Windows, 4
Zoom to Fit, 9, 10
24