User Manual - EZ Raider
37
LTD User Manual
Transcript of User Manual - EZ Raider

Doc# : 10MRM001 | Rev# : 2 LTD
User Manual

2
EZRaider User Manual
We at DSRaider would like to congratulate you on your purchase of the EZRaider, and welcome you to the growing community of EZRaider users. We want to thank you for your trust and wish you many years of safe, productive, and enjoyable use.
This user’s manual contains important information on the operation and maintenance of the EZRaider. This manual is an inseparable part of the EZRaider and should be reviewed carefully before making use of the vehicle. Please follow all of the instructions carefully to ensure your riding safety and enjoyment.
The information presented here is rich and detailed, but in the event of an error or omission, please contact our customer service department at: [email protected].

3
4-7
8-9
10-11
12
13
13
14
15-16
17
17
18
18
18
19-20
21
22
23
24
25
25
26-27
28
29
30
30
30
31
32
33-34
EZRaider User Manual
EZRaider - General Introduction
Vehicle Rear End
Vehicle Underside
EZRaider HD2 - General Introduction
EZRaider HD4 - General Introduction
Switches and Controls
Identifying the EZRaider
Driving Safety Instructions
Pre-ride Inspection
Driving
Charging the Battery
Towing
Transport
Storage
Cleaning
Maintenance
Troubleshooting
EZRaider Cart User Manual
Cart - General Introduction
E-Cart - General Introduction
Identifying the Cart
Cart Use Safety Instructions
Pre-ride Inspection
Driving the EZRaider with the Cart
Charging the E-Cart Battery
Towing
Storage
CleaningMaintenance
Troubleshooting
Accessories
Table of Contents
4
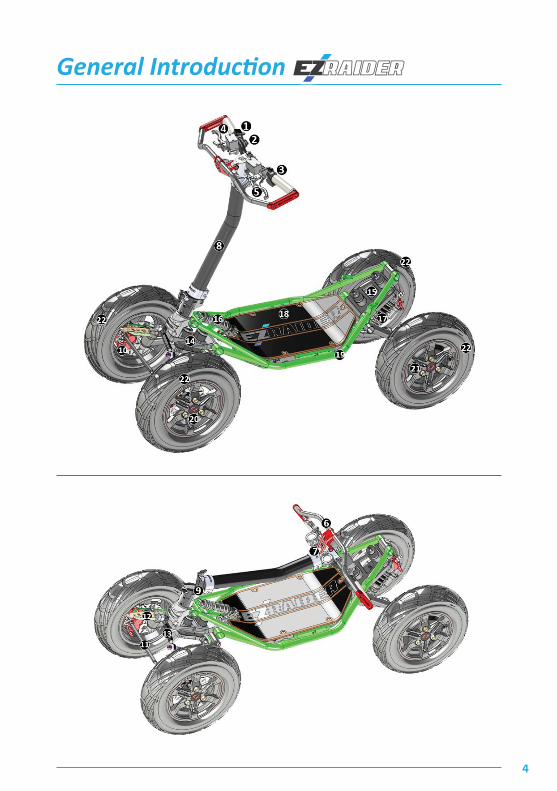
General Introduction
5
General Introduction
1. Throttle
2. Power on/off switch
3. Controls
4. Front brake lever and parking brake
5. Rear brake lever and parking brake
6. Handguard (optional)
7. Headlight switch
8. Steering column
9. Steering column folding mechanism
10. Brake (found in each wheel)
11. Long hex bar
12. Steering shaft
13. Short hex bar
14. Front rubber shock absorbers
15. Rear rubber shock absorbers
16. Front oil shock absorbers + spring
17. Rear oil/gas shock absorbers + spring
18. Standing platform and battery compartment
19. Chassis
20. Wheel rim
21. Wheel bolt covers
22. 120/90-10 Tire

6
1. Wheel bolts
2. Rear oil/gas shock absorbers + spring
3. Shock adjustment point
4. Disk brakes
5. Brakes
6. Towing point
7. Connection point with the EZRaider Cart
8. Luggage carrier - EZRaider model (optional)
9. Motor
Vehicle Rear End
7
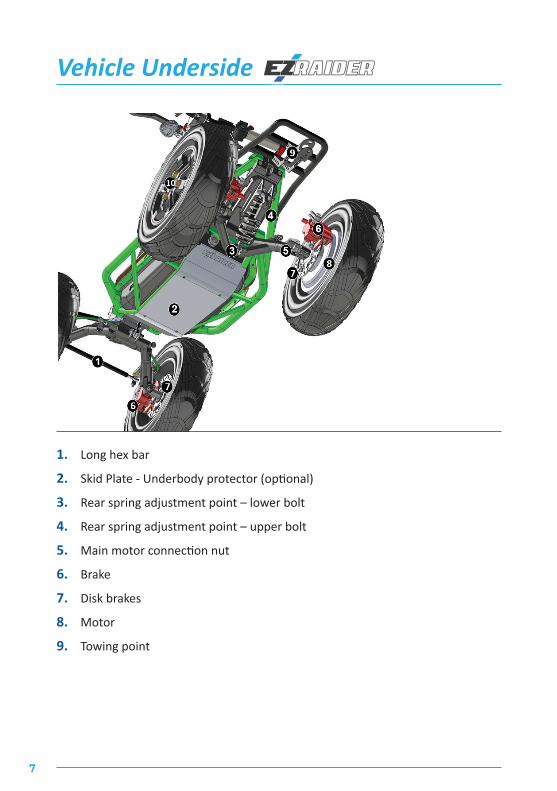
1. Long hex bar
2. Skid Plate - Underbody protector (optional)
3. Rear spring adjustment point – lower bolt
4. Rear spring adjustment point – upper bolt
5. Main motor connection nut
6. Brake
7. Disk brakes
8. Motor
9. Towing point
Vehicle Underside
8
HD2
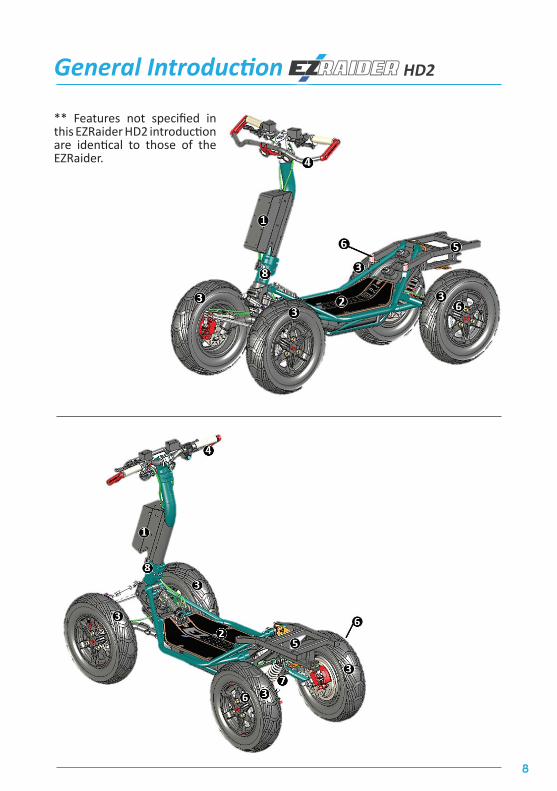
** Features not specified in this EZRaider HD2 introduction are identical to those of the EZRaider.
General Introduction
9
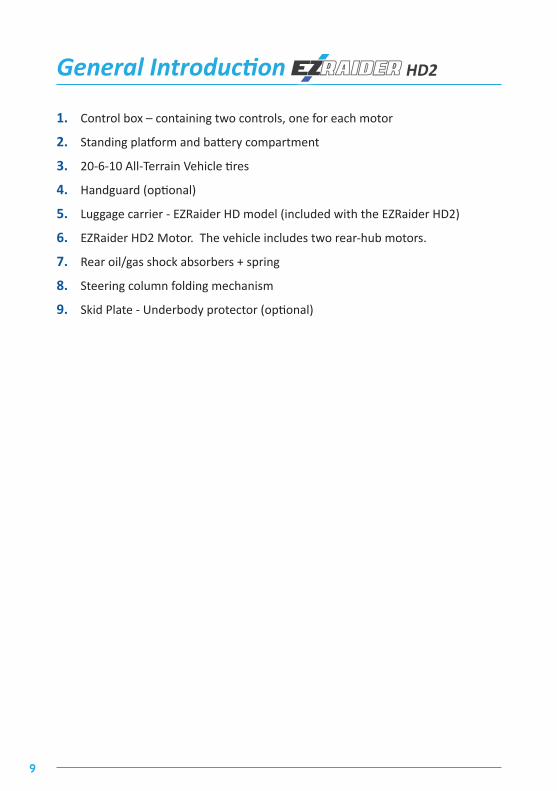
HD2General Introduction
1. Control box – containing two controls, one for each motor
2. Standing platform and battery compartment
3. 20-6-10 All-Terrain Vehicle tires
4. Handguard (optional)
5. Luggage carrier - EZRaider HD model (included with the EZRaider HD2)
6. EZRaider HD2 Motor. The vehicle includes two rear-hub motors.
7. Rear oil/gas shock absorbers + spring
8. Steering column folding mechanism
9. Skid Plate - Underbody protector (optional)
10
HD4
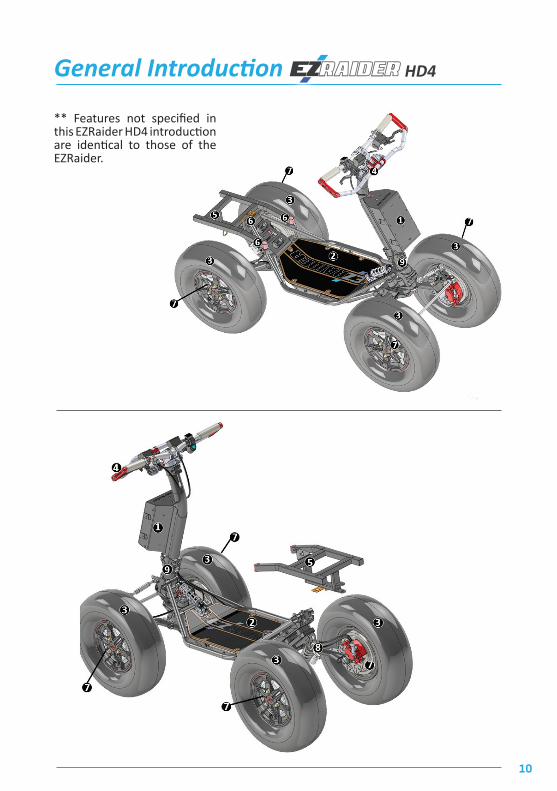
** Features not specified in this EZRaider HD4 introduction are identical to those of the EZRaider.
General Introduction

11
HD4General Introduction
1. Control box – containing four controls, one for each motor
2. Standing platform and battery compartment
3. 22-7-10 All-Terrain Vehicle tires
4. Handguard (optional)
5. Luggage carrier - EZRaider HD model (included with the EZRaider HD4)
6. Connection point with the EZRaider luggage carrier
7. EZRaider HD4 Motor. The vehicle includes four motors.
8. Rear oil/gas shock absorbers + spring
9. Steering column folding mechanism
10. Skid plate - Underbody protector (optional)
12
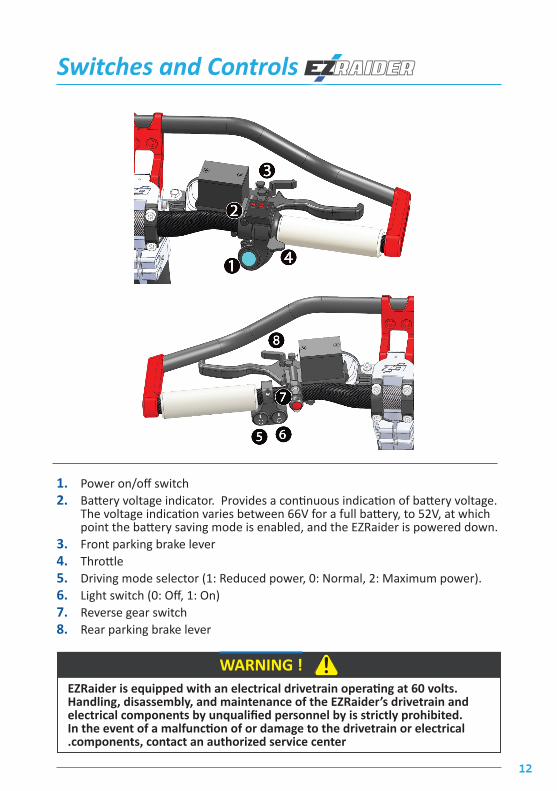
1. Power on/off switch2. Battery voltage indicator. Provides a continuous indication of battery voltage.
The voltage indication varies between 66V for a full battery, to 52V, at which point the battery saving mode is enabled, and the EZRaider is powered down.
3. Front parking brake lever4. Throttle5. Driving mode selector (1: Reduced power, 0: Normal, 2: Maximum power).6. Light switch (0: Off, 1: On)7. Reverse gear switch8. Rear parking brake lever
EZRaider is equipped with an electrical drivetrain operating at 60 volts. Handling, disassembly, and maintenance of the EZRaider’s drivetrain and electrical components by unqualified personnel by is strictly prohibited. In the event of a malfunction of or damage to the drivetrain or electrical.components, contact an authorized service center
WARNING !
Switches and Controls

13
Identifying the
Driving Safety Instructions
The EZRaider chassis number – which serves as a unique ID number for your vehicle – can be read from a number of locations on the vehicle:A sticker on the front of the chassisEngraved on the frame of the chassisAlways use this number when contacting the customer service department.
1. Read this User’s Manual thoroughly, including its safety instructions and warnings, before operating the EZRaider.
2. The EZRaider operator must be fit for driving. Driving the EZRaider is prohibited when under the influence of alcohol, drugs, or any other substance that inhibits the operator’s level of awareness.
3. In order to ensure the operator’s safety, the following protective equipment should be used: Protective helmet, protective glasses, riding gloves, elbow guards and knee pads.
4. Use of the EZRaider is restricted to persons aged 16 and up, and is subject to all relevant national and local regulations.
5. The operator should not suffer from restrictions in hand and finger movements, and should be able to stand in a stable manner.
6. Ensure that the handlebar-folding mechanism is locked and does not enable freedom of movement.
7. Check the planned route in advance to ensure that it is suited for use of the EZRaider.
8. Obey all rules, regulations, and road signs that apply to driving the EZRaider and to the travel route.
9. Driving speed must conform to terrain conditions.10. Avoid collisions with objects or other vehicles.11. While driving downhill the operator should slow the vehicle speed using
regenerative braking and the brake lever.12. Keep all parts of the body on the EZRaider while driving. Do not dismount the
EZRaider, or step one leg off the vehicle while it is in motion. The EZRaider should be dismounted only after it has reached a complete stop, the driver has applied the parking brake and has switched the power on/off switch to OFF.

14
Pre-ride Inspection
If a malfunction or suspicion of failure has been identified, the EZRaider should not be used until it has been repaired at an authorized service center.
A daily inspection prior to using the EZRaider will contribute to its proper functionality and driving safety.
1. General inspection. A visual inspection of the EZRaider, in order to identify a malfunction or potential point of failure.
2. Stickers. All the warning stickers should be intact and readable.3. Screws and nuts. Check all the visible screws and nuts. If you discover loose screws,
contact an authorized service center.4. Switches and controls. Check that the switches and controls are functioning properly.
Check the proper operation of the throttle, brake handle and parking brake. Check the proper function of the handlebar, turning the vehicle in both directions.
5. Cables and wiring. Check that the electrical wiring and control and brake cables are intact.
6. Steering. Make sure that the steering column is locked in an open state and that the folding lock mechanism is properly tightened.
7. Brakes. Check the soundness and functionality of the brakes. Make sure there is no leakage of hydraulic fluid from the braking system.
8. Standing platform. Check the integrity of the standing platform. Check that the anti-slip coating is properly bonded to the platform.
9. Chassis and suspension. Check integrity of the EZRaider chassis and the suspension components. Make sure there are no cracks or significant damage. Check the integrity of the suspension rubber supports.
10. Electrical system. Check that the headlights are undamaged and functioning properly. Check the functioning of the battery storage compartment and charge port. Check that the electrical wiring and control cables are intact, and that their shielding is not torn, frayed, or missing. Check that the electrical connectors are in proper working order.
11. Tires and wheels. Check that the tires are undamaged and that the air pressure conforms to the specifications in the table below.
WARNING !
Air Pressure Recommendations EZRaider EZRaider HD2 EZRaider HD4
Driving on paved roads PSI 8 PSI 6 PSI 6
Driving over rough terrain PSI 5 PSI 4 PSI 4
Minimal air pressure PSI 4 PSI 3 PSI 3
Air pressure during storage PSI 30 PSI 30 PSI 30
Use of the vehicle over rough terrain at low air pressure levels requires the injection of a.puncture-prevention substance inside the tires
.Note that driving on tires with low air pressure raises energy consumption levels

15
Driving
Driving in reverse is dangerous! Driving in reverse should be performed over minimal distances, at very slow speeds, and while paying attention to traffic safety!
WARNING !
1. Before use, make sure that the EZRaider is positioned on level ground, that the parking brake is engaged, and that there are no objects, animals or people in the vicinity of the vehicle that may be damaged or injured due to operation of the vehicle.
2. Grasp the EZRaider’s handlebar with both hands and stand on the standing platform, keeping your legs straight.
3. Turn the power on/off switch to ON.4. Check the battery voltage indicator to make sure that the battery voltage is
correct.5. Select the desired driving mode using the driving mode selector. It is
recommend to begin driving in mode 1 – reduced power mode. Use of this mode is the safest and provides the optimum operating range.
6. Gently rotate the throttle using your right thumb, start driving, and steer the EZRaider using the handlebar. Pull the right side of the handlebar toward your body in order to turn right. Pull the left side of the handlebar lever toward your body in order to turn left.
7. Braking: Releasing the throttle while in motion engages the regenerative braking function, which slows the EZRaider while charging the drivetrain battery. In order to come to a complete stop, pull the brake levers.
8. To stop the EZRaider while going uphill, release the throttle and pull and hold the brake lever at that position. Do not stop by applying constant pressure on the throttle!
9. In order to drive in reverse, stand in place and press the reverse switch while rotating the throttle.
1. If the handlebar-folding mechanism was used, make sure to tighten the mechanism after the first 500 meters of the ride.
2. Following use, make sure that the EZRaider is positioned on level ground. Lock the parking brake, turn the power on/off switch should be turned to OFF, and dismount the standing platform carefully.

16
IMPORTANT It is highly recommended to wear a helmet and other protective devices when riding the vehicle.
While driving, hold the handlebar with both hands. Do not drive with only one hand on the handlebar!Drive carefully when starting the drive from standstill. The throttle lever should be operated gently!Releasing the brake when the throttle is engaged may cause you to lose control of the vehicle.The handlebar rotation speed should be in a reverse ratio to the driving speed. While driving fast in a straight line, the handlebar should be turned very gently. Fast rotation of the handlebar in these conditions can result in a loss of control loss and cause the vehicle to roll over!Do not drive the vehicle in water deeper than 15 centimeters (6 inches). Driving in water deeper than 15 centimeters (6 inches) will expose the electrical system to water and cause irreparable damage to the vehicle.In wet and muddy conditions, the braking system performance is impaired. When a decrease in braking performance is felt, the brake lever should be used a few times to dry the brakes. Avoid driving at high speeds.Mud on the standing platform may cause the operator to slip and lose control. Do not drive when the standing platform is covered in mud!Be careful not to rotate the throttle if a motor is not turning due to overloading of the vehicle. In such a scenario, release the throttle immediately, reduce the load on the motor, and only then, resume driving. Failure to observe these instructions will cause irreparable damage to the vehicle.
WARNING !
17
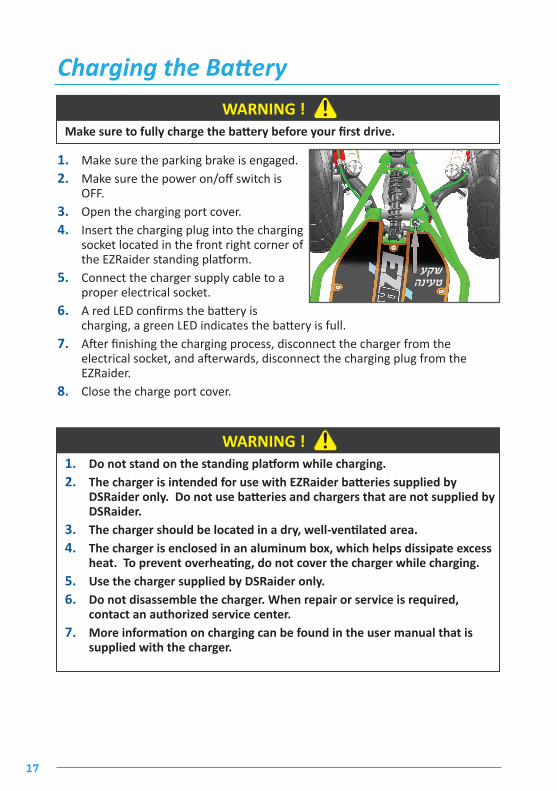
שקע טעינה
Make sure to fully charge the battery before your first drive.
1. Do not stand on the standing platform while charging.2. The charger is intended for use with EZRaider batteries supplied by
DSRaider only. Do not use batteries and chargers that are not supplied by DSRaider.
3. The charger should be located in a dry, well-ventilated area.4. The charger is enclosed in an aluminum box, which helps dissipate excess
heat. To prevent overheating, do not cover the charger while charging.5. Use the charger supplied by DSRaider only.6. Do not disassemble the charger. When repair or service is required,
contact an authorized service center.7. More information on charging can be found in the user manual that is
supplied with the charger.
WARNING !
WARNING !
Charging the Battery
1. Make sure the parking brake is engaged.2. Make sure the power on/off switch is
OFF.3. Open the charging port cover.4. Insert the charging plug into the charging
socket located in the front right corner of the EZRaider standing platform.
5. Connect the charger supply cable to a proper electrical socket.
6. A red LED confirms the battery is charging, a green LED indicates the battery is full.
7. After finishing the charging process, disconnect the charger from the electrical socket, and afterwards, disconnect the charging plug from the EZRaider.
8. Close the charge port cover.

18
Towing
Transport
Storage
The EZRaider is optionally supplied with the EZRaider Cart, which is used for towing.
See the chapter, EZRaider Cart, for a complete guide to the use of the cart.
Only towing accessories from DSRaider may be used with the EZRaider. Do not attempt to attach any cart to the vehicle other than the EZRaider Cart.
1. Use towing accessories from DSRaider only.2. When towing, do not exceed the maximum load weight as specified in
the chapter, EZRaider Cart.3. When towing, drive slowly and carefully.4. Drive carefully when towing downhill. If driving speed increases,
releasing the throttle to engage the regenerative braking function, which slows the EZRaider while charging the drivetrain battery. If driving speed continues to increase, pull the brake levers in order to slow the vehicle.
1. When the handlebar is folded, make sure that the switches and controls are protected from damage.
2. If the EZRaider is being transported in rainy weather conditions, make sure that the EZRaider is protected from the rain.
3. After transporting the EZRaider with its handlebar folded, press several times on the brake handles in order to release air from the braking system.
4. When operating the vehicle after transport, tighten the handlebar-folding mechanism.
1. Make sure the EZRaider is stored in a dry, well-ventilated place.2. The vehicle’s battery should be charged before storage.3. When storing the vehicle for an extended period of time, the battery should
be charged once every 6 months.4. The vehicle’s tires should be inflated to maximum pressure in accordance
with the air-pressure table in the section, Pre-ride Inspection.
WARNING !
WARNING !
19
Cleaning
Maintenance
• Water pressure streams can be used to clean heavy dirt from the EZRaider. The nozzle of the water hose should be at least 1.5 meters from the vehicle The water pressure used should be 150 bar or less. Avoid streaming water on the electrical cables and connection, and on the switches and controls on the handlebars.
1. Do not allow water to come in contact with the EZRaider motor, as this will lead to cancellation of the warranty!
2. Use water only to clean the vehicle. Cleaning detergents and chemicals may cause corrosion and color change.
1. All maintenance work should be performed while the power on/off switch is in the OFF position.
2. All maintenance work should be performed while the EZRaider is hoisted on a jack or lift, and the vehicle’s wheels are not in contact with the ground.
3. All maintenance work, other than the procedures specified in the table below, must be performed at an authorized service center.
4. If malfunctions are found during the maintenance work, they must be repaired at an authorized service center.
1. Turn the power on/off switch to OFF.2. Remove dust, dirt and mud using a gentle dry brush.3. Use a soft cloth, or a slightly damp sponge to clean the EZRaider. 4. Wipe the EZRaider with a soft, wet cloth, dipped in clean water.5. Dry the EZRaider using a soft, dry cloth.
Routine maintenance is required in order to maintain EZRaider’s safety and proper function. Follow the manufacturer-approved maintenance program, detailed in the table below, to achieve maximum performance and product lifetime.
NOTE
WARNING !
WARNING !

20
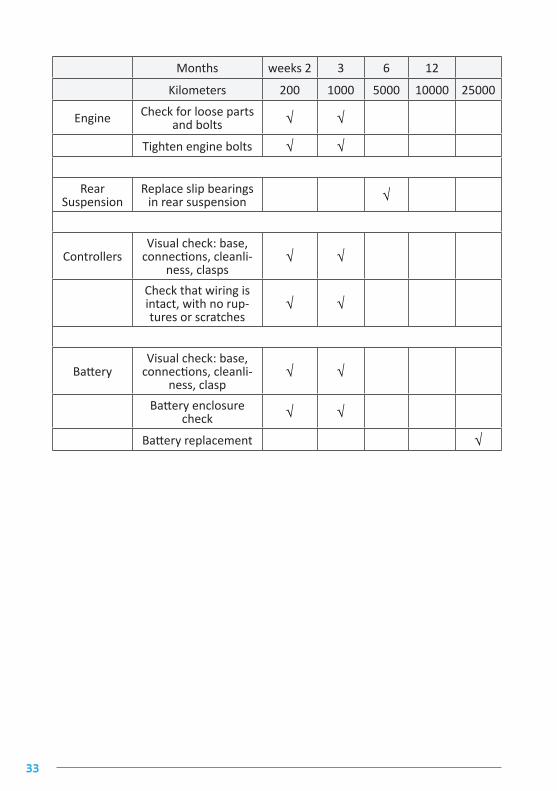
Months weeks 2 3 6 12
Kilometers 200 1,000 5,000 10,000 25,000
Engine Check for loose parts and bolts √ √Tighten engine bolts √ √
SteeringCheck for loose parts √ √
Check steering alignment √ √ Check for loose parts in front-wheel
hub bearings √ √
FrontSuspension Visual check of rubber bushings √ √
Visual check of rubber bushing bolt √ √ Check for loose parts in bottom axle
of front suspension √ √
Replace slip bearings in front suspen-sion √
RearSuspension Visual check of rubber bushings √ √
Visual check of rubber bushing bolt √ √Replace slip bearings in rear suspen-
sion √
Controllers Visual check: base, connections,cleanliness √ √
Check that wiring is intact, with noruptures or scratches √ √
Battery Visual check: base, connections,cleanliness, clasp √
Battery enclosure check √ √Battery replacement √
Maintenance

21
Troubleshooting
1. Do not detach the standing platform. Platform detachment should be performed an authorized service center only!
2. Do not disassemble the switches.3. Any action performed by the customer that is not specified in the table
below will lead to cancellation of the warranty!
WARNING !
The following table provides instructions for troubleshooting and repairing the EZRaider.
IMPORTANT
In case of any malfunction or fault that does not appear in the table, or that impacts user safety, contact an authorized service center, or contact our customer service department at [email protected].
# Problem Possible cause Repair
1 EZRaider does not drivewhen throttle is rotated
Power on/off switch is set to OFF Rotate the power on/off switch to.ON
Battery is not charged .Charge batteryParking brake is locked .Release parking brake lock
2 Choppy ride Battery depleted .Charge battery
3 Performance decrease whiledriving under heavy load
Controller / engineOverheating
Stop. Power down the EZRaider. Allow systems to cool down for 10
.minutes
4 Unstable rideFlat or leaky tire .Repair the tire
Incorrect tire pressure Inflate the tire to the indicated air.pressure
5 Parking lever is engaged butEZRaider does not stop Braking system malfunction .Contact the service center
!Do not use the vehicle
6EZRaider does not slow
down as usual when releas-ing the throttle
Controller malfunction .Contact the service center
Throttle stuck in FULL mode .Grasp both brake levers firmly
Release the front brake lever and rotate the power on/off switch to
.OFF
7 Brake noise during riding Foreign object caught betweenbrake pad and rotor .Release the foreign object
8 EZRaider does not ride inreverse Safety mechanism is active Release the throttle, stop in place,
.and try again
9 Lights do not operateSwitch malfunction .Turn lights off and back on again
Electrical system malfunction .Check integrity of wiring
In the event of a malfunction that prevents use of the vehicle or does not appear in the table, contact an authorized service center.

22
EZRaider Cart User Manual
Congratulations on your purchase of the EZRaider Cart from DSRaider.
DSRaider offers two cart models that are attached to the EZRaider and are used for towing:
Cart. Connects to the EZRaider and can tow loads of up to 150 kilograms.
E-Cart. Features two integrated electric motors, a dedicated battery, and an ex-clusive control interface with the EZRaider. The E-Cart can tow loads of up to 250 kilograms.
NOTE
The above mentioned load capacities are for optimal riding conditions. Capacities will be lower in accordance with field conditions.

23
Cart - General Introduction
1. Towing point2. Payload tying points3. Payload platform4. Carriage shaft height adjustment point5. 20-6-10 All-Terrain Vehicle tires6. Wheel rim 7. Sticker with chassis number

24
E-Cart - General Introduction
1. Towing point2. Payload tying points3. Battery voltage indicator4. Charging inlet 5. Battery compartment, 1750/3000 watt battery, two controllers6. Carriage shaft height adjustment point7. Control cable anchoring point8. 1500 watt motor9. Wheel rim10. 22-7-10 All-Terrain Vehicle tires11. Sticker with chassis number12. Payload platform

25
Identifying the Cart
The E-Cart is equipped with an electrical drivetrain operating at 60 volts. Handling, disassembly, and maintenance of the EZRaider’s drivetrain and electrical components by unqualified personnel by is strictly prohibited. In the event of a malfunction of or damage to the drivetrain or electrical components, contact an authorized service center.
WARNING !
Battery voltage indicator
The battery voltage indicator provides a continuous indication of battery voltage. The voltage indication varies between 66V for a full battery, to 52V, at which point the battery saving mode is enabled, and the EZRaider is powered down.
IMPORTANT
Any modifications to the cart structure will immediately void the product warranty.
The Cart/E-Cart chassis number – which serves as an ID number for the cart – can be read from a sticker on the front of the chassis, on the right-hand side. Always use this number when contacting the customer service department.

26
Cart Use Safety Instructions
NOTE
The following safety instructions are valid for all EZRaider Cart models.
1. Read this User’s Manual thoroughly, including its safety instructions and warnings, before operating the cart.
2. Use of the cart is restricted to persons aged 16 and up.3. Before towing, make sure that the cart is functioning correctly and that there
are no loose parts, cracks, or damage that will affect the performance of the cart.
4. The materials towed in the cart should be securely fastened to the cart in order to ensure that they will not come loose when riding.
5. Check the planned route in advance to ensure that it is suited for use of the EZRaider and Cart.
6. The operator of the EZRaider and Cart must be fit for driving. Driving the EZRaider and Cart is prohibited when under the influence of alcohol, drugs, or any other substance which inhibits the operator’s level of awareness.
7. Do not use the cart at first to tow heavy loads over difficult terrain. Begin with an empty cart at low speeds on an easy terrain, then increase loads and speed incrementally as you gain experience in use of the cart.
8. Obey all rules, regulations, and road signs that apply to driving the EZRaider and Cart.
9. Driving speed must conform to terrain conditions.10. Avoid collisions with objects or other vehicles.11. Reduce driving speed when using the cart, and be alert regarding changing
terrain conditions.12. While driving downhill the operator should slow the vehicle speed using
regenerative braking and the brake lever.13. Keep all parts of the body on the EZRaider while driving. Do not dismount the
EZRaider, or step one leg off the vehicle while it is in motion. The EZRaider should be dismounted only after it has reached a complete stop, the driver has applied the parking brake and has switched the power on/off switch to OFF.

27
Pre-ride Inspection
If a malfunction or suspicion of failure has been identified, the cart should not be used until it has been repaired at an authorized service center.
Make sure that the cart is loaded correctly – the payload should be distributed as follows: * 40% of the payload weight before the axle * 60% of the payload weight after the axle * between 5 and 50 kilograms at the towing point
WARNING !
WARNING !
A daily inspection prior to using the cart will contribute to its proper functionality and driving safety.
1. General check. A visual inspection of the cart, in order to identify a malfunction or potential point of failure.
2. Stickers. All the warning stickers should be intact and readable.3. Screws and nuts. Check all the visible screws and nuts. Tighten loose screws
as required.4. Payload platform. Check that the payload platform is undamaged, and that
the payload materials are securely fastened to the platform.5. Chassis and rack. Check the soundness of the cart’s chassis and suspension
components. Ensure that there are no cracks or significant damage.6. Interfaces. Check the points of interface between the EZRaider and the cart.
Make sure that the cart maneuvers freely and that the security pin is locked in place.
7. Tires and wheels. Check that the tires are undamaged and that the air pressure conforms to the specifications in the table below.
Driving on paved roads PSI 6Driving over rough terrain PSI 4Minimal air pressure PSI 3)Maximal air pressure )for storage and transport PSI 30Use of the cart over rough terrain at low air pressure levels requires the injec-.tion of a puncture-prevention substance inside the tires Note that driving on tires with low air pressure raises energy consumption.levels

28
שקע פיקוד
צג מתח סוללה
שקע מתח חשמלי 2 פיניםשקע טעינה
E-Cart Inspection
1. intact, and that their shielding is not torn, frayed, or missing. Check the soundness of the electrical wiring and control cables that connect the EZRaider and the E-Cart as well.
2. Electrical system. Check the functioning of the battery storage compartment, high-voltage outlet, control outlet, and electrical connectors.
To establish connectivity between the EZRaider and the E-Cart.
1. Cables and wiring. Check that the electrical wiring and control cables are Make sure that the power on/off switch of the EZRaider is set to OFF.
2. Connect the power cable from the E-Cart to the EZRaider’s 2-pin power connector.
3. Connect the control cable E-Cart to the EZRaider’s control outlet.4. Check that the cart’s display is functioning correctly5. Perform a short test ride with no payload in the cart.
To disconnect the EZRaider and the E-Cart.
1. Make sure that the power on/off switch of the EZRaider is set to OFF.2. Disconnect the E-Cart power cable from the EZRaider’s 2-pin electrical power
outlet.3. Disconnect the E-Cart control cable from the EZRaider’s control outlet.4. Detach the E-Cart from the EZRaider.
NOTE
When connecting the E-Cart to the EZRaider, make sure that the voltage differ-ential between the battery voltage of the E-Cart and the battery voltage of the EZRaider does not exceed 6 volts. A differential greater than 6 volts may cause damage to the batteries.
29
Driving the EZRaider with the Cart
1. Make sure that the cart’s payload is properly tied to the cart, so that it will not come loose while driving.
2. When the cart is attached, reduce driving speed by at least 40%3. When driving with the cart, begin by performing a test drive with an empty
cart, and make sure the vehicle and cart are operating properly. Then perform a test while driving in reverse.
4. Note that the turn radius increases when driving with the cart. Plan your route accordingly.
5. Note that the cart is wider than the EZRaider. This should be taken into account when planning your route through narrow passages.
• Drive carefully when starting the drive from standstill. The throttle lever should be operated gently!
• In wet and muddy conditions, the braking system performance is impaired. When a decrease in braking performance is felt, the brake lever should be used a few times to dry the brakes. Avoid driving at high speeds.
• Do not drive in water deeper than 15 centimeters (6 inches). Driving in water deeper than 15 centimeters (6 inches) will expose the electrical system to water and cause irreparable damage to the E-Cart.
• Be careful not to rotate the throttle if a motor is not turning due to overloading of the vehicle. In such a scenario, release the throttle immediately, reduce the load on the motor, and only then, resume driving. Failure to observe these instructions will cause irreparable damage to the E-Cart.
WARNING !

30
שקע טעינה
Charging the E-Cart Battery
• Do not load materials on the E-Cart during charging.• The charger is intended for use with EZRaider batteries supplied by
DSRaider only. Do not use batteries and chargers that are not supplied by DSRaider.
• The charger should be located in a dry, well-ventilated area.• The charger is enclosed in an aluminum box, which helps dissipate excess
heat. To prevent overheating, do not cover the charger while charging.• Use the charger supplied by DSRaider only.• Do not disassemble the charger. When repair or service is required, contact
an authorized service center.• More information on charging can be found in the user manual that is
supplied with the charger.
WARNING !
1. Make sure the E-Cart is parked on level ground.2. Make sure the electric and control cables between the EZRaider and the E-Cart
are disconnected.3. Open the charging port cover.4. Insert the charging plug into the charging socket located on the front of the
E-Cart, on the left-hand side.5. Connect the charger supply cable to a proper electrical socket.6. A red LED confirms the battery is charging, a green LED indicates the battery is
full.7. After finishing the charging process, disconnect the charger from the electrical
socket, and afterwards, disconnect the charging plug from the E-Cart.8. Close the charge port cover.

31
Towing
Storage
• Use towing accessories from DSRaider only.
• When towing, drive slowly and carefully.
• Drive carefully when towing downhill. If driving speed increases, releasing the throttle to engage the regenerative braking function, which slows the EZRaider while charging the drivetrain battery. If driving speed continues to increase, pull the brake levers in order to slow the vehicle.
WARNING !
IMPORTANT
The cart should be towed exclusively by the EZRaider. Do not attempt to attach any cart to the vehicle other than the EZRaider.
1. Make sure the cart is stored in a dry, well-ventilated place.2. The cart’s battery should be charged before storage.3. When storing the cart for an extended period of time, the battery should be
charged once every 6 months.4. The cart’s tires should be filled to maximum pressure (30 PSI).

32
Cleaning
Maintenance
1. Turn the power on/off switch to OFF.2. Remove dust, dirt and mud using a gentle dry brush.3. Use a soft cloth, or a slightly damp sponge to clean the cart. 4. Wipe the cart with a soft, wet cloth, dipped in clean water.5. Dry the cart using a soft, dry cloth.
Routine maintenance is required in order to maintain the cart’s safety and proper function. Follow the manufacturer-approved maintenance program, detailed in the table below, to achieve maximum performance and product lifetime.
NOTEWater pressure streams can be used to clean heavy dirt from the EZRaider. * The nozzle of the water hose should be at least 1.5 meters from the vehicle. * The water pressure used should be 150 bar or less. * Avoid streaming water on the electrical cables and connection, and on the switches and controls on the handlebars.
• Do not allow water to come in contact with the E-Cart’s, as this will lead to cancellation of the warranty!
• Use water only to clean the vehicle. Cleaning detergents and chemicals may cause corrosion and color change.
• All maintenance work should be performed while the cart is disconnected from the EZRaider.
• All maintenance work should be performed while the cart is hoisted on a jack or lift, and the vehicle’s wheels are not in contact with the ground.
• All maintenance work, other than the procedures specified in the table below, must be performed at an authorized service center.
• If malfunctions are found during the maintenance work, they must be repaired at an authorized service center. Do not use the cart again until the malfunction has been repaired.
WARNING !
WARNING !
33
Months weeks 2 3 6 12
Kilometers 200 1000 5000 10000 25000
Engine Check for loose partsand bolts √ √
Tighten engine bolts √ √
RearSuspension
Replace slip bearings in rear suspension √
Controllers Visual check: base,connections, cleanli-
ness, clasps√ √
Check that wiring isintact, with no rup-tures or scratches
√ √
Battery Visual check: base,connections, cleanli-
ness, clasp√ √
Battery enclosurecheck √ √
Battery replacement √

34
TroubleshootingThe following table provides instructions for troubleshooting and repairing the EZRaider Cart.
IMPORTANTIn case of any malfunction or fault that does not appear in the table, or that impacts user safety, contact an authorized service center, or contact our customer service department at [email protected].
• Do not attempt to disassemble the E-Cart’s battery compartment. The compartments should be opened at an authorized service center only!
• Any action performed by the customer that is not specified in the table below will lead to cancellation of the warranty!
In the event of a malfunction that prevents use of the vehicle or does not appear in the table, contact an authorized service center.
WARNING !
# Problem Possible cause Repair1 E-Cart does not drive when throttle
is rotatedPower on/off switch is set to OFF .Rotate the power on/off switch to ON
Battery is not charged .Charge batteryParking brake is locked .Release parking brake lock
Power cable is not connected tothe EZRaider
.Connect the power cable to the EZRaider
Control cable is not connected tothe EZRaider
.Connect the control cable to the EZRaider
The control cable shielding is torn, frayed, or missing
.Contact an authorized service center
2 Choppy ride Battery depleted .Charge battery The power cable or control cableshielding is torn, frayed, or missing
.Contact an authorized service center
3 Performance decrease while drivingunder heavy load
Controller / engine overheating Stop. Power down the E-Cart. Allow systems.to cool down for 10 minutes
4 Unstable ride Flat or leaky tire .Repair the tireIncorrect tire pressure .Inflate the tire to the indicated air pressure
6 E-Cart does not slow down as usualwhen releasing the throttle
Controller malfunction .Contact the service center
7 Brake noise during riding Foreign object caught betweenbrake pad and rotor
.Release the foreign object
8 EZRaider does not ride in reverse Safety mechanism is active Release the throttle, stop in place, and try.again
Control cable is not connected tothe EZRaider
.Connect the control cable to the EZRaider

35
Accessories
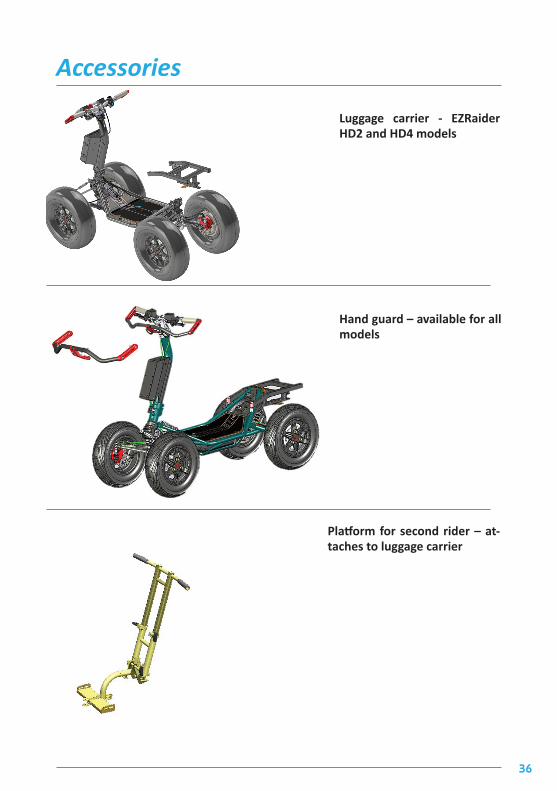
Luggage carrier - EZRaider model
Underbody protector
Driver seat
36
Luggage carrier - EZRaider HD2 and HD4 models
Hand guard – available for all models
Accessories
Platform for second rider – at-taches to luggage carrier

Doc# : 10MRM001 | Rev# : 2LTD