
User Manualbiomaxsecurity.com/product_manual/X990 manual - BioMax.pdf3.1.3 modif ing the user role...
59
User Manual Applicable Model : X990 www.biomaxsecurity.com
Transcript of User Manualbiomaxsecurity.com/product_manual/X990 manual - BioMax.pdf3.1.3 modif ing the user role...

User Manual
Applicable Model : X990
www.biomaxsecurity.com
ImportantImportantImportantImportant ClaimClaimClaimClaim
Firstly thank you for purchasing this facial and fingerprint hybrid terminal, before use, please read this manual
carefully to avoid the unnecessary damage! The company reminds you that the proper user will improve the use
affect and authentication speed.
No written consent by our company, any unit or individual isn't allowed to excerpt, copy the content of this manual
in part or in full, also spread in any form.
The product described in the manual maybe includes the software which copyrights are shared by the licensors
including our company, Except for the permission of the relevant holder, any person can't copy, distribute, revise,
modify, extract, decompile, disassemble, decrypt, reverse engineering, leasing, transfer, sub-license the software,
other acts of copyright infringement, but the limitations applied to the law is excluded.
Due to the constant renewal of products, the company can not undertake the actual product in
consistence with the information in the document, also any dispute caused by the difference between the
actual technical parameters and the information in this document. Please forgive any change without notice.
AboutAboutAboutAbout ThisThisThisThis ManualManualManualManual
This document describes the functions and operations of the new firmware of the 3/3.5-inch color screen.
AboutAboutAboutAbout thisthisthisthis manualmanualmanualmanual
� Not all the devices have the function with �.The real product prevails.
� The photograph in this manual may be different from that of the real product. The real product prevails.

I
1 Instruction for Use.................................................................................................................................................................1
1.1 Finger Placement.......................................................................................................................................................1
1.2 Verification Modes..................................................................................................................................................... 1
1.2.1 1: N Fingerprint Verification...........................................................................................................................1
1.2.2 1:1 fingerprint verification...............................................................................................................................1
1.2.3 Password Verification.....................................................................................................................................2
1.2.4 ID Card Verification�.....................................................................................................................................2
2 Main Menu............................................................................................................................................................................. 4
3. User Management............................................................................................................................................................... 6
3.1. Adding a User............................................................................................................................................................6
3.1.1 Entering a User ID.......................................................................................................................................... 6
3.1.2 Entering a Name.............................................................................................................................................6
3.1.3 modifing the user role.....................................................................................................................................7
3.1.4 Enrolling a Fingerprint....................................................................................................................................7
3.1.5 Enrolling an ID Card �.................................................................................................................................. 8
3.1.6 Enrolling a Password......................................................................................................................................8
3.1.7 Enroll Photo�..................................................................................................................................................8
3.1.8 Access Control Role.......................................................................................................................................8
3.2 Query a User in All User........................................................................................................................................... 9
3.2.1 Query by User ID and Name.......................................................................................................................10
3.2.2 Edit and delete a User................................................................................................................................. 10
3.3 Display Style.............................................................................................................................................................11
4 User Role............................................................................................................................................................................. 12
5 Access Control Setting�................................................................................................................................................... 13
5.1 Access Control Options.......................................................................................................................................... 13
5.2 Time Schedle........................................................................................................................................................... 14
5.3 Holiday setting..........................................................................................................................................................14
To check the effective time period of a holiday, enter numbers and.............................................................................. 15
5.4Access Groups..........................................................................................................................................................16
5.5 Set Combined Verification......................................................................................................................................17
5.6 anti-pass back.......................................................................................................................................................... 18
5.7 Duress alarm parameter.........................................................................................................................................18
6 IC Card management�......................................................................................................................................................19
6.1 Enroll as ID............................................................................................................................................................... 19
6.2 Enroll as Fingerprint Card.......................................................................................................................................20
6.3 Clear card information.............................................................................................................................................20
6.4 Copy card information.............................................................................................................................................21
6.5 Set card parameter value....................................................................................................................................... 22
7 Communication Setting......................................................................................................................................................23
7.1 Ethernet.....................................................................................................................................................................23
7.2 Serial Comm�......................................................................................................................................................... 23
7.3 PC Connection.........................................................................................................................................................24
7.4 Cellular Data Network�..........................................................................................................................................24
7.5 Wireless Network�................................................................................................................................................. 25
contents

User Manual for New Firmware of the 3-inch Color Screen
II
7.6 ADMS�.....................................................................................................................................................................26
7.7 Wiegand option�.....................................................................................................................................................27
7.7.1 Wiegand IN....................................................................................................................................................27
7.7.2 Wiegand OUT............................................................................................................................................... 27
8 System..................................................................................................................................................................................29
8.1 Date/Time................................................................................................................................................................. 29
8.2 Attendance................................................................................................................................................................30
8.3 Fingerprint.................................................................................................................................................................31
8.4 Reset......................................................................................................................................................................... 32
8.5 USB Upgrade........................................................................................................................................................... 32
9 Personalize.......................................................................................................................................................................... 33
9.1 User Interface...........................................................................................................................................................33
9.2 Voice..........................................................................................................................................................................34
9.3 Bell Schedules......................................................................................................................................................... 34
9.4 Punch State Options............................................................................................................................................... 36
9.5 Shortcut Key Mappings...........................................................................................................................................36
10 Data Manager....................................................................................................................................................................37
10.1 Delete Data.............................................................................................................................................................37
10.2Backup Data............................................................................................................................................................38
10.3 Restore Data.......................................................................................................................................................... 38
11 USB Manager....................................................................................................................................................................40
11.1 Download................................................................................................................................................................40
11.2 Uplad....................................................................................................................................................................... 40
11.3 Download Options................................................................................................................................................. 41
12 Attendance Search...........................................................................................................................................................42
13 Print�.................................................................................................................................................................................43
14 SMS....................................................................................................................................................................................44
14.1 Add a SMS............................................................................................................................................................. 44
14.2 Public, Personal and Drafts lists..........................................................................................................................45
14.3 Message Options...................................................................................................................................................45
14.4 Employee check SMS...........................................................................................................................................45
15 Work Code�..................................................................................................................................................................... 47
15.1 Add a work code....................................................................................................................................................47
15.2 All Work Codes...................................................................................................................................................... 47
15.3 Set work code........................................................................................................................................................ 48
16 Auto Test............................................................................................................................................................................49
17 System Information...........................................................................................................................................................50
Appendix..................................................................................................................................................................................51
Appendix 1 Description of Text Input Operation�.....................................................................................................51
Appendix 2 Image Upload Rules..................................................................................................................................51
Appendix 3 Print function�...........................................................................................................................................52
Appendix 4 anti-pass back�........................................................................................................................................ 53
Statement on Human Rights and Privacy...................................................................................................................56
Environment-Friendly Use Description........................................................................................................................57

1 Instruction for Use
1
1111 InstructionInstructionInstructionInstruction forforforfor UseUseUseUse
1.1.1.1.1111 FingerFingerFingerFinger PlacementPlacementPlacementPlacement
RecommendedRecommendedRecommendedRecommended fingersfingersfingersfingers: The index finger, middle finger or the ring finger; the thumb and little finger are not
recommended (because they are usually clumsy on the fingerprint collection screen).
1) Proper finger placement:
2) Improper finger placement:
SlantingSlantingSlantingSlanting Off-centerOff-centerOff-centerOff-center
NotNotNotNot flatflatflatflat totototo thethethethe surfacesurfacesurfacesurface Off-centerOff-centerOff-centerOff-center
1.1.1.1.2222 VerificationVerificationVerificationVerification ModesModesModesModes
1.1.1.1.2222.1.1.1.1 1111:::: NNNN FingerprintFingerprintFingerprintFingerprint VerificationVerificationVerificationVerification
The terminal compares current fingerprint collected by the fingerprint collector with all fingerprint data on the
terminal.
Press your finger on the fingerprint collector by adopting the proper finger placement. For details, see 1.1.1.1.1111 FingerFingerFingerFinger
PlacementPlacementPlacementPlacement.
When verification successful, aninterface shown above.
When verification failed, an interfaceshown above.
1111.2.2.2.2.2.2.2.2 1111:1:1:1:1 fingerprintfingerprintfingerprintfingerprint verificationverificationverificationverification
In the 1:1 fingerprint verification mode, the terminal compares current fingerprint collected through the fingerprint
collector with that in relation to the user ID entered through keyboard. Adopt this mode only when it is difficult to
TheTheTheThe fingerfingerfingerfinger isisisis flatflatflatflat totototo thethethethe surfacesurfacesurfacesurface
andandandand centeredcenteredcenteredcentered inininin fingeredfingeredfingeredfingered guide.guide.guide.guide.

User Manual for New Firmware of the 3-inch Color Screen
2
recognize the fingerprint.
Enter the user ID using keypadon the initial interface. Then pressOK. Place the enrolled fingerproperly on the fingerprint sensor.
When verification successful, aninterface shown above.
When verification failed, an interfaceshown above.
NotesNotesNotesNotes:
1.If it says that the enroll number is wrong, it means that there is no such number or the employee doesn't enroll
password.
2.If the device says "Please press again", place the finger on the fingerprint sensor again. You can try another 2
times by default. The repeated times can be set in 8.3 Fingerprint option.... If it fails after 2 times, return Step 1 for
second operation.
1.2.31.2.31.2.31.2.3 PasswordPasswordPasswordPassword VerificationVerificationVerificationVerification
In the password verification mode, the terminal compares the password entered with that in relation to the user ID.
Enter the user ID using keypad onthe initial interface. Then press OKOKOKOK.
Enter password and press OKOKOKOK. When verification successful, aninterface shown above.
When verification failed, an interfaceshown above.NotesNotesNotesNotes:
If the device says "Invalid ID", enter the password again. You can try another 2 times by default. The repeated
times can be set in 8.3 Fingerprint option. If it fails after 2 times, return Step 1 for second operation.
1.2.41.2.41.2.41.2.4 IDIDIDID CardCardCardCard VerificationVerificationVerificationVerification����
Only the products with a built-in ID card module support the ID card verification. The products with a built-in ID card

1 Instruction for Use
3
module support the following two verification modes:
IDIDIDID CardCardCardCard OnlyOnlyOnlyOnly: Users only need to swipe their ID cards for verification.
IDIDIDID ++++ FFFFingeringeringeringer VerificationVerificationVerificationVerification: After passing the ID card verification, you also need to perform finger verification.
For the settings of these two verification modes, see 6.5 IC Card Settings.
1.1.1.1.IDIDIDID CardCardCardCard OnlyOnlyOnlyOnly
1)If you have your ID card number enrolled in the system, you can pass the verification by swiping your ID card at
the swiping area in a proper way.
If the verification is successful, aninterface as shown above.
If the verification is not successful, aninterface as shown shown above.
2.2.2.2.IDIDIDID ++++ FacialFacialFacialFacial VerificationVerificationVerificationVerification
Swipe your ID card properly atthe swiping area to enter the 1:1facial verification mode.
Place the enrolled finger properlyon the fingerprint sensor.
If the verification is successful, aninterface as shown above.

User Manual for New Firmware of the 3-inch Color Screen
4
2222 MainMainMainMain MenuMenuMenuMenu
When the device is on initial interface, press to open main menumenumenumenu, as shown below:
UserUserUserUserssss: Through this submenu, you can browse the user information stored on the terminal, including the user ID,
name, user role, fingerprint, badge number, card, password, user photo, add, modify or delete the user
information.
UserUserUserUser RoleRoleRoleRole: used to set the rights of a user-defined role, that is, rights to menus.
AccessAccessAccessAccess ControlControlControlControl: Through this submenu, you can set the parameters of the electronic locks and related access
control devices.
ICCardICCardICCardICCard: Support Mifare non-touch intelligent card with working frequency of 13.56MHZ. Integrate fingerprint
attendance to other systems and support multi-verification mode to meet the demands of different people.
CCCCOMMOMMOMMOMM.... SettingsSettingsSettingsSettings: Through this submenu, you can set related parameters for communication between the terminal
and PC, including the IP address, Gateway, Subnet Mask, Baud Rate, Device ID and Comm Key and so on.
SystemSystemSystemSystem: Through this submenu, you can set system-related parameters, including the Date Time, Attendance,
Fingerprint, Camera, Reset and USB Upgrade, to enable the terminal to meet user requirements to the greatest
extent in terms of functions and display.
PersonalizePersonalizePersonalizePersonalize: used to meet user requirements to the greatest extent regarding display, audio, ringing, and
keyboard definition.
DataDataDataData MMMManageranageranageranager....: Through this submenu, you can perform management of data stored on the terminal, for example,
Delete Data, Backup Data and Restore Data.
USBUSBUSBUSB ManagerManagerManagerManager: Through this submenu, you can import user information and attendance data stored in a USB disk
to related software or other fingerprint recognition equipment.
AttendanceAttendanceAttendanceAttendance SearchSearchSearchSearch:::: For query the record saved in the device, query record function is provided.
Print:Print:Print:Print: used to determine whether to print attendance records immediately.
ShortShortShortShort MMMMessageessageessageessage: used to set a public or private short message. The short message will be displayed to a specified
person in the specified time after work attendance check, which facilitates information transfer.
WorkWorkWorkWork CodeCodeCodeCode: used to identify different work types, which facilitates work attendance check.
DiagnosticsDiagnosticsDiagnosticsDiagnostics: This submenu enables the system to automatically test whether functions of various modules are
normal, including the Screen, Fingerprint, Voice, Keyboard and Time.
SysSysSysSystemtemtemtem Info:Info:Info:Info: To check the current device capacity, device information and its firmware information.

2 Main Menu
5
MenuMenuMenuMenu TreeTreeTreeTree
U sers
New user
User Role
Access Control
IC Card
C O M M . Se ttings
S y s te m
Personalize
USB Manager
Data Manager
Attendance Search
Pr int
Short Message
All Users
Display Style
User Defined R o le
Time Schedule
H olidays
Access Groups
Combined Verification
Access Control O ptions
Duress Options
A nti-passback S e tup
Enroll as ID C a r d
Enroll as Fingerprint Card
Clean Card D a ta
Copy Card D a ta
IC Card O ptions
Enhernet
Ser ia l Comm.
PC Connection
Cellular Data N etw ork
Wireless N etw ork
A D M S
Wiegand Setup
Date Time
Attendance
Fingerprint
Camera
Reset
USB Upgrade
User Interface
V oice
Bell Schedules
Punch State O ptions
Shortcut Key Mappings
Delete Data
Backup Data
Restore DataD ow nload
U pload
Download O ptions
New Message
Public Messages
Personal Messages
Drafts
Message O ptions
Attendance Record
Attendance P ho to
Blacklist ATT P ho to
Data Field S e tup
Printer Options
W ork Code
Diagnostics
New Work C o d e
All Work C odes
Work Code O ptions
Test All
T est L CD
Test Voice
Test Keyboard
Test Fingerprint Sensor
Test Clock R T C
Device Capacity
Device Info
Firmware Info
System Info .

User Manual for New Firmware of the 3-inch Color Screen
6
3.3.3.3. UserUserUserUser ManagementManagementManagementManagement
Through this submenu, you can browse the user information stored on the terminal, including the user ID, name,
user role, fingerprint, badge number, card, password, user photo; add, modify or delete the user information. In
company's attendance management, for employee's change, the information on fingerprint sensor also needs
modification. Therefore, operations including "add, delete, check, modify and so on” can be done on fingerprint
sensor.
3.1.3.1.3.1.3.1. AddingAddingAddingAdding aaaa UserUserUserUser
Press on the initial interface. Select UsersUsersUsersUsers and press OKOKOKOK. Select NewNewNewNew UserUserUserUser and press OKOKOKOK.
3.1.13.1.13.1.13.1.1 EnteringEnteringEnteringEntering aaaa UserUserUserUser IDIDIDID
The terminal automatically allocates an ID starting from 1 for every user in sequence. If you use the ID allocated by
the terminal, you may skip this section.
Select UserUserUserUser IDIDIDID and press OKOKOKOK. Enter the user ID using keypad thenpress OKOKOKOK.
3.1.23.1.23.1.23.1.2 EnteringEnteringEnteringEntering aaaa NameNameNameName
Enter a user name through the keyboard.
Press▼to select NameNameNameName and pressOKOKOKOK.
Press **** to switch input method andenter the Name, then press OKOKOKOK.
TTTTip:ip:ip:ip: TheTheTheThe terminalterminalterminalterminal
supportssupportssupportssupports thethethethe 1-1-1-1- totototo 9-digit9-digit9-digit9-digit useruseruseruser
IDsIDsIDsIDs bybybyby default.default.default.default.
If a prompt message "The
user ID already exists!" is
displayed, enter another ID.
For details of operations on
keyboard interface, see Appendix1
TextTextTextText InputInputInputInput Instructions.Instructions.Instructions.Instructions.
TheTheTheThe terminalterminalterminalterminal supportssupportssupportssupports thethethethe 1-1-1-1-
totototo 23232323-character-character-character-character namesnamesnamesnames bybybyby
default.default.default.default.

3. User Management
7
3.1.33.1.33.1.33.1.3 modifmodifmodifmodifinginginging thethethethe useruseruseruser rolerolerolerole
Press▼ to select UserUserUserUser RoleRoleRoleRole andpress OKOKOKOK.
Press▼to select the rolerolerolerole and pressOKOKOKOK.
3.1.3.1.3.1.3.1.4444 EnrollingEnrollingEnrollingEnrolling aaaa FingerprintFingerprintFingerprintFingerprint
Press▼to select FingerprintFingerprintFingerprintFingerprint andpress OKOKOKOK.
Place your finger on the fingerprintsensor properly. For details, see1.1 Finger Placement.
Place the same finger on thefingerprint collector for threeconsecutive times correctly.
Enrollment succeeds. If the enrollmentfails, the system will display a promptmessage and return to the [EnrollFingerprint] interface. In this case, youneed to repeat the operations of step 2.
SuperSuperSuperSuper AdminAdminAdminAdmin: The super administrator has the operation rights to all menu functions.
NormalNormalNormalNormal useruseruseruser: If the system has an administrator, a common user is entitled only to authentication using his/her fingerprint,
password, or card. If the system does not have an administrator, a common user has the operation rights to all menu
functions.
UserUserUserUser DefinedDefinedDefinedDefined RoleRoleRoleRole: A user-defined role can be assigned some other menu functions in addition to the functions available
for a common user. (When logging in as a super administrator, you have the rights to assign menu functions to a
customized role.)

User Manual for New Firmware of the 3-inch Color Screen
8
3.1.3.1.3.1.3.1.5555 EnrollingEnrollingEnrollingEnrolling anananan IDIDIDID CardCardCardCard����
Press▼to select BadgeBadgeBadgeBadge NumberNumberNumberNumberand press OKOKOKOK.
Swipe your ID card properly in theswiping area.
Read Successfully!
3.1.63.1.63.1.63.1.6 EnrollingEnrollingEnrollingEnrolling aaaa PasswordPasswordPasswordPassword
Press▼to select PasswordPasswordPasswordPassword andpress OKOKOKOK.
Enter a password using keypadthen press OKOKOKOK.TheTheTheThe FFRFFRFFRFFR terminalterminalterminalterminal supportssupportssupportssupports thethethethe 1-1-1-1-totototo 8-digit8-digit8-digit8-digit passwordspasswordspasswordspasswords bybybyby default.default.default.default.
Re-enter the password according tothe system prompt and then pressOKOKOKOK.
3.1.73.1.73.1.73.1.7 EnrollEnrollEnrollEnroll PhotoPhotoPhotoPhoto����
If you have enrolled your photo in the system, the system will display your enrolled photo in addition to your ID and
name after you pass the verification.
Press▼to select UserUserUserUser PhotoPhotoPhotoPhoto andpress OKOKOKOK.
stand naturally in front of thescreen. Press OKOKOKOK
press ESC to directly return toprevious interface
3.1.83.1.83.1.83.1.8 AccessAccessAccessAccess ControlControlControlControl RoleRoleRoleRole
User access control option is to set open door access aimed at everybody, including subgroup setting, verification
mode, using time zone, duress fingerprint management.
AccessAccessAccessAccess group:group:group:group: Allocate enrolled user to different groups for management convenience.
VVVVerificationerificationerificationerification modemodemodemode:
1) Group verification type: Whether the user use his group's verification type

3. User Management
9
2) Individual verification type: Select the user's verification type. If group verification type is not used, others'
verification type won't be affected.
DuressDuressDuressDuress Fingerprint:Fingerprint:Fingerprint:Fingerprint: User enrolls a new fingerprint or specifies an enrolled fingerprint in the fingerprint sensor as
duress fingerprint. At any time anywhere, duress alarm will generate after the fingerprint passes verification.
ApplyApplyApplyApply GroupGroupGroupGroup TimeTimeTimeTime PeriodPeriodPeriodPeriod:
1) Select "ON", group time zone, the user use his group's default time zone
2) Select "OFF", set user unlocking time. If group time zone is not used, others' unlocking time won't be affected.
Press ▼ to select AccessAccessAccessAccessControlControlControlControl RoleRoleRoleRole and press OKOKOKOK.
Press OKOKOKOK enter to AccessAccessAccessAccess GroupGroupGroupGroupinterface
Enter the user group using keypadthen press OKOKOKOK to return.
Press ▼ to select verificationverificationverificationverificationmodemodemodemode and press OKOKOKOK.
Press ▼ to select verification typeand press OKOKOKOK.
Press ▼ to select DuressDuressDuressDuressFingerprintFingerprintFingerprintFingerprint and press OKOKOKOK.
Press / to select enrolledfingerprint and press OKOKOKOK.
Press ▼ to select ApplyApplyApplyApply GroupGroupGroupGroupTimeTimeTimeTime PeriodPeriodPeriodPeriod ,press OKOKOKOK to select toWhether the user use his group'sdefault time zone
When select "OFF",Press ▼ toselect TimeTimeTimeTime periodperiodperiodperiod 1111.
3.23.23.23.2 QueryQueryQueryQuery aaaa UserUserUserUser inininin AllAllAllAll UserUserUserUser
To facilitate administrators to locate a user quickly from a large number of enrolled users, the FFR terminal enables
user query by his/her "User ID" and "Name". (Location Search)

User Manual for New Firmware of the 3-inch Color Screen
10
Press on the initial interface. Select UsersUsersUsersUsers and press OKOKOKOK. Press ▼ to Select AllAllAllAll UserUserUserUser andpress OKOKOKOK.
3.2.13.2.13.2.13.2.1 QueryQueryQueryQuery bybybyby UserUserUserUser IDIDIDID andandandand NameNameNameName
Enter the user ID using keypad toquery to view all users.
The cursor to the user to be queried.
3.2.23.2.23.2.23.2.2 EditEditEditEdit andandandand ddddeleteeleteeleteelete aaaa UserUserUserUser
Press ▼ to select a UserUserUserUser andpress OKOKOKOK.
Press OKOKOKOK to enter User Infointerface.
The User ID cannot be modified,and the other operations are similarto those performed to add a user.
Press ▼ to select DeleteDeleteDeleteDelete andpress OKOKOKOK.
Press ▼ to select item need deleteand press OKOKOKOK.
Other user-defined
administrators are cleared when
user rights are deleted.
Press #### on the search
interface to change an input
method and press letter keys of
the numeric keyboard to search
by name.

3. User Management
11
3.33.33.33.3 DisplayDisplayDisplayDisplay StyleStyleStyleStyle
Press on the initial interface. Select UsersUsersUsersUsers and press OKOKOKOK. Press ▼ to Select DispiayDispiayDispiayDispiay StyleStyleStyleStyle andpress OKOKOKOK.
Press ▼ to select dispiay style andpress OKOKOKOK totototo return.
Single Line Multiple line
Mixed Line

User Manual for New Firmware of the 3-inch Color Screen
12
4444 UserUserUserUser RoleRoleRoleRole
Set the rights of a user-defined role, that is, rights to menus.
Press on the initial interface. Press to select UserUserUserUser RoleRoleRoleRole andpress OKOKOKOK.
Press ▼ to select UserUserUserUser DefinedDefinedDefinedDefinedRoleRoleRoleRole 1111 and press OKOKOKOK.
Press OKOKOKOK to open. Press ▼ to Select NameNameNameName and pressOKOKOKOK.
Press * to switch input method andenter the NameNameNameName, then press OKOKOKOK.
Press ▼ to select DefineDefineDefineDefine UserUserUserUserRoleRoleRoleRole and press OKOKOKOK
Press ▼ and OKOKOKOK to select rights.Press ESCESCESCESC to exit.

5 Access Control Setting
13
5555 AccessAccessAccessAccess ControlControlControlControl SettingSettingSettingSetting����
Access control option is to set user's open door time zone, control lock and related device's parameters.
Press on the initial interface. Press to select AccessAccessAccessAccess controlcontrolcontrolcontroland press OK.
Press ▼ to select AccessAccessAccessAccess ControlControlControlControlOptionsOptionsOptionsOptions and press OK.
To unlock, the enrolled user must accord with the following conditions:
1. The current unlock time should be in the effective time of user time zone or group zone.
2. The group where user is must be in access control (or in the same access control with other group, to open the
door together).
The system default the new enrolled user as the first group, default group time zone as 1, access control as the
first group, and the new enrolled user is in unlock (if user has modified the related setting of access control, the
system will be changed with user's modification.)
5.15.15.15.1 AccessAccessAccessAccess ControlControlControlControl OptionsOptionsOptionsOptions
Set parameters to control locks and related device.
DoorDoorDoorDoor LockLockLockLock DelayDelayDelayDelay((((s)s)s)s): Device control electronic lock is in enabling time. (effective value 1~10 seconds)
DoorDoorDoorDoor SensorSensorSensorSensor Delay(s)Delay(s)Delay(s)Delay(s): After the door is open, delay the time to check door sensor. If door sensor state is different
from the normal state of door sensor mode, alarm will be given off. This time is called door sensor delay. (effective
value: 1~99 seconds)
DDDDooroorooroor SSSSensorensorensorensor TypeTypeTypeType: It includes NONE, NC and NO. NONE means there is no door sensor. NO means the door is
open normally. NC means the door is closed normally.
DDDDooroorooroor AAAAlarmlarmlarmlarm Delay(s)Delay(s)Delay(s)Delay(s): When abnormal door sensor state is detected, alarm will be given off after some time. This
time is door sensor alarm. (effective value: 1~99 seconds)
RetryRetryRetryRetry TimeTimeTimeTime ToToToTo AlarmAlarmAlarmAlarm: When the failed press times reach the set times, alarm signal will come out.(effective value
1~9 times)
NCNCNCNC TTTTimeimeimeime PeriodPeriodPeriodPeriod: Set time zone for access control NC. Nobody can unlock during this time zone.
NONONONO TTTTimeimeimeime PeriodPeriodPeriodPeriod: Set time zone for access control NO. The lock is always in enabling state during this time zone.
Operation:Operation:Operation:Operation:

User Manual for New Firmware of the 3-inch Color Screen
14
Select AccessAccessAccessAccess CCCControlontrolontrolontrol OptionsOptionsOptionsOptionsand press OKOKOKOK.
Enter to AccessAccessAccessAccess CCCControlontrolontrolontrol Options,Options,Options,Options,As shown in the figure:
Press▲/▼to move cursor to the item to be set. If it is the input box, press numeric keys on small keyboard to input
the value. If it is the roll box, press / to switch the values. After setting, press menu directly to return to the last
interface. Press "ESC" to cancel setting and return to the last interface.
NoticeNoticeNoticeNotice:
1) When time zone is set for NO or NC, please set door sensor mode as None, or alarm signal may come out
during time zone of NO or NC.
2) If time zone of NO or NC has no definition, the device will prompt it and add the definition in time zone setting.
5.25.25.25.2 TimeTimeTimeTime SchedleSchedleSchedleSchedle
Time zone is the minimum unit of access control option. The whole system can define 50 time zones. Every time
zone defines seven time sections ( namely, a week). Every time section is the effective time zone within 24 hours
everyday. Every user can set 3 time zones. "or" exists among the three zones. It is effective if only one is satisfied.
Every time section format is HH:MM-HH:MMHH:MM-HH:MMHH:MM-HH:MMHH:MM-HH:MM, namely, accurate to minute.
Press▼to select TimeTimeTimeTime ScheduleScheduleScheduleScheduleand press OKOKOKOK.
Use numeric keys to search for atime period in the range from 1 to50. Press ▼ to select the item tobe set and press OKOKOKOK.
Press / to select a time optionand press ▲/▼ to set time.After setting a period of time, pressOKOKOKOK to save the setting and exit.
5.35.35.35.3 HolidayHolidayHolidayHoliday settingsettingsettingsetting
Special access control time may need during holiday. It is different to modify everybody's access control time. So a
holiday access control time can be set, which is applicable for all employees.
If holiday access control time is set, user's open door time zone during holiday subject to the time zone here.
If end time is smaller than start time (23:57- 23:56), the whole day is forbidden. If end time is bigger than
start time(00:00- 23:59), it is effective section.
Effective time zone for user unlocking:00:00-23:59 or end time is bigger than start time.
NotesNotesNotesNotes:::: The default time period number 1 indicates all-time access (that is, newly registered users are unlocked).

5 Access Control Setting
15
Press ▼ to select HolidaysHolidaysHolidaysHolidays andpress OKOKOKOK.
Press OKOKOKOK to AddAddAddAdd HolidayHolidayHolidayHoliday.... Press OKOKOKOK.
Enter the No.No.No.No. using keypad.PressOKOKOKOK.
Press ▼to select StartStartStartStart DateDateDateDate andEndEndEndEnd DateDateDateDate and press OKOKOKOK.
Press / to select a time option
and press ▲/▼ to set time.After setting a period of time, pressOKOKOKOK to save the setting and exit.
Press ▼to select TimeTimeTimeTime periodperiodperiodperiodand press OKOKOKOK.
Enter the TimeTimeTimeTime periodperiodperiodperiod usingkeypad. Press OKOKOKOK to return.
Press ▼to select AllAllAllAll HolidaysHolidaysHolidaysHolidays andpress OKOKOKOK.
To check the effective time periodof a holiday, enter numbers andyou can view the duration of aholiday. Press OKOKOKOK.
Press OKOKOKOK to enter Edit Hoildays. Edit Hoildays operations are similarto those performed to addaddaddadd HoildaysHoildaysHoildaysHoildays.
Press▼to select DeleteDeleteDeleteDelete and press OKOKOKOK.
User Manual for New Firmware of the 3-inch Color Screen
16
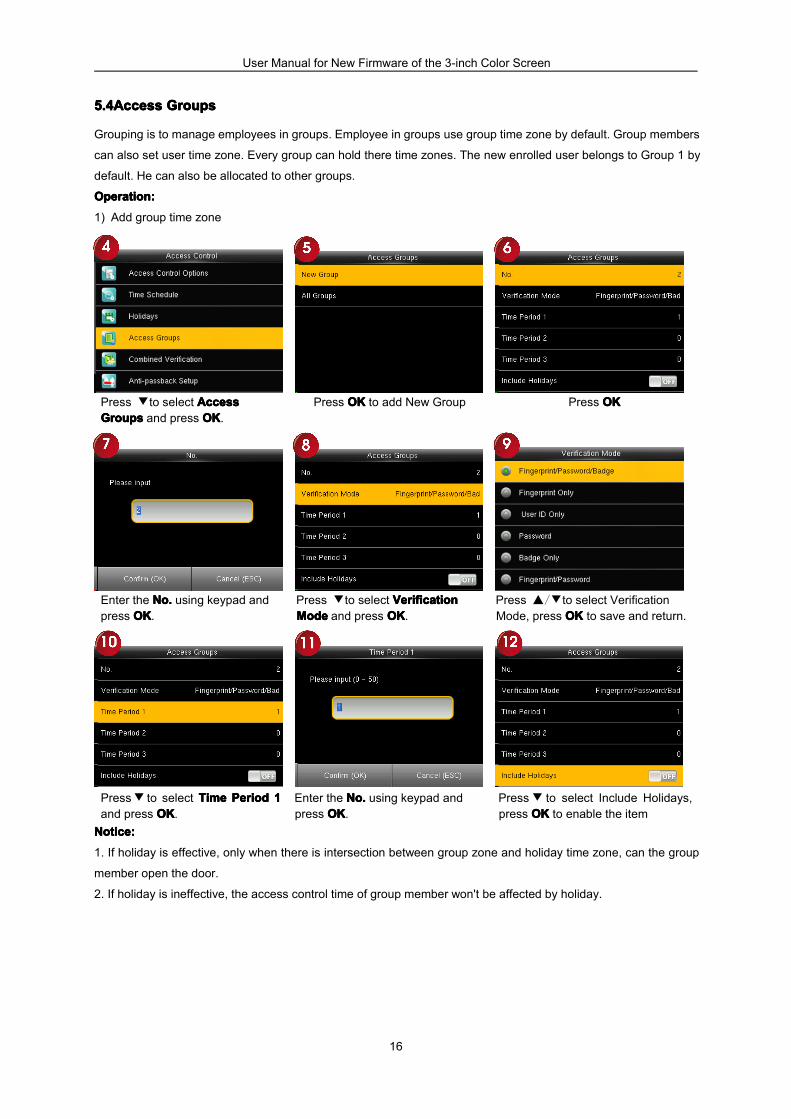
5.4Access5.4Access5.4Access5.4Access GroupsGroupsGroupsGroups
Grouping is to manage employees in groups. Employee in groups use group time zone by default. Group members
can also set user time zone. Every group can hold there time zones. The new enrolled user belongs to Group 1 by
default. He can also be allocated to other groups.
Operation:Operation:Operation:Operation:
1) Add group time zone
Press ▼to select AccessAccessAccessAccessGroupsGroupsGroupsGroups and press OKOKOKOK.
Press OKOKOKOK to add New Group Press OKOKOKOK
Enter the No.No.No.No. using keypad andpress OKOKOKOK.
Press ▼to select VerificationVerificationVerificationVerificationModeModeModeMode and press OKOKOKOK.
Press ▲/▼to select VerificationMode, press OKOKOKOK to save and return.
Press▼ to select TimeTimeTimeTime PeriodPeriodPeriodPeriod 1111and press OKOKOKOK.
Enter the No.No.No.No. using keypad andpress OKOKOKOK.
Press▼ to select Include Holidays,press OKOKOKOK to enable the item
Notice:Notice:Notice:Notice:
1. If holiday is effective, only when there is intersection between group zone and holiday time zone, can the group
member open the door.
2. If holiday is ineffective, the access control time of group member won't be affected by holiday.

5 Access Control Setting
17
2) Edit and Delete group time zone
Press ▼to select AllAllAllAll GroupsGroupsGroupsGroups andpress OKOKOKOK.
Press▼to select one of AllAllAllAll GroupsGroupsGroupsGroupsand press OKOKOKOK.
Press▼to select EditEditEditEdit and press OKOKOKOK.
The No.No.No.No. cannot be modified, andthe other operations are similar tothose performed to add a NewGroups. Press ESCESCESCESC to reture.
Press▼ to select DeleteDeleteDeleteDelete and pressOKOKOKOK.
Press▲/▼to select OKOKOKOK to deletethe Access Groups.
5.55.55.55.5 SetSetSetSet CombinedCombinedCombinedCombined VerificationVerificationVerificationVerification
Make various groups into different access controls to achieve multi-verification and improve security. An access
control can be made up of 5 groups at most.
Operation:Operation:Operation:Operation:
1)Add Combined Verification
For example, to add an unlocking combination which needs the verification of both group 1 and 2, as shown below:
Press▼to select CombinedCombinedCombinedCombinedVerificationVerificationVerificationVerification and press OKOKOKOK.
Press OKOKOKOK to add a new CombinedCombinedCombinedCombinedVerificationVerificationVerificationVerification.
Enter the No.No.No.No. using keypad andpress OKOKOKOK.

User Manual for New Firmware of the 3-inch Color Screen
18
2) Edit and Delete Combined Verification
Press▼to select the line to beedited, press OKOKOKOK.
Enter the No.No.No.No. using keypad andpress OKOKOKOK.
When setting successful, aninterface shown above.
NotesNotesNotesNotes: To delete an unlocking combination, set the group ID to all 0s.
5.65.65.65.6 anti-passanti-passanti-passanti-pass backbackbackback
Sometimes, some illegal person follows the employee into the gate, which will bring security problem. To prevent
such risk, this function is enabled. In record must match out record, or the gate won't be open.This function needs
two machines to work together.Refer to appendix 4 anti-pass back for anti-pass back setting.
5.75.75.75.7 DuressDuressDuressDuress alarmalarmalarmalarm parameterparameterparameterparameter
There is duress alarm parameter setting in the device. When employee come across duress, select duress alarm
mode, the device will open the door as usual. But the alarm signal will be sent to backstage alarm.
DuressDuressDuressDuress FunctionFunctionFunctionFunction: If select "Yes", press help then press fingerprint in the following 3 seconds or press ID number,
and duress alarm will come out after successful identification. If select "No", it is useless to press help.(help can be
set in keyboard definition.)
AlarmAlarmAlarmAlarm onononon 1:11:11:11:1 MatchMatchMatchMatch: if select "Yes", when user use 1:1 match mode, alarm signal will come out. Or there is no
alarm signal.
AlarmAlarmAlarmAlarm onononon 1:N1:N1:N1:N MatchMatchMatchMatch: if select "Yes", when user use 1:N match mode, alarm signal will come out. Or there is no
alarm signal.
AlarmAlarmAlarmAlarm onononon PasswordPasswordPasswordPassword: If select "Yes", when user use password verification mode, alarm signal will come out. Or
there is no alarm signal.
AlarmAlarmAlarmAlarm Delay(s)Delay(s)Delay(s)Delay(s): After duress alarm gets started, the alarm signal is not output directly. But it can be defined. After
some time, alarm signal will be generated automatically.(0-255 seconds).
Operation:Operation:Operation:Operation:
Press▼to select DuressDuressDuressDuress OptionsOptionsOptionsOptionsand press OKOKOKOK.
Enter to AccessAccessAccessAccess CCCControlontrolontrolontrol Options,Options,Options,Options,As shown in the figure:
Press ▲/▼to move cursor to the item to
be set. If it is the input box, press numeric
keys on small keyboard to input the value.
If it is the roll box, press / to switch
the values. After setting, press menu
directly to return to the last interface.
Press "ESC" to cancel setting and return
to the last interface.

6 IC Card management
19
6666 ICICICIC CCCCardardardard managementmanagementmanagementmanagement����
Support Mifare non-touch intelligent card with working frequency of 13.56MHZ. Integrate fingerprint attendance to
other systems and support multi- verification mode to meet the demands of different people.
OperationOperationOperationOperation::::
Press on the initial interface. Press to Select Users and pressOKOKOKOK.
Select EnrollEnrollEnrollEnroll asasasas IDIDIDID CardCardCardCard and pressOKOKOKOK.
6.16.16.16.1 EnrollEnrollEnrollEnroll asasasas IDIDIDID
Use Mifare card as ID card. Only card number is needed to enroll.
OperationOperationOperationOperation
1. Enroll
Enter the user ID using keypadthen press OKOKOKOK.
Swipe your ID card properly in theswiping area.
Operation succeeded!
RemarksRemarksRemarksRemarks: If the number you are deleting already exists on the device, a message, asking you whether to replicate
information to the card, is displayed.
2. Verification:
Swipe your ID card properly in the swiping area. When the verification is successful, the device will give prompt.
Please enter user accessaccessaccessaccess controlcontrolcontrolcontrol optionoptionoptionoption
to modify the verification mode as RF, or
verification won't be successful.

User Manual for New Firmware of the 3-inch Color Screen
20
6.26.26.26.2 EnrollEnrollEnrollEnroll asasasas FingerprintFingerprintFingerprintFingerprint CardCardCardCard
Enroll fingerprint and write fingerprint into card.
OperationOperationOperationOperation
1. Enroll
Press▼to select EnrollEnrollEnrollEnroll asasasasFingerprintFingerprintFingerprintFingerprint CardCardCardCard and press OKOKOKOK.
Enter the user ID using keypadthen press OKOKOKOK.
Press▼to select a finger and pressOKOKOKOK.
Place the same finger on thefingerprint collector for threeconsecutive times correctly. Fordetails, see 1.1 Finger Placement
Enrollment succeeds.Swipe your ID card properly in theswiping area.
Operation succeeded!
2. Verification:
Swipe your ID card properly in theswiping area.Operation succeeded!
"Please press your finger"Place your finger on the fingerprintsensor properly.
Successfully verified.As shown in thefigure:
NoteNoteNoteNotessss: If the pressed fingerprint is different from that stored in the card, the verification will fail.
6.36.36.36.3 ClearClearClearClear cardcardcardcard informationinformationinformationinformation
Delete all the information in the card being operated at present.
OperationOperationOperationOperation

6 IC Card management
21
Press▼to select CleanCleanCleanClean CardCardCardCardDataDataDataData and press OKOKOKOK
Swipe your ID card properly in theswiping area..
Deleting…
Operation succeeded!
6.46.46.46.4 CopyCopyCopyCopy cardcardcardcard informationinformationinformationinformation
Copy card information to the device (after copy, the fingerprint is still in the card),then press fingerprint attendance
directly on the device, with no need of using Mifare card.
OperationOperationOperationOperation
Press▼to select CopyCopyCopyCopy CardCardCardCard DataDataDataDataand press OKOKOKOK.
Select CopyCopyCopyCopy UserUserUserUser DataDataDataData OnlyOnlyOnlyOnly andpress OKOKOKOK.
Swipe your ID card properly in theswiping area..
Operation succeeded!
Put the card in the induction area, waiting for device to delete all
the information in the card. If the card data has been stored in the
device, the device will remind you whether to delete the
information in the device or not. "Yes" is to delete the user's
fingerprint and information in the device. "No" is to keep the
information.
CopyCopyCopyCopy UserUserUserUser DataDataDataData AndAndAndAnd FingerprintFingerprintFingerprintFingerprint:
Press▼ to select CopyCopyCopyCopy UserUserUserUser DataDataDataData AndAndAndAnd
FingerprintFingerprintFingerprintFingerprint the operations are similar to
those performed to CopyCopyCopyCopy CardCardCardCard DataDataDataData.

User Manual for New Firmware of the 3-inch Color Screen
22
6.56.56.56.5 SetSetSetSet cardcardcardcard parameterparameterparameterparameter valuevaluevaluevalue
Set password of Mifare card and decide whether the information should be saved or not.
VerifyVerifyVerifyVerify IDIDIDID CardCardCardCard Only:Only:Only:Only: If this parameter is set to "YES", you pass the
verification only after card verification. If this parameter is set to "NO", you
need to verify your password or fingerprint after card verification.
CardCardCardCard DataDataDataData StorageStorageStorageStorage ModeModeModeMode: Decide whether to save the enrolled information
to the device when enrolling card or fingerprint card. If "Not to save" is
selected, user information is saved to the card only. If "Only user" is selected,
the employee ID and card number are saved to the device. If "User +
fingerprint" is selected, the employee ID, card number, and fingerprint are
saved to the device. In the latter two modes, data is saved to both the card
and the device.
ICICICIC CardCardCardCard PasscodePasscodePasscodePasscode: After the password is set, the device will write password into the enrolled fingerprint card.
Then the fingerprint card can only be used on this device.
StoredStoredStoredStored FingerprintFingerprintFingerprintFingerprint CountCountCountCount:: Used to set the number of fingerprints saved to a card. Up to 10 fingerprints can be
saved.
Note:Note:Note:Note: When the device serves as access control machine to provide the high-level access control function, the
user information must be saved to the device for authentication purposes. For details, see 5 Access Control Setting.

7 Communication Setting
23
7777 CommunicationCommunicationCommunicationCommunication SettingSettingSettingSetting
Set parameters for communication between the device and a PC. The parameters include the IP address, gateway,
subnet mask, baud rate, machine ID, and login password.
Press on the initial interface. Press to COMM.COMM.COMM.COMM. SettingsSettingsSettingsSettings andpress OKOKOKOK.
Select EthernetEthernetEthernetEthernet and press OKOKOKOK.
7777.1.1.1.1 EthernetEthernetEthernetEthernet
When Ethernet is used for communication of device and PC, the following settings need to be checked:
IPIPIPIP AAAAddressddressddressddress: IP is 192.168.1.201 by default. You can modify it if it is necessary. But it cannot be the same with that
of PC.
SubnetSubnetSubnetSubnet MMMMaskaskaskask: It is 255.255.255.0 by default. You can modify it if it is necessary.
GatGatGatGateeeewaywaywayway: It is 0.0.0.0 by default. If the device and PC are in different net segment, it is necessary to set address.
DNS:DNS:DNS:DNS: The DNS Server is 0.0.0.0 by default and can be changed as required.
TCPTCPTCPTCP COMMCOMMCOMMCOMM PortPortPortPort: It is 4730 by default. You can modify it if it is necessary.
DHCPDHCPDHCPDHCP: short for Dynamic Host Configuration Protocol, which is used by a server to allocate dynamic IP addresses
to clients on a network
DisplayDisplayDisplayDisplay inininin StatusStatusStatusStatus BarBarBarBar: used to set whether to display network icons in the status bar of the main interface.
7777.2.2.2.2 SerialSerialSerialSerial CommCommCommComm����
When serial port (RS232/RS485) is used for communication of device and PC, the following settings need to be
checked:

User Manual for New Firmware of the 3-inch Color Screen
24
RS232:RS232:RS232:RS232:Whether use RS232 to communicate. Select "Yes" if RS232 is to be used.
RS485:RS485:RS485:RS485:Whether use RS485 to communicate. Select "Yes" if RS485 is to be used.
Baudrate:Baudrate:Baudrate:Baudrate: Used for communication with PC. There are five options: 9600, 19200, 38400, 57600 and 115200. If the
communication speed is high, RS232 is recommended. If the communication speed is low, RS 485 is
recommended.
USB:USB:USB:USB:Whether use USB to communicate. Select "Yes" if USB is to be used.
UCBUCBUCBUCB BaudratBaudratBaudratBaudrate:e:e:e: Used USB to communication with PC. There are five options: 9600, 19200, 38400, 57600 and
115200. If the communication speed is high,
DeviceDeviceDeviceDevice ID:ID:ID:ID: 1—254. If RS232/RS485 is used, this ID needs to be input on the software communication interface.
7777....3333 PCPCPCPC ConnectionConnectionConnectionConnection
To improve the security of attendance data, connection password needs to be set here. Connection password
must be input when PC software is to connect device to read data.
CommCommCommComm KeyKeyKeyKey: System password is 0 by default.(namely, there is no password.) it can be set as other value. After
setting, the password must be input if software is to communicate with device. Or the connection will fail. The
password length is 1~6 digits.
DeviceDeviceDeviceDevice IDIDIDID: 1—254. If RS232/RS485 is used, this ID needs to be input on the software communication interface.
Press▼to select PCPCPCPC ConnectionConnectionConnectionConnectionand press OKOKOKOK.
Press OKOKOKOK. Enter a password,press▼to selectConfirm(OK)Confirm(OK)Confirm(OK)Confirm(OK) and press OKOKOKOK.
7777.4.4.4.4 CellCellCellCelluuuularlarlarlar DataDataDataData NetworkNetworkNetworkNetwork����
When the equipment is in the Dial-Up Network, make sure the device is in the coverage of GPRS or CDMA signal,
and it is must known of the used modem type, APN name and access number and so on.

7 Communication Setting
25
CellularCellularCellularCellular DataDataDataData NetworkNetworkNetworkNetwork: whether to enable access to a mobile network
APNAPNAPNAPN SetupSetupSetupSetup: used to set APN information, such as the access number, user name, and password
HeartbeatHeartbeatHeartbeatHeartbeat SSSServerervererver
DetailsDetailsDetails: includes information about the connected mobile network, such as the network mode, telecom operator,
IP address, and received and sent data.
APN Setup:
APNAPNAPNAPN: Access Point Name, used to identify GPRS / CDMA types of business.
DialDialDialDial NumberNumberNumberNumber: The access number of GPRS / CDMA business.
UserUserUserUser NNNNameameameame andandandand PPPPasswordasswordasswordassword: used to check whether a user has the rights to access a network
7.57.57.57.5 WirelessWirelessWirelessWireless NetworkNetworkNetworkNetwork����
Wireless Fidelity (WIFI) is also known as the 802.11b standard. The greatest advantage of WIFI is its high
transmission rate up to 11Mbps. WIFI also features long transmission distance and excellent compatibility with
various existing 802.11 DSSS devices. IEEE 802.11b is a radio-based variant of IEEE 802.11. The bandwidth of
IEEE 802.11b can be up to 11 Mbps and automatically adjusted to 5.5Mbps, 2Mbps and 1Mbps depending the
signal strength and interference level, thus effectively ensuring network stability and reliability. Major advantages:
High transfer speed and reliability. The communication distance can be up to 305 m in an open area and 76 m to
122 m in an enclosed area. WIFI can be conveniently integrated with the existing wireline Ethernet, making the
networking cost even lower.
Our terminal is also WIFI-capable. It supports either built-in or external WIFI module to implement wireless data
transmission over the WIFI.
WIFIWIFIWIFIWIFI:Press OK to open or close WIFI.
Operation:Operation:Operation:Operation:
erver: collects attendance records from the device by using the data collection software provided by
Software. After you set the server IP address for the device correctly, the device will send attendance records to
the heartbeat server automatically.
Details

User Manual for New Firmware of the 3-inch Color Screen
26
Press▼to selectWirelessWirelessWirelessWirelessNetworkNetworkNetworkNetwork and press OKOKOKOK.
PressWIFIWIFIWIFIWIFI can open or close thefunction.
Pres▼to select "dlink-123456" andpress OKOKOKOK.
Enter a password,press▼to selectConfirm(OK)Confirm(OK)Confirm(OK)Confirm(OK) and press OKOKOKOK.
Connected,as shown in the figure: Connected, the initial interfaceasshown in the figure:
7777.6.6.6.6 ADMSADMSADMSADMS����
This submenu is used to connect the Webserver-related settings, such as Webserver IP address, port settings,
and whether to enable proxy settings.EnableEnableEnableEnable DomainDomainDomainDomain NameNameNameName: When the domain name mode is enabled, you access a website using a domain name in
the format of http://; otherwise, you must enter an IP address for website access.
SSSServererverervererver AddressAddressAddressAddress:IP address of Webserver
ServerServerServerServer portportportport:Port used by Webserver
EnableEnableEnableEnable ProxyProxyProxyProxy ServerServerServerServer: When you enable the proxy function, set the IP address and port number of the proxy
server. This option indicates whether to use a proxy IP address. You may choose to enter the proxy IP address or
the server address for Internet access, whichever you like.

7 Communication Setting
27
7.77.77.77.7 WiegandWiegandWiegandWiegand optionoptionoptionoption����
7777....7.17.17.17.1 WiegandWiegandWiegandWiegand ININININ
OperationOperationOperationOperation:
press▼to selectWiegandWiegandWiegandWiegand SetupSetupSetupSetupand press OKOKOKOK.
press OKOKOKOK. Press ▲/▼ and OKOKOKOK to select items.
When the setting is completed, press
OKOKOKOK to save the setting and exit.
WiegandWiegandWiegandWiegand Format:Format:Format:Format::The system has two built-in formats Wiegand 26-bits and Wiegand 34-bits.
WWWWiegandiegandiegandiegand BitsBitsBitsBits: specifies the number of bits occupied by the wiegand data.
pulsepulsepulsepulse widthwidthwidthwidth:Pulse width is 100 microseconds by default, which can be adjusted from 20 to 100.
PulsePulsePulsePulse intervalintervalintervalinterval:It is 1000 microseconds by default, which can adjusted between 200 and 20000.
IDIDIDID TypeTypeTypeType: specifies the content of the wiegand input signal, which can be an employee ID or a card ID based on
your requirement.
FormatFormatFormatFormat DetailsDetailsDetailsDetails: displays the information defined by various bits of the selected wiegand format.
7777....7.27.27.27.2 WiegandWiegandWiegandWiegand OUTOUTOUTOUT
WiegandWiegandWiegandWiegand FormatFormatFormatFormat: The system has two built-in formats Wiegand 26-bits and Wiegand 34-bits.
FailedFailedFailedFailed IDIDIDID: defines the output value for user authentication failures. The output format is determined by the setting
ofWiegandWiegandWiegandWiegand formatformatformatformat. The value ranges from 0 to 65535.
SiteSiteSiteSite codecodecodecode:Similar to device ID. But the code is specified by user. Different device can be repeated. (With range of
0-255)
pulsepulsepulsepulse widthwidthwidthwidth:Pulse width is 100 microseconds by default, which can be adjusted from 20 to 100.
PulsePulsePulsePulse intervalintervalintervalinterval:It is 1000 microseconds by default, which can adjusted between 200 and 20000.
IDIDIDID TypeTypeTypeType: specifies the output content for successful user authentication. You can select the employee ID or card
ID.
FormatFormatFormatFormat DetailsDetailsDetailsDetails: displays the information defined by various bits of the selected wiegand format.
OperationOperationOperationOperation
Wiegand 26format. E:Even parity;O:Odd parity;C:Card Number.
Wiegand 26 Even parity bit
Wiegand 26 Odd parity bit

User Manual for New Firmware of the 3-inch Color Screen
28
press OKOKOKOK. Press ▲/▼ and OKOKOKOK to select items.When the setting is completed,press OKOKOKOK to save the setting andexit.

8 System
29
8888 SystemSystemSystemSystem
Set system parameters to meet user's demand as many as possible.Including the DateDateDateDate TimeTimeTimeTime, AttendanceAttendanceAttendanceAttendance,
FingerprintFingerprintFingerprintFingerprint and so on.
Press on the initial interface. Select system and press OKOKOKOK. Select DateDateDateDate TimeTimeTimeTime and press OKOKOKOK.
8888.1.1.1.1 Date/TimeDate/TimeDate/TimeDate/Time
Select Date/TimeDate/TimeDate/TimeDate/Time and press OKOKOKOK. Press ▲/▼ and OKOKOKOK to select items.When the setting is completed,press OKOKOKOK to save the setting andexit.
SetSetSetSet Date/Time:Date/Time:Date/Time:Date/Time: This parameter is used to set the date and time of the FFR terminal.
24-Hour24-Hour24-Hour24-Hour TimeTimeTimeTime:::: This parameter is used to set the time display mode of the initial interface. Select "ON" to adopt the
24-hour display mode. Select "OFF" to adopt the 12-hour display mode.
DateDateDateDate Format:Format:Format:Format: This parameter is used to set the format of the date displayed on the all interface of the FFR
terminal.
CalenderCalenderCalenderCalender Type:Type:Type:Type: The device support the three calender type, like GregorianGregorianGregorianGregorian, IranIranIranIran GregorianGregorianGregorianGregorian and IranIranIranIran Lunai.Lunai.Lunai.Lunai. You
can modify it if it is necessary.
DaylightDaylightDaylightDaylight SavingSavingSavingSaving TimeTimeTimeTime����
DLST,also called Daylight Saving Time,is a system to prescescescescribe local time in order to save energy. The unified time
adopted during the system date is called "DLST". Usually, the time will be one hour forward in summer. It can make
people sleep early and get up early. It can also reduce lighting to save power. In autumn, the time will be recovered.
The regulations are different in different countries. At present, nearly 110 countries adopt DLST.
To meet the demand of DLST, a special optionoptionoptionoption can be customized on our RF Card Time & Attendance recorder.
Make the time one hour forward at XX (minute) XX (hour) XX (day) XX (month), and make the time one hour
backward at XX (minute) XX (hour) XX (day) XX (month) if necessary.
OperationOperationOperationOperation::::

User Manual for New Firmware of the 3-inch Color Screen
30
1) Set DLST as "enable".
2) Input DLST start time and end time.
For example, if 08:00, April 1st is set, the device enter DLST,and the time will be one hour forward. If it is
08:00,August 1st, the device will reset normal time.
3) Press OK to save setting. Press "ESCESCESCESC" to exit without saving.
Open DaylightDaylightDaylightDaylight SavingSavingSavingSaving TimeTimeTimeTime Set time in ByByByBy date/timedate/timedate/timedate/time Set time in ByByByBy week/dayweek/dayweek/dayweek/day
DaylightDaylightDaylightDaylight SavingSavingSavingSaving ModeModeModeMode: You can select the date mode (month-day-hour) or week mode (month-weekday-hour).
By default, the date mode is used.
DaylightDaylightDaylightDaylight SavingSavingSavingSaving SetupSetupSetupSetup: used to set the DST start time and end time.
Description of the date mode and week mode:
1. If the month when DST starts is later than that when DST ends, DST spans two different years. For example, the
DST start time is 2012-9-1 4:00 and the DST end time is 2013-4-1 4:00.
2. Assume that the week mode is selected and the DST starts from Sunday of the sixth week of September in 2012.
According to the calendar, September of 2013 does not have six weeks but has five weeks. In this case, in 2013,
DST starts at the corresponding time point of the last Sunday of September.
3. Assume that the DST starts from Monday of the first week of September in 2012. According to the calendar, the
first week of September in 2012 does not have Monday. In this case, the DST starts from the first Monday of
September in 2012.
8888.2.2.2.2 AttendanceAttendanceAttendanceAttendance
Press ▼ to select AttendanceAttendanceAttendanceAttendanceand press OKOKOKOK.
Press ▲/▼ and OKOKOKOK to select items.When the setting is completed, pressOKOKOKOK to save the setting and exit.
DupDupDupDuplicatelicatelicatelicate PunchPunchPunchPunch PeriodPeriodPeriodPeriod ((((m)m)m)m): If a user's attendance record already exists and the user punches in again within the
specified period (unit: minute), his/her second attendance record will not be stored. (Value scope: 1─60 minutes)
CameraCameraCameraCamera MMMModeodeodeode: when the employee is in attendance record, grasp photo and save it? It is aimed at the setting of all
employees.

8 System
31
ThereThereThereThere areareareare 5555 modesmodesmodesmodes:
No photo: there is no photo taken during attendance record.
Take photo, no save: take photo but not save photo during attendance record.
Take photo and save: take photo and save photo during attendance record.
Save on successful verification: When an employee passes the work attendance check, a
picture of the employee is taken and saved.
Save on failed verification: When an employee fails the work attendance check for three times
consecutively, a picture of the employee is taken and saved.
DisplayDisplayDisplayDisplay UserUserUserUser PhotoPhotoPhotoPhoto: whether the picture of a user is displayed when the user passes the work attendance check
AlphanumericAlphanumericAlphanumericAlphanumeric UserUserUserUser IDIDIDID: whether employee IDs can contain letters. Employee IDs with letters help classify
employees.
AttendanceAttendanceAttendanceAttendance LogLogLogLog AlertAlertAlertAlert: When the available space is insufficient to store the specified number of attendance
records, the FFR terminal will automatically generate an alarm. (Value scope: 1─99)
CyclicCyclicCyclicCyclic DeleteDeleteDeleteDelete ATTATTATTATT DataDataDataData: specifies the maximum number of attendance records that can be deleted at a time when
the number of attendance records reaches the upper limit. This function can be disabled; otherwise, the value
ranges from 1 to 999.
CyclicCyclicCyclicCyclic DeleteDeleteDeleteDelete ATTATTATTATT PhotoPhotoPhotoPhoto: specifies the maximum number of attendance pictures that can be deleted at one time
when the number of attendance pictures reaches the upper limit. This function can be disabled; otherwise, the
value ranges from 1 to 99.
ConfirmConfirmConfirmConfirm ScreenScreenScreenScreen Delay(sDelay(sDelay(sDelay(s)))): specifies the time for displaying the authentication result. The value ranges from 1s to
9s.
SaveSaveSaveSave IllegalIllegalIllegalIllegal VerificationVerificationVerificationVerification RecordRecordRecordRecord: Save the Illegal Verification Record generated in Illegal Time Zone and Illegal
Combination or not when the Access Control was Enable.
ExpirationExpirationExpirationExpiration RuleRuleRuleRule: You can select one of the three conditions: retaining user information and not saving attendance
records; retaining user information and saving attendance records; deleting user information.
8888.3.3.3.3 FingerprintFingerprintFingerprintFingerprint
Press ▼ to select FingerprintFingerprintFingerprintFingerprintand press OKOKOKOK.
Press ▲/▼ and OKOKOKOK to select items.When the setting is completed,press OKOKOKOK to save the setting andexit.
1:11:11:11:1 matchingmatchingmatchingmatching thresholdthresholdthresholdthreshold valuevaluevaluevalue: The similarity of ID + fingerprint verification and the enrolled template
1:N1:N1:N1:N matchingmatchingmatchingmatching thresholdthresholdthresholdthreshold valuevaluevaluevalue: The similarity of verification and the enrolled template
Recommended matching threshold value:
FRR FAR
Matching threshold value
1:N 1:1

User Manual for New Firmware of the 3-inch Color Screen
32
high low 45 25
middle middle 35 15
low high 25 10
FPFPFPFP SensorSensorSensorSensor SensitivitySensitivitySensitivitySensitivity: used to set the sensitivity of fingerprint collection. The default value MediumMediumMediumMedium is
recommended. You can set the sensitivity of fingerprint collection to HighHighHighHigh when the response to finger scan lags in
a dry environment. When the usage environment is humid, you can set the sensitivity of fingerprint collection to
LowLowLowLow if the fingerprint is difficult to identify.
1:11:11:11:1 RetryRetryRetryRetry TimesTimesTimesTimes: This parameter is used to set the retry times in the event of failure of 1:1 verification or password
verification due to absence of fingerprint enrollment or improper finger placement, so as to avoid repetitive
operations.
FingerprintFingerprintFingerprintFingerprint AlgorithmAlgorithmAlgorithmAlgorithm: This parameter is used to select the fingerprint algorithm version between 9.0 and 10.0.
Please select the algorithm version with caution because the fingerprint templates of these two algorithm versions
are incompatible.
FingerprintFingerprintFingerprintFingerprint ImageImageImageImage: This parameter is used to set whether to display the fingerprint image on the screen during
fingerprint enrollment or comparison. It has two values: Permanent Display and No Display.
8888....4444 ResetResetResetReset
Make device's communication option,system option and so on reset to the state of factory.
Press ▼ to select ResetResetResetReset andpress OKOKOKOK.
Press▲/▼ to select OKOKOKOK or CancelCancelCancelCanceland press OKOKOKOK.
8888....5555 USBUSBUSBUSB UpgradeUpgradeUpgradeUpgrade
You can upgrade the firmware program of the FFR terminal by using the upgrade file in the USB disk through this
parameter
If you need the firmware upgrade file, please contact our
technical support personnel. Generally the firmware upgrade
is not recommended.

9 Personalize
33
9999 PersonalizePersonalizePersonalizePersonalize
Press on the initial interface. Select PersonalizePersonalizePersonalizePersonalize and press OKOKOKOK. Select UserUserUserUser InterfaceInterfaceInterfaceInterface and press OKOKOKOK.
9.19.19.19.1 UserUserUserUser InterfaceInterfaceInterfaceInterface
According to their personal preferences, users can set up the initial interface style.
Press ▼ to select UserUserUserUser InterfaceInterfaceInterfaceInterfaceand press OK.
Press ▲/▼ and OKOKOKOK to select items.When the setting is completed, pressOKOKOKOK to save the setting and exit.
Wallpaper:Wallpaper:Wallpaper:Wallpaper: Users can choose wallpaper to display on the screen.
LanguageLanguageLanguageLanguage: You can select a language for the device based on your requirements.
LLLLockockockock powerpowerpowerpower KeyKeyKeyKey :To prevent hostile power-off, select whether to lock power-off or not. "disable": the power is off 3
seconds after pressing power-off. "enable": it is ineffective after pressing power-off....
MenuMenuMenuMenu ScreenScreenScreenScreen Timeout(s)Timeout(s)Timeout(s)Timeout(s): The device will display the main interface automatically when no operation is performed
on a menu within the menu timeout time. (This function can be disabled; otherwise, the value ranges from 60s to
99999s.)
IIIIdledledledle TimeTimeTimeTime ToToToTo SlideSlideSlideSlide ShowShowShowShow((((ssss)))): The advertisement picture is displayed when no operation is performed on the main
interface within the waiting time. (This function can be disabled; otherwise, the value ranges from 3s to 999s.)
SlideSlideSlideSlide ShowShowShowShow Interval(s)Interval(s)Interval(s)Interval(s):::: This parameter is used to set the picture cycle interval (value scope: 0─999 seconds).
IdleIdleIdleIdle TimeTimeTimeTime ToToToTo SleepSleepSleepSleep(m(m(m(m):):):): This parameter is used to specify a period after which the device is put in sleep mode if no
operation within this period. You can wake up the device from sleep by pressing any key or touching the screen.
Numerical range in 1 ~ 30 minutes, the factory default for 3 minutes.
MainMainMainMain ScreenScreenScreenScreen SSSStyletyletyletyle: used to set where and how the clock and status key are displayed on the main screen
CompanyCompanyCompanyCompany NNNNameameameame����: When a company name is specified, you can choose whether to print the company name in
print setting.
NotesNotesNotesNotes:::: Company name is only in the case of open print function can be set.

User Manual for New Firmware of the 3-inch Color Screen
34
9.29.29.29.2 VoiceVoiceVoiceVoice
Press ▼ to select VoiceVoiceVoiceVoice andpress OKOKOKOK.
Press ▲/▼ and OKOKOKOK to select items.When the setting is completed, pressOKOKOKOK to save the setting and exit.
VoiceVoiceVoiceVoice PromptPromptPromptPrompt:::: This parameter is used to set whether to play voice prompts during the operation of the FFR
terminal. Select "ON" to enable the voice prompt, and select "OFF" to mute.
KeyboardKeyboardKeyboardKeyboard PromptPromptPromptPrompt:::: This parameter is used to set whether to generate beep sound in response to every keyboard
touch. Select "ON" to enable the beep sound, and select "OFF" to mute.
VolumeVolumeVolumeVolume:::: This parameter is used to adjust the volume of voice prompts.
9.39.39.39.3 BellBellBellBell SchedulesSchedulesSchedulesSchedules
Many companies need bell for on-duty and off-duty. Some use manual bell. Some use electronic bell. To save cost
and provide convenience for management, we integrate bell functions to fingerprint sensor. You can set time for
bell. When it is the scheduled time, The device will automatically play the selected ringtone and trigger the relay
signal. The ringtone playing does not stop until the ringing duration has elapsed. By default, the device provides 15
ringtones.
1.1.1.1. AddingAddingAddingAdding aaaa BellBellBellBell
Press▼to select BellBellBellBell SchedulesSchedulesSchedulesSchedulesand press OKOKOKOK.
Press▼to select NewNewNewNew BellBellBellBellSchedulesSchedulesSchedulesSchedules and press OKOKOKOK.
Press▲/▼and OKOKOKOK to select items.When the setting is completed, pressOKOKOKOK to save the setting and exit.
BellBellBellBell SSSStatustatustatustatus: Whether to enable this bell
BellBellBellBell TTTTimeimeimeime: The bell rings automatically when it is the specified time.
RepeRepeRepeRepeatatatat: specifies whether to repeat the ringtone.
BellBellBellBell TypeTypeTypeType: You can select between internal ringing and external ringing. For internal ringing, the ring tone is played
by the loudspeaker of the terminal. For external ringing, the ring tone is played by an external electric bell that is
wired with the terminal.
RingRingRingRing ToneToneToneTone: Bell ring
InternalInternalInternalInternal bellbellbellbell delay(delay(delay(delay(s)s)s)s): specifies the duration for ringtone playing. The value ranges from 1s to 999s.

9 Personalize
35
NoticeNoticeNoticeNotice: Only some models have external ringing options.
2.2.2.2. EditEditEditEdit andandandand ddddeleteeleteeleteelete aaaa BellBellBellBell
Press ▼ to select BellBellBellBellSchedulesSchedulesSchedulesSchedules and press OK.OK.OK.OK.
Select NewNewNewNew BellBellBellBell SchedulesSchedulesSchedulesSchedules andpress OKOKOKOK.
Select EditEditEditEdit and press OKOKOKOK.
Edit a Bell the operations aresimilar to those performed to adda Bell.
Press▼to select DeleteDeleteDeleteDelete and press
OKOKOKOK.
Press ▼ to select "Yes" or "No" andpress OKOKOKOK.
3.3.3.3. OptionsOptionsOptionsOptions
When the function of external ringing is used, set the output terminal of external ringing.
Press▼to select OptionsOptionsOptionsOptions andpress OKOKOKOK.
Press OKOKOKOK. Press▼to select, press OKOKOKOK to saveand return.

User Manual for New Firmware of the 3-inch Color Screen
36
9.49.49.49.4 PunchPunchPunchPunch StateStateStateState OptionsOptionsOptionsOptions
Press▼to select PunchPunchPunchPunch StateStateStateStateOptionsOptionsOptionsOptions and press OKOKOKOK.
Press ▲/▼ and OKOKOKOK to select items.
When the setting is completed, press
OKOKOKOK to save the setting and exit.
PunchPunchPunchPunch StateStateStateState ModeModeModeMode: used to select a status key mode. The following modes are available:
Off: The status key function is not used. The status keys defined as shortcut keys become unavailable.
Manual Mode: The status keys are switched manually and the current status key will disappear when the preset
time elapses.
Auto Mode: If a shortcut status key is configured to be switched after a period of time, the status key is switched
automatically when the period of time elapses.
Manual and Auto Mode: The main interface displays the status keys that can be switched automatically, and you
are also allowed to switch status keys manually. A status key you select manually will be switched according to the
automatic switching plan after it disappears upon a timeout.
Manual Fixed Mode: After a status key is switched, it is always displayed until you switch it later again.
Fixed Mode: A status key is always displayed and cannot be switched.
PunchPunchPunchPunch StateStateStateState Timeout(s)Timeout(s)Timeout(s)Timeout(s): specifies the timeout period of the status key displayed on the main interface.
PunchPunchPunchPunch StateStateStateState RequiredRequiredRequiredRequired: specifies whether the status of work attendance check must be selected during
authentication.
9.59.59.59.5 ShortcutShortcutShortcutShortcut KeyKeyKeyKey MappingsMappingsMappingsMappings
You can define six shortcut keys as attendance status shortcut keys or functional shortcut keys. On the main
interface of the FFR terminal, press corresponding keys and the attendance status will be displayed or the function
interface will be rapidly displayed.
Press▼ to select ShortcutShortcutShortcutShortcut KeyKeyKeyKeyMappingsMappingsMappingsMappings and press OKOKOKOK.
Press▼ to select a key and PressOKOKOKOK .
Press ▲/▼ and OKOKOKOK to select items.When the setting is completed, pressOKOKOKOK to save the setting and exit.
NotesNotesNotesNotes: When setting the attendance status shortcut keys, you can also set the "Auto Switch" parameter. When
"AutoAutoAutoAuto SwitchSwitchSwitchSwitch" is enabled, the FFR terminal automatically switches the attendance status at the specified time. If a
status key is selected, the device will not use any status key when the status key function is disabled.
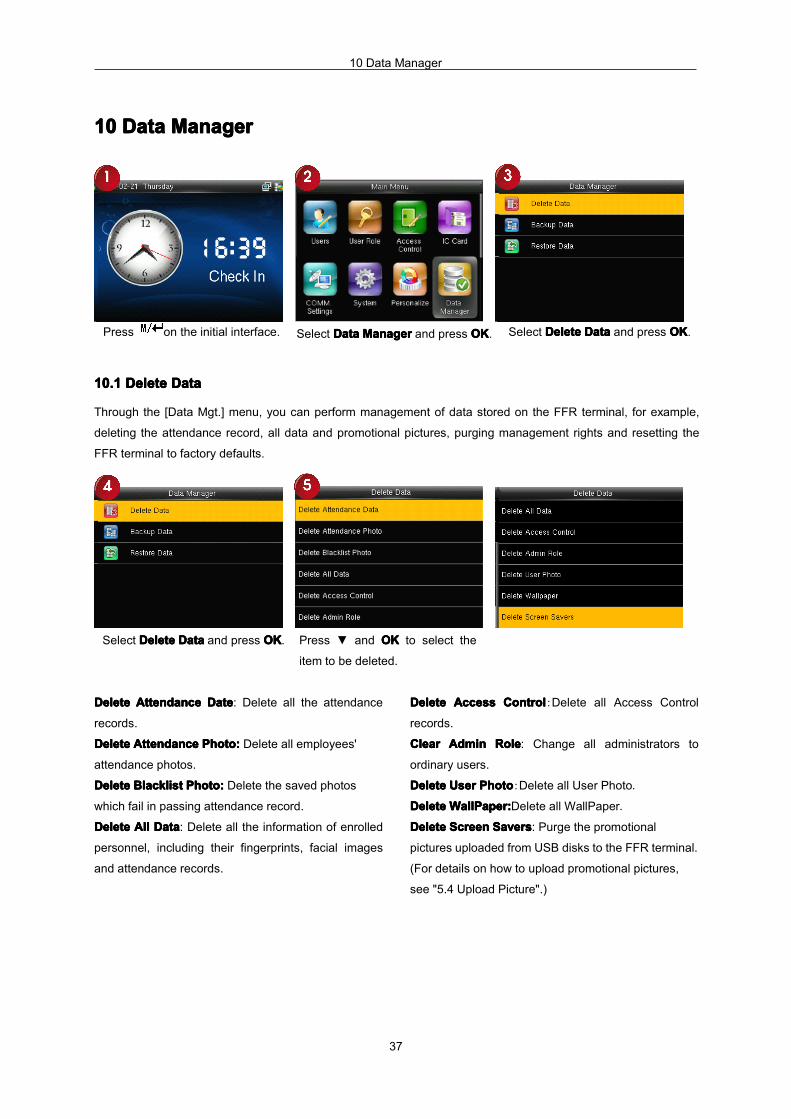
10 Data Manager
37
10101010 DataDataDataData ManagerManagerManagerManager
Press on the initial interface. Select DataDataDataData ManagerManagerManagerManager and press OKOKOKOK. Select DeleteDeleteDeleteDelete DataDataDataData and press OKOKOKOK.
10.110.110.110.1 DeleteDeleteDeleteDelete DataDataDataData
Through the [Data Mgt.] menu, you can perform management of data stored on the FFR terminal, for example,
deleting the attendance record, all data and promotional pictures, purging management rights and resetting the
FFR terminal to factory defaults.
Select DeleteDeleteDeleteDelete DataDataDataData and press OKOKOKOK. Press ▼ and OKOKOKOK to select the
item to be deleted.
DeleteDeleteDeleteDelete AttendanceAttendanceAttendanceAttendance DateDateDateDate: Delete all the attendance
records.
DeleteDeleteDeleteDelete AttendanceAttendanceAttendanceAttendance Photo:Photo:Photo:Photo: Delete all employees'
attendance photos.
DeleteDeleteDeleteDelete BlacklistBlacklistBlacklistBlacklist Photo:Photo:Photo:Photo: Delete the saved photos
which fail in passing attendance record.
DeleteDeleteDeleteDelete AllAllAllAll DataDataDataData: Delete all the information of enrolled
personnel, including their fingerprints, facial images
and attendance records.
DeleteDeleteDeleteDelete AccessAccessAccessAccess ControlControlControlControl:Delete all Access Control
records.
ClearClearClearClear AdminAdminAdminAdmin RoleRoleRoleRole: Change all administrators to
ordinary users.
DeleteDeleteDeleteDelete UserUserUserUser PhotoPhotoPhotoPhoto:Delete all User Photo.
DeleteDeleteDeleteDelete WallPaper:WallPaper:WallPaper:WallPaper:Delete all WallPaper.
DeleteDeleteDeleteDelete ScreenScreenScreenScreen SaversSaversSaversSavers: Purge the promotional
pictures uploaded from USB disks to the FFR terminal.
(For details on how to upload promotional pictures,
see "5.4 Upload Picture".)

User Manual for New Firmware of the 3-inch Color Screen
38
10.2Backup10.2Backup10.2Backup10.2Backup DataDataDataData
Back up the service data or configuration data of the device to the device or a USB drive.
Press▼to select BackupBackupBackupBackupDataDataDataDataand press OKOKOKOK.
Press▼to select BackupBackupBackupBackup totototoDeviceDeviceDeviceDevice and press OKOKOKOK.
Press ▼ and OKOKOKOK to select the localconfiguration items to be backupedto decice the selected items.
Press▼to select BackupBackupBackupBackup startstartstartstartand press OKOKOKOK.
NoteNoteNoteNote:Backup to USB Disk, the operations are similar to those performed to Backup to Device.
10.310.310.310.3 RestoreRestoreRestoreRestore DataDataDataData
Restore the data stored on the device or in the USB drive to the device.
Press▼to select RestoreRestoreRestoreRestore DataDataDataDataand press OKOKOKOK.
Press▼to select BackupBackupBackupBackup fromfromfromfromDeviceDeviceDeviceDevice and press OKOKOKOK.
Press ▼ and OKOKOKOK to select the localconfiguration items to be restoredand save the selected items.

10 Data Manager
39
Press▼to select StartStartStartStart RestoreRestoreRestoreRestoreand press OKOKOKOK.
Press▼to select "Yes""Yes""Yes""Yes" orororor "No""No""No""No"DeviceDeviceDeviceDevice and press OKOKOKOK.
NoteNoteNoteNote:Backup from USB Disk, the operations are similar to those performed to BackupBackupBackupBackup fromfromfromfrom DeviceDeviceDeviceDevice.

User Manual for New Firmware of the 3-inch Color Screen
40
11111111 USBUSBUSBUSB ManagerManagerManagerManager
Import user information, fingerprint template, attendance data and so on in the device to attendance software or
import user information and fingerprint to other devices through U disk.
Before you upload/download data from/to a USB drive, insert the USB drive into the USB interface of the device.
Insert U disk into USB slot offingerprint sensor through mini USB.
Press on the initial interface. Press▼to Select USBUSBUSBUSB ManagerManagerManagerManagerand press OKOKOKOK.
11.111.111.111.1 DownloadDownloadDownloadDownload
Select DownloadDownloadDownloadDownload and press OK. Press ▼ and OKOKOKOK to select the item tobe downloaded.
DownloadDownloadDownloadDownload AttendanceAttendanceAttendanceAttendance Data:Data:Data:Data: Import all the attendance data from the FFR terminal to a USB disk.
DownloadDownloadDownloadDownload UserUserUserUser DataDataDataData:::: Import all the user information, fingerprints and facial images from the FFR terminal to a
USB disk.
DownloadDownloadDownloadDownload UserUserUserUser PortraitPortraitPortraitPortrait:::: Import the employees' photos from the terminal to a USB disk.
DownloadDownloadDownloadDownload AttendanceAttendanceAttendanceAttendance PhotoPhotoPhotoPhoto: Download attendance photos saved in device to U disk. The format of photo is
JPG.
DownloadDownloadDownloadDownload BlacklistBlacklistBlacklistBlacklist PhotoPhotoPhotoPhoto: Download black list photos saved in device to U disk. The format of photo is JPG.
DownloadDownloadDownloadDownload workworkworkwork codecodecodecode: used to save work IDs on the device to a USB drive
11.211.211.211.2 UpladUpladUpladUplad
Press▼ to Select DownloadDownloadDownloadDownload andpress OKOKOKOK.
Press ▼ and OKOKOKOK to select the itemto be Uploaded.
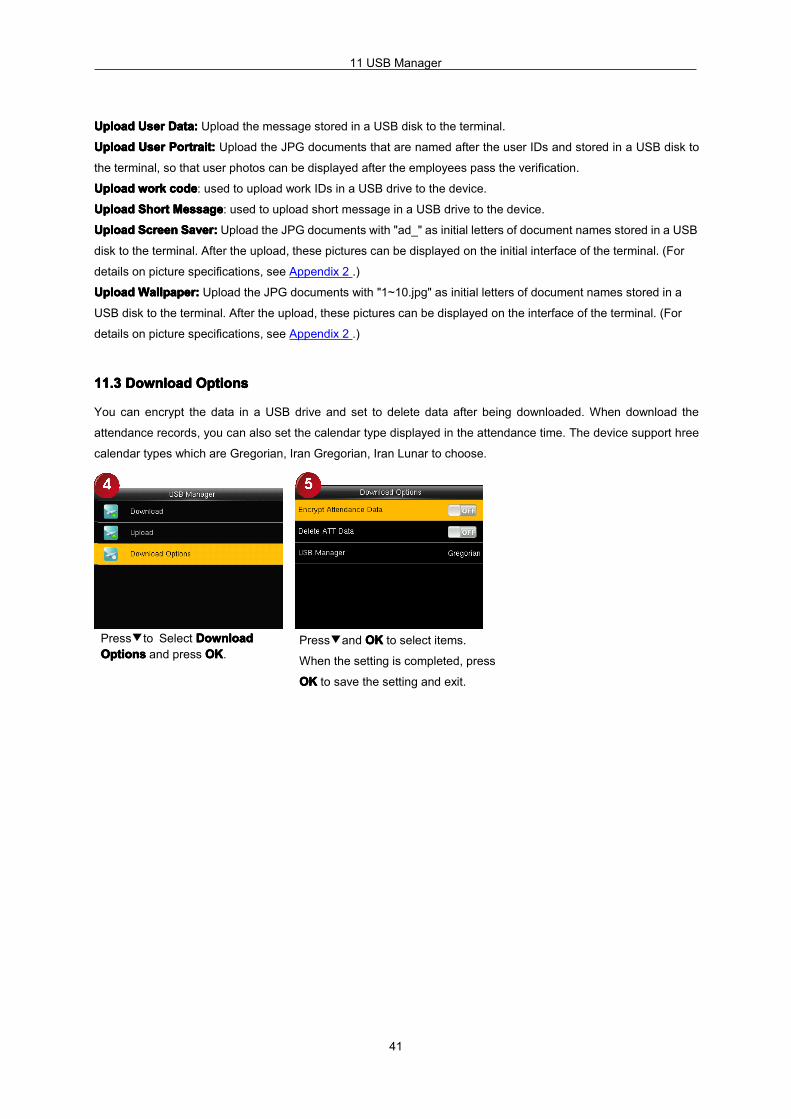
11 USB Manager
41
UploadUploadUploadUpload UserUserUserUser DataDataDataData:::: Upload the message stored in a USB disk to the terminal.
UploadUploadUploadUpload UserUserUserUser PortraitPortraitPortraitPortrait:::: Upload the JPG documents that are named after the user IDs and stored in a USB disk to
the terminal, so that user photos can be displayed after the employees pass the verification.
UploadUploadUploadUpload workworkworkwork codecodecodecode: used to upload work IDs in a USB drive to the device.
UploadUploadUploadUpload ShortShortShortShort MessageMessageMessageMessage: used to upload short message in a USB drive to the device.
UploadUploadUploadUpload ScreenScreenScreenScreen SaverSaverSaverSaver:::: Upload the JPG documents with "ad_" as initial letters of document names stored in a USB
disk to the terminal. After the upload, these pictures can be displayed on the initial interface of the terminal. (For
details on picture specifications, see Appendix 2 .)
UploadUploadUploadUpload Wallpaper:Wallpaper:Wallpaper:Wallpaper: Upload the JPG documents with "1~10.jpg" as initial letters of document names stored in a
USB disk to the terminal. After the upload, these pictures can be displayed on the interface of the terminal. (For
details on picture specifications, see Appendix 2 .)
11.311.311.311.3 DownloadDownloadDownloadDownload OptionsOptionsOptionsOptions
You can encrypt the data in a USB drive and set to delete data after being downloaded. When download the
attendance records, you can also set the calendar type displayed in the attendance time. The device support hree
calendar types which are Gregorian, Iran Gregorian, Iran Lunar to choose.
Press▼to Select DownloadDownloadDownloadDownloadOptionsOptionsOptionsOptions and press OKOKOKOK.
Press▼and OKOKOKOK to select items.
When the setting is completed, press
OKOKOKOK to save the setting and exit.

User Manual for New Firmware of the 3-inch Color Screen
42
12121212 AttendanceAttendanceAttendanceAttendance SearchSearchSearchSearch
Employee's attendance record will be saved in the device. For query convenience, queryqueryqueryquery recordrecordrecordrecord function is
provided.
1.1.1.1. AttendanceAttendanceAttendanceAttendance RecordRecordRecordRecord
Press on the initial interface. Press to select AttendanceAttendanceAttendanceAttendanceSearchSearchSearchSearch and press OKOKOKOK.
Press to select AttendanceAttendanceAttendanceAttendance RecordRecordRecordRecordand press OKOKOKOK.
Enter the user ID then press OKOKOKOK. Press to select TimeTimeTimeTime and pressOKOKOKOK.
The records in accordance with theconditions will be displayed:
UserUserUserUser IDIDIDID: Enter the user ID of the employee to query. If this field is left blank, you can query the attendance records
of all the employees. If you enter a user ID, you can query the attendance record of the employee with this user ID.
TimeTimeTimeTime RangeRangeRangeRange: Select a time period to query, including the customized time period, yesterday, this week, last week,
this month, last month, and all time periods.
2.2.2.2. AttendanceAttendanceAttendanceAttendance PhotoPhotoPhotoPhoto andandandand BlacklistBlacklistBlacklistBlacklist ATTATTATTATT PhotoPhotoPhotoPhoto
Attendance Photo and Blacklist ATT Photo, the operations are similar to those performed to AttendanceAttendanceAttendanceAttendance RecordRecordRecordRecord.

13 Print
43
13131313 PrintPrintPrintPrint����
You can connect the device to a printer so that attendance records can be printed.
Press on the initial interface. Press to select PrintPrintPrintPrint and pressOKOKOKOK.
Press▼to select DataDataDataData FieldFieldFieldField SetupSetupSetupSetupand press OKOKOKOK.
13.113.113.113.1 DataDataDataData FieldFieldFieldField SetupSetupSetupSetup
Press to select DataDataDataData FieldFieldFieldField SetupSetupSetupSetupand press OKOKOKOK.
Press to select the item to be setand press OKOKOKOK to enable or disablethe selected item.
13.2 PrinterPrinterPrinterPrinter OptionsOptionsOptionsOptions
Press to select PrinterPrinterPrinterPrinter OptionsOptionsOptionsOptionsand press OKOKOKOK.
Press to select the item to be setand press OKOKOKOK to enable or disablethe selected item.
NotesNotesNotesNotes: To enable the paper cutting function, connect the device to a printer equipped with the function. Then,
paper cutting is implemented automatically during printing based on the selected print information.
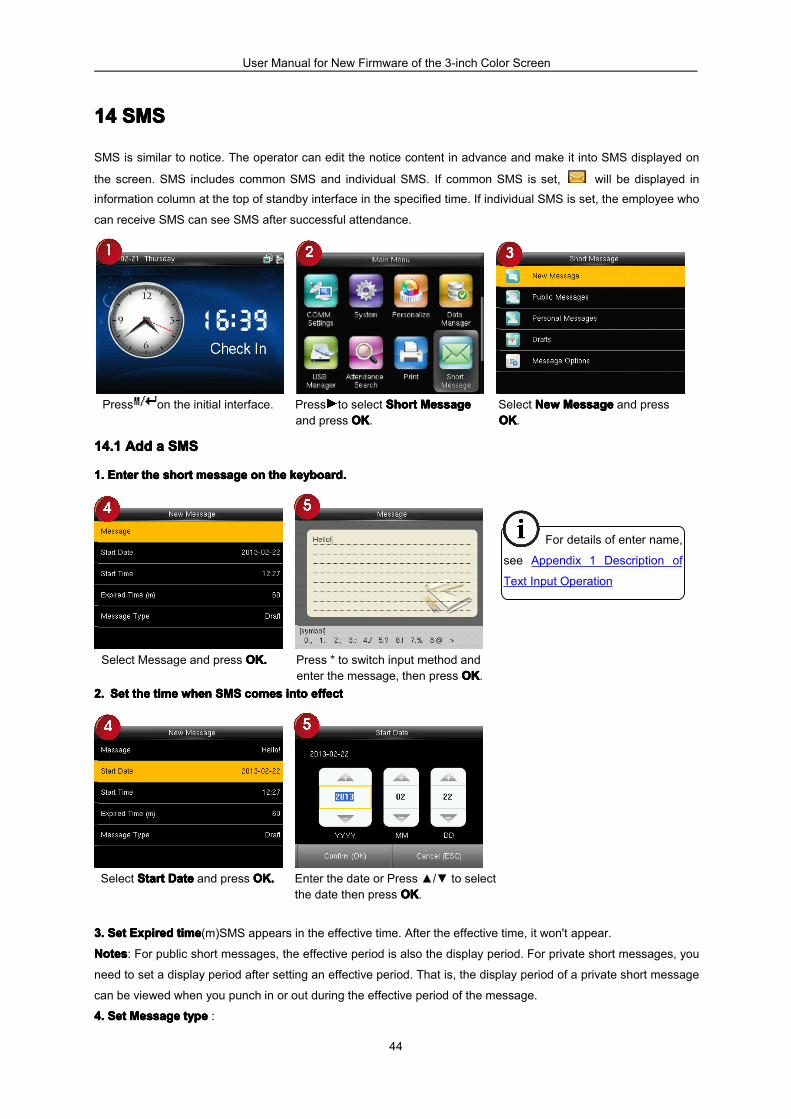
User Manual for New Firmware of the 3-inch Color Screen
44
14141414 SMSSMSSMSSMS
SMS is similar to notice. The operator can edit the notice content in advance and make it into SMS displayed on
the screen. SMS includes common SMS and individual SMS. If common SMS is set, will be displayed ininformation column at the top of standby interface in the specified time. If individual SMS is set, the employee who
can receive SMS can see SMS after successful attendance.
Press on the initial interface. Press to select ShortShortShortShort MessageMessageMessageMessageand press OKOKOKOK.
Select NewNewNewNew MessageMessageMessageMessage and pressOKOKOKOK.
14.114.114.114.1 AddAddAddAdd aaaa SMSSMSSMSSMS
1.1.1.1. EnterEnterEnterEnter thethethethe shortshortshortshort messagemessagemessagemessage onononon thethethethe keyboardkeyboardkeyboardkeyboard....
Select Message and press OK.OK.OK.OK. Press * to switch input method andenter the message, then press OKOKOKOK.
2.2.2.2. SetSetSetSet thethethethe timetimetimetime whenwhenwhenwhen SMSSMSSMSSMS comescomescomescomes intointointointo effecteffecteffecteffect
Select StartStartStartStart DateDateDateDate and press OK.OK.OK.OK. Enter the date or Press ▲/▼ to selectthe date then press OKOKOKOK.
3.3.3.3. SetSetSetSet ExpiredExpiredExpiredExpired timetimetimetime(m)SMS appears in the effective time. After the effective time, it won't appear.
NotesNotesNotesNotes: For public short messages, the effective period is also the display period. For private short messages, you
need to set a display period after setting an effective period. That is, the display period of a private short message
can be viewed when you punch in or out during the effective period of the message.
4.4.4.4. SetSetSetSet MessageMessageMessageMessage typetypetypetype :
For details of enter name,
see Appendix 1 Description of
Text Input Operation

14 SMS
45
Public: SMS able to be seen by all employees.
Personal: SMS aimed at individual only.
Draft: Preset SMS, no difference of individual SMS or common SMS.
SSSSelectelectelectelect Message Type andandandand presspresspresspressOK.OK.OK.OK.
PressPressPressPress▲/▼ totototo selectselectselectselect thethethethe messagemessagemessagemessagetypetypetypetype thenthenthenthen presspresspresspress OKOKOKOK....
14.214.214.214.2 PublicPublicPublicPublic,,,, PersonalPersonalPersonalPersonal andandandand DraftDraftDraftDraftssss listslistslistslists
Press ▼ to select the message list then press OKOKOKOK. You can view, edit or delete the one you selected. When edit
message, the operations are similar to those performed to addaddaddadd aaaa SMSSMSSMSSMS.
14.314.314.314.3 MessageMessageMessageMessage OptionsOptionsOptionsOptions
Set the personal Message Show Delay time on the initial interface.
Press to select MessageMessageMessageMessageOptionsOptionsOptionsOptions and press OKOKOKOK.
Press OKOKOKOK. Press▼to select the time and pressOKOKOKOK
14.414.414.414.4 EmployeeEmployeeEmployeeEmployee checkcheckcheckcheck SMSSMSSMSSMS
After configuration of a public short message, within the specified time period, the main interface displays the short
message icon in the upper right corner and displays the content of public short messages in scrolling mode inthe lower part so that all employees can view the information. The content of private short messages for a user is
displayed when the user is authenticated.

User Manual for New Firmware of the 3-inch Color Screen
46
Public message User authentication is successful afterthe show users messages.

15 Work Code
47
15151515 WorkWorkWorkWork CodeCodeCodeCode����
Employees' salaries are subject to their attendance records. Employees may be engaged in different types of work
which may vary with time periods. Considering the salaries vary with work types, the FFR terminal provides a
parameter to indicate the corresponding work type for every attendance record to facilitate rapid understanding of
different attendance situations during the handling of attendance data.
Press on the initial interface. Press to selectWorkWorkWorkWork CodeCodeCodeCode andpress OKOKOKOK.
Press▼ to select NewNewNewNewWorkWorkWorkWork CodeCodeCodeCodeand press OKOKOKOK.
15.115.115.115.1 AddAddAddAdd aaaa workworkworkwork codecodecodecode
IDIDIDID:::: A digital code of the work code.
NameNameNameName:::: The meaning of the work code.
1. Enter the ID.
Select IDIDIDID and Press OKOKOKOK. Enter the user ID using keypad thenpress OKOKOKOK.
2 Enter the name
Select NameNameNameName and press OKOKOKOK. Enter the name then press OKOKOKOK.
15.215.215.215.2 AllAllAllAll WorkWorkWorkWork CodesCodesCodesCodes
You can view, edit or delete the work code from the work codes list. The ID cannot be modified, and the other
operations are similar to those performed to add a work code When edit.
TTTTip:ip:ip:ip: TheTheTheThe terminalterminalterminalterminal
supportssupportssupportssupports thethethethe 1-1-1-1- totototo 99999999999999999999999999999999-digit-digit-digit-digit
IDsIDsIDsIDs bybybyby default.default.default.default.
If a prompt message "The ID
already exists!" is displayed, enter
another ID.
For details of enter name,
see Appendix1 TextTextTextText InputInputInputInput
Instructions.Instructions.Instructions.Instructions.
TheTheTheThe terminalterminalterminalterminal supportssupportssupportssupports thethethethe 1-1-1-1- totototo
23232323-character-character-character-character namesnamesnamesnames bybybyby default.default.default.default.

User Manual for New Firmware of the 3-inch Color Screen
48
Press to select AllAllAllAll WorkWorkWorkWork CodesCodesCodesCodesand press OKOKOKOK.
View all work codes. Press▼ to select the one you wantto edit or delete.
15.315.315.315.3 SetSetSetSet workworkworkwork codecodecodecode
Set verify whether enter theWorkWorkWorkWork CodeCodeCodeCode number must be entered must exist.
Press to selectWorkWorkWorkWork CodeCodeCodeCodeOptionsOptionsOptionsOptions and press OKOKOKOK.
Press OKOKOKOK to open or close.

16 Auto Test
49
16161616 AutoAutoAutoAuto TestTestTestTest
The auto test enables the system to automatically test whether functions of various modules are normal, including
the LCD, voice, sensor, keyboard and clock tests.
Press on the initial interface. Press to select DiagnosticsDiagnosticsDiagnosticsDiagnostics andpress OKOKOKOK.
Press▼ to select the one you wantto see and press OKOKOKOK.
TestTestTestTest AllAllAllAll: The terminal automatically tests the LCD, voice, sensor, keyboard and clock, press [OK] to continue and
press [ESC] to exit.
TestTestTestTest LCDLCDLCDLCD: The terminal automatically tests the display effect of the color TFT display by displaying full color, pure
white and pure black and checks whether the screen displays properly. You can continue the test by touching the
screen or exit it by pressing [ESC].
TestTestTestTest VoiceVoiceVoiceVoice: The terminal automatically tests whether the voice files are complete and the voice quality is good by
playing the voice files stored in the terminal. You can continue the test by touching the screen or exit it by pressing
[ESC].
TestTestTestTest KeyboardKeyboardKeyboardKeyboard: The terminal tests whether every key on the keyboard works normally. Press any key on the
[Keyboard Test] interface to check whether the pressed key matches the key displayed on screen. The keys are
dark-gray before pressed, and turn blue after pressed. Press [ESC] to exit the test.
TestTestTestTest FingerprintFingerprintFingerprintFingerprint SensorSensorSensorSensor: The terminal automatically tests whether the fingerprint collector works properly by
checking whether the fingerprint images are clear and acceptable. When the user places his/her finger in the
fingered guide, the collected fingerprint image is displayed on the screen in real-time. Press [ESC] to exit the test.
TestTestTestTest Camera:Camera:Camera:Camera: The device automatically tests whether the camera works properly by checking whether the
collected images are clear and acceptable. Press [ESC]] to exit the test.
TestTestTestTest ClockClockClockClock RTCRTCRTCRTC: The terminal tests whether its clock works properly by checking the stopwatch of the clock.
Touch the screen to start counting, and touch it again to stop to check whether the counting is accurate. Press
[ESC] to exit the test.

User Manual for New Firmware of the 3-inch Color Screen
50
11117777 SystemSystemSystemSystem InformationInformationInformationInformation
You can check the storage status as well as firmware information of the terminal through the [System Information]
option.
Press on the initial interface. Press to select SystemSystemSystemSystem InfoInfoInfoInfo andpress OKOKOKOK.
Press▼ to select the one you wantto see and press OKOKOKOK.
DeviceDeviceDeviceDevice CapacityCapacityCapacityCapacity: The number of enrolled users, administrators, passwords, the total fingerprint storage capacity
and occupied capacity, ID cards and attendance capacity are displayed respectively.
DeviceDeviceDeviceDevice ininininfofofofo: The Device name, serial number, MAC Address, Fingerprint Algorithm, Manufacture and
Manufacture date are displayed on the device interface.
FirmwareFirmwareFirmwareFirmware infoinfoinfoinfo: The Firmware version, Bio Service, Push Service, Standalone Service and Dev Service are
displayed on the firmware info interface.
DeviceDeviceDeviceDevice CapacityCapacityCapacityCapacity DeviceDeviceDeviceDevice ininininformationformationformationformation FirmwareFirmwareFirmwareFirmware informationinformationinformationinformation

Appendix
51
AppendixAppendixAppendixAppendix
AppendixAppendixAppendixAppendix 1111 DescriptionDescriptionDescriptionDescription ofofofof TextTextTextText InputInputInputInput OperationOperationOperationOperation����
The device can recognize English letters, symbols, and numbers. Press **** to display the input method and press **** again to
switch the input method. Press #### to enter a space. Press ESCESCESCESC to exit the input method.
DescriptionDescriptionDescriptionDescription ofofofof entryentryentryentry ofofofof EnglishEnglishEnglishEnglish lettersletterslettersletters andandandand symbolssymbolssymbolssymbols ((((forforforfor example,example,example,example, creatingcreatingcreatingcreating aaaa shortshortshortshort message)message)message)message)
Press **** to display the input
method.
Press **** again to switch the input
method. Select Aa, a, or A for using
uppercase and lowercase letters
based on requirements.
If necessary, you can press 4444 twice in
succession to select HHHH.
Press 2222 to select aaaa. Finish the text
input in the same way.
Press #### to enter a space if
necessary.
Press * to switch to the symbol input
method and press 6666. Select !!!!. When
you complete the input, press ESCESCESCESC to
exit.
AppendixAppendixAppendixAppendix 2222 ImageImageImageImage UploadUploadUploadUpload RulesRulesRulesRules
1. User photo: Create a new directory named "photo" in the root dire'ctory of disk U and place user photos into the
directory. A maximum of 8,000 photos can be stored and the size of each photo cannot exceed 15 KB. The image
name is X.jpg (X is the user's employee ID, which is not limited in the number of digits). Images must be in .jpg
format.
2. Advertising image: Create a new directory named "advertise" in the root directory of disk U and place advertising
images into the directory. A maximum of 20 images can be stored and the size of each image cannot exceed 30 KB.
There are no restrictions on the image name and type.
3. Wallpaper: Create a new directory named "wallpaper" in the root directory of disk U and place wallpapers into the
directory. A maximum of 20 wallpapers can be stored and the size of each wall paper cannot exceed 30 KB. There
are no restrictions on the image name and type.
Note:Note:Note:Note: If the size of a single user photo or attendance photo is 10 KB or less, a total of 10,000 photos can be stored.

11 附录
52
AppendixAppendixAppendixAppendix 3333 PrintPrintPrintPrint functionfunctionfunctionfunction����
� External printer
【ExplainExplainExplainExplain】
This function is designed for a serial port printer only, the parallel printer is unavailable. The printing content output via
RS232. After a user is verified, the result will be sent out through serial port. If device connect with the printer the result
can be printed directly, can also use the Super Terminal to view the output content.
Device connect with
printer
Device printer
2 TXD <-----> 3 RXD
3 RXD <-----> 2 TXD
5 GND <----->7 FG
RS232 Pin-line order
【Connection】
【Instructions】
1.In the device menu, press MenuMenuMenuMenu-->Comm.Comm.Comm.Comm.-->RS232/485RS232/485RS232/485RS232/485 and select baud rate as 19200.
2.In the device menu, enter MenuMenuMenuMenu-->Comm.Comm.Comm.Comm.-->SecuritySecuritySecuritySecurity and select the print mode. There are 7 print modes to choose.
NoticeNoticeNoticeNotice:
1. It will print garbled information or can't print when baud is not selected 119200.
2. When print mode is mode 5, Attendance verification by prompted to select whether to print.
For example: San punched the card at 13:24:55 on September 1, 2009, there are different print formats to select, shown
as below:
VersionVersionVersionVersion 1111
00001 San 09/09/01 13:24:55 I
VersionVersionVersionVersion 2222
User No:00001
Date Time Check-In
09/09/01 13:24:55

Appendix
53
VersionVersionVersionVersion 3333
San 00001 09/09/01 13:24:55
VersionVersionVersionVersion 4444
Break-In
15:24:55 01/09/2009
00001
VersionVersionVersionVersion 5555
00001 09.09.01 13:24:55 Check-In
VersionVersionVersionVersion 6666
00001
Date Check-In
09.09.01 13:24:55
VersionVersionVersionVersion 7777
User ID: 00001
Check-In
09.09.01 13:24:55
AppendixAppendixAppendixAppendix 4444 anti-passanti-passanti-passanti-pass backbackbackback����
【overviewoverviewoverviewoverview】
Sometimes, some illegal person follows the employee into the gate, which will bring security problem. To prevent such risk,
this function is enabled. In record must match out record, or the gate won't be open.
This function needs two machines to work together. One is installed inside the door (master machine hereinafter), the
other is installed outside the door (slave machine hereinafter). Wigand signal communication is adopted between the two
machines.
Note:Note:Note:Note: 1. Be sure that the fingerprint machine and printer (Super Terminal)
have the same baud rate.
2. If the default print format can not meet your needs, you contact our
business deputy our company is able to present other customized format

11 附录
54
【workingworkingworkingworking principleprincipleprincipleprinciple】
The master machine has Wigand In and slave machine has Wigand Out. Connect Wigand Out of slave machine to
Wigand In of master machine. Wigand output from slave machine must not own machine ID. The number sent to master
machine from slave machine must be found in the master machine.
【functionfunctionfunctionfunction】
Judge whether it is anti-pass back according to user's recent in-out record. In record and out record must be matched.
This machine supports out, in, or out-in anti-pass back (enter machine menu—setting—system setting—advanced
setting—anti-pass back).
When master machine is set as "out anti-pass back",if user wants to come in and go out normally, his recent record must
be "in", or he cannot go out. Any "out" record will be "anti-pass back refused". For example, a user's recent record is "in",
his second record can be "out" or "in". His third record is based on his second record. Out record and in record must
match.(Notice: if customer has no record before, then he can come in but cannot go out. )
When the master machine is set as "in anti-pass back",if the user wants to come in and go out normally, his recent record
must be "out", or he cannot go out. Any out record will be "anti-pass back refused" by the system. (Notice: if the
customer has no former record, then he can go out, but cannot come in. )
When the master machine is set as "out-in anti-pass back",if the user wants to come in and go out normally, if his recent
record is "out" and "in", then his next record must be "in" and "out".
【operationoperationoperationoperation】
1)Select model
Master machine: Machine with Wiegand in function, except for F10 Reader.
Slave machine: Machine with Wiegand Out function.
2)Menu setting
Press ▼ to select Anti-PassbackAnti-PassbackAnti-PassbackAnti-PassbackSetupSetupSetupSetup and press OKOKOKOK
Enter to Anti-PassbackAnti-PassbackAnti-PassbackAnti-Passback SetupSetupSetupSetup
interface
Anti-passAnti-passAnti-passAnti-pass backbackbackback
Out anti-passback: If the device does not store the record of a person, the person can check out after the first comparison.

Appendix
55
In case that a person's record has been stored in the device, an alarm will be raised when the person checks out without
the corresponding entry record in the device. If only out anti-passback is enabled, entry is allowed at any time.In anti-passback: If the device does not store the record of a person, the person can check in after the first comparison. In
case that a person's record has been stored in the device, an alarm will be raised when the person checks in without the
corresponding exit record in the device. If only in anti-passback is enabled, exit is allowed at any time.In/out anti-passback: If the device does not store the record of a person, the person can check in and out after the first
comparison. In case that a person's record has been stored in the device, an alarm will be raised when the person checks
in or out without a corresponding exit or entry record in the device.
No anti-passback: The door will be opened only when a person is authenticated by the master host.DeviceDeviceDeviceDevice statusstatusstatusstatus
Entry control: When a device is used to control entry, the device saves only the entry records.
Exit control: When a device is used to control exit, the device saves only the exit records.
None: When the status of a device is set to None, the anti-passback function is disabled on the device.3)modify device's Wiegand output format
When the two devices are communicating, only Wiegand signals without device ID are received. Enter device menu-
>communication option->Wiegand option or enter software-〉basic setting-〉device management-〉Wiegand,to modify
"defined format" as "wiegand26 without device ID".
4)enroll user
The user must be on master machine and slave machine at the same time, and user PIN must be the same. Therefore, it
is necessary to enroll user on master machine and slave machine at the same time.
5)connection instruction
Wiegand communication is adopted for master machine and slave machine. Refer to the following for connection::
Master Slave
IND0 <-----> WD0
IND1 <-----> WD1
GND <-----> GND