User Manual - pifrance.fr filev417m0010en ‒ 7/9/2019 user manual v-417.xx6025e0 pimag® high-load...
38
V417M0010EN ‒ 7/9/2019 User Manual V-417.XX6025E0 PIMAG® HIGH-LOAD LINEAR STAGE MOTION | POSITIONING
Transcript of User Manual - pifrance.fr filev417m0010en ‒ 7/9/2019 user manual v-417.xx6025e0 pimag® high-load...

V417M0010EN ‒ 7/9/2019
User ManualV-417.XX6025E0 PIMAG® HIGH-LOAD LINEAR STAGE
M O T I O N | P O S I T I O N I N G

Contents1 Legal Information.........................................................................................................4
2 About this Document..................................................................................................52.1 Objective and Target Group..............................................................................52.2 Explanation of Symbols.................................................................................... 5
2.2.1 Typographic Conventions................................................................. 52.2.2 Symbols Used.................................................................................... 5
2.3 Figures................................................................................................................62.4 Downloading Manuals...................................................................................... 6
3 Safety............................................................................................................................73.1 Intended Use......................................................................................................73.2 General Safety Instructions.............................................................................. 73.3 Organizational Measures.................................................................................. 7
3.3.1 User Manual.......................................................................................73.3.2 General Personnel Qualification.......................................................7
4 Product Description.....................................................................................................84.1 Model Overview.................................................................................................84.2 Product Labeling................................................................................................8
4.2.1 Type Plate........................................................................................... 94.3 Scope of Delivery...............................................................................................94.4 Overview.......................................................................................................... 10
4.4.1 Base Body.........................................................................................104.4.2 Drive..................................................................................................104.4.3 Linear Encoder Connector...............................................................104.4.4 Purge Air System............................................................................. 10
4.5 Direction of Motion..........................................................................................124.6 Suitable Electronics......................................................................................... 12
5 Unpacking.................................................................................................................. 13
6 Installation................................................................................................................. 146.1 Mounting the V-417.xx6025E0.........................................................................146.2 Connecting the V-417.xx6025E0 to the Protective Earth Conductor.............156.3 Building a Multi-Axis System......................................................................... 176.4 Mounting the Load onto the V-417.xx6025E0................................................ 176.5 Connecting the V-417.xx6025E0...................................................................... 18
7 Startup / Operation................................................................................................... 207.1 Starting and Operating the V-417.xx6025E0.................................................. 20
8 Maintenance...............................................................................................................228.1 Cleaning............................................................................................................228.2 Moving the Motion Platform by Hand........................................................... 22
CONTENTS V417M0010EN ‒ 7/9/2019
2 M O T I O N | P O S I T I O N I N G

9 Troubleshooting.........................................................................................................23
10 Transportation............................................................................................................2410.1 Attaching the Transport Safeguard................................................................ 2410.2 Preparing the V-417.xx6025E0 for Transportation......................................... 24
11 Customer Service Department.................................................................................25
12 Technical Data............................................................................................................ 2612.1 Specifications...................................................................................................2612.2 Maximum Ratings........................................................................................... 2812.3 Ambient Conditions and Classifications........................................................2812.4 Dimensions...................................................................................................... 29
13 Old Equipment Disposal........................................................................................... 31
14 Appendix.................................................................................................................... 3214.1 Pin Assignment................................................................................................32
14.1.1 Drive Connector............................................................................... 3214.1.2 Encoder Connector.......................................................................... 33
14.2 NTC Temperature Sensor................................................................................3314.3 PTC Temperature Sensor................................................................................ 35
15 EU Declaration of Conformity...................................................................................36
CONTENTS V417M0010EN ‒ 7/9/2019
3 M O T I O N | P O S I T I O N I N G

1 Legal Information
The following company names and brands are registered trademarks of Physik Instrumente(PI) GmbH & Co. KG:
PI®, PIC®, NanoCube®, PICMA®, PIFOC, PILine®, NEXLINE®, PiezoWalk®, PicoCube®,PiezoMove®, PIMikroMove, NEXACT®, Picoactuator®, PInano®, NEXSHIFT®, PITOUCH®,PIMag®, PIHera, Q-Motion®
The patents held by PI can be found in our list at http://www.physikinstrumente.com/en/about-pi/patents.
EnDat is a trademark of Dr. Johannes Heidenhain GmbH.
© 2019 Physik Instrumente (PI) GmbH & Co. KG, Karlsruhe, Germany. The text, photographs,and drawings in this manual are protected by copyright. With regard thereto, PhysikInstrumente (PI) GmbH & Co. KG reserves all rights. The use of any text, images anddrawings is permitted only in part and only when indicating the source.
Original instructionsFirst print: 7/9/2019Document number: V417M0010en, ASt
Subject to change. This manual is superseded by any new release. The latest versions of theuser manuals are available for download (p. 6) at www.pi.ws.
Publisher:PI miCos GmbHFreiburger Strasse 3079427 EschbachGermany
Customer service department:Physik Instrumente (PI) GmbH & Co. KGAuf der Roemerstrasse 176228 KarlsruheGermany
1 LEGAL INFORMATION V417M0010EN ‒ 7/9/2019
4 M O T I O N | P O S I T I O N I N G

2 About this Document
2.1 Objective and Target Group
This user manual contains the information needed for the intended use of theV-417.xx6025E0.
Basic knowledge of closed-loop systems, motion control concepts, and applicable safetymeasures is assumed.
2.2 Explanation of Symbols
This chapter explains the symbols and markings used by PI in their user manuals.
2.2.1 Typographic Conventions
Symbol / Label Meaning
1.
2.
Action consisting of several steps whose sequential order must be ob-served
List item
p. 5 Cross-reference to page 5
RS-232 Labeling of an operating element on the product (example: socket ofthe RS-232 interface)
Start > Settings Menu path in the PC software (example: to open the menu, the Startand Settings menus must be clicked successively)
POS? Command line or a command from PI's General Command Set (GCS)(example: command to get the axis position)
Device S/N Parameter name (example: parameter where the serial number is stor-ed)
5 Value that must be entered or selected via the PC software
2.2.2 Symbols Used
Symbol / Label Meaning
General hazard symbol
DANGERDangerous situationFailure to observe can lead to death or serious injury.
Measures for avoiding the risk.
WARNINGDangerous situationFailure to observe can lead to serious injury.
Action to take to avoid the risk.
2 ABOUT THIS DOCUMENT V417M0010EN ‒ 7/9/2019
5 M O T I O N | P O S I T I O N I N G

CAUTIONDangerous situationFailure to observe can lead to minor injury.
Actions to take to avoid the risk.
NOTICEDangerous situationFailure to observe can lead to material damage.
Action to take to avoid the risk.
InformationAdditional information on the V-417.xx6025E0 that can affect your application.
2.3 Figures
For better understandability, the colors, proportions and degree of detail in illustrations candeviate from the actual circumstances. Photographic illustrations may also differ and mustnot be seen as guaranteed properties.
2.4 Downloading Manuals
The latest versions of the user manuals can be downloaded (p. 6) at www.pi.ws.
For products that are supplied with software (data storage device in the scope of delivery),access to the manuals is protected by a password. Protected content is only displayed on thewebsite after entering the access data. You need the data storage device for the product toget the access data.
If a manual is missing or problems occur with downloading, contact our customer servicedepartment (p. 25).
Downloading Manuals
1. Open the website www.pi.ws.
2. If the product was shipped with a data storage device: Log into the website:a) Click Login.b) Enter the login data.
The login data is in the [...]_Releasenews_[...].pdf in the Manuals directory on thedata storage device.If necessary: Follow the link and register yourself to get the login data.
c) Click Login or press the Enter key.
3. Search for the product:a) Click Search.b) Enter the product number up to the period (e.g., V-417) into the search field.c) Click Start search or press the Enter key.d) If necessary: Click Load more results at the bottom of the list.
4. Click the corresponding product in the list of search results.
5. Click the Downloads tab. The manuals are shown under Documentation.
6. Click the desired manual and save it.
2 ABOUT THIS DOCUMENT V417M0010EN ‒ 7/9/2019
6 M O T I O N | P O S I T I O N I N G

3 Safety
3.1 Intended Use
The V-417.xx6025E0 is a laboratory device as defined by DIN EN 61010-1. It is intended forindoor use and use in an environment that is free of dirt, oil, and lubricants.
In accordance with its design, the V-417.xx6025E0 is intended for positioning, adjusting andshifting loads in one axis at various velocities. The V-417.xx6025E0 is not intended forapplications in areas, in which a failure would present severe risks to human beings or theenvironment.
The positioner is intended for operation with a horizontally aligned motion axis. A verticallyaligned motion axis may only be operated with suitable gravity compensation (not in thescope of delivery).
The intended use of the V-417.xx6025E0 is only possible when completely mounted andconnected. The thermal protection sensor built into the V-417.xx6025E0's motor must beevaluated and monitored. The V-417.xx6025E0 must be operated with suitableelectronics (p. 12). The electronics are not in the scope of delivery of the V-417.xx6025E0.
The V-417.xx6025E0 may not be used for purposes other than those stated in this usermanual. The V-417.xx6025E0 may only be used in compliance with the technicalspecifications and instructions in this user manual.
3.2 General Safety Instructions
The V-417.xx6025E0 is built according to state-of-the-art technology and recognized safetystandards. Improper use of the V-417.xx6025E0 may result in personal injury and/or damageto the V-417.xx6025E0.
Use the V-417.xx6025E0 only for its intended purpose and if it is in perfect condition. Read the user manual. Eliminate any faults and malfunctions that are likely to affect safety immediately.The operator is responsible for correct installation and operation of the V-417.xx6025E0.
3.3 Organizational Measures
3.3.1 User Manual
Always keep this user manual available with the V-417.xx6025E0. The latest versions ofthe user manuals can be downloaded (p. 6) at www.pi.ws.
Add all information from the manufacturer such as supplements or technical notes to theuser manual.
If you give the V-417.xx6025E0 to a third party, also include this user manual as well asother relevant information provided by the manufacturer.
Only use the device on the basis of the complete user manual. Missing information due toan incomplete user manual can lead to serious or fatal injuries and damage to equipment.
Only install and operate the V-417.xx6025E0 after you have read and understood this usermanual.
3.3.2 General Personnel Qualification
The V-417.xx6025E0 may only be installed, started up, operated, maintained, and cleaned byauthorized and appropriately qualified personnel.
3 SAFETY V417M0010EN ‒ 7/9/2019
7 M O T I O N | P O S I T I O N I N G

4 Product Description
4.1 Model Overview
PIMag® high-load linear stage, xx mm travel range, 166 mm width, 450 N loadcapacity, absolute linear encoder with EnDat 2.2 signal transmission, 1 nm sensorresolution, ironless 3-phase linear motor, to 300 V
Product number Travel range: xx
V-417.056025E0 102 mm (4")
V-417.096025E0 204 mm (8")
V-417.136025E0 305 mm (12")
V-417.176025E0 407 mm (16")
V-417.216025E0 508 mm (20")
V-417.256025E0 610 mm (24")
V-417.336025E0 813 mm (32")
4.2 Product Labeling
1
2
1
3
2
67
5 4
Figure 1: Product labeling on the V-417.xx6025E0
1. Warning symbol: Risk of crushing
2. Warning symbol: Hot surface
3. Type plate
4. Connector labeling
5. Optional protective earth connector
6. Functional earth
7. Purge air connection labeling
4 PRODUCT DESCRIPTION V417M0010EN ‒ 7/9/2019
8 M O T I O N | P O S I T I O N I N G

4.2.1 Type Plate
Figure 2: Type plate of the V-417.xx6025E0
1. Data matrix code (example; contains the serial number)
2. Product number (example)
3. Serial number (example), individual for each V-417.xx6025E0Meaning of the position (counting from the left):1 = internal information,2 and 3 = year of manufacture,4 to 9 = consecutive numbers
4. Warning and conformity symbols (old equipment disposal (p. 31), CE mark (p. 36))
4.3 Scope of Delivery
Product number Description
V-417.xx6025E0 Linear stage according to the order (p. 8)
For V-417.xx6025E0 with xx = 05, 09, 13, 17:
V417B0015
Mounting kit for mounting theV-417.xx6025E0, consisting of
12 socket head screws, ISO 4762 M6×30 2 dowel pins, ISO 8734, 4m6 × 12 12 flat washers, ISO 7092, D11 d6.4 h1, 6
mm
For V-417.xx6025E0 with xx = 21, 25, 33:
V417B0016
Mounting kit for mounting theV-417.xx6025E0, consisting of
20 socket head screws, ISO 4762 M6×30 2 dowel pins, ISO 8734, 4m6 × 12 20 flat washers, ISO 7092, D11 d6.4 h1, 6
mm
MP188EK Short instructions for PIMag® positioners to300 V
For V-417.xx6025E0 with xx = 17, 21, 25, 33:
V417B0029
Transport means: Carrying aid for theV-417.xx6025E0
4 PRODUCT DESCRIPTION V417M0010EN ‒ 7/9/2019
9 M O T I O N | P O S I T I O N I N G

4.4 Overview
1
2
43
Figure 3: Elements of the V-417.xx6025E0
1. Base body with drive
2. Motion platform
3. Drive and linear encoder connector
4. Purge air connector
4.4.1 Base Body
The base body is the basis of the positioner. The V-417.xx6025E0 is mounted onto a surfacevia the base body (p. 14).
The base body comprises the following subassembly (subassemblies):
Drive
The drive of the positioner is a 3-phase magnetic linear motor. The linear motor transfers thedrive force to the motion platform directly and free of friction.
Absolute linear encoder
Absolute encoders supply explicit position information that enables immediatedetermination of the position. Therefore, no referencing is necessary when switching on.
The position is measured directly at the motion platform, which minimizes the influence ofmechanical play and deformation when measuring the position.
4.4.2 Drive
The drive generates the torque required for the dynamics of the motion platform.
The drive comprises the following subassembly (subassemblies):
Motor
The motor generates the torque required for the dynamics of the motion platform.
4.4.3 Linear Encoder Connector
The linear encoder connector transmits the V-417.xx6025E0's sensor signals.
4.4.4 Purge Air System
The purge air system protects the drive and guides of the V-417.xx6025E0 againstsurrounding dust.
The purge air system comprises the following subassembly (subassemblies):
4 PRODUCT DESCRIPTION V417M0010EN ‒ 7/9/2019
10 M O T I O N | P O S I T I O N I N G

Passive dust protection
The passive dust protection consists of covering strips that seal the openings on the side ofthe V-417.xx6025E0's base body and therefore reduces the amount of dust that can penetrate.
Active dust protection
The active dust protection consists of a purge air connector on the base body of theV-417.xx6025E0, which creates a slight overpressure in the V-417.xx6025E0 and thereforereduces the amount of dust that can penetrate.
4 PRODUCT DESCRIPTION V417M0010EN ‒ 7/9/2019
11 M O T I O N | P O S I T I O N I N G

4.5 Direction of Motion
Positive Direction of Motion
Figure 4: Schematic representation of the direction of motion
4.6 Suitable Electronics
The V-417.xx6025E0 must be connected to suitable electronics that supply the necessaryvoltage for operating and if required, to evaluate the sensor and limit switch signals. Thefollowing electronics are suitable:
Product number Description
ACS modular controller
To order, contact our customer service department (p. 25).
4 PRODUCT DESCRIPTION V417M0010EN ‒ 7/9/2019
12 M O T I O N | P O S I T I O N I N G

5 UnpackingThe positioner is delivered with the transport safeguard installed.
12
Figure 5: V-417.xx6025E0 with transport safeguard
1. Transport safeguard
2. Wing screw with M6×10 thread
CAUTIONRisk of crushing by moving parts!Risk of minor injuries from crushing between the moving parts of the V-417.xx6025E0 or theload and a fixed part or obstacle.
Transport the V-417.xx6025E0 only when the transport safeguard is attached. Bring the V-417.xx6025E0 to the intended place of use. If the V-417.xx6025E0 was supplied
with a carrying aid: Use the carrying aid to transport the V-417.xx6025E0. Remove the transport safeguard afterwards.
Unpack the V-417.xx6025E0 and remove the transport safeguard
1. Unpack the V-417.xx6025E0 with care.
2. Compare the contents with the scope of delivery according to the contract and thedelivery note.
3. Inspect the contents for signs of damage. If any parts are damaged or missing, contactour customer service department (p. 25) immediately.
4. If the V-417.xx6025E0 was supplied with a carrying aid (p. 9): Use the carrying aid totransport the V-417.xx6025E0 to the intended place of use.
5. If the V-417.xx6025E0 was supplied with ESD protective caps on the connectors: Do notremove the ESD protective caps.
6. Remove the transport safeguard:a) Unscrew and remove the wing screw.b) Remove the transport safeguard.
7. Keep all packaging materials and the transport safeguard in case the product needs to bereturned.
5 UNPACKING V417M0010EN ‒ 7/9/2019
13 M O T I O N | P O S I T I O N I N G
6 Installation
6.1 Mounting the V-417.xx6025E0
Overview
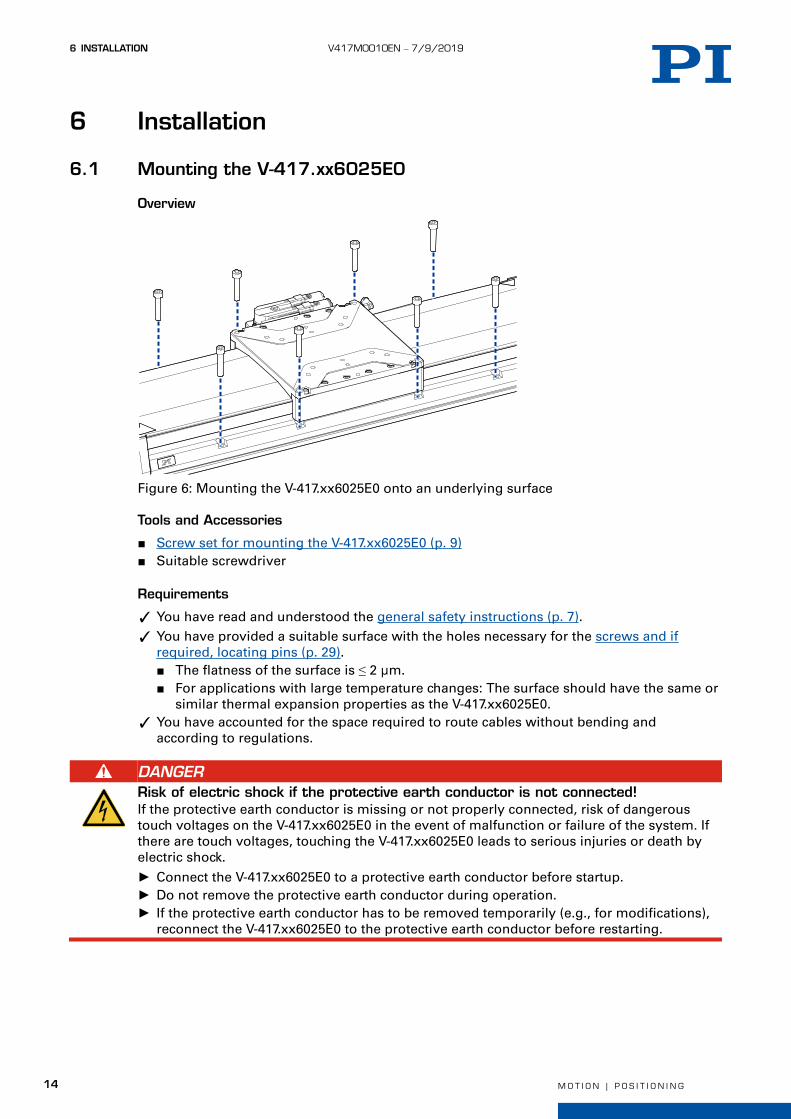
Figure 6: Mounting the V-417.xx6025E0 onto an underlying surface
Tools and Accessories
Screw set for mounting the V-417.xx6025E0 (p. 9) Suitable screwdriver
Requirements
You have read and understood the general safety instructions (p. 7).
You have provided a suitable surface with the holes necessary for the screws and ifrequired, locating pins (p. 29). The flatness of the surface is ≤ 2 μm. For applications with large temperature changes: The surface should have the same or
similar thermal expansion properties as the V-417.xx6025E0. You have accounted for the space required to route cables without bending and
according to regulations.
DANGERRisk of electric shock if the protective earth conductor is not connected!If the protective earth conductor is missing or not properly connected, risk of dangeroustouch voltages on the V-417.xx6025E0 in the event of malfunction or failure of the system. Ifthere are touch voltages, touching the V-417.xx6025E0 leads to serious injuries or death byelectric shock.
Connect the V-417.xx6025E0 to a protective earth conductor before startup. Do not remove the protective earth conductor during operation. If the protective earth conductor has to be removed temporarily (e.g., for modifications),
reconnect the V-417.xx6025E0 to the protective earth conductor before restarting.
6 INSTALLATION V417M0010EN ‒ 7/9/2019
14 M O T I O N | P O S I T I O N I N G

CAUTIONRisk of crushing by moving parts!Risk of minor injuries from crushing between the moving parts of the V-417.xx6025E0 or theload and a fixed part or obstacle.
Use safeguards to protect limbs in areas where they could be caught by moving parts. Maintain the safety distances according to DIN EN ISO 13857 when installing protective
structures.
NOTICEDamage due to collisions!Collisions can damage the V-417.xx6025E0, the load to be moved, and the surroundings.
Make sure that collisions are not possible between the V-417.xx6025E0, the load to bemoved, and the surroundings in the motion range of the V-417.xx6025E0.
Do not place any cables or other objects in areas where they could be caught by movingparts.
NOTICEExcessively long screws and locating pinsScrews and locating pins that are inserted too deeply can damage the V-417.xx6025E0.
Pay attention to the depth of the mounting and locating holes (p. 30) in theV-417.xx6025E0.
Only use screws and locating pins of the correct length for the respective mounting holes.
Mounting the V-417.xx6025E0 onto an Underlying Surface
1. If necessary: Insert the locating pins into the corresponding holes in the underlyingsurface.
2. Align the V-417.xx6025E0 on underlying surface so that the corresponding mounting holesin the V-417.xx6025E0 and underlying surface in line.
3. Put the V-417.xx6025E0 onto the underlying surface so that the locating pins can beinserted into the corresponding locating holes with the V-417.xx6025E0.
4. If necessary: Allow access to the mounting holes in the base body of the V-417.xx6025E0.Possible measures: Temporary startup of the V-417.xx6025E0 (p. 20) and commanding the motion
platform to a suitable position Push the motion platform by hand (p. 22)
5. If necessary, use a flat washer with each screw and insert the screws through the washerinto the mounting hole.
6. Tighten the screws in all accessible mounting holes completely.Recommended torque: 3 Nm
7. If necessary: Repeat steps 4 to 6 for all concealed mounting holes.
8. Check that the V-417.xx6025E0 is fixed firmly to the underlying surface.
6.2 Connecting the V-417.xx6025E0 to the Protective Earth Conductor
The V-417.xx6025E0 must be connected to the protective earth conductor via the driveconnector.
It is only necessary to connect the V-417.xx6025E0's base body to the protective earthconductor when the following conditions are met:
The electronics do not guarantee safe connection of the drive connector to the groundpotential.
6 INSTALLATION V417M0010EN ‒ 7/9/2019
15 M O T I O N | P O S I T I O N I N G

Overview
Figure 7: Protective earth connector on the V-417.xx6025E0
1. Connector for the protective earth conductor on the V-417.xx6025E0, indicated by theprotective earth symbol
2. Safety washer
3. Flat washer
4. Protective earth conductor lug
5. Screw, ISO 7045 M4×8
Tools and Accessories
Suitable protective earth conductor: Cable cross section ≥ 0.75 mm2
Contact resistance <0.1 Ω at 25 A at all connection points relevant for attaching theprotective earth conductor
Suitable screwdriver
Requirements
You have read and understood the general safety instructions (p. 7).
DANGERRisk of electric shock if the protective earth conductor is not connected!If the protective earth conductor is missing or not properly connected, risk of dangeroustouch voltages on the V-417.xx6025E0 in the event of malfunction or failure of the system. Ifthere are touch voltages, touching the V-417.xx6025E0 leads to serious injuries or death byelectric shock.
Connect the V-417.xx6025E0 to a protective earth conductor before startup. Do not remove the protective earth conductor during operation. If the protective earth conductor has to be removed temporarily (e.g., for modifications),
reconnect the V-417.xx6025E0 to the protective earth conductor before restarting.
Information Observe the applicable standards for connecting the protective earth conductor.
Connecting the V-417.xx6025E0 to the Protective Earth Conductor
1. If necessary, attach a suitable cable lug to the protective earth conductor.
2. Attach the cable lug of the protective earth conductor to the protective earth connectionas shown in the illustration of the V-417.xx6025E0.
3. Tighten the screw with a torque of 1.2 Nm to 1.5 Nm.
6 INSTALLATION V417M0010EN ‒ 7/9/2019
16 M O T I O N | P O S I T I O N I N G

4. Make sure that the contact resistance is <0.1 Ω at 25 A at all connection points relevant forattaching the protective earth conductor.
6.3 Building a Multi-Axis System
The V-417.xx6025E0 can be used in XY systems.
Designations in these instructions:
Lower positioner: Forms the basis of the multi-axis system, is attached to an underlyingsurface
Upper positioner: Forms the upper axis of the multi-axis system, is attached to the lowerpositioner rotated by 90°
NOTICEExcessively long screws and locating pinsScrews and locating pins that are inserted too deeply can damage the V-417.xx6025E0.
Pay attention to the depth of the mounting and locating holes (p. 30) in theV-417.xx6025E0.
Only use screws and locating pins of the correct length for the respective mounting holes.
6.4 Mounting the Load onto the V-417.xx6025E0
Overview
1
1
1
1
2
3
Figure 8: Mounting the load onto the V-417.xx6025E0
1. Screws
2. Load
3. Motion platform of the V-417.xx6025E0
Tools and Accessories
At least 3 screws with suitable dimensions (p. 30) Suitable tool for tightening the screws Optional: 2 suitably dimensioned dowel pins as locating pins for aligning the load on the
V-417.xx6025E0
6 INSTALLATION V417M0010EN ‒ 7/9/2019
17 M O T I O N | P O S I T I O N I N G

Requirements
You have read and understood the general safety instructions (p. 7).
You have mounted the V-417.xx6025E0 on the surface (p. 14) properly.
The V-417.xx6025E0 is not connected to the electronics.
You have prepared the load so that it can be fixed to the mounting holes on the motionplatform: The distance between the center of gravity of the load and the center of the motion
platform is as small as possible in all directions. At least three points are provided for fixing the load on the motion platform.
NOTICEImpermissibly high load on the V-417.xx6025E0An impermissible high load impairs the motion of the platform and can damage theV-417.xx6025E0.
Pay attention to the maximum permissible forces (p. 26) that may act on the motionplatform.
In the case of multi-axis systems, include the masses of the positioners to be movedwhen calculating the load.
NOTICEExcessively long screws and locating pinsScrews and locating pins that are inserted too deeply can damage the V-417.xx6025E0.
Pay attention to the depth of the mounting and locating holes (p. 30). Only use screws and locating pins of the correct length for the respective mounting holes.
Fixing the Load
1. If necessary: Insert the locating pins into the corresponding holes in the motion platform.
2. Align the load on the motion platform so that the mounting holes selected in the motionplatform can be used for mounting the load.
3. Place the load onto the motion platform so that the locating pins are inserted into thecorresponding locating holes in the load.
4. Tighten the screws in all mounting holes.
5. Check that the load is fixed firmly to the motion platform.
6.5 Connecting the V-417.xx6025E0
Tools and Accessories
Suitable cable set If necessary: Suitable screwdriver for the locking screws of the connectors. Optional: Purge air connector with the following properties:
Pressure: 2 to 6 bar (200 to 600 kPa); purge air hose: Outer diameter 4 mm; air quality asstated in the specifications (p. 26)
Requirements
You have read and understood the general safety instructions (p. 7).
You have read and understood the user manual for the electronics.
You have installed the electronics properly.
The electronics are switched off.
The V-417.xx6025E0 is connected to the protective earth conductor (p. 15).
6 INSTALLATION V417M0010EN ‒ 7/9/2019
18 M O T I O N | P O S I T I O N I N G

NOTICEDamage due to incorrect connection of the V-417.xx6025E0!Connecting unsuitable electronics or the wrong cable can lead to damage to theV-417.xx6025E0 or the electronics.
Make sure that the electronics support the drive type of the V-417.xx6025E0 and has beenconfigured accordingly.
Use cables from PI miCos only to connect the V-417.xx6025E0 to the electronics. Pay attention to correct pin assignment (p. 32).
Connecting the V-417.xx6025E0
1. If necessary: Remove the ESD protective caps from the connectors of the V-417.xx6025E0.
2. All of the V-417.xx6025E0's connections must be made in the following order:a) Optional: Purge air connector
Permissible pressure: 2 to 6 bar (200 to 600 kPa)b) Drive connectorc) Linear encoder connector
3. Secure the connectors against unintentional removal.
4. If necessary: Turn the drive and encoder connector carefully to a position suitable for yourinstallation conditions.The drive and encoder connector of the V-417.xx6025E0 can be turned up to 180° (in stepsof approximately 7°).
≈7°
Figure 9: Rotation range of the V-417.xx6025E0's drive/sensor connectors
6 INSTALLATION V417M0010EN ‒ 7/9/2019
19 M O T I O N | P O S I T I O N I N G

7 Startup / Operation
7.1 Starting and Operating the V-417.xx6025E0
Requirements
You have read and understood the general safety instructions (p. 7).
For startup with a load or in a multi-axis system: You have installed the V-417.xx6025E0properly (p. 14).
The V-417.xx6025E0 is connected to the protective earth conductor (p. 15).
If the V-417.xx6025E0 was delivered with the transport safeguard fitted: You have removedthe transport safeguard (p. 13).
You have read and understood the user manual for the electronics used.
If a digital controller is used: You have read and understood the manual for the PCsoftware used.
The electronics and if required, the PC software, have been installed (see the user manualfor the electronics).
DANGERRisk of electric shock if the protective earth conductor is not connected!If the protective earth conductor is missing or not properly connected, risk of dangeroustouch voltages on the V-417.xx6025E0 in the event of malfunction or failure of the system. Ifthere are touch voltages, touching the V-417.xx6025E0 leads to serious injuries or death byelectric shock.
Connect the V-417.xx6025E0 to a protective earth conductor before startup. Do not remove the protective earth conductor during operation. If the protective earth conductor has to be removed temporarily (e.g., for modifications),
reconnect the V-417.xx6025E0 to the protective earth conductor before restarting.
CAUTIONRisk of crushing by moving parts!Risk of minor injuries from crushing between the moving parts of the V-417.xx6025E0 or theload and a fixed part or obstacle.
Use safeguards to protect limbs in areas where they could be caught by moving parts. Maintain the safety distances according to DIN EN ISO 13857 when installing protective
structures.
CAUTIONRisk of being caught by moving parts!Risk of minor injury if hair, jewelry or clothing get caught by moving parts.
Fit safeguards around all areas with moving parts. Never work with the unprotected V-417.xx6025E0 if you have long hair, loose jewelry or
clothing.
CAUTIONBurning due to hot surface!The drive of the V-417.xx6025E0 and the surroundings can heat up during operation.Touching the drive and surrounding parts can result in minor injuries from burning.
Make sure that the hot drive and the surrounding parts cannot be touched.
7 STARTUP / OPERATION V417M0010EN ‒ 7/9/2019
20 M O T I O N | P O S I T I O N I N G

NOTICEOperating voltage excessively high or incorrectly connected!Operating voltages that are too high or incorrectly connected can cause damage to theV-417.xx6025E0.
Pay attention to the operating voltage range (p. 28), which is specified for theV-417.xx6025E0.
Pay attention to correct pin assignment (p. 32).
NOTICEDamage due to collisions!Collisions can damage the V-417.xx6025E0, the load to be moved, and the surroundings.
Stop the motion immediately if an electronics malfunction occurs. If possible, adapt the travel range limits of your mechanical system in the software that
you use for commanding the motion.
NOTICEUncontrolled oscillation!Oscillation can cause irreparable damage to the V-417.xx6025E0. Oscillation is indicated by ahumming noise and can be caused by the following:
The load and/or dynamics during operation differ considerably from the calibrationsettings.
If you notice oscillation, stop the V-417.xx6025E0 immediately.
Starting and Operating the V-417.xx6025E0
1. Start the electronics (see the user manual for the electronics).
2. Configure the electronics for the V-417.xx6025E0 during startup: If you are using a digital controller from PI: In the PC software, select the entry in the
positioner database that matches the V-417.xx6025E0 exactly. If you are using electronics from another manufacturer: Configure the electronics
according to the parameters of the V-417.xx6025E0.
3. Start a few motion cycles for testing purposes (see the user manual for the electronics).
7 STARTUP / OPERATION V417M0010EN ‒ 7/9/2019
21 M O T I O N | P O S I T I O N I N G

8 Maintenance
NOTICEDamage due to improper maintenance!Improper maintenance can lead to misalignment and failure of the V-417.xx6025E0.
Loosen screws only according to the instructions in this manual or the instructions of ourcustomer service department (p. 25).
8.1 Cleaning
Requirements
You have disconnected the V-417.xx6025E0 from the electronics.
Other Materials Required
Soft, lint-free cloth Mild cleaning agent or disinfectantIf you have any questions on the auxiliary materials recommended for the V-417.xx6025E0,contact our customer service department (p. 25).
NOTICEDamage due to unsuitable cleaning agents!Some cleaning agents can cause rusting on the V-417.xx6025E0 or dissolve plastics, paints oradhesives.
Do not clean with water or acetone.
Cleaning the V-417.xx6025E0
1. Dampen the cloth with the cleaning agent or disinfectant.
2. Carefully wipe the surfaces of the V-417.xx6025E0.
8.2 Moving the Motion Platform by Hand
It may be necessary to move the motion platform manually,
to allow access to the mounting holes in the positioner's base body for the mountingscrews,
to move the motion platform away from the mechanical hard stop and make theV-417.xx6025E0 operational again.
Requirements
You have disconnected the V-417.xx6025E0 from the electronics.
Moving the Motion Platform by Hand
1. Exert a steady force on the motion platform to move it.
8 MAINTENANCE V417M0010EN ‒ 7/9/2019
22 M O T I O N | P O S I T I O N I N G

9 Troubleshooting
The positioner does not move
Cable not connected correctly Check the cable connections.
The electronics or mechanics were replaced Run the startup (p. 20) once again.
Electronics not connected correctly Check all connecting cables (p. 18).
Defective electronics Check the electronics.
Excessive load Reduce the acceleration and velocity. Adapt the servo-control parameters, see the
user manual for the electronics. Reduce the load, see "Specifications" (p. 26).
The positioner was connected to the switch-ed-on electronics
Switch the electronics off and on again or restartthem with the RBT command or with the corre-sponding PC software function.
Incorrect configuration Check the V-417.xx6025E0's parameter settingsin the electronics connected and make the ap-propriate corrections.
Incorrect command or incorrect syntax Send the ERR? command to the PI electronicsconnected and check the error code returned.
Incorrect axis or channel commanded Make sure that the electronics use the correctaxis respectively channel identifier.
Reduced positioning accuracy
Warped base body Mount the V-417.xx6025E0 onto an even sur-face (p. 14).
Target position is approached too slowly orwith overshoot
Check whether the servo control parameter set-tings correspond to the selected closed-loopcontrol mode; see user manual for the controller.
If necessary, correct the settings of the servocontrol parameters.
The target position is not kept stable due toinappropriately set speed / acceleration
Correct the corresponding servo control parame-ter settings (see the user manual for the control-ler).
Uncontrolled oscillation
Large changes to the load or the alignmentof the V-417.xx6025E0
Switch off the servo control system or the con-troller immediately.
Check whether the servo control parameter set-tings correspond to the selected closed-loopcontrol mode; see user manual for the controller.
If necessary, correct the settings of the servocontrol parameters.
Increased wear
Increased wear due to small motion over along period of time
Perform a maintenance run (p. 22).
Traveling to the hard stop with maximumforce
Ensure that the end of the travel range is ap-proached at low velocity and with low force.
9 TROUBLESHOOTING V417M0010EN ‒ 7/9/2019
23 M O T I O N | P O S I T I O N I N G

10 Transportation
10.1 Attaching the Transport Safeguard
Tools and Accessories
Transport safeguard with wing screw (p. 13)
CAUTIONRisk of crushing by moving parts!Risk of minor injuries from crushing between the moving parts of the V-417.xx6025E0 or theload and a fixed part or obstacle.
Transport the V-417.xx6025E0 only when the transport safeguard is attached. Bring the V-417.xx6025E0 to the intended place of use. If the V-417.xx6025E0 was supplied
with a carrying aid: Use the carrying aid to transport the V-417.xx6025E0. Remove the transport safeguard afterwards.
NOTICEMechanical overload due to transportation without safeguardAn impermissible mechanical load on the V-417.xx6025E0 due to transportation without asafeguard can damage the V-417.xx6025E0 and lead to loss of accuracy.
Ship the V-417.xx6025E0 in the original packaging only and with the transport safeguardinstalled.
Attaching the transport safeguard
1. Attach the transport safeguard to theV-417.xx6025E0.
2. Align the transport safeguard so that one of its holes is over a mounting hole in themotion platform.
3. Fasten the transport safeguard to the motion platform with the wing screw.
10.2 Preparing the V-417.xx6025E0 for Transportation
Preparing the V-417.xx6025E0 for Transportation
1. Pay attention to the ambient conditions and classifications (p. 28).
2. Pack the V-417.xx6025E0 in the original packaging.
3. If the V-417.xx6025E0 is to be sent, use a stable outer box.
10 TRANSPORTATION V417M0010EN ‒ 7/9/2019
24 M O T I O N | P O S I T I O N I N G

11 Customer Service DepartmentFor enquiries and orders, contact your PI miCos representative or send us an email.
If you have any questions concerning your system, provide the following information:
Product and serial numbers of all products in the system Firmware version of the controller (if applicable) Version of the driver or the software (if applicable) Operating system on the PC (if applicable)If possible: Take photographs or make videos of your system that can be sent to ourcustomer service department if requested.
Customer service address:Physik Instrumente (PI) GmbH & Co. KGAuf der Roemerstrasse 176228 KarlsruheGermany
11 CUSTOMER SERVICE DEPARTMENT V417M0010EN ‒ 7/9/2019
25 M O T I O N | P O S I T I O N I N G

12 Technical Data
12.1 Specifications
Motion V-417.05 V-417.09 V-417.13 V-417.17 Unit Toler-ance
Active axes X X X X
Travel range 102 204 305 407 mm
Pitch / yaw ±14 ±19 ±29 ±39 μrad max.
Straightness / flat-ness
±2.5 ±4 ±6 ±8 μm max.
Velocity, unloaded 2000 2000 2000 2000 mm/s max.
Positioning accura-cy, uncalibrated
±4 ±8 ±10 ±12 μm typ.
Motion V-417.21 V-417.25 V-417.33 Unit Toler-ance
Active axes X X X
Travel range 508 610 813 mm
Pitch / yaw ±40 ±45 ±50 μrad max.
Straightness / flat-ness
±9 ±10 ±12 μm max.
Velocity, unloaded 2000 2000 2000 mm/s max.
Positioning accura-cy, uncalibrated
±14 ±15.5 ±17 μm typ.
Encoder options V-417.xxx025Ex Unit Toler-ance
Integrated sensor Absolute-measuring linear encoder
Sensor signal EnDat 2.2
Design Resolution 0.001 μm
Minimum Incremental Mo-tion
10 nm typ.
Bidirectional repeatability ±0.5 μm typ.
Limit switch –
12 TECHNICAL DATA V417M0010EN ‒ 7/9/2019
26 M O T I O N | P O S I T I O N I N G

Mechanical properties V-417.xxxxxx Unit Toler-ance
Guide type Recirculating ball bearing guide
Load capacity in Z 450 N max.
Permissible lateral force 250 N max.
Permissible torque in θX 40 N·m max.
Permissible torque in θY 30 N·m max.
Permissible torque in θZ 40 N·m max.
Drive properties V-417.xx6 Unit Toler-ance
Drive type Ironless 3-phase linear motor
Intermediate circuit voltage,RMS
300 V DC max.
Peak force 300 N typ.
Nominal force 87 N typ.
Peak current, RMS 15 A typ.
Nominal current, RMS 4.4 A typ.
Force constant, RMS 19.9 N/A typ.
Motor constant 8.4 N/√W typ.
Electrical time constant 0.35 ms
Resistance phase-phase 3.6 Ω typ.
Inductance phase-phase 1.2 mH typ.
Back EMF phase-phase 16 V·s/m max.
Pole pitch N-N 30 mm
12 TECHNICAL DATA V417M0010EN ‒ 7/9/2019
27 M O T I O N | P O S I T I O N I N G

Miscellaneous V-417 Unit Toler-ance
Operating TemperatureRange
5 to 40 °C
Material Aluminum, black anodized
stainless steel
Overall mass V-417.05 (102 mm travel range): 9.3
V-417.09 (204 mm travel range): 11.2
V-417.13 (305 mm travel range): 13.0
V-417.17 (407 mm travel range): 14.8
V-417.21 (508 mm travel range): 16.6
V-417.25 (610 mm travel range): 18.4
V-417.33 (813 mm travel range): 21.1
kg ±5 %
Moved mass 2.8 kg ±5 %
MTBF 20000 h
Connector M17 (motor)
M17 (linear encoder)
Fitting for purge air hose with outside diame-ter 4 mm
Purge air system Operating pressure: 2 to 6 bar (200 to 600kPa)
Relative humidity: < 70 %
Absolute humidity: < 35 g/m3
Recommended controllers ACS modular controller
12.2 Maximum Ratings
The V-417.xx6025E0 is designed for the following operating data:
Maximum operating voltage Maximum operating fre-quency
Maximum peak current, RMS
300 V – 15 A
12.3 Ambient Conditions and Classifications
The following ambient conditions and classifications for the V-417.xx6025E0 must beobserved:
12 TECHNICAL DATA V417M0010EN ‒ 7/9/2019
28 M O T I O N | P O S I T I O N I N G

Area of application For indoor use only
Maximum altitude 2000 m above msl
Relative humidity Max. 80 % for temperatures to 31 °C,linearly decreasing to 50 % at 40 °C
Storage temperature -20 °C to 60 °C
Transport temperature -20 °C to 60 °C
Overvoltage category II
Supply voltage fluctuations Max. ±10 % of the nominal voltage
Protection class I
Degree of pollution 1
Degree of protection according to IEC 60529 IP30
12.4 Dimensions
A
D(Energychain overlap
at hardstop)
X
Bcenter of travel position
(reference position)
6,6 / Ø 10,8x6,415
1/2 LSW (LE1) 1/2 LSW (LE2) 1/2 HDS 1/2 HDS
150
C
150
4 x Ø4 H7x7/107,5
8,5
83,5
82,5
X
75
45 165 1
211
70
75
100
150
75
100
150
2 x 4 H7x7
2 x 4 H7x7
2 x 4 H7x7
4 x M6 8
4 x M6 8
4 x M6 8
162
164
Figure 10: Dimensions of the V-417.xx6025E0
Dimensions in mm. Note that the decimal places are separated by a comma in the drawings.
12 TECHNICAL DATA V417M0010EN ‒ 7/9/2019
29 M O T I O N | P O S I T I O N I N G

Figure 11: Motion platform of the V-417.xx6025E0: Dimensions and mounting holes
Dimensions in mm. Note that the decimal places are separated by a comma in the drawings.
12 TECHNICAL DATA V417M0010EN ‒ 7/9/2019
30 M O T I O N | P O S I T I O N I N G

13 Old Equipment DisposalIn accordance with EU law, electrical and electronic equipment may not be disposed of in EUmember states via the municipal residual waste.
Dispose of your old equipment according to international, national, and local rules andregulations.
In order to fulfil the responsibility as the product manufacturer, PI miCos undertakesenvironmentally correct disposal of all PI miCos equipment free of charge, if it was madeavailable to the market after August 13, 2005.
Any old PI miCos equipment can be sent free of charge to the following address:
PI miCos GmbHFreiburger Strasse 3079427 EschbachGermany
13 OLD EQUIPMENT DISPOSAL V417M0010EN ‒ 7/9/2019
31 M O T I O N | P O S I T I O N I N G

14 Appendix
14.1 Pin Assignment
14.1.1 Drive Connector
A
B
C
1
23
45
PE
Figure 12: M17 9 (f)
Pin Function
A Phase 1
B Phase 2
C Phase 3
1 Output: Temperature sensor (NTC) (+)
2 Output: Temperature sensor (NTC) (-)
3 Not connected
4 Not connected
5 Outer shielding
PE Protective earth
14 APPENDIX V417M0010EN ‒ 7/9/2019
32 M O T I O N | P O S I T I O N I N G

14.1.2 Encoder Connector
Figure 13: M17 15 (f)
Pin Function
1 Output: DATA (+)
2 Output: DATA (-)
3 Output: CLOCK (+)
4 Output: CLOCK (-)
5 Not connected
6 Not connected
7 Not connected
8 Not connected
9 Not connected
10 Input: Power supply
11 Ground
12 Not connected
A Output: Temperature sensor (PTC) (+)
B Output: Temperature sensor (PTC) (-)
C Outer shielding
14.2 NTC Temperature Sensor
The V-417.xx6025E0 is equipped with an NTC temperature sensor for monitoring the coiltemperature. The electrical resistance of the NTC temperature sensor decreases considerablyas temperature increases. The controller must cut the power supply to the motor (switchingthreshold: 511 Ω) when the critical temperature (110 °C) is reached.
14 APPENDIX V417M0010EN ‒ 7/9/2019
33 M O T I O N | P O S I T I O N I N G

0
5000
10000
15000
20000
25000
30000
35000
0 10 20 30 40 50 60 70 80
R /
Ω
T / °C
Figure 14: NTC temperature sensor of the V-417.xx6025E0, electrical resistance overtemperature, 0°C to 80°C
0
200
400
600
800
1000
1200
1400
80 85 90 95 100 105 110 115 120 125 130
R /
Ω
T / °C
Figure 15: NTC temperature sensor of the V-417.xx6025E0, electrical resistance overtemperature, 80°C to 130°C
14 APPENDIX V417M0010EN ‒ 7/9/2019
34 M O T I O N | P O S I T I O N I N G

Temperature (°C) Electrical resistance (Ω)
0 32650
10 19900
20 12490
30 8057
40 5327
50 3603
60 2488
70 1752
80 1258
90 918
100 680
110 (critical temperature) 511 (switching threshold)
120 389
130 301
14.3 PTC Temperature Sensor
The V-417.xx6025E0 is equipped with a PTC temperature sensor to prevent the motor fromoverheating. The electrical resistance of the PTC temperature sensor increases considerablyinto the critical temperature range. The controller must cut the power supply to the motor(switching threshold) when the critical temperature is reached.
Temperature Electrical resistance
Up to 90°C < 250 Ω
Up to 105°C < 550 Ω
110°C (critical temperature) 1000 Ω (switching threshold)
More than 110°C > 1330 Ω
14 APPENDIX V417M0010EN ‒ 7/9/2019
35 M O T I O N | P O S I T I O N I N G

15 EU Declaration of ConformityAn EU Declaration of Conformity was issued for the V-417.xx6025E0 in accordance with thefollowing European directives:
Low Voltage Directive EMC Directive RoHS DirectiveThe standards applied for certifying conformity are listed below.
Safety (Low Voltage Directive): EN 61010-1 EMC: EN 61326-1 RoHS: EN 50581
15 EU DECLARATION OF CONFORMITY V417M0010EN ‒ 7/9/2019
36 M O T I O N | P O S I T I O N I N G

Glossary
BacklashPosition error caused by mechanical play in that drivetrain that occurs when changing thedirection. Backlash is caused by mechanical play in drivetrain components such asgearheads, bearings or by friction in the guides. In contrast to hysteresis, backlash can leadto instability in position-controlled systems because it causes dead time in the servo loop.Backlash depends on the temperature, acceleration, load, leadscrew position, positioningdirection, wear etc. Backlash is suppressed by preloading the drivetrain. A positionmeasuring method that can detect the position of the platform directly, eliminates all errorsin the drivetrain (direct measuring). The data table shows typical measured values. Data forvacuum versions can differ.
Design ResolutionThe theoretical minimum movement that can be made. Design resolution must not beconfused with minimum incremental motion. In indirect position measurement methods,values for drive screw pitch, gear ratio, motor or sensor/encoder resolution, for example, areincluded in the calculation of the resolution. Normally, the design resolution is considerablybelow the minimum incremental motion of the mechanics. In direct measurement methods,the resolution of the sensor system is specified.
Lateral ForceAlso: lateral load capacity
Maximum permissible force orthogonally to the positioning direction. This value is validdirectly for the motion platform and is reduced when the force acts above the platform.
Limit SwitchEach limit switch sends its signal to the controller on a dedicated line. The controller theninterrupts the motion avoiding that the positioner moves until the hard stop and getsdamaged. PI positioners have mechanical, noncontact optical or Hall-effect limit switches.
Load CapacityMaximum load in the vertical direction when the V-417.xx6025E0 is mounted horizontally.The contact point of the load is at the center of the motion platform.
Reference SwitchMany of the positioners are equipped with a direction sensing reference switch positionedapprox. in the middle of the travel range. It is recommended to approach the referenceswitch always from the same direction to obtain best position repeatability.
Function: Optical, magnetic
Sensor resolutionThe sensor can be the critical element of position resolution so it may be necessary tospecify the sensor resolution separately. Rotary encoder: Impulses per screw rotation. Linearencoder: Smallest motion still detected by the sensor system.
V417M0010EN ‒ 7/9/2019
37 M O T I O N | P O S I T I O N I N G

Travel rangeThe maximum possible travel range is limited by the length of the drive screw. A possiblegap between the limit switches determines the travel range.
V417M0010EN ‒ 7/9/2019
38 M O T I O N | P O S I T I O N I N G