Poop it, flush it, and is that really it? Just Smile and Wave, Just Smile and Wave!

by Fredrik Hubinette and Dmitry Shtok
2018
User Manual
ProffieBoard and TeensySaber
Open-Source advanced saber sound boards
ProffieBoardTeensySaber user manual by Fredrik Hubinette and Dmitry Shtok | 01
Contents
Introduction (P ndash 2)Features (P ndash 3)1 Helpful instructions and tutorials links ndash Where to buy (P ndash 4) ndash Tutorials and instructions (P ndash 5)
2 TeensySaber V3 instructions 1) Wiring diagrams ndash Board pinout (P ndash 6) ndash Board assembling (P ndash 7) ndash Basic Tri-Cree wiring diagram (P ndash 8-9) ndash Basic Neopixel wiring diagram (P ndash 10-11) ndash Basic Segmented string wiring diagram (P ndash 12-13) ndash Accent LEDs wiring diagram (P ndash 14) ndash OLED display wiring diagram (P ndash 15) ndash Bluetooth module wiring and setup (P ndash 16) ndash Blade ID resistor functions (P ndash 17) ndash More wiring diagrams (P ndash 18) ndash How to use it (P ndash 20) 2) Firmware upload and update ndash Software installation and setup (P ndash 21) ndash Uploading firmware (P ndash 22) 3) Changing sound board parameters (P ndash 23)
3 ProffieBoard instructions 1) Wiring diagrams ndash Whatrsquos needed (P ndash 24) ndash Board pinout (P ndash 25) ndash Basic Tri-Cree wiring diagram (P ndash 26-27) ndash Basic Neopixel wiring diagram (P ndash 28-29) ndash Basic Segmented string wiring diagram (P ndash 30-31) ndash Accent LEDs wiring diagram (P ndash 32) ndash Neopixel Accent LEDs wiring diagram (Sub-blades) (P ndash 33-34) ndash OLED display wiring diagram (P ndash 35) ndash Bluetooth module wiring and setup (P ndash 36) ndash Blade ID resistor functions (P ndash 37) ndash More wiring diagrams (P ndash 38) ndash How to use it (P ndash 39) 2) Firmware upload and update ndash Software installation and setup (P ndash 40) ndash Uploading firmware (P ndash 41) 3) Changing sound board parameters ndash configh file structure editing (P ndash 42) ndash Blade Styles (P ndash 43)
4 SD card recommendations (P ndash 44-45)5 Wire gauge and current rating tests (P ndash 46-48)6 Troubleshooting (P ndash 49)
updated19122018
02 | ProffieBoardTeensySaber user manual by Fredrik Hubinette and Dmitry Shtok
It really just started with a trip to Disneyland I was really just disappointed with the cheap plastic lightsabers they had available I had hoped to pick something more display-worthy or at least in the ldquotoys for grownupsrdquo category but did not find anything So when I got home I went and ordered an FX ldquoblack seriesrdquo Luke lightsaber which looks quite nice but the sound light and interactivity was still pretty disappointing At this point I started to think about how I would make a lightsaber I had already done things with neopixels before so that was kind of a no-brainer for making a better blade but I really wanted to do was to make the sound react fluidly to motion At this point I joined a bunch of forums and came across the NEC and Plecter boards but there didnrsquot seem to be a way to alter how they produced sounds so I picked up a teensy and a PJRC prop shield and started building from there The Teensy 32 + PJRC prop + SD card reader + voltage booster + FETs I ended up with was fairly large Luckily the Graflex lightsabers are also fairly large so I purchased a Graflex 21 and barely managed to squeeze everything in there Around this time I got kind of stuck with how to synthesize all the sounds a lightsaber makes so I decided to imple-ment support for Plecter and NEC sound fonts to get the saber I built make some sounds There are some amazing sound fonts out there but even so the interactivity I craved was still missing Since I didnrsquot really have a good idea for how to make that interactivity happen I took on a different challenge instead Make it smaller For the TeensySaber V2 I decided to try to make my own circuit board That meant integrating some components from the prop shield the sd card reader the voltage booster and the FETs into a single board To make things interesting I bought a Korbanth OWK which has an inner diameter of 78 inches and my goal was to fit everything in there It took a while to do but the result was the TeensySaber V2 board The V2 fits really great inside an OWK without cutting into the inner chassis parts and was generally a great success but the sound quality wasnrsquot as good as I wanted it to be so eventually I designed he TeensySaber V3 which is mostly the same as the V2 but uses a digital 3W amplifier As I was working on the TeensySaber V3 this guy Thexter showed up on a couple of forums with some great videos showing off an algorithm for better swing sounds Since this was what I wanted all along I couldnrsquot wait until he provided a description of his algorithm so that I could implement it Lucky for me he didnrsquot mind describing his algorithm so I imple-mented it My implementation never really sounded as good as his videos though but thatrsquos probably because Irsquom not really a font designer Later Thexter came back with an improved version which is what we now call ldquoSmoothSwing V2rdquo With SmoothSwing V3 TeensySaber V3 was getting some attention from people but a lot of people still thought it was too big since itrsquos made out of two boards sandwiched together The sandwiching also creates extra work for installers and extra complications for hobbyists so it was time to try to put everything together into one board At first I was thinking of using the same components that make up a Teensy to make the all-in-one board but it turned out to be complicated and expensive Instead I found another board called a ldquoButterflyrdquo which had nearly identical capabilities and an already functional arduino plugin Even better the Butterfly was 100 open source (the teensy is only mostly open source) I spent most of the Christmas vacation last year designing the Proffieboard and it took another couple of months of
testing to get a working prototype but itrsquos been a lot of fun
- Fredrik Hubinette
Read full interview on SaberSourcingProffieboard lightsaber controller developer Fredrik Hubinette interview
INTRODUCTION
ProffieBoardTeensySaber user manual by Fredrik Hubinette and Dmitry Shtok | 03
Specifications and features
ndash ProffieBoard specific ndash Dimensions 179x346x57mm (with micro USB port and micro SD card)
ndash ProffieBoard specific ndash Single pcb board design
ndash TeensySaber V3 specific ndash Dimensions 18x395x9mm (with micro USB port and micro SD card)
ndash TeensySaber V3 specific ndash 2-pcb boards stack design
ndash 100 Open-Source you may add any feature you like (GPLv3)
ndash Power supply 26-45 Volts up to 10A per LED output 1-6 single Li-Ion 36-37V (low 26V full 42V) battery recommended
ndash Speaker 4 ohm or 8 ohm 2W (with lower volume) or 3-5W (recommended)
ndash Unlimited amount of sound banksfonts supports regular (Plecter NEC) and ldquoSmoothswingrdquo sound fonts
ndash Sound FX (WAV sound files) boot blaster blocking lockup hum swing clash drag font force ingnition retraction
ndash Light FX blade flickering pulsing flash on clash drag stab blaster blocking lockup and other
ndash Music tracks (WAV sound files) playback in idle mode and saber sound effects background
ndash Micro SD card 4-16Gb Class 4-10 by SanDisk brand recommended
ndash Support for remote control via bluetooth (with external bluetooth module addon)
ndash Speedy 32-bit processor for advanced features like sound filters synthesizing and mp3 playback
ndash 3 Watts sound amplifier 16-bit digital output (12-bit for TeensySaber V1 and V2)
ndash Sample rate is 44kHz (default) 22kHz and 11kHz are supported and upsampled to 44kHz automatically
ndash Gapless playback with 25ms cross-fade when you interrupt one sample to go to another
ndash Polyphonic playback currently configured for up to 5 simultaneous samples
ndash ldquoSmoothswingrdquo algorithm support (a new more natural swing motion sounds playback)
ndash PL9823 (RGB) WS2812B (GRB) SK6812 (GRB WWA) Neopixel support
ndash 1234-color LED stars (Tri-Cree and Quad (also RGBA) LED modules)
ndash Segmented (6 segments + Flash string) classic string blades support
ndash Multi-blade support for dual and crossguard setups
ndash Blade LED type Presets and Blade Styles selection by different values of a resistor (Blade ID functions)
ndash Crystal chamber support
ndash Power-level indicator with neopixel blade
ndash OLED PLI and FONT animations display
ndash sound files upload to SD card via USB cable directly from PC (only from firmware version 1291 and up)
ndash POV (persistance of vision) mode support
ndash Accent LEDs support (also implemented as additional ldquobladesrdquo)
ndash Spoken error and low battery messages
ndash Easy and free firmware updates by user
Demonstration videos
Link to the demonstration video by K-SithLink to the demonstration video by Megtooth Sith SabersLink to the demonstration video by Zimmer LabsLink to the demonstration video by ShtokCustomWorx
FEATURES
04 | ProffieBoardTeensySaber user manual by Fredrik Hubinette and Dmitry Shtok
1HELPFUL LINKS
TeensySaber V3 boards
Send a message to this guy
Other parts links
RGB Neopixel strips (they are SK6812 though sellers list them as WS2812b)WWA (WhiteWhiteAmber) Neopixel strips SK6812 Source 1WWA (WhiteWhiteAmber) Neopixel strips SK6812 Source 2Individual Neopixel LEDsNeopixel stripsconnectorsother supplies (UK) ndash TheSaberArmoryTri-Cree high power LEDs (CanadaUSA) ndash TheCustomSaberShopTri-Cree high power LEDs (UK) ndash TheSaberArmoryVarious Accent LEDs (UK) ndash TheSaberArmoryVarious Batteries (UK) ndash TheSaberArmoryProtected KeepPower 18650 10A 3500mAh batteryProtected KeepPower 18650 15A 3120mAh batteryUnprotected Vapcell 21700 15A 5000mAh battery ndash requires external PCMUnprotected KeepPower 26650 15A 6000mAh battery ndash requires external PCM15A Protection Circuit Module (PCM)18650 Protected Battery holderHigh Power 13mm Recharge PortRecharge Ports (UK) ndash TheSaberArmoryHigh Power Kill SwitchVarious Switches (UK) ndash TheSaberArmorySCW Neopixel blade Pogo connectorTCSS Neopixel blade Pogo connectorGX16 Neopixelstring blade connectorsVarious Speakers (UK) ndash TheSaberArmory Various Speakers (UK) ndash JQ-sabersVarious Speakers (CanadaUSA) ndash TheCustomSaberShop2W and 3W Speakers ndash Saber Essentials4W Speakers ndash ebay
3D-printed chassis links
ShtokCustomWorx on ShapewaysGOTH-3Designs on Shapeways
Where to buy
ProffieBoards
TheSaberArmory (KR-sabers) UK storeJQ-sabers UK storeSaberBay Etsy USA storeShtokCustomWorx Etsy RUS store (not opened yet)
ProffieBoardTeensySaber user manual by Fredrik Hubinette and Dmitry Shtok | 05
1HELPFUL LINKS
Video tutorials by Megtooth Sith Sabers
Video tutorials by Megtooth Sith Sabers on youtubeLED Resistor Calculator
For more information please check these links
TeensySaber V3 sound board instructionsProffieBoard sound board instructionsrdquoBlade style sharingrdquo - here you can find and share custom blade stylesWeb Blade Style Editor 1 (default)Web Blade Style Editor 2 (restyle)Here you can get regular (Plecter NEC) or ldquoSmoothswingrdquo sound fontsProffieOSProffieBoardTeensySaber wiki on GitHubProfezzornrsquos Lab on The Rebel Armory forumsProfezzornrsquos Lab on FX-sabers forumsAsk your question in facebook group
Get latest ProffieOS firmware
Tutorials and instructions
06 | ProffieBoardTeensySaber user manual by Fredrik Hubinette and Dmitry Shtok
2TEENSYSABER V3 INSTRUCTIONS
WIRING DIAGRAMS1
Board pinout
used pads
Battery + ndash 26 to 45 volt input drives everything except the LEDs
Battery - ndash negative pad for LEDs needs to be at same level as GND when both are connected
GND ndash ground for electronics except LEDs Note that GND is also available on short edge of the teensy (See the teensy pinout for details)
Speaker +- ndash hooks up to speaker
Activation Aux Aux2 button ndash hook up to closing buttons or potentially touch buttons
Blade ID Neopixel Data 1 ndash normally used to measure the blade ID restor and if itrsquos a neopixel blade feed out neopixel data
LED 1 2 3 ndash hooks up to negative side of LED (positive side of LED hooks up directly to battery) These pads can handle
up to 30 volts
LED 4 5 6 ndash like LED123 but requires FETs to be placed on the bottom of the board to function Voltage is limited by
selection of FETs
Power 1 Power 2 Power 3 ndash these control the FETs which drive LED 1 2 3
AUX LED 1 2 3 ndash these are hooked up to pads on the bottom which can be populated with FETs and used to drive additional LEDs If the
bottom FETs are not populated these pins are free and can be used for any purpose
RX3 TX3 ndash these pins are used for wiring a bluetooth module for wireless control or additional Neopixel Data out
SDA SCL ndash these pins are used to wire OLED display
+33V 250mA max ndash generated by the Teensy for powering OLED display or Bluetooth module
micro USB port ndash micro USB port used only for firmware upload and can be used for sound files upload to SD card
THIS PORT ISNrsquoT USED FOR CHARGING THE BATTERY
LED output 1 2 3
Battery - Speaker + (red dot or ldquo+rdquo mark on speaker)Battery +
Data in (SD) SCK (SD)
Battery Volt SenseAux button
Activation buttonAux2 button
SDA
SCL
Blade ID Neopixel Data 1Audio data
Audio LRClock
Power 3+33VAudio GND (not used)+5V
Data out (SD)
Power 2
Audio clock
TX3Neopixel Data 2
RX3Neopixel Data 3
Power 1AUX3 LEDAUX2 LEDAUX1 LED
Motion InterruptAmplifier enable
SD card selectGND
Speaker -
LED output 4 5 6
micro USB port on Teensy 32
ProffieBoardTeensySaber user manual by Fredrik Hubinette and Dmitry Shtok | 07
2TEENSYSABER V3 INSTRUCTIONS
WIRING DIAGRAMS1
Board assembling
1 IMPORTANT
Cut the tiny trace with a knife between VIN and VUSB as shown
Teensy 32 bottom view
2 Solder 254mm header pins (gold plated recommended) to
TeensySaber V3 board on the top or on the bottom depending
on where you want to put Teensy 32 board
(please see next step)
3 Solder Teensy 32 board on top
(A ndash micro USB port on top SD card between boards) or on the bottom (B ndash SD card on top micro USB port between boards)
A B
+
08 | ProffieBoardTeensySaber user manual by Fredrik Hubinette and Dmitry Shtok
2TEENSYSABER V3 INSTRUCTIONS
WIRING DIAGRAMS1
Basic Tri-Cree wiring diagram(In-hilt LED)
2-5W 4-8 ohmspeaker(positive pad has red dot or ldquo+rdquo mark)
+
+
+
-
-
-
26 A
WG
26 AWG
30-32 AWG
28-30 AWG
28-30 AWG
30-32 AWG
Protected 36-37V (42V max at full charge) 10A 3500mAh battery recommended+18650 battery holder (optional)Keystone 1042P
AV switch with accent led(constantly ON no effects)
accent leds run mostly at10-15mA so resistors for them must be calculated accordingly
Main RGB led
additional RGB leds(optional)
In case no additional high power leds are needed LED channels 4 5 6can be used for 3 controllable (programmable for different effects) accent leds So AV switch led can be wired to one of these channelsby adding 1 MOSFET
LED Resistor Calculator
solder 3x FETs
solder 1 FET
ProffieBoardTeensySaber user manual by Fredrik Hubinette and Dmitry Shtok | 09
2TEENSYSABER V3 INSTRUCTIONS
WIRING DIAGRAMS1
Basic Tri-Cree wiring (In-hilt LED)ldquoconfighrdquo file setup
Use a given or build your wiring diagram on THIS PAGE then open any _configh file in the ldquolightsabergtconfigrdquo folder directory in any Text
Editor (Notepad - to see code correctly in Notepad Cut-and-Paste it to WordPad then Cut-and-Paste it back to Notepad Save) Ctrl+A (select all
text) and Delete it then Copy-and-Paste (Ctrl+C Ctrl+V) your wiring diagram config code (example below) into empty _configh file and
Save it under new name Follow the instructions on page 22 to upload it to the board
ldquov3_confighrdquoNUM_BLADES 2NUM_BUTTONS 2VOLUME 1000CLASH_THRESHOLD_G 10StyleNormalPtrltCYAN WHITE 300 800gt()StyleNormalPtrltCYAN WHITE 300 800gt()
CreeXPE2RedTemplatelt1000gtCreeXPE2GreenTemplatelt0gtCreeXPE2BlueTemplatelt240gtNoLED
TeensySaber V3 config setupnumber of ldquobladesrdquo usednumber of buttons used (1-3)Volume level (0-3000)Clash sensitivity (adjust lower or higher with 01 step)ldquoBlade 1rdquo styleldquoBlade 2rdquo style (in case only 1 blade is used you donrsquot need this line)LED configuration (use these XP-E2 LED templatesto define your LED If other LED resistors are used change these values to match Ohm1000=ltvaluegt)
where 1000 is 1 Ohm resistor 0 is no resistor240 is 024 Ohm resistorNoLED ndash no 4th led used
Preset 1
LED 1 configuration
LED 2 configuration
Preset 2 etc
10 | ProffieBoardTeensySaber user manual by Fredrik Hubinette and Dmitry Shtok
2TEENSYSABER V3 INSTRUCTIONS
WIRING DIAGRAMS1
Basic Neopixel wiring diagram
2-5W 4-8 ohmspeaker(positive pad has red dot or ldquo+rdquo mark)
+
+
+
-
-
-
22 A
WG
22 AWG
26 AWG
30 AWG
x2 28 AWG
x2 26 AWG
22 A
WG
30-32 AWG
30-32 AWG
Protected 36-37V (42V max at full charge) 10A 3500mAh or 15A 3120mAhbattery recommended+18650 battery holder (optional)Keystone 1042P
AV switch with accent led(constantly ON no effects)
accent leds run mostly at10-15mA so resistors for them must be calculated accordingly
Main Neopixel strip
additional Neopixelstrips(optional)
Neopixel bladeconnector
330 Ohm on the Blade pcb side
x3 28 AWGor x1 22 AWGfor Negative
330 Ohm on the Blade pcb side
arrows up
330 Ohm on the Blade pcb side
In case no additional Neopixel strips are needed LED channels 4 5 6can be used for 3 controllable (programmable for different effects) accent leds So AV switch led can be wired to one of these channelsby adding 1 MOSFETRecommended power wire gauges (22 AWG) are given for 2-strip blade For 3-strip blade you gonna need at least 20 AWG wires
solder 2x FETs
solder 1 FET
ProffieBoardTeensySaber user manual by Fredrik Hubinette and Dmitry Shtok | 11
2TEENSYSABER V3 INSTRUCTIONS
WIRING DIAGRAMS1
Basic Neopixel wiringldquoconfighrdquo file setup
ldquov3_confighrdquoNUM_BLADES 3NUM_BUTTONS 2VOLUME 1000CLASH_THRESHOLD_G 10IgnitionDelaylt0 any blade stylegtIgnitionDelaylt800 any blade stylegtIgnitionDelaylt800 any blade stylegtWS2811BladePtrlt118 WS2811 800kHz | WS2811 GRBgt()WS2811BladePtrlt26 7 ltbladePowerPin4gtgt()WS2811BladePtrlt26 8 ltbladePowerPin5gtgt()
TeensySaber V3 config setupnumber of ldquobladesrdquo usednumber of buttons used (1-3)Volume level (0-3000)Clash sensitivity (adjust lower or higher with 01 step)ldquoBlade 1rdquo style (main blade with IgnitionDelay 0)ldquoBlade 2rdquo style (CG blade 1 with IgnitionDelay 800)ldquoBlade 3rdquo style (CG blade 2 with IgnitionDelay 800)
strip configuration (defines how many pixels it has and to which LED output and pin is wired)
Preset 1
any blade style
strip (blade) 1 configuration
strip (blade) 2 configuration
strip (blade) 3 configuration
Preset 2 etc
Use a given or build your wiring diagram on THIS PAGE then open any _configh file in the ldquolightsabergtconfigrdquo folder directory in any Text
Editor (Notepad - to see code correctly in Notepad Cut-and-Paste it to WordPad then Cut-and-Paste it back to Notepad Save) Ctrl+A (select all
text) and Delete it then Copy-and-Paste (Ctrl+C Ctrl+V) your wiring diagram config code (example below) into empty _configh file and
Save it under new name Follow the instructions on page 22 to upload it to the board
12 | ProffieBoardTeensySaber user manual by Fredrik Hubinette and Dmitry Shtok
2TEENSYSABER V3 INSTRUCTIONS
WIRING DIAGRAMS1
Basic Segmented string wiring diagram
2-5W 4-8 ohmspeaker(positive pad has red dot or ldquo+rdquo mark)
+
+
-
-
24 A
WG
28 AWG
30-32 AWG
30-32 AWG
Protected 36-37V (42V max at full charge) 10A 3500mAh battery recommended+18650 battery holder (optional)Keystone 1042P
AV switch with accent led(constantly ON no effects)
accent leds run mostly at10-15mA so resistors for them must be calculated accordingly
6-segments string blade
FoC string
N-channel FET3A minimum
1
1 46 523
23456
Calculate resistors for each led segment of the blade string depending on which leds are used 5mm leds have max drive current around 25mA per led when 10mm leds can be 100mA and 200mA per ledSo pay attention to your led max current and Forward Voltage (Vf) when calculating a segment resistor resistence as well as its wattage Also choose wire gauges accordingly to meet segments and total blade max current draw level
LED Resistor Calculator
solder 3x FETs
ProffieBoardTeensySaber user manual by Fredrik Hubinette and Dmitry Shtok | 13
2TEENSYSABER V3 INSTRUCTIONS
WIRING DIAGRAMS1
Basic Segmented string wiringldquoconfighrdquo file setup
ldquov3_confighrdquoNUM_BLADES 1NUM_BUTTONS 2VOLUME 1000CLASH_THRESHOLD_G 10StyleNormalPtrltCYAN WHITE 300 800gt()ltBlue3mmLED 20 White3mmLEDgt
TeensySaber V3 config setupnumber of ldquobladesrdquo usednumber of buttons used (1-3)Volume level (0-3000)Clash sensitivity (adjust lower or higher with 01 step)Blade styleLED string configuration(here you mention the color and type of leds usedin the main blade string segments and FoC string20 is the FoC signal pin (Blade ID pin))
Preset
LED string configuration
Use a given or build your wiring diagram on THIS PAGE then open any _configh file in the ldquolightsabergtconfigrdquo folder directory in any Text
Editor (Notepad - to see code correctly in Notepad Cut-and-Paste it to WordPad then Cut-and-Paste it back to Notepad Save) Ctrl+A (select all
text) and Delete it then Copy-and-Paste (Ctrl+C Ctrl+V) your wiring diagram config code (example below) into empty _configh file and
Save it under new name Follow the instructions on page 22 to upload it to the board
14 | ProffieBoardTeensySaber user manual by Fredrik Hubinette and Dmitry Shtok
2TEENSYSABER V3 INSTRUCTIONS
WIRING DIAGRAMS1
Accent LEDs wiring diagram(optional)
Accent LEDs work with TeensySaber board as additional ldquobladesrdquo when powered by LED outputs 4 5 6 with FETs So they can have any effect
that blade can have If no effects needed accent led can be powered just by a 33V output pad (power-on led indication)
30-32 AWGRGB ledcommon-anode
4 ldquobladesrdquo1 main and 3 accent leds
main blade style (effects) main blade style (effects)
3 accent leds style (effects)accent led style (effects)
3 accent leds configurations
RGB accent led configuration
2 ldquobladesrdquo1 main and 1 RGB accent led
ldquoPower-onrdquo indicationaccent leds (no effects)
3 accent leds withindependent effects
+ 1 or more simple accent leds without effects
1 RGB accent led+ 1 or more simple accent leds
without effects
a) b)
b)
c)
c)
solder 3x FETs solder 3x FETs
ProffieBoardTeensySaber user manual by Fredrik Hubinette and Dmitry Shtok | 15
2TEENSYSABER V3 INSTRUCTIONS
WIRING DIAGRAMS1
OLED display wiring diagram(optional)
SSD1306 128x32 pixels OLED display allows to show battery level current preset name play different animations and even simple games It
can be wired to any blade configuration and requires just one additional line in the code to work You can get monochrome display in white
or blue color
SSD1306128x32OLED
SSD1306 ndash with blue or white display color selectSSD1306 ndash cheaper priceSSD1306 just screen ndash blue or white select
30-32 AWG
30-32 AWG
add this line to enable OLED display
display shows a preset name written in these quotes ldquoldquo
16 | ProffieBoardTeensySaber user manual by Fredrik Hubinette and Dmitry Shtok
2TEENSYSABER V3 INSTRUCTIONS
WIRING DIAGRAMS1
Bluetooth module wiring diagram(optional)
SOON
ProffieBoardTeensySaber user manual by Fredrik Hubinette and Dmitry Shtok | 17
2TEENSYSABER V3 INSTRUCTIONS
WIRING DIAGRAMS1
Blade ID resistor functions(optional)
SOON
18 | ProffieBoardTeensySaber user manual by Fredrik Hubinette and Dmitry Shtok
website TeensySaber V3 FULL wiring diagrams link
Scroll the page down till you see the interactive diagram Above the diagram there are components selection options Build your saber setup
with it and follow diagram to wire your board Then you need to copy the configuration code below and paste it into your _configh file
Choose components you want
2TEENSYSABER V3 INSTRUCTIONS
WIRING DIAGRAMS1
More wiring diagrams
ProffieBoardTeensySaber user manual by Fredrik Hubinette and Dmitry Shtok | 19
20 | ProffieBoardTeensySaber user manual by Fredrik Hubinette and Dmitry Shtok
2TEENSYSABER V3 INSTRUCTIONS
WIRING DIAGRAMS1
How to use it
Blade ignitionretraction ndash assuming you have at least one button pressing it briefly should turn the saber on or off If you have an AUX button pressing it briefly should also turn the saber on and off If you have no buttons you can turn the saber on and off by twisting your wrist back and forth Note that the motion has to be done long enough to count so a very quick flick of the wrist will not workTurn On muted ndash double-click power buttonNext preset ndash while saber is off click the AUX buttonPrevious preset ndash hold AUX button and click the Activation buttonTrigger Clash ndash while saber is on hit the bladeTrigger Lockup ndash while saber is on hold Activation button then trigger a clash Lockup releases when you let go of the Acti-vation buttonTrigger Drag ndash like lockup but point saber mostly down before holding Activation buttonTrigger Force ndash long-click AUX buttonStart soundtrack ndash long-click the Activation buttonTrigger Blaster Block ndash while saber is on short-click AUX button
Serial Monitor commands
battery_voltage ndash gets current battery voltage valueget_volume ndash get current volume valuepow ndash power OnOff the saberon ndash power On the saberoff ndash power Off the saberset_volume lt0-3000gt ndash set volume value (example set_volume 500)play ndash play the default preset trackplay trackslttrack namegt ndash play a specific track from tracks folder (example play tracksvenuswav)stop ndash stop the playing trackforce ndash play ldquoforcerdquo sound effectsdrag ndash play ldquodragrdquo sound effectsblast ndash play ldquoblasterrdquo sound effectslock ndash play ldquolockuprdquo sound effectsclash ndash play ldquoclashrdquo sound effectsreset ndash reboot the boardn ndash switch to next presetp ndash switch to previous presetlist_presets ndash show all presetssdtest ndash test SD card speed
ProffieBoardTeensySaber user manual by Fredrik Hubinette and Dmitry Shtok | 21
2TEENSYSABER V3 INSTRUCTIONS
FIRMWARE UPLOAD AND UPDATE2
Software installation and setup
To upload firmware to TeensySaber board Arduino IDE program is required Follow these steps to install it to your PC
1 Install latest Arduino IDE software (donrsquot use BETA)
Installing as Windows app also is not recommended
because it will be installed in a specific protected folder that
wonrsquot allow you to install Teensyduino software in it
If TeensySaber wonrsquot show up in COM port use
Arduino IDE 186 version
2 Install latest Teensyduino software in same directory
usually itrsquos CProgram Files (x86)Arduino on Windows
Follow installation instructions for your system
3 Select Teensy 32 31 in Tools -gt Board
USB Type ndash Serial CPU Speed ndash 96 MHz (overclock) Optimize ndash Smallest Code Port ndash COM(the number your PC assigned) (Teensy 32) Serial
Connect TeensySaber via USB cable to PC to be able to select
the Port donrsquot forget to connect battery first
22 | ProffieBoardTeensySaber user manual by Fredrik Hubinette and Dmitry Shtok
1 Download the TeensySaber firmware and SD card content
Unzip lightsaber-1286zip to your Documents directory or to
Desktop but not to Arduino program folder or anywhere in
Programs directory where all programs are installed You will
see a lightsaber folder and files inside it Donrsquot move any of
these files to any other location outside the lightsaber folder
and donrsquot reorganize them Unzip ProffieOS_SD_Cardzip to the
folder where you keep lightsaber-1286 folder Copy all files
from ProffieOS_SD_Card folder to your SD card
2 Unhide file extensions in File Explorer settings to see h ending
of config files Donrsquot add ldquohrdquo to the config file name
Go to config folder and create you own configh file (see page
23 for how-to)
Double-click the lightsaberino file
3 Add the name of your configh file as shown and Save this
lightsaberino file Make sure the other config files are
commented out there should be only one CONFIG_FILE
without You can have multiple config files
in lightsabergtconfig folder and just define the one you need
in lightsaberino file and upload it again to TeensySaber board
4 Connect battery to TeensySaber board and hook up to your PC
with a data transfer micro-USB-to-USB cable
Press arrow button it will compile and upload firmware to the
board Wait for your PC to make a sound or TeensySaber will
play boot sound if speaker is connected Now you can unplug
the USB cable Done
If it gives an error instead this means your configh file has
issues define CONFIG_FILE name has mistakes configh file
is out of config folder your PC user name is non-latin
2TEENSYSABER V3 INSTRUCTIONS
FIRMWARE UPLOAD AND UPDATE2
Uploading firmware
ProffieBoardTeensySaber user manual by Fredrik Hubinette and Dmitry Shtok | 23
2TEENSYSABER V3 INSTRUCTIONS
CHANGING PARAMETERS3
Changing sound board parameters
All sound files (sound fonts music tracks) are stored on the micro SD card Add required sound fonts folders (Plecter NEC and Smoothswing
fonts are supported no need to change WAV files names just copy and paste) to SD card root directory as itrsquos done in the default
ProffieOS_SD_Card content folder and music tracks to the tracks folder
Make sure to name all music tracks and sound fonts folders with latin characters and only up to 8 characters long without using any special
characters (like |[- etc)
Make sure you have a configini file in each sound font folder if there is none - copy one from some default TeensySaberProffieBoard sound
font and paste into newly added sound font folder It has only one parameter that you can modify - humstart It helps to match hum sound
start with blade ignition 1000 usually works fine
All blade effects LED configuration volume level clash sensitivity etc are changed in the configh file located in lightsabergtconfig folder
To do that open any _configh file in the ldquolightsabergtconfigrdquo folder directory in any Text Editor (Notepad - to see code correctly in Notepad
Cut-and-Paste it to WordPad then Cut-and-Paste it back to Notepad Save) Ctrl+A (select all text) and Delete it then Copy-and-Paste (Ctrl+C
Ctrl+V) your wiring diagram config code into empty _configh file and Save it under new name Follow the instructions on page 22 to
upload it to the board
TeensySaber V3 config setupnumber of ldquobladesrdquo usednumber of buttons used (1-3)
volume level (0-3000)
clash sensitivity (adjust lower or higher with 01 step)
sound font folder nametrack name
Preset name
Blade style
LED configuration (use these XP-E2 LED templatesto define your LED)
for Red use 1 Ohm resistor for Green - no resistor for Blue use 024 Ohm
NoLED ndash no 4th led used
Preset 1
24 | ProffieBoardTeensySaber user manual by Fredrik Hubinette and Dmitry Shtok
31
PROFFIEBOARD INSTRUCTIONS
Whatrsquos needed
ndash ProffieBoard
ndash micro SD-card (see page 44 for recommendations)
ndash a USB micro SD-card reader (to load sound files from PC to micro SD card)
ndash micro USB data transfer cable (CABLES THAT SUPPORT ONLY CHARGING WONrsquoT WORK)
ndash wires of different gauges (32-20 AWG) (PTFE coated copper stranded wires recommended) heat shrink
ndash ESD safe soldering station solder wire flux etc
ndash pliers helping hands etc
ndash isopropyl alcohol to clean pads before soldering (helps solder to stick better)
ndash Digital Multimeter (VERY USEFUL)
ndash computer running Windows Linux or Mac OS with internet access
ndash 37V Li-Ion Protected rechargeable battery switches recharge port speaker LEDs resistors chassis etc
ndash Smart Li-Ion CC-CV (Constant Current - Constant Voltage mode) battery charger for 37V (42V) cells
ndash patience
WIRING DIAGRAMS
ProffieBoardTeensySaber user manual by Fredrik Hubinette and Dmitry Shtok | 25
31
PROFFIEBOARD INSTRUCTIONS
Board pinout
Battery + ndash 26 to 45 volt input drives everything except the LEDs
Battery - ndash negative pad for LEDs needs to be at same level as GND when both are connected Both pads are internally connected
GND ndash ground for electronics except LEDs Note that there are two GND pads on the board that are internally connected
Speaker +- ndash hooks up to speaker
Activation (1) Aux (2) Aux2 button (3) ndash hook up to closing buttons or potentially touch buttons
Blade ID Neopixel Data 1 ndash normally used to measure the blade ID restor and if itrsquos a neopixel blade feed out neopixel data
Data 2 3 4 5 ndash additional neopixel data outputs or free for other purposes
LED 1 2 3 4 5 6 ndash hooks up to negative side of LED (positive side of LED hooks up directly to battery) These pads can handle
up to 30 volts
SDA SCL ndash these pins are used to wire OLED display or to communicate with the gyro and accelerometer chip
RX TX ndash these pins are used for wiring a bluetooth module for wireless control
SWDCLK SWDIO ndash can be hooked up to a ST-LINK device and lets you debug programs running on the ProffieBoard
+5V ndash generated by the ProffieBoard normally itrsquos only ON when sound is playing
+33V ndash generated by the ProffieBoard for powering OLED display Bluetooth module or some accent leds
BOOT RESET ndash buttons to put the ProffieBoard in bootloader mode if uploading doesnrsquot work
micro USB port ndash micro USB port used only for firmware upload and can be used for sound files upload to SD card (from firmware version
1291 and up) THIS PORT ISNrsquoT USED FOR CHARGING THE BATTERY
LED 4LED 3
LED 2
LED 1
LED 5
LED 6
RESETBOOT
Battery - Battery -
Speaker + (red dot or ldquo+rdquo mark on speaker)
Battery +
Aux button (2)Activation button (1)
Aux2 button (3)
Blade ID Neopixel Data 1
Data 5
Data 4Data 3Data 2
+33V
SWDIO
SWDCLK
+5V
TXRX
GND
GND
Reset
Speaker -
SCLSDA
micro USB port
WIRING DIAGRAMS
26 | ProffieBoardTeensySaber user manual by Fredrik Hubinette and Dmitry Shtok
3WIRING DIAGRAMS1
Basic Tri-Cree wiring diagram(In-hilt LED)
2-5W 4-8 ohmspeaker(positive pad has red dot or ldquo+rdquo mark)
+
+
-
-
26 AWG
26 A
WG
30-32 AWG
28-30 AWG
28-3
0 A
WG
30-32 AWG
Protected 36-37V (42V max at full charge) 10A 3500mAh battery recommended+18650 battery holder (optional)Keystone 1042P
AV switch with accent led(constantly ON no effects)
accent leds run mostly at10-15mA so resistors for them must be calculated accordingly
Main RGB led
additional RGB leds(optional)
In case no additional high power leds are needed LED channels 4 5 6 can be used for 3 controllable(programmable for different effects) accent leds So AV switch led can be wired to one of these channelsAccent leds also can be wired to Data pads 1-5 please see ldquoAccent LEDs wiring and setuprdquo page
LED Resistor Calculator
PROFFIEBOARD INSTRUCTIONS
ProffieBoardTeensySaber user manual by Fredrik Hubinette and Dmitry Shtok | 27
3WIRING DIAGRAMS1
Basic Tri-Cree wiring (In-hilt LED)ldquoconfighrdquo file setup
2-5W 4-8 ohmspeaker(positive pad has red dot or ldquo+rdquo mark)
Use a given or build your wiring diagram on THIS PAGE then open any _configh file in the ldquolightsabergtconfigrdquo folder directory in any Text
Editor (Notepad - to see code correctly in Notepad Cut-and-Paste it to WordPad then Cut-and-Paste it back to Notepad Save) Ctrl+A (select all
text) and Delete it then Copy-and-Paste (Ctrl+C Ctrl+V) your wiring diagram config code (example below) into empty _configh file and
Save it under new name Follow the instructions on page 22 to upload it to the board
ldquoproffieboard_v1_confighrdquoNUM_BLADES 2NUM_BUTTONS 2VOLUME 1000CLASH_THRESHOLD_G 10StyleNormalPtrltCYAN WHITE 300 800gt()StyleNormalPtrltCYAN WHITE 300 800gt()
CreeXPE2RedTemplatelt1000gtCreeXPE2GreenTemplatelt0gtCreeXPE2BlueTemplatelt240gtNoLED
ProffieBoard config setupnumber of ldquobladesrdquo usednumber of buttons used (1-3)Volume level (0-3000)Clash sensitivity (adjust lower or higher with 01 step)ldquoBlade 1rdquo styleldquoBlade 2rdquo style (in case only 1 blade is used you donrsquot need this line)LED configuration (use these XP-E2 LED templatesto define your LED If other LED resistors are used change these values to match Ohm1000=ltvaluegt)
where 1000 is 1 Ohm resistor 0 is no resistor240 is 024 Ohm resistorNoLED ndash no 4th led used
Preset 1
LED 1 configuration
LED 2 configuration
Preset 2 etc
PROFFIEBOARD INSTRUCTIONS
28 | ProffieBoardTeensySaber user manual by Fredrik Hubinette and Dmitry Shtok
3WIRING DIAGRAMS1
Basic Neopixel wiring diagram
2-5W 4-8 ohmspeaker(positive pad has red dot or ldquo+rdquo mark)
+
+
-
-
22 A
WG
22 AWG
x2 28 AWG
x2 26 AWG
22 A
WG
30-32 AWG30-32 AWG
Protected 36-37V (42V max at full charge) 10A 3500mAh or 15A 3120mAhbattery recommended+18650 battery holder (optional)Keystone 1042P
AV switch with accent led(constantly ON no effects)
accent leds run mostly at10-15mA so resistors for them must be calculated accordingly
Main Neopixel strip
additional Neopixelstrips(optional)
Neopixel bladeconnector
330 Ohm on the Blade pcb side
x3 28 AWGor x1 22 AWGfor Negative
330 Ohm on the Blade pcb side
arrows up
330 Ohm on the Blade pcb side
In case no additional Neopixel strips are needed LED channels 4 5 6 can be used for 3 controllable(programmable for different effects) accent leds So AV switch led can be wired to one of these channelsAccent leds also can be wired to Data pads 2-5 please see ldquoAccent LEDs wiring and setuprdquo page
Recommended power wire gauges (22 AWG) are given for 2-strip blade For 3-strip blade you gonna need at least 20 AWG wires
PROFFIEBOARD INSTRUCTIONS
ProffieBoardTeensySaber user manual by Fredrik Hubinette and Dmitry Shtok | 29
ldquoproffieboard_v1_confighrdquo
3WIRING DIAGRAMS1
Basic Neopixel wiringldquoconfighrdquo file setup
2-5W 4-8 ohmspeaker(positive pad has red dot or ldquo+rdquo mark)
NUM_BLADES 3NUM_BUTTONS 2VOLUME 1000CLASH_THRESHOLD_G 10IgnitionDelaylt0 any blade stylegtIgnitionDelaylt800 any blade stylegtIgnitionDelaylt800 any blade stylegtWS2811BladePtrlt118 WS2811 800kHz | WS2811 GRBgt()WS2811BladePtrlt26 blade2Pin ltbladePowerPin4gtgt()WS2811BladePtrlt26 blade3Pin ltbladePowerPin5gtgt()
ProffieBoard config setupnumber of ldquobladesrdquo usednumber of buttons used (1-3)Volume level (0-3000)Clash sensitivity (adjust lower or higher with 01 step)ldquoBlade 1rdquo style (main blade with IgnitionDelay 0)ldquoBlade 2rdquo style (CG blade 1 with IgnitionDelay 800)ldquoBlade 3rdquo style (CG blade 2 with IgnitionDelay 800)
strip configuration (defines how many pixels it has and to which LED output and pin is wired)
Preset 1
any blade style
strip (blade) 1 configuration
adjust this number to match your strips leds count
strip (blade) 2 configuration
strip (blade) 3 configuration
Preset 2 etc
Use a given or build your wiring diagram on THIS PAGE then open any _configh file in the ldquolightsabergtconfigrdquo folder directory in any Text
Editor (Notepad - to see code correctly in Notepad Cut-and-Paste it to WordPad then Cut-and-Paste it back to Notepad Save) Ctrl+A (select all
text) and Delete it then Copy-and-Paste (Ctrl+C Ctrl+V) your wiring diagram config code (example below) into empty _configh file and
Save it under new name Follow the instructions on page 22 to upload it to the board
PROFFIEBOARD INSTRUCTIONS
30 | ProffieBoardTeensySaber user manual by Fredrik Hubinette and Dmitry Shtok
3WIRING DIAGRAMS1
Basic Segmented string wiring diagram
2-5W 4-8 ohmspeaker(positive pad has red dot or ldquo+rdquo mark)
+
+
-
-
24 A
WG
28 AWG
30-32 AWG30-32 AWG
Protected 36-37V (42V max at full charge) 10A 3500mAh battery recommended+18650 battery holder (optional)Keystone 1042P
AV switch with accent led(constantly ON no effects)
accent leds run mostly at10-15mA so resistors for them must be calculated accordingly
6-segments string blade
FoC string
N-channel FET3A minimum
123456
Calculate resistors for each led segment of the blade string depending on which leds are used 5mm leds have max drive current around 25mA per led when 10mm leds can be 100mA and 200mA per ledSo pay attention to your led max current and Forward Voltage (Vf) when calculating a segment resistor resistence as well as its wattage Also choose wire gauges accordingly to meet segments and total blade max current draw level
LED Resistor Calculator
PROFFIEBOARD INSTRUCTIONS
ProffieBoardTeensySaber user manual by Fredrik Hubinette and Dmitry Shtok | 31
ldquoproffieboard_v1_confighrdquo
3WIRING DIAGRAMS1
Basic Segmented string wiringldquoconfighrdquo file setup
2-5W 4-8 ohmspeaker(positive pad has red dot or ldquo+rdquo mark)
NUM_BLADES 1NUM_BUTTONS 2VOLUME 1000CLASH_THRESHOLD_G 10StyleNormalPtrltCYAN WHITE 300 800gt()ltBlue3mmLED BladePin White3mmLEDgt
ProffieBoard config setupnumber of ldquobladesrdquo usednumber of buttons used (1-3)Volume level (0-3000)Clash sensitivity (adjust lower or higher with 01 step)Blade styleLED string configuration(here you mention the color and type of leds usedin the main blade string segments and FoC stringBladePin is the FoC signal pin (Blade ID pin))
Preset
LED string configuration
Use a given or build your wiring diagram on THIS PAGE then open any _configh file in the ldquolightsabergtconfigrdquo folder directory in any Text
Editor (Notepad - to see code correctly in Notepad Cut-and-Paste it to WordPad then Cut-and-Paste it back to Notepad Save) Ctrl+A (select all
text) and Delete it then Copy-and-Paste (Ctrl+C Ctrl+V) your wiring diagram config code (example below) into empty _configh file and
Save it under new name Follow the instructions on page 22 to upload it to the board
PROFFIEBOARD INSTRUCTIONS
32 | ProffieBoardTeensySaber user manual by Fredrik Hubinette and Dmitry Shtok
3WIRING DIAGRAMS1
Accent LEDs wiring diagram(optional)
Accent LEDs work with ProffieBoard as additional ldquobladesrdquo when powered by LED outputs 4 5 6 or Data pads 1 2 3 5 as PWM So they can
have any effect that blade can have If no effects needed accent led can be powered just by a 33V output pad (power-on led indication)
30-32 AWG
with Neopixel blade setup these 4 outputsdonrsquot work for regular accent leds
Recommended resistors to use for accent leds at 33V power source and 15mA drive
ndash 100 Ohm for Red (lt100000gt value in the code)ndash 13 Ohm for Green (lt13000gt value in the code)ndash 13 Ohm for Blue (lt13000gt value in the code)ndash 100 Ohm for Yellow (lt100000gt value in the code)ndash 20 Ohm for White (lt20000gt value in the code)
RGB ledcommon-anode
8 ldquobladesrdquo1 main and 7 accent leds
main blade style (effects) main blade style (effects)
7 accent leds style (effects)accent led style (effects)
7 accent leds configurations
RGB accent led configuration
2 ldquobladesrdquo1 main and 1 RGB accent led
ldquoPower-onrdquo indicationaccent leds (no effects)
7 accent leds withindependent effects
RGB accent led
a) b)
b)
c)
c)
PROFFIEBOARD INSTRUCTIONS
ProffieBoardTeensySaber user manual by Fredrik Hubinette and Dmitry Shtok | 33
3WIRING DIAGRAMS1
Neopixel Accent LEDs wiring diagram(optional)
With Neopixel setup additional neopixel leds or arrays can be used as accent leds There are 2 ways to wire them using additional Data
pins 2 3 4 5 or ldquoSub-bladesrdquo wiring with just 1 Data output pin Same way Neopixel connectors with on-board leds ca be wired
Option 1 ndash with extra Data pins
Main Blade
some accent leds
D1
D2
crystal leds
330 Ohm
330 Ohm
330 Ohm
main blade style (effects)
main blade 144 leds Data pin 1
accent leds blade style (effects)
accent leds ldquobladerdquo 4 leds Data pin 2
crystal leds blade style (effects)
crystal leds ldquobladerdquo 2 leds Data pin 3
3 ldquobladesrdquo1 main 1 accent leds array and 1 crystal leds array
PROFFIEBOARD INSTRUCTIONS
D3
follow arrows direction
34 | ProffieBoardTeensySaber user manual by Fredrik Hubinette and Dmitry Shtok
3WIRING DIAGRAMS1
Neopixel Accent LEDs wiring diagram(optional)
PROFFIEBOARD INSTRUCTIONS
Main Blade
some accent leds
1
3
5678
2
4
D1
crystal leds
follow arrows direction
330 Ohm
330 OhmData signal
With this setup a single array of neopixel leds is separated into a couple of sub-blades with their own style configuration and behaviour This
is really usefull when you want to use only one data pin More about ldquoSub-bladesrdquo on ProffieOS wiki page
Option 2 ndash with ldquoSub-bladesrdquo
main blade style (effects)
main blade sub-blade 140 leds (7-146) but from 6 to 145 in the code
accent leds blade style (effects)
accent leds sub-blade 4 leds (1-4) but from 0 to 3 in the code
crystal leds blade style (effects)
146 leds total used
crystal leds sub-blade 2 leds (5-6) but from 4 to 5 in the code
update default 144 to a higher total value if you get all accent leds +Main blade gt 144 Example update to 146 if you have 2 crystal leds +4 accent leds + 140 Main blade leds = 146
3 ldquobladesrdquo 1 main 1 accent leds array and 1 crystal leds array
ProffieBoardTeensySaber user manual by Fredrik Hubinette and Dmitry Shtok | 35
3WIRING DIAGRAMS1
OLED display wiring diagram(optional)
SSD1306 128x32 pixels OLED display allows to show battery level current preset name play different animations and even simple games It
can be wired to any blade configuration and requires just one additional line in the code to work You can get monochrome display in white
or blue color
SSD1306128x32OLED
SSD1306 ndash with blue or white display color selectSSD1306 ndash cheaper priceSSD1306 just screen ndash blue or white select
30-32 AWG
30-32 AWG
add this line to enable OLED display
display shows a preset name written in these quotes ldquoldquo
PROFFIEBOARD INSTRUCTIONS
36 | ProffieBoardTeensySaber user manual by Fredrik Hubinette and Dmitry Shtok
3WIRING DIAGRAMS1
Bluetooth module wiring diagram(optional)
SOON
PROFFIEBOARD INSTRUCTIONS
ProffieBoardTeensySaber user manual by Fredrik Hubinette and Dmitry Shtok | 37
3WIRING DIAGRAMS1
Blade ID resistor functions(optional)
SOON
PROFFIEBOARD INSTRUCTIONS
38 | ProffieBoardTeensySaber user manual by Fredrik Hubinette and Dmitry Shtok
website ProffieBoard FULL wiring diagrams link
Scroll the page down till you see the interactive diagram Above the diagram there are components selection options Build your saber setup
with it and follow diagram to wire your board Then you need to copy the configuration code below and paste it into your _configh file
Choose components you want
3WIRING DIAGRAMS1
More wiring diagrams
PROFFIEBOARD INSTRUCTIONS
ProffieBoardTeensySaber user manual by Fredrik Hubinette and Dmitry Shtok | 39
3WIRING DIAGRAMS1
How to use it
PROFFIEBOARD INSTRUCTIONS
Blade ignitionretraction ndash assuming you have at least one button pressing it briefly should turn the saber on or off If you have an AUX button pressing it briefly should also turn the saber on and off If you have no buttons you can turn the saber on and off by twisting your wrist back and forth Note that the motion has to be done long enough to count so a very quick flick of the wrist will not workTurn On muted ndash double-click power buttonNext preset ndash while saber is off click the AUX buttonPrevious preset ndash hold AUX button and click the Activation buttonTrigger Clash ndash while saber is on hit the bladeTrigger Lockup ndash while saber is on hold Activation button then trigger a clash Lockup releases when you let go of the Acti-vation buttonTrigger Drag ndash like lockup but point saber mostly down before holding Activation buttonTrigger Force ndash long-click AUX buttonStart soundtrack ndash long-click the Activation buttonTrigger Blaster Block ndash while saber is on short-click AUX button
Serial Monitor commands
battery_voltage ndash gets current battery voltage valueget_volume ndash get current volume valuepow ndash power OnOff the saberon ndash power On the saberoff ndash power Off the saberset_volume lt0-3000gt ndash set volume value (example set_volume 500)play ndash play the default preset trackplay trackslttrack namegt ndash play a specific track from tracks folder (example play tracksvenuswav)stop ndash stop the playing trackforce ndash play ldquoforcerdquo sound effectsdrag ndash play ldquodragrdquo sound effectsblast ndash play ldquoblasterrdquo sound effectslock ndash play ldquolockuprdquo sound effectsclash ndash play ldquoclashrdquo sound effectsreset ndash reboot the boardn ndash switch to next presetp ndash switch to previous presetlist_presets ndash show all presetssdtest ndash test SD card speed
40 | ProffieBoardTeensySaber user manual by Fredrik Hubinette and Dmitry Shtok
3FIRMWARE UPLOAD AND UPDATE2
Software installation and setup
PROFFIEBOARD INSTRUCTIONS
To upload firmware to ProffieBoard Arduino IDE program is required Follow these steps to install it to your PC
1 Install latest Arduino IDE software (donrsquot use BETA)
Installing as Windows app also is not recommended
because it will be installed in a specific protected folder that
wonrsquot allow you to install any additional softwareplugin in it
If ProffieBoard wonrsquot show up in COM port use
Arduino IDE 186 version
2 Install the Proffieboard Arduino Plugin and Zadig software
Follow installation instructions
3 Select Proffieboard-STM32L433 in Tools -gt Board
USB Type ndash Serial CPU Speed ndash 80 MHz Optimize ndash Smallest Code DOSFS ndash SDCARD (SPI) Port ndash COM(the number your PC assigned) (Butterfly-L433CC)
Connect Proffieboard via USB cable to PC to be able to select
the Port
ProffieBoardTeensySaber user manual by Fredrik Hubinette and Dmitry Shtok | 41
3FIRMWARE UPLOAD AND UPDATE2
Uploading firmware
PROFFIEBOARD INSTRUCTIONS
1 Download the ProffieBoard firmware and SD card content
Unzip lightsaber-1286zip to your Documents directory or to
Desktop but not to Arduino program folder or anywhere in
Programs directory where all programs are installed You will
see a lightsaber folder and files inside it Donrsquot move any of
these files to any other location outside the lightsaber folder
and donrsquot reorganize them Unzip ProffieOS_SD_Cardzip to the
folder where you keep lightsaber-1286 folder Copy all files
from ProffieOS_SD_Card folder to your SD card
2 Unhide file extensions in File Explorer settings to see h ending
of config files Donrsquot add ldquohrdquo to the config file name Go to config folder and create you own configh file (see page
42 for how-to)
Double-click the lightsaberino file
3 Add the name of your configh file as shown and Save this
lightsaberino file Make sure the other config files are
commented out there should be only one CONFIG_FILE
without You can have multiple config files
in lightsabergtconfig folder and just define the one you need
in lightsaberino file and upload it again to ProffieBoard
4 Connect battery to ProffieBoard and hook up to your PC
with a data transfer micro-USB-to-USB cable
Press arrow button it will compile and upload firmware to the
board Wait for red text progress bars to stop at 100
ProffieBoard will play boot sound if speaker is connected
Now you can unplug the USB cable Done
If it gives an error instead this means your configh file has
issues define CONFIG_FILE name has mistakes configh file
is out of config folder your PC user name is non-latin
42 | ProffieBoardTeensySaber user manual by Fredrik Hubinette and Dmitry Shtok
33
configh file structure editing
PROFFIEBOARD INSTRUCTIONS
CHANGING PARAMETERS
All sound files (sound fonts music tracks) are stored on the micro SD card Add required sound fonts folders (Plecter NEC and Smoothswing
fonts are supported no need to change WAV files names just copy and paste) to SD card root directory as itrsquos done in the default
ProffieOS_SD_Card content folder and music tracks to the tracks folder
Make sure to name all music tracks and sound fonts folders with latin characters and only up to 8 characters long without using any special
characters (like |[- etc)
Make sure you have a configini file in each sound font folder if there is none - copy one from some default TeensySaberProffieBoard sound
font and paste into newly added sound font folder It has only one parameter that you can modify - humstart It helps to match hum sound
start with blade ignition 1000 usually works fine
All blade effects LED configuration volume level clash sensitivity etc are changed in the configh file located in lightsabergtconfig folder
To do that open any _configh file in the ldquolightsabergtconfigrdquo folder directory in any Text Editor (Notepad - to see code correctly in Notepad
Cut-and-Paste it to WordPad then Cut-and-Paste it back to Notepad Save) Ctrl+A (select all text) and Delete it then Copy-and-Paste (Ctrl+C
Ctrl+V) your wiring diagram config code into empty _configh file and Save it under new name Follow the instructions on page 39 to
upload it to the board
Proffieboard config setupnumber of ldquobladesrdquo usednumber of buttons used (1-3)
volume level (0-3000)
clash sensitivity (adjust lower or higher with 01 step)
sound font folder nametrack name
Preset name
Blade style
LED configuration (use these XP-E2 LED templatesto define your LED)
for Red use 1 Ohm resistor for Green - no resistor for Blue use 024 Ohm
NoLED ndash no 4th led used
Preset 1
ProffieBoardTeensySaber user manual by Fredrik Hubinette and Dmitry Shtok | 43
33
Blade Styles
StylePtrltInOutHelperltSimpleClashltLockupltBlastltOnSparkltAudioFlickerltRgblt02550gtRgblt501000gtgtRgblt2552550gt150gtRgblt255500gtgtAudioFlickerltRgblt1002550gtRgblt2550150gtgtgtRgblt255100150gt40gt200300Blackgtgt
ndash this is how the Blade Style code looks pasted in the configh file Preset (it sits inside a StylePtrltgt container)
ndash this is how the Blade Style code looks when editing it inside a Blade Style Editor
Each Blade Style is made of a variety of Effects each added effect goes instead of a base color in the previous effect
PROFFIEBOARD INSTRUCTIONS
CHANGING PARAMETERS
ProffieBoard and TeensySaber use Blade Styles for the main saber blade and any other accent leds to define all light effects (color changing
flashes flickering delays ignitionretraction timing etc)
Use Blade Style Editor to create and adjust Blade Styles Megtooth Sith Sabers did a great video tutorial where he shows and explains
how to use Blade Style Editor Also you can grab some pre-made Blade Styles or share yours here on TRA forums
A Blade Style example of simple flickering Green blade with Spark on start Clash Blaster Lockup and Drag IgnitionRetraction effects
InOutHelperltSimpleClashltLockupltBlastltOnSparkltAudioFlickerltRgblt02550gtRgblt501000gtgtRgblt2552550gt150gtRgblt255500gtgtAudioFlickerltRgblt1002550gtRgblt2550150gtgtgtRgblt255100150gt40gt200300Blackgt
InOutHelperltbase color200300Blackgt ndash base color can be defined by words (WHITE RED GREEN PURPLE etc) or by Rgblt0-2550-2550-255gt values for more
custom shades 200 is extension length in milliseconds 300 is retraction length in milliseconds Black is color when retracted (also can be any other color)
SimpleClashltbase colorclash color40gt ndash clash effect 40 is clash duration in milliseconds
Lockupltbase colorlockup colorgt ndash lockup effect
Blastltbase colorblast colorgt ndash blaster effect
OnSparkltbase colorspark color150gt ndash spark on ignition effect 150 is spark duration in milliseconds
AudioFlickerltrdquoArdquo colorrdquoBrdquo colorgt ndash flickering effect (blade flickers to the actual saber hum sound) the more difference between ldquoArdquo and ldquoBrdquo colors - the more
abrupt is flickering
Rgblt255500gt ndash actual color in RGB format (0 is no light 255 is the maximum brightness value for Red Green or Blue channel)
44 | ProffieBoardTeensySaber user manual by Fredrik Hubinette and Dmitry Shtok
ndash SanDisk 4GB microSDHC Class 4 (Genuine) ndash SanDisk 4GB microSDHC Class 4 (Genuine)
130238 kbs = 1477 simultaneous audio streams 137812 kbs = 1562 simultaneous audio streams
ndash Patriot LX Series 16GB microSDHC UHS-IU1 Class 10 ndash Patriot LX Series 16GB microSDHC UHS-IU1 Class 10
133005 kbs = 1508 simultaneous audio streams
ndash GSkill 16GB microSDHC UHS-IU1 Class 10 ndash GSkill 16GB microSDHC UHS-IU1 Class 10
129534 kbs = 1469 simultaneous audio streams
ndash Kingston 16GB microSDHC UHS-IU1 Class 10 ndash Kingston 16GB microSDHC UHS-IU1 Class 10
128090 kbs = 1452 simultaneous audio streams
ndash SanDisk Ultra 16GB microSDHC UHS-IU1 A1 Class 10 ndash SanDisk Ultra 16GB microSDHC UHS-IU1 A1 Class 10
102663 kbs = 1164 simultaneous audio streams 11124 kbs = 1261 simultaneous audio streams
ndash SanDisk 8GB microSDHC Class 4 ndash SanDisk 8GB microSDHC Class 4
108506 kbs = 1230 simultaneous audio streams
ndash SanDisk 16GB microSDHC Class 4 ndash SanDisk 16GB microSDHC Class 4
102663 kbs = 1164 simultaneous audio streams 106957 kbs = 1213 simultaneous audio streams
ndash SanDisk Ultra 16GB microSDHC UHS-IU1 Class 10 ndash SanDisk Ultra 16GB microSDHC UHS-IU1 Class 10
102663 kbs = 1164 simultaneous audio streams 103909 kbs = 1178 simultaneous audio streams
ndash Smartbuy 4GB microSDHC Class 4 ndash Smartbuy 4GB microSDHC Class 4
75437 kbs = 855 simultaneous audio streams
ndash Kingston 8GB microSDHC Class 4 ndash Kingston 8GB microSDHC Class 4
75209 kbs = 822 simultaneous audio streams
ndash SanDisk 4GB microSDHC Class 4 (Fake) ndash SanDisk 4GB microSDHC Class 4 (Fake)
677 kbs = 769 simultaneous audio streams
Here is a list of tested micro SD cards speed with TeensySaber V3 and ProffieBoard Any card with speed over 900 kbs is recommended the
higher the speed is ndash the better Memory size of 4-16Gb is more than enough Cards were tested with a default firmware (1291) compiled
with ldquoSmallest Coderdquo under Optimize ldquodefault_proffieboard_confighrdquo file and default ProffieOS SD card sound files (7 folders)
To test your SD card speed simply hook up ProffieBoard to PC open Arduino IDE go to Tools and open Serial Monitor make sure you have
New Line and 9600 baud rate selected on the bottom of Serial Monitor window type and send sdtest command wait for the test result
4Recommended micro SD cards
BEST
TEENSYSABER PROFFIEBOARD
GOOD
BAD
PROFFIEBOARD INSTRUCTIONS
SD CARD RECOMMENDATIONS
ProffieBoardTeensySaber user manual by Fredrik Hubinette and Dmitry Shtok | 45
There are a lot of fake (chinese copies) microSD cards on the market from aliexpress ebay amazon etc They look very similar to genuine
cards but are a bit different though and have a twice lower writingreading speed Here is an example of a SanDisk 4Gb Class 4 card one is
genuine with 137812 kbs speed and the other one is fake with 677 kbs speed I got from ebay seller
Be carefull and pay attention to how the actual card looks if you are not sure ask seller for the real photo of SD card he sells
4Genuine and Fake SanDisk 4Gb Class 4 microSD
PROFFIEBOARD INSTRUCTIONS
SD CARD RECOMMENDATIONS
46 | ProffieBoardTeensySaber user manual by Fredrik Hubinette and Dmitry Shtok
WIRE GAUGE GUIDE
ProffieBoardTeensySaber user manual by Fredrik Hubinette and Dmitry Shtok | 47
RECHARGE PORTS AND KILL SWITCHES
48 | ProffieBoardTeensySaber user manual by Fredrik Hubinette and Dmitry Shtok
NEOPIXEL STRIPS CURRENT DRAW
ProffieBoardTeensySaber user manual by Fredrik Hubinette and Dmitry Shtok | 49
6TROUBLESHOOTING
For more help please check these linksProffieOSProffieBoardTeensySaber wiki on GitHubAsk your question on The Rebel Armory forumsAsk your question on FX-sabers forumsAsk your question in facebook group
How to solve most common issues
Quick troubleshooting tips
TeensySaber board or Proffieboard is not recognized by computer (nothing under Port selection in Arduino)
ndash Make sure a charged 37V battery is connected to the board micro-USB cable is a data transfer cable all plugins and drivers are installed ndash
check again pages 21 for TeensySaber or 40 for Proffieboard Try a different USB port on your computer
Sketch (code) compile error in Arduino IDE
ndash Check your define CONFIG_FILE ldquoconfig_confighrdquo line in opened lightsaberino file if itrsquos written correctly with config in it
Sketch (code) compile error in Arduino IDE
ndash Check if the _configh file you defined in the lightsaberino sketch file is same name as in the lightsaber-rdquofirmware versionrdquolightsaber
config folder and is located in this folder
Sketch (code) compile error in Arduino IDE
ndash Check your settings under Tools tab in Arduino IDE program Check again pages 21 for TeensySaber or 40 for Proffieboard
Sketch (code) compile error in Arduino IDE
ndash Check if your _configh file is correct Blade Styles Presets const unsigned int maxLedsPerStrip = 144 if BladeConfig blades[] = is correct
Sketch (code) compile error in Arduino IDE
ndash If nothing helps install Arduino IDE version 186 and try to compile and upload the firmware again
Sound doesnrsquot play
ndash Remove SD card and insert again check speaker wiring Make sure all sound files on SD card are correctly named (8 characters max long)
Re-format SD card in FAT32 load sound files and try again try another SD card
Board says ldquoLOW POWERrdquo
ndash Charge the battery
Serial Monitor shows info sent by the board but your commands donrsquot work
ndash In the bottom right corner of Serial Monitor window make sure the Line Ending drop down is set to New Line
Sound is weird and distorted
ndash Check your SD card speed (see page 44) Check speaker wiring try another good speaker
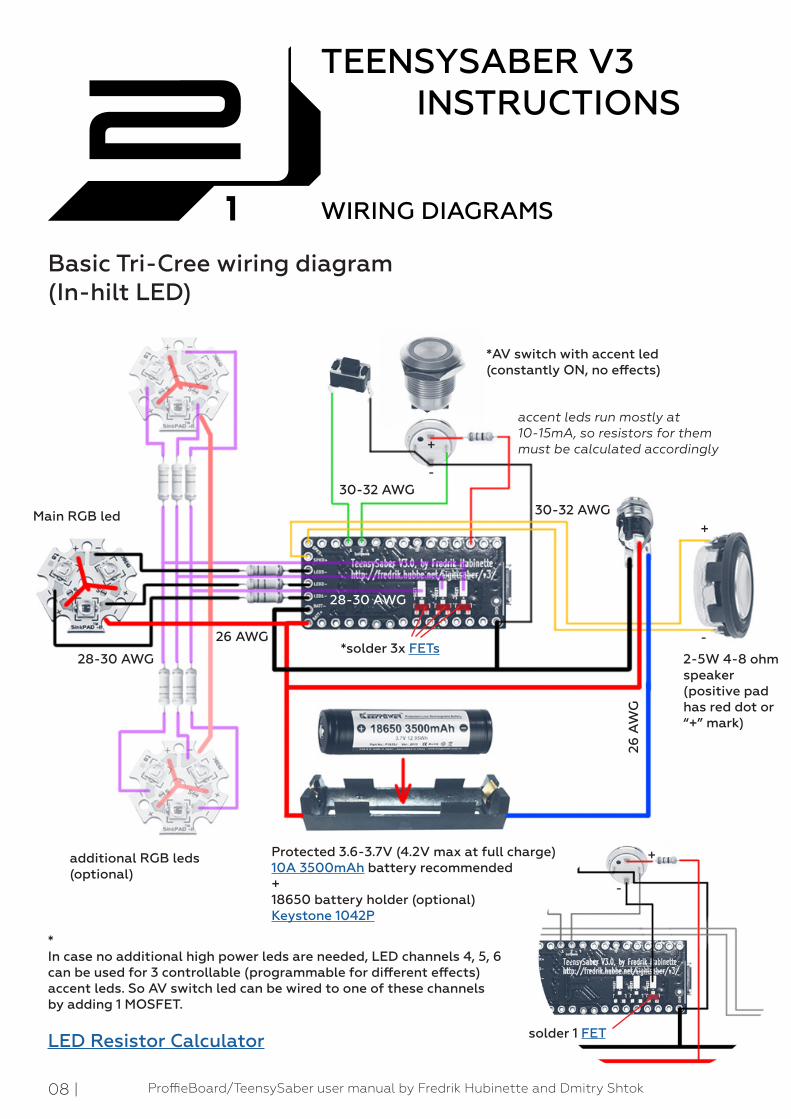
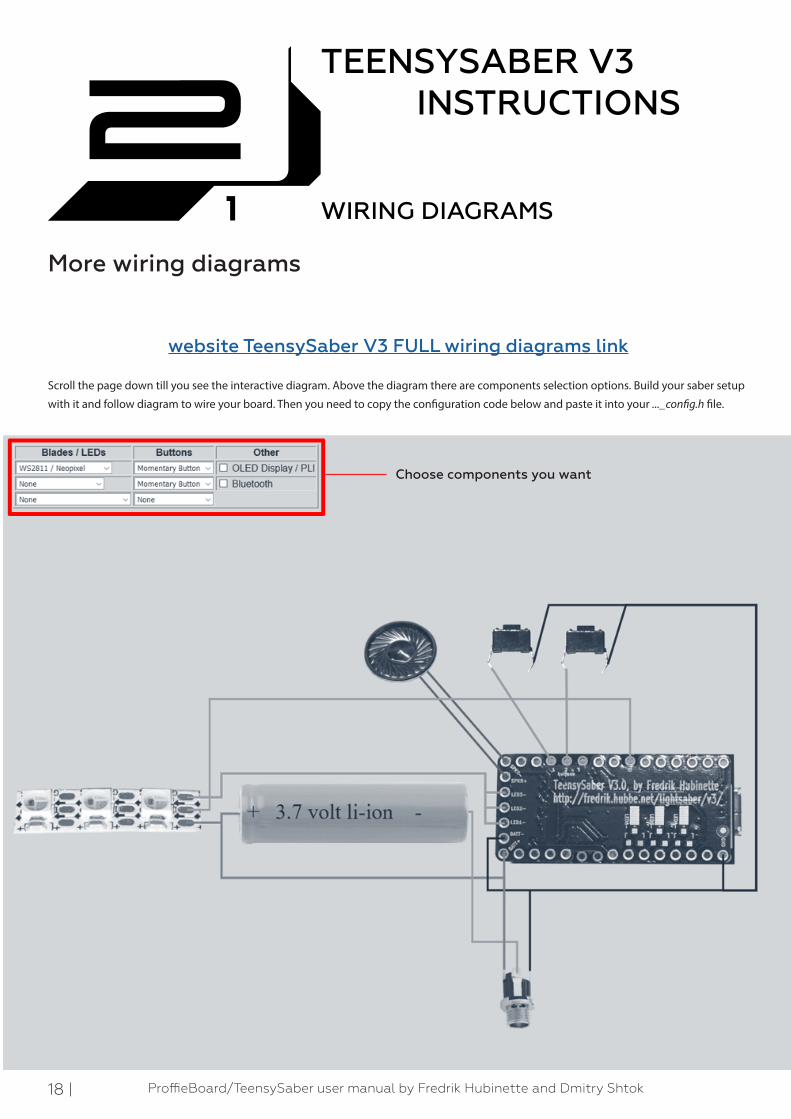