User Interface - Login Page · There are three distinct areas to the user interface (UI), which...
30
User Interface
Transcript of User Interface - Login Page · There are three distinct areas to the user interface (UI), which...
User Interface
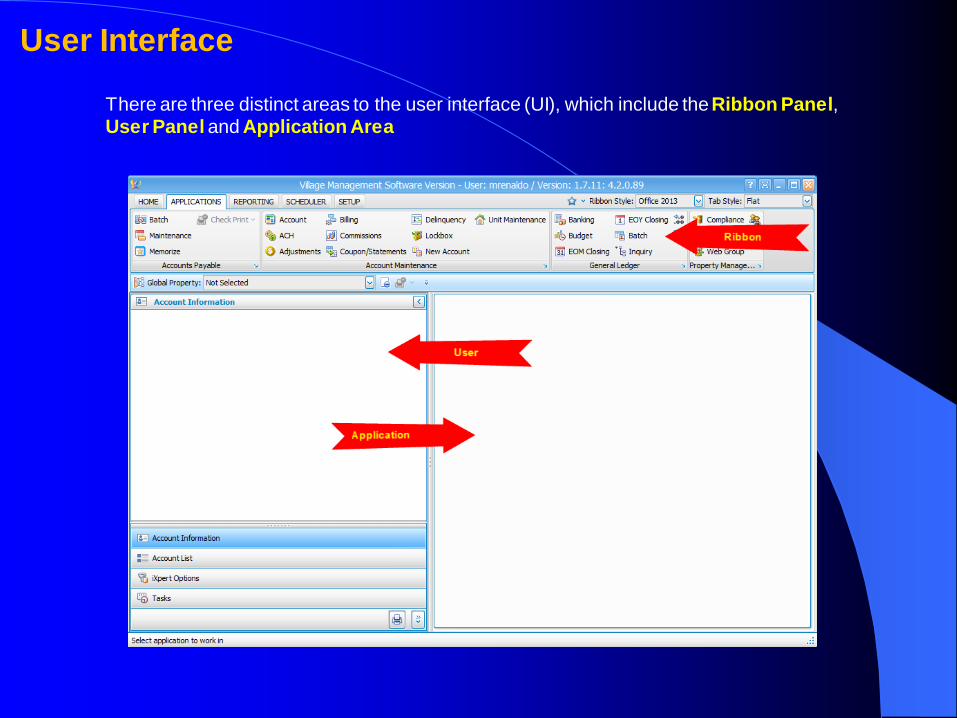
There are three distinct areas to the user interface (UI), which include the Ribbon Panel, User Panel and Application Area
User Interface

Ribbon Panel is located at the top of the screen and allows a user to:
Group panels (1 blue arrow), gives access to applications based on the users security definitions
Manage the User Interface (UI) skin (2 red arrow) Ribbon Style (3 purple arrow) Application Area Tab Style (4 green arrow) Email Template (5 yellow arrow) Quick User Toolbar (6 gold arrow) is used to:
Select properties to work with Customize common application selection Dynamic display of editing tools based on what the user is doing within the application
User Interface

User Interface (UI) Skin
The UI can be customized to change the appearance of VMS by selecting the small down arrow located next to the skin icon (within the red circle)
User Interface

Ribbon Style
The Ribbon Style allows the user to configure how the Ribbon Panel displays, which is useful when a user’s screen space is limited. Some Ribbon Styles will shrink the panel to allow the application more space for data entry and review
User Interface

Tab Style
The Tab Style defines how the running applications are added to the Application Area’s tab.
Grouped mode, the primary Application Area is tabbed, with the user applications shown under the primary tab
Flat mode, the user applications are shown individually, which gives additional space to a running application
User Interface

User Email Template
The user email template selection is used to define a custom template for individual emails (non-email blast) created in VMS by the user.
User templates are stored in the defined HTML Template folder and selectable using the dropdown.
An example of a User Template could be an accountant that needs her contact information to be used at the bottom of each email
User Interface

Quick User Toolbar
The Quick User Toolbar has several usages, which include property selection, custom user application links and any editing tools required by an application
Property Selection
Accessed using the dropdown, a users property list will display, allowing the user to select the properties to use when accessing the Common tools and Account application. The user can use Select or Clear all to define the properties to use and double-click a property as the Global Property used as the default selection for running applications
User Interface

Custom User Application Links
A user can select applications to be added to the custom toolbar by right-clicking an application within one of the group panels and selecting Add to Quick Access Toolbar. This action copies the application’s icon to the Quick Access Toolbar and can be used to run an application by clicking the icon rather than going to the group panel and searching for the desired application
In this example, the AP check print icon was added to the toolbar, allowing the user to print checks using the Quick Access Toolbar icon, instead of searching for the application in the group panel
The custom tools are saved and added when the user exits and enters VMS
User Interface

Editing Tools
As a user works in an application, there are tools associated to the application that are used for specific operations. Example, the Post button is used to process a transaction, which is enabled in the Quick Access Toolbar
User Interface

Group Panels
There are five group panel tabs: Home, Applications, Reporting, Scheduler, Setup
User Interface
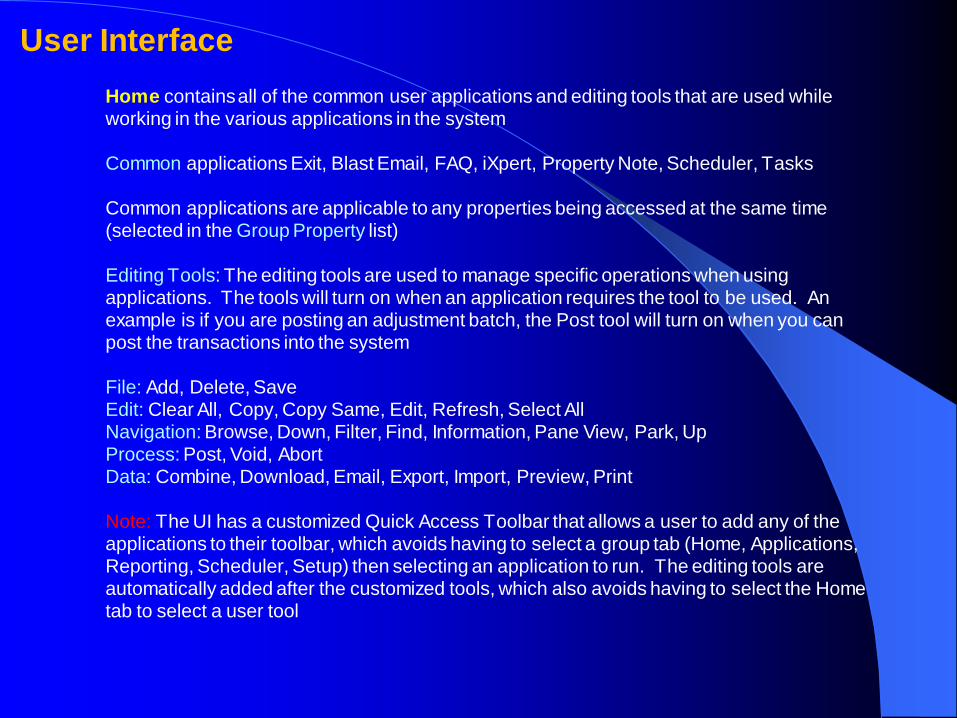
Home contains all of the common user applications and editing tools that are used while working in the various applications in the system
Common applications Exit, Blast Email, FAQ, iXpert, Property Note, Scheduler, Tasks
Common applications are applicable to any properties being accessed at the same time (selected in the Group Property list)
Editing Tools: The editing tools are used to manage specific operations when using applications. The tools will turn on when an application requires the tool to be used. An example is if you are posting an adjustment batch, the Post tool will turn on when you can post the transactions into the system
File: Add, Delete, SaveEdit: Clear All, Copy, Copy Same, Edit, Refresh, Select AllNavigation: Browse, Down, Filter, Find, Information, Pane View, Park, UpProcess: Post, Void, AbortData: Combine, Download, Email, Export, Import, Preview, Print
Note: The UI has a customized Quick Access Toolbar that allows a user to add any of the applications to their toolbar, which avoids having to select a group tab (Home, Applications, Reporting, Scheduler, Setup) then selecting an application to run. The editing tools are automatically added after the customized tools, which also avoids having to select the Home tab to select a user tool
User Interface

Applications contains the individual applications to manage data
Accounts Payable, Account Maintenance, General Ledger, Property Management
A user accesses an application by clicking the desired icon, which loads the application in the Application Area
Note: A user can right-click any application icon, then select the Add to Quick Access Toolbar if the application is used often, which avoids having to run the application within the ribbon
Note: As a best practice, it is recommend that a user not have numerous applications loaded in the Application Area unless they are frequently used. Having multiple applications opened will cause a delay in starting VMS
User Interface

Reporting contains the individual applications for managing merge letters, report groups and rendering reports
Note: There is a User Report panel that allows a user to generate reports for a specific account and / or properties, without the necessity of using the Report Generator in this group panel. This application is useful for creating reports for an entire property(s)
User Interface

Scheduler contains the tools used with the Scheduler application
Note: The Scheduler is accessible through Home | Common | Scheduler and is used to manage calendar events for a property
User Interface

Setup contains the setup applications for VMS to run
Note: Program Options is used to configure VMS, the other applications are used to manage the master data for all user applications
User Interface

User Panel is located to the left of the UI, this area allows a user to access user operation panels: The panels include: Information Panel: Displays the currently selected account from any applications Account List: A list of accounts derived from the selected property list iXpert: The primary search / export tool for many data resources managed Tasks: Used to determine all opened resource tasks from selected VMS areas User Report Generator: Used to print, email, export reports for a user listed in the
Account application or for selected properties
The slider control (red box), allows a user to reduce the bands (Account Information, Account List, iXpert Options, Tasks, User Reports) to just icons (sliding the bar down) which gives more space for the current panel
User Interface

Account List is used to show all accounts derived from the Property List
The list of accounts are used in several of the CRM applications, including Account, Adjustments, New Account, Compliance, Email Blast and Web Groups
Example, if a user wants to modify a specific account in the list, double-click the account in the grid, which loads the account in the Account tab
If a user wants to add an account to an AR adjustment batch, with the batch loaded, drag / drop an account to the adjustment area
User Interface

Account List this grid (and others in VMS) has special features used to locate, order and filter data within the grid
A user can customize the grid by right-clicking a column and selecting Hide this Column to remove a column or Column Chooser to add additional columns to the grid, which are saved when exiting and entering VMS
Columns can be dragged/dropped to other positions within the grid to create a special order
Clicking the column header changes the order of the data within the grid Clicking the filter icon within the column allows the user to filter data within the column A user can press ctrl + f on the keyboard to display a find tool, allowing the user to enter
search information
User Interface
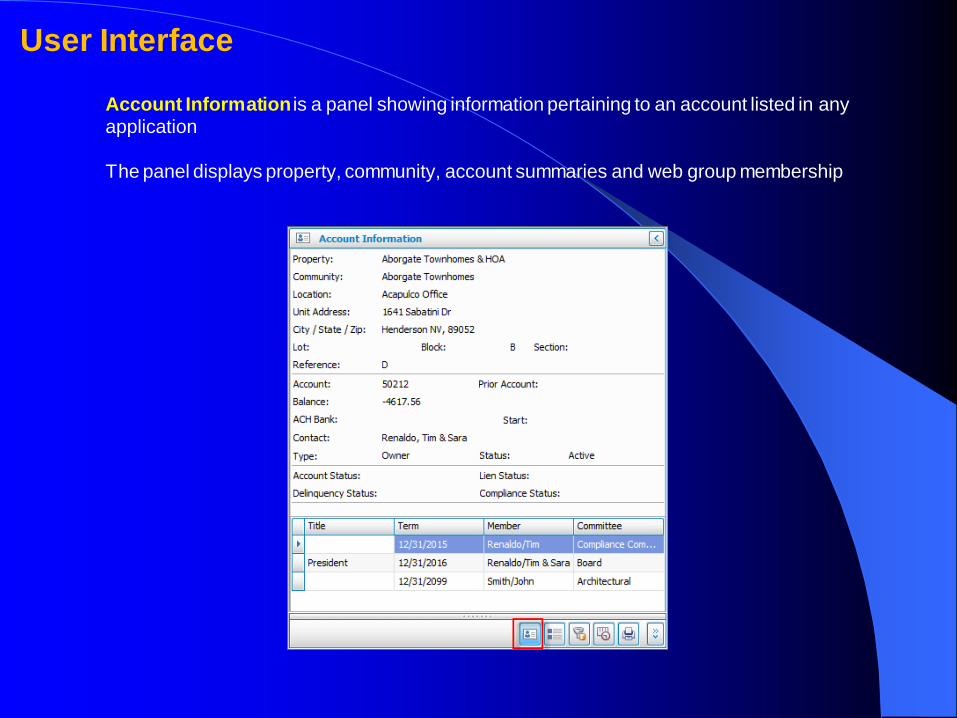
Account Information is a panel showing information pertaining to an account listed in any application
The panel displays property, community, account summaries and web group membership
User Interface

iXpert is a panel allowing the user to search resource data within the database, print compliance and delinquency batches
Resource areas, which is data entered throughout VMS, includes Account Notes, Account Registration, AP expenses, AR transactions, Architectural entries, GL entries, etc.
Options: Search: The user enters search criteria (end a word
with * to located the word anywhere within the data) Employee: Search for records associated to an
employee Account #: iXpert will search records for the entered
account # (the account number is automatically populated with the current account shown in the Account tab) otherwise it will search all Property List selections
Date range is entered to limit the search (30 days is assumed)
Open: Searches for only open resources
User Interface
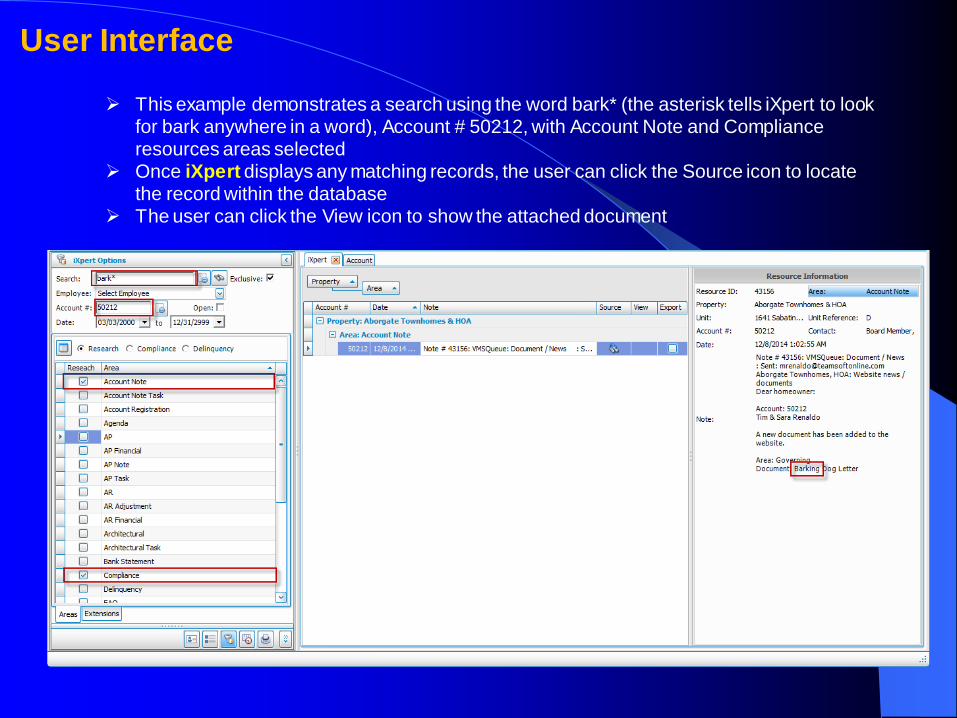
This example demonstrates a search using the word bark* (the asterisk tells iXpert to look for bark anywhere in a word), Account # 50212, with Account Note and Compliance resources areas selected
Once iXpert displays any matching records, the user can click the Source icon to locate the record within the database
The user can click the View icon to show the attached document
User Interface
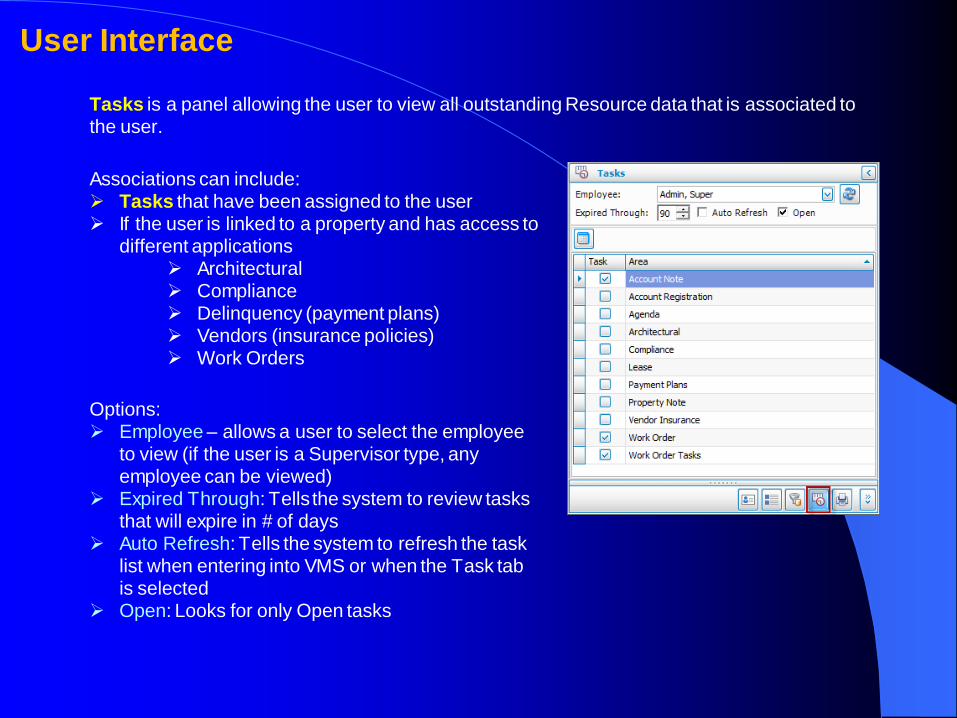
Tasks is a panel allowing the user to view all outstanding Resource data that is associated to the user.
Associations can include: Tasks that have been assigned to the user If the user is linked to a property and has access to
different applications Architectural Compliance Delinquency (payment plans) Vendors (insurance policies) Work Orders
Options: Employee – allows a user to select the employee
to view (if the user is a Supervisor type, any employee can be viewed)
Expired Through: Tells the system to review tasks that will expire in # of days
Auto Refresh: Tells the system to refresh the task list when entering into VMS or when the Task tab is selected
Open: Looks for only Open tasks
User Interface

User Interface
In the example below, the Resource Areas chosen include Account Note / Order, with the tasks shown in the list are open items that the employee is linked toOptions: The selected task can be edited by clicking the Edit tool in the toolbar, which has options
to close the task, add additional notes or assign the task to another employee (generates an email to the employee)
The user can drag/drop additional items to the Tasks/Documents grid, which are attached to the resource

Reports is a panel allowing the user to manage reports for a specific account or properties
Options: Add to Queue, Export, Email, Print, Preview are
operations allowed in this panel. Groups – Report groups are linked to application
areas and depending on the users security, the Groups dropdown will include all allowed report groups
Report Parameters: Depending on the selected report, parameters are displayed to allow for filtering. Additional parameters are added to include the specific account shown in the Account tab, which allows the user to create reports for just the selected account. By default the system assumes you are printing for the account, but unchecking the additional parameters will print a report for any properties selected in the Property tab.
User Interface

User Interface
In the example below, the Email report group is selected, with the Resident Statement with Email report selected.
Notice that account 50212 is selected in the Account tab, which caused the report panel filter area to include two additional parameters: Include Account Selection and Include Account Unit. These parameters are used to filter a selected report for the specific account shown, unchecking them would allow the user to print reports using the other parameters defined and / or properties selected in the Property tab.

Queue Tasks is a tab that shows a user all pending reports to process. A user can Add a report to the queue for scheduled printing. A report can be exported in several ways, but generally a report is added to the User Report area as a PDF and accessed using the User Reports tab.
Options: A user can select a queued report from the list
shown to alter the way the task scheduler (VMS Queue) will manage the report. Examples include uploading a report to the web site, emailing to board members (eDistribution Governing), printing or adding to the User Report tab. The user is emailed a confirmation from the system once a report is rendered
A queued report can be selected and deleted using the Delete tool
User Interface

Property is a tab that allows the user to select properties to use when creating reports. This list is independent of the Select Properties / Global Property selection. All properties linked to the employee are shown.
The Community tab allows the user to select specific communities for any property selected
Options: A user can select single, multiple or All properties
to use when printing reports
User Interface

User Reports is a tab that allows the user to work with any queued reports that were exported as a PDF file
Options: Reports can be moved up / down within the list
before combining A user can select single or multiple reports in this
list to either Export (which means combine them in a single PDF file) or email them to a recipient
A user can drag/drop external PDF files into the grid for specific properties
User Interface

VMS is a panel that lists documentation, videos and other helpful information that a user can use to learn about using VMS. Help information is grouped by Section of software, Area within the Section and filtered by the user’s access rights.
Capabilities: Use the Find tool to search the grid for specific
documentation Use the column filters located within each column
header (funnel icon) to locate specific Sections, Areas, Added dates and Documents by name
The following sections are available (based on user access):
General Information AP AR Configuration Property Management Reporting Setup
User Interface