USER GUIDE - NK Sports
32
USER GUIDE FOR COXBOX GPS AND COXBOX CORE www.coxbox.com
Transcript of USER GUIDE - NK Sports
USER GUIDEFOR COXBOX GPS AND
COXBOX CORE
www.coxbox.com

www.coxbox.com2
CONTENTS
Service ............................................... 3
CoxBox GPS + Core Features .......... 4
Installation Instructions ..................... 5
Quick Start Guide .............................. 6
Button Functionality .......................... 7
Rowing Screen Icons ........................ 8
Live Stream ........................................ 9
NK LiNK™ Logbook Guide ............... 10
Memory ............................................. 12
Data LiNK™ ....................................... 14
Setup Menu ....................................... 15
Advanced Setup Menu ..................... 16
Workouts ........................................... 18
Battery Use and Charging ................. 21
Proposition 65 Warning ..................... 23
Maintenance ...................................... 24
Limited Warranty ............................... 26
Compliance ........................................ 28

www.coxbox.com 3
We provide full factory service on every product we manufacture for as long as we make the product (and as long after as component availability permits). If we can’t repair a product, we will offer you a brand new replacement under our Trade In Trade Up program - even for accidental damage and misuse. If you have a problem with an NK product, visit www.nksports.com or contact us by phone, e-mail or in person and we’ll do our best to make it right.
For fastest service, you can initiate a service request 24-7 at www.nksports.com/nk-sports-service-request
For FAQ’s, chat and e-mail support, visit www.NKSports.com.
US Toll-Free 800-784-4221
Int’l Phone +1 610-447-1555
GENERAL INFO
TECHNICAL SUPPORT
REPAIRS
SERVICE

www.coxbox.com4
MENU NAVIGATION /FLEX FIELD BUTTONS
www.coxbox.comwww.coxbox.com
MENU NAVIGATION /FLEX FIELD BUTTONS
SEAT DISPLAY VIEW MODE (coming soon)
POWER ON/OFF & MENU MODE
DEDICATED VOLUME CONTROL
MONOBLOCK™ CONNECTOR PORTS WITH STABLESOCKET™
TECHNOLOGY.CoxBox GPS™
+
Core Front View
ATHLETE PERFORMANCE MODE (coming soon)
HOME SCREEN MODE
START/PAUSE/RESET
BUMPER
CoxBox Core is upgradable
to GPS
www.coxbox.com 5
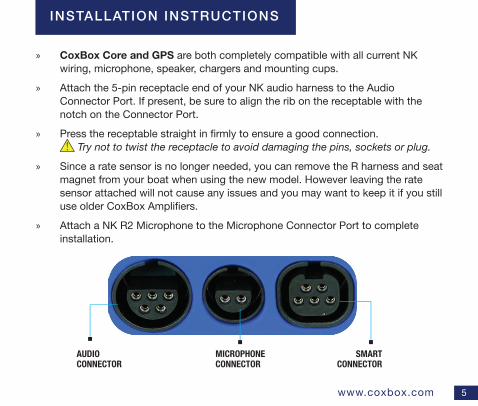
» CoxBox Core and GPS are both completely compatible with all current NK wiring, microphone, speaker, chargers and mounting cups.
» Attach the 5-pin receptacle end of your NK audio harness to the Audio Connector Port. If present, be sure to align the rib on the receptable with the notch on the Connector Port.
» Press the receptable straight in �rmly to ensure a good connection. Try not to twist the receptacle to avoid damaging the pins, sockets or plug.
» Since a rate sensor is no longer needed, you can remove the R harness and seat magnet from your boat when using the new model. However leaving the rate sensor attached will not cause any issues and you may want to keep it if you still use older CoxBox Ampli�ers.
» Attach a NK R2 Microphone to the Microphone Connector Port to complete installation.
INSTALLATION INSTRUCTIONS
AUDIOCONNECTOR
MICROPHONE CONNECTOR
SMART CONNECTOR

www.coxbox.com6
» Press and hold the power button to turn the unit on.
Use the arrow keys to adjust any �ex �elds on the display to change measurements for current row.
» Press the Start/Pause/Reset button to enter Ready mode (Ready will appear in middle of screen)
» Timer and recording will start when the �rst stroke is detected.
» Press the Start/Pause/Reset button to Stop the timer and recording. Press again to resume rowing.
» Hold the Start/Pause/Reset button until Reset appears and release to reset row and save stats in memory.
» Hold the Power button until Turn Off appears and release to turn off the unit. Turning off will save the correct session as well.
QUICK START GUIDE
Throughout this manual, features and functions speci�c to the GPS model are indicated by this icon.

www.coxbox.com 7
When on the main rowing screen, use left and right arrows to enter �ex �elds. Use up and down arrows to toggle the �ex �eld to different measurements.When in the menu screen, use up and down arrows to toggle between menu items. Use right arrow to enter menu item and use left arrow to exit menu item.
Use + to toggle volume higher and – to toggle volume lower. Press and hold – to lower volume quickly to zero. These buttons will change volume regardless of which screen is showing.
Press to enter Ready mode (for use right before starting rowing). Press again to Stop session. Hold and release when Reset is on the screen to reset values and save rowing session.
Press on any screen to immediately return to the main rowing screen.
Press to go into Seat Display Settings. (Supported on a future release)
Press to go into Seat Display Measurements. (Supported on a future release)
Press to enter Main Menu. Hold down to power on or power off (while on main rowing screen only). The unit will also power off automatically after - minutes of - .
BUTTON FUNCTIONALITY

www.coxbox.com8
GPS Mode / Satellite coverage: hollow icon means no satellite connection, �lled-in means adequate satellite connection. It is recommend to wait until symbol is �lled- in before starting your row.
Impeller Mode: Denotes connected to an impeller Speed and distance will be reported from impeller instead of GPS.
Battery Life. Each bar represents about 20% of a full charge.
Connected to mobile device for Live Streaming.
CoxBox is connected to mobile device, but mobile device has no cell service.
ROWING SCREEN ICONS

www.coxbox.com 9
GPS Mode / Satellite coverage: hollow icon means no satellite connection, �lled-in means adequate satellite connection. It is recommend to wait until symbol is �lled- in before starting your row.
Impeller Mode: Denotes connected to an impeller Speed and distance will be reported from impeller instead of GPS.
Battery Life. Each bar represents about 20% of a full charge.
Connected to mobile device for Live Streaming.
CoxBox is connected to mobile device, but mobile device has no cell service.
Select Live Stream to broadcast your CoxBox GPS measurements to the cloud for remote viewing. You will need to pair the CoxBox to a mobile phone and have the phone in range of CoxBox to broadcast your data live. We recommend keeping the phone in a waterproof bag.
NK is not responsible for damage to your phone. Be sure to use a waterproof bag or case designed for phones!
» Download NK LiNK Logbook application to your mobile device.
» Make sure Bluetooth is enabled on mobile device and has cellular coverage.
» Open the NK LiNK Logbook application. Go to the Stream page in the app.
» Enter a Boat ID and make sure Streaming is toggled to ON.
» Select Live Streaming option on the CoxBox. Then go to Phone Pairing-> Find New.
» You should show as connected fairly quickly. Use CoxBox normally to broadcast live. Connected phone must stay near CoxBox in boat.
» Go to the Logbook app or logbook.nksports.com to view live results.
LIVE STREAM

www.coxbox.com10
» Coxswain pairs CoxBox GPS to a mobile device using LiNK Logbook application on the Stream page.
» Coxswain places mobile device in waterproof bag and brings into boat.
» Live streaming results are broadcast to the cloud.
NK LINK LOGBOOK LIVE STREAMING GUIDE
COXSWAIN

www.coxbox.com 11
NK LINK LOGBOOK LIVE STREAMING GUIDE
» Coach or observer opens LiNK Logbook on their own mobile device and goes to Live page.
» Navigate the map to your current location and click on the boat name that you wish to view.
» There are no restrictions in the distance between these two mobile devices. As long as they each have Cellular or Wi� coverage you can monitor streaming athletes real time from anywhere in the world with Live LiNK.
C
OAC H O R OBS E R VER
INTERNET CLOUD

www.coxbox.com12
Every stroke taken with the CoxBox running is stored in memory and the memory can be reviewed in 100 meter increments. The speed input (GPS or Impeller) and system of units used will be stored as they were rowed. Both impeller and GPS stats can be viewed upon export. The total memory that the unit can store is approximately 25 hours.
» MEMORY STORAGE When the memory is full, the unit will stop recording data. When nearing or at full data, you must delete all session data to continue recording (see below). The amount of memory used can be found on the bottom of the Recall Menu. An alert message will appear when memory log is nearly full.
» DATA RECALL Select Data Recall from the Main Menu to review stored data. Recall memory will be formatted in sessions according to date and time. Just Row sessions will have the JustGo pre�x whereas a Workout session will just show the pieces run.
Please note: a session is not complete until: a) In Just Row, you reset the counter b) In Workout, the workout is completed or cancelled.
MEMORY
RECALL MENU SELECT
EXIT
Mar 10 06:15a
Delete All Session Data?
Mar 10 06:00a
Mar 09 06:27a
JustGo-3050M
4x5:00/2:00
5x5:00/10:00
Mar 06 03:24a
Mar 01 06:17p
2(6:00,3:00,1000M
8x1000M/3:00
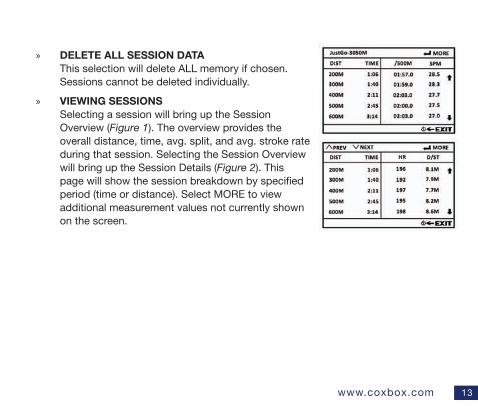
JustGo-3050M SELECT
EXIT
3050M 15:36.0 01:57.0 28.7
DIST TIME SPLIT RATE
Fig1:Session Overview
JustGo-3050M MORE
EXIT
100M 00:32 28.7 96
200M 1:06 28.5 92
300M 1:40 28.3 97
400M 2:11 27.7 95
500M 2:45 27.5 98
DIST TIME RATE HR
Fig2:Session Details
1:06961:0696
1:06921:0692
1:06971:0697
1:06951:0695
1:06981:0698
www.coxbox.com 13
Fig1:Session Overview
» DELETE ALL SESSION DATA This selection will delete ALL memory if chosen. Sessions cannot be deleted individually.
» VIEWING SESSIONS Selecting a session will bring up the Session Overview (Figure 1). The overview provides the overall distance, time, avg. split, and avg. stroke rate during that session. Selecting the Session Overview will bring up the Session Details (Figure 2). This page will show the session breakdown by speci�ed period (time or distance). Select MORE to view additional measurement values not currently shown on the screen.
Fig2:Session Details

www.coxbox.com14
Select this option to connect the CoxBox to a mobile device to upload session data.
» On your mobile device, download LiNK Logbook from the App or Google Play store nksports.com/link-logbook
» On your mobile device, turn Bluetooth on. Open LiNK Logbook and login to your account.
» In the app go to the Workout Log Screen. Press the arrow/cloud icon in the top right of the screen.
» On the CoxBox GPS, go to the Main Menu and select Data LiNK mode.
» In the Logbook app, your CoxBox should appear, select it to begin uploading data.
» After data has uploaded, select the calendar date and session you want to review.
DATA LiNK™

www.coxbox.com 15
SETUP MENU
» SPEED/DISTANCE SETUP Options are Speed mode or Split mode. Speed mode will display your speed in the top right window (which can be �exed). Split mode will display your pace expressed as a time to cover a 500 meter distance. Units allows you to change the units shown for speed and distance (options are: M,M/S, /500M; KM, KMH, /500M; or MI, MPH, /MI).
» INPUT The speed (and distance) Input can be set to GPS or Impeller. Please note you would need the SMART Impeller wiring to use impeller mode (GPS only).
» AUTO PAUSE If toggled ON, the unit will stop the timer if it does not detect a stroke within the last 6 seconds. If toggled OFF, the unit will not stop the timer even if no strokes are being detected. If you would like to stop the timer manually, select the button to start and stop the timer manually.
Please note: the unit will not Auto Pause during the Rest sessions of a Workout.
NOTE: Average Speed is always calculated as a function of the distance covered in the elapsed time shown. Because the timer will continue to run while you are not rowing, turning Auto Pause “OFF” will impact the calculation of your cumulative average speed.
» AUTO SHUTDOWN When Auto Shutdown is set to 10min, the unit will automatically shut off after 10 minutes of not detecting a stroke rate. If the Auto Shutdown is set to OFF, the unit will only turn off when the user manually shuts the unit down.
www.coxbox.com16
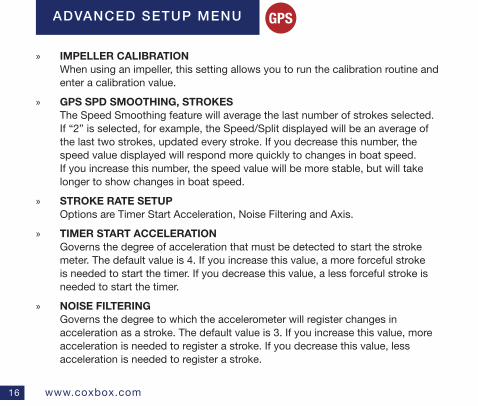
» IMPELLER CALIBRATION When using an impeller, this setting allows you to run the calibration routine and enter a calibration value.
» GPS SPD SMOOTHING, STROKES The Speed Smoothing feature will average the last number of strokes selected. If “2” is selected, for example, the Speed/Split displayed will be an average of the last two strokes, updated every stroke. If you decrease this number, the speed value displayed will respond more quickly to changes in boat speed. If you increase this number, the speed value will be more stable, but will take longer to show changes in boat speed.
» STROKE RATE SETUP Options are Timer Start Acceleration, Noise Filtering and Axis.
» TIMER START ACCELERATION Governs the degree of acceleration that must be detected to start the stroke meter. The default value is 4. If you increase this value, a more forceful stroke is needed to start the timer. If you decrease this value, a less forceful stroke is needed to start the timer.
» NOISE FILTERING Governs the degree to which the accelerometer will register changes in acceleration as a stroke. The default value is 3. If you increase this value, more acceleration is needed to register a stroke. If you decrease this value, less acceleration is needed to register a stroke.
ADVANCED SETUP MENU

www.coxbox.com 17
» AXIS Allows you to select Front-Back (2) or Any (3). Front-Back (2) is generally recommended for rowing assuming that the unit will be mounted perpendicular to the long axis of the boat. If mounting at a non-perpendicular axis, the recommendation is to toggle to Any (3).
» TIME AND DATE Used to change the format of the date and time displayed.
Please note: only time shows currently, date will be shown on recall screen.
» DIAGNOSTICS The Diagnostics screen provides information about the performance of your unit’s GPS receiver, accelerometer, HRM, clock, and charging system. This information assists NK tech support in troubleshooting your unit in case it is not functioning correctly.
» FACTORY RESTORE This will reset the �rmware back to the default settings. This will also erase all data sessions but will not reset odometer values.
Used to change the format of the date and time displayed.

www.coxbox.com18
» RUN LAST WORKOUT: Runs the last workout. This is a quick way to repeat single distance or single time workouts without setting up intervals.
NOTE : Press to ready the workout. Workout will start when �rst stroke is detected.
Press to pause a workout. Hold to cancel a workout.
» SINGLE DISTANCE: Select this option to run a single distance-based workout at the distance shown. Press , followed by and to adjust the distance. Then press 2x to run the workout.
» SINGLE TIME: Select this option to run a single time-based workout for the time shown. Press , followed by and to adjust the time. Then press 2x to run the workout.
» INTERVALS… Select this option to create a multi-interval based workout (e.g. time, distance, and/or rest periods). You can select from the pre-loaded workouts or customize to create your own. Up to 6 custom workouts can be programmed. The CoxBox is loaded with 6 default workouts, which are editable.
Please note: Interval workout names are automatically generated based on the type of intervals programmed.
WORKOUTS
WORKOUTS SELECT
EXIT
Single Distance
Run Last Workout
Single Time
Intervals...
2000M
00:30:00

www.coxbox.com 19
WORKOUTS SELECT
EXIT
Single Distance
Run Last Workout
Single Time
Intervals...
2000M
00:30:00
CREATING AN INTERVAL WORKOUT First select a pre-existing workout to edit. Use and to
select a �eld. Press the , followed by the and to modify the middle
column. Press again, followed by and to adjust the right column value.
Press return to �eld selection.
Please note: pressing the will automatically SAVE and exit the workout when �nished.
» COUNTDOWN: When toggled ON, a countdown timer will start when the �rst stroke is detected. When the countdown reaches zero, the workout will begin. Tip: The countdown allows the user to build to “race pace” before starting their workout. If countdown is toggled OFF, the workout will start immediately when the �rst stroke is detected.
» INTERVALS: Determines the type and number of intervals in the workout. If you select Equal, all work intervals will be equal in type and value and all rest intervals will be equal in type and value. If you select Variable, you can create a multi-faceted workout of work and rest intervals that can each vary by type and duration.

www.coxbox.com20
» WORK: De�nes the �rst work interval of the workout. Work can be time based or distance based. If more than one interval is being performed, a number will be added to this entry (i.e., Work1, Work2, Work3, etc).
» REST: De�nes the amount of rest in between work intervals. Rest can be time based or distance based. The number shown to the right is the rest value per the unit shown. Similarly if more than one rest period is entered in a variable workout, it will be followed by a number.
» NUMBER OF SETS: Select the number of sets of the proceeding interval workout to run. For example if you have a workout with a work and rest interval, setting this to 2 will run this work and rest interval workout twice.
» REST BETWEEN SETS: Only appears if Number of Sets is greater than 1. De�nes the rest period between a repeated group of intervals.
NEW INTERVAL WORKOUT SELECT
EXIT
Countdown OFF
Run Workout?
Intervals Equal
Work Dist
10S
1
100M
Rest Time
Repeat?
00:02:00
1

www.coxbox.com 21
» A fully charged battery will provide approximately 10+ hours of operation, depending on speech, volume, duration, backlight, Bluetooth and accessory usage. Each bar on the battery indicator represents 20% of battery life, or approximately 2 to 2.25 hours.
» CoxBox Core and GPS can be charged with any exisiting NK CoxBox charger. Standard NK chargers must be plugged into the audio port (the semi-circular connector).
» You may also speed up charging considerably with the new NK EspressoTM charger. This charger will charge the CoxBox in 1/3 of the time of the standard charger. The Espresso charger must be plugged in to the smart port (the rectangular connector).
» The CoxBox will always charge in the ON state, meaning you cannot turn it off while it is charging. The battery indicator will �ash to show that it is charging. When the battery indicator stops �ashing, the unit is fully charged.
» To fully charge the battery when dead with a standard NK charger will take roughly 12 hours. To fully charge the battery when dead with the Espresso charger will take roughly 4 hours. If you need an hour of usage with a dead battery, charge for 15 minutes with the Espresso charger.
BATTERY USE AND CHARGING
Standard (Exisiting) NK Chargers
NEW EspressoTM Charger
The CoxBox must only be charged with NK supplied chargers. Please do not attempt to charge CoxBox with any unapproved or 3rd party charging devices as permanent damage not covered under warranty may occur.
www.coxbox.com22
WARNING! LITHIUM-ION POLY BATTERY HAZARDS
Your CoxBox contains a lithium-ion poly battery pack. Lithium-ion batteries contain �ammable liquid electrolyte that may vent, ignite and produce sparks when subjected to high temperatures or when damaged or overcharged. If ignited, batteries may burn rapidly with a �are effect and may produce irritating, corrosive and/or toxic gases, including toxic hydrogen �uoride gas, which may cause dizziness or suffocation. Contact with battery electrolyte may be irritating to skin, eyes and mucous membranes.
Do not ever subject to �re or temperatures above 140°F | 60°C.
WARNING! A car in hot sunlight may exceed these temperatures!
» Do not charge, use, transport or store above 115°F | 45°C.
» Do not charge below 32°F| 0°C.
NOTE: Your CoxBox is quipped with a safety feature that will shut down charging if the battery is too hot or too cold.
» Do not puncture or open the unit.
» Do not continue to use a CoxBox that has been damaged, shows signs of water ingress, or has displayed repeated charging errors.
» If you see smoke or smell fumes, STOP charging or use immediately and remove the CoxBox from charge.
» If the unit’s internal battery pack is damaged, avoid contact with battery electrolyte, which may be irritating to skin, eyes and mucous membranes.
» In case of battery �re, evacuate the area to avoid inhalation of fumes. If possible, cover the battery with sand to extinguish the �re or use a dry ABC- type extinguisher.

www.coxbox.com 23
WARNING: This product and/or its included or branded accessories can expose you to chemicals, including lead, lead compounds and phthalate DEHP, which are known to the State of California to cause cancer and lead and lead compounds, bisphenol A (BPA), and phthalate DnHP, which are known to the State of California to cause birth defects or other reproductive harm. For more information, go to www.P65Warning.ca.gov and www.NKSports.com/prop65.
Many of the elements listed under Proposition 65 are commonly found in products in the electronics industry. Although NK Sports’ manufacturing process is “lead-free,” it remains possible that small amounts of lead could be found in components or subassemblies. Bisphenol A (BPSA) could be found in plastic housings, lenses, labels or adhesives, and DEHP & DINP (phthalates) could be found in PVC wire coatings of cables, housings, carrying cases, an/or power cords. Because we cannot guarantee that these chemicals are never present, we have elected to place the warning on our products to ensure compliance with California law and our customers’ right to know. While we have not attempted to evaluate exposure, we believe that normal consumer use of this product is unlikely to result in exposure that creates a signi�cant risk of harm. For more information visit www.NKSports.com/compliance or contact us directly at [email protected].
PROPOSITION 65 WARNING

www.coxbox.com24
Follow these steps to keep your CoxBox static-free and reliable for years.
Supplies: Isopropyl (rubbing) Alcohol, Pipe Cleaners, *Metal Cleaning Brush, *Nyogel Grease, Foam Swabs. (*Available from NK)
MAINTENANCE
1. Use Isopropyl alcohol to clean the inside of all the connector sockets.
2. Insert metal brush (supplied with Audio Maintenance kit) into each socket several times to loosen and clean debris. If you do not have the Audio Maintenance Kit metal brush, you can substitute a pipe cleaner for this step.
3. Next use a pipe cleaner to remove any excess alcohol and debris.

www.coxbox.com 25
4. Apply Nyogel grease to each of the sockets. Be careful not to over�ll, only a small amount is needed.
6. If not using Smart connector, cover with Smart Connector Cap.
5. Using a foam swab, apply Nyogel to inside and outside of all three rubber connectors, not the plastic.
Keep Smart Connector Cap in place any time you do not have something plugged in to connector. This is particularly important on the water as if prevents corrosion of the sockets.

www.coxbox.com26
LIMITED WARRANTY
Nielsen-Kellerman Co. (“NK”) guarantees your CoxBox to be free of defects in materials and workmanship for a period of TWO YEARS from your date of purchase. NK will repair or replace with the same or equivalent product, at NK’s option, any defective product or part when noti�ed within the warranty period. NK may use new or reconditioned parts in performing limited warranty repairs and building replacement products. NK will return the product via domestic ground shipping or NK’s choice of method of international shipping at no charge.
The following issues do not result from a manufacturing defect and are not
covered under this warranty:
» Damage due to improper use or neglect (including corrosion)
» Damage resulting from severe impact, crushing or mechanical harm
» Modifications or attempted repairs by someone other than an authorized NK repair agent
» Normal wear and tear
» Diminished battery capacity within normal range for the number of charge/discharge cycles
» Damage due to charging with a non-NK charger or charging system
2TWO-YEAR
LIMITED WARRAN
TY
www.coxbox.com 27
Your warranty period will be measured from your date of purchase. Ensure full warranty coverage by REGISTERING your NK product promptly at www.nksports.com. We keep your registration information in strict con�dence and do not sell it, share it, or use it for anything but product-related information bulletins (which you may decline receiving). If you do not register and cannot provide proof of purchase, your warranty period will be measured from our date of manufacture by serial number. Removing or defacing the serial number voids this warranty. Repair or replacement under the terms of this limited warranty does not extend or renew the warranty period.
Except for the warranties set forth herein, NK disclaims all other warranties, expressed, implied or statutory, including, but not limited to, the implied warranties of merchantability or �tness for a particular purpose. Any implied warranties that may be imposed by applicable law are limited to the term of this warranty. In no event shall NK be liable for any incidental, special or consequential damages, including, but not limited to, loss of business, loss of pro�ts, loss of data or use, whether in an action in contract or tort or based on a warranty, arising out of or in connection with the use or performance of an NK product, even if NK has been advised of the possibility of such damages. You agree that repair, and (upon availability) replacement, as applicable, is your sole and exclusive remedy with respect to any breach of the NK Limited Warranty set forth herein. All product liability and warranty options are governed exclusively by the laws of the Commonwealth of Pennsylvania.

www.coxbox.com28
COMPLIANCE
This device complies with part 15 of the FCC Rules. Operation is subject to the following two conditions:
1. This device may not cause harmful interference,
2. This device must accept any interference received, including interference that may cause undesired operation.
This Class B digital device complies with Canadian ICES-003.
Conforms with Council Directive 2004/108/EC (12/15/2004) on Electromagnetic Compatibility.
RoHS(Reduction of Hazardous Substances) compliant.
Marked in accordance with the WEEE (Waste Electrical and Electronic Equipment) Directive. Please do not dispose of the CoxBox, Charger or Battery Pack in your household trash. Return to NK, an NK dealer, or a designated recycling center for proper recycling and disposal.
Does not contain greater than >0.1% of the substances of Very High Concern (SVHC) on the REACH European Regulation on the Registration, Evaluation, Authorisation and Restriction of Chemicals Candidate List.
IC
RoHS

www.coxbox.com 29
SPECIFICATIONS
DISPLAY TYPE High contrast, sunlight readable monochrome LCD with 400x240 resolution
DISPLAY SIZE 3.6”x2.6”x1.2”
BATTERY TYPE 2600 mAh rechargable LiPoly multi-cell internal pack
BATTERY LIFE 10+ hours, fully charged
BATTERY LIFE EXPECTANCY
2 - 5 years, factory replaceable
CHARGING TIME Standard Charging – 8.5 hours. Espresso™ Charging – 3.5 hours
DIMENSIONS 3.20” tall x 4.4” diameter. Retro�ts in current mounting cup
WEIGHT 1lb 6.1 oz
WATERPROOF Waterproof to IP67, NEMA-6
BUOYANCY Floats
MEASUREMENTS Audio, Wireless Stroke Rate, Elapsed Time, Speed, Memory, Splits, Date, Distance per Stroke, Instantaneous Split/Speed
WARRANTY 2 years
ENVIRONMENTAL RoHS and REACH compliant and marked in accordance with the WEEE directive. Please do not dispose of CoxBox in your household trash Return to NK, an NK dealer, or a designated recycling center for proper disposal
ACCURACY Speed +/- 0.1 m/s; Distance +/- 2.5m over any distance

www.coxbox.com30

www.coxbox.com 31

2020
311644_3_20.02.21
Nielsen-Kellerman
www.NKSports.com


![Summarization of User-Generated Sports Video by … of User-Generated Sports Video ... conventions to extract high-level semantics by exploiting a ... and specific camera work [8].](https://static.fdocuments.net/doc/165x107/5ad5293d7f8b9aff228cbfc3/summarization-of-user-generated-sports-video-by-of-user-generated-sports-video.jpg)