User Guide for the RightFax Fax Service - UCY
11
INFORMATION SYSTEMS SERVICE NETWORKS AND TELECOMMUNICATIONS SECTOR User Guide for the RightFax Fax Service Web Utility August 2011
Transcript of User Guide for the RightFax Fax Service - UCY

INFORMATION SYSTEMS SERVICE
NETWORKS AND TELECOMMUNICATIONS SECTOR
User Guide for the RightFax Fax Service
Web Utility
August 2011
CONTENTS
1. Accessing the Web Utility
2. Change Password
3. Web Utility: the interface
4. Send a document
4.1 New Document
4.2 Add attachments
5. Print a document from your list
6. Contacts
6.1 Create an individual contact

2
NETWORKS AND TELECOMMUNICATIONS SECTOR, 2011
1. Accessing the Web Utility
Open the Internet Explorer browser and type in the following url address, or Ctrl + click on the link below:
http://faxsrv.ucy.ac.cy/webutil/
If it is the first time you are attempting to access the web utility, the following screen shall appear. Complete the
required fields (four steps indicated on the screenshot) and click Login. If you have logged in to the web utility
before, then you will be asked to enter only your User ID and Password.
The required server
information to be
entered here is
faxsrv.ucy.ac.cy
In the User ID field enter
the username you have
been given for the
RightFax application by
your IT administrator
In the Password field
enter the password you
have been given for the
RightFax application by
your IT administrator
Make sure the Use NT
Authentication field is
NOT checked
IMPORTANT NOTE:
Access to the Web Interface is possible only through the use
of Windows Internet Explorer web browser. Ctrl + click the
image below to download Internet Explorer in case it is not
installed on your computer:
1
4 3
2

2. Change Password
It is highly recommended that you proceed to changing your password as soon as possible. To do this, once you
have logged in to the application, first select Options from the list pane to your left. Use the vertical scroll bar and
scroll down to the Section User Information. Under the Change Password header, enter your Old Password and
then enter the New Password. In the Confirmation field re-enter the new password. Once you have completed
these three fields, click on the Change Password button:
A message will appear on top of the screen informing you whether the password changing was successful. If it was
not successful, the message will inform you on what needs to be corrected:
1
2
3
4
2
NETWORKS AND TELECOMMUNICATIONS SECTOR 2011
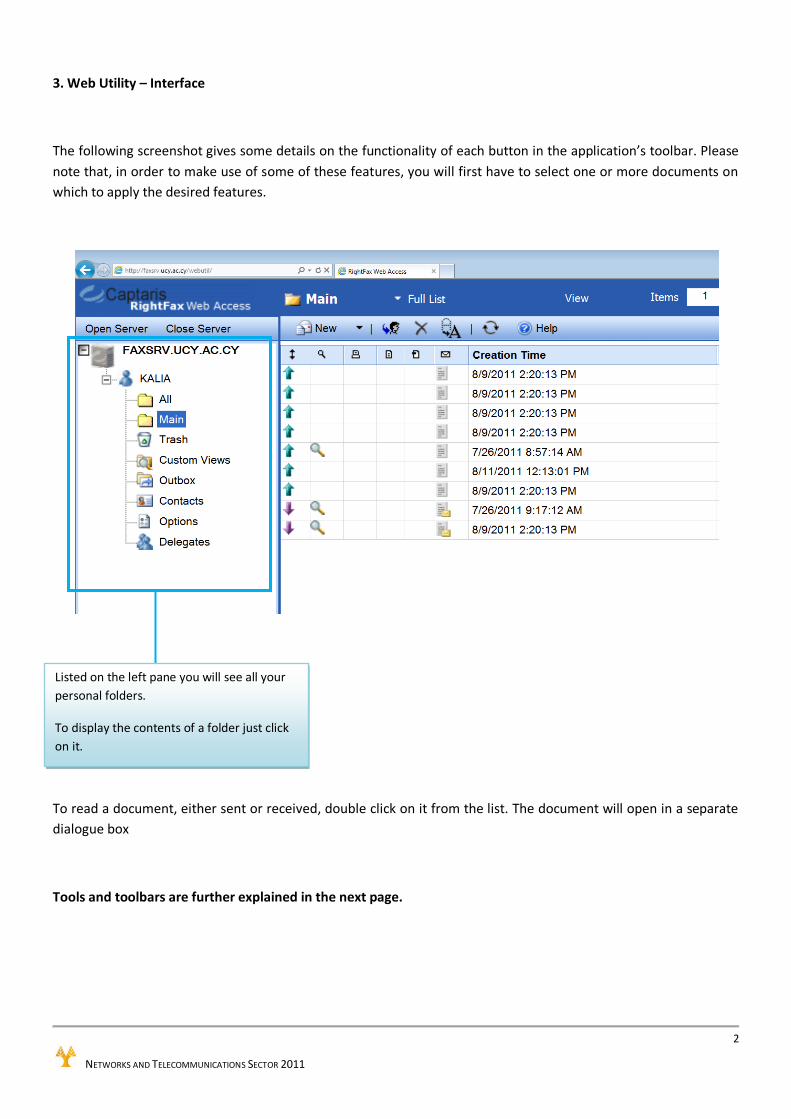
3. Web Utility – Interface
The following screenshot gives some details on the functionality of each button in the application’s toolbar. Please
note that, in order to make use of some of these features, you will first have to select one or more documents on
which to apply the desired features.
To read a document, either sent or received, double click on it from the list. The document will open in a separate
dialogue box
Tools and toolbars are further explained in the next page.
Listed on the left pane you will see all your
personal folders.
To display the contents of a folder just click
on it.

3
NETWORKS AND TELECOMMUNICATIONS SECTOR 2011
1. Green arrow up indicates that the document has been sent.
Red arrow down indicates that the document has been
received.
2. The document has been viewed.
3. The document has been printed.
4. The document has been OCRed or has binary file attached.
5. PDF created
6. The document has been routed to email inbox
1 2 3 4 5 6

4
NETWORKS AND TELECOMMUNICATIONS SECTOR 2011
4. Send a Document
4.1 New Document
To send a new fax document, click on the arrow next to New from the toolbar and then click on Document
(marked in the top left corner of the screenshot below). A new dialogue box will appear. Click on the To button. A
new dialogue box will open where you will be requested to enter the contact name, the fax number and other
information (only the Name and Fax fields are mandatory). Please note that you should always include the digit 9
before any fax number you are using. After you have finished entering this information, click on Add and repeat
the process to add another contact or click on Close to close the dialogue box and return to the new document
composition.
Alternatively, you can enter the recipient’s fax number or ID name (the name must be registered in your contacts)
directly in the To field as shown in the screenshot below. Please note that you should always include the digit 9
before any fax number you are using. After you have entered the fax number or ID name, click on this icon to
resolve the number or name (this means that the application will search for the name you have entered in your
contacts list).
In the Fax Cover Notes area, you can write any notes you wish to appear on the fax cover page. Click here to see
how the fax cover sheet will appear if you enter the text “Cover test”.
To attach a file to your fax, you can either click on the clip icon or click on Attachments. To read the instructions on
how to attach a file to your new fax document, please proceed to section 4.2.
To send the fax document, click on the Send button, located first in the toolbar:

5
NETWORKS AND TELECOMMUNICATIONS SECTOR 2011
Example of how the Cover Sheet will appear

6
NETWORKS AND TELECOMMUNICATIONS SECTOR 2011
4.2 Add Attachments
To attach a file, first click on the Browse button. A new dialogue box will appear allowing you to navigate through
your personal folders on your computer to find the file. Once you have tracked it, click Open. If you wish to attach
more than one files, click on the Browse button next to the Attachment 2 field and so on. Once you have selected
the files, click on the Upload button. A message will appear under the upload button informing you on how many
files you have attach. You may proceed to attaching more files or you may click Close and return to the New
Document dialogue box.
1
2
7
NETWORKS AND TELECOMMUNICATIONS SECTOR 2011
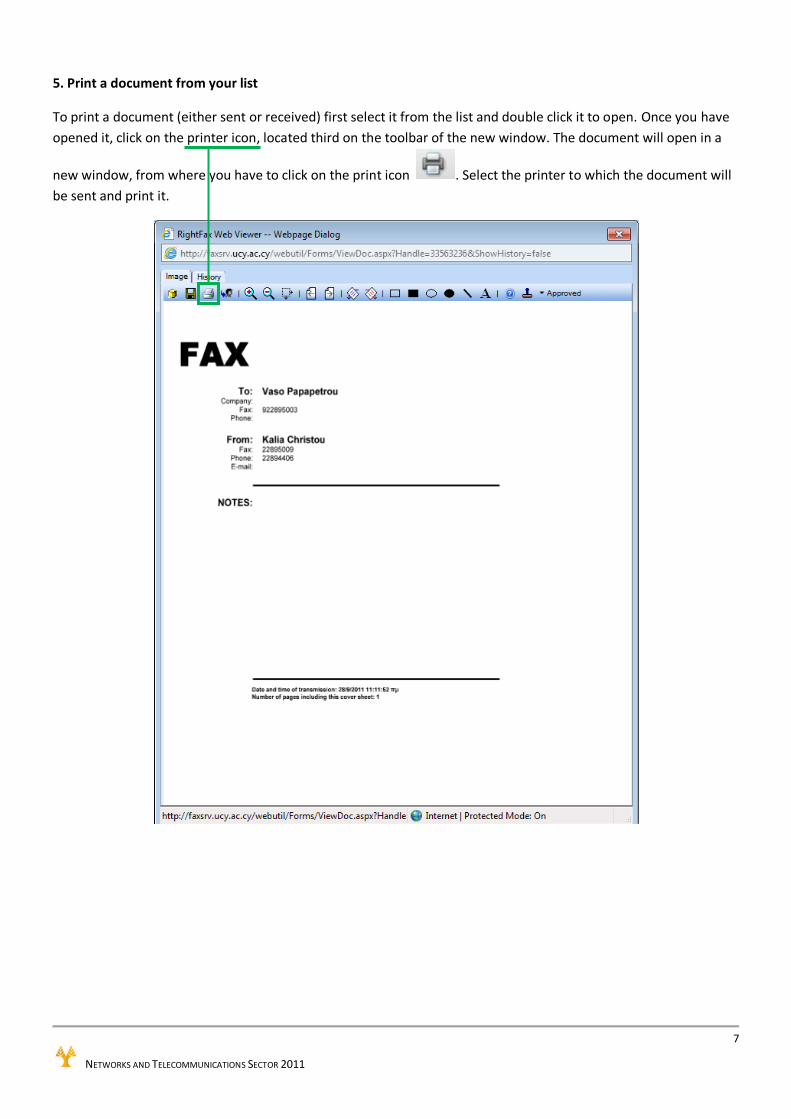
5. Print a document from your list
To print a document (either sent or received) first select it from the list and double click it to open. Once you have
opened it, click on the printer icon, located third on the toolbar of the new window. The document will open in a
new window, from where you have to click on the print icon . Select the printer to which the document will
be sent and print it.
8
NETWORKS AND TELECOMMUNICATIONS SECTOR 2011
6. Contacts
The Fax Service allows users to keep and make use of a personal e-mail and fax phonebook. Users can add both
individual and group entries. By using group entries, sending one document to multiple recipients becomes a very
easy and time-saving process. Please note that creating group entries is an option not available in the Web Utility.
However, if you have created group entries through the Client version of the Fax service, these will be visible and
available in your Contacts folder in the Web Utility.
Phonebook entries can be private or published. When a new entry is registered, it is set to private by default.
Private entries can be viewed only by the user. Published phonebook entries are visible to any other FaxUtil user
on the network.
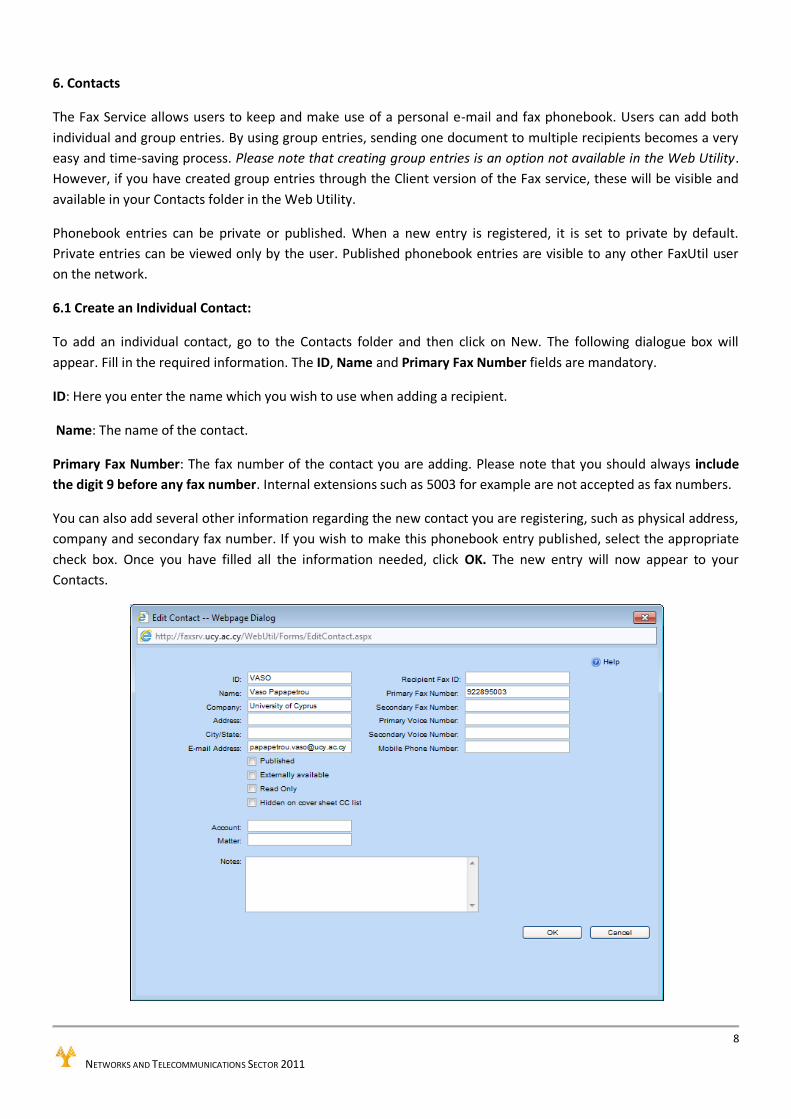
6.1 Create an Individual Contact:
To add an individual contact, go to the Contacts folder and then click on New. The following dialogue box will
appear. Fill in the required information. The ID, Name and Primary Fax Number fields are mandatory.
ID: Here you enter the name which you wish to use when adding a recipient.
Name: The name of the contact.
Primary Fax Number: The fax number of the contact you are adding. Please note that you should always include
the digit 9 before any fax number. Internal extensions such as 5003 for example are not accepted as fax numbers.
You can also add several other information regarding the new contact you are registering, such as physical address,
company and secondary fax number. If you wish to make this phonebook entry published, select the appropriate
check box. Once you have filled all the information needed, click OK. The new entry will now appear to your
Contacts.