User Guide - Epson Device Admin · Epson Device Admin Features Main Features Epson Device Admin is...
149
Epson Device Admin User’s Guide NPD5817-00 EN
Transcript of User Guide - Epson Device Admin · Epson Device Admin Features Main Features Epson Device Admin is...

Epson Device AdminUser’s Guide
NPD5817-00 EN

About this Manual
Marks and Symbols
!Caution:Instructions that must be followed carefully to avoid bodily injury.
c Important:Instructions that must be observed to avoid damage to your equipment.
Note:Instructions containing useful tips and restrictions on printer operation.
U Related InformationClicking this icon takes you to related information.
Artwork
Screenshots used in this manual are currently under development. They may differ from the release version.
Operating System References
In this manual, terms such as "Windows 10", "Windows 8.1", "Windows 8", "Windows 7", "Windows Vista", "WindowsServer 2016", "Windows Server 2012 R2", "Windows Server 2012","Windows Server 2008 R2", and "Windows Server2008" refer to the following operating systems. Additionally, "Windows"refers to all versions.
❏ Microsoft® Windows® 10 operating system
❏ Microsoft® Windows® 8.1 operating system
❏ Microsoft® Windows® 8 operating system
❏ Microsoft® Windows® 7 operating system
❏ Microsoft® Windows Vista® operating system
❏ Microsoft® Windows Server® 2016 operating system
❏ Microsoft® Windows Server® 2012 R2 operating system
❏ Microsoft® Windows Server® 2012 operating system
❏ Microsoft® Windows Server® 2008 R2 operating system
❏ Microsoft® Windows Server® 2008 operating system
Epson Device Admin User Guide Win
About this Manual
2

Contents
About this ManualMarks and Symbols. . . . . . . . . . . . . . . . . . . . . . . . . 2Artwork. . . . . . . . . . . . . . . . . . . . . . . . . . . . . . . . . 2Operating System References. . . . . . . . . . . . . . . . . . 2
Epson Device Admin FeaturesMain Features. . . . . . . . . . . . . . . . . . . . . . . . . . . . . 5Configuring the System. . . . . . . . . . . . . . . . . . . . . . 6Languages. . . . . . . . . . . . . . . . . . . . . . . . . . . . . . . 7
Setting UpSystem Requirements. . . . . . . . . . . . . . . . . . . . . . . 8
Hardware. . . . . . . . . . . . . . . . . . . . . . . . . . . . . . 8Software. . . . . . . . . . . . . . . . . . . . . . . . . . . . . . . 8Notes on operation. . . . . . . . . . . . . . . . . . . . . . . 9
Installing and Configuring the Environment. . . . . 10Preparing to install. . . . . . . . . . . . . . . . . . . . . . 10Installing for the first time and changingfeatures. . . . . . . . . . . . . . . . . . . . . . . . . . . . . . . 10Starting up and closing Epson Device Admin. . . . . . . . . . . . . . . . . . . . . . . . . . . . . . . . . . . . 14System settings. . . . . . . . . . . . . . . . . . . . . . . . . 14
Operation ScreenTop Screen. . . . . . . . . . . . . . . . . . . . . . . . . . . . . . 15Summary of Each Main Screen. . . . . . . . . . . . . . . 16
Side bar task menus. . . . . . . . . . . . . . . . . . . . . . 16Device management. . . . . . . . . . . . . . . . . . . . . 17Alert management. . . . . . . . . . . . . . . . . . . . . . 19Report management. . . . . . . . . . . . . . . . . . . . . 20Configuration template management. . . . . . . . . 21
Installation SettingsOperation Settings. . . . . . . . . . . . . . . . . . . . . . . . 23
Options screen. . . . . . . . . . . . . . . . . . . . . . . . . 24Mail. . . . . . . . . . . . . . . . . . . . . . . . . . . . . . . . . 25Timing. . . . . . . . . . . . . . . . . . . . . . . . . . . . . . . 26Formats. . . . . . . . . . . . . . . . . . . . . . . . . . . . . . 27Startup. . . . . . . . . . . . . . . . . . . . . . . . . . . . . . . 27Customize Ribbon. . . . . . . . . . . . . . . . . . . . . . 28Check for updates. . . . . . . . . . . . . . . . . . . . . . . 29
Registering to the device list. . . . . . . . . . . . . . . . . . 29Discovering devices. . . . . . . . . . . . . . . . . . . . . . 30Specifying individual devices. . . . . . . . . . . . . . . 33
Updating Device Information. . . . . . . . . . . . . . . . 34Group Management. . . . . . . . . . . . . . . . . . . . . . . 34
Create and edit user-defined groups. . . . . . . . . . 34Group editing. . . . . . . . . . . . . . . . . . . . . . . . . . 41Deleting a group. . . . . . . . . . . . . . . . . . . . . . . . 42
Device ManagementDevice Settings. . . . . . . . . . . . . . . . . . . . . . . . . . . 44Settings Template. . . . . . . . . . . . . . . . . . . . . . . . . 44
Creating a configuration template. . . . . . . . . . . 44Applying configuration template. . . . . . . . . . . . 47Editing configuration templates. . . . . . . . . . . . . 51Exporting and importing configurationtemplates. . . . . . . . . . . . . . . . . . . . . . . . . . . . . 52
Setting or changing devices one at a time. . . . . . . . 52Device properties screen. . . . . . . . . . . . . . . . . . 52Using an embeded web server to make devicesettings. . . . . . . . . . . . . . . . . . . . . . . . . . . . . . . 54
Setting an Administrator Password. . . . . . . . . . . . 55Setting individually. . . . . . . . . . . . . . . . . . . . . . 55Managing passwords in batches. . . . . . . . . . . . . 56
Registering Different Address Books. . . . . . . . . . . 61Editing individually. . . . . . . . . . . . . . . . . . . . . . 61Making batch settings. . . . . . . . . . . . . . . . . . . . 64
Updating Device Firmware. . . . . . . . . . . . . . . . . . 68Updating firmware. . . . . . . . . . . . . . . . . . . . . . 68Firmware Update Schedule. . . . . . . . . . . . . . . . 69
Daily ManagementManaging the Device List. . . . . . . . . . . . . . . . . . . 77
Collecting information regularly. . . . . . . . . . . . 77Displaying the device list settings. . . . . . . . . . . . 78
Managing Alerts. . . . . . . . . . . . . . . . . . . . . . . . . . 82Creating alerts. . . . . . . . . . . . . . . . . . . . . . . . . 82Adding groups monitored by alerts. . . . . . . . . . 84Setting the alert confirmation interval. . . . . . . . 85Editing alerts. . . . . . . . . . . . . . . . . . . . . . . . . . 86Switching the alert display. . . . . . . . . . . . . . . . . 87
Report Management. . . . . . . . . . . . . . . . . . . . . . . 88Creating reports. . . . . . . . . . . . . . . . . . . . . . . . 88Acquiring data. . . . . . . . . . . . . . . . . . . . . . . . 100Setting the data collection time and savingperiod. . . . . . . . . . . . . . . . . . . . . . . . . . . . . . . 101Switching the report display . . . . . . . . . . . . . . 102Sending archived reports by email. . . . . . . . . . 104
Epson Device Admin User Guide Win
Contents
3

Saving and deleting archived reports. . . . . . . . 106
MaintenancePrinting a Status Sheet. . . . . . . . . . . . . . . . . . . . . 107Backing up and Restoring. . . . . . . . . . . . . . . . . . 107
Items that can be backed up and restored. . . . . 107System settings. . . . . . . . . . . . . . . . . . . . . . . . 108Device list. . . . . . . . . . . . . . . . . . . . . . . . . . . . 110Password settings. . . . . . . . . . . . . . . . . . . . . . 112Address books. . . . . . . . . . . . . . . . . . . . . . . . . 115Configuration templates. . . . . . . . . . . . . . . . . 119
TroubleshootingTroubleshooting. . . . . . . . . . . . . . . . . . . . . . . . . 122
Cannot discover devices.. . . . . . . . . . . . . . . . . 122Cannot change the network interface, orcannot use it on the network.. . . . . . . . . . . . . . 122You do not know the IP address.. . . . . . . . . . . 123The message "The network connection isinvalid or not set. Check the network settings."is displayed when running Epson DeviceAdmin.. . . . . . . . . . . . . . . . . . . . . . . . . . . . . . 123Not Ready is displayed as the IP address on thedevice list.. . . . . . . . . . . . . . . . . . . . . . . . . . . . 123IP address changes on its own.. . . . . . . . . . . . . 124Devices from other companies are notdisplayed in the device list, or they aredisplayed but not enough device informationhas been acquired.. . . . . . . . . . . . . . . . . . . . . . 124
AppendixSecondary Device Management Method. . . . . . . . 125
Assigning IP address. . . . . . . . . . . . . . . . . . . . 125Checking for overlapping items. . . . . . . . . . . . 125
Batch Settings. . . . . . . . . . . . . . . . . . . . . . . . . . . 126Assigning information automatically. . . . . . . . 126Assigning information from settings one at atime (Manually assigned). . . . . . . . . . . . . . . . . 131Creating a SYLK file to describe the settings. . . 136Backing up device settings. . . . . . . . . . . . . . . . 142Setting items for the SYLK file. . . . . . . . . . . . . 145
Copyright and Trademarks. . . . . . . . . . . . . . . . . 149Notices. . . . . . . . . . . . . . . . . . . . . . . . . . . . . . . . 149
Epson Device Admin User Guide Win
Contents
4

Epson Device Admin Features
Main Features
Epson Device Admin is an application that allows you to install devices on the network, and then configure andmanage the devices. The following outlines the main features.
❏ Discovering devices You can discovering devices on the network, and then register them to a list. If Epson devices such as printers andscanners are connected to the same network segment as the administrator's computer, you can find them even ifthey have not been assigned an IP address. You can also discover devices that are connected to computers on the network by USB cables. You need to installthe Epson Device USB Agent on the computer.
❏ Setting devices You can make a template containing setting items such as the network interface and the paper source, and apply itto other devices as shared settings. When it is connected to the network, you can assign an IP address on a devicethat has not been assigned an IP address.
❏ Monitoring devices You can regularly acquire the status and detailed information for devices on the network. You can also monitordevices that are connected to computers on the network by USB cables and devices from other companies thathave been registered to the device list. To monitor devices connected by USB cables, you need to install the EpsonDevice USB Agent.
Epson Device Admin User Guide Win
Epson Device Admin Features
5

❏ Managing alerts You can monitor alerts about the status of devices and consumables. The system automatically sends notificationemails to the administrator based on set conditions.
❏ Managing reports You can create regular reports as the system accumulates data on device usage and consumables. You can thensave these created reports and send them by email.
Configuring the System
You can manage devices by setting up the following system.
❏ Epson Device Admin system
This is a station where a computer for an IT administrator is installed so that devices can be managed.
Computers for an IT administrator
❏ Device Admin Client
This software should be installed on the computer for the IT administrator.
❏ Device Admin Agent
This is installed along with this software, and then operates a service as part of a system. The regularlyacquires information, prepares reports, and sends alert notifications. The Device Admin Agent Monitormonitors whether or not the Device Admin Agent operates correctly.
Epson Device Admin User Guide Win
Epson Device Admin Features
6

❏ EDA database
This is installed in this software and records all information.
Languages
Epson Device Admin supports the following languages.
English, French, Italian, Germany, Spanish, Chinese (traditional), Russian, Portuguese (Brazilian), Chinese(Simplified), Portuguese (Portuguese), Dutch, Korean, Japanese
Epson Device Admin User Guide Win
Epson Device Admin Features
7

Setting Up
System Requirements
The following requirements are necessary to install this software.
Hardware
Minimum system requirements
❏ CPU: 2.0 GHz or faster x86/x64 processor
❏ Memory: 4 GB or more
❏ Hard disk: 500 MB or more free space (except Database usage)
❏ Display:1024 x 768 or higher monitor resolution, High Color 32 bit
Recommended system requirements
❏ CPU: 2.8 GHz or faster x64 processor (server system)
❏ Memory: 8 GB or more
❏ Hard disk: SSD, 500 MB or more free space (except Database usage)
❏ Display:1920 x 1080 or higher monitor resolution, High Color 32 bit
Software
Recommended Software
❏ Runtime: .NET Framework 4.0 or .NET Framework 4.5
Note:.NET Framework 4.5 is installed as standard on Windows 8 and Windows Server 2012 or later.
❏ Internet Explorer 8 or later
This is necessary when displaying an archive report.
Ports to use
Epson Device Admin continuously listens to several ports, therefore those ports must be opened for specific features.The following are the ports used by Epson Device Admin.
Epson Device Admin User Guide Win
Setting Up
8

Port Number Usage
161 Use this to acquire information on devices (SNMP).
3289 Use this to discover and configure devices on the network (ENPC).
427 Use this to discover devices on the network (SLP).
443 Use this to communicate by HTTPS, auto update, and update firmware.
25 (default) Use this for the SMTP server that sends email. Change the port number depending on theserver.
587 (default) Use this to send email using extended SMTP for security.
110 Use this to send email using POP before SMTP.
10015 (default) Use this to request interfaces that communicate between services and this software.
8080 (default) Use this to configure the proxy server settings and access the Internet.
64122 Use this to discover and configure USB devices by communicating with the Epson Device USBAgent.
53 Use this to acquire host name (DNS).
137 Use this to acquire host name (NBNS).
5355 Use this to acquire host name (LLMNR).
Windows services
This software registers the following as Windows services when setting up.
❏ Epson Device Admin Agent
❏ Epson Device Admin Agent Monitor
Virtual environment
This software will also operate under the following virtual environments. However, performance may declinedepending on the environment.
❏ Hyper-V
❏ VMWare vSphere
Notes on operation
❏ Disable your computer's sleep function, otherwise this software will not operate correctly.
❏ If you change the time zone setting while this software is operating, it will be applied after restarting.
❏ This software only supports IPv4.
❏ We recommend using servers for 24 hour operation.
Epson Device Admin User Guide Win
Setting Up
9

❏ The energy saving mode on the device may be disabled temporarily when acquiring data.
Installing and Configuring the Environment
Preparing to install
.Net Framework
You need to install .NET Framework 4.0 or .NET Framework 4.5 on the computer before you install this software.However, on computers running Windows 8 or Windows Server 2012 or later, you do not need to install it since .NETFramework 4.5 is installed as standard.
See the Microsoft Website for information on downloading .NET framework, installing, and explanations on usage.
https://www.microsoft.com/en-us/download/details.aspx?id=17851
Epson Device USB Agent
When you want to manage devices that are connected to computers on the network by USB cables, install the EpsonDevice USB Agent on the computer.
See the manual for the Epson Device USB Agent for details on installing and using the software.
Note:From the install files for Epson Device USB Agent, the file for Epson Device USB Agent settings(EDUSBAgentConfiguration.exe) is not used in Epson Device Admin.
Installing for the first time and changing features
c Important:Login to the computer by using an administrator account.
Initial installation
Follow the steps below to install this software.
A Run Setup.exe.
The Setup wizard starts.
Note:If the user account control screen is displayed, click Yes to allow installation.
Epson Device Admin User Guide Win
Setting Up
10

B Click Next.
C Check the licensing clauses, select I accept the terms of the license agreement, and then click Next.
D Select the folder where you want to install this software and then click Next.
Epson Device Admin User Guide Win
Setting Up
11

Note:❏ Select Browse to change the destination where the software will be installed.
❏ Select Disc Capacity to check the amount of free disc space.
E Select the features that you want to add, and then click Next.
You can also add the alert feature and the report feature. See the following for information on additionalfeature.
U “Alert management” on page 19
U “Report management” on page 20
F Make the database settings, and then click Next.
Select the folder where you want to install the database, and then enter the port number used to access to thedatabase.
Epson Device Admin User Guide Win
Setting Up
12

Note:Select Browse to change the destination where the database will be installed.
G Click Install.
Installation starts.
H Click Finish when the installation complete screen is displayed.
Changing features and uninstalling
You can change the installed features and uninstall this software from the Windows Control Panel.
A Open the Windows Control Panel.
B Select Uninstall a program to display the program list.
Epson Device Admin User Guide Win
Setting Up
13

C Right-click Epson Device Admin.
D Select one of the followings from the menu displayed.
To change a function: change
To uninstall the software: uninstall
E Follow the on-screen instructions to uninstall or change this software.
Updating
The following information and files are maintained even if you install an updated program or change the features.
❏ Information on acquired devices
❏ Settings for the discovery parameters
❏ Database files (From Epson Device Admin 2.x or later)
Starting up and closing Epson Device Admin
❏ Start up
Select Start menu - All Programs - EPSON - Epson Device Admin - Epson Device Admin.
❏ Close
Click "x" at the top-right of the screen, or click at the top-left of the screen, and then select Close.
System settings
You can configure Email settings and ribbon menu settings for management by using the option menu in the ribbonmenu on the device management screen.
See the following for more details.
U “Operation Settings” on page 23
Epson Device Admin User Guide Win
Setting Up
14

Operation Screen
Top Screen
The Epson Device Admin top screen is composed of the following panes.
The display changes depending on the item selected from the side bar task menu on the top screen.
No. Pane Explanation
1 Title bar Click the to open the Help to view explanations of each item in Epson Device Admin.
2 Side bar task menu Changes the feature being used. The screen switches depending on the item selected.
3 Ribbon menu Displays the menu for the feature selected on the side bar task menu.
4 Side bar content Displays the hierarchy for the feature selected on the side bar task menu.
5 Display view Displays information and setting content depending on the feature selected in the sidebar task menu or the side bar content.
6 Detailed deviceinformation
Displays details on the device selected from the Device List when you select Devices onthe side bar task menu.
7 Status bar Displays status information on the Device List when you select Devices on the side bartask menu.
Epson Device Admin User Guide Win
Operation Screen
15

Summary of Each Main Screen
Side bar task menus
Select a menu to switch from one menu to another.
❏ Device management screen
Allows you to manage devices on the network. You can discover and register devices, as well as update deviceinformation and so on.
U “Device management” on page 17
❏ Alert management screen
Allows you to manage alerts that are output from the device. The system can automatically inform you via emailabout devices with low supplies level, paper jam or device error.
U “Alert management” on page 19
❏ Report management screen
Allows you to manage reports that contain a variety of information about the devices. You can set how to outputreports containing information such as the frequency the device is used and the number of times consumables arereplaced.
U “Report management” on page 20
❏ Configuration template management screen
Allows you to manage settings for devices with templates. You can make settings for creating, applying, andbacking up setting templates.
U “Configuration template management” on page 21
Epson Device Admin User Guide Win
Operation Screen
16

Device management
Displays the device management screen when selecting Devices on the side bar task menu.
The device management screen is comprised of the following panes. See the following for available operations usingthe device management screen.
U “Installation Settings” on page 23
No. Pane Explanation
1 Ribbon menu There are three ribbons on the device management screen, and you can switch betweenthem by clicking the tabs.
❏ Home tab
Allows you to discover devices on the network, update information, changesettings for the device, apply templates, and so on.
❏ View tab
Allows you to set and change information displayed on the Device List.
❏ Groups tab
Allows you to make settings to manage devices in groups.
Epson Device Admin User Guide Win
Operation Screen
17

No. Pane Explanation
2 Tree view Displays setting groups in a folder tree formation. You can display groups that are setautomatically and user defined groups. You can also display the number of the devicesthat belong to each group.
The number of devices is displayed as shown below.
❏ Groups that are set automatically
Group name (the number of devices that belong to the group)
❏ Groups defined by the user
Group name (the number of devices that belong to the group) (the number ofdevices that belong to the child group*)
*If the same device belongs to multiple different child groups, it is counted as onedevice for each group. In that case, an * (asterisk) is displayed.
3 Device list Displays the list of registered devices. You can check the device's information and status.
4 Device detailedinformation screen
Displays detailed information for the device selected in the Device List. The displayeditems vary depending on the device. This is not displayed when multiple devices areselected.
5 Summary bar Displays a summary of devices registered in the Device List with information such as thenumber of devices.
6 Status bar Displays the network connection status of the computer as an icon and text.
The following status is displayed.
❏ Internet access
The computer is connected to the internet.
❏ Intranet access
The computer is connected to the internal network, but not connected to theinternet.
❏ Not connected
The computer is not connected to the network.
Epson Device Admin User Guide Win
Operation Screen
18

Alert management
Displays the alert management screen when selecting Alerts on the side bar task menu.
The Alert management screen is comprised of the following panes. See the following for available operations using theAlert management screen.
U “Managing Alerts” on page 82
No. Pane Explanation
1 Ribbon menu Creates alerts and manages information.
2 Tree view Switches the display for alert template classifications.
3 Alert list Displays the alert template list when anything except for Logs is selected in the treeview. Displays the logs list when Logs is selected in the tree view.
4 Alert group Displays the groups subscribed to the alert templates selected in the alert template list.Displays log details when Logs is selected in the tree view.
Epson Device Admin User Guide Win
Operation Screen
19

Report management
Displays the report management screen when selecting Reports on the side bar task menu.
The Report management screen is comprised of the following panes. See the following for available operations usingthe Report management screen.
U “Report Management” on page 88
No. Pane Explanation
1 Ribbon menu Switches the ribbon menu according to the tree view selected on the reportmanagement screen.
❏ Database - Data Collection
Menus for data collection.
❏ User Defined Report - Scheduled reports
Menus for creating reports and formatting.
❏ User Defined Report - Archived Reports
Menus for report files.
2 Tree view Displays data collection and report management trees. The ribbon menu and displayview are switched depending on the selected item.
Epson Device Admin User Guide Win
Operation Screen
20

No. Pane Explanation
3 Display view Displays the following depending on the item selected in the tree view.
❏ Database - Data collection
Top area: List of data collection conditions
Bottom area: List of devices
❏ User Defined Report - Scheduled reports
Top area: List of report schedules
Bottom area: Details about the selected schedule
❏ User Defined Report - Archived Reports
Top area: List of archive reports
Bottom area: Content of the selected archive report
Configuration template management
Displays the configuration template management screen when you select Configuration on the side bar task menu.
The configuration template management screen is comprised of the following panes. See the following for availableoperations using the configuration template management screen.
U “Settings Template” on page 44
No. Pane Explanation
1 Ribbon menu Manages configuration templates.
Epson Device Admin User Guide Win
Operation Screen
21

No. Pane Explanation
2 Tree view Displays configuration templates in a folder tree formation. Switches display viewsdepending on the selected item.
3 Display view Displays the following depending on the item selected in tree view.
❏ Configuration - Templates
Top area: List of configration templates
Bottom area: Content of the selected configuration template
❏ Configuration - Logs
Top area: List of logs
Bottom area: Content of the selected log
Epson Device Admin User Guide Win
Operation Screen
22

Installation Settings
Operation Settings
These settings are necessary to use each feature.
Device Registration
❏ Discovery Parameters: Discovery using an IP address
U “Specifying an IP address” on page 31
❏ Discovery Parameters: Discovery using an IP address range
U “Specifying an IP address range” on page 32
❏ Discovery Parameters: Discovery using a network address
U “Specifying a network address” on page 32
System Settings
❏ Email notification settings
U “Mail” on page 25
❏ Processing Time
U “Schedule settings” on page 77
❏ Password Manager
U “Managing passwords automatically” on page 56
❏ System settings
U “Backing up system settings” on page 108
Detailed Settings
❏ " Firmware external site access
U “Check for updates” on page 29
❏ Detailed Settings
U “Formats” on page 27
Alert Notifications
Epson Device Admin User Guide Win
Installation Settings
23

❏ Alert
U “Setting the alert confirmation interval” on page 85
Options screen
You can set discovery conditions as well as system settings on the Option screen.
A Select Devices on the side bar task menu.
B Select Home - Options on the ribbon menu.
C Select the item you want to configure.
D Set each item as necessary.
E Click OK.
Epson Device Admin User Guide Win
Installation Settings
24

You can set the email server (mail sending server) used for the notification feature.
Items Explanation
Host name/IP address Enter the host name or IP address for the SMTP server.
Enter the host name within 255 characters using A to Z, a to z, 0 to 9, hyphens (-), andunderscores (_). The label should be within 63 characters.
Enter the IP address in IPv4 format using numbers and periods (.).
Port number Enter the port number for the SMTP server from 1 to 65535.
Check the connection with the SMTP server.
Blue: Successfully connected to the server. Go to the next step.
Red: Failed to connect to the server.
If the software fails to connect to the server, check that all settings have been madecorrectly.
Connect using STARTTLS encryption Select this to encrypt the connection to the SMTP server.
Sender's email address This is the email address displayed in the email header sent from the system.
Enter up to 256 characters.
Maximum attachment size Specify the maximum attachment file size for email.
Server authentication settings Select this if the server requires authentication to send emails.
Select the authentication method from SMTP Auth (SMTP authentication) or POP beforeSMTP.
Host name/IP address Enter the host name or IP address for the authentication server when the authenticationmethod is POP before SMTP.
The entered text is the same as the host name and IP address for the SMTP server.
When this is the same as the authentication for the SMTP server, select Same as thesending server.
Login ID Enter the login ID for the SMTP server using up to 255 ASCII characters.
Epson Device Admin User Guide Win
Installation Settings
25

Items Explanation
Password Enter the password for the SMTP server using up to 255 ASCII characters.
Send Test Message Check whether or not the test email can be sent to the receiver's email address.
This button is available once the host name/IP address, port number, and sender's emailaddress have been entered. For the test email, the title "Epson Device Admin" and bodytext "Success. Email settings are correctly configured." are displayed in Englishregardless of the language setting.
Timing
Set timing of data collection and logs retention period.
Item Explanation
Update Device Information Sets the schedule to collect information about the devices using Auto-Update on theDevice management screen.
Refresh interval Collects device information at set intervals. You can set the interval time from 1 minuteto 23 hours and 59 minutes in intervals of 1 minute.
Select the day of the week Collects device information on the selected day and time. You can specify the time inintervals of 1 minute.
Epson Device Admin User Guide Win
Installation Settings
26

Formats
Set the data delimiters, paper size, and units for the report.
Item Explanation
CSV data delimiter Specifies data delimiters for CSV files when saving reports, archive reports, and so on.
The default value is ",".
U “Report Management” on page 88
Paper Size Reference Displays the paper size selected in this software. The default value is A4.
Unit Displays the units selected in this software. The default value is Meter (m).
Startup
Sets whether or not to collect device information when you start this software.
Epson Device Admin User Guide Win
Installation Settings
27

Item Explanation
Update device data at startup Sets whether or not to collect all device information when you start this software.
U “Updating Device Information” on page 34
Discovering and rebooting timeout(10-180)
Specifies the timeout time between the discovery and the reboot confirmation. You canspecify 10 to 180 seconds in intervals of 1 second. The default is 60.
U “Discovery condition settings” on page 31
Customize Ribbon
Set the ribbon menu display.
Item Explanation
Show Batch Settings button When this is selected, the Batch Settings button is displayed on the Home tab - Settinggroup on the ribbon menu for the Device Management screen.
U “Batch Settings” on page 126
Show Reset, Open, and Save buttonsin the Device List
When this is selected, the Reset, Open, and Save buttons are displayed on the Hometab - Device List group on the ribbon menu for the Device Management screen.
U “Device list” on page 110
Epson Device Admin User Guide Win
Installation Settings
28

Check for updates
Allows the software to access external sites to update this software or check and obtain firmware updates.
Item Explanation
Check for software updates atstartup
Checks for updates for the firmware at startup.
Check for firmware updates atstartup
Checks for updates for the firmware at startup.
Registering to the device list
Registers devices managed on the network to the device list.
You can use the following registration methods. Use the method that best suits your daily operation needs.
❏ Discover and register devices
Discover devices on the network and register them to the software. You can discover using conditions such asbeyond segment and specify network range.
U “Discovering devices” on page 30
❏ Specify individually and register
Specify the IP address and device ID and register it to the software. You can register specific devices or devices thatwere not found during a discovery.
U “Specifying individual devices” on page 33
Epson Device Admin User Guide Win
Installation Settings
29

❏ Register from a device list file
Load a device information file containing the device list and register them to the software. This is useful whenrestoring or migrating a system.
U “Backing up and Restoring” on page 107
Discovering devices
When you start Epson Device Admin, it automatically discovers devices in the same segment and registers Epsondevices to the device list.
Note:Click the icon next to the progress bar to stop discovering.
Discovering by using the discovery button
This discovers using the conditions set on the device management screen.
A Select Devices on the side bar task menu.
B Click Options on the ribbon menu.
C Set the appropriate conditions for the device you are discovering.
See the following for details.
Epson Device Admin User Guide Win
Installation Settings
30

U “Discovery condition settings” on page 31
D Click OK when you have finished setting the conditions.
E Click Discovery.
The software starts discovering and registers located devices to the device list.
When you click Device List - Save on the ribbon menu, you can save the displayed device list to a file. However,group information is not saved.
U “Backing up and Restoring” on page 107
Note:❏ When the software is connected to a network, it discovers for Epson devices even if no IP addresses have been
assigned.
❏ Devices that are connected to computers on the network by USB cables are discovered when the Epson DeviceUSB Agent is installed on the computer. See the manual for the Epson Device USB Agent for details.
Discovery condition settings
Sets the conditions for discovering. You can discover by specifying IP addresses, an IP address range, and networkaddresses. You can discover when an IP address is assigned to a device. See the following for details.
Note:❏ All enabled discovery conditions are performed in parallel.
❏ Epson devices in the same segment as Epson Device Admin can be discovered for regardless of the discovery conditions.
❏ Set the timeout for discovering from Options - Startup - Devices - Discovering and rebooting timeout (10-180)
Specifying an IP addressDiscovers for the specified IP address for the device using unicast.
Note:When you want to discover the device connected to the computer with a USB cable, specify the computer's IP address. Youneed to install the Epson Device USB Agent on the computer. See the manual for the Epson Device USB Agent for details.
Item Explanation
Enable discovery with IP address Select to enable this discovery condition.
Add Displays the screen where you can add an IP address
Enter the IP address for the device you want to discover in IPv4 format.
You can register up to 100 IP addresses.
Delete Deletes the selected IP address from the IP address list.
Epson Device Admin User Guide Win
Installation Settings
31

Item Explanation
Up, Down Moves the IP address up or down in the IP address list.
The discovery is performed in the order of the addresses in the IP address list.
Restore default settings Click this to clear the IP address list and disable discovering using IP addresses.
Specifying an IP address rangeDiscovers the specified IP address range for the device using unicast. You can perform this discovery when an IPaddress is assigned to the device.
Note:Devices that are connected to computers on the network by USB cables are discovered when the Epson Device USB Agent isinstalled on the computer. See the manual for the Epson Device USB Agent for details.
Item Explanation
Enable discovery with an IP addressrange
Select to enable this discovery condition.Discovers devices within the selected IP address range.
Add Displays the screen where you can set an IP address range.
Enter the start and end IP addresses for the range you want to discover in IPv4 format.
You can register a range of up to 20 IP addresses. You cannot register the discovery if thenumber of the IP address range exceeds 65536.
Change Changes the IP address range specified for the device selected in the discovery range.
Delete Deletes the IP address range specified for the device selected in the discovery range.
Restore default settings Click this to clear the discovery range and disable discovering using a range of IPaddresses.
Specifying a network addressDiscovers a device in the specified network address using multicast.
Item Explanation
Enable discovery with multicast Select this to send data to the specified network using port number 427 and multicast todiscover a device.
You need a router environment that supports IP multicast.
Enable discovery over networksegments
Select this to discover devices on networks beyond your router.
Sends data to the specified network using port number 3289 and broadcast to discovera device.
When sending using multicast, you can set the network range to be discovered inMulticast TTL (1-15).
Add Displays the screen where you can specify a network address.
Enter a network address and subnet mask in the subnet in IPv4 format. When theentered network address is the host address, it is automatically corrected and registeredto the discovery address list.
You can register up to 20 network addresses.
Epson Device Admin User Guide Win
Installation Settings
32

Item Explanation
Delete Deletes the selected network address and subnet mask from the discovery address list.
Multicast TTL (1-15) Sets the network range to be searched when sending by multicast. When set to "1", therouter is not passed through. When set to "2" or higher, the network range specified inNetwork to discover is discovered.
Restore default settings Click this to clear the discovery range and disable discovering using a range of IPaddresses.
Specifying individual devices
You can register devices that were not found using the discovery feature, or devices that were not made by Epson.
A Select Devices on the side bar task menu.
B Click Device List - Add on the ribbon menu.
C Select a method to classify the device.
Select IP Address when the device has a static IP address.
Select Host Name when the IP address for the device is set automatically.
D Enter the device information.
Enter the IP address in IPv4 format when you select IP Address as the method.
Enter the device name on the network when you select Host Name as the method.
Note:When you want to discover the device connected to the computer with a USB cable, specify the computer's IP address.You need to install the Epson Device USB Agent on the computer. See the manual for the Epson Device USB Agent fordetails.
E Click OK.
When communication is successful, the device is registered to the device list.
If it is not registered, make sure the IP address and host name are correct.
Epson Device Admin User Guide Win
Installation Settings
33

Updating Device Information
You can update detailed information about the status of devices registered in the device list and the status ofconsumables. The ribbon menu is unavailable when device information is being acquired.
A Select Devices on the side bar task menu.
B Click Update Device Information - All Devices on the ribbon menu.
When updating data individually, select the device from the device list, and then click Update DeviceInformation - Selected Devices.
Note:To make multiple selections, press Ctrl or Shift and click your mouse.
You can update device information automatically.
❏ Update when starting Epson Device Admin
Select Options - Startup - Device Management - Update device data at startup.
❏ Update regularly by using a timer
You can update data regularly by setting a schedule. See the following for details.
U “Collecting information regularly” on page 77
Group Management
You can manage devices registered to the device list as separate groups. The groups are displayed in the tree view whenyou select Devices on the side bar task menu.
You can create groups for specific purposes, such as the location devices are installed, organization names, differentfeatures of the printer or scanner, available paper sizes, and then manage the devices as groups.
You can use the following methods to register devices to a group.
❏ Assign automatically using set conditions
Discovered devices are assigned automatically using set conditions.
❏ Select devices
Select devices and register them to a group. You can create a group from the selected devices.
Create and edit user-defined groups
You can manage devices as a group by creating optional groups such as for the office and department of the device.
Epson Device Admin User Guide Win
Installation Settings
34

Create an automatic assignment group
Devices discovered through a search are automatically assigned to a group. Follow the steps below to set the conditionsfor assigning groups.
Note:You can create up to 2,000 groups. There is no limit for groups in the same layer.
A Select Devices on the side bar task menu.
B Click the Groups tab on the ribbon menu.
C Click New.
D Select the group name to use as the parent from Parent group.
When creating a new group, layers are created by assigning the User Defined Groups as the parent group. Youcan create up to eight layers of groups.
Epson Device Admin User Guide Win
Installation Settings
35

E Enter the new group name in Group Name.
Enter up to 256 characters in Unicode for the group name. You cannot use \ or ;.
F Click Enable auto filter.
G Click Add.
The setting screen for automatically assigning groups is displayed.
H Set the auto assignment conditions.
You can register up to 20 conditions.
See the following to make the settings.
Epson Device Admin User Guide Win
Installation Settings
36

Item Explanation
Device Information Items in the device list column. Select the following from the pull-down menu.
❏ Model
❏ IP address
❏ Department
❏ Location
❏ Remark
❏ Remark 2
❏ Groups
❏ Connection
❏ Manufacturer
Conditions Select conditions for the target items.
❏ When Device Information is set to IP Address:
Greater than or equal to
less than or equal to
Greater than
less than
Equal to
Not equal to
Start with
❏ When Device Information is set to Model, Department, Location, Remark orRemark 2:
Equal to
Not equal to
Include
Not include
Start with
End with
❏ When Device Information is set to Groups:
Belong
Not Belong
❏ When Device Information is set to Connection:
Equal to
Not equal to
Value When Device Information is set to IP Addresss, enter the IP address.
When Device Information is set to Connection, select Network or USB.
For other situations, enter up to 256 characters in Unicode.
Operation Selects the relationship to the last condition. The conditions are applied in order from thetop of the auto sorting conditions.
Epson Device Admin User Guide Win
Installation Settings
37

I Click OK.
The automatic assignment condition is added in the list.
To continue adding the auto assign groups, click Add.
Click Edit to edit the group in the list.
Click Delete to delete the group from the list.
Click or to change the order of the conditions.
J Click OK.
The newly created group is added to the tree view.
Add a device by creating a group
Register devices to the group after creating the group.
Note:You can create up to 2,000 groups. There is no limit for groups in the same layer.
A Select Devices on the side bar task menu.
B Click the Groups tab on the ribbon menu.
Epson Device Admin User Guide Win
Installation Settings
38

C Click New.
D Select the group name to use as the parent from Parent group.
When creating a new group, layers are created by assigning the User Defined Groups as the parent group. Youcan create up to eight layers of groups.
E Enter a new group name in Group Name.
Enter up to 256 characters in Unicode for the group name. You cannot use \ or ;.
Epson Device Admin User Guide Win
Installation Settings
39

F Click OK.
The new group is added to the tree view.
G Click Add/Remove device(s) on the ribbon menu.
H Select the group to which you want to add the device, and then click Next.
The device list is displayed.
I Select the device you want to register.
Select devices to register by Select devices and then click .
Note:To delete devices from the list, select the device in Added devices, and then click .
Epson Device Admin User Guide Win
Installation Settings
40

J Click OK.
Group editing
Change group names and parent groups in higher layers.
A Select Devices on the side bar task menu.
B Click the Groups tab on the ribbon menu.
C Click Edit.
D Select the group name to be edited from Parent group.
Epson Device Admin User Guide Win
Installation Settings
41

E Change the group name in Group Name.
If you want to change parent groups, enter the name from the parent group name.
F Click OK.
The changes are reflected in tree view.
Deleting a group
A Select Devices on the side bar task menu.
B Click the Groups tab on the ribbon menu.
C Click Delete.
Epson Device Admin User Guide Win
Installation Settings
42

D Click OK.
A screen is displayed asking you to confirm if you want to delete the group.
Deleting a group automatically deletes its sub-groups if there are any.
E Click OK.
The changes are reflected in tree view.
Devices from deleted groups are displayed in Ungrouped Devices.
Epson Device Admin User Guide Win
Installation Settings
43

Device Management
This section explains how to configure one device at a time, and how to configure batch settings for multiple devices.
Device Settings
Configure settings for devices on the network individually or collectively. Apply configuration information as atemplate or manage devices by exporting configuration information to a SYLK file.
See the following for details about the available methods.
Configuration template U “Settings Template” on page 44
Device properties and Embeded web server U “Setting or changing devices one at a time” on page 52
Batch Settings U “Batch Settings” on page 126
Settings Template
Set devices using a configuration template. A configuration template uses the device's property settings as a template,and then applies the settings to other devices. You can manage setting information without relying on specific devices.
The following templates are provided as presets.
❏ Factory default settings (Network I/F)
Return the network interface settings for devices to their default settings.
❏ Factory default settings (All)
Return all settings for devices to their default settings.
Creating a configuration template
Divert the device settings, and then create templates.
❏ Create from configuration template management screen
Create by selecting a device to use as a configuration template.
❏ Create from device management screen
Create by selecting a device to use as a configuration template from the device list.
Epson Device Admin User Guide Win
Device Management
44

Creating from the configuration template management screen
A Select Configuration on the side bar task menu.
B Click Save as Template.
The device selection screen is displayed.
C Select the base device to be used to create settings.
You can select groups to which devices are registered from the Select group(s) menu.
The base device must support unicast communication and the functions to be set.
D Click OK.
The configuration template information edit screen is displayed.
Epson Device Admin User Guide Win
Device Management
45

E Enter information for each item.
Item Explanation
Configuration TemplateName
Name of the configuration template.
Enter up to 1,024 characters in Unicode (UTF-8).
Author Information on the creator of the template.
Enter up to 1,024 characters in Unicode (UTF-8).
Comment Enter optional information.
Enter up to 1,024 characters in Unicode (UTF-8).
F Select the check boxes next to the items to be setting values.
Note:Some items are for writing only, and cannot be collected from the device and these fields are left empty. To make thesesettings, you need to enter a value manually.
Epson Device Admin User Guide Win
Device Management
46

G Click Save.
The template is saved.
Creating from the device management screen
A Select Devices on the side bar task menu.
B Select the base device to be used to create settings from the device list.
The base device must support unicast communication and the features to be set.
C Click Save as Configuration Template on the ribbon menu.
The configuration template information edit screen is displayed.
Note:You can also select from the menu displayed when you right-click the selected device.
D Enter information on the configuration template.
See step 5 in the last item for details.
E Change setting values as necessary, and then select the items you want to save to the template.
F Click Save.
The template is saved.
Applying configuration template
You can apply setting information to groups or individual templates by using a configuration template.
Items used to set target devices with the selected configuration template are applied.
You can apply settings using the following methods.
❏ Select devices and apply
Select devices from the device list, and then select the configuration template. You can select devices to be appliedby confirming device information in the list.
Epson Device Admin User Guide Win
Device Management
47

❏ Select configuration template and apply
Select a configuration template from the configuration template management screen, and then select devices. Youcan check the content of configuration templates in the list.
Select devices and apply
A Select Devices on the side bar task menu.
B Select the devices to which you want to apply the configuration template from the device list.
Note:To make multiple selections, press Ctrl or Shift and click your mouse.
C Click Apply Configuration Template on the ribbon menu.
The device selection screen is displayed.
Note:You can also select from the menu displayed when you right-click the selected device.
D Select the configuration templates you want to apply from Select a configuration template.
E Check that the devices to which you want to apply the configuration template are in the list.
The devices to which the settings will be applied are in the Selected Target list. To change these, move devices orgroups by using , , , and .
Epson Device Admin User Guide Win
Device Management
48

Use to move the selected device or group, and use to move all devices or groups.
Note:❏ When you select Devices and groups containing devices from the pull-down menu, each device is displayed.
❏ Groups are displayed when you select Groups. Select Include child group(s) to automatically select child groupswithin the selected group.
F Click Apply.
A confirmation screen for the configuration template to be applied is displayed.
G Click OK.
A confirmation screen for the application results is displayed.
H Check the content, and then click Close.
You can check detailed information by clicking Details.
Select configuration templates and apply
A Select Configuration on the side bar task menu.
Epson Device Admin User Guide Win
Device Management
49

B Click Apply.
The device selection screen is displayed.
C Select the configuration template you want to apply from Select a configuration template.
D Select the devices to which the configuration template will be applied.
The devices to which the settings will be applied are in the Select Target list. To change these, move devices orgroups by using , , , and .
Use to move the selected device or group, and use to move all devices or groups.
Note:❏ When you select Devices and groups containing devices from the pull-down menu, each device is displayed.
❏ Groups are displayed when you select Groups. Select Include child group(s) to automatically select child groupswithin the selected group.
Epson Device Admin User Guide Win
Device Management
50

E Click Apply.
A confirmation screen for the configuration template to be applied is displayed.
F Click OK.
A confirmation screen for the application results is displayed.
G Check the content, and then click Close.
You can check detailed information by clicking Details.
Editing configuration templates
You can change, duplicate, and delete a saved configuration template.
A Select Configuration on the side bar task menu.
B Select the configuration template you want to edit.
Epson Device Admin User Guide Win
Device Management
51

C Click Edit, Duplicate, or Delete on the ribbon menu.
D Edit the configuration template.
You can perform the following actions for each item.
❏ Edit
Change the setting values for the selected configuration template.
Click OK to save your edits.
❏ Duplicate
Creates a copy of the selected configuration template.
Edit the configuration template name in the text box as necessary. Click OK to save the copied template.
❏ Delete
Deletes the selected configuration template.
You cannot delete preset configuration templates. The selected configuration template is deleted when youclick OK on the confirmation screen.
Exporting and importing configuration templates
You can export and import a saved configuration template. You can use this for maintenance or backup. See thefollowing for details.
U “Configuration templates” on page 119
Setting or changing devices one at a time
Device properties screen
Configure one device at a time by using the Device Properties screen.
Note:You cannot configure the device while acquiring device information using the schedule function.
A Select Devices on the side ber task menu.
Epson Device Admin User Guide Win
Device Management
52

B Click the Home tab on the ribbon menu.
C Select the device you want to configure from the device list.
Note:When you select multiple devices, you cannot configure them. If you want to configure more than one device, use theConfiguration Template or the Batch Setting function.
U “Settings Template” on page 44
D Click Device Configuration.
The Device Properties screen is displayed.
When the password entry screen is displayed, enter the password, and then click OK.
E Set each item as necessary.
Set the device to match the environment being used. Displayed items differ depending on the model beingused.
See the following for the setting methods for each item.U Epson Device Admin Help "Device Properties"
F Click Transmit to set the necessary items.
Epson Device Admin User Guide Win
Device Management
53

G Click OK.
When the password entry screen is displayed, enter the password, and then click OK.
Transmit the settings.
Note:❏ The information is transmitted to the device, and then the message "Configuration successfully completed." is
displayed. Do not turn off the device or the wireless adapter, and do not send any data to the device.
❏ See the following when setting the password.
U “Setting an Administrator Password” on page 55
H Click OK.
I It can take up to three minutes until the settings are enabled. Do not turn off the device or wireless adapterduring this time.
The icon is displayed in the device list while setting up the device.
❏ If the icon remains after three minutes has passed, check the status of the device or the wirelessadapter.
❏ If the ! icon is displayed, communication with the IP address could not be completed. Check that the IPaddress is enabled in the environment being used.
Using an embeded web server to make device settings
You can run Embeded Web Server (Web Config, EpsonNet Config (Web), or Remote Manager) when an IPv4 IPaddress is set to allow unicast communication.
A Select Devices on the side ber task menu.
Epson Device Admin User Guide Win
Device Management
54

B Click the Home tab on the ribbon menu.
C Select the device you want to configure from the device list.
Note:When you select multiple devices, you cannot configure them. If you want to configure more than one device, use theConfiguration Template or the Batch Setting function.
U “Settings Template” on page 44
D Click Embedded Web Server.
The Embeded Web Server is displayed.
Note:❏ If you cannot select Launch Browser, check that the IP address has been changed from its default setting, or that
the IP address is not already in use.
❏ The message "There is a problem with this website’s security certificate." may be displayed when running theembeded web server. (The message varies depend on the browser.) This is displayed because the device uses SSLcommunication (encrypted communication) to protect your personal information. Click "Continue to thiswebsite (not recommended).".
E Set each item as necessary.
Set the device to match the environment being used. Displayed items differ depending on the model beingused.
Setting an Administrator Password
You can use an administrator password to protect device settings. The password is not set by default.
Setting individually
Configure one password at a time by using the Device Properties screen.
A Select Devices on the side bar task menu.
B Select the device you want to configure from the device list.
If the device is not displayed, check that the device or wireless adapter is turned on, or if the device is in the samesegment as the computer.
Epson Device Admin User Guide Win
Device Management
55

C Click Device Configuration on the Home tab in the ribbon menu.
D Click Administrator Settings - Admin Password, and then enter the password in New Password and ReenterNew Password.
E Click Transmit to set the necessary items.
It can take up to three minutes until the settings are enabled. Do not turn off the device or wireless adapterduring this time.
Note:The device administrator passwords are shared with each application used in network settings. Make sure youmanage the administrator password carefully.
Managing passwords in batches
You can save the password for devices in Epson Device Admin.
Managing passwords automatically
You can change settings without having to enter device's password the next time once an administrator password isauthenticated. Password information is saved to the data base of this software, and the software refers to the device'sMAC address after authentication.
You do need to enter the password when changing passwords of devices after saving password information. When therevised password is authenticated, saved password information is updated.
Note:This function is not accessible when batch settings or firmware update are in progress.
Epson Device Admin User Guide Win
Device Management
56

A Select Devices on the side bar task menu.
B Click Options on the ribbon menu.
C Select Password manager.
D Select Enable automatic password management.
E Click OK.
Setting a master password
If you set a master password, you need to enter the password when displaying the password list.
Creating a new master passwordSet a new master password. Once it has been set, you need to enter the password if you change it.
A Select Options - Password manager.
Epson Device Admin User Guide Win
Device Management
57

B Select Use master password.
The change master password screen is displayed.
C Enter the master password in New password and Confirm new password.
Enter the password you want to set using up to 20 ASCII characters.
D Click OK.
Changing the master passwordYou need to enter the password to change the master password settings.
Note:You also need to enter the password when you clear Use master password.
A Select Options - Password manager.
Epson Device Admin User Guide Win
Device Management
58

B Click Change Master Password.
The change master password screen is displayed.
C Enter the current master password in Current password.
D Enter the new master password in New password, and then enter the same password in Confirm newpassword.
Enter the password you want to set using up to 20 ASCII characters.
E Click OK.
Editing an administrator password using the list
You can edit the administrator password for a device using the password management list.
See the following for details on backing up and restoring the password management list.
U “Password settings” on page 112
Adding and editing a passwordAdd or change an administrator password.
Epson Device Admin User Guide Win
Device Management
59

A Select Options - Password manager.
B Click Password manager.
The password management screen is displayed.
Note:When a master password is set you need to enter the password.
C Click Add when setting a new password, and when changing settings select devices and then click Edit.
The add password screen is displayed.
Note:You can change the group display for devices in Group.
Epson Device Admin User Guide Win
Device Management
60

D When making new settings, enter the MAC address for the device.
When changing settings, the registered MAC address is displayed and cannot be edited.
E Enter any password in Password, and then enter the same password in Confirm new password.
Enter the password you want to set using up to 20 ASCII characters.
F Select the check-box next to the device that you want to manage.
Selected: Enables automatic authentication and password saving.
Cleared: Disables automatic authentication and password saving.
Registering Different Address Books
You can import email addresses, target folders, abbreviated fax numbers from a product and edit the data.
Editing individually
See the following for the batch setting function.U “Making batch settings” on page 64
Note:This function is only available for supported models.
A Select Devices on the side bar task menu.
Epson Device Admin User Guide Win
Device Management
61

B Select the device you want to configure from the device list.
C Click Device Configuration on the Home tab on the ribbon menu.
D Click the item you want to edit from the following. Displayed items differ depending on the device being used.
❏ Common - Contacts
❏ Administrator Settings - Access Limitation
❏ Scan - Mail Settings
❏ Scan - Target Folder
❏ Fax - Reception - FAX to Folder
❏ Fax - Reception - E-Mail
❏ Fax - Fax Number
See the following for detailed information on each item.U Epson Device Admin Help "Device Properties"
E Click Edit.
This step is unnecessary on the Administrator Settings - Access Limitation screen, Fax - Reception - FAX toFolder/E-Mail screens, and Fax - Fax Number screen. Go to step 5.
Epson Device Admin User Guide Win
Device Management
62

F Select the number you want to edit, and then click Edit.
G Set each item, and then click OK.
H If all settings are complete, click Transmit.
I When a confirmation screen is displayed, click OK to start transmitting the settings.
J Click OK to complete transmission.
Epson Device Admin User Guide Win
Device Management
63

Making batch settings
Creating a settings file
You can save and edit information for the same item.
You can save information that includes security items such as private information by setting a password. You cannotedit this file. See the following page for more details.U “Exporting by setting a password” on page 115
A Select Devices on the side bar task menu.
B Select the device you want to configure from the device list.
C Click Device Configuration on the Home tab on the ribbon menu.
D Click the item you want to edit. Displayed items differ depending on the device being used.
❏ Common - Contacts
❏ Administrator Settings - Access Limitation
❏ Scan - Mail Settings
❏ Scan - Target Folder
❏ Fax - Reception - E-Mail
❏ Fax - Fax Number
See the following for detailed information on each item.U Epson Device Admin Help "Device Properties"
E Select an export method.
If you select All Items, you need to set a password for the file. On Administrator Settings - Access Limitationscreen, when you click Export in the next step, you can then select an export format.This step is unnecessary on the Scan - Mail Settings/Target Folder screens, Fax - Reception - FAX to Folder/E-Mail screens, and Fax - Fax Number screen. Go to step 5.
Epson Device Admin User Guide Win
Device Management
64

F Click Export.
Screen for Contacts.
G Enter a file name, and then click Save.
A SYLK format file is saved with the extension ".slk".
Epson Device Admin User Guide Win
Device Management
65

H Open the SYLK file you saved in a spreadsheet application such as Microsoft Excel or in a text editor, and thenedit the information.
I Save the edited SYLK format file.
Reading the settings file
The software can read edited settings files.
See the following for details on binary files that include security items such as passwords and private information.
U “Importing files containing security information” on page 117
A Select Devices on the side bar task menu.
B Select the device you want to configure from the device list.
Note:To make multiple selections, press [Ctrl] or [Shift] and click your mouse.
C Click Device Configuration on the Home tab on the ribbon menu.
D Click the item you want to edit. Displayed items differ depending on the device being used.
❏ Common - Contacts
❏ Administrator Settings - Access Limitation
❏ Scan - Mail Settings
❏ Scan - Target Folder
❏ Fax - Reception - E-Mail
❏ Fax - Fax Number
See the following for detailed information on each item.U Epson Device Admin Help "Device Properties"
E Click Browse, and then select the file you want to import.
You need to enter the password when importing a binary file (.ene file).On Administrator Settings - Access Limitation screen, Scan - Mail Settings/Target Folder screen, Fax -Reception - FAX to Folder/E-Mail screens, and Fax - Fax Number screen, when you click Import in the nextstep, you can then select a file.
Epson Device Admin User Guide Win
Device Management
66

F Click Import.
Screen for Contacts.
G When the "Start Import Wizard Confirmation" message is displayed, click OK.
H Check the information in Imported Information, and then click Import.
If you want to import multiple files, click Read more File.
Epson Device Admin User Guide Win
Device Management
67

I Click Transmit.
J When a confirmation screen is displayed, click OK to start transmitting the settings.
K Click OK to complete transmission.
Updating Device Firmware
You can check for the latest firmware and then update the device's firmware if necessary.
Updating firmware
Check the firmware version site for the device, and update the firmware if necessary. Updates can only be performedfor devices that support the features registered to the device list.
Epson Device Admin User Guide Win
Device Management
68

Before updating you need to make settings to allow access to external sites.
U “Check for updates” on page 29.
A Select Devices on the side bar task menu.
B Click the Home tab on the ribbon menu.
C Select Check Updates.
Access external site to check for updates.
Display in the device list when firmware is updated.
D Select devices in the device list to update firmware.
E Click Update.
Firmware is updated.
Firmware Update Schedule
When you create firmware update schedules for devices, the firmware is automatically updated at the date and timeyou specified. You can update multiple devices at the same time.
Creating a Firmware Update Schedule
Create a firmware update schedule to specify the device that you want to update and the update date and time.
A Select Devices on the side bar task menu.
B Click the Home tab on the ribbon menu.
C Click Update.
The Firmware updates screen is displayed.
Epson Device Admin User Guide Win
Device Management
69

D Click New.
The firmware update schedule creation Wizard is displayed.
E Check Cautions on updating firmware, and then click Next.
Epson Device Admin User Guide Win
Device Management
70

F Specify where the firmware is stored.
❏ Load from Epson serverUpdates by downloading the latest version firmware from the Epson server.
❏ Load from PCUpdates using the firmware file that you specified.
G Click Next.
H Select the devices with firmware that you want to update.
You can select the group to which devices are registered from the select group menu.
Target devices are listed in the box on the right. To change these, move devices by using , , , and.
Epson Device Admin User Guide Win
Device Management
71

You can move selected devices by using , , and all devices by using , .
I Click Next.
The firmware is downloaded.
Epson Device Admin User Guide Win
Device Management
72

J Check the download result for each device in Status, and then click Next.
K Check the license agreements of the firmware for each device, select I agree with the license agreement, andthen click Next.
Epson Device Admin User Guide Win
Device Management
73

L Specify a schedule.
See the following to make the setting.
Item Explanation
Schedule name Enter the name for the firmware update schedule (up to 255 characters in Unicodewithout control characters).
Update start date and time Sets when the schedule starts.
❏ Set the schedule start dateSets the date and time to start the schedule. You can set the time in minute.
❏ Start immediatelyClick OK to save the schedule and start updating.
M Click OK.
The firmware update schedule is created and saved.
When Start immediately is selected for Update start date and time, the firmware update starts.
Editing firmware update schedules
You can change and delete firmware update schedules.
A Select Devices on the side bar task menu.
B Click the Home tab on the ribbon menu.
Epson Device Admin User Guide Win
Device Management
74

C Click Update.
Firmware updates screen is displayed.
D Select the schedule that you want to edit, and then make settings using the screen displayed.
❏ Change: Edit
The firmware update schedule Wizard is displayed. Change the settings using the Wizard.
❏ Delete: Delete
Displays the delete confirmation screen. To delete the schedule, click Yes.
Checking the Status of Firmware Update Schedules
You can check the status of the firmware update schedule for each device.
A Select Devices on the side bar task menu.
B Click the Home tab on the ribbon menu.
C Click Update.
Firmware updates screen is displayed.
D Select the firmware update schedule that the device you want to check the status is regisred, and then click ViewStatus.
View Status screen is displayed.
Epson Device Admin User Guide Win
Device Management
75

E Check the information displayed in the device list.
The following information is displayed.
❏ Model
❏ Host Name
❏ Before update
❏ After update
❏ Status
❏ IP Address
❏ MAC Address
❏ Serial Number
F Click OK to close the screen.
Epson Device Admin User Guide Win
Device Management
76

Daily Management
This chapter explains how to make preparations for daily management.
When you have set schedules for acquiring device information and alert notifications, this software collects deviceinformation and monitors devices automatically, and then sends you a notification if a problem occurs.
By making report settings, since this software collects device data for specified periods, you can check the frequencythe device is used and the status of consumables.
Managing the Device List
Collecting information regularly
You can update device information regularly by using Auto Refresh.
Schedule settings
Set the time interval for regularly collecting information.
A Select Devices on the side bar task menu.
B Click Options on the Home tab on the ribbon menu.
C Click Timing.
D Set the interval to collect information.
❏ Refresh interval
Epson Device Admin User Guide Win
Daily Management
77

Collects device information at regular intervals after starting Auto Update.
You can set the interval in units of one minute from 1 minute to 23 hours 59 minutes.
❏ Select the day of the week
Collects device information on a specified day and time.
You can specify Monday through Sunday, and the time in minutes.
E Click OK.
Starting Auto Update
Start Auto Update.
A Select Devices on the side bar task menu.
B Click Auto-Update on the Home tab on the ribbon menu.
Auto Refresh is started.
Note:You can cancel data collection using a schedule by clicking the icon at the bottom-right of the screen. The schedulesettings are canceled at the same time.
Displaying the device list settings
You can customize the display for the device list.
The following customizations are available.
❏ Display presets
Frequently used presets are provided by default.
You can also save the current display as a preset.
❏ Edit columns
You can edit columns, and display only those columns you need.
❏ Filtering
You can filter target devices by filtering the column displayed using a character string.
Epson Device Admin User Guide Win
Daily Management
78

Display presets
You can switch the display by using the menu on the View tab on the ribbon menu on device management screen.
Icon Explanation
Basic View Displays the default presets.
Default,Supplies, Counts
Default settings view. Displays consumables and the number of prints.
User Defined Displays registered preset in a pull-down menu.
Registering a presetYou can register the items for the current device list as a preset. You can register up to 256 items.
A Select Devices on the side bar task menu.
B Convert the display of the device list to the display registered as preset.
C Click Add as Preset on the View tab on the ribbon menu.
D Enter the name of the preset, and then click OK.
Enter up to 255 characters in Unicode.
Note:You can select the name of an existing preset, and overwrite the settings by clicking OK on the confirmation screen.
Editing presetsYou can change or delete the name of a registered preset or set the default preset.
Epson Device Admin User Guide Win
Daily Management
79

A Select Devices on the side bar task menu.
B Click Edit Preset on the View tab on the ribbon menu.
C Use the buttons to change the preset settings.
See the following to make the settings.
Item Explanation
Definition view list Displays user-defined presets. The default preset is displayed in bold.
, Moves the selected preset to up or down the list.
Change Name Changes the name of the selected preset.
Delete Deletes the selected preset.
Set as Default Sets the selected preset as the default. This is assigned to the Default button on theribbon menu.
D Click OK.
Editing columns
You can change the way columns are displayed in the device list.
A Select Devices on the side bar task menu.
Epson Device Admin User Guide Win
Daily Management
80

B Click Edit Column on the View tab on the ribbon menu.
C Use the buttons to change the preset settings.
The item Selected column(s) is displayed in the device list.
You can add the amount of remaining consumables, the number of times consumables have been replaced, andthe number and type of printed pages (A4, A3, Color, B&W).
Note:The actual display items may differ depending on the device being used.
❏ The number of prints contains paper jams, print mistakes, and status sheets.
❏ Depending on the timing for data collection, there may be errors in the total number of prints.
❏ The amount of ink remaining and replacement times are displayed in Gray for Dark Gray and in Light Gray forLight Gray depending on the device being used.
❏ The remaining amount of consumables is approximate.
❏ For ink injection devices, the amount of ink remaining and the ink replacement times are displayed as numberswhen performing operations as explained in the manual.
❏ Ink and toner with the same color are displayed in the same item.
❏ Ink for devices with sets of two colors that are the same is displayed as (C1) and (C2).
Item Explanation
Category Select the category for basic information and consumables for items displayed inAvailable Column.
, Moves the selected item to the column on the left or right.
, Moves the position the item is displayed up or down the list.
Epson Device Admin User Guide Win
Daily Management
81

D Click OK.
Using filters
By entering keywords in the Apply Filter text box on the ribbon menu, you can display devices containing the samecharacter string in the device list.
Enter up to 255 characters in Unicode. The software does not distinguish between upper and lower case characters.
To cancel the filter, delete the character string from the text box.
Managing Alerts
You can monitor alerts from devices and send notifications to set email addresses depending on the type of alert.
To use the alert feature, set the type of alert and the email recipient, and then connect it to the group of devices to bemonitored.
Note:Use this feature when selecting features during software installation. If it is not already installed, you can set it from theWindows Control Panel. See the following for details.
U “Changing features and uninstalling” on page 13
Creating alerts
You can create alerts based on the alert type and email address.
You can create it up to 10,000 items.
A Select Alerts on the side bar task menu.
Epson Device Admin User Guide Win
Daily Management
82

B Click New on the ribbon menu.
C Enter the items.
See the following to make the settings.
Item Explanation
Alert Name The name of the alert displayed on the alert list. Enter up to 1,024 characters in Unicode.
Alert Type Set the conditions for sending an alert notification. You can select from the following.
❏ Paper jam
❏ Paper out
❏ Supplies level low
❏ Supplies level warning
❏ Service call problem
❏ Cover open (For printers only)
❏ Tray Full
To Enter the email address to which alert notifications are sent.
When entering multiple addresses, separate the addresses with semi-colons (;). You canenter up to 32,767 bytes including [;]. Enter all addresses in the [TO] field. You cannot usethe [CC] or [BCC] fields.
You can select and insert multiple addresses that you have entered previously by clicking[Select from history].
Subject The subject of the alert notification email. You can enter up to 256 characters.
Message The text of the alert notification email. You can enter up to 64K bytes.
Epson Device Admin User Guide Win
Daily Management
83

Item Explanation
Default Notification E-mailRetransmission Interval ofthe Same Alert
Select the time until the next time the alert notification email is sent if the alert has notbeen cleared on the device.
Select from following.
Use Default, 5 minutes, 10 minutes, 30 minutes, 1 hour, 3 hours, 6 hours, 12 hours, 1 day, 2days, 3 days, 4 days, 5 days, 1 week
When selecting Use Default, the time set in Default Notification E-mailRetransmission Interval of the Same Alert in Options - Alert Notifications is applied.
D Click OK to save the alert and close the screen. Click Assign/Remove Group(s) to set monitored groups usingthe created alert.
When you click OK, the alert is created and added to the alert list.
When you click Assign/Remove Group(s), you can add groups to be monitored by alerts. See the following fordetails.
Adding groups monitored by alerts
You can set monitored groups with the created alert. This sends notifications when an alert is generated on a device inthe group.
A Select Alerts on the side bar task menu.
B Selects alert from the alert list.
You cannot add monitoring groups when selecting multiple templates.
C Click Assign/Remove Group(s) on the ribbon menu.
Epson Device Admin User Guide Win
Daily Management
84

D Select the group you want to monitor, and then click to move it to Subscribed Group(s).
When you move a group to Unsubscribed group(s) by clicking , alert monitoring is canceled.
E Click OK.
Alert monitoring for devices in the selected group begins.
Note:You can set multiple alerts for one group. Add the alerts to each monitoring group.
Setting the alert confirmation interval
You can set the interval to check alerts from the device.
A Select Devices on the side bar task menu.
B Click Options on the Home tab on the ribbon menu.
C Select Alert Notifications.
Epson Device Admin User Guide Win
Daily Management
85

D Set the interval to check for alerts.
See the following to make the settings.
Item Explanation
Interval to check for alerts[1-600]
Set the interval to check for alerts on devices.
Enter 1 to 600 seconds in intervals of 1 second.
Notification email resendinterval
Sets the time to resend a notification email that an alert has occurred if the alert is notcleared from a device.
Select from the following.
5 minutes/10 minutes/30 minutes/1 hour/3 hours/6 hours/12 hours/1 day/2 days/3 days/4days/5 days/1 week
Notify when the number ofpaper jams per dayexceeds the specifiednumber
Sends a notification when the number of paper jams on the scanner in one day (from 0:00 to23:59) is the same as the specified number.
Number of occurrences Sends a notification if the set number of paper jams that occurs in one day exceeds thespecified number of times. Enter 1 to 99 times in intervals of 1.
Editing alerts
You can change, duplicate, and delete alerts you created.
A Select Alerts on the side bar task menu.
B Select an alert from the alert list.
You can only select multiple alerts when deleting.
Epson Device Admin User Guide Win
Daily Management
86

C Set using the screen displayed when you click the button on the ribbon menu.
❏ Change: Edit
Displays the alert screen. Change the settings, and then click OK.
❏ Copy : Duplicate
Displays the alert name screen. Enter a new name, and then click OK.
❏ Delete : Delete
Displays the delete confirmation screen. To delete the alert, click OK.
Switching the alert display
You can switch the alert list and the log screen when clicking the item in the tree view.
The number next to the item name is the number of alerts in the item.
Alert list
Displays a list of alerts at the top.
Displays content for the selected alert and the monitored device group at the bottom.
❏ All
Displays all alerts.
❏ Subscribed Alerts
Displays alerts that have been subscribed to at least one group.
❏ Unsubscribed Alerts
Displays alerts that have not been subscribed to any groups.
Epson Device Admin User Guide Win
Daily Management
87

Log
When you select Logs from the tree view, a log of alert notifications are displayed at the top, and detailed content isdisplayed at the bottom.
You can set the time to save logs in Log retention period from Options - Timing.
Report Management
Report management allows you to output the status of devices, consumables, and accessories as a report.
You can create reports by using the Wizard.
Note:❏ Use this feature when selecting features during software installation. If it is not already installed, you can set it from the
Windows Control Panel. See the following for details.
U “Changing features and uninstalling” on page 13
❏ If your computer is set to daylight saving time, errors may be generated during data collection and timed intervals forreports.
Creating reports
You can create reports for target device groups using the conditions for the selected report format. You can create thereport by specifying a period or setting a regular schedule. Create device groups before creating reports.
U “Group Management” on page 34
A Select Reports on the side bar task menu.
B Select User Defined Report - Scheduled reports from the tree view.
C Click New on the ribbon menu.
The report creation Wizard is displayed.
Epson Device Admin User Guide Win
Daily Management
88

D Set conditions when acquiring report data.
Select from the following.
Device Usage / Hourly peak usage / Supply Usage / Accessory Inventory
E Select the conditions used to create a report by specifying the period or setting a schedule.
Create report by specifying a period: Clear the Create a Schedule check box.
Create report by setting the schedule: Select the Create a Schedule check box.
F Click Next.
G Select the target device group.
Target groups are listed in the box on the right. To change these, move groups by using , , , and.
You can move selected groups by using , , and all groups by using , .
Epson Device Admin User Guide Win
Daily Management
89

Select Include child group(s) to automatically select child groups within the selected group.
H Click Next.
I Specify the report format.
See the following to make the settings.
Item Explanation
Primary sort Select the key given first priority when sorting reports using device information items.
Secondary sort Select the key given second priority when sorting reports using device information items.Available items are the same as for Primary sort.
Epson Device Admin User Guide Win
Daily Management
90

Item Explanation
Device Information Select the device information items to be included in the report.
Data Column Select the collection data to be included in the report. See the following table for theavailable items.
Available items for collection conditions
Item Explanation
Device Usage (Printer) You can select information for compatible paper sizes.
❏ Total print pages:
The total number of pages printed from the time you start using the printer are trackedby the printer engine. This number is not only tracked during the report range, but alsoin periods out of the report range.
❏ Total print mono pages::
The total number of black-and-white pages printed from the time you start using theprinter are tracked by the printer engine. This number is not only tracked during thereport range, but also in periods out of the report range.
❏ Total print color pages::
The total number of color pages printed from the time you start using the printer aretracked by the printer engine. This number is not only tracked during the report range,but also in periods out of the report range.
❏ Total pages:
The total number of pages printed are tracked by the printer engine.
❏ Mono pages:
The total number of black-and-white pages printed are tracked by the printer engine.
❏ Color pages:
The total number of color pages printed are tracked by the printer engine.
❏ 1-sided pages:
The total number of simplex pages printed are tracked by the printer engine.
❏ 2-sided pages:
The total number of duplex pages printed are tracked by the printer engine.
❏ 1-sided mono pages:
The total number of simplex black-and-white pages printed are tracked by the printerengine.
❏ 1-sided color pages:
The total number of simplex color pages printed are tracked by the printer engine
❏ 2-sided mono pages:
The total number of duplex black-and-white pages printed are tracked by the printerengine.
❏ 2-sided color pages:
The total number of duplex color pages printed are tracked by the printer engine.
Epson Device Admin User Guide Win
Daily Management
91

Item Explanation
❏ Total Prints (m):
The total printed length is calculated by the printer engine (m).
❏ Total Prints (m2):
The total printed area is calculated by the printer engine (m2).
❏ Pages by Function (Printer)/Pages by Function (Copy)/Pages by Function (Fax)/Pagesby Function (Other):
The total number of pages printed is tracked by the printer engine for each function.
❏ Mono Pages by Function (Print)/Mono Pages by Function (Copy)/Mono Pages byFunction (Fax)/Mono Pages by Function (Others):
The total number of black-and-white pages printed is tracked by the printer engine foreach function.
❏ Color Pages by Function (Print)/Color Pages by Function (Copy)/Color Pages byFunction (Fax)/Color Pages by Function (Others):
The total number of color pages printed is tracked by the printer engine for eachfunction.
Note:The total page count in the report may differ from the actual total page count due to thetiming for data collection.
Epson Device Admin User Guide Win
Daily Management
92

Item Explanation
Device Usage (Scanner) You can select information for compatible paper sizes.
❏ Total Scan Sheets/Total Scan Pages:
The total number of sheets/pages scanned are tracked by the scanner engine.
❏ Mono Total Scan Sheets/Mono Total Scan Pages:
The total number of black-and-white pages scanned are tracked by the scannerengine.
❏ Color Total Scan Sheets/Color Total Scan Pages:
The total number of color pages scanned are tracked by the scanner engine.
❏ 1-Sided Total Scan Sheets/1-Sided Total Scan Pages:
The total number of simplex pages scanned are tracked by the scanner engine.
❏ 2-Sided Total Scan Sheets/2-Sided Total Scan Pages:
The total number of duplex pages scanned are tracked by the scanner engine.
❏ ADF Total Scan Sheets/ADF Total Scan Pages:
The total number of sheets/pages scanned using the ADF are tracked by the scannerengine.
❏ ADF Mono Total Scan Sheets/ADF Mono Total Scan Pages:
The total number of black-and-white sheets/pages scanned using the ADF are trackedby the scanner engine.
❏ ADF Color Total Scan Sheets/ADF Color Total Scan Pages:
The total number of color sheets/pages scanned using the ADF are tracked by thescanner engine.
❏ ADF 1-Sided Total Scan Sheets/ADF 1-Sided Total Scan Pages:
The total number of simplex sheets/pages scanned using the ADF are tracked by thescanner engine.
❏ ADF 2-Sided Total Scan Sheets/ADF 2-Sided Total Scan Pages:
The total number of duplex sheets/pages scanned using the ADF are tracked by thescanner engine.
❏ FB Total Scan Sheets/FB Total Scan Pages:
The total number of sheets/pages scanned on the FB are tracked by the scannerengine.
❏ FB Mono Total Scan Sheets/FB Mono Total Scan Pages:
The total number of black-and-white sheets/pages scanned on the FB are tracked bythe scanner engine.
❏ FB Color Total Scan Sheets/FB Color Total Scan Pages:
The total number of color sheets/pages scanned on the FB are tracked by the scannerengine.
Note:The total page count in the report may differ from the actual total page count due to thetiming for data collection.
Hourly peak usage You can select the same items as in Device Usage.
Supply Usage Displays the amount remaining and the replacement times for the ink/toner.
Epson Device Admin User Guide Win
Daily Management
93

Item Explanation
Accessory Inventory ❏ Memory
❏ Duplexer
❏ Paper Source
❏ FAX
The following shows the compatible paper sizes for Device Usage.
UI
A4 Letter A4/Letter
A3 Ledger A3/Ledger
A4 Letter A4/Letter
A5 A5 A5
A6 A6 A6
B4 Legal B4/Legal
B5 B5 B5
other other other
J Click Next.
K Specify the report range.
The display may differ depending on the data collection conditions that you selected in step 4.
When you have selected Device Usage, Supply Usage, or Accessory Inventory:
See the following to make the settings.
Epson Device Admin User Guide Win
Daily Management
94

Item Explanation
Report interval Select the interval for creating reports from the following.
❏ Per Day
❏ Per Week
❏ Per 2 Weeks
❏ Per Month
❏ Per Quarter
❏ Per Year
Date range Specify the report range from the date the report was created or by specifying adate on the calendar. Specify by using a combination of any number over 1 and aday/week/month/year.
When you have selected Hourly peak usage:
See the following to make the settings.
Item Explanation
Date range Specify the report range from the date the report was created or by specifying adate on the calendar. Specify by using a combination of any number over 1 and aday/week/month/year.
Time range Sets the target period of a report.
When setting 24 hours, select All day. When specifying a time, set the start andend times.
Note:If the report range contains a period before Epson Device Admin was installed, the information for that period isblank in the report.
L Click Next.
Epson Device Admin User Guide Win
Daily Management
95

M Specify email destinations.
See the following to make the settings.
Item Explanation
Type Specify whether or not to send a notification email.
To Enter the address to which the alerts are sent.
When entering multiple addresses, separate the addresses with semi-colons (;).You can enter up to 32,767 bytes including [;]. Enter all addresses in the [TO] field.You cannot use the [CC] or [BCC] fields.
Subject The subject of the alert notification email. You can enter up to 256 characters.
File format Sets the file format. You can select from PDF, HTML, or CSV.
N Click Next.
Epson Device Admin User Guide Win
Daily Management
96

O Specify a report name.
Name of the report to be output. Enter up to 1,024 characters in Unicode.Enter report name
P Click Next.
Q Specify a schedule.
Note:❏ If you clear the Create a Schedule check box in step 5, this screen is not displayed.
❏ Set the Start date and time for the Creation Schedule after the data collection time. If this is set to before the datacollection time, the report is created before starting data collection on the last day in the report range.
U “Setting the data collection time” on page 101
Epson Device Admin User Guide Win
Daily Management
97

See the following to make the settings.
Item Explanation
Start date and time Set the a day to start the schedule. The units are intervals of one minute.
End date Set the day to end the schedule.
Select None if you do not want to specify an end day.
Report Creation Cycle Specify the interval for creating reports.
R Click Next.
S Click OK.
The report or schedule is created.
The created report is saved as an archive report.
❏ Example of created report
Epson Device Admin User Guide Win
Daily Management
98

Data Type : Device UsagePrimary Sort : ModelSecondary Sort : NoneDevice Information : Model, MAC Address, and IP AddressData Column : Total Pages, Mono Pages, and Color PagesReport Interval : Per WeekDate Range: From 1 Month ago
Configuration Examples for Report Creation
See the following examples to create a report for a fixed range.
Device Usage/Supplies Usage/Accessories Inventory❏ Creating weekly reports for the last three months every month
Specify the Date Range for Report GenerationReport Interval: WeeklyDate Range: Last 3 MonthSpecify ScheduleReport Creation Cycle: Every Month
❏ Creating monthly reports for the last six months every month
Specify the Date Range for Report GenerationReport Interval: MonthlyDate Range: Last 6 MonthSpecify ScheduleReport Creation Cycle: Every Month
❏ Creating quarterly reports for the last year every quarter
Specify the Date Range for Report GenerationReport Interval: Every 3 monthsDate Range: Last 1 Year
Epson Device Admin User Guide Win
Daily Management
99

Specify ScheduleReport Creation Cycle: Every Quarter
Hourly Peak Usage❏ Creating daily reports every day
Specify the Date Range for Report GenerationDate Range: Last 1 DaySpecify ScheduleReport Creation Cycle: Every Day
❏ Creating a weekly report every week
Specify the Date Range for Report GenerationDate Range: Last 1 WeekSpecify ScheduleReport Creation Cycle: Every Week
Acquiring data
You can collect data for devices based on the selected data types. Acquired data is used for reports. You can set thecollection start time conditions. See the following for details.
U “Setting the data collection time” on page 101
A Select Reports on the side bar task menu.
B Select Database - Data Collection from the tree view.
C Select the collection conditions from the data collection conditions list.
You cannot select multiple collection conditions.
D Click Collect Now on the ribbon menu.
Epson Device Admin User Guide Win
Daily Management
100

Setting the data collection time and saving period
You can set how long collected data is saved from the option menu on the device management screen.
Setting the data collection time
You can set the collection time depending on the device data collection conditions.
A Select Devices on the side bar task menu.
B Click Options on the Home tab on the ribbon menu.
C Select Timing.
D Select Data Collection Time, and then set the start time to acquire data for each condition.
You can set from 0:00 to 23:59 in minutes.
See the following to make the settings.
Item Explanation
Device Usage The time to start collecting data based on the device usage conditions.
Supplies Usage The time to start collecting data based on the consumable usage conditions.
Accessories Inventory The time to start collecting data based on the accessory installation conditions.
Hourly Peak Usage Select this to set the time to start collecting data for reports.
Epson Device Admin User Guide Win
Daily Management
101

Setting the data saving period
You can set the period for saving collected data and reports.
A Select Options - Timing.
B Set Data retention period.
❏ Devices Data
Sets the period for saving collected data.
You can set the period from 1 to 5 in years. Data for which the saving period has expired is automaticallydeleted.
❏ Generated reports
Set the saving period for reports saved in the archives.
You can set the period from 1 to 5 in years. Data for which the saving period has expired is automaticallydeleted.
C Click OK.
Switching the report display
When you click items in the tree view, you can switch the report management display.
Epson Device Admin User Guide Win
Daily Management
102

The number of report formats and archived reports is displayed under User Defined Report.
Collecting data
Information on collecting data is displayed in Database - Data Collection in the tree view.
❏ Conditions for collecting data
The list of data types is displayed at the top.
You can set the Data Collection Times from the Options screen. See the following for details.
U “Setting the data collection time” on page 101
❏ Device list
The device list for collecting data and the device status is displayed at the bottom.
User defined reports
Displays the information on report management in User Defined Report in the tree view.
ScheduleDisplays the report format and the list of schedules when you select User Defined Report - Scheduled reports.
Epson Device Admin User Guide Win
Daily Management
103

When you select a schedule from the list at the top, the content is displayed at the bottom.
Archive reportDisplays the list of archived reports when you select User Defined Report - Archived Reports.
When you select a report, the content of the report is displayed.
Sending archived reports by email
You can send archived reports by email.
A Select Reports on the side bar task menu.
Epson Device Admin User Guide Win
Daily Management
104

B Select User Defined Report - Archived Reports from the tree view.
C Select the report you want to send by e-mail from the report list.
Note:To make multiple selections, press Ctrl or Shift and click your mouse.
D Click Email on the ribbon menu.
The email settings screen is displayed.
E Set each item.
See the following to make the settings.
Item Explanation
To Enter the email address to which you want to send a report.
When entering multiple addresses, separate the addresses with semi-colons (;).You can enter up to 32,767 bytes including [;].
Enter all addresses in the [TO] field. You cannot use the [CC] or [BCC] fields.
Subject The subject of the report email. You can enter up to 256 characters.
File format Sets the file format for the report. You can select PDF, HTML, or CSV.
F Click OK.
The set content is sent by e-mail.
Epson Device Admin User Guide Win
Daily Management
105

Saving and deleting archived reports
You can save and delete an archived report.
A Select Reports on the side bar task menu.
B Select User Defined Report - Archived Reports from the tree view.
C Select the report you want to save or delete from the report list.
You can only select multiple reports when deleting.
Note:To make multiple selections, press Ctrl or Shift and click your mouse.
D Click the edit button on the ribbon menu, and then make save settings or confirm that you want to delete thereport depending on the screen displayed.
❏ Save: Save the archived report(s)
The save settings screen is displayed. [Report Template Name + Report Create Day] is set as the file name.You can change this if necessary.
Select the file format and the location to save the file, and then click OK.
❏ Delete: Delete the archived report(s)
The delete confirmation screen is displayed. To delete the file, click OK.
Epson Device Admin User Guide Win
Daily Management
106

Maintenance
Printing a Status Sheet
When the devices in your network are printers, you can check detailed information on the devices by printing a statussheet.
You can send printing commands to multiple selected devices.
A Select Devices on the side bar task menu.
B Select a device (printer) to print a status sheet from the device list.
Note:To make multiple selections, press Ctrl or Shift and click your mouse.
C Click Print Status Sheet(s) on the Home tab on the ribbon menu.
D Click OK.
A status sheet is printed from the printer you selected.
Backing up and Restoring
You can backup and restore system settings. This allows you to prepare for a system failure, as well as add devices orreplace devices.
Items that can be backed up and restored
The following items can be backed up and restored.
❏ System settings
You can save and restore system settings and all Epson Device Admin data to a backup file.
U “System settings” on page 108
Epson Device Admin User Guide Win
Maintenance
107

❏ Device list
You can save and restore the device list to which devices were added to a backup file.
U “Device list” on page 110
❏ Password list
You can save and restore the password list managed by Epson Device Admin to a backup file.
U “Password settings” on page 112
❏ Address book
You can save and restore address book information such as addresses and fax numbers to a backup file.
U “Address books” on page 115
❏ Configuration template
You can save and restore configuration templates to a backup file.
U “Configuration templates” on page 119
❏ Device settings
You can save and restore configuration values for devices to a backup file.
U “Backing up device settings” on page 142
System settings
You can save the database file containing Option menu settings such as Notification email settings, Discoveryconditions, and External site access settings, as well as Alert and Formats settings in .zip file format.
Backing up system settings
Note:❏ Depending on the size of the database, it may take a while to backup the data.
❏ You cannot backup and restore when the firmware update schedule is running.
A Select Devices on the side bar task menu.
B Click Options on the Home tab on the ribbon menu.
C Click Backup/Restore.
Epson Device Admin User Guide Win
Maintenance
108

D Click Backup.
E Click Browse, specify the destination to save the backup file, and then click OK.
F When you want to set the password, select Use Password, and then enter the password.
Enter the password you want to set using up to 20 ASCII characters.
G Click OK.
The backup file is saved to the specified destination.
Restoring system settings
A Select Devices on the side bar task menu.
B Click Options on the Home tab on the ribbon menu.
C Click Backup/Restore.
Epson Device Admin User Guide Win
Maintenance
109

D Click Restore.
E Select the saved backup file, and then click OK.
F When a password is set for the file, enter the password, and then click OK.
G Click OK.
Restoring is started.
Device list
You can save and read the information on the device list for the device management screen in a device informationfile.
Note:❏ [Reset], [Open], and [Save] buttons are displayed on the ribbon menu on the device list management screen when
[Show Reset, Open, and Save buttons in the Device List] is selected from [Option] - [Detailed Settings].
U “Operation Settings” on page 23
❏ Group setting information is not saved when saving the device list.
Group setting information is saved when you backup the system settings.
U “System settings” on page 108
The following are the device information files.
❏ Device list file (PLF format)
This is an XML file containing the method for specifying IP addresses and MAC addresses for the device list.
❏ Device list file (TXT format)
This is a TXT file containing IP addresses separated by line breaks.
Epson Device Admin User Guide Win
Maintenance
110

❏ Device data file (PRDF format)
This is an XML file containing device list file information added when collecting device information. This isencrypted for security.
Saving a device information file
A Select Devices on the side bar task menu.
B Click the Home tab on the ribbon menu.
C Click Device List group - Save.
D Select the file format and save destination.
E Click Save.
Reading a device information file
A Select Devices on the side bar task menu.
B Click the Home tab on the ribbon menu.
C Click Device List group - Open.
Epson Device Admin User Guide Win
Maintenance
111

D Select the information handling method for the file you want to read.
E Select the device information file, and then click Open.
When reading the device list file (PLF format/TXT format), only information for MAC addresses and IPaddresses is displayed. To display other information, update the device information.
When reading the device data file (PRDF format), the read-only Logs group is added to the first layer of the treeview. Information on the device is displayed here. When you read the device data file again, the Logs group isreplaced with new information.
Password settings
You can backup and restore an administrator's password for devices using the password management list.
See the following for details on adding and editing passwords.
U “Adding and editing a password” on page 59
Backing up passwords
A Select Devices on the side bar task menu.
B Click Options on the ribbon menu.
C Select Password manager.
Epson Device Admin User Guide Win
Maintenance
112

D Click Password manager.
The password management screen is displayed.
E Click Export.
The password backup screen is displayed.
F Click Browse to select the destination to save the backup file.
G Enter a password in Password, and then enter the same password in Confirm new password.
Enter the password you want to set using up to 20 ASCII characters.
H Click OK.
Epson Device Admin User Guide Win
Maintenance
113

Restoring passwords
A Select Devices on the side bar task menu.
B Click Options on the ribbon menu.
C Select Password manager.
D Click Password manager.
The password management screen is displayed.
E Click Import.
The password restore screen is displayed.
Epson Device Admin User Guide Win
Maintenance
114

F Click Browse to select the backup file.
When overwriting current device passwords, select Overwrite an existing password.
G Enter the password you set for the backup file in Password.
Enter the password you want to set using up to 20 ASCII characters.
H Click OK.
Address books
You can export and import address books to a file by setting a password.
Note:This function is only available for supported models.
Exporting by setting a password
See the following for details on exporting items except for security information such as passwords and privateinformation.
U “Registering Different Address Books” on page 61
A Select Devices on the side bar task menu.
B Select the device from which you want to export the address book from the device list.
Note:To make multiple selections, press Ctrl or Shift and click your mouse.
C Click [Change Setting] on the [Home] tab on the ribbon menu.
D Click the item for which you want to edit contact details from the following. Displayed items differ dependingon the device being used.
❏ Common - Contacts
❏ Administrator Settings - Access Limitation
❏ Scan - Mail Settings
Epson Device Admin User Guide Win
Maintenance
115
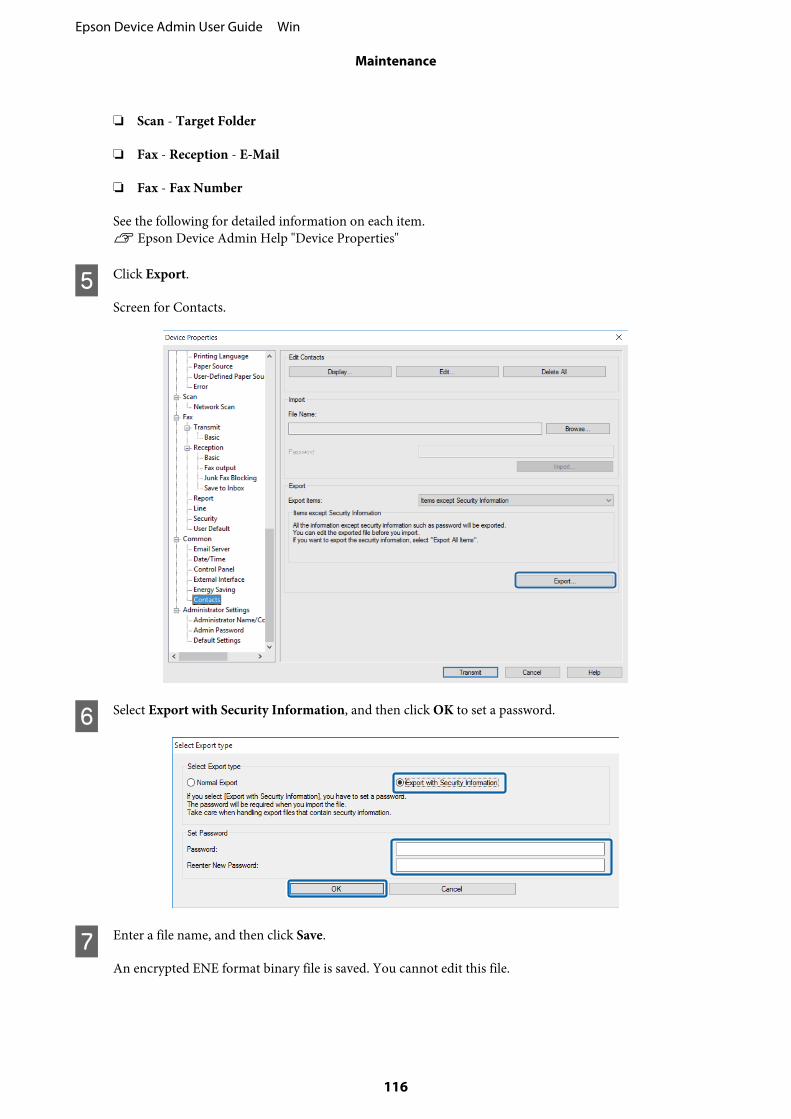
❏ Scan - Target Folder
❏ Fax - Reception - E-Mail
❏ Fax - Fax Number
See the following for detailed information on each item.U Epson Device Admin Help "Device Properties"
E Click Export.
Screen for Contacts.
F Select Export with Security Information, and then click OK to set a password.
G Enter a file name, and then click Save.
An encrypted ENE format binary file is saved. You cannot edit this file.
Epson Device Admin User Guide Win
Maintenance
116

When importing this file, a password is required.
Importing files containing security information
See the following for details on exporting items except for security information such as passwords and privateinformation.
U “Reading the settings file” on page 66
A Select Devices on the side bar task menu.
B Select the device for which you want to import an address book from the device list.
Note:To make multiple selections, press Ctrl or Shift and click your mouse.
C Click Device Configuration on the Home tab on the ribbon menu.
D Click the item you want to edit from E-Mail, FAX to Folder, or Fax Number. Displayed items differ dependingon the device being used.
Epson Device Admin User Guide Win
Maintenance
117

E Click Import.
Screen for Contacts
F When the "Start Import Wizard Confirmation" message is displayed, click OK.
G Set the path to the file you want to import, and then click Next.
Click Browse, and then select the binary file (*.ene) containing information such as email addresses or userinformation for the Access Limitation function, and then click Open. You need to enter the password set whenthe file was exported to open a binary file.
Epson Device Admin User Guide Win
Maintenance
118

H Click Transmit.
I When a confirmation screen is displayed, click OK to start transmitting the settings.
J Click OK to complete transmission.
Configuration templates
You can save and restore configuration templates to a file.
Saving configuration templates
A Select Configuration on the side bar task menu.
Epson Device Admin User Guide Win
Maintenance
119

B Select a configuration template to backup from the template list.
You cannot select preset configuration templates.
Note:To make multiple selections, press Ctrl or Shift and click your mouse.
C Click Backup on the ribbon menu.
D Select the destination to save the file and enter a file name
E Click Save.
TSE format template files are saved together in a Zip file.
Reading configuration templates
Unzip the Zip file containing configuration templates and retrieve the configuration template files (TSE format).
A Select Configuration on the side bar task menu.
B Click Import on the ribbon menu.
The file import screen is displayed.
C Select the configuration template file (TSE format) to be imported.
Epson Device Admin User Guide Win
Maintenance
120

D Click Open.
The configuration template is imported and the results are displayed.
E Click OK.
Epson Device Admin User Guide Win
Maintenance
121

Troubleshooting
Troubleshooting
Troubleshooting for Epson Device Admin.
Cannot discover devices.
Assign an IP address to the devices, and then specify the IP address manually.
For devices that are connected to computers on the network by USB cables, install the Epson Device USB Agent on thecomputers and search for them by using the computer's IP address.
Cannot change the network interface, or cannot use it on the network.
Solution 1) Check if you can print a network status sheet.If you can print the sheet, check the network settings printed on the network status sheet.
Solution 2) Check if hubs and LAN cables are working correctly. For hubs, check if the link lights for the ports where the devicesare connected are flashing or lit.
Check the following if the link light is off.
❏ Connect the hub to a different port.
❏ Connect to a different hub.
❏ Replace the LAN cable.
If you still cannot communicate after trying all of the above, the network interface may not be working. See the devicemanual for details.
Solution 3) Check if the IP address is valid.The default IP address is "192.168.192.168". However, you cannot use this address on the network. Change the addressaccording to your environment.
Solution 4) Check if Keep blocking, Cancel, or Block is selected on the "Windows Security Alert" screen or in your commerciallyavailable security software.Communication cannot be performed if one of these is selected. To enable communication, register this application asan exception in the Windows firewall or your commercially available security software.Some commercially available security software still may not allow communication. In this situation, close the securitysoftware while using this application. When you have finished using this application, restart your security software.
Epson Device Admin User Guide Win
Troubleshooting
122

You do not know the IP address.
Solution 1) If you want to use the DHCP function on the router (DHCP Server, or Wi-Fi router), set the device to automaticallyacquire the IP address.
Solution 2) To set up the IP address and subnet mask manually, see the following.
1. Check the IP address of the router (DHCP Server, or Wi-Fi router) that is connected to your computer. See therouter’s manual for details on checking the IP address.
2. For IPv4, the IP address is composed of four segments of numbers. From the first to the third segment of thenumbers, set the same number as the router. Set a unique number between 1 to 254 for the fourth segment.
Example: If the router's IP address is 192.168.1.1Set the device to 192.168.1.3Set 255.255.255.0 as the subnet mask if you are on a small network. Set the same number for all devices in the network.If the gateway can be configured, use the same IP address as the router. Note that you cannot use the address192.168.192.168 on the network.
The message "The network connection is invalid or not set. Check the network settings." is displayed when running Epson Device Admin.
This message is displayed in the following situations.
❏ When TCP/IP is not built-in to the computer.
❏ When the computer’s IP address is incorrect.
❏ When there is no DHCP server and the Epson Device Admin is set to acquire an address from the DHCP server.
Check the computer status, built-in TCP/IP, and set the IP address.
Not Ready is displayed as the IP address on the device list.
Solution 1) You can set up a network interface even if IP address is not displayed. In this case, MAC address is used to specify thedevice. You can check the MAC address by printing a status sheet or from the printer's control panel. See the product’sdocumentation for details.The IP address is displayed correctly when a network interface is configured.
Solution 2) Go to Devices - Options. Set the discovery conditions, and then click Discovery.U “Discovery condition settings” on page 31
Solution 3) Go to Options - Startup. Set the Discovering and rebooting timeout (10-180) to a larger value. However, discoveringmay take some time when a large value is set. U “Operation Settings” on page 23
Epson Device Admin User Guide Win
Troubleshooting
123

IP address changes on its own.
Solution 1) Set the Method for Specifying IP Address to Manual on the Basic - TCP/IP screen, and then manually enter the IPaddress.
Solution 2) If you want to set the Method for Specifying IP Address to Automatic and your DHCP server does not supportdynamic DNS, make sure you turn on the devices in the same order every time or keep them turned on.
Devices from other companies are not displayed in the device list, or they are displayed but not enough device information has been acquired.
The SNMP protocol is used to acquire device information in Epson Device Admin.
If you want to discover devices from other companies and acquire their information in Epson Device Admin, theyneed to support the SNMP protocol and be compliant with MIB II (RFC 1213), HostResource MIB (RFC1514), andPrinter MIB (RFC 1759).
Epson Device Admin acquires the device information using these MIBs. If devices from other companies cannotrespond to these MIBs, their information cannot be acquired.
Also, the volume of information acquired from devices from other companies may be less than the informationacquired from the Epson device.
Epson Device Admin User Guide Win
Troubleshooting
124

Appendix
Secondary Device Management Method
SYLK is a secondary method for managing devices and their settings.
Assigning IP address
Epson Device Admin can recognize the Epson devices on the network even when IP addresses have not been assigned.Follow the steps below to assign an IP address.
A Connect devices to the network using an Ethernet cable.
B Discover the devices.
Set the necessary discovery range.
U “Discovering devices” on page 30
C Use the filter feature on the device list to unfilter devices by [IP address].
U “Using filters” on page 82
D Save a SYLK file for making settings.
U “Create a file outlining the settings” on page 131
E Enter IP addresses in the network settings columns in the SYLK file, and then save the file.
F Set IP addresses for the devices using the batch settings feature.
U “Batch Settings” on page 126
Checking for overlapping items
When managing multiple devices, conflicts may occur when replacing devices for settings that are assigned uniquevalues for each device, such as IP addresses.
You can check for overlapping items when reading a SYLK file for device settings. Follow the steps below to findoverlapping IP addresses.
A Select devices in each group, or select all devices, to confirm conflict items from the device list.
Epson Device Admin User Guide Win
Appendix
125

B Save a SYLK file for making settings.
U “Create a file outlining the settings” on page 131
C Apply all SYLK files.
U “Assigning information automatically” on page 126
D When there are items that conflict, the following screen is displayed.
Check the message displayed.
E Search for items that conflict in the SYLK file created in step 2, and then correct the conflicts.
F Apply the SYLK file again.
Batch Settings
Make batch settings for multiple devices by importing a SYLK (*.slk) file.
See the following for details on creating a SYLK file.U “Creating a SYLK file to describe the settings” on page 136
Note:When you select Show Batch Settings button in Options - Customize Ribbon, the Batch Settings button is displayed on theDevice screen ribbon menu.
U “Operation Settings” on page 23
Assigning information automatically
A Select Devices on the side bar task menu.
Epson Device Admin User Guide Win
Appendix
126

B Select the device you want to configure from the device list.
Note:To make multiple selections, press Ctrl or Shift and click your mouse.
C Click Batch Settings on the Home tab on the ribbon menu.
Note:When you select Use batch configuration in Options - Customize Ribbon, the Batch Settings button is displayed onthe Device screen ribbon menu.
U “Operation Settings” on page 23
Epson Device Admin User Guide Win
Appendix
127

D Click Open.
E Select the SYLK file (*.slk) containing the settings, and then click Open.
The settings in the SYLK file are applied to the device.
F Select the devices for which you want to perform batch settings with the Status column set to Unset, and theProcess Status set to Assign Successful.
Note:To make multiple selections, press Ctrl or Shift and click your mouse.
Epson Device Admin User Guide Win
Appendix
128

See the following for detailed information on the Batch Settings screen.
U Epson Device Admin Help "Batch Settings Screen"
G Click Transmit.
Epson Device Admin User Guide Win
Appendix
129

H When the password entry screen is displayed, enter the password, and then click OK.
Transmit the settings.
Note:❏ A progress meter is displayed while the information is transmitted to the network interface. Do not turn off the
device or the wireless adapter, and do not send any data to the device.
❏ See the following to set a password.U “Setting an Administrator Password” on page 55
I Click OK.
J Check the status of the device you set.
For devices that show or , check the contents of the settings file, and that the device has rebootednormally.
See the following for detailed information on the Batch Settings screen.
Epson Device Admin User Guide Win
Appendix
130

U Epson Device Admin Help "Batch Settings Screen"
Assigning information from settings one at a time (Manually assigned)
Create a file describing the IP address, subnet mask, and the default gateway, and select one device at a time to makesettings.
Create a file outlining the settings
A Open a spreadsheet application (such as Microsoft Excel).
B Enter "TCPIP_IPAddressAuto", "TCPIP_IPAddress", "TCPIP_SubnetMask", and "TCPIP_Gateway" in thefirst row as the setting item names.
Enter setting items for the following text strings. To distinguish between upper case/lower case anddouble-byte/single-byte characters, if only one character is different, the item will not be recognized.Enter the setting item name as described below; otherwise, Epson Device Admin cannot recognize the settingitems.
TCPIP_IPAddressAuto TCPIP_IPAddress TCPIP_SubnetMask TCPIP_Gateway
Note:Create a file without MAC address information. Because the MAC address is automatically set as the key for use bydefault, information is assigned automatically when a MAC address is found, and manual assignment cannot beperformed. You can change the automatically assigned keys for use in [Tools] - [Options] - [Auto Assign] - [AutoAssign Key Settings] on the [Batch Settings] screen.
Epson Device Admin User Guide Win
Appendix
131

C Enter the values in each row.
"TCPIP_IPAddressAuto" specifies the setting method for assigning the IP address. If the setting value is "5", thestatic IP address is manually assigned.
TCPIP_IPAddressAuto TCPIP_IPAddress TCPIP_SubnetMask TCPIP_Gateway
5 192.168.100.102 255.255.255.0 192.168.100.101
5 192.168.100.103 255.255.255.0 192.168.100.101
5 192.168.100.104 255.255.255.0 192.168.100.101
D Enter a name and save as a SYLK file (*.slk).
Reading the configuration file and making settings one at a time
A Select [Device] on the side bar task menu.
B Select the device you want to configure from the device list.
Note:To make multiple selections, press Ctrl or Shift and click your mouse.
C Click Batch Settings on the Home tab on the ribbon menu.
Note:When you select Use batch configuration in Options - Customize Ribbon, the Batch Settings button is displayed onthe Device screen ribbon menu.
U “Operation Settings” on page 23
Epson Device Admin User Guide Win
Appendix
132

D Click Open.
Epson Device Admin User Guide Win
Appendix
133

E Select the SYLK file (*.slk) containing the settings, and then click Open.
F Click Display Devices, and then select the device you want to set.
Note:To make multiple selections, press Ctrl or Shift and click your mouse.
Epson Device Admin User Guide Win
Appendix
134

G Click Tools - Manual Assign.
Note:If you discover a device when the file is open or after opening the file, auto assignment is performed. If the targetsetting information has already been assigned to other devices, setting information is not displayed on the Manuallyassign setting information screen. Release the assignments from Tools - Release Assign.
H Select the setting information line you want to assign, and then click OK.
Epson Device Admin User Guide Win
Appendix
135

I Check that Unset is displayed in the Status column and Assign Successful is displayed in the Process Statuscolumn.
J Click Transmit, and then click OK.
Creating a SYLK file to describe the settings
You can create a SYLK file to describe information for performing batch settings. You can create a SYLK file using oneof the following methods.
Creating a SYLK file by acquiring information from the connected device
A Select Devices on the side bar task menu.
B Select the device you want to configure from the device list.
Note:To make multiple selections, press Ctrl or Shift and click your mouse.
Epson Device Admin User Guide Win
Appendix
136

C Click Batch Settings on the Home tab on the ribbon menu.
Note:When you select Use batch configuration in Options - Customize Ribbon, the Batch Settings button is displayed onthe Device screen ribbon menu.
U “Operation Settings” on page 23
Epson Device Admin User Guide Win
Appendix
137

D Click File - Save as.
E Enter the file name and select the target folder, and then click Save.
A backup file (*.slk) containing the current settings for all devices is created.
F Open the saved SYLK file in a spreadsheet application (such as Microsoft Excel) or in a text editor.
Setting information is entered in each row. Each row contains the settings for each individual device.Explanations for the setting items is provided on the following page.U “Setting items for the SYLK file” on page 145
Epson Device Admin User Guide Win
Appendix
138

G You can change settings or add a new row and enter setting information for a new device, and then save thefile.
Note:Security items, such as passwords, or read-only items are not output. When making a batch change to theAdministrator Password, add an "AdminNewPassword" column to the SYLK file, and then enter the new password.Also, if you want to automatically authorize the new password (without having to enter a password confirmation),add a column called "AdminCurrentPassword".
Creating a SYLK file based on a template
This section explains how to create a SYLK file based on a TCP/IP template.
A Select Devices on the side bar task menu.
B Select the device you want to configure from the device list.
Note:To make multiple selections, press Ctrl or Shift and click your mouse.
Epson Device Admin User Guide Win
Appendix
139

C Click Batch Settings on the Home tab on the ribbon menu.
Note:When you select Use batch configuration in Options - Customize Ribbon, the Batch Settings button is displayed onthe Device screen ribbon menu.
U “Operation Settings” on page 23
D Click File - Save Template File - TCP/IP settings.
Epson Device Admin User Guide Win
Appendix
140

E Enter the file name and select the target folder, and then click Save.
A SYLK file (*.slk) containing the TCP/IP related items written is created.
F Open the saved SYLK file in a spreadsheet application (such as Microsoft Excel) or in a text editor.Enter the MAC address and values such as IP address, subnet mask, and default gateway for each row.
See the following for details on each setting item.U “Setting items for the SYLK file” on page 145
Note:If you do not want to set a value, enter "#NULL#".
G Save the file.
Creating a new SYLK file
Using the MAC address and model name as the keys, you can create a new SYLK file to set the IP address.
A Open a spreadsheet application (such as Microsoft Excel).
Epson Device Admin User Guide Win
Appendix
141

B Enter "Info_MACAddress", "Info_ModelName", and "TCPIP_IPAddress" in the first row as the setting itemnames.
Enter setting items for the following text strings. To distinguish between upper case/lower case anddouble-byte/single-byte characters, if only one character is different, the item will not be recognized.Enter the setting item name as described below; otherwise, Epson Device Admin cannot recognize the settingitems.
Info_MACAddress Info_ModelName TCPIP_IPAddress
C Enter the MAC address, model name, and IP address for each network interface.
Info_MACAddress Info_ModelName TCPIP_IPAddress
0000XXXX0001 ALC-XXXXX 192.168.100.102
0000XXXX0002 ALC-XXXXX 192.168.100.103
0000XXXX0003 ALC-XXXXX 192.168.100.104
D Enter a name and save as a SYLK file (*.slk).
Backing up device settings
You can backup device settings by using the batch setting function.
Output a device setting value as a SYLK file.
Note:When you select Use batch configuration in Options - Customize Ribbon, the Batch Settings button is displayed on theDevice screen ribbon menu.
U “Operation Settings” on page 23
A Select Devices on the side bar task menu.
B Select the device you want to backup from the device list.
Note:To make multiple selections, press Ctrl or Shift and click your mouse.
Epson Device Admin User Guide Win
Appendix
142

C Click Batch Setting on the Home tab on the ribbon menu.
Epson Device Admin User Guide Win
Appendix
143

Note:Select the devices for which you do not want to create a backup file, and then click Tools - Release Assign. Click Yeswhen the confirmation message is displayed, and the Status column changes to Unassigned.
D Click File - Save as.
Epson Device Admin User Guide Win
Appendix
144

E Enter the file name and select the target folder, and then click Save.
A backup file (*.slk) containing the selected device settings is created.
Setting items for the SYLK file
This section explains the main settings that can be set in the SYLK file.
Item Description
Info_SerialNumber Displays the serial number of a device.This value is acquired from the device. The device is not affected by changing thevalue.
Info_MACAddress Displays the MAC address of a device.This value is acquired from the device. The device is not affected by changing thevalue.
Info_ModelName Displays the model name of a device.This value is acquired from the device. The device is not affected by changing thevalue.
Info_Software.X.Category (X:1 to 50) Displays information on the device’s software.This value is acquired from the device. The device is not affected by changing thevalue.
Info_Software.X.Name (X:1 to 50) Displays information on the device’s software.This value is acquired from the device. The device is not affected by changing thevalue.
Info_Software.X.Version (X:1 to 50) Displays information on the device’s software.This value is acquired from the device. The device is not affected by changing thevalue.
Info_Software.X.Vendor (X:1 to 50) Displays information on the device’s software.This value is acquired from the device. The device is not affected by changing thevalue.
Epson Device Admin User Guide Win
Appendix
145

Info_CommonDevice Enter a device name to use as a common protocol.Enter between 2 and 15 characters using A-Z, a-z, 0-9, and hyphens (-). You can onlyuse letters for the first character. You cannot use a hyphen for the final character.
You cannot use the following operations and values.
❏ Automatically acquiring DNS host name
❏ Exceeding 251 characters for the host name or the domain name.
Info_CommonLocation Enter information to identify the device. For example, where the device is located. Thenumber of characters you can enter varies depending on the product.
TCPIP_IPAddressAuto Specify whether the IP address is set manually or automatically.
1: Auto5: Manual
TCPIP_IPType_BOOTP Specify whether you want to set the IP address automatically with BOOTP.When TCPIP_IPAddressAuto is set to 5: Manual, this value is fixed at 0: OFF.
1: ON0: OFF
TCPIP_IPType_RARP Specify whether you want to set the IP address automatically with RARP.When TCPIP_IPAddressAuto is set to 5: Manual, this value is fixed at 0: OFF.
1: ON0: OFF
TCPIP_IPType_APIPA Specify whether you want to set the IP address automatically with APIPA.When TCPIP_IPAddressAuto is set to 5: Manual, this value is fixed at 0: OFF.
1: ON0: OFF
TCPIP_IPType_PING Specify whether you want to set the IP address automatically with PING.When TCPIP_IPAddressAuto is set to 5: Manual, this value is fixed at 0: OFF.
1: ON0: OFF
TCPIP_IPAddress Specify the IP address in IPv4 format.
You cannot use the following addresses.0.0.0.0255.255.255.255127.0.0.1224.0.0.0 to 239.255.255.255
TCPIP_SubnetMask Specify the subnet mask in IPv4 format.
You cannot use the following addresses.0.0.0.0255.255.255.255
TCPIP_Gateway Specify the default gateway in IPv4 format.
You cannot use the following addresses.255.255.255.255224.0.0.0 to 239.255.255.255
TCPIP_DNS_AddressAuto Specify whether you want to obtain the DNS server address manually orautomatically.
When TCPIP_IPAddressAuto is set to 5: Manual, this value is fixed at 0: Manual.0: Manual1: Auto
Epson Device Admin User Guide Win
Appendix
146

TCPIP_DNS_Server.1 toTCPIP_DNS_Server.N
Specify 1 to N as the number of DNS server addresses that can be registered to thedevice in IPv4 format.
You cannot use the following addresses.255.255.255.2550.0.0.0
TCPIP_DNS_HostDomainAuto Specify whether you want to obtain the DNS host name and domain name manuallyor automatically.When TCPIP_IPAddressAuto is set to 5: Manual, this value is fixed at 0: Manual.
0: Manual1: Auto
TCPIP_DNS_HostAuto Specify whether you want to obtain the DNS host name and domain name manuallyor automatically.When TCPIP_IPAddressAuto is set to 5: Manual, this value is fixed at 0: Manual.
0: Manual1: Auto
TCPIP_DNS_DomainAuto Specify whether you want to obtain the DNS host name manually or automatically.When TCPIP_IPAddressAuto is set to 5: Manual, this value is fixed at 0: Manual.
0: Manual1: Auto
TCPIP_DNS_HostName Enter a DNS host name.Enter between 2 and 63 characters using A-Z, a-z, 0-9, hyphens (-), and dots (.). You canonly use letters for the first character. You cannot use a hyphen or a dot for the finalcharacter.This value is invalid if the total number of characters of the host name and the domainname exceeds 251.
TCPIP_DNS_DomainName Enter a DNS name.Enter between 2 and 249 characters using A-Z, a-z, 0-9, hyphens (-), and dots (.). Youcan only use letters for the first character. You cannot use a hyphen or a dot for the finalcharacter.
You cannot use the following values.
❏ Using more than one dot in a row (for example ..)
❏ Exceeding 251 characters for the host name or the domain name.
TCPIP_DNS_DNSRegist Specify whether you want to register the network interface address for the DNS server.
0: Do not register1: Register
TCPIP_DNS_DirectRegist Specify how to register the network interface address to the DNS server.
0: Relay the DHCP1: Register directly
TCPIP_EnableBonjour Specify whether to use Bonjour.
0: Disable1: Enable
TCPIP_BonjourName Specify the Bonjour name.Enter between 2 and 53 characters using A-Z, a-z, 0-9, and hyphens (-). You can onlyuse letters for the first character. You cannot use a hyphen for the final character.
TCPIP_BonjourPrinterName Specify the Bonjour service or Bonjour printer name.Enter between 1 and 41 characters using A-Z a-z 0-9 !"#$%&'()*+,-./:;<=>?@[\]^_`{|}~and space.
Epson Device Admin User Guide Win
Appendix
147

EnableMSNet Specify whether to use Microsoft network shared printing.
0: Disable1: Enable
MSNet_HostName Specify the host name of an MS Network.Enter between 1 and 15 characters using A-Z a-z 0-9 !#$@%&;'()-.^_{}~ and space.
MSNet_WorkGroupName Specify the Workgroup name of an MS Network or domain name.Enter between 1 and 15 characters using A-Z a-z 0-9 !#$@%&;'()-.^_{}~ and space.
EnableAppleTalk Specify whether to use AppleTalk.
0: Disable1: Enable
NetIF_EnableTimeServer Specify whether to use the time server.
0: Do not use1: Use
NetIF_TimeServer Specify the address of the time server.The format you can enter varies depending on the server.
NetIF_TimeServerInterval Specify the interval for updating the time server information in seconds.Enter a value between 1 and 1440 in integral numbers.
NetIF_TimeServerStatus Displays the communication status of the time server.This value is acquired from the device. The device is not affected by changing thevalue.
USB_HostIF Specify whether to use the USB host I/F.
3: On4: Off
USB_IF Specify whether to use the USB I/F.
3: On4: Off
Admin_UserName Specify the administrator name for the device.Enter an administrator name between 1 and 255 characters except for ASCII controlcode.
Admin_PanelLock Specify whether to enable panel operations.
3: Enable4: Disable
AdminCurrentPassword Enter the current password when you want to change the administrator passwordusing automatic authentication.
AdminNewPassword Specify an administrator password of the device.Enter between 1 and 20 characters using A-Z a-z 0-9 !"#$%&'()*+,-./{|}~ and space.When an administrator password is set for device, you need to enter the currentpassword.
NICResetCmd Reset device settings to their defaults.
True: Reset device settings to factory defaults
Note:Available items vary depending on the device. #NULL# is entered for setting items that are not supported.
Epson Device Admin User Guide Win
Appendix
148

Copyright and Trademarks
❏ EPSON is a registered trademark, and EPSON EXCEED YOUR VISION or EXCEED YOUR VISION is atrademark of Seiko Epson Corporation.
❏ Microsoft, Windows, and Windows Vista are registered trademarks of Microsoft Corporation.
❏ General Notice: Other product names used herein are for identification purposes only and may be trademarks oftheir respective owners. Epson disclaims any and all rights in those marks.
© Seiko Epson Corporation 2017. All rights reserved.
Notices
❏ Reproduction of information in this manual is prohibited.
❏ All information in this manual is subject to change without notice.
❏ If you find inaccuracies or have concerns about this manual, contact Epson.
❏ Notwithstanding the preceding article, Epson cannot be held responsible for any effects resulting from the use ofthe product.
❏ Epson cannot be held responsible for any failures caused by the improper use of the product and the improperrepair of the product by a third party.
Epson Device Admin User Guide Win
Appendix
149