
Use Requisitions in SWIFT User Guide -...
143
ePRO eProcurement: Use Requisitions in SWIFT User Guide December 8, 2017 Version #1 Minnesota Management & Budget Copyright 2017 All Rights Reserved For updates to this and other training information, please see the SWIFT web pages at http://www.mn.gov/mmb/accounting/swift/
Transcript of Use Requisitions in SWIFT User Guide -...

ePRO
eProcurement: Use Requisitions in SWIFT
User Guide
December 8, 2017
Version #1Minnesota Management & Budget
Copyright 2017 All Rights Reserved
For updates to this and other training information, please see the SWIFT web pages at http://www.mn.gov/mmb/accounting/swift/

ePRO – Use Requisitions in SWIFT
Released December 8, 2017 (Version #1)Page ii
ePro - Use Requisitions in SWIFT To jump to an area within the User Guide, click on the topic in the Table of Contents. (Normal)
Table of Contents Course Overview 1
Purchasing Overview..........................................................................................................................2
Purchasing Stages.............................................................................................................................3
Requisition Document Types..............................................................................................................4
Course Lessons..................................................................................................................................4
Lesson 1: Create Open Market Requisitions (OMR)5
Lesson Overview................................................................................................................................5
Process Steps to Create an Open Market Requisition.......................................................................6
Process Steps to Create an OMR with an Item ID...........................................................................13
Process Steps to Create an Event from an Open Market Requisition.............................................19
Lesson 2: Create Contract Encumbering Orders (CEO) 22
Lesson Overview..............................................................................................................................22
Process Steps to Create a Contract Encumbering Order (CEO) Requisition..................................23
Process Steps to Tie the CEO Requisition to the Contract..............................................................30
Process Steps to Convert the CEO Requisition into a CEO Purchase Order..................................34
Lesson 3: Create Inventory Requisitions 40
Lesson Overview..............................................................................................................................40
Process Steps to Create an Inventory Requisition...........................................................................41
Process Steps to Review an Inventory Requisition for Possible Backorders...................................46
Lesson 4: Manage Requisitions50
Lesson Overview..............................................................................................................................50
Cancel a Partially Dispatched Requisition Line 51
Steps to cancel a requisition line......................................................................................................51
Cancel a Requisition in SWIFT54
Steps to Cancel a Requisition in SWIFT..........................................................................................54
Change Funding on a Requisition 56
Released December 8, 2017 (Version #1)Page

ePRO – Use Requisitions in SWIFT
Steps to Change Funding on a Requisition......................................................................................56
Create a New Requisition by Copying an Existing Requisition 58
Steps to create a new requisition by copying from an existing requisition.......................................58
Create and Use an Inventory Requisition Template in SWIFT 65
Create a Template for Inventory Requisitions..................................................................................65
Use a Template to Create Inventory Requisitions............................................................................68
Edit an Inventory Requisition Template in SWIFT 71
Steps to Delete a Line or Change the Quantity on a Line on a Template for Inventory Requisitions..........................................................................................................................................................71
Steps to Add a Line on an Existing Template for Inventory Requisitions.........................................73
Edit a CEO or OMR Requisition in SWIFT 76
Steps to edit a CEO or OMR requisition...........................................................................................76
Edit an Inventory Requisition 82
Steps to Edit an Inventory Requisition..............................................................................................82
Find and Use Category Codes 85
Use the Category Code Search Tool................................................................................................86
Run a Query 88
Steps to Run Queries.......................................................................................................................88
Update the Billing Location on a Requisition 91
Billing Location Error Messages on Requisitions.............................................................................91
Course Summary 94
Appendix A: Key Terms for Using Requisitions 95
Appendix B: Status Field Descriptions 103
Released December 8, 2017 (Version #1)Page ii

ePRO – Use Requisitions in SWIFT
ePro - Use Requisitions in SWIFT
Course Overview
The Use Requisitions in SWIFT (ePRO) user guide provides an overview of the eProcurement module in SWIFT.
The State of Minnesota uses SWIFT for officially managing its financial transactions. SWIFT’s eProcurement module (or ePRO) helps agencies to manage pre-encumbrances. A pre-encumbrance is the amount that you expect to spend, but which you have no legal obligation to spend. A requisition is a typical pre-encumbrance transaction. A requisition in SWIFT is an online form for requesting items or services.
A requisition is a document that agencies complete to notify their purchasing staff about items or services it needs to purchase.
It includes the amount, quantity and the timeframe for the purchase. Typically, a requisition initiates the purchasing process. It also contains authorization to proceed with the purchase. A requisition is typically a pre-encumbrance transaction.
In SWIFT, agencies can source the requisition to a purchase order, event or inventory transaction.
SWIFT does not process approvals through ePro. SWIFT routes approved requisitions to one of the following modules.
1. Purchase Order: A purchase order in SWIFT’s Purchasing module. SWIFT dispatches the final, approved purchase order to the supplier who fulfills the order by providing the requested good or service.
2. Event: A sourcing event (also called a solicitation) in SWIFT’s Strategic Sourcing module.3. Stock Request: A material stock request in SWIFT’s Inventory module where warehouse personnel can
fulfill the order. Currently only a few agencies use this feature.
Use requisitions for Open Market Requisitions (OMR), Real Estate Remodeling (RMO) or Construction Contract Encumbering Orders (CEO). Agencies using SWIFT’s Inventory module also use ePro requisitions when drawing from their inventoried items.
Target audience for this course: Agency buyers, contract coordinators, and agency heads with SWIFT approval authority. This course is focused on creating requisitions in SWIFT.
How to use this user guide: This guide is set up as a reference to help buyers easily find information about creating and managing requisitions in SWIFT. Buyers do not need every field described here. Check with your agency about policies and practices for creating and managing inventory orders and pre-encumbrances in SWIFT, as well as security access for this module.
Released December 8, 2017 (Version #1)Page 1

ePRO – Use Requisitions in SWIFT
Purchasing Overview
Purchasing is the process that enables State agencies to procure goods or services. State agencies record and track financial transactions in SWIFT. SWIFT incorporates all of the administrative functions across state agencies, including financial, procurement, reporting and the current SEMA4 (human resources/payroll) system. Purchasing is an expense account in SWIFT’s general ledger (GL). This account documents what the State of Minnesota agencies have encumbered for purchases of goods or services.
Purchasing refers to the SWIFT system used to enter requisitions, regular purchase orders, and contract purchase orders into a shared system. SWIFT assigns a unique system-generated ID number to each requisition, purchase order, receipt and voucher to provide tracking through each of the stages of the purchasing life cycle.
The Purchasing module in SWIFT is not the same as procurement. Minnesota's Office of State Procurement (OSP) facilitates the procurement of goods and services for the State of Minnesota and other governmental entities. OSP concentrates on the bid solicitation process, term contracts, acquisitions, etc.
There is a high level of integration between purchasing and all of the other SWIFT modules.
Released December 8, 2017 (Version #1)Page 2

ePRO – Use Requisitions in SWIFT
Purchasing Stages
1. AGENYStage 1: State Agency: When purchases are over a certain amount, state statute requires that the funds be pre-encumbered and a strategic sourcing event occurs. The SWIFT Strategic Sourcing module enables state agencies to solicit bids and proposals from outside vendors. This online process is called an event. To pre-encumber the funds, agencies need to create, approve and budget check a requisition. This process creates the pre-encumbrance balance and holds the funds in a budget. SWIFT forwards the approved requisition to purchasing staff, who copy it into the Strategic Sourcing event and put it out for formal bid.
Stage 2: Purchasing: Once the event has closed, staff, usually a buyer, in the purchasing department of that agency will gather all the bids submitted and determine the winning bidder.
Stage 3: Receiving: It most cases, state statute requires documentation such as an invoice that the agency receives the good or services (either partially or fully). In SWIFT, a receipt tracks the quantity or amount received against a purchase order. The encumbered purchase order, a SWIFT receipt and a valid invoice are usually required to allow payment to the vendor.
Stage 4: Accounts Payable: Accounts Payable staff create a voucher, or electronic invoice, for all or part of this procurement. SWIFT matches the voucher against the purchase order and/or receipt (if there is one) and runs the budget check process. SWIFT relieves any pre-encumbrance remaining on the requisition and records a journal entry that checks the expenditure against the budget. SWIFT sends a payment to the vendor.
Released December 8, 2017 (Version #1)Page 3

ePRO – Use Requisitions in SWIFT
Requisition Document Types
SWIFT routes requisitions depending upon the type of purchase request. Document types are the mechanism to determine how SWIFT routes them.
Doc Type Title Description
OMR Open Market Requisition
Normally used for items costing over $10,000 and need to be bid out via a Strategic Sourcing event. Goes through the SWIFT solicitation process, resulting in a Purchase Order (POR). OMRs will be entered in ePro and will be further processed through Strategic Sourcing by MMD or the agency (depending on their ALP authority).
CEO Contract Encumbering Order
Pre-encumbers funds; does not print. Can be used to set up an estimated amount of money for Building Construction (BCC), Other Construction (OCC) or Roadway Construction (RWC) contracts. Upon award of the contract the CEO requisition is tied to the contract, a CEO order encumbrance is created and the CEO requisition pre-encumbrance balance is relieved.
“Blank” Inventory Agencies can use SWIFT’s eProcurement module to manage the items they keep in stock in a warehouse. After the requestor creates the inventory requisition, SWIFT creates a material stock request to order inventory from the warehouse through SWIFT. Warehouse staff receive the material stock request after the daily batch processing. Then, they fulfill the orders and send the materials to where they are needed.
Course Lessons
The Lessons in the ePRO Use Requisitions in SWIFT course include:
1. Create Open Market Requisitions (OMR)
2. Create Contract Encumbering Orders (CEO)
3. Create Inventory Requisitions
4. Manage Requisitions
Released December 8, 2017 (Version #1)Page 4

ePRO – Use Requisitions in SWIFT
Lesson 1: Create Open Market Requisitions (OMR)
Lesson Overview
A requisition is a typical pre-encumbrance transaction. A requisition in SWIFT is an online form for requesting items or services.
Agencies typically use Open Market Requisitions (OMR) for items that cost over $10,000.00 and need to be bid out. The solicitation process results in a purchase order. Enter the requisition in SWIFT’s ePro module. Process it either through your agency or through the Office of State Procurement. The agency processes the events when its staff have the appropriate Authority for Local Purchase.
SWIFT provides two pages to create and manage Open Market Requisitions.
1. Create Requisition Page Create OMRs using the Create Requisition page.
2. Manage Requisition Page:
The Manage Requisition page provides you with the ability to review, edit, approve or cancel requisitions.
You can view requisitions in any status. You can only edit active requisitions that have not been sourced and do not have a status of Complete
or Canceled. IMPORTANT: Make sure you enter the correct ChartField information on the requisition. It is difficult to
update ChartField information on the purchase order created from the requisition.
After completing this lesson, you should be able to:
Create an Open Market Requisition (OMR)
Create an Open Market Requisition with an Item ID
Create an Event from an Open Market Requisition
Released December 8, 2017 (Version #1)Page 5

ePRO – Use Requisitions in SWIFT
Process Steps to Create an Open Market Requisition Step 1: Define the Requisition.
Step 2: Add Items and Services.
Step 3: Review and Submit the Requisition.
Step 4: Save and Submit the Requisition.
Step 1: Define the Requisition.
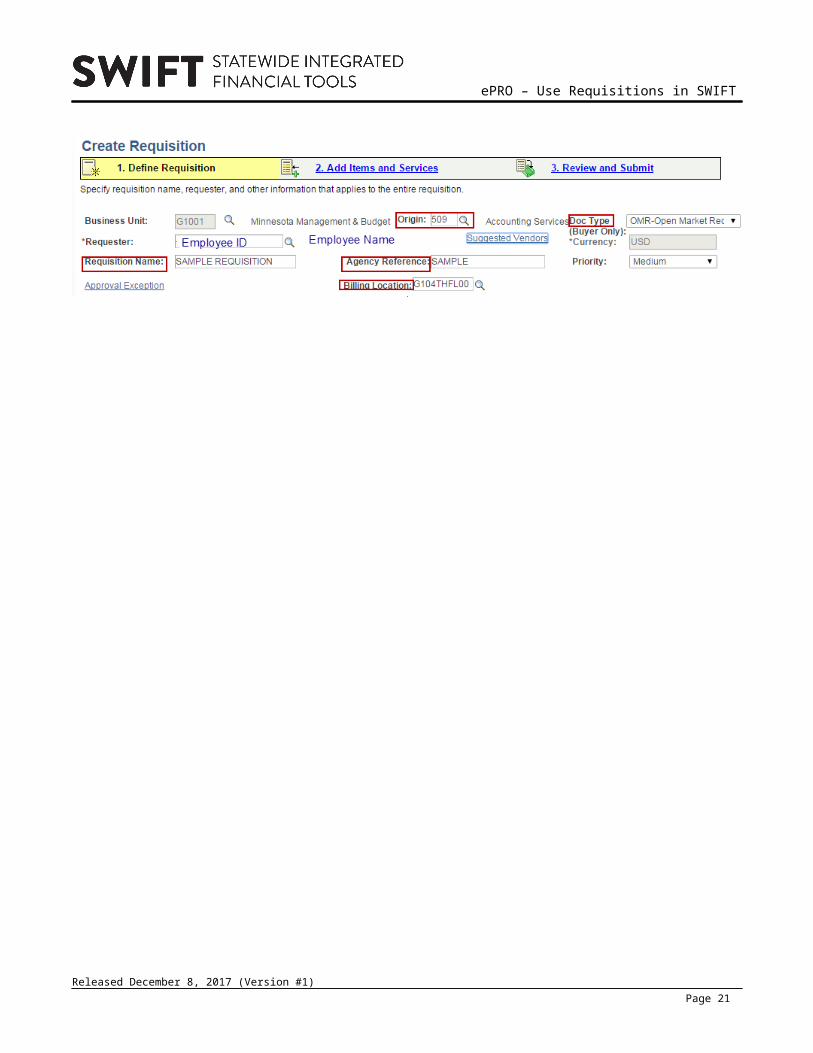
1. Navigation: eProcurement, Create Requisition
On the Create Requisition page 1. Define Requisition tab, enter the following fields on the header.
Fields on the header of the requisition. Required fields are marked with an asterisk (*).
Field Name Field Description
* Business Unit: Validate the default or enter a business unit.
* Requester Defaults to the person entering the Requisition. Can be changed.
* Requisition name Create a name that follows your agency’s policies (e.g., description of item including area of Minnesota)
* Origin This code represents which division, area or unit in the business unit that originated this requisition.
Agency Reference This optional field allows agencies to add additional information to the requisition. SWIFT carries it over to the purchase order and print versions.
* Billing Location Where vendors send their invoices for the business unit.
* Doc Type Select one of these values. OMR: Open Market Requisition CEO: Contract Encumbering Order Blank: Inventory Requisition
Released December 8, 2017 (Version #1)Page 6

ePRO – Use Requisitions in SWIFT
Released December 8, 2017 (Version #1)Page 7

ePRO – Use Requisitions in SWIFT
Expand the Line Details section. Enter the following fields as needed. You can enter shipping and accounting information here. SWIFT will default shipping and accounting information entered to all lines on the requisition. You can change them individually as needed.
You have two options to enter information into the requisitions line(s).
(1) Accept the defaults: Selecting “Default” will apply any defaulted values into any blank fields from the Line Defaults section to all lines of the requisition. It will not override values that already exist. This option may be helpful with requisitions with multiple lines.
Defaults on the Line Details section of the requisition.
Default Name Default Description
Shipping Defaults The Ship To value is required. Enter it here. Add the Due Date as needed Update the Attention field as needed.
Account Defaults Charfield1 Tab: The ChartFields values are required. Enter the Fund, Fin DeptID and Approp ID.
Details Tab: Confirm or update the Budget Date. Asset Information Tab: Do not enter asset information here. Enter it
on the purchase order.
(2) Manually enter the information. On the Shipping Default section, enter the Ship To address for your Business Unit. The Ship To is the
location where the goods are delivered. You can also enter the Due Date as needed. On the Accounting Defaults section, enter the Fund, Fin Dept ID and AppropID.
IMPORTANT: Make sure you enter the correct Chartfield information on the requisition. It is difficult to update Chartfield information on the purchase order created from the requisition.
Fields on the Line Defaults section of the requisition
Field Name Field Description
AppropID An appropriation ID is a 7-character alphanumeric identifier. It indicates a single appropriation account that controls the total amount of an agency’s expenditures. An appropriation is an account of any governmental agency that receives credit for the purchase. It legally authorizes spending or the collection of receipts as specified in session laws or state statutes.
Due Date The date the items are scheduled to arrive at the Ship To location.
Fin DeptID An 8-character alphanumeric identifier (Financial Department Identifier) represents the organizational function to which revenues and other activities must be applied.
Fund Assures that dollars are used to meet specific activities in Accordance with legislative intent, special regulations, restrictions and limitations. Fund examples include 1000 (General Fund; 2000 (Restricted Misc. Special Revenue); 3000 (Federal).
Ship To The Ship To is the location where the goods are delivered. The Ship To has tax implications.
Released December 8, 2017 (Version #1)Page 8

ePRO – Use Requisitions in SWIFT
When you have entered information, scroll to the bottom of the page. Click the Continue button.
Step 2: Add Items and Services.
1. Click on the Special Request tab. Select the Special Item link.
Released December 8, 2017 (Version #1)Page 9
ePRO – Use Requisitions in SWIFT
2. Enter the Item Description, Price, Quantity, Category and Unit of Measure.
The remaining fields are optional in SWIFT. Enter information in them as needed. You cannot edit the Price once you save the requisition. The Account in the ChartFields will default based on the Category chosen. You can update the Account
as needed as long as it aligns with the Category.
Fields on the Special Item section. Required fields are marked with an asterisk (*).
Field Name Field Description
* Item Description An item is the commodity or article to purchase. This field is used for items not in SWIFT’s Inventory module. Provide a brief description of the item.
* Price The anticipated cost of the item. Once you save the requisition, you cannot change the Price.
* Quantity The number of items to purchase.
* Category This is a grouping of similar goods or services for reporting purposes and spending analysis. It is represented by the United Nations Standard Products and Services Code (UNSPSC) in SWIFT.
* Unit of Measure How the item is measured.
3. If needed, click the Add Item button to add another line to the requisition.
Released December 8, 2017 (Version #1)Page 10

ePRO – Use Requisitions in SWIFT
4. Repeat to add as many lines as required.
The Requisition Summary at the top right of the page displays all items that you added.
NOTE: If you are creating a requisition using an Inventory Item ID, please refer to the Create an Open Market Requisition with an Item ID Reference Guide. http://mn.gov/mmb/accounting/swift/training-support/reference-guides/index.jsp
Step 3. Review and Submit the Requisition. Click on the 3. Review and Submit tab at the top of the requisition page.
1. Add, review or change information on this page.
On the header, you can update the Requester, Origin and Requisition Name.
2. To update a requisition line: Expand the requisition line. Click on the Expand Section icon (small triangle to the left of the checkbox on the line. Update the requisition as needed.
Released December 8, 2017 (Version #1)Page 11

ePRO – Use Requisitions in SWIFT
3. To update all lines: Click on the box on each line or click the Select All button. Then click on the Modify Line/Shipping/Accounting button.
4. On the Modify Line/Shipping/Account page, update values as need. Click the Apply button.
Step 4: Save and Submit the Requisition. 1. At the bottom on the requisition, click on the Save and Submit button.
If you changed any defaulted values on the requisition, SWIFT will display the Distribution Change Options page. Keep the default of All Distribution Lines. Click OK.
SWIFT will display a Confirmation page displaying the Requisition ID.
Released December 8, 2017 (Version #1)Page 12

ePRO – Use Requisitions in SWIFT
2. Click the Check Budget button.
The Budget Status will show as “Valid” on the Confirmation page if the budget check is successful.
If the Budget Status does not show as “Valid”, click the Edit Requisition button to return to the requisition. Correct the errors and save. Click the Check Budget button to run budget check.
3. When the requisition is in an “Approved” status and a Budget Status of “Valid”, process the OMR through the Strategic Sourcing process.
You have successfully created an Open Market Requisition.
Released December 8, 2017 (Version #1)Page 13

ePRO – Use Requisitions in SWIFT
Process Steps to Create an OMR with an Item IDCreating an Open Market Requisition (OMR) for materials that have an Item ID for use on a Strategic Sourcing Event requires additional information. You will need to make sure that there is a starting price loaded into SWIFT. You will also need to create an event from this requisition.
Step 1: Update the Item ID with the Per Unit Price.
Step 2: Define the Requisition using the Item ID.
Step 3: Add Items and Services.
Step 4: Review and Submit the Requisition.
Step 5: Save and Submit the Requisition.
Step 1: Update the Item ID with the Per Unit Price.
The Item ID to be used on a requisition needs to have a starting price loaded into SWIFT. This price allows SWIFT to create a pre-encumbrance. Contact the SWIFT Help Desk with the required Item ID’s and per unit price. They will ensure that the SWIFT information is updated.
Contact the SWIFT Help Desk: Email: [email protected]
Phone: 651-201-8100, option 2
Step 2: Define the Requisition using the Item ID. Once the Item ID has been updated, create an Open Market Requisition using the Item ID.
Navigation: eProcurement, Create Requisition
1. On the Create Requisition page 1. Define Requisition tab, enter the following fields.
Business Unit: Validate the default or enter a business unit. Requester: Defaults to the person entering the Requisition, but can be changed. Requisition Name: Create a name. Origin: This code represents which division, area or business unit that originated this requisition. Agency Reference: Carries over to the purchase order and prints on it. Billing Location: Where invoices are sent for this business unit. Doc Type: OMR
Released December 8, 2017 (Version #1)Page 14

ePRO – Use Requisitions in SWIFT
2. Expand the Line Defaults section. You can enter shipping and accounting information here. Entering the values in Line Defaults section and selecting the “Override” Default Option will populate those values on each line of the requisition. Or you can enter them manually on the Review and Submit page of the requisition.
Enter the following fields as needed.
o Default Options: Selecting “Default” will apply any defaulted values into any blank fields from the Line
Defaults section to all lines of the requisition. It will not override values that already exist.
Selecting “Override” will override any defaulted values with the values entered in the Line Defaults to all lines of the requisition. NOTE: This option may be helpful with requisitions with multiple lines.
o Shipping Defaults: The Ship To value is required. You can also add the Due Date and Attention fields as needed.
o Accounting Defaults: The ChartFields values are required.
o You can also add the Details as needed by your agency.
o Do not add asset information on the requisition. Enter it on the purchase order.
3. Click the Continue button when you are done with the Define Requisition page.
Released December 8, 2017 (Version #1)Page 15

ePRO – Use Requisitions in SWIFT
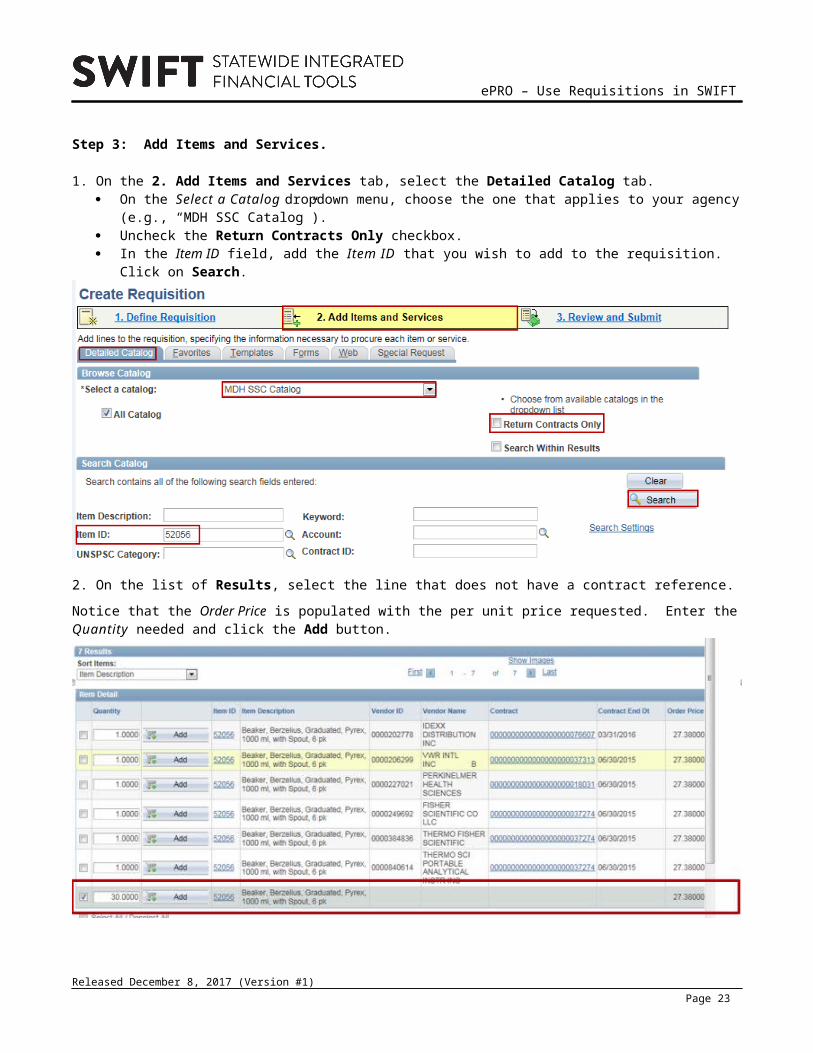
Step 3: Add Items and Services.
1. On the 2. Add Items and Services tab, select the Detailed Catalog tab. On the Select a Catalog dropdown menu, choose the one that applies to your agency (e.g., “MDH SSC
Catalog”). Uncheck the Return Contracts Only checkbox. In the Item ID field, add the Item ID that you wish to add to the requisition. Click on Search.
2. On the list of Results, select the line that does not have a contract reference.
Notice that the Order Price is populated with the per unit price requested. Enter the Quantity needed and click the Add button.
Released December 8, 2017 (Version #1)Page 16
ePRO – Use Requisitions in SWIFT
The Requisition Summary at the top of the page shows the line you added.
3. Repeat the steps above for each Item ID to be added to the requisition.
4. Once you have completed adding all the required items, click the 3. Review and Submit tab at the top of the page.
Step 4: Review and Submit the Requisition. 1. On the 3. Review and Submit tab, you can add, review or change information.
On the header, you can update the Requester, Origin and Requisition Name.
2. On the Requisition Lines section, click on the Expand icon to open the line.
Make sure to select the appropriate Ship To for the Inventory Center. Click on the Line Detail icon to open up the Sourcing Controls. This icon is located on the far right of
the requisition lines section. On the Line Details page, open up the Sourcing Controls section. Uncheck the Inventory Source
Flag. Click OK.
Released December 8, 2017 (Version #1)Page 17

ePRO – Use Requisitions in SWIFT
3. Repeat the above steps for each line on the requisition.
Step 5. Save and Submit the Requisition.
1. On the bottom of the 3. Review and Submit page, click the Save and Submit button.
SWIFT displays a confirmation page. Notice the Requisition ID.
2. Click on Check Budget.
After the requisition passes the budget check, the Budget Status is “Valid”. The Status is “Approved”.
Released December 8, 2017 (Version #1)Page 18

ePRO – Use Requisitions in SWIFT
The Pre-Encumbrance Balance is based on the unit price of the item.
This requisition is complete and ready to be copied into a Strategic Sourcing Event.
You have successfully created an Open Market Requisition with an Item ID.
Released December 8, 2017 (Version #1)Page 19

ePRO – Use Requisitions in SWIFT
Process Steps to Create an Event from an Open Market RequisitionWhen agencies wish to purchase a commodity costing over $10,000.00, they typically need to set up a requisition to pre-encumber the funds. Agencies must also bid out these purchases via a Strategic Sourcing Event. If the agency sets up the requisition in SWIFT, it can create the event directly in SWIFT. An Open Market Requisition (OMR) is the process to create the event.
Some factors for creating events from a requisition: You can copy requisition lines into events. If you copy a requisition into an event, the requisition is no
longer available for sourcing in SWIFT. You can copy multiple lines from multiple requisitions into a single SWIFT strategic sourcing event.
SWIFT creates a separate line on the sourcing event for each line copied from the requisition unless the line descriptions are identical. In that case, update each line description to make them each unique or SWIFT will aggregate the identical lines into one line with the total quantity.
SWIFT awards events to purchase orders when you create them from an OMR requisition.
This topic describes the basic steps to create an event from a requisition in SWIFT. Step 1: Summarize the Event/Define Event Basics Step 2: Copy Desired Lines from Requisition. Step 3: Complete Event.
For more information on the following topics, check out these SWIFT guides. Requisitions (ePro):
https://mn.gov/mmb/accounting/swift/training-support/reference-guides/epro.jsp Strategic Sourcing:
https://mn.gov/mmb/accounting/swift/training-support/reference-guides/strategic-sourcing.jsp Supplier Contracts:
https://mn.gov/mmb/accounting/swift/training-support/reference-guides/supplier-contract.jsp
Step 1: Summarize the Event/Define Event Basics
1. Access the Add a New Value page.
Navigation: Sourcing, Create Events, Event Details, Add a New Value.
2. On the Add a New Value page, enter the following information. Click Add.
Business Unit Origin Event ID should remain as “NEXT” Event Format should remain “Buy” Event Type should remain “RFx”
Released December 8, 2017 (Version #1)Page 20

ePRO – Use Requisitions in SWIFT
SWIFT will display the Create an Event page.
3. Enter required information on the Create an Event page.
Complete the Event Summary header information. Procurement Type: Select one of these types that end with “Request for Bid (RFB)”. The most common
type for creating events referencing a requisition is “ALP RFB”. Event Name Description Preview Date/Time Start Date/Time End Date/Time
4. Click Copy From dropdown list. Select “Requisition”. Click Go.
Step 2: Copy Desired Lines from Requisition.
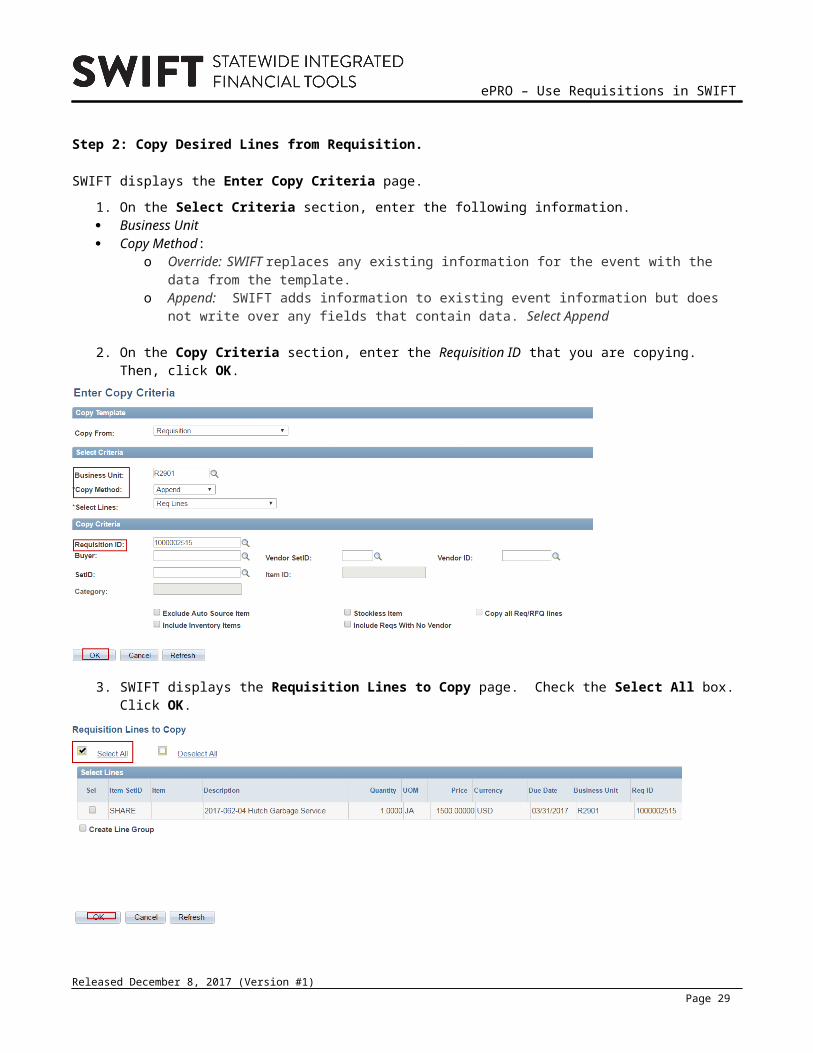
SWIFT displays the Enter Copy Criteria page.
1. On the Select Criteria section, enter the following information. Business Unit Copy Method:
o Override: SWIFT replaces any existing information for the event with the data from the template.o Append: SWIFT adds information to existing event information but does not write over any fields
that contain data. Select Append
Released December 8, 2017 (Version #1)Page 21

ePRO – Use Requisitions in SWIFT
2. On the Copy Criteria section, enter the Requisition ID that you are copying. Then, click OK.
3. SWIFT displays the Requisition Lines to Copy page. Check the Select All box. Click OK.
4. SWIFT displays the Event Line Items page with the lines populated from the requisition lines copied in. Click the Return to Event Overview link.
Step 3: Complete Event.SWIFT displays the Event Summary page. Continue to process the event in SWIFT.
You have successfully created an event from a requisition.
After completing this lesson, you should now be able to: Create an Open Market Requisition (OMR) Create an Open Market Requisition with an Item ID Create an Event from an Open Market Requisition
Released December 8, 2017 (Version #1)Page 22
ePRO – Use Requisitions in SWIFT
Lesson 2: Create Contract Encumbering Orders (CEO)
Lesson Overview
A requisition is a request for purchase that creates a pre-encumbrance transaction. This means that it sets aside the funds for a specific purchase. There is no legal obligation to spend the pre-encumbrance. The requisition is not sent out to vendors. A requisition in SWIFT is an online form for requesting items or services. It uses the eProcurement module. The pre-encumbrance is created through the budget check process in SWIFT.
Agencies typically use Contract Encumbering Order (CEO) requisitions to set up an estimated amount of money for construction projects such as Building Construction (BCC), Other Construction (OCC) or Roadway Construction (RWC) contracts. SWIFT provides the mechanism to convert the CEO requisition into a CEO purchase order which fully encumbers the funds.
Steps to Create a CEO Requisition and Convert it to a CEO Purchase Order
Step 1: Agencies create the CEO requisition in the eProcurement module for a construction project.
Step 2: Agencies determine the vendor, negotiate and award a contract for the project. The agency enters the CEO contract details in the Supplier Contracts module.
Step 3: The agency edits the CEO requisition to add the Contract ID to the requisition line details.
Step 4: The agency uses the Expedite Requisitions process in the eProcurement module to create a CEO purchase order. SWIFT processing relieves the CEO requisition’s pre-encumbrance balance.
After completing this lesson, you should be able to:
Create a Contract Encumbering Order
Tie the CEO Requisition to the Contract
Convert the CEO Requisition into a Purchase Order to Establish the Encumbrance
Released December 8, 2017 (Version #1)Page 23

ePRO – Use Requisitions in SWIFT
Process Steps to Create a Contract Encumbering Order (CEO) Requisition
Step 1: Define the Requisition. Step 2: Add Items and Services. Step 3: Review and Submit the Requisition. Step 4: Save and Submit and Budget Check the Requisition.
Step 1: Define the Requisition.
1. Navigation: eProcurement, Create Requisition
SWIFT displays the Create Requisition page. The Define Requisition section allows you to specify the requisition name, requester and other information that applies to the entire requisition. Adding information here carries throughout the requisition (e.g., ChartFields or Ship To).
On the Create Requisition page 1. Define Requisition tab, enter the following fields on the header.
Fields on the header of the requisition. Required fields are marked with an asterisk (*).
Field Name Field Description
* Business Unit: Validate the default or enter a business unit.
* Requester Defaults to the person entering the requisition. Can be changed.
* Requisition name Create a name that follows your agency’s policies (e.g., description of item including area of Minnesota).
* Origin This code represents which division, area or unit in the business unit that originated this requisition.
Agency Reference This optional field allows agencies to add additional information to the requisition. SWIFT carries it over to the purchase order and print versions.
* Billing Location Where vendors send their invoices for the business unit.
Released December 8, 2017 (Version #1)Page 24
ePRO – Use Requisitions in SWIFT
Field Name Field Description
* Doc Type Select CEO Requisition. OMR: Open Market Requisition CEO: Contract Encumbering Order Blank: Inventory Requisition
Expand the Line Defaults section. Enter shipping and accounting information here. SWIFT will default shipping and accounting information entered to all lines on the requisition. You can change them individually as needed.
2. Enter information on the requisition line(s).
You have three options to enter information into the requisitions line(s).
(1) Accept the defaults: Use the Default radio button:
Selecting “Default” will apply any defaulted values into any blank fields from the Line Defaults section to all lines of the requisition. SWIFT will not override values that already exist. This option may be helpful with requisitions with multiple lines.
(2) Override the defaults: Use the Override radio button:
If you select this option, the defaults specified in the Line Defaults section will override any populated values for these fields. Only non-blank values are assigned. This setting actually changes the values that default in based on user setup.
Defaults on the Line Details section of the requisition.
Default Name Default Description
Shipping Defaults The Ship To value is required. Enter it here. Add the Due Date as needed Update the Attention field as needed.
Account Defaults Charfield1 Tab: The ChartFields values are required. Enter the appropriate ChartField information for your agency.
Details Tab: Confirm or update the Budget Date. Asset Information Tab: Do not enter asset information here.
(3) Manually enter the information. On the Shipping Defaults section, enter the Ship To address for your Business Unit. The Ship To is the
location where the goods are delivered or the service is performed. You can also enter the Due Date as needed.
On the Accounting Defaults section, enter the appropriate ChartField information for your agency.
Released December 8, 2017 (Version #1)Page 25

ePRO – Use Requisitions in SWIFT
IMPORTANT: Make sure you enter the correct ChartField information on the requisition.
When you have entered all of your information, scroll to the bottom of the page. Click the Continue button. SWIFT displays the Add Items and Services page.
Step 2: Add Items and Services.Use the Add Items and Services page to add lines and specify the information needed to procure each item or service. Adding accounting and distribution information here stays at the individual line level not the entire requisition.
1. Click on the Special Request tab. Select the Special Item link.
Released December 8, 2017 (Version #1)Page 26

ePRO – Use Requisitions in SWIFT
2. Enter the Item Description, Price, Quantity, Category and Unit of Measure.
The remaining fields are optional in SWIFT. Enter information in them as needed. The Account in the ChartFields will default based on the Category chosen. You can update the Account
as needed as long as it aligns with the Category.
Fields on the Special Item section. Required fields are marked with an asterisk (*).
Field Name Field Description
* Item Description An item is the commodity or article to purchase. This field is used for items not in SWIFT’s Inventory module. Provide a brief description of the item.
* Price The anticipated cost of the item.
* Quantity The number of items to purchase.
* Category This is a grouping of similar goods or services for reporting purposes and spending analysis. It is represented by the United Nations Standard Products and Services Code (UNSPSC) in SWIFT.
* Unit of Measure How the item is measured.
Released December 8, 2017 (Version #1)Page 27

ePRO – Use Requisitions in SWIFT
3. Click the Add Item button to add a line to the requisition.
The Requisition Summary at the top right of the page displays all items that you added.
4. Repeat to add as many lines as required.
Step 3. Review and Submit the Requisition. 1. Click on the Review and Submit tab at the top of the page.
Use the Review and Submit page to see schedule and distribution information for the requisition. You can also update items that you previously entered on the Define Requisition page.
Add, review or change information on this page. On the header, you can update any field not grayed out.
To update a requisition line: Expand the requisition line. Click on the Expand Section icon (small triangle to the left of the checkbox on the line). Update the requisition as needed.
To update all lines: Click on the box on each line or click the Select All button. Then click on the Modify Line/Shipping/Accounting button.
Released December 8, 2017 (Version #1)Page 28

ePRO – Use Requisitions in SWIFT
2. On the Modify Line/Shipping/Accounting page, update values as need. Click the Apply button.
Step 4: Save and Submit the Requisition. 1. At the bottom on the requisition, click on the Save and Submit button.
If you changed any defaulted values on the requisition, SWIFT will display the Distribution Change Options page. Keep the default of All Distribution Lines. Click OK.
2. SWIFT will display a Confirmation page displaying the Requisition ID. Click the Check Budget button.
Released December 8, 2017 (Version #1)Page 29

ePRO – Use Requisitions in SWIFT
The Budget Status will show as “Valid” on the Confirmation page if the budget check is successful. If the Budget Status does not show as “Valid”, click the Edit Requisition button to return to the requisition. Correct the errors and save. Click the Check Budget button to run budget check.
3. When the requisition is in an “Approved” status and a Budget Status of “Valid”, update the CEO requisition to tie the contract to it.
You have successfully created a CEO Requisition.
Released December 8, 2017 (Version #1)Page 30
ePRO – Use Requisitions in SWIFT
Process Steps to Tie the CEO Requisition to the ContractThe next step in the process is to initiate and process the contract. You will need to enter the contract into SWIFT’s Supplier Contracts module. The contract Status must be “Approved” status.
When your agency has created a contract for the purchase that you pre-encumbered, tie the contract to the requisition in SWIFT. Edit the CEO requisition to create the tie between the requisition and the contract.
Use the Manage Requisition feature. This feature provides you with the ability to review, edit, or cancel requisitions. You can view requisitions in any status. You can only edit active requisitions that have not been sourced to another document and do not have a status of “Complete” or “Canceled”.
Steps to Tie the CEO Requisition to the Contract.
Step 1: Navigate to the Requisition that Needs the Contract Reference.
Step 2: Edit the Requisition to Add the Contract Information.
Step 1: Navigate to the Requisition that Needs the Contract Reference.
Navigation: eProcurement, Manage Requisitions.
1. On the Manage Requisitions page, enter the Business Unit and Requisition ID or another field and click on Search.
SWIFT shows the requisition is returned in the search results.
2. If the requisition Status is “Approved”, select “Edit Requisition” on the Select Action box. Click Go.
SWIFT displays the Edit Requisition page.
Released December 8, 2017 (Version #1)Page 31

ePRO – Use Requisitions in SWIFT
3. On the Edit Requisition page, click the Line Details icon to add the contract information to that line.
4. SWIFT displays the Line Details page. Add Repair Type CD, Work Order, Amount Only and Recycled as needed.
Fields on the Line Details page
Field Name Field Description
Amount Only Allows the user(s) to receive by Amount instead of Quantity. When you convert the requisition to the purchase order, Amount Only forces the purchase order line to “1”. This allows multiple receivers to use this purchase order until the full purchase order amount has been expensed.
Recycled Content The checkbox and associated % recycled field allows you to list if the purchase was made from recycled products and the percent of recycled content.
Repair Type This text field allows you to add optional Repair Type Code information to the requisition.
Released December 8, 2017 (Version #1)Page 32

ePRO – Use Requisitions in SWIFT
Field Name Field Description
Work Order This text field allows you to add optional Work Order information to the requisition.
Step 2: Edit the Requisition to Add the Contract Information. 1. On the Line Details page, open the Contract section. Click on the Contract Search icon.
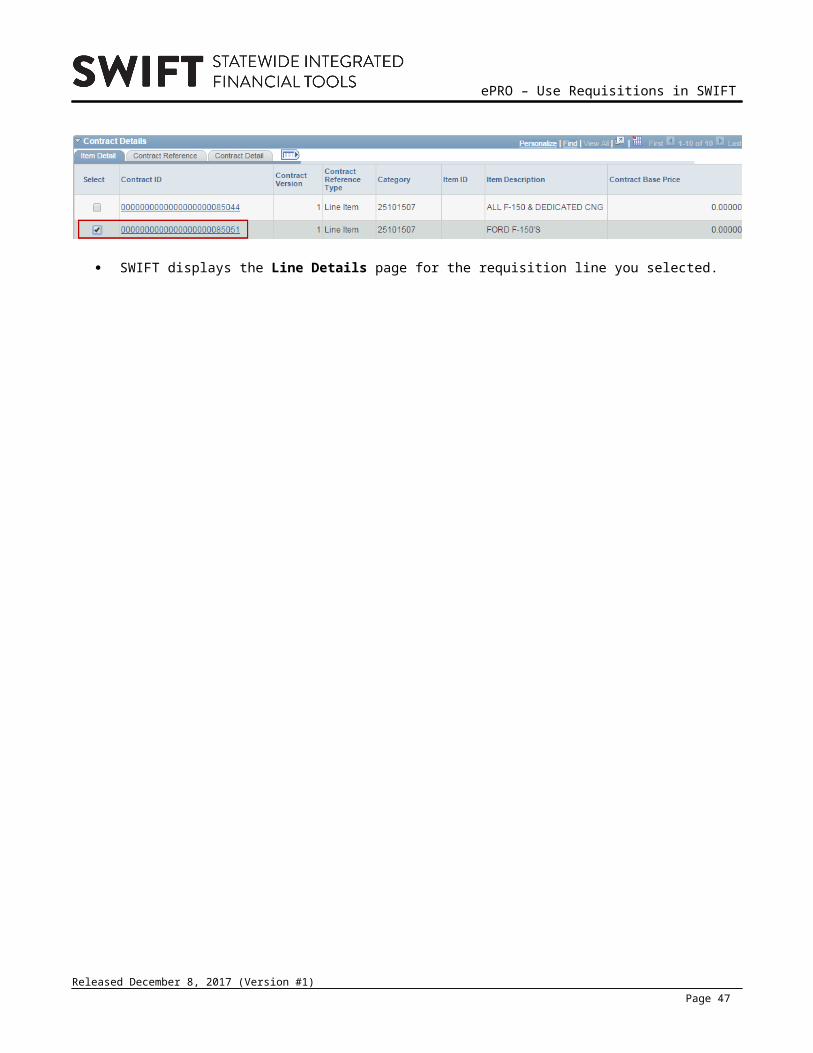
2. On the Contract Search page, enter the Contract ID that needs to be tied to the Requisition. Click on Search.
3. On the Contract Details page, click the Select checkbox next to the line of the desired contract. Click OK at the bottom of the page.
SWIFT displays the Line Details page for the requisition line you selected.
Released December 8, 2017 (Version #1)Page 33

ePRO – Use Requisitions in SWIFT
4. Open up the Contract section. Confirm or add the Contract ID from the contract that was created for this requisition. Scroll to the bottom of the page and select OK.
The Edit Requisition page displays.
5. Update any remaining lines to add contract information following the steps previously described. Click the Save and Submit button to save the updated requisition. The requisition does not need a
second budget check.
SWIFT presents a confirmation page. The Status is “Approved” and the Budget Status is “Valid”.
You are ready to expedite or process the CEO purchase order.
You have successfully tied the CEO requisition to the contract.
6. When you are ready, convert the CEO requisition to a CEO purchase order.
Released December 8, 2017 (Version #1)Page 34

ePRO – Use Requisitions in SWIFT
Process Steps to Convert the CEO Requisition into a CEO Purchase Order SWIFT offers the benefit of creating the purchase order for this transaction from the requisition.
Steps to convert the CEO Requisition into a CEO Purchase Order.
Step 1: Use the Expedite Requisitions Search page to locate the requisition.
Step 2: Build the Purchase Order.
Step 3: Validate and Dispatch the CEO Purchase Order.
Step 1: Use the Expedite Requisitions Search page to locate the requisition.
Navigation: eProcurement, Buyer Center, Expedite Requisitions
Enter the Business Unit and Requisition ID. Click on Search.
SWIFT displays all eligible requisition lines.
o The requisition must be in an “Approved” status.o It must have a “Valid” budget check. o The contract must be in an “Approved” status and available for the Business Unit.
Step 2: Build the Purchase Order.NOTE: The requisition will build a single purchase order for each instance of the expedite process. If you need a separate purchase order for each line, run this process separately for each line displayed.
1. On the Build Purchase Order section, make sure to specify a buyer.
Released December 8, 2017 (Version #1)Page 35

ePRO – Use Requisitions in SWIFT
2. On the Requisition Schedules Lines section, check the Include boxes on all of the lines you want to expedite.
3. Click on Submit button.
SWIFT converts (i.e., expedites) the requisition into a purchase order. You are ready to create the purchase order.
Step 3: Validate and Dispatch the CEO Purchase Order.
1. Locate the purchase order that was created through the Expedite Requisition process.
Navigation: Purchasing, Purchase Orders, Stage/Source Requests, Sourcing Workbench Search for the requisition using the Business Unit and Requisition ID. Click the Search button.
The Search Results section will display the purchase order created through the Expedite Requisition process. The Stg (Staging) Status should be “Completed”. The last column displays the PO ID.
2. Click on the Purchase Order number. SWIFT will open up the Add/Update POs page.
Released December 8, 2017 (Version #1)Page 36

ePRO – Use Requisitions in SWIFT
3. Update the Purchase Order.
Review the purchase order and update the fields as needed.
a. Review Header Information. Make sure that the Document Type is “CEO”. Update the Billing Location if needed.
b. Review the Lines Section.
Verify the PO Qty, Category and Price as needed for each line of the purchase order. Verify the Contract ID on the Contract tab. Click on the Schedule icon.
c. Add or Update Schedules Information.
Confirm that the Schedules information is correct for each line of the purchase order. Check the Sched Sales/Use Tax icon to confirm that the tax information is correct.
Released December 8, 2017 (Version #1)Page 37

ePRO – Use Requisitions in SWIFT
4. On the Sales/Use Tax Information page, confirm that the Tax Applicability and Ultimate Use Codes are correct for each schedule of the purchase order. The Tax Applicability field defaults to “Item is Exempt”. Update this page as needed for sales and use taxes. Click OK.
SWIFT returns you to the Schedules page. Click on the Distribution/ChartFields icon.
5. Add Distribution Information.
You may need to update information on the Distributions for Schedules page for each line of the purchase order. When you are sure that these fields are accurate, click on the OK button.
NOTE: Changing the distribution on the purchase order to a different ChartField string than what defaulted from the requisition will cause issues when liquidating the pre-encumbrance balance on the requisition.
Released December 8, 2017 (Version #1)Page 38

ePRO – Use Requisitions in SWIFT
SWIFT returns you to the Schedules page. Click on the Return to Main Page link.
6. Process the Purchase Order.
Save the purchase order. On the bottom of the purchase order, click the Save button. Approve the purchase order. On the header of the purchase order, click the Approve PO button.
NOTE: your agency may have internal approval processes prior to submitting purchase orders in SWIFT. Once appropriate approvals have been made, the PO Status will show “Approved”.
7. Once the PO Status shows as “Approved”, budget check the purchase order. Click the Budget Check icon.
Once the purchase order passes budget check, the Budget Status shows as “Valid”.
Note: If you added freight or taxes, SWIFT will update the Amount Summary fields.
Released December 8, 2017 (Version #1)Page 39

ePRO – Use Requisitions in SWIFT
8. Dispatch the purchase order. On the header, click the Dispatch button.
The Dispatch Options page is displayed. Keep the defaults. Click OK.
SWIFT displays a message if you wish to receive confirmation that the purchase was processed. Click Yes if you want to wait for it to process.
When SWIFT successfully dispatches the purchase order, SWIFT changes the PO Status to “Dispatched”.
You have successfully created and processed a Contract Encumbering Order purchase order.
After completing this lesson, you should now be able to:
Create a Contract Encumbering Order
Tie the CEO Requisition to the Contract
Convert the CEO Requisition into a Purchase Order to Establish the Encumbrance
Released December 8, 2017 (Version #1)Page 40

ePRO – Use Requisitions in SWIFT
Lesson 3: Create Inventory Requisitions
Lesson Overview
Agencies can use SWIFT’s eProcurement module to manage the items they keep in stock in a warehouse. Currently only a few agencies create requisitions to order their materials from their warehouses. This lesson describes the process to create and manage inventory requisitions. It provides the steps for the agency requestor to make sure the requisition is completely fulfilled.
Process to Create and Manage Inventory Requisitions
After the requestor creates the inventory requisition, SWIFT creates a material stock request to order inventory from the warehouse through SWIFT.
SWIFT processes pending material stock requests daily during batch processing. SWIFT’s batch processes at 10 a.m., 2 p.m. and 6 p.m. on business days.
Warehouse staff receive the material stock request after the daily batch processing. Then, they fulfill the orders and send the materials to where they are needed.
The requisition’s requestor is responsible to ensure that the inventory request was fulfilled completely and accurately when the materials are physically received at their destination.
Sometimes the warehouse is only able to fulfill part of the request. Warehouse staff record the partial fulfillment in SWIFT. SWIFT will create the backorder for the balance of the materials ordered.
The requestor uses SWIFT’s Material Stock Requests page to track the materials. The requestor needs to review this page to avoid creating duplicate requisitions.
For information about the field names and descriptions, please refer to the Appendix of this guide.
This lesson describes how to set up an inventory requisition and then review its fulfillment on the Material Stock Requests page.
After completing this lesson, you should be able to:
Create an Inventory Requisition
Released December 8, 2017 (Version #1)Page 41

ePRO – Use Requisitions in SWIFT
Review an Inventory Request for Possible Backorders
Process Steps to Create an Inventory Requisition Step 1: Define the Requisition.
Step 2: Add Items and Services.
Step 3: Save and Submit the Requisition.
Step 1: Define the Requisition.
1. Access the Create Requisition page.
Navigation: eProcurement, Create Requisition
SWIFT displays the Create Requisition page. It starts with the Define Requisition section. This section allows you to specify the requisition name, requester and other information that applies to the entire requisition. Adding information here carries throughout the requisition (e.g., ChartFields or Ship To).
2. Enter Information on the header of the Define Requisition tab.
On the Create Requisition page 1. Define Requisition tab, enter information in the following fields on the header.
Business Unit (may default in) Origin Doc Type: Keep blank for inventory requisitions Requisition Name (optional): If you keep it blank, SWIFT will default in the Requisition ID after you save
it. Agency Reference (optional) Billing Location
3. Enter Information on the Line Defaults section.
Click the Expand Section icon on the Line Defaults section.
SWIFT opens up the Line Defaults section. Enter information in the following fields.
Line Defaults: o If you select the Default button, SWIFT will assign any values defaulted from the requester’s user
setup to all requisition lines. o If you select the Override button, SWIFT will allow the requester to change any defaulted values.
SWIFT will also assign the new values to each requisition line.
Released December 8, 2017 (Version #1)Page 42

ePRO – Use Requisitions in SWIFT
Shipping Defaults: Enter the Ship To location. Ship To is the location where the goods are delivered. You can also enter the Due Date as needed.
On the Accounting Defaults section, enter the Location, Fund, Fin DeptID and AppropID or keep the defaulted values, as appropriate.
IMPORTANT: Make sure you enter the correct Chartfield information on the requisition. If you enter invalid values, SWIFT will not create the Material Stock Request (MSR).
When you entered the required information, scroll to the bottom of the page.
4. Click the Continue button. SWIFT displays the Add Items and Services page.
Step 2: Add Items and Services.Use the Add Items and Services tab to browse your agency’s catalog(s) and specify the information needed to order each item.
1. Select the Catalog.
Select the Detailed Catalog tab.
On the Browse Catalog section, select the appropriate catalog. IMPORTANT: Uncheck the Return Contracts Only box. If the box is left checked, SWIFT may not
return search results.
Released December 8, 2017 (Version #1)Page 43

ePRO – Use Requisitions in SWIFT
Released December 8, 2017 (Version #1)Page 44

ePRO – Use Requisitions in SWIFT
2. Search the Catalog for the Item.
On the Search Catalog section, add information to search for the item.
For example, search by Item Description or Item ID. Click the Search button on the top, right side of your screen.
SWIFT displays the results of your search.
You can see how many results were returned on the banner. In most cases, SWIFT will return multiple lines for the same Item ID. These results are due to multiple contracts available for you to purchase the item directly from the vendor.
On the Item Detail section of the results, select the checkbox next to the line you wish to use. Add the Quantity. Click Add for the item you wish to order from the warehouse.
You can use the Clear button to remove the search results before searching for more items. Repeat the search to add as many lines as required.
SWIFT updates the Requisition Summary box at the top of the page with your inventory items. Notice the Total Amount is “0.00”.
3. Review the Requisition.
Released December 8, 2017 (Version #1)Page 45

ePRO – Use Requisitions in SWIFT
Click on the Review and Submit tab at the top of the page. Use the Review and Submit page to see your full order.
IMPORTANT: If you need to edit the requisition, update it before you save and submit it. Once SWIFT runs the batch and creates the Material Stock Request, you cannot edit the requisition. Refer to the instructions in Lesson 4 of this guide on how to edit a requisition.
Step 3: Save and Submit the Requisition. 1. Save and submit the requisition.
At the bottom on the requisition, click on the Save & submit button.
SWIFT will display a Confirmation page with the Requisition ID. The Status is “Approved”. The Requisition Name is the same as the Requisition ID unless you entered a Requisition Name on the
Define Requisition page.
2. As a best practice, write down the Requisition ID. You will need it to follow its progress in SWIFT.
Released December 8, 2017 (Version #1)Page 46

ePRO – Use Requisitions in SWIFT
3. Budget check the requisition.
Click the Check Budget button.
The Budget Status will show as “Valid” on the Confirmation page if the budget check is successful. SWIFT will process the requisition and send it to the warehouse.
If the Budget Status does not show as “Valid”, click the Edit Requisition button to return to the requisition. Correct the errors and save. Click the Check Budget button to rerun budget check.
You have successfully created an Inventory Requisition.
Released December 8, 2017 (Version #1)Page 47

ePRO – Use Requisitions in SWIFT
Process Steps to Review an Inventory Requisition for Possible BackordersThe requisition’s requestor is responsible to ensure that the inventory requisition was fulfilled completely and accurately.
If the requester did not physically received everything that was ordered, they need to review the order before placing another requisition for the same material. If the material was not in stock at the time of the order, SWIFT automatically creates a backorder for the material. The warehouse staff will fill the backorder when replacement stock arrives in the warehouse.
These steps show how to look up a requisition and review the Material Stock Requests page to see if there is a backorder.
The requestor needs to avoid creating a duplicate requisition for the same material.
When a requestor places an inventory requisition to withdraw materials from the warehouse, the requested quantity may not be immediately available. The warehouse staff will ship the partial quantity if there is stock. SWIFT will create a backorder for the balance that staff did not ship. If the material has an on-hand balance of zero when the requisition is created, SWIFT will create a backorder for the full quantity on the order.
Steps to Review an Inventory Requisition for Possible Backorders
Step 1: Access the Inventory Requisition in the Manage Requisition page. Step 2: Review the Material Stock Requests page for this inventory requisition.
Step 1: Access the Inventory in the Manage Requisition page.
1. Access the Manage Requisitions page.
Navigation: eProcurement, Manage Requisitions SWIFT opens up the Manage Requisitions page. Enter search criteria such as Business Unit and
Requisition ID to find the requisition to update. Click Search.
Released December 8, 2017 (Version #1)Page 48
ePRO – Use Requisitions in SWIFT
SWIFT returns any Requisition IDs that match your search criteria.
2. Review the requisition.
Click the Expand Section icon to the left of the inventory requisition you are managing.
3. SWIFT opens up the requisition. Review the details.
For example, the requisition below has three lines on it with three different items.
SWIFT activated the Inventory icon. SWIFT sent this request to the warehouse to be filled. You can no longer change the requisition.
4. See the current status of each of the inventory lines.
Click on the Inventory icon to see the current status of the requisition lines. SWIFT takes you to the Stock Requests page that contains the details of the lines. They are called “Demand Lines”.
Released December 8, 2017 (Version #1)Page 49

ePRO – Use Requisitions in SWIFT
Step 2: Review the Stock Requests page for this inventory requisition.
This example shows a material stock request that was not completely fulfilled. There is a backorder.
1. Review the Demand Line 1 on the Stock Requests page.
The Reservation Status is “Shortage, Rules Not Met”. The Ship Quantity is zero, so nothing has shipped. The Original Quantity is the amount that was entered on the requisition (e.g., 32.0000). This stock request has more demand lines than the original requisition had requisition lines. It now has
six lines. You can see these extra lines on the top banner on the right (e.g., 1 of 6).
IMPORTANT: These extra lines indicate that something on the requisition was not available for shipping.
For example, Demand Line 1 of this stock request is for 32 pieces of Item ID 52751. The stock order was approved for 32 pieces but the warehouse staff did not ship them.
When a stock order is not shipped in full, SWIFT creates a second demand line for the same Item ID.
This second Demand Line creates the backorder.
Click on Show next row icon at the top of the page on the right to move to the next demand line.
Released December 8, 2017 (Version #1)Page 50

ePRO – Use Requisitions in SWIFT
2. Review the Demand Line 2 of the Stock Requests page.
SWIFT created Demand Line 2 for the backordered balance of the requisition.
32 pieces of Item 52751 were requested but zero were shipped. SWIFT shows the Backorder flag as checked on this second demand line.
SWIFT created a backorder for the 32 pieces that the warehouse did not have available to ship.
This backorder will stay open in SWIFT until the item is available in the warehouse. Once the requested quantity is available, SWIFT will automatically release the demand line to the
warehouse. Warehouse staff will ship the materials.
IMPORTANT: Do not reorder the items. Any reorder will result in a double shipment from the warehouse to the end user.
You have successfully reviewed an inventory request to view for possible backorders.
After completing this topic, you should now be able to:
Create an Inventory Requisition
Review an Inventory Request for Possible Backorders
Released December 8, 2017 (Version #1)Page 51

ePRO – Use Requisitions in SWIFT
Lesson 4: Manage Requisitions
Lesson Overview
This lesson reviews different ways to change or manage a requisition in SWIFT such as updating the billing location or funding. It also provides guidance on canceling and editing a requisition depending upon the type. It discusses how to create and edit a requisition template. It provides some commonly used queries and directions on how to use the Category Code search tool.
Changing a Requisition: Once you create a requisition, you may wish to change it. The nature of the change impacts how you update it in SWIFT.
Type of Change Description of Change
Cancel a Requisition or Requisition Line
You can cancel any requisition for which a purchase order, event or inventory request is not already submitted.
Cancel a Partially Dispatched Requisition Line
After creating and processing a requisition, an agency may decide they no longer need part of the requisition. You can cancel a requisition line if you no longer need it as long as it is not tied to another document, such as a purchase order, sourcing event or Inventory Material Stock Request.
Change Funding on a Requisition
If you receive a budget error on a requisition, it is likely your agency used incorrect ChartField information or Budget Year. You can edit requisitions that are not associated with a purchase order, event or an inventory item.
Create a Requisition by Copying an Existing Requisition
You can use an existing requisition to create a new one of the same document type.
Edit a Requisition or Requisition Template
You can edit any requisition that has not is not tied to another document such as a contract, purchase order, event or inventory transaction.
Run a Query When there are questions about the status or details of requisitions, SWIFT provides queries to fine up-to-the-minute information about them.
Update the Billing Location on a Requisition
This topic identifies error messages related to Billing Location on a requisition. It also provides the steps to remedy the error message.
After completing this lesson, you should be able to:
Cancel a Partially Dispatched Requisition Line Cancel a Requisition Change Funding on a Requisition Create a Requisition by Copying an Existing Requisition Create and Use a Requisition Template Edit a CEO or OMR Requisition Edit a Requisition Template Edit an Inventory Requisition Find a Category Code Run a Query
Released December 8, 2017 (Version #1)Page 52

ePRO – Use Requisitions in SWIFT
Update the Billing Location on a Requisition
Released December 8, 2017 (Version #1)Page 53

ePRO – Use Requisitions in SWIFT
Cancel a Partially Dispatched Requisition Line
After creating and processing a requisition, an agency may decide they no longer need part of the requisition. They want to release the pre-encumbrance balance on some of the lines back into the budget, but they don’t want to cancel the entire requisition. You can cancel a requisition line if you no longer need it.
There are limits to when you can cancel a requisition line. You cannot cancel a requisition line if it is tied to another document, such as a purchase order, sourcing event or Inventory Material Stock Request.
NOTE: If the Requisition Status is “Partially Dispatched”, this means that your agency created a purchase order from a requisition. Your agency did not use all of the requisition lines on the associated lines. In this case, you may need to cancel the unused requisition lines to release pre-encumbered funds.
This topic refers to cancel unwanted requisition lines on a multiple line requisition. It lists the steps to cancel a requisition line. It does not discuss the details about creating and processing the requisition based on its document type.
Steps to cancel a requisition line.
Step 1: Access the Requisition. Step 2: Cancel the Requisition Line.
Step 1: Access the Requisition
Navigation: eProcurement, Manage Requisitions
1. On the Manage Requisitions page, enter search criteria to locate the requisition.
Enter the Business Unit (BU). Enter Requisition ID, if known. Set Request Status to “All but Complete” or blank.
2. Click Search.
Released December 8, 2017 (Version #1)Page 54

ePRO – Use Requisitions in SWIFT
Step 2: Cancel the Requisition Line.
1. Open up the Requisitions section.
Click the Expand Section icon (far left of the line).
SWIFT opens up the Line Information section.
2. Click the Cancel icon (Red X) on the line you wish to cancel.
If the line is eligible to be cancelled (not tied to another document), SWIFT brings up a message to confirm you want to cancel the requisition line. Click OK.
Released December 8, 2017 (Version #1)Page 55

ePRO – Use Requisitions in SWIFT
3. Verify that SWIFT cancelled the line.
Scroll to the top of the page. Refresh the page by clicking the Search button again. Click the Expand Section icon again (far left of the line).
The Status of the line is now “Canceled”.
4. Budget check the requisition.
The Budget Status is “Not Chk’d”. On the Select Action dropdown menu, select “Check Budget”. Click Go.
Verify the Budget Status is now “Valid”.
SWIFT relieved the pre-encumbrance amount for the cancelled line. If the Budget Status is in error, resolve it and rebudget check it. Then, SWIFT can release the pre-encumbrance.
You have successfully canceled a line of a partially dispatched requisition.
Released December 8, 2017 (Version #1)Page 56

ePRO – Use Requisitions in SWIFT
Cancel a Requisition in SWIFT
After creating and processing a requisition, an agency may decide they no longer need the requisition. They want to release the pre-encumbrance balance back into the budget. You can cancel a requisition if you no longer need it. There are limits to when you can cancel a requisition.
The requisition cannot be canceled if it is tied to another document such as a purchase order, sourcing event or Inventory Material Stock Request.
This topic lists the steps to cancel a requisition. It does not discuss the details about creating and processing the requisition based on its document type.
Steps to Cancel a Requisition in SWIFT.
Step 1: Access the Requisition to Cancel. Step 2: Cancel the Requisition.
Step 1: Access the Requisition to Cancel
Navigation: eProcurement, Manage Requisitions
On the Manage Requisitions page, enter search criteria to locate the requisition.
o Enter the Business Unit (BU).o Enter Requisition ID, if known.o Set Request Status to “All but Complete” or blank. o Enter a Date From.
Click Search.
Locate the requisition you wish to cancel in the returned results
Step 2: Cancel the Requisition.
1. Select “Cancel Requisition” from the Select Action dropdown menu on the requisition you want to cancel. Click Go.
Released December 8, 2017 (Version #1)Page 57

ePRO – Use Requisitions in SWIFT
SWIFT displays the Requisition Details page for that requisition.
2. Review the information to make sure you wish to cancel the requisition. Then, click Cancel Requisition.
SWIFT returns you to the Manage Requisitions page. You can see that the Status is now “Canceled” for
that requisition and the Budget Status shows as “Not Chk’d”.
3. Budget check must be performed to completely release the pre-encumbered funds.
Select “Check Budget” from the Select Action dropdown menu and click the Go button. Budget check must be performed to completely release the pre-encumbered funds.
When the Status is “Canceled” and the Budget is “Valid”, you have successfully canceled a requisition.
You have successfully canceled a requisition in SWIFT.
Released December 8, 2017 (Version #1)Page 58

ePRO – Use Requisitions in SWIFT
Change Funding on a Requisition
Typically, agencies change funding on a requisition when they receive a budget error. If you receive a budget error on a requisition, it is likely your agency used incorrect ChartField information. It is also possible, that your agency used an incorrect budget year. You will need to ensure that both the ChartField information and the budget year are accurate. You can change the funding on a requisition for other reasons, too. You can update requisitions that are not associated with a purchase order, event or an inventory item.
If you need to restore the pre-encumbrance on a requisition associated with a SWIFT document, you need to cancel the contract, receipt, event, inventory item and/or purchase order. Then, you can change the funding on a requisition.
This topic provides the steps to change the funding on a requisition.
Steps to Change Funding on a Requisition
Step 1: Access the Requisition. Step 2: Update the ChartField Information. Step 3: Process the Requisition.
Step 1: Access the Requisition
Navigation: eProcurement, Manage Requisitions Enter the Business Unit and Requisition ID. Click Search.
SWIFT opens up the Search Results with the desired requisition.
Select the Edit Requisition option from the drop down menu. Click Go.
SWIFT displays the requisition lines for the desired requisition.
Released December 8, 2017 (Version #1)Page 59

ePRO – Use Requisitions in SWIFT
Step 2: Update the ChartField Information
1. Update the ChartFields information as needed.
Locate the line to change the ChartField information. Click the Expand Section icon on left side of the line. Click on the Chartfields 2 tab.
2. Update the Budget Date as needed.
On the ChartFields 2 tab, change the ChartField values as needed. Click on the Budget Information tab.
3. Update additional lines as needed.
Step 3: Process the Requisition
1. When you have changed the ChartFields and/or Budget Date, click Save & submit.
2. Run the budget check. Click the Check Budget button.
Ensure the budget check is valid once it is complete. If not resolve the budget error.
You have successfully changed the ChartField information on a requisition.
Released December 8, 2017 (Version #1)Page 60
ePRO – Use Requisitions in SWIFT
Create a New Requisition by Copying an Existing Requisition
Agencies can save time and use an existing requisition to create a new one in SWIFT’s eProcurement module. You will need to add the Doc Type and Billing Location as those fields do not copy over. Make sure that the details of the requisition fit the needs of the new requisition. You can add or delete lines as required for the new requisition.
IMPORTANT: Make sure you enter the correct ChartField information on the new requisition.
This topic lists the steps to create a new requisition by copying an existing one. It does not discuss the details about creating and processing the requisition based on its document type.
Steps to create a new requisition by copying from an existing requisition.
Step 1: Access the Requisition to Copy. Step 2: Copy from the Existing Requisition. Step 3: Update the Newly Created Requisition. Step 4: Review and Submit the Newly Created Requisition.
Step 1: Access the Requisition to Copy
Navigation: eProcurement, Manage Requisitions
On the Manage Requisitions page, locate the requisition you wish to copy.
o Enter the Business Unit (BU).o Enter the Requisition ID.o Click Search.
Step 2: Copy from the Existing Requisition. On the Requisitions section, scroll over to the <Select Action> menu. Select “Copy Requisition.” Click Go.
Released December 8, 2017 (Version #1)Page 61

ePRO – Use Requisitions in SWIFT
NOTE: If you are copying from a requisition that you did not create, SWIFT sends you a message. All copied defaults will remain unchanged. Click Yes, if you want to copy it.
Step 3: Update the Newly Created Requisition
SWIFT opens up the Create Requisition page with the new requisition.
1. Update the header of the requisition.
IMPORTANT. You need to confirm or update these areas to fit the new purchase request.
Origin Document Type: SWIFT does not copy the requisition Document Type into the new requisition values.
Select the correct requisition Document Type of “OMR”, “CEO” or blank (for Inventory requisitions only). Update the Requester, Requisition Name and Agency Reference as needed.
2. Add the Billing Location.
At the top of the page, click on the Define Requisition link. Add the Billing Location.
Released December 8, 2017 (Version #1)Page 62

ePRO – Use Requisitions in SWIFT
3. Review and update the Requisition Lines section.
At the top of the page, click the Review and Submit link. SWIFT opens up the Requisition Lines section.
Click the Expand Section icon for each line.
SWIFT opens up the line. Update these items as needed.
Review or update the Ship To location for each line. Review or update the Due Date for each line. Check the Attention To field and add any comments. Review or update the Distribute by field for each line. Review or update the Quantity as needed.
Released December 8, 2017 (Version #1)Page 63

ePRO – Use Requisitions in SWIFT
4. Click on the Description link. This link is near the top of the Requisition Lines section.
SWIFT brings you to the Special Request section of the Add Items and Services page for the line being updated.
Update the Item Description, Price, Quantity, Category, Unit of Measure and Due Date as needed. When you are done, scroll to the bottom of the page and click OK.
SWIFT returns you to the opened Requisition Lines section.
5. Review and update the ChartField information and Budget Date.
Click the Expand Section icon for each line that needs the ChartField values updated. On the Accounting Lines section, click the Chartfields2 tab for each line.
Change funding string values as needed on the ChartFields2 tab.
IMPORTANT: Make sure you enter the correct ChartField information on the requisition.
Review the Budget Date. Click the Budget Information tab. Update as needed for each line.
Released December 8, 2017 (Version #1)Page 64

ePRO – Use Requisitions in SWIFT
6. Add or delete any requisition lines as needed.
a. Add a Line:To add a line, scroll to the top of the page. Click on the Add Items and Services link.
Click on the Special Request tab, then the Special Item link.
SWIFT opens up the Special Request page.
On the Special Item section, enter the following values: Item Description, Price, Quantity, Category and Unit of Measure.
Then, click Add Item.
b. Delete a Line:To delete line, scroll to the top of the page. Click on the Review and Submit tab.
Released December 8, 2017 (Version #1)Page 65

ePRO – Use Requisitions in SWIFT
Click the checkbox next to the line you wish to delete in the Requisition Lines section. Click the Delete button at the bottom of the page.
SWIFT sends a message to make sure that you wish to delete the line. Click Yes.
Step 4: Review and Submit the Requisition.
Once all changes are complete, save and submit the new requisition.
Click on the Review and Submit tab.
Click Save and submit.
SWIFT displays a confirmation page with the new Requisition ID. Click Check Budget.
Released December 8, 2017 (Version #1)Page 66

ePRO – Use Requisitions in SWIFT
If the budget check is successful, the Budget Status is “Valid.”
If the Budget Status is not valid, then click the Edit Requisition button to return to the requisition.
Correct any errors and save it. Then, budget check it again.
When the requisition is in an “Approved” Status and has a Budget Status of “Valid”, the requisition can be tied to other documents such as an event or Inventory Material Stock Request.
You have successfully created a new requisition by copying an existing requisition.
Released December 8, 2017 (Version #1)Page 67
ePRO – Use Requisitions in SWIFT
Create and Use an Inventory Requisition Template in SWIFT
Agency staff can set up personal templates for inventory requisitions. These templates make it easier to place repetitive orders for the same items. These templates are user-specific. They cannot be shared with other agency staff. Agency staff can create multiple templates based on their needs. Templates do not contain ChartField information.
This topic explains how to create an inventory requisition. It also explains how to use it once you set one up.
Create a Template for Inventory Requisitions
Steps to Create a Template for Inventory Requisitions
Step 1: Add Items and Services to a new Inventory Requisition. Step 2: Create the Template. Step 3: Name the Template.
Step 1: Add Items and Services to a new Inventory Requisition.
Navigation: eProcurement, Create Requisition
SWIFT brings you to the Add Items and Services page. Click on the Detailed Catalog tab.
1. On the Browse Catalog section, select the appropriate catalog. IMPORTANT: Uncheck the Return Contracts Only box. If the box is left checked, SWIFT may not
return complete search results.
2. On the Search Catalog section, add information to search for the item.
For example, search by Item Description or Item ID. Click the Search button on the top, right side of your screen.
Released December 8, 2017 (Version #1)Page 68

ePRO – Use Requisitions in SWIFT
SWIFT displays the results of your search.
3. Review the search results.
Click on the desired item(s) to be added to the template.
IMPORTANT: Make sure to choose a line that does not have a contract associated to it. Otherwise, SWIFT will not allow the template to be used on a new requisition.
As a best practice, choose a Quantity of “1”. Then, click the Add button. Repeat to add additional items to the template.
Step 2: Create the Template.
Click on the Review and Submit tab at the top of the page. Click the checkbox on the lines to be added to the template. Click the Add to Template(s) button.
Released December 8, 2017 (Version #1)Page 69

ePRO – Use Requisitions in SWIFT
NOTE: The Vendor Name column should not have anything populated in it. If there is a Vendor Name on any of the lines, you can save the template. But SWIFT will give you an error if you try to use this template on a future requisition.
Step 4: Name the Template.
SWIFT displays the Add Selected Items to Template(s) page.
Enter a Template Name and add a Description. Click OK.
SWIFT will add the items listed in the Requisition Summary to the new template.
Save, submit and budget the check the requisition if you need it. SWIFT will save the new template whether or not the inventory requisition is saved.
You have successfully created an ePro requisition template for inventory items.
Released December 8, 2017 (Version #1)Page 70

ePRO – Use Requisitions in SWIFT
Use a Template to Create Inventory Requisitions
Steps to Use a Template to Create Inventory Requisitions
Step 1: Access the Inventory Requisition. Step 2: Pull Template and Required Information into the Requisition. Step 3: Save & Submit and Budget Check the Requisition.
Step 1: Access the Inventory Requisition Template.
Navigation: eProcurement, Create Requisition
1. On the Create Requisition page, fill out the Define Requisition section.
Confirm or fill in these fields: Business Unit, Origin, Requester and Billing Location. Doc Type should be left blank for inventory requisitions. As an option, you can also fill in the Requisition Name and Agency Reference.
2. Click the Expand section icon. Complete the Line Defaults section as needed.
Released December 8, 2017 (Version #1)Page 71

ePRO – Use Requisitions in SWIFT
3. Click the Add Items and Services link.
On the Add Items and Service page, select the Templates tab.
Step 2: Enter Information into the Template.
1. On the Templates tab, click the Expand section icon on the detail of the template you wish to use.
SWIFT opens up the template and display the items and quantity of each item in the template.
2. Enter the number of templates desired.
Click the Add button for each item. In the example on the previous page, each item on the template has a
Quantity of “1”. If you enter a Quantity of “5”, you will receive 5 of each item on the template.
The Requisition Summary shows each item on the template with the quantity you entered for each line.
NOTE: If you need to order additional items that are not in the template, click the Detailed Catalog tab to get back to the catalog. Search for the required item(s) and add to the requisition. SWIFT will not update the template. SWIFT will add additional items to this requisition.
Released December 8, 2017 (Version #1)Page 72

ePRO – Use Requisitions in SWIFT
Step 3: Save & Submit and Budget Check the Requisition.
1. Click the Review and Submit link at the top of the page.
You can see the items you selected on the template appear as the individual lines on the inventory requisition.
You can delete an individual line by selecting the line and clicking the Delete button. This will not change the template but will change this individual requisition.
You can add additional items to this requisition by clicking on the Add Items and Services link. There you can search for and add additional items.
2. Click the Save & submit button to save the requisition. Then, click the Check Budget button to finish the requisition.
You have successfully used a template for an inventory requisition.
Released December 8, 2017 (Version #1)Page 73

ePRO – Use Requisitions in SWIFT
Edit an Inventory Requisition Template in SWIFT
Agency staff can set up and maintain personal templates for inventory requisitions. These templates make it easier to place repetitive orders for the same items. These templates are user-specific. They cannot be shared with other agency staff. Agency staff can create multiple templates based on their needs. Templates do not contain ChartField information. Once created, agency staff can edit their inventory requisition templates.
This topic explains how to edit an inventory requisition. There are two ways to edit an inventory requisition:
1. To Delete a Line or Change the Quantity on a Template for an Inventory Requisition: Use the My Profile page to delete a line or change the quantity on the line.
2. To Add a Line on a Template for an Inventory Requisition: Create a new requisition using the template that needs additional lines added.
Steps to Delete a Line or Change the Quantity on a Line on a Template for Inventory Requisitions
Step 1: Access the Manage Personal Templates Link. Step 2: Edit the Template.
Step 1: Access the Manage Personal Templates Link.
Navigation: eProcurement, My Profile On the My Profile page, click on the Manage Personal Templates link.
On the Manage Personal Template page, locate the template you want to edit. Click on the View Details link.
Released December 8, 2017 (Version #1)Page 74

ePRO – Use Requisitions in SWIFT
Step 2: Edit the Template.
From the View Details page, you can remove lines or change quantities from the template. Use the Delete row icon to remove lines. SWIFT will send a Delete Confirmation message. Click OK.
You can also change the quantity on each line. Once you make the changes you need, click OK to exit the page.
SWIFT brings you back to the Manage Personal Templates page. Click Save.
You have successfully deleted a line or changed the quantity on an inventory requisition template.
Released December 8, 2017 (Version #1)Page 75
ePRO – Use Requisitions in SWIFT
Steps to Add a Line on an Existing Template for Inventory Requisitions
Step 1: Add Items and Services to a New Inventory Requisition. Step 2: Update the Requisition Template.
Step 1: Add Items and Services to a New Inventory Requisition.
Navigation: eProcurement, Create Requisition
SWIFT brings you to Create Requisition page.
1. Enter the required items on the Define Requisition page. Click on the Add Items and Services tab.
2. On the Add Items and Services tab, click on the Detailed Catalog tab.
3. Select the catalog and search for items.
On the Browse Catalog section, select the appropriate catalog. Make sure the Return Contract Only box is not checked. Use the various search fields to locate items. Common search criteria are Description or Item ID.
Click Search button.
4. Review the search results.
Released December 8, 2017 (Version #1)Page 76

ePRO – Use Requisitions in SWIFT
Click the box next to the item(s) you want added to the template. Click the Add button. Repeat the search results as needed to add additional items.
IMPORTANT: Make sure to choose a line that does not have a contract associated to it. SWIFT will not be able to use lines associated with a contract on the template.
5. Click on the Review and Submit tab at the top of the page.
Step 2: Update the Requisition Template.
1. Add items to the template.
On the Requisition Lines section, click the box on the lines of the items that you want to add to the requisition template.
Click the Add to Template(s) button.
Released December 8, 2017 (Version #1)Page 77

ePRO – Use Requisitions in SWIFT
2. Update or create a new template.
SWIFT displays the Add Selected Items to Template(s) page. SWIFT lists any personal templates you created. You can also create a new template.
To update an existing template, check the box next to the template you wish to update with the additional lines.
Or, to create a new template, add information in the Template Name and Description fields. Click OK.
3. Click the Save button.
SWIFT updates the template with the additional items. SWIFT will pull those items into requisitions using the updated or new template.
If you need to use the requisition, save, submit and budget the requisition.
You have successfully added lines to an existing requisition.
Released December 8, 2017 (Version #1)Page 78

ePRO – Use Requisitions in SWIFT
Edit a CEO or OMR Requisition in SWIFT
You can only edit active Contract Encumbering Order (CEO) or Open Market (OMR) Requisitions that have not been sourced to a purchase order, event or Inventory Material Stock Request and do not have a status of Complete or Canceled. Once you source the requisition, SWIFT changes the Source Status on each requisition line from “Available” to “In Process.” Once the lines are no longer in a Status of “Available”, SWIFT locks down the requisition and doesn’t allow edits.
This topic lists the steps to edit a CEO or OMR requisition.
Steps to edit a CEO or OMR requisition.
Step 1: Access the Requisition in the Manage Requisition page. Step 2: Edit the Requisition. Step 3: Save and Submit the Requisition.
Step 1: Access the Requisition in the Manage Requisition page.
Navigation: eProcurement, Manage Requisitions
SWIFT opens up the Manage Requisitions page.
1. Enter search criteria to find the requisition to update. Click Search.
SWIFT opens up the Requisitions section with any Req IDs that match your search criteria.
2. In the Select Action dropdown, select “Edit Requisition”. Click Go.
Step 2: Edit the Requisition.
SWIFT displays the Review and Submit tab on the Edit Requisition page. There are three tabs at the top of the page to review and possibly edit.
Released December 8, 2017 (Version #1)Page 79

ePRO – Use Requisitions in SWIFT
1. Review and edit the Define Requisition tab as needed.
SWIFT will not allow you to edit any fields that are marked in gray. Click on the Define Requisition tab.
On the Header section of the Define Requisition tab, update the following fields as needed.
Requisition Name, Origin, Agency Reference, Billing Location and Doc Type.
As an option, you can add potential vendors to invite for SWIFT’s Sourcing module for Open Market Requisitions.
Click on the Suggested Vendor link and update as needed. Tell the staff person responsible for sourcing the event to invite the vendors from this list on the event. The use of this feature is not required.
2. Review and edit the line defaults.
On the Line Defaults section of the Define Requisitions tab, click the Expand Section icon to open up the lines.
Review and update the following Line Defaults items as needed.
Default Options, Ship To, Due Date and Attention. Select the Override radio button if you want the values to override what already exists at the line level of
the requisition.
Released December 8, 2017 (Version #1)Page 80

ePRO – Use Requisitions in SWIFT
3. Review and update the Accounting Defaults.
You can update any value that is not marked in gray.
On the Accounting Defaults section on the Define Requisitions tab, review and update the following items as needed.
Chartfields1 tab: Any values you enter must be valid ChartField combinations. Details tab: Budget Date.
Released December 8, 2017 (Version #1)Page 81

ePRO – Use Requisitions in SWIFT
4. Update the Requisition Lines.
Click on the Review and Submit tab. Add, review or change information on this page. You can update any value that is not marked in gray.
Click the Expand Section icon to open up an individual line.
To make the same updates to all lines on the requisition, click the checkbox on each line or click the Select All button.
Released December 8, 2017 (Version #1)Page 82

ePRO – Use Requisitions in SWIFT
5. After you complete your edits, click on the Modify Line/Shipping/Accounting button.
On the Modify Line/Shipping/Account page, update any values as needed. Click the Apply button.
Step 3: Save and Submit the Requisition.
At the bottom on the requisition, click on the Save and Submit button.
If you updated this requisition, SWIFT will display the Distribution Change Options page. Keep the default of All Distribution Lines. Click OK.
Released December 8, 2017 (Version #1)Page 83

ePRO – Use Requisitions in SWIFT
SWIFT will display a Confirmation page displaying the Requisition ID. The Budget Status is “Not Checked.” Click the Check Budget button.
The Budget Status will show as “Valid” on the Confirmation page if the budget check is successful.
If the Budget Status does not show as “Valid”, click the Edit Requisition button to return to the requisition. Correct the errors and save. Then, click the Check Budget button to run budget check.
When the requisition is in an “Approved” status and with a Budget Status of “Valid”, the requisition has been successfully edited.
You can process it as needed.
You have successfully edited a CEO or OMR requisition.
Released December 8, 2017 (Version #1)Page 84
ePRO – Use Requisitions in SWIFT
Edit an Inventory Requisition
If you need to edit an inventory requisition, the best practice is to update it before you save and submit it.
Inventory requisitions are automatically updated as part of the SWIFT batch process. Once SWIFT runs the batch process and sources a requisition to an Inventory Material Stock Request, you can no longer edit the inventory requisition. If the requisition line status on an inventory requisition still shows as available, it can be edited using the same basic steps as an OMR or CEO requisition.
Steps to Edit an Inventory Requisition.
Step 1: Define the Requisition and Add Items and Services. Step 2: Edit the Requisition. Step 3: Save and Submit the Requisition.
Step 1: Define the Requisition and Add Items and Services.
The process of defining an inventory requisition is highlighted in Lesson 3 of the SWIFT eProcurement User Guide.
The process of adding items and services is also highlighted in Lesson 3.
All inventory requisitions must have the Item ID field populated with a valid SWIFT Item ID. Select the correct Item ID from the Detailed Catalog search. Update the quantity as needed. Do not save or submit the requisition if you think you may need to return to it and update it.
Step 2: Edit the Inventory Requisition.
1. Access the Inventory Requisition.
Click on the Review and Submit tab. Add, review or change information on this page.
2. Edit the inventory requisition.
Click on the Expand Section icon (small triangle) to the left of the checkbox on the line. Update the requisition as needed.
Click on the box on each line. Or, click the Select All link to make the same modifications to all the lines. The example below shows a change to the Ship To Location.
Released December 8, 2017 (Version #1)Page 85

ePRO – Use Requisitions in SWIFT
Then click on the Modify Line/Shipping/Accounting button.
On the Modify Line/Shipping/Account page, update values as need. Click the Apply button.
SWIFT displays the Distribution Change Options page. Determine which option makes sense for your update. This example shows keeping the default of All Distribution Lines.
Click OK.
Released December 8, 2017 (Version #1)Page 86

ePRO – Use Requisitions in SWIFT
Step 3: Save and Submit the Requisition.
1. Save and submit the requisition.
At the bottom on the requisition, click on the Save & submit button.
2. Budget check the inventory requisition.
SWIFT will display a Confirmation page displaying the Requisition ID with a Budget Status of “Not Checked”. It includes the Requisition Summary at the top right of the page. Click the Check Budget button.
After SWIFT processes the budget check, the Budget Status will show as “Valid” on the Confirmation page if the budget check is successful.
If the Budget Status does not show as “Valid”, click the Edit Requisition button to return to the requisition. Correct the errors and save. Then, click the Check Budget button to run budget check.
When the requisition is in an “Approved” status with a Budget Status of “Valid”, SWIFT batch processing will create the Inventory Material Stock Request and send the order to the warehouse to be shipped.
You have successfully edited and processed an inventory requisition.
Released December 8, 2017 (Version #1)Page 87

ePRO – Use Requisitions in SWIFT
Find and Use Category Codes
Category codes group similar purchases together for analysis. It is based on the United Nations Standard Products and Services Code (UNSPSC) classification system. The Category Code field in SWIFT is required on all purchasing documents. It must accurately represent the type of purchase. SWIFT has an easy-to-use search tool to help locate the correct Category Code for a purchase. This tool is located in the Minnesota Data Center (MDC) area of SWIFT.
This topic provides an overview of Category Codes. It lists a query to learn about Category Codes with tax implications. It describes how to access and use the Category Code search tool.
Category Code ClassificationCategory Codes are eight digit numeric code that classify purchases based on a hierarchy. In general, Category Codes that begin with 1-6 represent a physical good, something you can touch. Codes beginning with 7, 8 and 9 generally represent a service type of procurement.
In a few cases, a Category Code describes a particular kind of purchase is not a service or physical good. For those purchases, there are specific Category Code to use.
Administrative hearings or judges, use 92101800 All Grants, regardless of purpose, use 84101501 Data sharing agreements, use 93151500 Direct or Indirect costs, use 93151600 PCard and Fleet Cards, use 84141700
Category Codes Available in SWIFTUsers can run query M_CG_GBL_UNSPSC_TAX_STATUS to see the complete list of active Category Codes and their tax implications.
Navigation: Reporting Tools, Query, Query Viewer. In the Search By field, enter the query. Click Search. On the Search Results section, click on “Run to Excel” or “Run to HTML” to get a list of active Category
Codes.
On the View Results section, enter “%” as a wild card. Click View Results.
Released December 8, 2017 (Version #1)Page 88

ePRO – Use Requisitions in SWIFT
SWIFT displays the results on an HTML page or a spreadsheet. You can see all of the Category Codes. You can also see which ones are taxable and which ones are exempt.
Use the Category Code Search Tool.
1. Access the Category Code Search.
Navigation: Items, MDC Item Maintenance, MDC Searches, MDC Search Item Categories
2. Enter a Search Value in one or more of the Flex Fields.
Each of the three Flex Fields can be populated with a value to search by. Common search values are Keyword and/or Long Description. Keywords were added to SWIFT’s Category Codes to make it easier to locate the correct code. Results are more accurate using the Long Description field.
Users can search by just one criteria or up to three. Use a “contains” search when prompted for best results.
Use the Clear Field icon to change your search values. Click the Search button.
For this example, we are searching for the Category Code for “fish nets”.
NOTE: The search displays 100 rows at a time. Look at the top menu bar to see if there are more rows to view.
If the results are too large, hit “Ctrl” and the “F” keys at the same time. Enter another search term that helps narrow the results. SWIFT will tell you how many codes have that word. Search for the list to see which description best fits the item.
Released December 8, 2017 (Version #1)Page 89

ePRO – Use Requisitions in SWIFT
3. Use the Results of the Search.
Click on an individual record to see if it describes the purchase. View the Long Description and Keyword to make sure that this code fits your purchase.
As an option, click on the Account Restrictions tab.
SWIFT displays the Accounts attached to the Category Code.
Released December 8, 2017 (Version #1)Page 90

ePRO – Use Requisitions in SWIFT
Run a Query
When there are questions about the status or details of requisitions, SWIFT provides queries to fine up-to-the-minute information about them. A query is a customized data lookup in SWIFT using the Query Viewer under the Reporting Tools menu.
Query Viewer enables you to: Run queries and have results sent to a separate browser window. Download and format the data in an Excel worksheet and/or in an XML format. Schedule queries to run at predefined times or on recurring schedules (e.g., first thing in the morning).
The results of these scheduled queries are routed to your Report Manager in SWIFT.
Query Viewer provides several fields that can be used to locate queries. You can search for a query using the basic or advanced search options.
Basic Search Option: Search using only the “begins with” condition. Advanced Search Option: Search using one or more search criteria and selecting from a choice of
conditions for each criterion (e.g., “contains”). Wildcards (%) can be used in any of the fields to refine or broaden a search.
Query Naming ConventionsTo use a query to retrieve data from SWIFT, you will need to now its name or a part of its name. The naming convention for SWIFT is M_XX_GBL…
M is for Minnesota. XX represents the two-letter SWIFT module abbreviation (e.g., PO for Purchase Orders). GBL is for Global. It displays if all users have access to this query. Characters that appear after XX or GBL describe the kind of data the query will locate. For example, the
query M_PO_DEFAULTS_BY_VENDOR will show information associated with the Vendor. Use capital letters and the underscore symbol.
Common Queries for Requisitions
Query Name Purpose
M_PO_GBL_REQ_DETAILS Requisition details searchable by data range
M_PO_GBL_REQS_FOR_AMS_BUYERS Agency requisitions that are waiting to be processed by OSP buyers.
M_REQ_GBL_REQS_BY_REQUESTER ePro requisitions by requester.
Steps to Run Queries
Step 1: Enter Information into the Query Viewer. Step 2: Look at the Search Results to Find the Individual Query. Step 3: Enter Information into the Query that You Selected. Step 4: View the Report from the Query.
Released December 8, 2017 (Version #1)Page 91

ePRO – Use Requisitions in SWIFT
Step 1: Enter Information into the Query Viewer.
Navigation: Reporting Tools, Query, Query Viewer Enter the Query Name in the basic search. NOTE: It must follow the naming conventions. Click Search.
Or, click on the Advanced Search link and enter information (e.g., PURCHASE ORDER) in the Description field.
Step 2: Look at the Search Results to Find the Individual Query.
On the Run to section, choose a Run to method (e.g., HTML, Excel or XML). If you select “Excel”, you will get a spreadsheet that you can filter the results. SWIFT opens up a separate window or report with your data.
Released December 8, 2017 (Version #1)Page 92

ePRO – Use Requisitions in SWIFT
Step 3: Enter Information into the Query that You Selected.
Each query will have different parameters. Most require the Business Unit. You can see the fields that will be populated. Enter in the required information. Click on View Results.
CAUTION: Be careful in choosing search parameters. If the results are large or if there is a lot of activity in SWIFT, it may slow down your system.
Step 4: View the Report from the Query.Depending upon which Run to method you chose, you will get a report. If you download it in Excel, you can create filters to better analyze the results.
You have successfully run a query.
Released December 8, 2017 (Version #1)Page 93

ePRO – Use Requisitions in SWIFT
Update the Billing Location on a Requisition
A Billing Location value is required on all Contract Encumbering Order (CEO) and Open Market (OMR) Requisitions. It is not required on Inventory requisitions. Enter the Billing Location on the Define Requisition tab.
SWIFT may display several error messages related to Billing Location on a requisition.
This topic identifies error messages related to Billing Location on a requisition. It also provides the steps to remedy the error message.
Billing Location Error Messages on Requisitions
1. Billing Location is required when Doc Type is not blank.If the Document Type is equal to “CEO” or “OMR” and the Billing Location field is not populated, SWIFT displays the following error message when you save it.
Remedy: Return to the Requisition Definition tab. Enter a Billing Location for a CEO or OMR requisition.
2. Wrong Billing Location on an event created using a Requisition.A Billing Location value is required on all events. If an event is created without using a requisition, the Billing Location field must be populated. Once the event has been saved, you can change the Billing Location on the event manually until you post it.
Released December 8, 2017 (Version #1)Page 94
ePRO – Use Requisitions in SWIFT
When you use a requisition line(s) from an OMR to create the event line, the Billing Location value from the requisition populates the Billing Location value on the event when you save the event. You can change this value until you post the event.
If you use line(s) from multiple OMR requisitions to create the event lines on a single event, and the Billing Location value on the referenced requisitions are not the same, SWIFT displays the following error message when you save the event.
Remedy: Navigate to the Event Contract Details page on the event. Edit the event and ensure that all referenced requisitions have the same Billing Location value. If needed, create separate events.
3. The event Billing Location on the OMR does not populate the Billing Location field on Award Details page of an event.
When you award an event based on an OMR requisition, the event Billing Location populates the Billing Location field on the Award Details page, and it flows forward into the purchase order. The Billing Location value is only populated when the Award Type is “Purchase Order”.
Remedy: Make sure to change the Award Type to “Purchase Order”. Add the Billing Location.
Released December 8, 2017 (Version #1)Page 95

ePRO – Use Requisitions in SWIFT
4. The CEO Expedite Requisitions process fails to create a purchase order.When you create a purchase order from a CEO requisition during the Expedite Requisitions process, SWIFT populates the Billing Location value from the requisition on the purchase order. You can change this value before you dispatch the purchase order.
If you try to process multiple CEO requisitions in the Expedite Requisitions process and the Billing Location values on the referenced requisitions are not the same, SWIFT displays the following error message.
Remedy: Ensure that the Billing Location value is the same for all referenced requisitions based on the selected requisition lines. If the Billing Location values are not the same for each requisition that needs to be run through the Expedite Requisitions process, run the process separately for each requisition.
You have successfully identified error messages related to Billing Location on a requisition. You also learned the steps to remedy the error message.
After completing this lesson, you should now be able to:
Cancel a Partially Dispatched Requisition Line Cancel a Requisition Change Funding on a Requisition Create a Requisition by Copying an Existing Requisition Create and Use a Requisition Template Edit a CEO or OMR Requisition Edit a Requisition Template Edit an Inventory Requisition Find a Category Code Run a Query Update the Billing Location on a Requisition
Released December 8, 2017 (Version #1)Page 96

ePRO – Use Requisitions in SWIFT
Course Summary The Lessons in the ePRO Use Requisitions in SWIFT course included:
1. Create Open Market Requisitions (OMR)
2. Create Contract Encumbering Orders (CEO)
3. Create Inventory Requisitions
4. Manage Requisitions
Released December 8, 2017 (Version #1)Page 97

ePRO – Use Requisitions in SWIFT
Appendix A: Key Terms for Using Requisitions
Released December 8, 2017 (Version #1)Page 98

ePRO – Use Requisitions in SWIFT
Released December 8, 2017 (Version #1)Page 99
Term Name Term Description
Account The account identifies whether an accounting line is classified as a balance sheet, revenue, expenditure, or statistical transaction. The Account classifies specific transactions according to the nature of the receipt, expenditure, or effect on the financial position of the fund. All accounting transactions in SWIFT have an Account.
Acquisition The act of acquiring goods and services (including construction) for the use of a governmental activity through purchase, rent, or lease. Includes the establishment of needs, description of requirements, selection of procurement method, selection of sources, solicitation of procurement, solicitation for offers, award of contract, financing, contract administration, and related functions.
Activity ID Activities are specific tasks that make up a project. Users can add transactions and budgets to a project only at the Activity level. Additionally, the work breakdown structure can be used to setup tasks under a summary activity. The activity can be coded with an activity type, dates, descriptions and other attributes for additional reporting. Activities can have summary and detail activities for further breakdown.
Agency Cost 1 The Agency Cost 1 ChartField (CF1) is an optional field that may be used for reporting purposes. This ChartField is a classification used to track revenue or expenditures associated with a particular event or activity that is defined by the Agency.
Agency Cost 2 Agency Cost 2 (CF2) is used for Agency reporting such as location, region, or other administrative sub-unit related to the operation of an Agency.
Agency Reference This optional field allows agencies to add additional information to the requisition. SWIFT carries it over to the purchase order and print versions.
Amount Only Allows the user(s) to receive the purchase order line by Amount instead of Quantity. Amount Only forces the purchase order line to “1”.
Approp ID This ChartField represents appropriation unit. It is used as a key to various budget levels to create unique budgets when all other key ChartFields are the same.
Asset An asset is an owned item of value that is not considered consumable in nature. It has a value greater than 0 and a useful life of greater than one year.
Authority for Local Purchase (ALP)
The authority for local purchase (ALP) is a delegation to certain individuals to directly purchase certain goods and services. The delegation is from the Commissioner of Administration. It is granted to an individual who has successfully completed all requirements established by the Office of State Procurement. There are several ALP levels: Up to $2,500; Up to $5,000; Up to $25,000 and Special Delegations for in excess of $25,000.
Batch Process A process that is run to process multiple transactions. Batch processes can be scheduled to run at various times throughout the day on a pre-defined batch schedule.
Billing Location Where vendors send their invoices for the business unit.
Budget Check In Commitment Control, this is the processing of source transactions against control budget ledgers. Transactions can pass, fail or pass with a warning. This process creates and relieves encumbrances and pre-encumbrances.
Budget Date The date a transaction is recognized in SWIFT’s budget period.
Budget Period The interval of time (such as 12 months or 4 quarters) into which a period is divided for budgetary and reporting purposes. The ChartField allows

ePRO – Use Requisitions in SWIFT
Appendix B: Status Field Descriptions
This status field displays the current status of any document. This field exists on some search pages. It can filter the results of a search based on the value selected. These statuses are not specific to requisitions. They exist in other documents in SWIFT. However, the definitions below refer to their use on a requisition.
Approved: The requisition has been approved and is ready for sourcing. For this status to display at the header level, all lines of this requisition must be in an “Approved” status.
Cancelled: The requisition was entered and saved but then the entire requisition or each requisition line was canceled. For this status to display at the header level, all lines of this requisition must be in the “Canceled” status. A canceled requisition can be reopened within a certain number of days as specified for the purchasing Business Unit; otherwise, it is closed permanently.
Complete: The requisition is marked complete after the requisition is dispatched on a purchase order. The goods are received and the supplier is paid. A background process identifies the requisitions and moves them to the “Complete” status. Canceled requisitions and those that are completely fulfilled by inventory stock are also identified as “Complete”.
Denied: The entire requisition or each requisition line has been denied in the approval process. For this status to display at the header level, all lines of this requisition must be in the “Denied” status.
Open: The requisition has been entered and saved but not yet submitted. For this status to display at the header level, all lines of this requisition must be in the “Open” status. A requisition in this status may not be sourced to another document, such as an event or Inventory Material Stock Request.
PO Partially Canceled: The requisition contains some lines that have been placed on purchase orders and these purchase orders have subsequently been canceled. For this status to display, the purchase orders must all have the same status, “Canceled.” This status indicates that some of the requisition lines have not been sourced to a purchase order and it also indicates that none of the lines have been received or returned to supplier.
PO Partially Completed: The purchase order has been closed for some of the requisition lines, however the requisitions are not yet closed.
PO Partially Created: The requisition contains some lines that have been sourced to an approved purchase order. For this status to display, the purchase orders must all have the same status of “Approved.” This status indicates that some of the requisition lines have not been sourced to a purchase order and it also indicates that none of the lines have been received or returned to supplier.
PO(s) Created: The requisition has been placed on a purchase order that has been approved. This header status indicates that all lines of this requisition have been sourced to approved purchase orders and the requisition line status is “PO(s) Created.” For this status to display, the purchase orders must all have the same status of “Approved.”
PO(s) Cancelled: The requisition has been placed on a purchase order that has been subsequently been canceled. This header status indicates that all lines of this requisition have been sourced to canceled purchase orders and the requisition line status is “PO(s) Canceled.” For this status to display, the purchase orders must all have the same status of “Canceled.”
PO(s) Completed: The purchase order has been closed for all of the requisition lines, however the requisitions are not yet closed.
PO(s) Dispatched: The requisition has been placed on a purchase order and the purchase order has been dispatched to the supplier. This header status indicates that all lines of this requisition have been
Released December 8, 2017 (Version #1)Page 100

ePRO – Use Requisitions in SWIFT
sourced to dispatched purchase orders and the requisition line status is “PO(s) Dispatched.” For this status to display, the purchase orders must all have the same status of “ Dispatched.”
Partially Dispatched: The requisition contains some lines that have been placed on purchase orders and these purchase orders have been dispatched to the supplier. For this status to display, the purchase orders must all have the same status of “Dispatched.” This status indicates that some of the requisition lines have not been sourced to a purchase order and it also indicates that none of the lines have been received or returned to supplier.
Partially Received: The requisition contains some lines that have been placed on a purchase order, the purchase order has been dispatched to the supplier, and the goods have been fully or partially received. This status indicates that some of the requisition lines have not been received.
Pending: The requisition has been submitted and is awaiting approval. This header status indicates that all lines of this requisition have the line status of “Pending.”
Received: The requisition has been placed on a purchase order, the purchase order has been dispatched to the supplier, and the goods have been fully received. For this status to display at the header level, all lines of this requisition must be in the “Received” status.
See Lines: The lines of this requisition are in various stages of the approval process and the lines have different statuses (i.e. pending, approved, denied, and so on); however, none of the lines have been sourced to a purchase order.
Released December 8, 2017 (Version #1)Page 101


