
Uploading, Creating and Modifying Forms in simplifyMD.
13
Uploading, Creating and Modifying Forms in simplifyMD
-
Upload
kristina-gibbs -
Category
Documents
-
view
236 -
download
0
Transcript of Uploading, Creating and Modifying Forms in simplifyMD.

Uploading, Creating and Modifying Forms in simplifyMD

How to find and enter the simplifyMD Template Library-www.simplifyMD.com
Enter –•Username•Password
Select Template Library

Watch a quick Video to learn how to use the template library
Simply press the play button

Using the Template LibraryUse the folders on the left side of your screen to select the type of form or template you need.
Select the name of the document to view the form in the Preview Window.
Select the name of the document in the File Information box to download.
Make sure you save it to a place you will be able to find it later.
To go back to the Welcome page, select the “Welcome file” at the bottom of the folder list.

Saving a Form from the Template Library
Select the form
Select the file information link
Save document in RTF Rich Text Format
Save to the desktop or a document folder
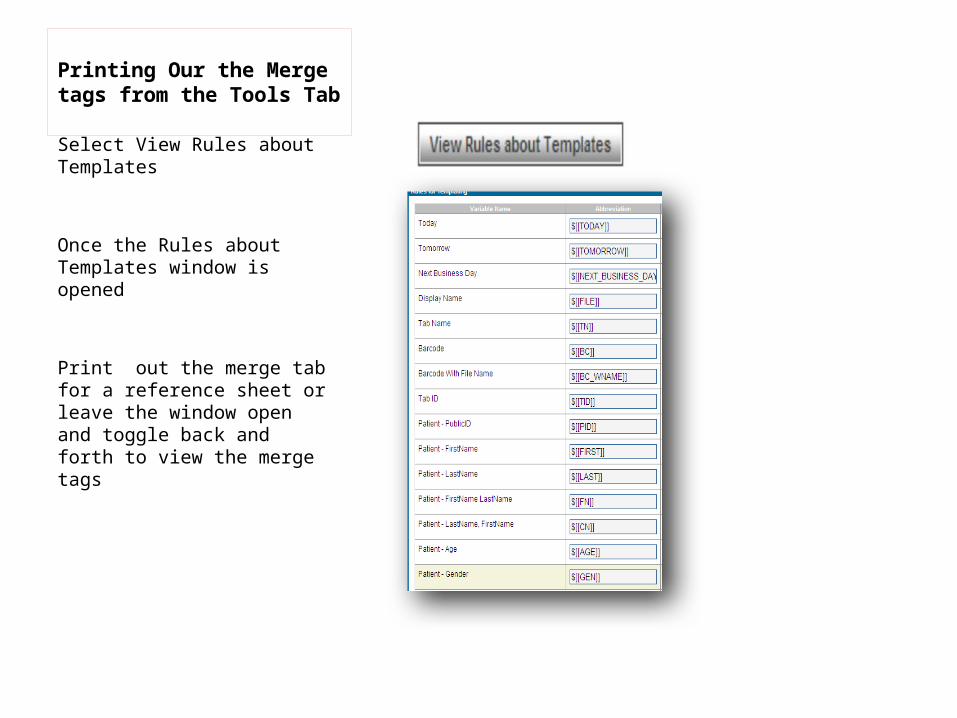
Printing Our the Merge tags from the Tools Tab
Select View Rules about Templates
Once the Rules about Templates window is opened Print out the merge tab for a reference sheet or leave the window open and toggle back and forth to view the merge tags

Adding a Barcode to a form
Add a Barcode to an existing form (Patient Information form) In the document header, right click and select Edit
Using your Merge Tag reference sheet
Use the Barcode with File Name$[[BC_WNAME]]
Note: Barcode should be 20-24 font size

Adding merge tags to an existing document
Select the appropriate merge tags
Add the merge tag to the body of the letter
Save as RTF and name the document

Uploading Forms to simplifyMD

Uploading forms and templates
•Select the Tools Tab
•Select Manage Templates from the Navigation Tree
•From the Tools detail window:•Select the Upload a template to the system
•Select the Tab where the document will be accessed•Enter a Display Name•Select Chart Note as the label•Browse for the document•Select upload

Test the form for accuracy
Select the document Tab
Select T button
Select Open Read Only
Verify document visually
Print the document
Scan document to Filing Center

• 2 backup USB hard drives (pictured bottom left).
• 1 is connected to server via a USB Cable (pictured bottom right) and a power outlet via a UPS unit
• Swap out the drives everyday – same time – store the one not connected to the
server offsite or in a locked fireproof safe.
• Label each drive– Backup 1 & Backup 2– Backup A & Backup B
• Database server back up– nightly at 1:00 A.M. local time.
• Swap out and plug in each day
Backing Up Your Data Digitally

Technical Support 678-578-6187 Monday through Friday from 8:00am-8:00pm. (ET)
Email: [email protected]