Upgrading to UPS WorldShip v9 - Shoptech The E2...
21
1 Upgrading to UPS WorldShip v9.0 These interface instructions support UPS WorldShip Software V 9.0. Your E2 Packing Lists MUST carry the Shipping Code “UPS” in order for the export to “see” them and list them on the Export tab of the interface. If you have special instructions for your shipping department (e.g., UPS Blue), enter this information in the Ship Via field on the Header tab of the Order. This will populate the Ship Via field on your Packing List. If you have multiple boxes in a shipment, use the Pack Separately option on the Detail tab of the E2 Packing List and determine the number of parts to be packed in each container. These “multiple” packages MUST be sent over to UPS divided this way so they can be properly numbered via the Reference Numbering system in WorldShip and assigned individual Tracking Numbers (refer to the Export Options in Step 5 on page 3). The Description of Contents field on the Bill of Lading tab cannot be more than 50 characters. Installing the Upgrade to V9.0 You do not have to uninstall your previous version of UPS WorldShip to upgrade. Simply run the CD and follow the onscreen instructions! This install is considerably longer than previous versions so please be patient. You will first be asked to select your desired application language. Then the setup wizard will begin, warning you to exit all other programs. This wizard automatically completes and restarts your computer so please do save and close all other programs so you do not lose any work in other applications. Click Next to continue.
Transcript of Upgrading to UPS WorldShip v9 - Shoptech The E2...
1
Upgrading to UPS WorldShip v9.0 These interface instructions support UPS WorldShip Software V 9.0. Your E2 Packing Lists MUST carry the Shipping Code “UPS” in order for the export to “see” them and list them on the Export tab of the interface. If you have special instructions for your shipping department (e.g., UPS Blue), enter this information in the Ship Via field on the Header tab of the Order. This will populate the Ship Via field on your Packing List. If you have multiple boxes in a shipment, use the Pack Separately option on the Detail tab of the E2 Packing List and determine the number of parts to be packed in each container. These “multiple” packages MUST be sent over to UPS divided this way so they can be properly numbered via the Reference Numbering system in WorldShip and assigned individual Tracking Numbers (refer to the Export Options in Step 5 on page 3). The Description of Contents field on the Bill of Lading tab cannot be more than 50 characters.
Installing the Upgrade to V9.0 You do not have to uninstall your previous version of UPS WorldShip to upgrade. Simply run the CD and follow the onscreen instructions! This install is considerably longer than previous versions so please be patient. You will first be asked to select your desired application language.
Then the setup wizard will begin, warning you to exit all other programs. This wizard automatically completes and restarts your computer so please do save and close all other programs so you do not lose any work in other applications. Click Next to continue.
2
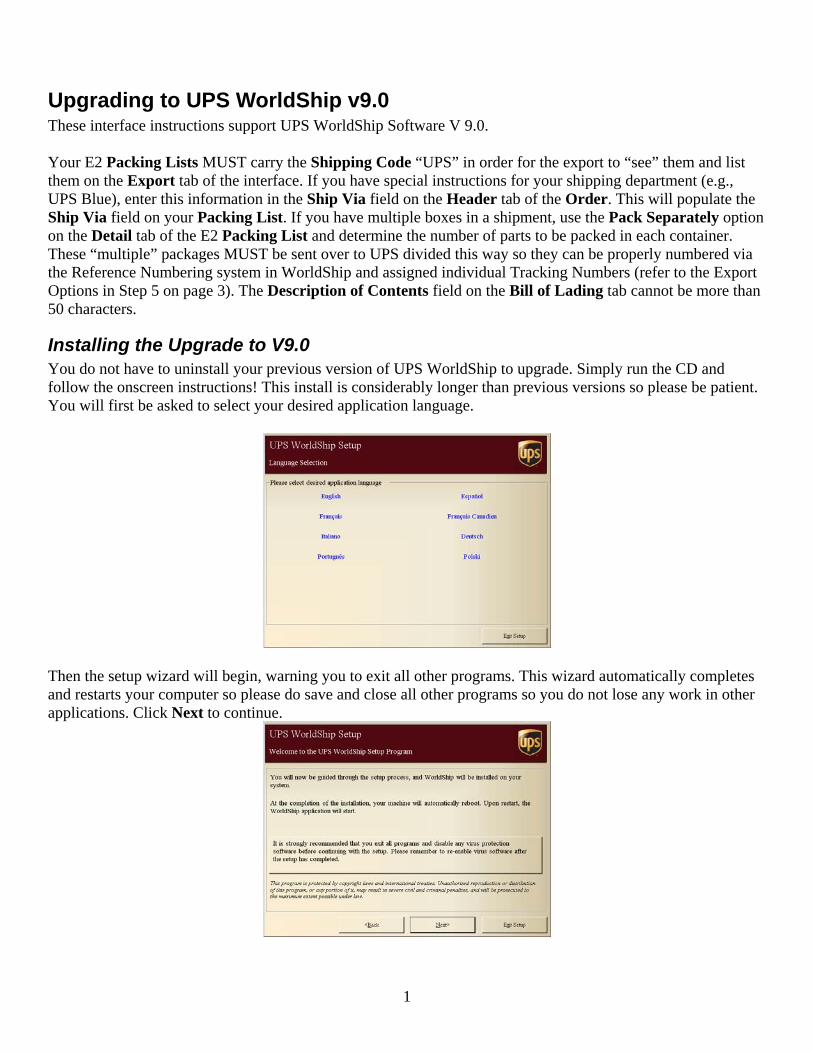
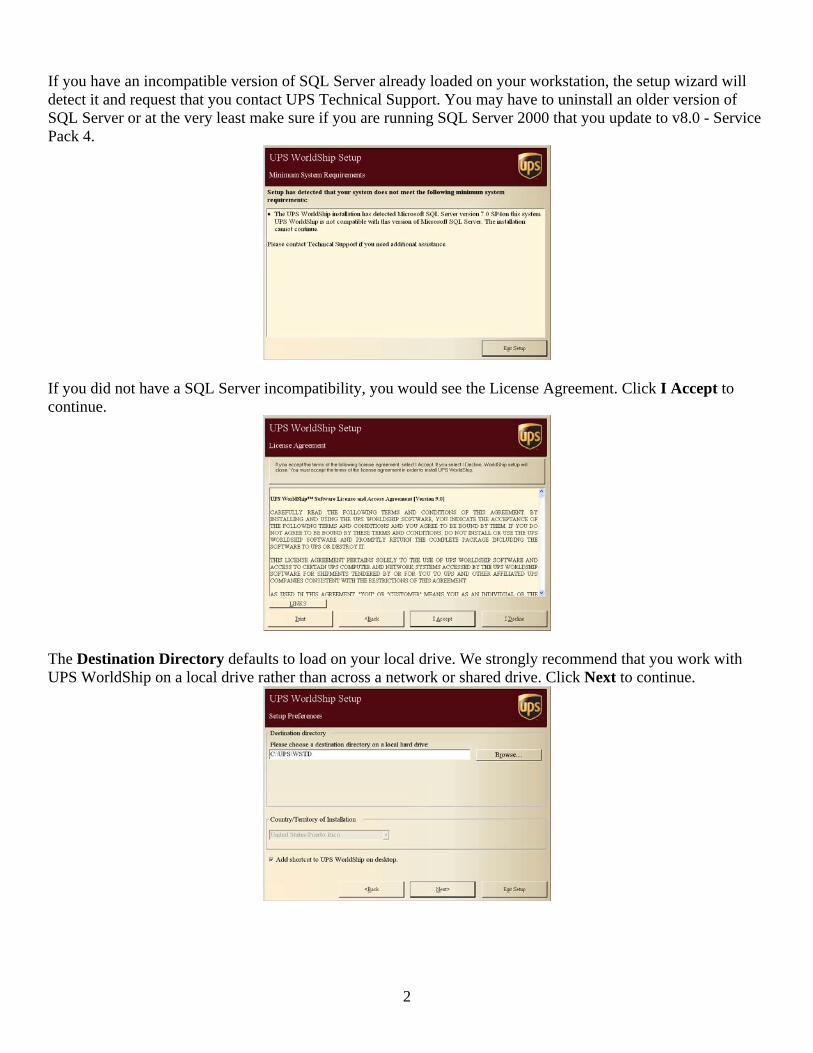
If you have an incompatible version of SQL Server already loaded on your workstation, the setup wizard will detect it and request that you contact UPS Technical Support. You may have to uninstall an older version of SQL Server or at the very least make sure if you are running SQL Server 2000 that you update to v8.0 - Service Pack 4.
If you did not have a SQL Server incompatibility, you would see the License Agreement. Click I Accept to continue.
The Destination Directory defaults to load on your local drive. We strongly recommend that you work with UPS WorldShip on a local drive rather than across a network or shared drive. Click Next to continue.
3
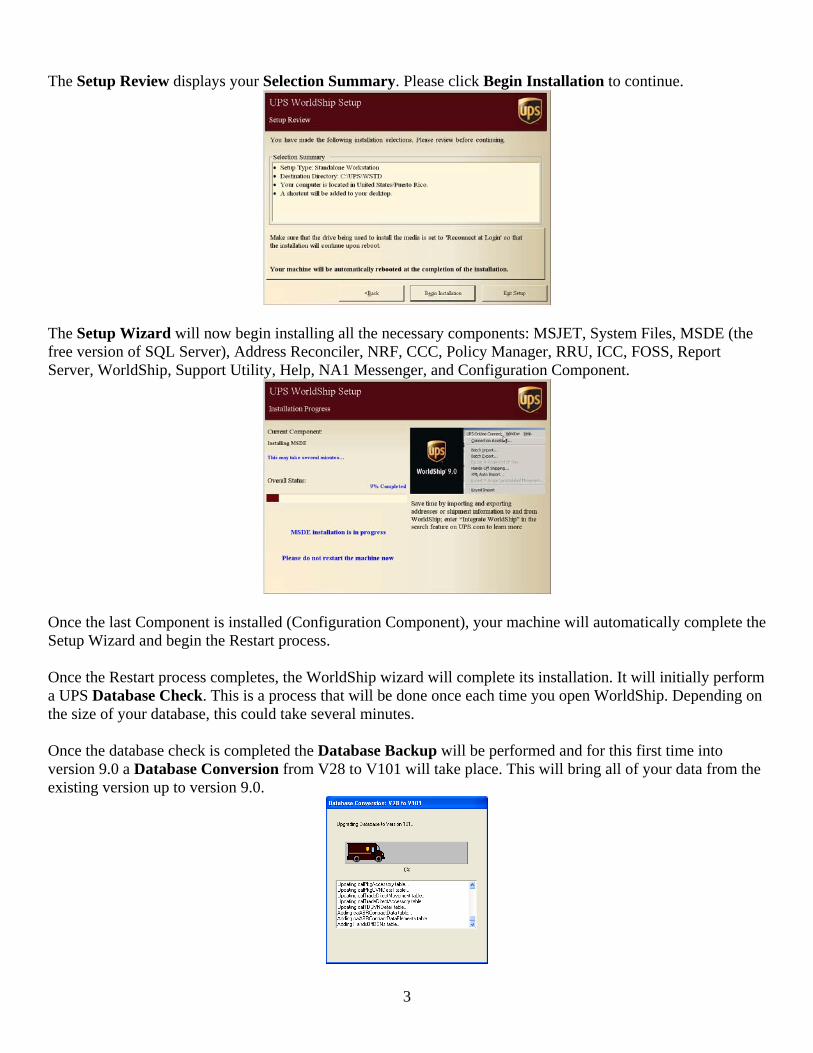
The Setup Review displays your Selection Summary. Please click Begin Installation to continue.
The Setup Wizard will now begin installing all the necessary components: MSJET, System Files, MSDE (the free version of SQL Server), Address Reconciler, NRF, CCC, Policy Manager, RRU, ICC, FOSS, Report Server, WorldShip, Support Utility, Help, NA1 Messenger, and Configuration Component.
Once the last Component is installed (Configuration Component), your machine will automatically complete the Setup Wizard and begin the Restart process. Once the Restart process completes, the WorldShip wizard will complete its installation. It will initially perform a UPS Database Check. This is a process that will be done once each time you open WorldShip. Depending on the size of your database, this could take several minutes. Once the database check is completed the Database Backup will be performed and for this first time into version 9.0 a Database Conversion from V28 to V101 will take place. This will bring all of your data from the existing version up to version 9.0.
4
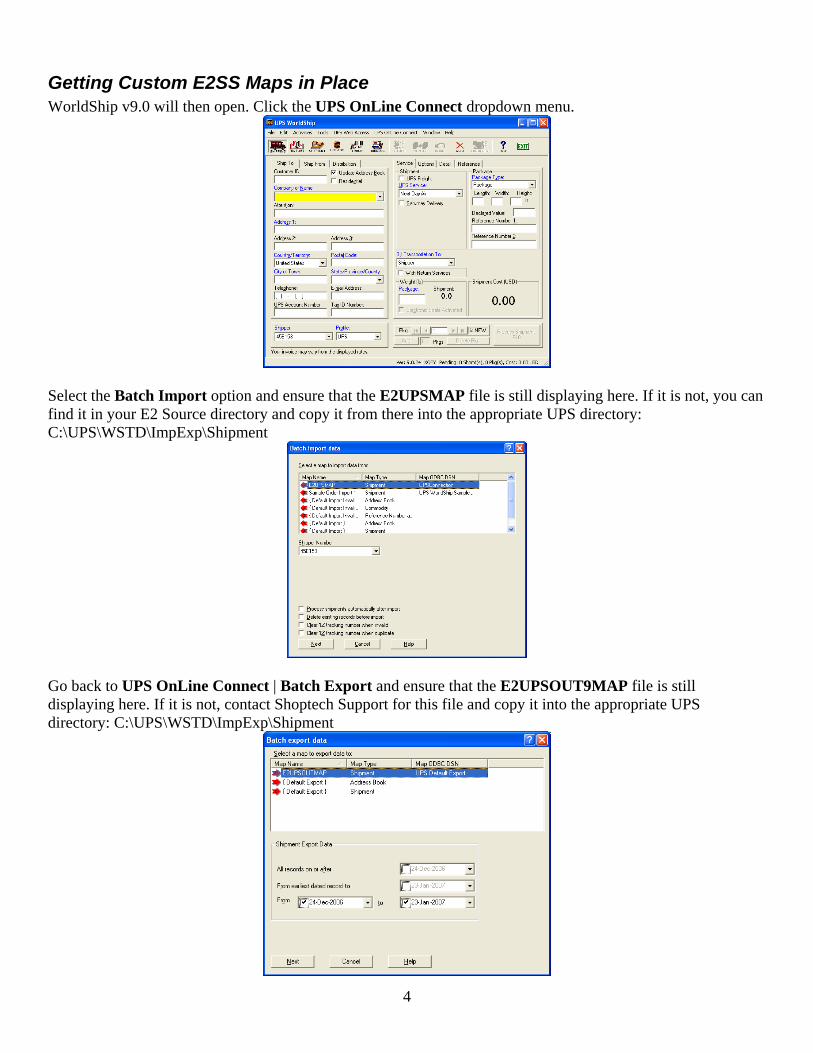
Getting Custom E2SS Maps in Place WorldShip v9.0 will then open. Click the UPS OnLine Connect dropdown menu.
Select the Batch Import option and ensure that the E2UPSMAP file is still displaying here. If it is not, you can find it in your E2 Source directory and copy it from there into the appropriate UPS directory: C:\UPS\WSTD\ImpExp\Shipment
Go back to UPS OnLine Connect | Batch Export and ensure that the E2UPSOUT9MAP file is still displaying here. If it is not, contact Shoptech Support for this file and copy it into the appropriate UPS directory: C:\UPS\WSTD\ImpExp\Shipment
5
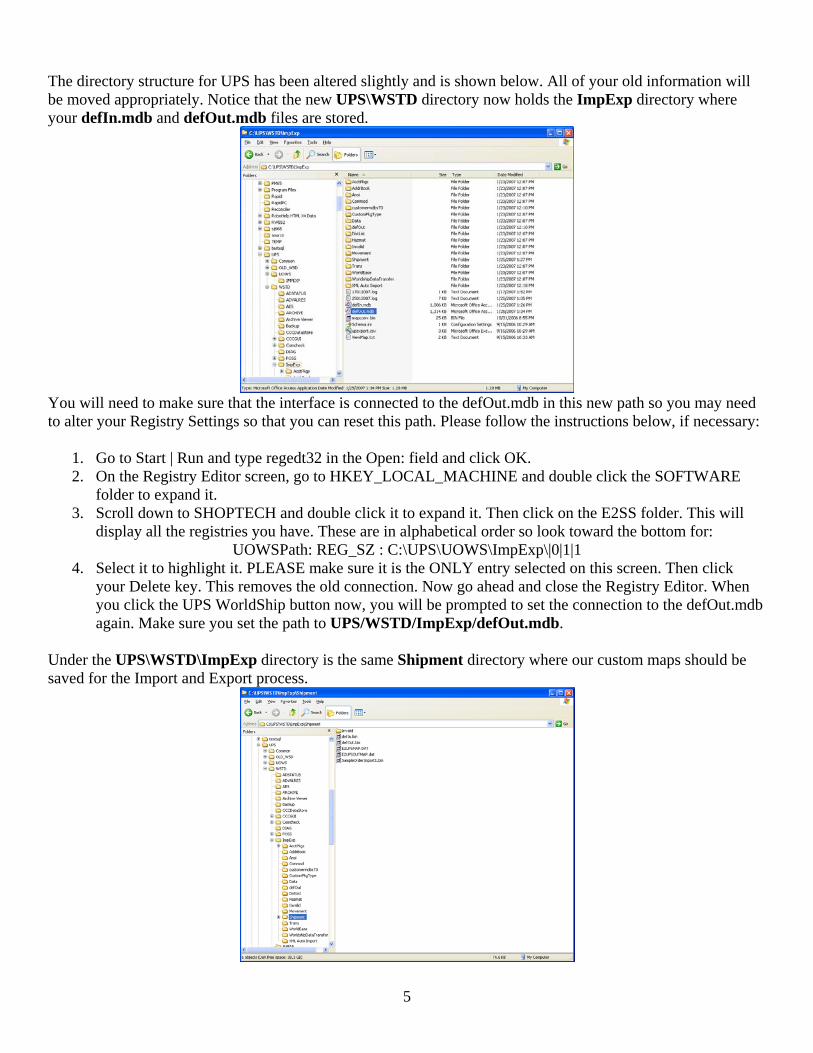
The directory structure for UPS has been altered slightly and is shown below. All of your old information will be moved appropriately. Notice that the new UPS\WSTD directory now holds the ImpExp directory where your defIn.mdb and defOut.mdb files are stored.
You will need to make sure that the interface is connected to the defOut.mdb in this new path so you may need to alter your Registry Settings so that you can reset this path. Please follow the instructions below, if necessary:
1. Go to Start | Run and type regedt32 in the Open: field and click OK. 2. On the Registry Editor screen, go to HKEY_LOCAL_MACHINE and double click the SOFTWARE
folder to expand it. 3. Scroll down to SHOPTECH and double click it to expand it. Then click on the E2SS folder. This will
display all the registries you have. These are in alphabetical order so look toward the bottom for: UOWSPath: REG_SZ : C:\UPS\UOWS\ImpExp\|0|1|1
4. Select it to highlight it. PLEASE make sure it is the ONLY entry selected on this screen. Then click your Delete key. This removes the old connection. Now go ahead and close the Registry Editor. When you click the UPS WorldShip button now, you will be prompted to set the connection to the defOut.mdb again. Make sure you set the path to UPS/WSTD/ImpExp/defOut.mdb.
Under the UPS\WSTD\ImpExp directory is the same Shipment directory where our custom maps should be saved for the Import and Export process.
6
Using UPS WorldShip Now you can automatically calculate UPS shipping costs and assign tracking numbers. Just create your Packing List and process it. This interface supports UPS WorldShip Software V 9.0. Your Packing Lists MUST carry the Shipping Code “UPS” in order for the export to “see” them and list them on the Export tab of the interface. If you have special instructions for your shipping department (e.g., UPS Blue), enter this information in the Ship Via field on the Header tab of the Order. This will populate the Ship Via field on your Packing List. If you have multiple boxes in a shipment, use the Pack Separately option on the Detail tab of the Shop System Packing List and determine the number of like parts to be packed in each container. These “multiple” packages MUST be sent over to UPS divided this way so they can be properly numbered via the Reference Numbering system in WorldShip and assigned individual Tracking Numbers (refer to the Export Options in Step 5 on page 7). The field Description of Contents on the Bill of Lading tab cannot be more than 50 characters.
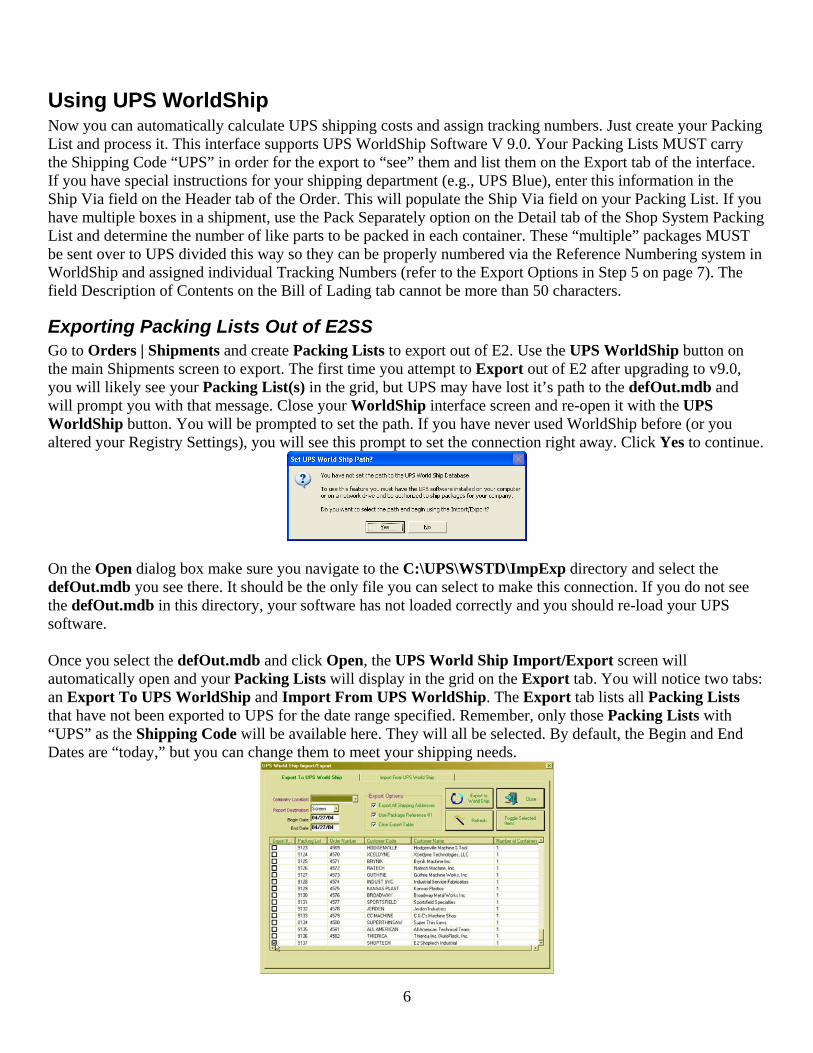
Exporting Packing Lists Out of E2SS Go to Orders | Shipments and create Packing Lists to export out of E2. Use the UPS WorldShip button on the main Shipments screen to export. The first time you attempt to Export out of E2 after upgrading to v9.0, you will likely see your Packing List(s) in the grid, but UPS may have lost it’s path to the defOut.mdb and will prompt you with that message. Close your WorldShip interface screen and re-open it with the UPS WorldShip button. You will be prompted to set the path. If you have never used WorldShip before (or you altered your Registry Settings), you will see this prompt to set the connection right away. Click Yes to continue.
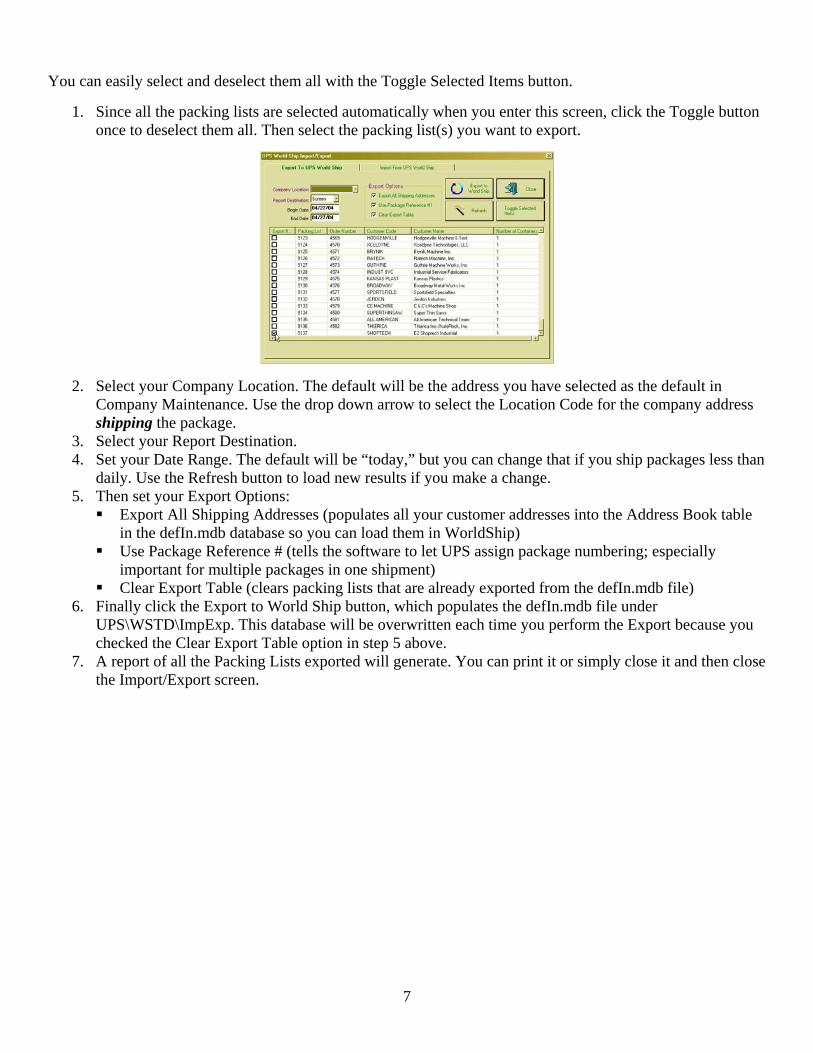
On the Open dialog box make sure you navigate to the C:\UPS\WSTD\ImpExp directory and select the defOut.mdb you see there. It should be the only file you can select to make this connection. If you do not see the defOut.mdb in this directory, your software has not loaded correctly and you should re-load your UPS software. Once you select the defOut.mdb and click Open, the UPS World Ship Import/Export screen will automatically open and your Packing Lists will display in the grid on the Export tab. You will notice two tabs: an Export To UPS WorldShip and Import From UPS WorldShip. The Export tab lists all Packing Lists that have not been exported to UPS for the date range specified. Remember, only those Packing Lists with “UPS” as the Shipping Code will be available here. They will all be selected. By default, the Begin and End Dates are “today,” but you can change them to meet your shipping needs.
7
You can easily select and deselect them all with the Toggle Selected Items button.
1. Since all the packing lists are selected automatically when you enter this screen, click the Toggle button once to deselect them all. Then select the packing list(s) you want to export.
2. Select your Company Location. The default will be the address you have selected as the default in Company Maintenance. Use the drop down arrow to select the Location Code for the company address shipping the package.
3. Select your Report Destination. 4. Set your Date Range. The default will be “today,” but you can change that if you ship packages less than
daily. Use the Refresh button to load new results if you make a change. 5. Then set your Export Options:
Export All Shipping Addresses (populates all your customer addresses into the Address Book table in the defIn.mdb database so you can load them in WorldShip)
Use Package Reference # (tells the software to let UPS assign package numbering; especially important for multiple packages in one shipment)
Clear Export Table (clears packing lists that are already exported from the defIn.mdb file) 6. Finally click the Export to World Ship button, which populates the defIn.mdb file under
UPS\WSTD\ImpExp. This database will be overwritten each time you perform the Export because you checked the Clear Export Table option in step 5 above.
7. A report of all the Packing Lists exported will generate. You can print it or simply close it and then close the Import/Export screen.

8
UPS WorldShip Once you have sent your packing list(s) to UPS, you will have to open the UPS Online WorldShip software. You’ll have two options for reconciling/processing your shipments once you have exported out of E2: the standard “batch” import or a “keyed” import where you enter the E2 Packing List numbers manually.
UPS Settings Before you get started, there are a few things you should set in UPS WorldShip prior to processing shipments.
Reference Numbers On page 7 of these instructions, the checkmark must be ON for the Use Package Reference # option under Export Options. The interface needs this reference field in order to map fields from UPS to E2. Some customers need to use Reference fields for Packing List Numbers, Customer Purchase Order Numbers, etc. so they will print on the label for the package. Since E2 needs Reference1 and Reference2, you may use 3, 4, or 5 to print this information on your label. Here’s how you change the default fields that print on the label!
1. Go to Tools | System Preferences and click on the Printing Setup tab. Notice the Reference Numbers Printed on the Label section. Reference No. 1 and Reference No. 2 are the default. Simply click the drop down arrows to select Reference No. 3, Reference No. 4, or Reference No. 5. Only two of the Reference fields will print on the label.
9
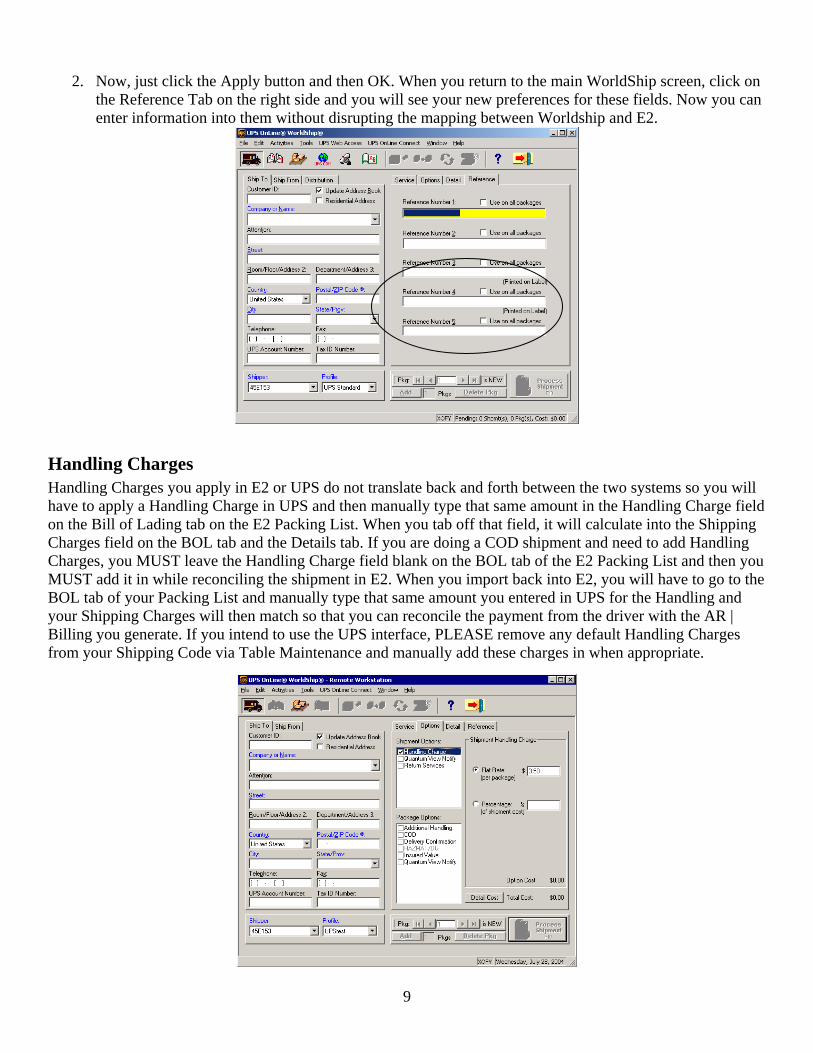
2. Now, just click the Apply button and then OK. When you return to the main WorldShip screen, click on the Reference Tab on the right side and you will see your new preferences for these fields. Now you can enter information into them without disrupting the mapping between Worldship and E2.
Handling Charges Handling Charges you apply in E2 or UPS do not translate back and forth between the two systems so you will have to apply a Handling Charge in UPS and then manually type that same amount in the Handling Charge field on the Bill of Lading tab on the E2 Packing List. When you tab off that field, it will calculate into the Shipping Charges field on the BOL tab and the Details tab. If you are doing a COD shipment and need to add Handling Charges, you MUST leave the Handling Charge field blank on the BOL tab of the E2 Packing List and then you MUST add it in while reconciling the shipment in E2. When you import back into E2, you will have to go to the BOL tab of your Packing List and manually type that same amount you entered in UPS for the Handling and your Shipping Charges will then match so that you can reconcile the payment from the driver with the AR | Billing you generate. If you intend to use the UPS interface, PLEASE remove any default Handling Charges from your Shipping Code via Table Maintenance and manually add these charges in when appropriate.
10
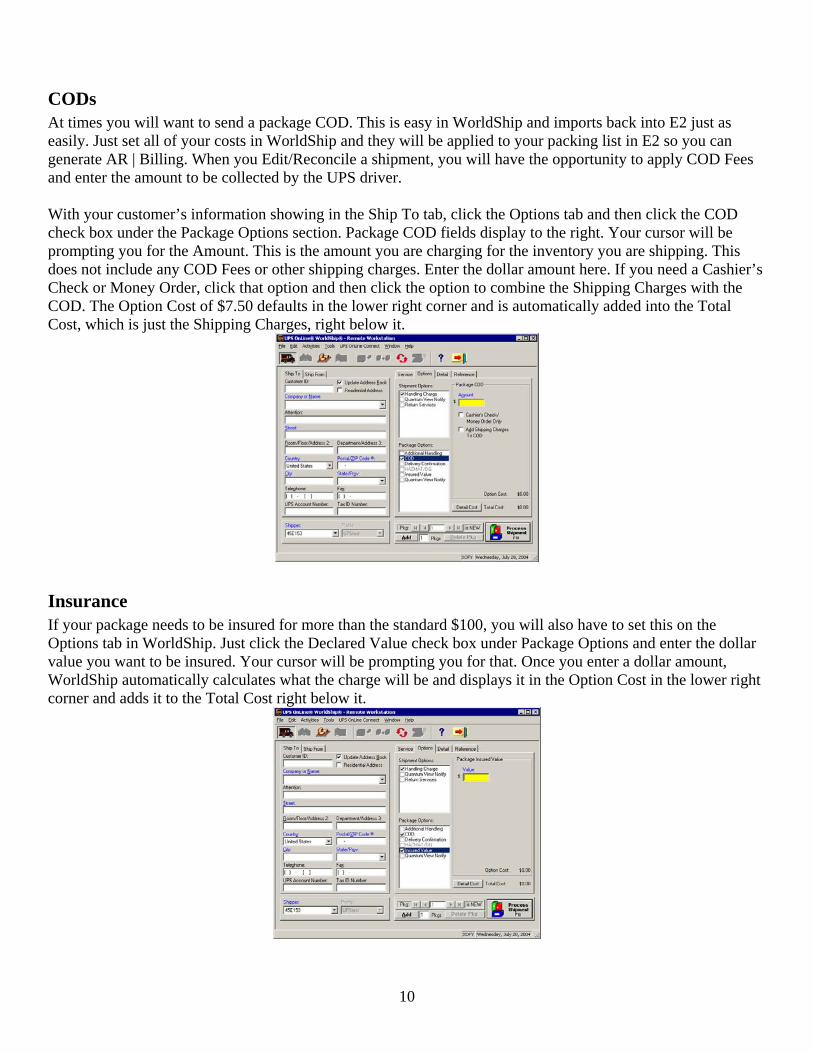
CODs At times you will want to send a package COD. This is easy in WorldShip and imports back into E2 just as easily. Just set all of your costs in WorldShip and they will be applied to your packing list in E2 so you can generate AR | Billing. When you Edit/Reconcile a shipment, you will have the opportunity to apply COD Fees and enter the amount to be collected by the UPS driver. With your customer’s information showing in the Ship To tab, click the Options tab and then click the COD check box under the Package Options section. Package COD fields display to the right. Your cursor will be prompting you for the Amount. This is the amount you are charging for the inventory you are shipping. This does not include any COD Fees or other shipping charges. Enter the dollar amount here. If you need a Cashier’s Check or Money Order, click that option and then click the option to combine the Shipping Charges with the COD. The Option Cost of $7.50 defaults in the lower right corner and is automatically added into the Total Cost, which is just the Shipping Charges, right below it.
Insurance If your package needs to be insured for more than the standard $100, you will also have to set this on the Options tab in WorldShip. Just click the Declared Value check box under Package Options and enter the dollar value you want to be insured. Your cursor will be prompting you for that. Once you enter a dollar amount, WorldShip automatically calculates what the charge will be and displays it in the Option Cost in the lower right corner and adds it to the Total Cost right below it.
11
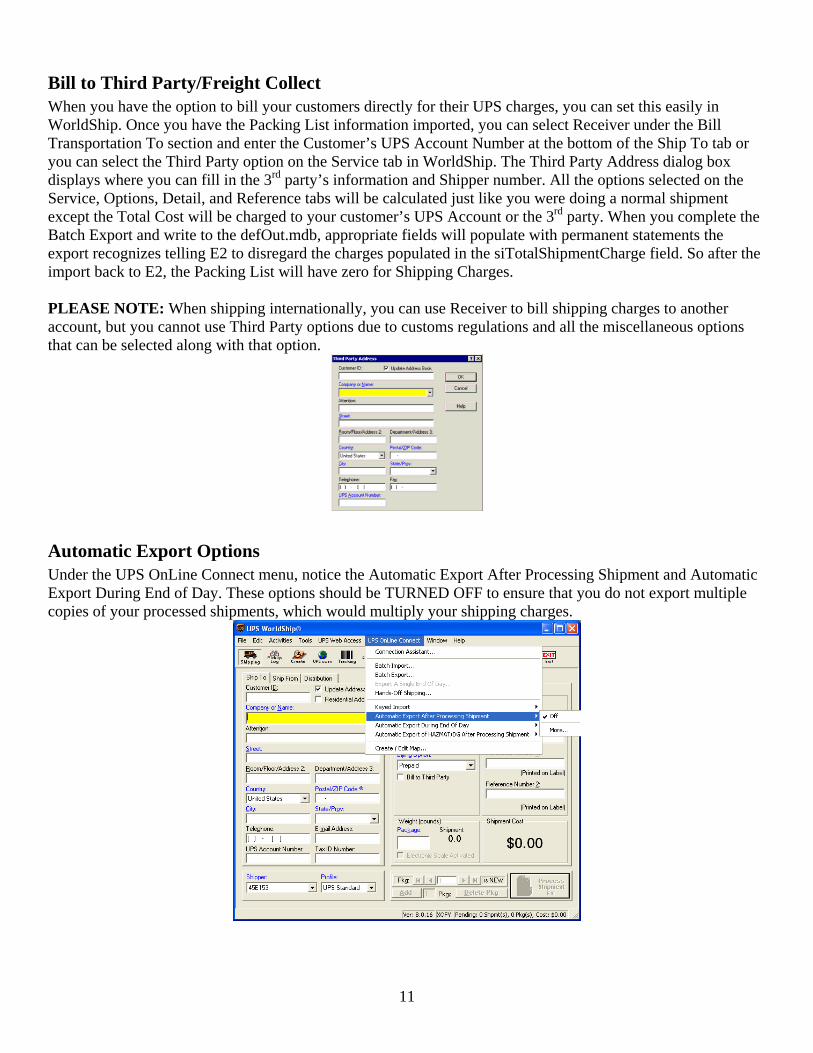
Bill to Third Party/Freight Collect When you have the option to bill your customers directly for their UPS charges, you can set this easily in WorldShip. Once you have the Packing List information imported, you can select Receiver under the Bill Transportation To section and enter the Customer’s UPS Account Number at the bottom of the Ship To tab or you can select the Third Party option on the Service tab in WorldShip. The Third Party Address dialog box displays where you can fill in the 3rd party’s information and Shipper number. All the options selected on the Service, Options, Detail, and Reference tabs will be calculated just like you were doing a normal shipment except the Total Cost will be charged to your customer’s UPS Account or the 3rd party. When you complete the Batch Export and write to the defOut.mdb, appropriate fields will populate with permanent statements the export recognizes telling E2 to disregard the charges populated in the siTotalShipmentCharge field. So after the import back to E2, the Packing List will have zero for Shipping Charges. PLEASE NOTE: When shipping internationally, you can use Receiver to bill shipping charges to another account, but you cannot use Third Party options due to customs regulations and all the miscellaneous options that can be selected along with that option.
Automatic Export Options Under the UPS OnLine Connect menu, notice the Automatic Export After Processing Shipment and Automatic Export During End of Day. These options should be TURNED OFF to ensure that you do not export multiple copies of your processed shipments, which would multiply your shipping charges.
12
Using the Reference Rate Utility How do I add the Fuel Surcharge to my published rates?
1. You can adjust your rates for the Fuel Surcharge by using the Reference Rate Utility, which is included with WorldShip. For more information on how to adjust your rates using the Reference Rate Utility, use this link to Fuel Surcharge info on ups.com: http://www.ups.com/content/us/en/resources/find/cost/fuel_surcharge.html
2. Beginning with WorldShip 9.0, the Reference Rate Utility is available only if you used the utility to modify rates in a previous version of WorldShip. http://www.ups.com/content/us/en/resources/find/cost/fuel_surcharge.html
How do I know if I have downloaded and installed the newest Rates? Select "Help", then choose "About UPS OnLine WorldShip". The UPS Service Rates Version will display MM/YY (Month/Year). For the 2007 rates you will view '01/07'. If the rates have not been applied, verify that the system date is correct. Shut down and restart the WorldShip application. Check in Help again.
UPS Processes Now that you have WorldShip set, you’re ready to assign tracking numbers and calculate shipping charges! You have two options here to get your Packing Lists into UPS – the standard Batch Import or the Keyed Import!
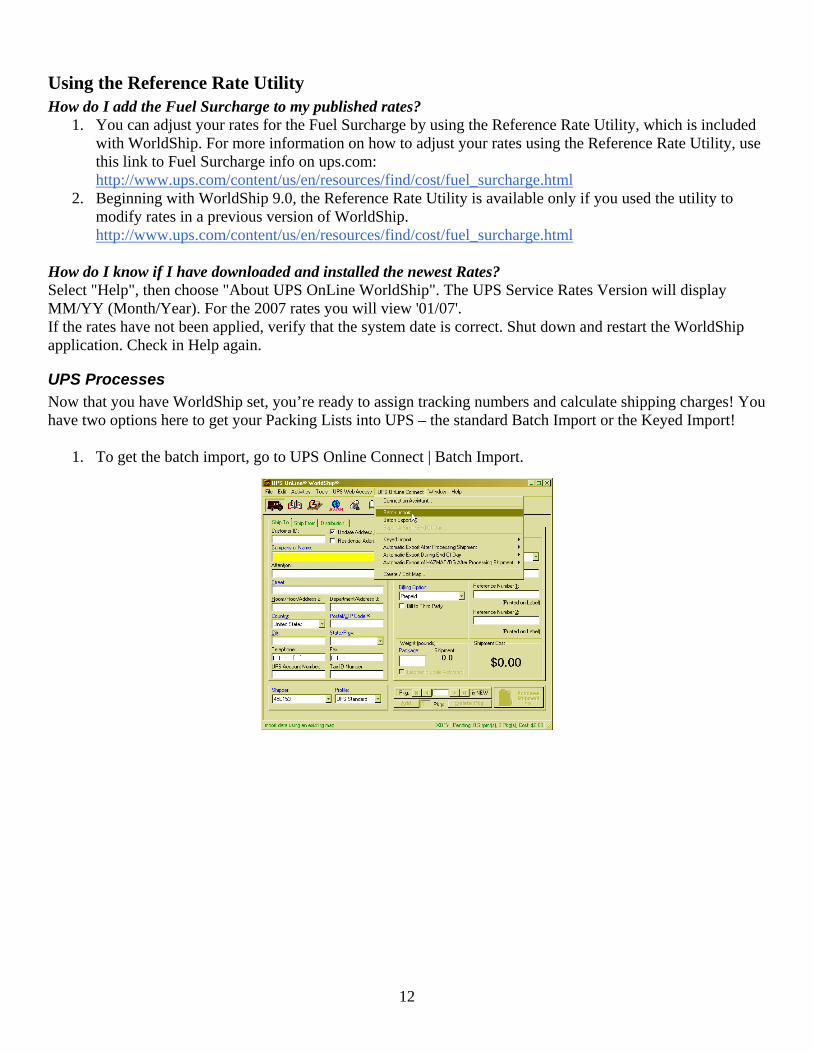
1. To get the batch import, go to UPS Online Connect | Batch Import.
13
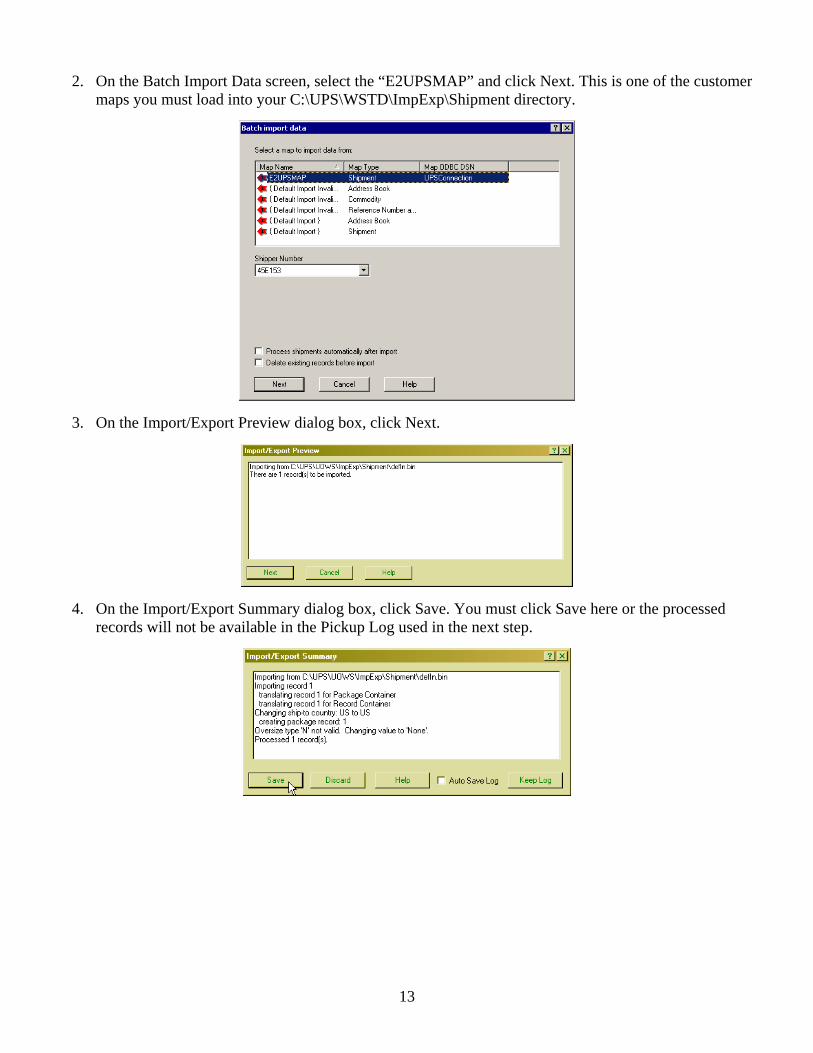
2. On the Batch Import Data screen, select the “E2UPSMAP” and click Next. This is one of the customer maps you must load into your C:\UPS\WSTD\ImpExp\Shipment directory.
3. On the Import/Export Preview dialog box, click Next.
4. On the Import/Export Summary dialog box, click Save. You must click Save here or the processed records will not be available in the Pickup Log used in the next step.
14
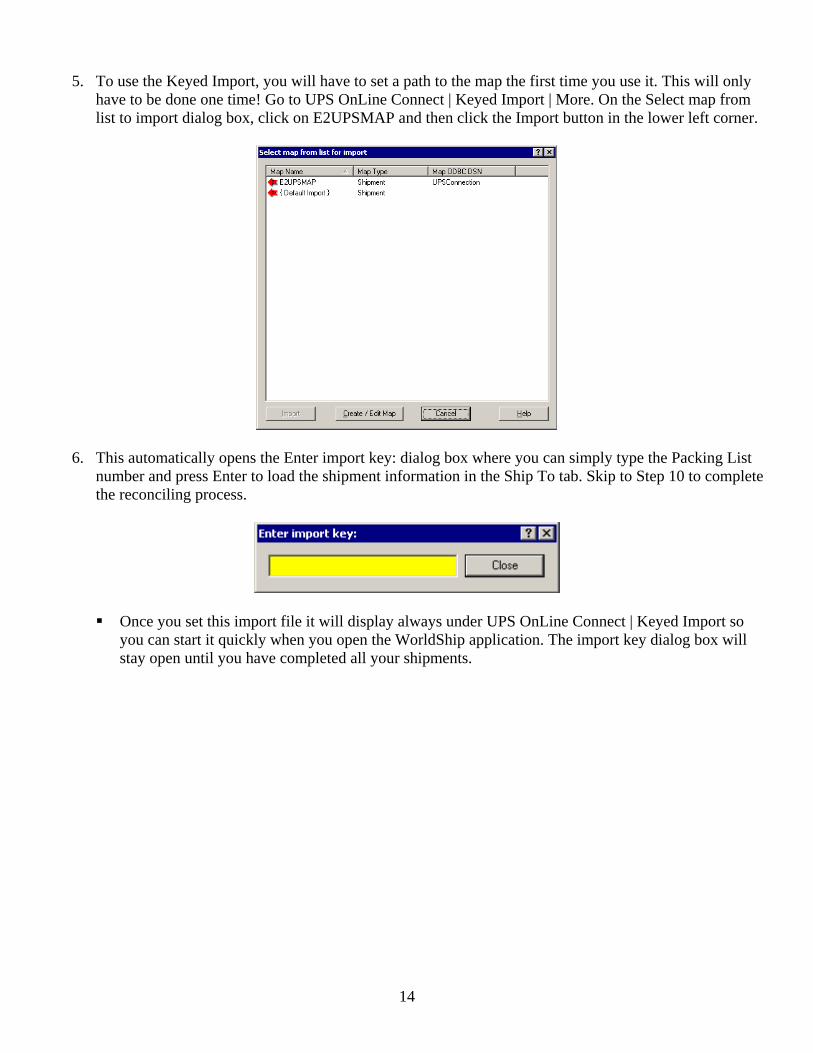
5. To use the Keyed Import, you will have to set a path to the map the first time you use it. This will only have to be done one time! Go to UPS OnLine Connect | Keyed Import | More. On the Select map from list to import dialog box, click on E2UPSMAP and then click the Import button in the lower left corner.
6. This automatically opens the Enter import key: dialog box where you can simply type the Packing List number and press Enter to load the shipment information in the Ship To tab. Skip to Step 10 to complete the reconciling process.
Once you set this import file it will display always under UPS OnLine Connect | Keyed Import so you can start it quickly when you open the WorldShip application. The import key dialog box will stay open until you have completed all your shipments.
15
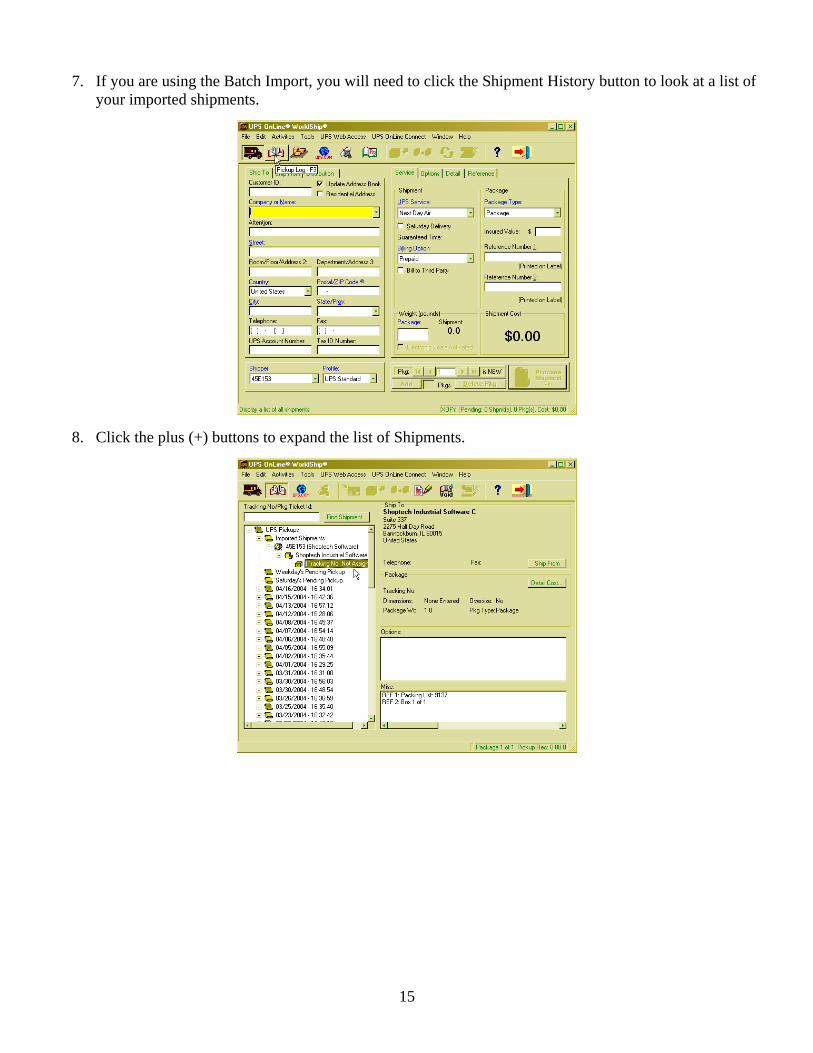
7. If you are using the Batch Import, you will need to click the Shipment History button to look at a list of your imported shipments.
8. Click the plus (+) buttons to expand the list of Shipments.
16
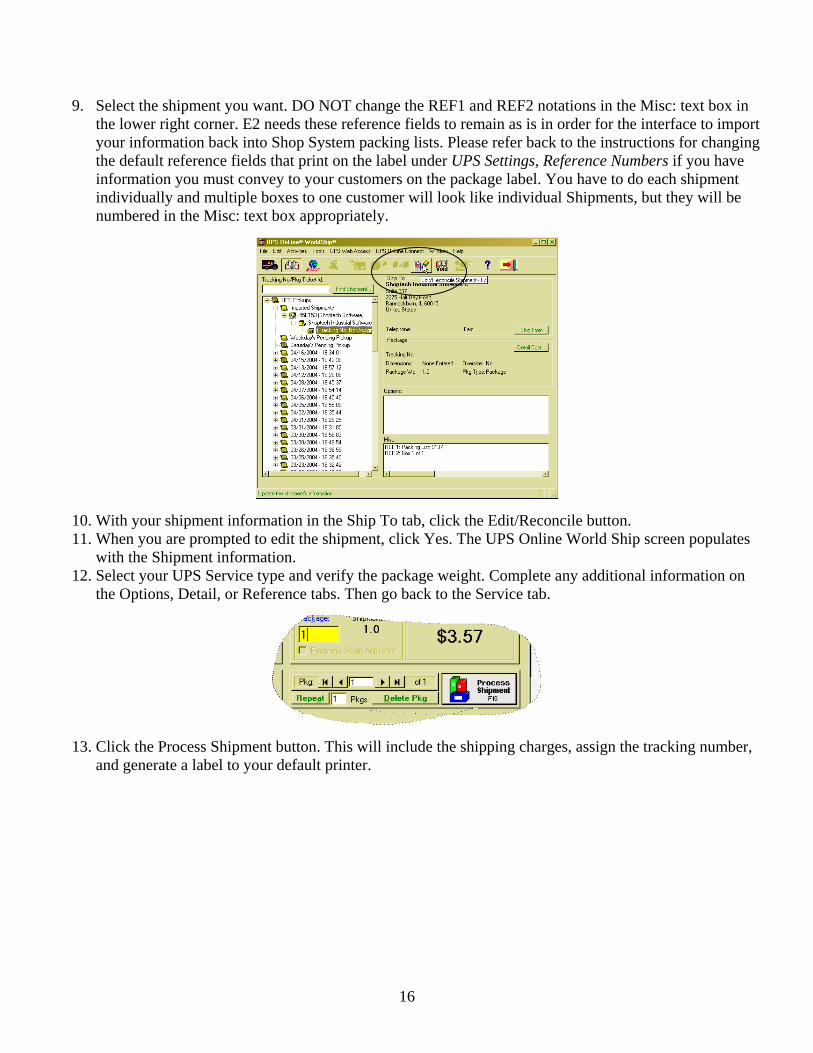
9. Select the shipment you want. DO NOT change the REF1 and REF2 notations in the Misc: text box in the lower right corner. E2 needs these reference fields to remain as is in order for the interface to import your information back into Shop System packing lists. Please refer back to the instructions for changing the default reference fields that print on the label under UPS Settings, Reference Numbers if you have information you must convey to your customers on the package label. You have to do each shipment individually and multiple boxes to one customer will look like individual Shipments, but they will be numbered in the Misc: text box appropriately.
10. With your shipment information in the Ship To tab, click the Edit/Reconcile button. 11. When you are prompted to edit the shipment, click Yes. The UPS Online World Ship screen populates
with the Shipment information. 12. Select your UPS Service type and verify the package weight. Complete any additional information on
the Options, Detail, or Reference tabs. Then go back to the Service tab.
13. Click the Process Shipment button. This will include the shipping charges, assign the tracking number, and generate a label to your default printer.

17
Importing Customer Addresses 1. Now, go back to UPS OnLine Connect and select Batch Import again. We will import your customer
addresses so they are all loaded in WorldShip. These are available to us because we checked the Export All Shipping Addresses under Export Options when we did the initial export out of E2. Select the Default Import of Address Book as the Map Type. Then select the type of import you would like. The Ship To option is the default on the Address Book tab. Select any other options you need and then click Next.
2. The Import/Export Preview will display the number of records you have imported. Click Next to continue.
18
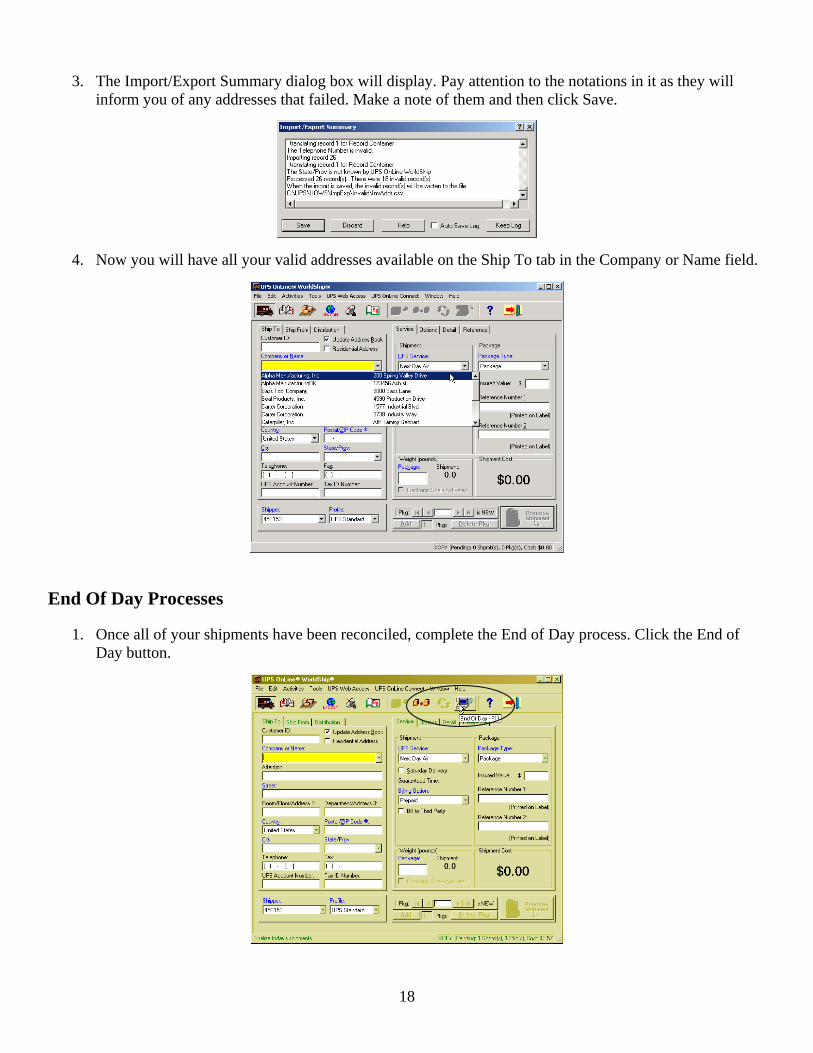
3. The Import/Export Summary dialog box will display. Pay attention to the notations in it as they will inform you of any addresses that failed. Make a note of them and then click Save.
4. Now you will have all your valid addresses available on the Ship To tab in the Company or Name field.
End Of Day Processes
1. Once all of your shipments have been reconciled, complete the End of Day process. Click the End of Day button.

19
2. When you are prompted to close today’s shipping, click Yes. The Pickup Summary Barcode Report and Daily Shipment Detail Report will generate automatically to your default printer.
3. Go to UPS Online Connect | Batch Export.
4. On the Batch Export Data dialog box, notice the Shipment Export Data information. The default is to export data for one month. This would not be necessary if you ship daily and you would want to change that date range to be “today” instead of the full month to avoid re-exporting past information into the defOut.mdb file. Select the E2UPSOUT9MAP and click Next. This is the other custom map you pasted in your C:\UPS\WSTD\ImpExp\Shipment directory.
20
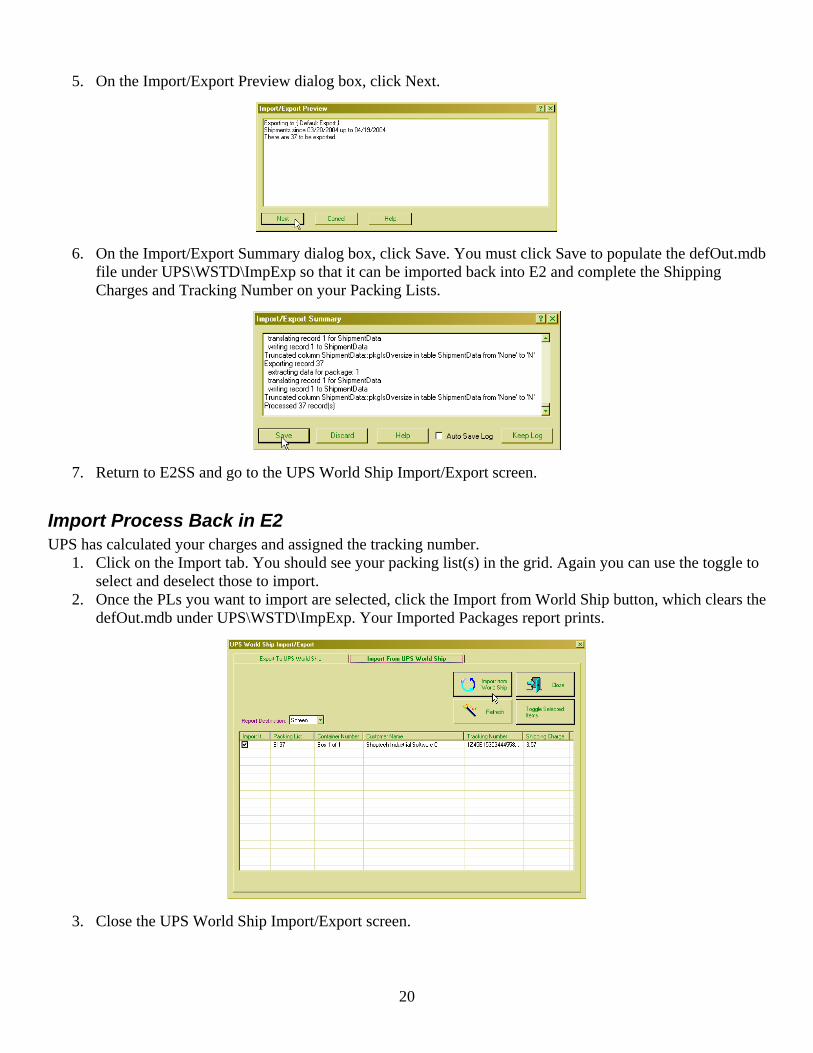
5. On the Import/Export Preview dialog box, click Next.
6. On the Import/Export Summary dialog box, click Save. You must click Save to populate the defOut.mdb file under UPS\WSTD\ImpExp so that it can be imported back into E2 and complete the Shipping Charges and Tracking Number on your Packing Lists.
7. Return to E2SS and go to the UPS World Ship Import/Export screen.
Import Process Back in E2 UPS has calculated your charges and assigned the tracking number.
1. Click on the Import tab. You should see your packing list(s) in the grid. Again you can use the toggle to select and deselect those to import.
2. Once the PLs you want to import are selected, click the Import from World Ship button, which clears the defOut.mdb under UPS\WSTD\ImpExp. Your Imported Packages report prints.
3. Close the UPS World Ship Import/Export screen.

21
4. Now Edit your Packing List. Notice the Shipping Charges on the Detail tab are populated and an Exported To UPS checkbox now displays with a checkmark.
5. Click on the Bill of Lading tab. Notice the Shipping Charges are populated there too along with the Tracking Number(s). Here you can select the Tracking Number and right click it to open the Container Detail screen. From here you can click the Details button to automatically open the UPS website to track your package.