
Upgrade Guide for PowerCenter 8.1 - Gerardnico · Upgrade Guide for PowerCenter 8.1.x. ......
67
Informatica (Version 9.0.1 HotFix 1) Upgrade Guide for PowerCenter 8.1.x
Transcript of Upgrade Guide for PowerCenter 8.1 - Gerardnico · Upgrade Guide for PowerCenter 8.1.x. ......

Informatica (Version 9.0.1 HotFix 1)
Upgrade Guide for PowerCenter 8.1.x

Informatica Upgrade Guide for PowerCenter 8.1.x
Version 9.0.1 HotFix 1September 2010
Copyright (c) 1998-2010 Informatica. All rights reserved.
This software and documentation contain proprietary information of Informatica Corporation and are provided under a license agreement containing restrictions on use anddisclosure and are also protected by copyright law. Reverse engineering of the software is prohibited. No part of this document may be reproduced or transmitted in any form,by any means (electronic, photocopying, recording or otherwise) without prior consent of Informatica Corporation. This Software may be protected by U.S. and/or internationalPatents and other Patents Pending.
Use, duplication, or disclosure of the Software by the U.S. Government is subject to the restrictions set forth in the applicable software license agreement and as provided inDFARS 227.7202-1(a) and 227.7702-3(a) (1995), DFARS 252.227-7013©(1)(ii) (OCT 1988), FAR 12.212(a) (1995), FAR 52.227-19, or FAR 52.227-14 (ALT III), as applicable.
The information in this product or documentation is subject to change without notice. If you find any problems in this product or documentation, please report them to us inwriting.
Informatica, Informatica Platform, Informatica Data Services, PowerCenter, PowerCenterRT, PowerCenter Connect, PowerCenter Data Analyzer, PowerExchange,PowerMart, Metadata Manager, Informatica Data Quality, Informatica Data Explorer, Informatica B2B Data Transformation, Informatica B2B Data Exchange and InformaticaOn Demand are trademarks or registered trademarks of Informatica Corporation in the United States and in jurisdictions throughout the world. All other company and productnames may be trade names or trademarks of their respective owners.
Portions of this software and/or documentation are subject to copyright held by third parties, including without limitation: Copyright DataDirect Technologies. All rightsreserved. Copyright © Sun Microsystems. All rights reserved. Copyright © RSA Security Inc. All Rights Reserved. Copyright © Ordinal Technology Corp. All rightsreserved.Copyright © Aandacht c.v. All rights reserved. Copyright Genivia, Inc. All rights reserved. Copyright 2007 Isomorphic Software. All rights reserved. Copyright © MetaIntegration Technology, Inc. All rights reserved. Copyright © Intalio. All rights reserved. Copyright © Oracle. All rights reserved. Copyright © Adobe Systems Incorporated. Allrights reserved. Copyright © DataArt, Inc. All rights reserved. Copyright © ComponentSource. All rights reserved. Copyright © Microsoft Corporation. All rights reserved.Copyright © Rouge Wave Software, Inc. All rights reserved. Copyright © Teradata Corporation. All rights reserved. Copyright © Yahoo! Inc. All rights reserved. Copyright ©Glyph & Cog, LLC. All rights reserved.
This product includes software developed by the Apache Software Foundation (http://www.apache.org/), and other software which is licensed under the Apache License,Version 2.0 (the "License"). You may obtain a copy of the License at http://www.apache.org/licenses/LICENSE-2.0. Unless required by applicable law or agreed to in writing,software distributed under the License is distributed on an "AS IS" BASIS, WITHOUT WARRANTIES OR CONDITIONS OF ANY KIND, either express or implied. See theLicense for the specific language governing permissions and limitations under the License.
This product includes software which was developed by Mozilla (http://www.mozilla.org/), software copyright The JBoss Group, LLC, all rights reserved; software copyright ©1999-2006 by Bruno Lowagie and Paulo Soares and other software which is licensed under the GNU Lesser General Public License Agreement, which may be found at http://www.gnu.org/licenses/lgpl.html. The materials are provided free of charge by Informatica, "as-is", without warranty of any kind, either express or implied, including but notlimited to the implied warranties of merchantability and fitness for a particular purpose.
The product includes ACE(TM) and TAO(TM) software copyrighted by Douglas C. Schmidt and his research group at Washington University, University of California, Irvine,and Vanderbilt University, Copyright (©) 1993-2006, all rights reserved.
This product includes software developed by the OpenSSL Project for use in the OpenSSL Toolkit (copyright The OpenSSL Project. All Rights Reserved) and redistribution ofthis software is subject to terms available at http://www.openssl.org.
This product includes Curl software which is Copyright 1996-2007, Daniel Stenberg, <[email protected]>. All Rights Reserved. Permissions and limitations regarding thissoftware are subject to terms available at http://curl.haxx.se/docs/copyright.html. Permission to use, copy, modify, and distribute this software for any purpose with or withoutfee is hereby granted, provided that the above copyright notice and this permission notice appear in all copies.
The product includes software copyright 2001-2005 (©) MetaStuff, Ltd. All Rights Reserved. Permissions and limitations regarding this software are subject to terms availableat http://www.dom4j.org/ license.html.
The product includes software copyright © 2004-2007, The Dojo Foundation. All Rights Reserved. Permissions and limitations regarding this software are subject to termsavailable at http:// svn.dojotoolkit.org/dojo/trunk/LICENSE.
This product includes ICU software which is copyright International Business Machines Corporation and others. All rights reserved. Permissions and limitations regarding thissoftware are subject to terms available at http://source.icu-project.org/repos/icu/icu/trunk/license.html.
This product includes software copyright © 1996-2006 Per Bothner. All rights reserved. Your right to use such materials is set forth in the license which may be found at http://www.gnu.org/software/ kawa/Software-License.html.
This product includes OSSP UUID software which is Copyright © 2002 Ralf S. Engelschall, Copyright © 2002 The OSSP Project Copyright © 2002 Cable & WirelessDeutschland. Permissions and limitations regarding this software are subject to terms available at http://www.opensource.org/licenses/mit-license.php.
This product includes software developed by Boost (http://www.boost.org/) or under the Boost software license. Permissions and limitations regarding this software are subjectto terms available at http:/ /www.boost.org/LICENSE_1_0.txt.
This product includes software copyright © 1997-2007 University of Cambridge. Permissions and limitations regarding this software are subject to terms available at http://www.pcre.org/license.txt.
This product includes software copyright © 2007 The Eclipse Foundation. All Rights Reserved. Permissions and limitations regarding this software are subject to termsavailable at http:// www.eclipse.org/org/documents/epl-v10.php.
This product includes software licensed under the terms at http://www.tcl.tk/software/tcltk/license.html, http://www.bosrup.com/web/overlib/?License, http://www.stlport.org/doc/license.html, http://www.asm.ow2.org/license.html, http://www.cryptix.org/LICENSE.TXT, http://hsqldb.org/web/hsqlLicense.html, http://httpunit.sourceforge.net/doc/license.html, http://jung.sourceforge.net/license.txt , http://www.gzip.org/zlib/zlib_license.html, http://www.openldap.org/software/release/license.html, http://www.libssh2.org,http://slf4j.org/license.html, http://www.sente.ch/software/OpenSourceLicense.html, and http://fusesource.com/downloads/license-agreements/fuse-message-broker-v-5-3-license-agreement.
This product includes software licensed under the Academic Free License (http://www.opensource.org/licenses/afl-3.0.php), the Common Development and DistributionLicense (http://www.opensource.org/licenses/cddl1.php) the Common Public License (http://www.opensource.org/licenses/cpl1.0.php) and the BSD License (http://www.opensource.org/licenses/bsd-license.php).
This product includes software copyright © 2003-2006 Joe WaInes, 2006-2007 XStream Committers. All rights reserved. Permissions and limitations regarding this softwareare subject to terms available at http://xstream.codehaus.org/license.html. This product includes software developed by the Indiana University Extreme! Lab. For furtherinformation please visit http://www.extreme.indiana.edu/.
This Software is protected by U.S. Patent Numbers 5,794,246; 6,014,670; 6,016,501; 6,029,178; 6,032,158; 6,035,307; 6,044,374; 6,092,086; 6,208,990; 6,339,775;6,640,226; 6,789,096; 6,820,077; 6,823,373; 6,850,947; 6,895,471; 7,117,215; 7,162,643; 7,254,590; 7,281,001; 7,421,458; and 7,584,422, international Patents and otherPatents Pending.

DISCLAIMER: Informatica Corporation provides this documentation "as is" without warranty of any kind, either express or implied, including, but not limited to, the impliedwarranties of non-infringement, merchantability, or use for a particular purpose. Informatica Corporation does not warrant that this software or documentation is error free. Theinformation provided in this software or documentation may include technical inaccuracies or typographical errors. The information in this software and documentation issubject to change at any time without notice.
NOTICES
This Informatica product (the “Software”) includes certain drivers (the “DataDirect Drivers”) from DataDirect Technologies, an operating company of Progress SoftwareCorporation (“DataDirect”) which are subject to the following terms and conditions:
1.THE DATADIRECT DRIVERS ARE PROVIDED “AS IS” WITHOUT WARRANTY OF ANY KIND, EITHER EXPRESSED OR IMPLIED, INCLUDING BUT NOTLIMITED TO, THE IMPLIED WARRANTIES OF MERCHANTABILITY, FITNESS FOR A PARTICULAR PURPOSE AND NON-INFRINGEMENT.
2. IN NO EVENT WILL DATADIRECT OR ITS THIRD PARTY SUPPLIERS BE LIABLE TO THE END-USER CUSTOMER FOR ANY DIRECT, INDIRECT,INCIDENTAL, SPECIAL, CONSEQUENTIAL OR OTHER DAMAGES ARISING OUT OF THE USE OF THE ODBC DRIVERS, WHETHER OR NOT INFORMED OFTHE POSSIBILITIES OF DAMAGES IN ADVANCE. THESE LIMITATIONS APPLY TO ALL CAUSES OF ACTION, INCLUDING, WITHOUT LIMITATION, BREACHOF CONTRACT, BREACH OF WARRANTY, NEGLIGENCE, STRICT LIABILITY, MISREPRESENTATION AND OTHER TORTS.
Part Number: PC-UPG-90100-HF1-0001

Table of Contents
Preface . . . . . . . . . . . . . . . . . . . . . . . . . . . . . . . . . . . . . . . . . . . . . . . . . . . . . . . . . . . . . . . . . . . . . . . . . . ivInformatica Resources. . . . . . . . . . . . . . . . . . . . . . . . . . . . . . . . . . . . . . . . . . . . . . . . . . . . . . iv
Informatica Customer Portal. . . . . . . . . . . . . . . . . . . . . . . . . . . . . . . . . . . . . . . . . . . . . . . . iv
Informatica Documentation. . . . . . . . . . . . . . . . . . . . . . . . . . . . . . . . . . . . . . . . . . . . . . . . iv
Informatica Web Site. . . . . . . . . . . . . . . . . . . . . . . . . . . . . . . . . . . . . . . . . . . . . . . . . . . . iv
Informatica How-To Library. . . . . . . . . . . . . . . . . . . . . . . . . . . . . . . . . . . . . . . . . . . . . . . . iv
Informatica Knowledge Base. . . . . . . . . . . . . . . . . . . . . . . . . . . . . . . . . . . . . . . . . . . . . . . v
Informatica Multimedia Knowledge Base. . . . . . . . . . . . . . . . . . . . . . . . . . . . . . . . . . . . . . . . v
Informatica Global Customer Support. . . . . . . . . . . . . . . . . . . . . . . . . . . . . . . . . . . . . . . . . . v
Chapter 1: Upgrade Overview. . . . . . . . . . . . . . . . . . . . . . . . . . . . . . . . . . . . . . . . . . . . . . . . . . . . . . 1Informatica Upgrade. . . . . . . . . . . . . . . . . . . . . . . . . . . . . . . . . . . . . . . . . . . . . . . . . . . . . . . . 1
Upgrade Process. . . . . . . . . . . . . . . . . . . . . . . . . . . . . . . . . . . . . . . . . . . . . . . . . . . . . . . . . . 2
Changing the Node Configuration. . . . . . . . . . . . . . . . . . . . . . . . . . . . . . . . . . . . . . . . . . . . 3
Upgrade Tasks. . . . . . . . . . . . . . . . . . . . . . . . . . . . . . . . . . . . . . . . . . . . . . . . . . . . . . . . . . . 3
Chapter 2: Before You Upgrade the Domain and Server Files. . . . . . . . . . . . . . . . . . . . . . . . 4Pre-Upgrade Tasks. . . . . . . . . . . . . . . . . . . . . . . . . . . . . . . . . . . . . . . . . . . . . . . . . . . . . . . . 4
Review the Windows Requirements. . . . . . . . . . . . . . . . . . . . . . . . . . . . . . . . . . . . . . . . . . . . . . 4
Review the Prerequisites. . . . . . . . . . . . . . . . . . . . . . . . . . . . . . . . . . . . . . . . . . . . . . . . . . 5
Review the Environment Variables. . . . . . . . . . . . . . . . . . . . . . . . . . . . . . . . . . . . . . . . . . . . 6
Verify the Maximum Heap Size Setting. . . . . . . . . . . . . . . . . . . . . . . . . . . . . . . . . . . . . . . . . 6
Review the UNIX Requirements. . . . . . . . . . . . . . . . . . . . . . . . . . . . . . . . . . . . . . . . . . . . . . . . 7
Review the Prerequisites. . . . . . . . . . . . . . . . . . . . . . . . . . . . . . . . . . . . . . . . . . . . . . . . . . 7
Review the Environment Variables. . . . . . . . . . . . . . . . . . . . . . . . . . . . . . . . . . . . . . . . . . . . 8
Verify the File Descriptor Settings. . . . . . . . . . . . . . . . . . . . . . . . . . . . . . . . . . . . . . . . . . . . 9
Verify the Maximum Heap Size Setting. . . . . . . . . . . . . . . . . . . . . . . . . . . . . . . . . . . . . . . . . 9
Set Up the X Window Server. . . . . . . . . . . . . . . . . . . . . . . . . . . . . . . . . . . . . . . . . . . . . . . 9
Prepare the Domain. . . . . . . . . . . . . . . . . . . . . . . . . . . . . . . . . . . . . . . . . . . . . . . . . . . . . . . 10
Migrate to a Supported Database. . . . . . . . . . . . . . . . . . . . . . . . . . . . . . . . . . . . . . . . . . . . 10
Back Up the Domain. . . . . . . . . . . . . . . . . . . . . . . . . . . . . . . . . . . . . . . . . . . . . . . . . . . . 10
Verify the Domain Configuration Repository Requirements. . . . . . . . . . . . . . . . . . . . . . . . . . . 11
Run infasetup. . . . . . . . . . . . . . . . . . . . . . . . . . . . . . . . . . . . . . . . . . . . . . . . . . . . . . . . 12
Prepare the PowerCenter Repository. . . . . . . . . . . . . . . . . . . . . . . . . . . . . . . . . . . . . . . . . . . . 14
Optimize Upgrade Performance. . . . . . . . . . . . . . . . . . . . . . . . . . . . . . . . . . . . . . . . . . . . . 14
Configure PowerCenter Sessions. . . . . . . . . . . . . . . . . . . . . . . . . . . . . . . . . . . . . . . . . . . . 14
Migrate to a Supported Database. . . . . . . . . . . . . . . . . . . . . . . . . . . . . . . . . . . . . . . . . . . . 15
Back Up the Repository. . . . . . . . . . . . . . . . . . . . . . . . . . . . . . . . . . . . . . . . . . . . . . . . . . 15
Table of Contents i
Prepare the PowerCenter Profiling Warehouse. . . . . . . . . . . . . . . . . . . . . . . . . . . . . . . . . . . . . . 15
Shut Down the Domain. . . . . . . . . . . . . . . . . . . . . . . . . . . . . . . . . . . . . . . . . . . . . . . . . . . . . 16
Prepare to Change the Node Configuration. . . . . . . . . . . . . . . . . . . . . . . . . . . . . . . . . . . . . . . . 16
Configure the Windows Machine. . . . . . . . . . . . . . . . . . . . . . . . . . . . . . . . . . . . . . . . . . . . 16
Configure the UNIX Machine. . . . . . . . . . . . . . . . . . . . . . . . . . . . . . . . . . . . . . . . . . . . . . . 17
Copy the Installation Directories. . . . . . . . . . . . . . . . . . . . . . . . . . . . . . . . . . . . . . . . . . . . 18
Verify Keystore File Name and Location. . . . . . . . . . . . . . . . . . . . . . . . . . . . . . . . . . . . . . . 19
Chapter 3: Domain and Server Files Upgrade. . . . . . . . . . . . . . . . . . . . . . . . . . . . . . . . . . . . . . 20Domain and Server Files Upgrade Overview. . . . . . . . . . . . . . . . . . . . . . . . . . . . . . . . . . . . . . . . 20
Upgrading in Graphical Mode. . . . . . . . . . . . . . . . . . . . . . . . . . . . . . . . . . . . . . . . . . . . . . . . . 20
Upgrading in Console Mode. . . . . . . . . . . . . . . . . . . . . . . . . . . . . . . . . . . . . . . . . . . . . . . . . . 23
Upgrading in Silent Mode. . . . . . . . . . . . . . . . . . . . . . . . . . . . . . . . . . . . . . . . . . . . . . . . . . . . 25
Creating the Properties File. . . . . . . . . . . . . . . . . . . . . . . . . . . . . . . . . . . . . . . . . . . . . . . 25
Running the Silent Installer. . . . . . . . . . . . . . . . . . . . . . . . . . . . . . . . . . . . . . . . . . . . . . . . 27
Upgrading with Changes to the Node Configuration. . . . . . . . . . . . . . . . . . . . . . . . . . . . . . . . . . . 27
Upgrading in Graphical Mode. . . . . . . . . . . . . . . . . . . . . . . . . . . . . . . . . . . . . . . . . . . . . . 27
Upgrading in Console Mode. . . . . . . . . . . . . . . . . . . . . . . . . . . . . . . . . . . . . . . . . . . . . . . 30
Upgrading in Silent Mode. . . . . . . . . . . . . . . . . . . . . . . . . . . . . . . . . . . . . . . . . . . . . . . . . 32
Troubleshooting the Domain Upgrade. . . . . . . . . . . . . . . . . . . . . . . . . . . . . . . . . . . . . . . . . . . . 35
Chapter 4: Before You Upgrade the Application Services. . . . . . . . . . . . . . . . . . . . . . . . . . 36Pre-Upgrade Tasks. . . . . . . . . . . . . . . . . . . . . . . . . . . . . . . . . . . . . . . . . . . . . . . . . . . . . . . . 36
Configure POSIX Asynchronous I/O. . . . . . . . . . . . . . . . . . . . . . . . . . . . . . . . . . . . . . . . . . . . . 36
Configure Informatica Environment Variables. . . . . . . . . . . . . . . . . . . . . . . . . . . . . . . . . . . . . . . 37
Configure Locale Environment Variables. . . . . . . . . . . . . . . . . . . . . . . . . . . . . . . . . . . . . . . . . . 37
Clear Browser Cache. . . . . . . . . . . . . . . . . . . . . . . . . . . . . . . . . . . . . . . . . . . . . . . . . . . . . . 38
Configure Browser Bookmarks. . . . . . . . . . . . . . . . . . . . . . . . . . . . . . . . . . . . . . . . . . . . . . . . 38
Prepare to Upgrade LDAP Users and Groups. . . . . . . . . . . . . . . . . . . . . . . . . . . . . . . . . . . . . . . 38
Tasks for Changing the Node Configuration. . . . . . . . . . . . . . . . . . . . . . . . . . . . . . . . . . . . . . . . 39
Install the Database Client Software. . . . . . . . . . . . . . . . . . . . . . . . . . . . . . . . . . . . . . . . . . 39
Configure Environment Variables. . . . . . . . . . . . . . . . . . . . . . . . . . . . . . . . . . . . . . . . . . . . 40
Verify that a Graphics Display Server is Available. . . . . . . . . . . . . . . . . . . . . . . . . . . . . . . . . 42
Copy Required Files. . . . . . . . . . . . . . . . . . . . . . . . . . . . . . . . . . . . . . . . . . . . . . . . . . . . 43
Update Port Numbers. . . . . . . . . . . . . . . . . . . . . . . . . . . . . . . . . . . . . . . . . . . . . . . . . . . 43
Verify the Node Backup Directory. . . . . . . . . . . . . . . . . . . . . . . . . . . . . . . . . . . . . . . . . . . . 43
Update Keystore File Name and Location. . . . . . . . . . . . . . . . . . . . . . . . . . . . . . . . . . . . . . 44
Verify the Data Transformation Requirements. . . . . . . . . . . . . . . . . . . . . . . . . . . . . . . . . . . . 44
Configure PowerExchange Adapters. . . . . . . . . . . . . . . . . . . . . . . . . . . . . . . . . . . . . . . . . . 45
Chapter 5: Application Service Upgrade. . . . . . . . . . . . . . . . . . . . . . . . . . . . . . . . . . . . . . . . . . . 46Application Service Upgrade Overview. . . . . . . . . . . . . . . . . . . . . . . . . . . . . . . . . . . . . . . . . . . 46
Service Upgrade for PowerCenter 8.1.x. . . . . . . . . . . . . . . . . . . . . . . . . . . . . . . . . . . . . . . . 46
ii Table of Contents
Service Upgrade Wizard. . . . . . . . . . . . . . . . . . . . . . . . . . . . . . . . . . . . . . . . . . . . . . . . . . . . 47
Running the Service Upgrade Wizard. . . . . . . . . . . . . . . . . . . . . . . . . . . . . . . . . . . . . . . . . 48
Users and Groups Conflict Resolution. . . . . . . . . . . . . . . . . . . . . . . . . . . . . . . . . . . . . . . . . 48
Chapter 6: Informatica Client Upgrade. . . . . . . . . . . . . . . . . . . . . . . . . . . . . . . . . . . . . . . . . . . . 50Informatica Client Upgrade Overview. . . . . . . . . . . . . . . . . . . . . . . . . . . . . . . . . . . . . . . . . . . . 50
Informatica Client Upgrade Options. . . . . . . . . . . . . . . . . . . . . . . . . . . . . . . . . . . . . . . . . . . . . 51
Upgrading in Graphical Mode. . . . . . . . . . . . . . . . . . . . . . . . . . . . . . . . . . . . . . . . . . . . . . . . . 51
Upgrading in Silent Mode. . . . . . . . . . . . . . . . . . . . . . . . . . . . . . . . . . . . . . . . . . . . . . . . . . . . 52
Creating the Properties File. . . . . . . . . . . . . . . . . . . . . . . . . . . . . . . . . . . . . . . . . . . . . . . 52
Running the Silent Installer. . . . . . . . . . . . . . . . . . . . . . . . . . . . . . . . . . . . . . . . . . . . . . . . 53
Chapter 7: After You Upgrade. . . . . . . . . . . . . . . . . . . . . . . . . . . . . . . . . . . . . . . . . . . . . . . . . . . . 54Informatica Domain. . . . . . . . . . . . . . . . . . . . . . . . . . . . . . . . . . . . . . . . . . . . . . . . . . . . . . . . 54
Configure LDAP Connectivity. . . . . . . . . . . . . . . . . . . . . . . . . . . . . . . . . . . . . . . . . . . . . . 54
Update the Log Events Directory. . . . . . . . . . . . . . . . . . . . . . . . . . . . . . . . . . . . . . . . . . . . 54
Update ODBC Data Sources. . . . . . . . . . . . . . . . . . . . . . . . . . . . . . . . . . . . . . . . . . . . . . . 54
Update Statistics for the Domain Configuration Repository. . . . . . . . . . . . . . . . . . . . . . . . . . . 55
View Log Events from the Previous Informatica Version. . . . . . . . . . . . . . . . . . . . . . . . . . . . . 55
PowerCenter Repository Service. . . . . . . . . . . . . . . . . . . . . . . . . . . . . . . . . . . . . . . . . . . . . . . 55
PowerCenter Integration Service. . . . . . . . . . . . . . . . . . . . . . . . . . . . . . . . . . . . . . . . . . . . . . . 55
Associate Linked Domains. . . . . . . . . . . . . . . . . . . . . . . . . . . . . . . . . . . . . . . . . . . . . . . . 55
Re-create PowerCenter Integration Service. . . . . . . . . . . . . . . . . . . . . . . . . . . . . . . . . . . . . 55
Web Services Hub. . . . . . . . . . . . . . . . . . . . . . . . . . . . . . . . . . . . . . . . . . . . . . . . . . . . . . . . 56
Associate Linked Domain. . . . . . . . . . . . . . . . . . . . . . . . . . . . . . . . . . . . . . . . . . . . . . . . . 56
Verify PowerCenter Repository Database User. . . . . . . . . . . . . . . . . . . . . . . . . . . . . . . . . . . 56
Index. . . . . . . . . . . . . . . . . . . . . . . . . . . . . . . . . . . . . . . . . . . . . . . . . . . . . . . . . . . . . . . 57
Table of Contents iii

PrefaceThe Upgrade Guide for PowerCenter 8.1.x is written for the system administrator who is responsible for upgradingthe Informatica product. This guide assumes that you have knowledge of operating systems, relational databaseconcepts, and the database engines, flat files, or mainframe systems in your environment. This guide alsoassumes that you are familiar with the interface requirements for your supporting applications.
Informatica Resources
Informatica Customer PortalAs an Informatica customer, you can access the Informatica Customer Portal site at http://mysupport.informatica.com. The site contains product information, user group information, newsletters,access to the Informatica customer support case management system (ATLAS), the Informatica How-To Library,the Informatica Knowledge Base, the Informatica Multimedia Knowledge Base, Informatica ProductDocumentation, and access to the Informatica user community.
Informatica DocumentationThe Informatica Documentation team takes every effort to create accurate, usable documentation. If you havequestions, comments, or ideas about this documentation, contact the Informatica Documentation team throughemail at [email protected]. We will use your feedback to improve our documentation. Let usknow if we can contact you regarding your comments.
The Documentation team updates documentation as needed. To get the latest documentation for your product,navigate to Product Documentation from http://mysupport.informatica.com.
Informatica Web SiteYou can access the Informatica corporate web site at http://www.informatica.com. The site contains informationabout Informatica, its background, upcoming events, and sales offices. You will also find product and partnerinformation. The services area of the site includes important information about technical support, training andeducation, and implementation services.
Informatica How-To LibraryAs an Informatica customer, you can access the Informatica How-To Library at http://mysupport.informatica.com.The How-To Library is a collection of resources to help you learn more about Informatica products and features. Itincludes articles and interactive demonstrations that provide solutions to common problems, compare features andbehaviors, and guide you through performing specific real-world tasks.
iv

Informatica Knowledge BaseAs an Informatica customer, you can access the Informatica Knowledge Base at http://mysupport.informatica.com.Use the Knowledge Base to search for documented solutions to known technical issues about Informaticaproducts. You can also find answers to frequently asked questions, technical white papers, and technical tips. Ifyou have questions, comments, or ideas about the Knowledge Base, contact the Informatica Knowledge Baseteam through email at [email protected].
Informatica Multimedia Knowledge BaseAs an Informatica customer, you can access the Informatica Multimedia Knowledge Base at http://mysupport.informatica.com. The Multimedia Knowledge Base is a collection of instructional multimedia filesthat help you learn about common concepts and guide you through performing specific tasks. If you havequestions, comments, or ideas about the Multimedia Knowledge Base, contact the Informatica Knowledge Baseteam through email at [email protected].
Informatica Global Customer SupportYou can contact a Customer Support Center by telephone or through the Online Support. Online Support requiresa user name and password. You can request a user name and password at http://mysupport.informatica.com.
Use the following telephone numbers to contact Informatica Global Customer Support:
North America / South America Europe / Middle East / Africa Asia / Australia
Toll FreeBrazil: 0800 891 0202Mexico: 001 888 209 8853North America: +1 877 463 2435 Standard RateNorth America: +1 650 653 6332
Toll FreeFrance: 00800 4632 4357Germany: 00800 4632 4357Israel: 00800 4632 4357Italy: 800 915 985Netherlands: 00800 4632 4357Portugal: 800 208 360Spain: 900 813 166Switzerland: 00800 4632 4357 or 0800 463200United Kingdom: 00800 4632 4357 or 0800023 4632 Standard RateBelgium: +31 30 6022 797France: 0805 804632Germany: 01805 702702Netherlands: 030 6022 797
Toll FreeAustralia: 1 800 151 830New Zealand: 1 800 151 830Singapore: 001 800 4632 4357 Standard RateIndia: +91 80 4112 5738
Preface v

vi
C H A P T E R 1
Upgrade OverviewThis chapter includes the following topics:
¨ Informatica Upgrade, 1
¨ Upgrade Process, 2
¨ Upgrade Tasks, 3
Informatica UpgradeYou can upgrade the following Informatica product versions to version 9.0.1 HotFix 1:
Informatica Product Version Comments
Informatica PowerCenter 8.1.x If the PowerCenter 8.1.x domain includes Metadata Manager or DataAnalyzer, you must upgrade to PowerCenter 8.6.1 before youupgrade.
Informatica PowerCenter 8.5.x If the PowerCenter 8.5.x domain includes the Metadata ManagerService or Reporting Service, you must upgrade to PowerCenter8.6.1 before you upgrade.
Informatica PowerCenter 8.6 If the PowerCenter 8.6 domain includes the Metadata ManagerService, Reporting Service, or Reference Table Manager Service,you must upgrade to PowerCenter 8.6.1 before you upgrade.
Informatica PowerCenter 8.6.1 Effective in version 9.0.1, the Reference Table Manager functionalityis available through the 9.0.1 Analyst Service. See the PowerCenter8.6.1 upgrade documentation for the steps to migrate thePowerCenter 8.6.1 reference table data to the Informatica 9.0.1Analyst tool.
Informatica Data Quality 8.6.2 You can migrate the contents of the Informatica Data Quality 8.6.2repository to the Informatica 9.0.1 Model repository. See the 9.0.1Data Quality migration documentation for details.
Informatica PowerCenter 9.0
Informatica Data Quality 9.0
Informatica Data Services 9.0
1

Informatica Product Version Comments
Informatica Data Explorer Advanced Edition 9.0 See the Informatica Data Quality 9.0 upgrade documentation.Complete the steps to upgrade Informatica Data Quality 9.0 unlessan exception is specified.
Informatica PowerCenter 9.0.1 See the Informatica 9.0.1 HotFix 1 Release Notes for details.
Informatica Data Quality 9.0.1 See the Informatica 9.0.1 HotFix 1 Release Notes for details.
Informatica Data Services 9.0.1 See the Informatica 9.0.1 HotFix 1 Release Notes for details.
If the product version you use cannot be upgraded to Informatica 9.0.1 HotFix 1, you must first upgrade to asupported version.
Upgrade ProcessThe upgrade consists of the following phases:
¨ Upgrading the domain and server files. To upgrade the domain and server files, run the Informatica serverinstaller and select the upgrade option. The domain upgrade wizard installs the server files and configures thedomain. If the domain has multiple nodes, you must upgrade all nodes.The following table describes the actions that the installer performs when you upgrade Informatica:
Tasks Description
Installs Informatica. Installs Informatica directories and files into the newdirectory.
Copies infa_shared directory.* Copies the contents of the infa_shared directory from theexisting installation directory into the new installationdirectory.
Upgrades the domain. Upgrades the domain to run version 9.0.1 applicationservices.The upgrade creates a new default Administrator useraccount in the domain.
Starts Informatica Services. Starts Informatica Services on the node.
*If you choose the installer option to update the node configuration, the installer does not copy directories.
¨ Upgrading the application services. After you upgrade the domain and server files, log in to the Administratortool and upgrade the application services. The service upgrade wizard provides a list of all application servicesthat must be upgraded. It upgrades the services based on the order required by the dependent objects.
¨ Upgrading the Informatica client. To upgrade the Informatica client, run the Informatica client installer andselect the upgrade option. If the client is installed on multiple machines, upgrade the client on all machines.
2 Chapter 1: Upgrade Overview

Changing the Node ConfigurationThe installer provides the option to Allow changes to node host name and port number. When you select thisoption you can change the node configuration. Change the node configuration when you move the Informaticainstallation to a different machine.
If you choose the option to update the node configuration, you need to perform additional upgrade steps. Thereare additional steps before you upgrade the domain and server files, and before you upgrade the applicationservices.
Upgrade TasksTo upgrade PowerCenter, complete the following tasks:
1. Complete the pre-upgrade tasks for the domain and server files to ensure that you can successfully run theinstaller.
2. Upgrade Informatica domain and server files. Use the server installer to upgrade Informatica domain andupgrade the server files on each node. If the domain contains multiple nodes, upgrade a gateway node beforeyou upgrade the worker nodes. After you upgrade the first gateway node, verify that the upgrade wassuccessful before you upgrade the other nodes in the domain.
3. Complete the pre-upgrade tasks for the application services.
4. Upgrade the application services. After installation, log in to the Administrator tool and upgrade theapplication services.
5. Upgrade the PowerCenter Client. Use the client installer to upgrade the PowerCenter client.
6. Perform the post-upgrade tasks.
Upgrade Tasks 3

C H A P T E R 2
Before You Upgrade the Domainand Server Files
This chapter includes the following topics:
¨ Pre-Upgrade Tasks, 4
¨ Review the Windows Requirements, 4
¨ Review the UNIX Requirements, 7
¨ Prepare the Domain, 10
¨ Prepare the PowerCenter Repository, 14
¨ Prepare the PowerCenter Profiling Warehouse, 15
¨ Shut Down the Domain, 16
¨ Prepare to Change the Node Configuration, 16
Pre-Upgrade TasksBefore you upgrade the domain and server files, complete the following tasks:
1. Review the operating system specific requirements.
2. Prepare the domain.
3. Prepare the PowerCenter Profiling warehouse.
4. Shut down the domain.
5. Prepare to change the node configuration.
Review the Windows RequirementsBefore you upgrade the domain, review the following Windows requirements:
1. Review the prerequisites.
2. Review the environment variables.
3. Verify the maximum heap size setting.
4

Review the PrerequisitesVerify that your system meets the upgrade requirements.
The following table lists the minimum system requirements for a domain with different node configurations:
Component Processor RAM Disk Space
Domain with all Data Quality, Data Services, andPowerCenter services running on one node
4 CPU 8 GB 20 GB
Domain with all PowerCenter services running on onenode
2 CPU 4 GB 4 GB
Domain with all PowerCenter services running on onenode except Metadata Manager Service and ReportingService
1 CPU 2 GB 3 GB
Metadata Manager Service running on a separate node 2 CPU 2 GB 3 GB
Reporting Service running on a separate node 1 CPU 512 MB 3 GB
Orchestration Server running on a separate node 1 CPU 512 MB 3 GB
Metadata Manager Agent 1 CPU 512 MB 220 MB
Note: When you upgrade, the installer requires an additional 4 GB disk space plus the amount of disk space usedby the existing infa_shared directory.
The following table lists the minimum system requirements to run PowerCenter Client:
Client Processor RAM Disk Space
PowerCenter Client 1 CPU 512 MB 1.2 GB
For more details, see the Product Availability Matrix at http://mysupport.informatica.com.
Temporary Disk Space Requirements for InstallationThe installer writes temporary files to the hard disk. Verify that you have enough available disk space on themachine to support the installation. When the installation completes, the installer deletes the temporary files andreleases the disk space.
The following table lists the temporary disk space requirements during installation of Informatica services:
Product Disk Space
Installer 1 GB
Informatica Services 605 MB
Review the Windows Requirements 5

The following table lists the temporary disk space requirements during installation of Informatica clients:
Product Disk Space
Installer 1 GB
Informatica Clients 550 MB
Review the Environment VariablesConfigure the environment variables to work with the Informatica installation. Incorrectly configured environmentvariables can cause the Informatica installation to fail.
The following table describes environment variables to review on Windows:
Variable Description
IATEMPDIR (InstallAnywhere) Location of the temporary files created during installation. Informatica requires 1 GBdisk space for temporary files.Configure the environment variable if you do not want to create temporary files in thedefault drive.
PATH Verify that the PATH environment variables do not contain earlier versions ofInformatica.
Library path Verify that the library path environment variables do not contain earlier versions ofInformatica.
INFA_HOME Contains the location of the Informatica installation directory. Clear this variablebefore you start the upgrade.
INFA_DOMAINS_FILE Contains the location of the domains.infa file. Clear this variable before you start theupgrade.
Verify the Maximum Heap Size SettingVerify that Informatica Services uses the required maximum heap size for the number of users in the domain.
The following table lists the minimum requirement for the maximum heap size settings:
Number of Domain Users Maximum Heap Size
1,000 or less 512 MB (default)
5,000 1024 MB
10,000 1024 MB
20,000 2048 MB
3,0000 3072 MB
6 Chapter 2: Before You Upgrade the Domain and Server Files

If the domain has more than 1,000 users, update the maximum heap size based on the number of users in thedomain.
1. Extract the installation files.
2. Go to the <installer>\source\tomcat\bin directory.
3. Use a text editor to open the infaservice.bat file.
4. Search for the following text: INFA_JAVA_OPTS=% INFA_JAVA_OPTS% -XX.
5. Set the value for -Xmx to the maximum heap size required for the number of Informatica domain users.For example, to set the maximum heap size to 1024 MB, use the following configuration:
set INFA_JAVA_OPTS=% INFA_JAVA_OPTS% -XX:GCTimeRatio=9 -Xmx1024m
Review the UNIX RequirementsBefore you upgrade the domain, review the following UNIX requirements:
1. Review the prerequisites.
2. Review the environment variables.
3. Verify the file descriptor settings.
4. Verify the maximum heap size setting.
5. Set up the X Windows server.
Review the PrerequisitesThe following table lists the minimum system requirements for a domain with different node configurations:
Component Processor RAM Disk Space
Domain with all Data Quality, Data Services, andPowerCenter services running on one node
4 CPU 8 GB 20 GB
Domain with all PowerCenter services running on onenode
2 CPU 4 GB 4 GB
Domain with all PowerCenter services running on onenode except Metadata Manager Service and ReportingService
1 CPU 2 GB 3 GB
Metadata Manager Service running on a separate node 2 CPU 2 GB 3 GB
Reporting Service running on a separate node 1 CPU 512 MB 3 GB
Orchestration Server running on a separate node 1 CPU 512 MB 3 GB
Note: When you upgrade, the installer requires an additional 4 GB disk space plus the amount of disk space usedby the existing infa_shared directory.
For more details, see the Product Availability Matrix at http://mysupport.informatica.com.
Review the UNIX Requirements 7

Temporary Disk Space Requirements for InstallationThe installer writes temporary files to the hard disk. Verify that you have enough available disk space on themachine to support the installation. When the installation completes, the installer deletes the temporary files andreleases the disk space.
The following table lists the temporary disk space requirements during installation:
Product Disk Space
Installer 1 GB
Informatica Services 605 MB
Review the Environment VariablesConfigure the environment variables to work with the Informatica installation. Incorrectly configured environmentvariables can cause the Informatica installation to fail.
Create the environment variables with the system user account that you will use for installation. Log in with theaccount that you plan to use to install Informatica, and then create the environment variables.
The following table describes environment variables to review on UNIX:
Variable Description
IATEMPDIR (InstallAnywhere) Location of the temporary files created during installation. Informatica requires 1 GBdisk space for temporary files.Configure the environment variable if you do not want to create temporary files in the /tmp directory.
PATH Verify that the PATH environment variables do not contain earlier versions ofInformatica.
Library path Verify that the library path environment variables do not contain earlier versions ofInformatica.
JRE_HOME If you install the Informatica services on a machine with 32-bit or 64-bit SUSE Linuxor Linux EMT64 operating system, clear the JRE_HOME environment variable beforeyou start the installation.
Locale environment variables Use LANG and LC_ALL to set the UNIX code page for the installer.Set the LANG and LC_ALL environment variables to the following values for thelanguage that you use:- English: C- Japanese: ja_JP.SJIS or ja_JP.PCK- Portuguese: pt_BR.ISO8859-1, pt_BR.8859-15, or pt_BRAfter you install, update the locale setting to one that is compatible with the codepage of the repository.
INFA_HOME Contains the location of the Informatica installation directory. Clear this variablebefore you start the upgrade.
INFA_DOMAINS_FILE Contains the location of the domains.infa file. Clear this variable before you start theupgrade.
8 Chapter 2: Before You Upgrade the Domain and Server Files

Verify the File Descriptor SettingsVerify that the operating system meets the file descriptor requirement.
Informatica service processes can use a large number of files. Set the file descriptor limit per process to 3000 orhigher.
Verify the Maximum Heap Size SettingVerify that Informatica Services uses the required maximum heap size for the number of users in the domain.
The following table lists the minimum requirement for the maximum heap size settings:
Number of Domain Users Maximum Heap Size
1,000 or less 512 MB (default)
5,000 1024 MB
10,000 1024 MB
20,000 2048 MB
3,0000 3072 MB
If the domain has more than 1000 users, update the maximum heap size based on the number of users in thedomain.
1. Extract the installation files.
2. Go to the <installer>\source\tomcat\bin directory.
3. Use a text editor to open the infaservice.sh file.
4. Search for the following text: INFA_JAVA_OPTS="${INFA_JAVA_OPTS} -XX.
5. Set the value for -Xmx to the maximum heap size required for the number of Informatica domain users.For example, to set the maximum heap size to 1024 MB, use the following configuration:
INFA_JAVA_OPTS="${INFA_JAVA_OPTS} -XX:GCTimeRatio=9 -Xmx1024m"
Set Up the X Window ServerWhen you run the Informatica installer in graphical mode, you must use a graphics display server. On UNIX, thegraphics display server is typically an X Window server. If you do not have the X Window server installed on themachine where you want to install Informatica, you can install Informatica using an X Window server installed onanother machine. Use the DISPLAY variable to redirect output of the X Window server to another UNIX machine.
The following table lists the commands to set the DISPLAY environment variable:
Shell Command Example
C setenv DISPLAY <TCP/IP node of XWindow server>:0 setenv DISPLAY 10.1.50.23:0
Bash/Korn export DISPLAY=”<TCP/IP node of XWindow server>:0” export DISPLAY=”10.1.50.23:0”
Bourne DISPLAY=”<TCP/IP node of XWindow server>:0”export display
DISPLAY=”10.1.50.23:0”export display
Review the UNIX Requirements 9
If you do not know the IP address of a UNIX machine where the X Window server is installed, ask your networkadministrator. For more information about redirecting the DISPLAY variable, see the documentation from the UNIXvendor.
If the X Window server does not support the font that the Informatica installer uses, the installer can displayincorrect labels on the buttons. For example, the button labeled Test Connection can appear as Test Connecti....
Prepare the DomainBefore you upgrade the domain, complete the steps to prepare the domain.
1. Migrate to a supported database.
2. Back up the domain.
3. Verify the domain configuration repository requirements.
Migrate to a Supported DatabaseIf the domain configuration is in a Sybase ASE database, you must migrate the domain configuration to an IBMDB2 UDB, Microsoft SQL Server, or Oracle database.
1. Shut down all application services in the domain.
2. Shut down the domain.
3. Back up the domain configuration.Run the infasetup BackupDomain command to back up the domain configuration to a file.
4. Create a database schema and a user account in a supported database.
5. Restore the domain configuration backup to the database schema.Run the infasetup RestoreDomain command to restore the domain configuration in the backup file to thespecified database schema.
6. Update the database connection for each gateway node.Gateway nodes must have a connection to the domain configuration repository to retrieve and update domainconfiguration. Run the infasetup UpdateGatewayNode command on each gateway node to update thedatabase connection information for each gateway node.
7. Start all nodes in the domain.
8. Enable all application services in the domain.
Back Up the DomainBefore you upgrade the domain, you must back up the domain.
Complete the following steps to back up the domain:
¨ Run the infasetup BackupDomain command to back up the domain configuration repository to a file.
¨ Back up the metadata configuration files to any directory accessible by the machines where you installInformatica.
10 Chapter 2: Before You Upgrade the Domain and Server Files

The following table describes the metadata files and the locations where you can find them:
Metadata File Description Location
nodemeta.xml Contains metadata for a node. Stored in the server/configdirectory on each node in thedomain.If you use the same backupdirectory name on all the nodes,rename nodemeta.xml beforecopying it to the backup location.For example, you back upnodemeta.xml to the /nodebakdirectory on nodeA and nodeB.Rename the configuration files sothat on nodeA the file is backedup to /nodebak/nodemeta_A.xml,and on nodeB the file is backedup to /nodebak/nodemeta_B.xml.
domains.infa Contains connectivity information for the gatewaynodes.
Stored in one of the followinglocations:- The Informatica installation
directory on the client andserver machines.
- The location configuredthrough theINFA_DOMAINS_FILEenvironment variable.
Verify the Domain Configuration Repository RequirementsUse the following rules and guidelines to verify the domain configuration repository database and user accountrequirements:
¨ The database must be accessible to all gateway nodes in the Informatica domain.
¨ The domain configuration can be in the same database schema as the PowerCenter, Metadata Manager, orData Analyzer repositories.
¨ If you create more than one domain, each domain configuration database must have a separate user account.
Oracle Database RequirementsUse the following guidelines when you set up the database on Oracle:
¨ Set the open_cursors parameter to 1000.
¨ The database user account must have the CONNECT, RESOURCE, and CREATE VIEW privileges.
IBM DB2 Database RequirementsUse the following guidelines when you set up the repository on IBM DB2:
¨ On the IBM DB2 instance where you create the database, set the following parameters to ON:
- DB2_SKIPINSERTED
- DB2_EVALUNCOMMITTED
- DB2_SKIPDELETED
Prepare the Domain 11

- AUTO_RUNSTATS
¨ On the database, set the following configuration parameters:
Parameter Value
applheapsz 8192
appl_ctl_heap_sz 8192
logfilsiz 8000
DynamicSections 1000
maxlocks 98
locklist 50000
auto_stmt_stats ONFor IBM DB2 9.5 only.
¨ Set the tablespace pageSize parameter to 32768.
In a single-partition database, specify a tablespace that meets the pageSize requirements. If you do not specifya tablespace, the default tablespace must meet the pageSize requirements.
In a multi-partition database, you must specify a tablespace that meets the pageSize requirements.
Define the tablespace on a single node.
¨ The database user account must have the CREATETAB and CONNECT privileges.
Note: The default value for DynamicSections in DB2 is too low for the Informatica repositories. Informaticarequires a larger DB2 package than the default. When you set up the DB2 database for the domain configurationrepository or a Model repository, you must set the DynamicSections parameter to at least 1000. If theDynamicSections parameter is set to a lower number, you can encounter problems when you install or runInformatica. The following error message can appear:
[informatica][DB2 JDBC Driver]No more available statements. Please recreate your package with a larger dynamicSections value.
Microsoft SQL Server Database RequirementsUse the following guidelines when you set up the repository on Microsoft SQL Server:
¨ Set the read committed isolation level to READ_COMMITTED_SNAPSHOT to minimize locking contention.
To set the isolation level for the database, run the following command:
ALTER DATABASE DatabaseName SET READ_COMMITTED_SNAPSHOT ONTo verify that the isolation level for the database is correct, run the following command:
SELECT is_read_committed_snapshot_on FROM sys.databases WHERE name = DatabaseName¨ The database user account must have the CONNECT, CREATE TABLE, and CREATE VIEW permissions.
Run infasetupInformatica infasetup includes command line programs to back up, restore, and update gateway nodes. infasetupis located in the following directory:
<Informatica Installation Directory>\server
12 Chapter 2: Before You Upgrade the Domain and Server Files

To back up the domain with infasetup, use the following syntax:
BackupDomain <<-DatabaseAddress|-da> database_hostname:database_port|
<-DatabaseConnectionString|-cs> database_connection_string>
<-DatabaseUserName|-du> database_user_name
<-DatabasePassword|-dp> database_password
<-DatabaseType|-dt> database_type
[<-DatabaseServiceName|-ds> database_service_name]
<-BackupFile|-bf> backup_file_name
[<-Force|-f>]
<-DomainName|-dn> domain_name
[<-SchemaName|-sc> schema_name Microsoft SQL Server only]
To restore the domain with infasetup, use the following syntax:
RestoreDomain<<-DatabaseAddress|-da> database_hostname:database_port|
<-DatabaseConnectionString|-cs> database_connection_string>
<-DatabaseUserName|-du> database_user_name
<-DatabasePassword|-dp> database_password
<-DatabaseType|-dt> database_type
[<-DatabaseServiceName|-ds> database_service_name]
<-BackupFile|-bf> backup_file_name
[<-Force|-f>]
[<-ClearNodeAssociation|-ca>]
[<-Tablespace|-ts> tablespace_name]
[<-SchemaName|-sc> schema_name Microsoft SQL Server only]
To update the gateway node with infasetup, use the following syntax:
UpdateGatewayNode[<-DatabaseAddress|-da> database_hostname:database_port
<-DatabaseConnectionString|-cs> database_connection_string]
[<-DatabaseUserName|-du> database_user_name]
[<-DatabasePassword|-dp> database_password]
[<-DatabaseType|-dt> database_type]
[<-DatabaseServiceName|-ds> database_service_name]
[<-DomainName|-dn> domain_name]
[<-NodeName|-nn> node_name]
[<-NodeAddress|-na> node_host:port]
[<-PreviousInfaHome|-ph> previous_infa_home]
[<-HttpsPort|-hs> https_port]
[<-KeystoreFile|-kf> keystore_file_location]
[<-KeystorePass|-kp> keystore_password]
Prepare the Domain 13

[<-LogServiceDirectory|-ld> log_service_directory]
[<-ServerPort|-sv> server_admin_port_number]
[<-SchemaName|-sc> schema_name Microsoft SQL Server only]
Prepare the PowerCenter Repository1. Optimize repository upgrade performance. You can optimize the repository to increase performance when you
upgrade a repository.
2. Configure PowerCenter sessions that contain custom transformations.
3. Migrate the repository to a supported database.
4. Back up the repository.
Optimize Upgrade PerformanceComplete the following tasks to optimize the repository and increase performance when you upgrade:
¨ Purge unnecessary versions from the repository. If your repository is enabled for version control, the repositorycan quickly grow very large depending on the frequency and number of versions added to the repository. Eachversion of an object occupies the same amount of space in the repository database. If the repository is verylarge, determine if there are versions that you do not need and purge these versions.
¨ Truncate the workflow and session log file. Use the Repository Manager or the pmrep TruncateLog commandto truncate the workflow and session log file and delete run-time information you do not need. For example, youcan delete all log events older than one month before upgrading the repository.
¨ Update statistics. PowerCenter identifies and updates the statistics of all repository tables and indexes whenyou upgrade a repository. You can update the statistics before upgrading the repository to increase upgradeperformance.
Configure PowerCenter SessionsIf the PowerCenter repository contains sessions with Custom transformations and if the deterministic property forthe transformation and the session recovery strategy are not configured correctly, the sessions will not run afteryou upgrade. Sessions that will not run meet the following conditions:
¨ The session contains a Custom transformation or a transformation built on the Custom transformation.Transformations built on the Custom transformation include Complex Data Exchange, HTTP, Java, SQL,Union, Web Services Consumer, XML Generator, and XML Parser transformations.
¨ The Output is Deterministic property for a Custom transformation is not enabled.
¨ The session is configured to resume from last checkpoint.
To resume a session, a recovery session must be able to produce the same data in the same order as the originalsession from the resume checkpoint. If a session can be resumed, and you do not enable the Output isDeterministic property for a Custom transformation, the sessions will not run after you upgrade.
To correctly configure the session recovery strategy and deterministic property, complete the following tasksbefore you upgrade:
1. Get the nondeterministic_resumable_pre860.sql SQL script from Informatica Global Customer Support.
14 Chapter 2: Before You Upgrade the Domain and Server Files
2. Run the SQL script on the PowerCenter repository that you want to upgrade.
The script generates a list of sessions that contain Custom transformations with the Output is Deterministicproperty disabled and the session recovery strategy configured to resume from last checkpoint.
3. For each session, determine if the output is deterministic.
Make the following changes on the PowerCenter repository objects:
¨ If the output is deterministic, enable the Output is Deterministic property in the custom transformations forthe session.
¨ If the output is not deterministic, configure the session recovery strategy to restart or fail the session andcontinue the workflow.
Migrate to a Supported DatabaseIf the PowerCenter repository is in a Sybase ASE database, you must migrate it to an IBM DB2 UDB, MicrosoftSQL Server, or Oracle database.
1. Back up the repository contents.Select the service in the Administration Console and in the Actions lists select Backup Contents.
2. Disable the service.
3. Create a database schema and a user account in a supported database.
4. Update the database connection properties, such as the database type, connect string, database user name,and database password.
5. Enable the service in exclusive mode.
6. Restore the repository backup to the database schema.In the Administration Console, select the service that manages the content that you want to restore and in theActions lists select Restore Contents.
7. Change the operating mode of the service to normal and restart the service.
Note: When you restore multiple repositories in a repository domain, register the local repositories with theglobal repository after you restore the repositories.
Back Up the RepositoryBack up the PowerCenter repository.
You cannot upgrade a repository or Repository Service that has the same name as the domain or that uses thefollowing characters in the name: ? " : < > * / \ |
If you are upgrading a repository that has the same name as the domain or that has any of these characters in thename, back up the repository and restore it using a different name.
To back up a PowerCenter repository, select the service in the Administration Console and on the Actions listselect Backup Contents.
Prepare the PowerCenter Profiling WarehouseBefore you upgrade the domain, back up the PowerCenter Profiling warehouse.
Use the native database backup option to back up the PowerCenter Profiling warehouse database.
Prepare the PowerCenter Profiling Warehouse 15

Shut Down the DomainYou must shut down the domain before you upgrade it.
To shut down the domain, stop the Informatica service process on each node in the domain.
You can stop the Informatica service process on each node using one of the following methods:
¨ To stop Informatica from the Windows Start menu, click Programs > Informatica[Version] > Server > StopInformatica Services.
¨ To stop Informatica on UNIX, you use the infaservice command. By default, the infaservice executable file isinstalled in the following directory:
<InformaticaInstallationDir>/tomcat/bin Enter the following command to stop the daemon:
infaservice shutdown
You can also stop the Informatica service from the Windows control panel or from the Administrator tool.
Prepare to Change the Node ConfigurationBefore you change the node configuration, complete the following steps:
1. Review the operating system specific requirements.
2. Copy the installation directory.
3. Verify the keystore file name and location.
Configure the Windows MachineBefore you upgrade the domain and server files, complete the following Windows tasks:
1. Determine port availability.
2. Create a system user account.
Note: Services may fail to start if there is a port number conflict.
Determine Port AvailabilityThe installer sets up the ports for components in the Informatica domain, and it designates the ports to use forapplication service processes that run on the node where you install Informatica.
You can specify the port numbers to use for the components and a range of port numbers to use for theapplication services. Or you can use the default port numbers provided by the installer. Verify that the portnumbers are available on the machines where you install the Informatica services.
16 Chapter 2: Before You Upgrade the Domain and Server Files
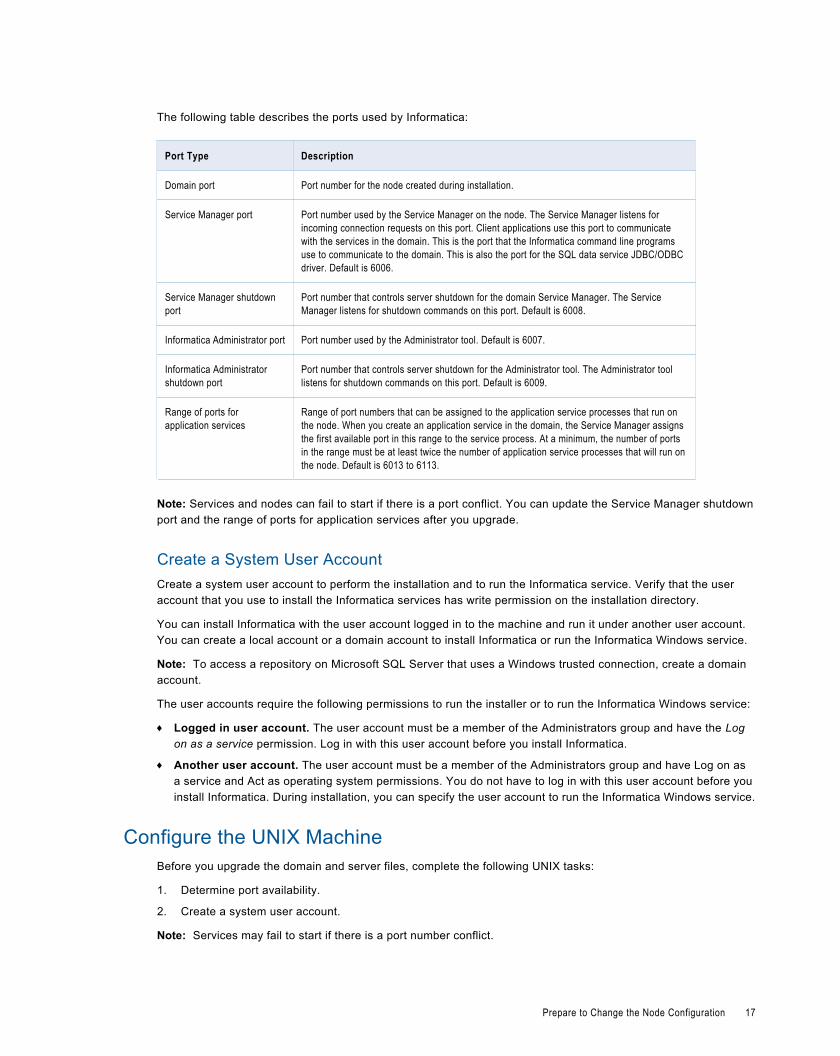
The following table describes the ports used by Informatica:
Port Type Description
Domain port Port number for the node created during installation.
Service Manager port Port number used by the Service Manager on the node. The Service Manager listens forincoming connection requests on this port. Client applications use this port to communicatewith the services in the domain. This is the port that the Informatica command line programsuse to communicate to the domain. This is also the port for the SQL data service JDBC/ODBCdriver. Default is 6006.
Service Manager shutdownport
Port number that controls server shutdown for the domain Service Manager. The ServiceManager listens for shutdown commands on this port. Default is 6008.
Informatica Administrator port Port number used by the Administrator tool. Default is 6007.
Informatica Administratorshutdown port
Port number that controls server shutdown for the Administrator tool. The Administrator toollistens for shutdown commands on this port. Default is 6009.
Range of ports forapplication services
Range of port numbers that can be assigned to the application service processes that run onthe node. When you create an application service in the domain, the Service Manager assignsthe first available port in this range to the service process. At a minimum, the number of portsin the range must be at least twice the number of application service processes that will run onthe node. Default is 6013 to 6113.
Note: Services and nodes can fail to start if there is a port conflict. You can update the Service Manager shutdownport and the range of ports for application services after you upgrade.
Create a System User AccountCreate a system user account to perform the installation and to run the Informatica service. Verify that the useraccount that you use to install the Informatica services has write permission on the installation directory.
You can install Informatica with the user account logged in to the machine and run it under another user account.You can create a local account or a domain account to install Informatica or run the Informatica Windows service.
Note: To access a repository on Microsoft SQL Server that uses a Windows trusted connection, create a domainaccount.
The user accounts require the following permissions to run the installer or to run the Informatica Windows service:
¨ Logged in user account. The user account must be a member of the Administrators group and have the Logon as a service permission. Log in with this user account before you install Informatica.
¨ Another user account. The user account must be a member of the Administrators group and have Log on asa service and Act as operating system permissions. You do not have to log in with this user account before youinstall Informatica. During installation, you can specify the user account to run the Informatica Windows service.
Configure the UNIX MachineBefore you upgrade the domain and server files, complete the following UNIX tasks:
1. Determine port availability.
2. Create a system user account.
Note: Services may fail to start if there is a port number conflict.
Prepare to Change the Node Configuration 17

Determine Port AvailabilityThe installer sets up the ports for components in the Informatica domain, and it designates the ports to use forapplication service processes that run on the node where you install Informatica.
You can specify the port numbers to use for the components and a range of port numbers to use for theapplication services. Or you can use the default port numbers provided by the installer. Verify that the portnumbers are available on the machines where you install the Informatica services.
The following table describes the ports used by Informatica:
Port Type Description
Domain port Port number for the node created during installation.
Service Manager port Port number used by the Service Manager on the node. The Service Manager listens forincoming connection requests on this port. Client applications use this port to communicatewith the services in the domain. This is the port that the Informatica command line programsuse to communicate to the domain. This is also the port for the SQL data service JDBC/ODBCdriver. Default is 6006.
Service Manager shutdownport
Port number that controls server shutdown for the domain Service Manager. The ServiceManager listens for shutdown commands on this port. Default is 6008.
Informatica Administrator port Port number used by the Administrator tool. Default is 6007.
Informatica Administratorshutdown port
Port number that controls server shutdown for the Administrator tool. The Administrator toollistens for shutdown commands on this port. Default is 6009.
Range of ports forapplication services
Range of port numbers that can be assigned to the application service processes that run onthe node. When you create an application service in the domain, the Service Manager assignsthe first available port in this range to the service process. At a minimum, the number of portsin the range must be at least twice the number of application service processes that will run onthe node. Default is 6013 to 6113.
Note: Services and nodes can fail to start if there is a port conflict. You can update the Service Manager shutdownport and the range of ports for application services after you upgrade.
Create a System User AccountCreate a user account specifically to run the Informatica daemon.
Verify that the user account you use to install Informatica has write permission on the installation directory.
Copy the Installation DirectoryCopy the directory of the previous version of Informatica to the machine where you want the new version ofInformatica to run. For example, if the previous version of Informatica is installed in C:\Informatica\861, copy the C:\Informatica\861 directory and subdirectories to the new machine.
When you run the upgrade installer, specify the Informatica installation directory on the new machine as the onethat you want to upgrade.
18 Chapter 2: Before You Upgrade the Domain and Server Files
Verify Keystore File Name and LocationIf the node uses HTTPS, verify that the keystore file is in the default location and that it uses the default file name.If the keystore file uses a different file name or directory, the Administrator tool fails to start after you upgrade thedomain.
The default location for the keystore file is <InformaticaInstallationDir>/server/tomcat/conf. The default file namefor the keystore file is PC_DEFAULT.keystore.
After you upgrade, you can use infasetup UpdateGatewayNode or UpdateWorkerNode to update the keystore filename and location.
Prepare to Change the Node Configuration 19
C H A P T E R 3
Domain and Server Files UpgradeThis chapter includes the following topics:
¨ Domain and Server Files Upgrade Overview, 20
¨ Upgrading in Graphical Mode, 20
¨ Upgrading in Console Mode, 23
¨ Upgrading in Silent Mode, 25
¨ Upgrading with Changes to the Node Configuration, 27
¨ Troubleshooting the Domain Upgrade, 35
Domain and Server Files Upgrade OverviewUse the server installer to upgrade the server files and domain of a previous version of PowerCenter. The serverinstaller provides a domain upgrade wizard to guide you through the upgrade process.
The upgrade wizard installs Informatica 9.0.1 HotFix 1 in the installation directory you specify. It does not modifythe files in the directory of the previous version.
The upgrade wizard reads the domain information from files in the previous version and uses the same settings toconfigure the domain and server files for Informatica 9.0.1 HotFix 1. It upgrades the tables of the domainconfiguration repository in the same database as the previous version.
Complete the pre-upgrade tasks before you start the upgrade. Run the installer on all machines that host previousversions of Informatica that you want to upgrade. On Windows, you can upgrade in graphical or silent mode. OnUNIX, you can upgrade in graphical, console, or silent mode.
Note: On UNIX, use native tar or GNU tar to extract the installer files. The user that runs the installer must haveread and write permissions on the installer files directory and execute permissions on install.sh.
Upgrading in Graphical ModeUse this procedure to upgrade PowerCenter on the same machine. You can upgrade the Informatica domain andserver files in graphical mode on Windows or UNIX.
To upgrade PowerCenter to another machine and modify the node configuration, see “ Upgrading with Changes tothe Node Configuration” on page 27.
20
On Windows, if you encounter problems when you run the install.bat file from the root directory, run the followingfile:
<InstallerExtractDirectory>/server/install.exe
1. Log in to the machine with the same user account that you used to install the previous version.
2. Close all other applications.
3. To begin the upgrade on Windows, run install.bat from the root directory.
To begin the upgrade on UNIX, use a shell command line to run install.sh from the root directory, and thenselect the option for graphical mode installation.
4. Select Install or upgrade to Informatica 9.0.1 with HotFix 1 and click Start.
¨ If you are upgrading from Informatica 9.0.1, select Apply HotFix 1 to Informatica 9.0.1. See theInformatica 9.0.1 HotFix 1 Release Notes for information about applying the hotfix.
5. In the Installation Type window, select Upgrade to Informatica 9.0.1 with HotFix 1 and click Next.
The Upgrade Pre-Requisites window displays the upgrade system requirements. Verify that all requirementsare met before you continue the upgrade.
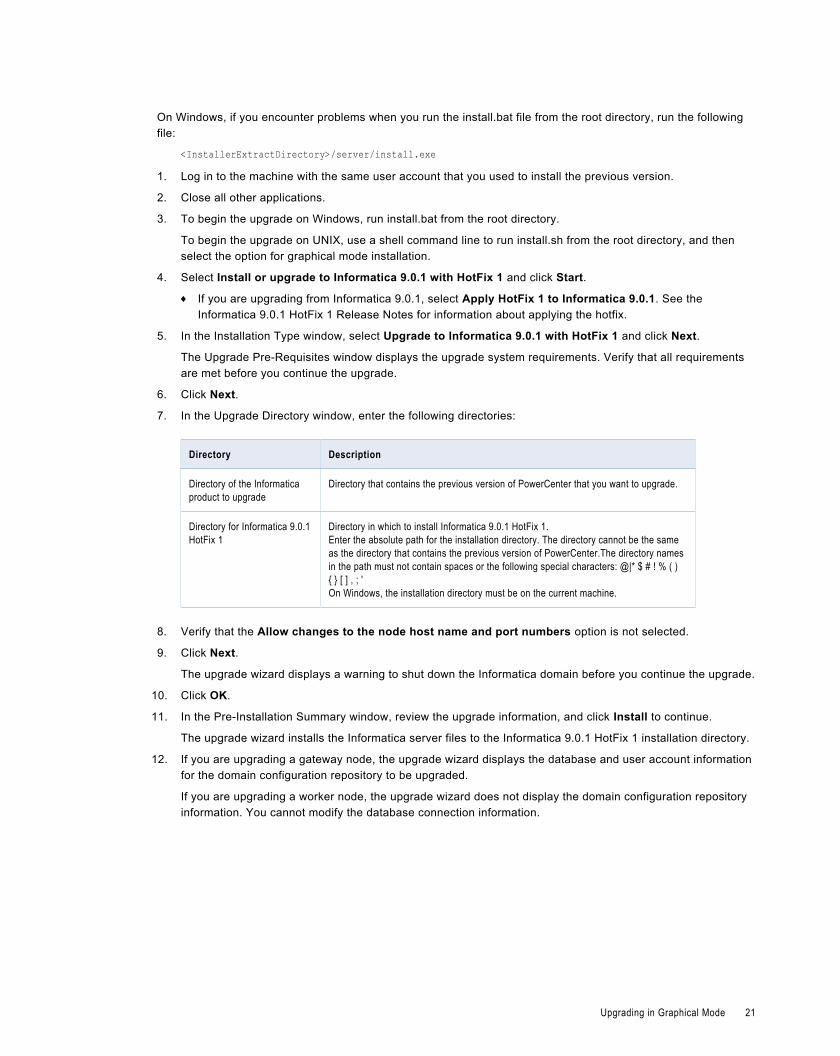
6. Click Next.
7. In the Upgrade Directory window, enter the following directories:
Directory Description
Directory of the Informaticaproduct to upgrade
Directory that contains the previous version of PowerCenter that you want to upgrade.
Directory for Informatica 9.0.1HotFix 1
Directory in which to install Informatica 9.0.1 HotFix 1.Enter the absolute path for the installation directory. The directory cannot be the sameas the directory that contains the previous version of PowerCenter.The directory namesin the path must not contain spaces or the following special characters: @|* $ # ! % ( ){ } [ ] , ; 'On Windows, the installation directory must be on the current machine.
8. Verify that the Allow changes to the node host name and port numbers option is not selected.
9. Click Next.
The upgrade wizard displays a warning to shut down the Informatica domain before you continue the upgrade.
10. Click OK.
11. In the Pre-Installation Summary window, review the upgrade information, and click Install to continue.
The upgrade wizard installs the Informatica server files to the Informatica 9.0.1 HotFix 1 installation directory.
12. If you are upgrading a gateway node, the upgrade wizard displays the database and user account informationfor the domain configuration repository to be upgraded.
If you are upgrading a worker node, the upgrade wizard does not display the domain configuration repositoryinformation. You cannot modify the database connection information.
Upgrading in Graphical Mode 21

The following table describes the properties that the installer displays for the domain configuration repository:
Property Description
Database type Database for the domain configuration repository.
Database user ID Database user account for the domain configuration repository.
User password Password for the database user account.
Tablespace Displayed for IBM DB2 only. Name of the tablespace for the upgraded domainconfiguration repository tables.If the database of the domain configuration repository that you are upgrading does notuse a 32 K tablespace, this property is blank. Enter the name of a tablespace with apage size of 32 K. In a single-partition database, if you do not specify a tablespacename, the installer writes the upgraded tables in the default tablespace. The defaulttablespace must be 32 K. In a multi-partition database, you must specify a 32 Ktablespace.
The upgrade wizard displays the database connection string for the domain configuration repository based onhow the connection string of the previous version was created at installation:
¨ If the previous version used a JDBC URL at installation, the upgrade wizard displays the JDBC connectionproperties, including the database address and service name.
¨ If the previous version used a custom JDBC connection string at installation, the upgrade wizard displaysthe custom connection string.
Optionally, you can specify additional JDBC parameters to include in the connection string. To provideadditional JDBC parameters, select JDBC parameters and enter a valid JDBC parameter string.
13. Click Test Connection to verify that you can connect to the database, and then click OK to continue.
14. Click Next.
On the Port Configuration Upgrade window, the upgrade wizard displays the default port numbers assigned tothe domain and node components.
15. You can specify new port numbers or use the default port numbers.
The following table describes the ports that you can specify:
Port Description
Service Manager port Port number used by the Service Manager in the node. Client applications and theInformatica command line programs use this port to communicate to the services in thedomain.
Informatica Administrator port Port number used by the Administrator tool.Available if you upgrade a gateway node.
Informatica Administratorshutdown port
Port number used by the Administrator tool to listen for shut down commands.Available if you upgrade a gateway node.
16. Click Next.
On Windows, the upgrade wizard creates a service to start Informatica. By default, the service runs under thesame user account as the account used for installation. You can run the Windows service under a differentuser account.
22 Chapter 3: Domain and Server Files Upgrade

17. Select whether to run the Windows service under a different user account.
The following table describes the properties that you set:
Property Description
Run Informatica under adifferent user account
Indicates whether to run the Windows service under a different user account.
User name User account with which to run the Informatica Windows service.Use the following format:DomainName\UserAccountThis user account must have the Act as operating system permission.
Password Password for the user account with which to run the Informatica Windows service.
18. Click Next.
The Post-Upgrade Summary window indicates whether the upgrade completed successfully.
19. Click Done.
You can view the upgrade log files to get more information about the tasks performed by the upgrade wizard andto view the configuration of installed components.
Upgrading in Console ModeUse this procedure to upgrade PowerCenter on the same machine. You can upgrade the Informatica domain andserver files in console mode on UNIX.
To upgrade PowerCenter to another machine and modify the node configuration, see “ Upgrading with Changes tothe Node Configuration” on page 27.
Note: When you run the installer in console mode, the words Quit and Back are reserved words. Do not use themas input text.
When the installer starts in console mode, it displays a message that it is preparing for silent mode installation. OnLinux IA-64, it displays a message that it cannot find the libc.so.6 file. On Solaris, it displays a message that itcannot find the install.bin file. You can ignore these messages.
1. Log in to the machine with the same user account that you used to install the previous version.
2. Stop all processes that access the directory and subdirectories of the Informatica product to upgrade,including command prompts and tail logs.
3. On a shell command line, run the install.sh file located in the root directory.
The installer displays the message to verify that the locale environment variables are set.
4. If the environment variables are not set, enter N to exit the installer and set them as required.
If the environment variables are set, enter Y to continue.
5. Enter 1 to install or upgrade to Informatica 9.0.1 with Hotfix 1.
¨ If you are upgrading from Informatica 9.0.1, select Apply HotFix 1 to Informatica 9.0.1. See theInformatica 9.0.1 HotFix 1 Release Notes for information about applying the hotfix.
6. Enter C for console mode installation.
7. Enter 2 to upgrade to Informatica 9.0.1 Hotfix 1.
Upgrading in Console Mode 23
Review the system requirements and pre-upgrade tasks. Verify that all upgrade requirements are met beforeyou continue.
8. Press Enter.
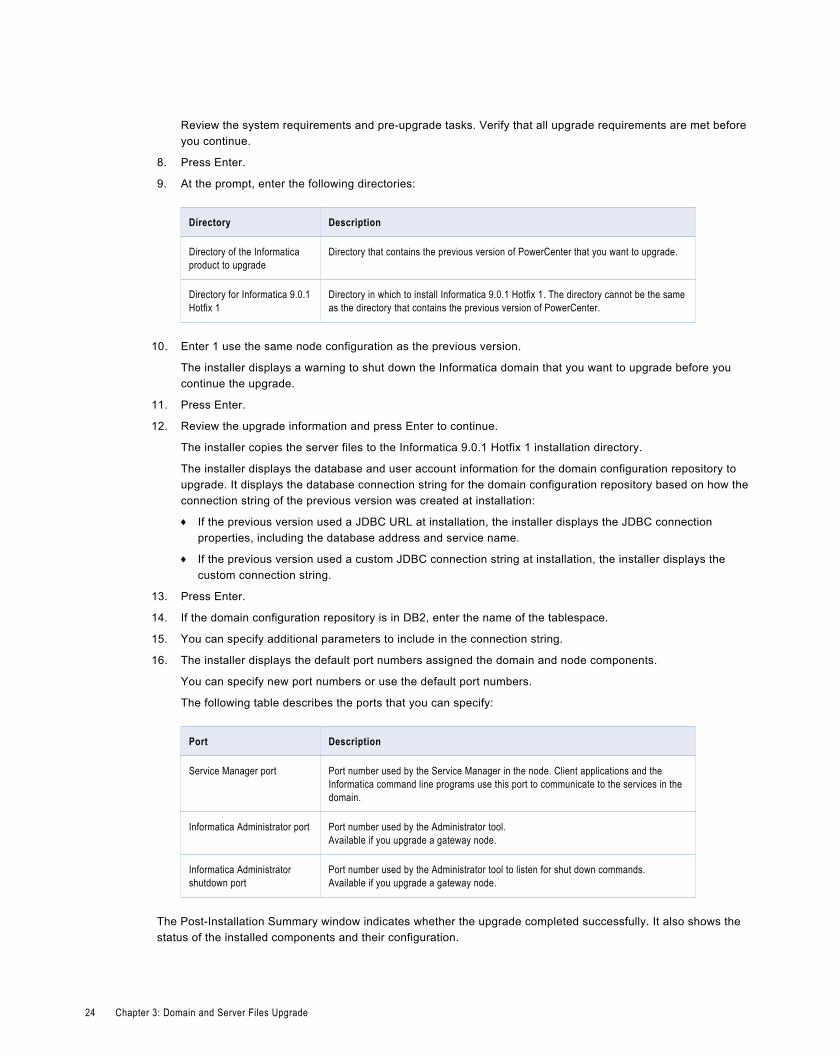
9. At the prompt, enter the following directories:
Directory Description
Directory of the Informaticaproduct to upgrade
Directory that contains the previous version of PowerCenter that you want to upgrade.
Directory for Informatica 9.0.1Hotfix 1
Directory in which to install Informatica 9.0.1 Hotfix 1. The directory cannot be the sameas the directory that contains the previous version of PowerCenter.
10. Enter 1 use the same node configuration as the previous version.
The installer displays a warning to shut down the Informatica domain that you want to upgrade before youcontinue the upgrade.
11. Press Enter.
12. Review the upgrade information and press Enter to continue.
The installer copies the server files to the Informatica 9.0.1 Hotfix 1 installation directory.
The installer displays the database and user account information for the domain configuration repository toupgrade. It displays the database connection string for the domain configuration repository based on how theconnection string of the previous version was created at installation:
¨ If the previous version used a JDBC URL at installation, the installer displays the JDBC connectionproperties, including the database address and service name.
¨ If the previous version used a custom JDBC connection string at installation, the installer displays thecustom connection string.
13. Press Enter.
14. If the domain configuration repository is in DB2, enter the name of the tablespace.
15. You can specify additional parameters to include in the connection string.
16. The installer displays the default port numbers assigned the domain and node components.
You can specify new port numbers or use the default port numbers.
The following table describes the ports that you can specify:
Port Description
Service Manager port Port number used by the Service Manager in the node. Client applications and theInformatica command line programs use this port to communicate to the services in thedomain.
Informatica Administrator port Port number used by the Administrator tool.Available if you upgrade a gateway node.
Informatica Administratorshutdown port
Port number used by the Administrator tool to listen for shut down commands.Available if you upgrade a gateway node.
The Post-Installation Summary window indicates whether the upgrade completed successfully. It also shows thestatus of the installed components and their configuration.
24 Chapter 3: Domain and Server Files Upgrade

You can view the upgrade log files to get more information about the upgrade tasks performed by the installer andto view the configuration properties for the installed components.
Upgrading in Silent ModeUse this procedure to upgrade PowerCenter on the same machine.
To upgrade PowerCenter to another machine and modify the node configuration, see “ Upgrading with Changes tothe Node Configuration” on page 27.
To upgrade the Informatica services without user interaction, upgrade in silent mode. Use a properties file tospecify the upgrade options. The installer reads the file to determine the upgrade options. You can use silentmode upgrade to upgrade the Informatica services on multiple machines on the network or to standardize theupgrade process across machines.
Copy the Informatica installation files to the hard disk on the machine that hosts the Informatica instance you planto upgrade.
To upgrade in silent mode, complete the following tasks:
1. Create the upgrade properties file and specify the upgrade options.
2. Run the installer with the upgrade properties file.
Creating the Properties FileInformatica provides a sample properties file that includes the upgrade parameters that are required by theinstaller. You can customize the sample properties file to specify the options for your upgrade.
The sample upgrade properties file is named SilentInput_upgrade.properties and is located in the root directory ofthe installation DVD or the installer download location. After you customize the file, save it with the file nameSilentInput.properties.
1. Go to the root of the directory that contains the installation files.
2. Find the file named SilentInput_upgrade.properties.
Back up the file before you modify it.
3. Use a text editor to open the file and modify the values of the upgrade parameters.
The following table describes the upgrade parameters that you can modify:
Property Name Description
INSTALL_TYPE Indicates whether to install or upgrade Informatica.If the value is 0, the installer performs a fresh installation of Informatica. If the value is1, the installer upgrades a previous version of Informatica.
UPG_DIFF_CONFIG Indicates whether to change the node configuration for the new version of Informatica.To upgrade a previous version of Informatica with the same machine configuration, setthis parameter to 0.
USER_INSTALL_DIR Directory in which to install the new version of PowerCenter. The directory cannot bethe same as the directory that contains the previous version of PowerCenter.
UPG_BACKUP_DIR Directory that contains the previous version of PowerCenter that you want to upgrade.
Upgrading in Silent Mode 25
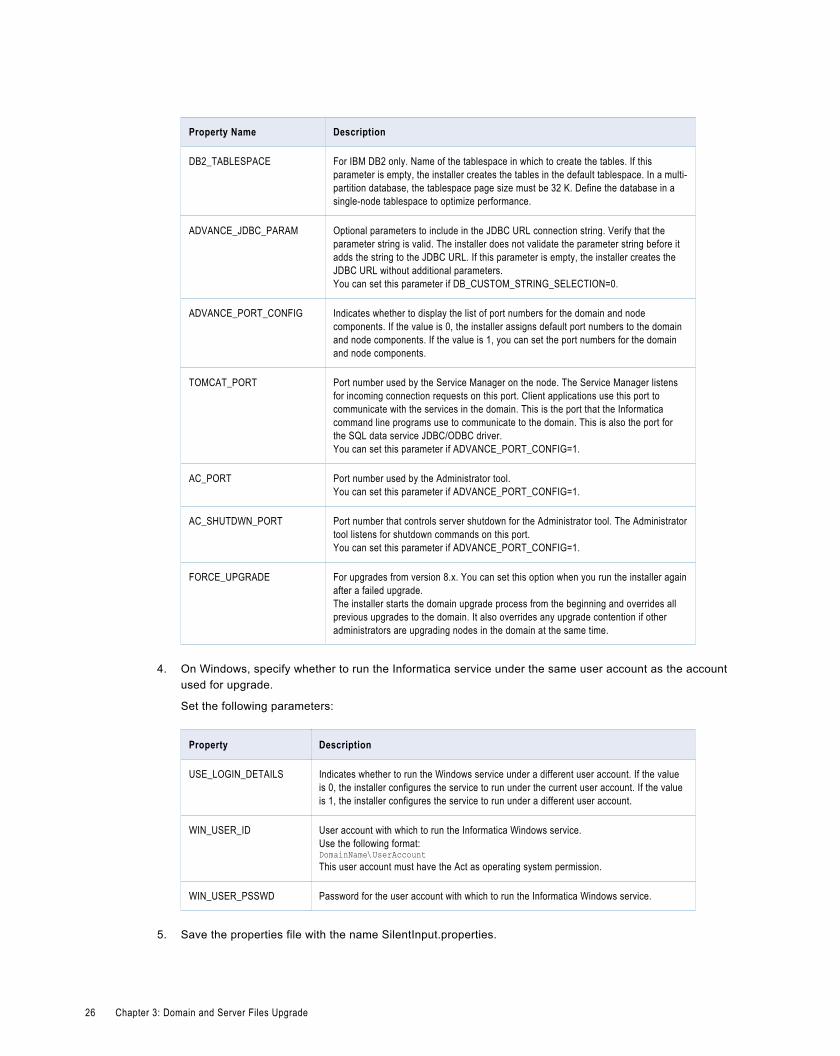
Property Name Description
DB2_TABLESPACE For IBM DB2 only. Name of the tablespace in which to create the tables. If thisparameter is empty, the installer creates the tables in the default tablespace. In a multi-partition database, the tablespace page size must be 32 K. Define the database in asingle-node tablespace to optimize performance.
ADVANCE_JDBC_PARAM Optional parameters to include in the JDBC URL connection string. Verify that theparameter string is valid. The installer does not validate the parameter string before itadds the string to the JDBC URL. If this parameter is empty, the installer creates theJDBC URL without additional parameters.You can set this parameter if DB_CUSTOM_STRING_SELECTION=0.
ADVANCE_PORT_CONFIG Indicates whether to display the list of port numbers for the domain and nodecomponents. If the value is 0, the installer assigns default port numbers to the domainand node components. If the value is 1, you can set the port numbers for the domainand node components.
TOMCAT_PORT Port number used by the Service Manager on the node. The Service Manager listensfor incoming connection requests on this port. Client applications use this port tocommunicate with the services in the domain. This is the port that the Informaticacommand line programs use to communicate to the domain. This is also the port forthe SQL data service JDBC/ODBC driver.You can set this parameter if ADVANCE_PORT_CONFIG=1.
AC_PORT Port number used by the Administrator tool.You can set this parameter if ADVANCE_PORT_CONFIG=1.
AC_SHUTDWN_PORT Port number that controls server shutdown for the Administrator tool. The Administratortool listens for shutdown commands on this port.You can set this parameter if ADVANCE_PORT_CONFIG=1.
FORCE_UPGRADE For upgrades from version 8.x. You can set this option when you run the installer againafter a failed upgrade.The installer starts the domain upgrade process from the beginning and overrides allprevious upgrades to the domain. It also overrides any upgrade contention if otheradministrators are upgrading nodes in the domain at the same time.
4. On Windows, specify whether to run the Informatica service under the same user account as the accountused for upgrade.
Set the following parameters:
Property Description
USE_LOGIN_DETAILS Indicates whether to run the Windows service under a different user account. If the valueis 0, the installer configures the service to run under the current user account. If the valueis 1, the installer configures the service to run under a different user account.
WIN_USER_ID User account with which to run the Informatica Windows service.Use the following format:DomainName\UserAccount This user account must have the Act as operating system permission.
WIN_USER_PSSWD Password for the user account with which to run the Informatica Windows service.
5. Save the properties file with the name SilentInput.properties.
26 Chapter 3: Domain and Server Files Upgrade
Running the Silent InstallerAfter you create the properties file, open a command window to start the silent upgrade.
1. Open a command window.
2. Go to the root of the server installer directory.
3. Verify that the directory contains the file SilentInput.properties with the upgrade options.
4. To start the silent upgrade process, double click the file silentinstall.bat.
The silent upgrade runs in the background. The process can take a while. The silent upgrade process is completewhen the Informatica_<Version>_Services_InstallLog.log is created in the installation directory.
The silent upgrade fails if you incorrectly configure the properties file or if the installation directory is notaccessible. If the upgrade fails, view the silent upgrade log file and correct the errors. Then run the silent installeragain. The silent upgrade log file name is silentErrorLog.log. The installer creates it in the root directory onWindows and in the user home directory on UNIX.
Upgrading with Changes to the Node ConfigurationThe installer provides the option to allow changes to the node host name and port numbers. Select this option toupgrade the server files and change the configuration the node.
Complete the pre-upgrade tasks before you run the installer. On Windows, you can run the installer in graphical orsilent mode. On UNIX, you can run the installer in graphical, console, or silent mode.
Note: On UNIX, use native tar or GNU tar to extract the installer files. The user that runs the installer must haveread and write permissions on the installer files directory and execute permissions on install.sh.
Upgrading in Graphical ModeUse this procedure to upgrade PowerCenter to another machine and modify the node configuration. To upgradePowerCenter on the same machine, see “Upgrading in Graphical Mode” on page 20.
You can upgrade the Informatica domain and server files in graphical mode on Windows or UNIX.
On Windows, if you encounter problems when you run the install.bat file from the root directory, run the followingfile:
<InstallerExtractDirectory>/server/install.exe
1. Log in to the machine with the same user account that you used to install the previous version.
2. Close all other applications.
3. To begin the upgrade on Windows, run install.bat from the root directory.
To begin the upgrade on UNIX, use a shell command line to run install.sh from the root directory, and thenselect the option for graphical mode installation.
4. Select Install or upgrade to Informatica 9.0.1 with Hotfix 1 and click Start.
If you are upgrading from Informatica 9.0.1, select Apply Hotfix 1 to Informatica 9.0.1. See the Informatica 9.0.1 Hotfix 1 Release Notes for information about applying the hotfix.
5. In the Installation Type window, select Upgrade to Informatica 9.0.1 with Hotfix 1 and click Next.
The Upgrade Pre-Requisites window displays the upgrade system requirements. Verify that all requirementsare met before you continue the upgrade.
Upgrading with Changes to the Node Configuration 27

6. Click Next.
7. In the Upgrade Directory window, enter the following directories:
Directory Description
Directory of the Informaticaproduct to upgrade
Directory that contains the previous version of PowerCenter that you want to upgrade.
Directory for Informatica 9.0.1Hotfix 1
Directory in which to install Informatica 9.0.1 Hotfix 1.Enter the absolute path for the installation directory. The directory cannot be the sameas the directory that contains the previous version of PowerCenter.The directory namesin the path must not contain spaces or the following special characters: @|* $ # ! % ( ){ } [ ] , ; 'On Windows, the installation directory must be on the current machine.
8. Select Allow changes to the node host name and port numbers.
Use this option to change the configuration of the Informatica product that you upgrade. If you are upgradingto a different machine, you can change the node configuration to match the new machine.
9. Click Next.
The upgrade wizard displays a warning to shut down the Informatica domain before you continue the upgrade.
10. Click OK.
11. In the Pre-Installation Summary window, review the upgrade information, and click Install to continue.
The upgrade wizard installs the Informatica server files to the Informatica 9.0.1 Hotfix 1 installation directory.
12. If you are upgrading a gateway node, the upgrade wizard displays the database and user account informationfor the domain configuration repository to be upgraded.
If you are upgrading a worker node, the upgrade wizard does not display the domain configuration repositoryinformation. You cannot modify the database connection information.
The following table describes the properties that the installer displays for the domain configuration repository:
Property Description
Database type Database for the domain configuration repository.
Database user ID Database user account for the domain configuration repository.
User password Password for the database user account.
Tablespace Displayed for IBM DB2 only. Name of the tablespace for the upgraded domainconfiguration repository tables.If the database of the domain configuration repository that you are upgrading does notuse a 32 K tablespace, this property is blank. Enter the name of a tablespace with apage size of 32 K. In a single-partition database, if you do not specify a tablespacename, the installer writes the upgraded tables in the default tablespace. The defaulttablespace must be 32 K. In a multi-partition database, you must specify a 32 Ktablespace.
The upgrade wizard displays the database connection string for the domain configuration repository based onhow the connection string of the previous version was created at installation:
¨ If the previous version used a JDBC URL at installation, the upgrade wizard displays the JDBC connectionproperties, including the database address and service name.
28 Chapter 3: Domain and Server Files Upgrade
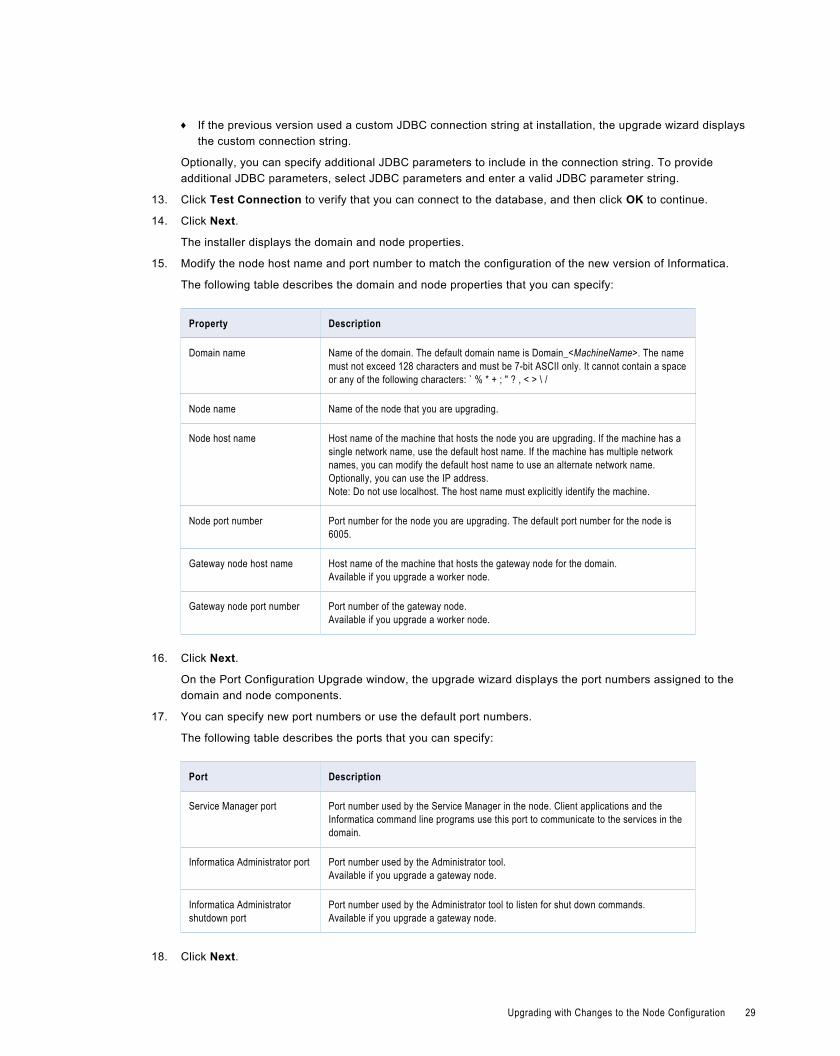
¨ If the previous version used a custom JDBC connection string at installation, the upgrade wizard displaysthe custom connection string.
Optionally, you can specify additional JDBC parameters to include in the connection string. To provideadditional JDBC parameters, select JDBC parameters and enter a valid JDBC parameter string.
13. Click Test Connection to verify that you can connect to the database, and then click OK to continue.
14. Click Next.
The installer displays the domain and node properties.
15. Modify the node host name and port number to match the configuration of the new version of Informatica.
The following table describes the domain and node properties that you can specify:
Property Description
Domain name Name of the domain. The default domain name is Domain_<MachineName>. The namemust not exceed 128 characters and must be 7-bit ASCII only. It cannot contain a spaceor any of the following characters: ` % * + ; " ? , < > \ /
Node name Name of the node that you are upgrading.
Node host name Host name of the machine that hosts the node you are upgrading. If the machine has asingle network name, use the default host name. If the machine has multiple networknames, you can modify the default host name to use an alternate network name.Optionally, you can use the IP address.Note: Do not use localhost. The host name must explicitly identify the machine.
Node port number Port number for the node you are upgrading. The default port number for the node is6005.
Gateway node host name Host name of the machine that hosts the gateway node for the domain.Available if you upgrade a worker node.
Gateway node port number Port number of the gateway node.Available if you upgrade a worker node.
16. Click Next.
On the Port Configuration Upgrade window, the upgrade wizard displays the port numbers assigned to thedomain and node components.
17. You can specify new port numbers or use the default port numbers.
The following table describes the ports that you can specify:
Port Description
Service Manager port Port number used by the Service Manager in the node. Client applications and theInformatica command line programs use this port to communicate to the services in thedomain.
Informatica Administrator port Port number used by the Administrator tool.Available if you upgrade a gateway node.
Informatica Administratorshutdown port
Port number used by the Administrator tool to listen for shut down commands.Available if you upgrade a gateway node.
18. Click Next.
Upgrading with Changes to the Node Configuration 29

On Windows, the upgrade wizard creates a service to start Informatica. By default, the service runs under thesame user account as the account used for installation. You can run the Windows service under a differentuser account.
19. Select whether to run the Windows service under a different user account.
The following table describes the properties that you set:
Property Description
Run Informatica under adifferent user account
Indicates whether to run the Windows service under a different user account.
User name User account with which to run the Informatica Windows service.Use the following format:DomainName\UserAccountThis user account must have the Act as operating system permission.
Password Password for the user account with which to run the Informatica Windows service.
20. Click Next.
The Post-Upgrade Summary window indicates whether the upgrade completed successfully.
21. Click Done.
You can view the upgrade log files to get more information about the tasks performed by the upgrade wizard andto view the configuration of installed components.
Upgrading in Console ModeUse this procedure to upgrade PowerCenter to another machine and modify the node configuration. To upgradePowerCenter on the same machine, see “Upgrading in Console Mode” on page 23.
You can upgrade the Informatica domain and server files in console mode on UNIX.
Note: When you run the installer in console mode, the words Quit and Back are reserved words. Do not use themas input text.
When the installer starts in console mode, it displays a message that it is preparing for silent mode installation. OnLinux IA-64, it displays a message that it cannot find the libc.so.6 file. On Solaris, it displays a message that itcannot find the install.bin file. You can ignore these messages.
1. Log in to the machine with the same user account that you used to install the previous version.
2. Stop all processes that access the directory and subdirectories of the Informatica product to upgrade,including command prompts and tail logs.
3. On a shell command line, run the install.sh file located in the root directory.
The installer displays the message to verify that the locale environment variables are set.
4. If the environment variables are not set, enter N to exit the installer and set them as required.
If the environment variables are set, enter Y to continue.
5. Enter 1 to upgrade to Informatica 9.0.1 Hotfix 1.
6. Enter C for console mode installation.
7. Enter 2 to upgrade to Informatica 9.0.1 Hotfix 1.
Review the system requirements and pre-upgrade tasks. Verify that all upgrade requirements are met beforeyou continue.
30 Chapter 3: Domain and Server Files Upgrade

8. Press Enter.
9. At the prompt, enter the following directories:
Directory Description
Directory of the Informaticaproduct to upgrade
Directory that contains the previous version of PowerCenter that you want to upgrade.
Directory for Informatica 9.0.1Hotfix 1
Directory in which to install Informatica 9.0.1. The directory cannot be the same as thedirectory that contains the previous version of PowerCenter.
10. Enter 2 to allow changes to the node host name and port number.
The installer displays a warning to shut down the Informatica domain that you want to upgrade before youcontinue the upgrade.
11. Press Enter.
12. Review the upgrade information and press Enter to continue.
The installer copies the server files to the Informatica 9.0.1 Hotfix 1 installation directory.
The installer displays the database and user account information for the domain configuration repository toupgrade. It displays the database connection string for the domain configuration repository based on how theconnection string of the previous version was created at installation:
¨ If the previous version used a JDBC URL at installation, the installer displays the JDBC connectionproperties, including the database address and service name.
¨ If the previous version used a custom JDBC connection string at installation, the installer displays thecustom connection string.
13. Press Enter.
14. If the domain configuration repository is in DB2, you can specify the name of the tablespace.
15. You can specify additional parameters to include in the connection string.
The installer displays the domain and node properties.
16. Modify the node host name and port number to match the configuration of the new version of Informatica.
The following table describes the domain and node properties that you can specify:
Property Description
Domain name Name of the domain. The default domain name is Domain_<MachineName>. The namemust not exceed 128 characters and must be 7-bit ASCII only. It cannot contain a spaceor any of the following characters: ` % * + ; " ? , < > \ /
Node name Name of the node that you are upgrading.
Node host name Host name of the machine that hosts the node you are upgrading. If the machine has asingle network name, use the default host name. If the machine has multiple networknames, you can modify the default host name to use an alternate network name.Optionally, you can use the IP address.Note: Do not use localhost. The host name must explicitly identify the machine.
Node port number Port number for the node you are upgrading. The default port number for the node is6005.
Upgrading with Changes to the Node Configuration 31

Property Description
Gateway node host name Host name of the machine that hosts the gateway node for the domain.Available if you upgrade a worker node.
Gateway node port number Port number of the gateway node.Available if you upgrade a worker node.
17. The installer displays the port numbers assigned the domain components.
You can specify new port numbers or use the default port numbers.
The following table describes the ports that you can specify:
Port Description
Service Manager port Port number used by the Service Manager in the node. Client applications and theInformatica command line programs use this port to communicate to the services in thedomain.
Informatica Administrator port Port number used by the Administrator tool.Available if you upgrade a gateway node.
Informatica Administratorshutdown port
Port number used by the Administrator tool to listen for shut down commands.Available if you upgrade a gateway node.
The Post-Installation Summary window indicates whether the upgrade completed successfully. It also shows thestatus of the installed components and their configuration.
You can view the upgrade log files to get more information about the upgrade tasks performed by the installer andto view the configuration properties for the installed components.
Upgrading in Silent ModeUse this procedure to upgrade PowerCenter to another machine and modify the node configuration. To upgradePowerCenter on the same machine, see “Upgrading in Silent Mode” on page 25.
To upgrade the Informatica services without user interaction, upgrade in silent mode. Use a properties file tospecify the upgrade options. The installer reads the file to determine the upgrade options. You can use silentmode upgrade to upgrade the Informatica services on multiple machines on the network or to standardize theupgrade process across machines.
Copy the Informatica installation files to the hard disk on the machine that hosts the Informatica instance you planto upgrade.
To upgrade in silent mode, complete the following tasks:
1. Create the upgrade properties file and specify the upgrade options.
2. Run the installer with the upgrade properties file.
Creating the Properties FileInformatica provides a sample properties file that includes the upgrade parameters that are required by theinstaller. You can customize the sample properties file to specify the options for your upgrade.
32 Chapter 3: Domain and Server Files Upgrade

The sample upgrade properties file is named SilentInput_Upgrade_NewConfig.properties and is located in the rootdirectory of the installation DVD or the installer download location. After you customize the file, save it with the filename SilentInput.properties.
1. Go to the root of the directory that contains the installation files.
2. Find the file named SilentInput_Upgrade_NewConfig.properties.
Back up the file before you modify it.
3. Use a text editor to open the file and modify the values of the upgrade parameters.
The following table describes the upgrade parameters that you can modify:
Parameter Name Description
INSTALL_TYPE Indicates whether to install or upgrade Informatica.To upgrade from a previous version of Informatica, set the value to 1.
UPG_DIFF_CONFIG Indicates whether to change the node configuration for the new version of Informatica.To upgrade a previous version of Informatica to a different machine configuration, setthis parameter to 1.
USER_INSTALL_DIR Directory in which to install Informatica the new version of Informatica. The directorycannot be the same as the directory that contains the previous version.
UPG_BACKUP_DIR Directory that contains the previous version of Informatica product that you want toupgrade.
DB_TYPE Database for the domain configuration repository. The value can be one of thefollowing databases:- Oracle- MSSQLServer- DB2
DB_UNAME Database user account name for the domain configuration repository.
DB_PASSWD Password for the database user account.
DB2_TABLESPACE For IBM DB2 only. Name of the tablespace in which to create the tables. If thisparameter is empty, the installer creates the tables in the default tablespace. In a multi-partition database, the tablespace page size must be 32 K.
DB_CUSTOM_STRING_SELECTION
Determines whether to use a JDBC URL or a custom connection string to connect tothe domain configuration repository database.If the value is 0, the installer creates a JDBC URL from the database properties youprovide. If the value is 1, the installer uses the custom connection string you provide.
DB_SERVICENAME Required if DB_CUSTOM_STRING_SELECTION=0.Service name for Oracle and IBM DB2 databases or database name for Microsoft SQLServer.
DB_ADDRESS Required if DB_CUSTOM_STRING_SELECTION=0.Host name and port number for the database instance in the format HostName:Port.
ADVANCE_JDBC_PARAM You can set this parameter if DB_CUSTOM_STRING_SELECTION=0.Optional parameters to include in the JDBC URL connection string. Verify that theparameter string is valid. The installer does not validate the parameter string before itadds the string to the JDBC URL. If this parameter is empty, the installer creates theJDBC URL without additional parameters.
Upgrading with Changes to the Node Configuration 33

Parameter Name Description
DB_CUSTOM_STRING Required if DB_CUSTOM_STRING_SELECTION=1.Valid custom JDBC connection string.
DOMAIN_HOST_NAME Host name of the machine that hosts the node that you are upgrading. If the machinehas a single network name, use the default host name. If the machine has multiplenetwork names, you can modify the default host name to use an alternate networkname. Optionally, you can use the IP address.Note: Do not use localhost. The host name must explicitly identify the machine.
DOMAIN_PORT Port number for the node that you are upgrading.
GATEWAYNODE_HOST Required if you upgrade a worker node.Host name of the machine that hosts the gateway node.
GATEWAYNODE__PORT Required if you upgrade a worker node.Port number for the gateway node.
TOMCAT_PORT Port number used by the Service Manager on the node. The Service Manager listensfor incoming connection requests on this port. Client applications use this port tocommunicate with the services in the domain. This is the port that the Informaticacommand line programs use to communicate to the domain. This is also the port forthe SQL data service JDBC/ODBC driver.
AC_PORT Port number used by the Administrator tool.
AC_SHUTDWN_PORT Port number that controls server shutdown for the Administrator tool. The Administratortool listens for shutdown commands on this port.
FORCE_UPGRADE For upgrades from version 8.x. You can set this option when you run the installer againafter a failed upgrade.The installer starts the domain upgrade process from the beginning and overrides allprevious upgrades to the domain. It also overrides any upgrade contention if otheradministrators are upgrading nodes in the domain at the same time.
4. On Windows, specify whether to run the Informatica service under the same user account as the accountused for upgrade.
Set the following parameters:
Property Description
USE_LOGIN_DETAILS Indicates whether to run the Windows service under a different user account. If the valueis 0, the installer configures the service to run under the current user account. If the valueis 1, the installer configures the service to run under a different user account.
WIN_USER_ID User account with which to run the Informatica Windows service.Use the following format:DomainName\UserAccount This user account must have the Act as operating system permission.
WIN_USER_PSSWD Password for the user account with which to run the Informatica Windows service.
5. Save the properties file with the name SilentInput.properties.
34 Chapter 3: Domain and Server Files Upgrade

Running the Silent InstallerAfter you create the properties file, open a command window to start the silent upgrade.
1. Open a command window.
2. Go to the root of the server installer directory.
3. Verify that the directory contains the file SilentInput.properties with the upgrade options.
4. To start the silent upgrade process, double click the file silentinstall.bat.
The silent upgrade runs in the background. The process can take a while. The silent upgrade process is completewhen the Informatica_<Version>_Services_InstallLog.log is created in the installation directory.
The silent upgrade fails if you incorrectly configure the properties file or if the installation directory is notaccessible. If the upgrade fails, view the silent upgrade log file and correct the errors. Then run the silent installeragain. The silent upgrade log file name is silentErrorLog.log. The installer creates it in the root directory onWindows and in the user home directory on UNIX.
Troubleshooting the Domain UpgradeIf the upgrade does not complete successfully, review log files to determine the cause of the failure. The upgradelog files are in the root of the directory where the new version of Informatica is installed. Review the following logfile: Informatica_<Version>_Services_Upgrade.log
If the upgrade fails, it can result in an inconsistent domain configuration. You can run the installer again to resolvethe inconsistent configuration and complete the upgrade process. When you run the installer again, select theRestart the Domain Configuration Upgrade option. The domain upgrade wizard starts the domain upgrade processfrom the beginning and overrides all previous upgrades to the domain. It also overrides any upgrade contention ifother administrators are upgrading other nodes in the domain at the same time.
Use the following guidelines when you run the installer after a failed upgrade:
¨ Resolve the problem indicated in the upgrade logs before you run the installer again.
¨ Verify that there are no other administrators upgrading other nodes in the domain when you run the installer.
¨ If errors persist after you run the installer with the Restart the Domain Configuration Upgrade option, restorethe domain configuration repository database from backup and run the installer again.
Troubleshooting the Domain Upgrade 35

C H A P T E R 4
Before You Upgrade theApplication Services
This chapter includes the following topics:
¨ Pre-Upgrade Tasks, 36
¨ Configure POSIX Asynchronous I/O, 36
¨ Configure Informatica Environment Variables, 37
¨ Configure Locale Environment Variables, 37
¨ Clear Browser Cache, 38
¨ Configure Browser Bookmarks, 38
¨ Prepare to Upgrade LDAP Users and Groups, 38
¨ Tasks for Changing the Node Configuration, 39
Pre-Upgrade TasksBefore you upgrade the application services, complete the following tasks:
1. Configure POSIX Asynchronous I/O.
2. Configure Informatica environment variables.
3. Configure locale environment variables.
4. Clear browser cache.
5. Configure browser bookmarks.
6. Prepare to upgrade LDAP users and groups.
7. Tasks for changing the node configuration.
Configure POSIX Asynchronous I/OIf you install Informatica on IBM AIX, make POSIX Asynchronous I/O available on any node where you want to runa PowerCenter Integration Service. A PowerCenter Integration Service running on an IBM AIX machine can fail tostart if POSIX Asynchronous I/O is not available.
36

Configure Informatica Environment VariablesYou can configure the INFA_DOMAINS_FILE and INFA_HOME environment variables to store the domain andinstallation location settings.
INFA_DOMAINS_FILE
The installer creates a domains.infa file in the Informatica installation directory. The domains.infa file containsthe connectivity information for the gateway nodes in a domain, including the domain names, domain hostnames, and domain host port numbers.
Set the value of the INFA_DOMAINS_FILE variable to the path and file name of the domains.infa file. If youconfigure the INFA_DOMAINS_FILE variable, you can run infacmd and pmcmd from a directory otherthan /server/bin.
Configure the INFA_DOMAINS_FILE variable on the machine where you install the Informatica services. OnWindows, configure INFA_DOMAINS_FILE as a system variable.
INFA_HOME
Use INFA_HOME to designate the Informatica installation directory. If you modify the Informatica directorystructure, you need to set the environment variable to the location of the Informatica installation directory orthe directory where the installed Informatica files are located.
For example, you use a softlink in UNIX for any of the Informatica directories. To configure INFA_HOME sothat any Informatica application or service can locate the other Informatica components it needs to run, setINFA_HOME to the location of the Informatica installation directory.
Configure Locale Environment VariablesUse LANG, LC_CTYPE, or LC_ALL to set the UNIX code page. Verify that the locale setting is compatible with thecode page for the repository. If the locale setting is not compatible with the repository code page, you cannotcreate a repository service.
Different UNIX operating systems require different values for the same locale. The value for the locale variable iscase sensitive.
Use the following command to verify that the value for the locale environment variable is compatible with thelanguage settings for the machine and the type of code page you want to use for the repository:
locale -a
The command returns the languages installed on the UNIX operating system and the existing locale settings.
Locale on Linux
All UNIX operating systems except Linux have a unique value for each locale. Linux allows different values torepresent the same locale. For example, “utf8,” “UTF-8,” “UTF8,” and “utf-8” represent the same locale on aLinux machine. Informatica requires that you use a specific value for each locale on a Linux machine. Makesure that you set the LANG environment variable appropriately for all Linux machines.
Locale for Oracle Database Clients
For Oracle database clients, set NLS_LANG to the locale you want the database client and server to use withthe login. A locale setting consists of the language, territory, and character set. The value of NLS_LANG
Configure Informatica Environment Variables 37
depends on the configuration. For example, if the value is american_america.UTF8, set the variable in a Cshell with the following command:
setenv NLS_LANG american_america.UTF8
Clear Browser CacheBefore you access the Administrator tool, clear the browser cache.
On Windows Internet Explorer, delete the browsing history, including temporary files, cookies, and history. OnMozilla Firefox, clear the offline storage.
If you do not clear the browser cache, the previous Administrator tool URL is not redirected to the latest URL andsome menu options may not appear.
Configure Browser BookmarksEffective in version 9.0.1, the Administrator tool URL has changed.
After you upgrade the domain, bookmarks to the Administrator tool are not valid.
Configure bookmarks with one of the following URLs:
¨ http://<host>:<port>
¨ http://<host>:<administrator_port>/administrator
Prepare to Upgrade LDAP Users and GroupsIf you upgrade from PowerCenter 8.1.1 and the PowerCenter Repository Service uses LDAP authentication,complete the following steps:
1. In the Administrator tool, configure the LDAP Directory Service property on the LDAP Connectivity tab ofthe LDAP Configuration dialog box.Use the Actions menu on the Security tab to access the LDAP Configuration dialog box.
2. On the Security Domain tab of the LDAP Configuration dialog box, create a security domain and clickSynchronize Now to import the LDAP users into the domain.
3. Run infacmd isp SetRepositoryLDAPConfiguration command to update LDAP configuration properties.Run infacmd from the following location:<9.0.1 InformaticaInstallationDir>\server\bin
4. Restart the PowerCenter Repository Service.
Run infacmd SetRepositoryLDAPConfigurationThe infacmd isp SetRepositoryLDAPConfiguration command uses the following syntax:
SetRepositoryLDAPConfiguration
<-DomainName|-dn> domain_name
<-UserName|-un> user_name
38 Chapter 4: Before You Upgrade the Application Services

[<-Password|-pd> password]
[<-SecurityDomain|-sdn> security_domain]
[<-Gateway|-hp> gateway_host1:port gateway_host2:port...]
[<-ResilienceTimeout|-re> timeout_period_in_seconds]
<-LDAPAddress|-la> ldap_server_address
<-SearchBase|-sb> search base
<-SearchScope|-ss> search scope
<-LDAPPrincipal|-lp> ldap_principal
<-LDAPCredential|-lc> ldap_credential
<-LoginAttribute|-lt> login attribute
<-LoginFilter|-lf> login filter
[<-UseSSL|-us> use_ssl]
[<-CertificateDatabase|-cd> certificate database for ssl]
Tasks for Changing the Node ConfigurationIf you chose the option to update the node configuration, you must complete additional steps.
Before you upgrade the application services, complete the following tasks:
1. Install the database client software.
2. Configure the environment variables.
3. Verify that a graphics display server is available.
4. Copy the required files.
5. Update port numbers.
6. Verify the location of the node backup directory.
7. Update the keystore file name and location.
8. Configure PowerExchange Adapters.
Install the Database Client SoftwareInstall database client software and configure connectivity on the gateway node and on the nodes that will run thePowerCenter Integration Service and PowerCenter Repository Service processes.
PowerCenter Integration ServiceDepending on the types of databases that the PowerCenter Integration Service will access, install the followingdatabase clients on the machine where the PowerCenter Integration Service runs:
¨ Oracle client
¨ IBM DB2 Client Application Enabler (CAE)
¨ Microsoft SQL Client, with Microsoft OLE DB provider for Microsoft SQL Server
Tasks for Changing the Node Configuration 39

¨ Sybase Open Client
¨ Teradata BTEQ client
PowerCenter Repository ServiceBased on the repository database, install the following database clients on the machine where the PowerCenterRepository Service runs:
¨ Oracle client
¨ IBM DB2 Client Application Enabler (CAE)
¨ Microsoft SQL Client, with Microsoft OLE DB provider for Microsoft SQL Server
Database Client Environment VariablesConfigure database client environment variables on the machines that run the PowerCenter Integration Serviceand the PowerCenter Repository Service processes. The database client path variable name and requirementsdepend on the UNIX platform and repository database.
After you configure the database environment variables, you can test the connection to the database from thedatabase client.
The following table describes the database environment variables you need to set in UNIX:
Database Environment VariableName
DatabaseUtility
Value
Oracle ORACLE_HOMEPATH
sqlplus Set to: <DatabasePath>Add: <DatabasePath>/bin
IBM DB2 DB2DIRDB2INSTANCEPATH
db2connect Set to: <DatabasePath>Set to: <DB2InstanceName>Add: <DatabasePath>/bin
Sybase ASE SYBASE12 or SYBASE15SYBASE_ASESYBASE_OCSPATH
isql Set to: <DatabasePath>/sybase<version>Set to: ${SYBASE[12 | 15]}/ASE-<version>Set to: ${SYBASE[12 | 15]}/OCS-<version>Add: ${SYBASE_ASE}/bin:${SYBASE_OCS}/bin:$PATH
Teradata PATH bteq Add: <DatabasePath>/bin
Configure Environment VariablesInformatica uses environment variables to store configuration information when it runs the application services andconnects to the clients. Configure the environment variables to meet the Informatica requirements. Incorrectlyconfigured environment variables can cause the Informatica domain or nodes to fail to start or can causeconnection problems between the Informatica clients and the domain.
To configure environment variables on UNIX, log in with the system user account you used to install Informatica.
Library Path Environment VariablesConfigure library path environment variables on the machines that run the PowerCenter Integration Service andPowerCenter Repository Service processes. The library path variable name and requirements depend on theUNIX platform and database.
40 Chapter 4: Before You Upgrade the Application Services

Solaris and Linux
On Solaris and Linux, configure the LD_LIBRARY_PATH environment variable.
The following table describes the values you set for the LD_LIBRARY_PATH for the different databases:
Database Value
Oracle <DatabasePath>/lib
IBM DB2 <DatabasePath>/lib
Sybase ASE “${SYBASE_OCS}/lib:${SYBASE_ASE}/lib:${LD_LIBRARY_PATH}”
Informix <DatabasePath>/lib
Teradata <DatabasePath>/lib
ODBC <CLOSEDODBCHOME>/lib
AIX
On AIX, configure the LIBPATH environment variable.
The following table describes the values you set for the LIBPATH for the different databases:
Database Value
Oracle <DatabasePath>/lib
IBM DB2 <DatabasePath>/lib
Sybase ASE “${SYBASE_OCS}/lib:${SYBASE_ASE}/lib:${LIBPATH}”
Informix <DatabasePath>/lib
Teradata <DatabasePath>/lib
ODBC <CLOSEDODBCHOME>/lib
HP-UX
On HP-UX, configure the SHLIB_PATH environment variable.
The following table describes the values you set for the SHLIB_PATH for the different databases:
Database Value
Oracle <DatabasePath>/lib
IBM DB2 <DatabasePath>/lib
Sybase ASE "${SYBASE_OCS}/lib:${SYBASE_ASE}/lib:${SHLIBPATH}"
Informix <DatabasePath>/lib
Tasks for Changing the Node Configuration 41

Database Value
Teradata <DatabasePath>/lib
ODBC <CLOSEDODBCHOME>/lib
Java Component VariablesInformatica installs the JRE to use with the following Java-based components:
¨ Custom transformations that use Java
¨ Java transformations
¨ PowerExchange for JMS
¨ PowerExchange for Web Services
¨ PowerExchange for webMethods
To use these components on AIX64, or HP-UX, configure the library path environment variables to point to thejava directory installed with Informatica. Configure these environment variables on machines where thePowerCenter Integration Service process runs.
The following table describes the library paths you configure to use Java-based components:
UNIX Platform Environment Variable Name Value
AIX64 LIBPATH Set to: java/jre/binSet to: java/jre/bin/classicSet to: /usr/lib:/lib
HP-UX SHLIB_PATH Set to: java/jre/lib/PA_RISC2.0/serverSet to: java/jre/lib/PA_RISC2.0Set to: /usr/lib:/lib
Verify that a Graphics Display Server is AvailableThe gateway nodes on UNIX require a graphics display server to run domain reports in Informatica Administrator.If you do not have a graphics display server, you can install and configure X Virtual Frame Buffer (Xvfb). Xvfb is anX server that renders graphics to virtual memory rather than to a graphics display device.
You can download and install Xvfb for the following operating systems:
¨ HP-UX. Xvfb is part of the HP-UX operating system. Install HP-UX patches and graphical packages to run Xvfbbased on when you installed or last patched the operating system. For instructions to run Xvfb on HP-UX, seethe following web site:
http://publib.boulder.ibm.com/tividd/td/ITM/GI10-5797-01/en_US/HTML/notesmst20.htm¨ AIX and Linux. Download and install Xvfb. For instructions to run Xvfb on AIX and Linux, see the following web
site:http://publib.boulder.ibm.com/infocenter/iwphelp/v2r5m1/index.jsp?topic=/com.ibm.wcs.ic.doc_2.5.1/install/i_inst_t_lwpsetup_xfvb_on_unx.html
¨ Solaris. You can download Xvfb for Solaris from the following web site:http://ferret.pmel.noaa.gov/FERRET_17sep07/FAQ/graphics/Solaris_Xvfb.html
Download and set up Xvfb for Solaris and use the following command to start the virtual frame buffer:% /usr/X11R6/bin/Xvfb :1 -screen 0 1152x900x8 &
42 Chapter 4: Before You Upgrade the Application Services
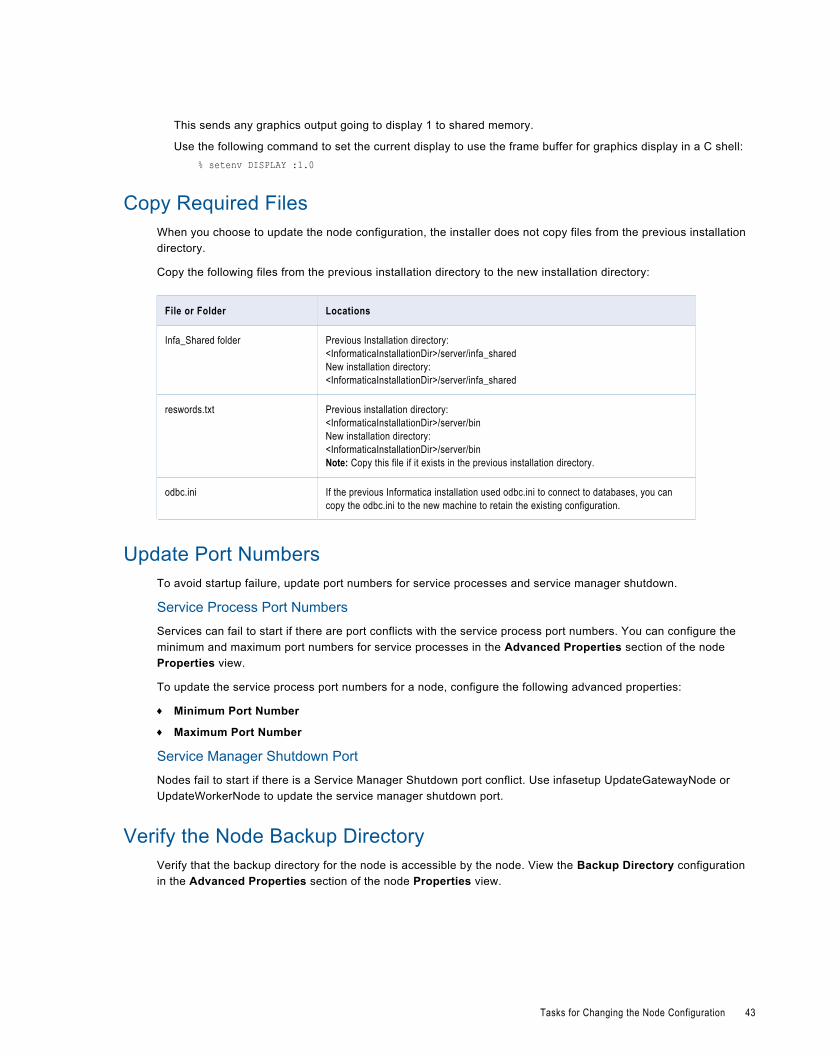
This sends any graphics output going to display 1 to shared memory.
Use the following command to set the current display to use the frame buffer for graphics display in a C shell:% setenv DISPLAY :1.0
Copy Required FilesWhen you choose to update the node configuration, the installer does not copy files from the previous installationdirectory.
Copy the following files from the previous installation directory to the new installation directory:
File or Folder Locations
Infa_Shared folder Previous Installation directory:<InformaticaInstallationDir>/server/infa_sharedNew installation directory:<InformaticaInstallationDir>/server/infa_shared
reswords.txt Previous installation directory:<InformaticaInstallationDir>/server/binNew installation directory:<InformaticaInstallationDir>/server/binNote: Copy this file if it exists in the previous installation directory.
odbc.ini If the previous Informatica installation used odbc.ini to connect to databases, you cancopy the odbc.ini to the new machine to retain the existing configuration.
Update Port NumbersTo avoid startup failure, update port numbers for service processes and service manager shutdown.
Service Process Port NumbersServices can fail to start if there are port conflicts with the service process port numbers. You can configure theminimum and maximum port numbers for service processes in the Advanced Properties section of the nodeProperties view.
To update the service process port numbers for a node, configure the following advanced properties:
¨ Minimum Port Number
¨ Maximum Port Number
Service Manager Shutdown PortNodes fail to start if there is a Service Manager Shutdown port conflict. Use infasetup UpdateGatewayNode orUpdateWorkerNode to update the service manager shutdown port.
Verify the Node Backup DirectoryVerify that the backup directory for the node is accessible by the node. View the Backup Directory configurationin the Advanced Properties section of the node Properties view.
Tasks for Changing the Node Configuration 43

Update Keystore File Name and LocationIf the node uses HTTPS and you moved the keystore file or renamed the keystore file before you upgraded thedomain, you can update the file name and location to match your previous configuration.
Use infasetup UpdateGatewayNode or UpdateWorkerNode to update the keystore file name and location.
Verify the Data Transformation RequirementsUnstructured Data transformations require the Data Transformation Engine. The Data Transformation Engine is acomponent of the Informatica B2B Data Exchange. Install the Data Transformation Engine on the machine wherethe PowerCenter Integration Service runs.
On UNIX, you must configure the Java environment for Data Transformation and verify the PowerCenter ICUlibraries.
Complete the following tasks:
¨ Set the CMJAVA_PATH environment variable to point to the JVM location in the Informatica installationdirectory.
¨ Verify that the latest version of the PowerCenter ICU libraries are available.
JVM LocationVerify that Data Transformation Studio uses the same Java Virtual Machine (JVM) as Informatica. If DataTransformation Studio uses a different JVM than Informatica, the session may shut down unexpectedly.
Set the CMJAVA_PATH environment variable to point to the JVM location in the Informatica installation directory.
The following table shows the JVM location in PowerCenter for UNIX platforms:
Operating System JVM Location Settings
AIX 64-bit <InformaticaInstallationDir>/java/jre/bin/classic : <InformaticaInstallationDir>/java/jre/bin
Linux.x86 <InformaticaInstallationDir>/java/jre/lib/i386/server : <InformaticaInstallationDir>/java/jre/lib/i386
Linux.x64 <InformaticaInstallationDir>/java/jre/lib/amd64/server : <InformaticaInstallationDir>/java/jre/lib/amd64
Solaris 64-bit <InformaticaInstallationDir>/java/jre/lib/sparcv9/server : <InformaticaInstallationDir>/java/jre/lib/sparcv9
HP-UX IA64 <InformaticaInstallationDir>/java/jre/lib/IA64W/hotspot : <InformaticaInstallationDir>/java/jre/lib/IA64W
JVM Location in AIXIn AIX, set the CMJAVA_PATH environment variable in the setEnv scripts to point to the JVM in the Informaticainstallation directory. You must also add a symbolic link from the libjvm.a library file to the libjvm.so library file.
1. Go to the Data Transformation installation directory.
2. Modify the setEnv.csh and setEnv.sh script files and add the CMJAVA_PATH setting:
setEnv.sh
CMJAVA_PATH=<InformaticaInstallationDir>/java/jre/bin/classic:<InformaticaInstallationDir>/java/jre/bin
44 Chapter 4: Before You Upgrade the Application Services

setEnv.csh
setenv CMJAVA_PATH <InformaticaInstallationDir>/java/jre/bin/classic:<InformaticaInstallationDir>/java/jre/bin
3. Go to the JVM directory and create a symbolic link from libjvm.a to libjvm.so.
Use the following commands:cd <InformaticaInstallationDir>/java/jre/bin/classic ln -s libjvm.so libjvm.a
ICU Library FilesData Transformation must use the latest version of the International Component for Unicode (ICU) library fromInformatica. The ICU library is packaged and installed with Data Transformation. If Informatica is installed afterData Transformation and contains a later version of the ICU library, set the library path so that DataTransformation uses the Informatica ICU library.
Set the library path to the following value:
UNIX Platform Variable Name Value
Solaris andLinux
LD_LIBRARY_PATH “<InformaticaInstallationDir>/server/bin:<CDEInstallationDir>/bin”
AIX LIBPATH “<InformaticaInstallationDir>/server/bin:<CDEInstallationDir>/bin”
HP-UX SHLIB_PATH “<InformaticaInstallationDir>/server/bin:<CDEInstallationDir>/bin”
Configure PowerExchange AdaptersIf your previous installation included PowerExchange Adapters, configure the PowerExchange Adapters on themachine that runs the new version of Informatica. If the PowerExchange Adapter has an installer, re-install thePowerExchange Adapter.
PowerExchange for SAP NetWeaver for PowerCenterIf your previous installation included PowerExchange for SAP NetWeaver you must also copy the saprfc.ini filefrom the previous server/bin directory to the latest server/bin directory.
Tasks for Changing the Node Configuration 45
C H A P T E R 5
Application Service UpgradeThis chapter includes the following topics:
¨ Application Service Upgrade Overview, 46
¨ Service Upgrade Wizard, 47
Application Service Upgrade OverviewThe product and product version determines the service upgrade process.
Some service versions require a service upgrade. When you upgrade a service, you must also upgrade thedependent services.
Use the service upgrade wizard, the actions menu of each service, or command line to upgrade services. Theservice upgrade wizard upgrades multiple services in the appropriate order and checks for dependencies. If youuse the command line to upgrade services, you must upgrade services in the correct order and verify that youupgrade dependent services.
After you upgrade the PowerCenter Repository Service, you must restart the service and its dependent services.
Note: A user with the Administrator role can upgrade services.
Service Upgrade for PowerCenter 8.1.xBefore you upgrade PowerCenter 8.1.x services, verify the following prerequisites:
¨ If you upgrade a repository that uses LDAP authentication, run the infacmd ispSetRepositoryLDAPConfiguration command to update LDAP configuration properties. Optionally, run infacmdisp ListRepoLDAPConfiguration to list LDAP configuration parameters.
¨ PowerCenter Repository Services are enabled and running in exclusive mode.
To upgrade services, upgrade the following object types:
1. PowerCenter Repository Service
2. Users and groups of each PowerCenter Repository Service
Upgrading Users and GroupsWhen you upgrade the PowerCenter Repository Service users and groups, the Service Manager moves the usersand groups to the domain. You can assign permissions to users after you upgrade users and groups.
You can upgrade users and groups one time for each repository.
46

Rules and Guidelines for Upgrading Native UsersReview the following rules and guidelines before you upgrade users in a repository:
¨ The default repository administrator in the repository is merged with the existing default Administrator useraccount in the domain. The password for the default repository administrator is not merged. You can changethe password for the Administrator user account after you complete the user upgrade process.
¨ The names of upgraded users and groups must conform to the same rules as the names of users and groups inthe domain. During the upgrade, the names of users and groups that are not valid are modified to conform tothe following rules:
- Any character in the user or group name that is not valid is replaced with an underscore. A numeric suffix isadded to the name. For example, the user name Tom*Jones is modified to Tom_Jones0. The followingcharacters are not valid for user or group names: , + " \ < > ; / * % ?
- If the new name with underscore and suffix exists in the native security domain, the suffix is increased by one.
- If a user or group name exceeds 80 characters, the name is shortened to 75 characters plus a numeric suffix.If the new name exists in the security domain, the suffix is increased by one. If the modified name exceeds 80characters, the user account is not upgraded.
¨ During the upgrade, any tab, carriage return, or character that is not valid in user or group descriptions isreplaced with a space. The characters < > “ are not valid in user and group descriptions. For example, thedescription [<title>An example</title>] is modified to [ title An example /title ].
¨ The user and group names are not case sensitive. A user account in the PowerCenter repository with the nameJSmith is a duplicate of a user account in the domain with the name jsmith.
Rules and Guidelines for Upgrading LDAP UsersReview the following rules and guidelines before you upgrade users in a repository that uses LDAP authentication:
¨ If the repository uses LDAP authentication, native users in the repository are not valid and will not be upgraded.
¨ The repository administrator user does not retain Administrator privileges. After you upgrade, use the username Administrator to perform domain administrator tasks. The Administrator user can assign privileges to theprevious repository administrator user after you upgrade users.
¨ If the repository you upgrade uses LDAP authentication, you must create a security domain and import LDAPusers into the domain before you upgrade users and groups. The domain does not verify that upgraded LDAPusers are associated with the LDAP server that PowerCenter used for LDAP.
¨ LDAP users that are not part of a security domain are not upgraded. The Administrator is granted permissionon all repository objects owned by LDAP users that are not upgraded.
Service Upgrade WizardUse the service upgrade wizard to upgrade services.
The service upgrade wizard provides the following options:
¨ Upgrade multiple services.
¨ Enable services before the upgrade.
¨ Automatically or manually reconcile user name and group conflicts.
¨ Display upgraded services in a list along with services that require an upgrade.
¨ Save the current or previous upgrade report.
You can access the service upgrade wizard from the Manage menu in the header area.
Service Upgrade Wizard 47

Upgrade ReportThe upgrade report contains the upgrade start time, upgrade end time, upgrade status, and upgrade processingdetails. To save the upgrade report, choose one of the following options:
Save Report
The Save Report option appears on step 4 of the service upgrade wizard.
Save Previous Report
The second time you run the service upgrade wizard, the Save Previous Report option appears on step 1 ofthe service upgrade wizard. If you did not save the upgrade report after upgrading services, you can selectthis option to view or save the previous upgrade report.
Running the Service Upgrade WizardUse the service upgrade wizard to upgrade services.
1. In the Informatica Administrator header area click Manage > Upgrade.
2. Select the objects to upgrade.
3. Optionally, specify if you want to Automatically reconcile user and group conflicts.
4. Click Next.
5. If dependency errors exist, the Dependency Errors dialog box appears. Review the dependency errors andclick OK. Then, resolve dependency errors and click Next.
6. Enter the repository login information. Optionally, choose to use the same login information for allrepositories.
7. Click Next.
The service upgrade wizard upgrades each service and displays the status and processing details.
8. If you are upgrading 8.1.1 PowerCenter Repository Service users and groups for a repository that uses anLDAP authentication, select the LDAP security domain and click Next.
9. If the Reconcile Users and Groups dialog box appears, specify a resolution for each conflict and click Next.
This dialog box appears when you upgrade 8.1.1 PowerCenter Repository Service users and groups and youchoose not to automatically reconcile user and group conflicts.
10. When the upgrade completes, the Summary section displays the list of services and their upgrade status.Click each service to view the upgrade details in the Service Details section.
11. Optionally, click Save Report to save the upgrade details to a file.
If you choose not to save the report, you can click Save Previous Report the next time you launch theservice upgrade wizard.
12. Click Close.
13. Restart upgraded services.
After you upgrade the PowerCenter Repository Service, you must restart the service and its dependentservices.
Users and Groups Conflict ResolutionWhen you upgrade PowerCenter Repository Service users and groups, you can select a resolution for user nameand group name conflicts.
Use the service upgrade wizard to automatically use the same resolution for all conflicts or manually specify aresolution for each conflict.
48 Chapter 5: Application Service Upgrade

The following table describes the conflict resolution options for users and groups:
Resolution Description
Merge with orMerge
Adds the privileges of the user or group in the repository to the privileges of the user or group in the domain.Retains the password and properties of the user account in the domain, including full name, description,email address, and phone. Retains the parent group and description of the group in the domain. Maintainsuser and group relationships. When a user is merged with a domain user, the list of groups the user belongsto in the repository is merged with the list of groups the user belongs to in the domain. When a group ismerged with a domain group, the list of users the group is merged with the list of users the group has in thedomain. You cannot merge multiple users or groups with one user or group.
Rename Creates a new group or user account with the group or user name you provide. The new group or useraccount takes the privileges and properties of the group or user in the repository.
Upgrade No conflict. Upgrades user and assign permissions.
When you upgrade a repository that uses LDAP authentication, the Users and Groups Without Conflicts sectionof the conflict resolution screen lists the users that will be upgraded. LDAP user privileges are merged with usersin the security domain that have the same name. The LDAP user retains the password and properties of theaccount in the LDAP security domain.
The Users and Groups With Conflicts section shows a list of users that are not in the security domain and willnot be upgraded. If you want to upgrade users that are not in the security domain, use the Security page to updatethe security domain and synchronize users before you upgrade users.
Service Upgrade Wizard 49
C H A P T E R 6
Informatica Client UpgradeThis chapter includes the following topics:
¨ Informatica Client Upgrade Overview, 50
¨ Informatica Client Upgrade Options, 51
¨ Upgrading in Graphical Mode, 51
¨ Upgrading in Silent Mode, 52
Informatica Client Upgrade OverviewUse the client installer to upgrade a previous version of the Informatica client tools. The Informatica 9.0.1 clienttools are installed on the installation directory you specify. The client installer configures the newly installed clienttools with the same settings as the previous version. The client installer does not modify the files of the previousversion of the client tools.
Complete the pre-upgrade tasks before you start the upgrade. Run the installer on all machines that host previousversions of the Informatica client tools that you want to upgrade. You can upgrade the Informatica clients ingraphical or silent mode.
When you run the client installer, select the Informatica client tool to upgrade.
For PowerCenter, you can upgrade the PowerCenter Client tools. PowerCenter Client is a set of tools you can useto manage the PowerCenter repository, mappings, and sessions. The client upgrade also upgrades the followingclient tools:
¨ Custom Metadata Configurator
¨ Orchestration Designer
¨ Mapping Architect for Visio
¨ Mapping Analyst for Excel
By default, the when you upgrade PowerCenter Client, the following components are also upgraded:
¨ DataDirect ODBC drivers
¨ Java Runtime Environment libraries
50

Informatica Client Upgrade OptionsYou can upgrade the Informatica client tools in one of the following ways:
¨ Upgrade in Graphical Mode. Upgrades the Informatica client tools in graphical mode. The installer guides youthrough the upgrade process.
¨ Upgrade in Silent Mode. Upgrades the Informatica client tools using a properties file that contains the upgradeoptions.
Upgrading in Graphical ModeIf you encounter problems when you run the install.bat file from the root directory, run the following file:
<InstallerExtractDirectory>/client/install.exe
1. Close all applications.
2. Run install.bat from the root directory.
3. Select Install or upgrade to Informatica 9.0.1 with Hotfix 1 and click Start.
¨ If you are upgrading from Informatica 9.0.1, select Apply HotFix 1 to Informatica 9.0.1. See theInformatica 9.0.1 HotFix 1 Release Notes for information about applying the hotfix.
The Installation Pre-Requisites window displays the system requirements. Verify that all installationrequirements are met before you continue the installation.
4. Click Next.
On the Select Component window, select the Informatica client you want to upgrade.
You can upgrade the following Informatica client applications:
¨ Informatica Developer
¨ PowerCenter Client
If both Informatica Developer and PowerCenter Client are installed on the machine, you can upgrade the toolsin the same process.
5. On the Upgrade Directory window, enter the following directories:
Directory Description
Directory of the Informaticaclient to upgrade
Directory that contains the previous version of the Informatica client tool that you wantto upgrade
Directory for Informatica 9.0.1client tools
Directory in which to install the Informatica 9.0.1 client toolsEnter the absolute path for the installation directory. The installation directory must beon the current machine. The directory names in the path must not contain spaces or thefollowing special characters: @|* $ # ! % ( ) { } [ ] , ; '
6. Click Next.
7. On the Pre-Installation Summary window, review the installation information, and click Install.
The installer copies the Informatica client files to the installation directory.
The Post-installation Summary window indicates whether the upgrade completed successfully.
8. Click Done.
Informatica Client Upgrade Options 51

You can view the installation log files to get more information about the upgrade tasks performed by the installer.
Upgrading in Silent ModeTo upgrade the Informatica client tools without user interaction, upgrade in silent mode. Use a properties file tospecify the upgrade options. The installer reads the file to determine the upgrade options. You can use silentmode upgrade to upgrade the Informatica client tools on multiple machines on the network or to standardize theupgrade process across machines.
Copy the Informatica installation files to the hard disk on the machine that hosts the Informatica client you plan toupgrade.
To upgrade in silent mode, complete the following tasks:
1. Create the upgrade properties file and specify the upgrade options.
2. Run the installer with the upgrade properties file.
Creating the Properties FileInformatica provides a sample properties file that includes the upgrade parameters that are required by theinstaller. You can customize the sample properties file to specify the options for your upgrade.The sample properties file is named SilentInput.properties and is located in the root of the client installer directory.
1. Go to the root of the directory that contains the client installation files.
2. Locate the file named SilentInput.properties.
Back up the file before you modify it.
3. Use a text editor to open the file and modify the values of the upgrade parameters.
The following table describes the upgrade parameters you can modify:
Property Name Description
USER_INSTALL_DIR Directory in which to install the Informatica 9.0.1 client tools.
INSTALL_TYPE Indicates whether to install or upgrade the Informatica client tools.Set this parameter to 1 upgrade a previous version of the Informatica client tools toversion 9.0.1.
UPG_BACKUP_DIR Directory of the previous version of the Informatica tools that you want to upgrade.
DXT_COMP Indicates whether to install Informatica Developer.If the value is 1, the Developer tool will be installed. If the value is 0, the Developertool will not be installed.Default is 1.
CLIENT_COMP Indicates whether to install the PowerCenter Client.If the value is 1, the PowerCenter Client will be installed. If the value is 0, thePowerCenter Client will not be installed.Default is 1.
4. Save the properties file.
52 Chapter 6: Informatica Client Upgrade
Running the Silent InstallerAfter you create the properties file, open a command window to start the silent upgrade.
1. Open a command window.
2. Go to root of the client installer directory.
3. Verify that the directory contains the file SilentInput.properties with the upgrade options.
4. To start the silent upgrade process, double click the file silentinstall.bat.
The silent upgrade runs in the background. The process can take a while. The silent upgrade process is completewhen the Informatica_9.0.1_Client_InstallLog.log is created in the installation directory.
The silent upgrade fails if you incorrectly configure the properties file or if the installation directory is notaccessible. If the upgrade fails, view the installation log files and correct the errors. Then run the silent installeragain.
Upgrading in Silent Mode 53
C H A P T E R 7
After You UpgradeThis chapter includes the following topics:
¨ Informatica Domain, 54
¨ PowerCenter Repository Service, 55
¨ PowerCenter Integration Service, 55
¨ Web Services Hub, 56
Informatica DomainAfter you upgrade, complete the post-upgrade tasks for the domain.
Configure LDAP ConnectivityIf the domain uses LDAP authentication, update the LDAP configuration after you upgrade.
Effective in version 9.0.1, the default maximum size for user import is set to 1000.
Previously, the default value was set to 0, which indicated that there was no maximum value.
When you upgrade, all users are imported into the domain. However, all users over 1000 will be dropped inreverse alphabetic order the next time the Service Manager synchronizes with the LDAP service directory.
To avoid dropping users, reset the maximum size in the LDAP connectivity configuration.
Update the Log Events DirectoryWhen you upgrade the domain, the log events directory points to the location you specified in the previousversion. When you upgrade the domain with changes to the node configuration, the log events directory points tothe isp/logs directory in the new installation directory.
To use a different directory for the logs, update the Log Directory Path property for the domain in the Administratortool. You can also use infasetup updateGatewaynode to update the directory. For example, you can configure thelog events directory as the server/infa_shared/logs directory in the new installation directory.
Update ODBC Data SourcesThe Informatica installation includes DataDirect 6.0 SP3 ODBC drivers. Re-create each ODBC data source to usethe new drivers.
54

Update Statistics for the Domain Configuration RepositoryIf the domain configuration repository is in an IBM DB2 9.1 database, run the DB2 reorgchk command to optimizedatabase operations. The reorgchk command generates the database statistics used by the DB2 optimizer inqueries and updates.
Use the following command:
REORGCHK UPDATE STATISTICS on SCHEMA SchemaName
View Log Events from the Previous Informatica VersionYou can view the log events from the previous Informatica version to troubleshoot domain issues.
The log event files for the previous version are located in <LogDirectoryPath>\<date>\<foldername>.bad.
Effective in version 9.0.1, use infacmd isp ConvertLogFile command to view log files from PowerCenter 8.1.1,8.5.x and 8.6.x.
The infacmd isp ConvertLogFile command uses the following syntax:
ConvertLogFile
<-InputFile|-in> input_file_name
[<-Format|-fm> format_TEXT_XML]
[<-OutputFile|-lo> output_file_name]
PowerCenter Repository ServiceAfter you upgrade the PowerCenter Repository Service, the service remains in Exclusive mode. Change theoperating mode of the PowerCenter Repository Service to Normal mode and restart the service.
PowerCenter Integration ServiceAfter you upgrade, complete the post-upgrade tasks for the PowerCenter Integration Service.
Associate Linked DomainsIf you used a linked domain repository in the previous installation, specify a repository that exists in the domain forthe associated repository of the PowerCenter Integration Service. Effective in 8.5, you cannot associate aPowerCenter Integration Service in the local domain with a PowerCenter Repository Service in another domain.When you upgrade a domain, the PowerCenter Integration Service loses the linked domain repository association.
To apply changes, restart the PowerCenter Integration Service.
Re-create PowerCenter Integration ServiceIf the PowerCenter Integration Service has the same name as the domain, re-create the PowerCenter IntegrationService. Effective in 8.5, you cannot have services in the domain that have the same name as the domain.
PowerCenter Repository Service 55

Web Services HubAfter you upgrade, complete the post-upgrade tasks for the Web Services Hub:
Associate Linked DomainIf you used a linked domain repository in the previous installation, specify a repository that exists in the domain forthe associated repository of the Web Service Hub. Effective in 8.5, you cannot associate the Web Service Hub inthe local domain with a PowerCenter Repository Service in another domain. When you upgrade a domain, theWeb Services Hub loses the linked domain repository association.
To apply changes, restart the Web Services Hub Service.
Verify PowerCenter Repository Database UserVerify the repository database user information for each Web Services Hub Service. When you upgrade users, youcan change user information or associate LDAP users with a security domain. Verify that the repository userinformation specified for the associated repository of the Web Services Hub Service is still valid.
Complete one of the following tasks for the repository user based on the repository user type and upgrade method:
User Type Upgrade Method Task Description
LDAP User Upgraded Specify the security domain for therepository user.
LDAP User Skipped Specify a new repository user for theassociated repository.
Repository User Merged Update the repository user name andpassword.
Repository User Renamed Update the repository user name.
To apply changes, restart the Web Service Hub Service.
56 Chapter 7: After You Upgrade

I N D E X
AAIX
configuring JRE path 42configuring X Virtual Frame Buffer (Xvfb) 42Java components 42LIBPATH 42
CComplex Data transformation
prerequisites 44
Ddatabase client
configuring 40environment variables 40
databasestesting connections 40
dbs2 connecttesting database connection 40
disk space requirementsinstallation requirements 8
DISPLAYenvironment variables 6
Domain Activity Reportingsetting up on UNIX 42
Eenvironment variables
database client 40DISPLAY 9installation 6, 8Java components 42library path 40UNIX database client 40
Ggraphical mode
installation requirements 9
HHP-UX
configuring JRE path 42configuring X Virtual Frame Buffer (Xvfb) 42Java components 42SHLIB_PATH 42
IIATEMPDIR
environment variables 6, 8installation requirements
disk space 8environment variables 6, 8X Window Server 9
Integration Servicedatabase client 39
isqltesting database connection 40
JJava components
AIX 42HP-UX 42
Java transformationconfiguring JRE path 42
JRE_HOMEenvironment variables 6, 8
LLANG
locale environment variables 6, 8LC_ALL
locale environment variables 6, 8LD_LIBRARY_PATH
library paths 45LIBPATH
AIX 42library paths 45
library pathenvironment variables 8
library pathsLD_LIBRARY_PATH 45LIBPATH 45SHLIB_PATH 45
Linuxconfiguring X Virtual Frame Buffer (Xvfb) 42database client environment variables 40library paths 40
PPATH
environment variables 8PowerExchange for JMS
configuring JRE path 42PowerExchange for Web Services
configuring JRE path 42
57

PowerExchange for webMethodsconfiguring JRE path 42
prerequisitesComplex Data transformation 44
RRepository Service
database client 40
SService Upgrade Wizard
upgrading services 47upgrading users 47
servicesService Upgrade Wizard 47
SHLIB_PATHHP-UX 42library path 45
Solarisconfiguring X Virtual Frame Buffer (Xvfb) 42
sqlplustesting database connection 40
system requirementsComplex Data Exchange 44
UUNIX
database client environment variables 40database client variables 40library paths 40user account 18
upgradingService Upgrade Wizard 47
user accountUNIX 18
XX Virtual Frame Buffer (Xvfb)
installing on UNIX 42X Window Server
installation requirements 9
58 Index