up Guide for STARBASE - apps.ptc.com · Sonquist, Benjamin Williamson, Dalenda Hoy, Darrick...
20
STARBASE, a DoD Youth Program Creo 2.0 Setup Guide for STARBASE
Transcript of up Guide for STARBASE - apps.ptc.com · Sonquist, Benjamin Williamson, Dalenda Hoy, Darrick...
STARBASE, a DoD Youth Program
Cre
o 2
.0 S
etu
p G
uid
e for
ST
AR
BA
SE
STARBASE Creo 2.0 Setup Guide for STARBASE
STARBASE, a DoD Youth Program Page 2 of 20
Written by Adam Haas Copyright © 2013, STARBASE and Parametric Technology Corporation (PTC).
Notice or Rights All rights reserved under copyright laws of the United States, United Kingdom and other countries. You may reproduce and transmit in any form (electronic, mechanical, photocopying, recording, or otherwise) all parts of this curriculum/tutorial for educational or informational purposes only. All credit and trademark notices must accompany and such reproduction made in whole or in part. This permission does not extend to the use of the STARBASE, or Department of Defense logos by persons, parties, entities, or organizations that are not officially a STARBASE program as authorized by the Office of Assistant Secretary of Defense for Reserve Affairs.
Nor does this permission extend to the reproduction or use of the PTC logo in any form (electronic, mechanical, photocopying, recording, or otherwise) except solely as the case may be during reproduction or use of this curriculum.
Trademarks STARBASE is a trademark or registered trademark in the United States and/or other countries and is for use solely with the US Department of Defense STARBASE youth program.
PTC, the PTC Logo, Creo, Pro/ENGINEER, Pro|DESKTOP, Wildfire, Windchill, and all PTC product names and logos are trademarks or registered trademarks of PTC and/or its subsidiaries in the United States and in other countries.
Acknowledgements Adam Haas, Curtis Siebenaller, Barb Koscak, Richard Simms, Benjamin Sonquist, Benjamin Williamson, Dalenda Hoy, Darrick Gregory, Joe Kalash, Jolene Kayser, Lori Henault, Mark Muzzin, Stacy Dolderer, Tom Foltz
STARBASE Creo 2.0 Setup Guide for STARBASE
STARBASE, a DoD Youth Program Page 3 of 20
Introduction ................................................................................................................................. 4
Task 1 – Create a PTC Academic Account ................................................................................. 4
Task 2 – Start the installation of Creo 2.0 ................................................................................... 5
Task 3 – Generate a license (using the internet) and complete the install ................................... 7
Task 4 – Generate a license (without the internet) and complete the install .............................. 11
Task 5 – Open permissions so you can configure Creo 2.0 for STARBASE.............................. 15
Task 6 – Configure Creo 2.0 for STARBASE ............................................................................ 16
Task 7 – Request access to the STARBASE – PTC Curriculum ............................................... 18
Task 8 – Download the STARBASE – PTC Curriculum............................................................. 19
Task 9 – Using the cleanup utility .............................................................................................. 20
STARBASE Creo 2.0 Setup Guide for STARBASE
STARBASE, a DoD Youth Program Page 4 of 20
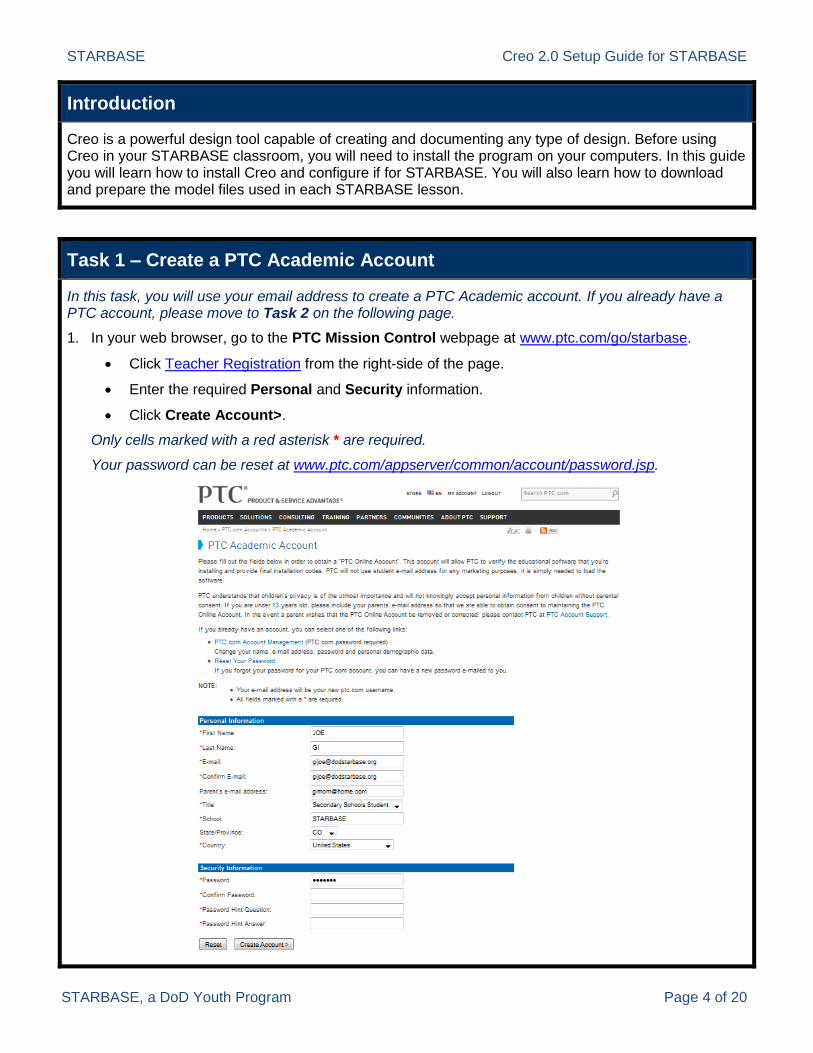
Introduction
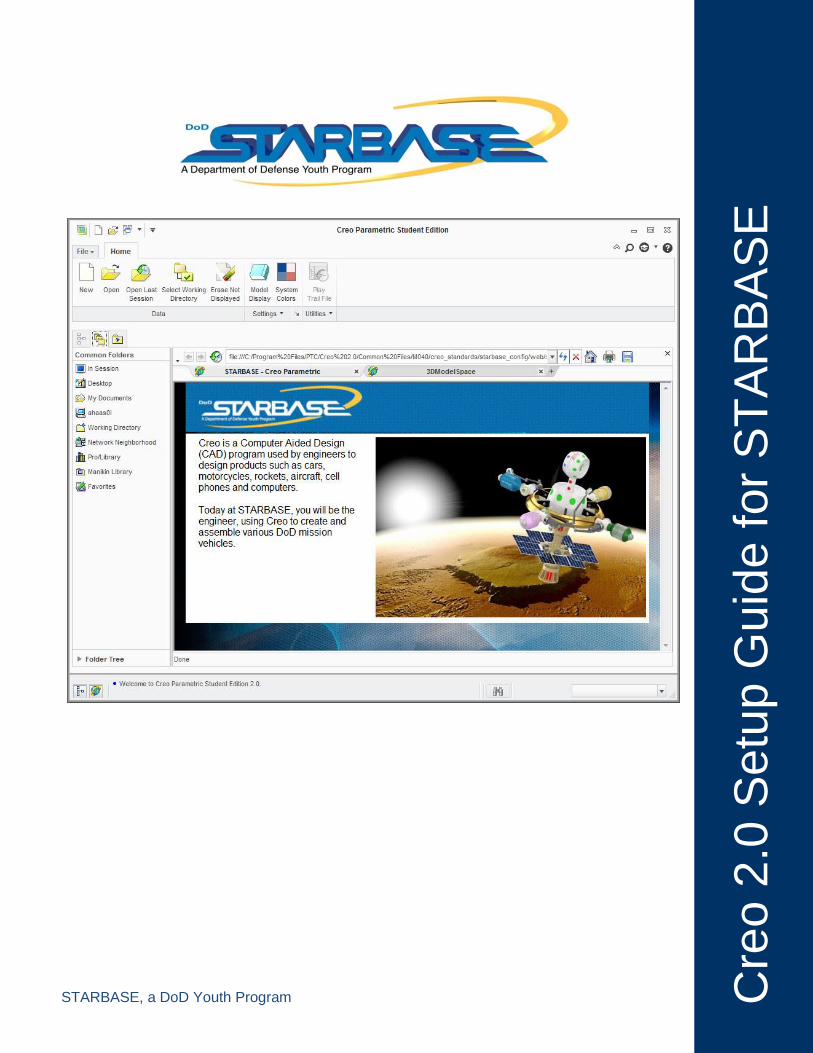
Creo is a powerful design tool capable of creating and documenting any type of design. Before using Creo in your STARBASE classroom, you will need to install the program on your computers. In this guide you will learn how to install Creo and configure if for STARBASE. You will also learn how to download and prepare the model files used in each STARBASE lesson.
Task 1 – Create a PTC Academic Account
In this task, you will use your email address to create a PTC Academic account. If you already have a PTC account, please move to Task 2 on the following page.
1. In your web browser, go to the PTC Mission Control webpage at www.ptc.com/go/starbase.
Click Teacher Registration from the right-side of the page.
Enter the required Personal and Security information.
Click Create Account>.
Only cells marked with a red asterisk * are required.
Your password can be reset at www.ptc.com/appserver/common/account/password.jsp.

STARBASE Creo 2.0 Setup Guide for STARBASE
STARBASE, a DoD Youth Program Page 5 of 20
Task 2 – Start the installation of Creo 2.0
In this task, you will learn how to begin the installation of Creo.
1. Place the Creo 2.0 installation DVD in your CD/ROM.
2. Using Windows Explorer, browse into the DVD:
Right-click setup and select Run as Administrator from the pop-up menu.
If a warning window opens, click Yes to confirm.
3. In the PTC Installation Assistant window, make sure Install or add new software is selected.
Click Next.
STARBASE Creo 2.0 Setup Guide for STARBASE
STARBASE, a DoD Youth Program Page 6 of 20
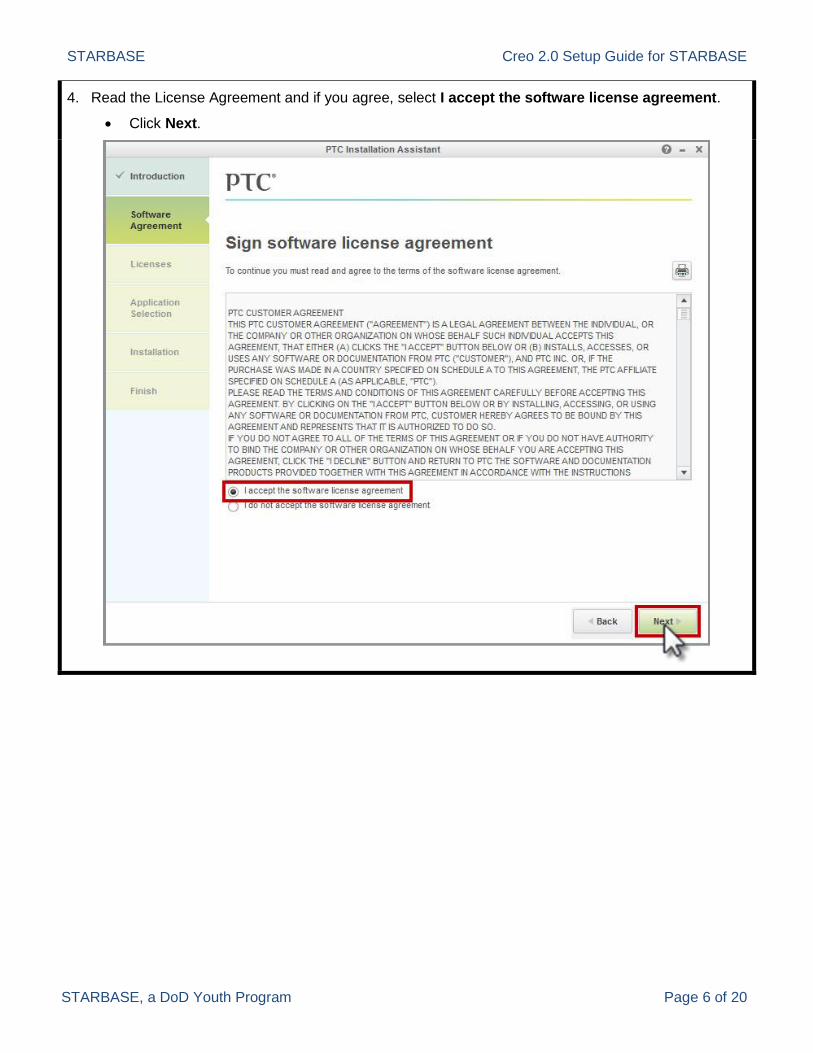
4. Read the License Agreement and if you agree, select I accept the software license agreement.
Click Next.
STARBASE Creo 2.0 Setup Guide for STARBASE
STARBASE, a DoD Youth Program Page 7 of 20
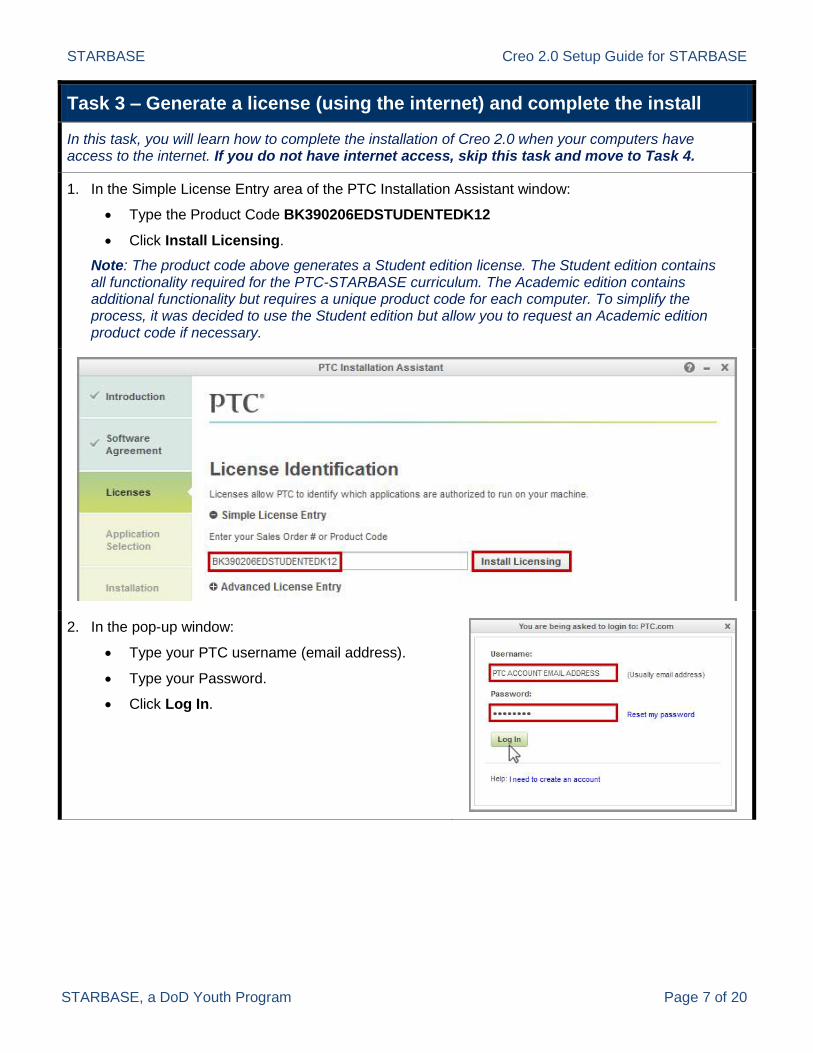
Task 3 – Generate a license (using the internet) and complete the install
In this task, you will learn how to complete the installation of Creo 2.0 when your computers have access to the internet. If you do not have internet access, skip this task and move to Task 4.
1. In the Simple License Entry area of the PTC Installation Assistant window:
Type the Product Code BK390206EDSTUDENTEDK12
Click Install Licensing.
Note: The product code above generates a Student edition license. The Student edition contains all functionality required for the PTC-STARBASE curriculum. The Academic edition contains additional functionality but requires a unique product code for each computer. To simplify the process, it was decided to use the Student edition but allow you to request an Academic edition product code if necessary.
2. In the pop-up window:
Type your PTC username (email address).
Type your Password.
Click Log In.
STARBASE Creo 2.0 Setup Guide for STARBASE
STARBASE, a DoD Youth Program Page 8 of 20
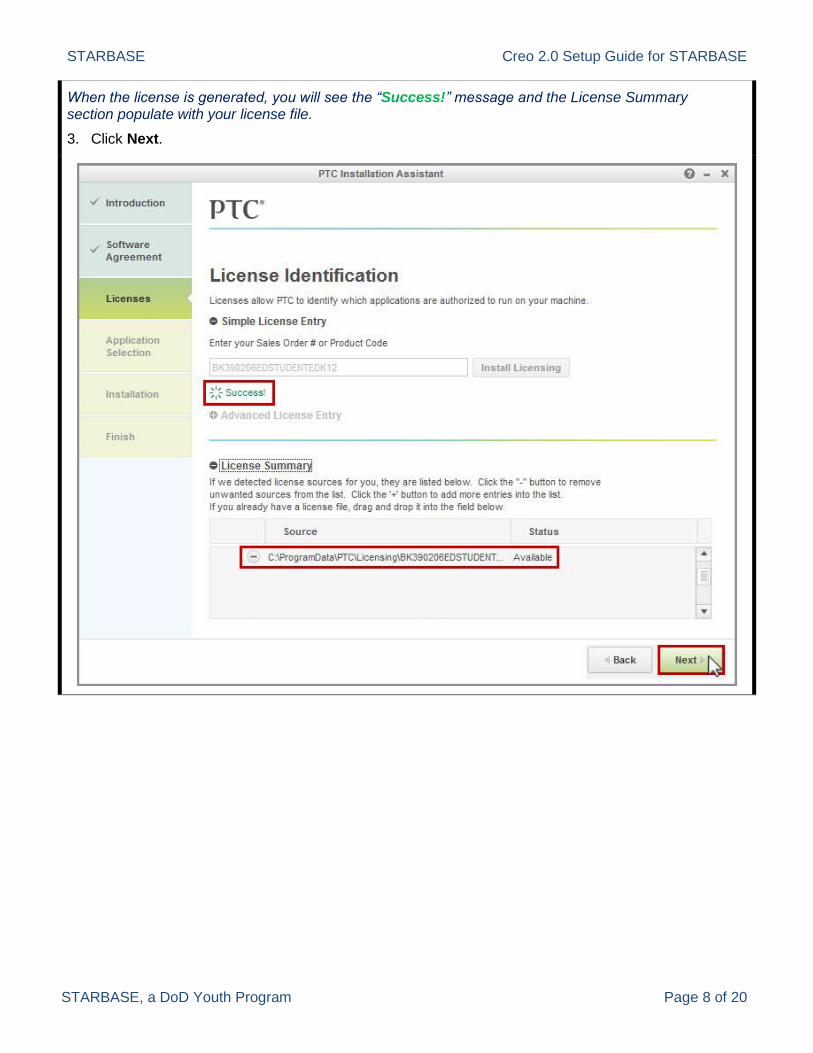
When the license is generated, you will see the “Success!” message and the License Summary section populate with your license file.
3. Click Next.
STARBASE Creo 2.0 Setup Guide for STARBASE
STARBASE, a DoD Youth Program Page 9 of 20
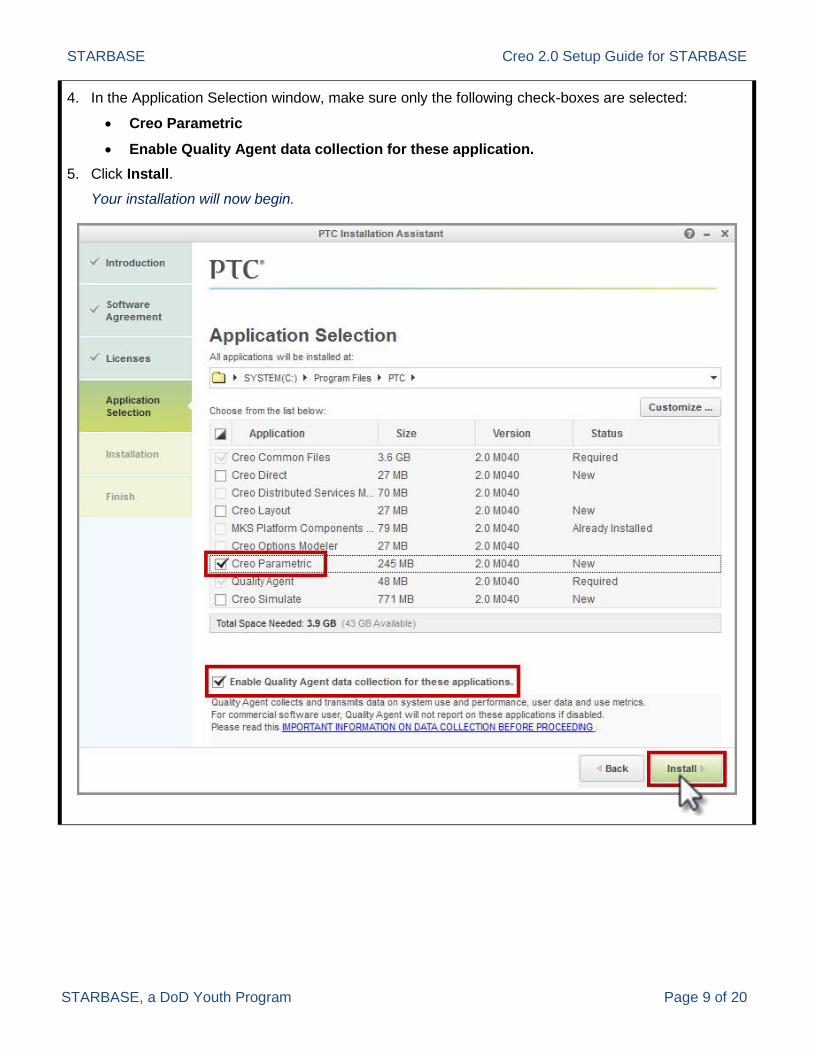
4. In the Application Selection window, make sure only the following check-boxes are selected:
Creo Parametric
Enable Quality Agent data collection for these application.
5. Click Install.
Your installation will now begin.
STARBASE Creo 2.0 Setup Guide for STARBASE
STARBASE, a DoD Youth Program Page 10 of 20
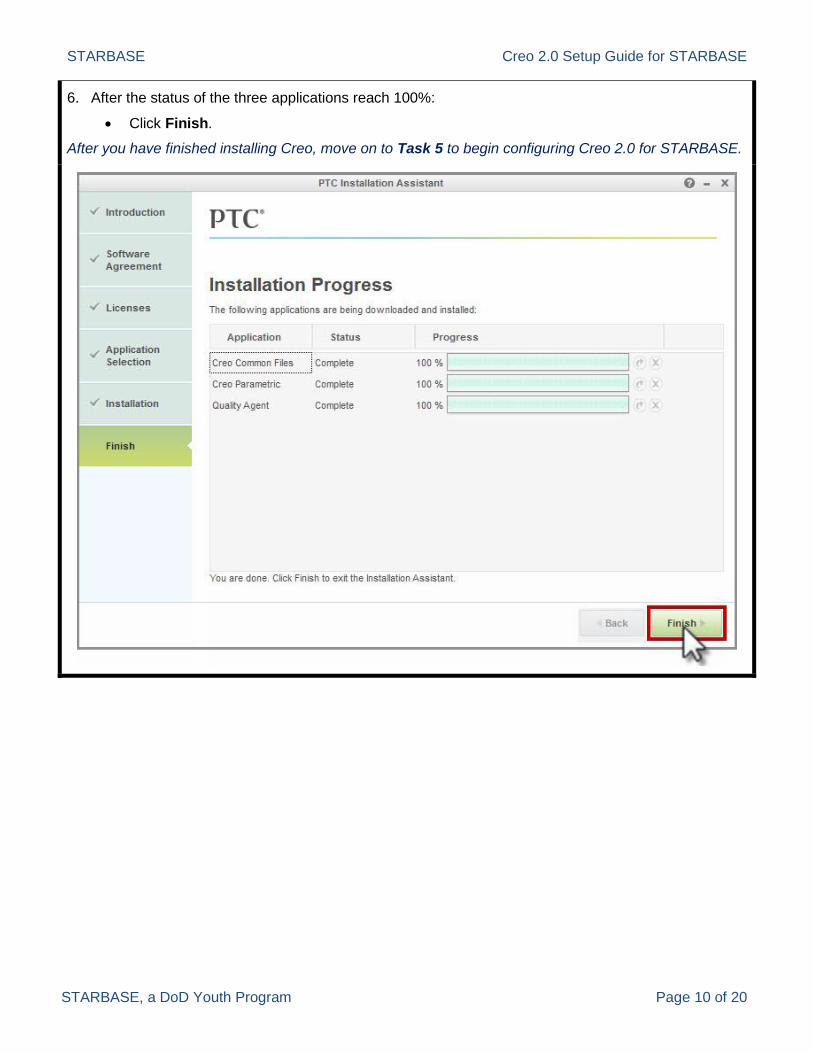
6. After the status of the three applications reach 100%:
Click Finish.
After you have finished installing Creo, move on to Task 5 to begin configuring Creo 2.0 for STARBASE.
STARBASE Creo 2.0 Setup Guide for STARBASE
STARBASE, a DoD Youth Program Page 11 of 20
Task 4 – Generate a license (without the internet) and complete the install
In this task, you will learn how to complete the installation of Creo 2.0 when your computers do not have access to the internet:
If you have internet access, go back to Task 3 to complete the installation.
If you have already completed the installation, move on to Task 5.
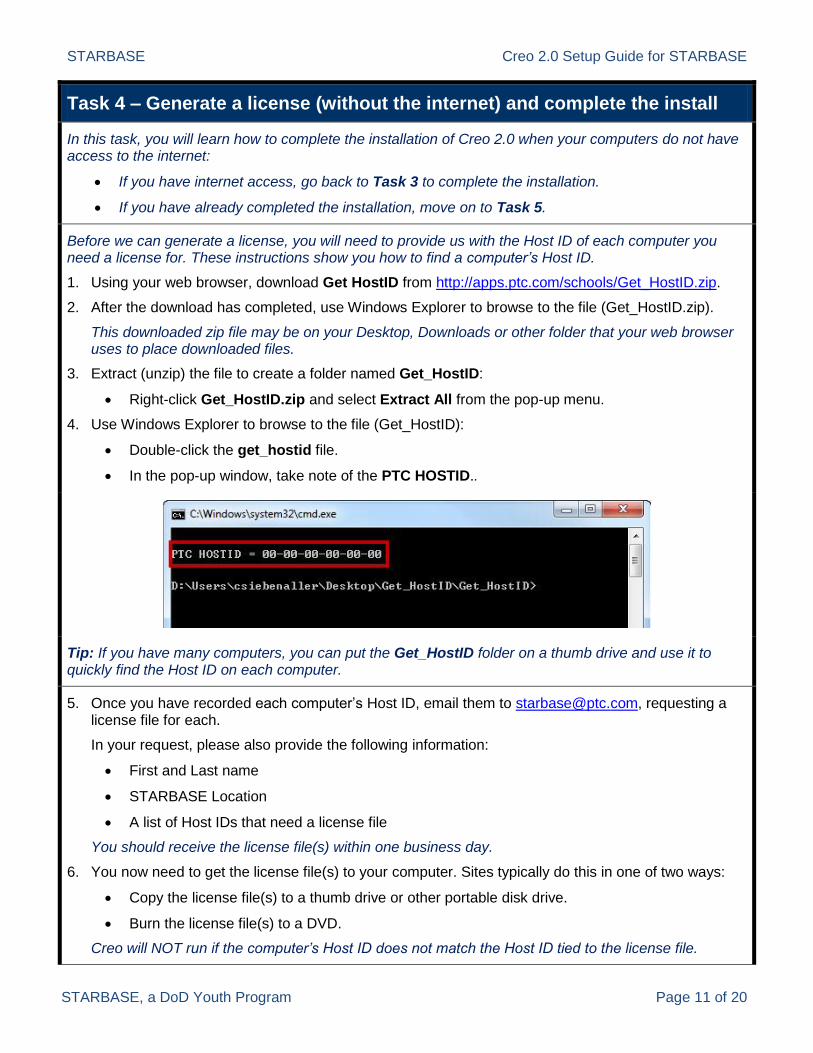
Before we can generate a license, you will need to provide us with the Host ID of each computer you need a license for. These instructions show you how to find a computer’s Host ID.
1. Using your web browser, download Get HostID from http://apps.ptc.com/schools/Get_HostID.zip.
2. After the download has completed, use Windows Explorer to browse to the file (Get_HostID.zip).
This downloaded zip file may be on your Desktop, Downloads or other folder that your web browser uses to place downloaded files.
3. Extract (unzip) the file to create a folder named Get_HostID:
Right-click Get_HostID.zip and select Extract All from the pop-up menu.
4. Use Windows Explorer to browse to the file (Get_HostID):
Double-click the get_hostid file.
In the pop-up window, take note of the PTC HOSTID..
Tip: If you have many computers, you can put the Get_HostID folder on a thumb drive and use it to quickly find the Host ID on each computer.
5. Once you have recorded each computer’s Host ID, email them to [email protected], requesting a license file for each.
In your request, please also provide the following information:
First and Last name
STARBASE Location
A list of Host IDs that need a license file
You should receive the license file(s) within one business day.
6. You now need to get the license file(s) to your computer. Sites typically do this in one of two ways:
Copy the license file(s) to a thumb drive or other portable disk drive.
Burn the license file(s) to a DVD.
Creo will NOT run if the computer’s Host ID does not match the Host ID tied to the license file.
STARBASE Creo 2.0 Setup Guide for STARBASE
STARBASE, a DoD Youth Program Page 12 of 20
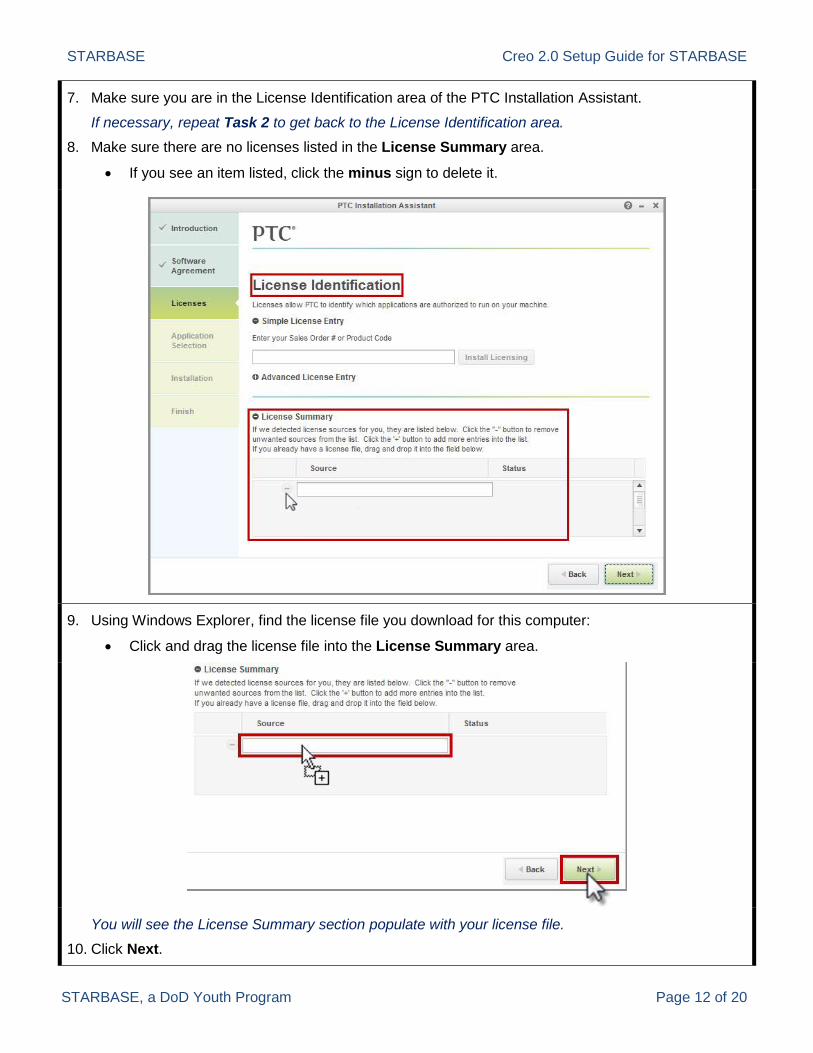
7. Make sure you are in the License Identification area of the PTC Installation Assistant.
If necessary, repeat Task 2 to get back to the License Identification area.
8. Make sure there are no licenses listed in the License Summary area.
If you see an item listed, click the minus sign to delete it.
9. Using Windows Explorer, find the license file you download for this computer:
Click and drag the license file into the License Summary area.
You will see the License Summary section populate with your license file.
10. Click Next.
STARBASE Creo 2.0 Setup Guide for STARBASE
STARBASE, a DoD Youth Program Page 13 of 20
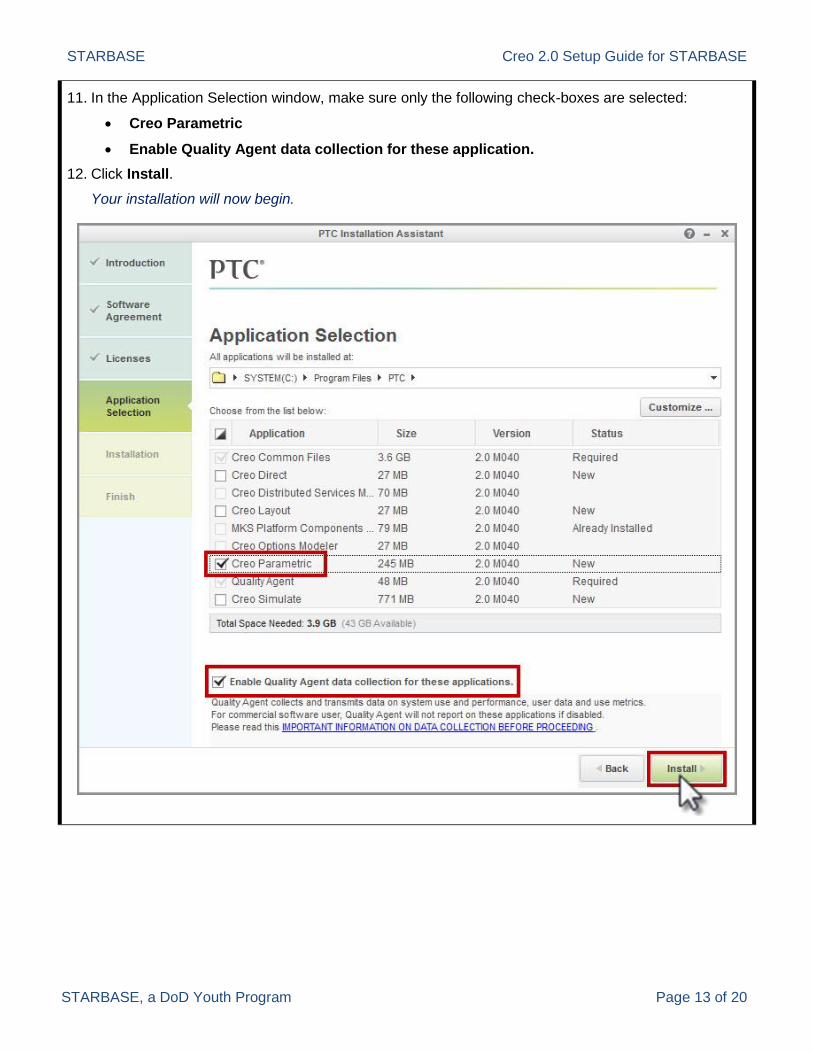
11. In the Application Selection window, make sure only the following check-boxes are selected:
Creo Parametric
Enable Quality Agent data collection for these application.
12. Click Install.
Your installation will now begin.

STARBASE Creo 2.0 Setup Guide for STARBASE
STARBASE, a DoD Youth Program Page 14 of 20
13. After the status of the three applications reach 100%:
Click Finish.
After you have finished installing Creo, move to Task 5 to begin configuring Creo 2.0 for STARBASE.
STARBASE Creo 2.0 Setup Guide for STARBASE
STARBASE, a DoD Youth Program Page 15 of 20
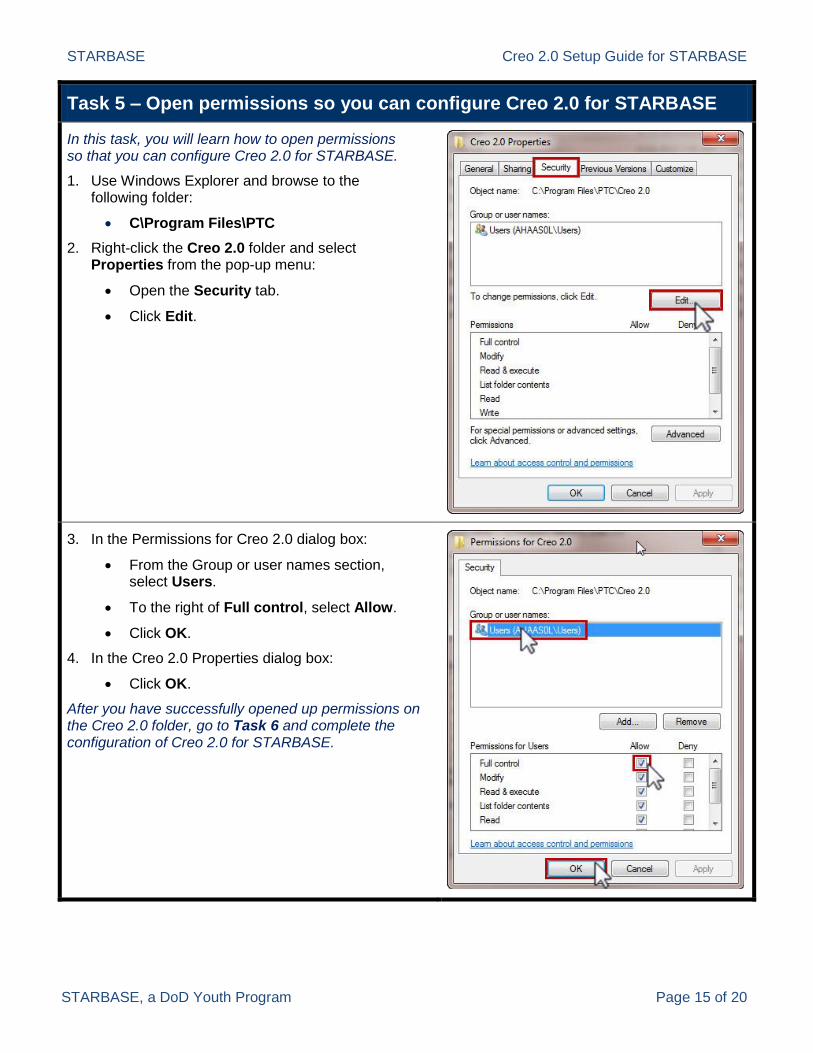
Task 5 – Open permissions so you can configure Creo 2.0 for STARBASE
In this task, you will learn how to open permissions so that you can configure Creo 2.0 for STARBASE.
1. Use Windows Explorer and browse to the following folder:
C\Program Files\PTC
2. Right-click the Creo 2.0 folder and select Properties from the pop-up menu:
Open the Security tab.
Click Edit.
3. In the Permissions for Creo 2.0 dialog box:
From the Group or user names section, select Users.
To the right of Full control, select Allow.
Click OK.
4. In the Creo 2.0 Properties dialog box:
Click OK.
After you have successfully opened up permissions on the Creo 2.0 folder, go to Task 6 and complete the configuration of Creo 2.0 for STARBASE.
STARBASE Creo 2.0 Setup Guide for STARBASE
STARBASE, a DoD Youth Program Page 16 of 20
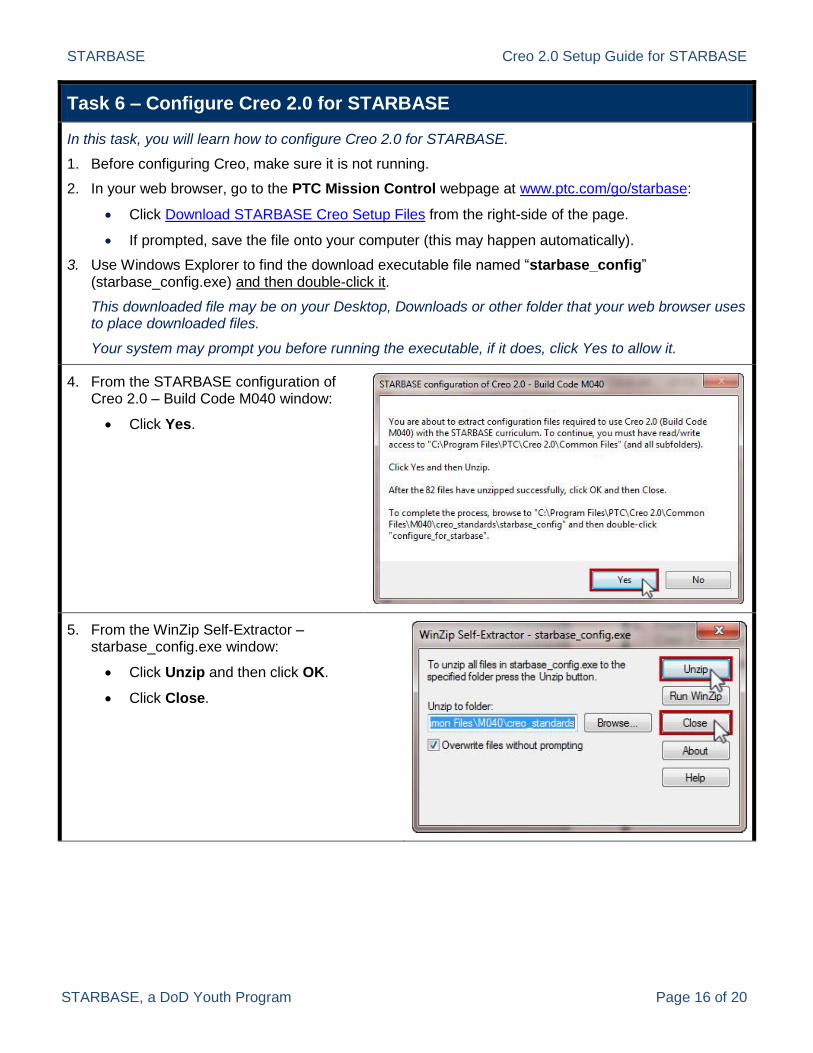
Task 6 – Configure Creo 2.0 for STARBASE
In this task, you will learn how to configure Creo 2.0 for STARBASE.
1. Before configuring Creo, make sure it is not running.
2. In your web browser, go to the PTC Mission Control webpage at www.ptc.com/go/starbase:
Click Download STARBASE Creo Setup Files from the right-side of the page.
If prompted, save the file onto your computer (this may happen automatically).
3. Use Windows Explorer to find the download executable file named “starbase_config” (starbase_config.exe) and then double-click it.
This downloaded file may be on your Desktop, Downloads or other folder that your web browser uses to place downloaded files.
Your system may prompt you before running the executable, if it does, click Yes to allow it.
4. From the STARBASE configuration of Creo 2.0 – Build Code M040 window:
Click Yes.
5. From the WinZip Self-Extractor – starbase_config.exe window:
Click Unzip and then click OK.
Click Close.

STARBASE Creo 2.0 Setup Guide for STARBASE
STARBASE, a DoD Youth Program Page 17 of 20
6. Use Windows Explorer and browse to the following folder:
C\Program Files\PTC\Creo 2.0\Common Files\M040\creo_standards\starbase_config
7. Double-click the file named configure_for_starbase:
If you see Access Denied in the pop-up window, press any key on your keyboard and move on to Task 6 to learn how to open access permissions.
If you do not see an Access Denied message, you are ready to use Creo 2.0. Press any key on your keyboard, and then move on to Task 7.
STARBASE Creo 2.0 Setup Guide for STARBASE
STARBASE, a DoD Youth Program Page 18 of 20
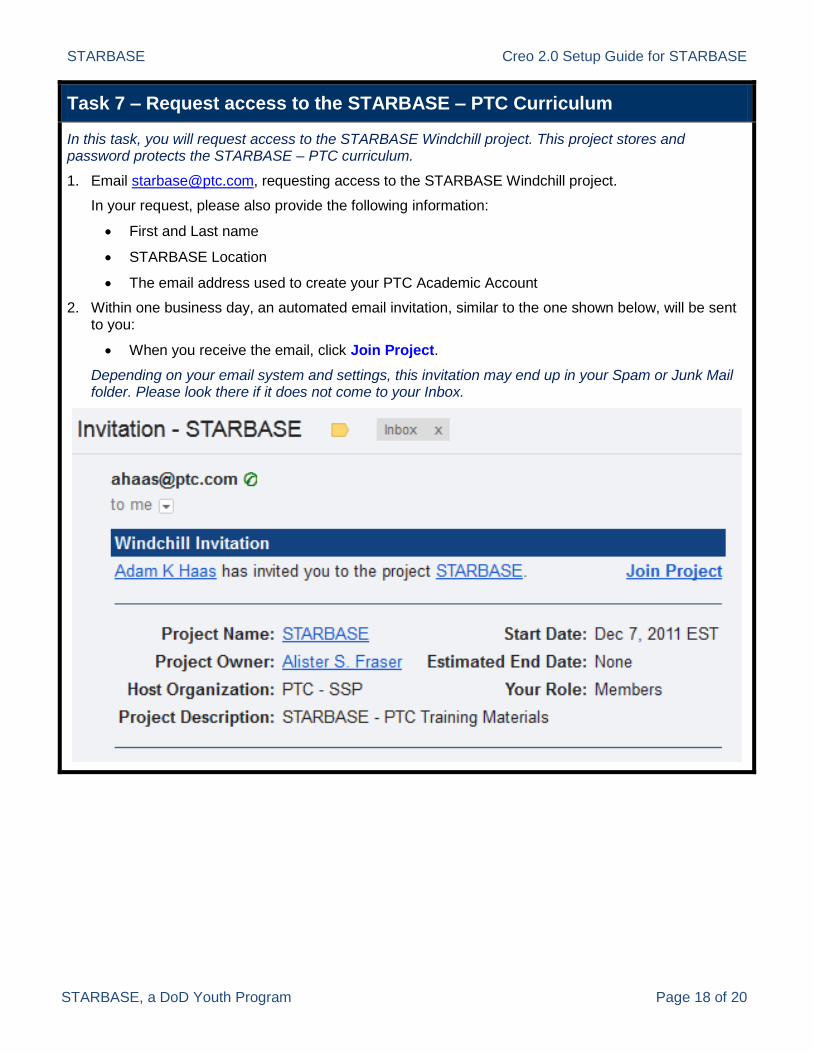
Task 7 – Request access to the STARBASE – PTC Curriculum
In this task, you will request access to the STARBASE Windchill project. This project stores and password protects the STARBASE – PTC curriculum.
1. Email [email protected], requesting access to the STARBASE Windchill project.
In your request, please also provide the following information:
First and Last name
STARBASE Location
The email address used to create your PTC Academic Account
2. Within one business day, an automated email invitation, similar to the one shown below, will be sent to you:
When you receive the email, click Join Project.
Depending on your email system and settings, this invitation may end up in your Spam or Junk Mail folder. Please look there if it does not come to your Inbox.

STARBASE Creo 2.0 Setup Guide for STARBASE
STARBASE, a DoD Youth Program Page 19 of 20
Task 8 – Download the STARBASE – PTC Curriculum
In this task, you will download the STARBASE – PTC curriculum.
1. In your web browser, go to the PTC Mission Control webpage at www.ptc.com/go/starbase:
To download a specific lesson, select the image above the title of that lesson.
To download all the lessons, select the Download All Classroom Curriculum link.
2. When prompted, enter your PTC username and password:
Your PTC username is the email address you used to create your PTC account.
You can reset your password at www.ptc.com/appserver/common/account/password.jsp.
3. In the download dialog box, select Save File to Disk:
In the Choose File dialog box, select Desktop or another location on your computer.
4. After the download has completed, use Windows Explorer to browse to the downloaded zip file (Rover_Creo2.zip, Submarine_Creo2.zip, STARBASE_Creo2.zip, etc).
The zip file is either on your Desktop, Downloads or other folder that your web browser uses to place downloaded files.
5. Extract (unzip) the file to create a folder named STARBASE_Creo2:
Right-click the zip file and select Extract All from the pop-up menu.
Notes:
Depending on your computer, operating system and software, the zip file may be extracted in a number of ways. The method you use may not exactly match the instructions in step 5 above.
This folder can be placed anywhere you want but we suggest it be placed in the C:\Users\Public\Documents folder. This will make it easier to find when you start Creo.
After the file is downloaded and unzipped, place the STARBASE_Creo2 folder on a thumb drive or burn it to a DVD so you can easily distribute it to other computers.
After you have extracted the STARBASE_Creo2 folder, the zip file can be deleted.
The PDF files for each lesson are found in the zLesson_Docs folder.
The “cleanup” batch file is explained in Task 9 of this document.
STARBASE Creo 2.0 Setup Guide for STARBASE
STARBASE, a DoD Youth Program Page 20 of 20
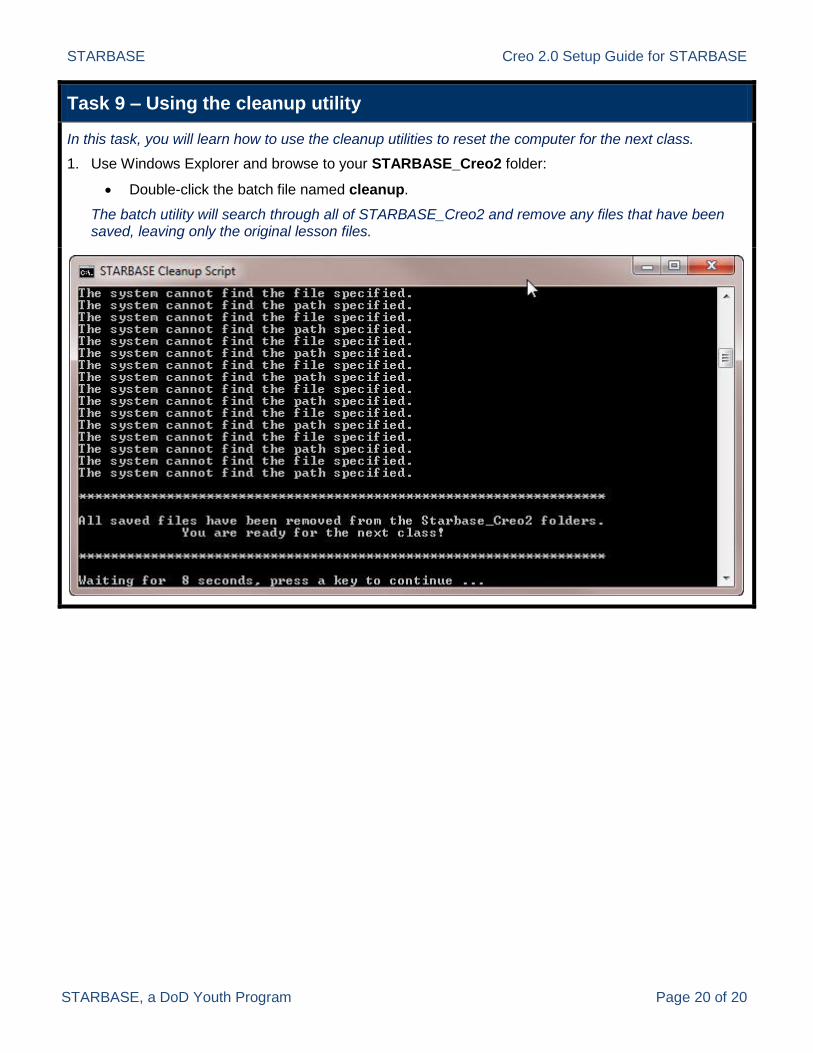
Task 9 – Using the cleanup utility
In this task, you will learn how to use the cleanup utilities to reset the computer for the next class.
1. Use Windows Explorer and browse to your STARBASE_Creo2 folder:
Double-click the batch file named cleanup.
The batch utility will search through all of STARBASE_Creo2 and remove any files that have been saved, leaving only the original lesson files.