University of Arkansas, United States Department of ... of Arkansas, United States Department of...
16
University of Arkansas, United States Department of Agriculture, and County Governments Cooperating
Transcript of University of Arkansas, United States Department of ... of Arkansas, United States Department of...

University of Arkansas United States Department of Agriculture and County Governments Cooperating
Contents
Selective Breeding for Better Queens 6
Biology of Bee Breeding 6
The Starter Hive 7
Grafting Bee Larvae 8
Finisher Hives 10
Mating Nucs 11
Caging Queens 12
Banking Queens 12
Shipping Queens 13
Record Keeping 13
Cloake Board Method 13
Introducing Queens 14
About the Authors Jon Zawislak is the apiculture instructor with the Entomology Department University of Arkansas Division of Agriculture in Little Rock Arkansas David Burns is a queen breeder and owner of Long Lane Honey Farm in Fairmount Illinois (wwwhoneybeesonlinecom) Both authors are Master Beekeepers certified through the Eastern Apicultural Society
Photo Credits Cover photo copy Alex Wild used by permission (wwwalexanderwildcom) Figures 1 5 6 10 12 13 14 15 16 17 18 19 by Jon Zawislak Figures 2 3 4 7 8 9 11 12 by David Burns
Raising Quality Queen Bees Jon Zawislak and David Burns
The queen honey bee is fundamental to a colonyrsquos survival and function She is the only member of the hive capable of producing more female offspring to keep the colony going The chemical pheromones produced by a queen bee impart a unique identity to each colony and its mem bers The presence of these pheromones also keeps the colony cohesive and orderly
A queen is the repository of a colonyrsquos heritable genetic traits These genetics influence many aspects of colony behaviors such as their defensiveness parasite tolerance and disease resistance rate of population growth and the efficiency of winter food consumption The importance of a quality queen bee cannot be over shyemphasized A colony of bees with un desirable traits can be remedied by requeen ing Within six weeks of replacing a queen most of the worker bees are replaced by the new queenrsquos offspring and noticeable changes in temperament and behavior will be evident
Beekeepers choose to raise queens for many reasons They can stock their own hives when queens die or need replacing They can save money by raising their own queens By doing so beekeepers can have queens available when
needed without the expense or delay of having queens shipped from another producer Surplus queens can be sold to others in the area who need them bringing extra income to the beekeeper
Every beekeeper can maintain one or more small nucs with a few frames holding a laying queen just in case one is needed By selectively raising their own queens beekeepers can take control of the characshyteristics they desire in their own bee stocks
Bee colonies raise queens naturally Inducing a colony to rear queens merely encourages this natural phenomenon subject to the beekeeperrsquos conditions and schedule While not diffishycult or time consuming the particular steps in rearing queen bees must be done on a schedule that matches the natural development cycle of honey bee queens (Table 1) Queen rearing cannot be sped up or slowed down for the convenience of the beekeeper If the schedule is not observed poor-quality queens may
Table 1 The schedule of tasks for rearing queen bees is based on the natural development cycle of honey bee queensThis process cannot be sped up slowed down or altered for the convenience of the beekeeper Become familiar with the timing of each step and prepare all equipshyment hives and bees to be ready on the appropriate dates If planning to rear a large number of queens on a continuous basis plan ahead so that mature cells are removed from finisher hives before new grafts are removed from the star ter Prepare sufficient mating nucs before virgin queens emerge Keep accurate records of each step in the process
Day 1 breeder queen lays eggs
Day 3 eggs hatch
Day 4 graft larvae place grafts into starter hive
Day 5 move grafts to finisher hive
Day 8-9 queen cells sealed
Day 12-14 move queen cells to mating nucs
Day 16 adult queens emerge from cells
Day 21 virgin queens begin nuptial flights
Day 30 mated queen laying eggs
Day 32 evaluate new queenrsquos brood pattern
- 5 shy
result or the beekeeper may find that a single early-emerging queen has destroyed several weeks of effort
Once the basic elements of the queen-rearing process are undershystood practically any beekeeper can raise surplus queens Many techshyniques have been developed to raise queens and the process can be indishyvidualized to overcome any chalshylenges While basic knowledge of honey bee biology is fundamental advanced beekeeping experience is not necessary However as with most activities knowledge and experience make queen rearing easier and more enjoyable
Selective Breeding forBetter Queens
Any beekeeper can produce new queens and most do it accidently But a queen breeder produces new queens with the goal of maintaining and improving high quality stocks Many honey bee behaviors are influenced by heritable genetic traits As the mother of the entire colony the qualities of a particular queen are expressed in every one of her offshyspring These traits can have proshyfound effects on the behavior and health of the whole colony
Temperament The reaction of a colony when it is approached opened or otherwise disturbed can be a genetic trait Africanized bees are particularly known for their extremely defensive behavior Gentle strains are especially important when keeping bees in urban settings
Mite tolerance Parasitic mites are among the greatest problems for beekeepers The effectiveness of current mite treatments is limited and their use has had other detrimenshytal effects on colony health Breedshying bees which are able to remove or resist parasites without the assisshytance of beekeepers is an important
step for improving the health of the beekeeping industry
Disease resistance Bees that exhibit hygienic behaviors are able to detect and remove diseased brood at a very early stage of infection This behavior greatly reduces the chance that an entire colony will become infected with a contagious pathogen
Colony population growth Some colonies will adjust their brood rearing to seasonal conditions They may increase in size prior to a nectar flow ensuring more foragers to collect nectar They may also reduce their population during times of summer dearth or approaching winter which allows them to use stored food more efficiently Other colonies maintain a large population and brood area despite conditions
Honey production Some colonies of bees will be better pro ducers of honey than others in the same apiary Honey producshytion is dependent on outside condishytions as well as colony population brood production and overall colony health Typically strong healthy colonies are better producers of honey and therefore good honey production often indicates good overall colony health As the beeshykeeper works to improve other traits that support colony health honey production should also increase
A bee breeder should take care to select only colonies with the most desirable characteristics from which to propagate new queens There is no perfect bee for all situations or conditions Rarely will any single colony possess all the most desirable characteristics but over successive generations a beekeeper should continue to select for preferred traits When selecting the breeding stock beekeepers must consider their own criteria regarding which characteristics are most desirable
Beekeepers can select one or more high-quality hives in their own
apiary to use as breeder stock or purchase breeder queens from other sources Commercial breeder queens may be instrumentally inseminated from selected drone lines to produce offspring with consistent traits These queens may cost several hunshydred dollars each and are generally used only to propagate more queens which are then open-mated with local drones
When selecting for healthy disease-and mite-resistant queen lines beeshykeepers are encouraged to breed from survivor stock These are colonies that have not been treated with chemical pesticides but natushyrally possess traits that allow them to overwinter successfully on their own and remain productive
Regularly treating colonies with pesticides to get rid of mites only breeds stronger mites At the same time it proshymotes the survival of bees that cannot cope with their natural enemies Breeding bees that are able to combat mites by themselves is ultimately the best solution for the beekeeping industry
Biology of Bee Breeding
Honey bee colonies consist of three specialized types of bees Each member has its own fundamental role to play in the production of new queens When rearing queen bees beekeepers will rely on all three of these types of bees to carry out their particular tasks
The drone is the male bee whose essential job is to mate with a virgin queen outside of the hive When his task is complete he will die immedishyately Drones add little value to a colony beyond this role but in terms of rearing productive queens their contribution is crucial
The workers make up the majority of the hive and are the backbone of the colonyrsquos survival
- 6 shy
and daily activity They construct combs feed and care for all the brood and the queen clean and guard the hive regulate the nest temperature forage for all the hiversquos needed resources (nectar pollen water and propolis) and store surplus food to ensure the colonyrsquos future
The queen bee is the key to the continuation of the colony She is the sole repository of the colonyrsquos genes her own and those of the drones with which she has mated A queen honey bee stores the millions of spermatozoa from multiple drones in a special organ within her abdomen called the spermatheca These sperm remain alive and viable for several years allowing her to fertilize eggs as they are deposited A healthy queen is capashyble of laying 1000 to 3000 eggs per day In addition to eggs she constantly produces chemical pheromones that regulate hive behaviors Her attendant workers known as her court or retinue feed and groom her throughout the day so that she can focus her attention on egg production to maintain the colonyrsquos population Through their association with their queen and their interactions with other workshyers these attendants distribute her pheromones throughout the hive
While a healthy queen bee can live for several years most workers live for little more than a month during the warm foraging season Therefore a colony of honey bees must have a laying queen or their population will dwindle within a few weeks A colony perpetually monitors the pershyformance of its queen If she is killed or removed they will quickly try to raise another queen from a suitable larva If the queen begins to perform poorly perhaps laying only unfertilized drone eggs then she will be superseded by a new queen A colony will also rear multiple queen larvae when they become overshycrowded and are preparing to swarm The old queen will leave with more than half of the colonyrsquos
workers just prior to a new virgin queen emerging from her cell
New queens are reared from young female bee larvae There is no funshydamental difference in any female bee larvae when they are small Each has the potential to become either a worker or a new queen All young bees are initially fed a rich diet of nutritious jelly by the workshyers Around the third day of their larval stage most larvae are changed to a diet called bee bread a mixture of pollen and honey When the larvae are switched to this diet they develop into worker bees (drones are also fed this mixed diet but they will always be drones) If a female larva is continuously fed a diet of royal jelly throughout its larval stage however it will develop into a queen bee
Once sealed drone cells are apparent in the hive a beekeeper can begin rearing queen bees Drones are sexushyally mature after 14 days Therefore a sufficient number of mature drones should be available by the time newly produced queens are ready to mate Queens can be reared into the fall as long as drones are still present in the hives Once drones have been expelled from the hives for winter queen rearing should not be attempted Queenless colonies will not expel drones but sufficient drones for good mating will be extremely limited in the fall
Beekeepers should ensure that all hives in their operation are well supplied with both pollen and honey (or protein patties and syrup) during times of dearth and drought Small colonies such as mating nucs can quickly run short of food if their bee populations are minimal
In order to make hives produce new queens beekeepers must try to mimic the conditions under which honey bees naturally begin raising their own queens The best queens are raised by hives that are currently queenless contain many young bees capable of producing royal jelly and
beeswax and have a surplus of pollen and honey stored in the hive The beekeeper creates these conditions in a starter hive
The Starter Hive
The easiest way to create the essential conditions for raising queens is to prepare a starter hive An ordinary five-frame nuc works very well as a cell starter Prepare the starter colony several hours before introducing the larvae that will be reared as queens A minishymum of 2 hours is necessary for the bees in this starter colony to observe that they are queenless (due to the significant drop in the level of queen pheromones in their bodies) Do not prepare more than 24 hours ahead of time
A well-prepared starter hive is among the most important factors in rearing high-quality queens This hive should be very crowded with mostly young healthy well-fed workers The nurse bees which produce the most royal jelly for the queen grafts are between 8shy12 days old They are usually found on combs of open brood
One of the frames in the starter hive is the cell bar frame which holds larvae that the beekeeper has selected to be reared as queens Two frames in the starter hive should be full of honey or nectar At least one frame should contain a large amount of pollen or bee bread This food is important for the young bees that will populate this hive They will need ample protein to produce the necessarily large amount of royal jelly that queen larvae require The honey will be used for energy and to secrete the wax that they will use to build the queen cells These frames can all be taken from a single hive or gathered from several hives The final frame can contain additional food or can be an empty drawn comb Arrange the combs as in the diagram (Figure 1)
- 7 shy
Figure 1 Arrange the frames of the starter hive so that the grafted larvae are in the center surrounded with food for the workers
No combs in the starter hive should contain eggs or open brood If any eggs or young larvae are present the bees may try to rear them as queens rather than the larvae selected by the beekeeper Older larvae cannot be reared as queens but will be fed and tended by the workers in the starter hive and will therefore compete with the selected grafts for limited resources Care must be taken to ensure that no queen bee is accishydently transferred to the starter hive Workers will not start queen cells in the presence of another queen
The starter hive should be crowded with many young workers These workers can all come from a single hive or from multiple hives Nurse bees generally will not fight with those from other colonies in the spring Begin by placing only two combs in the starter hive (against the outside walls) Gently shake or brush the bees from combs of open brood into the space between Careshyfully add the other two combs after the bees The cell bar frame will be added later leave a gap in the center for now This hive should be well ventilated with screen but all flight entrances should be closed comshypletely Keep the starter hive in a cool shaded location A wet sponge placed against the screen can assist the bees in keeping cool
Grafting BeeLarvae
Honey bees rear new queens from young larvae naturally When a colony becomes queenless or is pershyceived to have a poorly performing queen they will select larvae from among their brood and provision them abundantly with royal jelly Their cells will be elongated into vertical queen cells When preparing to swarm the queen deposits eggs in shallow vertical queen cups often along the bottom edges of combs The bees recognize that the larvae in these vertical cells are meant to become queens and will treat them accordingly When inducing the colony to rear queens the beekeeper presents selected larvae to the queenless starter colony in vertical cups as well The bees recognize this cue and will automatically begin to rear them as queens
Various techniques have been developed to select specific larvae and present them to a colony of bees to become new queens These methshyods can be divided into grafting and non-grafting techniques Grafting larvae is the standard method for producing large numbers of queens but can be easily done by the hobbyshyist who desires to raise only a few queens at a time When grafting larvae are removed from the comb with a small tool and transferred to individual queen cups
Some beekeepers are intimidated by the idea of handling delicate larvae and so many other methshyods have been developed to avoid this step These techniques may involve cutting or otherwise manipulating combs in which the queen has already deposited eggs or confining the queen in a space where she has no choice but to lay eggs in provided cups By conshytrast grafting larvae is not difficult requires few
tools and needs little preparation With minimal practice most anyone can develop the skills to graft queens within a short time
This manual describes a grafting technique (sometimes called the Doolittle method) For alternative methods of queen rearing (Alley Hopkins Miller Jenter etc) consult other sources for specific instrucshytions Regardless of which method is used to initially select the larvae the procedures for preparing starter and finisher hives are the same Also the timing of steps in queen-rearing procedures remains the same
Grafting larva requires very little specialized equipment All items can be purchased from beekeeping supshypliers modified from existing beeshykeeping equipment or created from scratch Before beginning grafting prepare the workspace by arranging all tools and necessary equipment within easy reach
A grafting tool (Figure 2) is used to pick up an individual larva from a comb and transfer it to a queen cell cup A variety of styles are available for purchase Use the grafting tool that best fits your needs and your technique for handling larvae The authors prefer the inexpensive spring-loaded Chinese grafting tool
Queen cell cups (Figure 3) hold the larvae in a vertical orientation in the starter hive which encourages the worker bees to rear them into new queens Cups made from plasshytic wood or wax may be purchased
Figure 2 There are many types of grafting tools Beekeepers should use the one that is most comfortable and best fits their technique
- 8 shy
wooden blocks to secure the cell bar Each cell bar needs a minimum of 1frac34 of space
Figure 3 Queen cell cups are mounted on a cell bar Plastic cups beneath it for (left) are avail able from most equip ment suppliersWax cups (right) are the bees to simple to make Bees will rear larvae placed in either type finish the cells
and to allow the beekeeper to remove them easily
Bright lighting is important when selecting appropriate larvae A headlamp or a desk lamp that can be easily moved and adjusted is useful for hands-free operation but a handheld flashlight is also effecshytive to illuminate the bottoms of the cells Good eyesight is necessary for grafting Some beekeepers may wish to purchase an inexpensive pair of reading glasses or other magnification aid
When the workspace is ready select a frame of brood from the breeder queenrsquos hive A darker frame (black plastic foundation or older wax comb) is preferable because the conshytrast makes pale-colored larvae easier to see Some beekeepers conshyfine their laying queen on a particushylar comb for a day to ensure having brood of a known and uniform age Usually however any frame with both eggs and open brood should contain more than a sufficient number of acceptable larvae When removing the frame from the colony gently brush all the bees into the
Figure 4 Good lighting is essential for selecting the best larvae A bright flashlight can be useful for directly illuminating cells Some may find that magnification is necesshysary to remove individual larvae from the comb and place them in cell cups
Wax cups can easily be made using a sup38 diameter wooden dowel with a smooth rounded end Soak the dowel in cold water dip into melted wax several times to build a thick layer and then twist to remove the cup when cool Different types or colors of cups can be useful to keep track of grafts reared from different breeder colonies
The queen cell cups are attached to the cell bar Some plastic cups are designed to fit snugly into a standard grooved bottom bar (shortshyened to fit within the frame) Wax and wooden cells can be secured to the bar with melted wax or propolis A cell bar frame is a standard bee hive frame modified with small
Figure 5 Only the youngest (smallest) larvae are suitable for grafting Choose larvae that are about the same size as an egg (left) A suitable larva should be curled slightly resting in a small pool of royal jelly in the bottom of its cell (center)The diet fed to an older larva (right) starting at day 3 stimulates its development into a worker and it cannot be reared as a queen
hive Do not jar the frame or otherwise shake the bees from it this may dislodge or injure the larvae
Place the frame on a table with the top bar toward you The cells in a comb are naturally angled slightly upward so elevating the bottom bar of the frame by a few inches using a block of wood or other support will allow you to see the bottoms of the cells more easily as you work Larvae in open brood cells are very susceptible to drying out when removed from the hive Place a wet towel under the frame and another on top to provide humidity for the larvae while you work (Figure 4)
Choose only larvae about the same size as an egg curved slightly into a ldquocommardquo shape and lying in their jelly (Figure 5) Approaching each larva from the back of the curve rather than the ends is the easiest way to get the tool beneath it When picking up a bee larva care must be taken to scoop up some royal jelly with it The tool should not actually touch the larva at all The flexible tip of a Chinese grafting tool slides easily down the side of the cell and beneath the larva (Figure 6) Pull the tool straight up the larva and jelly will stick to it Place the tip of the tool against the bottom of the queen cell cup and depress the spring button on the back of the tool The plunger will gently push the larva and jelly into the cell as the tongue retracts Other types of grafting tools will require slightly different techniques to transfer the
Figure 6 Use a grafting tool to lift out the larva along with some royal jellyThe tool never actually touches the delicate larva which floats on top of the sticky jelly Gently place the larva into the center of the queen cell cup without flipping it over
- 9 shy
larvae Position the larva in the center of the cell Young larvae are naturally lying on one side breathshying through only one set of spirashycles (breathing holes) If a larva is flipped over it may suffocate Be sure to keep the larva in the same orientation as it is transferred
Some beekeepers choose to ldquoprimerdquo queen cups with royal jelly collected from other cells or with other substances This method called wet grafting is both time consuming and unnecessary It is sufficient to transfer larvae to empty cell cups or dry grafting with enough jelly to sustain them and keep them from drying out The diet fed to developing queens is difshyferent than that fed to workers As soon as the bees in the starter hive discover the larvae they will begin to feed them appropriately
After several larvae have been transferred lay a damp cloth or paper towel across the tops of the filled queen cell cups to keep the grafts moist While these larvae are not very sensitive to changes in temshyperature they are extremely sensishytive to low humidity After all grafts have been made insert the cell bars into the cell bar frame If necessary use a small bit of wax or propolis to secure the cell bar in place Grafted larvae and jelly will naturally adhere to the insides of the cups but turn the cell bar frame over gently and do not jar the frame as it is being moved Place the cell bar frame into the center of the starter hive for 24-36 hours (Figure 7)
Figure 7 Place the frame of grafted larvae into the center of the starter hive for 24-36 hours
Finisher Hives
Because they are crowded and queenless bees in a starter hive are eager to begin raising new queens (Figure 8) However starter colonies are not apt to finish a large number of cells Their resources are too limited to continue feeding many queens If left in the starter hive the bees will selectively feed only some of the larvae abandoning the others For this reason the beekeeper must move the queen grafts to a strong hive which can finish rearing them A finisher hive contains the resources and population to care for many developing queens at once Finishers must be strong and queen-right and therefore will not be inclined to start new queen cells on their own However since the queen cells have already been started by other bees those in the finisher hive will continue feeding them and seal the cells
Figure 8 Bees in the starter hive begin elongating the queen cups and provision the cells with large quantities of royal jelly
Any healthy populous bee colony with at least two deep hive bodies and ample food stores can be used as a finisher hive To prepare the hive be sure the queen is in the lowest box and place a queen excluder above her If not confined below the laying queen will quickly find and destroy all developing queen cells The upper hive body should have at least two frames of open brood to draw nurse bees above the excluder This box should also have one empty space where the grafts will go in the center of the hive between frames of open brood Place frames containing pollen or bee bread on the other side of these brood frames
so that the nurse bees will have ready access to more protein These bees will need lots of pollen and honey in order to rear the queens
Remove the frame of grafted queen cells (Figure 9) from the starter hive after 24-36 hours and place it into the prepared finisher hive (Figure 10) There is no need to shake or brush the nurse bees from the grafting frame These bees are queenless and will not fight with the bees in the finisher hive They will continue to assist in caring for the grafted larvae The bees in the finisher hive will quickly recognize new queen cells and begin to provishysion them with an ample supply of royal jelly Once the new queen cells have been sealed another frame of grafts can be placed into the same hive to be finished Do not give the hive more open grafts than they can care for at once
Figure 9 The bees on the cell bar frame can be added to the finisher hiveThey will continue to care for the grafted queen larvae
Figure 10 A finisher hive should be strong well-fed and queenright An excluder keeps the queen in the lower box but allows workers to access both sections
- 10 shy
The bees in the starter hive can be returned to the colony from which they were taken may be added to a weak hive or may be used to start a new hive The beekeeper can take one of the started queen cells from the graft frame and press it gently into an empty portion of comb in the starter hive The bees will continue to rear this single queen which will emerge soon mate and begin to head a productive colony Place the hive in a suitable location and open the flight entrance Add another comb to the colony to replace the cell bar frame that was removed The new comb may be empty or full of food depending on the needs of the colony
New queen cells must be removed within a few days of the cells being sealed At the latest this should be done by day 14 or 10 days after grafting (see Table 1) If a new queen emerges earlier than expected into the finisher hive she will seek out and destroy all other sealed queen cells ruining the beekeeperrsquos efforts Cells can be removed directly to queenless hives to mating nucs or to an incubator If placed in an incubator cells should be kept upright and caged individually at 92degF with high humidity Transfer the virgin queens to mating nucs as soon as they emerge
MatingNucs
Once queen cells are sealed (Figure 11) they should be transshyferred to mating nucs before they can emerge The purpose of a mating nuc is to provide an environment for a virgin queen to emerge embark on her nuptial flights and begin laying eggs
A mating nuc is usually a very small hive with just enough bees and food to support itself (Figure 12) Any size hive can be used to house new queens but small nucs are often used due to the large number of hives that are needed by queen
Figure 11 Once the queen cells have been sealed by the finisher hive they should be removed If a single queen is allowed to emerge she will destroy all rival queens in their cells
Figure 12 Mating nucs are small hives that house the new queen while she takes her nuptial flights and begins to lay eggs Once she begins to lay in a good pattern she can be marked with the appropriate color
breeders Using small colonies also minimizes losses when queens fail to return from mating
Small nuc boxes holding three to five frames work very well Many beekeeping suppliers also offer various types of mini-nucs or stanshydard hives divided into three or four smaller sections with separate entrances It will benefit the queen producer to remain consistent in terms of equipment size so that swapping frames and woodenware will be easier Deep frames are recommended over medium or shallow because the bees can better regulate their temperature and can store more food
Mating nucs must be queenless Each should contain at least one or two frames of open brood covered with nurse bees and at least one frame of honey and pollen if there is none stored on the brood frames A nuc should have some area of empty
- 11 shy
cells where the new queen can begin laying eggs More bees can be shaken in but they are not always necessary Inspect mating nucs regushylarly for pests Small queenless colonies are particularly susceptible to wax moths and small hive beetles
After preparing mating nucs wait at least 12 hours before introducing a new queen or queen cell The bees in the mating nuc will better accept and care for the virgin queen if they recognize their queenless state Mating nucs can remain queenless for up to three weeks at a time while new queen cells are being created During this time they may try to create their own queens if open brood is available Laying workers may develop if nucs remain queenless for too long
Honey bee mating occurs outside the hive high in the air Virgin queens seek out areas where drones congreshygate Daytime temperature must reach 69degF for mating flights to occur Sufficient drones must also be available to the queen for successful mating to happen
Beekeepers may check the hive between 11 am and 4 pm and be unable to find a queen during this first week because she is out on a nuptial flight In this case remain patient and check again after 6 pm or early the following day If no evishydence of a queen can be found for several days introduce a new one A small number of queens do not return from mating flights
Drones typically remain within 15 miles of their hive Virgin queens fly a greater distance to seek mates minimizing chances that they will encounter brothers from their own hives Colonies with several combs of drone foundation can be placed at distances of one mile from the mating yard and in several direcshytions This practice known as drone flooding can be done to influence the mating stock available to virgin queens The colonies used as drone sources should have desirable traits
be of known lineage and should not be genetically related to the breeder queens Providing good queens to neighboring beekeepers is another way to improve the genetics of nearby drone sources
Once a queen has completed her mating flights she will soon begin to lay eggs It may take from sevshyeral days to a week for her to estabshylish a good brood pattern Once a queen begins laying and her brood pattern is judged to be adequate she can be removed and used to requeen a failing or queenless hive If she is to be offered for sale to another beekeeper she can be caged with several attendant bees for transportation If sufficient hives are not available to house all queens they can be banked to sustain them temporarily
CagingQueens
Many types of queen cages are available made from wood plastic or wire mesh Cages are used to proshytect queens during shipping separate them for banking and to introduce them into new hives Queen candy is used to plug the opening of the cage (Figure 13) This candy serves as food for the attendant bees during shipping It also slows the release of the queen into a new colony protecting her while the bees accept her pheromones
Traditionally queen cage candy has been made from sugar and honey but because spores of American
Figure 13 A queen cage with candy plug is used to separate and protect queens while they are banked during shipping and when introducing them into a new hive Attendant bees should not be added until the queen is ready for shipment
foulbrood can be transmitted in honey it is against the law in most states to ship bees with honey in any form Queen candy can be made by kneading together confectionersrsquo sugar and light corn syrup until a firm consistency has been reached It should be soft enough to shape withshyout crumbling but firm enough that it will hold its shape and not melt in a warm hive or in the mail
A mini-marshmallow can be used to plug the cage temporarily but these will soften quickly and should not be used for shipping Some beeshykeepers consider that the cornstarch added to confectionersrsquo sugar affects honey bee health and prefer to make their own by pulverizing pure granulated sugar in a coffee grinder or blender
BankingQueens
A queen bank (Figure 14) is prepared similar to a finisher hive strong well fed and queenright It also requires a queen excluder to keep the laying queen away from the caged queens The finisher hive can be used to bank queens as long as no open queen cells are present The hive will not be able to properly care for numerous open queen cells as well as adult queens
Figure 14 Caged queens can be banked for up to two weeksWorkers will care for both virgin and mated queens in the same colony Prepare a queen bank as you would a finisher hive
Virgin queens can be banked in individual cages for up to two weeks after emerging from their cells However they should be introduced into nucs and allowed to mate as soon as possible If held for more
than two weeks virgin queens will lose their inclination and ability to mate and will produce only unfertilized eggs (drones)
Mated queens can also be held in individual cages for up to two weeks When ready to ship three or four attendant bees should be added to the cage Choose these from among the workers clustering on the outside of the cage They are already accustomed to her scent and have been participating in feeding her Mated queens that are caged before they have had an opportunity to lay eggs often become poor-quality layers when later introduced to a hive Allowing queens to establish a good laying pattern in the mating nuc before they are caged also ensures that only high-quality queens are being sold Marking queens only after their laying pattern has been evalushyated is good practice This will assist the beekeeper in locating the queen again when it is time to cage her and establishes which queens are ready for shipment Use the established international queen marking color system (Table 2) for all queens that are offered for sale
Table 2 Standard queen marking colors repeat ever y 5 years Use the color for the last digit of the year in which the queen was matedThis color indicates the age of the queen and assures the beekeeper that she has not been replaced Marking queens is par ticularly impor tant in areas with established populations of Africanized honey bees
year ending in queen color
1 or 6 whitegray
2 or 7 yellow
3 or 8 red
4 or 9 green
5 or 0 blue
- 12 shy
ShippingQueens
Shipping queen bees through the US mail or by other common carri ers can be simple and con shyvenient but has risks A live queen can be killed easily if left in direct sunlight or in a hot vehicle Communicate with your shipping repre senta tive and pick-up driver (if possible) to ensure they are aware that you have live cargo Discuss their handling methods and estishymated travel times Some carriers may supply you with stiff cardshyboard document envelopes free of charge These are fine for shipping a small number of caged queens For larger numbers of queens special packaging may be necesshysary Shipping containers must have adequate ventilation Drill or punch holes in envelopes or use boxes with screen panels
Place a queen cage in an envelope so that the screened side is not against the envelope itself Just before sealing the packaging wet a fingertip with clean water and rub it across the screen mesh This simple technique of watering the queen before shipping will greatly reduce stress on the queen and workers during transit
Minimal shipping time is important Only ship queens using overnight or two-day service Beware of shipping in extremely hot or cold weather
Record Keeping
Record keeping is extremely important when breeding queen bees The schedule for queen rearshying procedures (Table 1) is necesshysarily based on the developmental cycle of the queen bee and cannot be altered The beekeeper should therefore establish clear written records to track the steps taken and know when to expect queens to emerge If a grafted larva was a day older than it appeared for instance
a queen may emerge a day earlier than expected
The particular pedigree of queen lines should be recorded as well Note the date and original source of breeding stock (name and location of breeder from which it was purshychased) bee race (Italian Russian Carniolan etc) and any other charshyacteristics or information that is known (VSH or hygienic traits) Begin new records for all colonies that are propagated from existing stocks or from feral colonies or swarms that were captured Consider everything you know about them as you evaluate colonies as potential breeding stock
When installing queen cells or virgin queens into a mating nuc record the date of introduction and then record the date when she is found to be laying eggs It is a good practice to mark each queen only after her egg-laying pattern has been evaluated
Cloake Board Method
The Cloake board method developed by Henry Cloake of New Zealand uses just one hive for both starting and finishing queen cells Because the ldquostarterrdquo bees must feed a large number of open brood in addition to the grafts they are unable to devote all of their resources to a large number of queen cells This system is not suitable for commercial queen production Howshyever on a small-scale a beekeeper can easily produce up to a dozen queens at a time using this method
A Cloake board consists of a wooden frame that provides a flight entrance to the bees above it with a queen excluder below and a sliding metal divider which functions to close off the queen excluder and preshyvents communication between the two groups of bees (Figure 15)
Begin with a strong queenright colony that has at least two deep hive bodies (Figure 16) Prepare the
hive by removing the upper box Rotate the lower box and bottom board 180 degrees so that the flight entrance is now to the back of the hive and completely close off the entrance to the lower box Confirm that the queen is in this lower box
If not already present move three to four frames of open brood into the upper box Remove one frame (empty or containing honey but not brood) leaving nine evenly spaced frames Ensure that the top box contains two frames with pollen or bee bread This food will be necesshysary to care for the open brood and queen cells
Place the Cloake board on top of the lower hive body without the metal divider The Cloak boardrsquos entrance should be facing forward or the same direction as the original openshying Replace the upper box and close the lid to the hive (Figure 17)
Leave the hive alone for 12 hours The open brood will attract nurse bees into the upper box Returning foragers will land on the front of the hive looking for the entrance and will eventually find their way into the upper entrance but it may take some time
After 12 hours slide the metal divider into place and unblock the lower entrance now facing to the rear of the hive (Figure 18) As bees adjust to the new openings most foragers that leave the lower entrance will return to the upper box These bees will bring fresh resources to the bees in the upper
Figure 15 A Cloake board consists of a queen excluder mounted in a wooden frame with a removable metal insert It also has a flight entrance above the excluder
- 13 shy
Figure 16 Begin with a strong queenright colony with at least two deep hive bodies
Figure 18 After 12 hours insert the metal floor and unblock the lower entrance Add the cell bar frame to the upper hive body
box Because communication with the queenright portion of the hive below has been cut off by the metal slide the bees in the upper box will soon perceive that they are queen-less and will be ready to nurture the grafts that will be placed in the upper section of the hive
Prepare a cell bar frame with a small number of grafts according the methods described earlier Open the top hive body and remove any emergency queen cells that the upper bees may have started Rearrange the nine frames to allow for the addition of the cell bar frame placing it near the center of the hive with brood and food on each side If necessary feed them pollen andor syrup Leave the metal slide in place for 24 hours The upper box in this state functions as the starter hive
After 24 hours remove the metal divider reuniting the two boxes (Figure 19) This allows the worker
Figure 17 Rotate the hive and place the Cloake board between hive bodies ensurshying that the queen remains below Block the lower flight entrance
Figure 19 After 24 hours remove the metal floor and allow the colony to finish the queen cells
bees from both sections to care for the grafts but the excluder prevents the queen from destroying the new queen cells
This method can also be accomshyplished by using any queen excluder and a piece of plywood or other material that completely cuts off communication between the halves of the colony
IntroducingQueens
For best results do not introduce a new queen until a hive has been queenless for at least 24 hours Look for eggs to be sure a laying queen is not present If so the workers will kill the new queen When replacing a queen remove (kill) the old one at least 24 hours before introducing the new queen
Destroy any queen cells in a hive before installing a new queen If a colony has started making queen
cells these bees may reject the new queen and continue raising their own If no eggs are visible the hive may have a virgin queen or a newly mated queen who will soon begin laying eggs Check the hive after 6 pm to spot a virgin queen which may have been out on a mating flight earlier in the afternoon A colony will not accept a new queen if a virgin queen is already present
Do not remove the candy plug from the queen cage Allow time for the new queenrsquos pheromones to permeate the hive Only remove the cork or plastic cap that is covering the candy Do not directly release the queen into the hive or the colony may kill her
Hang the queen cage in the center of the brood nest area The queen cage can be held snugly in place between two frames or suspended between two combs on a wire or string Do not place the screen side of the cage against a comb or the bees cannot feed the queen through the mesh and spread her phero shymones throughout the colony If the cage falls to the bottom of the hive bees will quickly cover it Use your hive tool to retrieve the cage and secure it between two frames
Always position the cage so that the candy plug faces up If the candy plug faces down dying attendant bees may fall and block the queenrsquos access to the exit
Do not remove the attendant bees from the cage These few bees already accept and feed the queen and will transfer her pheromones to the workers outside of the cage
Allow your bees three to five days to release the new queen After this time you may open the cage and release her
- 14 shy
Printed by University of Arkansas Cooperative Extension Service Printing Services
Issued in furtherance of Cooperative Extension work Acts of May 8 and June 30 1914 in cooperation with the US Department of Agriculture Director Cooperative Extension Service University of Arkansas The Arkansas Cooperative Extension Service offers its programs to all eligible persons regardless of race color national origin religion gender age disability marital or veteran status or any other legally protected status and is an Affirmative ActionEqual Opportunity Employer
MP518-PD-5-13N
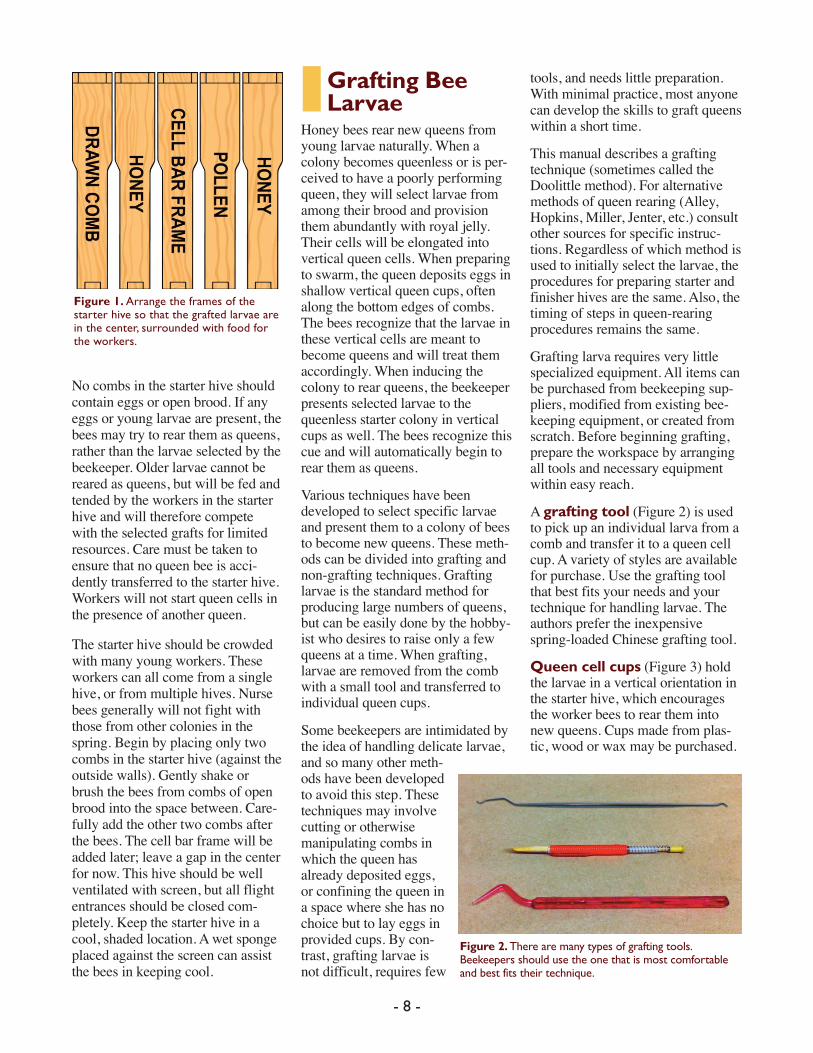
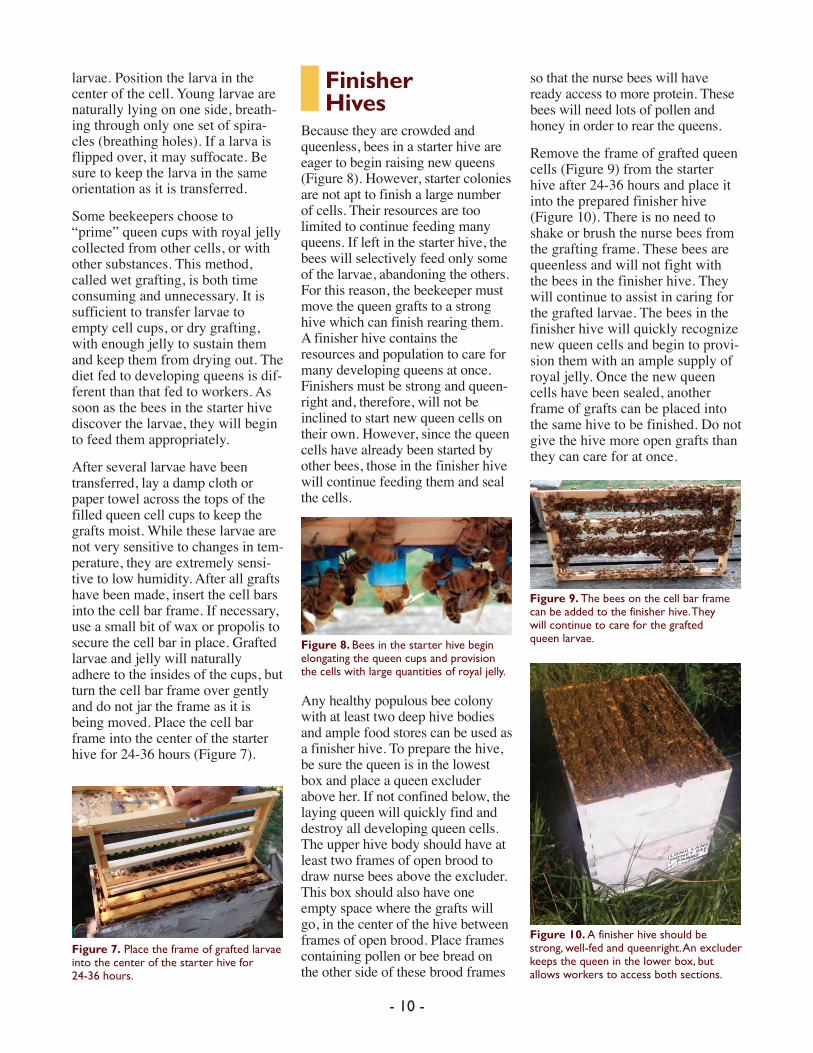
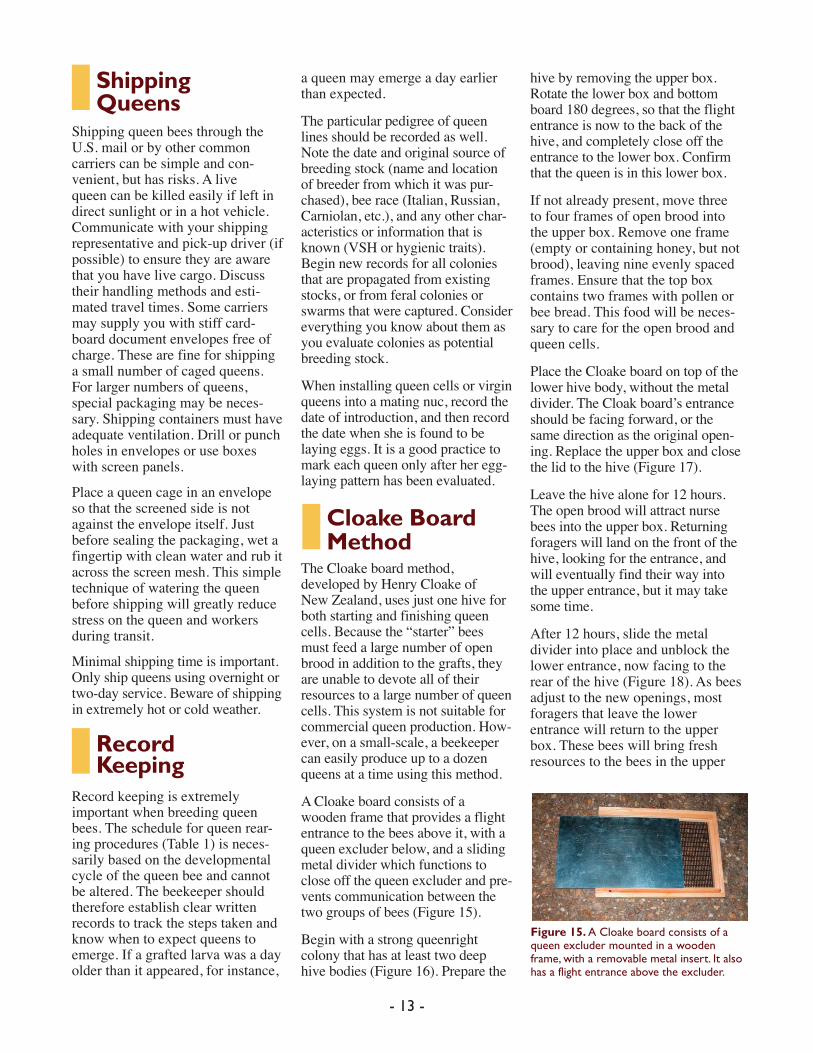