Unity Virtual Reality Projects - Sample Chapter
31
Free Sample
-
Upload
packt-publishing -
Category
Documents
-
view
79 -
download
1
description
Chapter No. 7 Physics and the EnvironmentExplore the world of Virtual Reality by building immersive and fun VR projects using Unity 3DFor more information: http://bit.ly/1ifDHUo
Transcript of Unity Virtual Reality Projects - Sample Chapter

Free Sample
In this package, you will find: • The author biography • A preview chapter from the book, Chapter 7 'Physics and the Environment' • A synopsis of the book’s content • More information on Unity Virtual Reality Projects

About the Author
Jonathan Linowes is the owner of Parkerhill Reality Labs, a start-up VR/AR consultancy fi rm. He is a veritable VR and 3D graphics enthusiast, full-stack web developer, software engineer, successful entrepreneur, and teacher. He has a fi ne arts degree from Syracuse University and a master's degree from the MIT Media Lab. He has founded several successful start-ups and held technical leadership positions at major corporations, including Autodesk Inc.
Preface
PrefaceToday, we are witnesses to the burgeoning of virtual reality (VR), an exciting new technology that promises to transform in a fundamental way how we interact with our information, friends, and the world at large.
What is consumer virtual reality? By wearing a head-mounted display (such as goggles), you can view stereoscopic 3D scenes. You can look around by moving your head and walk around by using hand controls or motion sensors. You can engage in a fully immersive experience. It's like you're really in some other virtual world.
This book takes a practical, project-based approach to teach you the specifi cs of virtual reality development with the Unity 3D game engine. We walk through a series of hands-on projects, step-by-step tutorials, and in-depth discussions using Unity 5 and other free or open source software. While VR technology is rapidly advancing, we'll try to capture the basic principles and techniques that you can use to make your VR games and applications immersive and comfortable.
You will learn how to use Unity to develop VR applications that can be experienced with devices such as the Oculus Rift or Google Cardboard. We'll cover technical considerations that are especially important and possibly unique to VR. By the end of this book, you will be equipped to develop rich, interactive virtual reality experiences using Unity.
What this book coversChapter 1, Virtually Everything for Everyone, is an introduction to the new technologies and opportunities in consumer virtual reality (VR) as regards games and non-gaming applications.
Chapter 2, Objects and Scale, discusses how you can build a simple diorama scene. It introduces the Unity 3D game engine as well as Blender for 3D modeling and explores the issues of world coordinates and scale.
Preface
Chapter 3, VR Build and Run, helps you confi gure your project to run on a VR headset, such as the Oculus Rift and Google Cardboard (Android or iOS). Then, we go into detail about how the VR hardware and software works.
Chapter 4, Gaze-based Control, explores the relationship between the VR camera and objects in the scene, including 3D cursors and gaze-based ray guns. This chapter also introduces Unity scripting in the C# programming language.
Chapter 5, World Space UI, implements many examples of user interface (UI) for VR, which includes a heads-up display (HUD), info-bubbles, and in-game objects with a lot of code and explanations.
Chapter 6, First-person Character, dissects the Unity character objects and components, which are used to build our own fi rst-person character with gaze-based navigation. Then, we'll explore the experience of having a fi rst-person virtual body and consider the issue of motion sickness.
Chapter 7, Physics and the Environment, dives into the Unity physics engine, components, and materials as we learn to work with forces and gravity in a number of VR project examples and games.
Chapter 8, Walk-throughs and Rendering, helps us build a 3D architectural space and implement a virtual walk-through. We also talk about rendering in Unity and performance optimizations.
Chapter 9, Using All 360 Degrees, uses 360-degree media in a variety of projects, including globes, panoramas, and photospheres. We also have a discussion on how it all works.
Chapter 10, Social VR Metaverse, explores the multiplayer implementations with VR using the Unity 5 networking components. We also have a look at VRChat as an example of an extensible platform for social VR.
Chapter 11, What's Next?, in this chapter the author comments about the potential of this exciting technology.
[ 149 ]
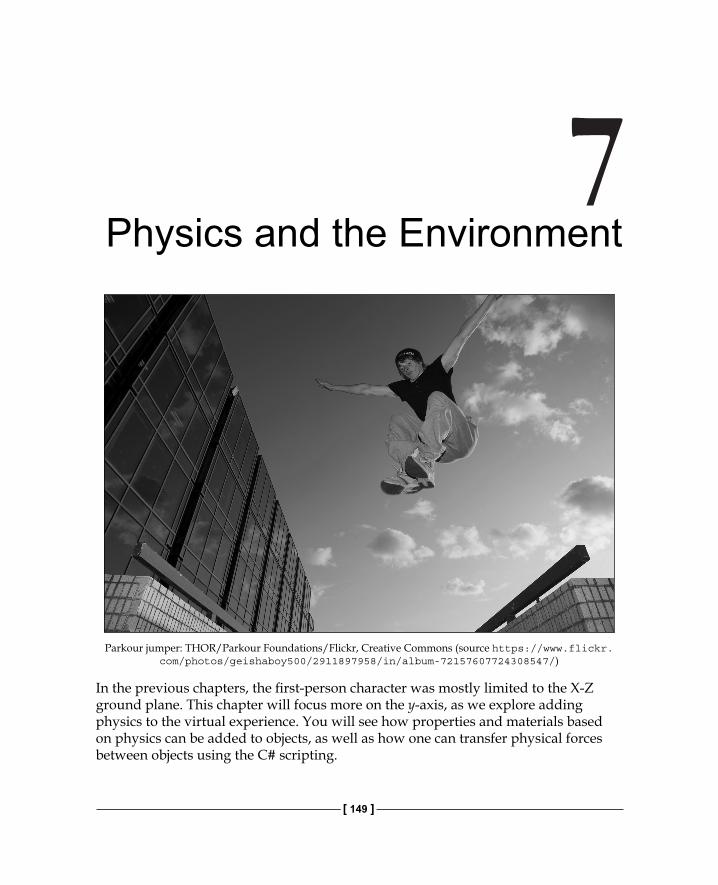
Physics and the Environment
Parkour jumper: THOR/Parkour Foundations/Flickr, Creative Commons (source https://www.flickr.com/photos/geishaboy500/2911897958/in/album-72157607724308547/)
In the previous chapters, the fi rst-person character was mostly limited to the X-Z ground plane. This chapter will focus more on the y-axis, as we explore adding physics to the virtual experience. You will see how properties and materials based on physics can be added to objects, as well as how one can transfer physical forces between objects using the C# scripting.
Physics and the Environment
[ 150 ]
In this chapter, you will learn the following topics:
• The Unity physics engine, the Unity Rigidbody component, and physic materials
• Transferring physical forces from one object to another with scripting• Implementing velocity and gravity on first-person characters• Interacting with the environment, including headshots and jump gestures• Building models in Blender
Note that the projects in this chapter are separate and are not directly required by the other chapters in this book. If you decided to skip any of it or not save your work, that's OK.
Unity physicsIn Unity, the behavior of an object that is based on physics is defi ned separately from its mesh (shape), materials (UV texture), and the renderer properties. The items that play into physics include the following:
• The Rigidbody component• The Collider component• The Physic Material• The project Physics Manager
Basically, physics (in this context) is defi ned by the positional and rotational forces that affect the transform of an object, such as gravity, friction, momentum, and collisions with other objects. It is not necessarily a perfect simulation of physics in the real world because it's optimized for performance and separation of concerns to facilitate animation. Besides, virtual worlds might just need their own laws of physics that aren't found in our God-given universe!
Unity 5 integrates the NVIDIA PhysX engine, a real-time physics calculation middleware, which implements classical Newtonian mechanics for games and 3D applications. This multiplatform software is optimized to utilize fast hardware processors when present. It is accessible via the Unity scripting API.

Chapter 7
[ 151 ]
A key to physics is the Rigidbody component that you add to objects. Rigidbodies have parameters for gravity, mass, and drag, among others. Rigidbodies can automatically react to gravity and collisions with other objects. No extra scripting is needed for this. During gameplay, the engine calculates each rigid object's momentum and updates its transform position and rotation.
Details on Rigidbodies can be found at http://docs.unity3d.com/ScriptReference/Rigidbody.html.
Unity projects have a global gravity setting, found in the project's Physics Manager by navigating to Edit | Project Settings | Physics. As you might expect, the default gravity setting is a Vector3 with values (0, -9.81, 0) that apply a downward force to all Rigidbodies. Gravity is in meters per second squared.
Rigidbodies can automatically react to gravity and collisions with other objects. Extra scripting is not needed for this.
In order to detect a collision, both the colliding objects must have a Collider component. There are built-in colliders with basic geometric shapes such as a cube, sphere, cylinder, and a capsule. A mesh collider can assume an arbitrary shape. If you can, it's best to use one or more basic collider shapes that approximately fi t the actual object rather than a mesh collider to reduce the expense of calculating the actual collisions during gameplay. (If you do, a mesh collider must be marked as convex and be limited to 255 triangles.)
When rigid objects collide, the forces pertinent to each object in the collision are applied to the others. The values of the resulting forces are calculated based on the objects' current velocity and body mass. Other factors are also taken into consideration, such as gravity and drag (that is, resistance). Furthermore, you have options to add constraints to freeze the position or rotation of a given object in any of its x, y, and z axes.
The calculations can be further affected when a Physic Material is assigned to the object's Collider, which adjusts the friction and the bounciness effects of the colliding objects. These properties will be applied only to the object that owns the Physic Material. (Note that it's really spelled Physic Material rather than Physics Material for historical reasons.)
Physics and the Environment
[ 152 ]
So, let's say that Object A (Ball) hits Object B (Brick). If Object A has bounciness and Object B does not, Object A will have an impulse applied in the collision, but Object B will not. However, you have options to determine how their friction and bounciness combine, as we'll see next. It's not necessarily an accurate simulation of real-world physics. It's a game engine, not a computer-aided engineering modeler.
From a scripting point of view, Unity will trigger events (also known as messages) when objects collide (OnTriggerEnter), each frame while objects are collided (OnTriggerStay), and when they've stopped colliding (OnTriggerExit).
If this sounds daunting, read on. The rest of this chapter breaks it down into understandable bits and pieces.
Bouncy ballsFeature: When a ball drops from mid-air and hits the ground, it bounces back up and down, and up again, diminished by gravity.
We are going to start simply with a new scene that consists of a ground plane and a sphere. Then, we'll add physics to it, a bit at a time, as follows:
1. Create a new scene by navigating to File | New Scene.2. Then, navigate to File | Save Scene As... and name it BallsFromHeaven.3. Create a new plane by navigating to GameObject | 3D Object | Plane and
reset its position using the Transform component's gear icon | Reset.4. Create a new sphere by navigating to GameObject | 3D Object | Sphere
and rename it BouncyBall.5. Set its Scale to (0.5, 0.5, 0.5) and Position to (0, 5,0) so that it's above the
center of the plane.6. Drag the Red material from Project Assets (created in Chapter 2, Objects
and Scale) onto it so that it looks like a bouncy ball.
The new Unity scene defaults come with Directional Light and Main Camera. It's OK to use this Main Camera for the time being.
Click on Play button. Nothing happens. The ball just sits in mid-air and doesn't move.
Chapter 7
[ 153 ]
Now, let's give it a Rigidbody, as follows:
1. With BouncyBall selected, in Inspector, navigate to Add Component | Physics | Rigidbody.
2. Click on Play button. It drops like a lead balloon.
Let's make it bounce, as follows:
1. In the Project panel, select the top-level Assets folder, navigate to Create | Folder, and rename it to Physics.
2. With the Physics folder selected, create a material by navigating to Assets | Create | Physic Material.
3. Name it Bouncy.4. Set its Bounciness value to 1.5. With the BouncyBall sphere selected in Hierarchy, drag the Bouncy asset
from Project onto the sphere's Collider material fi eld in Inspector.
Click on Play button. It bounces, but it does not go very high. We used the maximum value for Bounciness as 1.0. What's slowing it down? It's not the Friction settings. Rather, the Bounce Combine is set to Average, which determines how much of the bounciness of the ball (1) is mixed with that of the plane (0). So, it diminishes rapidly over time. We want the ball to retain all its bounciness. We will accomplish this, as follows:
1. Change the Bouncy object's Bounce Combine to Maximum.2. Click on Play button.
Much better. Actually, too much better. The ball keeps bouncing back up to its original height, ignoring gravity. Now, change the Bounciness to 0.8. The bounces diminish, and the ball will eventually come to a stop.
Let's check it out in VR, as follows:
1. Delete the default Main Camera from the Hierarchy root.2. Drag the MeMyselfEye prefab from Project Assets into the scene.
Set its Position to (0, 1, -4).
Run it in VR. Pretty neat! Even the simplest things look impressive in VR.
Physics and the Environment
[ 154 ]
OK, let's have some fun. Make it rain bouncy balls! To do this, we'll make the ball a prefab and write a script that instantiates new balls, dropping them from random positions, as follows:
1. Drag the BouncyBall object from Hierarchy into Project Assets/Prefabs folder, making it a prefab.
2. Delete the BouncyBall object from the Hierarchy, since we'll be instantiating them with a script.
3. Create an empty game controller object to attach the script to by navigating to GameObject | Create Empty. Rename it GameController.
4. In Inspector, navigate to Add Component | New Script, name it BallsFromHeaven, and open the script in MonoDevelop.
Edit the script so that it looks like this:
using UnityEngine;using System.Collections;
public class BallsFromHeaven : MonoBehaviour { public GameObject ball; public float startHeight = 10f; public float fireInterval = 0.5f;
private float nextBallTime = 0.0f;
void Update () { if (Time.time > nextBallTime) { nextBallTime = Time.time + fireInterval; Vector3 position = new Vector3( Random.Range (-4.0f, 4.0f), startHeight, Random.Range (-4.0f, 4.0f) ); Instantiate( ball, position, Quaternion.identity ); } }}
The script drops a new ball from startHeight at the rate of every fireInterval seconds (an interval of 0.5 means that a new ball is dropped every half second). The new ball position is at a random X-Z coordinate between -4 and 4. The Instantiate() function adds a new ball into the scene Hierarchy.

Chapter 7
[ 155 ]
Save the script. We now need to populate the Ball fi eld with the BouncyBall prefab, as follows:
1. With GameController selected in Hierarchy, drag the BouncyBall prefab from Project Assets/Prefabs folder onto the Ball slot in the Balls From Heaven (Script) panel in Inspector.
2. Be sure to use the BouncyBall prefab from Project Assets so that can be instantiated.
3. Save the scene. Run it in VR. Fun!
This is what I get:
Watch the Hierarchy panel as new balls are instantiated. Note that some balls end up bouncing off the plane platform but remain in the Hierarchy panel. We need to clean this up by adding a script that destroys the balls that are out of play, as follows:
1. Select the BouncyBall prefab in Project Assets/Prefabs.2. Navigate to Add Component | New Script, name it DestroySelf, and open
it in MonoDevelop.
Physics and the Environment
[ 156 ]
Here's a DestroySelf.cs script, which will destroy the object if its Y position is well below the ground plane (Y = 0):
using UnityEngine;using System.Collections;
public class DestroySelf : MonoBehaviour { void Update () { if (transform.position.y < -5f) { Destroy (gameObject); } }}
Whenever you have a script that instantiates objects, you must be aware of the lifecycle of the object and possibly arrange to destroy it when it is no longer needed.
In summary, we created a sphere with a Rigidbody and added a Physic Material with a Bounciness property of 0.8 and Bounce Combine to Maximum. Then, we waved the BouncyBall as a prefab and wrote a script to instantiate new balls that drop from above.
HeadshotsWouldn't it be fun to actually play with these bouncy balls? Let's make a game – try to aim the ball at a target using headshots. For this game, balls drop one at a time from above and bounce off your forehead (face), aiming for a target.
Feature: When a ball drops from above your head, you bounce it off your face and aim for a target.
To implement this, place a cube collider on the MeMyselfEye head, parented by the VR camera, so our head pose will move the face of the cube. I decided a cube shaped collider will be better for this game than a sphere or capsule, because it provides a fl at face (like a paddle) that will make the bounce direction more predictable. Balls will drop out of the sky. For a target, we'll use a fl attened cylinder. We'll add audio cues to indicate when a new ball has been released, and when a ball hits the target.
Chapter 7
[ 157 ]
Create a new scene and implement the head as follows:
1. Navigate to File | Save Scene As and name it BallGame.2. Delete the BallsFromHeaven script component attached to GameController
using gear icon Remove Component. We won't need it.3. In Hierarchy, unfold MeMyselfEye drilling down to the Main Camera object
and select it.4. In Inspector, navigate to Add Component | Physics | Box Collider.5. With GameController selected, navigate to Add Component |
Audio | Audio Source.6. Click on the small circle-shaped icon on the far right of the AudioClip fi eld of
Audio Source to open the Select AudioClip dialog box and choose the clip named Jump.
7. With GameController selected, navigate to Add Component | New Script, name it BallGame, and open it in MonoDevelop.
Note the box collider in the Scene view; it encases the head/camera of your fi rst-person character (as shown in following image). We'll play the Jump sound clip (provided with the Characters package of Unity's Standard Assets) to indicate when a new ball is dropped.
Here's the BallGame.cs script:
using UnityEngine;using System.Collections;
public class BallGame : MonoBehaviour { public GameObject ball; public float startHeight = 10f; public float fireInterval = 5f;
private float nextBallTime = 0.0f; private GameObject activeBall; private Transform head; private AudioSource audio;
void Start () { head = Camera.main.transform; audio = GetComponent<AudioSource> (); }
Physics and the Environment
[ 158 ]
void Update () { if (Time.time > nextBallTime) { nextBallTime = Time.time + fireInterval; audio.Play (); Vector3 position = new Vector3( head.position.x, startHeight, head.position.z + 0.2f ); activeBall = Instantiate( ball, position, Quaternion.identity ) as GameObject; } }}
We instantiate a new ball every fireInterval seconds from a startHeight position above the current head position and a small amount in front (0.2f) so that it doesn't land directly at the top of our head. No rotation is applied to the ball (Quaternion.identity).
Populate the public variables in Unity editor, as follows:
1. With GameController selected, drag the BouncyBall from Project Assets onto the Ball fi eld of the Ball Game panel in Inspector.
2. Try it in VR.
When you hear the ball, look up and aim the angle of your face to direct the bounce of the ball. COOOL!
Now, we need the target. Perform the following steps:
1. Create a fl at cylinder for the target, navigate to Game Object | 3D Object | Cylinder, and name it Target.
2. Set its Scale to (3, 0.1, 3) and Position to (1, 0.2, 2.5) so that it's out in front of you on the ground.
3. Drag the Blue material from the Project Assets/Materials folder (created in Chapter 2, Objects and Scale) onto it.
4. Note that its default Capsule Collider is domed, and it really won't do. On the Capsule Collider, select its gear icon | Remove Component.
Chapter 7
[ 159 ]
5. Then, navigate to Add Component | Physics | Mesh Collider.6. In the new Mesh Collider, check off the Convex checkbox and the
Is Trigger checkbox.7. Add an audio source by navigating to Add Component | Audio |
Audio Source.8. With the Target selected, click on the small circle icon on the far right of the
AudioClip fi eld to open the Select AudioClip dialog box, and choose the clip named Land.
9. And a new script, navigate to Add Component | New Script, name it TriggerSound, and open it in MonoDevelop.
The following TriggerSound.cs script will play a sound clip when you hit the target:
using UnityEngine;using System.Collections;
public class TriggerSound : MonoBehaviour { public AudioClip hitSound;
void Start() { audio = GetComponent<AudioSource> (); }
void OnTriggerEnter(Collider other) { audio.Play (); }}
The script uses the OnTriggerEnter() message handler to know when to play the audio clip. We're repurposing the Land clip that was provided with the Characters package under Unity's Standard Assets.
Physics and the Environment
[ 160 ]
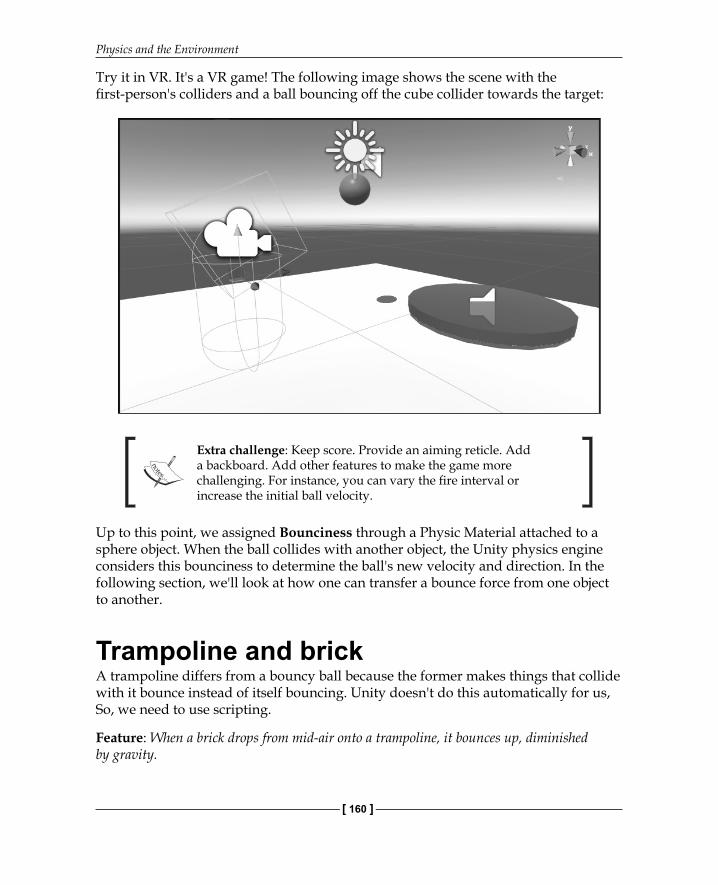
Try it in VR. It's a VR game! The following image shows the scene with the fi rst-person's colliders and a ball bouncing off the cube collider towards the target:
Extra challenge: Keep score. Provide an aiming reticle. Add a backboard. Add other features to make the game more challenging. For instance, you can vary the fi re interval or increase the initial ball velocity.
Up to this point, we assigned Bounciness through a Physic Material attached to a sphere object. When the ball collides with another object, the Unity physics engine considers this bounciness to determine the ball's new velocity and direction. In the following section, we'll look at how one can transfer a bounce force from one object to another.
Trampoline and brickA trampoline differs from a bouncy ball because the former makes things that collide with it bounce instead of itself bouncing. Unity doesn't do this automatically for us, So, we need to use scripting.
Feature: When a brick drops from mid-air onto a trampoline, it bounces up, diminished by gravity.
Chapter 7
[ 161 ]
Build the scene and turn the target into a trampoline, as follows:
1. Navigate to File | Save Scene As and name it BrickTrampoline.2. Delete the BallGame script component from GameController using gear
icon | Remove Component. We won't need it.3. Rename the Target object to Trampoline.4. Set its Position to (0, 0.2, 0).5. To create the brick, navigate to GameObject | 3D Object | Cube and
rename it to Brick.6. Set its Scale to (0.25, 0.5, 1) and Position to (0, 5, 0).7. Drag the Red material onto it.8. Add a Rigidbody by navigating to Add Component | Physics | Rigidbody.
When you play now, the brick drops to a dead stop. Make a new script on trampoline, as follows:
1. With Trampoline selected in Hierarchy, create the script by navigating to Add Component | New Script.
2. Name the Trampoline script, and open it for editing.
And the Trampoline.cs script as follows:
Using UnityEngine;using System.Collections;
public class Trampoline : MonoBehaviour { public float bounceForce = 1000.0f;
void OnTriggerEnter( Collider other ) { Rigidbody rb = other.GetComponent<Rigidbody> (); if (rb != null) { rb.AddForce (Vector3.up * bounceForce); } }}
When a rigid object collides with the trampoline, the OnTriggerEnter() function adds a bounceForce to its Rigidbody.
Physics and the Environment
[ 162 ]
Save the scene. Run it in VR. The brick now bounces on the trampoline. You may need to adjust the Bounce Force value by either increasing or decreasing it.
In summary, we have a brick with a Rigidbody, a trampoline without, and upon collision, the trampoline adds an upward force on the brick.
A human trampolineNow, you'll get to jump on the trampoline yourself.
Feature: When a fi rst-person character hits a trampoline, it bounces up, diminished by gravity.
Like a brickOne approach towards implementing this feature could be to treat the MeMyselfEye fi rst-person character like Brick and give it a Rigidbody and a Capsule Collider so that it can respond using physics. We'll try this fi rst just to see whether it works. For this to work, we need to disable its Character Controller component and start at the brick's position above the trampoline so that we can just drop, as follows:
1. Navigate to File | Save Scene As and name it HumanTrampoline.2. Delete Brick in Hierarchy; we won't need it.3. With MeMyselfEye selected in Hierarchy, set Position to (0, 5, 0).4. Navigate to Add Component | Physics | Rigidbody.5. Navigate to Add Component | Physics | Capsule Collider and set its
Height to 2.6. In the Rigidbody panel, under Constraints, check off the Freeze Rotation X,
Y, Z checkboxes so that we don't get sick.
Play the scene. Wheeee! We're jumping up and down. You may need to adjust the Bounce Force value.
The Trampoline script is calling the Rigidbody's AddForce() function with a bounceForce. However, the character has no locomotion of its own. We can continue down this path, but we won't.
Chapter 7
[ 163 ]
Like a characterIn the last chapter, we gave the fi rst-person MeMyselfEye a Character Controller component because it gives us many nice features that are needed for a fi rst-person character (including a collider and player-friendly physics). We want to use it again.
Start with a fresh copy of MeMyselfEye as follows:
1. In Hierarchy, delete the existing MeMyselfEye object.2. From the Project Assets/Prefabs folder, drag the MeMyselfEye prefab
into the scene.3. Set its Position to (0, 1, -4).4. Navigate to Add Component | Physics | Character Controller.5. Add the HeadLookWalkBounce script by navigating to Add Component |
New Script.
The script will be similar but slightly different from the HeadLookWalk script that we developed in Chapter 6, First-person Character. This time, we have to implement most of the physics ourselves. This means that instead of using CharacterController.SimpleMove(), we're going to use the more fl exible CharacterController.Move() instead. SimpleMove ignores the y-axis in the move direction, but we need to apply this for the bounce.
Open the HeadLookWalkBounce.cs script and edit as follows:
using UnityEngine;using System.Collections;
public class HeadLookWalkBounce : MonoBehaviour { public float velocity = 0.7f; public bool walking = false;
public float gravity = 9.8f; public float bounceForce = 0.0f;
private CharacterController controller; private Clicker clicker = new Clicker();
Physics and the Environment
[ 164 ]
private float verticalVelocity = 0.0f; private Vector3 moveDirection = Vector3.zero; void Start() { controller = GetComponent<CharacterController> (); } void Update () { if (clicker.clicked()) { walking = !walking; } if (walking) { moveDirection = Camera.main.transform.forward * velocity; } else { moveDirection = Vector3.zero; } if (controller.isGrounded) { verticalVelocity = 0.0f; } if (bounceForce != 0.0f) { verticalVelocity = bounceForce * 0.02f; bounceForce = 0.0f; } moveDirection.y = verticalVelocity; verticalVelocity -= gravity * Time.deltaTime; controller.Move (moveDirection * Time.deltaTime); }}
The script manages not just the horizontal velocity, but also verticalVelocity, which is calculated from bounceForce and gravity. If you're standing on any solid object (isGrounded), verticalVelocity is zeroed. If you're airborne, you're no longer grounded and gravity will be applied.
Modify the Trampoline.cs script to send the bounceForce to the character's HeadLookWalk script component, as follows:
using UnityEngine;using System.Collections;
public class Trampoline : MonoBehaviour {
Chapter 7
[ 165 ]
public float bounceForce = 300f;
void OnTriggerEnter( Collider other ) { Rigidbody rb = other.GetComponent<Rigidbody> (); if (rb != null) { rb.AddForce (Vector3.up * bounceForce); } else { HeadLookWalkBounce locomotor = other.GetComponent<HeadLookWalkBounce> (); if (locomotor != null) { locomotor.bounceForce = bounceForce; } } }}
The trampoline can now handle collision from characters or non-character objects. Bricks and characters respond differently to bounceForce. So, the magic forceFactor equalizes them (try adjusting this value and/or bounceForce in the trampoline).
Play it in VR. Walk forward onto the trampoline when a collision is detected. You'll go fl ying vertically and then descend back down.
This isn't a true trampoline mechanic, since you get pushed into the air just by touching it rather than having to jump on it fi rst. However, it works for our purposes.
Just for fun, create a pillar next to the trampoline and try to land on it by performing the following steps:
1. Navigate to GameObject | 3D Object | Cylinder and rename it to Pillar.2. Set its Position to (-2, 5, 2.2) and Scale to (1, 5, 1).3. Drag the material named Red onto it.

Physics and the Environment
[ 166 ]
Save the scene and play it in VR. Whee! Note how tall we get to jump. When in the air, look towards the pillar to land on it. If you keep walking off it, you drop back down to the ground. Here's what it will look like:
Summing up we did the following:
• At first, we had BouncyBall with a Physic Material, which Unity automatically applied upon collision, without scripting
• Then, we had a brick that received an upward force directly from the Trampoline script using Rigidbody.AddForce()
• Finally, in the preceding section, the first-person character script had its public bounceForce variable set by trampoline, which was manually applied as a vertical velocity along with gravity using CharacterController.Move()
The BouncyBall object with a Physic Material was moved automatically by the Unity physics engine, without scripting. The brick was moved by the trampoline, directly adding a force to the brick's Rigidbody. The fi rst-person character was moved by calculating its own move direction based on gravity and a bounceForce variable set by trampoline.

Chapter 7
[ 167 ]
Interlude – environment and thingsLet's spice up the scene with some more interesting environment and geometry. This section is optional. You can follow along or even do your own thing.
I've provided assets in the download fi les associated with this book. Where mentioned in the following section, some of these may be a part of the free packages found in the Unity Asset Store and included with permission from the creators:
1. Start a new version of the scene, save it navigating to File | Save Scene As..., and name it PhysicsWorld.
2. Select the ground plane and change its Scale to (5, 1, 5).
Now, we'll add some sky and earth.
Wispy SkyWe will add a nicer skybox named Wispy Sky. To add the skybox, perform the following steps:
1. Import the assets package provided with this book named WispySky.package.2. From the main menu bar, navigate to Window | Lighting.3. In the Lighting panel, select the Scene tab.4. In the Skybox fi eld, click on the circle icon on the far right to open the Select
Material dialog box.5. Select the material named WispySkyboxMat.
You can also grab the entirely free Wispy Skybox package published by Mundus Limited at the Asset Store.
The planet EarthAdd an Earth globe. We can do this with the following steps:
1. Import the assets package provided with this book named PlanetEarth.package.
2. In the Project panel, drill down to fi nd the Earth3968Tris prefab and drag it into the Scene view.
Physics and the Environment
[ 168 ]
3. Set its Position to (100, 0, 300).4. Set its Scale to (10, 10, 10).5. Drag the EarthOrbit animation clip onto it.6. Unfold the Earth3968Tris in Hierarchy and select its child with the same
name, and on this object, set its Rotation to (0, 90, 340).
You can also grab the entirely free Planet Earth Free package that was published by Close Quarter Games at the Asset Store. The source of the textures is http://www.shadedrelief.com/natural3/pages/textures.html.
The corporate logoNext, why don't we personalize the scene with something meaningful to you? We'll make it really big and jump on it. Maybe a guitar, a My Little Pony toy, or just a stack of some primitive 3D objects in Unity. I'm going to use the Packt logo because they're publishing this book. We'll use Blender for this.
BlenderAs we need a vector graphic version of a logo image, I started with a PNG image fi le, cropped it in Gimp, uploaded it to Vector Magic (http://vectormagic.com/), and got back an SVG fi le. The source fi les are included with this book. Then, I converted the 2D art into a 3D model in Blender, simply extruding it once, by performing the following steps:
1. Open the Blender app and select New fi le.2. Delete the default cube (right-click + X key).3. Navigate to File | Import | Scalable Vector Graphics (.svg) and load
Packt_Logo1.svg.4. Change the view as Top Ortho (keypad 1 + 5).5. VectorMagic includes an object for the background. Select the object and
then delete it (right-click + X).6. Select all (A key).7. For each letter, select it (right-click). In the Properties panel (the rightmost
panel), select the Data icon tab. Under the Geometry pane, change the Extrude value to 0.01.
8. Save it as logo.blend fi le.
Chapter 7
[ 169 ]
UnityIn Unity we perform the following steps:
1. Drag the logo.blend fi le into the Project Assets/Models folder.2. Confi gure the Import Settings with Scale Factor: 10, Mesh Compression:
High, Generate Colliders: check, Import Materials: uncheck.3. Scale and position it to your liking. I set Position to (18, 11, 24), Rotation to
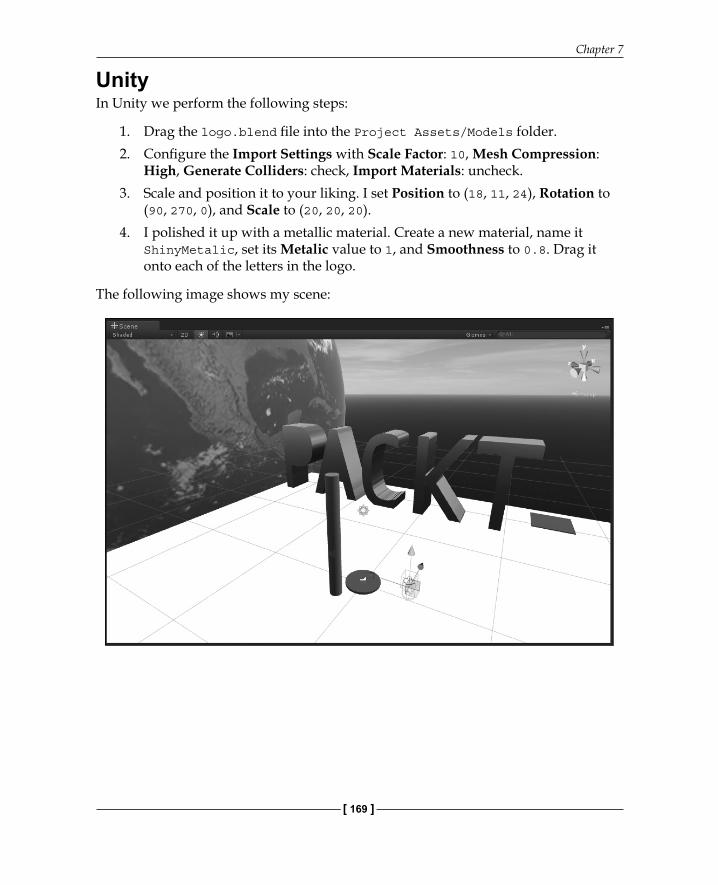
(90, 270, 0), and Scale to (20, 20, 20).4. I polished it up with a metallic material. Create a new material, name it
ShinyMetalic, set its Metalic value to 1, and Smoothness to 0.8. Drag it onto each of the letters in the logo.
The following image shows my scene:
Physics and the Environment
[ 170 ]
An elevatorWant to see the view from the top of the logo? Let's make a Mario-style elevator to get there.
Feature: Provide an elevator platform, which moves up and down, that I can walk onto and ride to the top of my logo.
Build it into the scene by performing the following steps:
1. Create the elevator platform by navigating to GameObject | 3D Object | Cube. Name it Elevator.
2. Set its so that it's aligned with the logo. By doing this, you can ride the platform and walk off it onto the top of the logo. I set Position to (17, 1.4, -8.8) and Scale to (4, 0.1, 4).
3. Drag the Blue material onto it.4. Create the script by navigating to Add Component | New Script.
Name it Elevate and open it for editing.
Here's the Elevate.cs code:
using UnityEngine;using System.Collections;
public class Elevator : MonoBehaviour { public float minHeight = 1.2f; public float maxHeight = 8.0f; public float velocity = 1; void Update () { float y = transform.position.y; y += velocity * Time.deltaTime; if (y > maxHeight) { y = maxHeight; velocity = -velocity; } if (y < minHeight) { y = minHeight; velocity = -velocity; } transform.position = new Vector3 (transform.position.x, y, transform.position.z); }}
Chapter 7
[ 171 ]
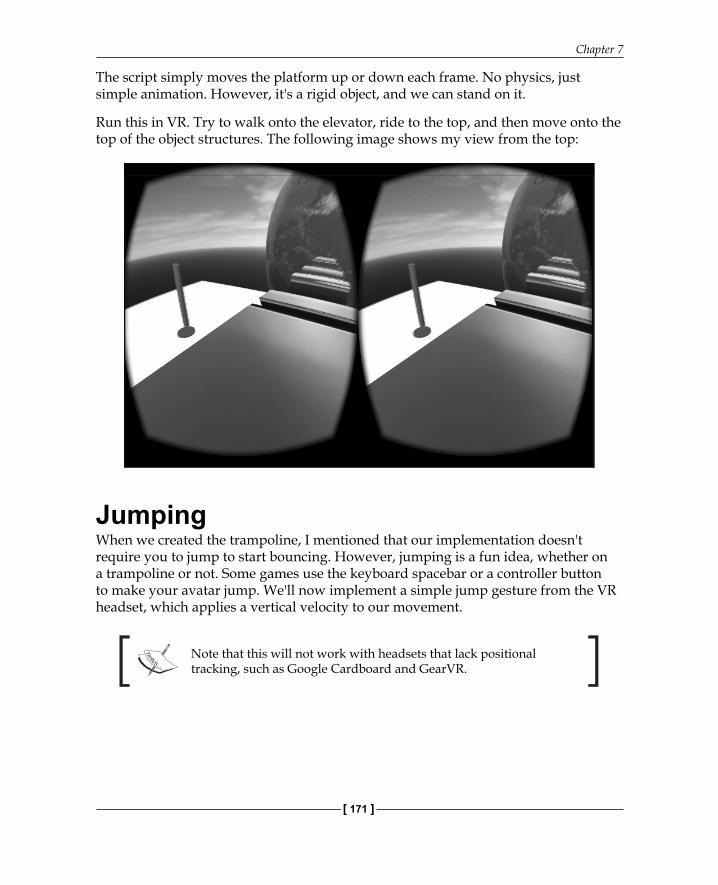
The script simply moves the platform up or down each frame. No physics, just simple animation. However, it's a rigid object, and we can stand on it.
Run this in VR. Try to walk onto the elevator, ride to the top, and then move onto the top of the object structures. The following image shows my view from the top:
JumpingWhen we created the trampoline, I mentioned that our implementation doesn't require you to jump to start bouncing. However, jumping is a fun idea, whether on a trampoline or not. Some games use the keyboard spacebar or a controller button to make your avatar jump. We'll now implement a simple jump gesture from the VR headset, which applies a vertical velocity to our movement.
Note that this will not work with headsets that lack positional tracking, such as Google Cardboard and GearVR.
Physics and the Environment
[ 172 ]
Feature: When I jump, my character in VR jumps.
To implement a jump gesture, we'll look for a rapid change in the Y position of the headset, which is very similar to the head nod gesture that we did in Chapter 5, World Space UI, (which checked for a rapid change in the x-axis angle). When a jump gesture is detected, we'll apply a vertical force to the fi rst-person , as follows:
1. With MeMyselfEye selected in Hierarchy, create the script by navigating to Add Component | New Script.
2. Name it JumpGesture and open it for editing.
Edit the JumpGesture.cs script, as follows:
using UnityEngine;using System.Collections;
public class JumpGesture : MonoBehaviour { public bool isJump = false; public float jumpForce = 1000.0f;
private float jumpRate = 1.0f; private float previousHeight; private HeadLookWalkBounce walkBounce;
void Start () { previousHeight = Camera.main.transform.position.y; walkBounce = GetComponent<HeadLookWalkBounce> (); } void Update () { if (DetectJump ()) { walkBounce.bounceForce = jumpForce; } }
private bool DetectJump() { float height = Camera.main.transform.localPosition.y; float deltaHeight = height - previousHeight; float rate = deltaHeight / Time.deltaTime; previousHeight = height; return (rate >= jumpRate); }}

Chapter 7
[ 173 ]
The Update() function calls DetectJump, which determines whether the player has actually jumped in real life by detecting a quick change in the camera's Y position. If the player did jump, then it sets bounceForce in the HeadLookWalkBounce script, like the trampoline did. If you want, you can modify jumpForce to be different from the value used by the trampoline.
Try it in VR. Ha! See, you don't need no stinkin' game controller to jump! Use your quads.
This is a simple approximation for illustration purposes. It only looks at the motion changes from the previous frame. I encourage you to explore new and better ways to use your head and body as VR input.
Extra challenge: For mobile VR devices with no positional tracking, try something else to invoke a jump.
SummaryIn this chapter, we took a grand tour of Unity's physics engine. First, I explained in layman's terms the relationship between Rigidbody, Colliders, and Physic Materials, and how the physics engine uses these to determine the velocity and collision of objects in the scene.
Then, we went through a variety of examples that showed how one can use the physics engine directly, indirectly, and not at all. The bouncy balls used the engine without scripting, but then we wrote scripts on top of it to implement a headshot game and a shower of balls. The trampoline examples use the physics engine to detect collisions, and we scripted the transfer force to another object. Lastly, we implemented our own gravity and bounce forces on a fi rst-person character, including a jump gesture. We did all of this while orbiting the Earth! Wonders never cease!
Physics mechanics are very important in game design as well as virtual reality. Unity's robust physics API gives developers the tools that are required to build pretty accurate and believable scenes as well as transcend reality and invent your own physics and oddities.
In the next chapter, we'll set aside much of the interactive features that we did in the past few chapters and look at some more canned or passive, animated VR experiences, such as rides and walkthroughs, which are commonly referred to as riding on rails.

Where to buy this book You can buy Unity Virtual Reality Projects from the Packt Publishing website. Alternatively, you can buy the book from Amazon, BN.com, Computer Manuals and most internet book retailers.
Click here for ordering and shipping details.
www.PacktPub.com
Stay Connected:
Get more information Unity Virtual Reality Projects