ITS488 Lecture 4: Google VR Cardboard Game Development: Basket Ball Game #2
Upload
kobkrit-viriyayudhakornCategory
view
133download
3
Lecture 5: Finish the Game &Deploying to iOS and Android
for Google CardboardDr. Kobkrit Viriyayudhakorn
iApp Technology [email protected]
ITS488 (Digital Content Creation with Unity - Game and VR Programming)

Show Score on GameOver Scene• When you change the
scene. All useful game objects are gone.
• Make ScoreCount survive the next scene.
• Add DontDestroyOnLoad(gameObject); in the Start Method.

ScoreCount Keep Creatings When User Press "Play Again?"
Solve by ScoreAbsorber
• Create a new ScoreAbsorber GameObject in Scene #3 (Gameover scene)
• Create a new C# Script ScoreAbsorber.cs
• Drag the ScoreAbsorber.cs to associated with GameObject
• Write down the following code.

ScoreAbsorber.cs
Exercise 1: Display Score on GameOver
• Create a new GameOverScoreDisplay C# file.
• Create a new Text item.
• Associate between GameOverScoreDisplay and Text.
• Find the ScoreAbsorber and update the text.


Importing the Asset Model
1. Download Asset Modelat https://www.dropbox.com/s/
q9xup1axi5m8lm8/Asset-Pack.zip?dl=0We gonna import the asset model from Joongly.
http://joongly.com/index.php?route=product/product&product_id=62

Importing Package
2. Assets > Import Package > Custom Package...Choose "ShootHoopKit.unitypackage"
3. Make sure that select everything and then select "Import"
4. Now you get Assets of the "ShootHoopKit"

Add Ringboard into the Scene
1. Drag and Drop "RingBoard" 2. Make it position correctly by using"Move", "Rotate", "Scale"
Exercise 2: Build Level from Assets.
• Duplicate the RingBoard Prefab for another 2 board
• Position them correctly around your scene.
• Remove the unnecessary block.
• Replace the ball that gets shot.

1. Duplicate the RingBoard Prefab for another 2 board.Position them correctly around your scene.
And play.
2. Drag and drop the Ball prefab to "Ball Launcher" And "Play"
**Adjust Ball Speed to make it playable**

Adding the Trigger
1. Remove all unused Target blocksSelect Them > Delete 2. Right click at the Ringboard and create empty.

1. Rename it as "Trigger", Move it at the hole of the Backboard, and Add Box Collider
2. Check "IsTrigger" 3. Add the new C# file"GoalTrigger"
4. Drag and dropcode to
the Trigger.

Have the following code...

Exercise 3
• Play button, to test the game.
• Duplicate it to multiple backboard
• Make the score to increase become public and adjustable in Unity.

Google CardboardDeployment

We need the newest version of Unity
• Install the newest setup of the following files
• Unity-2017.2.0f3.pkg
• UnitySetup-iOS-Support-for-Editor-2017.2.0f3.pkg
• UnitySetup-Android-Support-for-Editor-2017.2.0f3.pkg
• Android-Studio-IDE-171.4408382-mac.dmg
• Xcode 9.1

Download the Previous Lecture Code
http://github.com/kobkrit/VR_basketball

Build Unity for iOS
• Install Unity iOS Build Support
• Reopen the Unity & Switch Platform
• Xcode
• Use the following Apple Developer ID
• Username: [email protected]
• Password: SIITsiit1

Install iOS Build Support
1. Open File > Build Settings > iOS >Click on "Open Download Page"
2. It will download the package.
3. Follow the install instruction. After completed, Restart the unity again.

4. Select iOS > Tap Switch Platform
5. It will take a while
6. Press Build and Run,It will prompt you for enter the iOS project directory.
You can select any folder.

7. If you encounter the API update RequiredPress "I Made a Backup. Go Ahead!"
8. This will take a while... 9. When it is finished, the Xcode will show up.Go to tab "General" > Select "Unity-iPhone".
In Signing and Team Selection Box, Click at "None"and then "Add an Account..."

10. Write down your apple id’s username and password
• Use the following Apple Developer ID
• Username: [email protected]
• Password: SIITsiit1
11. You will see the above error, make change on the Bundle identifier to "com.kobkrit.{your-student-id}
Example: com.kobkrit.4722791763and then press "Tab"
You will see as below.

12. Redo it again for "Unity-iPhone Tests Target"Select a Team
13. Plug-in your iPhone to machine.Select it as the target.
And press "Play" button

Enabling VR
1. Open File > Build Settings > iOS >Click on "Player Setting"
2. At the XR Settings, Check at the Virtual Reality SupportedThen press +, Choose "Cardboard"

3. Press "Build And Run" again.
4. Re-assign Developer Team in Xcode,and Re-enter App Identifier.
Hit "Play" Button.

Build Unity for Android• Install Unity Android Build Support
• Install Android Studio
• Download & Install Android SDK
• Enable USB Debugging on Android Device
• Connect Android Device to the SDK
• Config Android SDK Path in Unity

Install Android StudioTo install Android Studio on your Mac, proceed as follows: 1. Launch the Android Studio
DMG file. 2. Drag and drop Android Studio
into the Applications folder, then launch Android Studio.
3. Select whether you want to import previous Android Studio settings, then click OK.
4. The Android Studio Setup Wizard guides you though the rest of the setup, which includes downloading Android SDK components that are required for development.
That's it! The following video shows each step of the recommended setup procedure.
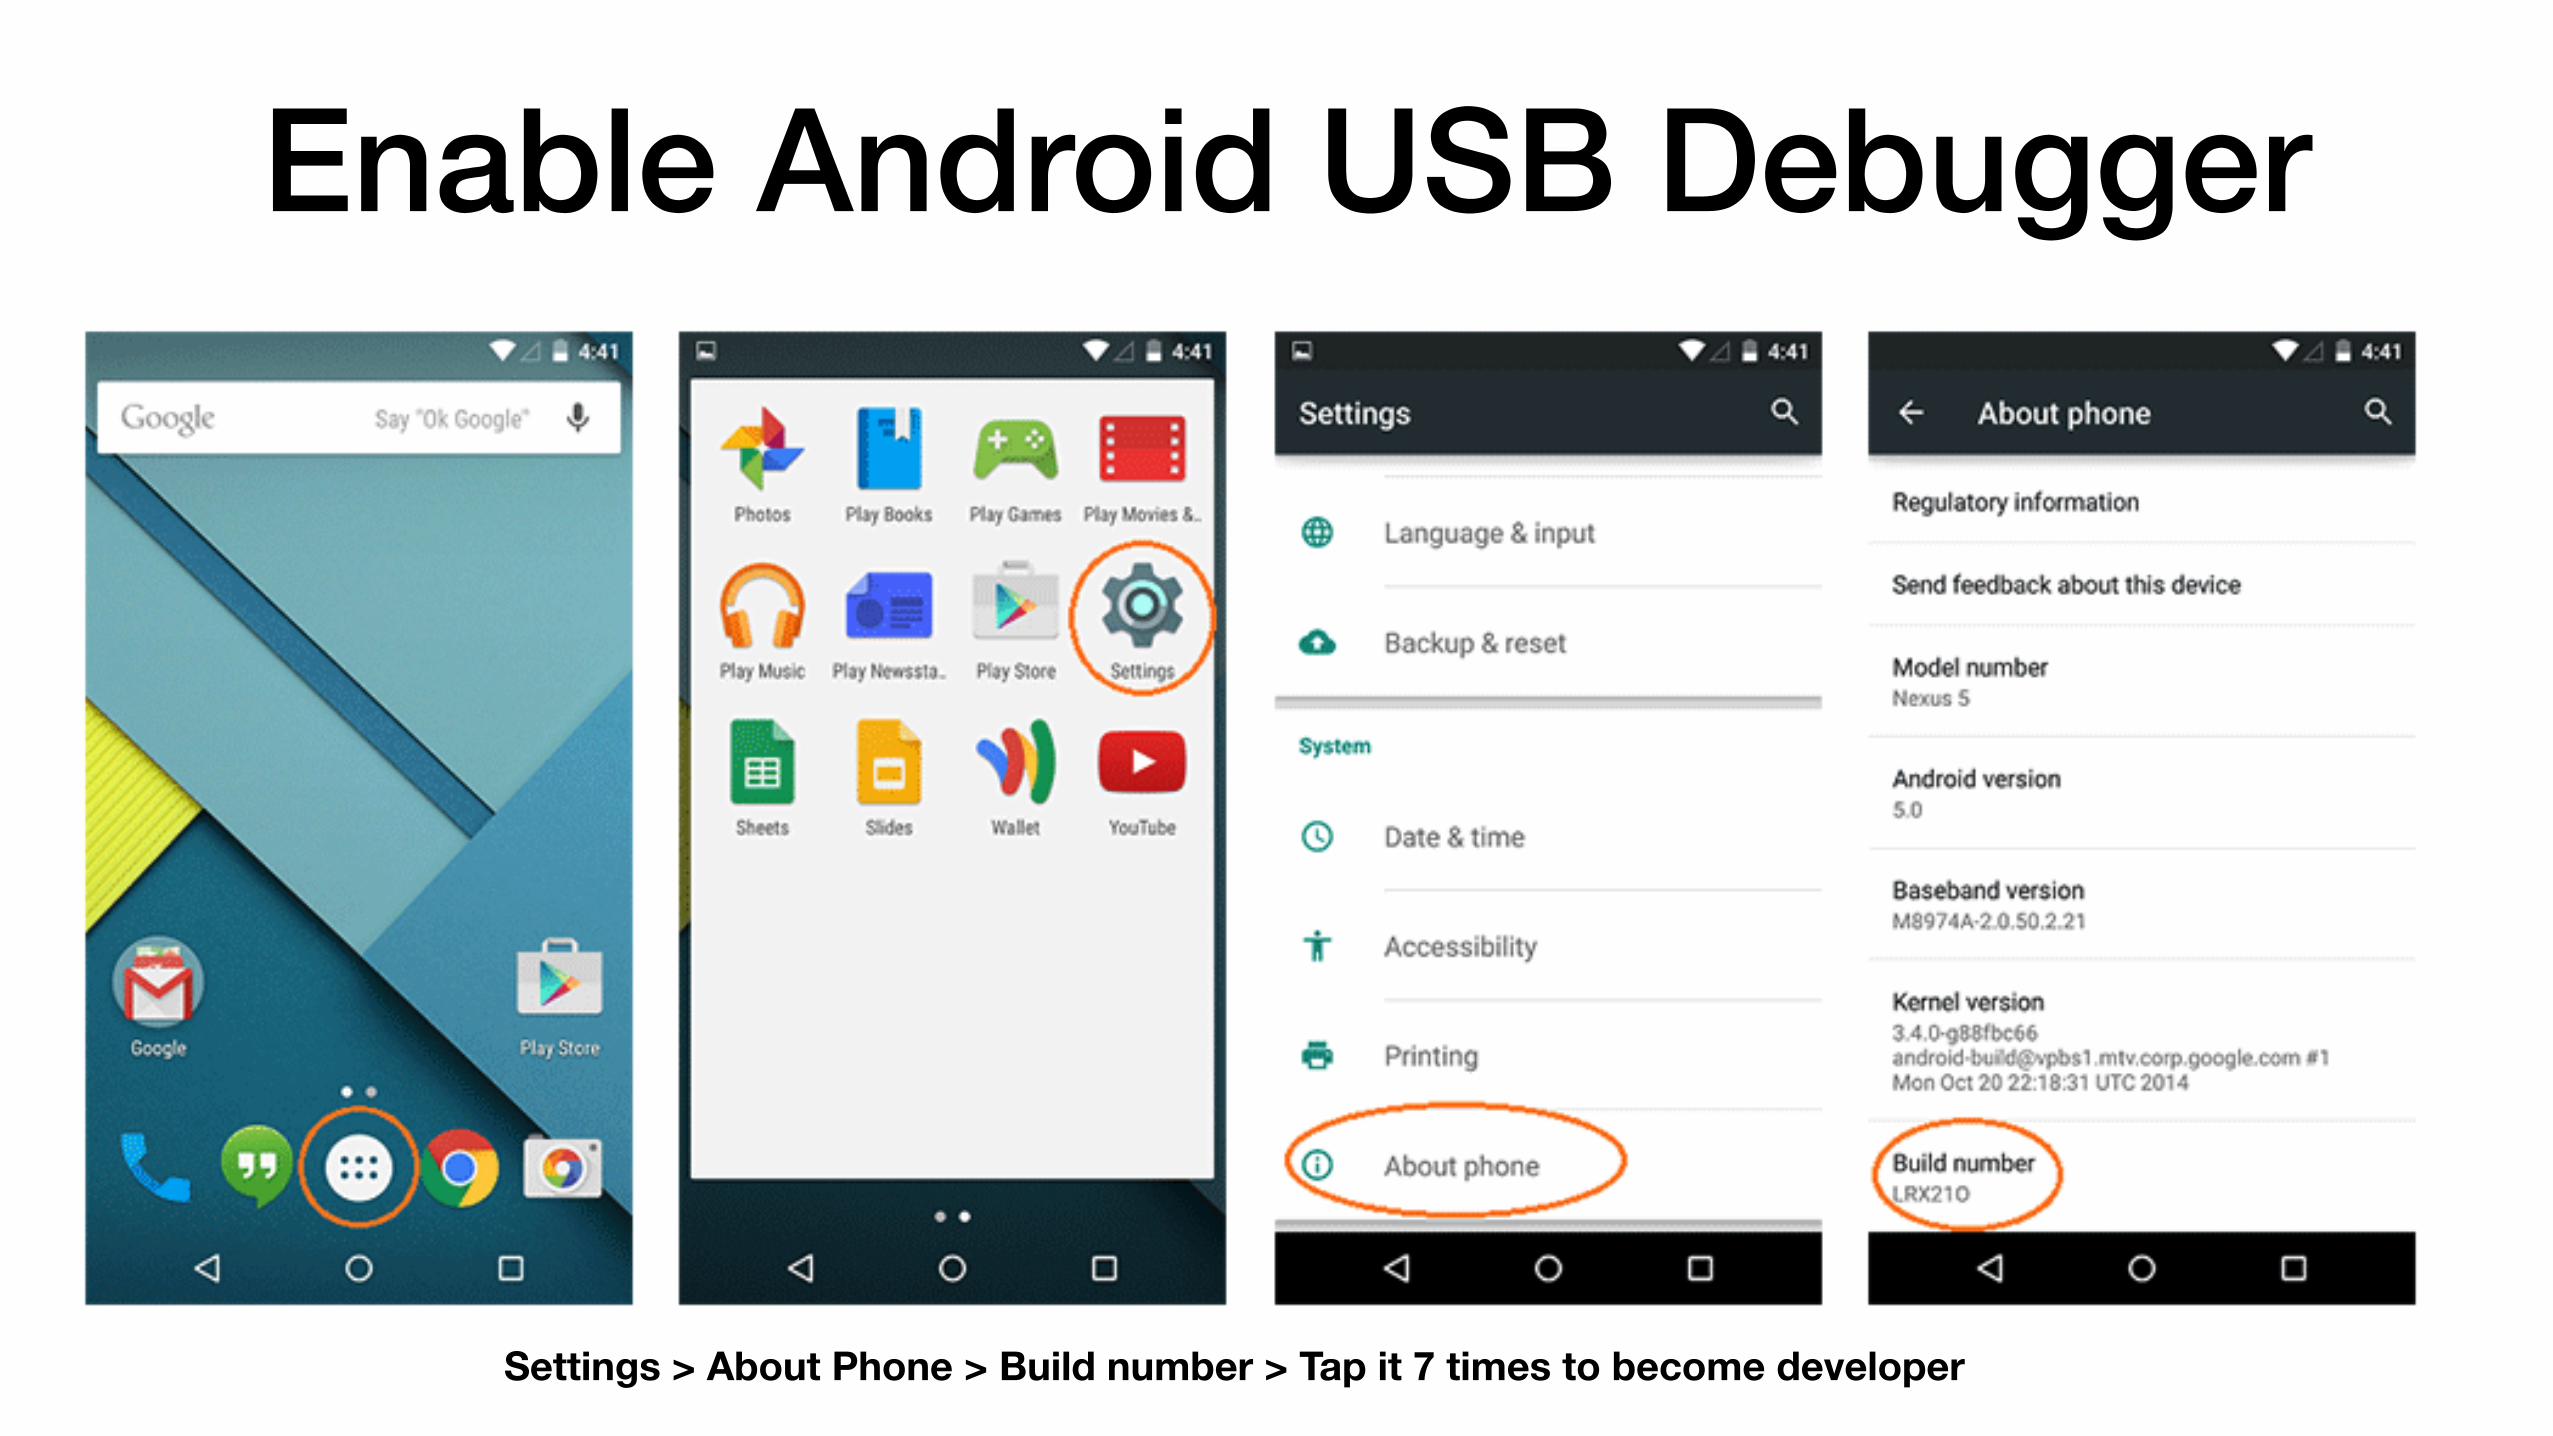
Enable Android USB Debugger
Settings > About Phone > Build number > Tap it 7 times to become developer

Enable Android USB Debugger #2
Settings > Developer Options > USB Debugging

Install Unity Android Build Support
1. Open File > Build Settings > AndroidClick on "Open Download Page"
2. It will download the package.
3. Follow the install instruction. After completed, Restart the unity again.

4. Plug in the Android phone to machine via USB cable.Press "Player Settings..."
5. Look at the right, At the Other Settings > Identification,Make change the Package Name to
com.Kobkrit.BasketBall
Change Target API Level to Android 7.1Minimum API Level to Android 6.0

6. Select Android Change Build System -> Gradle (New)
Enable Development BuildPress Build And Run
7. Save the Android Project to any location you like.
8. It will take a while..


![[IxD] Studio 02. Cardboard+Unity Workshop Part II](https://static.fdocuments.net/doc/165x107/58781e8f1a28aba12d8b6097/ixd-studio-02-cardboardunity-workshop-part-ii.jpg)