Unity Game Development Cookbook - Shroff Publishers
34
Paris Buttfield-Addison, Jon Manning & Tim Nugent Unity Game Development Cookbook Essentials for Every Game For Sale in the Indian Subcontinent & Select Countries Only* *Refer Back Cover G r a y s c a l e E d i t i o n
Transcript of Unity Game Development Cookbook - Shroff Publishers

Buttfield-Addison, M
anning & N
ugentU
nity Ga
me D
evelopm
ent C
ookbook
“Want to understand Unity? The Unity Game Development Cookbook is concise, easily understood, and filled with delicious morsels of game-making truth.”
—Liam EslerGame developer for Baldur’s Gate II: Enhanced Edition, Icewind Dale:
Enhanced Edition, and Pillars of Eternity
“Unity Game Development Cookbook is an invaluable resource for Unity developers. Jon, Tim, and Paris leverage their considerable experience to present easy to follow solutions for a wide range of problems. Whether you’re a complete beginner or an experienced developer, there’s something in here for everyone.”
—Tom BrophyLead Programmer, Mountains
(Creators of Florence)
Unity Game Development CookbookDiscover how to use the Unity game engine to its full potential for both 3D and 2D game development—from the basics of scripting to useful tricks in gameplay, behavior, and animation. With this problem-solving cookbook, you’ll get started in two ways:
First, you’ll learn about the Unity game engine through brief recipes that teach specific features of the software and scripting systems.
Second, you’ll apply a collection of snippets to address common gameplay scenarios, such as properly keeping score.
Using our cookbook format, we pinpoint the problem, set out the solution, and discuss how to solve your problem in the best and most straightforward way possible. This book is ideal for beginning to intermediate Unity developers.
You’ll find solutions for:• 2D and 3D graphics• Math, physics, and
character control• Animation and
movement
• Behavior and AI• Sound and music• Input and gameplay• Scripting and user
interface
Dr. Paris Buttfield-Addison is a game designer, computing researcher, and legal nerd, and the cofounder of game development studio Secret Lab.
Dr. Jon Manning is a software engineering expert in Swift, C#, and Objective-C. As cofounder of Secret Lab, he created the popular Yarn Spinner framework and helped on the BAFTA-winning game Night in the Woods.
Dr. Tim Nugent is a mobile app developer, game designer, and computing researcher.
DEVELOPMENT / MOBILE
Paris Buttfield-Addison, Jon Manning & Tim Nugent
Unity Game Development CookbookEssentials for Every Game
Twitter: @oreillymediafacebook.com/oreilly
For sale in the Indian Subcontinent (India, Pakistan, Bangladesh, Nepal, Sri Lanka, Bhutan, Maldives) and African Continent (excluding Morocco, Algeria, Tunisia, Libya, Egypt, and the Republic of South Africa) only. Illegal for sale outside of these countries.
SHROFF PUBLISHERS & DISTRIBUTORS PVT. LTD.
MRP: ` 1,375.00
ISBN : 978-93-5213-818-0
First Edition/2019/Paperback/English
For Sale in the Indian
Subcontinent & Select Countries
Only**Refer Back Cover
Grayscale Edition
Paris Buttfield-Addison, Jon Manning,and Tim Nugent
Unity Game DevelopmentCookbook
Essentials for Every Game
BeijingBeijing BostonBoston FarnhamFarnham SebastopolSebastopol TokyoTokyo
SHROFF PUBLISHERS & DISTRIBUTORS PVT. LTD.Mumbai Bangalore Kolkata New Delhi

For sale in the Indian Subcontinent (India, Pakistan, Bangladesh, Sri Lanka, Nepal, Bhutan, Maldives) and African Continent (excluding Morocco, Algeria, Tunisia, Libya,
Egypt, and the Republic of South Africa) only. Illegal for sale outside of these countries.
Authorized reprint of the original work published by O’Reilly Media, Inc. All rights reserved. No part of the material protected by this copyright notice may be reproduced or utilized in any form or by any means, electronic or mechanical, including photocopying, recording, or by any information storage and retrieval system, nor exported to any countries other than ones mentioned above without the written permission of the copyright owner.
Published by Shroff Publishers & Distributors Pvt. Ltd. B-103, Railway Commercial Complex, Sector 3, Sanpada (E), Navi Mumbai 400705 • TEL: (91 22) 4158 4158 • FAX: (91 22) 4158 4141 E - m a i l : s p d o r d e r s @ s h r o f f p u b l i s h e r s . c o m • W e b : w w w. s h r o f f p u b l i s h e r s . c o m CIN : U22200MH1992PTC067760 Printed at Jasmine Art Printers Pvt. Ltd., Navi Mumbai.
Unity Game Development Cookbookby Paris Buttfield-Addison, Jon Manning, and Tim Nugent
Copyright © 2019 Secret Lab. All rights reserved. ISBN: 978-1-491-99915-8 Originally printed in the United States of America.
Published by O’Reilly Media, Inc., 1005 Gravenstein Highway North, Sebastopol, CA 95472.
O’Reilly books may be purchased for educational, business, or sales promotional use. Online editions are also available for most titles (http://safari.oreilly.com). For more information, contact our corporate/insti-tutional sales department: (800) 998-9938 or [email protected].
Acquisition Editor: Rachel Roumeliotis Indexer: Judy McConvilleEditor: Jeff Bleiel Interior Designer: David FutatoProduction Editor: Deborah Baker Cover Designer: Karen MontgomeryCopyeditor: Rachel Monaghan Illustrator: Rebecca DemarestProofreader: Kim Cofer
Printing History:March 2019: First Edition
Revision History for the First Edition: 2019-03-12: First Release
See http://oreilly.com/catalog/errata.csp?isbn=9781491999158 for release details.
First Indian Reprint: April 2019
ISBN: 978-93-5213-818-0
The O’Reilly logo is a registered trademark of O’Reilly Media, Inc. Unity Game Development Cookbook, the cover image, and related trade dress are trademarks of O’Reilly Media, Inc.
While the publisher and the authors have used good faith efforts to ensure that the information and instructions contained in this work are accurate, the publisher and the authors disclaim all responsibility for errors or omissions, including without limitation responsibility for damages resulting from the use of or reliance on this work. Use of the information and instructions contained in this work is at your own risk. If any code samples or other technology this work contains or describes is subject to open source licenses or the intellectual property rights of others, it is your responsibility to ensure that your use thereof complies with such licenses and/or rights.

Table of Contents
Preface. . . . . . . . . . . . . . . . . . . . . . . . . . . . . . . . . . . . . . . . . . . . . . . . . . . . . . . . . . . . . . . . . . . . . . . vii
1. Working with Unity. . . . . . . . . . . . . . . . . . . . . . . . . . . . . . . . . . . . . . . . . . . . . . . . . . . . . . . . . . 11.1 Getting Around in Unity 11.2 Working with Game Objects 101.3 Working with Components 111.4 Working with Prefabs 151.5 Working with Scenes 161.6 Managing Assets 171.7 Building Unity Projects 181.8 Accessing Preferences 19
2. Scripting. . . . . . . . . . . . . . . . . . . . . . . . . . . . . . . . . . . . . . . . . . . . . . . . . . . . . . . . . . . . . . . . . . 212.1 Working with MonoBehaviours 212.2 Using Callbacks 262.3 Creating Frame Rate–Independent Behavior 282.4 Accessing Components 292.5 Finding Objects 312.6 Using Coroutines 322.7 Singletons 352.8 Loading a Level (Scene) 382.9 Storing Data on Disk 422.10 Saving and Loading the Game State 422.11 Managing Objects Using an Object Pool 582.12 Storing Data in Assets Using ScriptableObject 66
3. Input. . . . . . . . . . . . . . . . . . . . . . . . . . . . . . . . . . . . . . . . . . . . . . . . . . . . . . . . . . . . . . . . . . . . . 693.1 Working with Keyboard Input 69
iii

3.2 Working with Mouse Input 703.3 Locking and Hiding the Mouse Cursor 713.4 Working with Gamepads 723.5 Customizing Unity’s Input System 743.6 Responding to Pointer Events from the Event System 78
4. Math. . . . . . . . . . . . . . . . . . . . . . . . . . . . . . . . . . . . . . . . . . . . . . . . . . . . . . . . . . . . . . . . . . . . . 834.1 Storing Coordinates of Varying Dimensions Using Vectors 844.2 Rotating in 3D Space 894.3 Performing Transformations in 3D Space with Matrices 914.4 Working with Angles 954.5 Finding the Distance to a Target 974.6 Finding the Angle to a Target 98
5. 2D Graphics. . . . . . . . . . . . . . . . . . . . . . . . . . . . . . . . . . . . . . . . . . . . . . . . . . . . . . . . . . . . . . . 1015.1 Importing Sprites 1015.2 Adding a Sprite to the Scene 1035.3 Creating a Sprite Animation 1045.4 Creating a Sprite with 2D Physics 1055.5 Customizing Sprite Collision Shapes 1055.6 Using a Composite Collider 1085.7 Using the Sprite Packer 1105.8 Applying Forces to 2D Objects 1105.9 Creating a Conveyor Belt 1125.10 Using a Custom Material for Sprites 1145.11 Managing Sprite Sorting 1165.12 Using Sorting Groups 1175.13 Creating a 2.5D Scene 119
6. 3D Graphics. . . . . . . . . . . . . . . . . . . . . . . . . . . . . . . . . . . . . . . . . . . . . . . . . . . . . . . . . . . . . . . 1216.1 Creating a Simple Material 1216.2 Controlling a Material’s Property Through a Script 1236.3 Creating an Unlit Material 1256.4 Setting Up a Material Using Textures 1256.5 Making a Material Use a Shader 1286.6 Setting Up a Bloom Effect Using Post-Processing 1286.7 Using High-Dynamic-Range Colors 1336.8 Setting Up a Project to Use a Scriptable Render Pipeline 1366.9 Creating a Shader Using the Shader Graph 1386.10 Creating a Glowing Effect Using the Shader Graph 1406.11 Exposing Properties from a Shader Graph 1426.12 Animating a Shader over Time 144
iv | Table of Contents

6.13 Controlling the Speed of an Animated Shader 1466.14 Using a Subgraph to Reuse Graph Components 1476.15 Implementing a Dissolve Effect Using a Shader Graph 1496.16 Using Baked Lighting and Real-Time Lighting 1526.17 Using Baked Emission Sources 1546.18 Making Static Objects Cast Shadows on Dynamic Objects 1556.19 Using Light Probes to Influence Lighting 1566.20 Using Reflection Probes 1596.21 Faking a Dynamic Emissive Object 1636.22 Loading Textures from Disk 1646.23 Rendering to a Texture 1666.24 Saving Screenshots 169
7. Physics and Character Control. . . . . . . . . . . . . . . . . . . . . . . . . . . . . . . . . . . . . . . . . . . . . . . 1717.1 Understanding FixedUpdate 1717.2 Implementing Mouselook 1727.3 Controlling a 3D Character 1757.4 Interacting with Switches and Objects 1787.5 Picking Up and Putting Down Objects 1817.6 Detecting When an Object Is Touching Another Object 1877.7 Detecting When an Object Is in a Trigger Area 1887.8 Implementing Moving Platforms 1907.9 Implementing Platform Riding 1937.10 Responding to Being Pushed by Objects 197
8. Animation and Movement. . . . . . . . . . . . . . . . . . . . . . . . . . . . . . . . . . . . . . . . . . . . . . . . . . 2018.1 Animating an Object 2028.2 Basic Character Movement 2068.3 Inverse Kinematics 2118.4 Masked Movement 2158.5 Blended Movement 2208.6 Navigation and Animating in Sync 2248.7 Cinematic Camera Tracking 2288.8 Automatically Switching Cameras 2318.9 Keeping Multiple Objects in View 2328.10 Dollying a Camera 233
9. Gameplay. . . . . . . . . . . . . . . . . . . . . . . . . . . . . . . . . . . . . . . . . . . . . . . . . . . . . . . . . . . . . . . . 2379.1 Managing Quests 2379.2 Managing Hitpoints 2539.3 Creating a Top-Down Camera 2569.4 Dragging a Box to Select Objects 259
Table of Contents | v

9.5 Creating a Menu Structure 2639.6 Creating a Wheeled Vehicle 2679.7 Keeping a Car from Tipping Over 2719.8 Creating Speed Boosts 2729.9 Creating a Camera That Orbits Around Its Target 2749.10 Creating Orbiting Cameras That Won’t Clip Through Walls 2779.11 Detecting When the Player Has Completed a Lap 278
10. Behavior and AI. . . . . . . . . . . . . . . . . . . . . . . . . . . . . . . . . . . . . . . . . . . . . . . . . . . . . . . . . . . 28910.1 Defining a Path That AI Entities and the Player Can Follow 28910.2 Letting Entities in Your Game Follow a Path 29110.3 Enemies Detecting When They Can See the Player 29310.4 Finding a Good Distribution of Random Points (Poisson Disc) 29910.5 Enemies Detecting Where They Can Take Cover 30410.6 Building and Using a State Machine 310
11. Sound and Music. . . . . . . . . . . . . . . . . . . . . . . . . . . . . . . . . . . . . . . . . . . . . . . . . . . . . . . . . . 31511.1 Playing Sounds 31511.2 Setting Up a Mixer 31811.3 Using Audio Effects 32011.4 Using Send and Receive Effects 32211.5 Ducking 32511.6 Using Multiple Audio Zones 32611.7 Playing Audio Through Code 32811.8 Using a Sound Manager 329
12. User Interface. . . . . . . . . . . . . . . . . . . . . . . . . . . . . . . . . . . . . . . . . . . . . . . . . . . . . . . . . . . . . 33512.1 Working with UI Controls 33612.2 Theming Controls 34012.3 Animating the UI 34412.4 Creating a List of Items 34712.5 Fading Out List Items 35212.6 Creating Onscreen Position Indicators 35412.7 Custom Editors 35912.8 Property Drawers 36412.9 Attribute Drawers 36912.10 Asset Processing 37212.11 Scripted Importers 37412.12 Wizards 378
Index. . . . . . . . . . . . . . . . . . . . . . . . . . . . . . . . . . . . . . . . . . . . . . . . . . . . . . . . . . . . . . . . . . . . . . . 381
vi | Table of Contents

Preface
Welcome to the Unity Game Development Cookbook! We’re incredibly excited aboutthis book, and really proud of our work on it. We hope you find it a useful compan‐ion to your game development using the Unity engine.
Unity is an amazing platform, and the more you use it the more you’ll come up withnew ideas on how you can use it, why you could use it, and so on! It’s all very exciting.Trust us, we’ve been there.
As Secret Lab, we use Unity to build most of our video games. We’re best known forbuilding children’s games in Australia, as well as our contributions to the BAFTA- andIGF-winning Night in the Woods (http://nightinthewoods.com). We discovered Unitymore than a decade ago, and we haven’t stopped using it since.
In this book, we’ve assembled a selection of recipes to solve common problems thatwe found ourselves solving over and over as we build video games using Unity. Thisbook won’t cover every single tiny thing you want to know about Unity, but it hope‐fully covers the majority of things you’d be doing day-to-day in video game develop‐ment.
These recipes are about things we wish we had someone to ask about back when wewere first building our own games. We really hope they help you!
It’s a really exciting time to be using Unity. The game development world is gettingbigger and more interesting every day, and the tools and technologies we use are bet‐ter than ever.
Go out and build great games!
If you want to get more resources for this book, and our otherbooks, check out our website (http://www.secretlab.com.au).
vii

Resources Used in This BookIf you want to download all our code from the recipes throughout this book, head tohttps://github.com/thesecretlab/unity-game-development-cookbook-1e. We also have adedicated page for this book (http://secretlab.com.au/books/unity-cookbook-1e), wherewe keep both the source code as well as other downloads and resources.
Audience and ApproachThis book assumes that you know a little of the C# programming language, or a simi‐lar language like C++, Java, Go, Swift, Python, or other common languages, but don’tknow anything about Unity. This book is intended to be a companion to get yourgames up and running faster.
If you like our style, and want to read more Unity material from us,you can learn Unity from scratch in Mobile Game Developmentwith Unity, also available from the fine folks at O’Reilly.
Our screenshots are taken with macOS, but everything we talk about is generallyapplicable to Unity on Windows, macOS, or Linux.
Organization of This BookThis book is arranged into 12 chapters:
• Chapter 1 introduces the fundamental concepts you need to know in order to useUnity: game objects, components, scenes, and how to work with the Unity editoritself.
• Chapter 2 covers the scripting interface of Unity, which is the way you write theactual code that defines the way your game works. After we establish the basics,we’ll dive into some practical examples, including how to write a save and loadsystem, how to efficiently work with objects, and how to store your data in a waythat both your code and Unity can work with easily.
• In Chapter 3, you’ll learn how to get input from your user, in the form of key‐board input, the mouse, and from game pads. We’ll also discuss how to set upgame objects that react to input events, like the user clicking on them.
• Chapter 4 covers the fundamentals of some of the mathematical concepts that areuseful to know about when development games, such as vectors, matrices andquaternions. We’ll also look at some practical uses of these concepts, like detect‐ing if an object is in front of the player or not.
viii | Preface

• Chapter 5 discusses the 2D graphics and physics systems that are built in toUnity. You’ll learn how to display sprites, sort them, and make them bounce offeach other.
• Chapter 6 covers the material and shading system of Unity: how materials andshaders work, how to build a shader in Unity, and how to get the best results inyour scenes.
• In Chapter 7, you’ll learn how to make the 3D physics system of Unity do whatyou need it to in order to support common gameplay tasks, like picking up andthrowing objects, and creating a moving platform that the player can ride on.
• Chapter 8 introduces the animation system used in Unity, and covers topics likehow to set up a character to blend between different animation states, and how tointegrate player movement with character animation. We’ll also introduce thecamera system in Unity, and discuss how to set up cameras that move to followtargets.
• Chapter 9 is all about creating the gameplay that players interact with. There’s awide range of common gameplay tasks in here, like managing the state of a questthat you’ve given the player, tracking if a racing car is taking too much of a short‐cut, and managing how damage gets dealt between objects in your game.
• In Chapter 10, you’ll learn how to add brains to your characters, including theability to detect when the player can be seen, the ability to navigate a space andavoid obstacles, and the ability to figure out a place where they can’t be seen.
• Chapter 11 introduces the audio systems in Unity. We’ll cover the basics of play‐ing sounds, and then move on to more advanced features, like routing audio tomultiple groups, and automatically ducking the music when a character is speak‐ing.
• Chapter 12, our final chapter, covers the tools for building an interface for yourplayers to look at and interact with. We’ll cap the whole book off with a sectionon how to build your own tools in Unity, by extending the editor.
Conventions Used in This BookThe following typographical conventions are used in this book:
ItalicIndicates new terms, URLs, email addresses, filenames, and file extensions.
Constant width
Used for program listings, as well as within paragraphs to refer to program ele‐ments such as variable or function names, databases, data types, environmentvariables, statements, and keywords.
Preface | ix

Constant width bold
Shows commands or other text that should be typed literally by the user.
Constant width italic
Shows text that should be replaced with user-supplied values or by values deter‐mined by context.
This element signifies a tip or suggestion.
This element signifies a general note.
This element indicates a warning or caution.
Using Code ExamplesSupplemental material (code examples, exercises, errata, etc.) is available for down‐load from our website (https://www.secretlab.com.au/books/unity-cookbook-1e).
This book is here to help you get your job done. In general, if example code is offeredwith this book, you may use it in your programs and documentation. You do notneed to contact us for permission unless you’re reproducing a significant portion ofthe code. For example, writing a program that uses several chunks of code from thisbook does not require permission. Selling or distributing a CD-ROM of examplesfrom O’Reilly books does require permission. Answering a question by citing thisbook and quoting example code does not require permission. Incorporating a signifi‐cant amount of example code from this book into your product’s documentation doesrequire permission.
We appreciate, but do not require, attribution. An attribution usually includes thetitle, author, publisher, and ISBN. For example: “Unity Game Development Cookbookby Paris Buttfield-Addison, Jon Manning, and Tim Nugent (O’Reilly). Copyright 2019Secret Lab, 978-1-491-99915-8.”
If you feel your use of code examples falls outside fair use or the permission givenabove, feel free to contact us at [email protected].
x | Preface

O’Reilly Online Learning PlatformFor almost 40 years, O’Reilly Media has provided technologyand business training, knowledge, and insight to help compa‐nies succeed.
Our unique network of experts and innovators share their knowledge and expertisethrough books, articles, conferences, and our online learning platform. O’Reilly’sonline learning platform gives you on-demand access to live training courses, in-depth learning paths, interactive coding environments, and a vast collection of textand video from O’Reilly and 200+ other publishers. For more information, pleasevisit http://oreilly.com.
How to Contact UsPlease address comments and questions concerning this book to the publisher:
O’Reilly Media, Inc.1005 Gravenstein Highway NorthSebastopol, CA 95472800-998-9938 (in the United States or Canada)707-829-0515 (international or local)707-829-0104 (fax)
We have a web page for this book, where we list errata, examples, and any additionalinformation. You can access this page at http://bit.ly/unity-game-dev-cb.
To comment or ask technical questions about this book, send email to bookques‐[email protected].
For more information about our books, courses, conferences, and news, see our web‐site at http://www.oreilly.com.
Find us on Facebook: http://facebook.com/oreilly
Follow us on Twitter: http://twitter.com/oreillymedia
Watch us on YouTube: http://www.youtube.com/oreillymedia
AcknowledgmentsJon thanks his mother, father, and the rest of his crazily extended family for their tre‐mendous support.
Preface | xi

Paris thanks his amazing mother, without whom he wouldn’t be doing much of any‐thing at all really, let alone with enthuasiam. She’s about to submit her doctorate forassessment, and he’s sure she will be absolutely amazing at it.
Tim thanks his parents and family for putting up with his rather lackluster approachto life.
We’d all like to thank Rachel Roumeliotis, whose skill and advice were invaluable incompleting this book, as well as every other book we’ve written together. We thor‐oughly look forward to our coffee catchups every few months/year or so!
Thank you to our editor on this book, Jeff Bleiel. You were calm, clear, enthusiastic,and wonderful to work with. We hope to work on more books with you in the future!
Likewise, all the O’Reilly Media staff we’ve interacted with over the course of writingthe book have been the absolute gurus of their fields. O’Reilly Media has a vast arrayof incredibly talented people on staff, on contract, and generally surrounding them.It’s actually terrifying how good they are at their jobs.
A huge thank you to Tony Gray and the Apple University Consortium (AUC) for themonumental boost they gave us and others listed on this page. We wouldn’t be writ‐ing this book if it weren’t for them. And now you’re writing books, too, Tony—sorryabout that!
Thanks also to Neal Goldstein, who deserves full credit and/or blame for getting usinto the whole book-writing racket. We’re thankful for the support of the goons atMacLab (who know who they are and continue to stand watch for Admiral Dolphin’sinevitable apotheosis), as well as Professor Christopher Lueg, Associate ProfessorLeonie Ellis, and the staff at the University of Tasmania for putting up with us.
Thanks also to Mars G. for generally being amazing, as well as Dave J. for serving thecoffee. If you ever visit Hobart, Tasmania, Australia, make sure you get a coffee at Yel‐low Bernard. It’s the best.
Thanks also to our tech reviewers for their thoroughness and professionalism. Thereviews were brilliantly helpful.
Finally, thank you very much for buying our book—we appreciate it! And if you haveany feedback, please let us know. You can email us at [email protected] and find uson Twitter at @thesecretlab (https://twitter.com/thesecretlab).
xii | Preface

CHAPTER 1
Working with Unity
To make things in Unity, it’s important to understand how Unity works and how towork with it as a piece of software. In this chapter, we’ll take a tour through the inter‐face and features of Unity, so that you’ll be ready to start building things in the editor.
If you’re new to Unity, we recommend reading all the recipes inthis chapter, as well as in Chapter 2, before trying other recipes inthis book.
This chapter also introduces you to many of the terms used in the Unity ecosystem,which will help you make sense of the rest of this book.
1.1 Getting Around in UnityProblemYou want to learn how to navigate the Unity editor, and understand what each com‐ponent does, how to use it, and how to customize it.
SolutionUnity’s user interface is organized along windows of content. Each different view cando different things. In this recipe, we’ll present some of the most important ones andtalk about how to arrange the editor to suit your needs.
When you launch Unity and create a new project, you’ll be taken to the editor’s mainwindow (Figure 1-1).
1
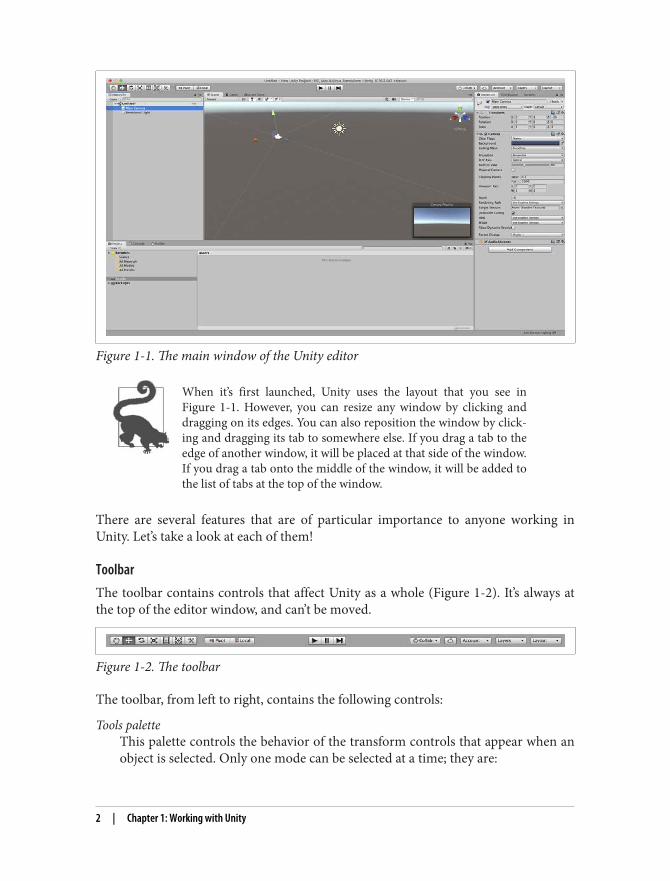
Figure 1-1. The main window of the Unity editor
When it’s first launched, Unity uses the layout that you see inFigure 1-1. However, you can resize any window by clicking anddragging on its edges. You can also reposition the window by click‐ing and dragging its tab to somewhere else. If you drag a tab to theedge of another window, it will be placed at that side of the window.If you drag a tab onto the middle of the window, it will be added tothe list of tabs at the top of the window.
There are several features that are of particular importance to anyone working inUnity. Let’s take a look at each of them!
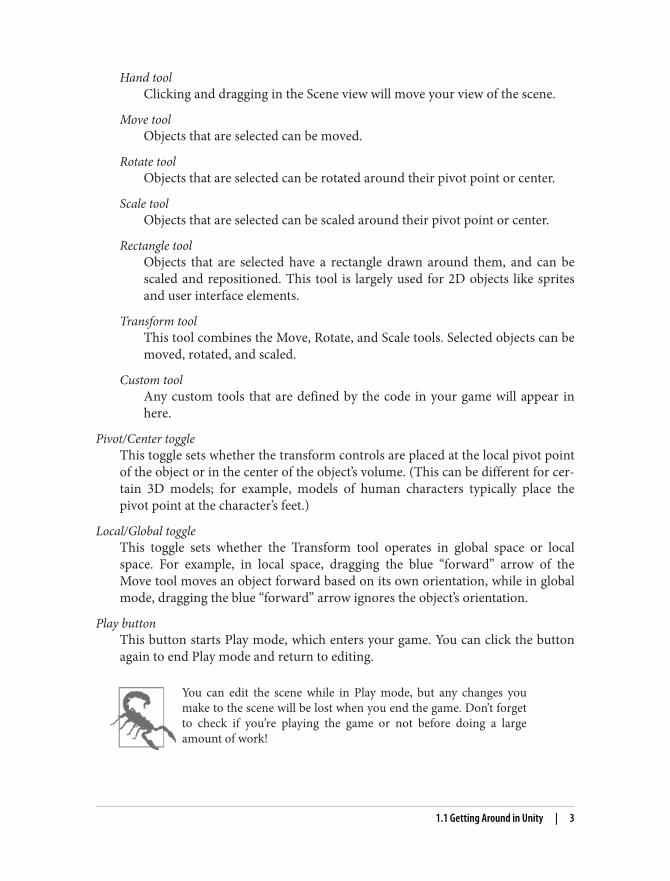
ToolbarThe toolbar contains controls that affect Unity as a whole (Figure 1-2). It’s always atthe top of the editor window, and can’t be moved.
Figure 1-2. The toolbar
The toolbar, from left to right, contains the following controls:
Tools paletteThis palette controls the behavior of the transform controls that appear when anobject is selected. Only one mode can be selected at a time; they are:
2 | Chapter 1: Working with Unity
Hand toolClicking and dragging in the Scene view will move your view of the scene.
Move toolObjects that are selected can be moved.
Rotate toolObjects that are selected can be rotated around their pivot point or center.
Scale toolObjects that are selected can be scaled around their pivot point or center.
Rectangle toolObjects that are selected have a rectangle drawn around them, and can bescaled and repositioned. This tool is largely used for 2D objects like spritesand user interface elements.
Transform toolThis tool combines the Move, Rotate, and Scale tools. Selected objects can bemoved, rotated, and scaled.
Custom toolAny custom tools that are defined by the code in your game will appear inhere.
Pivot/Center toggleThis toggle sets whether the transform controls are placed at the local pivot pointof the object or in the center of the object’s volume. (This can be different for cer‐tain 3D models; for example, models of human characters typically place thepivot point at the character’s feet.)
Local/Global toggleThis toggle sets whether the Transform tool operates in global space or localspace. For example, in local space, dragging the blue “forward” arrow of theMove tool moves an object forward based on its own orientation, while in globalmode, dragging the blue “forward” arrow ignores the object’s orientation.
Play buttonThis button starts Play mode, which enters your game. You can click the buttonagain to end Play mode and return to editing.
You can edit the scene while in Play mode, but any changes youmake to the scene will be lost when you end the game. Don’t forgetto check if you’re playing the game or not before doing a largeamount of work!
1.1 Getting Around in Unity | 3
Pause buttonThis button pauses the game. If you’re in Play mode, the game will pause imme‐diately. If you’re not in Play mode, you can still click this button; if you then clickthe Play button, the game will pause immediately after the first frame.
Step buttonThis button advances one frame, while keeping the game paused.
To be more specific, stepping forward “one frame” means thatUnity will advance the game’s clock by the fixed timestep and thenre-render the game. By default, the fixed timestep is 0.02 seconds;you can configure this in the project’s Time settings (from the Editmenu, choose Project Settings → Time).
Collab menuThis menu provides controls for working with Unity Collaborate, Unity’s versioncontrol service.
Unity Collaborate is outside the scope of this book, but the Unitymanual (https://bit.ly/2GMVmDv) provides a good introduction.
Services buttonThis button opens the Services view, which allows you to work with Unity’s web-based services like Cloud Build, Unity Analytics, and more. For more informa‐tion, see Unity’s Services page (https://unity3d.com/services).
Account buttonThis button allows you to configure your Unity account.
Layers buttonWith this button you can choose which layers are currently visible or selectable.
Layout buttonThis button allows you to save and restore a predefined layout of windows. Thisis useful when you have a layout that works well for tasks like animation, or levellayout, and you want to switch between different tasks without having to fiddlewith precise window placement.
SceneThe Scene view allows you to view, select, and modify the objects in a scene(Figure 1-3). In the Scene view, you can left-click on any object to select it; when an
4 | Chapter 1: Working with Unity
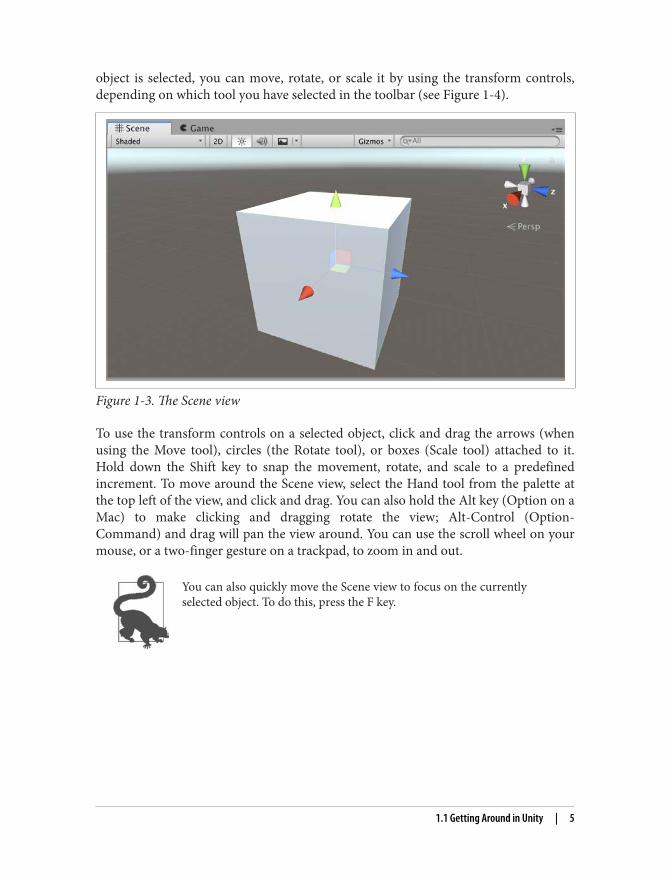
object is selected, you can move, rotate, or scale it by using the transform controls,depending on which tool you have selected in the toolbar (see Figure 1-4).
Figure 1-3. The Scene view
To use the transform controls on a selected object, click and drag the arrows (whenusing the Move tool), circles (the Rotate tool), or boxes (Scale tool) attached to it.Hold down the Shift key to snap the movement, rotate, and scale to a predefinedincrement. To move around the Scene view, select the Hand tool from the palette atthe top left of the view, and click and drag. You can also hold the Alt key (Option on aMac) to make clicking and dragging rotate the view; Alt-Control (Option-Command) and drag will pan the view around. You can use the scroll wheel on yourmouse, or a two-finger gesture on a trackpad, to zoom in and out.
You can also quickly move the Scene view to focus on the currentlyselected object. To do this, press the F key.
1.1 Getting Around in Unity | 5
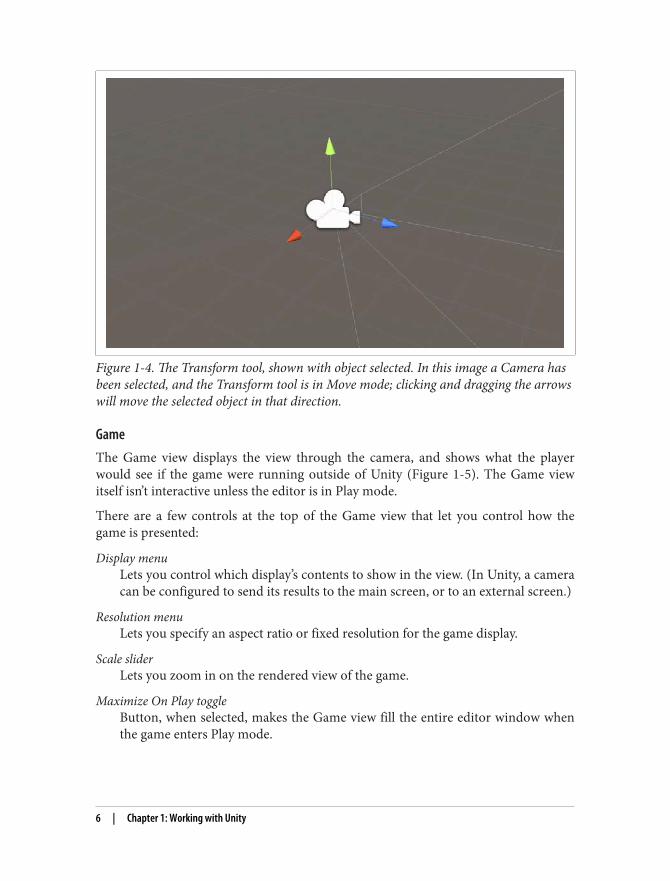
Figure 1-4. The Transform tool, shown with object selected. In this image a Camera hasbeen selected, and the Transform tool is in Move mode; clicking and dragging the arrowswill move the selected object in that direction.
GameThe Game view displays the view through the camera, and shows what the playerwould see if the game were running outside of Unity (Figure 1-5). The Game viewitself isn’t interactive unless the editor is in Play mode.
There are a few controls at the top of the Game view that let you control how thegame is presented:
Display menuLets you control which display’s contents to show in the view. (In Unity, a cameracan be configured to send its results to the main screen, or to an external screen.)
Resolution menuLets you specify an aspect ratio or fixed resolution for the game display.
Scale sliderLets you zoom in on the rendered view of the game.
Maximize On Play toggleButton, when selected, makes the Game view fill the entire editor window whenthe game enters Play mode.
6 | Chapter 1: Working with Unity

Figure 1-5. The Game view
Mute Audio toggleButton disables all audio playback from the game. (This is useful when you don’twant the game’s audio to play over the top of your music while you’re working,for example.)
Stats toggleButton controls whether performance statistics will be displayed in an overlaypanel.
Gizmos buttonLets you control whether the gizmos—icons that represent certain objects in thescene, like cameras—appear in the Game view, like they do in Scene view.
InspectorThe Inspector shows information about the objects currently selected (Figure 1-6).From here, you can control every component attached to the game object.
1.1 Getting Around in Unity | 7

Figure 1-6. The Inspector
8 | Chapter 1: Working with Unity
Components are a huge part of how Unity works, which meanswe’ll discuss them in Recipe 1.3, instead of here.
At the top of the Inspector, you can set the name of the currently selected object. Youcan also set an icon for the object by clicking the icon to the left of the object’s nameand choosing a symbol to use. This is useful for game objects that are invisible.
By default, the Inspector will change its contents when the current selection changes.If you don’t want it to do this, you can click the Lock icon at the top-right corner ofthe Inspector, and it will stay on the object that it’s currently displaying.
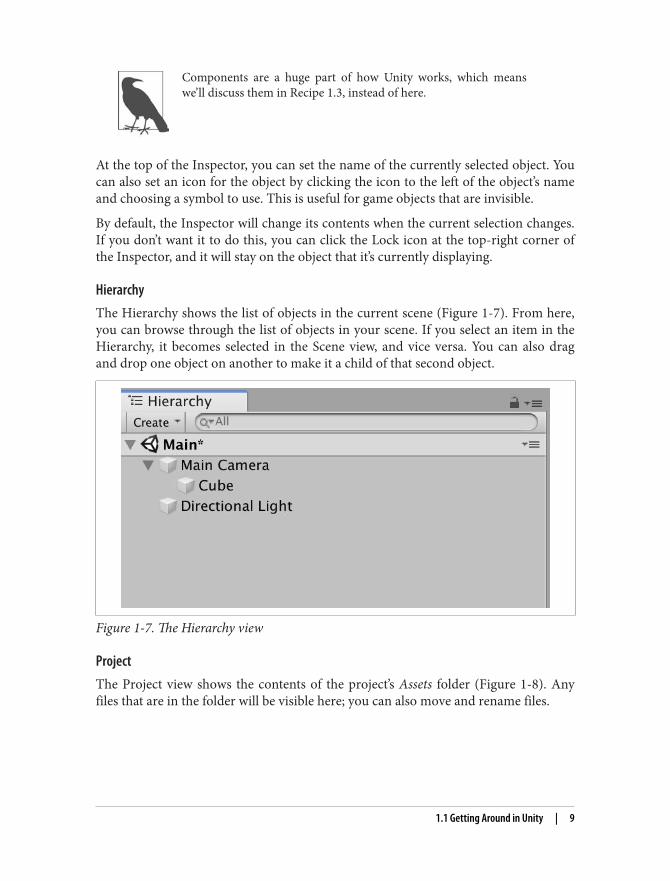
HierarchyThe Hierarchy shows the list of objects in the current scene (Figure 1-7). From here,you can browse through the list of objects in your scene. If you select an item in theHierarchy, it becomes selected in the Scene view, and vice versa. You can also dragand drop one object on another to make it a child of that second object.
Figure 1-7. The Hierarchy view
ProjectThe Project view shows the contents of the project’s Assets folder (Figure 1-8). Anyfiles that are in the folder will be visible here; you can also move and rename files.
1.1 Getting Around in Unity | 9
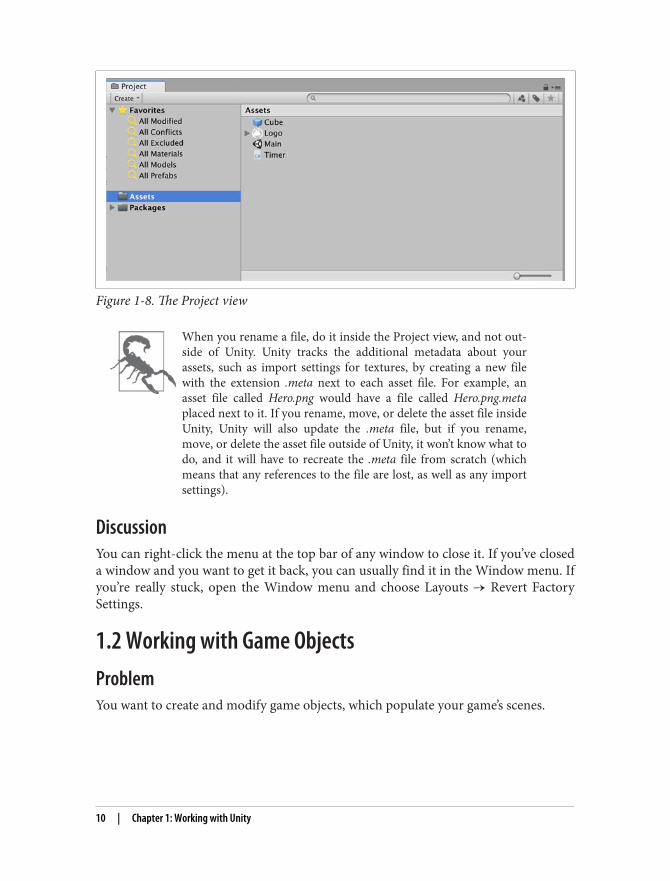
Figure 1-8. The Project view
When you rename a file, do it inside the Project view, and not out‐side of Unity. Unity tracks the additional metadata about yourassets, such as import settings for textures, by creating a new filewith the extension .meta next to each asset file. For example, anasset file called Hero.png would have a file called Hero.png.metaplaced next to it. If you rename, move, or delete the asset file insideUnity, Unity will also update the .meta file, but if you rename,move, or delete the asset file outside of Unity, it won’t know what todo, and it will have to recreate the .meta file from scratch (whichmeans that any references to the file are lost, as well as any importsettings).
DiscussionYou can right-click the menu at the top bar of any window to close it. If you’ve closeda window and you want to get it back, you can usually find it in the Window menu. Ifyou’re really stuck, open the Window menu and choose Layouts → Revert FactorySettings.
1.2 Working with Game ObjectsProblemYou want to create and modify game objects, which populate your game’s scenes.
10 | Chapter 1: Working with Unity

SolutionTo create a new, empty game object, open the GameObject menu, and choose CreateEmpty. A new, empty game object will be added to the scene. It won’t be visible in thescene, because it won’t have any components that render anything. To learn moreabout components, see Recipe 1.3.
You can also press Command-Shift-N (Control-Shift-N on a PC) tocreate a new, empty game object.
You can rename a game object by selecting it, and changing its name in the Inspector.
Game objects can be the child of other game objects. When a game object moves,rotates, or scales, its children are affected as well. This means that you can create hier‐archies of game objects that work together as a system; for example, a car could haveeach of its four wheels as child objects, which means that they automatically stay inthe correct position as the car moves around. To make one game object the child ofanother, drag and drop it onto another object in the Hierarchy (see “Hierarchy” onpage 9).
You can also reorder an object by dragging and dropping it in the Hierarchy. As ashortcut, you can make an object move to the end of its siblings by pressingCommand-Equals (Control-Equals on a PC), and move to the start of its siblings bypressing Command-Minus (Control-Minus on a PC).
DiscussionYou can also create new game objects by dragging and dropping assets into the Sceneview. For example, if you drag and drop a 3D model asset into the Scene view, Unitywill create a new game object that contains the necessary components for renderingthat model.
As a shortcut, you can quickly create an empty game object as a child of the currentlyselected object by opening the GameObject menu and choosing Create Empty Child.You can also press Option-Shift-N (Alt-Shift-N on a PC).
1.3 Working with ComponentsProblemYou want to add and modify components, which control the appearance and behaviorof your game objects.
1.3 Working with Components | 11

SolutionOn its own, a game object is just an empty container. It’s the components that make agame object actually do anything useful.
To get started in thinking about components, we’ll create a new game object thatcomes with some useful components built in: we’ll add a cube to the scene!
To do this, follow these steps:
1. Open the GameObject menu, and choose 3D Object → Cube. A new cube will beadded to the scene (Figure 1-9).
2. Select the new cube in the Hierarchy or the Scene view. The Inspector will updateto show the list of components attached to it (Figure 1-10).
Figure 1-9. A new cube, freshly added to the scene
12 | Chapter 1: Working with Unity

Figure 1-10. The Inspector for the new cube
1.3 Working with Components | 13

Every game object has at least one component: a Transform. The Transform compo‐nent stores the position, rotation, and scale of an object, and is also responsible forkeeping track of the parent of an object. You can’t remove the Transform component.
On the cube, you’ll find several additional components. Each of them do somethingdifferent:
• The MeshFilter loads a mesh from a file on disk for the MeshRenderer to use.(For the cube object we’re adding in this recipe, the asset is supplied by Unity;most of the game objects in your games will use assets you add to the project.)
• The MeshRenderer draws the mesh on the screen, using a Material asset to deter‐mine its appearance.
• The BoxCollider defines the physical shape of the object in the world.
Components let you configure how they work by exposing properties that are listedin the Inspector. For example, the MeshFilter component has a single property: theMesh that it should be using. This is an example of an object field—it’s a reference toanother object that’s part of your project. In the case of the MeshFilter, the field cantake any Mesh object; these are found in the assets you add to your project. The typeof object that an object field can use is determined by the component; you can’t dropany other kind of object besides a Mesh into this field, for example.
Object fields don’t have to refer to assets—they can also refer toother objects in the scene, too.
To add a component yourself, you can either use the Component menu or click theAdd Component button at the bottom of the Inspector. Both of these options will letyou specify what kind of component you want to add.
DiscussionYou can remove a component by clicking on the Gear icon at the component’s top-right corner, and choosing Remove Component.
To copy a component to another game object, click the Gear icon, and choose CopyComponent. Next, go to the object you want to copy the component to, and click theGear icon on any existing component (if it doesn’t have any, use the Transform tool).Click Paste Component As New, and the component you copied will be pasted.
Scripts (which we discuss in Chapter 2) are components, too, and work in the exactsame way as any other component you might attach to a game object.
14 | Chapter 1: Working with Unity

1.4 Working with PrefabsProblemYou want to store a game object in a file, so that you can reuse multiple copies of it.
SolutionNormally, game objects you add to your scenes are stored entirely within the scene. Ifyou want to define an object ahead of time, and then make multiple copies of it, youcan store it as a prefab. A prefab is an asset that stores a game object; you can instanti‐ate the prefab, which creates a copy of it in your scenes.
To make a prefab, first create the original object in the scene. For example, create anew cube by opening the GameObject menu and choosing 3D Object → Cube. Theobject will appear in both the scene and the Hierarchy.
Next, drag and drop the object from the Hierarchy into the Project view. A new filewill be created (Figure 1-11): this is the prefab! You’ll also notice that the cube’s entryin the Hierarchy view has turned blue, which indicates that it’s an instance of a prefab.You can now safely delete the original cube from the scene.
Figure 1-11. The new prefab, created from the cube
You can create an instance of a prefab by dragging and dropping the prefab into thescene. An instance is a copy of the game object and components stored in the prefab.
Edit a prefab by selecting the file in the Project view, clicking Open Prefab in theInspector, and making changes to it (Figure 1-12).
1.4 Working with Prefabs | 15

Figure 1-12. Editing the cube prefab
When you’re done, click the back arrow button in the Hierarchy. All instances of theprefab across your entire project will be updated to include your changes.
DiscussionInstantiated copies of prefabs are linked to their original; if you make changes to theprefab, the changes you make apply to any instances of it. The reverse is not true bydefault: if you make changes to an instance, they won’t apply to the original. Forexample, if you add an instance of the cube prefab to the scene and modify its Scaleproperty, the changes will apply only to that instance. Additionally, the property thatyou change will be highlighted in bold, and with a blue line, to make it easier to see.
However, if you do want to apply the changes, right-click the property that you’vechanged, and click “Apply to Prefab.” If you want to apply all of your changes, openthe Overrides menu at the top of the Inspector and click Apply All.
From the Overrides menu, you can also see a summary of thechanges you’ve made to an instance.
1.5 Working with ScenesProblemYou want to create and edit scenes, which are the containers for your game’s objects.
16 | Chapter 1: Working with Unity
SolutionWhen you create a new project, Unity will create a new, empty scene for you. Whenyou press Command-S (Control-S on a PC), Unity will save the scene file to disk; ifthis is the first time that the scene has been saved, Unity will ask you where to save it.You can create more scenes by opening the File menu and choosing New Scene; don’tforget to save your new scene to store it on disk.
DiscussionYou can use scenes for a variety of purposes. For example, your main menu can bestored as a scene, as well as each of your game’s levels. During gameplay, you can loadnew scenes via code. We’ll discuss this in Recipe 2.8.
1.6 Managing AssetsProblemYou want to add assets to your project and configure how Unity imports them.
SolutionTo add a file to your project, simply drag and drop it from the Finder (Explorer on aPC) into the Project view. Unity will import it and make it available to your project.
Once Unity has imported it, you can select the file and configure how Unity imports itby looking at the Inspector. Different file formats have different options; for example,you can configure an image to be imported as a sprite, in which case Unity will gener‐ate an additional sprite data asset for use in the sprite system (discussed in Chap‐ter 5), or as one of multiple different types of textures.
DiscussionUnity supports a wide variety of file formats:
• 3D objects (Autodesk FBX, Collada): Unity can also import Maya, Cinema 4D,3ds Max, Cheetah3D, Modo, Lightwave, Blender, and SketchUp files, if the corre‐sponding software is installed.
• (Audio: WAV, MP3, Ogg, AIFF): Unity also supports a variety of tracker moduleformats—specifically, Impulse Tracker (.it), Scream Tracker (.s3m), ExtendedModule File Format (.xm), and Module File Format (.mod).
• 2D textures (Adobe Photoshop, BMP, PNG, JPG, BMP, TGA)• Text (.txt, .json)
1.6 Managing Assets | 17

1.7 Building Unity ProjectsProblemYou want to configure Unity to build your game, so that you can distribute the gameto players.
SolutionTo build your game, open the Build Settings view by opening the File menu andchoosing Build Settings (Figure 1-13).
Figure 1-13. The Build Settings view
When you build your game, you specify which scenes should be included. If youhaven’t already saved your current scene, you should do so now by opening the Filemenu, and choosing Save, or by pressing Command-S (Control-S on a PC). You can
18 | Chapter 1: Working with Unity
drag and drop the scenes you want to include into the Scenes In Build list, or you canclick the Add Open Scenes button to add all scenes that you have open right now.
Next, you need to select which platform you want to build for. Unity supports a widerange of platforms, ranging from desktop PCs to mobile phones to consoles andmore. Only one platform can be selected at a time; the current platform will bemarked with a Unity logo next to it. To build for a different platform, select it andclick the Switch Platform button.
When you’re ready, click the Build button. Unity will ask you where you want to savethe build; once that’s done, Unity will start building.
DiscussionTo build for certain platforms, you need to download the appropriate platform sup‐port module. If you don’t have the necessary module, you won’t be able to build; toget the module, click the platform and click the Open Download Page button. You’llbe taken to the appropriate web page for downloading the module.
Certain platforms, like consoles, require a special license; see theUnity Platform Installation page (https://unity3d.com/platform-installation) for more information.
1.8 Accessing PreferencesProblemYou want to access the settings that control Unity’s behavior, both for the entire appli‐cation and for your current project.
SolutionTo open the per-project settings, open the Edit menu, and choose Project Settings.The Project Settings view will appear (Figure 1-14).
In the Project Settings view you can configure a wide range of possible settings foryour game, including the maximum resolution, build name, graphical quality set‐tings, input, and more.
For settings that affect the entire Unity application itself, access the Preferences view.
1.8 Accessing Preferences | 19
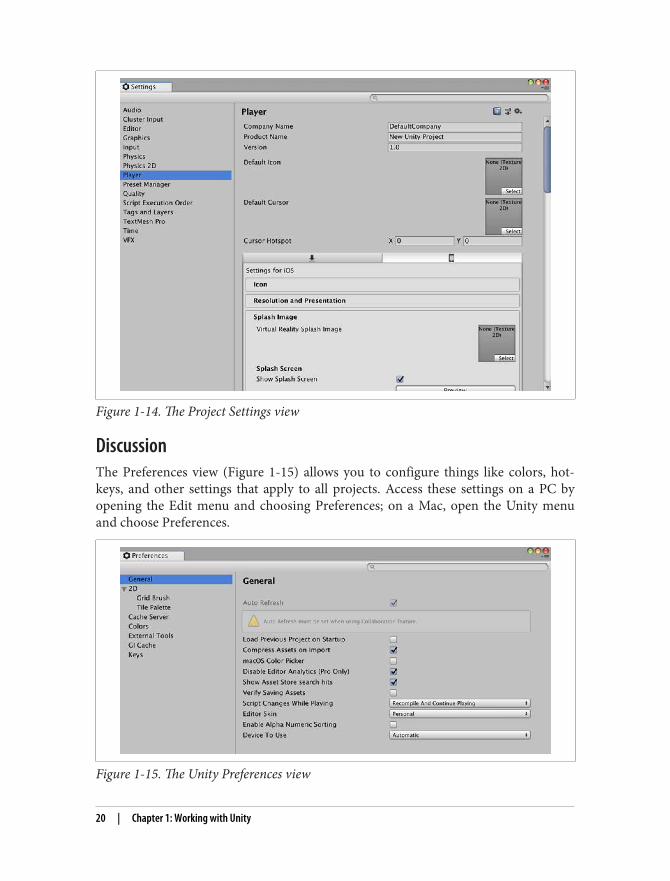
Figure 1-14. The Project Settings view
DiscussionThe Preferences view (Figure 1-15) allows you to configure things like colors, hot‐keys, and other settings that apply to all projects. Access these settings on a PC byopening the Edit menu and choosing Preferences; on a Mac, open the Unity menuand choose Preferences.
Figure 1-15. The Unity Preferences view
20 | Chapter 1: Working with Unity

Buttfield-Addison, M
anning & N
ugentU
nity Ga
me D
evelopm
ent C
ookbook
“Want to understand Unity? The Unity Game Development Cookbook is concise, easily understood, and filled with delicious morsels of game-making truth.”
—Liam EslerGame developer for Baldur’s Gate II: Enhanced Edition, Icewind Dale:
Enhanced Edition, and Pillars of Eternity
“Unity Game Development Cookbook is an invaluable resource for Unity developers. Jon, Tim, and Paris leverage their considerable experience to present easy to follow solutions for a wide range of problems. Whether you’re a complete beginner or an experienced developer, there’s something in here for everyone.”
—Tom BrophyLead Programmer, Mountains
(Creators of Florence)
Unity Game Development CookbookDiscover how to use the Unity game engine to its full potential for both 3D and 2D game development—from the basics of scripting to useful tricks in gameplay, behavior, and animation. With this problem-solving cookbook, you’ll get started in two ways:
First, you’ll learn about the Unity game engine through brief recipes that teach specific features of the software and scripting systems.
Second, you’ll apply a collection of snippets to address common gameplay scenarios, such as properly keeping score.
Using our cookbook format, we pinpoint the problem, set out the solution, and discuss how to solve your problem in the best and most straightforward way possible. This book is ideal for beginning to intermediate Unity developers.
You’ll find solutions for:• 2D and 3D graphics• Math, physics, and
character control• Animation and
movement
• Behavior and AI• Sound and music• Input and gameplay• Scripting and user
interface
Dr. Paris Buttfield-Addison is a game designer, computing researcher, and legal nerd, and the cofounder of game development studio Secret Lab.
Dr. Jon Manning is a software engineering expert in Swift, C#, and Objective-C. As cofounder of Secret Lab, he created the popular Yarn Spinner framework and helped on the BAFTA-winning game Night in the Woods.
Dr. Tim Nugent is a mobile app developer, game designer, and computing researcher.
DEVELOPMENT / MOBILE
Paris Buttfield-Addison, Jon Manning & Tim Nugent
Unity Game Development CookbookEssentials for Every Game
Twitter: @oreillymediafacebook.com/oreilly
For sale in the Indian Subcontinent (India, Pakistan, Bangladesh, Nepal, Sri Lanka, Bhutan, Maldives) and African Continent (excluding Morocco, Algeria, Tunisia, Libya, Egypt, and the Republic of South Africa) only. Illegal for sale outside of these countries.
SHROFF PUBLISHERS & DISTRIBUTORS PVT. LTD.
MRP: ` 1,375.00
ISBN : 978-93-5213-818-0
First Edition/2019/Paperback/English
For Sale in the Indian
Subcontinent & Select Countries
Only**Refer Back Cover
Grayscale Edition